


U s e r M a n u a l
catalog_ENG1024.indd 1 2006/11/10 ¤W¤È 11:23:38
Thank you for purchasing the all new Windows
Mobile™ PDA Phone!
Microsoft, MS-DOS, Windows, Windows NT, Windows Server, Windows
Mobile, ActiveSync, Excel, Internet Explorer, MSN, Outlook, PowerPoint,
and Word are trademarks, or registered trademarks of Microsoft
Corporation in the United States of America and/or other countries.
QuickMark and its icons are registered trademarks of SimpleAct, Inc.
Our company reserves the right to make modications to this manual
without further notice.
Warning: This device is limited for indoors use, under the
guaranteed conditions that it will not interfere with legal radio
stations and will not be interfered during operation.
!
!
catalog_ENG1024.indd 2 2006/11/10 ¤W¤È 11:23:38

Important Safety Precautions
Please adhere to the following safety precautions when using this
product to avoid risk of legal and monetary responsibilities.
Electrical Safety
This product is only operable when using battery supplied power.Using
other power sources may cause harmful conditions and will void all
guarantees for this product.
In-ight Safety
As this product may interfere with operation of in-ight navigation system
and navigation system communication networks, usage of this product in
an aircraft is prohibited by law in several countries.If by law permits you
using this product in an aircraft, please switch to In-ight Mode to turnoff
radio wave transmissions.
Environmental Restrictions
Do not use this product at a gas station or refueling station. Usage of
this product is also prohibited at fuel storages, chemical factories, and
locations with explosives.
Environmental Safety
Do not use this product in the following locations: gas station, fuel
storages, chemical factories, demolition worksites, potentially hazardous
explosive locations such as fuel area under ship holds, transport and
storage of fuel or chemical substance facilities, or locations with particles,
dust, metal dust, chemical substances etc in the air. Please remember
that sparks in these environments can cause explosions or re hazards
resulting in human casualties.
Road Safety
Unless in an emergency, drivers in moving vehicles are prohibited from
using hand held equipments for calls. It is permitted for drivers in moving
vehicles to use hands-free devices for calls. Usage of this product may
interfere with normal operations of medical instruments. Many hospitals
and clinics prohibit use of these equipments.
Non-Ionic Radiation
To ensure efciency of radio wave transmission and reduce interference,
user should operate this product under the recommended normal
environments. As with other similar mobile wireless communication
equipments, in order to comply with required operations and for the
safety of the users, it is recommended that the user maintains a safe
distance from the antenna during the operation of the equipment.
catalog_ENG1024.indd 3 2006/11/10 ¤W¤È 11:23:38
Dopod Defective Pixel Warranty Policy
As the LCD display on the handheld product is made up of high precision
components, possible lit or dark pixels (Note) appearing on the display
screen is a common occurrence from the product manufacturing
process.If your purchased product meets the following conditions, you
may request replacement of the LCD display module within seven days
from the purchase date
1. Total count of three or more malfunctioning pixels (lit or dark); or
2. Any two malfunctioning pixels (lit or dark) within 5mm of each other.
Lit Pixels: blue, red, white, or green dots on specic locations of LCD screen.
Dark Pixel: black dot on specic locations of the LCD screen.
catalog_ENG1024.indd 4 2006/11/10 ¤W¤È 11:23:38
Ge t ti ng t o Know Yo ur C80 0
1
1.1 Familiarize With the Handset and Accessories ............. 3
1.2 Insert SIM Card .............................................................7
1.3 Insert MicroSD card ....................................................... 8
1.4 Initial startup .................................................................. 9
1.5 Familiarize with the Today screen ...............................10
1.6 Using the Start Menu ................................................... 14
1.7 Standby mode and power on/off ..................................15
1.8 Restore to Default (Hard Reset) .................................. 16
Table of Contents
Le a rn ing th e In pu t Mo de s
Us i ng the C ommu ni cati on
3.1. Using the Phone ......................................................... 40
3.2. Making Voice Calls ..................................................... 45
3.3 Receiving Voice Calls .................................................. 50
3.4 Call Option ................................................................... 53
3.5 Additional Information on Dialing ................................. 59
3.6 SmartDailing ................................................................ 62
3.7 Managing Call History .................................................63
3.8 Congure Speed Dial .................................................65
2
3
1
2
3
2.1 Using the Input Methods.............................................. 22
2.2 Using Block Recognizer ..............................................28
2.3 Using Letter Recognizer .............................................. 29
2.4 Using Transcriber ........................................................ 30
2.5 Using the physical keyboard........................................ 32
catalog_ENG1024.indd 5 2006/11/10 ¤W¤È 11:23:38
4
5
6
7
4
5
6
7
Vie w Mes s age s
4.1 Using the Messaging Center ....................................... 70
4.2 SMS ............................................................................. 73
4.3 MMS (MultiMedia Message) ........................................ 79
4.4 Outlook E-mail ............................................................. 85
4.5 POP3 / IMAP4 Account ............................................... 92
Ma n ag ing Pe rson al Inf or mati on
Sy n ch roni zi ng Yo u r Ph on e
6.1 Introducing ActiveSync .............................................. 129
6.2 Installing ActiveSync ..................................................130
6.3 Installing Microsoft Ofce Outlook ............................. 132
6.4 First Connection ........................................................135
6.5 Using ActiveSync .......................................................138
6.6 Synchronizing with Multiple Computers..................... 139
6.7 Synchronize Through Bluetooth Connection ............. 141
6.8 Syncing with an Exchange Server ............................. 147
6.9
Using ActiveSync to Transfer and Manage Files .............. 150
6.10 Advanced PC Sync Settings ....................................153
6.11 Syncing Music, Video, and Pictures ........................ 159
6.12 Installing Software ................................................... 163
6.13 ActiveSync Connection Troubleshooting ................. 164
5.1 Contacts ......................................................................97
5.2 Calendar .................................................................... 107
5.3 Tasks ......................................................................... 115
5.4 Notes ......................................................................... 120
Ex p er ienc in g Mu lt imed ia Ent er tain me nt
7.1 Camera and Video Camera ....................................... 170
7.2 Viewing Pictures and Movies .....................................175
7.3 Windows Media Player .............................................. 181
7.4Today Screen & Themes ............................................ 190
catalog_ENG1024.indd 6 2006/11/10 ¤W¤È 11:23:38
8
9
8
9
10
10
11
11
Ex p er ienc e Mobi le Off i ce Li v e
8.1. Word Mobile .............................................................198
8.2 Excel Mobile ..............................................................205
8.3 PowerPoint Mobile.....................................................212
8.4 Adobe Reader LE ......................................................217
Wi r el ess Co nnec ti ons
Ex p er ienc in g In te rnet
En t er tain me nt
10.1 Internet Explorer ...................................................... 260
10.2. Pocket MSN............................................................ 267
9.1 Comm Manager ......................................................... 223
9.2 Wi-Fi Wireless Networking ........................................226
9.3 Bluetooth ...................................................................240
9.4 Bluetooth Explorer ..................................................... 247
9.5 Congure Network Service Provider Settings ..............249
9.6 Internet Sharing ......................................................... 251
Se t ti ng t he
Ph o ne Inf or mati on
11.1 My Information ......................................................... 278
11.2 Phone ...................................................................... 280
11.3 Congure Incoming Ring Tone ................................ 285
11.4 Function Button ........................................................ 286
11.5 Start Menu ............................................................... 288
11.6 Input ......................................................................... 289
11.7 Password Protection ................................................ 291
11.8 Sounds and Notications ......................................... 293
11.9 Removing Programs ................................................ 294
11.10 Local Area Setting .................................................. 296
11.11 Memory ..................................................................297
11.12 Power ..................................................................... 299
11.13 Backlight ............................................................... 300
11.14 Clock & Alarm ........................................................ 301
catalog_ENG1024.indd 7 2006/11/10 ¤W¤È 11:23:38
12
13
12
13
11.15 Screen .................................................................. 303
11.16 Device Information ................................................. 304
11.17 About ..................................................................... 305
11.18 Microphone AGC ...................................................306
11.19 Beam ..................................................................... 306
11.20 Advanced Wi-Fi Settings ........................................ 307
11.21 Connections .......................................................... 310
11.22 Task Manager .......................................................316
11.23 Keyboard sliding sound effect ................................ 317
Us i ng Mor e Prog ra ms
Q& A
13.1 Q&A ......................................................................... 347
12.1. Java MIDlet Manager .............................................322
12.2 File Explorer ............................................................324
12.3 Voice Commander ................................................... 331
12.4 ZIP ........................................................................... 336
12.5 Search ..................................................................... 340
12.6 Calculator ................................................................341
12.7 Game ....................................................................... 342
12.8 Recorder .................................................................. 344
catalog_ENG1024.indd 8 2006/11/10 ¤W¤È 11:23:39
After purchasing this product, carefully read
through the user manual before operatingFor
your reading convenience, this manual is designed with many tips and services in order to
help you nd information quickly.
Page Format
Generally, each page is separated into upper and lower areas, regardless of the left
or right half of the page. Browsing is made
from left to right and then from up to down
in a Z shape, continuing on the next page.
Th ere are sma ll red boxe s o n t h e o ute r
edge of the contents page to assist you in
finding specific chapter topics.
Topic Format
The beginning of each topic always starts
with the page on the right.Thetopic (first)
page will explain what f unctions are covere d un d er the s p e c i f ied to pic.Act i o n s
Index will help you to quickly find out how
to perform certain actions.The last part is
the conten ts pag e.T he con ten ts pag e is
separated into three levels. For exam ple,
in Chapter 3, 3. 1, 3. 2, 3. 3 serve as the
second level sub-headers; 3. 1 is then further divided into 3. 1. 1 Phone screen and
3. 1. 2 Input PIN number information subsections. Similar types of functions may be
further subdivided to reduce confusion.
How to Use This Manual
Mouse Cursor
At every screen on the phone there will
be one mou se cursor indi cating wher e
you should use your stylus.
3
Action: Phone Home screen
Press Call button
1
2
3. 1 Using the Phone
When you begin to use the Dopod S300 phone functions, you will need
to enter the SIM card PIN number in order to connect to the GSM mobile
network. When using this device, you can control wireless functions, e.g.
activate/deactivate the phone. You can also adjust the headset volume
anytime during a call or when using the device.
3. 1. 1 Phone Functions
At the Phone screen, you can access, dial, search contacts, or save
phone numbers to the contacts list. Under certain circumstances (such
as on a plane), you may need to turn off the phone functions of the
handset. You can use the Comm Manager to manually deactivate/
activate the phone’s communication functions. When the phone function
is off, you will not be able to receive calls, send/receive messages, or
use GPRS by connecting to a wireless mobile network. But other phone
functions such as browsing the calendar, listening to music, or playing
games can still be used.
Dividing Line
ome sc
reen
C
all button
tton
e during a call or when using the device
.
uring a call or when using the device.
h
one Function
s
ne Functions
P
hone screen, you can access, dial, search contac
t
ne screen, you can access, dial, search contac
numbers to the contacts list. Under certain circums
t
nder certain circum
n of
f
the phone functio
f the phone fun
t.
Y
ou can use the Comm Manager to manually deaManager to manua
e
the phone’s communication functions. When the
pation functions. Wh
ou will not be able to receive calls, send/receive m
e
eceive calls, send/
RS by connecting to a wireless mobile network. B
u
o a wireless mobile
ns such as browsing the calendar
ng the calendar
, listening to musi
c, lis
can st
ill b
e used.
d.
D
Chapter
catalog_ENG1024.indd 9 2006/11/10 ¤W¤È 11:23:40
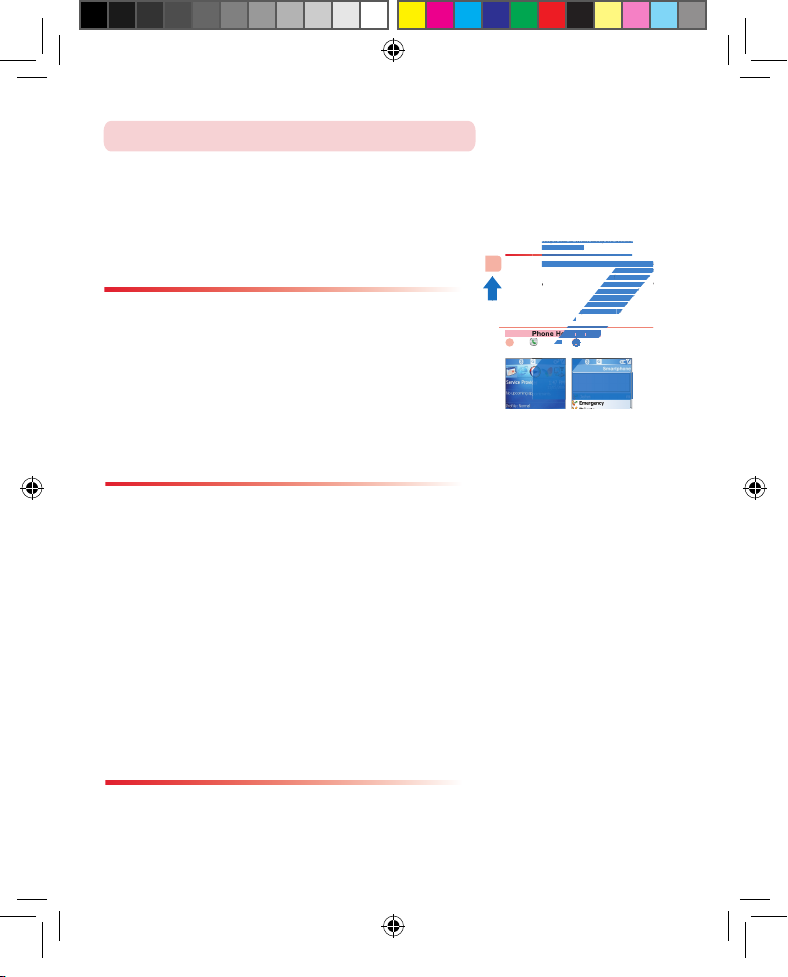
Every t opic’s c onten t page includes i cons that will assist the reader in ope rati ng the product and learnin g
quic kly.At the beginning of each action icon, the purpose o f this acti on will be outlined in red b ackg round
colo r.Each procedu re will indicate the step sequ ence
nu mb er s, the act io n you will nee d to exe cu te , the
scr een that appears for th is proc edu re, and the descrip tions for this procedure.
Select Change PIN
code
About Action Icons
This manual provid es tip sym bols to remind users of
some pointers, notes, and precautions.
Tip Symbols
Caution
Tips
!
Actio n to take
Proce dure Number
Mobil e p ho ne or
compu ter screen
Actio n descriptions
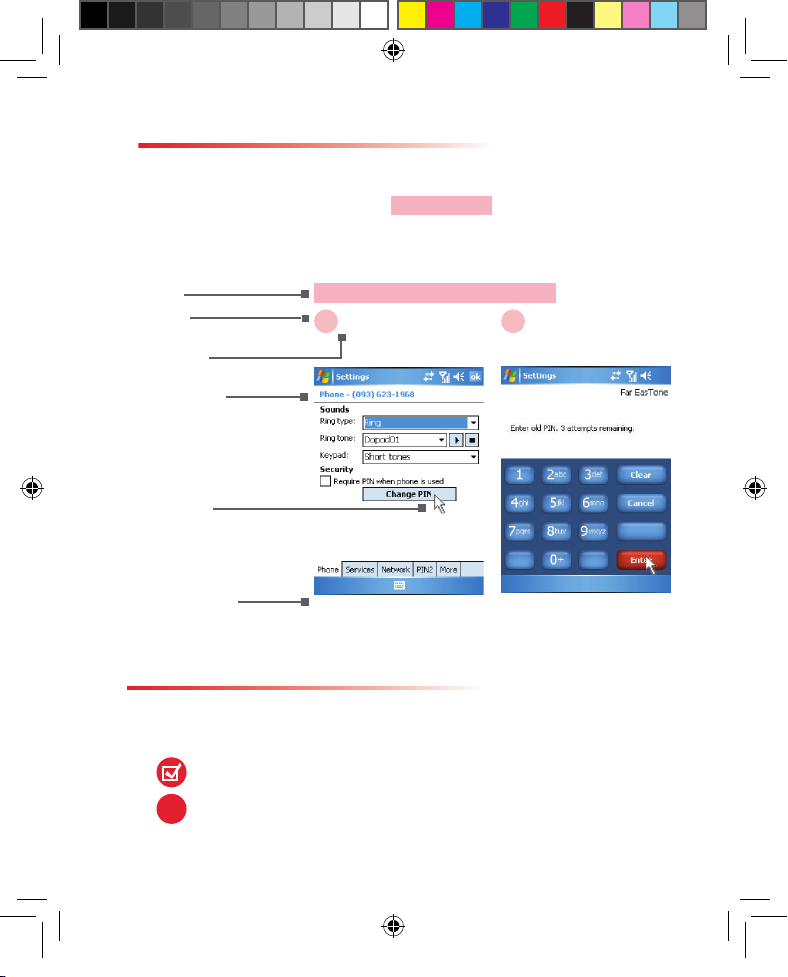
Action: Change PIN Code
Mouse Cursor
1
Select <digit keys>
then select Enter
2
"Phone" Screen Enter Old PIN Code
Name of
curre nt procedure
catalog_ENG1024.indd 10 2006/11/10 ¤W¤È 11:23:41

Topic
Getting to Know the C800
In this topic, you will learn to…
1. Getting to now the unit and accessories
2. Insert SIM card
3. Insert MicroSD card
4. Initial startup
5. Familiarize with the Home screen
6. Using the Start Menu
7. Standby mode and power on/off
8. Restore to Default (Hard Reset)
1
CH01_ENG1024.indd 1 2006/11/10 ¤U¤È 12:02:40

Action
Index
Familiarize With the Handset and Accessories ..................3
LED indicator ...................................................................... 6
Accessories ........................................................................6
Insert SIM card ...................................................................7
Insert MicroSD card ...........................................................8
Screen calibration .............................................................9
Install default program ....................................................... 9
Familiarize With the Today Screen ...................................10
Status indicator and program icons .................................. 11
Using the Start Menu .......................................................14
Power off .......................................................................... 15
Using the Restore to Default ............................................ 16
Hard Reset restore to default ........................................... 17
CH01_ENG1024.indd 2 2006/11/10 ¤U¤È 12:02:40
1
Ge t ti ng t o Kno w t he C 80 0
3
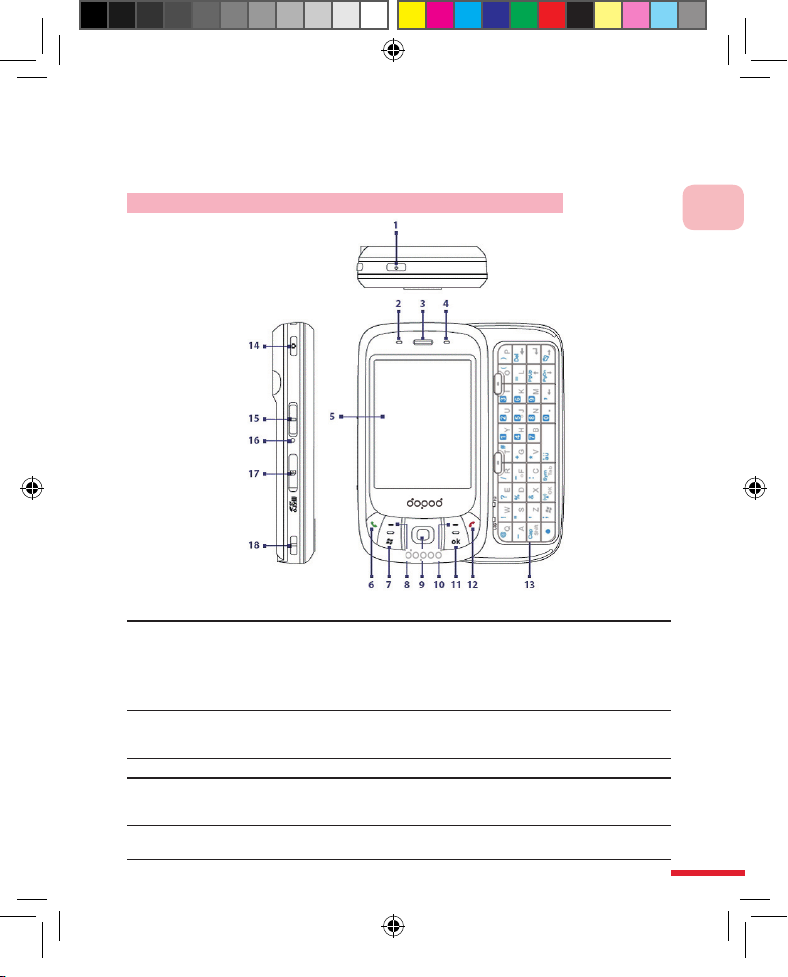
1.1 Familiarize With the Handset and Accessories
Getting to know the handset buttons, LED indicators, and appropriate
accessories.
Familiarize With the Handset and Accessories
1 Power button
Press the power button to turnoff the screen on the unit. After
the screen has been turned off, you will still be able to make
calls and receive messages. If you wish to turnoff the unit,
please press and hold the power button for 5 seconds. After the
phone has been turned off, you will not be able to make calls or
receive messages.
2 Left LED indicator
The left LED will indicate event notications, charging status,
and GSM/GPRS connection status. For descriptions on the
ashing indicators, please refer to the upcoming chapters.
3 Speaker Listen to voice calls
4
Right LED
indicator
The right LED will indicate the Wi-Fi and Bluetooth status.
For descriptions on the ashing indicators, please refer to the
upcoming chapters.
5 Touchscreen
Freehand drawing on the touchscreen with the stylus, or click
the screen for various information
CH01_ENG1024.indd 3 2006/11/10 ¤U¤È 12:02:41
Ge t ti ng t o Kno w t he C 80 0
1
4
6 Talk button Press the talk button to answer calls or make calls
7 Start menu button
Press the Start menu button to open the Start menu
8
Left conrmation
button
Press the left conrmation button to execute the corresponding
action or application on lower left of the screen
9
5-way navigation
button/
conrmation
button
When within an application, press up/down/left/right of the
navigation button to move the cursor to each of the options.
Press the conrmation button to select the option that the
cursor lands on
10
Right conrmation
button
Press the right conrmation button to execute the corresponding
action or application on lower left of the screen
11 OK button
Press the OK button to enter the input data or terminate
a application. The OK button corresponds to the function
identically of icon in upper right corner of screen
12 Hang up button
Press the hang up button to end the call or return to the Today
screen
13 Physical keyboard
Use the physical keyboard to enter text. For detailed
descriptions on the physical keyboard, please refer to the
second chapter.
CH01_ENG1024.indd 4 2006/11/10 ¤U¤È 12:02:41
1
Ge t ti ng t o Kno w t he C 80 0
5
14 Camera Button
Press once to activate the camera function.If the camera
function has been activated, you will be able to capture
photographs or record movies after a single press
15
Volume scroll
wheel
Scroll the scroll wheel to adjust volume of the device and during
in-calls
16 Reset button
Use the stylus to press the reset button to restart your phone
17 MicroSD slot
You can insert a MicroSD memory card into the MicroSD slot to
save data
18 Lanyard latch
You can hang the lanyard onto this latch
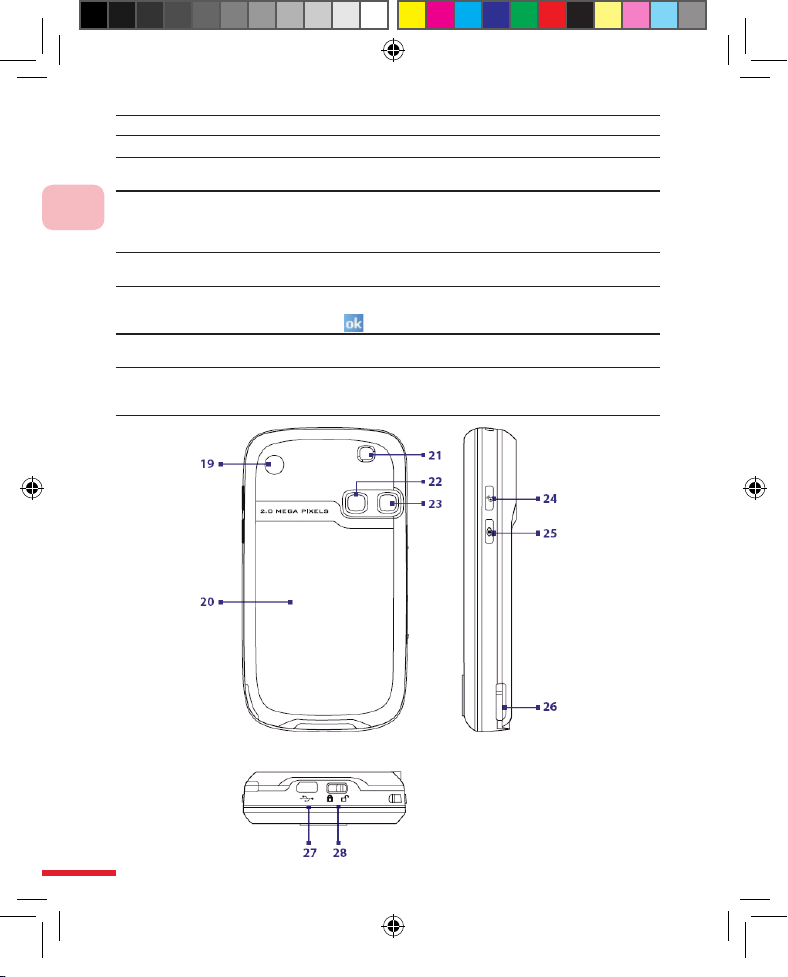
19
Car antenna
connector
Connects the mobile phone to the car’s antenna which will
allow better call quality.You will need to remove the rubber cap
and connect the antenna connector and plug to use. When not
in use, please replace the rubber cap.
20 Back cover
Remove the back cover to reveal the battery and SIM card
21 Amplier speaker
Listen to device sounds and music
22 Self-photo mirror
Use the self photo mirror to preview the scene when taking a
photo of yourself
23 Camera lens
2 megapixel CMOS camera. Capture photographs and record
movies
24 Comm Manager
Press this button to open the comm. manager
25
Voice command
button
Press this button to access the voice command to control the
phone, or to perform quick dialing
26 Stylus
Use the stylus on the touchscreen to do freehand drawing
27
Headset/Sync/
Power Port
Perform data sync or recharging with the USB cable; this port
is also used to provide Stereo Headset for Hands Free calling
or listening to music; or directly connect to AC adapter to
recharge.
28 Back cover latch
Flick this latch to open the back cover
CH01_ENG1024.indd 5 2006/11/10 ¤U¤È 12:02:42
Ge t ti ng t o Kno w t he C 80 0
1
6
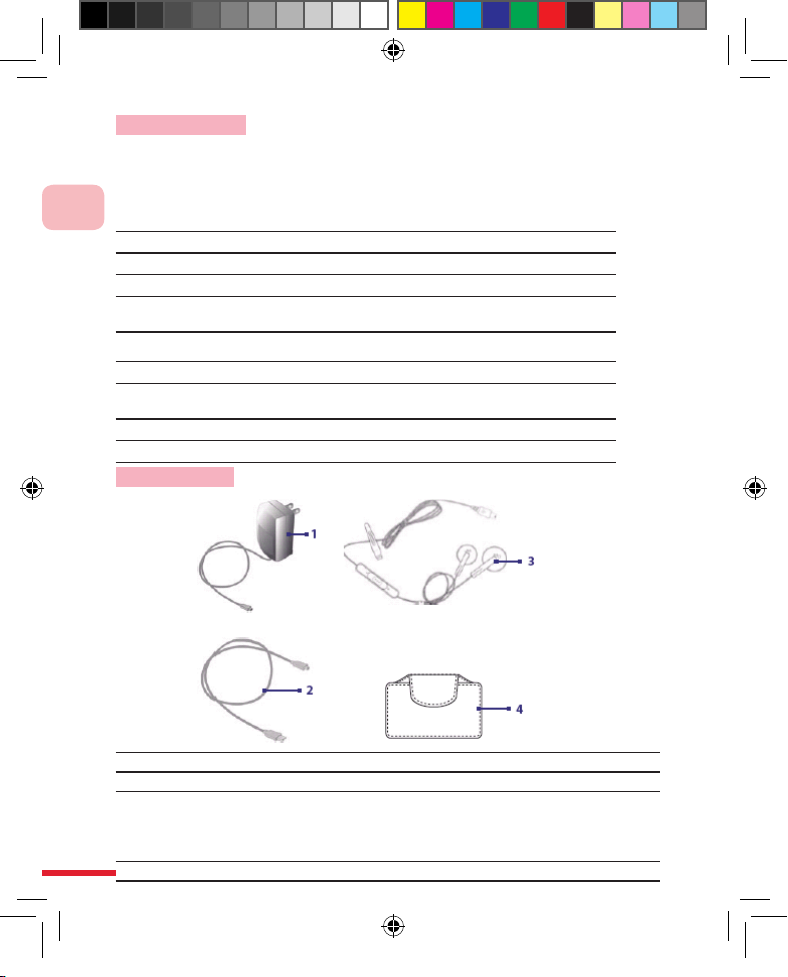
1 AC adapter Recharges the phone battery.
2 Sync cable Connect to the computer and perform data synchronization
3 Headset
The headset provides volume control buttons and Send/End
buttons.You can use the button to answer or hang up incoming
calls.Please plug the headset into the headset/sync/
power connector port to listen to music or make calls
4 Leather pouch For protection and convenient carrying of your phone.
LED indicator
The left LED indicator (green) is used to indicate the battery and network status of the
phone.
The right LED indicator (blue/green) is used to indicate the Bluetooth and Wi-Fi wireless
network connection status.
Left LED indicator status:
Indicators
Status
Solid green
Batter charging is complete.
Not lit
Battery compartment is empty.
Flashing green
1. Found GSM/GRPS/EDGE network
2. System messages
Right LED indicator status:
Indicators
Status
Flashing blue
Bluetooth mode is in “Activated” or “Detected”
mode.
Flashing green
Wi-Fi mode is “Activated”
Switch ashing blue/green
Bluetooth and Wi-Fi modes are “Activated”
Accessories
CH01_ENG1024.indd 6 2006/11/10 ¤U¤È 12:02:42
1
Ge t ti ng t o Kno w t he C 80 0
7
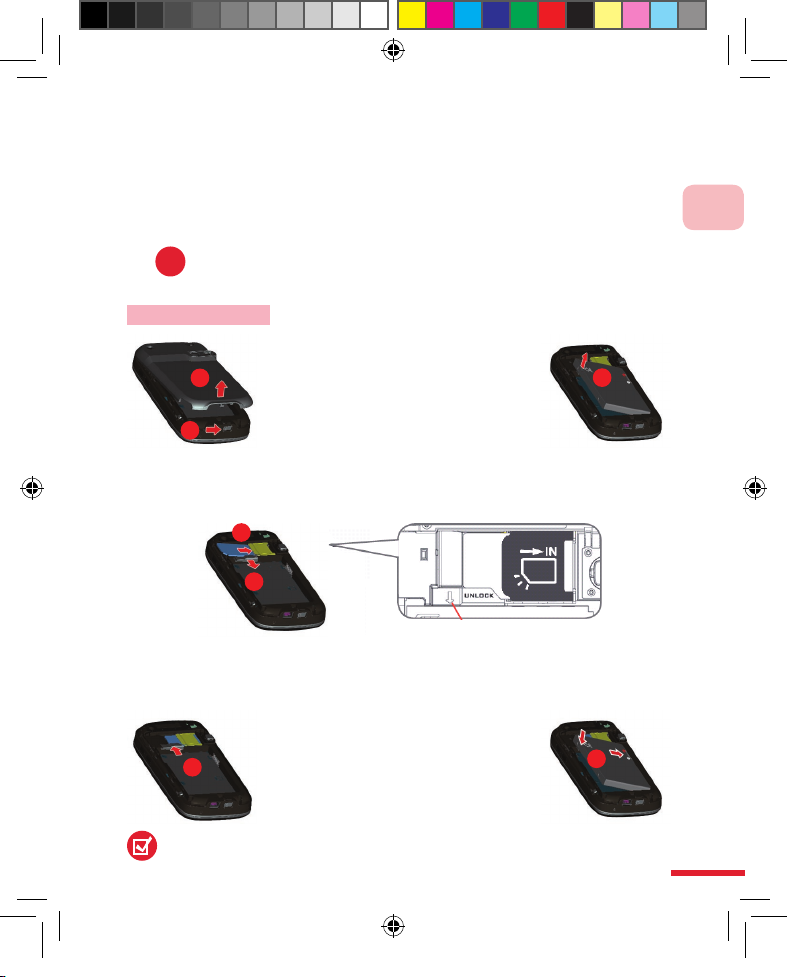
1.2 Insert SIM Card
SIM (subscriber identity module) card is provided by your telecom
service provider, it contains your basic data.For example the phone
number and address book.Before inserting the card, make sure that the
phone power is turned off.
!
If you do not insert the SIM card, you will not be able to use the
mobile communication functions
Insert SIM card
1. Flick open the catch: hole the
handset in one hand, with the back
side facing up. Then follow the
indicated direction as the illustration
to ick open the catch.
2. Remove the battery cover: pull the
battery cover up.
3.
Remove the batter: hold on to the groove to left side of
battery, then lift off the battery.
4.
Slide the SIM card latch downwards: slide down to open the SIM card latch.
5.
Insert the SIM card in the direction to the right: insert the SIM card into the
slot.
6. Slide the SIM card latch upwards:
slide up to close the SIM card latch.
7. Install the battery and battery cover:
place the battery into the battery
compartment, then close the battery
cover.
3
2
1
6
7
To remove the SIM card, please rst open the SIM card latch (step 4), then push
on the top of SIM card and slide the card to the left out of the slot. Then replace
the battery ad close the battery cover.
4
5
SIM card latch
CH01_ENG1024.indd 7 2006/11/10 ¤U¤È 12:02:43
Ge t ti ng t o Kno w t he C 80 0
1
8
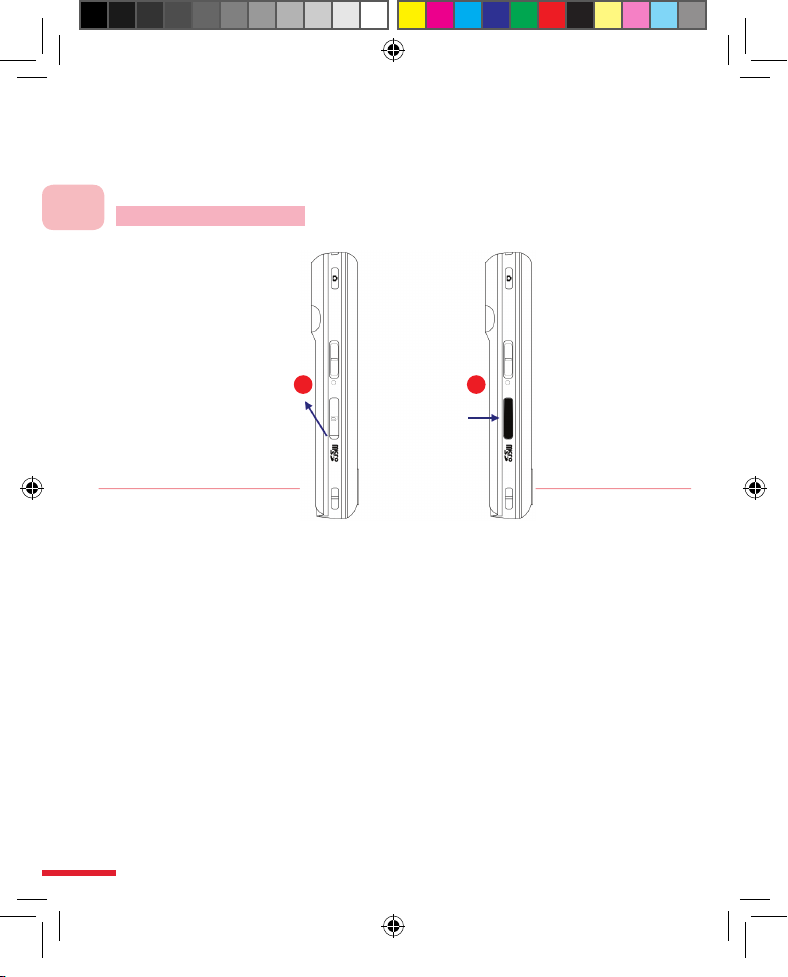
1.3 Insert MicroSD card
Install Micro SD card.You can store pictures, music, documents, and
program data etc. on the MicroSD memory card.
Insert MicroSD card
1 2
Hold on to the
MicroSD memory
card protective cover
on left side of unit,
then pull outwards.
Insert the
MicroSD
memory card
CH01_ENG1024.indd 8 2006/11/10 ¤U¤È 12:02:43
1
Ge t ti ng t o Kno w t he C 80 0
9
Please click on the center
of the crosshair appearing
on the screen in order to
complete screen calibration.
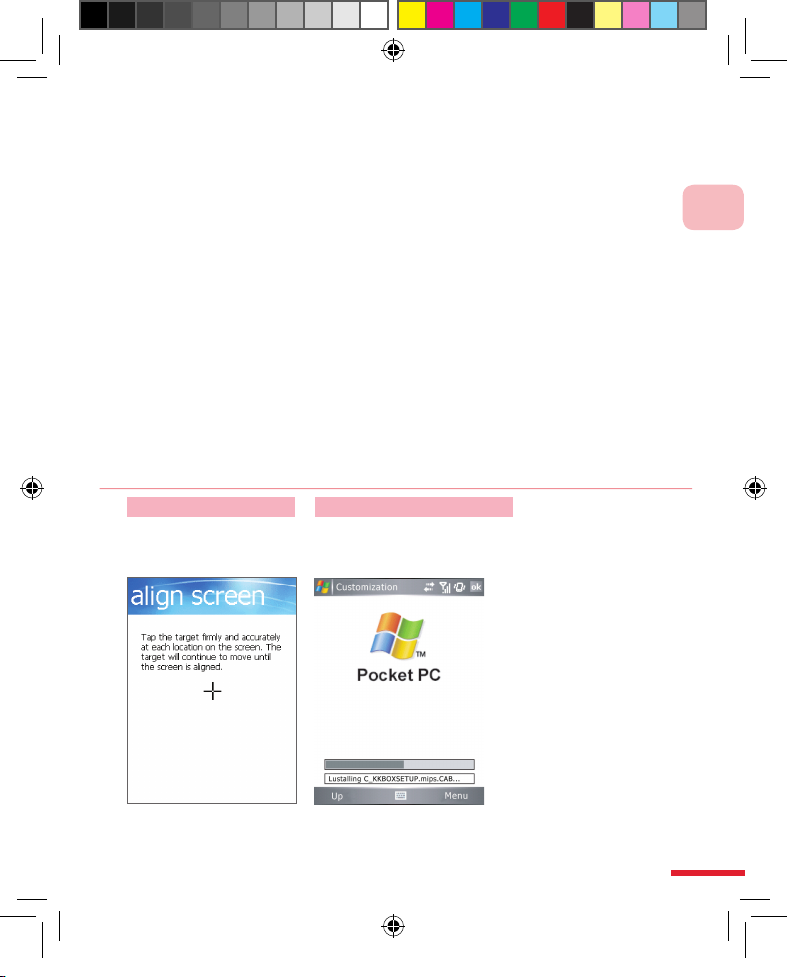
1.4 Initial startup
During initial startup, the system will guide you on how to use the quick
menu, calibrate the screen on your device, install the preset applications,
and congure the mobile network. Please follow the onscreen directions.
Screen calibration
Install default program
Please wait for the automatic
program installation to
complete installing the
preset applications.
▲ Screen calibration
screen
▲ Default program
installation screen
CH01_ENG1024.indd 9 2006/11/10 ¤U¤È 12:02:45
Ge t ti ng t o Kno w t he C 80 0
1
10
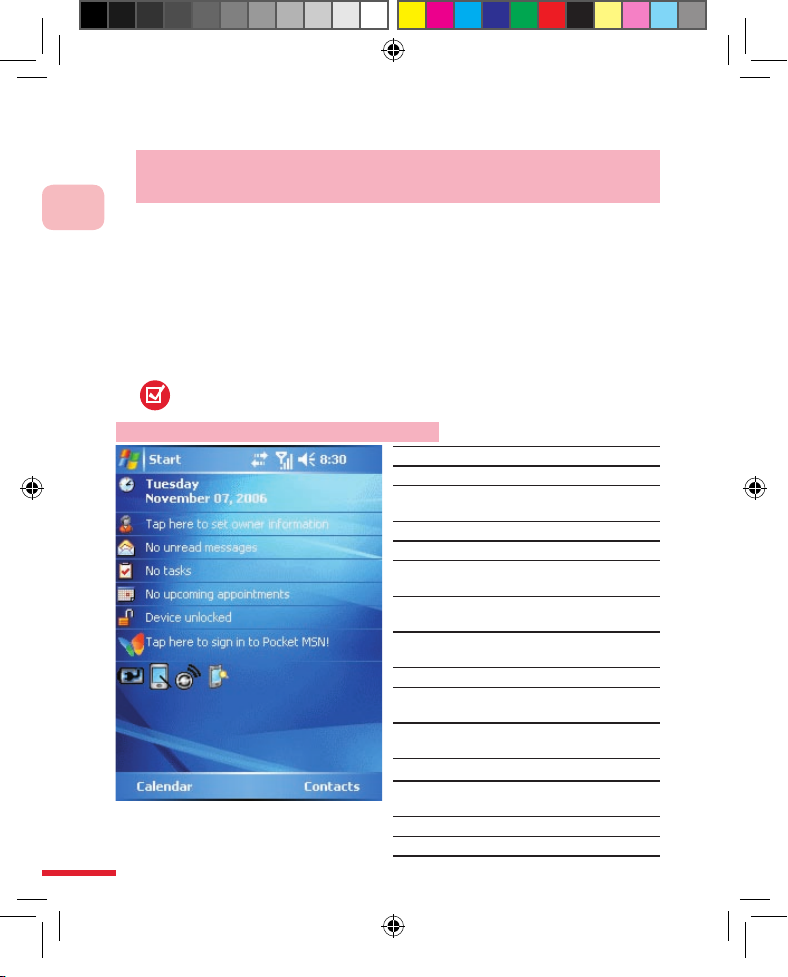
1.5 Familiarize with the Today screen
The C800 mobile phone comes with special edition themes out of
the factory. This manual uses the Windows Mobile™ 5 default Today
screen, themes and menus as sample explanations.
Today screen displays the following important information: Status
indicator, time and date, upcoming appointments, personal information,
pending tasks, SMS, and missed calls.You can directly click on the
icons to launch applications or settings.The icons located on the status
bar include: roaming, available GPRS service, time, missed calls, new
messages, reception status, and GPRS connection.
If you wish to customize the shown items on the Home screen,
background picture etc. Please select Start > Settings > Today.
For conguring the Today screen, please refer to section 7.4 Today
screen & themes
Familiarize With the Today Screen
1 Click to show Start menu
2 Click to check connection status
3
Shows the current signal strength,
click to open phone settings
4 Click to adjust vibrate/ring tone level
5 Show system time
6
Show system date and time. Click to
congure the time, date, and alarm
7
Shows the owner name, click to
congure the name
8
Click to access SMS, task, or the
calendar
9 Click to open Pocket MSN
10
Battery status, click to launch power
management
11
Click to change the orientation of
screen display
12
Click to launch comm. manager
13
Click to open the nightlight settings
screen
14 Click to open the calendar
15 Click to open contacts
CH01_ENG1024.indd 10 2006/11/10 ¤U¤È 12:02:46
1
Ge t ti ng t o Kno w t he C 80 0
11
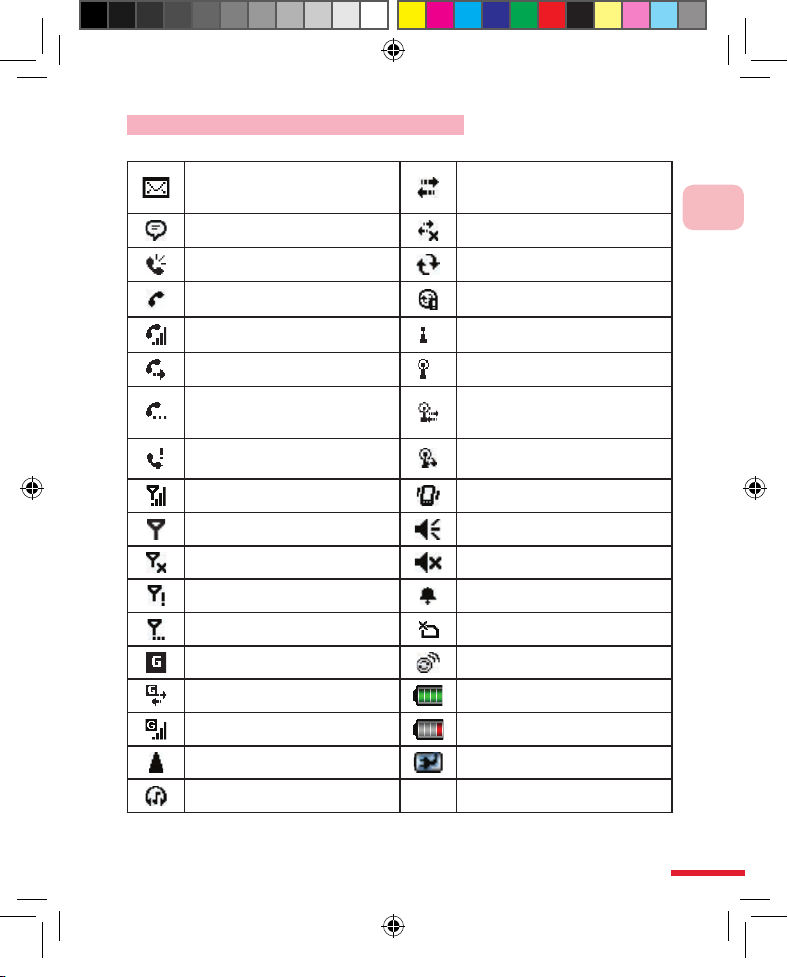
Status indicator and program icons
Status indicator:
New E-mail or text message
(MMS, SMS, text message
services)
Connecting
Message notication, click to view No connection
Speakerphone on Syncing
Connect when SIM card is not
inserted
Data sync error
Use voice call
Wi-Fi activated, but not yet
connected
Call forwarding activated Detected Wi-Fi signal
Call waiting
Connected to wireless network;
connecting to wireless network
(when arrow is moving)
Missed call Using Wi-Fi to sync data
Signal strength Vibrate mode activated
No signal Audio on
Wireless is off Audio off
No service Ring tone
Searching for service SIM card not inserted
Using GPRS service Comm Manager
GPRS connecting Battery level
Using GPRS Insufcient battery level
Roaming Battery Charging
Using Bluetooth stereo headset
CH01_ENG1024.indd 11 2006/11/10 ¤U¤È 12:02:47
Ge t ti ng t o Kno w t he C 80 0
1
12
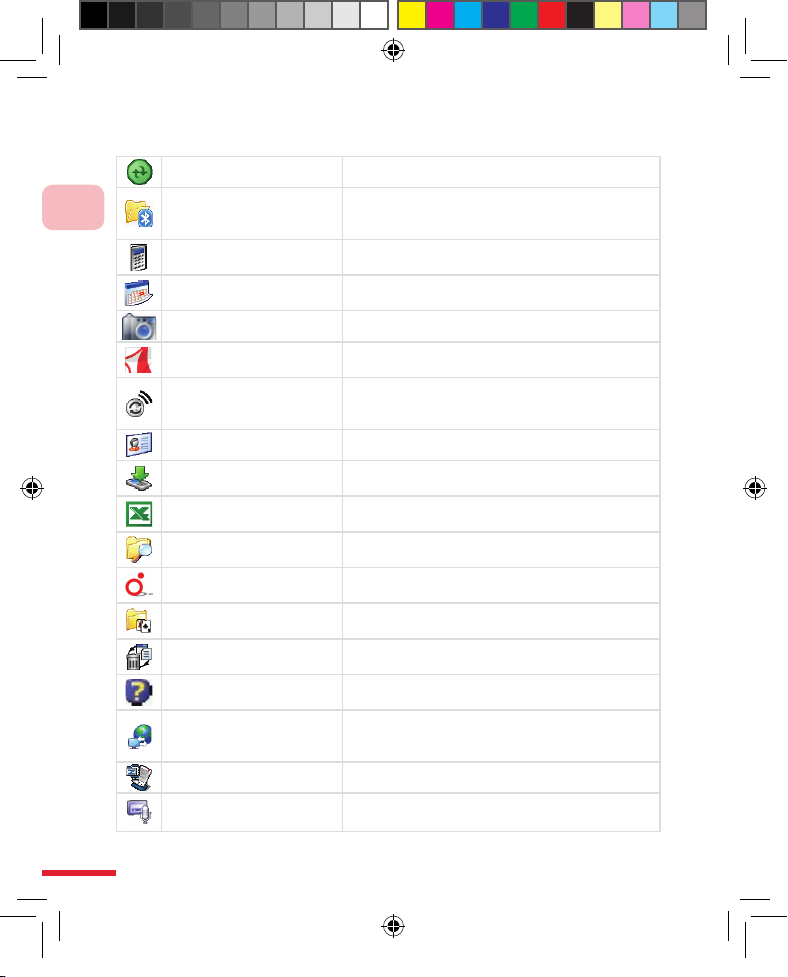
Preinstalled applications on the handset:
ActiveSync Syncs data between the phone and the computer
Bluetooth Explorer
Search for surrounding Bluetooth devices. Access
shared folders on other devices through Bluetooth
connection
Calculator
Runs simple math calculations such as addition,
subtraction, multiplication, and division
Calendar
Records appointment information, as well add
new appointments
Camera Take pictures or record movies with audio
Adobe Reader LE
Enables you to read PDF Documents on the
phone
Comm Manager
Allows you to efciently turn on/off your phone,
sync with the computer, mute the phone, access
Bluetooth, enable/disable Direct Push etc
Contacts.
Record and manage contact information
Download Agent
Provide download status and information such as
the content of the downloaded material.
Excel Mobile
Enables you to edit spreadsheets on the handset,
or create new Excel documents
File Explorer
Allow you to organize and manage les on the
phone
My Connect
Instantly connect to the provided Dopod network
services:
games
The 5 built-in games: Bubble Breaker, Solitaire,
MAGIC PUZ, Another World, and Golf
Return to Default
Clear data in memory, returns to factory default
values, then restart
Description
Enables you to quickly nd the solution to
problems on the handset
Internet Sharing
Enables your notebook computer to connect to
the Internet through the data connection function
on the handset
ZIP Create or uncompress compressed les
Recorder Record audio
CH01_ENG1024.indd 12 2006/11/10 ¤U¤È 12:02:47
1
Ge t ti ng t o Kno w t he C 80 0
13
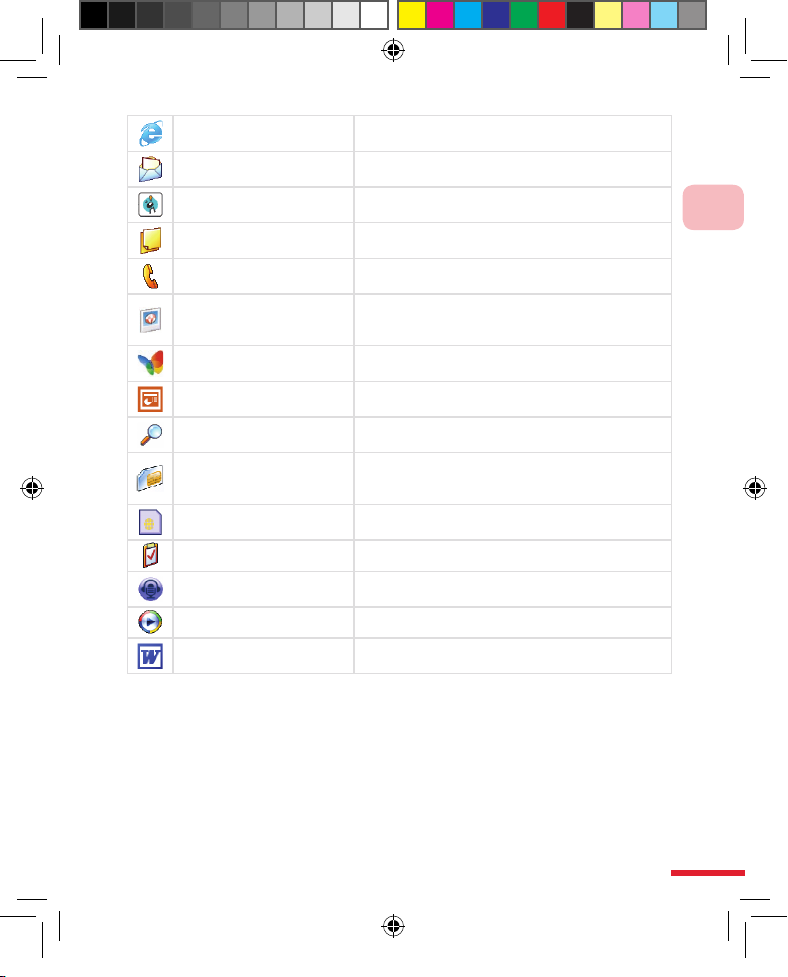
Internet Explorer
For browsing the Internet / WAP websites and to
download new programs / les from the Web
Messaging Center
Allow you to send and receive E-mail, text
messages, and MMS
MIDlet Manager
Allow you to install and execute JAVA applications,
such as games and tools
Notes
Allow you to take notes with freehand drawing or
with the keyboard, or record audio
Phone
You can dial, answer calls, and video calls; switch
between calls and create multi-way calls
Pictures & Videos
Browse and manage image and movie les saved
on the handset or memory card. Default folder is
“My Pictures” folder
Pocket MSN
Provide MSN Messenger instant messaging and
MSN Hotmail e-mail services
PowerPoint Mobile
Enable you to read PowerPoint Documents on the
phone
Search
Search for data, les, and other information on the
handset
SIM Manager
Allow you to manage the contacts stored on the
SIM card as well as copy the contacts onto the
phone.
STK services
Enables you to use information and services
provided by your telecom service provider
Tasks Manage your task items
Voice Commander
Record voice tags to dial to contacts with voice
control, or execute applications
Windows Media Playback multimedia and audio les
Word Mobile
Enable you to edit or create new Word documents
the handset
CH01_ENG1024.indd 13 2006/11/10 ¤U¤È 12:02:48
Ge t ti ng t o Kno w t he C 80 0
1
14
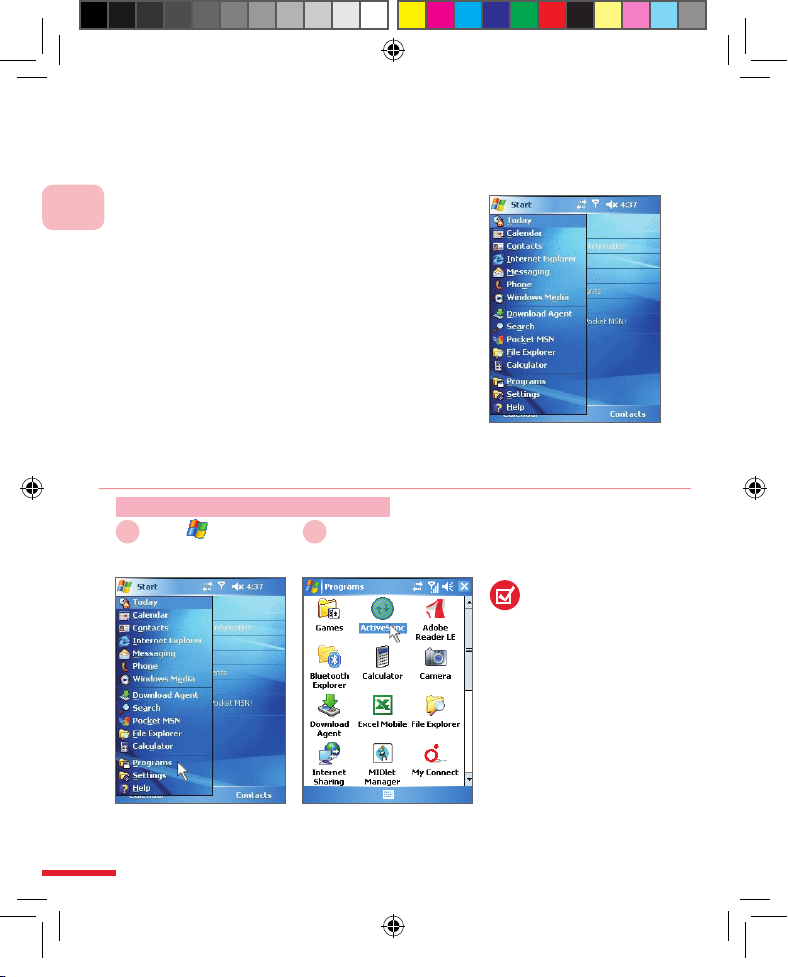
1.6 Using the Start Menu
Start Menu will show the quick launch links for
applications, most recently used programs,
program les, settings, and descriptions.
fter the Start Menu is opened, you can press
the A, B, C etc. keys on the keyboard to
launch the corresponding applications.
As indicated in the gure to the right, press I to
launch Internet Explorer®, or press A to launch
the calendar application.
Action: Using the Start Menu
Select > Program
Files
1
Select <Program
Items>
2
The handset has
been installed with
various applications
for use. You will be
able to obtain other
applications and install
to the handset from the
Windows Mobile™
Quick User CD,
download from the
Internet, or purchase
from retailers.
▲Start Menu screen
Select the program you
wish to open, for example:
ActiveSync
CH01_ENG1024.indd 14 2006/11/10 ¤U¤È 12:02:49
1
Ge t ti ng t o Kno w t he C 80 0
15
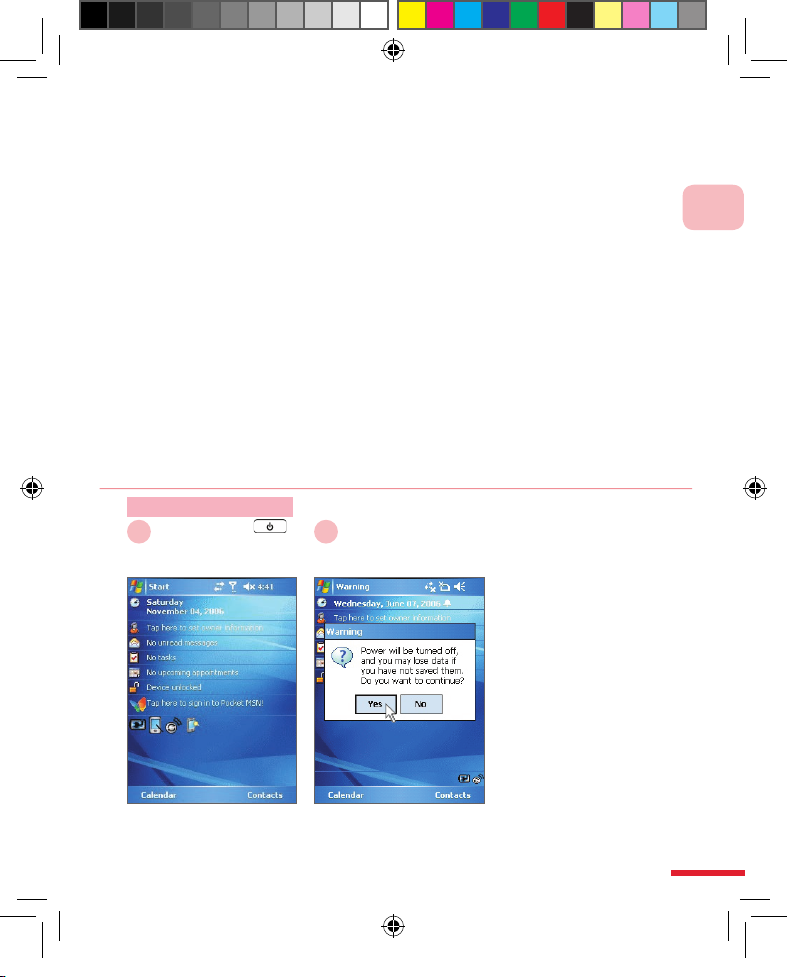
1.7 Standby mode and power on/off
When you short press the power button, the handset will enter standby
mode and turnoff the screen. The phone and Bluetooth functions will
continue to be activated and consume battery power.
You can long press the power button to completely turnoff the power.
After power to the handset has been turned off, the communications and
other functions will cease to operate.
If you only wish to turnoff the communication function of the handset,
please refer to section 3.1.3 Activate/deactivate phone function.
Action: Power off
Press and hold
Power button
1
Select Yes
2
System power offProperly turnoff your phone
CH01_ENG1024.indd 15 2006/11/10 ¤U¤È 12:02:49
Ge t ti ng t o Kno w t he C 80 0
1
16
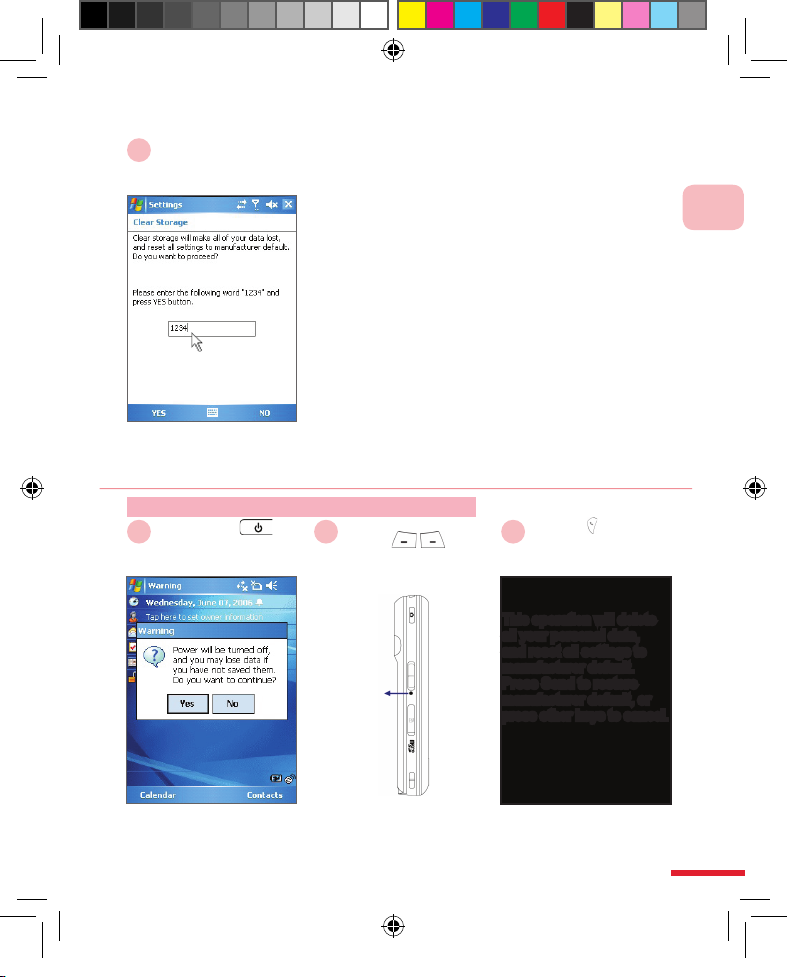
1.8 Restore to Default (Hard Reset)
Restoring to default will clear all data in the memory on the handset.
After system restart, the handset will return to factory default. Contacts,
tasks, calendar appointment, personal information, as well as additionally
installed applications/conguration will be cleared. You can sync the data
to the computer or copy to memory card prior to restoring to the default
settings to avoid the loss of data. This will avoid the lost of data.When
the handset malfunctions due to inappropriate controls, you can attempt
to restore to factory default.
For data synchronization, please refer to Chapter 6 Synchronizing Your
Phone.
When the system is unable to startup, you can try to use hard reset
to restore to default settings.We recommend that you contact our
customer service representatives before using this function in order
to avoid damages to your phone and data.
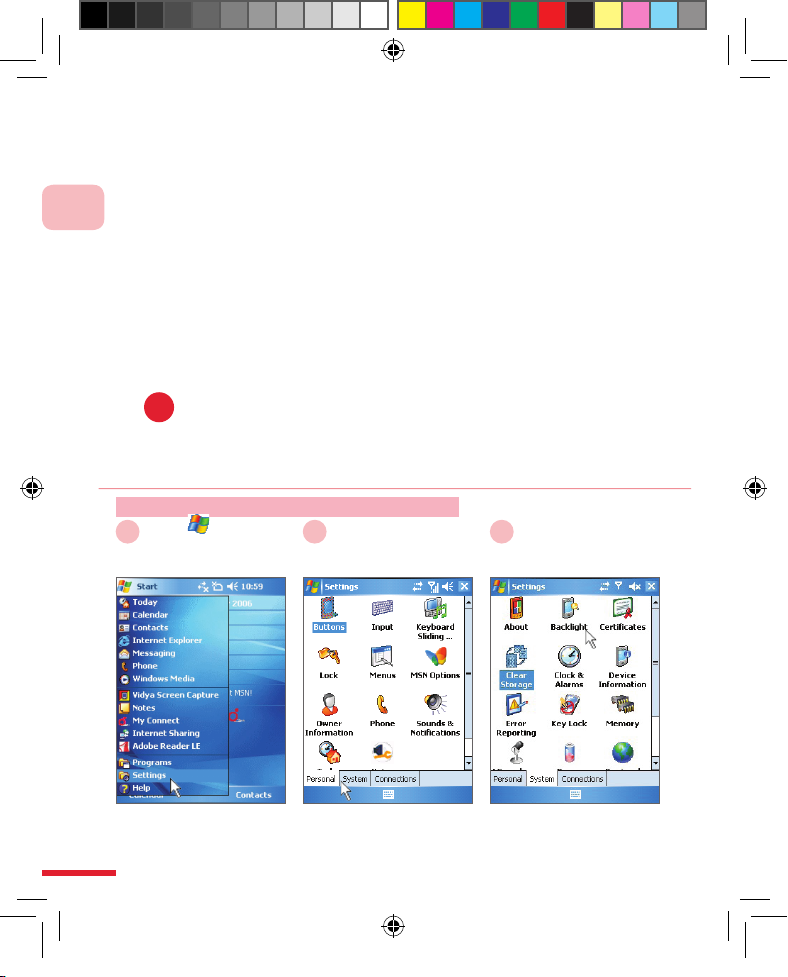
Action: Using the Restore to Default
Select > Settings
1
Select System
2
Select Restore to
default
3
Launch restore to default
application
!
CH01_ENG1024.indd 16 2006/11/10 ¤U¤È 12:02:50
1
Ge t ti ng t o Kno w t he C 80 0
17
Press & hold
Power button
Then select Yes
Enter 1234
Then select Yes
4
Action: Hard Reset restore to default
At the same time, press &
hold the left/right
conrmation button plus
the power button then
press the Reset button
Press the Talk button
to restore to defaults, or
press <Other buttons> to
cancel
2
Simultaneously press and hold
the left/right conrmation button
plus the power button, then use
the stylus to push in the reset
button on left side of the unit
31
Turn off the phone
Reset
button
Please enter 1234 then
select Yes. The phone will
restart after resetting
This operation will delete
all your personal data,
and reset all settings to
manufacturer default.
Press Send to restore
manufacturer default, or
press other keys to cancel.
CH01_ENG1024.indd 17 2006/11/10 ¤U¤È 12:02:51
Ge t ti ng t o Kno w t he C 80 0
1
18
CH01_ENG1024.indd 18 2006/11/10 ¤U¤È 12:02:51

Topic
Learning the Input
Methods
In this topic, you will learn to…
1. Using the Input Methods
2. Using Block Recognizer
3. Using Letter Recognizer
4. Using Transcriber
5. Using the Physical Keyboard
2
CH02_ENG1024.indd 19 2006/11/10 ¤W¤È 11:27:15

Learning the Input Methods
2
20
Action
Index
Show / hide the on-screen keyboard ................................ 22
Entering uppercase or symbols ........................................ 23
Continuously enter uppercase .........................................24
Switching to number / symbols keyboard layout .............. 24
Switching to Latin keyboard layout ................................... 25
Switching to symbol pad ..................................................25
Switching to phone pad alphanumerical input .................. 26
Phone pad alphanumerical input interface ...................... 26
Switch to Phone pad input keyboard ................................ 27
Using the phone pad T9 English input .............................27
Block recognizer input screen ......................................... 28
Using block recognizer .....................................................28
Letter recognizer input screen .......................................... 29
Using Letter Recognizer ................................................... 29
Transcriber screen ..........................................................30
Using transcriber .............................................................. 31
Handwriting recognition .................................................... 31
Using the physical keyboard ............................................32
CH02_ENG1024.indd 20 2006/11/10 ¤W¤È 11:27:15

2
Learning the Input Methods
21
Using the physical keyboard to enter lowercase ..............33
Using the physical keyboard to enter uppercase .............34
Using the physical keyboard to continuously
enter uppercase ...............................................................34
Using the physical keyboard to enter numbers ................ 35
Using the physical keyboard to continuously
enter numbers .................................................................. 35
Using the physical keyboard to enter symbols ................36
CH02_ENG1024.indd 21 2006/11/10 ¤W¤È 11:27:15

Learning the Input Methods
2
22
2.1 Using the Input Methods
Your phone comes with the following built-in input methods: on-screen
keyboard, letter recognizer, transcriber, block recognizer, and symbol
pad.
2.1.1 Familiarize with the on-screen keyboard
You can enter text through the on-screen keyboard on the touch screen.
The status of current input method is displayed at the center of the
taskbar. The input method icons:
Keyboard
Letter Recognizer or Block Recognizer
Transcriber
Symbol Pad
Action: Show / hide the on-screen keyboard
Click
1
Click
2
You can use the stylus to
select and enter text from
the on-screen keyboard
The on-screen keyboard has
been deactivated. You can click
on the input method icon again
to show the on-screen keyboard
3
CH02_ENG1024.indd 22 2006/11/10 ¤W¤È 11:27:16

2
Learning the Input Methods
23
2.1.2 Using on-screen keyboard
When using the on-screen keyboard to enter text, you must use the
stylus and select the letters, numbers, or symbols shown on the touch
screen. You can quickly switch between uppercase and lowercase;
quickly switch to numbers/symbol or Latin keyboard layouts. You can
also use the symbol pad input method to easily enter symbols.
Action: Entering uppercase or symbols
Click
(on-screen keyboard)
1
Click
(on-screen keyboard)
2 3
The on-screen keyboard
will become uppercase and
symbols ! @ # $ etc.
After entering a character,
the input method will switch
back to lowercase
CH02_ENG1024.indd 23 2006/11/10 ¤W¤È 11:27:18

Learning the Input Methods
2
24
Action: Continuously enter uppercase
Double click
(on-screen keyboard)
1
Click
(on-screen keyboard)
2
Click
(osk)
3
On-screen keyboard will
become uppercase
Before you click on ,
the input method will
remain in uppercase
Action: Switching to number / symbols keyboard layout
Click
(upper left of osk)
1
Click
(upper left of osk)
You can now select and
enter the shown numbers
and symbols on the osk
3
Click to return to the
alphabets keyboard layout
2
CH02_ENG1024.indd 24 2006/11/10 ¤W¤È 11:27:20

2
Learning the Input Methods
25
Action: Switching to Latin keyboard layout
Click
(lower left of osk)
1 2
Click
(lower left of osk)
3
Click to return to the
alphabets keyboard layout
You can now select and
enter the shown Latin
letters on the osk
Action: Switching to symbol pad
Click
(right of the input
method icon)
1
Click and selec
Symbol Pad
2
Click the symbol
3
You can choose the symbol
or click / (pages
up / down), (exit)
The icon will only be
shown when the osk has
been activated
CH02_ENG1024.indd 25 2006/11/10 ¤W¤È 11:27:22

Learning the Input Methods
2
26
Action: Switching to phone pad alphanumerical input
Click
(right of the input
method icon)
1
Select Phone Pad
2 3
The phone pad input
interface, you can enter
letters or numbers on the
phone style keypad
The icon will only be
shown when the osk has
been activated
Phone pad alphanumerical input interface
You can select the phone pad interface to enter alphanumerical characters,
switch to T9/numbers (123) / standard English (abc) keypad input, switch to
upper/lowercase, enter spacing character (Tab), and open the symbol pad
keyboard.
1
Word selection area
2 Delete characters (backspace)
3 Go to words to the right
4 Enter selected word
5
Switch to T9 English / numbers (123)
/ standard English (abc) input method.
The icon shows the input keypad
currently in use
6 Enter spacing character (Tab)
7
Open the symbol pad input keypad
8 Go to words to the left
9 Switch to upper/lowercase
10
T9 English / numbers (123) / standard
English (abc) input keypads
CH02_ENG1024.indd 26 2006/11/10 ¤W¤È 11:27:24

2
Learning the Input Methods
27
Action: Using the phone pad T9 English input
Click <Phone Pad>
1
Click <Word
Selection>
2 3
Select the correct word in
the word selection area, for
example: LOVE
Enter another word Enter the word you wish to
type, for example: L, O, V,
E
Action: Switch to Phone pad input keyboard
Click
1
Click
2
Click
3
Currently using numeric
input keypad, click to
switch to standard English
input keypad
Currently using standard
English input keypad, click
to switch to T9 English
input keypad
Currently using T9 English
input keypad, click to
switch to numeric input
keypad
CH02_ENG1024.indd 27 2006/11/10 ¤W¤È 11:27:26

Learning the Input Methods
2
28
2.2 Using Block Recognizer
By using the block recognizer input method, the handset will recognize
the characters, symbols, or numbers that you write on the screen
Action: Using block recognizer
Click
(right of input method
icon)
1
Select
Block Recognizer
2
The icon will only be
shown when the osk has
been activated
3
Block recognizer input
screen
Block recognizer input screen:
1 Phrase selection area
Select the phrase to
use
2 Character input area Write the characters
3
Numbers/symbols
input area
Write the numbers/
symbols
Block recognizer shortcut icon descriptions
Delete Insert blank
Symbols
keypad
Next line
Move cursor left Move cursor right
Block recognizer input screen
CH02_ENG1024.indd 28 2006/11/10 ¤W¤È 11:27:28

2
Learning the Input Methods
29
2.3 Using Letter Recognizer
By using the letter recognizer input method, the handset will recognize
the characters, symbols, or numbers your write on the screen.
Action: Using Letter Recognizer
Click
(right of input method
icon)
1
Click
Letter Recognizer
2
The icon will only be
shown when the osk has
been activated
3
Letter recognizer input
screen
Letter recognizer input screen:
1 Phrase selection area Select the phrase to use
2 Uppercase input area For uppercase input
3 Lowercase input area For lowercase input
4
Numbers / symbols input
area
For numbers / symbols
input
Letter recognizer shortcut icon descriptions
Delete Insert blank
Symbols keypad Next line
Move cursor left Move cursor right
Letter recognizer input screen
CH02_ENG1024.indd 29 2006/11/10 ¤W¤È 11:27:30

Learning the Input Methods
2
30
2.4 Using Transcriber
Transcriber is a handwriting recognition program that allows you to write in
cursive, print, or a combination of both. Transcriber works transparently in
the background of programs, recognizing words with its integrated dictionary.
When transcriber is turned on, it interprets stylus movements anywhere on
the screen as handwriting input.
Transcriber screen
Transcriber shortcut icon descriptions:
Automatically convert recognized characters to uppercase
Default recognition mode
Recognize numbers, activate calculation function
Insert blank
Next line
Move cursor forwards
Move cursor backward
Delete
Activate / deactivate assisting input keypad for numbers / symbols
Congure character recognition shape
Congure transcriber
CH02_ENG1024.indd 30 2006/11/10 ¤W¤È 11:27:30

2
Learning the Input Methods
31
Action: Using transcriber
Click
(right of input method
icon)
1
Select Transcriber
2 3
The icon will only be
shown when the osk has
been activated
Transcriber input screen
Action: Handwriting recognition
Handwrite
<Characters>
1 2
Please handwrite
characters on the screen,
for example: Dopod
Successfully recognized
the characters
CH02_ENG1024.indd 31 2006/11/10 ¤W¤È 11:27:32

Learning the Input Methods
2
32
2.5 Using the physical keyboard
You can use the physical keyboard to easily enter text. When you are
using the physical keyboard, please slide the screen to the right, the
screen will then automatically rotate its orientation to the horizontal
reading direction for your typing convenience.
2.5.1 Open the physical keyboard
Physical keyboard layout diagram:
Action: Using the physical keyboard
Push the screen to the
right
1 2
Please push the screen to
the right
The screen will rotate to the horizontal
reading orientation for your typing
convenience
CH02_ENG1024.indd 32 2006/11/10 ¤W¤È 11:27:39

2
Learning the Input Methods
33
2.5.2 Input with the physical keyboard
You can use the physical keyboard to easily input text.
Input method:
Please directly press the corresponding keys to input lowercase letters
To input uppercase, please rst press and then press the
corresponding keys
For continuously uppercase input, please rst press then ,
and then press the corresponding keys
To enter a single number or symbol, please rst press and then
press the corresponding numbers/symbols indicated in blue on the
keys
Press twice to continuously enter the corresponding symbol or
number indicated in blue on the keys
First press then press to access the symbol pad
Use / / / to move the cursor position
•
•
•
•
•
•
•
Action: Using the physical keyboard to enter lowercase
Press
1 2
Use the physical keyboard
to enter text, for example:
press
Text has been entered
CH02_ENG1024.indd 33 2006/11/10 ¤W¤È 11:27:40

Learning the Input Methods
2
34
Action: Using the physical keyboard to enter uppercase
Press
then press
1 2
Using the physical
keyboard to enter text
Enter uppercase letters
Action: Using the physical keyboard to continuously enter uppercase
Press
then press
1
Press
2
Continuously enter
uppercase letters
3
Text has been entered
CH02_ENG1024.indd 34 2006/11/10 ¤W¤È 11:27:41

2
Learning the Input Methods
35
Action: Using the physical keyboard to enter numbers
Press
then press
1 2
Using the physical
keyboard to enter numbers
Numbers have been
entered
Action: Using the physical keyboard to continuously enter numbers
Press
twice then
press
1 2
Using the physical
keyboard to enter numbers
Numbers have been
entered
CH02_ENG1024.indd 35 2006/11/10 ¤W¤È 11:27:42

Learning the Input Methods
2
36
Action: Using the physical keyboard to enter symbols
Press
then press
1
Select
2
The symbols table opened,
you can click or use the up
/ down / left / right buttons
to select the symbol
Open the symbols table
3
Symbol has been entered
CH02_ENG1024.indd 36 2006/11/10 ¤W¤È 11:27:43

Topic
Using the Communication
In this topic, you will learn ...
1. Using the Phone
2. Dial Voice Call
3. Receiving Voice Calls
4. Call Options
5. Additional Information on Dialing
6. Smart Dailing
7. Managing Call Records
8. Configure Speed Dial
3
CH03_ENG1024.indd 37 2006/11/10 ¤W¤È 11:33:06

Us i ng th e C omm u ni cat i on
3
38
Action
Index
Enter PIN Code ................................................................ 44
Enter the SIM Card Code (PUK) ...................................... 45
Turn off the Phone Function ............................................. 46
Turn on the Phone Function ............................................. 47
Adjust Phone Volume ....................................................... 48
Use the Phone Dialing Application ...................................49
Dialing from Contacts List ................................................50
Dialing When Browsing Contact Information .................... 50
Using Call History for Dialing ...........................................51
Using SIM Card Manager Dialing ..................................... 51
Use Speed Dialing from Phone Screen ...........................52
Use Speed Dialing Application to Dial .............................. 52
Use Voice Command Dialing ...........................................53
Answering Incoming Calls ................................................54
Reject Incoming Calls ......................................................55
View Missed or Rejected Incoming Calls ......................... 55
Dialing Missed Calls .........................................................56
End Call ............................................................................56
Answer New Incoming Call, Hold Original Call ................57
End New Incoming Call, Return to Original Call ..............58
Continue with Original Call ...............................................58
Keep Original Call, Dial Second Number ......................... 59
Create Multi-way Conference ........................................... 60
CH03_ENG1024.indd 38 2006/11/10 ¤W¤È 11:33:06

3
Us i ng th e C omm u ni cat i on
39
Switch to Private Call .......................................................60
Speaker Phone on ...........................................................61
Turn the Hands-free Off ...................................................61
Activate Mute ...................................................................62
Turn off Mute Function ..................................................... 62
Use Speed Dial List to Dial Voicemail Number ................ 63
Dialing Emergency Calls .................................................. 64
Dialing International Calls ................................................64
Using SIM Card Services (STK) ....................................... 65
Use Phone Application to Ceate Call Notes ..................... 65
Using SmartDailing at the phone application ..................66
Congure Smart Dialing ................................................... 66
Browse Call Information ................................................... 67
Filter call history ...............................................................68
Delete Single Call History ................................................68
Creating a Speed Dial Entry ............................................. 69
Removing a Speed Dial Entry .......................................... 70
CH03_ENG1024.indd 39 2006/11/10 ¤W¤È 11:33:06

Us i ng th e C omm u ni cat i on
3
40
3.1. Using the Phone
You can use the Comm Manager to activate/
deactivate the phone and wireless functions.
Also, v\olume is adjustable at any time during a
call or when using the phone.
3.1.1 Phone Screen
At the phone screen, you can directly enter the
number to dial, use contacts dialing, Speed
Dialing, browse call records, create notes and
congure the phone.
3.1.2 Enter PIN code
Each time you activate the phone functions, you
will need to enter the SIM card PIN code (per-
sonal identication number) provided by your
account’s telecom service provider.
Action: Enter PIN Code
Select
<Number buttons>
1
Select Enter
2
Finish entering the PIN
code
▲ Phone Screen
3
Enter your SIM card PIN
code
After activating the phone
function, the antenna
icon on top of screen will
be
CH03_ENG1024.indd 40 2006/11/10 ¤W¤È 11:33:07

3
Us i ng th e C omm u ni cat i on
41
Action: Enter the SIM Card Code (PUK)
Select
<Number buttons>,
then select Enter
1
Select
<Number buttons>,
Then Select Enter
2
Tap
<Number buttons>,
then select Enter
3
Enter the new PIN code
again for conrmation
Enter the PUK unlock
code
!
If an incorrect PIN code is entered more than 3 times, the SIM card will
automatically be locked and you will not be able to use the phone
functions. If this occurs, please contact your account’s telecom service
provider to obtain the SIM card code (PUK) to unlock the SIM card.
Please enter your new
custom PIN code
CH03_ENG1024.indd 41 2006/11/10 ¤W¤È 11:33:07

Us i ng th e C omm u ni cat i on
3
42
Action: Turn off the Phone Function
Select
1
Select
2 3
After phone function is
turned off, the antenna icon
will be
You can use the Comm Manager to activate/
deactivate the phone, Wi-Fi wireless network,
and Bluetooth wireless functions. In certain
circumstances, such as when on an airplane,
you may be required to turn off the phone
and other wireless communication functions.
Briey pressing the power button to turn off
the device merely enables standby mode
on the phone, and does not completely turn
off the phone functions. After turning off the
phone function, you will still be able to operate
the application programs on the phone.
Using Comm Manager to
turn off phone functions
Today screen
▲Using Comm Manager to turn on/off phone
functions
3.1.3 Activate/Deactivate Phone Functions
CH03_ENG1024.indd 42 2006/11/10 ¤W¤È 11:33:08

3
Us i ng th e C omm u ni cat i on
43
Select
1
Select
2
Today screen Using Comm Manager
to turn on phone functions (Note 1)
(Note 1) Please
enter your SIM
card PIN code if
required.
Action: Turn on the Phone Function
CH03_ENG1024.indd 43 2006/11/10 ¤W¤È 11:33:08

Us i ng th e C omm u ni cat i on
3
44
3.1.4 Adjust Call and Device Volume
You can use the volume adjust button or
select the speaker icon from the top of the
Today screen, to adjust the “phone " and
"device " volume respectively.Adjusting
the “phone” volume will adjust the ring tone
volume;adjusting the “device” volume will
change the alarm, notication, reminder, or
music volume.
When using “Vibrate ” mode, calls and device volume will automatically be set to mute.
When a call is received the phone will vibrate.
When using “Off ” mode, calls and device
volume will automatically be set to mute, and
the vibrate function will not be activated.
Action: Adjust Phone Volume
Select
1
Select Volume Slider
or move volume slider
or press Volume key
2
Select Vibrate or Off
3
Adjust volume. mean
device Volume ,
represent phone volume
Activate “Vibrate” or “Off”
mode Modes
Today screen
▲Adjust phone volume
CH03_ENG1024.indd 44 2006/11/10 ¤W¤È 11:33:09

3
Us i ng th e C omm u ni cat i on
45
3.2. Making Voice Calls
You can use the phone application programs, contacts, call records, SIM
manager, speed dialing function, and voice commands to make calls.
During a call, you will still be able to access other application programs,
or return to the Today screen. When using speed dialing, you only need
to select the number button on the phone screen to dial the most recently
used numbers. For example, if you have assigned a contact to the second speed dial location, you only need to press and hold the number “2”
button on the phone screen to dial the contact. You can also access the
speed dial application from the phone screen. Voice commands provide
voice-dialing functions to enable voice control of the device. You must
activate voice commands before use. When in use, follow the provided
voice operation hints.
For contact management, please refer to 5.1; for browse call history
please refer to 3.7; to congure speed dialing please refer to 3.8; to congure and use voice commands please refer to 12.3.
Action: Use the Phone Dialing Application
Select > Phone
or Call button
1
Select
<Number buttons>
2
Select Talk
3
Open the Phone screen Enter the number you
wish to dial
Calling
CH03_ENG1024.indd 45 2006/11/10 ¤W¤È 11:33:10

Us i ng th e C omm u ni cat i on
3
46
Action: Dialing from Contacts List
Press the direction key
to select <Contacts>,
then press
Call
button
1 2
Choose the desired contact
to call
Action: Dialing When Browsing Contact Information
Select <Contacts>
1
Select Call mobile /
Call home / Call work
or send SMS
2
Select the contact to call Select dialing location, for
example: select Call mobile
3
Dialing the Contact
Dialing the Contact
(Note 1) Press the
left/right direction
button to dial the
contact’s mobile,
home, or ofce
number
CH03_ENG1024.indd 46 2006/11/10 ¤W¤È 11:33:12

3
Us i ng th e C omm u ni cat i on
47
Action: Using Call History for Dialing
Select Call history
1
Select <Contacts>
2
Select Call or press
Call button
3
At the phone Home
screen, access the call
Choose the contact to
call in call history
Dial contact in call his-
tory
Action: Using SIM Card Manager Dialing
Select >
Programs
1 2
Select and hold
<Contacts>
Then select Call
3
Open SIM Manager Please rst select the
SIM card contact to
dial, then select Call
CH03_ENG1024.indd 47 2006/11/10 ¤W¤È 11:33:14

Us i ng th e C omm u ni cat i on
3
48
Action: Use Speed Dialing from Phone Screen
Select and hold
<number button>
1 2
Please select the
corresponding speed
dialing number button (Note
1) on screen, for example: 2
Dial the speed dialing
specied contact
Action: Use Speed Dialing Application to Dial
Select
Speed Dialing
1
Select <Speed Dialing
number index>
2 3
You can also access the
Speed Dial application from
the Phone screen.
Select the speed dialing
number index to dial, for
example: 2
Dial the speed dialing
specied contact
(Note 1) If the
specied contact
number is 12, you
can select “1” and
then select and
hold “2” to dial the
contact numbered
“12.”
CH03_ENG1024.indd 48 2006/11/10 ¤W¤È 11:33:15

3
Us i ng th e C omm u ni cat i on
49
Select Voice
Commander
2
Say Call <Contact> at
<Home/Work/Mobile>
3
Activate Voice Commander For example, say
call to Jason mobile
Say conrm or
cancel
4A
Say or select
<Location>
4B 5
If you said the dialing location
(for example: ofce), please
conrm whether to dial the
contact
If you did not specify the dialing
location, please say or select
the location on the screen, for
example: mobile phone.
Voice dialing to the Contact
Select >
Programs
1
You can also press the
Voice Commander button
to activate directly.
Action: Use Voice Command Dialing
CH03_ENG1024.indd 49 2006/11/10 ¤W¤È 11:33:17

Us i ng th e C omm u ni cat i on
3
50
3.3 Receiving Voice Calls
When you receive incoming calls, the phone
screen display will show the incoming message, you can choose to accept or reject the
incoming call.When you are on a call, you can
still select the start menu and access other
application programs at any time, or return to
the Today screen.
Action: Answering Incoming Calls
Press Call button
or tap Answer
1 2
Incoming call prompt Answering Incoming Calls
▲In call screen
CH03_ENG1024.indd 50 2006/11/10 ¤W¤È 11:33:18

3
Us i ng th e C omm u ni cat i on
51
Action: Reject Incoming Calls
Select Ignore or press
Hang up button
1 2
Incoming call prompt
Top of the screen will show
to remind you that you
have missed calls.
Action: View Missed or Rejected Incoming Calls
Select Notication
or prests the device's
Left Shortcut Button
1
Select View
or press on the device
Left Shortcut Button
2 3
The missed call notication screen
The call notication
screen lists the missed
call information
CH03_ENG1024.indd 51 2006/11/10 ¤W¤È 11:33:19

Us i ng th e C omm u ni cat i on
3
52
Action: Dialing Missed Calls
Select <Missed Calls>
Then select Call
Or press Call button
1 2
Call list screen
Dialing missed calls
Action: End Call
Select End or press
Hang up button
1 2
In call End call
CH03_ENG1024.indd 52 2006/11/10 ¤W¤È 11:33:20

3
Us i ng th e C omm u ni cat i on
53
3.4 Call Option
You can choose to hold a call, switch between calls, set up multi-way
calls during a call, as well as use the hands-free speakerphone or activate the microphone muting function during a call.
If you receive incoming calls while on a call, the phone will show a noti-
cation. Please select whether to answer the new incoming call. When
answering new incoming calls, you can use line switching to listen to one
call, or connect the call to set up multi-way conferencing. If you wish to
initiate multi-way conferencing, please place the rst call on hold, and
then dial the second phone number. You can use the built-in speakerphone to speak with callers without using the handset. Using the speakerphone allows other people to hear the conversation. You can mute the
speaker so that the other party will not be able to hear your voice but
continue to hear from them.
Action: Answer New Incoming Call, Hold Original Call
1
Select Answer
or press
Call button
2 3
▲In call screen
Noties you of new incom-
ing call
You are currently talking to
the new incoming caller;
the original call will be
automatically kept on hold
CH03_ENG1024.indd 53 2006/11/10 ¤W¤È 11:33:21

Us i ng th e C omm u ni cat i on
3
54
Action: End New Incoming Call, Return to Original Call
Select End
1 2
End new incoming call,
return to original call
Continue with original call
Action: Continue with Original Call
Select Swap
1 2
Switch call to other side
CH03_ENG1024.indd 54 2006/11/10 ¤W¤È 11:33:21

3
Us i ng th e C omm u ni cat i on
55
Action: Keep Original Call, Dial Second Number
Select Hold
1
Select Keypad
or press Left
shortcut button
2
Select
<Number buttons>
3
Hold original call
Orginal call holding Enter the second phone
number
Select Talk
4 5
Create new call
Dial the second phone
number
CH03_ENG1024.indd 55 2006/11/10 ¤W¤È 11:33:22

Us i ng th e C omm u ni cat i on
3
56
Action: Create Multi-way Conference
Select Menu >
Conference
1 2
You can use “Conference”
to create a multi-way
conference
Connect screen will show
“conferencing” after
creating.
Not all service
providers support
multi-way
conferencing,
please contact your
service provider for
more information.
Action: Switch to Private Call
Select Menu >
Private
1
Select <private call to
create>, then
select Private
2 3
Select your private call
contacts or call to create
During multi-way
conferencing, you can create
a private call with one side
and hold other calls
Creating private call with
one side, and holding other
calls
!
CH03_ENG1024.indd 56 2006/11/10 ¤W¤È 11:33:22

3
Us i ng th e C omm u ni cat i on
57
(Note1)
You can also select
Menu>Speaker Off.
Press & hold Call
button to actiivate
speaker phone
(speaker on) function
Keep away from the
device while using
the speaker phone
function to prevent the
damage to the hearings.
Action: Speaker Phone on
Select Speaker On
1 2
In Call screen (Note1)
When speakerphone is
activated, the top of the
screen will display Icon
Action: Turn the Hands-free Off
2
Select Speaker Off
1
Hands-free speakerphone
is off
Hands-free speakerphone
is activated
(Note 1)
(Note 1) You can
also select menu >
Speaker Off
CH03_ENG1024.indd 57 2006/11/10 ¤W¤È 11:33:23

Us i ng th e C omm u ni cat i on
3
58
Action: Activate Mute
Select Mute
1 2
▲In call screen
When Mute is activated,
the top of screen will
display Icon
Action: Turn off Mute Function
Select
Select Unmute
1 2
Mute function activated
(Note 1)
Mute function turned off,
the other side can hear you
(Note1) You can
also select Menu
> Mute
(Note1) You can
also select Menu >
Unmute
CH03_ENG1024.indd 58 2006/11/10 ¤W¤È 11:33:23

3
Us i ng th e C omm u ni cat i on
59
3.5 Additional Information on Dialing
You can use additional dialing functions, including dialing to voice mail,
emergency and international calling, using SIM card service (STK), and
creating call notes.
To listen to voicemail messages, you can dial the voicemail number (pro-
vided by the service provider) from the phone application. The rst speed
dial slotis usually set up as the voicemail number; you can also use other
speed dial slots to call the voicemail number. Please check with your
service provider for your voicemail number. If you need to dial the local
emergency help number, do so by dialing directly from the phone application. When the phone functions are off or the keypad is locked, you
can still dial emergency calls. You can use various information services
such as customer service and voicemail that are built into the SIM card
by the service provider. To use the SIM card services, please rst insert
your SIM card into the phone. SIM card information services may vary
depending on the service provider. When dialing international calls, if the
area code starts with the number “0”, the number “0” can be ignored.
Action: Use Speed Dial List to Dial Voicemail Number
Select 1
1 2
Speed Dial Screen.Speed
dial entry 1 preset as the
voicemail number
Dial voicemail number
CH03_ENG1024.indd 59 2006/11/10 ¤W¤È 11:33:24

Us i ng th e C omm u ni cat i on
3
60
Action: Dialing Emergency Calls
Select <emergency
phone number>
then select Call
1 2
Dialing emergency callsEnter emergency phone
number
SIM card may store
other emergency
help numbers,
please ask your
service provider for
more information.
!
Action: Dialing International Calls
Select and hold
+0
1
Select <Numbers>
then select Call
2 3
Until phone screen shows+.
+ will replace the country
code for your current
location
Enter the complete
international phone number,
including country code, area
code, and the number to dial
Make international call
!
CH03_ENG1024.indd 60 2006/11/10 ¤W¤È 11:33:24

3
Us i ng th e C omm u ni cat i on
61
Action: Using SIM Card Services (STK)
Select
(STK Icon )
2
Select >
Programs
1
The STK icon displayed
name is your service
provider name
Action: Use Phone Application to Ceate Call Notes
Select Create Note
2
Edit
<Note Content>
3
Select Menu
1
Phone Screen For phone screen edit-
ing notes please refer
to 5.4 Notes Application
CH03_ENG1024.indd 61 2006/11/10 ¤W¤È 11:33:25

Us i ng th e C omm u ni cat i on
3
62
3.6 SmartDailing
Smart Dialing is integrated in the phone
applications, providing you with even more
convenient phone dialing. When you select
the number or the English characters representing the number (for example: the number
“8” is represented by t, u, v), Smart Dialing
will automatically search stored contacts, SIM
card contacts and received call items, then
lets you choose the number or contact to dial.
After the search is complete, you can select
and hold <items result of search>, then select
<Call Option> ( for example: dial mobile
phone, send messages, etc)
You can use the phone application screen to
Select number pad to execute SmartDailing.
▲SmartDailing Screen
Using SmartDailing at the phone application
Congure Smart Dialing
▲Smart Dailing Conguration screen
Enter Smart Dailing Conguration Screen:
• at the phone screen Select Menu > Smart
Dialing Options
Smart Dailing Conguration Option:
Option Description
Enable
SmartDailing
Choose if to enable this function
Automatically
expand selected
contact
Selected contact automatically shows name and phone
number
Enable drag-scroll Hold item and drag to scroll list
Enable double-click
for dialing
Double click on item in list to
dial out
Expand panel when
using hardware
keyboard
Expand panel when pressing
English/number button from
the hardware keyboard
Scroll unit
Select / Scroll Unit
CH03_ENG1024.indd 62 2006/11/10 ¤W¤È 11:33:26

3
Us i ng th e C omm u ni cat i on
63
3.7 Managing Call History
The phone application call history lets you browse, delete, and man-
age call details.You can use the lter function to search for the desired
history.The lter function can display call records as follows: all calls,
missed calls, incoming calls, video calls, and by contact name,for your
convenience to brower the call history.
Call history icon description:
: Incoming voice call
: Dial Voice Call
: Outgoing voice call
Action: Browse Call Information
2
Select
<phone list item>
1
Call history screen.
Please select the call
item to browse
Call information display
screen (Note 1)
(Note1) You can
browse: call date,
time, and call
length
CH03_ENG1024.indd 63 2006/11/10 ¤W¤È 11:33:26

Us i ng th e C omm u ni cat i on
3
64
Action: Delete Single Call History
Select Yes
2
(Note1)
To delete entire call
history, please select.
Please Select Menu >
Delete all calls
Select and hold
<Contacts>
Then select delete
1
Call history screen
Conrm to delete single
call history
(Note 1)
Action: Filter call history
Select
<Filter Criteria>
2 3
Select
Menu > Filter
1
Call history screen Select the call type to
browse.For example,
Outgoing
List all outgoing calls
CH03_ENG1024.indd 64 2006/11/10 ¤W¤È 11:33:27

3
Us i ng th e C omm u ni cat i on
65
3.8 Congure Speed Dial
The phone speed dial application allows you
to use the number buttons to quickly dial contacts. Before using the speed dialing function,
you must rst create speed dial entries using
the speed dial application. You will also be
able to delete and edit the speed dial entries.
Action: Creating a Speed Dial Entry
Select <Contacts>
2
Select Menu >Add
1
Edit <Name>
3
Speed Dial application
screen
Please enter the name.
The default is the contact
name.
Choose the contact to set
up for speed dialing. For
example, Franky.
▲Speed Dial Screen
CH03_ENG1024.indd 65 2006/11/10 ¤W¤È 11:33:27

Us i ng th e C omm u ni cat i on
3
66
Select or
Choose <Location>
5
Select <Number>
4
Select
6
Select the number to
correspond to the speed
dial entry
Select the corresponding
number button.For
example, 2
Finish creating a speed dial
entry
Select
Menu > Delete
2
Select <Contacts>
1
Select Yes
3
Action: Removing a Speed Dial Entry
Speed dial application
screen. Select the contact
to delete.
Removing a Speed Dial
Entry
Confrim to delete this
Speed Dial entry
CH03_ENG1024.indd 66 2006/11/10 ¤W¤È 11:33:28

Topic
View Message
In this topic, you will learn ...
1. Use the Messaging Center
2. SMS
3. MMS
4. Outlook E-mail
5. POP3 / IMAP4 Account
4
CH04_ENG1024.indd 67 2006/11/10 ¤W¤È 11:59:36

68
4
Vie w Mes s age
Action
Index
Open the messaging Center ............................................70
Switch accounts ...............................................................71
Switch folders ...................................................................71
Adding a new message ....................................................73
Open messages ............................................................... 74
Close messages ............................................................... 75
Reply messages ............................................................... 75
Deleting messages ........................................................... 76
Add new message folder .................................................. 76
Moving messages ............................................................77
Copy message to SIM card ..............................................78
Copy message to Inbox ...................................................78
New multimedia (MMS) message ....................................79
New multimedia (MMS) message ....................................80
Browser MMS message ................................................... 81
Reply to a MMS messaging .............................................82
Deleting MMS message ................................................... 82
Moving MMS message ..................................................... 83
Congure MMS message Option ..................................... 83
Drafting and sending e-mails ...........................................85
Drafting and sending e-mails ...........................................86
Recieving e-mail ............................................................... 87
Browse e-mail ..................................................................87
Download complete e-mail contents ................................88
CH04_ENG1024.indd 68 2006/11/10 ¤W¤È 11:59:36

69
4
Vie w Mes s age
Download attached les ................................................... 88
Save the attached le to storage card .............................. 89
Reply to e-mails ...............................................................89
Reply all ...........................................................................90
Forward mail ....................................................................91
Adds a new POP3/IMAP mail account .............................92
Send and receive e-mail ..................................................94
CH04_ENG1024.indd 69 2006/11/10 ¤W¤È 11:59:36

70
4
Vie w Mes s age
4
4.1 Using the Messaging Center
The messaging center is used to manage your SMS, MMS, and e-mail
messages. You can use the messaging center to send and receive
SMS, MMS, Outlook® e-mails, and other messages from custom e-mail
accounts.
By switching accounts, you can browse SMS, MMS, Outlook® e-mail or
other e-mail accounts.
Action: Open the messaging Center
2
Select >
Messaging Center
1
CH04_ENG1024.indd 70 2006/11/10 ¤W¤È 11:59:38

71
4
Vie w Mes s age
4
Action: Switch accounts
Select Menu >
Go to > < Message
type>
1 2
Choose the message type to
use. For example: Outlook
e-mail
Switched to Outlook e-mail
You can also use
the following two
methods to switch
accounts:
Use the track ball
moving left/right
to switch between
SMS, MMS, and
Outlook E-mail
accounts
Action: Switch folders
Select Inbox
1
Select
<Folder to open>
2 3
Open the folder to view
(Note 1), for example:
Drafts
Folder switched
CH04_ENG1024.indd 71 2006/11/10 ¤W¤È 11:59:41

72
4
Vie w Mes s age
4
(Note1) Default folder description:
Folder Description
Inbox Stores all received messages.
Deleted Items Deleted messages are saved in Deleted Items.
Drafts Stores message drafts.
Outbox Stores outgoing messages that are ready to be sent.
Sent Items Sent messages are saved in Sent Items as a backup.
CH04_ENG1024.indd 72 2006/11/10 ¤W¤È 11:59:41

73
4
Vie w Mes s age
4
You can directly enter the
number into the recipient
eld
For example, Bruce
4.2 SMS
Through SMS you can quickly send / receive text messages to other
people.The fee for each message transaction will depend on the telecom
service provider.
A single message can have up to 160 English characters or 70 Chinese
characters. When your text count exceeds the character limit, the
phone will automatically split the text into two or more messages before
sending.Browse received messages. Read and unread messages are
indicated by the following icons:
: Unread messages : Read messages
When you receive messages, you can use the reply message option
to reply to the original sender.; The recipient of the reply message is
automatically lled in.
You can also delete unwanted messages to conserve memory on
the phone.or you can categorize different type of messages by using
messages folders.
Action: Adding a new message
Select Add
1
Select Menu >
Add Recipient
2
Select <Contacts to
send to>
3
CH04_ENG1024.indd 73 2006/11/10 ¤W¤È 11:59:43

74
4
Vie w Mes s age
4
Select the lower
empty eld, then
Enter <Text>
4
Select Send
5 6
Message sent
Action: Open messages
Select
<Message to browse>
1 2
Message opened, you
can browse the message
contents
CH04_ENG1024.indd 74 2006/11/10 ¤W¤È 11:59:46

75
4
Vie w Mes s age
4
Action: Reply messages
Select and hold
<Message to reply>
1
Select Reply
2 3
Message editing screen.
Action: Close messages
Select
1 2
Browse message icon
changed to
CH04_ENG1024.indd 75 2006/11/10 ¤W¤È 11:59:48

76
4
Vie w Mes s age
4
Action: Deleting messages
Select and hold
<Message to delete>
1
Select Delete
2 3
Dele ted me s sages are
move d to th e “D e l e t ed
Items” folder
Action: Add new message folder
Select Menu >
Tools>Manage
Folders
1
Select and hold Text
Message
2
Select New Folder
3
CH04_ENG1024.indd 76 2006/11/10 ¤W¤È 11:59:51

77
4
Vie w Mes s age
4
Action: Moving messages
Enter
<folder name>
Select again
4 5
Select <folder to move
to>
Select again
3
For example, select
Company
For example, company New folder added
Select and hold
<Message to move>
1
Select Move
2
CH04_ENG1024.indd 77 2006/11/10 ¤W¤È 11:59:54

78
4
Vie w Mes s age
4
Select Menu > copy to
SIM card
1 2
Message copied to SIM
card
Action: Copy message to SIM card
Action: Copy message to Inbox
Select Menu > Copy
to Inbox
1 2
Message has been copied
to Inbox
CH04_ENG1024.indd 78 2006/11/10 ¤W¤È 11:59:56

79
4
Vie w Mes s age
4
4.3 MMS (MultiMedia Message)
You can easily create or share MMS messages with friends and family.
MMS enables you to send or browse pictures, movies, audio, and text in
an MMS message.
Browse received MMS messages, read and unread messages are
indicated by the following icons:
: Unread MMS messages
: Read MMS messages
When you receive a MMS message, you can reply to the original sender.
The recipient of the reply message is automatically lled in.You can
also delete unnecessary MMS messages to save memories;and also
congure the MMS message sent options.
Action: New multimedia (MMS) message
Select Add
1
Select <MMS example
to use>
2
Select Recipient
Then enter <Recipient
phone number>
3
Before using MMS messages, you must rst activate GPRS service
through your telecom service provider to be able to send and
receive MMS messages.Fees for MMS message transactions will
depend on the telecom service provider.
CH04_ENG1024.indd 79 2006/11/10 ¤W¤È 11:59:58

80
4
Vie w Mes s age
4
Select and enter
Subject
4
Select
5
Select <Picutres and
Videos>Then Select
Select
6
Insert pictures or videos Choose a picture or video
to send(Note1)
Select Enter text here
then Enter <Text to
send>
7
Select
Insert audio clipe here
8
Choose
<audio clip>
9
You can also select
Recordings
Continue: New multimedia (MMS) message
CH04_ENG1024.indd 80 2006/11/10 ¤U¤È 12:00:04

81
4
Vie w Mes s age
4
Select Send
10 11
MMS message Sent
Action: Browser MMS message
Select <MMS
message to browse>
1 2
MMS message playing
(Note1) If you
are having large
pictures size, it is
likely resulted in
MMS sent fail. It is
recommended to
use the "Pictures
& Videos" to
select the les
to be sent, via
"Pictures & Videos,
the program
will compress
the le for your
automatically.
CH04_ENG1024.indd 81 2006/11/10 ¤U¤È 12:00:06

82
4
Vie w Mes s age
4
Action: Reply to a MMS messaging
Select and hold <the
MMS message to
reply >
1
Select Reply
2 3
Please to 4.3 for adding a
new MMS Message
Action: Deleting MMS message
Select and hold <the
MMS message to
delete>
1
Select Delete
2 3
Deleted messages are
moved to “Deleted Items”
CH04_ENG1024.indd 82 2006/11/10 ¤U¤È 12:00:09

83
4
Vie w Mes s age
4
Action: Moving MMS message
Select and hold <the
MMS message to
move>
1
Select Move
2
Select <folder to move
to>
Select again
3
For example: Drafts
Action: Congure MMS message Option
Select Menu > Tools >
Option...
1
Select MMS
2
Choose the MMS Options
setting you wish to set up
(Note 1)
Select and check
<MMS message options>
3
CH04_ENG1024.indd 83 2006/11/10 ¤U¤È 12:00:12

84
4
Vie w Mes s age
4
(Note1) Congure options for sending MMS messages. You can
request delivery notication so that when the message is delivered,
recipient’s phone will respond with a notication.
MMS Message settings:
Option Description
Retrieve messages
immediately
Automatically receive MMS messages
Download no roaming
notication
Do not display roaming related notication
Save sent Message Save the sent message in the device
Reject all Message No MMS messages will be received
Allow delivery report When message is sent to the recipient device, system will
automatically notify you
Allow read report When message is sent to the recipient device, system will
automatically notify you
Times to retry Before delivery stops ,times for system to resend
Pictures resolution Choose the sent images resolution
CH04_ENG1024.indd 84 2006/11/10 ¤U¤È 12:00:13

85
4
Vie w Mes s age
4
4.4 Outlook E-mail
You can use a Microsoft Ofce Outlook® e-mail account or remote
Exchange Server® account to send and receive e-mail via an
ActiveSync® sync connection.E-mails will be sent/received
simultaneously when synchronizing between the phone and a computer
or Exchange Server®.
When your C800 is congured to sync via the “e-mail” option with an
Exchange Server®, you can specify a sync setting of “when item arrives”
in the ActiveSync® scheduler to activate the Direct Push function.For
conguration of ActiveSync®, please refer to descriptions in Chapter
6.You can draft e-mail to contacts. You can also append les on the
phone to the message.You can also browse received e-mail and les
appended to e-mails.Read and unread e-mail messages are indicated by
the following icons:
: Read mail, with appended les : Unread mail, with appended les
When replying to the sender, the recipient and the original message will
be induded automatically.
Action: Drafting and sending e-mails
Select Add
1
Select and enter
Receipent
2
Select and Enter
<Subject>
3
CH04_ENG1024.indd 85 2006/11/10 ¤U¤È 12:00:14

86
4
Vie w Mes s age
4
Select <blank text
body>, Enter <mail
body>
4 5
Select Menu >
Insert > le
6
Select
<Files to send>
7
Select Send
8 9
Append leEnter the text body. For
example: FYI
Please enter the mail body
in the empty editing eld
During next execution of
ActiveSync, mail will be
automatically sent
For example, dopod
smartphone guide
Continue: Drafting and sending e-mails
CH04_ENG1024.indd 86 2006/11/10 ¤U¤È 12:00:18

87
4
Vie w Mes s age
4
Action: Recieving e-mail
Select
Send / Recieve
1 2
You must perform
Ac tiv e Sy n c s yn c bef ore
receiving mail
Received E-mail
Action: Browse e-mail
Select <E-mail to
browse>
1
Select
2 3
You can also select and
view the appended les
Icon for read e-mail
becomes
CH04_ENG1024.indd 87 2006/11/10 ¤U¤È 12:00:21

88
4
Vie w Mes s age
4
Action: Download complete e-mail contents
Select Obtain
remaining parts of this
message
1 2
E-mail contents will be
completely downloaded
during next sync
Action: Download attached les
Select <File to
download>
1 2
File will be downloaded
during next sync
CH04_ENG1024.indd 88 2006/11/10 ¤U¤È 12:00:24

89
4
Vie w Mes s age
4
Action: Save the attached le to storage card
Select Menu > Tools>
Option
1
Select Storage
2
Select Store
attachments on
storage card
3
Action: Reply to e-mails
Select and hold
<E-mail to reply to>
1
Select Reply
2
Select <blank text
body> then enter
<Message to reply>
3
Enter the mail body in the
empty editing eld, for
example: Thanks
CH04_ENG1024.indd 89 2006/11/10 ¤U¤È 12:00:27

90
4
Vie w Mes s age
4
Select Send
4 5
During next execution of
ActiveSync, mail will be
automatically sent
Action: Reply all
2
Select Menu >
Reply All
1
All recipients will be
automatically lled in
CH04_ENG1024.indd 90 2006/11/10 ¤U¤È 12:00:31
 Loading...