

Page 1
U s e r M a n u a l
C730_A_WWE_Manual.indb 1 2007/4/17 7:33:58 PM
Page 2

2
Thank you for your purchase of this all new Windows Mobile™ Smart
Phone!
Please read carefully before continue:
The battery in the box has not been fully charged.
While being charged, the battery should not be removed.
If you are trying to disassemble the body of the mobile phone, the warranty of your mobile phone
will void.
Microsoft, MS-DOS, Windows, Windows NT, Windows Server, Windows Mobile, ActiveSync, Excel, Internet
Explorer, MSN, Outlook, PowerPoint and Word are trademarks, or registered trademarks of Microsoft
Corporation in the United States of America, or in other countries.
Bluetooth and the Bluetooth logo are trademarks owned by Bluetooth SIG, Inc.
Wi-Fi is a registered trademark of the Wireless Fidelity Alliance, Inc.
microSD is a trademark of SD Card Association.
Java, J2ME and all other Java-based marks are trademarks or registered
trademarks of Sun Microsystems, Inc. in the United States and other countries.
!
!
Dopod will not be held responsible for resulting damages, technical
or editorial errors from this section. This information is provided “as-is”
and does not come with any guarantees. All information will be subject
to change and Dopod reserves the right to modify contents contained
herein this document. No further notications will be available.
!
This device is limited for indoors use, under the guaranteed conditions
that it will not interfere with legal radio stations and will not be
interfered during operation.
C730_A_WWE_Manual.indb 2 2007/4/17 7:34:00 PM
Page 3

3
Important Safety Precautions
Please adhere to the following safety precautions when using this product to avoid risk of legal and monetary
responsibilities.
Electrical Safety
This product is only operable when using battery supplied power. Using other power sources may cause
harmful conditions and will void all guarantees for this product.
Aviation Safety
As this product may interfere with the operation of the aviation navigation system and communication
networks of the navigation system, usage of this product in an aircraft is prohibited by law in several countries.
If by law permits you using this product in an aircraft, please switch to Inight Mode to turno radio wave
transmissions.
Environmental Restrictions
Do not use this product at a gas station or refueling station. Usage of this product is also prohibited at fuel
storages, chemical factories, and locations with explosives.
Environmental Safety
Do not use this product in the following locations: gas station, fuel storages, chemical factories, demolition
worksites, potentially hazardous explosive locations such as fuel area under ship holds, transport and storage
of fuel or chemical substance facilities, or locations with particles, dust, metal dust, chemical substances etc in
the air. Please remember that sparks in these environments can cause explosions or re hazards resulting in
human casualties.
Road Safety
Unless in an emergency, drivers in moving vehicles are prohibited from using hand held equipments for calls.
In certain countries, it is permitted for drivers in moving vehicles to use hands-free devices for calls. Usage of
this product may interfere with normal operations of medical instruments. Many hospitals and clinics prohibit
use of these equipments.
Non-Ionic Radiation
To ensure eciency of radio wave transmission and reduce interference, user should operate this product
under the recommended normal environments. As with other similar mobile wireless communication
equipments, in order to comply with required operations and for the safety of the users, it is recommended
that the user maintains a safe distance from the antenna during the operation of the equipment.
Dopod Defective Pixel Warranty Policy
As the LCD display on the handheld product is made up of high precision components, possible
lit or dark pixels (Note) appearing on the display screen is a common occurrence from the product
manufacturing process. If your purchased product meets the following conditions, you may request
replacement of the LCD display module within seven days from the purchase date.
1. Total count of three or more malfunctioning pixels (lit or dark); or
2. Any two malfunctioning pixels (lit or dark) within 5mm of each other.
Lit Pixels: blue, red, white, or green dots on specic locations of LCD screen.
Dark Pixel: black dot on specic locations of the LCD screen.
C730_A_WWE_Manual.indb 3 2007/4/17 7:34:01 PM
Page 4

4
Table of Contents
Ge t t in g t o k no w y o ur p h on e
Pho n e Fu n ct io n s
3.1 Phone Function .......................................................... 40
3.2 Making Phone Calls ................................................... 45
3.3 Receiving Voice Calls................................................. 52
3.4 Call Options ................................................................. 54
3.5 Additional Information on Dialing ........................ 59
3.6 Speed Dial .................................................................... 63
1
In p u t Me t ho ds
2.1 Changing Input Methods ........................................ 25
2.2 Input Modes ................................................................ 26
2.3 Deleting Texts by Using Back Button .................... 30
2.4 Clipboard ..................................................................... 31
2
3
1
2
3
1.1 Phone and Accessories ............................................. 3
1.2 Insert the USIM/SIM Card ........................................ 8
1.3 Insert the microSD Card ........................................... 9
1.4 Home Screen ............................................................... 10
1.5 Frequently used functions ...................................... 15
1.6 Clear Storage (Hard Reset) ...................................... 21
C730_A_WWE_Manual.indb 4 2007/4/17 7:34:03 PM
Page 5
5
4
Ma n a gi n g P e rs o na l I nf o rm at i on
4.1 Contacts ....................................................................... 68
4.2 Calendar ....................................................................... 82
4.3 Tasks .............................................................................. 93
4.4 Voice Notes .................................................................. 96
5
Exc h a ng i ng Me ss a ge s
5.1 Messaging .................................................................... 102
5.2 Text Message ............................................................... 104
5.3 Outlook E-mail ............................................................ 111
5.4 MMS............................................................................... 120
5.5 POP3/IMAP4 E-mail Account .................................. 126
5.6 Configuring Messaging ............................................ 129
6
Exp e ri e nc in g M u lt im e di a
6.1 Camera and Recoder ................................................. 139
6.2 Pictures and Videos ................................................... 150
6.3 Windows Media Player ............................................. 157
6.4 Audio Manager .......................................................... 168
6.5 Streaming Media ........................................................ 170
7
Ge t t in g C o nn e ct ed
7.1 Comm Manager .......................................................... 173
7.2 Bluetooth ..................................................................... 174
7.3 WiFi network ............................................................... 183
7.4 Internet Sharing ......................................................... 187
7.5 Network Wizard .......................................................... 193
4
5
6
7
C730_A_WWE_Manual.indb 5 2007/4/17 7:34:04 PM
Page 6

6
Exp e ri e nc in g I nt e rn e t
8.1 Internet Explorer ........................................................ 199
8.2 Windows Live .............................................................. 217
8
Syn c h ro n iz i ng You r P h on e
9.1 Windows Mobile Device Center and O ffice Outlook
2007 234
9.2 Establishing Connection .......................................... 239
9.3 Using ActiveSync ....................................................... 241
9.4 Sy nch ron izin g with a C omp ute r inst alle d wit h
Windows XP................................................................. 242
9.5 Synchronize through Bluetooth Connection ..... 244
9.6 Sync with Exchange Server ..................................... 248
9.7 File Transfer and Management ............................... 251
9.8 Advanced PC Sync Settings .................................... 254
9.9 Sync Music, Video, and Pictures ............................. 257
9.10 Import pictures and video clips ........................... 259
9.11 Installing Software .................................................. 261
9.12 ActiveSync Connec tion Troubleshooting .......... 263
9
8
9
C730_A_WWE_Manual.indb 6 2007/4/17 7:34:05 PM
Page 7
7
10
Se t t in gs
10.1 Home Screen ............................................................ 268
10.2 The Phone Settings ................................................. 271
10.3 Sound ......................................................................... 273
10.4 Removing Programs ............................................... 277
10.5 Profiles ........................................................................ 279
10.6 Time and Zone.......................................................... 283
10.7 Unlock Screen Clock ............................................... 285
10.8 Personal Information .............................................. 286
10.9 Protecting Your Phone ........................................... 287
10.10 Power Management ............................................. 291
10.11 Accessibility ............................................................ 292
10.12 Find Operating System Version ........................ 293
10.13 JOGGR ...................................................................... 294
11
Mo r e A p pl i ca t io n s
11.1 Java (MIDlet Manager) ........................................... 297
11.2 File Explorer .............................................................. 298
11.3 Task Manager ............................................................ 299
11.4 Office Mobile ............................................................ 300
11.5 SIM Manager ............................................................. 304
11.6 Calculator .................................................................. 305
11.7 Games ......................................................................... 306
11.8 Voice Commander ................................................... 308
11.9 Cyberon Talking Dictionary ................................. 310
11.10 Info Feed ................................................................. 311
11.11 Adobe Reader LE ................................................... 313
11.12 Quick Notes ............................................................ 314
11.13 Windows Update ................................................... 315
10
11
12
A
C730_A_WWE_Manual.indb 7 2007/4/17 7:34:06 PM
Page 8
8
After purchasing this product, please carefully read through
the user ’s man ual be fore operating. For your rea di ng
convenience, this manual is designed with many tips and
services in order to help you to nd information quickly.
Page Format
Generally, each page is separated into upper and lower
areas, rega rdle ss of the lef t or right ha lf of the pag e.
Browsing is made from left to right and then from up to
down in a Z shape, continuing on the next pages. There are
small red boxes on the outer edges of the contents page to
assist you in nding specic chapter topics.
Topic Format
The beginning of each topic always starts from the right page: The topic (first) page
will explain what feat ures you will learn from the specific top ic. The Actions Index
will assist you to quickly search for how to per form certain actions. The last part is
the contents page. The contents page is separated into three levels. For example, in
Chapter 3, there are 3.1, 3.2, 3.3 as the second level; 3.1 is then further divided into
3.1.1 Phone screen and 3.1.2 Input PIN number. Similar types of functions may be
further subdivided to reduce confusion.
How to Use This Manual
This manual provides tip symbols to remind users of some
concepts, notes, and precautions.
Tip Symbols
Caution
Tips
!
3
Dividing Line
Page Number
Chapter
50
Phone Home screen
Press Call button
1
Switch to the Phone screen
3.1 Using the Phone Function
When you begin to use the Dopod C500 phone functions, you will need to enter
the SIM card PIN number in order to connect to the GSM mobile network. When
using this phone, you can control wireless functions such as activate/deactivate
the phone. You can also adjust the headset volume anytime during a call or when
using the device.
3.1.1 Phone Functions
In the Ph one sc reen, yo u can access, dial, search contacts , or save p hone
numbers to the contacts list. Under certain circumstances (such as on a plane),
you may need to turn off the phone functions of the handset. You can use the
Comm Manager to manually deactivate/activate the phone’s communication
functions. When the phone function is off, you will not be able to receive calls,
send/receive messages, or use GPRS to connect to wireless mobile network. But
other hand set functions such as browsing the calendar, listening to music, or
playing games can still be used.
Please sw itc h t o Infli ght Mo de in an ai rcra ft acc ordi ng to l oca l
regulations.
!
Action:
2
me sc
e
e
t
o
n
ecctionstions
on
esscc
een,een,
yy
ououccanan
aa
cccceess
ss
,
,
diadia
,
,
ss
eeaachch
cc
ootata
ccttss
,,
oo
s
o
thheecc
ootata
cc
tstslistlist
..ndnd
eeccee
taintain
cici
cumst
ancumstan
cceess
(suc
h(such
a
s
ddttoo
tutu
offoff
tt
ee
hoon
ene
cc
tions
tions
oo
thth
ee
nds
ee
tt
..
o
age
t
o
anua
lydeacti
a
t
e/
a
ccti
tiaatt
eeththee
hon
ee
ss
co
m
W
t
ep
o
nefu
c
t
ioi
s
o
ffff
,,
yy
o
uou
willwill
no
tnoteaa
e
t
o
i
v
e
e
ssa
ge
s
,
or
s
e
GPR
S
tocc
onnonn
eecctt
tt
oo
wiwi
eeeessssile
d
se
tfc
tions
sas
o
ww
singsing
thethe
calen
dacalenda
,
i
s
t
ening
t
escan
still
beed.
s
eswitct
o
flig
tt
MM
odod
e
e
ii
aa
aa
ii
c
c
a
f
tacc
o
d
i
g
a
ti
on
s
.
2
C730_A_WWE_Manual.indb 8 2007/4/17 7:34:18 PM
Page 9

9
Every topic’s content page includes icons that will assist the reader in operating the
product and learning quickly. At the beginning of each action icon, the purpose of
this action will be outlined in red background color. Each procedure will indicate
the numbering, the action you will need to execute, the screen that appears for this
procedure, and the descriptions for this procedure.
About Action Icons
Name of current procedure
Actions to take
Procedure Number
Mobile phone or computer
screen
Action descriptions
Action: Switch input method
S wi tc h i n pu t m e th o d s
anywhere th at text can be
entered.
Select the input language.
Press FN key
then press Space
key
Select Language
1
2
C730_A_WWE_Manual.indb 9 2007/4/17 7:34:21 PM
Page 10

10
C730_A_WWE_Manual.indb 10 2007/4/17 7:34:22 PM
Page 11

Topic
Getting to know your phone
In this topic, you will learn to…
1. Phoneand Accessories
2. Insert the USIM/SIM card
3. Insert a microSD card
4. Home Screen
5. Frequently used functions
6. Clear Storage (Hard Reset)
1
C730_A_WWE_Manual.indb 1 2007/4/17 7:34:24 PM
Page 12
2
Index
Action
Familiarize Yourself with the Phone and Accessories ..............3
Accessories .............................................................................................6
LED indicator ..........................................................................................7
Insert the USIM/SIM card ..................................................................8
Insert the microSD card .....................................................................9
Familiarize Yourself With the Home Screen .............................10
Status indicator and program icons ...........................................11
Using the Start Menu .......................................................................15
Return to the Home screen............................................................ 16
Go back to the previous page ....................................................... 16
Switch to a Dierent Prole ........................................................... 17
Use the menu...................................................................................... 17
Using the keypad lock .....................................................................18
Unlock keypad .................................................................................184
JOGGR tutorial .................................................................................... 19
Use Voice Commander to control the phone ..........................20
Using the Clear Storage .................................................................21
C730_A_WWE_Manual.indb 2 2007/4/17 7:34:26 PM
Page 13
3
1
Getting to know your phone
1.1 Phone and Accessories
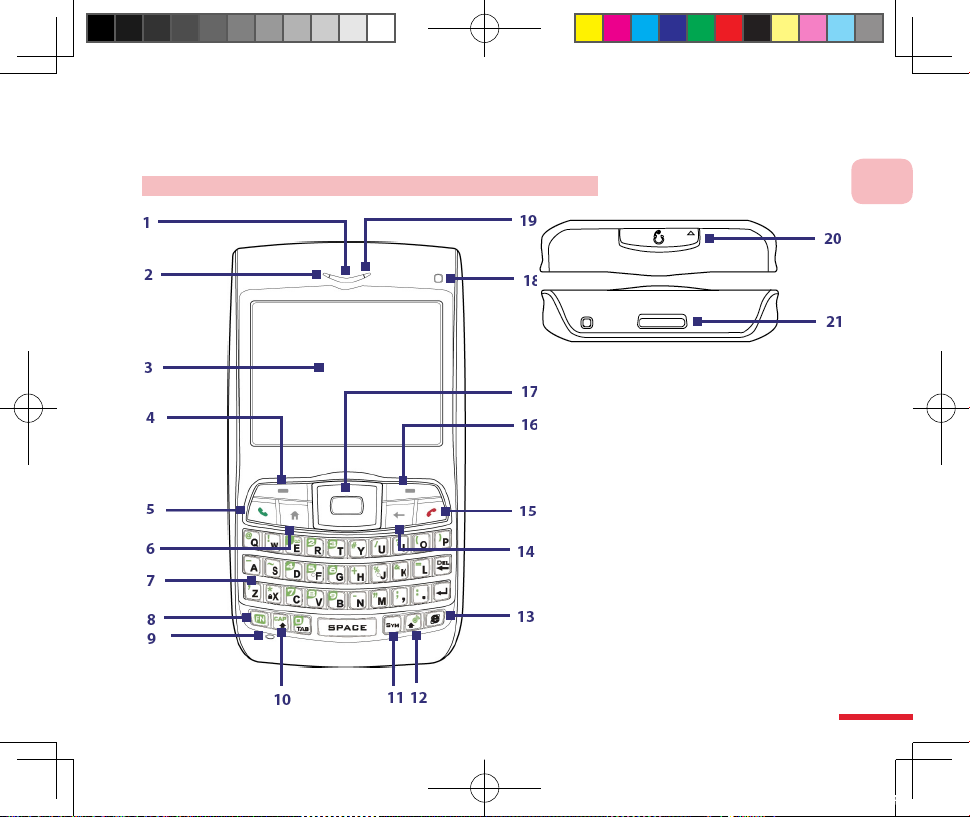
Get to know the handset buttons, LED indicators, and related accessories.
Familiarize Yourself with the Phone and Accessories
C730_A_WWE_Manual.indb 3 2007/4/17 7:34:28 PM
Page 14

4
1
Getting to know your phone
1 Speaker Listen to a phone call.
2 LED Indicator
This indicator (green/red/amber) notifies you of the battery and network
status of your phone.
3 Display Screen
4 Left Soft Key Press to perform the command shown in the label above the button.
5 Talk Button
Press to dial a phone number, answer a call, switch to another call, or put a
call on hold. Press and hold to activate/deactivate speakerphone mode.
6 Home Button Press to go to the Home Screen.
7 Qwerty KeyboardKeyboard
This is similar to a standard keyboard on a PC. Use Qwerty keyboard to enter
alphanumerical characters, and symbols.
8 Button
Press once to let you type symbols (characters in green) and enter numbers
in text elds. Press two more times for continuous symbol or number entries.
9 Microphone
Speak into the microphone when receiving or making a phone call or during
voice recording.
10 Button
Press to type a single capital letter. Press the FN key, then this key to type in
all caps.
11 Button Press to open the Symbol table.
12 Button Press the key and this key to open Comm Manager.
13 Button Press to open Internet Explorer Mobile.
14 Back Button Press to go to the previous screen, or backspace over characters.
15 Hang Up Button Press to end a call, or press and hold to lock the phone.
16 Right Soft Key Press to perform the command shown in the label above the button.
17
Na vig atio n Con tro l
Bu ttons /Cen ter OK
Button
Use to scroll left, right, up, or down. Press the center to use as the
CENTER OK button.
18 Light Sensor
Dark conditions sensed here will activate a backlight under the
keyboard.
C730_A_WWE_Manual.indb 4 2007/4/17 7:34:30 PM
Page 15

5
1
Getting to know your phone
199 LED indicator
This indicator (blue/green/amber) notifies you of Bluetooth and Wi-Fi
connectivity status.
20
Sync Connector/
Earphone Jack
Pry open the plastic cover to connect the USB cable to synchronize data or
recharge the battery. You can also connect the earphone to listen to audio
media or use the phone’s hands-free kit.
21
Release Lock Press to release the back cover lock.
C730_A_WWE_Manual.indb 5 2007/4/17 7:34:31 PM
Page 16
6
1
Getting to know your phone
22 Amplier speaker
When usi ng the ampli fier speaker, you can listen to sys te m so un ds,
communication, and music.
23 Camera lens CMOS lens with 2.0 megapixels.
24 Self-photo Mirror Helps you take a photo of yourself by aligning your reection in this mirror.
25 Power Button Hold for 2 seconds to turn the phone on/o.
26 microSD Slot Pry open the rubber cover to install microSD card.
27
Voice Recognition
Button
Press to open the voice recognition program; Press and hold to open Voice
Notes.
28
Car Antenna
Connector
Lets you attach your phone to the car antenna for better network reception.
Remove the back cover, then peel off the rubber cap and connect the
antenna jack.
29 Battery Cover Open the battery cover to install the battery, USIM/SIM card.
30 Camera Button Press to open the Camera program.
311 JOGGR
Slide the JOGGR up/down to scroll the page, press twice to select an item,
return to the previous page, or open the Messaging Center.
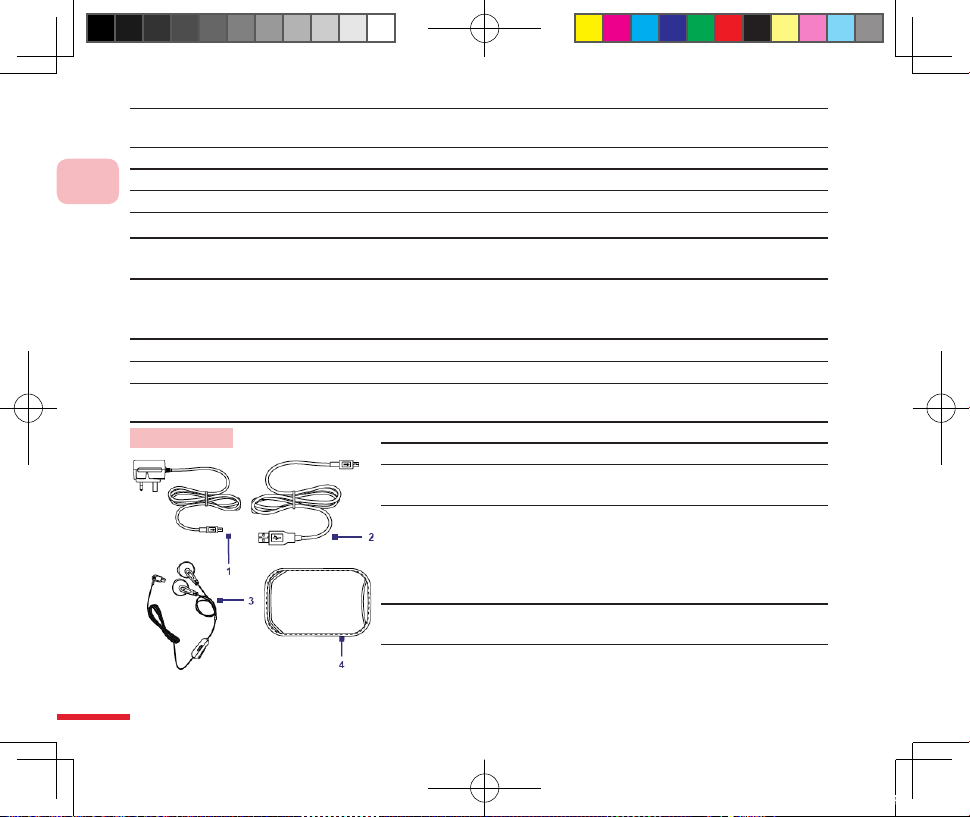
Accessories
1 AC Adapter Recharge the phone battery.
2 USB Cable
Connect your phone to a PC and synchronize
data.
3 Stereo Headset
Provide a volume control slider and a TALK/
END button. You can press the button to pick
up a call or put a call on hold or press and
hold the button to end the call. Plug into
earphone jack to listen to audio les.
4 Pouch
Store your phone in the pouch to keep it
away from dust and prevent scratches.
C730_A_WWE_Manual.indb 6 2007/4/17 7:34:33 PM
Page 17

7
1
Getting to know your phone
LED indicator
The left LED indicator (orange/red/green) is used for indicating the phone battery and network status.
The right LED indicator (blue) is used for indicating the Bluetooth status.
The table below is the representative meaning for each dierent LED indicator color:
Left LED Status
Solid green Battery is fully charged.
Blank Battery case is empty, no USIM/SIM card inserted or phone is o.
Solid amber Battery is charging or the phone is using ActiveSync to synchronize with a PC.
Solid red Battery is not installed or battery is over discharged.
Blinking green Connected to the network.
Blinking red Battery very low (less than 10%).
Blinking amber
Battery temperature is higher or less than the functional limits of 0 to 48 degrees Celsius
(32 to 118 degrees Fahrenheit), and has stopped charging.
Amber/Green
LED o
Battery fault. The “Battery Fault” indicator ( ) is displayed. In this case, the blinking
green LED can be recovered by unplugging the AC adapter.
Right LED Status
Blinking blue Bluetooth mode set to "On" or "Visible" mode.
Blinking green Connected to Wi-Fi network.
C730_A_WWE_Manual.indb 7 2007/4/17 7:34:34 PM
Page 18
8
1
Getting to know your phone
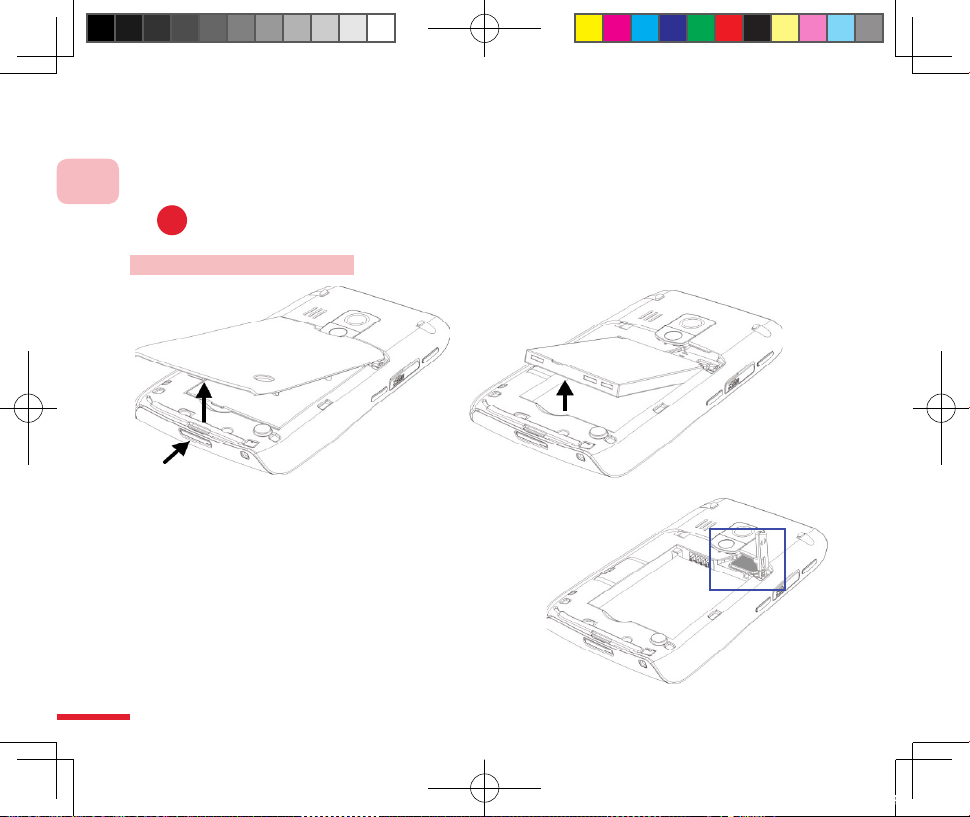
1.2 Insert the USIM/SIM Card
Your USIM/SIM (subscriber identity module) card is provided by your telecom service provider, it
contains your basic data. For example the phone number and address book.
You will not be able to access/use any telecom services without a USIM/SIM. (Please contact the
telecom service provider for more information regarding telecom services and USIM/SIM)
Insert the USIM/SIM card
Procedures:
1. Open the USIM/SIM card lock, by pulling it down slightly
and then towa rds you, at the top- right corner of the
battery compartment.
2. Insert the USIM/SIM card into the slot at the top-right
corner with its gold-plated contacts facing down. Push
the USIM/SIM card all the way in until the USIM/SIM card
locks into place.
3. Close the USIM/SIM card lock.
The USIM/SIM card slot.
!
C730_A_WWE_Manual.indb 8 2007/4/17 7:34:37 PM
Page 19
9
1
Getting to know your phone
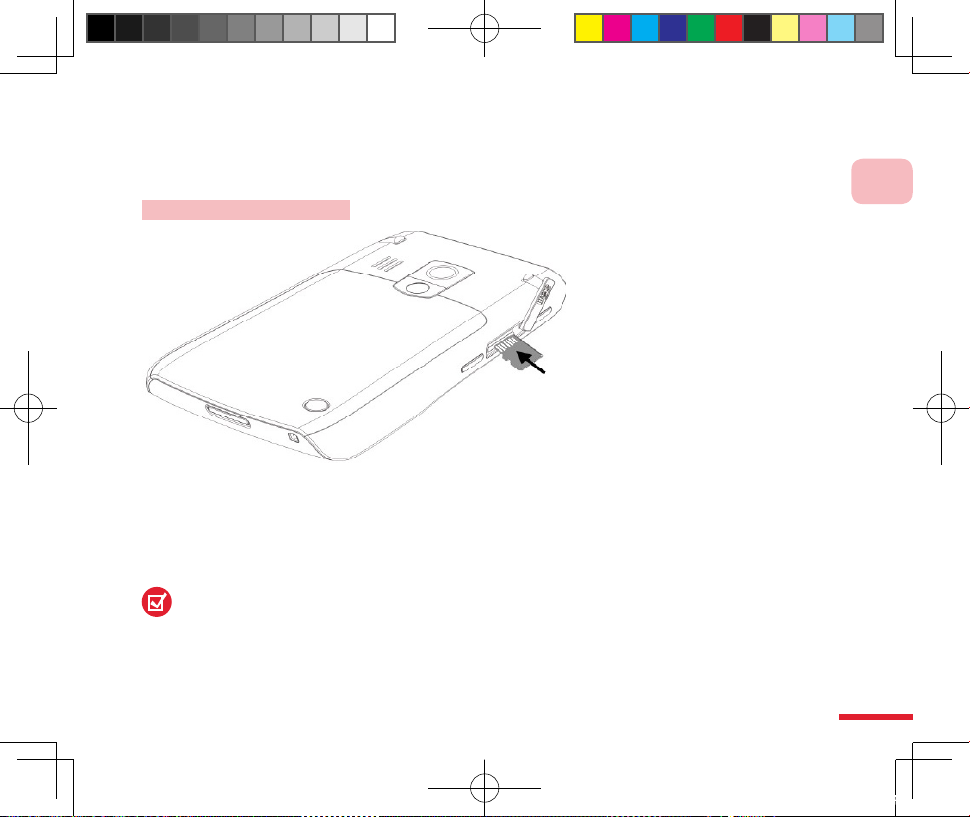
1.3 Insert the microSD Card
Insert the microSD card. You can store information such as pictures, documents, and program data on
the microSD card.
Insert the microSD card
Procedures:
1. With the keyboard facing down, pry open the microSD cover on the right side of the phone.
2. Insert the microSD card into the slot with its gold contacts facing up, then replace the cover.
To remove, press the microSD card to pop it out of the slot.
C730_A_WWE_Manual.indb 9 2007/4/17 7:34:38 PM
Page 20
10
1
Getting to know your phone
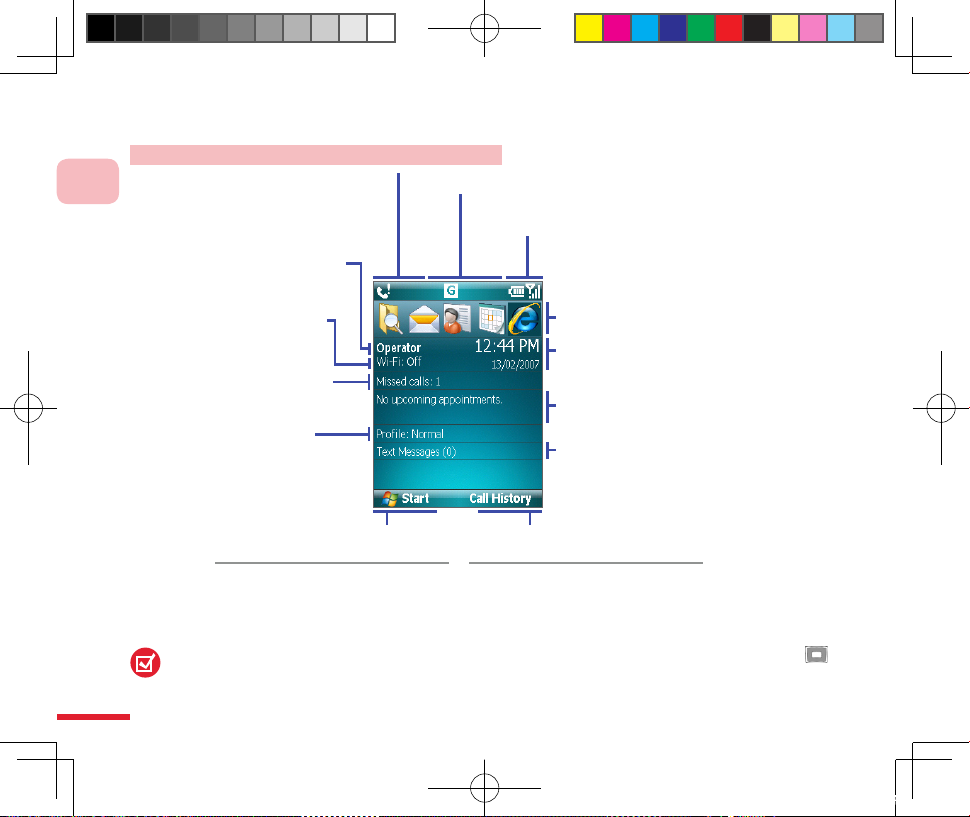
1.4 Home Screen
Displays message status: missed calls, new messages, etc.
Display network status and the current line, Bluetooth
, Wi-Fi and JOGGR status.
Displays current battery level and the
network signal strength.
The most recently used programs.
Date. Select this eld for activating the
Comm Manager.
Display telecom service
provider name.
The Wi-Fi network status.
Display missed calls.
Select this eld to view all
missed calls.
Display next upcoming appointment
Select this eld for activating Calendar.
Display current prole.
Select this eld for switching
the prole.
Display the number of unread messages.
Select this eld for open the Messaging.
In the main screen, press the left
soft key to show all the software
installed in the device.
In the main screen, press the right
soft key to ope n Contac ts , Call
History and Messages.
Displays function to the lef t
soft key.
Displays function of the right soft
button.
This picture above shows all items of the Home screen. When you use your phone, please press
Navigation Control Buttons to scroll the Home screen and view all items.
Familiarize Yourself with the Home Screen
C730_A_WWE_Manual.indb 10 2007/4/17 7:34:40 PM
Page 21

11
1
Getting to know your phone
Status indicator and program icons
The following table lists common status indicators with their description.
Uppercase text input GPRS available
Connecting to wireless
network
Lowercase text input GPRS in use
Wi-Fi function enabled,
but phone not connected
to a wireless network yet
Continuous uppercase
English letter input
3G available Wi-Fi connected
Numeric or s y m b o l
input (labeled in blue
color)
3G in use Speakerphone on
Numeric or s y m b o l
(labeled in blue color)
input, locked
EDGE available
Dia ling while no USIM/
SIM card is inserted
PinYin input method EDGE in use Call on hold
Ringer o Signal strength Calls forwarded
Battery charging
Radio connected or no
signal
Missed call
Battery level Radio o Voice call in progress
Low battery Roaming JOGGR disabled
Very low battery Sync error JOGGR turned as scroll
No battery or batter y
fault
Bluetooth on or visible
mode
JOGGR turned as volume
controller
C730_A_WWE_Manual.indb 11 2007/4/17 7:34:43 PM
Page 22

12
1
Getting to know your phone
US IM/SI M ca rd wit h
fault
New Windows Messenger
message
New text-message
N o U S I M/ S IM c a rd
installed
Microphone muted New Message
Vibrate call alert
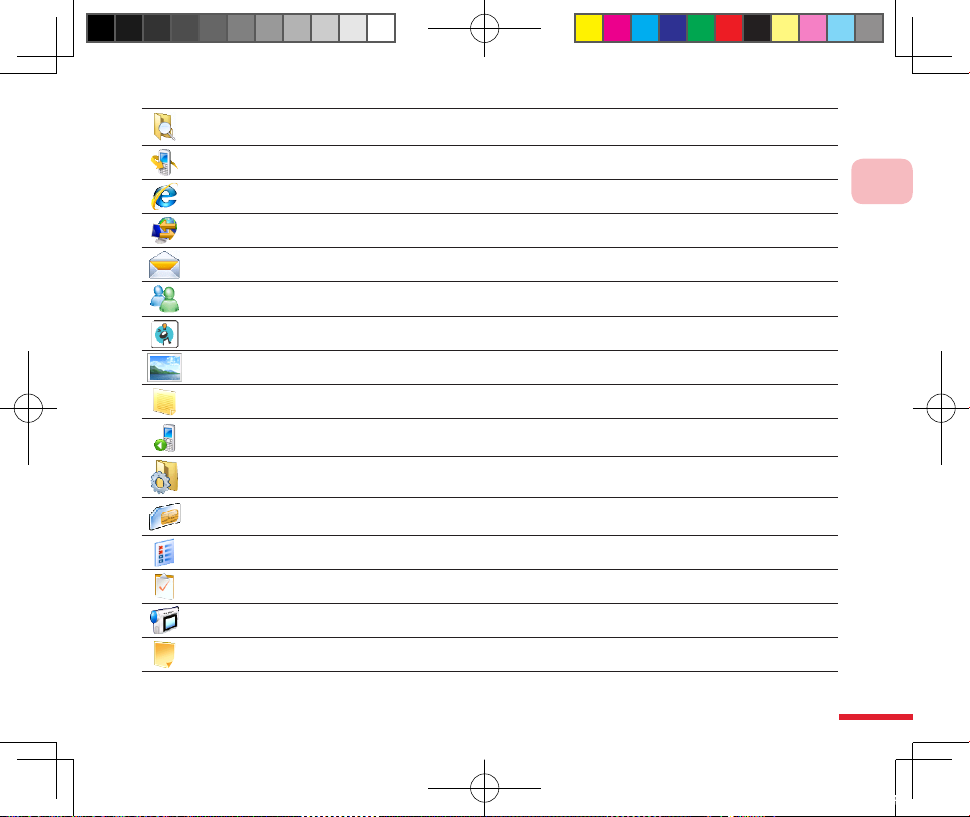
The following are some of the program icons. These programs have already been installed on the phone.
ActiveSync Synchronize data between the phone and the computer.
Adobe Reader LE Allows you to read PDF les on the phone.
Audio Manager Allows you to organize and manage the voice message les.
Bluetooth Explorer
Allows you to search and browse for devices that have activated le sharing
function.
Calculator
Runs simple math calculations such as addition, subtraction, multiplication,
and division.
Calendar Schedules appointment(s) information and creates meeting requests.
Word Mobile Allows you to view/edit Word documents.
PowerPoint Mobile Allows you to view PowerPoint documents.
Excel Mobile Allows you to view/edit Excel documents.
Comm Manager
Allows you to eciently turn on/o your phone, sync with the computer,
mute the phone, access Bluetooth, enable/disable Direct Push, etc.
Contacts Records contact information.
C730_A_WWE_Manual.indb 12 2007/4/17 7:34:46 PM
Page 23
13
1
Getting to know your phone
File Explorer Allows you to browse and manage the les stored in your phone.
Call History Keeps track of all phone calls made, received, and missed.
Internet Explorer Browse the Internet and WAP webpages.
Internet Sharing Share the GPRS connection through USB or Bluetooth.
Messaging You can send/receive messages, e-mail and MMS.
Messenger
Allows you to connect to the Microsoft Live Messenger Services for you to
communicate with your Messenger contacts.
MIDlet Manager Download and install application programs in Java.
Pictures & Videos Organize and sort your media les.
Quick Notes Allows you to record frequently used text messages.
Speed Dial
Allows you to create the dial entries for frequently dialed numbers or
accessed programs.
Settings Congure the settings in your phone.
SIM Manager
Allows you to manage contacts stored on the SIM card as well as copy the
contacts onto the phone.
Task Manager Display and close the application program.
Tasks Used for tracing your working activities.
Video camera Records video clips of various modes and length.
Voice Notes Allows you to make a voice memo quickly using voice recording.
C730_A_WWE_Manual.indb 13 2007/4/17 7:34:48 PM
Page 24
14
1
Getting to know your phone
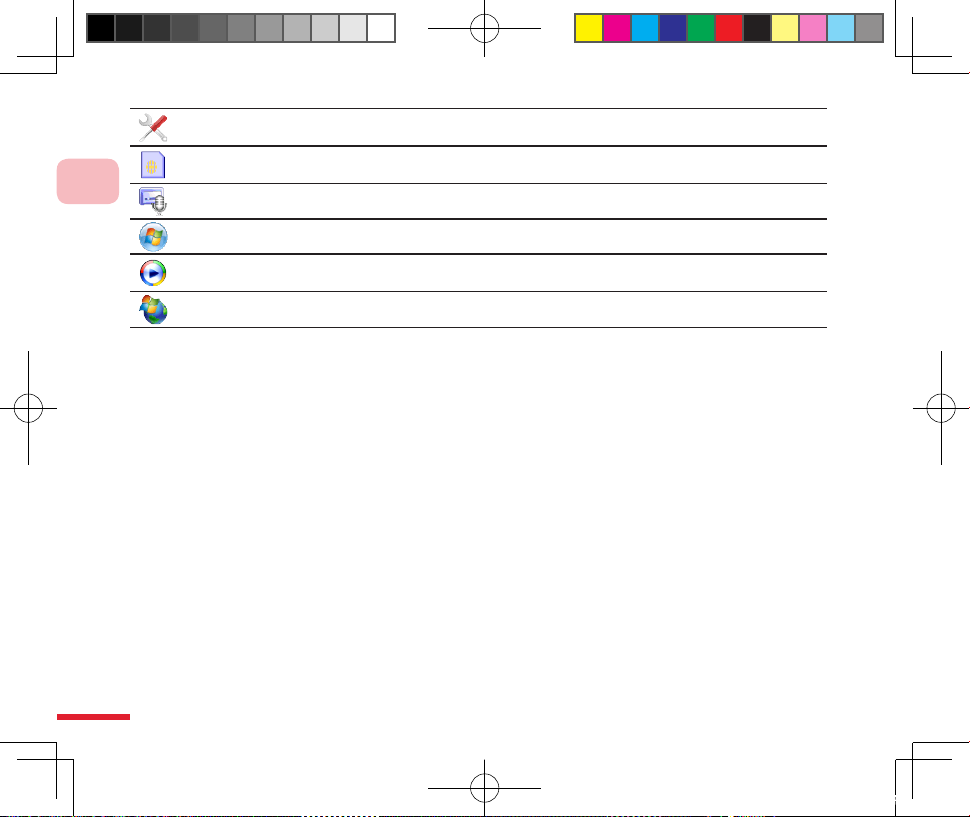
Network Wizard
Detect the SIM card you are using and auto apply the appropriate settings
for data services (MMS, Internet, etc)
STK Services
Allows access to SIM Tool Kit(STK) services. For more information on STK
services please contact the service provider.
Audio Recorder Allows you to record an audio clip and send it through MMS.
Windows Live Allows you to connect and use Windows Live Services.
Windows Media
Player
Play back the audio and video les in the phone.
Windows Update Connect to Microsoft website for updating your Windows Mobile.
C730_A_WWE_Manual.indb 14 2007/4/17 7:34:49 PM
Page 25

15
1
Getting to know your phone
Select Start
21
1.5 Frequently used functions
In this chapter, several basic operating functions of the C730 mobile phone will be described. If you are
using Windows Mobile™ products for the rst time, please read the contents of this chapter carefully.
Action: Using the Start Menu
At the Home screen , select
Start.
You can use
Switch application program.
Run application program.
Start Menu The Start menu
is located at the bottom-left
corner of the Home screen
and displays various program
icons that are spread across
one or more screens. The
shortcuts for the software
bundled with the phone and
the application programs
installed by the user will be
placed in the Start Menu.
C730_A_WWE_Manual.indb 15 2007/4/17 7:34:51 PM
Page 26

16
1
Getting to know your phone
Press Ho me S cr een
button
21
Action: Return to the Home screen
In the File Explorer, press
Back to go back to the
previous folder.
Press Back button
21
Action: Go back to the previous page
You can go back to the Home
screen at any screen to run
other tasks.
You can press End
Call button to return to
t h e H o m e s c r e e n .
H ow ev e r, i f y ou a re
making a call, the call
will be ended.
You can use the Back button
to go back to the previous
screen of a program.
If you are editing text,
the back button is used
for deleting text.
C730_A_WWE_Manual.indb 16 2007/4/17 7:34:54 PM
Page 27

17
1
Getting to know your phone
Use
Switch the items in the quick list.
Selecttheitemsinthequicklist.Select the items in the quick list.
2
Action: Switch to a Dierent Prole
File Explorer window.
You can use
Switch the items in the Menu.
Select the items in the Menu.
Action: Use the menu
There are many application
programs having Menu
that allow you to perform
additional functions (such
as open a le, save a le,
etc). Press correct Left/Right
corresponding button to
activate the Menu.
Press Power
button !Please do not
[Press &hold]
1
While in dierent situations,
you can choose a dierent
prole, for example, change
the ringtone mode to vibrate
mode.
Please refer to 10.5 Switch
and Edit Proles.
2
Select Menu
1
C730_A_WWE_Manual.indb 17 2007/4/17 7:34:57 PM
Page 28

18
1
Getting to know your phone
Keypad is locked.
Action: Using the Keypad Lock
2
Press and hold * or
Hang Up button
1
Action: Unlock Keypad
Press *
2
Select Unlock
1 3
Keypad has been unlocked.
C730_A_WWE_Manual.indb 18 2007/4/17 7:34:59 PM
Page 29
19
1
Getting to know your phone
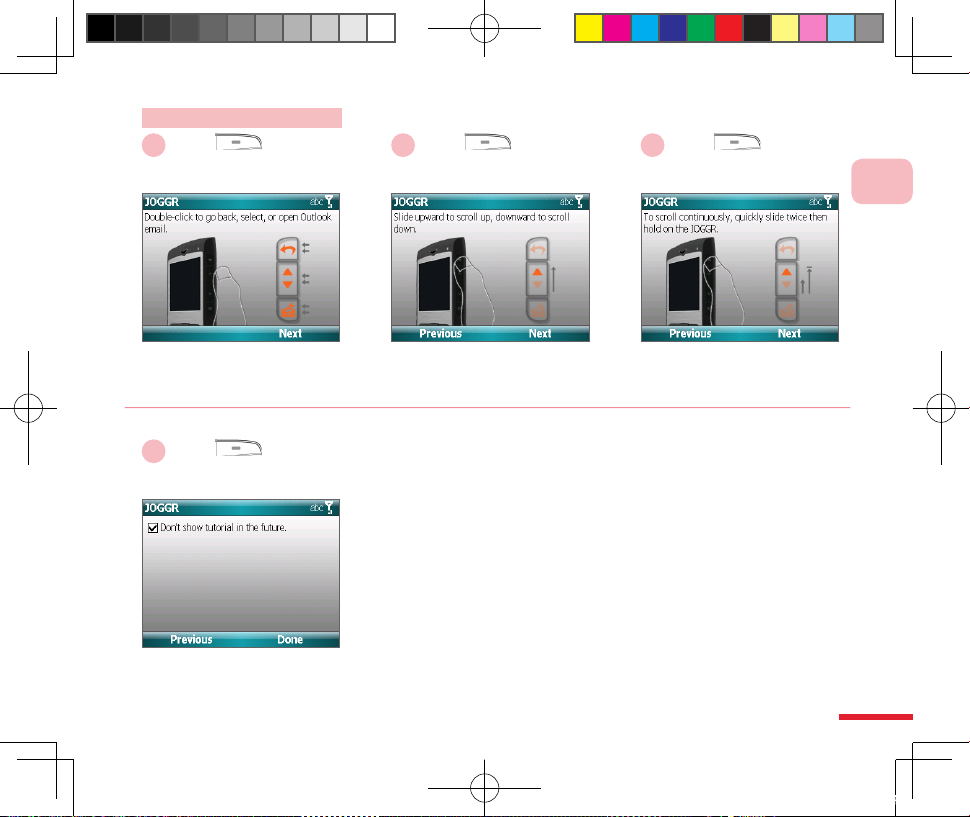
Action: JOGGR tutorial
Dou bl e- click to go ba ck,
select, or open Outlook email.
(Note 1)
Slide the scroll bar up or down to
set the volume control or move
the cursor. (Note 2)
Select Next Select Next
21
To scroll continuously, quickly
sl ide twi ce the n hold t he
JOGGR.
Select Next
3
Mark the checkbox " Don't show
tutor ial in the future" to disable
automat ically r un this tut oria l
during startup.
Select Done
4
When the phone starts up for the rst time it will run the JOGGR
tutorial. You can select Settings > JOGGR and mark the checkbox
"Open tutorial after 3 clicks within 10 seconds". You can congure
JOGGR operation be selecting Conguration > JOGGR, including:
Scroll bar
Adjust volume
Adjust volume (only applicable to incoming calls and Windows
Media)
•
•
•
(Note 1)
Tapping the Back icon twice is the same as pressing the Back
button.
Tapping the scrollbar twice is the same as pressing the OK button.
Tap the Mail icon twice to open the Messaging.
(Note 2) Slide the scroll bar up or down to set the volume control or
move the cursor.
C730_A_WWE_Manual.indb 19 2007/4/17 7:35:02 PM
Page 30

20
1
Getting to know your phone
Action: Use Voice Commander to control the phone
Voic e com man der s cre en.
Follow the onscreen tips to
use voice control .
Press
Voice Recognition button
21
C730_A_WWE_Manual.indb 20 2007/4/17 7:35:04 PM
Page 31

21
1
Getting to know your phone
Open the Start Menu.
Select Start Select Se tt in gs >
Clear Storage . Then press
the OK button
1
2
Action: Using the Clear Storage
1.6 Clear Storage (Hard Reset)
Cle ar Storag e will remove all informatio n from the memory, such as contacts, tasks, calendar
appointments etc. Additionally installed applications and settings will also be cleared. You can sync the
data to the computer prior to restoring to the default settings to avoid loss of data. When your phone
is not functioning properly, you can try to restore the factory default settings. For data synchronization,
please refer to Chapter 9 Synchronizing Your Phone. We recommend that you contact our customer
service before using this function in order to avoid damage to your phone or data. Please go to the
Dopod website member registration area and download the C730 2577 software installation les, then
reinstall the following software:
Cyberon Voice Commader/Talking Dictionary
Info Feed
Color themes.
The third-party softwares with the system may dierent according to the phone you purchased.
Please contact customer service or visit Dopod website to download the latest software.
•
•
•
Enter 1234
Then select Yes
3
Ente r 1234 and selec t Ye s.
The phone will restart after
resetting.
C730_A_WWE_Manual.indb 21 2007/4/17 7:35:06 PM
Page 32

22
C730_A_WWE_Manual.indb 22 2007/4/17 7:35:07 PM
Page 33

Topic
Learning Input Methods
In this topic, you will learn about...
Change Input Modes
Enter Texts
Deleting Texts by using Back Button
Clipboard
1.
2.
3.
4.
2
C730_A_WWE_Manual.indb 23 2007/4/17 7:35:11 PM
Page 34

24
Action Index
Change Input Method .....................................................................25
Enter Symbols ..................................................................................... 26
Enter Number .....................................................................................27
English texts .......................................................................................28
Using PinYin to input characters .................................................29
Deleting characters ..........................................................................30
Using Editing Modes ........................................................................31
Select text ............................................................................................ 32
Copy text .............................................................................................. 32
Cut text .................................................................................................. 33
Paste text .............................................................................................. 33
Undo ......................................................................................................34
Move the cursor to prex/sux of text ..................................... 34
Delete text in front of cursor .........................................................35
Delete text behind cursor ..............................................................35
C730_A_WWE_Manual.indb 24 2007/4/17 7:35:13 PM
Page 35

25
2
Learning Input Methods
Select
<Input Method>
2.1 Changing Input Methods
Use the ke yp ad to ente r tex t such as Ch in es e and English
characters, numbers, and symbols. Enter the characters through
the English and PinYin as indicated.
Chinese PinYin input method availability varies by countries.
Switching Input Methods.
Action: Change Input Method
S wi tc h i n pu t m e th o d s
anywhere th at text can be
entered.
Select the input language.
Select the input methods, for
example: EN (English).
Press FN key
then press Space
key
Select Language
1
2 3
!
C730_A_WWE_Manual.indb 25 2007/4/17 7:35:18 PM
Page 36

26
2
Learning inout Methods
Press next page to switch to
other pages.
Press SYM key
Select <Symbol>
32
2.2 Input Modes
This describes how to use the phone’s built-in English, PinYin, and
number input modes to input characters.
To insert a new line break while in any input mode, press
OK button.
2.2.1 Symbols
Using the phone to enter various punctuation symbols.
Action: Enter Symbols
Succ es sfully e ntere d the
selected symbols.
Symbol input method.
1
C730_A_WWE_Manual.indb 26 2007/4/17 7:35:21 PM
Page 37

27
2
Learning Input Methods
If you on ly press on ce,
entering a number will return
to the original input method.
The icon located at the upper
right corner indicates that you have
switched to numeric input mode.
Press FN key twice
Press <Numbers>
32
2.2.2 Numbers
Using Numeric Input mode to enter numbers:
Numeric input illustration:
Press FN key Enter a single number
Press FN key twice Continuously enter numbers
E.g. 022345678
Action: Enter Number
Entering numbers.
1
C730_A_WWE_Manual.indb 27 2007/4/17 7:35:24 PM
Page 38

28
2
Learning inout Methods
Please press the corresponding
English keys on the keyboard to
input letters.
You can u se th e le ft/ rig ht
keys to select words.
Press <English>
Select <Word> Press OK button
32
2.2.3 English
This describes how to use the keyboard to quickly input English
letters. To see how to switch to English input mode, please refer
to the instructions in chapter 2.1.
English entering status:
First letter in upper case, followed by lower case letters.
All lower case.
All upper case.
En gli sh wor d suc ces sfu lly
entered.
Action: English texts
English input method.
1
C730_A_WWE_Manual.indb 28 2007/4/17 7:35:27 PM
Page 39

29
2
Learning Input Methods
For example: to enter “王”,
pr ess the ke ys W, A, N, G
respectively.
Us e the lef t/ri ght ke ys to
select the character.
Press
<PinYin characters>
Select <Characters> Press OK button
321
2.2.4 PinYin
This describes how to use the PinYin quickly input mode to enter
Simpied Chinese characters. To see how to switch to character
stroke input mode, please refer to the instructions in chapter 2.1.
En ter the corr esp ond ing pinyin c har act ers to inp ut
Simpified Chinese character. For example: to enter "王",
press the characters W, A, N, G.
Text successfully entered.
Action: Using PinYin to input characters
PinYin input.
C730_A_WWE_Manual.indb 29 2007/4/17 7:35:30 PM
Page 40

30
2
Learning inout Methods
2.3 Deleting Texts by Using Back Button
You can use Back button to delete a single character, or press and hold the Back button to delete all
characters.
You can use the left/right keys to move the
cursor to the character to delete, then press
the Back button to delete the character.
Successfully deleted a character. Hold the Back
button to delete all characters.
Press Back button
2
Action: Deleting characters
1
C730_A_WWE_Manual.indb 30 2007/4/17 7:35:34 PM
Page 41

31
2
Learning Input Methods
2.4 Clipboard
You can use the clipboard to select characters, and then copy, cut, paste or delete them.
There are two edit modes build in the clipboard:
Menu Function
Edit1 Copy, paste, cut and select.
Edit2 Back, undo, delete and Hm/End.
Action: Using Editing Modes
Select
<Edit Function>
S wi tc h i n pu t m e th o d s
anywhere th at text can be
entered.
S el ec t a ed i t mo de, f or
example: Edit1
Se lec t a edi t fu nct ion , for
example: Select.
Press FN key
then press Space
key
Select <Edit Mode>
1
2 3
C730_A_WWE_Manual.indb 31 2007/4/17 7:35:39 PM
Page 42

32
2
Learning inout Methods
Action: Select text
Press the OK button
S wi tc h i n pu t m e th o d s
anywhere th at text can be
entered.
Se le ct cha ractors that you
want to edit.
Characters selected.
Select Select Select <Characters>
1
2 3
Action: Copy text
Characters saved in clipboard.
Select Copy
1
2
C730_A_WWE_Manual.indb 32 2007/4/17 7:35:44 PM
Page 43

33
2
Learning Input Methods
Action: Cut text
Characters saved in clipboard.
Select Cut
1
2
Action: Paste text
Select Paste
Use Navigation Control
buttons to select the place
you want to paste characters.
Se le ct cha ractors that you
want to edit.
Characters pasted.
Select <Paste Place>
Press FN key
then press , and
then select Edit1
1
2 3
C730_A_WWE_Manual.indb 33 2007/4/17 7:35:49 PM
Page 44

34
2
Learning inout Methods
Action: Undo
Undo the previous operation. Al ready ba ck to previ ous
operation.
Press FN key
then press , and
then select Edit2
Select Undo
1
2 3
Action: Move the cursor to prex/sux of text
The cursor moved to the end
of text.
Press FN key
then press , and
then select Edit2
Select Hm/End
1
2 3
C730_A_WWE_Manual.indb 34 2007/4/17 7:35:55 PM
Page 45

35
2
Learning Input Methods
Action: Delete text in front of cursor
Select Paste
Use Navigation Control
buttons to move the cursor
after he character deleted.
Characters deleted.
Press FN key
then press , and
then select Edit2
Select Back
1
2 3
Action: Delete text behind cursor
Use Navigation Control
buttons to move the cursor
before the character deleted.
Characters deleted.
Press FN key
then press , and
then select Edit2
Select DEL
1
2 3
C730_A_WWE_Manual.indb 35 2007/4/17 7:36:00 PM
Page 46

36
2
Learning inout Methods
C730_A_WWE_Manual.indb 36 2007/4/17 7:36:01 PM
Page 47

Topic
Phone Functions
In this topic, you will learn about
Phone Func tion
Making Phone Calls
Receving Voice Calls
Call Oprions
Additional Information on Dialing
Setting Up Speed Dial Entries
1.
2.
3.
4.
5.
6.
3
C730_A_WWE_Manual.indb 37 2007/4/17 7:36:03 PM
Page 48

38
Action Index
Phone Home screen .........................................................................40
Disable Phone Function .................................................................. 41
Enable phone functions .................................................................. 42
Enter SIM PIN....................................................................................... 43
Adjust Earpiece Volume .................................................................. 44
Dial from the phone screen ........................................................... 45
Dial from Contacts list .....................................................................46
Dial from Contacts Details..............................................................47
Dial from Call History .......................................................................48
Use speed dialing from Home screen ........................................ 49
Use speed dial from Speed Dial Manager ................................50
Dial Contacts from Voice Commander ......................................51
Answer Incoming Calls .................................................................... 52
Check missed calls ............................................................................53
End call .................................................................................................. 53
Hold the call ........................................................................................54
Swap calls ............................................................................................. 55
Create Multi-party Conferencing ................................................. 56
C730_A_WWE_Manual.indb 38 2007/4/17 7:36:04 PM
Page 49

39
Enable/Disable speakerphone .....................................................57
Enable mute ........................................................................................58
Dial up voicemail ............................................................................... 59
Make emergency calls .....................................................................60
Make international calls .................................................................. 61
Use SIM card services (STK) ............................................................ 62
Create a speed dial............................................................................63
Edit a speed dial ................................................................................. 64
C730_A_WWE_Manual.indb 39 2007/4/17 7:36:04 PM
Page 50

40
3
Phone Functions
3.1 Phone Function
When you begin to use the Dopod C730 phone functions, you will need to enter the SIM PIN in order
to connect to the GSM mobile network. When using this phone, you can control wireless functions
such as enable/disable the phone. You can also adjust the headset volume during a call or when using
the device.
3.1.1 Phone Functions
At the Phone screen, you can access, dial, search contacts or save phone numbers to the contacts list.
Under certain circumstances (such as on a plane), you may need to turn o the phone functions. You
can use the Comm Manager to enable/disable the phone’s communication functions. When the phone
function is o, you will not be able to receive calls, send/receive messages, or use HSDAP/3G/GPRS
to connect to wireless mobile network. But other hand set functions such as browsing the calendar,
listening to music, or playing games can still be used.
Action: Phone Home screen
Press Call button
1 2
Switch to the Phone screen
C730_A_WWE_Manual.indb 40 2007/4/17 7:36:08 PM
Page 51

41
3
Phone Functions
Action: Disable Phone Function
P re ss P o w e r
button
1
S e l e c t C o m m
Manager
Then Press OK
2
Select
Then Press OK
3
Press the Power bu tton to
activate the quick list.
Use the Up/Down directional
button to select the Comm
Manager.
Phone functions enable. Press
to turn o the phone.
Select Exit
4 5
Home screen will display
“Phone O”.
You can also press End Call
b u tt on to re tu r n t o t he
previous screen.
C730_A_WWE_Manual.indb 41 2007/4/17 7:36:17 PM
Page 52

42
3
Phone Functions
Select Exit
4 5
The Ho me s cr een displ ays
and your telecom service
provider’s name.
Action: Enable phone functions
P re ss P o w e r
Button
1
S e l e c t C o m m
Manager
Then Press OK
2
Select
Then Press OK
3
Press the Power bu tton to
activate the quick list.
Use the Up/Down directional
button to select the Comm
Manager.
While turning off the phone
functions, enter the PIN code
(please refer to section 3.1.2).
You can also press End Call
b u tt on to re tu r n t o t he
previous screen.
C730_A_WWE_Manual.indb 42 2007/4/17 7:36:32 PM
Page 53

43
3
Phone Functions
Action: Enter SIM PIN
Enter <SIM PIN code>
1
Select Done
2 3
En te r th e ph one’s SIM P IN
code.
The icon locate at the upper
rig ht corne r i ndicates that you
have turned the phone on.
3.1.2 Enter SIM PIN
Each time you turn on the phone or activate the phone functions,
you will need to enter the SIM card PIN (personal identication
number) provided by your account’s telecom service provider.
Please wait for the phone to
verify the PIN code.
Enter SIM PIN.
C730_A_WWE_Manual.indb 43 2007/4/17 7:36:34 PM
Page 54

44
3
Phone Functions
3.1.3 Adjust Earpiece Volume
Adjust the earpiece volume, including headset, music, games,
and ring tone sound tests. This does not include adjustments of
the incoming call ring tones and reminders. You can also adjust
earpiece volume during a call.
For sound settings, please refer to section 10.3; for prof ile
settings, please refer to section 10.5.
Action: Adjust Earpiece Volume
Scroll JOGGR
1
Scroll JOGGR
2
Earpiece volume adjustment
screen
C730_A_WWE_Manual.indb 44 2007/4/17 7:36:36 PM
Page 55

45
3
Phone Functions
3.2 Making Phone Calls
You can dial calls directly from Home screen, phone screen,
contacts, speed dial entries, call records, SIM Manager, or use the
voice labels to dial to contacts by voice control.
3.2.1 Phone Home screen
Enter the dialing screen by pressing the call button; you will then
be able to enter the phone number and make a call.
Action: Dial from the phone screen
Press Call button
1
Enter <Phone Number>
T he n P r es s C a l l
Button
2
Making a call .Press the Call button to open
the phone screen.
A ut o m a ti ca l l y li s t t h e
matched contacts.
3
D ia lin g f ro m th e p ho n e
screen.
C730_A_WWE_Manual.indb 45 2007/4/17 7:36:38 PM
Page 56

46
3
Phone Functions
3.2.2 Dialing by Using Contacts
Choose the contact and the phone number in the Contacts List.
You can use the Left/Right button to switch the contact’s number.
To create a contact and to edit contacts, please refer to section 4.1
Contacts Descriptions.
Following each contact’s entry or phone number, “M” stands
for mobile number, “H” stands for home number and “W”
stands for work number.
In the Phone screen, you can perform search operation; for
example, press the keypad button 3 for searching Contacts
whose name begins with DEF.
Action: Dial from Contacts list
Select Contacts
1
Select <the contact
you wish to dial up>
2
Press Call button
3
Open Contacts list. Dial the default number of
the contact.
Using Contacts application
p r og r a m t o d i a l u p
recipients.
C730_A_WWE_Manual.indb 46 2007/4/17 7:36:39 PM
Page 57

47
3
Phone Functions
Action: Dial from Contacts Details
Select <Contacts>
Then Press OK
1
Select <the contact
you wish to dial up>
2
Press Call button
3
Open the contact’s Contact
Details that you wish to dial
up.
Select the contact’s number
yo u wi sh t o d i al up , fo r
example: mobile number.
Dialing up the Contact.
C730_A_WWE_Manual.indb 47 2007/4/17 7:36:41 PM
Page 58

48
3
Phone Functions
Select <Contacts>
T he n P r es s C a l l
Button
3
Select the contact you wish
to dial up.
3.2.3 Call History
Using Call History for dialing. The Call History includes incoming
calls, missed calls, and outgoing calls.
Call History icon:
: Missed calls
: Received Calls
: Outgoing calls
•
•
•
Action: Dial from Call History
Select Start
1
Select Call History
Then Press Enter
2
O p en t h e A p p l i c a t io n
program menu.
Dialing from Call History.
C730_A_WWE_Manual.indb 48 2007/4/17 7:36:43 PM
Page 59

49
3
Phone Functions
3.2.4 Speed Dial
You can set speed dial entries/shortcuts for the frequently dialed
contact numbers or frequently used application items. You will
only need to press and hold the corresponding speed dial entry/
shortcut button to dial up the contact or access the application
program.
If you set the corresponding number as two digits, such as 14,
then you can rst enter 1 and then hold 4 to activate the speed
dial. For speed dial settings, please refer to section 3.6.
Action: Use speed dialing from Home screen
Press and hold <Sp eed
d ia l c or re s p o n d in g
button>
1 2 3
You have successfully dialed
up the contact.
At the Home screen, press the
speed dial button.
Us in g sp ee d di al bu tto ns
to c orr esp ond t o fun ctio n
dialing.
C730_A_WWE_Manual.indb 49 2007/4/17 7:36:45 PM
Page 60

50
3
Phone Functions
Action: Use speed dial from Speed Dial Manager
Select Start
1
Select Speed Dial
Then Press OK
2
Select <the contact
you wish to dial to>
3
Press Call button
4
Dialing to the Contact.
Open the Start Menu. Open Speed Dial Application
program.
Speed Dial menu.
C730_A_WWE_Manual.indb 50 2007/4/17 7:36:46 PM
Page 61

51
3
Phone Functions
3.2.5 Voice Commander for Dialing
The voice tags voice control dialing function will allow you to quick dial
using the pre-recorded voice tags.
3
Dialing the Contact.
Action: Dial Contacts from Voice Commander
P r e s s V o i c e
Commander button
1
S ay Ca l l < Co nt a ct >
<Home/Work/Mobile>
2
Say the voice tag after the
prompt.
Press the Voice Commander
button on the left side of the
handset.
Message screen for voice tags
voice control dialing.
C730_A_WWE_Manual.indb 51 2007/4/17 7:36:48 PM
Page 62

52
3
Phone Functions
3.3 Receiving Voice Calls
When you receive an incoming call, the phone will display the
information on the screen for the user to decide weather to
answer or ignore the call. When you are already taking a call, you
will still be able to press the Home button to return to the Home
screen at any time, or operate other application programs.
3.3.1 Answering Incoming Calls
Use the phone to answer incoming calls from other contacts.
Action: Answer Incoming Calls
Press Call button
or select Answer
1 2
Answered incoming calls.Incoming call information.
Incoming call display screen.
C730_A_WWE_Manual.indb 52 2007/4/17 7:37:15 PM
Page 63

53
3
Phone Functions
Sekect Missed Calls
1
Press OK button
2 3
At the Home screen, use the
direc tional buttons to move
to the Missed Calls item.
Dis play the hist or y of al l
incoming calls.
Action: Check missed calls
Press Hang UP button
1 2
Call ends.
Action: End call
C730_A_WWE_Manual.indb 53 2007/4/17 7:37:20 PM
Page 64

54
3
Phone Functions
3.4 Call Options
Set up the “During Call” options. You can choose to use Flash,
activate mute, Speakerphone, or Conference etc.
3.4.1 Call Waiting
You can use call waiting to hold the current call. When you use
call waiting you will still be charged for the minutes used.
Action: Hold the call
Select Menu >
Hold
1 2
Call is held. To cancel, please
select “Unhold”.
Swap to another call during a
conference connection.
C730_A_WWE_Manual.indb 54 2007/4/17 7:37:21 PM
Page 65

55
3
Phone Functions
3.4.2 Swap calls
You can swap between two calls.
1
Select Answer
2
Select Swap
3
While you are taking a call ,
another caller is received.
Swapping to the other call.
Swap to another call during a
conference connection.
Action: Swap calls
C730_A_WWE_Manual.indb 55 2007/4/17 7:37:23 PM
Page 66

56
3
Phone Functions
3.4.3 Conference Call
You can hold one call, then dial up a second phone number, or
answer a new incoming call during the current one.
N o t a ll se rvi ce p ro vi ders s u pp or t mu lt i- par ty
conferencing, please contact your service provider for
more information.
!
Select Menu
1
Select Conference
Then Press OK
2 3
Multi-par ty Conferencing is
created.
Speakerphone activated
screen.
Action: Create Multi-party Conferencing
C730_A_WWE_Manual.indb 56 2007/4/17 7:37:24 PM
Page 67

57
3
Phone Functions
3.4.4 Enable/Disable speakerphone
Use the built-in speakerp hone for conversation with callers
without holding the handset. Using the speakerphone allows
other people to listen in to the conversation.
While usin g the spea kerphone, please do not place
the handset close to your ears to avoid damaging your
hearing.
Select Menu >
Speakerphone On
1 2
Press Menu >
Speakerphone o
3
A ft er s p e a k e r p h o n e i s
ac tivat ed, the upp er r ight
screen corner will display
You can also press and hold
Call buttonto activate the
speakerphone function.
You can also press and hold
Call button to deactivate
the speakerphone function.
!
Action: Enable/Disable speakerphone
Speakerphone activated
screen.
C730_A_WWE_Manual.indb 57 2007/4/17 7:37:27 PM
Page 68

58
3
Phone Functions
3.4.5 Mute
Du ring a c all, you ca n tem por aril y tur n off th e hand set
micro ph one to preven t the pe rson on th e other side from
hearing your voice.
Select Menu >
Mute
1 2
You can also select the Mute
key directly on the screen.
After Mute is activated, the
upper right screen corner will
display icon.
Enable mute.
Action: Enable mute
C730_A_WWE_Manual.indb 58 2007/4/17 7:37:28 PM
Page 69

59
3
Phone Functions
3.5 Additional Information on Dialing
To listen to voicemail messages, you can dial directly to the
voicemail number (provided by the service provider) from the
phone screen. The first slot of speed dial is usually setup as
the voicemail number; you can also use other speed dials to
call voicemail. Your service provider will provide you with your
voicemail number.
3.5.1 Voicemail
When your phone cannot be answered, the telecom system will
automatically connect the incoming call to voicemail. You can
dial up voicemail to listen to your messages.
Select Start
1
Select Speed Dial
Then Press OK button
2
Select Voicemail
T he n P r es s C a l l
button
3
Activate Speed Dial. You can also press and hold
th e spee d dia l but t o n 1
directly on the Home screen.
Open the Start Menu.
Dial up voicemail from the
Speed Dial application
program.
Action: Dial up voicemail
C730_A_WWE_Manual.indb 59 2007/4/17 7:37:32 PM
Page 70

60
3
Phone Functions
3.5.2 Emergency calls
If you need to dial the local emergency number, do so by dialing
directly from the phone screen. When the phone functions are o
or keypad is locked, you can still make emergency calls.
SIM card may store other emergency help numbers, please
ask your service provider for more information.
!
Ente r <the emergen cy
ph one nu mbe r> Th en
Press Call Button
1 2
Making emergency calls.I t i s p o s s i b l e t o d i a l
emergency numbers when
the Home screen or keypad is
Making emergency calls.
Action: Make emergency calls
C730_A_WWE_Manual.indb 60 2007/4/17 7:37:33 PM
Page 71

61
3
Phone Functions
3.5.3 International calls
Use the phone for international dialing. International dialing
code includes the country codes for both you and your recipient.
Dial from the Home screen or
the phone screen.
“+”will rep lace the country
code for your current location.
1
Press and hold
Enter <phone number>
2
Press Call button
3
Make international calls.
Action: Make international calls
Making international calls.
C730_A_WWE_Manual.indb 61 2007/4/17 7:37:35 PM
Page 72

62
3
Phone Functions
S e l e c t
(STK Service)
Then Pres OK button
3.5.4 SIM card services (STK)
You can use the various information services, such as calling customer services and voicemail, built into
the SIM card by your service provider. To use the SIM card services, please rst insert your SIM card into
the phone. SIM card information services may vary depending on dierent service providers.
Select Start
1 2
The displayed name on the
STK Ser vice is your service
provider’s name.
Open the Start Menu.
Action: Use SIM card services (STK)
C730_A_WWE_Manual.indb 62 2007/4/17 7:37:37 PM
Page 73

63
3
Phone Functions
3.6 Speed Dial
You can create a speed dial entry (or shor tcut ) ent ri es for
frequently dialed numbers or accessed programs.
Select Contacts
1
Select <Contacts>
Then Press OK
2
Select
<the contact information
to setup>
3
Activate Contacts list. Choose the contact to set up
for speed dialing.
Choose the information item
to set up, for example: mobile
number.
Speed dial settings screen.
Action: Create a speed dial
C730_A_WWE_Manual.indb 63 2007/4/17 7:37:39 PM
Page 74

64
3
Phone Functions
Choose Menu >
Add to Speed Dial
4
Sel ec t <k ey board
assignment> Then select
Done
5 6
Use the Left/Right directional
b ut to n s t o c ho os e th e
corresponding numberic key.
You have successfully added
the speed dial entry.
Select <Dial entry>
Then Press OK
1
Enter
<eld you wish to edit>
2
Select Done
3
Selec t the spe ed dial entry
you wish to edit.
Action: Edit a speed dial
C730_A_WWE_Manual.indb 64 2007/4/17 7:37:42 PM
Page 75

Topic
Manage Personal Information
In this topic, you will learm about...
Contacts
Calendar
Tasks
Voice notes
1.
2.
3.
4.
4
C730_A_WWE_Manual.indb 65 2007/4/17 7:37:45 PM
Page 76

66
Action Index
Open Contacts from Home screen..............................................69
Open Contacts application program .........................................69
Add new Contact to Outlook ........................................................70
Set up contact’s extension number dialing ............................. 71
Add new SIM card contacts ...........................................................72
Copy SIM card contacts to the phone ........................................73
Copy phone contacts to SIM card ............................................... 73
Search contact by name .................................................................74
Search contact by phone number .............................................75
Dial the Contact ...............................................................................75
View and editing contact ...............................................................76
View the contact’s call history ...................................................... 77
Use the contacts lter ..................................................................... 78
Set up contacts categories ............................................................ 79
Use MMS to send contacts ............................................................. 80
Send contacts via Bluetooth ........................................................81
Send contacts via Text Message .................................................81
Open Calendar ..................................................................................82
C730_A_WWE_Manual.indb 66 2007/4/17 7:37:47 PM
Page 77

67
Open Calendar from Home Screen ............................................ 83
Add new appointments ................................................................. 83
View and editing appointments .................................................85
Switch the calendar view................................................................86
Appointment reminder screen ..................................................... 87
Send Appointment via MMS .........................................................88
Beam appointment via Bluetooth .............................................. 89
Congure Calendar options .........................................................90
Send Invitation to Attendess of an Appointment .....................................91
View Attendess of an Appointment ...................................................................92
Open the Tasks .................................................................................. 93
Add new tasks ...................................................................................94
Edit a task ............................................................................................94
Set task as complete........................................................................ 95
Open voice notes .............................................................................96
Add a new voice note ..................................................................... 97
Play a Voice Note ..............................................................................97
Rename voice note .......................................................................... 98
Delete voice note .............................................................................98
C730_A_WWE_Manual.indb 67 2007/4/17 7:37:48 PM
Page 78

68
4
Managing Personal Information
4.1 Contacts
You can add new contacts and information for contacts. Setting up communication information for the
contact will allow you to connect with the person quickly or browse the contact's information. Contacts
will be saved in the phone memory. You can also sync the contacts
info with Microsoft Exchange Server® or Microsoft Oce Outlook® on
a personal computer through ActiveSync®. In addition you can also ll
out each information eld including category, e-mail, address, pictures,
and ring tones. To sync your phone, please refer to Chapter 9.
4.1.1 Adding new contacts to the phone
You can add new contacts to Outlook and their information to the
phone. Setting up the various communication methods for the contact
will allow you to connect to the person quickly.
In the contacts list entries, “M” represents mobile number, “H” represents
home number, and “W” represents work number.
The icon in front of the Contact’s name indicates that the data
entry is stored in the internal memory (Outlook contacts); icon
indicates that the data entry is stored in SIM card; icon
indicates that the data entry represents a contact in Windows
Live.
Contacts application
progra
Enter various information
for the contact
C730_A_WWE_Manual.indb 68 2007/4/17 7:37:49 PM
Page 79

69
4
Manage Personal Information
Action: Open Contacts from Home screen
Open Contacts application
program
Contacts screen
Select Start
1
2
Open Program Files Open Contacts application
program
Contacts screen
Select Start
Select Contacts
Then Press OK
1
2 3
Action: Open Contacts application program
C730_A_WWE_Manual.indb 69 2007/4/17 7:37:52 PM
Page 80

70
4
Managing Personal Information
Select Done
4
Select Contacts Select Outlook
Contact
Then Press OK
Move to last name
and rst name. Enter
<Contact's name>
1
2 3
Action: Add new Contact to Outlook
C730_A_WWE_Manual.indb 70 2007/4/17 7:37:54 PM
Page 81

71
4
Manage Personal Information
In the contacts editing screen,
enter the pause symbol after
the phone number.
Enter the contacts extension
number, for example: 123.
Select Menu >
Insert Pause
Input
<extension number>
1
2
Action: Set up contact’s extension number dialing
You can also use Microsoft Oce Outlook® on a personal computer to set up the contact’s picture, then
sync the info to the phone via ActiveSyncR or the Windows Mobile™ Device Center in Windows Vista™.
Contact’s information elds:
Last Name First Name Oce phone number 1, 2 Mobile Number 1, 2
Picture E-mail 1, 2, 3 Instant Message 1, 2, 3 Work phone number
Car Phone Number Work Fax Number Home Fax Number Assistant Phone Number
File As Company Department Job Title
Home Address Other Addresses Notes Nickname
Manager Government ID Account Name Customer ID
Assistant Home number 1, 2 Category Radio Phone Number
Oce Location Birthday Spouse Custom ring tone
Pager Web Page Work Address Anniversary
Children
C730_A_WWE_Manual.indb 71 2007/4/17 7:37:55 PM
Page 82

72
4
Managing Personal Information
4.1.2 SIM Card Contacts
You can use “Contacts” and “SIM Manager” to browse, add, delete
and edit the contact information stored on your SIM card.
When you replace the SIM card in the phone, the original contacts
on the SIM card will change to the new SIM card contacts.
However the phone’s Outlook contacts will not be changed. You
can enter the name and phone number for SIM card contacts. But
you will not be able to specify other information elds such as
category, e-mail, address, pictures, and ring tones. To use the SIM
Card Manager, please refer to section 11.5.
Contacts screen.
Saves the contacts
information onto the SIM
card.
Select Menu Select SIM Contact
Then Press OK
Enter <contact's name>
and <number>. Then
Select Done
1
2 3
Action: Add new SIM card contacts
Editing SIM card contacts.
C730_A_WWE_Manual.indb 72 2007/4/17 7:37:57 PM
Page 83

73
4
Manage Personal Information
Select Menu >
Save to SIM
Select <SIM Contact> Select Menu >
Save to Contacts
2
3
Action: Copy SIM card contacts to the phone
Select contects you want to
copy to SIM.
Save to SIM.
Action: Copy phone contacts to SIM card
Select
<the number to be
copied>
Select Done
1 2 3
Select Menu >
Sim Manager
1
C730_A_WWE_Manual.indb 73 2007/4/17 7:37:59 PM
Page 84

74
4
Managing Personal Information
4.1.3 Search Contacts and Dial
You can perform search by contact’s name and number(s). For
example, when you press , it will search for contacts names
with English letters wxyz.
Using T9 predictive text input mode to search for contacts. Please
refer to section 10.10 Assistant Tools and choose the input mode
to use for “Smartdial Settings”
Enter <word to search>
Action: Search contact by name
Enter <word to search>
Found words are highlighted.
You can continue to enter the
next word.
You have successfully
found the contact you were
searching for.
1
2 3
Searching contact by name.
C730_A_WWE_Manual.indb 74 2007/4/17 7:38:01 PM
Page 85

75
4
Manage Personal Information
Enter <word to search>
Action: Search contact by phone number
Contacts that have phone
numbers starting with 0912
will be highlighted.
Search according to contact’s
phone number. For example,
enter 0912.
1
2
Action: Dial the Contact
Select <number>
Then select Call
Select the contact’s number.
For example, Mobile Number.
Dialing the Contact.You can follow the search
methods introduced in this
section to select the contact.
2 3
Select
<the contact you wish to
dial to>
1
C730_A_WWE_Manual.indb 75 2007/4/17 7:38:03 PM
Page 86

76
4
Managing Personal Information
Move to
<contact to view>
Then Press OK
Action: View and editing contact
Select <Contact>
Then Press Edit
Edit <Item>
Then Press Done
You can also edit the contact
directly from Menu > Edit.
For editing contacts, please
refer to section 4.1.1.
Select the contact you wish
to view.
1
2 3
4.1.4 View & Edit Contacts
You can view a contact’s information, make calls, send messages
or e-mail, and update each contact’s information to keep the
contact’s information correct and up-to-date. To add a new
contact, please refer to section 4.1.1.
Viewing contact information .
C730_A_WWE_Manual.indb 76 2007/4/17 7:38:05 PM
Page 87

77
4
Manage Personal Information
Action: View the contact’s call history
Move to
<Phone number>
Then Press Dial
If you have ever called the
contact, the call history item
will appear in the View contact’s
information screen.
Select the contact you wish
to view.
2 3
Move to
<contact to view>
Then Press OK
1
C730_A_WWE_Manual.indb 77 2007/4/17 7:38:07 PM
Page 88

78
4
Managing Personal Information
Action: Use the contacts lter
Select
Menu > Filter >
<category to switch>
Choose the category you
wish to switch to.
Browse contacts under this
category.
In the Contacts screen, use
the sorting function to switch
category.
1
2 3
4.1.5 Contacts Filter
You can use category sorting to quickly search for contacts.
For contacts sorting setup, please refer to section 4.1.4 Editing
Contacts.
Using category sorting to
manage contacts.
C730_A_WWE_Manual.indb 78 2007/4/17 7:38:09 PM
Page 89

79
4
Manage Personal Information
Category setup is complete.
Select Done
Contacts information edit
screen.
Choose the category you
wish to set up.
Select Menu >
Edit
Select Categories
Then Press OK
Select
<Categories>
Then Press OK
1
2 3
4
Action: Set up contacts categories
If you wish to add or delete contacts category groups, please
modify the category groups from Microsoft Oce Outlook®
on a personal computer, then sync to the phone. For sync
information, please refer to Chapter 9.
C730_A_WWE_Manual.indb 79 2007/4/17 7:38:12 PM
Page 90

80
4
Managing Personal Information
Use MMS to send contacts
4.1.6 Send Contacts Information
You can transfer contacts information via vCard (Note 1), MMS or use
Bluetooth with other people. For use SMS, please refer to Section 5.2; for
use MMS, please refer to Section 5.3; for Bluetooth connection, please refer
to Section 7.2.
(Note 1) vCard: Electronic Business Card. Used to record your contacts’
information. You can send your own vCard to other phones or computes
that have vCard compatibility.
If you want to use Bluetooth to transfer the data, the Bluetooth on
the receiver side must be set as searchable or it must have been
matched with your handset. For setting of Bluetooth, please refer to
section 7.2.
You can use the following procedures to share contacts information via MMS:
Under the Contacts List, choose the contacts you wish to transfer, and
then select Menu > Send as vCard
At the MMS Edit screen, choose the recipient or enter the recipient
phone number
After editing is completed, select Send.
•
•
•
Transfer contacts through
Bluetooth.
Category setup is
complete.
C730_A_WWE_Manual.indb 80 2007/4/17 7:38:13 PM
Page 91

81
4
Manage Personal Information
Please conrm both transmitter
and receiver have activated the
Bluetooth function.
To cancel exchange, select Cancel.
After the transfer is completed,
press Back button to exit.
Select
<Contact to send>
Select Menu > Send
Contact > Beam
Select <device to switch>.
Then Select Beam
1
2 3
Action: Send contacts via Bluetooth
Select
<contacts to transfer>
Select Menu > Send
Contact > Message
Select <the number to be
sent>. Then Press
Done
1
2 3
Action: Send contacts via Text Message
For the following SMS
transmission procedure, please
refer to Section 5.2 Sending SMS.
C730_A_WWE_Manual.indb 81 2007/4/17 7:38:16 PM
Page 92

82
4
Managing Personal Information
4.2 Calendar
You can use the calendar to schedule appointments, including
meetings and other events. Your appointments will be displayed
on the Home screen just before the scheduled time.
4.2.1 Use Calendar
You can add a new appointment and set the Start/End date
and appointment status information. You can customize your
personal schedule and set up a reminder to display before the
appointment start time.
Action: Open Calendar
Open Start Menu. Open Calendar application
program.
Select Start
Select Calendar
Then Press OK
1
2
Calendar Home screen.
3
Calendar application program.
C730_A_WWE_Manual.indb 82 2007/4/17 7:38:19 PM
Page 93

83
4
Manage Personal Information
Calendar screen.
Select
<appointment item>
Then Press OK
1
2
Action: Open Calendar from Home Screen
(Note 1, 2, 3)
Select
Mene > New
Appointment
Enter <appointment
subject>
Enter <other details>
Select Done
1
2 3
Action: Add new appointments
C730_A_WWE_Manual.indb 83 2007/4/17 7:38:21 PM
Page 94

84
4
Managing Personal Information
4
(Note 1) Appointment information eld:
Subject Appointment subject
Start Date Appointment start date
Start Time Appointment start time
End Date Appointment end date
End Time Appointment end time
All Day Event Displayed on top of calendar only and will not take up time slots
Location Appointment location
Attendee Appointment attendee
Reminder Appointment reminders
Occurrence Appointment re-occurring number of time or frequency
Status Appointment status
Sensitivity Appointment condentiality
Notes Notes
(Note 2) The number of times the appointment re-occurs
Once Appointment occurs only once
Same day every week Appointment occurs on same day of every week
Same day every month Appointment occurs on same day of every month
Same day every year Appointment occurs on same day of every year
(Note 3) Appointment status:
Busy Takes up this time slot
Free Will not take up this time slot. You can schedule other
appointments for the same time slot.
Tentative Unconrmed appointment
Outside This Appointment will take place outside of the oce
When you set your operating mode to “Automatic” and if the occurring appointment is set as “Busy”,
the phone automatically switches to “Vibrate” mode.
C730_A_WWE_Manual.indb 84 2007/4/17 7:38:23 PM
Page 95

85
4
Manage Personal Information
Use the Left/Right directional
button to select the date.
Edit the selected
appointment.
Select
<appointment to view>
Then Press OK
Select Menu >
Edit
Enter <the eld to
modify>. Then Press
Done
321
Action: View and editing appointments
For example, modify the
Appointment Subject as
“Dinner”.
4.2.2 Viewing and editing appointments
You can view and edit appointment contents. To edit appointment contents, please refer to section 4.2.1
Adding New Appointments.
From the weekly view screen, the lled in blocks indicates the appointment time, line on the side
indicates an all day event. Each appointment status is represented with a color block:
Busy: deep blue
Out of Oce: Magenta
Tentative: light blue
Free: White
Monthly View date block icon:
: Indicates there are appointments in the morning on that day
: Indicates there are appointments in the afternoon on that day
: Indicates there are appointments both in the morning and afternoon on that day
•
•
•
•
•
•
•
C730_A_WWE_Manual.indb 85 2007/4/17 7:38:26 PM
Page 96

86
4
Managing Personal Information
Agenda View. Switch to
weekly display.
Weekly View. Switch to
monthly display.
Select Week Select Month Select Agenda
321
Action: Switch the calendar view
Monthly View. Switch back to
Agenda display.
C730_A_WWE_Manual.indb 86 2007/4/17 7:38:28 PM
Page 97

87
4
Manage Personal Information
Reminder will be displayed
when the scheduled
appointment time is near.
View the current appointment
or snooze the reminder.
Select Menu >
View Item
Select Replay
321
Action: Appointment reminder screen
Upcoming appointment(s).
4.2.3 Reminder
A reminder screen will popup before the scheduled appointment
time on the phone.
You can choose to "Dismiss" the reminder or use the
"menu" to snooze the reminder.
Reminder screen.
C730_A_WWE_Manual.indb 87 2007/4/17 7:38:29 PM
Page 98

88
4
Managing Personal Information
Send Appointment via MMS
4.2.4 Send Calendar Information
You can exchange calendar information with others via vCalendar
(Note 1), by MMS, or through Bluetooth. To use MMS, please
refer to section 5.4; to use Bluetooth connection, please refer to
section 7.2.
(Note 1) vCalendar: electronic calendar. For recording your
personal appointment schedule. You can send your own
vCalendar to other phones or computers that have vCalendar
compatibility.
You can use the following procedures to share appointment
information via MMS
Under the View Calendar screen, choose the appointment(s)
you wish to transfer, then select Menu > Send as
vCalendar
At the MMS Edit screen, choose the recipient or enter the
recipient phone number
After editing is completed, select Send.
•
•
•
Calendar application program.
Use MMS to send your
appointment
C730_A_WWE_Manual.indb 88 2007/4/17 7:38:30 PM
Page 99

89
4
Manage Personal Information
Press Back
Select
<appointment to send>
Then Press OK
Select Menu >
Beam Appointment
Select <device to
exchange>. Then Press
Beam
1
2 3
54
Action: Beam appointment via Bluetooth
C730_A_WWE_Manual.indb 89 2007/4/17 7:38:32 PM
Page 100

90
4
Managing Personal Information
Open the Calendar options
settings screen.
Congure the Calendar
options.
Select Menu >
Tools > Options
Select <the item to
set up>
1 2
Action: Congure Calendar options
4.2.5 Calendar Options
Set up the calendar options to display. For example, lunar calendar, rst day of the week, number of
days to view, and reminder time.
Calendar Options
Options Description
Start in Set the default view option for calendar.
First day of week Choose which day as the rst day of the week
Week View Choose how many days to display for the Weekly View
Month View
Choose whether you wish to have the week numbers
displayed in the Monthly View
Set reminders Sets up the reminder preset time period
Respond to meetings via Set the default response to the appointment.
C730_A_WWE_Manual.indb 90 2007/4/17 7:38:33 PM
 Loading...