

User Manual
C720w.indb 1 2006/11/8 ¤U¤È 08:13:06

2
Thank you for the purchase of your all new Windows Mobile™ Smart Phone!
Microsoft, MS-DOS, Windows, Windows NT, Windows Server, Windows Mobile, ActiveSync,
Excel, Internet Explorer, MSN, Outlook, PowerPoint and Word are trademarks or registered
trademarks of Microsoft Corporation in the United States of America, or in other countries.
QuickMark and its icons are registered trademarks of SimpleAct, Inc.
MascotCapsule is a registered trademark of HI Corporation.
ClearVue Document, ClearVue Presentation, and ClearVue Worksheet are registered
trademarks of WESTTEK.
Another World and Magic Puz are registered trademarks of Magic Productions.
!
Our company reserves the right to make modifications to this manual without further notice.
!
Warning: This device is limited to indoor use, under the guaranteed conditions that it will
not interfere with legal radio stations and will not be interfered with during operation.
Important Safety Precautions.
Please adhere to the following safety precautions when using this product to avoid risk of legal
and monetary responsibilities.
Electrical Safety
This product is only operable when using battery supplied power. Using other power sources
may cause harmful conditions and will void all guarantees for this product.
Inflight Safety
Since this product may interfere with the operation of inflight navigational systems and
navigational system communications networks, use of this product in an aircraft is prohibited
by law in several countries. If the law permits you to use this product in an aircraft, please
switch to Inflight Mode to turn off radio wave transmissions.
Environmental Restrictions
Do not use this product at a gas station or refueling station. Use of this product is also
prohibited at fuel storage facilities, chemical factories, and locations with explosives.
C720w.indb 2 2006/11/8 ¤U¤È 08:13:06

3
Environmental Safety
Do not use this product in the following locations: gas station, fuel storages, chemical factories,
demolition worksites, potentially hazardous explosive locations such as fuel area under ship
holds, transport and storage of fuel or chemical substance facilities, or locations with particles,
dust, metal dust, chemical substances etc in the air. Please remember that sparks in these
environments can cause explosions or fire hazards resulting in human casualties.
Road Safety
Unless in an emergency, drivers in moving vehicles are prohibited from using hand held
equipment for calls. In certain countries, it is permitted for drivers in moving vehicles to use
hands-free devices for calls. Use of this product may interfere with the normal operation of
medical instruments. Many hospitals and clinics prohibit use of this equipment.
Non-Ionic Radiation
To ensure efficiency of radio wave transmission and reduce interference, users should operate
this product in the recommended environments. As for similar mobile wireless communication
equipment, in order to comply with required operations and for the safety of users, it is
recommended that the user maintain a safe distance from the antenna during the operation of
the equipment.
Dopod Defective Pixel Warranty Policy
Since the LCD display on the handheld product is made from high precision components,
constantly lit or dark pixels (see Note) appearing on the display screen is a common
occurrence that results from the product manufacturing process. If your purchased product
meets the following conditions, you may request replacement of the LCD display module within
seven days from the purchase date:
1. Total count of three or more malfunctioning pixels (lit or dark); or
2. Any two malfunctioning pixels (lit or dark) within 5mm of each other.
Lit Pixels: blue, red, white, or green dots in specific locations of the LCD screen.
Dark Pixels: black dots in specific locations of the LCD screen.
C720w.indb 3 2006/11/8 ¤U¤È 08:13:06

4
Table of Contents
Getting to know your phone
Learning about the Input Modes
Using the Communication Functions
1.1
Familiarize Yourself with the Handset and Accessories
..4
1.2 Insert SIM Card .............................................................
8
1.3 Insert Micro SD Card .....................................................
9
1.4 Familiarize Yourself with the Home Screen ...................
10
1.5 Application Program Menu ............................................19
1.6 Clear Storage (Hard Reset) ...........................................24
2.1
Switching the Input Method ...........................................27
2.2
Using Various Input Modes ............................................28
2.3
Deleting characters........................................................33
3.1 Using the Phone ............................................................
36
3.2 Making Phone Calls
.......................................................41
3.3 Receiving Voice Calls ....................................................
47
3.4 Call Options ...................................................................
50
3.5 Additional Information on Dialing ...................................
56
3.6 Setting up Speed Dial Entries
........................................60
1
2
3
1
2
3
C720w.indb 4 2006/11/8 ¤U¤È 08:13:06
5
4
Managing Personal Information
4.1 Contacts .......................................................................66
4.2 Calendar .......................................................................
79
4.3 Tasks ............................................................................
90
4.4 Voice Notes ..................................................................
93
5
View Messages
5.1 Messaging Center ........................................................100
5.2 SMS ..............................................................................
102
5.3 Outlook E-mail ..............................................................
110
5.4 MMS .............................................................................
118
5.5 POP3/IMAP4 E-mail Accounts .....................................12
6
5.6 Conguring the Messaging Center ...............................130
6
Experiencing Multimedia Entertainment
6.1 Camera and Video Camera .......................................... 138
6.2 Viewing Pictures and Movies ........................................ 14
8
6.3 Windows Media Player .................................................
155
7
Connecting with Wireless Communications
7.1 Comm Manager ............................................................ 167
7.2 Bluetooth Connection ...................................................
173
7.3 Internet Sharing ............................................................
182
7.4 WiFi Wireless Networking
............................................. 188
4
5
6
7
C720w.indb 5 2006/11/8 ¤U¤È 08:13:06
6
Experiencing Internet Entertainment
8.1 Internet Explorer ........................................................... 196
8.2 Pocket MSN
.................................................................. 213
8
Synchronizing Your Phone
9.1 About ActiveSync .......................................................... 227
9.2 Installing ActiveSync .....................................................
228
9.3 Installing Microsoft Ofce Outlook ................................ 230
9.4 Initial Connection ..........................................................
233
9.5 Using ActiveSync .......................................................... 236
9.6 Syncing with Multiple Computers .................................237
9.7 Synchronizing Through a Bluetooth Connection .......... 238
9.8 Syncing with Exchange Server ..................................... 244
9.9 Syncing to Transfer and Manage Files ......................... 247
9.10 Advanced PC Sync Settings ....................................... 250
9.11 Syncing Music, Video, and Picture ............................. 256
9.12 Installing Software ...................................................... 26
0
9.13 ActiveSync Connection Troubleshooting .................... 26
2
9
8
9
C720w.indb 6 2006/11/8 ¤U¤È 08:13:06
7
10
Setting the Phone Information
10.1 Home screen .............................................................. 268
10.2 Phone Settings ........................................................... 27
1
10.3 Sounds .......................................................................27
2
10.4 Removing Programs ................................................... 27
7
10.5 Proles........................................................................ 279
10.6 Time and Location ...................................................... 283
10.7 Disable Clock Display When Handset is Locked ........ 285
10.8 Personal Information ..................................................286
10.9 Protecting Your Phone ................................................ 288
10.10 Power Management .................................................292
10.11 Accessibility ..............................................................294
10.12 Finding the Operating System Version Number ....... 29
6
10.13 JOGGR ..................................................................... 29
8
11
Using More Programs
11.1 Java (MIDlet Manager) ............................................... 304
11.2 File Explorer ................................................................ 30
5
11.3 Task Manager .............................................................30
6
11.4 Using the ClearVue Suite
............................................ 307
11.5 SIM Card Manager ..................................................... 311
11.6 Calculator .................................................................... 312
11.7 Games ........................................................................ 313
11.8 Voice Commander ......................................................317
11.9 Talking Dictionary
赛微隨身典
..................................... 319
11.10 RSS of Dopod International Corp. ............................ 320
11.11 Adobe Reader LE ...................................................... 322
10
11
C720w.indb 7 2006/11/8 ¤U¤È 08:13:07
8
3.1 Using the Phone
When you begin to use the C720w phone functions, you will need to enter the SIM card PIN
number in order to connect to a GSM mobile network. When using this device, you can control
wireless functions, such as activating/deactivating the phone. You can also adjust the headset
volume at any time during a call or when using the device.
3.1.1 Phone Functions
At th e Ph on e sc ree n, y ou c an a cce ss, dia l, s ear ch c ont ac ts, or s ave
ph on e n u mb er s t o t he c on ta ct s li st . Un de r ce rt ai n ci rc u ms ta nc
es (such as on a plane), you may need to turn off the phone func
tions of the hand set. You can us e t he Comm Manag er to manuall y d eactiva te/
act iva te the pho ne 's c om mun ica ti on f un cti ons . W hen th e ph one fu nc
tion i s off , you will not b e abl e to re cei ve ca lls, send /re ceiv e mes
sage s, o r use GPR S to c onn ect t o a wi rel ess mob ile n etw ork . But oth
Action: Phone Home Screen
Press Call button
1 2
Switch to the phone screen.
3
36
Page Number
Dividing Line
Scree
ton
22
pp
yy
rto
c
onnect
connecttotoaaGSMGSM
mobile
mobile
n
etwork.
network.
W
hen
When
u
sin
gusing
ns,such
such
asas
a
ctivating/deactivatin
gactivating/deactivating
th
ethe
p
hone.
phone.
YY
ouou
ime during a call or when using the device.
during a call or when using the device.
nction
sti
scr een ,
you
can
acc ess ,ces s,
dial,di al,
s
ear c
hsear
co
er s
t
othe
contac
tss
li
st .
li st .
UU
nder
nd er
ce r
t
a
a
plane), you may need to turn off the phone fun
cd to turn off the pho
and
set.You
canusesethethe
C
omm
Comm
M
anager
Mtom
p
oescouucc
aattoounun
ctose
w
no
t
b
e able
able
toto
r
eceive
rece ive
calls,
s
end
/reGPRS
to
conn ec
tconn ect
toto
aawirel
esswmo
bile
Chapter
After purchasing this product, carefully read through
the user manual before operating. For your reading
convenience, this manual is designed with many tips and
features in order to help you find information quickly.
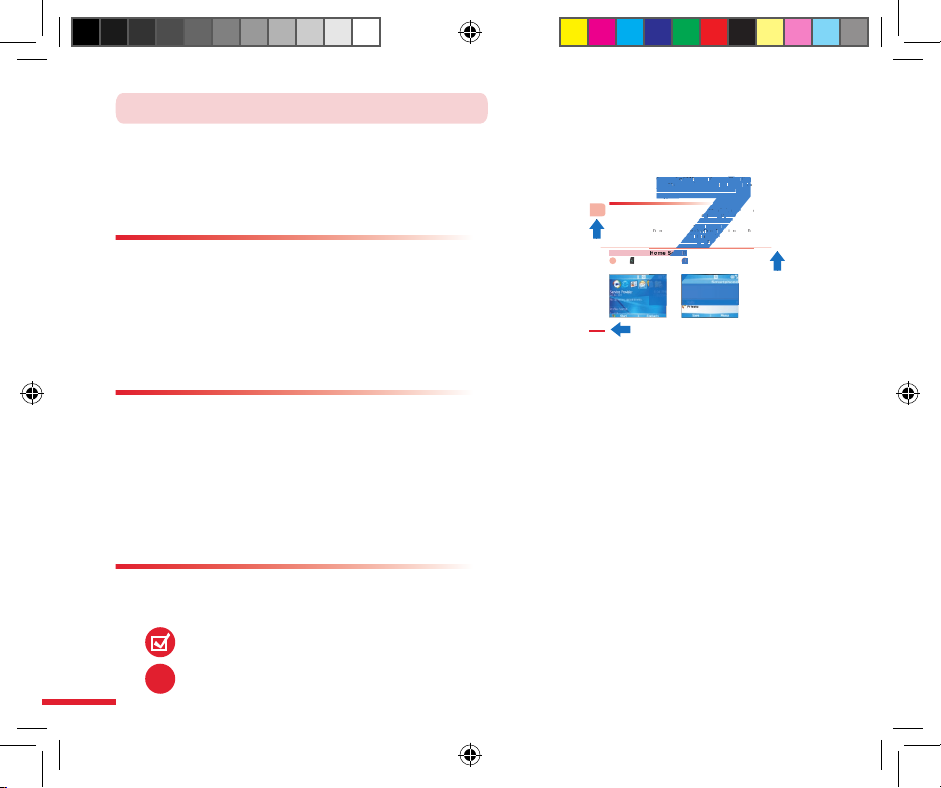
Page Format
Generally, each page (both left and right) is separated
into upper and lower sections. Browsing is done from
left to right and then from up to down in a Z pattern,
continuing on to the following pages. There are small red
boxes on the outer edges of the contents page to assist
you in finding specific chapter topics.
Topic Format
The right-hand page is the beginning for each topic: the first topic page will explain
which functions are discussed in the specific topic; the Action Index will assist you
in quickly locating the instructions for the action. The last part is the contents page,
which is separated into three levels. For example, in Chapter 3.1, sections 3.1, 3.2,
3.3 are at the second level; 3.1 is then further divided into 3.1.1 Phone screen and
3.1.2 Input PIN number. Similar types of functions may be further subdivided to reduce
confusion.
How to Use This Manual
This manual provides tip symbols to remind users of
certain pointers, notes, and precautions.
Tip Symbols
Caution
Tips
!
C720w.indb 8 2006/11/8 ¤U¤È 08:13:12
9
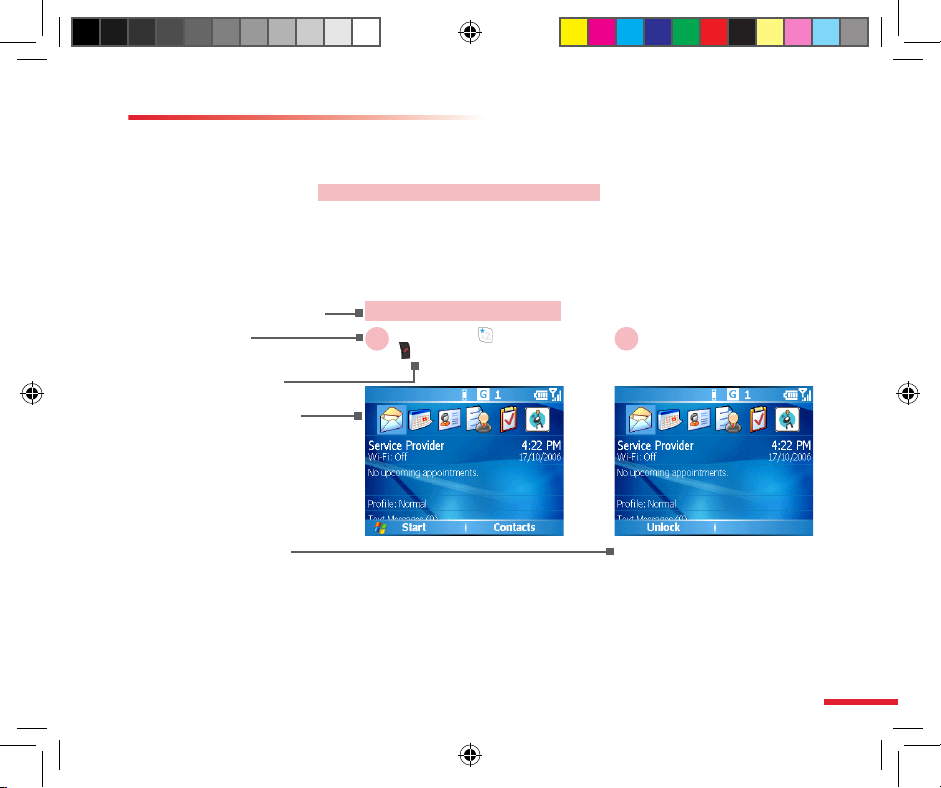
Every topic’s content page includes icons that will assist
the reader in operating the product and learning about it
quickly. At the beginning of each action icon, the purpose
of the action will be outlined in black on a red background.
Each step of the procedure will be shown along with a
number, a description of the action you will need to execute,
the screen that appears for the step, and the description of
the procedure.
About Action Icons
Name of current procedure
Actions to take
Step Number
Mobile phone or
computer screen
Action descriptions
Action: Lock keypad
Keypad is locked.
Press & hold * key or
Hang up button
21
C720w.indb 9 2006/11/8 ¤U¤È 08:13:13

10
C720w.indb 10 2006/11/8 ¤U¤È 08:13:13

Topic
Getting to know your phone
In this topic, you will learn to…
1. Familiarize Yourself with the Handset
and Accessories
2. Insert SIM card
3. Insert Micro SD card
4. Familiarize Yourself with the Home
Screen
5. Application Program Menu
6. Clear Storage (Hard Reset)
1
C720w.indb 1 2006/11/8 ¤U¤È 08:13:13

2
Action
Index
Familiarize Yourself with the Handset and Accessories ... 4
LED indicators .................................................................. 6
Accessories ...................................................................... 7
Insert SIM card ................................................................. 8
Insert Micro SD card ......................................................... 9
Familiarize Yourself with the Home Screen ...................... 10
Status indicator and program icons .................................. 11
Switching from Home Screen to Comm Manager ............ 15
Switching from Home Screen to
Most Recently Used Program ........................................... 15
Switching from Home Screen to
Upcoming Appointments ................................................... 16
Switching from Home Screen to Profiles .......................... 16
Switching from Home Screen to Text Messages .............. 17
Default theme with Dopod Home screen ......................... 17
JOGGR tutorial ................................................................. 18
Using the Start Menu ........................................................ 19
Use the menu ................................................................... 20
Using the Quick List .......................................................... 20
Using the Back button ....................................................... 21
Return to the Home Screen .............................................. 21
Use voice commands to control the phone ....................... 22
C720w.indb 2 2006/11/8 ¤U¤È 08:13:13

3
Keypad lock ...................................................................... 22
Undo keypad lock ............................................................. 23
Using the Clear Storage .................................................. 24
C720w.indb 3 2006/11/8 ¤U¤È 08:13:13
4
1
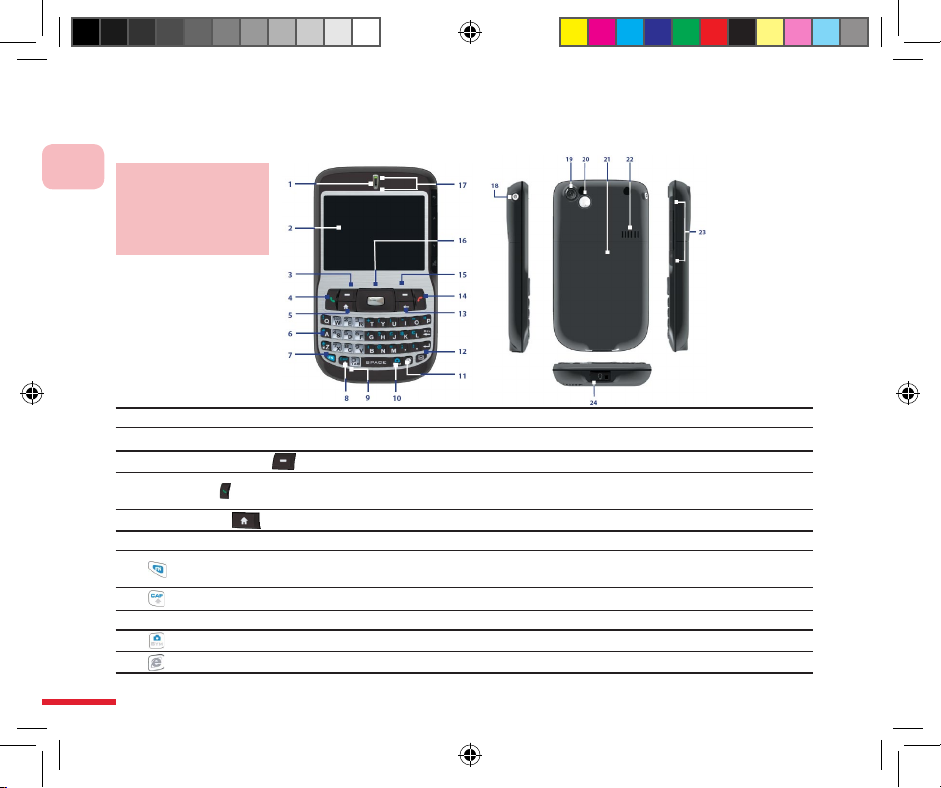
Familiarize Yourself with the Device
1.1 Familiarize Yourself with the Handset and Accessories
Get to know the handset buttons, LED indicators, and related accessories.
1 Speaker For listening to system sounds, communication, and music.
2 Display Screen
3 Left function button
Press to perform the function corresponding to the label above the button.
4 Talk button
Press to dial, talk, switch to another call, or hold. Press & hold to turn on or turn
off hands free mode.
5 Home button
Press to return to Home screen, press & hold to open Quick List.
6 Qwerty keyboard Use Qwerty keyboard to enter alphanumerical characters, and symbols.
7 button
Press once to switch to number input, press twice to make number input the
default input method.
8
button
When used during English input, switches between upper and lower case.
9 Microphone Used for making a call or recording.
10 button
Press to access symbol input or the camera.
11
button
Press to access Internet Explorer web browser.
Familiarize
Yourself with the
Handset and
Accessories
C720w.indb 4 2006/11/8 ¤U¤È 08:13:14

5
1
Familiarize Yourself with the Device
12 button Press to access the Message Center.
13
Back button Press to return to the previous page, or delete a character in the text column.
14
Hang up button Press to end a call.
15 Right function button Press to perform the function corresponding to the label above the button.
16
Navigation control
buttons/OK button
Use to scroll the page, up, down, left, and right. The round, center button is the
OK button.
17 LED indicator
The top indicator shows the battery or network status, the bottom blue indicator
informs you of the current Bluetooth status. Please read the descriptions table
at the end of this chapter to learn more about LED indicator settings.
18 Power button Hold for 2 seconds to turn the phone on/off.
19 Camera lens CMOS lens with 130 megapixels.
20
Self-photo mirror Helps you take a photo of yourself by aligning your reflection in this mirror.
21
Battery cover Open the battery cover to install the battery, SIM card, and Micro SD card.
22 Amplifier speaker
When using the amplifier speaker, you can listen to system sounds,
communication, and music.
23 JOGGR
Slide the JOGGR up/down to scroll the page, press twice to select an item,
return to the previous page, or open the Messaging Center.
24 Headset/Sync/Power Port
Perform data sync or recharging with the USB cable; this port is also used to
provide Stereo Headset for Hands Free calling or listening to music; or directly
connect phone to AC adapter to recharge.
The Hong Kong version includes a character stroke QWERTY keyboard. The Taiwan version
includes a Zhu-yin QWERTY keyboard.
C720w.indb 5 2006/11/8 ¤U¤È 08:13:15
6
1
Familiarize Yourself with the Device
LED indicators
The top multi-colored LED indicator (orange/red/green) indicates the phone battery and network
status.
The lower LED indicator (blue/green) indicates the Bluetooth and WiFi wireless network
connection status.
The table below shows the status indicated by the LED colors:
Top LED Status
Solid green Battery charging is complete.
Not lit Battery compartment is empty.
Solid orange Battery is charging, or phone is in sync with computer using ActiveSync through USB cable.
Flashing green Found telecom network.
Flashing red Insufficient battery level (less than 4%)
Flashing orange
Battery temperature is too high or too low (outside the operating range of 0-48 oC) and
charging has stopped.
Orange/green
LED indicator
Turn Off Battery malfunctioning. Displays the “Battery Malfunctioning” message ( ).
Unplug the AC adapter to resume flashing green LED.
Dark/fading Disconnected from the network.
Bottom LED Status
Flashing blue Bluetooth mode is in “Activated” or “Detected” mode.
Flashing green WiFi wireless network is activated
C720w.indb 6 2006/11/8 ¤U¤È 08:13:15

7
1
Familiarize Yourself with the Device
1 AC adapter Recharges the phone battery.
2 Sync cable For data synchronization with the computer.
3 Headset
The headset provides volume control buttons and Send/End buttons.You can use the
button to answer or hang up incoming calls.
Plug in the Headset/Sync connector to listen to music or make calls.
Using the headset will block outside sounds. Please do not use the headset in hazardous
locations
4 Leather pouch
For protection and convenient carrying of your phone.
Accessories
C720w.indb 7 2006/11/8 ¤U¤È 08:13:15
8
1
Familiarize Yourself with the Device
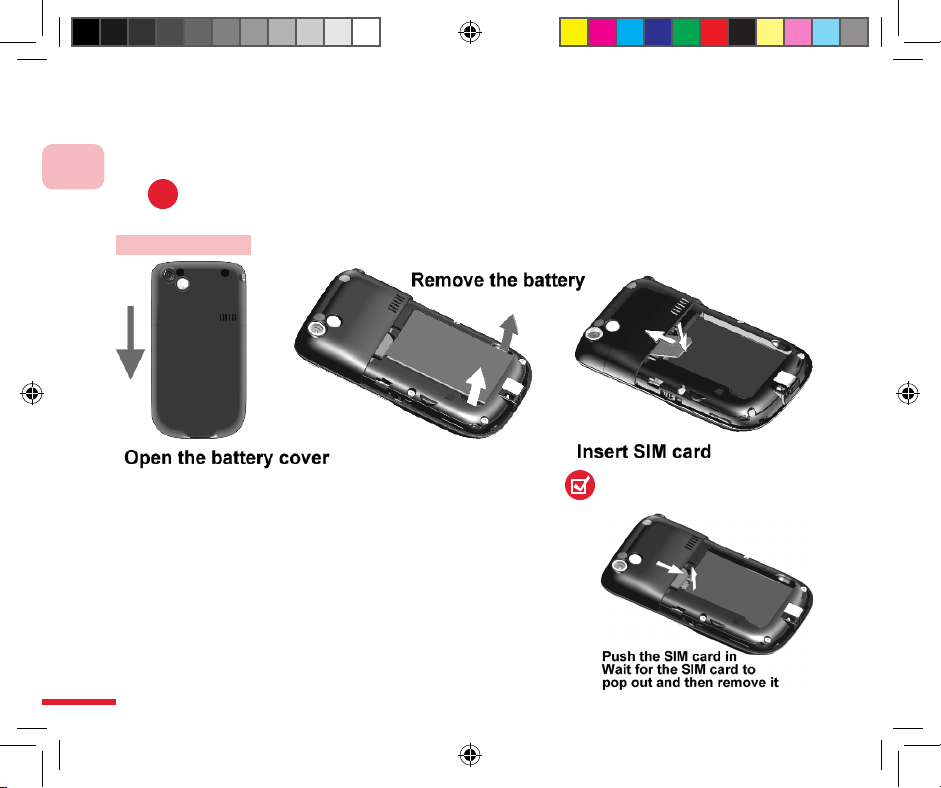
1.2 Insert SIM Card
SIM (subscriber identity module) card is provided by your telecom service provider. It contains
basic data; for example, the phone number and address book.
!
If the SIM card is not inserted, the communication functions cannot be used.
Insert SIM card
Procedures:
1. Opening the battery cover: hold the phone in one hand,
front side facing down, and place the phone in middle of
your palm. Slide the battery cover in the direction indicated
in the illustration.
2. Inserting the SIM card: insert the card in reverse into the
slot with the SIM card’s gold contacts facing down. Gently
push the battery into position. Replace the battery cover.
To remove the SIM card, please push in the SIM card and
wait for the SIM card to pop out before removing the card.
Replace the battery and battery cover.
Illustration for removing the
SIM card
C720w.indb 8 2006/11/8 ¤U¤È 08:13:16
9
1
Familiarize Yourself with the Device
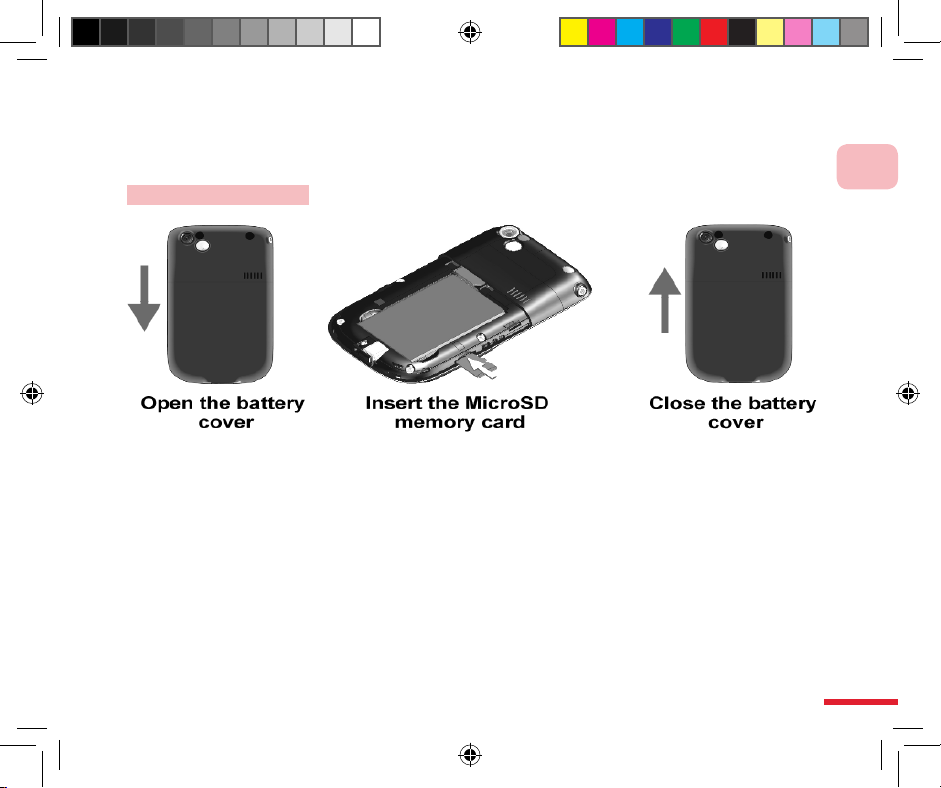
1.3 Insert Micro SD Card
Insert Micro SD card. You can store information such as pictures, sounds, documents, and
program data on the Micro SD card.
Insert Micro SD card
Procedures:
1. Remove the battery cover.
2. Insert the Micro SD card into the slot.
3. Replace the battery cover.
C720w.indb 9 2006/11/8 ¤U¤È 08:13:17
10
1
Familiarize Yourself with the Device
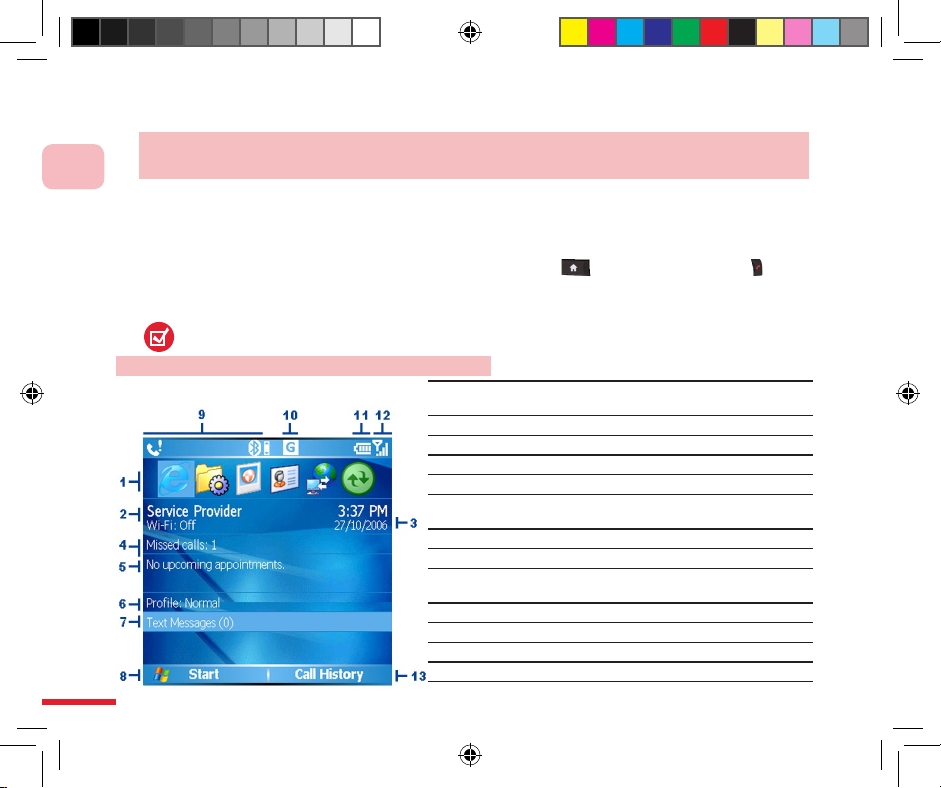
1.4 Familiarize Yourself with the Home Screen
The C720w mobile phone provides customized factory default themes and 3D menus.
Further details are provided in Chapters 10 and 11. This manual uses the Windows Mobile™ default Home
screen, themes and menus as samples.
The Home screen will display the following important information: status indicator, telecom service provider,
time and date, upcoming appointments, operating modes, SMS, missed calls, as well as recently used
program icons. You can select the desired icon and then press the OK button to access a program. The
icons located on the status bar include roaming, GPRS availability, battery status, missed calls, new
messages, reception status, and GPRS connection status.
1. To switch back to the Home screen from any program, press the home page button or the hang
up button.
2. To customize the contents displayed on the Home screen, including the background picture and settings,
etc., press Start > Setup > Home Screen.
For Home Screen setup, please refer to 10.1 (Home screen)
Familiarize Yourself with the Home Screen
1
Choose the most recently used program, and access it
directly from the Home screen.
2 Display the telecom service provider name.
3 Display date, time, and alarm status.
4
View missed calls.
5 View the next scheduled date.
6
Display the current configuration file contents. Press once
to modify the profile contents.
7 Press to open the message folder.
8 Press to display the program menu.
9
Display alert details, for example missed calls or new
messages.
10 Display the GPRS or GSM network status.
11 Display the battery status.
12
Display network signal strength.
13
C720w.indb 10 2006/11/8 ¤U¤È 08:13:18
11
1
Familiarize Yourself with the Device
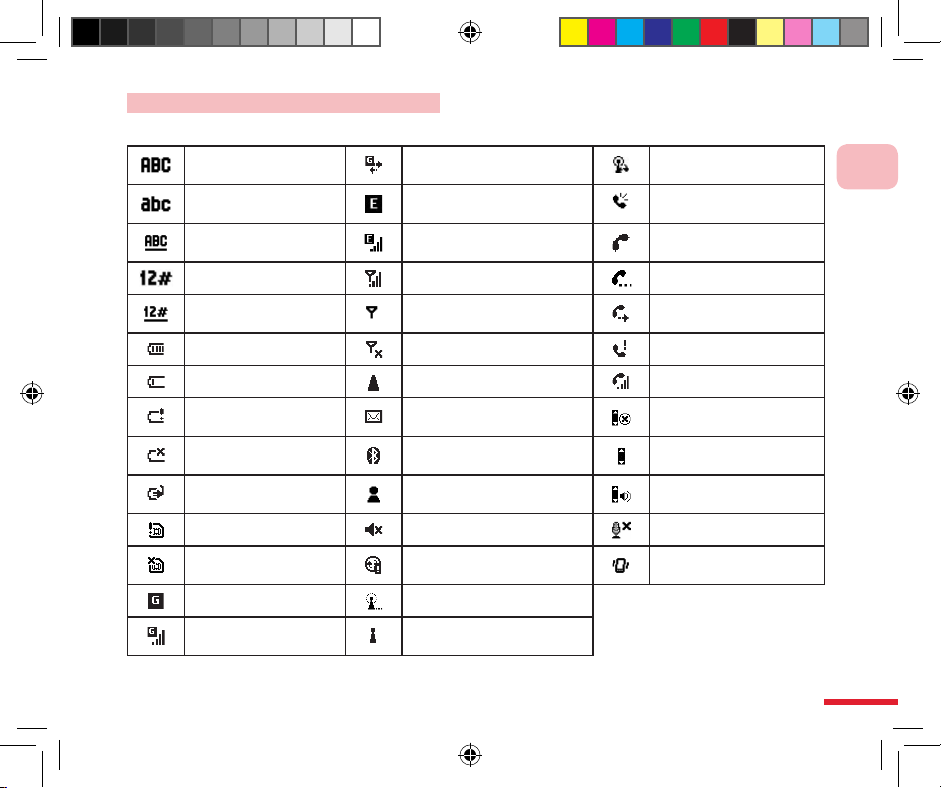
Status indicator and program icons
The table below lists the most common status indicators and their meanings:
English upper case
input
Connecting to GPRS Use WiFi synchronization
English lower case
input
Available EDGE Use hands free speaker
English upper case
input lock
EDGE in use
Connect when SIM card
is not inserted
Number input Signal strength Call waiting
Number input lock
Wireless connected or no
signal
Call forwarding activated
Battery level Wireless is off Missed call
Insufficient battery level Roaming Voice call currently in use
Battery level extremely
low
New e-mail or text messages
(SMS, message service)
JOGGR function disabled
No ba ttery or battery
error
Bluetooth
Use JOGGR as scroll
wheel
Battery Charging New instant message
Use JOGGR as volume
control
SIM card error Ring tone off Mute microphone
SIM card is not
inserted
Synchronization error Vibrate on incoming calls
Available GPRS Connecting to WiFi network
GPRS in use
WiFi in use, but no signal
found
C720w.indb 11 2006/11/8 ¤U¤È 08:13:18
12
1
Familiarize Yourself with the Device
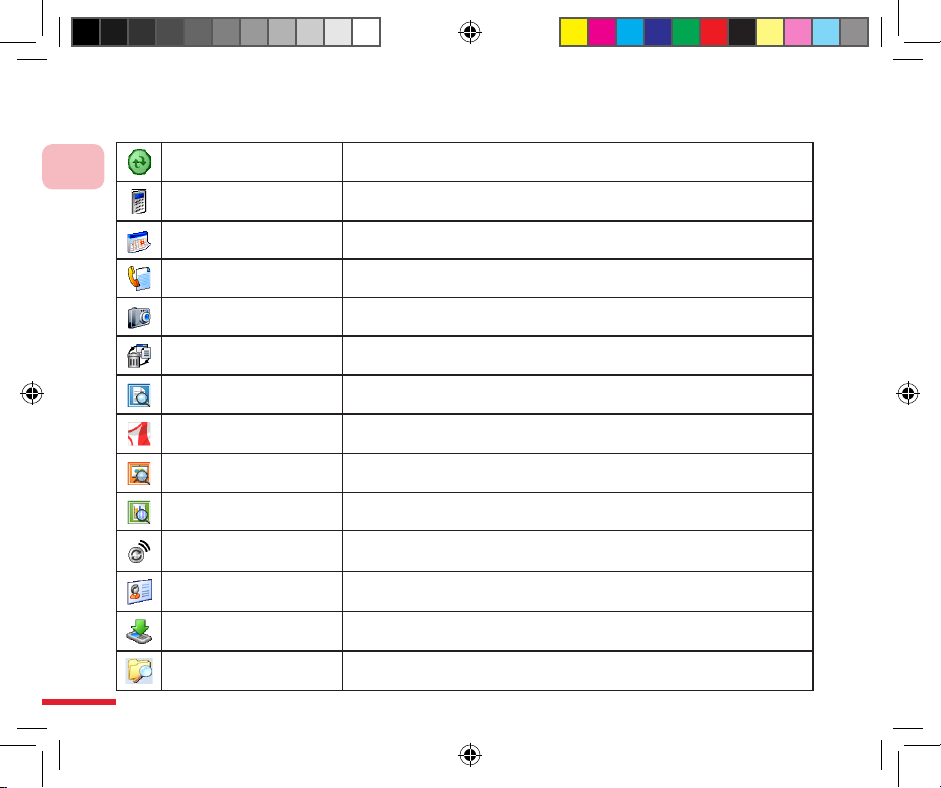
The following are some of the program icons. These programs have already been installed on the
phone.
ActiveSync Syncs data between the phone and the computer.
Calculator
Performs simple math calculations such as addition, subtraction,
multiplication, and division.
Calendar Schedules appointment(s) information and creates meeting requests.
Phone records History of all dialed numbers and missed calls.
Camera Provides multiple photographic modes.
Clear Storage Clears data in memory, returns to factory default values, and then restarts.
ClearVue Document Allows you to read Word files on the phone.
Adobe Reader LE Allows you to read PDF files on the phone.
ClearVue Presentation Allows you to read PowerPoint files on the phone.
ClearVue Worksheet Allows you to read Excel files on the phone
Comm Manager
Allows you to efficiently turn on/off your phone, sync with the computer,
mute the phone, access Bluetooth, enable/disable Direct Push, etc.
Contacts Records contact information.
Download Agent
Provides download status and information such as the content of the
downloaded material.
File Explorer Allows you to organize and manage files on the phone.
C720w.indb 12 2006/11/8 ¤U¤È 08:13:19
13
1
Familiarize Yourself with the Device
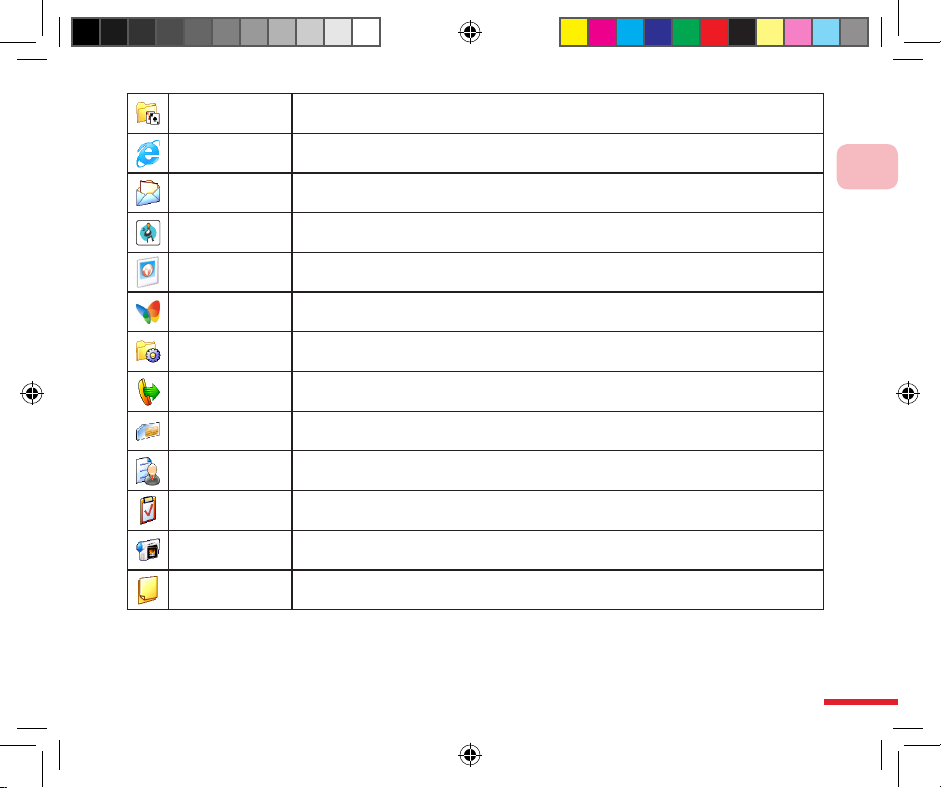
Games Four built-in games: Another World, MagicPuz, Bubble Breaker and Solitaire.
Internet Explorer
For browsing Internet / WAP websites and downloading new programs /
files from the Web.
Messaging Center Allows you to send and receive E-mail, text messages, and MMS.
MIDlet Manager Allows you to install JAVA applications, such as games and tools.
Pictures & Videos
Browse and manage pictures and videos stored on the phone or memory card.
The default folder is the My Pictures folder.
Pocket MSN For instant messaging with contacts in MSN Messenger.
Settings Allows you to configure the various phone settings.
Speed Dial
Allows you to create the speed dial entry for frequently dialed numbers or accessed
programs.
SIM Manager
Allows you to manage the contacts stored on the SIM card as well as copy the
contacts onto the phone.
Task Manager Records and manages the programs that are currently in use.
Tasks Manages your task items.
Video camera Records video clips of various modes and length.
Voice Memo Allows you to record brief voice reminders.
C720w.indb 13 2006/11/8 ¤U¤È 08:13:19
14
1
Familiarize Yourself with the Device
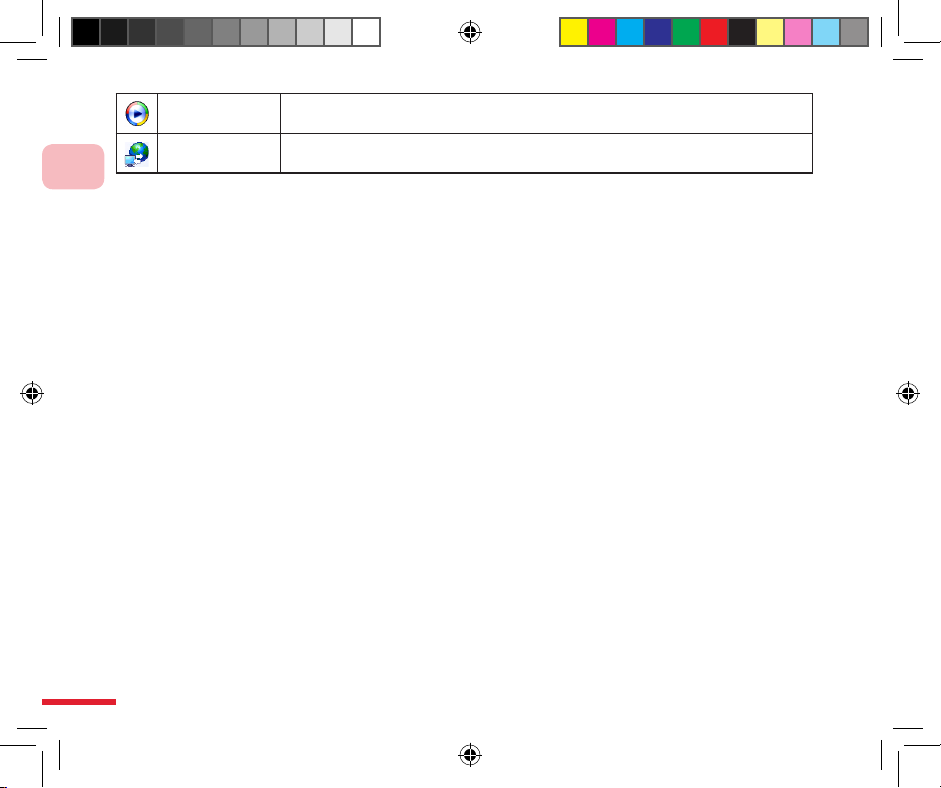
Windows Media Allows you to playback movies and sound files.
Internet Sharing Allows your phone to function as a modem through Bluetooth or USB.
(Note 1) Restore to default settings not only removes all memory data stored on the C720w, but
also removes all of your installed programs and Dopod plug-in programs (for example: QuickMark,
Another World, MagicPuz, personal dictionary, and 3D menus). You can connect to the Dopod
website’s member’s page through the Internet to download files and re-install.
(Note 2) The icons above are the Windows Default icons. Your mobile phone is pre-installed with
Dopod 3D menus at the factory, therefore some of the icons may be different. For a description of
the 3D icons, please refer to 11.9.
C720w.indb 14 2006/11/8 ¤U¤È 08:13:20
15
1
Familiarize Yourself with the Device
Choose the program you wish
to switch to, then press the OK
button.
Goes to your Recent Programs.
Select <Program>
then press the
OK button
21
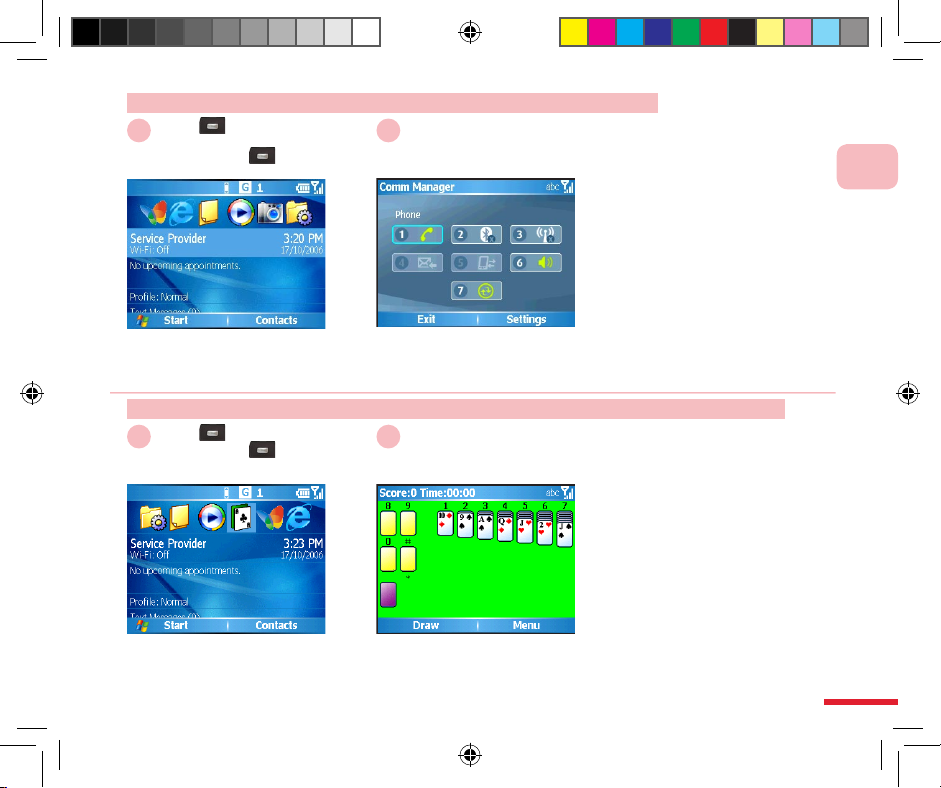
Action: Switching from Home Screen to Most Recently Used Program
Choose the telecom service
provider / time column, press
the OK button.
Opens the Comm Manager.
Select
<Service Provider>/<Time>
then press the
OK button
21
Action: Switching from Home Screen to Comm Manager
C720w.indb 15 2006/11/8 ¤U¤È 08:13:20

16
1
Familiarize Yourself with the Device
Choose the appointment items
you wish to search for, then
press the OK button.
Open th e calend ar and vi ew
upcoming appointments.
Select <Appointment>
then press the
OK button
21
Action: Switching from Home Screen to Upcoming Appointments
Choose Profiles, then press the
OK button.
Choose the profile you wish to
use, then press the OK button
to confirm the switch.
Select
<Operating Mode>
then press the
OK button
Select
<Operating Mode>
then press the
OK button
21
Action: Switching from Home Screen to Profiles
C720w.indb 16 2006/11/8 ¤U¤È 08:13:21

17
1
Familiarize Yourself with the Device
Select SMS, then press the OK
button.
Goes to the SMS Home screen.
Select Messages(0)
then press the OK
button
21
Action: Switching from Home Screen to Text Messages
▲ Default theme with Dopod
Home screen .
Default theme with Dopod Home screen
The default themes,
Home screen on the
C720w can be
changed (please refer
to 10.1, Home screen
section).
C720w.indb 17 2006/11/8 ¤U¤È 08:13:22
18
1
Familiarize Yourself with the Device
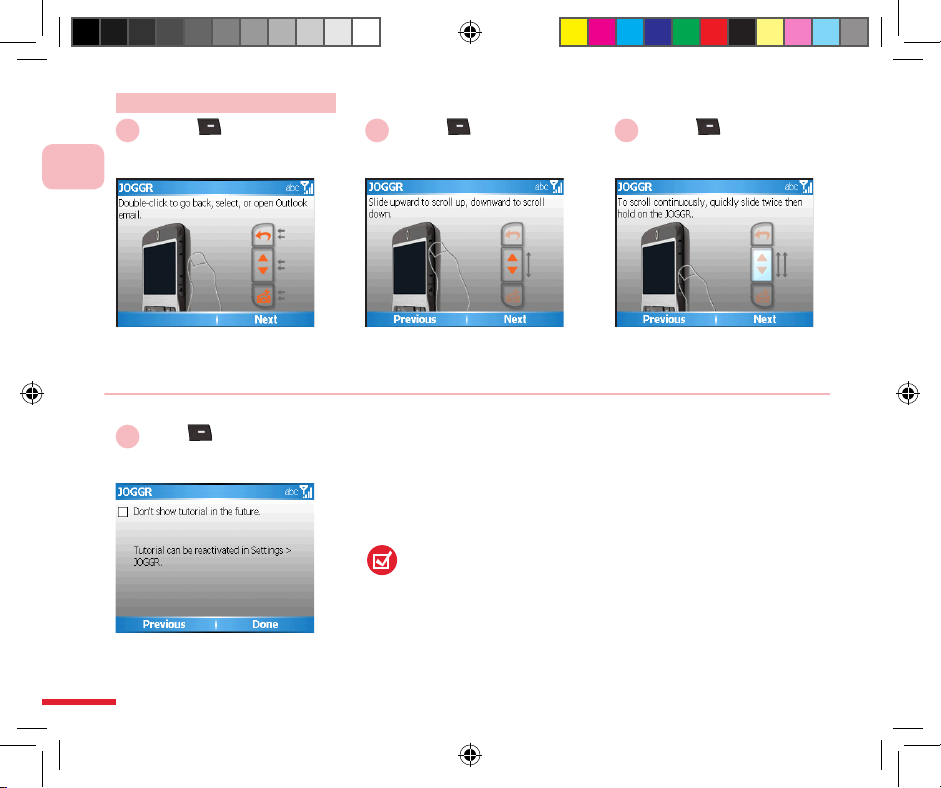
Action: JOGGR tutorial
Double-click to go back, select,
or open Outlook email. (Note 1)
Slide the scroll bar up or down
to set the volume control or
move the cursor. (Note 2)
Choose Next Choose Next
21
To scroll continuously, quickly
slide twice then hold the
JOGGR.
Choose Next
3
If you do not wish to automatically
run this tutorial during startup,
please mark the checkbox "Don't
show tutorial in the future".
Select Finish
4
When the phone starts up for the first time it will run the JOGGR
tutorial. You can select Settings > JOGGR and mark the checkbox
"Open tutorial after 3 clicks within 10 seconds".
You can configure JOGGR operation be selecting Configuration >
JOGGR, including:
・
Scroll bar
・
Adjust volume
・
Adjust volume (only applicable to incoming calls and Windows
Media)
(Note 1)
Tapping the Back icon twice is the same as pressing the Back button.
Tapping the scrollbar twice is the same as pressing the OK button.
Tap the Mail icon twice to open the Messaging Center.
(Note 2) Slide the scroll bar up or down to set the volume control or
move the cursor
C720w.indb 18 2006/11/8 ¤U¤È 08:13:23

19
1
Familiarize Yourself with the Device
1.5 Application Program Menu
The Start Menu is located in lower left corner of the Home screen. It can display various
program icons. At the Start Menu, you can
Press“Others” or # to switch to the next page.
Press the back button or # to switch to the previous page.
Press the back button to switch to the previous menu.
Most of the programs on the phone provide function menus ( right function button). You can
use the directional button function or enter the icon's number directly.
•
•
•
At the Home screen, select
Start.
To view more programs, select
More.
Choose Start Select <Program>
then press the
OK button
21
Action: Using the Start Menu
The phone is pre-installed
with multiple programs for
your immediate access.You
can also install other application
programs from the Windows
MobileTM Quick Operation CD,
or download them from the
Internet. In addition, you can
purchase other mobile phone
software from retailers and install
them onto the phone.
C720w.indb 19 2006/11/8 ¤U¤È 08:13:24

20
1
Familiarize Yourself with the Device
Opens the Menu.
Use the directional button to
select the item and then press
the OK button or enter the
icon’s number directly.
Select Function Menu Select <Item>
or press <Number Pad>
Action: Use the menu
Open Quick List.
Select the option you wish to
use. You can also press the
corresponding number key to
the left.
Press the Power button Select <Mode>
the press the
OK button
21
Action: Using the Quick List
The Quick List provides
convenient control
functions such as phone
lock, keypad lock, inflight
mode, and selection of the
phone’s other operating
modes (please refer to 10.4
Control Modes).
1 2
C720w.indb 20 2006/11/8 ¤U¤È 08:13:25

21
1
Familiarize Yourself with the Device
Action: Return to the Home Screen
Press the Home screen
button in any currently running
application to return to the
Home screen.
Return to the Home screen.
Press the
Home button
21
Action: Using the Back button
Press the Back button in the
currently running application.
Returns to the previous
application.
Returns to the previous
application.
Press the Back button
21
C720w.indb 21 2006/11/8 ¤U¤È 08:13:26

22
1
Familiarize Yourself with the Device
Action: Use voice commands to control the phone
Voice commands home screen.
You can follow the onscreen tips
to use voice control functions.
Press and hold the
Home button
21
Action: Keypad lock
Keypad is locked.
Press & hold the * key
or the Hang up button
21
C720w.indb 22 2006/11/8 ¤U¤È 08:13:27

23
1
Familiarize Yourself with the Device
Action: Undo keypad lock
Keypad is locked. Please press
any key on the keypad.
Press any key
Press the * key
Lock is undone.
1 2 3
C720w.indb 23 2006/11/8 ¤U¤È 08:13:27

24
1
Familiarize Yourself with the Device
Opens the Start Menu. Hard Reset restore to default. After confirmation, enter 1234
and select Yes.The phone will
restart after resetting.
Choose Start
Select Accessories >
Clear Storage
then press the
OK button
Enter 1234
then select Yes
Action: Using the Clear Storage
1.6 Clear Storage (Hard Reset)
Clear Storage will remove all information from the memory, such as contacts, tasks, calendar appointments
etc. Additionally installed applications and configuration settings will also be cleared. You can sync the
data to the computer prior to restoring to the default settings to avoid loss of data. When your phone is not
functioning properly, you can try to restore the factory default settings. For data synchronization, please refer
to Chapter 9 Synchronizing Your Phone. If the system is unable to start up, you can try to use a hard reset
to restore the default settings. We recommend that you contact our customer service representatives before
using this function in order to avoid damage to your phone or data. Please go to the Dopod website member
registration area and download the C720w 2577 software installation files, then reinstall the following
software:
Games: Another World, Magic Puz
Talking Dictionary/Cyberon Voice Commader
Color themes
RSS BBC
The external plugins included with the system may vary according to the version that you purchased. You
may contact customer service or go to the Dopod website to download the latest software.
•
•
•
•
1 2 3
C720w.indb 24 2006/11/8 ¤U¤È 08:13:28

Topic
Learning about the Input Modes
In this topic, you will learn about…
1. Switching the Input Method
2. Using Various Input Modes
3. Deleting characters
2
C720w.indb 25 2006/11/8 ¤U¤È 08:13:28

26
Action
Index
Switch Input Method .........................................................27
Switch to Symbol Input .....................................................28
Switching to numeric input ...............................................29
Using character strokes to input characters .....................30
Entering English text ........................................................31
Deleting characters ..........................................................32
C720w.indb 26 2006/11/8 ¤U¤È 08:13:28

27
2
Using the Communication Functions
2.1 Switching Input Modes
You can use the keypad to enter text such as Chinese
and English characters, numbers, and symbols. Enter the
characters through the English PinYin or keystroke symbols
as indicated.
▲ Switching Input Modes
Switch input methods anywhere
that text can be entered
Select the input language Select the input mode, for
example: PinYin
Press the FN key
then press the
space key
Select Language
Select <Input Mode>
1
2 3
Action: Switch Input Method
C720w.indb 27 2006/11/8 ¤U¤È 08:13:29

28
2
Learning about the Input Modes
You can also press, then
press the symbol input on the
keyboard.
Press next page to switch to
other pages.
Press the SYM key
Select <Symbol>
321
2.2 Using Various Input Modes
This describes how to use the phone’s built-in English,
ch ara cte r s tro ke, an d n umb er inp ut mode s t o inp ut
characters.
To insert a line break while in any input mode, press
the OK button.
2.2.1 Symbols
Using the phone to enter various punctuation and emoticon
symbols.
▲ Symbol input mode
Action: Switch to Symbol Input
Successfully entered the
selected symbols.
C720w.indb 28 2006/11/8 ¤U¤È 08:13:30

29
2
Using the Communication Functions
If you on ly pr ess onc e,
entering a number will return to
the original input mode.
Th e ico n loc a ted at t he
upper right corner indicates that
you have switched to numeric
input mode.
Press the FN key twice
Select <Symbol>
Press <Numbers>
321
2.2.2 Numbers
Using Numeric Input mode to enter numbers:
Numeric input illustration:
Press the FN key
Enter a single
number
Press the FN key
twice
Continuously
enter numbers
▲ Entering numbers
E.g. 022345678
Action: Switching to numeric input
C720w.indb 29 2006/11/8 ¤U¤È 08:13:31

30
2
Learning about the Input Modes
For example: to enter “王”,
press the number keys 1, 1, 2,
1 respectively.
Use the left/right keys to select
the character.
Press
<Character Strokes>
Select <Characters> Press the OK button
321
2.2.3 Character Stroke
This describes how to use the character stroke quick input
mode to enter Chinese characters. If the character to enter
is complicated, it can be broken into two parts. To see how
to switch to character stroke input mode, please refer to the
instructions in chapter 2.1.
Corresponding button / character strokes:
▲ Character strokes input
Text successfully entered.
Action: Using character strokes to input characters
C720w.indb 30 2006/11/8 ¤U¤È 08:13:32

31
2
Using the Communication Functions
Please press the corresponding
English keys on the keyboard
to input letters.
You can use the left/right keys
to select words.
Press <English>
Select <Characters> Press the OK button
321
2.2.4 English
This describes how to use the keyboard to quickly input
English letters. To see how to switch to English input mode,
please refer to the instructions in chapter 2.1.
English entering status:
First letter in upper case,
followe d by lower ca se
letters.
All lower case.
All upper case.
▲ English input
English word successfully
entered.
Action: Entering English text
C720w.indb 31 2006/11/8 ¤U¤È 08:13:33

32
2
Learning about the Input Modes
2.3 Deleting characters
You can use the Back button to delete a single character, or press and hold the Back button
to delete all characters.
You can use the left/right keys to
move the cursor to the character
to delete, then press the Back
button to delete the character.
Successfully deleted a
character. Hold the Back button
to delete all characters.
Press the Back button
1
2
Action: Deleting characters
C720w.indb 32 2006/11/8 ¤U¤È 08:13:34

Topic
Using the Communication
Functions
In this topic, you will learn about…
1. Using the Phone
2. Making Phone Calls
3. Receiving Voice Calls
4. Call Options
5. Additional Information on Dialing
6. Setting up Speed Dial Entries
3
C720w.indb 33 2006/11/8 ¤U¤È 08:13:34

34
Action
Phone Home Screen ........................................................36
Turn off the phone function ..............................................37
Turn on the phone functions ............................................38
Enter PIN code .................................................................39
Adjusting headset volume ................................................ 40
Dialing from the phone screen .........................................41
Dialing from Contacts list .................................................42
Dialing from Contacts Details ...........................................43
Using Call History for dialing ............................................ 44
Use speed dialing from the Home screen ........................ 45
Use speed dial from Speed Dial Manager .......................46
Answering Incoming Calls ................................................47
Reject incoming calls .......................................................48
Checking missed calls ......................................................48
End call ............................................................................49
Hold ..................................................................................50
Swap calls ........................................................................ 51
Create multi-way conference call ..................................... 52
Activate/deactivate speakerphone ...................................53
Activate mute ...................................................................54
Unmute .............................................................................55
Access voicemail ..............................................................56
Index
C720w.indb 34 2006/11/8 ¤U¤È 08:13:34

35
Dialing emergency calls ...................................................57
Dialing international calls .................................................58
Using SIM card services (STK) ........................................ 59
Creating a speed dial entry ..............................................60
Editing a speed dial entry ................................................. 61
Removing a Speed Dial Entry .......................................... 62
C720w.indb 35 2006/11/8 ¤U¤È 08:13:34

36
3
Using the Communication Functions
3.1 Using the Phone
When you begin to use the C720w phone functions, you will need to enter the SIM card PIN
number in order to connect to a GSM mobile network. When using this device, you can control
wireless functions, such as activating/deactivating the phone. You can also adjust the headset
volume at any time during a call or when using the device.
3.1.1 Phone Functions
At the Phone screen, you can access, dial, search contacts, or save phone numbers to the
contacts list. Under certain circumstances (such as on a plane), you may need to turn off the
phone functions of the handset. You can use the Comm Manager to manually deactivate/
activate the phone’s communication functions. When the phone function is off, you will not be
able to receive calls, send/receive messages, or use GPRS to connect to a wireless mobile
network. But other phone functions such as browsing the calendar, listening to music, or
playing games can still be used.
Action: Phone Home Screen
Press Call button
1 2
Switch to the phone screen.
C720w.indb 36 2006/11/8 ¤U¤È 08:13:35

37
3
Using the Communication Functions
Action: Turn off the phone function
Press the Power button
1
Select Comm Manager
then press the OK
button
2
Select
then press the OK
button
3
Press and release the Power
button briefly to access the
Quick List.
Use the up/down direction keys
to select Comm Manager.
hone functions activated. Press
to turn off the phone.
Select Exit
4 5
Home Screen will display
“Phone Off”.
C720w.indb 37 2006/11/8 ¤U¤È 08:13:36

38
3
Using the Communication Functions
Select Exit
4 5
The Home Screen displays your
telecom service provider name.
Action: Turn on the phone functions
Press the Power button
1
Select Comm Manager
then press the
OK button
2
Select
then press the
OK button
3
Press and release the Power
button briefly to access the
Quick List.
Use the up/down direction keys
to select Comm Manager.
Phone functions are turned
off. Enter the PIN code (please
refer to section 3.1.2).
C720w.indb 38 2006/11/8 ¤U¤È 08:13:37

39
3
Using the Communication Functions
▲ Enter SIM PIN code.
Action: Enter PIN code
Enter
<SIM PIN code>
1
Select Done
2 3
Enters the phone’s SIM PIN
code.
The icon located at the
upper right corner indicates that
you have turned the phone on.
3.1.2 Enter PIN code
Each time you turn on the phone or activate the phone
functions, you will need to enter the SIM card PIN code
(personal identification number) provided by your account’s
telecom service provider.
C720w.indb 39 2006/11/8 ¤U¤È 08:13:37

40
3
Using the Communication Functions
3.1.3 Adjust Handset Volume
Adjusts the handset volume, including headset, music,
games, and ring tone sound tests. This does not include
adjustments for incoming call ring tones and reminders.
You can also adjust headset volume during a call.
For sound settings, please refer to section 10.3; for control
mode settings, please refer to section 10.5.
You can use the JOGGR to adjust the volume. For using
the JOGGR configurations, please refer to section 10.13.
▲ Headset volume adjustment
screen
Action: Adjusting headset volume
Slide the JOGGR
1 2
Slide the JOGGR touch panel
on right side of unit.
Use the JOGGR.
C720w.indb 40 2006/11/8 ¤U¤È 08:13:38

41
3
Using the Communication Functions
3.2 Making Phone Calls
You can directly make calls to contacts from the Home
Screen, Phone Screen, Contacts, Quick dial list, Call
history, or SIM manager.
3.2.1 Phone Screen
Enter the dialing screen by pressing the call button; you will
then be able to enter the phone number and dial the call.
▲ Dialing from the phone
screen.
Action: Dialing from the phone screen
Press the Call button
1
Enter <the phone number
you wish to dial>
Then press the Call button
2
Calling.Press the Call button to open
the phone screen.
Press the Call button to open
the phone screen.
3
C720w.indb 41 2006/11/8 ¤U¤È 08:13:38

42
3
Using the Communication Functions
3.2.2 Dialing by Using Contacts
Choose the contact and the phone number in the Contacts
List. You can use the Left/Right button to select the
contact’s number in the Contacts List.
To create a contact and to edit contacts, please refer to
section 4.1 Contacts Descriptions.
Each contact entry or phone number can be coded
“M”, for mobile number, “H” for home number, or “W”
for work number.
▲ Using Contacts application
program to dial to the
recipient.
Action: Dialing from Contacts list
Select Contacts
1
Select <the contact
you wish to dial>
2
Press the Call button
3
Opens Contacts list. Dialing the Contact.
C720w.indb 42 2006/11/8 ¤U¤È 08:13:39

43
3
Using the Communication Functions
Action: Dialing from Contacts Details
Select <Contacts>
then press the OK
button
1
Select <the contact
you wish to dial>
2
Press the Call button
3
Opens the Contact Details for
the contact that you wish to dial.
Select the number for the
contact you wish to dial, for
example: mobile number.
Dialing the Contact.
C720w.indb 43 2006/11/8 ¤U¤È 08:13:40

44
3
Using the Communication Functions
3
Dialing the Contact.
3.2.3 Dialing from Call History
This describes how to use Call History for dialing. The Call
History includes incoming calls, missed calls, and outgoing
calls.
Call History icon:
: Missed calls
: Answered incoming calls
: Outgoing calls
•
•
•
▲ Dialing from Call History.
Action: Using Call History for dialing
Press the Call button
1
Select <Contacts>
then press the Call
button
2
Select the contact you wish to
dial.
Opens the Application program
menu.
C720w.indb 44 2006/11/8 ¤U¤È 08:13:41

45
3
Using the Communication Functions
3.2.4 Using Speed Dial
You can set speed dial entries/shortcuts for frequently
dialed contact numbers or frequently used application
items. Just press and hold the corresponding speed dial
entry/shortcut button to dial contacts or access application
programs.
If you set the corresponding number using two digits, such
as 14, then you can first enter 1 and then hold 4 to activate
the speed dial entry. For speed dial settings, please refer to
section 3.6.
▲ Use speed dial buttons to
dial the speed dial numbers.
Action: Use speed dialing from the Home screen
Press and hold
<corresponding speed dial
button>
1 2 3
You have successfully dialed
the contact.
At the Home screen, press the
speed dial button, for example:
4.
C720w.indb 45 2006/11/8 ¤U¤È 08:13:41

46
3
Using the Communication Functions
Action: Use speed dial from Speed Dial Manager
Choose Start
1
Select Speed Dial
then press the OK
button
2
Select <the contact
you wish to dial>
3
Press the Call button
4
Dialing the Contact.
C720w.indb 46 2006/11/8 ¤U¤È 08:13:42

47
3
Using the Communication Functions
3.3 Receiving Voice Calls
When you receive an incoming call, the phone will display
the information on the screen and you can decide whether
to answer or ignore the call. When you are on a call, you
can still press the Home button to return to the Home
screen at any time, or operate other application programs.
3.3.1 Answering Incoming Calls
Using the phone to answer incoming calls from other
contacts.
▲ Incoming call display screen.
Action: Answering Incoming Calls
Press the Call button
or select to answer
1 2
Answered incoming calls.Incoming call information.
C720w.indb 47 2006/11/8 ¤U¤È 08:13:43

48
3
Using the Communication Functions
Action: Reject incoming calls
Press Hang Up button
or select Ignore
1 2
Incoming call information. The upper left screen corner will
show to remind you of
missed calls. (Note 1)
(Note 1) The Home screen will
display “Number of missed
calls”.
Action: Checking missed calls
Select Missed Calls
1
Press the OK button
2 3
At the Home screen, use the
directional buttons to move to
the Missed Calls item.
Displays the history of all
incoming calls.
C720w.indb 48 2006/11/8 ¤U¤È 08:13:44

49
3
Using the Communication Functions
Action: End call
Press the
Hang Up button
1 2
Call has ended.
C720w.indb 49 2006/11/8 ¤U¤È 08:13:44

50
3
Using the Communication Functions
3.4 Call Options
This describes how to set up the “During Call” options. You
can choose to use Flash, activate mute, Speakerphone, or
Conference, etc.
3.4.1 Using Call Waiting
You can use call waiting to hold the current call. When you
use call waiting you will still be charged for the minutes
used.
▲ Call Waiting screen.
Action: Hold
Select Menu > Hold
1 2
Call is held. To cancel, please
select “Unhold”.
C720w.indb 50 2006/11/8 ¤U¤È 08:13:45

51
3
Using the Communication Functions
3.4.2 Swap Calls
You can swap between two calls.
▲ Swap to another call during
a multi-call connection.
Action: Swap calls
1
Select Answer
2
Select Swap
3
When a call is taking place,
another call comes in.
Swapping to the other call.
C720w.indb 51 2006/11/8 ¤U¤È 08:13:45

52
3
Using the Communication Functions
3.4.3 Create Multi-Way Conference Call
You can hold one call, then dial out to a second phone
number, or answer a new incoming call during the current
one.
Not all service providers support multi-way
conferencing. Please contact your service provider for
more information.
!
▲ Activate multi-way
conferencing function.
Action: Create multi-way conference call
Select the Function
Menu
1
Select Conference
then press the OK
button
2
Create multi-way conference
call.
C720w.indb 52 2006/11/8 ¤U¤È 08:13:46

53
3
Using the Communication Functions
3.4.4 Activate/Deactivate the Speakerphone
This describes how to use the built-in speakerphone to talk
with callers without holding the handset. Using the
speakerphone allows other people to listen in to the
conversation.
When using the hands-free speakerphone, please do not
hold the phone close to your ear to avoid hearing damage
due to excessive volume.
▲ Spea k e r pho n e ac tiv ated
screen.
Action: Activate/deactivate speakerphone
Select Menu >
Speakerphone On
1 2
Select Menu >
Speakerphone Off
3
After the speakerphone is
activated, the upper right screen
corner will display the icon.
You can also press and hold the
Call button to activate the
speakerphone function.
You can also press and hold the
Call button to deactivate the
speakerphone function.
C720w.indb 53 2006/11/8 ¤U¤È 08:13:47

54
3
Using the Communication Functions
3.4.5 Activate Mute
During a call, you can temporarily turn off the handset
microphone to prevent the person on the other side from
hearing your voice.
▲ Activate mute.
Action: Activate mute
Select Menu > Mute
1 2
You can also select the Mute
key directly on the screen.
After Mute is activated, the
upper right screen corner will
display the icon.
C720w.indb 54 2006/11/8 ¤U¤È 08:13:47

55
3
Using the Communication Functions
Action: Unmute
Select Menu > Unmute
1 2
You can also select
Unmute directly on the screen.
Mute is deactivated.
C720w.indb 55 2006/11/8 ¤U¤È 08:13:48

56
3
Using the Communication Functions
3.5 Additional Information on Dialing
To listen to voicemail messages, you can dial the voicemail
number (provided by the service provider) directly from the
phone screen. The first speed dial slot is usually set up for
voicemail; you can also use other speed dial entries to call
the voicemail number. Your service provider will provide
you with your voicemail number.
3.5.1 Retrieving Voicemail
When your phone cannot be reached, the telecom system
will automatically connect incoming calls to voicemail. You
can dial the voicemail number to listen to your messages.
▲ Dial the voic email nu mber
from the Speed Dial application program.
Action: Access voicemail
Choos Start
1
Select Speed Dial
then press the
OK button
2
Select Voicemail then
press the Call button
3
Opens Speed Dial. You can also press & hold the
speed dial button (1) from the
Home screen.
Opens the Start Menu.
C720w.indb 56 2006/11/8 ¤U¤È 08:13:48

57
3
Using the Communication Functions
3.5.2 Dialing Emergency Calls
If you need to dial the local emergency help number, do so
by dialing directly from the phone screen. Even if the phone
functions are off or the keypad is locked, you can still dial
emergency calls.
The SIM card may store other emergency help
numbers. Please ask your service provider for more
information.
!
▲ Dialing emergency calls.
Enter <Emergency
number> then press the
Call button
1 2
Dialing emergency calls.It is possible to dial emergency
numbers when the Home
screen or keypad is locked.
Action: Dialing emergency calls
C720w.indb 57 2006/11/8 ¤U¤È 08:13:49

58
3
Using the Communication Functions
3.5.3 Dialing International Calls
This describes how to use the phone for international
dialing. The international dialing code includes the country
codes for both you and your recipient.
▲ Dialing international calls.
Dial from the Home screen or
the phone screen.
Pressing "+" will enter the
country code for your current
location.
1
Press & hold
then enter <the phone
number you wish to dial>
2
Press the Call button
3
Dialing international calls.
Action: Dialing international calls
C720w.indb 58 2006/11/8 ¤U¤È 08:13:50

59
3
Using the Communication Functions
Select (STK icon)
then press the
OK button
3.5.4 Using SIM Card Services (STK)
You can use the various informational services, such as customer services and voicemail, built
into the SIM card by the service provider. To use the SIM card services, please first insert your
SIM card into the phone. SIM card informational services may vary according to the particular
service provider.
Action: Using SIM card services (STK)
Choose Start
1 2
The STK icon displayed name
is your service provider name.
Opens the Start Menu.
C720w.indb 59 2006/11/8 ¤U¤È 08:13:50

60
3
Using the Communication Functions
3.6 Setting up Speed Dial Entries
You can create speed dial (or shortcut) entries for frequently dialed numbers or accessed programs.
Action: Creating a speed dial entry
Select Contacts
1
Select <Contacts>
then press the OK
button
2
Select
<the contact information
you wish to set up>
3
Opens Contacts list. Choose the contact to set up for
speed dialing.
Choose the information item
to set up, for example: mobile
number.
▲ Speed dial settings screen.
C720w.indb 60 2006/11/8 ¤U¤È 08:13:51

61
3
Using the Communication Functions
Choose Menu > Add
to Speed Dial
4
Select <Specify key>
then select Finish
5 6
Use the Left/Right directional
buttons to choose the
corresponding number key.
You have successfully added
the speed dial entry.
Action: Editing a speed dial entry
Select
<Dialing item> then press
the OK button
1
Select Edit
2
Enter the
<field you wish to edit>
3
Select the speed dial entry you
wish to edit.
C720w.indb 61 2006/11/8 ¤U¤È 08:13:52

62
3
Using the Communication Functions
Action: Removing a Speed Dial Entry
Select <Dialing item>
1
Select Menu > Delete
2
Choose Yes
3
4
Please note that deleted entries
cannot be restored.
You have successfully deleted
the speed dial entry.
C720w.indb 62 2006/11/8 ¤U¤È 08:13:53

Topic
Managing Personal
Information
In this topic, you will learn about…
1. Contacts
2. Calendar
3. Tasks
4. Voice Memo
4
C720w.indb 63 2006/11/8 ¤U¤È 08:13:53

64
Action
Index
Opening the Contacts application program
from the Home screen ......................................................66
Adding new contacts to the phone ....................................67
Setting up contact’s extension line dialing ........................69
Add New SIM CardContacts .............................................70
Copying SIM card contacts to the phone .......................... 71
Copying phone contacts to SIM card ................................ 71
Setting up contact categorie .............................................76
Transfer contacts via BluetoothTransfer Contacts ............78
Opening calendar application program ............................. 79
Opening calendar application program
from Home screen ............................................................80
Adding new appointments ................................................81
Viewing and editing appointments ....................................84
Switching the calendar display mode ...............................85
Switching from Home screen to Text Messages ..............86
Using MMS to transfer appointments ...............................87
Using Bluetooth to transfer appointments .........................88
Congures the Calendar options ......................................89
Using Tasks ......................................................................90
Adding new tasks ..............................................................91
Setting tasks as completed ...............................................92
C720w.indb 64 2006/11/8 ¤U¤È 08:13:53

65
Using Voice Notes ............................................................93
Adding a new voice note ...................................................94
Play Back Voice Notes .....................................................95
Renaming Voice Notes .....................................................96
Deleting Voice Notes ........................................................96
C720w.indb 65 2006/11/8 ¤U¤È 08:13:54

66
4
Managing Personal Information
4.1 Contacts
You can add new contacts and information for existing
contacts. Setting up information for the contact will allow
you to connect with the person quickly or browse the
contact’s information. Contacts are saved in the phone’
s memory. You can also sync contact info with a Microsoft
Exchange Server ® or Microsoft Office Outlook ® on a
personal computer through ActiveSync ®. In addition, you
can also enter information in each field, including category,
e-mail, address, pictures, and ring tones.To sync your
phone, please refer to Chapter 9.
▲ Contacts application
program.
Action: Opening the Contacts application program from the Home screen
Opens the Contacts application
program.
Contacts screen.
Select Contacts
1
2
C720w.indb 66 2006/11/8 ¤U¤È 08:13:54

67
4
Managing Personal Information
▲ Enter various information for
the contact.
4.1.1 Adding new contacts to the phone
Adding new contacts to the phone
For contact list entries, “M” represents a mobile
number, “H” represents a home number, and “W”
represents a work number.
Opens Contacts application
program.
Select Add New directly from
the screen, or select Add New
Contact from the Menu.
Enter first and last name. For
example: last name “Lin”, first
name “Makin”.
Select Contacts Select Add new
Go to the last name and
first name fields
respectively. Enter
<Contact’s name>
1
2 3
Action: Adding new contacts to the phone
C720w.indb 67 2006/11/8 ¤U¤È 08:13:55

68
4
Managing Personal Information
Choose the picture for the
incoming or outgoing calls of the
contact you wish to set up
(Note 2).
Enter the contact’s e-mail
address.
Select <Picture>
then select Contacts
Move to E-mail
then enter <E-mail>
Select Finish
987
Enter the contact’s mobile
number, for example:
0918123123.
Select a ring tone (Note 1). For
example, Alouette_14kb.
Go to Mobile Phone
then enter <Mobile Phone>
Go to
Custom Ring Tone
Then select
<ring tone>
Go to Picture
then press the OK
button
654
Select a picture.
You have successfully created
a new contact.
C720w.indb 68 2006/11/8 ¤U¤È 08:13:56

69
4
Managing Personal Information
(Note 1) You can save custom ring tones under the \Application Data\Sounds folder on the phone.
(Note 2) You can also use Microsoft Office Outlook ® on a personal computer to set up the contact’
s picture, then sync the info to the phone via ActiveSync ®.
Contact’s information fields:
Last Name Picture Work Fax number Work number Other Addresses Government ID
First Name e-mail 1, 2, 3 Home Fax number Department Notes Account Name
Work phone 1, 2
Instant messaging
1, 2, 3
Assistant Phone
number
Job Title Job Title Customer ID
Mobile number Category Radio Phone number Office Location Birthday Spouse
Home number 1, 2
Pager Web Page Work Address Anniversary Children
Custom Ring Tone Car Phone
number
File As Home Address Manager Assistant
The contacts editing screen.
Enter the pause symbol after
the phone number.
Enter the contacts extension
number, for example: 123.
Input <Extension numbe>
1
2
Action: Setting up contact’s extension line dialing
Select Menu >
Insert Pause
C720w.indb 69 2006/11/8 ¤U¤È 08:13:57

70
4
Managing Personal Information
4.1.2 Managing SIM Card Contacts
You can add and save new contacts to your SIM card.
When you replace the SIM card on the phone, the contacts
from the original SIM card will be replaced with the new
SIM card contacts. However the contacts stored in the
phone’s memory will not be changed. You can enter the
name and phone number for SIM card contacts, but you
will not be able to specify other information fields such as
category, e-mail, address, pictures, and ring tones.To use
the SIM Card Manager, please refer to section 11.5.
The SIM Card Manager formats contact names in “First
name” “Last Name” order. If the contact’s name is “Smith,
Roger”, the name will be displayed as “Roger Smith”.
▲ Editing SIM card contacts.
Opens Contacts menu. Saves the contact information
to the SIM card.
Select Menu Select
New SIM CardContacts
Enter <Contacts name> /
<number>
then select Finish
1
2 3
Action: Add New SIM CardContacts
C720w.indb 70 2006/11/8 ¤U¤È 08:13:57

71
4
Managing Personal Information
Select Menu >
Contacts to SIM Card
Choose the SIM card contacts
to copy to the phone. For
example: Kana.
Select
<SIM card contact>
Select Menu > Save to
Contacts
1
2
Action: Copying SIM card contacts to the phone
SIM Card Manager main
screen.
Check the box for the contact to
copy to SIM card. For example,
Kally.
Saves phone contacts to SIM
card.
Action: Copying phone contacts to SIM card
Check
<Contact to copy>
Select Save
1 2 3
C720w.indb 71 2006/11/8 ¤U¤È 08:13:58

72
4
Managing Personal Information
4.1.3 Search Contacts and Dial
The C720w only supports searching of English contacts.
You can search on the contact name or phone number. For
example, when you press , it will search for contact
names with the English letter “w”.
▲ Searching contact by name.
Enter <Words to search>
Action: Search contacts by name
Enter <Words to search>
Found words are highlighted.
You can continue to enter the
next word.
You have successfully found
the contact you were
searching for.
You can continue to enter the
next word.
1
2 3
C720w.indb 72 2006/11/8 ¤U¤È 08:13:59

73
4
Managing Personal Information
Enter <Words to search>
Action: Search contacts by phone number
Enter <Words to search>
Contacts that have phone
numbers starting with 0912 will
be highlighted.
Search according to the contact’
s phone number. For example:
enter 0912.
1
2
C720w.indb 73 2006/11/8 ¤U¤È 08:14:00

74
4
Managing Personal Information
Move to
<Contacts to view>
then press the OK button
Action: Viewing and editing contact information
Move to
<Contact name>
then select Edit
Enter <Item to edit>
then select Finish
You can also edit the contact
directly by selecting “Menu >
Edit”.
For editing contacts, please
refer to section 4.1.1.
Select the contact you wish to
view.
1
2 3
4.1.4 Viewing and Editing Contacts
You can view a contact’s information, dial calls, send
messages or e-mail, and to update each contact’s
information to keep the contact’s information correct and
up-to-date.To add a new contact, please refer to section
4.1.1.
▲ Viewing contact information.
C720w.indb 74 2006/11/8 ¤U¤È 08:14:00

75
4
Managing Personal Information
Select
Menu > Filter
Action: Using the contact sorting function
Select
<Category to switch>
Choose the category you wish
to switch to. For example:
AGroup.
Use the Filter function to switch
categories.
Use the Filter function to switch
categories.
1
2 3
4.1.5 Using Contact Sorting
You can use category sorting to quickly search for contacts.
For contact sorting setup, please refer to section 4.1.4
Editing Contacts.
▲ Using category sorting to
manage contacts.
C720w.indb 75 2006/11/8 ¤U¤È 08:14:01

76
4
Managing Personal Information
Category setup is complete.
Select Finished
Choose the category you wish
to set up. For example, Class.
You can also choose multiple
categories.
Select Type
then press the OK
button
Select <Type>
then press the OK
button
Select Finish
1
2 3
4
Action: Setting up contact categorie
If you wish to add or delete contact category groups,
please modify the category groups using Microsoft Office
Outlook® on a personal computer, then sync to the phone.
For sync information, please refer to Chapter 9.
C720w.indb 76 2006/11/8 ¤U¤È 08:14:02

77
4
Managing Personal Information
Using MMS to transfer contacts
4.1.6 Transmitting Contact Information
You can transfer contact information via vCard (Note 1),
use MMS to share contact information, or use Bluetooth to
transfer and share contact information with other people.
To use MMS, please refer to section 5.3; to use Bluetooth,
please refer to section 7.2.
(Note 1) vCard: Electronic Business Card. Used to record
you or your contacts’ business card information. You can
send your own vCard to other phones or computers with
vCard compatibility.
▲ Transfer contacts through
Bluetooth.
▲ Using MMS to share contact
information.
You can use the following procedure to share contact
information via MMS.
Under the Contacts List, choose the contacts you wish to
transfer, and then select Menu > Send as vCard.
t the MMS Edit screen, choose the recipient or enter the
recipient number.
After editing is completed, select Transfer.
•
•
•
C720w.indb 77 2006/11/8 ¤U¤È 08:14:03

78
4
Managing Personal Information
Returns to the Contacts screen.
After transfer is complete, the
screen will display “Finished”.
Return to Contacts List.
Press the Back button
To cancel data beaming, select
Cancel Cancel.
Select
<Contacts to transfer>
Select Menu > Send
Contact > Beam
Select <Device to ex-
change> then select
Information Exchange
1
2 3
54
Action: Transfer contacts via BluetoothTransfer Contacts
C720w.indb 78 2006/11/8 ¤U¤È 08:14:04

79
4
Managing Personal Information
4.2 Calendar
You can use the calendar to schedule appointments,
including meetings and other events. Your appointments
will be displayed on the Home screen just before the
scheduled time.
▲ Calendar application
program.
Action: Opening calendar application program
Opens Contacts application
program.
Opens Calendar application
program.
Choose Start
Select Calendar
then press the OK
button
1
2
Calendar Home screen.
3
C720w.indb 79 2006/11/8 ¤U¤È 08:14:04

80
4
Managing Personal Information
Choose the appointment
entry from the Home screen.
For example, no upcoming
appointments.
Calendar Home screen.
Select <Appointment>
then press the
OK button
1
2
Action: Opening calendar application program from Home screen
C720w.indb 80 2006/11/8 ¤U¤È 08:14:05

81
4
Managing Personal Information
4.2.1 Adding New Appointments
This describes how to add a new appointment and set
the start/end date(s) and appointment status information.
You can customize your personal schedule and set up a
reminder to display before the appointment start time.
▲ Add new appointment and
edit appointment information.
Enters the appointment subject.
For example: Date (Note 1).
Enters the appointment start
date. For example: 23/10/2006.
Select
Menu > New Appointment
Enter
<Appointment subject>
Enter <Start date>
1
2 3
Action: Adding new appointments
C720w.indb 81 2006/11/8 ¤U¤È 08:14:06

82
4
Managing Personal Information
Configures the phone to set
a reminder time before the
appointment. For example: 15
minutes.
Sets the number of times for the
appointment to repeat.
(Note 2). For example: once.
Select <Reminder time> Select <Repeating> Select <Status>
Enters the appointment start
time. For example: 12:00 PM.
Enters the appointment end
date. For example: 23/10/2006.
Enters the appointment end
time. For example: 1:00 PM.
Enter <Start time> Enter <End date> Enter <End time>
4
5 6
987
Selects the appointment status.
(Note 3)
C720w.indb 82 2006/11/8 ¤U¤È 08:14:07

83
4
Managing Personal Information
You have successfully created
a new appointment.
Choose Finish
10
(Note 1) Appointment information field:
Subject Appointment subject
Start date Appointment start date
Start time Appointment start time
End date Appointment end date
End time Appointment end time
All Day
Event
Displayed on top of calendar only and will not take up
time slots
Location Appointment location
Reminder Appointment reminders
Occurs Appointment repetition amount or frequenc
Status Appointment status
Sensitivity Appointment confidentiality
Notes Notes
(Note 2) The number of times the appointment repeats:
Once Appointment occurs only once
Same day every week Appointment occurs on same day of every week
Same day every month Appointment occurs on same day of every month
Same day every year Appointment occurs on same day of every year
(Note 3) Appointment status:
Busy Takes up this time slot
Free Will not take up this time slot. You can schedule other appointments for the same time slot.
Tentative Unconfirmed appointment
Out of Office This Appointment will take place outside of the office
If you set your operating mode to “Automatic” and a repeating appointment is set to “Busy”,
the phone automatically switches to “Meeting” mode (mute/silent).
C720w.indb 83 2006/11/8 ¤U¤È 08:14:07

84
4
Managing Personal Information
You can also use the Left/Right
directional button to select the
date.
Edits the selected appointment.
Select <Appointment
to view> then press the
OK button
Select Edit
Enter
<field you wish to edit>
321
Action: Viewing and editing appointments
For example, modify the
Appointment Subject as “Meet
with Fiona”.
4.2.2 Viewing and Editing Appointments
You can view and edit appointment contents. To edit
appointment contents, please refer to section 4.2.1 Adding
New Appointments.
From the weekly view screen, the filled in blocks indicate
the appointment time, and a line on the side indicates an
all day event. Each appointment status is represented with
a color block:
Busy: deep blue
Out of Office: Magenta
Tentative: light blue
Free: White
•
•
•
•
▲ View appointment
information.
C720w.indb 84 2006/11/8 ¤U¤È 08:14:08

85
4
Managing Personal Information
Agenda View. Switches to
weekly display.
Weekly View. Switches to
monthly display.
Select Weekly Select Monthly Select Agenda
You have successfully modified
the appointment.
Select Finish
4
5
321
Action: Switching the calendar display mode
Monthly View. Switches back to
Agenda display.
C720w.indb 85 2006/11/8 ¤U¤È 08:14:09

86
4
Managing Personal Information
The reminder will be
displayed when the scheduled
appointment time is near.
View the current appointment or
snooze the reminder.
Select
Menu > View Item
Select Finish
321
Action: Switching from Home screen to Text Messages
Upcoming appointment(s).
4.2.3 Appointment Reminders
A reminder screen will pop up on the phone before the
scheduled appointment time.
You can choose to turn off the reminder or use the
menu to snooze the reminder.
▲ Appointment reminder
screen.
C720w.indb 86 2006/11/8 ¤U¤È 08:14:10

87
4
Managing Personal Information
▲ Using MMS to share
appointment information.
Using MMS to transfer appointments
4.2.4 Transferring Calendar Information
You can exchange calendar information with others via
vCalendar (Note 1), by MMS, or through Bluetooth. To use
MMS, please refer to section 5.4; to use Bluetooth, please
refer to section 7.2.
(Note 1) vCalendar: Electronic calendar. Used for your
personal appointment schedule. You can send your own
vCalendar to other phones or computers with vCalendar
compatibility.
▲ Using Bluetooth to transfer
appointments.
You can use the following procedure to share appointment
information via MMS
Under the View Calendar screen, choose the
appointment(s) you wish to transfer, then select Menu >
Send as vCalender.
At the MMS Edit screen, choose the recipient or enter
the recipient number, then select send.
•
•
C720w.indb 87 2006/11/8 ¤U¤È 08:14:11

88
4
Managing Personal Information
Returns to Contacts screen.
After transfer is complete, the
screen will display “Finished”.
Returns to Appointments
screen.
Press the Back button
Agenda View screen
To cancel data exchange,
please select Cancel.
Select
<Appointment to send>
then press the
OK button
Select
Menu > Beam Appointment
Select
<Device to exchange>
then select
Information Exchange
1
2 3
54
Action: Using Bluetooth to transfer appointments
C720w.indb 88 2006/11/8 ¤U¤È 08:14:12

89
4
Managing Personal Information
Opens the Calendar options
settings screen.
Configures the Calendar
options.
Select Menu > Options
Select <items you wish to
configure>
1 2
Action: Configures the Calendar options
▲ Calendar Options settings
screen.
4.2.5 Calendar Options
Set up the calendar options to display. For example, first day of
the week, number of days to view, and reminder time.
Calendar Options:
Options Description
First day of the week Choose which day is the first day of the week
Week View.
Choose how many days to display for the Weekly
View
Month View
Choose whether to display week numbers in the
Monthly View
Set reminders Sets up the reminder preset time period
C720w.indb 89 2006/11/8 ¤U¤È 08:14:13

90
4
Managing Personal Information
Opens the Application program
menu.
Opens the Tasks application
program.
Choose Start
Select Task
then press the OK
button
321
The Tasks application program
screen.
4.3 Tasks
The Tasks function can assist you in tracking the status of various tasks. Tasks can be
one-time or repeating. You can set up reminders for tasks, or manage them by setting up
different categories. All of your entered tasks will be displayed in the Tasks List. Overdue tasks
will display in red. If you need more detailed task information, you can first sync to a computer
by using ActiveSync®, then edit them using Microsoft Office Outlook®. To sync your phone,
please refer to Chapter 9.
Action: Using Tasks
C720w.indb 90 2006/11/8 ¤U¤È 08:14:13
 Loading...