


58
5
User Manual

Dopod585 User Manual
Safeguard
2
Congratulations on the purchase of your new Windows Mobile™
Dopod585!
Please read before operating your device.
THE DEVICE IS NOT CHARGED WHEN YOU TAKE IT OUT
OF THE BOX.
DO NOT REMOVE THE BATTERY PACK WHEN THE DEVICE
IS CHARGING.
WHEN INSERTING YOUR SIM CARD, MAKE SURE THE
DEVICE IS POWERED OFF, AND THAT THE SIM CARD
SNAPS INTO THE SOCKET SECURELY.
YOUR WARRANTY IS INVALIDATED IF YOU OPEN OR
TAMPER WITH THE DEVICE’S OUTER CASING.
(For more
information, see the enclosed warranty statement.)
EXPLOSIVE ATMOSPHERES
When in any area with a potentially explosive atmosphere or where
fl ammable materials exist, the product should be turned off and the user
should obey all signs and instructions. Sparks in such areas could cause
an explosion or fi re resulting in bodily injury or even death. Users are
advised not to use the equipment at refueling points such as service or
gas stations. Users are reminded of the need to observe restrictions
on the use of radio equipment in fuel depots, chemical plants or where
blasting operations are in progress. Areas with a potentially explosive
atmosphere are often, but not always, clearly marked. These include
fueling areas, below deck on boats, fuel or chemical transfer or storage
facilities, and areas where the air contains chemicals or particles, such
as grain, dust, or metal powders.

Dopod585 User Manual
Contents
Chapter1 Getting Started 7
1.1 Knowing your Dopod585 8
1.2 Status indicators 15
1.3 Setting up your Dopod585 16
1.4 Included Accessories 20
1.5 Navigating 21
1.6 Entering text and numbers 26
1.7 Securing your Dopod585 30
Chapter2 Using your Dopod585 33
2.1 Making a call 34
2.2 Receiving a call 37
2.3 Using Contacts and Beaming 39
2.4 Photo Caller ID 47
2.5 In-call options 56
2.6
Retrieving a voice mail message 56
2.7 Reviewing your calls 57
2.8 Speed Dials and Voice Tags 59
2.9 Advanced dialing information 63
Chapter3 Using Your Camera 65
3.1 Camera Mode 66
3.2 Album Mode 78
Chapter4 Personalizing your Dopod585 87
4.1 Customizing Phone Settings 88
4.2 Customizing Profi les and Sounds 95
3
Contents

Dopod585 User Manual
Contents
4
4.3 Customizing Date and Time 99
Chapter5 Getting Connected 101
5.1 Connecting to the Internet 102
5.2 Pocket Internet Explorer 105
5.3 Bluetooth 108
5.4 Modem Link 111
Chapter6 Messaging Features 113
6.1 Setting up accounts 114
6.2 Managing accounts 116
6.3 Creating E-mail and SMS messages 117
6.4 Receiving E-mail and SMS messages 120
6.5 Viewing message folders 124
6.6 Managing messaging 126
6.7 Using Pocket MSN Messenger 130
6.8 MMS messaging 133
Chapter7 Synchronizing 143
7.1 Using ActiveSync 144
7.2 Installing ActiveSync 145
7.3 Server ActiveSync 146
7.4 Other information 149
Chapter8 Applications 151
8.1 Using Calendar 152
8.2 Using Tasks 155
8.3 Using Calculator 156
8.4 Using Voice Notes 157
8.5 Using Windows Media Player 158

Dopod585 User Manual
Contents
5
8.6 Using Java Manager 164
8.7 Games 168
Chapter9 Maintaining Your Dopod585 171
9.1 Adding and Removing Programs 172
9.2 File Manager 173
9.3 Task Manager 180
9.4 Space Maker 182
Appendix 187
Regulatory Notices 188
Troubleshooting 198
Specifi cations 204
Index 207

Dopod585 User Manual
Contents
6

Chapter 1
Getting Started
1.1 Knowing your Dopod585
1.2 Status Indicators
1.3 Setting up your Dopod585
1.4 Accessories
1.5 Navigating
1.6 Entering Text and Numbers
1.7 Securing your Dopod585
8
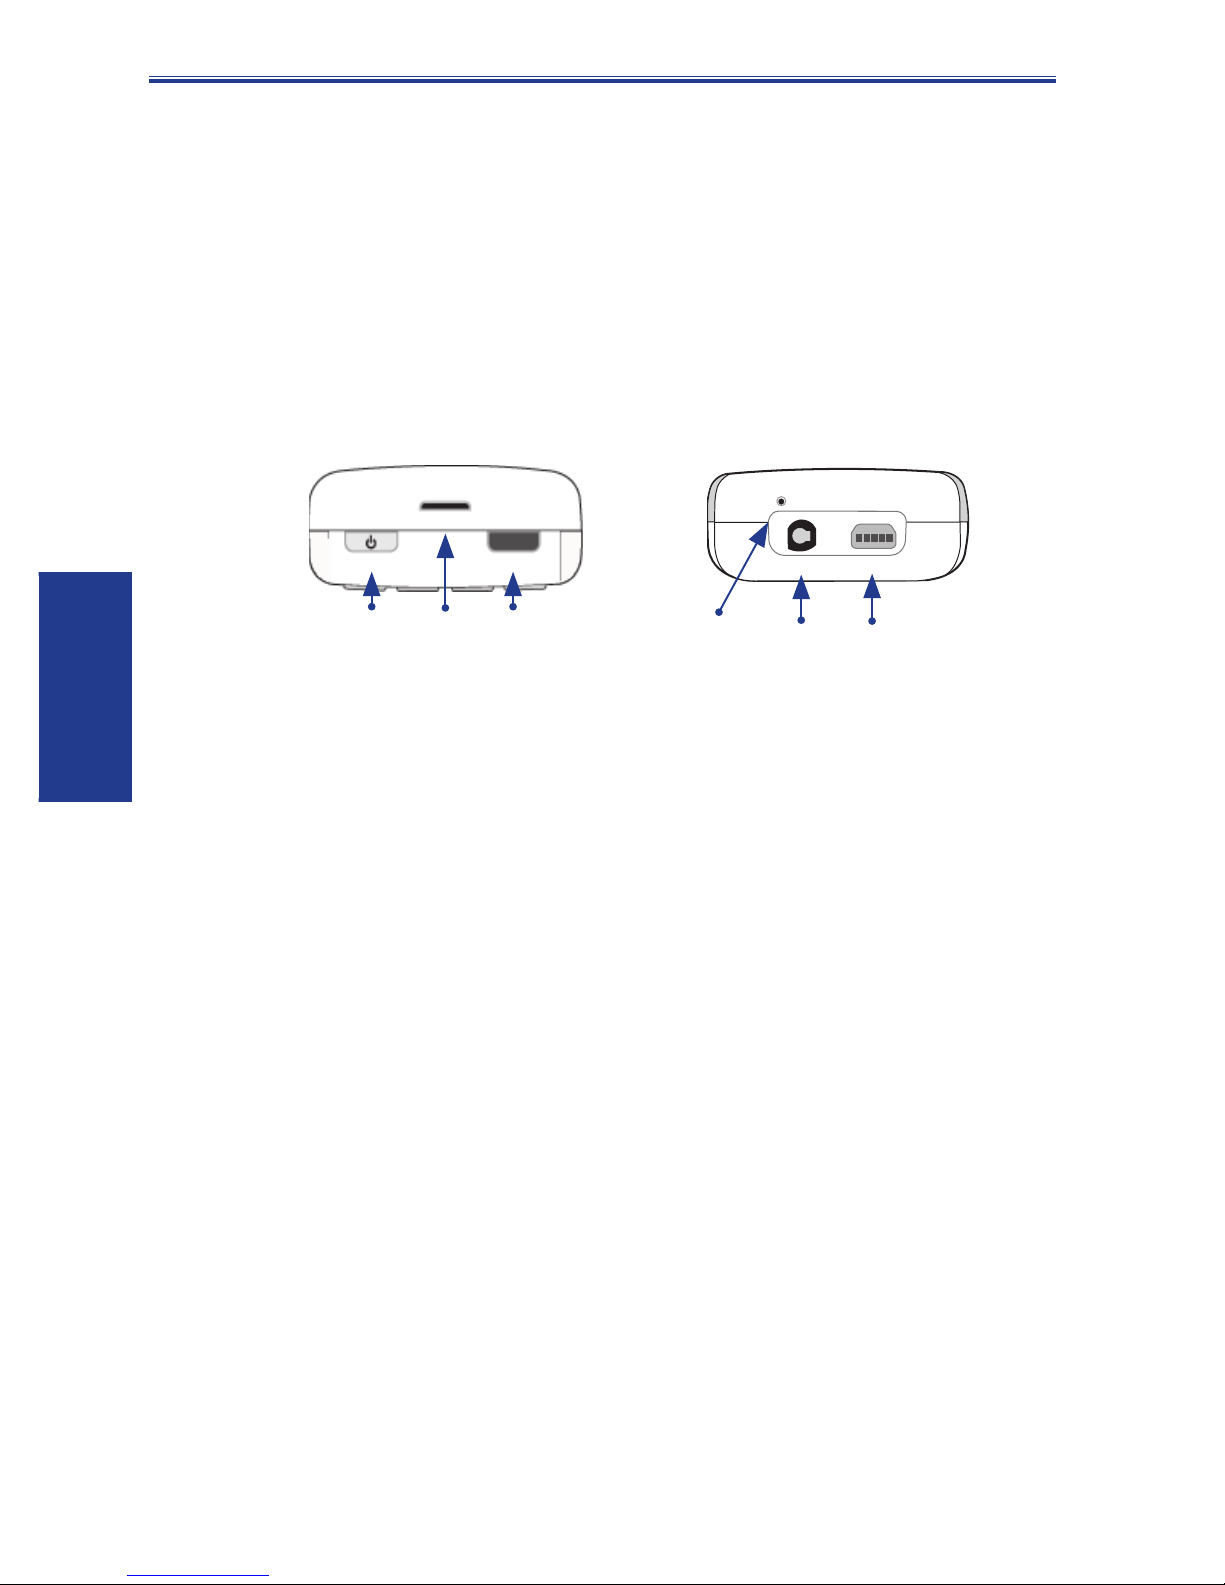
1.1 Knowing your Dopod585
This section will help you become familiar with your
Dopod585’s hardware, including a basic introduction to
the buttons and features found on the top, bottom, front,
side, and rear of the phone. A brief explanation of the LED
indicator is also provided.
Top View Bottom View
1. Power button
When your Dopod585 is turned Off, press and hold the
Power button to turn it On, and vice versa. When the
Dopod585 is On, press and quickly release the Power
button to display the Quick List (illustrated later in this
chapter), which allows you to change profi les or “lock”
your Dopod585.
2. Speaker
(An additional speaker can be found on the front of the
Dopod585.)
3. Infrared (IrDA) port
Enables your Dopod585 to receive data from another
IR-compatible device through beaming.
4. Microphone
5. Earphone plug
Plug the earphone jack here to use the hands-free mode
or listen to sound or multimedia fi les.
6. Mini-USB connector
Attach the mini-USB cable here to synchronize your
Dopod585 with a desktop or notebook PC, or to charge
its battery.
Dopod585 User Manual
1. Getting
Started
4
6
1
2
3
5
9
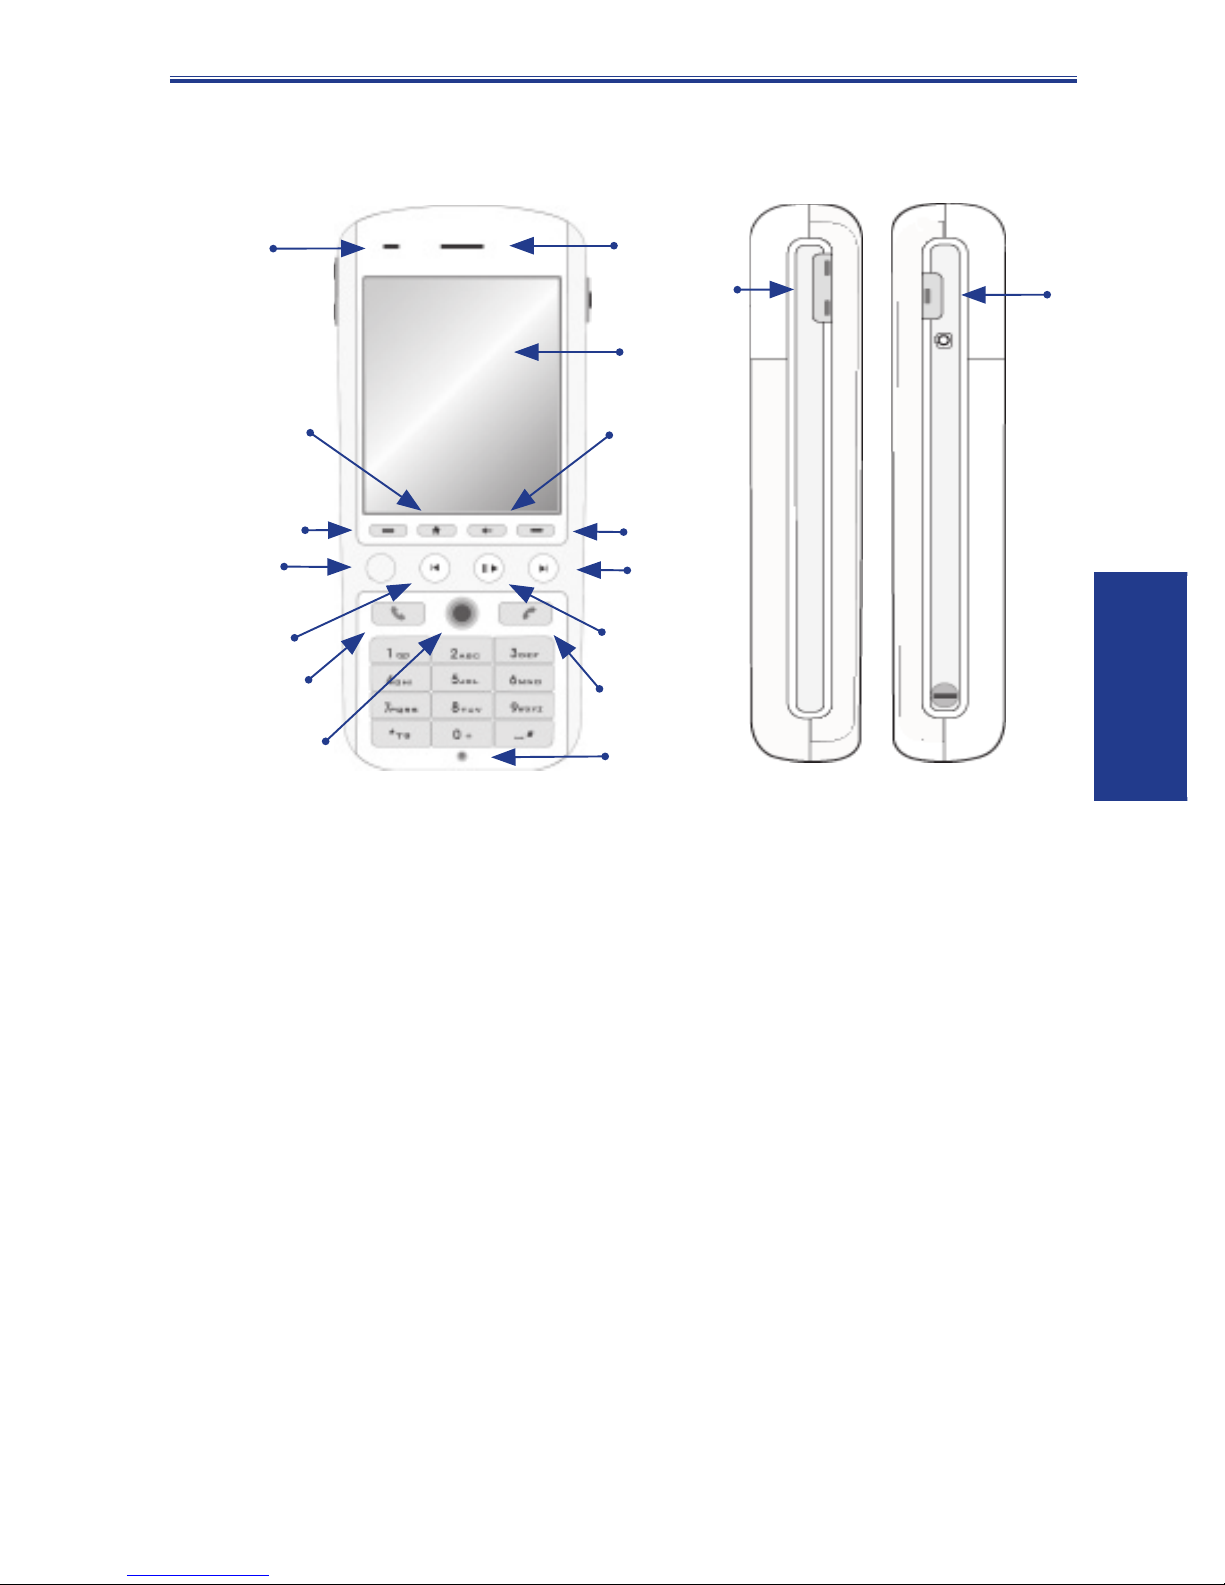
Front View Side View
Left Right
1. LED Indicator
The LED Indicator notifi es you of the battery and network
status of your Dopod585. The meaning of the various
colors in the LED Indicator are described in a table later
in this section.
2. Home key
Press to return to the Home screen.
3. Left Softkey (Softkey 1)
Performs the function shown in the “softkey label” on the
screen immediately above the button. (For example, when
in the Home screen, pressing the Left Softkey opens the
Start menu.)
14
15
Dopod585 User Manual
1. Getting
Started
1
2
12
3
4
6
9
8
10
13
16
17
11
5
7

10
4. 3 x 3 Grid button
By pressing this button you can call up the Applications menu
to access your more frequently required applications.
5. Media Player — Previous Hotkey
If Windows Media Player is not running, pressing this
hotkey will launch it (see Chapter 8 for information about
using Media Player).
If already running, behaviors are as follows:
• A quick press and release within the fi rst two seconds
of fi le playback will stop playing the current fi le, jump
to the previous fi le, and begin playing it.
• A quick press and release after the fi rst two seconds of
fi le playback will go back to the beginning of the current
fi le and start playing it again from the beginning.
• Pressing and holding will “fast rewind” (with
playback).
• If a fi le is selected but not currently being played, the
previous fi le in the sequence will be selected.
• If Media Player is running in foreground but no fi le is
loaded, nothing happens when you press this hotkey.
6. Talk key
Press to start a call or answer an incoming call. Press and
hold to turn the speakerphone mode on or off, or switch
between an active call and a call on hold.
7. Navigation Pad
Use to scroll selection up, down, left, or right. Press
straight down on the center of the Navigation Pad (known
as the Action button) to select. In a text fi eld, use the
navigation pad to move the cursor right or left, character
by character.
8. Speaker
(An additional speaker can be found on the top of your
Dopod585.)
9. Display screen
Dopod585 User Manual
1. Getting
Started

11
The status indicators concerning the current mode,
battery strength, the current activity, or active program
are displayed in the Title Bar at the top of the screen. In
the center of the screen is the active menu or program
(or incoming live video stream if Camera mode is active).
At the bottom of the screen are the menus or commands
related to the active program.
10. Back key
Press to go back to the previous screen, or to backspace
over one character in a text fi eld. Press and hold to delete
the contents of an editable fi eld.
11. Right Softkey (Softkey 2)
Performs the function shown in the “softkey label” on the
screen immediately above the button. (In many cases,
pressing the Right Softkey opens a menu associated with
a particular application.)
12. Media Player — Next Hotkey
If Windows Media Player is not running, pressing this
hotkey will launch it (see Chapter 8 for information about
using Media Player).
If already running, behaviors are as follows:
• A quick press and release during fi le playback will stop
playing the current fi le, and start playing the next fi le in
the sequence.
• Pressing and holding will “fast forward” (with
playback).
• If a fi le is selected but not currently being played, the
next fi le in the sequence will be selected.
• If Media Player is running in foreground but no fi le is
loaded, nothing happens when you press this hotkey.
13. Media Player — Pause/Play/Stop Hotkey
If Windows Media Player is not running, pressing this
hotkey will launch it (see Chapter 8 for information about
using Media Player).
If already running, behaviors are as follows:
• A quick press and release during fi le playback will
Dopod585 User Manual
1. Getting
Started

12
pause the playback. Another quick press will resume
playback.
• Pressing and holding will stop the playback.
• If a fi le is selected but not currently being played,
pressing this hotkey will start playback of that fi le.
• When a fi le in “My Media” subfolders is selected,
pressing this hotkey will bring Windows Media Player
to the foreground and the fi le will be played.
• If Media Player is running in foreground but no fi le is
loaded, nothing happens when you press this hotkey.
14. End key
Press to end a call; press to return to the Home screen;
or press and hold to lock the keypad.
15. Light Sensor
If enabled in Settings > Power Management, dark
conditions (ambient luminance lower than 20~28 lux)
sensed here will activate a backlight under the keypad,
making it easier to see the buttons.
16. Volume / Voice Tag / Voice Notes button
On the left side of your Dopod585, one of the functions
of this button is to let you adjust Volume during the talk
mode.
During the standby mode, pressing and holding the
Volume Down button will launch the Voice Tag feature
(explained in section 2.8). Or, you can press and hold the
Volume Up button to launch the Voice Notes recorder
(see section 8.6).
17. Camera button
On the right side of your Dopod585, this button switches
to the Camera mode (if not already in Camera mode).
If already in Camera mode, pressing this button captures
a still image or begins capturing a video clip, depending
on the current capture submode.
LED Indicator Lights
Dopod585 User Manual
1. Getting
Started

13
The various colors that might display in the LED Indicator
(item 1 in the previous illustration) are summarized in the table
below.
LED Indicator Status
Solid green Battery is fully charged
Blank Battery case is empty
Solid Amber Battery is charging
Flashing green Network is attached
Flashing red Battery very low (less than 4%)
Flashing blue Bluetooth set to “On” mode or “Discover-
able” mode
Flashing amber Battery temperature is hotter or colder
than the functional limits of 0 to 48
degrees Celsius, and has stopped
charging
Amber / green LED off Battery fault. The “Battery Fault” icon
is displayed (
). In this case, the
fl ashing green LED can be recovered
by unplugging the AC adaptor.
Dim Network is disconnected.
Dopod585 User Manual
1. Getting
Started
14
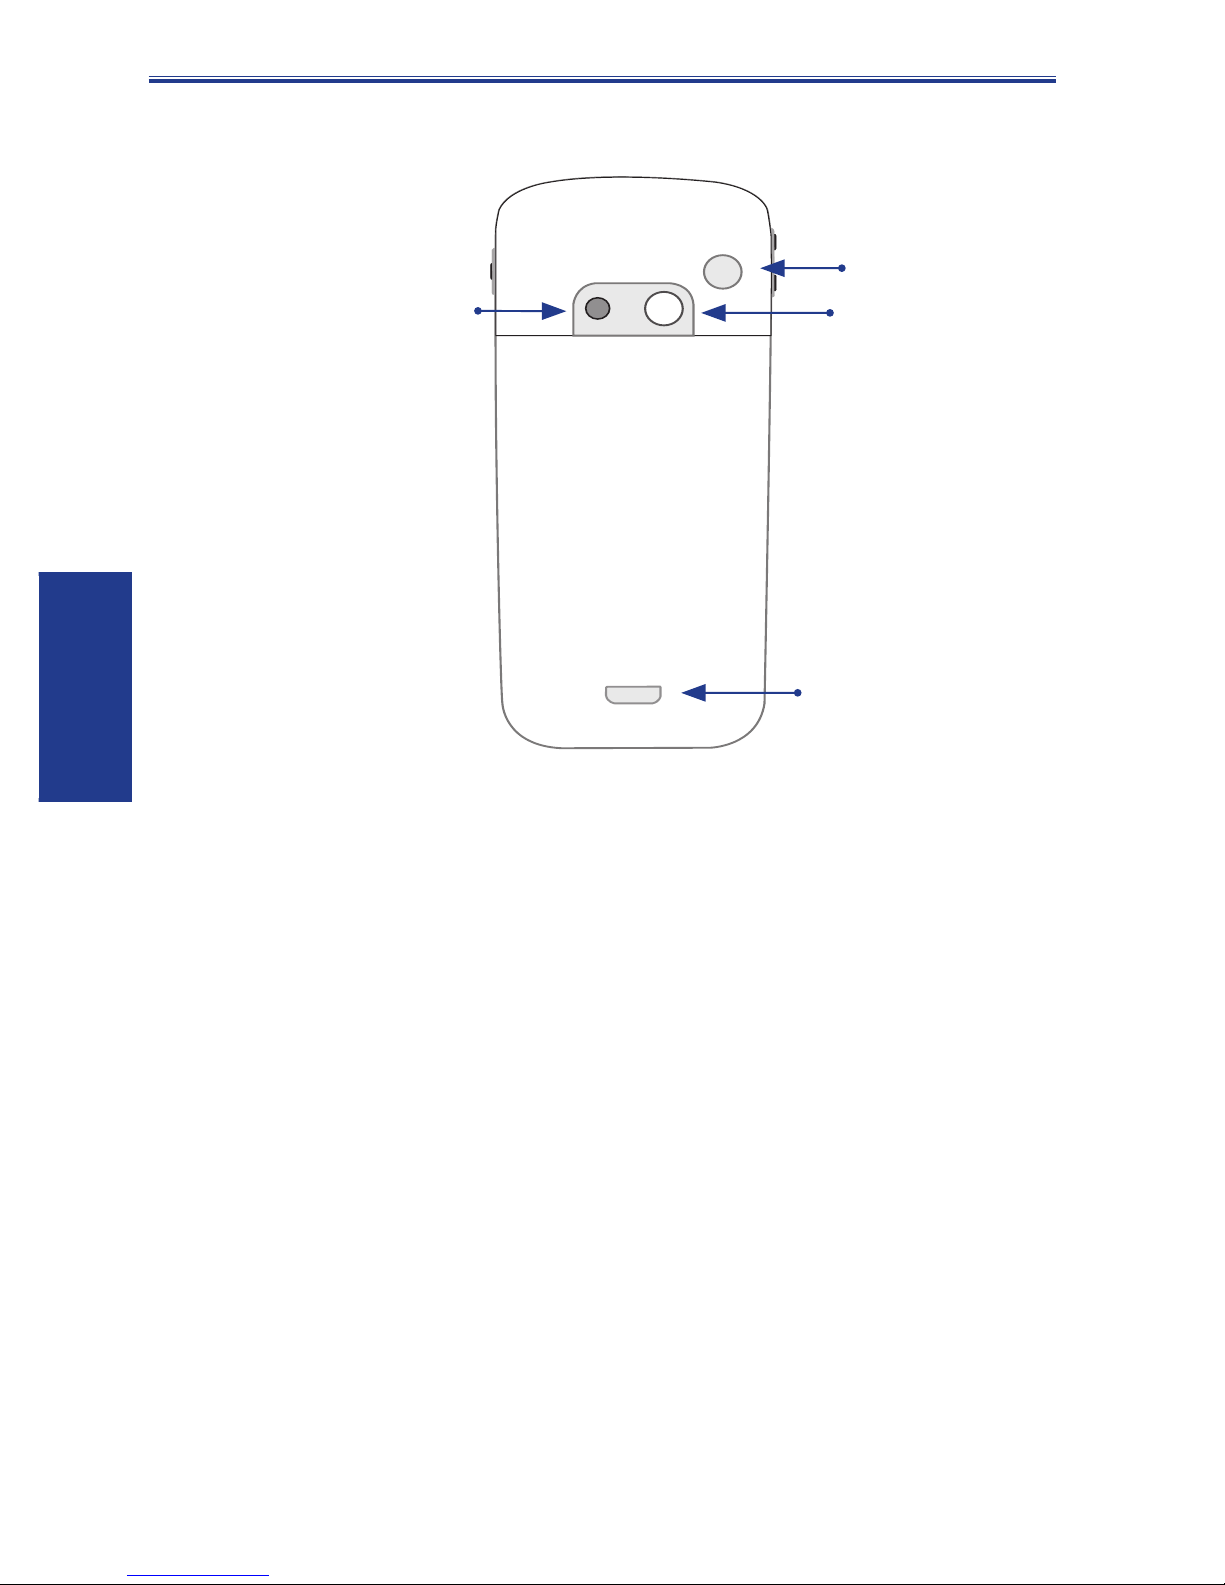
Back View
1. Car antenna connector
Allows you to attach your Dopod585 to a car antenna for
better network signal reception, if desired.
2. Camera lens
The “live” incoming video stream enters through this lens,
when Camera mode is active.
3. Self-Portrait mirror
Position your Dopod585 until this mirror refl ects the image
you want to capture.
4. Battery release latch
Press to release this latch when you want to access the
battery, SIM card, and Mini-SD card. (More illustrations
in section 1.3.)
1
2
3
4
Dopod585 User Manual
1. Getting
Started
15
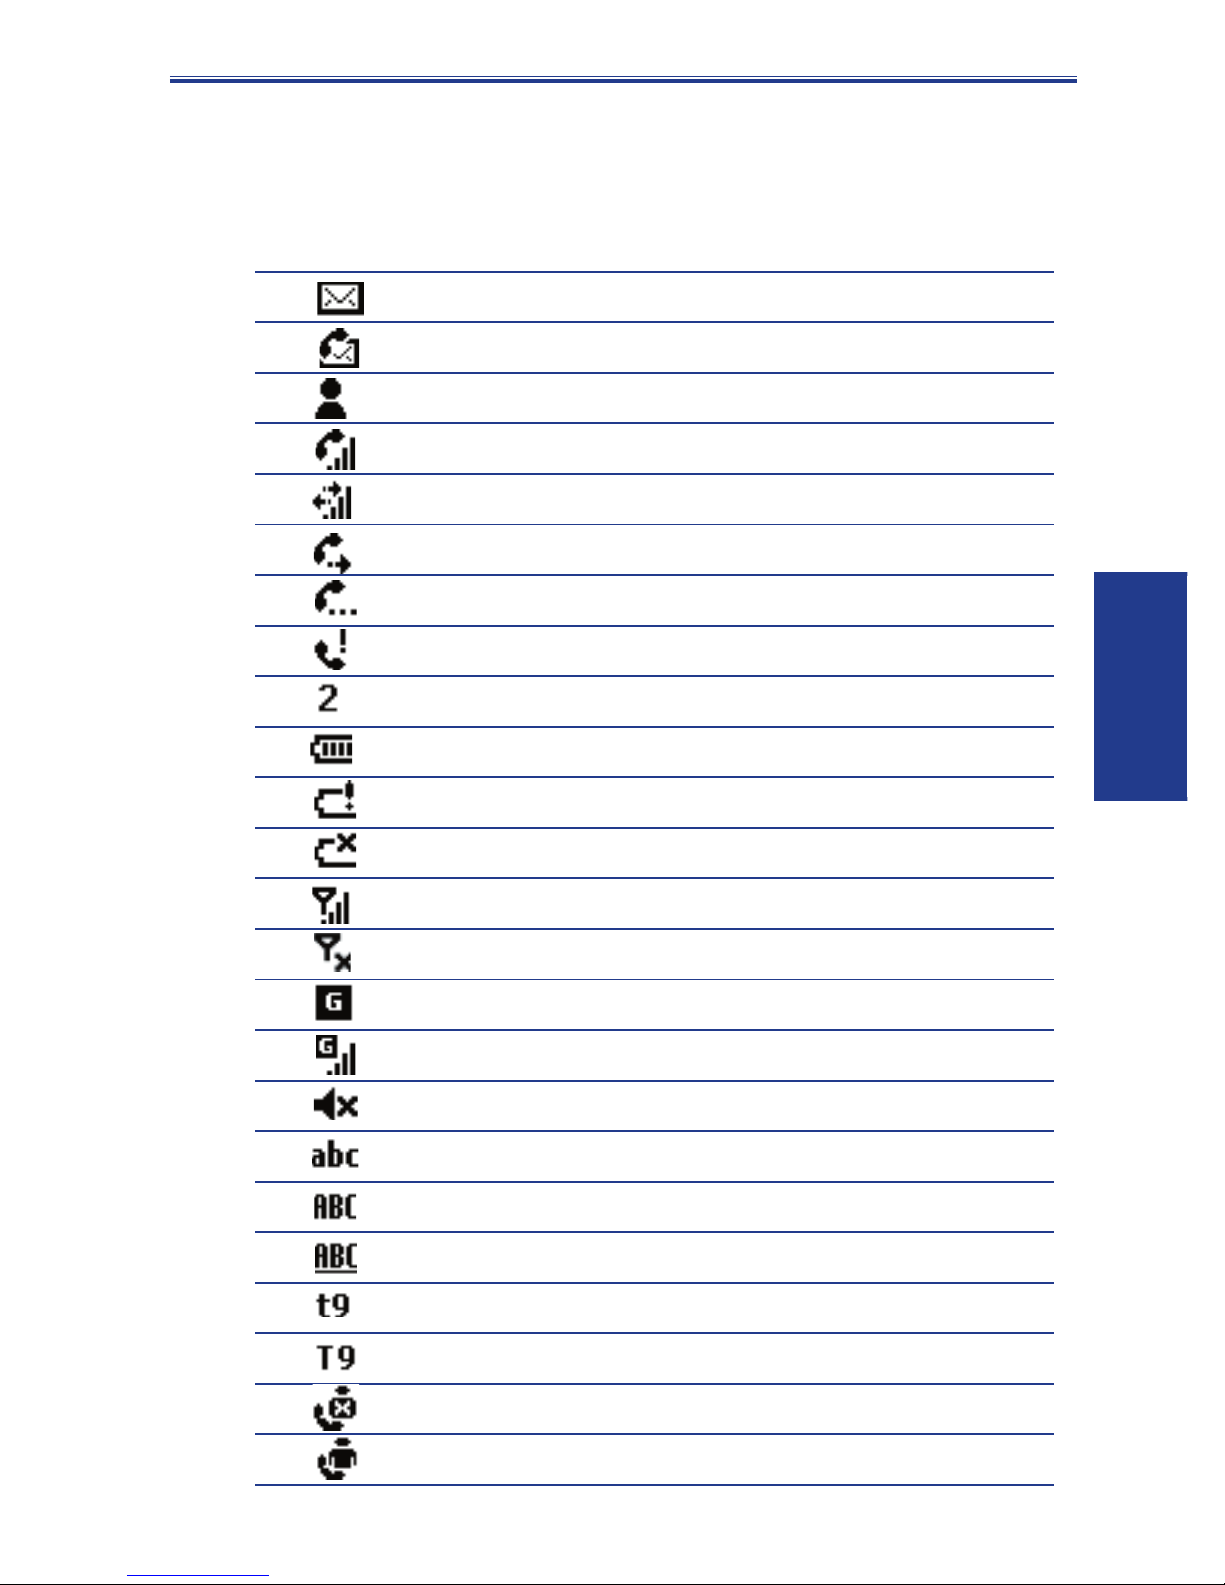
1.2 Status indicators
Status indicators are located in the Title Bar at the top of the
phone’s display screen. The following table lists common
sta tus indicators and their meanings:
New e-mail
New voice mail
New instant message
Voice call active
Data call active
Call forwarding
Call on hold
Missed call
“1” indicates Line 1; “2” indicates Line 2
Battery full
Battery very low (less than 4%)
Battery fault
Signal strength
Radio off
GPRS available
GPRS in use
Ringer off
Multipress input mode, lowercase
Multipress text input mode, uppercase
Multipress text input mode, caps lock
T9 text input mode, lowercase
T9 text input mode, uppercase
Caller ID monitor is off
Caller ID monitor is running
Dopod585 User Manual
1. Getting
Started
16
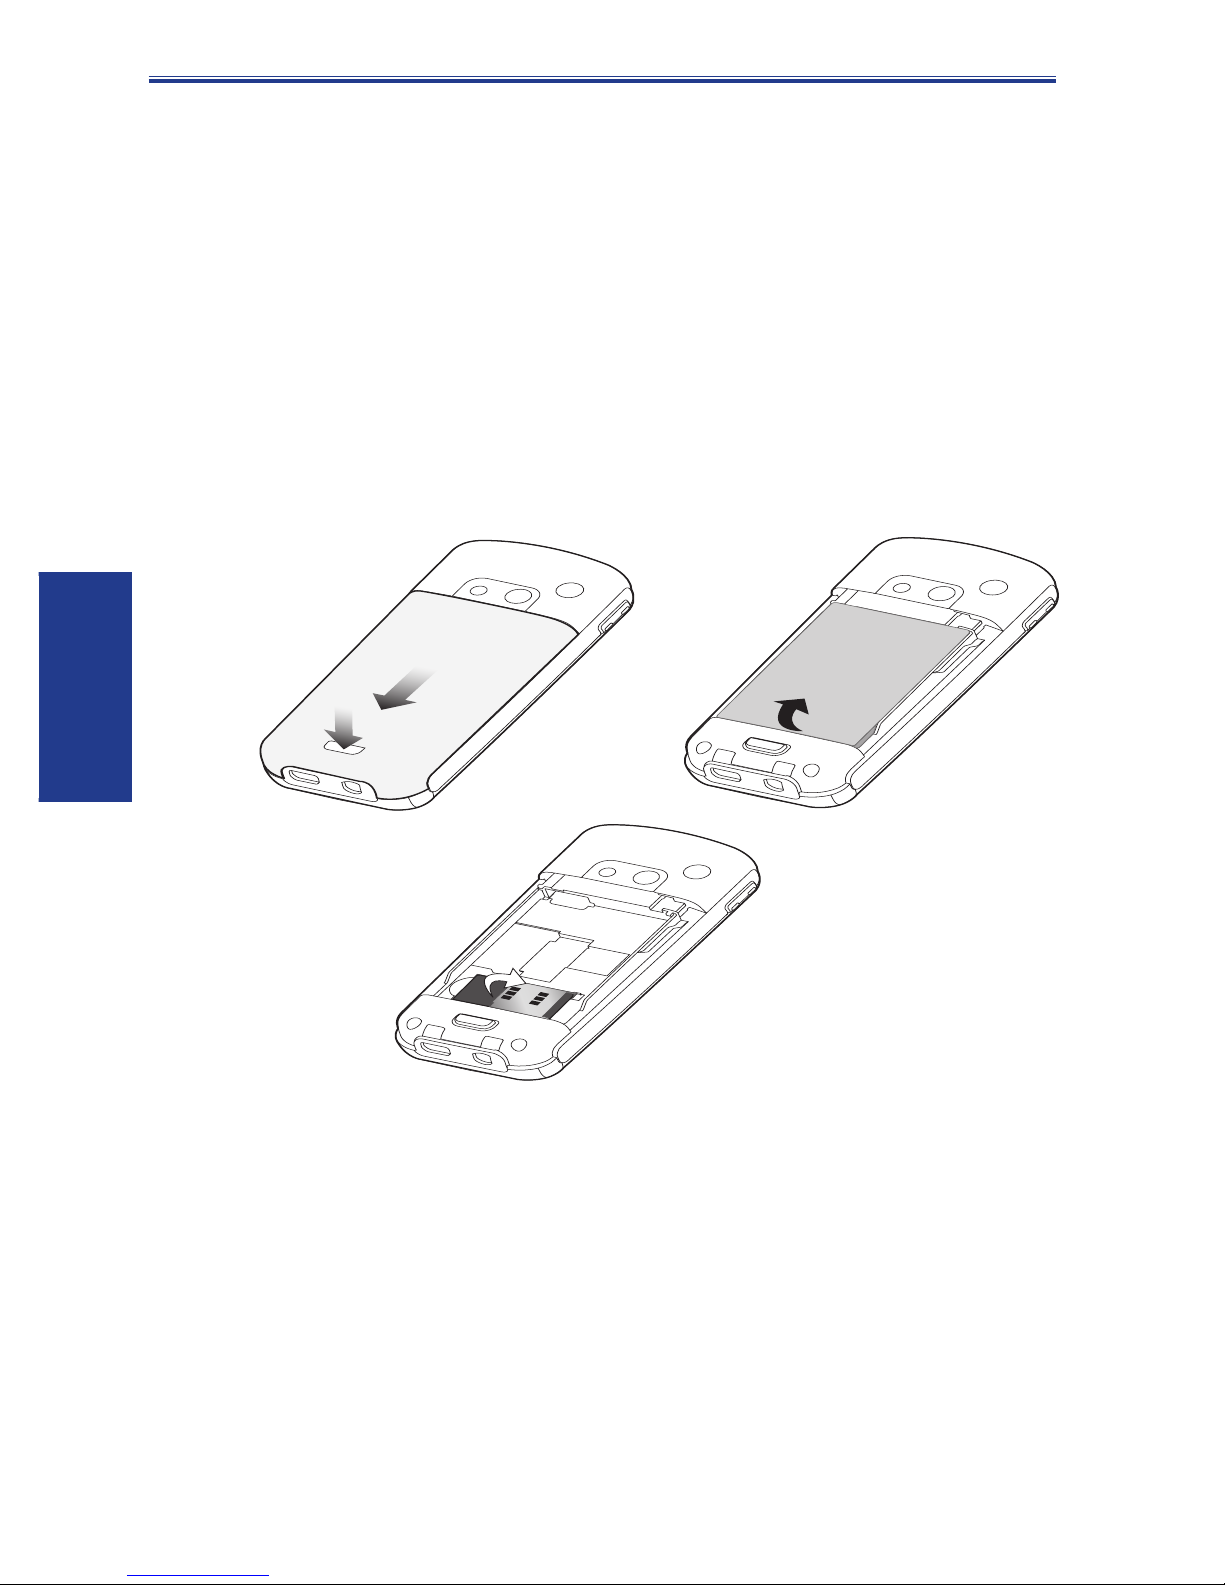
1.3 Setting up your Dopod585
In this section you will learn how to install a battery, SIM card,
Mini-SD card, and how to charge the battery.
Installing the SIM Card
The SIM (Subscriber Identifi cation Module) card contains
a computer chip that stores your personal number, phone
book, and other services provided by your cellular service
provider.
To insert a SIM card:
1. Press on the battery release latch and move the backside
cover downward to open.
2. Remove the battery by lifting it up from both sides of the
bottom end.
3. Lift up the SIM metal socket.
4. Insert the SIM card with the gold-plated contact area on
the card facing down. Push the metal socket down to lock
into place.
Dopod585 User Manual
1. Getting
Started
17
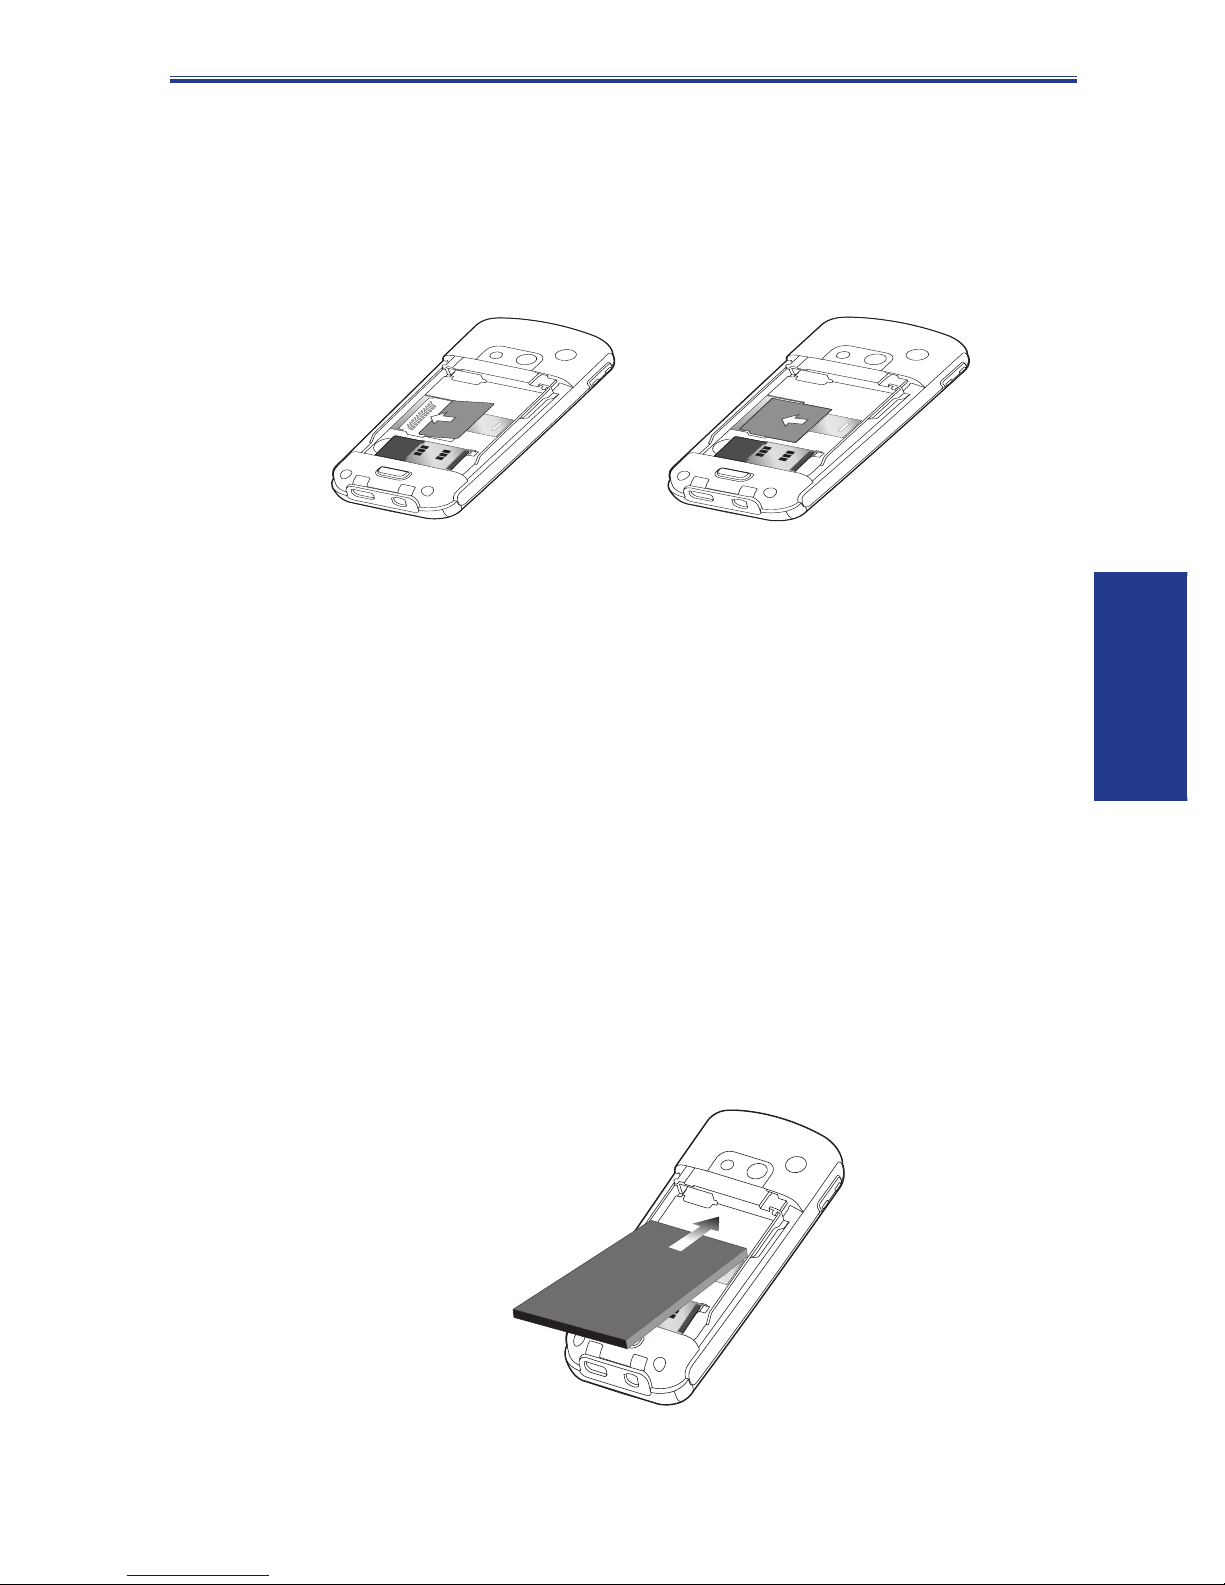
Installing the Mini-SD card
Use only the Mini-SD (Secure Digital) card in your Dopod585.
You can install the Mini-SD card to store images, video clips,
music, and other data you may have obtained.
To insert a Mini-SD card:
1. Remove the back phone cover as explained on the
previous page.
2. Slide the Mini-SD card into the holder, with the gold-plated
contact area facing down.
3. Push the card down and slide the metal latch over the
Mini-SD card to secure it into place.
Installing the Battery
1. Insert the battery by aligning the exposed copper part of
the battery pack with the protruding copper conductor,
then gently push the bottom of the battery into place.
2. Slide the cover on the phone.
Dopod585 User Manual
1. Getting
Started

18
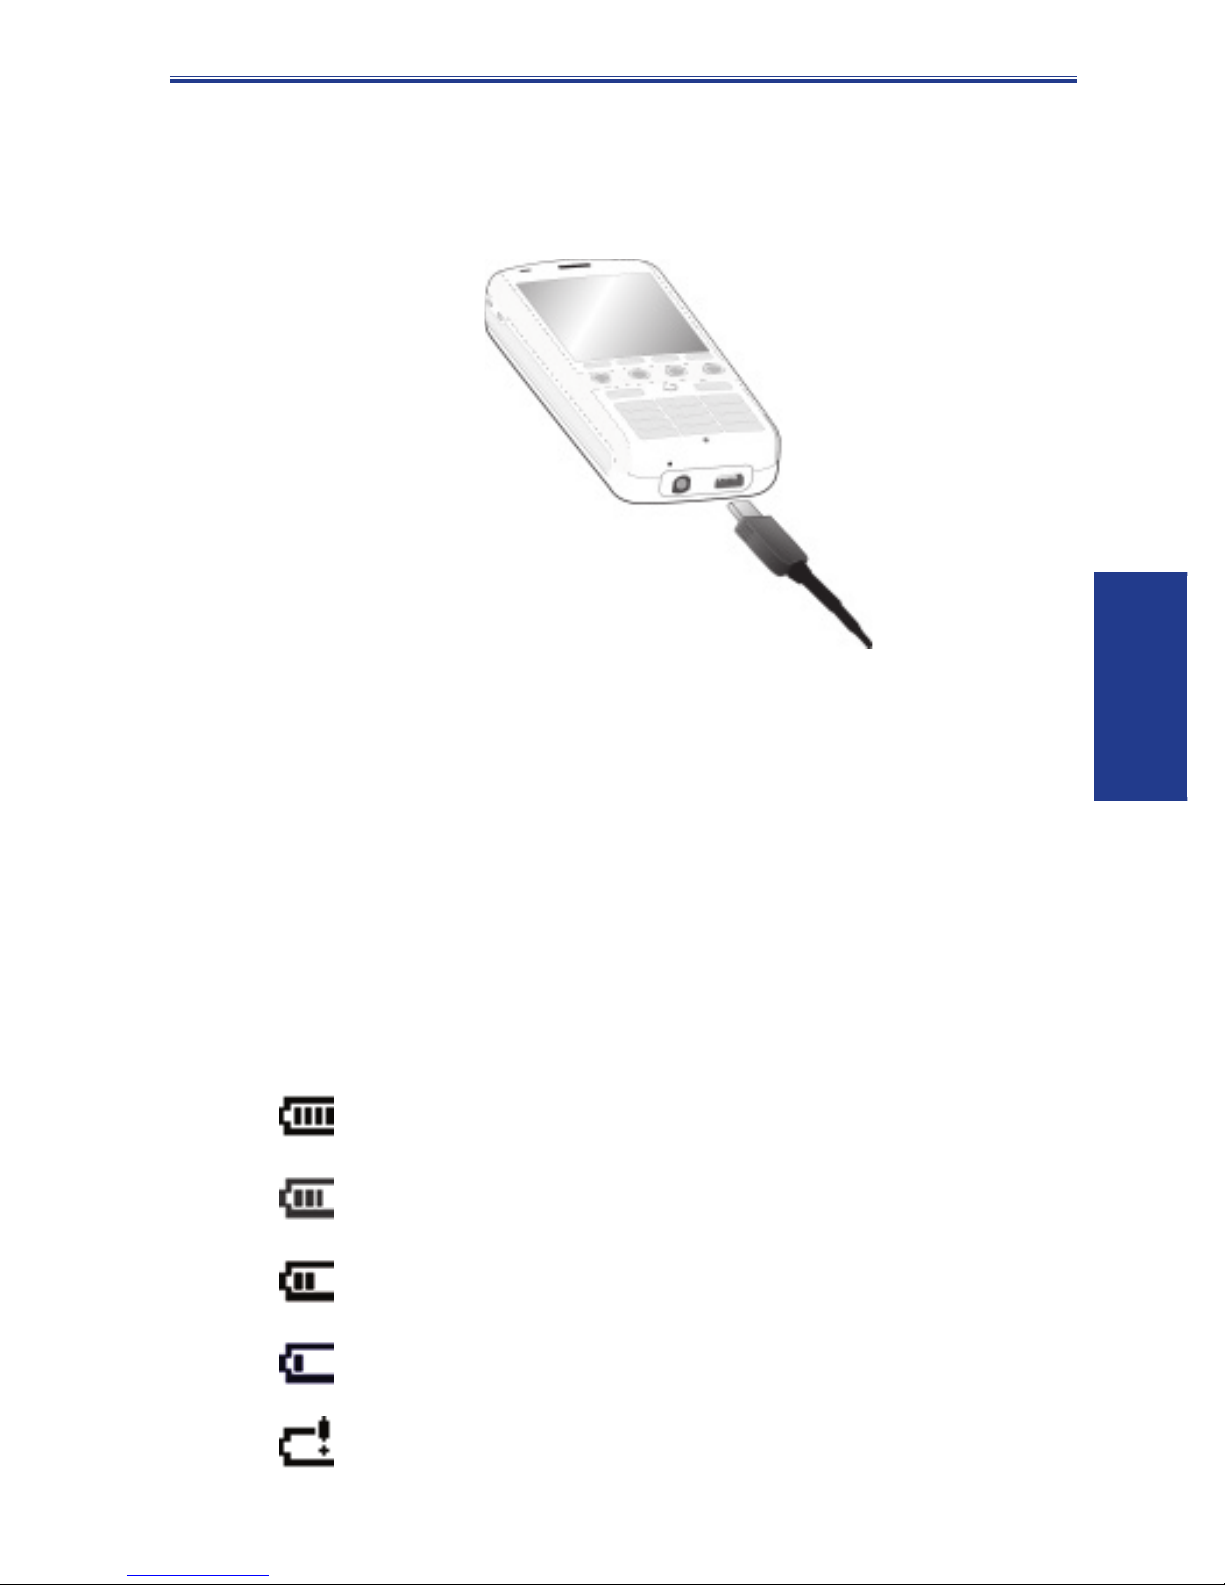
Charging the Battery
Your Dopod585 is powered by a rechargeable Lithium-Ion
battery. The battery will eventually wear out after a few
hundred charges or discharges. Replace the battery through
an authorized vendor when the operating time is noticeably
shorter than usual.
The time it takes for a battery to fully charge depends on the
environment temperature at the time of charge. A completed
charge normally takes about 3.5 to 4 hours in 0-10 degree
temperatures, and less than 3 hours in temperatures ranging
from 20 to 45 degrees.
Fully charge the new battery before using your Dopod585
for the fi rst time. When the low-battery indicator appears,
save any unsaved data you are working on by synchronizing
your Dopod585 with your PC or an Exchange Server. Do
not restart your Dopod585 until you have connected it to an
external pow er source.
NOTE: Do not leave your Dopod585 connected to a
charger for longer than a week because overcharging can
shorten a battery’s lifespan. Your battery will automatically
discharge when the phone is not in use. Leaving the battery
in extremely hot or cold places may also reduce its capacity
or shorten its lifespan.
Mode Estimated battery life
Talk Time 3.5 to 4 hours
GPRS 2 hours prox.
Standby 140 hours
Dopod585 User Manual
1. Getting
Started
19
Your Dopod585 can be charged whether it is powered on or
off. Charge your battery by plugging the AC adaptor into the
Mini-USB connector at the base of the device.
If your Dopod585 is turned off, charging is indicated by an
amber light. If turned on, charging is indicated by the solid
amber light on the LED indicator and the charging icon (icons
are shown below). The completed charge is indicated by
either a green light or a charged icon. You can also charge
your Dopod585 using the USB Sync cable while connected
to the PC’s USB port.
Battery Capacity indicator icons
Full
50%-74% capacity
28%-49% capacity
Less than 27% capacity
“Very Low” alert (less than 4%)
Dopod585 User Manual
1. Getting
Started

20
1.4 Included Accessories
Mini USB cable
A USB cable is provided to allow you to syn chro nize
information between your Dopod585 and a desktop or
notebook PC using ActiveSync. You can also charge the
Dopod585’s battery by plugging the cable to a PC USB
port.
Stereo earphones with handsfree
function
Use the earphones to listen to sound or multimedia fi les. The
earphones can also function as a handsfree device.
Using the earphones
Connect the earphone cable to the earphone jack located at
the base of the phone (identifi ed in an illustration in section
1.1). Press the “Press To Talk” button to receive an incoming
call. Press and hold it to end a call. Rotate the Volume
buttons to adjust the sound level.
Dopod585 User Manual
1. Getting
Started

21
1.5 Navigating
This section discusses how to navigate through your
Dopod585’s screens in order to perform tasks effi ciently.
Navigation Pad
The Navigation Pad was identified as item #7 in the
illustration on page 9. It provides an easy way to move or
scroll through selections on the screen.
• Press the left side of the Navigation Pad to move left.
• Press the right side of the Navigation Pad to move right.
• Press the top of the Navigation Pad to move up.
• Press the bottom of the Navigation Pad to move down.
Action button
Select a highlighted item by pressing straight down on the
center of the Navigation Pad, which is also known as the
Action button. In many cases, scrolling to an item and
pressing the Action button executes a command, or takes
you to a program or setting, or serves as the Done/Save
function. When you scroll to a checkbox, pressing the Action
button activates or clears the box.
Softkeys
There are two softkeys on your Dopod585, located directly
below the display screen: the Left Softkey (“Softkey 1”)
and the Right Softkey (“Softkey 2”). These are identifi ed as
items 3 and 11 in the illustration on page 9. Each softkey
performs the command displayed immediately above it on
the screen (called the “Softkey label”).
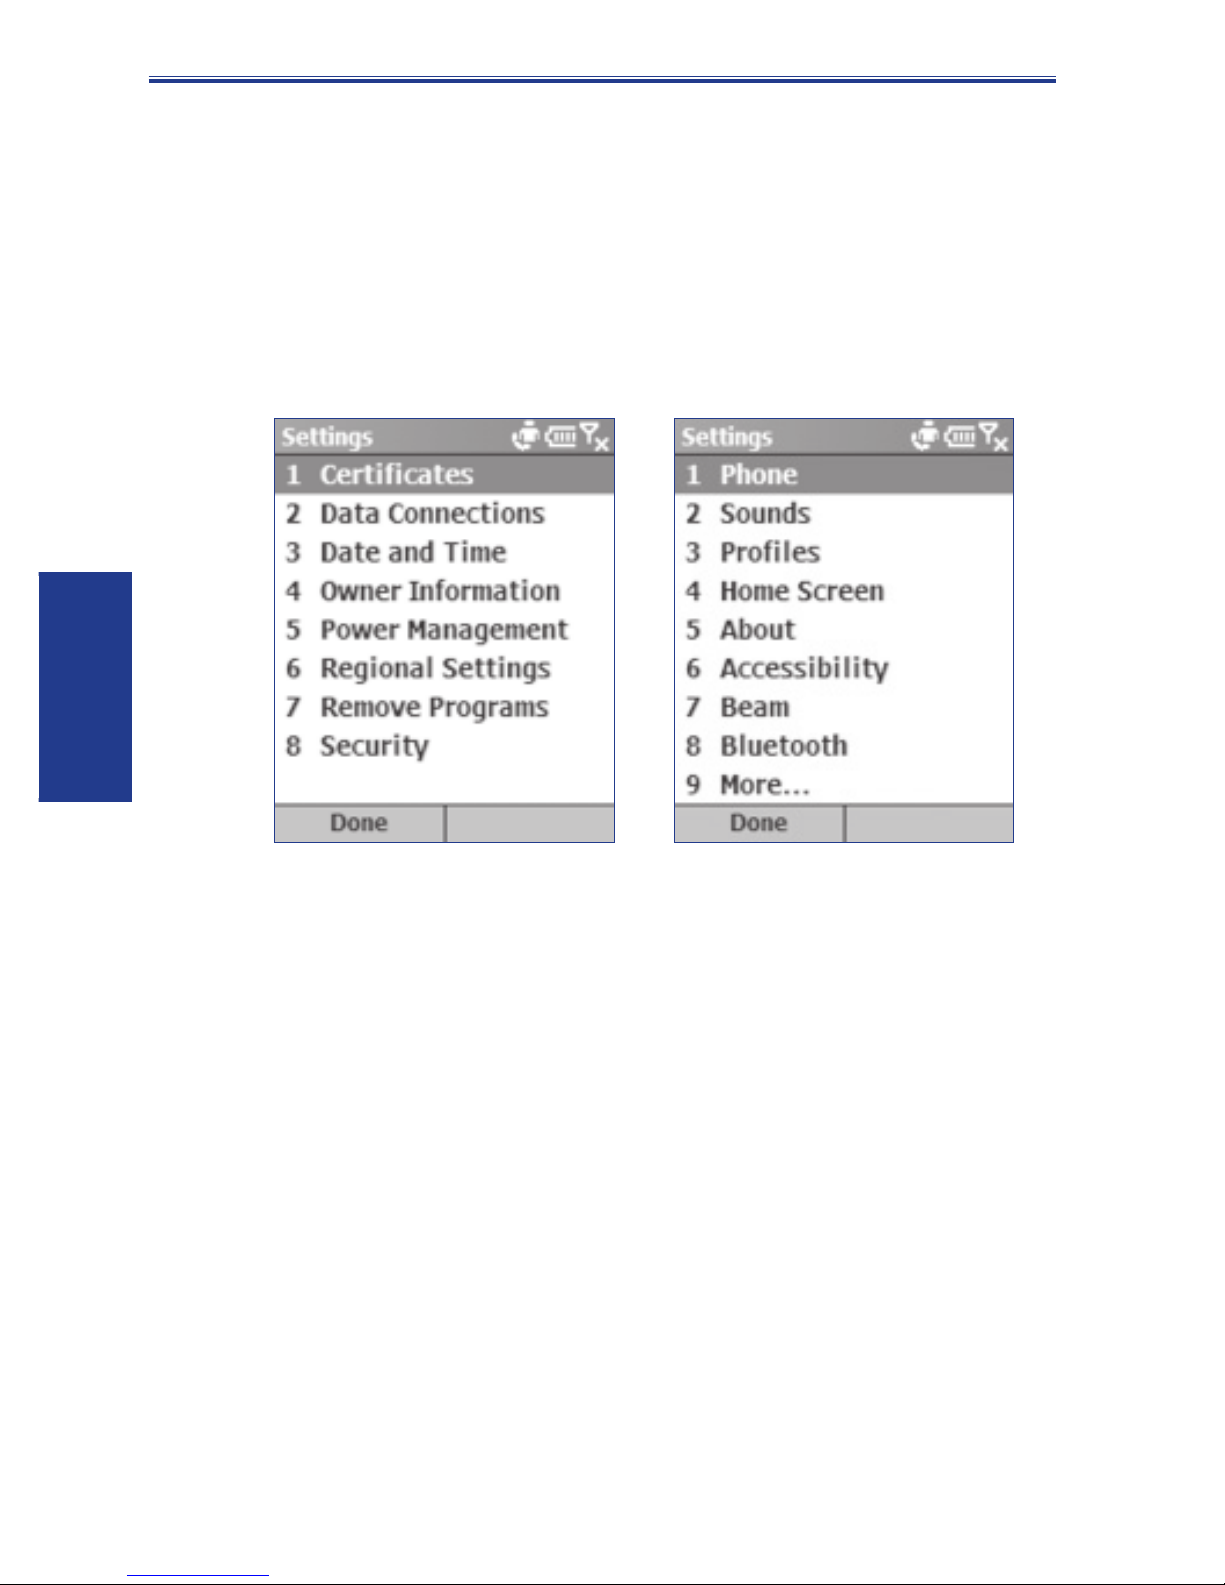
Note that you can also use Settings > Right Softkey on
the Start menu, as illustrated and described in Chapter 4, to
assign different applications to the Right Softkey function.
Dopod585 User Manual
1. Getting
Started
22
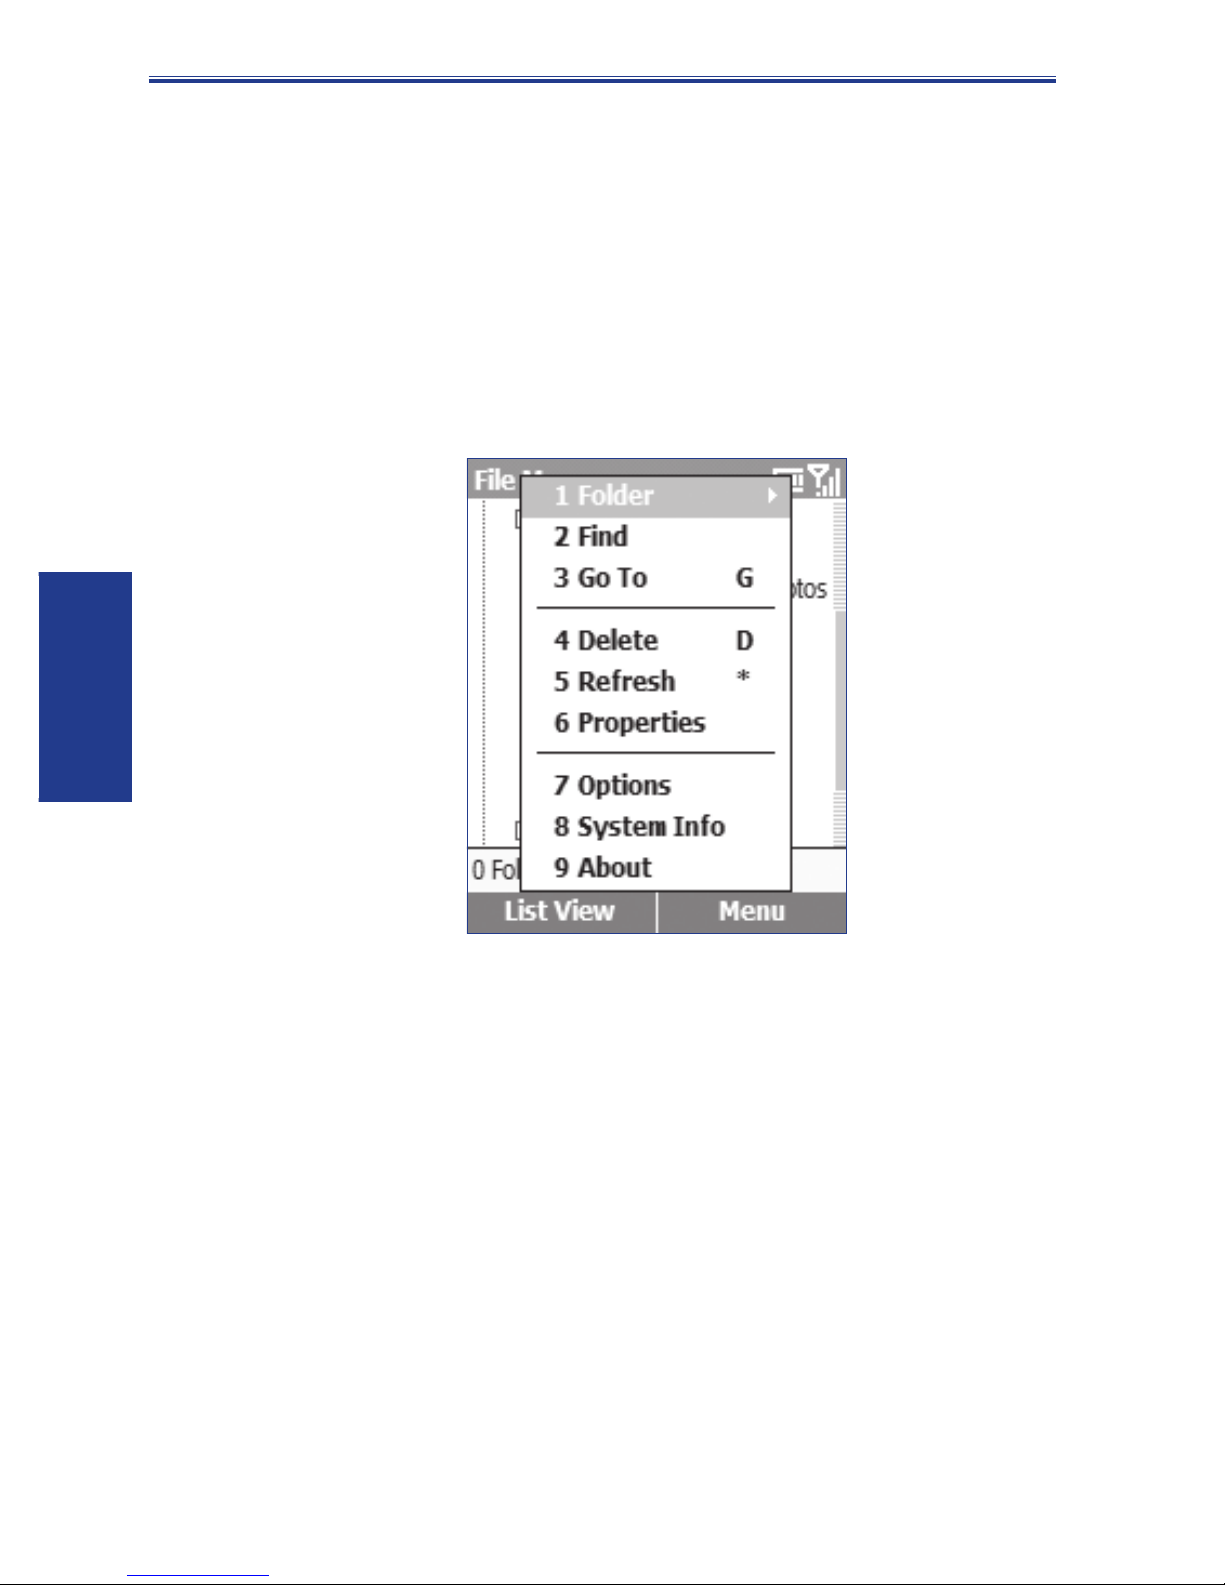
Menus
On many screens, the function of the Right Softkey is to open
a menu which displays a list of options that are relevant to
the current screen/application. Selecting a menu op tion will
either perform that command or take you to another part of
the user interface where you can perform the com mand. The
example menu shown below comes from the File Manager
application.
Dopod585 User Manual
1. Getting
Started
23
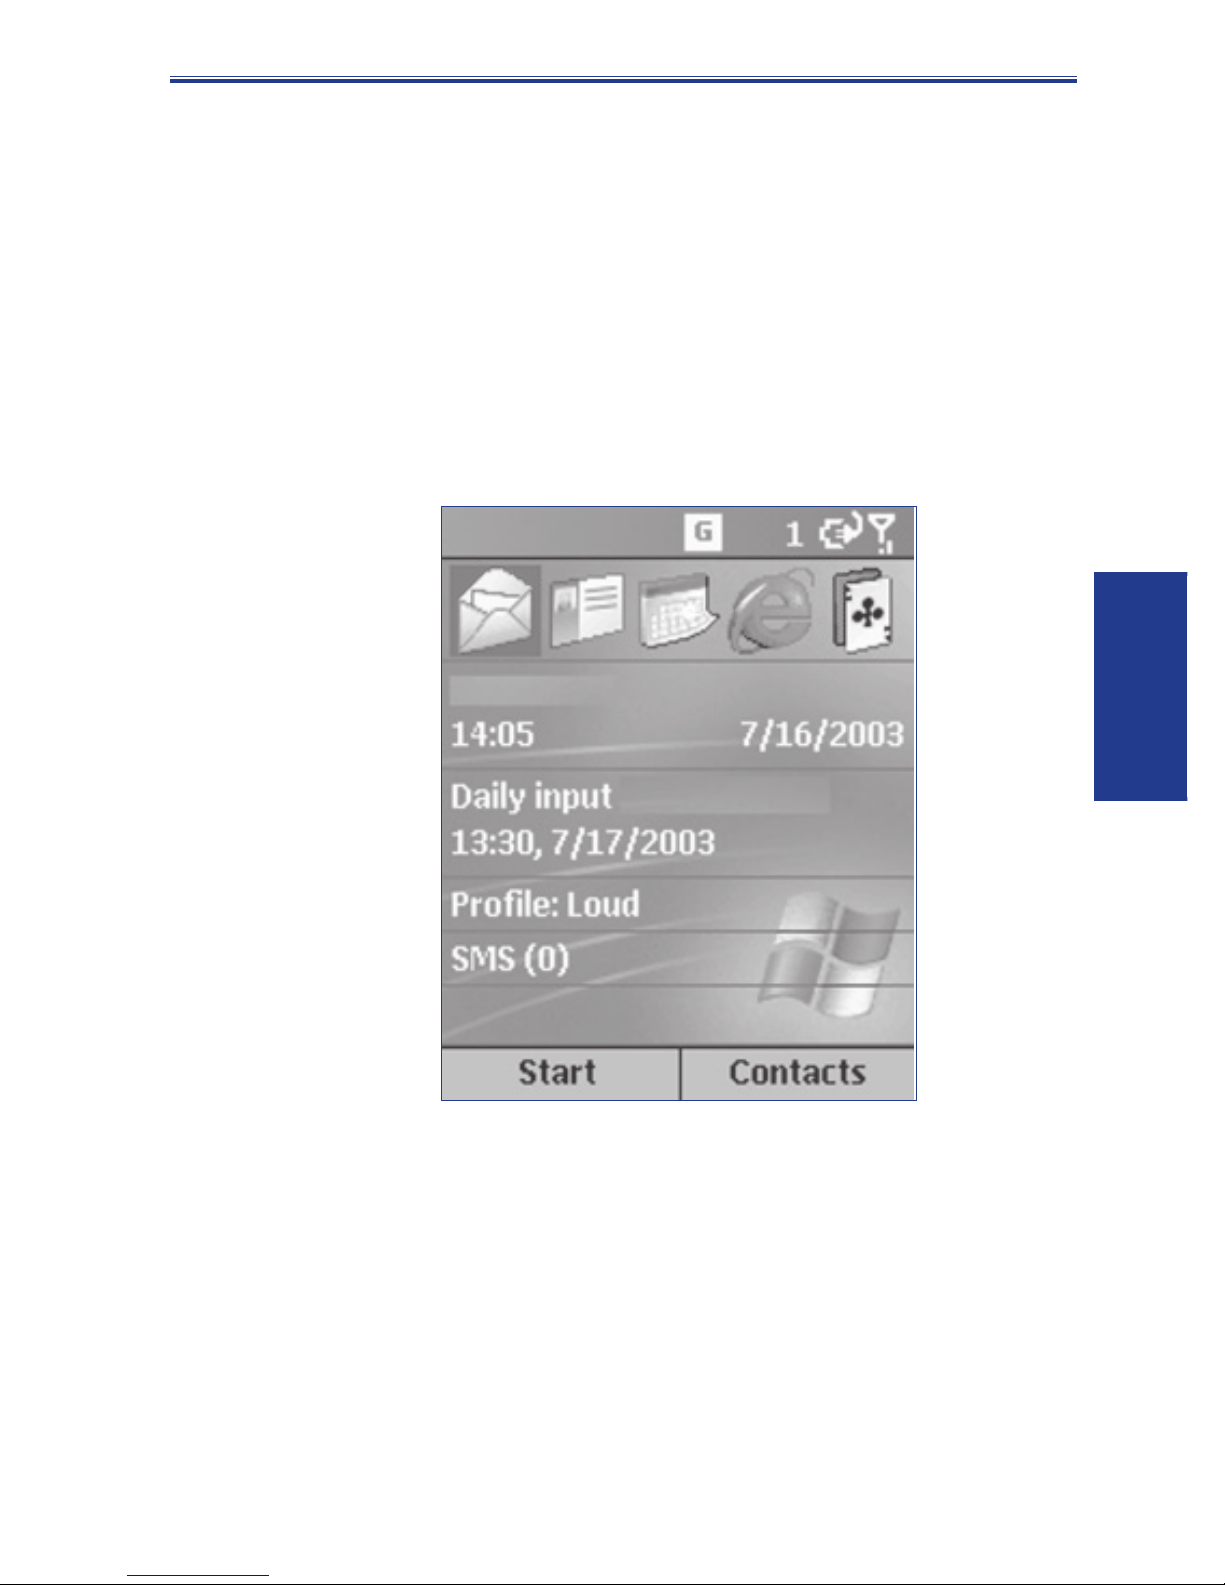
The Home button
Pressing the Home button (item 2 in the illustration on page
9) takes you to the Home screen, which is your starting place
for most tasks. All programs and features can be accessed
from the Home screen.
If you use Settings > Home Screen to change to a different
Home Screen Layout value, then this becomes a “most
recently used applications” list, and will display the icons of
the fi ve applications that were most recently accessed.
In addition, other data is displayed in the Home screen, such
as date/time, your upcoming appointments, number of new
unread messages, and current profi le. Selecting one of
these will open the related screen.
Dopod585 User Manual
1. Getting
Started
24
The Start menu
Your Dopod585 comes with several bundled programs that
you can start using immediately.
Pressing the Left Softkey when in the Home screen will open
the Start menu. To access the next “page” of the Start menu,
press 9 on your keypad.
Select an item by scrolling to it and pressing the Action
button. Or, you can press the corresponding number on
the menu.
The Back button
Pressing the Back button takes you to the previous screen,
in a similar manner to the Back button on an Internet browser.
In a text fi eld, pressing the Back key moves the cursor back
and deletes the character to the left (similar to pressing the
Backspace key on a keyboard).
Dopod585 User Manual
1. Getting
Started
25
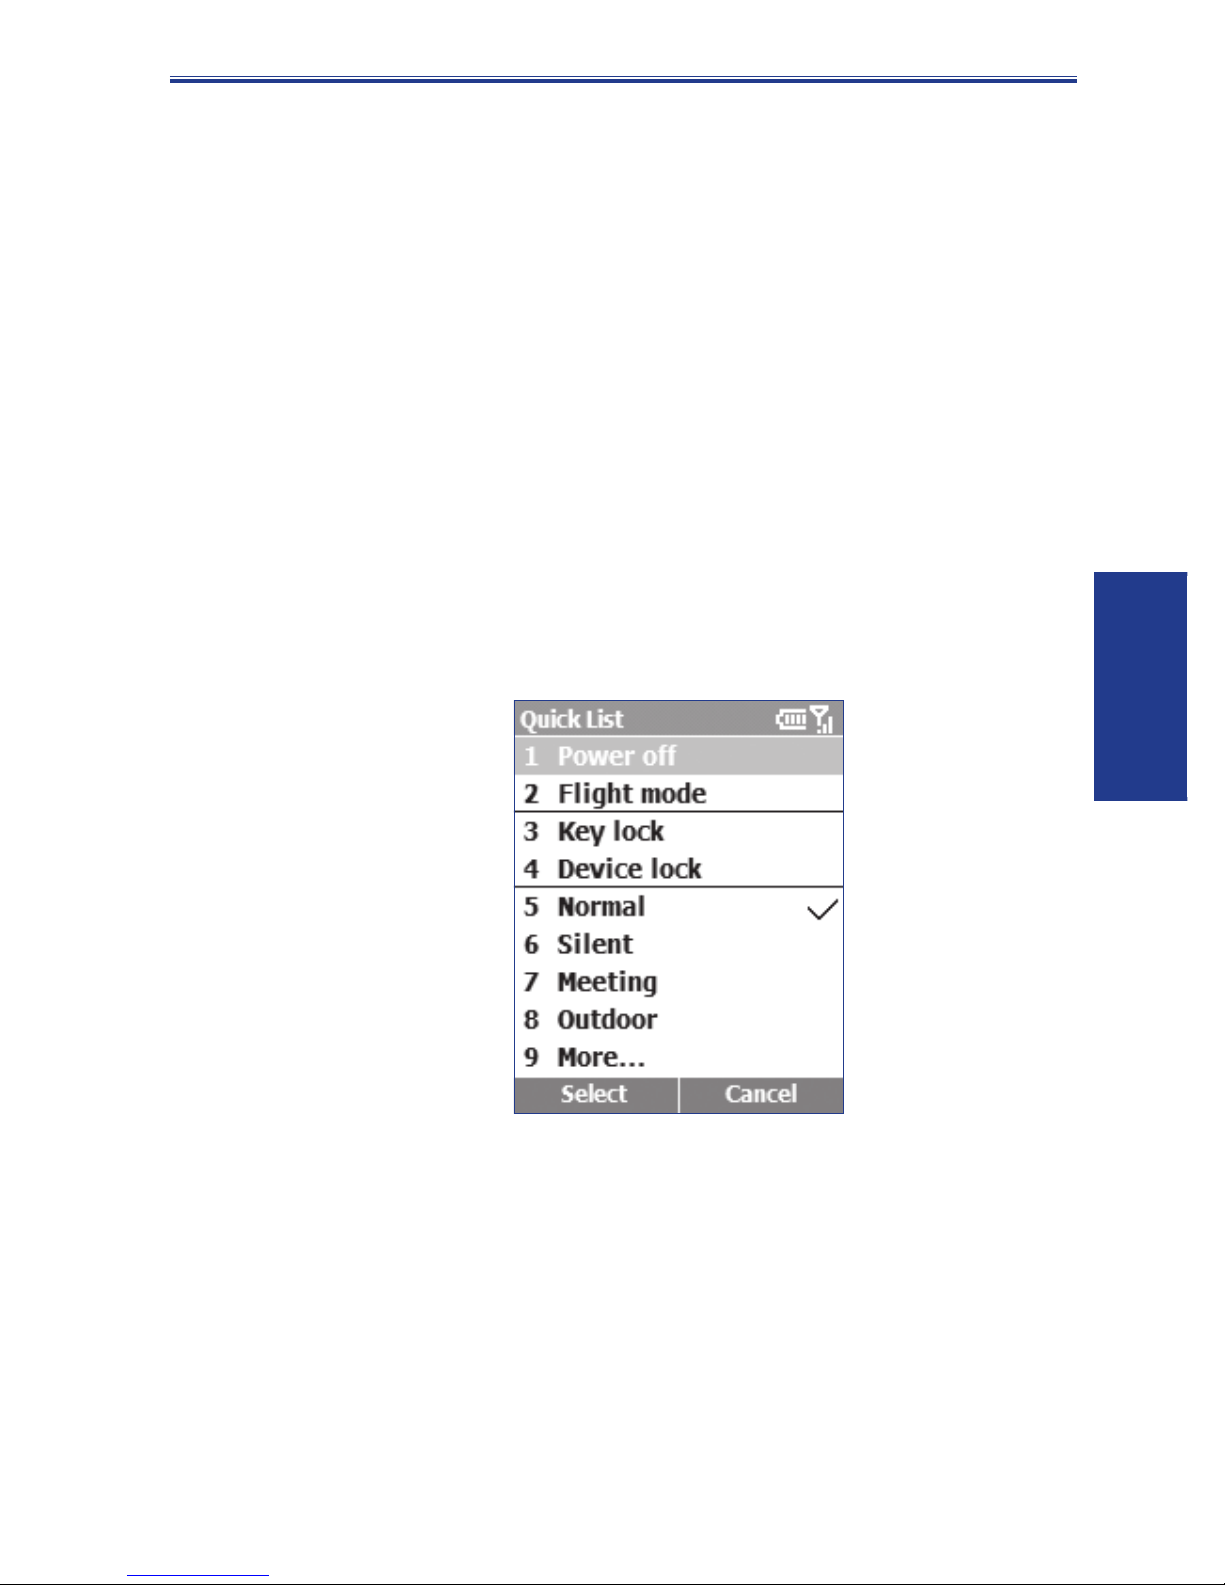
The Quick List
The Quick List offers convenient access to a list of functions,
such as locking your Dopod585, locking the phone's keypad,
enabling/disabling Flight mode, and choosing a different
profi le. (Please see section 4.2 for more details about
profi les.)
To use the Quick List:
1. Press and quickly release the Power button on top of your
Dopod585 to display the Quick List. (Caution: If you press
and hold the Power button too long, your Dopod585 will
power off.)
2. Select the item you want by scrolling to it and then pressing
the Action button, or the related number.
Dopod585 User Manual
1. Getting
Started

26
1.6 Entering text and numbers
Your Dopod585 supports three input modes for entering
text and numbers: Multipress, T9, and Numeric. The
Multipress and T9 modes are used for entering text, and the
Numeric mode is for entering numbers. When you se lect a
fi eld that requires text or numeric entry, your Dopod585 will
auto matically select the ap pro pri ate input mode.
When the cursor is in a fi eld which requires text or number
input, you can switch input modes yourself by holding down
the asterisk (*) key to pop up the menu. Commands on
the menu are Symbols, 123, Abc, and T9 Languages.
Selecting T9 Languages will open a submenu of all the
languages available on your Dopod585 with T9 capability.
One of the following status indicators will display in the Title
Bar to show which input mode is currently active:
Indicator Mode
abc
Abc
ABC
t
9
T
9
T9
123
Multipress text input mode, lowercase
Multipress text input mode, uppercase
Multipress text input mode, caps lock
T9 text input mode, lowercase
T9 text input mode, uppercase
T9 text input mode, caps lock
Numeric input mode
Dopod585 User Manual
1. Getting
Started

27
Multipress mode
When you are in Multipress mode, you can enter a letter by
pressing the number key on which the letter appears. To
enter the fi rst letter on the number key, press the key once,
to enter the second letter, press the key twice quickly, and
so on. The letter entered most recently is underlined until
you have completed the keypresses for the letter and moved
on to the next letter.
For example: To enter the word "hat," press 44, 2, 8.
When you enter letters that are on the same number key,
you must pause after entering the fi rst letter and wait until the
underline disappears before entering the next letter, so your
Dopod585 can process the fi rst letter. This pause is called
the “Multipress time-out,” and you can adjust the length of
the pause between keypresses.
For example: To enter the word "cat," press 222, pause,
press 2, and then press 8. Press the # key to move a
space.
To enter punctuation in Multipress mode, press 1 re peat ed ly
until you see the punctuation mark that you want.
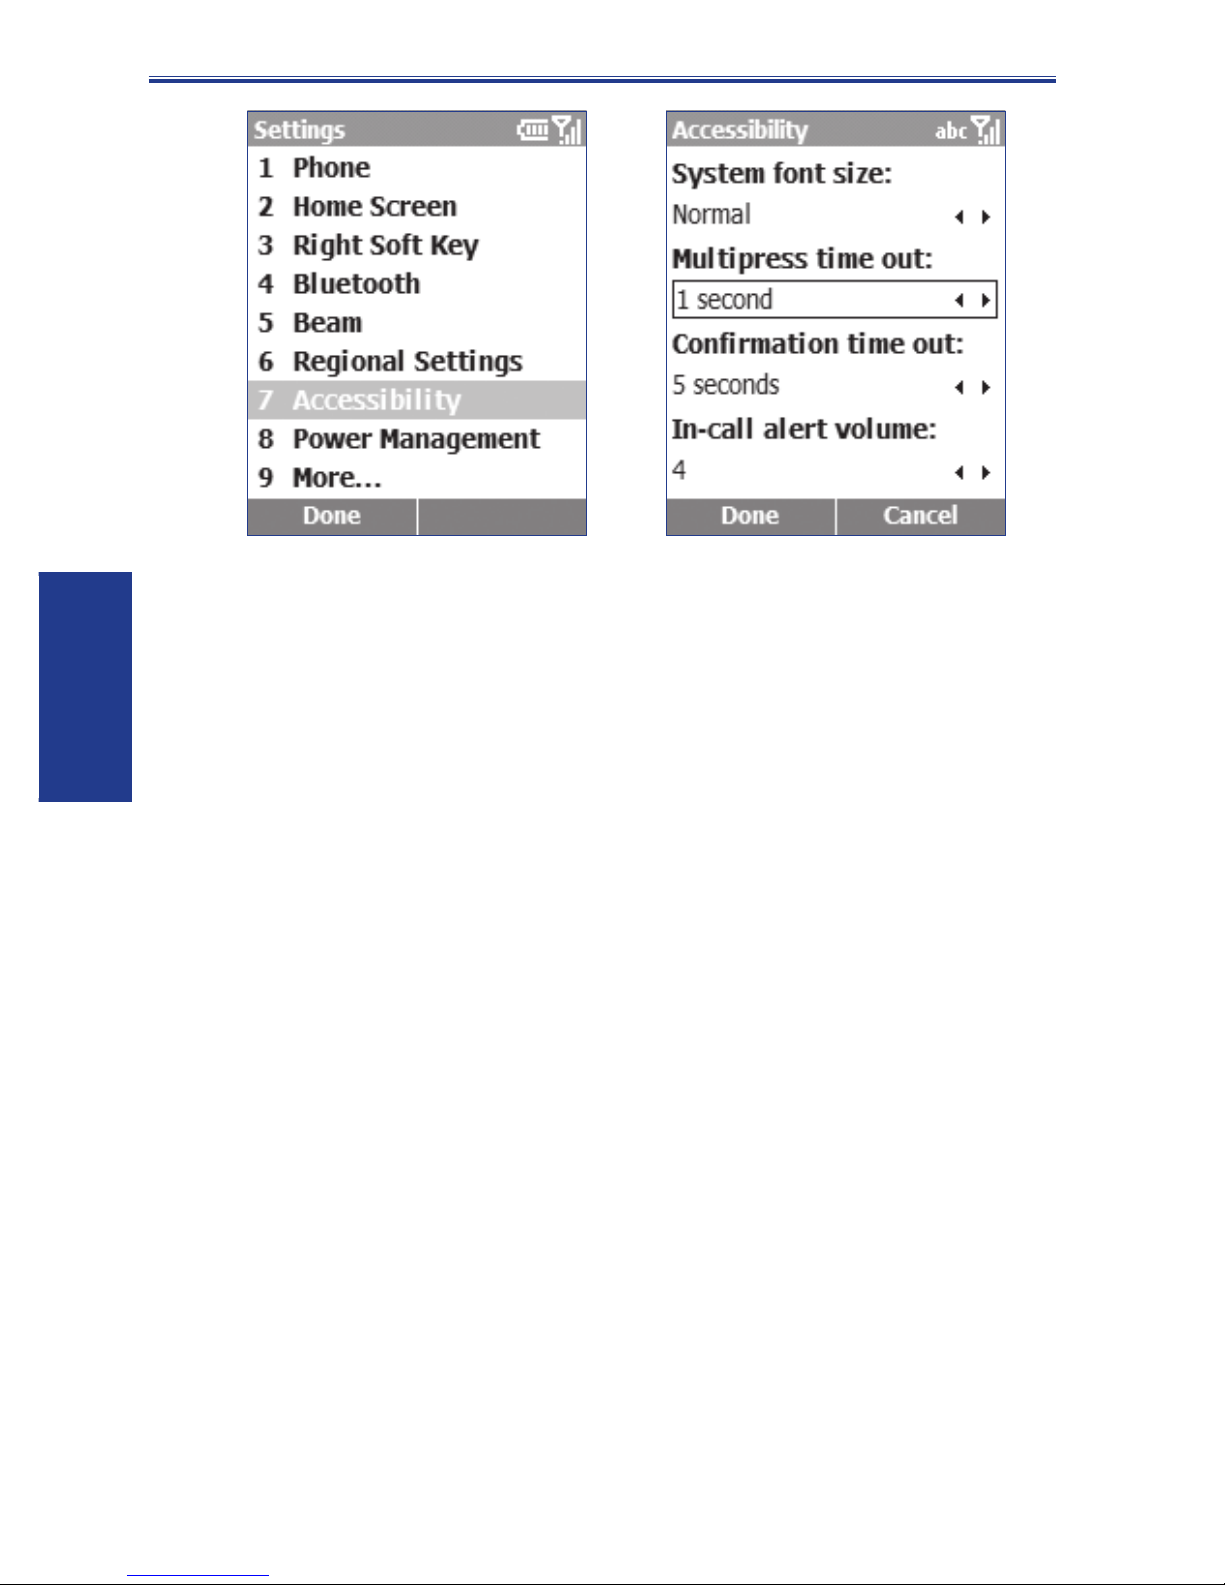
To change the Multipress Time-Out setting:
1. Select Settings from the Start menu.
2. Select Accessibility.
3. In the Multipress time-out fi eld, select the length of the
pause between keypresses that you prefer.
(See illustrations on the next page.)
Dopod585 User Manual
1. Getting
Started
28
T9 mode
When you are in the T9 mode, just press the number keys that
contain the letters that you want to form a word. T9 will then
analyze your keypresses and attempt to complete the word.
For example: To enter the word "shoe," press 7, 4, 6, 3.
To enter text in T9 mode:
1. When in an editable fi eld, press and hold the asterisk (*)
key until the input menu appears. Select the desired T9
language from the menu. The t9 indicator should display
in the Title Bar.
2. Enter letters by pressing the keys on which the letters
appear. Press a key only once for each letter.
3. Press the # key to accept the word and enter a space after
it, or press the Down button on the Navigation Pad to scroll
through the available words; press the Action button to
accept the word choice.
4. Press 1 and then press the Up or Down button on the
Navigation Pad to cycle through common punctuation
symbols.
NOTE: T9 cannot always fi nd the word you want in the T9
dictionary. In these cases, switch to Multipress mode. After
you have entered the word in Multipress mode, the word will
be added to the T9 dictionary.
Dopod585 User Manual
1. Getting
Started

29
Numeric mode
When you are in the Numeric mode, just press the number(s)
you want to enter on the keypad. If a fi eld permits numerical
entry only, such as the Work phone fi eld in Contacts, the
input mode will automatically default to Numeric mode.
Miscellaneous input tasks
• To enter a space: In Multipress or T9 mode, press the #
key.
• To start a new line: Press the Action button.
• To switch between uppercase, lowercase, and caps
lock: Press the * key.
• To enter a symbol: Press and hold the # key, select the
symbol you want, and then press the Done softkey.
• To enter a number, an asterisk (*), or a pound sign
(#): Press and hold the * button on the phone keypad to
pop up a selection list, then select 123 for Numeric mode.
You can then press the desired corresponding key on the
keypad.
• To delete characters: Press the Back button to
backspace over a single character. Press and hold the
Back button to backspace and delete all text in a fi eld.
• To enter the plus (+) sign for international calls: Press
and hold 0.
Dopod585 User Manual
1. Getting
Started

30
1.7 Securing your Dopod585
You can customize the level of security you want to have on
your Dopod585 by locking the SIM card, the keypad, or the
entire phone.
Locking the keypad
The keypad lock turns off the keypad functionality. This is a
helpful feature if, for example, the phone is turned on and in
your pocket, and you want to prevent accidental keypresses
from dialing a number, etc. One way is to select Settings
> Security > Enable Phone Lock from the Start menu.
Another way:
• To lock your keypad: When in the Home screen, press
and hold the End button. The Left Softkey will display
Unlock, indicating that your phone is locked.
• To unlock your keypad: When in the Home screen, press
the Unlock softkey, and press the # key.
Locking the SIM card
Locking your SIM (Subscriber Identity Module) card pre vents
you from us ing your Dopod585, but you can still turn it on
and make emer gen cy calls. When you turn your Dopod585
on, you will be prompted for your PIN1 password, which you
must enter correctly before you can use the phone.
• To lock the SIM: Select Settings > Security > Enable
SIM Lock, and then press the Action button. Enter your
PIN1 password, and then press the Done softkey.
• To unlock the SIM: Select Settings > Security > Disable
SIM Lock, and then press the Action button. Enter your
PIN1 password, and then press the Done softkey.
Dopod585 User Manual
1. Getting
Started

31
Locking your Dopod585
Locking your Dopod585 prevents access to personal
data. When you enable this feature, your Dopod585 will
automatically lock after a specifi ed time of inactivity. A screen
will be displayed requiring your phone lock password before
access is granted. You can still receive calls and make
emergency calls when the phone is locked.
• To lock your Dopod585:
1. Press the Power button and quickly release, to display
the Quick List. Select Device lock, then press the OK
softkey.
2. In the Lock phone after fi eld, select the amount of
time you want your Dopod585 to be inactive before it
automatically locks.
3. In the Password fi eld, enter the password you want
to use, to access your Dopod585 when it is locked.
4. In the Confi rm password fi eld, enter the password
again, then press the Done softkey.
• To unlock your Dopod585: Press the Unlock softkey,
enter your password, then press the Unlock softkey
again.
• To turn off phone lock: Select Settings > Security
> Disable Phone Lock, enter your password, and then
press the Done softkey.
NOTE: If you forget your password, please call your
Customer Care Service Center for information about how
to reset your device and thereby regain access to it. The
procedure will cause your Dopod585 to lose all programs
you had installed, and personal data. However, note that
if you had previously synchronized with a PC, you will be
able to recover the lost programs easily by synchronizing
with it again, after the reset. Therefore it is recommended
that you synchronize periodically, in the event that you ever
need to easily recover your data.
Dopod585 User Manual
1. Getting
Started

32
Dopod585 User Manual
1. Getting
Started

Chapter 2
Using your Dopod585
2.1 Making a call
2.2 Receiving a call
2.3 Contacts and beaming
2.4 Photo Caller ID
2.5 In-call options
2.6 Retrieving a Voice Mail message
2.7 Reviewing your calls
2.8 Speed Dials and Voice Tags
2.9 Advanced dialing information

Dopod585 User Manual
2. Using
your phone
34
2.1 Making a call
There are several ways to make a call on your Dopod585.
Making a call from the Home screen
When in the Home screen, press the numbers on the keypad
to enter the phone number, and then press the Talk button
to make the call. Press the Back button if you need to
backspace over a digit.
As you enter a phone number, your phone searches
Contacts, Call History, Speed Dial lists, and your SIM card,
to fi nd a matching number. Matching names and numbers
will be displayed. When you see the name of the person
you want to call (or the entire number) displayed, select it
and press the Talk button.
In this example, the fi rst few digits of a phone number have
been entered. The names listed in this screen have all been
found to have phone numbers that start with these digits. At
this point, you can select the desired name without having
to enter more numbers.

Dopod585 User Manual
2. Using
your phone
35
Making a call from Contacts
Refer to section 2.3 if you need information about how to
access your Pocket Contacts.
To make a call by Contact name
If there are many contacts listed, you can enter the fi rst few
letters of the desired contact's name to perform a search.
Select the name you want to call, then press the Talk button.
The phone number that has been specifi ed as the default
phone number for that contact entry will be dialed.
To change the default number for a Contact:
Select the contact whose default phone number you want
to change, then press the Right or Left navigational button
to change the default number. The abbreviation at the right
side of the list indicates the default number. For example,
if you change “w” to “m,” the default number changes from
Work phone (w) to Mobile phone (m). A list of abbreviations
and their meanings is included in section 2.3.
To make a call from an open Contact Card:
Select the desired contact, then press the Action button to
display all the information for that contact. Select the number
you want to call, then press the Talk button. (See section
2.3 for an illustration of a Contact Card.)

Dopod585 User Manual
2. Using
your phone
36
Making a call using a recently dialed
number
When in the Home screen, press the Talk button to display
a list of recently-dialed names/numbers. Select the item
you want to dial, then press the Talk button again. Note that
you can also use the menu in this screen to open a Call Info
screen for the selected item.
Making a call from the Call History list
Select Call History from the Start menu. Select the number
or name you want to call, then press the Talk button.
Making a call from a hyperlink
When you see an underlined phone number presented as
a hyperlink in an E-mail message, just scroll to it, and press
the Ac tion button to make the call.
Making emergency calls
Calls to emergency service numbers can be made under
any circumstances, even if you have locked the SIM card
and/or your phone. To place an emergency call, dial the
emergency number appropriate for your location, and press
the Talk button.

Dopod585 User Manual
2. Using
your phone
37
2.2 Receiving a call
When you receive a call, the name and number of the
caller are displayed on the screen. If the name of the
caller is not in your Contacts list, only the caller's phone
number is dis played, as shown in the example below. You
can answer a call by press ing the Talk but ton or the Left
softkey (“Accept”).
If don't want to take the call, press the Right softkey
(“Reject”). Note that selecting Reject will connect the caller
to your voice mail box, if you subscribe to this service. You
can also select Call History from the Start Menu to view a
list of incoming call records.
NOTE: This is the default behavior for incoming calls. See
the section 2.4 if you want a Photo ID (which you have
associated with the caller) to be displayed on your screen
during incoming calls.

Dopod585 User Manual
2. Using
your phone
38
Answering a second call using Call
Waiting
If you are already talking on your Dopod585 when you
receive another call, the Call Waiting screen will appear.
To place the current call on hold and answer the incoming
call, press the Left Softkey (“Accept”) or the Talk button to
simultaneously place the fi rst call on hold and answer the
second call.
If you want to end the fi rst call before answering the incoming
call, press the End button, and then press the Ac cept soft
key or the Talk button to accept the incoming call.
Rejecting a Call Waiting call
If you are talking on your Dopod585 when you receive
another call, and you don't want to answer the incoming
call, press the Right Softkey (“Reject”) in the Call Waiting
screen. This will keep your current call in progress, but will
connect the “call waiting” caller to your voice mail box, if you
sub scribe to this service.

Dopod585 User Manual
2. Using
your phone
39
2.3 Using Contacts and Beaming
You can think of Contacts as an online address book, where
you can store information about people and businesses you
communicate with in contact cards. For example, you can
store multiple phone numbers, E-mail and street ad dress es,
Web pages, birthdays, anniversary dates, etc. You can use
Contacts to dial phone numbers and compose E-mail and
SMS messages directly from a contact card.
The Contact list
The Contacts list displays the names of your contacts
alphabetically, along with an abbreviation for the default
communication method, such as the person's work phone
number (w) or home phone number (h). This makes it easy
to reach the contact using the method you prefer. Note that if
the contact entry includes a work phone number, your phone
will automatically set it as the default number.

Dopod585 User Manual
2. Using
your phone
40
Accessing your Pocket Contacts
When in the Home screen, you can press the Right Softkey
to open the Contacts list directly (if you have not changed
the assignment of the Right Softkey to a different application
using Settings > Right Softkey). A sample Contacts listing
is shown below on the right.
Or, you can select Contacts from the Start menu, or select
the Contacts icon from the “most recently used” icons in the
Home screen, to open the screen shown below on the left,
which contains a list of applications. Then select Contacts
from the list to access Pocket Contacts (shown below on
the right).
NOTE: You can also access your Contacts by selecting
Photo Caller ID in this list, as explained in section 2.4.

Dopod585 User Manual
2. Using
your phone
41
The following table shows some of the abbreviations that might be
displayed in the Contacts list, and their meanings.
Abbreviation Meaning
w Work phone
w2 Second work phone
wfx Work facsimile
h Home phone
h2 Second home phone
m Mobile phone
pgr Pager
car Car phone
txt Text message number
e E-mail address
e2 Second E-mail address
e3 Third E-mail address
web Web page
To call a contact using the default number:
1. Press the Right Softkey (“Contacts”) when in the Home
screen to directly open the Contacts. Or, select Contacts
from the Start menu, then select “Contacts” in the list.
2. Scroll to and highlight the contact you want to call.
3. Press the Talk button. The phone dials the contact's
default phone number. The abbreviation for this number
appears to the right of the contact name.

Dopod585 User Manual
2. Using
your phone
42
NOTE: If you want to change the default number, select the
desired Contact entry and press the Action button. Then
select the number you want to assign as the default, and
select Set as Default from the menu.
To call a contact using a number other than the default
number:
Select the contact in the list, press the Left or Right
navigational buttons to display the abbreviation for the
number you want to use, then press the Talk button.
To fi nd a contact by entering a name:
Begin entering the name of the contact to fi nd until the name
is displayed. For example, to fi nd "Sandra," enter 7, 2, 6,
3, 7, 2 because these numbers correspond to the letters
for that name.
To fi lter contacts:
Select Filter from the menu, then select the category whose
entries you want to display, such as Business, Miscellaneous,
or Personal. Only the contacts assigned to the category you
select are displayed in the list.
To create a new contact:
When the Contacts list is displayed, press the Left Softkey
(“New”), or select New Contact from the menu. After
entering the desired data, press Done.
To delete a contact:
Select the desired entry in the Contacts list, then select
Delete from the menu.
To assign a Photo ID to a contact:
Use the Photo Caller ID application. This is explained in
section 2.4.

Dopod585 User Manual
2. Using
your phone
43
Contact cards
To view a “contact card,” select the desired contact in the
list and press the Action button. A contact card displays all
of the information that you have entered for that contact.
You can use the menu to add it to your Speed Dial, send
a text message, save it to your SIM card, set the selected
number as the default number, beam the Contact, delete
it, or edit it.
To view and edit an existing contact card:
Select the desired entry from the Contact list. Press the
Action button to view the contact card. If you wish to
modify it, press the Left Softkey (“Edit”) or select Edit from
the menu.
To call a contact from a contact card:
Select the desired entry from the Contact list. Press the
Action button to access that contact card. Press the Up or
Down navigational button to select the number you want to
call, then press the Action button to dial that number.

Dopod585 User Manual
2. Using
your phone
44
To send E-mail from a contact card:
1. Select the desired entry from the Contact list.
2. Press the Action button to open the related contact card.
3 Select the E-mail address and press the Action button.
4. Select an account to use, then press the Action button.
5. Enter a subject, compose your message, and then select
Send.
Using contact card menu options
Select the desired contact in the list, then press the Action
button to access the related contact card. Using the menu
accessed from that screen, you can perform the functions
listed below.
Add Speed Dial
Enables you to create a shortcut to a phone number, E-mail
address, or Web URL by assigning one or two numbers as
a speed dial. (See section 2.7.)
Send SMS Message
Enables you to send a short message to the contact
person.
Add Voice Tag
After recording a Voice Tag, it serves as a shortcut to a phone
number, E-mail address, or Web URL when you speak the
Voice Tag. (See section 2.7.)
Save to SIM
Saves the contact to the SIM card.
Set as Default
Makes the selected phone number or E-mail address the
default communication method for the contact.
Beam Contact
Sends the contact card data to another mobile device or a
desktop PC using infrared or Bluetooth (see next page).

Dopod585 User Manual
2. Using
your phone
45
Delete
Removes the contact card from the Contacts list.
Edit
Enables you to modify information in the contact card.
Beaming information
You can use the Bluetooth or infrared port on your Dopod585
phone to send and receive (beam) contact information
between your Dopod585 and another mobile de vice or a PC
that has Bluetooth or an infrared port and supports vCards
and vCal. However, you cannot beam SIM con tacts. See
Chapter 5 for more information about Bluetooth.
To beam a contact:
1. Press the Right Softkey (“Contacts”) when in the Home
screen to directly open the Contacts. Or, select Contacts
from the Start menu, then select “Contacts” in the list.
2. Select the Contact entry you want to beam.
3. Select Beam Contact from the menu in the Contacts
screen.
4. Scroll to the device to which you want to beam.
5. Do one of the following:
• To beam by infrared, make sure that the infrared
ports are unobstructed and within close range of each
other.
• To beam by using Bluetooth, make sure that both
Bluetooth radios are turned on and that Bluetooth is
discoverable on the receiving device.
6. Press the Left Softkey (“Beam”).
Status information will then be displayed, indicating the
name of the de vice to which your Dopod585 is beaming,
and wheth er the beaming process is pending, fi nished, or
has failed.

Dopod585 User Manual
2. Using
your phone
46
To receive beamed information:
1. Select Settings from the Start menu.
2. In the Settings screen, select Beam.
3. Select the Receive incoming beams checkbox so that
the checkbox is checked.
4. Do one of the following:
• To receive by infrared, align the infrared ports so that
they are unobstructed and within close range of each
other.
• To receive by using Bluetooth, make sure your
Bluetooth radio is turned on and in discoverable
mode.
5. Select Done. Your Dopod585 is now capable of receiving
beams (until you clear the Receive incoming beams
checkbox).
NOTE: Your Dopod585 can receive beamed fi les of any
type, but you may need to copy some fi les to your PC for
viewing.
SIM contacts
SIM contacts are stored on your SIM card. When you insert
your SIM card into a different device, you can view and
use the SIM contact information on the new device. Unlike
regular contact cards, you can store only one phone num ber
for each SIM contact.
To create a new SIM contact:
1. Press the Right Softkey (“Contacts”) when in the Home
screen to directly open the Contacts. Or, select Contacts
from the Start menu, then select “Contacts” in the list.
2. Open the menu and select New SIM Contact.
3. Enter the Name and Number, then select Done.
The new contact appears in your contact list. A SIM icon will
display to the right of the name, indicating that the contact
is stored on your SIM card.

Dopod585 User Manual
2. Using
your phone
47
2.4 Photo Caller ID
Photo Caller ID is an application that adds more fun to using
your Dopod585. It allows you to assign photos or animated
GIF fi les to the entries in your Contacts. Then when a
person calls you (for whom you have previously assigned
a photo ID), that photo ID will appear on your Dopod585’s
incoming call screen.
You can also perform maintenance on the Contacts, even
create new Contacts and Groups and assign members to
the Groups, right from within Photo Caller ID.
Photo Caller ID does not run automatically when you turn
on your Dopod585. You must invoke it after your Dopod585
is turned on.
Starting the Photo Caller ID program
To invoke Photo Caller ID, select Contacts from the Start
menu to open the Contacts screen, then select Photo Caller
ID from the choices in that screen.

Dopod585 User Manual
2. Using
your phone
48
The Caller ID screen will then open, and all of your Contacts
will be listed. An icon should display in the Title Bar to
indicate that the “Caller ID monitor” is running, meaning that
Photo IDs (if assigned) will display when incoming calls are
received. (Section 1.2 of Chapter 1 illustrates the Photo
Caller ID monitor “On” and “Off” icons.)
NOTE: Even if Photo Caller ID is not running, you can
still use Caller ID to assign photos and manage contacts
and groups. The photos will display within your Contacts
application, but incoming calls will not be able to display
the Photo IDs you assigned. (To disable Photo Caller ID
manually, use Options > General as mentioned later in
this section.)
Main List View and Detailed View
When you start the Photo Caller ID application, the main
List View will display as shown in the example on the next
page. The Contacts entries fully mirror those in your Pocket
Contacts. Any changes you make to your Contacts data
using Photo Caller ID will simultaneously be made in your
Pocket Contacts.
In the example on the next page, a Photo ID has already
been assigned to the selected Contact entry. The icon at
the rightmost side of each Contact indicates whether the
Contact resides in your phone’s local memory or on the SIM
card. If a Photo ID has been assigned, an additional icon
will indicate such.

Dopod585 User Manual
2. Using
your phone
49
Main (List) View Detailed View
To switch to Detailed View, press the Action button. All data
that has been entered for the selected Contact will be listed.
To switch back to List View, select Cancel from the menu.
Menu Commands
The menu in Detailed View lets you display the Next or
Previous contact entry; Edit or Delete the current contact;
and Assign or Unassign a photo ID to it.
The menu in the main List View contains the following
commands:
New
Opens a standard screen in which you can enter data and
create a new entry in your Pocket Contacts.
Delete
Select the entry you want to delete, then select Delete. A
message will remind you that if you delete this entry using
Photo Caller ID, it will also be deleted in your Dopod585’s
Contacts.

Dopod585 User Manual
2. Using
your phone
50
Reset Filter
This command is enabled after you have performed any
manual fi ltering of entries using your Dopod585’s keypad.
For example, if you have pressed the keys for “j,” “a,” “c,” and
“k” to list only the entries containing the string “jack,” you can
select Reset Filter, or press the * shortcut key, to reset the
main view so that all entries are once again listed. (NOTE:
This command does not affect any fi ltering you may have
done using the Filter command explained below.)
Manage Group
This command provides a convenient interface that lets you
perform complete management of your contacts groups.
Initially, it opens the Manage Group screen, which lists
all currently existing groups and the number of members
assigned to each group, as well as the Photo ID assigned
to the selected group (if any).
Press the Right Softkey in the Manage Group screen to open
the menu, which lets you create New groups, Rename or
Delete groups, Assign Members to groups, Assign Photo
or Unassign Photo, and Preview the behavior of an already-
assigned photo and/or template.
The Assign Photo, Unassign Photo, and Preview
commands in the Manage Group screen operate the same
as those for assigning individual Photo IDs, as explained
later in “Assigning a Photo ID to a Contact.” Note that a
Photo ID assigned to a group will display during an incoming
call only if no individual Photo ID has been assigned to the
caller. The individually-assigned Photo ID has precedence
over the group-assigned Photo ID.
Filter
This command opens a submenu that lets you control
which category of items are listed on the screen: SIM
Only, Contacts Only, and Group. By default, No Filter
is active.

Dopod585 User Manual
2. Using
your phone
51
Assign Photo
Explained later in “Assigning a Photo ID to a Contact.”
Preview
This command is available if a Photo ID is currently assigned
to the selected Contact entry. First, select a Contact entry in
the list that already has a photo assigned to it. Then select
Preview, or press the # button on your phone keypad.
Options
Selecting Options opens a submenu that contains three
commands: Set Default Photos, Display Settings, and
General.
Set Default Photos — Opens a screen that lets you assign,
change, or unassign default Photo IDs for Unknown Photo,
Not-found Photo, and general Default Photo, as follows:
Unknown Photo: This photo will display whenever the
phone number of the incoming call is not known to Photo
Caller ID because no phone number was “passed in” to
your Dopod585. This would occur if the person calling
you has blocked their phone number from being displayed
to the receiver, or has not enabled the broadcast of their
Caller ID.
Not-found Photo: This option in the Set Default Photos
screen lets you assign a generic Photo ID to any incoming
call from a person whose number is not found in your
Contacts. That is, the phone number of the incoming call is
known, but has no matching entry in your Contacts.
Default Photo: This photo will display when the incoming
call is found to be from a matching entry in your Contacts
database, but so far there is no user-assigned Photo ID
for either that individual Contact entry, or for the Group it
belongs to.

Dopod585 User Manual
2. Using
your phone
52
Display Settings — Selecting this from the Options
submenu opens the Display Settings screen, which allows
you to specify whether the Photo ID should consist of only a
photo (Use Photo Only), or a photo merged with a template
(Use Template). Options available in this screen will depend
on which of these is active in the Display Style fi eld. This
screen is illustrated in the next subsection (“Assigning a
Photo ID to a Contact”).
General — Opens a screen that contains two options:
Storage Path for Re-sized Photos: Every time you
use Assign Photo to assign a photo, Photo Caller ID
will automatically copy and re-size the original photo fi le.
You can then delete the original fi le, if you wish to save
valuable storage space in the phone. The Storage Path
for Resized Photos fi eld allows you to specify whether
you want these re-sized photos to be saved to your phone
or to your Storage Card.
Display Photo During Incoming or Waiting Call: Active
by default. If you uncheck this checkbox and then select
“Done,” Photo Caller ID will be disabled. The phone
will recover its original background image for incoming
calls, and the Incoming Call monitor will be unloaded from
memory. No photos will display when the checkbox is not
checked.
Assigning a Photo ID to a Contact
The Assign Photo command lets you assign an image fi le
or animated GIF fi le (“Photo ID”) to an individual Contact
entry stored in your Pocket Contacts, or Phonebook entry
on the SIM card. You can also specify a size, and a position
for the Photo ID.
And, to add more fun and a stronger visual impact to your
incoming calls, you can assign an animated “template ID,”
which will serve as a frame around the image, if desired.
Templates are animated GIF fi les, and are available in both

Dopod585 User Manual
2. Using
your phone
53
Portrait and Landscape orientation. You can choose to
display the Photo ID only, or the Photo ID together with a
template ID, and easily change Photo IDs and/or Template
IDs at any time.
NOTE: The steps in this subsection are for the Assign
Photo command on the main menu (individual Contact
assignment), but this same basic procedure can also be
followed when:
• Assigning a Photo ID to a Group (using the Assign Photo
command on the menu in the Manage Group screen).
• Assigning “Unknown Photo,” “Not-found Photo,” and
“Default Photo” (using the Assign Photo command on
the menu in the Set Default Photos screen).
• Assigning an individual Photo ID using the Assign Photo
command on the menu accessed when in Detailed
View.
First, make sure the photo you want to use is either a JPEG,
BMP, or GIF fi le (either still or animated GIF). By default, the
\\Storage\My Documents folder is searched for these fi le
types. If the fi le you want to use is located somewhere else,
you can optionally search other folders in Step 2 below.
1. In the main Caller ID screen, select the desired Contact
in the list.
2. Select Assign Photo from the menu, or simply press the
Left Softkey. The fi rst Assign Photo screen will appear.
In it, your JPEG, BMP, and GIF fi les will be displayed as
thumbnails. (If you want to search other folders, open the
menu and use the Change Folder command.)

Dopod585 User Manual
2. Using
your phone
54
Optional: If desired, you can use Photo Caller ID’s New
from Camera command to take a new picture and then
assign it as a Photo ID right away. Open the menu in this
Assign Photo screen and select New from Camera. This
switches to the Camera mode. After taking a new photo,
you will be returned to Photo Caller ID so you can assign
the new photo as a Photo ID.
3. Select the fi le you want to use as the Photo ID.
4. Press the Left Softkey (“Next”). A Preview screen
opens.
If Use Template is active in the Display Settings screen, the
photo is previewed in a template when you press “Next.”
You can use the menu in this Preview screen to preview the
Next Template or Previous Template, or press the Right
or Left navigational buttons to do so.
If Use Photo Only happens to be active in the Display
Settings screen as shown below, the photo alone is
previewed according to the current Position setting in
Display Settings.

Dopod585 User Manual
2. Using
your phone
55
5. If this Preview screen already shows the setup you want,
press the Left Softkey (“Done”).
Or, to access various setup options, press the Right
Softkey to open the menu.
Select Display Settings from the menu if you want to
switch to either Photo Only assignment or Use Template
assignment. If you choose Use Photo Only, you can specify
one of several positions, and a size. If you choose Use
Template, you can specify the template to be used, and the
method for fi tting the photo on the Incoming Call screen.
You can also open the Display Settings screen outside
of the “Assign Photo” process by selecting Options >
Display Settings from the main menu in List View, and
you can preview the behavior of any Photo ID assignment
by selecting Preview.

Dopod585 User Manual
2. Using
your phone
56
2.5 In-call options
Listed below are the menu options that might possibly be
available when a call is in progress. Some of these options
are only avail able when multiple calls are in progress or
during a con fer ence call.
End — Disconnect the call.
Hold — Place the active call on hold.
Unhold — Activate the call on hold.
Swap — Switch between two calls.
Save Contacts — Create a Contact record for the caller.
Conference — Join together all existing calls, if you have
subscribed to this service.
Private — Break one call out of a conference and make this
call active while the rest of the conference is on hold.
Speakerphone — Increase the volume of the earphone.
Mute — Mute the microphone for the active call. The other
party will not hear anything you say, but you can still hear
the other party.
Unmute — Turn the microphone back on for the active
call.
2.6
Retrieving a voice mail message
On the Home screen, press and hold 1 to call your
voice mailbox, and follow the prompts to retrieve your
mes sag es.
NOTE: This is actually a Speed Dial (see section 2.8).
Speed Dial 1 is reserved for voice mail access and the
number is confi g ured in your settings.

Dopod585 User Manual
2. Using
your phone
57
2.7 Reviewing your calls
Using Call History and Call Timers, you can view
in for ma tion about phone calls that you have made and
received. For example, you can see who has called you
recently and fi nd out how much time you have spent talking
on your Dopod585.
Call History
Call History displays the last 36 calls that you have made,
received, and missed. Each entry in Call History contains
the start time of the call, the duration, the caller's name,
if available, and the caller's number. The oldest calls are
automatically deleted from the list to make room for the
new est calls.
To view your Call History, select Call History from the
Start menu. If desired, you can then fi lter the list so that
only Missed Calls, Incoming Calls, or Outgoing Calls are
listed. Simply open the menu in the Call History screen,
select Filter, and then select the desired category from the
submenu.
Other commands on the menu in the Call History screen
besides Filter:
Find Contact — Lets you view Contact information related
to the selected entry.
E-mail — Select the entry in the Call History list to whom
you want to send E-mail, then select E-mail on the menu.
You will be switched to the Messaging screen.
View Timers — Opens the Call Timers screen. See the
subsection below for details.

Dopod585 User Manual
2. Using
your phone
58
Delete — Removes the selected item from the list.
Delete List — Removes all items in Call History.
Save to Contacts — Creates a new Contact entry using the
info related to the selected item in Call History.
Call Timers
To access the Call Timers screen, select Call History from
the Start menu, then open the menu in the Call History screen
and select View Timers.
Call Timers gives you detailed information regarding the
length of your last call, the total number of calls made and
re ceived, calls by type (incoming, outgoing, roaming, and
data), and a lifetime counter.
Call Timers is useful for keep ing track of your calling pat terns,
for example to determine what type of calling plan you want.
It can also help you estimate your monthly billing. You can
reset Call Timers to zero (0), for example to start timing calls
for a new monthly billing cycle.

Dopod585 User Manual
2. Using
your phone
59
2.8 Speed Dials and Voice Tags
You can create “Speed Dials” for frequently-called phone
numbers by simply pressing and holding one or two keys.
You may choose Speed Dial entries from 2-99. Speed
Dial 1 is reserved for voice mail access, and the number is
confi g ured in your settings.
You can create a Speed Dial for a phone number, a program
on the Start menu, an E-mail address, or Web page address
(URL) that is stored in Contacts.
Speed Dials
Creating a Speed Dial for a contact phone number
1. In the Home screen, select Contacts from the Start
menu, then select Contacts from the list of applications.
(This screen was illustrated near the beginning of section
2.3.)
2. Select the desired Contact entry and then press the Action
button to access its Contact card. All data entered for that
Contact will be listed.
3. Select the phone number for which you want to assign a
Speed Dial.
4. Press the Right Softkey to open the menu and select Add
Speed Dial.
5. In the Keypad Assignment fi eld of the Add Speed Dial
screen, select the number you want to assign as the Speed
Dial. Press the Left or Right navigational button to select,
or press the Action button to view the full list of choices.
Note: You can also use the Voice Tag fi eld in the Add
Speed Dial screen if you want to assign a Voice Tag (see
next subsection).
6. Press the Left Softkey (“Done”) to save the new Speed
Dial.

Dopod585 User Manual
2. Using
your phone
60
For URLs and E-mail addresses
You can also create Speed Dials for URLs (Web addresses)
and E-mail addresses that are stored in Contacts. In Step 3
above, just select the desired E-Mail address or URL address
(instead of a phone number).
Making a call using a Speed Dial
When in the Home screen, press and hold the number on the
keypad that you have assigned as a Speed Dial for a num ber.
If the Speed Dial number consists of two digits, press the fi rst
digit and then press and hold the second digit.
Viewing Speed Dials you have created
Select Contacts from the Start menu to open the screen
shown at the beginning of section 2.4, then select Speed
Dial from the list of applications in that screen. All Speed
Dial entries will be listed. In addition, you can use the menu
in this screen to perform the following:
Run — Invokes the contact method associated with the
selected Speed Dial (dials a number, starts Internet Explorer,
or invokes Messaging). You can perform this same function
by pressing the Left Softkey (“Go”).
Find Contact — Opens the Contact card associated with
the selected Speed Dial.
Delete — Deletes the selected Speed Dial entry from the
list.
Filter — Lets you fi lter the list to display only the Speed Dial
items or only the Voice Tag items.

Dopod585 User Manual
2. Using
your phone
61
Voice Tags
You can record a voice tag (“Speed Dial Voice Recognition”)
for a phone number, E-mail address, or Web page address
that is stored in your Contacts. Then, when you verbally
speak the voice tag, your Dopod585 automatically dials
the associated phone number, opens an E-mail message
using the associated address, or goes to the associated
Web page.
Creating a Voice Tag for a phone number, E-mail
address, or URL in your Contacts
1. In the Home screen, select Contacts from the Start
menu, then select Contacts from the list of applications.
(This screen was illustrated near the beginning of section
2.3.)
2. Select the desired Contact entry, then press the Action
button to access the related Contact card. All data entered
for that Contact will be listed.
3. Select the phone number, E-mail address, or Web page
address for which you want to assign a Voice Tag.
4. Press the Right Softkey to open the menu, and select Add
Voice Tag.
5. After the message/beep, begin recording the voice tag
(preferably one easy-to-recognize word).
6. Your Dopod585 will automatically play back the voice tag.
If successful, a message will indicate such. Select OK to
close the message screen.
7. The Add Speed Dial screen will display. It displays,
and allows you to edit, the Name, Value, and Keypad
Assignment. Press the Left Softkey (“Done”) when ready
to save the new voice tag.
To use the voice tag, press and hold the Volume Down
button on the left side of your Dopod585 for three seconds
in the Home screen, to invoke the recording function. Say
the word that you recorded as a voice tag. Your Dopod585
plays back the voice tag and then dials the associated
phone number; or opens a new E-mail message; or goes
to the associated Web page (whichever you chose prior to
creating it in Step 3 above).

Dopod585 User Manual
2. Using
your phone
62
Creating a Voice Tag for an application
You can also associate a voice tag with an application. For
example, to build a voice tag for the Calendar application,
do as follows:
1. In the Home screen, press the Left Softkey (“Start”) to
open the Start menu.
2. In the Start menu, highlight Calendar in the menu.
3. Press the Right Softkey to open the menu and select Add
Voice Tag.
4. After the message/beep, say “Calendar.”
5. Your Dopod585 will automatically play back the voice tag.
If successful, a message will indicate such. Select OK to
close the message screen.
6. The Add Speed Dial screen will display. It displays,
and allows you to edit, the Name, Value, and Keypad
Assignment. Press the Left Softkey (“Done”) when ready
to save the new voice tag.
Then, in the future, you can invoke the Calendar
application by holding the recording button in the Home
screen and then saying “Calendar” after the beep. The
system will repeat the voice tag “Calendar” to indicate that
it recognized the word, and will then launch Calendar. If
the phone misinterprets the word, press the End softkey
and start over, making sure to speak the word clearly and
closely into your Dopod585’s microphone.

Dopod585 User Manual
2. Using
your phone
63
2.9 Advanced dialing information
The following information covers advanced dialing options
that may be useful for phone numbers requiring special
dialing instructions.
Inserting an international country code
International calls require a country code to be included in the
phone number. A plus sign (+) must appear fi rst, followed by
the country code and the rest of the phone number. To enter
the plus sign, press and hold 0 until + ap pears.
Inserting a three-second pause in a
dialing sequence
Some international calls require a three-second pause in the
dialing sequence in order for the call to process successfully.
To insert a pause:
1. In the Home screen, select Contacts from the Start menu,
then select Contacts from the list of applications.
2. Select the Contact entry that contains the phone number
in which you want to insert a pause, then press the Action
button to access the Contact card for that entry.
3. Press the Left Softkey (“Edit”), or select Edit from the
menu.
4. In the Edit Contact screen, select the specifi c phone
number in which you want to insert the pause. Then
press the Left or Right navigational buttons to position
the cursor within the number where you want to insert a
three-second pause.
5. Open the menu and select Insert Pause. The letter "p" will
appear in the number for your reference, to show where the
three-second pause will occur in the dialing sequence.
6. Press the Left Softkey (“Done”).

Dopod585 User Manual
2. Using
your phone
64
Inserting a manual pause in a dialing
sequence
There may be phone numbers that require a pause longer
than three seconds in the dialing sequence. For these cas es,
you can pause as long as you want, and manually continue
the dialing sequence using the Talk button.
Follow the same steps outlined above in “Inserting a threesecond pause in a dialing sequence,” except in Step 5, select
Insert Wait from the menu. The letter “w” will appear in
the number for your reference, to show where the indefi nite
pause will occur in the dialing sequence. Don’t forget that
when you call a number containing a “manual pause,” you
will need to press the Talk button to continue dialing.

Chapter 3
Using Your Camera
3.1 Camera Mode
3.2 Album Mode

Dopod585 User Manual
3.
Using your
camera
66
3.1 Camera Mode
When in Photo capture mode, you can capture standard still
images. In Picture Theme capture mode, you can place
your captured images into attractive frames (templates).
Use Photo ID capture mode to capture an image that you
want to assign to one of your Contacts as a Photo ID. Or,
switch to Video or MMS Video capture mode and capture
“live” video streams (with audio if desired), then share them
with others. You can even send the captured fi les via E-mail,
MMS, Bluetooth, or infrared beaming.
Invoking Camera mode
Use any of these methods to switch to Camera mode on
your Dopod585:
• Press the Camera button on the right side of your
Dopod585. The live incoming video stream will be shown
on your screen. If you have not yet started the Camera
application, the Photo capture mode will be active by
default. If you previously started the Camera in the current
session, the most recently used capture mode will be
active.
•
Select Camera from the Start Menu, or select Album and
then press the Left Softkey (“Camera”).
• By default, the Camera icon is one of the fi ve icons in
the “recently used programs” bar at the top of the Home
screen. Select the icon and press the Action button.
Choosing a Capture submode
When in Camera mode, select Capture Mode from the main
menu, and then select either Photo, Video, MMS Video,
Photo ID, or Picture Theme from the submenu.
NOTE: Newly-captured video fi les are placed in your \My
Documents folder by default. However, the fi rst time you
capture a new still image, a new My Photos folder will be
created under \My Documents, and the new image fi le will
be placed there.

Dopod585 User Manual
3.
Using your
camera
67
Capturing a still image
Switch to Photo capture mode. When in Photo capture
mode, the word “Photo” is shown in the Title Bar, as shown
in the fi gure below.
The current capture size (resolution) dimensions are shown
at the upper left of the screen. Press 2 on your keypad to
switch to the other resolutions available, or use the menu
as explained later. Press the navigation pad up if you want
to Zoom In, or down to Zoom back out. The current Zoom
ratio is shown near the lower left of the screen. (See the
“Zooming In and Out” section for a complete list of capture
sizes and related zoom capability.)
Besides specifying a capture size, you can also specify the
destination storage media for saved fi les, rename them after
capturing them, and an output quality (the output format
for image capture is JPEG). The number of images you
can still capture, according to available memory and your
current settings, is always displayed near the upper right
of the screen.
To capture the image, press the hardware Camera button
on the right side of your Dopod585, or the Left Softkey
(“Capture”), or the Action button.

Dopod585 User Manual
3.
Using your
camera
68
Capturing a video using Video mode
Switch to Video capture mode as explained earlier. When
in Video capture mode, the word “Video” will be shown in
the Title Bar.
The Capture Size dimensions are shown near the upper left
of the screen. Press 2 on your keypad to select the size
(176 x 144, or 128 x 96). Press the navigation pad Up if you
want to zoom in, or Down to zoom back out.
To specify the output format, select Options from the menu
and then Modes (or, select Manage from the Capture Mode
submenu). In the Encoder fi eld, select either MPEG-4,
H.263, or Motion-JPEG AVI. Also in this screen, you can
set a limit to the video fi le size, if desired.
Select Options > Video to specify whether or not to capture audio to accompany the video clip, and to change the
default fi lenaming convention if desired. As a shortcut, you
can press the 6 button on your phone keypad to toggle
audio-capture capability On and Off. An icon resembling a
microphone in the lower right of the Video Capture screen
indicates whether audio capture is enabled or disabled.
When Off, a diagonal line is drawn through the icon, as
shown below.
Audio recording enabled Audio recording disabled
The amount of time available for your next video capture,
according to available memory and your current settings, is
always displayed near the upper right of the screen.
To begin capturing a video clip, press the Camera button
on the right side of your Dopod585, or the Left Softkey
(“Capture”), or the Action button. Press any of them again to
stop recording. If a limit has been set for the video fi le size,
recording will stop automatically when the limit is reached.

Dopod585 User Manual
3.
Using your
camera
69
Capturing a video using MMS Video
mode
Switch to MMS Video capture mode. The usage, method of
capturing, and options for MMS Video capture mode are the
same as for Video capture mode, except for the following:
Whereas the Video capture mode allows you to set any fi le
size limitation, MMS Video mode is permanently set to a
fi le size limitation of 95 KB. When the video currently being
recorded reaches a fi le size of 95 KB, the recording process
will automatically stop.
In addition, when in MMS Video mode, there are only two
choices for Encoder type: MPEG-4, and H.263. Typically,
it is recommended that you use H.263 for video fi les to be
sent as MMS attachments.
Using Photo ID mode
The Photo ID capture mode captures a still image in the
same way as Photo capture mode, but captures at a size
(176 x 180) which is convenient to use directly as a Photo
ID for one of your contacts.
Immediately after capturing an image using Photo ID capture mode, you can select Save As > Caller ID Photo from
the menu in the Review screen (shown later in the section
entitled The Review screen) to invoke the Photo Caller ID
application.
In Photo Caller ID, all entries in your Pocket Contacts will
be listed. Select the Contact to which you want to assign
the image you just captured. Then press the Left Softkey
(“Next”) and then again (“Done”) to assign the photo. After
that, you will be returned to the Capture screen of Camera
mode automatically.

Dopod585 User Manual
3.
Using your
camera
70
Using Picture Theme mode to frame your
captured photos
The Picture Theme capture mode lets you place your captured images into selected frames.
When in Camera mode, select Capture Mode > Picture
Theme from the menu, or press 1 on your keypad until
Picture Theme is the active capture mode.
When you switch to Picture Theme, one of your templates
in the \My Documents\Frames folder will be loaded. To
load a different template, press the navigation pad Left or
Right; or select Select Template from the menu to browse
and preview each template. The fi le name, dimensions, and
number of images required for that template will be displayed
in the Select Template screen, as shown below on the left.
The fi gure on the right below shows the Picture Theme capture mode, ready to capture an image. The incoming video
stream is previewed in the “place holder” where the captured
image will be placed (in this example, it’s the place holder on
the left). Note that “(1/2)” is displayed in the lower right of
the screen. This indicates that the next image captured will
be the fi rst one; no images have been captured yet.

Dopod585 User Manual
3.
Using your
camera
71
In templates that require two or more images, the focus
switches to another “place holder” after the fi rst one is
fi lled.
To capture an image, press the Camera button on the right
side of your Dopod585, the Left Softkey (“Capture”), or the
Action button. The image will be saved with the frame.
Zoom capability is determined by the currently loaded
template, as shown later in the table in the “Zooming in and
out” section.
The Review screen
If the Review after capture checkbox is checked in the Options > General screen (it is checked by default), a “Review”
screen will appear immediately after you have captured a
fi le using any of the fi ve capture submodes.
In the example below, a video fi le has just been captured, so
the fi rst frame of the video fi le is shown in the Review screen.
Pressing the Right Softkey will open the menu illustrated.

Dopod585 User Manual
3.
Using your
camera
72
In the previous fi gure, the Title Bar indicates Zoom mode.
This means you can press the Up and Down buttons to
Zoom In and Out.
Or, when in Zoom mode, you can press the Action button
to switch to Pan mode. If the image is too large to fi t in the
display area, you can press the Up, Down, Left, or Right
buttons to pan the image to the desired position.
Commands on the menu in the Review screen vary according
to the type of captured fi le, as follows:
Play — This command is available on the menu only if the
newly-captured fi le is a video fi le. A Progress Bar at the bottom of the screen will indicate progress of the playback.
Send — via E-mail, via MMS, or via Bluetooth/Infrared
beaming:
If the newly-captured fi le is a video fi le in Motion-JPEG AVI
or MPEG-4 format, the Send submenu contains the via
E-mail command, which invokes a new Compose E-mail
screen with the fi le already attached. If the new fi le is a
video in H.263 format, or if it is a still image (Photo, Photo
ID, Picture Theme), both via E-mail and via MMS are available on this submenu. (The MMS Composer application is
explained in Chapter 6.)
Finally, the Beam File command on the Send submenu lets
you beam the fi le using either Infrared or Bluetooth. After
you select Beam File, align your Dopod585 phone’s port with
the port of the other device. When a device is detected, the
device name will be displayed on the screen. If an Infrared
device is detected, the fi le will be beamed directly. If a
Bluetooth device is detected, press the Left Softkey (“Beam”)
to start beaming.

Dopod585 User Manual
3.
Using your
camera
73
File — This submenu lets you:
• Delete (if you decide you don’t want to keep the fi le)
• Move to (select the folder where you want to move it to)
• Copy to (select the folder where you want to copy it to)
• Rename (keep the fi le and change its name)
Save As — If the newly-captured fi le is a video, this submenu
lets you save the fi rst frame of the video as your Home
Screen image, and also contains a command to Restore
Home Screen if you want to re-set to the original Home
screen. In addition to the above two commands, if the fi le is
a still image, the Caller ID Photo command will be available.
This invokes the Photo Caller ID application (as explained
in the previous chapter) and lets you assign the image as a
Photo ID to an entry in your Pocket Contacts.
Back — Keeps the fi le with its default fi lename, and returns
to the Capture screen, ready to do more captures.
Album — Switches to the Thumbnail View of Album mode,
where you can view, organize, and manipulate the fi les.
Zooming in and out
When in one of the fi ve capture modes, you can press the
Up/Down button to Zoom In/Out. However, Zoom capability
depends on the current Capture Mode, Encoder type, and
Resolution (Capture Size), all of which can be specifi ed in
the Options > Mode screen.
Another way to zoom is to select Zoom on the menu.

Dopod585 User Manual
3.
Using your
camera
74
Capture Mode Capture Size Setting Zoom Available
Photo 160 x 120 1x, 2x, 4x, 8x
320 x 240 1x, 2x, 4x
640 x 480 1x, 2x
1280 x 1024 1x, 2x
Photo ID 176 x 180 1x, 2x, 4x
Picture Theme Depends on the size of the currently loaded tem-
plate. Examples:
160 x 120 template 1x, 2x, 4x, 8x
320 x 240 template 1x, 2x, 4x
640 x 480 template 1x, 2x
800 x 480 template 1x, 2x
Video and
MMS Video
128 x 96 1x, 2x
176 x 144 1x, 2x,
NOTE: “1x” indicates normal (unzoomed) size.

Dopod585 User Manual
3.
Using your
camera
75
Adjusting for various lighting conditions
From the main menu, select Ambience. The Ambience
submenu lets you easily adjust the Capture screen so that
it looks its best in various environments. Auto is the default
setting, which means it will automatically adjust to different
lighting conditions. You can optionally select Daylight,
Incandescent, Fluorescent, or Night.
Or, you can affect the color display of the incoming video
stream by selecting Grayscale (black and white), Sepia
(light orange hue) or Cool (blue tint).
Adjusting Camera Properties
In addition, you can select Adjust View from the Ambience submenu if you wish to make adjustments to various
Camera Properties of the sensor output. After the Adjust
View screen opens, you can press the Up or Down button to
change the Property (either Gamma, Brightness, Satura-
tion, or Hue), then press the Right or Left button to change
the value of the current Camera Property. If you wish to reset the Camera Properties to their original default settings,
simply open the menu in the Adjust View screen and select
Restore Default.
Setting various Options
After you select Options from the menu, you can enter different screens to customize various behaviors of Camera
mode, as follows:
General
In the General screen, you can:
• Specify the storage media to which newly-captured fi les
are saved: Storage Card, or Internal Memory (\Storage\My
Documents).

Dopod585 User Manual
3.
Using your
camera
76
• Set the Flicker Adjustment according to the electrical
voltage used in your country.
• Enable Review mode, so that every time you capture any
new image or video fi le, you will enter the Review screen
(shown and explained earlier). It is enabled by default.
• Disable the audible “shutter” sound so that images will be
captured silently.
• Apply “Date and time stamp” while capturing images.
Select this check box to automatically compose the current
date and time in the captured images.
Counter
By default, sequential numbers are incorporated into the fi lename of each new image or video you capture. This screen
lets you reset the counters individually to 001.
Photo
All still images you capture are saved in the JPEG format.
In the Photo screen of Options, you can specify a JPEG
quality (Basic, Normal, Fine, Superfi ne), and you can change
the default fi le name prefi x (IMAGE) if desired. And the fi le
sequential name can go up to 5 digits.
The location you specify in the Template Folder fi eld is
where Camera will look for templates when you enter
Picture Theme mode. You can choose Storage Card or
Internal Memory. If Internal Memory is chosen, Camera
will look in the \Storage\My Documents\Frames folder of
your Dopod585 phone, where a collection of template fi les
is located. Likewise, if Storage Card is chosen, it will look
in \My Documents\Frames of the Storage Card.

Dopod585 User Manual
3.
Using your
camera
77
Video
By default, all video clips you capture will have accompanying
audio recorded along with the video. In this screen, you can
disable or re-enable the recording of audio along with your
video fi les. (Or, when in a Capture screen, you can simply
press 6 on your Dopod585’s keypad to toggle audio capture
On and Off.) You can also change the default fi lename prefi x
(VIDEO) which is used for each new video capture. For
example, if your fi rst video capture is in the MPEG-4 format,
the fi le name would be VIDEO_001.mp4
Modes
The fi elds available in the Modes screen will vary depending on the Capture Mode and Encoder type selected. (The
“Encoder” is the output format of newly-captured fi les.)
If Photo is the selected Capture Mode, you can choose the
desired Resolution (capture size). They are all listed in the
table in the “Zooming In and Out” section.
If Video is the selected Capture Mode, you can use the
Encoder fi eld to specify what fi le format to record in, and
a desired Resolution. In addition, you can set a maximum
limit to the fi le size and duration. For example, if you enter
600 KB in the Limit Video File Size fi eld, then recording
will automatically stop when that fi le size is reached. And if
you set to 5 seconds, recording will be terminated when 5
seconds of video has been taken.
If MMS Video is the selected Capture Mode, the “Limit Video
File Size” fi eld is not available. This is because the maximum
fi le size is set to 95 KB for MMS Video captures. Encoder
types available are MPEG-4 and H.263.
There are no changeable options available in the Modes
screen when Picture Theme or Photo ID is the selected
Capture Mode.
NOTE: Another way to enter the Modes screen is to select
Menu > Capture Modes > Manage.

Dopod585 User Manual
3.
Using your
camera
78
About
Displays the name/module, version/build, and copyright
information.
Switching to Album Mode to view and manage
your images/videos:
• When in Camera mode, select Album from the menu when
in a Capture screen or Review screen. Or,
• Press the * key or the # key on your phone when in a
Capture mode, to switch to Album’s Thumbnail view.
3.2 Album Mode
The Album program allows you to view the image and
video fi les you have captured, as well as audio fi les and
images/videos you have obtained from other sources such
as E-mail, a Storage card, Infrared/Bluetooth beaming, or
synchronized from a PC.
You can manipulate and organize the fi les into “albums” and
slide shows with various transition effects. View images as
thumbnails in various sizes, or in an enlarged view. You can
zoom in/out, fl ip horizontally or vertically, rotate, sort, and
associate fi les. You can even crop/resize/adjust brightness
and save as a new fi le. In addition, if you connect to a
server with media content via the Internet, Album can play
the streaming media.
Supported File Formats
Still-image formats JPEG (.jpg, .jpeg, .jpe); GIF (.gif, .giff);
PNG (.png); Bitmap fi les (.bmp, .2bp,
.wbmp, .wbm)
Animation format Animated GIF
Video format Motion-JPEG AVI (.avi)
MPEG-4 Simple profi le (.mp4)
3GPP – H.263 baseline (.3gp)

Dopod585 User Manual
3.
Using your
camera
79
Audio formats MPEG-4 AAC (Advanced Audio Coding)
in .MP4 format
WAV
MIDI (standard MIDI type 0, 1, and SPMIDI)
AMR-NB (Narrow Band)
AMR-WB (Wide Band)
Thumbnail view mode
Camera searches for the supported image, video, and audio
fi les in your \My Documents folder. You can use the Change
Folder command to search other folders if desired. Select
Scan Subfolder Files in Options > General if you also want
the subfolders of the parent folder to be searched.
Shown below on the left is Large thumbnail size. An example of List View is shown on the right. Use the Options >
Thumbnail screen to change to other thumbnail views such
as Normal, Small, or Portrait. You can also opt to show an
index number and an “Info Bar” which displays data about
the selected thumbnail (shown on the left below).
Large thumbnails with Info Bar List View

Dopod585 User Manual
3.
Using your
camera
80
To play a video or audio fi le, or to view a still image in an
enlarged view, select the related thumbnail and then press
the Action button to switch to Detailed View.
Detailed View mode
Detailed View mode utilizes more of the screen to display still
images or to play back video, animated GIF, or audio fi les.
Press the navigation pad Left or Right to display the previous
or next fi le. Press the Up or Down button to Zoom In or Out.
If it is too large to fi t in the display area, press the Action
button to switch to Pan mode. You can then press Up/Down/
Left/Right to pan to the desired portion of the image.
The Title Bar displays the index number of the fi le, and indicates whether Pan mode or Zoom mode is active.
In the example above, Album’s Detailed View shows a video
fi le playback in progress. A “progress bar” and time counter
near the bottom of the screen indicate the fi le format and the
amount of time that has elapsed during the playback.

Dopod585 User Manual
3.
Using your
camera
81
If you wish to view fi les in Full Screen mode, select View >
Full Screen from the menu, or press 6 on your keypad to
toggle between Detailed View and Full Screen. The Title Bar
and Softkey Labels are hidden during Full Screen view.
Press 7 to play/pause, or 8 to mute/unmute audio play.
Press * for Actual Size, or # for a Fit-in-window display.
Slide Show view mode
First, in Thumbnail View mode, select the thumbnail that you
want to appear initially in the slide show. Then select Slide
Show from the menu. The slide show will then begin with
the currently selected fi le.
Or, as a shortcut, you can press 0 when in either Thumbnail
View or Detailed View to start a slide show. Each image,
video, and audio fi le in the current folder will be played using the full screen, according to the settings that have been
specifi ed in the Slide Show Options screen.
The Slide Show Options screen can be accessed by either
selecting Slide Show Options from the menu during Slide
Show view mode, or by selecting Options > Slide Show
from the menu when in Thumbnail View mode. The options
are summarized in the next section.
During a slide show, pressing 6 will also toggle the display
of the Title Bar and Softkey Labels on and off; or, select Full
Screen from the menu. Even if the Softkey labels are not
displayed, you can still press the Right Softkey to open the
menu, or the Left Softkey to end the slide show. You can also
end a slide show by selecting End Show from the menu, or
by pressing the * button or your Dopod585’s Back button.
To pause a slide show, press the Action button. When
ready to continue playing the slide show, press the Action
button again.

Dopod585 User Manual
3.
Using your
camera
82
During a slide show, you can press the navigation pad Left
and Right to traverse to the previous or next slide.
To choose the type and speed of transition effects to be used
during a slide show, select Transition Effects from the menu
when in Slide Show view. Or, when in Thumbnail view, you
can select Options > Transition Effects from the menu.
Summary of Options screens
Select Options from the menu when in Thumbnail view to
access the following screens:
General
The options in this screen let you choose whether or not
to:
• Search subfolders of the current folder for fi les of the
supported types.
• Show the images in ROM in the Album screen.
• Force backlight and power to remain on during video and
audio playback.
• Mute audio while playing video fi les.
• Automatically replay video, audio, and animated GIF
fi les.
• Show or hide the Progress Bar during playback in Detailed
View.
• Automatically rotate left, right, or never.
Slide Show
In this screen you can specify:
• The amount of time each fi le will display during the slide
show.
• A rule for slide rotation during slide shows.
• The order of slide play (forward, backward, or random).
• Whether or not to force the backlight and system power
to stay on during a slide show.

Dopod585 User Manual
3.
Using your
camera
83
• Whether or not you want each slide show to start in Full
Screen view (Title Bar and Softkey labels are hidden).
Transition Effects
Select from dozens of transition effects to be used between
slides during a slide show, and specify the speed. This
screen also lets you preview each choice before selecting
it.
Sort By
Lets you sort the sequence of the fi les in the current folder
according to Name, Date, Size, or Type. Then specify Ascending or Descending order.
Thumbnail
Choose the size for the thumbnails displayed in Thumbnail
mode: Small, Normal, Large, Portrait, or List view. In addition, you can optionally show an index number in the upper
left corner of each thumbnail; and an “Info Bar” in which data
about the selected fi le is displayed.
Association
Choose the fi letypes you want to associate with Album.
Then, whenever you select a fi le of that type, it will automatically be opened in Album (Bitmap, JPEG, GIF, PNG, AVI,
MPEG-4, MIDI, WAV, AMR-WB, AMR-NB, and SDP fi les).
Network
The settings in this tab are used in conjunction with the
Connect command on the menu when in Thumbnail View
(explained on the next page). The values in the two UDP Port
Range fi elds refer to the range of protocol used to transfer
data through the Internet. These should already be assigned
to the optimal values by your operator, and normally will not
need to be changed. In the Connect Via fi eld, specify the
network to be used for the Connect command (for example,
“The Internet,” “Work,” “WAP Network,” etc.).

Dopod585 User Manual
3.
Using your
camera
84
Summary of Menu Functions
Some of the functions that the menus in Thumbnail View
and Detailed View allow you to perform:
• Send the selected fi le via MMS, via E-mail, via Infrared
beaming, or Bluetooth.
• Delete, move, or copy the selected fi le.
• Save As a Caller ID Photo.
• Save As RingTone Line 1 or Line 2 (if a MIDI fi le is
selected).
• Rename the selected fi le.
• View Properties of the selected fi le (such as name, folder,
date, size, type, colors, frames, dimensions, resolution,
audio type, channel, etc.).
• View the current fi le in Full Screen (Title Bar and Softkey
labels are hidden).
• Rotate an image 90 degrees clockwise.
• Change to another folder and display fi les of the supported
fi letypes in that folder, including sub-options to switch to
\My Documents on your SD card, jump up one level, or
select recently visited folders.
• The New command in Thumbnail view includes a sub-
option to invoke the voice recorder function of your
Dopod585 phone, and record a Voice Note.
• The Connect command in Thumbnail view allows you to
connect to a server with media content via the Internet,
and play the straming media. Enter the desired URL in
the rtsp:// fi eld, then press Done. If the connection is
made successfully, the media will be played immediately in
Detailed View mode. In addition, a URL fi le will be created
and shown in your Thumbnail View for future use, making
it easy to connect to the related URL and play the media
fi le again. The name you specify in the Filename fi eld
will be used as the fi lename of the new URL fi le.
• Switch to Camera mode.
• Edit Bitmap, JPEG, or still GIF fi les, and save changes to
a different fi letype. (More information on next page.)

Dopod585 User Manual
3.
Using your
camera
85
Editing Files
Album now allows you to edit BMP, JPEG, or still GIF fi les.
You can crop, resize, and adjust brightness/contrast/gamma.
First, select the image you want to edit. Then select Edit
from the menu when in either Thumbnail View or Detailed
View to enter the Edit screen.
Crop
In the Edit screen, select Crop from the menu. Press the
navigation pad up/down/left/right to position the crossbar
as desired, then press the Action button to delineate one
corner of the area you want to crop. Press the navigation
pad up/down/left/right as needed to enclose the desired area
of the image for cropping, and press the Action button again
to fi nish specifying the area. Then select Set Area from the
menu. You can also move the specifi ed square/rectangle,
or resize it, using Move Area or Resize Area. Press the
Left Softkey (“Done”) to end the operation.
Resize
After you select Resize from the menu, the Resize screen
opens. You can choose to resize the current image by a
certain Percentage (up to a maximum of 500%), or by Di-
mension (width/height up to 9999 pixels).
Level
This command lets you adjust the Brightness, Contrast, or
Gamma properties of an existing image. After you select
Level from the menu in the Edit screen, the Brightness
screen will open. To switch to the Contrast or Gamma
screens, select from the menu, or press the navigation pad
Left or Right. To adjust lighter or darker, press the navigation pad Up or Down.
Save As
This command lets you save the edited version of the fi le to
a new fi lename, a different fi le format, and the desired folder.
Or, you can use Save to overwrite the original fi le.

Dopod585 User Manual
3.
Using your
camera
86

Chapter 4
Personalizing your
Dopod585
4.1 Customizing Phone Settings
4.2 Customizing Profi les and Sounds
4.3 Customizing Date and Time

Dopod585 User Manual
4. Personalizing
your phone
88
4.1 Customizing Phone Settings
You can easily view and change various settings in your
Dopod585. For example, you can use your favorite photo
for the Home screen background, set up Call Forwarding to
manage your calls more effi ciently, defi ne the Right Softkey
to invoke different applications, and much more.
Select Settings from the Start menu. The items in the
Settings screen are illustrated below.
Phone
When you select Phone in the Settings screen shown
above, the Phone screen appears and offers the following
options:
Call Barring
Enables you to block incoming and/or outgoing calls.
Call Forwarding
Enables you to forward calls to another number.

Dopod585 User Manual
4. Personalizing
your phone
89
Call Options
Specify your Voice Mail number, SMS Service Center
number, Country code, and Area code. If you check the
Any key answer checkbox, you will be able to answer
incoming calls by pressing any key. If Show SIM Contacts
is checked, entries on the SIM card will be displayed in your
Contacts list.
Call Waiting
Turn the Call Waiting function on or off.
Caller ID
Let your identifi cation be known to all callers; to only the
people in your contacts; or to no callers.
Channels
Confi gure cell broadcast.
Fixed Dialing
Limit your calling area to one or more specifi c phone numbers
and/or area codes.
Networks
Identifi es your current network, and allows you to change
your network selection from Automatic to Manual. In addition,
the menu in the Networks screen lets you fi nd a new network,
select a network, and list preferred networks.

Dopod585 User Manual
4. Personalizing
your phone
90
Home Screen
Home screen settings are used to change the Home screen
layout, the color scheme, the background image, and the
time delay before the Home screen appears when your
Dopod585 is idle.
To view or change these settings, select Settings > Home
Screen from the Start menu.
Operator Default is the default setting in the Home Screen
Layout fi eld. One of the features of Operator Default is
that the fi ve icons at the top of the Home screen will always
remain the same (Mobile Jukebox, Messages, Camera,
My Media, and Contacts). If you change to a different
Home Screen Layout setting, then the fi ve icons shown will
represent the fi ve most recently used applications.
Note that the images available for selection in the
Background Image fi eld are those currently in the \Storage\
My Documents folder of your Dopod585. (If the image fi le
you want to use as the Home screen background image
is not there, copy the fi le to \Storage \My Documents,
then try again to make your selection from the Background
Image fi eld.)

Dopod585 User Manual
4. Personalizing
your phone
91
Right Soft Key
This feature lets you assign a different function to the Right
Softkey. By default, pressing the Right Softkey in the Home
screen opens the Contacts screen. If you want to “map” it to
another application, select Settings > Right Soft Key.
In the Right Soft Key screen that opens, simply select the
application you want to assign to the Right Softkey, then
press Done. After that, the label for the Right Softkey in
the Home screen will display the application you chose, and
pressing the Right Softkey (when that application name is
shown in the label) will invoke that application.
Bluetooth
Please see the next chapter for usage of this setting.
Beam
If you want to receive infrared or Bluetooth beams from other
devices, you must turn on the option to receive incoming
beams. To do this, select Settings > Beam, then activate
the Receive Incoming Beams checkbox (that is, make sure
the checkbox is checked). After you press the Left Softkey
(“Done”), your Dopod585 will be able to receive all incoming
beams from other devices.

Dopod585 User Manual
4. Personalizing
your phone
92
Regional Settings
In the Regional Settings screen, (Settings > Regional
Settings), you can change the language used by your
Dopod585. After changing the language and some of the
other settings, you must power your Dopod585 off and back
on, in order to make the changes take effect.
However, when changing languages, note that it is possible
that not all applications will be displayed with the new
language because of the default “language set” in your
Dopod585.
The following items can be adjusted in the Regional Settings
screen: Language, Locale, Short Date style, Long Date style;
and the format of Time, Positive and Negative numbers,
Positive and Negative currency amounts.
Accessibility
Select Settings > Accessibility to view or modify your
settings for System Font Size, Multipress Time-out,
Confi rmation Time-out, and In-call Alert Volume. See section
1.6 for more details about this, and an illustration.
Power Management
Select Settings > Power Management from the Start menu
if you want to check the current battery level. Also in the
Power Management screen, you can adjust various powersaving settings. Backlight time-out, Display time-out, and
Light Sensor enabled or disabled.
The light sensor is located at the bottom of your Dopod585,
under the 0 button on your keypad. Selecting On in the Light
Sensor Enable fi eld will cause a “backlight” behind your
keypad to activate and stay on, when ambient luminance
is lower than 20~28 lux, making it easier to see the buttons
in dark conditions. Selecting Off in this fi eld will conserve
battery power. However, even if Off is selected, a backlight
will turn on temporarily every time you press a button on your
Dopod585, whether you are in a dark or light environment.

Dopod585 User Manual
4. Personalizing
your phone
93
NOTE: You can also view the Battery Level in the form of a
percentage, using the File Manager application described in
Chapter 9. (Select the System Info command on the menu
in File Manager.)
Remove Programs
This feature lets you conveniently delete any programs from
your Dopod585 that you installed after purchasing it. Note
that you cannot use this feature to remove any of the core
programs that came with your Dopod585, such as Contacts,
Calendar, Internet Explorer, etc.
When you select Settings > Remove Programs from the
Start menu, the programs you have installed will be listed
in the Remove Programs screen. Select the one you want
to remove, then select Remove from the menu.
Security
Select Settings > Security from the Start menu to enable the
phone lock or SIM lock, and to set the phone lock password.
This was explained in detail in Chapter 1 (section 1.7).
Certifi cates
On your Dopod585, you can add and delete public key
certifi cates. These certifi cates help establish your identity
when you log on to a secure network, such as a corporate
network. Certifi cates also help establish the identity of
oth er computers, such as servers, with which you connect.
This helps prevent unauthorized users from accessing your
device and its information.
You can store two types of certifi cates on your Dopod585:
Personal certifi cates that establish your identity, and Root
certifi cates that establish the identity of servers with which
you connect. Your Dopod585 may include a set of preinstalled certifi cates.

Dopod585 User Manual
4. Personalizing
your phone
94
Certifi cates that establish your identity:
Select Settings > Certifi cates > Personal, then select
View from the menu to view the selected certifi cate, or
Delete to delete it.
Certifi cates that identify servers you've connected to:
Select Settings > Certifi cates > Root. Select the desired
certifi cate in the list, then select View from the menu to
view the details of the selected certifi cate (or Delete to
delete it).
Data Connections
Please see the next chapter for usage of this setting.
Owner Information
Select Settings > Owner Information from the Start menu
to enter your personal information such as name, phone
number, and E-mail address. This is helpful, for example,
in the event that you lose your Dopod585, so that you can
be contacted if it is found. In the Owner Information screen,
there is also a Notes fi eld in which you can enter any other
miscellaneous information, if desired.
About
Select Settings > About from the Start menu to open
the About screen, which displays information about your
Dopod585's operating system such as version numbers,
copyright information, processor, total/available storage,
and total/available memory.

Dopod585 User Manual
4. Personalizing
your phone
95
4.2 Customizing Profi les and
Sounds
Select Profi les from the Start menu to access the screen
shown on the left below. Select Activate in this screen if you
want to switch to a different profi le, or modify the attributes of
an existing profi le. Select Sounds if you want to customize
the sounds for ring tones, notifi cations, and reminders.
Activate
Selecting Activate opens the screen shown on the right
above. All available profi les are listed, and the active profi le
is indicated by a check mark to the right. Profi les are used
to confi gure how your Dopod585 notifi es you of events such
as an incoming call, an ap proaching appointment, or an
arriving message. For ex ample, when you are attending a
meeting, you can choose the Meeting profi le, which turns
off your system sound volume, lowers the ring volume of
your Dopod585, notifi es you of incoming calls via vibration,
etc. Each profi le is pre-defi ned to use either an audible
ring notifi cation, or a vibration notifi cation, with different
alarm types, volumes, etc., as listed in the table on the
next page.

Dopod585 User Manual
4. Personalizing
your phone
96
NOTE: You can also select a different profi le using the
Quick List. To display the Quick List screen (illustrated in
Chapter 1), press the Power button on your phone and
release quickly. Scroll to the desired profi le and then press
the Action button to select it.
The following table lists the profi les that come with your
Dopod585, and their default attibutes.
Profi le
Name
Ring
Type
Ring
Volume
Alarm
Type
Alarm
Volume
Notifi cation
Type
Notifi cation
Volume
System
Sound
Volume
Normal Vibrate
& ring
4 Play sound 3 Vibrate
/ sound
32
Silent Vibrate Off Vibrate Off Vibrate Off Off
Meeting Vibrate 1 Play sound 1 Play
sound
1Off
Outdoor Ring Loud Increasing Loud Play
sound
Loud 3
Automatic
(Automatically switches between the Normal profi le and the Meeting profi le,
when the Calendar indicates that the current time is busy.)
Headset Ring 3 Increasing 3 Play
sound
33
Car Ring 4 Increasing 4 Play
sound
44
Speaker
phone
Ring Loud Increasing Loud Play
sound
Loud 2
NOTE: The Headset profi le and Car profi le both have an additional fi eld
(Auto-answer) which lets you optionally specify a number of seconds, after
which incoming calls will automatically be answered.
To edit a profi le's attributes, highlight the desired profi le in the
Profi les screen, then select Edit from the menu. If you later
want to restore the settings back to the default attributes,
select Reset to default from the menu.

Dopod585 User Manual
4. Personalizing
your phone
97
Sounds
Sounds settings are used to customize the sounds for ring
tones, notifi cations, and reminders.
Select Profi les from the Start menu, then select Sounds
in the initial Profi les screen. The Sounds screen will open
(illustrated on the next page), in which you can specify what
sound fi le to use for the following functions:
• Ring tone (line 1 and line 2)
• Reminders
• New E-mail arrival
• New SMS text message arrival
• New voice message arrival
• New instant message arrival
• New channel message arrival
• Alarm clock
• SIM toolkit messages
• Exclamation
• Question
• Warnings
• Keypad control
After selecting one of the fi elds above, you can press the
Right or Left navigational buttons to select different sounds.
Or, press the Action button to open the Select an Item screen
to view the entire list of sounds available for that fi eld, and
select from that list.

Dopod585 User Manual
4. Personalizing
your phone
98
You can use the menu in the Sounds screen to Play or
Delete the selected item.
Press the Left Softkey ("Done") to save all changes.
To use your own sound:
1. Go to where the desired sound fi le is stored on your
desktop computer, and copy the fi le. The WAV, MIDI,
and WMA fi letypes can be used.
2. In ActiveSync on your desktop computer, click Explore,
go to \Storage\Application Data\Sounds, then paste the
sound fi le into the Sounds folder.
3. On your Dopod585, select Profi les > Sounds from the
Start menu to open the screen shown above.
4. Select the desired category (such as Ringtone, Reminders,
New E-mail, etc.), select the sound fi le you copied to the
phone, then press the Left Softkey ("Done").

Dopod585 User Manual
4. Personalizing
your phone
99
4.3 Customizing Date and Time
Select Organiser from the Start menu, then select Date
and Time from the list in the Organiser screen. The Date
and Time screen will open as shown below. It allows you to
change your local time zone, the current date, the time, set
an alarm time, and turn the alarm feature on or off.
NOTE: The other items in the Organiser screen are
explained in Chapter 8.

Dopod585 User Manual
4. Personalizing
your phone
100
 Loading...