

Page 1

Quick Start Guide
818 Pro
Page 2
2
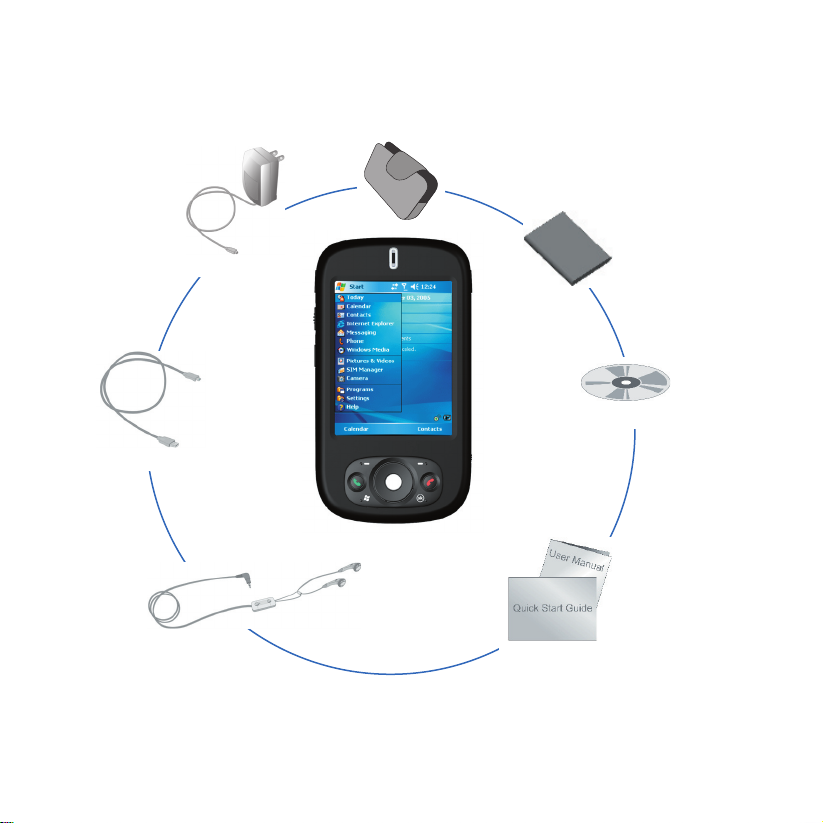
1. What’s in the Box?
AC Adapter
USB Cable
Pouch
Battery
Getting Started CD
Dopod 818 Pro
Headset
User Manual and
Quick Start Guide
Page 3
2. The Dopod 818 Pro
1
3
15
14
6
16
7
8
9
17
2
3
4
5
11
1210
13
18
23
19
20
242221
Page 4

4
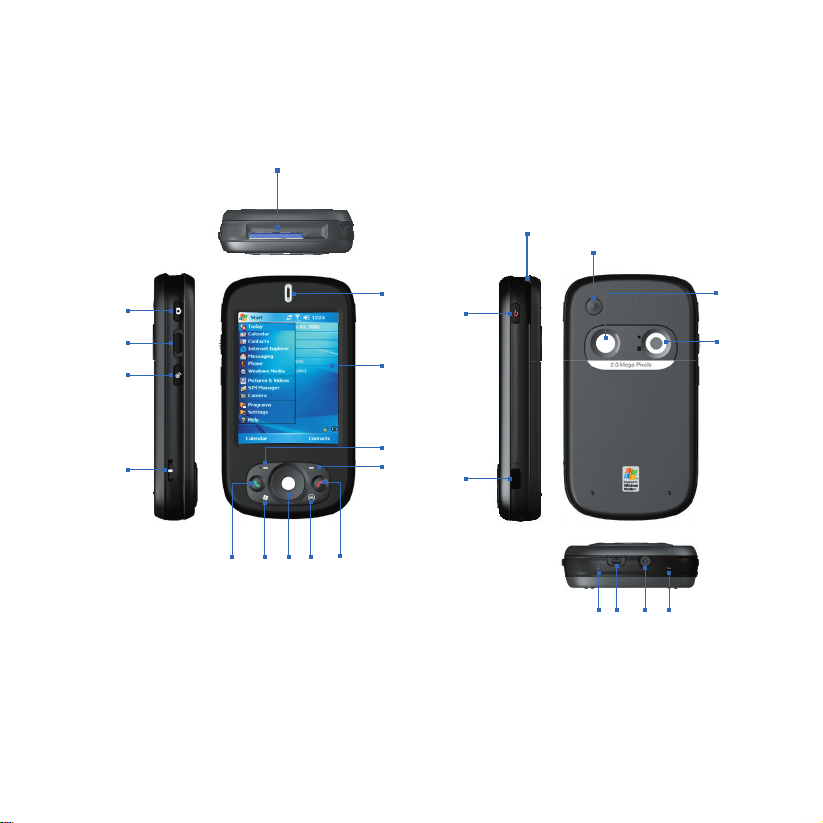
Parts of the Dopod 818 Pro
No. Item Function
1 MMC/SD or SDIO
Card Slot
2 CAMERA Button Press to launch the camera; press again to take a photo or video clip,
3 Volume Controller Slide up or down to adjust the volume.
4 COMM MANAGER/
Voice Commander
5 Strap Holder Lets you attach a strap for carrying your Dopod 818 Pro.
6 Notification LEDs Green and Amber LED for GSM standby, SMS message, GSM network
7 Touch Screen Tap the stylus on-screen to write, draw, or make a selection.
8 Left SOFT KEY Performs the command shown in the label above the button.
9 Right SOFT KEY Performs the command shown in the label above the button.
10 TALK Button Press to answer an incoming call or dial a number.
11 START Button
12 Navigation Control Press this multi-directional control up, down, left, or right to move through
13 OK Button Press to confirm your data entries, or to exit the program in use.
14 END Button Press to end a call.
15 Stylus Use the stylus to write, draw, or select items on the touch screen.
16 POWER Button Press to turn off your Dopod 818 Pro temporarily. This switches your
17 Infrared Port Lets you exchange file(s) or data with other devices wirelessly.
18 Car Antenna
Connector
19 Self-Portrait Mirror Turn the back side of your Dopod 818 Pro to face yourself so that your
In this card slot, insert an MMC or SD card for storing data, or insert an SD
input/output card such as a network card.
depending on the specified capture mode.
Press to open Comm Manager; press and hold to activate Voice Command.
status, notification, and battery charging status.
Blinking Blue LED for Bluetooth system notification of powered-up and ready
to transmit radio frequency signal, and blinking Green for Wi-Fi status.
Press to open the Start menu.
menus or program instructions; carry out the selection by pressing the center
button.
device to sleep mode. To turn it off completely, press and hold (for about 5
seconds).
When your device is in sleep mode, you can still use the phone function
to receive calls. When you turn off the device completely, all functions
including the phone will be unavailable for use.
You can connect your phone to a car antenna to have better reception
quality.
image reflects on the mirror when taking self-portrait shots.
Page 5

No. Item Function
20 Camera Lens The camera lens on your Dopod 818 Pro supports two shoot modes: Wide-
angle mode (normal) and Macro mode (close-up). To change the shoot
mode, push the switch up for wide-angle mode or down for macro mode.
21 RESET Button With the stylus, press the RESET button to soft-reset your Dopod 818 Pro.
22 Sync Connector Use this connector for synchronizing data or recharging the battery.
23 Earphone Jack Allows you to listen to audio media or use the phone’s hands-free kit.
24 Microphone Speak into the microphone when receiving or making a phone call or voice
recording.
Accessory Function
AC adapter Converts AC to DC for recharging the battery.
USB cable Connects your Dopod 818 Pro to a PC and synchronize data.
Stereo headset Provides a volume control jog dial and a Send/End button. You can use the
button to pick up and hang up incoming and outgoing calls.
5
Page 6
6
3. Getting Ready
Before you start using your Dopod 818 Pro, you must install a SIM card and a charged
battery. The SIM card contains your phone number and service details, and it stores
phonebook entries and your messages.
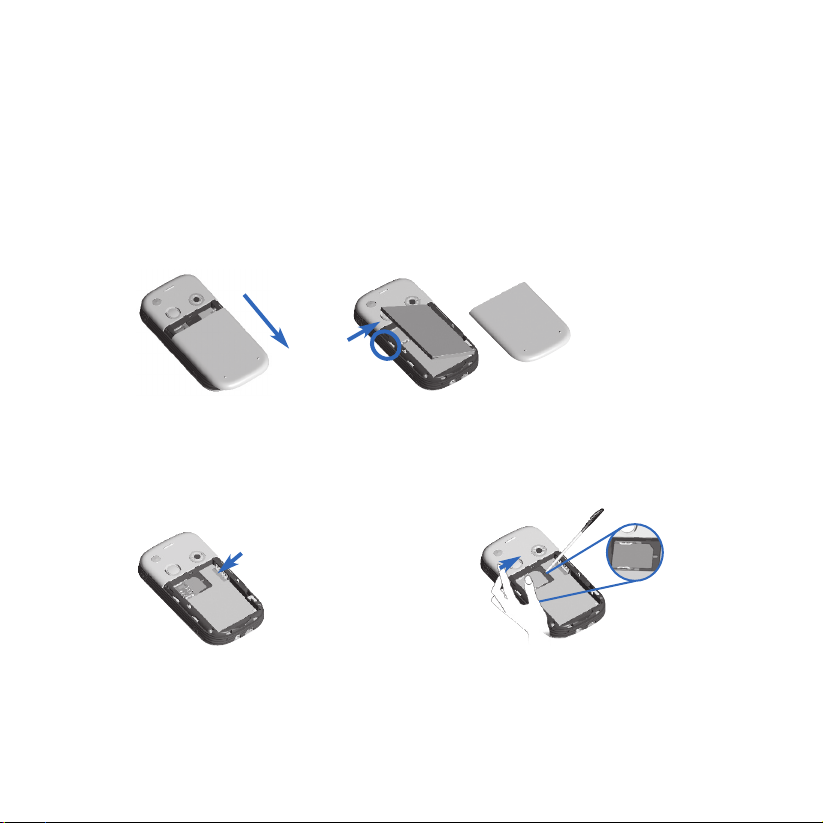
Install the SIM card
1. Make sure your Dopod 818 Pro is turned off.
2. Slide the cover latch to remove the battery cover.
Then remove the battery. Lift the battery up from the upper left side of the battery slot
using your finger.
3. Insert the SIM card into the SIM card slot with its gold contacts facing down (the cut-off
corner of the SIM card should match the cut-off corner in the slot).
To take the SIM card out, use the stylus to press into the SIM card slot hole, and then
lightly lift up the SIM card while pressing the left-most side of the SIM card, and then
slide it out.
Slide the SIM
card into the
SIM card slot.
Press lightly to
slide the SIM
card out.
Use the stylus to
press into the SIM
card slot hole.
4. Replace the battery (see instructions in the next section).
5. Replace the battery cover.
Page 7
Install and charge the battery
New batteries are shipped partially charged. Before you can use your Dopod 818 Pro, you
need to install and charge the battery. To install the battery, remove the battery cover first,
and then insert the battery by aligning the exposed copper part of the battery pack with the
protruding copper conductor which is on the upper right side of the battery slot. Insert the
right side of the battery first, then gently push the battery into place, and replace the battery
cover.
Some batteries perform best after several full charge/discharge cycles. You can charge the
battery in two ways:
7
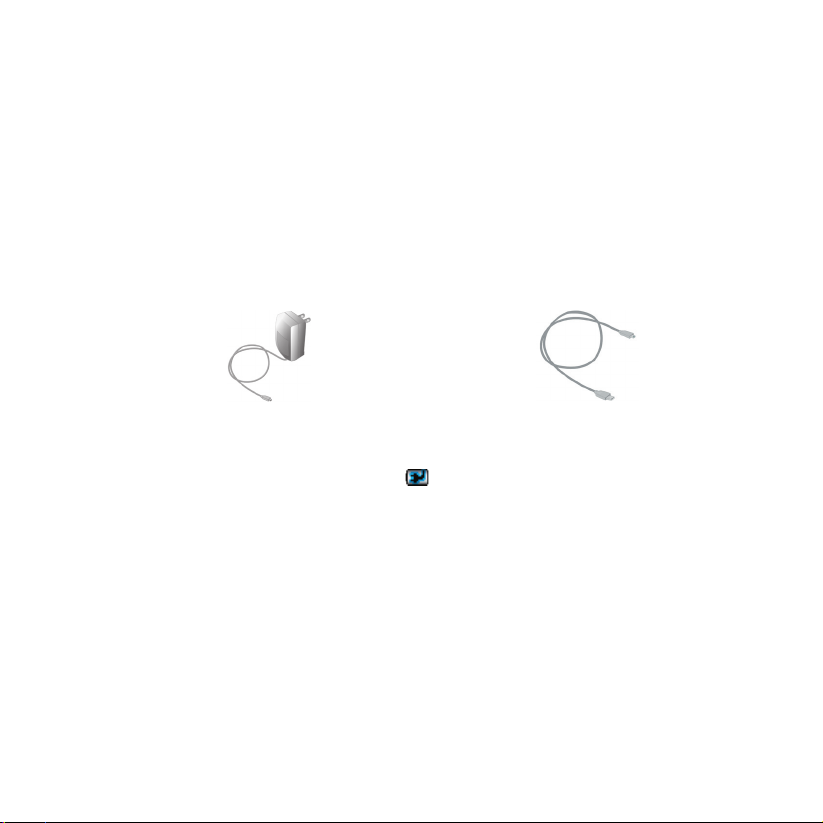
• Connect your Dopod 818 Pro directly to
an electrical outlet using the AC adapter.
When your device is turned off, charging is indicated by a solid amber light on the LED
indicator. When your device is turned on, charging is indicated by a solid amber light on the
LED indicator as well as a charging icon ( ) on the device screen.
• Plug the sync cable to the USB port on
your PC and to the sync connector on
Dopod 818 Pro.
Page 8
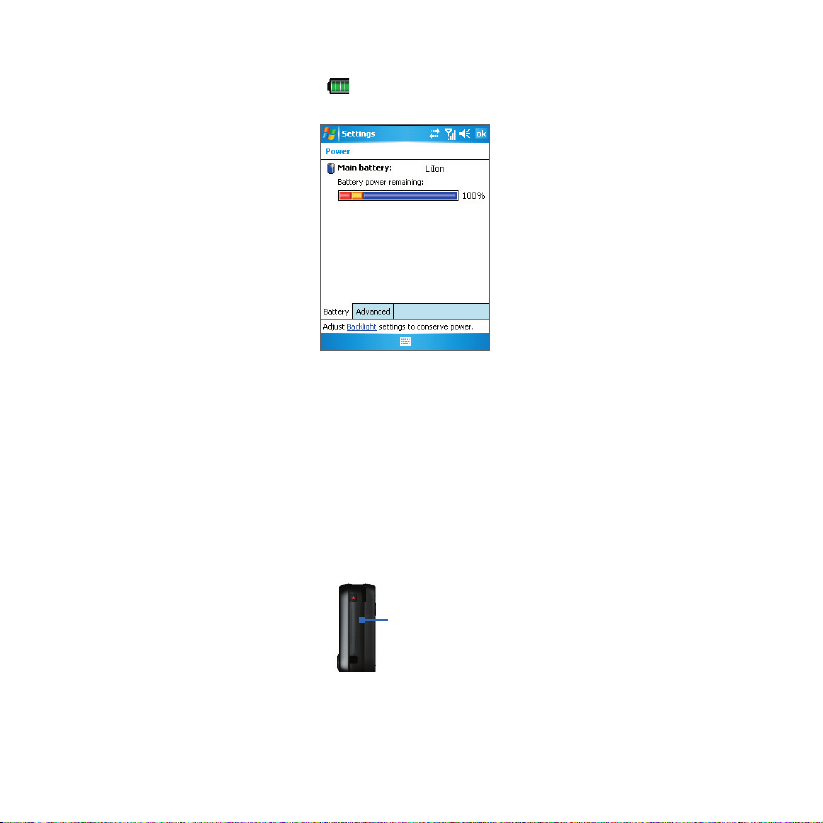
8
Check the battery power
• Tap the battery level icon ( ) on the Today screen. The Power Settings screen will
then open where you can see the current battery power level.
Battery power indicator
When the battery power gets very low, a warning message will be displayed. When you
see this, immediately save your data by synchronizing with your PC, or save your data on a
secondary storage card, and then turn off your device. Do not attempt to restart your device
until you have connected it with the power adapter.
Turn on your Dopod 818 Pro
Press POWER to turn on your Dopod 818 Pro. When you turn on your device for the first
time, you are asked to complete a screen calibration process.
To turn off your device, press POWER again.
POWER button
Page 9
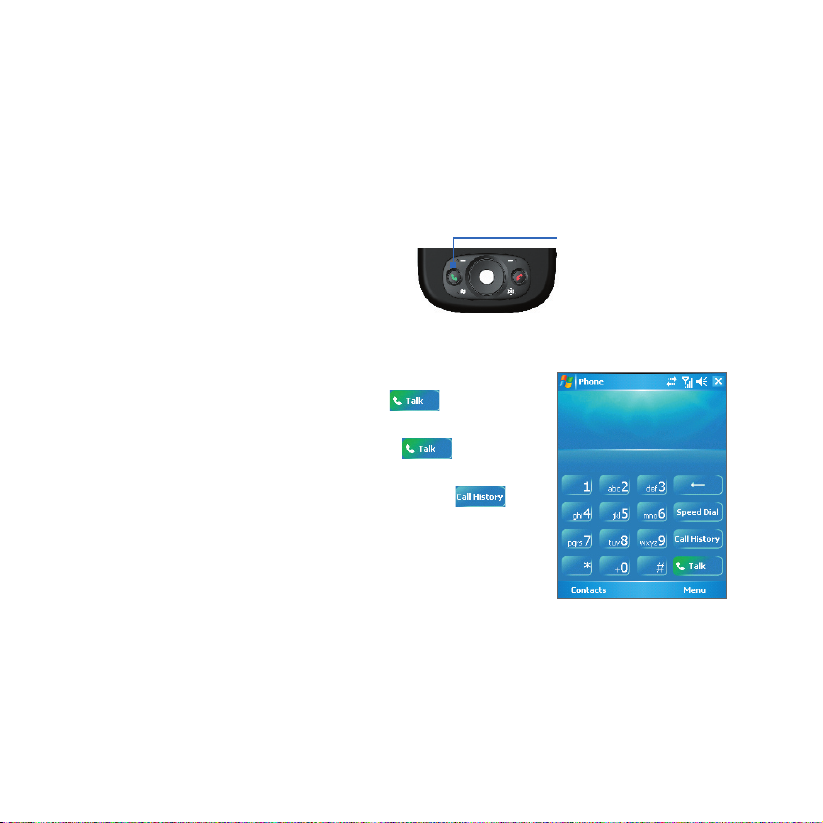
4. Making a Call
Like a standard mobile phone, you can use your Dopod 818 Pro to make, receive, and
keep track of calls and send SMS messages. You can also take notes while talking, and dial
directly from Contacts.
The Phone screen
From the Phone screen, you can access Call History, Speed Dial, and Phone settings. To
open the Phone screen, do one of the following:
TALK button
• Use the stylus to tap Start > Phone.
• Press TALK on the device.
Make a call
• from the Phone screen: On the Phone screen, tap
the desired phone number, then tap
• from Contacts: On the Phone screen, tap Contacts.
Then, tap the desired contact and tap
press TALK.
• from Call History: On the Phone screen, tap .
Then, scroll to the desired contact or phone number,
and tap Call.
.
or
Phone screen
9
Page 10
10
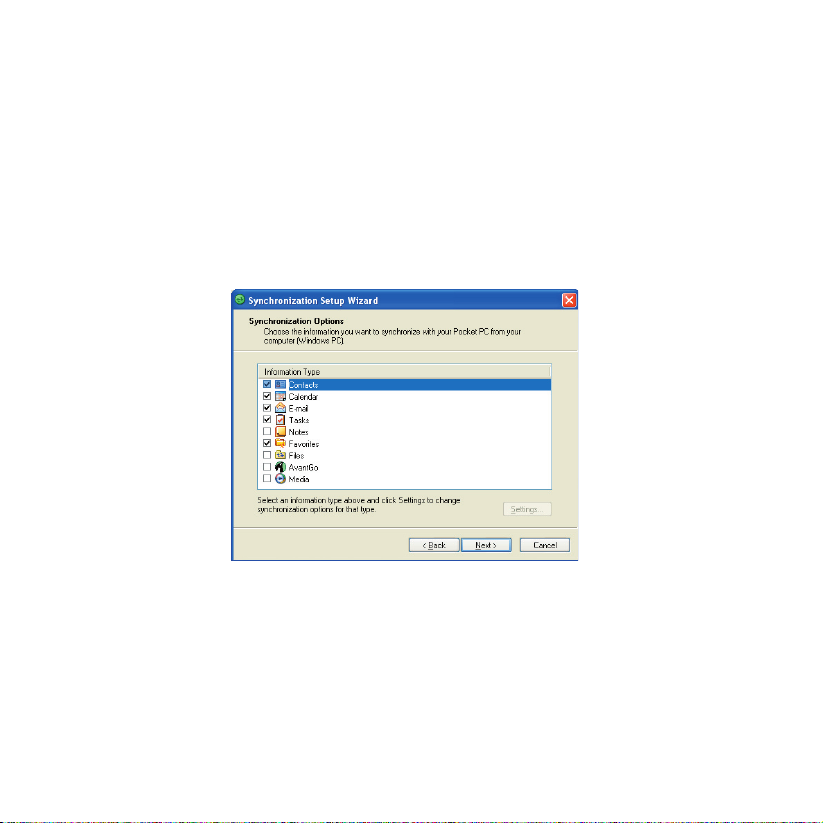
5. Synchronizing Outlook Information
Using Microsoft® ActiveSync®, you can synchronize information on your Dopod 818 Pro with
information on your PC, such as Outlook content. ActiveSync is already installed on your
device, but you need to install it on your PC if you don’t already have it. Insert the Getting
Started CD into the CD drive of your PC. Follow the instructions on the installation wizard
screen to install ActiveSync. Once installation is completed, connect the sync cable to your
device and plug it into your PC’s USB port.
To set up a partnership between your device and the PC, turn on your device. When the PC
detects a USB connection, it starts the ActiveSync Synchronization Setup Wizard. Follow
the instructions on the screen and select the Outlook items you want to synchronize.
Synchronization Setup Wizard
(Synchronization Options)
Page 11

PC requirement to run ActiveSync 4.1
To connect your Dopod 818 Pro to the PC, you must have the Microsoft® ActiveSync®
program installed on your PC. ActiveSync 4.1 is included in the Installation CD, which is
compatible with the following operating systems and applications:
• Microsoft® Windows® 2000 Service Pack 4
• Microsoft® Windows® Server 2003 Service Pack 1
• Microsoft® Windows® Server 2003 IA64 Edition Service Pack 1
• Microsoft® Windows® Server 2003 x64 Edition Service Pack 1
• Microsoft® Windows® XP Professional Service Packs 1 and 2
• Microsoft® Windows® XP Home Service Packs 1 and 2
• Microsoft® Windows® XP Tablet PC Edition 2005
• Microsoft® Windows® XP Media Center Edition 2005
• Microsoft® Windows® XP Professional x64 Edition
• Microsoft® Outlook® 98, Microsoft® Outlook® 2000 and Microsoft® Outlook® XP, and
Microsoft® Outlook® 2003 messaging and collaboration clients
• Microsoft® Office 97, excluding Outlook
• Microsoft® Office 2000
• Microsoft® Office XP
• Microsoft® Office 2003
• Microsoft® Internet Explorer 4.01 or later (required)
• Microsoft® Systems Management Server 2.0
11
Page 12
12
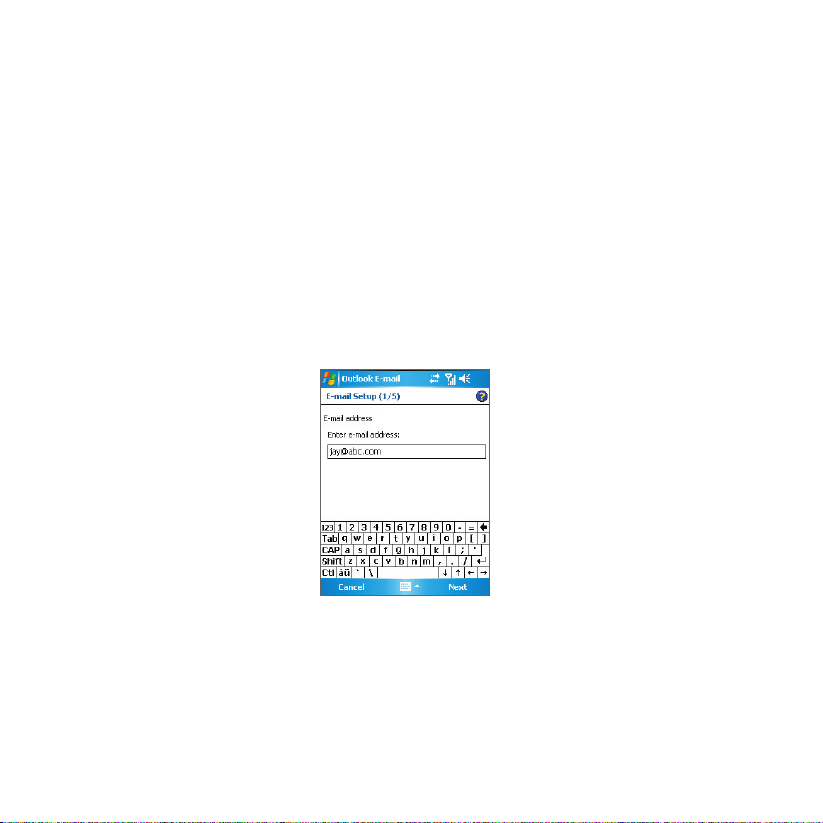
6. Setting Up an E-mail Account
Your Outlook E-mail account is ready to use. However, you need to set up an e-mail
account that you have with an Internet service provider (ISP) or an account that you access
using a VPN server connection (typically a work account) before you can send and receive
mail.
Set up an e-mail account
1. Tap Start > Messaging.
2. Tap Menu > Tools > New Account.
3. Enter your e-mail address, and tap Next.
Auto configuration will help you download necessary e-mail server settings.
4. Once Auto configuration has finished, tap Next.
5. Enter your name (the name you want displayed when you send e-mail) and your
password.
Setting up e-mail account
Tip Select the Save password check box if you want to save your password so that you do not need
to enter it again.
Page 13
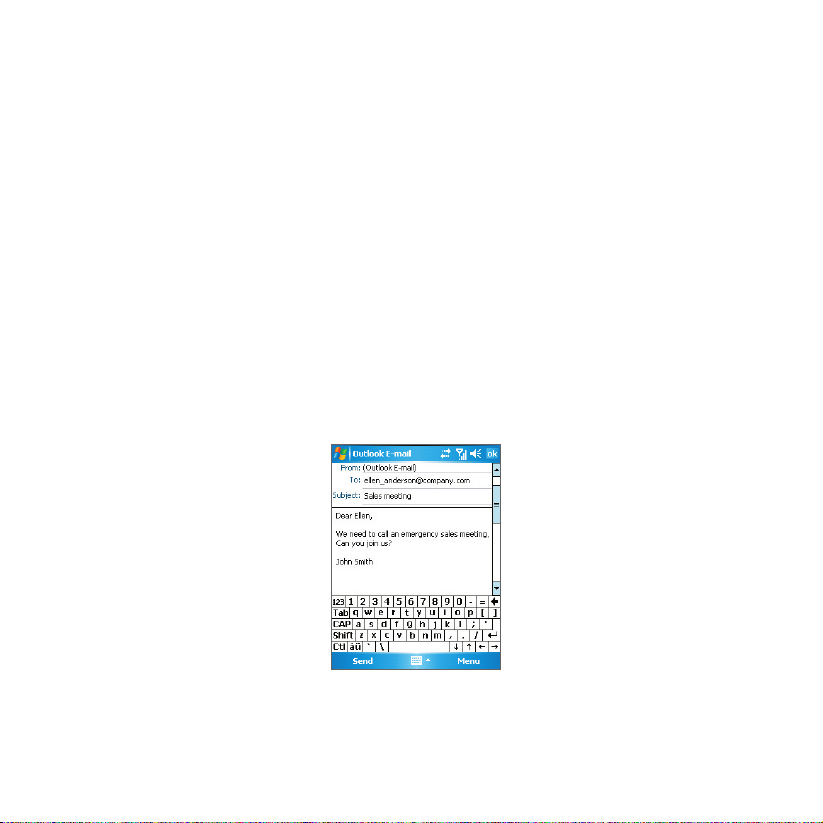
7. Sending a Message
Your Dopod 818 Pro is capable of sending and receiving E-mail, SMS, and MMS messages
as long as it is connected to the network. Although you can send text messages (SMS) to
only mobile phone numbers, MMS messages can be sent to both mobile phone numbers
and e-mail addresses.
Compose and send a message
1. In the message list, tap Menu > Switch Accounts and select an account.
2. Tap New.
3. Enter the e-mail address or text message address of one or more recipients,
separating them with a semicolon. To access addresses and phone numbers from
Contacts, tap To.
4. Enter your message.
• To quickly add common messages, tap Menu > My Text and tap a desired
message.
• To check the spelling, tap Menu > Spell Check.
5. Tap Send.
13
Composing message
Note SMS and MMS can only be sent if your Dopod 818 Pro is connected to a GSM network. Email
messages can be sent only if your Dopod 818 Pro has Internet access (e.g. via GSM network,
USB/Bluetooth connection to computer, etc).
Page 14
14
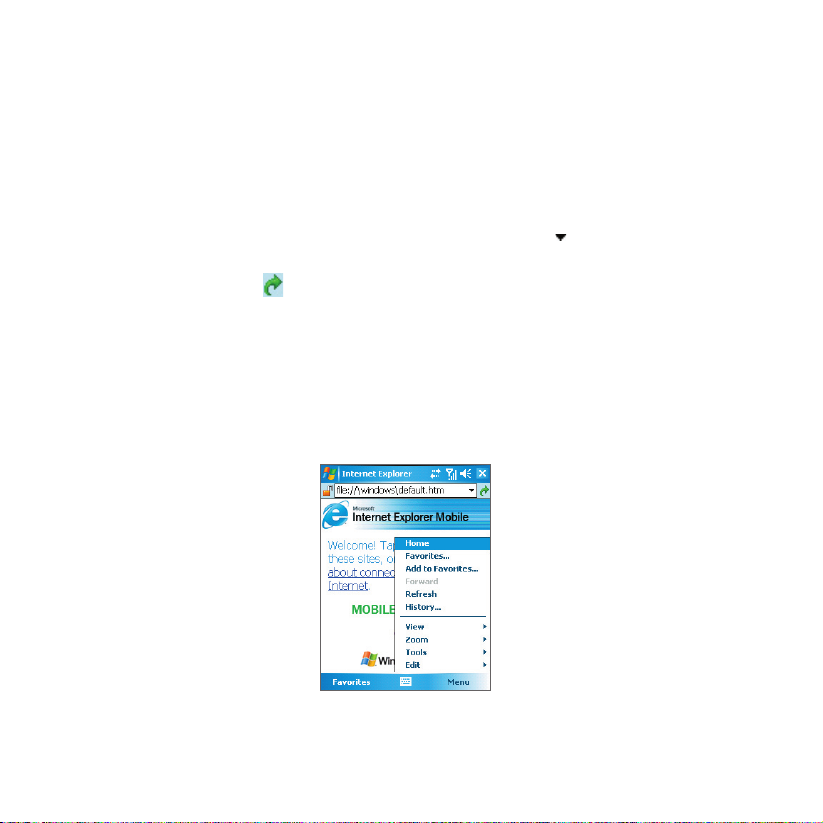
8. Browsing the Internet
You can set up connections to the Internet or to a corporate network to browse the Internet.
The pre-loaded browser,
optimized for use on your Dopod 818 Pro.
Use Internet Explorer Mobile
1. Tap Start > Internet Explorer.
2. To go to a web site, enter the URL address of the desired web site in the address bar
that appears at the top of the screen. Tap the down arrow (
from previously entered addresses.
3. Tap the Go icon ( ) to go to the web address you entered.
4. Tap Back to go back to the previous page.
5. Tap Menu > Refresh to refresh the web page on the screen.
6. Tap Menu > Home to go back to the Home page.
7. Tap Menu > Favorites, and then select the favorite website you want to visit. To add
a favorite link while browsing the Internet, go to the page you want to add. Then, tap
Menu > Add to Favorites, or tap and hold on the page to select Add to Favorites
from the shortcut menu.
Internet Explorer Mobile, is a full-featured Internet browser, and
) to choose one web site
Internet Explorer Mobile
Page 15

9. Using the Camera and Pictures & Videos
Taking photos and recording video clips along with audio is easy with your Dopod 818 Pro’s
built-in camera.
Before capturing a photo or video clip, adjust the lens found at the back of the Dopod 818
Pro to one of the following modes:
Wide-angle mode - to take shots at normal range
Macro mode - to take shots at close-up range
Launch the camera
• Tap Start > Programs > Camera.
• Tap Start > Programs > Pictures & Videos, then tap the Camera icon.
• Press CAMERA on your device.
15
To exit the camera, tap the
Exit icon ( ) on the screen.
Camera
Page 16

16
Capture a still image
1. After launching the camera, tap or on the screen or press NAVIGATION control
left or right to select the Photo capture mode.
2. Press the CAMERA button, or the ENTER button on NAVIGATION control to capture a
still image.
Capture a video clip
1. After launching the camera, tap or on the screen or press NAVIGATION control
left or right to select the Video capture mode.
2. Press the CAMERA button, or the ENTER button on NAVIGATION control to start
recording a video clip. To stop recording, press the ENTER button or CAMERA button
again.
Use the Pictures & Videos program
The Pictures & Videos program collects, organizes, and sorts all of your captured images
and video clips on your device. You can use this program to view/play pictures and video
clips. You can even view the pictures as a slide show, beam them, send them via e-mail, edit
them, or set them as the background on the Today screen.
The down arrow
The media icon
Tap to view the selected image
Page 17

View pictures
1. Tap Start > Programs > Pictures & Videos. The images in the My Pictures folder
appear as thumbnails by default.
2. Select a picture and tap View.
Play videos
1. Tap Start > Programs > Pictures & Videos. By default, the contents of the My
Pictures folder will be shown.
2. To find the video clips that you captured, tap the down arrow ( ) next to the My
Pictures folder and tap My Documents. Then tap My Videos. Video clips are displayed
as thumbnails by default, which appear with a media icon ( ).
3. Tap the desired thumbnail to play it with the built-in Windows Media Player.
17
Page 18

18
10. Entering Information
When you start a program or select a field that requires text or numbers, the Input Panel
automatically becomes available. The Input Panel provides access to the various input
methods, including Block Recognizer, Keyboard, Letter Recognizer, Phone Pad, and
Transcriber
input method is currently selected. The Input Selector arrow (shown at the right side of the
Input Panel icon) opens a list of available input methods.
Show/hide the Input Panel
To show or hide the Input Panel, tap the Input Panel icon on the menu bar.
. By default, the Input Panel icon appears on the menu bar to indicate which
Icon Input method
The on-screen keyboard.
Letter Recognizer or Block Recognizer.
Phone Pad
Transcriber
Input Panel (Keyboard)
Input Selector arrow
Input Panel icon
Page 19

11. Status Indicators
The Today screen displays important information, such as upcoming appointments and
status indicators. Following are some of the status icons that you may see on your Dopod
818 Pro:
Icon Description Icon Description
Battery is fully charged Maximum signal strength
Battery power is very low No signal
Battery charging
Sound on No phone service
Sound off Searching for phone service
Ringer in vibration mode Voice call in progress
Connection is active Calls are forwarded
Connection is not active Call on hold
Synchronization in progress Missed call
Synchronization error New e-mail or text messages
GPRS (General Packet Radio Services)
available
GPRS in use New voice mail
There are more notifications.
Tap the icon to view all.
Wi-Fi connecting Device is locked
Wi-Fi on Device is unlocked
Wi-Fi on. : Wi-Fi off
Phone features are turned off and Flight
mode is enabled
Roaming
Alarm
19
Page 20

20
12. Customizing your Dopod 818 Pro
You can customize the look and feel of your Dopod 818 Pro and set the time and date
according to the current time zone.
Customize the Today screen
1. Tap Start > Settings > Personal tab > Today.
2. On the Appearance tab, select the desired theme for the background of the Today
screen.
3. On the Items tab, select the items you want to appear on the Today screen.
Customize the Start Menu
1. Tap Start > Settings > Personal tab > Menus.
2. Select the check boxes of the items you want to appear in the Start menu. You can
select up to seven items.
Set the time and date
1. Tap Start > Settings > System tab > Clock & Alarms.
2. Select the correct time zone and change the date or time.
Today settings Menu settings
Page 21

13. Making Your Dopod 818 Pro More Secure
There are two kinds of security on your Dopod 818 Pro. You can protect your SIM card from
unauthorized use by assigning a PIN (Personal Identification Number). Additionally, you can
prevent unauthorized access to any part of the device by using password protection.
Protect your SIM card with a PIN
1. Tap Start > Phone.
2. On the Phone screen, tap Menu > Options > Phone tab.
3.
Tap Require PIN when phone is used. To change the PIN at any time, tap Change PIN.
Protect your device with a password
1. Tap Start > Settings > Personal tab > Password.
2. Select the Prompt if device unused for check box, and in the box to the right,
select how long your device must be turned off before a password is required. In the
Password type box, select the type of password you would like to use. Enter the
password and confirm it.
3. On the Hint tab, enter a phrase that will help you remember your password, but
doesn’t allow others to guess your password. The hint will be displayed after the wrong
password is entered four times.
4. Tap OK. The next time your device is turned on, you will be prompted to enter your
password.
21
Setting up your PIN Setting up password
Page 22

22
14. More Information
For more instructions, refer to the User Manual or contact your local dealer for assistance.
Page 23

快速入門手冊
818 Pro
Page 24

24
1. 包裝盒中有什麼配件?
AC 變壓器
USB 纜線
皮套
電池
快速操作光碟
Dopod 818 Pro
耳機
使用手冊及
快速入門手冊
Page 25

2. Dopod 818 Pro
25
1
15
14
6
16
7
8
9
17
2
3
4
5
11
1210
13
18
23
19
20
242221
Page 26

26
Dopod 818 Pro 各部說明
編號 項目 功能
1 MMC/SD 或 SDIO
卡插槽
相機按鈕
2
音量控制鈕
3
通訊管理員/
4
語音命令鍵
話機繩孔
5
6 提示 LED 燈 綠色與琥珀黃色顯示 GSM 待機、SMS 訊息、GSM 網路狀態、提示通知,
觸按式螢幕
7
左對應鍵
8
右對應鍵
9
通話鍵
10
開始鍵
11
導覽控制鍵
12
13 OK 鍵
結束鍵
14
觸控筆
15
電源鍵
16
紅外線連接埠
17
車用天線連接器
18
自拍鏡
19
您可以插入 MMC 或 SD 卡以儲存資料,或是插入 SD 輸入/輸出卡,例如
網路卡。
按一下以啟動相機功能,再按一下會根據指定的拍攝模式,拍攝照片或是
影片。
上下滑動以調整音量。
按一下以啟動通訊管理員,按住以進行語音命令。
讓您可以繫上話機繩以攜帶您的 Dopod 818 Pro 話機。
以及電池充電的狀態。
閃動的藍色燈號,顯示藍芽系統已開啟,並且準備好傳輸無線電頻率訊號。
閃動的綠色燈號則顯示在 Wi-Fi 狀態。
使用觸控筆在螢幕上書寫、畫圖或是進行選擇。
按一下以執行按鈕上方的「對應鍵標籤」所顯示的功能。
按一下以執行按鈕上方的「對應鍵標籤」所顯示的功能。
按一下以接聽來電,或撥出電話號碼。
按一下以開啟開始功能表。
以上、下、左、右按這個多方向控制鍵,便可以在功能表或程式圖示間移
動;按中央按鈕來執行選取的項目。
按一下以確認您輸入的資料項目,或是離開使用中的程式。
按一下以結束通話。
使用觸控筆在觸按式螢幕上書寫、畫圖或是選擇項目。
按一下以暫時關閉話機電源。並將話機切換至睡眠模式。 若要完全關閉電
源,請按住電源鍵(約五秒鐘)。
當話機為睡眠模式時,您仍可以接聽來電。當您關閉話機電源時,則無法使
用話機所有的功能。
使用無線連接功能,讓話機與其他話機交換檔案或數據。
您可以將話機連接到汽車天線,讓電話使用較強的接收訊號。
當您要進行自拍時,將話機轉到背面面對自己,讓您的影像反射在鏡子中。
Page 27

編號 項目 功能
相機鏡頭
20
21
22
23
24
重設按鈕
同步化連接器
耳機插孔
麥克風
Dopod 818 Pro 話機中的相機鏡頭,支援二種拍攝模式:廣角模式(一般)
及近拍模式(近拍)。若要切換拍攝模式,向上推鏡頭鈕以切換至廣角模
式,或是向下推以切換至近拍模式。
使用觸控筆按重設按鈕,便可以讓 Dopod 818 Pro 話機進行暖開機的動
作。
用以同步化數據或為電池充電。
插入耳機收聽音樂或使用電話的免持通話設備。
用來撥接電話或進行錄音。
27
配件 功能
AC 變壓器
USB 纜線 連接 Dopod 818 Pro 話機與電腦,以同步化數據。
立體聲耳機
將交流電轉換為直流電,以進行電池充電。
在耳機上有音量控制快旋鈕,及傳送/結束鈕。您可以用來接聽或是結束通
話。
Page 28

28
3. 開始使用
在您開始使用 Dopod 818 Pro 話機之前,您必須安裝 SIM 卡和一顆已充電之電池。SIM 卡中
包含您的電話號碼和服務內容,並儲存了電話簿項目及訊息。
安裝 SIM 卡
1. 在安裝之前,請確認 Dopod 818 Pro 話機電源已關閉。
2. 向下滑動後蓋,移除電池蓋。
移除電池。用手指從電池槽的左上角拿起電池。
3. 將 SIM 卡插入 SIM 卡插槽,將金色接觸面朝下(SIM 卡上的截角,應對齊插槽的截
角)。
若要取出 SIM 卡,使用觸控筆壓下 SIM 卡插槽孔,當按下 SIM 卡的左側時,SIM 卡會
稍微地抬起,再將 SIM 卡滑出插槽。
將 SIM 卡滑入
SIM 卡插槽。
輕壓以將 SIM
卡推出。
使用觸控筆壓下
SIM 卡插槽孔。
4. 重置電池(請見下一段的說明)。
5. 將電池蓋蓋回。
Page 29

安裝及進行電池充電
出廠的新電池存有少量電力。您需要將電池放入話機,並為電池充電,才能夠使用 Dopod
818 Pro 話機。若要安裝電池,請先移除電池蓋,將電池組的銅接頭對準話機電池槽的右上
角,把電池安裝到話機中。先放入電池的右側,輕輕地將電池推到定位,再蓋上電池蓋。
有些電池要完全充電/放電數次,才會發揮最佳效能。有二種電池充電的方式:
29
• 使用 AC 變壓器,將 Dopod 818 Pro 話機
直接連接到電源插座。
當您的話機為關機狀態時,LED 指示燈顯示琥珀黃色燈號,呈現充電中的狀態。當您的話機
為開機狀態時,LED 指示燈會顯示琥珀黃色燈號,以及在螢幕中會出現 ( ) 的充電圖示。
• 將同步化纜線插入電腦的 USB 埠,和
Dopod 818 Pro 話機上的同步化連接
器。
Page 30

30
檢查電池電力
• 在 Today 畫面中,點選電池狀態的圖示 ( ) 。會開啟電源設定畫面,您可以查看目前
電池的電力。
電池電力指示燈
當電力極低時,在螢幕上會出現警告的訊息。當您看到這個訊息時,請立即使用同步化的功
能,將資料儲存到電腦中,或是將資料儲存到記憶卡中,然後關閉話機電源。在話機連接至電
源變壓器前,請勿重新啟動您的話機。
開啟 Dopod 818 Pro 話機電源
按下電源鍵以開啟 Dopod 818 Pro 話機電源。當您首次啟動話機時,需要完成螢幕校準的操
作。
再按一下電源按鈕,即會關閉話機電源。
電源鍵
Page 31

4. 撥打電話
如同標準的行動電話一樣,您可以使用您的 Dopod 818 Pro 話機,來撥接電話、保存通話記
錄,以及傳送 SMS 訊息。您也可以在通話中紀錄記事,以及直接從連絡人清單中撥打電話。
電話畫面
在電話畫面中,您可以進入通話記錄、快速撥號和電話的設定。若要開啟電話畫面,請執行下
列一項操作:
通話鍵
• 使用觸控筆點選開始 > 電話。
• 按下話機上的通話鍵。
撥打電話
• 從電話螢幕:在電話螢幕中,點選電話號碼,再點選
。
• 從連絡人清單: 在電話螢幕中,點選連絡人。點選
要撥打電話的連絡人,按下
鍵。
• 從通話紀錄: 在電話螢幕中,點選 。捲動到要
撥打電話的連絡人或電話號碼,然後點選撥號。
,或是按下通話
電話螢幕
31
Page 32

32
5. 同步化 Outlook 資料
使用 Microsoft® ActiveSync®,您即能夠同步化 Dopod 818 Pro 話機與電腦的資料,例如
Outlook 的內容。在您的話機中,已安裝 ActiveSync 程式,但是您如果尚未在電腦端安裝的
話,則需要先行安裝。將 快速操作光碟 置入電腦的光碟機中。依照安裝精靈的指示,安裝
ActiveSync。當安裝完成時,將同步化纜線插入話機,並接到電腦的 USB 埠中。
若要將話機連接至電腦,請開啟話機電源。當電腦偵測到 USB 連線時,即會啟動
ActiveSyncw 同步化設定精靈。請依照畫面中的指示,並選擇您要進行同步化的 Outlook 項
目。
同步化設定精靈
(同步化選項)
Page 33

執行 ActiveSync 4.1 的電腦基本規格
當您將 Dopod 818 Pro 連接到電腦後,您必須在電腦端安裝 Microsoft® ActiveSync® 程式。
ActiveSync 4.1 程式已包含在安裝光碟中,可相容於以下的作業系統和應用程式:
• Microsoft® Windows® 2000 Service Pack 4
• Microsoft® Windows® Server 2003 Service Pack 1
• Microsoft® Windows® Server 2003 IA64 Edition Service Pack 1
• Microsoft® Windows® Server 2003 x64 Edition Service Pack 1
• Microsoft® Windows® XP Professional Service Packs 1 and 2
• Microsoft® Windows® XP Home Service Packs 1 and 2
• Microsoft® Windows® XP Tablet PC Edition 2005
• Microsoft® Windows® XP Media Center Edition 2005
• Microsoft® Windows® XP Professional x64 Edition
• Microsoft® Outlook® 98, Microsoft® Outlook® 2000 及 Microsoft® Outlook® XP,及
Microsoft® Outlook® 2003 訊息和協同作業客戶端版本
• Microsoft® Office 97,不包括 Outlook。
• Microsoft® Office 2000
• Microsoft® Office XP
• Microsoft® Office 2003
• Microsoft® Internet Explorer 4.01 或更新的版本(必要)
• Microsoft® Systems Management Server 2.0
33
Page 34

34
6. 設定電子郵件帳號
您可以直接使用原有的 Outlook 電子郵件帳號。然而,在您開始接收和傳送郵件之前,您需
要設定由網路服務供應商(ISP),或是您存取VPN伺服器連線(通常是工作帳號)所使用的
電子郵件帳號。
設定電子郵件帳號
1. 點選開始 > 訊息中心。
2. 點選功能表 > 工具 > 新增帳號。
3. 輸入您的電子郵件地址,並點選下一步。
自動組態會協助您下載必要的電子郵件伺服器設定值。
4. 在自動組態完成後,點選下一步。
5. 輸入您的姓名 (您想要顯示在傳送電子郵件上的姓名)和密碼。
設定電子郵件帳號
提示 若您要儲存密碼,請勾選儲存密碼的核選方塊,之後您便不需要再次輸入。
Page 35

7. 傳送訊息
當您的 Dopod 818 Pro 話機連接到網路後,即可以隨時收發電子郵件、SMS 及 MMS 訊息。
您僅可傳送文字訊息(SMS)到行動電話的使用者,但是可以同時傳送 MMS 訊息到行動電話
的使用者及電子郵件的收件者。
編輯和傳送訊息
1. 在訊息清單上,點選功能表 > 切換帳號,並選擇一個帳號。
2. 點選新訊息。
3. 輸入一個或多個收件人的電子郵件地址或是文字訊息地址,並以分號隔開每一個收件人
的地址。若要開啟連絡人的地址和電話號碼,請點選收件者。
4. 輸入您的訊息。
• 若要快速輸入一般內容到郵件中,點選功能表 > 我的文字,並選擇一則所需要的訊息
內容。
5. 點選傳送。
35
編輯訊息
注意 您僅能在話機連結至 GSM 網路時,才可以傳送 SMS 及 MMS 訊息。僅當您的 Dopod 818 Pro
話機可以存取網際網路時(例如使用 GSM 網路、以USB/藍芽連結至電腦等),才可傳送電子郵
件訊息。
Page 36

36
8. 瀏覽網際網路
您可以設定直接連線到網際網路,或是連線到企業網路,以瀏覽網際網路。Dopod 818 Pro 話
機預先載入的 Internet Explorer Mobile,是具備完整功能的網際網路瀏覽器,專為行動設備
使用而設計。
使用 Internet Explorer Mobile
1. 點選開始 > Internet Explorer。
2. 若要開啟網站,請在畫面上方的地址欄中,輸入該網站的URL地址。點選向下的箭頭
( ) ,以選擇過去輸入過的網址。
3. 點選移至的圖示 ( ) ,連結到您所輸入的網址。
4. 點選上一頁,回到前一個瀏覽的畫面。
5. 點選功能表 > 重新整理,更新目前瀏覽的頁面內容。
6. 點選功能表 > 首頁,回到首頁。
7. 點選功能表 > 我的最愛,選擇您要瀏覽的網站。若要將目前瀏覽的網站加入我的最愛清
單中,點選功能表 > 加到我的最愛,或是點選並停在目前所瀏覽的頁面上,再從捷徑選
單中,選擇加到我的最愛的功能。
Internet Explorer Mobile
Page 37

9. 使用照相機及圖片&視訊程式
您可以輕鬆地使用 Dopod 818 Pro 話機內建之相機,拍攝照片及有聲音的影片。
在您拍攝照片或是影片之前,請將 Dopod 818 Pro 話機背後的鏡頭,調整為以下其中之一的
模式:
廣角模式 - 拍攝一般照片
近拍模式 - 拍攝近拍照片
載入照相機
• 點選開始 > 程式集 > 相機。
• 點選開始 > 程式集 > 圖片與視訊,再點選相機的圖示。
• 按下話機上的相機鈕。
若要離開相機功能,點選畫面中離開的圖示 ( ) 。
37
相機
Page 38

38
拍攝靜態照片
1. 在進入相機模式之後,點選畫面中的 或 ,或是按下瀏覽按鍵中的左右鍵,選擇照
片拍攝模式。
2. 按下相機鈕,或是按下瀏覽按鍵中的確認鈕,拍攝靜態的影像。
拍攝影片
1. 在進入相機模式之後,點選畫面中的 或 ,或是按下瀏覽按鍵中的左右鍵,選擇影
片拍攝模式。
2. 按下相機鈕或是瀏覽按鍵的確認鈕,以開始拍攝影片。若您要停止錄製影片,只要再次
按下確認鈕或是照相鈕即可。
使用圖片與視訊程式
圖片與視訊的程式,可以協助您收藏、編輯和分類在本話機中的所有圖片與視訊檔案。您可以
在本話機上瀏覽/播放這些圖片和視訊檔案。您可以用幻燈片來觀賞照片、發送照片、透過電
子郵件傳送照片、編輯照片,或將照片設為 Today 畫面的背景。
向下的箭頭
點選以檢視所選的圖片。
Page 39

檢視圖片
1. 點選開始 > 程式集 > 圖片與視訊。在我的圖片資料夾中的圖片,會以縮圖的方式呈現。
2. 選擇圖片並點選檢視。
播放視訊檔案
1. 點選開始 > 程式集 > 圖片與視訊,再點選我的圖片資料夾旁向下的箭頭 ( ) 並點選我
的文件夾。再點選我的影片。影片會以縮圖的方式呈現,視訊的媒體檔圖像為 ( )。
2. 選擇視訊並點選縮圖,以內建的 Windows Media 播放。
39
Page 40

40
10. 輸入資料
當您開啟的程式或是選擇的欄位,需要輸入文字或號碼時,螢幕會自動出現輸入台供您使用。
輸入台中有多種不同的輸入法,包括手寫板、全螢幕手寫、注音及倉頡。輸入台是預設出現
在功能表列中,以說明目前所選擇的輸入法。點選輸入法選擇器箭頭(顯示在輸入台圖像右
方),可以開啟輸入法清單。
圖像 指出選擇的輸入法是
英文輸入,且標點符號為半行
英文輸入,且標點符號為全行
注音輸入,且標點符號為半行
注音輸入,且標點符號為全行
全螢幕手寫輸入
輸入台圖像(鍵盤)
輸入法選擇器箭頭
輸入台圖像
手寫版輸入
倉頡虛擬鍵盤輸入
虛擬鍵盤注音輸入
顯示/隱藏輸入台
若要顯示或隱藏輸入台,點選功能表列中的輸入台圖像。
Page 41

11. 狀態指示器
在 Today 的畫面中,顯示了許多的重要資訊,例如,將要發生的約會和狀態指示器。以下為
在 Dopod 818 Pro 話機畫面中,可以看到的部分狀態圖像:
圖像 說明 圖像 說明
電池已充電完成。 最大訊號強度
電池電力極低 無訊號
電池充電中 關閉話機功能並開啟飛航模式
聲音開啟 無通話服務
聲音關閉 搜尋通話服務
來電鈴聲為震動模式 正在進行語音通話
連結功能啟動 已啟動來電轉接
連結功能關閉 待接通話
同步化進行中 未接來電
同步化失敗 有新的電子郵件或文字訊息
可使用GPRS (整合封包無線電服務)
GPRS 使用中
還有更多指示器.
點選圖像來查看所有指示器。
Wi-Fi已連接
Wi-Fi開啟
Wi-Fi開啟 : Wi-Fi關閉
漫遊中
新的語音信件
鬧鈴
41
Page 42

42
12. 自訂您的 Dopod 818 Pro
您可以自行設定您的 Dopod 818 Pro 顯示畫面,以及根據不同的時區,自行設定時間和日
期。
自訂 Today 畫面
1. 點選開始 > 設定 > 個人標籤 > Today。
2. 在外觀的標籤中,選擇想要作為 Today 畫面背景的主題。
3. 在項目標籤中,選擇您想要在 Today 畫面中顯示的項目。
自訂開始功能表
1. 點選開始 > 設定 > 個人標籤 > 功能表。
2. 勾選您想要在開始功能表中,顯示的項目的核取方塊。您最多可以選擇七個項目。
設定時間和日期
1. 點選開始 > 設定 > 系統標籤 > 時鐘與鬧鐘。
2. 選擇正確的時區,以及修改日期或時間。
Today 畫面
功能表設定
Page 43

13. 讓您的 Dopod 818 Pro 更安全
您的 Dopod 818 Pro 話機有兩種安全保護措施。您可以設定 PIN 碼 (個人辨別號碼),以防止
話機被他人盜用。另外,您可以設定密碼保護,避免他人擅自使用您的話機。
使用 PIN 碼來保護 SIM 卡
1. 點選開始 > 電話。
2. 在電話畫面中,點選功能表 > 選項 > 電話標籤。
3.
點選使用電話時,需要輸入 PIN 碼。若要修改 PIN 碼時,點選變更 PIN 碼。
使用密碼來保護話機
1. 點選開始 > 設定 > 個人標籤 > 密碼。
2. 選擇如果裝置未使用超過以下時間則提示的核取方塊,並在方塊右邊,選取話機強制關
閉前的密碼輸入時間限制。在密碼類型方塊中,勾選您要使用的密碼類型。輸入並確認
密碼。
3. 在提示標籤輸入片語。這個片語將幫助您記起密碼,卻不會讓別人猜出密碼。輸入錯誤
的密碼四次,提示便會出現。
4. 點選 OK。下一次開機時,話機會提示您輸入密碼。
43
設定 PIN 碼
設定密碼
Page 44

44
14. 了解更多的資訊
若要了解更多的說明,請參照使用手冊中的內容,或向您當地的經銷商詢問。
 Loading...