


User Manual
595 Manual.indb 1 2006/7/4 �� 05:07:18
Thank you for purchasing the all new Windows
MobileTM Smartphone!
Microsoft, MS-DOS, Windows, Windows NT, Windows Server, Windows
Mobile, ActiveSync, Excel, Internet Explorer, MSN, Outlook, PowerPoint, and
Word are trademarks, or registered trademarks of Microsoft Corporation in
the United States of America and/or other countries.
QuickMark and its icons are registered trademarks of SimpleAct, Inc.
MascotCapsule is a registered trademark of HI Corporation.
ClearVue Docum ent, ClearVue PD F, Clear Vue Pr esent ation , ClearVue
Worksheet are registered trademarks of WESTTEK.
Another World, Magic Puz are registered trademark of Magic Productions.
!
Our company reserves the right to make modications to this manual
without further notice.
!
Warning: This device is limited to indoor use, under the guaranteed
conditions that it will not interfere with legal radio stations and will
not be interfered with during operation.
595 Manual.indb 2 2006/7/4 �� 05:07:18
Important Safety Precautions
Please adhere to the following safety precautions when using this product to avoid
the risk of legal and monetary liabilities.
Electrical Safety
This product is only operable when using battery supplied power. Using other
power sources may cause harmful conditions and will void all guarantees for this
product.
Inight Safety
As this product may interfere with the operation of inight navigation system a and
navigation system communication networks, usage of this product in an aircraft
is prohibited by law in several countries. If you are permitted by law to use this
product in an aircraft, please switch to Inight Mode to turn off radio wave transmissions.
Environmental Restrictions
Do not use this product at a gas station or refueling station. Usage of this product is
also prohibited at fuel storages, chemical factories, and locations with explosives.
Environmental Safety
Do not use this product in the following locations: gas stations, fuel storages, chemical factories, demolition worksites, potentially hazardous explosive locations such
as fuel areas under ship holds, transport and storage of fuel or chemical substance
facilities, or locations with particles, dust, metal dust, chemical substances etc in
the air. Please remember that sparks in these environments can cause explosions
or re hazards resulting in human casualties.
Road Safety
Unless in an emergency, drivers in moving vehicles are prohibited from using hand
held equipment for calls. In certain countries, it is permitted for drivers in moving
vehicles to use hands-free devices for calls. Usage of this product may interfere
with normal operations of medical instruments. Many hospitals and clinics prohibit
use of these equipment.
Non-Ionic Radiation
To ensure efciency of radio wave transmissions and reduced interference, users
should operate this product under the recommended normal environments. As with
other similar mobile wireless communication equipment, in order to comply with the
required operations and safety considerations for the user, it is recommended that
the user maintains a safe distance from the antenna during the operation of the
equipment.
Dopod Defective Pixel Warranty Policy
As the LCD display on the handheld product is made up of high precision components, possible lit or dark pixels (Note) appearing on the display screen is a
common occurrence from the product manufacturing process. However, if your
purchased product meets the following conditions, you may request replacement of
the LCD display module within seven days from the purchase date.
1. Total count of three or more malfunctioning pixels (lit or dark); or
2. Any two malfunctioning pixels (lit or dark) within 5mm of each other.
Lit Pixels: blue, red, white, or green dots on specic locations of LCD screen.
Dark Pixel: black dot on specic locations of the LCD screen.
595 Manual.indb 3 2006/7/4 �� 05:07:18
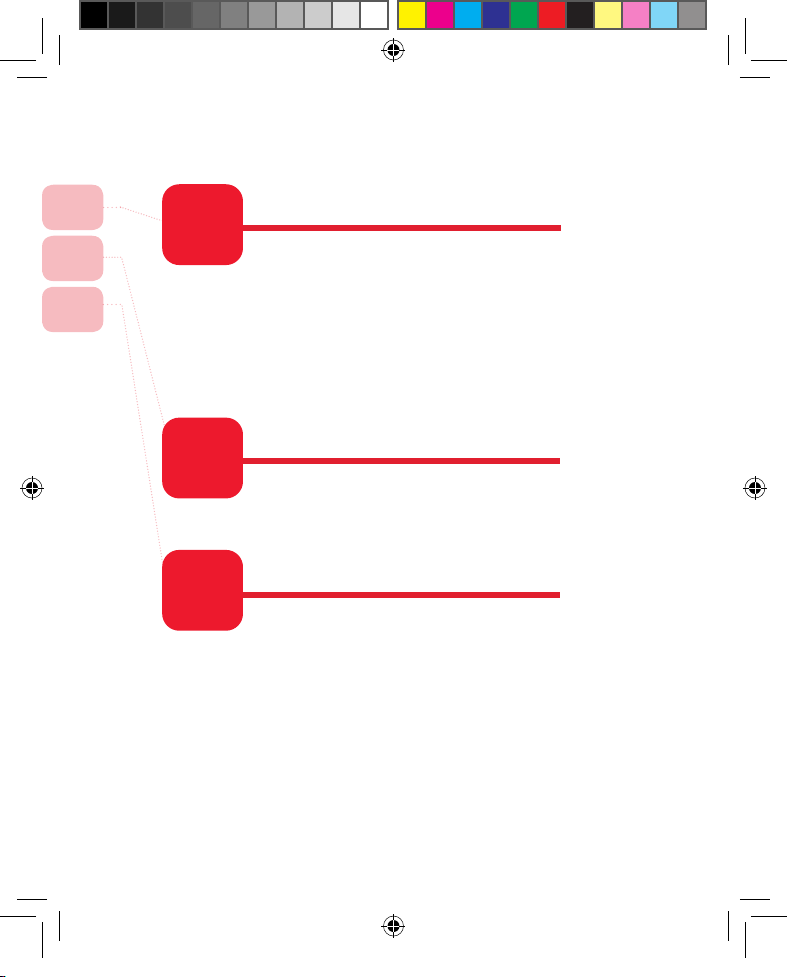
Table of Contents
Familiarize Yourself with the Device
Learning the Input Modes
Using the Communication Functions
1. 1 Familiarize With the Handset
and Accessories ....................... 3
1. 2 Battery and SIM Card ............... 8
1. 3 Insert Micro SD Card ................ 9
1. 4 Familiarize With the Home
Screen ..................................... 10
1. 5 Familiarize With the Application
Program Menu .......................... 17
1. 6 Restore to Default
(Hard Reset)............................. 20
2. 1 Switching Input Modes .............
25
2. 2 Using Various Input Modes ....... 26
2. 3 Using the Back Button to
Delete Characters .................... 37
3. 1 Using the Phone .......................
42
3. 2 Making Phone Calls .................. 47
3. 3 Receiving Voice Calls ............... 54
3. 4 Video calls ................................ 57
3. 5 Call Options ............................. 60
3. 6 Additional Information on
Dialing ...................................... 66
3. 7 Setting Up Speed Dial
Entries...................................... 70
1
2
3
1
2
3
595 Manual.indb 4 2006/7/4 �� 05:07:19
4
Managing Personal Information
4. 1 Contacts ................................... 76
4. 2 Calendar .................................. 90
4. 3 Tasks ........................................ 101
4. 4 Voice Notes .............................. 104
5
View Messages
5. 1 Messaging ............................... 112
5. 2 Text Messages ......................... 114
5. 3 Outlook E-mail .......................... 122
5. 4 MMS ........................................ 130
5. 5 POP3/IMAP4 E-mail Account .... 138
5. 6 Configure various settings in
Messaging ............................... 142
6
Experiencing Multimedia Entertainment
6. 1 Camera and Video Recorder .... 153
6. 2 Viewing Pictures and Videos .... 164
6. 3 Windows Media Player ............. 171
6. 4 MP3 Player............................... 180
7
Connecting With Wireless Communications
7. 1 Comm Manager ........................ 186
7. 2 Bluetooth Connection ............... 191
7. 3 Modem Mode ........................... 203
7. 4 GPRS Configuration ................. 219
4
5
6
7
595 Manual.indb 5 2006/7/4 �� 05:07:19
Experiencing Internet Entertainment
8. 1 Internet Explorer ....................... 226
8. 2 Pocket MSN ............................. 243
8
Synchronizing Your Phone
9. 1 About ActiveSync ..................... 258
9. 2 Installing ActiveSync ................. 259
9. 3 Installing Microsoft Office
Outlook .................................... 261
9. 4 Initial Connection ...................... 264
9. 5 Using ActiveSync ...................... 267
9. 6 Sync with Multiple Computers ... 268
9. 7 Synchronize Through Bluetooth
Connection ............................... 269
9. 8 Sync with Exchange Server ...... 272
9. 9 Sync to Transfer and Manage
Files ......................................... 275
9. 10 Advanced PC Sync Settings ..... 278
9. 11 Synchronize Music, Video, and
Pictures .................................... 284
9. 12 Installing Software .................... 288
9. 13 ActiveSync Connection
Troubleshooting ........................ 290
9
8
9
595 Manual.indb 6 2006/7/4 �� 05:07:20
10
Setting the Phone Information
10 .1 Home screen ............................ 296
10. 2 The Phone Settings .................. 299
10. 3 Configure Video Calls ............... 300
10. 4 Sounds ..................................... 302
10. 5 Removing Programs ................. 307
10. 6 Profiles ..................................... 309
10. 7 Time and Location .................... 313
10.8 Display Time When Keypad is
Locked .................................... 315
10. 9 Personal Information ................ 316
10. 10 Protecting Your Phone .............. 318
10. 11 Power Management.................. 323
10. 12 Accessibility ............................. 325
10. 13 Search for Operating System
Version Number ........................ 327
11
Using More Programs
11. 1 Java (MIDlet Manager) ............. 332
11. 2 File Explorer ............................. 333
11. 3 Task Manager ........................... 334
11. 4 Using ClearVue Suite ............... 335
11. 5 SIM Manager ............................ 340
11. 6 QuickMark Mobile Barcode ....... 341
11. 7 Calculator ................................. 343
11. 8 Games ..................................... 344
11. 9 3D Menu .................................. 348
11.10 Voice commander ..................... 351
10
11
12
12
Q&A
12. 1 Q&A ..............................................353
595 Manual.indb 7 2006/7/4 �� 05:07:20
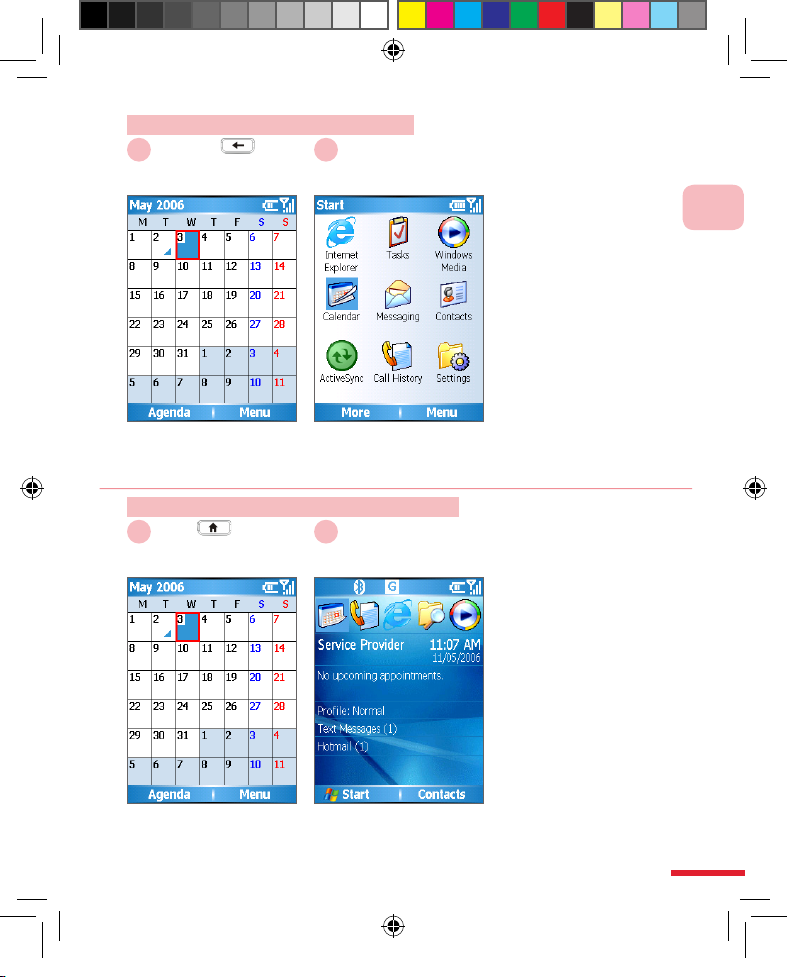
3
42
Action: Phone Home screen
Press Call button
1
Switch to the phone
screen.
2
3. 1 Using the Phone
When you begin to use the 595 phone functions, you will need to enter
the SIM card PIN number in order to connect to the GSM mobile
network. When using this device, you can control wireless functions, e.g.
activate/deactivate the phone. You can also adjust the headset volume
anytime during a call or when using the device.
3. 1. 1 Phone Functions
At the Phone screen, you can access, dial, search contacts, or save
phone numbers to the contacts list. Under certain circumstances (such
as on a plane), you may need to turn off the phone functions of the
handset. You can use the Comm Manager to manually deactivate/
activate the phone’s communication functions. When the phone function
is off, you will not be able to receive calls, send/receive messages, or
use GPRS by connecting to a wireless mobile network. But other phone
functions such as browsing the calendar, listening to music, or playing
games can still be used.
Dividing Line
Page Number
o
sc
C
all button
tton
2
e during a call or when using the device
.
uring a call or when using the device.
one Function
s
ne Functions
hone screen, you can access, dial, search contac
t
ne screen, you can access, dial, search contac
numbers to the contacts list. Under certain circums
t
nder certain circum
n of
f
the phone functio
f the phone fun
t.
Y
ou can use the Comm Manager to manually deaManager to manua
the phone’s communication functions. When the
pation functions. Wh
ou will not be able to receive calls, send/receive m
e
eceive calls, send/
RS by connecting to a wireless mobile network. B
u
o a wireless mobile
ns such as browsing the calendar
ng the calendar
, listening to musi
c, lis
can st
ill b
e used.
d.
Chapter
After purchasing this product, carefully read
through the user manual before operating.
For your reading convenience, this manual
is designed with many tips and services in
order to help you nd information quickly.
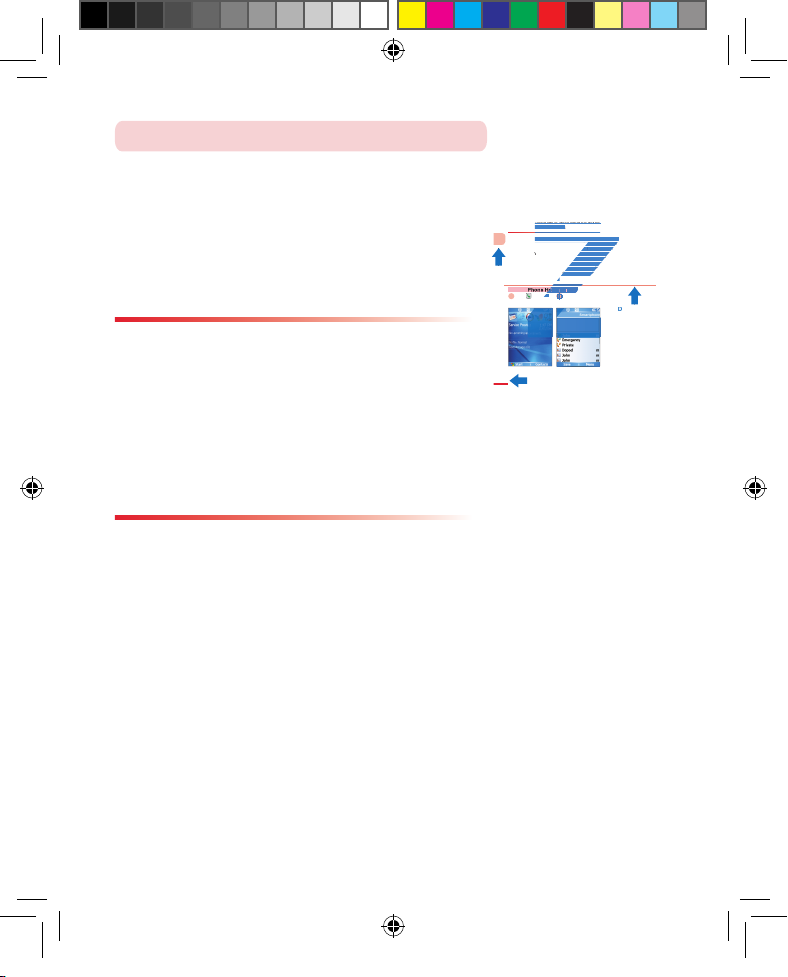
Page Format
Generally, each page is separated into upper and lower areas, regardless of the left
or right half of the page. Browsing is made
from left to right and then from up to down
in a Z shape, continuing on the next page.
There are small red boxes on the outer
edge of the contents page to assist you in
nding specic chapter topics.
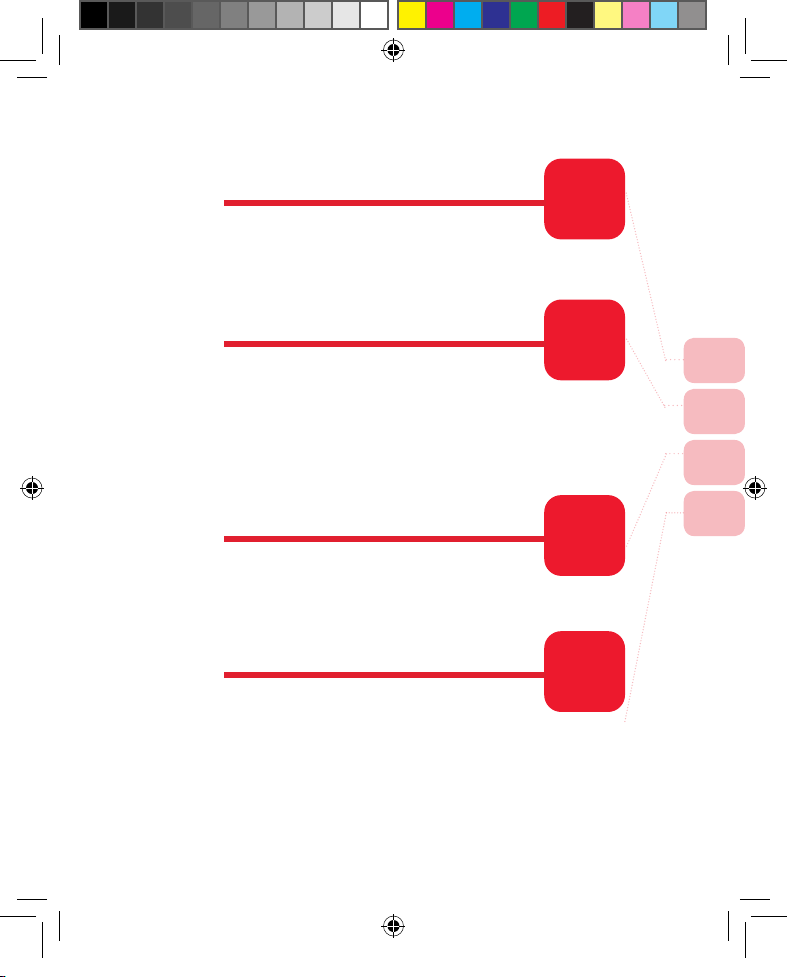
Topic Format
The beginning of each topic always starts
with the page on the right. The topic (rst)
page will explain what functions are cov-
ered under the specied topic. The Actions
Index will help you to quickly nd out how
to perform certain actions. The last part is
the contents page. The contents page is
separated into three levels. For example,
in Chapter 3, 3. 1, 3. 2, 3. 3 serve as the
second level sub-headers; 3. 1 is then further divided into 3. 1. 1 Phone screen and
3. 1. 2 Input PIN number information subsections. Similar types of functions may be
further subdivided to reduce confusion.
How to Use This Manual
595 Manual.indb 8 2006/7/4 �� 05:07:23
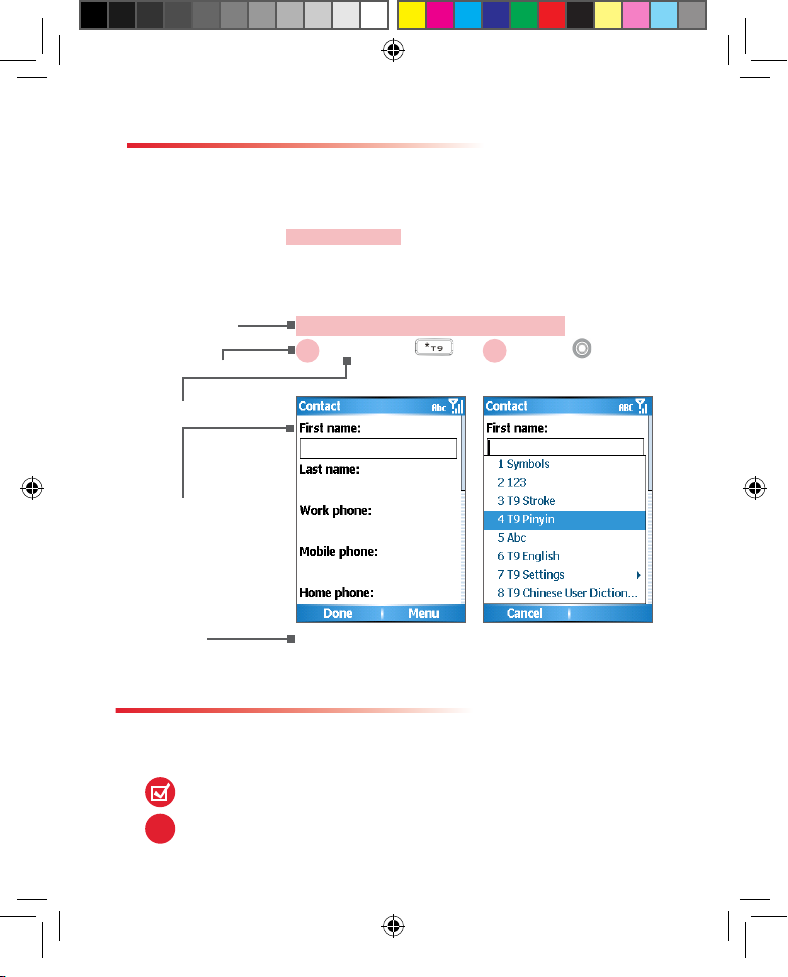
Every topic’s content page includes icons
that will assist the reader in operating the
product and learning quickly. At the beginning
of each action icon, the purpose of this action
will be outlined in red background color. Each
procedure will indicate the step sequence
numbers, the action you will need to execute,
the screen that appears for this procedure,
and the descriptions for this procedure.
About Action Icons
This manual provides tip symbols to remind
users of some pointers, notes, and precautions.
Tip Symbols
Caution
Tips
!
Select <I n p u t
Mode>
Action: Switch Input Method
Press & hold .
1
Switch input m et ho ds
wherever the text entry
elds can be located.
Example: T9 Pinyin
spelling.
2
Name of current
procedure
Actions to take
Procedure Number
Mobile phone or
computer screen
Action
descriptions
595 Manual.indb 9 2006/7/4 �� 05:07:24

595 Manual.indb 10 2006/7/4 �� 05:07:24

Topic
Familiarize Yourself
with the Device
In this topic, you will learn about…
1. Familiarize With the Handset and
Accessories
2. Insert SIM Card
3. Insert Micro SD Card
4. Familiarize With the Home Screen
5. Familiarize With the Application
Program Menu
6. Restore to Default (Hard Reset)
1
595 Manual.indb 1 2006/7/4 �� 05:07:24

Action
Index
Familiarize With the Handset and Accessories ............... 3
LED Indicator ................................................................ 5
Accessories ................................................................... 6
Remove the Battery ....................................................... 7
Insert SIM Card ............................................................. 7
Insert Micro SD Card ..................................................... 8
Familiarize with the Home Screen.................................. 9
Status Indicator and Program Icons ............................. 10
Switching from Home Screen to Comm Manager ......... 13
Switching from Home Screen to Most Recently
Used Program ............................................................. 13
Switching from Home Screen to Upcoming
Appointments .............................................................. 14
Switching from Home Screen to Profiles ...................... 14
Switching from Home Screen to Text Messages ........... 15
Themes and 3D Menu Screen ..................................... 15
Using the Start Menu ................................................... 17
Using the Menu ........................................................... 18
Using the Quick List..................................................... 18
Using the Back But ton ................................................. 19
Return to the Home Screen ......................................... 19
Using the Restore to Default ........................................ 20
Hard Reset Restore to Default ..................................... 21
595 Manual.indb 2 2006/7/4 �� 05:07:24
1
Familiarize Yourself with the Device
3
1.1 Familiarize With the Handset
and Accessories
Getting to know your handset buttons, LED
indicators, and appropriate accessories.
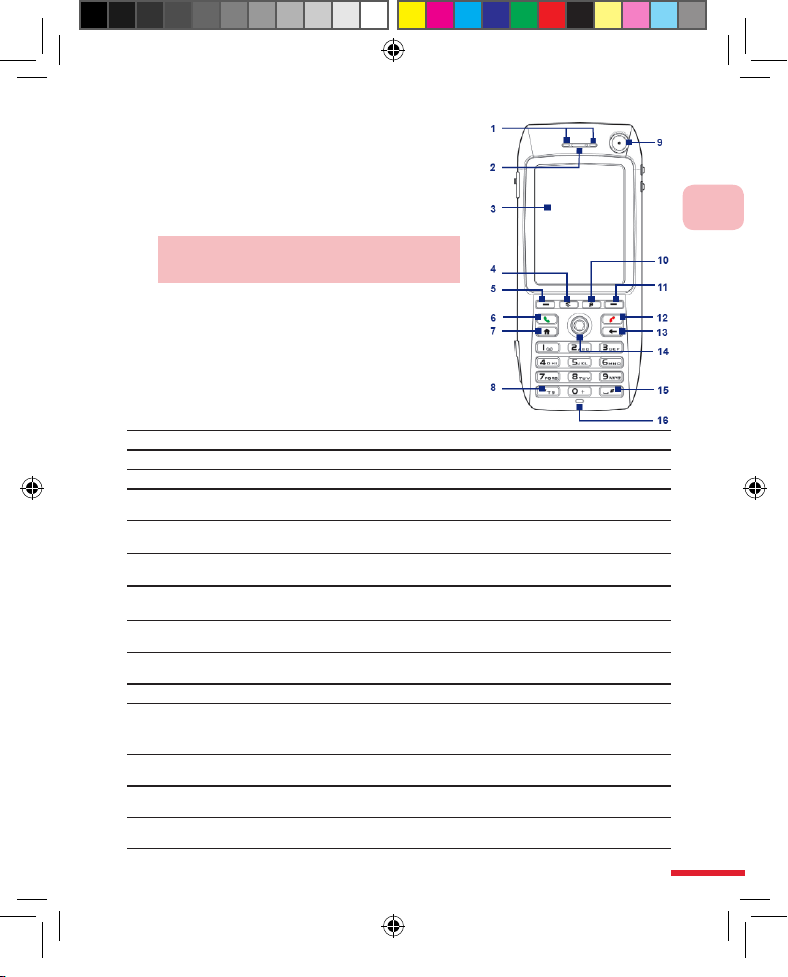
Familiarize With
the Handset and Accessories
1
LED indicator
LED indicator displays the current device’s status
2
Speaker
3
Screen
4
Video Calls button
After phone number is entered, press the Video Calls button,
then you may start video calling.
5
Left corresponding
button
Long press to open the Voice Command function.
6
Talk button
Press to perform dialing, talking, switch to another call, or
hold. Press & hold to activate or turn off hands free mode.
7
Home
screen button
Press to return to Home screen, press & hold to open Quick
List.
8
Star (*) button
Press to switch between upper/lower case of text input, or
press & hold to select Text Input Mode from the menu.
9
Secondary camera
You can use secondary camera to perform video calling, or to
take pictures.
10
Internet Explorer
Open the Internet browser
11
Right
corresponding
button
Press to run the displayed function of “corresponding key label” above the button.
12
End call button
Press the end call button to end the call, or press & hold to
lock the keypad.
13
Back button
Press to return to the previous page, or delete a character in
the text column.
14
Direction button
Use to scroll the page up, down, left, and right. Or press the
center round button for the OK button.
595 Manual.indb 3 2006/7/4 �� 05:07:25
Familiarize Yourself with the Device
1
4
15
Pound (#)
button
Press to insert a blank character, or press & hold to show the
Symbols List.
16
Microphone Used for making a call or recording.
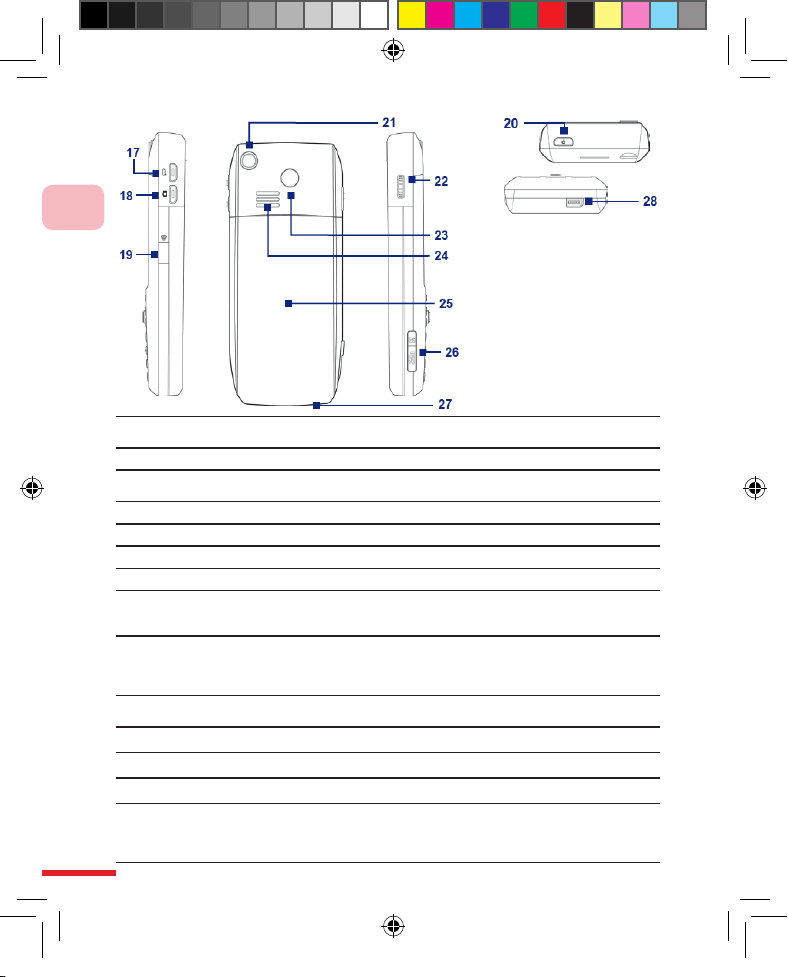
17
Voice command
button
Press to activate Voice Commander and long press to activate
Voice Note.
18
Camera keypad Press to activate camera function
19
IR port Transmit data through the IR port.
20
Power button Press to switch handset mode. Hold down to turn on/off handset.
21
Primary camera
22
Wheel
Volume can be adjusted up or down. Alternatively, select an item
on the screen and press on the scrollwheel to cycle through the
available options.
23
Car antenna
connector
Connect the mobile phone to the car antenna for better call
quality. Just remove the rubber cap and connect the antenna to
the antenna connecter when in use. When not in use, please
replace the rubber cap.
24
Amplier
speaker
Press to run the displayed function of “corresponding key label”
above the button.
25
Battery cover Open the battery cover to insert the battery, and SIM card.
26
Micro SD socket
27
Microphone Used for making a call or recording.
28
Headset/Sync/
Power Port
connection
Perform data sync or recharge using the USB cable; this port
is also used to provide stereo headset for hands free calling,
listening to music, or directly connects to the AC adapter for
recharge.
595 Manual.indb 4 2006/7/4 �� 05:07:25
1
Familiarize Yourself with the Device
5
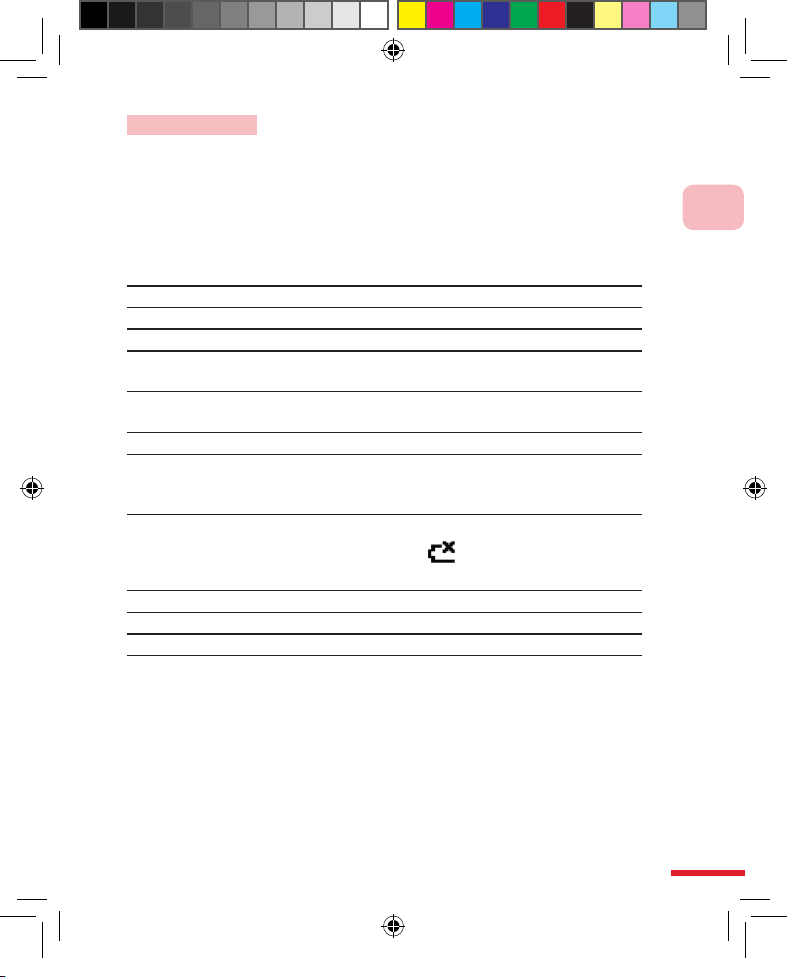
LED Indicator
The top double-co lo re d LED indicator (orange/red /g re en ) is used for
indicating the phone battery and network status. The bottom LED indicator
(blue) is used for indicating the Bluetooth status.
The table below explains what each of the different LED indicator colors
represent:
Top LED Status
Solid green Battery charging is complete.
Not lit Battery compartment is empty.
Solid orange
Battery is charging, or phone is being sync’ed with the
computer using ActiveSync through USB cable.
Flashing
green
Found telecom network.
Flashing red Insufcient battery level (less than 4%).
Flashing
orange
Ba t tery temp e r atur e is highe r tha n the speci f ied
operation range of 48°C or lower than 0°C and battery
has been stopped from charging.
Orange/green
LED indicator
Turn Off Malfunctioning Battery. Displays the “Battery
Malfunctioning” message ( ). Unplug the AC adapter
to resume ashing green LED.
Dark/fading Disconnected from the network.
Bottom LED Status
Flashing blue Bluetooth mode is in “Activated” or “Detected” mode.
595 Manual.indb 5 2006/7/4 �� 05:07:26
Familiarize Yourself with the Device
1
6
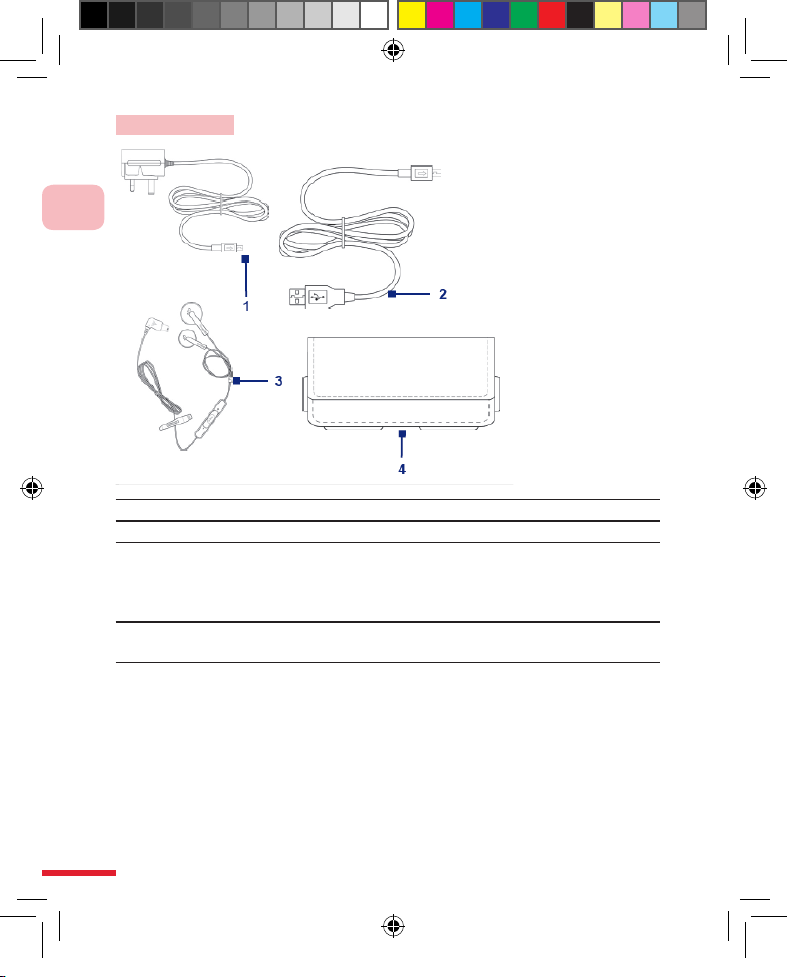
1 AC adapter Recharges the phone battery.
2 Sync cable Data synchronization with the computer.
3 Headset
The headset provides volume control buttons and Send/
End buttons. You can use the button to answer or hang
up incoming calls. Plug in the Headset/Sync connector
to listen to music or make calls.
4
Leather
pouch
For convenient carrying and protection of your phone.
Accessories
595 Manual.indb 6 2006/7/4 �� 05:07:26
1
Familiarize Yourself with the Device
7
1.2 Battery and SIM Card
The SIM (Subscriber Identity Module) card is provided by your telecom
service provider. It contains your basic data, for example, the phone
number and address book.
Before inserting the card, make sure that the phone power is turned off.
!
If the SIM card is not inserted, the communication functions cannot
be used.
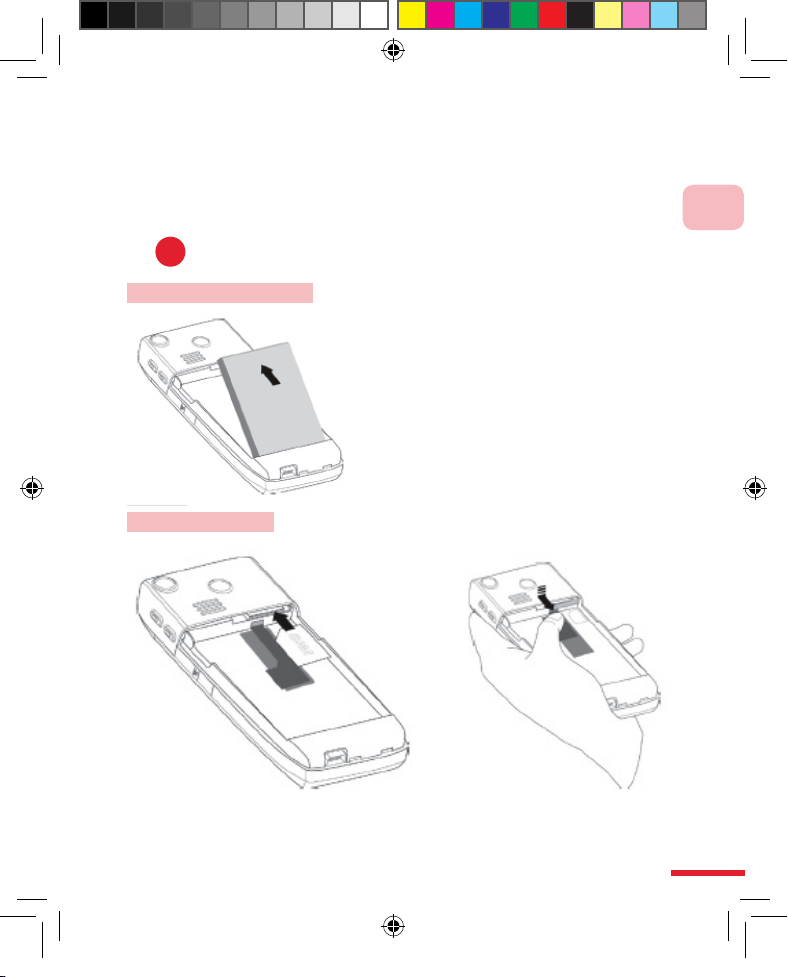
Insert SIM Card
1. Insert the SIM card: Insert the SIM card into the SIM socket in the
direction as indicated in the illustration
2. Remove the SIM card: Pull black plastic lever outwards to eject SIM card.
Remove the Battery
Loosen upwards the battery in the
direction as indicated in the illustration to
remove the battery
595 Manual.indb 7 2006/7/4 �� 05:07:27
Familiarize Yourself with the Device
1
8
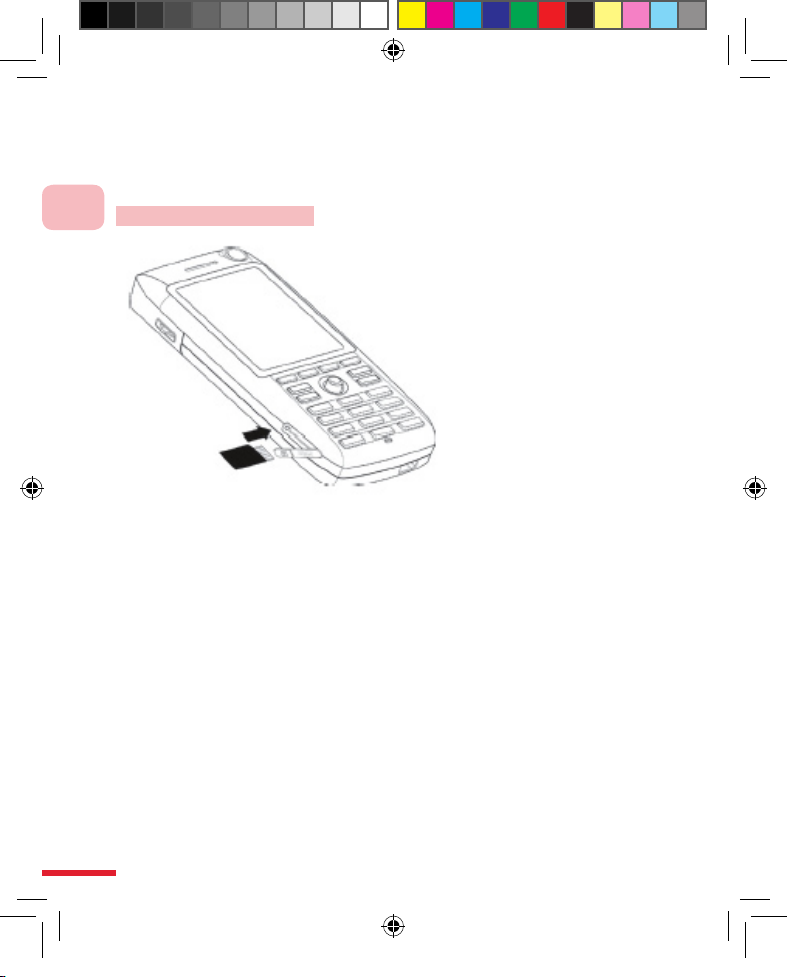
1.3 Insert Micro-SD Card
Ins ert Micr o-SD ca rd. You can store i nformation such as pict ures,
documents, and program data on the Micro-SD card.
1. Open protective plastic cover.
2. Insert Micro-SD card: Insert Micro-SD card as shown in picture and push
in fully to the end.
3. Rem ov e Micr o- SD c ar d: Push Micro-SD card to the end, it will be
automatically ejected.
Insert Micro-SD Card
595 Manual.indb 8 2006/7/4 �� 05:07:27
1
Familiarize Yourself with the Device
9
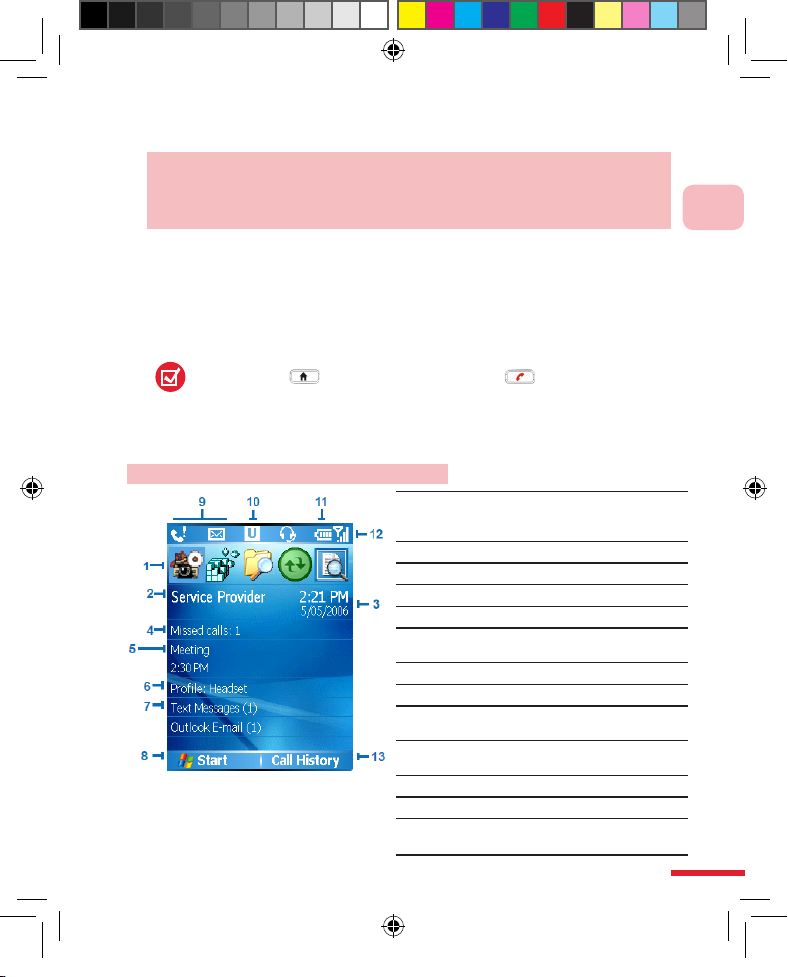
1.4 Familiarize with the Home Screen
The 595 mobile phone provides customized factory default themes and
3D menus. Further details are provided in Chapters 10 and 11. This
manual uses the Windows default Home screen, themes and menus as
sample instructions.
The Home screen will display the following important information:
status indicator, telecom service provider, time and date, upcoming
appointments, SMS, missed calls, as well as your recently used program
icons. You can select the desired icon and then press the OK button
to access the program. The icons located on the status bar include
roaming, available UMTS/GPRS, battery status, missed calls, new
messages, reception status, and UMTS/GPRS connection.
1. To switch back to the Home screen from various programs,
press the Home page button or the Hang up button.
2. To customize the contents displayed on Home screen, including
the background picture and settings, press Start > Setup >
Home Screen.
For Home screen setup, please refer to 10.1 (Home Screen).
Familiarize with the Home Screen
1
Choose the most recently used program,
and access it directly from the Home
screen.
2
Display telecom service provider name.
3
Display date, time, and alarm status.
4
View missed calls.
5
View next scheduled appointment.
6
Display prole contents. Press once to
modify the prolie contents.
7
Press to open the message folder.
8
Press to display the program menu.
9
Displays hints such as missed calls or
new messages.
10
Display UMTS/GPRS or GSM network
status.
11
Display battery status.
12
Display network signal strength.
13
Press to access contact list, call records,
or message contents.
595 Manual.indb 9 2006/7/4 �� 05:07:28
Familiarize Yourself with the Device
1
10
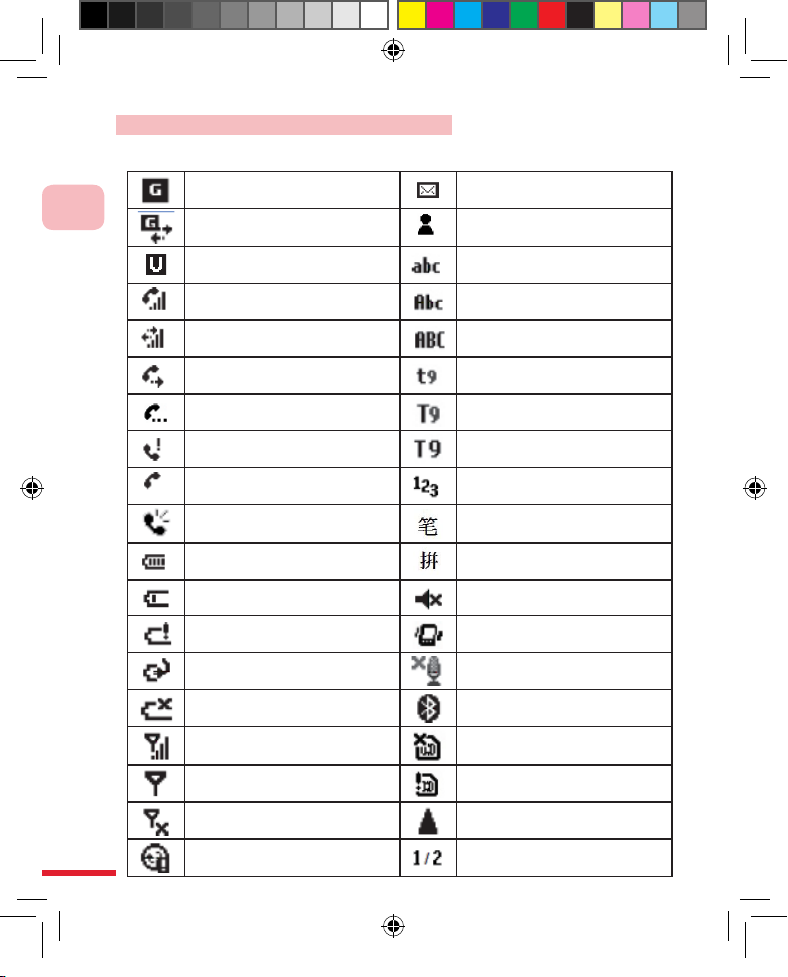
Status Indicator and Program Icons
The table below explains what the most common status indicators represent:
Available GPRS
New E-mail or text message
(SMS, text message services)
Connected GPRS New instant message
Available UMTS (3G)
Multiple click text input mode,
lower case
Voice calls currently in use
Multiple click text input mode,
with the rst letter capitalized
Data calls currently in use
Multiple click te xt input mo de ,
upper case
Call forwarding activated T9 text input mode, lower case
Call waiting
T9 text input mode, with the rst
letter capitalized
Missed call T9 text input mode, locked
Con nect when SI M card is not
inserted
Numeric input mode
Speakerphone on T9 Stroke
Battery level T9 Pinyin
Insufcient battery level Ring tone off
Battery level extremely low Vibrate on incoming calls
Battery Charging Mute microphone
No battery or battery error Bluetooth
Signal strength SIM card is not inserted
Wireless connected or no signal SIM error
Wireless is off Roaming
Synchronization error Line 1/2
595 Manual.indb 10 2006/7/4 �� 05:07:31
1
Familiarize Yourself with the Device
11
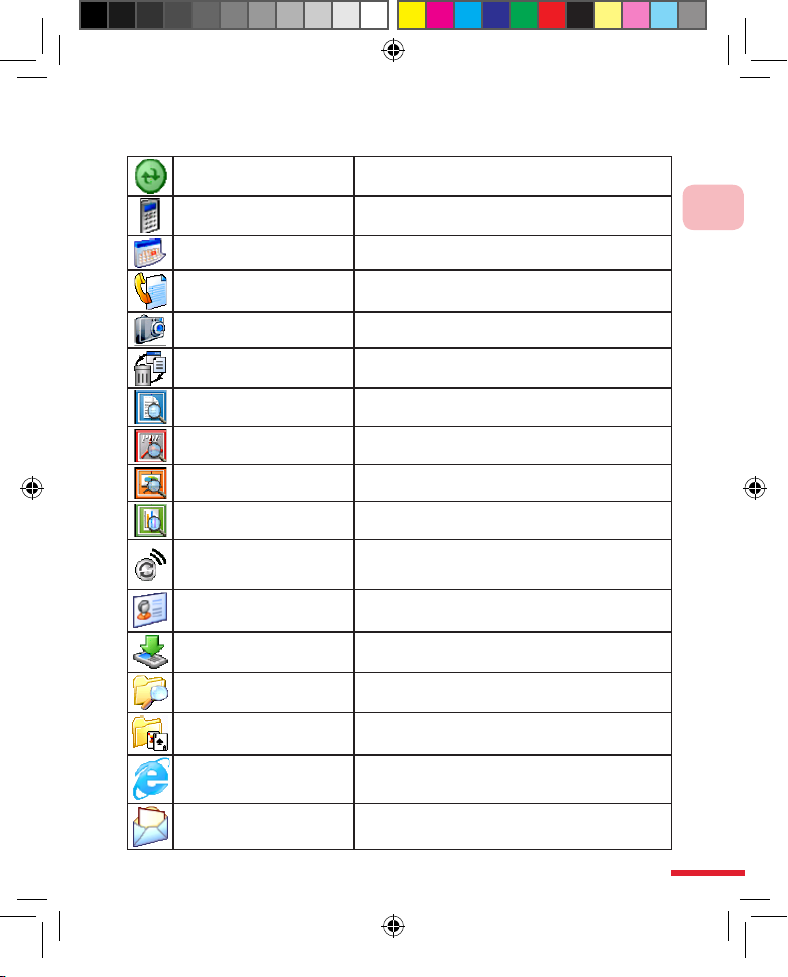
The following are some of the program icons. These programs have already
been installed on the phone.
ActiveSync Syncs data between the phone and the computer.
Calculator
Runs simple math calculations such as addition,
subtraction, multiplication, and division.
Calendar
Schedules appointment(s) information and creates
meeting requests.
Call History History of all dialed numbers and missed calls.
Camera Provides multiple photoshooting modes.
Clear Storage (Note 1)
Clears data in memory, returns to factory default
values, then restarts.
ClearVue Document Allows you to read Word les on the phone.
ClearVue PDF Allows you to read PDF les on the phone.
ClearVue PPT Allows you to read PowerPoint les on the phone.
ClearVue Worksheet Allows you to read Excel les on the phone.
Comm Manager
Allows you to efciently turn on/off your phone,
sync with the computer, mute the phone, access
Bluetooth, enable/disable Direct Push etc.
Contacts Records contact information.
Download Agent
Provides download status and information such as
the content of the downloaded material.
File Explorer
Allows you to organize and manage les on the
phone.
Games
Four built-in games: Another World, MagicPuz,
Bubble Breaker and Solitaire.
Internet Explorer
For browsing the Internet / WAP websites and to
download new programs / les from the Web.
Messaging
Allows you to send and receive E-mail, text
messages, and MMS.
595 Manual.indb 11 2006/7/4 �� 05:07:33
Familiarize Yourself with the Device
1
12
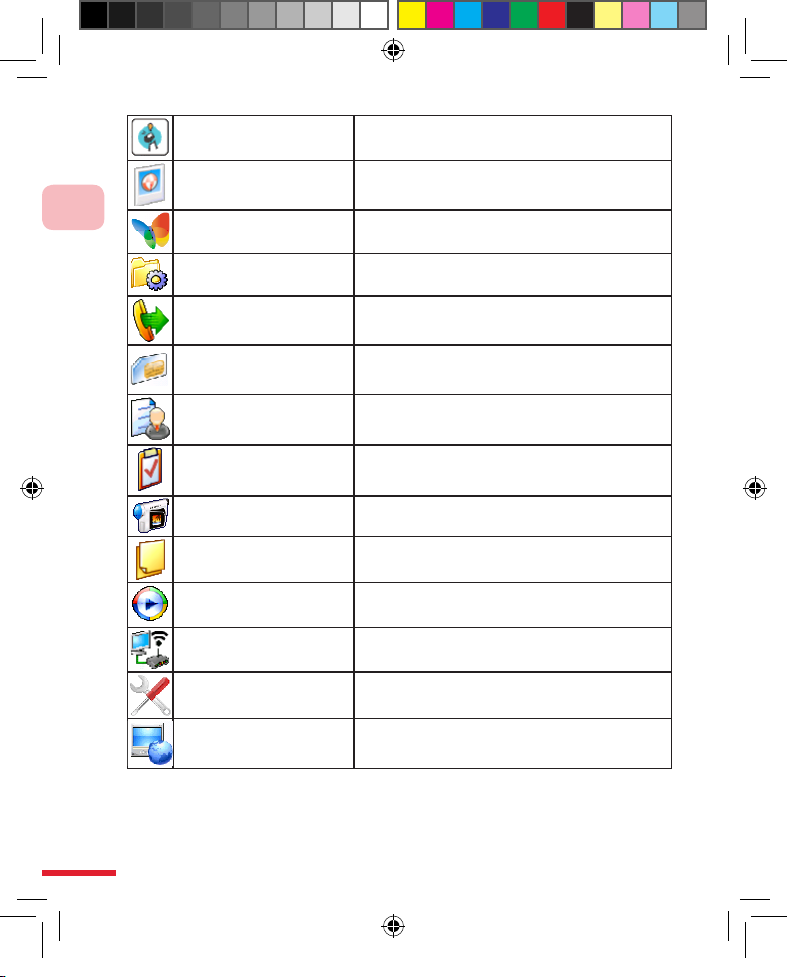
MIDlet Manager
Allows you to install JAVA applications, such as
games and tools.
Pictures & Videos
Browse and manage pictures and videos stored
on the phone or memory card. Default folder is My
Pictures folder.
Pocket MSN
For inst an t mes sa gi ng w it h contacts in M SN
Messenger.
Settings
Al l ows you to con f ig u r e th e v a ri o u s ph one
settings.
Speed Dial
Allow s you to create the sp eed dial en try for
frequently dialed numbers or accessed programs.
SIM Manager
Allows you to manage the contacts stored on the
SIM card as well as copy the contacts onto the
phone.
Task Manager
Rec ords and manag es th e program s that are
currently in use.
Tasks Manages your task items.
Video Recorder Records video clips of various modes and length.
Voice Notes Allows you to record brief voice reminders.
Windows Media Allows you to playback movies and sound les.
Wireless Modem
Al low s y ou r p hon e to f unc tio n as a mod em
through Bluetooth or USB.
Network Wizard
Automatically detect your SIM card and correctly
setup the appropriate GPRS/MMS congurations.
Streaming Media
Play the Streaming Media on the web, such as
broadcasting, etc.
(Note 1) The icons above are the W indows Default icons. Your mobile phone is preinstalled with Dopod 3D menus at the factory, therefore some of the icons may be
different. To understand the 3D ic on, please refer to 11.9.
(Note 2) Restore to default settings not only removes all memor y data stored on 595,
but will also remove any of your installed programs and Dopod plug-in programs (For
example: QuickMark, MP3 Player, MagicPuz, and 3D menus). You can connect to the
Dopod member’s webpage through the Internet to download les and re-install them.
595 Manual.indb 12 2006/7/4 �� 05:07:35
1
Familiarize Yourself with the Device
13
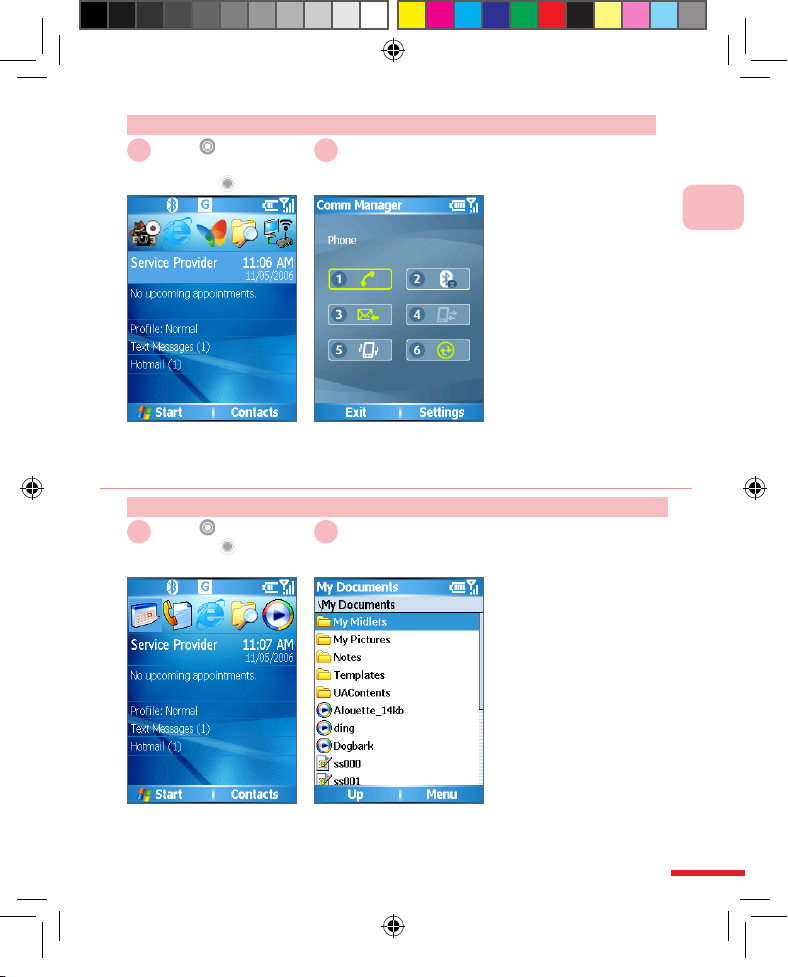
Action: Switching from Home Screen to Comm Manager
Select <Program>
Press the OK button.
1 2
Choose the program you
wish to switch to, then
press the OK button.
Goes to your Recent
Programs.
Select Service
provider / time
Press the OK button
1 2
Choose the service provider
/ time column, press the OK
button.
Opens the Comm Manager.
Action: Switching from Home Screen to Most Recently Used Program
595 Manual.indb 13 2006/7/4 �� 05:07:36
Familiarize Yourself with the Device
1
14
Action: Switching from Home Screen to Upcoming Appointments
Select
<Appointment>
Press the OK button
1 2
Goes to your Upcoming
Appointments.
Choose the appointment
items you wish to search for,
then press the OK but ton.
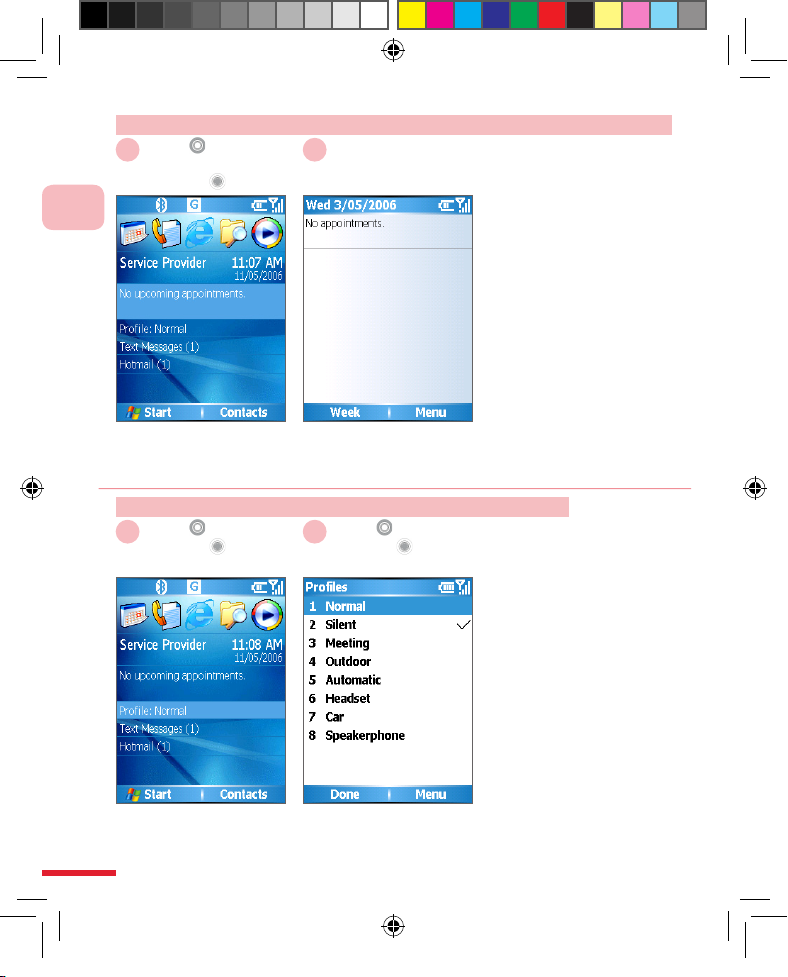
Action: Switching from Home Screen to Proles
Select Proles
Press the OK button
1
Select <Proles>
Press the OK button
2
Choose the prole you wish
to use, then press the OK
button to conrm the switch.
Choose Proles, then press
the OK but ton.
595 Manual.indb 14 2006/7/4 �� 05:07:38
1
Familiarize Yourself with the Device
15
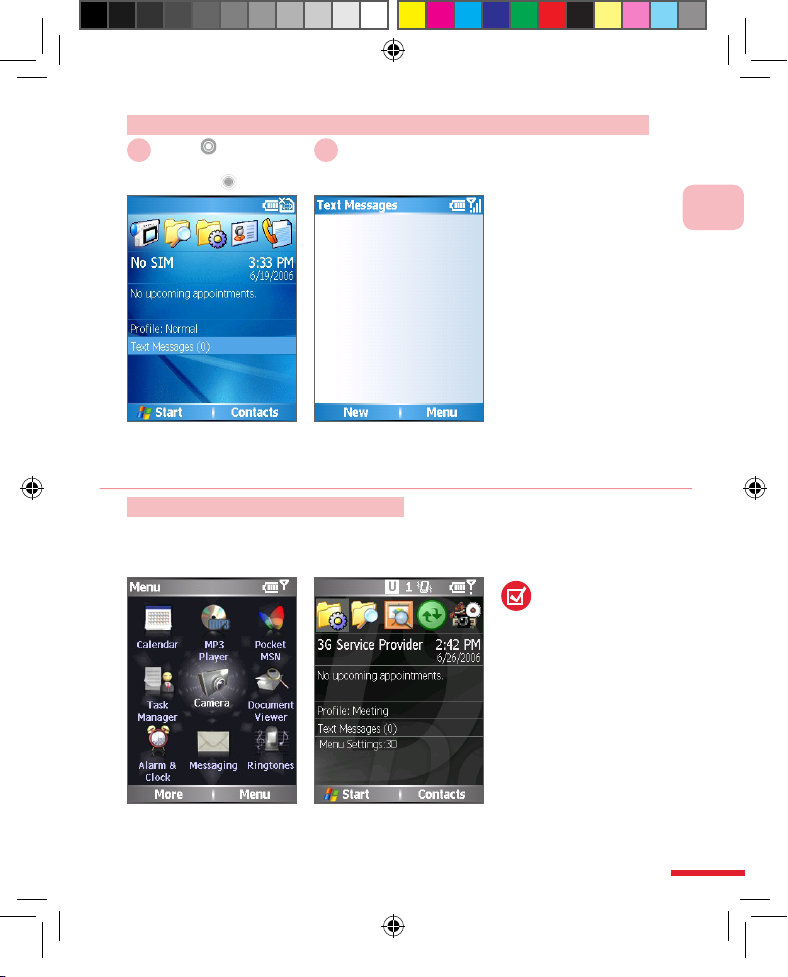
Action: Switching from Home Screen to Text Messages
Select Text
Messages
Press the OK button
1 2
Goes to the SMS Home
screen.
Select SMS, then press
the OK but ton.
Themes and 3D Menu Screen
▲ Default 3D menu
screen.
The default themes,
Home screen, and
the 3D menu on 595
can be changed (please
refer to 10.1 Home screen
section).
▲ Default Dopod 3 D
menu.
595 Manual.indb 15 2006/7/4 �� 05:07:39
Familiarize Yourself with the Device
1
16
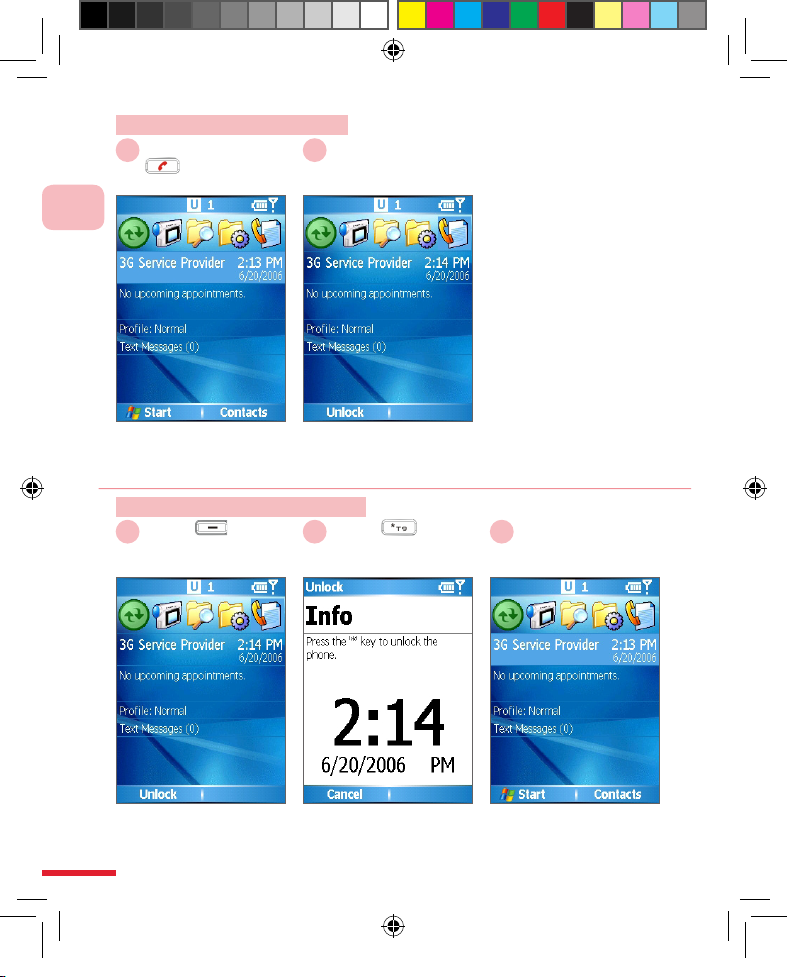
Action: Use Device Lock
Press and hold
1 2
Action: Undo Device Lock
Select Unlock
1
Select
2
Device locked
3
595 Manual.indb 16 2006/7/4 �� 05:07:41
1
Familiarize Yourself with the Device
17
1.5 Familiarize with the Application Program Menu
The Start is located in the lower left corner of the Home screen. It can
display various program icons on a single or multiple page screen.
At the Start Menu, you can:
Press “More” or # to switch to the next page.
Press the Back button or * to switch to the previous page.
Press the Back button to switch to the previous page.
Most of the programs on the phone provide function menus (Right
function button ). You can use the directional button function or enter
the icon’s number directly.
•
•
•
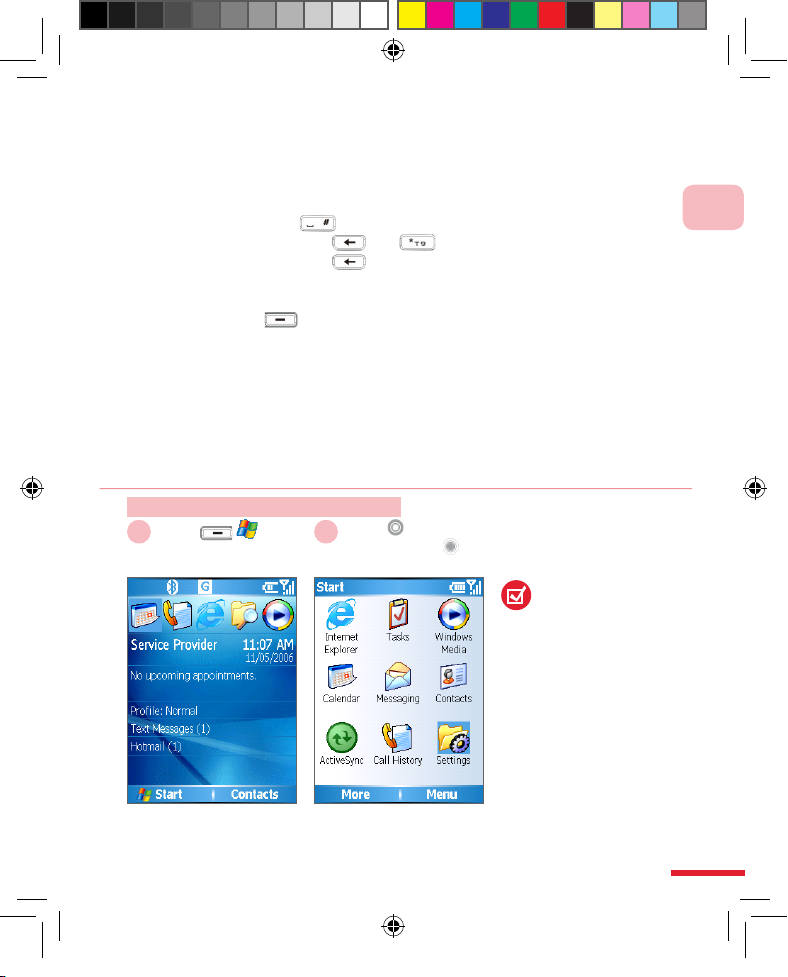
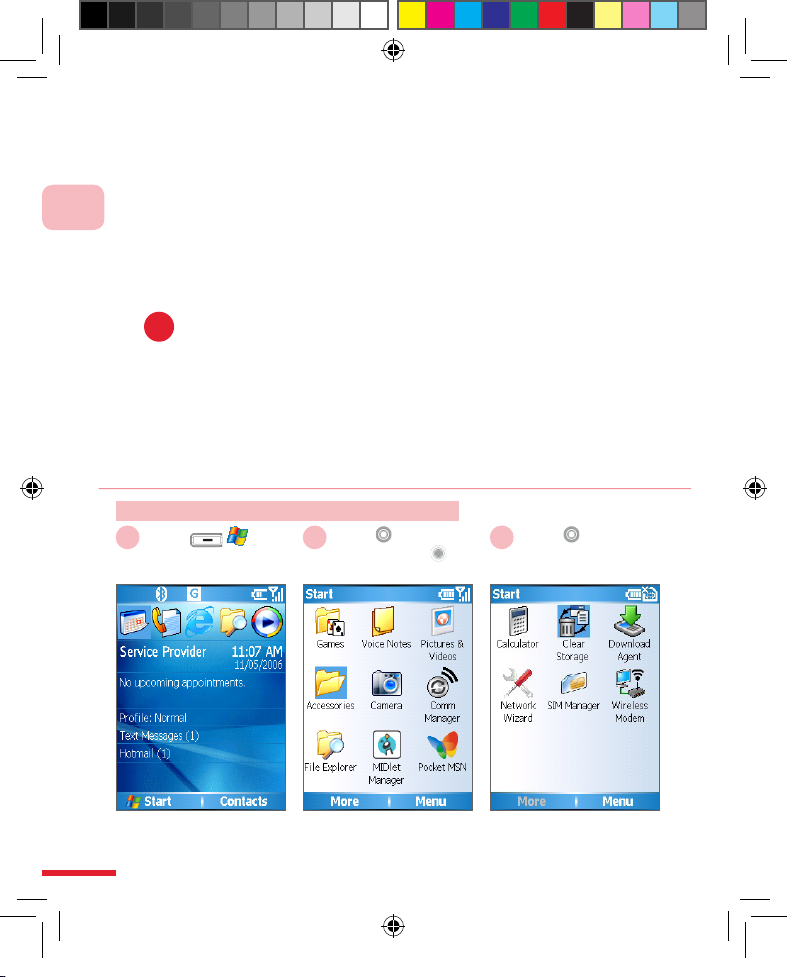
Action: Using the Start Menu
Select
Start
1
Select <Program>
Then press the OK
button
2
At the Home screen, select
Start.
To view more programs,
select More.
The phone has been
pre-installed with
multiple programs
for your immediate
access. You will also
be able to install other
application programs from
the Windows MobileTM
Quick Operation CD, or
download them from the
Internet. In addition, you
can also purchase other
mobile phone software
from retailers and install
them onto the phone.
595 Manual.indb 17 2006/7/4 �� 05:07:42
Familiarize Yourself with the Device
1
18
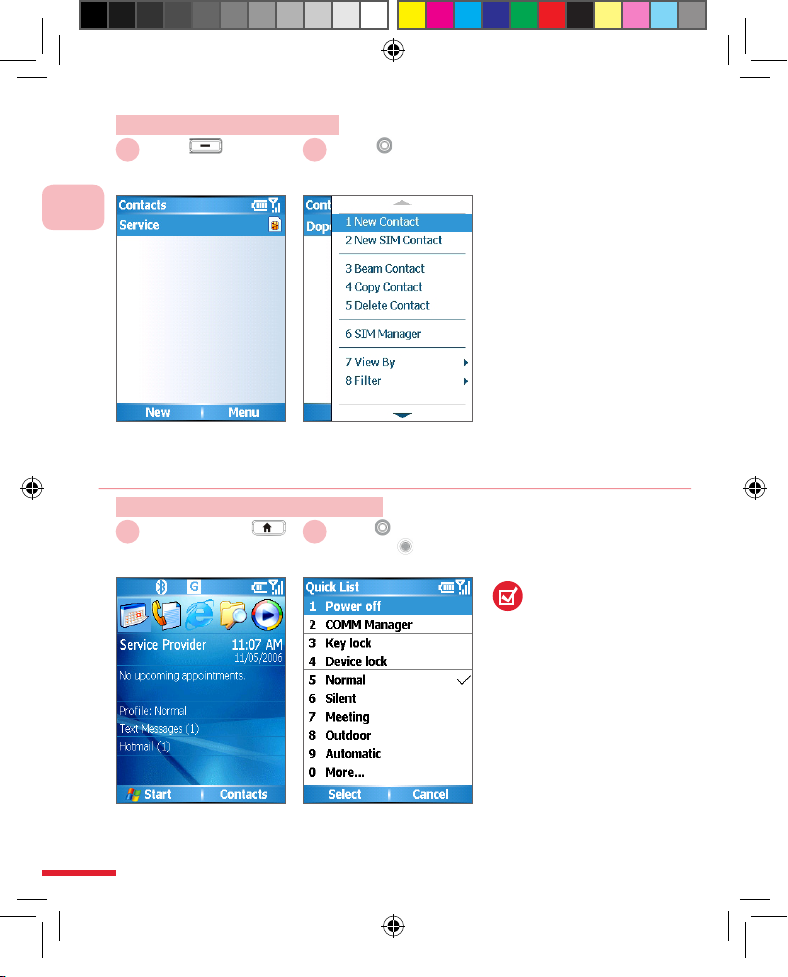
Action: Using the Quick List
Press & hold the
Home screen button
1
Select <Mode>
Press the OK
button
2
Open Quick List. Select the option you wish
to use. You can also press
the corresponding number
key to the left.
Action: Using the Menu
Select Menu
1
Select <Menu>
or press <Number
Pad>
2
Open Menu. Use the directional button to
select the item and then press
the OK but ton or enter the icon’s
number directly.
The Quick List
provides convenient
control functions
such as phone lock,
keypad lock, inight mode,
and selection of the
phone’s other operation
modes (please refer to
10.4 Control Modes).
595 Manual.indb 18 2006/7/4 �� 05:07:43
1
Familiarize Yourself with the Device
19
Action: Using the Back Button
Press the Back
button
1 2
Press the Back button
in the application that is
currently running.
Returns to the previous
application.
Action: Return to the Home Screen
Press <Home
screen button>
1 2
Pressing the Home screen
button in any application
that is currently running
will retur n you to the Home
screen.
Return to the Home
screen.
595 Manual.indb 19 2006/7/4 �� 05:07:45
Familiarize Yourself with the Device
1
20
1.6 Restore to Default (Hard Reset)
Restore to default settings will remove all settings such as contacts,
tasks, calendar appointments, additionally installed programs, and
setup values in the memory. The phone will be reset to factory default
settings and restart. To avoid the loss of data, you can sync the data
to your computer prior to restoring the default settings. When improper
operations prevent your phone from functioning properly, you can try to
restore to factory default settings.
For data synchronization, please refer to Chapter 9 Synchronizing Your
Phone.
When the system is unable to startup, you can try to use Hard Reset
to restore to default settings. We recommend that you contact our
customer service representatives before using this function, in order
to avoid damage to your phone and data. If you need to Hard Reset
your phone, please register as a member at the Dopod website and
download the 595 software installation les to reinstall the following
software:
Game: Another world, Magic Puz
QuickMark
MP3 Player
3D menu with Dopod Desktop Theme
Cyberon Voice Commander
•
•
•
•
•
Action: Using the Restore to Default
Select
Start
1
Select Accessories
Then press the OK
button
2
Select Clear
Storage
3
Open Acc essories. Go to the Restore to
Defaults program.
!
595 Manual.indb 20 2006/7/4 �� 05:07:46

1
Familiarize Yourself with the Device
21
Enter 1234
Then select Yes
4
After conrmation, enter 1234
and select Yes. The phone will
restart after resetting.
Action: Hard Reset Restore to Default
Press & hold
Power
button
1
At the same time, press & hold
the Left /Right Soft
Key, then press the
Power button once.
2
Press the
number key 0 or any
other keys to cancel
3
First, turn off the
phone.
Press & hold the Left /Right soft
keys, then press the power button
once. Wait for the screen to
reappear, then release the soft
keys.
Press the number key 0 to
conrm restore to defaults,
or press any other keys to
cancel.
Power button
595 Manual.indb 21 2006/7/4 �� 05:07:49

Familiarize Yourself with the Device
1
22
595 Manual.indb 22 2006/7/4 �� 05:07:49

Topic
Learning the Input
Modes
In this topic, you will learn about…
1. Switching Input Modes
2. Using Various Input Modes
3. Using the Back Button to Delete
Characters
2
595 Manual.indb 23 2006/7/4 �� 05:07:49

Action
Switching Input Modes .............................................. 25
Switch to Symbol Input .............................................. 26
Switching to numer ic input .........................................27
Enter Chinese characters using T9 Strokes ............... 28
Entering complicated characters ............................... 29
Enter Chinese characters using T9 Pinyin ................. 31
Entering T9 English ................................................... 3 3
Adding T9 English words ........................................... 3 4
T9 Preferences ..........................................................35
T9 Chinese User Dictionary .......................................35
T9 My Words ............................................................. 35
Entering English text ..................................................36
Deleting a single charac ter ........................................ 37
Deleting all characters ............................................... 38
Index
2
595 Manual.indb 24 2006/7/4 �� 05:07:49

2
Learning the Input Modes
25
Select Input Mode
Action: Switching Input Modes
Press & hold
1
Input modes can be
switched anywhere within
the text entry elds.
For example: T9 Pinyin
spelling.
2
2.1 Switching Input Modes
You will be able to use the keypad to enter
text such as Chinese, English, numbers,
and symbols. Enter the characters through
the English alphabets Pinyin, and keystroke
symbols as indicated on the keypad.
3
You have successfully
switched to T9 Pinyin
mode.
▲
Switching Input Modes.
595 Manual.indb 25 2006/7/4 �� 05:07:50

2
Learning the Input Modes
26
2.2 Using Various Input Modes
Using various built-in input modes on the
phone: character, T9, and numeric input
modes.
To insert a line break under any input
mode, press the OK button.
2.2.1 Symbols
Using the phone to enter various punctuation
and emotion symbols.
Action: Switch to Symbol Input
Press & hold
Then select the
Symbol
1
Select the Symbol
Then select the OK
Button
2 3
You can also hold the # key
to activate the direct symbol
input function.
Press Previous/Next Page
to switch to other pages.
You have successfully
entered the selected
symbols.
595 Manual.indb 26 2006/7/4 �� 05:07:52

2
Learning the Input Modes
27
2.2.2 Numbers
Using Numeric Input mode to enter numbers.
Action: Switching to numeric input
Press & hold
Then select 123
1 2
Press
Number
3
The located at the upper
right corner indicates that you
have switched to numeric input
mode.
For example: 12345678.
▲ Entering numbers.
595 Manual.indb 27 2006/7/4 �� 05:07:53

2
Learning the Input Modes
28
2. 2. 3 T9 Strokes
Use the character strokes quick input mode
to enter Chinese characters. If the character
to be entered is complicated, it can be broken
into two parts.
Corresponding button/character strokes:
Action: Enter Chinese characters using T9 Strokes
Press & hold
Then select T9
Strokes
1
2
Press T9
Strokes
3
The located at the upper
right corner indicates that you
have switched to T9 character
stroke input mode.
For example: to enter
“Wang”, press the number
keys 9, 2, 6, 4 respectively.
▲Strokes input.
595 Manual.indb 28 2006/7/4 �� 05:07:55

2
Learning the Input Modes
29
Press & hold
Selected Character
Code
4
Press
Strokes
5
Make sure the input is a
complete character, then
select the character without
the underline.
You have successfully
entered the character.
Action: Entering complicated characters
Press Strokes
1
Press & hold
Selected Character
Code
2
Press Strokes
3
Select the second part of
the character.
Select the rst part of the
character. The underlined
character is a part of another
character.
595 Manual.indb 29 2006/7/4 �� 05:07:56

2
Learning the Input Modes
30
Press & hold
Selected Character
Code
4
You have successfully
entered your desired
character.
595 Manual.indb 30 2006/7/4 �� 05:07:57

2
Learning the Input Modes
31
2.2.5 T9 Pinyin
T9 pinyin can enable you to enter Chinese characters with Romanized
pinyin. Please refer to 2.2.6 Entering Pinyin with English Input Method.
Action: Enter Chinese characters using T9 Pinyin
Press & hold
Then select T9
Pinyin
1
Press <Pinyin>
2
Select the <Correct
pinyin>
3
in the upper right hand
corner indicates that you
have switched to T9 Pinyin
input mode.
595 Manual.indb 31 2006/7/4 �� 05:07:58

2
Learning the Input Modes
32
Press & hold
<S el e ct ed Cha rac te r
Code>
4
595 Manual.indb 32 2006/7/4 �� 05:07:58

2
Learning the Input Modes
33
2. 2. 5 Entering English characters
There are two ways to enter English letters using 595.
T9 English – Use T9 English to key in English words faster. You can also
add new words to the dictionary to increase typing speed.
English – Press the respective number key as indicated by the labeled
alphabets to input English. English entering status:
First letter in upper case, followed by
lower case letters.
All lower case.
All upper case.
Action: Entering T9 English
Press & hold
Then select T9
English
1
2
Press
The English to Enter
3
The located at the upper
right corner indicates that
you have switched to T9
English input mode.
For example: to enter
“John”, press the number
keys 5, 6, 4, 6 respectively.
595 Manual.indb 33 2006/7/4 �� 05:07:59

2
Learning the Input Modes
34
Action: Adding T9 English words
Press Any number key
1
Select Add Word?
2
Enter Add Word?
Press the OK
button
3
Enter the new word to add.
4
Press English
5
The entered word has been
added to the dictionary.
595 Manual.indb 34 2006/7/4 �� 05:08:01

2
Learning the Input Modes
35
Action: T9 Preferences
Press & hold
Then select T9
Settings
1
Select Preferences
2 3
Setup T9 input preference
settings.
You can congure the
desired setup items here.
T9 Chinese User
Dictionary
You can use the Chinese
User’s Dictionary to set up
shortcuts for phrases which
will speed up text entering.
T9 My Words
You can use My Words to set
up English phrases for quick
and convenient text input.
595 Manual.indb 35 2006/7/4 �� 05:08:02

2
Learning the Input Modes
36
Action: Entering English text
2
Press
The English to Enter
3
Press & hold
Then select Abc
1
The located at the upper
right corner indicates that you
have switched to English input
mode.
(Note 1) (Note 2)
(Note 1) If the letter to be entered is at the back, press the number key
repeatedly. For example, to enter “L” press number key three times.
(Note 2) Under English mode, you can press to enter punctuation or
to insert a comma.
595 Manual.indb 36 2006/7/4 �� 05:08:03

2
Learning the Input Modes
37
2. 3 Using the Back Button to Delete Characters
You can use the Back button to delete a single character, or press and
hold the Back button to delete all characters.
Action: Deleting a single character
Press the Back
button
1 2
To return to the previous
character and delete it,
press the Back button.
You have successfully
deleted a single character.
595 Manual.indb 37 2006/7/4 �� 05:08:04

2
Learning the Input Modes
38
Action: Deleting all characters
Press & hold
Back button
1 2
To delete the entire word or
contents in the number eld,
press and hold the Back
button.
You have successfully
deleted all characters.
595 Manual.indb 38 2006/7/4 �� 05:08:05

Using the
Communication
Functions
In this topic, you will learn about…
1. Using the Phone
2. Making Phone Calls
3. Receiving Voice Calls
4. Video Calls
5. Call Options
6. Additional Information on Dialing
7. Setting Up Speed Dial Entries
Topic
3
595 Manual.indb 39 2006/7/4 �� 05:08:05

Phone Home Screen .................................................. 42
Turn Off the Phone Function ...................................... 43
Turn on the Phone Functions ..................................... 44
Enter PIN Code .......................................................... 45
Adjusting Headset Volume ......................................... 46
Dialing from the Phone Screen ...................................47
Dialing from Contacts List ..........................................48
Dialing from Contacts Details ..................................... 49
Using Call History for Dialing ..................................... 50
Use Speed Dialing from Home Screen .......................52
Use Speed Dial from Speed Dial Manager .................53
Answering Incoming Calls .......................................... 54
Reject Incoming Calls ................................................ 55
Checking Missed Calls ............................................... 55
End Call .....................................................................56
Hold ........................................................................... 60
Swap Calls .................................................................61
Creating Multi-Way Conferencing ...............................62
Activate/Deactivate the Speakerphone ....................... 63
Activate Mute ............................................................. 64
Action
Index
595 Manual.indb 40 2006/7/4 �� 05:08:05

Unmute ......................................................................65
Dial to Voicemail ........................................................ 66
Dialing Emergency Calls ............................................ 67
Dialing International Calls .......................................... 68
Using SIM Card Services (STK) ................................. 69
Creating a Speed Dial ................................................ 70
Editing a Speed Dial .................................................. 71
Removing a Speed Dial .............................................. 72
595 Manual.indb 41 2006/7/4 �� 05:08:06

3
Using the Communication Functions
42
Action: Phone Home Screen
Press Call
button
1
Switch to the phone
screen.
2
3. 1 Using the Phone
When you begin to use the 595 phone functions, you will need to enter
the SIM card PIN number in order to connect to the GSM/UMTS mobile
network. When using this device, you can control wireless functions, e.g.
activate/deactivate the phone. You can also adjust the headset volume
anytime during a call or when using the device.
3. 1. 1 Phone Functions
At the Phone screen, you can access, dial, search contacts, or save
phone numbers to the contacts list. Under certain circumstances (such
as on a plane), you may need to turn off the phone functions of the
handset. You can use the Comm Manager to manually deactivate/
activate the phone’s communication functions. When the phone function
is off, you will not be able to receive calls, send/receive messages, or
use GPRS/UMTS by connecting to a wireless mobile network. But other
phone functions such as browsing the calendar, listening to music, or
playing games can still be used.
595 Manual.indb 42 2006/7/4 �� 05:08:06

3
Using the Communication Functions
43
Action: Turn Off the Phone Function
Press Power
button
1
Select Comm
Manager and then
press the OK button
2
Select
and then press the
OK button
3
Use Up/Down buttons to
select Comm Manager.
Phone functions are
activated, and pressing
the button will turn off the
phone.
Select Exit
4 5
Home screen will display
“Phone Off”.
595 Manual.indb 43 2006/7/4 �� 05:08:08

3
Using the Communication Functions
44
Select Exit
4 5
The Home screen displays
your telecom service
provider name.
Action: Turn on the Phone Functions
Press Power
button
1
Select Comm
Manager then press
the OK button
2
Select
then press the OK
button
3
Use Up/Down buttons to
select Comm Manager.
While turning off the phone
functions, enter the PIN
code (please refer to
section 3.1.2).
595 Manual.indb 44 2006/7/4 �� 05:08:10

3
Using the Communication Functions
45
3. 1. 2 Enter PIN Code
Each time you turn on the phone or activate
the phone functions, you will need to enter
the SIM card PIN code (personal identication
number) provided by your account’s telecom
service provider.
▲ Enter SIM PIN code.
Action: Enter PIN Code
Enter <SIM PIN>
1
Select Done
2 3
Enter the phone’s SIM PIN
code.
The icon located at the
upper right corner indicates
that you have turned the
phone on.
595 Manual.indb 45 2006/7/4 �� 05:08:11

3
Using the Communication Functions
46
3. 1. 3 Adjust Handset Volume
During a call, you can adjust the headset
volume to clearly hear the conversation.
For sound settings, please refer to section
10. 4; for control mode settings, please refer
to section 10. 5.
▲ Headset volume
adjustment screen
Action: Adjusting Headset Volume
Scroll the
wheel
1
Scroll the
wheel
2
Press down on the scroll
wheel on the left side of
unit
Scroll the wheel to adjust
volume
595 Manual.indb 46 2006/7/4 �� 05:08:12

3
Using the Communication Functions
47
Dialing...
3. 2 Making Phone Calls
You can dial calls directly from Home screen,
phone screen, contacts, speed dial entries,
call records, SIM Manager, or use the voice
labels to dial your contacts by voice control.
3. 2. 1 Phone Screen
Enter the dialing screen by pressing the call
button; you will then be able to enter the
phone number and dial call.
▲ Dialing from the phone
screen.
Action: Dialing from the Phone Screen
Press Call
button
1
Enter <the phone
number you with to
dial> Press Call
button
2 3
Press the Call button to
open the phone screen.
Automatically lists the
contacts that apply.
595 Manual.indb 47 2006/7/4 �� 05:08:13

3
Using the Communication Functions
48
3. 2. 2 Dialing by Using Contacts
Choose the contact and the phone number in
the Contacts List. You can use the Left/Right
button to switch the contact’s number.
To create a contact and to edit contacts,
please refer to section 4. 1 Contacts
Descriptions.
Following each contact’s entry or phone
number, “M” stands for mobile number,
“H” stands for home number, “W” stands
for work number.
▲ Using Contacts
application program to
dial up the recipient.
Action: Dialing from Contacts List
Select Contacts
1
Select <the contact
you want to dial>
2
Press Call
button
3
Opens Contacts list. Dialing up the contact.
595 Manual.indb 48 2006/7/4 �� 05:08:14

3
Using the Communication Functions
49
Action: Dialing from Contacts Details
Select <Contacts>
Then press the OK
button
1
Select <the contact
you want to dial>
2
Press Call
button
3
Opens the person's
Contact Details that you
want to access.
Select the contact’
s number you want to
dial, for example: mobile
number.
Dialing up the contact.
595 Manual.indb 49 2006/7/4 �� 05:08:15

3
Using the Communication Functions
50
3. 2. 3 Dialing from Call History
Using Call History for dialing. The Call History
includes incoming calls, missed calls, and
outgoing calls.
Call History icon:
Missed call
Answered incoming calls
Answered Video Calls
Outgoing calls
Outgoing video calls
▲Dialing from Call History.
Action: Using Call History for Dialing
Select
Start
1
Select Call History
Then press the OK
button
2
Select <Contacts>
Then press Call
button
3
Select the contact you want
to dial.
Opens the Application
program menu.
595 Manual.indb 50 2006/7/4 �� 05:08:17

3
Using the Communication Functions
51
4
Dialing up the contact.
595 Manual.indb 51 2006/7/4 �� 05:08:17

3
Using the Communication Functions
52
3. 2. 4 Using A Speed Dial
You can set speed dial entries/shortcuts
for frequently dialed contact numbers or
frequently used application items. You will only
need to press and hold the corresponding
speed dial entry/shortcut button to dial your
contacts or access application programs. If
you set the corresponding number as two
digits, such as 14, then you can rst enter 1
and then hold 4 to activate the speed dial. For
speed dial settings, please refer to section 3. 6.
▲ Using speed dial
buttons to correspond
to function dialing.
Action: Use Speed Dialing from Home Screen
Press and hold
<Speed dial
corresponding button>
1 2 3
You have successfully
dialed up the contact.
At the Home screen, press
the speed dial button, for
example: 4.
595 Manual.indb 52 2006/7/4 �� 05:08:18

3
Using the Communication Functions
53
Action: Use Speed Dial from Speed Dial Manager
Select
Start
1
Select Speed Dial
Then press the OK
button
2
Select the contact
you want to dial
3
Opens Start Menu. Opens the Speed Dial
Application program.
Speed Dial menu.
Press Call
button
4
Dialing up the contact.
595 Manual.indb 53 2006/7/4 �� 05:08:19

3
Using the Communication Functions
54
▲ Incoming call display
screen.
Action: Answering Incoming Calls
Press Call button
or select Answer
1 2
Answered incoming calls.Incoming call information.
3. 3 Receiving Voice Calls
When you receive an incoming call, the phone
will display the information on both the inner
and outer screen for the user to decide on
answering or ignoring the call. When you
are in a call, you will still be able to press the
Home button to return to the Home screen
at any time, or operate other application
programs.
3. 3. 1 Answer Incoming Calls
Using the phone to answer incoming calls
from other contacts.
595 Manual.indb 54 2006/7/4 �� 05:08:20

3
Using the Communication Functions
55
Action: Reject Incoming Calls
Press Hang Up
button
or select Ignore
1 2
Incoming call information.
The located at the upper
left hand corner indicates
the missed calls (Note 1).
(Note 1) The Home
screen will display
“Number of missed
calls”. The outer screen
will also show that you
have missed calls.
Action: Checking Missed Calls
Select Missed Calls
1
Press the OK
button
2 3
At the Home screen, use
the directional buttons to
move to the Missed Calls
item.
Displays the history of all
incoming calls.
595 Manual.indb 55 2006/7/4 �� 05:08:22

3
Using the Communication Functions
56
Action: End Call
Press Hang Up
button
1 2
Call has ended.
595 Manual.indb 56 2006/7/4 �� 05:08:22

3
Using the Communication Functions
57
3.4 Video Calls
You can use the phone application to make video calls to contacts.
Before dialing or answering video calls, please make sure you are using
a 3G mobile network supported USIM card and account. When the task
bar at the top of the screen shows the appropriate icon , it means that
you are already using a UMTS mobile network, and are able to dial/
receive video calls.
When using the video call function, make sure both sides are:
• Using a phone and account that support 3G video functions
• Able to receive 3G signals on both sides during a call
Action:Create/End Video Call
Press Call
button
1
Enter <phone number>
Press Video Call
button
2 3
Video call in progress
595 Manual.indb 57 2006/7/4 �� 05:08:24

3
Using the Communication Functions
58
End video call End call
Press Hang Up
button
4 5
Action: Answer Video Calls
Press Call
button
1 2
+886912345678
595 Manual.indb 58 2006/7/4 �� 05:08:26

3
Using the Communication Functions
59
Video Call Options
During a video call, you can select the following options to adjust video
settings:
: Adjust video brightness
/ : activate/deactivate video camera
/ : activate/deactivate microphone
/ : select the main (front of unit) lens or secondary (back
of unit) lens
/ / / : select the image location
595 Manual.indb 59 2006/7/4 �� 05:08:26

3
Using the Communication Functions
60
▲ Call Waiting screen.
Action: Hold
Select
Menu > Hold
1 2
Call is held. To cancel,
please select “Unhold”.
3. 5 Call Options
Setting up the “During Call” options You
can choose to use Flash, activate mute,
Speakerphone, or Conference etc.
3. 5. 1 Using Call Waiting
You can use call waiting to hold the current
call. When you use call waiting you will still be
charged for the minutes used.
595 Manual.indb 60 2006/7/4 �� 05:08:26

3
Using the Communication Functions
61
3. 5. 2 Swap Calls
You can swap between two calls.
▲ Swap to another call
during a multi-call
connection.
Action: Swap Calls
1
Select Answer
2
Select Swap
3
When a call is taking place,
another call dials in.
Swapping to the other call.
595 Manual.indb 61 2006/7/4 �� 05:08:27

3
Using the Communication Functions
62
3. 5. 3 Create Multi-Way Conferencing
You can hold one call, then dial out the second
phone number, or answer a new incoming call
during the current one.
Not all service providers support multiway conferencing, please contact your
service provider for more information.
!
▲ Activate multi-way
conferencing function.
Action: Creating Multi-Way Conferencing
Select Menu
1
Select Conference
Then press the OK
button
2
Create multi-way
conferencing.
595 Manual.indb 62 2006/7/4 �� 05:08:28

3
Using the Communication Functions
63
3. 5. 4 Activate/Deactivate the Speakerphone
Using the built-in speakerphone for
conversation with callers without holding the
handset. Using the speakerphone allows other
people to listen in to the conversation.
▲ Speakerphone
activated screen.
Action: Activate/Deactivate the Speakerphone
Select Menu >
Speakerphone On
1 2
You can also press and
hold Call button to
activate the speakerphone
function.
After speakerphone is
activated, the upper right
screen corner will display
the icon.
Select Menu >
Speakerphone Off
3
You can also press and
hold Call button to
deactivate the
speakerphone function.
595 Manual.indb 63 2006/7/4 �� 05:08:29

3
Using the Communication Functions
64
3. 5. 5 Activate Mute
During a call, you can temporarily turn off the
handset microphone to prevent the person on
the other side from hearing your voice.
▲ Activate mute.
Action: Activate Mute
Select Menu >
Mute
1 2
You can also select the
Mute key directly on the
screen.
After Mute is activated, the
upper right screen corner
will display the icon.
595 Manual.indb 64 2006/7/4 �� 05:08:30

3
Using the Communication Functions
65
Action: Unmute
Select Menu >
Unmute
1 2
You can also select
Unmute directly on the
screen.
Mute is deactivated.
595 Manual.indb 65 2006/7/4 �� 05:08:31

3
Using the Communication Functions
66
3. 6 Additional Information on Dialing
To listen to messages in the voicemail, you
can dial the voicemail number (provided by
the service provider) from the phone screen
directly. The rst slot of speed dial is usually
set up as the voicemail number; you can also
use other speed dials to call the voicemail.
Your service provider will provide you with
your voicemail number.
3. 6. 1 Dialing to Voicemail
When your phone cannot be reached, the
telecom system will automatically connect the
incoming call to the voicemail. You can dial up
the voicemail to listen to your messages.
▲ Dial up the voicemail
from the Speed Dial
application program.
Action: Dial to Voicemail
Select
Start
1
Select Speed Dial
Then press the OK
button
2
Select Voicemail
Then press Call
button
3
Opens Speed Dial. You can also press &
hold the speed dial button
1 directly on the Home
screen.
Opens Start Menu.
595 Manual.indb 66 2006/7/4 �� 05:08:32

3
Using the Communication Functions
67
3. 6. 2 Dialing Emergency Calls
If you need to dial the local emergency help
number, do so by dialing directly from the
phone screen. When the phone functions
are off or keypad is locked, you can still dial
emergency calls.
The SIM card may store other emergency
help numbers, please ask your service
provider for more information.
!
▲Dialing emergency calls.
Action: Dialing Emergency Calls
Enter the emergency
phone number
Then press
Call button
1 2
Dialing emergency calls.It is possible to dial
emergency numbers when
the Home screen or keypad
is locked.
595 Manual.indb 67 2006/7/4 �� 05:08:33

3
Using the Communication Functions
68
▲ Dialing International
Calls.
Dial from the Home screen
or the phone screen.
“+” will replace the country
code for your current
location.
1
Press and hold
Enter <the phone
number you want to
dial>
2
Press Call
button
3
Dialing international calls.
Action: Dialing International Calls
3. 6. 3 Dialing International Calls
Using the phone for international dialing.
International dialing code includes the country
codes for both you and your recipient.
595 Manual.indb 68 2006/7/4 �� 05:08:34

3
Using the Communication Functions
69
3. 6. 4 Using SIM Card Services (STK)
You can use the various informational services, such as calling customer
services and voicemail, built in the SIM card by the service provider.
To use the SIM card services, please rst insert your SIM card into the
phone. SIM card informational services may vary depending on the
different service providers.
Action: Using SIM Card Services (STK)
Select
Start
1
Select Accessories
Then press the OK
button
2
Select (STK icon)
Then press the OK
button
3
The STK icon's displayed
name is your service
provider name.
Opens Start Menu. Opens Accessories.
595 Manual.indb 69 2006/7/4 �� 05:08:36

3
Using the Communication Functions
70
3. 7 Setting Up Speed Dial Entries
You can create a speed dial entry (or shortcut)
entries for frequently dialed numbers or
accessed programs.
Action: Creating a Speed Dial
Select Contacts
1
Select <Contacts>
Then press the OK
button
2
Select
<Contact information
to set up>
3
Opens Contacts list. Choose the contact to set
up for speed dialing.
Choose the information
item to set up, for example:
mobile number.
▲ Speed dial settings
screen
595 Manual.indb 70 2006/7/4 �� 05:08:38

3
Using the Communication Functions
71
Select Menu >
Add to Speed Dial
4
Select <Keypad
assignment>
Then select Done
5 6
Use the Left/Right buttons
to choose the corresponding
number key.
You have successfully
added the speed dial entry.
Action: Editing a Speed Dial
Select <Dialing item>
Then press the OK
button
1
Select Edit
2
Enter <the Field you
want to edit>
3
Select the speed dial entry
you want to edit.
595 Manual.indb 71 2006/7/4 �� 05:08:40

3
Using the Communication Functions
72
Action: Removing a Speed Dial
Select <Dialing
item>
1
Select Menu
2
Select Delete
3
Select Yes
4 5
Please note that the
deletion cannot be
restored.
You have successfully
deleted the speed dial.
595 Manual.indb 72 2006/7/4 �� 05:08:42

Managing Personal
Information
Topic
In this topic, you will learn about…
1. Contacts
2. Calendar
3. Tasks
4. Voice Notes
4
595 Manual.indb 73 2006/7/4 �� 05:08:42

Opening Contacts Application Program from
Home Screen .............................................................77
Opening Contacts Application Program ..................... 77
Adding New Contacts to the Phone ............................78
Setting Up Contact’s Extension Line Dialing ............... 80
Adding New SIM Contacts ..........................................81
Copying SIM Contacts to the Phone ........................... 82
Copying Phone Contacts to SIM Card ........................82
Searching Contact by Name .......................................83
Searching Contact by Phone Number ......................... 84
Dialing to Contacts ..................................................... 84
Viewing and Editing Contact.......................................85
Using the Contacts Sorting Function .......................... 86
Setting Up Contacts Categories ................................. 87
Using MMS to Transfer Contacts ................................ 88
Transfer Contacts Via IR/Bluetooth ............................ 89
Opening Calendar Application Program ...................... 90
Opening Calendar Application Program from
Home Screen .............................................................91
Adding New Appointments ......................................... 92
Action
Index
595 Manual.indb 74 2006/7/4 �� 05:08:42

Viewing and Editing Appointments .............................. 95
Switching the Calendar Display Mode ......................... 96
Appointment Reminder Screen .................................... 97
Using MMS to Transfer Appointments ......................... 98
Using Bluetooth to Transfer Appointments .................. 99
Setting Up Calendar Options ...................................... 100
Open the Tasks Application ........................................101
Adding New Tasks ......................................................102
Setting Tasks as Complete ......................................... 103
Open the Voice Notes Program ..................................104
Adding a New Voice Note ...........................................105
Playback Voice Notes ................................................106
Renaming Voice Notes ............................................... 107
Deleting Voice Notes .................................................. 107
595 Manual.indb 75 2006/7/4 �� 05:08:43

4
Managing Personal Information
▲ Enter various
information for the
contact
4. 1 Contacts
You can add new contacts and information
for contacts. Setting up all available
communication information for the contact will
allow you to connect with the person quickly
or browse the contact’s information. Contacts
will be saved in the phone memory. You can
also sync the contacts info with Microsoft
Exchange Server ® or Microsoft Ofce
Outlook ® on a personal computer through
ActiveSync ®. In addition you can also ll out
each informational eld including category,
e-mail, address, pictures, and ring tones. To
sync your phone, please refer to Chapter 9.
4. 1. 1 Adding New Contacts to the Phone
You can add new contacts and their
information to the phone. Setting up the
various communication methods for the
contact will allow you to connect to the person
quickly.
On the contacts list entries, the display
of “M” represents mobile number, “H”
represents home number, and “W”
represents work number.
▲ Contacts application
program
76
595 Manual.indb 76 2006/7/4 �� 05:08:43

4
Managing Personal Information
77
Action: Opening Contacts Application Program
Select
Start
1
Select Contacts
Then press the OK
button
2 3
Opens Program File. Opens Contacts application
program.
Contacts List screen.
Action: Opening Contacts Application Program from Home Screen
Select Contacts
1
Opens Contacts application
program.
Contacts screen.
2
595 Manual.indb 77 2006/7/4 �� 05:08:45

4
Managing Personal Information
78
Action: Adding New Contacts to the Phone
1 2
Go to Last name,
and First name
respectively. Enter
<Contact’s name>
3
Select Add New directly
from the screen or select
Add New Contact from the
Menu.
Enter rst and last name.
For example: last name
“Li”, rst name “Helen”
Select Contacts Select New
Opens Contacts application
program.
Go to Custom ring
tone, then Select
<Ring tone>
5
Go to Picture
Then press the OK
button
6
Go to Mobile
phone, then enter
<Mobile phone>
4
Enter the contact’s mobile
number. For example,
0918123123.
Select a ring tone (Note 1).
For example, Tremor.
Select a picture.
595 Manual.indb 78 2006/7/4 �� 05:08:47

4
Managing Personal Information
79
Select <Picture>
Then select
Contacts
7
Go to E-mail
Then select <E-mail>
8 9
Select Done
Choose the picture for the
incoming or outgoing calls of
the contact you want to set
up. (Note 2)
Enter the contact’s e-mail
address.
You have successfully
created a new contact.
(Note 1) You can save custom ring tones under the \Application Data\Sounds
folder on the phone.
(Note 2) You can also use Microsoft Ofce Outlook ® on a personal computer to set up the contact’s picture, then sync the info to the phone via ActiveSync ®.
Contact’s information elds:
Last Name Picture Work Fax Company Other
address
Government
ID
First Name E-mail
1, 2, 3
Home Fax Department Notes Account
name
Work phone 1, 2 Instant
Message
1, 2, 3
Assistant
phone
Job title Nickname Customer ID
Mobile phone Categories Radio phone Ofce
Location
Birthday Spouse
Home phone 1,2 Pager Web page Ofce
address
Anniversary Children
Custom ring
tone
Car phone File as Home
address
Manager Assistant
595 Manual.indb 79 2006/7/4 �� 05:08:48

4
Managing Personal Information
80
Select Menu >
Insert Pause
1
Enter <Extension
number>
2
Action: Setting Up Contact’s Extension Line Dialing
The contact's editing
screen. Enter the pause
symbol after the phone
number.
Enter the contact's
extension number, for
example: 123.
595 Manual.indb 80 2006/7/4 �� 05:08:49

4
Managing Personal Information
81
4. 1. 2 Managing SIM Contacts
Adding and saving new contacts onto your
SIM card. When you replace the SIM card on
the phone, the original contacts on the SIM
card will change to the new SIM contacts.
However the phone’s contacts will not be
changed. You can enter the name and phone
number for SIM contacts. But you will not be
able to specify other information elds such as
category, e-mail, address, pictures, and ring
tones. To use the SIM Card Manager, please
refer to section 11. 5.
SIM Card Manager formats the contact names
in the “First name”, “Last Name” order. If the
phone contacts name is “Smith, Roger”, the
name will be displayed as “Roger Smith”.
▲ Editing SIM Contact.
Action: Adding New SIM Contacts
1 2
Enter <Name> and
<Number>
Then select Done
3
Select Menu Select New SIM
Contact
Opens Contacts menu. Saves the contact's
information onto the SIM
card.
595 Manual.indb 81 2006/7/4 �� 05:08:50

4
Managing Personal Information
82
Action: Copying SIM Contacts to the Phone
Select Menu >
Contacts to SIM
1
Check-mark
<Contact to copy>
2
Select Save
3
SIM Manager’s main
screen.
Check the contacts to copy
to SIM card. For example,
Dopod.
Saves phone contacts to
SIM card.
Choose the SIM contacts
to copy to the phone. For
example: Roger Smith.
Select
<SIM Contact>
1
Select Menu >
Add to Contacts
2
Action: Copying Phone Contacts to SIM Card
595 Manual.indb 82 2006/7/4 �� 05:08:52

4
Managing Personal Information
83
4. 1. 3 Search Contacts and Dial
You can perform a search by the contact’s
name and number(s). For example, when you
press , it will search for contact names
with English letters and Pinyin spelling.
Using T9 Strokes input mode to search for
contacts. Please refer to section 10. 10
Assistant Tools and choose the input mode to
use for “Smartdial Settings”
▲ Searching contact by
name.
Action: Searching Contact by Name
Enter
<Words to search>
1
Enter
<Words to search>
2 3
You have successfully
found the contact you were
searching for.
Found words are
highlighted. You can
continue to enter the next
word.
For example, to search for
“Al”, press
respectively (Note 1).
595 Manual.indb 83 2006/7/4 �� 05:08:53

4
Managing Personal Information
84
Select <Number>
Then select Call
2 3
Select <the contact
you want to dial>
1
Select the contact’s
number. For example,
Mobile Number.
Dialing up the contact.
Action: Dialing to Contacts
You can follow the search
methods introduced in this
section to select the contact.
Action: Searching Contact by Phone Number
2
Enter <Numbers to
search>
1
Search according to
contact’s phone number.
For example, enter 0952
Contacts that have phone
numbers starting with 0952
will be highlighted.
595 Manual.indb 84 2006/7/4 �� 05:08:55

4
Managing Personal Information
85
4. 1. 4 Viewing and Editing Contacts
You can view a contact’s information, dial
calls, send messages or e-mail, and update
each contact’s information to keep it accurate.
To add a new contact, please refer to section
4.1.1.
Action: Viewing and Editing Contact
Go to <contact to
view>
Then press the OK
button
1
Go to <Contact
name>
Then select Edit
2
Enter <entry to edit>
Then select
Done
3
You can also edit the
contact directly from Menu
Edit.
For editing contacts, please
refer to section 4.1.1.
▲ Viewing contact
information.
Select the contact you want
to view.
595 Manual.indb 85 2006/7/4 �� 05:08:56

4
Managing Personal Information
86
Action: Using the Contacts Sorting Function
Select Menu >
Filter
1
Select
<Category to switch>
2
4. 1. 5 Using Contacts Sorting
You can use category sorting to quickly search
for contacts. For contacts sorting setup,
please refer to section 4.1.4 Editing Contacts.
▲ Using category sorting
to manage contacts.
3
Using Filter function to
switch categories.
Select the category you
want to switch to. For
example, Personal.
Browse contacts under this
category.
595 Manual.indb 86 2006/7/4 �� 05:08:58

4
Managing Personal Information
87
Action: Setting Up Contacts Categories
Select Categories
Then press the OK
button
1
Select Preferences
Then press the OK
button
2
Choose the category
you want to set up. For
example, Business.
You can also select multiple
categories.
Select Done
3
Select Done
4
Category setup is
complete.
If you want to add or delete contacts category
groups, please modify the category groups
from Microsoft Ofce Outlook® on a personal
computer, then sync to the phone. For sync
information, please refer to Chapter 9.
595 Manual.indb 87 2006/7/4 �� 05:08:59

4
Managing Personal Information
88
4. 1. 6 Transmitting Contacts Information
You can transfer via vCard (Note 1), use
MMS to share information with contacts, or
use Bluetooth to transfer and share contacts
information with other people. To use MMS,
please refer to section 5. 3; to use Bluetooth
connection, please refer to section 7. 2.
(Note 1) vCard: Electronic Business Card.
Used to record your business card information
or that of your contacts. You can send your
own vCard to other phones or computers that
have vCard compatibility.
To use your Bluetooth to transfer data,
Bluetooth at the receiving end must
be set to discoverable, or have been
synchronized with your phone. For
Bluetooth setup methods, please refer
to section 7.2. To use IR to transfer data,
please line up the IR ports on both devices.
▲ Transfer contacts
through Bluetooth.
Using MMS to Transfer Contacts
▲ Using MMS for sharing.
You can use the following procedures to share
contacts information via MMS.
Under the Contacts List, choose the
contacts you want to transfer, and then
select Menu > Send as vCard.
At the MMS Edit screen, select the Recipient
or enter the recipient phone number.
After editing is complete, select Send.
•
•
•
595 Manual.indb 88 2006/7/4 �� 05:09:00

4
Managing Personal Information
89
Action: Transfer Contacts Via IR/Bluetooth
Select
<ontacts you want to
transfer>
1
Select Menu >
Beam Contact
2
Return to Contacts screen.
After transfer is complete, the
screen will display “Done”.
Return to Contacts List.
Select <Device you
want to exchange with>
Then select Beam
Data
3
To cancel data transfer,
select Cancel.
Press the Back
button
4 5
595 Manual.indb 89 2006/7/4 �� 05:09:02

4
Managing Personal Information
90
4. 2 Calendar
You can use the calendar to schedule
appointments, including meetings and other
events. Your appointments will be displayed
on the Home screen just before the scheduled
time.
▲ Calendar application
program.
Action: Opening Calendar Application Program
Select
Start
1
Select Calendar
Then press the OK
button
2
Calendar Home screen.Opens Calendar
application program.
Opens Start Menu.
3
595 Manual.indb 90 2006/7/4 �� 05:09:03
 Loading...