

Page 1
MD-702 Internet Tablet
User Manual
Page 2

Page 3

Using this manual
This device, built on the Google Android operating
system, gives you access to many useful and
entertaining applications to enrich your mobile web
experience.
With integrated Wi-Fi access and a responsive
touch screen, you can play games, read books ,
stay up-to-date on the latest news , sports, and
weather, manage your multimedia and business
files, and browse the web for maps, business
locations, and more.
Read me first
● Please read all safety precautions and this
manual carefully before using your device to
ensure safe and proper use.
● The descriptions in this manual are based on
the default settings of your device.
● Images and screenshots used in this user
manual may differ in appearance from the
actual product.
1
● Content in this user manual may differ from the
product, or from software provided by service
providers or carriers, and is subject to change
without prior notice.
● Available features and additional services may
vary by device, software, or service provider.
● Formatting and delivery of this user manual is
based on Google Android operating systems
and may vary depending on the user’s
operating system.
● Applications and their functions may vary by
country, region, or hardware specifications.
Dopo is not liable for performance issues
caused by third-party applications.
Using this manual
1
Page 4
● Dopo is not liable for performance issues or
incompatibilities caused by user editing of
registry settings.
● Sound sources, wallpapers, and images
provided in this device are licensed for limited
use. Extracting and using these materials for
commercial or other purposes is an infringement
of copyright laws.
● Please keep this manual for future reference.
● Use only approved software. Pirated or illegal
software may cause damage or malfunctions
that are not covered by your manufacturer's
warranty.
● The items supplied with your device may vary
depending on the software and accessories
available in your region or offered by your
service provider.
● Accessories other than the supplied ones may
not be compatible with your device.
Instructional icons
Before you start, familiarize yourself with the icons
you will see in this manual:
Warning
—situations that could cause injury
to yourself or others
Caution
—situations that could cause
damage to your device or other equipment
Note
—notes, usage tips, or additional
information
►
Refer to
—pages with related information, for
example: ► p. 10
(represents “see page 10”)
→
Followed by
—the order of options or menus
you must select to perform a step, for example:
In Menu mode, select
Settings
→
Wireless &
network
(represents
Settings
, followed by
Wireless & network
)
[ ]
Square brackets
—device keys; for example:
[
] (represents the Power/Resting)
Using this manual
2
Page 5
Copyright
This user manual is protected under international
copyright laws.
No part of this user manual may be reproduced,
distributed, translated,or transmitted in any form or
by any means, electronic or mechanical,including
photocopying, recording, or storing in any
information storage and retrieval system, without
the prior written permission of Dopo.
Trademarks
● The Android logo, Google Maps™, Google
Mail™,YouTube™ are trademarks of Google,
Inc.
● Oracle and Java are registered trademarks of
Oracle and/or its affiliates.Other names may be
trademarks of their respective owners.
● Wi-Fi
®
, the Wi-Fi CERTIFIED logo, and the Wi-Fi
logo are registered trademarks of the Wi-Fi
Alliance.
● DivX
®
, DivX Certified®, and associated logos
are trademarks of DivX,Inc. and are used under
license.
● All other trademarks and copyrights are the
property of their respective owners.
ABOUT DIVX VIDEO
DivX® is a digital video format created by DivX, Inc.
This is an official DivX Certified
®
device that plays
DivX video. Visit www.divx.com for more
information and software tools to convert your files
into DivX video.
DivX Certified
®
to play DivX® video up to HD 720p,
including premium content May play DivX
®
video
up to HD 1080p.
ABOUT DIVX VIDEO-ON-DEMAND
This DivX Certified® device must be registered in
order to play purchased DivX Video-on-Demand
(VOD) movies. To obtain your registration code,
locate the DivX VOD section in your device setup
menu. Go to vod.divx.com for more information on
how to complete your registration.
Using this manual
3
Page 6

Contents
Assembling ········································· 06
Unpack ···················································· 06
Charge the battery ··································· 06
Insert a memory card (optional) ················ 07
Getting started ···································· 09
Turn your device ON and OFF ················ 09
Switch to Silent mode ······························ 09
Get to know your device ·························· 10
Using the touch screen ···························· 11
Get to know the home screen ················· 13
Access applications ································· 15
Customize your device ···························· 16
Enter text ················································· 18
Web ··················································· 19
Browser ··················································· 19
Amazon Appstore ···································· 22
YouTube ·················································· 23
Maps ······················································· 24
Places ····················································· 25
Google Search ········································ 25
Communication ·································· 26
Google Mail ············································· 26
Email ······················································· 27
Entertainment ······································ 29
Music ······················································· 29
Camera ··················································· 30
Video ······················································· 33
Gallery ····················································· 33
Calendar ·················································· 34
Contents
4
Page 7

Connectivity ······································· 35
PC connections ······································· 35
Wi-Fi ························································ 36
3G connection ········································· 38
Ethernet connection ································ 38
Tools ··················································· 39
Shelves ···················································· 39
OfficeSuite ··············································· 39
Explorer ··················································· 40
Clock ······················································· 42
Calculator ················································ 43
Settings ················································ 44
Access the Settings menu ······················· 44
Wireless & networks ································ 44
Sound ······················································ 45
Display ···················································· 45
HDMI Setting ··········································· 45
Location and security ······························ 46
Applications ············································ 46
Accounts & sync ······································ 47
Privacy ···················································· 47
Storage ···················································· 47
Language & keyboard ····························· 47
Date & time ············································· 48
About device ··········································· 48
Troubleshooting ··································· 49
Safety precautions ······························· 51
FCC warning ······································· 59
Disclaimer ··········································· 60
Contents
5
Page 8
Assembling
Unpack
Check your product box for the following items:
● Mobile device
● Power adaptor
● PC data cable
● Stereo Earphone
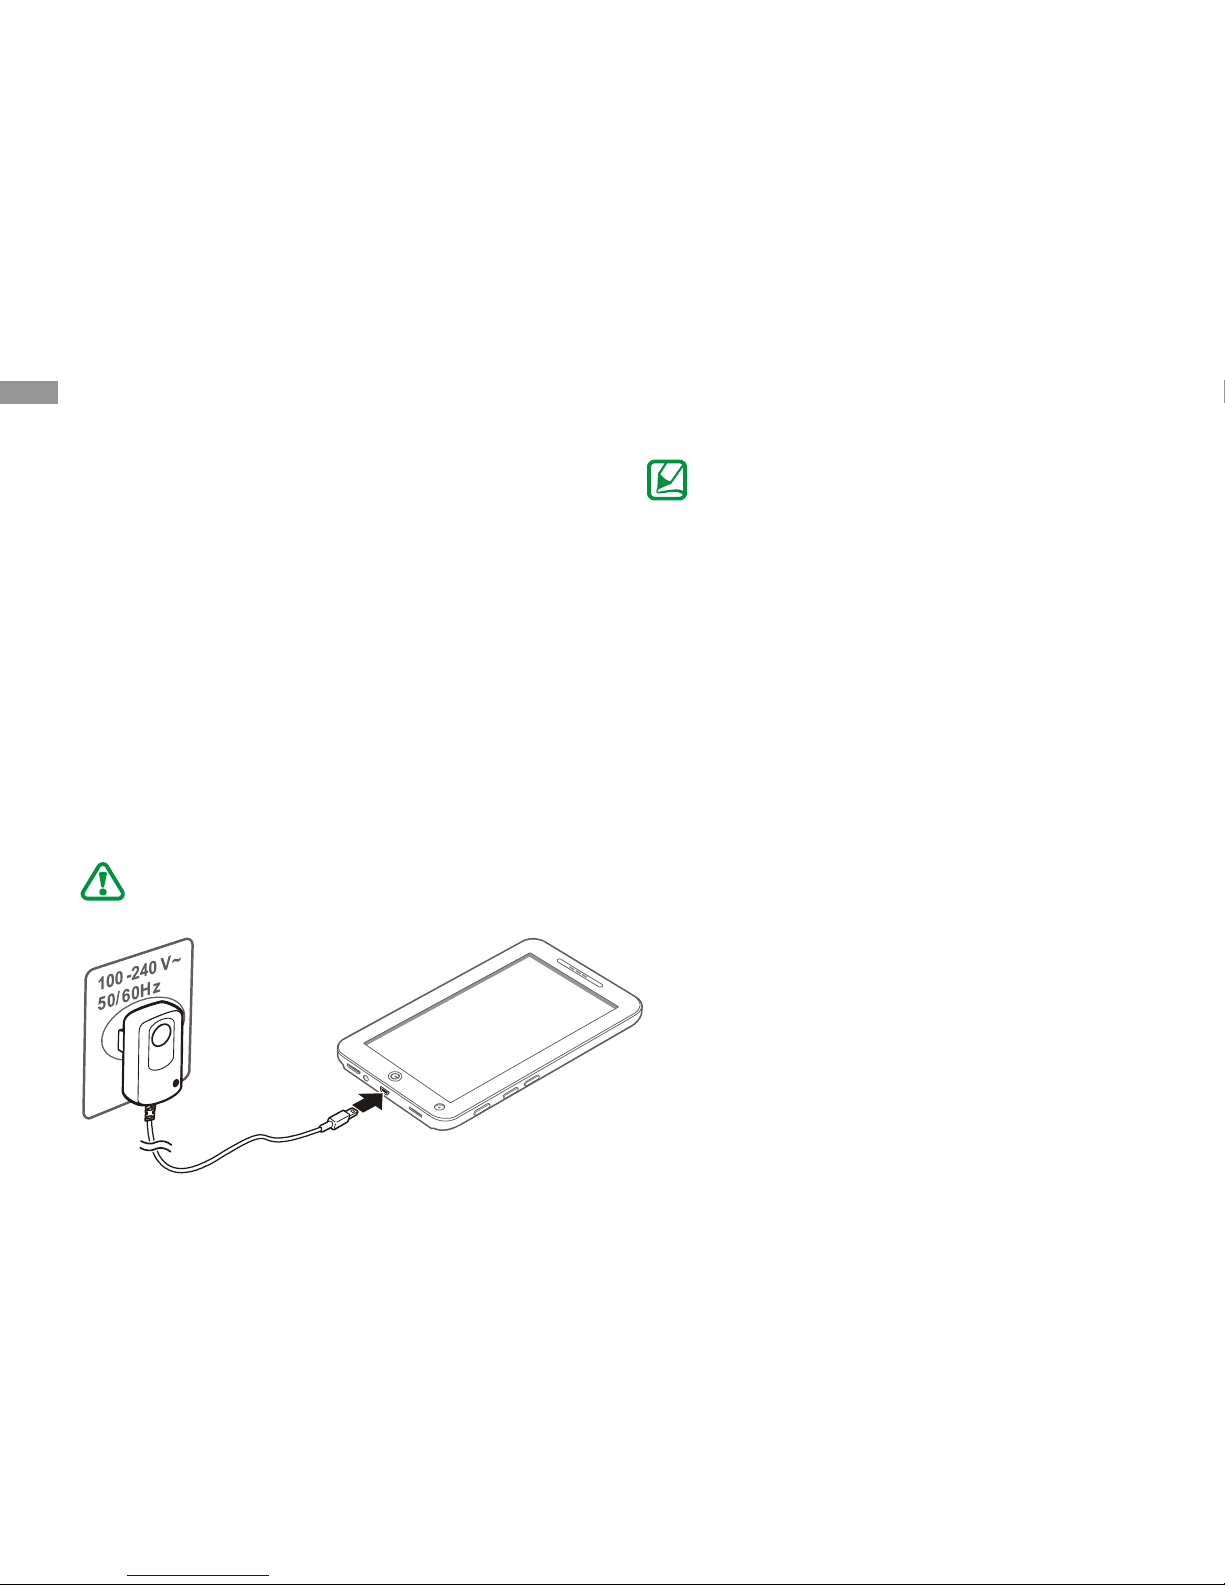
Charge the battery
Your device has a built-in battery. Before using the
device for the first time,you must charge the
battery.
Use only supplied chargers. Unauthorized
chargers/adaptors can cause batteries to
explode or damage your device.
● Charge the battery only with the supplied
charger. You cannot charge the battery
with the PC data cable.
● When your battery is low, the device will
emit a warning tone and display a low
battery message. The battery icon will also
be empty and turn red. If the battery level
becomes too low, the device will
automatically power off. Recharge your
battery to continue using your device.
● The rechargeable battery incorporated in
this product is not user replaceable. For
information on its replacement, please
contact your service provider.
● Improperly connecting the travel adaptor
can cause serious damage to the device.
Any damage caused by misuse is not
covered by the warranty.
● You can use the device while it is charging,
but it may take longer to fully charge the
battery.
Assembling
6
Page 9
● While the device is charging, the touch
screen and the touch keys may not function
due to an unstable power supply. If this
happens, unplug the power adaptor from
the power outlet or unplug the PC data
cable from the device.
● While charging, the device may heat up.
This is normal and should not affect your
device’s lifespan or performance.
● If your device is not charging properly,
bring your device and the charger to your
service provider .
● When the battery is fully charged unplug
the power adaptor .
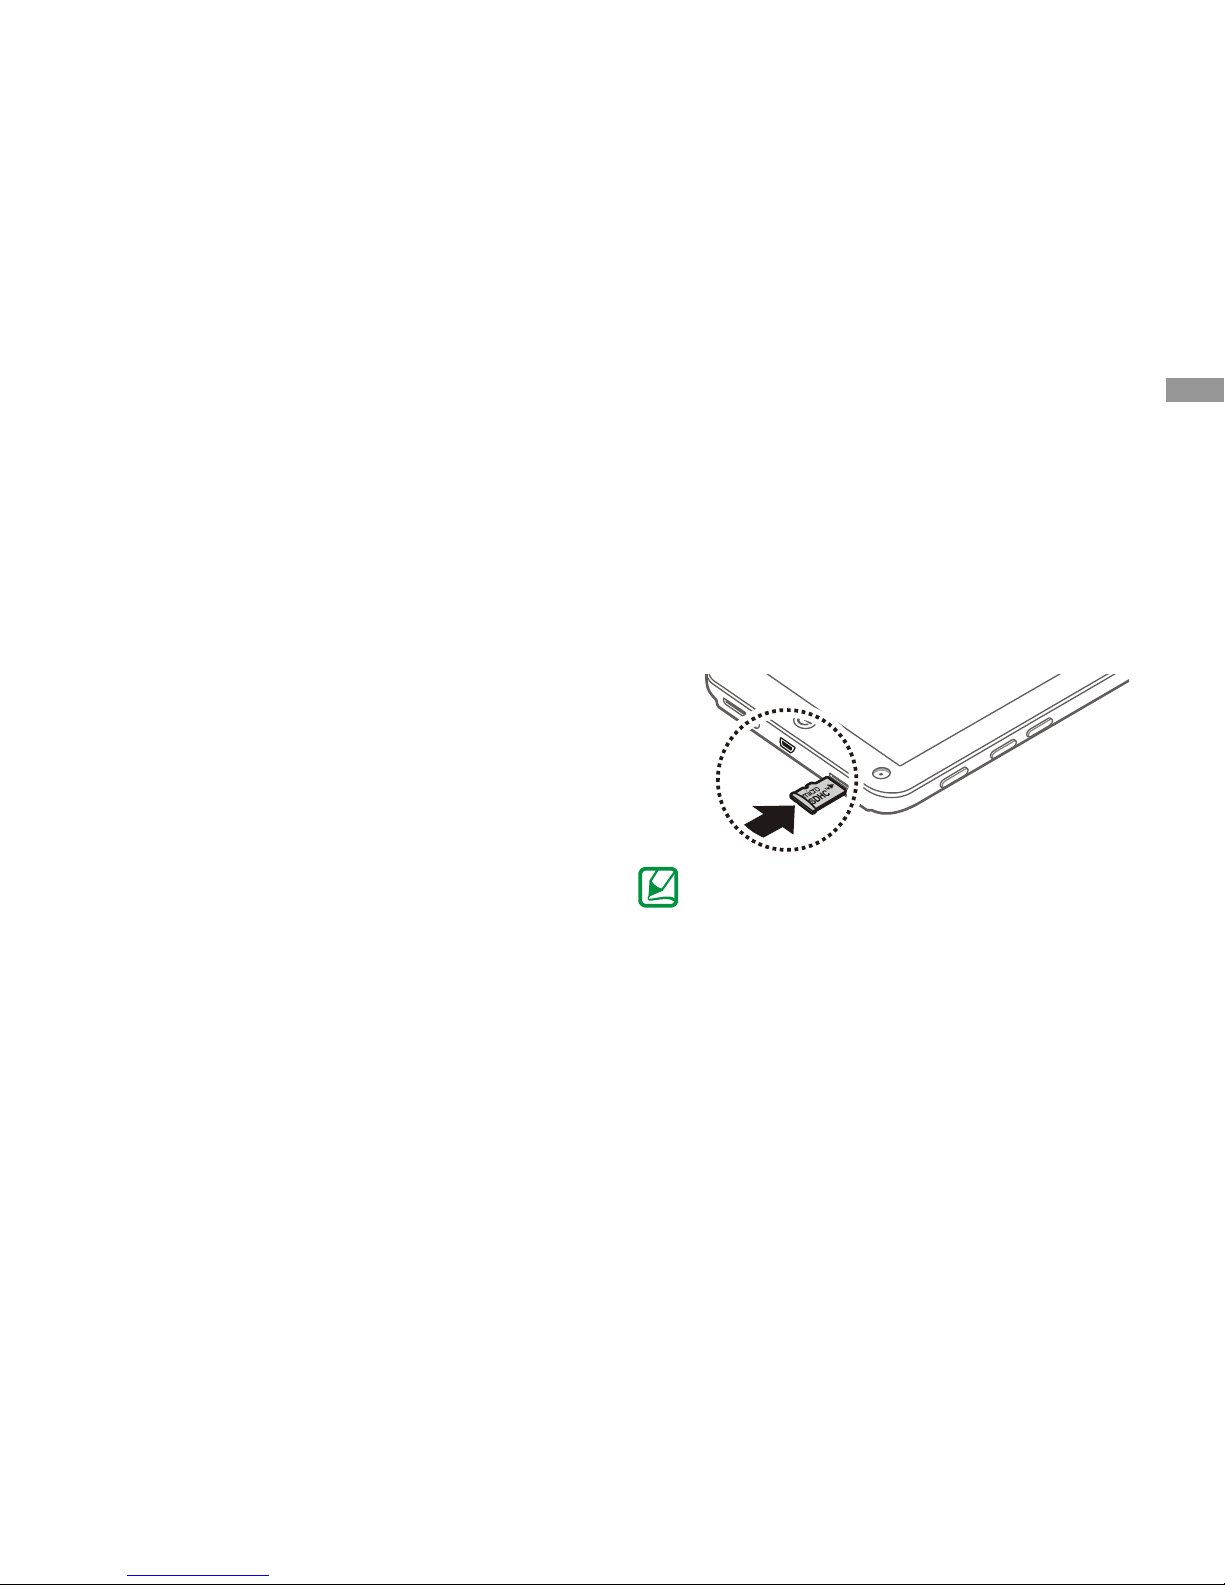
Inserting the memory card (optional)
To store additional files, you must insert a memory
card into the card reader.
Your device accepts
microSD™
or
microSDHC™
memory cards with maximum capacities of 32 GB
(depending on memory card manufacturer and
type).
● Your device supports only the FAT file
structure for memory cards. If you insert a
card formatted with a different file structure,
your device will ask you to reformat the
memory card.
● Frequent writing and erasing of data will
shorten the lifespan of memory cards.
● When you insert a memory card in your
device, the file directory of the memory card
will appear in the external_sd folder under
the internal memory.
Assembling
7
Page 10
>>Removing the memory card
Before removing a memory card, first unmount
(dismount) it for safe removal.
In Menu mode, select
Settings
[ ]
Storage
→
→
Unmount SD card OK.→
Push the memory card gently until it
disengages from the device.
Pull the memory card out of the memory
card slot.
Do not remove a memory card while the
device is transferring or accessing
information, as this could result in loss of
data or damage to the memory card or
device.
>>Format the memory card
Formatting your memory card on a PC may cause
incompatibilities with your device. Format the
memory card only on the device.
In Menu mode, select
Settings
[ ] →
Storage
→
Erase SD card
→
Erase SD card .
Before formatting the memory card,
remember to make backup copies of all
important data stored on your device. The
manufacturer’s warranty does not cover loss
of data resulting from user actions.
Assembling
8
Page 11
Getting started
Turn your device ON and OFF
1
.
To turn on your device,
Press and hold [
].
If you turn on your device for the first time, follow
the on-screen instructions to set up your device.
2.
To turn off your device, press and hold [ ]
and then select Power off → OK.
Switch to Silent mode
● Press and hold [ ] and then select Silent
mode.
● You can set the device to alert you to various
events in Silent mode.
In Menu mode, select
Settings
[
]
→
Sound →Silent mode
.
When you switch to Silent mode, [
] will
appear in place of status bar.
Getting started
9
Page 12
Get to know your device
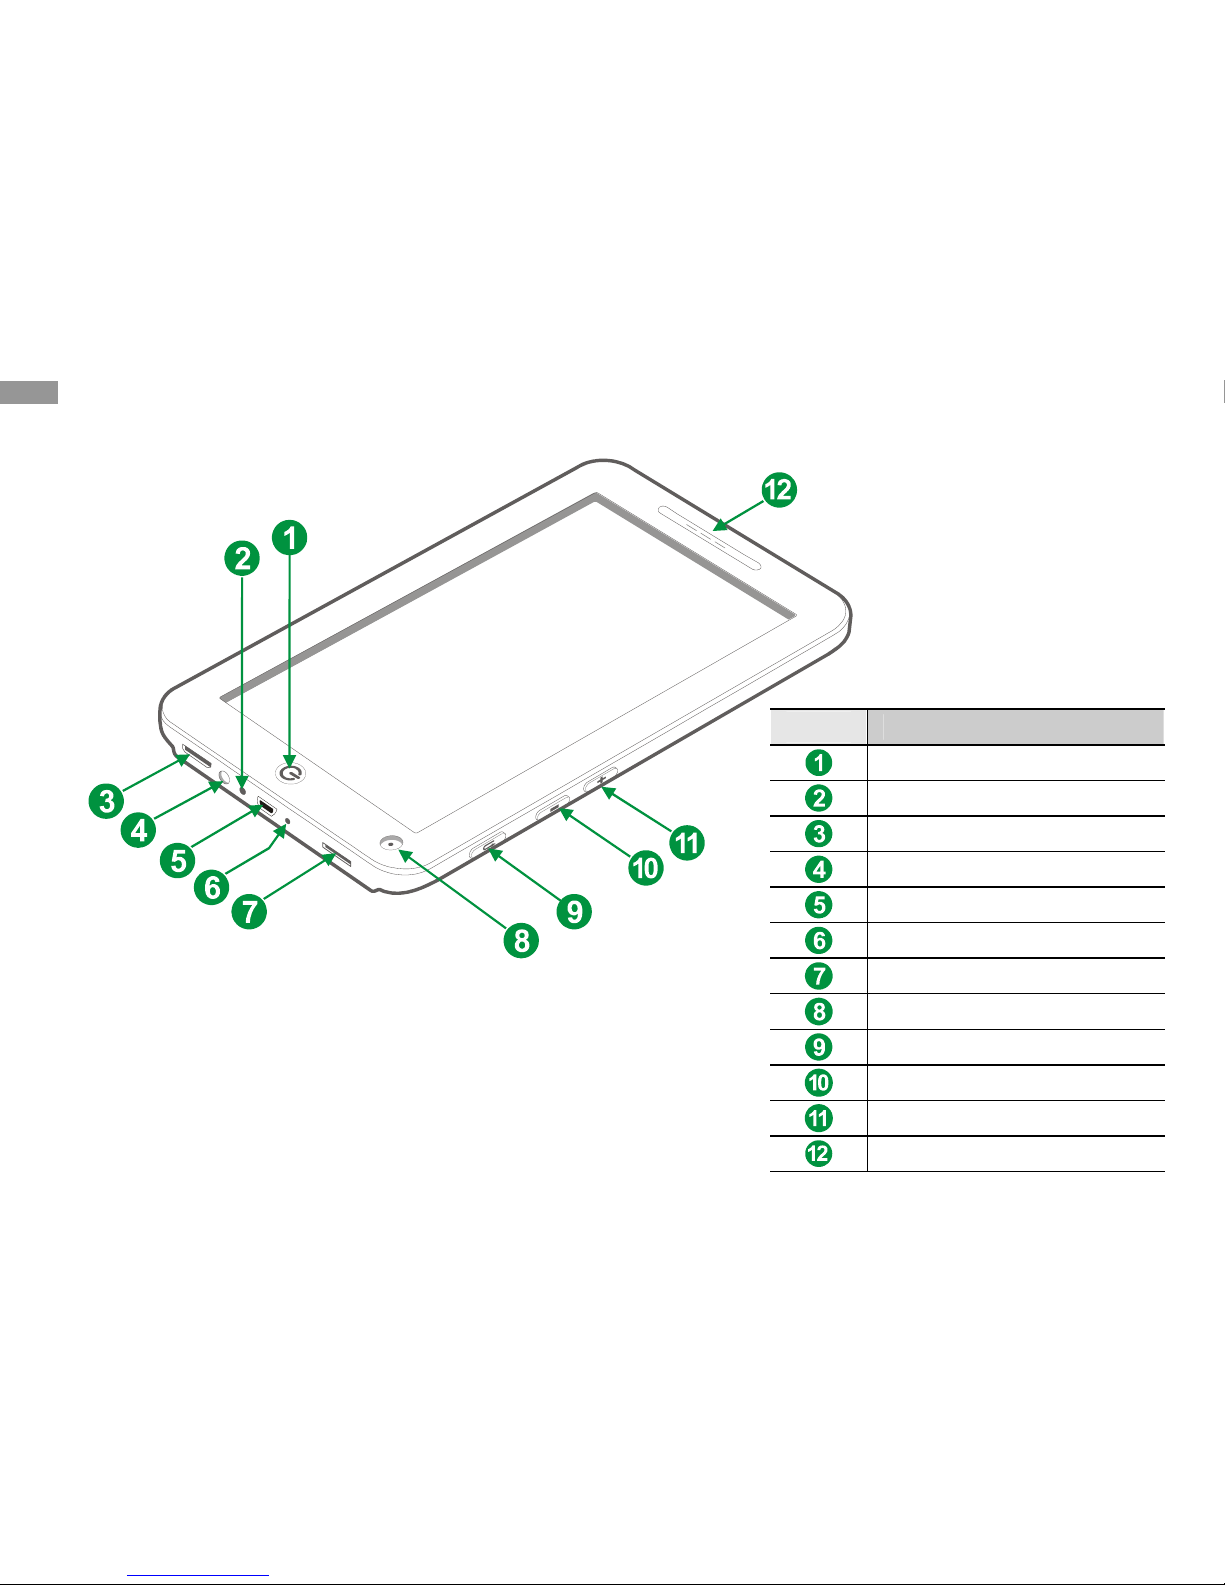
>>Device layout
Number
Function
Power/Lock/Wake key
Reset/Indicator light
Mini HDMI port
Headset jack (Φ3.5mm)
Mini USB data/charge port
Microphone
Memory card slot
Camera
Return key
Volume - key
Volume + key
Speaker
Getting started
10
Page 13
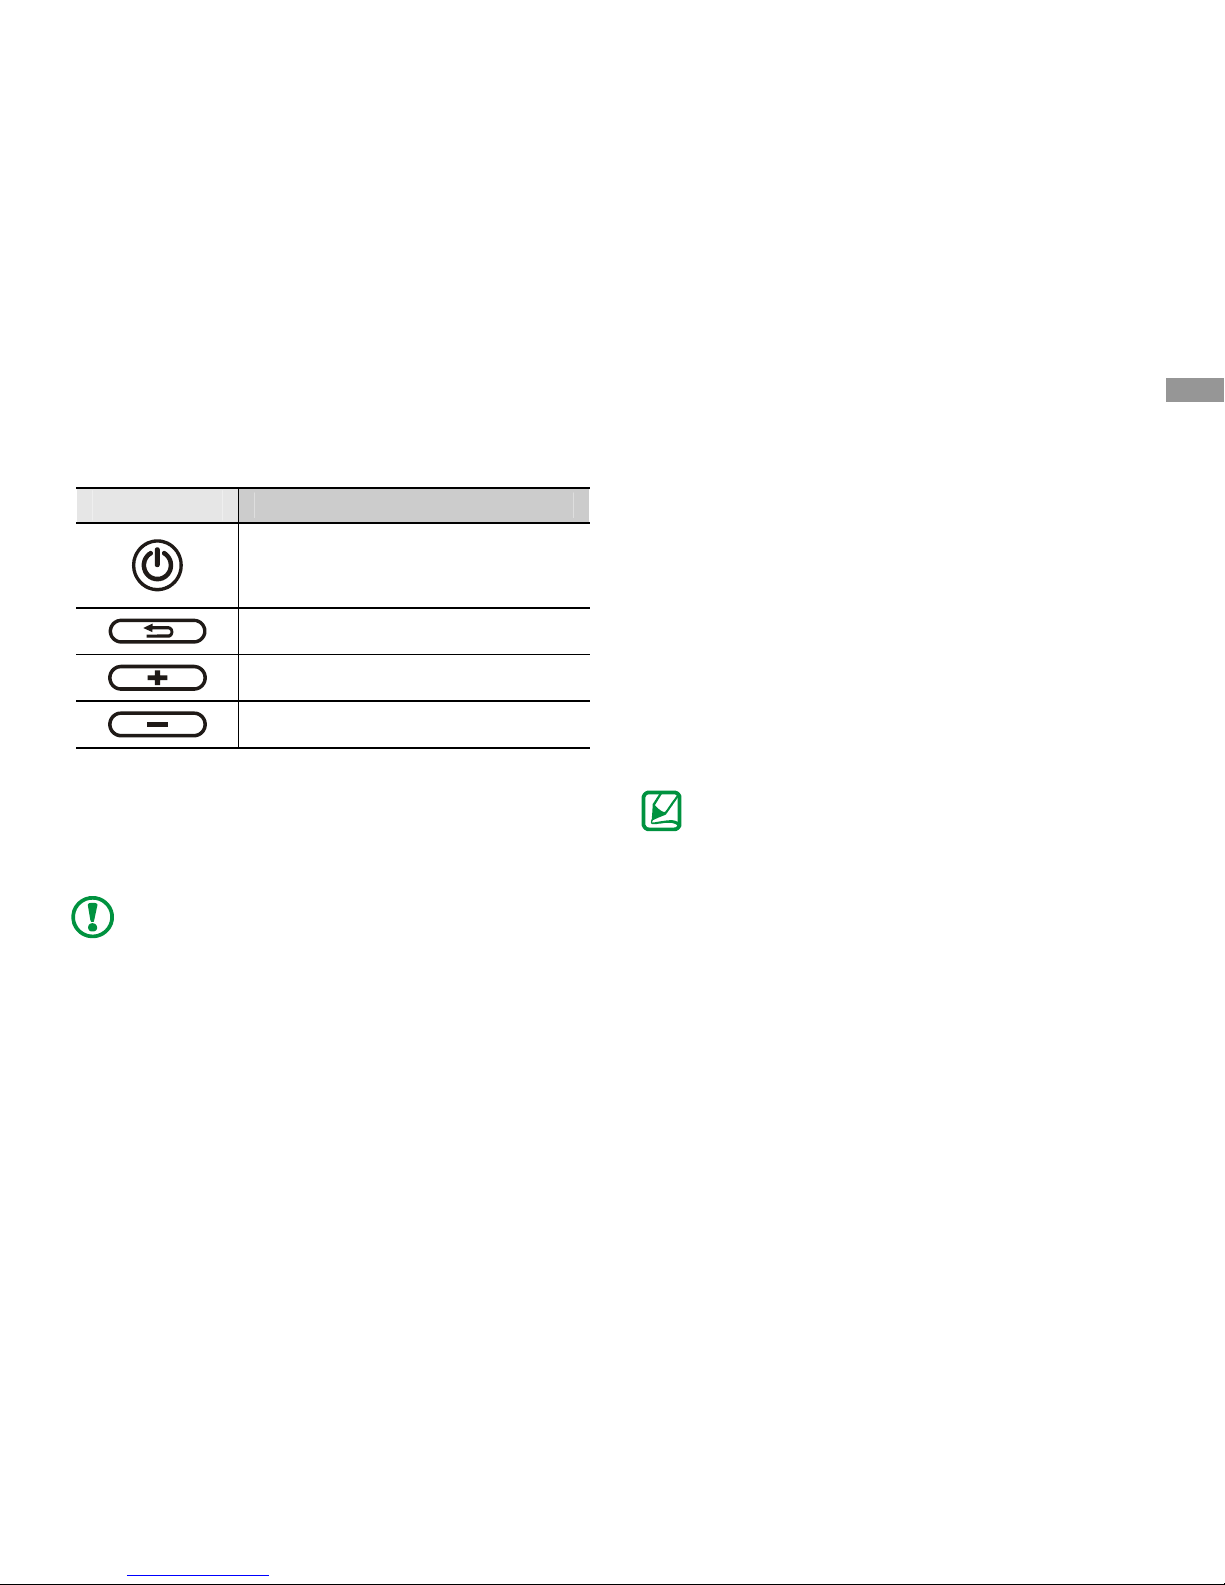
>>keys
Number
Function
Power ON/OFF
Lock the Screen
Wake up the Screen
Return
Increase device’s volume
Decrease device’s volume
Use the touch screen
Your device’s touch screen lets you easily select
items or perform functions.How to use the touch
screen.
● To avoid scratching the touch screen, do
not use sharp tools.
● Do not allow the touch screen to come into
contact with other electrical devices.
Electrostatic discharges can cause the
touch screen to malfunction.
● Do not allow the touch screen to come into
contact with water. The touch screen may
malfunction in humid conditions or when
exposed to water.
● For optimal use of the touch screen, remove
the screen protection film before using your
device.
● Your touch screen has a layer that detects
small electrical charges emitted by the
human body. For best performance, tap the
touch screen with your fingertip. The touch
screen will not react to touches of sharp
tools, such as a stylus or pen.
You can control your touch screen with the
following actions:
● Tap: Touch once with your finger to select
or launch a menu, option, or application.
● Drag: Tap and drag your finger up, down,
left, or right to move to items on lists.
● Tap and hold: Tap an item and hold it for
more than 2 seconds to open a pop-up
option list.
● Drag and drop: Tap and hold your finger on
an item, and then drag your finger to move
the item.
● Double-tap: Tap twice quickly with your
finger to zoom in or out while viewing
photos.
Getting started
11
Page 14
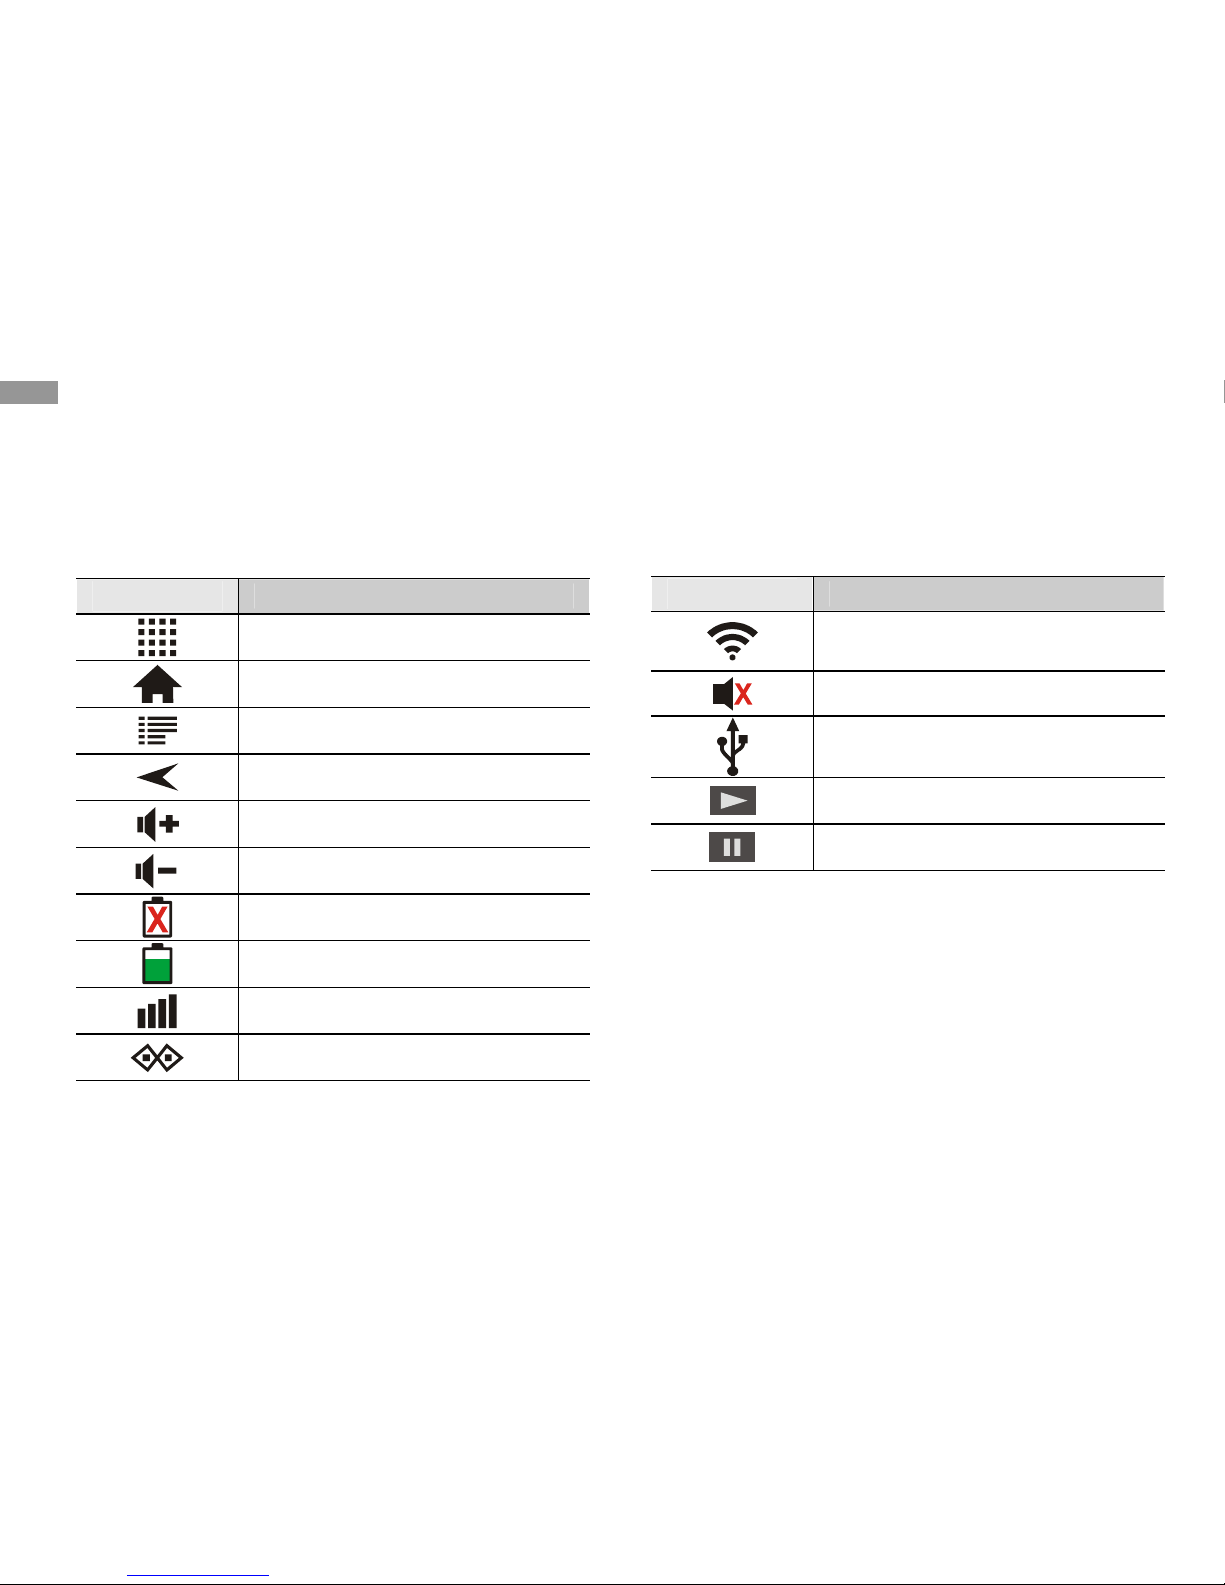
>> Indicator icons
Icons shown on the display screen may vary
depending on your products.
Icon
Definition
Applications / Main menu
Return to the home screen
Menu
Return to the previous screen
Volume UP
Volume DOWN
Unable to charge
Battery power level
Signal strength
Ethernet
Icon
Definition
WLAN activated
Silent mode
Connected to PC
Music playback in progress
Music playback in pause
Getting started
12
Page 15
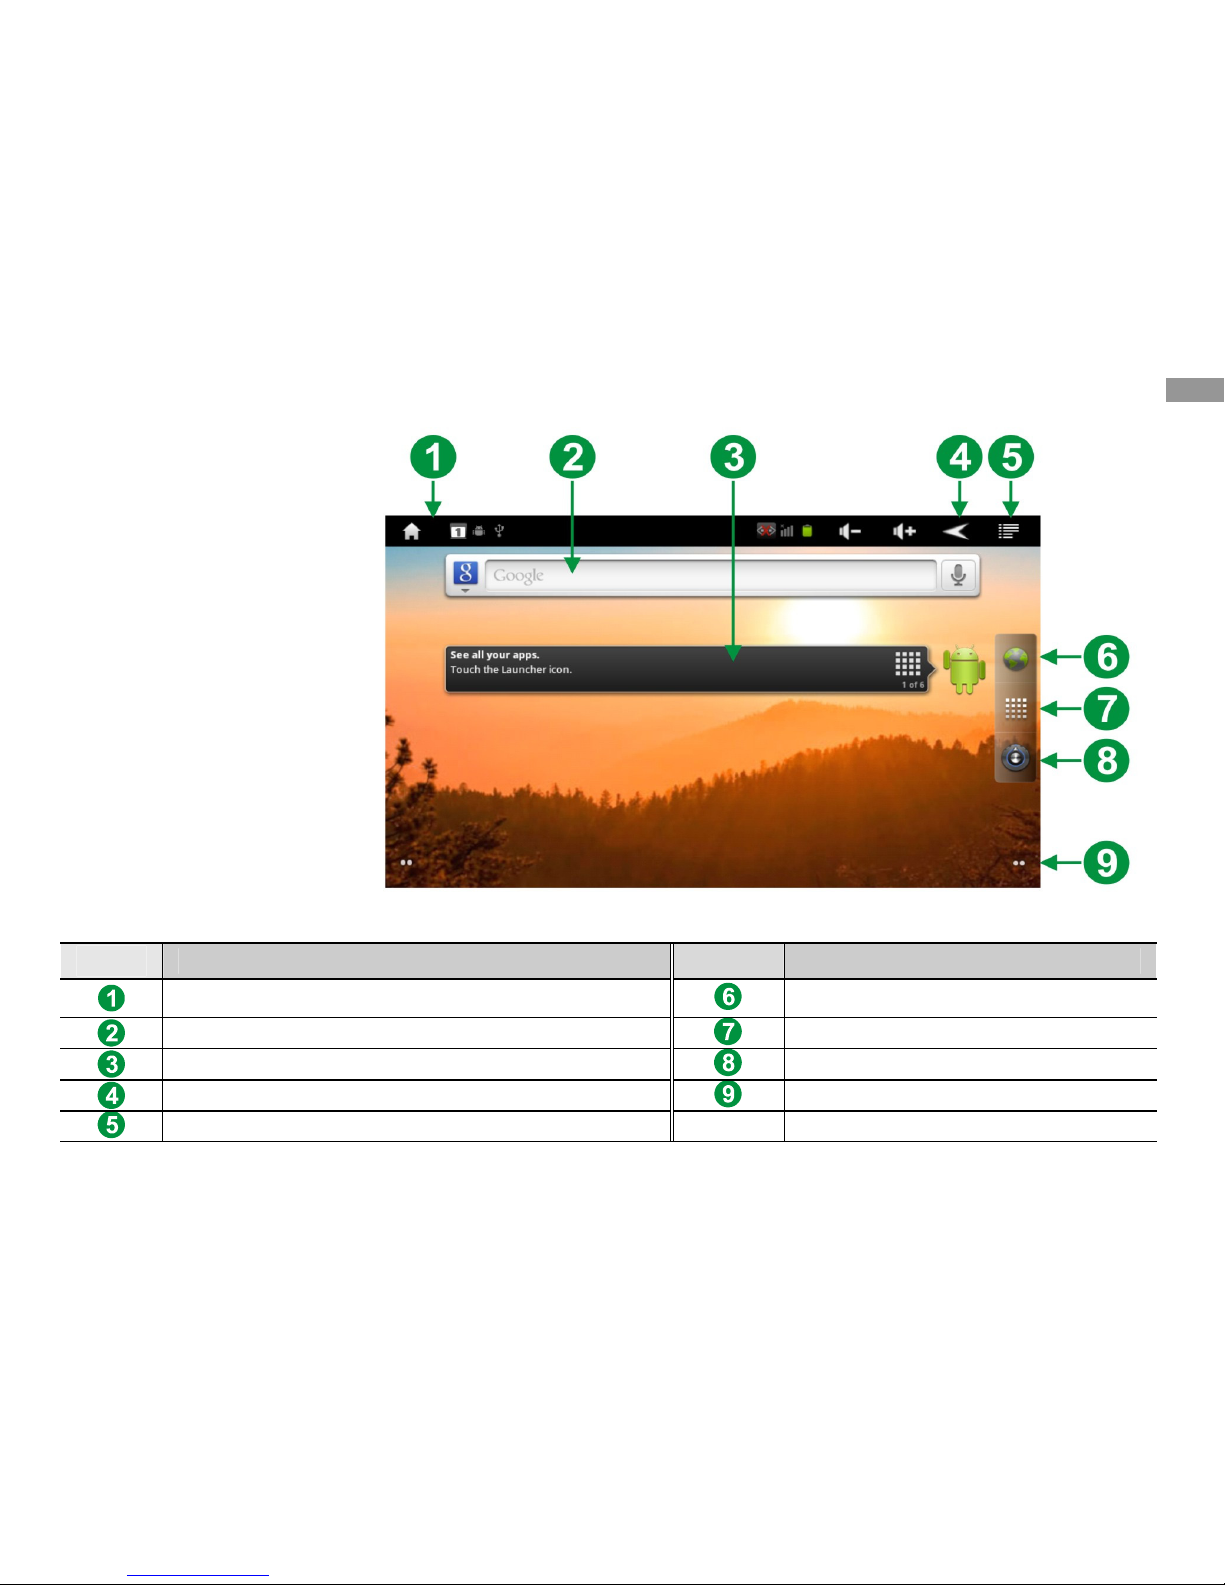
Get to know the
home screen
When the device is in
Idle mode, you will see
the home screen. From
the home screen, you
can view your device’s
status and access
Menu mode. Scroll left
or right to a panel of
the home screen. The
screen below may
differ depending on
your region or service
provider.
Numbe
Function
Numbe
Function
Display indicator and device’s current status
Open the web browser
Search the web with the Google Search widget
Access Main Menu mode
Help for home screen
System setting
Return to the previous screen
Move to corresponding panel
Applications Menu / setting
Getting started
13
Page 16

>>Add items to the home screen
You can customize the home screen by adding
shortcuts to applications or items in applications,
widgets, or folders. In Idle mode, tap at the blank
space of the screen for 3 seconds.
1.
Select an item category.
● Shortcuts: Add shortcuts to items, such as
applications, bookmarks,and contacts.
● Widgets: Add widgets. Widgets are small
applications that provide convenient
functions and information on your idle
screen.
● Folders: Create a new folder or add folders
for your contacts.
● Wallpapers: Set a background image.
2.
Select an item to add to the home screen.
>>Move items on the home screen
To move an item, Tap and hold the item until it
vibrates.
Drag the item to the location you want.
>>Remove items from the home
screen
Tap and hold the item you want to remove.
The trash bin appears at the bottom of the home
screen.
Drag the item to the trash bin.
When the item and the trash bin turns red, release
the item.
>>Add a shortcut to an application
In Menu mode, tap and hold an application icon.
The shortcut icon for the application is added to
the home screen. Move the icon to the location
you want or move it to another panel of
the home screen.
Getting started
14
Page 17
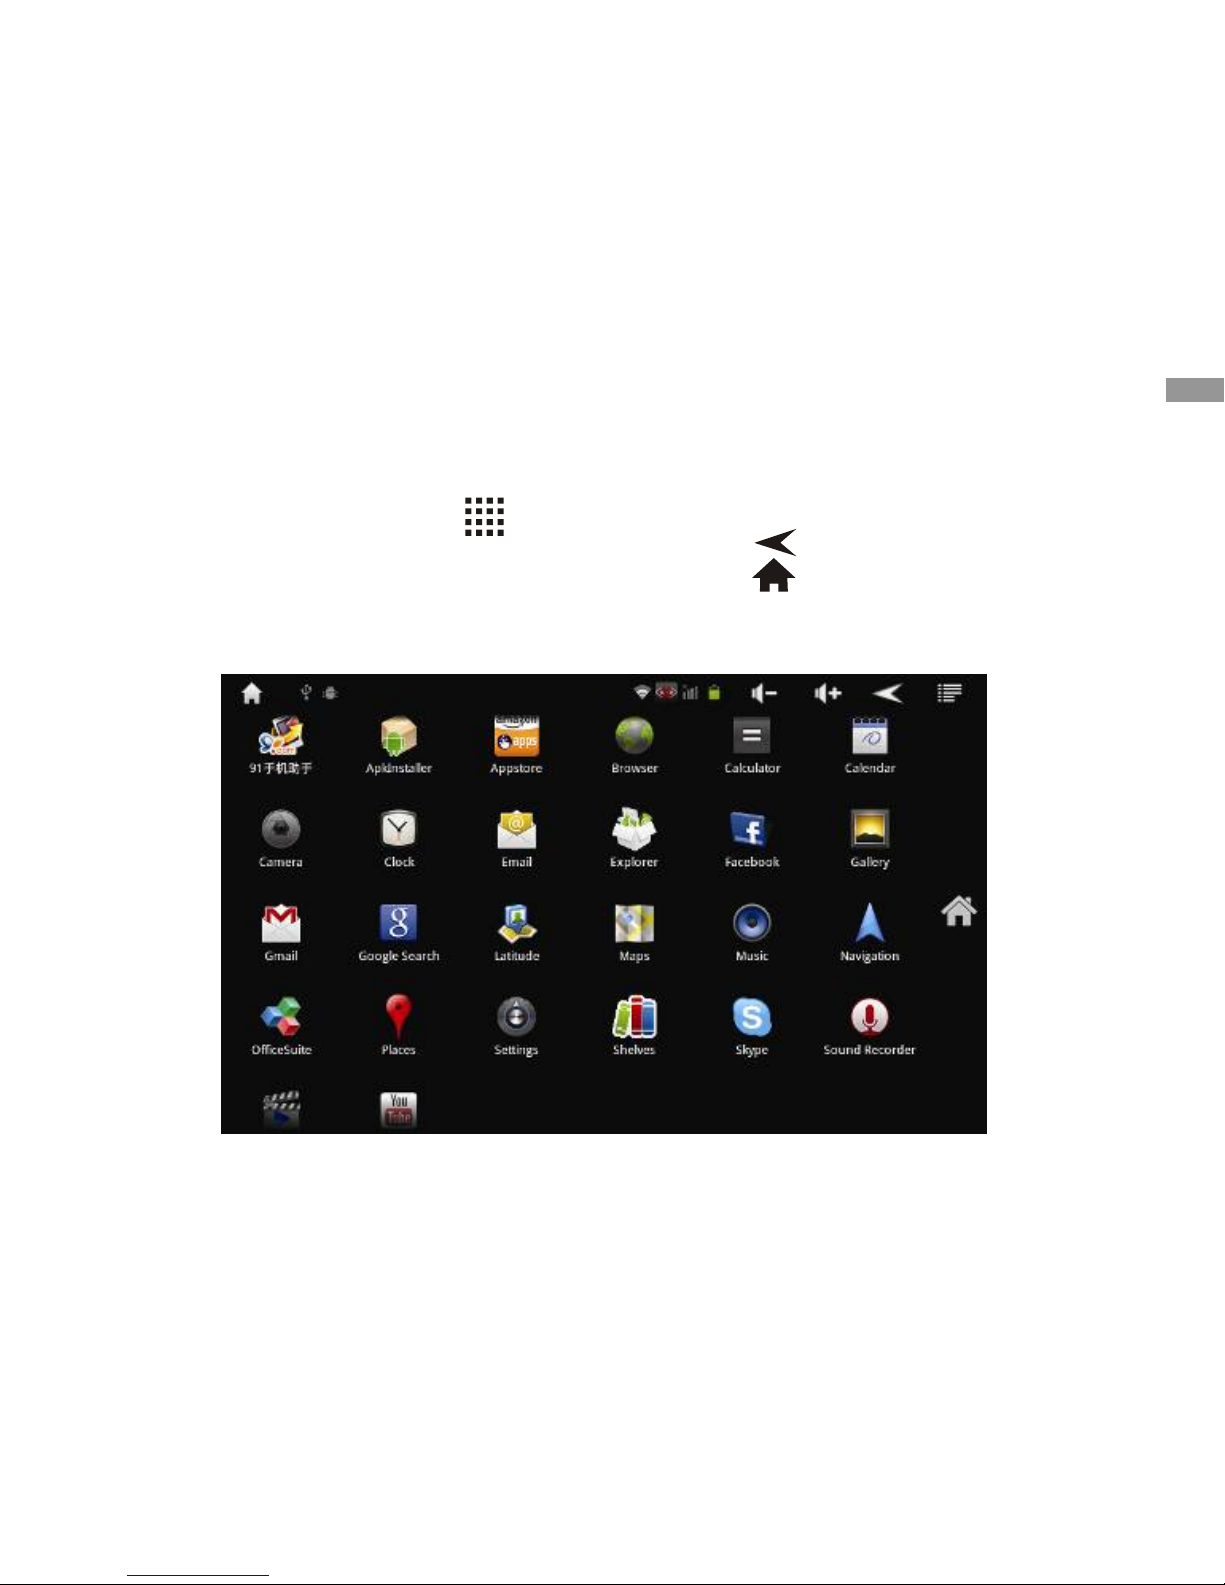
Access applications
1.
In Idle mode, select
Applications
[ ]to
access Menu mode.
2.
Scroll left or right to another menu screen.
3.
Select an application.
4.
Press [ ] to return to the previous screen;
Press [
] to return to the home screen.
Getting started
15
Page 18

Customize your device
Get more from your device by customizing it to
match your preferences.
>>Change the language of the
display
In Menu mode, select
Settings
[ ]
→
Language & keyboard → Select language.
Select a language you want.
>>Set the current time and date
In Menu mode, select
Settings
[ ]
→ Date
and time.
Select your time zone, set the time and date, and
change other options.
>>Select a wallpaper for the home
screen
In Idle mode, press [ ] →
Wallpaper
.
Select an image folder → an image.
Select
Set wallpaper
.
Dopo is not responsible for any use of default
images or wallpapers provided on your device.
>>Activate animation for switching
windows
You can set a transition effect between windows
while using the device
In Menu mode, select
Settings
[ ]
→ Display
→ Animation
.
Select an animation option.
>>Display Brightness Adjustment
In Menu mode, select
Settings
[ ]
→ Display
→ Brightness→ OK
.
The brightness level of the display will affect how
quickly the device consumes battery power.
Getting started
16
Page 19
>>Set up screen lock
You can lock the touch screen with a secret
pattern or password to prevent unauthorized
people from using the device.
● Once you set a screen lock, your device
will require an unlock code each time you
turn it on or unlock the touch screen.
● If you forget your PIN or password, bring
your device to a Service Center to reset it.
● Dopo is not responsible for any loss of
security codes or private information or
other damages caused by illegal software.
>>Set an unlock pattern
In Menu mode, select
Settings
[ ]
→
Location & security → Set up screen lock →
Pattern
.
See the on-screen instructions and example
patterns and select
Next
(if necessary).
Draw a pattern by dragging your finger to connect
at least 4 dots.
Select
Continue
.
Draw a pattern again to confirm.
Select
Confirm
.
>>Set an unlock PIN code
In Menu mode, select
Settings
[ ]
→
Location & security → Set up screen lock →
PIN
.
Enter a new PIN (numeric) and select
OK
.
Enter the PIN again and select
OK
to
Confirm
your PIN
.
Getting started
17
Page 20

>>Set an unlock password
In Menu mode, select
Settings
[ ]
→
Location & security → Set up screen lock →
Password
.
Enter a new password (alphanumeric) and select
OK
.
Enter the password again and select
OK
to
Confirm your password
.
Once the PIN lock is enabled, you must enter the
PIN each time you turn on the device or access
menus that require the PIN.
Enter text
You can enter text by selecting characters on the
virtual keypad.
You cannot enter text in certain languages. To
enter text, you should change the writing language
to one of the supported languages.
>>Change the text input method
Tap and hold the text input field and select Input
method → a text input method (Android Keyboard
or Chinese Keypad ).
>>Copy and paste text
While you are entering text, you can use the copy
and paste feature to use text in other applications.
Place the cursor where you want to start.
Drag or select to the text you want.
Select to
Copy
, or to
Cut
the text onto the
clipboard.
In another application, place the cursor where you
want to paste the text.
Select
Paste
→ to insert the text from the clipboard
into the text field.
Getting started
18
Page 21
Web
Web services require a data connection. Contact
your operator to choose the best data plan.
Browser
Learn to access and bookmark your favorite web
pages.
● You may incur additional charges for
accessing the web and downloading data.
For details, contact your service provider.
● The web browser menu may be labeled
differently depending on your service
provider.
● Available icons may vary depending on
your region or service provider.
>>Browse web pages
1.
In Menu mode, select
Browser
[
] to
launch your homepage.
To access a specific web page, select the URL
input field and enter the web address of the web
page [
]
.
Web
19
Page 22
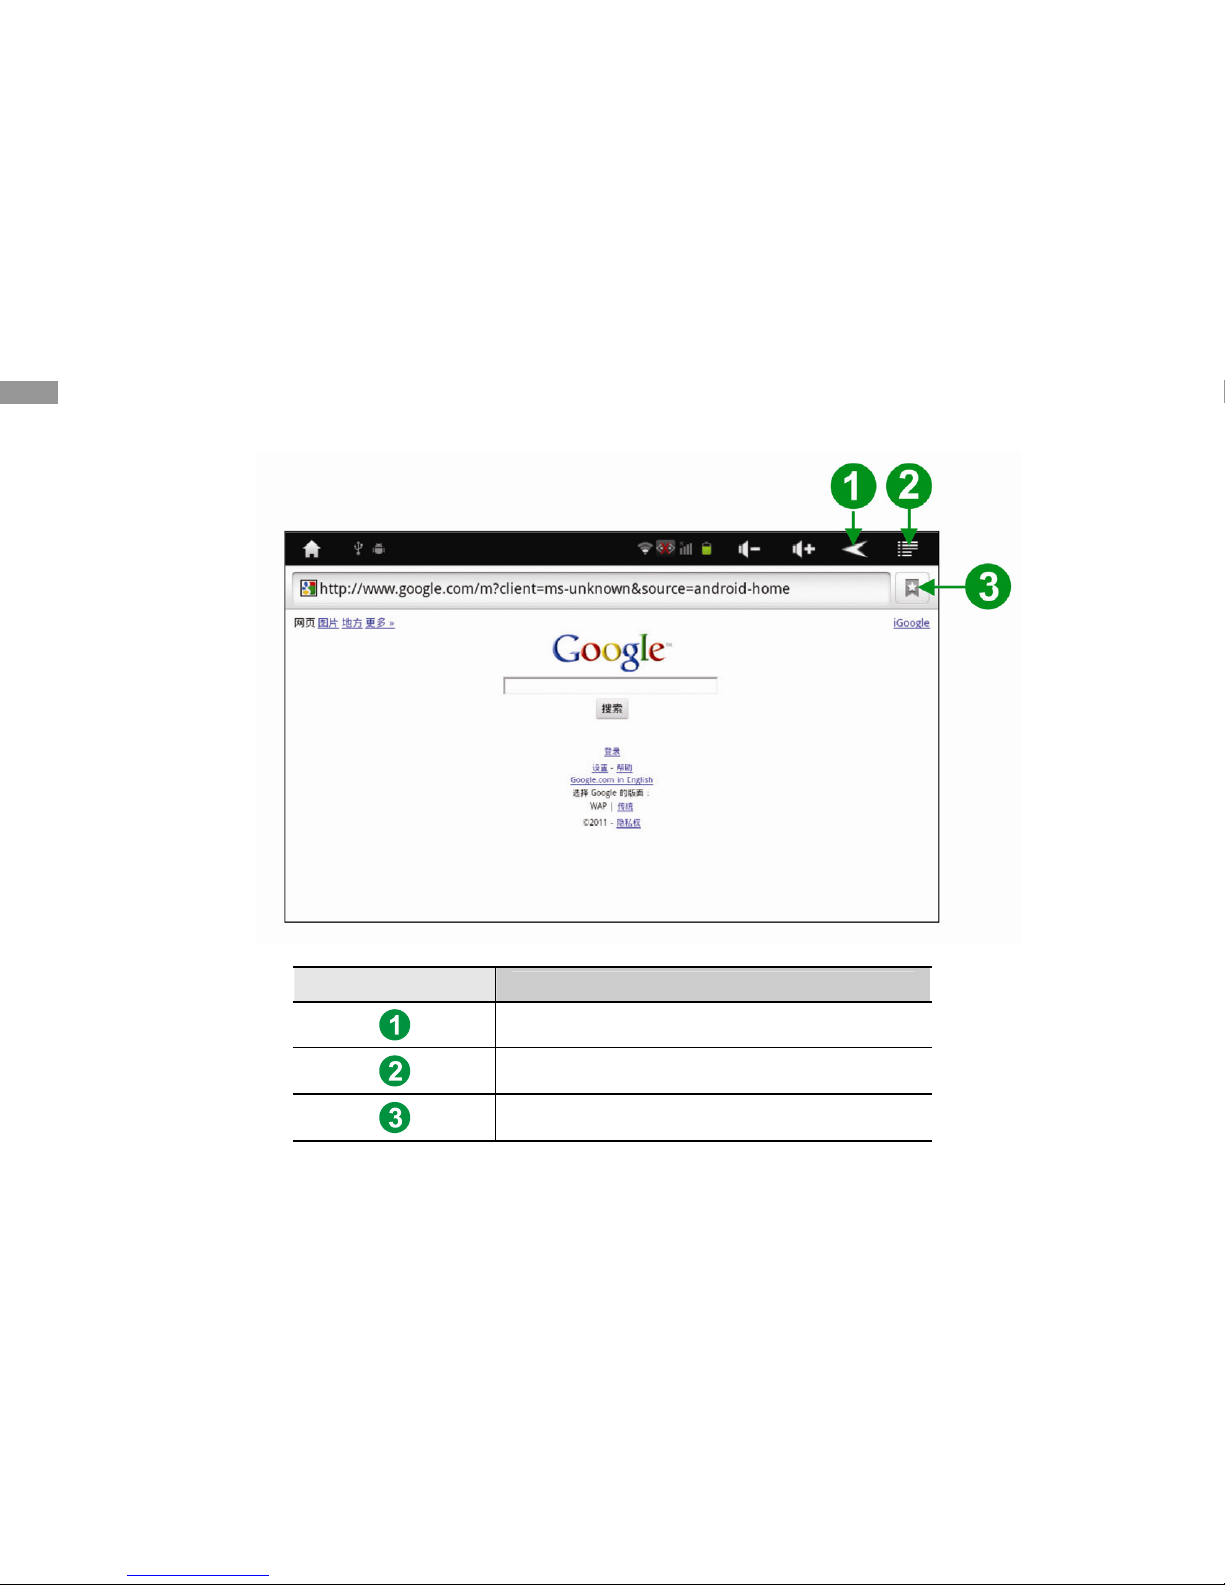
2.
Navigate the web
Number
Function
Return to previous web page
Menu
Bookmark
Web
20
Page 23
While browsing the web page, use the following
options
,
select [ ] →
More
.
● To bookmark the current web page, select
[
] →
More
→
Add bookmark
.
● To search for text on the web page, select
[
] →
More → Find on page
.
● To customize browser settings, select
[
] →
More
→
Settings
.
● To send the web address of the web page to
others, select [
] →
More→ Share page
.
● To view page details, select [
] →
More
→
Page info
.
>>Open multiple pages
You can open multiple pages and switch back and
forth between them.In Menu mode, select
Browser
[
].
Select [
] →
Windows
.
The web displayed on the icon means the currently
open windows.
Select New
Windows
to open a new window.
Access another web page on the new window.
To switch back and forth between currently open
windows, select
Windows
and select a web page
to retrieve.
>>Bookmark your favorite web pages
If you know the web address of the web page, you
can manually add a bookmark.
Web
21
Page 24
>>Add a bookmark
In Menu mode, select
Browser
[
].
Select [
] →
More
→
Add bookmark
.
To bookmark the web page you were viewing,
select
OK
.
To use bookmark options, select→ Bookmarks,
and tap and hold a
bookmark
:
● To open the web page in the current
window, select
Open
.
● To open the web page in a new window,
select
Open in new window
.
● To edit the web page information , select
Edit bookmark
.
● To add the bookmark shortcut to the home
screen, select
Add shortcut to Home
.
● To send the web address of the web page
to others, select
Share link
.
● To copy the web address of the web page,
select
Copy link URL
.
● To delete the bookmark, select
Delete
bookmark
.
● To use the web page as your homepage
of the browser, select
Set as homepage
.
Amazon Appstore
Your device’s functionality can be extended by
installing additional applications. Amazon
Appstore provides you an easy and quick way to
get games and mobile applications.
● This feature may be unavailable
depending on your region or service
provider.
● Your device will save user files from
downloaded applications to the internal
memory.
>>Download and install an
application
In Menu mode, select
Amazon Appstore
.
If you are launching this application for the first
time, read the terms and conditions and select
Accept
.
Search for a file or application and download it.
Web
22
Page 25

YouTube
Learn to view and upload videos via YouTube.
This feature may be unavailable depending on
your region or service provider.
>>Watch videos
In Menu mode, select
YouTube
.
If you are launching this application for the first
time, select
Accept
.
Select a video from the list.
Rotate the device to landscape view.
Web
23
Page 26
Maps
Learn to use Google Maps™ to find your location,
search the map for
streets, cities, or countries, and get directions.
>>Search for a specific location
In Menu mode, select
Maps
.
If you are launching this application for the first
time, select
OK
.
The map will display your current location.
Enter a keyword for the location and select [
] .
● To view a list of all results for your search, select
[
].
● To zoom in or out, select [
] or [ ].
● To search for a place around you, select [
].
● To add layers to the map, select [
].
● To view your current location, select [
].
>>Get directions to a specific
destination
In Menu mode, select
Maps
.
Press [
] →
Directions
.
Enter the addresses of the
My Location
and the
End Point
.
To enter an address from your contact list or point
the location on the map, press [
] →
Contacts
or
Point on map
.
Select a travel method (car, bus, or walk) and
select
Go
.
Select a travel route to view details of your trip (if
necessary).
When you are finished, press [
] →
Clear
Map
[ ].
Web
24
Page 27
Places
Learn to search for a place around you.
This feature may be unavailable depending on
your region or service provider.
1.
In Menu mode, select Places.
2.
Select a category.
3.
Your device searches for places around your
current location that are related to the category.
4.
Select the name of a place to view its details.
To view the place on the map, select [
].
To view the route to the place, select
[
] .
Google Search
You can search for applications in your device and
specific data on the web. In Menu mode, select
Google Search.
Enter a letter or a word of the data to search for.
Select the item's name you want to access.
Change the Google Search settings, press [
]
→
Search settings → Google search
-
Show web suggestions
: Set the device to
display suggestions while you are entering a
keyword.
-
Use My Location
: Set the device to use your
current location for Google search and other
Google services.
-
Search history
: Set the device to show the
search of your Google account.
-
Manage search history
: Manage the search
history of your Google account.
Web
25
Page 28
Communication
Google Mail
You can retrieve new email messages from
Google Mail™ to your Inbox.When you access this
application, the Inbox screen appears. The total
number of unread messages displays in the title
bar and they display in bold.
● This feature may be unavailable depending on
your region or service provider.
● This Google Mail menu may be labeled
differently depending on your service provider.
>>Send an email message
In Menu mode, select
Gmail
[ ].
Press [ ] →
Compose
[ ].
Enter a name or address in the recipient field.
Enter a subject and message.
To attach an image file, press [
] →
Attach
[ ] → a file.
Select [
] to send the message.
>>View an email message
In Menu mode, select
Gmail
[ ].
Select an email message.
From the message view, use the following options:
● To reply to the message, select [
]
.
● To reply to the message including all recipients,
select [
] →
Reply all
.
● To forward the message to other people, select
[
]→
Forward
.
● To add a star to the message, select [
]
.
● To view an attachment, select
Preview.
To
save it to your device, select
Download
.
● To archive the message, select
Archive
.
● To delete the message, select
Delete
.
● To move to the previous or next message,
select or .
Communication
26
Communication
26
Page 29
>>Organize email by labels
You can organize your email by labeling your
messages or adding stars to
mark important messages. You can sort messages
by label filter.
Add a label to a message
From the Inbox screen, tap and hold a message.
Select Change
labels
.
Select a label to add and select OK.
Add a star to a message
From the Inbox screen, tap and hold a message.
Select
Add star
. The star icon next to the
message is activated.
Filter messages
From the Inbox screen, press [ ] →
Go to
labels
[ ].
Select the label of the messages you want to view.
Email
Learn to send or view email messages via your
personal or company email account.
>>Set up an email account
1.
In Menu mode, select
Email
[ ].
2.
Enter your email address and password.
3.
Select
Next
(for general email accounts) or
Manual setup
(for other company email
accounts).
4.
Follow the on-screen instructions.
5.
To add more email accounts, press [ ]
→
Account manager
→
Add account
and
repeat steps 2-4 above.
When you are finished setting up the email
account, the email messages are downloaded to
your device. If you have created more than two
accounts, you can switch between email accounts.
Select an account name at the top left of the
screen and select one you want to retrieve
messages from.
Communication
27
Page 30

>>Send an email message
In Menu mode, select
Email
[ ] → an email
account.
Press [
] →
Compose
.
Add recipients of your message.
● Enter email addresses manually, separating
them with a semicolon or a comma.
● Select email addresses from the lists .
● Press [
] →
Add Cc/Bcc
to add more
recipients.
● Press [
] →
Add attachment
to add more
files.
You can attach media files, contacts, or location
information.
Select
Send
to send the message.
If you are offline or outside your service area, the
message will be held in the outbox until you are
online and in your service area.
>>View an email message
When you open an email account, you can view
previously retrieved emails offline or connect to the
email server to view new messages. After
retrieving email messages, you can view them
offline.
In Menu mode, select
Email
→ an email account.
Press [
] → [
]
Refresh
to update the
message list.
Select an email message.
Communication
28
Page 31
Entertainment
Music
Learn to listen to your favorite music while on the
go with the music Player.
>>Add music files to your device
Start by transferring files to your device or memory
card:
● Download from
the wireless web.
● Download from
a PC ► p. 35
● Copy to your
memory card.
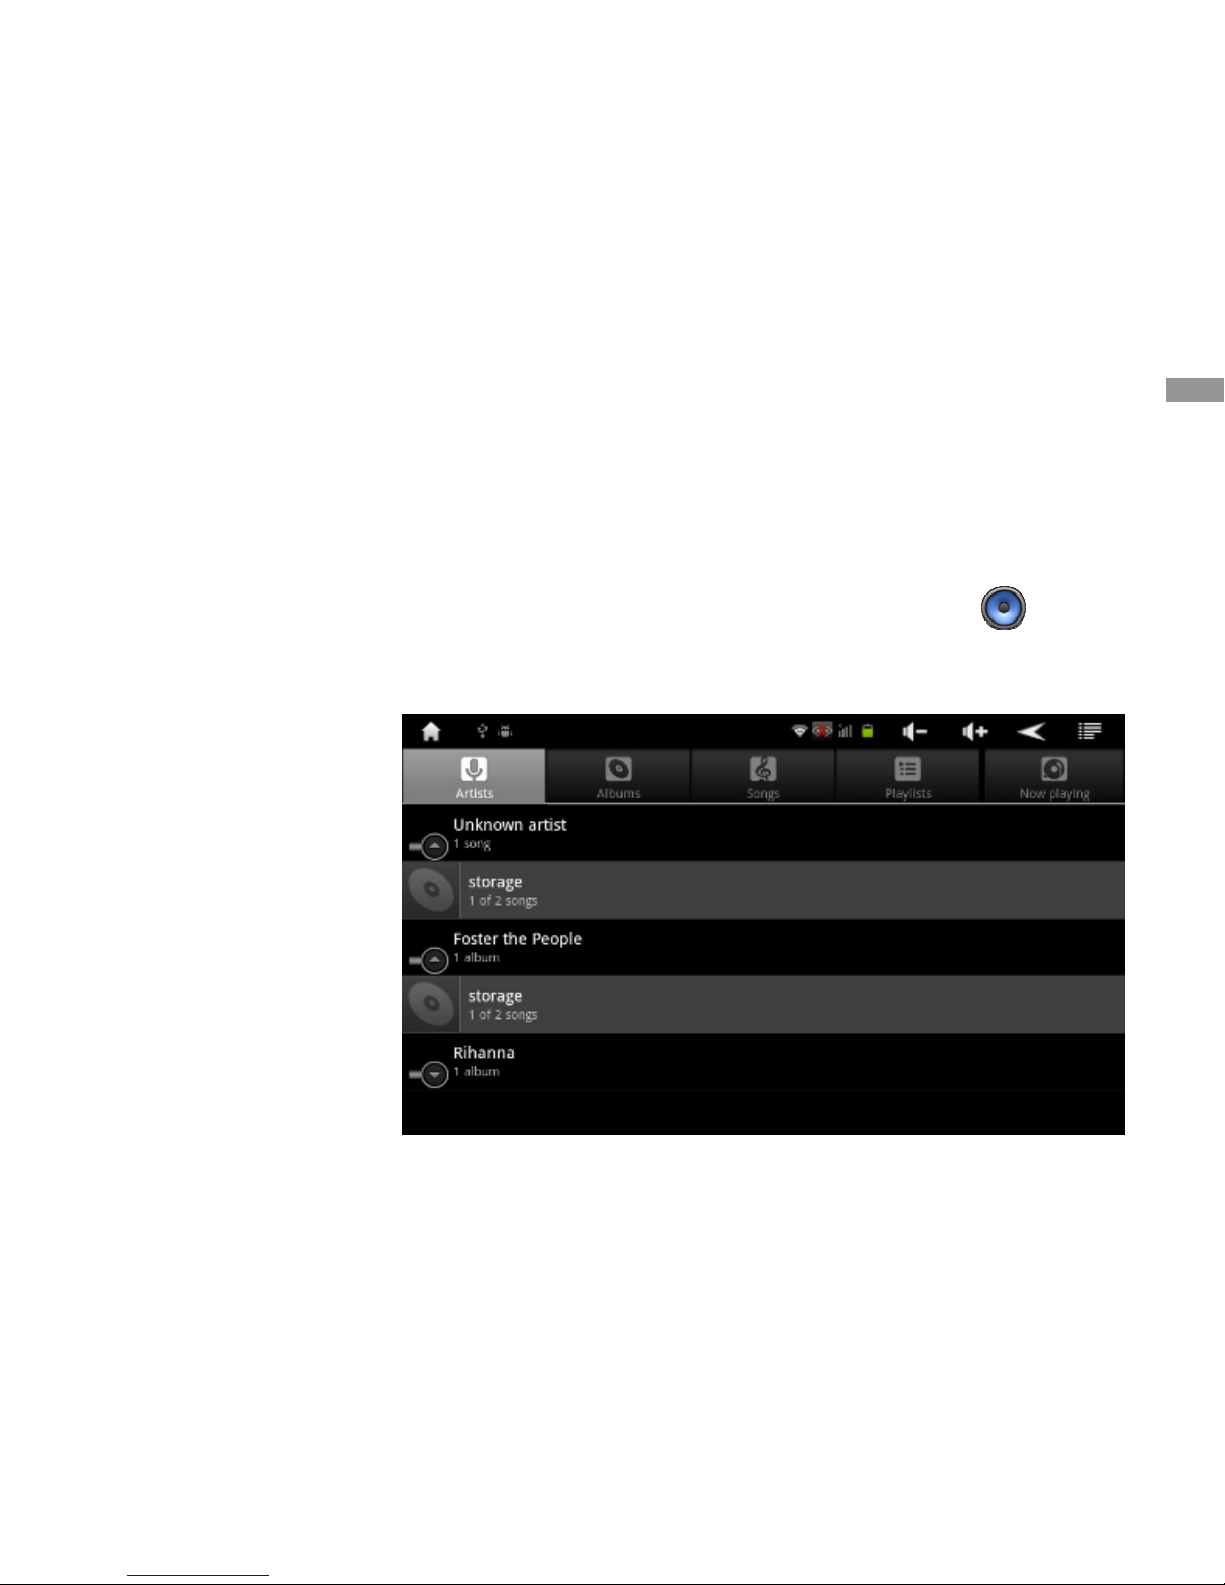
>> Play music
After transferring music files to your device or
memory card,
1.
In Menu mode, select
Music
[ ].
2.
Select a music category.
3.
Select a music file.
Entertainment
29
Page 32
>>Create a play List
In Menu mode, select
Music
[ ] →
Play lists
.
Select
Recently added
→ [
] →
Save as
play list
→
Play list name
.
Enter a title for your new playlist and select
Save
.
Select the files you want to include and select
Add
to play list
.
Camera
Learn how to capture and view photos and videos.
You can take photos at resolutions up to 640 x 480
pixels (0.3 megapixels) and videos at resolutions
up to 640 x 480 pixels.
● The camera interface appears only in
the landscape orientation.
● The memory capacity may differ
depending on the shooting scene or
shooting conditions.
Entertainment
30
Page 33
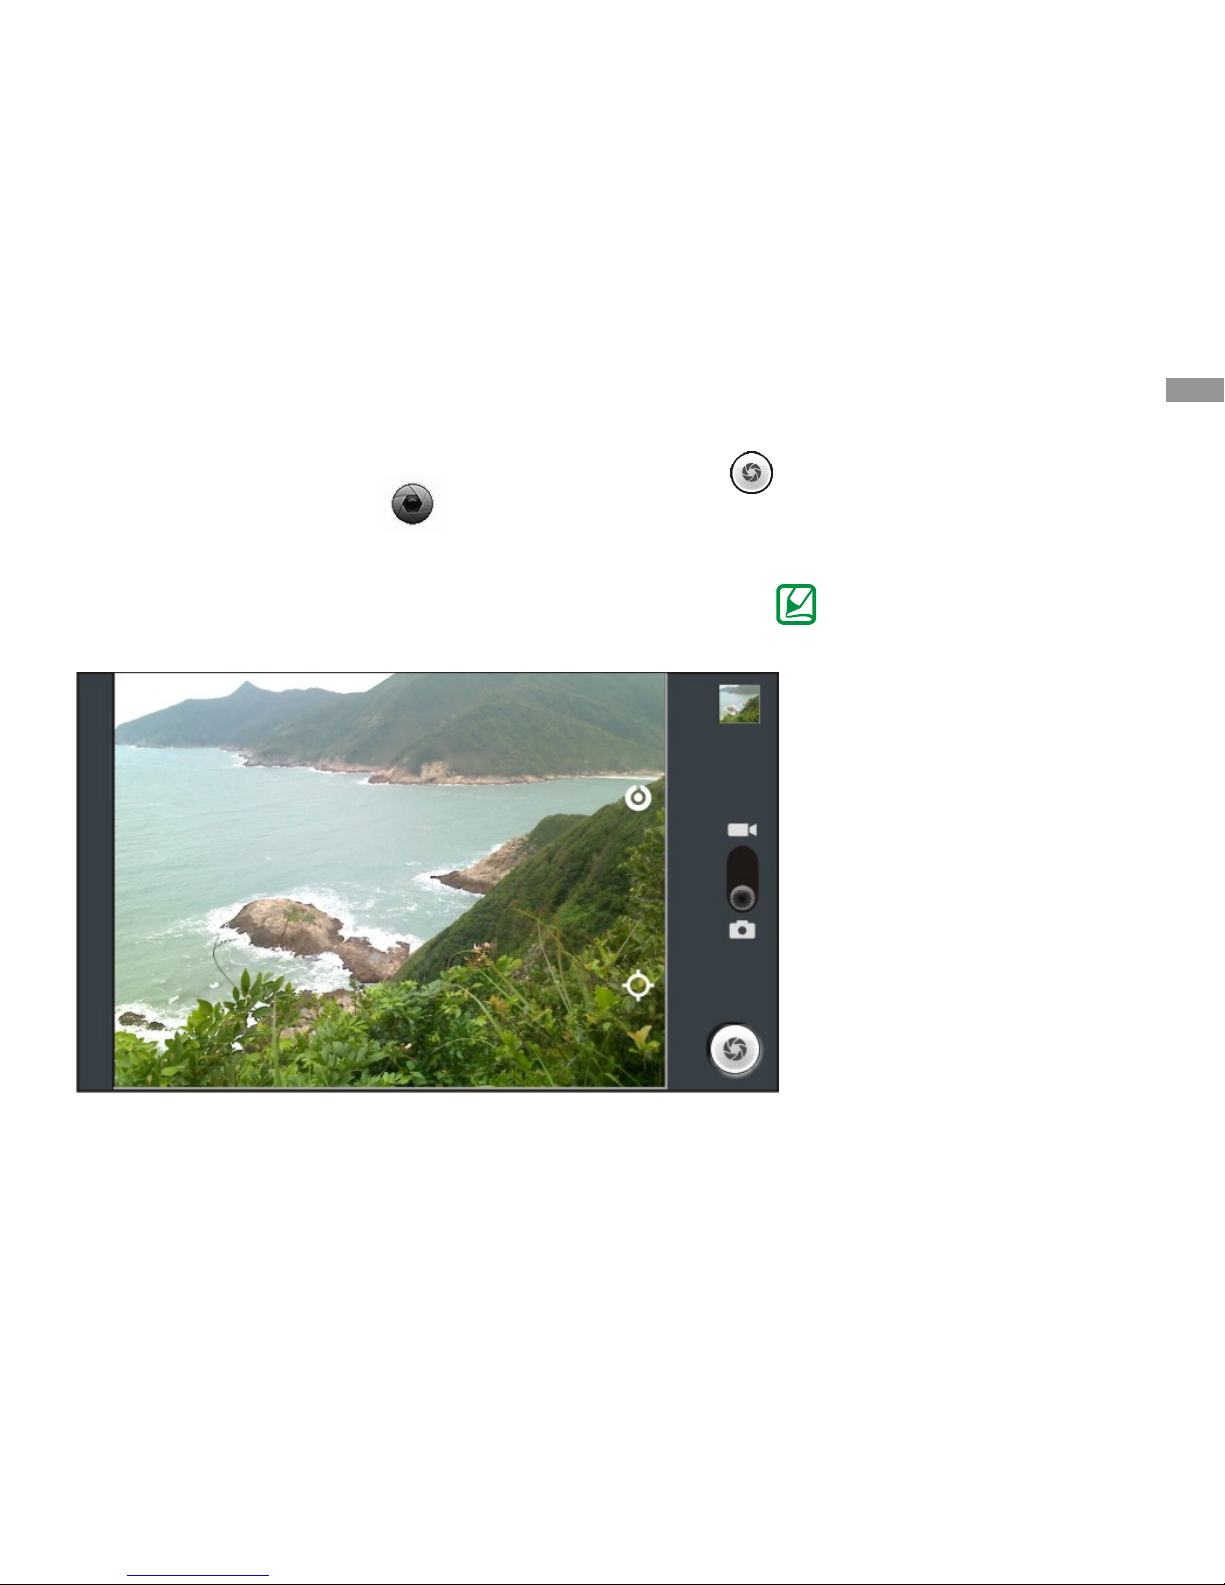
>>Capture a photo
In Menu mode, select
Camera
[ ]to turn on the
camera.
Rotate the device to landscape view.
Aim the lens at the subject and make any
necessary adjustments
Select [
] to take a photo. The photo is saved
automatically After taking photos, select the image
viewer icon to view the captured photos.
● To view more photos, scroll
left or right. You can also tap
the screen and scroll through
the thumbnails of photos at
the bottom of the screen.
● To zoom in or out, place two
fingers on the screen and
spread them apart (move
your fingers closer together
to zoom out) or double-tap
the screen.
● To send a photo to others,
select
Share
.
● To set a photo as wallpaper,
select
More
→
Set as
.
● To delete a photo, select
Delete
.
Entertainment
31
Page 34
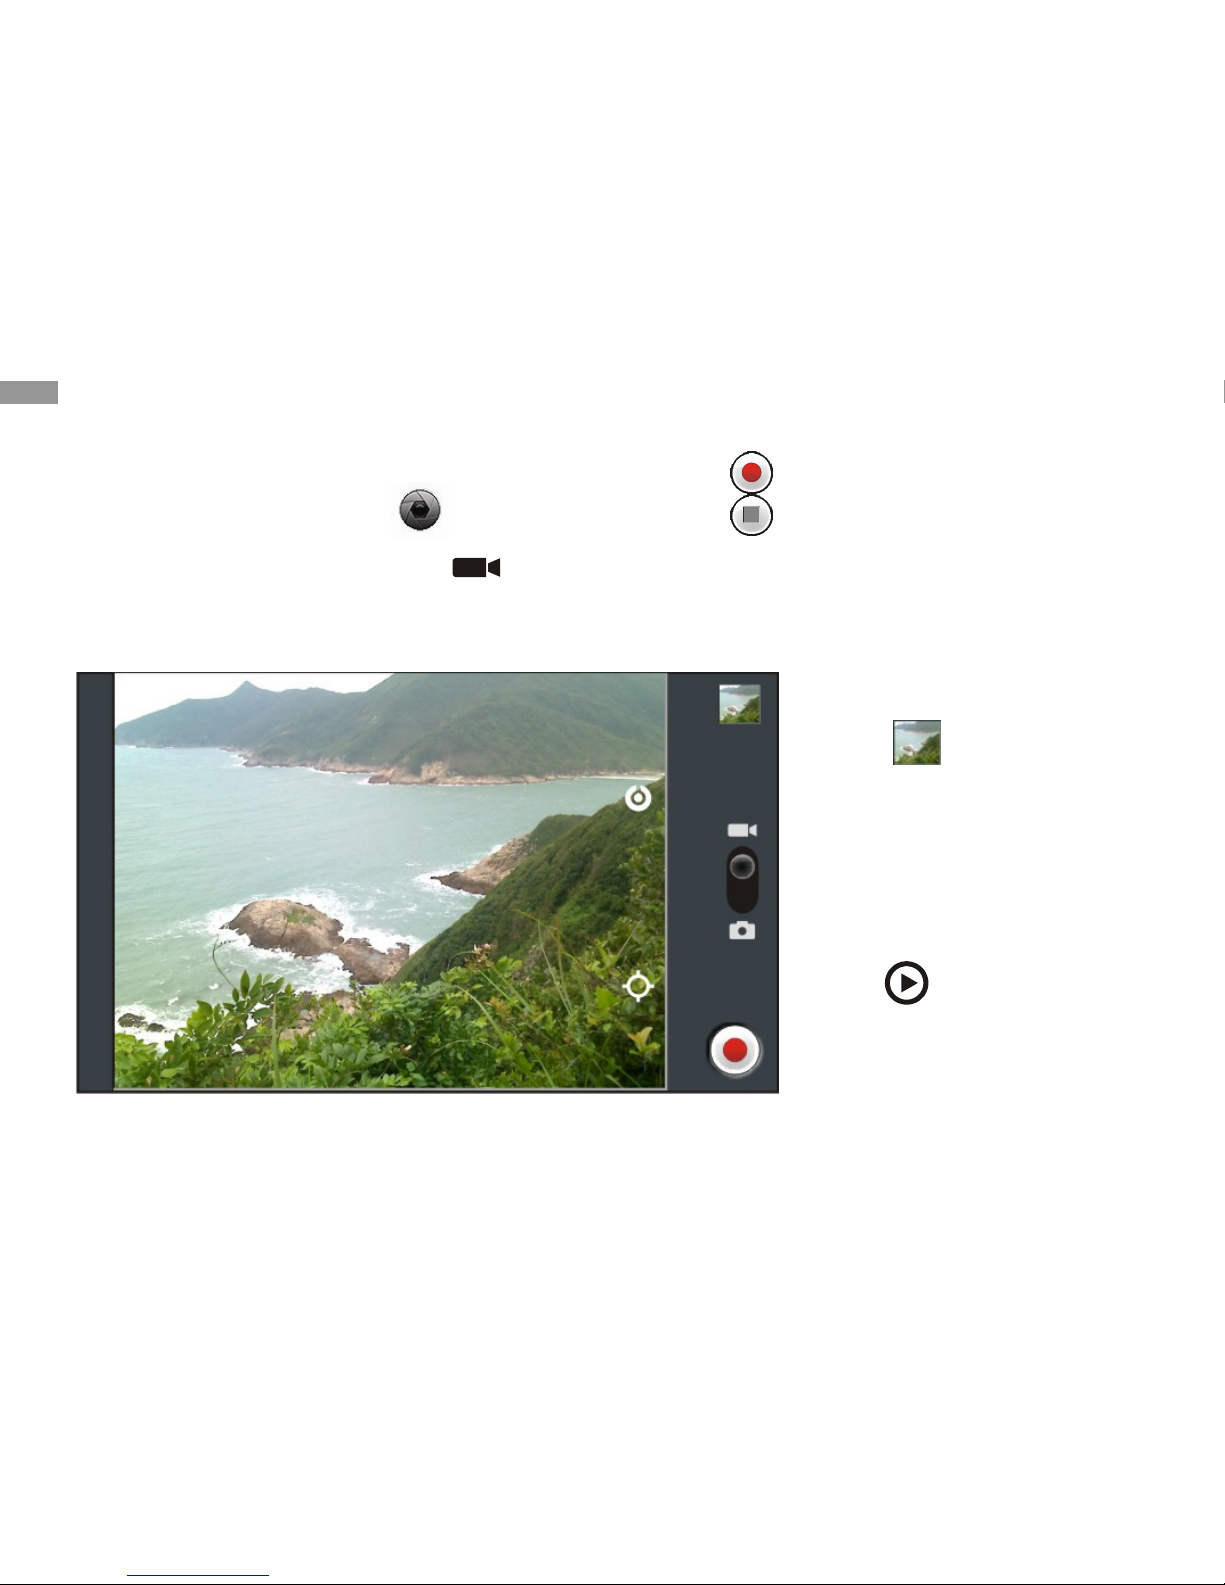
>>Record a video
In Menu mode, select
Camera
[ ] to turn on
the camera.
Slide up to switch to the camcorder [
].
Aim the lens at the subject and make any
necessary adjustments.
Select [
] to start recording.
Select [
] to stop recording.
The video is saved automatically.
The camera may not be able to properly record
videos to a memory card with
a slow transfer speed.
After recording videos, select
the [ ] to view the
recorded videos.
● To view more videos, scroll
left or right. You can also tap
the screen and scroll through
the thumbnails of videos at
the bottom of the screen.
● To play a video, select
[
]→
Play
.
● To send a video to others,
select
Share
.
● To delete a video, select →
Delete
.
Entertainment
32
Page 35
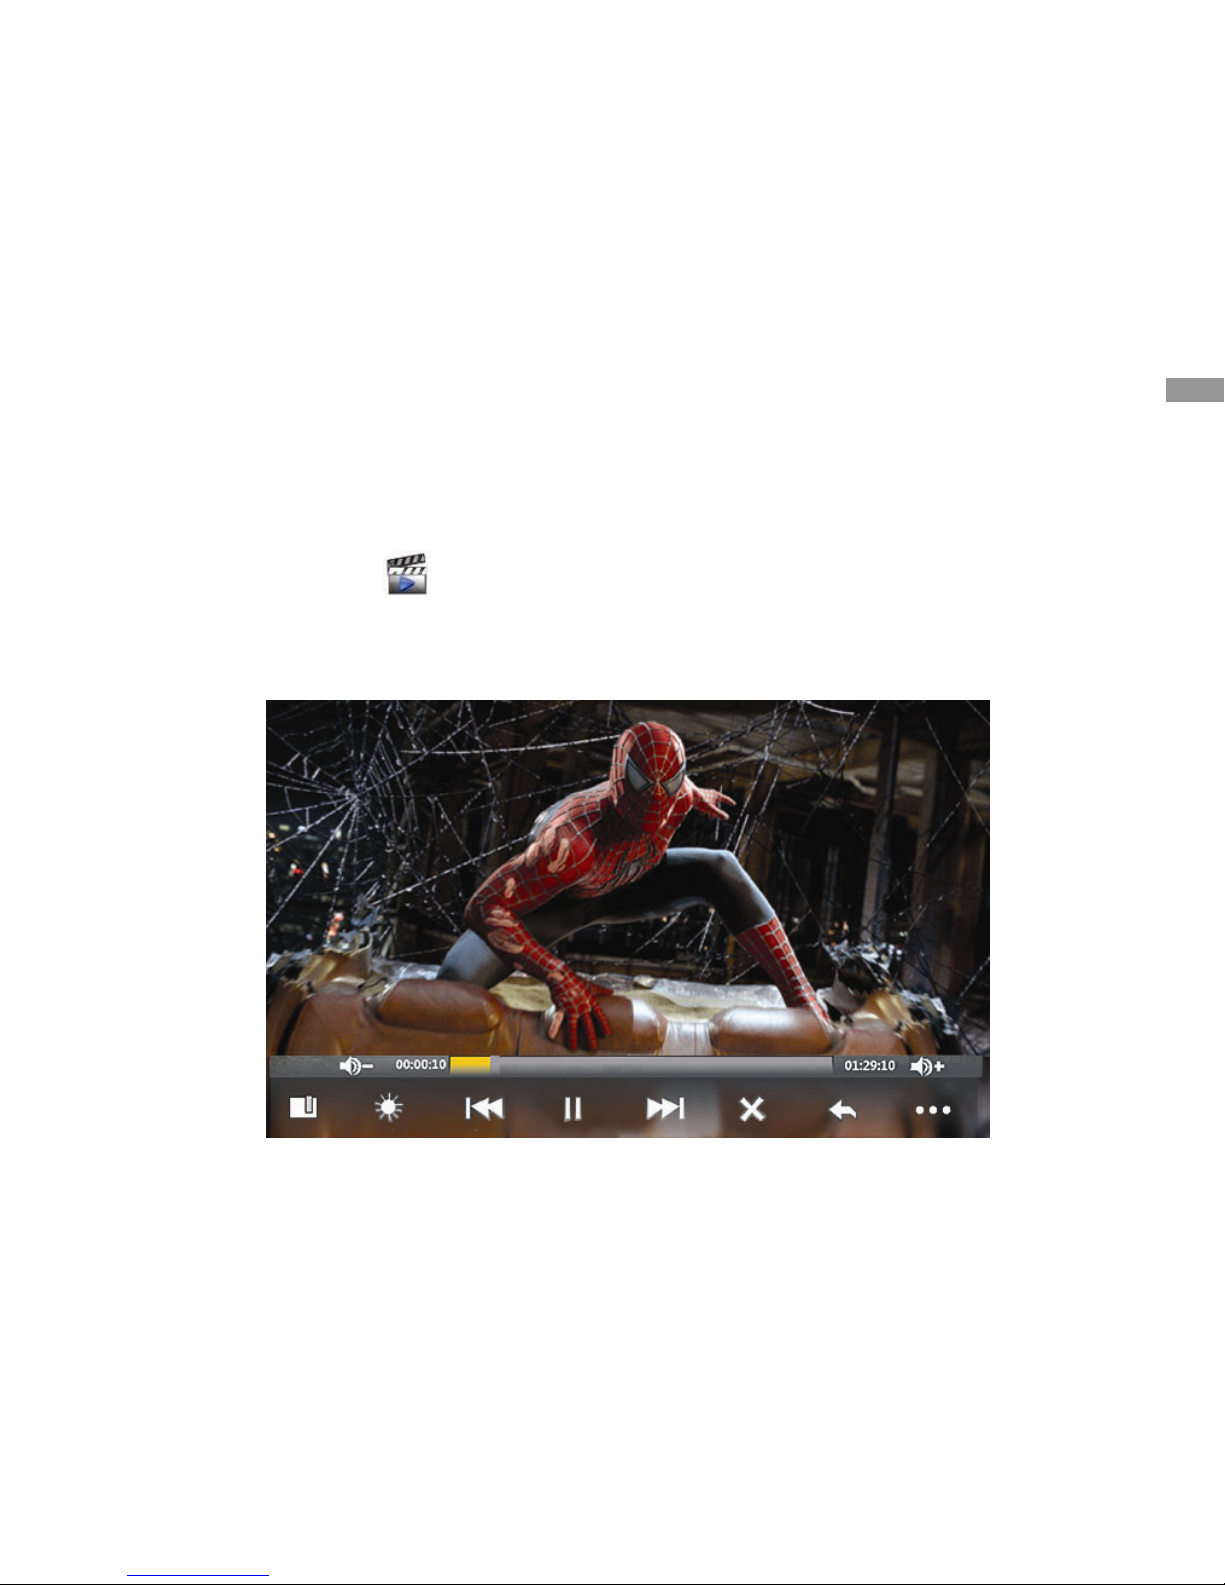
Video
Learn to use the video player to play various video
formats.
In Menu mode, select
Video
[ ].
Select a video to play.
Control playback with the following keys,displayed
at bottom of video
Gallery
Learn to view photos and play videos saved in
your device's memory and memory card.
Entertainment
33
Page 36
>>View a photo
In Menu mode, select
Gallery
[ ].
Select a folder.
To change the view mode, select
or
at the top right of the screen.
Select a photo (with no icon) to view.
>>Play a video
In Menu mode, select
Gallery
[ ].
Select a folder.
To change the view mode, select
or
at the top right of the screen.
Select a video (with the icon) to play.
Control playback with the virtual keys.
Calendar
Learn to create and manage daily, weekly or
monthly events, and set alarms
to remind yourself of important events.
>>Change the calendar view
In Menu mode, select
Calendar
[ ].
Press [
] ,select a view mode from the top
of the calendar.
●
Day
: Hourly blocks for one full day
●
Week
: A list of scheduled appointments for
the days in one full week
●
Month
: Daily blocks for the current month
●
Agenda
: A list of all scheduled appointments
Entertainment
34
Page 37
>>Create an event
In Menu mode, select
Calendar
[ ].
Press[
] →
More
→
New event
.
Enter the details of the event as required.
Select
Done
.
>>View events
To view today’s schedule,
In Menu mode, select
Calendar
[ ].
Select
Today
.
Select an event to view its details.
Connectivity
PC connections
Learn to connect your device to a PC with the
supplied PC data cable.
By connecting the device to a PC, you can
transfer data to and from your device directly.
>>Connect as a mass storage device
You can connect your device to a PC as a
removable disk and access the file directory. If you
insert a memory card in the device, you can also
access the file directory of the memory card by
using the device as a memory card reader.
The file directory of the memory card will appear
as a removable disk, separate from the internal
memory.
If you want to transfer files from or to a memory
card, insert a memory card into the device.
Use the PC data cable to connect your device to a
PC.
Connectivity
35
Page 38

When connected, it shows USB connected
[
] ,slide down the status bar, then select
USB connected →Turn on USB storage →OK
.
Open the folder to view files.
Copy files from the PC to the memory card.
When you are finished, slide down the status
bar, then select
Turn off USB storage
.
To disconnect the device from the PC, click the
USB device icon on the Windows task bar and
click the option to safely remove the mass storage
device. Then remove the PC data cable from the
PC.
Otherwise, you may lose data stored on the
memory card or damage the memory card.
Wi-Fi
Learn to use your device’s wireless networking
capabilities to activate and connect to any wireless
local area network (WLAN) compatible with the
IEEE 802.11 a/b/g/n standards.
You can connect to the internet or other network
devices anywhere an access point or wireless
hotspot is available.
Your device uses non- harmonized frequency and
is intended for use in all European countries. The
WLAN can be operated in EU without restriction
indoors, but cannot be operated outdoors in
France.
Connectivity
36
Page 39

>>Activate the WLAN feature
In Menu mode, select
Settings
[ ] →
Wireless
& networks
→
Wi-Fi settings
.
Select
Wi-Fi
to activate the WLAN feature.
An active WLAN running in the background will
consume battery power faster.
To preserve battery power, activate the WLAN
only when needed.
>>Find and connect to a WLAN
In Menu mode, select
Settings
[ ] →
Wireless
& networks
→
Wi-Fi settings
.
The device will automatically search for available
WLANs.
Select a network under
Wi-Fi networks
.
Enter a password for the network (if necessary).
Select Connect.
>>Add a WLAN manually
In Menu mode, select
Settings
[ ] →
Wireless
& networks
→
Wi-Fi settings
→
Add Wi-Fi
network
.
Enter the SSID for the network and select the
security type.
Set the security settings depending on the
selected security type. Select
Save
.
Connectivity
37
Page 40

>>Connect to a WLAN using a Wi-Fi
Protected Setup (WPS)
You can connect to a secured network by using a
WPS button or WPS PIN. To connect to a WLAN
with a WPS button,
In Menu mode, select
Settings
[ ] →
Wireless
& networks
→
Wi-Fi settings
→
WPS PBC
.
Press a WPS button on the access point within 2
minutes.
To connect to a WLAN with a WPS PIN,
In Menu mode, select
Settings
[ ] →
Wireless
& networks
→
Wi-Fi settings
.
Select a network indicated by the WPS icon and
select
WPS PIN
.
On the access point, enter the PIN and press the
start button.
3G connection
Select
Setting
[ ] →
Wireless & networks
→
Mobile networks
→
Data enabled
Ethernet connection
Select
Setting
[ ] →
Wireless & networks
→
Ethernet settings
→
Ethernet
Connectivity
38
Page 41
Tools
Shelves
How to open and read book files.
>> To read books
In Menu mode, select
Shelves
[ . ]
Select a book from the bookshelf.
While reading a book, use the following options:
● To move pages, drag your finger left or right or
tap near the left or right margin of a page.
● To view the table of contents, bookmarks,
etc. , select[
] .
● To customize the settings for fonts,
select[
]→
Font Size
.
● To view book details, select[
] →
Book
Info
.
● To bookmark the current page, delete
Bookmarks and Show Bookmarks ,
select[
]→
Bookmarks
.
OfficeSuite
Learn to open and read document files on your
device. This application supports
the following file formats:
DOC, DOCX, XLS ,XLSX, PPT,PPTX,PPS ,
PPSX, TXT.
For more information, select
OfficeSuite
[
]
in the menu mode, then select
OfficeSuite Pro
.
( Need to log on to the internet )
Tools
39
Page 42
Explorer
Learn to quickly and easily access all of your
images, videos, music, sound clips, and other
types of files stored on your device and memory
card.
Tools
40
Page 43
>>Supported file formats
Type
Format
Image
bmp, gif, jpg, png,3gp, mp4, avi,
wmv, flv, mkv (Codec: MPEG4,
H.263, Sorenson H.263, H.264,
VC-1, DivX/XviD)
Music
mp3, m4a, mp4, 3gp, 3ga, wma, ogg,
oga, aac, flac
● Some file formats are not supported
depending on the software of the device.
● If the file size exceeds the available
memory, an error can occur when you
open files.
● Avoid locking the device’s screen while
playing a DivX Video- On-Demand. Each
time you lock the screen while playing a
DivX Video-On-Demand, one of your
available rental counts will be decreased.
>>Open a file
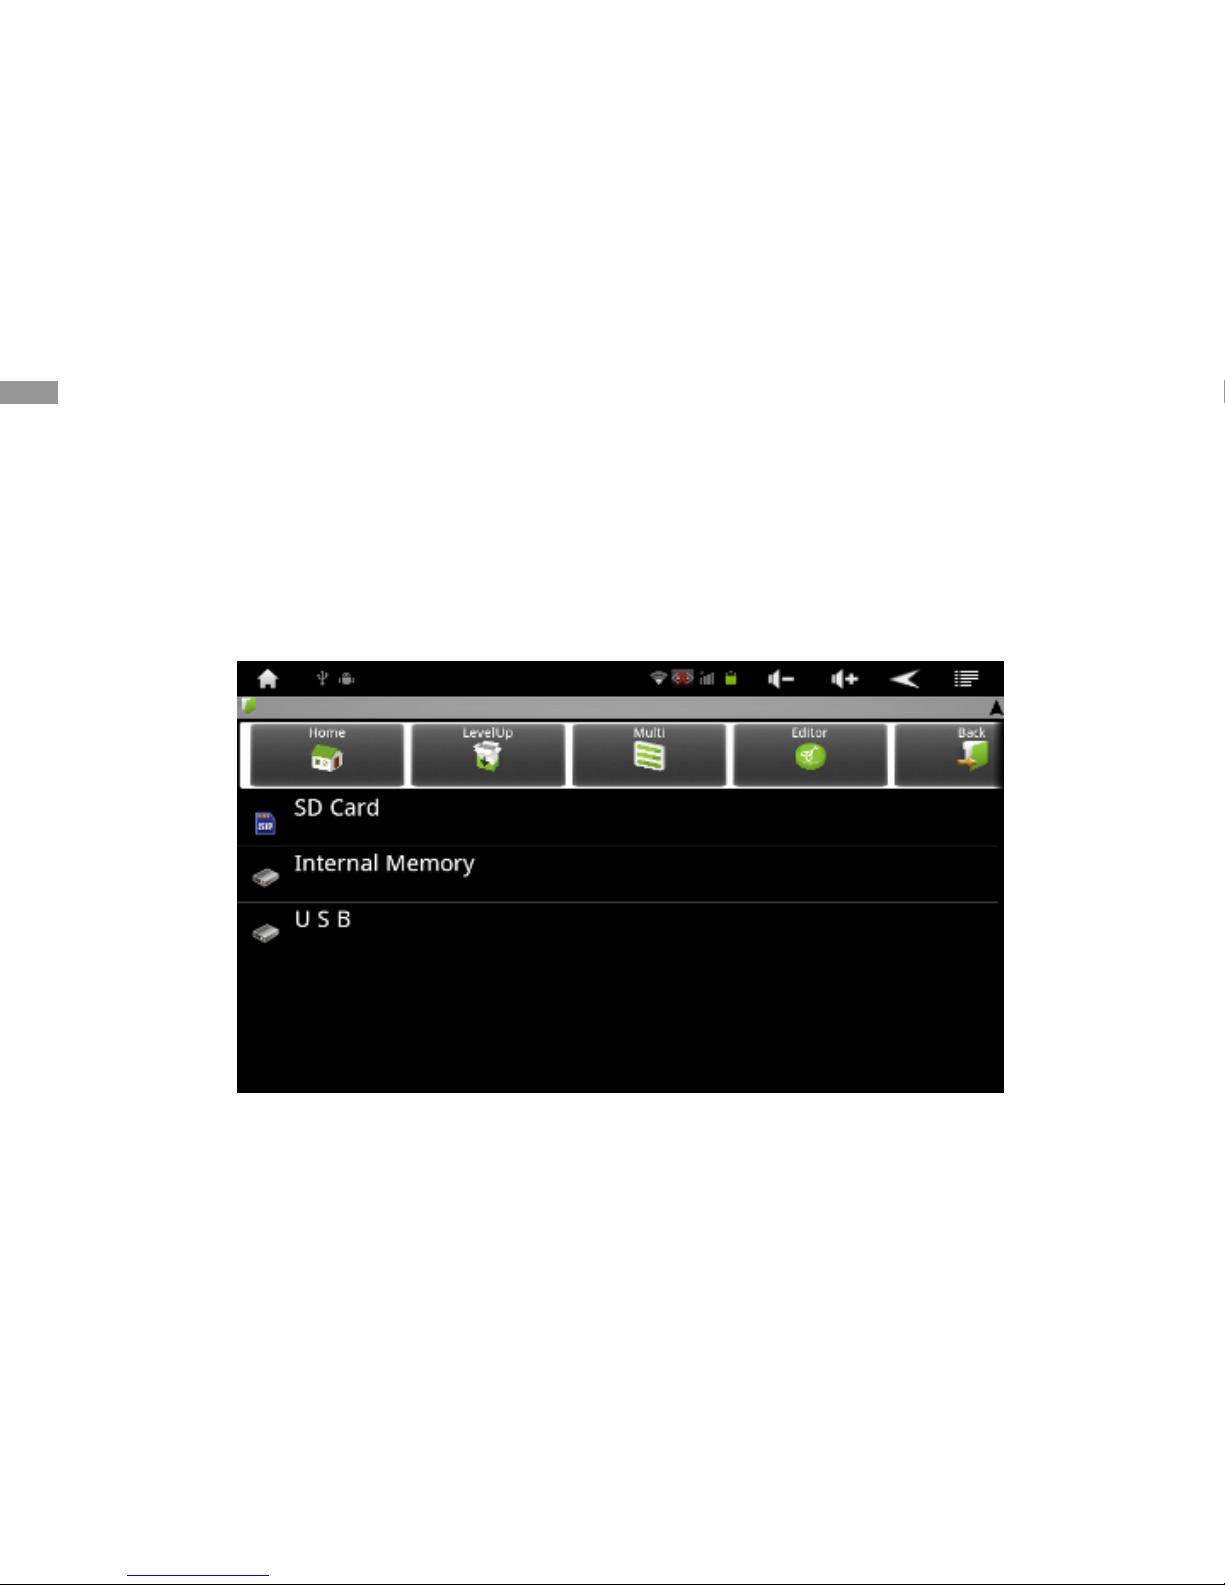
In Menu mode, select
Explorer
[ ].
Select a route
SD Card
/
Internal Memory
/
USB
Select a folder.
To move up one level in the file directory, select
level UP
.
Select a file to open.
>>Copy and Move files
In Menu mode, select
Explorer
[ ] →
Editor
.
Select folders or files to copy or move.
Select
Copy or Move
.
Locate a folder and select
Paste
.
>>Delete files
In Menu mode, select
Explorer
[ ] →
Editor
.
Select folders or files to delete.
Select
Delete → Delete
.
Tools
41
Page 44
Clock
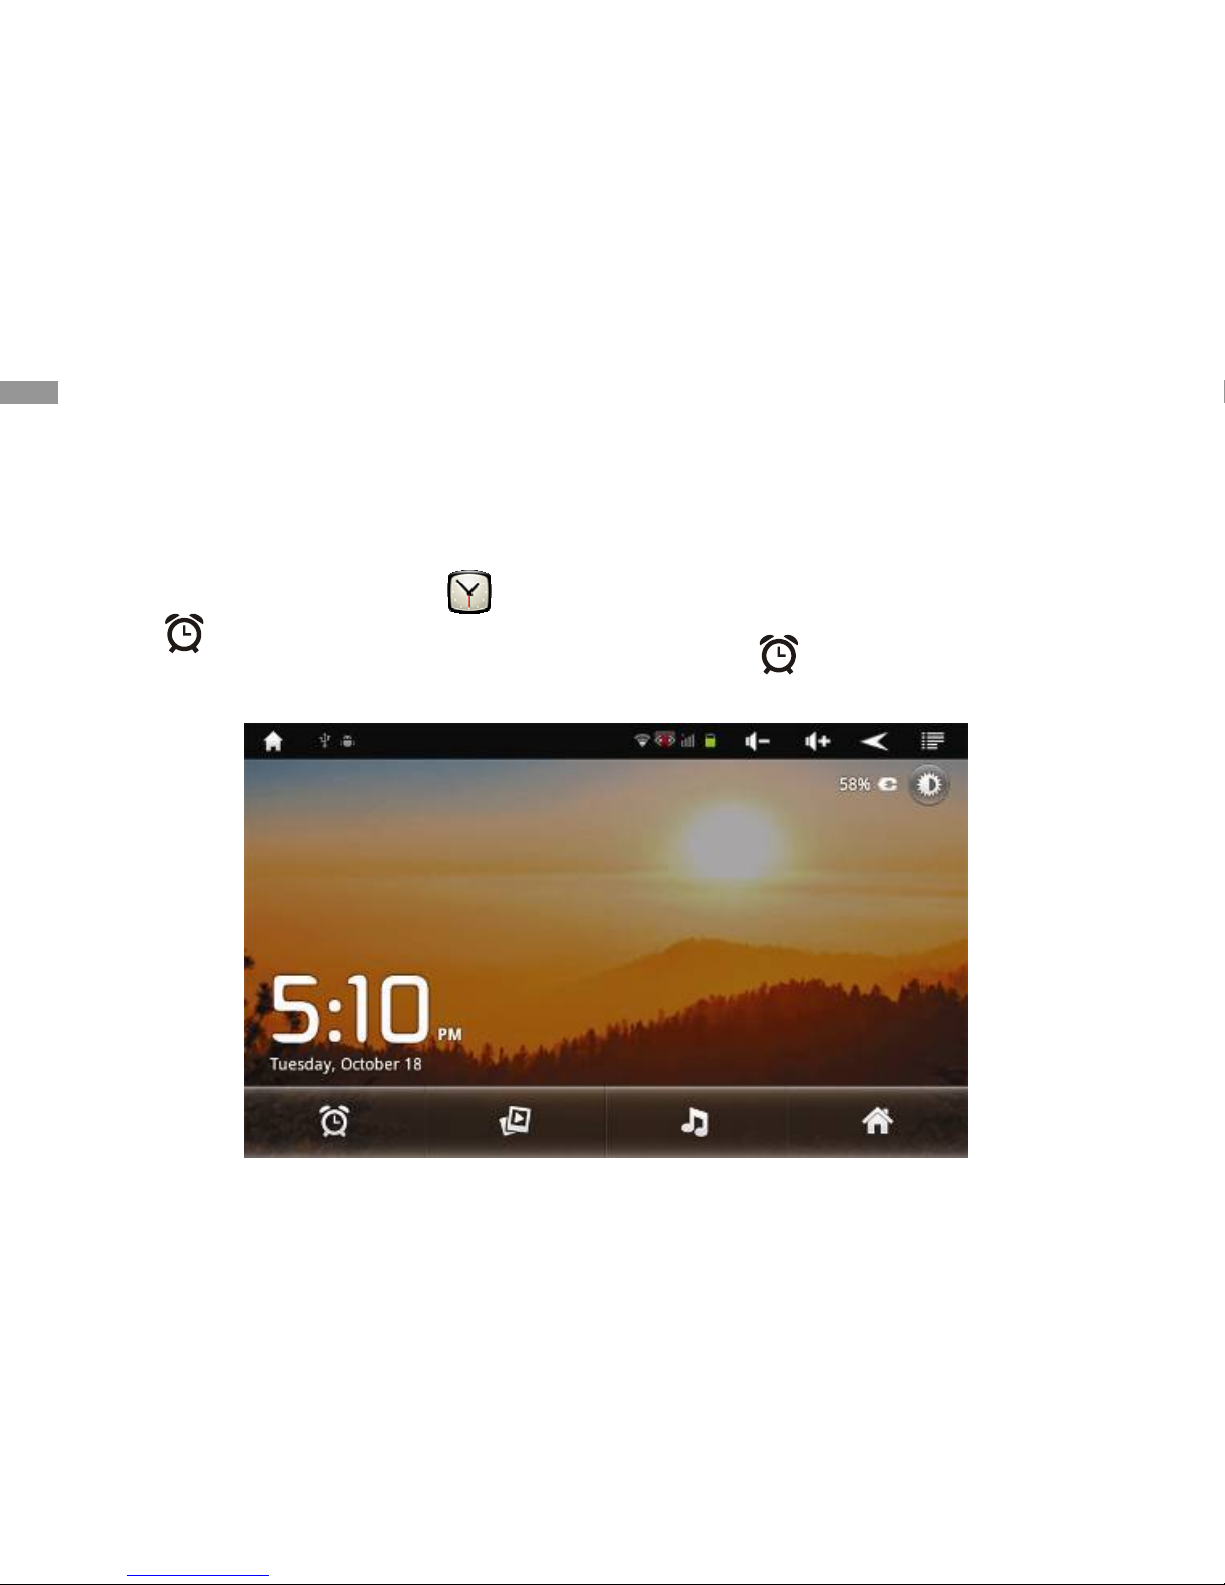
Learn to set and control alarms .
>>Set a new alarm
In Menu mode, select
Alarm Clock
[ ].
Press [
] →
Add alarm
.
Set alarm details.
When you are finished, select
Set
.
>>Stop an alarm
To snooze or dismiss the reminder, select
Snooze
or
Dismiss
.
>>Delete an alarm
In Menu mode, select
Clock
.
Press [
] → Select alarms to delete
Select
Delete
.
Tools
42
Page 45
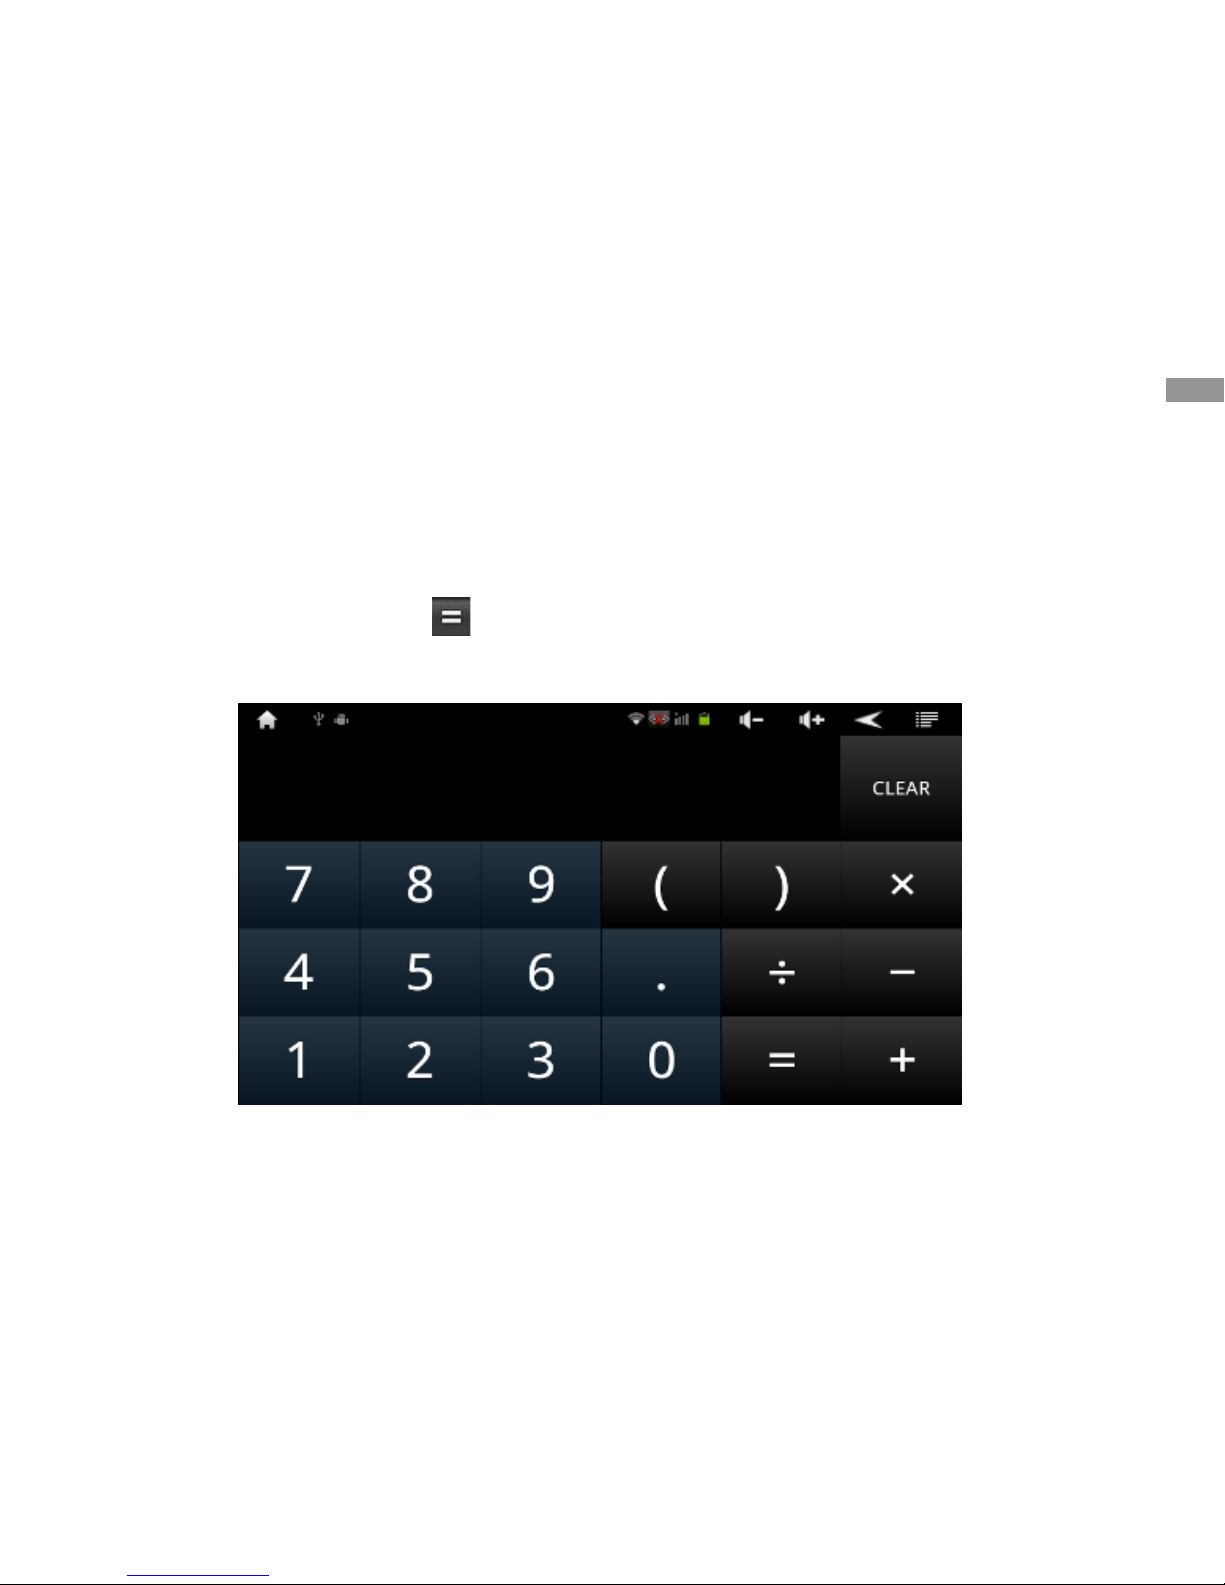
Calculator
Learn to perform mathematical calculations
directly on your device like a typical hand-held or
desktop calculator.
In Menu mode, select
Calculator
[ ].
Use the keys that correspond to the calculator
display to perform basic mathematical operations.
Rotate the device to landscape view to use the
scientific calculator.
Tools
43
Page 46

Settings
Access the Settings menu
1. In Menu mode, select
Settings
[ ].
2. Select a setting category and select an option.
Wireless & network
Change the settings for wireless network
connections.
>>Wi-Fi
Turn the WLAN feature on or off.
>>Wi-Fi settings
●
Wi-Fi
: Turn the WLAN feature on or off. ► p. 55
●
Network notification
: Set the device to notify
you when an open network is available.
●
WPS PBC
: Connect to a WLAN using a Wi-Fi
Protected setup (WPS) button.
●
Add Wi-Fi network
: Add WLAN APs manually.
>>Mobile networks
Connect to a 3G network via USB 3G modem.
●
Modem power
: Turn modem power on / off.
●
Data enabled
: Enable data access over
Mobile network
●
Data roaming
: Connect to data services
when roaming
>>Ethernet settings
Select
Ethernet
to turn on wired Ethernet, when
connecting the device from USB to Ethernet
( RJ45 ) .
Select
Static IP Settings→ Use Static IP
if necessary to set the static IP address.
Settings
44
Page 47
Sound
Change the settings for various sounds on your
device.
●
Silent mode
: Activate Silent mode to
mute all sounds except media sounds and
alarm ring tones.
●
Volume
: Adjust the volume level for call
ring tones, music and videos, alarm ring
tones, device system, and notifications.
●
Audible touch tones
: Set the device to
sound when you touch the keys on the
dialing screen.
●
Audible selection
: Set the device to
sound when you select an application or
option on the touch screen.
●
Screen lock sounds
: Set the device to
sound when you lock or unlock the touch
screen.
Display
Change the settings for the display.
●
Brightness
: Set the brightness of the
display.
●
Auto-rotate screen
: The display will
adjust automatically when the device is
tilted from portrait to landscape.
●
Animation
: Set the device to display
animation when you switch between
windows.
●
Screen timeout
: Set the length of time
the device waits before turning off the
display's backlight.
HDMI Setting
To turn ON or
OFF
the HDMI.
Settings
45
Page 48

Location and security
●
Use wireless networks
: Set to use
wireless networks to find your location .
●
Set up screen lock
: Set the unlock
security code.
--
None
: Disable screen unlock security.
--
Pattern
: Set an unlock pattern to
unlock the screen.
--
PIN
: Set a PIN to unlock the screen.
--
Password
: Set a password to unlock
the screen.
●
Visible passwords
: Set the device to
display your password as you enter.
●
Install from SD card
: Install encrypted
certificates that are stored in a memory
card.
●
Set password
: Create and confirm a
password for accessing credentials.
Applications
Change the settings for managing installed
applications.
●
Unknown sources
: Select to download
applications from any source. If you do not
select this option, you can download
applications only from the Android Market.
●
Manage applications
: Access the list of
the applications installed on the device and
check the application information. You can
also view the applications that are currently
running or stored in a memory card.
●
Running services
: View the services you
are using and access them as needed.
●
Storage use
: View available memory and
the memory used by applications.
●
Development
:
-
USB debugging
: Select to connect your
device to a PC by using a PC data cable.
This is for application development.
-
Stay awake
: Set the device’s screen to stay
on while charging the battery.
Settings
46
Page 49

Accounts & sync
Change the settings for the auto sync feature or
manage accounts for synchronization.
●
Background data
: Select this setting to
use the auto sync feature. The auto sync
will run in the background without opening
applications and synchronize data.
●
Auto-sync
: Set the device to synchronize
contact, calendar, and email data
automatically.
Privacy
●
Back up my data
: Set to back up your
settings and application data to the Google
server.
●
Automatic restore
: Set to restore your
settings and application data when the
applications are reinstalled on your device.
●
Factory data reset
: Reset your settings to
the factory default values and delete all
your data.
Storage
Check memory information of memory cards and
your device, and format the external or internal
memory.
Language & keyboard
Change the settings for text input.
>>Select language
Select a display language for all menus and
applications.
>>Select input method
Select a default keyboard type for text input.
Settings
47
Page 50

Date & time
Access and alter the following settings to control
how time and date are displayed on your device:
●
Automatic
: Use network-provided values.
●
Set date
: Set the current date manually.
●
Select time zone
: Set your home time zone.
●
Set time
: Set the current time manually.
●
Use 24-hour format
: Set to the time to be
displayed in 24-hour format.
●
Select date format
: Select a date format.
About device
Access information about your device, check the
device’s status, and learn how to use your device.
Settings
48
Page 51

Troubleshooting
Your device displays network or
service error messages
● When you are in areas with weak signals or
poor reception, you may lose reception. Move
to another area and try again.
● You cannot access some options without a
subscription. Contact your service provider for
more details.
The touch screen responds slowly or
improperly
If your device’s touch screen is not responding
properly, try the following:
● Remove any protective covers from the touch
screen. Protective covers may prevent the
device from recognizing your inputs and are
not recommended for touch screen devices.
● Ensure that your hands are clean and dry
when tapping the touch screen.
● Restart your device to clear any temporary
software bugs.
● Ensure that your device software is upgraded
to the latest version.
● If the touch screen is scratched or damaged,
take it to your local service provider .
Your device freezes or has fatal errors
If your device freezes or hangs up, you may need
to close programs or reset the device to regain
functionality. If your device is still responsive but a
program is frozen, close the program using the
task manager. If your device is frozen and
unresponsive, press
Reset
, and the device will
reboot automatically.
If this does not solve the problem, perform a
factory data reset. In Menu mode, select
Settings
→
Privacy
→
Factory data reset
→
Reset MID
→
Erase everything
.
The device beeps and the battery icon
flashes
Your battery is low. Recharge the battery to
continue using the device.
Troubleshooting
49
Page 52

The battery does not charge properly
or the device turns off
If the battery will no longer charge completely,
contact your service provider.
Your device is hot to the touch
When you use applications that require more
power or use applications on your device for an
extended period of time, your device may feel hot
to the touch. This is normal and should not affect
your device's lifespan or performance.
Error messages appear when
launching the camera
The device must have sufficient available memory
and battery power to operate the camera
application. If you receive error messages when
launching the camera, try the following:
● Charge the battery.
● Free some memory by transferring files to a
PC or deleting files from your device.
● Restart the device.
● If you are still having trouble with the camera
application after trying these tips, contact the
service provider.
Error messages appear when opening
music files
Some music files may not play on the device for a
variety of reasons. If you receive error messages
when opening music files on your device, try the
following:
● Free some memory by transferring files to a
PC or deleting files from your device.
● Ensure that the music file is not Digital Rights
Management (DRM)- protected. If the file is
DRM-protected, ensure that you have the
appropriate license or key to play the file.
● Ensure that your device supports the file type.
A connection is not established when
you connect the device to a PC
● Ensure that the PC data cable you are using is
compatible with your device.
● Ensure that you have the proper drivers
installed and updated on your PC.
Troubleshooting
50
Page 53

Safety precautions
To prevent injury to yourself and others or damage
to your device, read the following information
before using your device.
Warning: Prevent electric shock, fire,
and explosion
Do not use damaged power cords or plugs, or
loose electrical sockets
Do not touch the power cord with wet hands,
or disconnect the charger by pulling on the
cord
Do not bend or damage the power cord
Do not use your device while charging or touch
your device with wet hands
Do not short-circuit the charger or the battery
Do not drop or cause an impact to the charger
or the device.
Do not charge the battery with chargers that
are not approved by the manufacturer
Do not use your device during a thunderstorm
Your device may malfunction and your risk of
electric shock is increased.
Do not handle a damaged or leaking Lithium
Ion (Li-Ion) battery
For safe disposal of your Li-Ion batteries, contact
your nearest authorized service center.
Handle and dispose of batteries and
chargers with care
● Use only approved batteries and chargers
specifically designed for your device.
Incompatible batteries and chargers can
cause serious injuries or damage to your
device.
● Never dispose of batteries or devices in a fire.
Follow all local regulations when disposing of
used batteries or devices.
● Never place batteries or devices on or in
heating devices, such as microwave ovens,
stoves, or radiators. Batteries may explode
when overheated.
● Never crush or puncture the battery. Avoid
exposing the battery to high external pressure,
which can lead to an internal short circuit and
overheating.
Safety precautions
51
Page 54

Protect the device, batteries, and
chargers from damage
● Avoid exposing your device and batteries to
very cold or very hot temperatures.
● Extreme temperatures can cause the device to
become deformed and reduce the charging
capacity and life of your device and batteries.
Caution: Follow all safety warnings
and regulations when using your
device in restricted areas
Turn off your device where prohibited
Comply with all regulations that restrict the use of a
mobile device in a particular area.
Do not use your device near other
electronic devices
Most electronic devices use radio frequency
signals. Your device may interfere with other
electronic devices.
Do not use your device near a
pacemaker
● Avoid using your device within a 6 inches
range of a pacemaker if possible, as your
device can interfere with the pacemaker.
● If you must use your device, keep at least 6
inches away from the pacemaker.
● To minimize the possible interference with a
pacemaker, use your device on the opposite
side of your body from the pacemaker.
Safety precautions
52
Page 55

Do not use your device in a hospital
or near medical equipment that can
be interfered with by radio frequency
If you personally use any medical equipment,
contact the manufacturer of the equipment to
ensure the safety of your equipment from radio
frequency.
If you are using a hearing aid, contact
the manufacturer for information
about radio interference
Some hearing aids may be interfered with by the
radio frequency of your device. Contact the
manufacturer to ensure the safety of your hearing
aid.
Turn off the device in potentially
explosive environments
● Always comply with regulations, instructions
and signs in potentially explosive
environments.
● Do not use your device at service stations,
near fuel or chemicals, and at blasting areas.
● Do not store or carry flammable liquids, gases,
or explosive materials in the same
compartment as the device, its parts, or
accessories.
Turn off your device when in an
aircraft
Using your device in an aircraft is illegal. Your
device may interfere with the electronic
navigation instruments of the aircraft.
Electronic devices in a motor vehicle
may malfunction due to the radio
frequency of your device
Electronic devices in your car may malfunction due
to radio frequency of your device. Contact the
manufacturer for more information.
Safety precautions
53
Page 56

Comply with all safety warnings and
regulations regarding mobile device
usage while operating a vehicle
While driving, safely operating the vehicle is your
first responsibility. Never use your mobile device
while driving, if it is prohibited by law. For your
safety and the safety of others, practice good
common sense and remember the following tips:
● Use a hands-free device.
● Position your device within easy reach. Be
able to access your wireless device without
removing your eyes from the road.
Proper care and use of your mobile
device
Keep your device dry
● Humidity and all types of liquids may damage
device parts or electronic circuits.
● When wet, turn off your device. Dry your
device with a towel and take it to a service
center.
● Liquids will change the color of the label that
indicates water damage inside the device.
Water damage to your device can void your
manufacturer’s warranty.
Do not use or store your device in
dusty, dirty areas
Dust can cause your device to malfunction.
Do not store your device on uneven
surfaces
If your device falls, it can be damaged.
Safety precautions
54
Page 57

Do not store your device in hot or
cold areas. Use your device at -4°F to
113°F
● Your device can explode if left inside a closed
vehicle, as the inside temperature can reach
up to 176°F.
● Do not expose your device to direct sunlight
for extended periods of time (such as on the
dashboard of a car).
● Store the battery at -4°F to 113°F.
Do not store your device with metal
objects such as coins, keys and
necklaces
● Your device may become deformed or
scratched and malfunction.
Do not store your device near
magnetic fields
● Your device may malfunction or the battery
may discharge from exposure to magnetic
fields.
● Magnetic strip cards, including credit cards,
phone cards, passbooks, and boarding passes,
may be damaged by magnetic fields.
● Do not use carrying cases or accessories with
magnetic closures or allow your device to
come in contact with magnetic fields for
extended periods of time.
Do not store your device near or in
heaters, microwaves, hot cooking
equipment, or high pressure
containers
● The battery may leak.
● Your device may overheat and cause a fire.
Do not drop your device or cause
impact to your device
● The screen of your device may be damaged.
● If bent or deformed, your device may be
damaged or parts may malfunction.
Safety precautions
55
Page 58

Ensure maximum battery and charger
life
● Avoid charging batteries for more than a week,
as overcharging may shorten battery life.
● Over time, unused batteries will discharge and
must be recharged before use.
● Disconnect chargers from power sources
when not in use.
● Use batteries only for their intended purposes.
Use manufacturer-approved batteries,
chargers, accessories and supplies
● Using generic batteries or chargers may
shorten the life of your device or cause the
device to malfunction.
● We cannot be responsible for the user’s safety
when using accessories or supplies that are
not approved.
Do not allow infants or pets to bite or
suck on the device or the battery
● Doing so may damage the device or cause an
explosion.
● If children use the device, make sure that they
use the device properly.
Protect your hearing
● Excessive exposure to loud sounds can cause
hearing damage.
● Exposure to loud sounds while driving may
distract your attention and cause an accident.
● Always turn the volume down before plugging
the earphones into an audio source and use
only the minimum volume setting necessary to
hear your conversation or music.
Use caution when using the device
while walking or moving
Always be aware of your surroundings to avoid
injury to yourself or others.
Safety precautions
56
Page 59

Do not carry your device in your back
pockets or around your waist
You can be injured or damage the device if you
fall.
Do not disassemble, modify, or repair
your device
● Any changes or modifications to your device
can void your manufacturer’s warranty. For
service, take your device to a Local Service
Center.
● Do not disassemble or puncture the battery, as
this can cause explosion or fire.
Do not paint or put stickers on your
device
Paint and stickers can clog ventilation and prevent
proper operation. If you are allergic to
paint or metal parts of the product, you may
experience itching, eczema, or swelling of the
skin. When this happens, stop using the product
and consult your physician.
When cleaning your device:
● Wipe your device or charger with a clean soft
towel.
● Clean the terminals of the battery with a cotton
ball or a towel.
● Do not use chemicals or detergents.
Do not use the device if the screen is
cracked or broken
Broken glass or acrylic could cause injury to your
hands and face. Take the device to a Local
Service Center to have it repaired.
Do not use the device for anything
other than its intended use. Avoid
disturbing others when using the
device in public.Do not allow children
to use your device
Your device is not a toy. Do not allow children to
play with it as they could hurt themselves and
others or damage the device.
Safety precautions
57
Page 60

Install mobile devices and equipment
with caution
● Ensure that any mobile devices or related
equipment installed in your vehicle are
securely mounted.
● Avoid placing your device and accessories
near or in an air bag deployment area.
Improperly installed wireless equipment can
cause serious injury when air bags inflate
rapidly.
Allow only qualified personnel to
service your device
Allowing unqualified personnel to service your
device may result in damage to your device
and will void your manufacturer’s warranty.
Handle memory cards with care
● Do not remove a card while the device is
transferring or accessing information, as this
could result in loss of data and/or damage to
the card or device.
● Protect cards from strong shocks, static
electricity, and electrical noise from other
devices.
● Do not touch gold- colored contacts or
terminals with your fingers or metal objects. If
dirty, wipe the card with a soft cloth.
Be sure to back up important data
Dopo is not responsible for data loss.
Do not distribute copyright-protected
material
Do not distribute copyright-protected material that
you have recorded to others without the
permission of the content owners. Doing this may
violate copyright laws. The manufacturer is not
liable for any legal issues caused by the user’s
illegal use of copyrighted material.
Safety precautions
58
Page 61

FCC warning
Changes or modifications not expressly approved
by the party responsible for compliance could be
avoid the user’s authority to operate the
equipment.
This equipment has been tested and found to
comply with the limits for a Class B digital device,
pursuant to Part 15 of the FCC Rules. These limits
are designed to provide reasonable protection
against harmful interference in a residential
installation. This equipment generates uses and
can radiate radio frequency energy and, if not
installed and used in accordance with the
instructions, may cause harmful interference to
radio communications. However, there is no
guarantee that interference will not occur in a
particular installation. If this equipment does cause
harmful interference to radio or television reception,
which can be determined by turning the equipment
off and on, the user is encouraged to try to correct
the interference by one or more of the following
measures:
--Reorient or relocate the receiving antenna.
--Increase the separation between the
equipment and receiver.
--Connect the equipment into an outlet on a
circuit different from that to which the receiver
is connected.
--Consult the dealer or an experienced radio/TV
technician for help.
Safety precautions
59
Page 62

Disclaimer
Some content and services accessible through this
device belong to third parties and are protected by
copyright, patent, trademark and/or other
intellectual property laws. Such content and
services are provided solely for your personal
noncommercial use. You may not use any content
or services in a manner that has not been
authorized by the content owner or service
provider. Without limiting the foregoing, unless
expressly authorized by the applicable content
owner or service provider, you may not modify,
copy, republish, upload, post, transmit, translate,
sell, create derivative works, exploit, or distribute in
any manner or medium any content or services
displayed through this device.
Third party services may be terminated or
interrupted at any time, and Dopo makes no
representation or warranty that any content or
service will remain available for any period
of time. Content and services are transmitted by
third parties by means of networks and
transmission facilities. Without limiting the
generality of this disclaimer, Dopo expressly
disclaims any responsibility or liability for any
interruption or suspension of any content or
service made available through this device.
Dopo is neither responsible nor liable for customer
service related to the content and services.
Safety precautions
60
Page 63

Page 64

SERVICE CENTER
1845 S. Vineyard Ave, Ste.4 Ontario,CA
91761
Tel:
909-974-2859
Fax:
909-974-2865
Hours: 8:30AM - 5PM PST
English.11/2011.Rev.1.0
 Loading...