

Page 1
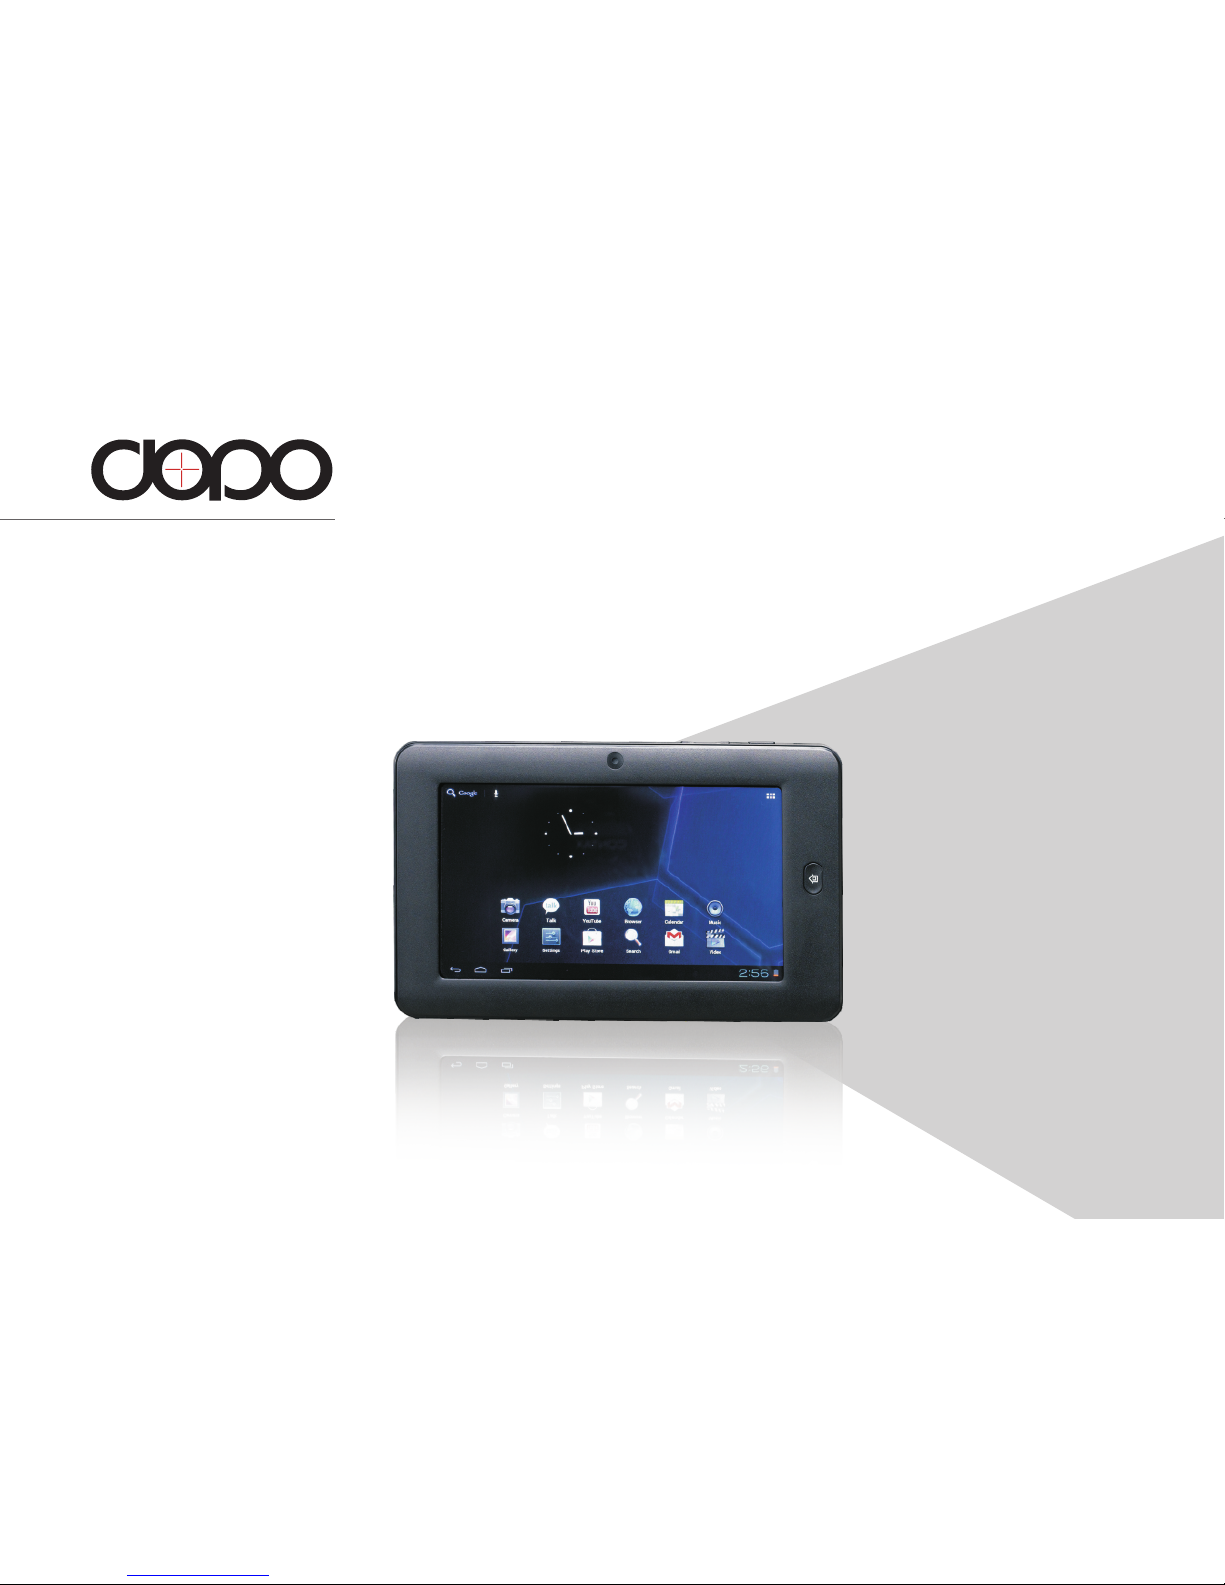
User Manual
Internet Tablet T711
Read this manual before installation and use.
Page 2
Page 3
Important Safety Instructions .......................................
Features ........................................................................
................................................
Basic Operations ..........................................................
Getting Started .............................................................
Home Screen at a Glance ............................................
About applications .....................................................
Preinstalled Ap pl ic at io ns . .. .. .. .. .. .. .. .. .. .. .. .. .. .. .. .......
Browser ..........................................................
Settings ..........................................................
Apk In st al le r .. .. .. .. .. .. .. .. .. .. .. .. .. .. .. ......................
Video Player ...................................................
Music .............................................................
Gallery ...........................................................
Explorer .........................................................
SoudRecorder ................................................
Calculator ......................................................
Canlendar ......................................................
Clock .............................................................
Camera ..........................................................
Introducing your device
4
5
6
7
8
8
9
10
10
10
11
11
12
14
14
15
15
15
15
16
Connecting to the Internet .......................................................
Troubleshooting .......................................................................
Compliance Information ..........................................................
Warranty ....................................................................................
17
18
19
21
Contents
T711
3
EN
Page 4
READ THIS FIRST BEF OR E US IN G YOUR TAB LE T
Thank you for your purcha se of the 7" Internet
Tablet
4 EN
T711
Important Safety Instructions
1. Do not use the tablet in extremely hot, cold, dusty or damp
environments.
2. Do not drop the tablet when using it.
3. The usage life of battery is subject to the operating
condition and environment.
4. Please charge the battery in the following instances:
A. The icon of battery level shows weak
B. System powers off automatically, an d po we rs o ff again
after restarting
C. Keys do not work.
5. During the formatting or uploading/downloading, do not
disconnect the tablet from the PC. Disconnection during
updating or data transfer may damage files or the tablet.
6. Static discharge to the cable during connection to the
computer may corrupt files or the storage area of the tablet.
7. The images in this manual may vary slightly from actual
product.
8. Dismantling the tablet and will void the warranty.
Please check the trouble shooting section of this manual if
experiencing problems.
9. Our company reserves the right to improve the product.
Different software and hardware versions might affe ct t he
product performance and functions, therefore the product
shall be subject to change without further notice.
10. Please respect the copyright laws in your area.
11. Th e ta bl et i s eq ui pp ed w it h th e to uc h sc re en , so k ey s on
machine surface are for assistance only.
※ All warranty information, product features and
specifications are subject to change without notice.
Page 5
T711
Features
7" 800*400 capacitive touch screen.
Support MP3/WMA/ AAC/OGG /WAV music format.
Support video of AVI/ WMV/MP4/ MKV/ RM/RMVB/TS/ FLV
format, up to 1080P.
Support Micro SD Card.
Support picture auto browse in PNG/JPG/BMP/JPEG/GIF
format.
Energy-saving setting, brightness control and sleep.
Support multi languages.
Support Win2000 /Win XP/Vista system/Win 7.
Support downloading files from internet.
USB2.0 high speed transfer
Support APK program installation.
Portable disk.
OTG function. Support play files from USB device, of which
the rated current should be lower than 500mA, via OTG port.
When play files saved in a hard disk, for the power
consumption is large, please connect an outer power.
G-Sensor function.
One Camera on front panel.
Support multi-point touch function
Support WIFI Wireless Connection
Support firmware upgrade.
5 EN
Page 6
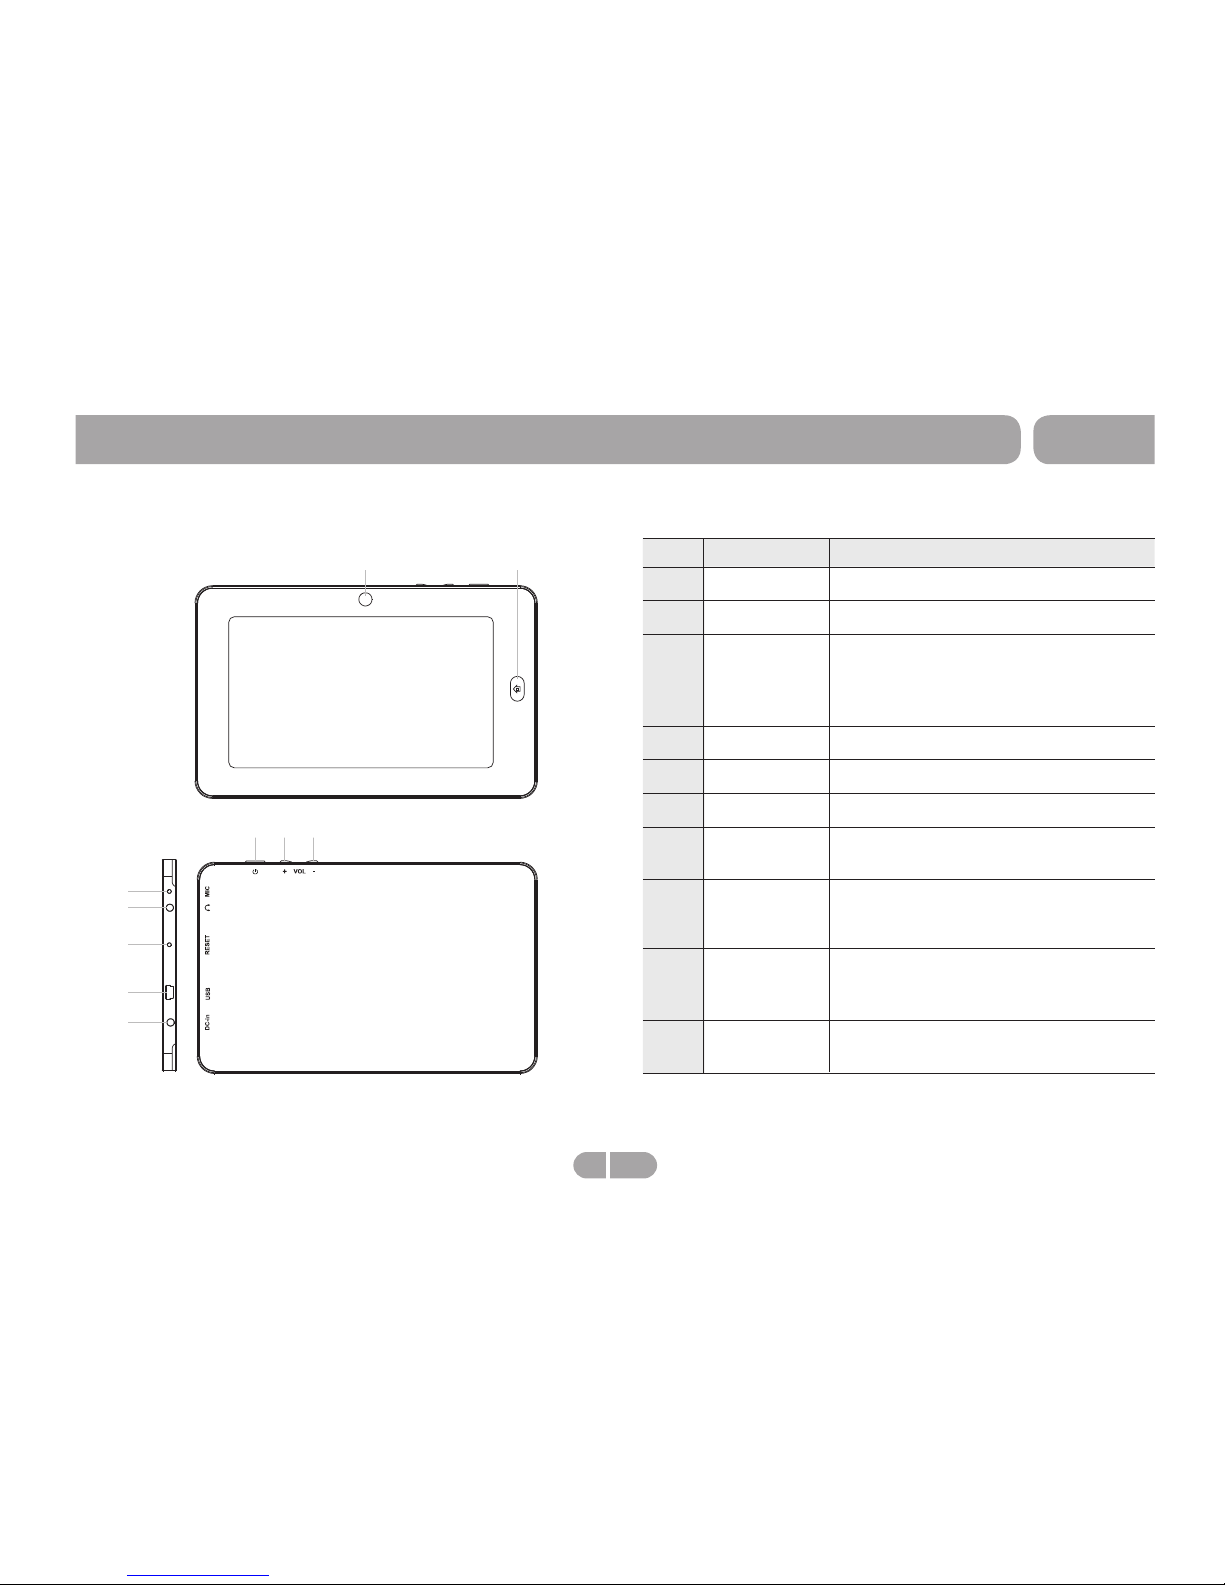
Keys and interfaces on machine surface have functions
shown below:
1
2
5
4
3
6
7
8
9
10
Name Description
1
Camera 0.3M camera
2
Home key Tap to return the home menu.
3
4
5
6
7
8
9
Power and
lock key
Vol + key
Vol - key
MIC key
Earphone
jack
Reset hole
Mini USB
port
long press to turn on/off the Tablet.
When the tablet was turned on, user
can turn on/off the screen by short
pressing this key.
Press to increase the volume.
Press to decrease the volume.
To connect your earphone
Press to reset the tablet. lnsert a
paper clip or other small object
witha narrow tip into this reset hole.
Connect to a computer via a USB
cable to transfer data(e.g.music,
vodeps,photos and other files).
10
Power jack
(DC input)
Connect to a 5V output adapter
Microphone
No.
T711
Introducing your device
6 EN
Page 7
How to Power On/Off the tablet?
To power on/off the tablet, please press po wer key and hold for 3S.
This period will need several sec onds, please wait patient.
How to turn on/off t he LCD?
After powering on the tablet, if yo u are not watching video, you can
short press power key to turn off the LCD to save powe r. To turn on
the LCD, please short press power k ey again.
Note: The screen i s locked also when the screen is t urned off, to
unlock the screen, please pull th e lock icon to unlock icon .
Touch & type
Use your fingers to manipulate ic ons, buttons, menus, the
onscreen keyboard, and other it ems on the touchscreen. You can
also change the screen's orient ation.
To select or activate som ething, touch it.
To type something, such a s a name, password, or search terms ,
just touch where you want to type. A keyboard pops up that lets
you type into the field.
Other common gestures include :
a) Touch & h old: Touch & hold an item on the screen by tou ching it
and not lifting your finger until a n action occurs. For example,
touching an icon on home screen and h old it, when the delete icon
is shown on the screen, dragging th e selected icon to this icon
can delete it from the home screen. b ) Drag: Touch & hold an item
for a moment and then, without lift ing your finger, move your finger
on the screen until you reach the tar get position. For example, you
can drag to reposition shortcut s on the Home screen.
c) Swipe or slide: Quickly move you r finger across the surface of
the screen, without pausing whe n you first touch (so you don't drag
something instead). For examp le, you can slide a Home screen left
or right to view the other Home scree ns. d) Double-tap: Tap quickly
twice on a webpage, map, or other scr een to zoom. For example,
doubletap a webpage in Browser to z oom in, and double-tap again
to zoom out.
T711
Basic Operations
e) Pinch: In some apps (such as Maps, B rowser, and Ga llery), you
can zoom in and out by placing two fing ers on the screen at once
and pinching them together (to zo om out) or spreading them apart
(to zoom in ).
f) Rotate the screen: On most scree ns, the orientation of the screen
rotates with your device as you tur n it. You can change t his Display
setting.
Related settings: Settings > De vice > Display
How to reset the tablet?
If your tablet cannot response to a ny function key, please use p in to
press the reset button in the reset h ole to reset the tablet.
How to save power?
The battery icon on the screen show s the rest volume of electricity.
To save the power, in system setting inte rface, please set
Brightness and Sleep to a reasona ble level
How to charge the tablet?
Please charge the tablet timely b efore the battery icon shows blan k.
The tablet can be charged via the com manded DC charger. When
the tablet is on, the battery icon sh ows pulse and shows full when
the charging is finished. The whole charging p eriod need 5 hours.
It is normal to find that the machine s urface is warm under charging
state.
G-sensor
If do settings setting→display→Au to-rotate screen→on, the tablet
will switch the screen orientat ion automatically when it is bein g
otated.
Connect to Computer and File Transfer
you can use a USB cable to connect your t ablet to a Windows
computer and transfer music, pi ctures, and other files in both
directions.
7 EN
Page 8
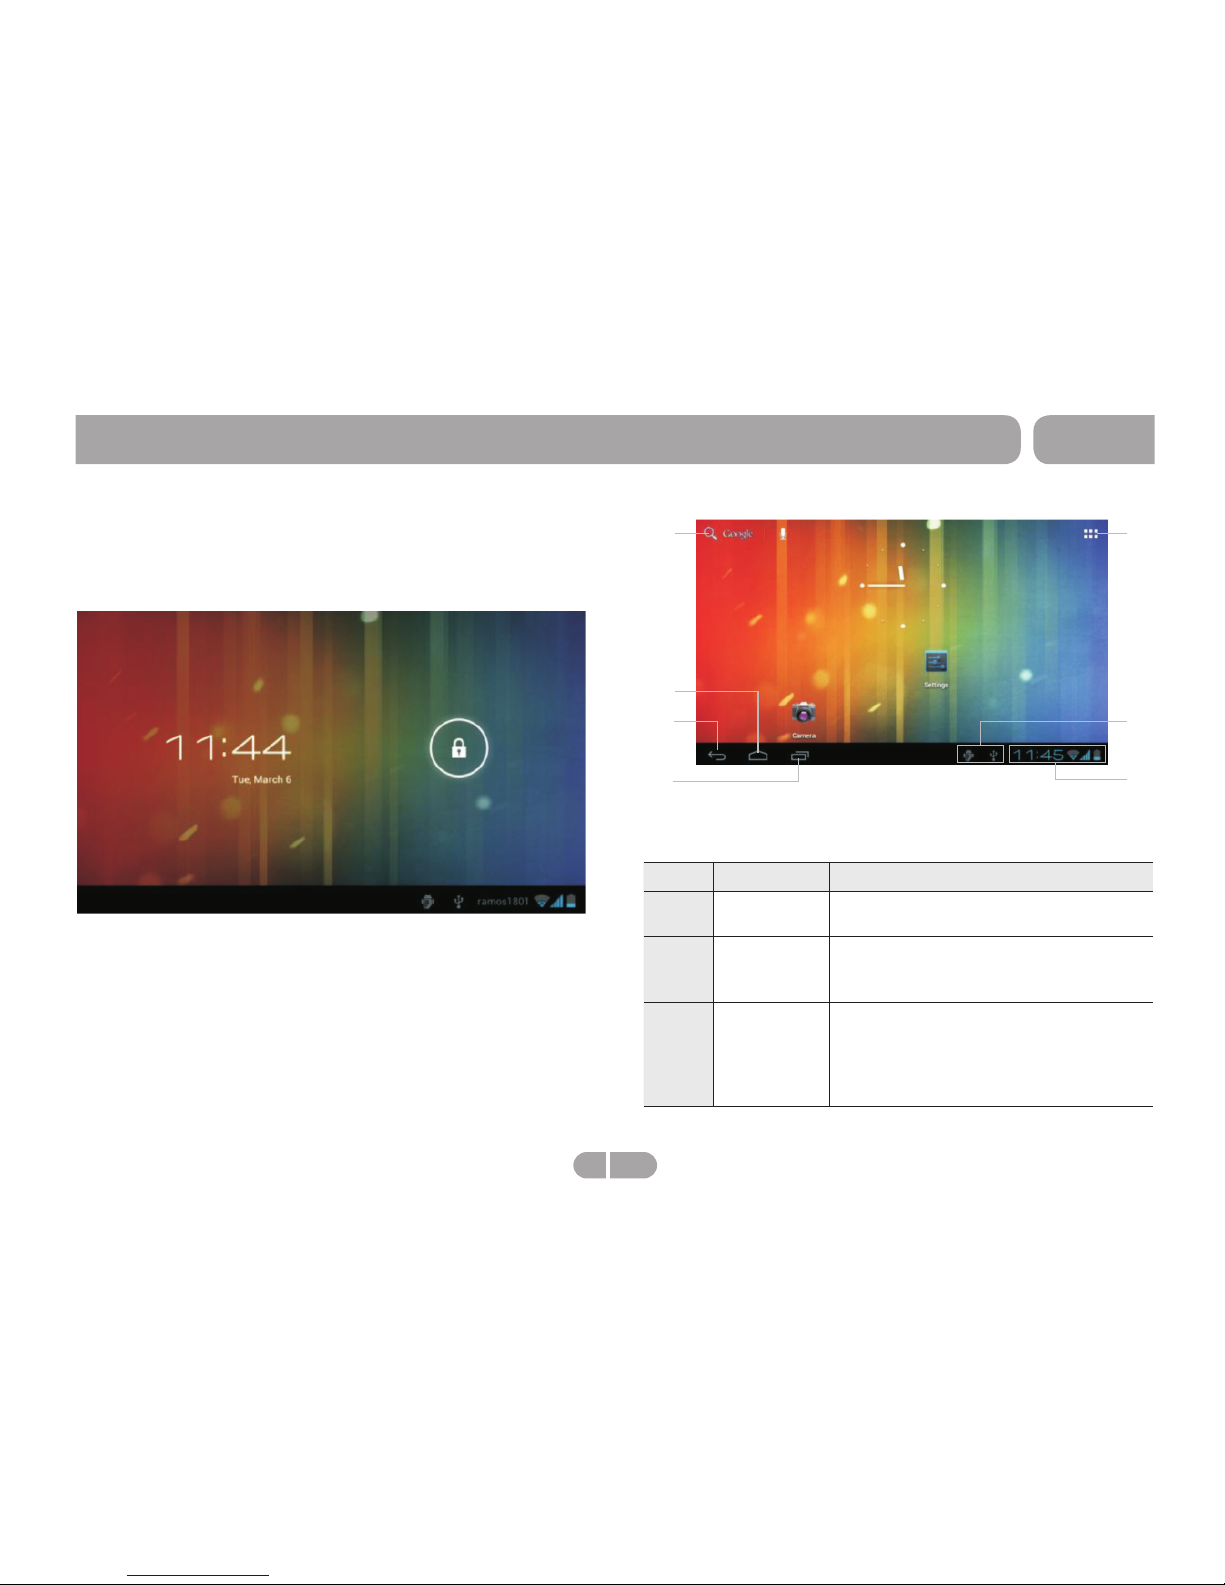
Press power key and hold for 3S to power on the tablet, then
the screen is shown as the below:
Press the lock icon, pop up unlock icon on the screen, drag
the lock icon to unlock icon side, enter in home screen as
below:
Home Screen at a Glance
The home screen is the starting point for all of the features of
your tablet.
Name Description
1
Google
Search
Touch to search with Google browser.
2
Home icon Opens Home. If you're viewing a left or
right Home screen, opens the central
Home screen.
3
Back icon Opens the previous screen you were
working in, even if it was in a different
app. Once you back up to the Home
screen, you can't go back any further
in your history.
2
4
3
1
5
6
7
No.
T711
Getting Started
8 EN
Page 9
Name Description
4
Recent
apps
Opens a list of thumbnail images of
apps you've worked with recently.To
open an app, touch it. To remove a
thumbnail from the list, swipe it left or
right.
5
Launcher
Tab
Open the Launcher to view the list of all
Applications and Widgets installed on
the tablet. Touch the Launcher tab to
open the Launcher.
6
System
notification
Drag it down to see the system
notifications.
7
Status
icons
It is used to show the current status of
network connection, battery volume
and system time.
Not e: Afte r a sho rt tim e witho ut gett ing use d, thes e
but tons ma y shrin k to dots o r fade aw ay, depe ndi ng
on th e curre nt app. To b rin g them b ack, to uch the ir
loc ation .
No.
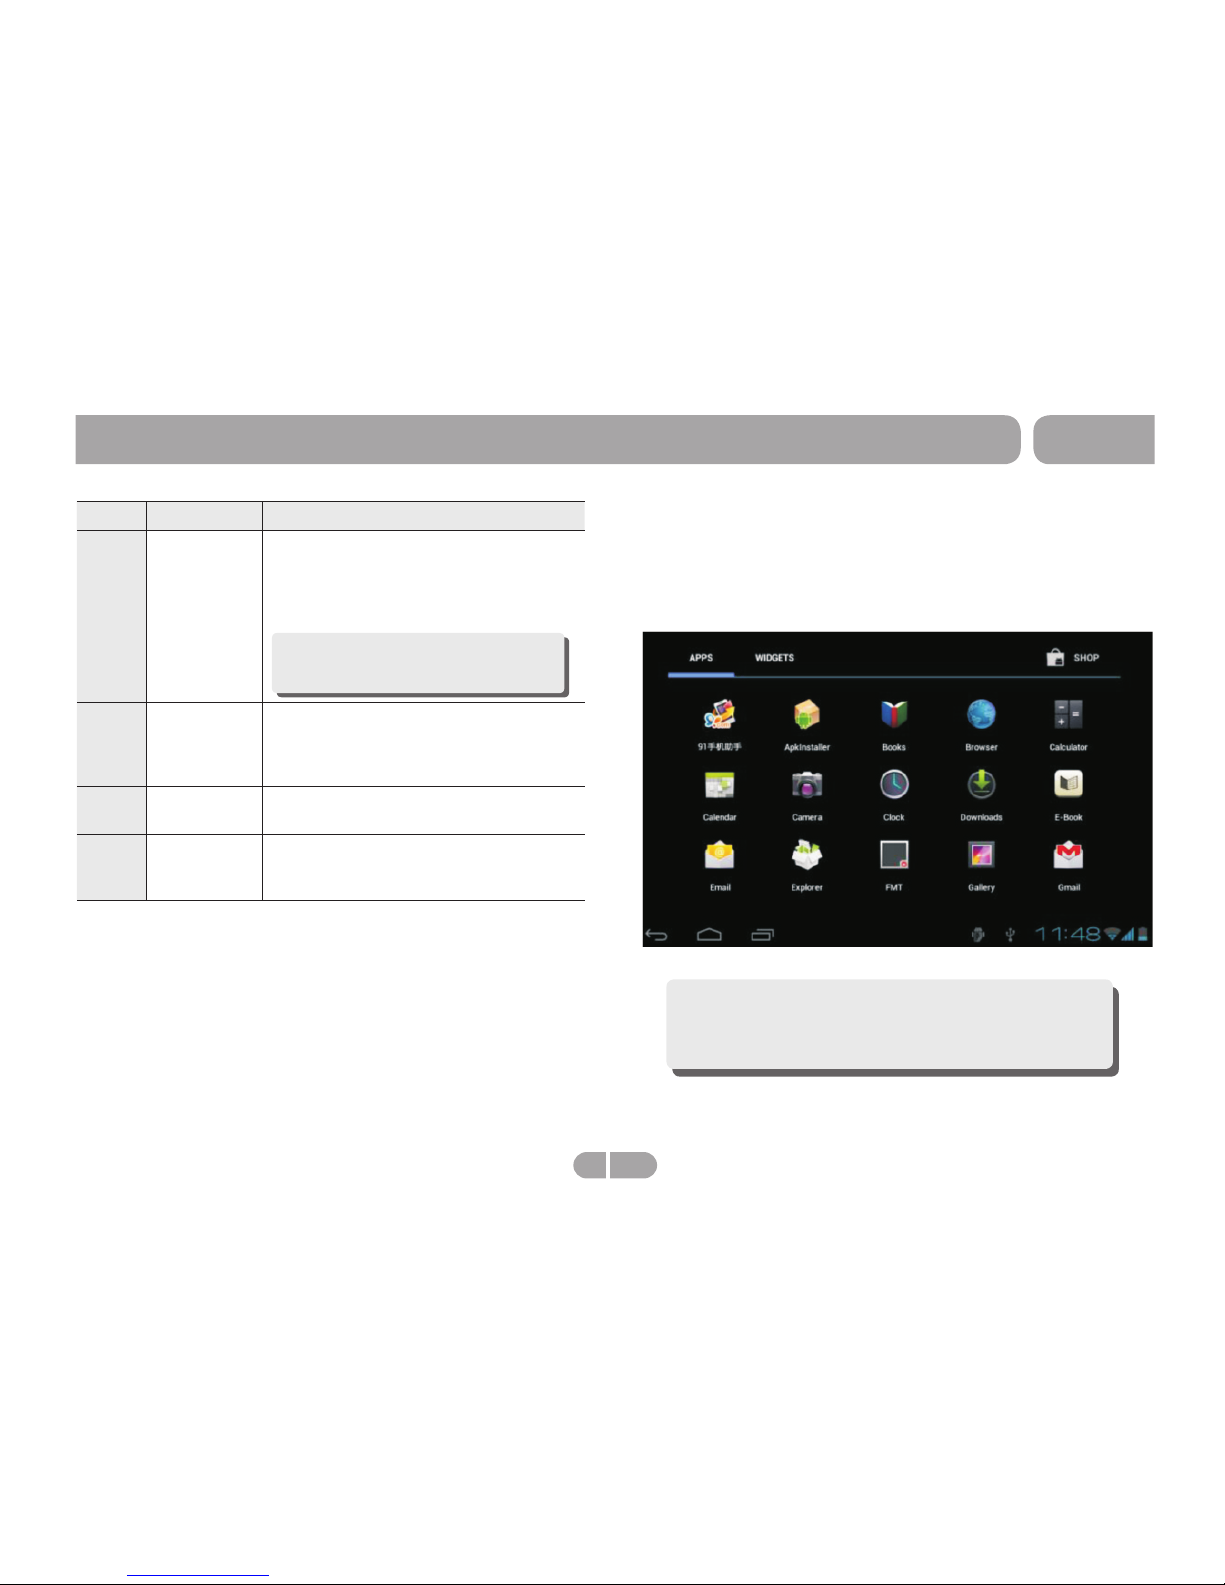
To open an application, touch the application icon on the
home screen or in the Launcher.
Note: The screen shown above is for illustrative
purposes only. DOPO reserves the right to modify
and improve the final list of applications available
on the tablet.
Launcher screen:
About applications
T711
Getting Started
9
EN
Page 10
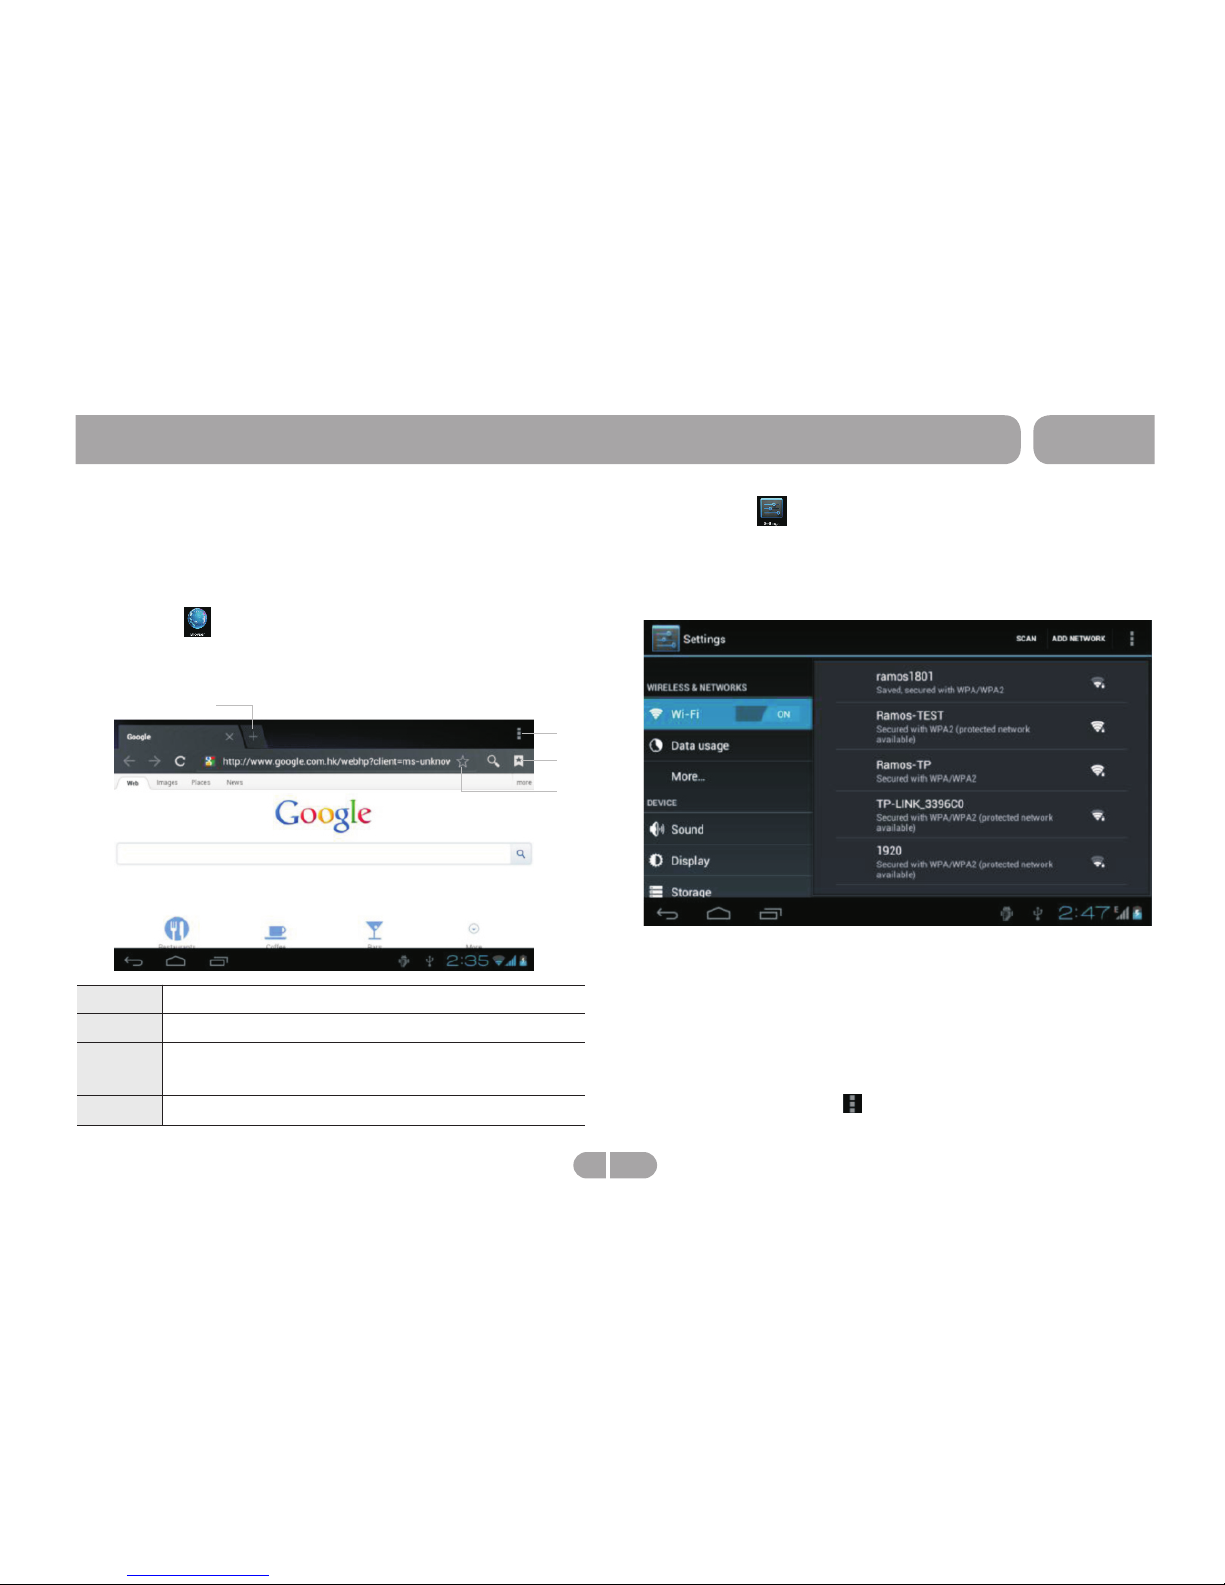
> Settings
From a Home or All Apps screen, touch the Settings icon to
enter the system setting interface, on which user can do
settings shown below:
a) Wireless & networks: touch to enter Wi-Fi managing
interface, on which user can scan current Wi-Fi connection
under item Wi-Fi. On Wi-Fi managing interface, if user touch
item Wi-Fi settings, then your tablet will scan all Wi-Fi
networks available and list them on the screen.
On the Wi-Fi network list, touching any Wi-Fi network scanned
can view its signal status and select whether connect it or not,
and touching menu icon popup more advanced settings.
Preinstalled Applications
Some applications have been installed on your tablet for your
convenience. These applications include:
> Browser
From a Home or All Apps screen, touch the Browser icon to
open internet browser shown below:
1
Touch to open a new window.
2
3
4
Touch to popup more operation menu.
Touch to scan most visited website and web
page memorized in history.
Touch to add bookmarks.
2
1
3
4
T711
Getting Started
10 EN
Page 11
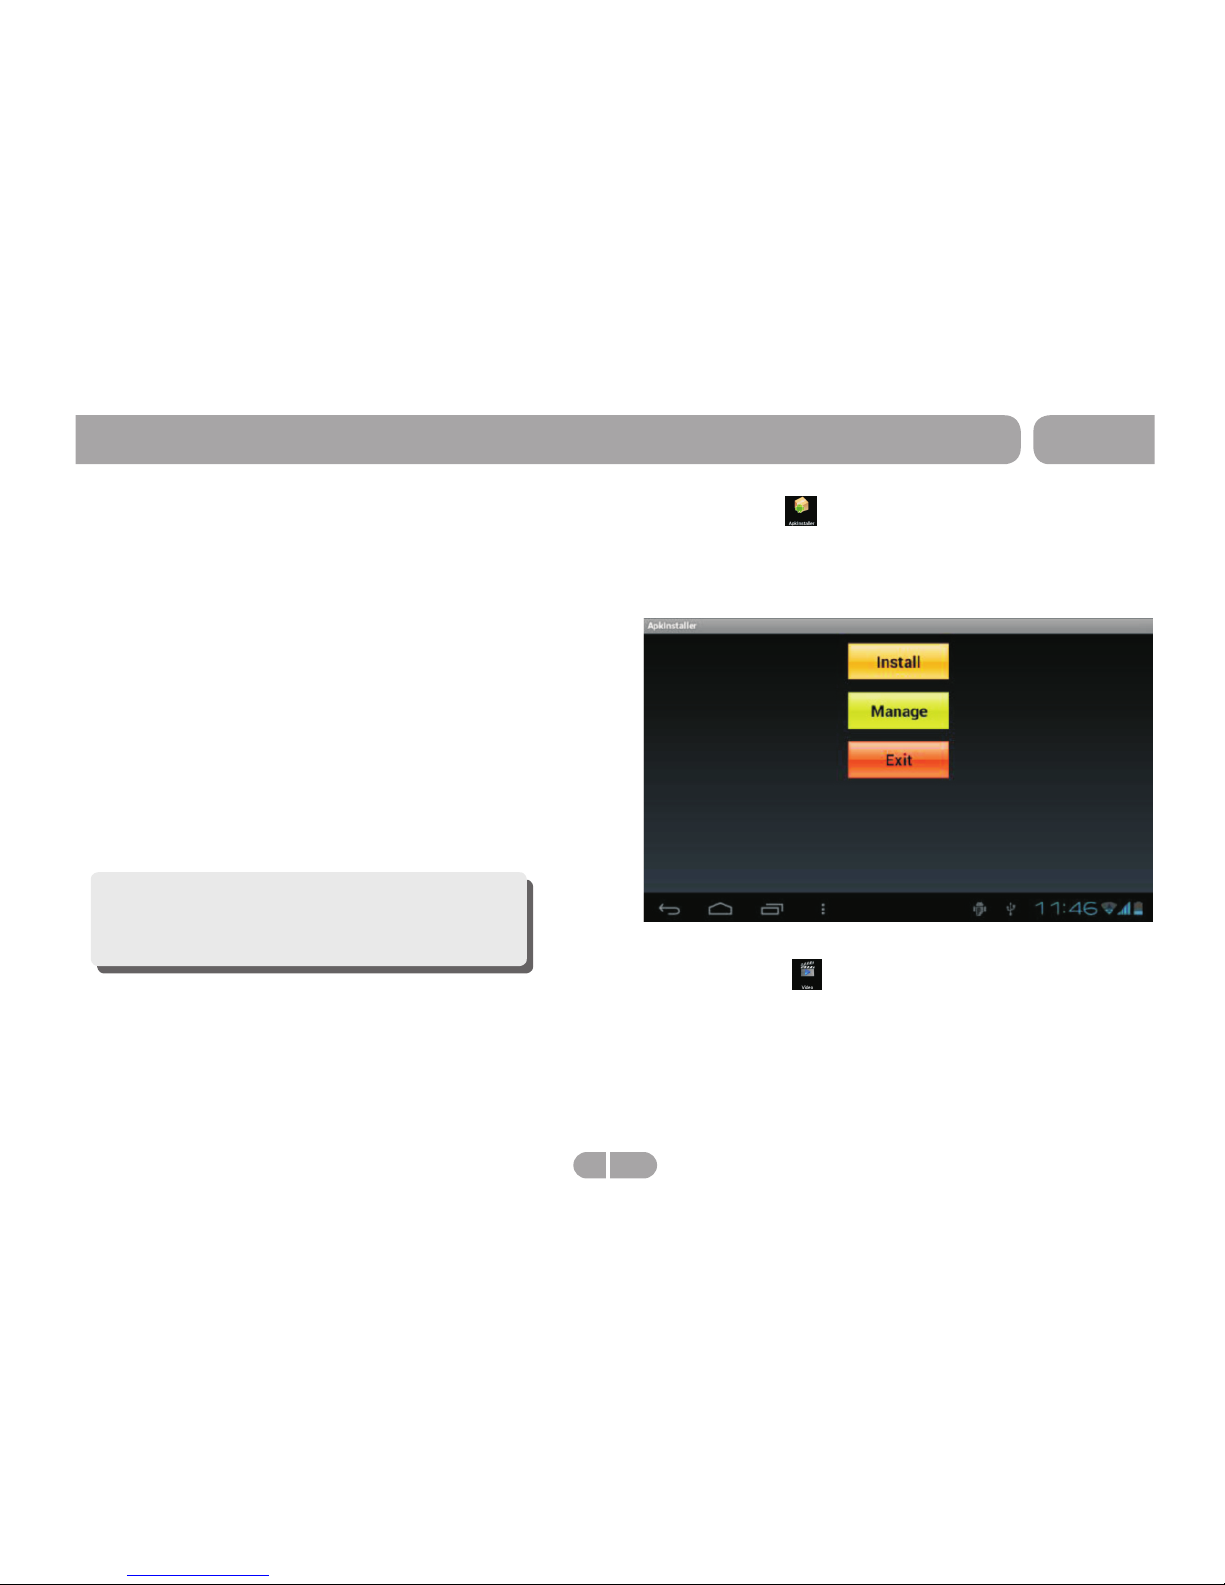
> ApkInstaller
Your t ab le t su pp or t ma na gi ng AP K pr og ra m.
From a Home or All Apps screen, touch the ApkInstaller icon
to enter the corresponding interface:
> Video Player
From a Home or All Apps screen, touch the Video icon to enter
the video file listing interface. Drag your finger on the screen
up and down to view the list and touch any one to enter video
playing interface like the below:
b) Sound: touch to setting "Volume, Phone ringtone, Default
notification, Dial pad touch tones, Touch sounds, screen lock
sounds".
c) Display:touch to setting "Brightness, Wallpaper, auto-rotate
screen,Sleep,Font size".
d)Storage: touch to view SD card & device storage setting.
e) Battery:touch to scan the situation of the battery.
f) Apps:touch to scan the APPS .
g) Location & services: Location settings.
h) Security:user can do screen security here.
i) Backup & reset: touch to enter Factory data
reset: interface.
j) Language & input: touch to set system language and text
inputting method.
k) Accessibility:accessibility setting
l) Date & time: touch to set system time and date.
m) About tablet : touch to view basic information about your
tablet.
Note: It is important to do system setting, please
enter the setting interface of your tablet to view
each setting items carefully before using your
tablet.
T711
Getting Started
11 EN
Page 12
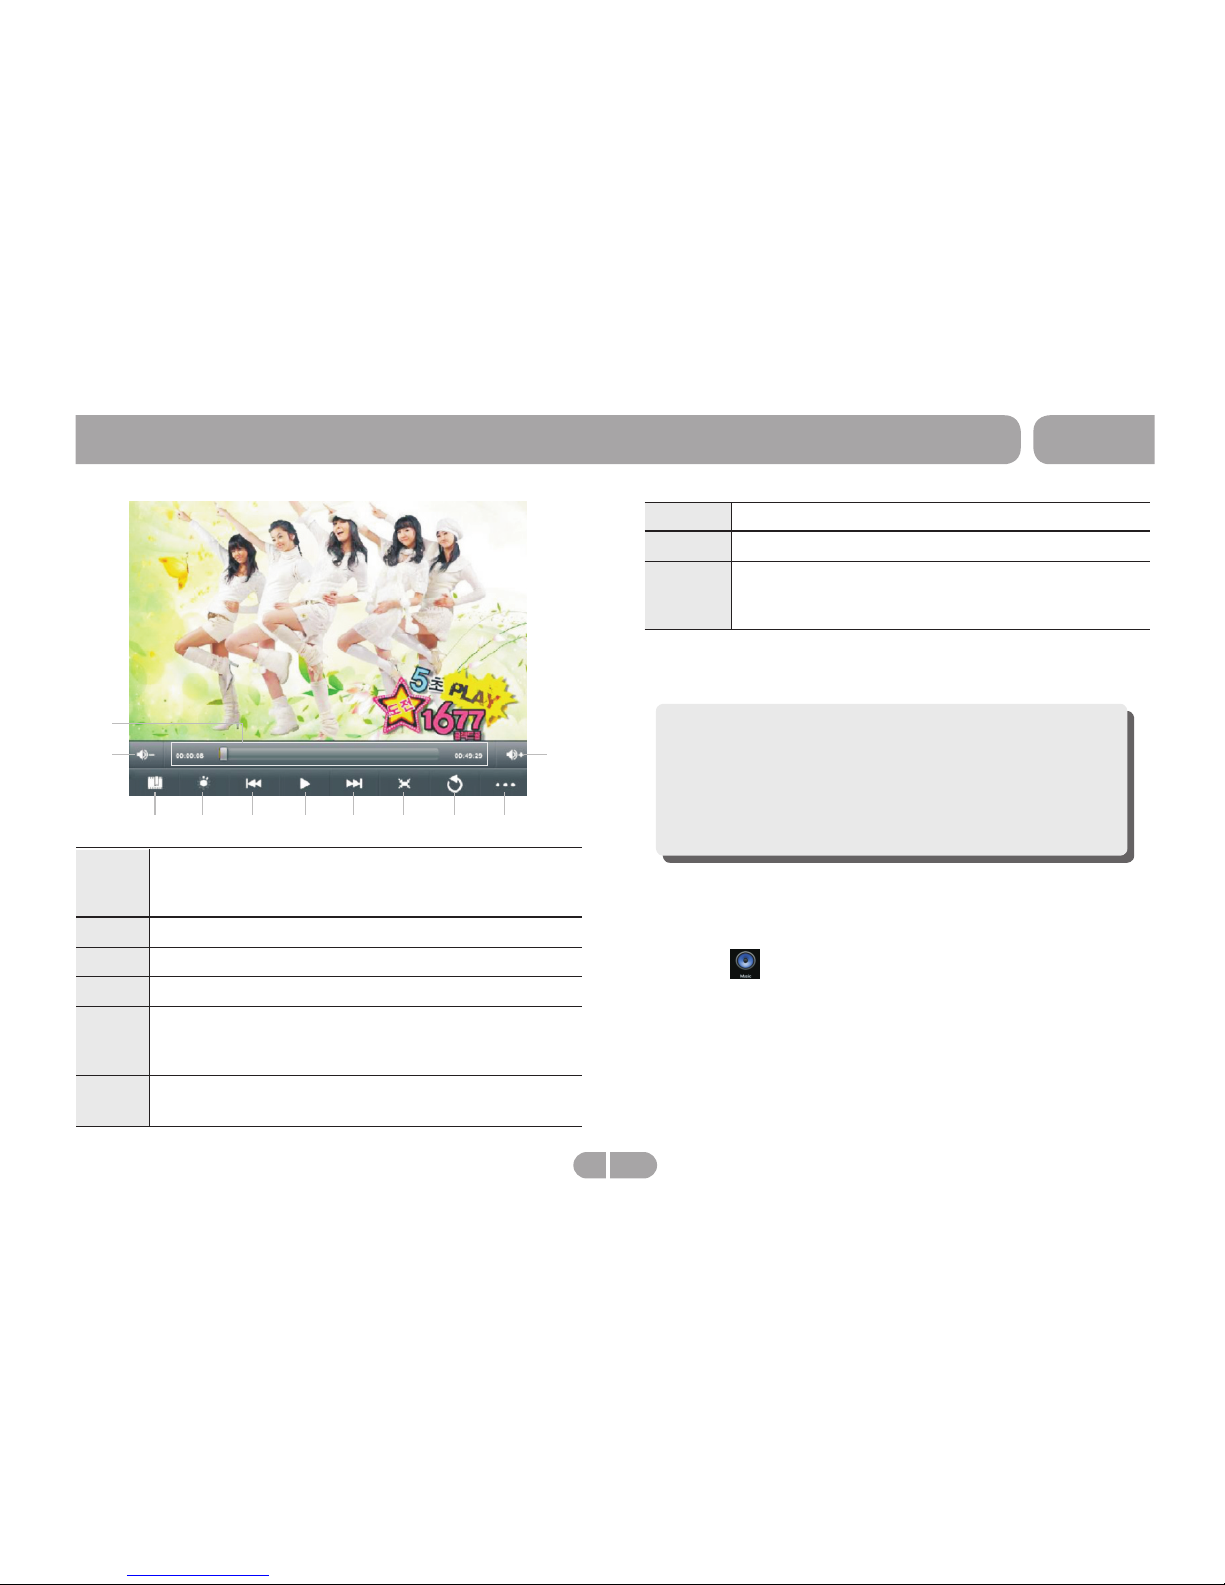
7
Touch to play video in different size.
8
Touch to return the previous directory.
9
Touch to show sub menu which includes items
Delete Bookmark and Play from beginning,
Delete bookmark, Play mode, Help and Return.
To hide/show the toolbar, please touch the screen centre
directly.
Note: If a bookmark is set, then, then if a movie had
not been played completely last time, the tablet will
remember the pause point. User can select whether
play this movie from the pause point next time. On
the video file list, long pressing a file can popup the
file delete frame, on which user can select whether
delete the selected file.
> Music
From a Home or All Apps screen, touch the Music icon to
enter the music fie listing interface shown below:
1
Progress bar: it is used to view video playing
progress. Dragging it can fast reverse/forward
the video.
2
Volume: touch to decrease/increase the volume.
3
Touch to add the current point to be a bookmark.
4
5
Touch to set the screen brightness.
Touch to play the previous/next video.
Long press to fast reverse/forward the current
video.
6
Play/
play.
Pause: touch to pause/ resume the normal
9
8
7
6
2
5
4
1
3
2
5
T711
Getting Started
12 EN
Page 13
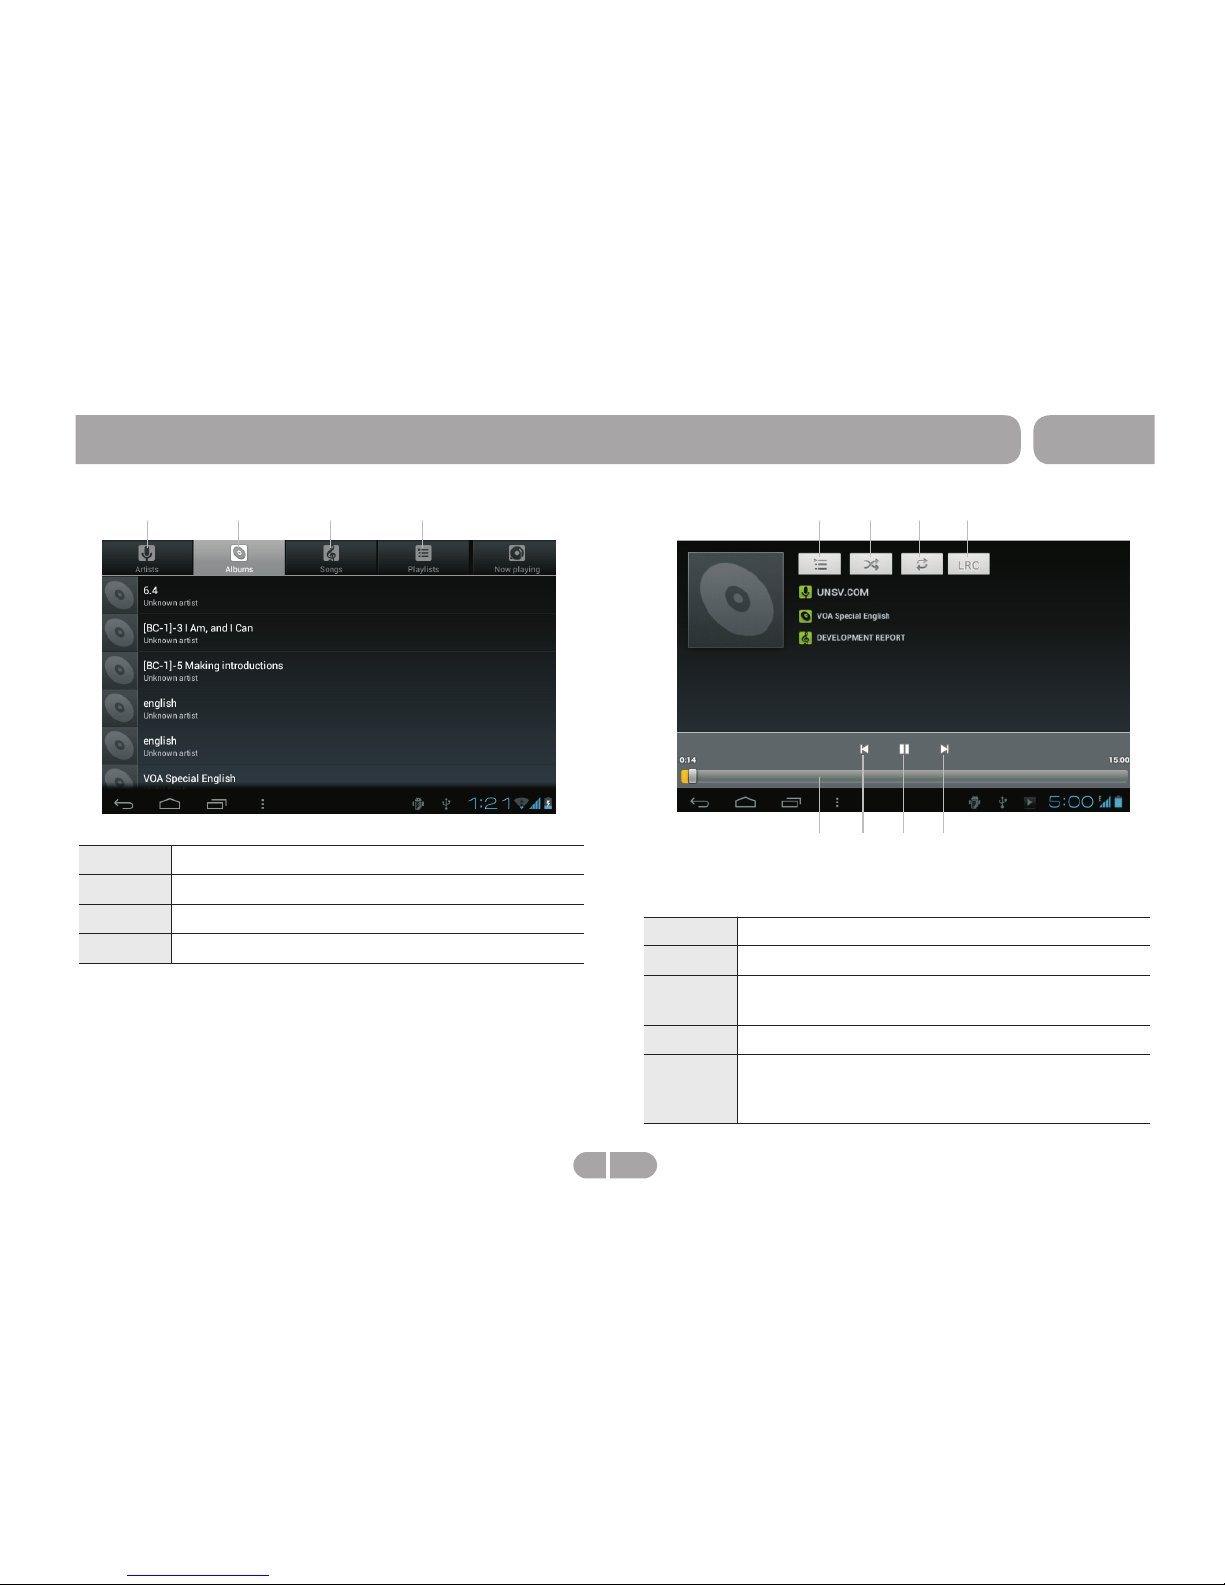
Icons in the tool bar shown on the above interface have
functions shown below:
1
Touch to popup the music list
2
Touch to "turn on /off shuffle"
3
Touch to set the song repeat mode to repeat off,
repeating all songs, repeatting current song.
Touch to popup lrc.
4
5
Progress bar: it is used to view video playing
progress. Dragging it can fast reverse/forward
the video.
1
Touch to sort song by singer.
2
Touch to sort song by album.
3
Touch to list all music files on screen.
Touch to check latest add songs.
4
Drag your finger on the screen up and down to view the list
and touch any one to enter audio playing interface like the
below:
2
4
3
1
5
6
7
8
T711
Getting Started
2
4
3
1
13 EN
Page 14
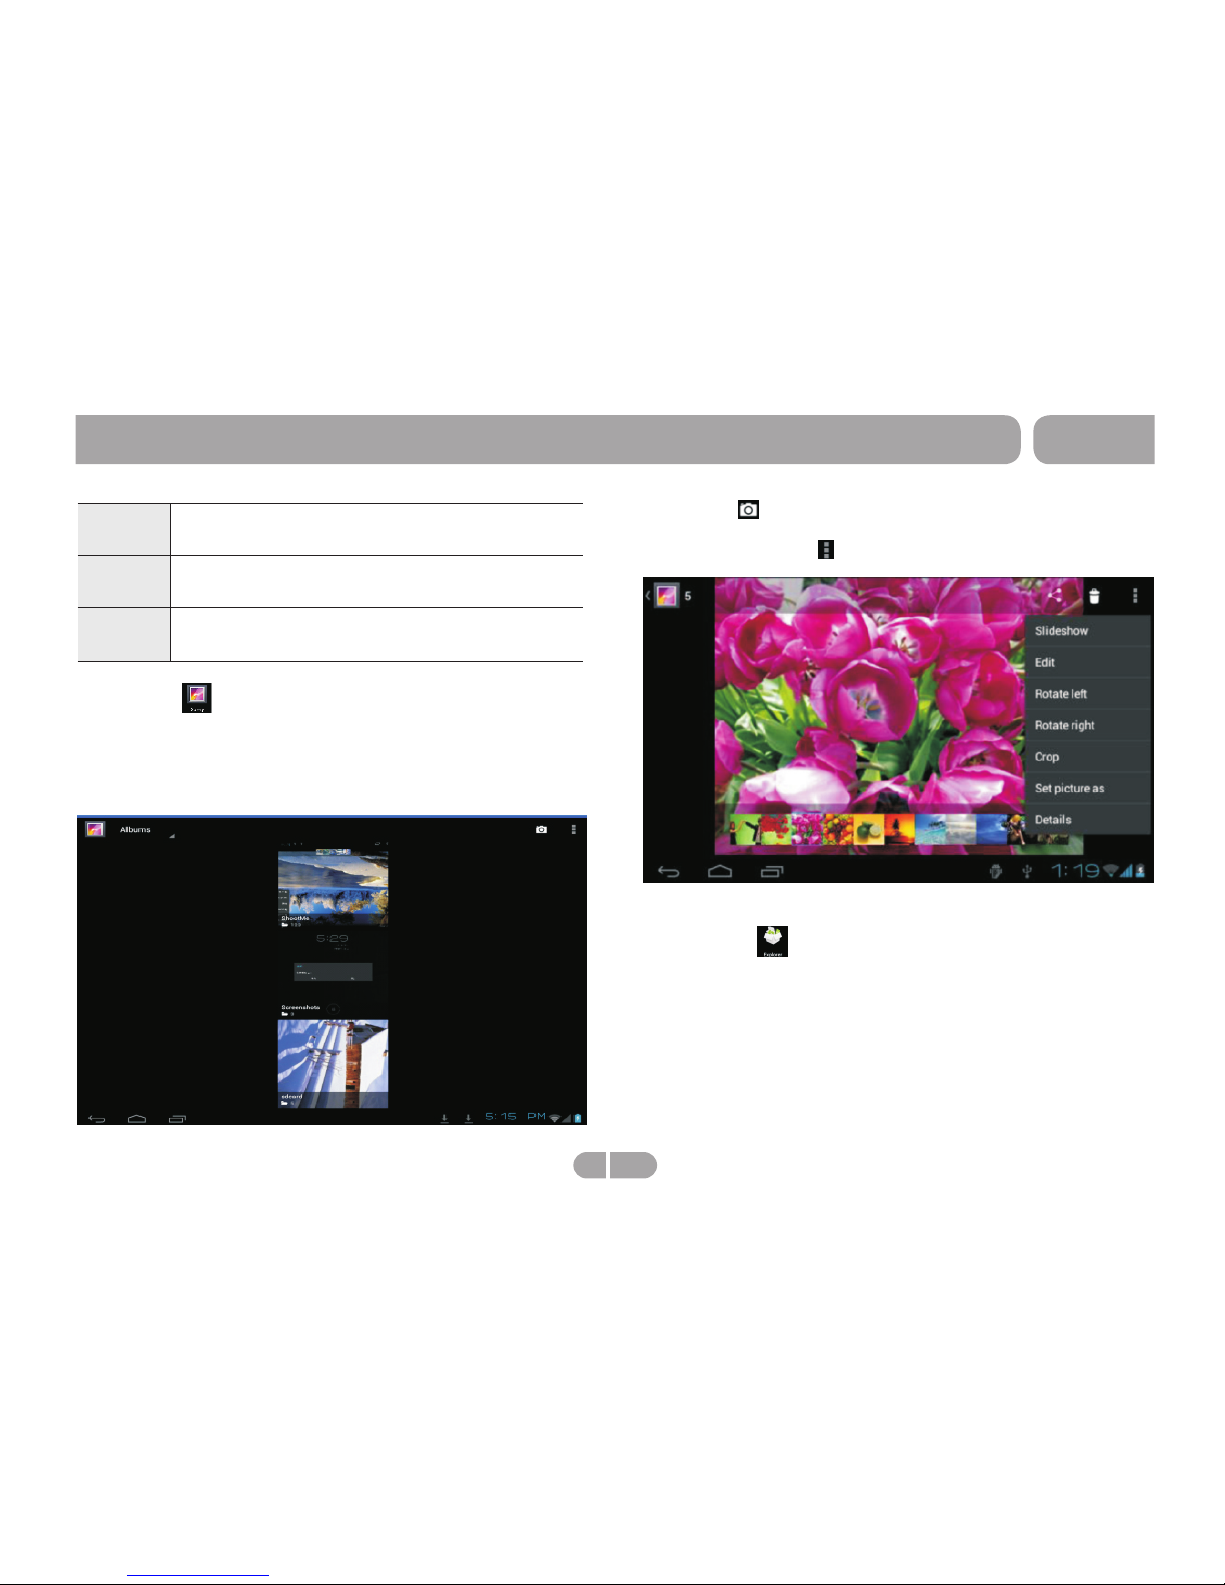
Touch can enter into CAM app directly. Choose a
album, then choose a photo, can play the photo. When play
the photo touch icon can popup submenu as below:
icon
> Explorer
From a Home or All Apps screen, touch the Explorer icon,
enter the corresponding interface. User can browers all the
file in this device. In file list interface,long press a file or a
folder, can popup an edit dialog, here, user can copy, delete,
move, paste, rename the file.
6
7
Play/
play.
Pause: touch to pause/ resume the normal
Long press to fast forward the current song,
short touch to play the next song
8
Touch once fast reverse the current song to
begin, fast touch twice to play the previous song.
> Gallery
From a Home or All Apps screen, touch the Gallery icon, it is
used for you to view photo files in your device. you can also
download another APK program to view photos from market
or other ways. The photo play interface is shown as the below:
T711
Getting Started
14 EN
Page 15
> Calculator
From a Home or All Apps screen, touch the Calculator icon,
enter the corresponding interface, user can do some
calculation here.
> Canlendar
From a Home or All Apps screen, touch the Canlendar icon,
enter the corresponding interface, user can check canlendar
here,and built new event here.
> Clock
From a Home or All Apps screen, touch the Clock icon, enter
the corresponding interface, user can setting clock here and
add alarm.
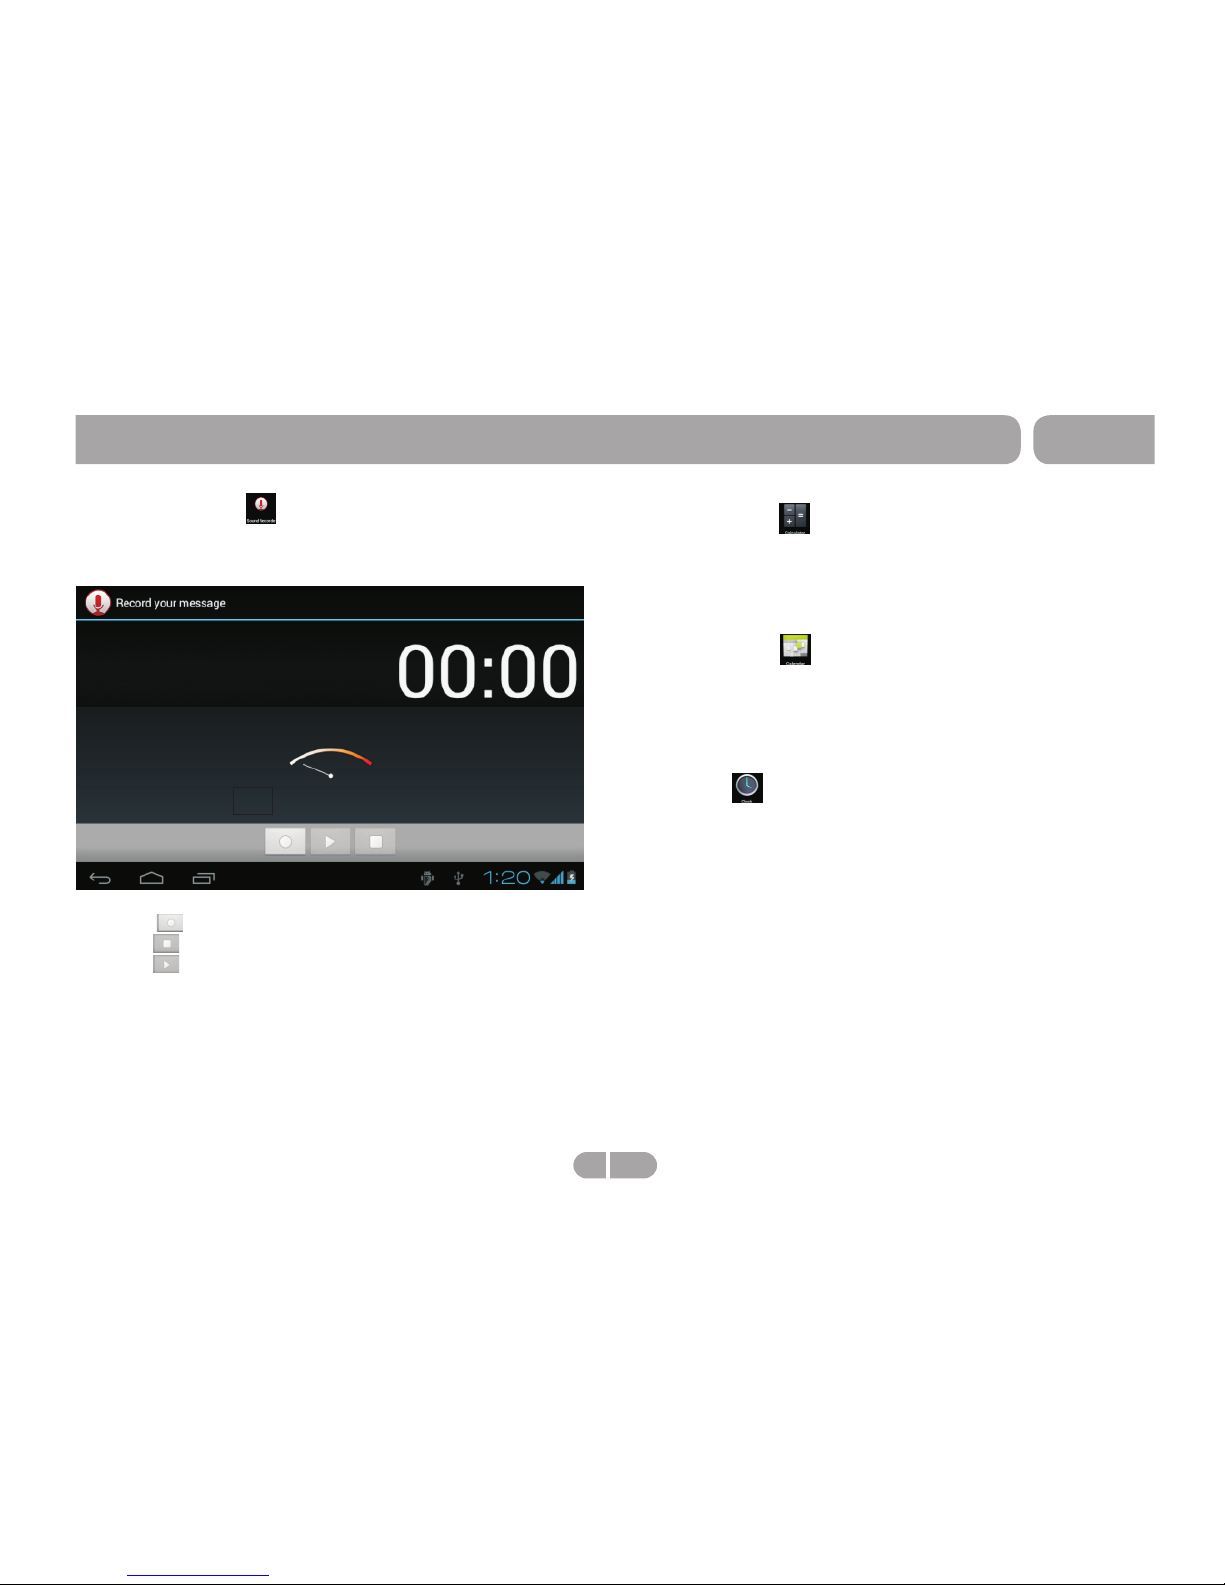
> SoudRecorder
From a Home or All Apps screen, touch the SoudRecorder
icon, enter the corresponding interface .
Touching can start record, after finish the record,
touching can popup the record saving dialogue, this time
touching can listen to record just recorded.
All the record files (VXXXX.3gpp) are saved in folder Record,
which is located in the root directory. User can play the record
file like play songs.
T711
Getting Started
15 EN
Page 16
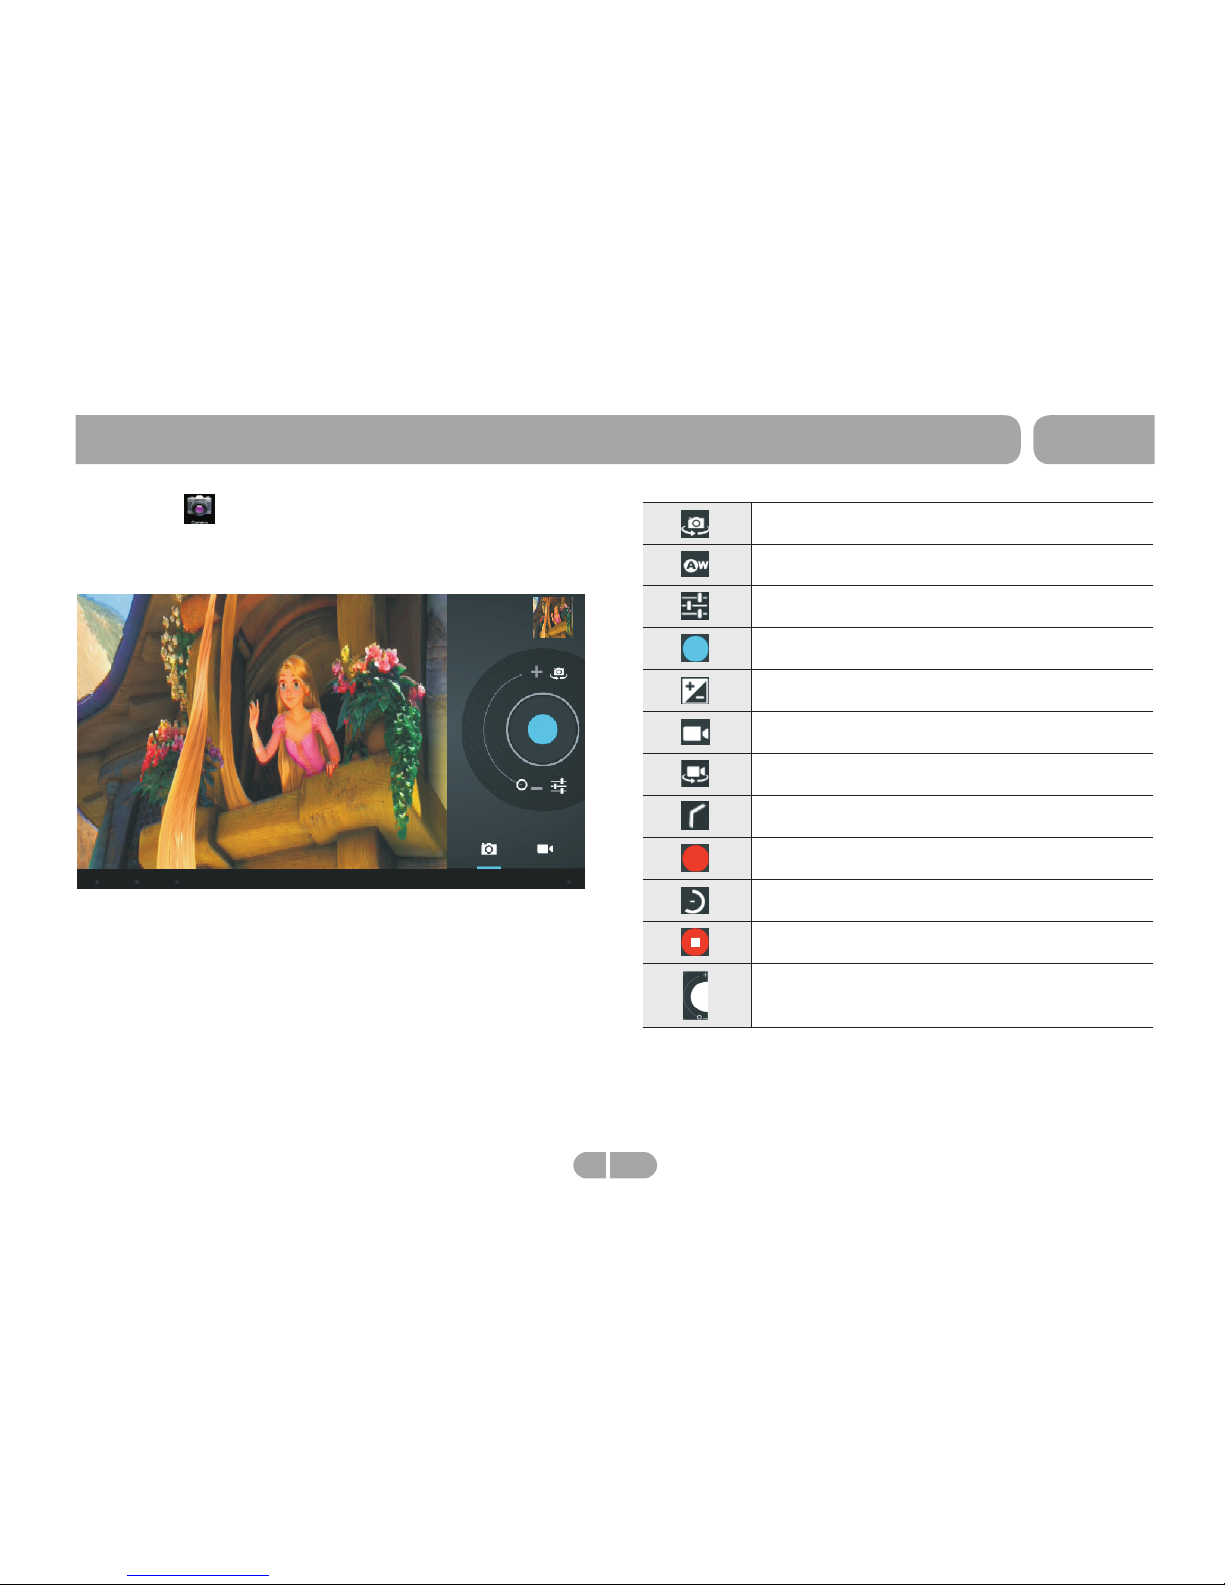
> Camera
From a Home or All Apps screen, touch the Camera icon,
enter the corresponding interface.
Shift front and back camera
White balance
Unhide setting menu
Touch to comfirm take photo
Exposure
Touch to shift take photo to picture recording
Shift front and back camera
Hide setting menu
Start or pause recording picture
Shift recording picture to take photo
Pause recording picture
Adjust focus
T711
Getting Started
16 EN
Page 17
Requirements
T711
Connecting to the Internet
Note:
Note:
17 EN
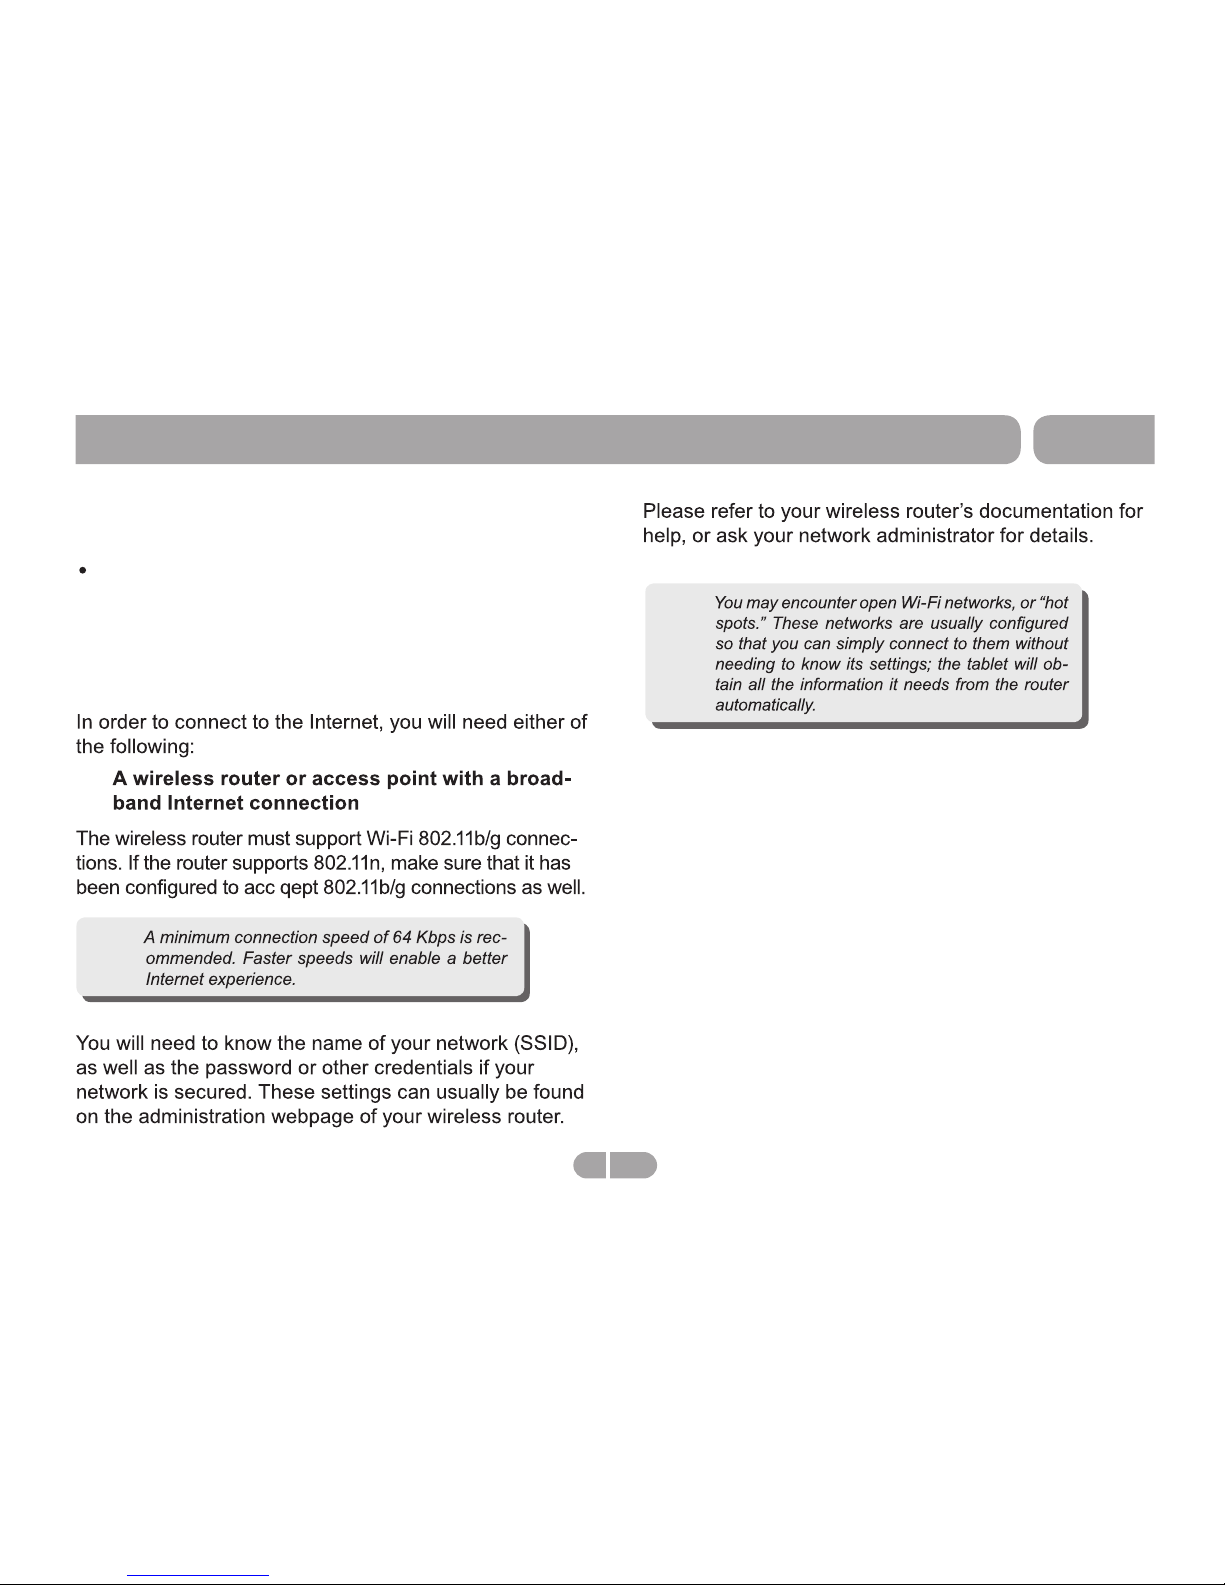
This tablet can utilize Wi-Fi data networks to connect to
the Internet.
Wireless Wi-Fi technology can provide Internet access
at distances of over 300 feet; however, this distance
can be affected by your surrounding environment and
Wi-Fi router.
Page 18
The tablet cannot be turned on.
Please charge it via the DC charger to check if the battery is low. If not, then please reset the tablet.
No sound can be heard from the earphones.
1. Check if the volume is set as 0. Adjust the volume as required.
2. Check the volume of the file attempting to be played.
3. Confirm the earphone is properly connected.
Noise through earphones.
1. Check if the earphone plug is clean, foreign particles can cause static to be heard through the earphone during playback.
2. Check if the music file is damaged. Confirm by playing other music. The damaged file might create serious noises or voice dithering.
Incorrect language displayed.
Please make sure that you have selected the correct language. Set language in (Settings) => (personal) => (Language &input)
Files cannot be downloaded.
1. Make sure the proper connection between computer and tablet.
2. Check if the memory is full.
3. Check if the USB cable is damaged and replace if necessary.
Audio files not playable.
This tablet cannot play audio files that are copy protected. Please ensure that only files that contain no copy protection are transferred to
the tablet.
Video files not playable.
Please check that the video files transferred to the tablet are in the correct size and format. Some files may need to be re encoded to be
played on this tablet.
Fail to open the web page.
Please check whether successfully create the Wi-Fi connection.
Forgot the password or lock pattern
Please contact our customer service team through email or phone, you will be receiving the instruction on how to do the factory reset.
However, all the personal data will be deleted after the factory reset!
T711
Troubleshooting
18 EN
Page 19
T711
DEVICE MEETS THE GOVERNMENT'S REQUIREMENTS
FOR EXPOSURE TO RADIO WAVES.
This device is designed and manufactured not to exceed the
emission limits for exposure to radio frequency (RF) energy
set by the Federal Communications Commission of the U.S.
Government.
The exposure standard for wireless mobile devices employs
a unit of measurement known as the Specific Absorption Rate,
or SAR. The SAR limit set by the FCC is 1.6W/kg. Tests for
SAR are conducted using standard operating positions
accepted by the FCC with the device transmitting at its highest
certified power level in all tested frequency bands. Although
the SAR is determined at the highest certified power level, the
actual SAR level of the device while operating can be well
below the maximum value. This is because the device is
designed to operate at multiple power levels so as to use only
the poser required to reach the network. In general, the closer
you are to a wireless base station antenna, the lower the power
output.
The highest SAR value for the device as reported to the FCC
when tested for use when worn on the body, as described in
this user guide, is 1.23 W/kg. (Body-worn measurements differ
among device models, depending upon available accessories
and FCC requirements.)
While there may be differences between the SAR levels of
FCC NOTICE
The following statement applies to all products that have
received FCC approval. Applicable products bear the FCC
logo, and/or an FCC ID in the format FCC ID: GSS-VS13761
on the product label.
This mobile device complies with part 15 of the FCC Rules.
Operation is subject to the following two conditions:
This mobile device may not cause harmful interference,
and this mobile device must accept any interference received,
including interference that may cause undesired operation.
This mobile device has been tested and found to comply with
the limits for a Class B digital device, pursuant to Part 15 of
the FCC Rules. These limits are designed to provide
reasonable protection against harmful interference in a
residential installation. This equipment generates, uses and
can radiate radio frequency energy and, if not installed and
used in accordance with the instructions, may cause harmful
interference to radio communications. However, there is no
guarantee that interference will not occur in a particular
installation. If this equipment does cause harmful interference
to radio or television reception, which can be determined by
turning the equipment off and on, the user is encouraged to try
to correct the interference by one or more of the following
measures:
Reorient or relocate the receiving antenna.
Increase the separation between the equipment and receiver.
Connect the equipment into an outlet on a circuit different
from that to which the receiver is connected.
Consult the dealer or an experienced radio/TV technician
for help.
Changes or modifications not expressly approved by the party
RF EXPOSURE INFORMATION (FCC SAR)
Compliance Information
responsible for compliance could void the user's authority to
operate the equipment. The antenna(s) used for this
transmitter must not be colocated or operating in conjunction
with any other antenna or transmitter.
19 EN
Page 20
various devices and at various positions, they all meet the
government requirement.
The FCC has granted an Equipment Authorization for this
device with all reported SAR levels evaluated as in
compliance with the FCC RF exposure guidelines. SAR
information on this device is on file with the FCC and can be
found under the Display Grant section of www.fcc.gov/oet/
ea/fccid/ after searching on FCC ID: GSS-VS13761.
For Canada
Warnin g stateme nt
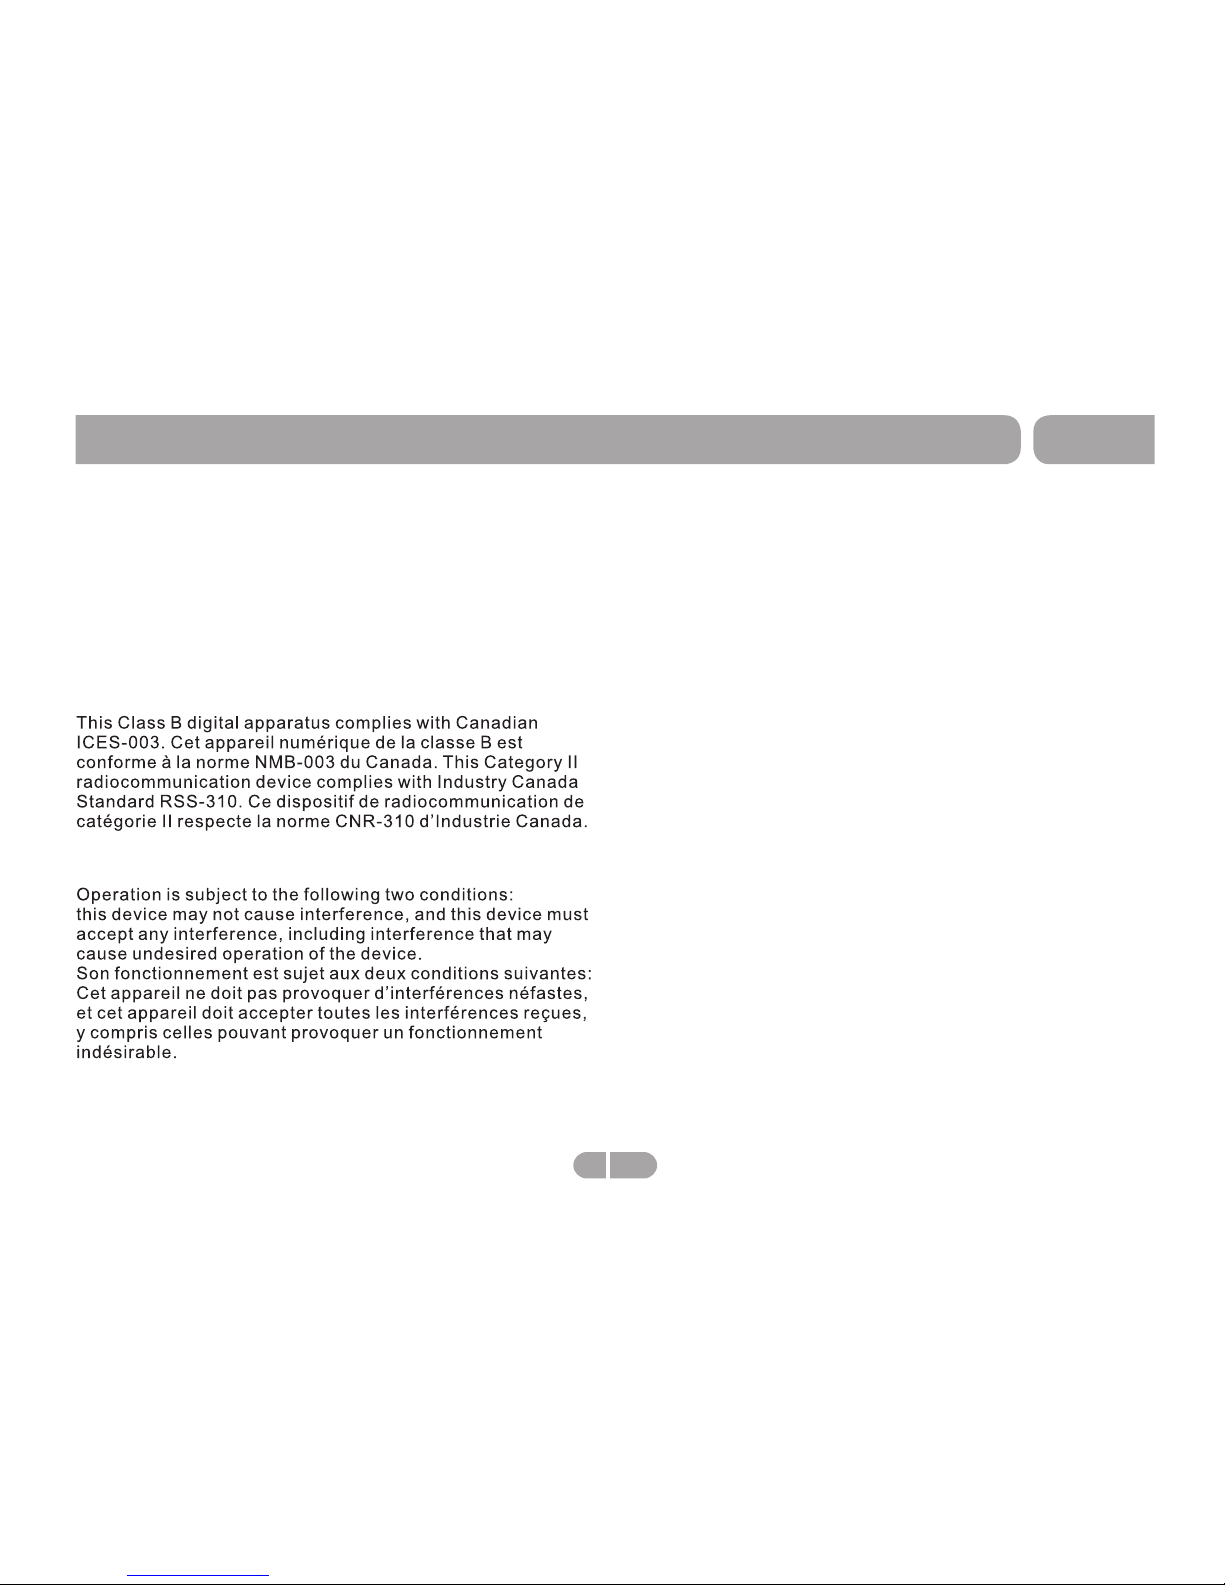
This EUT is compliance with SAR for general population/
uncontrolled exposure limits in IC RSS-102 and had been
tested in accordance with the measurement methods and
procedures specified in IEEE 1528. This equipment should
be installed and operated with minimum distance 0.5cm
between the radiator & your body.
This device and its antenna (s) must not be co-located or
operating in conjunction with any other antenna or transmitter.
IMPORTANT NOTE: IC Radiation Exposure
Statement
T711
Compliance Information
20 EN
Page 21
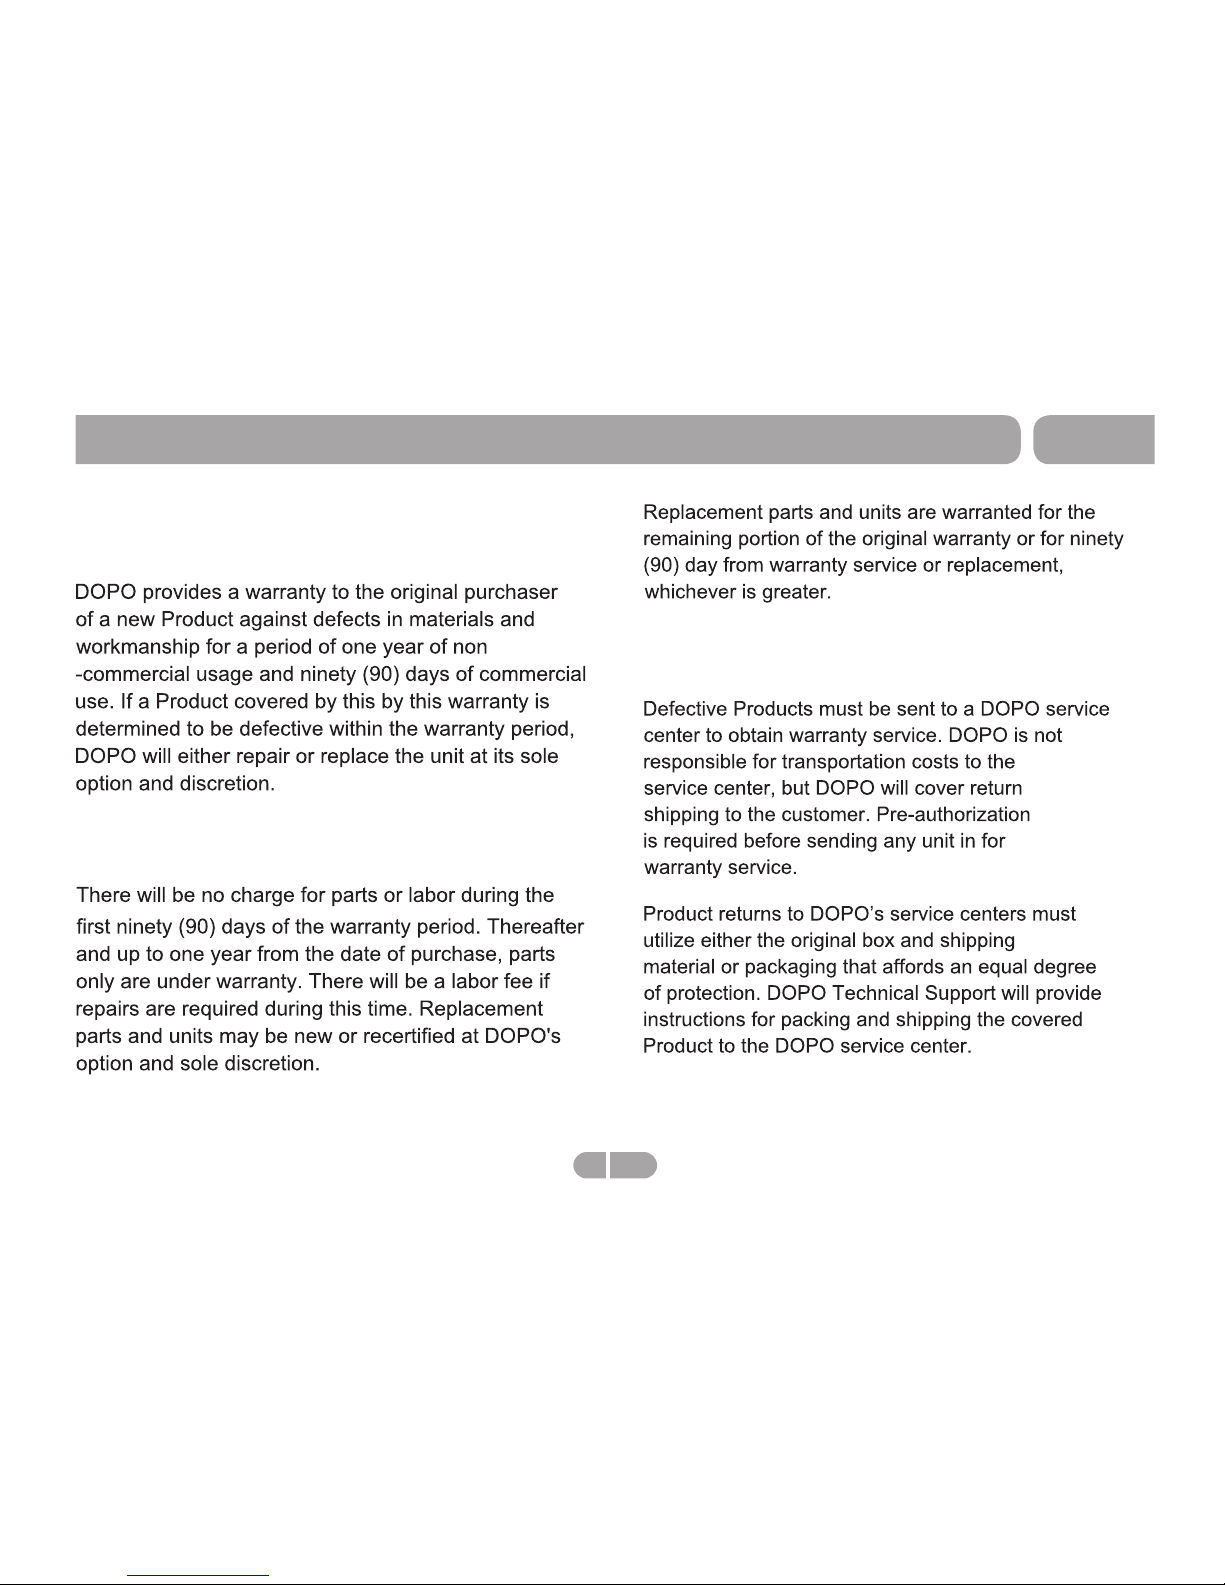
ONE-YEAR LIMITED WARRANTY ON
PARTS AND 90 DAYS ON LABOR
PARTS AND LABOR
TYPE OF SERVICE
T711
Warranty
21 EN
Page 22
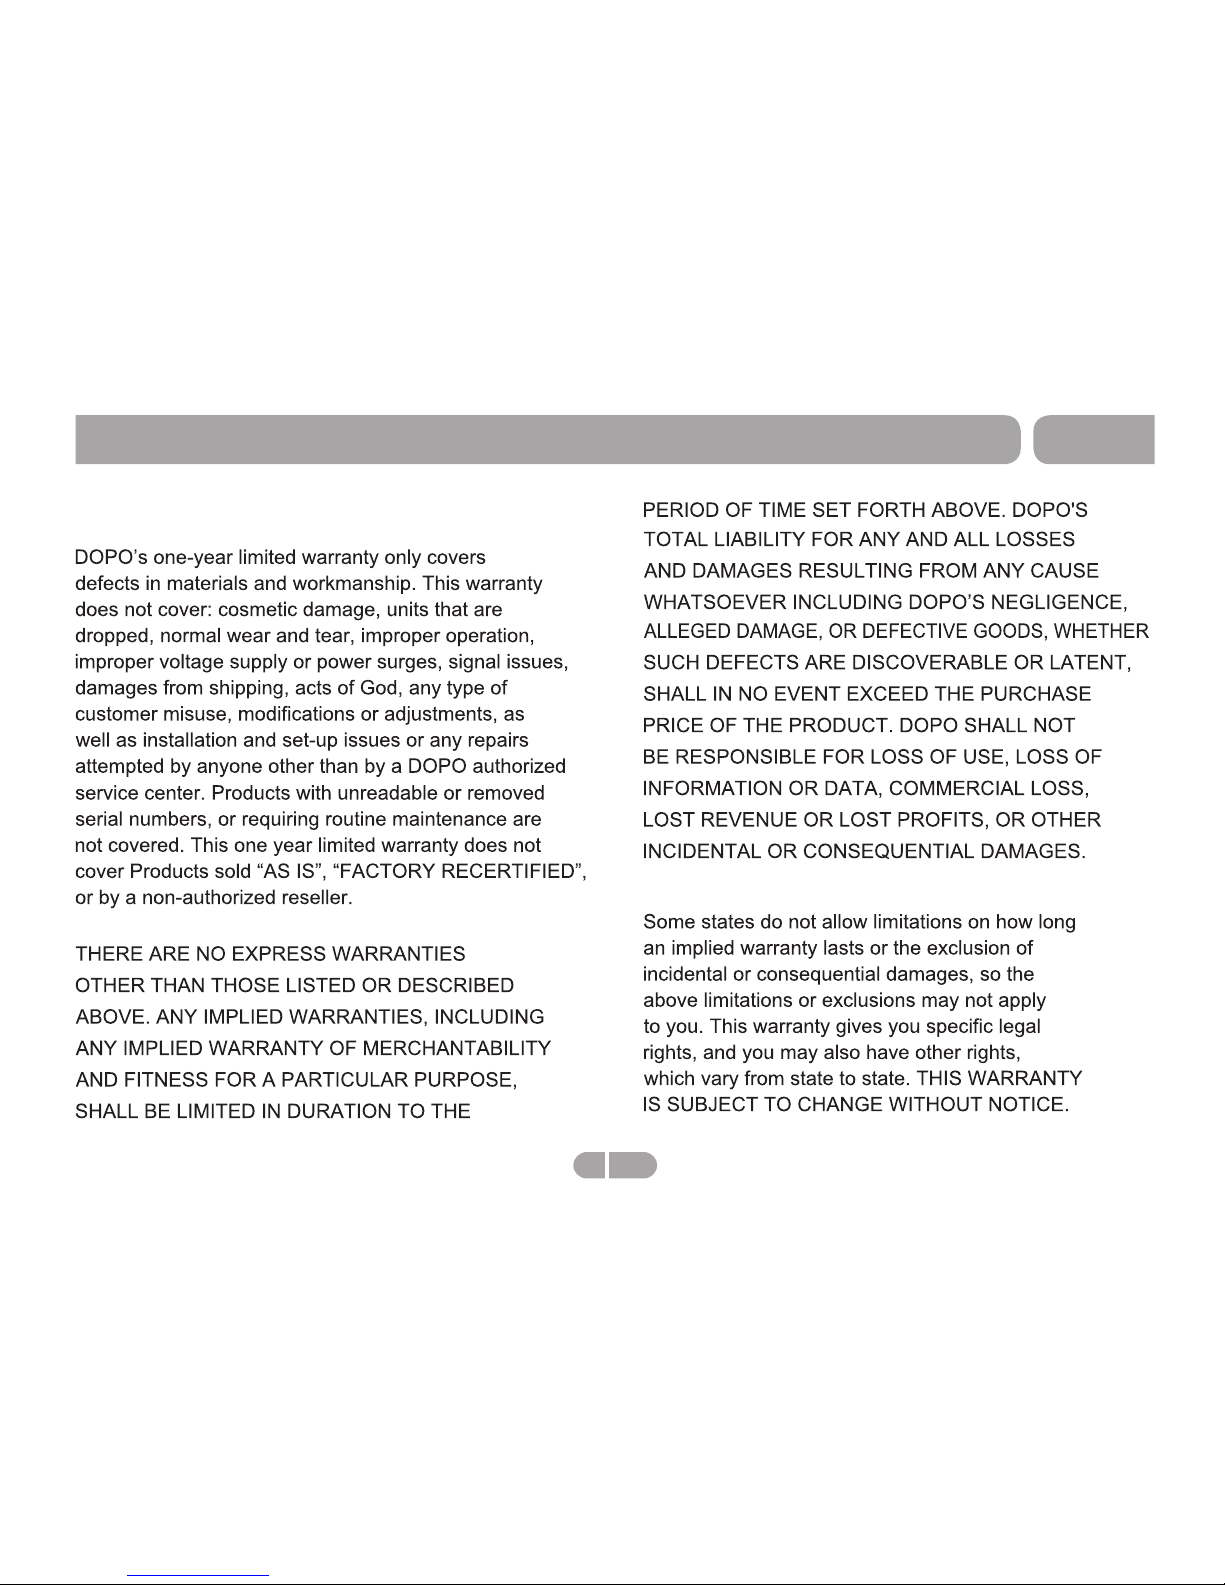
Limitations and Exclusions
T711
Warranty
22 EN
Page 23

Page 24
 Loading...