

Page 1
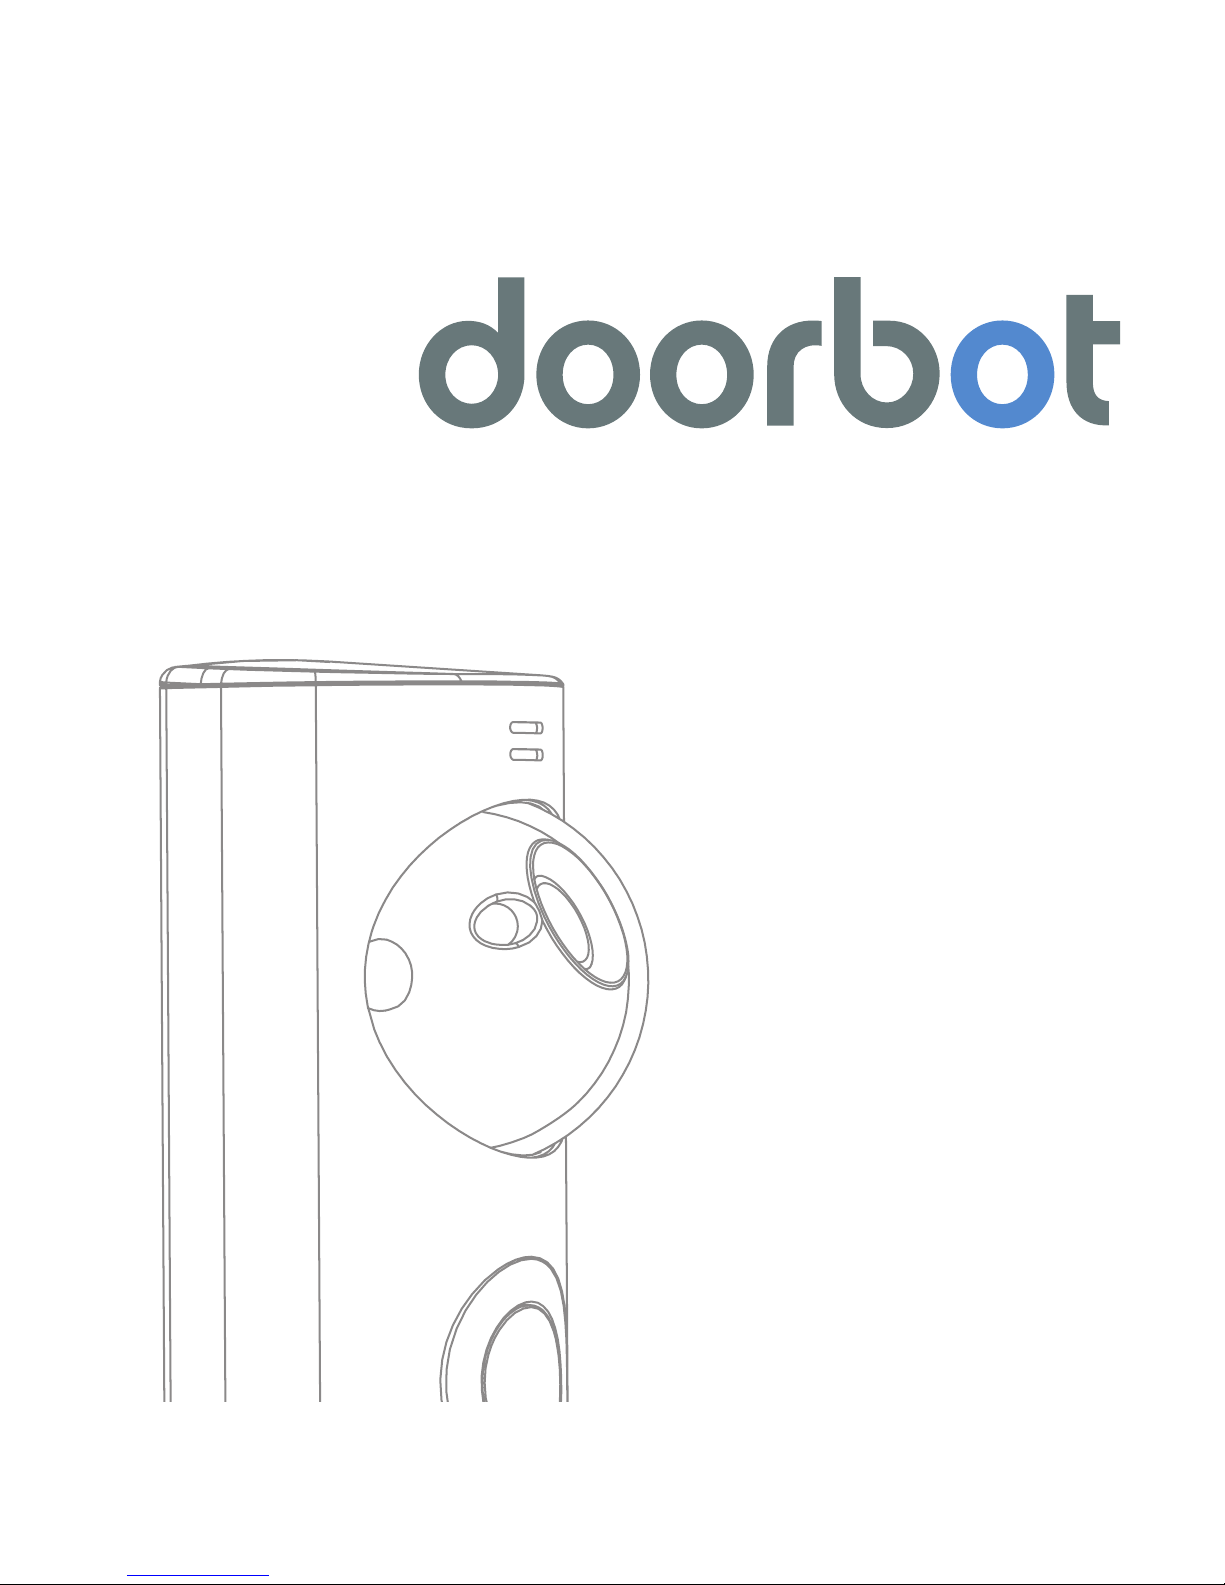
User Manual
Page 2

Table of Contents
1
DoorBot Features.................................................2
In the Box.............................................................5
Technical Specifications........................................6
Technical Requirements........................................7
Wi-Fi Setup..........................................................8
Removing DoorBot from a Network......................11
Installation............................................................12
Charging the Battery.............................................19
Camera Rotation...................................................20
Mobile Application..................................................21
Page 3
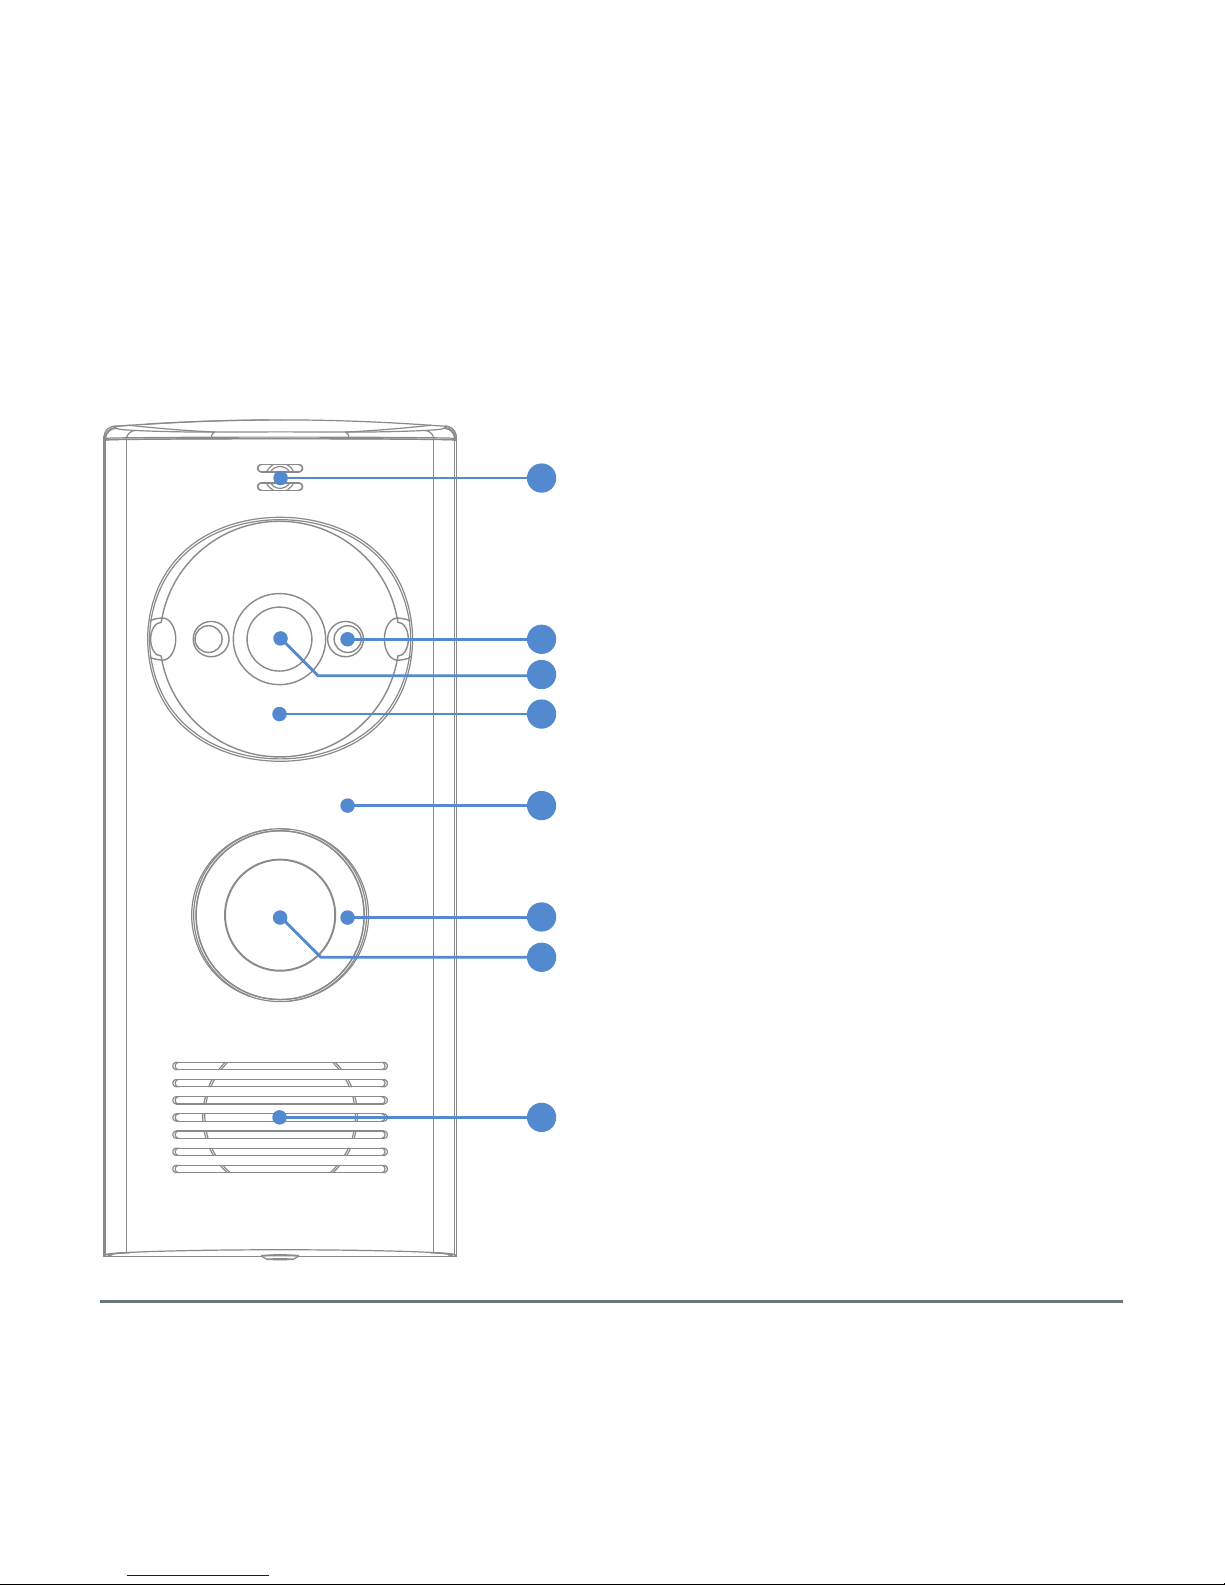
DoorBot Features
1
2
3
4
5
6
7
8
2
1. Microphone
2. Night Vision LED’s
3. VGA Camera (640x480)
4. Adjustable Camera Housing
5. Brushed Aluminum Faceplate
6. LED Ring
7. Button
8. Speaker
Page 4
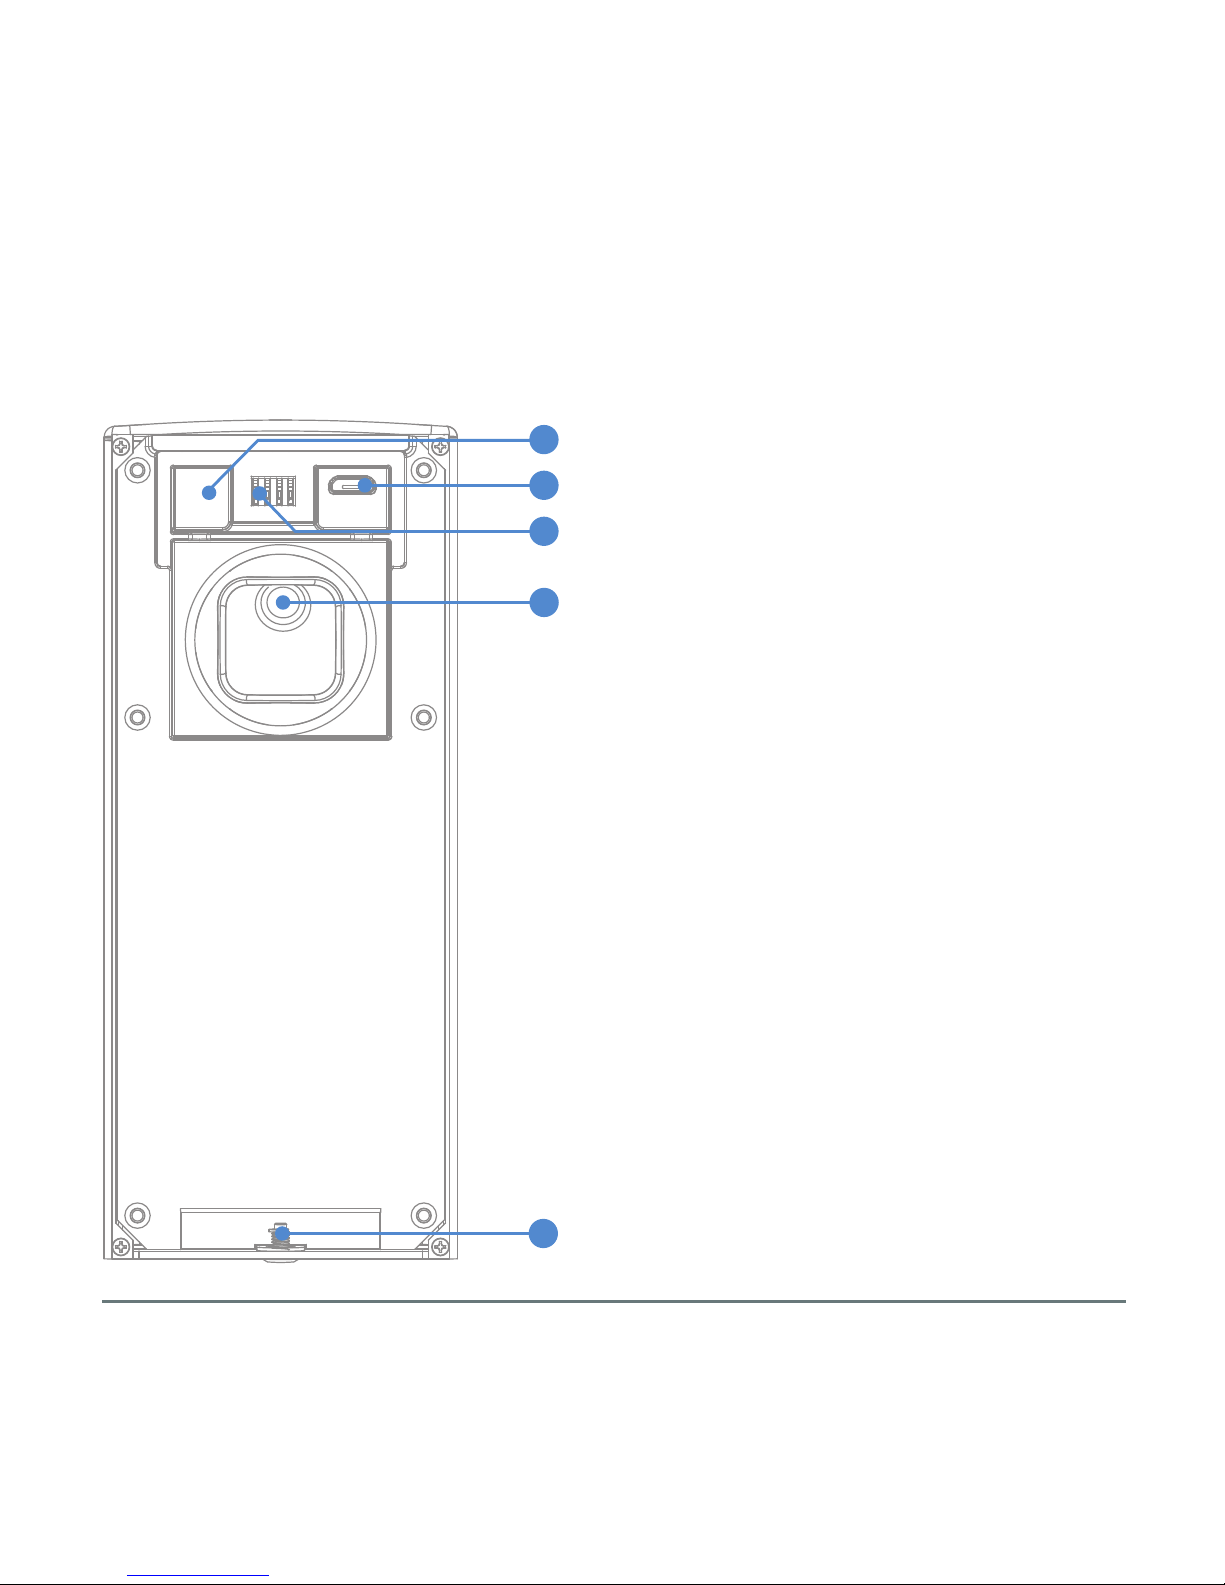
DoorBot Features
10
9
11
12
13
3
9. Reset Button
10. Micro-USB Charging Port
11. Bracket Contacts
12. Camera Rotation Port
13. Security Screw
Page 5
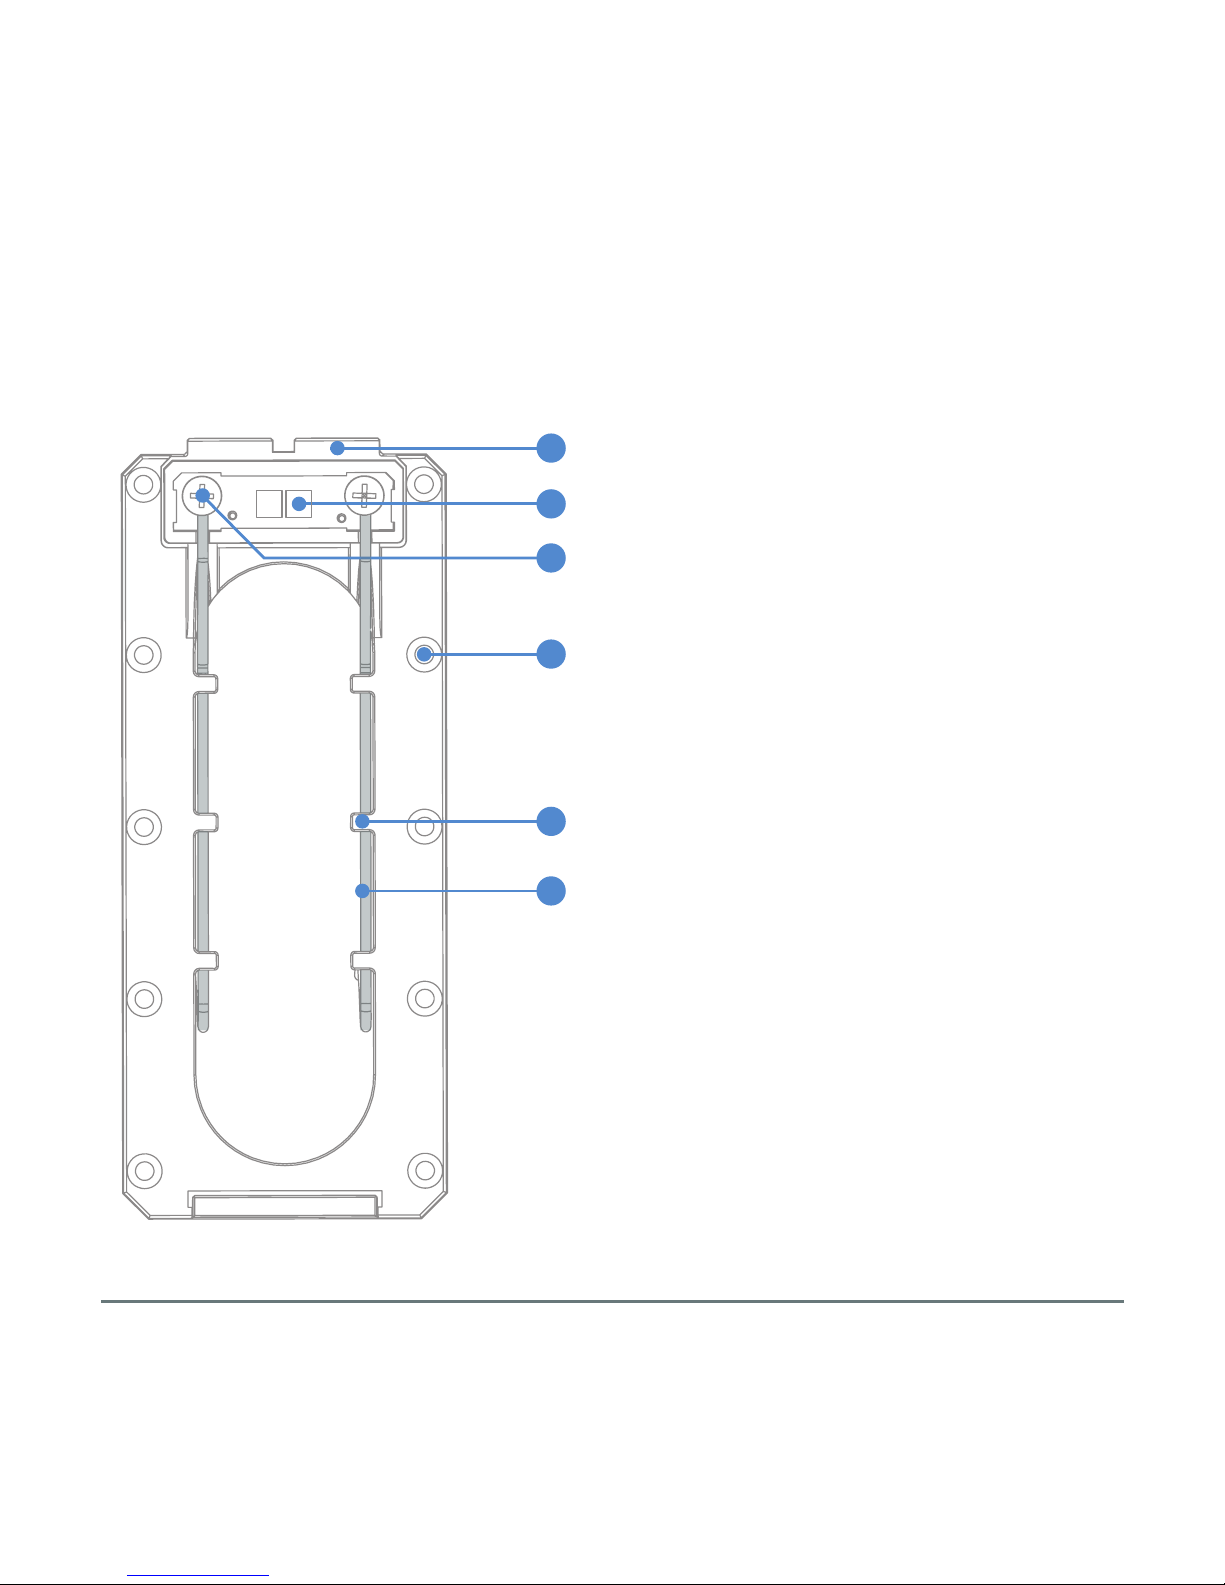
DoorBot Features
15
14
16
17
18
19
4
14. Bracket Coupler
15. Conductive Gasket
16. Terminal
17. Installation Screw port
18. Wire Management Track
19. Doorbell Wiring (not provided)
Page 6
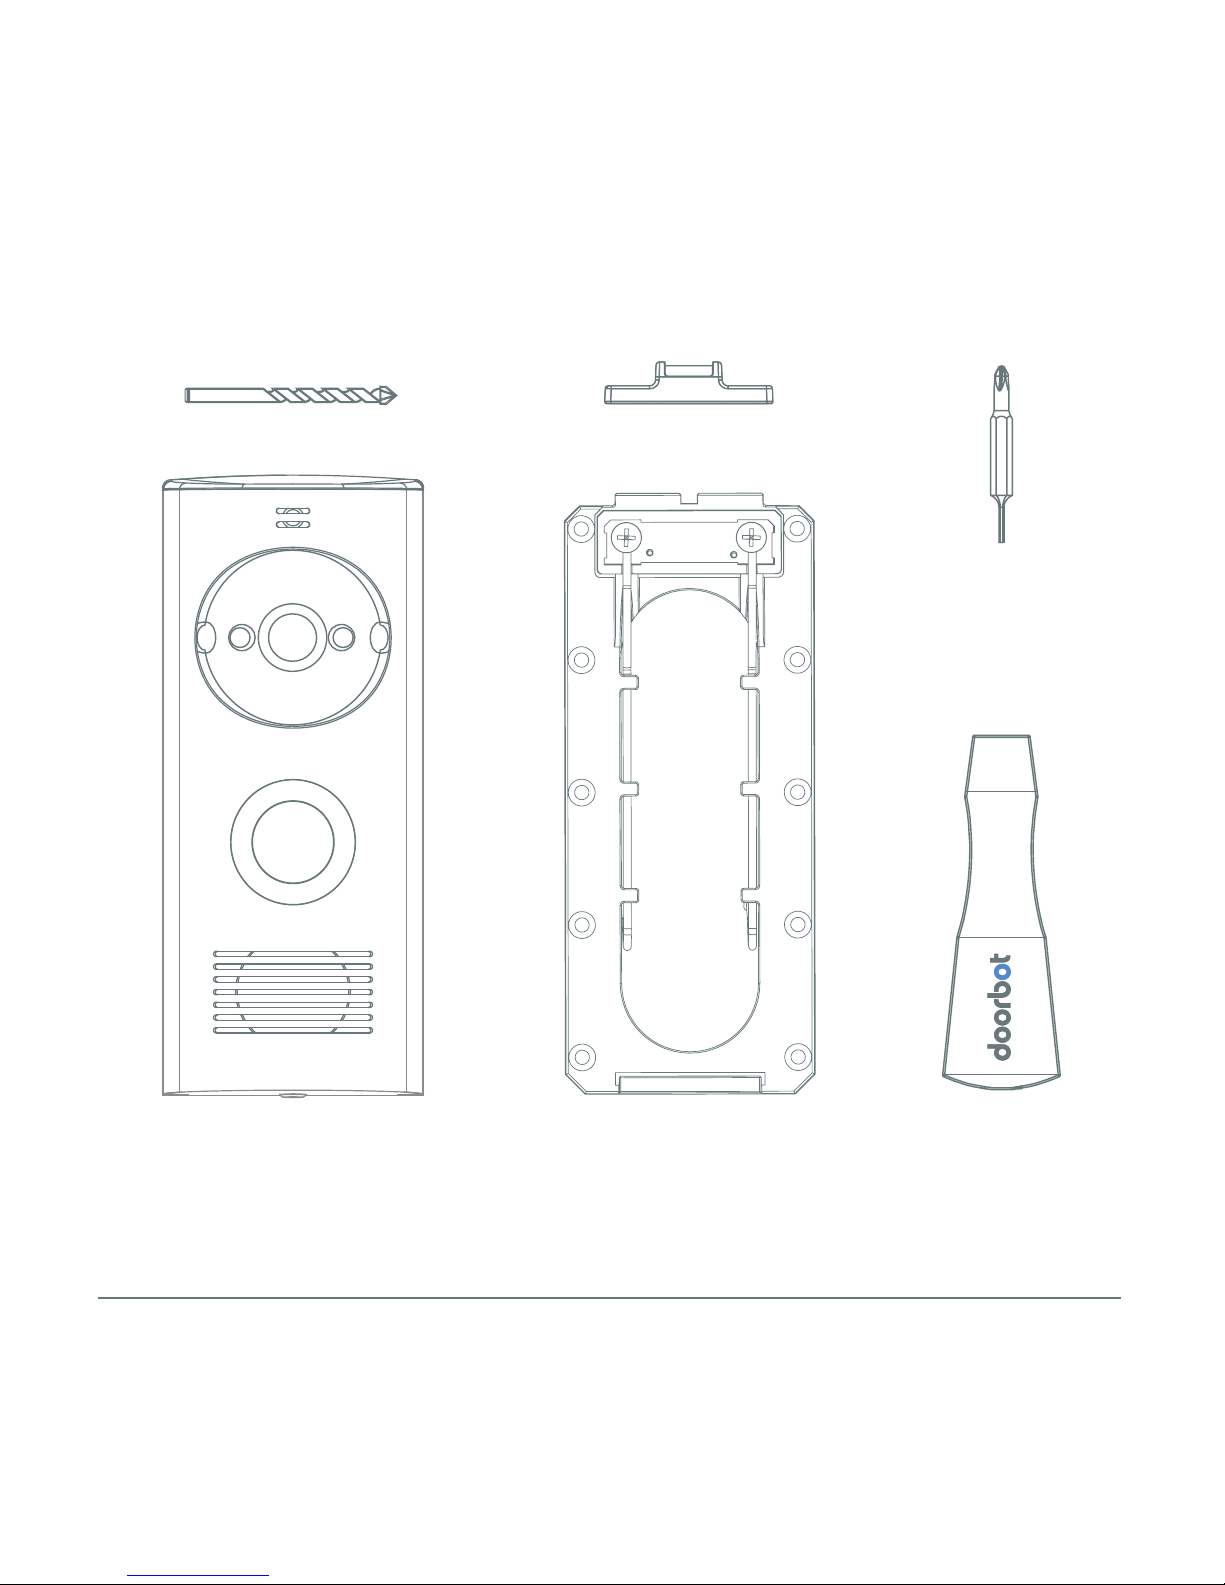
In the Box
5
DoorBot Mounting Bracket Screwdriver
Double-End
Screw Bit
LevelDrill Bit
Additional Components: Micro-USB Charging Cord, Sealing Tape, Threaded Screws,
Aluminum Siding Screws, Wall Anchors, Quick Install Guide
Page 7
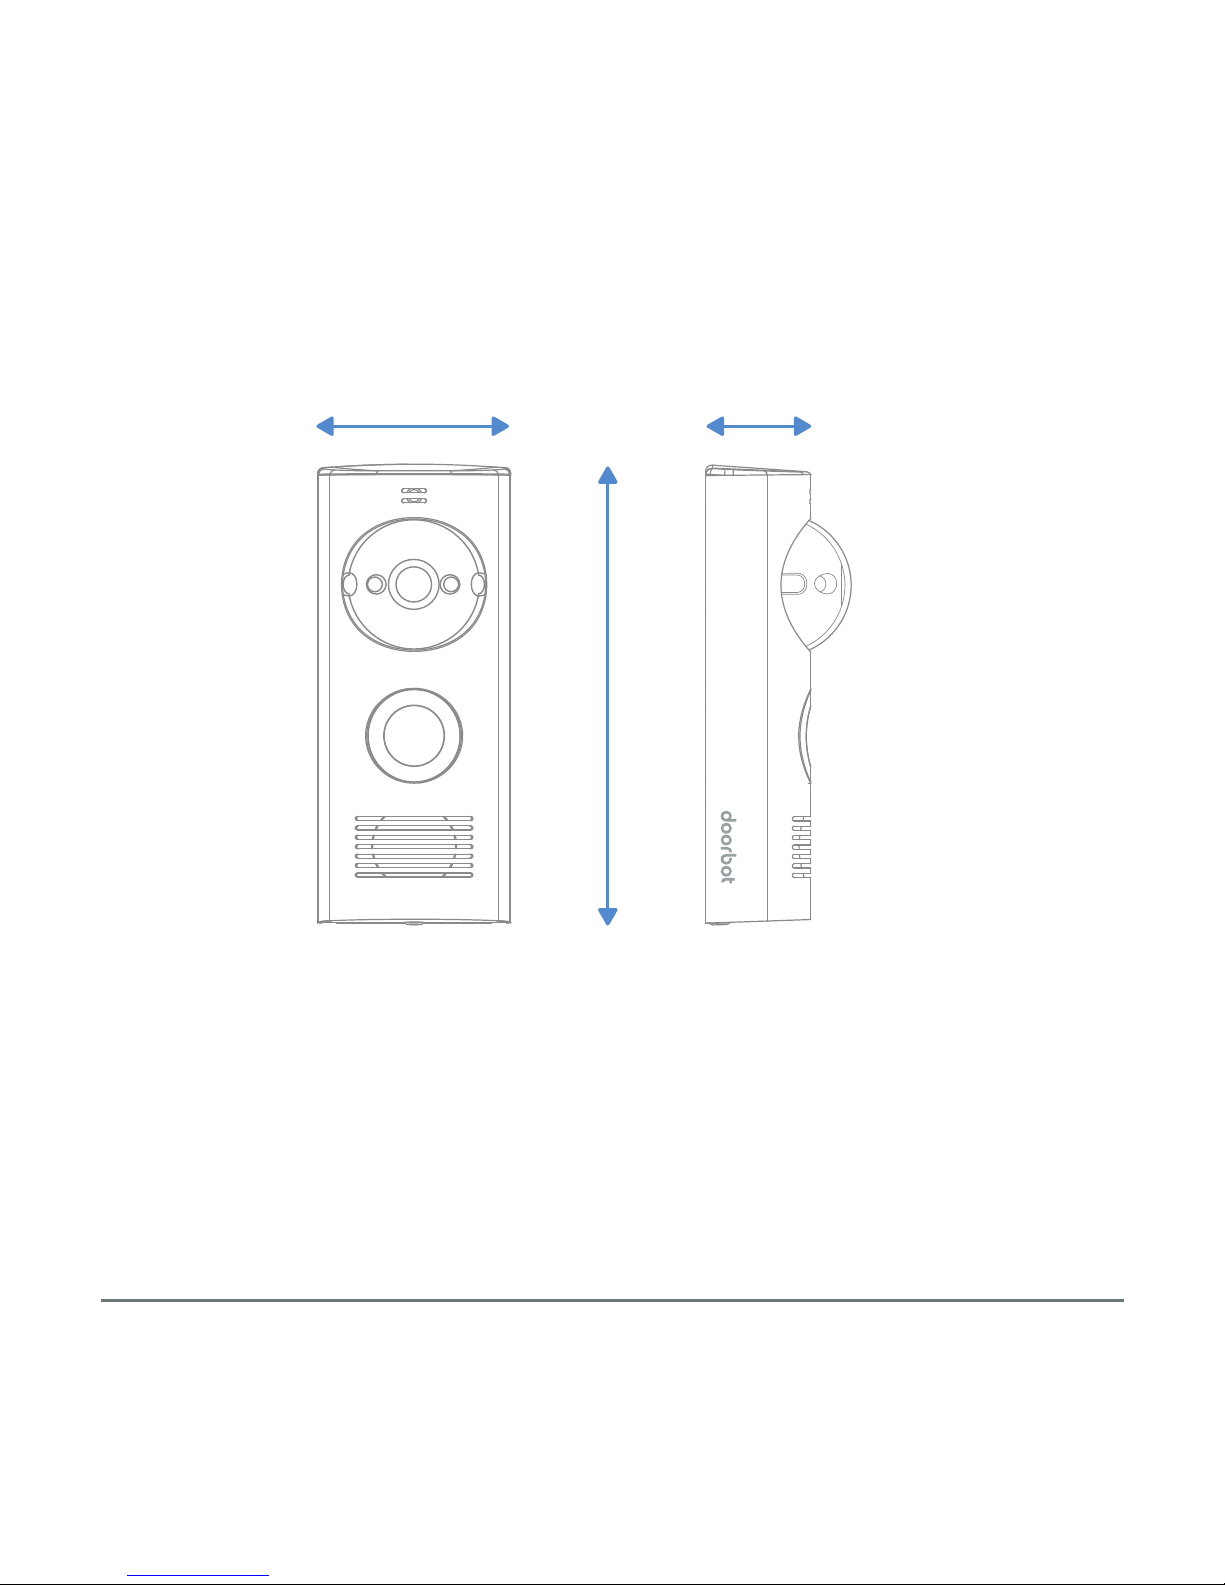
Technical Specifications
6
5.68”
2.39” 1.30”
Weight: 8.1oz
Battery: 3500 mAh
Power Input: 8-24 VAC
(wired)
5 VDC @ 500mA (micro-USB)
Video: 640 x 480 VGA
Operating Temperature: 5-122 °F
Weather Resistant
Page 8
Technical Requirements
High Speed Internet: DSL, Cable or FiOS
(for optimal performance)
Wi-Fi: 802.11b 2.4 GHz
Web Browser: Internet Explorer 7+
Google Chrome
Firefox 3+
Safari 3+
7
Setup: Android 2.3+iOS 6+
Session Processing:
Android 2.3+iOS 6+
Note: DoorBot may work with legacy software as long as the user’s smart device is
connected to a W-Fi network. Certain functionality may be limited without connection
to a Wi-Fi network.
Page 9
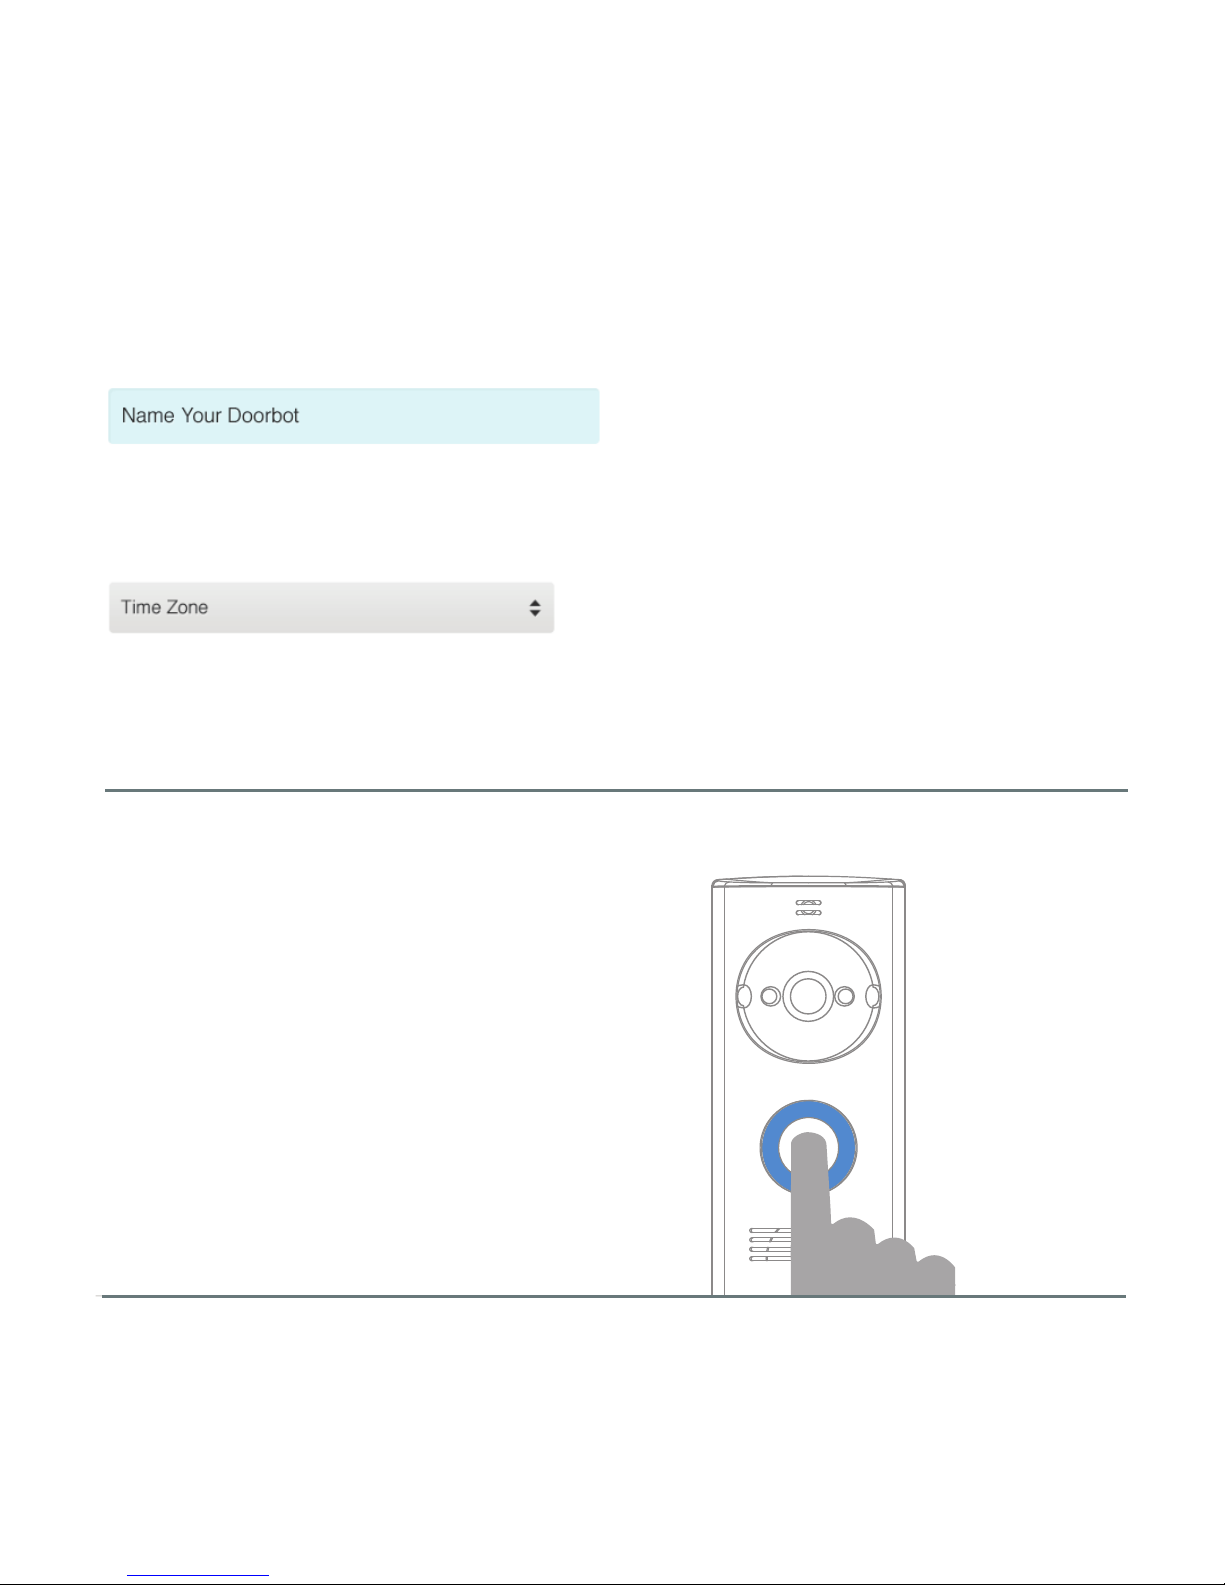
Connecting DoorBot to a wireless network
STEP 1
Press the DoorBot to
begin setup.
Choose a descriptive name for your
DoorBot (e.g. Eric’s Front Door).
Choose the timezone in which
your DoorBot will be located in.
8
Page 10
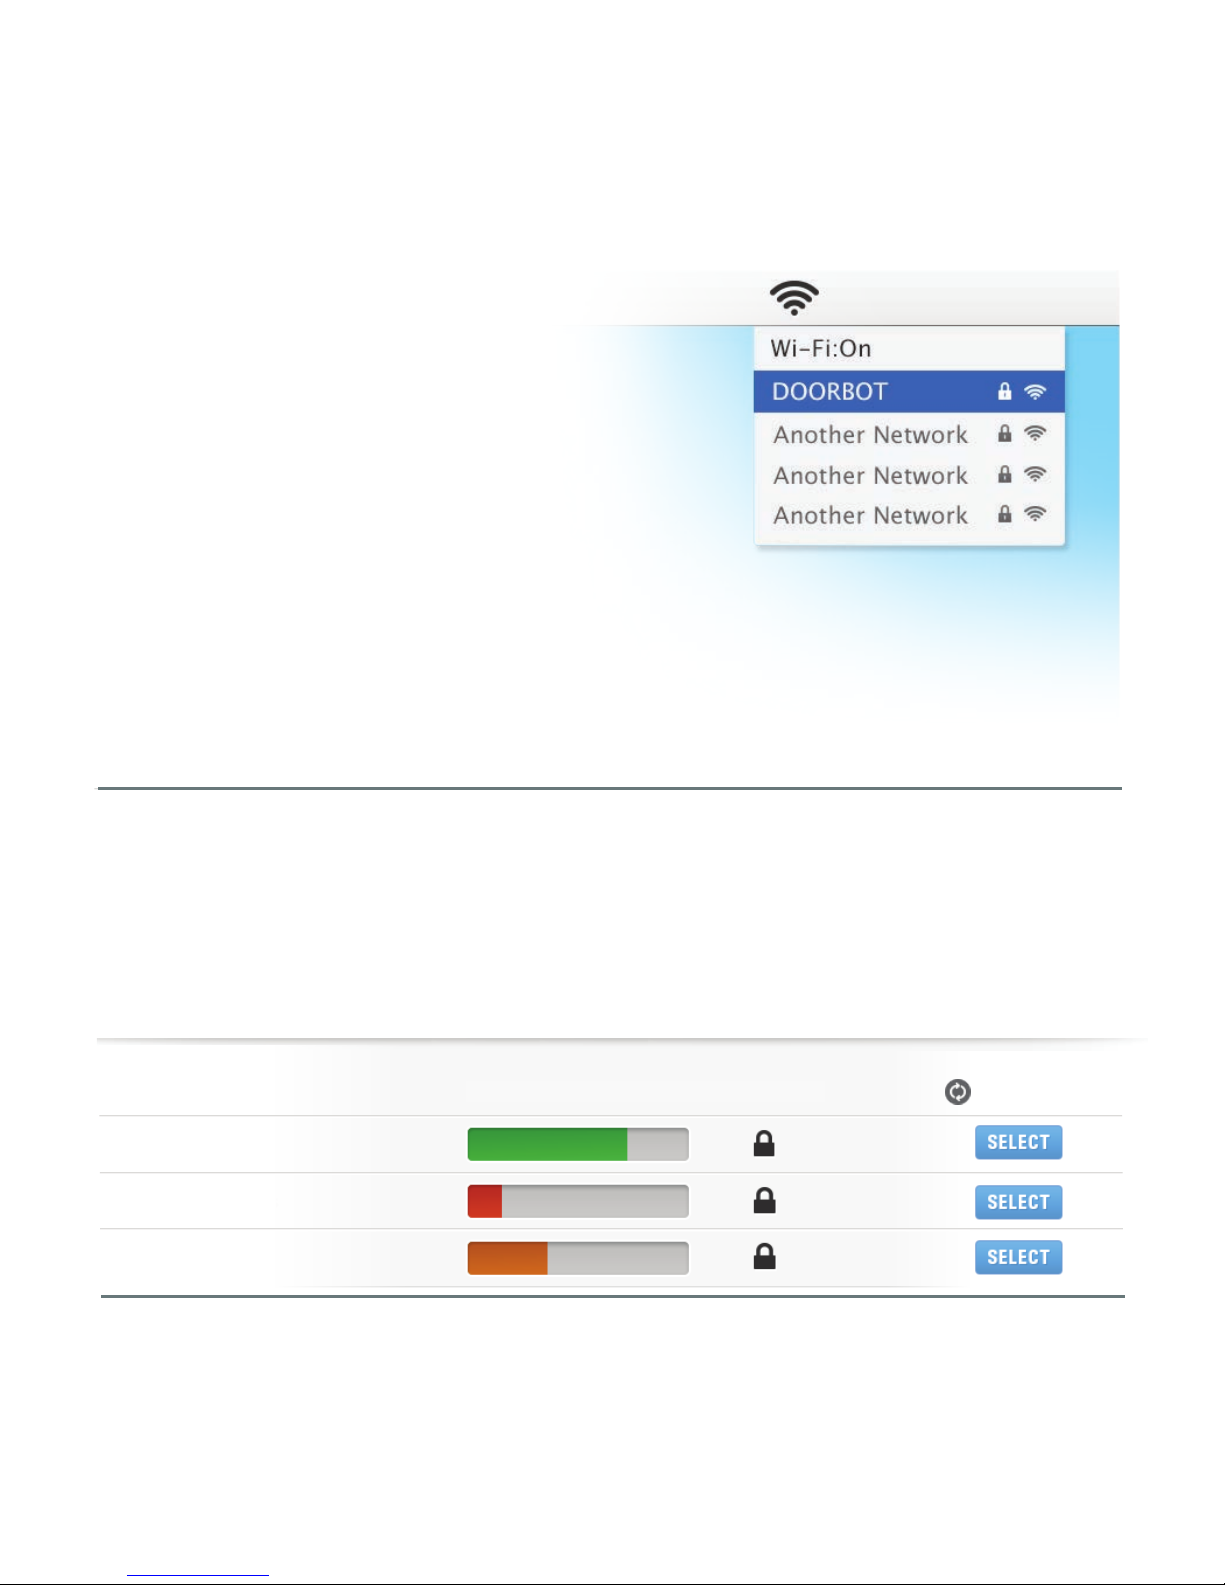
STEP 2
STEP 3
NETWORK NAME SIGNAL STRENGTH SECURE REFRESH
User’s Wi-Fi Network
Another Network
Another Network
Connect to the DoorBot Network.
Choose a network for your DoorBot to connect to.
9
Page 11
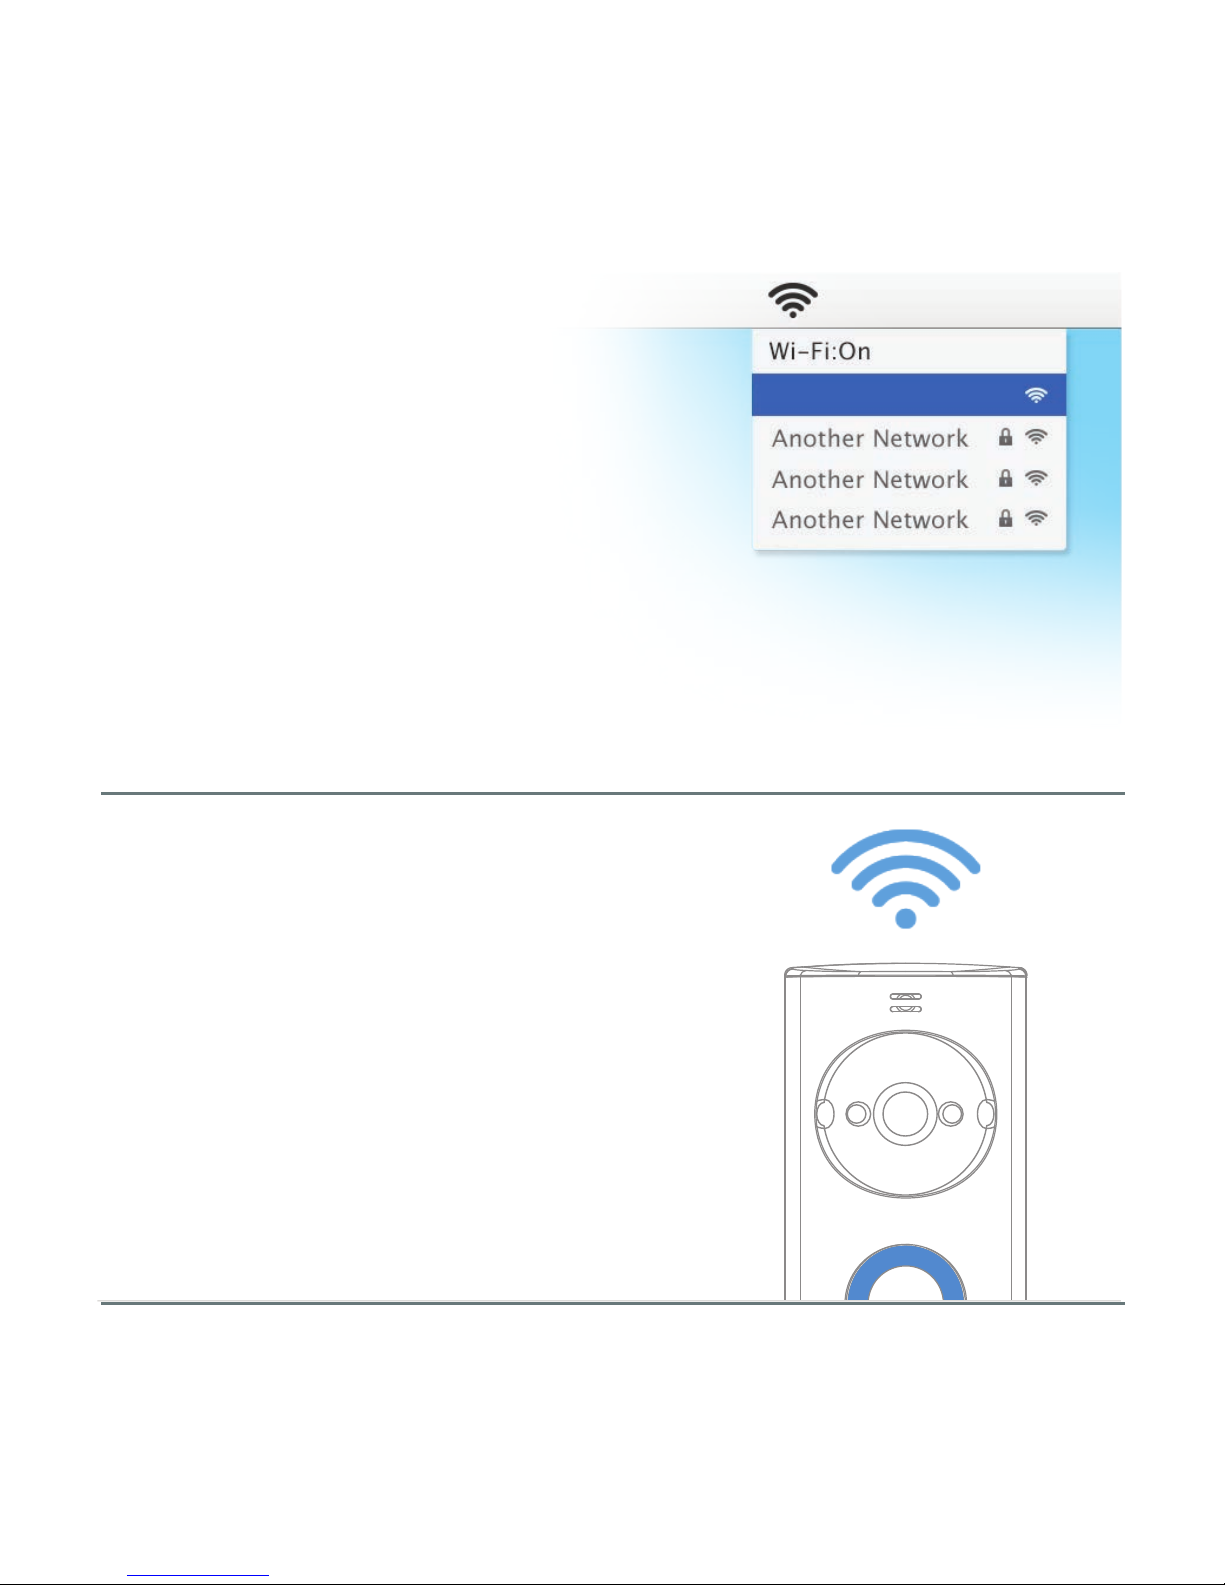
STEP 4
User’s Wi-Fi Network
Now that you've established a
connection for DoorBot, go
ahead and reconnect to your
personal Wi-Fi network.
SUCCESS!
10
The setup process is complete once
you've connected back to your
personal Wi-Fi network.
Page 12
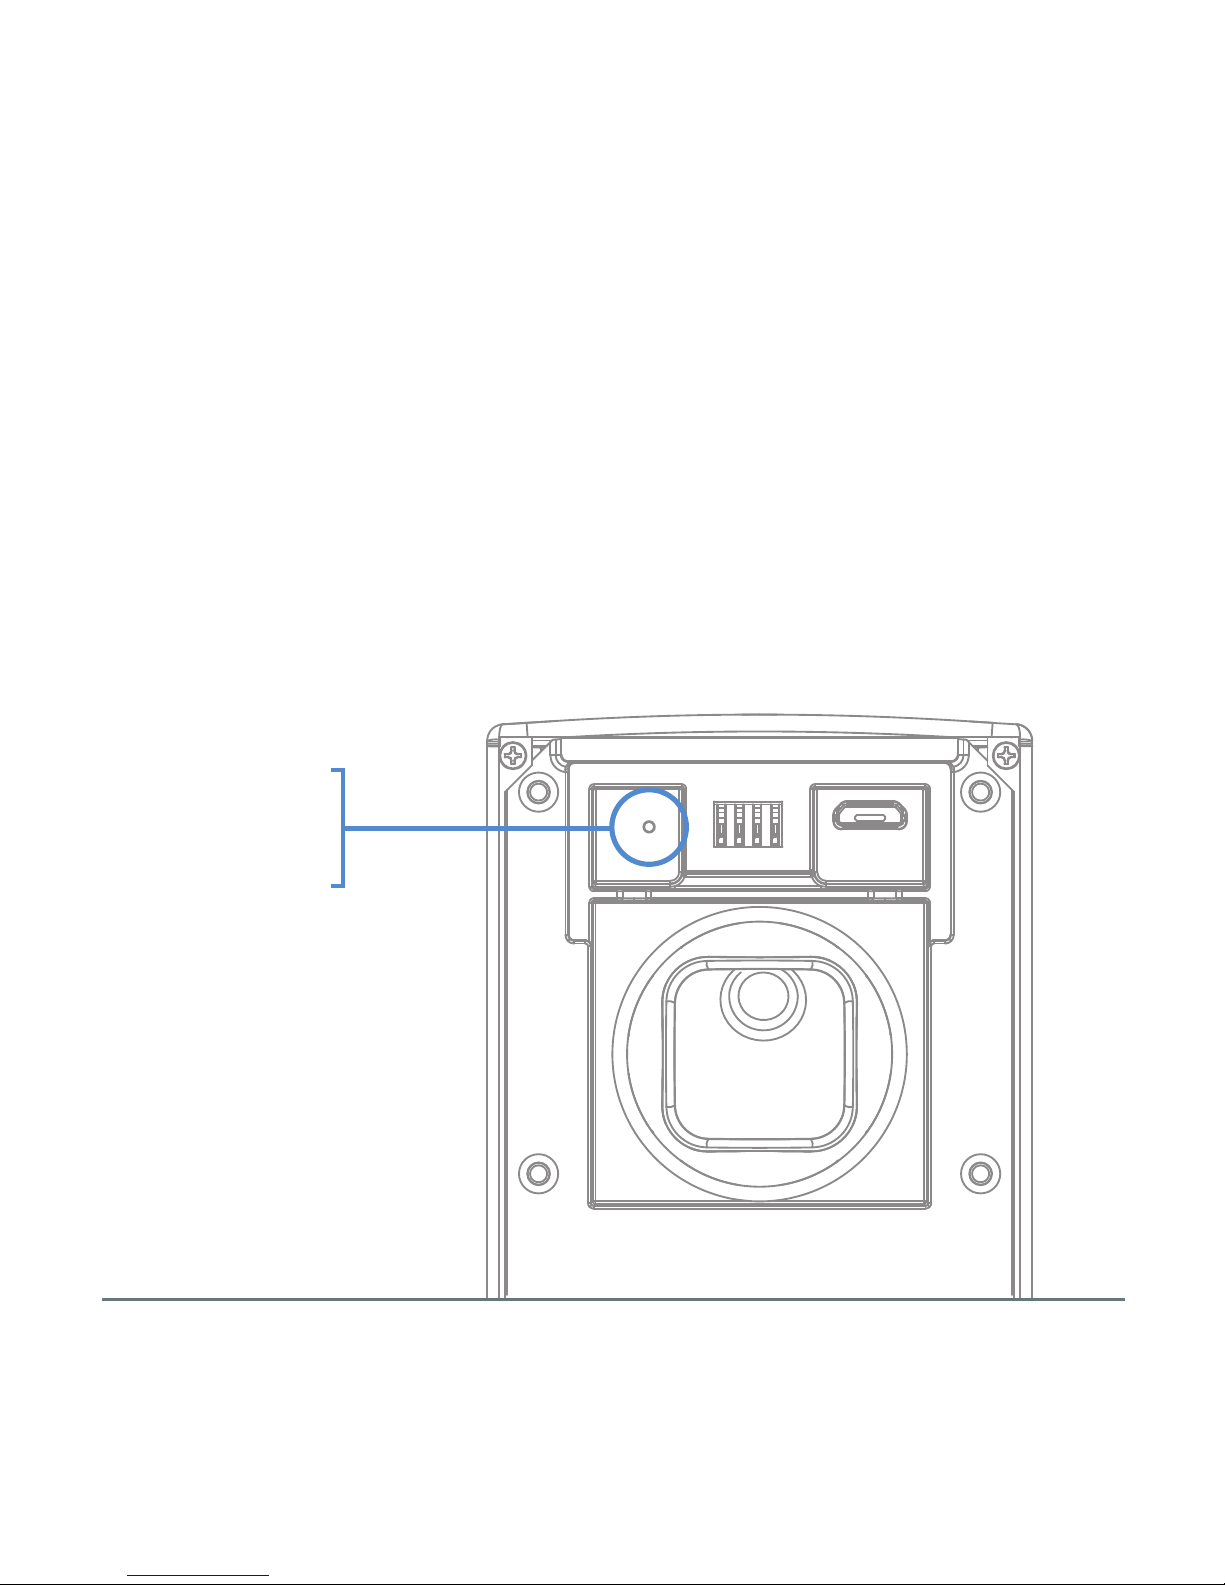
Removing DoorBot from a Wi-Fi Network
11
RESET
BUTTON
To change the Wi-Fi network that your DoorBot is connected to, press
the reset button on the back of the device. Once reset, you'll need to
follow the steps in the Quick Install Guide before you can
continue using your DoorBot.
Page 13
Installation
STEP 1
12
DoorBot can be mounted to wood, stucco, brick, concrete, or
aluminum siding. Included in the package are all of the tools
necessary to mount your DoorBot.
If you plan on connecting DoorBot to your wired doorbell, follow
the instructions labeled Wired, otherwise follow the Wireless
steps to complete installation.
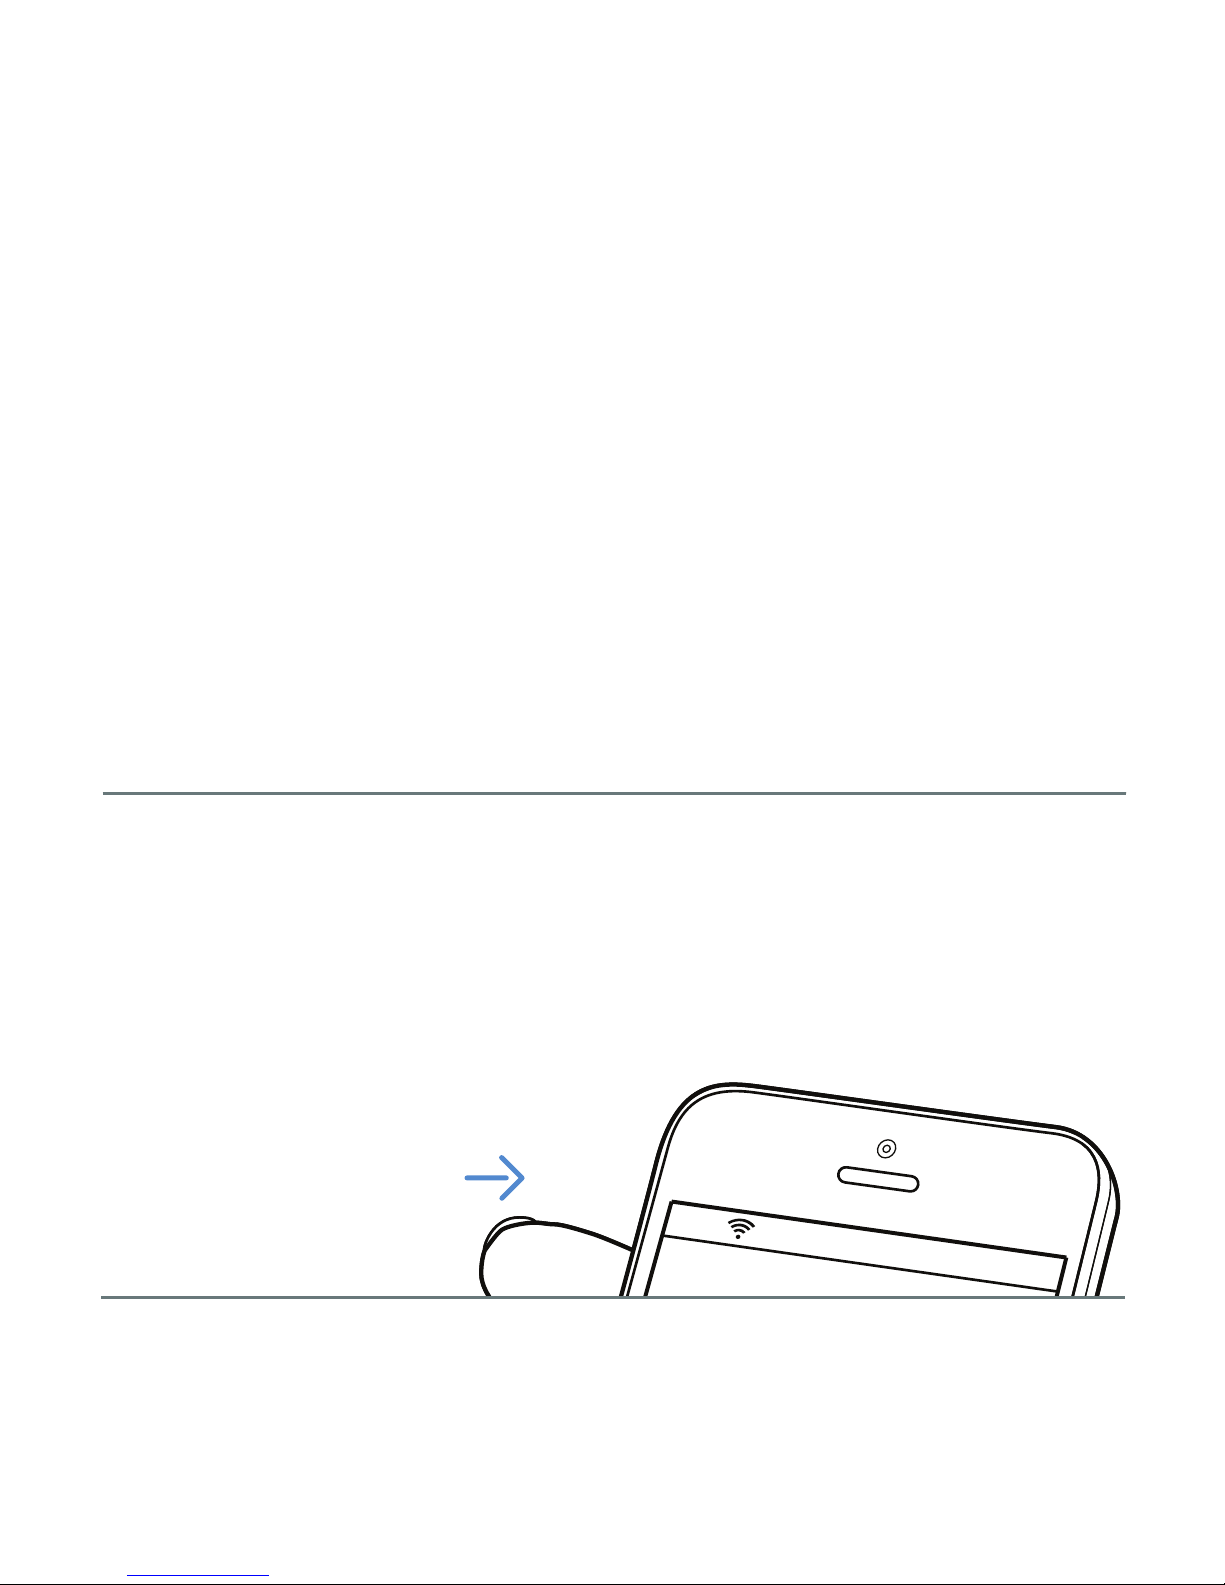
First, you want to make sure that you have WiFi at your door.
Place your smartphone or tablet on the exterior wall that you
intend to mount DoorBot. If you see a Wi-Fi connection then
proceed with the installation.
JUMP TO STEP 4 TO CONTINUE
WITH WIRELESS INSTALLATION
Page 14
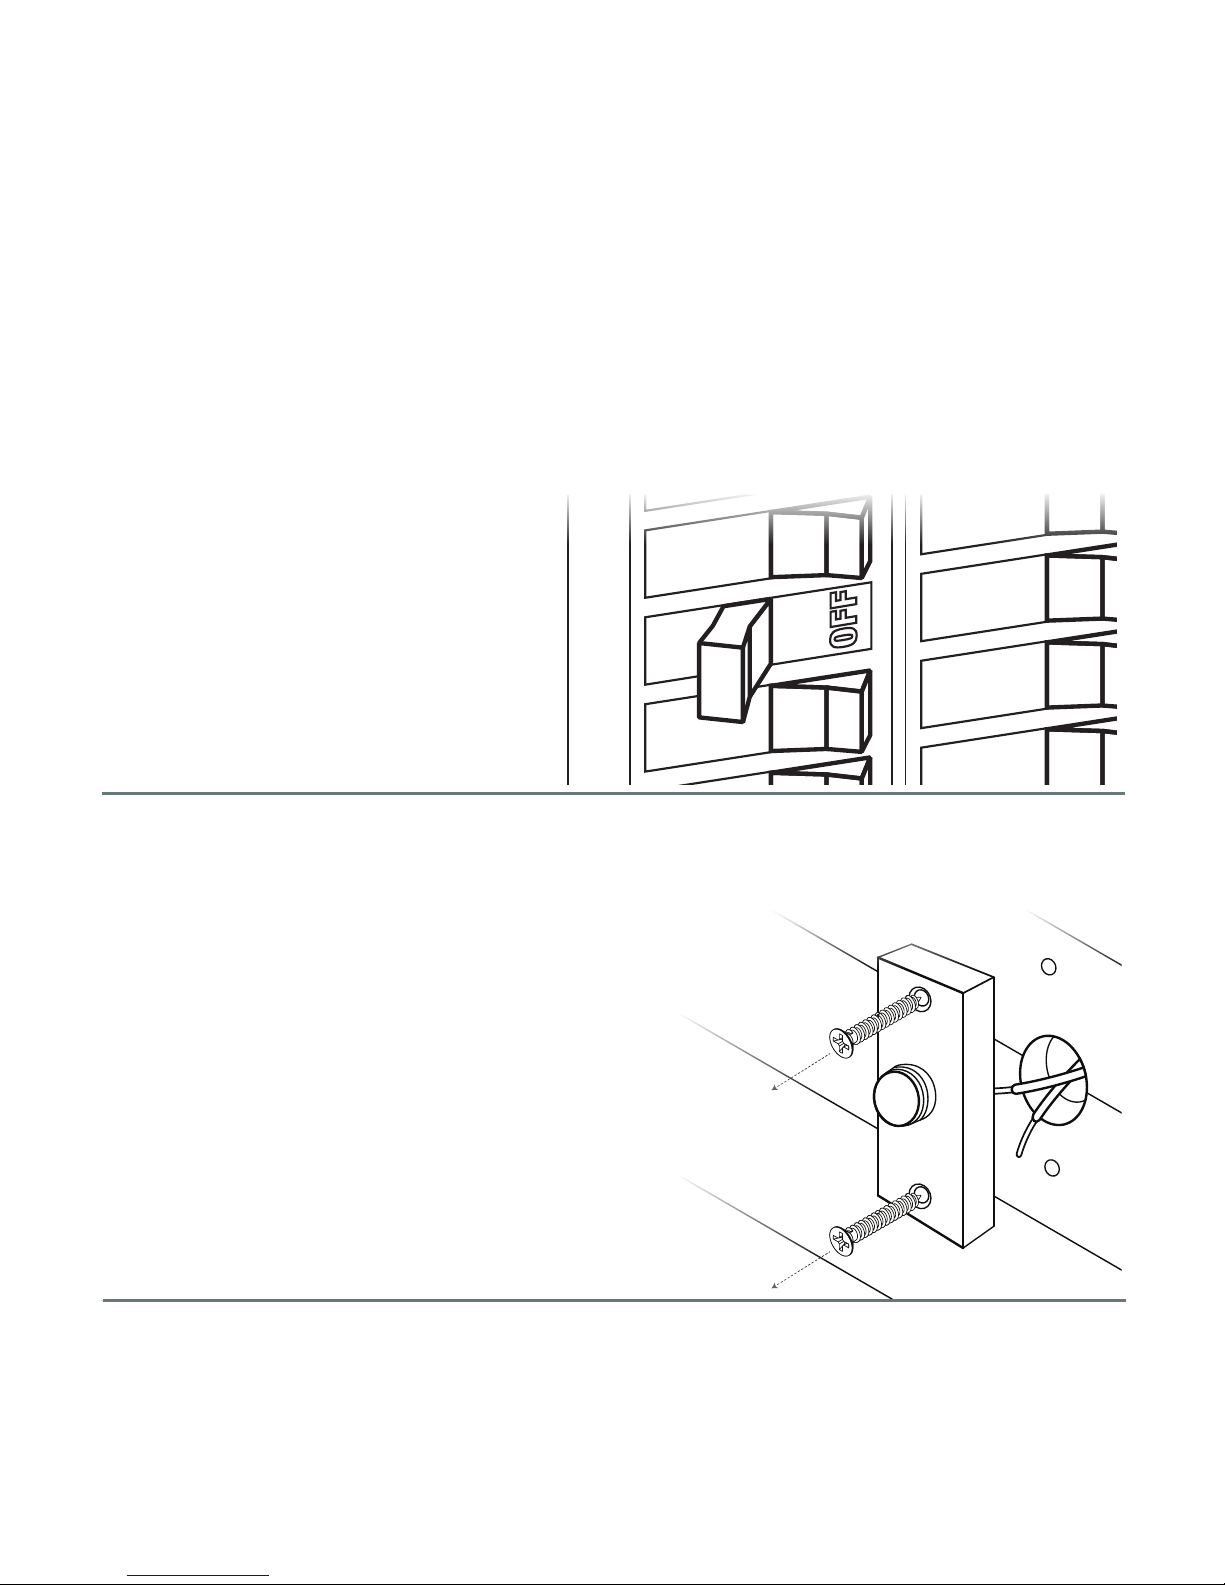
STEP 2 (WIRED INSTALLATION ONLY)
STEP 3 (WIRED INSTALLATION ONLY)
13
Now find the outlet or circuit breaker to turn off
power to your wired doorbell.
Unscrew the doorbell button and detach
the wires from the back of the doorbell.
Page 15
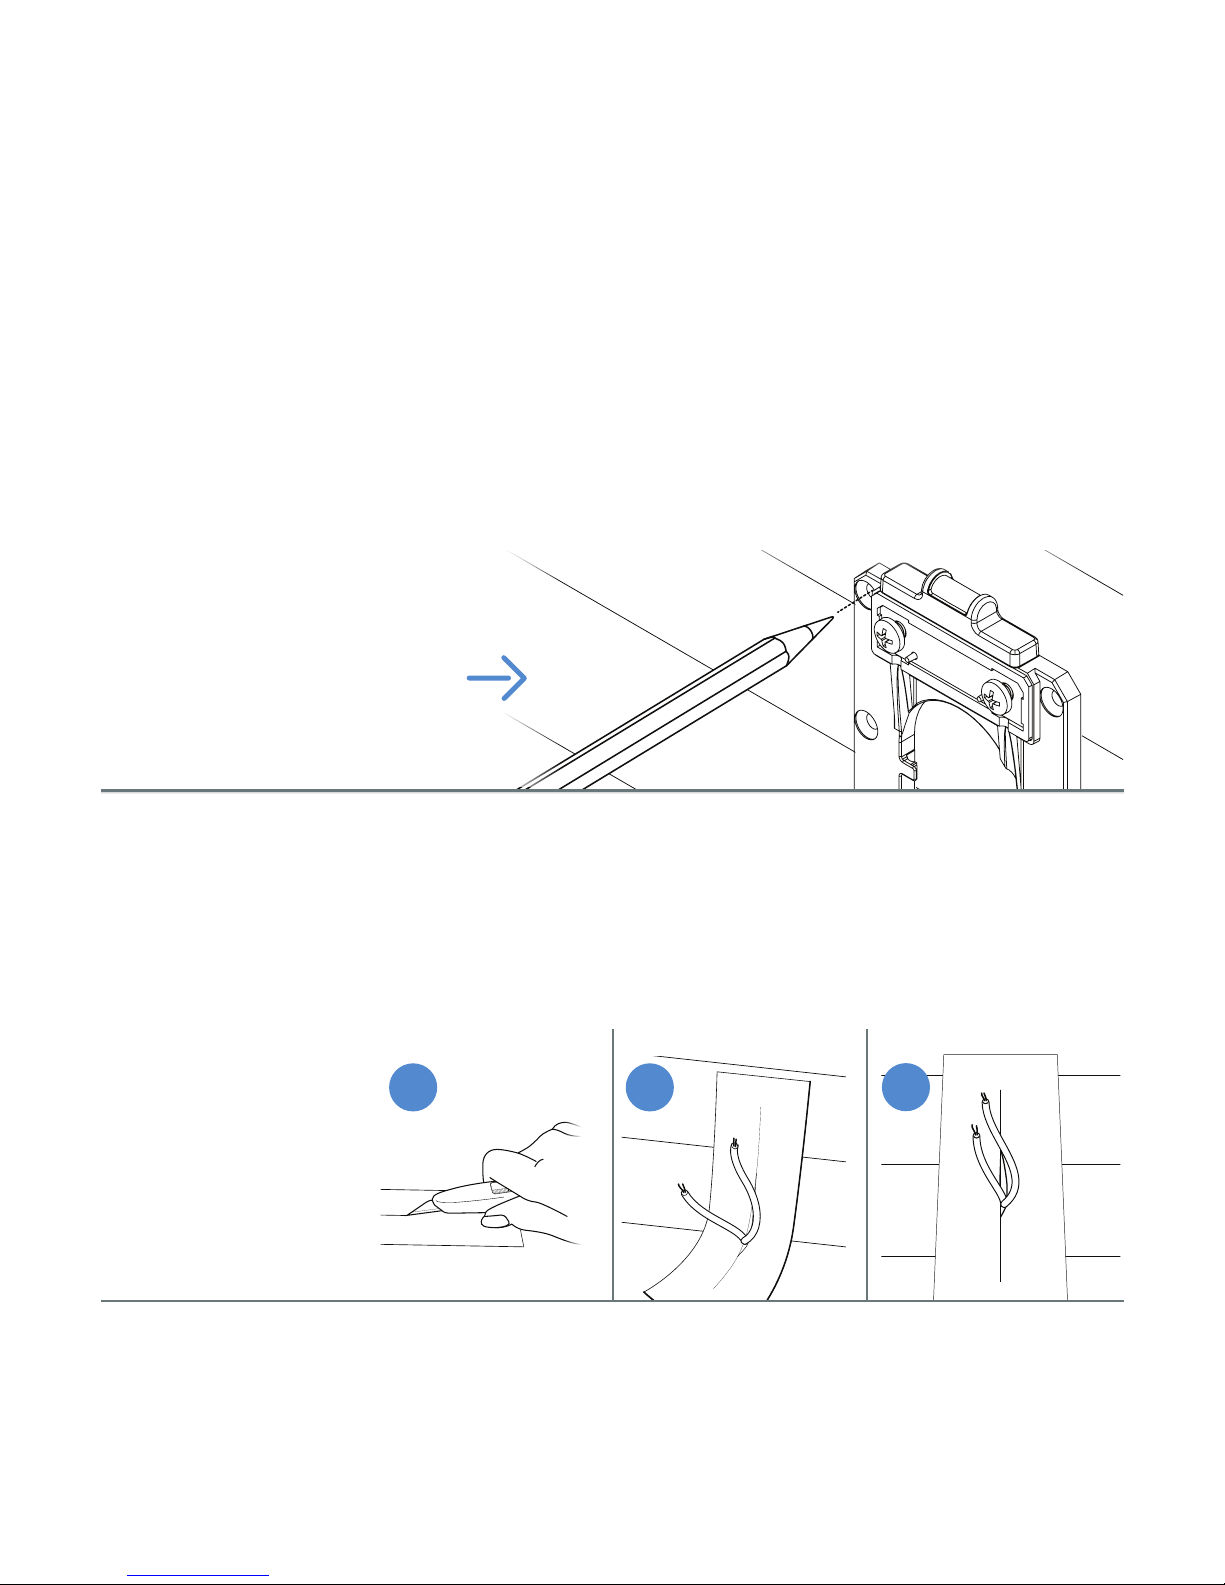
STEP 4
STEP 5
(WIRED INSTALLATION ONLY)
14
Press the mounting bracket against the wall ensuring it is level with the
included level attachment and mark off screw holes. If wiring your
DoorBot, you'll want to make sure the doorbell wires are near
the center of the bracket.
JUMP TO STEP 6 TO CONTINUE
WITH WIRELESS INSTALLATION
Create a small slit in the center of the provided sealing tape. Then
gently pull the pre-existing wiring out from your wall and through
the slit in the sealing tape.
1 2 3
Page 16
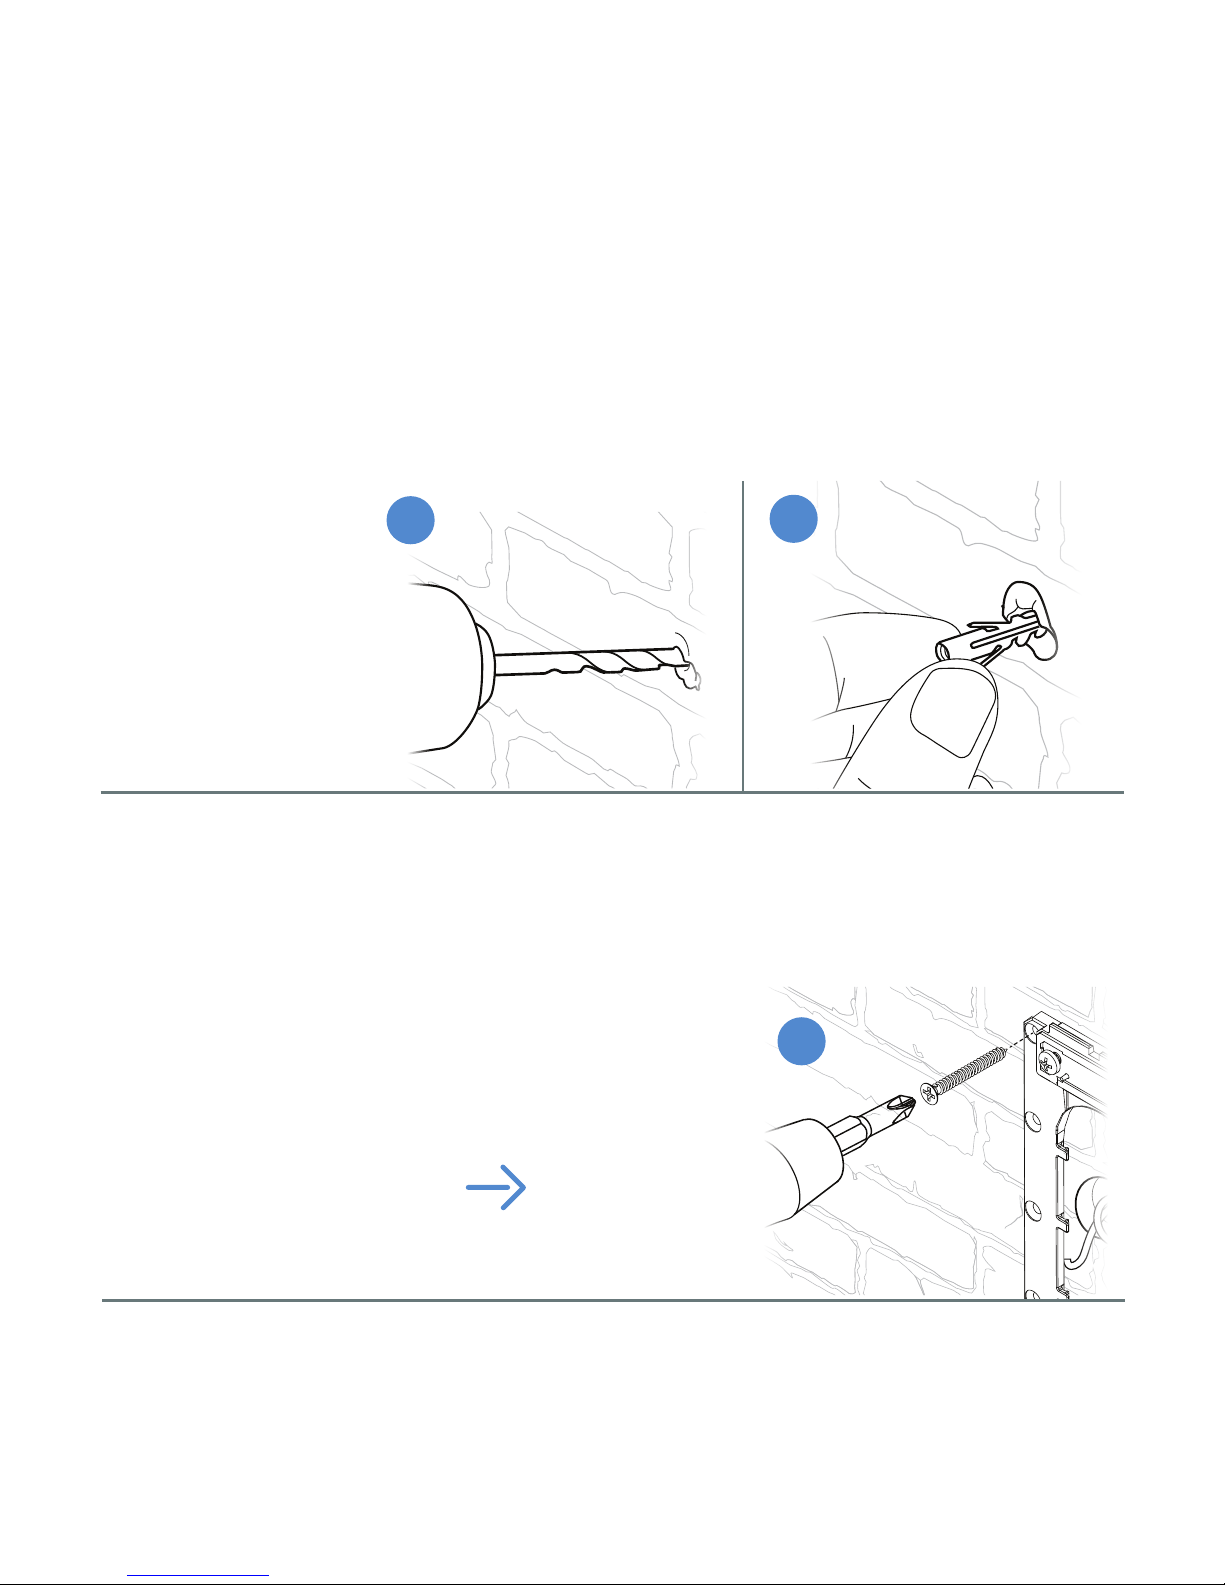
STEP 6 - ON BRICK/STUCCO/CONCRETE
15
Once you have your mounting bracket marked off, drill 4 holes into
the wall with the provided drill bit.
Screw the provided threaded screws into the wall anchors until
they're completely in the wall and the mounting bracket is flush
against the wall.
1
2
CONTINUED
JUMP TO STEP 8 TO CONTINUE
WITH WIRELESS INSTALLATION
3
Page 17
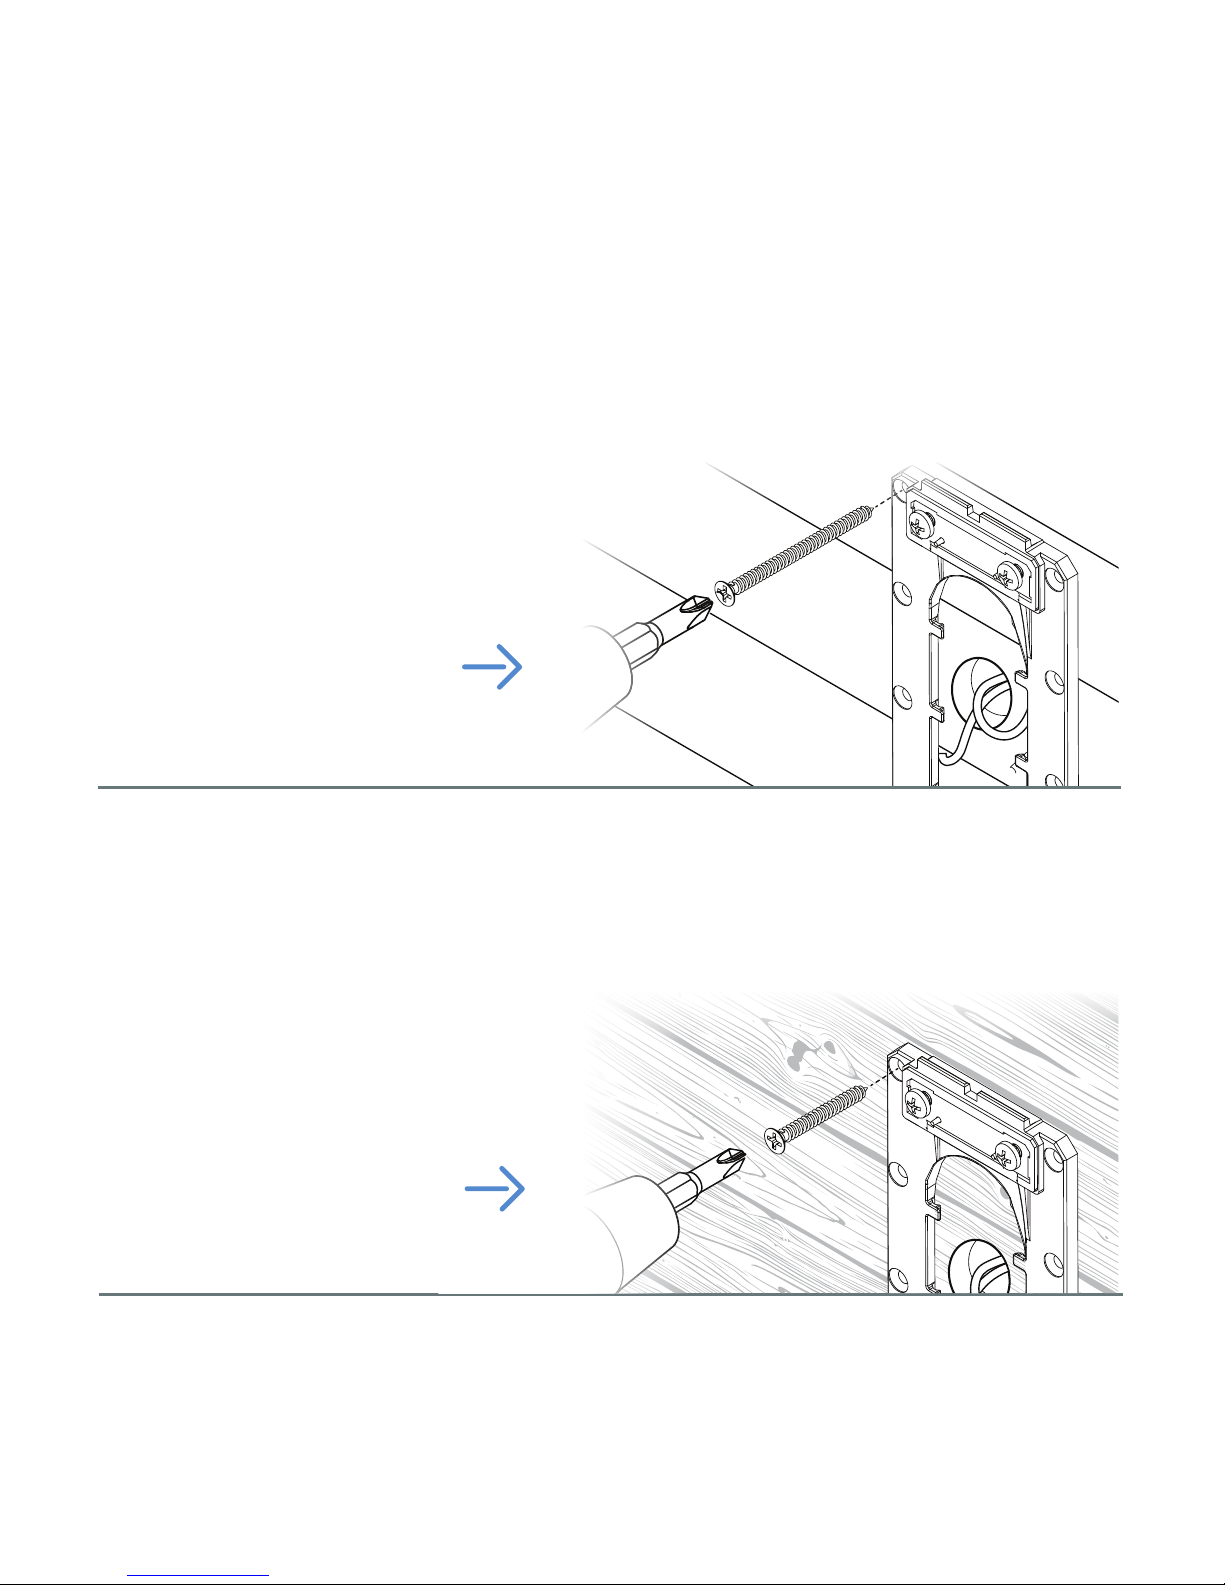
ON ALUMINUM SIDING
ON WOOD
16
Screw in the provided aluminum siding screws into the screw holes
on the mounting plate, through the aluminum
siding, and into the wood backing.
Screw in the provided threaded screws into the screw holes on the
mounting plate, and through the wood surface.
JUMP TO STEP 8 TO CONTINUE
WITH WIRELESS INSTALLATION
JUMP TO STEP 8 TO CONTINUE
WITH WIRELESS INSTALLATION
Page 18
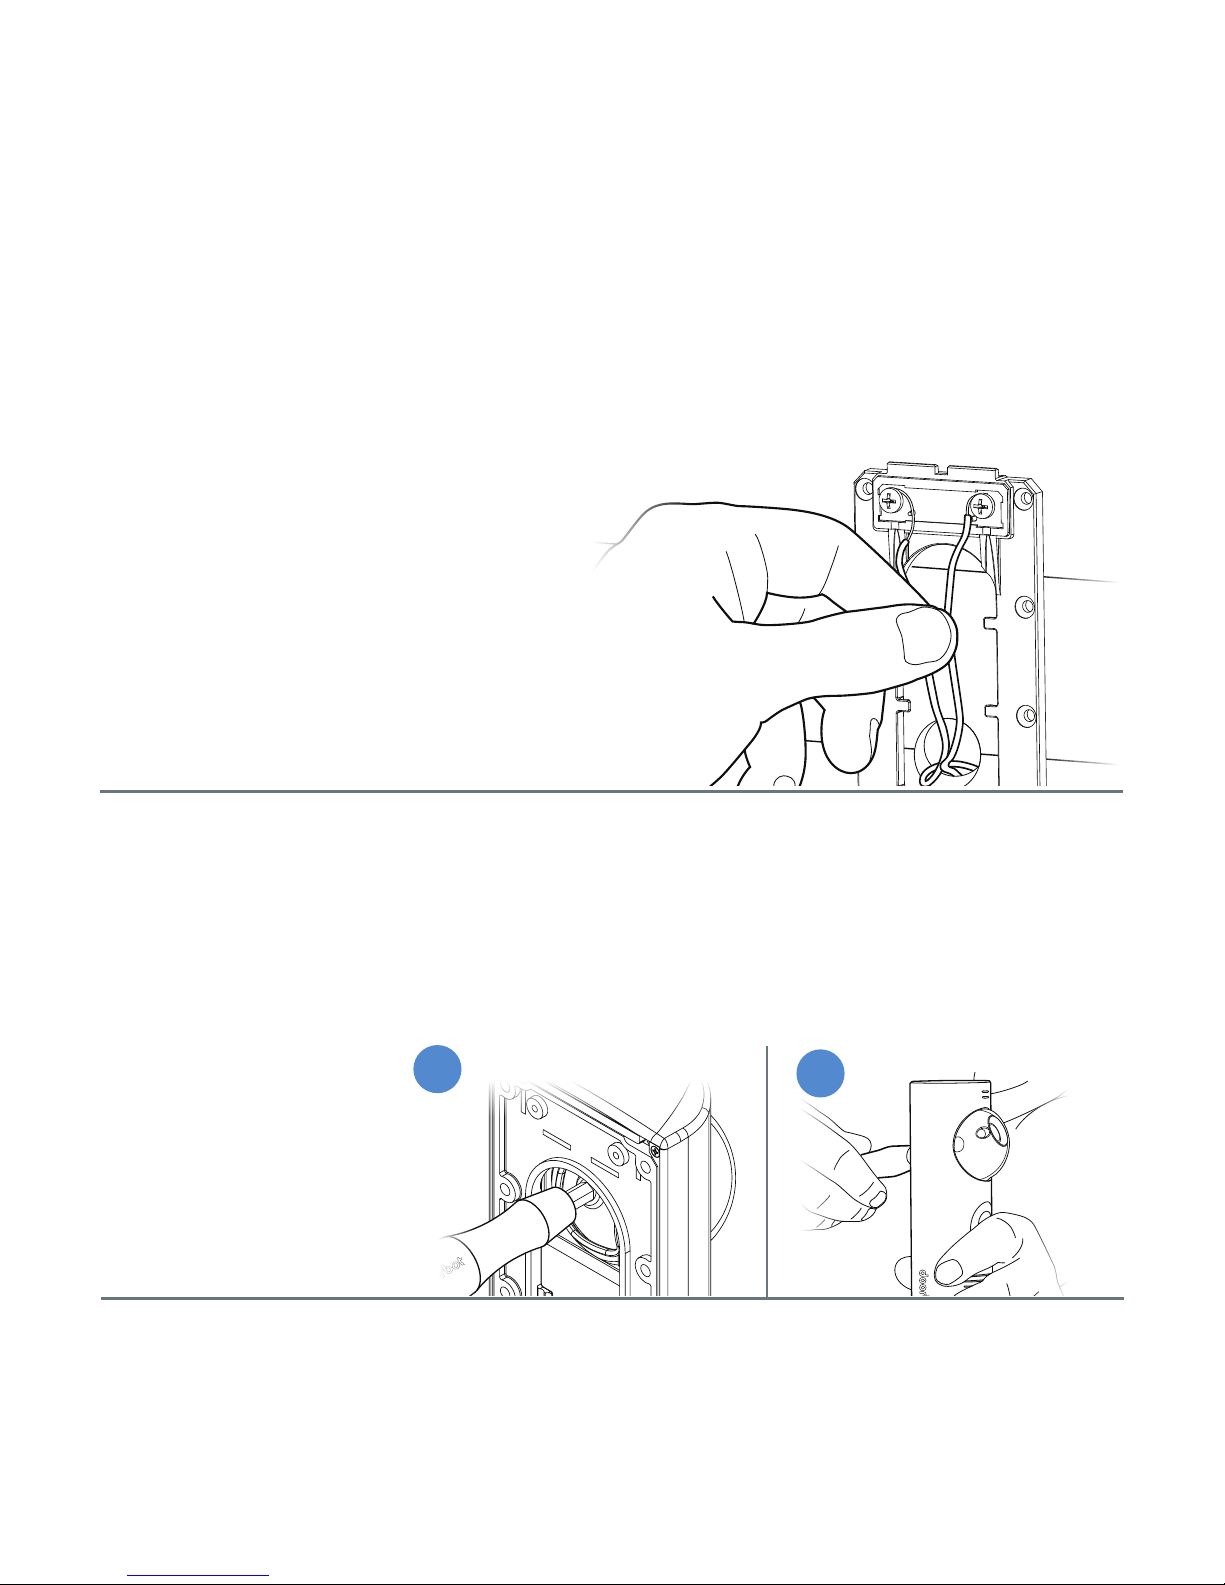
STEP 7
(WIRED INSTALLATION ONLY)
STEP 8
17
Take the doorbell wires and attach them to the terminals mounted
at the top of the mounting bracket by tightly
winding the wire around the
exposed screw shaft.
It does not matter which wire
goes to which terminal.
Prior to mounting DoorBot, take the included screwdriver and place it
in the camera rotation port located on the back of the device. Using
the screwdriver like a joystick, adjust the camera angle as needed.
1
2
Page 19
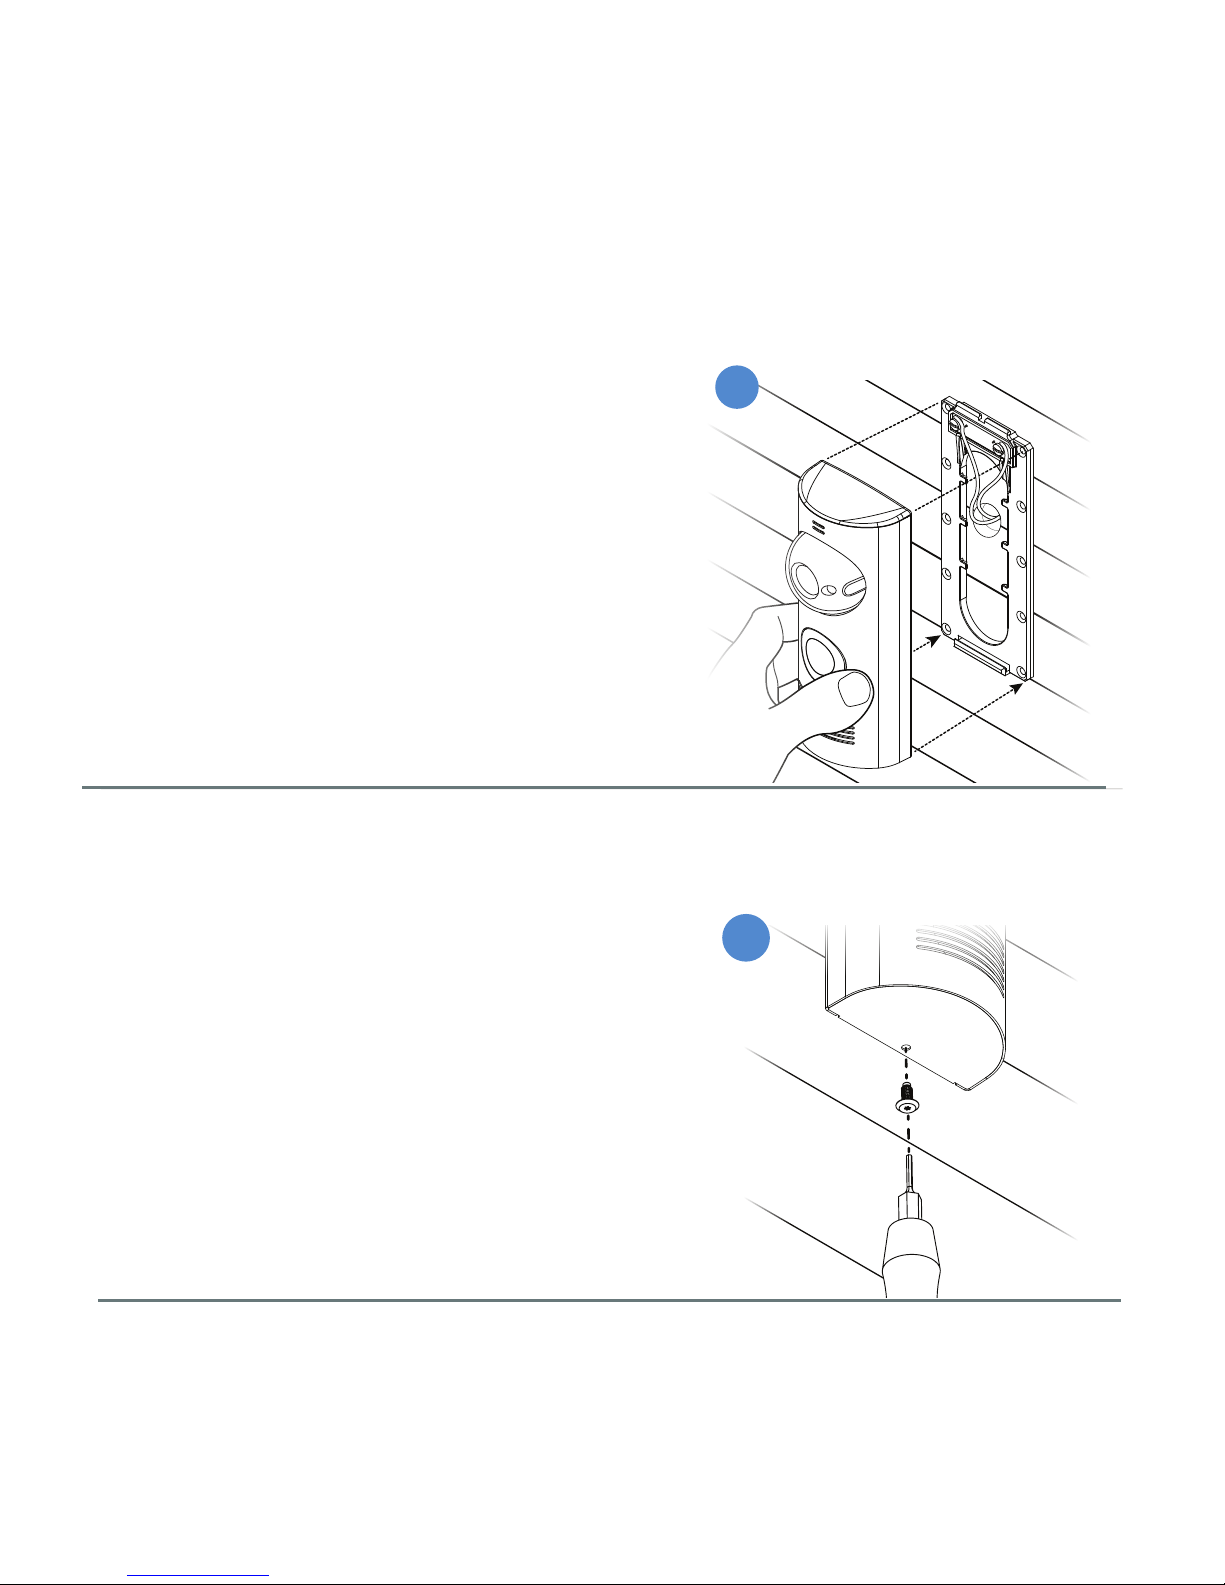
STEP 9
1
2
18
Mount your DoorBot on the bracket
by hooking it over the
bracket coupler.
Use the provided screwdriver and
proprietary bit to secure the screw
at the bottom of the DoorBot.
At this point you may now restore
power to your doorbell circuit.
(wired installation only)
Page 20
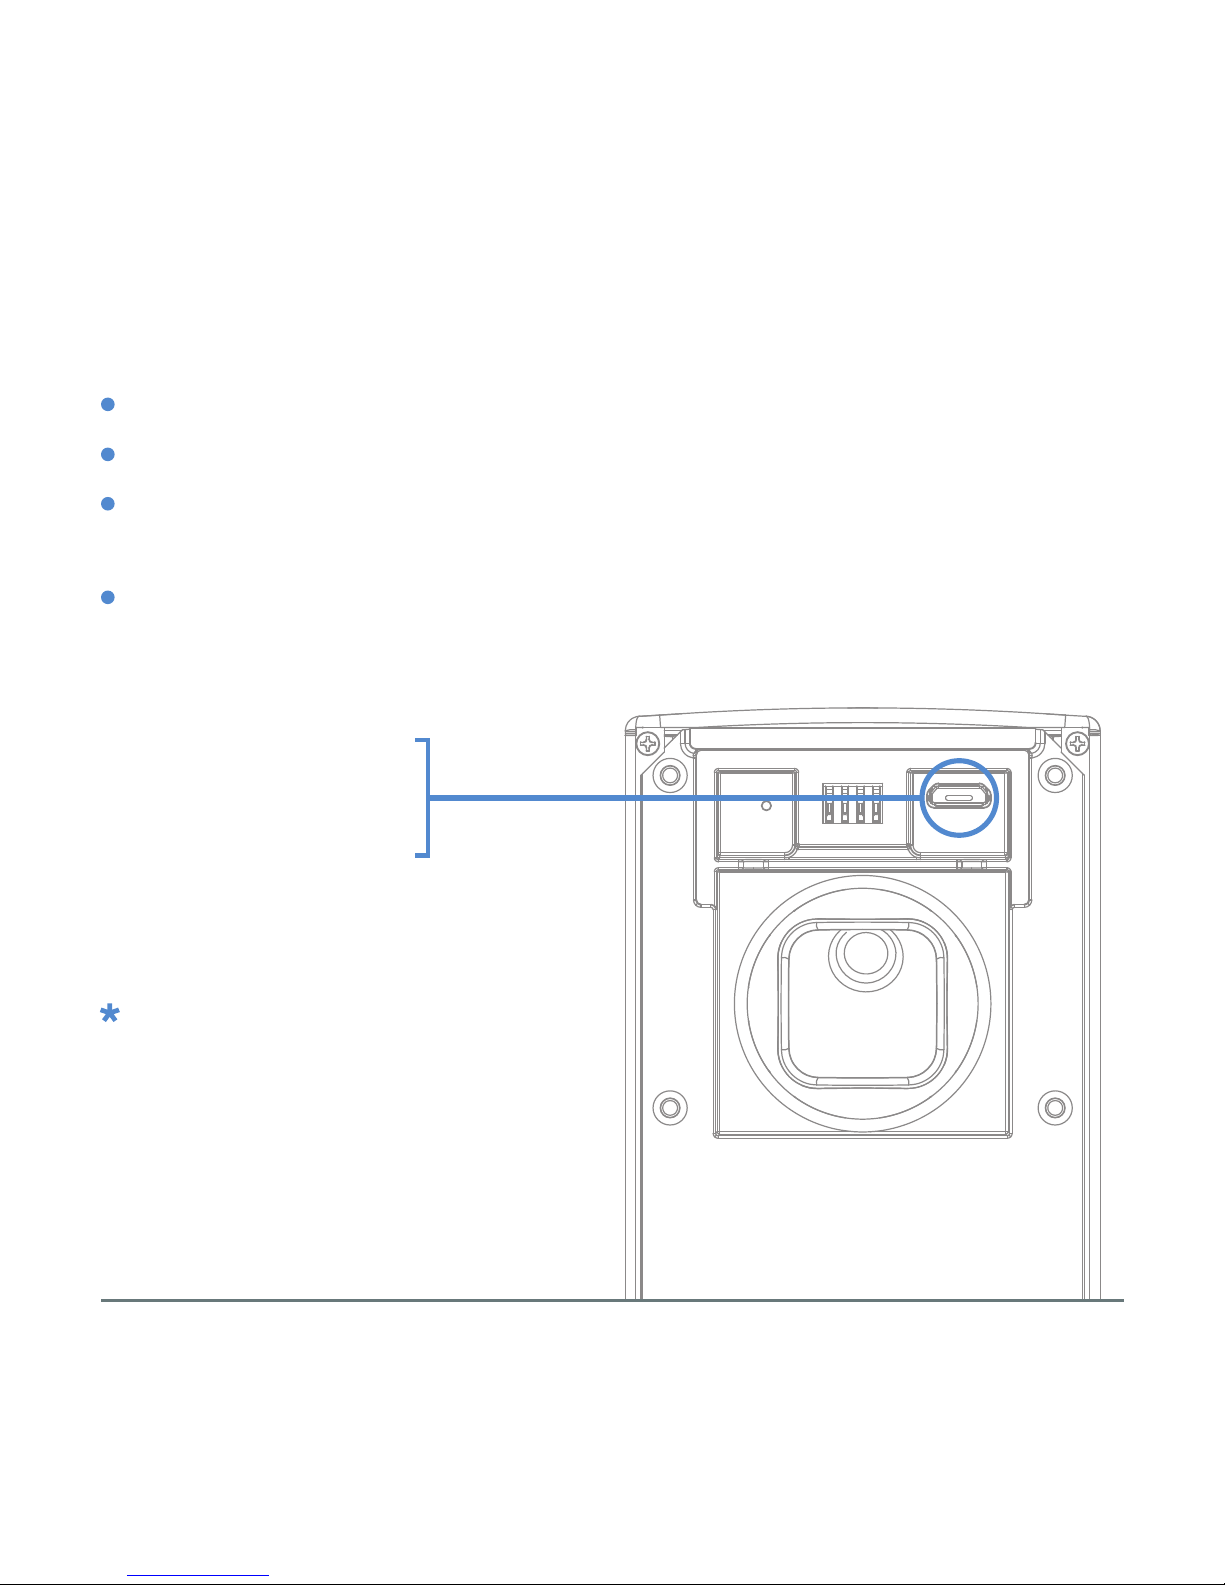
Charging the Battery
MICRO-USB
CHARGING PORT
Your DoorBot should come fully charged and last for over a year.
You can view the battery life through the mobile app.
To recharge your DoorBot, simply remove it from the mounting
bracket and use the included micro-USB charging cord.
The LED ring will blink as it charges, and then stop
once fully powered.
It is not necessary to charge
DoorBot when connected
directly to a wired doorbell.
*
19
Page 21
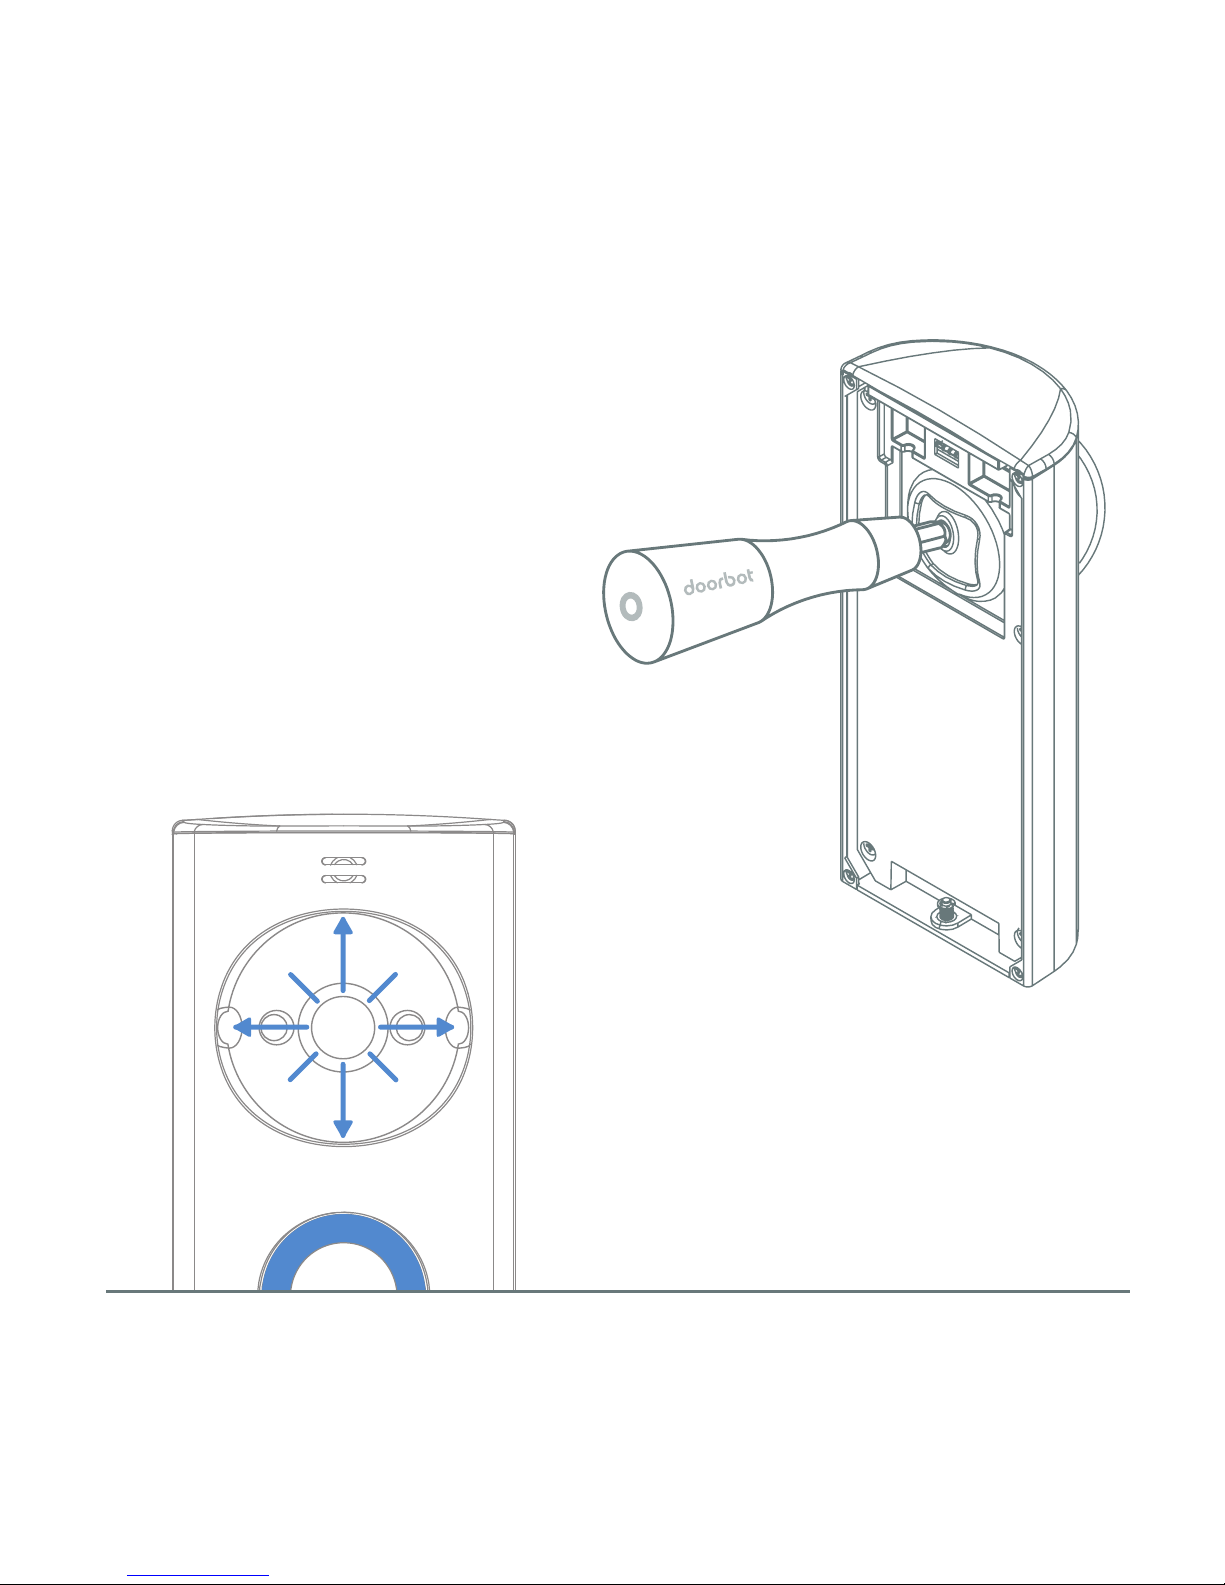
Camera Rotation
20
Prior to mounting DoorBot, take the included
screwdriver and insert it in the camera rotation
port located on the back of the device.
Using the screwdriver like a
joystick, adjust the camera
angle as needed.
30° END-TO-END
CAMERA ROTATION
123° FIELD OF VIEW
AND
Page 22
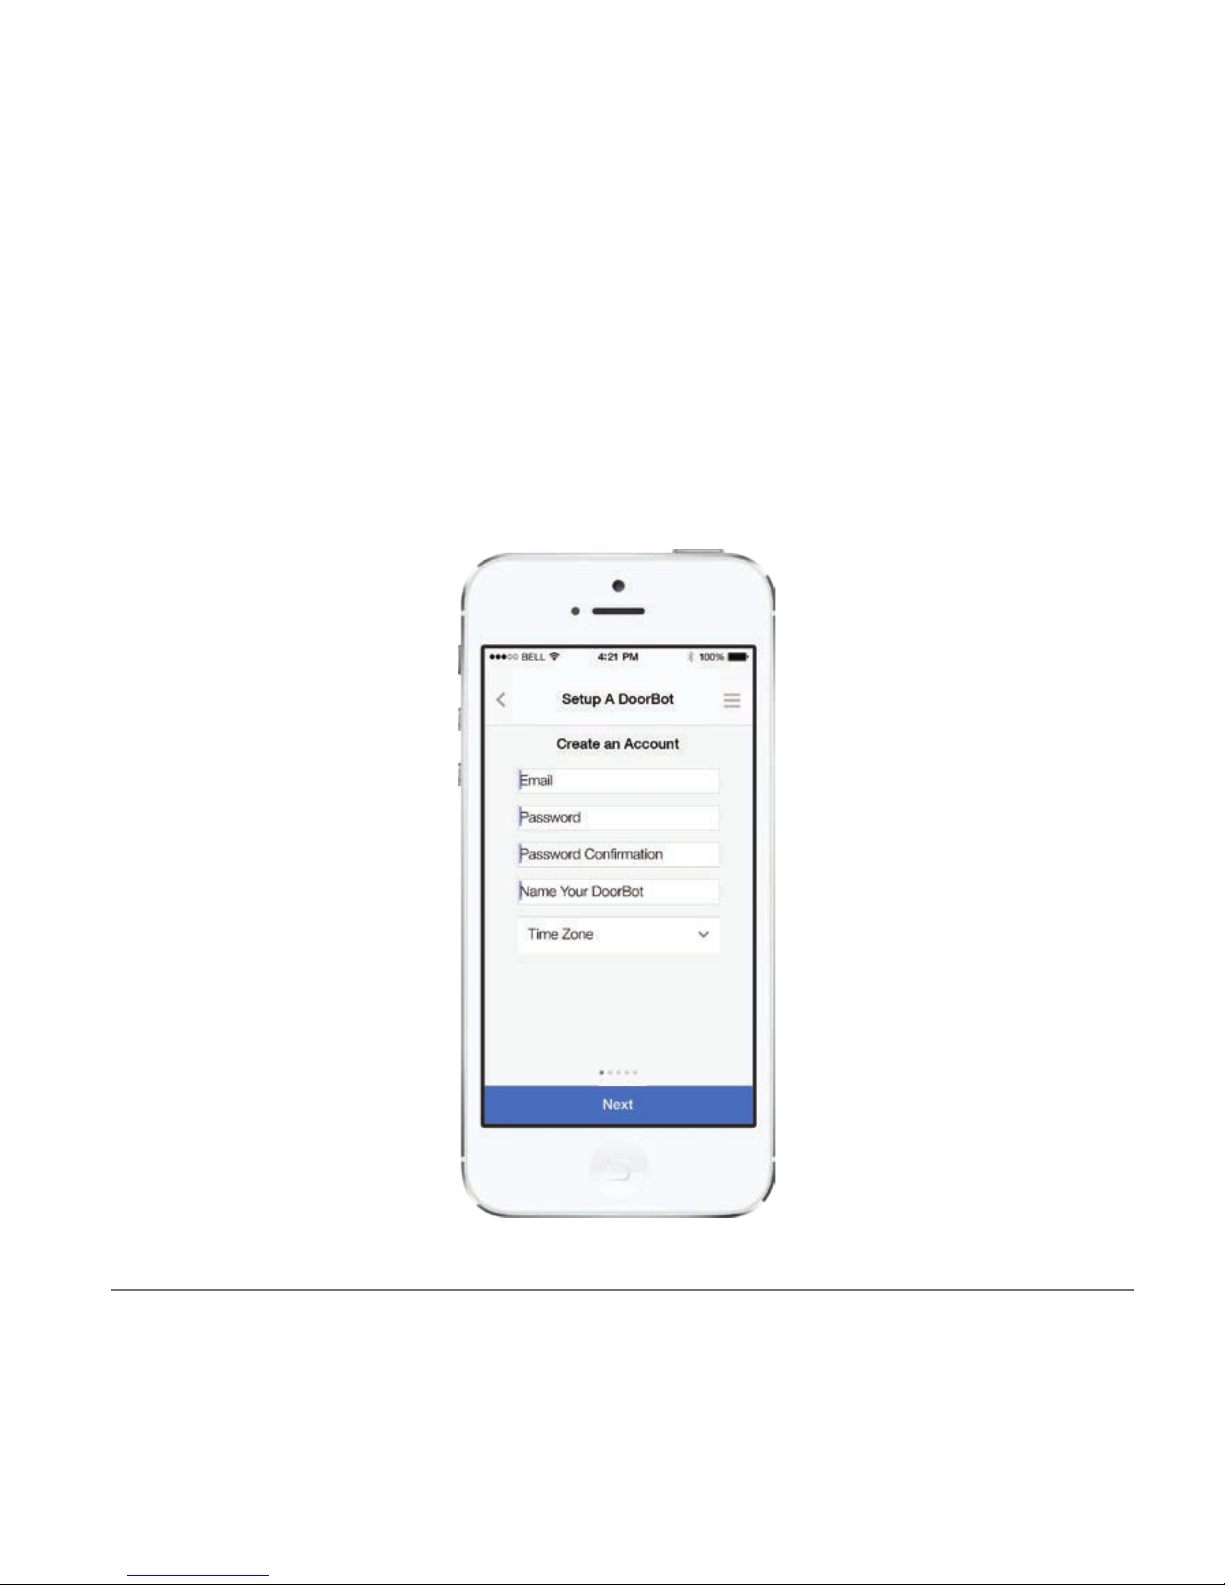
Mobile Application
SETUP A DOORBOT
Choose a descriptive name for your DoorBot (e.g. Eric’s Front Door)
and which timezone it will be in.
21
Page 23
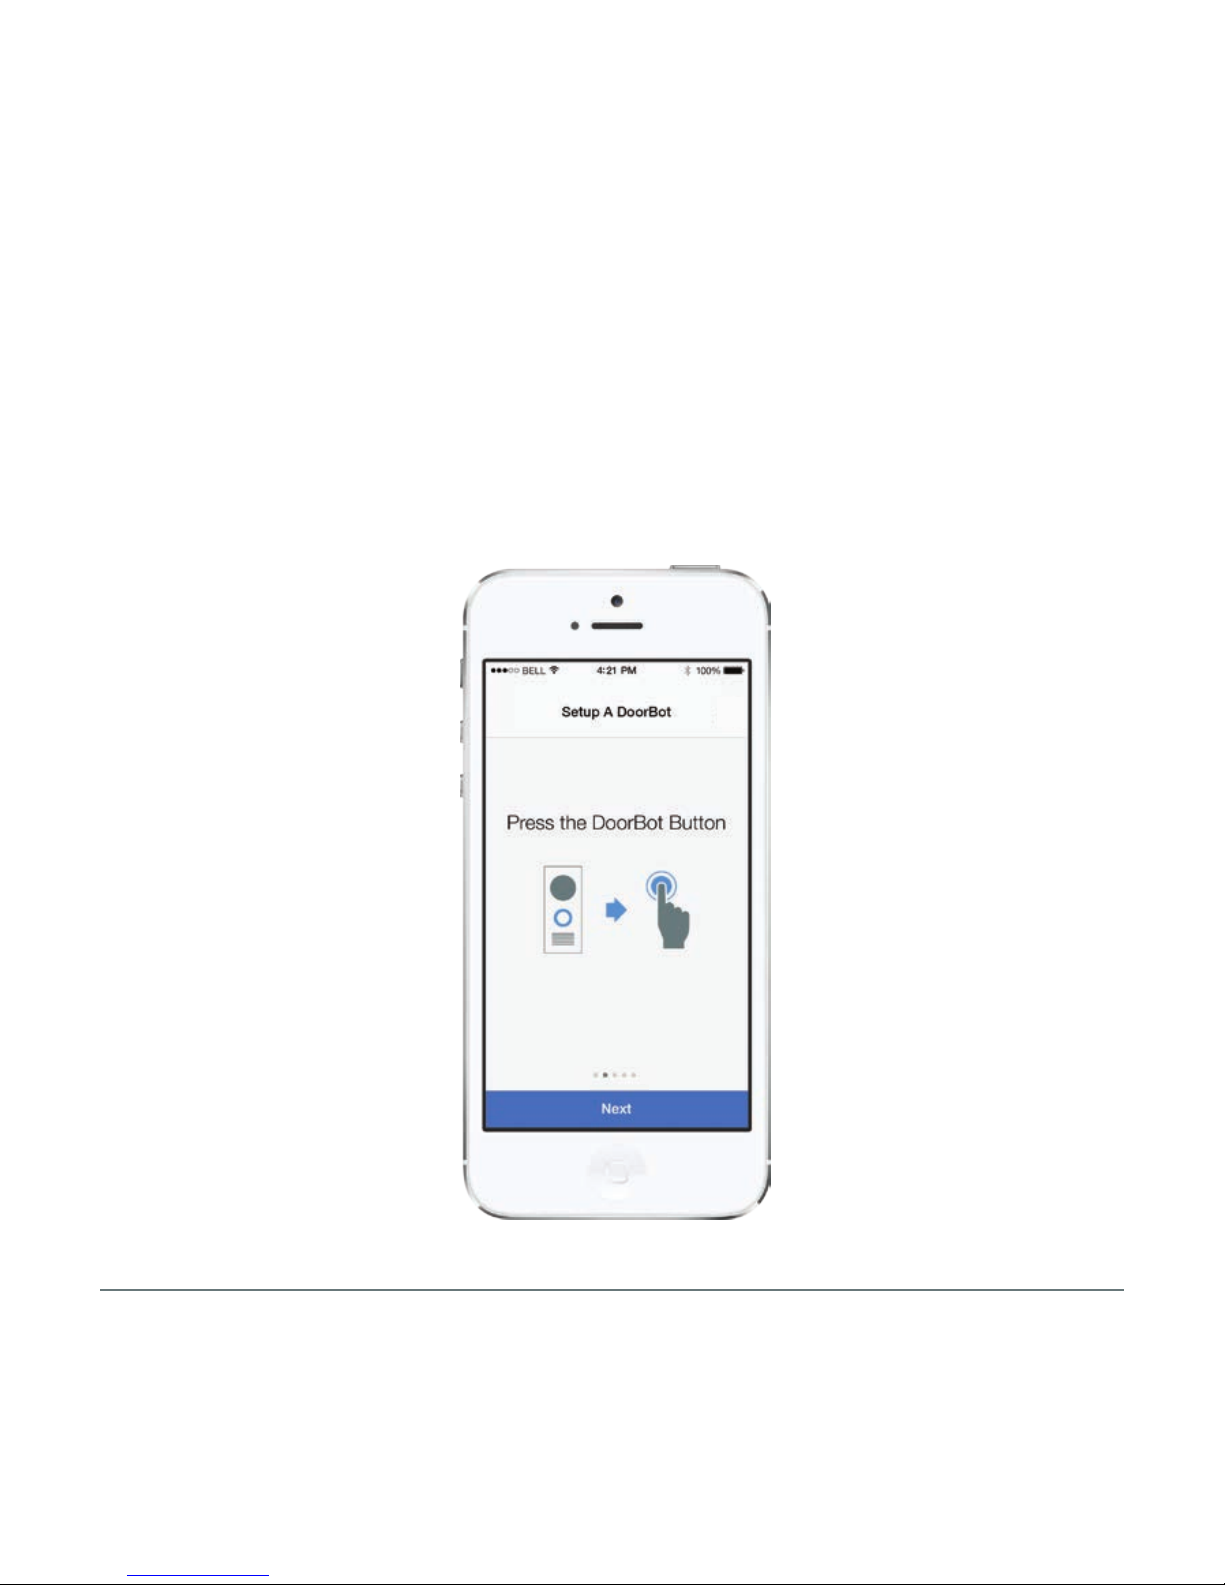
SETUP A DOORBOT - STEP 1
Press the DoorBot button
to begin setup.
22
Page 24
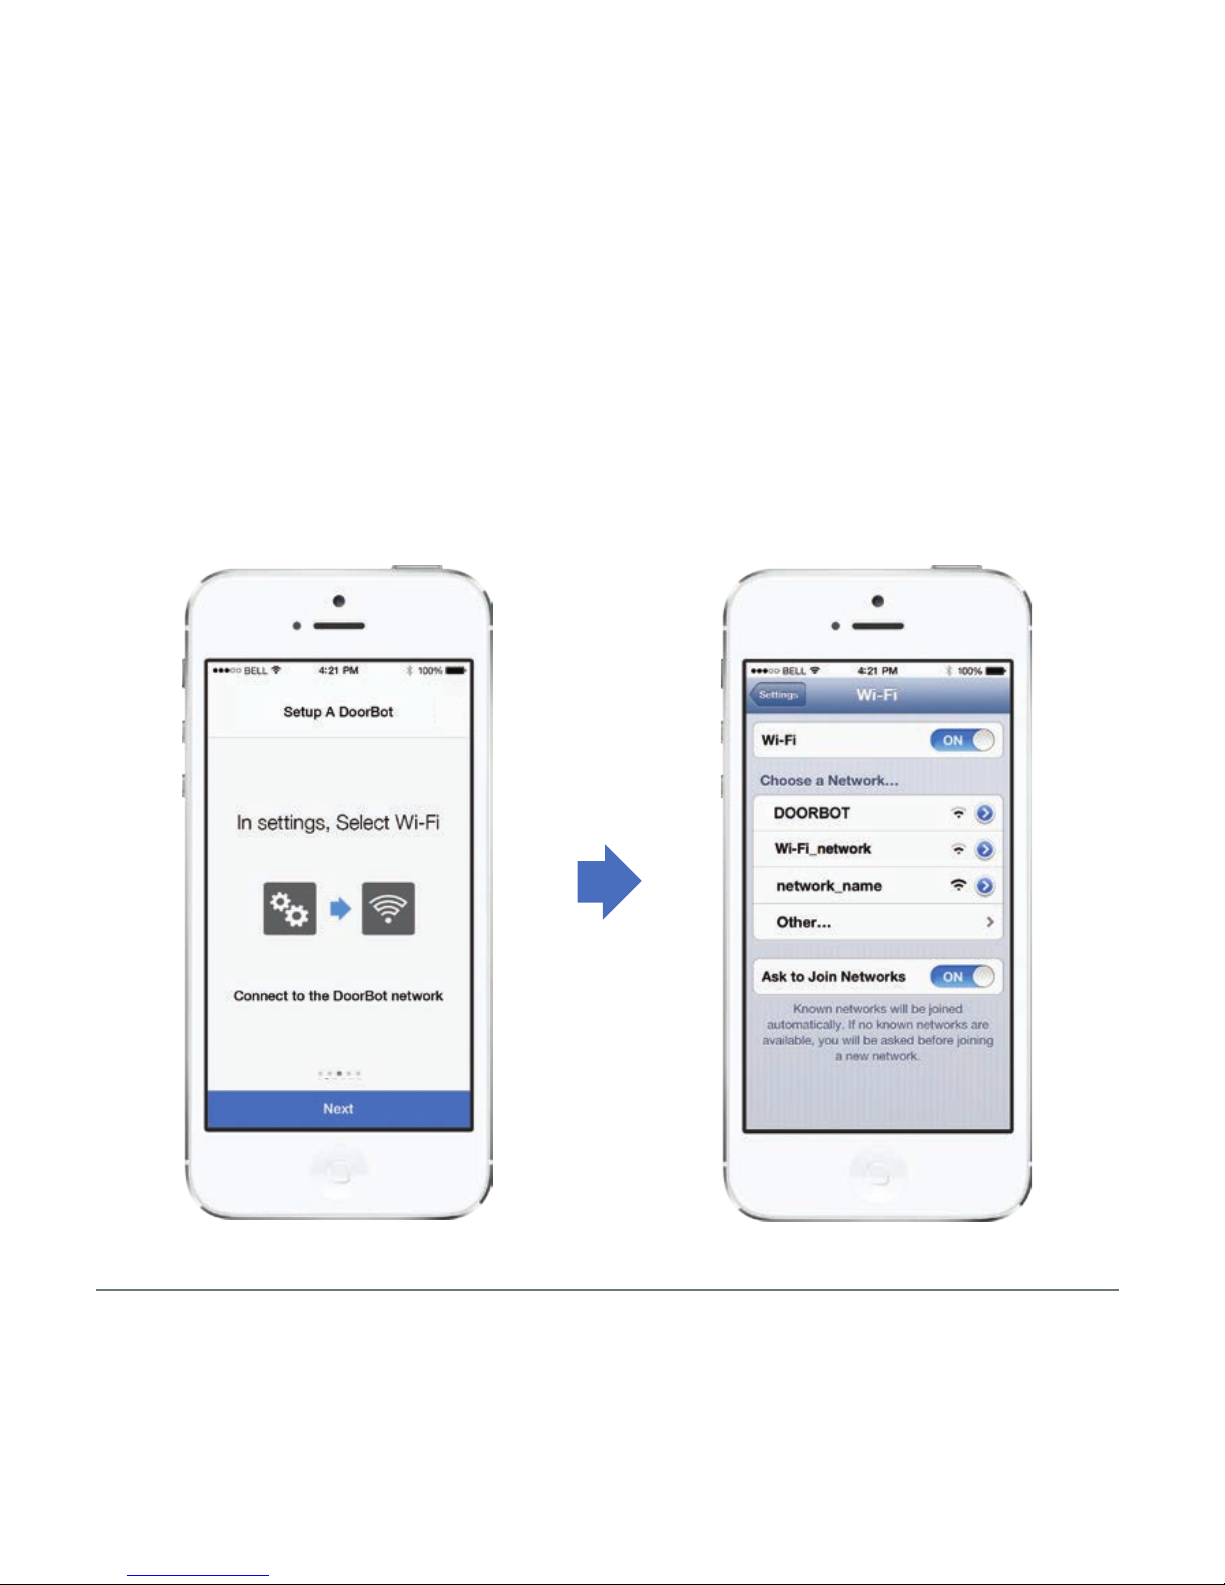
SETUP A DOORBOT - STEP 2
Exit out of the app and connect
to the DoorBot network.
23
Page 25
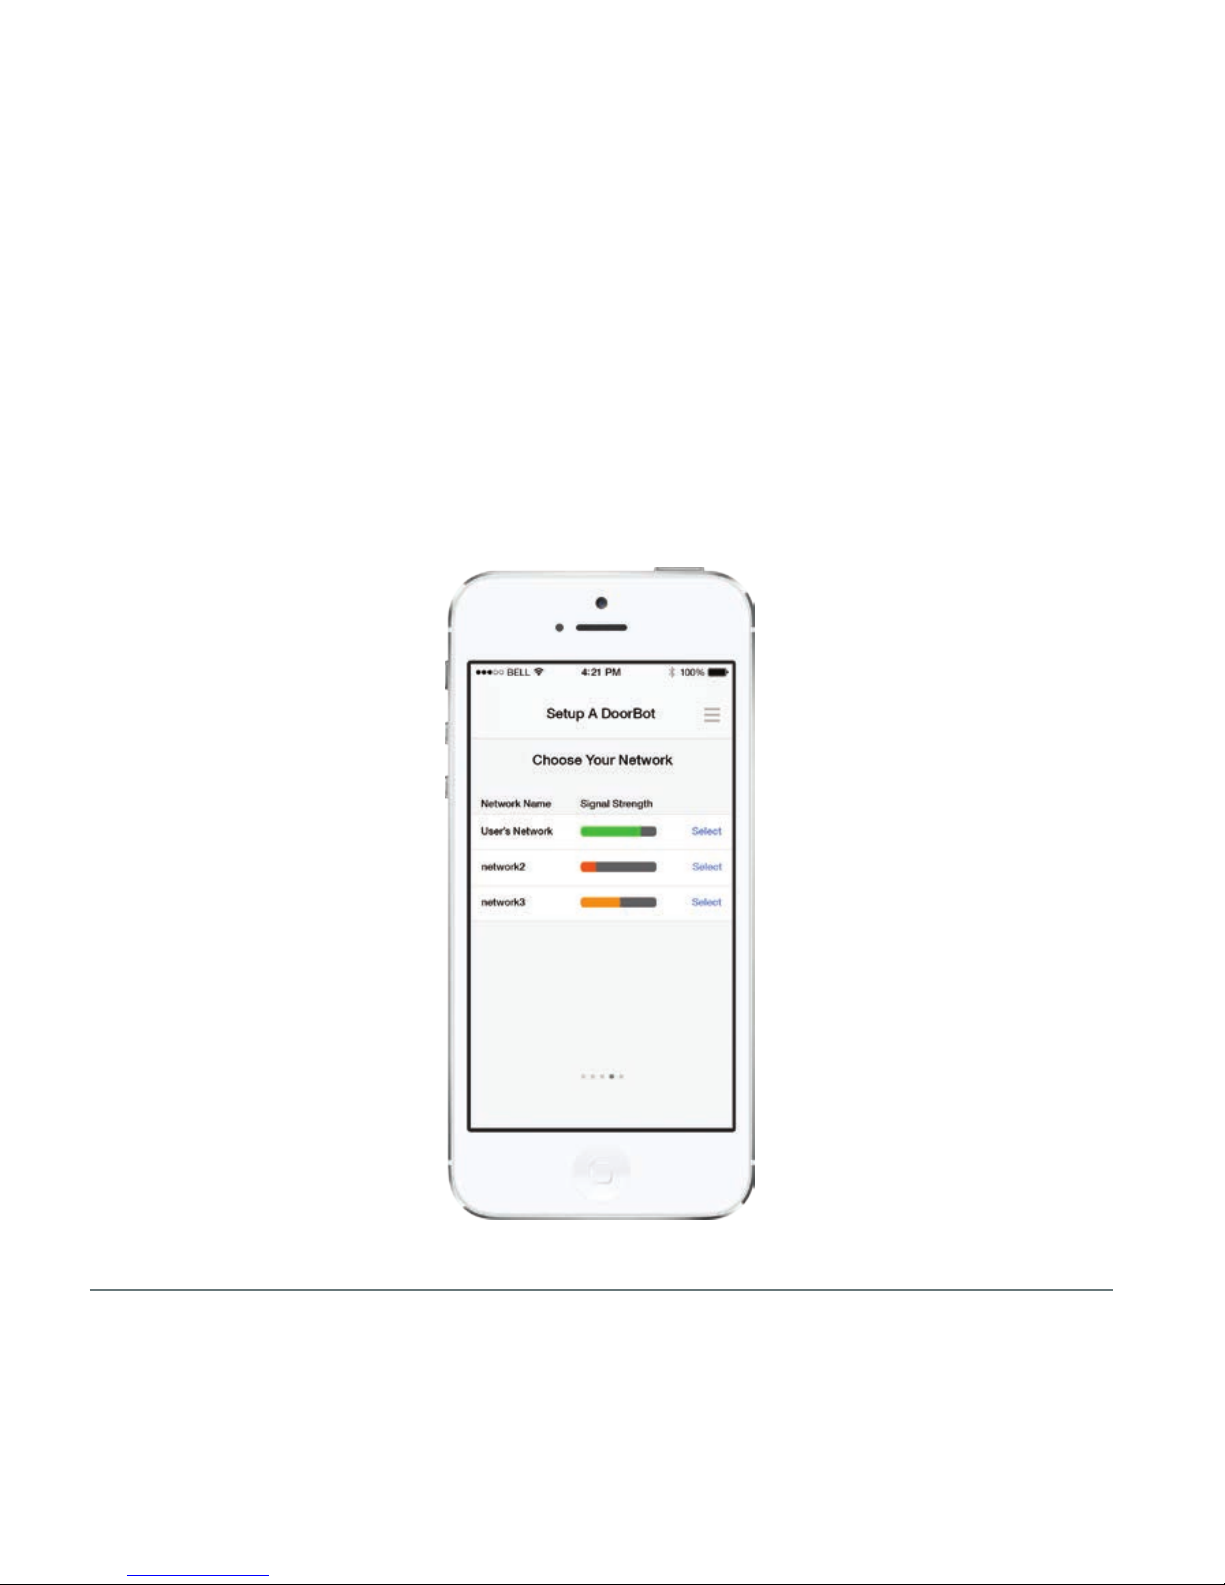
SETUP A DOORBOT - STEP 3
Launch the app and select your Wi-Fi
network to complete setup.
24
Page 26
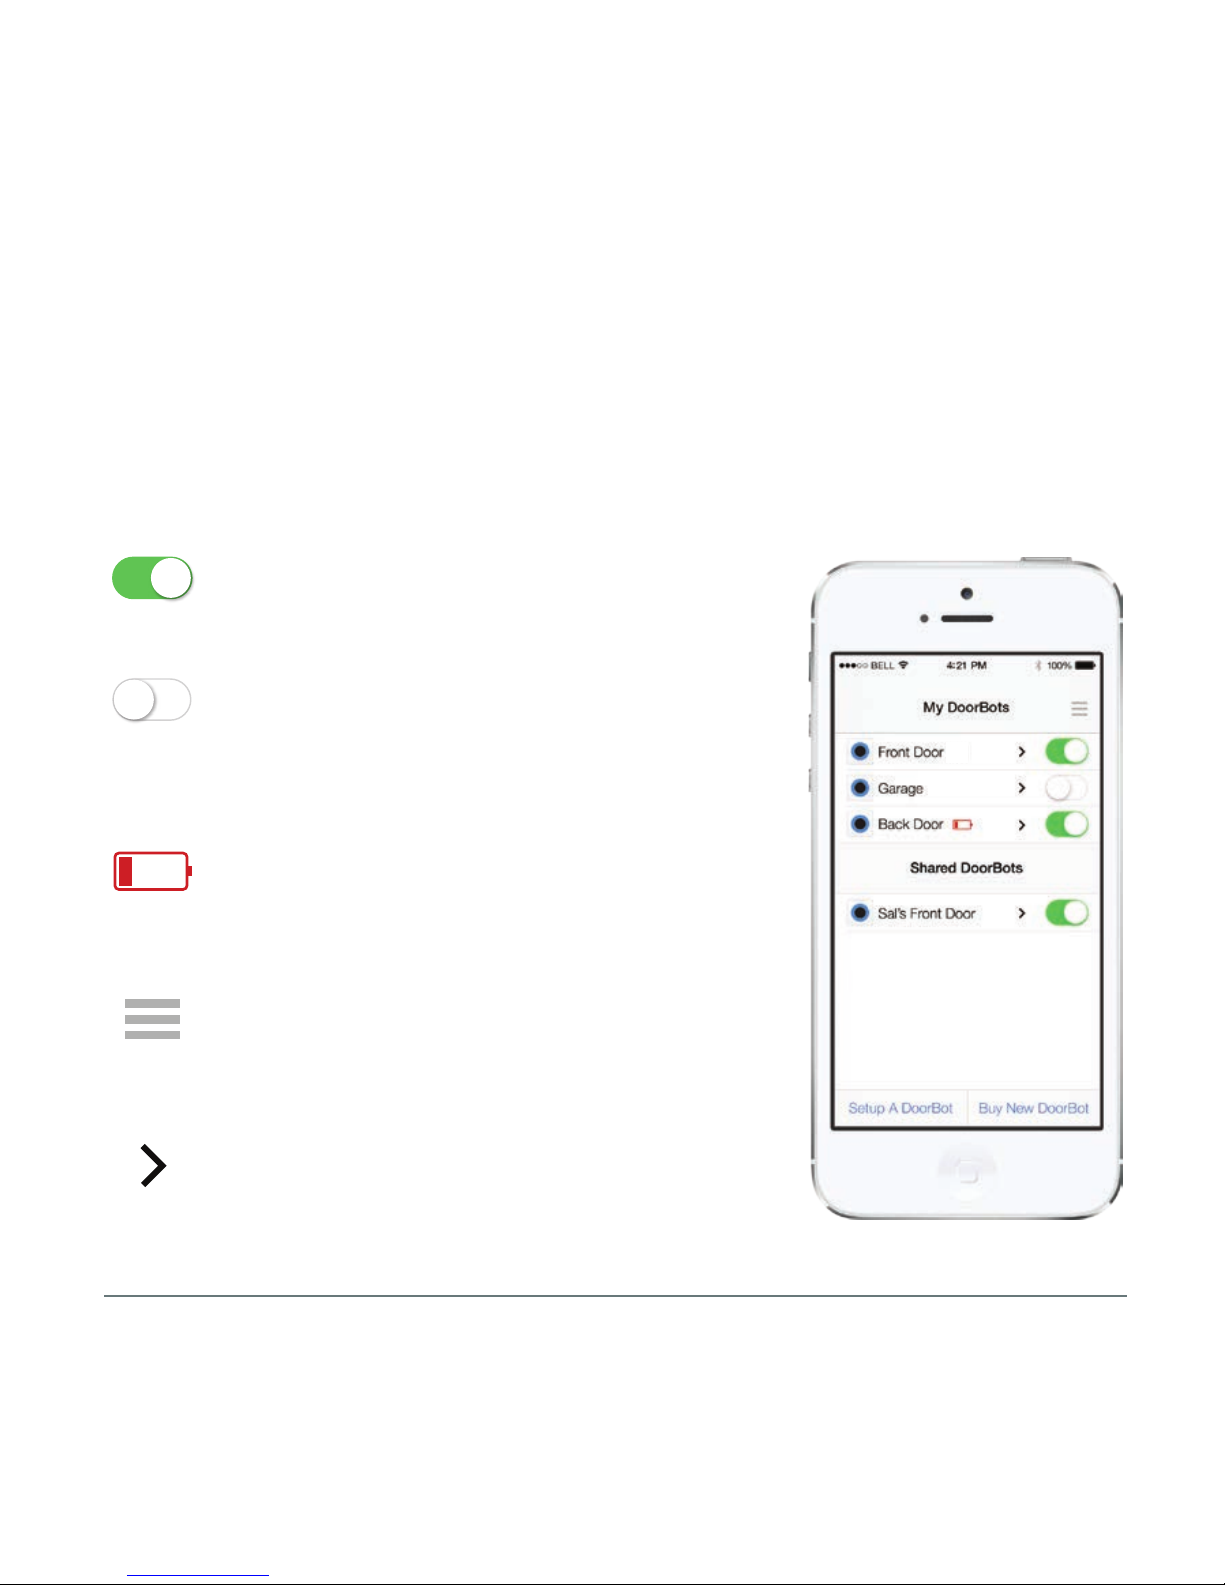
25
MY DOORBOTS
The My DoorBots page displays each DoorBot that you own and is
connected to a Wi-Fi network. Here you can monitor
multiple components and features of DoorBot.
ON
DoorBot is live.
OFF
DoorBot is inactive and will not notify you when
you have arriving guests. You can turn your
DoorBot on by pressing this button.
LOW BATTERY
Notifies you when the battery is running
low. You will also be notified via email.
ACCOUNT SETTINGS
Manage your password, log out of the app, or
add a new DoorBot to your account.
DOORBOT DASHBOARD
Access specific information for each DoorBot.
Page 27
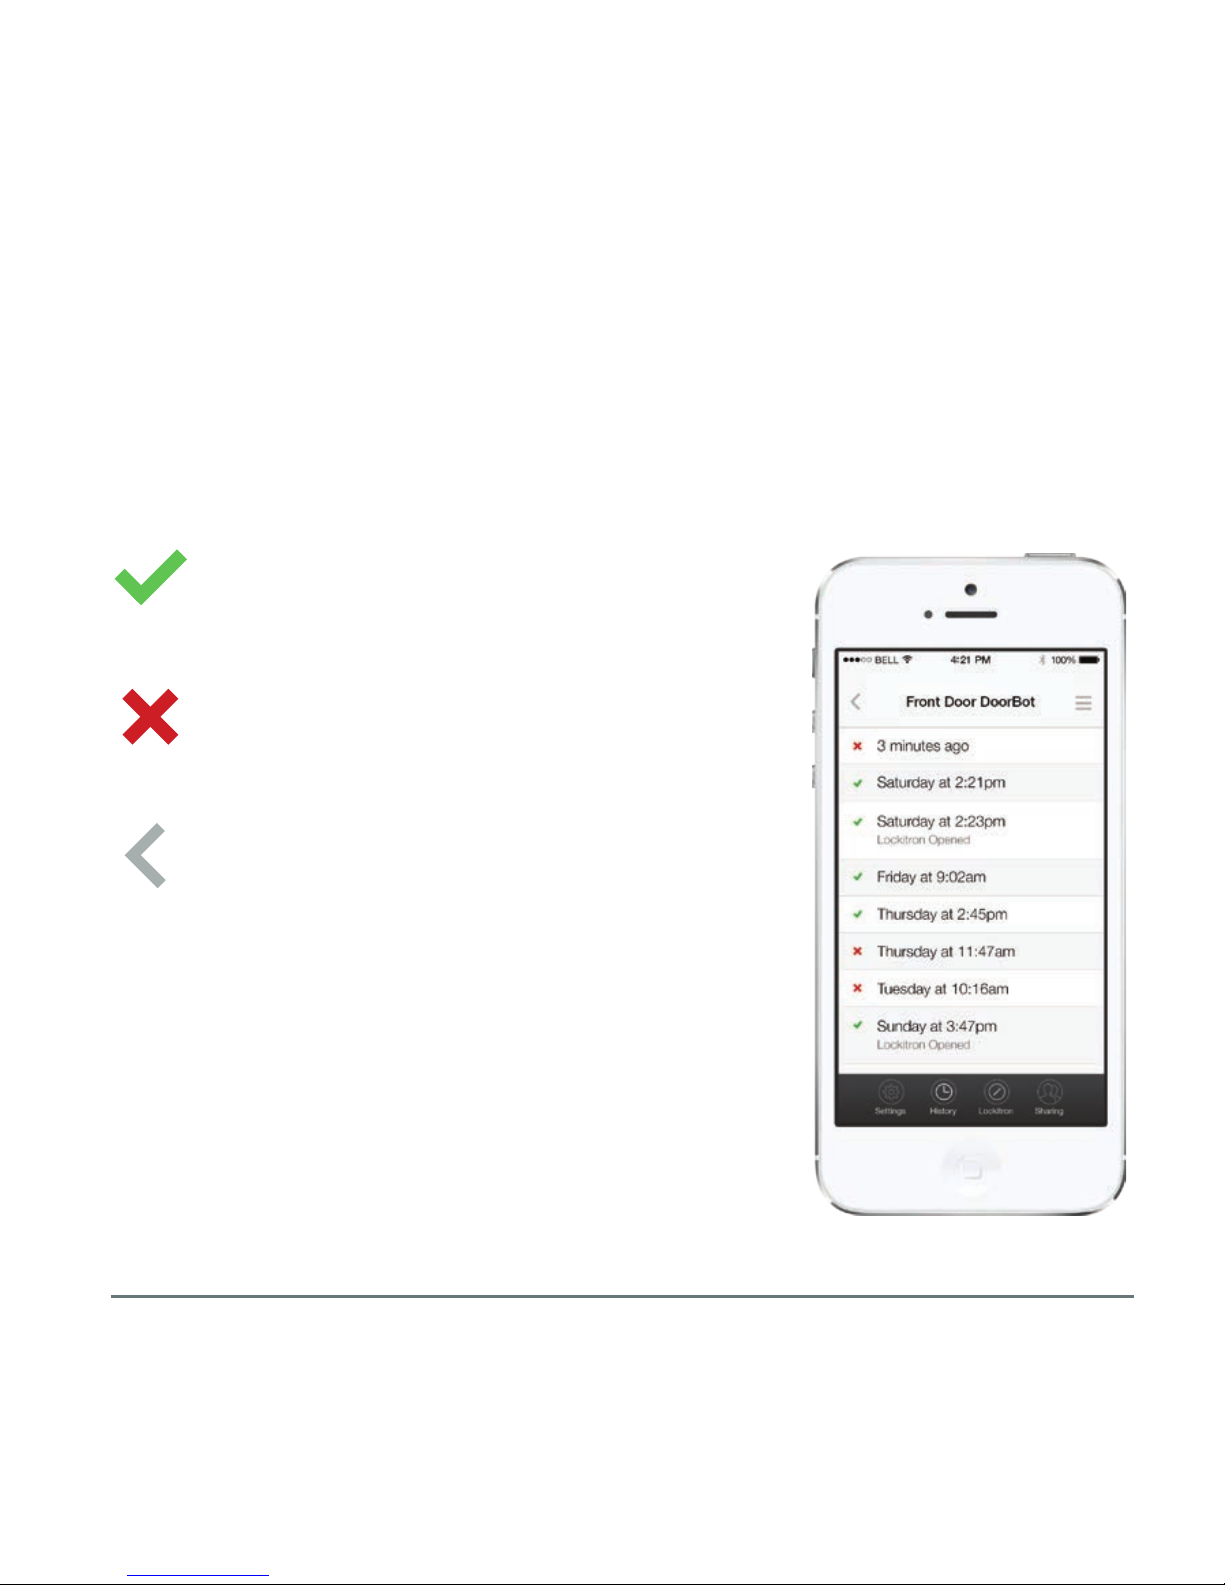
DOORBOT HISTORY
The DoorBot History page shows you the list of calls that were both
answered and missed.
ANSWERED CALL
The call was answered by someone
connected to that DoorBot.
MISSED CALL
The call was either never answered, or it
was rejected.
RETURN
Return to My DoorBots Page.
26
Page 28
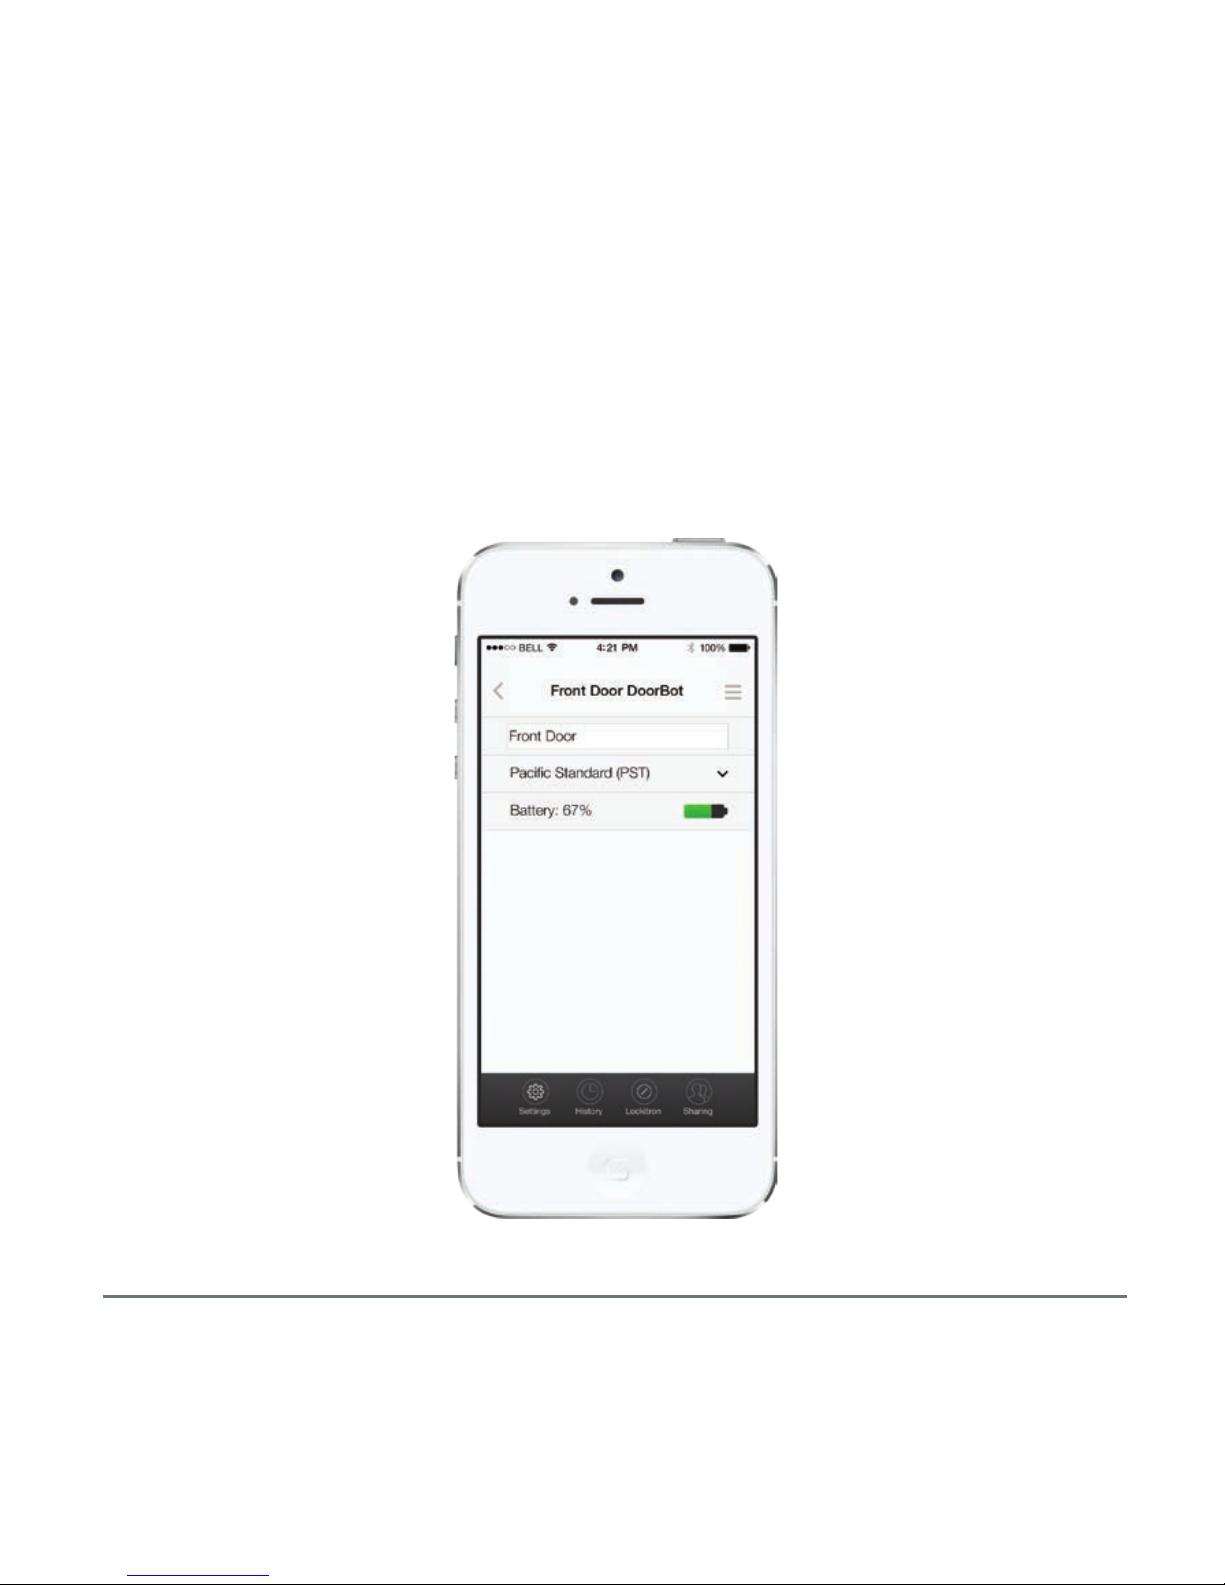
DOORBOT SETTINGS
Manage settings specific to that DoorBot.
27
Page 29
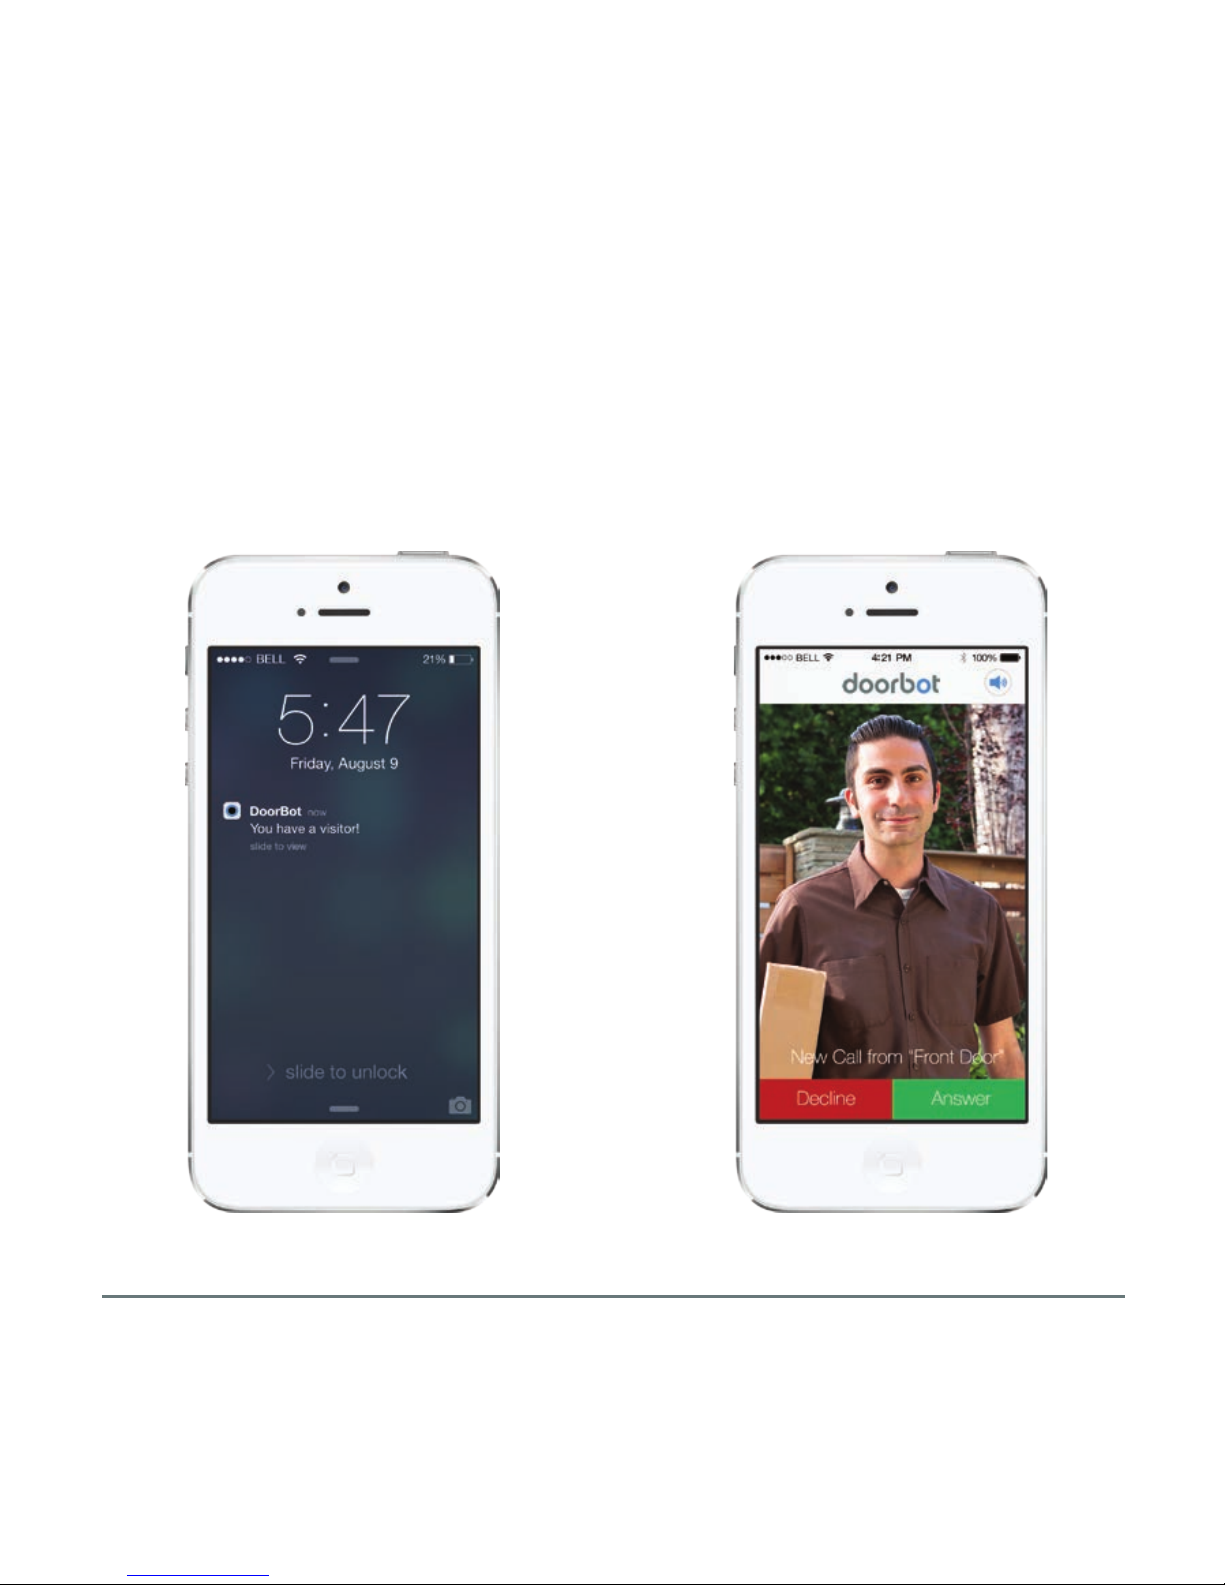
ANSWERING DOORBOT
DoorBot will send a push notification when you have a visitor. You'll
be able to see your guests prior to accepting/declining the call.
28
Page 30
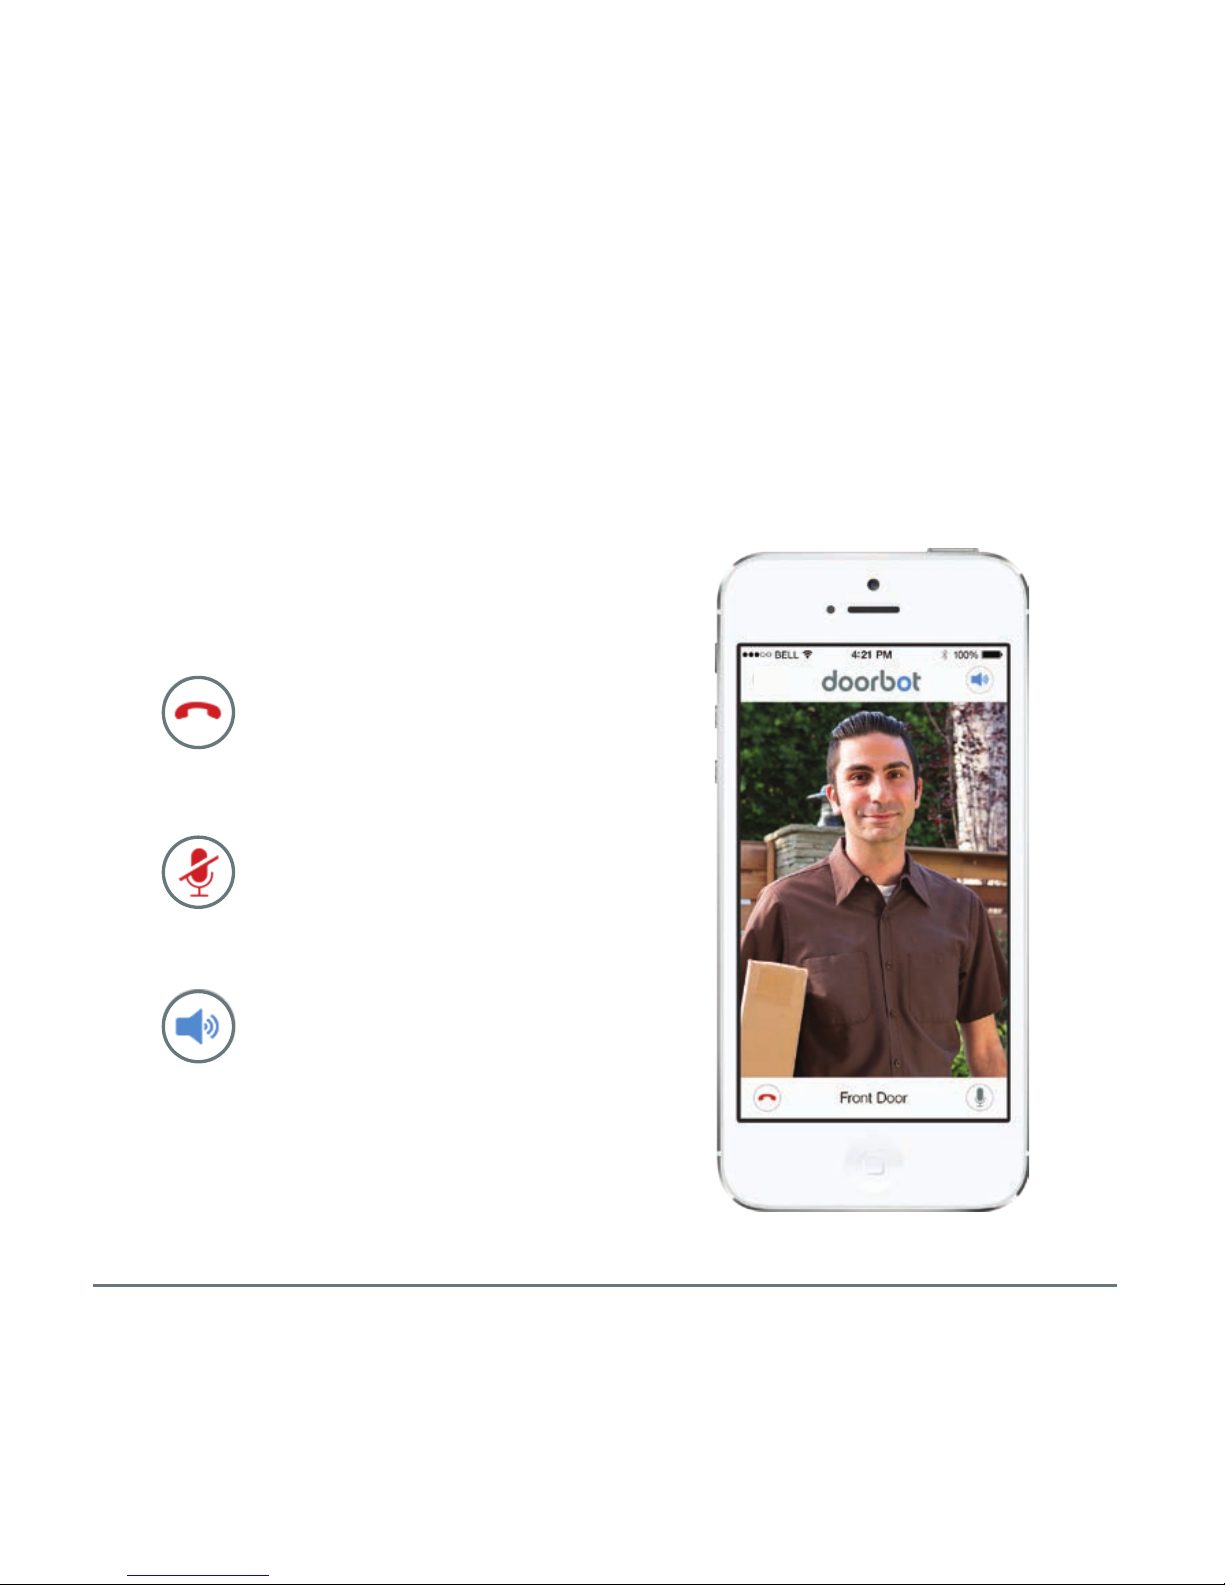
ANSWERING DOORBOT
If you choose to answer the call, you'll see some options/features
within the app screen.
END CALL
MUTE
SPEAKER
29
 Loading...