

Page 1

IDoorBell Fon
Quick Installation Guide
DP68
Page 2
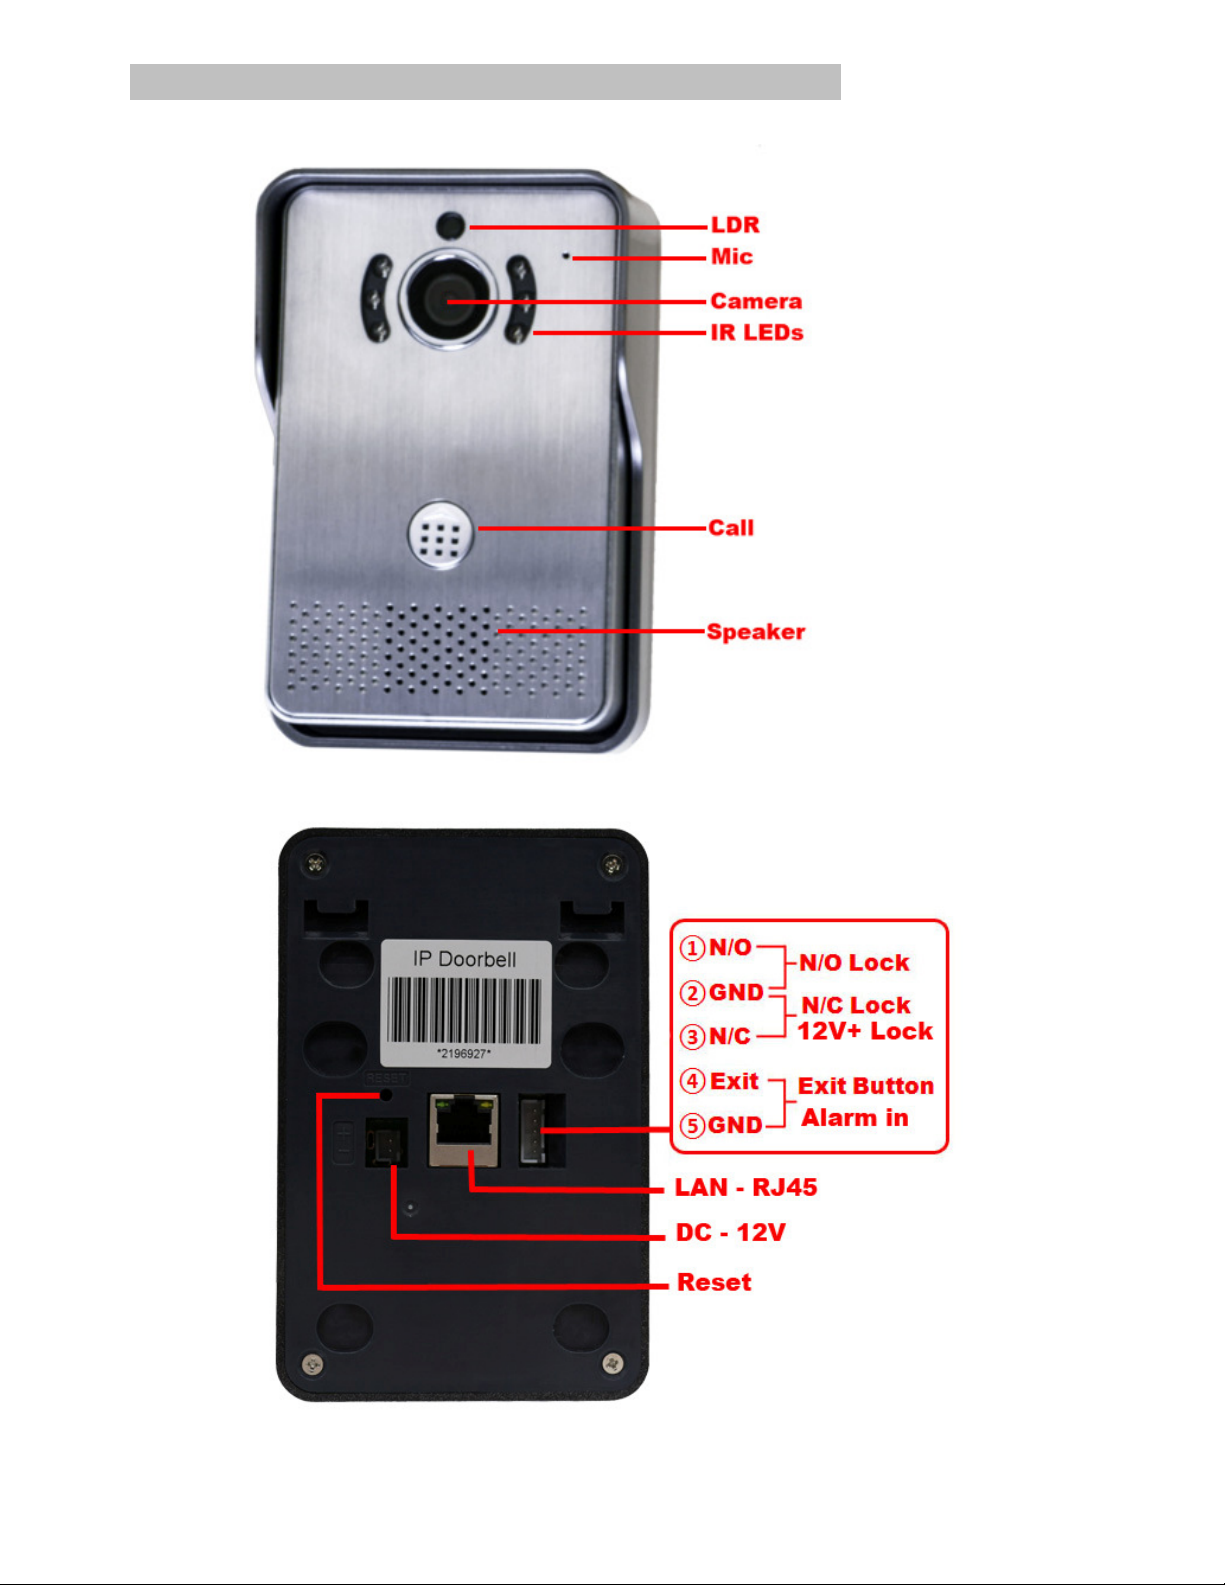
1. Interface
1.
Front Panel
2.
Back Panel
Page 3
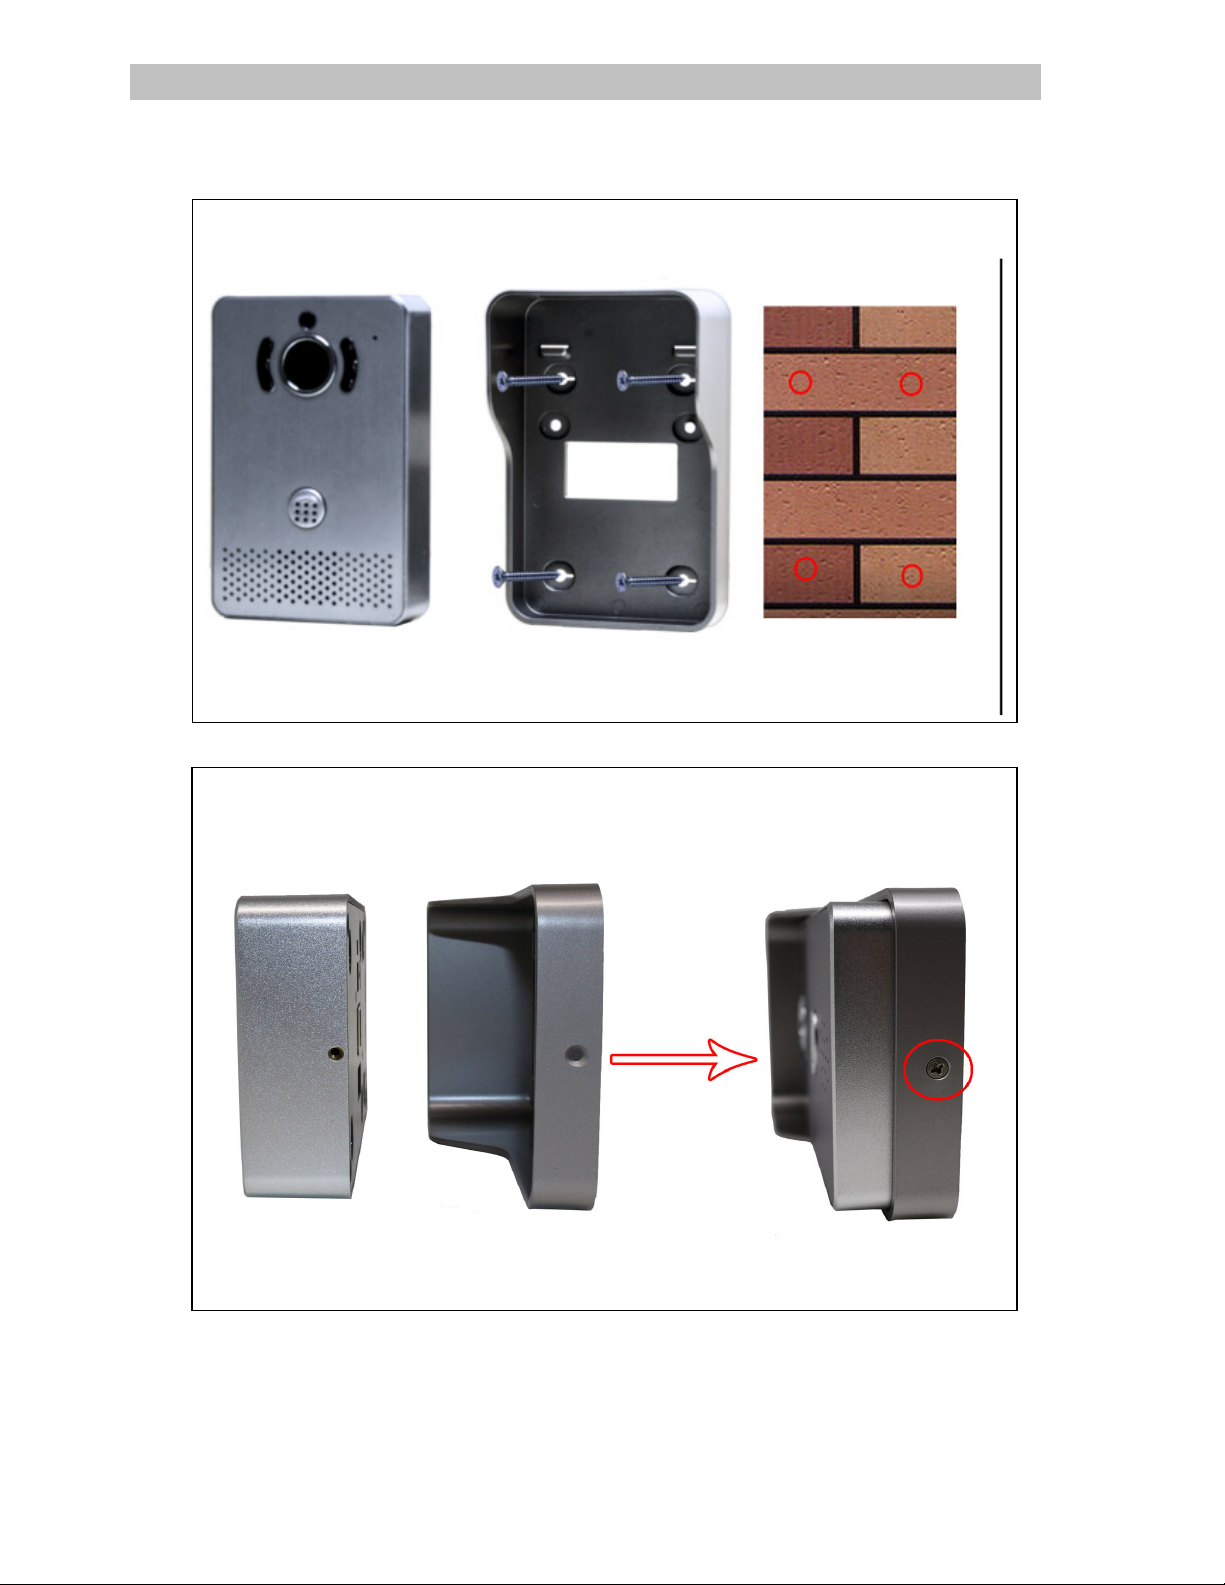
2. Doorbell Installation Options and Rain Cover Mounting
Note: For the best camera angle, position the camera around eye level.
Direct to Wall Mounting (4 screws)
Securing DoorBell to Rain Cover (1 Screw)
Page 4
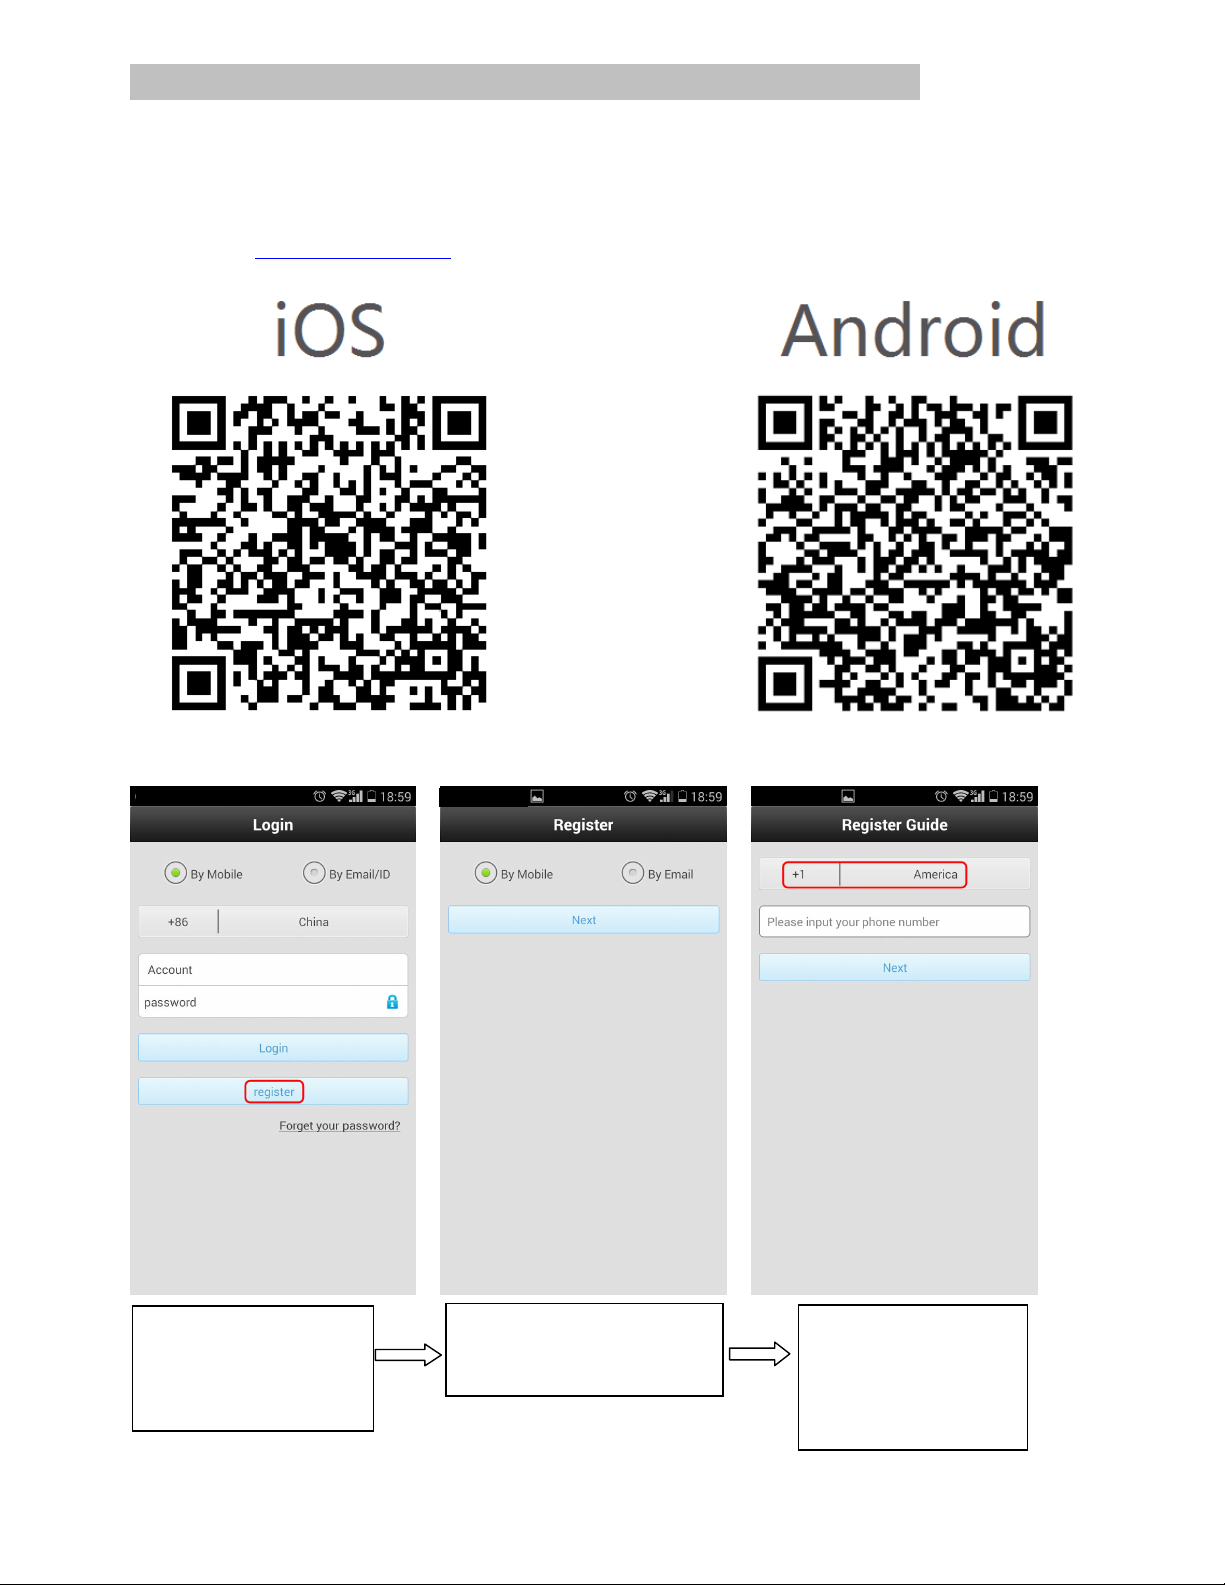
2.
Choose to register by
3. Mobile Phone App Instructions
1.
Installing the Yoosee App
Scan the below QR Code.
OR – Search and download the Yoosee app from the iTunes App Store or Google Play.
OR - Visit http://www.yoosee.co to download.
2.
Registering and logging to Yoosee.
1. After downloading
and installing the app,
open it and tap on the
“register button.
3. If registering by
mobile phone or by email.
Mobile phone, please
make sure you choose
your country right to
receive code.
Page 5
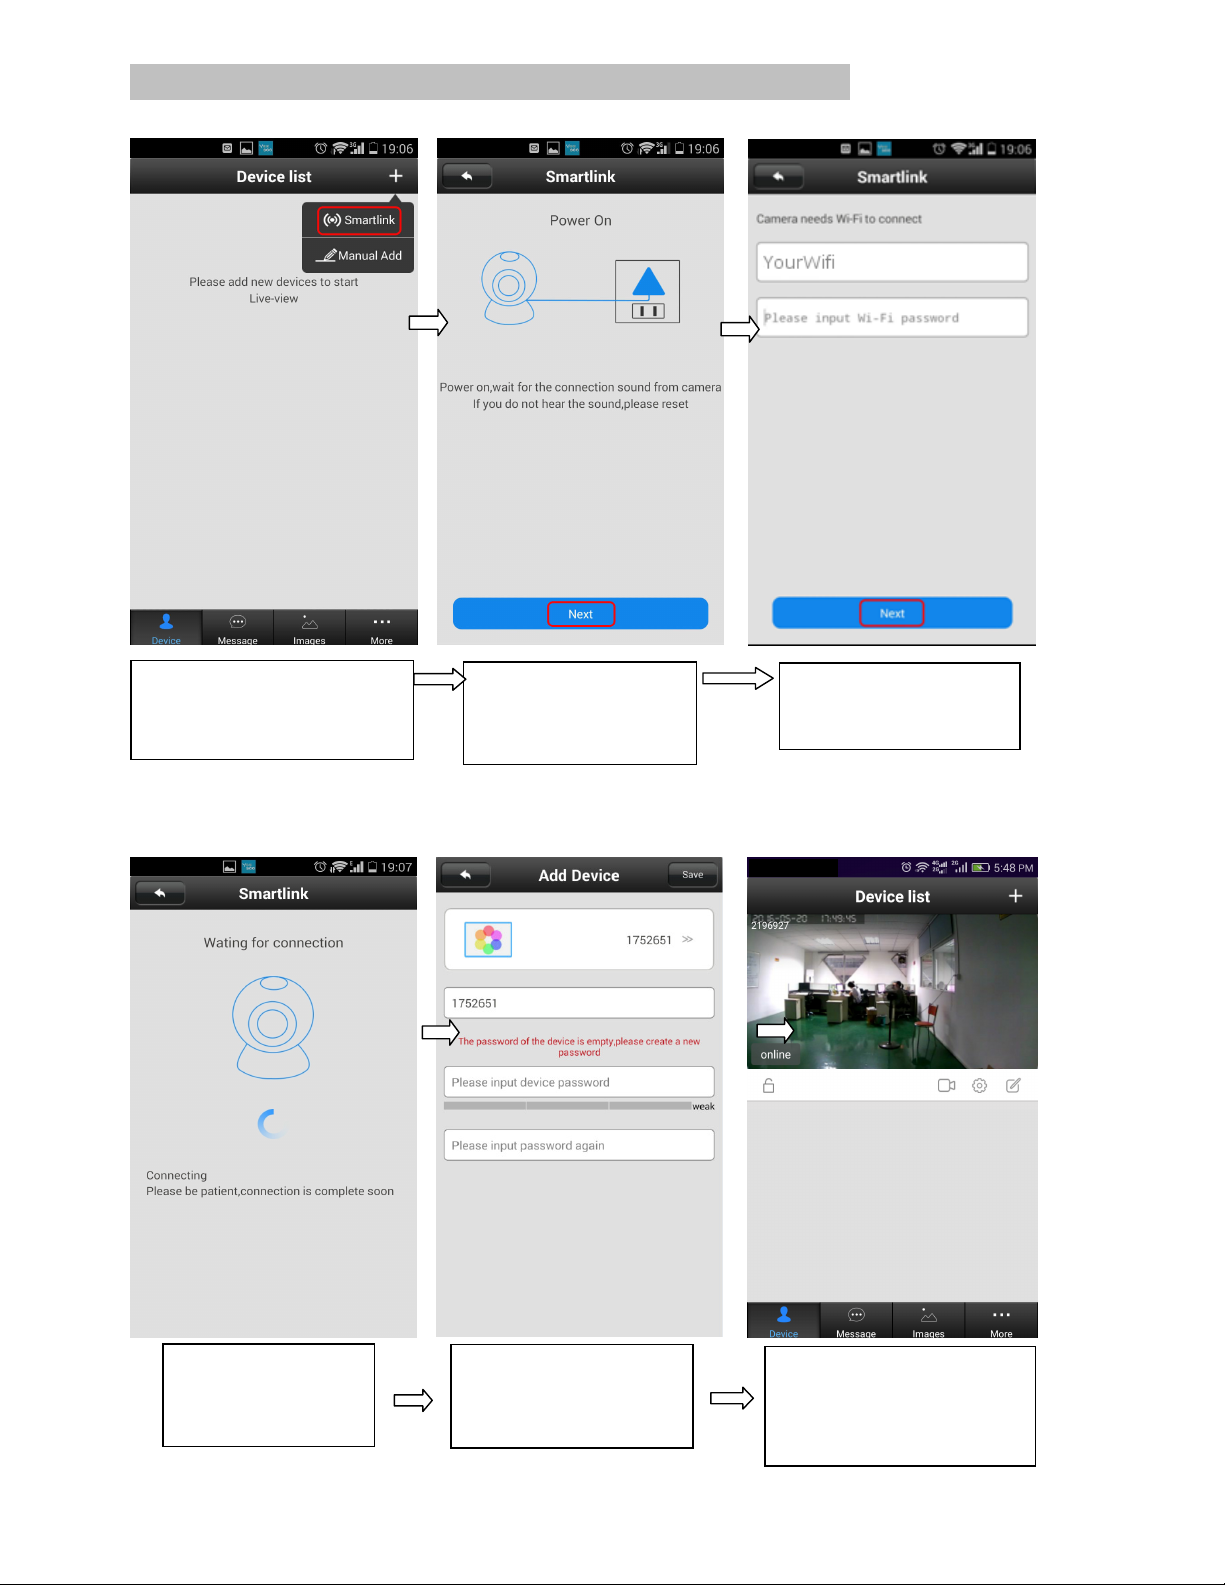
1.Open the software.
Tap
on
4.Wait for the WiFi
5. Setu
p a pa
ssword for
4. Network Configuration
Wirelessly Link your Device to your Yoosee App on the same Network
“+” on the top right and
choose “Smartlink”.*
*Be sure to enable Smartlink within 5 minutes of powering on your IDoorBell Fon
**You must connect to the same WiFi network as your IDoorBell Fon from your smartphone or tablet to Smartlink
2. Follow the on-screen
instruction. Click
“NEXT” when finished.
3. Input Wifi password
and click “NEXT”. **
connection to
complete.
6. After setting up your
your DoorBell. Tap
Save.
password, the device list
will appear. Click on your
device to view live video.
Page 6
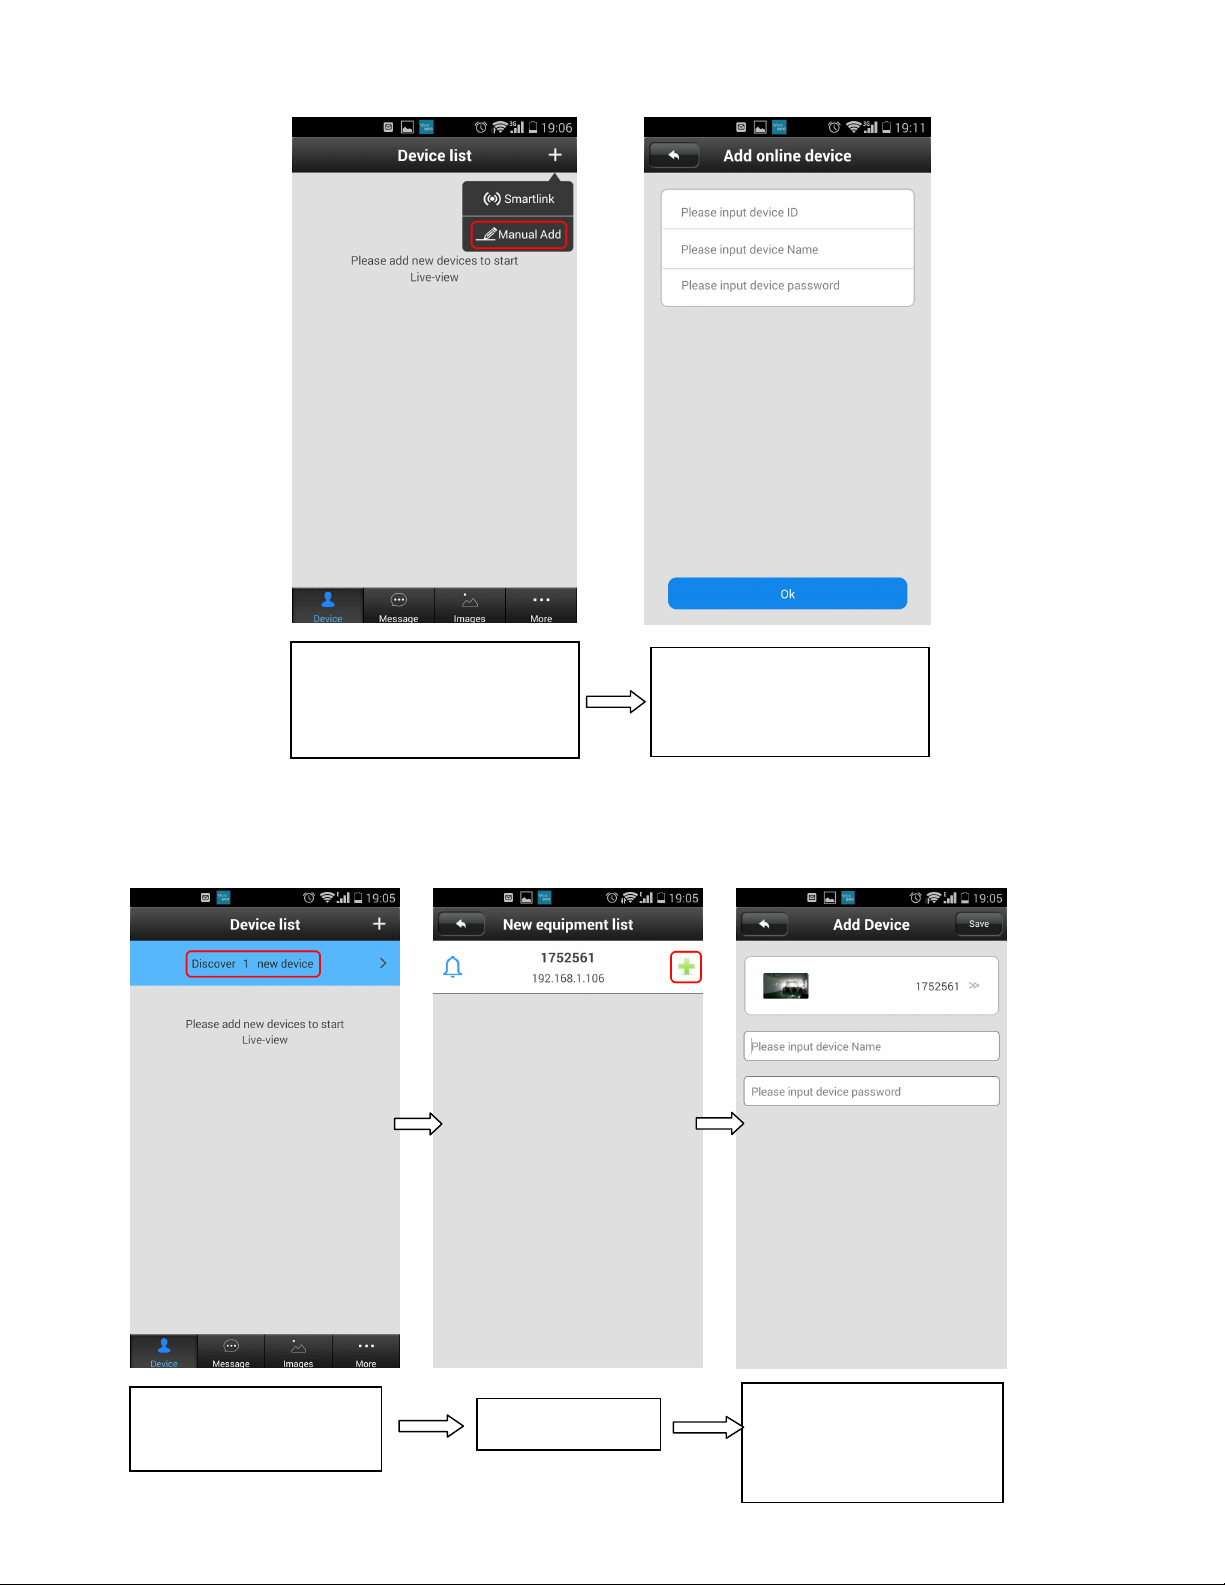
1. Open the software. Click
Remotely Link your Device to your Yoosee App
on “+” on the top right and
choose “Manual Add”.
Link your Device to your Yoosee App over LAN
2. Input the device ID, name
and password and tap the
“Ok” button.
1.Open the Yoosee app.
Tap on “Discover 1 new
2.Tap “+”
3. Input device name and
password and tap the
“Save” button on the top
right.
Page 7
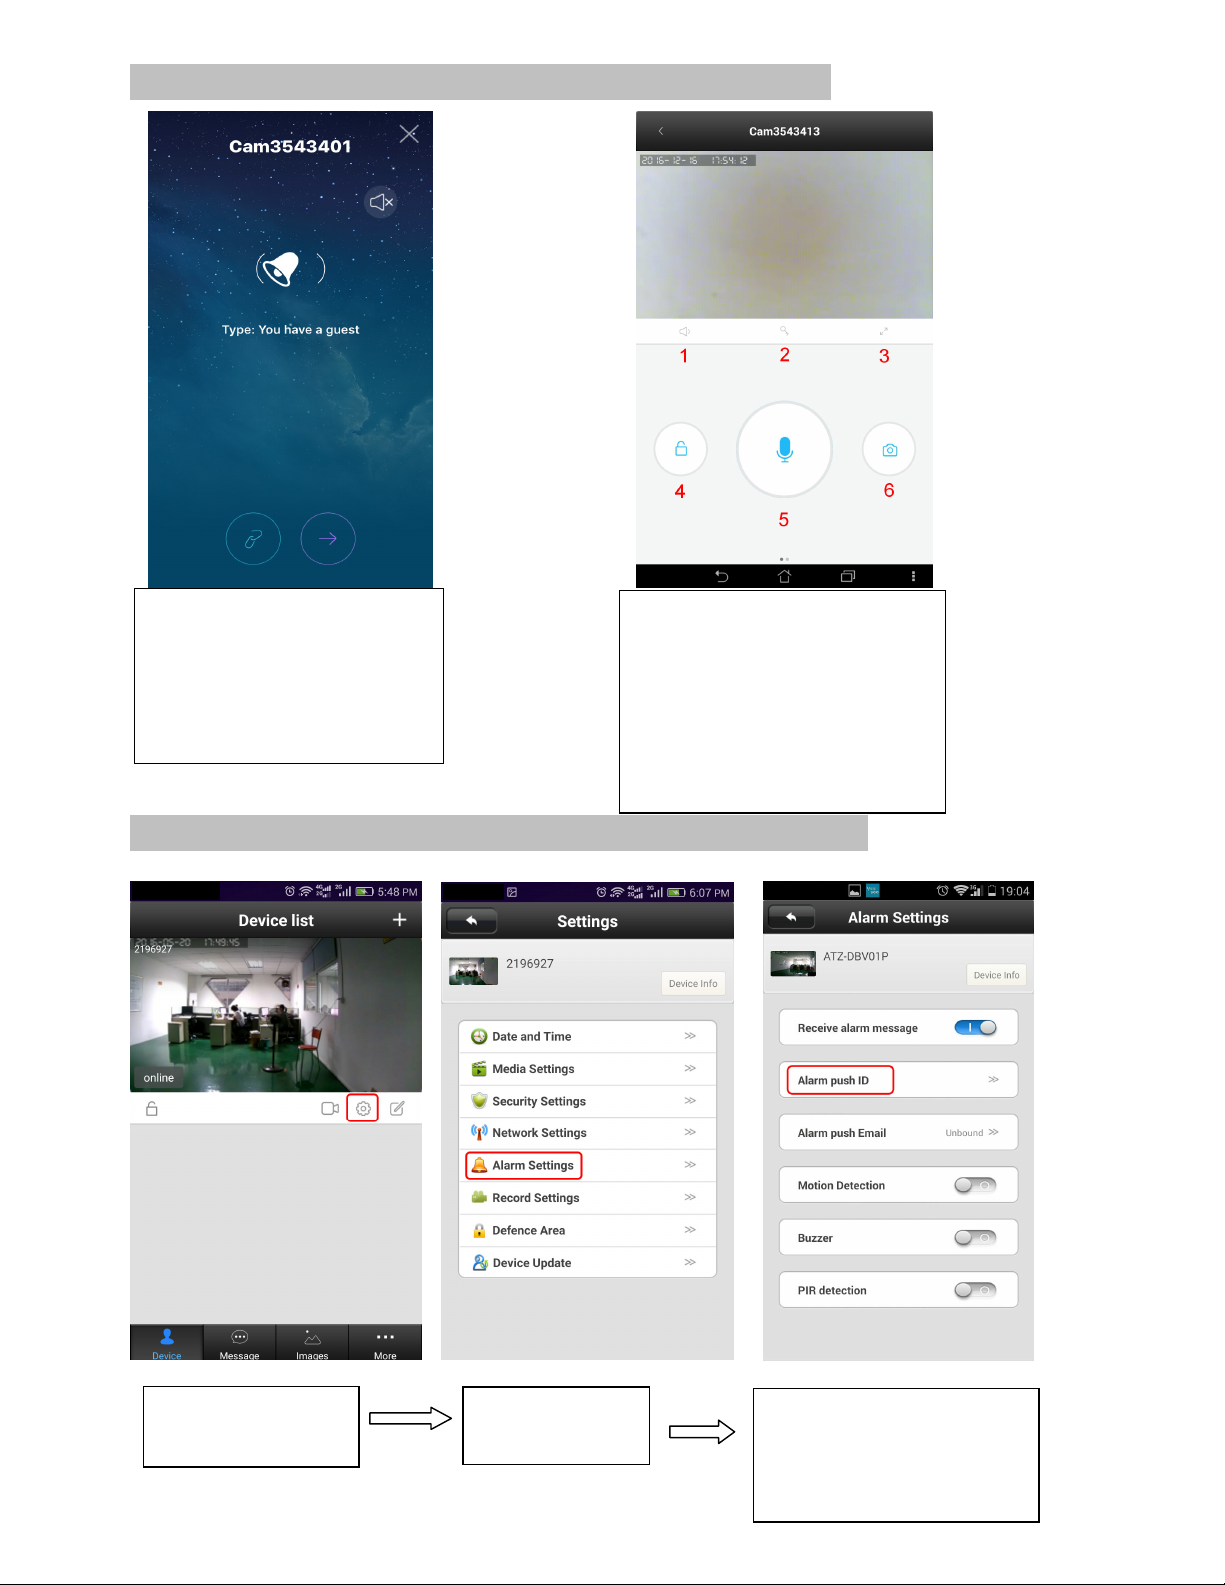
1.Tap on the
•
5. Incoming Call
Press the right button to
answer.
• Press the left button to
disable push notification.
• Press the “X” button to
ignore the call.
1. Mute/unmute speaker
2. Unlock door
3. Landscape mode.
4. Enable/disable protection mode
5. Mute/unmute microphone
6. Take snapshot
*Press the back button or home
button on your to end call.
6. Security Protection
1. Alarm Settings
“settings” icon
2. Choose Alarm
Settings
3. Turn push notifications on
or off and register new phone
numbers or emails.
Page 8
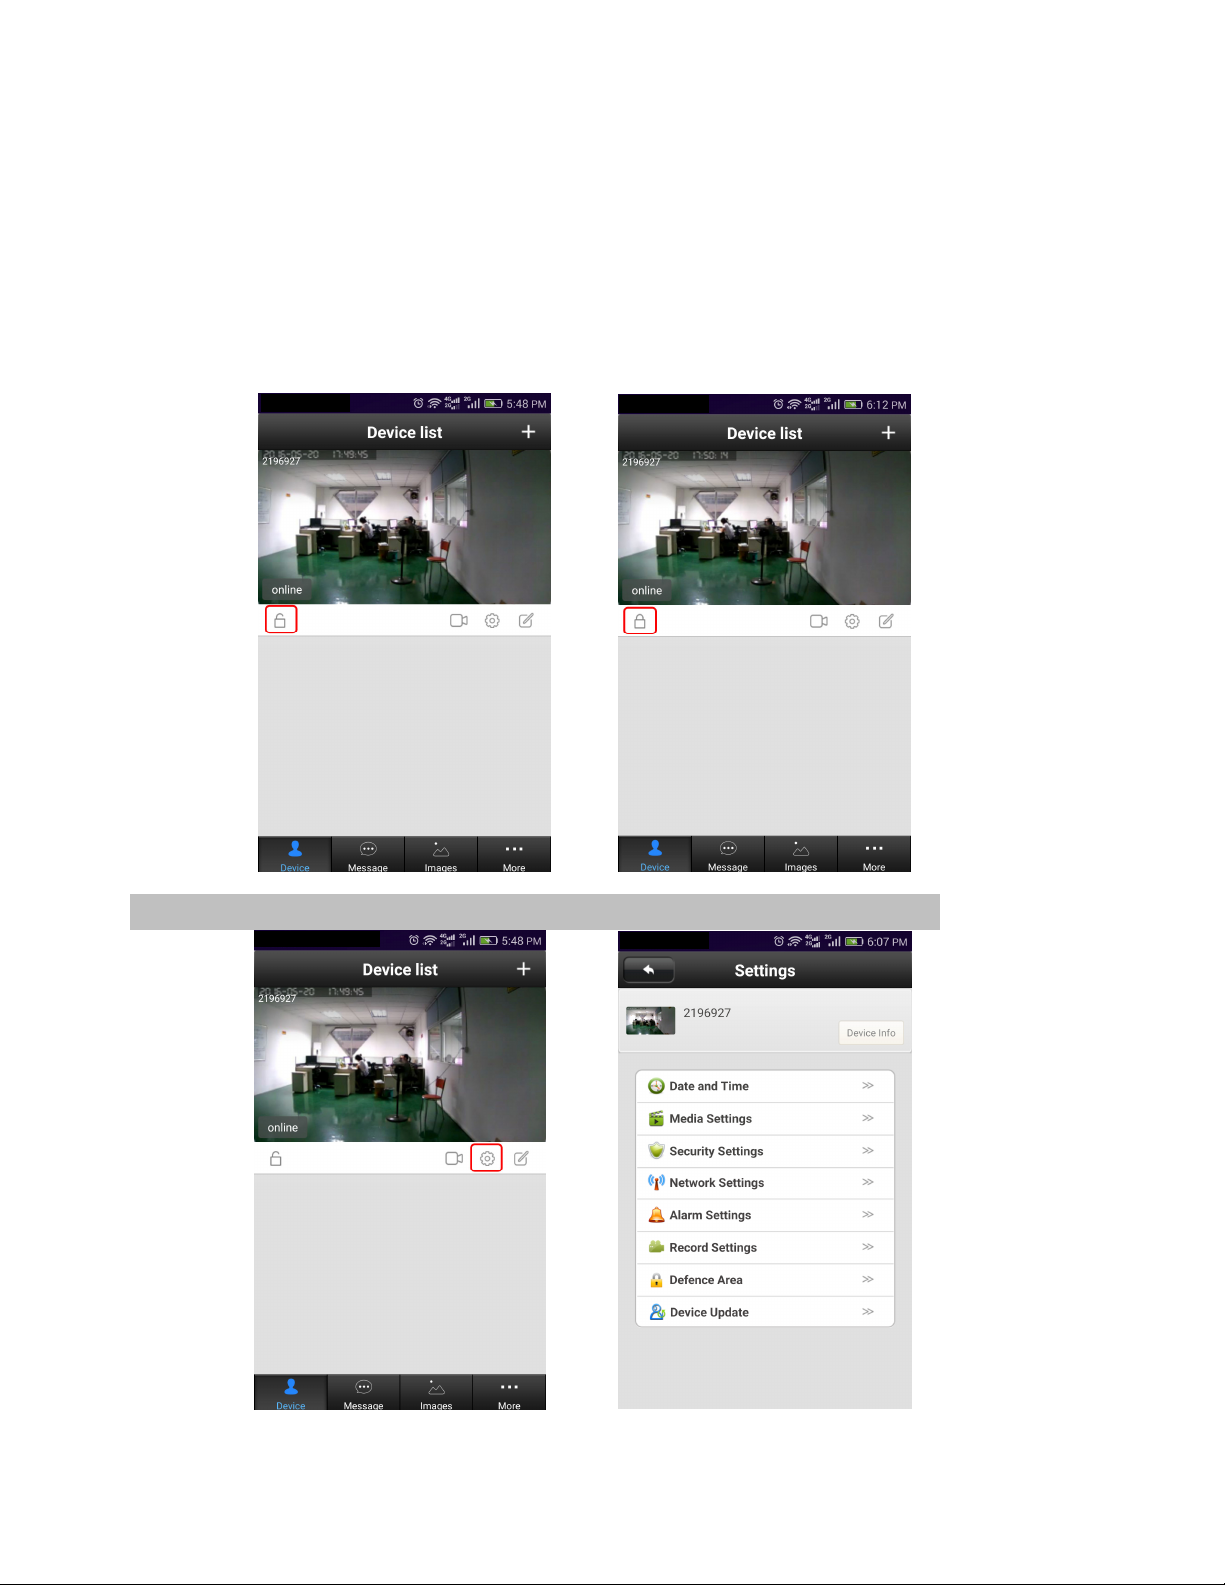
Alarm Settings:
Receive alarm message: On by default. If off, users cannot receive messages and alarm push.
Alarm push ID: This is set to the initial registration phone number. Supports up to five accounts.
Alarm push Email: Set an email to receive calls and snapshots.
Motion Detection: Disabled.
Buzzer: Closed by default. It will send out the alarm when the buzzer is open.
PIR (Human Infrared Detection): Not available.
2. Protection and Removal
Unlock Protection Mode: Your mobile phone will no longer receive alarms.
Protection Mode: Your mobile phone will receive alarms.
7. Other Information
Page 9
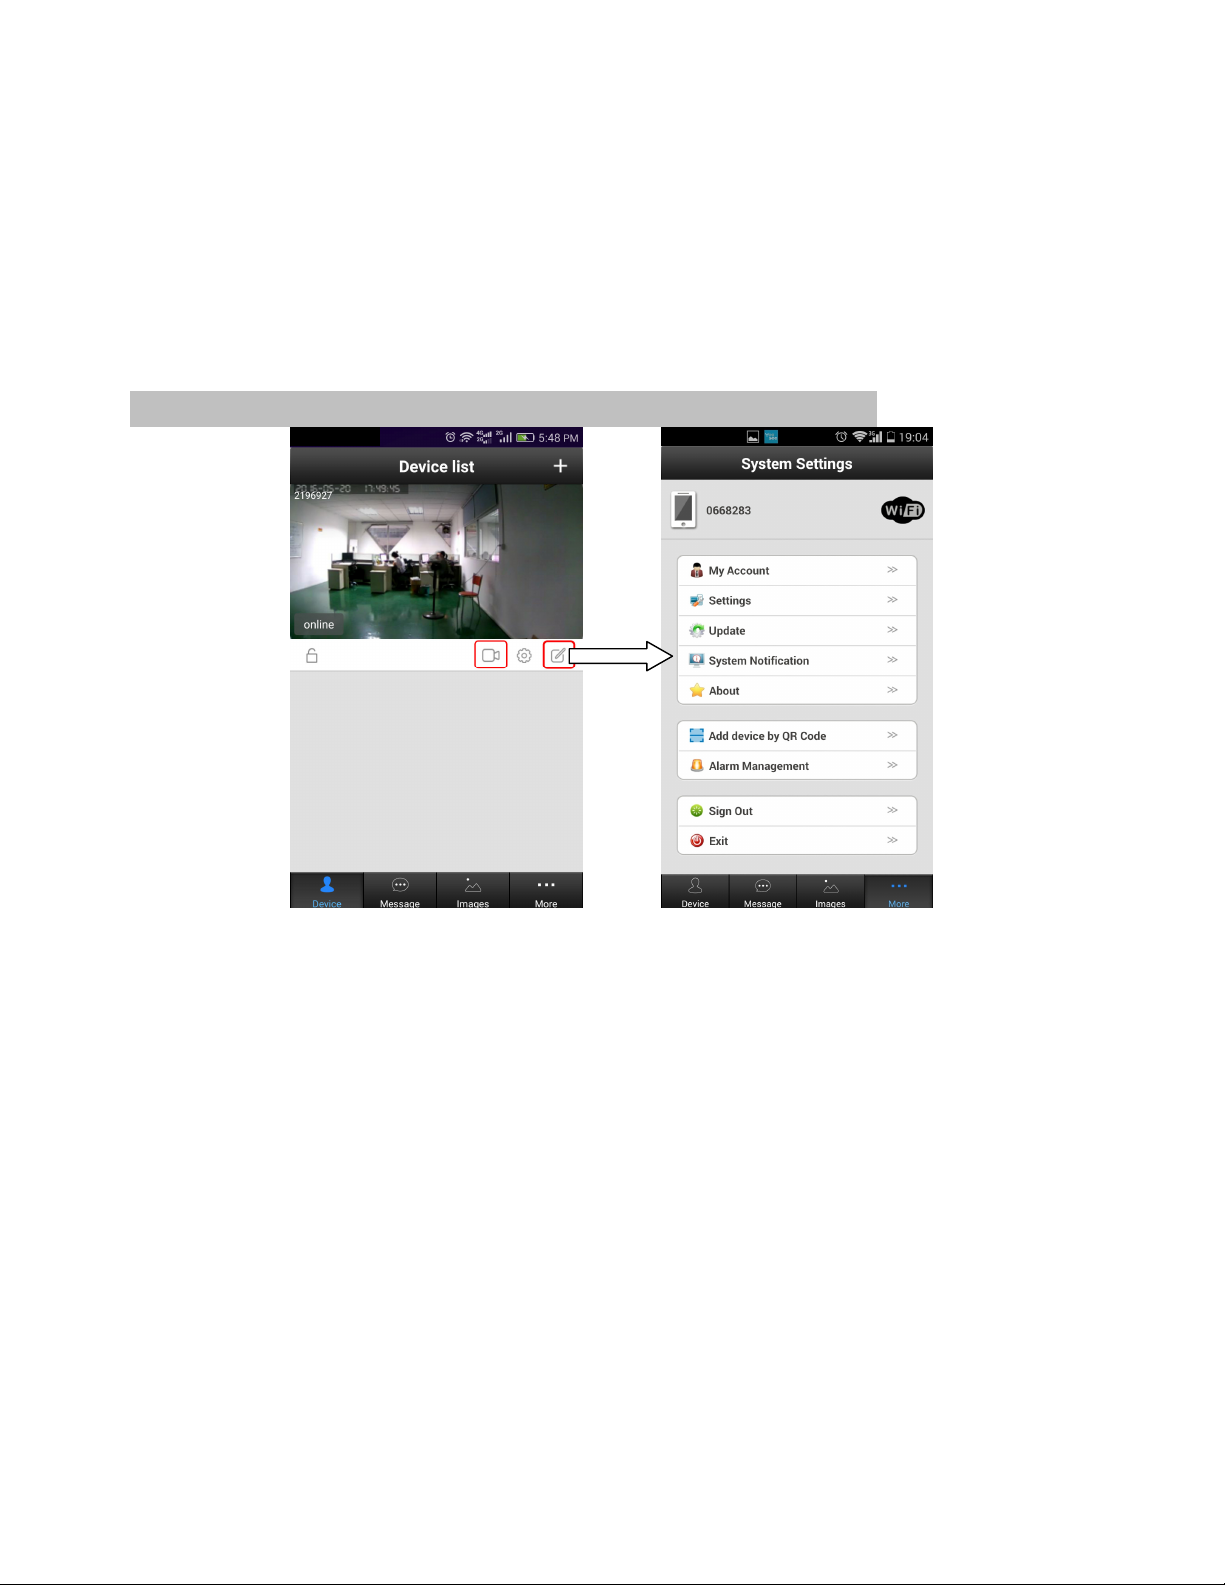
Device Info: Display the current firmware information of the device.
Date and Time: Set device time.
Media Settings: Set video image format (N/P) and image reversal.
Security Settings: Modify admin password.
Network Settings: Switch between LAN and WiFi network.
Alarm Settings: Configure the door phone alarm information.
Record Settings: Set the recording mode (requires SD card).
Defence Area: Not available.
Storage Setting: Check SD card information.
Device Update: Check for device firmware updates.
8. App Function Introduction
Playback: Play SD card recordings.
Edit: Edit device name and password.
Device: Display the device list.
Message: Record visitor and alarm messages.
Image: Record the screenshot.
More:
My Account: Check and configure information about the current account, modify the account password.
Settings: Configure alarm/call rings, push notifications, and automatic start options.
Update: Check for updates.
System Notification: Important system notification
About: App description and version
Sign Out: Sign out of the current account.
Exit: Exit the app.
Page 10
Night Vision
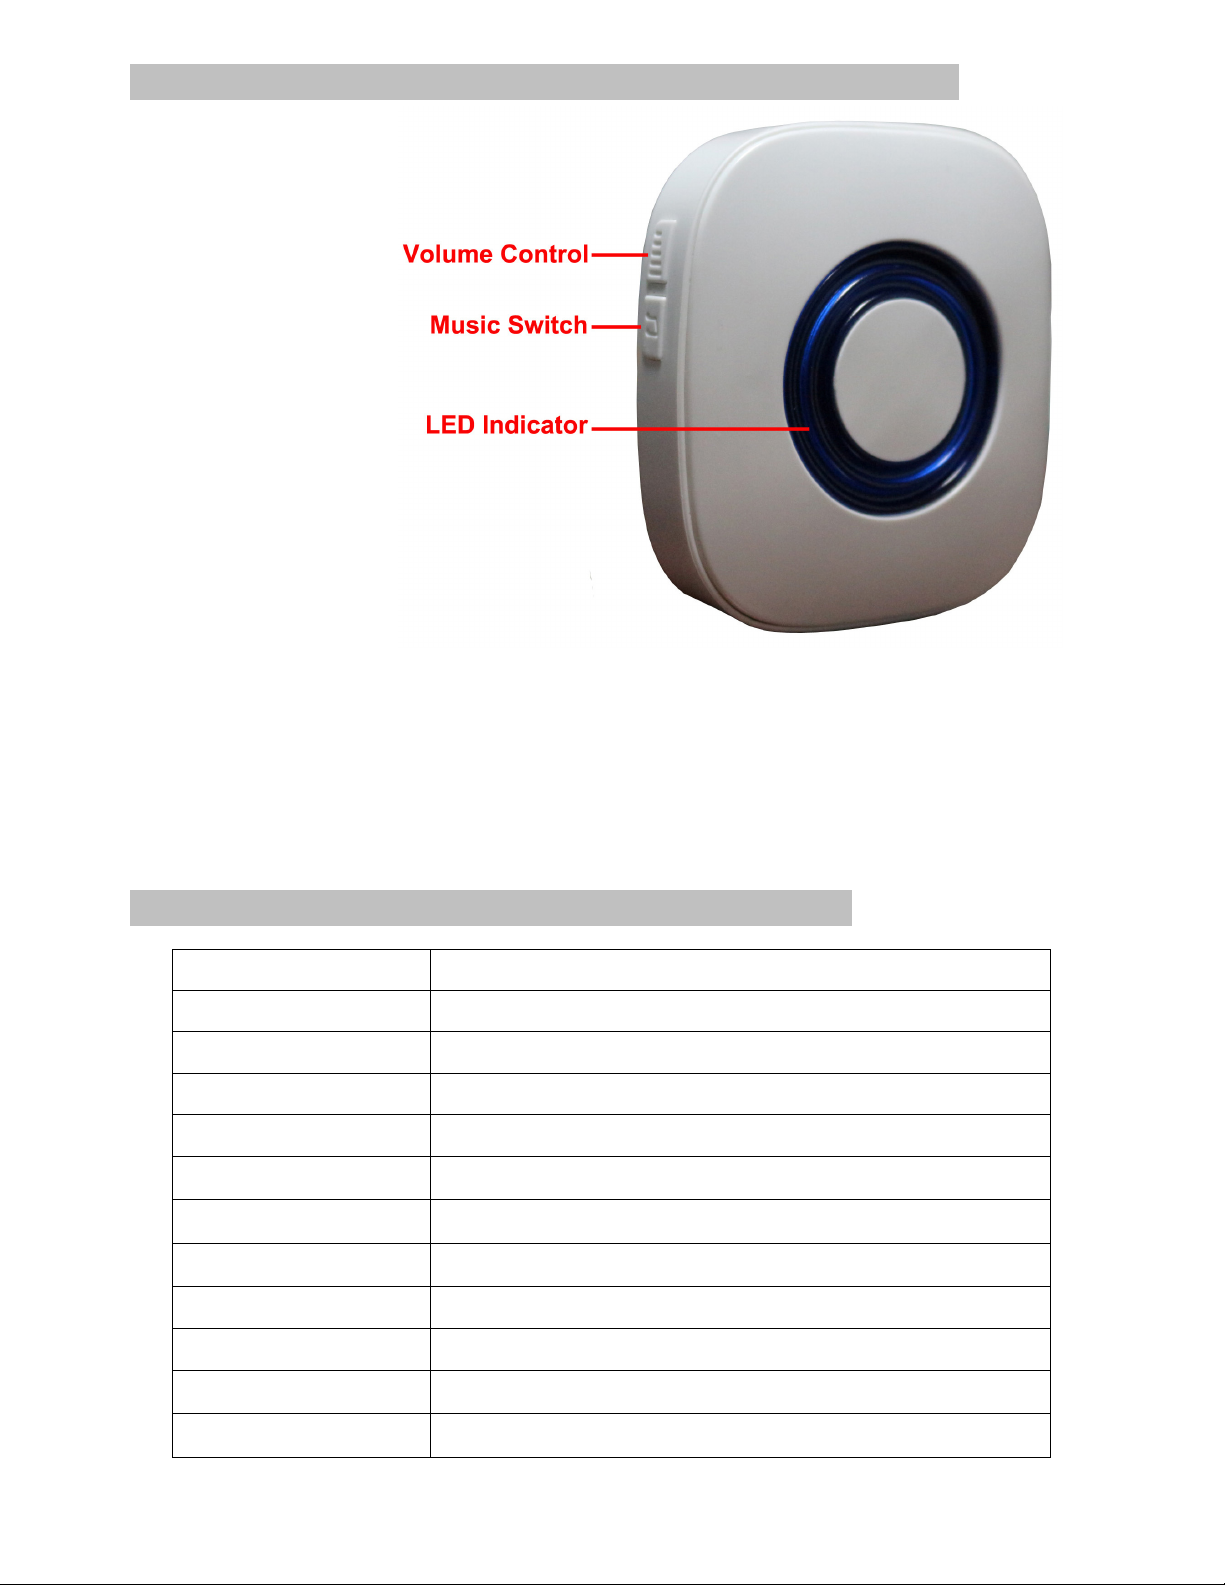
9. Indoor Chime
1. 433MHz
2. Learning Code
3. Distance: 30-80m
4. 52 Different Chimes
Pairing Program Instruction
1.
Cycle through and select your preferred chime before pairing by pressing the music switch.
2.
Activate Pairing
a. Press the volume button and music button at the same time.
b. Press the call button on your IDoorBell within 5 seconds.
c. Selected chime will play if successful.
d. Repeat steps a through c for additional chime modules.
3.
To reset and clear the pairing, hold the music button for 5 seconds
10. Main Specification
Chipset Hi 3518E
WiFi
Indoor Bell
Storage Support Max. 64GB TF Card
Resolution 1.0MP - 720P (1280*720), VGA (640*480), QVGA (320*240)
Audio
Alarm Motion Detection PIR (human body infrared sensor detection)
Visual Angle
One-Key WiFi Connection
433MHz, Learning Code, Distance: 80m
Full-duplex Audio, G.711A
2.1mm Lens, 145° super wide angle
6pcs LED Lights, IR 3m, IR-Cut, no Color Change
Support Protocol TCP/IP, UDP, SMTP, DHCP, UPnP, P2P, ONVIF
Item Size (L x W x H) 134 x 87 x 29mm
Certificate ISO, CE, FCC, RoHS
 Loading...