

Page 1
Important – Keep these instructions
for future reference
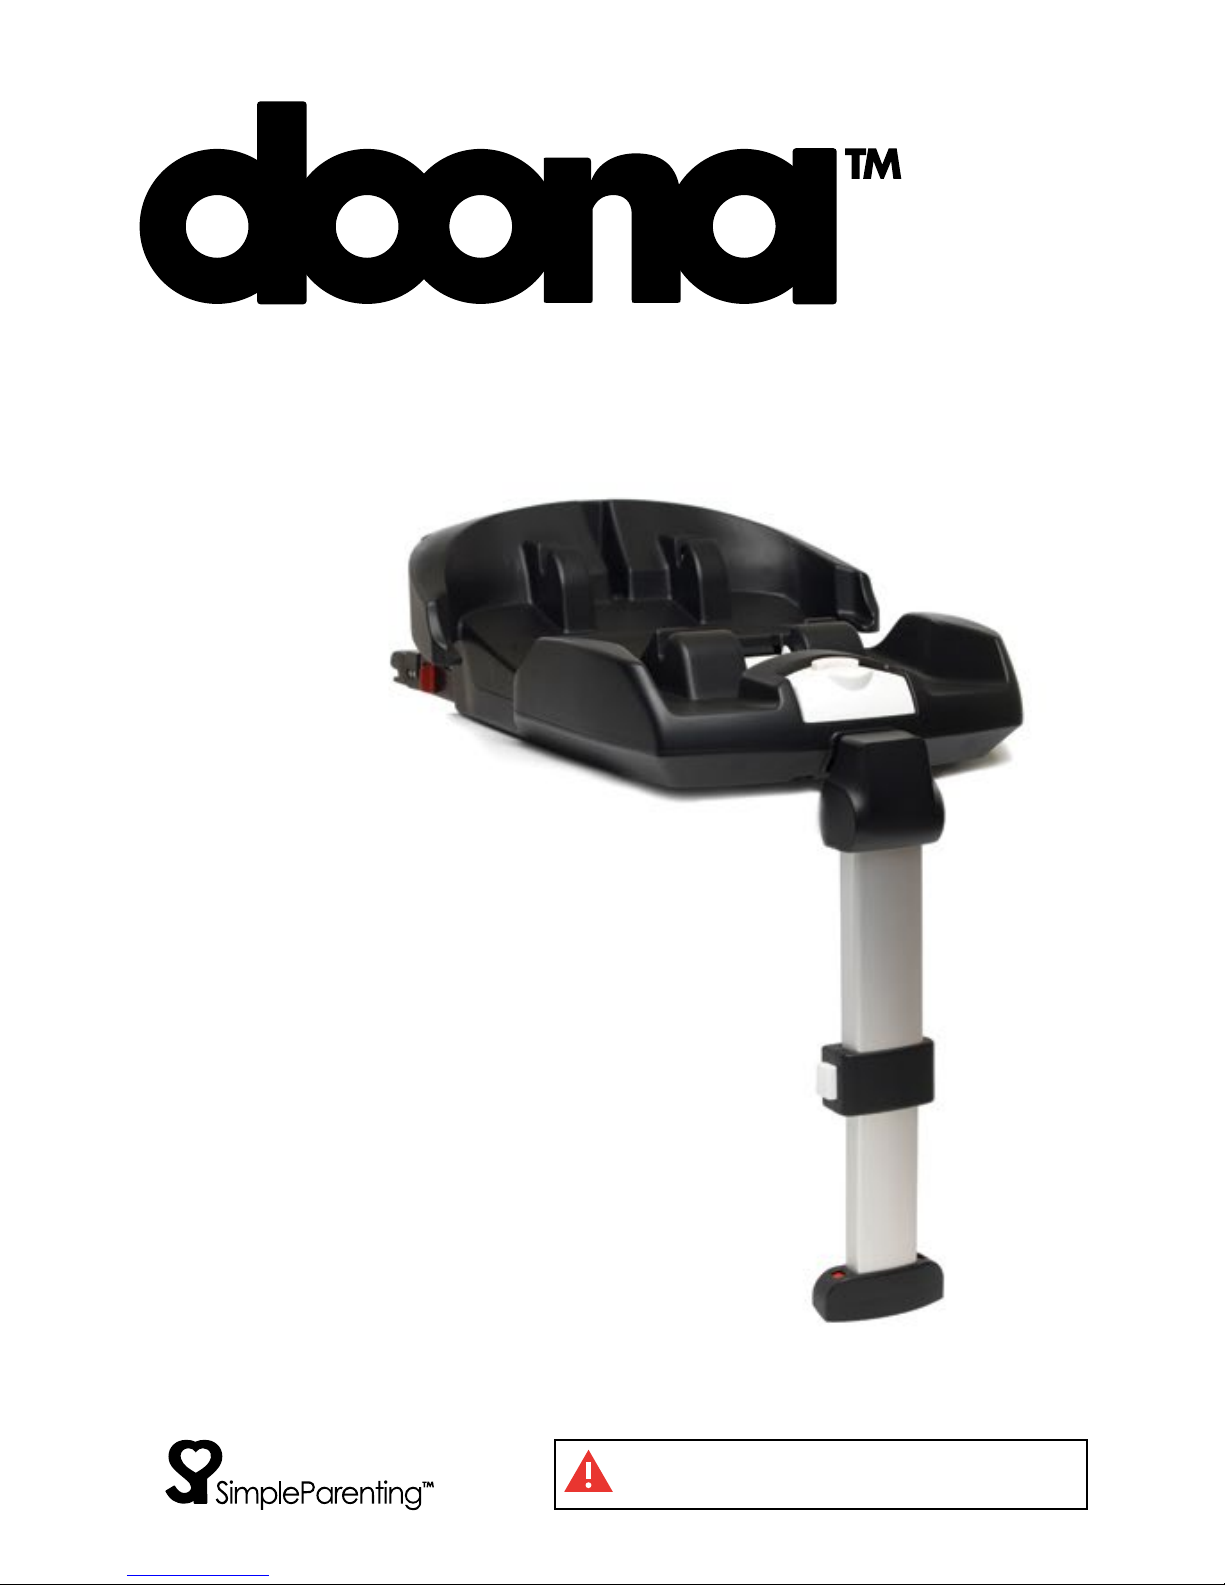
ISOFIX Base.
User Guide
ECE R44/04 ISOFIX
Class E
Group 0+
Up to 13kg
Language: English
Page 2

THE NEXT GENERATION CAR SEAT / ISOFIX BASE
4
01/
Vital information / Warnings ..............................................................7
02/
Suitability ...........................................................................................10
03/
Product overview .............................................................................11
04/
Use in the vehicle .............................................................................12
05/
Installing the Doona ISOFIX Base in the vehicle ...........................15
5.1. Securing the Doona ISOFIX Base in your vehicle ...................15
5.2. Removing the Doona ISOFIX Base from your vehicle............18
06/
Installing and removing the Doona Car Seat from
the Doona ISOFIX Base ....................................................................20
Table of
contents.
Page 3

5
TABLE OF CONTENTS
6.1. Securing the Doona Car Seat on the Doona
ISOFIX Base ........................................................................................20
6.2 Removing the Doona Car Seat from the Doona
ISOFIX Base ........................................................................................23
07/
Car tting List .....................................................................................25
08/
Care instructions ...............................................................................26
8.1. Cleaning .....................................................................................26
09/
Two-year warranty ...........................................................................27
10/
Warranty Card ..................................................................................29
Page 4

THE NEXT GENERATION CAR SEAT / ISOFIX BASE
Congratulations on choosing Simple Parenting’s Doona as your baby’s
safety and mobility solution.
In order to protect your baby, and allow easy use of the Doona inside
and outside of the car, the Doona ISOFIX Base must always be used and
installed as described in these instructions.
Important – Keep these instructions for future reference. Read these
instructions carefully, your child’s safety may be affected if you do not
follow these instructions.
If you have any further questions regarding the use of this base, please
feel free to contact us at:
Simple Parenting
4B, 12 Shipyard Lane, Quarry Bay,
Hong Kong,
Hong Kong
Phone: (852) 3580-1330
Email: [email protected]
Website: www.simpleparenting.co
6
Page 5
0 1 / Vital information
/ warnings.
VITAL INFORMATION / WARNINGS
7
WARNING!
Read this user guide carefully and save
it for future reference. Failure to follow the
instructions in the guide could result in
serious injury to your child.
WARNING!
Use original accessories and manufacturer
approved parts only. Do not make any
alterations or additions to the Doona
ISOFIX Base.
WARNING!
Always check car tting list before installation.
WARNING!
In a case of a car accident violent stresses
occur. If the product is involved in a car
accident we recommend you change it.
Page 6
THE NEXT GENERATION CAR SEAT / ISOFIX BASE
8
WARNING!
Do not use this product if any components
are broken or missing.
WARNING!
Any luggage or other objects liable to
cause injuries in the event of a collision shall
be properly secured. The Doona ISOFIX Base
must always be secured with the support leg,
even when not in use.
WARNING!
Never leave your child unattended in the
Doona Car Seat, both inside and outside of
the car.
Page 7
9
VITAL INFORMATION / WARNINGS
WARNING!
Do not use the Doona ISOFIX Base in seating
positions where there is an airbag installed.
WARNING!
It is recommended to cover up the Doona
ISOFIX Base when the car is parked in the
sun, as plastic and metal parts may become
extremely hot.
Page 8
THE NEXT GENERATION CAR SEAT / ISOFIX BASE
10
0 2 / Suitability.
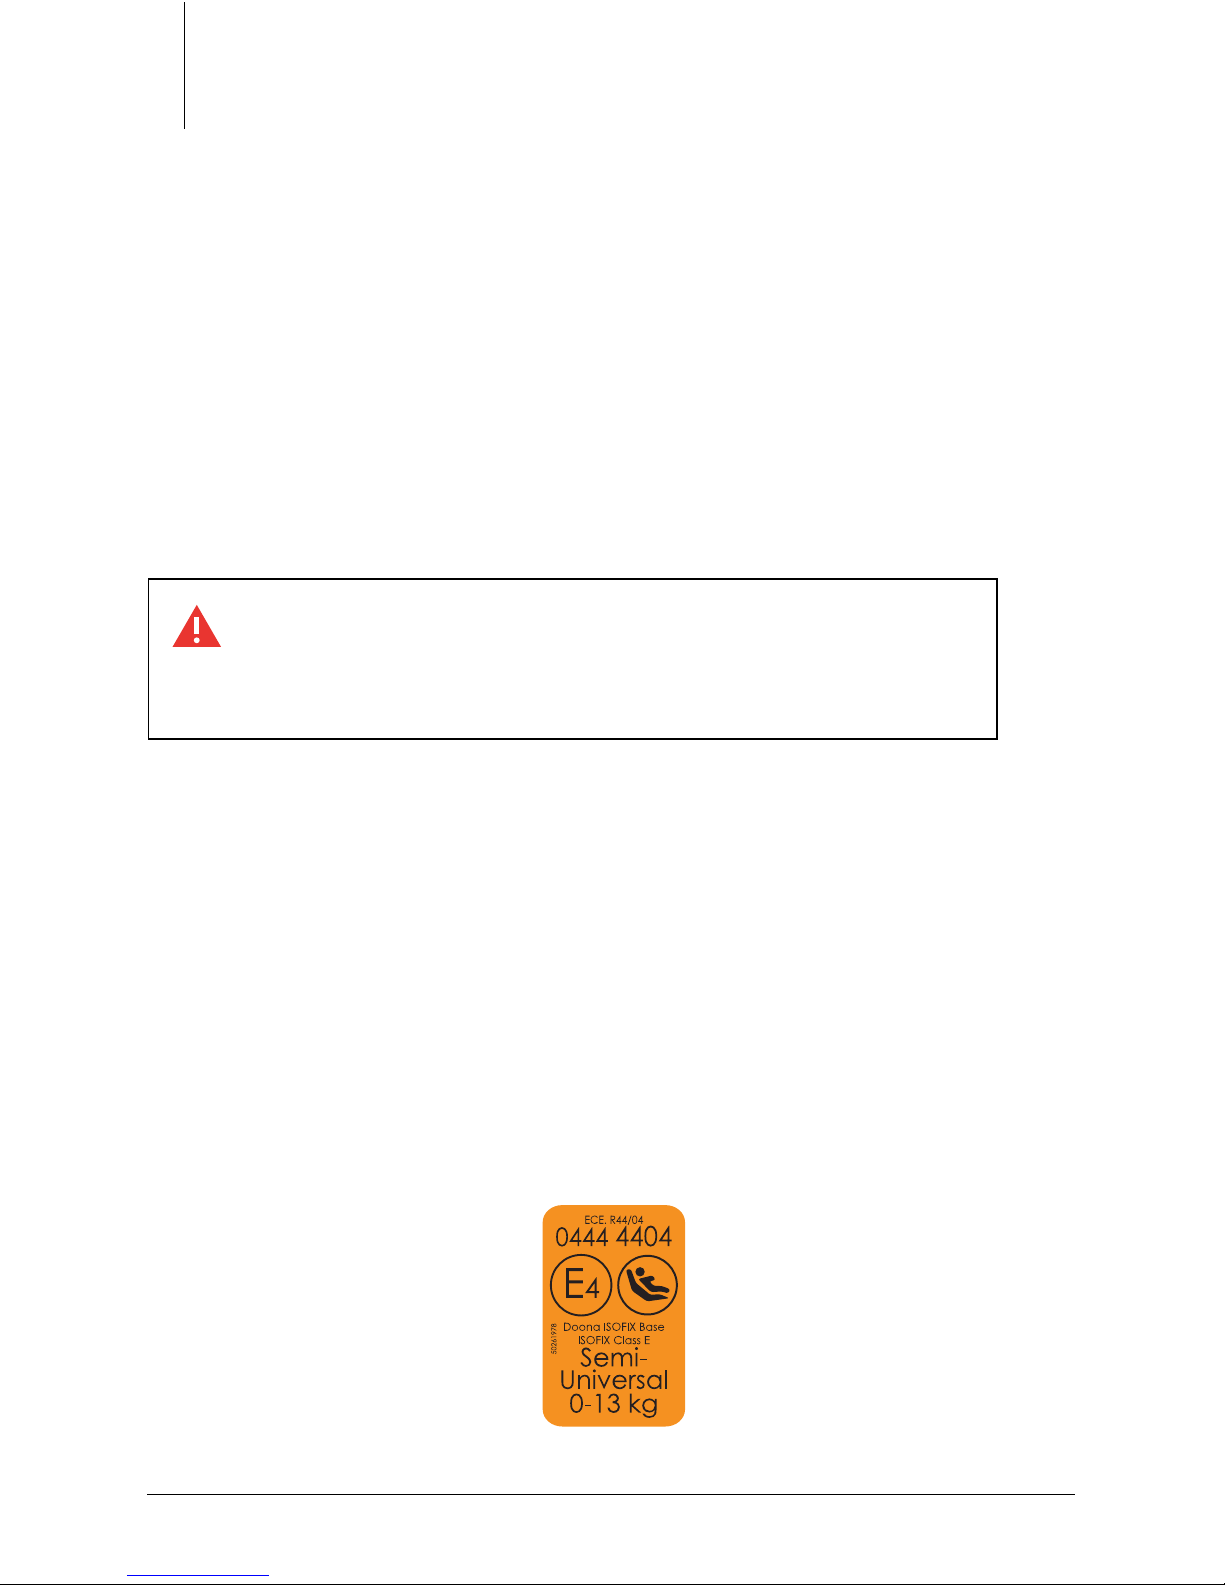
Certication – Approval Mark
The Doona ISOFIX Base is compatible with the Doona Car Seat, and
is intended for Rear-Facing use only.
Group: 0+
Weight: Up to 13 kg
Safety Information:
NOTICE
• This is an ISOFIX CHILD RESTRAINT SYSTEM. It is approved to
Regulation No. 44, 04 series of amendments for general use in
vehicles tted with ISOFIX anchorage systems.
• It will t vehicles with positions approved as ISOFIX positions (as
detailed in the vehicle handbook), depending on the category
of the child seat and of the xture.
• The mass group and the ISOFIX size class for which this device is
intended is: E (0-13 Kg).
WARNING!
Do not use the Doona ISOFIX Base in seating
positions where there is an airbag installed.
Page 9
11
0 3 / Product overview.
PRODUCT OVERVIEW
Page 10
THE NEXT GENERATION CAR SEAT / ISOFIX BASE
12
0 4 / Use in the vehicle.
E
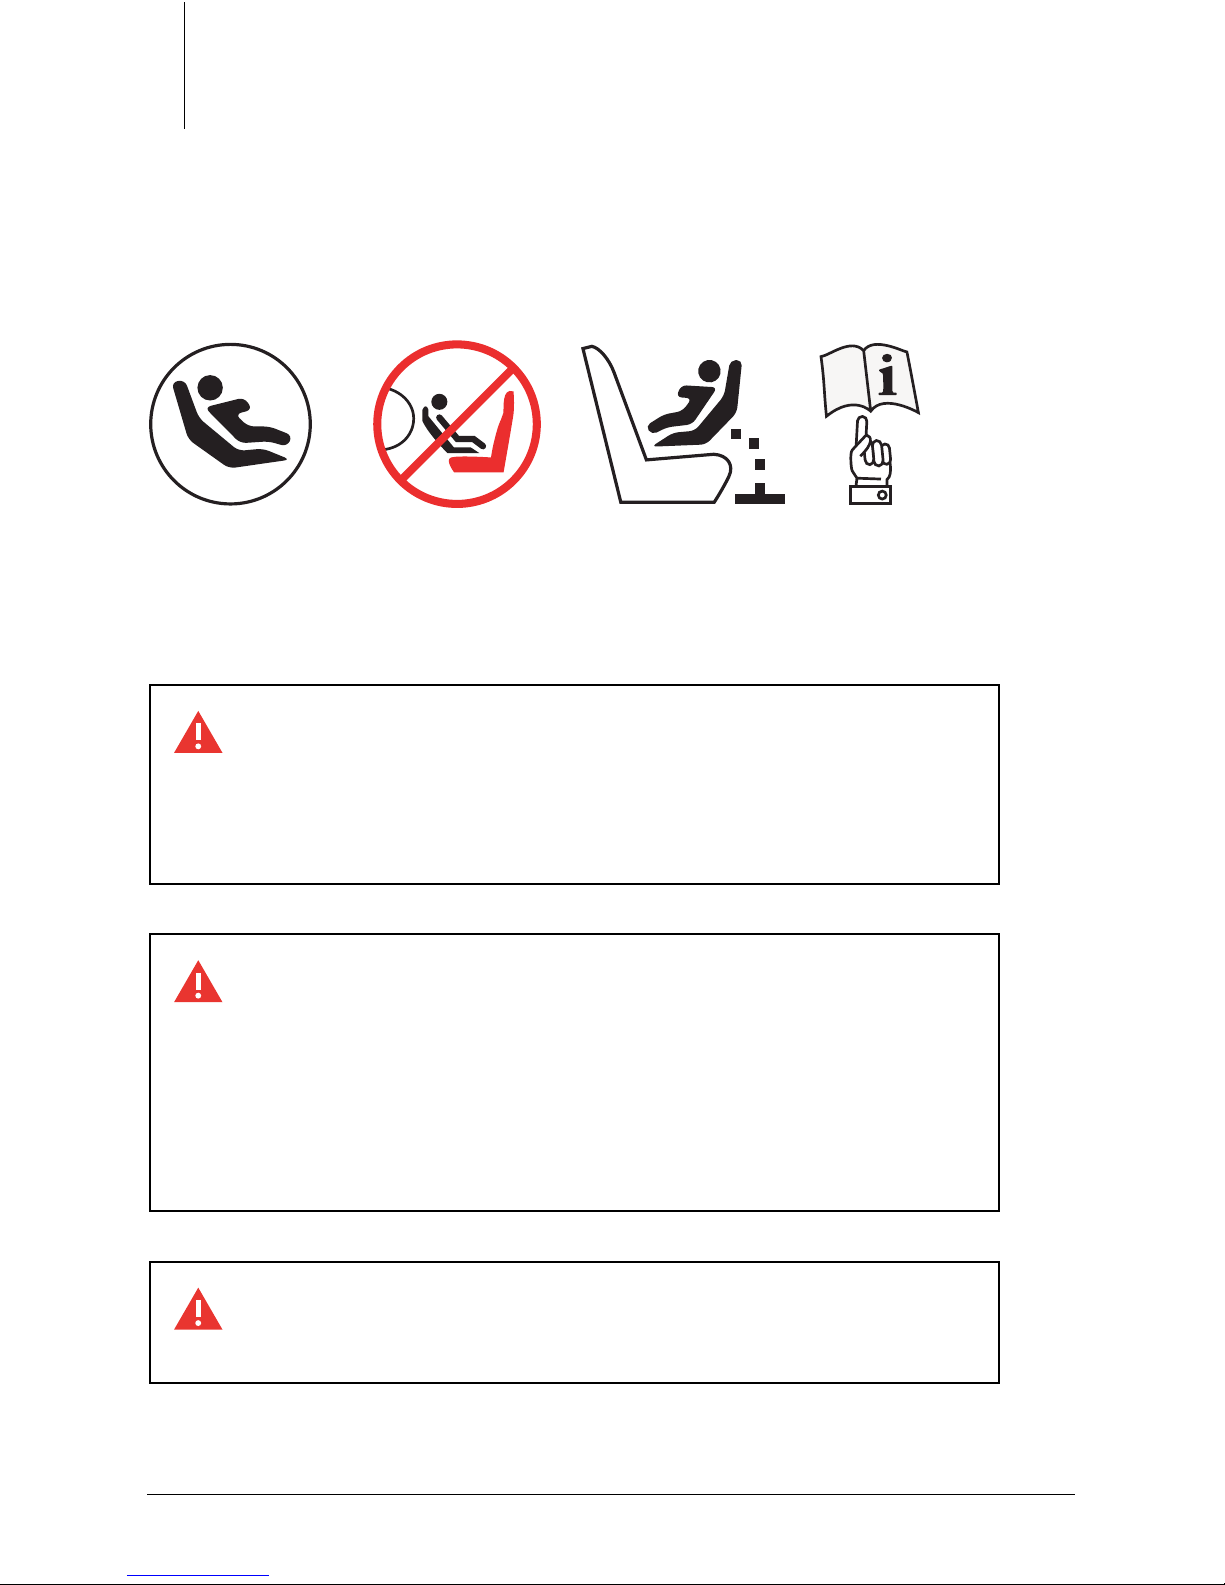
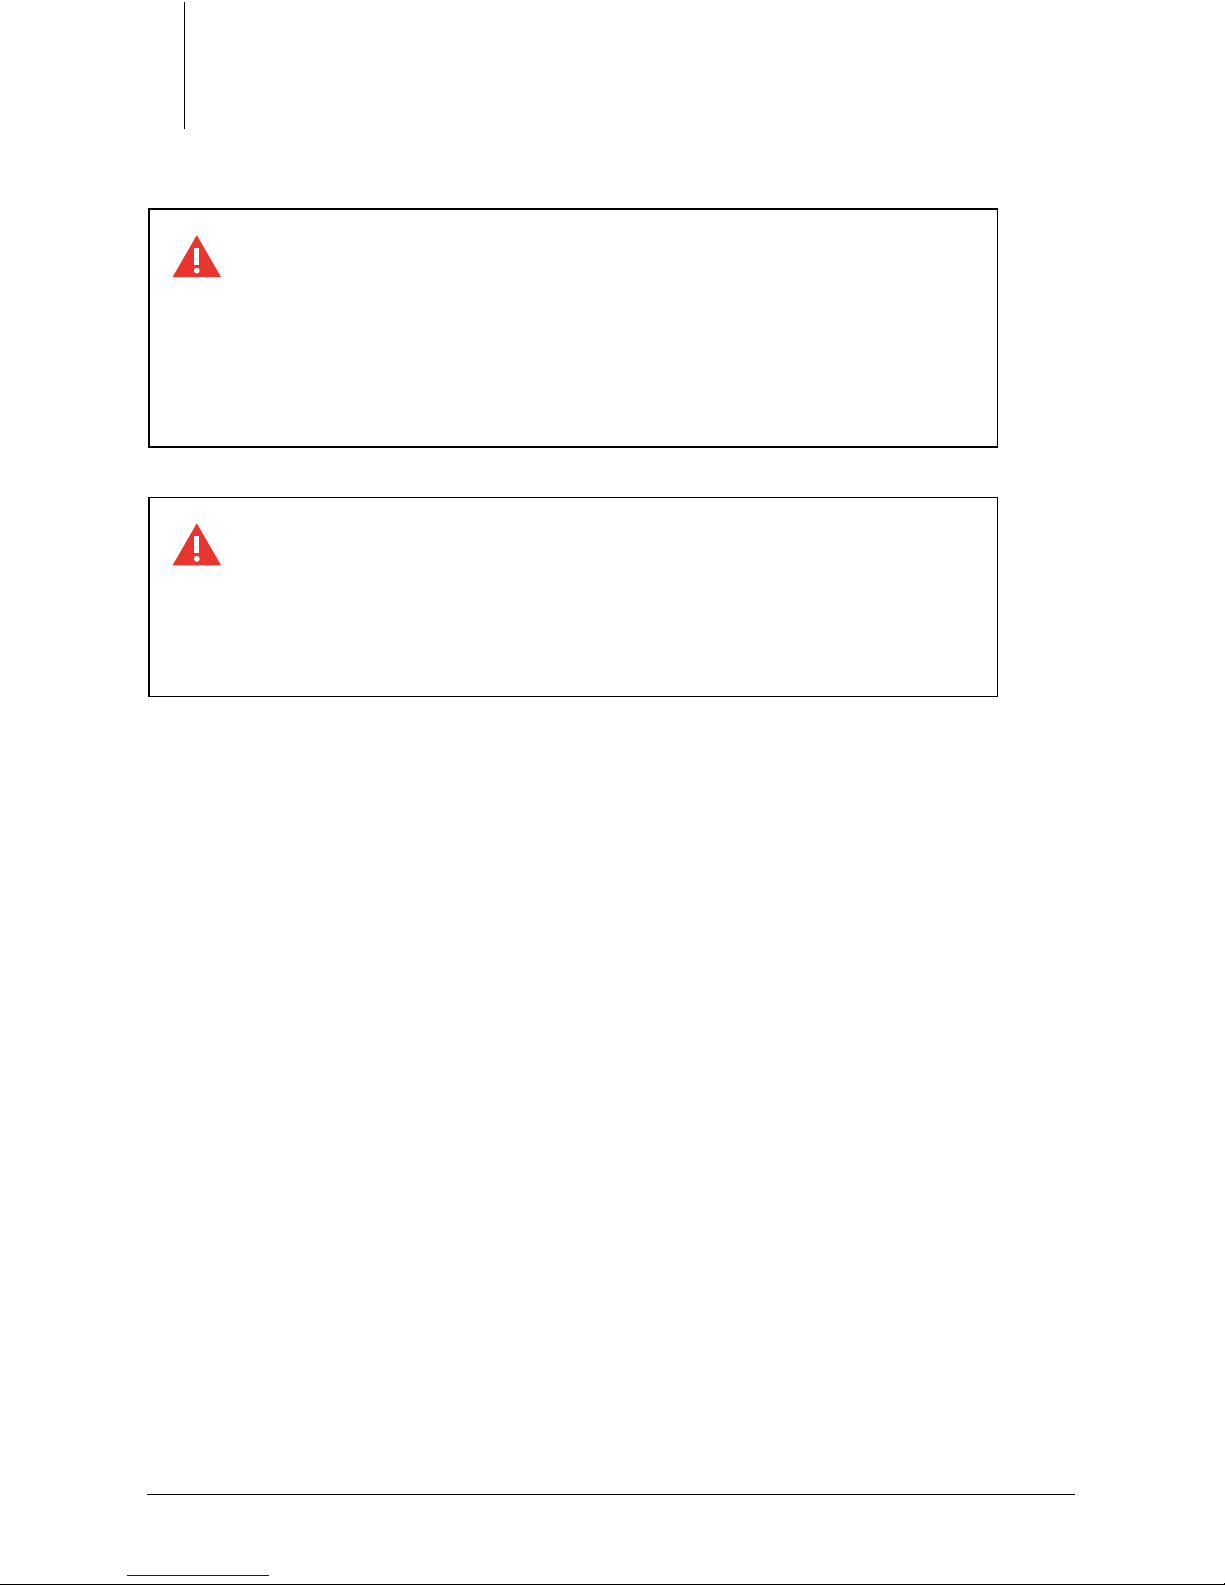
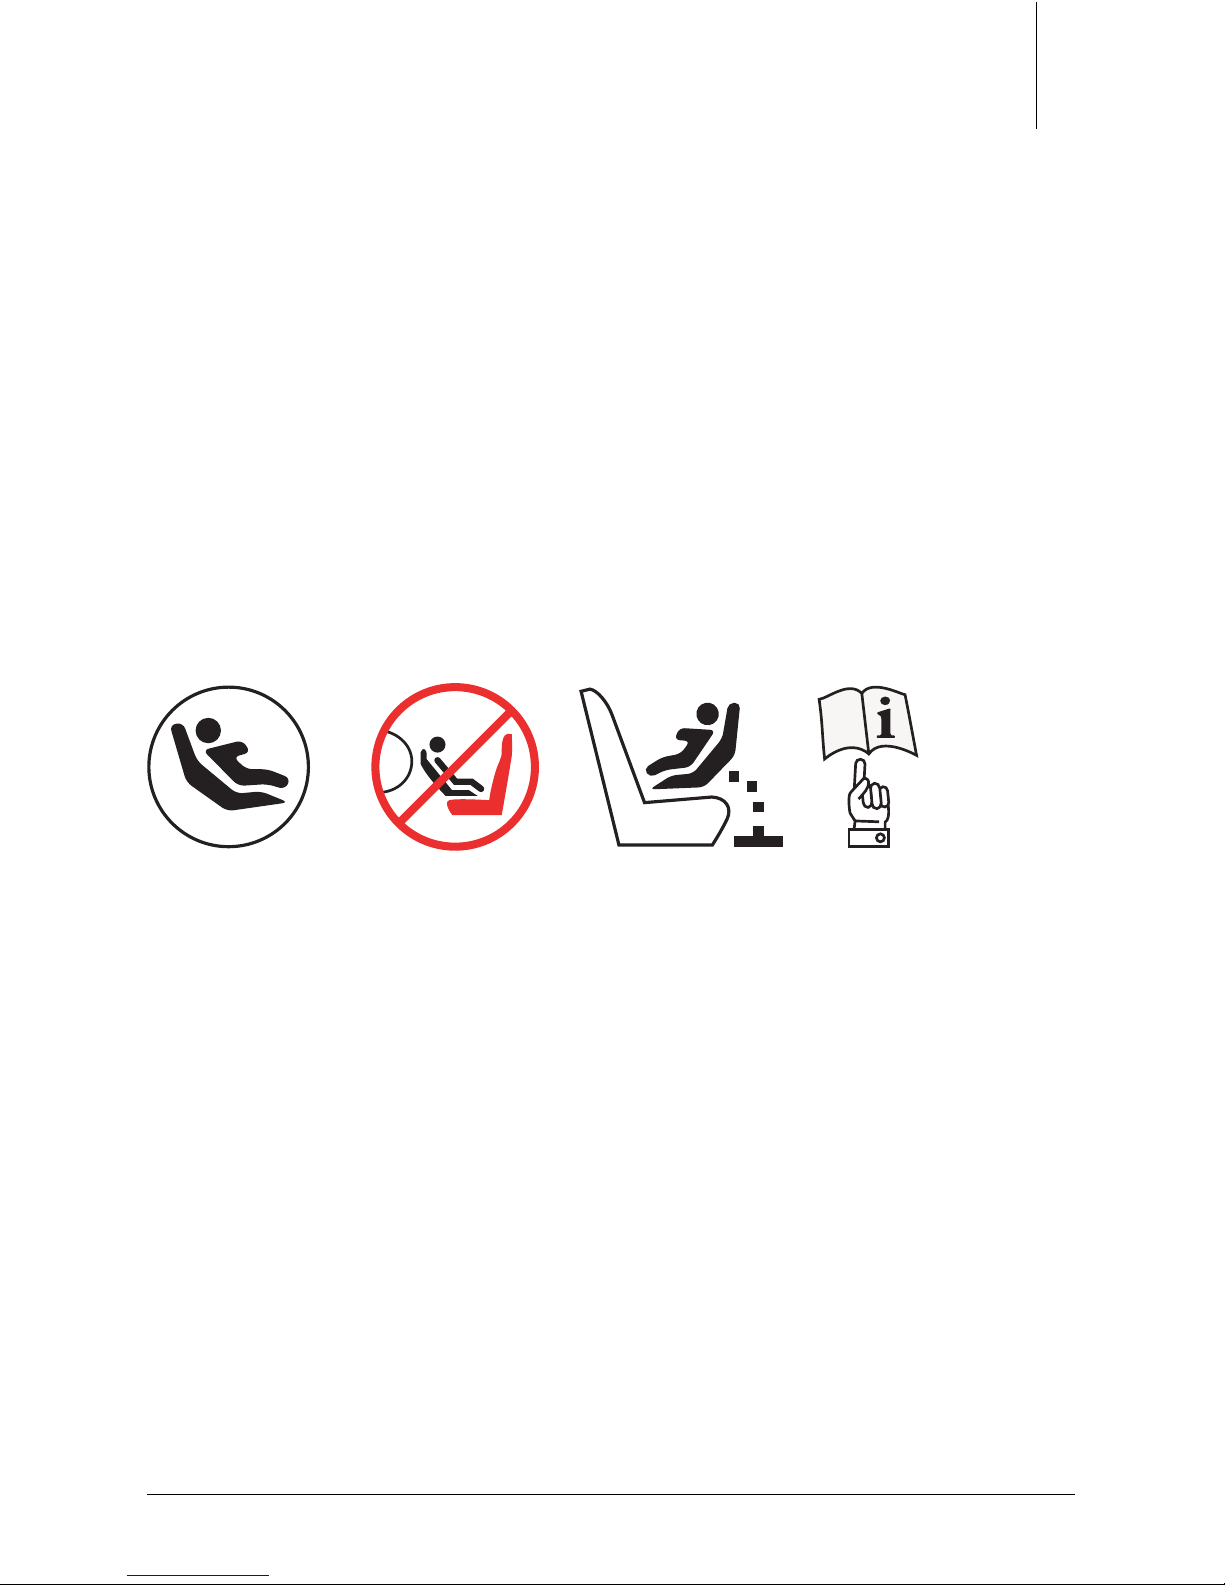
Please observe the instructions on the use of child restraint systems
and ISOFIX Bases described in your vehicle owner’s manual.
DO NOT use on a passenger seat with a
front airbag!
For seats with side airbags,
please observe the instructions in your
vehicle owner’s manual.
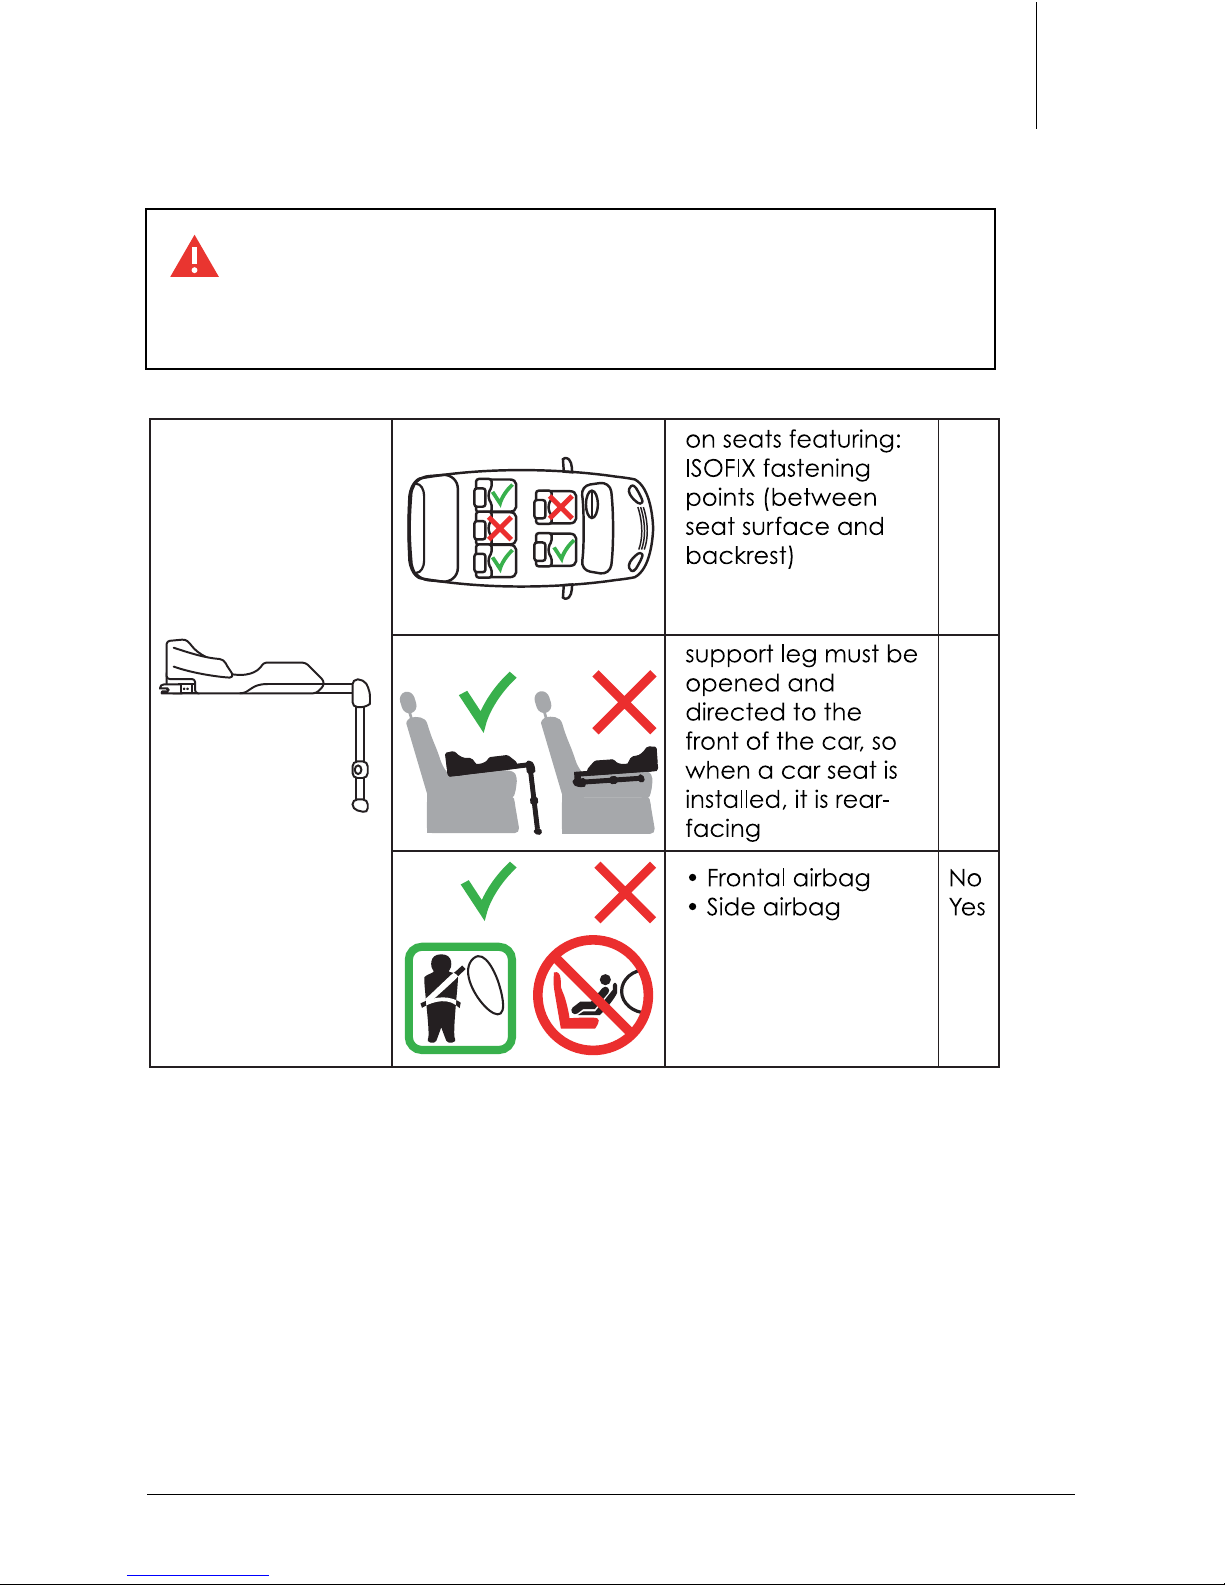
The Doona ISOFIX Base may be used
only on a forward facing seat equipped
with ISOFIX anchor points. Either on the
passenger seat or on the back seat, but it
should always face backwards. Lock the
rear seats that fold down.
Correct attachment to the ISOFIX anchor
points is essential for the safety of your child.
Page 11
13
USE IN THE VEHICLE
The Doona ISOFIX Base is approved for use with the Doona Car Seat.
The Doona ISOFIX Base is compatible for use in cars with approved
ISOFIX anchor points (See chapter 7 for Car tting list).
If your car is equipped with ISOFIX anchor points, you can install the
Doona ISOFIX Base using the ISOFIX connectors in combination with
the support leg.
Never use a different installation method
other than the one described in the
User Guide.
Page 12
THE NEXT GENERATION CAR SEAT / ISOFIX BASE
14
This manual includes detailed instructions only regarding installation
with a base. For detailed instructions regarding the use with a vehicle
3-point belt without a base, refer to the user guide provided with the
Doona Car Seat.
Fastening the Doona Car Seat to the vehicle using the Doona ISOFIX
Base is based on semi-universal approval. The seat may only be used
with a base in the vehicles detailed in the list of approved vehicle
types enclosed with the base. This list is constantly updated. The
latest version can be obtained from www.simpleparenting.co
To protect your vehicle
Some vehicle seat covers made from sensitive materials (e.g. velour,
leather, etc.) may develop wear marks when car seats and bases
are used. This can be avoided by placing the Vehicle Seat Protector
between the Doona ISOFIX Base and the vehicle seat.
WARNING!
In an accident, enormous forces occur.
Never try to secure a child on your lap with
the vehicle seat belt or by holding onto
them.
WARNING!
An airbag hitting the Doona Car Seat can
cause serious injuries to your child, possibly
resulting in death.
Page 13
15
0 5 / Installing the
Doona ISOFIX Base in
the vehicle.
INSTALLING THE DOONA ISOFIX BASE IN THE VEHICLE
5.1. Securing the Doona ISOFIX
Base in your vehicle
E
To secure the Doona ISOFIX Base in your vehicle, proceed
as follows:
Note: Installation of the Doona ISOFIX Base in the front seat of
the vehicle is not recommended, yet possible (subject to the
existence of ISOFIX anchors in the front seat). Should you decide
to install your Doona ISOFIX Base in the front, make sure to disable
the Airbag system.
IMPORTANT! Secure any fold down seats.
Page 14

THE NEXT GENERATION CAR SEAT / ISOFIX BASE
16
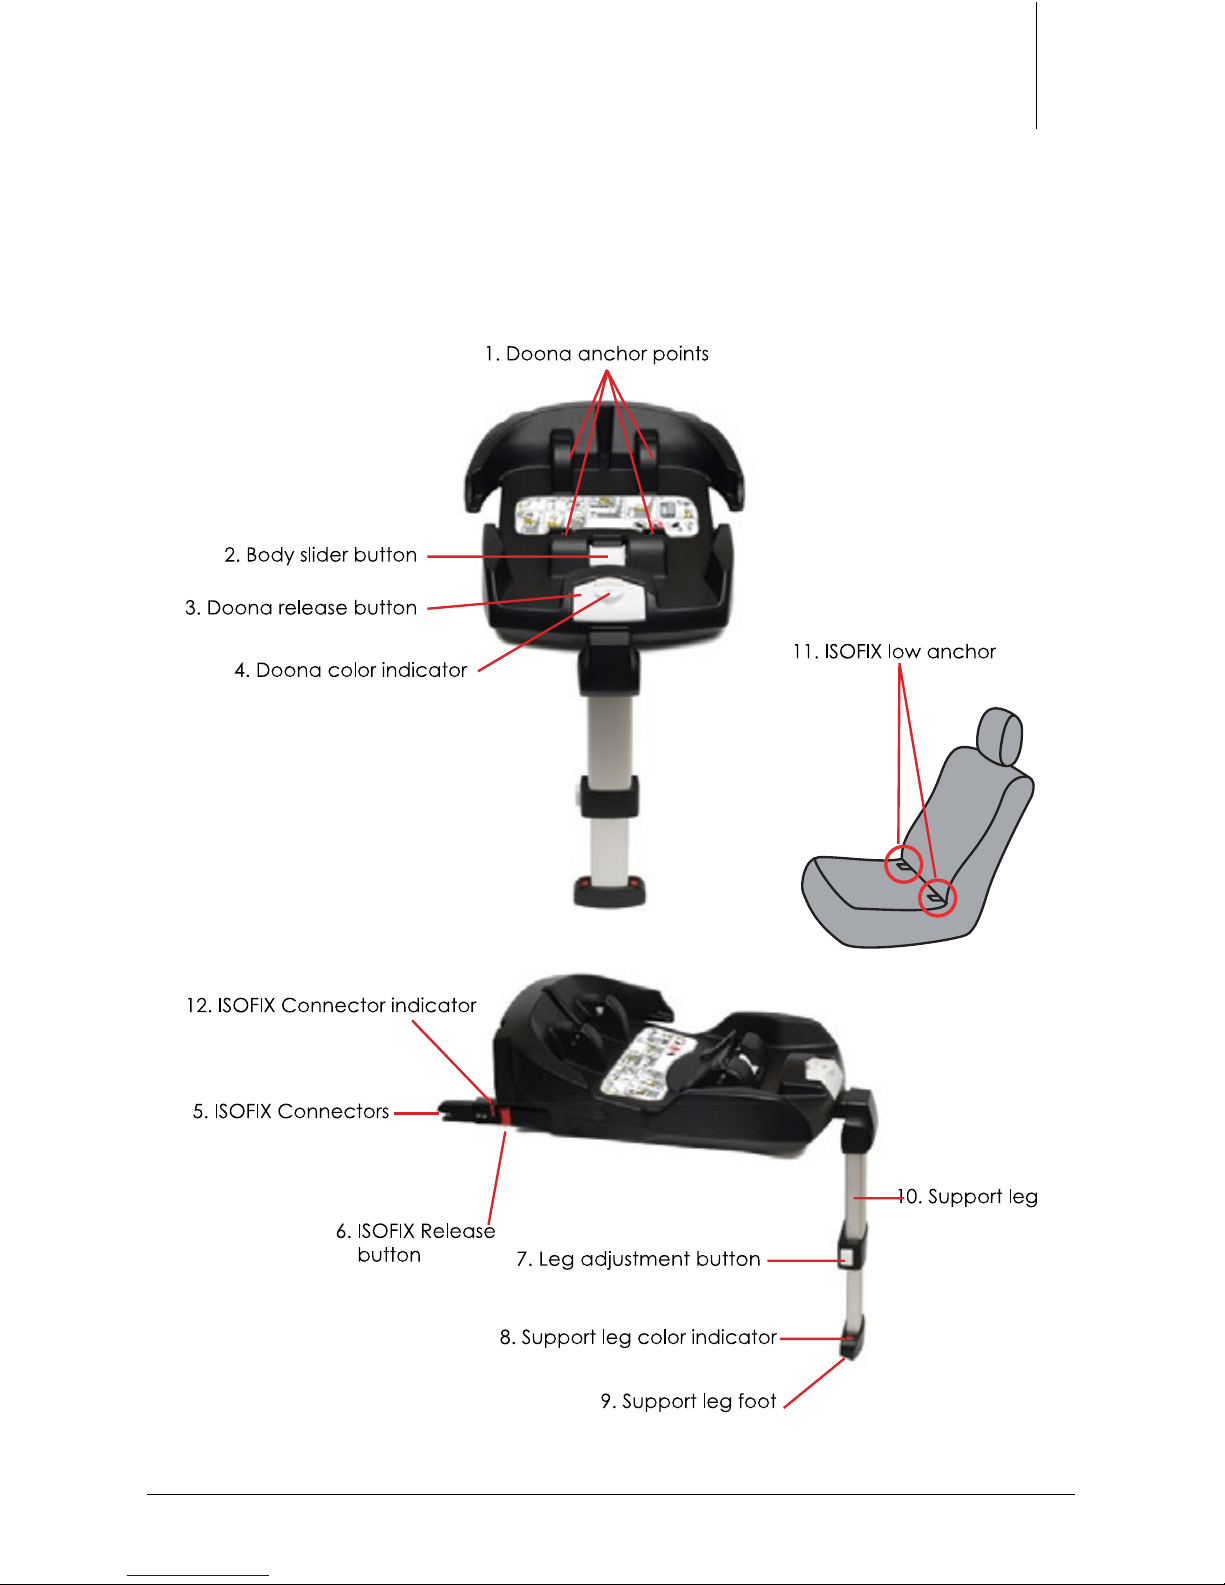
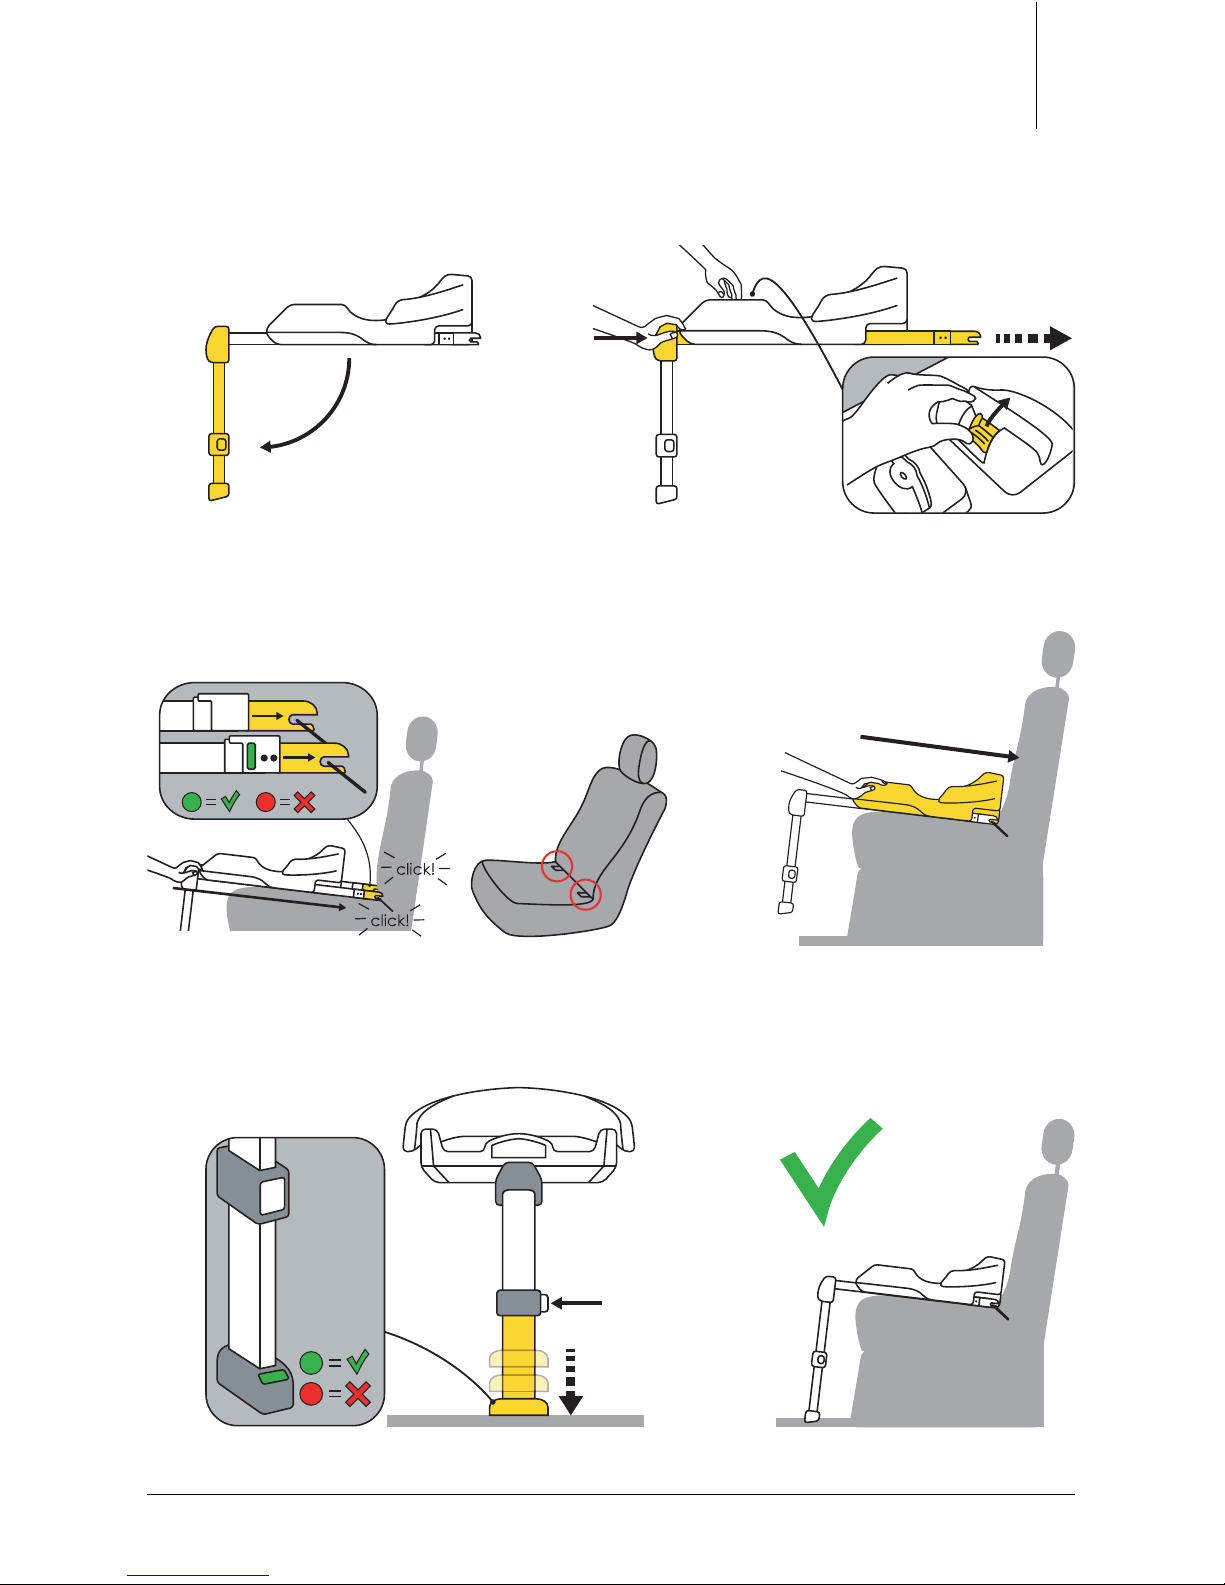
Step 1: Unfold the support leg (#10)
Step 2: Make sure the ISOFIX Connectors (#5) are sticking out
to the maximum from the Doona ISOFIX main body. In case
they are not, lift the body slider button (#2) with one hand, and
push the support leg with the other hand towards the body until
the ISOFIX Connectors (#5) are exposed and reach maximum
length.
Step 3: Place the Doona ISOFIX Base with the ISOFIX Connectors
(#5) facing the back of the vehicle›s seat. Align the ISOFIX
Connectors (#5) with the vehicle ISOFIX low anchors (#11).
Push the Doona ISOFIX Base from the top of the support leg
until the base clicks and locks with both connectors.
Step 4: Slide the Doona ISOFIX Base body, until it reaches the
back of the seat, and is rmly in place.
Step 5: Adjust the support leg (#10) by pressing the Leg
adjustment button (#7) and extending it until it rests rmly on
the oor of the vehicle. Make sure the color of support leg color
indicator (#8) changes from red to green.
IMPORTANT! Always use the support leg (#10) to ensure the safe use
of the Doona ISOFIX Base.
IMPORTANT! The support leg (#10) must never be suspended in mid-air
or supported by other objects.
IMPORTANT! Under no circumstances should this product be used if
the support leg color indicator (#8) remains red.
Note: When the support leg (#10) rests rmly on the oor of the
vehicle and the support leg color indicator (#8) is green, assure that
the gap between the Doona ISOFIX Base body and the vehicle
seat is minimal.
Page 15
17
2.1.
4.3.
5.
INSTALLING THE DOONA ISOFIX BASE IN THE VEHICLE
Page 16
THE NEXT GENERATION CAR SEAT / ISOFIX BASE
18
1.
5.2. Removing the Doona ISOFIX
Base from your vehicle
Step 1: Make sure the Doona Infant Car Seat is not connected
to the ISOFIX Base. In case it is connected, please remove it rst.
Detailed description for removing the Doona Infant Car Seat
from the ISOFIX Base can be found in chapter 6.2.
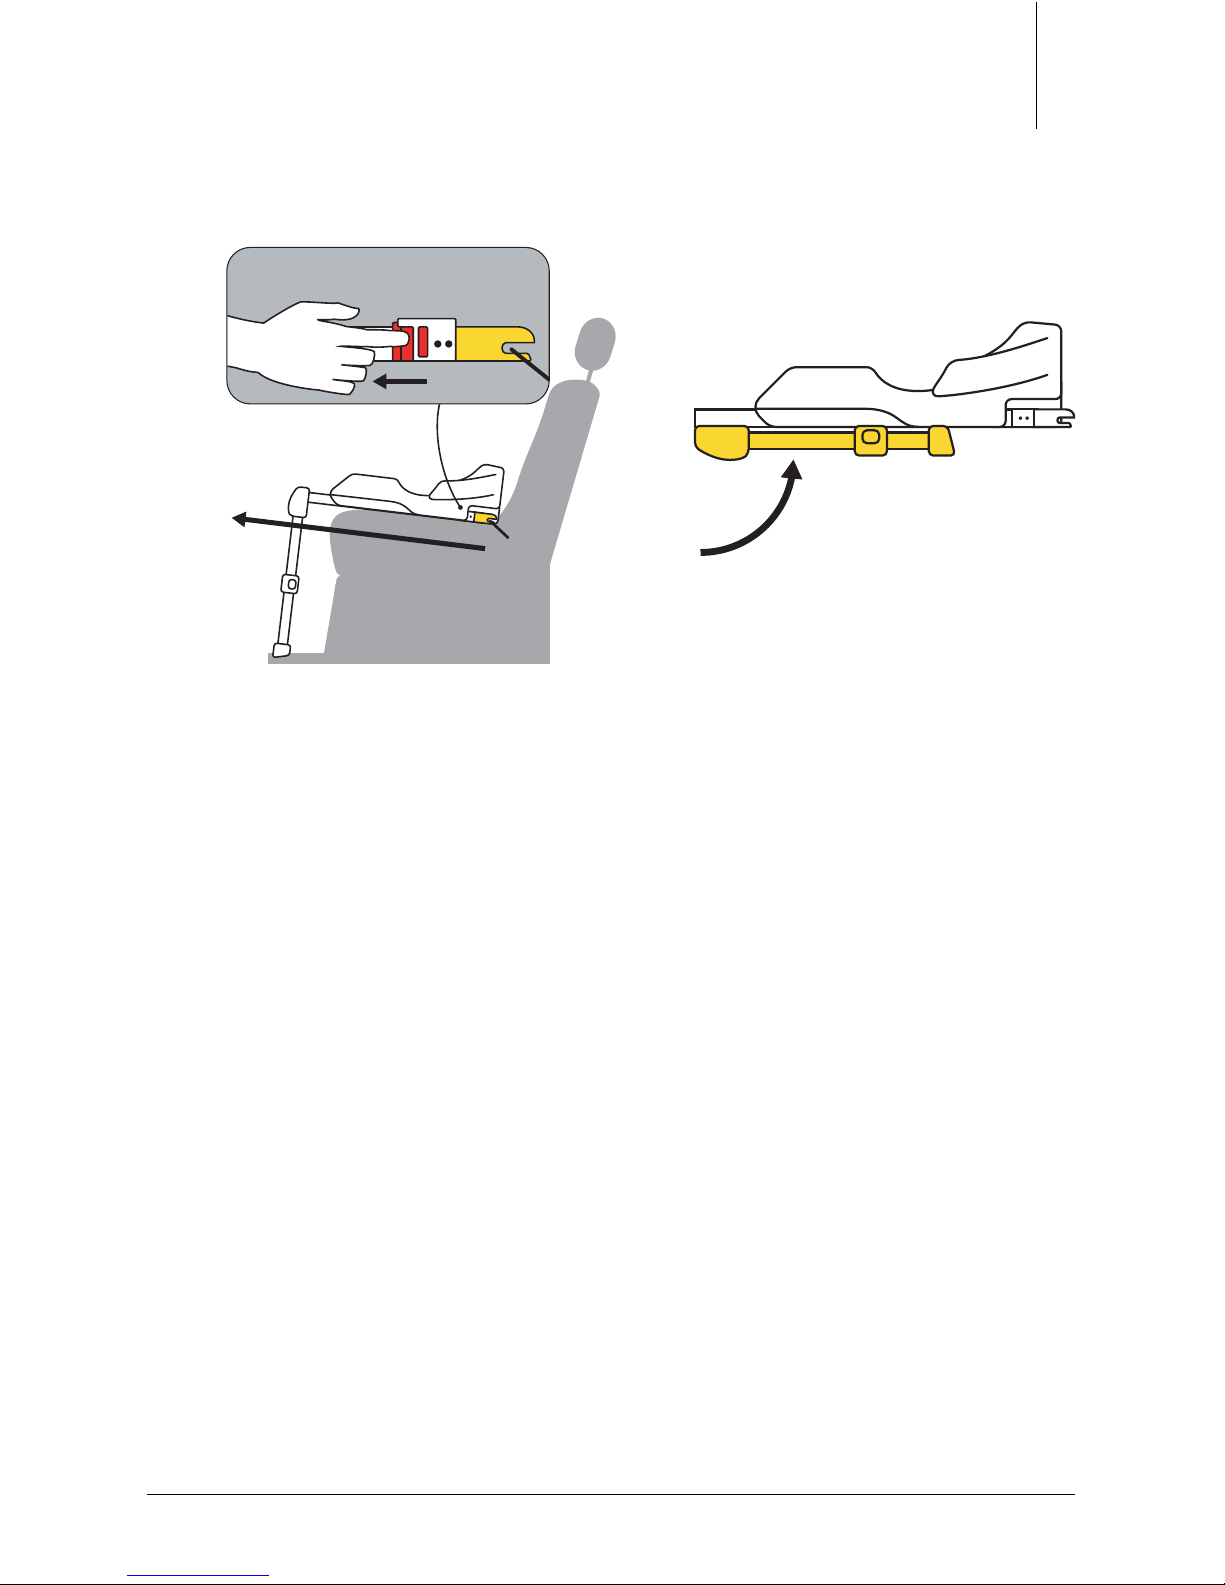
Step 2: Pull the ISOFIX release button (#6) on each side of the
Doona ISOFIX Base, and pull the ISOFIX Base body away from
the vehicle’s ISOFIX low anchors, until the Doona ISOFIX Base is
completely disconnected.
Step 3: Fold the support leg (#10).
Note: Do not leave the Doona ISOFIX Base unattached inside
the vehicle. Any luggage or other objects liable to cause
injuries in the event of a collision shall be properly secured.
Page 17
19
2. 3.
INSTALLING THE DOONA ISOFIX BASE IN THE VEHICLE
Page 18

THE NEXT GENERATION CAR SEAT / ISOFIX BASE
20
0 6 / Installing and
removing of the Doona
Car Seat from the
Doona ISOFIX Base.
6.1. Securing the Doona Car Seat
on the Doona ISOFIX Base
After securing the Doona ISOFIX Base in your vehicle (See chapter
5 for instructions), you may now easily connect and remove the
Doona Car Seat from your vehicle. To do so, follow the steps below:
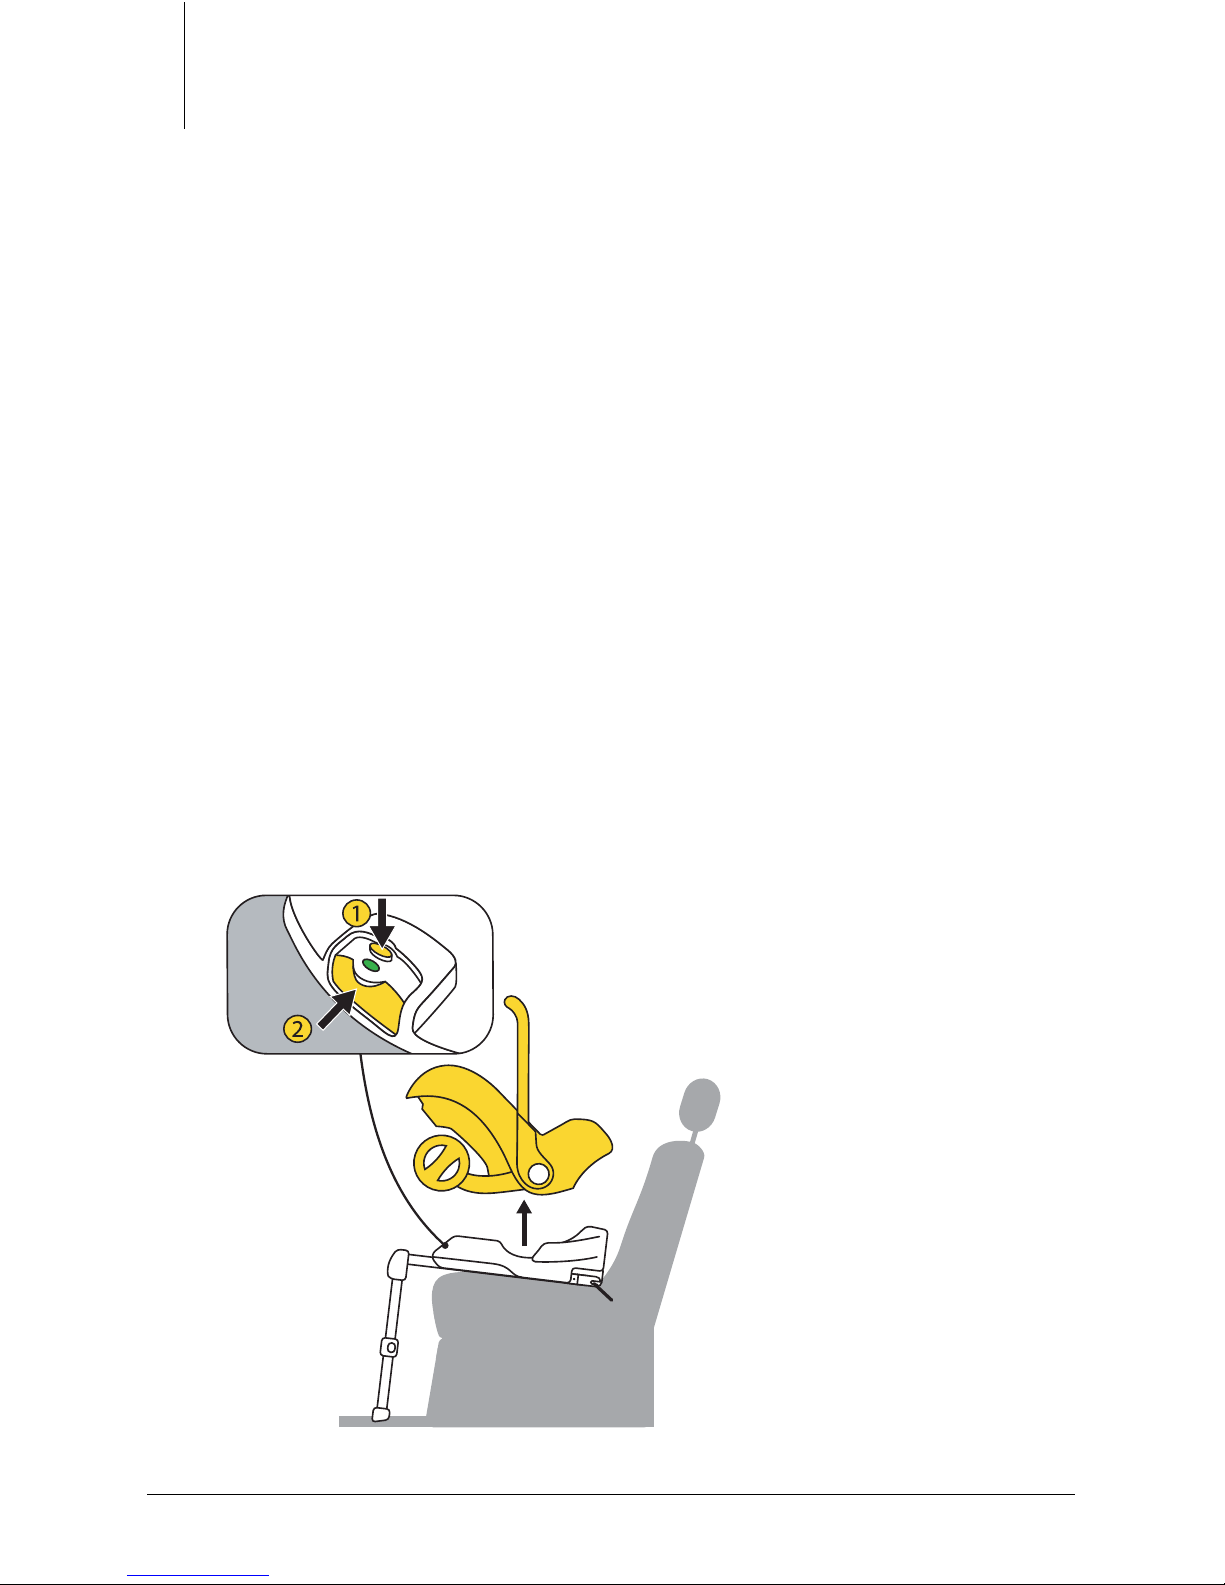
IMPOTRANT! Before installing the Doona car seat on the Doona ISOFIX
Base, make sure that the Doona release button (#3) is pressed in,
and the Doona color indicator (#4) is red. It should turn green only
when the Doona car seat was correctly installed on the Doona
ISOFIX Base.
In case the Doona color indicator (#4) is Green before installing the
Doona Car Seat, You should press down the small top button, and
while it is pressed down push the entire Doona release button (#3)
forward until it clicks in place and the Doona color indicator (#4)
turns red.
Page 19
Doona metal bars
21
INSTALLING AND REMOVING OF THE DOONA CAR SEAT FROM THE DOONA ISOFIX BASE
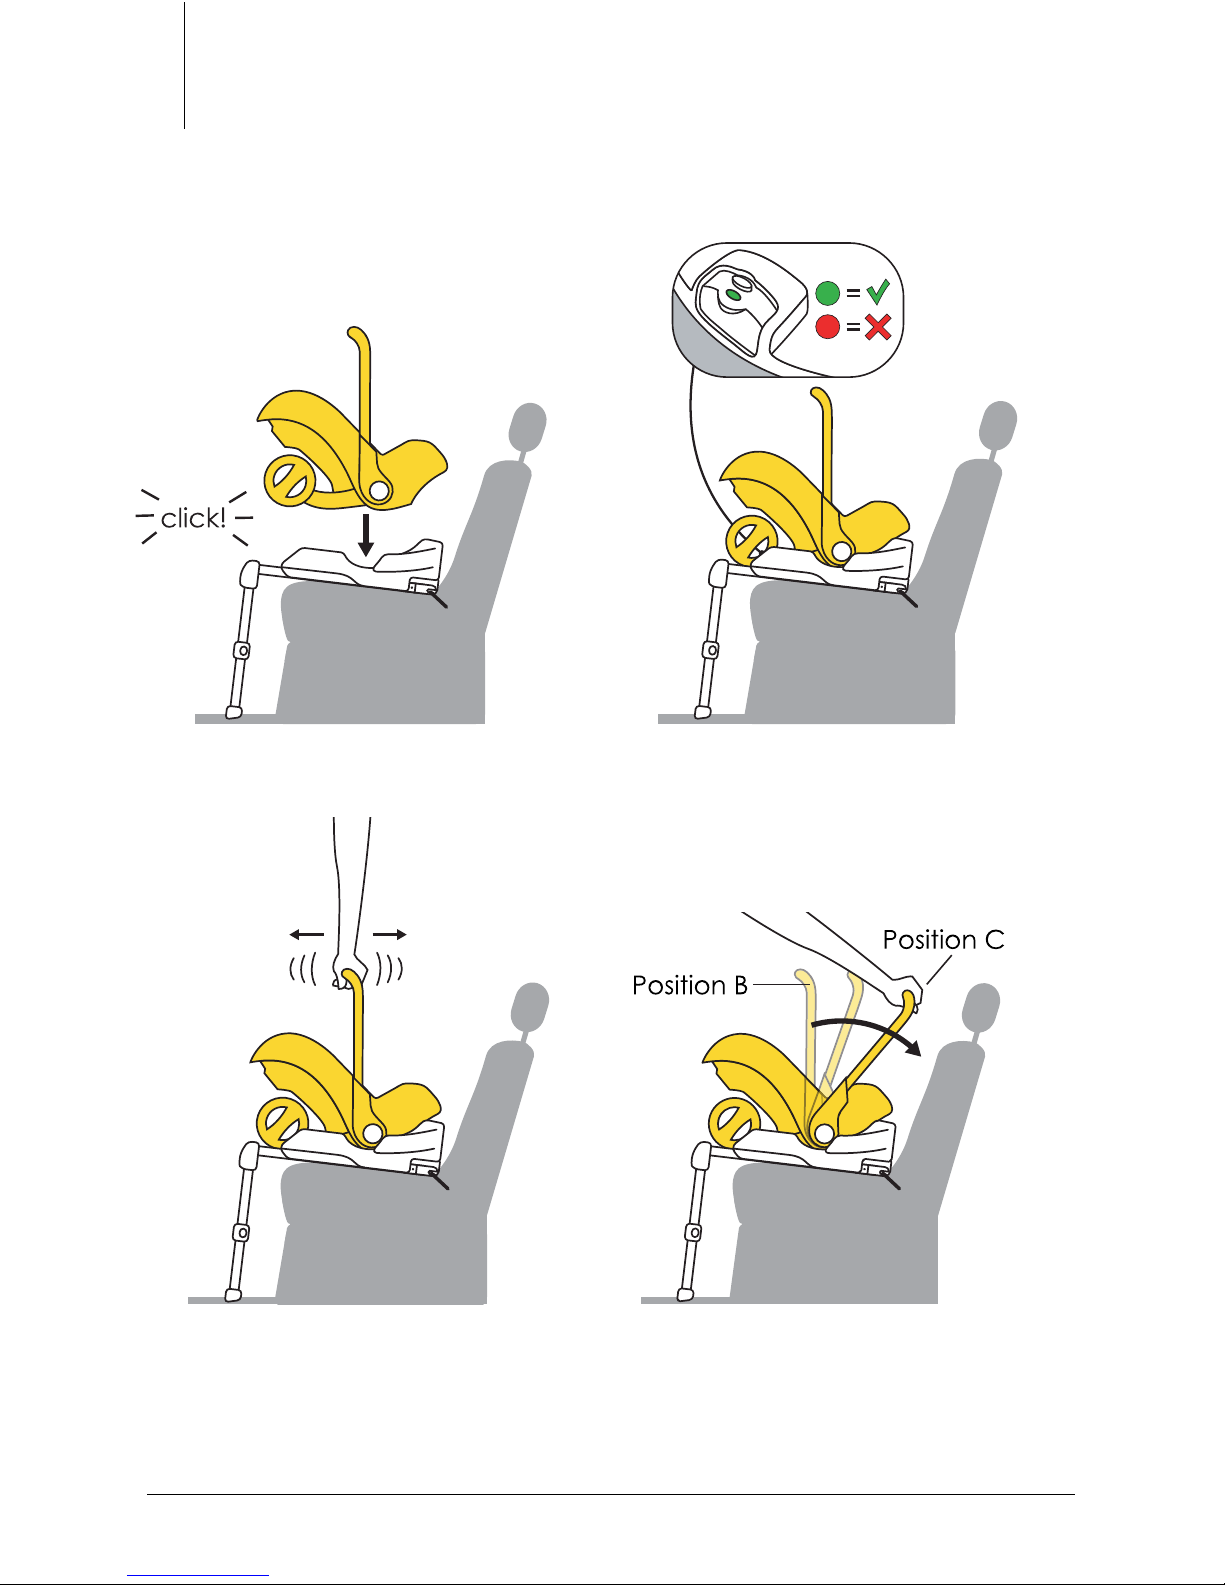
Step 1: When the Doona is in car seat mode (wheels are
folded), and the handle is in its upright position B, place the
Doona Car Seat facing the back of the vehicle (opposite the
driving direction).
Note: For further information about folding the Doona Car
Seat and adjusting the handle, please refer to the Doona Car
Seat User Guide.
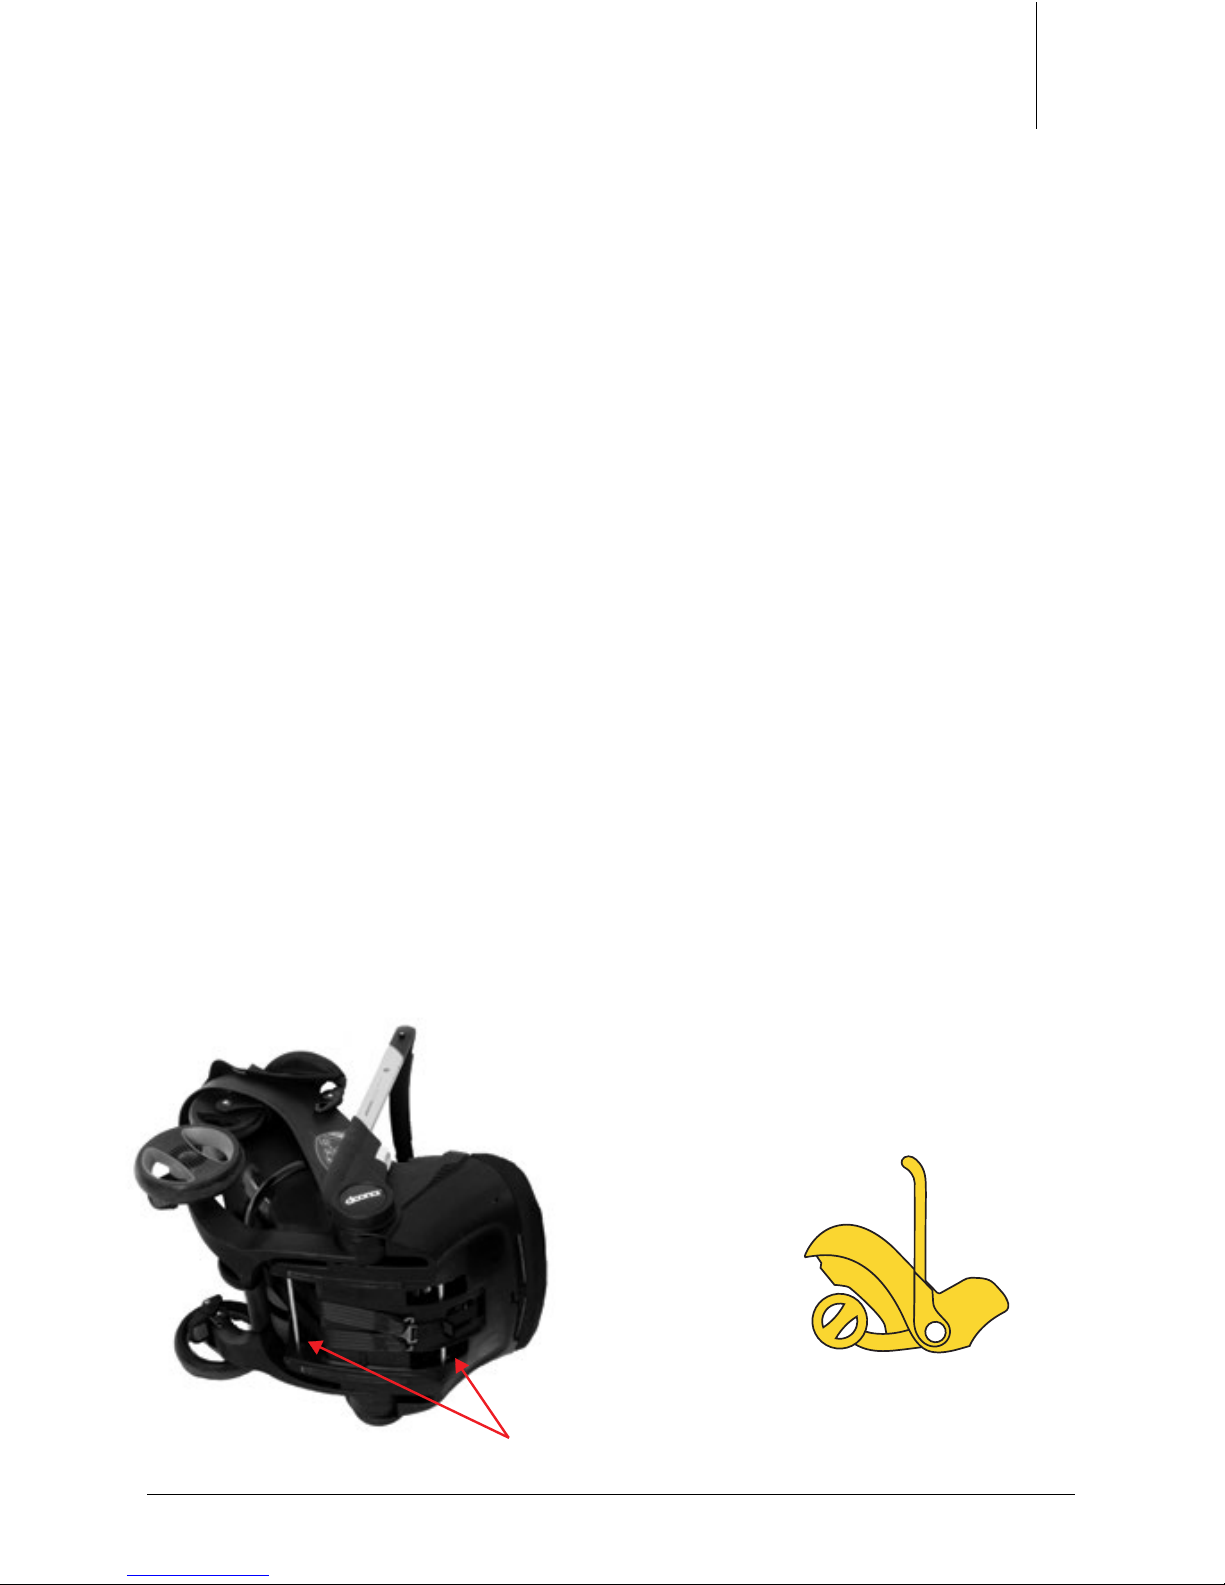
Step 2: Position the Doona Car Seat and align its 2 metal bars
(See image below) above the Doona anchor points (#1) in
the Doona ISOFIX Base. Slide the Doona Car Seat into the
Doona anchor points (#1) until you hear a ‘click’ sound and it
is locked in place.
Step 3: Check the Doona color indicator (#4) – it should turn
from red to green once the Doona Car Seat is properly placed
and locked successfully.
Step 4: Check that the Doona is secure by shaking the handle.
The Doona should stay xed in place.
Step 5: Rotate the handle to position C, for full anti-rebound
protection.
1.
(continues on next page)
Page 20
THE NEXT GENERATION CAR SEAT / ISOFIX BASE
22
4.
5.
2.
3.
Page 21
23
6.2. Removing the Doona Car Seat
from the Doona ISOFIX Base
1.
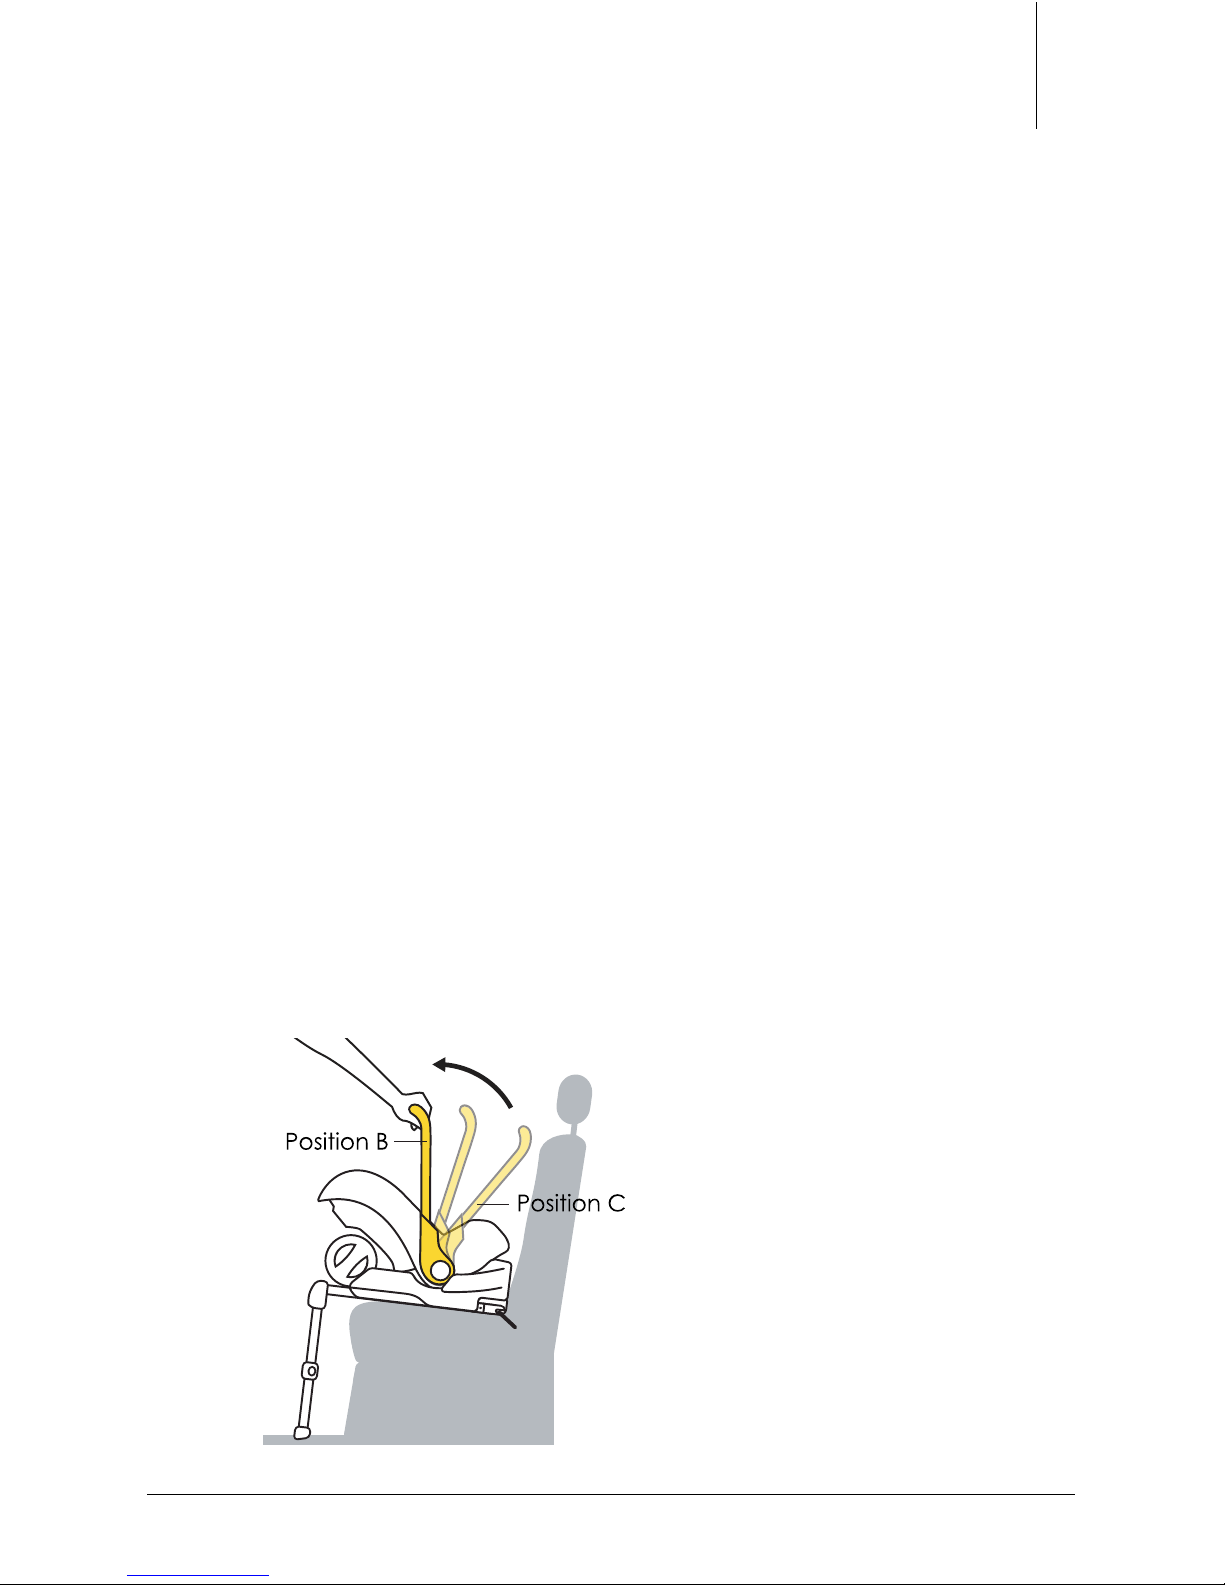
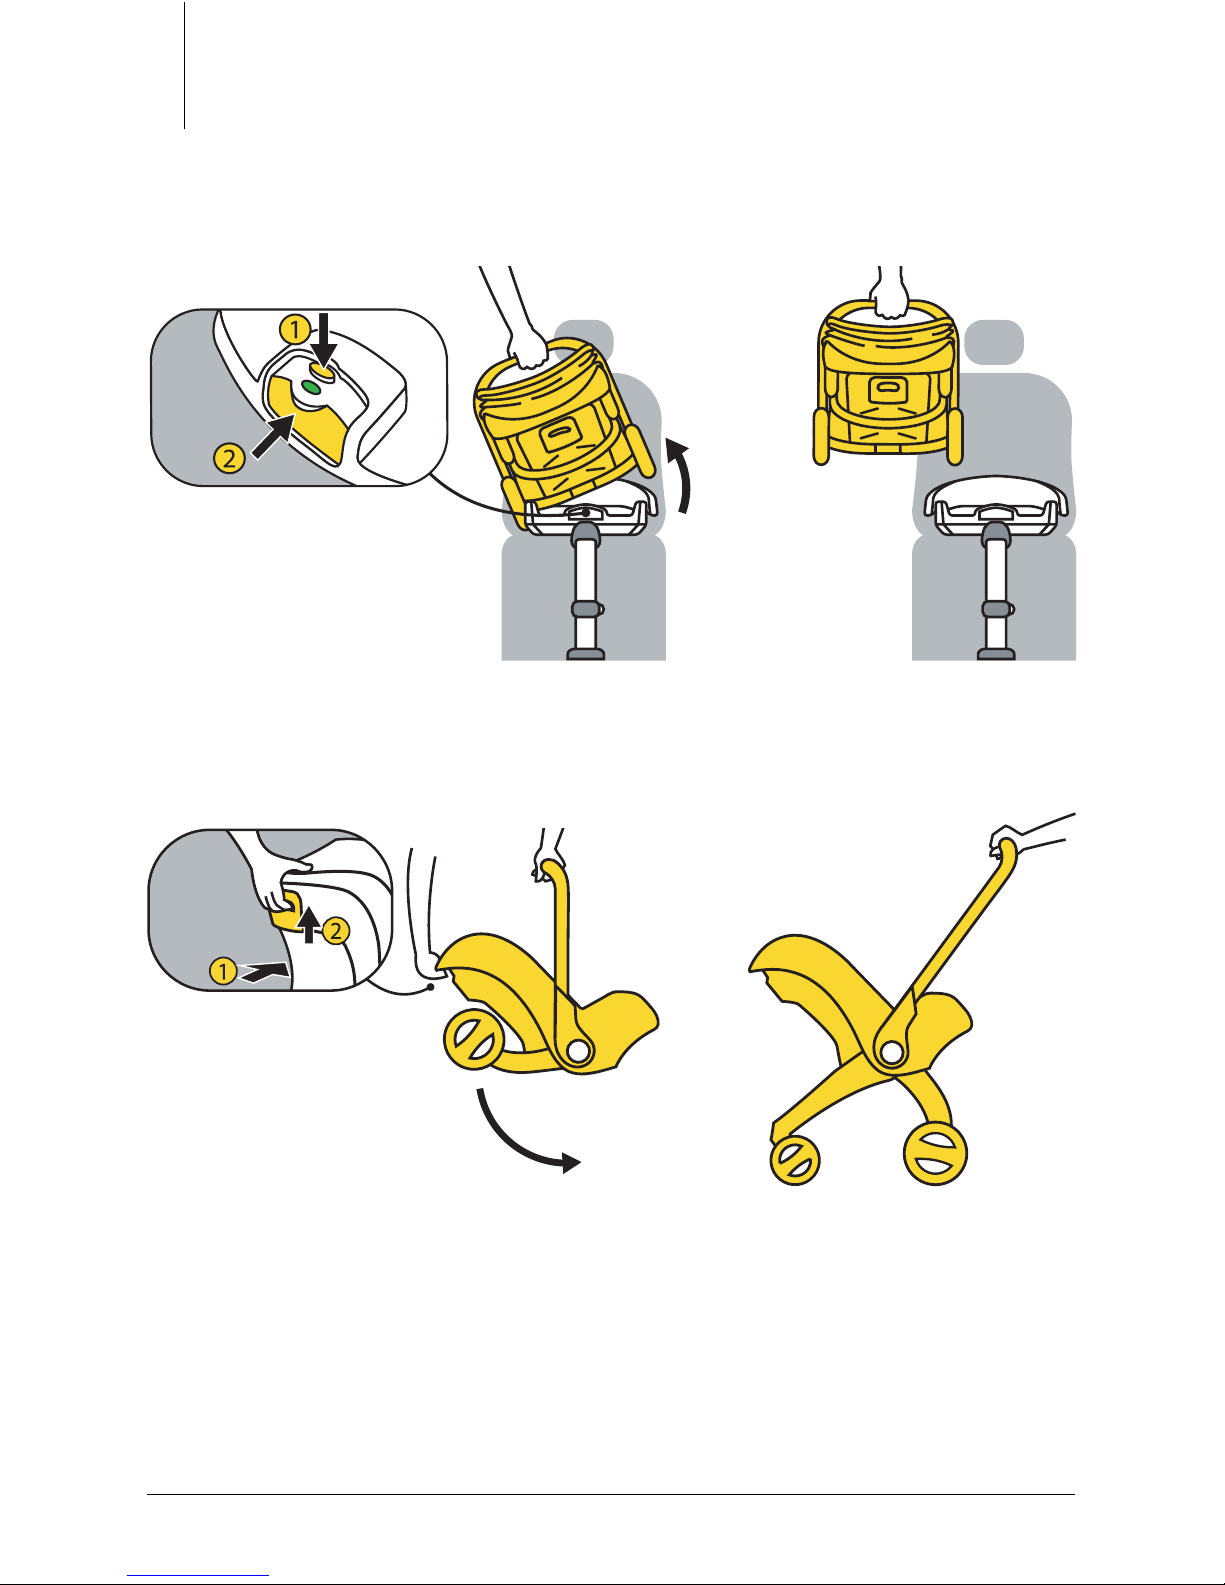
Step 1: Rotate the Doona Car Seat handle from position C to
upright position B.
Step 2: Hold the Doona Car Seat handle with one hand, and
press the Doona release button (#3) with the other hand.
You should press down the small top button, and while it is
pressed down push the entire Doona release button (#3) for-
ward until it clicks in place and the Doona color indicator (#4)
turns red. While pressing the Doona release button (#3), tilt the
Doona toward your body until it is released from the Doona
anchor points (#1).Once the Doona Car Seat is disconnected
from the base, lift the Doona and place it outside of the car.
Step 3: Unfold the Doona Car Seat wheels, rotate and extend
the handle to ‘stroller mode’ and you are ready to go!
Note: For further information about unfolding the Doona Car Seat
and adjusting the handle, please refer to the Doona Car Seat
User Guide.
(continues on next page)
INSTALLING AND REMOVING OF THE DOONA CAR SEAT FROM THE DOONA ISOFIX BASE
Page 22
THE NEXT GENERATION CAR SEAT / ISOFIX BASE
24
2. I
I
II
II3.
Page 23

25
0 7 / Car tting list.
To obtain further information on tting the Doona ISOFIX Base in
specic cars, please contact us at: [email protected] or visit
our website: www.simpleparenting.co
CAR FITTING LIST
Page 24
THE NEXT GENERATION CAR SEAT / ISOFIX BASE
26
0 8 / Care instructions.
8.1. Cleaning
It is recommended to clean the Doona ISOFIX Base periodically, in
order to keep it properly functioning.
Always remove the Doona Car Seat before cleaning the Doona ISOFIX
Base. It is also recommended to remove the Doona ISOFIX Base from
the car in order to clean it properly.
To clean the ISOFIX Base, sponge clean or rinse using warm water, soap
and a rag. DO NOT use any solvents or lubrication. Using anything other
than soapy water can cause the moving parts to malfunction.
ASSURING PROPER FUNCTION
• In an accident, at a collision speed above 10 km/h,
the Doona ISOFIX Base could suffer damage which
is not necessarily visible. In this case, the ISOFIX Base
must be replaced. Please dispose of it properly.
• Regularly check all important parts for damage.
Ensure the correct operation of all mechanical
components.
• Should the Doona ISOFIX Base be damaged (for
example after dropping it) it must be inspected.
• Never use spare parts or accessories other than
those supplied or approved by the manufacturer –
The Doona ISOFIX Base is compatible only with the
Doona Car Seat.
Page 25

27
We guarantee that the Doona ISOFIX Base was manufactured in
accordance with the European safety standards and regulations,
and it meets the highest standards of quality.
For the Doona ISOFIX Base we provide a 2-year warranty against
manufacturing or material defects. The warranty period is effective
from the day of purchase. As proof of purchase we ask that you
ll out the Warranty Card and retain it for the whole term of the
warranty period, together with your sales receipt.
In case of a warranty claim, the Warranty Card must be returned
together with the product to your local distributor.
Please also register your Doona ISOFIX Base online at:
www.simpleparenting.co
The Warranty will cover a Doona ISOFIX Base which has been
handled properly.
The warranty does not apply in the following cases:
• The product shows normal signs of wear and tear.
• Damage occurs as a result of exposing the product to
• excessive stress.
• Damage occurs as a result of inappropriate or improper use.
0 9 / Two-year
warranty.
TWO-YEAR WARRANTY
Page 26

THE NEXT GENERATION CAR SEAT / ISOFIX BASE
28
• When the product has been used for a purpose other than that
specied in this user manual.
In the event of a warranty claim, please contact us directly at:
Page 27

29
1 0 / Warranty card.
Warranty card:
Name:
Address:
Post code:
City/Town:
State:
Country:
Telephone no. (including area code):
E-mail address:
Doona ISOFIX Base serial no. :
Store where product was purchased:
Date of purchase:
WARRANTY CARD
Page 28

simpleparenting.co
 Loading...