

Dongguan Newmen Electronics Technology P001NOR User Manual
P- 00 1(OFN) 100G的书写纸
尺寸:210*148MM 料号:HPML-00100754
P-001 User Manual
Packag e con tents
2.4GHz w ire less pres enter 1pc
Mini rec eiv er 1pc
AAA alkali ne ba ttery 2pc s
Quick in sta ll guide 1p c
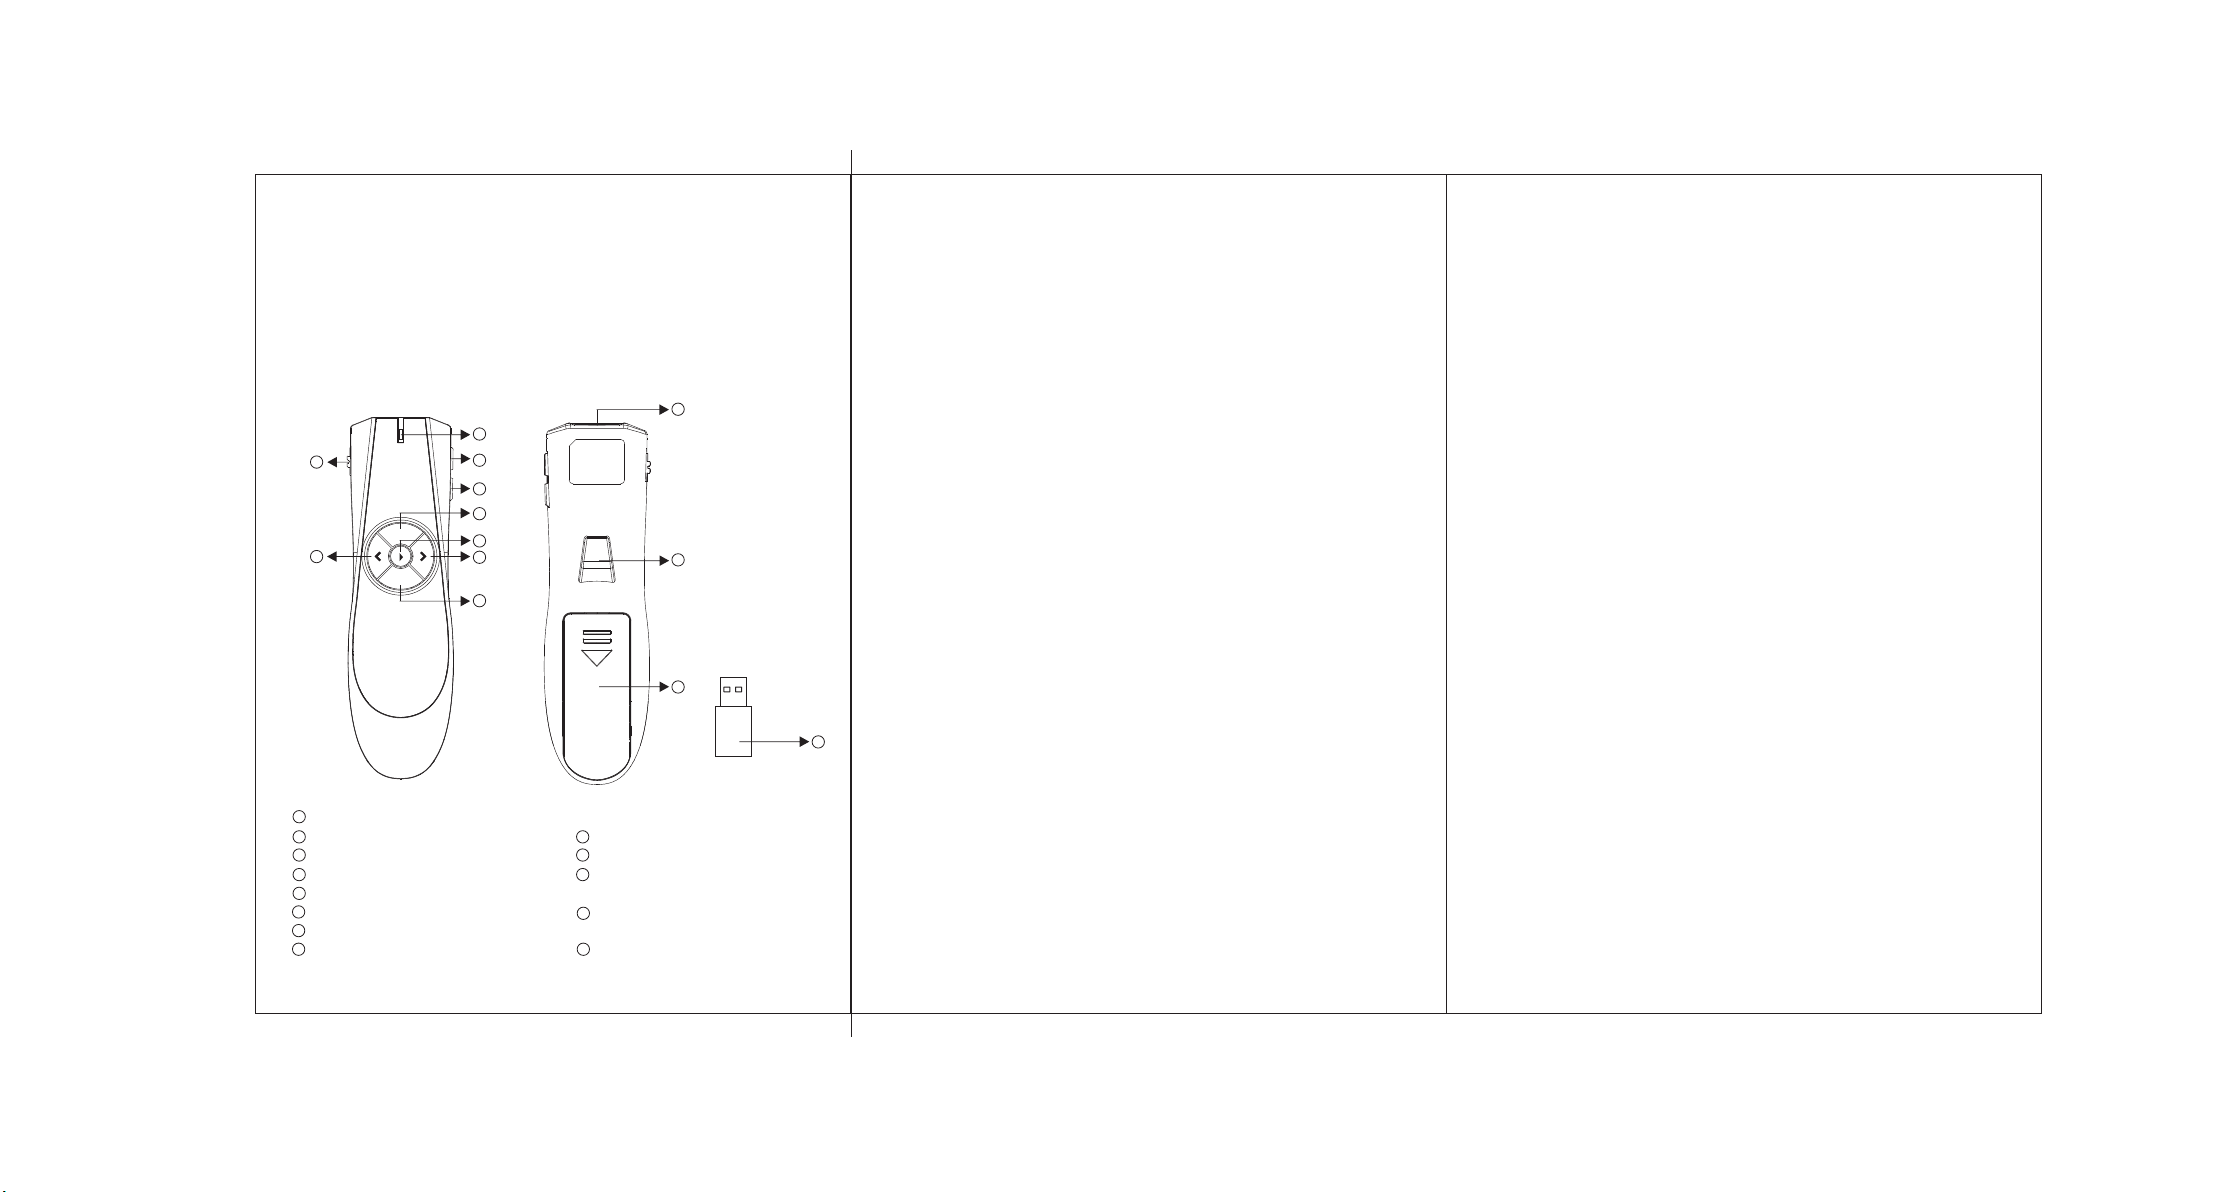
Descri pti on of keys
1
8
O F N
E sc
9
B
1
Indica tor L ight (Wor king star t indicat ion a nd low-vo ltage alarm)
2
Increa se Vol ume Decr ease Volume
4
Esc Play
6
Page Dow n Bla ck Sc reen
8
Power On /Off
9
Page Up Re d Laser Pointer
11
Contro l But ton of Red La ser Pointer
12
Batter y Cov er Mini Rec eiver
2
3
4
5
6
7
3
5
7
10
13
10
11
12
Specif ica tion
Operat ing d istance : Up to 15 mete rs
Wirele ss ca rrier fre que ncy: 2.4G Hz
Input vo lta ge: 3V
Resolu tio n of OFN: 800 DPI
Note on Re d Las er Pointe r
This pro duc t can gener ate s afe red las er beam. Ho wev er, to avoid h arm , please
don't po int t he red lase r bea m to eyes of yo ur own or oth ers . Never giv e it to
childr en as a t oy.
Operat ing p rocess
1.Remo ve th e battery c over of pre sen ter, inser t two AA A ba tteries i nto the bat ter
compar tme nt by prope r pos itive (+) a nd negati ve (- ) ends as spe cified by the
marksi n the b attery co mpartment.
2.Take ou t the mini rec
The comp ute r system wi ll automatic ally dete ct it a nd instal l USB drive r.
3.Repla ce the battery co ver and tu rn on the present er. When dr iver is au tomatical ly
instal led , compute r will remind th e device is r ead y to use.
If it's un usa ble, plea se operate as fo llowing w ay.
1. Pull ou t the m ini recei ver f rom USB por t and turn of f present er.
2. Reinse rt mini re ceiver into a USB port, put presen ter clo se to mini receiv er, with
a distan ce of 2 0cm, pres s the Play bu tto n and don't r ele ase it, tur n on
presen ter, t he mini rec eiv er and pres enter wil l set c onnecti on at o nce, then y o
may use it . This proc ess m ust be fini shed with in 1 mi nute.
Ex pl ana ti on on P ow erPoi nt a pp li cat io n
1. a Power Poi nt file.Open
2.Pres s Pla y button to p lay a Power Poi nt file.
3.Use Pa ge UP and Pag e Dow n buttons t o page up and d own . Control v olu me by
Vol + and Vol -.
13
4.Pres s but ton B to get bl ack scree n.
5.To genera te re d laser bea m, pr ess the Con trol Butt on of R ed Laser Po inter.
6.Pres s but ton Esc to ex it.
System r equ irement s
Window s XP/ Vist a/7
eiv er from ba ttery cover, inse rt it into a US B port of compute
y
r.
n
i
u
This device complies with Industry Canada license-exempt RSS standard(s).
Operation is subject to the following two conditions:
(1) this device may not cause interference, and (2) this device must accept any
interference, including interference that may cause undesired operation of the device.
Le présent appareil est conforme aux CNR d'Industrie Canada applicables aux
appareils radio exempts de licence. L'exploitation est autorisée aux deux conditions
suivantes : (1) l'appareil ne doit pas produire de brouillage, et (2) l'utilisateur de
l'appareil doit accepter tout brouillage radioélectrique subi, même si le brouillage est
susceptible d'en compromettre le fonctionnement
Warning: Changes or modifications to this unit not expressly approved by the party
responsible for compliance could void the user’s authority to operate the equipment.
NOTE:
This equipment has been tested and found to comply with the limits for a Class B
digital device, pursuant to part 15 of the FCC Rules. These limits are designed to
provide reasonable protection against harmful interference in a residential installation.
This equipment generates, uses and can radiate radio frequency energy and, if not
installed and used in accordance with the instructions, may cause harmful interference
to radio communications.
However, there is no guarantee that interference will not occur in a particular
installation. If this equipment does cause harmful interference to radio or television
reception, which can be determined by turning the equipment off and on, the user is
encouraged to try to correct the interference by one or more of the following measures:
-Reorient or relocate the receiving antenna.
-Increase the separation between the equipment and receiver.
-Connect the equipment into an outlet on a circuit different from that to which the
receiver is connected.
-Consult the dealer or an experienced radio/TV technician for help.
This device complies with Part 15 of FCC Rules. Operation is subject to the following
two conditions:1) this device may not cause harmful interference, and 2) this device
must accept any interference received, including interference that may cause undesired
operation.
 Loading...