

Page 1
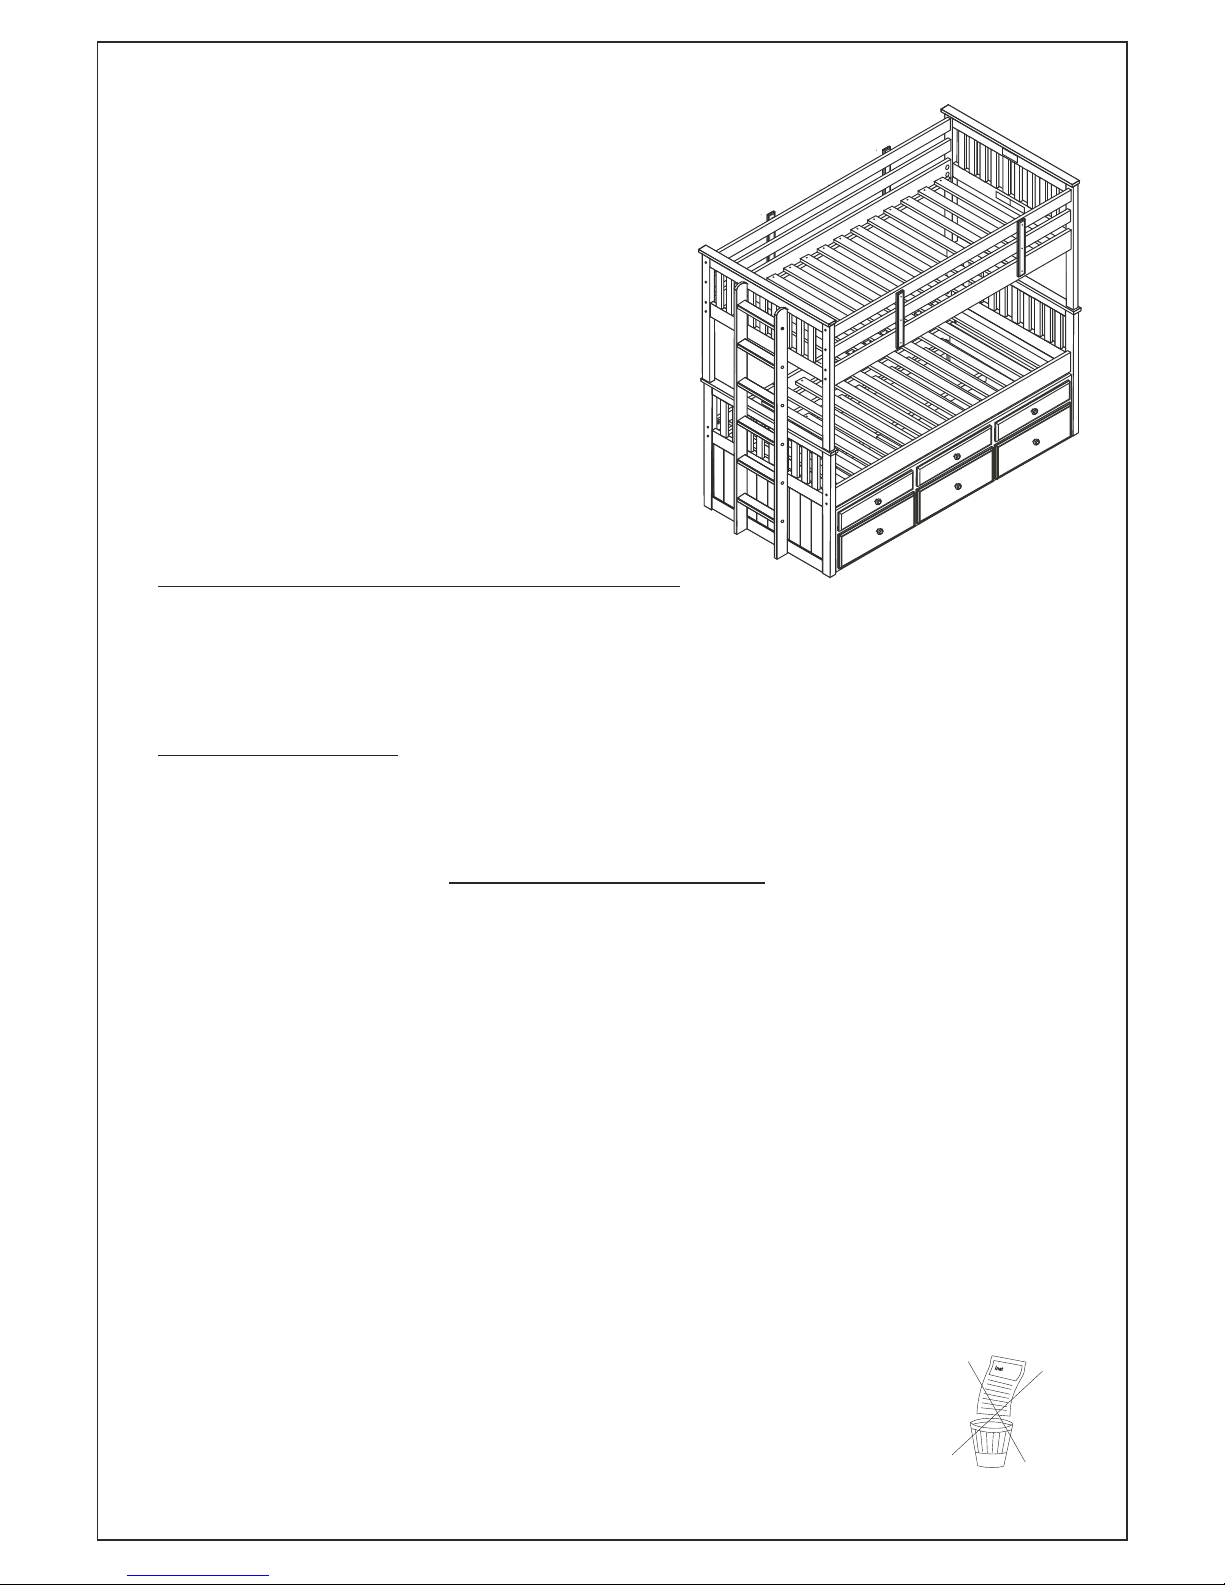
V-133-3 MISSION CAPTAINS
TRUNDLE BUNK BED
ASSEMBLY INSTRUCTIONS
SIZE OF MATTRESS AND FOUNDATION (SUPPORT)
This bed is designed to use a twin mattress ( 37 ½”- 38 ½”x 74 - 75”) and bunkie board (37 ½"x 74”).The
total thickness must not exceed 9” inchess. Do not use mattress without the proper bunkie board of safe
foundation.
Note:There must be at least 5” inches from
top
surface
of
mattress to top edge or guardrails.
Be sure to check all packing material carefully
for small parts which may have come loose
inside the carton during shipment. Separate,
identify and count all parts and hardware.
Compare with the parts list to be sure all parts
are present.
“DO NOT TIGHTEN SCREWS
UNTIL COMPLETELY ASSEMBLED”
REPLACEMENT PARTS.
Replacement parts, including additional guard rails, may be obtained from place of purchase or original
distribution.
SAFETY WARNINGS!
1- Follow the information on the warning label appearing on the upper bunk end structure and on the carton. Do
not remove warning label from bed.
2-Always use the recommended size mattress or mattress support, or both, to help prevent the likelihood
of entrapment or falls.
3- Surface of mattress must be at least 5 inchess below the upper edge of guardrails.
4- Do not allow children under 6 years of age to use the upper bunk.
5- Prohibit more than one person on upper bunk.
6- Periodically check and ensure that the guardrail, ladder and other components are in their proper posi-
tion, free from damage, and that all connectors are tight.
7- Do not allow horseplay on or under the bed and prohibit jumping on the bed.
8-Always use the ladder for enterning and leaving the upper bunk.
9- Do not use substitute parts. Contact manufacturer or dealer for replacement parts.
10- Use of a night light may provide added safety precaution for a child using the upper bunk.
11- If the bunk bed will be placed next to a wall, the guardrails that runs the full length of the bed should
be placed against the wall to prevent entrapment between the bed and the wall.
12-Always use guard rails on both long sides of the upper bunk.
13-The use of water or sleep flotation mattresses is prohibited.
14-Keep these instructions for future reference.
15-Strangulation Hazard - Never attach or hang items to any part of the bunk bed that are not designed for
use with the bed: for example, but not limited to, hooks, belts, and jump ropes, etc.
IMPORTANT: PLEASE READ INSTRUCTIONS BEFORE STARTING THE ASSEMBLY
n
t
I
s
ct
io
ns
ru
ct
ions
ru
TO OBTAIN PARTS, PLEASE CONTACT: DONCO TRADING COMPANY - FORT WORTH, TEXAS
Page 2
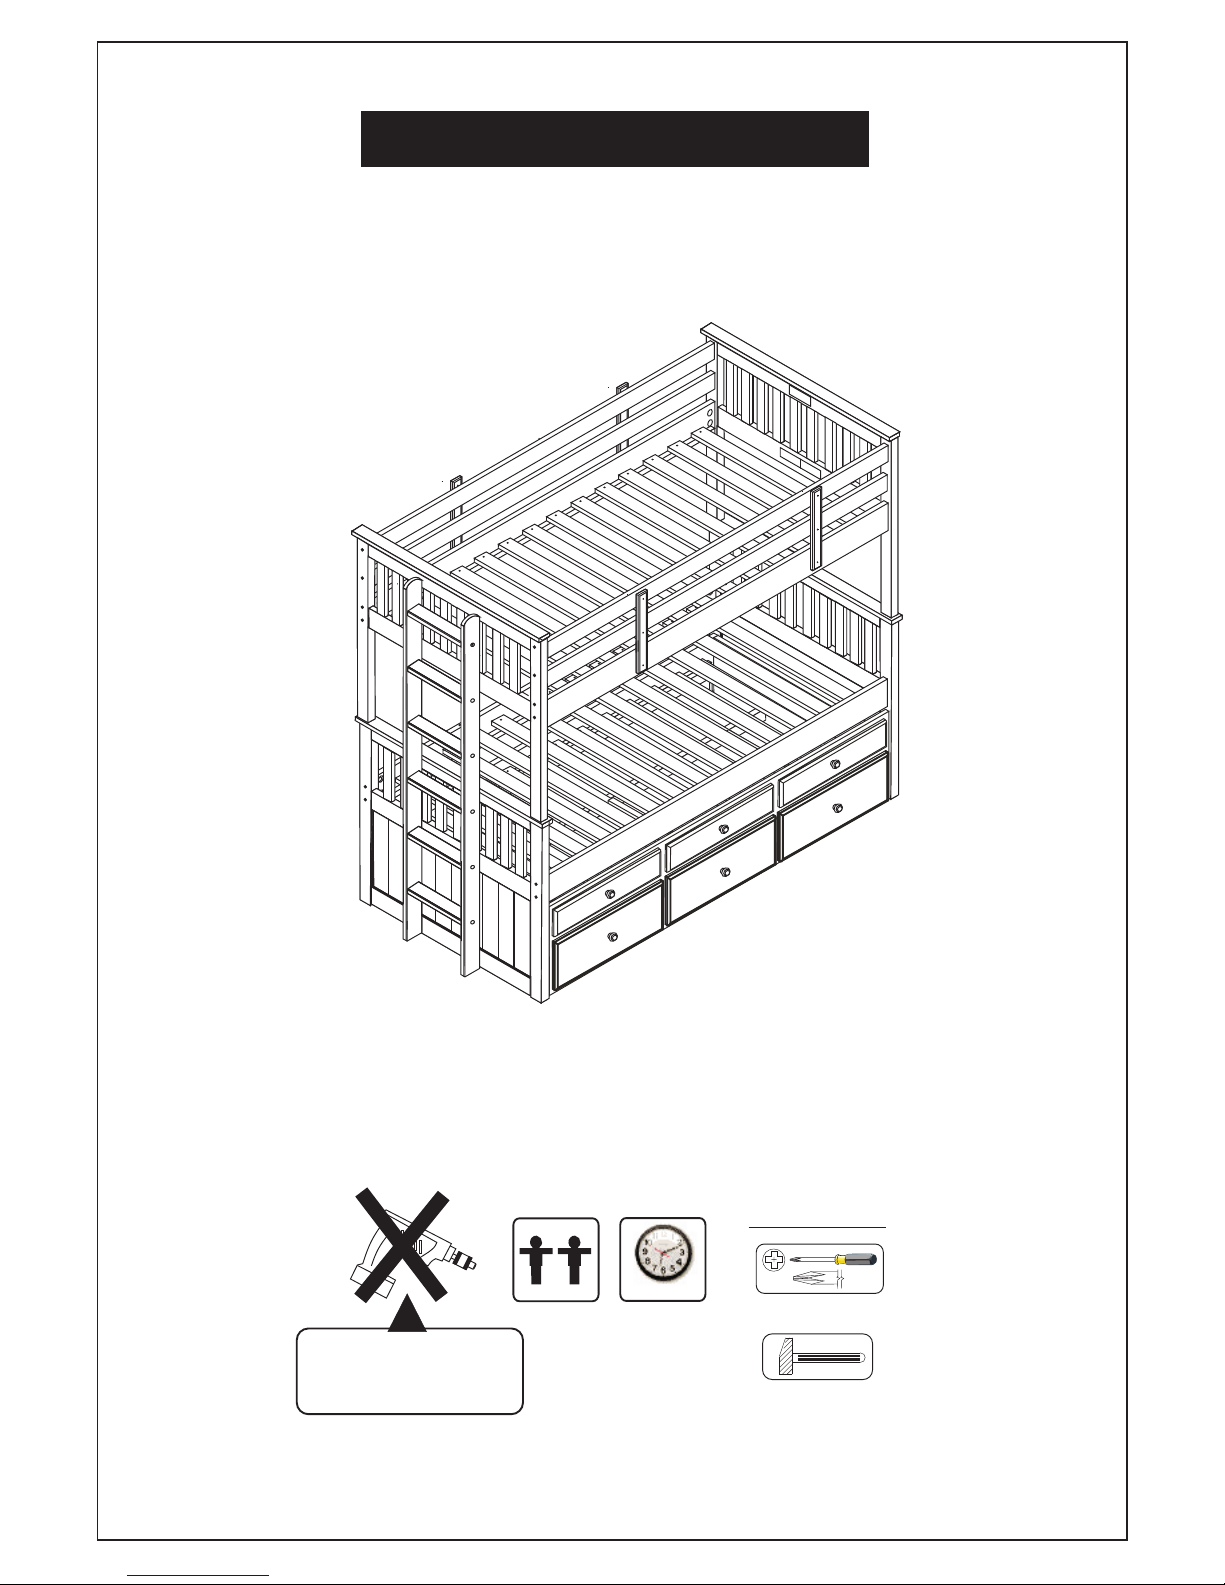
V-133-3 MISSION CAPTAINS
TRUNDLE BUNK BED
ASSEMBLY INSTRUCTIONS
Thank you for purchasing this quality product. Be sure to check all packing
material carefully for small parts which may have come loose inside the
carton during shipment. Separate, identify and count all parts and hardware.
Compare with the parts list to be sure all parts are present.
“DO NOT TIGHTEN SCREWS UNTIL COMPLETELY ASSEMBLED”
IMPORTANT:
PLEASE READ INSTRUCTION BEFORE STARTING THE ASSEMBLY
* Use of power tool to assemble this
product will invalidate any claim and
damage this product making unsafe !!!
* Please assemble on a clean soft
surface to avoid damage.
!
+
2:00 h
Tools Required
(Not includ)
(Not includ)
Page 3

E
Qty
L
Qty
C
Qty
A
G
J
Qty
D
Qty
Qty
B
Half Moon
1/4"
I
H
K
Qty
Hex Screwdriver
Qty
Qty
F
Qty
Qty
16
24
1/4”X80
7,0X50
16
4,0X30
01
124
04
10X100
36
3,5X16
10X40
06
8X25
34
4,0X50
32
02
Qty
04
Identifying the Hardware/part list- Identify the hardware using the illustrations below.
Part List: V-133-3 MISSION CAPTAINS TRUNDLE BUNK BED
Qty
M
12
3,5X20
Qty
N
12
10X10
Qty
O
02
WOOD SPACER
Qty
P
06
DRAWER STOP
3x
R
Qty
06
6x20
Q
Page 4
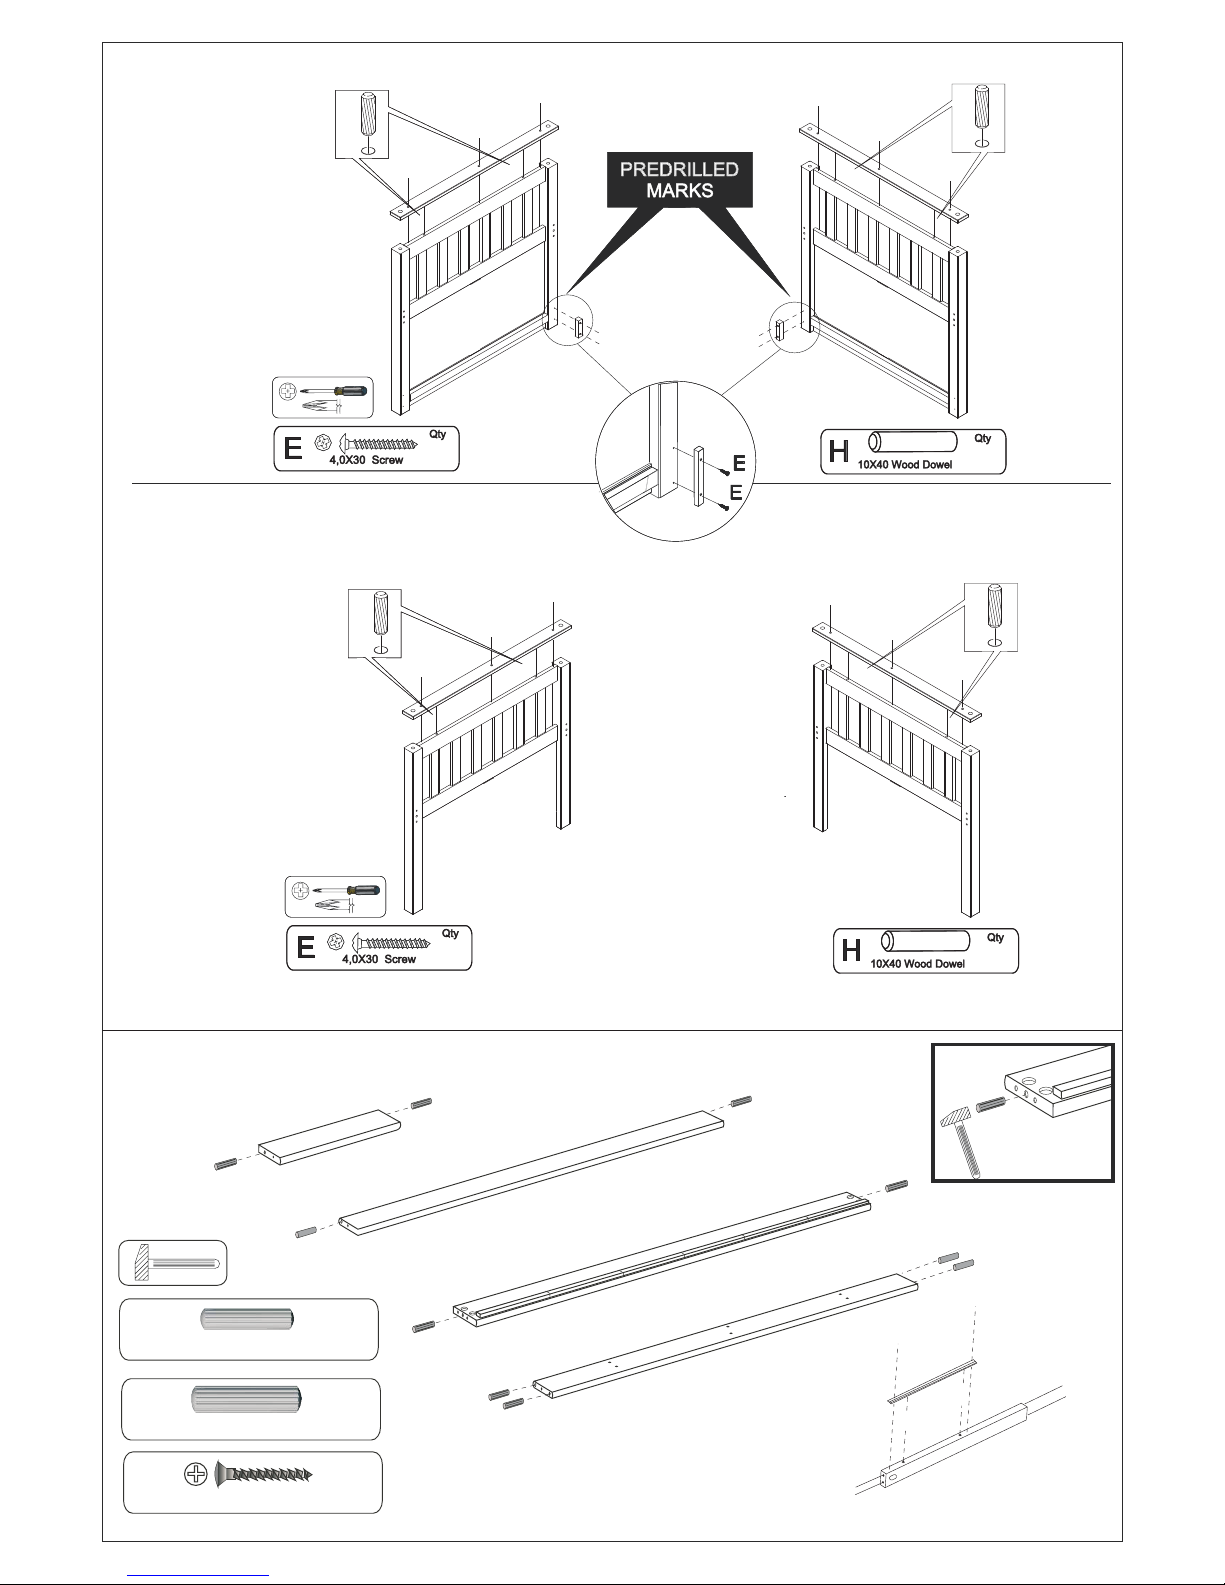
01
E
E
E
E
E
E
E
E
E
E
10
04
H
H
H
H
H
H
E
E
E
E
E
E
06
04
H
H
H
H
H
H
TOP
01.1
BOTTOM
H
X6
H
S
S
T
P
E
X4
H
H
A
D
A
I
G
U
R
R
S
L
X4
H
H
SID
E
R
I
A
S
L
X1
J
J
J
J
J
J
J
J
J
J
3x
E
E
Qty
H
28
10X40
Qty
J
22
8X25
Qty
E
06
4,0X30
H
01.2
Page 5
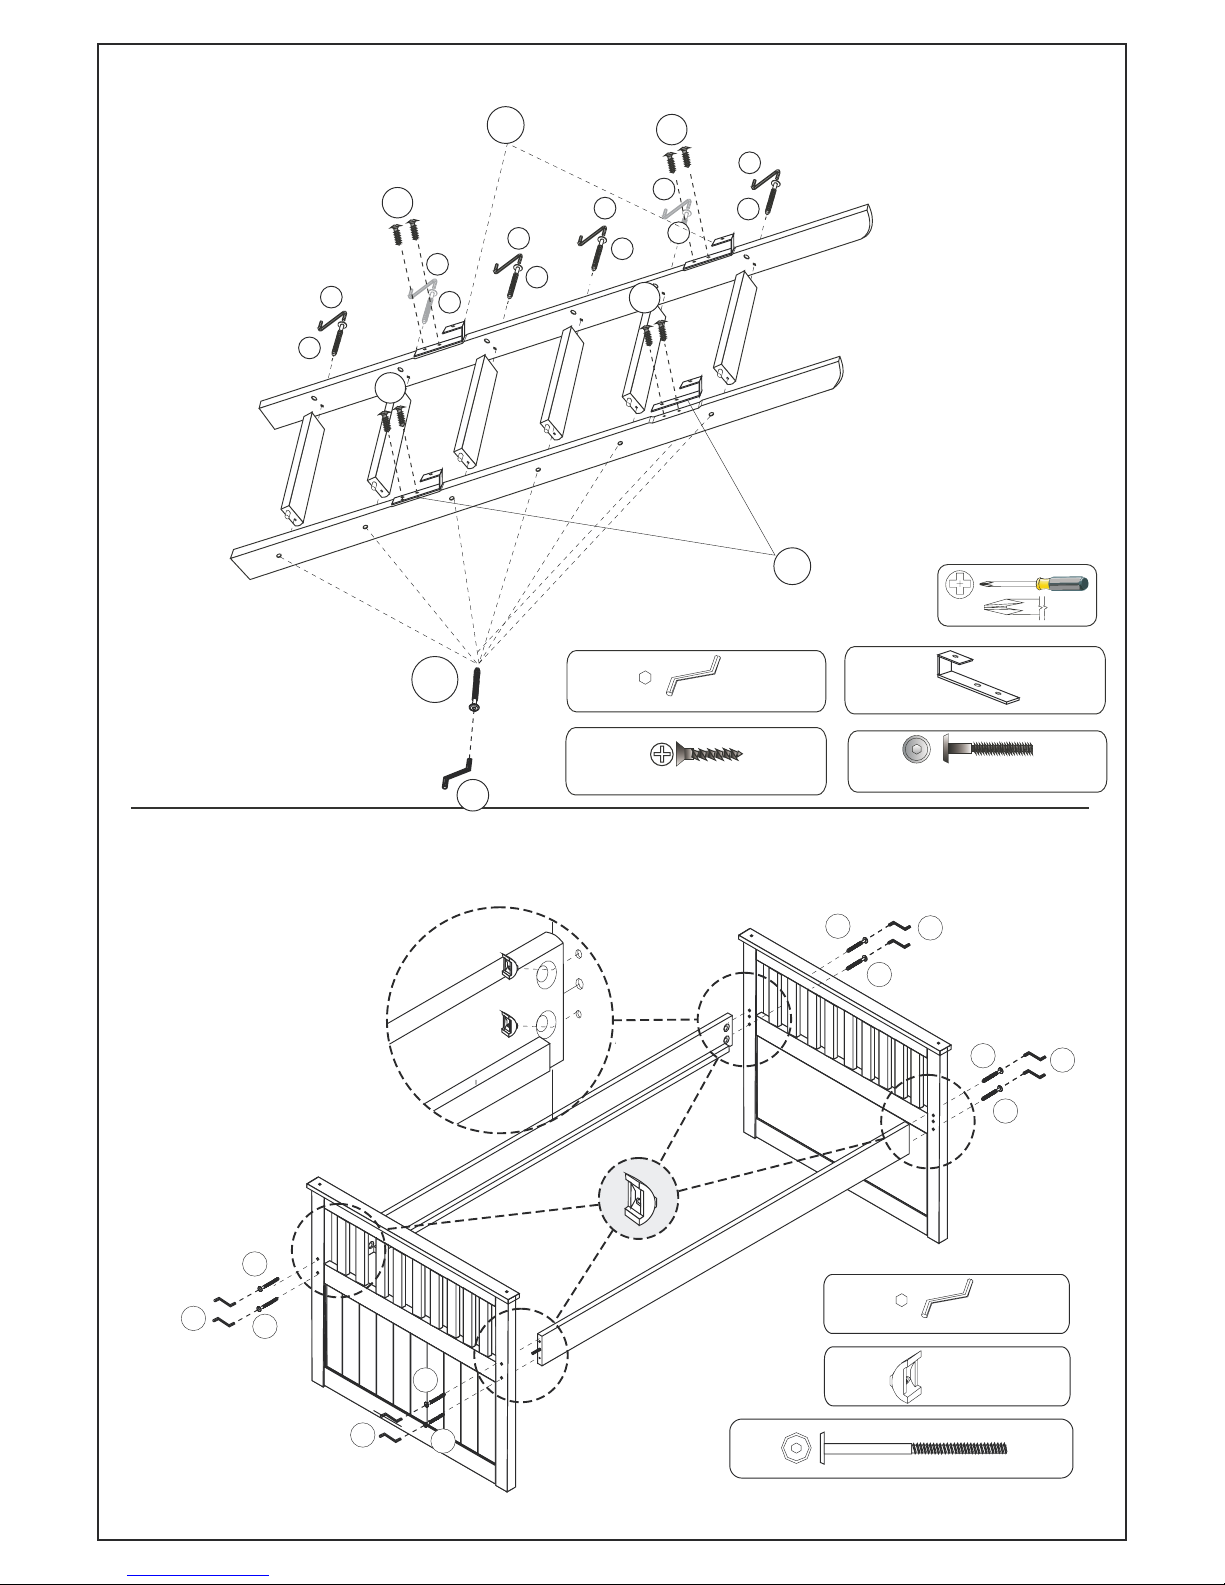
02
03
Qty
F
Qty
G
I
Qty
Hex Screwdriver
08
3,5X16
01
04
Qty
C
12
7,0X50
I
I
A
A
A
A
A
A
A
A
I
I
B
B
B
Half Moon
Qty
08
01
Qty
1/4x80 Screw
A
Qty
08
B
1/4"
Hex Screwdriver
I
I
C
C
G
G
G
C
C
C
C
C
I
I
I
I
I
I
I
I
G
F
F
BOTTOM BED
LADDER
Page 6
E
E
E
E
E
E
E
E
E
E
E
E
04
E
08
Qty
4,0X30 Screw
E
E
E
E
E
E
E
E
E
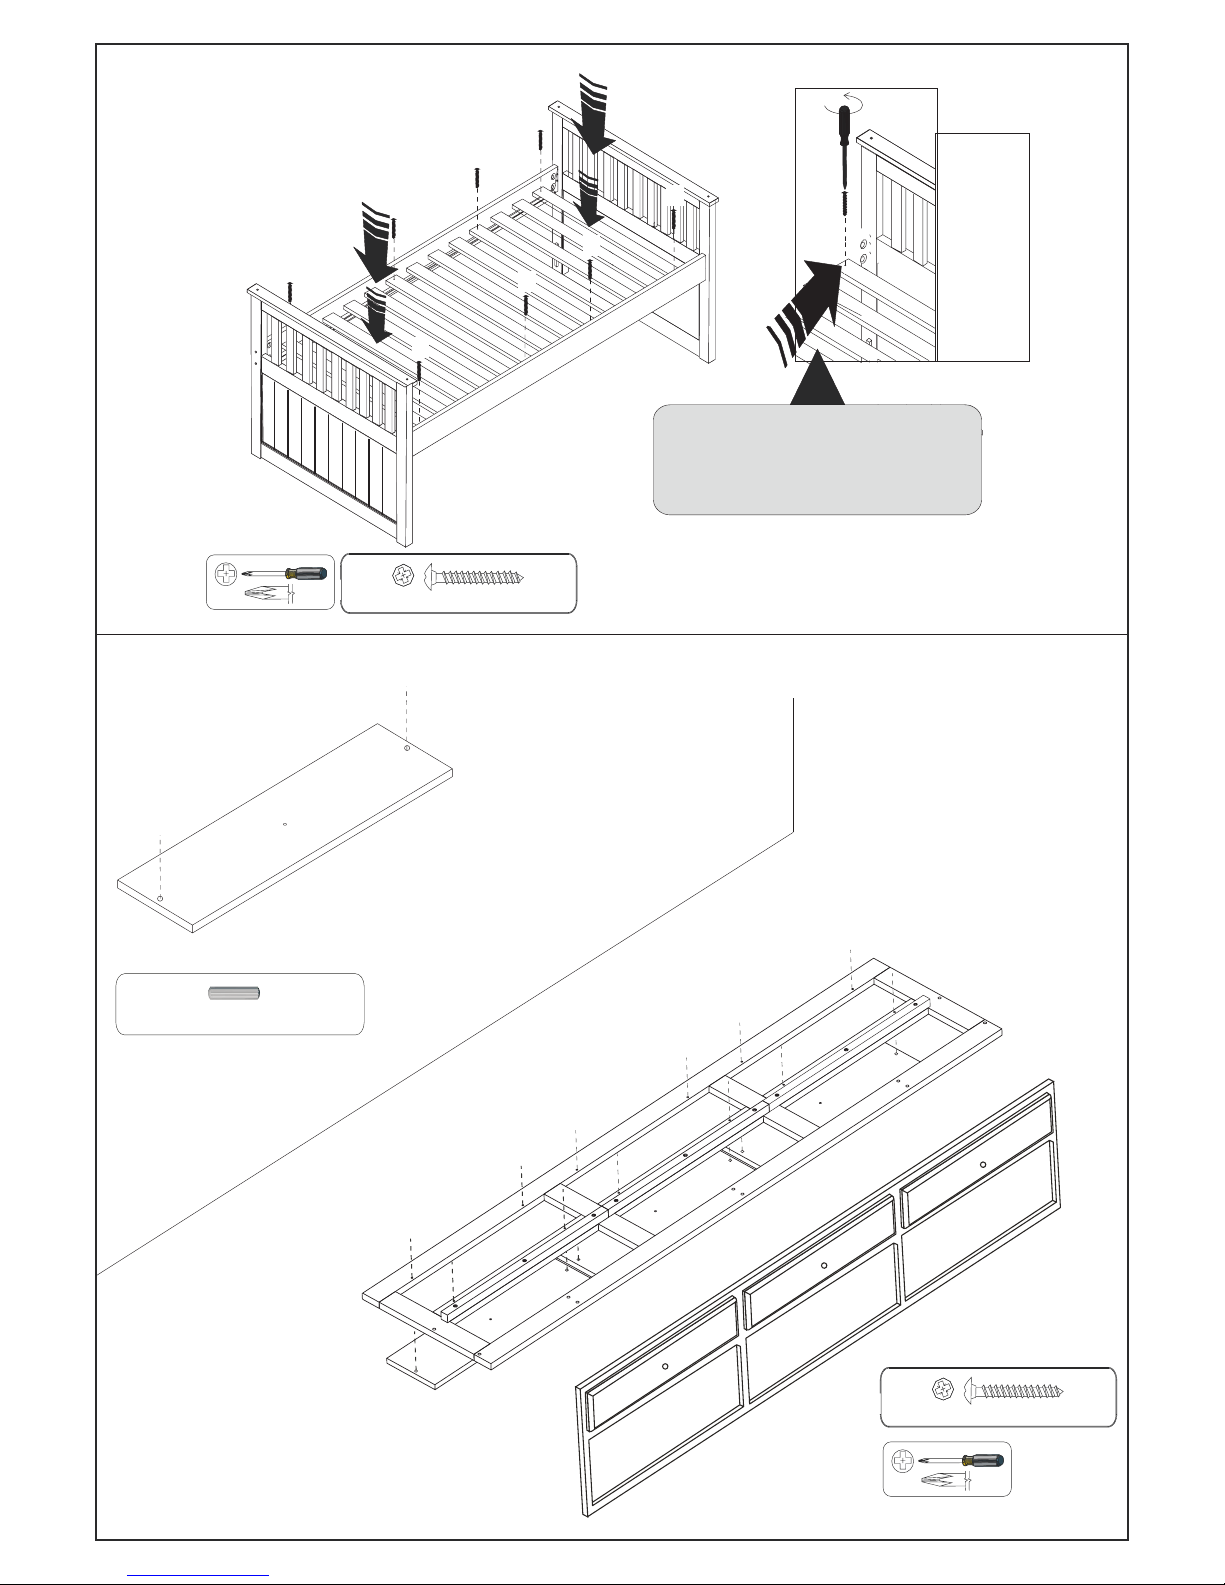
The first slats must be fixed
here at 3”
from each headboard end.
R
R
05.1
R
Qty
06
6x20
TOP FRONT DRAWERS !
3X
TRUNDLE
E
A
T
T
NTI
ON!
T
S
L
F
E
T
E
E
H
E
3
MA
LER
FR
O
N
T
D
R
A
WE
R
S
MU
S
T
BE
I
X
ED
I
N
TH
R
U
N
D
L
F
R
A
M
!
05
E
12
Qty
4,0X30 Screw
Page 7
E
E
E
K
K
K
E
E
E
E
E
K
03
Qty
E
12
Qty
4,0X30 Screw
Q
Qty
G
3,5X16
16
Qty
J
8X25
04
J
J
J
J
G
G
G
G
Q
05.2
05.3
05.4
C
I
E
E
E
L
L
E
03
Qty
4,0X30 Screw
L
02
Qty
4,0X50 Screw
HexScrewdriver
01
Qty
I
7,0x50Screw
C
04
Qty
Page 8
06
DRAWERS
E
24
Qty
4,0X30 Screw
N
N
N
N
O
O
M
M
M
M
Qty
N
12
10X10
Qty
O
02
WOOD SPACER
Qty
M
12
3,5X20
06.1
4”
Qty
P
06
Qty
G
DRAWER STOP
06
3,5X16
06.2
G
4”
B
C
A
K
P
P
G
E
E
15
Qty
4,0X30 Screw
8X25 Wood Dowel
06
Qty
J
J
K
03
Qty
K
06.3
3x
3x
Page 9
!
E
08
Qty
4,0X30 Screw
07
09
E
E
E
E
E
E
E
E
E
08
Page 10

The first slats must be fixed
E
E
08
Qty
4,0X30 Screw
10
B
B
B
A
A
A
A
A
A
A
A
C
C
C
C
C
C
C
C
I
I
I
I
I
I
I
I
Qty
B
Half Moon
1/4"
08
Qty
C
08
7,0X50
Qty
A
08
1/4”X80
I
Qty
HexScrew driver
01
TOP BED
E
E
E
E
E
E
E
E
11
here at 3”
from each headboard end.
Page 11
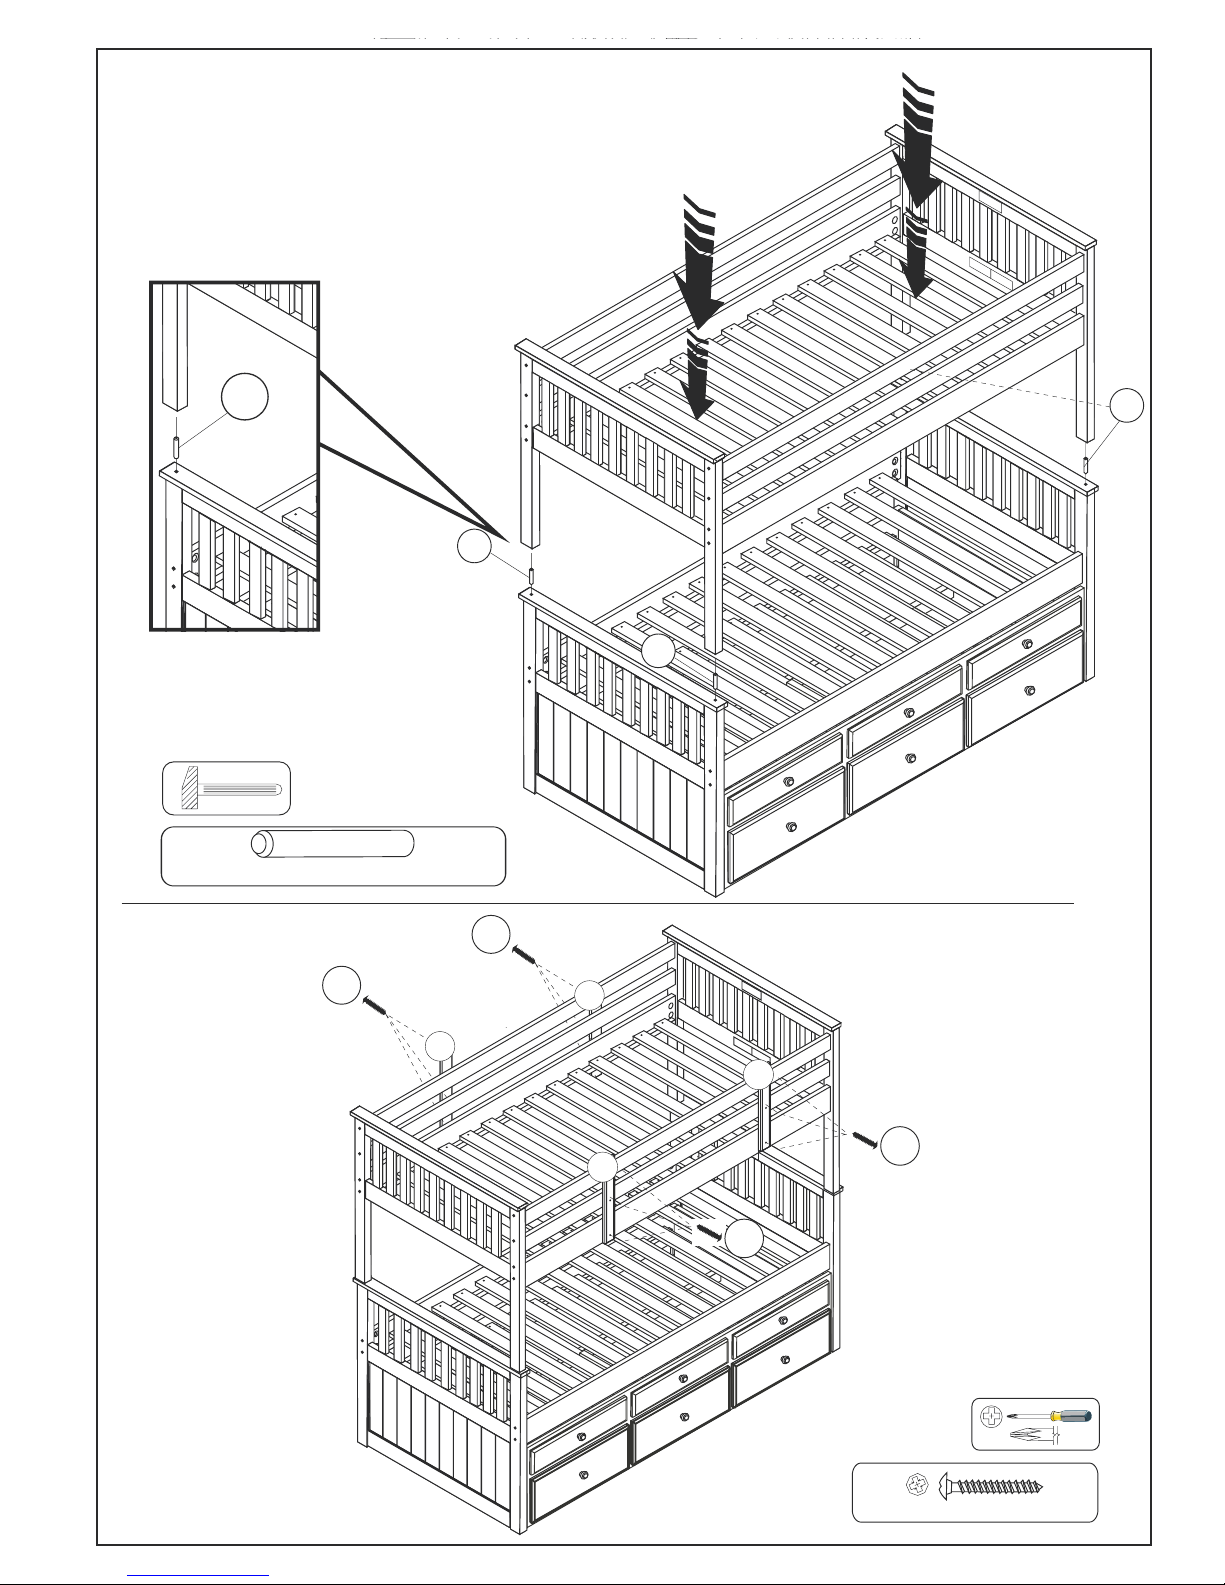
E
23
D
D
12
D
04
D
Qty
10x100 WoodDowel
E
12
Qty
4,0X30 Screw
D
D
D
E
23
E
23
E
23
13
Page 12
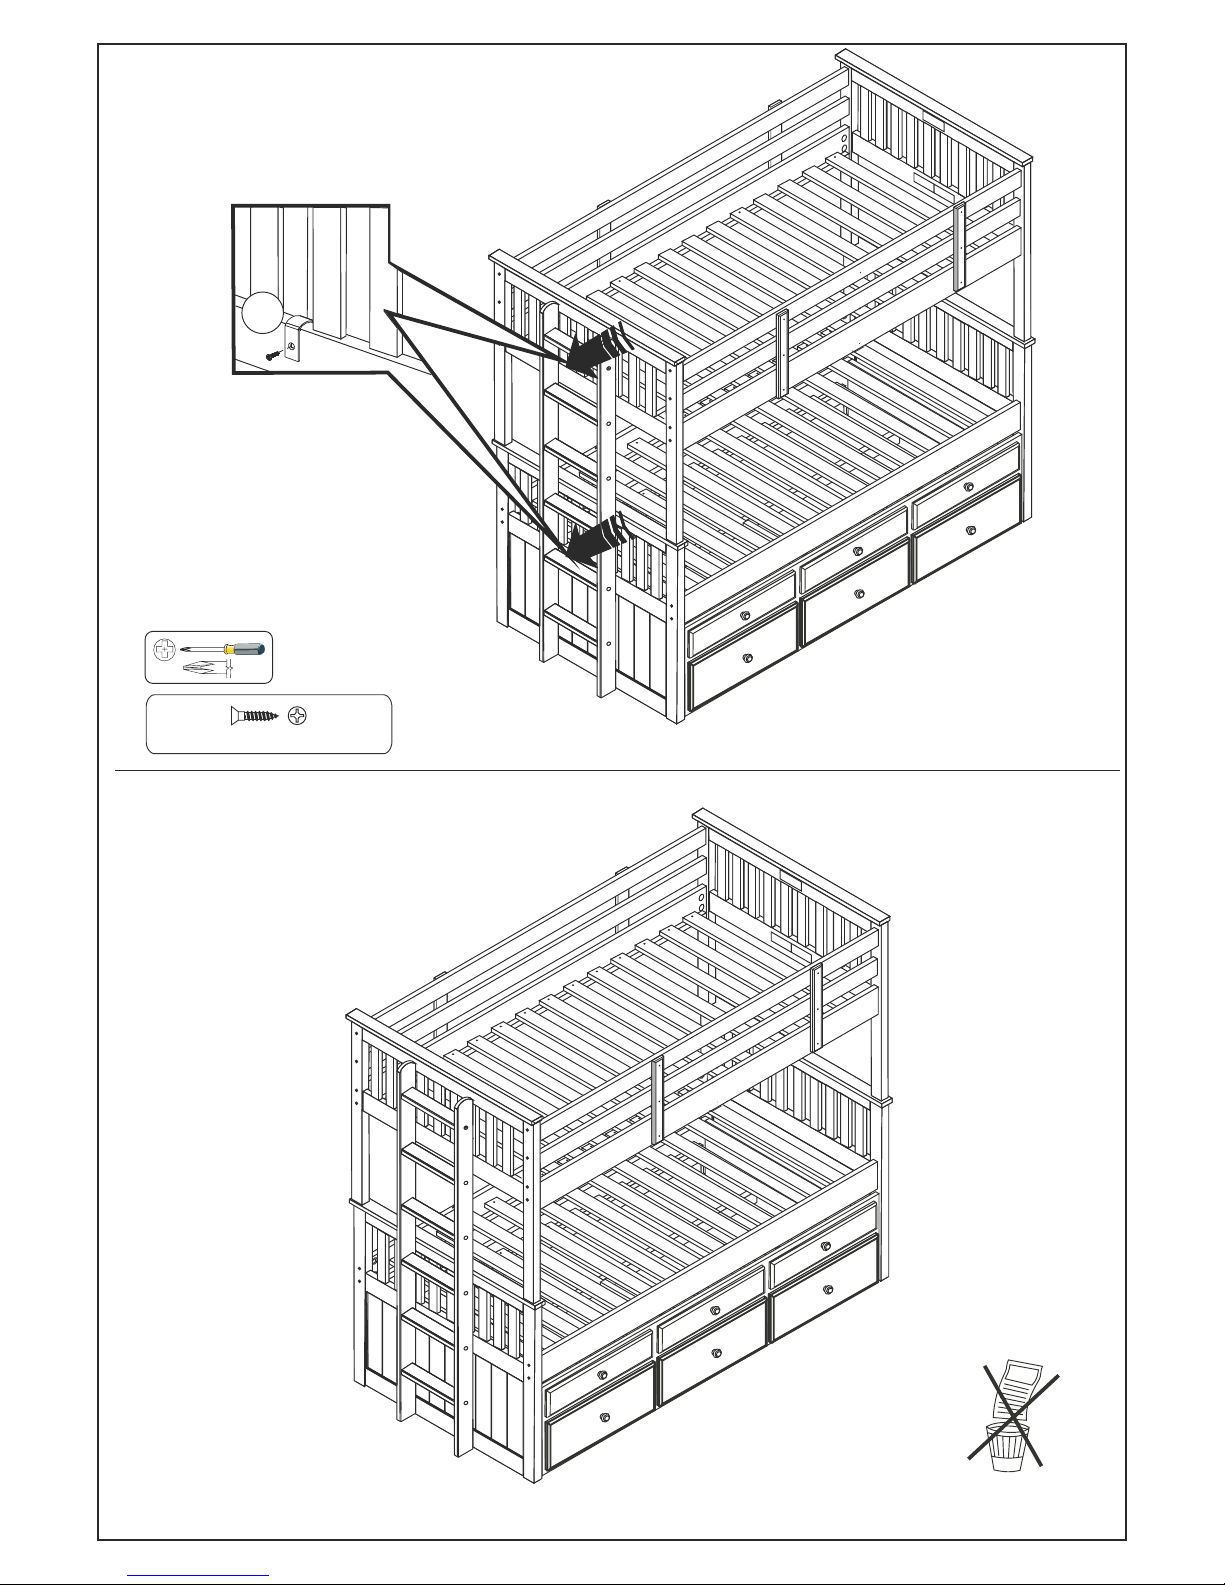
14
3,5x16
G
04
Qty
n
I
st
ct
o
i
s
n
u
r
In
t
s
io
t
c
s
n
ru
G
 Loading...