

Page 1

Resource Identifier 000-130
Revision R1.8 2015-07-24
NETNode Operations Guide
IP Mesh Systems
Tactical Communications and Surveillance
Commercial in Confidence
The Cobham Centre - Solent
Fusion 2
1100 Parkway
Solent Business Park
Whiteley
Hampshire
PO15 7AB
United Kingdom
+44 (0)1489 566 750
www.cobham.com/tcs
Page 2

NETNode Operations Guide
Commercial in
Confidence
IP Mesh Systems
000-130
R1.8 2015-07-24
Commercial in
Confidence
Page 0-1
0. Preface
0.1 About this Publication
This publication contains details required for the Operation and Administration of the
equipment or system.
Since the available functions are licensed and rely on the actual installation, not all the
functions and or applications contained in this document can be related or applicable to the
system you will be working with.
Actual screen presentation can be different from those in this document because of software
changes or your browser configuration.
0.2 Who Must Read this Publication
This publication is meant for anyone interested in how the system can best be used, but it is
of most benefit to:
Operators who are in charge of the daily operation of the equipment.
Installers who are responsible for the pre-installation, on-site installation and
configuration of the system in the end-user environment.
Maintainers who are responsible for maintaining the equipment or system.
0.3 Your Knowledge
In this publication we think you have a full knowledge of:
Basic Personal Computer Operations.
Basic Radio Frequency (RF) Principles.
0.4 Notice about Specifications
While Cobham tries to keep the precision of the information contained in its material guides,
the information can change without notice. Performance specifications included in this
publication are included for customer guidance and to help system installation. Actual
operating performance can change.
0.5 Notice about this Guide
The material described in this publication has continuous development and improvement.
All applicable details of the material and its functions (with the information and applicable
details in this guide) are given by Cobham in good faith. But, it is acknowledged
that there can be errors or omissions in this guide.
Page 3

NETNode Operations Guide
Commercial in
Confidence
IP Mesh Systems
000-130
R1.8 2015-07-24
Commercial in
Confidence
Page 0-2
Typographic Convention
Example
TEXT in small capitals represents a key push on the
console keyboard or hardware panel.
ESC, F1, SHIFT
The + sign means “hold down the first key while pushing
the second key”.
Push CTRL+C to abort
<Text> Serves as a placeholder for text that you will
replace as applicable to its context.
Use the filename
<systemname>.sys for…
Text in bold emphasises a new word or term of
significance.
We name this a protocol
and its function is…
[-a] Text in these brackets shows an optional component
that can be left out.
Ls [-a]
NN This shows a value entered on a numeric keypad.
45 on the numeric keypad
Successive menu selections are shown with arrows to
show a sub-menu. In this example this means:
Select the Insert menu, then select picture, then select
from file.
Insertpicturefrom file
0.6 Typographic Conventions
This publication uses these typographic conventions to identify text that has a special
meaning:
0.7 Symbols
This publication uses these symbols to highlight important information:
WARNING: A written notice given to a reader when a situation might cause personal injury
or loss of life.
CAUTION: A written notice given when a situation might cause damage to or destruction of
equipment or systems.
Note: A written notice given to tell you something or to supply more information.
Page 4

NETNode Operations Guide
Commercial in
Confidence
IP Mesh Systems
000-130
R1.8 2015-07-24
Commercial in
Confidence
Page 0-3
Publication
Source
NETNode User Guide
Cobham Tactical Communications and Surveillance
IP Concept Guide
Cobham Tactical Communications and Surveillance
Revision
Date
Authors
Summary of Changes
Draft 1
2012-11-19
R Cogswell
Initial draft document for
review.
Revision 1.0
2012-11-19
R Cogswell
First formal release.
Revision 1.1
C Baudouin
Updates to manual.
Revision 1.2
2012-12-11
R Cogswell
Formatting review.
Revision 1.3
2010-12-14
C Baudouin
Added V4.2 features.
Revision 1.4
2013-11-03
C Baudouin
Added V5.0 features.
Revision 1.5
2013-12-13
C Baudouin
Added V5.2 roaming.
0.8 Trademarks
All trademarks or registered trademarks in this publication are the property of their related
owners.
Copyright © 2014 Cobham TCS Limited.
All rights reserved.
No part of this document can be copied, distributed, transmitted, transcribed, kept in a
retrieval system or translated into other languages without the prior written permission of
Cobham TCS Limited.
Cobham TCS Limited owns the copyright of this publication which is supplied in confidence
and must not be used for functions other than for which it is supplied.
0.9 Related Publications
It can also be necessary to read:
0.10 Revision History
This publication was written and produced by the Cobham Technical Publications Team.
This is a change controlled publication. Each page of this publication shows a revision
number at the bottom left corner.
Changes to a page will increase the revision status of the full publication.
Page 5

NETNode Operations Guide
Commercial in
Confidence
IP Mesh Systems
000-130
R1.8 2015-07-24
Commercial in
Confidence
Page 0-4
Revision
Date
Authors
Summary of Changes
Revision 1.6
2014-07-17
C Baudouin
Added V5.4 interlink
updates.
Revision 1.7
2014-09-30
R Cogswell
Fixed limit to Mesh ID.
STE-100 Compliant.
Revision 1.8
2015-08-03
I Reilly
Added AES key Apply, how
to License and Upgrade
Page 6

NETNode Operations Guide
Commercial in
Confidence
IP Mesh Systems
000-130
R1.8 2015-07-24
Commercial in
Confidence
Page 0-5
Contents
0. Preface ..................................................................................... 0-1
0.1 About this Publication ...................................................................................... 0-1
0.2 Who Must Read this Publication ........................................................................ 0-1
0.3 Your Knowledge .............................................................................................. 0-1
0.4 Notice about Specifications ............................................................................... 0-1
0.5 Notice about this Guide .................................................................................... 0-1
0.6 Typographic Conventions ................................................................................. 0-2
0.7 Symbols.......................................................................................................... 0-2
0.8 Trademarks .................................................................................................... 0-3
0.9 Related Publications ......................................................................................... 0-3
0.10 Revision History ........................................................................................... 0-3
Contents ......................................................................................... 0-5
1. Basic Operation ......................................................................... 1-1
1.1 General .......................................................................................................... 1-1
1.2 Starting and Stopping the NETNode .................................................................. 1-1
1.3 Working with the IP Interface ........................................................................... 1-2
1.4 Working with IP Cameras - Panasonic BB-HCM735 ............................................. 1-3
1.5 Working with Composite Cameras ..................................................................... 1-8
1.6 About AVI H264 Coding ................................................................................. 1-13
2. Advanced Operation ................................................................. 2-14
2.1 Configuring your NETNode for the very first time ............................................. 2-14
2.2 Configuring your NETNode with Node Finder ................................................... 2-16
2.3 Working with Talkback ................................................................................... 2-17
2.4 Configuring your NETNode for GPS ................................................................. 2-23
2.5 About NETNode IP Functionally ...................................................................... 2-26
2.6 Multicast Packet Processing ............................................................................ 2-27
2.7 Understanding Streaming Over IP ................................................................... 2-30
2.8 Configuring Multicast Streaming...................................................................... 2-30
2.9 About RTSP Streaming ................................................................................... 2-31
2.10 Working with Stream Recording and Playback ............................................... 2-32
2.11 Video Flow Control ..................................................................................... 2-36
2.12 Working with VLAN ..................................................................................... 2-38
2.13 Port Blocking (V5.4 onwards) ...................................................................... 2-41
2.14 Interlink Mode ............................................................................................ 2-42
2.15 Adding Static Routes ................................................................................... 2-44
2.16 Routing Information Protocol ....................................................................... 2-45
2.17 Spanning Tree Protocol ............................................................................... 2-46
2.18 Roaming .................................................................................................... 2-46
3. Advanced Setup ....................................................................... 3-50
3.1 About Advanced Setup ................................................................................... 3-50
3.2 Connecting your PC to your Radio ................................................................... 3-50
Page 7

NETNode Operations Guide
Commercial in
Confidence
IP Mesh Systems
000-130
R1.8 2015-07-24
Commercial in
Confidence
Page 0-6
3.3 Configuring the Basic Settings ........................................................................ 3-54
3.4 Working with the Status /Overview Sub-Tab .................................................... 3-56
3.5 Working with the Status /Spectra Sub-Tab....................................................... 3-60
3.6 Working with the Status / Maps Sub-Tab ......................................................... 3-62
3.7 Working with the Map Display ........................................................................ 3-65
3.8 Uploading Map Data ...................................................................................... 3-66
3.9 Working with the Global Settings Tab .............................................................. 3-68
3.10 Working with the Configuration Tab ............................................................. 3-75
3.11 Working with the Information Tab ............................................................... 3-84
3.12 Working with the Encoder Tab ..................................................................... 3-86
3.13 Licensing the NETNode ............................................................................... 3-91
3.14 Upgrading the Firmware.............................................................................. 3-93
4. Appendix A – Cautions and Warnings ........................................ 4-97
4.1 Cautions and Warnings .................................................................................. 4-97
4.2 EMC / Safety and Radio Approvals .................................................................. 4-98
4.3 CE Marking ................................................................................................... 4-98
5. Appendix B - Precautions and Maintenance ................................ 5-99
5.1 Caring for your Equipment ............................................................................. 5-99
5.2 Charging ....................................................................................................... 5-99
5.3 Working with Lithium Batteries ....................................................................... 5-99
5.4 Cleaning ..................................................................................................... 5-100
5.5 Storage ...................................................................................................... 5-100
5.6 Repairs ....................................................................................................... 5-100
5.7 Getting Technical Support ............................................................................ 5-100
5.8 Operate with the Cobham RMA Service ......................................................... 5-101
6. Appendix C-Glossary ............................................................... 6-103
6.1 Glossary ..................................................................................................... 6-103
Page 8

NETNode Operations Guide
Commercial in
Confidence
IP Mesh Systems
000-130
R1.8 2015-07-24
Commercial in
Confidence
Page 1-1
1. Basic Operation
1.1 General
This chapter covers day to day operations of a fully configured NETNode system.
When installed and configured the NETNode is easy to operate. These guidelines will help
you do basic operations on your NETNode.
Note: If you are working with a new system or it is necessary to change a configuration,
look at the Advanced Operation and Advanced Setup in this guide.
1.2 Starting and Stopping the NETNode
NETNode units don’t have power switches – you simply apply power to them and they will
start up.
Before you start
This is necessary:
A NETNode
A source of power.
Step 1: Powering Up
1. Energize the NETNode with one of the procedures in
2. On the front panel, the Indicator LED will show stable red. You can see the Indicator LED
change to stable green depending on the condition of the network.
Setting up your NETNode
.
Step 2: Stopping
It is important to stop the system carefully. This makes sure that all procedures are stopped
correctly and no data or settings are forgotten.
1. Disconnect the power cable from the NETNode.
2. On the front Panel, the LED will go out.
3. The system is shutdown safely.
Next Steps
Working with the IP Interface.
Page 9
NETNode Operations Guide
Commercial in
Confidence
IP Mesh Systems
000-130
R1.8 2015-07-24
Commercial in
Confidence
Page 1-2
1.3 Working with the IP Interface
When working with NETNodes you’ll be connecting with an IP interface and a web browser.
Step 1: Connect the NETNode to your Computer
1. Use the notes in
Setting up your NETNode
, to connect your PC to the NETNode.
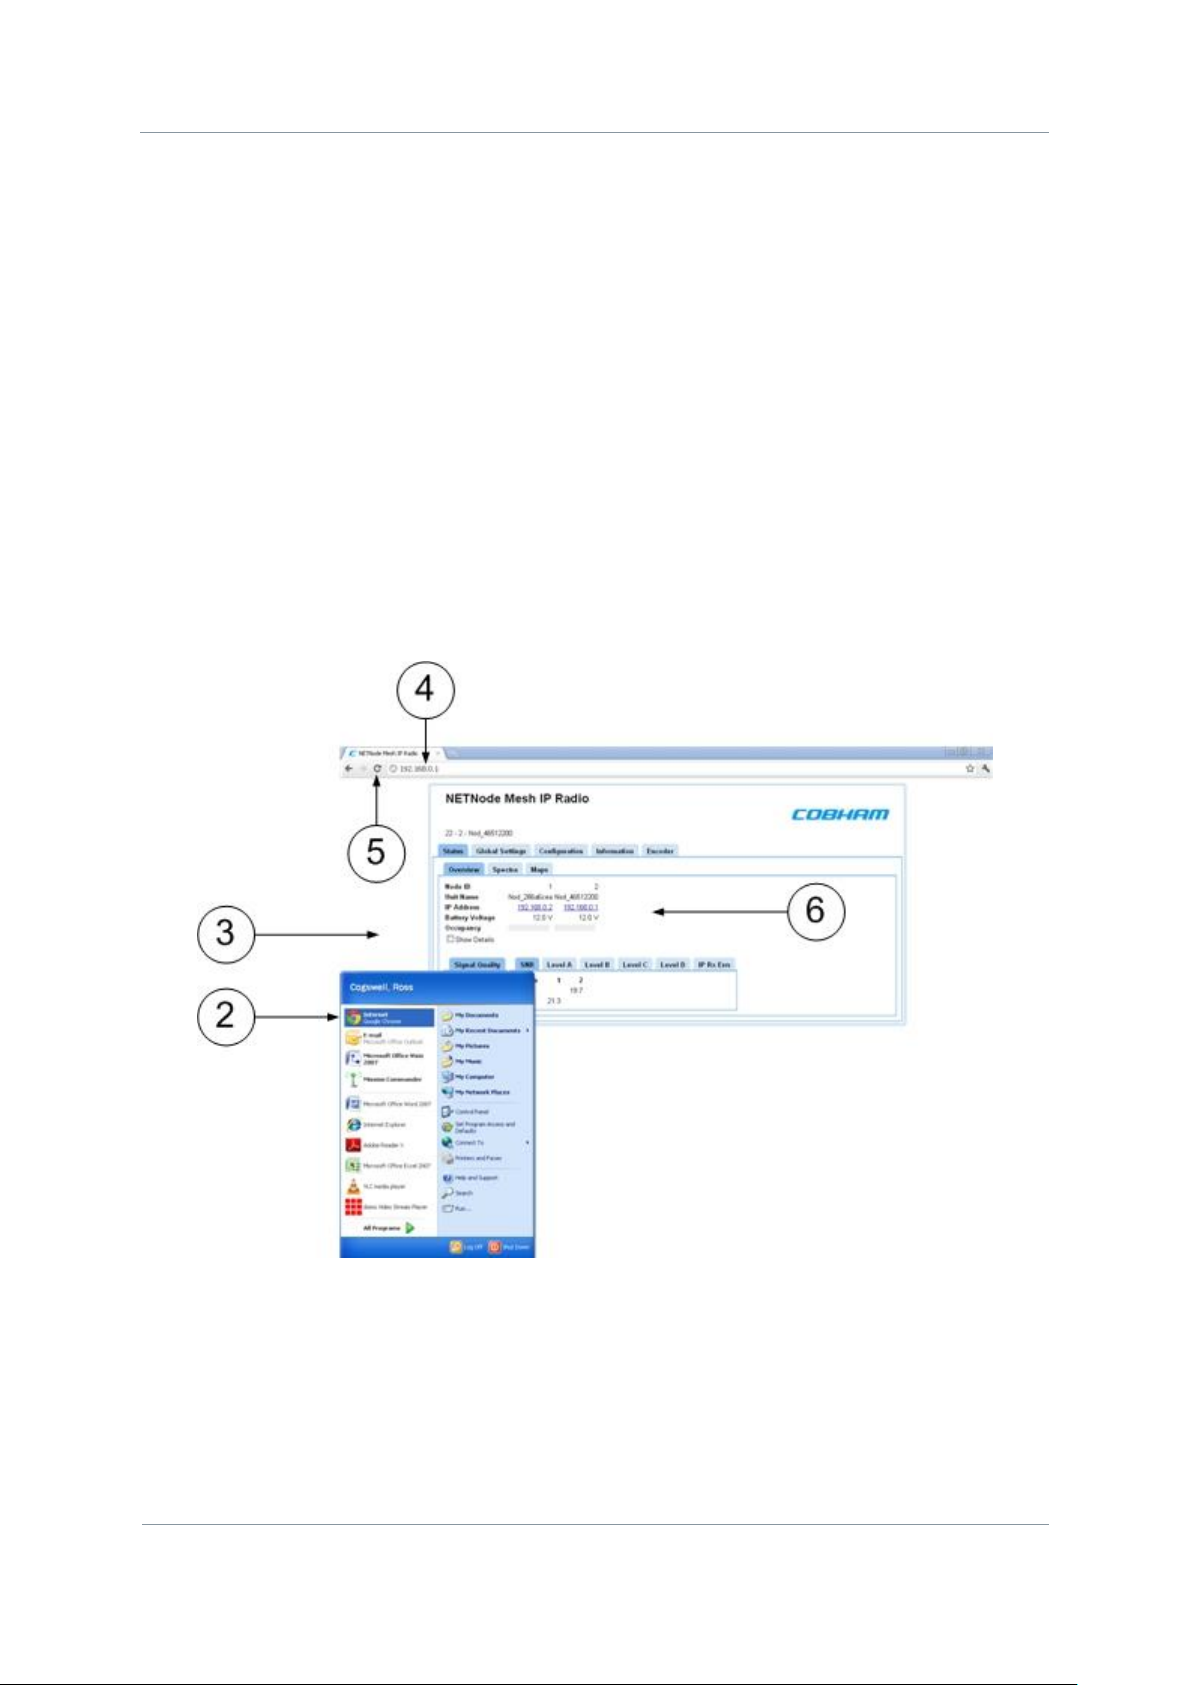
Step 2: Start the Control Session
1. Power up the NETNode.
2. Click Start Internet on the PC.
3. Your browser window will open.
4. Type the IP address of the NETNode you wish to configure like this example:
http://192.168.2.1/
5. Click the Refresh button.
6. The web browser opens the Status Overview page of the NETNode.
Figure 1-1 Starting a control session
Page 10
NETNode Operations Guide
Commercial in
Confidence
IP Mesh Systems
000-130
R1.8 2015-07-24
Commercial in
Confidence
Page 1-3
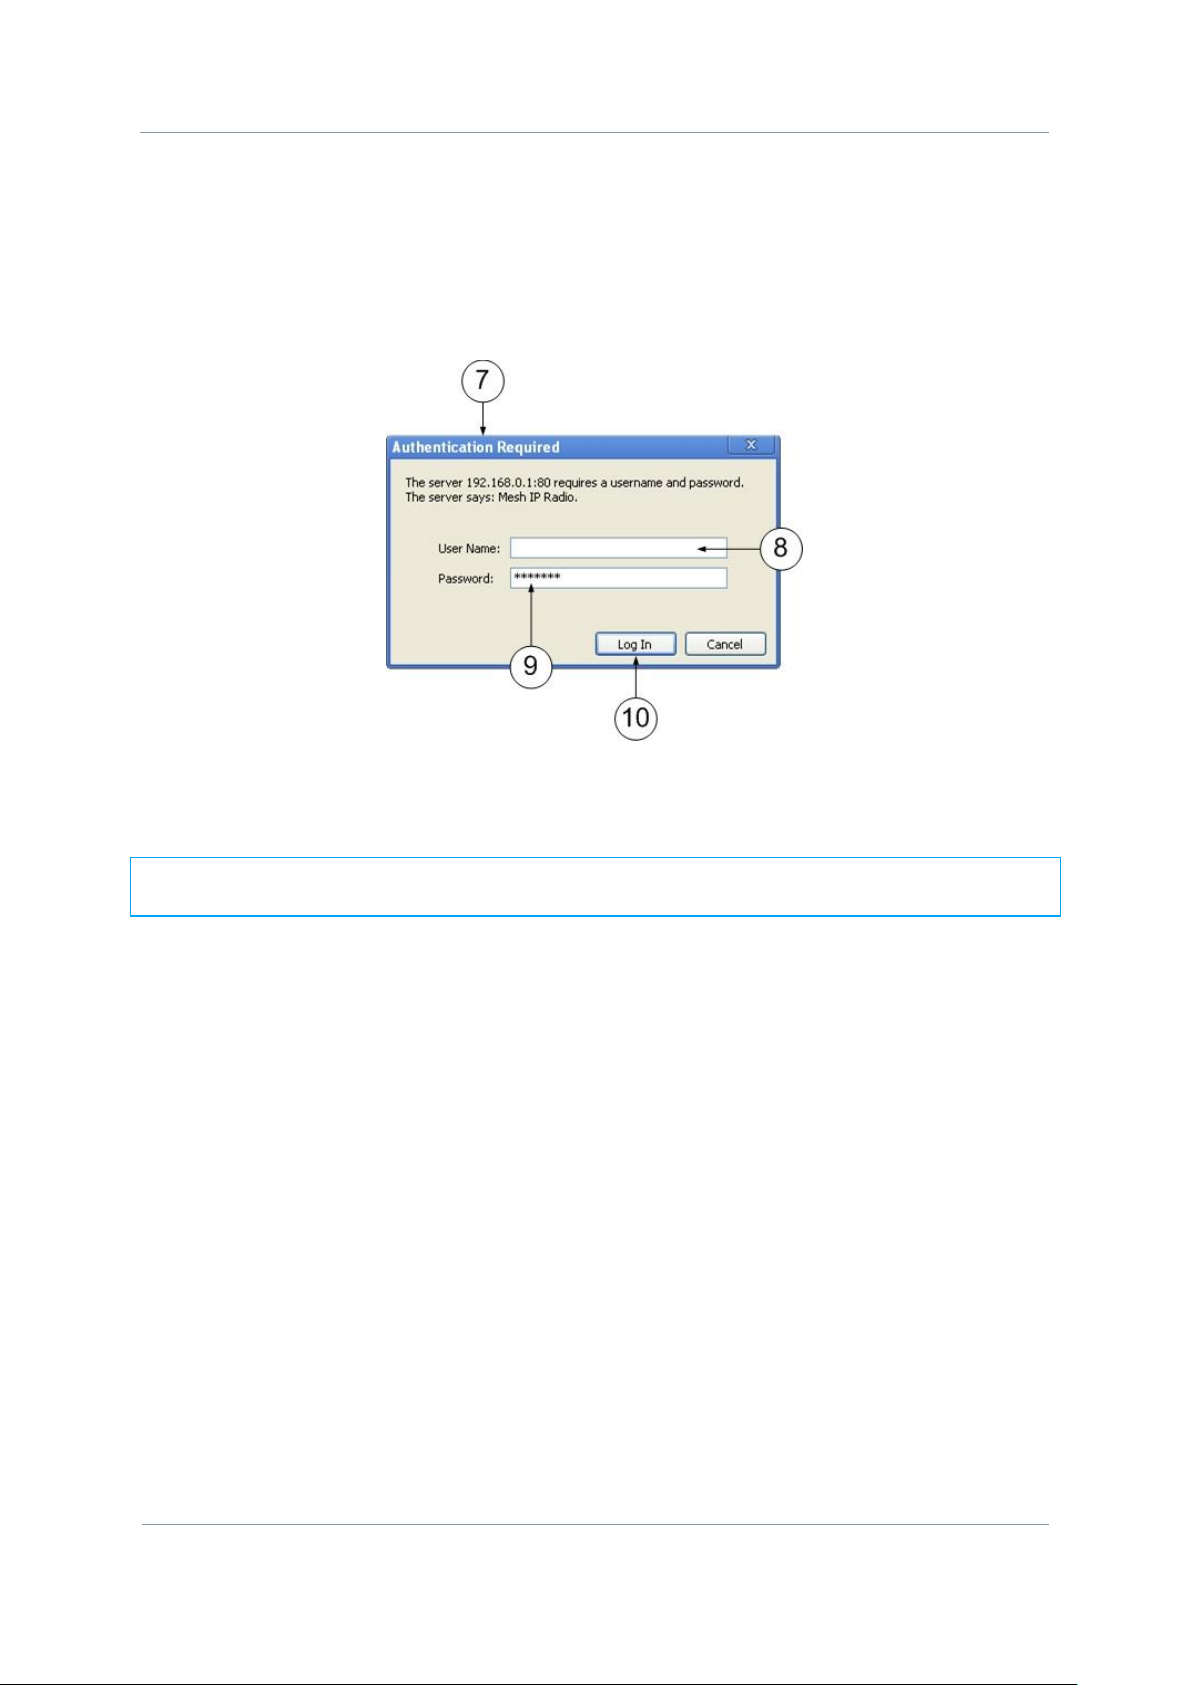
Step 3: Log in to the Control Application
7. The Authentication Required dialog opens.
8. By default, the User Name is not required.
9. By default the password is meshweb.
10. Click the Log In button.
Figure 1-2 NETNode Authentication Dialog
At this time, you are logged in to the NETNode and can start configuring it to suit your
operation. All the details of working with the Control System are located in
Note: If you are simply trying to get some NETNodes configured to operate together as a
mesh network then jump to
Configuring the Basic Settings
.
Advanced Setup
1.4 Working with IP Cameras - Panasonic BB-
HCM735
You will wish to operate with IP cameras across your mesh network. IP cameras are
manufactured by many different companies and they each have different features. We’ll use
the example of a Panasonic IP Camera as it demonstrates many of the techniques that
will be necessary on many manufacturers’ IP cameras.
Before you start
This is necessary:
Like most IP cameras, the Panasonic BB-HCM735 comes with:
.
Camera head with integrated microphone and PTZ mounting
Power supply
Software for the PC that will monitor and control the camera.
Page 11
NETNode Operations Guide
Commercial in
Confidence
IP Mesh Systems
000-130
R1.8 2015-07-24
Commercial in
Confidence
Page 1-4
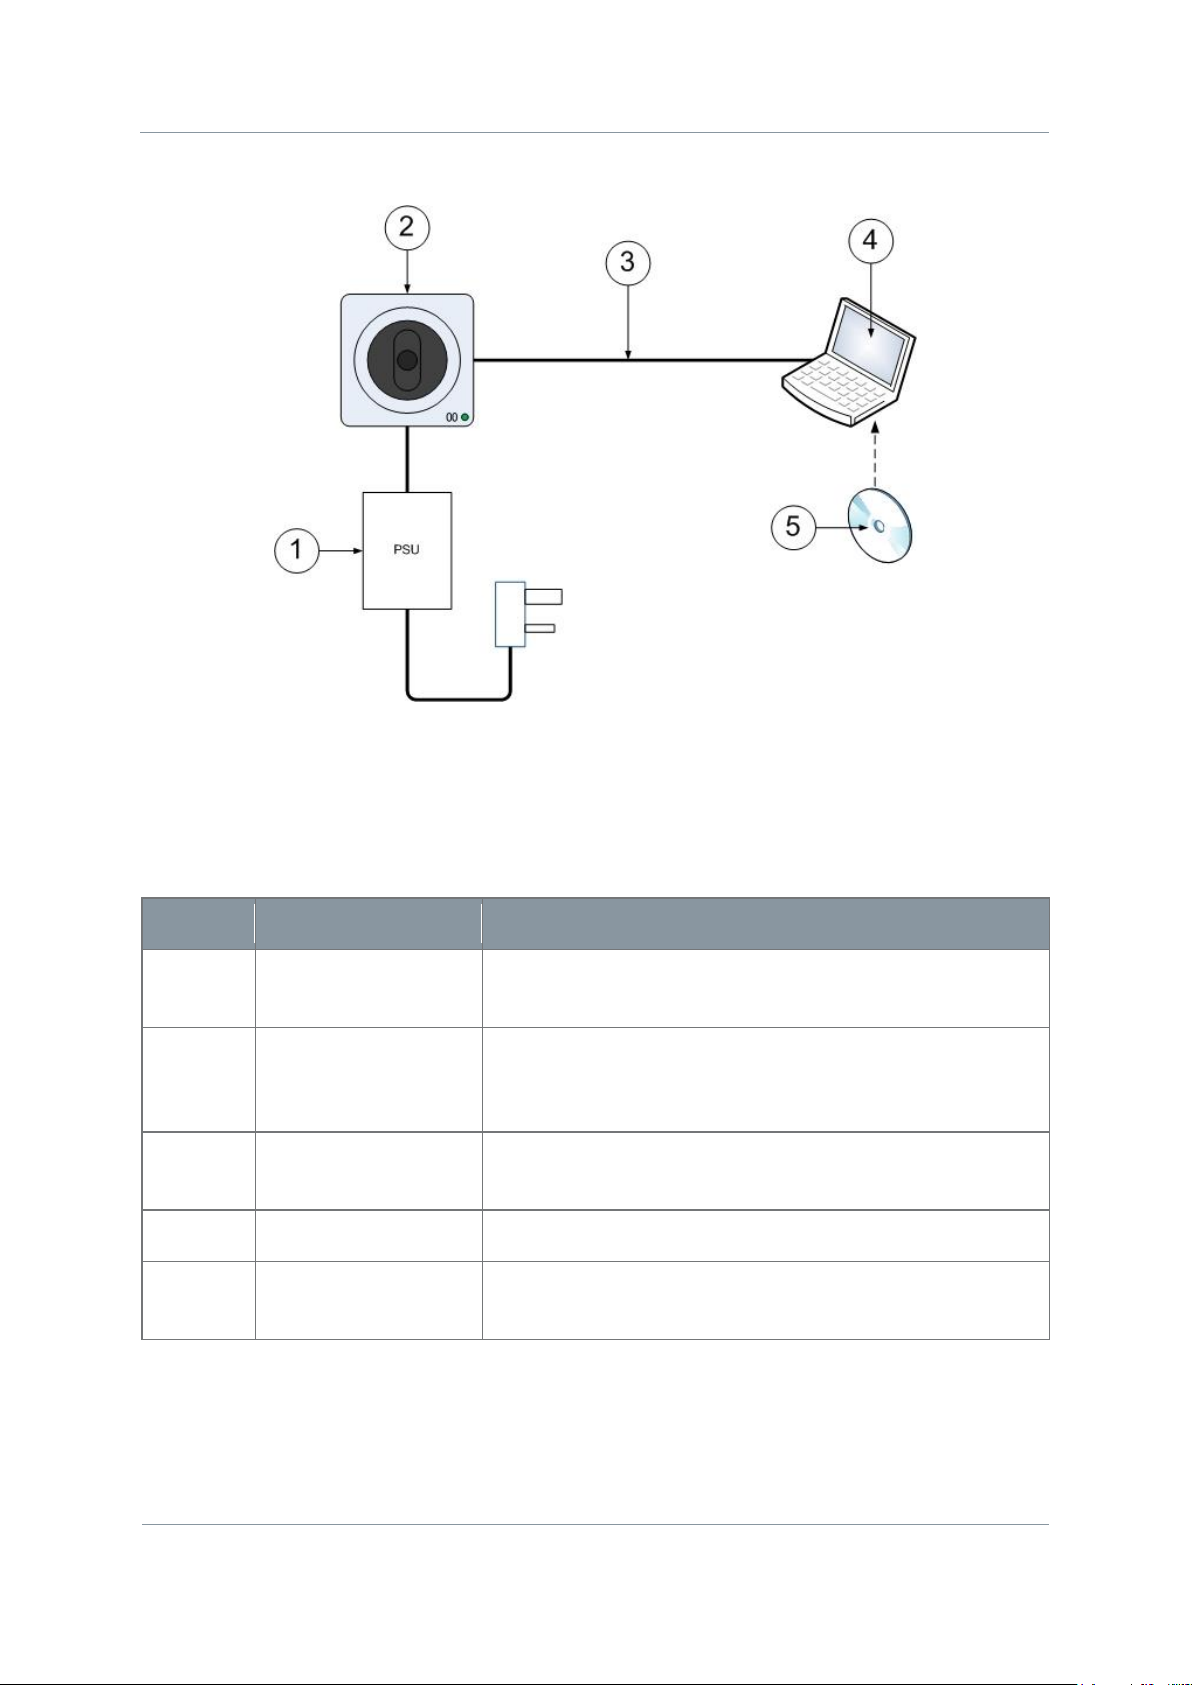
Serial
Part
Description
1
Panasonic AC
Adaptor, BB-HCA3
Converts 100-240VAC 50-60Hz to 12VDC 0.75A for the
camera head.
2
Panasonic BBHCM735 Camera
Head
Has integrated camera, microphone and PTZ systems.
3
Ethernet Cable
The cable is used for the initial configuration. This will
be replaced by the mesh network after setup.
4
Personal Computer
Needs to support video from the camera.
5
Panasonic Network
Camera Software
The CD contains configuration setup and Network
camera viewer software.
Step 1: Rig the Camera
Figure 1-3 Rigging an IP Camera
Table 1-1 – Rigging an IP Camera
Page 12
NETNode Operations Guide
Commercial in
Confidence
IP Mesh Systems
000-130
R1.8 2015-07-24
Commercial in
Confidence
Page 1-5
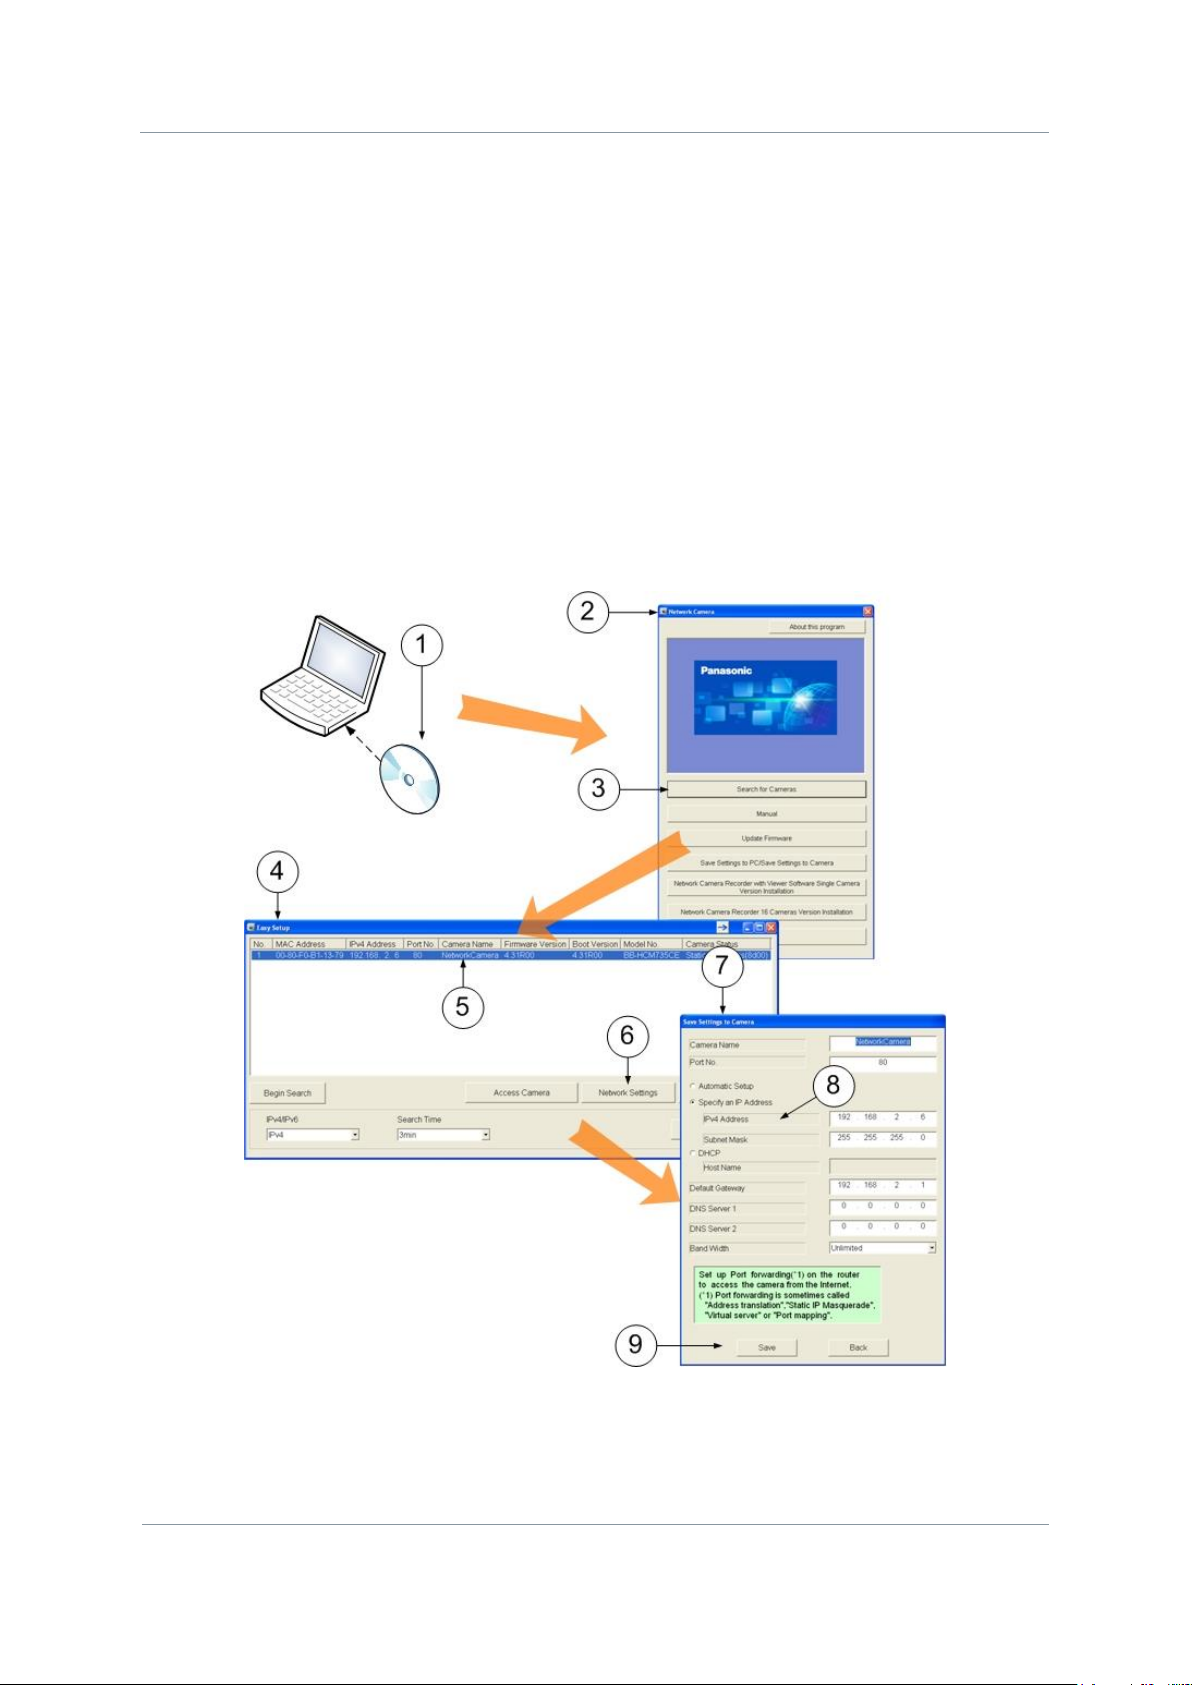
Step 2: Configure the Camera for the first time
It is necessary to have all the parts in the diagram rigged as above.
1. Put the Panasonic Network Camera Software disk into your PC – it auto starts.
2. The Network Camera software starts.
3. Click the Search for Cameras button.
4. The Easy Setup dialog opens.
5. Highlight the camera you wish to operate with.
6. Click the Network Settings button.
7. The Save Settings to Camera dialog opens.
8. Set up a fixed IP address for the camera.
9. Click the Save button.
Figure 1-4 Panasonic BB-HCM735 setup
Page 13
NETNode Operations Guide
Commercial in
Confidence
IP Mesh Systems
000-130
R1.8 2015-07-24
Commercial in
Confidence
Page 1-6
Serial
Part
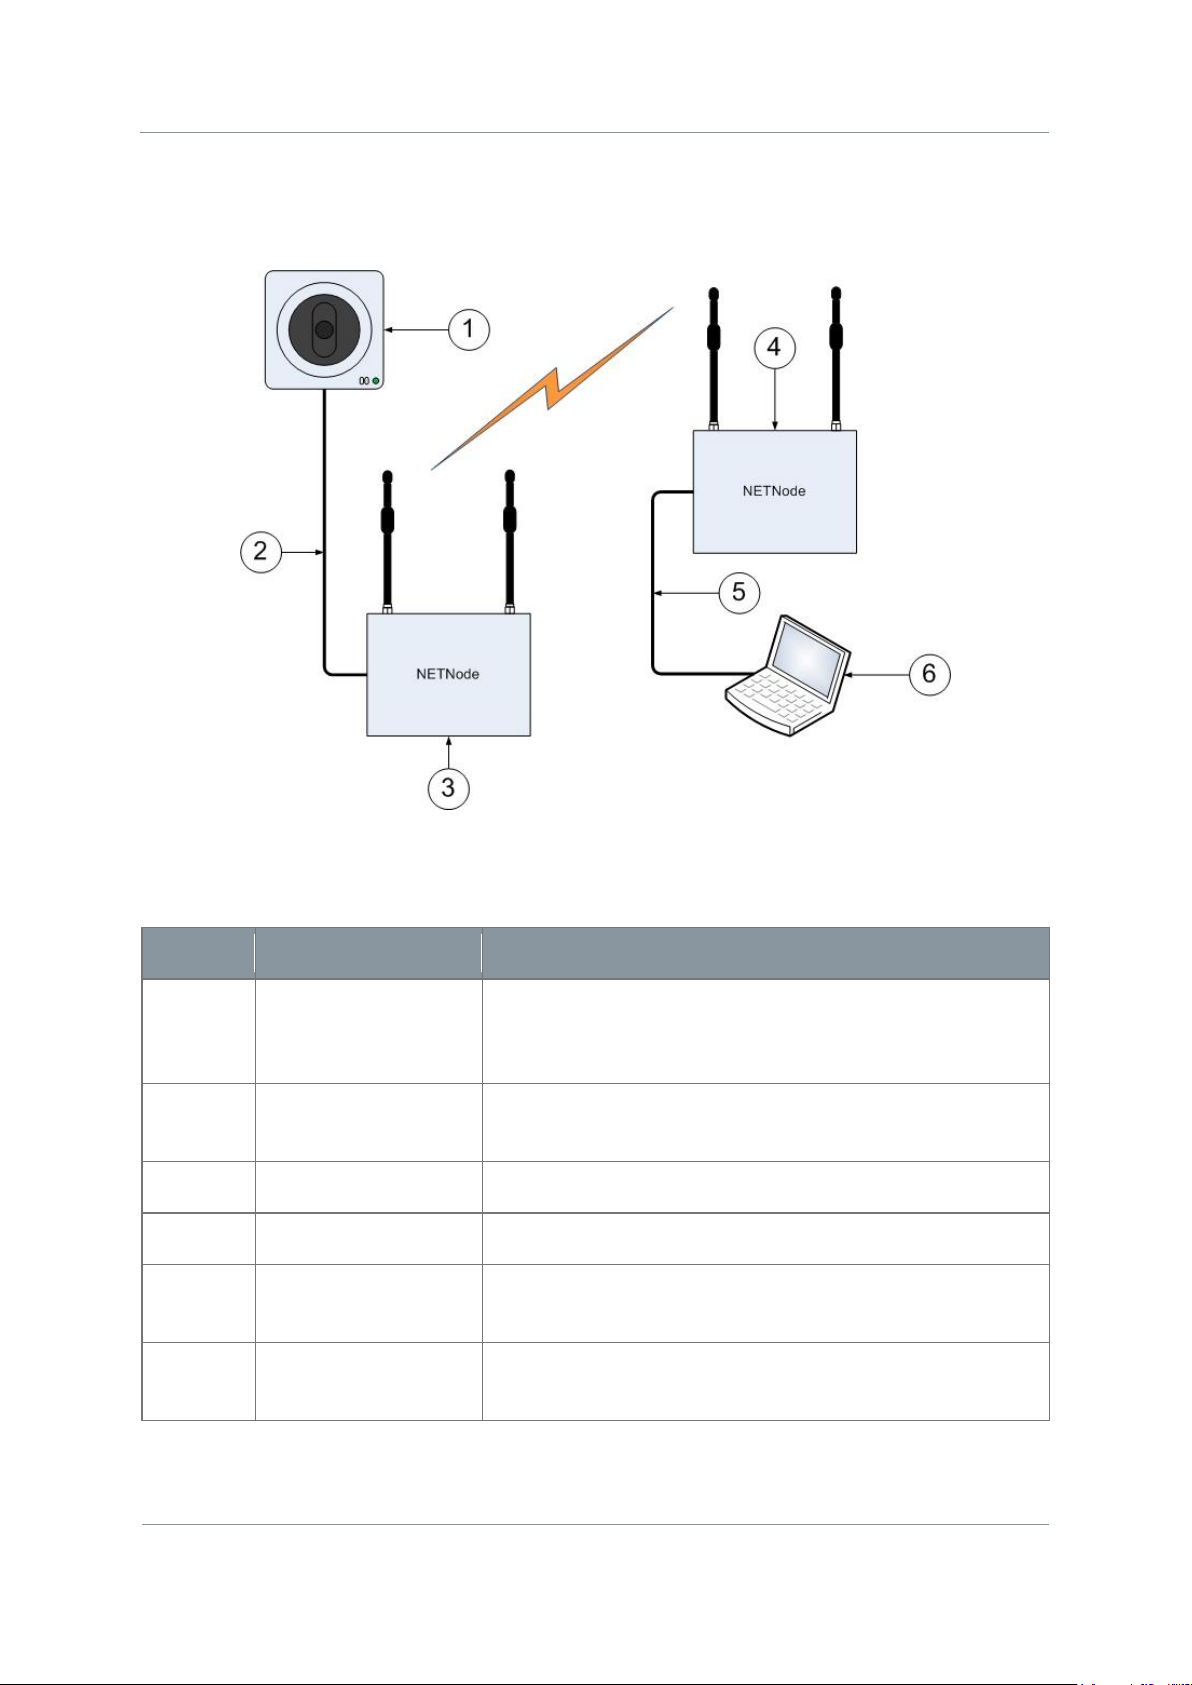
Description
1
Panasonic BBHCM735 Camera
Head
Has integrated camera, microphone and PTZ systems.
2
Ethernet
You’ll connect the camera to one of the two Ethernet
ports available on the NETNode.
3
First NETNode
Located near the target.
4
Second NETNode
Located at the safe location.
5
Ethernet
You’ll connect the PC to one of the two Ethernet ports
available on the NETNode.
6
PC
The PC has Panasonic software pre-configured to
monitor the output of the camera.
Step 3: Rig the Camera across the Mesh
It will be necessary to have two or more fully configured NETNodes, A configured Panasonic
BB-HCM735 Network Camera and a PC with the Panasonic software loaded and configured.
Figure 1-5 Sending IP video across Mesh
Table 1-2 – Sending IP video over Mesh
Page 14
NETNode Operations Guide
Commercial in
Confidence
IP Mesh Systems
000-130
R1.8 2015-07-24
Commercial in
Confidence
Page 1-7
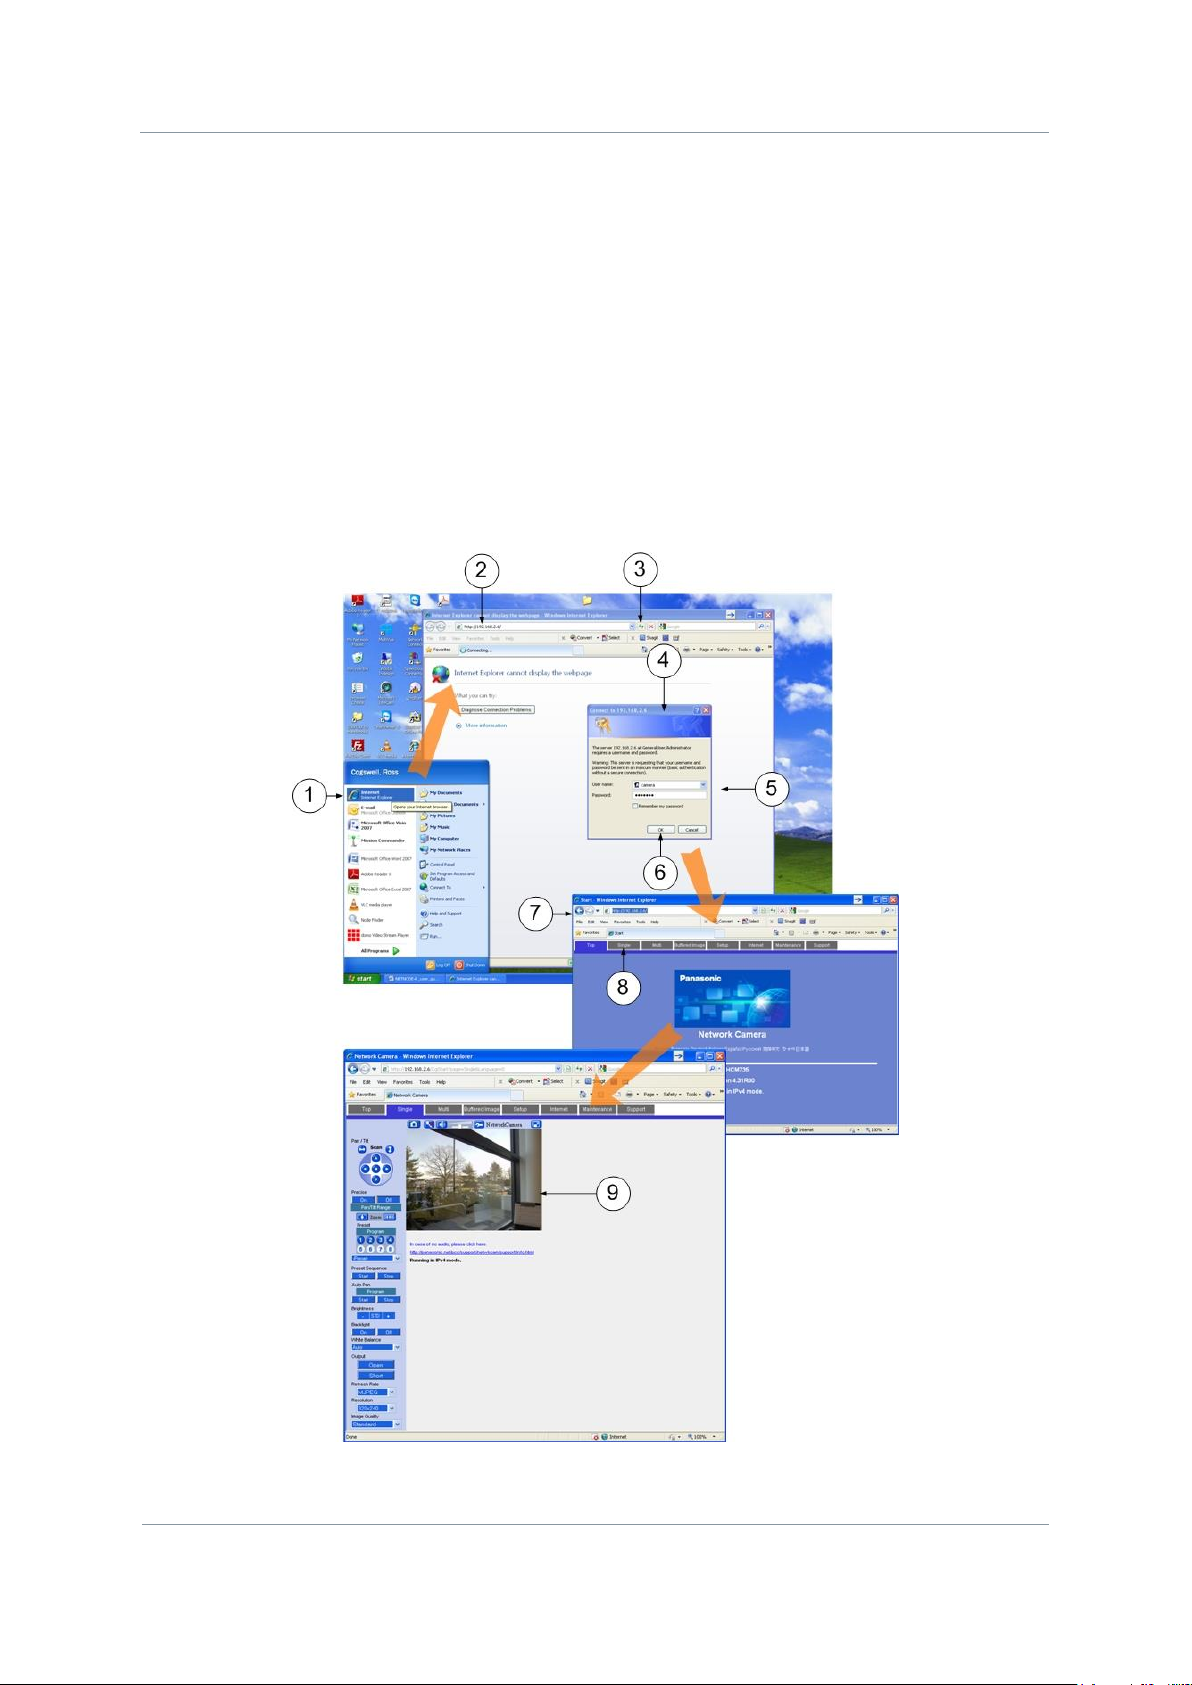
Step 4: Monitor the Camera across the Mesh
1. On the PC, click Start Internet to open your web browser.
2. Type the camera IP address into the browser address bar.
3. Click Refresh button.
4. The Connect to dialog box opens.
5. Type in the User name and password for the camera.
6. Click the OK button.
7. The Panasonic Viewing software starts in your browser.
8. Click Single Tab.
9. The Network Camera Control Page opens.
Figure 1-6 Connecting to IP camera across a Mesh network
Page 15

NETNode Operations Guide
Commercial in
Confidence
IP Mesh Systems
000-130
R1.8 2015-07-24
Commercial in
Confidence
Page 1-8
With the Panasonic BB-HCM735 Network camera connected in this manner you can use the
software to:
Monitor the camera output
Pan
Tilt
Zoom
Move to Preset positions
Scan in pan and tilt
Panasonic systems also support multi-camera display and some recording facilities.
You’ll find many features in the software to let you to configure the camera:
White balance
Resolution
Brightness
Image quality
IP Settings
Note: There are many types of IP camera that you could operate on a mesh system. They
will all have different features. Study the documentation that comes with your chosen
camera.
Note: You will monitor or listen to
most
assets in the same way depending on the device
being used. Each IP device will have its own control software but is usually accessed by a
web browser.
1.5 Working with Composite Cameras
Sometimes it will be necessary to use composite cameras across your mesh network. If
the MESH node has an AVI option fitted then it will accept standard composite video (NTSC
or PAL) and it will encode and stream the video across the Network. An Encoder Tab appears
on the Web-browser if an internal video encoder is fitted.
Step 1: Check if your NETNode has the AVI board
The AVI board is a factory fitted option. Look at the device label which will have the letters
AVI if the board is fitted.
You can also check by logging on to the NETNode and checking if the Encoder tab is
displayed on the Control Pages. The encoder tab is only there when the board is fitted and
the Global Settings Main Auxiliary Address is set to 1.
Note: The Mini Mesh cannot be fitted with an AVI board.
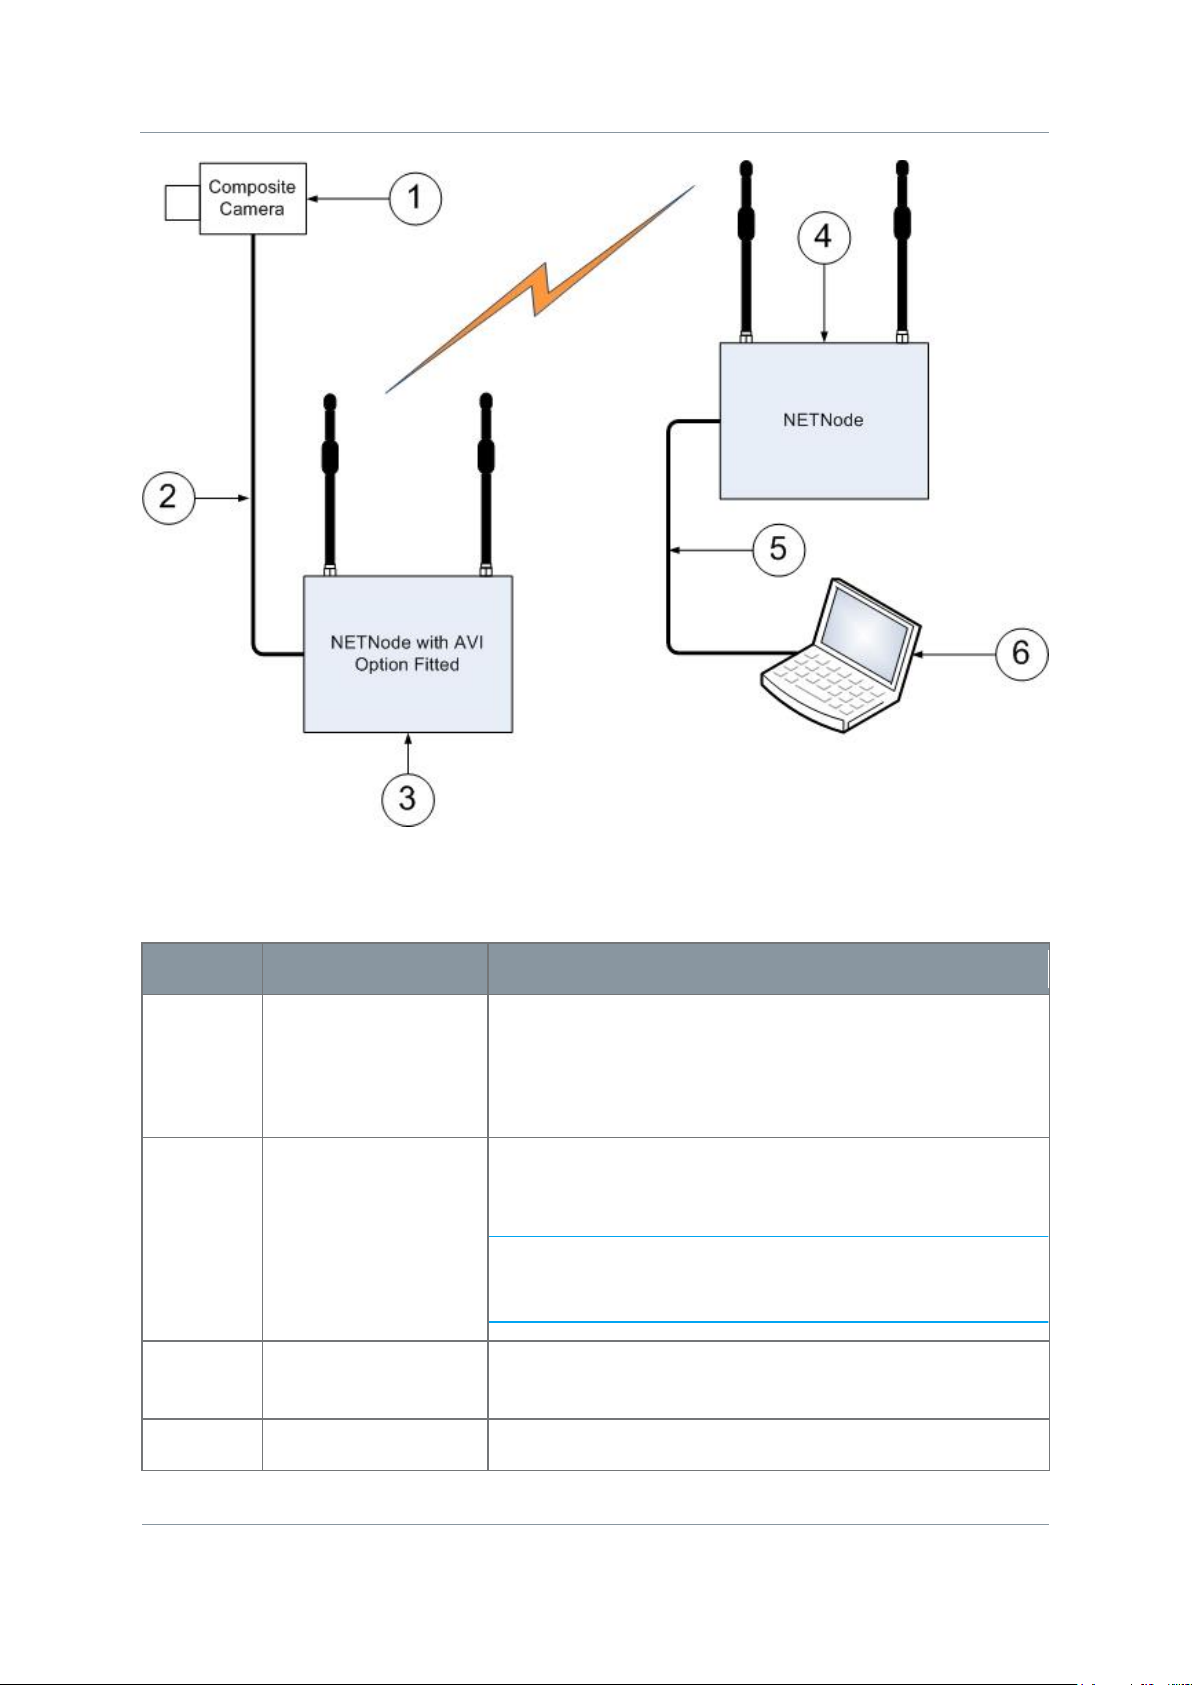
Step 2: Connect a Composite Camera
It will be necessary to have a fully configured NETNode with AVI option fitted, a composite
camera source and a PC to monitor the images.
Page 16
NETNode Operations Guide
Commercial in
Confidence
IP Mesh Systems
000-130
R1.8 2015-07-24
Commercial in
Confidence
Page 1-9
Serial
Part
Description
1
Composite Camera
Connect the video output of the camera to the BNC 2way plug (sockets) on the CA0477 A/V cable.
Connect the audio output (if available) to the Phono 2way plugs (pins) on the CA0477 A/V cable.
2
CA0477 A/V Cable
Assembly
Connect the Amphenol 19-way plug (pins) to the
Amphenol 19-way receptacle (sockets) on the
NETNode.
Note: Microphone power is on the audio connectors at
approximately 3V (applicable for Electret
microphones).
3
First NETNode with
AVI option fitted
Located near the target. Remember, the Auxiliary
address must be set at 1 to see the Encoder tab.
4
Second NETNode
Located at the safe location.
Figure 1-7 Sending composite video across Mesh network
Page 17
NETNode Operations Guide
Commercial in
Confidence
IP Mesh Systems
000-130
R1.8 2015-07-24
Commercial in
Confidence
Page 1-10
Serial
Part
Description
5
Ethernet
You’ll connect the PC to one of the two Ethernet ports
available on the NETNode.
6
PC
Has Cobham Stream player software or VLC software
loaded and configured.
Table 1-3 – Sending composite video across Mesh network
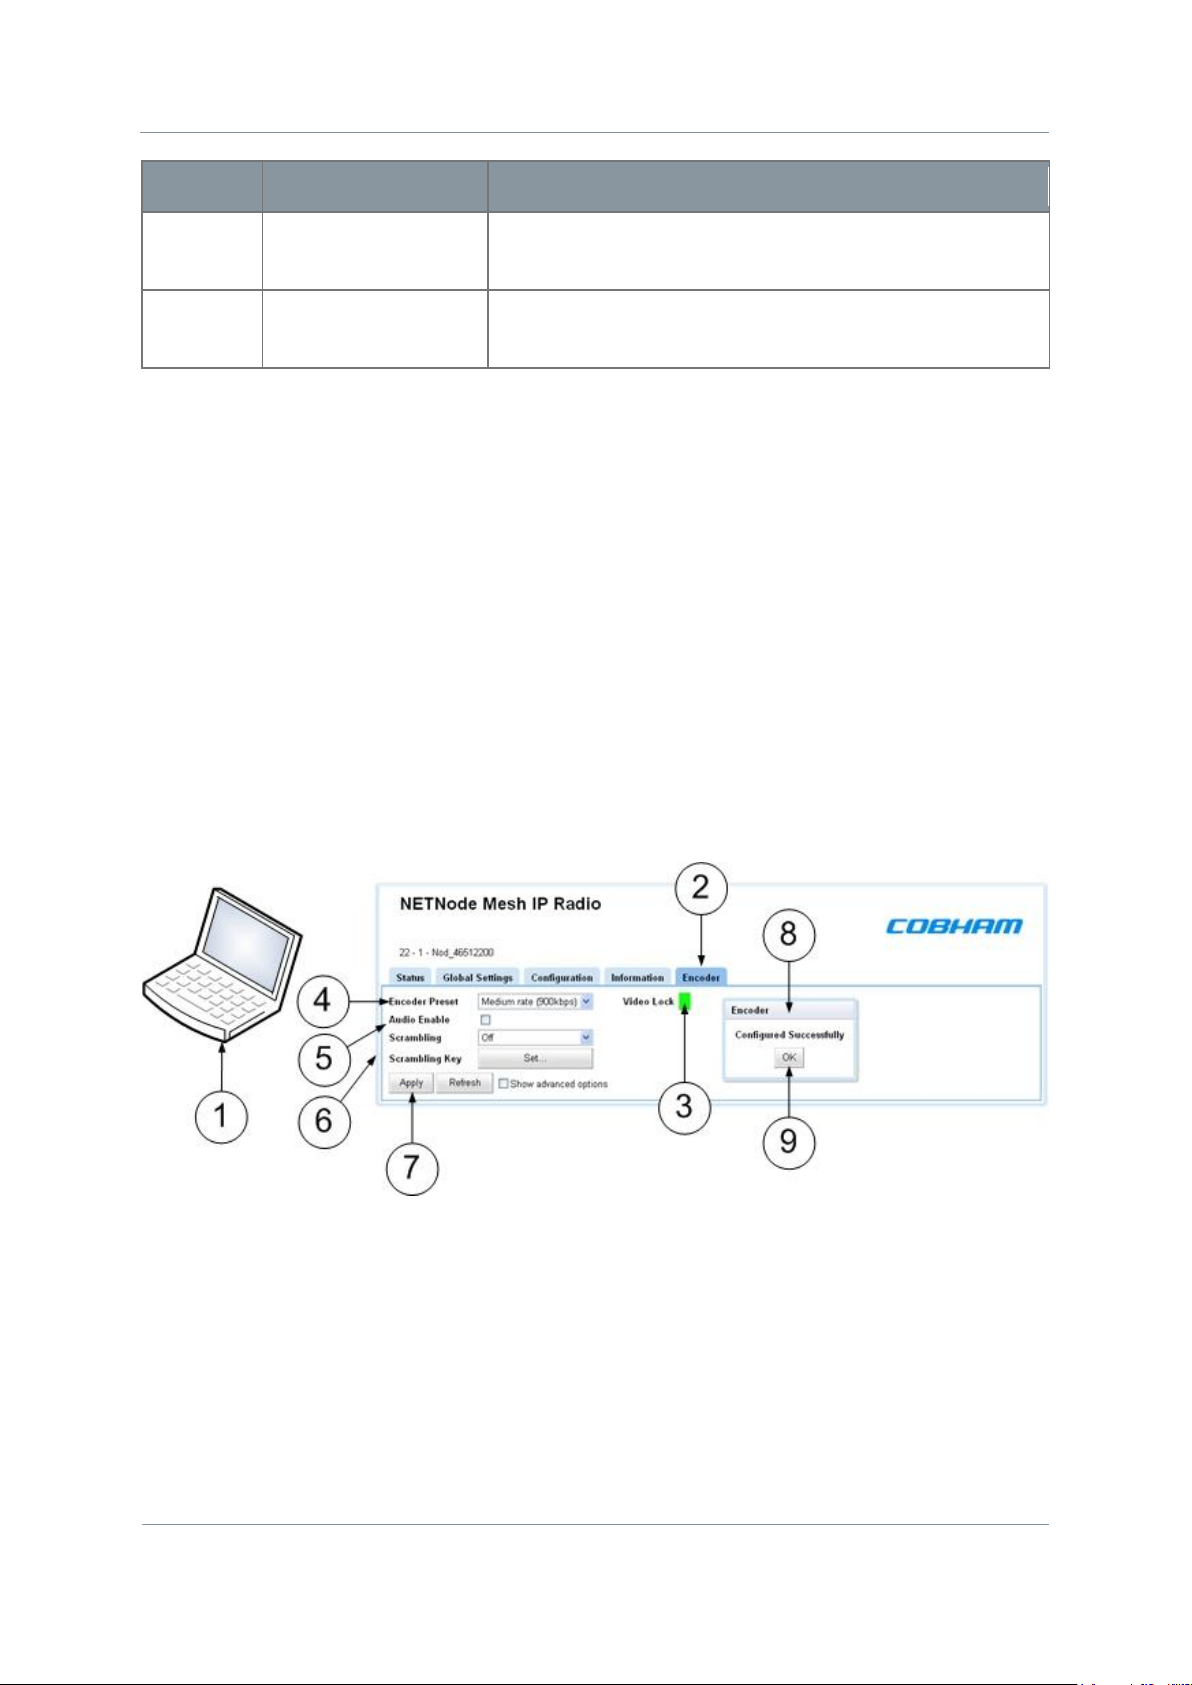
Step 3: Configure the NETNode with the AVI Option Fitted
1. Connect your PC to the NETNode and log on.
2. Navigate to the Encoder tab.
3. Check that the Video Lock indicator is showing green.
4. Set the Encoder Preset drop-down box to Medium rate (900kbps).
5. Set the Audio Enable checkbox to Checked if you have an audio source connected.
6. Set the Scrambling drop-down box to off.
7. Click Apply button.
8. The Encoder Configured Successfully dialog opens.
9. Click OK button.
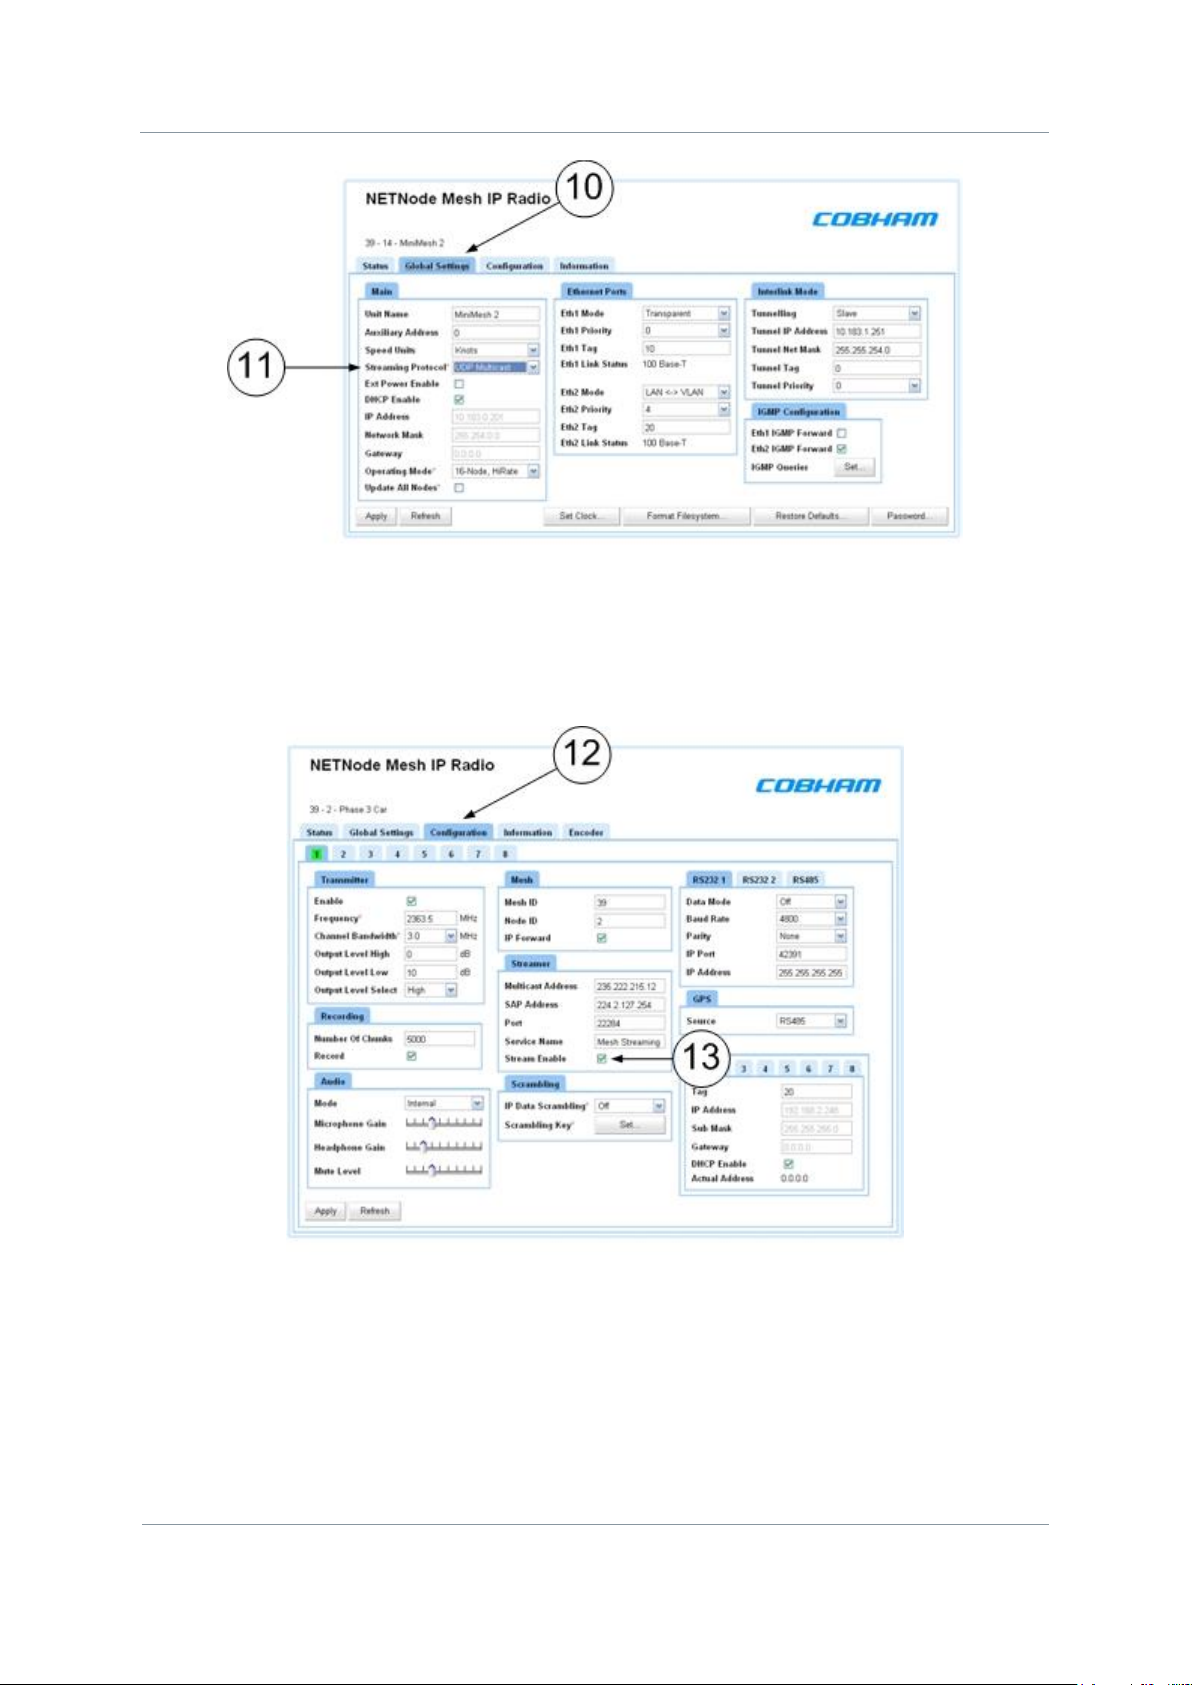
Figure 1-8 Encoder configuration
10. Navigate to the Global Settings tab.
11. In the Main pane, set Streaming Protocol to UDP Multicast.
Page 18
NETNode Operations Guide
Commercial in
Confidence
IP Mesh Systems
000-130
R1.8 2015-07-24
Commercial in
Confidence
Page 1-11
Figure 1-9 Global Settings, Streaming Protocol
12. Navigate to the Configuration tab.
13. In the Streamer pane, click Stream Enable tick box.
Step 4: Stream the Images on the PC Connected NETNode
At this time, look to the other NETNode that has the PC connected. At this part of the link we
will use a technique called streaming to monitor the pictures. While you can download
many types of free streaming software, we will use Cobham Stream Player.
Figure 1-10 Configuration, Stream Enable
Page 19
NETNode Operations Guide
Commercial in
Confidence
IP Mesh Systems
000-130
R1.8 2015-07-24
Commercial in
Confidence
Page 1-12
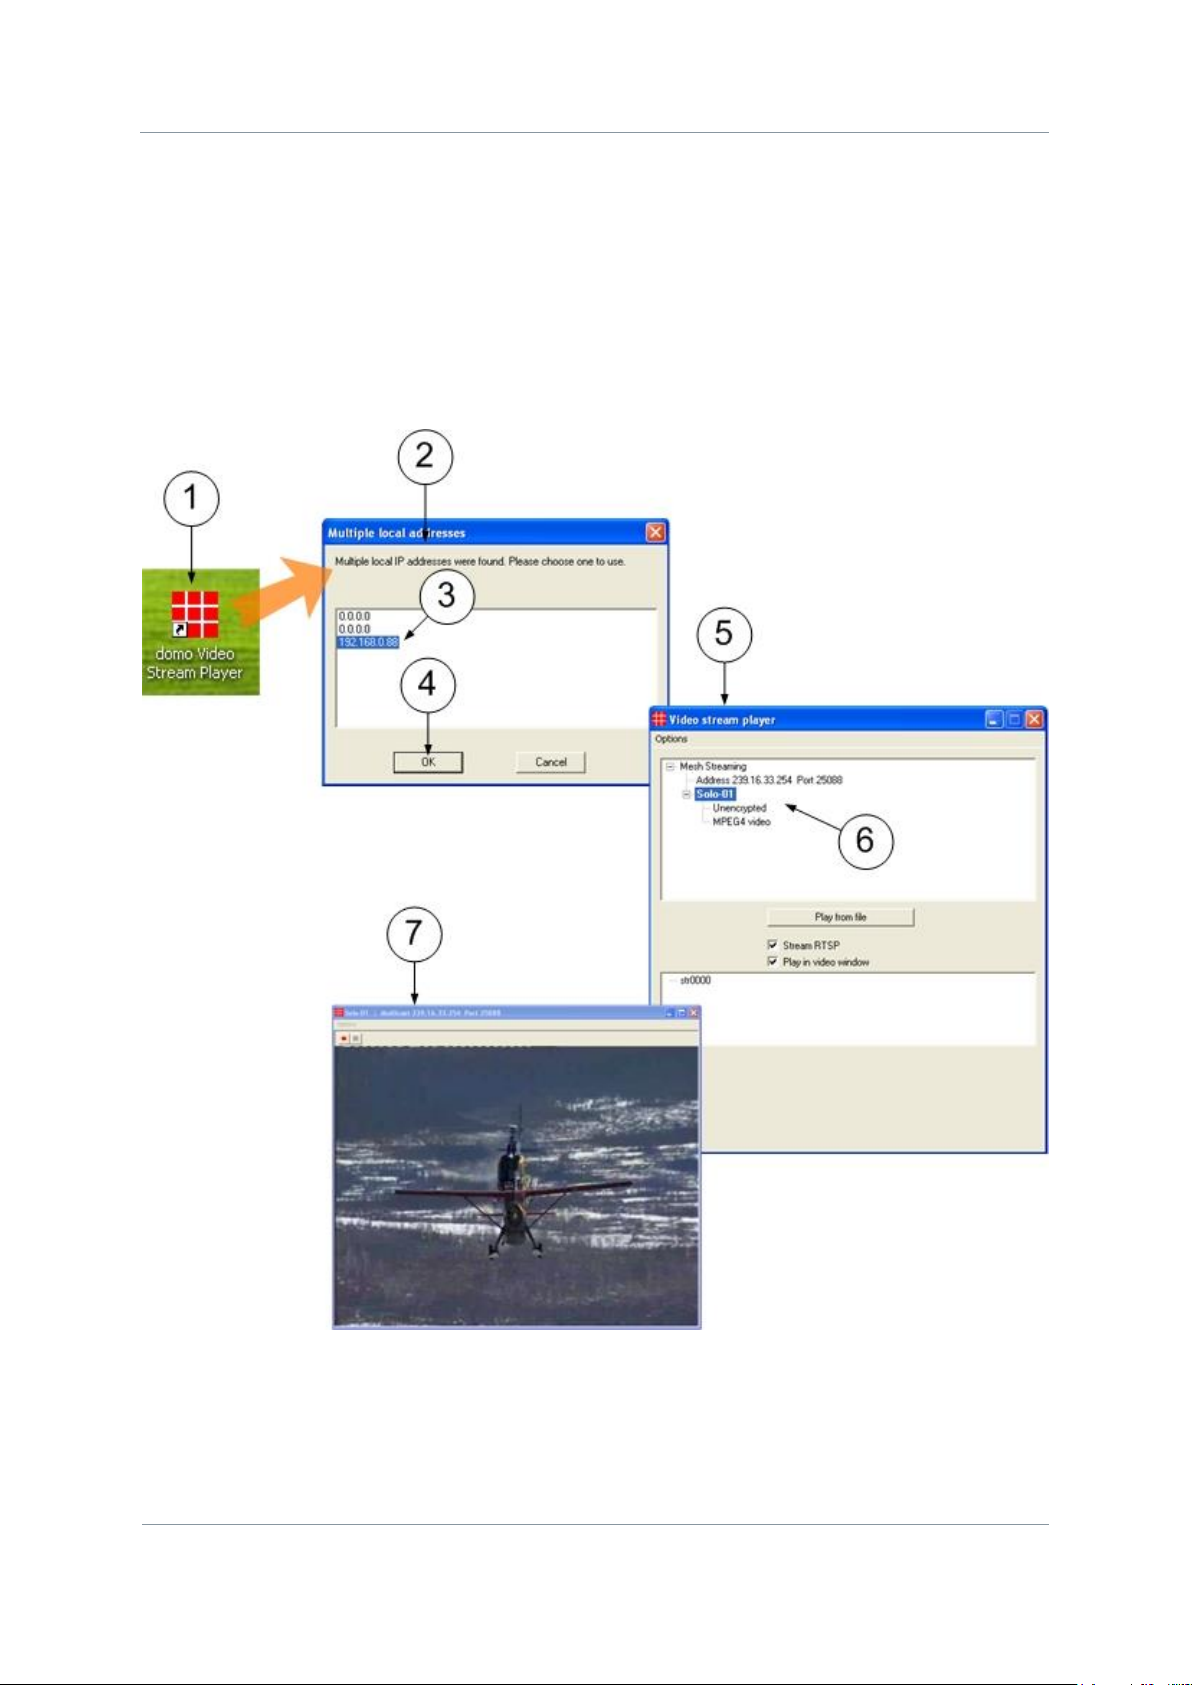
1. Double-click Stream Player icon.
2. The Multiple Local Addresses dialog opens.
3. Highlight the IP address of your PC.
4. Click OK.
5. Video Stream Player dialog opens.
6. Cascade Mesh Streaming menu and double-click the stream you wish to play.
7. The video will start to play in a new window.
Figure 1-11 Setting up Cobham Stream Player
Page 20

NETNode Operations Guide
Commercial in
Confidence
IP Mesh Systems
000-130
R1.8 2015-07-24
Commercial in
Confidence
Page 1-13
1.6 About AVI H264 Coding
Phase three units with the AVI option can be upgraded to give H264 video (improved
quality/lower bitrates) and MP3 audio (MPEG1 and half rate MPEG2). The software to
upgrade these units can be found on the Information Tab together with upgrade
instructions.
Page 21

NETNode Operations Guide
Commercial in
Confidence
IP Mesh Systems
000-130
R1.8 2015-07-24
Commercial in
Confidence
Page 2-14
2. Advanced Operation
2.1 Configuring your NETNode for the very first time
Usually, you’ll connect to your NETNodes with an IP connection. There are some times when
it will be necessary to connect to the NETNode with a serial connection:
The first time you get it out of the box from the factory
If you have forgotten the IP address
If you have lost the password
The unit has been left in DHCP mode and it is necessary to apply a fixed IP address
In these cases you’ll connect your NETNode to your PC with the Serial cable and operate
Node Finder.
The most important thing to do when you first get a NETNode is to connect serially and
switch off DHCP. Then apply a fixed IP address. At this time you can operate with the
NETNode quickly with simple IP connections.
Step 1: Connect to your Personal Computer with Serial (RS232)
It will be necessary to have a fully powered NETNode, a personal computer operating the
Mesh Serial Configuration Tool and the correct data cable supplied with the unit.
NETNode-3-Robust – CA0406
NETNode-3-Plain – CA0474
NETNode-Mini Plain – CA0474
1. Connect the Control Cable Assembly to the control receptacle on the NETNode.
2. At this time, connect the D-Type 9-way plug (sockets) marked RS232 on the control
cable to the D-Type 9-way receptacle (pins) on your personal computer.
CAUTION: There are two D-Type 9-way plugs on each control cable – make sure you
select the RS232 version by checking the label attached to the cable near the plug. The
other is RS485.
Note: Some PCs do not have D-Type 9-way receptacles. In this case, it will be necessary to
get a USB plug (pins) to D-Type 9-way plug (pins) adapter cable. These are easy to get from
computer stores.
Page 22

NETNode Operations Guide
Commercial in
Confidence
IP Mesh Systems
000-130
R1.8 2015-07-24
Commercial in
Confidence
Page 2-15
Figure 2-1 Connecting to the NETNode through serial port
Page 23
NETNode Operations Guide
Commercial in
Confidence
IP Mesh Systems
000-130
R1.8 2015-07-24
Commercial in
Confidence
Page 2-16
2.2 Configuring your NETNode with Node Finder
Step 1: Setup the Serial Connection between NETNode and PC
Connect your NETNode to your computer with the control cable. See
NETNode for the very first time
earlier in this section.
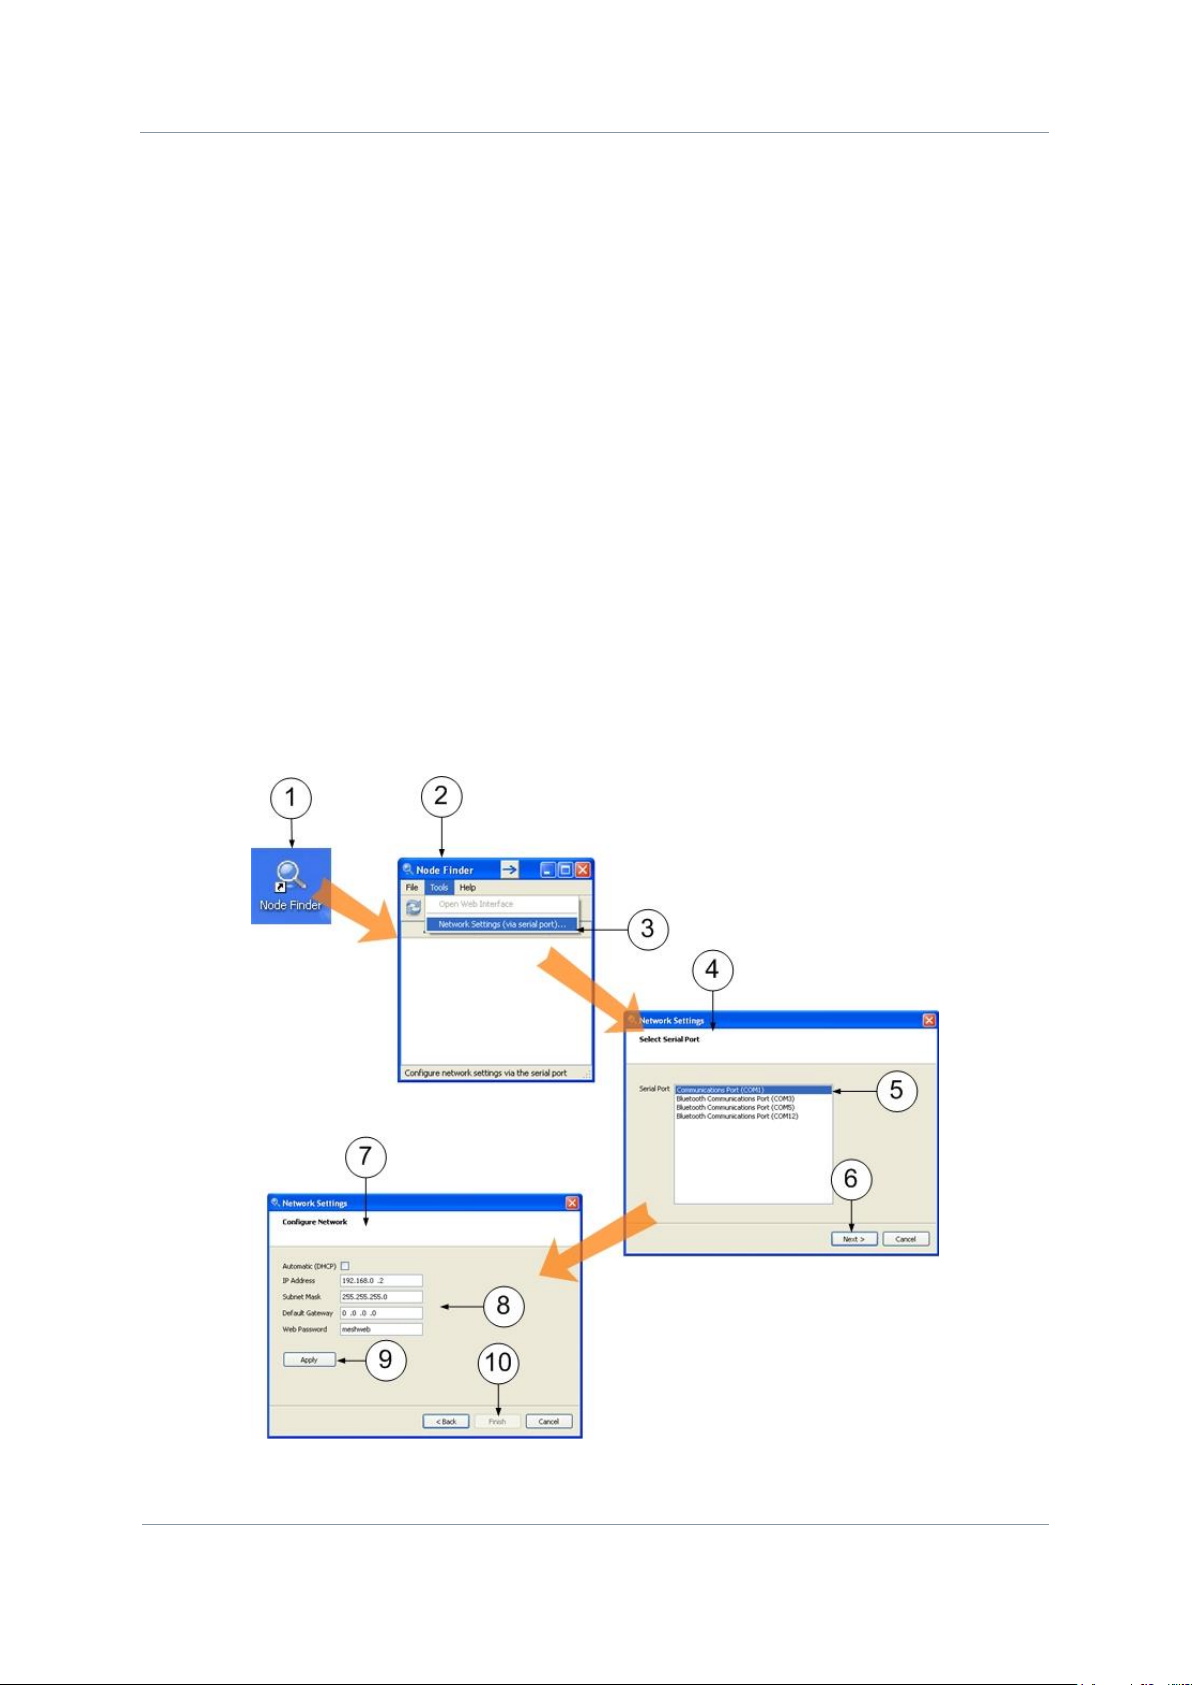
Step 2: Start Node Finder
1. Double-click the Node Finder icon on the computer desktop.
2. The Node Finder application opens.
3. Click Tools Network Settings (via serial port)…
4. The Select Serial Port dialog opens.
5. Select the Serial port for your NETNode.
6. Click Next> button.
7. The Configure Network dialog opens.
8. Set up the network.
9. Click Apply button.
10. Click Finish button.
Configuring your
Figure 2-2 Using Node Finder
Page 24

NETNode Operations Guide
Commercial in
Confidence
IP Mesh Systems
000-130
R1.8 2015-07-24
Commercial in
Confidence
Page 2-17
2.3 Working with Talkback
When you have established a mesh network it is possible to attach headsets to NETNodes in
the network. These headsets let you to listen and talk to a different operator on the network
(‘party line’).
Step 1: Rig the Headsets
It will be necessary to have at least two fully configured NETNodes, at least two headsets
and the correct Microphone/Headphone External Cable Assembly
NETNode-3-Robust – CA0589
NETNode-3-Plain – CA0588
NETNode-Mini Plain – CA0588
Here’s an example using the NETNode-3-R (Robust):
1. With the Microphone/headphone cable, connect to the Audio receptacle on the NETNode
marked T/B (NETNode-3-Plain & NETNode-3-Mini Plain) or CTRL/DATA (NETNode-3Robust).
2. Connect the microphone plug of the headset to the inline plug marked IN on the CA0589
cable.
3. Connect the headphone plug of the headset to the inline plug marked OUT on the
CA0589 Cable.
4. Do the same for other NETNodes with headsets.
Figure 2-3 Using Talkback across NETNode-3-Robust RF link
Page 25

NETNode Operations Guide
Commercial in
Confidence
IP Mesh Systems
000-130
R1.8 2015-07-24
Commercial in
Confidence
Page 2-18
Serial
Part
Description
1
First NETNode
Configured to operate with headset.
2
CA0589 Headset
cable
Amphenol 22-way plug (pins) to
3.5mm plug 3 Pole (socket) audio in and
3.5mm plug 3 Pole (socket) audio out.
3
Inline TRS Plug
Marked IN
This is where you connect your headset microphone
plug.
Note: Microphone power is on the audio connectors
at approximately 3V (applicable for Electret
microphones)
4
Inline TRS Plug
Marked OUT
This is where you connect your headphone plug.
5
Microphone Plug
Usually pink in colour.
6
Headphone Plug
Usually green in colour.
7
Domestic Headset
As used with domestic computer applications like
Skype.
8
Second NETNode
Configured to operate with headset.
9
CA0589 Headset
cable
Amphenol 22-way plug (pins) to
3.5mm plug 3 Pole (socket) audio in and
3.5mm plug 3 Pole (socket) audio out.
10
Domestic Headset
As used with domestic computer applications like
Skype. Connect the same as the first NETNode.
Table 2-1 – Using Talkback
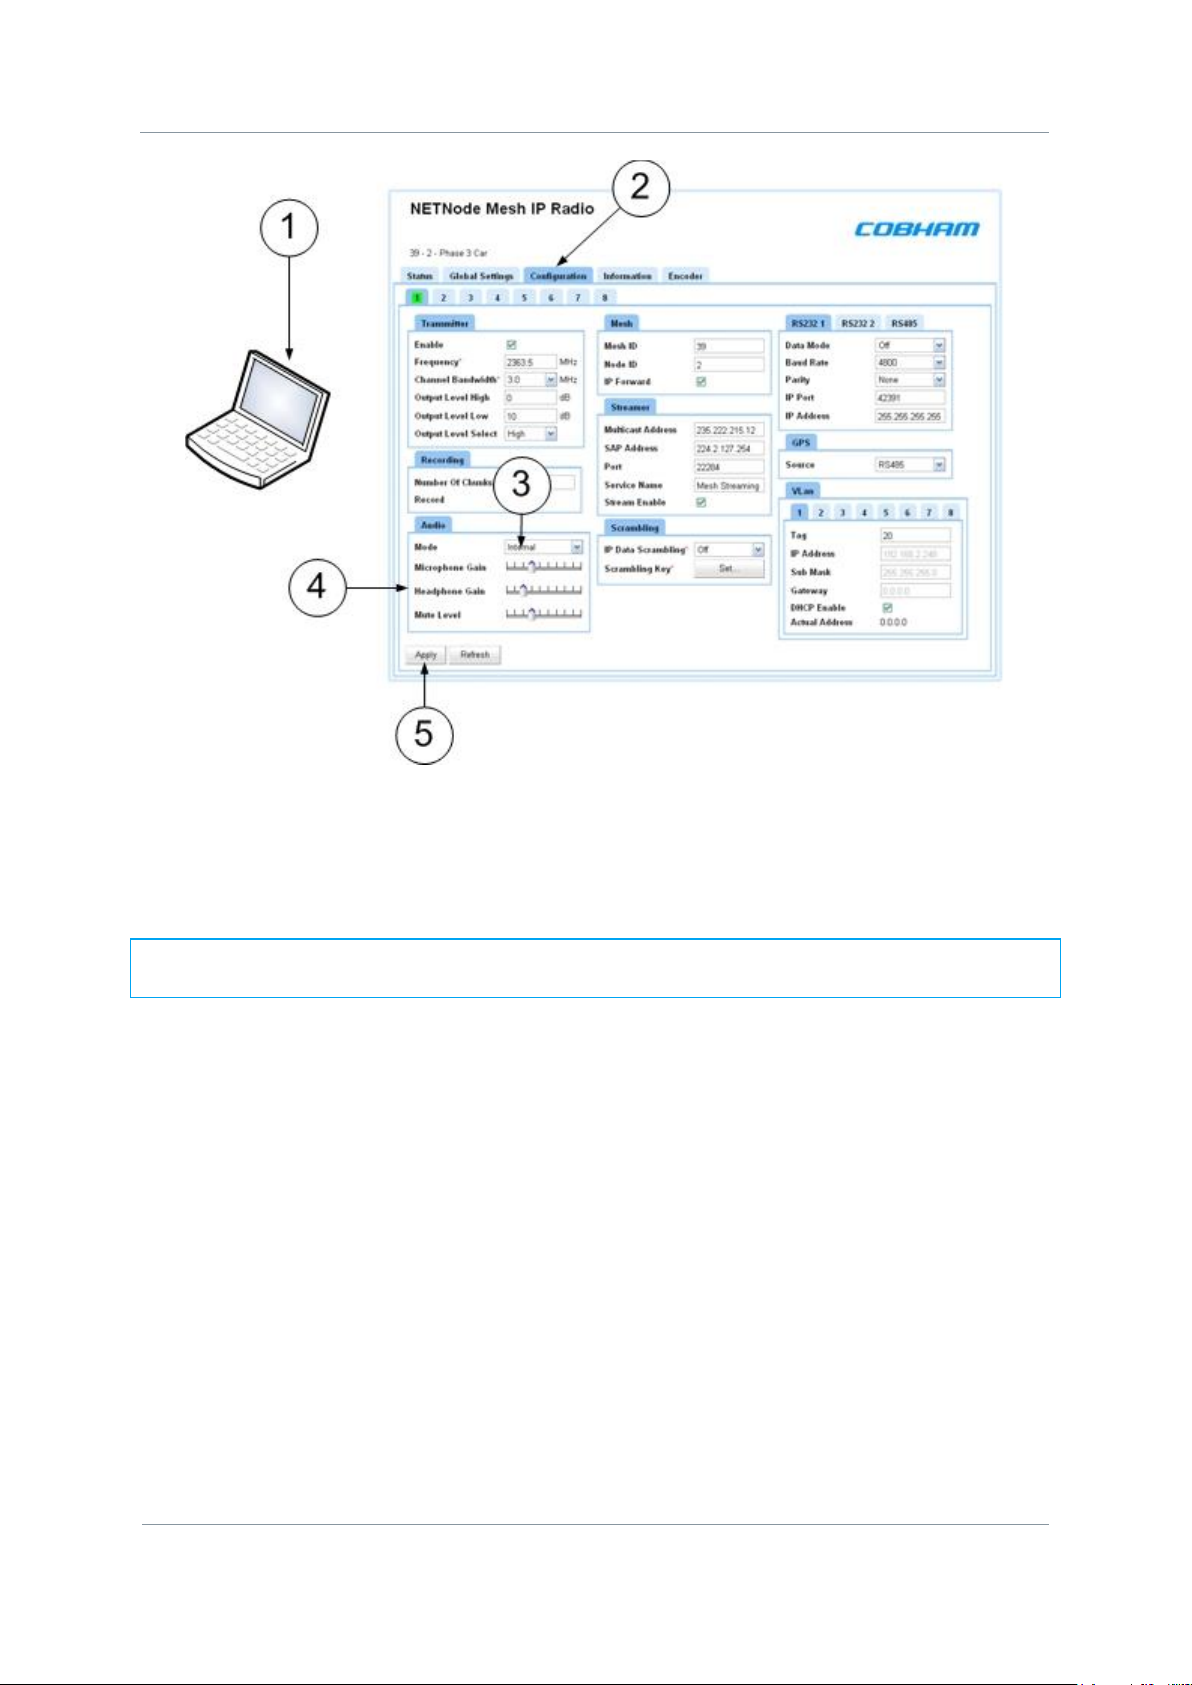
Step 2: Configure the NETNode to operate with Talkback
1. Connect your PC to the NETNode and log on
2. Navigate to the Configuration tab
3. In the Audio pane, set the Mode drop-down box to Internal
4. Adjust the Microphone Gain, Headphone Gain and Mute level to suit your
environment. The mute level must be set at a high enough level so that only speech (and
not ambient noise) is allowed through.
5. Click the Apply button.
6. Repeat on each NETNode that has a headset attached.
Page 26
NETNode Operations Guide
Commercial in
Confidence
IP Mesh Systems
000-130
R1.8 2015-07-24
Commercial in
Confidence
Page 2-19
Figure 2-4 Talkback Configuration
Step 3: Test the Talkback
When you listen on the headset and nobody is talking, you’ll hear a tone each ten seconds
to show that the audio circuit is operating.
Note: This is open talkback. Everyone on the network can hear you at all times. A Push
to Talk switch can be installed with the microphone to stop this.
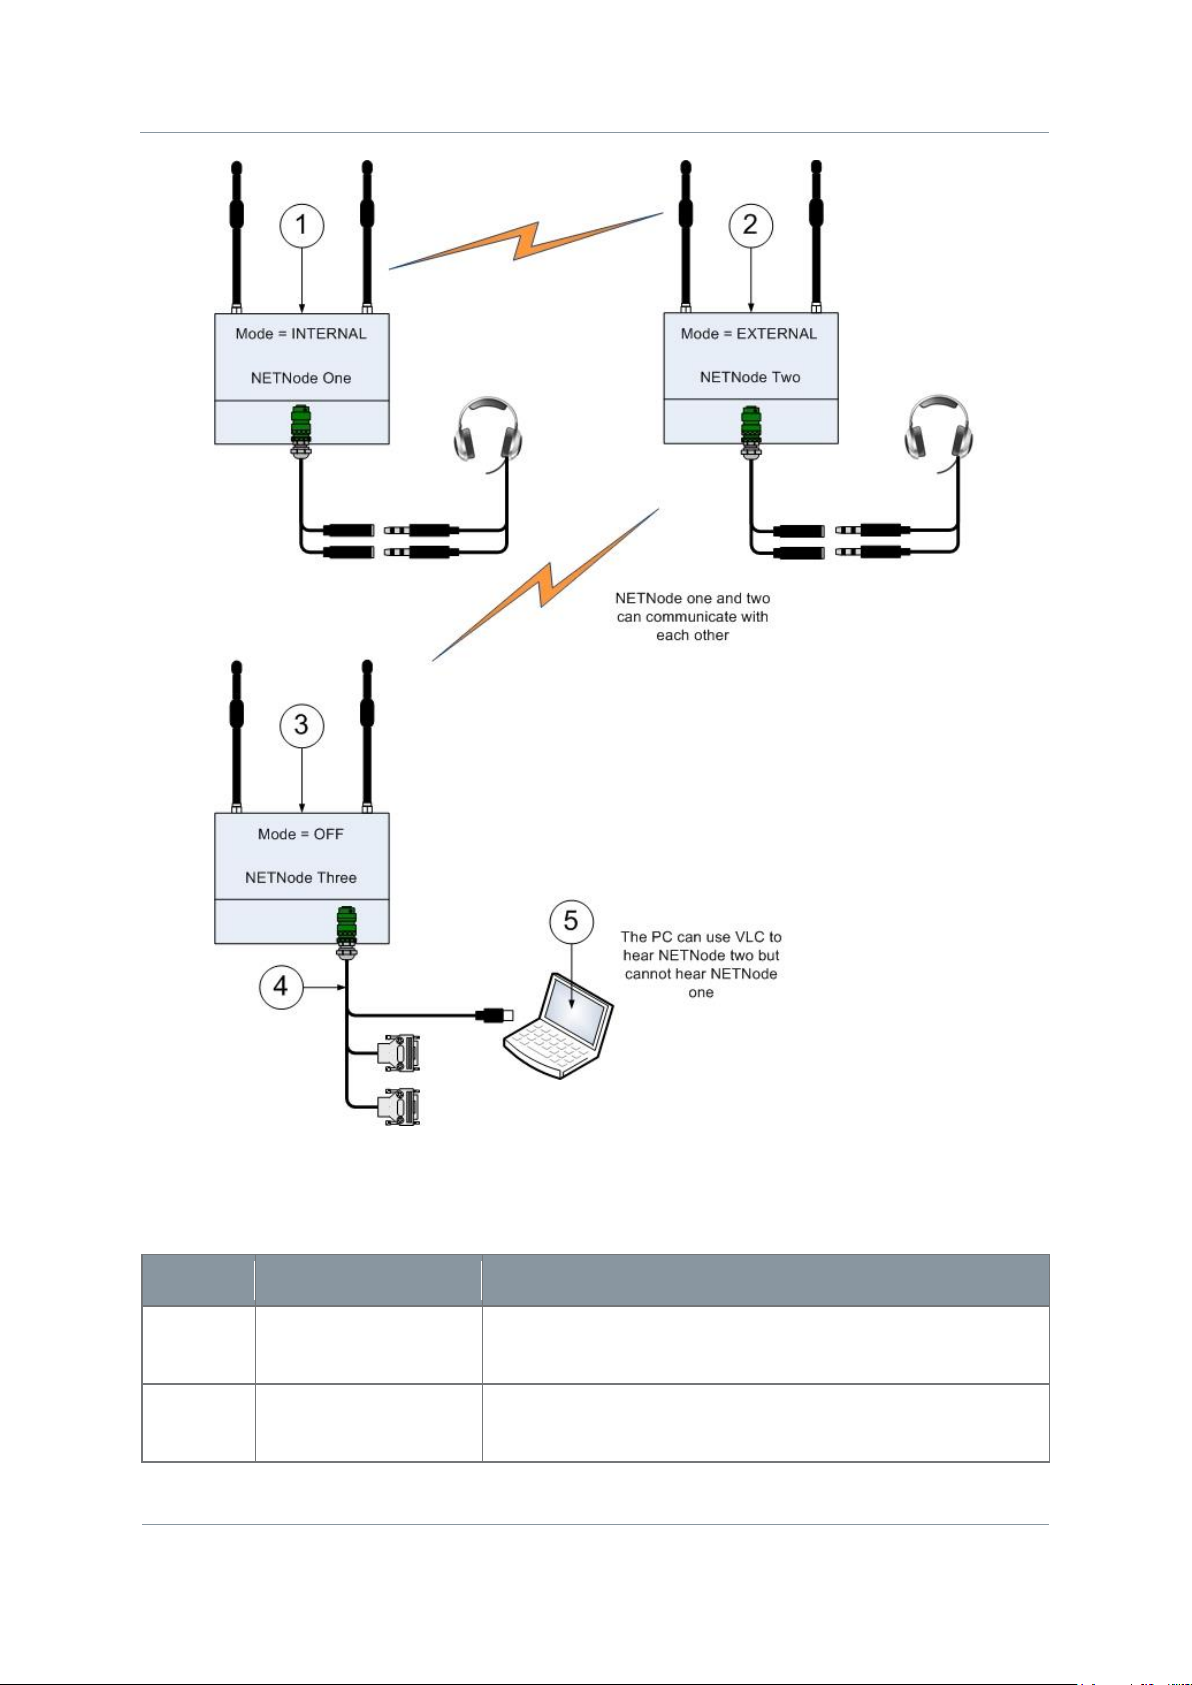
Step 4: Explore the Remote Setting
You’ll see that in Configuration Audio Mode there is a setting called Remote. If you
are using headsets on each NETNode they will continue to operate as described above.
Internal mode only distributes the talkback audio within the local mesh network.
But, Remote mode allows the onward distribution of this audio on an external IP network
with RTSP protocols.
This enables you to connect a PC to a second NETNode and hear what is being said across
the network with streaming software like VLC and the URL:
rtsp://ip_address_of_unit/audio.sdp
Page 27
NETNode Operations Guide
Commercial in
Confidence
IP Mesh Systems
000-130
R1.8 2015-07-24
Commercial in
Confidence
Page 2-20
Serial
Part
Description
1
First NETNode
Configured to operate with headset with INTERNAL
mode set.
2
Second NETNode
Configured to operate with headset with REMOTE mode
set.
Figure 2-5 Remote Setting
Page 28

NETNode Operations Guide
Commercial in
Confidence
IP Mesh Systems
000-130
R1.8 2015-07-24
Commercial in
Confidence
Page 2-21
Serial
Part
Description
3
Third NETNode
You can connect your PC to this NETNode with the
Ethernet connection cable and use VLC software to
hear the second NETNode headset which is in
REMOTE mode.
Note: You will not hear the first NETNode as that is
in INTERNAL mode.
4
Ethernet Cable
NETNode-3-Robust – CA0406
NETNode-3-Plain – AP000465 (Optional)
NETNode-Mini Plain – CA0505
5
PC
Personal Computer operating VLC software. You can
stream the output of the second NETNode.
Table 2-2 – Talkback Configuration
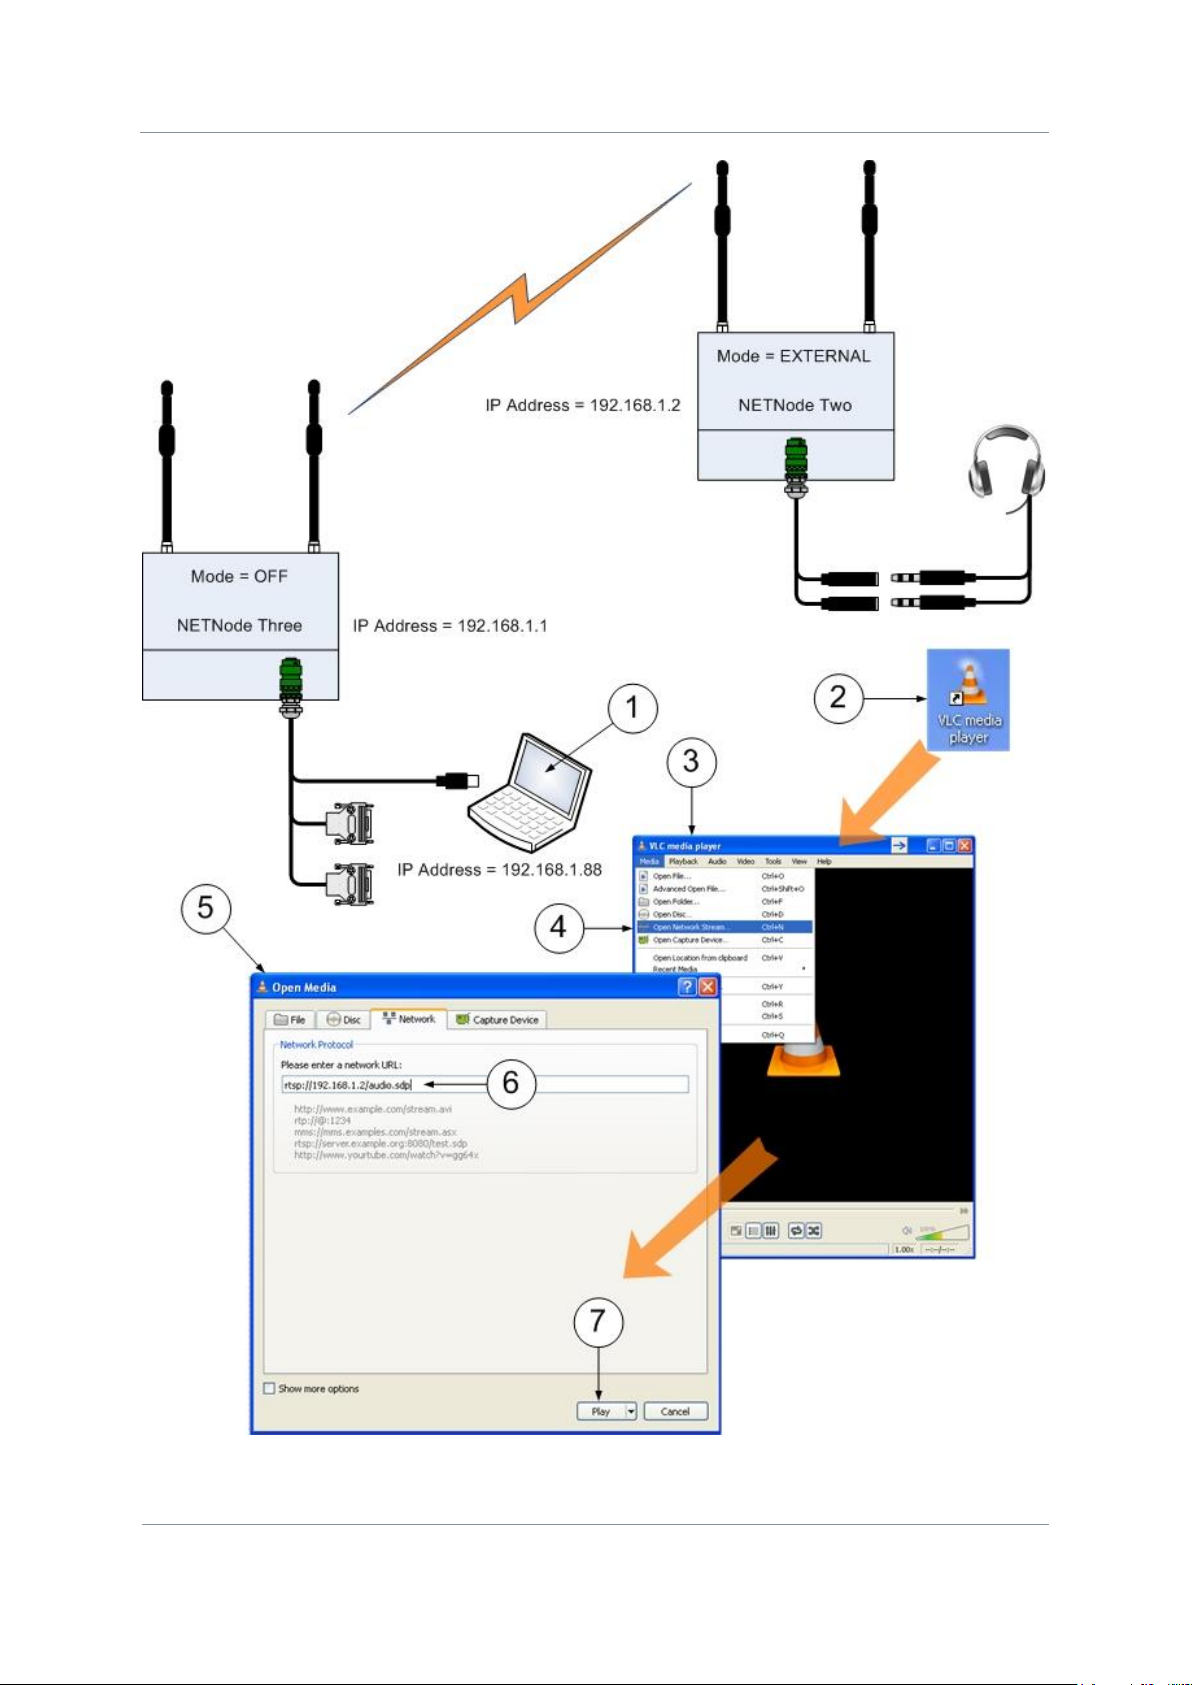
Step 5: Use VLC to stream from a Remote Enabled NETNode
1. Connect your PC to NETNode three.
2. Double-click the VLC icon on your desktop.
3. VLC media player window opens.
4. Select Media Open Network Stream from the drop-down menu.
5. The Open Media window opens.
6. Type the Network URL like this example: rtsp://192.168.1.2/audio.sdp
7. Click the Play button.
Note: The IP address for VLC is the NETNode that has the headset to which you wish to
listen. It can be necessary to turn the mute level down to zero to stop VLC from stopping
when there is no stream.
Note: You can get VLC free from the internet at: www.videolan.org/vlc/
Page 29
NETNode Operations Guide
Commercial in
Confidence
IP Mesh Systems
000-130
R1.8 2015-07-24
Commercial in
Confidence
Page 2-22
Figure 2-6 Streaming Audio with VLC player
Page 30

NETNode Operations Guide
Commercial in
Confidence
IP Mesh Systems
000-130
R1.8 2015-07-24
Commercial in
Confidence
Page 2-23
2.4 Configuring your NETNode for GPS
If you attach a applicable GPS receiver to a NETNode you can use GPS location data on your
system. It can be very useful to show the location of NETNodes on a digital mapping screen
for example.
The NETNode system uses the NMEA 0183 GPS protocol to send GPS data.
We’ll use the example of operating with a Garmin GPS 17X Receiver.
Step 1: Connect the GPS Receiver to the NETNode
It will be necessary to have a Garmin GPS 17X Receiver, a Garmin cable a fully powered and
configured NETNode, a Data Cable Assembly and a PC with a web browser.
NETNode-3-Robust – CA0406
NETNode-3-Plain – CA0474
NETNode-Mini Plain – CA0474
1. Connect the Data Cable to the receptacle on the NETNode:
NETNode-3-Robust – Amphenol 19-way receptacle (Sockets) Marked AV/PTZ
NETNode-3-Plain – LEMO 3-way receptacle (Sockets) Marked AUX
NETNode-Mini Plain – D-Type 15-way receptacle (Sockets) Marked AUX
2. Connect your GPS 17X cable to the RS485 D-Type 9-way plug (sockets) on your data
cable assembly.
Step 2: Configure NETNode for operation with the Garmin GPS 17X
1. Connect your PC to the NETNode and log on.
2. Navigate to the Configuration tab.
3. In the RS485 pane, set: Data Mode to Off, Baud Rate to 4800, Parity to None (the
other settings are unimportant).
4. In the GPS pane set the drop-down box to RS485.
5. Click the Apply button.
6. On phase 3 units it will be necessary to enable external DC power on the Global
Settings > Main panel tab.
7. The Configured Successfully message appears, click OK.
Note: It is necessary for the Garmin cable to be adapted for use with NETNodes.
Page 31

NETNode Operations Guide
Commercial in
Confidence
IP Mesh Systems
000-130
R1.8 2015-07-24
Commercial in
Confidence
Page 2-24
Figure 2-7 GPS Configuration
Step 3: Test the Garmin GPS 17X with the NETNode
You have connected and configured your Garmin GPS 17X. Here is how we can test it.
1. Connect your PC to the NETNode and log on.
2. Navigate to the Status Maps tab.
3. Make sure the Option Buttons are set to Network.
4. Click the local NETNode with the GPS connected.
5. The GPS data will show.
Page 32

NETNode Operations Guide
Commercial in
Confidence
IP Mesh Systems
000-130
R1.8 2015-07-24
Commercial in
Confidence
Page 2-25
Figure 2-8 GPS Data Displayed in the Maps Sub-tab
Step 4: Display the GPS Location on a Map
1. Connect your PC to the NETNode and login
2. Navigate to the Status Maps tab
3. Make sure the Option Buttons are set to a map (1,2,3 or 4)
4. Click the local NETNode with the GPS connected
5. Check the Use GPS checkbox
6. The NETNode with the GPS will jump to the correct location on the map.
Page 33

NETNode Operations Guide
Commercial in
Confidence
IP Mesh Systems
000-130
R1.8 2015-07-24
Commercial in
Confidence
Page 2-26
Figure 2-9 GPS NETNode located on a map
Note: You must have a map loaded on the GPS and have loaded the coordinates of the
corners of the map. Only then will the GPS show the location of the NETNode.
You can find out how to upload maps and set coordinates in the
Advanced Setup
chapter.
2.5 About NETNode IP Functionally
Each NETNode behaves as a Switched Hub. This hub contains two real ports (‘eth0’ and
‘eth1’), a virtual port to each remote NETNode across the radio interface (‘msh0’ – ‘msh15’
(where number=node)), and a local virtual port (‘loc’) for control and local streaming. The
HUB contains additional packet filtering to prevent unnecessary packets from being passed
across the network.
The packet filtering rules are as follows:
Only packets of type ARP and IP are passed all other packet types are blocked
Scanning Tree Protocol is forwarded (and a metric added if passed across the radio) if
enabled
The maximum MTU is 1514 or 1518 for VLAN single tagged packets
VLAN packets are supported if enabled on a tag by tag basis
Only packets from the local subnet are passed by default
Packets for other subnets are allowed if Static Routes are manually entered or Routing
Information Protocol is enabled and received
Broadcast packets on IP address 255.255.255.255 or within the same subnet are passed
to all ports
Multicast packets 224.0.0.1 – 224.0.0.255 are passed to all ports
Page 34

NETNode Operations Guide
Commercial in
Confidence
IP Mesh Systems
000-130
R1.8 2015-07-24
Commercial in
Confidence
Page 2-27
Other multicast packets are supported by IGMP control and only forwarded to ports
which are members of that group
Unicast packets are forwarded only to the correct port
Each NETNode keeps an ARP table. This contains the IP, MAC and additionally a port (real
and virtual) of each unicast IP address on the system for the main subnet. The table is built
up by recording the source addresses for both ARP and IP packets entering the NETNode.
There is a separate list for each VLAN on the system.
When a unicast packet arrives on the local subnet, the destination IP address is searched for
in the table, and the packet sent to this port in the table. If no entry is found then this
results in the unit generating an ARP request (who is ...?). Destination IP addresses which
are not on the local subnet are checked against the static and RIP routes and forwarded to
the correct gateway. If this fails then the default gateway address is used.
NETNodes will also send out gratuitous ARP’s when they join the network. This aids network
cohesion.
NETNodes support to following protocols on the local port (‘loc’):
ARP (LAN and VLAN)
ICMP ping (LAN and VLAN)
IGMP (LAN and VLAN)
RIP v2 (LAN and VLAN)
DHCP (LAN and VLAN)
HTTP control (TCP port 80 and 50080)
TFTP (for upgrades)
RTSP/RTP (TCP port 520 for streaming)
TELNET (RS232 over IP)
In addition NETNodes also include a number of Domo/Cobham proprietary protocols for
control and network discovery. These tend to be UDP over specific port numbers.
2.6 Multicast Packet Processing
IP multicast is a technique for one-to-many communication over an IP infrastructure in a
network. It is often used for streaming of services such as audio and video. These can take
up large bandwidths in a network. In order to manage this in the MESH system, each
NETNode functions as a multicast router allowing the flow of packets only when required. IP
multicast is often used for communication between routers/gateways.
The Internet Group Management Protocol (IGMP) is a communications protocol used by
hosts and adjacent routers on IP networks to establish multicast group memberships. In
order to perform multicast routing each NETNode acts an IGMP snooper/router.
NETNodes from v4.1 onwards support IGMP (v2) protocol. Separate multicast routing tables
are maintained for the main LAN and for each VLAN in the system.
Detailed Multicast Forwarding rules for NETNodes 2.6.1
To send multicast packets across the MESH a set of rules are applied:
Page 35

NETNode Operations Guide
Commercial in
Confidence
IP Mesh Systems
000-130
R1.8 2015-07-24
Commercial in
Confidence
Page 2-28
Note: To prevent excess network traffic only one forced querier per VLAN should be set
on the MESH network.
1. IP packets with destination address 224.0.0.0 are blocked; these are used internally
within the MESH.
2. IP packets with destination addresses 224.0.0.1 to 224.0.0.255 and 239.255.255.250
(SSDP) are flooded to all nodes and interfaces regardless of being members of the group
or not.
3. All other multicast packets are forwarded only to nodes and interfaces which are
members of the group.
Although non-registered groups should be forwarded to all destinations, this is
the MESH to control bandwidth.
There are two types of interface as far as IGMP is concerned:
1. Multicast-router interfaces – these interfaces lead towards multicast routers or IGMP
queriers
2. Group-member interfaces – these interfaces lead towards hosts
prevented
in
IGMP Querier 2.6.2
A querier is required on the network to ensure proper functionality of the IGMP protocol. A
querier periodically sends out a IGMP general query which causes each host to send out a
membership report for each of its’ group. This in turn refreshes the multicast routing tables
in the routers. Without this, the table entries would eventually timeout and become void.
There is usually only one querier on the network. This is the multicast router with lowest IP
address, and any routers with higher addresses fall silent.
NETNodes act as multicast routers. By default, a NETNode will become a querier at start up,
and will continue to send queries if it has the lowest IP address of all the NETNodes and
multicast routers.
Connecting a NETNode to a Multicast Router 2.6.3
To let IGMP function correctly between MESH and an external multicast router, the ports
connected between the multicast-router and the NETNode must be set to forward IGMP
membership reports. For the NETNode the Eth1 or Eth2 check boxes must be ticked
(depending on which port the router is connected to), and a similar procedure repeated on
the multicast-router. This will forward IGMP reports for both LAN and all VLANs.
Alternatively, if the external multicast-router management interface is not accessible, and the
multicast router has a
a second querier on a NETNode using the IGMP Force Query popup panel. This will cause
the external multicast router to continue to forward IGMP membership reports to the MESH.
A querier can be setup for each VLAN. The presence of a forced querier will automatically
prevent any other (non-forced) queriers starting up on the local (but not on a remote) MESH
network.
1. Connect your PC to the NETNode and log on.
2. Navigate to the Global Settings tab.
lower IP
address than all MESH nodes, then it is necessary to start up
Page 36

NETNode Operations Guide
Commercial in
Confidence
IP Mesh Systems
000-130
R1.8 2015-07-24
Commercial in
Confidence
Page 2-29
Note: NETNode Multicast and RTSP streaming (Multicast and Uniicast) depend on IGMP
functionality.
3. On the IGMP Configuration Pane you can select IGMP forwarding for each port.
4. You can select a forced IGMP Querier by hitting the IGMP Querier Set button.
5. This will produce a Force IGMP Querier popup box.
6. You can select to place an IGMP Querier on the local LAN and/or any of the VLANs.
7. Click OK.
8. You must hit Apply on the Configuration Pane for the changes to take effect.
Figure 2-10 IGMP Configuration
Protocols such as PIM (Protocol Independent Multicast) designed for router to router
interfaces but NETNodes do not process this type of packet.
Forcing a querier on the MESH network can be useful when no external querier is present,
and the user wishes to override the default behaviour of the MESH selecting the NETNode
with the lowest IP address. This may have poor RF connectivity. Instead the user can choose
the NETNode which has good RF connectivity.
IGMP Reference Material 2.6.4
For a more detailed understanding of multicasting and IGMP some reference material is
available to read.
http://tools.ietf.org/html/rfc2236 IGMP-v2
http://tools.ietf.org/html/rfc4541 Considerations for IGMP Snooping Switches
http://www.juniper.net/techpubs/en_US/junos11.3/topics/concept/igmp-snooping-multicastforwarding.html
Page 37

NETNode Operations Guide
Commercial in
Confidence
IP Mesh Systems
000-130
R1.8 2015-07-24
Commercial in
Confidence
Page 2-30
2.7 Understanding Streaming Over IP
Streaming is the transmission of digital audio or video or the listening and viewing of such
data without first storing it.
This section is relevant only to customers that have the NETNode-AVI-UP option fitted into
their NETNode unit.
The NETNode supports:
Raw Multicast streaming
RTSP/RTP streaming.
2.8 Configuring Multicast Streaming
For multicast streaming the transport stream video data is transmitted over the Ethernet
network by means of multicasting i.e. continuous real-time streaming of packets accessible
to any PC connected to the network.
It is thus possible for more than one connected PC to view the streamed data
simultaneously.
Two types of multicast IP packets are streamed:
Packets carrying video, audio and data as received by the unit.
Packets known as Session Announcement Protocol and Sessions Description Protocol
data (SAP and SDP), which contain information regarding the nature and location of the
stream itself.
Step 1: Open the Configuration Tab Streamer Pane
When you have got a Video or Audio product into the NETNode, you can wish to stream that
information down a fixed IP link. The Configuration Streamer pane enables you to
configure this facility easily.
In Cobham systems we have the ability to carry streams using multicast protocols and these
streams can come from external or internal sources. This is controlled by the Source Mask.
To make sure we don’t overload the bandwidth we wish to be able to choose which nodes
get to receive the stream. This is controlled by the Destination Mask.
Step 2: Setup the Service Name
Textual information naming the multicast stream as delivered in the SAP/SDP packets from
the unit. The default setting is Mesh Streaming
Step 3: Stream Enable
This function enables the streaming of Video that originates from the internal encoder (if it is
fitted). This must be set to On for UDP multicast, RTSP multicast streaming or RTSP unicast
streaming.
Step 5: Check the Multicast Address
This text box enables you to change the multicast address used by the unit. Different
NETNodes (even if they are on separate MESHs) should have different multicast addresses to
Page 38

NETNode Operations Guide
Commercial in
Confidence
IP Mesh Systems
000-130
R1.8 2015-07-24
Commercial in
Confidence
Page 2-31
Note: Having two NETNodes set to the same multicast address will cause both to stream
(even if RTSP modes are selected) which is wasteful of bandwidth.
make sure that IGMP packets only open up the stream from that source. This is a change
from previous versions of software.
Step 6: Check the SAP Address
This text box enables you to change the value of SAP/ SDP multicast address used by the
unit.
The default value is 224.2.127.254 and the port used is 9875.
These are standard multicast values for such parameters, and it is recommended they are
not changed unless specifically required due to routing restrictions.
Step 7: Check the Port
A good rule is to use numbers above 10,000 to avoid conflict with existing services.
When you set up a port number on several computers on a network they will all listen for
packets directed to that port.
Step 8: Configure the Service Name
This text box lets you name the multicast stream as delivered in the SAP/SDP packets from
the unit. Default is MPEG Stream.
2.9 About RTSP Streaming
Real Time Streaming Protocol (RTSP) allows automatic control of the routing through the
mesh system. To use this feature the streaming protocol box must be set to the same RSTP
multicast or Unicast modes for all nodes in the system (this will happen if the Update all
nodes checkbox is checked).
The streaming protocol is selected on the Global Settings tab – see Chapter 10-5
with the Global Settings Tab
To access a stream on an AVI unit the URL is as follows:
rtsp://<ip_address_of_AVI_unit>/stream.sdp
This will automatically set the internal destination masks of the AVI node and the endpoint
node (the node where the data emerges from the Ethernet) to the correct values. The
destination values displayed in the destination mask on the Configuration Tab no longer have
any effect in this mode of operation.
for details.
Working
If necessary the endpoint node will convert the multicast RTP packets to unicast (and remap
the port numbers) if the Software player does not support multicast streaming. Unicast can
also be forced by setting the mode to RTSP Unicast. The Mesh always uses multicast packets
internally as this is more bandwidth efficient when reaching multiple destinations.
Page 39

NETNode Operations Guide
Commercial in
Confidence
IP Mesh Systems
000-130
R1.8 2015-07-24
Commercial in
Confidence
Page 2-32
Note: the player must be able to support transport stream packets (MP2T – suitable players
include VLC media player). Ports on different AVI NETNodes should be set to different
unique values (use even addresses for RTSP/RTP).
The source mask, internal multicast address, service name and port number are still used in
this mode.
It is possible to stream just the video elementary stream rather than the complete transport
stream. This is performed by:
rtsp://<ip_address_of_AVI_unit>/video1.sdp
This can be useful for players which don’t accept MP2T streams.
2.10 Working with Stream Recording and Playback
The NETNode Robust allows recording of the video from the AVI unit onto a micro SD card.
Files are recorded in 30 second lengths called chunks, and are stored in a compressed
transport stream format. They can subsequently be downloaded through the web browser
from the file system, or alternatively the card can be inserted into an external computer.
Files are stored in FAT16 format and thus are easily read. The date and time is always stored
in UTC format regardless of the time-zone setting.
Step 1: Insert an SD Card
To use this facility first put a 2GB micro SD card into the slot on the NETNode.
This will cause the green LED on the SD card slot to come on. The card must only be
removed when the LED is green to prevent corruption of the data on the card.
Step 2: Format the SD Card
The SD card must be formatted in FAT16 format. If not, the flash can be formatted using
Global setting Format file system button.
Step 3: Observe the File Length
This is the maximum number of files stored on the card and the oldest will be removed first.
This must be set so that the number of files does not become bigger than the capacity of the
SD card.
Step 4: Start Recording
To set the recording mode make sure the AVI unit’s video encoder is set up correctly (See
Chapter 8 Section 8
camera.
1. Connect your PC to the NETNode and login.
Working with the Encoder Tab
) and the video feed connected from the
2. Make sure the Encoder tab has been set up correctly.
3. Navigate to the Configuration tab.
4. In the Recording pane, select the Record checkbox.
5. Click the Apply button to accept the changes.
Page 40

NETNode Operations Guide
Commercial in
Confidence
IP Mesh Systems
000-130
R1.8 2015-07-24
Commercial in
Confidence
Page 2-33
Figure 2-11 Setting up recording
The data is recorded onto the SD card in 30 second chunks. Thus the dimension of each
chunk is the encoded bit-rate (in bits/s) * 30 / 8. Set the maximum number of chunks to be
less than the capacity of the card over the chunk size, to prevent the data from exceeding
SD card capacity.
Step 5: Check Recording is Taking Place
1. Connect your PC to the NETNode and login.
2. Navigate to the Information tab.
3. Click File System.
4. The File System window opens.
5. Click Flash Card.
6. The Directory window opens.
7. Click Stream.
8. The file window opens with all your recordings.
Page 41

NETNode Operations Guide
Commercial in
Confidence
IP Mesh Systems
000-130
R1.8 2015-07-24
Commercial in
Confidence
Page 2-34
Each file is one chunk representing 30 seconds of data. When the number of chunks is
reached, the oldest file is deleted and recording continues providing the SD capacity is not
exceeded.
For example to set a continuous recording of the last five minutes of encoded video you
would set the number of chunks to 10 and this would continuously record and overwrite the
last five minutes of video.
With a 1Mb/s video stream and a 2GB SD card a user can record just over four hours of
video data.
1Mb/s is equivalent to 125kBytes/second of data. A 2GByte SD card can store 16,000
seconds of video before it hits capacity or 533 30 second chunks.
To keep a safe margin a 500 chunk limit must be used giving just over four hours of
recording if recording a 1Mb/s video stream.
Figure 2-12 Recorded video file system
Page 42

NETNode Operations Guide
Commercial in
Confidence
IP Mesh Systems
000-130
R1.8 2015-07-24
Commercial in
Confidence
Page 2-35
Step 6: Playing back the Recorded Data
The recorded data can be viewed directly with a player such as VLC media player:
1. Connect your PC to NETNode with the SD card installed.
2. Double-click the VLC icon on your desktop.
3. VLC media player window opens.
4. Select Media Open Network Stream from the drop-down menu.
5. The Open Media window opens.
6. Type the Network URL like this example: rtsp://192.168.1.2/record.sdp.
7. Click the Play button.
8. VLC media player window opens with your playback.
Figure 2-13 Setting up VLC player
Page 43

NETNode Operations Guide
Commercial in
Confidence
IP Mesh Systems
000-130
R1.8 2015-07-24
Commercial in
Confidence
Page 2-36
In this mode of operation the slider bar on VLC can be moved to navigate to different parts
of the recording.
Note: Playback will always start on the next 30 second chunk. The Network Time Protocol
(NTP) timestamps in the data contain the time the recording was transferred to SD card.
Step 7: Transferring the Files
Individual recorded files can be transferred to the PC using the Web interface to download
the files. To do this operation, simply right click on the file.
The SD card can also be removed and inserted into a card slot on the PC to read the files.
The SD card format is FAT16 with the date stored in UTC format.
2.11 Video Flow Control
Video flow control allows the video bitrate to be varied depending on the MESH bandwidth
available. This prevents corruption of the video when MESH bandwidth drops, and allows the
picture quality to adapt accordingly.
The VFC operates by monitoring the latency from the video encoder to the MESH endpoint or
endpoints (this is where the video emerges from the MESH network). At the endpoint a
special acknowledgement packet (RACK) is sent back to the source. The system tries to
maintain the round trip to the target latency.
Video flow control requires the internal encoder to be upgraded to version 1.4 or greater.
See the H264 encoder upgrade instructions to see how to do this.
To setup the video flow control, first check that the streaming protocol on the global settings
plane is set to RTSP unicast or multicast. On the configuration plane set the video bitrate on
the encoder tab to the lower of maximum value that the link will support, and what is
required to give the required picture quality. This value will not be exceeded. Setting this
value too high will degrade performance.
At this time, go to the streamer plane, and enable Video Flow Control. It can be necessary to
adjust the Target Latency depending on the network. Too low a value will drop the actual
bitrate, too high a value will increase latency and cause overflow in the internal FIFOs, which
will corrupt the video. The value must be chosen so it is just big enough to give full capacity.
In most cases the default value of 80ms will operate well. It is possible to reduce the value a
little to give spare capacity for other services.
Page 44

NETNode Operations Guide
Commercial in
Confidence
IP Mesh Systems
000-130
R1.8 2015-07-24
Commercial in
Confidence
Page 2-37
It is possible to see how much capacity is in use on the Status > Overview page by
clicking show details and looking at the Video Flow Rate. This is a percentage of the
maximum video bitrate (in this example, about 85%).
The encoder does not change transport stream rate, but video bitrate. This affects the
number of null packets in the stream. The NetNode compresses the transport stream packets
by removing the null and replacing with a marker byte before being sent across the radio
interface. This is reinserted by the NetNode the far end. Although the transport stream rate
does not change, the quantity of data send across the air interface does. The rate can vary
between 25% and 100% of the encoder specified bit rate.
Note: The H264 encoder will switch into low delay mode when VFC is enabled.
Note: VFC will also affect the recording quality on the SD card.
Page 45

NETNode Operations Guide
Commercial in
Confidence
IP Mesh Systems
000-130
R1.8 2015-07-24
Commercial in
Confidence
Page 2-38
2.12 Working with VLAN
A Virtual LAN (VLAN) enables a number of networks to share the same physical resources
such as routers and cabling while remaining fully independent of each other.
The use of VLAN makes it possible to have completely separate networks running over a
common NETNode mesh system without sharing data between the networks.
VLANs are created to provide the segmentation services traditionally provided by routers in
LAN configurations. VLAN addresses issues such as scalability, security, and network
management.
Routers in VLAN topologies provide broadcast filtering, security, address summarization, and
traffic flow management. By definition, switches may not bridge IP traffic between VLANs as
it would violate the integrity of the VLAN broadcast domain.
Step 1: Configure the NETNode to operate with VLAN
By default the standard mesh network does not allow passage of VLAN packets. To let VLAN
packets through the system each NETNode must be programmed with:
The VLAN tag
A correct IP address
Subnet mask
Gateway
Version 4.0 software onwards supports DHCP auto-configuration of each VLAN.
The VLAN tag is a number between 1- 4095 and is unique to each VLAN in the system. It
identifies each VLAN.
The setting of the IP address and subnet mask allows additional filtering of the IP packets as
they enter the NETNode. Setting the gateway address allows packets not on the local subnet
to be forward to this address. It also allows the generation of ARP and ICMP reply packets
which aids internal switching and testing of the VLAN network.
The NETNode mesh network supports up to eight separate VLANS. Each VLAN is maintained
by a separate ARP table within each NETNode.
1. Connect your PC to the NETNode and log on.
2. Navigate to the Configuration tab.
3. In the VLAN pane, select a VLAN sub-tab.
4. Set the Tag, IP Address, Sub Mask and Gateway (if applicable) for each VLAN.
5. Alternatively, set DHCP Enable if there is a DHCP server operating on this VLAN, and
auto-configuration of the IP address is required.
6. Click Apply button.
Page 46

NETNode Operations Guide
Commercial in
Confidence
IP Mesh Systems
000-130
R1.8 2015-07-24
Commercial in
Confidence
Page 2-39
Figure 2-14 VLAN Configuration
In the example above the NETNode is set up to support a VOIP (Voice over IP) system
operating using a VLAN through the mesh system. The IP Address supports ICMP ping and
can be used for debugging.
Optional Step 2: Configure VLAN Tagging and Stripping on Ethernet
Ports
The NETNode allows VLAN tagging and stripping on the two external Ethernet ports.
Note: Changing the Mode of the Ethernet port which you are currently using to control a
NETNode will cause loss of control of the unit. The user may only be able to regain control
using the other Ethernet port or the RS232 interface.
1. Connect your PC to the NETNode and login.
2. Navigate to the Global Settings tab.
3. In the Ethernet Ports pane, set Eth2 Mode to LAN<->VLAN.
4. Set Eth2 Priority to 4.
5. Set Eth2 Tag to 1531.
6. Click Apply button.
Page 47

NETNode Operations Guide
Commercial in
Confidence
IP Mesh Systems
000-130
R1.8 2015-07-24
Commercial in
Confidence
Page 2-40
Figure 2-15 VLAN Tagging and Stripping
In the example above Ethernet Port 1 is acting as a typical Ethernet port enabling you to
web browse as normal into the radio and send data across the radio network on the same IP
address range as the radio IP addresses.
Ethernet Port 2 is configured to support a VLAN with a Tag of 1531.
About the VLAN Tagging 2.12.1
VLAN tagging adds the VLAN tag as the packet enters the NETNode port and removes it
again when a VLAN packet of the correct tag exits. Only VLAN packets with the correct tag
will exit the port.
This is selected by Global Settings Ethn Mode LAN<->VLAN.
The tag number and priority must also be specified.
Using VLAN Tagging 2.12.2
Suppose the system administrator wishes a camera to be connected to each NETNode, but
each on a separate network so that individual users cannot snoop onto other cameras, or
change the configuration of the Mesh system.
Connecting the camera to each NETNode and setting the Ethernet port using different VLAN
tags for each NETNode would enable this.
The endpoint node could pass the VLAN tags unaltered by setting:
Global Settings Ethn Mode Transparent, and programming all eight VLAN
addresses and tags in this node.
The endpoint node could then be connected to an external intelligent router which puts out
the separate LAN networks out on separate ports. In this example the endpoint would
typically be at the HQ building.
About VLAN Stripping 2.12.3
VLAN stripping removes the VLAN tag as the packet enters the port and adds it again when
the packet exits. This is selected by:
Global Settings Ethn Mode VLAN<->LAN.
The tag number and priority must also be specified.
Page 48

NETNode Operations Guide
Commercial in
Confidence
IP Mesh Systems
000-130
R1.8 2015-07-24
Commercial in
Confidence
Page 2-41
Note: Stripping will block non VLAN traffic on that port. Priority is required but currently is
not implemented in the mesh system.
Using VLAN Stripping 2.12.4
VLAN stripping allows a NETNode to pass its data over an IP backbone without interference
to other traffic on the network. It also has the potential to let multiple NETNodes on the
same mesh network to connect to the same IP infrastructure.
CAUTION: Changing the Mode of an Ethernet port to VLAN can cause temporary collapse to
the IP network the NETNode is connected to, if done incorrectly. A good understanding of
the network topology is required before implementing VLAN on a mesh system.
Note: Some units may have Ethernet port numbers reversed. Check which port is connected
by looking at the Ethn Link Status. If control of unit is lost, connect to other port and wait
30 seconds or repower unit.
LAN traffic only 2.12.5
This is selected by Global Settings Ethn Mode LAN traffic only.
This allows LAN traffic (and the management interface) through, and blocks any VLAN traffic
from the port. This mode is useful for isolation.
VLAN traffic only 2.12.6
This is selected by Global Settings Ethn Mode VLAN traffic only.
This allows all VLAN traffic through, and blocks any LAN traffic from the port. No tags are
added or removed. This mode is useful for isolation.
Tagged VLAN only 2.12.7
This is selected by Global Settings Ethn Mode Tagged VLAN only.
This allows VLAN traffic with the tag set by the Ethn through, and blocks any other traffic
(LAN and VLAN) from that port. No tags are added or removed. This mode is useful for
isolation.
About Disable Mode 2.12.8
This disables the external port and is useful for security.
2.13 Port Blocking (V5.4 onwards)
To prevent IP loops forming in the Mesh network, each NETNode performs a port blocking
function. Every 2 seconds a broadcast port probe packet (UDP port 29837) is sent out from
each physical port. Each Ethernet interface uses a separate MAC address which is different
to the units’ main MAC address so as not to confuse switched hubs or routers. The UDP
Page 49

NETNode Operations Guide
Commercial in
Confidence
IP Mesh Systems
000-130
R1.8 2015-07-24
Commercial in
Confidence
Page 2-42
packet contains a list of serial numbers of the nodes which are linked across the radio
network.
If a NETNode detects this packet arriving at a physical port with the same serial number as
itself then the port is blocked unless this is the lowest IP address (if the interlink IP address
is set), then lowest serial number and then the lowest port number in the system. The port
will remain blocked for an additional 30s after the condition is removed. Port probe packets
continue to be sent while the port is blocked.
This prevents IP loops forming by shutting off the physical port of the NETNode to and from
the units’ main MAC address and VLAN addresses. This may be used to an advantage – for
example multiple NETNodes or a single NETNode (using both ports) can be connected to the
same IP backbone providing redundancy if unit or one connection fails.
Note: Port blocking is only effective over a single MESH network. For multiple networks
which contain a loop, routers with Spanning Tree Protocol may be used.
MAC Address Blocking 2.13.1
NETNodes also provide a secondary method of blocking loops.
If a packet which has the same source MAC address arrives via multiple ports (including the
radio interface), then any packet with this source MAC address is blocked for 5s and until the
condition is cleared.
2.14 Interlink Mode
Usually, IP networks do not allow multiple routes from an IP source to an IP destination
address. This precludes multiple nodes to be connected to the same IP backbone network.
For example in a city it is often advantageous to have multiple high points on the same mesh
all connected to the same IP backbone. In this example connection of two NETNodes onto
the same IP backbone would cause a loop to be created in the network.
In practice each NETNode identifies this network loop occurrence (same MAC address
appearing on multiple ports) and blacklists the entry for 30 seconds, to prevent this
happening.
But, it can be extremely useful to be able to connect multiple NETNodes to the same
backbone. For example, a city Mesh system may have two nodes on two different buildings.
In this example it may be that a mobile node is only served by the one of the two nodes (for
example Mesh #1 in the diagram below), and if this not the node connected to the backbone
then IP forwarding over the radio link would have to take place. This reduces the overall
network capacity; as the hop means information has to be sent twice over the radio network.
Step 1: Understanding Interlink Operation
Interlink mode replaces the radio links between the mesh nodes on the backbone with an IP
tunnelling protocol over the IP backbone. To make this IP tunnelling possible one of the
NETNodes acts as a master allowing both tunnelling data and the main IP data through the
Ethernet interfaces while the other nodes act only as slaves just allowing IP tunnelling data
to and from that node.
Page 50

NETNode Operations Guide
Commercial in
Confidence
IP Mesh Systems
000-130
R1.8 2015-07-24
Commercial in
Confidence
Page 2-43
To isolate the IP layers each NETNode contains a second IP address (and MAC address)
which is used for the tunnelling. This IP address only supports ARP, ICMP (ping) and the
UDP tunnelling packets.
When this Interlink mode is activated, each node also sends out a broadcast packet on the
second IP interface which advertises it’s presence on the IP backbone. This allows each node
to know what other nodes are connected to the backbone, and thus whether the interlink
data can be sent across the IP network. The nodes also check that there is one and only one
master on the network and correct this if necessary. This is useful if, for example, the master
is lost from the network.
Step 2: Configure the NETNode to operate with Interlink Mode
If there are multiple mesh networks on different frequencies anywhere on the same network
they must have different Mesh IDs before starting. This can be checked with Node finder.
To enable the interlink mode, select the interlink mode tab and provide an IP address for
each active port connected to the IP backbone. The IP address must be on the same subnet
as the NetNode. Both ports can be used (for redundancy) but in this case, both ports must
have different IP addresses and share the same NETNodes on the backbone. (That is, a unit
cannot act as a switched hub for the tunnelling data).
Figure 2-16 Interlink RF operation
Page 51

NETNode Operations Guide
Commercial in
Confidence
IP Mesh Systems
000-130
R1.8 2015-07-24
Commercial in
Confidence
Page 2-44
Interlink Mode across a VLAN Network (v3.6 onwards) 2.14.1
It is possible to send the interlink data across a separate network. To configure this mode, a
Tunnel VLAN tag and priority must be set to a nonzero value. The Tunnel IP address and
Tunnel Network mask must be set appropriately. This causes a VLAN tag to be added to the
tunnel IP data.
Figure 2-17 Tunnelling settings
The VLAN tag may be removed by an external router, or the NETNode may be configured so
that one Ethernet port has VLAN tagging enabled with the same tag (and priority) as the
tunnel tag. This can then be directly connected to the tunnelling network.
Interlink mode uses UDP ports 29836 (Unicast) and 29837 (network broadcast), which it can
be necessary to unblock on some firewalls.
Note: All separate Mesh networks connected to the IP network (no matter where) must
have different Mesh IDs. Failure to do this will result in loss of functionality.
Note: The Interlink NETNodes must always be linked via the radio interface, as well as the
IP backbone to operate correctly. This ensures the system remains as a single Mesh
Network.
2.15 Adding Static Routes
V5.0 onwards of the software lets the user add static routes for subnets which are not part
of the MESH subnet. Static routes are supported for both LAN and VLAN. Any packet which
matches the subnet specified will be forwarded to that gateway rather than the default
gateway.
To add a static route to the system, browse to the node which is physically connected to the
router for that gateway/subnet. On the configuration -> static routes page select one of the
four entries which is not in use (i.e. Network = 0.0.0.0). Add in the network, subnet mask
and the gateway (which must be on the local subnet). Optionally add the VLAN tag or 0 if on
the main LAN.
Each node distributes its’ own static routes round to all nodes within the MESH network. The
diagram below illustrates a particular example of this:
Page 52

NETNode Operations Guide
Commercial in
Confidence
IP Mesh Systems
000-130
R1.8 2015-07-24
Commercial in
Confidence
Page 2-45
Note: If a static route is added to a VLAN then a VLAN entry must also exist for that tag.
Note: Do not add the same static route to different nodes in the system. Because all static
routes are distributed within the MESH network this will cause much confusion.
Note: It is best to add the static route to the node physically connected to that
gateway/subnet, i.e. not across the radio link. As well as minimising confusion, this ensures
that if the node goes down it only affects its’ own static routes.
Up to four static routes can be added per node.
2.16 Routing Information Protocol
V5.0 of the software now supports snooping of RIP v2 packets to allow the automatic
identification of gateways to different subnets. To enable this feature the RIP v2 enable
checkbox must be selected in Global Settings > IGMP/RIP Snooping dialog box.
Figure 2-18 Routing Information Protocol
Page 53

NETNode Operations Guide
Commercial in
Confidence
IP Mesh Systems
000-130
R1.8 2015-07-24
Commercial in
Confidence
Page 2-46
NETNodes can also send out an initial RIP v2 general query packet to aid starting up of the
network.
Note: NETNodes do not currently snoop on OSPF packets.
2.17 Spanning Tree Protocol
V5.0 of the software now allows STP/RSTP packets to pass through the system. This allows
external routers to check for IP loops in the network.
Figure 2-19 Spanning Tree Protocol
A packet entering a port of the MESH network is forwarded on to all other ports on the
MESH in the same way as a broadcast packet. A fixed value of 5000000 is added to the
current route path cost for STP/RSTP packets which go across the radio interface. This
allows a router to favour non MESH radio routes when a direct Ethernet path is available.
CAUTION: It is recommended to disable STP in interlink mode. During a master-slave
switch it is possible for an STP packet originating from a particular router port to be sent
back to the same port. This may cause the port to shut down.
2.18 Roaming
Roaming allows a NETNode to move between one MESH network and another. This is very
useful, for example, in city networks where there can be a large number of nodes or
sufficient bandwidth to support the use of multiple frequencies. Another example might be
an airborne environment where an aircraft may be required to join different city MESH’s
located across the country.
Each separate MESH Network is called a ‘zone’. A zone can consist of a single NetNode base
station or a large existing MESH network with multiple connected high point ‘base-station’
nodes.
Roaming currently supports four modes of operation: ‘Off’, ‘Round Robin’, ‘GPS Location’ and
‘External/Manual’. Round Robin hops sequentially between networks; while GPS location uses
a simple path loss model to pick the best network to join. There are advantages and
disadvantages in each method. The External/Manual mode allows control of the zones
through a remote command or by the manual zone button. This allows applications such as
Page 54

NETNode Operations Guide
Commercial in
Confidence
IP Mesh Systems
000-130
R1.8 2015-07-24
Commercial in
Confidence
Page 2-47
Mission Commander (which can contain topographic data) to select the zone the unit
operates in. The manual zone button is useful for testing the zone functions correctly.
Each zone uses a base configuration. This is the configuration stored in the Configuration tab
panel. The base configuration is then overlaid and overwritten with the local parameters
from the Zone tab such as frequency, mesh ID etc. If the Overwrite IP Address box is
selected then DHCP Enable, IP Address, Subnet Mask and Gateway on the Global Setting
> main tab will also be overwritten with the local values from the Zone tab. The Zone
Name is not used but is useful for identification.
Using the same configuration for multiple zones allows, for example, the scrambling keys
and VLAN addresses to be reused.
Setting the base configuration to off disables the zone.
Note: When roaming is enabled, some of the parameters on the global settings and
configuration panels will be overwritten with the zone information. The update all nodes
checkbox will also be cleared.
The active zone box together with the green highlighted roaming zone indicates which zone
is currently active.
Page 55

NETNode Operations Guide
Commercial in
Confidence
IP Mesh Systems
000-130
R1.8 2015-07-24
Commercial in
Confidence
Page 2-48
Round Robin Mode 2.18.1
Round Robin mode simply looks for 10s at each active zone at a time and if a signal is found
joins that Network. If no signal is found or the current signal is lost then Round Robin moves
onto the next zone. Obviously with large numbers of zones this becomes very slow. The
other disadvantage with this mode of operation is that the NETNode will not leave the
network until the signal is lost even when alternate Networks may be available at higher
signal strengths. But it is simpler to configure than GPS location mode.
GPS Location Mode 2.18.2
For GPS Roaming, each zone contains a list of primary antenna (fixed) sites. For each site
the GPS location, height, and the antenna parameters are entered into the antenna base
sites panel.
For this mode to operate a GPS receiver must be connected to the roaming NETNode. Please
see section 2.4 on how to perform this task. The presence of a working GPS is indicated by
the 3D fix in the GPS Fix status box.
For each zone a path loss is calculated between the Roaming NETNode and each of the
individual sites. A number of path loss models are supported – the urban mode increases the
path loss at a quicker rate than the free space model and takes into amount antenna heights
(Egli’s model). The semi-urban model is a halfway house between the urban and free space
models. The loss also includes an over the horizon model (the aircraft applications). The
lowest loss from all sites and zones is calculated and then compared with the lowest loss of
all sites on the current zone. The NETNode will switch to the new zone if difference exceeds
a small threshold to allow for some hysteresis.
Up to five sites are supported per zone. For more than five fixed sites it is suggested
entering the principle sites around the periphery of the area. Latitude and Longitude data
can be readily acquired from the WEB using tools such as Google maps. The beam width box
allows for sector antennas to be specified. Setting the beam width to 360 assures an Omni
antenna. Setting the beam width to zero indicates that site is not in use.
GPS location may not work well in cluttered environments where the path loss and actual
signal strength do not correlate well. It is very suited to airborne applications.
Note: The GPS panel and data rate must be set correctly for all configurations which
roaming is used. If this is not done then the GPS will become disabled when the unit
changes configuration.
Downloading and Uploading Zone Data 2.18.3
Zone data may be downloaded and uploaded in to different units. To download the zone
data, on the browser manually type in the URL: http://ip_address_of_unit/roaming.json. The
resulting file can be saved to disk. This file is in JSON, or JavaScript Object Notation
format and can be easily edited in a text editor if required. The file can be uploaded back
into any unit by clicking the Roaming Upload Button, and entering the file name in the dialog
box.
Page 56

NETNode Operations Guide
Commercial in
Confidence
IP Mesh Systems
000-130
R1.8 2015-07-24
Commercial in
Confidence
Page 2-49
Page 57

NETNode Operations Guide
Commercial in
Confidence
IP Mesh Systems
000-130
R1.8 2015-07-24
Commercial in
Confidence
Page 3-50
3. Advanced Setup
3.1 About Advanced Setup
To get the most from your radio system you must customise the programming for your
operations and area.
CAUTION: Before you start programming your radio make sure the batteries are new and
fully charged. If not, you could operate an AC adapter to power your radio.
If the radio loses power while you program it, its memory might be corrupted and it will be
necessary to reset defaults. All information programmed in the radio might be lost.
The Control Application or Control Pages let you control the communications system, to
keep it operating in a correct and stable mode. It lets you to change many of the settings of
the unit like frequency or bandwidth.
The control system can be a Control Application that operates on your PC connected to
the device with Serial communications.
If not, it can be Control Pages that are viewed on your PC browser when connected to the
device with IP communications.
3.2 Connecting your PC to your Radio
The NETNode uses Control Pages accessed from your web browser which enables you to
do many configuration tasks quickly and easily.
This section tells you how to connect your PC to the NETNode and then configure the unit
with the control pages.
Step 1: Install the Control Application
You install a browser (Internet Explorer, Firefox or Chrome for example) onto your Personal
Computer (PC).
At this time you can start the browser and connect to the Control Pages and start configuring
your NETNode.
Step 2: Make an IP Connection between Radio and PC
It will be necessary to have a fully powered NETNode, the correct Ethernet cable for your
variant and a personal computer operating a web browser. The Ethernet cables are:
NETNode-3-Robust – CA0403 or CA0406
NETNode-3-Plain – AP000465 (Standard RJ45-RJ45 Ethernet cable – Available
separately)
NETNode-Mini Plain – CA0505
Page 58

NETNode Operations Guide
Commercial in
Confidence
IP Mesh Systems
000-130
R1.8 2015-07-24
Commercial in
Confidence
Page 3-51
1. Connect the Ethernet cable to the NETNode Ethernet receptacle.
2. Connect the RJ45 8-way plug (pins) to the RJ45 8-way receptacle (sockets) on your
Personal Computer.
Figure 3-1 NETNode IP Connections
Page 59

NETNode Operations Guide
Commercial in
Confidence
IP Mesh Systems
000-130
R1.8 2015-07-24
Commercial in
Confidence
Page 3-52
Step 3: Start the Control Pages
1. Power up the NETNode.
2. Click Start Internet on the PC.
3. Your browser window will open.
4. Type the IP address of the NETNode you wish to configure like this example:
http://192.168.0.1/
5. Click the Refresh button.
6. The web browser opens the Status Overview page of the NETNode.
Figure 3-2 Starting the Control Session
Step 4: Log on to the Control Pages
7. The Authentication Required dialog opens
8. By default, the User Name is not required
9. By default the password is meshweb.
10. Click Log In button.
Page 60

NETNode Operations Guide
Commercial in
Confidence
IP Mesh Systems
000-130
R1.8 2015-07-24
Commercial in
Confidence
Page 3-53
Figure 3-3 Logging In
Step 5: Look at the Primary Window
Each Windows based application must have a Primary window as its entry point. For the
NETNode this is the Web Browser showing the first of the Control Pages.
Figure 3-4 NETNode Status/Overview Control Page
Page 61

NETNode Operations Guide
Commercial in
Confidence
IP Mesh Systems
000-130
R1.8 2015-07-24
Commercial in
Confidence
Page 3-54
No.
Property / Description
1
Status tab. Divided into Overview, Spectra and Maps sub-tabs. This displays
detailed status information of received signal quality, battery and mapping
information.
2
Global Settings tab. Divided into Main, Ethernet Ports and Interlink Mode
panes.
You’ll find the Set Clock, Format File system, Restore Defaults and Password
buttons here too.
3
Configuration tab. Divided into Transmitter, Recording, Audio, Mesh,
Streamer, RS232, GPS, Scrambling and VLAN panes. The Configuration tab
contains the list of 8 presets. For each preset the user can specify
demodulation parameters, decoding modes, and descrambling configuration.
4
Information tab. Contains information including software versions and unit
specific data. You’ll need this information during a support call for example.
5
Sub-Tabs. Simply enables you to break down information from a tab.
6
SNR Pane. The tabs and sub-tabs are broken down into panes of information.
This particular one is all about Signal to Noise ratios for example.
Table 3-1 – The Primary Window
3.3 Configuring the Basic Settings
You will wish to configure a device to start to explore what you can do with a mesh network.
Step 1: Configure the Big Seven
It will be necessary to have some powered NETNodes for which you know the IP address
and a PC with a web browser.
There are only seven things you have to configure on each NETNode to make them form a
mesh network.
1. Connect you PC to the first NETNode and with your browser, log on to the control
pages.
2. Select Global Settings tab.
3. Set the Operating Mode on all units to the same type. For best performance set 16-
Node, Hi-Rate. Others modes give compatibly with earlier software versions.
4. Click Apply.
Note: If you select 16-Node, Hi-Rate as your operating mode, you can only select
between 1 to 63 for your Mesh ID.
Page 62

NETNode Operations Guide
Commercial in
Confidence
IP Mesh Systems
000-130
R1.8 2015-07-24
Commercial in
Confidence
Page 3-55
Figure 3-5 Configuring the Big Seven – Global Settings Tab
5. Navigate to the Configuration Settings tab.
Figure 3-6 Configuring the Big Seven- Configuration Tab
At this time there are six more basic setup fields that let you quickly setup the unit without
getting into details. (We’ll discuss those later).
There are basic things to setup:
Page 63

NETNode Operations Guide
Commercial in
Confidence
IP Mesh Systems
000-130
R1.8 2015-07-24
Commercial in
Confidence
Page 3-56
No.
Basic Setting
What you can do...
6
Enable
Select this checkbox to switch the transmitter on.
7
Frequency
Type in the frequency you wish to use for your mesh. This
must be the same on all units.
8
Channel Bandwidth
Select the bandwidth you wish to use for your mesh from
the drop-down list. This must be the same on all units.
9
Mesh ID
Type in a mesh ID you wish use for your mesh. This must
be the same on all units in the mesh network. The mesh ID
tells the unit which mesh it belongs to. All NETNodes on
Mesh ID 60 for example will communicate with each other.
1 to 255 (8 and 12 Node systems)
1 to 63 (16 Node, Hi-Rate)
Note: If you select 16-Node, Hi-Rate as your operating
mode, you can only select between 1 to 63 for your Mesh
ID.
10
Node ID
Type in a Node ID for each node in the mesh. The node ID
must be unique and can only be 0 to 11 for a twelve node
mesh system.
Note: A node can automatically reassign its Node ID at
power up if it finds a conflict with an existing node.
11
IP Forward
Select this checkbox to switch IP forwarding on.
Table 3-2 – Quick Setup
Note: Remember to click the Apply button. This is important to saving all your settings.
That’s it! Do the same procedure on each NETNode that you require in your mesh network.
When you power these configured NETNodes they will make a mesh network ready for you
to use.
All the other fields in the control pages are simply tools for you to use with your working
network.
CAUTION: If you select to use encryption, the encryption type and keys must align.
3.4 Working with the Status /Overview Sub-Tab
This displays detailed status information of received signal quality and enables navigation
between nodes.
The Status tab is divided into three sub-tabs:
Overview
Page 64

NETNode Operations Guide
Commercial in
Confidence
IP Mesh Systems
000-130
R1.8 2015-07-24
Commercial in
Confidence
Page 3-57
No
Property
Range
Description
1
Node ID
0 to 7 or
0 to 11 or
0 to 15 depending on
operating mode.
We are showing two NETNodes with
Node IDs of 1 and 2. There could be up
to sixteen NETNodes in a mesh with
Node IDs numbered 0 to 15.
The Node ID can be shown in different
colours when a NETNode experiences
traffic congestion.
2
Unit Name
You can use up to 12
alphanumeric
characters for the Unit
name.
The unit name is a friendly name to make
it easier for you to know which NETNode
we are talking about. This name is
assigned in the Global Settings Tab.
3
IP Address
192.168.9.99 for
example.
This shows the IP address of the unit
that we set up in our initial configuration.
Notice that it is shown as a hyperlink. If
you click on one of these hyperlinks the
browser will switch to that NETNode.
Spectra
Maps
Step 1: Open the Overview Sub-Tab
1. Click Status Overview.
2. The Status tab opens focussed on the Overview sub-tab.
Figure 3-7 The Status / Overview Tab
Step 2: Interpret the Basic Details
Page 65

NETNode Operations Guide
Commercial in
Confidence
IP Mesh Systems
000-130
R1.8 2015-07-24
Commercial in
Confidence
Page 3-58
No
Property
Range
Description
4
Battery
Voltage
11 to 16V.
This returns the battery voltage of the
NETNode. Not exciting when we are on
mains in the lab but important when you
are looking at a node located on a high
building some miles away which is
operating on batteries.
5
FPGA
Temperature
Temperature in Degrees
Celsius (phase 3 units
only).
This is the internal temperature of the
FPGA. The box will become yellow or
red if the unit is too hot. The unit must
be allowed to cool and placed in better
airflow if the temperature reaches the red
zone.
CAUTION: Operating the unit at high
temperatures will lower the life of the
internal components and the RF PA.
6
Occupancy
Blue and Orange bars.
The blue bar gives a visual indication of
the volume of data generated by this
NETNode. An orange bar gives a visual
indication of the volume of data being
forwarded by the NETNode from other
Nodes.
7
Node TX
Retries
Number of Node retries
each 2 seconds.
This must be zero (‘-‘) with occasional
ones. Higher values will have an
unwanted effect the throughput of the
system. If problems occur check for
interference and that there is no other
MESH system operating on the same or
adjacent frequency.
Step 3: Select the Show Details Checkbox
If you select this box you’ll see a lot of data about TX IP Packets etc. This can give you
important information about the operating of the network.
Table 3-3 – Basic Details
Page 66

NETNode Operations Guide
Commercial in
Confidence
IP Mesh Systems
000-130
R1.8 2015-07-24
Commercial in
Confidence
Page 3-59
Colour
Means...
Green
Reliable path for 16QAM modulation.
Yellow
Reliable path for QPSK modulation.
Red
Unreliable path. Avoid passing data across this path.
White
No Link.
Colour
Means...
Green
Reliable path for 16QAM 2/3 rate modulation.
Lime
Reliable path for 16QAM 1/2 rate modulation.
Yellow
Reliable path for QPSK 2/3 modulation.
Orange
Reliable path for QPSK 1/2 modulation.
Figure 3-8 The Status / Overview Tab showing Details
Step 4: Interpret the Signal Quality Pane (1)
This gives you a simple picture of the signal quality around the mesh system. Ideally, we’d
like to see stable green boxes for all links. Naturally, mobile units will go out of range or
interference will cause a unit to degrade for a while. The good thing is the mesh will find a
new routing and heal itself when it can, keeping your network on air.
The column position corresponds to the transmit node, and the row position to the receive
node.
What the colours mean:
Table 3-4 – Signal Quality Display (8 and 12-Node operating mode)
Page 67

NETNode Operations Guide
Commercial in
Confidence
IP Mesh Systems
000-130
R1.8 2015-07-24
Commercial in
Confidence
Page 3-60
Colour
Means...
Red
Unreliable path. Avoid passing data across this path.
BPSK 2/3 modulation only.
White
No Link.
Table 3-5 – Signal Quality Display (16-Node Hi-Rate operating mode)
Step 5: Read the SNR Pane (2)
This pane shows the Signal to Noise Ratios for each of the NETNodes.
The columns correspond to the transmit node and the rows to the receive node.
Step 6: Read the Level A Pane (3)
This pane shows the dBm value for antenna A on the NETNode unit. There are equivalent
panes for antennas B, C and D.
The columns correspond to the transmit node and the rows to the receive node.
The diagonal entries show interference levels. These can be shown in a yellow or red colour
if interference is bad. It can be necessary to install inline filters on the antennas in some
situations. Please speak to Cobham for more details.
Non diagonal entries can be heighted yellow when the signal level reaching that input is
significantly lower than then other inputs. A full row of highlighted entries can show a faulty
antenna or cable, and is worth investigating.
Step 7: Read the IP Rx Errs Pane (4)
This pane shows the number of IP receive errors for each NETNode.
3.5 Working with the Status /Spectra Sub-Tab
Step 1: Open the Spectra Sub-Tab
1. Click Status Spectra.
2. The Status tab opens focussed on the Spectra sub-tab.
Page 68

NETNode Operations Guide
Commercial in
Confidence
IP Mesh Systems
000-130
R1.8 2015-07-24
Commercial in
Confidence
Page 3-61
Figure 3-9 The Status / Spectra Tab
Step 2: Interpret the Spectra Displays
There are up to four displays labelled A, B, (C & D for quad unit) which shows the spectra
being received on the two (or four) diversity antennas of the NETNode you are attached to.
But, there could be several NETNodes transmitting on the mesh thus it is necessary to
define which unit we are looking at.
This is done with the option buttons on the left side of the spectra display. In our example,
the option button for Mast is selected. This means the two displays are showing spectra for
that NETNode’s transmissions as received on our node’s two antennas.
Step 3: Interpret the Interference Display
The last option button is called Interference. When you select this, the displays show the
spectra when none of the NETNodes in the mesh are transmitting. This enables us to look
for interference on the frequency we are planning to use for our mesh.
Page 69

NETNode Operations Guide
Commercial in
Confidence
IP Mesh Systems
000-130
R1.8 2015-07-24
Commercial in
Confidence
Page 3-62
Figure 3-10 The Status / Spectra Tab, Interference Display
3.6 Working with the Status / Maps Sub-Tab
Step 1: Open the Maps Sub-Tab
1. Click Status Maps.
2. The Status tab opens focussed on the Maps sub-tab.
Figure 3-11 The Status/Maps Tab, Network Map Display
Page 70

NETNode Operations Guide
Commercial in
Confidence
IP Mesh Systems
000-130
R1.8 2015-07-24
Commercial in
Confidence
Page 3-63
If the NETNode we select has a GPS receiver
connected and the Use GPS checkbox is selected,
the NETNode can broadcast accurate information
about its location to other nodes or fixed assets on
the mesh.
Step 2: Set the Option Button (1)
The option buttons let you select between Network and one of four map displays for the
mesh. Select Network at this time.
Note: When you are in Network mode the Upload, Set Coordinates and Reset Locations
buttons are greyed out.
Step 3: Read the Node Information (2)
Looking at the option buttons you’ll see some node information about the NETNode you are
currently attached to. We talked about this information in the Overview Pane above.
Step 4: Read the GPS Information (3)
Step 5: Select the Show Details Checkbox (4)
When the Show Details checkbox is selected the node information shown above is
expanded to show things like TX IP Packets which are useful when diagnosing network
problems.
Step 6: Select the Show Names Checkbox (5)
When the Show Names checkbox is selected the friendly names for the nodes is shown on
the network map display.
Step 7: Interpret the Display Pane when in Network Display (6)
In the example above you can see the network display is selected. This gives a simple
graphical image of the NETNodes in the mesh and the links between them.
Each NETNode is shown as a circle with a white number. (If the number turns red, then the
node is temporarily congested).
If you have the Show Names checkbox selected, you’ll also see the node name displayed.
The links between the nodes are shown as coloured lines. As each NETNode supports
bidirectional operation there are usually two lines for each link.
Page 71

NETNode Operations Guide
Commercial in
Confidence
IP Mesh Systems
000-130
R1.8 2015-07-24
Commercial in
Confidence
Page 3-64
Colour
Means...
Green
Reliable path for 16QAM modulation.
Yellow
Reliable path for QPSK modulation.
Red
Unreliable path. Avoid passing data across this path.
White
No Link.
Colour
Means...
Green
Reliable path for 16QAM 2/3 rate modulation.
Lime
Reliable path for 16QAM 1/2 rate modulation.
Yellow
Reliable path for QPSK 2/3 modulation.
Orange
Reliable path for QPSK 1/2 modulation.
Red
Unreliable path. Avoid passing data across this path.
BPSK 2/3 modulation only.
White
No Link.
Step 7: Simplify the Display Pane when in Network Display (7)
You can simply select to examine paths to and from a single node when there are a large
number of nodes available. To do this click the applicable option button for that node. To
return to the full display, select the option button, All Paths.
Note: The buttons above the display are greyed out as they have no function when the
Network option button is selected.
What the colours mean:
Table 3-6 – Signal Quality Display (8 and 12-Node operating mode)
Table 3-7 – Signal Quality Display (16-Node Hi-Rate operating mode)
In the example above you are seeing static lines but when you are connected to a live
system, you will see these lines changing status and the RF environment changes or
NETNodes move about.
Page 72

NETNode Operations Guide
Commercial in
Confidence
IP Mesh Systems
000-130
R1.8 2015-07-24
Commercial in
Confidence
Page 3-65
3.7 Working with the Map Display
Step 1: Switch to Map Display
Select one of the numbered option buttons. This changes the display to the map
display. There are four possible map displays each selected by an option button.
Figure 3-12 The Status / Maps Tab, Map 1 Display
You’ll see the mesh network diagram overlaid onto a map of the area showing the nodes and
the links between them.
There are two ways you can put the nodes onto the map:
Manual Placement
GPS Placement
Step 2: Manually put a Node on the Map
Put the mouse pointer on the node symbol. The pointer will change to a four-headed arrow.
Left click and drag the node to the location on the map where the node must be displayed.
Note: You can drag a node symbol to anywhere on the map. Usually, you put the symbol
where the node is actually located, but there is nothing to stop you simply randomly placing
the symbol in Portsmouth when the physical NETNode is in Southampton for example.
Page 73

NETNode Operations Guide
Commercial in
Confidence
IP Mesh Systems
000-130
R1.8 2015-07-24
Commercial in
Confidence
Page 3-66
Step 3: Monitor the GPS put a Node on the Map
If a NETNode has a GPS unit connected it can report its location which can then be displayed
on the map.
1. Make sure you are connected to a NETNode with GPS attached.
2. Make sure the Use GPS checkbox is selected.
3. The symbol for that node will jump to the correct location on the map where the actual
NETNode is currently located. If it moves, it will move on the map, showing heading
speed and height.
3.8 Uploading Map Data
Each of the four map option buttons can contain a different map. It is necessary for these
maps to be uploaded before you can use them.
Step 1: Upload a Map Image File
To upload a map it is necessary to have an internal drive which has been formatted. (See
Information Tab
It is also necessary to have an image file containing the map for the area you are interested
in. The system supports four file types for maps:
).
.JPG
.PNG
.GIF
.BMP
We recommend operating with JPEGs as they are good quality but small files. Bitmaps on the
other hand are excellent quality but very large. There is a small quantity of memory available
in each NETNode for maps.
1. Click the Upload… button.
2. The Upload Map Data dialog opens.
Page 74

NETNode Operations Guide
Commercial in
Confidence
IP Mesh Systems
000-130
R1.8 2015-07-24
Commercial in
Confidence
Page 3-67
3. Click the Browse button and navigate to your image file.
4. Click the Upload File button to put the image in the NETNode flash memory.
Step 2: Set the Coordinates
When you have loaded your map, it will be necessary to find out the coordinates of three
of the corners of the map image to let the GPS operate.
It is necessary to know the Top Left, Top Right and Bottom Left coordinates of your
image.
These coordinates must be in decimal format and accurate to six places. (You probably
know Latitude and Longitude as being expressed in degrees, minutes and seconds).
You can get the coordinates from your map data source for example.
1. Click the Set Coordinates button.
2. The Coordinates dialog box opens.
3. Type in the coordinates of each of the corners of the image.
4. Click OK.
Step 3: Test the Reset Locations Button
When you have loaded a new map or you have been moving nodes on an existing map it
can be necessary to reset their locations. This can be useful if you lose nodes off the edge of
the map.
You can make the system reset the locations of all the nodes or a combination of them.
Page 75

NETNode Operations Guide
Commercial in
Confidence
IP Mesh Systems
000-130
R1.8 2015-07-24
Commercial in
Confidence
Page 3-68
5. Click the Reset Locations… button.
6. The Reset Locations dialog opens.
7. Click the All button or select the nodes
you wish to reset.
8. Click the OK button.
9. The system resets the locations and
switches off the GPS tracking function.
3.9 Working with the Global Settings Tab
This tab enables you to make configuration changes which apply to the full unit.
Step 1: Open the Global Settings Tab
1. Click the Global tab.
2. The Global tab opens.
Figure 3-13 The Global Settings Tab
Page 76

NETNode Operations Guide
Commercial in
Confidence
IP Mesh Systems
000-130
R1.8 2015-07-24
Commercial in
Confidence
Page 3-69
Property
Range
Description
Unit Name
You can use up to
12 alphanumeric
characters for the
Unit name.
The unit name is a friendly name to make it
easier for you to know which NETNode we are
talking about.
Auxiliary
Address
0 or 1.
Usually, the NETNode will be operating with IP
devices like cameras microphones or GPS units and
the Auxiliary address is left as 0.
Some NETNodes (Robust and Plain with AVI
option) can use composite cameras. To do this
they have a second board installed called a D550.
To make sure the NETNode recognises the D550
we have to set the auxiliary address to 1. At this
time, your composite camera can be used with the
system.
Speed Units
Knots, MPH or
KPH.
If you have a GPS connected to a NETNode it can
supply speed data. You can select the units you
wish to use for speed in this combo box.
Streaming
Protocol
UDP Multicast.
RTSP Multicast.
RTSP Unicast.
If your NETNode is licensed for streaming, you’ll
have three possible streaming protocols to select
from.
External Power
Enable
Checkbox
Select or Clear.
There is an external power output which can be
used to give 12VDC (1A) to an external device.
This could be a camera, GPS antenna or other
device. See pin outs in Part D of this document set.
It is necessary to have a custom cable for this
operation.
DHCP Enable
Checkbox
Select or Clear.
In some situations having DCHP enabled can be
applicable for advanced users of the system but in
most cases it’s better if each NETNode has its own
fixed address.
If selected, then the NETNode will try to get its IP
address from a DHCP server on the network – this
DHCP server can be located through a second
NETNode across the radio interface.
Step 2: Interpret the Fields in the Main Pane
The Main pane is concerned with basic settings that it is necessary to apply globally across
the network. Here are the fields you can operate with:
Page 77

NETNode Operations Guide
Commercial in
Confidence
IP Mesh Systems
000-130
R1.8 2015-07-24
Commercial in
Confidence
Page 3-70
Property
Range
Description
IP Address
Example:
192.168.2.120
If the radio is not automatically acquiring its IP
address through a DHCP server then a fixed IP
address needs to be assigned to the unit
Type an IP address for this NETNode in the IP
address text box. It can be a class of network of
your choosing.
Network Mask
Example:
255.255.255.0
The network mask lets a network administrator
divide a network into smaller more efficient
subnets to stop large numbers of IP packets being
routed through the network. This is usually defined
by the network administrator.
Type a subnet mask in the Network mask text
box.
Gateway
Example:
192.168.2.120
A default gateway is used by a host when an IP
packet's destination address belongs to someplace
outside the local subnet. The default gateway
address is usually an interface belonging to the
LAN’s border router.
We recommend you keep the gateway at the same
setting as the IP Address.
Operating Mode
8-Node System
12-Node System
16-Node, Hi-Rate
Select 16 Node Hi-Rate across all MESH NETNodes
for best performance. Other modes are there for
backward compatibility with earlier versions of
software.
Update All
Nodes
Select or Clear
When you make changes to global setting they are
usually applied to the NETNode you are currently
attached to. Sometimes it’s really convenient to
update all the NETNodes in the mesh, for example
when you wish to change the frequency of all units
at the same time.
Select the Update All Nodes checkbox to enable
these global updates on all nodes.
Parameters which are globally updated are
marked with ‘*’.
Examples of things you can update like this are:
Frequency
Bandwidth
Table 3-8 – Interpreting the Main Pane
Page 78

NETNode Operations Guide
Commercial in
Confidence
IP Mesh Systems
000-130
R1.8 2015-07-24
Commercial in
Confidence
Page 3-71
Property
Range
Description
Eth 1 Mode
Transparent
LAN<->VLAN
VLAN<->LAN
LAN traffic only
VLAN traffic only
Eth1 tagged VLAN
See
Working with VLAN
for details.
Eth 1 Priority
0,1,2,3,4,5,6,7
Typically use 4.
Eth 1 Tag
1 - 4095
The VLAN tag on which this operates.
Eth 1 Link Status
Not Connected
10 Base-T
100 Base-T
Indicates the link status.
Property
Range
Description
Tunnelling
Off
Master
Slave
Default is Off.
There will only be one master. See
Interlink Mode
for details.
Tunnel IP
Address
IP Address
The IP Address the NETNode will use to pass
tunnelled data. This address responds to ICMP ping
for debugging purposes.
Tunnel Network
Mask
Network Mask IP
Address
Subnet Mask. Example 255.255.255.0
Tunnel Tag
0 - 4095
The tag used for the VLAN tunnel operation.
If set to zero the LAN is used.
Tunnel Priority
0,1,2,3,4,5,6,7
Typically use 4.
Step 3: Interpret the Ethernet Ports Pane
Table 3-9 – Ethernet Ports Pane
Step 4: Interpret the Interlink Mode Pane
Table 3-10 – Interlink Mode Pane
Page 79

NETNode Operations Guide
Commercial in
Confidence
IP Mesh Systems
000-130
R1.8 2015-07-24
Commercial in
Confidence
Page 3-72
Property
Range
Description
Eth1 IGMP
Forwarding
Select or Clear
Default is Off.
Allows forwarding of IGMP membership reports on
this interface.
Eth2 IGMP
Forwarding
Select or Clear
Default is Off.
Allows forwarding of IGMP membership reports on
this interface.
IGMP Querier
Popup box
Allows a forced IGMP querier to be added for the
LAN and each VLAN on the system.
Step 5: Interpret the IGMP Configuration Pane
Step 6: Use the Apply Button Consistently
Each time you change a parameter on the Control Application it is very important to click
the Apply button and wait for a moment for the changes to be sent to the device.
It is very important to hit apply after ticking/un-ticking Update All Nodes before altering
other parameters.
Personnel change a parameter and then wonder why the device has not changed behaviour.
Always click the Apply button.
Step 7: Test the Refresh Button
The browser software will poll the device regularly which lets it update the Control Pages
with the latest changes.
To force a refresh of the control pages it is necessary to click the Refresh Button.
Step 8: Set the Clock
1. Click the Set Clock Button.
2. The Set Clock dialog opens.
3. Set the Date field.
4. Change the time.
5. Select a Time Zone from the drop-down list.
6. Select a Daylight Saving offset from the drop-down list.
7. Choose an Auto Set Time mode.
8. Click the Set button.
Page 80

NETNode Operations Guide
Commercial in
Confidence
IP Mesh Systems
000-130
R1.8 2015-07-24
Commercial in
Confidence
Page 3-73
Flash
Use
Internal Flash
Holds the maps and coordinates files.
External Memory Card
Used to record video material.
Figure 3-14 Set Clock dialogue box
Note: To set the clock automatically, set the Auto Set Time field to GPS. At this time, the
NETNode will set its internal clock based on signals from an attached GPS unit.
Step 9: Format the File System (ONLY do this if needed)
There are two flash drives built into each NETNode.
1. Click the Format File System… button.
2. The Format Flash File system dialog opens.
3. Click Format Internal Flash button.
4. The Format Flash warning message is displayed.
5. Click the OK button. Your internal Flash drive will be formatted.
Page 81

NETNode Operations Guide
Commercial in
Confidence
IP Mesh Systems
000-130
R1.8 2015-07-24
Commercial in
Confidence
Page 3-74
Figure 3-15 File Formatting System
Note: If you wish to format the External Memory Card, click the Format External Memory
Card button at step 3 above.
Step 10: Restore Defaults (ONLY do this if really required)
To restore a default condition to the full unit:
1. Click the Restore Defaults button.
2. The Restore Defaults dialog opens.
3. Click the OK button.
Figure 3-16 Restore defaults options
Page 82

NETNode Operations Guide
Commercial in
Confidence
IP Mesh Systems
000-130
R1.8 2015-07-24
Commercial in
Confidence
Page 3-75
Step 11: Change Password (ONLY do this if really required)
1. Click the Password… button.
2. The Change Password dialog opens.
3. Type in the Old Password.
4. Type in the New Password in the New Password text box.
5. Type in the New Password in the Confirm New Password text box.
6. Click the OK button.
Figure 3-17 Changing your password
3.10 Working with the Configuration Tab
This tab enables you to make configuration changes which apply to this NETNode.
Step 1: Open the Configuration Tab
1. Click the Configuration tab.
2. The Configuration tab opens.
Page 83

NETNode Operations Guide
Commercial in
Confidence
IP Mesh Systems
000-130
R1.8 2015-07-24
Commercial in
Confidence
Page 3-76
Property
Range
Description
Enable
Checkbox
Select or Clear
This simply turns on the transmitter when selected.
Remember that the transmitter only sends when it
has data ready to move. All NETNodes in a mesh
must have their transmitters enabled.
Input frequency
(MHz)
L, S and C
Bands
The frequency in megahertz (MHz) that you wish to
use for this preset.
If you try to input a frequency that is out of range,
the radio will tune the lowest available frequency
automatically.
Figure 3-18 Configuration Tab
Step 2: Find which Preset Tab is Active (1)
The darker blue tab shows the preset you are currently editing.
The green box shows which preset is currently active in the receiver.
In the example above, preset one is active and preset one is also available for editing.
Step 3: Configure the Transmitter Settings Pane (2)
Page 84

NETNode Operations Guide
Commercial in
Confidence
IP Mesh Systems
000-130
R1.8 2015-07-24
Commercial in
Confidence
Page 3-77
Property
Range
Description
Channel
Bandwidth
2.5MHz
3.0MHz
3.5MHz
5.0MHz
6.0MHz
You can configure the channel bandwidth with this
drop-down box.
If you use a lower bandwidth range will increase.
If you use a higher bandwidth range must decrease.
Output Level
High
0 to 30dB
The level of attenuation in dB that will be applied to
the high output level. This could be useful if your
transmitter is swamping a second unit nearby.
Output Level
Low
0 to 30dB
The level of attenuation in dB that will be applied to
the low output level. This could be useful if your
transmitter is swamping a second unit nearby.
Output Level
Select
Low or High
You can select high or low output level to suit the RF
environment you are working in. When you select
high or low here it applies attenuation you have set
in the output level setting discussed above.
Property
Range
Description
Number of
Chunks
0 to 5000
A chunk is about thirty seconds of video.
This is the maximum number of chunks stored on
the card and the oldest will be removed first. This
must be set so that the number of files does not get
more than the capacity of the SD card.
Record
Checkbox
Select or Clear
When you select this box, the video will be recorded
to the built in SD card. To playback, use Mission
Commander or VLC and the command:
rtsp://<ipaddress>/record.sdp
Table 3-11 – Transmitter Settings Pane
Step 4: Configure the Recording Settings Pane (3)
If the NETNode has the AVI option fitted, it can make short recordings on an SD card which
is inserted into the front panel of the unit.
Table 3-12 – Recording Settings Pane
Page 85

NETNode Operations Guide
Commercial in
Confidence
IP Mesh Systems
000-130
R1.8 2015-07-24
Commercial in
Confidence
Page 3-78
Unit
Parameter
Options
Notes
Mode
Off
Internal
Remote
Off simply disables the headset.
Internal mode only distributes the talk back audio
in the local mesh network.
Remote mode allows the onward distribution of this
audio on an external IP network using RTSP
protocols.
The remote mode also allows external
‘eavesdropping’ of the audio using the URL:
rtsp://ip_address_of_unit/audio.sdp
Audio can also be sent to that unit using the same
port as the RTP packet. The audio format must be
G726-32 with a payload size of 512 bytes.
Microphone
Gain
Variable Slider
When a talkback headset is attached to the unit, this
slider controls the microphone gain.
Headphone
Gain
Variable Slider
When a talkback headset is attached to the unit, this
slider controls the headphone gain.
Mute Level
Variable Slider
When a talkback headset is attached to the unit, this
slider controls the mute level. This control is very
much like the squelch control found on
communication radios.
Sets the level at which is microphone is enabled.
Below this level no packets are sent.
An external push to talk switch can be connected
with the microphone to do the same task if required.
All NETNode units give a low level bleep tone when
no talkback is received and the unit is connected
onto the mesh network.
Step 5: Configure the Audio Settings Pane (4)
Table 3-13 – Audio Settings Pane
Page 86

NETNode Operations Guide
Commercial in
Confidence
IP Mesh Systems
000-130
R1.8 2015-07-24
Commercial in
Confidence
Page 3-79
Unit
Parameter
Options
Notes
Mesh ID
1 to 255 (8 and
12 Node
systems)
1 to 63 (16
Node, Hi-Rate)
The Mesh ID tells the unit which group it belongs
to. All NETNodes on Mesh ID 60 for example will
communicate with each other.
Note: If you select 16-Node, Hi-Rate as your
operating mode, you can only select between 1 to
63 for your Mesh ID.
Node ID
0 to Max
Number of
Nodes - 1
The Node ID gives the unit a unique ID within the
mesh. Each must have a unique Node ID. The
maximum number of nodes is determined by
operating mode set in the global settings tab.
IP Forward
Select or Clear
If this node is connected to an IP source selecting
the IP Forward check box will make sure this data
is passed around the mesh for access on other units.
Property
Range
Description
Multicast
Address
Use different
values for each
NETNode
This text box enables you to change the multicast
address used by the unit for internal streaming. The
default value is random to make sure different
NETNodes have different multicast addresses.
Step 6: Configure the Mesh Settings Pane (5)
Table 3-14 – Mesh Settings Pane
Step 7: Configure the Streamer Settings Pane (6)
When you have got the asset to the NETNode, you may wish to stream that information
down a fixed IP link. The streamer pane enables you to configure this easily.
Streaming is the transmission of digital audio or video or the listening and viewing of such
data without first storing it.
In Cobham systems we can carry streams using multicast protocols and these streams can
come from external or internal sources. The internal source (an optional encoder) is enabled
with Stream Enable.
Page 87

NETNode Operations Guide
Commercial in
Confidence
IP Mesh Systems
000-130
R1.8 2015-07-24
Commercial in
Confidence
Page 3-80
Property
Range
Description
SAP Address
The default
value is
224.2.127.254
and the port
used is 9875.
This text box enables you to change the value of
SAP/ SDP multicast address used by the unit.
The default value is 224.2.127.254 and the port
used is 9875.
These are standard multicast values for such
parameters, and it is recommended they are not
changed unless specially required due to routing
restrictions.
Port
10000 or above
Protocols like TCP or UDP use port numbers in the
header to direct traffic around the network. Low port
numbers are used by computer systems for
predefined tasks. For example SMPT (for your email
service) uses port 25.
A good rule is to use numbers above 10,000 to avoid
conflict with existing services.
When you set up a port number on several
computers on a network they will all listen for
packets directed to that port.
The default value is random.
Service Name
Mesh Streaming
This text box lets you name the multicast stream as
delivered in the SAP/SDP packets from the unit.
Default is Mesh Streaming.
Stream Enable
Select or Clear
This enables the streaming of Video that originates
from the internal encoder (if it is fitted). This must
be selected for UDP multicast, RTSP multicast
streaming or RTSP unicast streaming.
Table 3-15 – Streamer Settings Pane
Step 8a: Configure the Scrambling Settings Pane (7)
It can be very important to scramble received assets before they are passed across
networks.
The system offers DES, AES128 and AES 256 and this encrypts all user data exchanged
across the network.
The DES+, AES128+ and AES256+ settings make sure that the network will only process
encrypted data. Any data sent in the clear by any nodes will not be presented or accepted by
a NETNode if the DES+ or AES+ is set on the unit.
This drop-down box enables you to select the scrambling scheme you wish to use. You can
select: AES128, AES128+, AES256, AES256+, DES, DES+. Only licensed features will be
shown in the drop-down box.
Page 88

NETNode Operations Guide
Commercial in
Confidence
IP Mesh Systems
000-130
R1.8 2015-07-24
Commercial in
Confidence
Page 3-81
Note: AES and DES scrambling is a licensable item. Speak to Cobham for details.
Step 8b: Set the Scrambling Key (7)
When you select a scrambling scheme it is necessary to specify a key that it will use.
Here’s how:
1. Click the Scrambling Key Set… button.
2. The Scrambling Key dialog opens.
3. Select the Key type from the Key Type combo box.
4. Type your key in the xxx bit key combo box.
5. Click OK.
6. Once the key has been set it is essential to click Apply.
Note: If you make a mistake when typing the key, use the Clear button.
Figure 3-19 Setting up encryption
Page 89

NETNode Operations Guide
Commercial in
Confidence
IP Mesh Systems
000-130
R1.8 2015-07-24
Commercial in
Confidence
Page 3-82
Property
Range
Description
Data Mode
Off
UDP
TCP Server
TCP Client
Off – Data transfer is switched off.
UDP - UDP (User Datagram Protocol) is used to
move data about the network. The packets are sent
out and the system does not expect a reply. There is
no way that the sending device can tell if the data
arrived at the destination.
TCP - TCP (Transmission Control Protocol) is used to
move data about the network. The packets are sent
out and the system will expect a reply. Each
message is acknowledged by the destination device.
Setting TCP server allows applications such as
telnet to connect to the port.
Setting one NETNode to TCP server and one to
TCP client allows data pipes to be formed.
Default is OFF.
Baud Rate
Speeds available
are: None,
Illegal, 1200,
2400, 4800,
9600, 19200,
38400, 57600,
and 115200.
This is where you set the speed at which data will be
transferred across the network.
Note: The data is assumed to be eight bits.
Default is 4800.
Parity
None
Even
Odd
A parity bit is a bit that is added to make sure that
the number of bits with the value one in a set of bits
is even or odd. Parity bits are used as the simplest
form of error detecting code.
There are two variants of parity bits: even parity
bit and odd parity bit. When using even parity, the
parity bit is set to 1 if the number of ones in a given
set of bits (including the parity bit) is even. When
using odd parity, the parity bit is set to 1 if the
number of ones in a given set of bits (including the
parity bit) is odd. In other words, an even parity bit
will be set to "1" if the number of 1's + 1 is even,
and an odd parity bit will be set to "1" if the number
of 1's +1 is odd.
Default is None.
Step 9: Configure the RS232/RS485 Data Settings Pane (8)
The NETNode can send and receive data through its RS232/1, RS232/2 or its RS485 serial
port. See
Controls, Connections and Indicators
to find out which port you are using.
Page 90

NETNode Operations Guide
Commercial in
Confidence
IP Mesh Systems
000-130
R1.8 2015-07-24
Commercial in
Confidence
Page 3-83
Property
Range
Description
IP Port
42391
These set an IP address and Port to and from which
the data will transferred.
The user can connect to the data port through telnet
by setting the mode to TCP and the port number to
23.
The user can connect two data ports on different
units together through setting UDP mode and using
the aligning port numbers.
Default is 42391.
IP Address
255.255.255.255
The IP address of the destination computer which
wishes to connect or all 255’s for any host.
Table 3-16 – RS232/RS485 Data Settings Pane
Page 91

NETNode Operations Guide
Commercial in
Confidence
IP Mesh Systems
000-130
R1.8 2015-07-24
Commercial in
Confidence
Page 3-84
Property
Range
Description
Source
Off
RS232
RS485
Encoder
Off - simply turns off the GPS.
RS232 or RS485 is set when the GPS has been
connected to the Data port on the NETNode and this
is where the system will look for GPS data.
Encoder is set when the GPS has been connected to
the Encoder port (AV) and this is where the system
will look for GPS data. This is only possible with the
AVI variant of the NETNode.
Step 10: Configure the GPS Settings Pane (9)
It is possible to connect a GPS receiver to a NETNode. This switch enables you to select the
source for the GPS. There are three choices:
Table 3-17 – GPS Settings Pane
Step 11: Configure the VLAN Settings Pane (10)
It can be valuable to make Virtual LANs within the physical LAN of the mesh network. These
virtual LANs are configured in the VLAN Settings pane. See
Working with VLAN
for details.
3.11 Working with the Information Tab
This tab enables you to find information about the system. It can be necessary to have this
information when you make a support call to Cobham for example.
Step 1: Open the Information Tab
1. Click the Information tab
2. The Information tab opens
Page 92

NETNode Operations Guide
Commercial in
Confidence
IP Mesh Systems
000-130
R1.8 2015-07-24
Commercial in
Confidence
Page 3-85
Unit
Parameter
Options
Notes
Software
Version
V4.2
The current version of firmware operating on the
NETNode.
FPGA Version
1
The current version of FPGA located in the
NETNode.
Serial Number
46512200
Unique identifier for your unit.
MAC Address
00:11:6A:AB:D5:0A
Unique identifier for the network card.
Board Type
88
Cobham board identity.
Unit Type
73
Cobham board identity.
License
1D00
Current license type installed.
Figure 3-20 The Information Tab
Step 2: Interpret the Information Pane (1)
The information tab gives you some details about the hardware and software loaded into
your NETNode unit. This could be very valuable during a support call for our engineers to
help you.
Table 3-18 – Interpreting the Information Pane
Page 93

NETNode Operations Guide
Commercial in
Confidence
IP Mesh Systems
000-130
R1.8 2015-07-24
Commercial in
Confidence
Page 3-86
Step 3: Look at the Manual (2)
Click on this hyperlink to open a version of the on-board manual for the NETNode.
Step 4: About the H264 Encoder Upgrade (3)
If your NETNode has an AVI board fitted, this dialog enables you to load the encoder with a
Codec to support H.264 operations.
Note: If the AVI option is upgraded to support H.264 then MPEG-2 and MPEG-4 ASP
encoding are no longer supported.
Step 5: Look at the File System (4)
Click on this hyperlink to open the file system of the NETNode. This is where all your map
and configuration files are stored. You can share these files with other NETNodes to save
time.
Step 6: Check the Connected Devices List (5)
When you connect a second Cobham device to your NETNode, providing it has the
Identifying Protocol available, it will show up in the Connected Devices list.
If the NETNode has an internal Dual H.264 and H.264HD Audio Video Interface option fitted,
(NETNode-AVI-HDUP3P or NETNode-AVI-HDUP3R), then the IP address of the Internal AVI
encoder will show in this list.
At this time, you can click on an item in the list to jump directly to it, rather like you can
jump between NETNodes on the Status / Overview tab.
Today, NETNodes and D850 IP Encoders have the Identifying Protocol to show in the list but
other products will have this feature in the future.
3.12 Working with the Encoder Tab
If your unit has a video encoder card installed there will be an Encoder tab shown.
Note: The video encoder card is available as a factory fit option with both the NETNode-3-
Robust and the NETNode-3-Plain, this option cannot be fitted to the NETNode-Mini Plain.
This tab enables you to configure the Encoder. It is necessary to have the optional encoder
fitted to your NETNode before the Encoder tab appears. It is also necessary to make sure
that Global Settings Auxiliary Address has the numeral 1 in the field to switch on the
encoder tab.
Note: If you use the Restore Defaults button on the Control Application, the Auxiliary
address is always returned to 0. You must reset the Auxiliary address to 1 before you can
use the encoder tab again.
Step 1: Open the Encoder Tab
1. Click the Encoder tab.
2. The Encoder tab opens.
Page 94

NETNode Operations Guide
Commercial in
Confidence
IP Mesh Systems
000-130
R1.8 2015-07-24
Commercial in
Confidence
Page 3-87
Property
Options
Notes
Encoder Preset
Low rate
(500kbps)
Medium rate
(900kbps)
High rate
(1.8Mbps)
Video Lock
Red
Green
Red means no video lock.
Green means video is locked.
Audio Enable
Checkbox
Select or Clear
Select the Audio Enable checkbox to switch on the
audio. Audio will take some of the available
bandwidth. For some applications you may wish to
turn off audio to let all the bandwidth to be used by
video.
Figure 3-21 The Encoder Tab
Step 2: Configure the Encoder Settings Pane (1)
This is where you configure your encoder to suit the Composite camera source you’re
operating. It also helps you to make best use of the available bandwidth on the mesh
network.
Page 95

NETNode Operations Guide
Commercial in
Confidence
IP Mesh Systems
000-130
R1.8 2015-07-24
Commercial in
Confidence
Page 3-88
Property
Options
Notes
Scrambling
Off
AES128
AES256
DES
It can be very important to scramble received
composite assets before they are passed across
networks.
The system offers DES, AES128 and AES 256 and
this encrypts all composite assets exchanged across
the network.
This combo box enables you to select the scrambling
scheme you wish to use. You can select: DES,
AES128 or AES256.
Default is OFF
Table 3-19 – Encoder Settings Pane
Note: This scrambling of the composite signal is independent of the Main IP
Scrambling on the node. This composite scrambling is nested in the Main IP scrambling.
This means you can scramble the Composite signal and then scramble the full IP data again.
Step 3: Configure the Scrambling Key
When you select a scrambling scheme it is necessary to specify a key that it will use.
Here’s how:
1. Click the Scrambling Key Set… button.
2. The Scrambling Key dialog opens.
3. Select the Key type from the Key Type combo box.
4. Type your key in the xxx bit key combo box.
5. Click the OK button.
6. Once the key has been set it is essential to click Apply.
Note: If you make a mistake when typing the key, use the Clear button.
Step 4: Select the Show Advanced Options Checkbox
If you select the Show Advanced Options checkbox, the dialog will expand like this:
Page 96

NETNode Operations Guide
Commercial in
Confidence
IP Mesh Systems
000-130
R1.8 2015-07-24
Commercial in
Confidence
Page 3-89
Property
Range
Description
Video Input
Off
PAL
NTSC
NTSC no ped
S-Video PAL
S-Video NTSC
S-Video NTSC no ped
SDI PAL
SDI NTSC
You can select the video to be off or an
available setting to suit the camera source
you have.
MPEG Mode
MPEG2
MPEG4
H264
Select between MPEG2 and MPEG4. For H264
the video card must be upgraded. Details for
this are on the information pane.
Figure 3-22 The Encoder Tab, Advanced Options Display
Page 97

NETNode Operations Guide
Commercial in
Confidence
IP Mesh Systems
000-130
R1.8 2015-07-24
Commercial in
Confidence
Page 3-90
Property
Range
Description
MPEG4 /H264
Encoding Mode
Low Delay Interlaced
Standard Delay
Interlaced
Low Delay Progressive
Standard Delay
Progressive
SIF
QSIF
Default is Low Delay Interlaced.
If you have selected MPEG4 mode then these
settings apply.
Video Bit rate
A number
You can type in a bit rate you wish the
encoder to use. If you set more than the
capacity of the encoder it simply won’t
operate. This item is for advanced users only.
MPEG4/H264
Frame rate
Full
1/2
1/4
1/8
1/24
If full frame rate is giving unsatisfactory
quality, you can step this down until you get
a satisfactory picture. Only applies to MPEG4.
Use when unit is operating at low bitrates.
Horizontal
Resolution
704, 528, 480 and 352
The number of pixels across each line of the
screen. Changing the horizontal resolution to
lower values will make the coded picture
softer.
Try to align horizontal resolution to the
resolution of the camera for best image
results.
Video
Sharpness
Normal
Sharp
You can increase the sharpness of the video
but you will reduce the bandwidth.
Page 98

NETNode Operations Guide
Commercial in
Confidence
IP Mesh Systems
000-130
R1.8 2015-07-24
Commercial in
Confidence
Page 3-91
Property
Range
Description
Audio Encoder
Off
32kHz 12bit Stereo
32kHz 12bit Mono
32kHz 8bit Stereo
32kHz 8bit Mono
16kHz 8bit Stereo
16kHz 8bit Mono
8kHz 8bit Stereo
8kHz 8bit Mono
32kHz MPEG Layer 1 Stereo
32kHz MPEG Layer 1 Mono
48kHz MPEG Layer 1 Stereo
48kHz MPEG Layer 1 Mono
32kHz MPEG Layer 2 Stereo
32kHz MPEG Layer 2 Mono
48kHz MPEG Layer 2 Stereo
48kHz MPEG Layer 2 Mono
32kHz MPEG Layer 3 Stereo
32kHz MPEG Layer 3 Mono
44.1kHz MPEG Layer 3 Stereo
44.1kHz MPEG Layer 3 Mono
48kHz MPEG Layer 3 Stereo
48kHz MPEG Layer 3 Mono
16kHz MPEG Layer 3 Stereo
16kHz MPEG Layer 3 Mono
24kHz MPEG Layer 3 Stereo
24kHz MPEG Layer 3 Mono
Default is audio Off.
You can select one of many modes to suit
operating and bandwidth requirements.
As you select each of these audio modes and
apply them, monitor the Video bitrates
parameter and see it change.
The higher the audio quality used the less the
video bandwidth available
MP3 modes are only available with H264.
MPEG Audio
Bit rate
8 to 384kbit/s
This is the MPEG audio sampling rate. Usually
the higher the number the better the quality.
Audio Input
Level
0, 12, 24, 36 and 48dB
Used to set the audio gain applied to the
audio input signal.
0db is no gain which is the default setting. If
you have low level audio sources you may
wish to apply more gain.
Table 3-20 – Encoder Tab, Advanced Options Display
3.13 Licensing the NETNode
Feature availability in NETNodes is controlled by license. If you require a new feature,
contact your Cobham representative who can arrange for a license to be produced for you.
Page 99

NETNode Operations Guide
Commercial in
Confidence
IP Mesh Systems
000-130
R1.8 2015-07-24
Commercial in
Confidence
Page 3-92
The license generated is in the form of a *.lic file. This file will contain a 72 digit license
code.
Step 1: Prepare for the License Upgrade
1. Open the license file provided by Cobham using Notepad or similar text editor.
2. Highlight and copy only the 72 digit numbers highlighted below:
3. Open the Web Browser application
Step 2: Insert the License Code
1. Holding down the Ctrl key on your keyboard, right-click the COBHAM logo on the web
browser.
2. The Engineering dialogue box opens.
3. Select Main to write commands to the D84x PCB.
4. Type wglco;<paste code here>; (paste in the 72 digit code copied in Step 1).
5. Click the Send button.
6. You’ll see a Reply code.
7. Click Done to complete the process.
Note: If the reply code is Failed, then the license code has not gone into the NETNode.
This may be caused by incorrect syntax, for example check the punctuation is semi-colons
either side of the license code.
Page 100

NETNode Operations Guide
Commercial in
Confidence
IP Mesh Systems
000-130
R1.8 2015-07-24
Commercial in
Confidence
Page 3-93
Figure 3-23 Inserting your new license code
3.14 Upgrading the Firmware
Step 1: Enable TFTP in Windows 7/Vista on your PC
Your PC will need to be enabled as a TFTP client to perform a TFTP upgrade. In Windows 7
and Vista this may need to be activated.
1. On your PC click StartControl PanelPrograms.
2. Select Programs and Features.
3. Click Turn Windows features on or off at the top left of the dialogue box.
4. Check the TFTP Client checkbox.
5. Click the OK button.
 Loading...