

Chapter
Chapter
Chapter
GettinG Started
1
1
1
In This Chapter...
Introduction ............................................................................................................... 1–2
Purpose of this Manual .............................................................................................1–2
Purpose of this Chapter ............................................................................................ 1–2
Online Help Files and Other Documentation ............................................................ 1–2
Technical Support..................................................................................................... 1–2
Conventions Used ...................................................................................................... 1–3
Key Topics for Each Chapter ..................................................................................... 1–3
Before You Begin ....................................................................................................... 1–4
Do-more! PLC System Components .........................................................................1–5
Do-more! Designer Software System Requirements .................................................. 1–5
Step 1: Install Do-more Designer Software .............................................................. 1–6
Step 2: Launch Do-more! Designer Software ........................................................... 1–9
Step 3: Install Hardware .......................................................................................... 1–11
Step 4: Apply Power to the Do-more! PLC ............................................................. 1–12
Step 5: Establish Communication ...........................................................................1–13
Step 6: Verify Hardware Configuration ..................................................................1–19
Step 7: Create a Ladder Logic Program ..................................................................1–23
Rung #1 ................................................................................................................. 1–23
Rung #2 ................................................................................................................. 1–26
Step 8: Save a Project .............................................................................................. 1–28
Step 9: Write Project to the Do-more PLC .............................................................1–28
Step 10: Testing Project Using Data View ..............................................................1–29
Accessing the Help File ............................................................................................ 1–31

Chapter 1: Getting Started
Introduction
Purpose of this Manual
Thank you for purchasing from our Do-more PLC family of products. This manual shows
you how to install, set up, program, troubleshoot and maintain your Do-more PLC. For
installation personnel, this manual contains information on power and signal wiring,
mounting details and configuration procedures.
This manual can be very helpful as a quick reference guide for those who are experienced in
PLCs. For those who may be new to PLCs or our products, reading this manual will give you an
understanding of the variety of features available with the Do-more PLC.
Purpose of this Chapter
This chapter will guide you through the basic set up of a Do-more H2 Series PLC. It contains
step by step instructions on installing the programming software, installing and configuring your
hardware, applying power to the PLC, establishing a communications link, and creating, saving
and writing a project to the CPU. Once these steps are completed, your Do-more PLC will be
running a ladder logic project that you have programmed.
Online Help Files and Other Documentation
Do-more Designer, the Do-more PLC programming software, is available for free download from
our website at:
http://www.automationdirect.com
The software includes searchable online help topics covering all aspects of the software, instruction
set, module set up and communication.
1–2
Technical Support
We strive to make our manuals the best in the industry. We rely on your feedback to
let us know if we are reaching our goal. If you cannot find the solution to your particular
application, or, if for any reason you need technical assistance, please call us at:
770-844-4200
Our technical support group will work with you to answer your questions. They are available
Monday through Friday from 9:00 A.M. to 6:00 P.M. Eastern Time. We also encourage you to
visit our web site where you can find technical and non-technical information about our products
and our company.
http://www.automationdirect.com
Do-more H2 Series PLC Hardware User Manual, 1st Edition, Rev. I - H2-DM-M
Conventions Used
When you see the “note pad” icon in the left-hand margin, the paragraph to its immediate right will be a
special note. Notes represent information that may make your work quicker or more efficient. The word
NOTE: in boldface will mark the beginning of the text.
When you see the “exclamation point” icon in the left-hand margin, the paragraph to its immediate right
will be a warning. This information could prevent injury, loss of property, or even death in extreme
cases. Any warning in this manual should be regarded as critical information that should be read in its
entirety. The word WARNING in boldface will mark the beginning of the text.
Chapter 1: Getting Started
Key Topics for Each Chapter
The beginning of each chapter will list the key topics
that can be found in that chapter.
Do-more H2 Series PLC Hardware User Manual, 1st Edition, Rev. I - H2-DM-M
Getting Started!
In This Chapter...
.............................................................................1-2
Introduction
About Getting Started!
Supplemental Manuals and Other Help
Technical Support
....................................................................1-2Purpose of this Manual
......................................................................1-2
.............................................................................1-2
....................................................................1-3Conventions Used
CHAPTER
1
............................................1-2
1–3
Chapter 1: Getting Started
R
/
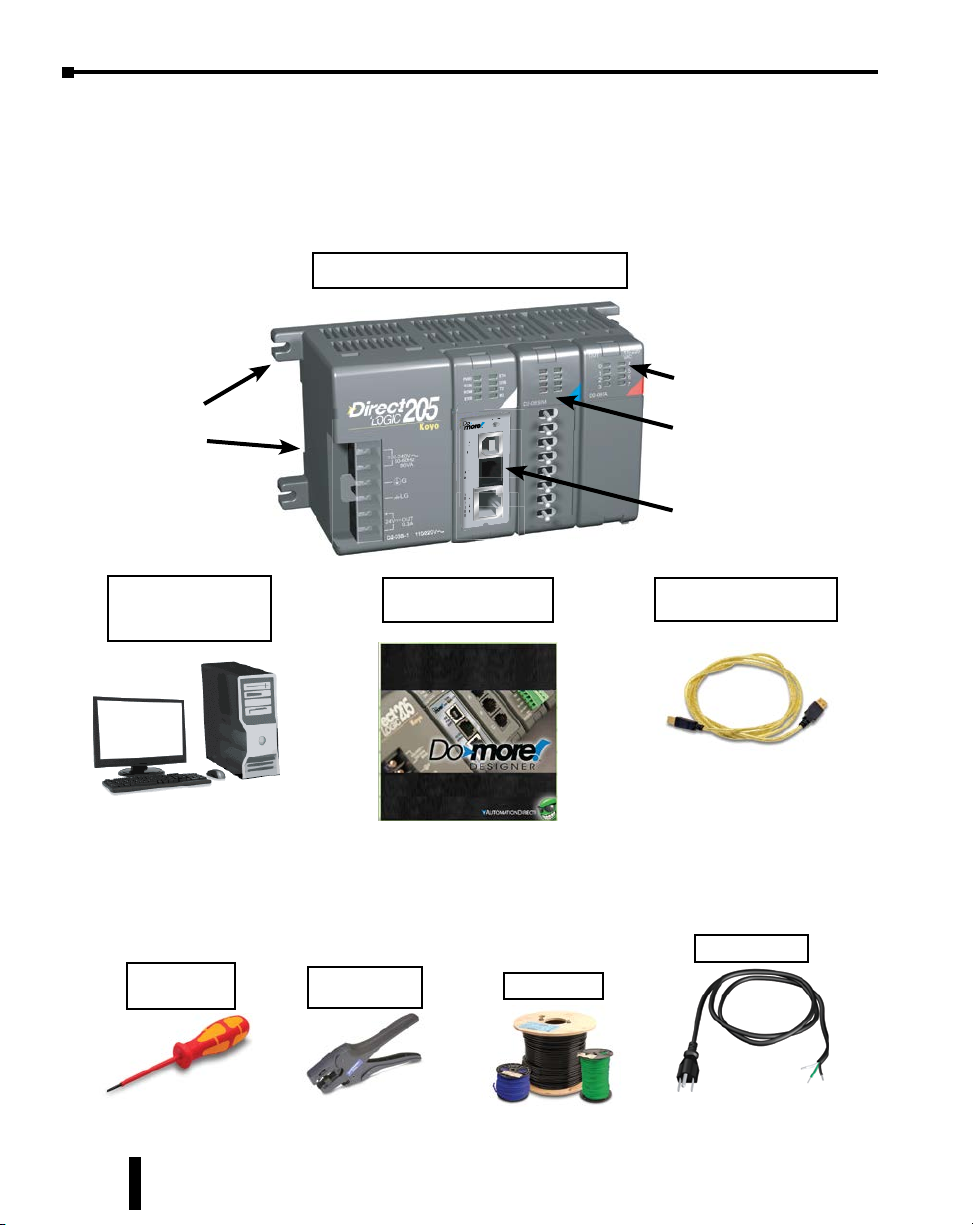
Before You Begin
It is recommended that the following items be available to make this short step-by-step
introduction to the Do-more PLC go smoothly.
D2-03B-1 Base
with 110/220 VAC
Power Supply
Example Do-more PLC
H2-DM1E
H2-DM1E
TERM
STOP
RUN
USB
PGM
PORT
RS-232
SERIAL
E
T
1
H
0
E
/
R
1
N
0
E
0
T
D2-08TA Output Module
F2-08SIM Module
Do-more! CPU Module
PC Running
Windows XP, Vista,
Windows 7, Windows 8
Not available from
Automationdirect.com.
Screwdriver
TW-SD-VSL-1
Programming Software
Download software from
our webste at: http://www.
automationdirect.com
Wire Strippers
DN-WS
Do-more! Designer
Hookup Wire
USB-A to USB-B
Programming Cable
You can also use an Ethernet
or Serial (D2-DSCBL) cable
for programming, but we
recommend using a USB cable;
just plug it in and it works.
AC Power Cord
Not available from
Automationdirect.com.
1–4
Do-more H2 Series PLC Hardware User Manual, 1st Edition, Rev. I - H2-DM-M
Chapter 1: Getting Started
Do-more! PLC System Components
The Do-more H2 Series CPU modules were designed to stand in place of the DL205 series PLC.
As a result, this CPU easily integrates with DL205 PLC family components. The following is a
summary of the major parts of a Do-more H2 Series PLC.
CPU
H2-DM1/H2-DM1E
Bases
The Do-more H2 Series CPU module can be placed into any DL205 PLC family base. The four base
sizes available are 3, 4, 6 and 9 slot. All bases include a built-in power supply and can be purchased for
use with AC or DC sources. The Do-more H2 Series PLC supports local and Ethernet remote
I/O configurations only.
NOTE: The Do-more H2 Series PLC does not support local expansion I/O.
I/O Modules
The DL205 PLC family has some of the most powerful I/O modules in the industry. A complete
range of discrete modules which support 24VDC, 110/220 VAC and up to 10A relay outputs
(subject to derating) are offered. The analog modules provide 12 and 16 bit resolution and several
selections of input and output signal ranges (including bipolar). Several specialty modules are also
available.
Do-more! Designer Software System Requirements
The Do-more! Designer Windows-based programming software works with Windows® XP
(Home or Professional, 32-bit), Vista (Home, Basic, Premium, 32 or 64-bit), Windows 7
(Home, Professional, Ultimate, 32 or 64-bit), Windows 8 & 10 (Home, Professional, Enterprise
32 or 64-bit; Windows 8 RT edition is NOT supported).
Please check the following requirements when choosing your PC configuration:
• Minimum PC to PLC Connectivity, at least one of the following:
- USB Port: connects to the CPU with USB-A connector (USB-A to USB-B cable)
- RS-232 Serial Port: connects to the CPU with RJ-12 connector (RJ-12 to DB9 or RJ-12
to USB-B serial converter cable)
- Ethernet Port: connects to the CPU (H2-DM1E) with RJ-45 10Base-T or 100Base-T
(Cat5 Patch Cable)
• Hard Disk: 100MB free disk space
• Video Display: 1024x768, 256 colors resolution (1280x720, true color recommended)
• Windows XP, 32-bit:
- 800MHz, single core CPU (2GHz, multi-core or hyper-threaded recommended)
- 512MB RAM (2GB recommended)
• Vista, Windows 7 or Windows 8 & 10, 32 or 64-bit:
- 1GHz, single core CPU (2GHz, multi-core recommended)
- 1GB RAM (3GB recommended)
NOTE: The PC/Laptop/Ethernet Switch connector at the “opposite end” of the PLC connector will dictate
what kind of cable you need.
Do-more H2 Series PLC Hardware User Manual, 1st Edition, Rev. I - H2-DM-M
1–5
Chapter 1: Getting Started
Step 1: Install Do-more Designer Software
Download the Do-more Designer programming software (DM-PGMSW) from our website
at http://automationdirect.com and launch the install procedure.
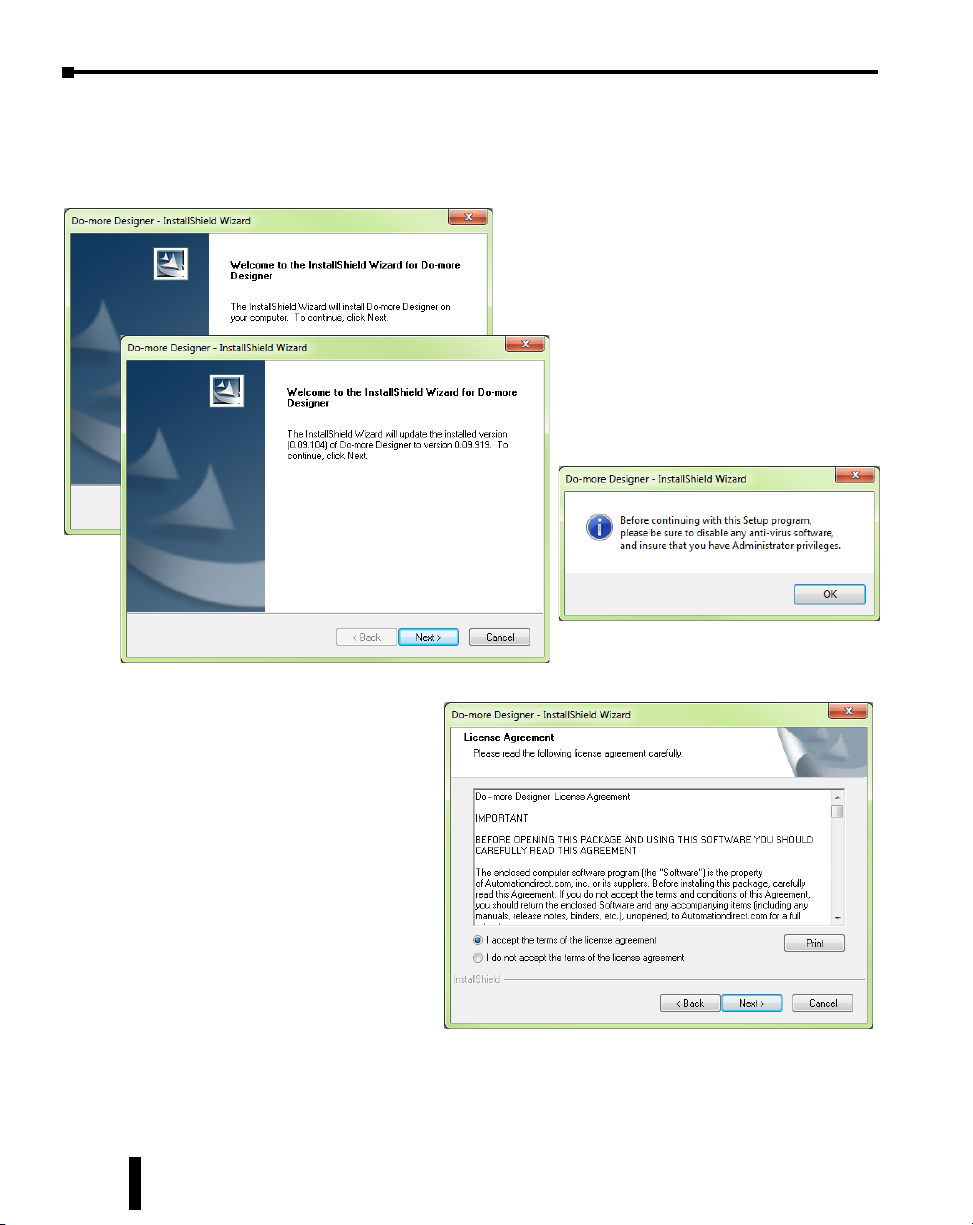
The first screen that opens is the Welcome
screen seen here. If there are previous versions of
this software already installed, this screen will
detail the version number of the software being
replaced and the one being installed, click Next
to continue.
An alert window will appear requesting
that all anti-virus software be disabled
and also reminding the user that
Administrative restrictions may exist.
1–6
The License Agreement window
will be displayed next. Read over
the agreement, select “I accept the
terms of the license agreement” and
click the Next button to continue.
There is also the option to print the
license agreement if desired. The
print function will print the license
agreement to a pdf file and save it
in the location you choose.
Do-more H2 Series PLC Hardware User Manual, 1st Edition, Rev. I - H2-DM-M
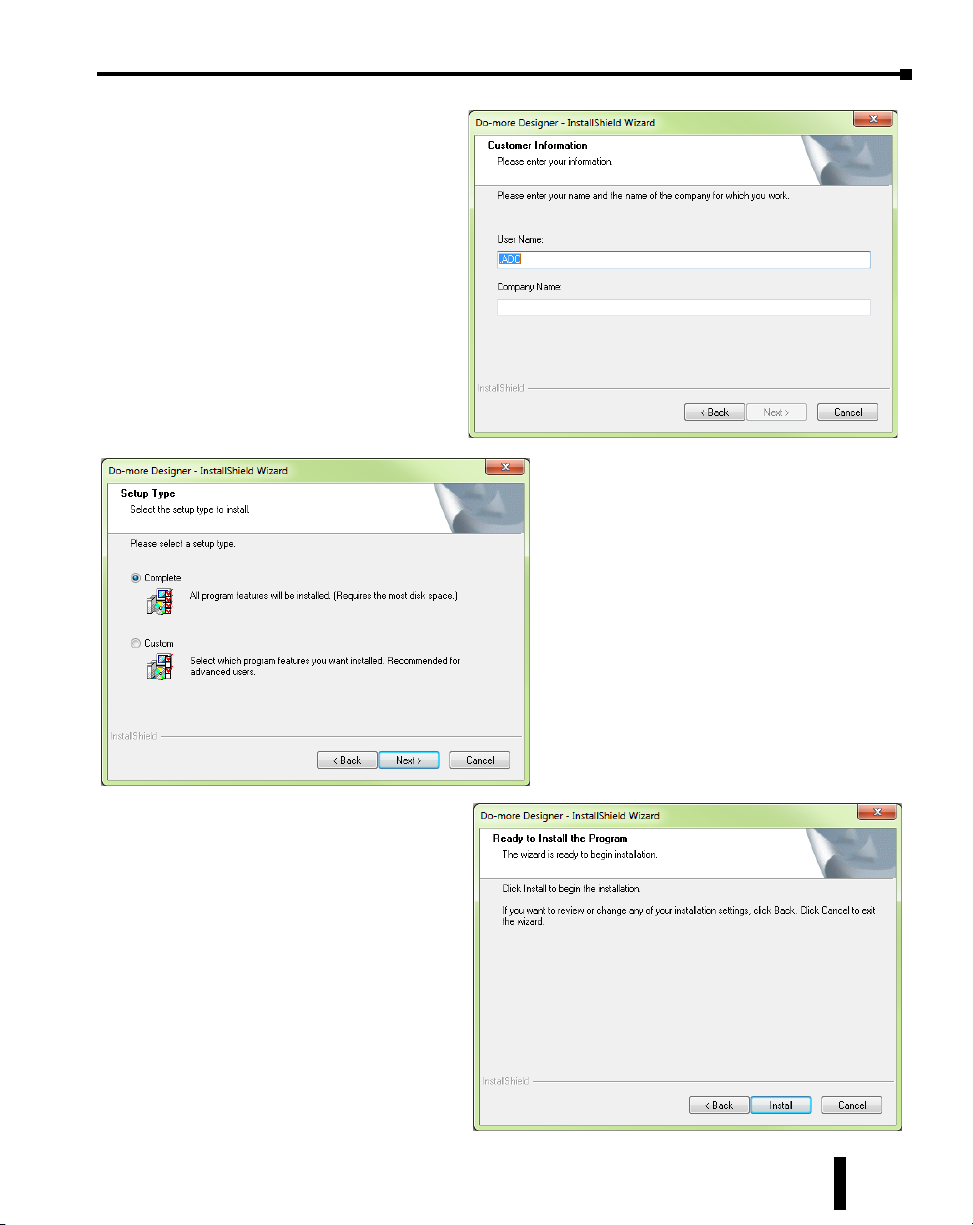
Now the software will ask a little
about you. Please fill in the
information requested on the
Customer Information screen and
click Next to continue.
At this stage, the software will ask
which type of install you would like
to perform. The Select Type
window seen below gives two
options for installation type:
Complete and Custom.
Chapter 1: Getting Started
Custom installation allows you to choose which
program features to install, whereas Complete
installation installs all of the program features
available. The Complete installation is selected
by default and is recommended for first-time
users.
Select the installation type desired and click the
Next button to continue.
The next screen to appear is the
Ready to Install the Program
window. This window is an alert
window, cautioning you that the
program is about to be installed. If
there are any changes that need to
be made to the install settings do
them now before continuing.
To review or change any of the
previous installation selections, click
the Back button to return to the
appropriate window and make the
change. If no changes are necessary
click the Install button to begin the
installation.
Do-more H2 Series PLC Hardware User Manual, 1st Edition, Rev. I - H2-DM-M
1–7
Chapter 1: Getting Started
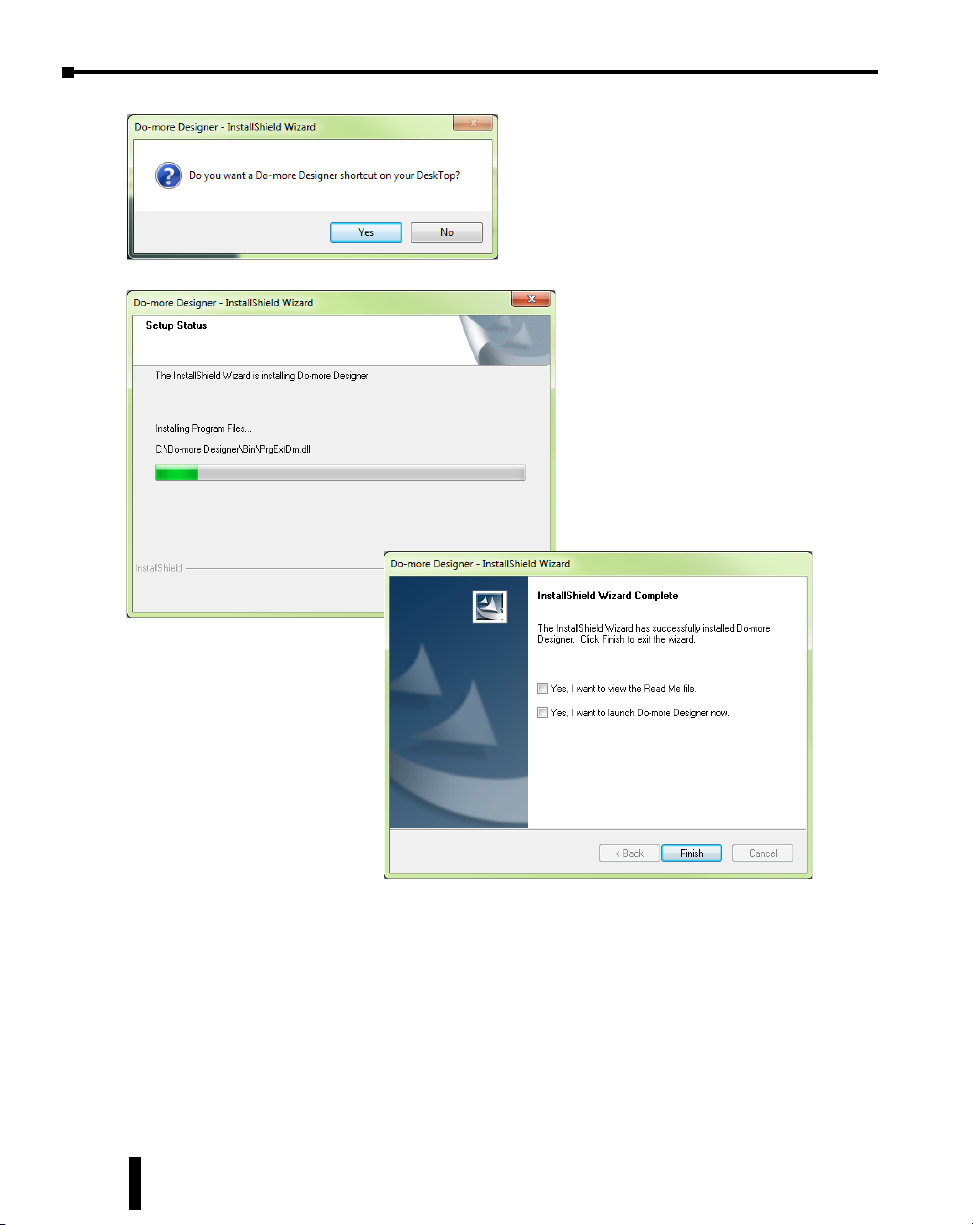
The popup shown here will allow you to choose
whether or not to install a shortcut for the
software on your PC’s desktop. Click Yes or No
to continue with the installation.
The software will now install the
needed files and folders with the Setup
Status window detailing the status of
the installation.
Once the installation has been
successfully completed, the window
below will open. Your software is now
installed and ready to use. The
installation wizard can now be closed
by clicking the Finish button at the
bottom of the window.
1–8
Do-more H2 Series PLC Hardware User Manual, 1st Edition, Rev. I - H2-DM-M
Chapter 1: Getting Started
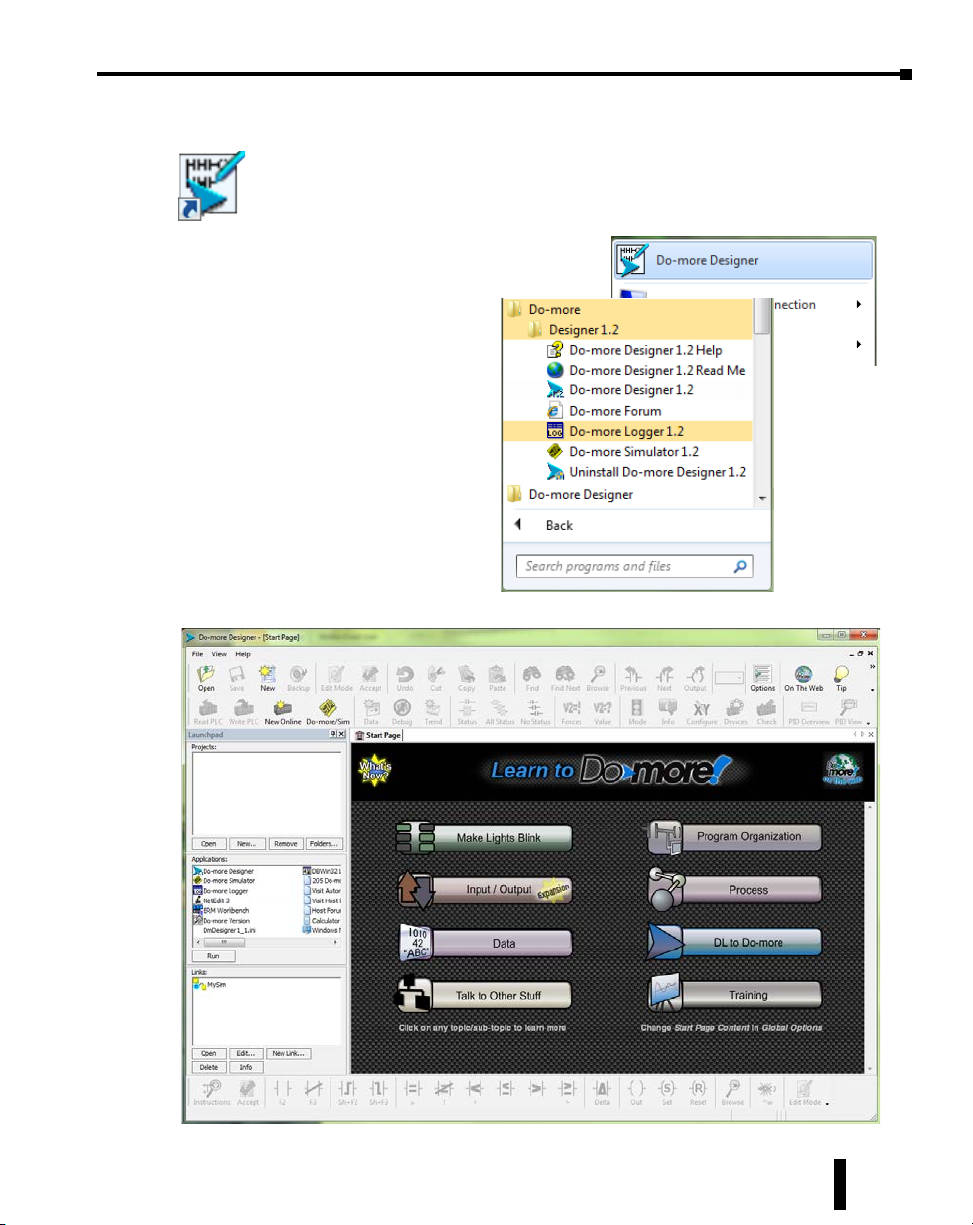
Step 2: Launch Do-more! Designer Software
After installing Do-more! Designer, launch the software by double clicking the
desktop DM icon.
You can also launch the software from the PC’s Start
menu or All Programs menu. If the software link is
not embedded in the Start menu, use
the path: Start > All Programs > Domore > Designer x.x > Do-more
Designer x.x to launch the software.
The Do-more! Designer Software will
start up and display the Start Page
shown below. This page consists
of a Launchpad with quick links to
existing projects, software applications
and communications links. There
is also a section containing shortcuts
to important help file topics and
the Do-more! Designer simulator
application.
Do-more H2 Series PLC Hardware User Manual, 1st Edition, Rev. I - H2-DM-M
1–9
Chapter 1: Getting Started
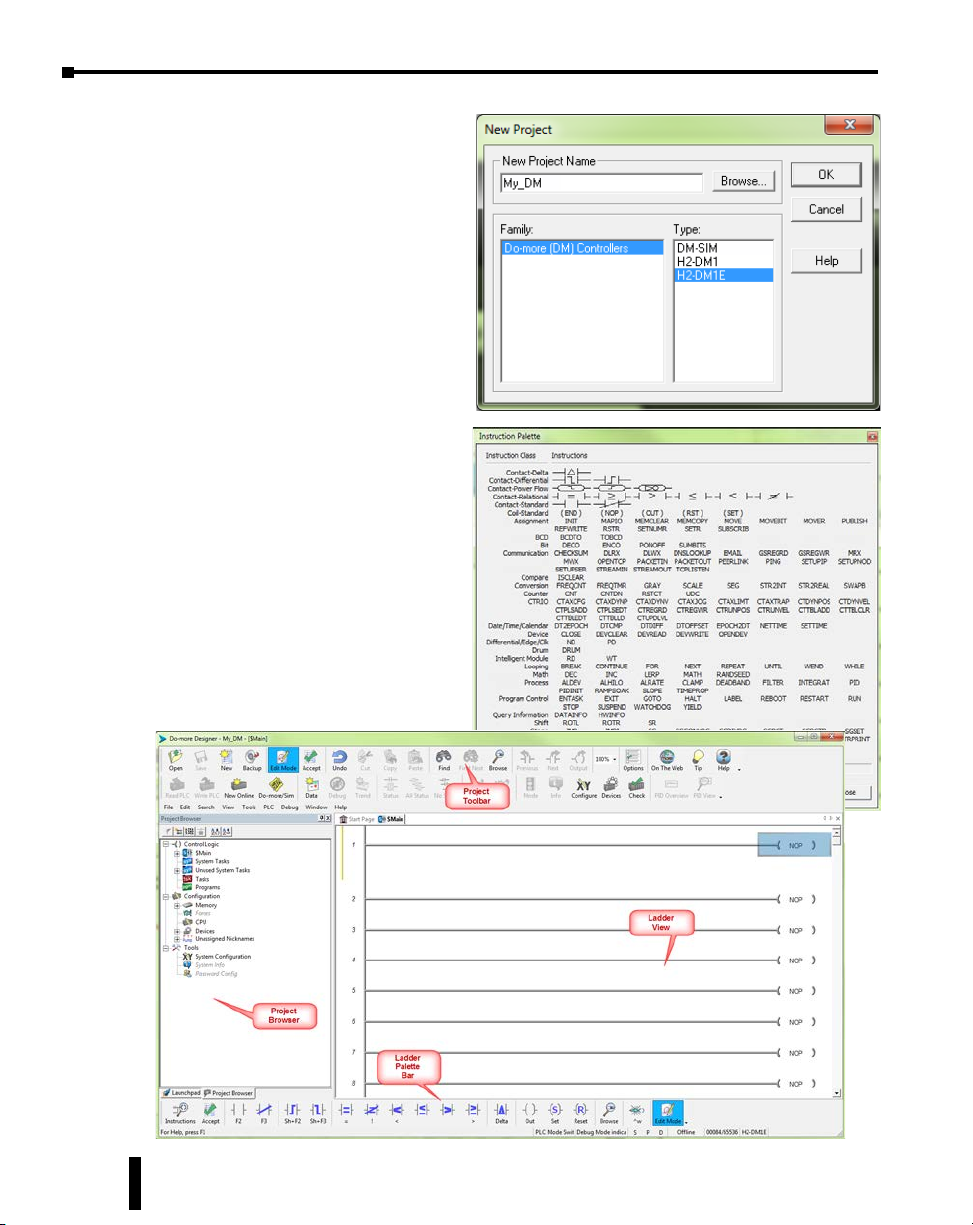
To begin a new project offline select
New from the toolbar on the Start
Page. The New Project window seen
here will open.
Name the new project and select the
type of controller it is intended for. You
can use the Browse button to choose a
different location to store the project or
use the default location. Click OK after
your selections have been made to
continue. The Main programming
window and Instruction Palette shown
below will open.
The Instruction Palette lists all of the
instructions available for use in your
program. A brief explanation of
each instruction is provided once the
instruction is highlighted and a more
detailed explanation is available in the
help file.
The Main programming window is
divided into menus and toolbars for
quick access to configurations,
instructions and other needed items
used during project development.
1–10
Do-more H2 Series PLC Hardware User Manual, 1st Edition, Rev. I - H2-DM-M

Step 3: Install Hardware
O
/
/
The “Installation and Wiring” chapter of this manual contains detailed information for the
installation of components in your Do-more! PLC system. The following summary explains
the basic steps for installing modules in a base.
First slide the module retaining clips to the out position and align the PC board(s) of the
module with the grooves on the top and bottom of the base. Push the module straight into the
base until it is firmly seated in the backplane connector. Once the module is inserted into the
base, push in the retaining clips to firmly secure the module to the base.
H2-DM1E
USB
PGM
PORT
RS-232
SERIAL
E
T
1
H
0
E
/
R
1
N
0
E
0
T
Chapter 1: Getting Started
Push the retaining clips in to
secure the module to the base
TERM
STOP
RUN
Align module PC board to slots
CPU must be positioned in the
in base and slide in
first slot of the base
WARNING: Minimize the risk of electrical shock, personal injury, or equipment damage. Always
disconnect the system power before installing or removing any system component.
Once all of the modules have been
installed in the base, connect the USB
cable. Use a standard USB cable with
Type A and Type B connectors.
H2-DM1E
TERM
RUN
STOP
USB
PGM
PORT
RS-232
SERIAL
E
1
T
0
H
/
E
1
R
0
N
0
E
T
(Ethernet and Serial connections are
also available, but are not shown for
this example.)
Do-more H2 Series PLC Hardware User Manual, 1st Edition, Rev. I - H2-DM-M
Type
B
Type A
1–11

Chapter 1: Getting Started
1 10/220 V AC Base T erminal Strip
Step 4: Apply Power to the Do-more! PLC
Power is supplied to the Do-more! PLC through the backplane of the base from the power
supply. The following diagrams show the terminal connections located on the power supplies
of the DL205 bases. The base terminals can accept up to 16AWG. You may be able to use
larger wiring depending on the type of wire used, but 16AWG is the recommended size. Do not
over-tighten the connector screws; the recommended torque value is 7.81 lb·in (0.882 N·m).
100 – 240 VAC
G
LG
+
24 VDC OUT,
NOTE: You can connect either a 115VAC or 220VAC supply to the AC terminals.
0.3A
1–12
125 VDC Base T erminal Strip 12/24 VDC Base T erminal Strip
+
10.2 – 28.8 VDC
–
G
+
1 20 – 240 VDC
–
G
LG
+
24 VDC OUT,
–
0.3A
Once all of the power wiring has been completed and verified, connect the appropriate
voltage source to the power supply and power up the controller. The Do-more PLC will
perform a self evaluation once power is applied. Refer to the “Installation and Wiring”
chapter of this manual for more power supply and input wiring information.
Do-more H2 Series PLC Hardware User Manual, 1st Edition, Rev. I - H2-DM-M

Step 5: Establish Communication
Now that the Do-more PLC is powered up, you need to establish a communications link
between the PC and the PLC. The Do-more! Designer software provides a Link Wizard to
assist you with configuring this new communications link. To open the Link Wizard, select
the New Link... button in the Links section of the Main Page’s Launchpad as shown below.
Chapter 1: Getting Started
The Link Wizard will first ask you to
choose which communications port you
will be using. In this example, we will be
using a USB connection. Select USB,
click Next and the wizard will
automatically search for available CPU’s
on that port.
Choose the CPU that you are
programming and select Next. The Domore Designer software will create a link to
that controller.
The Link Wizard will now display the
saved settings for this link as seen on
following page.
Do-more H2 Series PLC Hardware User Manual, 1st Edition, Rev. I - H2-DM-M
1–13

Chapter 1: Getting Started
Once you have completed configuring
your communications link, either
manually with the Link Editor or
automatically with the Link Wizard, it will
be available to select in the Links section of
the Launchpad. There you can edit, enable/
disable, delete or view statistics for that link.
A unique name is required for each link that is
created. Name the new link and, if desired, give it a
description then select Finish.
You can also manually configure each link by selecting
the Link Editor... button from the lower left corner
of the Link Wizard. The Configure Link dialog will
open, as seen below, allowing you to select PLC types,
port parameters, and protocols.
1–14
Do-more H2 Series PLC Hardware User Manual, 1st Edition, Rev. I - H2-DM-M

Chapter 1: Getting Started
Select the New Online button and the Online dialog box, seen below, will open. From this
dialog, you are given available communications links to choose from with options to add, edit
disable/enable, or delete links.
Choose the appropriate link, select OK
and the software will connect to the Domore PLC. If the mode selector switch on
the CPU module is not in the Term position
when connecting, the warning shown below
will appear.
You are allowed to continue if you wish or place the
mode selector switch on the CPU module in the
Term position to avoid any unintended
communication errors.
If you were connecting to the CPU module with a project created offline, you may encounter
the message window shown here.
Do-more H2 Series PLC Hardware User Manual, 1st Edition, Rev. I - H2-DM-M
1–15

Chapter 1: Getting Started
Only with the New Online option does the Do-more PLC assume that you are creating a new
project from scratch. With any other method, such as PLC > Connect, the software will compare
the project in the controller with the offline version you have open. If there are any differences,
this warning window will appear detailing the options available for continuing:
1. Go Online and view the DISK project - This option
will go online with the PLC but display the project
from disk. Status displays may show incorrect
information. If the memory configuration in the diskbased project contains elements that are incompatible
with the memory configuration currently in the
Do-more PLC the message box seen here will be
displayed.
2. Go Online and view the PLC project – The project from the PLC will be opened by Do-more!
Designer.
3. Cancel, and return to Offline – This option will cancel the connection attempt and return to the
offline project.
4. Compare Programs... – If you are unsure as to why the two projects are different, then this option
will do a comparison of the projects and detail the differences found. An example comparison is
seen below.
In this example,
the PLC
project titled
My_ DM was
with a project
stored on the
PC. The report
window shown
above illustrates
the differences
found between the
two.
compared
1–16
Do-more H2 Series PLC Hardware User Manual, 1st Edition, Rev. I - H2-DM-M

Chapter 1: Getting Started
According to the report, the PLC project was different in two areas. First, a new code-block was found
only in the PLC project. This new code-block is titled MyNewProgram and is highlighted in green.
The green color represents items that exist only in the Current Project (project in PLC) and not in the
Other (project in PC). Also, the comparison noted that a normally open contact (STR) was changed to
a normally closed contact (STRN) at $Main@0. This item is highlighted in blue which represents items
that are different between the PLC Project and the project in the PC.
Other colors used in the comparison are red, which notes items that exist only in the project on the
PC and not in the PLC and black which highlights items that are identical in both projects. There are
also numerous checkbox and radio button options available to help you analyze the differences between
projects.
Once you have connected to the CPU either by using the New Online option or using PLC
> Connect for offline projects, you may encounter the initialization windows shown below.
The Set PLC Clock option allows you to
set the internal, real-time clock of the PLC.
The Set PLC Clock window has
options for Timezones and Daylight
Savings Adjustments.
The Setup System Configuration
option allows you to configure the
parameters of the Do-more PLC. I/O
module configuration, CPU ports,
and I/O mapping profiles are a few
of the parameters available in the
System Configuration window. Refer
to the following section for Hardware
Configuration options.
Do-more H2 Series PLC Hardware User Manual, 1st Edition, Rev. I - H2-DM-M
1–17

Chapter 1: Getting Started
Once all parameters have been configured, the following programming window will open with
the online toolbar active.
1–18
Notice the status bar indications which show PLC type, memory usage, communication
status, PLC errors, PLC mode, etc. Hovering your mouse over the status bar will highlight
the items that are selectable. If you select one of these items, a new window will open with
real-time data and options that are available for that selection.
As an example, the System Information window seen here appears after selecting the Memory
Usage indication from the status bar.
Do-more H2 Series PLC Hardware User Manual, 1st Edition, Rev. I - H2-DM-M

Step 6: Verify Hardware Configuration
Next, you will need to verify the hardware configuration for accuracy. The Do-more PLC
has an auto discover feature that will automatically detect the I/O modules installed in the
base. You can see the results of this search by selecting PLC > System Configuration, double
clicking the CPU link under the Configuration tab in the Project Browser, or by clicking the XY
Configure icon in the Project Toolbar.
Chapter 1: Getting Started
O n
the
left
side
o f
the
System Configuration window is an index of topics titled
Configuration Entries. Click the I/O Configuration tab and you should see an overview of
the modules that the software located, similar to the following.
From here you can verify that the software has detected all of the I/O modules that are installed.
At this point, you should also verify the base size. The Do-more PLC cannot automatically
detect the base size and if it needs to be corrected, select the DL205 Base tab in the index and
choose the appropriate size from the drop down list on that page.
Do-more H2 Series PLC Hardware User Manual, 1st Edition, Rev. I - H2-DM-M
1–19

Chapter 1: Getting Started
The Do-more PLC allows the I/O to be manually configured as well. In order to do so, you
must first set the I/O Configuration Mode to manual. Select the DL205 Local I/O Master tab
found under the I/O Configuration tab in the Configuration Entries index.
NOTE: If the manually configured I/O modules do not match the installed I/O modules, the PLC will not go
into Run Mode.
After you have set the configuration mode to Manual, select the DL205 Base tab in the
Configuration Entries index. This will take you to the following set up window.
The 205 Local I/O Master
Configuration window shown
here will appear. From here
select Manual to configure the
I/O modules that are installed
in the system yourself. It is
important to remember that
the PLC will compare what you
configure with what is installed
and they must match for the
PLC to work properly.
1–20
Notice that from this window, you can perform a Manual Base Scan. When initiated, this scan
will poll the available modules in the base connected to the PC and display the I/O found. The
results can then be altered as you choose. This window also contains the Base Size selection
which is used to select the base size that the system is using.
To manually enter your I/O modules into the configuration, right click on the slot the module
will reside in, select Add Module and then choose the module from the drop down list.
Do-more H2 Series PLC Hardware User Manual, 1st Edition, Rev. I - H2-DM-M

Chapter 1: Getting Started
Once you have selected the module, it will appear in the slot that was chosen.
If an I/O module is manually configured but is not available for install or if at any time it has
been removed for maintenance, the I/O configuration will allow you to place that module in
an Optional state. This will allow the PLC to function properly without any hardware
mismatch errors. As previously mentioned, the Do-more PLC will not enter Run mode if the
configuration does not match the actual modules installed. With the Optional state, these errors
can be avoided.
To make a module Optional, right click on the module and select Optional from the drop down
list. The module will be labeled with the word “Optional” and the PLC will ignore it when
performing the configuration comparison.
Do-more H2 Series PLC Hardware User Manual, 1st Edition, Rev. I - H2-DM-M
1–21

Chapter 1: Getting Started
After the hardware configuration has been verified select the I/O Mappings tab in the
Configuration Entries index. This option will display the assigned addresses for the configured
modules as seen below.
1–22
These X, Y, WX and WY addresses are automatically assigned by Do-more Designer. You
have the option to manually configure these addresses by selecting Manual in the Mapping
Mode section at the bottom of the window.
The Manual Mode Instructions section, also found at the bottom of the window, details the
various color indications associated with this mode.
Do-more H2 Series PLC Hardware User Manual, 1st Edition, Rev. I - H2-DM-M

Step 7: Create a Ladder Logic Program
To create a ladder logic program, you must first place the software in the Edit Mode. Click
the Edit Mode button found in the Project Toolbar or Ladder Palette Bar or use the shortcut
Ctrl+E.
When in Edit Mode, all of the Ladder Palette Bar’s options will become active and the cursor
in Ladder View will fill in blue. Now, you are ready to begin entering the example ladder logic
below.
Chapter 1: Getting Started
Rung #1
Place the box cursor in the NOP position on Rung #1.
If the Instruction Palette is not open, then
click Instructions from the Ladder Palette
Bar and select the TMR (Timer) or type
a “T” and select TMR from the drop down menu, then
press Enter. Once TMR is selected, a Timer dialog box
appears.
1. Set the Timer Struct to T1.
2. Enter 03 into the Preset
Constant Value for the
seconds (s) preset.
3. Click the checkmark in the
upper left corner to accept.
After clicking the checkmark,
Rung #1 should show the T1
timer (TMR) instruction with
a preset of 3.000 seconds. A user variable can be assigned
to the preset value if needed.
Do-more H2 Series PLC Hardware User Manual, 1st Edition, Rev. I - H2-DM-M
1–23

Chapter 1: Getting Started
Since a Timer is a structure it has predefined elements associated with it. Elements such as
.Acc (accumulated time), .Done (the completion bit) and .Timing (the timer is enabled and
timing). Therefore, if “T1.” is entered into any contact name the Auto-Complete feature of
Do-more Designer will display all applicable bit (boolean) selections available for that structure.
Selecting the T1.Done option as seen below, will assign this element to the contact and the
contact name will be T1.Done.
This feature works for all structures including: timers, counters, PID loops and strings. Many
system data types such as, $Main and $FirstScan, as well as user-created devices like ECOM,
CTRIO, or SERIO modules can also use this feature. See the Do-more Designer Help file for
more information on structures.
Now place the box cursor in the leftmost
column of Rung #1. Type in a meaningful
nickname, such as “T1_Start”, and press
Enter or select the Normally Open Contact
(F2) from the Ladder Palette Bar, enter
“T1_Start” for the name and click the
checkmark in the upper left corner. Either
method will open the Create Nickname
dialog seen here. Select the third option to
assign the nickname to a specified element,
type the desired memory bit for this
contact (C1) and select OK.
1–24
Rung #1 should now appear as follows:
Do-more H2 Series PLC Hardware User Manual, 1st Edition, Rev. I - H2-DM-M

Chapter 1: Getting Started
With the cursor in the position to the right of
contact T1_Start, you are going to begin
drawing a branch circuit. Under the Edit
drop down menu, select Wire, then select
Down. Notice the shortcuts that are available
for wire drawing. The wire that should now
appear in your ladder could have also been
drawn using the shortcut Ctrl+Down Arrow.
NOTE: There are also Delete Wire options
in the Edit drop down menu that are used
to erase any wires not needed.
Now place the cursor in the space to the left of the new line and select another normally open
contact.
Type in the nickname “T1_Manual”
and assign bit C2. Select OK to accept
and Rung #1 should now resemble the
rung seen on the following page.
Do-more H2 Series PLC Hardware User Manual, 1st Edition, Rev. I - H2-DM-M
1–25

Chapter 1: Getting Started
Rung #2
Place a normally open contact in the first position of Rung #2. This contact will be tied to the
Done bit of timer T1. Therefore, the name for this contact should be entered as “T1.Done”.
There should be no Create Nickname dialog as seen with the earlier normally open contacts.
1–26
Lastly, you will need to add an Out coil to the end of Rung #2. Place the cursor at the end of
the rung and either select Out from the Ladder Palette Bar or just type “OUT” and select the
Out instruction from the drop down menu. Next, choose which bit will be tied to this coil.
Tie this coil to the physical output Y1 by typing “Y1” and click the checkmark.
The ladder program should now look like the following. When either the T1_Start or T1_
Manual contact is energized, the timer will begin timing. When it times out, contact T1_Done
will energize and the output coil Y1 will turn on. Note that an END instruction is not required.
Do-more H2 Series PLC Hardware User Manual, 1st Edition, Rev. I - H2-DM-M

Chapter 1: Getting Started
The yellow bar in the margin signifies logic that has not been accepted. So once you have
verified your logic, click the Accept button in the Project Toolbar or the Ladder Palette Bar to
accept the changes.
You should now see blue and green bars,
shown below, signifying that the logic has
not been downloaded to the CPU or saved.
Now exit the Edit mode by once again clicking the Edit Mode button.
Do-more H2 Series PLC Hardware User Manual, 1st Edition, Rev. I - H2-DM-M
1–27

Chapter 1: Getting Started
Step 8: Save a Project
Save the project by selecting Save Project (Ctrl+S) from the File drop down menu. Or save
the file under a different name or in a different location by selecting the Save Project As...
option.
Step 9: Write Project to the Do-more PLC
Now that you have created the example ladder logic program, you can write the program to
the PLC. To do so, click the Write PLC button in the Project Toolbar.
1–28
If the Write PLC button is not active, then you must first connect to the PLC to activate the
online portion of the Project Toolbar (see the “Establish Communication” section of this
chapter). If you have altered the System Configuration, which includes the hardware
configuration, in any way, then the PLC must be taken out of the Run mode in order to
process the download.
Do-more H2 Series PLC Hardware User Manual, 1st Edition, Rev. I - H2-DM-M

The message seen here will appear asking you to
verify if this is a good time to do so. Since this is
the setup phase of this system, select Switch to
Program Mode and continue with the download.
If this system was previously commissioned
and in use, then you would need to verify that
the process it is controlling can be interrupted at this time
before continuing.
Download the project and once the download is finished,
assuming there are no errors, the Do-more PLC should
return to the Run mode. If at any time you
need to change the PLC mode, select the Mode
icon in the Project Toolbar, click the Mode
Status indication in the Status Bar or select
PLC > PLC Modes....
The PLC Modes window shown here will open displaying
the current mode the PLC is in with options to change it
to either Run or Program mode. Click OK to accept the
change or Cancel to exit.
Step 10: Testing Project Using Data View
With the project successfully downloaded into the Do-more PLC, you can now test
the function of the ladder program using the Data View tool. To start, you need
to open a new Data window in the software. To do so, click the Data icon in the
Project Toolbar, select Debug > Data View > New or press Ctrl+Shift+F3.
Chapter 1: Getting Started
The Data View window seen here will now open. This
window will open in the project browser section of the
programming window but it can be relocated anywhere
on the screen by clicking the title bar and dragging it to
a new location.
Now enter the elements that you wish to monitor. On
line one type “C1” under the Element column and press
Enter. You will see the C1 change to the variable name
associated with it or T1_Start. On line two type the
element “C2” and on line three type “Y1”.
With the ladder elements entered into the Data View window, you now need to activate their
status. To do so, click the All Status icon on the Project Toolbar or select Debug > All Status
On. The All Status On option will not only activate the status of the Data View window but
also the status of the ladder program as seen on the following page.
Do-more H2 Series PLC Hardware User Manual, 1st Edition, Rev. I - H2-DM-M
1–29

Chapter 1: Getting Started
The next step is to enable edits within the Data View window. To do so, click the yellow box
with the “E” found in the top left corner of the Data View window, as seen above. The Edits
column is now added to the Data View window.
The Edits column allows you to make changes to the current values of the elements listed.
T1_Start’s current value is OFF. Click the ON button under the Edits column and the Write
Current Edit and the Writes All Edits buttons will appear at the top of the window. These
buttons will write individual or all edits made in the Data View window to the PLC.
1–30
Click the Write Current Edit to PLC button and confirm it. This will write the new value to
T1_Start. Once T1_Start changes to an ON state, the timer (T1) will begin to time and
quickly reach the preset. As soon as the preset is reached, the done bit T1.Done, will turn
ON causing output Y1 to also turn ON as seen on the following page. Now write an OFF to
T1_Start and watch as the timer and Y1 reset.
Do-more H2 Series PLC Hardware User Manual, 1st Edition, Rev. I - H2-DM-M

Congratulations, you have now programmed, downloaded and tested a ladder logic program for
the Do-more PLC. Feel free to experiment with a program of your own and don’t forget that
the software Help file is an essential tool to use when programming your controller.
Accessing the Help File
The Do-more! Designer software Help file, seen below, is available as a quick reference or
detailed guide to the many features and capabilities of the Do-more PLC. To access the
Help File select the Help File icon from the Project Toolbar, choose Help from
the Help menu drop down or use the shortcut F1.
Chapter 1: Getting Started
Do-more H2 Series PLC Hardware User Manual, 1st Edition, Rev. I - H2-DM-M
1–31
 Loading...