

Page 1
DO917GDK
Handleiding
Mode d’emploi
Gebrauchsanleitung
Instruction booklet
Manual de instrucciones
Návod k použití
Návod na použitie
Drank koelkast met glasdeur voor commercieel gebruik
Réfrigérateur à boissons avec porte en verre pour un usage commercial
Getränkekühlschrank mit Glastür zur gewerblichen Nutzung
Drink refrigerator with glass door for commercial use
Frigoríco para bebidas con puerta de vidrio para uso comercial
Chladící vitrína s prosklenými dveřmi
Chladiaca vitrína s presklenými dverami
PRODUCT OF
Page 2
Lees aandachtig alle instructies - bewaar deze handleiding voor latere raadpleging.
Lisez attentivement les instructions - gardez le mode d’emploi pour utilisation ultérieur.
Lesen Sie genau die Anweisungen - bewahren Sie die Gebrauchsanleitung für spätere
heranziehung.
Read all instructions carefully - save this instruction manual for future reference.
Lea detenidamente todas las instrucciones - Conserve este manual para futura referencia.
Před použitím si důkladně přečtěte tento manuál - manuál si uschovejte i pro případ
budoucího nahlédnutí.
Pred použitím si dôkladne prečítajte tento manuál - manuál si uschovajte aj pre prípad
budúceho nahliadnutie.
NL Nederlands 3
FR Français 12
DE Deutsch 20
EN English 29
ES Espagnol 37
CZ Čeština 46
SK Slovenčina 54
Page 3

GARANTIE
Geachte klant,
Al onze producten ondergaan steeds een strenge kwaliteitscontrole,
alvorens ze aan je worden aangeboden. Mocht je desondanks toch nog
problemen hebben met jouw toestel, dan betreuren wij dit ten zeerste.
In dat geval verzoeken wij je contact op te nemen met onze klantendienst.
Onze medewerkers zullen je met plezier verder helpen.
+32 14 21 71 91 info@linea2000.be
Maandag – Donderdag : 8.30u – 12.00u en van 13.00u – 17.00u
Vrijdag : 8.30u – 12.00u en van 13.00u – 16.30u
Dit apparaat heeft een garantietermijn van 2 jaar vanaf de datum van aankoop. Gedurende
de garantieperiode zal de distributeur volledige verantwoording op zich nemen voor
gebreken die aanwijsbaar berusten op materiaal- of constructiefouten. Wanneer dergelijke
gebreken voorkomen, zal het apparaat, indien nodig, vervangen of gerepareerd worden. De
garantieperiode van 2 jaar zal op dit moment niet terug beginnen, maar loopt verder tot 2
jaar na de aankoop van het toestel. De garantie wordt verleend op basis van het kassaticket.
Indien je apparaat defect is binnen de garantietermijn van 2 jaar, dan mag je het toestel
samen met het originele kassaticket binnenbrengen in de winkel waar je het toestel hebt
aangekocht.
De garantie op accessoires en onderdelen die onderhevig zijn aan slijtage, bedraagt 6
maanden.
De garantie en verantwoordelijkheid/aansprakelijkheid van de leverancier en fabrikant
vervallen automatisch in de volgende gevallen:
· Bij het niet naleven van de instructies in deze handleiding.
· Bij verkeerde aansluiting, vb. te hoge elektrische spanning.
· Bij verkeerd, hardhandig of abnormaal gebruik.
· Bij onvoldoende of verkeerd onderhoud.
· Bij herstelling of wijziging van het toestel door de consument of niet gemachtigde derden.
· Bij gebruik van onderdelen of accessoires welke niet worden aanbevolen of geleverd door
de leverancier / fabrikant.
NL
www.domo-elektro.be
DO917GDK
3
Page 4

NL
VEILIGHEIDSVOORSCHRIFTEN
· Dit toestel mag gebruikt worden door kinderen vanaf 16 jaar en ouder, en door personen
met een fysieke of sensoriële beperking of mensen met een beperkte mentale capaciteit
of gebrek aan ervaring of kennis, op voorwaarde dat deze personen toezicht krijgen of
instructies hebben gekregen over het gebruik van het toestel op een veilige manier en dat
ze ook de gevaren kennen bij het gebruik van het toestel.
· Kinderen mogen niet met het toestel spelen.
· Onderhoud en reiniging van het toestel mogen niet gebeuren door kinderen, tenzij ze
ouder zijn dan 16 jaar en toezicht krijgen. Hou het toestel en het snoer buiten het bereik
van kinderen jonger dan 16 jaar.
· Dit toestel is geschikt om te gebruiken in de huishoudelijke omgeving en in gelijkaardige
omgevingen zoals:
· Keukenhoek voor personeel van winkels, kantoren en andere gelijkaardige
professionele omgevingen
· Boerderijen
· Hotel- en motelkamers en andere omgevingen met een residentieel karakter
· Gastenkamers, of gelijkaardige
· Opgelet: het toestel mag niet gebruikt worden met een externe timer of een aparte
afstandsbediening.
· Lees alle instructies voor gebruik.
· Kijk voor gebruik na of het voltage vermeld op het toestel overeenkomt met het voltage
van het elektriciteitsnet.
· Laat het snoer niet op een heet oppervlak of over de rand van een tafel of aanrecht
hangen.
· Gebruik het toestel nooit wanneer het snoer of de stekker beschadigd is, na een slechte
werking van het toestel of wanneer het toestel beschadigd is. Breng het toestel dan naar
het dichtsbijzijnde gekwaliceerde service center voor nazicht en reparatie.
· Streng toezicht is noodzakelijk wanneer het toestel door of in de buurt van kinderen
gebruikt wordt.
· Het gebruik van accessoires die niet aanbevolen of verkocht worden door de fabrikant, kan
brand, elektrische schokken of verwondingen veroorzaken.
· Trek de stekker uit het stopcontact wanneer het toestel niet in gebruik is, vooraleer
onderdelen te monteren of demonteren en vooraleer het toestel te reinigen. Trek de
stekker bij de stekker zelf uit het stopcontact. Trek nooit aan het snoer om de stekker uit
het stopcontact te trekken.
· Zet dit toestel nooit op of in de buurt van een gasvuur of elektrisch vuur of op een plaats
waar het in contact zou kunnen komen met een warm toestel.
· Gebruik het toestel niet buiten.
· Gebruik het toestel enkel voor het doel waarvoor het bestemd is.
· Gebruik het toestel altijd op een stevig, droog, een oppervlak.
4
DO917GDK
Page 5
· De fabrikant is niet verantwoordelijk voor ongelukken die een gevolg zijn van verkeerd
gebruik van het toestel, of het niet naleven van de regels zoals ze vermeld zijn in deze
handleiding.
· Alle herstellingen, buiten het gewone onderhoud van het toestel, moeten uitgevoerd
worden door de fabrikant of zijn dienst na verkoop. Probeer het toestel nooit zelf te
repareren.
· Dompel het toestel, het elektrisch snoer of de stekker nooit onder in water of een andere
vloeistof.
· Zorg ervoor dat kinderen het elektrisch snoer niet kunnen aanraken.
· Hou het snoer uit de buurt van scherpe randen en hete onderdelen of andere
warmtebronnen.
· Verwijder voor het eerste gebruik alle verpakkingsmaterialen en eventuele promotionele
stickers.
· Hou de ventilatie-openingen vrij, zorg ervoor dat ze niet versperd of belemmerd zijn.
· Gebruik geen andere elektrische toestellen in de koelkast, tenzij ze voor dit doel zijn
goedgekeurd door de fabrikant.
· Bewaar geen explosieve stoen in het toestel, zoals bijvoorbeeld spuitbussen met
brandbaar drijfgas.
· Zorg ervoor dat het koelcircuit niet beschadigd raakt, bv. tijdens transport of installatie.
· Zorg ervoor dat de stekker niet geplet wordt of beschadigd raakt door de achterkant van
het toestel. Dit kan oververhitting en bijgevolg brand veroorzaken.
· Zorg ervoor dat je toegang hebt tot de stekker van het toestel.
· Trek niet aan het snoer.
· Als het stopcontact los zit, steek de stekker dan niet in het stopcontact. (risico op
elektrische schok of brand)
· Dit toestel is zwaar. Wees voorzichtig tijdens het verplaatsen ervan.
· Vermijd lange blootstelling aan zonlicht.
NL
www.domo-elektro.be
DO917GDK
5
Page 6
NL
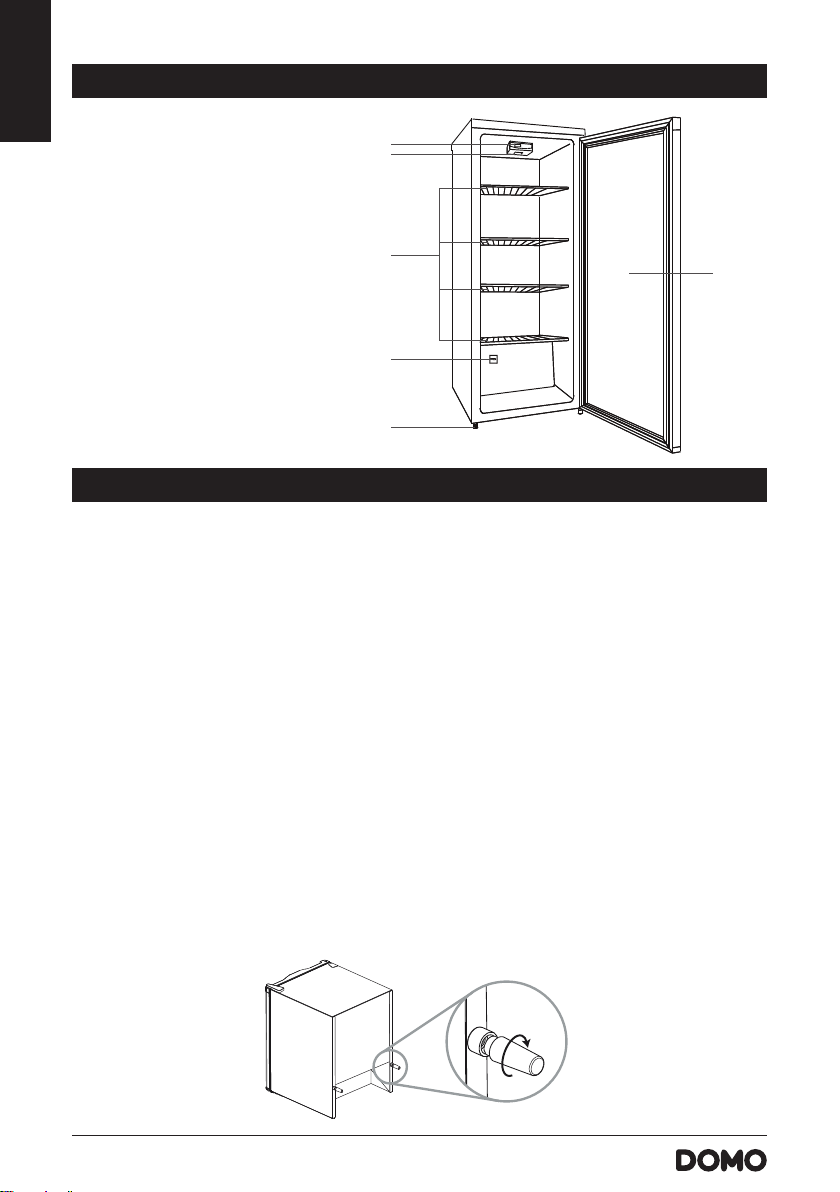
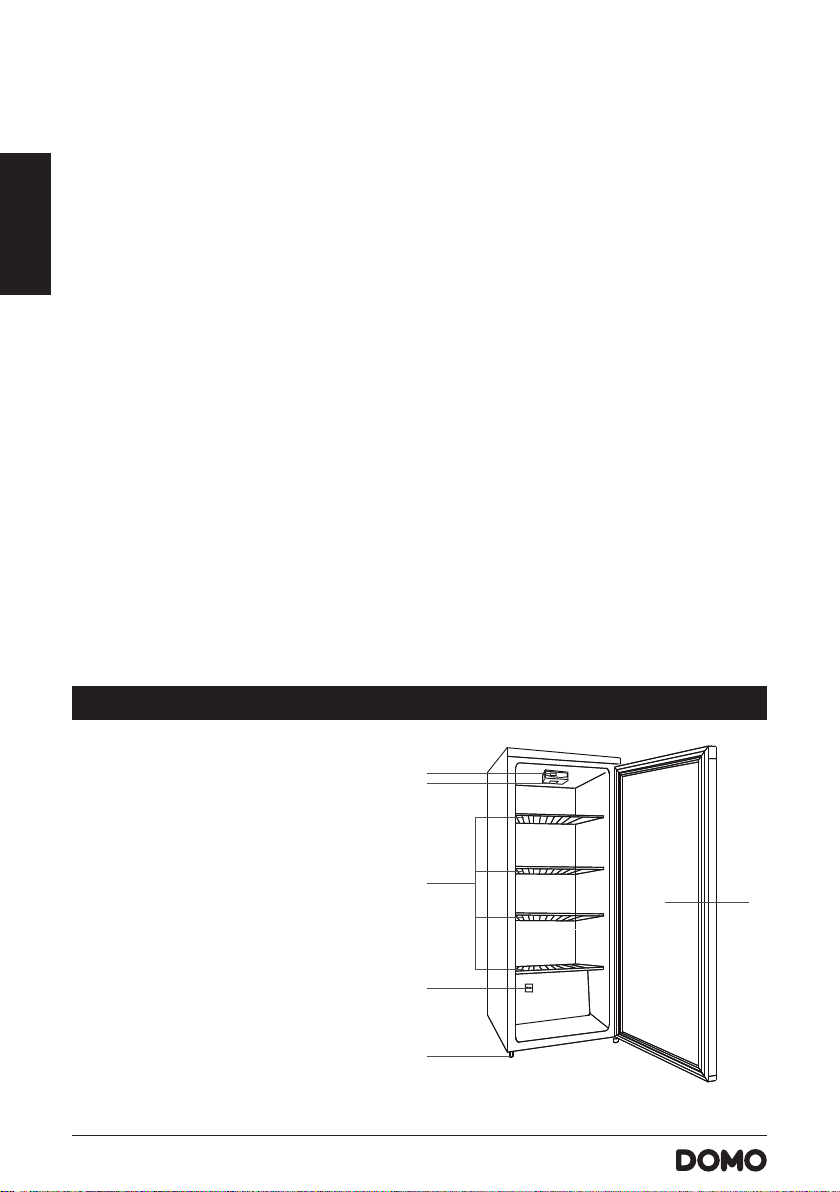
ONDERDELEN
1. Bedieningspaneel
2. Led-verlichting
3. Leggers
4. Temperatuursensor
5. Stelvoetjes
6. Glazen deur
1
2
3
4
5
6
INSTALLATIE
· Verwijder alle verpakkingsmateriaal, zowel binnenin als aan de buitenkant. Maak de
buitenkant van het toestel schoon met een droge doek. De binnenkant kan je reinigen met
een zachte, vochtige doek.
· Vermijd direct zonlicht en warmte. Zonlicht kan de buitenkant van de koelkast aantasten.
Warmte zal voor een hoger verbruik zorgen. De omgevingstemperatuur moet tussen 16°C
en 32°C zijn. De ideale omgevingstemperatuur is tussen 22°C en 25°C.
· Vermijd een te hoge vochtigheidsgraad.
· Controleer voordat je de koelkast op de netvoeding aansluit of de spanning op het
typeplaatje van het apparaat overeenstemt met de spanning bij je thuis. Een andere
spanning kan het apparaat beschadigen.
· De stekker is de enige manier om het apparaat van de voeding te ontkoppelen, zorg dat
deze altijd makkelijk bereikbaar is. Om de voeding naar het apparaat te ontkoppelen,
schakel het apparaat uit en haal vervolgens de stekker uit het stopcontact.
· Zorg ervoor dat de lucht vrij rond de koelkast kan circuleren. Boven de koelkast moet er
min. 10 cm ruimte vrij zijn, aan de zijkanten is dit min. 5 cm. De achterkant van de koelkast
moet minstens 13 cm verwijderd zijn van de muur. Om ervoor te zorgen dat je de koelkast
niet helemaal tegen de muur kan duwen, zijn er spacers voorzien. Schroef deze vast aan de
achterzijde van de koelkast.
6
DO917GDK
Page 7
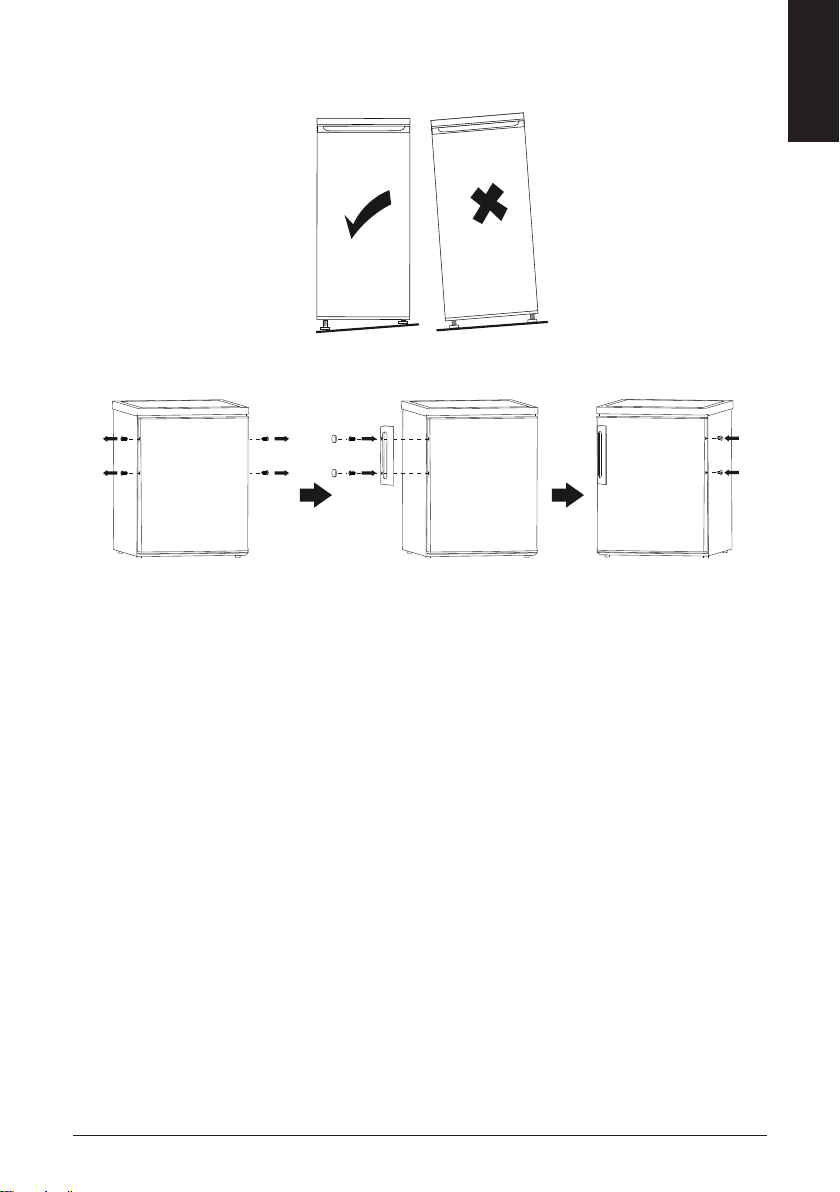
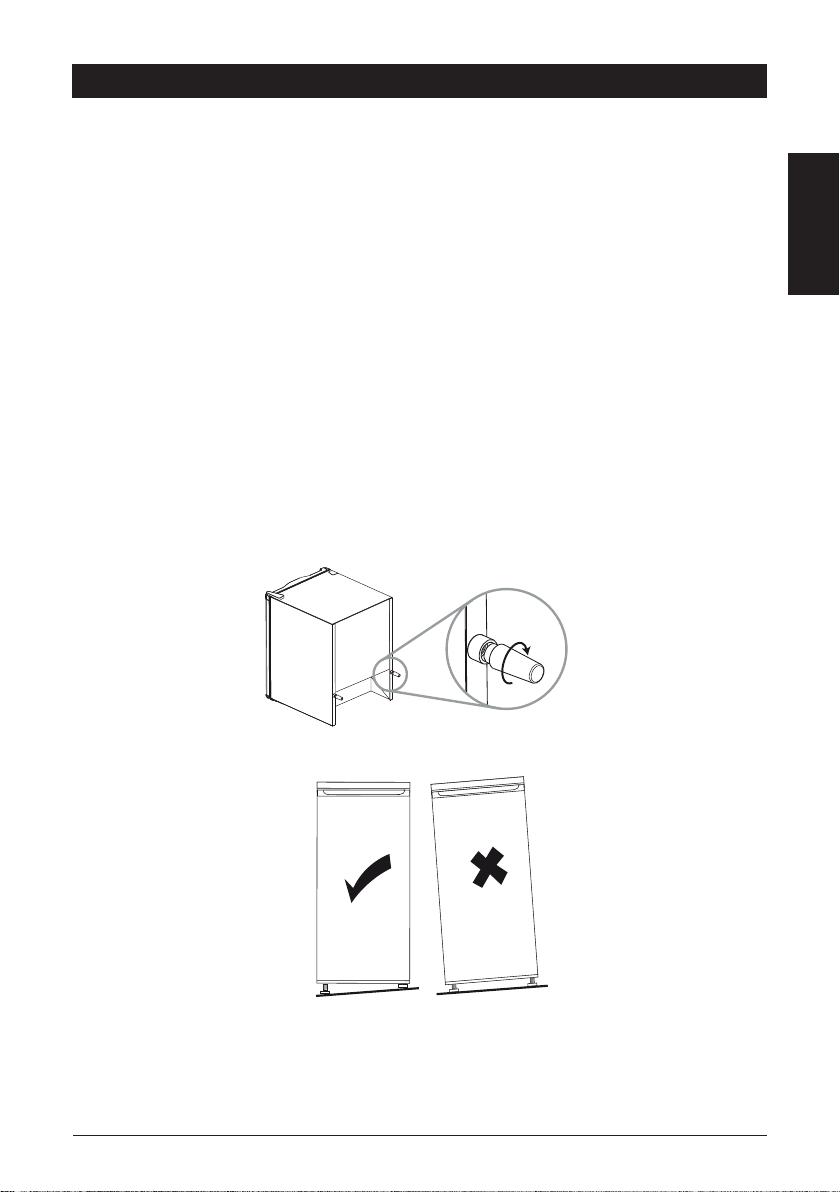
· Voor oneen oppervlakken kunnen de voorste stelvoetjes op één lijn worden gebracht.
· Installeer de handgreep.
· Laat het toestel 2 uur staan vooraleer het aan te zetten. Zo kan het koelmiddel zich zetten.
· Laat het apparaat gedurende 6 uur werken zonder levensmiddelen zodat de kast tot de
gepaste temperatuur aoelt.
NL
DRAAIRICHTING VAN DE DEUR WIJZIGEN
De koelkast heeft een omkeerbare deur. Als je de scharnieren van de deur naar de andere kant
wil brengen, is het aanbevolen om contact op te nemen met een erkende reparateur om hem
het werk te laten uitvoeren. Voordat je de draairichting wijzigt, controleer of de stekker uit het
stopcontact is gehaald en dat het apparaat leeg is.
www.domo-elektro.be
DO917GDK
7
Page 8
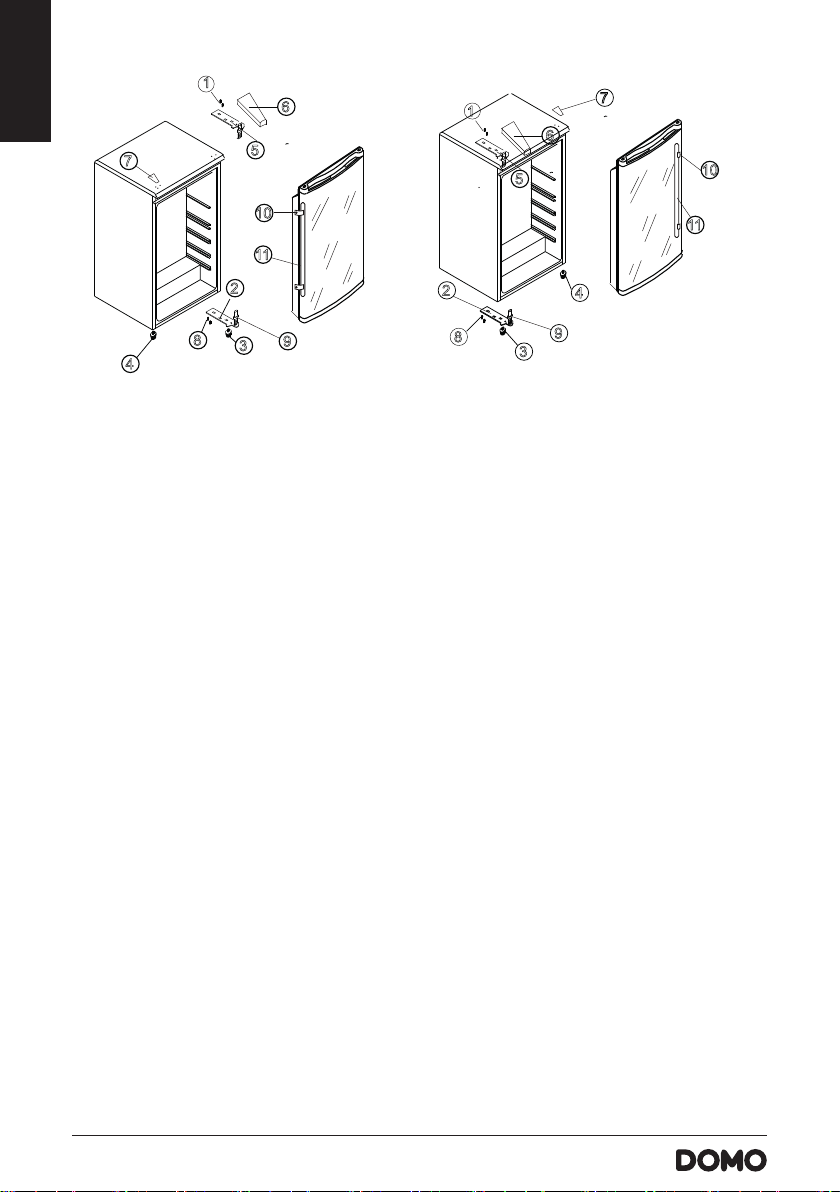
Reversing the Door Swing of Your Beverage Cooler
Before Reversing the door ,the power must be shut off.
All parts removed must be saved to do the reinstallation of the door.
NOTE:
This beverage cooler has the capability of either opening the door from the
left or right side. The unit is delivered to you with the door opening from the
left side. Should you desire to reverse the opening direction, please follow
these instructions.
This beverage cooler has been built with the door hinges on the left. If you wish
to change the opening direction, follow the instructions below:
2. Remove the two screws (1) that hold the upper hinge (5) (right side) to the
frame. Take away the upper hinge (5).
3. Lift the door and place it on a padded surface to prevent scratching it.
5. Remove the two screws(8) that hold the lower hinge(2) and Make sure to
Remove the lower hinge(2).
6. Remove the left front leg (4) and transfer it to the right side.
7. Remove the hole cover plate(7) to the right side.
8.
Before placing this lower hinge(2), remove the bolt-pin (9) and reverse
the direction of the lower hinge(2). Then install the lower hinge (2) onto
the left side of the lower frame with two screws (8).
10. Set the door to its place making sure the door seat at the lower hinge(2)
.
11. While holding the door in the closed position secure the upper hinge (5) in the
top frame of left side with two screws (1). Please remember that do not tighten
the two screws(1) until the top of the door is levelled with the counter top.
1. Remove the upper hinge cover(6) first
12. Install the upper hinge cover(6) on the upper hinge..
9. Insert the bolt-pin(9) to the lower hinge (2).
4. Remove the two screws (10) that hold the handle (11) (on the right side frame).
Change the handle to the left side frame.
NL
7
4
1
6
5
10
11
2
8
9
3
1
6
5
2
8
4
9
3
1. Verwijder het afdekplaatje (6) van de scharnieren.
2. Verwijder de twee schroeven (1) van het bovenste scharnier (5). Verwijder het scharnier.
3. Til de deur op en plaats deze op een zacht oppervlak om krassen te vermijden.
4. Verwijder de schroeven (10) van het handvat (11). Verplaats het handvat naar de andere
zijde.
5. Verwijder de schroeven (8) en het scharnier (2) aan de onderzijde van de deur.
6. Verwijder het stelvoetje (4) en verplaats het naar de andere zijde.
7. Verplaats het afdekplaatje van de boorgaten (7) bovenop de koelkast naar de andere
zijde.
8. Voor je het onderste scharnier (2) terugplaatst, verwijder de scharnierpin (9) en keer
de richting van het scharnier om. Plaats het scharnier (2) terug aan de andere zijde en
schroef het vast met de twee schroeven (8).
9. Plaats de scharnierpin (9) in het scharnier (2).
10. Plaats de deur op het onderste scharnier (2).
11. Houd de deur vast in gesloten positie en schroef het bovenste scharnier (5) vast met
de twee schroeven (1). Met de deur gesloten, controleer of de deur zowel horizontaal
als verticaal is uitgelijnd en de afdichtingen op alle zijden gesloten zijn voordat je het
bovenste scharnier (5) volledig vastmaakt.
12. Plaats het afdekplaatje (6) terug. Indien nodig, stel de stelvoetjes af.
7
10
11
JOUW APPARAAT VERPLAATSEN
· Als het apparaat voor welke reden dan ook wordt uitgeschakeld, wacht 10 minuten voordat
je het opnieuw inschakelt. De druk in het koelsysteem dient eerst te worden gestabiliseerd.
· Schakel het apparaat uit en haal de stekker uit het stopcontact. Verwijder alle
levensmiddelen. Verwijder tevens alle mobiele onderdelen (leggers, accessoires, etc.) of
maak ze vast in de koelkast om schokken te vermijden.
8
DO917GDK
Page 9
Do not store food in beverage cooler, as interior temperature may not get cool
enough to prevent spoilage. As a natural result of condensation, in summer
months or area of high humidity, the glass door may built up moisture on the
outside. Just wipe it away.
IMPORTANT SAFEGUARDS
It is recommended you install the beverage cooler in a place where the ambient
temperature is between 22-25 degree Celsius .If the ambient temperature
in above or below the recommended temperature, conditions may cause the
interior temperature to fluctuate.
OPERATING YOUR BEVERAGE COOLER
If the interior light is left on, the temperature inside the beverage cooler will be higher.
The above temperatures may fluctuate depending on whether or not the interior
bulb is on or off or whether the bottles are located on the lower/middle or lower
section.
Recommended Temperatures for chilling beverage
Sparkling wines 7- C
Cold beverage -6 C
· Verplaats het apparaat en installeer. Als het apparaat tijdens het verplaatsen op zijn zijde
werd gehouden, zelfs al was dit zeer kort, laat het apparaat minstens 10 minuten in de
rechtopstaande positie staan voordat je het apparaat inschakelt.
· De koelkast gebruikt isobutaan (R600a) als koelmiddel. Niettegenstaande dat R600a een
milieuvriendelijk en natuurlijk gas is, is het explosief. Wees dus zeer voorzichtig tijdens
het verplaatsen of installeren van jouw apparaat om schade aan de koelelementen te
vermijden. In geval van een lek dat werd veroorzaakt door schade aan de koelelementen,
haal jouw koelkast weg van open vlammen of warmtebronnen en verlucht de kamer waar
het apparaat zich in bevindt enkele minuten.
GEBRUIK
· De koelkast is enkel geschikt voor drank en absoluut niet voor voeding.
· Als je het toestel voor de eerste keer gebruikt, of hergebruikt na lang stilstaan, kan
er een afwijking zijn tussen de getoonde temperatuur op het display en de werkelijke
temperatuur. Na enkele uren zal dit vanzelf verholpen zijn.
· Er zit een klein temperatuurverschil tussen de boven- en onderkant van de koelkast.
Doordat warme lucht stijgt, zijn de bovenste leggers iets warmer dan de leggers onderaan
in de koelkast.
LEGGERS
Je kan de leggers verzetten naar de hoogte van je essen. Je kan de leggers hoger of lager
plaatsen door deze uit de koelkast te schuiven.
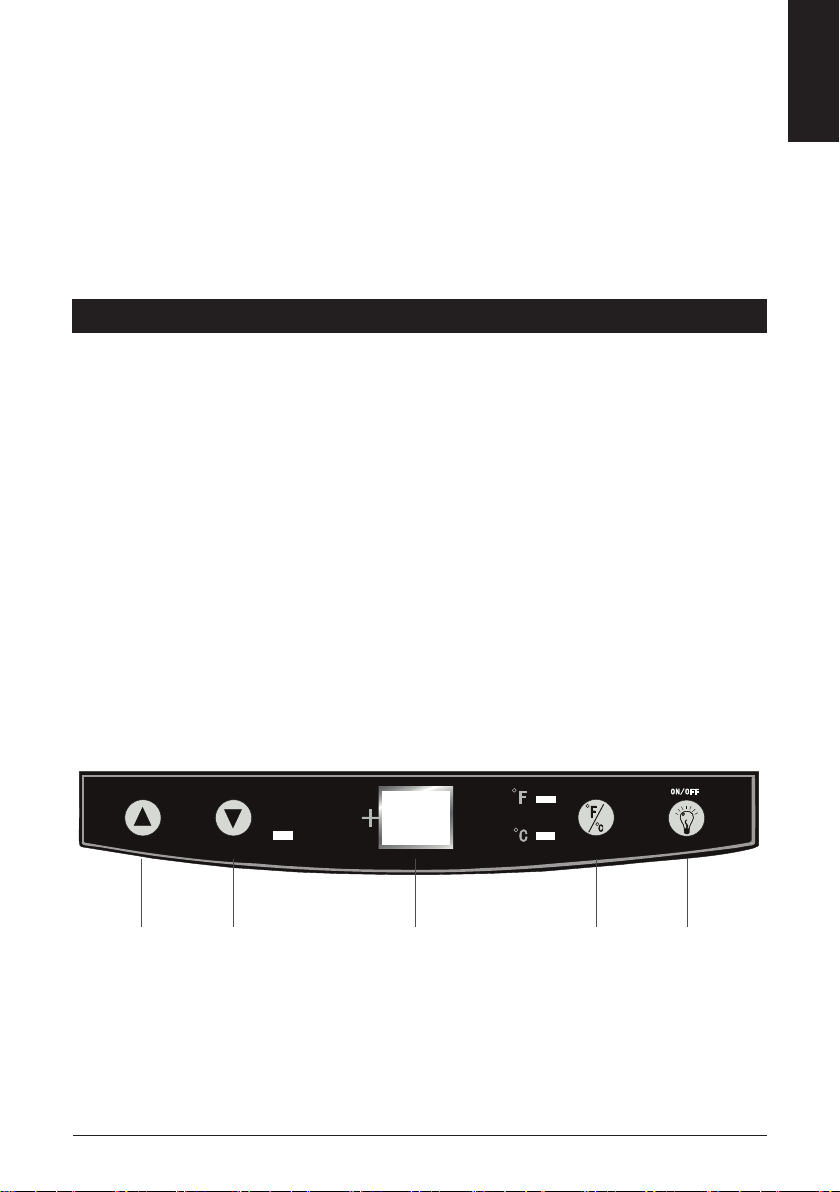
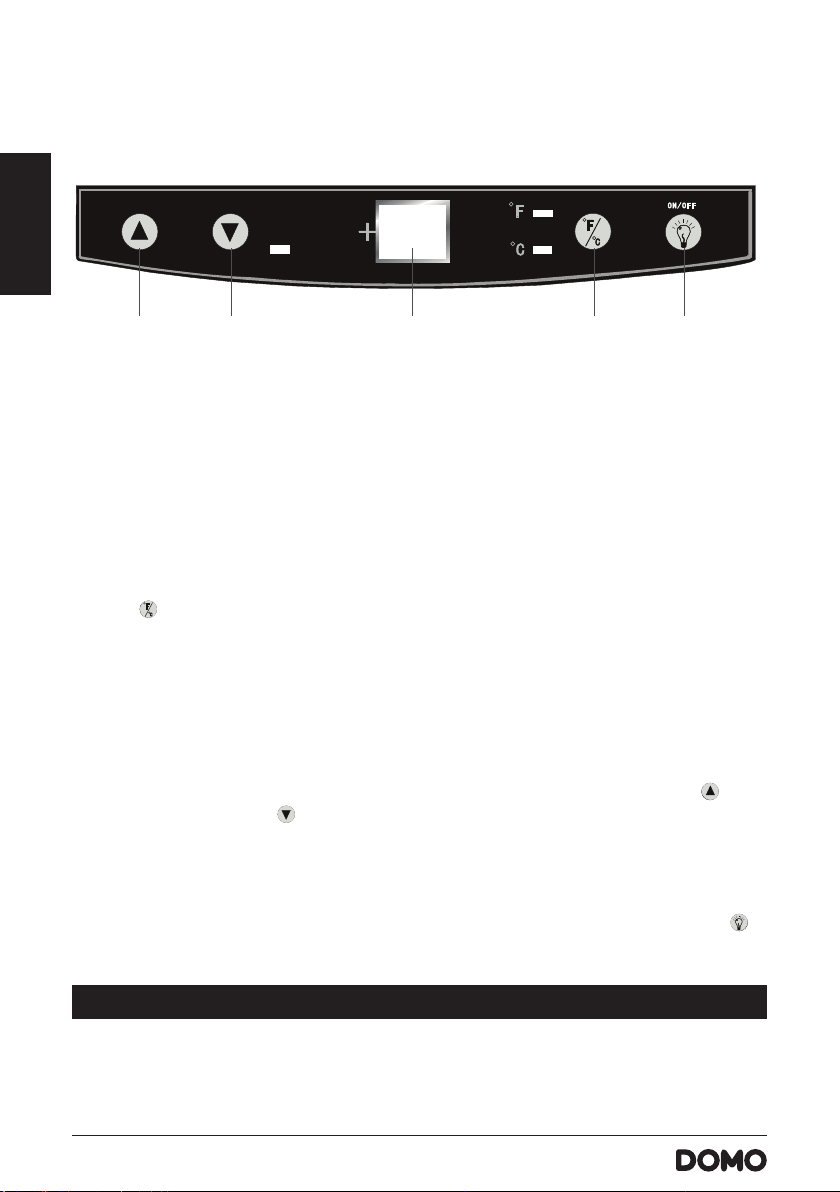
BEDIENINGSPANEEL
NL
BEVERAGE
1 2 3 4 5
1. Temperatuur verhogen
2. Temperatuur verlagen
3. Display
4. Fahrenheit/Celsius aanduiding
5. Aan/uit verlichting
www.domo-elektro.be
DO917GDK
9
Page 10
Aanduiding Fahrenheit/Celsius instellen
NL
De standaard fabrieksinstelling staat op 45°F en is te lezen op het display. Je kan de
aanduiding veranderen naar Celsius met de knop ‘Fahrenheit/Celsius aanduiding’
Naast de knop zijn 2 indicatielampjes te zien. Dat van Fahrenheit zal rood branden als je voor
de Fahrenheit-aanduiding kiest. Op het display staat een F achter de temperatuur. Als je kiest
voor de Celsius-aanduiding zal het indicatielampje Celsius geel kleuren. Op het display staat
een C achter de temperatuur.
Temperatuur instellen
Met de knoppen ‘temperatuur verhogen’
temperatuur instellen. Per druk op de knop zal de temperatuur 1° veranderen.
Verlichting
Je kan de verlichting aan- en uitzetten met de knop ‘aan/uit verlichting’
Opgelet: de temperatuur in de koelkast kan beïnvloed worden door de verlichting te laten
branden.
en ‘temperatuur verlagen’
kan je de
.
REINIGING EN ONDERHOUD
· Trek de stekker uit het stopcontact.
· Haal alles uit de koelkast en berg de drank op in een koele ruimte.
· Gebruik geen agressieve schoonmaakmiddelen of oplosmiddelen.
· Maak het apparaat schoon met een zachte doek, warm water en een mild
schoonmaakmiddel.
· Reinig de dichting alleen met schoon water en veeg vervolgens grondig af.
VAKANTIE
Wanneer je voor een korte periode op vakantie gaat, kan je het toestel ingeschakeld laten.
Wanneer je voor een langere periode op vakantie gaat, doe je best het volgende :
· Haal alle essen uit de koelkast.
· Verwijder de stekker uit het stopcontact.
· Reinig de koelkast grondig.
· Laat de deur van de koelkast open om schimmelvorming en slechte geuren te vermijden.
STROOMPANNE
De meeste stroompannes worden hersteld in 1 of 2 uur en zullen de temperatuur van
de koelkast niet veranderen. Je moet het openen van de koelkastdeur tot een minimum
beperken tijdens een stroompanne.
Tijdens een langere stroompanne moet je maatregelen nemen om de drank koel te houden.
10
DO917GDK
Page 11
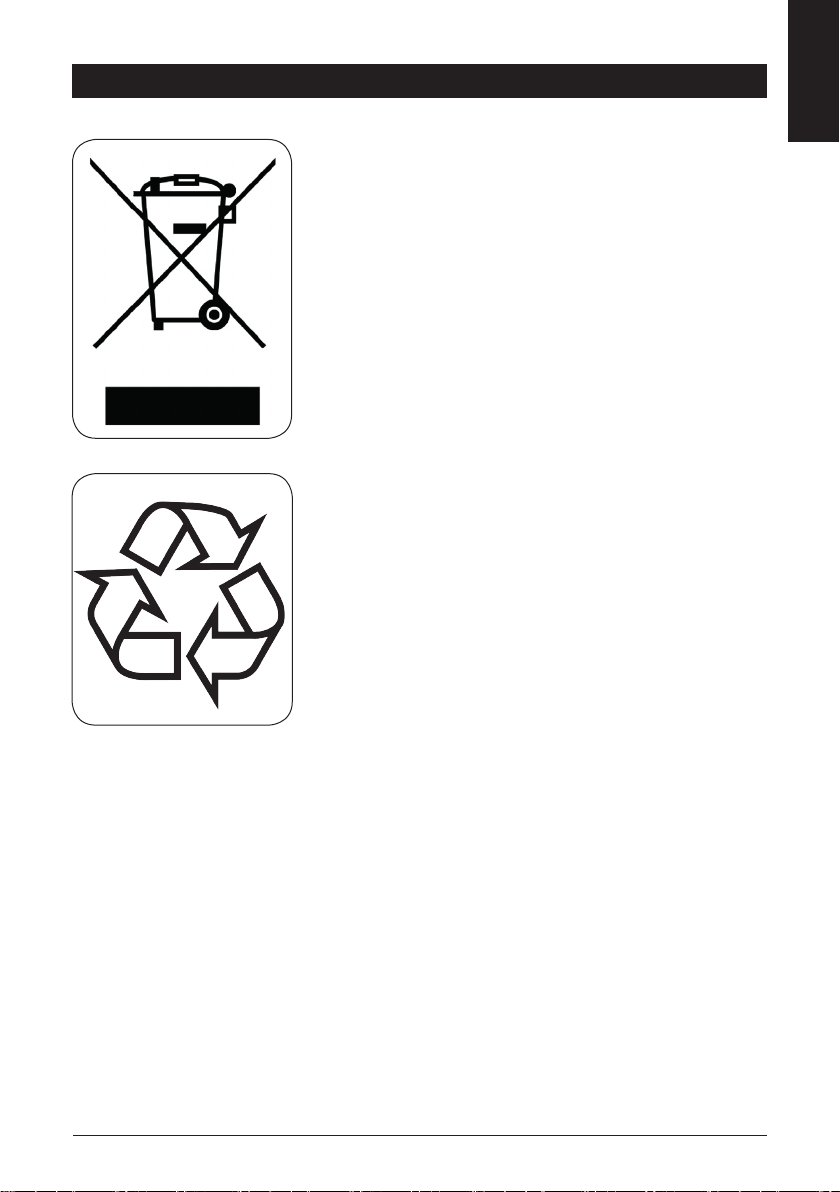
MILIEURICHTLIJNEN
NL
Dit symbool op het product of op de verpakking wijst erop dat
dit product niet als huishoudafval mag worden behandeld.
Het moet naar een plaats worden gebracht waar elektrische
en elektronische apparatuur wordt gerecycleerd. Als je ervoor
zorgt dat dit product op de correcte manier wordt verwijderd,
voorkom je mogelijk voor mens en milieu negatieve gevolgen
die zich zouden kunnen voordoen in geval van verkeerde
afvalbehandeling. Voor meer details in verband met het
recycleren van dit product, neem je best contact op met de
gemeentelijke instanties, het bedrijf of de dienst belast met
de verwijdering van huishoudafval of de winkel waar je het
product hebt gekocht.
Het verpakkingsmateriaal is recycleerbaar. Behandel de
verpakking milieubewust.
www.domo-elektro.be
DO917GDK
11
Page 12
GARANTIE
Cher client,
Tous nos produits sont soumis à des contrôles qualité stricts avant
d’être proposés à la vente. Si vous deviez toutefois rencontrer
FR
Dans ce cas, nous vous invitons à prendre contact avec notre service à la clientèle.
Cet appareil est garanti 2 ans à compter de la date d’achat. Durant la période de garantie, le
distributeur assumera l’entière responsabilité en cas de défauts de fonctionnement (matériel)
ou de fabrication. Si un tel problème survient, l’appareil sera remplacé ou réparé. La période
de garantie de 2 ans ne reprend pas à zéro, mais se poursuit (jusqu’à 2 ans à compter de la
date d’achat de l’appareil). La garantie est accordée sur la base du ticket de caisse.
Pour les accessoires et les éléments d’usure, une garantie de 6 mois s’applique.
La garantie et la responsabilité du fournisseur et du fabricant n’ont plus eet dans les cas
suivants :
· Les instructions du manuel n’ont pas été suivies.
· Mauvais raccordement, par ex. tension électrique trop forte.
· Utilisation contraire, brutale ou anormale.
· Entretien insusant ou non conforme.
· Réparation ou modication de l’appareil par le consommateur ou un tiers non autorisé.
· Utilisation d’éléments ou d’accessoires qui ne sont pas recommandés ou fournis par le
fournisseur/fabricant.
un problème avec votre appareil, nous le déplorons vivement.
Nos collaboratrices se feront un plaisir de vous aider !
+32 14 21 71 91 info@linea2000.be
Du lundi au jeudi : 8 h 30 – 12 h et 13 h – 17 h
Vendredi : 8 h 30 – 12 h et 13 h – 16 h 30
12
DO917GDK
Page 13

CONSIGNES DE SÉCURITÉ
· Cet appareil peut être utilisé par des enfants âgés d’au moins 16 ans et par des personnes
ayant des capacités physiques, sensorielles ou mentales réduites ou dénuées d’expérience
ou de connaissance, s’ils (si elles) sont correctement surveillé(e)s ou si des instructions
relatives à l’utilisation de l’appareil en toute sécurité leur ont été données et si les risques
encourus ont été appréhendés.
· Veillez à ce que les enfants ne puissent pas jouer avec l’appareil. L’entretien et le nettoyage
de l’appareil ne peuvent pas s’eectuer par des enfants, à moins qu’ils aient plus de 16 ans
et qu’ils soient sous surveillance. Gardez l’appareil et le cordon hors de la portée d’enfants
de moins de 16 ans.
· Cet appareil est destiné à un usage domestique ou à d’autres usages comme:
· Dans la cuisine du personnel dans des magasins, des bureaux ou d’autres lieux mis en
rapport avec l’environnement de travail.
· Dans les fermes.
· Dans les chambres d’hôtels, de motels et d’autres lieux avec un caractère résidentiel.
· Dans les chambres d’hôtes ou similaires.
· Attention: l’appareil ne peut pas être utilisé avec une minuterie externe ou une commande
à distance séparée.
· Veuillez lire toutes les instructions avant d’utiliser l’appareil.
· Vériez avant usage si la tension indiquée sur l’appareil correspond à la tension du réseau
électrique de votre domicile.
· Ne laissez pas le cordon pendre sur une surface chaude ou sur le rebord d’une table.
· N’utilisez jamais l’appareil lorsque le cordon ou la che sont endommagés, après un
mauvais fonctionnement de l’appareil ou lorsque l’appareil est endommagé. Amenez alors
l’appareil au centre de services le plus proche pour contrôle et réparation.
· Soyez très attentif lorsque l’appareil est utilisé par des enfants ou à proximité d’enfants.
· L’utilisation d’accessoires non préconisés par le fabricant peut provoquer un incendie, une
électrocution ou des blessures.
· Retirez la che de la prise lorsque l’appareil n’est pas utilisé, avant d’installer ou d’enlever
des pièces et avant de nettoyer l’appareil. Retirez la che de la prise. Ne tirez jamais sur le
câble pour retirer la che de la prise.
· Ne placez jamais cet appareil sur ou à proximité d’un feu au gaz ou d’un feu électrique où il
pourrait entrer en contact avec un appareil chaud.
· N’utilisez pas l’appareil à l’extérieur.
· Utilisez l’appareil uniquement dans le but auquel il est destiné.
· Utilisez toujours l’appareil sur une surface solide, sèche et plane.
· Le fabricant décline toute responsabilité pour des accidents qui découleraient d’un mauvais
usage de l’appareil ou du non-respect des instructions fournies dans ce manuel.
· Toutes les réparations, en dehors de l’entretien ordinaire de l’appareil, doivent être
réalisées par le fabricant ou son service après-vente.
www.domo-elektro.be
DO917GDK
FR
13
Page 14
· N’immergez jamais le cordon électrique, la che ou l’appareil lui-même dans l’eau ou tout
autre milieu liquide.
· Veillez à ce que les enfants ne puissent pas toucher à l’appareil ou au cordon électrique.
· Tenez le cordon éloigné de rebords tranchants et de pièces brûlantes ou d’autres sources
de chaleur.
· Avant la première utilisation, enlevez tous les éléments d’emballage et les éventuels
FR
autocollants promotionnels.
· Gardez les orices de ventilation dégagés, veillez à ce qu’ils ne soient ni encombrés ni
entravés.
· N’utilisez aucun autre appareil électrique dans le réfrigérateur, sauf s’il est agréé à cette n
par le fabricant.
· Ne conservez jamais de matière explosive dans l’appareil, comme p.ex. des aérosols à gaz
propulseur inammable.
· Veillez à ne pas endommager le circuit de refroidissement, p.ex. lors du transport ou de
l’installation.
· Veillez à ce que le cordon d’alimentation ne soit ni écrasé ni endommagé par l’arrière de
l’appareil. Ceci pourrait provoquer une surchaue et par conséquent un incendie.
· Veillez à avoir accès à la che de l’appareil.
· Ne tirez pas sur le cordon.
· Si la prise électrique n’est pas bien xée, ne branchez pas l’appareil (risque de choc
électrique ou d’incendie).
· Cet appareil est lourd. Soyez prudent en le déplaçant.
· Évitez une exposition prolongée à la lumière solaire.
PARTIES
1. Panneau de commande
2. Éclairage LED
3. Clayettes
4. Sonde de température
5. Pieds de mise à niveau
6. Porte en verre
14
DO917GDK
1
2
3
4
5
6
Page 15
INSTALLATION
· Ôtez tout le matériel d’emballage, tant à l’intérieur qu’à l’extérieur. Nettoyez l’extérieur de
l’appareil à l’aide d’un chion sec. Vous pouvez nettoyer l’intérieur de l’appareil à l’aide d’un
chion doux et humide.
· Évitez la lumière directe du soleil et la chaleur. La lumière du soleil risque de dégrader
l’extérieur du réfrigérateur. La chaleur augmentera la consommation d’énergie. La
température ambiante doit être comprise entre 16 et 32 °C. La température ambiante
idéale se situe entre 22 et 25 °C.
· Évitez la lumière directe du soleil et la chaleur. La lumière du soleil risque de dégrader
l’extérieur du réfrigérateur. La chaleur augmentera la consommation d’énergie.
· Évitez un taux d’humidité trop élevé.
· Avant de brancher le réfrigérateur pour la première fois, vériez que la tension du
courant fourni par le réseau électrique de votre habitation correspond à la tension de
fonctionnement du réfrigérateur indiquée sur la plaque signalétique de l’appareil. Une
tension diérente pourrait endommager l’appareil.
· Veillez à assurer une libre circulation de l’air autour du réfrigérateur. Un espace libre d’au
moins 10 cm doit être laissé au-dessus du réfrigérateur. Sur les côtés, cet espace doit être
d’au moins 5 cm. L’arrière du réfrigérateur doit être placé à au moins 13 cm du mur. Des
entretoises sont fournies pour que le réfrigérateur ne puisse pas être poussé contre le mur.
Vissez l’entretoise à l’arrière du réfrigérateur.
FR
· Si l’appareil est installé sur une surface irrégulière, il pourra être ajusté au moyen des pieds
réglables.
www.domo-elektro.be
DO917GDK
15
Page 16

· Installez la poignée.
Reversing the Door Swing of Your Beverage Cooler
Before Reversing the door ,the power must be shut off.
All parts removed must be saved to do the reinstallation of the door.
NOTE:
This beverage cooler has the capability of either opening the door from the
left or right side. The unit is delivered to you with the door opening from the
left side. Should you desire to reverse the opening direction, please follow
these instructions.
This beverage cooler has been built with the door hinges on the left. If you wish
to change the opening direction, follow the instructions below:
2. Remove the two screws (1) that hold the upper hinge (5) (right side) to the
frame. Take away the upper hinge (5).
3. Lift the door and place it on a padded surface to prevent scratching it.
5. Remove the two screws(8) that hold the lower hinge(2) and Make sure to
Remove the lower hinge(2).
6. Remove the left front leg (4) and transfer it to the right side.
7. Remove the hole cover plate(7) to the right side.
8.
Before placing this lower hinge(2), remove the bolt-pin (9) and reverse
the direction of the lower hinge(2). Then install the lower hinge (2) onto
the left side of the lower frame with two screws (8).
10. Set the door to its place making sure the door seat at the lower hinge(2)
.
11. While holding the door in the closed position secure the upper hinge (5) in the
top frame of left side with two screws (1). Please remember that do not tighten
the two screws(1) until the top of the door is levelled with the counter top.
1. Remove the upper hinge cover(6) first
12. Install the upper hinge cover(6) on the upper hinge..
9. Insert the bolt-pin(9) to the lower hinge (2).
4. Remove the two screws (10) that hold the handle (11) (on the right side frame).
Change the handle to the left side frame.
4
FR
· Après installation, laissez l’appareil reposer pendant 2 heures avant de le mettre sous
tension. Le gaz réfrigérant pourra ainsi se stabiliser.
· Après installation, laissez l’appareil reposer pendant 6 heures avant de le mettre sous
tension. Le gaz réfrigérant pourra ainsi se stabiliser.
CHANGEMENT DU SENS D’OUVERTURE DE LA PORTE
La porte du réfrigérateur est réversible. Si vous avez besoin de monter la porte du
réfrigérateur dans l’autre sens, il est recommandé d’appeler votre agent d’entretien agréé
pour eectuer cette inversion, ou de demander à un technicien.
Avant d’inverser le sens d’ouverture de la porte, vous devez vous assurer que l’appareil est
débranché et vide.
7
1
6
5
10
11
2
8
9
3
1
5
2
8
3
7
6
4
9
1. Enlevez la cache de protection (6) des charnières.
2. Retirez les deux vis (1) de la charnière supérieure (5). Retirez la charnière.
3. Soulevez la porte et posez-la sur une surface lisse, an d’éviter de la grier.
4. Retirez les vis (10) de la poignée (11). Déplacez la poignée de l’autre côté.
5. Retirez les vis (8) et la charnière (2) au bas de la porte.
6. Retirez le pied de mise à niveau (4) et placez-le de l’autre côté.
7. Placez de l’autre côté le cache de protection des trous de perçage (7) situé sur le dessus
du réfrigérateur.
10
11
16
DO917GDK
Page 17

8. Avant de replacer la charnière inférieure (2), enlevez la goupille de charnière (9) et
inversez le sens de la charnière. Replacez la charnière (2) de l’autre côté, et resserrez les
deux vis (8).
9. Placez la goupille de charnière (9) dans la charnière (2).
10. Placez la porte sur la charnière inférieure (2).
11. Maintenez la porte en position fermée et vissez la charnière supérieure (5) avec les deux
vis (1). Avant de revisser dénitivement la charnière supérieure (5), vériez que la porte
est bien ajustée lorsqu’elle est fermée, tant horizontalement que verticalement, et que
les joints d’étanchéité se referment sur tous les côtés,.
12. Replacez le cache de protection (6). Si nécessaire, ajustez les pieds réglables.
DÉPLACEMENT DE VOTRE RÉFRIGÉRATEUR
· Si l’appareil est éteint pour une raison quelconque, attendez 10 minutes avant de le
remettre en marche. Cela permettra à la pression du système de réfrigération de s’égaliser.
· Éteignez l’appareil et débranchez le câble d’alimentation de la prise secteur Enlevez tous
les aliments. Enlevez également toutes les pièces mobiles (clayettes, accessoires, etc.) ou
attachez-les dans le réfrigérateur an d’éviter tout risque de choc.
· Déplacez l’appareil jusqu’à son nouvel emplacement. Si l’appareil a été placé sur un des ses
côtés durant un certain temps, remettez-le en position verticale et attendez au moins 10
minutes avant de le mettre en marche.
· Votre réfrigérateur utilise de l’isobutane (R600a) comme réfrigérant. Bien que le R600a
soit un gaz écologique et naturel, il est explosif. Vous devez donc faire attention pendant
le transport et l’installation pour éviter que les éléments de réfrigération de l’appareil ne
soient endommagés. En cas de fuite due à la détérioration des éléments de réfrigération,
éloignez votre réfrigérateur des ammes nues et des sources de chaleur, et ventilez la
pièce où il se trouve durant quelques minutes.
FR
UTILISATION
· Le réfrigérateur convient uniquement pour des boissons et en aucun cas pour des aliments.
· Si vous utilisez l’appareil pour la première fois ou le remettez en service après une
pause prolongée, il peut y avoir un écart entre la température achée sur l’écran et la
température réelle. Cet écart se résorbera après quelques heures.
· La température dière légèrement entre le haut et le bas du réfrigérateur. Étant donné
que l’air chaud monte, la température au niveau des clayettes du haut est légèrement plus
élevée que dans le bas du réfrigérateur.
CLAYETTES
Vous pouvez déplacer les clayettes en fonction de la hauteur de vos bouteilles. Vous pouvez
www.domo-elektro.be
DO917GDK
17
Page 18
Do not store food in beverage cooler, as interior temperature may not get cool
enough to prevent spoilage. As a natural result of condensation, in summer
months or area of high humidity, the glass door may built up moisture on the
outside. Just wipe it away.
IMPORTANT SAFEGUARDS
It is recommended you install the beverage cooler in a place where the ambient
temperature is between 22-25 degree Celsius .If the ambient temperature
in above or below the recommended temperature, conditions may cause the
interior temperature to fluctuate.
OPERATING YOUR BEVERAGE COOLER
If the interior light is left on, the temperature inside the beverage cooler will be higher.
The above temperatures may fluctuate depending on whether or not the interior
bulb is on or off or whether the bottles are located on the lower/middle or lower
section.
Recommended Temperatures for chilling beverage
Sparkling wines 7- C
Cold beverage -6 C
monter ou descendre les clayettes en les faisant glisser hors du réfrigérateur.
PANNEAU DE COMMANDE
FR
BEVERAGE
1 2 3 4 5
1. Augmenter la température
2. Diminuer la température
3. Écran
4. Indication en degrés Fahrenheit / Celsius
5. Témoin marche/arrêt
Réglage de l’unité de température Fahrenheit/Celsius
Le réfrigérateur est réglé par défaut à 45 °F et la température réglée est indiquée à l’écran.
Vous pouvez modier l’achage en degrés Celsius avec le bouton « indication en Fahrenheit /
Celsius »
Deux témoins lumineux se trouvent près du bouton. Si vous choisissez l’indication en
degrés Fahrenheit, le témoin Fahrenheit s’allumera en rouge . L’écran achera un F après
la température. Si vous choisissez l’indication en degrés Celsius, le témoin lumineux Celsius
s’allumera en jaune. L’écran achera un C après la température.
Réglage de la température
Vous pouvez régler la température à l’aide des boutons « augmenter la température »
« diminuer la température »
descend de 1°.
Éclairage
Vous pouvez allumer et éteindre les lumières avec le bouton marche / arrêt de l’éclairage.
Attention : la température du réfrigérateur peut être aectée lorsque l’éclairage reste allumé.
NETTOYAGE ET ENTRETIEN
· Débranchez l’appareil.
· Retirez le contenu réfrigérateur et stockez les boissons dans un endroit frais.
· N’utilisez pas de produits nettoyants abrasifs ou des solvants.
18
DO917GDK
. À chaque pression sur le bouton, la température monte ou
et
Page 19
· Nettoyez l’appareil avec un chion doux imprégné d’eau chaude et de détergent.
· Nettoyez le joint de porte avec de l’eau claire uniquement, puis essuyez-le soigneusement.
VACANCES
Lorsque vous partez en vacances pour une courte période, vous pouvez laisser l’appareil
branché.
Lorsque vous partez en vacances pour une longue période, il est préférable de procéder
comme suit :
· Retirez toutes les bouteilles du réfrigérateur.
· Enlevez la che de la prise de courant.
· Nettoyez à fond le réfrigérateur.
· Laissez la porte du réfrigérateur ouverte pour éviter la formation de moisissure et les
mauvaises odeurs.
PANNE DE COURANT
La plupart des pannes de courant sont rétablies endéans 1 ou 2 heures et ne modieront pas la
température de votre réfrigérateur. Vous devez toutefois réduire au minimum l’ouverture de la
porte du réfrigérateur au cours d’une panne de courant.
En cas de panne de courant prolongée, vous devez prendre des dispositions pour garder les
boissons au frais.
FR
MISE AU REBUT
www.domo-elektro.be
Ce symbole sur le produit ou son emballage indique que ce produit
ne peut être traité comme déchet ménager. Il doit plutôt être
remis au point de ramassage concerné, se chargeant du recyclage
du matériel électrique et électronique. En vous assurant que ce
produit est éliminé correctement, vous favorisez la prévention des
conséquences négatives pour l’environnement et la santé humaine
qui, sinon, seraient le résulat d’un traitement inapproprié des
déchets de ce produit. Pour obtenir plus de détails sur le recyclage
de ce produit, veuillez prendre contact avec le bureau municipal de
votre région, votre service d’éliminiation des déchets ménagers ou le
magasin où vous avez acheté le produit.
L’emballage est recyclable. Traitez l’emballage écologiquement.
19
DO917GDK
Page 20

GARANTIE
Sehr geehrter Kunde,
Sämtliche unserer Produkte unterliegen einer strengen Qualitätskontrolle,
bevor Sie Ihnen angeboten werden. Sollten dennoch
Probleme mit Ihrem Gerät auftreten, bedauern wir dies zutiefst.
Wir möchten Sie in diesem Fall bitten, unseren Kundenservice zu kontaktieren.
Unsere Mitarbeiter helfen Ihnen gern weiter!
+32 14 21 71 91 info@linea2000.be
DE
Montag – Donnerstag: 8:30 Uhr – 12:00 Uhr und von 13:00 Uhr – 17:00 Uhr
Freitag: 8:30 Uhr – 12:00 Uhr und von 13:00 Uhr – 16:30 Uhr
Dieses Gerät hat eine Garantiefrist von 2 Jahren ab dem Kaufdatum. Während der Garantiezeit
übernimmt der Hersteller die vollständige Verantwortung für Mängel, die nachweislich auf
Material- oder Konstruktionsfehler zurückzuführen sind. Wenn derartige Mängel auftreten,
wird das Gerät wenn nötig ausgetauscht oder repariert. Die Garantiezeit von 2 Jahren beginnt
in diesem Moment nicht erneut, sondern sie läuft bis 2 Jahre nach dem Kaufdatum weiter. Die
Garantie wird auf der Grundlage des Kassenbons gewährt.
Die Garantie auf Accessoires und Verschleißteile beträgt 6 Monate.
Die Garantie und die Verantwortung/Haftung des Lieferanten und Herstellers entfallen
automatisch in den folgenden Fällen:
· Bei Nichtbeachtung der Anweisungen in dieser Bedienungsanleitung.
· Bei falschem Anschluss, z.B. bei einer zu hohen Stromspannung.
· Bei falscher, grober oder abnormaler Verwendung.
· Bei unzureichender oder falscher Wartung.
· Bei vom Verbraucher oder von nicht ermächtigten Dritten vorgenommenen Reparaturen
oder Änderungen am Gerät.
· Bei der Verwendung von Ersatzteilen oder Accessoires, die nicht vom Lieferanten /
Hersteller empfohlen oder geliefert werden.
20
DO917GDK
Page 21

SICHERHEITSVORKEHRUNGEN
· Dieses Gerät darf von Kindern ab 16 Jahren oder älter gebraucht werden. Ebenso dürfen
Personen mit körperlicher bzw. leichter geistiger Behinderung sowie Personen mit
eingeschränkter Erfahrung das Gerät betätigen. Dies unter der Voraussetzung, dass diese
Personen ausreichende Anweisungen sowohl zum Gebrauch des Gerätes, als auch zu den
hiermit verbundenen Gefahren erhalten haben.
· Kinder dürfen nicht mit dem Gerät spielen. Die Pege und Wartung des Gerätes darf
nicht von Kindern ausgeführt werden, es sei denn, dass dies unter Aufsicht passiert und
es sich um Kinder handelt, die älter als 16 Jahre sind und im Voraus ausreichend über den
Gebrauch/die Wartung informiert worden sind. Sorgen Sie dafür, dass sich das Gerät nicht
in Anwesenheit von Kindern unter 16 Jahren bendet.
· Dieses Gerät eignet sich zum Gebrauch im Haushalt oder ähnlichen Umgebungen, wie z.B.:
· Küchenzeile für Personal in Geschäften, Büros oder anderen professionellen
Umgebungen
· Bauernhöfe
· Hotel-/Motel-/Gästezimmer u.ä.
· Achtung: das Gerät darf nicht mit einer externen Zeitschaltuhr oder Fernbedienung
gebraucht werden.
· Bitte alle Anweisungen vor dem Gebrauch durchlesen.
· Vor der Benutzung prüfen, ob die Spannung, die auf dem Gerät angegeben ist, mit der
Spannung Ihres Stromnetzes übereinstimmt.
· Lassen Sie das Netzkabel nicht über den Tisch oder die Anrichte hängen, oder in Kontakt
mit heißen Oberächen kommen.
· Benutzen Sie das Gerät niemals, wenn die Kabelschnur oder der Stecker beschädigt
ist, nach beeinträchtigtem Funktionieren des Gerätes, oder wenn das Gerät beschädigt
ist. Bringen Sie in solchen Fällen das Gerät zur nächsten qualizierten Servicestelle zur
Überprüfung und/oder Reparatur.
· Beim Einsatz des Gerätes in Anwesenheit von Kindern ist strenge Aufsicht geboten.
· Die Verwendung von Zubehör, das nicht vom Hersteller empfohlen oder verkauft wird,
besteht die Gefahr von Brand, elektrischen Schlages oder von Verletzungen.
· Ziehen Sie den Stecker aus der Steckdose, wenn das Gerät nicht im Einsatz ist, Einzelteile
montiert oder demontiert werden, oder das Gerät gereinigt wird. Ziehen Sie den Stecker
direkt am Stecker selber und nicht an der Kabelschnur aus der Steckdose.
· Stellen Sie das Gerät nicht in der Nähe oder auf einer Gasamme, einer elektrischen Platte
oder an einer Stelle ab, auf der es in Kontakt mit einem Elektroofen oder einem anderen
heißen Geräten kommen kann.
· Benutzen Sie das Gerät nicht im Freien.
· Benutzen Sie das Gerät ausschließlich für den Zweck, für den es gedacht ist.
· Stellen Sie das Gerät immer auf eine stabile, ache und trockene Oberäche.
· Der Hersteller ist nicht verantwortlich für Unfälle, die als Folge von unsachgemäßem
DE
www.domo-elektro.be
DO917GDK
21
Page 22

Gebrauch des Geräts oder Nichtbefolgen der in dieser Anleitung aufgeführten Regeln
entstehen.
· Sämtliche Reparaturen, abgesehen von der gewöhnlichen Pege, sind durch den Hersteller
oder dessen Kundendienst zu übernehmen.
· Das Gerät, das Kabel oder den Stecker niemals in Wasser oder in andere Flüssigkeiten
tauchen.
· Sorgen Sie dafür, dass Kinder das Netzkabel oder das Gerät nicht berühren können.
· Netzkabel vor scharfen Kanten, heißen Gegen-ständen oder anderen Wärmequellen
schützen.
· Beim ersten Gebrauch Verpackungsmaterial und mögliche Werbeauleber komplett
entfernen.
· Halten Sie die Lüftungsönungen frei und sorgen Sie dafür, dass diese nicht verstopft oder
DE
behindert werden.
· Verwenden Sie keine anderen elektrischen Geräte im Kühlschrank, außer wenn sie vom
Hersteller für diesen Zweck zugelassen wurden.
· Fassen Sie die Lampe nicht an, wenn diese lange gebrannt hat. Sie kann sehr heiß sein.
· Die Lampe ist nur für dieses Gerät bestimmt. Verwenden Sie diese nie als
Innenraumbeleuchtung.
· Bewahren Sie keine explosiven Stoe im Gerät, wie beispielsweise Sprühaschen mit
brennbarem Triebmittel.
· Sorgen Sie dafür, dass der Kühlkreislauf nicht beschädigt wird, z.B. während des Transports
oder bei der Montage.
· Achten Sie darauf, dass das Kabel nicht durch die Rückseite des Gerätes platt gedrückt
oder beschädigt wird. Dies kann Überhitzung oder Feuer verursachen.
· Achten Sie darauf, dass Sie Zugang zum Stecker des Gerätes haben.
· Ziehen Sie nicht am Kabel.
· Wenn die Steckdose lose ist, stecken Sie den Stecker nicht in diese Steckdose. (Risiko eines
Stromschlags oder Brandgefahr)
· Dieses Gerät ist schwer. Seien Sie beim Transport vorsichtig.
· Vermeiden Sie eine lange Exposition gegenüber Sonnenlicht.
22
DO917GDK
Page 23

TEILE
1. Bedienpaneel
2. LED-Beleuchtung
3. Regale
4. Temperatursensor
5. Stellfüße
6. Glastür
1
2
3
6
4
5
INSTALLATION
· Das Verpackungsmaterial sowohl innen als auch außen entfernen. Die Außenseite des
Apparats mit einem sauberen, feuchten Tuch reinigen. Die Innenseite kann mit einem
weichen, feuchten Tuch gereinigt werden.
· Direktes Sonnenlicht und Wärme vermeiden. Sonnenlicht kann die Außenseite
des Kühlschranks angreifen. Wärme verursacht einen höheren Stromverbrauch.
Die Umgebungstemperatur muss zwischen 16 °C und 32 °C liegen. Die ideale
Umgebungstemperatur liegt zwischen 22 °C und 25 °C.
· Einen zu hohen Feuchtigkeitsgrad vermeiden.
· Bevor Sie den Kühlschrank an das Stromnetz anschließen, kontrollieren Sie, ob die
Spannung auf dem Typenschild Ihres Geräts mit der Spannung in Ihrer Wohnung
übereinstimmt. Eine andere Spannung kann das Gerät beschädigen.
· Sie können das Gerät nur über den Stecker vom Stromnetz trennen. Sorgen Sie dafür, dass
er immer einfach zugänglich ist.
· Achten Sie darauf, dass die Luft um den Kühlschrank herum frei zirkulieren kann. Oberhalb
des Kühlschranks müssen mind. 10 cm Abstand eingehalten werden. An den Seiten müssen
es mind. 5 cm sein. An der Rückseite des Kühlschranks muss ein Mindestabstand zur Wand
von mindestens 13 cm eingehalten werden. Um sicherzustellen, dass der Kühlschrank nicht
direkt an eine Wand geschoben wird, ist er mit Platzhaltern ausgestattet. Schrauben Sie
diese an der Rückseite an den Kühlschrank.
DE
www.domo-elektro.be
DO917GDK
23
Page 24

· Bei unebenen Oberächen können die vorderen Stellfüße zur Ausrichtung verwendet
werden.
DE
· Montieren Sie den Gri.
· Lassen Sie das Gerät nach dem Aufstellen 2 Stunden stehen, bevor Sie es einschalten. So
kann sich das Kühlmittel verteilen.
· Das Gerät nach dem Aufstellen vor dem Einschalten 6 Stunden stehen lassen. So kann das
Kühlmittel sich verteilen.
ÖFFNUNGSRICHTUNG DER TÜR ÄNDERN
Der Türanschlag des Kühlschranks kann verändert werden. Wenn Sie die Scharniere der Tür
auf die andere Seite versetzen möchten, empfehlen wir, einen anerkannten Fachmann zu
kontaktieren und ihn diese Arbeiten durchführen zu lassen. Bevor Sie die Önungsrichtung
ändern, kontrollieren Sie, ob der Stecker aus der Steckdose gezogen wurde und dass das
Gerät leer ist.
24
DO917GDK
Page 25

Reversing the Door Swing of Your Beverage Cooler
Before Reversing the door ,the power must be shut off.
All parts removed must be saved to do the reinstallation of the door.
NOTE:
This beverage cooler has the capability of either opening the door from the
left or right side. The unit is delivered to you with the door opening from the
left side. Should you desire to reverse the opening direction, please follow
these instructions.
This beverage cooler has been built with the door hinges on the left. If you wish
to change the opening direction, follow the instructions below:
2. Remove the two screws (1) that hold the upper hinge (5) (right side) to the
frame. Take away the upper hinge (5).
3. Lift the door and place it on a padded surface to prevent scratching it.
5. Remove the two screws(8) that hold the lower hinge(2) and Make sure to
Remove the lower hinge(2).
6. Remove the left front leg (4) and transfer it to the right side.
7. Remove the hole cover plate(7) to the right side.
8.
Before placing this lower hinge(2), remove the bolt-pin (9) and reverse
the direction of the lower hinge(2). Then install the lower hinge (2) onto
the left side of the lower frame with two screws (8).
10. Set the door to its place making sure the door seat at the lower hinge(2)
.
11. While holding the door in the closed position secure the upper hinge (5) in the
top frame of left side with two screws (1). Please remember that do not tighten
the two screws(1) until the top of the door is levelled with the counter top.
1. Remove the upper hinge cover(6) first
12. Install the upper hinge cover(6) on the upper hinge..
9. Insert the bolt-pin(9) to the lower hinge (2).
4. Remove the two screws (10) that hold the handle (11) (on the right side frame).
Change the handle to the left side frame.
1
6
7
5
10
11
2
4
8
9
3
1
6
5
2
8
4
9
3
1. Entfernen Sie die Abdeckung (6) der Scharniere.
2. Entfernen Sie die beiden Schrauben (1) des obersten Scharniers (5). Das Scharnier
entfernen.
3. Heben Sie die Tür hoch und legen Sie diese zur Vermeidung von Kratzern auf einen
weichen Untergrund.
4. Entfernen Sie die Schrauben (10) des Gries (11). Versetzen Sie den Gri auf die andere
Seite.
5. Entfernen Sie die Schrauben (8) und das Scharnier (2) an der Unterseite der Tür.
6. Entfernen Sie den Stellfuß (4) und versetzen Sie ihn auf die andere Seite.
7. Versetzen Sie die Abdeckung der Bohrungen (7) auf der Oberseite des Kühlschranks auf
die andere Seite.
8. Bevor Sie das untere Scharnier (2) wieder montieren, entfernen Sie den Scharnierbolzen
(9) und ändern Sie die Scharnierrichtung. Setzen Sie das Scharnier (2) an der anderen
Seite wieder ein und schrauben Sie es mit den beiden Schrauben (8) fest.
9. Setzen Sie den Scharnierbolzen (9) in das Scharnier (2).
10. Setzen Sie die Tür auf das unterste Scharnier (2).
11. Halten Sie die Tür in geschlossenem Zustand fest und schrauben Sie das obere Scharnier
(5) mit den beiden Schrauben (1) fest. Kontrollieren Sie bei geschlossener Tür, dass die
Tür sowohl senkrecht als auch waagerecht ausgerichtet und die Dichtungen an allen
Seiten anliegen, bevor Sie das obere Scharnier (5) vollständig festziehen.
12. Setzen Sie die Abdeckung (6) wieder ein. Stellen Sie falls nötig die Stellfüße ein.
7
10
11
DE
VERSETZEN DES GERÄTS
· Wen Sie das Gerät, unabhängig aus welchem Grund, ausschalten, warten Sie 10 Minuten,
bis Sie es erneut einschalten. Der Druck im Kühlsystem muss zunächst stabilisiert werden.
· Schalten Sie das Gerät aus und ziehen Sie den Netzstecker aus der Steckdose. Sämtliche
Lebensmittel entnehmen. Entfernen Sie außerdem alle abnehmbaren Teile (Regale,
www.domo-elektro.be
DO917GDK
25
Page 26

Do not store food in beverage cooler, as interior temperature may not get cool
enough to prevent spoilage. As a natural result of condensation, in summer
months or area of high humidity, the glass door may built up moisture on the
outside. Just wipe it away.
IMPORTANT SAFEGUARDS
It is recommended you install the beverage cooler in a place where the ambient
temperature is between 22-25 degree Celsius .If the ambient temperature
in above or below the recommended temperature, conditions may cause the
interior temperature to fluctuate.
OPERATING YOUR BEVERAGE COOLER
If the interior light is left on, the temperature inside the beverage cooler will be higher.
The above temperatures may fluctuate depending on whether or not the interior
bulb is on or off or whether the bottles are located on the lower/middle or lower
section.
Recommended Temperatures for chilling beverage
Sparkling wines 7- C
Cold beverage -6 C
Zubehör, usw.) oder befestigen Sie diese im Kühlschrank, um Erschütterungen zu
vermeiden.
· Versetzen Sie das Gerät und installieren Sie es. Wenn Sie das Gerät während des Transports
auf die Seite gelegt haben, auch wenn dies nur sehr kurz der Fall war, lassen Sie das Gerät
mindestens 10 Minuten gerade stehen, bevor Sie es erneut einschalten.
· Ihr Gerät verwendet das Kühlmittel Isobutan (R600a). Obwohl R600a ein
umweltfreundliches und natürliches Gas ist, ist es explosiv. Seien Sie deshalb während
des Transports oder bei der Installation des Geräts sehr vorsichtig, um Schäden an
den Kühlelementen zu vermeiden. Im Falle eines Lecks durch eine Beschädigung der
Kühlelemente halten Sie den Kühlschrank von oenem Feuer oder Wärmequellen fern und
lüften Sie den Raum, in dem sich das Gerät bendet, für einige Minuten.
GEBRAUCH
DE
· Der Kühlschrank ist nur für Getränke geeignet und absolut nicht für Lebensmittel.
· Wenn Sie das Gerät erstmals in Betrieb nehmen oder es erneut verwenden, nachdem es
lange Zeit außer Betrieb war, kann eine Abweichung zwischen der angezeigten Temperatur
und der tatsächlichen Temperatur auftreten. Nach einigen Stunden ist diese von selbst
verschwunden.
· Es besteht ein geringer Temperaturunterschied zwischen dem oberen und dem unteren
Bereich des Kühlschranks. Da warme Luft aufsteigt, sind die oberen Einlegeböden etwas
wärmer als die Einlegeböden im unteren Bereich des Kühlschranks.
EINLEGEBÖDEN
Sie können die Einlegeböden entsprechend Ihrer Flaschenhöhen einschieben. Sie können die
Einlegeböden höher oder tiefer einsetzen, indem Sie diese aus dem Kühlschrank ziehen.
BEDIENFELD
BEVERAGE
1. Temperatur erhöhen
2. Temperatur senken
3. Display
1 2 3 4 5
26
DO917GDK
Page 27

4. Fahrenheit/Celsius-Anzeige
5. An/Aus Beleuchtung
Fahrenheit/Celsius-Anzeige einstellen
Die standardmäßige Einstellung ab Werk ist 45 °F und kann auf dem Display abgelesen
werden. Sie können die Anzeige mit der Taste „Fahrenheit/Celsius-Anzeige“
ändern.
Neben der Taste sind 2 Kontrollleuchten zu sehen. Die Kontrollleuchte für Fahrenheit brennt
rot, wenn Sie die Fahrenheit-Anzeige auswählen. Auf dem Display erscheint ein F hinter der
Temperatur. Wenn Sie die Celsius-Anzeige auswählen, leuchtet die Kontrollleuchte gelb auf.
Auf dem Display erscheint ein C hinter der Temperatur.
auf Celsius
Temperatur einstellen
Mit den Tasten „Temperatur erhöhen“
Temperatur einstellen. Pro Knopfdruck ändert sich die Temperatur um 1°.
Beleuchtung
Sie können die Beleuchtung mit der Taste „An/Aus Beleuchtung“
Achtung: Die Temperatur des Kühlschranks kann durch die brennende Beleuchtung
beeinusst werden.
und „Temperatur senken“
können Sie die
ein- und ausschalten.
REINIGUNG UND WARTUNG
· Ziehen Sie den Stecker aus der Steckdose.
· Leeren Sie den Kühlschrank und lagern Sie die Getränke in einem kühlen Raum.
· Verwenden Sie keine aggressiven Reinigungs- oder Lösungsmittel.
· Reinigen Sie das Gerät mit einem weichen Tuch mit warmem Wasser und einem milden
Reinigungsmittel.
· Reinigen Sie die Türdichtung nur mit warmem Wasser und reiben Sie diese anschließend
gründlich ab.
URLAUB
Falls Sie für eine kurze Zeit in Urlaub gehen, kann das Gerät eingeschaltet bleiben.
Falls Sie für längere Zeit in Urlaub gehen, kann wie folgt verfahren werden :
· Entnehmen Sie alle Flaschen aus dem Kühlschrank.
· Den Stecker aus der Steckdose ziehen
· Den Kühlschrank gründlich reinigen.
· Die Türe des Kühlschranks oen lassen, um Schimmel und schlechten Geruch zu
DE
www.domo-elektro.be
DO917GDK
27
Page 28

vermeiden.
STROMAUSFALL
Die meisten Stromausfälle werden innerhalb von 1 bis 2 Stunden behoben und ändern die
Temperatur des Kühlschranks nicht. Die Kühlschranktüre, während eines Stromausfalls, so
wenig wie möglich önen.
Während eines längeren Stromausfalls müssen Sie Maßnahmen zur Kühlung der Getränke
treen.
ENTSORGEN
DE
Dieses Symbol auf dem Produkt oder seiner Verpackung
weist darauf hin, dass dieses Produkt nicht als normaler
Haushaltsabfall zu behandeln ist, sondern an einem
Sammelpunkt für das Recyling von elektrischen und
elektronischen Geräten abgegeben werden muss. Durch Ihren
Beitrag zum korrekten Entsorgen dieses Produkts schützen
Sie die Umwelt und die Gesundheit Ihrer Mitmenschen.
Umwelt und Gesundheit werden durch falsches Entsorgen
gefährdet. Weitere Informationen über das Recycling dieses
Produkts erhalten Sie von Ihren Rathaus, Ihrer Müllabfuhr
oder dem Geschäft, in dem Sie das Produkt gekauft haben.
Das Verpackungsmaterial ist wiederverwertbar. Entsorgen
Sie die Verpackung umweltgerecht und führen Sie sie der
Wertstosammlung zu.
28
DO917GDK
Page 29

WARRANTY
Dear client ,
All of our products are always submitted to a strict quality control before they are sold to you.
Should you nevertheless experience problems with your device, we sincerely regret this.
In that case, we kindly request you to contact our customer service.
Our sta will gladly assist you.
+32 14 21 71 91 info@linea2000.be
Monday – Thursday: 8.30 – 12.00 and 13.00 – 17.00
Friday: 8.30 – 12.00 and 13.00 – 16.30
This appliance has a two year warranty period. During this period the manufacturer is
responsible for any failures that are the direct result of construction failure. When these
failures occur the appliance will be repaired or replaced if necessary. The warranty will not be
valid when the damage to the appliance is caused by wrong use, not following the instructions
or repairs executed by a third party. The guarantee is issued with the original till receipt. All
parts, which are subject to wear, are excluded from the warranty.
If your device breaks down within the 2-year warranty period, you can return the device
together with your receipt to the shop where you purchased it.
The guarantee on accessories and components that are liable to wear-and-tear is only 6
months.
EN
The guarantee and responsibility of the supplier and manufacturer lapse automatically in the
following cases:
· If the instructions in this manual have not been followed.
· In case of incorrect connection, e.g., electrical voltage that is too high.
· In case of incorrect, rough or abnormal use.
· In case of insucient or incorrect maintenance.
· In case of repairs or alterations to the device by the consumer or non-authorised third
parties.
· If the customer used parts or accessories that are not recommended or provided by the
supplier / manufacturer.
www.domo-elektro.be
DO917GDK
29
Page 30

SAFETY INSTRUCTIONS
· This appliance may be used by children from the age of 16 and up, and also by persons with
a physical or sensorly limitation, as well as mentally limited persons or persons with a lack
of experience and knowledge. But only on the condition that these persons have received
the necessary instructions on how to use this appliance in a safe way and know the dangers
that can occur by using this appliance.
· Children cannot be allowed to play with the appliance.
· Maintenance and cleaning of the appliance may not be done by children, unless they
are older than 16 years old and are under supervision. Keep the appliance out of reach of
children younger than 16 years old.
· This appliance is suitable to be used in a household environment and in similar
surroundings such as:
· Kitchen for personnel of shops, oces or other similar professional surroundings
· Farms
· Hotel or motel rooms and other surroundings with a residential character
· Guest rooms or similar
· Attention: This appliance cannot be used with an external timer or a separate remote
EN
control.
· Read all instructions before use.
· Before use, check if the voltage stated on the appliance corresponds with the voltage of
the power net at your home.
· Do not let the cord hang on a hot surface or on the edge of a table or counter top.
· Never use the appliance when the cord or plug is damaged, after malfunction or when the
appliance itself is damaged. In that case, take the appliance to the nearest qualied service
center for check-up and repair.
· Close supervision is necessary when the appliance is used near or by children.
· The use of accessories that are not recommended or sold by the manufacturer can cause
re, electrical shock or injuries.
· Unplug the appliance when it is not in use, before assembling or disassembling any parts
and before cleaning the appliance. Unplug the appliance by grasping the plug. Never
unplug by pulling the cord.
· Never place this appliance near a gas stove or electrical stove or in a place where it may
come into contact with a warm appliance.
· Do not use the appliance outdoors.
· Only use the appliance for its intended use.
· Always use the appliance on a steady, dry and level surface.
· The manufacturer can not be held responsible for accidents that result from improper use
of the appliance or not following the instructions described in this manual.
· All repairs should be carried out by the manufacturer or its aftersales service.
30
DO917GDK
Page 31

· Never immerse the appliance, the cord or the plug in water or any other liquid.
· Make sure that children do not touch the cord or appliance.
· Keep the cord away from sharp edges and hot parts or other heat sources.
· Before use, remove all packaging materials and any promotional stickers.
· Keep the ventilation openings free of obstructions.
· Do not use any other electrical appliance inside the fridge, unless they are approved for
this purpose by the manufacturer.
· Do not keep any explosive substances inside the appliance, like for instance aerosol cans
with a ammable propellant.
· Make sure that the refrigerant circuit does not get damaged, for instance during
transportation or installation.
· Make sure that the plug does not get squashed or damaged by the back of the appliance. A
squashed or damaged power plug may overheat and cause re.
· Make sure that you have access to the plug of the appliance.
· Do not pull the cord.
· If the socket is loose, do not plug in the appliance. (risk of electric shock or re)
· This is a heavy appliance. Be careful when moving it.
· Avoid long exposure to direct sunlight.
PARTS
EN
1. Control panel
2. LED Lighting
3. Shelves
4. Temperature sensor
5. Levelling feet
6. Glass door
www.domo-elektro.be
1
2
3
4
5
6
31
DO917GDK
Page 32

INSTALLATION
· Remove the exterior and interior packing, wipe the outside thoroughly with a soft dry cloth
and the inside with a wet, lukewarm cloth.
· Avoid direct sunlight and heat. Direct sunlight may aect the acrylic coating. Heat sources
nearby will cause higher electricity consumption. The ambient temperature must be
between 16 °C and 32 °C. The ideal ambient temperature is between 22 °C and 25 °C.
· Avoid very moist places.
· Before connecting your refrigerator to the power supply, check that the voltage stated
on the rating label of your appliance corresponds to the voltage in your home. A dierent
voltage could damage the appliance.
· Make sure that the air can circulate around the refrigerator. Above the refrigerator, there
must be at least 10 cm of free space, and on the sides this must be at least 5 cm. The back
of the refrigerator must be at least 13 cm away from the wall. Spacers have been provided
with the refrigerator to ensure that it cannot be pushed right up against the wall. Fasten
these to the back of the refrigerator.
EN
· For uneven surfaces, front feet can be aligned.
· Install the handle.
32
DO917GDK
Page 33

Reversing the Door Swing of Your Beverage Cooler
Before Reversing the door ,the power must be shut off.
All parts removed must be saved to do the reinstallation of the door.
NOTE:
This beverage cooler has the capability of either opening the door from the
left or right side. The unit is delivered to you with the door opening from the
left side. Should you desire to reverse the opening direction, please follow
these instructions.
This beverage cooler has been built with the door hinges on the left. If you wish
to change the opening direction, follow the instructions below:
2. Remove the two screws (1) that hold the upper hinge (5) (right side) to the
frame. Take away the upper hinge (5).
3. Lift the door and place it on a padded surface to prevent scratching it.
5. Remove the two screws(8) that hold the lower hinge(2) and Make sure to
Remove the lower hinge(2).
6. Remove the left front leg (4) and transfer it to the right side.
7. Remove the hole cover plate(7) to the right side.
8.
Before placing this lower hinge(2), remove the bolt-pin (9) and reverse
the direction of the lower hinge(2). Then install the lower hinge (2) onto
the left side of the lower frame with two screws (8).
10. Set the door to its place making sure the door seat at the lower hinge(2)
.
11. While holding the door in the closed position secure the upper hinge (5) in the
top frame of left side with two screws (1). Please remember that do not tighten
the two screws(1) until the top of the door is levelled with the counter top.
1. Remove the upper hinge cover(6) first
12. Install the upper hinge cover(6) on the upper hinge..
9. Insert the bolt-pin(9) to the lower hinge (2).
4. Remove the two screws (10) that hold the handle (11) (on the right side frame).
Change the handle to the left side frame.
· Allow the appliance to stand for 2 hours before turning it on. This allows the cooling agent
to settle.
· After installation, leave the freezer for 12 hours before turning it on. This way the
refrigerant can settle.
DOOR CONVERSION
The refrigerator has a reversible door. If you need to hinge your door on the opposite side it is
recommended that you call your local authorised service agent to make this conversion or ask
a technician.
Before you reverse the door, you should ensure the appliance is unplugged and empty.
1
6
7
4
1. Remove the cover plate (6) of the hinges.
2. Remove the two screws (1) of the upper hinge (5). Remove the hinge.
3. Lift the door o and place it on a soft surface to prevent scratching.
4. Remove the screws (10) of the handle (11). Move the handle to the other side.
5. Remove the screws (8) and the hinge (2) to the other side of the door.
6. Remove the adjustable foot (4) and place it on the other side.
7. Move the cover plate of the drill holes (7) on the top of the refrigerator to the other side.
8. Before you replace the bottom hinge (2), remove the hinge pin (9) and reverse the
5
10
11
2
8
9
3
1
6
5
2
8
4
9
3
direction of the hinge. Replace the hinge (2) on the other side and fasten it with the two
screws (8).
9. Place the hinge pin (9) in the hinge (2).
10. Position the door on the lowest hinge (2).
11. Grip the door in a closed position and fasten the top hinge (5) with the two screws (1).
With the door closed, check whether the door is aligned horizontally as well as vertically
and that the seal closes on all sides before you tighten the upper hinge (5) completely.
12. Replace the cover plate (6). If necessary, adjust the adjustable feet.
7
10
11
EN
www.domo-elektro.be
DO917GDK
33
Page 34

Do not store food in beverage cooler, as interior temperature may not get cool
enough to prevent spoilage. As a natural result of condensation, in summer
months or area of high humidity, the glass door may built up moisture on the
outside. Just wipe it away.
IMPORTANT SAFEGUARDS
It is recommended you install the beverage cooler in a place where the ambient
temperature is between 22-25 degree Celsius .If the ambient temperature
in above or below the recommended temperature, conditions may cause the
interior temperature to fluctuate.
OPERATING YOUR BEVERAGE COOLER
If the interior light is left on, the temperature inside the beverage cooler will be higher.
The above temperatures may fluctuate depending on whether or not the interior
bulb is on or off or whether the bottles are located on the lower/middle or lower
section.
Recommended Temperatures for chilling beverage
Sparkling wines 7- C
Cold beverage -6 C
MOVING YOUR APPLIANCE
· If the appliance is turned o for any reason, wait for 10 minutes before turning it back on.
This will allow the refrigeration system pressures to equalise before restarting.
· Turn o the appliance and unplug it from the mains socket. Remove all food. Also remove
all mobile parts (shelves, accessories, etc.) or x them into the fridge to avoid any shock.
· Relocate and install. If the appliance has been left on its side for any length of time, leave it
standing upright for at least 10 minutes.
· Your appliance uses isobutane (R600a) as a refrigerant. Although R600a is an
environmentally friendly and natural gas, it is explosive. Therefore you should be careful
during shipment and installation to prevent your appliance’s cooler elements from being
damaged. In the event of a leak caused by damage to the cooler elements, move your
fridge from open ame or heat sources and ventilate the room where the appliance is
located for a few minutes.
USE
· The refrigerator is only suitable for drinks and most denitely not for food.
· When using the appliance for the rst time, or using it after a period of non-activity, there
EN
may be a discrepancy between the temperature displayed and the actual temperature. This
will correct itself after a few hours.
· There is a minor temperature dierence between the top and bottom in the refrigerator.
Because hot air rises, the upper shelves are somewhat warmer than the shelves at the
bottom of the refrigerator.
SHELVES
The shelves can be adjusted to the height of your bottles. The shelves can be raised or lowered
by sliding them out of the refrigerator.
CONTROL PANEL
1 2 3 4 5
BEVERAGE
1. Raising the temperature
2. Lowering the temperature
3. Display
4. Fahrenheit/Celsius indicator
5. Light on/o
34
DO917GDK
Page 35

Setting Fahrenheit/Celsius indicator
The standard factory setting is 45 °F and can be read on the display. The display can be altered
to read Celsius with the ‘Fahrenheit/Celsius indicator’ button
Next to button, there are 2 indicator lights. If Fahrenheit is selected, the Fahrenheit indicator
will be red. The display will have an F behind the temperature. If Celsius is selected, the Celsius
indicator light will be yellow. The display will have a C behind the temperature.
Setting the temperature
The temperature can be set with the ‘raise temperature’
buttons. Each push of the button changes the temperature by 1°.
Lighting
The light can be turned on and o with the ‘on/o’ button
Caution: the temperature in the refrigerator can be inuenced by having the light on.
.
and ‘lower temperature’
.
CLEANING AND MAINTENANCE
· Remove the plug from the outlet.
· Take everything out of the refrigerator and store the drinks in a cool area.
· Do not use abrasive cleaning agents or solvents.
· Clean the appliance with a soft cloth, warm water and detergent.
· Wipe the door seal with clear water only and then wipe dry thoroughly.
EN
VACATION TIME
For short vacation periods, leave the control knobs at their usual settings. During longer
absences:
· Remove all bottles from the refrigerator.
· Disconnect from electrical outlet.
· Clean the refrigerator thoroughly, including defrost pan.
· Leave door open to avoid possible formations of condensate, mold or odors.
POWER FAILURE
Most power failures are corrected within an hour or two and will not aect your refrigerator
temperatures. However, you should minimize the number of door openings while the power
is o.
During a lengthy power outage, measures will have to be taken to keep the drinks cool.
www.domo-elektro.be
DO917GDK
35
Page 36

ENVIRONMENTAL GUIDELINES
This symbol on the product or on its packaging indicates
that this product may not be treated as household waste.
Instead it must be brought to the applicable collection point
for recycling of electrical and electronic equipment. By
ensuring this product is disposed of correctly, you will help
prevent potential negative consequences for the environment
and human health, which could otherwise be caused by
inappropriate waste handling of this product. For more
detailed information about recycling of this product, please
contact your local city oce, your household waste disposal
service or the shop where you purchased the product.
The packaging is recyclable. Please treat the packaging
ecologically.
EN
36
DO917GDK
Page 37

GARANTIA
Este aparato tiene un periodo de garantía de 2 años a partir de la fecha de compra. Durante
el periodo de garantía, el distribuidor será completamente responsable de los defectos
directamente asignables a errores del material y fabricación. Cuando se detecten este tipo de
errores, y siempre que se estime necesario, el aparato se sustituirá o reparará. A partir de ese
momento, el periodo de garantía de 2 años no volverá a iniciarse, sino que seguirá siendo de 2
años a partir del momento de compra. La garantía se concede sobre la base del recibo de caja.
La garantía de los accesorios y componentes sujetos a desgaste es de 6 meses.
La garantía y la responsabilidad/imputabilidad del proveedor y el fabricante expiran
automáticamente en los siguientes casos:
· Cuando no se cumplan las instrucciones que aparecen en este manual.
· En el caso de una conexión inadecuada, por ejemplo, a una tensión eléctrica demasiado
alta.
· En caso de uso incorrecto, brusco o anormal.
· En caso de insuciente o incorrecto mantenimiento.
· Si el consumidor o un tercero no autorizado realizan reparaciones o modicaciones en el
aparato.
· Si se usan componentes o accesorios que no están recomendados o que no son
suministrados por el proveedor/fabricante.
www.domo-elektro.be
ES
37
DO917GDK
Page 38

INSTRUCCIONES DE SEGURIDAD
· Este aparato está diseñado para ser utilizado por niños a partir de 16 años de edad y
por personas con discapacidades físicas, sensoriales o mentales, o por personas que no
dispongan de suciente experiencia y conocimientos, a no ser que sean supervisados o
instruidos inicialmente en la utilización segura del aparato y los posibles peligros.
· Los niños deben estar siempre bajo supervisión, para asegurar que no juegan con el
aparato.
· El mantenimiento y la limpieza del aparato no pueden efectuarse por niños, a no ser que
tengan más de 16 años de edad y sean supervisados. Mantenga el aparato y el cordón
eléctrico fuera del alcance de niños menores de 16 años.
· Este aparato está diseñado para ser utilizado en un entorno doméstico y en entornos
similares como:
· En la cocina para el personal de tiendas, ocinas y otros entornos profesionales
similares.
· En las ncas.
· En las habitaciones de hoteles y moteles y otros entornos con un carácter residencial.
· En los cuartos de huéspedes o similares.
· Atención: el aparato no puede ser utilizado con un temporizador externo o un mando a
distancia separado.
· Lea todas las instrucciones antes del uso.
· Antes de utilizarlo, compruebe si el voltaje indicado en el aparato corresponde al voltaje de
la electricidad de su casa.
· No permita que el cable cuelgue sobre una supercie o el borde de una mesa o encimera.
ES
· No utilice nunca el aparato si el cable o el enchufe están dañados, después de un mal
funcionamiento de la unidad o si están dañados. Lleve el aparato al distribuidor autorizado
más cercano centro para la inspección y reparación.
· Se requiere supervisión cuando el aparato es usado por o cerca de niños.
· El uso de accesorios no recomendados o vendidos por el fabricante puede causar
incendios, descargas eléctricas o lesiones.
· Desenchufe la toma de corriente cuando no se usa, para montar o desmontar piezas y
antes de limpiarlo. Desconecte el enchufe de la toma de corriente. Nunca tire del cable
para desenchufarlo.
· No encienda nunca el aparato cerca de una estufa de gas o eléctrica, ni en un lugar donde
pueda entrar en contacto con un horno eléctrico o con otro aparato caliente.
· No utilice el aparato en el exterior.
· Utilice el aparato sólo para el n para el que se ha fabricado.
· Coloque siempre el aparato sobre una supercie rme, horizontal y seca.
· El fabricante no es responsable de los accidentes que resulten del uso incorrecto del
aparato, ni del incumplimiento de las normas establecidas en este manual.
· Todas las reparaciones aparte del mantenimiento ordinario de la unidad deben ser
38
DO917GDK
Page 39

efectuadas por el fabricante o por su servicio post-venta.
· No sumerja nunca el aparato, el cable o el enchufe en agua o cualquier otro líquido.
· Asegúrese de que los niños no puedan tocar el cable eléctrico o el aparato.
· Mantenga el cable alejado de bordes alados y piezas calientes u otras fuentes de calor.
· Antes del primer uso retire todos los materiales de embalaje y etiquetas de promoción.
· Mantenga las ranuras de ventilación libres y asegúrese de que no están bloqueadas u
obstruidas.
· No utilice ningún otro aparato eléctrico en el interior del frigoríco, a menos que el mismo
esté aprobado para este n por el fabricante.
· Nunca almacene materiales explosivos en el aparato como, por ejemplo, aerosoles con gas
propulsor inamable.
· Asegúrese de que el circuito de refrigeración no se daña, por ejemplo, durante el
transporte o la instalación.
· Asegúrese de que el cable no quede aplastado o dañado por la parte trasera de la unidad.
Esto puede causar sobrecalentamiento y, en consecuencia, se podría producir un incendio.
· Asegúrese de tener acceso al enchufe del aparato.
· No tire del cable.
· Si la toma de corriente está suelta, no inserte el enchufe en la toma de corriente (riesgo de
descarga eléctrica o incendio).
· Este aparato es pesado. Tenga cuidado al desplazarlo.
· Evite una exposición prolongada a la luz solar.
PIEZAS
1. Panel de control
2. Iluminación LED
3. Estantes
4. Sensor de temperatura
5. Patas ajustables
6. Puerta de vidrio
www.domo-elektro.be
ES
1
2
3
4
5
6
39
DO917GDK
Page 40

INSTALACIÓN
· Retire todo el material de embalaje, tanto del interior como del exterior. Limpie el exterior
del aparato con un paño seco. El interior puede limpiarlo con un paño suave y húmedo.
· Evite la luz directa del sol y el calor. La luz solar puede deteriorar el exterior del frigoríco.
El calor aumentará el consumo. La temperatura ambiente debe estar entre 16 ° C y 32 ° C.
La temperatura ideal es entre 22 °C y 25 °C.
· Evite un grado de humedad demasiado elevado.
· Antes de conectar el frigoríco a la red eléctrica se debe comprobar que la tensión de
la placa de especicaciones del aparato se corresponde con el voltaje de su hogar. Otra
tensión puede dañar el aparato.
· El enchufe es la única forma de desconectar el aparato de la alimentación, asegúrese de
que es fácil acceder al mismo.
· Asegúrese de que el aire pueda circular libremente alrededor del frigoríco Por encima
del frigoríco debe haber un mínimo de 10 cm de espacio libre disponible, en los lados,
el espacio mínimo disponible debe ser de 5 cm. La parte posterior del frigoríco debe
estar a una distancia de al menos 13 cm de la pared. Para asegurar que no puede empujar
el frigoríco completamente contra la pared, se proporcionan espaciadores. Debe
atornillarlos en la parte trasera del frigoríco.
ES
· Para supercies irregulares, las patas delanteras se pueden alinear.
40
DO917GDK
Page 41

· Instale el tirador.
Reversing the Door Swing of Your Beverage Cooler
Before Reversing the door ,the power must be shut off.
All parts removed must be saved to do the reinstallation of the door.
NOTE:
This beverage cooler has the capability of either opening the door from the
left or right side. The unit is delivered to you with the door opening from the
left side. Should you desire to reverse the opening direction, please follow
these instructions.
This beverage cooler has been built with the door hinges on the left. If you wish
to change the opening direction, follow the instructions below:
2. Remove the two screws (1) that hold the upper hinge (5) (right side) to the
frame. Take away the upper hinge (5).
3. Lift the door and place it on a padded surface to prevent scratching it.
5. Remove the two screws(8) that hold the lower hinge(2) and Make sure to
Remove the lower hinge(2).
6. Remove the left front leg (4) and transfer it to the right side.
7. Remove the hole cover plate(7) to the right side.
8.
Before placing this lower hinge(2), remove the bolt-pin (9) and reverse
the direction of the lower hinge(2). Then install the lower hinge (2) onto
the left side of the lower frame with two screws (8).
10. Set the door to its place making sure the door seat at the lower hinge(2)
.
11. While holding the door in the closed position secure the upper hinge (5) in the
top frame of left side with two screws (1). Please remember that do not tighten
the two screws(1) until the top of the door is levelled with the counter top.
1. Remove the upper hinge cover(6) first
12. Install the upper hinge cover(6) on the upper hinge..
9. Insert the bolt-pin(9) to the lower hinge (2).
4. Remove the two screws (10) that hold the handle (11) (on the right side frame).
Change the handle to the left side frame.
· Deje que el aparato repose 2 horas antes de encenderlo. Esto permite que el refrigerante
se asiente.
· Deje el aparato después de la instalación 6 horas antes de encenderlo. Así se puede asentar
el refrigerante.
CAMBIO DE DIRECCIÓN DE LA PUERTA
El frigoríco tiene una puerta reversible. Si quiere trasladar las bisagras de la puerta hacia el
otro lado, le recomendamos que se ponga en contacto con un taller de reparación autorizado
para llevar a cabo el trabajo. Antes de cambiar la dirección de giro, compruebe que el enchufe
se ha desconectado de la toma de corriente y que el aparato está vacío.
7
4
1. Retire la placa de cubierta (6) de las bisagras.
1
6
5
10
11
2
8
9
3
1
5
2
8
3
7
6
4
9
2. Retire los dos tornillos (1) de la bisagra superior (5). Retire la bisagra.
3. Levante la puerta y colóquela sobre una supercie suave para evitar arañazos.
4. Retire los tornillos (10) del tirador (11). Desplace el asa hacia el otro lado.
5. Retire los tornillos (8) y la bisagra (2) de la parte inferior de la puerta.
6. Retire la pata niveladora (4) y desplácela hacia el otro lado.
7. Mueva la placa de cubierta de los oricios de perforación (7) en la parte superior del
frigoríco hasta el otro lado.
8. Antes de volver a colocar la bisagra inferior (2), retire el pasador de bisagra (9) e invierta
www.domo-elektro.be
10
11
DO917GDK
ES
41
Page 42

la dirección de la bisagra. Vuelva a colocar la bisagra (2) de nuevo en el otro lado y
atorníllela con los dos tornillos (8).
9. Coloque el pasador de la bisagra (9) en la bisagra (2).
10. Coloque la puerta en la bisagra inferior (2).
11. Mantenga la puerta con seguridad en posición cerrada y atornille la bisagra superior (5)
con los dos tornillos (1). Con la puerta cerrada, compruebe si la puerta está alineada
tanto horizontal como verticalmente, así como que las juntas están cerradas por todos
los lados antes de jar completamente la bisagra superior (5).
12. Coloque la placa de cubierta (6) de nuevo. Si es necesario, ajuste las patas de ajuste.
DESPLAZAR SU APARATO
· Si el aparato se apaga por cualquier motivo, espere 10 minutos antes de volver a
encenderlo. La presión en el sistema de refrigeración se debe estabilizar antes de volver a
encenderlo.
· Apague el aparato y retire el enchufe de la toma de corriente. Retire todos los alimentos.
También debe retirar todas las partes móviles (estantes, accesorios, etc.) o jarlos en el
frigoríco para evitar choques.
· Desplace el aparato e instálelo. Si el dispositivo se mantuvo posicionado sobre un lado
mientras se trasladaba, aunque fuera durante un tiempo muy corto, el aparato deberá
ponerse en posición vertical durante al menos 10 minutos antes de encender el aparato.
· Su aparato utiliza isobutano (R600a) como refrigerante. A pesar de que el R600a es un gas
respetuoso con el medio ambiente y natural, es explosivo. Por lo tanto, debe tener mucho
cuidado al mover o instalar el aparato para evitar daños en los elementos de refrigeración.
En el caso de que se produzca una fuga por un daño en los elementos de refrigeración,
ES
mantenga el frigoríco alejado de llamas o fuentes de calor y ventile la habitación donde se
encuentra el aparato durante algunos minutos.
USO
· El frigoríco solo es apto para bebidas, no para comida.
· Si utiliza el aparato por primera vez o lo reutiliza después de un largo periodo de
inactividad, es posible que se produzca una desviación entre la temperatura mostrada en la
pantalla y la temperatura real. Después de unas horas se corregirá automáticamente.
· Hay una pequeña diferencia de temperatura entre la parte superior e inferior del frigoríco.
Debido a que el aire caliente se eleva, las capas superiores estarán un poco más calientes
que las capas de la parte inferior del frigoríco.
ESTANTES
Puede cambiar los estantes para adecuarlos a la altura de sus botellas. Puede poner los
42
DO917GDK
Page 43

Do not store food in beverage cooler, as interior temperature may not get cool
enough to prevent spoilage. As a natural result of condensation, in summer
months or area of high humidity, the glass door may built up moisture on the
outside. Just wipe it away.
IMPORTANT SAFEGUARDS
It is recommended you install the beverage cooler in a place where the ambient
temperature is between 22-25 degree Celsius .If the ambient temperature
in above or below the recommended temperature, conditions may cause the
interior temperature to fluctuate.
OPERATING YOUR BEVERAGE COOLER
If the interior light is left on, the temperature inside the beverage cooler will be higher.
The above temperatures may fluctuate depending on whether or not the interior
bulb is on or off or whether the bottles are located on the lower/middle or lower
section.
Recommended Temperatures for chilling beverage
Sparkling wines 7- C
Cold beverage -6 C
estantes más altos o más bajos, deslizándolos fuera del frigoríco.
PANEL DE CONTROL
BEVERAGE
1 2 3 4 5
1. Aumentar la temperatura
2. Reducir la temperatura
3. Pantalla
4. Indicación Fahrenheit/Celsius
5. Encender/apagar la iluminación
Ajustar la Indicación Fahrenheit/Celsius
El ajuste de fábrica es de 45 °F y se puede leer en la pantalla. Puede cambiar la visualización a
Celsius con el botón de Indicación Fahrenheit/Celsius.
Al lado del botón 2 se pueden ver las lámparas indicadoras. Si ha elegido la indicación
Fahrenheit, las lámparas indicadoras de Fahrenheit se encenderán en rojo. En la pantalla
aparecerá una F detrás de la temperatura. Si elige la indicación Celsius, la lámpara indicadora
Celsius se iluminará en color amarillo. En la pantalla aparecerá una C detrás de la temperatura.
Ajustar la temperatura
Con los botones “aumentar la temperatura”
la temperatura. Por cada presión del botón cambiará la temperatura 1 °.
Iluminación
Puede encender y apagar las luces con el botón encender/apagar la iluminación.
Tenga en cuenta que la temperatura en el interior del frigoríco puede verse afectada por
dejar encendida la iluminación.
LIMPIEZA Y MANTENIMIENTO
· Retire el enchufe de la toma de corriente.
· Retire todo del frigoríco y almacene la bebida en un espacio fresco.
· No utilice productos de limpieza agresivos o disolventes.
www.domo-elektro.be
y “reducir la temperatura”
ES
es posible ajustar
43
DO917GDK
Page 44

· Limpie el aparato con un paño suave, agua tibia y un detergente suave.
· Limpie la junta de la puerta solo con agua limpia y frote a fondo.
VACACIONES
Si se va de vacaciones durante un periodo corto, el aparato puede permanecer enchufado. Si
se va de vacaciones durante un periodo largo, lo mejor es hacer lo siguiente:
· Retire todas las botellas del frigoríco.
· Retire el enchufe de la toma de corriente.
· Limpie bien el frigoríco.
· Deje la puerta abierta del frigoríco para evitar la aparición de moho y malos olores.
APAGÓN
La mayoría de los apagones duran entre 1 y 2 horas y no suelen alterar la temperatura del
frigoríco. Limite la apertura de la puerta del frigoríco en la mayor medida posible durante
un apagón. Durante una caída de corriente prolongada, debe tomar medidas para mantener
las bebidas frías.
44
ES
DO917GDK
Page 45

DIRECTRICES MEDIOAMBIENTALES
El símbolo en el producto o en el embalaje indica que este
producto no puede ser tratado como residuo doméstico. Se
debe llevar a un lugar en el que se reciclan equipos eléctricos
y electrónicos. Si se asegura de que este producto se desecha
correctamente, usted ayudará a evitar posibles consecuencias
negativas para las personas y el medio ambiente que serían
causadospor un tratamiento de residuos inadecuado. Para
obtener información más detallada sobre el reciclaje de
este producto, póngase en contacto con su ayuntamiento, o
con la empresa o departamento responsable del servicio de
recogida de basura doméstica, o con la tienda donde adquirió
el producto.
El material de embalaje es reciclable. Trate el embalaje de una
manera medioambientalmente responsable.
www.domo-elektro.be
ES
45
DO917GDK
Page 46

ZÁRUKA
Pro záruku začínající dnem prodeje spotřebiče platí na území ČR tyto podmínky:
1. trvání záruky: 2 roky
2. poskytování záruky:
a) záruční opravu provedeme podle našeho zvážení opravou nebo výměnou vadných dílů,
jestliže tyto závady vznikly prokazatelně vadou materiálu nebo chybou při výrobě
b) záruční oprava bude provedena jen při předložení tohoto záručního listu a dokladu o
zaplacení
c) jestliže dojde k opravě nebo výměně spotřebiče v záruční době, záruční doba se prodlužuje
3. záruka se nevztahuje
a) na mechanické poškození
b) nesprávné používání v rozporu s návodem k použití
1. záruka zaniká:
- při použití spotřebiče jinak než v domácnosti
- při provádění opravy nebo změny na spotřebiči osobou jinou než pověřenou naším servisem
Na tento spotřebič poskytujeme záruku na nedostatky, které jsou označeny jako
výrobní chyby nebo chyby materiálu. Záruční doba začíná dnem prodeje a je uznána po
předložení potvrzeného tohoto záručního listu nebo orig.dokladu o zaplacení + tento
nepotvrzený, ale vyplněný ZL pro záznam opravy. Případné reklamace můžete uplatnit v
místě nákupu tohoto přístroje nebo v servisním středisku rmy:
Domo-elektro s.r.o. Hluboká 147, 34506 Kdyně viz www.domo-elektro.cz
tel. 379 789 684 nebo na servis@domo-elektro.cz , tel. 379 422 550
CZ
46
DO917GDK
Page 47

BEZPEČNOSTNÍ POKYNY
· Přístroj nesmí být používán dětmi věku mezi 0-16let. Děti starší 16 let smí přístroj
používat pouze pod dohledem. Osoby se sníženou psychickou, motorickou nebo mentální
schopností smí používat přístroj pouze za neustálého dohledu odpovědné osoby, která je
seznámena s pravidly používání a případným rizikem.
· Děti si s přístrojem nesmí hrát.
· Přístroj a přívodní kabel držte mimo dosah dětí mladších 16 let. Údržbu a čištění nesmí
provádět děti mladší 16 let a zároveň musí být pod dohledem dospělé osoby.
· Přístroj je určen pro používání v domácnostech a podobných prostředích, tak jako je:
· kuchyňky v obchodech, kancelářích atd.
· chaty, chalupy
· hotely, penziony a jiné dočasné ubytování
· POZOR: Aby se předešlo rizikům úrazu (poškození), nesmí být přístroj používán se žádnou
externí součástí (např. časovač, vypínač, přepínač …)
· Před použitím si důkladně přečtěte návod k použití.
· Před použití zkontrolujte zda parametry el. sítě odpovídají požadovaným parametrů na
informativním štítku přístroje.
· Nenechávejte viset kabel přístroje přes hranu stolu a vyvarujte se toho, aby přišel do styku
s horkými plochami.
· Pokud je přívodní kabel poškozen, přístroj nepoužívejte. Kabel musí být okamžitě opraven
v odborném servise nebo proškolenou osobou.
· Pokud se v blízkosti přístroje pohybují děti buďte zvláště opatrní.
· Pokud přístroj nepoužíváte, nebo se jej chystáte rozebírat či měnit součásti, tak přístroj
odpojte od el. napětí. Před rozebírání, skládáním i před čistěním, vždy musí být přístroj
odpojen od el. sítě.
· Nikdy nenechávejte zapnutý přístroj bez dozoru.
· Přístroj nestavte do blízkosti jiných zdrojů tepla (např. trouba, sporák … )
· Přístroj nestavte do blízkosti vznětlivých nebo výbušných materiálů.
· Přístroj není určen pro venkovní použití.
· Přístroj používejte pouze k účelům, ke kterým je zamýšlen a vyroben.
· Přístroj stavte na pevné, rovné a stabilní místo.
· Výrobce ani prodejce nenese odpovědnost za vzniklá rizika z nedodržení správného
využívání.
· Všechny případné opravy a úpravy smí být řešeny pouze originálním nebo odborně
proškoleným servisem.
· Přístroj ani přívodní kabel nikdy neponořujte do vody ani jiné tekutiny.
· Děti se nesmí dotýkat přívodního kabelu ani jiných elektronických součástek.
· Ujistěte se, že před použitím odlepíte a odstraníte veškeré reklamní a ochranné fólie. Děti
si s ochrannými ani reklamními polepy nesmí hrát.
www.domo-elektro.be
DO917GDK
CZ
47
Page 48

· Větrací otvory a průduchy na přístroji udržujte vždy čisté. Nikdy nesmí být ničím zakryty.
· Nikdy nepoužívejte žádný jiný elektrický přístroj uvnitř lednice.
· Před prvním použitím si důkladně zkontrolujte zda je lednice v pořádku a zda nebyla nijak
poškozena při přepravě.
· Ujistěte se, že zástrčka není nijak poškozen, poškozená zástrčka nebo kabel může způsobit
požár.
· Vždy a za každých okolností musí být zásuvka se zapojenou zástrčkou přístupná.
· Nikdy přístroj neodpojujte tahem za kabel, tahejte přímo za zástrčku.
· Pokud je zásuvka uvolněná, přístroj nezapínejte. (Nebezpečí úrazu elektrickým proudem
nebo požáru)
· Lednice je velmi těžká, proto buďte při manipulaci velmi opatrní.
· Zamezte, aby přístroj stál dlouhodobě na přímém slunečním svitu.
ČÁSTI
1. Ovládací panel
2. Vnitřní LED osvětlení
3. Regály
4. Senzor teploty
5. Výškově nastavitelná nožička
6. Skleněné dveře
PŘED PRVNÍM POUŽITÍM
CZ
· Nejdříve odstraňte všechny obaly, reklamní i ochranné folie. Vnější prostory otřete jemným
suchým hadrem a vnitřní prostory vymyjte vlhkým nebo mokrým hadrem.
· Vyvarujte se, aby lednice nestála dlouhodobě na přímém slunci. Přímé slunce může
způsobit lehkou změnu barvy povrchu. Jiný tepelný zdroj v blízkosti zvyšuje spotřebu
přístroje. Průměrná teplota místnosti, kde lednice stojí, by měla být mezi 16-32 °C. Ideální
teplota místnosti je 22-25°C.
· Nestavte na příliš vlhká místa.
· Před zapojením lednice ještě zkontrolujte, zda se parametry vaší el. sítě schodují s
požadovanými parametry na štítku přístroje.
· Přístroj okolo sebe musí mít stále dostatečné místo na cirkulaci vzduchu. Nad lednicí
1
2
3
4
5
6
48
DO917GDK
Page 49

musí být alespoň 10 cm a na stranách alespoň 5 cm místa. Zadní stěna přístroje musí být
alespoň 13 cm od zdi, k tomu napomůžou zarážky na zadní straně, které Vám nedovolí
přístroj přímo přitisknout na zeď. Tyto zarážky najdete v balení a před spuštěním je
přišroubujte na zadní stěnu.
· Pokud máte nerovnou, nebo hrbolatou podlahu, tak můžete lednici vyrovnat pomocí
přední nastavitelné nožičky.
· Na dveře si našroubujte madlo na otevírání (viz obrázek).
· Jakmile lednici usadíte na místo, nechte ji ještě 2 hodiny stát v klidu než ji zapnete.
PŘEHOZENÍ DVEŘÍ
Tato lednice má dveře, které se dají přehodit a otevírat na opačnou stranu. Pokud je chcete
přehodit a přešroubovat panty, zavolejte odborný servis nebo se alespoň zeptejte zkušeného
technika.
Před začátkem úpravy dveří musí být lednice prázdná a vypojená z el. sítě.
www.domo-elektro.be
DO917GDK
CZ
49
Page 50

Reversing the Door Swing of Your Beverage Cooler
Before Reversing the door ,the power must be shut off.
All parts removed must be saved to do the reinstallation of the door.
NOTE:
This beverage cooler has the capability of either opening the door from the
left or right side. The unit is delivered to you with the door opening from the
left side. Should you desire to reverse the opening direction, please follow
these instructions.
This beverage cooler has been built with the door hinges on the left. If you wish
to change the opening direction, follow the instructions below:
2. Remove the two screws (1) that hold the upper hinge (5) (right side) to the
frame. Take away the upper hinge (5).
3. Lift the door and place it on a padded surface to prevent scratching it.
5. Remove the two screws(8) that hold the lower hinge(2) and Make sure to
Remove the lower hinge(2).
6. Remove the left front leg (4) and transfer it to the right side.
7. Remove the hole cover plate(7) to the right side.
8.
Before placing this lower hinge(2), remove the bolt-pin (9) and reverse
the direction of the lower hinge(2). Then install the lower hinge (2) onto
the left side of the lower frame with two screws (8).
10. Set the door to its place making sure the door seat at the lower hinge(2)
.
11. While holding the door in the closed position secure the upper hinge (5) in the
top frame of left side with two screws (1). Please remember that do not tighten
the two screws(1) until the top of the door is levelled with the counter top.
1. Remove the upper hinge cover(6) first
12. Install the upper hinge cover(6) on the upper hinge..
9. Insert the bolt-pin(9) to the lower hinge (2).
4. Remove the two screws (10) that hold the handle (11) (on the right side frame).
Change the handle to the left side frame.
1
6
7
5
1
5
7
6
10
10
11
4
2
8
9
3
2
8
4
9
3
1. Odstraňte krytku horního pantu (6).
2. Vyšroubujte šroubky (1) z horního pantu (5). Pant odejměte.
3. Dveře nadzvedněte a vysaďte – položte je stranou na měkké a stabilní místo.
4. Odšroubujte šroubky (10) z madla a madlo přehoďte podobným způsobem na druhou
CZ
stranu.
5. Odšroubujte šrouby (8) ze spodního pantu (2). Pant přemístěte na druhou stranu.
6. Vyšroubujte výškově nastavitelnou nožičku a přemístěte také na druhou stranu.
7. Pomocí horní krytky (7) dírek po šroubech překryjte díry šroubů od horního pantu.
8. Ještě než přemístíte spodní pant (2), tak z něho vyjměte tyčku na usazení dveří (9).
Samotný pant otočte a pomocí 2 šroubů (8) utáhněte.
9. Tyčku na usazení dveří (9) opět nasaďte do spodního pantu.
10. Vezměte dveře na nasaďte je na upevněný pant.
11. Dveře si lehce přidržte a pomocí horního pantu (5) je upevněte na své místo. Horní pant
přišroubujte pomocí šroubků (1).
12. Ještě před nálním dotažením horního pantu zavřete dveře a zkontrolujte, zda těsnění
dveří správně doléhá po celém svém obvodu. Těsnění musí těsnit ve vertikální i
horizontální rovině, jakmile tomu tak je, tak horní pant (5) důkladně dotáhněte.
13. Pant opět přikryjte krytkou (6). Pokud je potřeba, tak lednici vyrovnejte pomocí výškově
nastavitelné nožičky.
PŘEMISŤOVÁNÍ LEDNICE
· Pokud se lednice z jakéhokoli důvodu vypnula, tak před jejím opětovným zapnutím
počkejte alespoň 10 min. Tento čas napomůže k tomu, aby se vyrovnaly tlaku uvnitř
chladícího systému.
· Lednici vypněte a vypojte z el. sítě. Vyjměte všechno jídlo a nápoje. Z lednice vyndejte i
všechny police a pohyblivé části. Nebo je také můžete nějak připevnit, aby při manipulaci s
lednicí nezpůsobily škodu.
· Lednici přemístěte a nechte alespoň 10 minut v klidu stát před jejím spuštěním.
· V chladícím systému je naplněno chladivo R600a. Tento typ chladiva je ekologicky šetrný,
50
DO917GDK
11
Page 51

Do not store food in beverage cooler, as interior temperature may not get cool
enough to prevent spoilage. As a natural result of condensation, in summer
months or area of high humidity, the glass door may built up moisture on the
outside. Just wipe it away.
IMPORTANT SAFEGUARDS
It is recommended you install the beverage cooler in a place where the ambient
temperature is between 22-25 degree Celsius .If the ambient temperature
in above or below the recommended temperature, conditions may cause the
interior temperature to fluctuate.
OPERATING YOUR BEVERAGE COOLER
If the interior light is left on, the temperature inside the beverage cooler will be higher.
The above temperatures may fluctuate depending on whether or not the interior
bulb is on or off or whether the bottles are located on the lower/middle or lower
section.
Recommended Temperatures for chilling beverage
Sparkling wines 7- C
Cold beverage -6 C
ale je vznětlivý. Proto buďte při jakékoli manipulaci velmi opatrní, aby se chladící systém
nijak neporušil. Pokud by se chladící okruh narušil a chladivo unikalo, tak nesmí v okolí
lednice být otevřený oheň ani žádné tepelné zdroje. Místnost do které uniklo chladivo
vyvětrejte.
POUŽITÍ
· Tato lednice je vyrobena a zamýšlena pouze na chlazení nápojů (nikoli potravin).
· Pokud jste lednici právě poprvé zapnuli, a nebo po delší době nečinnosti, je možné že se
mírně liší aktuální vnitřní teplota a teplota zobrazená na ovládacím panelu. Tento jev se
však po několika hodinách srovná a vše bude v pořádku.
· Uvnitř lednice jsou minimální teplotní rozdíly mezi horní a spodní částí, to je způsobeno
tím, že teplejší vzduch stoupá. Proto je horní police lednice mírně teplejší a spodní
chladnější.
OVLÁDACÍ PANEL
BEVERAGE
1 2 3 4 5
1. Zvyšování nastavené teploty
2. Snižování nastavené teploty
3. Displej
4. Ukazatel stupňů Farenheit / Celsius
5. Spínač vnitřní světla
Nastavení ukazatele teploty.
Lednice v normálním režimu drží teplotu 45 °F, což je čitelné i na displeji. Na displeji si můžete
nastavit zobrazení teploty Ferenheit nebo Celsius (přepnete pomocí tlačítka)
zapnuté stupně Farenheita, tak bude kontrolka svítit červeně a za číslem teploty bude svítit
písmenko F.
Pokud máte zvolené stupně Celsia, tak kontrolka bude svítit žlutě a za číslem teploty bude
písmenko C.
Nastavení teploty
Požadovanou teplotu si lehce změníte pomocí tlačítek „zvyšovaní
stisknutí tlačítka změní teplotu o 1 °C.
www.domo-elektro.be
/snižování
CZ
. Pokud máte
“. Každé
51
DO917GDK
Page 52

Osvětlení
Osvětlení lze zapnout a vypnout pomocí spínače.
UPOZORNĚNÍ: vnitřní teplota lednice se může mírně ovlivnit, pokud bude osvětlení
dlouhodobě zapnuto.
ČIŠTĚNÍ A ÚDRŽBA
· Vypojte zástrčku z el. sítě.
· Z lednice vše vyndejte a nápoje uskladněte na chladném místě.
· Nepoužívejte žádná drsná ani agresivní čistidla.
· Přístroj čistěte pomocí jemného a vlhkého hadříku, případně namočeným do vlažné vody
se saponátem.
· Těsnění dveří stačí otírat čistou vodou a následně je důkladně osušit.
ECO REŽIM DOVOLENÉ
Při kratším nevyužívání (odjezdu) můžete nechat vše tak jak je. Pokud však odjíždíte na delší
dobu, tak doporučujeme následující postup:
Vyjměte z lednice všechny nápoje.
Lednici odpojte od el sítě.
Přístroj vyčistěte jako obvykle (včetně odmražovací nádobky).
Nechte dveře otevřené, tak aby se uvnitř nesrážela vlhkost a nevznikala plíseň.
VÝPADEK PROUDU
Naprostá většina výpadku el. energie se opraví do 1 až 2 hodin od vypadnutí, taková doba bez
proudu nemá velký vliv na nápoje uvnitř lednice. Abychom ještě minimalizovali změny teploty
uvnitř, tak nesmíme často otevírat dveře.
Pokud výpadek proudu trvá mnohonásobně déle, tak doporučujeme teplotu uvnitř
kontrolovat a v případě potřeby všechny nápoje přemístit na jiné chladné místo
CZ
52
DO917GDK
Page 53

OHLED NA ŽÍVOTNÍ PROSTŘEDÍ
Symbol na přístroji či na jeho obalu znamená, že s tímto
výrobkem není možno nakládat jako s běžným domovním
odpadem, nýbrž musí být odevzdán na místech určených
ke sběru a likvidaci elektrických a elektronických zařízení.
Dodržením tohoto doporučení chráníte životní prostředí a
zdraví spoluobčanů. Více informací o možnostech likvidace
nebezpečného odpadu obdržíte na obecních nebo městských
úřadech, sběrných dvorech nebo v prodejně, kde jste přístroj
zakoupili.
Obalové materiály jsou recyklovatelné, nakládejte s nimi
podle předpisů pro životní prostředí.
www.domo-elektro.be
CZ
53
DO917GDK
Page 54

ZÁRUKA
Pre záruku začínajúcich dňom predaja spotrebiča platí na území SR tieto podmienky:
1. trvania záruky: 2 roky
2. poskytovanie záruky:
a) záručnú opravu vykonáme podľa nášho zvážení opravou alebo výmenou chybných dielov,
ak tieto závady vznikli preukázateľne chybou materiálu alebo chybou pri výrobe
b) záručná oprava bude vykonaná len pri predložení tohto záručného listu a dokladu o
zaplatenie
c) ak dôjde k oprave alebo výmene spotrebiča v záručnej dobe, záručná doba sa predlžuje.
3. záruka sa nevzťahuje
a) na mechanické poškodenie
b) nesprávne používanie v rozpore s návodom na použitie
1. záruka zaniká:
- Pri použití spotrebiča inak ako v domácnosti
- Pri vykonávaní opravy alebo zmeny na spotrebiči osobou inou ako poverenou naším
servisom
Na tento spotrebič poskytujeme záruku na nedostatky, ktoré sú označené ako výrobné
chyby alebo chyby materiálu. Záručná doba začína dňom predaja a je uznaná po predložení
potvrdeného tohoto záručného listu alebo orig.dokladu o zaplatení + tento nepotvrdený, ale
vyplnený ZL pre záznam opravy. Prípadné reklamácie môžete uplatniť v mieste nákupu tohto
prístroja alebo v servisnom stredisku rmy:
Domo-elektro s.r.o. Hluboká 147, 34506 Kdyně pozri www.domo-elektro.cz
tel. 379 789 684 alebo na servis@domo-elektro.cz, tel. 379 422 550
SK
54
DO917GDK
Page 55

BEZPEČNOSTNÉ POKYNY
· Prístroj nesmie byť používaný deťmi veku medzi 0-16let. Deti staršie ako 16 rokov môžu
používať prístroj iba pod dohľadom. Osoby so zníženou psychickou, motorickú alebo
mentálnou schopnosťou smie používať prístroj len za neustáleho dohľadu zodpovednej
osoby, ktorá je oboznámená s pravidlami používania a prípadným rizikom.
· Deti si s prístrojom nesmie hrať.
· Prístroj a prívodný kábel držte mimo dosahu detí mladších ako 16 rokov. Údržbu a čistenie
nesmú vykonávať deti mladšie ako 16 rokov a zároveň musí byť pod dohľadom dospelej
osoby.
· Prístroj je určený pre používanie v domácnostiach a podobných prostrediach, tak ako je:
· kuchynky v obchodoch, kanceláriách atď.
· chaty, chalupy
· hotely, penzióny a iné dočasné ubytovanie
· POZOR: Aby sa predišlo riziku úrazu (poškodenie), nesmie byť prístroj používaný sa žiadnu
externú súčasťou (napr. Časovač, vypínač, prepínač ...)
· Pred použitím si dôkladne prečítajte návod na použitie.
· Pred použití skontrolujte či parametre el. siete zodpovedajú požadovaným parametrov na
informatívnym štítku prístroja.
· Nenechávajte visieť kábel prístroja cez hranu stola a vyvarujte sa toho, aby prišiel do styku
s horúcimi plochami.
· Pokiaľ je prívodný kábel poškodený, prístroj nepoužívajte. Kábel musí byť okamžite
opravený v odbornom servise alebo preškolenou osobou.
· Ak sa v blízkosti prístroja pohybujú deti buďte zvlášť opatrní.
· Pokiaľ prístroj nepoužívate, alebo sa ho chystáte rozoberať či meniť súčasti, tak prístroj
odpojte od el. napätia. Pred rozoberanie, skladaním aj pred čistením, vždy musí byť prístroj
odpojený od el. siete.
· Nikdy nenechávajte zapnutý prístroj bez dozoru.
· Prístroj nestavajte do blízkosti iných zdrojov tepla (napr. Rúra, sporák ...)
· Prístroj nestavajte do blízkosti horľavých alebo výbušných materiálov.
· Prístroj nie je určený pre vonkajšie použitie.
· Prístroj používajte iba na účely, na ktoré je zamýšľaný a vyrobený.
· Prístroj stavajte na pevné, rovné a stabilné miesto.
· Výrobca ani predajca nenesie zodpovednosť za vzniknuté riziká z nedodržania správneho
využívania.
· Všetky prípadné opravy a úpravy smie byť riešené len originálnym alebo odborne
preškoleným servisom.
· Prístroj ani prívodný kábel nikdy neponárajte do vody ani inej tekutiny.
· Deti sa nesmú dotýkať prívodného kábla ani iných elektronických súčiastok.
· Uistite sa, že pred použitím odlepíte a odstránite všetky reklamné a ochranné fólie. Deti si s
www.domo-elektro.be
DO917GDK
SK
55
Page 56

ochrannými ani reklamnými polepy nesmie hrať.
· Vetracie otvory a prieduchy na prístroji udržujte vždy čisté. Nikdy nesmie byť ničím
zakryté.
· Nikdy nepoužívajte žiadny iný elektrický prístroj vnútri chladničky.
· Pred prvým použitím si dôkladne skontrolujte či je chladnička v poriadku a či sa
nepoškodila pri preprave.
· Uistite sa, že zástrčka nie je nijako poškodený, poškodená zástrčka alebo kábel môže
spôsobiť požiar.
· Vždy a za každých okolností musí byť zásuvka so zapojenou zástrčkou prístupná.
· Nikdy prístroj neodpájajte ťahom za kábel, ťahajte priamo za zástrčku.
· Ak je zásuvka uvoľnená, prístroj nezapínajte. (Nebezpečenstvo úrazu elektrickým prúdom
alebo požiaru)
· Lednice je veľmi ťažká, preto buďte pri manipulácii veľmi opatrní.
· Zabráňte, aby prístroj stál dlhodobo na priamom slnečnom svite.
ČASTI
1. Ovládací panel
2. Vnútorné LED osvetlenie
3. Regály
4. Senzor teploty
5. Výškovo nastaviteľná nožička
6. Sklenené dvere
1
2
3
6
4
5
PRED PRVÝM POUŽITÍM
· Najskôr odstráňte všetky obaly, reklamné aj ochranné fólie. Vonkajšie priestory utrite
jemnou suchou handrou a vnútorné priestory vymyte vlhkou alebo mokrou handrou.
· Vyvarujte sa, aby chladnička nestála dlhodobo na priamom slnku. Priame slnko môže
SK
spôsobiť ľahkú zmenu farby na povrchu. Iný tepelný zdroj v blízkosti zvyšuje spotrebu
prístroja. Priemerná teplota miestnosti, kde chladnička stojí, by mala byť medzi 16-32 ° C.
Ideálna teplota miestnosti je 22-25 ° C.
· Nestavajte na príliš vlhké miesta.
· Pred zapojením chladničky ešte skontrolujte, či sa parametre vašej el. siete schodom s
56
DO917GDK
Page 57

požadovanými parametrami na štítku prístroja.
· Prístroj okolo seba musí mať stále dostatočné miesto na cirkuláciu vzduchu. Nad
chladničkou musí byť aspoň 10 cm a na stranách aspoň 5 cm miesta. Zadná stena prístroja
musí byť aspoň 13 cm od steny, k tomu napomôžu zarážky na zadnej strane, ktoré Vám
nedovolia prístroj priamo pritlačiť na stenu. Tieto zarážky nájdete v balení a pred spustením
je priskrutkujte na zadnú stenu.
· Ak máte nerovnú, alebo hrboľatú podlahu, tak môžete chladničku vyrovnať pomocou
prednej nastaviteľné nožičky.
· Na dvere si naskrutkujte madlo na otváranie (viď obrázok).
· Akonáhle chladničku usadíte na miesto, nechajte ju ešte 2 hodiny stáť v pokoji než ju
zapnete.
www.domo-elektro.be
DO917GDK
SK
57
Page 58

Reversing the Door Swing of Your Beverage Cooler
Before Reversing the door ,the power must be shut off.
All parts removed must be saved to do the reinstallation of the door.
NOTE:
This beverage cooler has the capability of either opening the door from the
left or right side. The unit is delivered to you with the door opening from the
left side. Should you desire to reverse the opening direction, please follow
these instructions.
This beverage cooler has been built with the door hinges on the left. If you wish
to change the opening direction, follow the instructions below:
2. Remove the two screws (1) that hold the upper hinge (5) (right side) to the
frame. Take away the upper hinge (5).
3. Lift the door and place it on a padded surface to prevent scratching it.
5. Remove the two screws(8) that hold the lower hinge(2) and Make sure to
Remove the lower hinge(2).
6. Remove the left front leg (4) and transfer it to the right side.
7. Remove the hole cover plate(7) to the right side.
8.
Before placing this lower hinge(2), remove the bolt-pin (9) and reverse
the direction of the lower hinge(2). Then install the lower hinge (2) onto
the left side of the lower frame with two screws (8).
10. Set the door to its place making sure the door seat at the lower hinge(2)
.
11. While holding the door in the closed position secure the upper hinge (5) in the
top frame of left side with two screws (1). Please remember that do not tighten
the two screws(1) until the top of the door is levelled with the counter top.
1. Remove the upper hinge cover(6) first
12. Install the upper hinge cover(6) on the upper hinge..
9. Insert the bolt-pin(9) to the lower hinge (2).
4. Remove the two screws (10) that hold the handle (11) (on the right side frame).
Change the handle to the left side frame.
PREHODENIE DVERÍ
Táto chladnička má dvere, ktoré sa dajú prehodiť a otvárať na opačnú stranu. Ak ich chcete
prehodiť a preskrutkovať pánty, zavolajte odborný servis alebo sa aspoň spýtajte skúseného
technika.
Pred začiatkom úpravy dverí musí byť chladničky prázdna a vypojení z el. siete.
1
6
7
4
1. Odstráňte krytku horného pántu (6).
2. Vyberte skrutky (1) z horného pántu (5). Pánt odoberte.
3. Dvere nadvihnite a vysaďte - položte ich stranou na mäkké a stabilné miesto.
4. Odstráňte skrutky (10) z madla a madlo prehoďte podobným spôsobom na druhú stranu.
5. Odstráňte skrutky (8) zo spodného pántu (2). Pánt premiestnite na druhú stranu.
6. Vyskrutkujte výškovo nastaviteľnú nožičku a premiestnite tiež na druhú stranu.
7. Pomocou hornej krytky (7) dierok po skrutkách prekryte diery skrutiek od horného pántu.
8. Ešte než premiestnite spodný pánt (2), tak z neho vyberte tyčku na usadenie dverí (9).
Samotný pánt otočte a pomocou 2 skrutiek (8) utiahnite.
9. Tyčku na usadenie dverí (9) opäť nasaďte do spodného pántu.
10. Vezmite dvere na nasaďte ich na upevnený pánt.
11. Dvere si ľahko pridržte a pomocou horného pántu (5) je upevnite na svoje miesto. Horný
pánt priskrutkujte pomocou skrutiek (1).
12. Ešte pred nálnym dotiahnutím horného pántu zatvorte dvere a skontrolujte, či tesnenie
5
10
11
2
8
9
3
1
6
5
2
8
4
9
3
dverí správne dolieha po celom svojom obvode. Tesnenie musí tesniť vo vertikálnej aj
horizontálnej rovine, akonáhle to tak je, tak horný pánt (5) dôkladne dotiahnite.
13. Pánt opäť prikryte krytkou (6). Ak je potreba, tak chladničku vyrovnajte pomocou
výškovo nastaviteľné nožičky.
SK
7
10
11
PREMIESTŇOVANIE LEDNICE
· Ak sa chladničky z akéhokoľvek dôvodu vypla, tak pred jej opätovným zapnutím počkajte
aspoň 10 min. Tento čas napomôže k tomu, aby sa vyrovnali tlaku vo vnútri chladiaceho
58
DO917GDK
Page 59

Do not store food in beverage cooler, as interior temperature may not get cool
enough to prevent spoilage. As a natural result of condensation, in summer
months or area of high humidity, the glass door may built up moisture on the
outside. Just wipe it away.
IMPORTANT SAFEGUARDS
It is recommended you install the beverage cooler in a place where the ambient
temperature is between 22-25 degree Celsius .If the ambient temperature
in above or below the recommended temperature, conditions may cause the
interior temperature to fluctuate.
OPERATING YOUR BEVERAGE COOLER
If the interior light is left on, the temperature inside the beverage cooler will be higher.
The above temperatures may fluctuate depending on whether or not the interior
bulb is on or off or whether the bottles are located on the lower/middle or lower
section.
Recommended Temperatures for chilling beverage
Sparkling wines 7- C
Cold beverage -6 C
systému.
· Lednici vypnite a vypojte z el. siete. Odstráňte všetko jedlo a nápoje. Z chladničky vyberte
aj všetky police a pohyblivé časti. Alebo je tiež môžete nejako pripevniť, aby pri manipulácii
s chladničkou nespôsobili škodu.
· Lednici premiestnite a nechajte aspoň 10 minút v kľude stáť pred jej spustením.
· V chladiacom systéme je naplnené chladivo R600a. Tento typ chladiva je ekologicky šetrný,
ale je vznetlivý. Preto buďte pri akejkoľvek manipulácii veľmi opatrní, aby sa chladiaci
systém nijako neporušil. Ak by sa chladiaci okruh narušil a chladivo unikalo, tak nesmie v
okolí chladničky byť otvorený oheň ani žiadne tepelné zdroje. Miestnosť do ktorej uniklo
chladivo vyvetrajte.
POUŽITIE
· Táto chladnička je vyrobená a zamýšľaná iba na chladenie nápojov (nie potravín).
· Ak ste chladničku práve prvom zapnutí a alebo po dlhšej dobe nečinnosti, je možné že sa
mierne líši aktuálna vnútorná teplota a teplota zobrazená na ovládacom paneli. Tento jav
sa však po niekoľkých hodinách zrovná a všetko bude v poriadku.
· Vnútri chladničky sú minimálne teplotné rozdiely medzi hornou a spodnou časťou, to je
spôsobené tým, že teplejší vzduch stúpa. Preto je horná polica chladničky mierne teplejšie
a spodnú chladnejšie.
OVLÁDACÍ PANEL
1. Zvyšovanie nastavenej teploty
2. Znižovanie nastavenej teploty
3. Displej
4. Ukazovateľ stupňov Farenheit / Celsius
5. Spínač vnútorné svetlá
1 2 3 4 5
BEVERAGE
Nastavenie ukazovateľa teploty.
Lednice v normálnom režime drží teplotu 45 ° F, čo je čitateľné aj na displeji. Na displeji si
môžete nastaviť zobrazenie teploty Ferenheit alebo Celsius (prepnete pomocou tlačidla)
. Ak máte zapnuté stupňa Fahrenheita, tak bude kontrolka svietiť na červeno a za číslom
teploty bude svietiť písmenko F.
www.domo-elektro.be
SK
59
DO917GDK
Page 60

Pokiaľ máte zvolené stupňa Celzia, tak kontrolka bude svietiť na žlto a za číslom teploty bude
písmenko C.
Nastavenie teploty
Požadovanú teplotu si ľahko zmeníte pomocou tlačidiel “zvyšovaní
stlačenie tlačidla zmení teplotu o 1 ° C.
Osvetlenie
Osvetlenie možno zapnúť a vypnúť pomocou spínača.
UPOZORNENIE: vnútorná teplota chladničky sa môže mierne ovplyvniť, ak bude osvetlenie
dlhodobo zapnuté.
/ znižovaní
”. Každé
ČISTENIE A ÚDRŽBA
· Vypojte zástrčku z el. siete.
· Z chladničky všetko vyberte a nápoje uskladnite na chladnom mieste.
· Nepoužívajte žiadna drsná ani agresívny čistidlá.
· Prístroj čistite pomocou jemného a vlhkej handričky, prípadne namočenou do vlažnej vody
so saponátom.
· Tesnenie dverí stačí utierať čistou vodou a následne ich dôkladne osušiť.
ECO REŽIM DOVOLENKY
Pri kratšom nevyužívanie (odchodu) môžete nechať všetko tak ako je. Ak však odchádzate na
dlhšiu dobu, tak odporúčame nasledujúci postup:
· Vyberte z chladničky všetky nápoje.
· Lednici odpojte od el siete.
· Prístroj vyčistite ako obvykle (vrátane odmrazovač nádobky).
· Nechajte dvere otvorené, tak aby sa vo vnútri nezrážala vlhkosť a nevznikala pleseň.
VÝPADOK PRÚDU
Prevažná väčšina výpadku el. energia sa opraví do 1 až 2 hodín od vypadnutia, taká doba bez
prúdu nemá veľký vplyv na nápoje vnútri chladničky. Aby sme ešte minimalizovali zmeny
teploty vo vnútri, tak nesmieme často otvárať dvere.
Ak výpadok prúdu trvá mnohonásobne dlhšie, tak odporúčame teplotu vnútri kontrolovať a v
SK
prípade potreby všetky nápoje premiestniť na iné chladné miesto.
60
DO917GDK
Page 61

OHĽAD NA ŽIVOTNÉ PROSTREDIE
Symbol na prístroji alebo na jeho obale znamená, že s
týmto výrobkom nie je možné nakladať ako s domovým
odpadom, ale musí byť odovzdaný na miestach určených
na zber a likvidáciu elektrických a elektronických zariadení.
Dodržaním tohto odporúčania chránite životné prostredie
a zdravie spoluobčanov. Viac informácií o možnostiach
likvidácie nebezpečného odpadu obdržíte na obecných alebo
mestských úradoch, zberných dvoroch alebo v predajni, kde
ste prístroj zakúpili.
Obalové materiály sú recyklovateľné, nakladajte s nimi podľa
predpisov pre životné prostredie.
www.domo-elektro.be
SK
61
DO917GDK
Page 62

Webshop
BESTEL
de originele
Domo-accessoires
en -onderdelen
online via:
COMMANDEZ
d’authentiques
accessoires et
pièces Domo en
ligne sur:
Original-Zubehör
BESTELLEN SIE
die Domo
und -Ersatzteile
online über:
the original
accessories and
parts online at:
ORDER
Domo
webshop.domo-elektro.be
of scan hier:
ou scannez ici:
oder hier scannen:
or scan here:
LINEA 2000 bvba - Dompel 9 - 2200 Herentals - Belgium - Tel: +32 14 21 71 91 - Fax: +32 14 21 54 63
 Loading...