

Page 1
DO7111S
Handleiding Strijkijzer met stoomgenerator
Mode d’emploi Fer à repasser avec centrale vapeur
Gebrauchsanleitung Bügeleisen mit dampfgenerator
Instruction booklet Iron with steam generator
Manual de instrucciones Plancha con Generador de vapor
Istruzioni per l’uso Ferro da stiro con caldaia a vapore
Návod k použití Žehlička s parním generátorem
Návod na použitie Žehlička s parným generátorom
PRODUCT OF
Page 2
Lees aandachtig alle instructies - bewaar deze handleiding voor latere raadpleging.
Lisez attentivement les instructions - gardez le mode d’emploi pour utilisation ultérieur.
Lesen Sie genau die Anweisungen - bewahren Sie die Gebrauchsanleitung für spätere
heranziehung.
Read all instructions carefully - save this instruction manual for future reference.
Lea detenidamente todas las instrucciones - Conserve este manual para futura referencia.
Leggere con attenzione le istruzioni - conservarle per future consultazioni
Před použitím si důkladně přečtěte tento manuál - manuál si uschovejte i pro případ
budoucího nahlédnutí.
Pred použitím si dôkladne prečítajte tento manuál - manuál si uschovajte aj pre prípad
budúceho nahliadnutie.
NL Nederlands 3
FR Français 9
DE Deutsch 15
EN English 21
ES Espagnol 27
IT Italiano 33
CZ Čeština 39
SK Slovenčina 45
Page 3
GARANTIE
Geachte klant,
Al onze producten ondergaan steeds een strenge kwaliteitscontrole,
alvorens ze aan je worden aangeboden. Mocht je desondanks toch nog
problemen hebben met jouw toestel, dan betreuren wij dit ten zeerste.
In dat geval verzoeken wij je contact op te nemen met onze klantendienst.
Onze medewerkers zullen je met plezier verder helpen.
+32 14 21 71 91 info@linea2000.be
Maandag – Donderdag : 8.30u – 12.00u en van 13.00u – 17.00u
Vrijdag : 8.30u – 12.00u en van 13.00u – 16.30u
Dit apparaat heeft een garantietermijn van 2 jaar vanaf de datum van aankoop. Gedurende de
garantieperiode zal de distributeur volledige verantwoording op zich nemen voor gebreken die
aanwijsbaar berusten op materiaal- of constructiefouten. Wanneer dergelijke gebreken voorkomen, zal
het apparaat, indien nodig, vervangen of gerepareerd worden. De garantieperiode van 2 jaar zal op dit
moment niet terug beginnen, maar loopt verder tot 2 jaar na de aankoop van het toestel. De garantie
wordt verleend op basis van het kassaticket. Indien je apparaat defect is binnen de garantietermijn van 2
jaar, dan mag je het toestel samen met het originele kassaticket binnenbrengen in de winkel waar je het
toestel hebt aangekocht.
De garantie op accessoires en onderdelen die onderhevig zijn aan slijtage, bedraagt 6 maanden.
De garantie en verantwoordelijkheid/aansprakelijkheid van de leverancier en fabrikant vervallen
automatisch in de volgende gevallen:
· Bij het niet naleven van de instructies in deze handleiding.
· Bij verkeerde aansluiting, vb. te hoge elektrische spanning.
· Bij verkeerd, hardhandig of abnormaal gebruik.
· Bij onvoldoende of verkeerd onderhoud.
· Bij herstelling of wijziging van het toestel door de consument of niet gemachtigde derden.
· Bij gebruik van onderdelen of accessoires welke niet worden aanbevolen of geleverd door de
leverancier / fabrikant.
NL
VEILIGHEIDSVOORSCHRIFTEN
Wanneer je elektrische toestellen gebruikt, moeten volgende veiligheidsinstructies in acht genomen
worden:
· Lees deze instructies zorgvuldig door. Bewaar deze handleiding om later te raadplegen.
· Verwijder voor het eerste gebruik alle verpakkingsmaterialen en eventuele promotionele stickers.
Zorg ervoor dat kinderen niet met de verpakkingsmaterialen spelen.
· Dit toestel is geschikt om te gebruiken in de huishoudelijke omgeving en in gelijkaardige omgevingen
zoals:
· Keukenhoek voor personeel van winkels, kantoren en andere gelijkaardige professionele
omgevingen
· Boerderijen
· Hotel- en motelkamers en andere omgevingen met een residentieel karakter
· Gastenkamers, of gelijkaardige
www.domo-elektro.be
DO7111S
3
Page 4
NL
· Dit toestel mag gebruikt worden door kinderen vanaf 16 jaar en personen met een fysieke of
sensoriële beperking of mensen met een beperkte mentale capaciteit of gebrek aan ervaring of
kennis, op voorwaarde dat deze personen toezicht krijgen of instructies hebben gekregen over het
gebruik van het toestel op een veilige manier en dat ze ook de gevaren kennen bij het gebruik van het
toestel. Kinderen mogen niet met het toestel spelen. Het onderhoud en de reiniging van het toestel
mogen niet door kinderen gebeuren tenzij ze ouder zijn dan 16 jaar en onder toezicht staan.
· Houd het toestel en de voedingskabel buiten het bereik van kinderen jonger dan 16 jaar.
· Het toestel moet afgesloten worden van het elektriciteitsnet als het niet gebruikt wordt, bij reparatie
en wanneer onderdelen vervangen worden. Laat het toestel eerst aoelen vooraleer onderdelen te
vervangen en vooraleer het toestel schoon te maken.
· Als de voedingskabel beschadigd is, moet hij vervangen worden door de fabrikant, een service center
of gekwaliceerde personen om ongevallen te vermijden.
· OPGELET: om ongevallen te vermijden, mag dit toestel niet bediend worden door een externe
bediening, zoals een externe timer, of op een net aangesloten worden dat regelmatig op- en afgezet
wordt.
· Laat het toestel niet zonder toezicht achter wanneer het aangesloten is op het elektriciteitsnet.
· Het strijkijzer mag enkel geplaatst en gebruikt worden op een vlak en stabiel oppervlak dat tegen
stoom en hitte kan.
· Het strijkijzer mag niet gebruikt worden als het gevallen is, als er zichtbare tekenen van schade zijn
of als het toestel lekt. Gebruik het toestel nooit wanneer de voedingskabel of stekker beschadigd
is, na een slechte werking van het toestel of wanneer het toestel beschadigd is. Breng het toestel
dan naar de dienst na verkoop van DOMO of het dichtsbijzijnde gekwaliceerde service center voor
nazicht, reparatie of elektrische/mechanische aanpassingen. Probeer het toestel nooit eigenhandig te
repareren.
Waar je dit symbool ziet, kan het toestel heel warm worden. Raak dit oppervlak van
het toestel niet aan, gebruik altijd de handvatten.
· Gebruik het toestel niet buiten.
· Verplaats het strijkijzer niet als het nog in gebruik is of nog heet is. Laat het toestel eerst volledig
aoelen voordat het verplaatst of onderhouden wordt.
· Gebruik het toestel enkel voor het doel waarvoor het bestemd is.
· Vul het waterreservoir nooit met een andere vloeistof dan water.
· Kijk voor gebruik na of het voltage vermeld op het toestel overeenkomt met het voltage van het
elektriciteitsnet thuis.
· De voedingskabel moet steeds aangesloten worden op een stopcontact dat geïnstalleerd en geaard is
volgens de lokale standaarden en normen.
· Gebruik enkel de accessoires die meegeleverd worden met het strijkijzer.
· Dompel het toestel, de voedingskabel of de stekker nooit onder in water of een andere vloeistof. Dit
om elektrische schokken of brand te voorkomen.
· Gebruik dit toestel niet met natte handen.
· Rol de voedingskabel volledig af om oververhitting op de kabel te voorkomen.
· Laat de voedingskabel geen warme oppervlakken aanraken.
· Sluit de voedingskabel pas op het stopcontact aan nadat het toestel zeker correct gemonteerd is. Om
het toestel te verwijderen van het stopcontact, moet de bediening eerst in de «OFF» of «0» positie
gezet worden. Daarna mag de stekker uit het stopcontact verwijderd worden. Trek nooit aan de
voedingskabel of het toestel zelf om de stekker uit het stopcontact te verwijderen.
4
DO7111S
Page 5
· Wees er zeker van dat het toestel volledig afgekoeld is voordat het waterreservoir geopend wordt om
te reinigen. Controleer achteraf of het waterreservoir op de juiste manier terug geïnstalleerd is.
· Als het toestel niet goed onderhouden wordt, kan dit de levensduur van het toestel drastisch
verminderen en een gevaarlijke situatie veroorzaken.
· Ongevallen of schade veroorzaakt door het niet volgen van deze regels zijn op eigen risico. Noch de
fabrikant, de importeur of leverancier kan daar dan verantwoordelijk voor geacht worden.
BEWAAR DEZE INSTRUCTIES OM LATER TE RAADPLEGEN
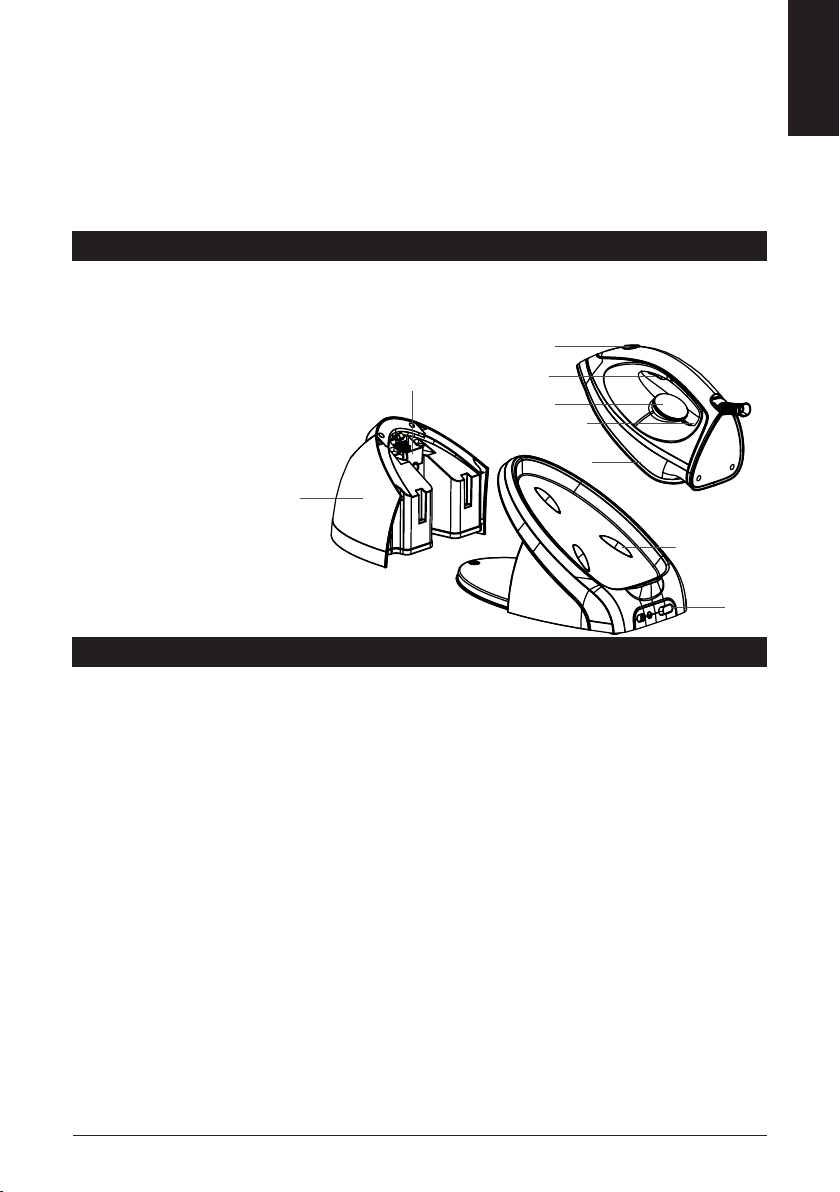
ONDERDELEN
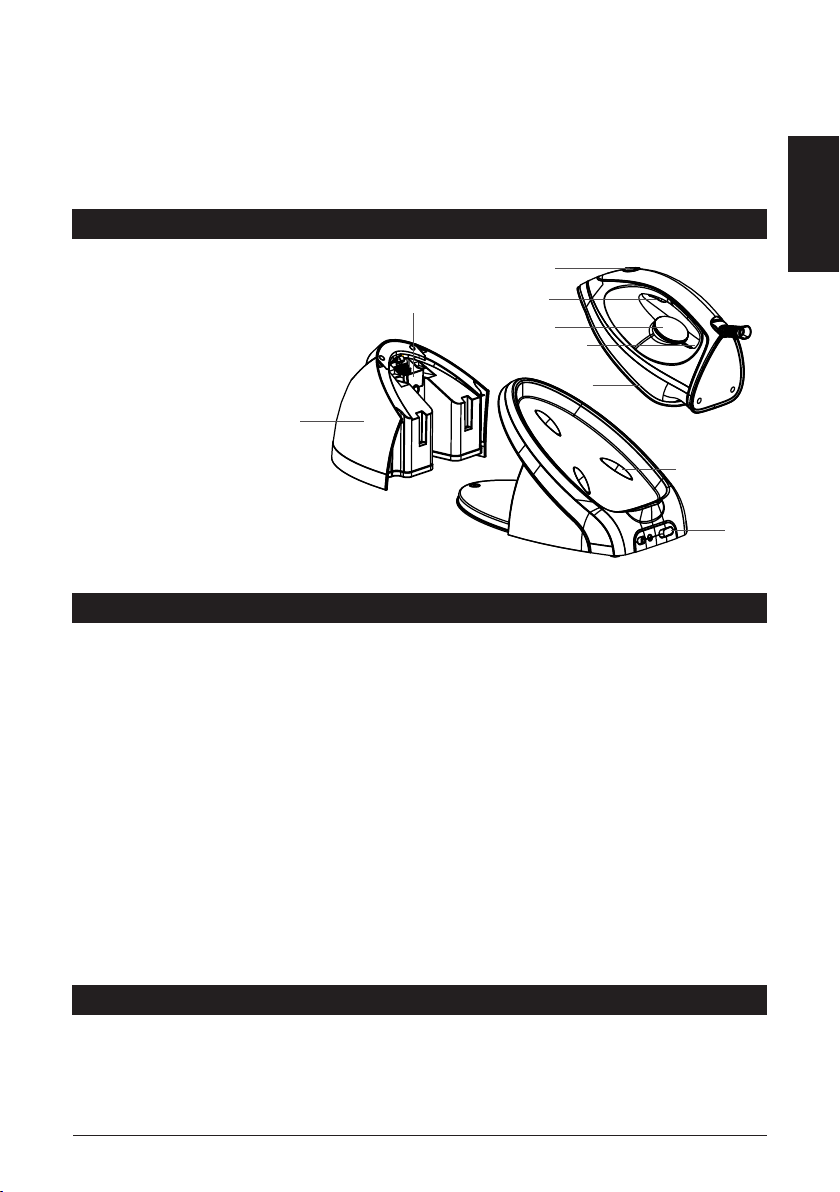
1. Vulopening
2. Waterreservoir
3. Temperatuurindicatielampje
4. Stoomknop
5. Temperatuurschijf
6. Stoomstootknop met
zelfreinigingsfunctie en
indicatielampje
7. Strijkzool
8. Thermische
isolatiekussentjes
9. Aan/uitknop
1
2
6
4
5
3
7
8
9
VOOR HET EERSTE GEBRUIK
NL
· Verwijder eventuele stickers en beschermfolie van de strijkzool.
· Verwarm het strijkijzer tot op de maximumtemperatuur en strijk gedurende een aantal minuten over
een vochtige doek om eventuele resten van de strijkzool te verwijderen.
OPGELET:
· De toestellen worden na productie telkens even getest. Het is dus normaal dat er zich
condensatiedruppels gevormd hebben in het waterreservoir.
· Het is normaal dat er tijdens het eerste gebruik een vreemde geur vrijkomt. Deze geur zal na een tijd
verdwijnen.
· Er kunnen deeltjes uit de strijkzool komen tijdens het eerste gebruik. Dit is normaal. De deeltjes zijn
niet schadelijk en zullen na een tijd verdwijnen.
· Wanneer je het toestel aanzet, kan de stoomgenerator een pompgeluid maken. Dit is normaal. Dit
geluid is een teken dat er water in de stoomgenerator wordt gepompt.
· Tijdens het opwarmen van de strijkzool zal er automatisch een beetje stoom uit de strijkzool komen.
Ook dit is normaal en zal ongeveer 3 seconden duren.
www.domo-elektro.be
DO7111S
5
Page 6
NL
GEBRUIK
Deze stoomgenerator biedt 2 opties: droog strijken of met stoom strijken. Volg hiervoor onderstaande
instructies. Lees ook goed de strijktips onderaan deze rubriek alvorens het toestel te gebruiken.
DROOG STRIJKEN
1. Zet het strijkijzer op de thermische isolatiekussentjes.
2. Steek de stekker in het stopcontact en druk op de aan/uitknop. Het
temperatuurindicatielampje zal beginnen knipperen.
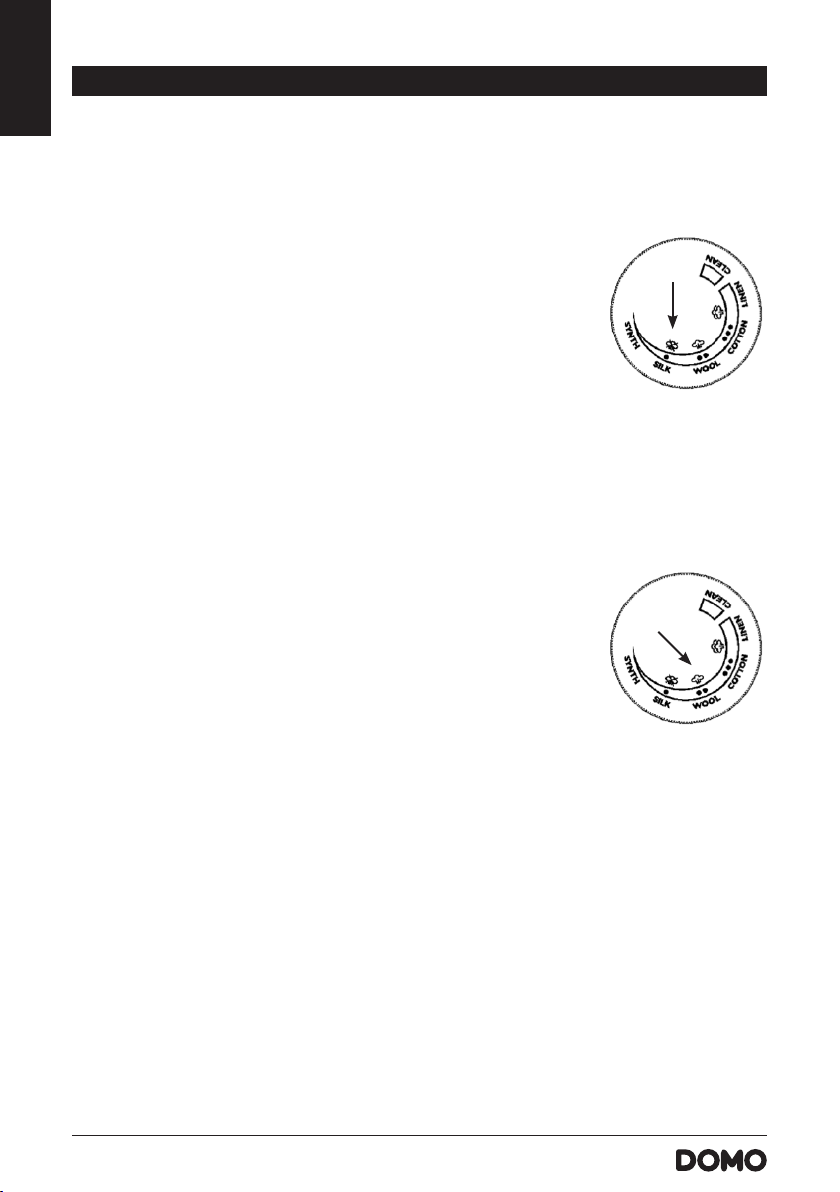
3. Draai de temperatuurschijf op de gewenste stand, aankelijk van de soort
stof die gestreken moet worden. Het temperatuurindicatielampje zal
knipperen en het strijkijzer zal beginnen opwarmen.
4. Wanneer het temperatuurindicatielampje blijft branden, is de
geselecteerde temperatuur bereikt. Je kan nu beginnen met strijken.
Opgelet: raak de hete strijkzool nooit aan!
MET STOOM STRIJKEN
Opgelet: steek de stekker nog niet in het stopcontact.
1. Vul het waterreservoir met water, let op dat je het maximumniveau (1,5 l) niet overschrijdt. Gebruik
alleen leidingwater of 50% leidingwater en 50% gedemineraliseerd water in geval van hard water.
2. Plaats het waterreservoir terug in het toestel. Je hoort een klik als het reservoir correct in het toestel
geplaatst is. Als het reservoir niet correct in het toestel is geplaatst, zal het ook niet werken.
3. Zet het strijkijzer op de thermische isolatiekussentjes. Steek de stekker
in het stopcontact, druk op de aan/uitknop. Draai de temperatuurschijf
naar de gewenste temperatuur, aankelijk van de soort stof. Het
temperatuurindicatielampje zal beginnen knipperen.
4. Als het temperatuurindicatielampje blijft branden, heeft het toestel de
juiste temperatuur bereikt.
5. Om te strijken met stoom, druk je op de stoomknop aan de binnenkant
van het handvat van het strijkijzer. Er zal een continue stoom uit de zool
gespoten worden. Wanneer je de knop loslaat, strijk je weer droog, zonder stoom.
6. Voor hardnekkige plooien kan je ook een stoomstoot gebruiken. Druk hiervoor op de
stoomstootknop bovenaan het handvat van het strijkijzer.
OPGELET:
· Raak de hete strijkzool nooit aan!
· Richt de stoom nooit op mensen!
7. Plaats na het strijken het strijkijzer op de thermische isolatiekussentjes. Druk op de aan/uitknop
en het toestel zal uitschakelen. Het temperatuurindicatielampje gaat nu uit. Trek de stekker uit het
stopcontact. Laat het toestel volledig aoelen.
Als je gedurende 10 minuten het toestel niet gebruikt, zal het temperatuurindicatielampje gaan
knipperen. Als je binnen die 10 minuten op een knop duwt, blijft het strijkijzer op temperatuur. Anders
zal het toestel overschakelen naar slaapmodus. Als je na 10 minuten in slaapmodus nog steeds geen
aanpassing hebt gemaakt, zal het toestel zichzelf automatisch uitschakelen. Dit is een beveiliging voor als
je het strijkijzer vergeet uit te schakelen. Je kan het toestel terug aanschakelen via de aan/uitknop.
6
DO7111S
Page 7
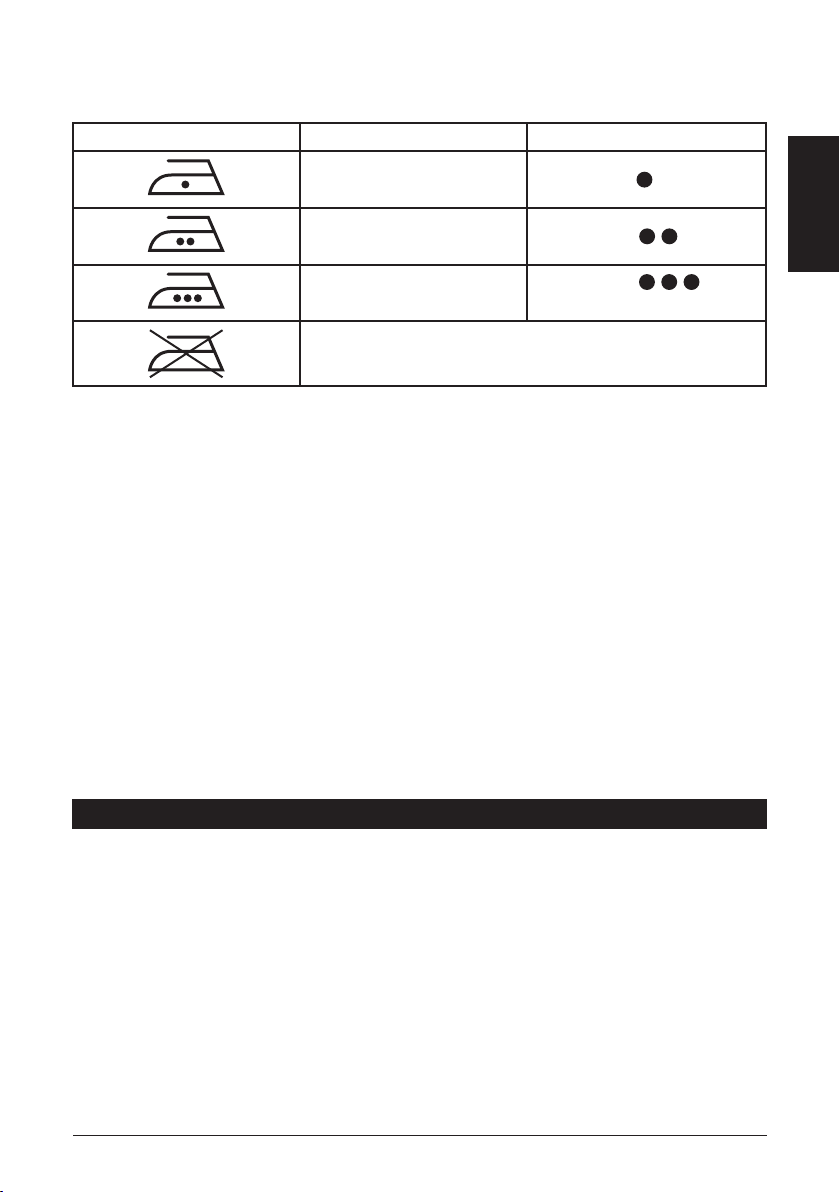
STRIJKTABEL
Stel met de draaischijf de juiste temperatuur in voor de juiste stof.
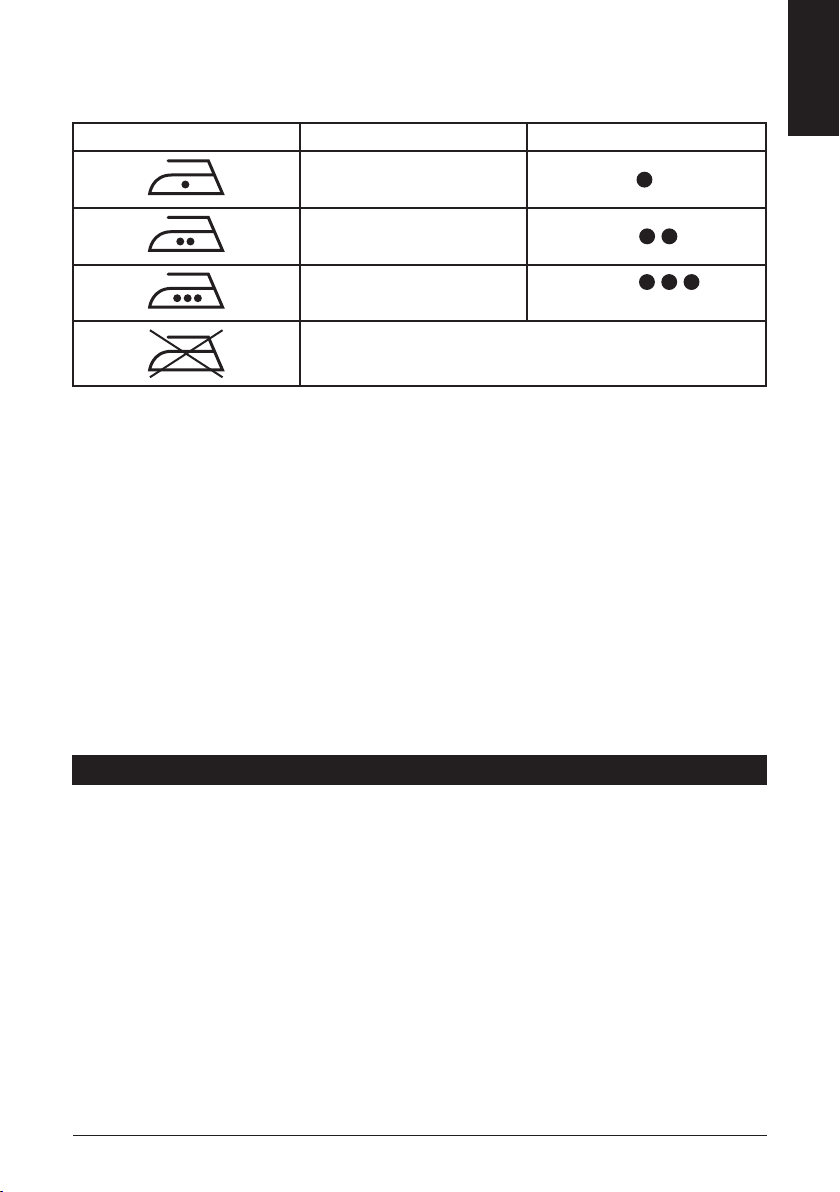
Symbool Stof Temperatuurschijf
NL
synthetische stof/zijde
wol
katoen
linnen
Dit symbool betekent dat het artikel niet gestreken mag worden!
STRIJKTIPS
· Check altijd eerst of er een etiket aan het kledingstuk hangt met instructies voor het strijken. Als dit
het geval is, volg dan altijd deze instructies.
· Het strijkijzer warmt sneller op dan dat het aoelt. Strijk daarom altijd eerst de kledingstukken die de
laagste temperatuur nodig hebben, zoals synthetische stoen.
· Als een stof uit meerdere soorten vezels bestaat, kies dan altijd de laagste temperatuur om de
combinatie van deze vezels te strijken.
· Zijde en andere stoen die blinken moeten langs de binnenkant gestreken worden.
· Fluweel en andere stoen die snel blinkend worden, moeten met lichte druk in één richting gestreken
worden. Hou het strijkijzer altijd in beweging.
· Strijk nooit over ritsen of andere metalen voorwerpen in een kledingstuk. Dit kan de strijkzool
beschadigen. Strijk altijd rond zulke objecten.
Opgelet: wanneer je wollen stoen strijkt, kan de stof gaan blinken. Keer daarom het kledingstuk
binnenstebuiten om het te strijken.
70<T<120°C
100<T<160°C
140<T<210°C
170<T<225°C MAX
REINIGING EN ONDERHOUD
· Trek de stekker uit het stopcontact en laat het toestel aoelen alvorens het te reinigen.
· Veeg restjes op de strijkzool af met een vochtige doek of met een niet-bijtend (vloeibaar)
schoonmaakproduct.
Let op: gebruik geen chemische, stalen, houten of schurende producten om de strijkzool schoon te
schrobben.
· Maak het bovenste deel van het strijkijzer schoon met een zachte, vochtige doek.
· Veeg de druppels op de stoomgenerator weg en maak de thermische isolatiekussentjes schoon met
een droge doek.
· Wanneer je de stoomgenerator voor lange tijd niet gebruikt, giet het water dan uit het waterreservoir
en zet het strijkijzer op de thermische isolatiekussentjes om het op te bergen.
OPGELET: gebruik alleen leidingwater (of 50% leidingwater en 50% gedemineraliseerd water in geval van
hard water) in de stoomgenerator. Opgepast: 100% onthard of gedemineraliseerd water moet vermeden
worden! Bij gebruik van een “ontharder” en/of geparfumeerd water kunnen bruine vlekken ontstaan, met
een beschadiging van de stoomkamer tot gevolg.
www.domo-elektro.be
DO7111S
7
Page 8
NL
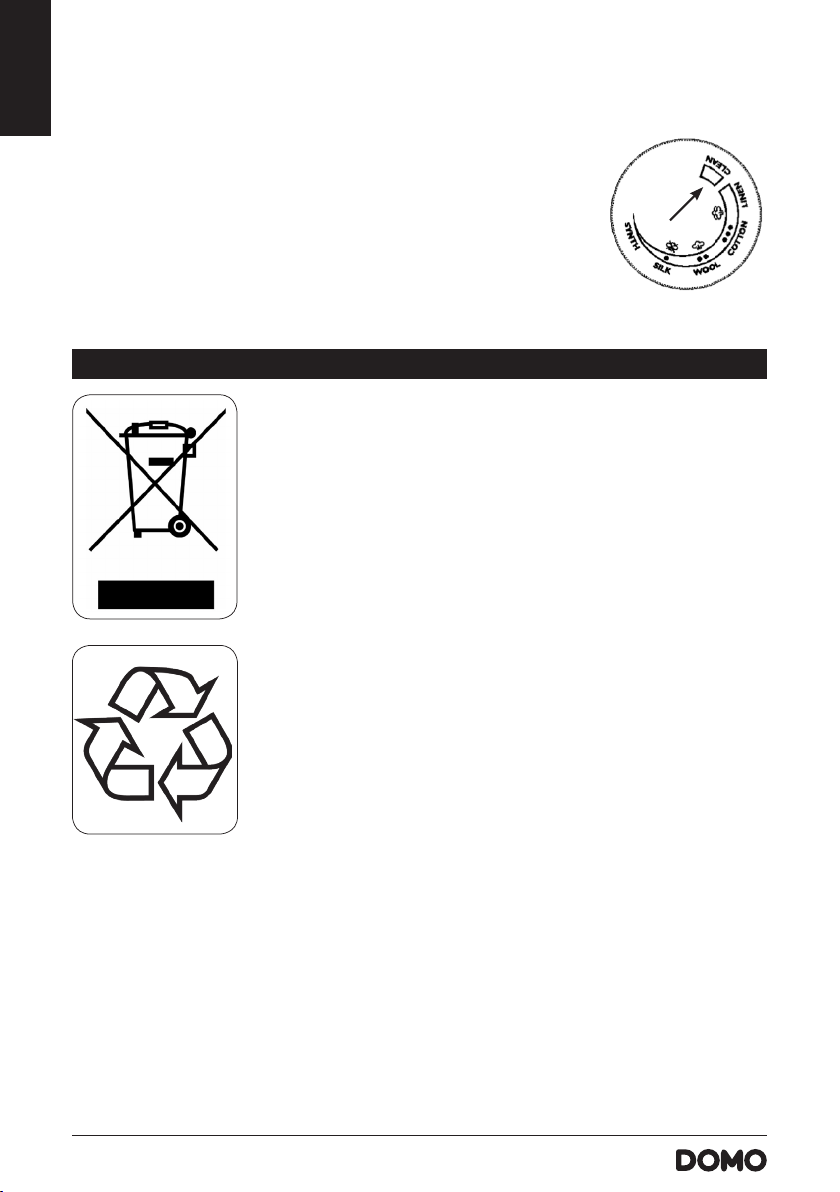
ZELFREINIGINGSFUNCTIE
Na een aantal strijkuren zal het indicatielampje van de zelfreinigingsfunctie beginnen knipperen. Dit geeft
aan dat je het strijkijzer moet reinigen.
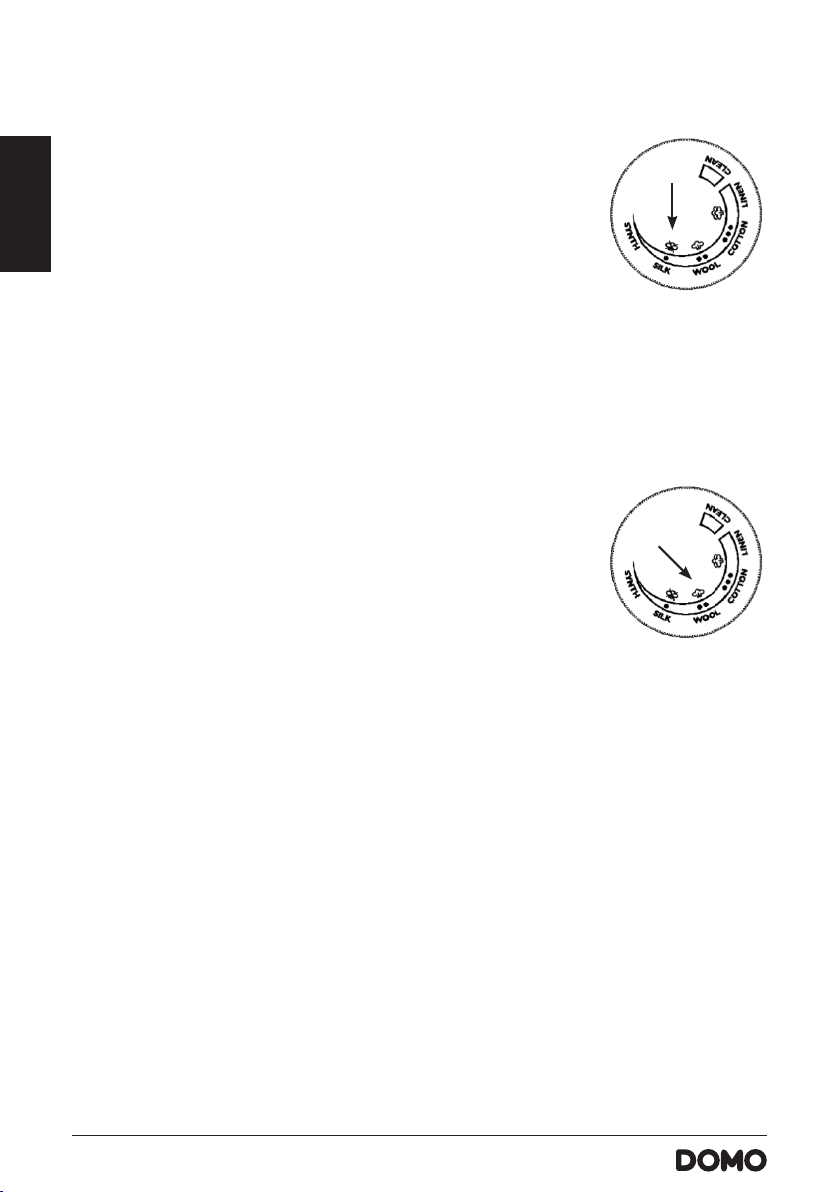
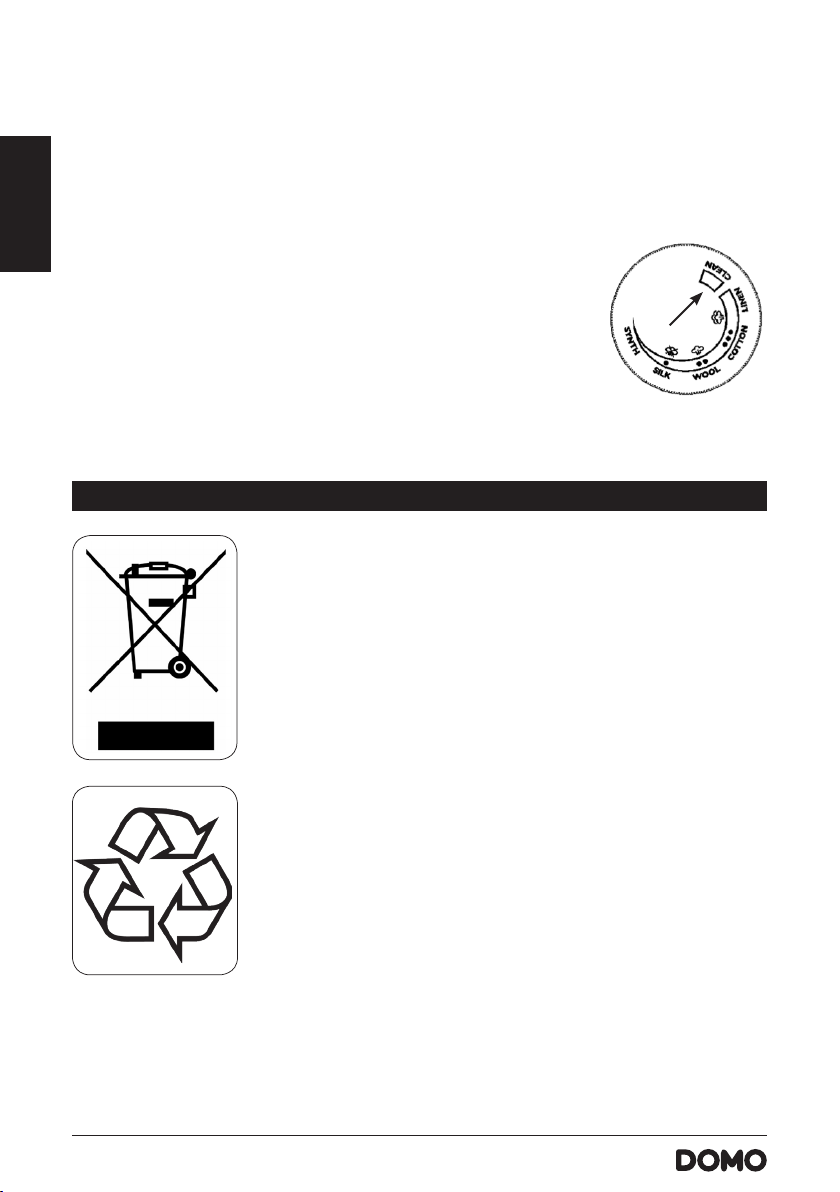
1. Houd het strijkijzer boven een gootsteen of zet het op een rooster in de
gootsteen. Opgelet: je mag het stijkijzer niet op de basis laten staan.
2. Draai de temperatuurschijf naar ‘CLEAN’. Houd het knopje voor de
stoomstoot en de stoomknop tegelijkertijd ingedrukt gedurende enkele
seconden om het reinigen te starten. Het temperatuurindicatielampje zal
knipperen gedurende het ontkalkproces.
3. De pomp zal water door het strijkijzer laten stromen waardoor het zichzelf
reinigt. Dit duurt ongeveer één minuut.
4. Als het toestel voldoende gereinigd is, schakelt het toestel zichzelf automatisch uit.
MILIEURICHTLIJNEN
Dit symbool op het product of op de verpakking wijst erop dat dit product niet
als huishoudafval mag worden behandeld. Het moet naar een plaats worden
gebracht waar elektrische en elektronische apparatuur wordt gerecycleerd.
Als je ervoor zorgt dat dit product op de correcte manier wordt verwijderd,
voorkom je mogelijk voor mens en milieu negatieve gevolgen die zich zouden
kunnen voordoen in geval van verkeerde afvalbehandeling. Voor meer
details in verband met het recycleren van dit product, neem je best contact
op met de gemeentelijke instanties, het bedrijf of de dienst belast met de
verwijdering van huishoudafval of de winkel waar je het product hebt gekocht.
Het verpakkingsmateriaal is recycleerbaar. Behandel de verpakking
milieubewust.
8
DO7111S
Page 9
GARANTIE
Cher client,
Tous nos produits sont soumis à des contrôles qualité stricts avant
d’être proposés à la vente. Si vous deviez toutefois rencontrer
un problème avec votre appareil, nous le déplorons vivement.
Dans ce cas, nous vous invitons à prendre contact avec notre service à la clientèle.
Nos collaboratrices se feront un plaisir de vous aider !
+32 14 21 71 91 info@linea2000.be
Du lundi au jeudi : 8 h 30 – 12 h et 13 h – 17 h
Vendredi : 8 h 30 – 12 h et 13 h – 16 h 30
Cet appareil est garanti 2 ans à compter de la date d’achat. Durant la période de garantie, le distributeur
assumera l’entière responsabilité en cas de défauts de fonctionnement (matériel) ou de fabrication. Si un
tel problème survient, l’appareil sera remplacé ou réparé. La période de garantie de 2 ans ne reprend pas
à zéro, mais se poursuit (jusqu’à 2 ans à compter de la date d’achat de l’appareil). La garantie est accordée
sur la base du ticket de caisse.
Pour les accessoires et les éléments d’usure, une garantie de 6 mois s’applique.
La garantie et la responsabilité du fournisseur et du fabricant n’ont plus eet dans les cas suivants :
· Les instructions du manuel n’ont pas été suivies.
· Mauvais raccordement, par ex. tension électrique trop forte.
· Utilisation contraire, brutale ou anormale.
· Entretien insusant ou non conforme.
· Réparation ou modication de l’appareil par le consommateur ou un tiers non autorisé.
· Utilisation d’éléments ou d’accessoires qui ne sont pas recommandés ou fournis par le fournisseur/
fabricant.
FR
CONSIGNES DE SÉCURITÉ
Les consignes de sécurité suivantes doivent être respectées lors de l’utilisation de tout appareil électrique:
· Lisez ces consignes très attentivement. Conservez ce mode d’emploi an de pouvoir le consulter
ultérieurement.
· Avant la première utilisation, enlevez tous les éléments d’emballage et les éventuels autocollants
promotionnels. Veillez à ce que les enfants ne jouent pas avec les matériaux d’emballage.
· Cet appareil est conçu pour être utilisé dans un environnement domestique ou dans des
environnements comparables, tels que :
· Coin-cuisine du personnel dans les commerces, les bureaux et autres environnements
professionnels comparables
· Fermes
· Chambres d’hôtel ou de motel et autres environnements à caractère résidentiel
· Chambres d’hôtes ou comparables
· Cet appareil peut être utilisé par des enfants âgés de 16 ans ou plus et par des personnes présentant
un handicap physique ou sensoriel, une capacité mentale limitée ou un manque d’expérience ou
de connaissances, à condition que ces personnes soient sous surveillance ou qu’elles aient reçu des
instructions sur la manière d’utiliser l’appareil en toute sécurité et qu’elles connaissent les dangers liés
www.domo-elektro.be
DO7111S
9
Page 10
à son utilisation. Les enfants ne peuvent pas jouer avec cet appareil. L’entretien et le nettoyage de
l’appareil ne peuvent pas être eectués par des enfants, sauf s’ils sont âgés de plus de 16 ans et sous la
surveillance d’un adulte.
· Gardez l’appareil et le cordon électrique hors de portée des enfants.
· Débranchez l’appareil lorsqu’il n’est pas utilisé ainsi qu’avant d’installer ou d’enlever des pièces et
avant de nettoyer l’appareil. Mettez au préalable tous les boutons en position « arrêt » et débranchez
FR
l’appareil en saisissant la che électrique. Ne tirez jamais sur le cordon pour retirer la che de la prise.
· En cas de dégâts au cordon d’alimentation, celui-ci doit être remplacé par le fabricant, un centre de
services ou une personne qualiée, an d’éviter tout accident.
· ATTENTION : Pour éviter tout accident, cet appareil ne peut pas être actionné via une commande
externe comme un minuteur extérieur, ni être raccordé à un réseau régulièrement mis sous tension ou
hors tension.
· Ne laissez pas l’appareil sans surveillance tant qu’il est raccordé au réseau électrique.
· L’ouverture de remplissage ne peut jamais être ouverte lorsque l’appareil fonctionne. Suivez les
consignes de ce manuel pour remplir l’appareil en toute sécurité.
· Le fer à repasser ne peut être placé et utilisé que sur une surface plane et stable, résistant à la vapeur
et à la chaleur.
· Le fer à repasser ne peut être utilisé après une chute, s’il présente des signes visibles de dégâts ou s’il
fuit. N’utilisez jamais l’appareil si le cordon d’alimentation ou la che est endommagé(e), après un
mauvais fonctionnement de l’appareil ou lorsque l’appareil est lui-même endommagé. Portez dans
ce cas l’appareil au service après vente de DOMO ou au centre de services qualié le plus proche,
pour contrôle, réparation ou modications électriques/mécaniques. Ne tentez jamais de réparer cet
appareil vous-même.
Là où vous apercevez ce symbole, l’appareil peut être brûlant. N’entrez pas en contact
avec la surface de l’appareil, utilisez toujours les poignées.
· N’utilisez pas l’appareil à l’extérieur.
· Ne déplacez pas le fer à repasser lorsqu’il fonctionne encore ou qu’il est encore chaud. Laissez toujours
refroidir l’appareil avant de le déplacer ou d’assurer son entretien.
· N’utilisez l’appareil que pour l’usage auquel il est destiné.
· Ne remplissez jamais le réservoir à eau avec un autre liquide que de l’eau.
· Vériez avant usage si la tension indiquée sur l’appareil correspond à la tension du réseau électrique de
votre domicile.
· Le cordon d’alimentation doit toujours être branché dans une prise de courant placée et mise à la terre
conformément aux normes et standards locaux.
· N’utilisez que les accessoires livrés avec le fer à repasser.
· N’immergez jamais l’appareil, le cordon d’alimentation ou la che dans l’eau ou tout autre liquide. Ceci
an d’éviter des chocs électriques ou un incendie.
· N’utilisez pas l’appareil si vous avez les mains mouillées.
· Déroulez complètement le cordon d’alimentation, pour éviter toute surchaue.
· Ne laissez pas le cordon d’alimentation au contact de surfaces chaudes.
· Ne branchez le cordon d’alimentation dans la prise de courant qu’après vous être assuré que l’appareil
soit correctement monté. Pour débrancher l’appareil, la commande doit être préalablement placée
en position « OFF » ou « 0 ». Après quoi, la che électrique peut être retirée de la prise de courant. Ne
tirez jamais sur le cordon d’alimentation ni sur l’appareil pour le débrancher.
· Assurez-vous que l’appareil a complètement refroidi avant d’ouvrir le réservoir à eau pour le nettoyer.
Contrôlez après coup que le réservoir à eau a été replacé correctement.
10
DO7111S
Page 11
· Si l’appareil n’est pas correctement entretenu, sa durée de vie peut en être fortement diminuée et une
situation de danger en résulter.
· Les accidents ou dommages causés par le non-respect de ces consignes sont à vos propres risques.
Ni le fabricant, ni l’importateur, ni le fournisseur ne peuvent, dans ce cas, en être tenus pour
responsables.
CONSERVEZ CES CONSIGNES POUR POUVOIR LES CONSULTER ULTÉRIEUREMENT
PARTIES
FR
1. Ouverture de remplissage
2. Réservoir d’eau
3. Témoin lumineux de
température
4. Bouton vapeur
5. Sélecteur de température
6. Bouton de commande du
jet de vapeur avec fonction
de nettoyage automatique
et voyant lumineux
7. Semelle de repassage
8. Coussinets d’isolation
thermique
9. Bouton marche/ arrêt
1
2
6
4
5
3
7
8
9
AVANT LA PREMIÈRE UTILISATION
· Retirez les éventuels autocollants et le lm de protection de la semelle du fer à repasser.
· Faites chauer le fer à repasser jusqu’à la température maximale et repassez pendant quelques
minutes sur un chion humide an d’éliminer les éventuels résidus adhérant à la semelle.
ATTENTION:
· Les appareils sont systématiquement testés après production. Il est donc normal que des gouttes de
condensation se soient formées dans le réservoir d’eau.
· Lors de la première utilisation, l’appareil peut dégager une odeur particulière. Ce phénomène est tout
à fait normal. Cette odeur disparaîtra après un certain temps.
· Lors de la première utilisation, des particules peuvent se dégager par la semelle du fer à repasser. Ceci
est tout à fait normal. Les particules ne sont pas nocives et elles disparaîtront après un certain temps.
· À la mise sous tension, la centrale vapeur peut produire un bruit de pompe. Ceci est tout à fait normal.
Ce bruit est un signe que de l’eau circule dans la centrale vapeur.
· Pendant l’échauement de la semelle, celle-ci laisse automatiquement s’échapper un petit peu de
vapeur. Ce phénomène est également normal et dure environ 3 secondes.
UTILISATION
Cette centrale vapeur ore 2 options: repassage à sec et repassage à la vapeur. Respectez bien les
instructions qui suivent. De même, avant d’utiliser l’appareil, lisez attentivement les conseils de repassage
à la n de cette rubrique.
www.domo-elektro.be
DO7111S
11
Page 12
REPASSAGE À SEC
1. Placez le fer à repasser sur les coussinets d’isolation thermique de la centrale vapeur.
2. Branchez l’appareil, et appuyez sur le bouton marche / arrêt. Le voyant
lumineux de la température commence à clignoter.
3. Réglez le sélecteur de température sur la position souhaitée, en fonction
FR
de la nature du textile à repasser. Le témoin lumineux de température
commencera à clignoter et le fer commencera à chauer.
4. Quand le témoin lumineux de température reste allumé, la température
sélectionnée est atteinte. Vous pouvez à présent commencer à repasser.
Attention: Ne touchez jamais la semelle de repassage, celle-ci est brûlante !
REPASSAGE À LA VAPEUR
Attention: Ne branchez pas encore la che dans une prise de courant.
1. Remplissez le réservoir d’eau. Assurez-vous de ne pas dépasser le niveau maximum (1,5 litre). Utilisez
uniquement de l’eau du robinet ou un mélange d’eau du robinet et d’eau déminéralisée (50/50) si
l’eau est dure dans votre région.
2. Remettez le réservoir d’eau dans l’appareil. Vous entendrez un clic si le réservoir est placé
correctement dans l’appareil. Si ce n’est pas le cas, l’appareil ne fonctionnera pas.
3. Mettez le fer à repasser sur les coussinets d’isolation thermique. Branchez
l’appareil, et appuyez sur le bouton marche / arrêt. Placez le sélecteur de
température sur la position souhaitée, en fonction du type de textile. Le
voyant lumineux de la température commence à clignoter.
4. Quand le témoin lumineux de température reste allumé, l’appareil a atteint
la température correcte.
5. Pour repasser à la vapeur, appuyez sur le bouton vapeur situé sur l’intérieur
de la poignée du fer à repasser. Un jet de vapeur continu sera alors projeté
par la semelle. Lorsque vous relâchez le bouton, vous repassez de nouveau à sec, c’est-à-dire sans
vapeur.
6. Vous pouvez également utiliser le jet de vapeur pour les faux plis. À cette n, appuyez sur le bouton
de commande du jet de vapeur en haut de la poignée du fer à repasser.
Attention :
· Ne touchez jamais la semelle de repassage, celle-ci est brûlante !
· Ne dirigez jamais le jet de vapeur vers des personnes !
7. Après avoir repassé, mettez le fer à repasser sur les coussinets d’isolation thermique. Appuyez sur
le bouton marche/arrêt pour éteindre l’appareil. Le voyant lumineux de la température s’éteint.
Débranchez la che de la prise électrique. Laissez l’appareil refroidir complètement.
Si vous n’utilisez pas l’appareil pendant 10 minutes, le voyant lumineux de la température clignote. Si
vous appuyez sur un bouton pendant ces 10 minutes, le fer à repasser reste à température. Autrement,
l’appareil se met en mode veille. Après 10 minutes en mode veille, l’appareil s’éteint automatiquement. Il
s’agit d’une sécurité au cas où vous oubliez d’éteindre le fer à repasser. Vous pouvez rallumer l’appareil à
l’aide du bouton marche/arrêt.
12
DO7111S
Page 13
SYMBOLES DE REPASSAGE
Utilisez le sélecteur rotatif pour régler la température de l’appareil en fonction du tissu à repasser.
Symbole Matière Sélecteur de température
synthétique/soie
laine
coton
lin
Ne pas repasser les articles comportant ce symbole!
CONSEILS DE REPASSAGE
· Commencez toujours par vérier la présence sur le vêtement d’une étiquette reprenant des
instructions de repassage. Si tel est le cas, suivez toujours ces instructions.
· Le fer à repasser chaue plus vite qu’il ne refroidit. C’est pourquoi il est préférable de toujours
commencer par repasser les vêtements qui nécessitent la température la plus basse, comme les
textiles synthétiques.
· Quand une matière est composée de plusieurs types de bres, choisissez toujours la température la
plus basse pour repasser cette combinaison de bres.
· La soie et les autres tissus brillants doivent être repassés sur le côté intérieur.
· Le velours et les autres tissus sensibles à l’eet luisant doivent toujours être repassés dans le même
sens en exerçant une légère pression. Maintenez toujours le fer à repasser en mouvement.
· Ne passez jamais le fer par-dessus des fermetures à glissière ou autres éléments métalliques
incorporés à un vêtement. Cela risquerait de détériorer la semelle de repassage. Passez toujours le fer
en contournant ces éléments.
Attention: Le repassage d’articles à base de laine peut produire un eet luisant. C’est pourquoi il est
recommandé de repasser ces vêtements sur l’envers.
70<T<120°C
100<T<160°C
140<T<210°C
170<T<225°C MAX
FR
NETTOYAGE ET ENTRETIEN
· Avant de nettoyer l’appareil, débranchez-le et laissez-le refroidir totalement.
· Essuyez les résidus présents sur la semelle de repassage avec un chion humide ou avec un détergent
(liquide) non abrasif.
Attention: N’utilisez pas de produits chimiques, abrasifs, en métal ou en bois pour nettoyer la semelle
de repassage.
· Nettoyez la partie supérieure du fer à repasser avec un chion doux et humide.
· Essuyez les gouttes sur la centrale vapeur et nettoyez les coussinets d’isolation thermique avec un
chion sec.
· Si vous ne comptez pas utiliser la centrale vapeur pendant une longue période, videz l’eau contenue
dans le réservoir et placez le fer à repasser sur les coussinets d’isolation thermique avant de le ranger.
www.domo-elektro.be
DO7111S
13
Page 14
ATTENTION: Pour votre centrale vapeur, utilisez uniquement de l’eau du robinet (ou 50% d’eau du robinet
et 50% d’eau déminéralisée si l’eau est dure dans votre région). Attention : N’utilisez pas d’eau adoucie ou
déminéralisée seule ! L’utilisation d’une eau adoucie et/ou parfumée peut provoquer l’apparition de taches
brunes et entraîner une dégradation de la chambre de vapeur.
FR
Le voyant lumineux de la fonction de nettoyage automatique commence à clignoter après quelques
heures de repassage. Ceci indique qu’il faut nettoyer le fer à repasser.
1. Tenez le fer à repasser au-dessus de l’évier ou mettez-le sur une grille dans
l’évier. Attention : ne placez pas l’appareil sur sa base.
2. Tournez le bouton de réglage de la température sur « CLEAN ». Maintenez
le bouton de commande du jet de vapeur et le bouton de vaporisation
enfoncés simultanément pendant quelques secondes pour commencer
le nettoyage. Le voyant lumineux de la température clignote pendant le
processus de détartrage.
3. La pompe permettra à l’eau de circuler à travers le fer, le nettoyant lui-même. Cela durera environ
une minute.
4. Si l’appareil est susamment nettoyé, l’appareil s’éteint automatiquement.
MISE AU REBUT
Ce symbole sur le produit ou son emballage indique que ce produit ne peut
être traité comme déchet ménager. Il doit plutôt être remis au point de
ramassage concerné, se chargeant du recyclage du matériel électrique et
électronique. En vous assurant que ce produit est éliminé correctement, vous
favorisez la prévention des conséquences négatives pour l’environnement et
la santé humaine qui, sinon, seraient le résulat d’un traitement inapproprié
des déchets de ce produit. Pour obtenir plus de détails sur le recyclage de ce
produit, veuillez prendre contact avec le bureau municipal de votre région,
votre service d’éliminiation des déchets ménagers ou le magasin où vous avez
acheté le produit.
14
L’emballage est recyclable. Traitez l’emballage écologiquement.
DO7111S
Page 15

GARANTIE
Wir möchten Sie in diesem Fall bitten, unseren Kundenservice zu kontaktieren.
Sehr geehrter Kunde,
Sämtliche unserer Produkte unterliegen einer strengen Qualitätskontrolle,
bevor Sie Ihnen angeboten werden. Sollten dennoch
Probleme mit Ihrem Gerät auftreten, bedauern wir dies zutiefst.
Unsere Mitarbeiter helfen Ihnen gern weiter!
+32 14 21 71 91 info@linea2000.be
Montag – Donnerstag: 8:30 Uhr – 12:00 Uhr und von 13:00 Uhr – 17:00 Uhr
Freitag: 8:30 Uhr – 12:00 Uhr und von 13:00 Uhr – 16:30 Uhr
Dieses Gerät hat eine Garantiefrist von 2 Jahren ab dem Kaufdatum. Während der Garantiezeit
übernimmt der Hersteller die vollständige Verantwortung für Mängel, die nachweislich auf Material- oder
Konstruktionsfehler zurückzuführen sind. Wenn derartige Mängel auftreten, wird das Gerät wenn nötig
ausgetauscht oder repariert. Die Garantiezeit von 2 Jahren beginnt in diesem Moment nicht erneut,
sondern sie läuft bis 2 Jahre nach dem Kaufdatum weiter. Die Garantie wird auf der Grundlage des
Kassenbons gewährt.
Die Garantie auf Accessoires und Verschleißteile beträgt 6 Monate.
Die Garantie und die Verantwortung/Haftung des Lieferanten und Herstellers entfallen automatisch in
den folgenden Fällen:
· Bei Nichtbeachtung der Anweisungen in dieser Bedienungsanleitung.
· Bei falschem Anschluss, z.B. bei einer zu hohen Stromspannung.
· Bei falscher, grober oder abnormaler Verwendung.
· Bei unzureichender oder falscher Wartung.
· Bei vom Verbraucher oder von nicht ermächtigten Dritten vorgenommenen Reparaturen oder
Änderungen am Gerät.
· Bei der Verwendung von Ersatzteilen oder Accessoires, die nicht vom Lieferanten / Hersteller
empfohlen oder geliefert werden.
SICHERHEITSVORKEHRUNGEN
Wenn Sie elektrische Geräte verwenden, müssen folgende Sicherheitshinweise beachtet werden:
· Lesen Sie diese Hinweise sorgfältig durch. Bewahren Sie diese Bedienungsanleitung zum späteren
Nachschlagen auf.
· Entfernen Sie vor dem ersten Gebrauch alle Verpackungsmaterialien und möglichen Werbeauleber.
Sorgen Sie dafür, dass Kinder nicht mit den Verpackungsmaterialien spielen.
· Dieses Gerät eignet sich für den Einsatz im Haushalt und in ähnlichen Umfeldern, zum Beispiel in
folgenden Bereichen:
· Küchenbereich für Mitarbeiter von Geschäften, Büros und anderen ähnlichen beruichen
Umfeldern.
· Bauernhöfe
· Hotel- und Motelzimmer und andere Bereiche mit wohnungsähnlichem Charakter
· Gästezimmer oder Ähnliches
DE
www.domo-elektro.be
DO7111S
15
Page 16
· Diese Gerät darf von Kindern ab 16 Jahren und Menschen mit körperlichen oder sensorischen
Behinderungen oder Menschen mit eingeschränkten geistigen Fähigkeiten oder mangelnder
Erfahrung bzw. Sachkenntnis unter der Bedingung verwendet werden, dass diese Personen
beaufsichtigt werden oder sie eine Anleitung zur sicheren Verwendung des Geräts erhalten haben und
sich der Gefahren bei der Verwendung des Geräts bewusst sind. Kinder dürfen nicht mit dem Gerät
spielen. Die Wartung und Reinigung des Geräts darf nicht durch Kinder ausgeführt werden, außer
diese sind älter als 16 Jahre und werden von einem Erwachsenen beaufsichtigt.
· Das Gerät und das Netzkabel sind außerhalb der Reichweite von Kindern zu bewahren.
· Netzstecker ziehen, wenn das Gerät nicht in Gebrauch ist, bevor Teile montiert oder abmontiert
werden und vor der Reinigung. Stellen Sie zunächst alle Schalter auf „Aus“ und ziehen Sie den Stecker
am Stecker selbst aus der Steckdose. Ziehen Sie den Stecker nie am Netzkabel aus der Steckdose.
· Wenn das Netzkabel beschädigt ist, sollte es, um Unfälle auszuschließen, durch den Hersteller, den
DE
Kundendienst oder eine qualizierte Person ersetzt werden.
· ACHTUNG: Zur Vermeidung von Unfällen sollte das Gerät nicht mit einem externen Zusatzgerät, wie
z. B. über einen externen Timer oder an einen Stromkreislauf angeschlossen werden, der regelmäßig
ein- und ausgeschaltet wird.
· Lassen Sie das Gerät nicht unbeaufsichtigt stehen, wenn es an das Stromnetz angeschlossen ist.
· Die Einfüllönung darf während des Gebrauchs auf keinen Fall geönet werden. Folgen Sie für ein
sicheres Befüllen den Anweisungen in dieser Gebrauchsanleitung.
· Das Bügeleisen darf nur auf ebenen und stabilen Oberächen verwendet und abgestellt werden,
denen Dampf und Hitze nicht schaden kann.
· Das Bügeleisen darf nicht benutzt werden, wenn es hingefallen ist, sichtbar beschädigt ist oder leckt.
Verwenden Sie das Gerät nie, wenn das Netzkabel oder der Stecker beschädigt ist, wenn es nicht
richtig funktioniert oder beschädigt ist. Bringen Sie das Gerät in diesem Fall zur Durchsicht, Reparatur
oder für elektrische/mechanische Anpassungen zum DOMO-Kundendienst oder zum nächstgelegenen
Servicecenter. Versuchen Sie nie, das Gerät selbst zu reparieren.
An Stellen, die durch dieses Symbol gekennzeichnet sind, kann das Gerät sehr heiß
werden. Berühren Sie die Oberäche des Geräts nicht, verwenden Sie die Grie zum
Anfassen.
· Verwenden Sie das Gerät nicht im Freien.
· Versetzen oder tragen Sie das Bügeleisen nicht, solange es noch in Gebrauch oder noch heiß ist. Das
Gerät muss erst komplett abkühlen, bevor es an einen anderen Ort gestellt oder gewartet wird.
· Gerät nur für den vorgesehenen Zweck verwenden.
· Der Wassertank darf nur mit Wasser befüllt werden, andere Flüssigkeiten sind nicht zulässig.
· Vor Gebrauch überprüfen, ob die auf dem Gerät angegebene Spannung mit dem des Stromnetzes
übereinstimmt.
· Das Netzkabel muss stets an eine Steckdose angeschlossen werden, die gemäß den örtlichen
Standards und Normen isoliert und geerdet wurde.
· Verwenden Sie nur das mit dem Bügeleisen mitgelieferte Zubehör.
· Tauchen Sie das Gerät, das Kabel oder den Stecker auf keinen Fall in Wasser oder andere Flüssigkeiten.
Dies könnte andernfalls zu Stromschlägen und Brandgefahr führen.
· Verwenden Sie das Gerät nicht mit nassen Händen.
· Rollen Sie das Netzkabel vollständig ab, um eine Überhitzung des Kabels zu vermeiden.
· Das Netzkabel darf nicht mit heißen Flächen in Kontakt kommen.
· Schließen Sie das Netzkabel erst an die Steckdose an, wenn das Gerät korrekt zusammengebaut
wurde. Um das Gerät vom Netzstrom zu trennen, muss der Bedienschalter zuerst in die „AUS“- oder
16
DO7111S
Page 17

„0“-Position gestellt werden. Anschließend kann der Stecker aus der Steckdose gezogen werden.
Ziehen Sie nie am Gerät oder am Netzkabel, um den Stecker aus der Steckdose zu ziehen.
· Stellen Sie sicher, dass das Gerät vollständig abgekühlt ist, bevor der Wassertank für die Reinigung
geönet wird. Nach der Reinigung muss überprüft werden, ob der Wassertank wieder korrekt
angebracht ist.
· Wenn das Gerät nicht gut gewartet wird, kann dies die Lebensdauer des Geräts drastisch verringern
und zu Gefahrensituationen führen.
· Für Unfälle oder Schäden, die durch die Nichtbefolgung dieser Regeln verursacht werden, haften
Sie selbst. Weder der Hersteller noch der Importeur oder der Lieferant können in solchen Fällen zur
Verantwortung gezogen werden.
BEWAHREN SIE DIESE HINWEISE ZUM SPÄTEREN NACHSCHLAGEN AUF
TEILE
1. Füllönung
2. Wassertank
3. Temperaturkontrollleuchte
4. Dampnopf
5. Temperaturwählscheibe
6. Dampfstoßknopf mit
Selbstreinigungsfunktion
und Kontrollleuchte
7. Bügelsohle
8. Wärmeisolierende Kissen
9. An-/Aus-Schalter
1
2
6
4
5
3
7
8
9
VOR DER ERSTEN INBETRIEBNAHME
· Entfernen Sie alle eventuellen Auleber und Schutzfolien von der Bügeleisensohle.
· Lassen Sie das Bügeleisen auf maximale Temperatur erwärmen und bügeln Sie einige Minuten ein
feuchtes Tuch, um eventuelle Reste auf der Bügeleisensohle zu entfernen.
ACHTUNG:
· Die Geräte werden nach der Produktion jeweils kurz getestet. Es ist deshalb normal, dass sich
Kondensationtropfen im Wasserbehälter gebildet haben.
· Es ist normal, dass während des ersten Gebrauchs ein ungewohnter Geruch entsteht. Der Geruch wird
nach kurzer Zeit verschwinden.
· Es kann sein, dass während des ersten Gebrauchs kleine Teilchen aus der Bügeleisensohle kommen.
Auch das ist normal und wird nach kurzer Zeit auören.
· Wenn Sie das Gerät anstellen kann es sein, dass der Dampfgenerator ein Pumpgeräusch macht. Dies
ist ebenfalls normal. Das Geräusch entsteht, sobald Wasser in den Dampfgenerator gepumpt wird.
· Während des Aufwärmens des Bügeleisens wird automatisch etwas Dampf aus der Bügeleisensohle
entweichen. Dies wird etwa 3 Sekunden dauern und ist ebenfalls normal.
DE
www.domo-elektro.be
DO7111S
17
Page 18

GEBRAUCH
Der Dampfgenerator bietet Ihnen 2 Möglichkeiten: 1. ohne Dampf bügeln, 2. mit Dampf bügeln. Folgen
Sie hierfür den unten stehenden Anweisungen. Lesen Sie ebenfalls die Bügeltipps, die Sie anschliessend
an die Anweisungen nden können, bevor Sie das Gerät benutzen.
OHNE DAMPF BÜGELN
1. Stellen Sie das Bügeleisen auf die wärmeisolierenden Kissen des Dampfgenerators.
2. Stecken Sie den Netzstecker in die Steckdose und drücken Sie den An-/
Ausschalter. Die Temperaturkontrollleuchte beginnt zu blinken.
3. Drehen Sie die Temperaturwählscheibe auf den gewünschten Stand.
Dieser ist abhängig von der Art des Stoes, den Sie bügeln wollen. Die
DE
Temperaturkontrollleuchte beginnt zu blinken und das Bügeleisen beginnt
sich aufzuheizen.
4. Wenn die Temperaturkontrollleuchte durchgehend brennt, ist die
ausgewählte Temperatur erreicht. Sie können mit dem Bügeln beginnen.
ACHTUNG: Berühren Sie die Bügeleisensohle nicht!
MIT DAMPF BÜGELN
Achtung: stecken Sie den Stecker noch nicht in die Steckdose.
1. Füllen Sie den Wassertank mit Wasser. Achten Sie darauf, dass Sie den maximal zugelassenen
Wasserstand nicht überschreiten (1,5l). Verwenden Sie nur Leitungswasser oder bei hoher
Wasserhärte 50 % Leitungswasser und 50 % destilliertes Wasser.
2. Setzen Sie den Wassertank wieder in das Gerät. Der Tank rastet hörbar
ein, wenn er korrekt in das Gerät eingesetzt wurde. Wenn der Tank nicht
ordnungsgemäß in das Gerät eingesetzt wurde, funktioniert es nicht.
3. Stellen Sie das Bügeleisen auf das wärmeisolierende Kissen. Stecken
Sie den Netzstecker in die Steckdose und drücken Sie den An-/
Ausschalter. Drehen Sie die Temperaturwählscheibe auf den gewünschten
Temperaturstand. Dieser ist abhängig von der Art des Stoes, den Sie
bügeln wollen. Die Temperaturkontrollleuchte beginnt zu blinken.
4. Wenn die Temperaturkontrollleuchte durchgehend brennt, hat das Gerät die richtige Temperatur
erreicht.
5. Zum Bügeln mit Dampf drücken Sie die Dampftaste an der Innenseite des Gris des Bügeleisens.
Aus der Sohle strömt dann ein Dauerdampf. Bei Loslassen der Dampftaste erfolgt das Bügeln wieder
trocken, ohne Dampf.
6. Für hartnäckige Falten können Sie auch den Dampfstoß verwenden. Drücken Sie hierzu den
Dampfstoßknopf oben am Gri des Bügeleisens.
Bitte beachten:
· Fassen Sie die Bügelsohle niemals an!
· Richten Sie den Dampf nie auf Menschen!
7. Stellen Sie das Bügeleisen nach dem Bügeln auf das wärmeisolierende Kissen. Drücken Sie den An-/
Aus-Schalter. Das Gerät schaltet sich dann aus. Die Temperaturkontrollleuchte leuchtet nicht mehr
auf. Ziehen Sie den Stecker aus der Steckdose. Lassen Sie das Gerät vollständig abkühlen.
Wenn das Gerät 10 Minuten lang nicht verwendet wurde, beginnt die Temperaturkontrollleuchte
zu blinken. Wenn Sie innerhalb dieser 10 Minuten einen Schalter drücken, hält das Bügeleisen seine
18
DO7111S
Page 19

Temperatur. Andernfalls wechselt das Gerät in den Ruhemodus. Wenn Sie nach 10 Minuten im
Ruhemodus noch immer keine Änderung vorgenommen haben, schaltet sich das Gerät automatisch aus.
Dabei handelt es sich um eine Sicherheitsfunktion, falls Sie vergessen, das Bügeleisen auszuschalten. Sie
können das Gerät über den An-/Aus-Schalter wieder einschalten.
BÜGELTABELLE
Stellen Sie mit der Drehscheibe die passende Temperatur je nach Gewebeart ein.
Symbol Sto Temperaturwählscheibe
synthetischer Sto/Seide
Wolle
Baumwolle
Leinen
Diese Symbol bedeutet, dass der Sto nicht gebügelt werden darf.
BÜGELTIPPS
· Schauen Sie erst nach, ob an dem Kleidungsstück, welches Sie bügeln wollen ein Etikett hängt, auf
dem Bügelanweisungen stehen. In diesem Falle folgen Sie den Anweisungen des Herstellers.
· Das Bügeleisen wärmt schneller auf als dass es abkühlt. Bügeln Sie darum erst Stoe, die eine
niedrigere Temperatur nötig haben, wie z.B. synthetische Stoe.
· Wenn ein Sto aus gemischten Fasern gewoben ist verwenden Sie die niedrigste Temperatur zum
Bügeln dieser Stozusammenstellung.
· Seide und andere Stoe, die glänzen, müssen von der Rückseite aus gebügelt werden.
· Samt und andere Stoe, die schnell glänzen, sollten mit leichtem Druck in eine Richtung gebügelt
werden. Achten Sie darauf, dass Sie das Bügeleisen stets in Bewegung halten.
· Bügeln Sie nicht über Reissverschlüsse oder andere Dinge aus Metall an Kleidungsstücken, da diese
die Sohle des Bügeleisens beschädigen könnten. Bügeln Sie stets rundum diese Gegenstände.
Achtung: Wenn Sie Stoe aus Wolle bügeln kann es sein, dass diese danach glänzen. Drehen Sie darum
bei diesen Stoe die Innenseite nach aussen um sie zu bügeln.
70<T<120°C
100<T<160°C
140<T<210°C
170<T<225°C MAX
DE
REINIGUNG UND WARTUNG
· Ziehen Sie den Stecker aus der Steckdose und lassen Sie das Gerät abkühlen, bevor Sie es reinigen.
· Waschen Sie Reste auf der Sohle mit einem feuchten Tuch und einem nicht scheuernden (üssigen)
Reinigungsprodukt ab.
ACHTUNG: Benutzen Sie keine chemischen oder scheuernden Produkte, um die Bügeleisensohle zu
reinigen. Benutzen Sie ebenfalls keine Scheuerschwämme oder Metallwolle.
· Reinigen Sie das obere Teil des Bügeleisens mit einem weichen, feuchten Tuch.
· Trocknen Sie die Feuchtigkeitsrückstände mit einem weichen Tuch und reinigen Sie die
wärmeisolierenden Kissen mit einem trockenen Tuch.
· Sollte der Dampfgenerator eine Zeit lang nicht benutzt werden leeren Sie den Wassertank und stellen
Sie das Bügeleisen auf die Ablage mit den wärmeisolierenden Kissen, um es zu verstauen.
www.domo-elektro.be
DO7111S
19
Page 20

Achtung: Benutzen Sie ausschliesslich Leitungswasser (oder 50% Leitungswasser und 50% destilliertes
Wasser bei sehr kalkhaltigem Leitungswasser) in Ihrem Dampfgenerator. Ebenfalls wichtig: Die alleinige
Verwendung von enthärtetem oder von destilliertem Wasser ist zu vermeiden! Bei Wasserenthärtern und/
oder parfümiertem Wasser können braune Flecken entstehen und der Dampfgenerator kann beschädigt
werden.
SELBSTREINIGUNGSFUNKTION
Wenn Sie einige Stunden lang gebügelt haben, beginnt die Kontrollleuchte der Selbstreinigungsfunktion
zu blinken. Diese zeigt an, dass das Bügeleisen gereinigt werden muss.
1. Halten Sie das Bügeleisen über ein Spülbecken oder stellen Sie es auf einen Rost in ein Spülbecken.
Achtung: Sie dürfen das Bügeleisen nicht auf dem Sockel abstellen.
DE
2. Stellen Sie die Temperaturwählscheibe auf „CLEAN“. Halten Sie
den Dampfstoßknopf und den Dampnopf gleichzeitig einige
Sekunden lang gedrückt, um mit der Reinigung zu beginnen. Die
Temperaturkontrollleuchte blinkt während des Entkalkens.
3. Die Pumpe lässt Wasser durch das Bügeleisen strömen, durch das es sich
selbst reinigt. Dies dauert etwa eine Minute.
4. Wenn das Gerät ausreichend gereinigt ist, schaltet es sich automatisch ab.
ENTSORGEN
Dieses Symbol auf dem Produkt oder seiner Verpackung weist darauf hin, dass
dieses Produkt nicht als normaler Haushaltsabfall zu behandeln ist, sondern
an einem Sammelpunkt für das Recyling von elektrischen und elektronischen
Geräten abgegeben werden muss. Durch Ihren Beitrag zum korrekten
Entsorgen dieses Produkts schützen Sie die Umwelt und die Gesundheit Ihrer
Mitmenschen. Umwelt und Gesundheit werden durch falsches Entsorgen
gefährdet. Weitere Informationen über das Recycling dieses Produkts
erhalten Sie von Ihren Rathaus, Ihrer Müllabfuhr oder dem Geschäft, in dem
Sie das Produkt gekauft haben.
20
Das Verpackungsmaterial ist wiederverwertbar. Entsorgen Sie die Verpackung
umweltgerecht und führen Sie sie der Wertstosammlung zu.
DO7111S
Page 21

WARRANTY
Dear client ,
All of our products are always submitted to a strict quality control before they are sold to you.
Should you nevertheless experience problems with your device, we sincerely regret this.
In that case, we kindly request you to contact our customer service.
Our sta will gladly assist you.
+32 14 21 71 91 info@linea2000.be
Monday – Thursday: 8.30 – 12.00 and 13.00 – 17.00
Friday: 8.30 – 12.00 and 13.00 – 16.30
This appliance has a two year warranty period. During this period the manufacturer is responsible for
any failures that are the direct result of construction failure. When these failures occur the appliance will
be repaired or replaced if necessary. The warranty will not be valid when the damage to the appliance is
caused by wrong use, not following the instructions or repairs executed by a third party. The guarantee is
issued with the original till receipt. All parts, which are subject to wear, are excluded from the warranty.
If your device breaks down within the 2-year warranty period, you can return the device together with
your receipt to the shop where you purchased it.
The guarantee on accessories and components that are liable to wear-and-tear is only 6 months.
The guarantee and responsibility of the supplier and manufacturer lapse automatically in the following
cases:
· If the instructions in this manual have not been followed.
· In case of incorrect connection, e.g., electrical voltage that is too high.
· In case of incorrect, rough or abnormal use.
· In case of insucient or incorrect maintenance.
· In case of repairs or alterations to the device by the consumer or non-authorised third parties.
· If the customer used parts or accessories that are not recommended or provided by the supplier /
manufacturer.
EN
SAFETY INSTRUCTIONS
When using electrical appliances, basic safety precautions should always be taken, including the
following:
· Read all instructions carefully. Keep this manual for future reference.
· Make sure all packaging materials and promotional stickers have been removed before using the
appliance for the rst time. Make sure children cannot play with the packaging materials.
· This appliance is intended to be used in household and similar applications such as:
· sta kitchen areas in shops, oces and other working environments;
· farm houses;
· by clients in hotels, motels and other residential type environments;
· bed and breakfast type environments.
· Children should be supervised to ensure that they do not play with the appliance.
· This appliance can be used by children aged from 16 years and above and persons with reduced
physical, sensory or mental capabilities or lack of experience and knowledge if they have been given
www.domo-elektro.be
DO7111S
21
Page 22

supervision or instruction concerning use of the appliance in a safe way and understand the hazards
involved. Children shall not play with the appliance. Cleaning and user maintenance shall not be made
by children unless they are older than 16 and supervised.
· Keep the appliance and its cord out of reach of children younger than 16 years.
· The appliance must be disconnected from its power source when not in use, during service and when
replacing parts. Allow to cool before putting on or taking o parts, and before cleaning the appliance.
· If the supply cord is damaged, it must be replaced by the manufacturer, its service agent or similarly
qualied persons in order to avoid a hazard.
· CAUTION: In order to avoid a hazard this appliance must not be supplied through an external
switching device, such as a timer, or connected to a circuit that is regularly switched on and o by the
utility.
· The iron must not be left unattended while it is connected to the supply mains.
· The lling aperture must not be opened during use. Follow the instructions of this booklet for safe
relling.
· The iron must be used and rested on a at, stable surface and resistant to heat and hot steam.
· The iron is not to be used if it has been dropped, if there are visible signs of damage or if it is leaking.
Do not operate this appliance with a damaged cord or plug or in the event the appliance malfunctions
or has been damaged in any manner. Return the appliance to the DOMO Service Department or its
EN
service agent for examination, repair, or electrical or mechanical adjustment. Do not try to repair the
appliance yourself.
The surface(s) marked with this symbol are liable to get hot during use. It is advised not
to touch the surfaces of the appliance other than the handles to avoid burns.
· Do not use or store this appliance outdoors.
· Do not move the iron while in use or when still hot. Allow to cool before moving the iron or before
maintenance.
· Do not use this appliance for other than intended use.
· Do not ll the water reservoir with any other liquid than water.
· Do not use the steam function of the iron without water in the reservoir. This might cause damage to
the iron.
· Check carefully that the voltage and frequency of the power net match the indications on the rating
label of the appliance.
· The plug must be plugged into an appropriate outlet that is installed and grounded in accordance with
all local standards and requirements.
· Only use the utensils delivered with the appliance.
· To protect against electrical shock or burns, do not immerse unit, cord, or plug in water or other liquid.
· Do not operate the appliance with wet hands.
· Unwrap the cord completely to prevent overheating of the cord.
· Do not let the power supply cord touch hot surfaces.
· Only ll the water reservoir with no other liquid than water.
· Make sure the appliance is correctly assembled, then plug the cord in the wall outlet. To disconnect,
turn controls to “OFF” or “0” position, then remove the plug from the wall. Never pull the cord or
appliance to remove the plug from the socket.
· Make sure the appliance has cooled down before opening the boiler for cleaning. Make sure the bolt of
the boiler is correctly and well xed onto the appliance after maintenance.
· Failure to maintain this appliance in a clean condition could adversely aect the life of the appliance
and possibly result in a hazardous situation.
22
DO7111S
Page 23

· Any injury or damage caused by failure to comply with these rules are at your own risk. Neither the
manufacturer, importer, or the supplier may be held liable.
SAVE THESE INSTRUCTIONS FOR FUTURE REFERENCE
PARTS
1. Filling opening
2. Water tank
3. Temperature indication
light
4. Steam release button
5. Temperature dial
6. Steam button with selfcleaning function and
indicator light
7. Soleplate
8. Thermal insulation pads
9. On/o button
1
2
6
4
5
3
7
8
9
BEFORE THE FIRST USE
· Remove any stickers or protective foil from the soleplate.
· Heat up the iron until the maximum temperature and iron on a damp cloth during a couple of minutes
to remove any possible residues from the soleplate.
EN
CAUTION:
· Appliances are tested following production. It is thus perfectly normal if droplets of condensation have
formed in the water tank.
· During the rst use it is normal that a specic odeur escapes from the appliance. This odeur will
disappear after a while.
· Some particles may come out of the soleplate during the rst use. This is normal. The particles are
harmless and will disappear after a while.
· When turning on the appliance, the steam generator may produce a pumping sound. This is normal.
This sound indicates that water is pumped into the steam generator.
· While the soleplate is heating up, some steam will be released automatically. This is also normal and
will last for about 3 seconds.
www.domo-elektro.be
DO7111S
23
Page 24

USE
This steam generator oers 2 options: dry ironing or steam ironing. Follow the instructions below. Also
carefully read the ironing tips at the end of this section before using the appliance.
DRY IRONING
1. Place the iron on the thermal insulation pads of the steam generator.
2. Put the plug into the outlet and press the on/o button. The temperature
indicator light will start ashing.
3. Select the desired temperature with the temperature dial, according to the
kind of fabric that needs to be ironed. The temperature indication light will
start ashing and the iron will start warming up.
4. When the temperature indication light stays on, the selected temperature
has been reached. You can now start ironing.
Caution: Never touch the hot soleplate!
STEAM IRONING
Caution: do not plug in the appliance yet at this point.
EN
1. Fill the water tank with water. Make sure that you do not exceed the maximum level (1,5 L). Use only
mains water or 50 % mains water and 50 % de-mineralised water if you have hard water.
2. Replace the water reservoir in the appliance. You will hear a click when the reservoir is correctly
positioned in the appliance. If the reservoir is not correctly positioned in the appliance, it will not
work.
3. Place the iron on the thermal insulation cushions. Put the plug into the
outlet and press the on/o button. Set the temperature dial to the desired
temperature, according to the kind of fabric. The temperature indicator
light will start ashing.
4. When the temperature indication light stays on, the appliance has reached
the right temperature.
5. To iron with steam, press the steam button on the inside of the iron’s
handle. A continuous ow of steam will come out of the sole. When you release the button, you will
iron dry, without steam.
6. Use a steam boost to get rid of stubborn wrinkles. To do so, press the steam button at the top of the
iron’s handle.
Please note:
· Do not touch the hot sole of the iron!
· Never aim steam at people!
7. After ironing, place the iron on the thermal insulation pads. Press the power button and the
appliance will turn o. The temperature indicator light will now go out. Pull the plug out of the
socket. Allow the appliance to cool down completely.
If you do not use the appliance for 10 minutes, the temperature indicator light will ash. If you press a
button within those 10 minutes, the iron will stay at the right temperature. Otherwise, the appliance
will switch to sleep mode. If you still haven’t made any adjustments after 10 minutes in sleep mode, the
appliance will automatically turn itself o. This is a safety feature in case you forget to turn o the iron.
You can switch the appliance back on using the on/o button.
24
DO7111S
Page 25

IRONING TABLE
Use the dial to select the correct temperature for the correct material.
Symbol Fabric Temperature dial
synthetic fabric/silk
wool
cotton
linnen
This symbol means that the article can not be ironed!
IRONING TIPS
· Always check rst if there is a label on the garment with instructions for ironing. If this is the case, then
always follow these instructions.
· The iron heats up faster than it cools down. Therefore, always iron the garments that require the
lowest temperature rst, like synthetic fabrics.
· If a fabric contains several types of bres, always choose the lowest temperature to iron the
combination of these bres.
· Silk and other shiny fabrics should be ironed inside-out.
· Velvet and other fabrics that easily become shiny should be ironing with slight pressure, in one
direction. Always keep the iron moving.
· Never iron over zippers or other metal objects in a garment. This can damage the soleplate. Always
iron around such objects.
Caution: if you iron woollen fabrics, the fabric may become shiny. That is why you should turn the
garment inside-out for ironing.
70<T<120°C
100<T<160°C
140<T<210°C
170<T<225°C MAX
EN
CLEANING AND MAINTENANCE
· Unplug the appliance and let it cool down before cleaning it.
· Wipe residues from the soleplate with a damp cloth or with a non-abrasive (liquid) cleaner.
Caution: Do not use any chemical, steel, wooden or abrasive cleaners to scrape the soleplate.
· Clean the upper part of the iron with a soft, damp cloth.
· Wipe the water drops on the steam generator and the thermal insulation pads with a dry cloth.
· When not using the steam generator for a long time, pour out the water from the water tank and place
the iron on the thermal insulation pads to store the appliance.
CAUTION: Only use tap water (or 50% tap water and 50% demineralized water in case of hard water) in
your steam generator. Careful: De-scaled or de-mineralised water must never be used on its own, but
must be combined with tap water. In case of use of a “softener” and/or perfumed water, brown stains
could emerge, which would cause damage to the steam chamber.
www.domo-elektro.be
DO7111S
25
Page 26

After a few hours of ironing, the self-cleaning function’s indicator light will start ashing. This means you
need to clean the iron.
1. Hold the iron above a sink or place it on an oven rack in the sink. Attention: you may not leave the
iron on the base.
2. Turn the temperature dial to ‘CLEAN’. Hold down the Steam Jet and
Steam Buttons simultaneously for a few seconds to start cleaning. The
temperature indicator light will ash during the descaling process.
3. The pump will allow water to ow through the iron, cleaning it itself. This
will take about one minute.
4. If the appliance has been cleaned suciently, the appliance will turn of
automatically.
ENVIRONMENTAL GUIDELINES
This symbol on the product or on its packaging indicates that this product
may not be treated as household waste. Instead it must be brought to
the applicable collection point for recycling of electrical and electronic
EN
equipment. By ensuring this product is disposed of correctly, you will help
prevent potential negative consequences for the environment and human
health, which could otherwise be caused by inappropriate waste handling of
this product. For more detailed information about recycling of this product,
please contact your local city oce, your household waste disposal service or
the shop where you purchased the product.
26
The packaging is recyclable. Please treat the packaging ecologically.
DO7111S
Page 27

GARANTIA
Este aparato tiene un periodo de garantía de 2 años a partir de la fecha de compra. Durante el periodo
de garantía, el distribuidor será completamente responsable de los defectos directamente asignables
a errores del material y fabricación. Cuando se detecten este tipo de errores, y siempre que se estime
necesario, el aparato se sustituirá o reparará. A partir de ese momento, el periodo de garantía de 2 años
no volverá a iniciarse, sino que seguirá siendo de 2 años a partir del momento de compra. La garantía se
concede sobre la base del recibo de caja.
La garantía de los accesorios y componentes sujetos a desgaste es de 6 meses.
La garantía y la responsabilidad/imputabilidad del proveedor y el fabricante expiran automáticamente en
los siguientes casos:
· Cuando no se cumplan las instrucciones que aparecen en este manual.
· En el caso de una conexión inadecuada, por ejemplo, a una tensión eléctrica demasiado alta.
· En caso de uso incorrecto, brusco o anormal.
· En caso de insuciente o incorrecto mantenimiento.
· Si el consumidor o un tercero no autorizado realizan reparaciones o modicaciones en el aparato.
· Si se usan componentes o accesorios que no están recomendados o que no son suministrados por el
proveedor/fabricante.
INSTRUCCIONES DE SEGURIDAD
Cuando utilice aparatos eléctricos, se deben seguir las instrucciones de seguridad mencionadas a
continuación:
· Lea detenidamente estas instrucciones. Conserve este manual para consultarlo posteriormente.
· Antes del primer uso retire todos los materiales de embalaje y etiquetas promocionales. Asegúrese de
que los niños no puedan jugar con el material de embalaje.
· Este aparato es adecuado para su uso en el ámbito doméstico y entornos similares como:
· Zona de cocina para el personal de tiendas, ocinas y otros entornos profesionales similares.
· Granjas.
· Habitaciones de hoteles y moteles, y otros entornos de carácter residencial.
· Habitaciones de invitados o similares.
· Supervise en todo momento a los niños para que no jueguen con el aparato.
· Este aparato puede ser utilizado por niños de 16 años o más, personas con discapacidad física o
sensorial, o personas con capacidad mental limitada o falta de experiencia o conocimiento, siempre,
y en tanto en cuanto, dichas personas estén vigiladas o hayan recibido instrucciones sobre el uso del
aparato de manera segura y conozcan los peligros del uso del mismo. Los niños no deben jugar con el
ventilador. El mantenimiento y la limpieza del dispositivo no deben ser realizados por niños, a menos
que tengan 16 años o más y estén supervisados por un adulto.
· Mantenga el aparato fuera del alcance de los niños.
· Saque el enchufe de la toma de corriente cuando no use el aparato, antes de montar o desmontar
piezas y antes de limpiarlo. Ponga primero todos los botones en posición de apagado y desconecte el
cable de alimentación de la toma de corriente. No tire nunca del cable de alimentación para sacar el
enchufe de la toma de corriente.
· Si el cable de alimentación está dañado, para evitar accidentes, debe sustituirlo el fabricante, un
centro de reparación autorizado o una persona cualicada.
· ATENCIÓN: para evitar peligros, el aparato no debe ser controlado con un dispositivo externo, como
un temporizador externo, ni debe conectarse a una red que se encienda y se apague con frecuencia.
· No deje el aparato desatendido cuando esté conectado a la red eléctrica.
ES
www.domo-elektro.be
DO7111S
27
Page 28

· El oricio de llenado no se puede abrir nunca durante el uso. Siga las instrucciones de este manual para
llenar el aparato de manera segura.
· La plancha solo se puede colocar y utilizar sobre una supercie plana y estable, resistente al vapor y al
calor.
· La plancha no se puede utilizar si se ha caído, si existen signos de daño visibles o si presenta alguna
fuga. No utilice nunca el aparato si el cable de alimentación o el enchufe están dañados, después de
un mal funcionamiento del aparato o cuando el aparato está dañado. En caso de que el aparato esté
dañado, llévelo al servicio de postventa de DOMO o al centro de servicio cualicado más cercano
para su inspección, reparación o para realizar ajustes eléctricos/mecánicos. Nunca intente reparar el
aparato por su cuenta.
Si ve este símbolo, eso quiere decir que el aparato puede calentarse mucho. No
toque nunca la supercie del aparato; utilice siempre las asas.
· No utilice el aparato al aire libre.
· No mueva la plancha si se encuentra todavía en funcionamiento ni mientras sigue estando caliente.
Espere a que el aparato se enfríe del todo antes de cambiarlo de lugar o efectuar labores de
mantenimiento.
· Utilice el aparato únicamente para el n para el que está destinado.
· No llene nunca el depósito de agua con otro líquido que no sea agua.
· Antes de utilizarlo, compruebe si el voltaje indicado en el aparato coincide con el voltaje de la red
eléctrica de su vivienda.
· El cable de alimentación debe estar conectado a una toma de corriente que debe haber sido instalada
y conectada a tierra de acuerdo con las normas y reglamentos locales.
· Solo debe utilizar los accesorios que se suministran con la plancha.
ES
· Nunca sumerja el aparato, el cable de alimentación o el enchufe en agua o en cualquier otro líquido.
Esto evitará choques eléctricos o incendios.
· No utilice el aparato con las manos mojadas.
· Desenrolle el cable de alimentación completamente para evitar el sobrecalentamiento del mismo.
· No deje que el cable de alimentación toque supercies calientes.
· Solo debe introducir el cable de alimentación en la toma de corriente después de que el aparato
se haya montado correctamente. Antes de retirar el cable del aparato de la toma de corriente, el
control se debe poner en la posición «OFF» o «0». A continuación podrá retirar el cable de la toma
de corriente. Nunca tire del aparato o del cable de alimentación para retirar el enchufe de la toma de
corriente.
· Asegúrese de que el aparato se haya enfriado por completo antes de abrir el depósito de agua para
limpiarlo. Compruebe después que el depósito de agua se haya vuelto a instalar correctamente.
· Si no se realiza un correcto mantenimiento del aparato, la vida útil del aparato se reducirá
drásticamente y se podrían producir situaciones peligrosas.
· Los accidentes o los daños ocasionados por el no seguimiento de estas normas son su propia
responsabilidad. Ni el fabricante, ni el importador ni el distribuidor pueden ser considerados
responsables a este respecto.
CONSERVE ESTAS INSTRUCCIONES PARA CONSULTARLAS POSTERIORMENTE
28
DO7111S
Page 29

PIEZAS
1. Oricio de llenado
2. Depósito de agua
3. Luz indicadora de la
temperatura
4. Botón del Vapor
5. Disco de temperatura
6. Botón de chorro de
vapor con función de
autolimpieza y luz
indicadora
7. Suela
8. Almohadillas de
aislamiento térmico
9. Botón encendido/ apagado
1
2
6
4
5
3
7
8
ANTES DEL PRIMER USO
· Quite todas las etiquetas y la película protectora de la suela.
· Precaliente la plancha a la temperatura máxima y planche durante unos minutos sobre un paño
húmedo para limpiar cualquier residuo de la suela.
9
PRECAUCIÓN:
· Los aparatos siempre se prueban después de la producción. Por lo tanto, es normal que se formen
gotas de condensación en el depósito de agua.
· Es normal que durante el primer uso despida un olor extraño. Este olor desaparecerá después de un
tiempo.
· Puede que salgan residuos de la suela durante el uso inicial. Esto es normal. Las partículas no son
perjudiciales y desaparecen después de un tiempo.
· Cuando se enciende el generador pude hacer un ruido de bombeo. Esto es normal. Este sonido es una
señal de que se bombea agua al generador de vapor.
· Durante el calentamiento de la suela sale automáticamente un poco de vapor de la suela. Una vez
más, esto es normal y durará unos 3 segundos.
www.domo-elektro.be
DO7111S
ES
29
Page 30

USO
Este generador de vapor ofrece 2 opciones: planchado en seco o con vapor. Siga las instrucciones
siguientes. Lea bien los consejos de planchado siguientes antes de utilizar el generador.
PLANCHADO EN SECO
1. Coloque la plancha sobre las almohadillas de aislamiento térmico del generador de vapor.
2. Introduzca el enchufe en la toma de corriente y pulse el botón de
encendido/apagado. La luz indicadora de temperatura empezará a
parpadear.
3. Gire el control de temperatura a la posición deseada, lo que depende del
tipo de tejido a planchar. La luz indicadora de temperatura comenzará a
parpadear y la plancha comenzará a calentar.
4. Si la luz indicadora de temperatura queda encendida, la temperatura
seleccionada es alcanzada. Ahora puede empezar a planchar.
Precaución: ¡No toque nunca la suela caliente!
PLANCHADO A VAPOR
Nota: no inserte aún el enchufe en la toma de corriente.
1. Llene el depósito con agua. Tenga cuidado de no exceder su nivel máximo (1,5L). Solo debe usar
agua del grifo o un 50 % de agua del grifo y un 50 % de agua desmineralizada, en el caso de agua
dura.
2. Vuelva a colocar el depósito de agua en el aparato. Oirá un clic cuando el depósito esté colocado
correctamente en el aparato. Si el depósito no está correctamente colocado en el aparato, este
ES
tampoco funcionará.
3. Coloque la plancha sobre las almohadillas de aislamiento térmico.
Introduzca el enchufe en la toma de corriente y pulse el botón de
encendido/apagado. Gire el control de temperatura a la temperatura
deseada, en función del tipo de tejido. La luz indicadora de temperatura
empezará a parpadear.
4. Si la luz indicadora de temperatura queda encendida, el aparato ha
alcanzado la temperatura correcta.
5. Para planchar con vapor, pulse el botón de vapor que se encuentra en el
interior del asa de la plancha. Se pulverizará un vapor continuo desde la suela de la plancha. Al soltar
el botón, volverá a planchar en seco, sin vapor.
6. Para las arrugas persistentes también puede utilizar un chorro de vapor. Presione el botón de chorro
de vapor situado en la parte superior del asa de la plancha.
Atención:
· ¡No toque nunca la suela caliente!
· ¡No dirija nunca el vapor hacia las personas!
7. Cuando acabe de planchar, coloque la plancha sobre las almohadillas de aislamiento térmico.
Presione el botón de encendido/apagado y el aparato se apagará. La luz indicadora de temperatura
también se apagará. Retire el enchufe de la toma de corriente. Deje que el aparato se enfríe
completamente.
Si no usa el aparato durante 10 minutos, la luz indicadora de temperatura empezará a parpadear. Si
presiona un botón dentro de esos 10 minutos, la plancha seguirá manteniendo la temperatura. De lo
30
DO7111S
Page 31

contrario, el aparato cambiará al modo en espera. Si pasados 10 minutos en el modo en espera no ha
realizado ningún ajuste, el aparato se apagará automáticamente. Esta es una protección para cuando
se olvide de apagar la plancha. Puede volver a encender el aparato a través del botón de encendido/
apagado.
TABLA DE PLANCHADO
Con la rueda giratoria, ajuste la temperatura correcta para el tejido en cuestión.
Símbolo Tejido Disco de temperatura
Tejido sintético / seda
lana
algodón
lino
¡Este símbolo signica que el artículo no se debe planchar
CONSEJOS DE PLANCHADO
· Verique siempre primero si hay una etiqueta en la prenda con instrucciones para planchar. Si es así,
siga siempre esas instrucciones.
· La plancha tarda más en calentarse que en enfriarse. Por tanto planche siempre primero los artículos
que requieran temperatura más baja, como los sintéticos.
· Si un tejido tiene varios tipos de bras, seleccione siempre la temperatura más baja para planchar la
combinación de estas bras.
· La seda y otras telas brillantes se deben planchar por el lado interior.
· El terciopelo y otras telas que tienden fácilmente a brillar, deben plancharse con presión ligera y en
una dirección. Mantenga la plancha siempre en movimiento.
· Nunca planche sobre cremalleras u otros objetos de metal de una prenda. Esto puede dañar la suela.
Planche siempre alrededor de estos objetos.
Nota: al planchar tejidos de lana, la tela puede brillar. Por lo tanto tiene que dar la vuelta a la prenda para
plancharla.
70<T<120°C
100<T<160°C
140<T<210°C
170<T<225°C MAX
ES
LIMPIEZA Y MANTENIMIENTO
· Desconecte el enchufe de la toma de corriente y deje que el aparato se enfríe antes de limpiarlo.
· Limpie los residuos de la suela con un paño húmedo o con un agente de limpieza no abrasivo (líquido).
Precaución: No utilice productos químicos, acero, madera o productos abrasivos para limpiar la suela
de la plancha.
· Limpie la parte superior de la plancha con un paño suave y húmedo.
· Limpie las gotas del generador de vapor y limpie las almohadillas de aislamiento térmico con un paño
seco.
· Si no usa el generador de vapor durante períodos largos, vacíe el depósito de agua y coloque la
plancha sobre las almohadillas de aislamiento térmico para guardarla.
www.domo-elektro.be
DO7111S
31
Page 32

PRECAUCIÓN: Use solamente agua potable (o 50% de agua y 50% de agua desmineralizada en caso
de agua dura) en el generador de vapor. ¡Tenga cuidado: ¡Se debe evitar el uso exclusivo de agua
desmineralizada o agua ablandada (siempre se debe combinar con agua del grifo)! Cuando se utiliza un
“ablandador” y/o agua perfumado pueden surgir manchas de agua marrón con daño a la cámara de vapor
como resultado.
FUNCIÓN AUTOLIMPIANTE
Después de algunas horas de planchado, la luz indicadora de la función de autolimpieza empezará a
parpadear. Lo que indica que tiene que limpiar la plancha.
1. Sujete la plancha sobre un fregadero o colóquela sobre una rejilla en el fregadero. Atención: no
puede dejar la plancha sobre la base.
2. Gire el selector de temperatura hasta “CLEAN”. Mantenga presionado el
botón de chorro de vapor y el botón de vapor al mismo tiempo durante
unos segundos para empezar a limpiar. La luz indicadora de temperatura
parpadeará durante el proceso de descalcicación.
3. La bomba permitirá que el agua uya a través de la plancha y la limpiará por
sí misma. Este proceso durará un minuto.
4. Si el aparato está sucientemente limpio, el aparato se apaga
automáticamente.
DIRECTRICES MEDIOAMBIENTALES
El símbolo en el producto o en el embalaje indica que este producto no puede
ser tratado como residuo doméstico. Se debe llevar a un lugar en el que se
ES
reciclan equipos eléctricos y electrónicos. Si se asegura de que este producto
se desecha correctamente, usted ayudará a evitar posibles consecuencias
negativas para las personas y el medio ambiente que serían causadospor
un tratamiento de residuos inadecuado. Para obtener información más
detallada sobre el reciclaje de este producto, póngase en contacto con su
ayuntamiento, o con la empresa o departamento responsable del servicio de
recogida de basura doméstica, o con la tienda donde adquirió el producto.
32
El material de embalaje es reciclable. Trate el embalaje de una manera
medioambientalmente responsable.
DO7111S
Page 33

GARANZIA
La garanzia dell’apparecchio è valida per 2 anni a partire dalla data di acquisto. Durante il periodo di
validità della garanzia, il distributore si assume la piena responsabilità dei difetti dei materiali o di quelli
di fabbricazione. In caso di presenza di tali difetti, se necessario, si procederà alla sostituzione o alla
riparazione dell’apparecchio. Il periodo di garanzia di 2 anni non ricomincia in quel momento, ma continua
per 2 anni dalla data di acquisto dell’apparecchio. Per la garanzia fa fede la data riportata sullo scontrino.
Se l’apparecchio si rivela difettoso nel periodo di validità della garanzia, cioè 2 anni, potete portarlo,
insieme allo scontrino, nel negozio dove l’avete acquistato.
La garanzia sugli accessori e sui componenti soggetti a usura è di 6 mesi.
La garanzia e la responsabilità del negoziante e del produttore decadono automaticamente nei seguenti
casi:
· mancata osservanza delle istruzioni contenute nel presente manuale;
· errato collegamento, per esempio con tensione elettrica troppo alta;
· uso errato, anormale e manesco;
· manutenzione insuciente o errata;
· riparazione o modiche all’apparecchio eseguite dal cliente o da terzi non autorizzati;
· uso di accessori o componenti non raccomandati o forniti dal negoziante o dal produttore.
INDICAZIONI DI SICUREZZA
· Quando si utilizzano dispositivi elettrici, è necessario tenere presenti le seguenti istruzioni di sicurezza:
· Leggere con attenzione le presenti istruzioni. Conservare le istruzioni per possibili future consultazioni.
· Prima di utilizzare il prodotto, togliere tutti gli imballi e gli eventuali adesivi promozionali. Assicurarsi
che i bambini non giochino con gli imballaggi.
· Questo apparecchio è destinato unicamente all’uso domestico e in ambienti analoghi, quali:
· angoli cottura riservati al personale nei negozi, negli uci e in altri ambienti professionali
· Fattorie
· Camere di alberghi, motel e altre strutture ricettive residenziali
· Camere per vacanze o ambienti analoghi
· L’apparecchio può essere utilizzato da bambini di età superiore a 16 anni e da persone con ridotte
capacità siche, sensoriali o mentali, o con mancanza di esperienza o conoscenza, solo se sorvegliati
o se hanno ricevuto istruzioni sull’uso sicuro dell’apparecchio e ne comprendono i rischi. I bambini
non possono giocare con l’apparecchio. Le operazioni di pulizia e di manutenzione non devono essere
eettuate dai bambini di età inferiore a 16 anni e senza sorveglianza.
· Tenere l’apparecchio fuori dalla portata dei bambini di età inferiore a 16 anni.
· L’apparecchio deve essere staccato dall’alimentazione elettrica quando non viene utilizzato, in caso
di riparazione e quando vengono sostituite delle parti. Lasciare rareddare l’apparecchio prima di
sostituire eventuali componenti e prima di pulirlo.
· Se il cavo di alimentazione è danneggiato, deve essere sostituito dal produttore, da un centro
assistenza o da persone qualicate, questo per evitare incidenti.
· ATTENZIONE: Per evitare il rischio di incidenti, l’apparecchio non deve essere utilizzato con strumenti
esterni, come ad esempio un timer e non deve essere collegato a una rete che viene accesa e spenta in
continuazione.
· Non lasciare l’apparecchio incustodito se è collegato alla rete elettrica.
· L’apertura per il riempimento non deve mai essere aperta durante l’uso. Seguire le istruzioni del
presente manuale per riempire l’apparecchio in modo sicuro.
· Il ferro può essere utilizzato solo su una supercie piana e stabile, resistente al vapore e al calore.
IT
www.domo-elektro.be
DO7111S
33
Page 34

· Il ferro non deve essere utilizzato se è caduto, se presenta segni visibili di danni o se perde. Non
utilizzare mai l’apparecchio se il cavo di alimentazione o la spina sono danneggiati, dopo un
malfunzionamento o quando è danneggiato. Portare l’apparecchio al servizio assistenza post-vendita
di DOMO o al centro assistenza autorizzato più vicino per farlo controllare, riparare o per apportare le
necessarie modiche elettriche o tecniche. Non cercare mai di riparare da soli l’apparecchio.
· Tenere l’apparecchio e il cavo di alimentazione fuori dalla portata dei bambini di età inferiore a 16 anni
quando è acceso o si sta rareddando.
Questo simbolo indica che l’apparecchio può diventare molto caldo. Non toccare questa
supercie, utilizzare sempre l’impugnatura.
· Non utilizzare l’apparecchio all’aperto.
· Non spostare il ferro da stiro mentre è in uso o se è ancora caldo. Prima di spostare l’apparecchio o di
sottoporlo a manutenzione, lasciarlo rareddare completamente.
· Utilizzare l’apparecchio solo per lo scopo previsto.
· Il serbatoio deve essere riempito sempre e solo con acqua. Non è ammesso nessun altro liquido.
· Prima dell’uso, controllare che il voltaggio riportato sull’apparecchio corrisponda a quello della rete
elettrica domestica.
· Il cavo di alimentazione deve essere sempre collegato a una presa installata correttamente e con
messa a terra in conformità alla normativa locale vigente.
· Utilizzare solo gli accessori forniti insieme al ferro da stiro.
· Non immergere mai l’apparecchio, il cavo o la spina in acqua o in altri liquidi. Questo per evitare scosse
elettriche o incendi.
· Non utilizzare questo apparecchio con le mani bagnate.
· Srotolare completamente il cavo di alimentazione per evitare che si surriscaldi.
· Il cavo di alimentazione non deve mai entrare in contatto con superci calde.
· Inserire il cavo di alimentazione nella presa solo dopo aver correttamente montato l’apparecchio.
Per staccare l’apparecchio dalla presa, assicurarsi che sia su “OFF” o in posizione “0”. Solo dopo sarà
possibile staccarlo dalla presa. Non tirare mai il cavo di alimentazione o l’apparecchio per staccare la
spina dalla presa di corrente.
· Assicurarsi che l’apparecchio sia completamente freddo prima di aprire il serbatoio dell’acqua per
IT
pulirlo. Controllare quindi che il serbatoio sia posizionato nel modo corretto.
· Se l’apparecchio non viene pulito bene, la sua durata di vita può ridursi in modo drastico e possono
vericarsi situazioni pericolose.
· Gli incidenti o i danni causati dalla mancata osservanza delle presenti istruzioni sono responsabilità
dell’utilizzatore. Non possono essere ritenuti responsabili per tali danni né il produttore, né
l’importatore, né il fornitore.
CONSERVARE LE ISTRUZIONI PER POSSIBILI FUTURE CONSULTAZIONI
34
DO7111S
Page 35

COMPONENTI
1. Apertura di riempimento
2. Serbatoio dell’acqua
3. Spia luminosa di
indicazione della
temperatura
4. Tasto del vapore
5. Disco della temperatura
6. Pulsante del getto di
vapore con funzione di
autopulizia e spia luminosa
7. Piastra
8. Gommini isolamento
termico
9. Tasto on/o
1
2
6
4
5
3
7
8
PRIMA DELL’USO
· Togliere eventuali adesivi e pellicole protettive dalla piastra del ferro.
· Scaldare il ferro no alla massima temperatura e passarlo per alcuni minuti su un panno umido per
eliminare eventuali residui presenti sulla piastra.
ATTENZIONE:
· Dopo la produzione, gli apparecchi vengono sempre testati. È quindi normale che si siano formate
delle gocce di condensa nel serbatoio dell’acqua.
· È normale che al primo utilizzo si senta uno strano odore. Questo odore scomparirà dopo qualche
minuto.
· È possibile che durante il primo utilizzo fuoriescano dalla piastra piccole particelle. È normale. Non
sono dannose e scompariranno dopo qualche minuto.
· Quando si accende il ferro, il generatore di vapore emette un suono simile a quello di una pompa. È
normale. Il rumore è il segnale che l’acqua viene pompata nel generatore di vapore.
· Durante il riscaldamento, dalla piastra uscirà automaticamente un po’ di vapore. Anche questo è
normale e durerà circa 3 secondi.
9
IT
UTILIZZO
Questo generatore di vapore presenta 2 opzioni: stiratura a secco o a vapore. Seguire le istruzioni
riportate sotto. Leggere con attenzione anche i suggerimenti riportati in fondo a questo paragrafo prima
di utilizzare l’apparecchio.
STIRARE A SECCO
1. Mettere il ferro sui gommini di isolamento termico.
2. Inserire la spina nella presa e premere il tasto on/o. La spia della
temperatura inizia a lampeggiare.
3. Ruotare il disco della temperatura nella posizione desiderata, che dipende
dal tipo di tessuto che deve essere stirato. La spia della temperatura
lampeggia e il ferro inizia a riscaldarsi.
www.domo-elektro.be
DO7111S
35
Page 36

4. Quando la spia della temperatura rimane accesa, signica che è stata raggiunta quella selezionata.
Si può iniziare a stirare.
Attenzione: non toccare mai la piastra calda!
STIRARE CON IL VAPORE
Attenzione: non inserire la spina nella presa di corrente.
1. Riempire il serbatoio con acqua, facendo attenzione a non superare il livello massimo consentito (1,5
litri). Utilizzare sempre acqua del rubinetto o 50 % acqua del rubinetto e 50
% acqua demineralizzata in caso di acqua dura.
2. Riposizionare il serbatoio dell’acqua nell’apparecchio. Si udirà un clic
quando il serbatoio è posizionato correttamente nell’apparecchio.
Se il serbatoio non è posizionato correttamente nell’apparecchio non
funzionerà.
3. Posizionare il ferro da stiro sui cuscini di isolamento termico. Inserire la
spina nella presa, premere il tasto on/o. Ruotare il disco sulla temperatura
desiderata, a seconda del tipo di tessuto. La spia della temperatura inizia a lampeggiare.
4. Se la spia luminosa della temperatura rimane accesa signica che l’apparecchio ha raggiunto la
temperatura corretta.
5. Per stirare con il vapore, premere il tasto del vapore sul lato interno della maniglia del ferro. Dal ferro
fuoriesce vapore in continuo. Quando si rilascia il tasto, si stira a secco, senza vapore.
6. In caso di pieghe dicili, è possibile utilizzare il getto di vapore. A tale ne premere il pulsante del
vapore sulla parte superiore del manico del ferro da stiro.
ATTENZIONE:
· Non toccare mai la piastra calda!
· Non indirizzare mai il getto di vapore sulle persone!
7. Dopo la stiratura posizionare il ferro da stiro sui cuscini di isolamento termico. Premere il pulsante
on/o e l’apparecchio si spegne. La spia della temperatura si spegne. Scollegare la spina dalla presa
elettrica. Lasciare rareddare completamente l’apparecchio.
Se non si utilizza l’apparecchio per 10 minuti la spia della temperatura lampeggia. Premendo un pulsante
entro questi 10 minuti il ferro da stiro si mantiene alla giusta temperatura. In caso contrario esso passa alla
IT
modalità di sospensione. Se non vengono apportare modiche dopo 10 minuti che l’apparecchio si trova
in modalità “sleep”, questo si spegne automaticamente. Si tratta di una funzione di protezione nel caso in
cui ci si dimentichi di spegnere il ferro da stiro. È possibile riaccendere l’apparecchio utilizzando il pulsante
on/o.
TABELLA STIRATURA
Con il disco, impostare la temperatura corretta per il tessuto da stirare.
Simbolo Tessuto Disco della temperatura
tessuto sintetico/seta
lana
cotone
lino
70<T<120°C
100<T<160°C
140<T<210°C
170<T<225°C MAX
36
DO7111S
Page 37

Questo simbolo indica che il capo non deve essere stirato!
SUGGERIMENTI
· Controllare sempre prima se sui capi da stirare è presente l’etichetta con le istruzioni. Se è presente,
seguire sempre le istruzioni.
· Il ferro si scalda più rapidamente di quanto non si rareddi. Stirare quindi sempre prima i capi di
abbigliamento che richiedono temperature inferiori, come per esempio quelli sintetici.
· Se un capo è composto da più tipi di bre, selezionare sempre la temperatura più bassa per stirare.
· La seta e altri tipi di tessuti lucidi devono sempre essere stirati a rovescio.
· Il velluto e altri tessuti che diventano lucidi devono essere stirati con una leggera pressione e in una
sola direzione. Tenere sempre il ferro in movimento.
· Non stirare mai cerniere o altri oggetti in metallo presenti sui capi di abbigliamento. Ciò potrebbe
danneggiare la piastra. Stirare sempre attorno a questi oggetti.
Attenzione: quando si stirano tessuti in lana, è possibile che si produca un eetto lucido. Stirare il capo a
rovescio.
PULIZIA E MANUTENZIONE
· Togliere la spina dalla presa di corrente e lasciare rareddare completamente l’apparecchio prima di
pulirlo.
· Togliere eventuali residui dalla piastra con un panno umido o con un detergente (liquido) non abrasivo.
Attenzione: non utilizzare prodotti chimici, in acciaio, legno o abrasivi per pulire la piastra.
· Pulire la parte superiore del ferro con un panno morbido e umido.
· Togliere le gocce dal generatore di vapore e pulire i gommini di isolamento termico con un panno
asciutto.
· Se il generatore di vapore non viene utilizzato per lunghi periodi di tempo, gettare l’acqua del
serbatoio e riporre il ferro sui gommini di isolamento termico.
ATTENZIONE: utilizzare sempre acqua del rubinetto (o 50 % acqua del rubinetto e 50 % acqua
demineralizzata) nel generatore del vapore. Attenzione: evitare acqua demineralizzata o addolcita al 100
%! L’utilizzo di acqua “addolcita” e/o profumata può causare macchie scure e avere come conseguenza
danni alla caldaia.
Dopo alcune ore di stiratura la spia della funzione di autopulizia inizia a lampeggiare. Signica che è
necessario pulire il ferro.
1. Tenere il ferro da stiro sopra un lavandino o posizionarlo su una griglia nel lavandino. Attenzione:
non lasciare il ferro da stiro sulla base.
2. Ruotare il selettore della temperatura su “CLEAN”. Tenere premuti
contemporaneamente i pulsanti del getto del vapore e del vapore per alcuni
secondi per iniziare la pulizia. La spia della temperatura lampeggia durante
il processo di decalcicazione.
3. La pompa fa circolare l’acqua nel ferro, pulendolo. L’operazione dura circa
un minuto.
4. Quando il ferro è completamente pulito, si spegne automaticamente.
www.domo-elektro.be
DO7111S
IT
37
Page 38

MISURE AMBIENTALI
Il simbolo sul prodotto o sulla confezione indica che esso non deve essere
trattato come riuto domestico. Deve, al contrario, essere conferito al
punto di raccolta predisposto per il riciclo delle apparecchiature elettriche
ed elettroniche. Facendo in modo che questo prodotto venga smaltito
correttamente aiuterete a prevenire potenziali conseguenze negative per
l’ambiente e la salute dell’uomo, che potrebbero essere causate da uno
smaltimento non corretto. Per maggiori informazioni sul riciclo di questo
prodotto, consultare le autorità comunali, l’azienda o il servizio responsabili
della raccolta dei riuti domestici o il negozio in cui il prodotto è stato
acquistato.
Il materiale di imballaggio è riciclabile. Lo smaltimento dell’imballaggio deve
avvenire al ne di tutelare l’ambiente.
38
IT
DO7111S
Page 39

ZÁRUKA
1. trvání záruky: 2 roky
2. poskytování záruky:
a) záruční opravu provedeme podle našeho zvážení opravou nebo výměnou vadných dílů, jestliže tyto
závady vznikly prokazatelně vadou materiálu nebo chybou při výrobě
b) záruční oprava bude provedena jen při předložení tohoto záručního listu a dokladu o zaplacení
c) jestliže dojde k opravě nebo výměně spotřebiče v záruční době, záruční doba se prodlužuje
3. záruka se nevztahuje
a) na mechanické poškození
b) nesprávné používání v rozporu s návodem k použití
1. záruka zaniká:
- při použití spotřebiče jinak než v domácnosti
- při provádění opravy nebo změny na spotřebiči osobou jinou než pověřenou naším servisem
Na tento spotřebič poskytujeme záruku na nedostatky, které jsou označeny jako výrobní chyby nebo
chyby materiálu. Záruční doba začíná dnem prodeje a je uznána po předložení potvrzeného tohoto
záručního listu nebo orig.dokladu o zaplacení + tento nepotvrzený, ale vyplněný ZL pro záznam opravy.
Případné reklamace můžete uplatnit v místě nákupu tohoto přístroje nebo v servisním středisku rmy:
Domo-elektro s.r.o. Na Kobyle, 34506 Kdyně viz www.domo-elektro.cz
tel. 379 789 684 nebo na servis@domo-elektro.cz , tel. 379 422 550
· Pečlivě si přečtěte tyto informace a manuál nechte i pro pozdější nahlédnutí.
· Ujistěte se, že před použitím odlepíte a odstraníte veškeré reklamní a ochranné fólie.
· Děti si s ochrannými ani reklamními polepy nesmí hrát.
· Přístroj je určen pro používání v domácnostech a podobných prostředích, tak jako je:
· kuchyňky v obchodech, kancelářích atd.
· chaty, chalupy
· hotely, penziony a jiné dočasné ubytování
· Přístroj nesmí používat osoby (ani děti) se sníženou psychickou, motorickou nebo mentální
schopností. Pokud nejsou pod odborným dohledem, tak jej nesmí používat ani osoby bez
dostatečného seznámení o pravidlech správného použití.
· Dohlédněte, aby si děti nehrály s přístrojem.
· Přístroj smí používat pouze děti starší 16 let. Osoby se sníženou psychickou, motorickou nebo
mentální schopností smí používat přístroj pouze za neustálého dohledu odpovědné osoby, která je
seznámena s pravidly používání a případným rizikem.
· Čistění a běžnou údržbu smí provádět pouze osoby starší 16 let a při tom být pod dohledem.
· Přístroj a jeho el. kabel skladujte mimo dosah dětí mladších 16 let.
www.domo-elektro.be
DO7111S
CZ
39
Page 40

· Pokud přístroj nepoužíváte, nebo se jej chystáte rozebírat či měnit součásti, tak přístroj odpojte od el.
napětí. Před rozebírání, skládáním i před čistěním, vždy nechte přístroj dostatečně vychladnout.
· Pokud je přívodní kabel poškozen, musí být vždy okamžitě opraven v odborném servise nebo
proškolenou osobou.
· POZOR: Aby se předešlo rizikům úrazu (poškození), nesmí být přístroj používán se žádnou externí
součástí (např. časovač, vypínač, přepínač …)
· Nenechávejte žehličku bez dozoru, pokud je zapojena v el. síti.
· Neotevírejte zásobník vody během provozu. Doplňujte dle přiložených instrukcí v návodu.
· Žehličku odstavujte na rovnou a stabilní plochu, která je odolná horkým povrchům.
· Žehličku nepoužívejte pokud z ní kape voda nebo je jakkoli viditelně poškozena či netěsní. Žehličku
s poškozeným přívodním kabelem nepoužívejte, i když je stále plně funkční. Jakkoli poškozený
přístroj je nutné nechat zkontrolovat odborným servisem DOMO-ELEKTRO nebo jiným proškoleným
pracovníkem. Nezkoušejte opravovat žehličku sami!!
· Žehličku držte mimo dosah dětí mladších 16 let, pokud je zapojená v el. síti nebo je stále teplá/horká.
POVRCHY označené tímto symbolem jsou při používání velmi horké. Nedotýkejte se
jich. Pro přenos používejte výhradně rukojeti či madla k tomu určené.
· Nepoužívejte ani neskladujte žehličku venku.
· S přístrojem během jeho používání nemanipulujte. Vždy ho nechte důkladně vychladnout a až poté
přemisťujte.
· Nepoužívejte žehličku jinak než je zamýšleno.
· Do zásobníku vody nenalévejte žádnou jinou tekutinu než vodu.
· Pokud je žehlička s prázdným zásobníkem vody, nikdy nespouštějte parní funkce ani páru. Mohlo by to
poškodit celý přístroj.
· Před použití zkontrolujte zda parametry el. sítě odpovídají požadovaným parametrů na informativním
štítku přístroje.
· Zástrčka přívodního kabelu smí být zapojena pouze do zásuvky s uzemněním a všemi standartními
parametry dle místí sítě.
· Používejte pouze přístlušenství s přístrojem dodané.
· Přístroj ani přívodní kabel nikdy neponořujte pod vodu, jinak hrozí nebezpečí úrazu.
· Nepoužívejte / nesahejte na přístroj s mokrýma rukama.
· Přívodní kabel co nejvíce rozviňte, aby se nepřehříval.
· Nenechávejte viset kabel přístroje přes hranu stolu a vyvarujte se toho, aby přišel do styku s horkými
plochami.
· Nikdy nenalévejte do zásobníku na vodu jinou tekutinu než je čistá voda.
· Vypnutý přístroj zkontroluje, zda je řádně složen, a až poté zapojte. Při vypnutí přístroje nejdříve
CZ
otočte spínače na polohu OFF/0, až poté odpojte z el. sítě. Nikdy netahejte za přívodní kabel, ale
odpojujte přímo za zástrčku.
· Před otevřením zásobníku/tlakového šroubu generátoru se vždy důkladně ujistěte, že je přístroj i
náplně dostatečně chladné. Po vyčistění se vždy ujistěte, že je tlakový šroub generátoru dostatečně
dotažen a zásobník na žehličce správně usazen.
· Zanedbaná údržba může vést ke zkrácení životnosti přístroje a případně k nebezpečí úrazu
· Veškeré zranění a rizika úrazu vzniklá nedodržením těchto pravidel a pokynů jdou na odpovědnost
uživatel. Výrobce ani prodejce není schopen nést odpovědnost za vzniklá rizika z nedodržení těchto
pokynů.
ULOŽTE SI TENTO NÁVOD K POZDĚJŠÍMU NAHLÉDNUTÍ
40
DO7111S
Page 41

1. Víko na doplňování vody
2. Zásobník na vodu
3. Světelná kontrolka teploty
4. Spoušť páry
5. Nastavení teploty
6. Tlačítko páry s funkcí
samočištění a světelnou
kontrolkou
7. Žehlící plocha
8. Teplu odolné polštářky
9. Hlavní on/o spínač
1
2
6
4
5
3
7
8
9
· Odstraňte veškeré obalové materiály, samolepky a fólie ze všech částí přístroje.
· Nechte nahřát žehličku na maximální teplotu a poté pár minut žehlete vlhkou látku, abyste odstranili
možné zbytky nečistot na žehlicí ploše.
· Spotřebiče jsou během výroby testovány. Proto je tedy možné a normální, když se v zásobníku na
vodu vytvoří kapičky zkondenzované vody.
· Během prvního žehlení můžete z přístroje cítit specický zápach. Tento zápach po chvíli zmizí.
· Skrz otvory v žehlící ploše mohou při prvním žehlení vyjít nějaké částečky. Toto je úplně normální. Tyto
částečky jsou neškodné a po chvíli vymizí.
· Po zapnutí přístroje může parní generátor vydávat zvuk připomínající pumpování. Toto je úplně
normální. Tento zvuk znamená, že generátor si pumpuje do sebe ze zásobníku vodu.
· Při nahřívání žehličky může dojít k samovolnému úniku trochy páry. Toto je úplně normální a nebude
to trvat déle než 3 vteřiny.
Tento parní generátor nabízí dvě možnosti žehlení: suché, nebo s párou. Přečtěte si následující instrukce.
Také si pozorně přečtěte tipy na žehlení na konci této kapitoly.
1. Položte žehličku na teplu odolné polštářky na vrchu těla parního
generátoru.
2. Přívodní kabel zapojte do el. sítě a stiskněte hlavní spínač on/o. Světelná
kontrolka teploty začne blikat
3. Nastavte na žehličce otočným kolečkem požadovanou teplotu odpovídající
žehlenému materiálu. Kontrolka teploty začne blikat a žehlička se začne
nahřívat.
4. Jakmile bude kontrolka už jen svítit, znamená to, že se dosáhlo požadované
teploty.
Upozornění: Nikdy se nedotýkejte žehlící plochy žehličky!
www.domo-elektro.be
DO7111S
CZ
41
Page 42

Upozornění: zatím ještě přístroj do elektrické sítě nepřipojujte.
1. Vyjměte zásobník vody a přes otvor doplnění opatrně doplňte vodu. Dejte pozor, abyste nepřesáhli
maximální hladinu vody (1,5 l).Pokud máte v regionu tvrdší vodu, tak používejte 50% vaší vody a
přidejte 50% destilované vody.
2. Nádržku na vodu vložte zpět do přístroje. Jakmile zásobník správně usadíte, tak uslyšíte lehké
cvaknutí. Pokud zásobník není správně usazen, tak žehlička nebude fungovat.
3. Položte žehličku na gumové „polštářky“ na základně přístroje. Ty jsou k
tomu určené a jsou odolné vysokým teplotám. Přívodní kabel zapojte do el.
sítě a stiskněte hlavní spínač on/o. Světelná kontrolka teploty začne blikat.
4. Jakmile bude kontrolka hlavního spínače už jen svítit, tak je žehlička
připravena k žehlení.
5. Žehlení s párou: pro spuštění páry stiskněte tlačítko na vnitřní straně
rukojeti. Ze žehlící plochy se začne linout pára. Po uvolnění tlačítka se
přestane pářit a vy tak začnete žehlit „na sucho“ - bez páry.
6. Chcete-li vyžehlit i velké zmačkaniny na látce, použijte TURBO napařování. Napařování zapnete
stiskem parního tlačítka na horní části rukojeti.
Varování:
· Nikdy se nedotýkejte horké žehlící plochy!
· Nikdy nemiřte párou na lidi, ani zvířata!
7. Po žehlení odložte žehličku na tepelně odolné podložky. A přístroj vypněte vypínačem. Kontrolka
teploty zhasne. Vypojte zástrčku ze zásuvky a nechte přístroj zcela vychladnout.
Pokud bude žehlička v klidu déle než 10 minut, tak se rozbliká kontrolka teploty (znak přechodu do
pohotovostního režimu). Pokud se alespoň 1x za 10 minut bude žehlit nebo upravovat nastavení teploty,
tak žehlička bude vždy držet vámi nastavenou teplotu. V opačném případě se přístroj přepne do režimu
spánku. Po dalších 10 minutách nečinnosti už v pohotovostním režimu se automaticky celý přístroj vypne.
Jedná se o bezpečnostní funkci v případě, že žehličku zapomenete vypnout. Žehličku můžete kdykoli
zapnout pomocí hlavního spínače on/o.
Vždy sledujte doporučené teploty žehlení a nastavujte na žehličce správnou teplotu.
Symbol Materiál Nastavení teploty
umělé vlákno, hedvábí
CZ
vlna
bavlna, ložní prádlo
Tento symbol znamená, že se tento materiál nesmí žehlit!
42
DO7111S
70<T<120°C
100<T<160°C
140<T<210°C
170<T<225°C MAX
Page 43

· Před žehlením si vždy zkontrolujte zda máte správně nastavenou teplotu s ohledem na instrukce
uvedené na štítku žehleného oděvu. Pokud se na oděvu tento štítek nachází, vždy se jím řiďte.
· Žehlička se nahřívá rychleji, než chladne, proto první žehlete oděvy, které vyžadují nejnižší teplotu.
· Pokud se oděv skládá z různých druhů vláken, vždy nastavte teplotu podle toho, které vyžaduje
nejnižší teplotu.
· Hedvábí a jiné lesklé textilie by měly být žehleny naruby.
· Samet a další látky, které mají podobná hlubší vlákna by se měly žehlit s mírným tlakem a v jednom
směru. Nikdy žehličku nenechávejte stát v jednom místě.
· Nikdy nežehlete přes zipy, nebo jiné kovové předměty v oděvu. Mohli byste poškodit žehlící plochu.
Vždy se takovým předmětům vyhněte.
Upozornění: pokud žehlíte vlněné tkaniny, mohou se začít lesknout. Žehlete takové tkaniny naruby.
· Odpojte přístroj od el. proudu a nechte případně úplně vychladnout.
· Otřete zbytky ze žehlící plochy pomocí vlhkého hadříku, nebo jemným tekutým čistícím prostředkem.
Upozornění: Nepoužívejte žádné chemické, kovové, dřevěné, nebo hrubé čistící prostředky, abyste
nepoškrábali žehlící plochu.
· Tělo žehličky můžete vyčistit jemným vlhkým hadříkem.
· Kapky vody na přístroji vysušte suchým hadříkem.
· Pokud přístroj nebudete používat po delší dobu, vylijte vodu ze zásobníku a žehličku položte na své
místo na teplu odolné polštářky na vrchu parního generátoru.
UPOZORNĚNÍ: Používejte pouze vodu z vodovodu (nebo půl napůl naředěnou s destilovanou vodou).
Opatrně: Destilovanou (odvápněnou) vodu nepoužívejte do žehličky samostatně, vodu kombinujte s
normální kohoutkovou vodou. V případě použití měkčené vody, nebo parfémované vody, se mohou
objevit hnědé skvrny a může dojít až k poškození parní komory.
Po několika hodinách aktivního žehlení začne blikat kontrolka funkce „self-cleaning“ = čištění. To značí, že
je již potřeba žehličku vyčistit/odvápnit.
1. Vezměte a držte žehličku nad dřezem nebo nad jinou nádobou. Pozor:
žehličku nikdy nenechávejte na základně.
2. Ovladač teploty nastavte na hodnotu „CLEAN“. Ve chvíli kdy potřebujete
zahájit čištění, tak podržte současně stisknutá tlačítka páry a spoušť páry
(držte několik sekund). Během procesu odvápňování – čištění bude blikat
kontrolka teploty.
3. Čerpadlo bude skrze žehličku prohánět vodu a tím se celý vnitřek odvápní.
Takový proces zabere cca 1 minutu.
4. Jakmile bude přístroj pročištěn, tak se automaticky vypne.
www.domo-elektro.be
DO7111S
CZ
43
Page 44

Symbol na přístroji či na jeho obalu znamená, že s tímto výrobkem
není možno nakládat jako s běžným domovním odpadem, nýbrž musí
být odevzdán na místech určených ke sběru a likvidaci elektrických a
elektronických zařízení. Dodržením tohoto doporučení chráníte životní
prostředí a zdraví spoluobčanů. Více informací o možnostech likvidace
nebezpečného odpadu obdržíte na obecních nebo městských úřadech,
sběrných dvorech nebo v prodejně, kde jste přístroj zakoupili.
Obalové materiály jsou recyklovatelné, nakládejte s nimi podle předpisů pro
životní prostředí.
44
CZ
DO7111S
Page 45

ZÁRUKA
Pre záruku začínajúcich dňom predaja spotrebiča platí na území SR tieto podmienky:
1. trvania záruky: 2 roky
2. poskytovanie záruky:
a) záručnú opravu vykonáme podľa nášho zvážení opravou alebo výmenou chybných dielov, ak tieto
závady vznikli preukázateľne chybou materiálu alebo chybou pri výrobe
b) záručná oprava bude vykonaná len pri predložení tohto záručného listu a dokladu o zaplatenie
c) ak dôjde k oprave alebo výmene spotrebiča v záručnej dobe, záručná doba sa predlžuje.
3. záruka sa nevzťahuje
a) na mechanické poškodenie
b) nesprávne používanie v rozpore s návodom na použitie
1. záruka zaniká:
- Pri použití spotrebiča inak ako v domácnosti
- Pri vykonávaní opravy alebo zmeny na spotrebiči osobou inou ako poverenou naším servisom
Na tento spotrebič poskytujeme záruku na nedostatky, ktoré sú označené ako výrobné chyby alebo chyby
materiálu. Záručná doba začína dňom predaja a je uznaná po predložení potvrdeného tohoto záručného
listu alebo orig.dokladu o zaplatení + tento nepotvrdený, ale vyplnený ZL pre záznam opravy. Prípadné
reklamácie môžete uplatniť v mieste nákupu tohto prístroja alebo v servisnom stredisku rmy:
· Pri používaní jakkéhokoli el. spotrebiče dbajte na zvýšenú opatrnosť a dodržujte určitá bezpečnostné
pravidlá:
· Starostlivo si prečítajte tieto informácie a manuál nechajte aj k neskoršiemu nahliadnutiu.
· Uistite sa, že pred použitím odlepíte a odstránite všetky reklamné a ochranné fólie.
· Deti sa s ochrannými ani reklamnými polepy nesmie hrať.
· Prístroj je určený pre používanie v domácnostiach a podobných prostrediach, tak ako je:
· kuchynky v obchodoch, kanceláriách atď.
· chaty, chalupy
· hotely, penzióny a iné dočasné ubytovanie
· Prístroj nesmú používať osoby (ani deti) so zníženou psychickou, motorickú alebo mentálnou
schopností. Ak nie sú pod odborným dohľadom, tak ho nesmie používať ani osoby bez dostatočného
zoznámenie o pravidlách správneho použitia.
· Dohliadnite, aby sa deti nehrali s prístrojom.
· Prístroj smie používať iba deti staršie ako 16 rokov. Osoby so zníženou psychickou, motorickú alebo
mentálnou schopnosťou smie používať prístroj len za neustáleho dohľadu zodpovedné osoby, ktorá je
oboznámená s pravidlami používania a prípadným rizikom.
· Čistenie a bežnú údržbu môžu vykonávať len osoby staršie ako 16 rokov a pri tom byť pod
dohľadom.
· Prístroj a jeho el. kábel skladujte mimo dosahu detí mladších ako 16 rokov.
· Pokiaľ prístroj nepoužívate, alebo sa ho chystáte rozoberať či meniť súčasti, tak prístroj odpojte od el.
napätia. Pred rozoberanie, skladaním aj pred čistením, vždy nechajte prístroj dostatočne vychladnúť.
www.domo-elektro.be
DO7111S
SK
45
Page 46

· Pokiaľ je prívodný kábel poškodený, musí byť vždy okamžite opravený v odbornom servise alebo
preškolenou osobou.
· POZOR: Aby sa predišlo riziku úrazu (poškodenie), nesmie byť prístroj používaný sa žiadnou externé
súčasťou (napr. časovač, vypínač, prepínač ...)
· Nenechávajte žehličku bez dozoru, ak je zapojená v el. sieti.
· Neotvárajte zásobník vody počas prevádzky. Dopĺňajte podľa priložených inštrukcií v návode.
· Žehličku odstavte na rovnú a stabilnú plochu, ktorá je odolná horúcim povrchom.
· Žehličku nepoužívajte pokiaľ z nej kvapká voda alebo je akokoľvek viditeľne poškodená alebo netesní.
Žehličku s poškodeným prívodným káblom nepoužívajte, aj keď je stále plne funkčná. Akokoľvek
poškodený prístroj je nutné nechať skontrolovať odborným servisom DOMOELEKTRO alebo iným
preškoleným pracovníkom. Neskúšajte opravovať žehličku sami !!
· Žehličku držte mimo dosahu detí mladších ako 16 rokov, pokiaľ je zapojená v el. sieti alebo je stále
teplá / horúca.
POVRCHY označené týmto symbolom sú pri používaní veľmi horúce. Nedotýkajte sa
ich. Pre prenos používajte výhradne rukoväte či madlá k tomu určené.
· Nepoužívajte ani neskladujte žehličku vonku.
· S prístrojom počas jeho používania nemanipulujte. Vždy ho nechajte dôkladne vychladnúť a až potom
premiestňujte.
· Nepoužívajte žehličku inak ako je zamýšľané.
· Do zásobníka vody nenalievajte žiadnu inú tekutinu ako vodu.
· Ak je žehlička s prázdnym zásobníkom vody, nikdy nespúšťajte parné funkcie ani páru. Mohlo by to
poškodiť celý prístroj.
· Pred použití skontrolujte či parametre el. siete zodpovedajú požadovaným parametrov na
informatívnym štítku prístroja.
· Zástrčka prívodného kábla smie byť zapojená iba do zásuvky s uzemnením a všetkými štandartnými
parametre podľa miesta siete.
· Používajte iba přístlušenství s prístrojom dodané.
· Prístroj ani prívodný kábel nikdy neponárajte pod vodu, inak hrozí nebezpečenstvo úrazu.
· Nepoužívajte / nesiahajte na prístroj s mokrými rukami.
· Prívodný kábel čo najviac rozviňte, aby sa neprehrieval.
· Nenechávajte visieť kábel prístroja cez hranu stola a vyvarujte sa toho, aby prišiel do styku s horúcimi
plochami.
· Nikdy nenalievajte do zásobníka na vodu inú tekutinu ako je čistá voda.
· Vypnutý prístroj skontroluje, či je riadne zložený, a až potom zapojte. Pri vypnutí prístroja najskôr
otočte spínače na polohu OFF / 0, až potom odpojte z el. siete. Nikdy neťahajte za prívodný kábel, ale
odpájajte priamo za zástrčku.
· Pred otvorením zásobníka / tlakového skrutky generátora sa vždy dôkladne uistite, že je prístroj i
náplne dostatočne chladné. Po vyčistení sa vždy uistite, že je tlakový skrutka generátora dostatočne
dotiahnutý a zásobník na žehličke správne usadený.
· Zanedbaná údržba môže viesť ku skráteniu životnosti prístroja a prípadne k nebezpečenstvu úrazu
· Všetky zranenia a rizika úrazu vzniknutá nedodržaním týchto pravidiel a pokynov idú na zodpovednosť
SK
používateľ. Výrobca ani predajca nie je schopný niesť zodpovednosť za vzniknuté rizika z nedodržania
týchto pokynov.
ULOŽTE SI TENTO NÁVOD NA NESKORŠIEMU NAHLIADNUTIU
46
DO7111S
Page 47

1. Veko na doplňovanie vody
2. Zásobník na vodu
3. Svetelná kontrolka teploty
4. Spúšť páry
5. Nastavenie teploty
6. Tlačidlo pary s funkciou
samočistenia a svetelnou
kontrolkou
7. Žehliaca plocha
8. Teplu odolné vankúšiky
9. Hlavné on/o spínač
1
2
6
4
5
3
7
8
· Odstráňte všetky obalové materiály, samolepky a fólie zo všetkých častí prístroja.
· Nechajte nahriať žehličku na maximálnu teplotu a potom pár minút žehlite vlhkú látku, aby ste
odstránili možné zvyšky nečistôt na žehliacej ploche.
UPOZORNENIE:
· Spotrebiče sú počas výroby testované. Preto je teda možné a normálne, keď sa v zásobníku na vodu
vytvorí kvapôčky skondenzovanej vody.
· Počas prvého žehlenie môžete z prístroja cítiť špecický zápach. Tento zápach po chvíli zmizne.
· Cez otvory v žehliacej ploche môžu pri prvom žehlení vyjsť nejaké čiastočky. Toto je úplne normálne.
Tieto čiastočky sú neškodné a po chvíli vymizne.
· Po zapnutí prístroja môže parný generátor vydávať zvuk pripomínajúci pumpovanie. Toto je úplne
normálne. Tento zvuk znamená, že generátor si pumpuje do seba zo zásobníka vodu.
· Pri nahrievanie žehličky môže dôjsť k samovoľnému úniku trochy pary. Toto je úplne normálne a
nebude to trvať dlhšie ako 3 sekundy.
9
Tento parný generátor ponúka dve možnosti žehlenie: suché, alebo s parou. Prečítajte si nasledujúce
inštrukcie. Tiež si pozorne prečítajte tipy na žehlenie na konci tejto kapitoly.
1. Položte žehličku na teplu odolné vankúšiky na vrchu tela parného
generátora.
2. Prívodný kábel zapojte do el. siete a stlačte hlavný spínač on/o. Svetelná
kontrolka teploty začne blikať
3. Nastavte na žehličke otočným kolieskom požadovanú teplotu
zodpovedajúce žehlenému materiálu. Kontrolka teploty začne blikať a
žehlička sa začne nahrievať.
4. Akonáhle bude kontrolka už len svietiť, znamená to, že sa dosiahlo požadovanej teploty.
Upozornenie: Nikdy sa nedotýkajte žehliacej plochy žehličky!
www.domo-elektro.be
DO7111S
SK
47
Page 48

Upozornenie: v tento okamih ešte prístroj nezapínajte ani nezapájajte do el. siete.
1. Vyberte zásobník vody a cez otvor doplnenie opatrne doplňte vodu. Uistite sa, aby ste neprekročili
maximálny objem zásobníka (1,5 litre). Ak máte v regióne tvrdšie vodu, tak používajte 50% miestnej
vody a 50% destilovanej vody.
2. Nádržku na vodu vložte späť do prístroja. Akonáhle zásobník správne usadíte, tak budete počuť
ľahké cvaknutie. Ak zásobník nie je správne usadený, tak žehlička nebude fungovať.
3. Položte žehličku na gumové “vankúšiky” na základni prístroja. Tie sú na to
určené a sú odolné vysokým teplotám. Zapojte žehličku do siete a zapnite
hlavným spínačom on / o. Regulátorom teploty si nastavte požadovanú
teplotu na žehlenie (vždy nasledujte inštrukcie na oblečenie). Svetelná
kontrolka teploty začne blikať.
4. Voda v parnom generátore sa začne nahrievať., akonáhle bude prístroj
dostatočne nahriaty, tak kontrolka zostane svietiť.
5. Pre žehlenie s parou stačí stlačiť tlačidlo vnútri hornej rukoväti (v spodnej
strane). Po stlačení začne zo žehliacej plochy chrliť para. Akonáhle tlačidlo uvoľníte, tak para
prestane a vy začnete žehliť na sucho (bez pary).
6. Na vyžehlenie väčších prehybov, zmačkanin, použite parný ráz. Naparovanie zapnete stlačením
parného tlačidla na hornej časti rukoväte.
Varovanie:
· Nikdy sa nedotýkajte horúcej žehliacej plochy!
· Nikdy nemierte parou na ľudí, ani zvieratá!
7. Po žehlenie odložte žehličku na tepelne odolné podložky. A prístroj vypnite vypínačom. Kontrolka
teploty zhasne. Vypojte zástrčku zo zásuvky a nechajte prístroj celkom vychladnúť.
Pokiaľ bude žehlička v pokoji dlhšie ako 10 minút, tak sa rozbliká kontrolka teploty (znak prechodu do
pohotovostného režimu). Ak sa aspoň 1x za 10 minút bude žehliť alebo upravovať nastavenia teploty,
tak žehlička bude vždy držať vami nastavenú teplotu. V opačnom prípade sa prístroj prepne do režimu
spánku. Po ďalších 10 minútach nečinnosti už v pohotovostnom režime sa automaticky celý prístroj vypne.
Ide o bezpečnostnú funkciu v prípade, že žehličku zabudnete vypnúť. Žehličku môžete kedykoľvek zapnúť
pomocou hlavného spínača on / o.
Vždy sledujte doporučené teploty žehlenie a nastavujte na žehličke správnu teplotu.
Symbol Materiál Nastavenie teploty
umelé vlákno, hodváb
vlna
bavlna, posteľná bielizeň
SK
Tento symbol znamená, že sa tento materiál nesmie žehliť!
48
DO7111S
70<T<120°C
100<T<160°C
140<T<210°C
170<T<225°C MAX
Page 49

· Pred žehlením si vždy skontrolujte či máte správne nastavenú teplotu s ohľadom na inštrukcie
uvedené na štítku žehleného odevu. Ak sa na odeve tento štítok nachádza, vždy sa ním riaďte.
· Žehlička sa nahrieva rýchlejšie, než chladne, preto prvý žehlite odevy, ktoré vyžadujú najnižšiu teplotu.
· Ak sa odev skladá z rôznych druhov vlákien, vždy nastavte teplotu podľa toho, ktoré vyžaduje najnižšiu
teplotu.
· Hodváb a iné lesklej textílie by mali byť žehliť naruby.
· Zamat a ďalšie látky, ktoré majú podobné hlbší vlákna by sa mali žehliť s miernym tlakom a v jednom
smere. Nikdy žehličku nenechávajte stáť v jednom mieste.
· Nikdy nežehlite cez zipsy, alebo iné kovové predmety v odeve. Mohli by ste poškodiť žehliacu plochu.
Vždy sa takýmto predmetom vyhnite.
Upozornenie: ak žehlíte vlnené tkaniny, môžu sa začať lesknúť. Žehlite také tkaniny naruby.
· Odpojte prístroj od el. prúdu a nechajte prípadne úplne vychladnúť.
· Utrite zvyšky zo žehliacej plochy pomocou vlhkej handričky, alebo jemným tekutým čistiacim
prostriedkom.
Upozornenie: Nepoužívajte žiadne chemické, kovové, drevené, alebo hrubé čistiace prostriedky, aby
ste nepoškriabali žehliacu plochu.
· Telo žehličky môžete vyčistiť jemnou vlhkou handričkou.
· Kvapky vody na prístroji vysušte suchou handričkou.
· Pokiaľ prístroj nebudete používať dlhší čas, vylejte vodu zo zásobníka a žehličku položte na svoje
miesto na teplu odolné vankúšiky na vrchu parného generátora.
UPOZORNENIE: Používajte iba vodu z vodovodu (alebo pol napol nariedenou s destilovanou
vodou). Opatrne: Destilovanou (odvápnenú) vodu nepoužívajte do žehličky samostatne, vodu kombinujte
s normálnou kohútikovú vodou. V prípade použitia mäkčené vody, alebo parfumované vody, sa môžu
objaviť hnedé škvrny a môže dôjsť až k poškodeniu parnej komory.
Po niekoľkých hodinách aktívneho žehlenie začne blikať kontrolka funkcie “self-cleaning” = čistenie. To
značí, že je už potrebné žehličku vyčistiť / odvápniť.
1. Vezmite a držte žehličku nad drezom alebo nad inou nádobou. Pozor:
žehličku nikdy nenechávajte na základni.
2. Ovládač teploty nastavte na hodnotu “CLEAN”. Vo chvíli keď potrebujete
začať čistenie, tak podržte súčasne stlačené tlačidlá pary a spúšť pary
(držte niekoľko sekúnd). Počas procesu odvápňovanie - čistenia bude blikať
kontrolka teploty.
3. Čerpadlo bude skrze žehličku preháňať vodu a tým sa celý vnútrajšok
odvápni. Takýto proces zaberie cca 1 minútu.
4. Akonáhle bude prístroj prečistený, tak sa automaticky vypne.
www.domo-elektro.be
DO7111S
SK
49
Page 50

Symbol na prístroji alebo na jeho obale znamená, že s týmto výrobkom
nie je možné nakladať ako s domovým odpadom, ale musí byť odovzdaný
na miestach určených na zber a likvidáciu elektrických a elektronických
zariadení. Dodržaním tohto odporúčania chránite životné prostredie a zdravie
spoluobčanov. Viac informácií o možnostiach likvidácie nebezpečného
odpadu obdržíte na obecných alebo mestských úradoch, zberných dvoroch
alebo v predajni, kde ste prístroj zakúpili.
Obalové materiály sú recyklovateľné, nakladajte s nimi podľa predpisov pre
životné prostredie.
50
SK
DO7111S
Page 51

SK
www.domo-elektro.be
DO7111S
51
Page 52

Webshop
BESTEL
de originele
Domo-accessoires
en -onderdelen
online via:
COMMANDEZ
d’authentiques
accessoires et
pièces Domo en
ligne sur:
BESTELLEN SIE
Original-Zubehör
die Domo
und -Ersatzteile
online über:
ORDER
the original
Domo
accessories and
parts online at:
webshop.domo-elektro.be
of scan hier:
ou scannez ici:
oder hier scannen:
or scan here:
LINEA 2000 bvba - Dompel 9 - 2200 Herentals - Belgium - Tel: +32 14 21 71 91 - Fax: +32 14 21 54 63
 Loading...