

Page 1
HANDLEIDING
MODE D’EMPLOI
GEBRAUCHSANLEITUNG
INSTRUCTION BOOKLET
MANUAL DE INSTRUCCIONES
NÁVOD K POUŽITÍ
INMAAKKETEL
STÉRILISATEUR DE CONSERVES
ENAMEL POT
EINKOCHAUTOMAT
AUTOCLAVE
AUTOMATICKÝ ZAVAŘOVACÍ HRNEC SMALTOVANÝ
DO322W
PRODUCT OF
Page 2

DO322W
GARANTIEVOORWAARDEN
Wij hanteren een garantietermijn van 2 jaar vanaf de datum van aankoop. Gedurende de
garantieperiode zal de distributeur volledige verantwoording op zich nemen voor gebreken,
die aanwijsbaar berusten op materiaal- of constructiefouten. Wanneer dergelijke gebreken
voorkomen, zal het apparaat indien nodig vervangen of gerepareerd worden. Het recht op
garantie vervalt wanneer de gebreken zijn ontstaan door hardhandig gebruik, het niet in
acht nemen van de gebruiksaanwijzing of ingreep door derden. De garantie wordt verleend
op basis van het originele kassaticket. Alle onderdelen die aan slijtage onderhevig zijn,
vallen buiten de garantie. Indien je apparaat defect is binnen de garantietermijn van 2 jaar,
dan mag je het toestel samen met het originele kassaticket binnenbrengen in de winkel
waar je het toestel hebt aangekocht.
CONDITIONS DE GARANTIE
Nous accordons une garantie de 2 ans sur ce produit à partir de la date d’achat.
Pendant la durée de la garantie, le distributeur prendra à sa charge la réparation des vices
de fabrication ou de matières, en se réservant le droit de décider si certaines pièces doivent
être réparées ou échangées, ou si l’appareil lui-même doit être échangé. Les dommages
occasionnés par une utilisation inadéquate (branchement continu, erreur de voltage, prise
inappropriée, choc, etc...), l’usure normale ne portant préjudice ni au bon fonctionnement
ni à la valeur de l’appareil, excluent toute prétention à la garantie. La garantie devient
caduque si des réparations ont été effectuées par des personnes non agréées. La garantie est
accordée sur la base du ticket de caisse original.Toutes les pièces détachées non résistantes
et par conséquent sujettes à l‘usure, ne sont pas sous garantie. Dans le cas où votre
appareil est défectueux pendant la période de garantie de 2 ans, vous pouvez ramener votre
appareil, ainsi que votre ticket de caisse, au magasin où vous l’avez acheté.
GARANTIE
Die Garantie für dieses Gerät beträgt 2 Jahr ab dem Kaufdatum. Während dieser
zweijärigen Garantie trägt der Verteiler die Verantwortung für Mangel, die eindeutig
auf Material- oder Konstruktionsfehler zurückzuführen sind. Wenn es solche mangel
gibt, wird das Gerät, wenn notwendig, ersetzt oder repariert. Das Recht auf Garantie
erlischt, wenn die Mängel auf eine unangemessene Anwendung, die Nichtbefolgung der
Gebrauchsanleitungen oder eine Reparatur von einer dritten Partei zurückzuführen sind.
Die Garantie wird auf der Grundlage des originalen Kassenbons gewährt. Alle Teile, dem
Verschleiß ausgesetzt sein, sind nicht in der Garantie eingeschlossen. Wenn Ihr Gerät
innerhalb der Garantiefrist von zwei Jahren defekt ist, können Sie das Gerät zusammen mit
Ihrem Kassenbon in das Geschäft zurückbringen, in dem Sie des gekauft haben.
WARRANTY
This appliance has a two year warranty period. During this period the manufacturer is
responsible for any failures that are the direct result of construction failure. When these
failures occur the appliance will be repaired or replaced if necessary. The warranty will
not be valid when the damage to the appliance is caused by wrong use, not following the
instructions or repairs executed by a third party. The guarantee is issued with the original
LINEA 2000 - Dompel 9 - 2200 Herentals Belgium - Tel 014/21.71.91 - Fax : 014/21.54.63
Page 3

DO322W
till receipt. All parts, which are subject to wear, are excluded from the warranty.
If your device breaks down within the 2-year warranty period, you can return the device
together with your receipt to the shop where you purchased it.
CONDICIONES DE GARANTÍA
Este aparato tiene un término de garantía de 2 años, desde la fecha de la compra.
Durante el período de garantía, el suministrador asumirá la entera responsabilidad en
cuanto a defectos debidos a errores de material o de fabricación.
En caso de tales defectos, el aparato será reemplazado o reparado, cuando sea necesario. La
garantía perderá su vigencia en caso de defectos causados por mal uso, no cumplimiento
del manual de instrucciones o intervención por una tercera persona. La garantía se concede
sobre la base del recibo de caja. La garantía no cubre piezas expuestas al desgaste.
Si el producto está defectuoso dentro del período de garantía de 2 años, puede traer su
recibo de caja junto con el teléfono a la tienda donde adquirió la unidad.
ZÁRUKA
Pro záruku začínající dnem prodeje spotřebiče platí na území ČR tyto podmínky:
1. trvání záruky: 2 roky
2. poskytování záruky:
a) záruční opravu provedeme podle našeho zvážení opravou nebo výměnou vadných dílů,
jestliže tyto závady vznikly prokazatelně vadou materiálu nebo chybou při výrobě
b) záruční oprava bude provedena jen při předložení tohoto záručního listu a dokladu o
zaplacení
c) jestliže dojde k opravě nebo výměně spotřebiče v záruční době, záruční doba se
prodlužuje
3. záruka se nevztahuje
a) na mechanické poškození
b) nesprávné používání v rozporu s návodem k použití
1. záruka zaniká:
- při použití spotřebiče jinak než v domácnosti
- při provádění opravy nebo změny na spotřebiči osobou jinou než pověřenou
naším servisem
Na tento spotřebič poskytujeme záruku na nedostatky, které jsou označeny jako výrobní
chyby nebo chyby materiálu. Záruční doba začíná dnem prodeje a je uznána po předložení
potvrzeného tohoto záručního listu nebo orig.dokladu o zaplacení + tento nepotvrzený,
ale vyplněný ZL pro záznam opravy. Případné reklamace můžete uplatnit v místě nákupu
tohoto přístroje nebo v servisním středisku rmy:
Domo-elektro s.r.o. Hluboká 147, 34506 Kdyně viz www.domo-elektro.cz
tel. 379 789 684 nebo na servis@domo-elektro.cz , tel. 379 422 550
LINEA 2000 - Dompel 9 - 2200 Herentals Belgium - Tel 014/21.71.91 - Fax : 014/21.54.63
Page 4

DO322W
Type nr. apparaat
N° de modèle de l’appareil DO 322W
Type nr des Gerätes
Type nr. of appliance
N° de modelo del aparato
Model
Naam
Nom ..................................................................................................................................
Name
Nombre
Jméno
Adres
Adresse .............................................................................................................................
Address
Dirección
Adresa
Aankoopdatum
Date d’achat .....................................................................................................................
Kaufdatum
Date of purchase
Fecha de compra
Datum nákupu,podpis a razítko
Tel.: ..................................................................................................................................
* Jméno kupujícího, adresu a tel.spojení je nutno vyplnit pokud si zákazník přeje
zaslání opraveného přístroje domů. Bez úplného vyplnění všech ostatních údajů v
záručním listu nebude možno Vaši reklamaci včas vyřídit.
4
Page 5

Reklamace : (vyplní zákazník nebo obchod)
Popis vady 1. reklamace/Datum uplatnění reklamace:
Popis vady 2. reklamace/Datum uplatnění reklamace:
Popis vady 3. reklamace/Datum uplatnění reklamace:
Záznamy servisu :
1.reklamace (datum přijetí/odeslání/ číslo reklamačního dokladu)
DO322W
2.reklamace (datum přijetí/odeslání/ číslo reklamačního dokladu)
3.reklamace (datum přijetí/odeslání/ číslo reklamačního dokladu)
* Jméno kupujícího, adresu a tel.spojení je nutno vyplnit pokud si zákazník přeje
zaslání opraveného přístroje domů.
Bez úplného vyplnění všech ostatních údajů v záručním listu nebude možno Vaši
reklamaci včas vyřídit.
5
Page 6
DO322W
RECYCLAGE-INFORMATIE
Dit symbool op het product of op de verpakking wijst erop dat dit product niet als
huishoudafval mag worden behandeld. Het moet naar een plaats worden gebracht waar
elektrische en elektronische apparatuur wordt gerecycleerd. Als u ervoor zorgt dat dit
product op de correcte manier wordt verwijderd, voorkomt u mogelijk voor mens en
milieu negatieve gevolgen die zich zouden kunnen voordoen in geval van verkeerde
afvalbehandeling. Voor meer details in verband met het recycleren van dit product,
neemt u best contact op met de gemeentelijke instanties, het bedrijf of de dienst belast
met de verwijdering van huishoudafval of de winkel waar u het product hebt gekocht.
Het verpakkingsmateriaal is recycleerbaar. Behandel de verpakking milieubewust.
INFORMATION DE RECYCLAGE
Ce symbole sur le produit ou son emballage indique que ce produit ne peut être traité
comme déchet ménager. Il doit plutôt être remis au point de ramassage concerné, se
chargeant du recyclage du matériel électrique et électronique.
En vous assurant que ce produit est éliminé correctement,
vous favorisez la prévention des conséquences négatives pour
l’environnement et la santé humaine qui, sinon, seraient le
résulat d’un traitement inapproprié des déchets de ce produit.
Pour obtenir plus de détails sur le recyclage de ce produit,
veuillez prendre contact avec le bureau municipal de votre
région, votre service d’éliminiation des déchets ménagers ou
le magasin où vous avez acheté le produit.
L’emballage est recyclable. Traitez l’emballage
écologiquement.
RECYCLING INFORMATIONEN
Dieses Symbol auf dem Produkt oder seiner Verpackung
weist darauf hin, dass dieses Produkt nicht als normaler
Haushaltsabfall zu behandeln ist, sondern an einem
Sammelpunkt für das Recyling von elektrischen und
elektronischen Geräten abgegeben werden muss. Durch Ihren
Beitrag zum korrekten Entsorgen dieses Produkts schützen
Sie die Umwelt und die Gesundheit Ihrer Mitmenschen.
Umwelt und Gesundheit werden durch falsches Entsorgen gefährdet. Weitere
Informationen über das Recycling dieses Produkts erhalten Sie von Ihren Rathaus,
Ihrer Müllabfuhr oder dem Geschäft, in dem Sie das Produkt gekauft haben.
Das Verpackungsmaterial ist wiederverwertbar. Entsorgen Sie die Verpackung
umweltgerecht und führen Sie sie der Wertstoffsammlung zu.
6
Page 7
DO322W
RECYCLING INFORMATION
This symbol on the product or on its packaging indicates that this product may not
be treated as household waste. Instead it must be brought
to the applicable collection point for recycling of electrical
and electronic equipment. By ensuring this product is
disposed of correctly, you will help prevent potential negative
consequences for the environment and human health, which
could otherwise be caused by inappropriate waste handling of
this product. For more detailed information about recycling
of this product, please contact your local city ofce, your
household waste disposal service or the shop where you
purchased the product.
The packaging is recyclable. Please treat package ecologically.
INFORMACIÓN DE RECICLAJE
El símbolo en el producto o el embalaje indica que este
producto no puede ser tratado como residuo doméstico. Los
residuos de aparatos tienen que ser depositados en un punto
de recogida destinado al reciclaje de aparatos eléctricos y
electrónicos. Eliminando este producto de manera correcta,
se puede evitar las consecuencias negativas posibles para
el hombre y el medio ambiente en caso de un tratamiento
de residuos incorrecto. Si desea obtener más información sobre el reciclaje de este
producto, pónganse en contacto con la ocina municipal, la empresa o el servicio de
recogida de residuos domésticos correspondiente o con el establecimiento dónde ha
adquirido el producto.
El material de embalaje es reciclable. Trate el embalaje de manera ecológica.
INFORMACE O RECYKLACI ODPADU
Symbol na přístroji či na jeho obalu znamená, že s tímto výrobkem není možno
nakládat jako s běžným domovním odpadem, nýbrž musí být odevzdán na místech
určených ke sběru a likvidaci elektrických a elektronických zařízení. Dodržením
tohoto doporučení chráníte životní prostředí a zdraví spoluobčanů. Více informací o
možnostech likvidace nebezpečného odpadu obdržíte na obecních nebo městských
úřadech, sběrných dvorech nebo v prodejně, kde jste přístroj zakoupili. Obalové
materiály jsou recyklovatelné, nakládejte s nimi podle předpisů pro životní prostředí.
7
Page 8

DO322W
Als het elektrisch snoer beschadigd is, moet het
vervangen worden door de fabrikant, zijn dienst na
verkoop of een gelijkaardig gekwaliceerd persoon, om
ongelukken te voorkomen.
Si le cordon électrique est endommagé, il doit être
remplacé par le fabricant, son service après-vente ou
toute autre personne qualiée, pour éviter tout accident.
Wenn das Stromkabel beschädigt ist, muss es vom
Hersteller, dessen Kundendienst oder einer gleichartig
geschulten Person ersetzt werden, um Unglücke zu
verhindern.
If the supply cord is damaged, it must be replaced by the
manufacturer, its service agent or a similarly qualied
person in order to avoid a hazard.
Cuando el cordón eléctrico está dañado, tiene que ser
reemplazado por el fabricante, el servicio posventa o una
persona similarmente calicada, para evitar accidentes.
Jestliže je poškozen přívodní kabel, musí být neprodleně
vyměněn v odborném servisu nebo oprávněnou osobou.
Jinak hrozí nebezpečí úrazu!
8
Page 9

DO322W
VEILIGHEIDSINSTRUCTIES
Dit toestel mag gebruikt worden door kinderen vanaf
8 jaar en ouder, en door personen met een fysieke
of sensoriële beperking of mensen met een beperkte
mentale capaciteit of gebrek aan ervaring of kennis,
op voorwaarde dat deze personen toezicht krijgen of
instructies hebben gekregen over het gebruik van het
toestel op een veilige manier en dat ze ook de gevaren
kennen bij het gebruik van het toestel.
Kinderen mogen niet met het toestel spelen.
Onderhoud en reiniging van het toestel mogen niet
gebeuren door kinderen, tenzij ze ouder zijn dan 8 jaar en
toezicht krijgen. Hou het toestel en het snoer buiten het
bereik van kinderen jonger dan 8 jaar.
Dit toestel is geschikt om te gebruiken in de
huishoudelijke omgeving en in gelijkaardige omgevingen
zoals:
• Keukenhoek voor personeel van winkels, kantoren
en andere gelijkaardige professionele omgevingen
• Boerderijen
• Hotel- en motelkamers en andere omgevingen met
een residentieel karakter
• Gastenkamers, of gelijkaardige
Opgelet: het toestel mag niet gebruikt worden met een
externe timer of een aparte afstandsbediening.
9
Page 10

DO322W
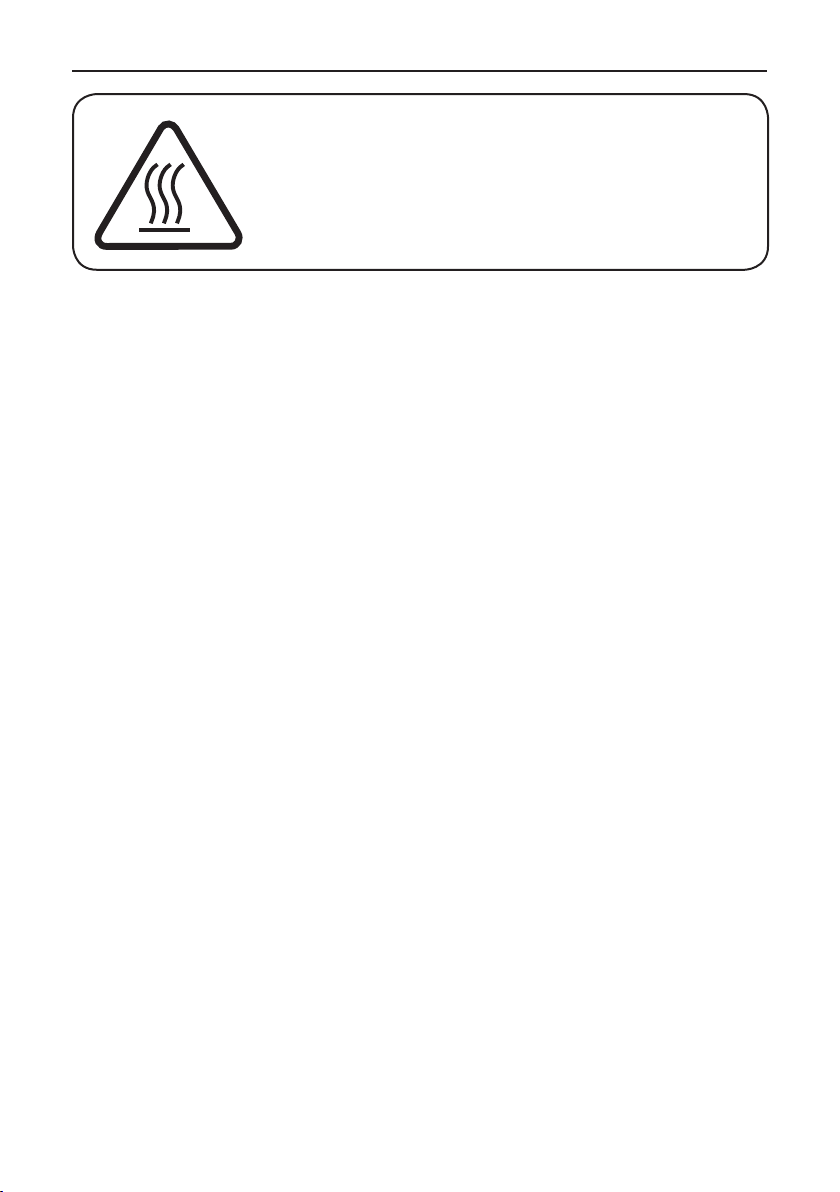
Het toestel kan warm worden tijdens
het gebruik. Houd het elektrisch
snoer weg van hete onderdelen en
dek het toestel niet af.
Gelieve vooraleer het toestel in te schakelen de
handleiding zorgvuldig na te lezen en deze goed te
bewaren.
• Tijdens het gebruik worden de wanden van het toestel
zeer heet. Het toestel mag uitsluiten aan de handvaten
of aan de controleknop aangeraakt worden, zo niet
bestaat een risico voor brandwonden. Het toestel
tijdens het gebruik nooit verplaatsen. Laat het eerst
afkoelen.
• Sluit het toestel uitsluitend aan op wisselstroom en
met de spanning zoals op het type aanduidingsplaatje
vermeld.
• Het toestel mag niet ingeschakeld worden als de
stroomkabel beschadigd is, het toestel zichtbaar
beschadigd is, als het gevallen is of in water
ondergedompeld werd.
• Bij twijfel het toestel door een onderhoudsdienst laten
controleren. Het toestel en de stroomkabel mogen
alleen door een erkende onderhoudstechnicus hersteld
worden.
• Personen, kinderen inbegrepen, die wegens hun
fysische, sensorische of geestelijke mogelijkheden
10
Page 11

DO322W
of hun onervarenheid niet in staat zijn om het toestel
veilig te gebruiken, mogen het toestel niet zonder
toezicht of instructies door een verantwoordelijke
persoon gebruiken.
• Kinderen moeten onder toezicht blijven om te
verzekeren dat zij niet met het toestel spelen.
• Als het toestel aan het stroomnet aangesloten is, mag
het niet zonder toezicht blijven.
• Na gebruik en vooraleer het toestel te reinigen, moet
de stekker uitgetrokken worden. Hetzelfde geldt bij
een storing. Gebruik geen vreemde onderdelen die niet
door de producent aanbevolen werden.
• Het toestel alleen op een passend stopcontact
aansluiten.
• Het toestel niet in open lucht gebruiken.
• De stroomkabel mag niet met de hete onderdelen van
het toestel in aanraking komen en mag niet over de
tafel hangen.
• Het toestel mag niet in de omgeving van
gasvlammen of van elektrische toestellen met open
verwarmingsweerstanden of in een opgewarmde oven
gebruikt worden.
• Plaats het toestel op een hittebestendige oppervlakte
en op een afstand van ongeveer 20 cm van de wanden.
• Het toestel mag niet voor een andere bestemming
gebruikt worden.
• Het toestel nooit in water onderdompelen en de
stroomkabel tegen vochtigheid beschermen. Gevaar
voor elektrocutie.
11
Page 12
DO322W
• Verzeker u ervan dat brandbare voorwerpen niet met
het toestel in contact kunnen komen of zich in de
buurt ervan bevinden. Als het toestel begint te branden
onmiddellijk de stroomkabel uittrekken.
• Verpakkingsmateriaal zoals bijv. foliezakjes is geen
speelgoed voor kinderen.
• Bij oneigenlijk gebruik of verkeerde bediening
kan voor eventuele schade geen waarborg gegeven
worden.
• Als de stroomkabel beschadigd is, moet deze door
de producent of door zijn serviceafdeling of door een
bevoegde technicus vervangen worden om gevaar te
vermijden.
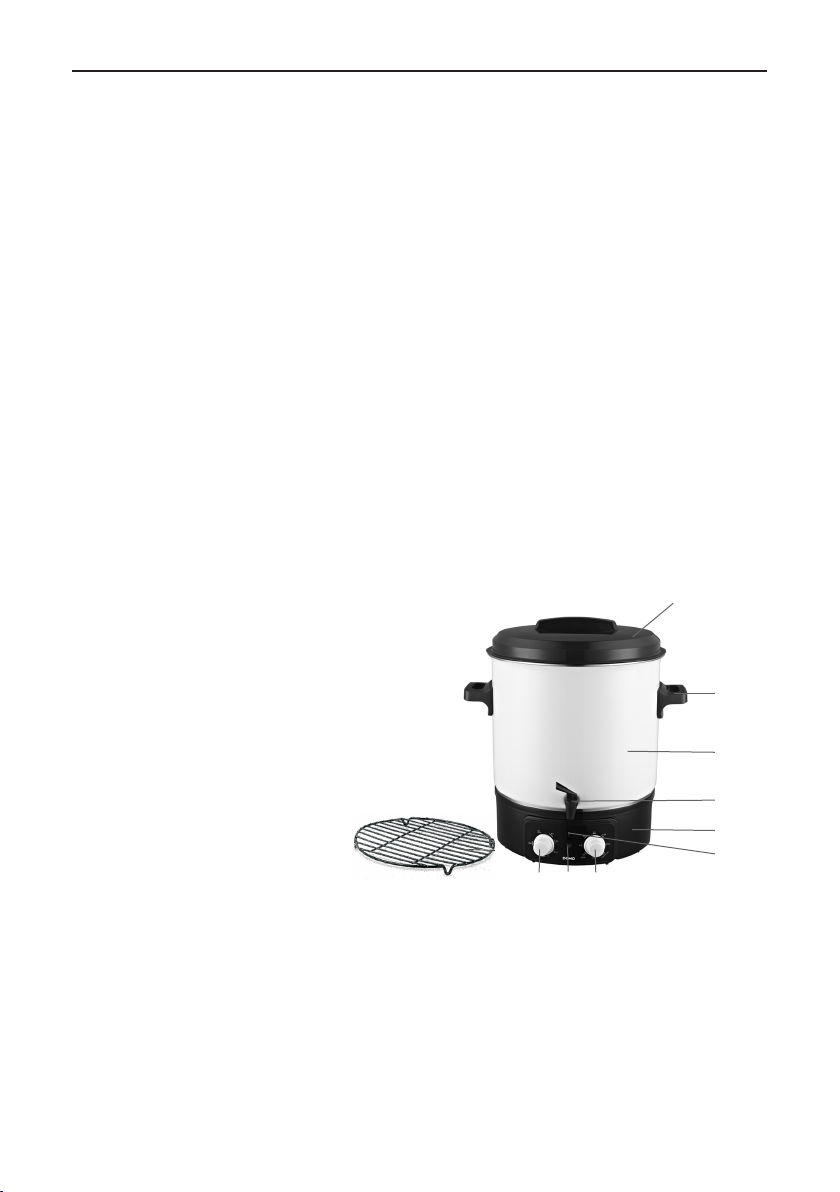
ONDERDELEN
1. Deksel
2. Handgreep (hittebestendig)
3. Geëmailleerde pot
4. Kraan
5. Voetstuk
6. Aan/uit knop
7. Thermostaatknop
8. Verklikkerlicht
9. Tijdschakelaar
10. Rooster
10
De handleiding steeds bewaren. Het toestel is uitsluitend voor normaal huishoudelijk
gebruik bestemd.
12
7 8 9
1
2
3
4
5
6
Page 13

DO322W
Algemeen
• Opgelet! Het apparaat niet verwarmen wanneer het geen water bevat.
• Bij het steriliseren worden de ingemaakte levensmiddelen tot ten minste 100°C
verhit. Bij het pasteuriseren is de temperatuur 80°C.
• Het toestel kan voor vele doeleinden gebruikt worden: voor het inmaken, het
koken, het opwarmen au bain-marie, het bereiden van warme dranken, het
blancheren van groenten, enz.
• Dik vloeibare eetwaren die snel aanbranden, moeten langzaam en bij voortdurend
roeren opgewarmd worden.
• Indien uw toestel onvoorzien leeg zou koken, vermijdt een droogkookbeveiliging
oververhitting. Laat vervolgens het toestel goed afkoelen vooraleer water bij te
vullen. Zo niet ontstaat gevaar voor brandwonden door stoomvorming. Bovendien
kan de geëmailleerde wand beschadigd worden.
• Uw inmaakautomaat heeft een inhoud van 27 liter. Het vloeistofniveau mag
slechts tot maximum 4 cm onder de bovenste rand van de pot bijgevuld worden.
Belangrijke richtlijnen voor gebruik
• Omwille van de hygiëne moet het toestel voor gebruik eenmaal uitgekookt
worden. Tijdens het eerste gebruik is reukvorming mogelijk die echter na een
korte tijd verdwijnt.
• Giet ongeveer 6 liter water in het vat. Zet de thermostaat op maximum en
schakel het toestel met de thermostaatknop aan. Draai de knop in de richting van
de wijzers van de klok tot hij op ongeveer 60 minuten staat. Na aoop van de
ingestelde tijd schakelt het toestel zich automatisch uit. Na het afkoelen mag het
toestel in gebruik genomen worden.
Het toestel in- en uitschakelen
1. Zet de thermostaatknop (7) op de gewenste stand nadat u de inmaakketel met het
nodige water hebt gevuld.
2. Zet de aan/uit knop (6) op stand 1.
3. Draai de tijdschakelaar (9) tegen de richting van de wijzers van de klok op Cont.
(ononderbroken werking). Het toestel begint op te warmen.
4. Het verklikkerlicht (8) gaat aan en duidt aan dat de verwarming werkt.
5. Zodra de ingestelde temperatuur bereikt wordt, hoort men de signaaltoon en
het verklikkerlicht gaat uit. De signaaltoon geeft aan dat nu de inmaaktijd in
overeenstemming met de tabel gekozen moet worden.
6. Schakel de signaaltoon uit en draai de tijdschakelaar (9) in de zin van het wijzers
van het uurwerk tot op de gewenste inmaaktijd. Vanaf nu wordt de temperatuur
precies op peil gehouden. Het verklikkerlicht gaat uit, maar gaat af en toe terug
aan, telkens de temperatuur onder de ingestelde temperatuur zakt. Het juist
aanhouden van de temperatuur is belangrijk voor de kwaliteit van het ingemaakt
voedsel. Zodra de inmaaktijd afgelopen is, schakelt het toestel zich automatisch
uit.
13
Page 14
DO322W
Richtlijnen voor het inmaken
Onder inmaken verstaat men het conserveren van levensmiddelen zonder
chemische conserveringsstoffen. De geproduceerde hitte doodt de in de ingemaakte
levensmiddelen aanwezige kiemen. Tegelijkertijd wordt door de ontstane onderdruk
het inmaakglas kiemvrij en luchtdicht afgesloten. Afhankelijk van de aard en de
van de hoeveelheid ingemaakte levensmiddelen maakt men een onderscheid tussen
steriliseren en pasteuriseren. Voor gewoon huisgebruik is pasteuriseren voldoende. U
hebt passende inmaakbokalen met schroefsluiting of deksels met gummiringen nodig.
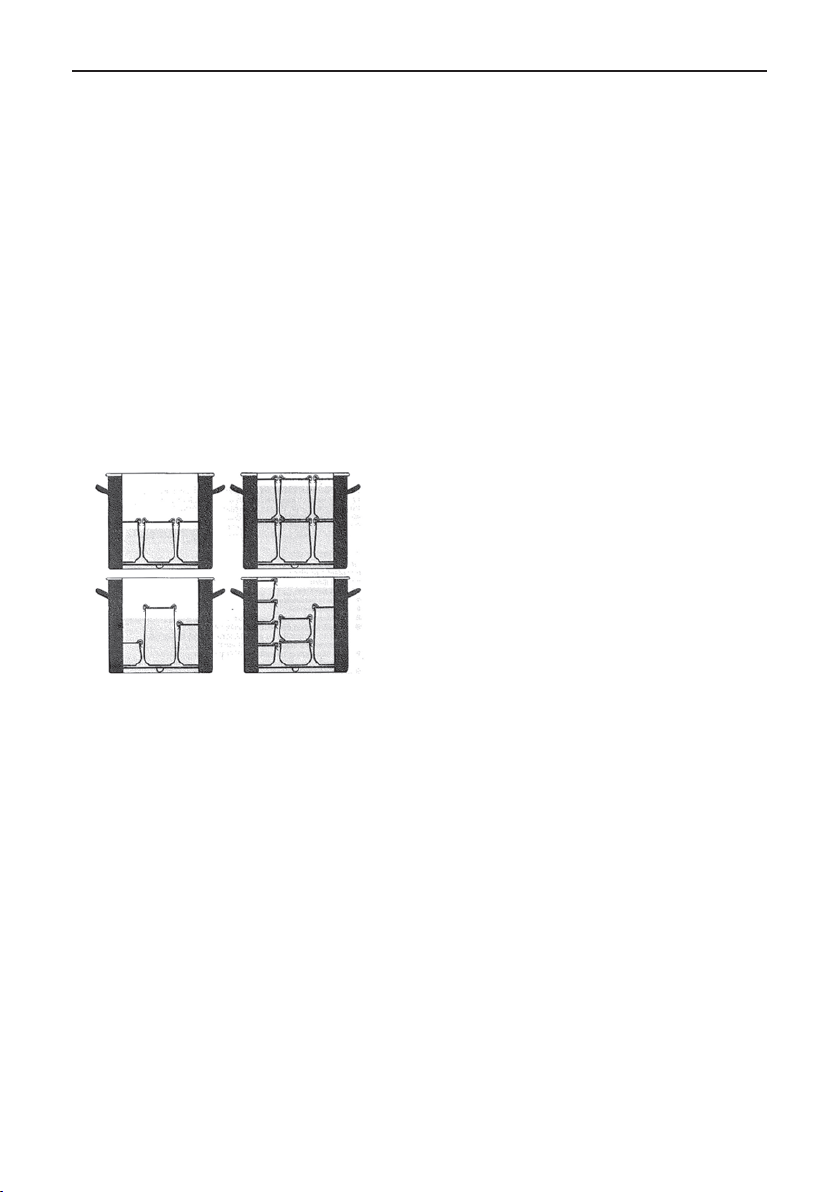
1. Het inmaakrooster in de inmaakautomaat leggen.
2. Plaats de goed gesloten inmaakbokalen op het inmaakrooster. Maximaal tot 14,
in lagen boven elkaar geplaatste inmaakbokalen, met elk een inhoud van 1 liter
kunnen gesteriliseerd / gepasteuriseerd worden.
3. Vul de inmaakautomaat met water tot de bovenste inmaakbokalen voor ¾ onder
water staan. Let erop dat de inmaakbokalen in de onderste laag goed afgesloten
zijn zodat er geen water kan indringen. (zie de guur).
4. Plaats het deksel (1) op de inmaakautomaat.
5. Zet de thermostaatknop (7) in overeenstemming met de inkooktabel op de
gewenste temperatuur. De vermelde inkooktijden hebben betrekking op de
werkelijke inkookduur en beginnen te tellen vanaf het ogenblik dat de gewenste
temperatuur bereikt wordt. (zie inkooktabel hieronder)
6. Zet de aan/uit knop (6) op 1.
7. Schakel het toestel aan door de tijdschakelaar (9) tegen de richting van de wijzers
van de klok op Cont. (ononderbroken werking) te draaien. U zult een elektronisch
signaal horen zodra de ingestelde temperatuur bereikt wordt.
8. Nu begint de opwarmfase. Het opwarmen kan tot 90 minuten duren. Van zodra u
de elektronische beep hoort, stelt u de inkooktijd volgens de tabel in.
9. De schakelaar voor de signaaltoon kan nu uitgeschakeld worden. Plaats daarom
de aan/uit knop (6) op 0.
10. Na aoop van de inkooktijd schakelt het toestel zich automatisch uit. U hoort dan
het belsignaal van de thermostaat.
11. Schakel het toestel uit. Zet de thermostaat op off en trek de stekker uit het
stopcontact.
12. Plaats een recipiënt dat tegen heet water kan onder de kraan en druk de tapkraan
14
Page 15
naar onder. Het water loopt af.
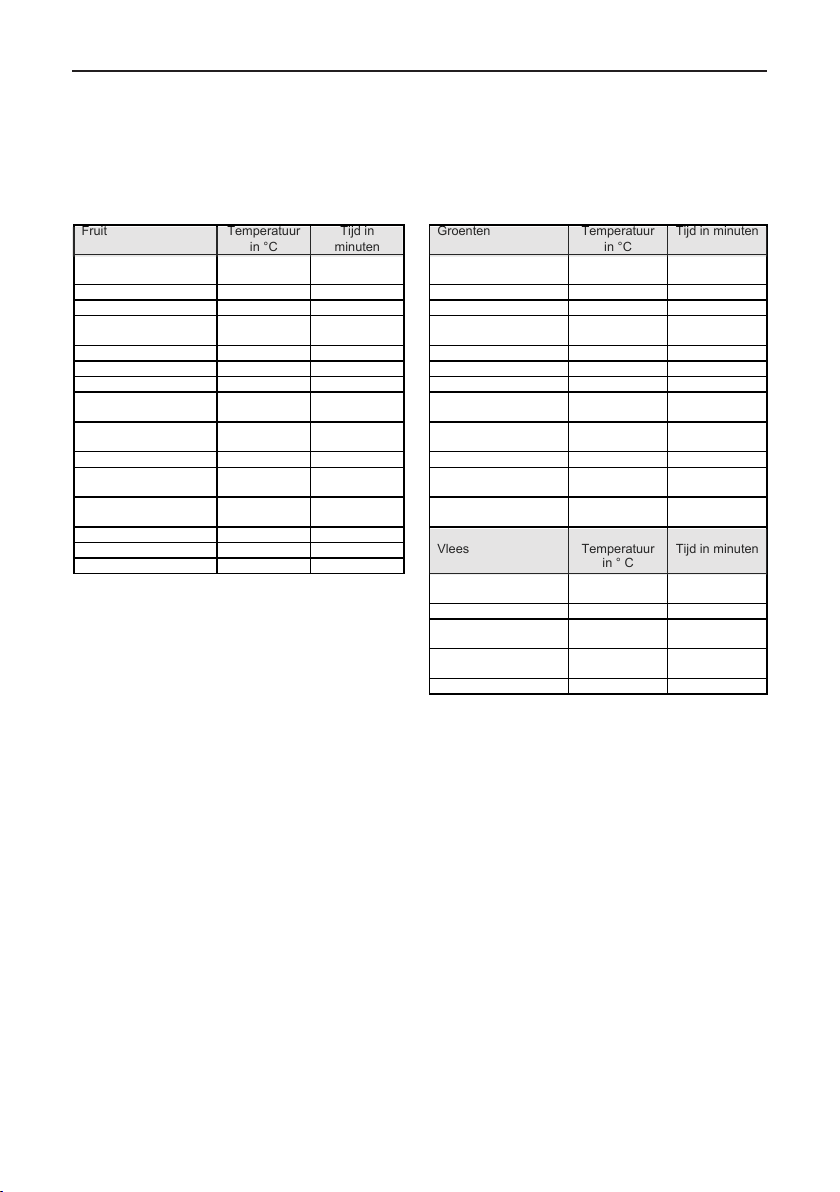
Fruit
Temperatuur
in °C
Tijd in
minuten
Groenten
Temperatuur
in °C
Tijd in minuten
Appel
zacht / hard 90 30
Bloemkool
100 max 90
Appelmoes
90
30
Asperges
100 max
120
Kersen
80
30
Erwten
100 max
120
Peren
zacht / hard 90 30
Wortelen
Rode bieten
100 max 90
Aardbeien 25
Augurken
90
30
Braambessen
80
30
Pompoen
90
30
Rabarber
100 max
30
Koolraap
100 max
90
Frambozen
Kruisbessen
80 30
Spruitjes
Rode kolen
100 max 120
Aalbessen
Veenbessen
90 25
Selderij
100 max
120
Abrikozen
90
30
Paddenstoelen
100 max
110
Mirabellen
Reine-claude
90 30
Bonen
100 max
120
Perziken
90
30
Tomaten
Tomatenpuree
90 30
Pruimen
90
30
Kweeperen
95
25
Bosbessen
85
25
Stuk braadvlees
(doorgebraden)
100 max 120
Bouillon
100 max
60
Wild, gevogelte
doorgebraden
100 max 75
Goulash
doorgebraden
100 max
75
Gehakt, worst (rauw)
100 max
110
13. Als het water afgelopen is, het toestel laten afkoelen.
14. Neem de bokalen voorzichtig uit het toestel. Laat de klemmen of andere
dekselbevestigingen op de bokalen totdat deze volledig afgekoeld zijn.
inkooktabel
DO322W
Opgepast: Na het inkoken zijn de inmaakbokalen zeer
heet. Verbrandingsgevaar! Gebruik a.u.b. een kooktang
om de bokalen uit te laden.
De ingemaakte levensmiddelen droog, koel en in de
duisternis bewaren.
Vlees
Temperatuur
in ° C
Tijd in minuten
richtlijnen voor het opwarmen en warm houden
Het toestel is ook geschikt voor het opwarmen en het warm houden van vloeistoffen
bijv het opwarmen van een glühwein of het bereiden van een punch
Opgepast bij het vullen van het toestel. Het vloeistofniveau mag slechts tot maximum
4 cm onder de bovenste rand van de pot bijgevuld worden, zo niet kan de vloeistof
overlopen.
1. Vul het toestel met de gewenste vloeistof.
2. Zet het deksel op de pot en kies de gewenste temperatuur.
3. Zet het toestel met de tijdschakelaar aan. (Tegen de richting van de wijzers van
de klok op Cont. zetten.) De vloeistof wordt nu in overeenstemming met de
instelling van de thermostaat warm gehouden.
4. De signaaltoonschakelaar geeft een geluidstoon als de gewenste temperatuur
bereikt wordt.
5. Roer regelmatig in de vloeistof om de warmte gelijkmatig te verdelen.
6. Als u het elektronisch geluidssignaal hoort, is de gewenste temperatuur bereikt.
15
Page 16
DO322W
De signaaltoonschakelaar mag nu uitgezet worden.
7. Vloeistoffen zonder vaste bestanddelen kunnen via de kraan afgetapt worden. Zet
een beker onder de tapkraan en druk de taphefboom omlaag. Zodra voldoende
vloeistof in de beker is, laat u de taphefboom gewoon los. Als u grotere
vloeistofhoeveelheden wenst af te tappen, trekt u de taphefboom naar boven tot
hij vaststaat. U hoeft nu de taphefboom niet langer vast te houden.
Tap geen vloeistof met vaste bestanddelen af, bijv. soepen of gelijkaardige
levensmiddelen. De vaste bestanddelen verstoppen de tapkraan.
Belangrijk!
Door regelmatig te roeren, wordt de vloeistof gelijkmatig opgewarmd. Tegelijk
vermijdt u dat soep of hutsepot op de boden van de pot aanbrandt.
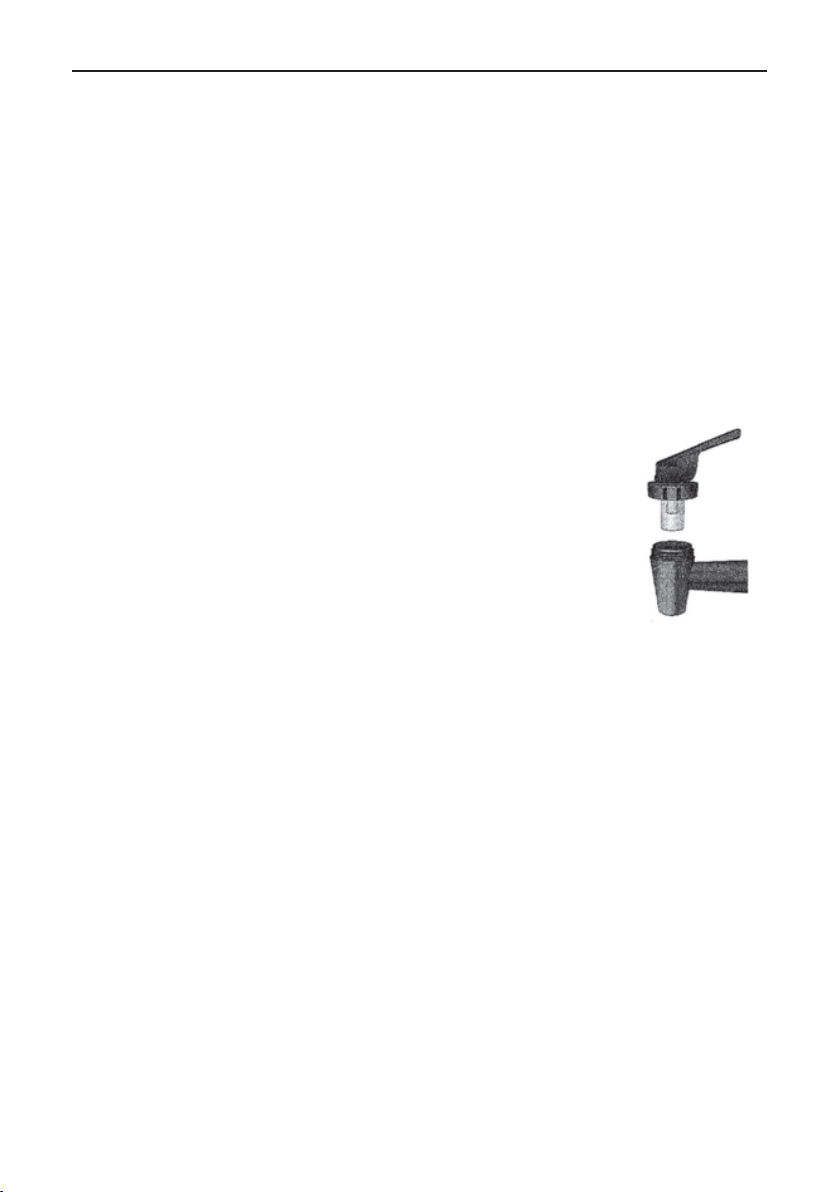
Het reinigen van de tapkraan
Voor een grondige reiniging van de tapkraan kan deze volledig uit
elkaar genomen worden.
- de taphefboom losdraaien
- in een zacht sopje reinigen
- met helder water afspoelen
- indien nodig, hardnekkig vuil met een ronde borstel verwijderen
- de tapkraan terug monteren
- opnieuw met helder water spoelen
Reiniging en onderhoud
Steeds eerst de stekker uittrekken vooraleer met de reiniging te beginnen.
Het is best om de bodem van het vat met een zachte borstel of met een vochtige doek
te reinigen. Gebruik nooit scherpe of harde voorwerpen. Deze kunnen krassen in de
geëmailleerde wand veroorzaken. Als het toestel volledig afgekoeld is, veegt u het met
een vochtige doek schoon. Vervolgens met een droge doek na wrijven.
Ontkalken
Kalkafzettingen op de boden van het vat veroorzaken energieverlies en verminderen
de levensduur van het toestel.
Ontkalk het toestel van zodra kalkafzettingen zichtbaar zijn.
Gebruik een normaal in de handel verkrijgbaar ontkalkingsmiddel. Ga tewerk zoals in
de instructies voor het ontkalkingsmiddel beschreven staat.
Na het ontkalken het toestel met veel zuiver water uitspoelen.
Het bewaren van het toestel
Wikkel de stroomkabel rond de haspel (aan de onderkant van de sokkel)
Steek de stekker in de voorziene ligplaats (midden, onderaan in het toestel). Het
toestel op een droge plaats bewaren.
16
Page 17

DO322W
PRÉCAUTIONS
Cet appareil peut être utilisé par des enfants âgés d’au
moins 8 ans et par des personnes ayant des capacités
physiques, sensorielles ou mentales réduites ou dénuées
d’expérience ou de connaissance, s’ils (si elles) sont
correctement surveillé(e)s ou si des instructions
relatives à l’utilisation de l’appareil en toute sécurité
leur ont été données et si les risques encourus ont été
appréhendés.
Veillez à ce que les enfants ne puissent pas jouer avec
l’appareil. L’entretien et le nettoyage de l’appareil ne
peuvent pas s’effectuer par des enfants, à moins qu’ils
aient plus de 8 ans et qu’ils soient sous surveillance.
Gardez l’appareil et le cordon hors de la portée d’enfants
de moins de 8 ans.
Cet appareil est destiné à un usage domestique ou à
d’autres usages comme:
• Dans la cuisine du personnel dans des magasins,
des bureaux ou d’autres lieux mis en rapport avec
l’environnement de travail.
• Dans les fermes.
• Dans les chambres d’hôtels, de motels et d’autres
lieux avec un caractère résidentiel.
• Dans les chambres d’hôtes ou similaires.
Attention: l’appareil ne peut pas être utilisé avec une
minuterie externe ou une commande à distance séparée.
17
Page 18
DO322W
L’appareil peut chauffer pendant
l’utilisation. Tenez le cordon
électrique à distance de parties
chaudes et ne couvrez pas l’appareil.
Avant la mise en marche, lisez soigneusement et
entièrement le mode d’emploi et conservez-le.
• Pendant l’utilisation, les surface de l’appareil deviennent
très chaudes. Ne touchez pas l’appareil ailleurs qu’aux
poignées ou sur le bouton de commande, sinon, vous
risquez de vous brûler. Ne transportez jamais l’appareil
pendant l’utilisation, laissez-le toujours refroidir.
• L’appareil doit être exclusivement connecté à une tension
alternative de la tension correspondent à la plaque
signalétique.
• Ne mettez jamais l’appareil en marche si la ligne
d’alimentation est endommagée, si l’appareil présente des
détériorations visibles, si l’appareil est tombé s’il a été
plongé dans l’eau.
• En cas de doute, faites vérier l’appareil par un service
après-vente autorisé.
• Les personnes, y compris les enfants, qui ne sont pas en
état d’utiliser l’appareil en toute sécurité, pour des raisons
d’aptitudes physiques, sensorielles ou intellectuelles,
ou opur des raisons de manqué d’expérience ou de
connaissance ne doivent pas utiliser l’appareil sans être
surveillées ou instruites par une personne responsable.
• Les enfants doivent être surveillés an de vous assurer
qu’ils ne joueront pas avec l’appareil. L’appareil ne
18
Page 19

DO322W
doit pas être laissé sans surveillance lorsque la che est
branchée.
• La che électrique doit être débranchée après utilisation,
avant le nettoyage ainsi qu’en cas de défaut quelconque.
N’utilisez aucun accessoire étranger qui n’est pas
recommandé par le fabricant.
• Ne branchez l’appareil que sur une prise adaptée.
N’utilisez jamais l’appareil en plein air.
• Le l de branchement sur le réseau ne doit pas toucher
les parties chaudes de l’appareil et ne doivent pas pendre
par dessus la table. L’appareil ne doit pas être utilise à
proximité de ammes de gaz ni d’appareils électriques
comportant des serpentines chauffants nus, ni dans un four
chaud.
• Posez l’appareil sur une surface résistant à la chaleur et à
une distance d’environ 20 cm des murs.
• L’appareil ne doit pas être utilise pour des emploies
étrangers à son utilisation initiale.
• Ne plongez jamais l’appareil dans l’eau. De même,
protégez le l d’alimentation de l’humidité : risque de
choc électrique.
• Assurez-vous qu’aucune substance combustible ne touche
appareil ou ne se trouve à proximité. Si l’appareil prend
feu, débranchez aussitôt la che.
• Les matériaux d’emballage comme, par exemple, les
sachets en plastique ne doivent pas être mis dans les mains
des enfants.
• En cas d’utilisation non-conforme ou de fausse
manoeuvre, aucune responsabilité ne sera prise pour les
éventuels dommages.
• Si le câble d’alimentation est endommagé, il doit être
19
Page 20

DO322W
remplacé par le fabricant, son service après vente ou
des personnes de qualication similaire an d’éviter un
danger.
• Conservez toujours le mode d’emploi pour consultation
ultérieure.
Description
1. Couvercle
2. Poignée
3. Cuve émaillée
4. Robinet
5. Socle
6. Interrupteur
7. Bouton Thermostat
8. Signal lumineux
9. Minuteur
10. Grille
10
Généralités
• Attention! Ne pas chauffer l’appareil lorsqu’il ne contient pas d’eau/liquiede.
Verse auparavant de l’eau.
• Dans la stérilisation, la matière à traiter est portée à au moins 100°C. Dans le cas
de la pasteurisation, la température de chauffage est de 80°C.
• L’appareil est utilisable pour divers emplois : pour la stérilisation, la cuisson, pour
réchauffer au bain-marie, pour la préparation de boissons chaudes, le blanchiment
de légumes, etc...
• Les liquides épais, qui tendent à attacher, devront être chauffés lentement et en
remuant constamment.
• Si votre appareil vient par erreur de manipulation à être chauffe à vide, une
protection de marche à sec empêche la surchauffe. Dans un tel cas, laissez
l’appareil refroidir avant d’y verser de l’eau, sinon vous risques d’être brûlé par
la vapeur qui se dégage. Par ailleurs, la surface extérieure émaillée risque d’être
endommagée.
• Votre cuiseur automatique abc a une capacité de 27 litres. La limite maximum de
liquide contenu dans la cuve peut être jusqu’à 4 cm au-dessous du bord supérieur
de la cuve.
7 8 9
1
2
3
4
5
6
Instruction importante devant utilisation
• Lors de la première utilisation, il peut se dégager une odeur, qui ne se dissipera
qu’après une brève durée de fonctionnement.
20
Page 21

DO322W
• Pour des raisons d’hygiène, l’appareil devrait initialement être ébouillanté.
Pour cela, remplissez l’appareil de 6 litre d’eau. Réglez le thermostat sur max et
allumez l’appareil au moyen du minuteur. Pour cela, tournez le bouton de mise
en marche dans le sens des aiguilles d’une montre pour le régler sur environ 60
minutes. Après écoulement du temps réglé, l’appareil s’éteint automatiquement.
Une fois refroidi, l’appareil peut être utilisé.
Allumer et éteindre l’appareil
1. Réglez le bouton thermostat (7) de température sur la température désirée.
2. Réglez l’interrupteur (6) sur 1.
3. Réglez le minuteur (9) sur Cont (fonctionnement continu) en le tournant dans le
sens inverse des aiguilles d’une montre. L’appareil commence à chauffer.
4. Le voyant de contrôle (8) s’allume et indique que le chauffage est en marche.
5. Dès que la température réglée est atteinte, le signal acoustique retentit et le voyant
de contrôle s’éteint. Le signal acoustique indique que vous devez maintenant
sélectionner le temps de stérilisation d’après le tableau.
6. Mettez l’interrupteur du signal sonore sur arrêt.
7. Réglez le minuteur (9) sur le temps de stérilisation désiré en le tournant dans le
sens des aiguilles d’une montre. Maintenant, la température restera maintenue
avec précision, le voyant lumineux s’éteint, mais se rallume par intermittence
lorsqu’on tombe au-dessous de la température réglée. La précision de la conduite
de la température est importante pour la qualité du produit à stériliser. Lorsque le
temps de stérilisation s’est écoulé, l’appareil s’arrête automatiquement.
Instruction pour la stérilisation.
On entend par stérilisation, la conservation de produits alimentaires sans produits de
conservation chimiques. La chaleur produite tue les germes présents dans le produit
à stériliser. En même temps, sous l’effet de la suppression engendrée, les bocaux de
conserve sont débarrassés de leurs germes et rendus étanches à l’air. Selon la nature
et la masse de la matière à stériliser, on distingue entre la stérilisation et de pasteurisation.
1. Posez la grille dans l’appareil de stérilisation.
2. Posez les bocaux de conserve bien fermés sur la grille. Il est possible de
pasteuriser ou de stériliser de 7 à 14 bocaux selon le type et la capacité des
bocaux utilisés en les superposant.
3. Remplissez l’appareil d’eau jusqu’à ce que les
bocaux du haut soient immergés dans l’eau dans
la limite du maximum autorisé (soit jusqu’à 4
cm du bord supérieur de la cuve). Veillez à ce
que les bocaux soient bien fermés, an que l’eau
ne puisse pas y pénétrer. (vois gure)
4. Mettez le couvercle (1) .
21
Page 22

DO322W
5. Sélectionnez la température désirée en vous reportant au tableau de stérilisation.
Les temps de stérilisation indiqués se rapportent au temps de stérilisation réel
à partir du moment où la température souhaitée est atteinte. La montée en
température peut durer jusqu’à 90 minutes.
6. Réglez l’interrupteur (6) sur 1.Un signal sonore retentit lorsque la température
réglée est atteinte.
7. Mettez l’appareil en marche au moyen du minuteur (9). Pour cela, réglez le
minuteur sur Cont en le tournant dans le sens inverse des aiguilles d’une montre.
Maintenant, la phase de chauffage commence.
8. Dès que le signal sonore retentit, réglez le temps de stérilisation en vous reportant
au tableau ci-joint. Pour cela, tournez le bouton du minuteur dans le sens des
aiguilles d’une montre. Vous pouvez maintenant éteindre le bouton du signal
sonore. Mettez l’interrupteur (6) à bascule sur 0.
9. Après écoulement du temps de stérilisation, l’appareil s’arrête automatiquement.
L’arrêt est indiqué par une sonnerie du minuteur.
10. Maintenant, vous pouvez éteindre l’appareil. Mettez le régulateur de température
sur OFF. Retirez la che de la prise.
11. Placez un récipient résistant à la température sous le robinet et abaissez le levier.
L’eau coule.
12. Lorsque l’eau s’est écoulée, laissez l’appareil refroidir.
13. Attendez le refroidissement complet de l’appareil avant de retirer les bocaux.
Chauffer des liquides ou les maintenir au chaud
L’appareil convient parfaitement pour chauffer des liquides et pour préparer un punch
ou un vin chaud.
Attention ; Ne remplissez qu’au maximum jusqu’a 4cm au-dessous du bord supérieur
de la cuve, sinon le liquide risque de déborder.
1. Mettez le couvercle en place, sélectionnez la température désirée. Mettez
l’appareil en marche au moyen du minuteur (tournez-le dans le sens inverse des
aiguilles d’une montre pour le placer sur Cont.). Le liquide sera maintenu chaud
en respectant le réglage du thermostat.
2. Le bouton du signal sonore indique le moment où la température est atteinte.
Remuez le liquide régulièrement pour que la chaleur soit uniformément répartie.
3. Lorsque le signal sonore retenti, la température est atteinte. Maintenant, vous
pouvez mettre le bouton du signal sonore sur arrêt.
4. Les liquides qui ne contiennent pas d’éléments solides peuvent être soutirés au
moyen du robinet.
5. Tenez un récipient résistant à la chaleur sous le robinet et abaissez le levier
et relâchez-le lorsque vous avez terminé. Si vous voulez tirer de plus grandes
quantités de liquide, tirez le levier vers le haut jusqu’à ce qu’il reste immobile,
ensuite vous n’avez plus à tenir le levier.
6. Ne soutirez pas de liquides qui contient des composants solides, comme les
soupes ou autres liquides analogues. Les composants solides boucheraient le
robinet.
22
Page 23

DO322W
Fruits Tem-
péra-
ture en
Pommes Douces/
dures
Compote de pommes
Cerises 80 30
Poires Douces/
dures
Arbouses 90 25
Mûres 80 30
Rhubarbe 100
Framboises
Grosseilles à
maquereau
Groseilles 90 25
Airelles 90 30
Abricots 90 30
Mirabelles
Reine-claudes
Pêches 90 30
Prunes
Quetsches
Coings 95 25
Myrtilles 85 25
90 30
90 30
90 30
Max
80 30
90 30
90 30
Temps
en
Min.
°C
30
Attention, après la stérilisation, les
bocaux sont très chauds. Vous risquez de
vous brûler. Servez-vous d’une pince à
stériliser pour retirer les bocaux.
Conservez les conserves dans un endroit
sec, frais et à l’abri de la lumière.
Légumes Tempéra-
ture en
°C
Chou-Fleur 100 Max 90
Asperges 100 Max 120
Petits pois 100 Max 120
Carottes 100 Max 90
Cornichons 90 30
Potiron 90 30
Chou Rave 100 Max 90
Chou de Brux. 100 Max 120
Chou rouge 100 Max 120
Céléri 100 Max 110
Champignons 100 Max 110
Haricots 100 Max 120
Tomates 90 30
Concentré de
90 30
tomates
Viandes Tempéra-
ture en
°C
Rôti à point en
100 Max 120
pièce
Bouillon de
100 Max 60
viande
Gibier Volaille 100 Max 75
Goulâche rôti à
100 Max 75
point
Viande hachée 100 Max 110
Chair à sau-
100 Max 110
cisses crue
Cont 70 120
Foie gras (mi-
90 60
cuit)
Foie gras (cuit) 80 120
23
Temps
en Min
Temps
en Min.
Page 24

DO322W
Nettoyage du robinet de soutirage
Pour pouvoir nettoyer à fond le robinet, il faut le démonter:
• Dévissez le levier du robinet
• Nettoyez-le dans un produit vaisselle peu agressif
• Rincez à l’eau claire
• Si nécessaire, enlevez les salissures attachées avec un cure-pipe
• Rincez une nouvelle fois à l’eau claire
• Revisser le levier de soutirage
Nettoyage et entretien
Pour nettoyer l’appareil, débranchez toujours la prise de courant. Le mieux est de
nettoyer le fond de la cuve avec une brosse douce ou avec un chiffon humide. Ne vous
servez jamais d’objets pointus ou durs. Vous risqueriez d’abîmer l’émail. Lorsque
l’appareil est refroidi, essuyez le corps avec un chiffon doux humide. Ensuite, frottezle avec un chiffon sec.
Détartrage
Les dépôts de calcaire sur le fond de la cuve conduisent à des pertes d’énergie et sont
préjudiciables à la longévité de l’appareil. Détartrez l’appareil dès que des dépôts de
calcaire apparaissent. Utilisez un détartrant habituel du commerce. Procédez comme
décrit dans le mode d’emploi du détartrant. Après le détartrage, rincez l’appareil à
grande eau.
Rangement
Enroulez le câble de branchement autour de l’enrouleur de câble (sous le socle).
Enfoncez la che dans la prise spéciale (au milieu du fond du corps).
Rangez dans un endroit sec.
24
Page 25

DO322W
SICHERHEITSANWEISUNGEN
Dieses Gerät darf von Kindern ab 8 Jahren oder
älter gebraucht werden. Ebenso dürfen Personen
mit körperlicher bzw. leichter geistiger Behinderung
sowie Personen mit eingeschränkter Erfahrung das
Gerät betätigen. Dies unter der Voraussetzung, dass
diese Personen ausreichende Anweisungen sowohl
zum Gebrauch des Gerätes, als auch zu den hiermit
verbundenen Gefahren erhalten haben.
Kinder dürfen nicht mit dem Gerät spielen. Die Pege
und Wartung des Gerätes darf nicht von Kindern
ausgeführt werden, es sei denn, dass dies unter Aufsicht
passiert und es sich um Kinder handelt, die älter als
8 Jahre sind und im Voraus ausreichend über den
Gebrauch/die Wartung informiert worden sind. Sorgen
Sie dafür, dass sich das Gerät nicht in Anwesenheit von
Kindern unter 8 Jahren bendet.
Dieses Gerät eignet sich zum Gebrauch im Haushalt oder
ähnlichen Umgebungen, wie z.B.:
• Küchenzeile für Personal in Geschäften, Büros oder
anderen professionellen Umgebungen
• Bauernhöfe
• Hotel-/Motel-/Gästezimmer u.ä.
Achtung: das Gerät darf nicht mit einer externen
Zeitschaltuhr oder Fernbedienung gebraucht werden.
25
Page 26

DO322W
Das Gerät kann während des Gebrauchs
warm werden. Das elektrische Kabel
von heißen Teilen entfernt halten und
das Gerät nicht abdecken.
Bitte lesen Sie die Gebrauchsanweisung vor der
Inbetriebnahme sorgfältig durch und bewahren Sie
diese auf.
• Warnung : Bei elektrischen Geräten besteht immer ein
gewisses Stromschlagrisiko, das zu Verletzungen führen kann. Bitte beachten Sie deshalb die nachstehenden Sicherheitshinweise.
• Die Oberächen des Gerätes werden während der
Inbetriebnahme heiß. Das Gerät dar nur an den
Griffen oder am Kontrollknopf berührt werden, sonst
besteht Verbrennungsgefahr. Das Gerät während der
Benutzung nie transportieren, immer abkühlen lassen.
• Das Gerät nur an Wechselstrom mit Spannung gemäß
Typenschild anschließen.
• Das Gerät darf nicht in Betrieb genommen werden,
wenn die Zuleitung beschädigt ist, das Gerät sichtbare
Schäden aufweist, wenn das Gerät einmal heruntergefallen sein sollte oder wenn es in Wasser getaucht
wurde.
• Im Zweifelsfall sollte das Gerät von einer
Servicestelle überprüft werden. Gerät und
Zuleitung können nur von einem autorisierten
Reparaturfachmann repariert werden.
26
Page 27

DO322W
• Personen, einschließlich Kinder, die aufgrund ihrer
physischen, sensorischen oder geistigen Fähigkeiten
oder ihrer Unerfahrenheit oder Unkenntnis nicht in
der Lage sind, das Gerät sicher zu benutzen, dürfen
das Gerät nicht ohne Aufsicht oder Anweisung durch
eine verantwortliche Person benutzen.
• Kinder müssen überwacht werden, um sich zu gehen,
dass sie nicht mit dem Gerät spelen.
• Das Gerät darf nicht unbeaufsichtigt sein, wenn der
Netzstecker eingesteckt ist.
• Nach Gebrauch, vor jeder Reinigung und bei jeder
Störung sollte der Netzstecker gezogen werden. Keine
fremden Zubehörteile verwenden, die nicht vom
Hersteller empfohlen wurden.
• Nur in eine passende Steckdose einstecken.
• Das Gerät darf nicht in der Nähe von Gasammen
oder Elektrogeräten mit offener Heizspirale, oder im
beheizten Ofen verwendet werden.
• Das Gerät auf eine hitzebeständige Oberäche stellen
und einen Abstand von ca. 20 cm zu Wandächen einhalten.
• Das Gerät darf nicht zweckentfremdet verwendet werden.
• Das Gerät nie in Wasser tauchen, ebenso die
Zuleitung vor Feuchtigkeit schützen. Gefahr von
Stromschlag.
• Es ist sicherzustellen, dass keine brennbaren Teile das
Gerät berühren oder in dessen Nähe sind. Wenn das
Gerät Feuer fängt, sofort den Netzstecker ziehen.
27
Page 28

DO322W
• Verpackungsmaterialien, wie z. B. Folienbeutel gehö-
ren nicht in Kinderhände.
• Bei Zweckentfremdung oder falscher Bedienung kann
keine Haftung für evtl. Schäden übernommen werden.
• Wenn das Netzkabel beschädigt ist, muss es durch den
Hersteller oder seinen Kundendienst oder durch einen
qualizierten Techniker ersetzt werden, um Gefahren
zu vermeiden.
• Bedienungsanleitung immer aufbewahren.
• Das Gerät ist nur für normale Haushaltszwecke zu
verwenden.
• Das Gerät ist vielseitig verwendbar : zum Einkochen,
Kochen, Wärmen im Wasserbad.
Geräteübersicht
1. Gehäusedeckel
2. Griffe
3. Emaille Topf
4. Zapfhahn
5. Gehäuse Unterteil
6. Signalschalter
7. Thermostat Knopf
8. Signalleuchte
9. Zeitschaltuhr
10. Einlegerost
10
Algemein
• Achtung! Bitte achten Sie darau, dass immer genûgend Flüssigkeit im Tank
vorhanden ist.
• Zubereitung von heißen Getränken, Blanchieren von Gemüse usw.
• Dicküssige, zum Anbrennen neigende Speisen müssen langsam unter ständigem
Rühren erwärmt werden. Sollte Ihr Gerät einmal leerkochen, verhindert ein
zusätzlicher Trockengehschutz eine Überhitzung. Das Gerät dann gut abkühlen
lassen, bevor wieder Wasser nachgefüllt wird, sonst besteht Verbrühungsgefahr
durch Dampfbildung. Außerdem kann dadurch die Emailleoberäche beschädigt
28
7 8 9
1
2
3
4
5
6
Page 29

DO322W
werden. Beim ersten Gebrauch kann Geruch entstehen, der sich nach kurzer
Betriebsdauer verliert.
• Aus hygienischen Gründen sollte das Gerät einmal ausgekocht werden. Dazu
ca. 6 Liter Wasser einfüllen, Thermostat auf Max. stellen, über die Zeitschaltuhr
wird das Gerät eingeschaltet. Dazu den Einschaltknopf im Uhrzeigersinn auf ca.
60 Min. einstellen. Nach der eingestellten Zeit schaltet das Gerät automatisch ab.
Nach dem Abkühlen ist das Gerät einsetzbar.
Hinweise zum Einkochen
Unter Einkochen versteht man die Konservierung von Lebensmitteln ohne chemische
Konservierungsstoffe. Die erzeugte Hitze tötet die im Einmachgut vorhandenen
Keime ab. Gleichzeitig wird durch den entstehenden Unterdruck das Einmachglas
keimfrei und luftdicht verschlossen. Je nach Art und Masse des Einkochgutes
unterscheidet man zwischen Sterilisieren und Pasteurisieren. Beim Sterilisieren
wird das einkochtgut auf mindestens 100°C erhitzt. Beim Pasteurisieren liegt
die Erhitzungstemperatur bei 80°C. Für den Hausgebrauch ist das Pasteurisieren
ausreichend. Es werden entsprechende Einmachgläser mit Schraubverschluß oder
Verschlußkappen mit Gummiringen benötigt.
Gerät ein- und ausschalten
1. Temperaturregler auf die gewünschte Temperatur einstellen.
2. Signalton Schalter auf 1 stellen.
3. Zeitschaltuhr gegen den Uhrzeigersinn auf (Cont.)stellen. (Dauerbetrieb) Das
Gerät beginnt zu heizen.
4. Die Kontrolleuchte leuchtet auf und zeigt an, wenn die Heizung aktiv ist.
5. Sobald die eingestellte Temperatur erreicht ist, ertönt das akustische Signal
und die Kontrolleuchte erlischt. Das akustische Signal zeigt an, dass jetzt die
Einkochzeit laut Tabelle gewählt werden sollte.
6. Den Signalton-Schalter ausschalten, die Zeitschaltuhr im Uhrzeigersinn auf die
gewünschte Einkochtzeit einstellen.Jetzt wird die Temperatur präzise gehalten,
die Signalleuchte erlischt, leuchtet aber zwischendurch immer wieder auf, wenn
die eingestellte Temperatur unterschritten wird.Eine präzise Temperaturführung
ist wichtig für die Qualität des Einkochgutes.Wenn die Einkochtzeit abgelaufen
ist schaltet das Gerät automatisch ab.
29
Page 30

DO322W
Arbeitsablauf
1. Einkochgitter in den Einkochautomaten legen.
2. Stellen Sie die gut verschlossenen Einmachgläser auf das Einkochgitter.Es können
maximal 14 Einmachgläser mit einem Fassungvermögen von 1 Liter übereinander
sterilisiert / pasteurisisert werden.
3. Füllen Sie den Einkochtautomaten mit Wasser, bis die oberen Einmachgläser zu
3/4 im Wasser stehen. Achten Sie darauf, dass die Einmachgläser in der unteren
Lage gut verschlossen sind, damit kein Wasser Eindringen kann. (Siehe Abb.)
4. Setzen sie den Deckel auf.
5. Stellen Sie den Temperaturregler auf die gewünschte Temperatur laut
Einkochtabelle. Die angegebenen Einkochtzeiten beziehen sich auf die
tatsächliche Einkochzeit.
6. Die Zeit beginnt, wenn die eingestellte Temperatur erreicht ist.Das Aufheizen
kann bis zu 90 Min. dauern.
7. Signaltonschalter auf 1 stellen, es ertönt ein elektronisches Signal, wenn die
eingestellte Temperatur erreicht ist.
8. Das Gerät über die Zeitschaltuhr einschalten. Dazu die Zeitschaltuhr entgegen
dem Uhrzeigersinn auf (Cont.) drehen.
9. Jetzt beginnt die Heizphase.Sobald der elektronische Signalton ertönt, die
Einkochtzeit gemäß einstellen.
10. Der Signalton-Schalter kan jetzt ausgeschaltet werden. Den Kippschalter auf 0
stellen.
11. Nach Ablauf der Einkochzeit schaltet das Gerät automatisch ab, was durch einen
Klingelton der Zeitschaltuhr angezeigt wird.
12. Das Gerät kann jetzt ausgeschaltet werden.
13. Temperaturregeler auf Off stellen und den Netzstecker aus der Steckdose ziehen.
14. Stellen Sei ein temperaturbeständiges Gefäß unter den Zapfhahn und drücken Sie
den Zapfhebel nach unten. Das Wasser läuft ab.
15. Wenn das Wasser abgelaufen ist, das Gerät abkühlen lassen.
16. Gläser entnehmen. Klammern oder sontige Deckelhalterungen bis zur
30
Page 31

DO322W
vollständigen Abkühlung auf den Gläsern belassen.Flüssigkeiten aufwärmen bzw.
warmhalten, Glühwein oder Punch aufwärmen
Flüssigkeiten aufwärmen bzw. warmhalten, Glühwein oder
Punch aufwärmen.
Das Gerät eignet sich hervorraged zum Erwärmen von Flüssigkeiten, Punsch oder
Glühwein.
Achtung beim Befüllen, maximal bis 4 cm unterhalb des oberen Randes befüllen,
ansonsten kann die Flüssigkeit überlaufen.
1. Den Deckel aufsetzen, die gewünschte Temperatur wählen, das Gerät über die
Zeitschaltuhr einschalten. (gegen den Uhrzeigersinn auf Cont. stellen.) Die
Flüssigkeit wird jetzt entsprechend der Thermostateinstellung warmgehalten. Der
Signaltonschalter zeigt an, wenn die Temperatur erreicht ist.
2. Rühren Sie die Flüssigkeit regelmäßig verteilt. Wenn der elektronische Signalton
ertönt, ist die Temperatur erreicht. Der Signaltonschalter kann jetzt ausgeschaltet
werden.
3. Sie können Flüssigkeiten ohne feste Bestandteile durch den Zapfhahn abzapfen.
Halten Sie einen Becher unter den Zapfhahn und drücken Sie den Zapfhebel nach
unten. Wenn sich die gewünschte Flüssigkeitsmenge im Becher bendet, lassen
Sie den Zapfhebel einfach los. Wenn Sie größere Flüssigkeitsmengen zapfen
wollen, ziehen Sie den Zapfhebel nach oben, bis er fest steht, dann müssen Sie
den Zapfhebel nicht festhalten.
Zapfen Sie keine Flüssigkeiten mit festen Bestandteilen, z.B. Suppen oder ähnliches.
Die festen Bestandteile verstopfen den Zapfhahn.
Wichtig!!
Durch regelmäßiges Rühren bekommen Sie eine gleichzeitig verhindern Sie dass
Suppen oder Eintöpfe am Geräteboden anbrennen.
31
Page 32

DO322W
Obst Tem-
peratur
Zeit in
Min.
in °C
Äpfel weich / hart 90 30
Apfelmus 90 30
Kirschen 80 30
Birnen weich / hart 90 30
Erdbeeren 90 25
Brombeeren 80 30
Rhabarber 100
30
Max
Himbeeren
80 30
Stachelbeeren
Johannisbeeren
90 25
Preiselbeeren
Aprikosen 90 30
Mirabellen
90 30
Renekloden
Prsiche 90 30
Paumen
90 30
Zwetschgen
Quitten 95 25
Heidelbeeren 85 25
Vorsicht, die Einmachgläser sind nach dem
Einkochen heiß, Verbrennungsgefahr. Bitte
benutzen Sei eine Einkochzange um die Gläser
zu entnehmen.
Eingemachtes trocken, kühl und dunkel
aufbewahren.
Gemüse Tem -
peratur
Zeit in
Min.
in °C
Blumenkohl 100
90
Max
Spargel 100
120
Max
Erbsen 100
120
Max
Möhren
Karotten
100
Max
90
Gewürzgurken 90 30
Kürbis 90 30
Kohlrabi 100
90
Max
Rosenkohl
Rotkohl
Sellerie 100
100
Max
120
120
Max
Pilze 100
110
Max
Bohnen 100
120
Max
Tomaten
90 30
Tomatenmark
Fleisch Te m -
peratur
Zeit in
Min.
in °C
Braten im Stück
100 Max 120
durchgebraten
Fleischbrühe 100 Max 60
Wild, Geügel
100 Max 75
durchgebraten
Gulasch durchge-
100 Max 75
braten
Hackeisch
100 Max 110
Wurstmasse (roh)
32
Page 33

DO322W
Reinigung des Zapfhahnes
Zur gründlichen Reinigung des Zapfhahnes kann dieser zerlegt
werden.
• Zapfhebel abschrauben
• in einer milden Spüllauge reinigen
• mit klarem Wasser abspülen
• notfalls hartnäckige Verschmutzungen mit einem
Pfeifenputzer reinigen
• Zapfhebel wieder zusammenschrauben
• erneut mit klarem Wasser durchspülen
Reinigung und Pflege
Zum Reinigen immer den Netzstecker ziehen. Am besten reinigen Sie den
geschlossenen Topfboden mit einer weichen Bürste oder mit einem feuchten Tuch.
Verwenden Sie niemals spitze oder harte Gegenstände, diese würden die Emailierung
zerkratzen. Nachdem das Gerät abgekühlt ist, wischen Sie das Gehäuse mit einem
feuchten, weichen Tuch ab.
Anschließend mit einem trockenen Tuch nachreiben.
Entkalken
Kalkablagerungen am Gehäuseboden führen zu Energieverlusten und beeinträchtigen
die Lebensdauer des Geräts.
Entkalken Sie das Gerät, sobald sich Kalkablagerungen zeigen.
Benutzen Sie ein handelsübliches Entkalkungsmittel. Gehen Sie so vor, wie in der
Anleitung des Entkalkungsmittels beschrieben. Nach dem Entkalkungsvorgang das
Gerät mit viel klarem Wasser ausspülen.
Aufbewahren
Netzkabel um die Kabelaufwicklung aufwickeln (Gehäuseunterseite)
Netzstecker in das Steckerdepot einstecken.
(Mitte des Gehäusebodens)
Trocken aufbewahren.
Reparaturhinweis
Achtung! Elektrogeräte dürfen nur durch Elektro-Fachkräfte oder den autorisierten
Kundendienst repariert werden, weil durch unsachgemäße Reparatur erhebliche
Folgeschäden entstehen können.
33
Page 34

DO322W
SAFETY INSTRUCTIONS
This appliance may be used by children from the age of
8 and up, and also by persons with a physical or sensorly
limitation, as well as mentally limited persons or persons
with a lack of experience and knowledge. But only on the
condition that these persons have received the necessary
instructions on how to use this appliance in a safe way
and know the dangers that can occur by using this
appliance.
Children cannot be allowed to play with the appliance.
Maintenance and cleaning of the appliance may not be
done by children, unless they are older than 8 years old
and are under supervision. Keep the appliance out of
reach of children younger than 8 years old.
This appliance is suitable to be used in a household
environment and in similar surroundings such as:
• Kitchen for personnel of shops, ofces or other
similar professional surroundings
• Farms
• Hotel or motel rooms and other surroundings with a
residential character
• Guest rooms or similar
Attention: This appliance cannot be used with an external
timer or a separate remote control.
34
Page 35

DO322W
The appliance can become hot during
use. Keep the power cord away
from hot parts and don’t cover the
appliance.
Before plugging in the device, please read the
instructions carefully and keep them in an accessible
place.
• The walls of the device become very hot during use.
The device may only be touched on the handles or on
the control knob, so there is no risk of burns. Do not
move the device during use. Let it cool off rst.
• Only connect the device to an alternating current
source with the voltage indicated on the information
plate.
• The device may not be connected if the power cable is
damaged, the device itself is visibly damaged or if it
has fallen into water.
• If you have doubts, have the device checked by the
maintenance service. The device and the power cable
may only be repaired by a maintenance technician.
• People, including children, who are not in a position
to safely use the device due to physical, sensory or
mental capacities, or their inexperience, may not use
the device without supervision or instructions from a
responsible person.
• Make sure that children are supervised so that they
cannot play with the device.
35
Page 36

DO322W
• If the device is connected to the power supply, it must
be constantly monitored.
• After use and before cleaning the device, you must
pull the plug from the socket. The same applies in the
event of a malfunction. Do not use parts which are not
recommended by the manufacturer.
• The device may only be connected to a suitable outlet.
• Do not use the device outside.
• The power cable may not come into contact with the
hot parts of the device and may not hang over the
table.
• The device may not be used near a gas ame or
electrical appliances with open heating elements or in
a warm oven.
• Place the device on a heat resistant surface and at a
distance of approximately 20 cm of the walls.
• The device may not be used for any purpose other
than that for which it is intended.
• The device may never be submersed in water and the
power cable must be protected from moisture. Danger
of electrocution.
• Make sure that ammable objects do not come
into contact with or are located near the device.
If the device starts to burn, pull the power cable
immediately.
• Packaging material, such as plastic bags, are not toys
for children.
• In the event of improper use or improper operation
there can be no warranty for damage.
36
Page 37

DO322W
• If the power cable is damaged, this must be replaced
by the manufacturer’s service department or by a
certied technician in order to avoid danger.
Components
1. Cover
2. Handle (heat resistant)
3. Enamelled pot
4. Tap
5. Foot
6. On/off button
7. Thermostat button
8. Detector light
9. Time switch
10. Grate
Always keep the instructions. The device is only intended for normal household use.
General
• Attention! Do not heat the appliance when the tank contains no water.
• When sterilizing, the preserved food must be heated to at least 100°C. When pasteurizing, the temperature is 80°C.
• The device can be used for many purposes: for preserving, boiling, heating in a
bain-marie, preparation of hot drinks, blanching vegetables, etc.
• Thick viscous foods which burn easily must be heated slowly while being stirred
continuously.
• If your device boils dry, the dry cook safety prevents overheating. Let the device
cool down completely before adding water. This prevents burns by the formation
of steam. In addition, the enamelled wall may be damaged.
• Your canner has a capacity of 27 litres. The liquid level may only reach a
maximum of 4 cm under the lowest edge of the pot.
10
7 8 9
1
2
3
4
5
6
Important guidelines for use
• For hygienic reasons, the device must be boiled before use. During rst use, there
may be some smoke which will dissipate after a short time.
• Put approximately 6 litres of water in the pot. Set the thermostat to the maximum
and turn the device on with the thermostat button. Turn the knob in clockwise
until it is set at approximately 60 minutes. After the set time, the device will
automatically turn off. After cooling, the device is ready to use.
37
Page 38

DO322W
Turning the device on and off
Set the thermostat knob (7) to the desired temperature after lling the pot with the
necessary water.
1. Set the on/off knob (6) position 1.
2. Turn the time switch (9) clockwise to Cont. (continual operation). The device will
start to heat up.
3. The indicator light (8) comes on and indicates that the device is heating up.
4. As soon as the set temperature is achieved, you will hear a signal tone and the
indicator light will switch off. The signal tone indicates that you must now select
the canning time using the table.
5. Turn the signal tone off and turn the time knob (9) clockwise to set the clock to
the desired time. Now the temperature will be kept constant. The indicator light
goes of, but will come on from time to time when the temperature falls under
the set temperature. Maintaining the temperature is important for the quality of
canned food. As soon as the canning time is up, the device turns off automatically.
Guidelines for canning
Canning involves preserving food without chemical preservatives. The heat produced
kills any germs present in the canned food. At the same time, the vacuum produced
seals the jar with no germs and airtight. Depending on the type and the amount of
preserved food, there is a difference between sterilizing and pasteurizing. Pasteurizing
is sufcient for normal household use. You need suitable jars with screw closures or
covers with rubber rings.
1. Put the canning grate into the canner.
2. Place the tightly closed jars on the grate. A maximum of 14, layered jars, each
with 1 litre of contents can be sterilized/pasteurized.
3. Fill the canner with water so that the top jars are 3/4 under water. Make sure that
the jars in the lower layer are sealed so that no water can permeate them. (see the
gure).
4. Place the cover (1) on the canner.
5. Set the thermostat (7) in accordance with the canning table to the desired
temperature. The canning times indicated are based on the actual canning time
38
Page 39

DO322W
CANNING TABLE
Fruit
Temperature
in °C
Time in
minutes
Apples
soft/hard
Apple sauce
90
30
Cherries
80
30
Pears
soft/hard
Strawberries
25
Rhubarb
100 max
30
Raspberries
Gooseberrie
Currants
Cranberries
Apricots
90
30
Mirabelles
Reine-claude
Peaches
90
30
Plum s
90
30
Quince
95
25
Blueberries
85
25
Note
Vegetables
Temperature
in °C
Total time in
minutes
Asparagus
100 max
120
Peas
100 max
120
Carrots
Beets
Cucumbers/Pickles
90
30
Pumpkin
90
30
Kohlrabi
100 max
90
Brussels
sprouts
Celery Root
100 max
120
Mushrooms
100 max
110
Beans
100 max
120
Tomatoes
Tomato purée
Total time in
Steak (cooked)
Stock
100 max
60
Game, poultry
cooked
Goulash
cooked
100 max
75
Ground meat,
100 max
110
and start to count down from the moment that the desired temperature is reached.
(see canning table below)
6. Set the on/off knob (6) position 1.
7. Turn the time switch (9) clockwise to Cont. (continual operation). You will hear
an electronic signal as soon as the set temperature is achieved.
8. The heat-up phase starts now. Heating up can take up to 90 minutes. As soon as
you hear the electronic beep, set the canning time according to the table.
9. The switch for the signal tone can now be turned off. Set the on/off knob (6) top
0.
10. After the set canning time, the device will automatically turn off. You will then
hear the bell signal of the thermostat.
11. Turn the device off. Turn the thermostat to off and pull the plug from the outlet.
12. Place a container resistant to hot water under the tap and press the tap down. The
water will drain out.
13. When the water is drained, let the device cool down.
14. Carefully take the jars out of the device. Leave the clamps or other cover fasteners
on the jars until they have cooled completely.
: After canning, the jars will be very hot. Danger of
burns! Use tongs to take the jars out.
The canned food should be stored in a dry, cool and
dark place.
90 30
90 30
80 30
90 25
90 30
Cauliflower 100 m ax 90
100 max 90
100 max 120
90 30
Meat
Temperature
in ° C
100 max 120
100 max 75
39
minutes
Page 40

DO322W
Guidelines For Heating Up And Keeping Hot
The device is also suitable for heating up liquids and keeping them hot such as heating
glühwein or preparing a punch
Note: when lling the device. The liquid level may only reach a maximum of 4 cm
under the lowest edge of the pot so that liquids do not overow.
1. Fill the pot with the desired liquid.
2. Put the lid on the post and select the desired temperature.
3. Turn the device on with the time switch. (Set the clock to Cont. by turning
counter-clockwise.) The liquid will be kept warm consistent with the thermostat
settings.
4. The signal tone switch will sound as soon as the desired temperature is reached.
5. Stir the liquid regularly to equally distribute the heat.
6. When you hear the electronic signal, the desired temperature has been reached.
The signal tone may now be switched off.
7. Liquids with no solids can be accessed via the tap. Put a cup under the tap and
press the lever. As soon as enough liquid is in the cup, release the tap. If you want
to access larger amounts of liquid, pull the tap up until it stays by itself. You do
not have to hold the tap lever.
8. Do not tap liquids with solids in them such as soup or that type of food. The
solids will clog the tap.
9. Important!
The liquid will heat up evenly if you stir it. This also ensures that soup of mashed
potato does not burn to the bottom of the pot.
Cleaning The Tap
• The tap can be taken apart for thorough cleaning
• Unscrew the tap lever
• Clean in slightly soapy water
• Rinse with clear water
• If necessary, remove stubborn dirt with a round brush
• Reinstall the tap
• Rinse again with clear water
Cleaning And Maintenance
Always rst pull the plug before cleaning.
It is best to clean the bottom of the pot with a soft brush or moist cloth. Never use
sharp of hard objects. This may cause scratches in the enamelled walls. When the
device has completely cooled, wipe it clean with a moist cloth. Then dry with a dry
cloth.
40
Page 41

DO322W
Decalcification
Calcium deposits on the bottom will cause energy loss and reduce the life of the
device.
Decalcify the device as soon as calcium deposits are visible.
Use a normal decalcier. Follow the instruction described on the decalcier.
Rinse with clean water after decalcifying.
Storing The Device
Wrap the power cord around the reel (on the bottom of the base).
Put the plug in the place provided (in the middle of the bottom of the device) and store
it in a dry place.
41
Page 42

DO322W
PRECAUCIONES IMPORTANTES
Este aparato está diseñado para ser utilizado por
niños a partir de 8 años de edad y por personas con
discapacidades físicas, sensoriales o mentales, o por
personas que no dispongan de suciente experiencia
y conocimientos, a no ser que sean supervisados o
instruidos inicialmente en la utilización segura del
aparato y los posibles peligros.
Los niños deben estar siempre bajo supervisión, para
asegurar que no juegan con el aparato.
El mantenimiento y la limpieza del aparato no pueden
efectuarse por niños, a no ser que tengan más de 8 años
de edad y sean supervisados. Mantenga el aparato y el
cordón eléctrico fuera del alcance de niños menores de 8
años.
Este aparato está diseñado para ser utilizado en un
entorno doméstico y en entornos similares como:
• En la cocina para el personal de tiendas, ocinas y
otros entornos profesionales similares.
• En las ncas.
• En las habitaciones de hoteles y moteles y otros
entornos con un carácter residencial.
• En los cuartos de huéspedes o similares.
Atención: el aparato no puede ser utilizado con un
temporizador externo o un mando a distancia separado.
42
Page 43

DO322W
El aparato puede calentarse durante el
uso. Mantenga el cable eléctrico lejos
de las piezas calientes y no cubra el
aparato.
Antes de conectar el aparato lea cuidadosamente el
manual y guárdelo bien.
• Durante el uso las paredes del aparato se calientan
mucho. Solo se debe tocar el aparato por el asa o
el botón de control, de lo contrario hay riesgo de
quemaduras. No mueva nunca el aparato si está
funcionando. Deje que se enfríe.
• Conecte el aparato solamente a corriente alterna del
voltaje indicado en la placa de características.
• El aparato no debe estar encendido si está dañado el
cable de alimentación, si el aparato está visiblemente
dañado, si se cae o es sumergido en agua.
• Si tiene dudas, encargue la revisión del aparato a un
centro de servicio. El aparato y el cable de corriente
solo deben ser reparados por un técnico de servicio
autorizado.
• Las personas, incluidos niños, que por sus capacidades
físicas, sensoriales o mentales, o por su falta de
experiencia no sean capaces de utilizar el aparato
de forma segura, no deben utilizar el aparato
sin supervisión o instrucciones de una persona
responsable.
• Se debe vigilar a los niños para asegurarse de que no
43
Page 44

DO322W
jueguen con el aparato.
• Cuando el aparato está conectado a la red eléctrica, no
se debe dejar sin vigilancia.
• Después del uso y antes de limpiar el aparato, se debe
sacar el enchufe. Lo mismo se aplica en caso de fallo.
No utilice piezas no recomendadas por el fabricante.
• El aparato sólo se debe conectar a una toma de
corriente adecuada.
• No use el aparato al aire libre.
• El cable de alimentación no debe tocar las partes
calientes del aparato ni colgar sobre la mesa.
• El aparato no debe estar cerca de llamas de gas o de
aparatos eléctricos con elementos calefactores abiertos
ni utilizarse en un horno caliente.
• Coloque el aparato sobre una supercie resistente al
calor y a una distancia de aproximadamente 20 cm de
las paredes.
• El aparato no debe ser utilizado para ningún otro
propósito.
• No sumerja nunca el aparato en agua y proteja el cable
de alimentación contra la humedad, para que no corra
riesgo de electrocutarse.
• Asegúrese de que no haya objetos inamables cerca
del aparato ni entren en contacto con el mismo. Si
el aparato empieza a arder saque inmediatamente el
cable de alimentación.
• Los materiales de embalaje como bolsas de papel no
son juguetes para los niños.
• En caso de uso indebido o funcionamiento incorrecto
44
Page 45

no se puede ofrecer ninguna garantía.
• Si el cable de alimentación está dañado, debe ser
reemplazado por el fabricante o su departamento de
servicio, o reemplazado por un técnico cualicado
para evitar el peligro.
Piezas
1. Tapa
2. Asa (resistente al calor)
3. Recipiente esmaltado
4. Grifo
5. Base
6. Botón de ENCENDIDO
7. Botón del termostato
8. Luz indicadora
9. Temporizador
10. Parrilla
10
7 8 9
DO322W
1
2
3
4
5
6
Guarde siempre el manual. El aparato está destinado solamente para uso doméstico
normal.
Generalidades
• Al esterilizar comida enlatada se debe calentar al menos a 100ºC. En la
pasteurización, la temperatura es de 80ºC.
• El aparato se puede utilizar para muchos nes: para conservar, cocinar, calentar al
baño María, preparar bebidas calientes, escaldar verduras, etc.
• Los alimentos líquidos espesos que se queman rápidamente, deben calentarse
lentamente y removiendo constantemente.
• Si el aparato se deja hirviendo vacío sin vigilancia, un dispositivo automático
de seguridad evita el sobrecalentamiento. Deje que el aparato se enfríe antes de
llenarlo con agua. De lo contrario existe el riesgo de quemaduras por la formación
de vapor. Además, se puede dañar la pared esmaltada.
• Su autoclave tiene una capacidad de 27 litros. El nivel de líquido debe alcanzar
sólo un máximo de 4 cm por debajo del borde superior del recipiente.
45
Page 46

DO322W
Instrucciones De Uso Importantes
• Por razones de higiene, el aparato debe hervir antes del primer uso. Durante el
primer uso puede salir un poco de humo que desaparece después de breve tiempo.
• Eche aproximadamente 6 litros de agua al interior del recipiente. Ajuste el
termostato al máximo y apague el aparato con el botón del termostato. Gire el
mando en dirección de las agujas del reloj hasta unos 60 minutos. Después del
tiempo programado, el aparato se apaga automáticamente. Después de enfriarse,
el aparato puede volverse a usar.
Encendido Y Apagado Del Aparato
1. Ponga el mando del termostato (7) en la posición deseada después de llenar la
autoclave con el agua necesaria.
2. Ajuste el botón de ENCENDIDO/APAGADO (6) a la posición 1.
3. Gire el temporizador (9) en dirección contraria a las agujas del reloj hasta “Cont.”
(funcionamiento continuo). El aparato empieza a calentarse.
4. La luz indicadora (8) se enciende e indica que el calentamiento funciona.
5. Una vez que se alcanza la temperatura, se oye el pitido y el indicador luminoso se
apaga. El pitido indica que el tiempo de calentamiento debe ser elegido ahora de
acuerdo con la tabla.
6. Apague el pitido y gire el temporizador (9) en el sentido de las agujas del reloj al
tiempo de calentamiento deseado. A partir de ahora, la temperatura se mantiene
con precisión. La luz indicadora se apaga, pero de vez en cuando se vuelve a
encender siempre que la temperatura cae por debajo de la temperatura jada.
El mantenimiento correcto de la temperatura es importante para la calidad de la
comida enlatada. Una vez ha terminado el tiempo de calentamiento, el aparato se
apaga automáticamente
Directrices Para Conservación
Por conservación se entiende conservar los alimentos sin conservantes químicos. El
calor producido mata los gérmenes presentes en la comida conservada. Al mismo
tiempo, el vacío parcial cierra el envase de forma hermética y libre de gérmenes.
Dependiendo de la naturaleza y la cantidad de alimentos en conserva hay una
distinción entre esterilización y pasteurización. Para el uso normal en el hogar la
pasteurización es suciente. Se necesitan envases de preparación apropiados con tapón
de rosca o tapas con anillos de goma.
1. Introduzca la parrilla en la autoclave.
2. Coloque los recipientes para conservación, bien cerrados, sobre la parrilla. Se
pueden esterilizar o pasteurizar hasta 14 envases de 1 litro cada uno, colocados
unos encima de otros en capas.
3. Rellenar con agua hasta que la parte superior de los envases esté tres cuartas
partes bajo el agua. Tenga cuidado de que los envases de la capa inferior estén
bien sellados de modo que no pueda entrar agua. (Véase la gura).
46
Page 47

DO322W
4. Vuelva a colocar la tapa (1) sobre la autoclave.
5. Ajuste el mando del termostato (7) de acuerdo con la tabla de cocción a la
temperatura deseada. Los tiempos de cocción mencionados se reeren a la
duración real de la cocción y se empiezan a contar desde el momento en que se
alcanza la temperatura deseada (ver la tabla de cocción siguiente)
6. Ajuste el botón de ENCENDIDO/APAGADO (6) en 1.
7. Encienda el aparato girando el temporizador (9) contra del sentido de las agujas
del reloj hasta la posición “Cont.” (funcionamiento continuo). Escuchará una
señal electrónica cuando se alcance la temperatura.
8. Ahora se inicia la fase de calentamiento. El calentamiento puede durar hasta 90
minutos. Tan pronto como se oye el pitido electrónico, se debe denir el tiempo
de cocción de acuerdo con la tabla.
9. El interruptor de la señal acústica se puede desactivar ahora. Para ello ponga el
botón ENCENDIDO/APAGADO (6) a 0.
10. Al nal del tiempo de cocción el aparato se apaga automáticamente y se
escuchará el timbre del termostato.
11. Apague el aparato. Ajuste el termostato a la posición APAGADO y saque el
enchufe de la toma.
12. Coloque un recipiente resistente al agua caliente bajo el grifo y empuje el grifo
hacia abajo. El agua se acaba.
13. Cuando el agua se haya acabado, deje que el aparato se enfríe.
14. Retire los recipientes del aparato. Deje las abrazaderas u otros elementos de
jación para cubrir los envases hasta que estén completamente enfriados.
47
Page 48

DO322W
TABLA DE COCCIÓN
Fruta
Temperatura
en °C
Tiempo en
minutos
Manzana
blanda / dura
Puré de manzana
90
30
Cerezas
80
30
Peras
blanda / dura
Fresas
25
Zarzamora
80
30
Ruibarbo
100 máx.
30
Frambuesas
Grosella s
arándanos
Albaricoques
90
30
Ciruelas
Melocotones
90
30
Ciruelas
90
30
Mem brillos
95
25
Arándanos
85
25
Tenga cuidado
e
use un alicate para hervir los tarros para descargar.
Los encurtidos seco, fresco y guardar en la oscuridad.
Verduras
Temperatura
en °C
Tiempo en
minutos
Espárragos
100 máx.
120
Guisantes
100 máx.
120
Zanahorias,
remolacha roja
Pepinillos vinagre
90
30
Calabaza
90
30
Colinabo
100 máx.
90
Coles de Bruselas,
col roja
Apio
100 máx.
120
Champiñones
100 máx.
110
Judías
100 máx.
120
Tomates,
puré de tomate
Trozos de carne
asada
Caldo
100 máx.
60
Caza y aves asadas
Goulash
asado
100 máx.
75
Grosellas espinosas
Mirabellen y
Reine-claude
stá muy caliente. ¡Peligro de quemaduras! Por favor,
Directrices Para Calentar Y Mantener Caliente
El aparato también es adecuado para calentar y mantener líquidos calientes, por
ejemplo, calentar vinos calientes o preparar ponches.
Tenga cuidado al llenar el aparato. El nivel del líquido no debe superar como máximo
4 cm por debajo del borde superior del recipiente para que no se desborde el líquido.
: Después de la ebullición, el envase
90 30
90 30
80 30
90 25
90 30
Coliflor 100 máx. 90
100 máx. 90
100 máx. 120
Temperatura
en ° C
100 máx. 120
100 máx. 75
100 máx. 110
Carne
Carne picada,
salchichas (crudas)
90 30
Tiempo en
minutos
1. Llene el aparato con el líquido deseado.
2. Ponga la tapa sobre e la señal da un pitido cuando se alcanza la temperatura
deseada.
3. Encienda el aparato con el temporizador y fíjelo girando en sentido contrario a las
agujas del reloj hasta la posición “Cont.”. El líquido se mantendrá caliente según
el ajuste del termostato.
4. El interruptor de la señal da un pitido cuando se alcanza la temperatura deseada.
5. Remueva el líquido con frecuencia para repartir el calor uniformemente.
6. Cuando se alcanza la temperatura deseada se oye una señal electrónica. Entonces
se debe desactivar el interruptor de la señal.
7. Los líquidos sin partículas sólidas se pueden drenar a través de la válvula.
Coloque un vaso debajo del grifo y empuje la palanca del grifo hacia abajo. Una
vez que hay suciente líquido en el vaso, deje suelta la palanca del grifo. Si desea
48
Page 49

DO322W
drenar grandes cantidades de líquido, levante la palanca del grifo hasta que quede
ja. Entonces ya no tiene que mantener más la palanca.
Escurra el líquido con componentes sólidos, sopas o alimentos similares. Los sólidos
obstruyen el grifo.
¡Importante!
Al remover con regularidad el líquido se calienta de manera uniforme. Al mismo
tiempo se evita quemar la sopa o guiso del fondo de la olla.
Limpieza Del Grifo
Para una limpieza a fondo del grifo puede desmontarlo por
completo.
• aoje la palanca del grifo
• limpie el grifo en una solución de detergente suave
• enjuague con agua limpia
• si es necesario quite con un cepillo redondo la suciedad
endurecida
• vuelva a montar el grifo
• -enjuague de nuevo con agua limpia
Limpieza Y Mantenimiento
Quite siempre el enchufe antes de empezar la limpieza.
Es mejor limpiar el fondo del recipiente con un cepillo suave o un paño húmedo.
No use nunca objetos puntiagudos o duros, ya que pueden rayar el revestimiento de
esmalte de la pared. Cuando el aparato se ha enfriado completamente, límpielo con un
paño húmedo. Después, frote con un paño seco.
Descalcificación
Los depósitos de calcio del fondo del recipiente causan pérdida de energía y reducen
la vida útil del aparato.
Descalcique el aparato cuando los depósitos de calcio sean visibles.
Use un agente normal de descalcicación del comercio. Proceda como se describe en
las instrucciones de descalcicación.
Después de descalcicar el aparato enjuáguelo con agua limpia.
Aparato De Ahorro Neto
Enrolle el cable alrededor de la bobina (en la parte inferior de la base)
Coloque el enchufe en el lugar indicado (par central por debajo del aparato). Guarde el
aparato en un lugar seco.
49
Page 50

DO322W
DŮLEŽITÉ
Přečtěte si pečlivě tento návod k použití a uschovejte si
jej pro pozdější nahlédnutí a radu.
Tento přístroj byl vyroben pouze pro využití v
domácnosti a smí být používán výhradně podle pokynů
uvedených níže.
Tento přístroj nesmí být samostatně obsluhován osobami
s mentální nebo motorickou poruchou a také lidmi bez
základních zkušeností pro obsluhu. Obsluhu je nutno
řádně proškolit, seznámit ji s možnými riziky nebo nechat
pracovat pod dozorem. Zvláště dětem není dovoleno si s
přístrojem hrát nebo jej samostatně obsluhovat. Údržbu a
čištění přístroje nesmí provádět děti mladší 8 let.
Přístroj nesmí být používán po extrémně dlouhou
dobu jako profesionální přístroje. Je určen zvláště do
kuchyněk pracovních kolektivů, kanceláří, hotelových
pokojů nebo podobných zařízení pro nárazové použití.
Pozor: Tento přístroj je zakázáno používat s externím
časovačem nebo jiným dálkovým ovládáním.
Přístroj může být během používání
horký. Dbejte na to, aby se přívodní
kabel nedotýkal jeho horkých částí a
přístroj ničím nepřikrývejte.
50
Page 51

DO322W
Bezpečnostní pokyny
Při používání elektrických spotřebičů je potřeba
dodržovat základní bezpečnostní opatření včetně
následujících:
Tento přístroj nesmí být používám dětmi od 0 do 8
let. Tento přístroj mohou používat děti ve věku od 8
let a výše pouze za předpokladu, že jsou neustále pod
dohledem. Tento přístroj mohou používat i lidé se
sníženými fyzickými, smyslovými, nebo mentálními
schopnostmi, či s nedostatkem zkušeností a znalostí,
pouze pokud jim je poskytnut dohled, nebo instrukce
týkající se používání spotřebiče bezpečným způsobem a
pokud dostatečně rozumí rizikům spojeným s použitím
přístroje.
S přístrojem by si děti neměly hrát. Údržbu a čistění
nesmí provádět děti mladší 8 let a pokud nejsou pod
neustálým dohledem.
Držte přístroj mimo dosah dětí mladších 8 let.
Tento přístroj je určený pouze pro požití v domácnosti,
nebo v prostředí podobného charakteru, jako například:
• kuchyně používané zaměstnanci v obchodech,
kancelářích a jiných podobných profesních
prostředích;
• hospodářské budovy a chalupy;
• hotelové a motelové pokoje a další podobná prostředí
51
Page 52

DO322W
ubytovacího charakteru, kde jsou spotřebiče
používány ubytovanými klienty;
• ubytování s charakterem polopenze, kde jsou
spotřebiče používány ubytovanými klienty.
UPOZORNĚNÍ: aby se zabránilo nebezpečí, nesmí
být přístroj zapojen na externí spínací zařízení, jako je
například časovač, nebo jiný elektrický obvod, který
pravidelně spíná a vypíná.
Před zapojením přístroje a prvním použitím důkladně
pročtěte tento manuál a uchovejte ho na pozdější
nahlédnutí.
• Před prvním použitím přístroje se ujistěte, že jste
z přístroje odstranili veškeré obalové materiály a
propagační samolepky.
• Povrchy označené symbolem „horký povrch“ mohou
být během používání přístroje horké. Abyste předešli
popálení, doporučujeme používat k manipulaci s
přístrojem pouze k tomu určených rukojetí. Nechte
přístroj vždy vychladnout.
• Nezapojujte přístroj s poškozeným kabelem, nebo
pokud je přístroj viditelně poškozen. Nezapojujte,
pokud přístroj omylem spadl do vody.
• Pokud máte pochybnosti o stavu přístroje, nechte ho
raději překontrolovat proškoleným servisem. Přístroj a
přívodní kabel smí být opravován pouze v odborném
servisu.
• Lidé a děti, které nejsou dostatečně seznámeny s
52
Page 53

DO322W
pravidly používání nebo nemejí dostatečné zkušenosti
nesmí tento přístroj používat.
• Nikdy nenechávejte přístroj během provozu bez
dozoru.
• Po ukončení používání a před čištěním vždy přístroj
vypojte z el. sítě. Používejte pouze originální
příslušenství dodané se spotřebičem.
• Pečlivě zkontrolujte, zda napětí a frekvence Vaší
elektrické sítě odpovídá údajům uvedeným na
typovém štítku spotřebiče. Zástrčka musí být zapojena
do vhodné zásuvky, která je nainstalována a uzemněna
v souladu se všemi normami a předpisy platnými v
dané zemi.
• Nepoužívejte přístroj venku.
• Nedovolte, aby napájecí kabel visel přes ostré hrany
stolu, nebo kuchyňské linky. Nedovolte, aby se
napájecí kabel dotýkal jakýchkoliv horkých ploch.
• Neumisťujte přístroj v blízkosti horkého plynového,
nebo elektrického sporáku, či v blízkosti dřezu, nebo
blízko pečící trouby.
• Tento přístroj by měl být umístěn ve stabilní poloze
s držadly nasměrovanými tak, aby jste předešli
náhodnému vylití. Minimální vzdálenost od stěn by
měla být alespoň 20 cm.
• Nepoužívejte přístroj k jiným účelům, než ke kterým
je určen.
• Nemanipulujte s hrncem pokud je v něm horká voda.
• Přístroj nikdy neponořujte pod vodu a přívodní kabel
udržujte v suchu.
53
Page 54

DO322W
• Neumisťujte v blízkosti hořlavých materiálů, plynu,
nebo výbušnin. Pokud přístroj začne hořet, ihned
vypojte přívodní kabel z el. sítě.
• Obalový materiál (např. sáčky, polystyren atd.) nejsou
hračky a děti si s ním nesmí hrát.
• Jakékoliv zranění, nebo škody způsobené
nedodržováním těchto pravidel jsou na Vaše vlastní
riziko. Výrobce, dovozce, ani dodavatel nemůže být za
tato zranění a škody odpovědný.
• Přístroj nepoužívejte pokud má poškozený kabel, nebo
zástrčku, nebo v případě, že byl jakýmkoliv způsobem
poškozen, nebo vykazuje nějakou poruchu. Takový
přístroj vraťte zpět do autorizovaného servisu rmy
DOMO, nebo jej nechte přezkoušet v jiném odborném
servisu, který se zabývá elektrickými spotřebiči.
Nikdy se nepokoušejte přístroj opravovat sami.
Součásti
1. Víko
2. Rukojeť (teplu vzodrná)
3. Tělo hrnce
4. Výpustní kohout
5. Podstava
6. Hlavní spínač
7. Ovladač termostatu
8. Světelná kontrolka
9. Ovladač časovače
10. Mřížka (rošt)
10
Vždy dodržujte předepsaná pravidla použití. Tento přístroj je určen pouze pro domácí
použití.
54
7 8 9
1
2
3
4
5
6
Page 55

DO322W
Obecné zásady
• POZOR! Nikdy nezapínejte hrnec pokud v něm není voda
• Sterilování: teplota zavařenin musí přesáhnout 100 °C.
• Pasterizace teplota zavařenin musí přesáhnout 80 °C.
• Přístroj může být použit k více účelům: zavařování, vaření, ohřávání, příprava
horkých nápojů, blačírování zeleniny atd …
• Potraviny s hustou konzistencí jsou náchylnější k připálení ode dna, musí být
ohřívány pomaleji a během toho často promíchávány.
• Pokud jste nechali hrnec běžet na prázdno, tak se díky pojistce vypne. Pokud se
tak stane, nechte ho vychladnout a až poté nalijte vodu. Takto předejdete riziku
popálenin párou. V jiném případě by tímto teplotním šokem mohly být poškozeny
smaltované stěny.
• Tento zavařovací hrnec má objem 27 litrů. Vodu lijte maximálně 4 cm pod
nejnižší okraj.
Důležité pokyny k použití
• Z hygienických důvodů: přístroj před prvním použitím musí být naplněn a voda v
něm přímo převařena. Během prvního použití je možné, že se objeví lehký dým,
ten však brzy zmizí a vše je v pořádku.
• Do hrnce nalijte cca 6 litrů vody. Nastavte termostat na maximální hodnotu,
hrnec zapnete pomocí ovladače časovače. Ovladač časovače otočte ve směru
hodinových ručiček, nastavte přibližně 60 min. Nechte vařit, po uplynutí
nastaveného času se hrnec automaticky vypne. Takto převařený hrnec nechte
vychladnout, vodu vylijte a poté je vše připraveno k použití.
Zapnutí / vypnutí hrnce
Nejdříve nalijte do hrnce vodu a poté nastavte ovladač termostatu (7) na požadovanou
teplotu. Spotřebič je vybaven přesným termostatem, jehož čidlo snímá teplotu ze dna
hrnce. Termostat můžete plynule nastavit na požadovanou teplotu od 30°C do bodu
varu. Nastavená teplota je automaticky udržována.
1. Hlavní spínač (6) zapněte do polohy 1.
2. Nastavením časovače (9) proti směru hodinových ručiček do koncové polohy
(Cont. = nepřetržitý provoz) začne hrnec hřát. Nepřetržitý provoz nastavíte
pootočením časovače proti směru hodinových ručiček až do konce (cca o 15°).
3. Světelná kontrolka (8) se rozsvítí a značí, že je hrnec právě v provozu a hřeje.
4. Jakmile se dosáhne nastavené teploty, tak se rozezní zvukový signál (ten lze
vypnout přepínačem 6) a světelná kontrolka zhasne. Po zaznění signálu nastavte
požadovaný čas dle tabulky a nebo receptu. Otočením po směru hodinových
ručiček na Vámi zvolenou hodnotu času.
5. Hlavní přepínačem (6) jste vypnuli zvukový signál a nastavili tedy požadovaný
čas k zavařování. Odteď se bude udržovat stálá teplota po celý nastavený čas.
Světelná kontrolka bude střídavě zhasínat, podle toho jak se bude zapínat
55
Page 56

DO322W
a vypínat topné těleso k udržování navolené teploty. Na konci zavařovaní
(nastaveného času) se přístroj automaticky vypne a kontrolka zhasne.
6. Po ukončení procesu otočte ovladačem termostatu (7) úplně doleva a vypojte
hrnec z elektrické sítě.
Pokyny a rady pro zavařování
Zavařování představuje konzervaci potravin bez použití přidaných chemických
konzervantů. Velká teplota zabíjí většinu bakterií, které jsou v potravinách. Podtlak
vytvořený během zavařování zároveň uzavře sklenici tak, že je vzduchotěsná.
V závislosti na způsobu konzervace a množství zavařenin rozlišujeme sterilování a
pasterizaci.
Pro běžné domácnosti je vhodná pasterizace, pro tu musíme mít sklenice se závitem a
těsnící gumou pod víkem.
• Ovoce a zeleninu nerozkrájené dobře umýt a nechat okapat.
• Zelené fazole a hrách jsou trvanlivější, když je předem mírně podusíte.
• Sklenice, plechovky, lahve a uzávěry umyjte pečlivě pod horkou vodou,
vypláchněte a nechte uschnout na čisté utěrce.
• Uzávěry nechte až do použití v čisté horké vodě.
• Nepoužívejte žádná poškozená nebo stará víčka.
• Po nastavení časovače nesmí dojít ke změně polohy termostatu, neboť by
došlo k poruše odpočítávání času. Pokud je nutné během tepelného procesu
změnit teplotu, nastavte časovač zpět do „0“, kontrolka zhasne. Nově nastavte
termostatem zvolenou teplotu a pak časovačem nastavte opět požadovaný
zavařovací čas.
Postup při zavařování
1. Vložit rošt (10)
2. Naskládat dobře utažené sklenice. Maximálně vložte 14 sklenic, sládejte do patra
nad sebe.
3. Doporučuje se do hrnce napustit vodu, tak aby horní patro sklenic bylo ponořeno
ze ¾. Víčka na sklenicích (zvláště spodní patro) musí být dostetečně utěsněny, tak
aby se pod ně nedostala voda.
56
Page 57

DO322W
POZNÁMKA: Ohřátí plného obsahu hrnce trvá cca 1,5 hod. Proto je mnohem
úspornější verze zavařování sterilizací v páře – do hrnce dáme jen 5–10 cm vody
a sklenice postavíme na rošt. Takto můžete ušetřit až 60% energie.
4. Hrnec uzavřete víkem (1)
5. Nastavte termostat (7) na požadovanou teplotu dle tabulky či receptu. Čas
potřebný pro kvalitní zavařování se uvádí vždy až od chvíle kdy je dosaženo
nastavené teploty. Pro inspiraci nahlédněte do níže vypsané tabulky.
6. Hlavní spínač (6) sepněte do polohy 1
7. Ovladač časovače otočte proti směru hodinových ručiček až do konce – cca o 15°
(Cont = nepřetržitý).
Ve chvíli, kdy hrnec dosáhne navolené teploty, tak se ozve zvukový signál
(zvukový signál lze vypnout hlavním
spínačem (1)).
8. Poté začíná zavařovací fáze. Nezapomeňte nastavit ovladač časovače na potřebný
čas, dle receptu.
9. Nastavíte otočením doprava po směru hodinových ručiček na požadovanou
hodnotu.
10. Po uplynutí nastaveného času se přístroj automaticky vypne. Ozve se zvonkový
signál časovače.
11. Vypněte přístroj. Termostat nastavte co nejvíce doleva na pozici OFF a přívodní
kabel vypojte z el. sítě.
12. Pod výpustný kohout vložte horku vzdornou nádobu a dostatečném objemu, tak
aby pojmula všechnu vodu z hrnce a vodu pomocí kohoutu vypusťte.
13. Přístroj nechte vychladnout.
14. Opatrně vyndejte zavařeniny. Pro jistotu používejte kuchyňské chňapky, neboť
sklenice nejspíš budou stále teplé.
• POZOR na opaření!!! Po ukončení budou sklenice stále velmi horké. Po vyndání
použijte utěrku nebo chňapky. Zavařeniny by měly bý skladovány v suchu a
chladu.
Pokyny pro zahřátí a udržení teploty
Přístroj je také vhodný na zahřívání nápojů a jejich následné udržení v teplém stavu.
Ideální na přípravu svařeného vína nebo přípravy punče.
Poznámka: Hrnec nikdy nepřeplňujte. Maximálně ho můžete naplnit 4 cm pod okraj.
1. Hrnec naplňte nápojem
2. Přikryjte víkem a nastavte požadovanou teplotu.
3. Hlavní spínač (6) musí být v poloze 1
4. Přístroj zapnete pomocí natočení časovače proti směru hodinových ručiček až do
konce – cca o 15°
(Cont = nepřetržitý, trvalý provoz a časovač se nehýbe).
Hrnec se nahřeje na požadovanou teplotu a bude ji stále udržovat.
5. Ve chvíli, kdy se dosáhne navolené teploty, tak zazní zvukový signál.
57
Page 58

DO322W
6. Zvukový signál lze vypnout přepnutím středového tlačítka (6) do polohy 0.
7. Tekutiny bez pevných částic lze vypouštět přes výpustný kohout. Pod kohout
vložte nádobu, která je tepluvzdorná a pojme objem, který chcete vypustit. Pokud
chcete vypustit celý objem, můžete kohout otevřít až do polohy, kdy bude držet
sám otevřený.
8. Nikdy nevypouštějte tekutiny s pevnými částicemi, ty by mohly ucpat kohout
zevnitř.
9. Důležité!!! Pokud zahříváte obsah s pevným podílem (např. polévku, guláš),
musíte pravidělně kontrolovat zda se obsah nepřipaluje ode dna. Pravidelně obsah
promíchávejte.
Čištění výpustnýho kohoutu
• Kohout může být rozebrán (pro snadnější a důkladnější
čistění)
• Odšroubujte horní část kohoutu.
• Součásti kohoutu omyjte vodou se saponátem.
• Propláchněte čistou vodou.
• Pokud je to nutně, tak pevné usazeniny můžete odstranit
kartáčem.
• Znovu kohout sešroubujte.
• Opět propláchněte čistou vodou.
58
Page 59

DO322W
Časový spínač
Tento časovač má 2 funkce:
1. trvalý provoz - knoík otočit úplně doleva proti směru chodu hodinových ručiček
do polohy ON / Continue
- trvalý provoz znamená, že časovač není v provozu a hrnec hřeje nepřetržitě
dlouho.
2. automatický provoz, plynule nastavitelný od 20-120 minut - knolík otočte ve
směru chodu hodinových ručiček vpravo na požadovanout hodnotu. Časovač
začně odpočívat navolený čas.
Pro použití odšťavňovacího nástavce má termostat funkci odšt’avňování, která
zaručuje stálý ohřev s vyřazením termostatu. Po ukončení a při přerušení provozu
otočte časovačem proti směru chodu hodinových ručiček vlevo na 0.
Čištění a údržba
Vždy nejdříve vypojte přístroj z el. sítě. Hrrnec musí být před čistěním chladný.
Vnitřní dno hrnce čistětě pomocí jemného kartáče nebo jen vlhkým hadrem, tak aby se
dno nepoškrábalo. Použití tvrdého kartáče by mohlo způsobit poškrábání a nenávratné
zničení smaltové vrstvy.
Po dokonalém vyčištění a vytření ještě hrnec vysušte
Odvápnění
Případná vápenatá vrstva na dně hrnce způsobuje vyšší spotřebu energie a snižuje
životnost přístroje.
Hrnec odvápněte vždy, když už je vápenatá vrstva viditelná. Nikdy nečekejte déle.
Používejte na to klasický odvápňovač a postupujte dle návodu na jeho obalu. Po
odvápnění vždy hrnec ještě důkladně opláchněte čistou vodou.
Uskladnění hrnce
Přívodní kabel smotejte do přihrádky v podstavě.
Zástrčku pevně umístěte do připravených otvorů uprostřed dna podstavy. Tkto
připravený hrnec skladujte v suchém místě.
59
Page 60

Webshop
BESTEL
de originele
Domo-accessoires
en -onderdelen
online via:
COMMANDEZ
d’authentiques
accessoires et
pièces Domo en
ligne sur:
BESTELLEN SIE
Original-Zubehör
die Domo
und -Ersatzteile
online über:
ORDER
the original
Domo
accessories and
parts online at:
webshop.domo-elektro.be
of scan hier:
ou scannez ici:
oder hier scannen:
or scan here:
LINEA 2000 bvba - Dompel 9 - 2200 Herentals - Belgium - Tel: +32 14 21 71 91 - Fax: +32 14 21 54 63
 Loading...