

Page 1

G20i Operator’s Quick Reference Guide
HEALTH AND SAFETY
• Read the relevant Safety Data Sheet (SDS) before storing,
handling, transporting or using the ink cartridges.
• Disconnect the power before making any wiring connections.
• Ensure all cables are secured away from moving production
line components.
• Use only lint free wipes when cleaning the cartridge nozzles.
• Clean cartridge nozzles according to the instructions in the
product manual available at: www.DominoCaseCoding.com
• Protect the print heads from impact with proper adjustment
and alignment of side rails and product guides.
• Do not open any enclosed components of the printer or print
heads. They contain no user-serviceable parts.
• Wear suitable protective equipment when operating the
G20i.
• The G20i is for indoor use only, do not operate the printer
outdoors, or in an environment outside of the specified
operating range.
PRINTER DESCRIPTION
The G20i is a compact thermal ink jet printer, intended to print
data on user supplied products on manufacturing production
lines.
The G20i uses a Domino BK640 ink cartridge as the print engine.
The G20i can be controlled with a wireless USB keyboard, an
Android device via Bluetooth or a PC connected via USB.
For further instructions, refer to the G20i Product Manual
available at: www.DominoCaseCoding.com
SPECIFICATION
Length 107.5mm (4.23")
Width 74.5mm (2.93")
Height: 83mm (3.27")
Weight: 450g
Power Supply: 12V, 5.0A, 60W
Maximum Power
Consumption:
48W
Temperature Range: +5°C to +50°C
(+41°F to +122°F)
Humidity Range: 10% to 90% non-condensing
HARDWARE INSTALLATION
Carry out a risk assessment of the area before the printer is
installed.
Ensure that the Ground Cable is fitted to the Anti Shock Clamp
and connected to a suitable ground point according to local
regulations.
(1)
(2)
G20i Printer
Anti Shock
Clamp
Ground Cable
Round Bar
Base Clamp
(3)
(4)
Round Bar
Clamp
PACKAGE CONTENTS
G20i Printer
Base Clamp
Clamps x2
Anti Shock Clamp
Round Bars
Screws x10
Wireless USB Keyboard
USB Cable
Power Adapter
Tools
Ground Cable
INK CARTRIDGE INSTALLATION
(1) Remove the cover from the ink cartridge.
(2) Insert the ink cartridge into the G20i.
(3) Close the latch.
KEYBOARD CONNECTION
(1) Insert the USB keyboard receiver into the USB
keyboard slot.
(2) Insert 2 AAA batteries (included) into the keyboard.
(3) Turn on the keyboard.
POWER SUPPLY CONNECTION
CAUTION: Only use the power adapter provided.
(1) Plug the power adapter into the 12 VDC socket.
(2) Plug the power adapter into a power source.
(3) Turn on the power adapter using the in-line switch.
Page 2
G20i Operator’s Quick Reference Guide
START PRINTING
To start printing using the wireless USB keyboard:
(1) From the Main Menu, use the arrow keys to highlight
Operation.
(2) Press the Enter button.
(3) Press the Enter button to select Start.
Main menu
Message
Operation
Settings
Operation
Start
Purge
Connect PC
STOP PRINTING
To stop printing using the wireless USB keyboard:
(1) From the Main Menu, use the arrow keys to highlight
Operation.
(2) Press the Enter button.
(3) Press the Enter button to select Stop.
Main menu
Message
Operation
Settings
Operation
Stop
Purge
Connect PC
CREATE A MESSAGE
To create a message using the wireless USB keyboard:
(1) From the Main Menu, use the arrow keys to highlight
Message and press the Enter button.
(2) Press the Enter button to select Create New.
(3) Use the arrow keys to highlight Normal font or
Uppercase font and press the Enter button.
Main menu
Message
Create New
Open
Information
Message
Normal font
Uppercase font
(4) Highlight the required Font size and number of lines of
text, then press the Enter button.
(5) Use the keyboard to input a text item into the message,
or press the Insert button to enter other data types.
(6) Press the ESC key when finished.
(7) Select Save to save the messag e to internal memory, or
select No to discard the message.
Message
Font
12.7mm
Lines
1
5.92mm
2
2.54mm
4
1.69mm
6
3.89mm
3
Edit message
TEXT
(3) Set Active to Enable.
(4) Edit the printer’s Name and Pin, press Enter when
complete.
String
Purge
Print sid e
Sensor
Direction
Print Mod e
Unit
Bluetooth
Settings
Active:
Name:
Pin:
Enable
G20i
1234
String
Purge
Print sid e
Sensor
Direction
Print Mod e
Unit
Bluetooth
Settings
Active:
Name:
Pin:
Enable
Printer1
1331
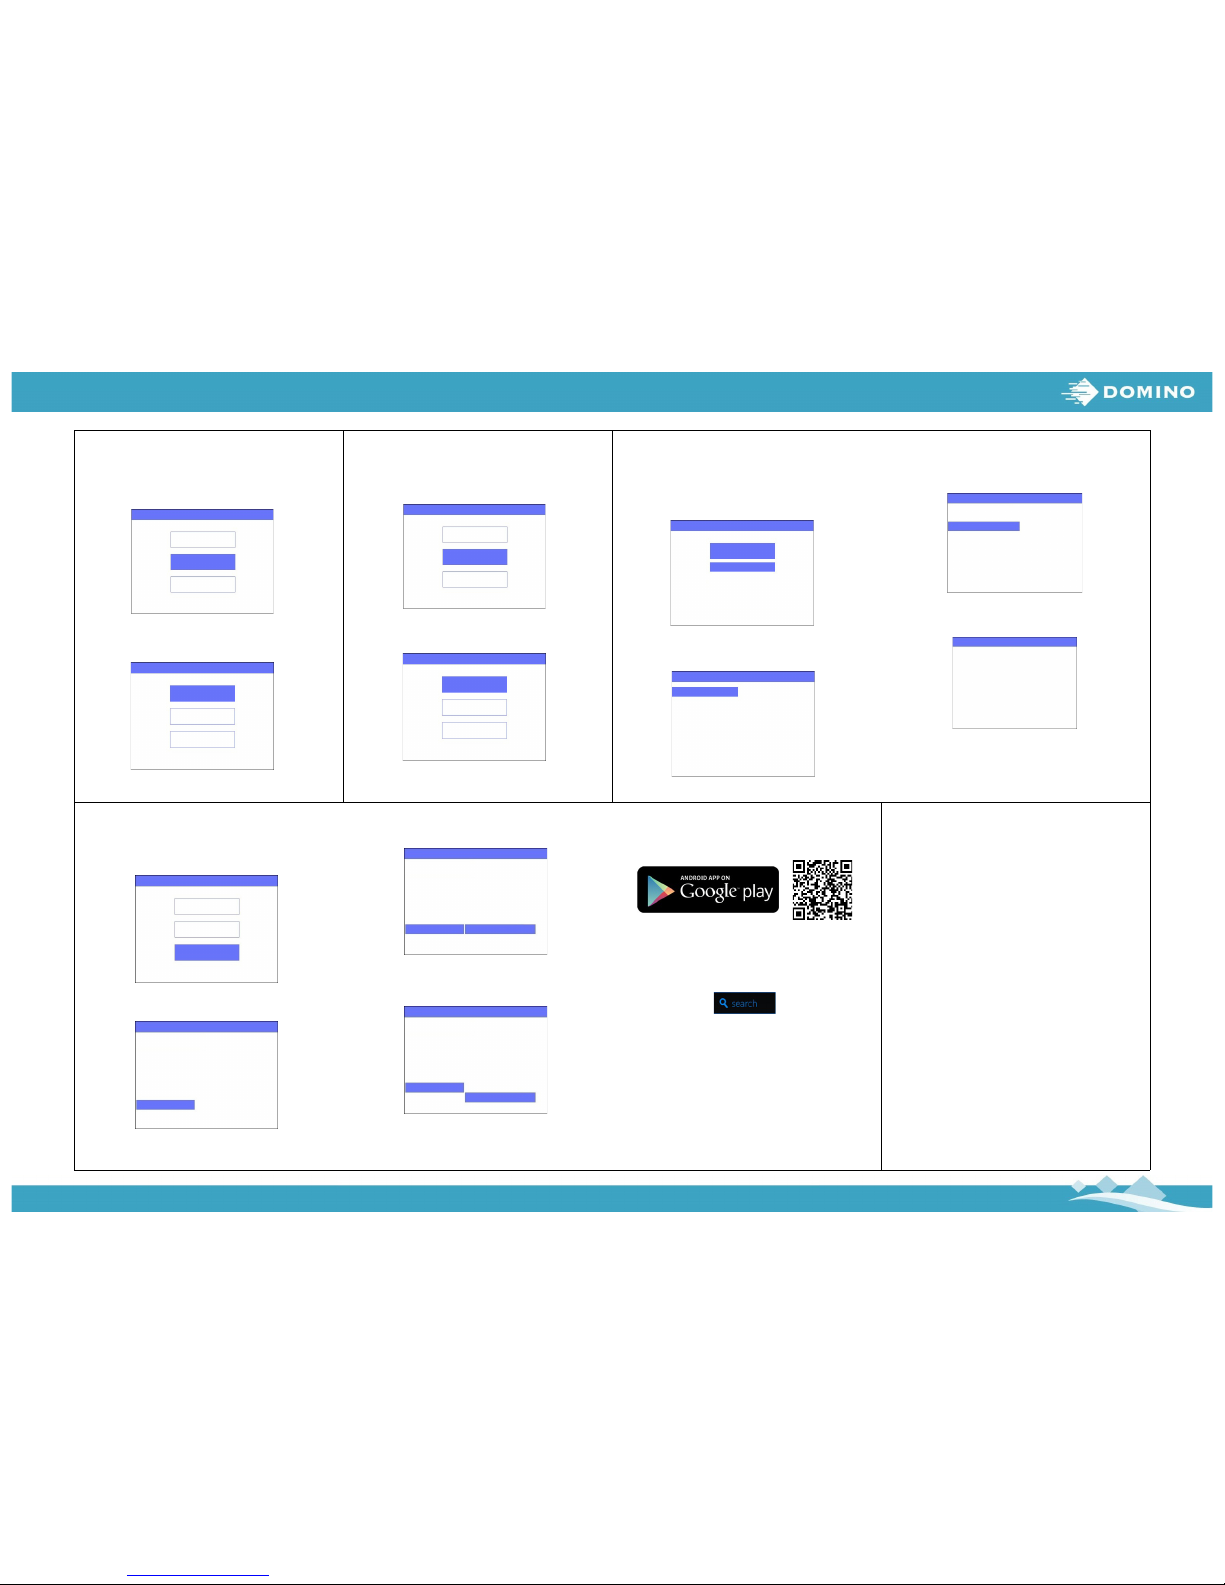
BLUETOOTH SETUP
To control the printer from an Android device via Bluetooth:
(1) From the Main Menu, use the arrow keys to highlight
Settings and press the Enter button.
(2) Highlight Bluetooth and press the Enter button.
Main menu
Message
Operation
Settings
String
Purge
Print sid e
Sensor
Direction
Print Mod e
Unit
Bluetooth
Settings
(5) Install the Domino G20i application on the Android
device.
(6) Turn on Bluetooth on the Android device.
(7) Open the G20i printer application.
(8) Select Printers.
(9) Select Search.
(10) Select the name of the printer when it appears in the
Printers list.
(11) Select Connect.
ADDITIONAL DOCUMENTATION
• Documentation in your local language is available at:
www.DominoCaseCoding.com
• 文档下载地址 :
www.DominoCaseCoding.com
• 繁體中文手冊 :
www.DominoCaseCoding.com
• Tài liệu với ngôn ngữ của bạn có sẵn tại:
www.DominoCaseCoding.com
• Dokumen dalam bahasa lokal tersedia di:
www.DominoCaseCoding.com
• /:
www.DominoCaseCoding.com
• 日本語マニュアルはここから入手できます :
www.DominoCaseCoding.com
© Domino Printing Sciences plc 2016
EPT024620 Issue 1 June 2016
 Loading...