

ENDEFRESPTITNL
DA
SVNOFIRUPLSKCS
HU
ENERGY & LIGHTING
SINEPOWER
MCP1204, MCP1207
Battery charger
Operating manual . . . . . . . . . . . . . . . . . . . . . 6
Batterielader
Bedienungsanleitung . . . . . . . . . . . . . . . . .22
Chargeur de batteries
Notice d’utilisation . . . . . . . . . . . . . . . . . . .40
Cargador de batería
Instrucciones de uso . . . . . . . . . . . . . . . . . .59
Carregador de baterias
Manual de instruções . . . . . . . . . . . . . . . . .78
Caricatore per batterie
Istruzioni per l’uso . . . . . . . . . . . . . . . . . . . .95
Acculader
Gebruiksaanwijzing. . . . . . . . . . . . . . . . . . 113
Batterilader
Betjeningsvejledning . . . . . . . . . . . . . . . . 131
Batteriladdare
Bruksanvisning . . . . . . . . . . . . . . . . . . . . . 147
Batterilader
Bruksanvisning . . . . . . . . . . . . . . . . . . . . . 164
Akkulaturi
Käyttöohje . . . . . . . . . . . . . . . . . . . . . . . . . 181
Устройство для заряда
аккумуляторных батарей
Инструкция по эксплуатации . . . . . . . . . 197
Ładowarka akumulatorowa
Instrukcja obsługi . . . . . . . . . . . . . . . . . . . 216
Nabíjačka batérií
Návod na obsluhu. . . . . . . . . . . . . . . . . . . 235
Nabíječka baterií
Návod k obsluze . . . . . . . . . . . . . . . . . . . . 251
Akkumulátortöltő
Használati utasítás. . . . . . . . . . . . . . . . . . .266

PerfectCharge MCP1204/1207
1
2
1
2
2
3
4
1
rt/gn
bl
5
3
4
DE EN FR ES IT NL DA SV
bl Blau Blue Bleu Azul Blu Blauw Blå Blå
gn Grün Green Vert Verde Verde Groen Grøn Grön
rt Rot Red Rouge Rojo Rosso Rood Rød Röd
3
PerfectCharge MCP1204/1207
3
4
NO FI PT RU PL CS SK HU
bl Blå Sininen Azul Синий Niebieski Modrá Modrá Kék
gn Grønn Vihreä Verde Зеленый Zielony Zelená Zelená Zöld
rt Rød Punainen
12 345678
U
14 V
I
4 / 7A
≤ 1A
≤ 0,6A
10 ms (100 Hz)
1 min
20 s ≤ 8 h
14,4 V
Ver -
melho
Красный
Mode 2
Mode 1
≤ 8 h 5 min ≤ 4 h
Czerwony
1 min
Červená Červená Piros
14,7 V
13,8 V
14,4 V
12,8 V
t
t
1
2
3
4
PerfectCharge MCP1204/1207
5
A
B
3.
2.
1.
1
2
3
1.
2.
3.
5

EN
PerfectCharge MCP1204/1207
Please read this instruction manual carefully before first use, and store it in
a safe place. If you pass on the product to another person, hand over this
instruction manual along with it.
Table of contents
1 Explanation of symbols. . . . . . . . . . . . . . . . . . . . . . . . . . . . . . . . . . . . . . . . . . .7
2 General safety instructions . . . . . . . . . . . . . . . . . . . . . . . . . . . . . . . . . . . . . . . .7
3 Scope of delivery . . . . . . . . . . . . . . . . . . . . . . . . . . . . . . . . . . . . . . . . . . . . . . 11
4 Accessories . . . . . . . . . . . . . . . . . . . . . . . . . . . . . . . . . . . . . . . . . . . . . . . . . . . 11
5 Intended use . . . . . . . . . . . . . . . . . . . . . . . . . . . . . . . . . . . . . . . . . . . . . . . . . .12
6 Technical description . . . . . . . . . . . . . . . . . . . . . . . . . . . . . . . . . . . . . . . . . . . 12
7 Using the battery indicator . . . . . . . . . . . . . . . . . . . . . . . . . . . . . . . . . . . . . . . 16
8 Using accessories . . . . . . . . . . . . . . . . . . . . . . . . . . . . . . . . . . . . . . . . . . . . . .17
9 Caring for and cleaning the battery indicator . . . . . . . . . . . . . . . . . . . . . . . . 18
10 Troubleshooting . . . . . . . . . . . . . . . . . . . . . . . . . . . . . . . . . . . . . . . . . . . . . . . 19
11 Warranty . . . . . . . . . . . . . . . . . . . . . . . . . . . . . . . . . . . . . . . . . . . . . . . . . . . . 20
12 Disposal . . . . . . . . . . . . . . . . . . . . . . . . . . . . . . . . . . . . . . . . . . . . . . . . . . . . . 20
13 Technical data . . . . . . . . . . . . . . . . . . . . . . . . . . . . . . . . . . . . . . . . . . . . . . . . .21
6

EN
PerfectCharge MCP1204/1207 Explanation of symbols
1 Explanation of symbols
DANGER!
D
!
!
A
I
Safety instruction: Failure to observe this instruction will cause fatal or
serious injury.
WARNING!
Safety instruction: Failure to observe this instruction can cause fatal or
serious injury.
CAUTION!
Safety instruction: Failure to observe this instruction can lead to injury.
NOTICE!
Failure to observe this instruction can cause material damage and impair
the function of the product.
NOTE
Supplementary information for operating the product.
2 General safety instructions
2.1 General safety
The manufacturer accepts no liability for damage in the following cases:
• Faulty assembly or connection
• Damage to the product resulting from mechanical influences and excess voltage
• Alterations to the product without express permission from the manufacturer
• Use for purposes other than those described in the operating manual
Note the following basic safety information when using electrical devices to protect
against:
• Electric shock
• Fire hazards
• Injury
7

EN
General safety instructions PerfectCharge MCP1204/1207
2.2 General safety
DANGER!
D
!
• In the event of fire, use a fire extinguisher which is suitable for electrical
devices.
WARNING!
• Only use the device as intended.
• Ensure that the red and black terminals never come into contact.
• Disconnect the device from the mains.
– Before cleaning and maintenance
–After use
– Before changing a fuse
• The device may not be used if the device itself or the connection cable
are visibly damaged.
• If the power cable for this device is damaged, it must be replaced by
the manufacturer, customer service or a similarly qualified person in
order to prevent safety hazards.
• This appliance may only be repaired by qualified personnel. Inadequate repairs may cause serious hazards.
• The device may not be opened by improper means, as otherwise protection class IP65 can no longer be guaranteed.
• This dev ice can be used by childre n aged 8 years or over, a s well as by
persons with diminished physical, sensory or mental capacities or a
lack of experience and knowledge, providing they are supervised, or
have been taught how to use the device safely and are aware of the
resulting risks.
• Electrical devices are not toys.
Always keep and use the device out of the reach of children.
• Children must be supervised to ensure that they do not play with the
device.
A
8
NOTICE!
• Before start-up, check that the voltage specification on the type plate
is the same as that of the power supply.
• Ensure that other objects cannot cause a short circuit on the contacts
of the device.
• Never pull the plug out of the socket by the connection cable.
• Store the device in a dry and cool place.

EN
PerfectCharge MCP1204/1207 General safety instructions
2.3 Safety when connecting the device electronically
DANGER! Danger of electrocution
D
!
!
2.4 Operating the device safely
• For connection on boats:
If electrical devices are incorrectly connected on boats, corrosion
damage to the boat might occur. Have the device connected by a
specialist (marine) electrician.
• If you are working on electrical systems, ensure that there is somebody
close at hand who can help you in emergencies.
WARNING!
• Always use sockets which are grounded and secured by residual current circuit breakers.
• Make sure that the lead has a sufficient cross-section.
• Lay the cables so that they cannot be damaged by the doors or the
bonnet.
Crushed cables can lead to serious injury.
CAUTION!
• Lay the cables so that they cannot be tripped over or damaged.
D
!
!
DANGER! Danger of electrocution
• Do not touch exposed cables with your bare hands. This applies especially when operating the device from the AC mains.
• To be able to disconnect the device quickly from the mains, the socket
must be close to the device and be easily accessible.
WARNING!
• Only use the device in closed, well-ventilated rooms.
• Do not use the device with lead-acid batteries in enclosed spaces.
These batteries give off explosive hydrogen gas that can be ignited by
sparks on electrical connections.
CAUTION!
• Do not operate the device
– In salty, wet or damp environments
– In the vicinity of corrosive fumes
– In the vicinity of combustible materials
– In areas where there is a danger of explosions.
9

EN
General safety instructions PerfectCharge MCP1204/1207
• Before starting the device, ensure that the power supply line and the
plug are dry.
• Always disconnect the power supply when working on the device.
• Please observe that parts of the device may still conduct voltage even
if the fuse has blown.
• Do not disconnect any cables when the device is still in use.
NOTICE!
A
2.5 Safety precautions when handling batteries
!
!
• Ensure good ventilation.
WARNING!
• Batteries contain aggressive and caustic acids. Avoid battery fluid
coming into contact with your body. If your skin does come into
contact with battery fluid, wash the part of your body in question
thoroughly with water.
If you sustain any injuries from acids, contact a doctor immediately.
CAUTION!
• When working on the batteries, do not wear any metal objects such as
watches or rings.
Lead acid batteries can cause short circuits which can cause serious
injuries.
• Danger of explosions!
Never attempt to charge a frozen or defective battery.
Place the battery in a frost-free area and wait until the battery has acclimatised to the ambient temperature. Then start the charging process.
• Wear goggles and protective clothing when you work on batteries.
Do not touch your eyes when you are working on the battery.
• Do not smoke and ensure that no sparks can arise in the vicinity of the
engine or battery.
A
10
NOTICE!
• Only use rechargeable batteries.
• Prevent any metal parts from falling on the battery. This can cause
sparks or short-circuit the battery and other electrical parts.
• Make sure the polarity is correct when connecting the battery.
• Follow the instructions of the battery manufacturer and those of the
manufacturer of the system or vehicle in which the battery is used.

EN
PerfectCharge MCP1204/1207 Scope of delivery
• If you need to remove the battery, first disconnect the earth
connection. Disconnect all connections and all consumers from the
battery before removing it.
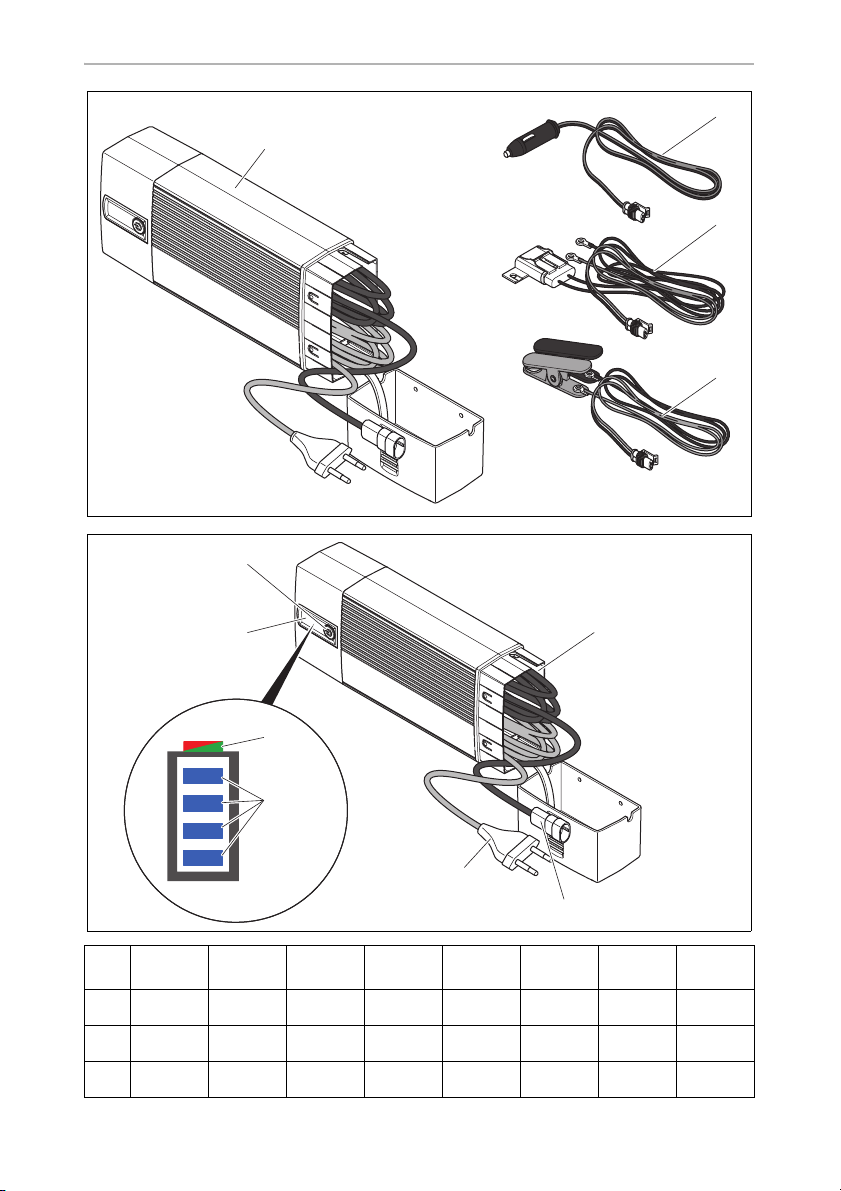
3Scope of delivery
No. in
fig. 1,
page 3
1 Battery charger
2 Connection cable with 12 V plug (cigarette lighter)
3 Connection cable with cable lugs
4 Connection cable with battery terminals
— Operating manual
Description
4 Accessories
Available as accessories (not included in the scope of delivery):
Description Ref. no.
Battery indicator
(including connection cable with cable lugs)
Wall bracket for the battery charger 9102500079
9600000094
11

EN
Intended use PerfectCharge MCP1204/1207
5 Intended use
The battery charger can charge or supply a float charge voltage to 12 V batteries
used to generate power in vehicles or on boats.
The battery charger can be used on the following types of battery:
• Lead automotive batteries
• Gel batteries
• Fleece batteries (AGM)
• Maintenance-free batteries
NOTICE!
A
The battery charger is only suitable for use indoors.
The battery charger is not suitable for mounting in one fixed place. The wall bracket
(accessory; ref. no. 9102500079) must be used for this purpose.
The battery charger may not be used on other types of batteries (e.g.
NiCd, NiMH etc.) or defective batteries (e.g. with a cell short circuit).
6 Technical description
The battery charger charges batteries that are used as a source of voltage on board
vehicles or boats, or supplies them with a float charge voltage to ensure they are not
discharged.
The service life of most lead batteries is reduced by sulphation: lead sulphate forms
into large, smooth crystals over the course of time and the amorphous, spongy
structure disappears. The ability to recharge and therefore the charging capacity
gradually decreases and the battery ages.
The battery charger operates using specific frequencies in parts of its charging curve.
This causes the crystals to vibrate in their resonant frequency. They decompose into
their amorphous structure. Their molecules can be integrated back into the charging
process which in turn increases the charging voltage, starting current and the
capacity of the battery again.
All lead batteries are protected from premature ageing by regular charging using the
battery charger.
The battery charger can be operated in three operating modes:
• Mode 1: Charge mode with 14.4 V
This mode is used for lead, gel and maintenance-free batteries.
12

EN
PerfectCharge MCP1204/1207 Technical description
• Mode 2: Charge mode with 14.7 V
This mode is used for AGM batteries.
• Mode 3: Voltage supply with 13.7 V (battery is not connected)
This mode is used as a power supply function, e.g. for supplying voltage to the
vehicle in the event of replacing a battery, or during maintenance work using
service devices.
The device can be installed on a wall using the wall bracket for stationary storage
(accessory).
Furthermore, an external battery indicator (accessory) can be used. This shows the
battery capacity and can be connected to the battery permanently using a connection cable with cable lugs. When it indicates the battery is empty, the battery charger
can be connected to the battery indicator and the battery can be charged directly.
The battery indicator can be attached to a wall or to a wall bracket for the battery
charger using a wall bracket.
6.1 Control elements
NOTE
I
The version for continental Europe is depicted.
No. in
fig. 2,
page 3
Designation Description
1 Status LEDs See chapter “Status indications” on page 14
2 Pushbutton Selects the operating mode:
Mode 1: Press button for 1 s
(Battery is connected)
Mode 2: Press button for 5 s
(Battery is connected)
Mode 3: Press button for 10 s
(Battery is not connected)
3 230 V cable Connection to mains voltage
4 12 V cable Connection for the connection cable
5 Cable compartment For storing the connection cable
13

EN
Technical description PerfectCharge MCP1204/1207
6.2 Status indications
Designation Description
Red LED Flashing: The polarity is incorrect, or the battery voltage is less than
9V.
Constantly lit: The connection to the battery was disconnected
during the charging process.
Green LED Constantly lit: Mode 1 or mode 3 is active.
Flashing: Mode 2 is active.
Blue LEDs In mode 1 and mode 2, the LEDs indicate the phase in which the
battery charger is currently operating (see the following table).
The LEDs flash in succession when the battery charger is operating
in wait mode (the mains voltage is connected but the battery is not
connected).
The LEDs flash simultaneously when the battery charger is ready for
use (mains voltage is connected, battery is connected, button has
not been pressed).
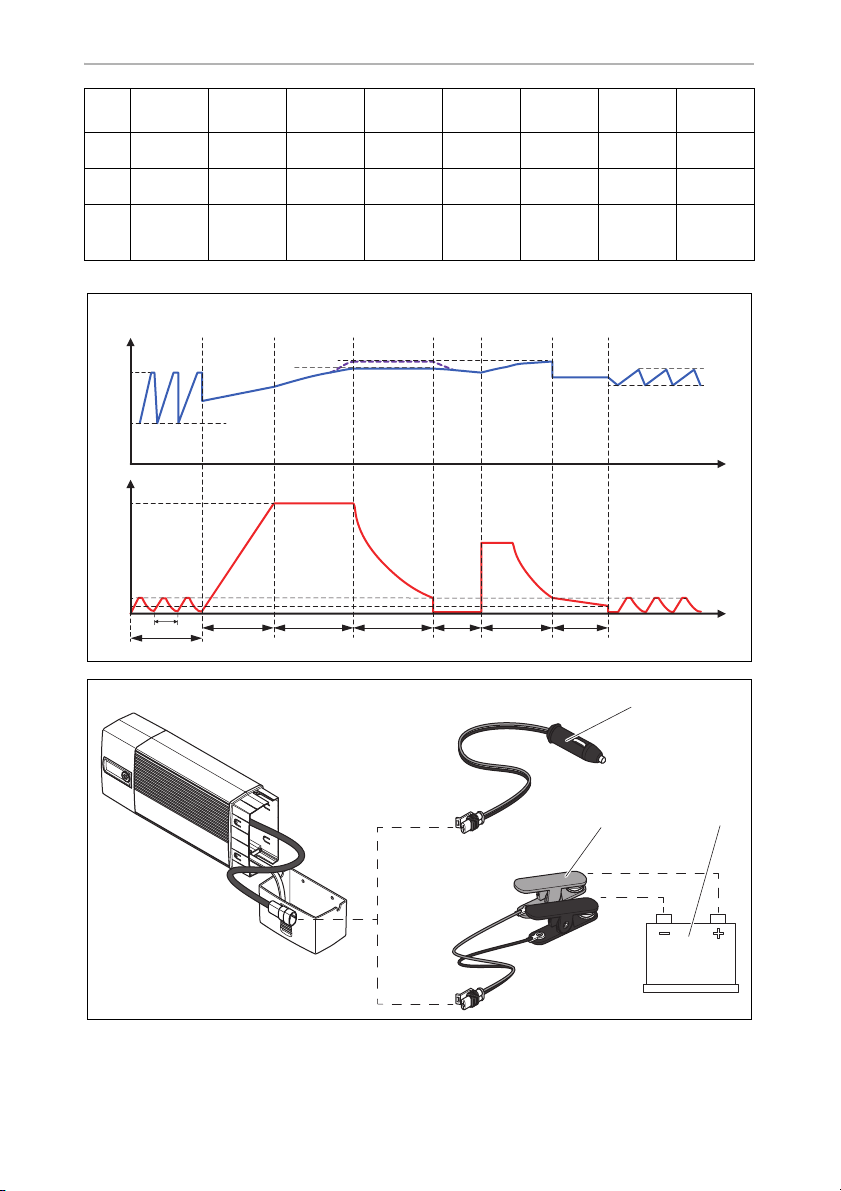
Meaning of the blue LEDs (mode 1 and 2)
12 345678
14 V
U
14,4 V
Mode 2
Mode 1
14,7 V
13,8 V
14,4 V
12,8 V
4
3
2
1
Key to the figure:
LED status Meaning
14
t
Off
Flashing
Constant glow

EN
PerfectCharge MCP1204/1207 Technical description
6.3 Battery charging function
The battery charger operates in eight phases (fig. 3, page 4).
1: Desulphation
Sulphated batteries are revived in the desulphation phase. The current and voltage
pulse, so that sulphate is decomposed into its amorphous structure. The battery
capacity is restored.
2: Soft start
The charging capability of the battery is tested using the power consumption in the
soft-start phase. When the battery is defective, the charging process is aborted.
3: I phase (bulk)
The empty battery is charged with constant current (100 % charge current). As soon
as the battery voltage has reached the charge voltage, the charge current decreases.
4: U0 phase (absorption)
The voltage remains constant during the U0 phase (U0). Once the battery is completely charged, the U0 phase has finished.
5: Analysis
The float charge of the battery is checked in the analysis phase. If the voltage drops
too quickly, the battery can not retain the charge and must be replaced.
6: Reconditioning
The voltage is increased again in the reconditioning phase in order to generate
controlled gas formation in the battery. This gas formation prevent acid stratification
(different concentrations of acid in the battery cells).
7: U phase (float)
The battery switches to float charging in the U phase. The battery voltage is retained
at 100 %.
15

EN
Using the battery indicator PerfectCharge MCP1204/1207
8: Maintenance
In the maintenance phase, the charging voltage is switched off and the battery
voltage is permanently measured. If it falls below 12.8 V, the battery charger charges
the battery up to a maximum of 14.4 V. Then it switches the charging voltage off
again and measures the battery voltage again.
This ensures secure winterizing, for example.
7 Using the battery indicator
NOTICE!
A
7.1 Connecting the battery charger
➤ Check that the battery is in good condition:
➤ Check the following:
– The battery housing for damage
– The fluid level in the battery
– The pole contacts
Make sure you do not reverse the polarity.
• Positive battery terminal: red terminal
• Negative battery terminal: black terminal
Incorrect polarity can damage the battery indicator.
Fill the battery with the medium specified by the manufacturer, if necessary.
Clean off any dirt present.
➤ Connect the power cable for the battery charger to the 230 V AC mains.
➤ When you are using the connection cable with the 12 V plug: Switch the vehicle
ignition on.
Connecting the battery charger to the battery (fig. 4, page 4)
NOTE
I
➤ Insert the charging plug (1) into the 12 Vg socket (e.g. the cigarette lighter), or…
➤ …connect the connection cable (2) to the battery (3) using the battery terminals,
or to the battery charging points provided in the vehicle.
The connection cable with the 12 V plug is only suitable for use with
cables and accessories.
16

EN
PerfectCharge MCP1204/1207 Using accessories
7.2 Using the battery charger
➤ Select the required mode:
Mode 1 (battery is connected): Press the button for 1 s.
Mode 2 (battery is connected): Press the button for 5 s.
Mode 3 (battery is not connected): Press the button for 10 s.
✓ The charging process starts in mode 1 and 2.
A constant voltage supply is started in mode 3.
✓ The LEDs show the charging progress of the battery of the battery charger (see
chapter “Status indications” on page 14).
➤ To end the charging process, press the button once again.
NOTE
I
When the red LED flashes because the battery voltage is under 9 V, you
can charge the battery to over 9 V in mode 3. To do this, disconnect the
battery and switch to mode 3. Once the battery has been charged over
9 V, you can switch the battery charger to mode 1 or 2 again to start
normal charging.
8Using accessories
NOTE
I
Accessories are not included in the scope of delivery.
If you have questions regarding the accessories, please contact your
local service partner.
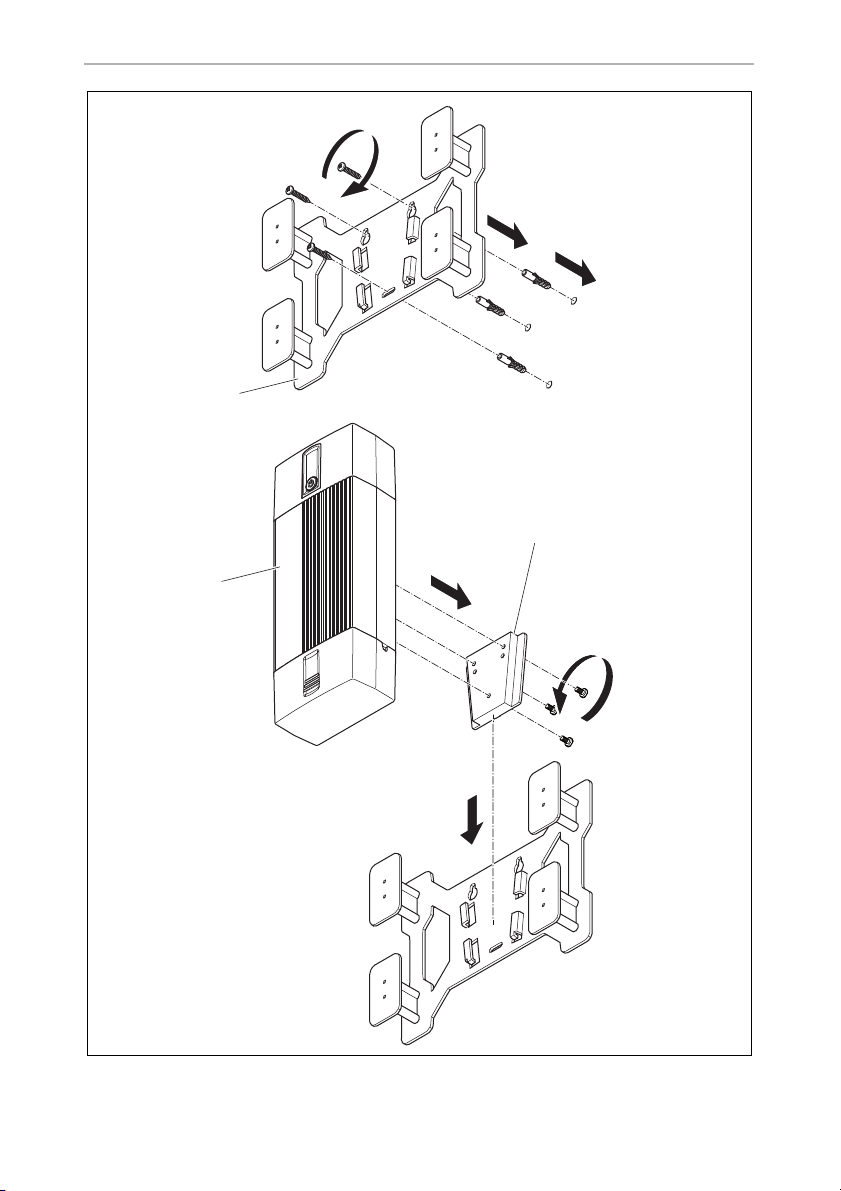
8.1 Storing the battery charger in the wall bracket
Installation instructions
When selecting the installation location for the wall bracket, observe the following
information:
• The wall bracket must be installed in a location protected from moisture.
• The wall bracket may not be installed in areas containing flammable materials.
• The wall bracket may not be installed in dusty environments.
• The device must be installed on a level and sufficiently sturdy surface.
17

EN
Caring for and cleaning the battery indicator PerfectCharge MCP1204/1207
Installing the wall bracket
Install the wall bracket as follows (fig. 5, page 5):
➤ Attach the wall bracket (1) to the installation location you chose.
➤ Attach the adapter (2) to the battery charger (3).
Storing the battery charger
Store the battery charger as follows (fig. 5, page 5):
➤ Push the battery charger (3) along with the adapter into the cone-shaped
brackets from above.
To release it, lift the battery charger upwards out of the brackets.
8.2 Using the battery charger with a battery indicator
NOTE
I
➤ Connect the battery charger to the battery indicator.
Notes on connection battery chargers to the battery indicator and on
using the battery indicator can be found in the installation and operating
manual for the battery indicator.
➤ Use the battery charger as described (see chapter “Using the battery charger” on
page 17).
9 Caring for and cleaning the battery
indicator
NOTICE!
A
➤ Occasionally clean the product with a damp cloth.
18
Do not use sharp or hard objects or cleaning agents for cleaning as these
may damage the product.

EN
PerfectCharge MCP1204/1207 Troubleshooting
10 Troubleshooting
WARNING!
!
I
The red LED indicates a fault:
LED display Cause Remedy
Flashing Inverse polarity Check the cables and connections.
Flashing Battery voltage < 9 V The battery cannot be charged.
Constantly lit Battery no longer connected The connection to the battery was
Do not open the device. You risk sustaining an electric shock by doing
this.
NOTE
If you have detailed questions about the battery charger data, please
contact the manufacturer (addresses on the back of the instruction
manual).
Replace the battery.
disconnected during the charging
process.
Check the cables and connections.
Fuse in the connection cable
was tripped
Replace the fuse (10 A plug-in fuse for
vehicles)
19

EN
Warranty PerfectCharge MCP1204/1207
11 Warranty
The statutory warranty period applies. If the product is defective, please contact the
manufacturer's branch in your country (see the back of the instruction manual for the
addresses) or your retailer.
For repair and guarantee processing, please include the following documents when
you send in the device:
• A copy of the receipt with purchasing date
• A reason for the claim or description of the fault
12 Disposal
➤ Place the packaging material in the appropriate recycling waste bins wherever
possible.
If you wish to finally dispose of the product, ask your local recycling centre
or specialist dealer for details about how to do this in accordance with the
M
applicable disposal regulations.
20
EN
PerfectCharge MCP1204/1207 Technical data
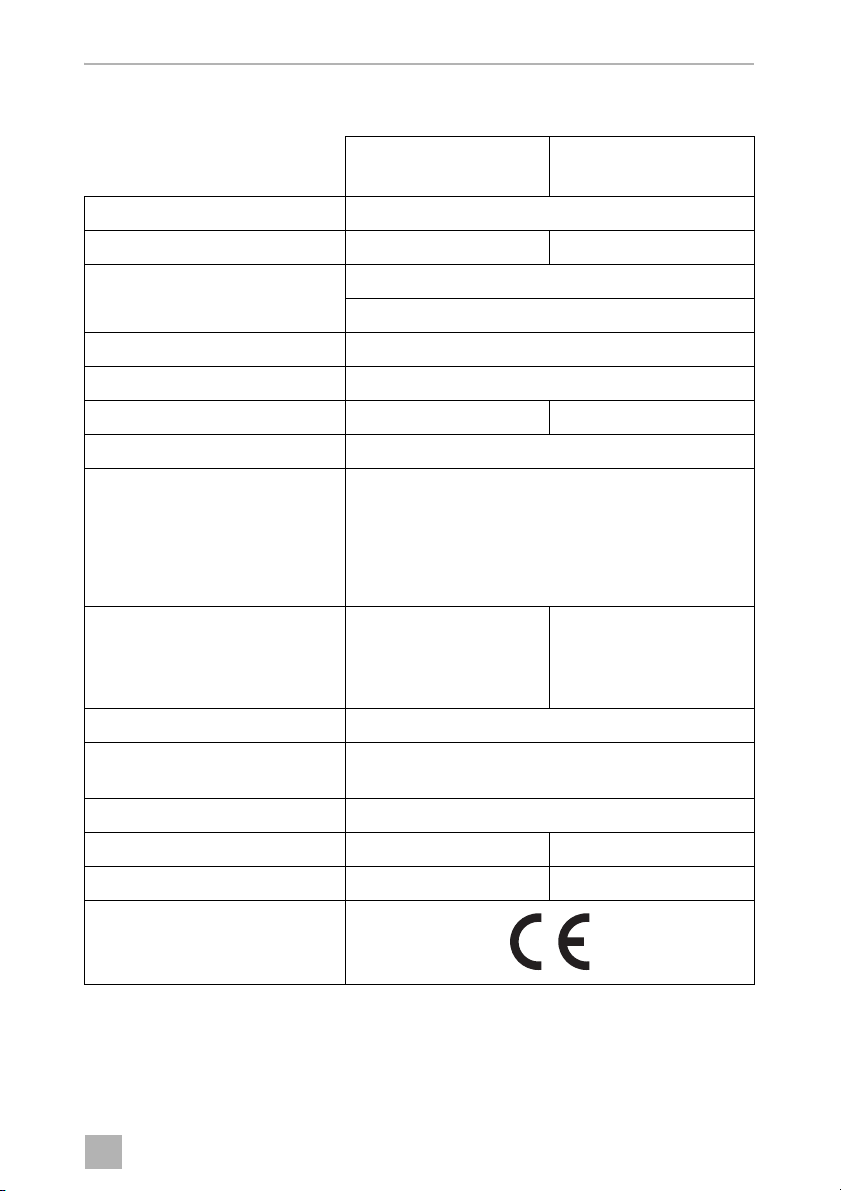
13 Technical data
PerfectCharge
MCP1204
Rated input voltage: 230 Vw
Max. continuous output current: 4.0 A ± 0.25 A 7.0 A ± 0.5 A
Absorption voltage: 14.4 V ± 0.2 V (mode 1)
14.7 V ± 0.2 V (mode 2)
Float voltage: 13.8 V ± 0.2 V
Output voltage in mode 3: 13.7 V ± 0.2 V
Maximum charging current: 4.0 A 7.0 A
Efficiency up to: 85 %
Type of batteries: 12 V batteries:
Lead automotive batteries
Gel batteries
Fleece batteries (AGM)
Maintenance-free batteries
Recommended battery capacities:
Charge: 7 – 110 Ah 15 – 160 Ah
Float charge: 7 – 180 Ah 15 – 250 Ah
Protection class: IP65
Ambient temperature for
operation:
Ambient temperature for storage –20 °C to +70 °C
Dimensions W x D x H: 90 x 220 x 55 mm 90 x 250 x 55 mm
–5 °C to +50 °C
PerfectCharge
MCP1207
Weight: 0.5 kg 0.7 kg
Certifications:
21

DE
PerfectCharge MCP1204/1207
Bitte lesen Sie diese Anleitung vor der Inbetriebnahme sorgfältig durch
und bewahren Sie sie auf. Geben Sie sie im Falle einer Weitergabe des
Produktes an den Nutzer weiter.
Inhaltsverzeichnis
1 Erklärung der Symbole . . . . . . . . . . . . . . . . . . . . . . . . . . . . . . . . . . . . . . . . . 23
2 Allgemeine Sicherheitshinweise . . . . . . . . . . . . . . . . . . . . . . . . . . . . . . . . . 23
3 Lieferumfang . . . . . . . . . . . . . . . . . . . . . . . . . . . . . . . . . . . . . . . . . . . . . . . . . 27
4 Zubehör. . . . . . . . . . . . . . . . . . . . . . . . . . . . . . . . . . . . . . . . . . . . . . . . . . . . . 28
5 Bestimmungsgemäßer Gebrauch . . . . . . . . . . . . . . . . . . . . . . . . . . . . . . . . 28
6 Technische Beschreibung . . . . . . . . . . . . . . . . . . . . . . . . . . . . . . . . . . . . . . 29
7 Batterielader benutzen . . . . . . . . . . . . . . . . . . . . . . . . . . . . . . . . . . . . . . . . . 33
8 Zubehör verwenden . . . . . . . . . . . . . . . . . . . . . . . . . . . . . . . . . . . . . . . . . . . 35
9 Batterielader pflegen und reinigen . . . . . . . . . . . . . . . . . . . . . . . . . . . . . . . 36
10 Fehlerbeseitigung. . . . . . . . . . . . . . . . . . . . . . . . . . . . . . . . . . . . . . . . . . . . . 37
11 Gewährleistung. . . . . . . . . . . . . . . . . . . . . . . . . . . . . . . . . . . . . . . . . . . . . . . 38
12 Entsorgung . . . . . . . . . . . . . . . . . . . . . . . . . . . . . . . . . . . . . . . . . . . . . . . . . . 38
13 Technische Daten . . . . . . . . . . . . . . . . . . . . . . . . . . . . . . . . . . . . . . . . . . . . . 39
22

DE
PerfectCharge MCP1204/1207 Erklärung der Symbole
1 Erklärung der Symbole
GEFAHR!
D
!
!
A
I
Sicherheitshinweis: Nichtbeachtung führt zu Tod oder schwerer
Verletzung.
WARNUNG!
Sicherheitshinweis: Nichtbeachtung kann zu Tod oder schwerer
Verletzung führen.
VORSICHT!
Sicherheitshinweis: Nichtbeachtung kann zu Verletzungen führen.
ACHTUNG!
Nichtbeachtung kann zu Materialschäden führen und die Funktion des
Produktes beeinträchtigen.
HINWEIS
Ergänzende Informationen zur Bedienung des Produktes.
2 Allgemeine Sicherheitshinweise
2.1 Allgemeine Sicherheit
Der Hersteller übernimmt in folgenden Fällen keine Haftung für Schäden:
• Montage- oder Anschlussfehler
• Beschädigungen am Produkt durch mechanische Einflüsse und Über-
spannungen
• Veränderungen am Produkt ohne ausdrückliche Genehmigung vom Hersteller
• Verwendung für andere als die in der Anleitung beschriebenen Zwecke
Beachten Sie folgende grundsätzliche Sicherheitsmaßnahmen beim Gebrauch von
elektrischen Geräten zum Schutz vor:
• elektrischem Schlag
• Brandgefahr
• Verletzungen
23

DE
Allgemeine Sicherheitshinweise PerfectCharge MCP1204/1207
2.2 Grundlegende Sicherheit
GEFAHR!
D
!
• Verwenden Sie im Falle eines Feuers einen Feuerlöscher, der für
elektrische Geräte geeignet ist.
WARNUNG!
• Benutzen Sie das Gerät nur zu seinem bestimmungsgemäßen
Gebrauch.
• Achten Sie darauf, dass sich nie die rote und die schwarze Klemme
berühren.
• Trennen Sie das Gerät vom Netz
– vor jeder Reinigung und Pflege
– nach jedem Gebrauch
– vor einem Sicherungswechsel
• Wenn das Gerät oder das Anschlusskabel sichtbare Beschädigungen
aufweisen, dürfen Sie das Gerät nicht in Betrieb nehmen.
• Wenn das Anschlusskabel dieses Gerätes beschädigt wird, muss es
durch den Hersteller, seinen Kundendienst oder eine ähnlich qualifizierte Person ersetzt werden, um Gefährdungen zu vermeiden.
• Reparaturen an diesem Gerät dürfen nur von Fachkräften durchgeführt werden. Durch unsachgemäße Reparaturen können erhebliche
Gefahren entstehen.
• Das Gerät darf nicht unsachgemäß geöffnet werden, da sonst die
Schutzklasse IP65 nicht mehr gewährleistet ist.
• Dieses Gerät kann von Kindern ab 8 Jahren und darüber sowie von
Personen mit verringerten physischen, sensorischen oder mentalen
Fähigkeiten oder Mangel an Erfahrung und Wissen benutzt werden,
wenn sie beaufsichtigt oder bezüglich des sicheren Gebrauchs des
Gerätes unterwiesen wurden und die daraus resultierenden Gefahren
verstehen.
• Elektrogeräte sind kein Kinderspielzeug!
Verwahren und benutzen Sie das Gerät außerhalb der Reichweite von
Kindern.
• Kinder sollten beaufsichtigt werden, um sicherzustellen, dass sie nicht
mit dem Gerät spielen.
24

DE
PerfectCharge MCP1204/1207 Allgemeine Sicherheitshinweise
ACHTUNG!
A
2.3 Sicherheit beim elektrischen Anschluss des Gerätes
D
!
• Vergleichen Sie vor der Inbetriebnahme die Spannungsangabe auf
dem Typenschild mit der vorhandenen Energieversorgung.
• Achten Sie darauf, dass andere Gegenstände keinen Kurzschluss an
den Kontakten des Gerätes verursachen.
• Ziehen Sie den Stecker nie am Anschlusskabel aus der Steckdose.
• Lagern Sie das Gerät an einem trockenen und kühlen Ort.
GEFAHR! Lebensgefahr durch Stromschlag!
• Bei Anschluss auf Booten:
Bei falschem Anschluss elektrischer Geräte auf Booten kann es zu
Korrosionsschäden am Boot kommen. Lassen Sie das Gerät von
einem fachkundigen (Boots-)Elektriker anschließen.
• Wenn Sie an elektrischen Anlagen arbeiten, stellen Sie sicher, dass
jemand in der Nähe ist, um Ihnen im Notfall helfen zu können.
WARNUNG!
• Verwenden Sie stets geerdete und durch FI-Schutzschalter gesicherte
Steckdosen.
• Achten Sie auf einen ausreichenden Leitungsquerschnitt.
• Verlegen Sie die Leitungen so, dass sie nicht durch Türen oder Motor-
hauben beschädigt werden.
Eingequetschte Kabel können zu lebensgefährlichen Verletzungen
führen.
VORSICHT!
!
2.4 Sicherheit beim Betrieb des Gerätes
D
• Verlegen Sie die Leitungen so, dass keine Stolpergefahr entsteht und
eine Beschädigung des Kabels ausgeschlossen ist.
GEFAHR! Lebensgefahr durch Stromschlag!
• Fassen Sie nie mit bloßen Händen an blanke Leitungen. Dies gilt vor
allem beim Betrieb am Wechselstromnetz.
• Um bei Gefahr das Gerät schnell vom Netz trennen zu können, muss
sich die Steckdose in der Nähe des Gerätes befinden und leicht
zugänglich sein.
25

DE
Allgemeine Sicherheitshinweise PerfectCharge MCP1204/1207
WARNUNG!
!
!
A
• Benutzen Sie das Gerät ausschließlich in geschlossenen, gut belüfte-
ten Räumen.
• Verwenden Sie das Gerät nicht in geschlossenen Räumen mit Blei-
säure-Batterien. Diese Batterien entlüften explosives Wasserstoffgas,
das durch einen Funken an den elektrischen Verbindungen entzündet
werden kann.
VORSICHT!
• Betreiben Sie das Gerät nicht
– in salzhaltiger, feuchter oder nasser Umgebung
– in der Nähe von aggressiven Dämpfen
– in der Nähe brennbarer Materialien
– in explosionsgefährdeten Bereichen
• Achten Sie vor der Inbetriebnahme darauf, dass Zuleitung und Stecker
trocken sind.
• Unterbrechen Sie bei Arbeiten am Gerät immer die Stromversorgung.
• Beachten Sie, dass auch nach Auslösen der Schutzeinrichtung (Siche-
rung) Teile des Gerätes unter Spannung bleiben können.
• Lösen Sie keine Kabel, wenn das Gerät noch in Betrieb ist.
ACHTUNG!
• Achten Sie auf gute Belüftung.
2.5 Sicherheit beim Umgang mit Batterien
WARNUNG!
!
!
26
• Batterien können aggressive und ätzende Säuren enthalten. Verhindern Sie jeden Körperkontakt mit der Batterieflüssigkeit. Sollte es
doch zur Berührung mit Batterieflüssigkeit kommen, so spülen Sie das
entsprechende Körperteil gründlich mit Wasser ab.
Suchen Sie bei Verletzungen durch Säure unbedingt einen Arzt auf.
VORSICHT!
• Tragen Sie während der Arbeit an Batterien keine Metallgegenstände
wie Uhren oder Ringe.
Bleisäure-Batterien können Kurzschluss-Ströme erzeugen, die zu
schweren Verbrennungen führen können.

DE
PerfectCharge MCP1204/1207 Lieferumfang
• Explosionsgefahr!
Versuchen Sie nie, eine gefrorene oder defekte Batterie zu laden.
Stellen Sie die Batterie in diesem Fall an einen frostfreien Ort und
warten Sie, bis sich die Batterie der Umgebungstemperatur angepasst hat. Beginnen Sie erst dann mit dem Ladevorgang.
• Tragen Sie eine Schutzbrille und Schutzkleidung, wenn Sie an
Batterien arbeiten. Berühren Sie nicht Ihre Augen, während Sie an
Batterien arbeiten.
• Rauchen Sie nicht und stellen Sie sicher, dass keine Funken in der
Nähe des Motors oder der Batterie entstehen.
ACHTUNG!
A
• Verwenden Sie ausschließlich wieder aufladbare Batterien.
• Verhindern Sie, dass metallische Teile auf die Batterie fallen. Das kann
Funken erzeugen oder die Batterie und andere elektrische Teile kurzschließen.
• Beachten Sie beim Anschluss die korrekte Polarität.
• Beachten Sie die Anleitungen des Batterieherstellers und des
Herstellers der Anlage oder des Fahrzeugs, in denen die Batterie verwendet wird.
• Falls Sie die Batterie ausbauen müssen, trennen Sie als erstes die
Masseverbindung. Trennen Sie alle Verbindungen und alle
Verbraucher von der Batterie, bevor Sie diese ausbauen.
3 Lieferumfang
Pos. in
Abb. 1,
Seite 3
1 Batterielader
2 Anschlusskabel mit 12-V-Stecker (Zigarettenanzünder)
3 Anschlusskabel mit Kabelschuhen
4 Anschlusskabel mit Batterieklemmen
– Bedienungsanleitung
Bezeichnung
27

DE
Zubehör PerfectCharge MCP1204/1207
4Zubehör
Als Zubehör erhältlich (nicht im Lieferumfang enthalten):
Bezeichnung Art.-Nr.
Batterieindikator
(einschließlich Anschlusskabel mit Kabelschuhen)
Wandhalterung für den Batterielader 9102500079
9600000094
5 Bestimmungsgemäßer Gebrauch
Der Batterielader kann 12-V-Batterien, die an Bord von Fahrzeugen oder Booten zur
Stromerzeugung genutzt werden, laden oder mit einer Erhaltungsspannung
versorgen.
Der Batterielader kann an folgenden Batterietypen verwendet werden:
• Blei-Starterbatterien
• Gel-Batterien
• Vlies-Batterien (AGM)
• wartungsfreie Batterien
ACHTUNG!
A
Der Batterielader ist ausschließlich für den Betrieb in geschlossenen Räumen
geeignet.
Der Batterielader darf nicht an anderen Batterietypen (z. B. NiCd,
NiMH usw.) oder defekten Batterien (z. B. mit Zellenschluss) verwendet
werden.
Der Batterielader ist nicht dazu geeignet, fest montiert zu werden. Hierzu muss die
Wandhalterung (Zubehör; Art.-Nr. 9102500079) verwendet werden.
28

DE
PerfectCharge MCP1204/1207 Technische Beschreibung
6 Technische Beschreibung
Der Batterielader lädt Batterien, die an Bord von Fahrzeugen oder Booten als
Spannungsquelle genutzt werden, oder versorgt diese mit einer Erhaltungsspannung, so dass diese sich nicht entladen.
Die Lebensdauer der meisten Bleiakkus wird durch die sogenannte Sulfatierung verkürzt: Das Bleisulfat bildet sich im Laufe der Zeit zu glatten, großen Kristallen aus.
Dadurch verschwindet die amorphe, schwammige Struktur. Die Ladefähigkeit und
damit die Ladekapazität sinken systematisch ab, und die Batterie altert.
Der Batterielader arbeitet in Teilen seiner Ladecharakteristik mit spezifischen
Frequenzen. Dadurch werden die Kristalle zum Schwingen in ihrer Eigenfrequenz
angeregt. Sie zerfallen wieder in ihre amorphe Struktur. Ihre Moleküle können
wieder in den Ladeprozess integriert werden. Dadurch steigen Ladespannung,
Kälteprüfstrom und Kapazität der Batterie wieder an.
Sämtliche Bleibatterien werden durch regelmäßiges Laden mit dem Batterielader
vor verfrühtem Altern bewahrt.
Der Batterielader kann in drei Betriebsmodi betrieben werden:
• Modus 1: Lademodus mit 14,4 V
Dieser Modus wird für Blei-, Gel- und wartungsfreie Batterien verwendet.
• Modus 2: Lademodus mit 14,7 V
Dieser Modus wird für AGM-Batterien verwendet.
• Modus 3: Spannungsversorgung mit 13,7 V (Batterie ist nicht verbunden)
Dieser Modus dient als Netzteilfunktion, z. B. zur Spannungsversorgung des
Fahrzeugs bei Batteriewechsel oder bei Wartungsarbeiten mit Servicegeräten.
Für die stationäre Aufbewahrung kann das Gerät mit der Wandhalterung an eine
Wand montiert werden (Zubehör).
Außerdem kann ein externer Batterieindikator (Zubehör) verwendet werden. Dieser
zeigt die Kapazität der Batterie an und kann über ein Anschlusskabel mit Kabelschuhen dauerhaft mit der Batterie verbunden werden. Wenn die Batterie als leer
angezeigt wird, kann der Batterielader an den Batterieindikator angeschlossen
werden und die Batterie direkt aufladen.
Der Batterieindikator kann mit einer Wandhalterung an einer Wand oder an die
Wandhalterung des Batterieladers befestigt werden.
29

DE
Technische Beschreibung PerfectCharge MCP1204/1207
6.1 Bedienelemente
HINWEIS
I
Pos. in
Abb. 2,
Seite 3
Abgebildet ist die Version für Kontinentaleuropa.
Bezeichnung Beschreibung
1 Status-LEDs Siehe Kapitel „Betriebsanzeigen“ auf Seite 31
2 Taster Wählt den Betriebsmodus aus:
Modus 1: Taster 1 s lang drücken
(Batterie ist verbunden)
Modus 2: Taster 5 s lang drücken
(Batterie ist verbunden)
Modus 3: Taster 10 s lang drücken
(Batterie ist nicht verbunden)
3 230-V-Kabel Anschluss an Netzspannung
4 12-V-Kabel Anschluss für die Anschlusskabel
5 Kabelfach Zum Verstauen der Anschlusskabel
30

DE
PerfectCharge MCP1204/1207 Technische Beschreibung
6.2 Betriebsanzeigen
Bezeichnung Beschreibung
Rote LED Blinken: Die Polarität ist vertauscht, oder die Batteriespannung liegt
unter 9 V.
Dauerleuchten: Die Verbindung zur Batterie wurde während des
Ladevorgangs unterbrochen.
Grüne LED Dauerleuchten: Modus 1 oder Modus 3 ist aktiv.
Blinken: Modus 2 ist aktiv.
Blaue LEDs Die LEDs zeigen im Modus 1 und 2 an, in welcher Phase sich der
Batterielader befindet (siehe folgende Tabelle).
Die LEDs blinken nacheinander, wenn der Batterielader sich im
Wartezustand befindet (Netzspannung ist angeschlossen, Batterie
ist nicht angeschlossen).
Die LEDs blinken gleichzeitig, wenn der Batterielader einsatzbereit
ist (Netzspannung ist angeschlossen, Batterie ist angeschlossen,
Taster nicht gedrückt).
Bedeutung der blauen LEDs (Modus 1 und 2)
12 345678
14 V
U
14,4 V
Mode 2
Mode 1
14,7 V
13,8 V
14,4 V
12,8 V
4
3
2
1
Legende zur Abbildung:
LED-Zustand Bedeutung
Aus
Blinken
Dauerlicht
t
31

DE
Technische Beschreibung PerfectCharge MCP1204/1207
6.3 Batterielade-Funktion
Der Batterielader arbeitet in acht Phasen (Abb. 3, Seite 4).
1: Desulfatierung (Desulphation)
In der Desulfatierungs-Phase werden sulfatierte Batterien angeregt. Strom und
Spannung pulsieren, so dass Sulfat wieder in seine amorphe Struktur zerfällt. Die
Kapazität der Batterie wird wiederhergestellt.
2: Soft Start
In der Soft-Start-Phase wird die Ladefähigkeit der Batterie anhand der Stromaufnahme geprüft. Wenn die Batterie defekt ist, wird der Ladevorgang abgebrochen.
3: I-Phase (Bulk)
Die leere Batterie wird mit konstantem Strom (100 % Ladestrom) geladen. Sobald die
Batteriespannung die Ladespannung erreicht hat, nimmt der Ladestrom ab.
4: U0-Phase (Absorption)
Während der U0-Phase bleibt die Spannung konstant (U0). Wenn die Batterie vollständig geladen ist, ist die U0-Phase beendet.
5: Analyse
In der Analyse-Phase wird die Ladeerhaltung der Batterie geprüft. Wenn die
Spannung zu schnell abfällt, kann die Batterie die Ladung nicht halten und muss
ersetzt werden.
6: Rekonditionierung (Recondition)
In der Rekonditionierungs-Phase wird die Spannung erneut erhöht, um eine
kontrollierte Gasbildung in der Batterie zu erzeugen. Diese Gasbildung verhindert
die Säureschichtung (unterschiedliche Säurekonzentrationen in den Batteriezellen).
7: U-Phase (Float)
In der U-Phase schaltet der Batterielader auf Erhaltungsladung um. Die Batteriespannung wird auf 100 % gehalten.
32

DE
PerfectCharge MCP1204/1207 Batterielader benutzen
8: Wartung (Maintenance)
In der Wartungs-Phase wird die Ladespannung abgeschaltet und die Batteriespannung permanent gemessen. Fällt diese unter 12,8 V lädt der Batterielader die
Batterie auf maximal 14,4 V. Dann schaltet er die Ladespannung wieder ab und misst
erneut die Batteriespannung.
Dadurch kann z. B. eine sichere Überwinterung bewirkt werden.
7 Batterielader benutzen
ACHTUNG!
A
7.1 Batterielader anschließen
➤ Prüfen Sie die Batterie auf ihren ordnungsgemäßen Zustand.
➤ Prüfen Sie:
– das Batteriegehäuse auf Beschädigungen
– den Flüssigkeitszustand der Batterie
– die Pol-Kontakte
Achten Sie darauf, dass die Polarität nicht vertauscht wird:
• Plusklemme der Batterie: rote Klemme
• Minusklemme der Batterie: schwarze Klemme
Falsche Polarität kann den Batterielader beschädigen.
Füllen Sie die Batterie ggf. mit dem vom Hersteller geforderten Medium
nach.
Säubern Sie eventuelle Verschmutzungen.
➤ Schließen Sie das Netzkabel des Batterieladers an das 230-V-Wechselstromnetz
an.
➤ Wenn Sie das Anschlusskabel mit dem 12-V-Stecker benutzen: Schalten Sie die
Zündung Ihres Fahrzeuges ein.
33

DE
Batterielader benutzen PerfectCharge MCP1204/1207
Batterielader an Batterie anschließen (Abb. 4, Seite 4)
HINWEIS
I
➤ Stecken Sie den Ladestecker (1) in die 12-Vg-Steckdose (z. B. Zigaretten-
anzünder) oder …
➤ … schließen Sie das Anschlusskabel (2) mit den Batterieklemmen an die Batterie
(3) oder an die fahrzeugseitig vorgesehenen Batterieladepunkte an.
Das Anschlusskabel mit dem 12-V-Stecker ist ausschließlich für den
Gebrauch von Kabeln und Zubehör geeignet.
7.2 Batterielader benutzen
➤ Wählen Sie den gewünschten Modus aus:
Modus 1 (Batterie ist angeschlossen): Drücken Sie den Taster 1 s lang.
Modus 2 (Batterie ist angeschlossen): Drücken Sie den Taster 5 s lang.
Modus 3 (Batterie ist nicht angeschlossen): Drücken Sie den Taster 10 s lang.
✓ In Modus 1 und 2 startet der Ladevorgang.
In Modus 3 startet konstante Spannungsversorgung.
✓ Die LEDs zeigen den Ladefortschritt der Batterie des Batterieladers an (siehe
Kapitel „Betriebsanzeigen“ auf Seite 31).
➤ Um den Ladevorgang zu beenden, drücken Sie den Taster nochmal.
HINWEIS
I
Wenn die rote LED blinkt, weil die Batteriespannung unter 9 V liegt,
können Sie die Batterie im Modus 3 über 9 V aufladen. Klemmen Sie
hierzu die Batterie ab, und schalten Sie in Modus 3. Wenn die Batterie
über 9 V aufgeladen ist, können Sie den Batterielader wieder in Modus 1
oder 2 schalten, um einen regulären Ladevorgang zu starten.
34

DE
PerfectCharge MCP1204/1207 Zubehör verwenden
8 Zubehör verwenden
HINWEIS
I
8.1 Batterielader in Wandhalterung aufbewahren
Montagehinweise
Beachten Sie bei der Wahl des Montageortes der Wandhalterung folgende Hinweise:
• Die Wandhalterung muss an einer vor Feuchtigkeit geschützten Stelle montiert
werden.
• Die Wandhalterung darf nicht in Umgebungen mit entflammbaren Materialien
montiert werden.
• Die Wandhalterung darf nicht in staubigen Umgebungen montiert werden.
• Die Montagefläche muss eben sein und eine ausreichende Festigkeit aufweisen.
Wandhalterung montieren
Montieren Sie die Wandhalterung wie folgt (Abb. 5, Seite 5):
Das Zubehör ist nicht im Lieferumfang enthalten.
Bei Fragen zu Zubehör wenden Sie sich bitte an Ihren Service-Partner.
➤ Befestigen Sie die Wandhalterung (1) an dem von Ihnen gewählten Montageort.
➤ Befestigen Sie die Adapter (2) am Batterielader (3).
Batterielader aufbewahren
Bewahren Sie den Batterielader wie folgt auf (Abb. 5, Seite 5):
➤ Schieben Sie den Batterielader (3) mit dem Adapter von oben in die konisch
zulaufenden Halterungen.
Zum Lösen heben Sie den Batterielader nach oben aus den Halterungen.
35

DE
Batterielader pflegen und reinigen PerfectCharge MCP 1204/1207
8.2 Batterielader mit Batterieindikator benutzen
HINWEIS
I
➤ Schließen Sie den Batterielader an den Batterieindikator an.
➤ Benutzen Sie den Batterielader wie beschrieben (siehe Kapitel „Batterielader
benutzen“ auf Seite 34).
Hinweise zum Anschluss an den Batterieindikator und zur Benutzung
des Batterieindikators finden Sie in der Montage- und Bedienungsanleitung des Batterieindikators.
9 Batterielader pflegen und reinigen
ACHTUNG!
A
➤ Reinigen Sie das Produkt gelegentlich mit einem feuchten Tuch.
Keine scharfen oder harten Gegenstände oder Reinigungsmittel zur
Reinigung verwenden, da dies zu einer Beschädigung des Produktes
führen kann.
36

DE
PerfectCharge MCP1204/1207 Fehlerbeseitigung
10 Fehlerbeseitigung
WARNUNG!
!
I
Die rote LED zeigt einen Fehler an:
LED-Anzeige Ursache Behebung
Blinken Verpolung Prüfen Sie die Leitungen und
Blinken Batteriespannung < 9 V Die Batterie kann nicht geladen werden.
Dauerleuchten Batterie nicht mehr
Öffnen Sie das Gerät nicht. Sie setzen sich der Gefahr eines elektrischen
Schlages aus!
HINWEIS
Bei detaillierten Fragen zu den Daten des Batterieladers wenden Sie
sich bitte an den Hersteller (Adressen siehe Rückseite der Anleitung).
Verbindungen.
Ersetzen Sie die Batterie.
Die Verbindung zur Batterie wurde
verbunden
Sicherung im Anschlusskabel
hat ausgelöst
während des Ladevorgangs unterbrochen.
Prüfen Sie die Leitungen und
Verbindungen.
Ersetzen Sie die Sicherung (KFZ-Stecksicherung 10 A)
37

DE
Gewährleistung PerfectCharge MCP1204/1207
11 Gewährleistung
Es gilt die gesetzliche Gewährleistungsfrist. Sollte das Produkt defekt sein, wenden
Sie sich bitte an die Niederlassung des Herstellers in Ihrem Land (Adressen siehe
Rückseite der Anleitung) oder an Ihren Fachhändler.
Zur Reparatur- bzw. Gewährleistungsbearbeitung müssen Sie folgende Unterlagen
mitschicken:
• eine Kopie der Rechnung mit Kaufdatum,
• einen Reklamationsgrund oder eine Fehlerbeschreibung.
12 Entsorgung
➤ Geben Sie das Verpackungsmaterial möglichst in den entsprechenden
Recycling-Müll.
Wenn Sie das Produkt endgültig außer Betrieb nehmen, informieren Sie
sich bitte beim nächsten Recyclingcenter oder bei Ihrem Fachhändler
M
über die zutreffenden Entsorgungsvorschriften.
38

DE
PerfectCharge MCP1204/1207 Technische Daten
13 Technische Daten
MCP1204 MCP12 07
Eingangsnennspannung: 230 Vw
Max. Dauer-Ausgangsstrom: 4,0 A ± 0,25 A 7,0 A ± 0,5 A
Absorptionsspannung: 14,4 V ± 0,2 V (Modus 1)
14,7 V ± 0,2 V (Modus 2)
Erhaltungsspannung: 13,8 V ± 0,2 V
Ausgangsspannung Modus 3: 13,7 V ± 0,2 V
Maximaler Ladestrom: 4,0 A 7,0 A
Wirkungsgrad bis zu: 85 %
Batterietypen: 12-V-Batterien:
Blei-Starterbatterien
Gel-Batterien
Vlies-Batterien (AGM)
wartungsfreie Batterien
Empfohlene Batteriekapazitäten:
Ladung: 7 – 110 Ah 15 – 160 Ah
Erhaltungsladung: 7 – 180 Ah 15 – 250 Ah
Schutzklasse: IP65
Umgebungstemperatur Betrieb: –5 °C bis +50 °C
Umgebungstemperatur Lagerung: –20 °C bis +70 °C
Abmessungen B x T x H: 90 x 220 x 55 mm 90 x 250 x 55 mm
Gewicht: 0,5 kg 0,7 kg
Zulassungen:
39

FR
PerfectCharge MCP1204/1207
Veuillez lire ce manuel attentivement avant de mettre l'appareil en service
et conservez-le. En cas de passer le produit, veuillez le transmettre au
nouvel acquéreur.
Sommaire
1 Symboles. . . . . . . . . . . . . . . . . . . . . . . . . . . . . . . . . . . . . . . . . . . . . . . . . . . . .41
2 Consignes générales de sécurité . . . . . . . . . . . . . . . . . . . . . . . . . . . . . . . . . . 41
3 Contenu de la livraison . . . . . . . . . . . . . . . . . . . . . . . . . . . . . . . . . . . . . . . . . 46
4 Accessoires . . . . . . . . . . . . . . . . . . . . . . . . . . . . . . . . . . . . . . . . . . . . . . . . . . 46
5 Usage conforme . . . . . . . . . . . . . . . . . . . . . . . . . . . . . . . . . . . . . . . . . . . . . . 47
6 Description technique . . . . . . . . . . . . . . . . . . . . . . . . . . . . . . . . . . . . . . . . . 48
7 Utilisation du chargeur de batterie. . . . . . . . . . . . . . . . . . . . . . . . . . . . . . . . 52
8 Utilisation des accessoires . . . . . . . . . . . . . . . . . . . . . . . . . . . . . . . . . . . . . . 54
9 Entretien et nettoyage du chargeur de batterie . . . . . . . . . . . . . . . . . . . . . 55
10 Réparation des pannes . . . . . . . . . . . . . . . . . . . . . . . . . . . . . . . . . . . . . . . . . 56
11 Garantie. . . . . . . . . . . . . . . . . . . . . . . . . . . . . . . . . . . . . . . . . . . . . . . . . . . . . 57
12 Retraitement . . . . . . . . . . . . . . . . . . . . . . . . . . . . . . . . . . . . . . . . . . . . . . . . . 57
13 Caractéristiques techniques . . . . . . . . . . . . . . . . . . . . . . . . . . . . . . . . . . . . . 58
40

FR
PerfectCharge MCP1204/1207 Symboles
1Symboles
DANGER !
D
!
!
A
I
Consigne de sécurité : le non-respect de ces consignes entraîne la
mort ou de graves blessures.
AVERTISSEMENT !
Consigne de sécurité : le non-respect de ces consignes peut entraîner
la mort ou de graves blessures.
ATTENTION !
Consigne de sécurité : le non-respect de ces consignes peut entraîner
des blessures.
AVIS !
Le non-respect de ces consignes peut entraîner des dommages
matériels et des dysfonctionnements du produit.
REMARQUE
Informations complémentaires sur l'utilisation du produit.
2 Consignes générales de sécurité
2.1 Consignes générales de sécurité
Le fabricant décline toute responsabilité pour des dommages dans les cas suivants :
• des défauts de montage ou de raccordement
• des influences mécaniques et des surtensions ayant endommagé le matériel
• des modifications apportées au produit sans autorisation explicite de la part du
fabricant
• une utilisation différente de celle décrite dans la notice
41

FR
Consignes générales de sécurité PerfectCharge MCP1204/1207
Lors de l'utilisation d'appareils électriques, les consignes générales de sécurité
suivantes doivent être respectées afin d'éviter
• une décharge électrique,
• un incendie,
• des blessures.
2.2 Consignes générales de sécurité
DANGER !
D
!
• En cas d'incendie, utilisez un extincteur adapté aux appareils
électriques.
AVERTISSEMENT !
• N'utilisez l’appareil que conformément à l'usage pour lequel il a été
conçu.
• Veillez à ce que la pince rouge et la pince noire ne se touchent jamais.
• Débranchez l'appareil du secteur
– avant tout nettoyage et entretien
– après chaque utilisation
– avant le changement d'un fusible
• Si l’appareil ou le câble de raccordement présentent des dommages
visibles, il est interdit de mettre l'appareil en service.
• Si le câble de raccordement de l'appareil est endommagé, il doit être
remplacé par le fabricant, son service après-vente ou une personne de
qualification similaire, afin d'éviter tout danger.
• Seul un personnel qualifié est habilité à effectuer des réparations sur
l'appareil. Toute réparation mal effectuée risquerait d'entraîner de
graves dangers.
• L'appareil ne doit pas être ouvert de manière non conforme. La classe
de protection IP65 ne serait plus garantie dans ce cas.
• Les enfants âgés de 8 ans et plus ainsi que les personnes ayant des
déficiences physiques, sensorielles ou mentales ou un manque
d'expérience ou de connaissances peuvent utiliser ce produit à
condition d'être sous surveillance ou d'avoir reçu des instructions
concernant l'utilisation de l'appareil en toute sécurité et de
comprendre les dangers qui en résultent.
42

FR
PerfectCharge MCP1204/1207 Consignes générales de sécurité
• Les appareils électriques ne sont pas des jouets pour enfants.
Placez et utilisez l'appareil hors de leur portée.
• Les enfants doivent être surveillés pour s'assurer qu'ils ne jouent pas
avec l'appareil.
AVIS !
A
2.3 Consignes de sécurité concernant le raccordement
D
• Avant la mise en service, vérifiez que la tension indiquée sur la plaque
signalétique correspond à l'alimentation électrique dont vous disposez.
• Veillez à ce que d'autres objets ne provoquent aucun court-circuit au
niveau des contacts de l'appareil.
• Ne tirez jamais sur le câble de raccordement pour sortir la fiche de la
prise.
• Stockez l'appareil dans un endroit frais et sec.
électrique de l'appareil
DANGER ! Danger de mort par électrocution !
• En cas de raccordement sur des bateaux :
un raccordement incorrect des appareils électriques sur des bateaux
peut entraîner des dommages dus à la corrosion au niveau du bateau.
L'appareil doit être raccordé par un électricien spécialisé.
• Lorsque vous effectuez des travaux sur des installations électriques,
assurez-vous qu'une personne pouvant vous apporter assistance en
cas d'urgence se trouve à proximité.
!
!
AVERTISSEMENT !
• Utilisez uniquement des prises de courant mises à la terre protégées
par un disjoncteur différentiel.
• Veillez à avoir une section de câble suffisante.
• Posez les câbles de manière à ce qu'ils ne puissent pas être endomma-
gés par les portières ou par le capot du moteur.
Des câbles compressés peuvent entraîner des blessures mortelles.
ATTENTION !
• Posez les câbles de manière à exclure tout risque de trébuchement ou
d'endommagement du câble.
43

FR
Consignes générales de sécurité PerfectCharge MCP1204/1207
2.4 Consignes de sécurité concernant le fonctionnement
de l'appareil
DANGER ! Danger de mort par électrocution !
D
!
!
• Ne touchez jamais les lignes électriques dénudées avec les mains
nues. Cela est surtout valable en cas de fonctionnement sur secteur.
• Afin qu'il soit possible de couper rapidement l'appareil du secteur, la
prise secteur doit se trouver à proximité de l'appareil et être facilement accessible.
AVERTISSEMENT !
• Utilisez l'appareil uniquement dans des pièces fermées et bien
aérées.
• N'utilisez pas l'appareil dans des endroits fermés avec des batteries
au plomb-acide. Ces batteries dégagent de l'hydrogène explosif et il
suffit d'une étincelle sur les raccordements électriques pour enflammer celui-ci.
ATTENTION !
• N'utilisez pas l'appareil
– en milieu humide, à forte teneur en sel,
– à proximité de vapeurs agressives,
– à proximité de matériaux inflammables,
– ou dans un environnement explosif.
• Avant de mettre l'appareil en service, assurez-vous que la ligne d'ali-
mentation électrique et le connecteur sont secs.
• Coupez l'alimentation électrique au cours de travaux sur l'appareil.
• Attention : même après déclenchement du dispositif de sécurité
(fusible), il est possible que certaines pièces de l'appareil restent sous
tension.
• Ne débranchez pas de câbles pendant le fonctionnement de
l'appareil.
A
44
AVIS !
• Veillez à ce que l'aération soit suffisante.

FR
PerfectCharge MCP1204/1207 Consignes générales de sécurité
2.5 Consignes de sécurité concernant la manipulation de
batteries
AVERTISSEMENT !
!
!
• Les batteries peuvent contenir des acides dangereux et corrosifs.
Evitez tout contact avec le liquide que contient la batterie. En cas de
contact avec le liquide de la batterie, lavez soigneusement à l’eau la
partie du corps concernée.
Faites impérativement examiner par un médecin toute blessure à
l'acide.
ATTENTION !
• Lorsque vous manipulez les batteries, veillez à ne porter aucun objet
métallique tel que montre ou bague.
Les batteries au plomp-acide peuvent générer des courants de courtcircuit susceptibles d'entraîner de graves brûlures.
• Risque d’explosion !
N'essayez jamais de charger une batterie gelée ou défectueuse.
Stockez la batterie dans un endroit à l'abri du gel et attendez qu'elle
ait atteint la température ambiante. Le processus de chargement peut
alors commencer.
• Portez des lunettes ainsi que des vêtements de protection lorsque
vous manipulez la batterie. Ne touchez pas vos yeux pendant le travail
sur la batterie.
• Ne fumez pas et assurez-vous qu'aucune étincelle n'est générée à
proximité du moteur ou de la batterie.
A
AVIS !
• Utilisez exclusivement des batteries rechargeables.
• Evitez que des pièces électriques ne tombent sur la batterie. Cela peut
provoquer des étincelles et des courts-circuits sur la batterie ou
d'autres pièces électriques.
• Lors du raccordement, veillez à respecter la polarité indiquée.
• Conformez-vous aux instructions du fabricant de la batterie ainsi que
du fabricant de l'installation ou du véhicule dans lesquels la batterie
est utilisée.
• Si vous devez démonter la batterie, coupez tout d'abord la connexion
à la masse. Débranchez toutes les connexions et tous les consommateurs de la batterie avant de démonter celle-ci.
45

FR
Contenu de la livraison PerfectCharge MCP1204/1207
3 Contenu de la livraison
Pos. dans
fig. 1,
page 3
1 Chargeur de batterie
2 Câble de raccordement avec connecteur 12 V (allume-cigares)
3 Câble de raccordement avec cosses de câble
4 Câble de raccordement avec bornes de batterie
– Notice d'utilisation
Désignation
4 Accessoires
Disponibles en accessoires (non compris dans la livraison) :
Désignation N° de produit
Indicateur de batterie
(avec câble de raccordement à cosses de câble)
Support mural pour le chargeur de batterie 9102500079
9600000094
46

FR
PerfectCharge MCP1204/1207 Usage conforme
5Usage conforme
Le chargeur de batteries peut charger ou alimenter en tension de maintien les
batteries de 12 V utilisées comme source de courant à bord de véhicules ou de
bateaux.
Le chargeur de batterie peut être utilisé pour les types de batterie suivants :
• Batteries de démarrage au plomb
• Batteries au gel
• Batteries à recombinaison de gaz (AGM)
• Batteries sans entretien
AVIS !
A
Le chargeur de batterie est conçu exclusivement pour une utilisation dans les pièces
fermées.
Le chargeur de batterie ne convient pas pour un montage fixe. Pour ce faire, il faut
utiliser le support mural (accessoires ; n° d'art. 9102500079).
Le chargeur de batterie ne doit pas être utilisé sur d'autres types de
batteries (p. ex. NiCd, NiMH, etc.) ou des batteries défectueuses (p. ex.
avec court-circuit interne).
47

FR
Description technique PerfectCharge MCP1204/1207
6 Description technique
Le chargeur de batterie charge les batteries utilisées comme source de tension dans
les véhicules ou les bateaux, ou les alimente par une tension de compensation, afin
qu'elles ne se déchargent pas.
La durée de vie de la plupart des batteries au plomb est raccourcie par ce que l'on
appelle le sulfatage : avec le temps, le sulfate de plomb forme de grands cristaux
lisses. Cela fait disparaître la structure amorphe, spongieuse. La possibilité de
chargement et donc la capacité de chargement chutent systématiquement, et la
batterie vieillit.
Le chargeur de batterie fonctionne dans des parties de sa courbe de charge avec
des fréquences spécifiques. Les cristaux sont ainsi incités à vibrer à leur propre
fréquence. Ils reviennent à leur structure amorphe. Leurs molécules peuvent de
nouveau être intégrées dans le processus de charge. Cela permet de faire
augmenter la tension de charge, le courant d'essai de décharge à froid et la capacité
de la batterie.
Toutes les batteries au plomb sont protégées d'un vieillissement précoce par un
rechargement régulier.
Le chargeur de batterie peut fonctionner selon trois modes :
• Mode 1 : mode de chargement à 14,4 V
Ce mode est utilisé pour les batteries au plomb, au gel et sans entretien.
• Mode 2 : mode de chargement à 14,7 V
Ce mode est utilisé pour les batteries AGM.
• Mode 3 : alimentation électrique de 13,7 V (la batterie n'est pas raccordée)
Ce mode sert de fonction de bloc d'alimentation, p. ex. pour l'alimentation
électrique du véhicule en cas de changement de batterie ou en cas de travaux de
maintenance avec des appareils d'entretien.
En cas de stockage fixe, l'appareil peut être installé sur un mur grâce au support
mural (accessoires).
De plus, il est possible d'utiliser un indicateur de batterie externe (accessoires).
Celui-ci affiche la capacité de la batterie et peut être raccordé de manière permanente à la batterie, grâce à un câble de raccordement à cosses de câble. Si la batterie
est affichée comme vide, le chargeur de batterie peut être raccordé à l'indicateur de
batterie et recharger la batterie directement.
À l'aide d'un support mural, l'indicateur de batterie peut être fixé à un mur ou au
support mural du chargeur de batterie.
48

FR
PerfectCharge MCP1204/1207 Description technique
6.1 Eléments de commande
REMARQUE
I
Pos. dans
fig. 2,
page 3
La version présentée est celle pour l’Europe continentale.
Désignation Description
1 LED d'état Voir chapitre « Témoins lumineux de fonctionnement »,
page 50
2 Touche Sélection du mode de fonctionnement :
Mode 1 : appuyer 1 s sur la touche
(la batterie est raccordée)
Mode 2 : appuyer 5 s sur la touche
(la batterie est raccordée)
Mode 3 : appuyer 10 s sur la touche
(la batterie n'est pas raccordée)
3 Câble 230 V Raccordement à la tension du secteur
4 Câble 12 V Raccordement pour le câble de raccordement
5 Logement câble Pour ranger le câble de raccordement
49

FR
Description technique PerfectCharge MCP1204/1207
6.2 Témoins lumineux de fonctionnement
Désignation Description
LED rouge Clignote : la polarité est inversée, ou la tension de la batterie est
inférieure à 9 V.
Éclairage permanent : la connexion avec la batterie a été
interrompue pendant la procédure de chargement.
LED verte Éclairage permanent : le mode 1 ou le mode 3 est activé.
Clignote : le mode 2 est actif.
LED bleues Les LED indiquent au mode 1 et 2 dans quelle phase le chargeur de
batterie se trouve (voir tableau suivant).
Les LED clignotent l'une après l'autre lorsque le chargeur de
batterie se trouve en attente (la tension du secteur est raccordée, la
batterie n'est pas raccordée).
Les LED clignotent simultanément lorsque le chargeur de batterie
est prêt à être utilisé (la tension du secteur est raccordée, la batterie
est raccordée, la touche n'est pas enfoncée).
Signification des LED bleues (mode 1 et 2)
12 345678
14 V
U
14,4 V
Mode 2
Mode 1
14,7 V
13,8 V
14,4 V
12,8 V
4
3
2
1
Légende de l'illustration :
État de la LED Signification
Arrêt
Clignote
Allumage continu
50
t

FR
PerfectCharge MCP1204/1207 Description technique
6.3 Fonction charge de batterie
Le chargeur de batterie fonctionne en huit phases (fig. 3, page 4).
1 : désulfatation (Desulphation)
Pendant la phase de désulfatation, les batteries sulfatées sont stimulées. Le courant
et la tension envoient des pulsations de sorte que le sulfate retourne à une structure
amorphe. La capacité de la batterie est restaurée.
2 : Soft Start
Dans la phase de soft start, la capacité de chargement de la batterie est vérifiée via
l'intensité absorbée. Si la batterie est défectueuse, la procédure de chargement est
interrompue.
3 : Phase I (Bulk)
La batterie déchargée est chargée de courant constant (courant de charge 100 %).
Dès que la tension de la batterie a atteint la tension de charge, le courant de charge
diminue.
4: Phase U0 (absorption)
Pendant la phase U0, la tension reste constante (UO). Une fois la batterie complètement chargée, la phase U0 est terminée.
5: Analyse
Dans la phase d'analyse, le maintien de charge de la batterie est contrôlé. Si la
tension chute trop rapidement, la batterie ne peut maintenir la charge et doit être
remplacée.
6 : reconditionnement (Recondition)
Pendant la phase de reconditionnement, la tension est de nouveau augmentée afin
de générer une formation contrôlée de gaz dans la batterie. Cette formation de gaz
empêche la stratification (différentes concentrations d'acide dans les cellules de
batterie).
51

FR
Utilisation du chargeur de batterie PerfectCharge MCP1204/1207
7: phase U (Float)
Dans la phase U, le chargeur de batterie commute sur la charge de maintien. La
tension de batterie est maintenue à 100 %.
8 : maintenance
Pendant la phase de maintenance, la tension de charge est éteinte et la tension de la
batterie est mesurée en permanence. Si celle-ci chute en dessous de 12,8 V, le
chargeur de batterie charge la batterie à 14,4 V maximum. Puis il éteint de nouveau
la tension de charge et mesure de nouveau la tension de la batterie.
Cela permet p. ex. d'obtenir un hivernage en toute sécurité.
7 Utilisation du chargeur de batterie
AVIS !
A
Assurez-vous que la polarité n'est pas inversée :
• pôle positif de la batterie : borne rouge
• pôle négatif de la batterie : borne noire
Une polarité incorrecte peut endommager le chargeur de batterie.
7.1 Raccordement du chargeur de batterie
➤ Vérifiez le bon état de la batterie.
➤ Effectuez les contrôles suivants :
– détériorations du boîtier de la batterie
– état du liquide de la batterie
Le cas échéant, remplissez la batterie avec le fluide recommandé par le
fabricant.
– les contacts des pôles
Nettoyez les salissures éventuelles.
➤ Raccordez le câble secteur du chargeur de batterie au réseau alternatif 230 V.
➤ Si vous utilisez le câble de raccordement avec le connecteur 12 V : mettez
l'allumage de votre véhicule en marche.
52

FR
PerfectCharge MCP1204/1207 Utilisation du chargeur de batterie
Raccordement du chargeur de batterie à une batterie (fig. 4, page 4)
REMARQUE
I
➤ Enfoncez le connecteur de charge (1) dans la prise d'alimentation 12 Vg (p. ex.
allume-cigares)…
➤ … raccordez le câble de raccordement (2) aux bornes de la batterie (3) ou aux
points de chargement de la batterie prévus sur le véhicule.
Le câble de raccordement avec le connecteur 12 V est exclusivement
conçu pour l'utilisation de câbles et d'accessoires.
7.2 Utilisation du chargeur de batterie
➤ Sélectionnez le mode souhaité :
Mode 1 (la batterie est raccordée) : appuyez sur la touche pendant 1 s.
Mode 2 (la batterie est raccordée) : appuyez sur la touche pendant 5 s.
Mode 3 (la batterie n'est pas raccordée) : appuyez sur la touche pendant 10 s.
✓ En mode 1 et 2, la procédure de chargement démarre.
En mode 3, l'alimentation constante en tension démarre.
✓ Les LED indiquent la progression de la charge de batterie du chargeur de batterie
(voir chapitre « Témoins lumineux de fonctionnement », page 50).
➤ Pour mettre fin à la procédure de chargement, appuyez de nouveau sur la
touche.
REMARQUE
I
Si la LED rouge clignote parce que la tension de la batterie est en
dessous de 9 V, la batterie peut être rechargée en mode 3 à plus de 9 V.
Pour ce faire, débranchez la batterie de cela et passez en mode 3.
Lorsque la batterie est chargée à plus de 9 V, vous pouvez commuter le
chargeur de batterie à nouveau en mode 1 ou 2 pour démarrer une
charge régulière.
53

FR
Utilisation des accessoires PerfectCharge MCP1204/1207
8 Utilisation des accessoires
REMARQUE
I
8.1 Conservation du chargeur de batterie dans le support
Instructions de montage
Lisez attentivement les remarques suivantes lors du choix du lieu d'installation du
support mural :
• Le support mural doit être monté à un endroit protégé de l'humidité.
• Le support mural ne doit pas être monté dans des environnements contenant des
matériaux inflammables.
• Le support mural ne doit pas être monté dans des environnements poussiéreux.
• La surface de montage doit être plane et présenter une stabilité suffisante.
Montage du support mural
Les accessoires ne sont pas compris dans la livraison :
En cas de questions concernant les accessoires, veuillez vous adresser à
votre partenaire de service après-vente.
mural
Montez le support mural comme suit (fig. 5, page 5) :
➤ fixez le support mural (1) à l'emplacement de montage que vous avez choisi.
➤ Fixez l'adaptateur (2) au chargeur de batterie (3).
Conservation du chargeur de batterie
Conservez le chargeur de batterie de la manière suivante (fig. 5, page 5) :
➤ insérez le chargeur de batterie (3) avec l'adaptateur par en haut dans les supports
coniques.
Pour le détacher, soulevez le chargeur de batterie vers le haut pour le sortir des
supports.
54

FR
PerfectCharge MCP1204/1207 Entretien et nettoyage du chargeur de batterie
8.2 Utilisation du chargeur de batterie avec un indicateur
de batterie
REMARQUE
I
➤ Raccordez le chargeur de batterie à l'indicateur de batterie.
➤ Utilisez le chargeur de batterie selon la description (voir chapitre « Utilisation du
chargeur de batterie », page 53).
Vous trouverez des indications pour le raccordement de l'indicateur de
batterie et pour son utilisation dans les instructions de montage et de
service de l'indicateur de batterie.
9 Entretien et nettoyage du chargeur de
batterie
AVIS !
A
➤ Nettoyez le produit avec un tissu humide.
N’utilisez aucun objet coupant ou dur, ni de détergents pour le
nettoyage. Cela pourrait endommager le produit.
55

FR
Réparation des pannes PerfectCharge MCP1204/1207
10 Réparation des pannes
AVERTISSEMENT !
!
I
La LED rouge indique une erreur :
Affichage LED Cause Solution
Clignote les inversions de polarité Vérifiez les lignes et les connexions.
Clignote Tension de la batterie < 9 V La batterie ne peut pas être chargée.
N'ouvrez pas l'appareil. Vous vous exposez à un risque d'électrocution !
REMARQUE
En cas de questions sur les caractéristiques du chargeur de
batterie, veuillez vous adresser au fabricant (adresses au dos de la
notice).
Remplacez la batterie.
Éclairage
permanent
La batterie n'est plus
connectée
Le fusible du câble de
raccordement a sauté.
La connexion avec la batterie a été
interrompue pendant la procédure de
chargement.
Vérifiez les lignes et les connexions.
Remplacez le fusible (fusible pour
véhicule 10 A)
56

FR
PerfectCharge MCP1204/1207 Garantie
11 Garantie
Le délai légal de garantie s'applique. Si le produit s'avérait défectueux, veuillez vous
adresser à la filiale du fabricant située dans votre pays (voir adresses au verso du
présent manuel) ou à votre revendeur spécialisé.
Veuillez y joindre les documents suivants pour la gestion des réparations et de la
garantie :
• une copie de la facture avec la date d'achat,
• le motif de la réclamation ou une description du dysfonctionnement.
12 Retraitement
➤ Jetez les emballages dans les conteneurs de déchets recyclables prévus à cet
effet.
Lorsque vous mettrez votre produit définitivement hors service, informezvous auprès du centre de recyclage le plus proche ou auprès de votre
M
revendeur spécialisé sur les prescriptions relatives au retraitement des
déchets.
57

FR
Caractéristiques techniques PerfectCharge MCP1204/1207
13 Caractéristiques techniques
PerfectCharge
MCP1204
Tension nominale d'entrée : 230 Vw
Courant de sortie permanent
max. :
Tension d'absorption : 14,4 V ± 0,2 V (mode 1)
Tension de maintien : 13,8 V ± 0,2 V
Tension de sortie Mode 3 : 13,7 V ± 0,2 V
Courant de charge maximum : 4,0 A 7,0 A
Rendement jusqu'à : 85 %
Types de batteries : Batteries 12 V :
Capacités recommandées pour la
batterie :
Charge : 7 – 110 Ah 15 – 160 Ah
Charge d'entretien : 7 – 180 Ah 15 – 250 Ah
4,0 A ± 0,25 A 7,0 A ± 0,5 A
14,7 V ± 0,2 V (mode 2)
Batteries de démarrage au plomb
Batteries au gel
Batteries à recombinaison de gaz (AGM)
Batteries sans entretien
PerfectCharge
MCP1207
Type de protection : IP65
Température ambiante de
fonctionnement :
Température ambiante de
stockage :
Dimensions l x p x h : 90 x 220 x 55 mm 90 x 250 x 55 mm
Poids : 0,5 kg 0,7 kg
Certifications :
De –5 °C à +50 °C
De –20 °C à +70 °C
58

ES
PerfectCharge MCP1204/1207
Antes de poner en funcionamiento el producto, lea atentamente estas instrucciones y consérvelas para futuras consultas. En caso de vender o entregar el producto a otra persona, entregue también estas instrucciones.
Índice
1 Explicación de los símbolos . . . . . . . . . . . . . . . . . . . . . . . . . . . . . . . . . . . . . 60
2 Indicaciones generales de seguridad . . . . . . . . . . . . . . . . . . . . . . . . . . . . . 60
3 Volumen de entrega . . . . . . . . . . . . . . . . . . . . . . . . . . . . . . . . . . . . . . . . . . . 65
4 Accesorios. . . . . . . . . . . . . . . . . . . . . . . . . . . . . . . . . . . . . . . . . . . . . . . . . . . 65
5 Uso adecuado . . . . . . . . . . . . . . . . . . . . . . . . . . . . . . . . . . . . . . . . . . . . . . . . 66
6 Descripción técnica . . . . . . . . . . . . . . . . . . . . . . . . . . . . . . . . . . . . . . . . . . . 67
7 Uso del cargador de batería. . . . . . . . . . . . . . . . . . . . . . . . . . . . . . . . . . . . . .71
8 Uso de accesorios. . . . . . . . . . . . . . . . . . . . . . . . . . . . . . . . . . . . . . . . . . . . . 73
9 Mantenimiento y limpieza del cargador de batería. . . . . . . . . . . . . . . . . . . 74
10 Solución de fallos . . . . . . . . . . . . . . . . . . . . . . . . . . . . . . . . . . . . . . . . . . . . . 75
11 Garantía legal . . . . . . . . . . . . . . . . . . . . . . . . . . . . . . . . . . . . . . . . . . . . . . . . 76
12 Gestión de residuos . . . . . . . . . . . . . . . . . . . . . . . . . . . . . . . . . . . . . . . . . . . 76
13 Datos técnicos. . . . . . . . . . . . . . . . . . . . . . . . . . . . . . . . . . . . . . . . . . . . . . . . 77
59

ES
Explicación de los símbolos PerfectCharge MCP1204/1207
1 Explicación de los símbolos
¡PELIGRO!
D
!
!
A
I
Indicación de seguridad: su incumplimiento acarrea la muerte
o graves lesiones.
¡ADVERTENCIA!
Indicación de seguridad: su incumplimiento puede acarrear la
muerte o graves lesiones.
¡ATENCIÓN!
Indicación de seguridad: su incumplimiento puede acarrear
lesiones.
¡AVISO!
Su incumplimiento puede acarrear daños materiales y perjudicar el
correcto funcionamiento del producto.
NOTA
Información adicional para el manejo del producto.
2 Indicaciones generales de seguridad
2.1 Seguridad general
El fabricante declina toda responsabilidad ante daños ocurridos en los siguientes
casos:
• errores de montaje o de conexión
• daños en el producto debido a influencias mecánicas y sobretensiones
• modificaciones realizadas en el producto sin el expreso consentimiento del
fabricante
• utilización del aparato para fines distintos a los descritos en las instrucciones
60

ES
PerfectCharge MCP1204/1207 Indicaciones generales de seguridad
Al utilizar aparatos eléctricos, respete las siguientes normas básicas de seguridad
para protegerse de:
• descargas eléctricas
• peligro de incendio
• lesiones
2.2 Seguridad básica
¡PELIGRO!
D
!
• En caso de incendio, utilice un extintor adecuado para aparatos
eléctricos.
¡ADVERTENCIA!
• Utilice el aparato solo para aquellos fines para los que ha sido
concebido.
• Preste atención a que los bornes rojo y negro nunca entren en
contacto.
• Desconecte el aparato de la red
– antes de realizar cualquier tarea de limpieza o mantenimiento
– después de cada uso
– antes de cambiar un fusible.
• Si el aparato o el cable de conexión presentan daños visibles, no se
debe poner en marcha el aparato.
• Si se daña el cable de conexión del aparato, el fabricante, su servicio
de atención al cliente o una persona cualificada debe reemplazarlo
para evitar así posibles peligros.
• Solo personal especializado está autorizado a realizar reparaciones en
el aparato. Una reparación incorrecta entraña riesgos considerables.
• Queda prohibido abrir el aparato de forma inadecuada porque, de lo
contrario, no se garantiza la clase de protección IP65.
• Los niños mayores de 8 años y las personas de capacidad física,
sensorial o mental disminuida, así como aquellas personas con falta de
experiencia y conocimientos suficientes solo podrán utilizar este
aparato bajo vigilancia o si han sido instruidos respecto al uso seguro
del aparato y a los posibles peligros que pueden emanar de él.
• Los aparatos eléctricos no son juguetes.
Mantenga y utilice el aparato fuera del alcance de los niños.
• Controle a los niños para asegurarse de que no jueguen con el
aparato.
61

ES
Indicaciones generales de seguridad PerfectCharge MCP1204/1207
¡AVISO!
A
2.3 Seguridad durante la conexión eléctrica del aparato
D
!
• Antes de la puesta en funcionamiento, compare el valor de tensión
indicado en la placa de características con el suministro de energía
existente.
• Asegúrese de que no haya otros objetos que causen un cortocircuito
en los contactos del aparato.
• No desenchufe nunca el cable de conexión tirando de él.
• Almacene el aparato en un lugar seco y fresco.
¡PELIGRO! ¡Peligro de muerte por descarga eléctrica!
• Conexión en embarcaciones:
La conexión incorrecta de aparatos eléctricos en embarcaciones
puede producir daños de corrosión en la embarcación. Deje que un
electricista especializado en instalaciones en embarcaciones conecte
el aparato.
• Al trabajar en instalaciones eléctricas asegúrese de que haya alguien
en las cercanías para que le pueda ayudar en caso de emergencia.
¡ADVERTENCIA!
• Utilice siempre cajas de enchufe con puesta a tierra y protegidas
mediante interruptor de protección FI.
• Asegúrese de que la longitud de la sección de cable sea suficiente.
• Tienda los cables de forma que las puertas o el capó del motor no los
puedan dañar.
Los cables aplastados pueden provocar lesiones que pongan en
peligro la vida.
!
62
¡ATENCIÓN!
• Tienda los cables de tal forma que no se pueda tropezar con ellos ni se
pueda dañar el cable.

ES
PerfectCharge MCP1204/1207 Indicaciones generales de seguridad
2.4 Seguridad durante el funcionamiento del aparato
¡PELIGRO! ¡Peligro de muerte por descarga eléctrica!
D
!
!
• No toque directamente con las manos cables sin aislamiento. Esto
rige especialmente en caso de funcionamiento con la red de corriente
alterna.
• Para poder desconectar rápidamente de la red el aparato en caso de
peligro, el enchufe tiene que estar cerca del aparato y se debe poder
acceder a él con facilidad.
¡ADVERTENCIA!
• Monte el aparato únicamente en recintos cerrados y bien ventilados.
• No utilice el aparato en recintos cerrados con baterías de plomo y
ácido. Estas baterías desprenden gas de hidrógeno explosivo que se
puede incendiar a partir de una chispa en las uniones eléctricas.
¡ATENCIÓN!
• No utilice este aparato
– en entornos con contenido de sal, húmedos o mojados,
– en las proximidades de vapores agresivos,
– en las proximidades de materiales inflamables,
– en áreas con riesgo de explosión.
• Antes de la puesta en funcionamiento, asegúrese de que el cable de
alimentación y la clavija de enchufe estén secos.
• Siempre que realice tareas en el aparato desconecte la alimentación
de corriente.
• Tenga en cuenta que incluso después de haberse activado el dispositivo de protección (fusible), algunas partes del aparato pueden seguir
bajo tensión.
• No desconecte ningún cable mientras el aparato aún se encuentre en
funcionamiento.
A
¡AVISO!
• Preste atención a que haya una buena ventilación.
63

ES
Indicaciones generales de seguridad PerfectCharge MCP1204/1207
2.5 Seguridad en el manejo de baterías
¡ADVERTENCIA!
!
!
• Las baterías pueden contener ácidos agresivos y corrosivos. Evite el
contacto corporal con el líquido de la batería. Si a pesar de ello
entrase en contacto con dicho líquido, enjuague bien con agua la
parte afectada.
Si se han producido lesiones, acuda al médico.
¡ATENCIÓN!
• Mientras esté realizando trabajos con las baterías no lleve ningún
objeto de metal como relojes o anillos.
Las baterías de plomo-ácido pueden producir corrientes de
cortocircuito que podrían provocar graves quemaduras.
• ¡Peligro de explosión!
Nunca intente cargar una batería congelada o defectuosa.
Coloque la batería en un lugar protegido contra las heladas y espere
a que la batería se encuentre a temperatura ambiente. Empiece
entonces a cargarla.
• Lleve gafas y ropa de protección cuando trabaje con las baterías. No
se lleve nunca las manos a los ojos mientras esté realizando trabajos
con las baterías.
• No fume y asegúrese de que no salte ninguna chispa en las cercanías
del motor o de la batería.
A
64
¡AVISO!
• Utilice únicamente baterías recargables.
• Evite que caigan sobre la batería piezas metálicas. Ello podría
provocar chispas o se podría cortocircuitar la batería y otras partes
eléctricas.
• Al realizar la conexión preste atención a la polaridad correcta.
• Siga las instrucciones dadas por el fabricante de la batería y por el
fabricante de la instalación o del vehículo donde se utilice la batería.
• Si desea desmontar la batería, desconecte primero la conexión a
masa. Desconecte de la batería todas las uniones y consumidores
antes de desmontarla.

ES
PerfectCharge MCP1204/1207 Volumen de entrega
3 Volumen de entrega
Pos. en
fig. 1,
página 3
1 Cargador de batería
2 Cable de conexión con clavija de 12 V (mechero del vehículo)
3 Cable de conexión con terminales de cable
4 Cable de conexión con bornes de la batería
– Instrucciones de uso
Denominación
4Accesorios
Disponibles como accesorios (no incluidos en el volumen de entrega):
Denominación N.° de art.
Indicador de batería
(inclusive cable de conexión con terminales de cable)
Soporte de pared para el cargador de batería 9102500079
9600000094
65

ES
Uso adecuado PerfectCharge MCP1204/1207
5Uso adecuado
El cargador de batería puede cargar o suministrar tensión de mantenimiento a
baterías de 12 V que se utilizan a bordo de vehículos o embarcaciones para generar
corriente.
El cargador de batería puede utilizarse con los siguientes tipos de baterías:
• Baterías de arranque de plomo
• Baterías de gel
• Baterías AGM
• Baterías sin mantenimiento
¡AVISO!
A
El cargador de batería está concebido para ser utilizado exclusivamente en recintos
cerrados.
El cargador de batería no es apto para un montaje fijo. Para ello se ha de utilizar el
soporte de pared (accesorio; n.° de art. 9102500079).
El cargador de batería no debe utilizarse con otros tipos de baterías
(p. ej. NiCd, NiMH, etc.) ni en baterías defectuosas (p. ej. con
cortocircuito interno).
66

ES
PerfectCharge MCP1204/1207 Descripción técnica
6 Descripción técnica
Este cargador carga baterías que se utilizan a bordo de vehículos o embarcaciones
como fuente de tensión o les suministra tensión de mantenimiento a fin de que no se
descarguen.
La vida útil de la mayoría de baterías de plomo queda reducida por la llamada sulfatación: el sulfato plúmbico forma con el paso del tiempo cristales grandes y lisos. Por
ello desaparece la estructura amorfa y poco definida. La facilidad y la capacidad de
carga se reducen sistemáticamente y la batería se deteriora.
En partes de su característica de carga, el cargador de batería trabaja con determinadas frecuencias específicas. De esta forma se produce la oscilación de los cristales
en su propia frecuencia. Estos se desintegran en su estructura amorfa. Sus moléculas
pueden volver a integrarse en el proceso de carga. De esta forma aumentan de
nuevo la tensión de carga, la corriente de ensayo en frío y la capacidad de la batería.
Cargando regularmente todas las baterías de plomo se previene un envejecimiento
prematuro.
El cargador de batería se puede utilizar en tres modos:
• Modo 1: modo de carga con 14,4 V
Este modo se utiliza para baterías de plomo, de gel y para las baterías que no
requieren mantenimiento.
• Modo 2: modo de carga con 14,7 V
Este modo se utiliza para baterías AGM.
• Modo 3: alimentación de tensión con 13,7 V (la batería no está conectada)
Este modo actúa de fuente de alimentación para, por ejemplo, suministrar
tensión al vehículo al cambiar la batería o durante los trabajos de mantenimiento
con aparatos de mantenimiento.
El aparato se puede guardar de forma estacionaria en el soporte de pared
(accesorio).
También se puede utilizar un indicador externo de batería (accesorio). Este indicador muestra la capacidad de la batería y se puede conectar de forma permanente a
la misma por medio de un cable de conexión con terminales de cable. Cuando se
indica que la batería está descargada, se puede conectar el cargador de batería al
indicador de batería para cargar directamente la batería.
El indicador de batería puede fijarse a la pared con un soporte de pared o bien al
soporte de pared del cargador de batería.
67

ES
Descripción técnica PerfectCharge MCP1204/1207
6.1 Elementos de mando
NOTA
I
Pos. en
fig. 2,
página 3
En la imagen se representa la versión para Europa continental.
Denominación Descripción
1 LED de estado Véase capítulo “Indicaciones de funcionamiento” en la
página 69
2 Pulsador Selecciona el modo de funcionamiento:
Modo 1: presionar el pulsador durante 1 s
(la batería está conectada)
Modo 2: presionar el pulsador durante 5 s
(la batería está conectada)
Modo 3: presionar el pulsador durante 10 s
(la batería no está conectada)
3 Cable de 230 V Conexión a la tensión de red
4 Cable de 12 V Conexión para el cable de conexión
5 Compartimento para
cable
Para guardar el cable de conexión
68

ES
PerfectCharge MCP1204/1207 Descripción técnica
6.2 Indicaciones de funcionamiento
Denominación Descripción
LED rojo Intermitencia: se ha invertido la polaridad o la tensión de la batería
es inferior a 9 V.
Iluminación permanente: la conexión a la batería se ha interrumpido
durante el proceso de carga.
LED verde Iluminación permanente: está activo el modo 1 o el modo 3.
Intermitencia: modo 2 activo.
LED azules En el modo 1 y 2, los LED indican en qué fase se encuentra el
cargador de batería (ver la tabla siguiente).
Los LED parpadean sucesivamente cuando el cargador de batería
se encuentra en estado de espera (la tensión de red está conectada,
la batería no está conectada).
Los LED parpadean simultáneamente cuando el cargador de batería
está listo para el funcionamiento (la tensión de red está conectada,
el pulsador no está presionado).
Significado de los LED azules (modos 1 y 2)
12 345678
14 V
U
14,4 V
Mode 2
Mode 1
14,7 V
13,8 V
14,4 V
12,8 V
4
3
2
1
Leyenda de la figura:
Estado del LED Significado
Apagado
Intermitencia
Luz constante
t
69

ES
Descripción técnica PerfectCharge MCP1204/1207
6.3 Función de carga de batería
El funcionamiento del cargador de batería atraviesa ocho fases (fig. 3, página 4).
1: Desulfatación (Desulphation)
En la fase de desulfatación se tratan las baterías sulfatadas. Se emiten pulsos de
corriente y tensión que provocan que el sulfato se desintegre en su estructura
amorfa. Con ello se restablece nuevamente la capacidad de la batería.
2: Arranque suave
En la fase de arranque suave se comprueba la capacidad de carga de la batería a
partir del consumo de corriente. Si la batería está defectuosa se interrumpe el
proceso de carga.
3: fase I (Bulk)
La batería descargada se carga con corriente constante (100 % de la corriente de
carga). En cuanto la tensión de la batería alcanza la tensión de carga, se reduce la
corriente de tensión.
4: fase U0 (Absorption)
Durante la fase U0, la tensión permanece constante (U0). Cuando la batería está
totalmente cargada, finaliza la fase U0.
5: análisis
En la fase de análisis se comprueba el mantenimiento de carga de la batería. Si la
tensión decae con mucha rapidez, la batería no puede mantener la carga y se
deberá cambiar.
6: Reacondicionamiento (Recondition)
En la fas e de reacondicionamiento se vuelve a aumentar la tensión para generar en la
batería una formación de gas controlada. Esta formación de gas impide que se
produzca la estratificación del ácido (distintas concentraciones de ácido en las
celdas de la batería).
7: Fase U (Float)
En la fase U, el cargador de batería cambia a la carga de mantenimiento. La tensión
de la batería se mantiene al 100 %.
70

ES
PerfectCharge MCP1204/1207 Uso del cargador de batería
8: Mantenimiento (Maintenance)
En la fase de mantenimiento se desconecta la tensión de carga y se mide
permanentemente la tensión de la batería, de modo que cuando ésta desciende de
12,8 V, el cargador carga la batería a un máximo de 14,4 V. A continuación, vuelve a
desconectar la tensión de carga y vuelve a medir la tensión de la batería.
De esta forma la batería atraviesa el invierno de forma segura.
7 Uso del cargador de batería
¡AVISO!
A
7.1 Conectar el cargador de batería
➤ Asegúrese de que la batería se encuentre en perfecto estado.
➤ Compruebe:
– que la carcasa de la batería no presente daños
– el estado del líquido de la batería
–los polos
Asegúrese de no invertir la polaridad:
• Borne positivo de la batería: borne rojo
• Borne negativo de la batería: borne negro
Una polaridad incorrecta puede dañar el cargador de batería.
En caso necesario, rellene la batería con el líquido indicado por el fabricante.
Limpie los posibles restos de suciedad.
➤ Conecte el cable de red del cargador de batería a la red de corriente alterna de
230 V.
➤ Si utiliza el cable de conexión con la clavija de 12 V: conecte el encendido del
vehículo.
71

ES
Uso del cargador de batería PerfectCharge MCP1204/1207
Conexión del cargador de batería a una batería (fig. 4, página 4)
NOTA
I
➤ Enchufe la clavija de carga (1) en la toma de 12 Vg (por ejemplo, mechero del
vehículo) o …
➤ … conecte el cable de conexión (2) con los bornes de la batería a la batería (3) o
a los puntos de carga de la batería previstos en el vehículo.
El cable de conexión con la clavija de 12 V únicamente es apto para el
uso de cables y accesorios.
7.2 Uso del cargador de batería
➤ Seleccione el modo que desee:
Modo 1 (la batería está conectada): presione el pulsador durante 1 segundos.
Modo 2 (la batería está conectada): presione el pulsador durante 5 segundos.
Modo 3 (la batería no está conectada): presione el pulsador durante
10 segundos.
✓ El proceso de carga se inicia en los modos 1 y 2.
En el modo 3 se inicia la alimentación de tensión constante.
✓ Los LED indican el proceso de carga de la batería conectada al cargador (ver
capítulo “Indicaciones de funcionamiento” en la página 69).
➤ Para finalizar el proceso de carga, vuelva a presionar el pulsador.
NOTA
I
Si el LED rojo parpadea porque la tensión de la batería es inferior a 9 V,
puede cargar la batería en el modo 3 a través de 9 V. Para ello desconecte la batería y conecte en el modo 3. Cuando la batería esté cargada
a través de 9 V, puede conectar el cargador de batería nuevamente en
el modo 1 o 2 para comenzar un proceso de carga regular.
72

ES
PerfectCharge MCP1204/1207 Uso de accesorios
8 Uso de accesorios
NOTA
I
8.1 Guardar el cargador de batería en el soporte de
Indicaciones para el montaje
Al elegir el lugar de montaje del soporte de pared, tenga en cuenta las siguientes
indicaciones:
• El soporte de pared se debe montar en un lugar protegido contra la humedad.
• El soporte de pared no se debe montar en un entorno con materiales
inflamables.
• El soporte de pared no se puede montar en un entorno polvoriento.
• La superficie de montaje tiene que ser plana y tener una resistencia suficiente.
Montaje del soporte de pared
Los accesorios no van incluidos en el volumen de entrega.
Para cualquier pregunta respecto a los accesorios diríjase a su socio de
servicio.
pared
Monte el soporte de pared como se indica a continuación (fig. 5, página 5):
➤ Fije el soporte de pared (1) en el lugar de montaje que haya elegido.
➤ Fije el adaptador (2) al cargador de batería (3).
Guardar el cargador de batería
Conecte el cargador de batería como se indica a continuación (fig. 5, página 5):
➤ Desde arriba, deslice el cargador de batería (3) con el adaptador en los soportes
de terminación cónica.
Para soltarlo, desencaje hacia arriba el cargador de batería de los soportes.
73

ES
Mantenimiento y limpieza del cargador de batería PerfectCharge MCP1204/1207
8.2 Uso del cargador de batería con indicador de batería
NOTA
I
➤ Conecte el cargador de batería directamente al indicador de batería.
➤ Utilice el cargador de batería tal y como se describe (ver capítulo “Uso del carga-
dor de batería” en la página 72).
En las instrucciones de montaje y de uso del indicador de batería,
encontrará indicaciones para la conexión al indicador de batería y para
el uso del indicador de batería.
9 Mantenimiento y limpieza del cargador
de batería
¡AVISO!
A
➤ Limpie de vez en cuando el producto con un paño húmedo.
No utilice ningún objeto o producto de limpieza corrosivo o duro en la
limpieza, ya que podría dañar el producto.
74

ES
PerfectCharge MCP1204/1207 Solución de fallos
10 Solución de fallos
¡ADVERTENCIA!
!
I
El LED rojo indica un fallo:
Indicador LED Causa Solución
Intermitencia Inversión de polaridad Compruebe los cables y las
Intermitencia Tensión de la batería < 9 V No se puede cargar la batería.
Iluminación
permanente
¡No abra el aparato! ¡Corre el riesgo de sufrir una descarga eléctrica!
NOTA
Para preguntas detalladas sobre los datos del cargador de batería,
póngase en contacto con el fabricante (encontrará las direcciones al
dorso de las instrucciones).
conexiones.
Cambie la batería.
La batería ya no está
conectada
La conexión a la batería se ha interrumpido durante el proceso de carga.
Compruebe los cables y las
conexiones.
Ha saltado el fusible del cable
de conexión
Cambie el fusible (fusible de automóvil
de 10 A)
75

ES
Garantía legal PerfectCharge MCP1204/1207
11 Garantía legal
Rige el plazo de garantía legal. Si el producto presenta algún defecto, diríjase a la
sucursal del fabricante de su país (ver direcciones en el dorso de estas instrucciones)
o a su establecimiento especializado.
Para la tramitación de la reparación y de la garantía debe enviar también los siguientes documentos:
• una copia de la factura con fecha de compra,
• el motivo de la reclamación o una descripción de la avería.
12 Gestión de residuos
➤ Deseche el material de embalaje en el contenedor de reciclaje correspondiente.
Cuando vaya a desechar definitivamente el producto, infórmese en el
centro de reciclaje más cercano o en un comercio especializado sobre las
M
normas pertinentes de eliminación de materiales.
76

ES
PerfectCharge MCP1204/1207 Datos técnicos
13 Datos técnicos
PerfectCharge
MCP1204
Tensión nominal de entrada: 230 Vw
Corriente máx. de entrada
permanente:
Tensión de absorción: 14,4 V ± 0,2 V (modo 1)
Tensión de mantenimiento: 13,8 V ± 0,2 V
Tensión de salida modo 3: 13,7 V ± 0,2 V
Corriente máxima de carga: 4,0 A 7,0 A
Eficacia hasta: 85 %
Tipos de batería: Baterías de 12 V:
Capacidades de batería
recomendadas:
Carga: 7 – 110 Ah 15 – 160 Ah
Carga de mantenimiento: 7 – 180 Ah 15 – 250 Ah
4,0 A ± 0,25 A 7,0 A ± 0,5 A
14,7 V ± 0,2 V (modo 2)
Baterías de arranque de plomo
Baterías de gel
Baterías AGM
Baterías sin mantenimiento
PerfectCharge
MCP1207
Clase de protección: IP65
Temperatura ambiente para el
funcionamiento:
Temperatura ambiente
almacenamiento:
Dimensiones A x P x H: 90 x 220 x 55 mm 90 x 250 x 55 mm
Peso: 0,5 kg 0,7 kg
Homologaciones:
de –5 °C a +50 °C
de –20 °C a +70 °C
77

PT
PerfectCharge MCP1204/1207
Por favor, leia atentamente este manual antes da colocação em funcionamento do aparelho e guarde-o em local seguro. Em caso de transmissão do
produto, entregue o manual ao novo utilizador.
Índice
1 Explicação dos símbolos . . . . . . . . . . . . . . . . . . . . . . . . . . . . . . . . . . . . . . . 79
2 Indicações gerais de segurança . . . . . . . . . . . . . . . . . . . . . . . . . . . . . . . . . . 79
3 Material fornecido. . . . . . . . . . . . . . . . . . . . . . . . . . . . . . . . . . . . . . . . . . . . . 84
4 Acessórios . . . . . . . . . . . . . . . . . . . . . . . . . . . . . . . . . . . . . . . . . . . . . . . . . . . 84
5 Utilização adequada . . . . . . . . . . . . . . . . . . . . . . . . . . . . . . . . . . . . . . . . . . . 84
6 Descrição técnica . . . . . . . . . . . . . . . . . . . . . . . . . . . . . . . . . . . . . . . . . . . . . 85
7 Utilizar o carregador da bateria . . . . . . . . . . . . . . . . . . . . . . . . . . . . . . . . . . 89
8 Utilizar o acessório . . . . . . . . . . . . . . . . . . . . . . . . . . . . . . . . . . . . . . . . . . . . 90
9 Conservar e limpar o carregador da bateria . . . . . . . . . . . . . . . . . . . . . . . . .91
10 Eliminação de erros. . . . . . . . . . . . . . . . . . . . . . . . . . . . . . . . . . . . . . . . . . . . 92
11 Garantia . . . . . . . . . . . . . . . . . . . . . . . . . . . . . . . . . . . . . . . . . . . . . . . . . . . . . 93
12 Eliminação . . . . . . . . . . . . . . . . . . . . . . . . . . . . . . . . . . . . . . . . . . . . . . . . . . . 93
13 Dados técnicos . . . . . . . . . . . . . . . . . . . . . . . . . . . . . . . . . . . . . . . . . . . . . . . 94
78

PT
PerfectCharge MCP1204/1207 Explicação dos símbolos
1 Explicação dos símbolos
PERIGO!
D
!
!
A
I
Indicação de segurança: o incumprimento causa a morte ou
ferimentos graves.
AVISO!
Indicação de segurança: o incumprimento pode provocar a morte ou
ferimentos graves.
PRECAUÇÃO!
Indicação de segurança: o incumprimento pode provocar
ferimentos.
NOTA!
O incumprimento pode causar danos materiais e pode prejudicar o
funcionamento do produto.
OBSERVAÇÃO
Informações suplementares sobre a operação do produto.
2 Indicações gerais de segurança
2.1 Segurança geral
O fabricante não se responsabiliza por danos nos seguintes casos:
• Erros de montagem ou de conexão
• Danos no produto resultantes de influências mecânicas e sobretensões
• Alterações ao produto sem autorização expressa do fabricante
• Utilização para outras finalidades que não as descritas no manual de instruções
Tenha em atenção as seguintes medidas de segurança fundamentais na utilização de
aparelhos elétricos para a proteção contra:
• Choque elétrico
• Perigo de incêndio
• Ferimentos
79

PT
Indicações gerais de segurança PerfectCharge MCP1204/1207
2.2 Princípios básicos de segurança
PERIGO!
D
!
• Em caso de incêndio utilize um extintor que seja adequado para apa-
relhos elétricos.
AVISO!
• Utilize o aparelho apenas para o fim previsto.
• Tenha atenção para que o borne vermelho e o borne preto nunca se
toquem.
• Desligue o aparelho da rede elétrica
– antes de cada limpeza e conservação
– após cada utilização
– antes da mudança de fusíveis
• Se o aparelho ou o cabo de conexão apresentar danos visíveis, o
mesmo não deve ser colocado em funcionamento.
• Se o cabo de conexão deste aparelho se danificar, o mesmo tem de
ser substituído pelo fabricante, pelo seu serviço de assistência técnica
ou por uma pessoa com qualificações equivalentes para evitar perigos.
• As reparações neste aparelho apenas devem ser realizadas por técnicos especializados. As reparações inadequadas podem provocar
perigos substanciais.
• O aparelho não pode ser aberto incorretamente, caso contrário a
classe de proteção IP65 deixa de estar garantida.
• Este aparelho pode ser utilizado por crianças a partir dos 8 anos, assim
como por pessoas com capacidades físicas, sensoriais ou mentais
reduzidas ou com insuficiente experiência e conhecimento, quando
supervisionadas ou quando tenham recebido informação acerca da
utilização segura do aparelho e compreendam os perigos dele resultantes.
• Os aparelhos elétricos não são brinquedos!
Guarde e utilize o aparelho fora do alcance das crianças.
• As crianças devem ser supervisionadas para assegurar que não brincam com o aparelho.
80

PT
PerfectCharge MCP1204/1207 Indicações gerais de segurança
NOTA!
A
2.3 Segurança durante a ligação elétrica do aparelho
D
• Antes da colocação em funcionamento, compare a indicação da
tensão na placa de características com a alimentação de energia
existente.
• Tenha atenção para que outros objetos não causem curto-circuito
nos contactos do aparelho.
• Nunca retire a ficha da tomada elétrica puxando pelo cabo de
conexão.
• Guarde o aparelho num local seco e fresco.
PERIGO! Perigo de morte devido a choque elétrico!
• No caso de conexão em embarcações:
Se os aparelhos elétricos forem instalados incorretamente em embarcações, podem ocorrer danos na embarcação causados por corrosão. A conexão do aparelho deve ser efetuada por um eletricista
(naval).
• Quando trabalha em unidades elétricas, certifique-se que está alguém
por perto para o ajudar em caso de emergência.
!
!
AVISO!
• Utilize sempre tomadas elétricas com ligação à terra e protegidas por
fusíveis de proteção FI.
• Tenha atenção a uma secção transversal suficiente do cabo!
• Coloque os cabos de forma a que não sejam danificados através de
portas ou de capôs de motores.
Cabos trilhados podem conduzir a ferimentos com risco de vida.
PRECAUÇÃO!
• Coloque os cabos de modo a que não exista perigo de queda e que
se possa excluir danos nos cabos.
81

PT
Indicações gerais de segurança PerfectCharge MCP1204/1207
2.4 Segurança durante a utilização do aparelho
PERIGO! Perigo de morte devido a choque elétrico!
D
!
!
• Nunca toque nos cabos não blindados apenas com as mãos. Isto
aplica-se, em especial, durante o funcionamento com rede de
corrente alterna.
• Para poder separar rapidamente o aparelho da rede em caso de
perigo, a tomada elétrica deve-se encontrar nas proximidades do
aparelho e ser de fácil acesso.
AVISO!
• Use o aparelho exclusivamente em espaços fechados e bem
ventilados.
• Não utilize o aparelho em espaços fechados com baterias de ácido
de chumbo. Estas baterias libertam hidrogénio gasoso explosivo, que
pode ser incendiado com uma faísca causada pelas ligações elétricas.
PRECAUÇÃO!
• Não opere o aparelho
– em ambiente salífero, húmido ou molhado
– na proximidade de vapores agressivos
– na proximidade de materiais inflamáveis
– em atmosferas potencialmente explosivas
• Antes da colocação em funcionamento, certifique-se de que o cabo
de alimentação e a ficha estão secos.
• Para realizar trabalhos no aparelho, deve interromper sempre a
alimentação de corrente.
• Tenha em atenção que mesmo depois de disparar o dispositivo de
segurança (fusível) há peças do aparelho que podem permanecer sob
tensão.
• Não solte cabos enquanto o aparelho estiver em funcionamento.
A
82
NOTA!
• Assegure uma boa ventilação.

PT
PerfectCharge MCP1204/1207 Indicações gerais de segurança
2.5 Segurança ao manusear as baterias
AVISO!
!
!
• As baterias podem conter ácidos agressivos e cáusticos. Evite
qualquer tipo de contacto do corpo com o líquido das baterias. Se,
mesmo assim, entrar em contacto com o líquido das baterias, então
deve lavar a respectiva parte do corpo exaustivamente com água.
No caso de ferimentos devido ao ácido é imprescindível consultar
um médico.
PRECAUÇÃO!
• Durante o trabalho com as baterias, não use objectos metálicos como
relógios ou anéis.
Baterias de ácido de chumbo podem gerar correntes de curtocircuito que podem causar graves queimaduras.
• Perigo de explosão!
Nunca tente carregar uma bateria congelada ou com defeito.
Neste caso guarde a bateria num local sem gelo e aguarde até a
bateria estar adaptada à temperatura ambiente. Só depois deve
começar o processo de carregamento.
• Use óculos e vestuário de protecção quando trabalhar com as
baterias. Não toque nos olhos enquanto trabalha com as baterias.
• Não fume e certifique-se de que não são criadas faíscas perto do
motor ou da bateria.
A
NOTA!
• Use exclusivamente baterias recarregáveis.
• Evite que caiam peças metálicas em cima da bateria. Isto pode causar
faíscas ou um curto-circuito na bateria ou em outras peças eléctricas.
• Durante a conexão, tenha atenção à polaridade correcta.
• Tenha tenção aos manuais do fabricante das baterias e do fabricante
da unidade ou do veículo, no qual é usada a bateria.
• Caso tenha de desmontar a bateria, separe a mesma da ligação da
massa. Separe todas as ligações e todos os consumidores da bateria
antes de desmontar a mesma.
83

PT
Material fornecido PerfectCharge MCP1204/1207
3 Material fornecido
Pos. na
fig. 1,
página 3
1 Carregador da bateria
2 Cabo de conexão com ficha de 12 V (isqueiro)
3 Cabo de conexão com terminal de cabos
4 Cabo de conexão com bornes da bateria
– Manual de instruções
Designação
4Acessórios
Disponível como acessório (não consta do material fornecido):
Designação N.º art.
Indicador da bateria
(incluindo cabo de conexão com terminais de cabos)
Suporte de parede para carregador da bateria 9102500079
9600000094
5Utilização adequada
O carregador da bateria pode carregar ou alimentar com corrente de conservação,
baterias de 12 V, que são usadas a bordo de veículos ou embarcações para gerar
corrente.
O carregador da bateria pode ser utilizado com os seguintes tipos de bateria:
• Baterias de arranque de chumbo
• Baterias de gel
• Baterias AGM
• Baterias isentas de manutenção
NOTA!
A
84
O carregador da bateria não pode ser utilizado com outros tipos de
bateria (por ex. NiCd, NiMH, etc.) ou com baterias avariadas (por ex.
com curto-circuito).

PT
PerfectCharge MCP1204/1207 Descrição técnica
O carregador da bateria destina-se exclusivamente a ser utilizado em locais
fechados.
O carregador da bateria não se destina a ser montado de forma fixa. Para isso é
necessário utilizar um suporte de parede (acessório; n.º art. 9102500079).
6 Descrição técnica
O carregador da bateria que é usado para gerar corrente a bordo de veículos ou
embarcações ou alimenta as mesmas com uma tensão de conservação de modo a
que não descarreguem.
A vida útil da maioria das baterias de chumbo é diminuída através da chamada
sulfatização: com o passar do tempo, o sulfato de chumbo transforma-se em cristais
lisos de grandes dimensões. Assim, desaparece a estrutura esponjosa amorfa. A
capacidade de carga e, assim, a capacidade de carregamento diminuem
sistematicamente, fazendo com que a bateria envelheça.
O carregador da bateria funciona, nos componentes da sua característica de
carregamento, com frequências específicas. Assim, os cristais são levados a vibrar
na sua própria frequência. Voltam então a desintegrar-se para a sua estrutura amorfa.
As suas moléculas podem ser novamente integradas no processo de carregamento.
Deste modo, a tensão de carga, a corrente de ensaio a frio e a capacidade da bateria
aumentam novamente.
Todas as baterias de chumbo são protegidas contra o envelhecimento precoce
através do carregamento regular com um carregador da bateria.
O carregador da baterias pode ser operado em três modos de operação:
• Modo 1: Modo de carregamento com 14,4 V
Este modo é utilizado nas baterias de chumbo, gel e nas baterias sem
manutenção.
• Modo 2: Modo de carregamento com 14,7 V
Este modo é utilizado nas baterias AGM.
• Modo 3: Alimentação de tensão com 13,7 V (bateria desconetada)
Este modo funciona como fonte de alimentação, por exemplo, para alimentação
de tensão do veículo durante a mudança da bateria ou nos trabalhos de manutenção com aparelhos de assistência técnica.
Para um armazenamento fixo, o aparelho pode ser fixado na parede com o suporte
de parede (acessório).
85

PT
Descrição técnica PerfectCharge MCP1204/1207
Além disso pode ainda ser utilizado um indicador da bateria externo (acessório).
Este indica a capacidade da bateria e pode estar ligado permanentemente à bateria
através do cabo de conexão com terminais de cabos. Se a bateria for indicada como
estando vazia, é possível ligar o carregador da bateria ao indicador da bateria e fazer
o carregamento direto.
O indicador da bateria pode ser fixo a um suporte de parede ou ao suporte de
parede de um carregador da bateria.
6.1 Elementos de comando
OBSERVAÇÃO
I
Pos. na
fig. 2,
página 3
A versão ilustrada destina-se à Europa continental.
Designação Descrição
1 LED de estado Ver capítulo “Indicações de funcionamento” na
página 87
2 Botão Seleciona o modo de funcionamento:
Modo 1: Premir o botão durante 1 segundos
(bateria conetada)
Modo 2: Premir o botão durante 5 segundos
(bateria conetada)
Modo 3: Premir o botão durante 10 segundos
(Bateria desconetada)
3 Cabo de 230 V Conexão à rede de alimentação
4 Cabo de 12 V Conexão para cabo de conexão
5 Compartimento para
cabo
Para armazenamento do cabo de conexão
86

PT
PerfectCharge MCP1204/1207 Descrição técnica
6.2 Indicações de funcionamento
Designação Descrição
LED vermelho Piscar: Polaridade trocada ou tensão da bateria inferior a 9 V.
Luz permanente: A conexão à bateria foi interrompida durante o
processo de carregamento.
LED verde Luz permanente: Modo 1 ou Modo 3 ativo.
Piscar: O modo 2 está ativo.
LED azuis Os LED indicam, nos Modos 1 e 2, em que fase se encontra o
carregador da bateria (ver tabela seguinte).
Os LED piscam sequencialmente se o carregador da bateria se
encontrar no modo de espera (a tensão de rede está conetada, a
bateria não está conetada).
Os LED piscam simultaneamente quando o carregador da bateria
estiver operacional (a tensão de rede está conetada, bateria ligada,
botão não premido).
Significado dos LED azuis (Modos 1 e 2)
12 345678
14 V
U
14,4 V
Mode 2
Mode 1
14,7 V
13,8 V
14,4 V
12,8 V
4
3
2
1
Legenda da figura:
Estado LED Significado
Desligado
Piscar
Luz permanente
t
87

PT
Descrição técnica PerfectCharge MCP1204/1207
6.3 Função de carregamento da bateria
O carregador da bateria funciona em oito fases (fig. 3, página 4).
1: Dessulfatação (Desulphasion)
Na fase de dessulfatação é provocada a vibração de baterias sulfatadas. A pulsação
da corrente e da tensão desintegra o sulfato que volta à sua estrutura amorfa. A capacidade da bateria é restabelecida.
2: Soft Start
Na fase de Soft Start a capacidade de carga da bateria é verificada com base no
consumo de corrente. Se a bateria estiver danificada, o processo de carga é interrompido.
3: Fase I (Bulk)
A bateria vazia é carregada com corrente constante (100 % corrente de caga). Assim
que a tensão da bateria tenha alcançado a tensão de carga, a corrente de carga
diminui.
4: Fase U0 (Absorption)
Durante a fase U0 a tensão mantém-se constante (U0). Quando a bateria está totalmente carregada, termina a fase U0.
5: Análise
Na fase de Análise é verificada a manutenção da carga da bateria. Se a tensão cair
demasiado rápido significa que a bateria não consegue manter a carga, devendo ser
substituída.
6: Recondicionamento (Recondition)
Na fase de recondicionamento a tensão é novamente aumentada, de modo a gerar
uma formação de gás controlada na bateria. Esta formação de gás impede a estratificação do ácido (concentrações de ácido distintas nas células das baterias).
7: Fase U (Float)
Na fase U o carregador da bateria comuta para o carregamento de conservação. A
tensão da bateria é mantida nos 100 %.
88

PT
PerfectCharge MCP1204/1207 Utilizar o carregador da bateria
8: Manutenção (Maintenance)
Na fase de manutenção, a tensão de carregamento desliga-se e a tensão da bateria
é medida permanentemente. Se descer abaixo de 12,8 V, o carregador da bateria
carrega a bateria para o máximo de 14,4 V. Em seguida, a tensão de carregamento
é novamente desligada e a tensão da bateria volta a ser medida.
Esta medida permite, entre outros, uma maior segurança durante o período de
inverno.
7 Utilizar o carregador da bateria
NOTA!
A
7.1 Ligar o carregador da bateria
➤ Verifique se a bateria está em bom estado.
➤ Verifique:
– se a caixa da bateria apresenta danos
– o nível de líquido da bateria
– os contactos dos polos
Tenha atenção para que a polaridade não seja trocada:
• Borne positivo da bateria: borne vermelho
• Borne negativo da bateria: borne preto
A polaridade incorreta pode danificar o carregador da bateria.
Encha a bateria, se necessário, com o meio indicado pelo fabricante.
Remova eventuais sujidades.
➤ Conete o cabo de alimentação do carregador da bateria à rede de corrente
alternada de 230 V.
➤ Se utilizar o cabo de conexão com a ficha de 12 V: Ligue a ignição do seu veículo.
Ligar o carregador da bateria à bateria (fig. 4, página 4)
OBSERVAÇÃO
I
➤ Ligue a ficha do carregador (1) à tomada de 12 Vg (por exemplo isqueiro) ou …
➤ … ligue o cabo de conexão (2) com os bornes da bateria à bateria (3) ou aos
pontos de carregamento previstos no veículo.
O cabo de conexão e a ficha de 12 V é adequado exclusivamente para
uso com os cabos e acessórios.
89

PT
Utilizar o acessório PerfectCharge MCP1204/1207
7.2 Utilizar o carregador da bateria
➤ Selecione o modo desejado:
Modo 1 (bateria está conetada): Prima o botão durante 1 segundos.
Modo 2 (bateria está conetada): Prima o botão durante 5 segundos.
Modo 3 (bateria desconetada): Prima o botão durante 10 segundos.
✓ Nos modos 1 e 2 o processo de carregamento arranca.
O modo 3 arranca com uma tensão de alimentação constante.
✓ Os LED indicam a progressão do carregamento da bateria (ver capítulo “Indica-
ções de funcionamento” na página 87).
➤ Para terminar o processo de carregamento, verifique novamente o botão.
OBSERVAÇÃO
I
Quando o LED vermelho piscar, devido à tensão da bateria se encontrar
abaixo de 9 V, poderá carregar a bateria acima de 9 V no modo 3. Para
tal, retire a bateria e comute para o modo 3. Quando a bateria estiver
carregada com mais de 9 V, poderá voltar a comutar o carregador da
bateria para o modo 1 ou 2 a fim de iniciar um carregamento regular.
8 Utilizar o acessório
OBSERVAÇÃO
I
O acessório não faz parte do material fornecido.
Caso subsistam dúvidas quanto ao acessório dirija-se, por favor, ao
serviço de assistência técnica da sua área.
8.1 Guardar o carregador da bateria no suporte de
parede
Indicações de montagem
Ao selecionar o local de montagem do suporte de parede, tenha atenção às
seguintes indicações:
• O suporte de parede deve ser montado num local protegido da humidade.
• O suporte de parede não pode ser montado em ambientes com materiais
inflamáveis.
• O suporte de parede não pode ser montado em ambientes com poeiras.
• A superfície de montagem deve ser plana e apresentar uma estabilidade
suficiente.
90

PT
PerfectCharge MCP1204/1207 Conservar e limpar o carregador da bateria
Montar o suporte de parede
Montar o suporte de parede do seguinte modo (fig. 5, página 5):
➤ Fixe o suporte de parede (1) no local de montagem selecionado.
➤ Fixe o adaptador (2) ao carregador da bateria (3).
Guardar o carregador da bateria
Guardar o carregador da bateria do seguinte modo (fig. 5, página 5):
➤ Insira o carregador da bateria (3) com o adaptador nos apoios cónicos, a partir
de cima.
Para soltar, puxar o carregador da bateria para cima, retirando-o dos apoios.
8.2 Utilizar o carregador da bateria com o indicador da
bateria
OBSERVAÇÃO
I
➤ Ligar o carregador da bateria ao indicador da bateria.
Encontra mais informação relativa à conexão ao indicador da bateria e à
utilização do indicador da bateria no manual de montagem e operação
do indicador da bateria.
➤ Utilize o carregador da bateria conforme descrito (ver capítulo “Utilizar o carre-
gador da bateria” na página 90).
9 Conservar e limpar o carregador da
bateria
NOTA!
A
➤ De vez em quando, limpe o aparelho com um pano húmido.
Não utilizar objectos afiados ou duros ou agentes de limpeza para
a limpeza, uma vez que podem ser causados danos no produto.
91

PT
Eliminação de erros PerfectCharge MCP1204/1207
10 Eliminação de erros
AVISO!
!
I
O LED vermelho sinaliza uma avaria:
Indicação LED Causa Eliminação
Piscar Polos Verifique os cabos e as conexões.
Piscar Tensão da bateria < 9 V A bateria não pode ser carregada.
Não abra o aparelho. Corre o risco de sofrer um choque elétrico!
OBSERVAÇÃO
Caso surjam questões mais pormenorizada relativamente aos dados
do carregador da bateria queira entrar em contacto com o fabricante
(endereços ver no verso do manual).
Substituir a bateria.
Luzes
permanentes
Bateria não conetada A conexão à bateria foi interrompida
durante o processo de carregamento.
Verifique os cabos e as conexões.
O fusível do cabo de
conexão disparou
Substitua o fusível (fusível de encaixe
automóvel de 10 A)
92

PT
PerfectCharge MCP1204/1207 Garantia
11 Garantia
É válido o prazo de garantia legal. Se o produto estiver com defeito, por favor,
dirija-se à representação do fabricante no seu país (endereços, ver verso do manual)
ou ao seu revendedor.
Para fins de reparação ou de garantia, terá de enviar os seguintes documentos em
conjunto:
• uma cópia da factura com a data de aquisição,
• um motivo de reclamação ou uma descrição da falha.
12 Eliminação
➤ Sempre que possível, coloque o material de embalagem no respectivo
contentor de reciclagem.
Para colocar o aparelho definitivamente fora de funcionamento, por
favor, informe-se junto do centro de reciclagem mais próximo ou
M
revendedor sobre as disposições de eliminação aplicáveis.
93

PT
Dados técnicos PerfectCharge MCP1204/1207
13 Dados técnicos
PerfectCharge
MCP1204
Tensão nominal de entrada: 230 Vw
Duração máx. da corrente de saída: 4,0 A ± 0,25 A 7,0 A ± 0,5 A
Tensão de absorção: 14,4 V ± 0,2 V (Modo 1)
14,7 V ± 0,2 V (Modo 2)
Tensão de conservação: 13,8 V ± 0,2 V
Tensão de saída Modo 3: 13,7 V ± 0,2 V
Corrente de carregamento máx.: 4,0 A 7,0 A
Eficiência até: 85 %
Tipos de baterias: Baterias de 12 V:
Baterias de arranque de chumbo
Baterias de gel
Baterias AGM
Baterias isentas de manutenção
Capacidades da bateria recomendadas:
Carregamento: 7 – 110 Ah 15 – 160 Ah
Carregamento de conservação: 7 – 180 Ah 15 – 250 Ah
Classe de proteção: IP65
Temperatura ambiente – funcionamento: –5 °C a +50 °C
PerfectCharge
MCP1207
Temperatura ambiente –
armazenamento:
Dimensões L x P x A: 90 x 220 x 55 mm 90 x 250 x 55 mm
Peso: 0,5 kg 0,7 kg
Certificações:
–20°C a +70°C
94

IT
PerfectCharge MCP1204/1207
Prima di effettuare la messa in funzione, leggere accuratamente questo
manuale di istruzioni, conservarlo e, nel caso in cui il prodotto venga consegnato ad un altro utente, consegnare anche le relative istruzioni.
Indice
1 Spiegazione dei simboli . . . . . . . . . . . . . . . . . . . . . . . . . . . . . . . . . . . . . . . . 96
2 Indicazioni di sicurezza generali. . . . . . . . . . . . . . . . . . . . . . . . . . . . . . . . . . 96
3 Dotazione . . . . . . . . . . . . . . . . . . . . . . . . . . . . . . . . . . . . . . . . . . . . . . . . . . . 101
4 Accessori . . . . . . . . . . . . . . . . . . . . . . . . . . . . . . . . . . . . . . . . . . . . . . . . . . . . 101
5 Uso conforme alla destinazione . . . . . . . . . . . . . . . . . . . . . . . . . . . . . . . . . . 101
6 Descrizione tecnica. . . . . . . . . . . . . . . . . . . . . . . . . . . . . . . . . . . . . . . . . . . .102
7 Impiego del caricabatterie . . . . . . . . . . . . . . . . . . . . . . . . . . . . . . . . . . . . . .106
8 Impiego degli accessori . . . . . . . . . . . . . . . . . . . . . . . . . . . . . . . . . . . . . . . .108
9 Cura e pulizia del caricabatterie . . . . . . . . . . . . . . . . . . . . . . . . . . . . . . . . . .109
10 Eliminazione dei guasti . . . . . . . . . . . . . . . . . . . . . . . . . . . . . . . . . . . . . . . . . 110
11 Garanzia . . . . . . . . . . . . . . . . . . . . . . . . . . . . . . . . . . . . . . . . . . . . . . . . . . . . 111
12 Smaltimento . . . . . . . . . . . . . . . . . . . . . . . . . . . . . . . . . . . . . . . . . . . . . . . . . 111
13 Specifiche tecniche. . . . . . . . . . . . . . . . . . . . . . . . . . . . . . . . . . . . . . . . . . . . 112
95

IT
Spiegazione dei simboli PerfectCharge MCP1204/1207
1 Spiegazione dei simboli
PERICOLO!
D
!
!
A
I
Avviso di sicurezza: la m anca ta os serv an za d i q ues to av viso comp orta
ferite gravi anche mortali.
AVVERTENZA!
Avviso di sicurezza: la mancata osservanza di questo avviso può
causare ferite gravi anche mortali.
ATTENZIONE!
Avviso di sicurezza: la mancata osservanza di questo avviso può
essere causa di lesioni.
AVVISO!
La mancata osservanza di questa nota può causare danni materiali e
compromettere il funzionamento del prodotto.
NOTA
Informazioni integranti relative all'impiego del prodotto.
2 Indicazioni di sicurezza generali
2.1 Sicurezza generale
Il produttore non si assume nessuna responsabilità per danni nei seguenti casi:
• errori di montaggio o di allacciamento
• danni al prodotto dovuti a influenze meccaniche o a sovratensioni
• modifiche al prodotto senza esplicita autorizzazione del produttore
• impiego per altri fini rispetto a quelli descritti nel manuale di istruzioni
Durante l'uso di apparecchi elettrici attenersi alle misure di sicurezza fondamentali
descritte qui di seguito per proteggersi da:
• scosse elettriche
• pericolo di incendio
• lesioni
96

IT
PerfectCharge MCP1204/1207 Indicazioni di sicurezza generali
2.2 Sicurezza di base
PERICOLO!
D
!
• In caso di incendio usare un estintore per apparecchi elettrici.
AVVERTENZA!
• Utilizzare l'apparecchio solo in conformità all'uso previsto.
• Fare attenzione che il morsetto rosso e quello nero non entrino mai in
contatto.
• Scollegare l'apparecchio dalla rete
– prima di effettuare la pulizia e la cura
– dopo ogni utilizzo
– prima di sostituire un fusibile
• Se l'apparecchio o il cavo di collegamento presentano danni visibili,
non mettere in funzione il dispositivo.
• Se il cavo d i collegamento di questo apparecchio viene danneggiato,
esso deve essere sostituito dal produttore, dal suo servizio assistenza
clienti o da personale ugualmente qualificato, al fine di evitare pericoli.
• Questo apparecchio può essere riparato solo da personale specializzato. Possono insorgere gravi pericoli in seguito a riparazioni non
eseguite in maniera corretta.
• L'apparecchio non può essere aperto in modo improprio altrimenti la
classe di protezione IP65 non può essere garantita.
• Il presente apparecchio può essere usato sia da bambini dagli 8 anni
in su, sia da persone con ridotte capacità fisiche, sensoriali o mentali o
con poca esperienza o conoscenze, se non lasciati soli o se istruiti
sull’utilizzo sicuro dell’apparecchio e in grado di capire i pericoli che
possono sorgere.
• Gli elettrodomestici non sono giocattoli!
Conservare e utilizzare l’apparecchio lontano dalla portata dei
bambini.
• Sorvegliare i bambini per evitare che giochino con l’apparecchio.
97

IT
Indicazioni di sicurezza generali PerfectCharge MCP1204/1207
AVVISO!
A
2.3 Sicurezza durante il collegamento elettrico
D
!
• Prima della messa in funzione, confrontare i dati della tensione riportati
sulla targhetta con quelli delle prese e degli attacchi disponibili.
• Assicurarsi che altri oggetti non causino un cortocircuito sui contatti
dell'apparecchio.
• Non estrarre mai la spina dalla presa tirando il cavo di collegamento.
• Immagazzinare l’apparecchio in un luogo fresco e asciutto.
dell'apparecchio
PERICOLO! Pericolo di morte a causa di scossa elettrica!
• In caso di collegamento su imbarcazioni:
Se gli apparecchi elettrici vengono collegati in modo errato sulle
imbarcazioni, possono verificarsi danni all'imbarcazione dovuti a
corrosione. L'apparecchio deve essere collegato da un elettricista
competente in campo navale.
• Quando si eseguono lavori agli impianti elettrici, assicurarsi che nelle
vicinanze si trovi qualcuno in grado di intervenire in caso di necessità.
AVVERTENZA!
• Utilizzare sempre prese collegate a terra e protette da un interruttore
differenziale di protezione.
• Accertarsi che la sezione del cavo sia sufficientemente ampia.
• Posare le linee in modo che non possano essere danneggiate se fatte
passare attraverso porte o cofani del motore.
Cavi schiacciati possono causare lesioni mortali.
!
98
ATTENZIONE!
• Posare i cavi in modo tale che non sussista pericolo di inciampo e che
si possano escludere eventuali danni al cavo.

IT
PerfectCharge MCP1204/1207 Indicazioni di sicurezza generali
2.4 Sicurezza durante l’utilizzo del dispositivo
PERICOLO! Pericolo di morte a causa di scossa elettrica!
D
!
!
• Non toccare mai i cavi nudi a mani nude. Questo vale soprattutto per
il funzionamento con rete di alimentazione in corrente alternata.
• Per essere in grado di staccare velocemente l'apparecchio dalla rete
in caso di pericolo, è necessario che la presa si trovi nelle vicinanze
dell'apparecchio e che sia facilmente accessibile.
AVVERTENZA!
• Utilizzare l'apparecchio esclusivamente in ambienti chiusi ben aerati.
• Non impiegare l'apparecchio in luoghi chiusi con batterie al piombo
acido. Queste batterie sprigionano gas di idrogeno esplosivo che una
semplice scintilla ai collegamenti elettrici può fare infiammare.
ATTENZIONE!
• Non azionare il dispositivo
– in ambienti salini, umidi o bagnati,
– in prossimità di vapori aggressivi,
– in prossimità di materiali infiammabili,
– in zone a rischio di esplosione.
• Prima della messa in funzione, assicurarsi che la linea di alimentazione
e la spina siano asciutte.
• Interrompere sempre l'alimentazione elettrica qualora si operi
sull'apparecchio.
• Notare che, anche dopo l'attivazione del dispositivo di protezione
(fusibile), alcuni componenti dell'apparecchio possono rimanere
sotto tensione.
• Non staccare nessun cavo se l'apparecchio è ancora in funzione.
A
AVVISO!
• Accertarsi che ci sia una buona aerazione.
99

IT
Indicazioni di sicurezza generali PerfectCharge MCP1204/1207
2.5 Sicurezza durante l'uso delle batterie
AVVERTENZA!
!
!
• Le batterie possono contenere acidi aggressivi e corrosivi. Evitare che
il liquido delle batterie venga a contatto con la pelle. Qualora si verifichi un contatto, lavare accuratamente la parte del corpo compromessa con acqua.
Qualora si verifichino ferite dovute all'acido, chiamare immediatamente un medico.
ATTENZIONE!
• Quando si opera sulle batterie non indossare oggetti di metallo ad es.
orecchini o anelli.
Le batterie al piombo acido possono creare correnti di cortocircuito
che possono causare gravi ustioni.
• Pericolo di esplosioni!
Non cercare mai di caricare una batteria congelata o difettosa.
In questo caso collocare la batteria in un luogo non esposto al gelo e
aspettare finché la batteria non si è adattata alla temperatura
ambiente. Solo allora è possibile avviare la fase di carica.
• Portare occhiali e abbigliamento di protezione quando si lavora con le
batterie. Quando si opera con le batterie, evitare di toccarsi gli occhi.
• Non fumare e assicurarsi che non vengano prodotte scintille in
prossimità del motore o della batteria.
A
100
AVVISO!
• Utilizzare esclusivamente batterie ricaricabili.
• Evitare che componenti metallici cadano sulla batteria. Questo può
provocare scintille o cortocircuitare la batteria e altri componenti
elettrici.
• Durante il collegamento accertarsi che la polarità sia corretta.
• Osservare i manuali del produttore della batteria, del produttore
dell'impianto oppure del veicolo dove la batteria viene utilizzata.
• Qualora sia necessario smontare la batteria, staccare come prima cosa
il collegamento a massa. Prima di smontarla, staccare tutti i relativi
collegamenti e utenze dalla batteria.
 Loading...