


ENDEFRESPT
IT
NLDASV
NOFIRUPLSK
CS
HU
MOBILE COOLING
CFF
CFF20, CFF35, CFF 45, CFF70DZ
Mobile refrigerating appliance
Operating manual . . . . . . . . . . . . . . . . . . . . 11
Mobiles Kühlgerät
Bedienungsanleitung . . . . . . . . . . . . . . . . .32
Appareil de réfrigération mobile
Notice d’utilisation . . . . . . . . . . . . . . . . . . .55
Aparato móvil de refrigeración
Instrucciones de uso . . . . . . . . . . . . . . . . . .77
Aparelho de refrigeração móvel
Manual de instruções . . . . . . . . . . . . . . . . .99
Apparecchio di refrigerazione
mobile
Istruzioni per l’uso . . . . . . . . . . . . . . . . . . . 121
Mobiel koelapparaat
Gebruiksaanwijzing. . . . . . . . . . . . . . . . . .144
Transportabelt køle-/fryseapparat
Betjeningsvejledning . . . . . . . . . . . . . . . .166
Mobil kyl-/frysprodukt
Bruksanvisning. . . . . . . . . . . . . . . . . . . . . . 187
Mobil kjøleboks
Bruksanvisning . . . . . . . . . . . . . . . . . . . . .208
Siirrettävä kylmäsäilytyslaite
Käyttöohje . . . . . . . . . . . . . . . . . . . . . . . . .229
Мобильное охлаждающее
устройство
Инструкция по эксплуатации . . . . . . . . . 250
Przenośne urządzenie chłodnicze
Instrukcja obsługi . . . . . . . . . . . . . . . . . . . 273
Mobilný chladiaci spotrebič
Návod na obsluhu. . . . . . . . . . . . . . . . . . . 296
Mobilní chladicí spotřebič
Návod k obsluze . . . . . . . . . . . . . . . . . . . . 318
Mobil hűtőkészülék
Használati utasítás. . . . . . . . . . . . . . . . . . .339

2021 Dometic Group. The visual appearance of the contents of this manual is
©
protected by copyright and design law. The underlying technical design and the
products contained herein may be protected by design, patent or be patent
pending. The trademarks mentioned in this manual belong to Dometic Sweden AB.
All rights are reserved.
CFF20 CFF35, CFF45
CFF70DZ
3x
1
1
1
2
3
4
12/24 V DC12/24 V DC 100–24 0 V AC100–24 0 V AC
1
CFF20, CFF35, CFF45, CFF70DZ
3
CFF20, CFF35, CFF45, CFF70DZ
CFF20
CFF70DZ
CFF35, CFF45
2
4
°
1 2 3 4 5 6 7
°
1 2 3 4 5 6 7
1 2 3 45 6 7
8
CFF20
CFF35, CFF45
CFF70DZ
3
100 – 240V~AC 12 – 24V DC
31 2 4
4
CFF20, CFF35, CFF45, CFF70DZ
5
CFF20, CFF35, CFF45, CFF70DZ
CFF20 CFF70DZCFF35, CFF45
2x
1
2
1
5
6
1.
2.
3.
1.
2.
1.
2.
2.
1.
3.
2.
1.
180°
6
CFF20, CFF35, CFF45, CFF70DZ
7
2.
1.
1.
A
BA
B
BA
CFF20
CFF70DZ
CFF35, CFF45
2.
1.
1.
2.
7
CFF20, CFF35, CFF45, CFF70DZ
8

CFF20, CFF35, CFF45, CFF70DZ
CFF35,
CFF45
B
A
8
CFF35, CFF45
9
9
CFF20, CFF35, CFF45, CFF70DZ
1
2
1
CFF70DZCFF35, CFF45
0
123
1 2 3
a
A
B
b
10

EN
CFF20, CFF35, CFF45, CFF70DZ Explanation of symbols
Please read these instructions carefully and follow all instructions, guidelines, and warnings included in this product manual in order to ensure
that you install, use, and maintain the product properly at all times. These instructions MUST stay with this product.
By using the product, you hereby confirm that you have read all instructions, guidelines, and warnings carefully and that you understand and
agree to abide by the terms and conditions as set forth herein. You agree to use this product only for the intended purpose and application
and in accordance with the instructions, guidelines, and warnings as set forth in this product manual as well as in accordance with all applicable laws and regulations. A failure to read and follow the instructions and warnings set forth herein may result in an injury to yourself and
others, damage to your product or damage to other property in the vicinity. This product manual, including the instructions, guidelines, and
warnings, and related documentation, may be subject to changes and updates. For up-to-date product information, please visit
www.dometic.com.
Contents
1 Explanation of symbols . . . . . . . . . . . . . . . . . . . . . . . . . . . . . . . . . . . . . . . . . . 11
2 Safety instructions . . . . . . . . . . . . . . . . . . . . . . . . . . . . . . . . . . . . . . . . . . . . . .12
3 Scope of delivery . . . . . . . . . . . . . . . . . . . . . . . . . . . . . . . . . . . . . . . . . . . . . .14
4 Intended use . . . . . . . . . . . . . . . . . . . . . . . . . . . . . . . . . . . . . . . . . . . . . . . . . . 15
5 Function description. . . . . . . . . . . . . . . . . . . . . . . . . . . . . . . . . . . . . . . . . . . . 15
6 Operation . . . . . . . . . . . . . . . . . . . . . . . . . . . . . . . . . . . . . . . . . . . . . . . . . . . .17
7 Cleaning and maintenance. . . . . . . . . . . . . . . . . . . . . . . . . . . . . . . . . . . . . . 26
8 Troubleshooting . . . . . . . . . . . . . . . . . . . . . . . . . . . . . . . . . . . . . . . . . . . . . . 27
9 Warranty . . . . . . . . . . . . . . . . . . . . . . . . . . . . . . . . . . . . . . . . . . . . . . . . . . . . 29
10 Disposal. . . . . . . . . . . . . . . . . . . . . . . . . . . . . . . . . . . . . . . . . . . . . . . . . . . . . 29
11 Technical data . . . . . . . . . . . . . . . . . . . . . . . . . . . . . . . . . . . . . . . . . . . . . . . . 30
1 Explanation of symbols
DANGER!
D
!
!
Safety instruction: Indicates a hazardous situation that, if not avoided,
will result in death or serious injury.
WARNING!
Safety instruction: Indicates a hazardous situation that, if not avoided,
could result in death or serious injury.
CAUTION!
Safety instruction: Indicates a hazardous situation that, if not avoided,
could result in minor or moderate injury.
11

EN
Safety instructions CFF20, CFF35, CFF45, CFF70DZ
NOTICE!
A
I
Indicates a situation that, if not avoided, can result in property damage.
NOTE
Supplementary information for operating the product.
2 Safety instructions
WARNING! Failure to obey these warnings could result in death
or serious injury.
!
Electrocution hazard
• Do not operate the cooling device if it is visibly damaged.
• If this cooling device's power cable is damaged, it must be replaced
to prevent safety hazards.
• This cooling device may only be repaired by qualified personnel.
Improper repairs can lead to considerable hazards.
Fire hazard
• When positioning the device, ensure the supply cord is not trapped or
damaged.
• Do not locate multiple portable socket-outlets or portable power
supplies at the rear of the device.
Health hazard
• This device can be used by children aged from 8 years and above and
persons with reduced physical, sensory or mental capabilities or lack
of experience and knowledge if they have been given supervision or
instruction concerning use of the device in a safe way and understand
the hazards involved.
• Children shall not play with the device.
• Cleaning and user maintenance shall not be made by children without
supervision.
• Children aged from 3 to 8 years are allowed to load and unload
cooling devices.
Explosion hazard
• Do not store any explosive substances such as spray cans with a
flammable propellant in the cooling device.
12

EN
CFF20, CFF35, CFF45, CFF70DZ Safety instructions
CAUTION! Failure to obey these cautions could result in minor or
moderate injury.
!
Electrocution hazard
• Before starting the cooling device, ensure that the power supply line
and the plug are dry.
• Disconnect the cooling device from the power supply
– before each cleaning and maintenance
– after every use
Health hazard
• Please check if the cooling capacity of the device is suitable for storing
the food or medicine you wish to cool.
• Food may only be stored in its original packaging or in suitable
containers.
• Opening the cooling device for long periods can cause significant
increase of the temperature in the compartments of the device.
• Clean regularly surfaces that can come in contact with food and
accessible drainage systems.
• If the device is left empty for long periods:
– Switch off the device.
– Defrost the device.
– Clean and dry the device.
– Leave the lid open to prevent mould developing within the device.
A
NOTICE! Damage hazard
• Check that the voltage specification on the type plate corresponds to
that of the energy supply.
• Only connect the cooling device as follows:
– With the DC connection cable to a DC power supply in the vehicle
– Or with the AC connection cable to an AC power supply
• Never pull the plug out of the socket by the cable.
• If the cooling device is connected to a DC outlet: Disconnect the
cooling device and other power consuming devices from the battery
before connecting a quick charging device.
• If the cooling device is connected to a DC outlet: Disconnect the
cooling device or switch it off when you turn off the engine. Otherwise
you may discharge the battery.
• The cooling device is not suitable for transporting caustic materials or
materials containing solvents.
13
EN
Scope of delivery CFF20, CFF35, CFF45, CFF70DZ
• The insulation of the cooling device contains flammable cyclopentane
and requires special disposal procedures. Deliver the cooling device
at the end of its life-cycle to an appropriate recycling center.
• Do not use electrical devices inside the cooling device unless they are
recommended by the manufacturer for the purpose.
• Do not place the cooling device near naked flames or other heat
sources (heaters, direct sunlight, gas ovens etc.).
• Risk of overheating!
Ensure at all times that there is a minimum of 50 mm ventilation on all
four sides of the cooling device. Keep the ventilation area free of any
objects that could restrict the air flow to the cooling components.
Do not place the cooling device in closed compartments or areas with
none or minimal air flow.
• Ensure that the ventilation openings are not covered.
• Do not fill the inner container with ice or fluids.
• Never immerse the cooling device in water.
• Protect the cooling device and cables against heat and moisture.
• The device shall not to be exposed to rain.
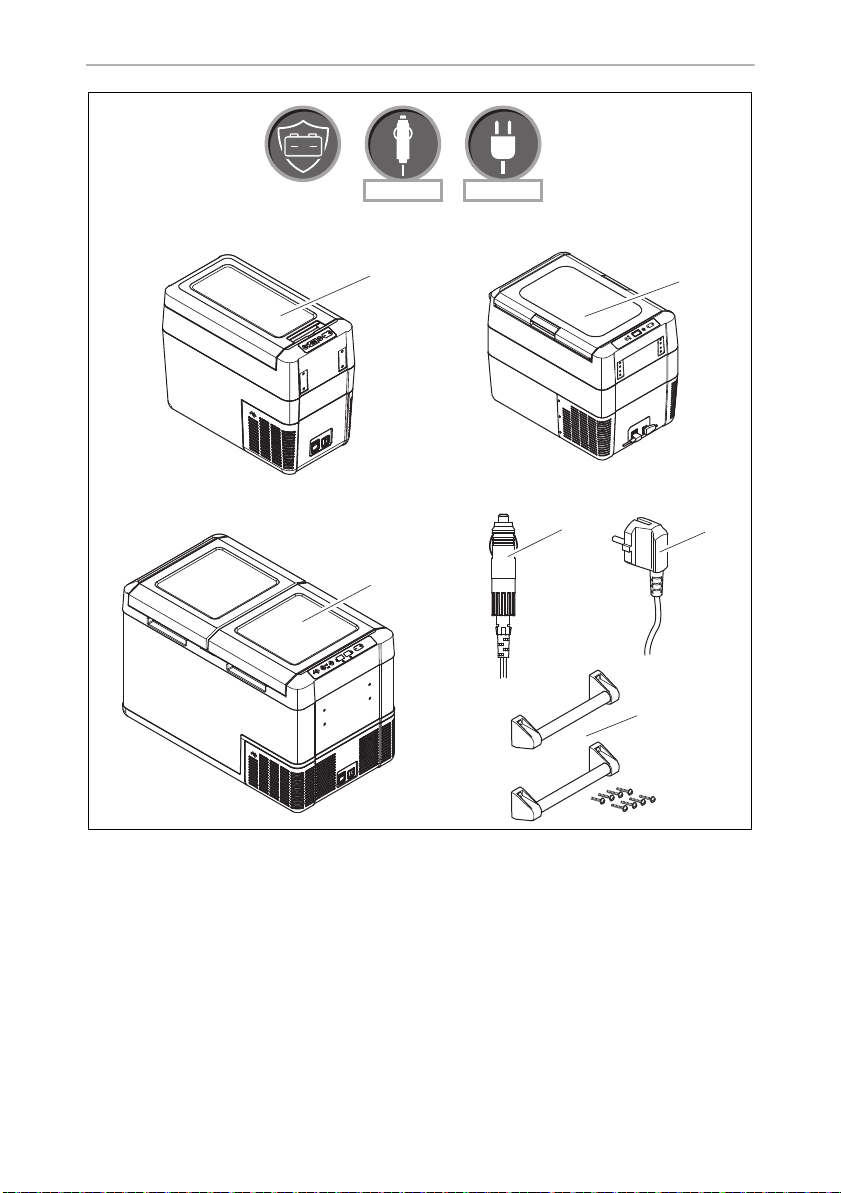
3Scope of delivery
Item
(fig. 1, page 3)
1 1 Cooler
2 1 Connection cable for DC connection
3 1 Connection cable for AC connection
4 2 Carry handle, consisting of:
– 1 Operating manual
14
Quantity Description
•2 holders
•1 handle
• 4 fastening screws
• 1 allen wrench

EN
CFF20, CFF35, CFF45, CFF70DZ Intended use
4 Intended use
The cooling box is suitable for cooling food. The cooling box is also suitable for use
on vehicles. The cooling box is designed to be operated from a DC power supply
socket of a vehicle or from an AC power supply.
The cooling box is suitable for camping use.
The cooling box is not suitable for:
• storage of corrosive, caustic or solvent-containing substances
• freezing of food
This cooling box is not intended to be used as a built-in appliance.
This cooling box is only suitable for the intended purpose and application in accor-
dance with these instructions.
This manual provides information that is necessary for proper installation and/or
operation of the cooling box. Poor installation and/or improper operating or
maintenance will result in unsatisfactory performance and a possible failure.
The manufacturer accepts no liability for any injury or damage to the product
resulting from:
• Incorrect assembly or connection, including excess voltage
• Incorrect maintenance or use of spare parts other than original spare parts
provided by the manufacturer
• Alterations to the product without express permission from the manufacturer
• Use for purposes other than those described in this manual
Dometic reserves the right to change product appearance and product
specifications.
5 Function description
A low maintenance refrigerant circuit with compressor provides the cooling. The
generous insulation and powerful compressor ensure efficient and fast cooling.
The cooler is portable.
The cooler can withstand a short-term inclination of 30°, for example on boats.
15

EN
Function description CFF20, CFF35, CFF45, CFF70DZ
5.1 Scope of functions
• Power supply with priority circuit for connecting to the AC mains
• Three-level battery monitor to protect the vehicle battery
switches off automatically at low battery voltage
• Display with temperature gauge in °C and °F
• Temperature setting: With two buttons in steps of 1 °C (2 °F)
• Display dimming function with 3 brightness levels
• Removable wire basket (CFF35, CFF45, CFF 70DZ only)
• Removable carrying handles
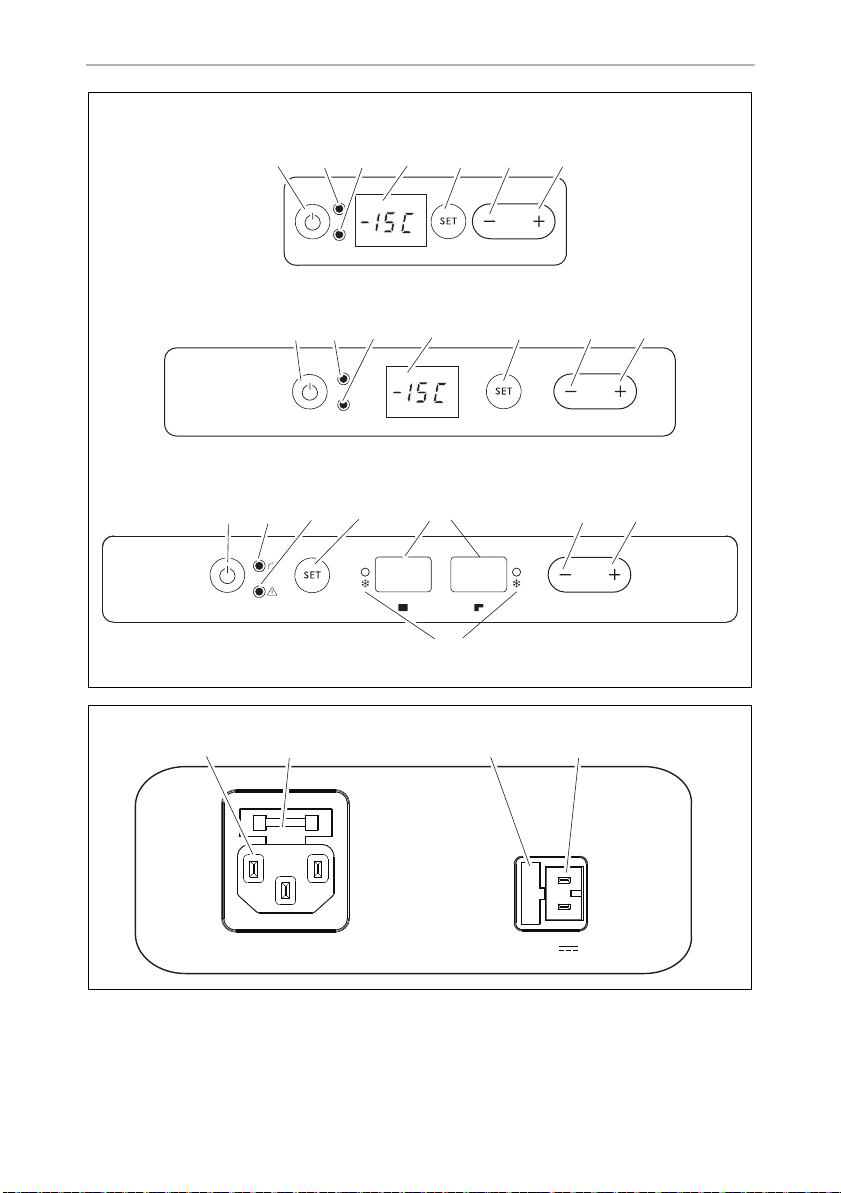
5.2 Operating and display elements
Lid latches (fig. 2, page 4)
Operating panel (fig. 3, page 5)
Item Description Explanation
1ON
OFF
2
POWER
3 ERROR LED flashes red: Device is switched on but not ready
4 – Display, shows the information
5 SET Selects the input mode
6 DOWN – Press once to decrease the value
7 UP + Press once to increase the value
“P”
Switches the cooler on or off when the button is pressed for
between one and two seconds
Status indication
LED lights up green: Compressor is on
LED lights up orange: Compressor is off
LED flashes orange: Display switched off automatically due
to low battery voltage
for operation
CFF70DZ only: There‘s one display per zone
– Temperature setting
– Celsius or Fahrenheit display
– Set battery monitor
– Set brightness of display
16

EN
CFF20, CFF35, CFF45, CFF70DZ Operation
Item Description Explanation
8 CFF70DZ only: Status indication: LED lights up blue when the
compartment is cooling
Connection sockets (fig. 4, page 5)
Item Description
1 Connection socket AC voltage supply
2 AC fuse holder
3 DC fuse cover
4 Connection socket DC voltage supply
6Operation
To avoid food waste, note the following:
• Keep temperature fluctuation as low as possible. Only open the cooling box as
often and for as long as necessary. Store the foodstuff in such a way that the air
can still circulate well.
• Adjust the temperature to the quantity and type of the foodstuff.
• Foodstuff can easily absorb or release odor or taste. Always store foodstuff
covered or in closed containers/bottles.
6.1 Before initial use
NOTE
I
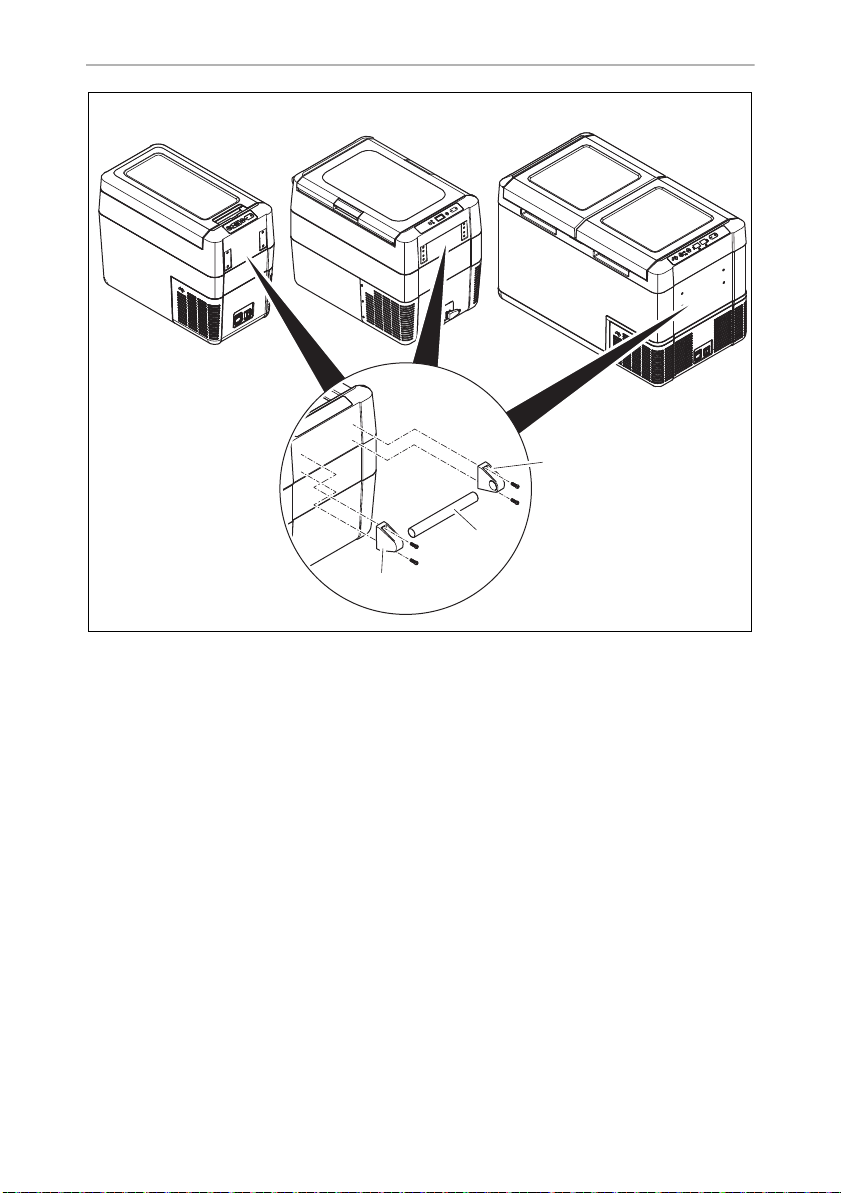
Mounting the handles (fig. 5, page 6)
The handles are enclosed unassembled. If you wish to attach the handles, proceed
as follows:
➤ Assemble a handle by putting two holders (1) and a handle (2) together.
➤ Fasten the holders with the enclosed screws in the holes provided.
Before starting your new cooler for the first time, you should clean it
inside and outside with a damp cloth for hygienic reasons (please also
refer to the chapter “Cleaning and maintenance” on page 26).
17

EN
Operation CFF20, CFF35, CFF45, CFF70DZ
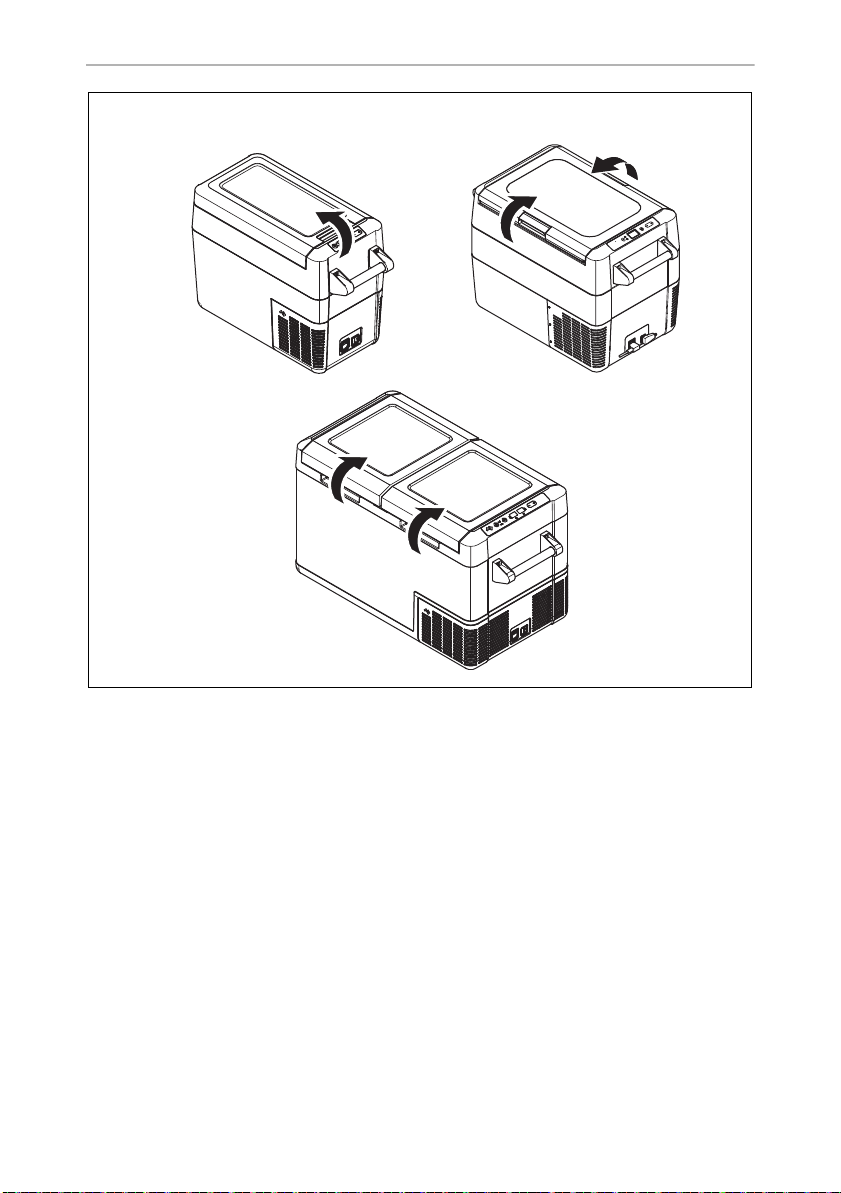
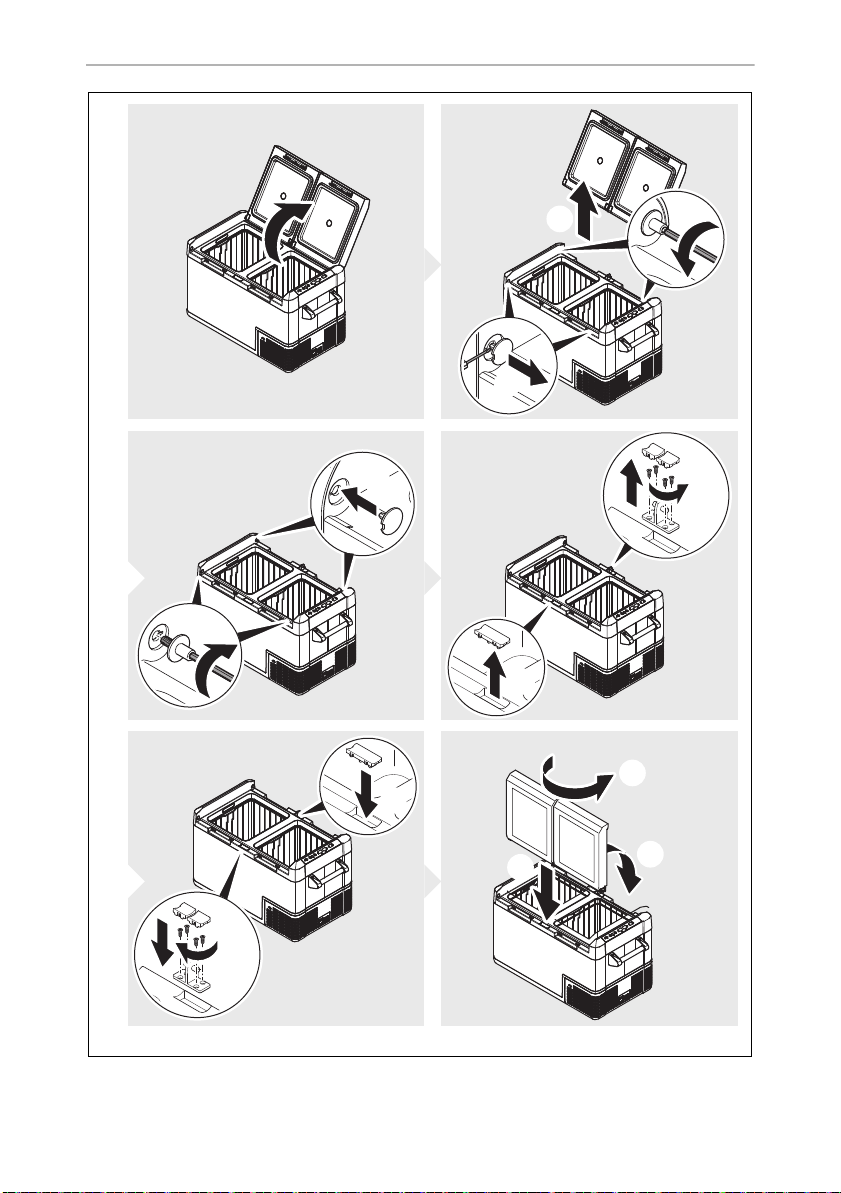
Reversing the lid opening
➤ CFF70DZ: To reverse the lid opening, proceed as shown (fig. 6, page 7).
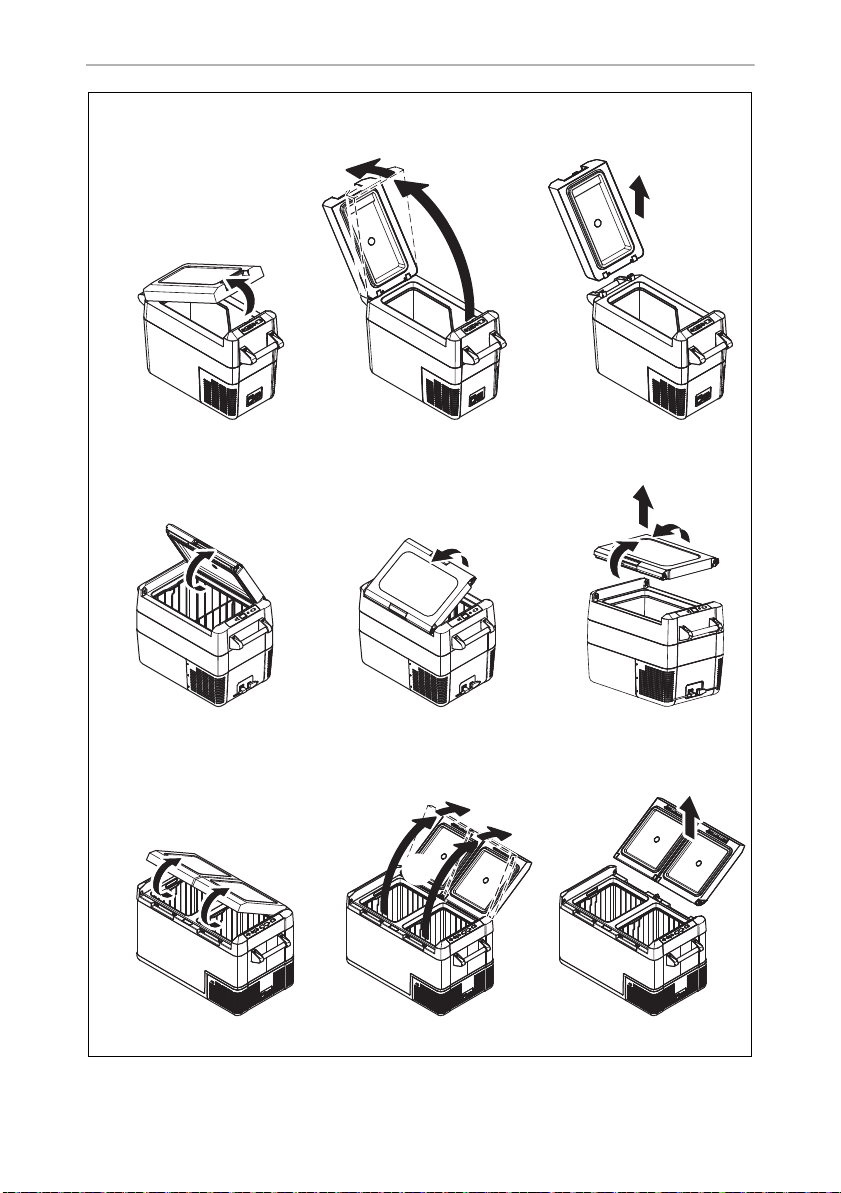
Opening or removing the lid (fig. 7, page 8)
➤ To open the lid, unlatch (A).
CFF35, CFF45: The lid can be opened from either side.
➤ CFF35, CFF45: To remove the lid, unlatch both sides at the same time (B).
CFF20, CFF70DZ: To remove the lid, push the lid beyond the lid stop
position (B).
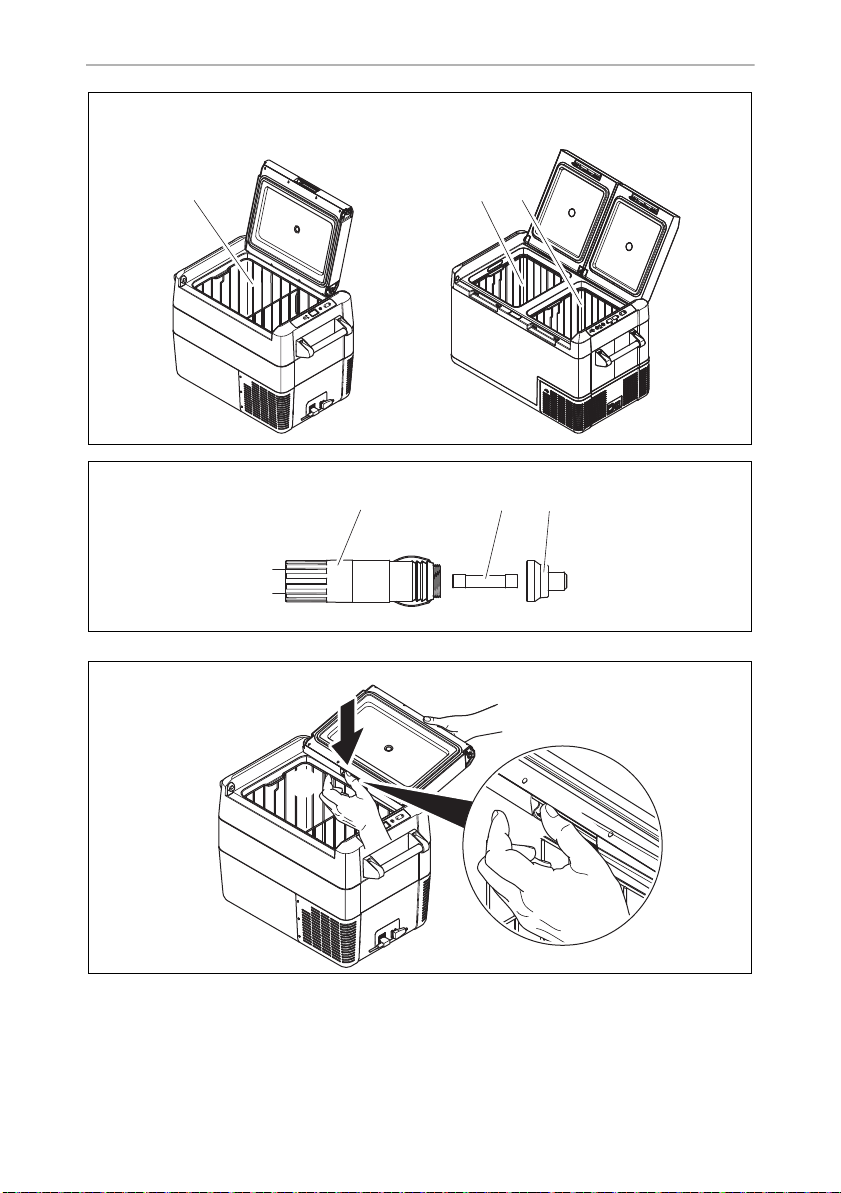
Lid stop position (fig. 8, page 9)
The lid has a built-in stop position (A). Do not force the lid past the built-in stop (B).
NOTICE! DAMAGE HAZARD
A
Removing the basket (fig. 9, page 9)
A
CFF35, CFF45: If the lid has been forced too far, follow the steps
described in the chapter “The lid has been forced past the built-in stop
(CFF35, CFF45 only)” on page 28.
NOTICE! DAMAGE HAZARD!
Removing the basket with the lid open may scratch the lid and deform
the basket. We recommend to remove the lid before removing the
basket.
Selecting the temperature units
Temperature display units can be switched between Celsius and Fahrenheit as
follows:
➤ Switch on the cooler.
➤ CFF20, CFF35, CFF45: Press the “SET” button (fig. 3 5, page 5) twice.
CFF70DZ: Press the “SET” button (fig. 3 5, page 5) three times.
➤ Use the “UP +” (fig. 3 7, page 5) or “DOWN –” (fig. 3 6, page 5) buttons to
select Celsius or Fahrenheit.
✔ The selected temperature unit then appears in the display for a few seconds. The
display flashes several times before it returns to the current temperature.
18

EN
CFF20, CFF35, CFF45, CFF70DZ Operation
6.2 Saving energy
• Choose a well ventilated location which is protected from direct sunlight.
• Allow warm food to cool down first before placing it in the cooling device to
keep cool.
• Do not open the cooling device more often than necessary.
• Do not leave the cooling device open for longer than necessary.
• If the cooler has a basket: For optimal energy consumption, position the basket
according to its position on delivery.
• On a regularly basis, make sure the lid seal still fits properly.
• Defrost the cooler once a layer of ice forms.
• Avoid unnecessarily low temperatures.
6.3 Connecting the cooler
Connecting to a battery (vehicle or boat)
The cooler can be operated with 12 V or 24 V
NOTICE! DAMAGE HAZARD
A
For safety reasons the cooler is equipped with an electronic system to prevent
polarity reversal. This protects the cooler against short-circuiting when connecting to
a battery.
Using the fused DC plug
A
➤ Plug the DC connection cable (fig. 1 2, page 3) into the DC voltage socket of
the cooler (fig. 4 4, page 5).
➤ Connect the connection cable to a DC power outlet.
Disconnect the cooler and other consumer units from the battery before
you connect the battery to a quick charging device.
Overvoltage can damage the electronics of the device.
NOTICE! DAMAGE HAZARD
For protection of the device the DC cable supplied includes a fuse inside
the plug. Do not remove the fused DC plug.
Only use the DC cable supplied.
g.
19

EN
Operation CFF20, CFF35, CFF45, CFF70DZ
Connecting to an AC power supply
DANGER! ELECTROCUTION HAZARD
D
The coolers have an integrated multi-voltage power supply with priority circuit for
connecting to an AC voltage source. The priority circuit automatically switches the
cooler to AC operation if the device is connected to an AC power supply, even if the
DC connection cable is still attached.
When switching between the AC power supply and the battery supply, the red LED
may light up briefly.
➤ Plug the AC connection cable (fig. 1 3, page 3) into the AC voltage socket of
the cooler (fig. 4 1,page 5).
➤ Connect the connection cable to an AC power outlet.
Failure to obey these warnings will result in death or serious injury.
• Never handle plugs and switches with wet hands or if you are standing on a wet surface.
• If you are operating your cooler on board a boat from a AC power
supply, you must install a residual current circuit breaker between the
AC power supply and the cooler.
Seek advice from a trained technician.
6.4 Using the battery monitor
The device is equipped with a multi-level battery monitor that protects your vehicle
battery against excessive discharging when the device is connected to the on-board
DC supply.
If the cooler is operated when the vehicle ignition is switched off, the cooler switches
off automatically as soon as the supply voltage falls below a set level. The cooler will
switch back on once the battery has been recharged to the restart voltage level.
NOTICE! DAMAGE HAZARD
A
When switched off by the battery monitor, the battery will no longer be
fully charged. Avoid starting repeatedly or operating current consumers
without longer charging phases. Ensure that the battery is recharged.
20

EN
CFF20, CFF35, CFF45, CFF70DZ Operation
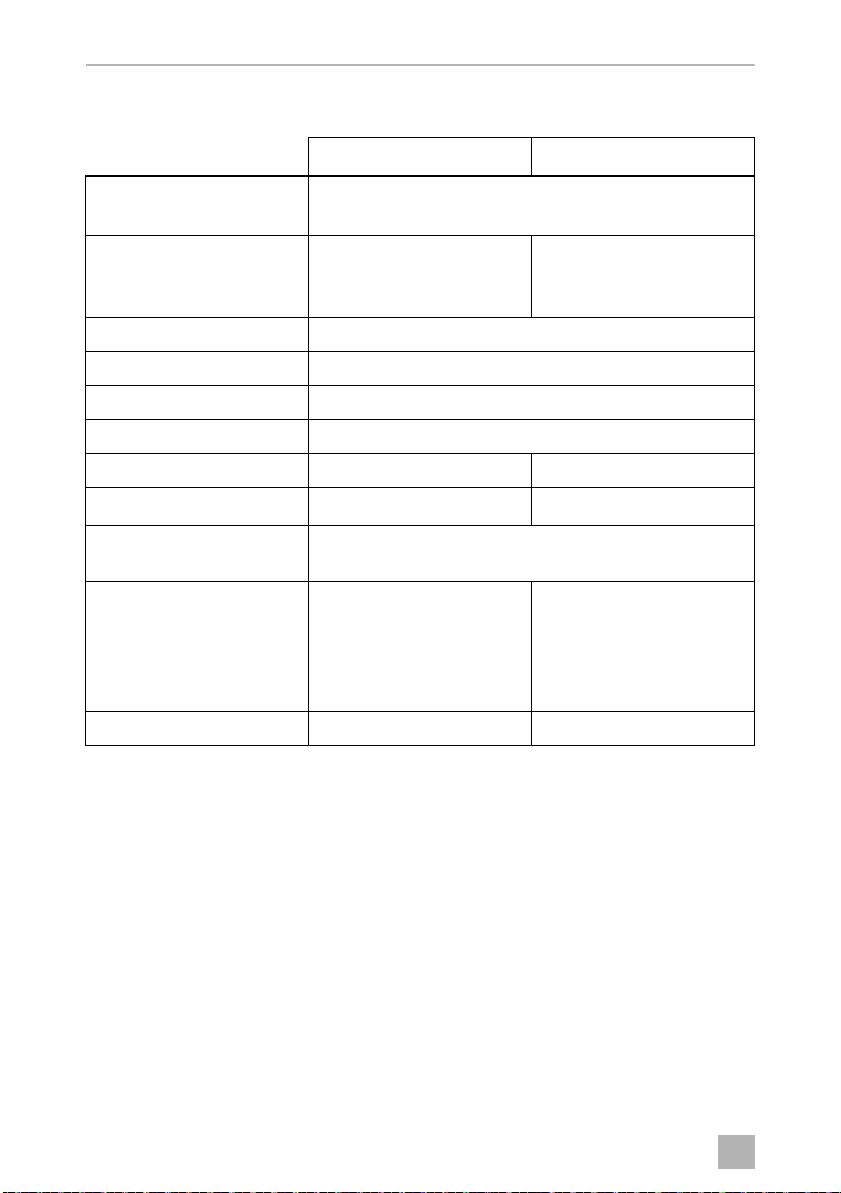
In “HIGH” mode, the battery monitor responds faster than at the levels “LOW” and
“MED” (see the following table).
Battery monitor mode LOW MED HIGH
Switch-off voltage at 12 V
Restart-voltage at 12 V
Switch-off voltage at 24 V
Restart voltage at 24 V
The battery monitor mode can be selected as follows:
➤ Switch on the cooler.
➤ Press the “SET” button (fig. 3 5, page 5):
– CFF 20, CFF35, CFF45: Three times.
– CFF 70DZ: Four times.
➤ Use the “UP +” (fig. 3 7, page 5) or “DOWN –” (fig. 3 6, page 5) buttons to
select the battery monitor mode.
✔ Display will be as follows:
Lo (LOW), ΠEd (MED), Hi (HIGH)
✔ The selected mode then appears in the display for a few seconds. The display
flashes several times before it returns to the current temperature.
NOTE
I
When the cooler is supplied by the starter battery, select the battery
monitor mode “HIGH”. If the cooler is connected to a supply battery,
the battery monitor mode “LOW” will suffice.
10.1 V 11.2 V 11.8 V
11.4 V 12.2 V 12.6 V
21.5 V 24.1 V 24.6 V
23.0 V 25.3 V 26.2 V
6.5 Using the cooler
NOTICE! OVERHEATING HAZARD
A
Ensure at all times that there is sufficient ventilation so that the heat that
generated during operation can dissipate. Ensure that the ventilation
slots are not covered. Make sure that the device is sufficiently far away
from walls and other objects so that the air can circulate.
21

EN
Operation CFF20, CFF35, CFF45, CFF70DZ
➤ Place the cooler on a firm foundation.
Make sure that the ventilation slots are not covered and that the heated air can
dissipate. We recommend keeping a gap of at least 50 mm around ventilation
holes.
NOTICE! DAMAGE HAZARD
A
➤ Connect the cooler (see chapter “Connecting the cooler” on page 19).
A
➤ Press the “ON/OFF” button (fig. 3 1, page 5) for between one and two
seconds.
✔ The LED “P” lights up (fig. 3 2, page 5).
✔ The display (fig. 3 4, page 5) switches on and shows the current temperature.
✔ The cooler starts cooling the interior.
I
Place the cooler as shown (fig. 1, page 3). If you operate the cooler in
a different orientation it can be damaged.
NOTICE! EXCESSIVELY LOW TEMPERATURE HAZARD
Ensure that the only those objects are placed in the cooler that are
intended to be cooled at the selected temperature.
NOTE
When operating from a battery, the display switches off automatically if
the battery voltage is low. The LED “P” flashes orange.
Latching the cooler lid
➤ Close the lid.
➤ Press the latch (fig. 2, page 4) down, until it latches in place audibly.
NOTE
I
22
CFF35, CFF45: When latching the lid, ensure that both latch side pins
are fully engaged to ensure a good lid seal. One latch may engage
slightly before the other.
If the lid is not closed equally at both sides, press until a second click is
heard.

EN
CFF20, CFF35, CFF45, CFF70DZ Operation
6.6 Setting the temperature
CFF20, CFF35, CFF 45
➤ Press the “SET” button (fig. 3 5, page 5) once.
➤ Use the “UP +” (fig. 3 7, page 5) and “DOWN –” (fig. 3 6, page 5) buttons to
select the cooling temperature.
✔ The cooling temperature appears in the display for a few seconds. The display
flashes several times and then the current temperature is displayed again.
CFF70DZ
➤ Press the “SET” button (fig. 3 5, page 5):
– once for the large compartment
– twice for the small compartment
✔ The chosen compartment‘s display blinks.
➤ Use the “UP +” (fig. 3 7, page 5) and “DOWN –” (fig. 3 6, page 5) buttons to
select the cooling temperature.
Each compartment can be set to work as a refrigerator or a freezer compartment.
✔ The cooling temperature appears in the chosen compartment‘s display for a few
seconds. The display flashes several times and then the current temperature is
displayed again.
6.7 Switching a compartment off or on (CFF70DZ)
If only one compartment is required, the other compartment can be switched off to
save energy.
Switching off a compartment
If the display of the compartment shows a temperature, you can switch off the
compartment as follows:
➤ Press the “SET” button (fig. 3 5, page 5):
– Once for the large compartment
– Twice for the small compartment
✔ The display of the respective compartment blinks.
➤ Press the “ON/OFF” button (fig. 3 1, page 5).
✔ “OFF” flashes for five seconds on the display of the respective cooling
compartment, then “OFF” is displayed.
23

EN
Operation CFF20, CFF35, CFF45, CFF70DZ
Switching on a compartment
If the display of the compartment shows “OFF”, you can switch on the compartment
as follows:
➤ Press the “SET” button (fig. 3 5, page 5):
– Once for the large compartment
– Twice for the small compartment
✔ The display of the respective compartment blinks.
➤ Press the “ON/OFF” button (fig. 3 1, page 5).
✔ The cooling temperature appears in the display for a few seconds. The display
flashes several times and then the current temperature is displayed.
6.8 Setting the display brightness
The display brightness can be dimmed for low ambient light conditions. To set the
dimming level of the display proceed as follows:
➤ Switch on the cooler.
➤ Press the “SET” button (fig. 3 5, page 5):
– CFF 20, CFF35, CFF45: Four times.
– CFF 70DZ: Five times.
➤ Use the “UP +” (fig. 3 7, page 5) or “DOWN –” (fig. 3 6, page 5) buttons to
set the brightness of the display.
✔ Display will be as follows:
d0 (default), d1 (medium), d2 (dark)
✔ The display shows the set mode for several seconds. The display flashes twice
before it returns to the current temperature.
NOTE
I
• The factory setting of brightness of the display is d0 (default).
• If a fault occurs, the brightness automatically reverts to brightness d0
(default). After troubleshooting the set brightness is reactivated.
6.9 Switching off the cooler
➤ Empty the cooler.
➤ Switch the cooler off.
➤ Pull out the connection cable.
24

EN
CFF20, CFF35, CFF45, CFF70DZ Operation
If you do not want to use the cooler for a longer period of time:
➤ Leave the lid slightly open. This prevents odor build-up.
6.10 Defrosting the cooler
Humidity can form frost in the interior of the cooling device or on the evaporator. This
reduces the cooling capacity.
NOTICE! DAMAGE HAZARD
A
To defrost the cooler, proceed as follows:
➤ Take out the contents of the cooler.
➤ If necessary, place them in another cooling device to keep them cool.
➤ Switch off the device.
➤ Leave the lid open.
➤ Wipe off the defrosted water.
Never use hard or pointed tools to remove ice or to loosen objects
which have frozen in place.
6.11 Replacing the AC fuse
DANGER! ELECTROCUTION HAZARD
D
➤ Disconnect the power supply to the device.
➤ Remove the connection cable.
➤ Pry out the fuse insert (fig. 4 2, page 5) with a screwdriver.
➤ Replace the defective glass fuse with a new one that has the same type and rating
(4 A, 250 V).
➤ Press the fuse insert back into the housing.
➤ Reconnect the power supply to the device.
Failure to obey this warning will result in death or serious injury.
Disconnect the power supply and the connection cable before you
replace the device fuse.
25

EN
Cleaning and maintenance CFF20, CFF35, CFF45, CFF70DZ
6.12 Replacing the device DC Fuse
➤ Disconnect the power supply to the device.
➤ Pry out the fuse cover (fig. 4 3, page 5) to access the fuse.
➤ Reverse the fuse cover and use the hook to remove the fuse.
➤ Replace the defective fuse with a new fuse of the same type (Automotive Stan-
dard blade fuse, 10 A).
➤ Re-fit the fuse cover.
➤ Reconnect the power supply to the device.
6.13 Replacing the DC plug fuse (fig. a, page 10)
➤ Unscrew the contact pin housing (3) from the plug (1).
➤ Replace the defective fuse (2) with a new fuse of the same type and rating (3AG,
Fast Acting, 10 A).
➤ Re-assemble the plug in reverse order.
6.14 Replacing the light PCB
NOTICE! Damage hazard
A
The lamp can only be replaced by the manufacturer, a service agent or
similarly qualified person to avoid hazard.
7 Cleaning and maintenance
WARNING! ELECTROCUTION HAZARD
!
A
26
Failure to obey this warning could result in death or serious injury.
Always disconnect the device from the power supply before you clean
and service it.
NOTICE! Damage hazard
• Never clean the cooler under running water or in dish water.
• Do not use abrasive cleaning agents or hard objects during cleaning
as these can damage the cooler.

EN
CFF20, CFF35, CFF45, CFF70DZ Troubleshooting
➤ Occasionally clean the device interior and exterior with a damp cloth.
➤ Make sure that the air inlet and outlet vents on the device are free of any dust and
dirt, so that heat can be released and the device is not damaged.
8 Troubleshooting
Fault Possible cause Suggested remedy
Device does not
function, LED does
not glow.
The device does not
cool (plug is inserted,
“POWER” LED is lit).
The device does not
cool (plug is inserted,
“POWER” LED flashes
orange, display is
switched off).
No voltage present in
the connected power
outlet.
One of the device fuses
is defective.
The integrated mains
adapter is defective.
Defective compressor. This can only be repaired by an
Battery monitor is set
too high.
Battery voltage is too
low.
Plugged in DC power outlet: In most
vehicles the ignition must be turned on
before power will be supplied to the DC
power outlet.
Plugged in AC power outlet: Try using
another plug outlet.
Replace the defective device fuse, see
chapter “Replacing the AC fuse” on
page 25 or chapter “Replacing the
device DC Fuse” on page 26.
This can only be repaired by an
authorised repair center.
authorised repair center.
Select a lower battery monitor setting.
Test the battery and charge it as needed.
27

EN
Troubleshooting CFF20, CFF 35, CFF45, CFF70DZ
Fault Possible cause Suggested remedy
When operating from
the DC outlet:
The ignition is on
and the device is not
working and the LED
is not lit.
The display shows an
error message (e.g.
“Err1”) and the appliance does not cool.
The DC outlet is dirty.
This results in a poor
electrical contact.
The fuse of the DC plug
has blown.
The device DC fuse has
blown.
The vehicle fuse has
blown.
The appliance has
switched off due to an
internal fault.
If the plug of your cooler becomes very
warm in the DC outlet, either the DC
outlet must be cleaned or the plug has
not been assembled correctly.
Replace the fuse in the DC plug, see
chapter “Replacing the DC plug fuse
(fig. a, page 10)” on page 26.
Replace the defective fuse, see chapter
“Replacing the device DC Fuse” on
page 26.
Replace the vehicle’s DC outlet fuse.
Please refer to your vehicle’s operating
manual.
This can only be repaired by an
authorised repair center.
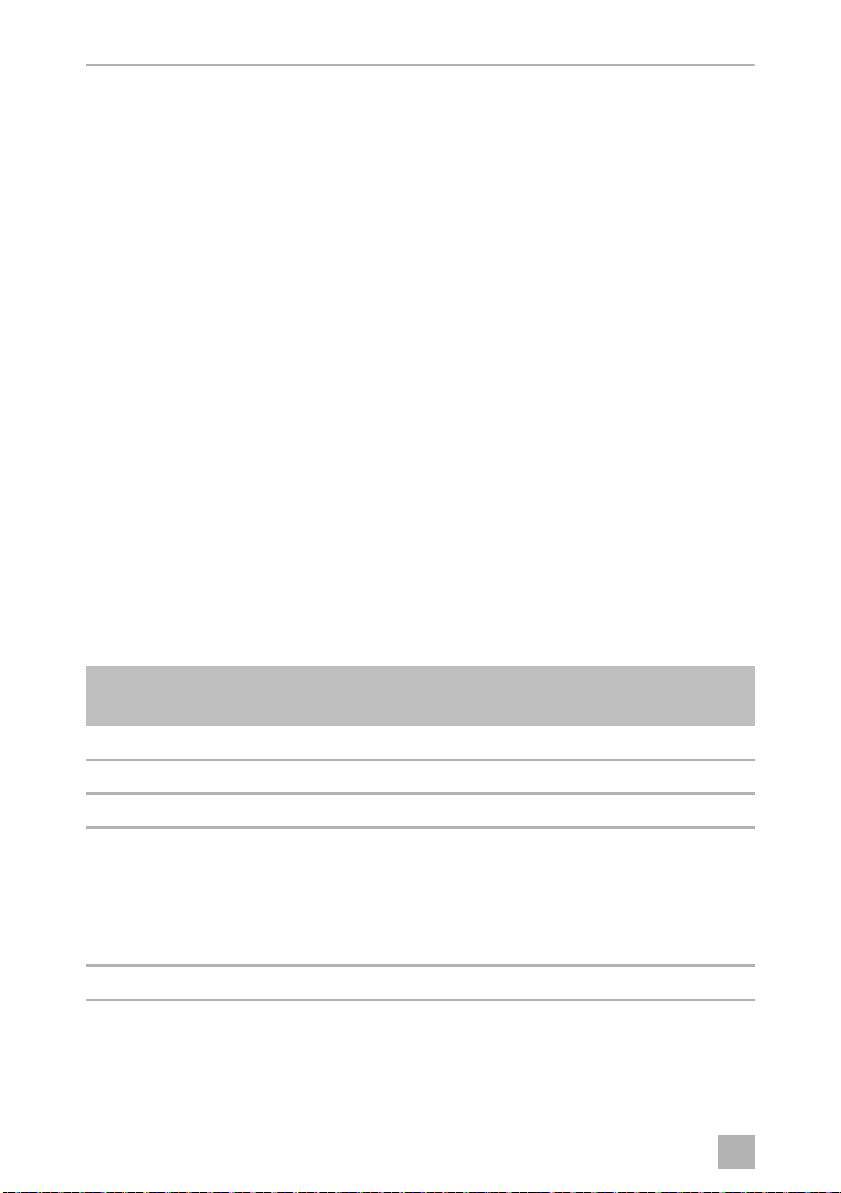
8.1 The lid has been forced past the built-in stop (CFF35, CFF45 only)
Proceed as follows (fig. b, page 10):
➤ Support the lid with one hand (A).
➤ Hold the latch down with the other hand (B).
CAUTION! HEALTH HAZARD
!
A
➤ Close the lid as far as possible without pinching your thumb, while still holding
the latch down, to keep it from breaking.
✔ The lid should now be approximately at the angle shown (fig. b, page 10).
➤ Remove the hand from the latch (B), and continue closing the lid all the way.
Failure to obey this caution could result in minor or moderate injury.
Beware pinching your thumb while closing the lid.
NOTICE! DAMAGE HAZARD!
Failure to observe this instruction can cause the lid to break off.
28

EN
CFF20, CFF35, CFF45, CFF70DZ Warranty
NOTE
I
The hinges may release from the correct position during the final closing
action. Reposition the lid as follows:
➤ Operate the latches on both sides of the lid simultaneously.
➤ Lift and reposition the lid.
9Warranty
The statutory warranty period applies. If the product is defective, please contact the
manufacturer's branch in your country (see dometic.com/dealer) or your retailer.
For repair and warranty processing, please include the following documents when
you send in the device:
• A copy of the receipt with purchasing date
• A reason for the claim or description of the fault
10 Disposal
➤ Place the packaging material in the appropriate recycling waste bins wherever
possible.
M
If you wish to finally dispose of the product, ask your local recycling centre
or specialist dealer for details about how to do this in accordance with the
applicable disposal regulations.
29
EN
Technical data CFF20, CFF35, CFF45, CFF70DZ
11 Technical data
CFF20 CFF35
Connection voltage: 12/24 Vg
100 to 240 Vw
Rated current: 12 Vg: 4.8 A
24 Vg: 2.8 A
240 Vw: 0.3 A
Cooling capacity: +20 °C to –18 °C (+68 °F to 0 °F)
Climate class: N, T
Ambient temperature: +16 °C to +43 °C (+60 °F to +110 °F)
Refrigerant: R134a
Refrigerant volume: 28 g 34 g
equivalent: 0.040 t 0.049 t
CO
2
Global warming potential
(GWP):
Dimensions
(WxHxD) (including
handles):
(W x H x D) (with handles
removed):
Weight: 10.5 kg 17.2 kg
283 x 430 x 660 mm
283 x 430 x 533 mm
1430
12 Vg: 7.8 A
24 Vg: 3.5 A
240 Vw: 0.4 A
715 x 407 x 398 mm
590 x 500 x 443 mm
30

EN
CFF20, CFF35, CFF45, CFF70DZ Technical data
CFF45 CFF70DZ
Connection voltage: 12/24 Vg
100 to 240 Vw
Rated current: 12 Vg: 8.6 A
24 Vg: 3.8 A
240 Vw: 0.41 A
Cooling capacity: +20 °C to –18 °C (+68 °F to 0 °F)
Climate class: N, T
Ambient temperature: +16 °C to +43 °C (+60 °F to +110 °F)
Refrigerant: R134a
Refrigerant volume: 43 g 34 g
equivalent: 0.061 t 0.049 t
CO
2
Global warming potential
(GWP):
Dimensions
(WxHxD) in (including
handles):
(W x H x D) (with handles
removed):
Weight: 18.6 kg 26.4 kg
715 x 475 x 398 mm
590 x 475 x 398 mm
1430
12 Vg: 9.0 A
24 Vg: 4.0 A
240 Vw: 0.44 A
914 x 500 x 443 mm
785 x 500 x 443 mm
NOTE
I
If the ambient temperature is above +32 °C (+90 °F), the minimum
temperature cannot be attained.
Conformity:
Contains fluorinated greenhouse gases
Hermetically sealed equipment
31

DE
Erklärung der Symbole CFF 20, CFF35, CFF45, CFF 70DZ
Lesen und befolgen Sie bitte alle Anweisungen, Richtlinien und Warnhinweise in diesem Produkthandbuch sorgfältig, um sicherzustellen,
dass Sie das Produkt ordnungsgemäß installieren und stets ordnungsgemäß betreiben und warten. Diese Anleitung MUSS bei dem Produkt
verbleiben.
Durch die Verwendung des Produktes bestätigen Sie hiermit, dass Sie alle Anweisungen, Richtlinien und Warnhinweise sorgfältig gelesen
haben und dass Sie die hierin dargelegten Bestimmungen verstanden haben und ihnen zustimmen. Sie erklären sich damit einverstanden,
dieses Produkt nur für den angegebenen Verwendungszweck und gemäß den Anweisungen, Richtlinien und Warnhinweisen dieses Produkthandbuchs sowie gemäß allen geltenden Gesetzen und Vorschriften zu verwenden. Eine Nichtbeachtung der hierin enthaltenen Anweisungen und Warnhinweise kann zu einer Verletzung Ihrer selbst und anderer Personen, zu Schäden an Ihrem Produkt oder zu Schäden an
anderem Eigentum in der Umgebung führen. Dieses Produkthandbuch, einschließlich der Anweisungen, Richtlinien und Warnhinweise,
sowie die zugehörige Dokumentation können Änderungen und Aktualisierungen unterliegen. Aktuelle Produktinformationen finden Sie
unter www.dometic.com.
Inhalt
1 Erklärung der Symbole . . . . . . . . . . . . . . . . . . . . . . . . . . . . . . . . . . . . . . . . . 32
2 Sicherheitshinweise . . . . . . . . . . . . . . . . . . . . . . . . . . . . . . . . . . . . . . . . . . . 33
3 Lieferumfang . . . . . . . . . . . . . . . . . . . . . . . . . . . . . . . . . . . . . . . . . . . . . . . . . 36
4 Bestimmungsgemäßer Gebrauch . . . . . . . . . . . . . . . . . . . . . . . . . . . . . . . . 36
5 Funktionsbeschreibung . . . . . . . . . . . . . . . . . . . . . . . . . . . . . . . . . . . . . . . . 37
6 Bedienung. . . . . . . . . . . . . . . . . . . . . . . . . . . . . . . . . . . . . . . . . . . . . . . . . . . 39
7 Reinigung und Pflege . . . . . . . . . . . . . . . . . . . . . . . . . . . . . . . . . . . . . . . . . . 49
8 Störungsbeseitigung . . . . . . . . . . . . . . . . . . . . . . . . . . . . . . . . . . . . . . . . . . 50
9 Garantie . . . . . . . . . . . . . . . . . . . . . . . . . . . . . . . . . . . . . . . . . . . . . . . . . . . . . 52
10 Entsorgung . . . . . . . . . . . . . . . . . . . . . . . . . . . . . . . . . . . . . . . . . . . . . . . . . . 52
11 Technische Daten . . . . . . . . . . . . . . . . . . . . . . . . . . . . . . . . . . . . . . . . . . . . . 53
1 Erklärung der Symbole
GEFAHR!
D
!
32
Sicherheitshinweis auf eine Gefahrensituation, die zum Tod oder zu
schwerer Verletzung führt, wenn sie nicht vermieden wird.
WARNUNG!
Sicherheitshinweis auf eine Gefahrensituation, die zum Tod oder zu
schwerer Verletzung führen kann, wenn sie nicht vermieden wird.

DE
CFF20, CFF35, CFF45, CFF70DZ Sicherheitshinweise
VORSICHT!
!
A
I
Sicherheitshinweis auf eine Gefahrensituation, die zu einer leichten
oder mittelschweren Verletzung führen kann, wenn sie nicht vermieden
wird.
ACHTUNG!
Hinweis auf eine Situation, die zu Sachschäden führen kann, wenn sie
nicht vermieden wird.
HINWEIS
Ergänzende Informationen zur Bedienung des Produktes.
2 Sicherheitshinweise
WARNUNG! Nichtbeachtung dieser Sicherheitshinweise kann
zum Tod oder zu schweren Verletzungen führen.
!
Lebensgefahr durch Stromschlag
• Wenn das Kühlgerät sichtbare Beschädigungen aufweist, dürfen Sie
es nicht in Betrieb nehmen.
• Wenn das Anschlusskabel dieses Kühlgerätes beschädigt wird, muss
es ersetzt werden, um Gefährdungen zu vermeiden.
• Reparaturen an diesem Kühlgerät dürfen nur von Fachkräften durchgeführt werden. Durch unsachgemäße Reparaturen können erhebliche Gefahren entstehen.
Brandgefahr
• Stellen Sie beim Aufstellen des Geräts sicher, dass das Anschlusskabel
nicht eingeklemmt oder beschädigt wird.
• Positionieren Sie an der Geräterückseite keine tragbaren Mehrfachsteckdosen oder tragbare Netzteile.
Gesundheitsgefahr
• Dieses Gerät kann von Kindern ab 8 Jahren und Personen mit eingeschränkten physischen, sensorischen oder geistigen Fähigkeiten oder
einem Mangel an Erfahrung und Wissen verwendet werden, wenn sie
beaufsichtigt werden oder eine Anleitung zur sicheren Benutzung des
Geräts erhalten haben und sie die daraus resultierenden Gefahren verstehen.
• Kinder dürfen nicht mit dem Kühlgerät spielen.
33

DE
Sicherheitshinweise CFF20, CFF 35, CFF45, CFF70DZ
• Reinigung und Benutzer-Wartung dürfen nicht von Kindern ohne
Beaufsichtigung durchgeführt werden.
• Kinder im Alter von 3 bis 8 Jahren dürfen Kühlgeräte be- und entladen.
Explosionsgefahr
• Lagern Sie keine explosionsfähigen Stoffe wie z. B. Sprühdosen mit
brennbarem Treibgas im Kühlgerät.
VORSICHT! Nichtbeachtung dieser Sicherheitshinweise kann zu
leichten oder mittelschweren Verletzungen führen.
!
Lebensgefahr durch Stromschlag
• Achten Sie vor der Inbetriebnahme darauf, dass Zuleitung und Stecker
trocken sind.
• Trennen Sie das Kühlgerät von der Stromversorgung
– vor jeder Reinigung und Pflege
– nach jedem Gebrauch
Gesundheitsgefahr
• Prüfen Sie, ob die Kühlleistung des Kühlgerätes den Anforderungen
der Lebensmittel oder Medikamente entspricht, die Sie kühlen
wollen.
• Lebensmittel dürfen nur in Originalverpackungen oder geeigneten
Behältern eingelagert werden.
• Das Öffnen des Kühlgerätes über einen längeren Zeitraum kann einen
erheblichen Temperaturanstieg in den Fächern des Gerätes verursachen.
• Reinigen Sie regelmäßig Oberflächen, die mit Lebensmitteln und
zugänglichen Entwässerungssystemen in Berührung kommen
können.
• Wenn das Gerät für längere Zeit leer steht:
– Schalten Sie das Gerät aus.
– Tauen Sie das Gerät ab.
– Reinigen und trocknen Sie das Gerät.
– Lassen Sie den Deckel offen, um Schimmelbildung im Gerät zu
verhindern.
A
34
ACHTUNG! Beschädigungsgefahr
• Vergleichen Sie die Spannungsangabe auf dem Typenschild mit der
vorhandenen Energieversorgung.

DE
CFF20, CFF35, CFF45, CFF70DZ Sicherheitshinweise
• Schließen Sie das Kühlgerät nur wie folgt an:
– mit dem Gleichstrom-Anschlusskabel an das Gleichstromnetz im
Fahrzeug
– oder mit dem Wechselstrom-Anschlusskabel an das
Wechselstromnetz
• Ziehen Sie den Stecker nie am Anschlusskabel aus der Steckdose.
• Wenn das Kühlgerät an der Gleichstrom-Steckdose angeschlossen
ist: Klemmen Sie Ihr Kühlgerät und andere Verbraucher von der
Fahrzeugbatterie ab, bevor Sie ein Schnellladegerät anschließen.
• Wenn das Kühlgerät an der Gleichstrom-Steckdose angeschlossen
ist: Trennen Sie die Verbindung oder schalten Sie das Kühlgerät aus,
wenn Sie den Motor ausschalten. Sonst kann die Fahrzeugbatterie
entladen werden.
• Das Kühlgerät ist nicht geeignet für den Transport ätzender oder
lösungsmittelhaltiger Stoffe.
• Die Isolierung des Kühlgeräts enthält brennbares Zyklopentan und
erfordert ein besonderes Entsorgungsverfahren. Führen Sie das
Kühlgerät am Ende seiner Lebensdauer einer ordnungsgemäßen
Entsorgung zu.
• Benutzen Sie keine Elektrogeräte innerhalb des Kühlgerätes, außer
wenn diese Elektrogeräte vom Hersteller dafür empfohlen werden.
• Stellen Sie das Kühlgerät nicht in der Nähe von offenen Flammen oder
anderen Wärmequellen (Heizung, starke Sonneneinstrahlung, Gasöfen usw.) ab.
• Überhitzungsgefahr!
Achten Sie stets darauf, dass die Belüftung auf allen vier Seiten des
Kühlgeräts mindestens 50 mm beträgt. Halten Sie den Lüftungsbereich frei von jeglichen Gegenständen, die den Luftdurchfluss zu
den Kühlkomponenten behindern können.
Platzieren Sie das Kühlgerät nicht in geschlossenen Fächern oder
Bereichen, die keinen oder nur einen minimalen Luftstrom aufweisen.
• Achten Sie darauf, dass die Lüftungsöffnungen nicht abgedeckt
werden.
• Füllen Sie keine Flüssigkeiten oder Eis in den Innenbehälter.
• Tauchen Sie das Kühlgerät nie in Wasser.
• Schützen Sie das Kühlgerät und die Kabel vor Hitze und Nässe.
• Das Gerät darf keinem Regen ausgesetzt werden.
35

DE
Lieferumfang CFF20, CFF35, CFF45, CFF70DZ
3 Lieferumfang
Position
(Abb. 1, Seite 3)
1 1 Kühlbox
2 1 Anschlusskabel für Gleichstrom-Anschluss
3 1 Anschlusskabel für Wechselstrom-Anschluss
4 2 Tragegriff, bestehend aus:
– 1 Bedienungsanleitung
Anzahl Beschreibung
•2Halterungen
• 1 Griffstück
• 4 Befestigungsschrauben
• 1 Innensechskantschlüssel
4 Bestimmungsgemäßer Gebrauch
Die Kühlbox eignet sich zum Kühlen von Lebensmitteln. Die Kühlbox ist auch für den
Einsatz in Fahrzeugen geeignet. Die Kühlbox kann über den Gleichstromanschluss
eines Fahrzeugs oder am Wechselstromnetz betrieben werden.
Die Kühlbox ist für den Einsatz beim Camping geeignet.
Die Kühlbox ist nicht für folgende Verwendungszwecke geeignet:
• Lagerung von korrosiven, ätzenden oder lösungsmittelhaltigen Stoffen
• Einfrieren von Lebensmitteln
Diese Kühlbox ist nicht für den Einsatz als Einbaugerät geeignet.
Diese Kühlbox ist nur für den angegebenen Verwendungszweck und die Anwen-
dung gemäß dieser Anleitung geeignet.
Dieses Handbuch enthält Informationen, die für die ordnungsgemäße Installation
und den ordnungsgemäßen Betrieb der Kühlbox erforderlich sind. Installationsfehler und/oder ein nicht ordnungsgemäßer Betrieb oder nicht ordnungsgemäße
Wartung haben eine unzureichende Leistung und u. U. einen Ausfall des Geräts zur
Folge.
Der Hersteller übernimmt keine Haftung für Verletzungen oder Schäden am
Produkt, die durch Folgendes entstehen:
• Unsachgemäße Montage oder falscher Anschluss, einschließlich Überspannung
36

DE
CFF20, CFF35, CFF45, CFF70DZ Funktionsbeschreibung
• Unsachgemäße Wartung oder Verwendung von anderen als den vom Hersteller
gelieferten Original-Ersatzteilen
• Veränderungen am Produkt ohne ausdrückliche Genehmigung des Herstellers
• Verwendung für andere als die in der Anleitung beschriebenen Zwecke
Dometic behält sich das Recht vor, das Erscheinungsbild des Produkts und dessen
technische Daten zu ändern.
5 Funktionsbeschreibung
Die Kühlung erfolgt durch einen wartungsarmen Kühlkreislauf mit Kompressor. Die
umfassende Isolierung und der leistungsstarke Kompressor gewährleisten eine effiziente und schnelle Kühlung.
Die Kühlbox ist für den mobilen Einsatz geeignet.
Die Kühlbox kann einer kurzzeitigen Krängung von 30° ausgesetzt werden, z. B.
beim Einsatz auf Booten.
5.1 Funktionsumfang
• Netzteil mit Vorrangschaltung zum Anschluss an Wechselspannung
• Dreistufiger Batteriewächter zum Schutz der Fahrzeugbatterie
automatische Abschaltung bei niedriger Batteriespannung
• Display mit Temperaturanzeige in °C und °F
• Temperatureinstellung: Mit zwei Tasten in Schritten von 1 °C (2 °F)
• Displayhelligkeitsregelung mit 3 Helligkeitsstufen
• Abnehmbarer Drahtkorb (nur CFF35, CFF45, CFF70DZ)
• Abnehmbare Tragegriffe
37

DE
Funktionsbeschreibung CFF20, CFF35, CFF45, CFF70DZ
5.2 Bedien- und Anzeigeelemente
Deckelverriegelungen (Abb. 2, Seite 4)
Bedienfeld (Abb. 3, Seite 5)
Pos. Beschreibung Erläuterung
1ON
OFF
2 BETRIEBSAN-
„P“
ZEIGE
3 ERROR LED blinkt rot: Gerät ist eingeschaltet, jedoch nicht
4 – Display, zeigt die Werte an
5 SET Wählt den Eingabemodus
6 MINUS – Einmal drücken, um den Wert zu verringern
7 PLUS + Einmal drücken, um den Wert zu erhöhen
8 Nur CFF70DZ: Betriebsanzeige: Die LED leuchtet blau, wenn das
Schaltet die Kühlbox ein oder aus, wenn die Taste ein bis zwei
Sekunden gedrückt wird
Betriebsanzeige
LED leuchtet grün: Kompressor ist an
LED leuchtet orange: Kompressor ist aus
LED blinkt orange: Display aufgrund niedriger Batterie-
spannung automatisch ausgeschaltet
betriebsbereit
Nur CFF70DZ: Es gibt ein Display pro Zone
– Temperatureinstellung
– Anzeige Celsius oder Fahrenheit
– Einstellung Batteriewächter
– Einstellung Displayhelligkeit
Fach gekühlt wird
Anschlussbuchsen (Abb. 4, Seite 5)
Pos. Beschreibung
1 Anschlussbuchse Wechselspannungsversorgung
2 Halter Sicherung für Wechselstromkreis
3 Abdeckung Sicherung für Gleichstromkreis
4 Anschlussbuchse Gleichspannungsversorgung
38

DE
CFF20, CFF35, CFF45, CFF70DZ Bedienung
6Bedienung
Um Lebensmittelverschwendung zu vermeiden, beachten Sie bitte Folgendes:
• Halten Sie Temperaturschwankungen so gering wie möglich. Öffnen Sie die
Kühlbox nur so oft und so lange wie nötig. Lagern Sie Lebensmittel so, dass die
Luft immer noch gut zirkulieren kann.
• Passen Sie die Temperatur der Menge und Art der Lebensmittel an.
• Lebensmittel nehmen leicht Gerüche auf und geben Gerüche oder Aromen ab.
Lagern Sie Lebensmittel daher stets abgedeckt oder in geschlossenen Behältern
bzw. Flaschen.
6.1 Vor dem ersten Gebrauch
HINWEIS
I
Griffe montieren (Abb. 5, Seite 6)
Die Griffe liegen lose bei. Falls Sie die Griffe montieren wollen, gehen Sie wie folgt
vor:
Bevor Sie das neue Kühlgerät in Betrieb nehmen, sollten Sie es aus hygienischen Gründen innen und außen mit einem feuchten Tuch reinigen
(siehe auch Kapitel „Reinigung und Pflege“ auf Seite 49).
➤ Fügen Sie jeweils zwei Halter (1) und ein Griffstück (2) zu einem Griff zusammen.
➤ Befestigen Sie die Halter mit den beiliegenden Schrauben in den vorgesehenen
Bohrungen.
Deckelöffnungsrichtung umkehren
➤ CFF70DZ: Um die Deckelöffnungsrichtung umzukehren, gehen Sie wie abge-
bildet vor (Abb. 6, Seite 7).
Deckel öffnen oder abnehmen (Abb.7, Seite 8)
➤ Um den Deckel zu öffnen, entriegeln Sie (A).
CFF35, CFF45: Der Deckel kann von beiden Seiten geöffnet werden.
➤ CFF35, CFF45: Lösen Sie die Verriegelung an beiden Seiten (B) gleichzeitig,
um den Deckel abzunehmen.
CFF 20, CFF70DZ: Um den Deckel abzunehmen, drücken Sie den Deckel über
die Deckelanschlagposition (B) hinaus.
39

DE
Bedienung CFF20, CFF 35, CFF45, CFF70DZ
Deckelanschlagposition (Abb. 8, Seite 9)
Der Deckel wird durch einen integrierten Anschlag in einer Endposition gehalten
(A). Drücken Sie den Deckel nicht gewaltsam über diese Endposition hinaus (B).
ACHTUNG! BESCHÄDIGUNGSGEFAHR
A
Korbeinsatz herausnehmen (Abb. 9, Seite 9)
A
Temperatureinheit wählen
Die Temperaturanzeige kann zwischen Celsius und Fahrenheit umgeschaltet werden. Gehen Sie dazu wie folgt vor:
➤ Schalten Sie die Kühlbox ein.
CFF35, CFF45: Wenn der Deckel zu weit geöffnet wurde, führen Sie
die in Kapitel „Der Deckel wurde über den integrierten Anschlag hinaus
gedrückt (nur CFF35, CFF45)“ auf Seite 51 beschriebenen Schritte
durch.
ACHTUNG! BESCHÄDIGUNGSGEFAHR!
Wird der Korbeinsatz bei geöffnetem Deckel herausgenommen, kann
der Deckel verkratzt und der Korbeinsatz verbogen werden. Wir empfehlen daher, den Deckel vor Herausnehmen des Korbeinsatzes abzunehmen.
➤ CFF20, CFF35, CFF45: Drücken Sie die Taste „SET“ (Abb. 3 5, Seite 5)
zweimal.
CFF70DZ: Drücken Sie die Taste „SET“ (Abb. 3 5, Seite 5) dreimal.
➤ Wählen Sie mithilfe der Plus- „+“ (Abb. 3 7, Seite 5) bzw. Minus-Taste „–“
(Abb. 3 6, Seite 5) Celsius oder Fahrenheit aus.
✔ Das Display zeigt für einige Sekunden die eingestellte Temperatureinheit an. Das
Display blinkt einige Male, bevor es zur Darstellung der aktuellen Temperatur
zurückkehrt.
6.2 Energie sparen
• Wählen Sie einen gut belüfteten und vor Sonneneinstrahlung geschützten Stellplatz.
• Lassen Sie warme Speisen erst abkühlen, bevor Sie sie im Gerät kühl halten.
• Öffnen Sie das Kühlgerät nicht häufiger als nötig.
• Lassen Sie das Kühlgerät nicht länger offen stehen als nötig.
40

DE
CFF20, CFF35, CFF45, CFF70DZ Bedienung
• Wenn das Gerät über einen Korb verfügt: Um einen optimalen Energieverbrauch
zu erreichen, positionieren Sie den Korb auf die gleiche Weise wie bei der Auslieferung.
• Prüfen Sie in regelmäßigen Abständen, ob die Dichtung des Deckels noch richtig sitzt.
• Tauen Sie die Kühlbox ab, sobald sich eine Eisschicht gebildet hat.
• Vermeiden Sie eine unnötig tiefe Innentemperatur.
6.3 Kühlgerät anschließen
An eine Batterie anschließen (Fahrzeug oder Boot)
Die Kühlbox kann mit 12 V oder 24 V
ACHTUNG! BESCHÄDIGUNGSGEFAHR
A
Zur Sicherheit ist die Kühlbox mit einem elektronischen Verpolungsschutz ausgestattet, der die Kühlbox vor Kurzschluss beim Batterieanschluss schützt.
Gleichstromstecker mit Sicherung verwenden
A
➤ Stecken Sie das Gleichstromanschlusskabel (Abb. 1 2, Seite 3) in die Gleich-
spannungsbuchse der Kühlbox (Abb. 4 3, Seite 5).
➤ Schließen Sie das Anschlusskabel an eine Gleichstromversorgung an.
Klemmen Sie die Kühlbox und andere Verbraucher von der Batterie ab,
bevor Sie die Batterie mit einem Schnellladegerät aufladen.
Überspannungen können die Elektronik der Geräte beschädigen.
ACHTUNG! BESCHÄDIGUNGSGEFAHR
Zum Schutz des Geräts verfügt das im Lieferumfang enthaltene Gleichstromkabel über eine Sicherung im Stecker. Entfernen Sie nicht den
Gleichstromstecker mit der Sicherung.
Verwenden Sie nur das im Lieferumfang enthaltene Gleichstromkabel.
g betrieben werden.
41

DE
Bedienung CFF20, CFF 35, CFF45, CFF70DZ
Anschluss an eine Wechselstromversorgung
GEFAHR! LEBENSGEFAHR DURCH STROMSCHLAG
D
Die Kühlgeräte verfügen über ein integriertes Multispannungsnetzteil mit Vorrangschaltung zum Anschluss an eine Wechselspannung. Durch die Vorrangschaltung
wird automatisch auf Wechselspannungsbetrieb umgeschaltet, wenn das Gerät an
ein Wechselstromnetz angeschlossen wird, auch wenn das Gleichstromanschlusskabel noch angeschlossen ist.
Beim Umschalten zwischen Wechselstromnetz und Batterieversorgung kann die
rote LED kurz aufleuchten.
➤ Stecken Sie das Wechselstromanschlusskabel (Abb. 1 3, Seite 3) in die Wech-
selspannungsbuchse der Kühlbox (Abb. 4 1, Seite 5).
➤ Schließen Sie das Anschlusskabel an eine Wechselstromversorgung an.
Nichtbeachtung dieser Warnungen kann zum Tod oder schwerer Verletzung führen.
• Hantieren Sie nie mit Steckern und Schaltern, wenn Sie nasse Hände
haben oder mit den Füßen in der Nässe stehen.
• Wenn Sie Ihr Kühlgerät an Bord eines Bootes an einem Wechselspannungsnetz betreiben, müssen Sie einen FI-Schutzschalter zwischen Wechselspannungsnetz und Kühlgerät schalten.
Lassen Sie sich von einem Fachmann beraten.
6.4 Batteriewächter verwenden
Das Gerät ist mit einem mehrstufigen Batteriewächter ausgestattet, der Ihre Fahrzeugbatterie beim Anschluss an das Bordnetz vor zu tiefer Entladung schützt.
Wird die Kühlbox bei ausgeschalteter Zündung im Fahrzeug betrieben, schaltet sich
die Kühlbox selbstständig ab, sobald die Versorgungsspannung unter einen einstellbaren Wert abfällt. Die Kühlbox schaltet sich wieder ein, sobald durch Aufladung der
Batterie die Wiedereinschaltspannung erreicht wird.
ACHTUNG! BESCHÄDIGUNGSGEFAHR
A
Die Batterie ist bei Abschalten durch den Batteriewächter nicht mehr
vollständig aufgeladen. Vermeiden Sie daher mehrmaliges Starten oder
den Betrieb von Stromverbrauchern ohne längere Aufladephasen.
Sorgen Sie dafür, dass die Batterie wieder aufgeladen wird.
42

DE
CFF20, CFF35, CFF45, CFF70DZ Bedienung
Im Modus „HIGH“ spricht der Batteriewächter schneller an als in den Stufen „LOW“
und „MED“ (siehe folgende Tabelle).
Batteriewächter-Modus LOW MED HIGH
Ausschaltspannung bei 12 V
Wiedereinschaltspannung bei 12 V
Ausschaltspannung bei 24 V
Wiedereinschaltspannung bei 24 V
Der Batteriewächter-Modus kann wie folgt eingestellt werden:
➤ Schalten Sie die Kühlbox ein.
➤ Drücken Sie die Taste „SET“ (Abb. 3 5, Seite 5):
– CFF 20, CFF35, CFF45: dreimal.
– CFF 70DZ: viermal.
➤ Wählen Sie mithilfe der Plus- „+“ (Abb. 3 7, Seite 5) bzw. Minus-Taste „–“
(Abb. 3 6, Seite 5) den Batteriewächter-Modus aus.
✔ Auf dem Display wird Folgendes angezeigt:
Lo (LOW), ΠEd (MED), Hi (HIGH)
✔ Das Display zeigt für einige Sekunden den eingestellten Modus an. Das Display
blinkt einige Male, bevor es zur Darstellung der aktuellen Temperatur zurückkehrt.
HINWEIS
I
Wenn die Kühlbox von der Starterbatterie versorgt wird, wählen Sie den
Batteriewächter-Modus „HIGH“. Wenn die Kühlbox an eine Versorgungsbatterie angeschlossen ist, ist der Batteriewächter-Modus „LOW“
ausreichend.
10,1 V 11,2 V 11,8 V
11,4 V 12,2 V 12,6 V
21,5 V 24,1 V 24,6 V
23,0 V 25,3 V 26,2 V
6.5 Kühlgerät verwenden
ACHTUNG! GEFAHR VON ÜBERHITZUNG
A
Stellen Sie jederzeit eine ausreichende Belüftung sicher, sodass die
beim Betrieb entstehende Wärme abgeführt werden kann. Stellen Sie
sicher, dass die Lüftungsschlitze nicht abgedeckt sind. Sorgen Sie dafür,
dass das Gerät in ausreichendem Abstand zu Wänden oder Gegenständen steht, sodass die Luft zirkulieren kann.
43

DE
Bedienung CFF20, CFF 35, CFF45, CFF70DZ
➤ Stellen Sie die Kühlbox auf eine feste Unterlage.
Achten Sie darauf, dass die Lüftungsschlitze nicht abgedeckt sind und die
erwärmte Luft abgeleitet werden kann. Wir empfehlen einen Abstand von mindestens 50 mm um die Lüftungsschlitze.
ACHTUNG! BESCHÄDIGUNGSGEFAHR
A
➤ Schließen Sie die Kühlbox an (siehe Kapitel „Kühlgerät anschließen“ auf
Seite 41).
A
➤ Drücken Sie die Ein-/Austaste (Abb. 3 1, Seite 5) für ein bis zwei Sekunden.
✔ Die LED „P“ leuchtet auf (Abb. 3 2, Seite 5).
✔ Das Display (Abb. 3 4, Seite 5) schaltet sich ein und zeigt die aktuelle Tempe-
ratur an.
Stellen Sie die Kühlbox wie dargestellt auf (Abb. 1, Seite 3). Wird die
Kühlbox in einer anderen Ausrichtung betrieben, kann das Gerät Schaden nehmen.
ACHTUNG! GEFAHR DURCH ZU NIEDRIGE TEMPERATUR
Achten Sie darauf, dass sich nur Gegenstände bzw. Waren in dem Kühlgerät befinden, die auf die gewählte Temperatur gekühlt werden dürfen.
✔ Die Kühlbox startet mit dem Kühlen des Innenraums.
HINWEIS
I
Kühlboxdeckel verriegeln
➤ Schließen Sie den Deckel.
➤ Drücken Sie die Verriegelung (Abb. 2, Seite 4) nach unten, bis sie hörbar ein-
rastet.
I
44
Bei Betrieb an einer Batterie schaltet sich das Display bei niedriger Batteriespannung automatisch ab. Die LED „P “ blinkt orange.
HINWEIS
CFF35, CFF45: Stellen Sie bei Verriegeln des Deckels sicher, dass die
Verriegelungsstifte auf beiden Seiten vollständig eingerastet sind, um
eine gute Abdichtung des Deckels sicherzustellen. Eine Verriegelung
rastet möglicherweise kurz vor der anderen ein.
Wenn der Deckel nicht auf beiden Seiten gleichmäßig geschlossen ist,
drücken Sie erneut, bis ein Einrasten hörbar ist.

DE
CFF20, CFF35, CFF45, CFF70DZ Bedienung
6.6 Temperatur einstellen
CFF20, CFF35, CFF 45
➤ Drücken Sie die Taste „SET“ (Abb. 3 5, Seite 5) einmal.
➤ Stellen Sie mithilfe der Plus- „+“ (Abb. 3 7, Seite 5) bzw. Minus-Taste „–“
(Abb. 3 6, Seite 5) die Kühltemperatur ein.
✔ Das Display zeigt für einige Sekunden die Kühltemperatur an. Das Display blinkt
einige Male, bevor es zur Darstellung der aktuellen Temperatur zurückkehrt.
CFF70DZ
➤ Drücken Sie die Taste „SET“ (Abb. 3 5, Seite 5):
–einmal für das große Fach
– zweimal für das kleine Fach
✔ Das Display des gewählten Fachs blinkt.
➤ Stellen Sie mithilfe der Plus- „+“ (Abb. 3 7, Seite 5) bzw. Minus-Taste „–“
(Abb. 3 6, Seite 5) die Kühltemperatur ein.
Jedes Fach kann so eingestellt werden, dass es als Kühl- oder Tiefkühlfach dient.
✔ Das Display des gewählten Fachs zeigt für einige Sekunden die Kühltemperatur
an. Das Display blinkt einige Male, bevor es zur Darstellung der aktuellen Temperatur zurückkehrt.
6.7 Ein Fach ein- oder ausschalten (CFF70DZ)
Wenn nur ein Fach benötigt wird, kann das andere Fach abgeschaltet werden, um
Energie zu sparen.
Ein Fach ausschalten
Wenn das Display des Fachs eine Temperatur anzeigt, können Sie das Fach wie folgt
ausschalten:
➤ Drücken Sie die Taste „SET“ (Abb. 3 5, Seite 5):
–einmal für das große Fach
– zweimal für das kleine Fach
✔ Das Display des jeweiligen Fachs blinkt.
➤ Drücken Sie den Taster „ON/OFF“ (Abb. 3 1, Seite 5).
✔ Auf dem Display des jeweiligen Kühlfachs blinkt „OFF“ fünf Sekunden lang, dann
wird „OFF“ angezeigt.
45

DE
Bedienung CFF20, CFF 35, CFF45, CFF70DZ
Ein Fach einschalten
Wenn das Display des Fachs „OFF“ anzeigt, können Sie das Fach wie folgt einschalten:
➤ Drücken Sie die Taste „SET“ (Abb. 3 5, Seite 5):
–einmal für das große Fach
– zweimal für das kleine Fach
✔ Das Display des jeweiligen Fachs blinkt.
➤ Drücken Sie den Taster „ON/OFF“ (Abb. 3 1, Seite 5).
✔ Das Display zeigt für einige Sekunden die Kühltemperatur an. Das Display blinkt
einige Male, bevor es zur Darstellung der aktuellen Temperatur zurückkehrt.
6.8 Displayhelligkeit einstellen
Die Displayhelligkeit kann an dunkle Umgebungen angepasst werden. Um die Helligkeitsstufe des Displays einzustellen, gehen Sie wie folgt vor:
➤ Schalten Sie die Kühlbox ein.
➤ Drücken Sie die Taste „SET“ (Abb. 3 5, Seite 5):
– CFF 20, CFF35, CFF45: viermal.
– CFF 70DZ: fünfmal.
➤ Stellen Sie mithilfe der Plus- „+“ (Abb. 3 7, Seite 5) oder Minus-Taste „–“
(Abb. 3 6, Seite 5) die Helligkeit des Displays ein.
✔ Auf dem Display wird Folgendes angezeigt:
d0 (Standard), d1 (mittel), d2 (dunkel)
✔ Auf dem Display wird der eingestellte Modus für einige Sekunden angezeigt.
Das Display blinkt zweimal, bevor es zur Darstellung der aktuellen Temperatur
zurückkehrt.
HINWEIS
I
• Die werkseitige Standardeinstellung des Displays ist d0 (Standard).
• Bei Auftreten einer Störung wird die Helligkeit automatisch auf den
Wert d0 (Standard) zurückgestellt. Nach der Störungsbeseitigung
wird die eingestellte Helligkeit wieder aktiviert.
46

DE
CFF20, CFF35, CFF45, CFF70DZ Bedienung
6.9 Kühlgerät ausschalten
➤ Entleeren Sie die Kühlbox.
➤ Schalten Sie die Kühlbox aus.
➤ Ziehen Sie das Anschlusskabel ab.
Wenn Sie die Kühlbox für längere Zeit nicht benutzen wollen:
➤ Lassen Sie den Deckel leicht geöffnet. So verhindern Sie, dass sich Gerüche
bilden.
6.10 Kühlbox abtauen
Luftfeuchtigkeit kann sich im Innenraum des Kühlgerätes als Reif niederschlagen, der
die Kühlleistung verringert.
ACHTUNG! BESCHÄDIGUNGSGEFAHR
A
Gehen Sie wie folgt vor, um die Kühlbox abzutauen:
➤ Entfernen Sie alle Gegenstände aus dem Kühlgerät.
Verwenden Sie nie harte oder spitze Werkzeuge zum Entfernen von Eisschichten oder zum Lösen festgefrorener Gegenstände.
➤ Lagern Sie sie ggf. in einem anderen Kühlgerät, damit sie kalt bleiben.
➤ Schalten Sie das Gerät aus.
➤ Lassen Sie den Deckel geöffnet.
➤ Wischen Sie das Tauwasser auf.
6.11 Sicherung für Wechselstromkreis ersetzen
GEFAHR! LEBENSGEFAHR DURCH STROMSCHLAG
D
➤ Unterbrechen Sie die Spannungsversorgung des Gerätes.
➤ Entfernen Sie das Stromkabel.
Nichtbeachtung dieser Warnung kann zum Tod oder schwerer Verletzung führen.
Trennen Sie das Gerät vor dem Austauschen der Gerätesicherung von
der Spannungsversorgung und ziehen Sie das Anschlusskabel ab.
47

DE
Bedienung CFF20, CFF 35, CFF45, CFF70DZ
➤ Hebeln Sie den Sicherungseinsatz (Abb. 4 2, Seite 5) z. B. mit einem Schrau-
bendreher heraus.
➤ Tauschen Sie die defekte Glassicherung gegen eine neue Sicherung desselben
Typs mit demselben Wert (4 A, 250 V) aus.
➤ Drücken Sie den Sicherungseinsatz wieder in das Gehäuse.
➤ Verbinden Sie das Gerät wieder mit der Spannungsversorgung.
6.12 Gerätesicherung für Gleichstromkreis ersetzen
➤ Unterbrechen Sie die Spannungsversorgung des Gerätes.
➤ Hebeln Sie die Abdeckung der Sicherung (Abb. 4 3, Seite 5) heraus.
➤ Drehen Sie die Abdeckung der Sicherung um und entfernen Sie die Sicherung
mithilfe des Hakens.
➤ Ersetzen Sie die defekte Sicherung durch eine neue Sicherung des gleichen Typs
(Flachstecksicherung, 10 A, gemäß Automobilstandard).
➤ Setzen Sie den Sicherungsdeckel wieder ein.
➤ Verbinden Sie das Gerät wieder mit der Spannungsversorgung.
6.13 Sicherung im Gleichstromstecker ersetzen (Abb. a, Seite 10)
➤ Schrauben Sie das Kontaktstiftgehäuse (3) vom Stecker (1) ab.
➤ Ersetzen Sie die defekte Sicherung (2) durch eine neue Sicherung desselben
Typs mit demselben Wert (3AG, flink, 10 A).
➤ Setzen Sie den Stecker in umgekehrter Reihenfolge wieder zusammen.
6.14 Lichtleiterplatte wechseln
ACHTUNG! Beschädigungsgefahr
A
Die Lampe darf nur durch den Hersteller, einen Kundendienst oder eine
ähnlich qualifizierte Person ersetzt werden, um um Beschädigungen zu
vermeiden.
48

DE
CFF20, CFF35, CFF45, CFF70DZ Reinigung und Pflege
7 Reinigung und Pflege
WARNUNG! LEBENSGEFAHR DURCH STROMSCHLAG
!
A
➤ Reinigen Sie das Kühlgerät innen und außen gelegentlich mit einem feuchten
Tuch.
➤ Stellen Sie sicher, dass die Be- und Entlüftungsöffnungen des Kühlgerätes frei
von Staub und Verunreinigungen sind, damit die beim Betrieb entstehende
Wärme abgeführt werden kann und das Kühlgerät keinen Schaden nimmt.
Nichtbeachtung dieser Warnung kann zum Tod oder schwerer Verletzung führen.
Trennen Sie vor jeder Reinigung und Pflege das Gerät von der Stromversorgung.
ACHTUNG! Beschädigungsgefahr!
• Reinigen Sie das Kühlgerät niemals unter fließendem Wasser oder
gar im Spülwasser.
• Verwenden Sie zur Reinigung keine scharfen Reinigungsmittel oder
harten Gegenstände, da diese das Kühlgerät beschädigen können.
49

DE
Störungsbeseitigung CFF20, CFF35, CFF45, CFF70DZ
8 Störungsbeseitigung
Störung Mögliche Ursache Lösungsvorschlag
Das Gerät funktioniert
nicht, LED leuchtet
nicht.
Das Gerät kühlt nicht
(Stecker ist eingesteckt, LED der
Betriebsanzeige leuchtet).
Das Gerät kühlt nicht
(Stecker ist eingesteckt, LED der
Betriebsanzeige blinkt
orange, Display ist
abgeschaltet).
Die angeschlossene
Stromversorgung führt
keine Spannung.
Eine der Gerätesicherungen ist defekt.
Das integrierte Netzteil
ist defekt.
Kompressor defekt. Die Reparatur darf nur von einem zuge-
Der Batteriewächter ist
zu hoch eingestellt.
Batteriespannung nicht
ausreichend.
An Gleichstrom-Steckdose angeschlossen: Bei den meisten Fahrzeugen muss
der Zündschalter eingeschaltet sein,
damit die Gleichstromsteckdose Spannung führt.
An Wechselstrom-Steckdose angeschlossen: Versuchen Sie es an einer
anderen Steckdose.
Tauschen Sie die defekte Gerätesicherung aus (siehe Kapitel „Sicherung für
Wechselstromkreis ersetzen“ auf
Seite 47 oder Kapitel „Gerätesicherung
für Gleichstromkreis ersetzen“ auf
Seite 48).
Die Reparatur darf nur von einem zugelassenen Kundendienstbetrieb durchgeführt werden.
lassenen Kundendienstbetrieb durchgeführt werden.
Wählen Sie eine niedrigere Einstellung
für den Batteriewächter.
Prüfen Sie die Batterie und laden Sie sie
gegebenenfalls.
50

DE
CFF20, CFF35, CFF45, CFF70DZ Störungsbeseitigung
Störung Mögliche Ursache Lösungsvorschlag
Bei Betrieb an der
Gleichstromsteckdose:
Die Zündung ist eingeschaltet, das Gerät
funktioniert nicht und
die LED leuchtet nicht.
Das Display zeigt eine
Fehlermeldung (z. B.
„Err1“) an und das
Gerät kühlt nicht.
Die Gleichstromsteckdose ist verschmutzt.
Das hat einen schlechten elektrischen Kontakt zur Folge.
Die Sicherung des
Gleichstromsteckers ist
durchgebrannt.
Die Gerätesicherung für
den Gleichstromkreis ist
durchgebrannt.
Die Fahrzeug-Sicherung
ist durchgebrannt.
Eine interne Betriebsstörung hat das Gerät
ausgeschaltet.
Wenn der Stecker in der Gleichstromsteckdose sehr warm wird, muss entweder die Steckdose gereinigt werden
oder der Stecker ist möglicherweise
nicht richtig zusammengebaut.
Ersetzen Sie die Sicherung im Gleichstromstecker (siehe Kapitel „Sicherung
im Gleichstromstecker ersetzen
(Abb. a, Seite 10)“ auf Seite 48).
Tauschen Sie die defekte Sicherung aus
(siehe Kapitel „Gerätesicherung für
Gleichstromkreis ersetzen“ auf Seite 48).
Tauschen Sie die Sicherung der Gleichstromsteckdose des Fahrzeugs aus.
Beachten Sie dazu die Bedienungsanleitung Ihres Fahrzeugs.
Die Reparatur darf nur von einem zugelassenen Kundendienstbetrieb durchgeführt werden.
8.1 Der Deckel wurde über den integrierten Anschlag hinaus gedrückt (nur CFF35, CFF45)
Gehen Sie wie folgt vor (Abb. b, Seite 10):
➤ Stützen Sie den Deckel mit einer Hand (A).
➤ Drücken Sie mit der anderen Hand die Verriegelung nach unten (B).
VORSICHT! GESUNDHEITSGEFAHR
!
A
Nichtbeachtung kann zu geringer oder mittelschwerer Verletzung führen.
Achten Sie darauf, sich bei Schließen des Deckels nicht den Daumen
einzuklemmen.
ACHTUNG! BESCHÄDIGUNGSGEFAHR!
Nichtbeachtung kann zu einem Abbrechen des Deckels führen.
51

DE
Garantie CFF20, CFF35, CFF45, CFF70DZ
➤ Schließen Sie den Deckel so weit, wie es ohne Einklemmen Ihres Daumens mög-
lich ist, und drücken Sie dabei die Verriegelung weiter nach unten, damit diese
nicht abbricht.
✔ Der Deckel sollte nun in etwa im gezeigten Winkel sein (Abb. b, Seite 10).
➤ Entfernen Sie die Hand von der Verriegelung (B) und schließen Sie den Deckel
vollständig.
HINWEIS
I
Die Scharniere können sich während des Schließens aus ihrer korrekten
Position lösen. Positionieren Sie den Deckel wie folgt:
➤ Betätigen Sie die Scharniere auf beiden Seiten des Deckels gleich-
zeitig.
➤ Heben Sie den Deckel ab und positionieren Sie ihn neu.
9 Garantie
Es gilt die gesetzliche Gewährleistungsfrist. Sollte das Produkt defekt sein, wenden
Sie sich bitte an die Niederlassung des Herstellers in Ihrem Land (siehe
dometic.com/dealer) oder an Ihren Fachhändler.
Zur Reparatur- bzw. Gewährleistungsbearbeitung müssen Sie folgende Unterlagen
mitschicken:
• eine Kopie der Rechnung mit Kaufdatum,
• einen Reklamationsgrund oder eine Fehlerbeschreibung.
10 Entsorgung
➤ Geben Sie das Verpackungsmaterial möglichst in den entsprechenden
Recycling-Müll.
Wenn Sie das Produkt endgültig außer Betrieb nehmen, informieren Sie
sich bitte beim nächsten Recyclingcenter oder bei Ihrem Fachhändler
M
52
über die zutreffenden Entsorgungsvorschriften.

DE
CFF20, CFF35, CFF45, CFF70DZ Technische Daten
11 Technische Daten
CFF20 CFF35
Anschlussspannung: 12/24 Vg
100 bis 240 Vw
Nennstrom: 12 Vg: 4,8 A
24 Vg: 2,8 A
240 Vw: 0,3 A
Kühlleistung: +20 °C bis –18 °C (+68 °F bis 0 °F)
Klimaklasse: N, T
Umgebungstemperatur: +16 °C to +43 °C (+60 °F to +110 °F)
Kältemittel: R134a
Kältemittelvolumen: 28 g 34 g
-Äquivalent: 0,040 t 0,049 t
CO
2
Treibhauspotential (GWP): 1430
Abmessungen
(B x H x T) (inkl. Griffe):
(B x H x T) (bei abgenomme-
nen Griffen):
283 x 430 x 660 mm
283 x 430 x 533 mm
12 Vg: 7,8 A
24 Vg: 3,5 A
240 Vw: 0,4 A
715 x 407 x 398 mm
590 x 500 x 443 mm
Gewicht: 10,5 kg 17,2 kg
53

DE
Technische Daten CFF20, CFF35, CFF45, CFF70DZ
CFF45 CFF70DZ
Anschlussspannung: 12/24 Vg
100 bis 240 Vw
Nennstrom: 12 Vg: 8,6 A
24 Vg: 3,8 A
240 Vw: 0,41 A
Kühlleistung: +20 °C bis –18 °C (+68 °F bis 0 °F)
Klimaklasse: N, T
Umgebungstemperatur: +16 °C to +43 °C (+60 °F to +110 °F)
Kältemittel: R134a
Kältemittelvolumen: 43 g 34 g
-Äquivalent: 0,061 t 0,049 t
CO
2
Treibhauspotential (GWP): 1430
Abmessungen
(B x H x T) (inkl. Griffe):
(B x H x T) (bei abgenomme-
nen Griffen):
715 x 475 x 398 mm
590 x 475 x 398 mm
12 Vg: 9,0 A
24 Vg: 4,0 A
240 Vw: 0,44 A
914 x 500 x 443 mm
785 x 500 x 443 mm
Gewicht: 18,6 kg 26,4 kg
HINWEIS
I
Konformitätserklärung:
Enthält fluorierte Treibhausgase
Hermetisch geschlossene Einrichtung
Beim Umgebungstemperaturen über +32 °C (+90 °F) kann die minimale Temperatur nicht erreicht werden.
54

FR
CFF20, CFF35, CFF45, CFF70DZ Signification des symboles
Veuillez lire et suivre attentivement l’ensemble des instructions, directives et avertissements figurant dans ce manuel afin de vous assurer que
vous installez, utilisez et entretenez le produit correctement à tout moment. Ces instructions DOIVENT rester avec ce produit.
En utilisant le produit, vous confirmez par la présente que vous avez lu attentivement l’ensemble des instructions, directives et avertissements
et que vous comprenez et acceptez de respecter les modalités et conditions énoncées dans le présent document. Vous acceptez d’utiliser
ce produit uniquement pour l’usage et l’application prévus et conformément aux instructions, directives et avertissements figurant dans le
manuel du produit, ainsi qu’à toutes les lois et réglementations applicables. Si vous ne lisez et ne respectez pas les instructions et les
avertissements figurant dans ce manuel, vous risquez de vous blesser ou de blesser d’autres personnes, d’endommager votre produit ou
d’endommager d’autres biens à proximité. Le présent manuel produit, y compris les instructions, directives et avertissements, ainsi que la
documentation associée peuvent faire l’objet de modifications et de mises à jour. Pour obtenir des informations actualisées sur le produit,
rendez-vous sur www.dometic.com.
Sommaire
1 Signification des symboles . . . . . . . . . . . . . . . . . . . . . . . . . . . . . . . . . . . . . . 55
2 Consignes de sécurité . . . . . . . . . . . . . . . . . . . . . . . . . . . . . . . . . . . . . . . . . 56
3 Contenu de la livraison . . . . . . . . . . . . . . . . . . . . . . . . . . . . . . . . . . . . . . . . . 59
4 Usage conforme . . . . . . . . . . . . . . . . . . . . . . . . . . . . . . . . . . . . . . . . . . . . . . 59
5 Description du fonctionnement . . . . . . . . . . . . . . . . . . . . . . . . . . . . . . . . . . 60
6 Utilisation . . . . . . . . . . . . . . . . . . . . . . . . . . . . . . . . . . . . . . . . . . . . . . . . . . . . 62
7 Nettoyage et maintenance. . . . . . . . . . . . . . . . . . . . . . . . . . . . . . . . . . . . . . .71
8 Guide de dépannage . . . . . . . . . . . . . . . . . . . . . . . . . . . . . . . . . . . . . . . . . . 72
9 Garantie . . . . . . . . . . . . . . . . . . . . . . . . . . . . . . . . . . . . . . . . . . . . . . . . . . . . . .74
10 Mise au rebut. . . . . . . . . . . . . . . . . . . . . . . . . . . . . . . . . . . . . . . . . . . . . . . . . .74
11 Caractéristiques techniques. . . . . . . . . . . . . . . . . . . . . . . . . . . . . . . . . . . . . 75
1 Signification des symboles
DANGER !
D
!
Consigne de sécurité signalant une situation dangereuse qui entraîne
la mort ou de graves blessures si elle n’est pas évitée.
AVERTISSEMENT !
Consigne de sécurité signalant une situation dangereuse qui peut
entraîner la mort ou de graves blessures si elle n’est pas évitée.
55

FR
Consignes de sécurité CFF20, CFF35, CFF45, CFF70DZ
ATTENTION !
!
A
I
Consigne de sécurité signalant une situation dangereuse qui peut
entraîner des blessures de gravité moyenne ou légère si elle n’est pas
évitée.
AVIS !
Remarque signalant une situation qui peut entraîner des dommages
matériels si elle n’est pas évitée.
REMARQUE
Informations complémentaires sur l'utilisation du produit.
2 Consignes de sécurité
AVERTISSEMENT ! Le non-respect de ces mises en garde peut
entraîner des blessures graves, voire mortelles.
!
Danger de mort par électrocution
• Si l’appareil présente des dégâts visibles, vous ne devez pas le mettre
en service.
• Si le câble d’alimentation de ce dispositif de refroidissement est
endommagé, il doit être remplacé pour éviter tout danger.
• Seul un personnel qualifié est habilité à effectuer des réparations sur
l’appareil. Toute réparation mal effectuée risque d’entraîner de graves
dangers.
Risque d’incendie
• Veillez à ne pas coincer ni endommager le cordon d’alimentation lors
de la mise en place de l’appareil.
• Ne placez pas de multiprises portables ou de blocs d’alimentation
portables à l'arrière de l’appareil.
Risque pour la santé
• Cet appareil peut être utilisé par des enfants âgés de 8 ans et plus et
des personnes ayant des capacités physiques, sensorielles ou
mentales réduites ou un manque d’expérience et de connaissances,
s’ils sont sous surveillance ou ont reçu des instructions sur l’utilisation
de l’appareil en toute sécurité et comprennent les risques impliqués.
• Les enfants ne doivent pas jouer avec cet appareil.
56

FR
CFF20, CFF35, CFF45, CFF70DZ Consignes de sécurité
• Le nettoyage et la maintenance ne doivent pas être effectués par des
enfants sans surveillance.
• Les enfants âgés de 3 à 8 ans peuvent charger et décharger les
appareils de réfrigération.
Risque d'explosion
• Ne stockez aucune substance explosive comme p. ex. des aérosols
contenant des agents propulseurs dans l'appareil.
ATTENTION ! Le non-respect de ces mises en garde peut
entraîner des blessures légères ou de gravité modérée.
!
Danger de mort par électrocution
• Avant de mettre l’appareil en service, assurez-vous que la ligne
d’alimentation électrique et la fiche sont sèches.
• Débranchez l'appareil du secteur
– avant tout nettoyage et entretien
– après chaque utilisation
Risque pour la santé
• Veuillez vérifier si la puissance frigorifique de l'appareil correspond à
la température de conservation recommandée pour les aliments ou
les médicaments que vous souhaitez refroidir.
• Les aliments ne peuvent être conservés que dans leurs emballages
originaux ou dans des récipients appropriés.
• Une ouverture prolongée de l’appareil de réfrigération peut entraîner
une augmentation significative de la température dans les compartiments de l’appareil.
• Nettoyez régulièrement les surfaces qui entrent en contact avec les
aliments, ainsi que les systèmes de drainage accessibles.
• Si l’appareil reste vide pendant une longue période :
– Éteignez l’appareil.
– Dégivrez l’appareil.
– Nettoyez et séchez l’appareil.
– Laissez la porte ouverte pour éviter la formation de moisissures à
l’intérieur de l’appareil.
A
AVIS ! Risque d'endommagement
• Comparez la tension indiquée sur la plaque signalétique avec
l’alimentation électrique dont vous disposez.
57

FR
Consignes de sécurité CFF20, CFF35, CFF45, CFF70DZ
• Branchez l’appareil uniquement comme indiqué ci-dessous :
– avec le câble de raccordement CC sur une prise CC du véhicule
– ou avec le câble de raccordement CA au secteur à courant
alternatif
• Ne tirez jamais sur le câble de raccordement pour sortir la fiche de la
prise.
• Si la glacière est raccordée à la prise CC : débranchez de la batterie la
glacière et les autres consommateurs d’énergie avant de raccorder un
chargeur rapide.
• Si la glacière est raccordée à la prise CC : débranchez ou éteignez la
glacière lorsque vous éteignez le moteur. Dans le cas contraire, il se
pourrait que la batterie se décharge.
• N’utilisez pas la glacière pour le transport de produits corrosifs ou de
solvants.
• Cette glacière contient du cyclopentane inflammable dans son
isolation. Les gaz contenus dans le matériau d'isolation exigent une
procédure de retraitement particulière. Une fois que vous ne l'utilisez
plus, recyclez l'appareil de manière conforme.
• N'utilisez aucun appareil électrique dans la glacière, sauf si ces
appareils sont recommandés par le fabricant pour cet usage.
• Ne placez pas l’appareil près de flammes ou d’autres sources de
chaleur (chauffage, rayons solaires, réchauds à gaz, etc.).
• Risque de surchauffe !
En toutes circonstances, maintenir une zone de ventilation de 50 mm
minimum autour du dispositif de réfrigération. Cette zone de ventilation doit rester libre de tout objet susceptible de réduire le flux d’air
acheminé vers les composants réfrigérants.
Ne placez pas le dispositif de réfrigération dans des zones ou à
l’intérieur de boîtiers clos dans lesquels l’air ne peut circuler pas ou
trop peu.
• Assurez-vous que les fentes d’aération ne sont pas recouvertes.
• Ne pas remplir le bac intérieur de substances liquides ou de glace.
• Ne plongez jamais l’appareil dans l’eau.
• Tenez l’appareil et les câbles à l’abri de la chaleur et de l’humidité.
• L'appareil ne doit pas être exposé à la pluie.
58

FR
CFF20, CFF35, CFF45, CFF70DZ Contenu de la livraison
3 Contenu de la livraison
Élément
(fig. 1, page 3)
1 1 Glacière
2 1 Câble de raccordement au courant continu
3 1 Câble de raccordement au courant alternatif
4 2 Poignée de transport, composée de :
– 1 Manuel d’utilisation
Quantité Description
• 2 supports
• 1 poignée
• 4 vis de fixation
• 1 clé Allen
4Usage conforme
La glacière est conçue pour la réfrigération d’aliments. La glacière peut également
être utilisée dans des véhicules. La glacière est conçue pour être raccordée à la prise
d’alimentation CC d’un véhicule ou à une alimentation CA.
La glacière est adaptée à une utilisation en camping.
La glacière n’est pas conçue pour :
• le stockage de substances corrosives, caustiques ou contenant des solvants
• la congélation d’aliments
Cette glacière n’est pas destinée à être utilisée comme appareil intégré.
Cette glacière convient uniquement à l’usage et à l’application prévus, conformé-
ment au présent manuel d’instructions.
Ce manuel fournit les informations nécessaires à l’installation et/ou à l’utilisation
correcte de la glacière. Une installation, une utilisation ou un entretien inappropriés
entraînera des performances insatisfaisantes et une éventuelle défaillance.
Le fabricant décline toute responsabilité en cas de blessure ou de dommage
résultant :
• d’un montage ou d’un raccordement incorrect, y compris d’une surtension
• d’un entretien inadapté ou de l’utilisation de pièces de rechange autres que les
pièces de rechange d’origine fournies par le fabricant
59

FR
Description du fonctionnement CFF20, CFF35, CFF45, CFF70DZ
• des modifications apportées au produit sans autorisation explicite du fabricant ;
• des usages différents de ceux décrits dans le manuel.
Dometic se réserve le droit de modifier l’apparence et les spécifications produit.
5 Description du fonctionnement
La réfrigération est assurée par un circuit de refroidissement à compresseur qui
nécessite peu d’entretien. L’isolation forte et le puissant compresseur assurent un
refroidissement particulièrement rapide.
La glacière convient pour une utilisation mobile.
La glacière supporte pendant une courte durée d’être inclinée à 30 °, par exemple
sur les bateaux.
5.1 Étendue des fonctions
• Alimentation électrique avec raccordement prioritaire pour raccordement au
courant alternatif
• Protecteur de batterie à trois niveaux pour protéger la batterie du véhicule
S’éteint automatiquement lorsque la tension de la batterie est faible
• Écran avec affichage de la température en °C et °F
• Réglage de la température : Avec deux touches par pas de 1 °C (et de 2 °F)
• Écran avec fonction de tamisage à 3 niveaux de luminosité
• Élément panier amovible (CFF35, CFF45, CFF70DZ uniquement)
• Poignées amovibles
60

FR
CFF20, CFF35, CFF45, CFF70DZ Description du fonctionnement
5.2 Éléments de commande et d’affichage
Loquets du couvercle (fig. 2, page 4)
Panneau de commande (fig. 3, page 5)
Pos. Description Explication
1ON
OFF
2
POWER « P »
3 ERROR La LED clignote en rouge : L’appareil est allumé mais n’est pas
4 – Écran, affiche les valeurs
5 SET Sélection du mode de saisie
6 DOWN – Une pression sur cette touche diminue la valeur de saisie
7 UP + Une pression sur cette touche augmente la valeur de saisie
8 CFF70DZ uniquement : Indication d’état : La LED s’allume en
Permet de mettre en marche ou d’arrêter la glacière en appuyant
une à deux secondes sur la touche
Indication d’état
La LED s’allume en vert : Le compresseur est en marche
La LED s’allume en orange : Le compresseur est arrêté
La LED clignote en orange : Affichage éteint automatiquement en
raison de la faible tension de la batterie
prêt à fonctionner
CFF70DZ uniquement : un affichage par zone
– Réglage de la température
– Affichage en Celsius ou Fahrenheit
– Réglage du protecteur de batterie
– Réglage de la luminosité de l’écran
bleu lorsque le compartiment est en cours de refroidissement
Prises de raccordement (fig. 4, page 5)
Pos. Description
1 Prise de raccordement de l’alimentation en tension alternative
2 Porte-fusible CA
3 Couvercle de fusible CC
4 Prise de raccordement de l’alimentation en tension continue
61

FR
Utilisation CFF20, CFF35, CFF45, CFF70DZ
6Utilisation
Pour éviter de gâcher des aliments, notez les éléments suivants :
• Évitez autant que possible les variations de température. Ouvrez uniquement la
glacière lorsque c’est nécessaire et le moins longtemps possible. Entreposez les
aliments de sorte que l’air puisse circuler librement entre eux.
• Ajustez la température en fonction de la quantité et de la nature des aliments.
• Les aliments peuvent facilement absorber ou dégager des odeurs. Entreposez
toujours les aliments dans des conteneurs/bouteilles couverts ou fermés.
6.1 Avant la première utilisation
REMARQUE
I
Montage des poignées (fig. 5, page 6)
Les poignées sont fournies non assemblées. Si vous souhaitez fixer les poignées,
procédez comme suit :
Avant de mettre en service votre nouvelle glacière, vous devez, pour
des raisons d’hygiène, la nettoyer à l’intérieur et à l’extérieur à l’aide
d’un tissu humide (voir aussi chapitre « Nettoyage et maintenance »,
page 71).
➤ Montez une poignée en assemblant deux supports (1) et une poignée (2).
➤ Fixez les supports en vissant les vis fournies dans les trous prévus.
Inversion du sens d’ouverture du couvercle
➤ CFF70DZ : Pour inverser l’ouverture du couvercle, procédez comme indiqué
(fig. 6, page 7).
Ouverture ou retrait du couvercle (fig. 7, page 8)
➤ Pour ouvrir le couvercle, déverrouillez (A).
CFF35, CFF45 : Le couvercle peut être ouvert des deux côtés.
➤ CFF 35, CFF45 : Pour retirer le couvercle, déverrouillez les deux côtés en même
temps (C).
CFF 20, CFF70DZ : Pour retirer le couvercle, poussez le couvercle au-delà de la
position d’arrêt (B).
62

FR
CFF20, CFF35, CFF45, CFF70DZ Utilisation
Position d’arrêt du couvercle (fig. 8, page 9)
Le couvercle possède une position d’arrêt intégrée (A). Ne forcez pas sur le couvercle pour l’amener au-delà de cette butée (B).
AVIS ! RISQUE D’ENDOMMAGEMENT
A
Retrait du panier (fig. 9, page 9)
A
Sélection des unités de température
Les unités de température peuvent être commutées entre Celsius et Fahrenheit de la
manière suivante :
➤ Mettez la glacière en marche.
➤ CFF20, CFF35, CFF45 : Appuyez deux fois sur la touche « SET » (fig. 3 5,
page 5).
CFF70DZ : Appuyez trois fois sur la touche « SET » (fig. 3 5, page 5).
CFF35, CFF45 : Si vous avez trop forcé sur le couvercle, suivez les
étapes décrites dans le chapitre « Le couvercle a été forcé au-delà de sa
position d’arrêt intégrée (CFF35, CFF45 uniquement) », page 73.
AVIS ! RISQUE D’ENDOMMAGEMENT !
En cas de retrait du panier avec le couvercle ouvert, cela peut rayer le
couvercle et déformer le panier. Nous vous recommandons de retirer le
couvercle avant d’enlever le panier.
➤ Sélectionnez Celsius ou Fahrenheit à l’aide des touches « UP + » (fig. 3 7,
page 5) ou « DOWN – » (fig. 3 6, page 5).
✔ L’écran affiche l’unité de température sélectionnée pendant quelques secondes.
L’écran clignote plusieurs fois avant de revenir à l’affichage de la température
actuelle.
6.2 Économie d’énergie
• Choisissez un emplacement bien aéré et à l’abri du soleil.
• Laissez refroidir les aliments chauds avant de les placer dans l’appareil de
réfrigération.
• N’ouvrez pas le dispositif de réfrigération plus souvent que nécessaire.
• Ne laissez pas l’appareil de réfrigération ouvert plus longtemps que nécessaire.
• Si la glacière est équipée d’un bac : Pour une consommation d’énergie optimale,
positionnez le bac conformément à sa position à la livraison.
63

FR
Utilisation CFF20, CFF35, CFF45, CFF70DZ
• Vérifiez régulièrement que le joint de la porte est correctement positionné.
• Dégivrez la glacière dès qu’une couche de glace s’est formée.
• Évitez les basses températures inutiles.
6.3 Raccordement de la glacière
Raccordement à une batterie (véhicule ou bateau)
La glacière peut être utilisée sur une alimentation 12 V ou 24 V
AVIS ! RISQUE D’ENDOMMAGEMENT
A
Pour des raisons de sécurité, la glacière est équipée d’un système électronique pour
empêcher l’inversion de polarité. Cela protège la glacière contre un court-circuit lors
de la connexion à une batterie.
Utilisation de la fiche CC protégée par fusible
A
➤ Branchez le câble de raccordement au courant continu (fig. 1 2, page 3) dans
la prise de tension CC de la glacière (fig. 4 3, page 5).
➤ Branchez le câble de raccordement à la prise de sortie CC.
Raccordement à un réseau alternatif
D
Débranchez la glacière et les autres consommateurs d’énergie de la batterie avant de recharger la batterie avec un chargeur rapide.
Les surtensions peuvent endommager l’électronique des appareils.
AVIS ! RISQUE D’ENDOMMAGEMENT
Pour la protection de l’appareil, le câble CC fourni comprend un fusible
à l’intérieur de la fiche. Ne retirez pas la fiche CC protégée par fusible.
Utilisez uniquement le câble de raccordement fourni à la livraison.
DANGER ! RISQUE D’ÉLECTROCUTION
Le non-respect de cette mise en garde entraînera des blessures graves,
voire mortelles.
• Ne vous approchez pas de fiches ou de commutateurs lorsque vous
avez les mains mouillées ou les pieds dans l’eau.
• Si vous raccordez votre glacière à un réseau alternatif à bord d’un
bateau, vous devez dans tous les cas brancher un disjoncteur différentiel entre le réseau alternatif et la glacière.
Veuillez vous renseigner auprès d’un spécialiste.
g.
64

FR
CFF20, CFF35, CFF45, CFF70DZ Utilisation
Les glacières sont équipées d’un bloc d’alimentation intégré à tensions multiples
avec raccordement prioritaire pour branchement sur une tension alternative. Le raccordement prioritaire permet de passer directement en fonctionnement sur courant
alternatif quand l’appareil est raccordé à un réseau de courant alternatif, même si le
câble de raccordement au courant continu est encore branché.
Lors de la commutation entre l’alimentation secteur et l’alimentation de la batterie, la
LED rouge peut s’allumer brièvement.
➤ Branchez le câble de raccordement au courant alternatif (fig. 1 3, page 3) dans
la prise de tension CA de la glacière (fig. 4 1, page 5).
➤ Branchez le câble de raccordement à la prise de sortie CA.
6.4 Utilisation du protecteur de batterie
Le conteneur réfrigérant est équipé d’un protecteur de batterie à plusieurs niveaux
qui protège la batterie de votre véhicule, afin d’éviter une décharge profonde
lorsqu’il est raccordé au réseau en courant CC.
Si la glacière est mise en marche alors que l’allumage du véhicule est éteint, elle
s’arrête automatiquement dès que la tension d’alimentation descend en dessous
d’une valeur prédéfinie. La glacière se remet en marche dès que la batterie est
rechargée et que la tension de rallumage est atteinte.
AVIS ! RISQUE D’ENDOMMAGEMENT
A
En mode « HIGH », le protecteur de batterie se met en marche plus rapidement
qu’en mode « LOW » ou « MED » (voir tableau suivant).
Mode protecteur de batterie LOW MED HIGH
Tension d’arrêt à 12 V
Tension de redémarrage à 12 V
Tension d’arrêt à 24 V
Tension de redémarrage à 24 V
En cas d’extinction par le protecteur de batterie, la batterie n’est plus
complètement chargée. Évitez les démarrages répétés ou l’utilisation
de consommateurs d’énergie sans phases de charge plus longues. Veillez à recharger la batterie.
10,1 V 11,2 V 11,8 V
11,4 V 12,2 V 12,6 V
21,5 V 24,1 V 24,6 V
23,0 V 25,3 V 26,2 V
65

FR
Utilisation CFF20, CFF35, CFF45, CFF70DZ
Le protecteur de batterie peut être sélectionné comme suit :
➤ Mettez la glacière en marche.
➤ Appuyez sur la touche « SET » (fig. 3 5, page 5) :
– CFF 20, CFF35, CFF45 : Trois fois.
– CFF 70DZ : Quatre fois.
➤ Servez-vous des touches « UP + » (fig. 3 7, page 5) ou « DOWN – » (fig. 3 6,
page 5) pour sélectionner le mode du protecteur de batterie.
✔ L’écran indique :
Lo (LOW), ΠEd (MED), Hi (HIGH)
✔ L’écran affiche le mode sélectionné pendant quelques secondes. L’écran cli-
gnote plusieurs fois avant de revenir à l’affichage de la température actuelle.
REMARQUE
I
6.5 Utilisation de la glacière
A
Lorsque la glacière est alimentée par la batterie de démarrage, réglez le
protecteur de batterie sur le mode « HIGH ». Si la glacière est raccordée
à une batterie d’alimentation, le mode « LOW » suffit.
AVIS ! RISQUE DE SURCHAUFFE
Garantissez en permanence une ventilation suffisante pour que la chaleur générée pendant le fonctionnement puisse se dissiper. Assurezvous que les fentes d’aération ne sont pas recouvertes. Veillez à ce que
l’appareil se trouve à une distance suffisante des murs ou des objets, de
sorte que l’air puisse circuler.
➤ Placez la glacière sur une surface stable.
Veillez à ce que les fentes d’aération ne soient pas recouvertes, afin que l’air
chaud puisse bien s’évacuer. Nous vous recommandons de maintenir une distance d’au moins 50 mm autour des ouvertures d’aération.
AVIS ! RISQUE D’ENDOMMAGEMENT
A
➤ Raccordez la glacière (voir chapitre « Raccordement de la glacière », page 64).
66
Montez la glacière comme indiqué sur l’illustration (fig. 1, page 3). Si
la glacière est utilisée dans une autre position, l’appareil risque d’être
endommagé.

FR
CFF20, CFF35, CFF45, CFF70DZ Utilisation
AVIS ! RISQUE DE TEMPÉRATURES TROP BASSES
A
➤ Appuyez pendant une à deux secondes sur la touche « ON/OFF » (fig. 3 1,
page 5).
✔ La LED « P » s’allume (fig. 3 2, page 5).
✔ L’écran (fig. 3 4, page 5) s’allume et indique la température actuelle.
✔ La glacière commence par la réfrigération du compartiment intérieur.
I
Verrouillage du couvercle de la glacière
➤ Fermez le couvercle.
➤ Abaissez le verrouillage (fig. 2 , page 4) jusqu’à ce qu’il s’enclenche de manière
audible.
I
Veillez à ne déposer dans la glacière que des objets ou des aliments qui
peuvent être réfrigérés à la température sélectionnée.
REMARQUE
Lorsque vous utilisez la batterie, l’écran s’éteint automatiquement si la
tension de la batterie est faible. La LED « P » clignote en orange.
REMARQUE
CFF35, CFF45 : Au moment de verrouiller le couvercle, assurez-vous
que les deux étriers latéraux sont entièrement enclenchés afin de garantir une bonne étanchéité au niveau du couvercle. Il se peut que l’un des
deux loquets s’engage un peu avant l’autre.
Si le couvercle n’est pas fermé de manière égale des deux côtés,
appuyez dessus jusqu’à entendre un second clic.
6.6 Réglage de la température
CFF20, CFF35, CFF 45
➤ Appuyez une fois sur la touche « SET » (fig. 3 5, page 5).
➤ Sélectionnez la température de refroidissement à l’aide des touches « UP + »
(fig. 3 7, page 5) et « DOWN – » (fig. 3 6, page 5).
✔ L’écran affiche la température de réfrigération pendant quelques secondes.
L’affichage clignote plusieurs fois, puis la température actuelle est à nouveau affichée.
67

FR
Utilisation CFF20, CFF35, CFF45, CFF70DZ
CFF70DZ
➤ Appuyez sur la touche « SET » (fig. 3 5, page 5) :
– une fois pour le grand compartiment
– deux fois pour le petit compartiment
✔ L’affichage du compartiment choisi clignote.
➤ Sélectionnez la température de refroidissement à l’aide des touches « UP + »
(fig. 3 7, page 5) et « DOWN – » (fig. 3 6, page 5).
Chaque compartiment peut être réglé pour fonctionner comme un réfrigérateur
ou un congélateur.
✔ L’affichage du compartiment choisi indique la température de réfrigération pen-
dant quelques secondes. L’affichage clignote plusieurs fois, puis la température
actuelle est à nouveau affichée.
6.7 Mise en marche ou à l’arrêt d’un compartiment (CFF 70DZ)
Si un seul compartiment est nécessaire, l’autre peut être arrêté pour économiser de
l’énergie.
Arrêt d’un compartiment
Si l’affichage du compartiment indique une température, vous pouvez arrêter le
compartiment comme suit :
➤ Appuyez sur la touche « SET » (fig. 3 5, page 5) :
– une fois pour le grand compartiment
– deux fois pour le petit compartiment
✔ L’affichage du compartiment correspondant clignote.
➤ Appuyez sur le bouton « ON/OFF » (fig. 3 1, page 5).
✔ « OFF » clignote pendant cinq secondes sur l’affichage du compartiment de
refroidissement concerné, puis « OFF » est affiché.
Mise en marche d’un compartiment
Si l’affichage du compartiment indique « OFF », vous pouvez mettre le compartiment en marche comme suit :
➤ Appuyez sur la touche « SET » (fig. 3 5, page 5) :
– une fois pour le grand compartiment
– deux fois pour le petit compartiment
68

FR
CFF20, CFF35, CFF45, CFF70DZ Utilisation
✔ L’affichage du compartiment correspondant clignote.
➤ Appuyez sur le bouton « ON/OFF » (fig. 3 1, page 5).
✔ L’écran affiche la température de réfrigération pendant quelques secondes.
L’affichage clignote plusieurs fois, puis la température actuelle est affichée.
6.8 Réglage de la luminosité de l’écran
La luminosité de l’écran peut s’adapter à une luminosité ambiante faible. Pour effectuer le réglage, procédez de la manière suivante :
➤ Mettez la glacière en marche.
➤ Appuyez sur la touche « SET » (fig. 3 5, page 5) :
– CFF 20, CFF35, CFF45 : Quatre fois.
– CFF 70DZ : Cinq fois.
➤ Servez-vous des touches « UP + » (fig. 3 7, page 5) ou « DOWN – » (fig. 3 6,
page 5) pour sélectionner la luminosité de l’écran.
✔ L’écran indique :
d0 (par défaut), d1 (moyenne), d2 (sombre)
✔ L’écran affiche le mode de fonctionnement réglé pendant plusieurs secondes.
L’écran clignote deux fois avant de revenir à l’affichage de la température
actuelle.
REMARQUE
I
• Le réglage d’usine de la luminosité de l’écran est d0 (par défaut).
• En cas de dysfonctionnement, la luminosité bascule automatiquement sur d0 (par défaut). Une fois la panne éliminée, la luminosité
réglée est réactivée.
6.9 Éteindre la glacière
➤ Videz l’appareil de réfrigération.
➤ Éteignez la glacière.
➤ Débranchez le câble de raccordement.
Lorsque vous ne voulez pas utiliser la glacière pendant une période prolongée :
➤ Laissez le couvercle légèrement ouvert. Vous évitez ainsi la formation d’odeurs.
69

FR
Utilisation CFF20, CFF35, CFF45, CFF70DZ
6.10 Dégivrage de la glacière
L’ hum idi té d e l’ air peut se con den ser sou s fo rme de g ivre au n ive au d e l’ éva por ate ur
ou à l’intérieur de l’appareil de réfrigération. Cela diminue la puissance frigorifique.
AVIS ! RISQUE D’ENDOMMAGEMENT
A
Procédez de la manière suivante pour dégivrer la glacière :
➤ Sortez le contenu de la glacière.
➤ Placez les aliments éventuellement dans un autre réfrigérateur pour qu’ils restent
froids.
➤ Éteignez l’appareil.
➤ Laissez le couvercle ouvert.
➤ Essuyez l’eau de dégivrage.
N’utilisez jamais d’outils durs ou pointus pour enlever la glace ou pour
décoincer les objets pris dans la glace.
6.11 Remplacement du fusible CA
DANGER ! RISQUE D’ÉLECTROCUTION
D
Le non-respect de cette mise en garde entraînera des blessures graves,
voire mortelles.
Débranchez l’alimentation électrique et le câble de raccordement avant
de remplacer le fusible de l’appareil.
➤ Débranchez l’alimentation électrique de l’appareil.
➤ Retirez le câble de raccordement.
➤ Retirez le porte-fusible (fig. 4 2, page 5) en faisant p. ex. levier avec un tourne-
vis.
➤ Remplacez le fusible en verre défectueux par un nouveau fusible de même valeur
(4A, 250 V).
➤ Replacez le porte-fusible dans le boîtier, en appuyant dessus.
➤ Raccordez de nouveau l’alimentation électrique de l’appareil.
6.12 Remplacement du fusible CC de l’appareil
➤ Débranchez l’alimentation électrique de l’appareil.
70

FR
CFF20, CFF35, CFF45, CFF70DZ Nettoyage et maintenance
➤ Retirez le couvercle du fusible (fig. 4 3, page 5) pour accéder au fusible.
➤ Retournez le couvercle du fusible et utilisez le crochet pour retirer le fusible.
➤ Remplacez le fusible défectueux par un fusible neuf de même type et de même
caractéristique (fusible lame standard automobile, 10 A).
➤ Remettez le couvercle du fusible en place.
➤ Raccordez de nouveau l’alimentation électrique de l’appareil.
6.13 Remplacement du fusible de la fiche CC (fig. a, page 10)
➤ Dévissez le boîtier de la fiche de contact (3) du connecteur (1).
➤ Remplacez le fusible défectueux (2) par un fusible neuf de même type et de
même caractéristique (3AG, Fast Acting, 10 A).
➤ Remontez le connecteur en effectuant les opérations dans l’ordre inverse.
6.14 Remplacement de la platine de commande lumineuse
AVIS ! Risque d’endommagement
A
La lampe doit uniquement être remplacée par le fabricant, un technicien
du service après-vente ou toute autre personne de qualification similaire
afin d’éviter tout danger.
7 Nettoyage et maintenance
AVERTISSEMENT ! RISQUE D’ÉLECTROCUTION
!
A
Le non-respect de ces mises en garde peut entraîner des blessures
graves, voire mortelles.
Avant toute opération de nettoyage ou d’entretien de l’appareil, veillez
à débrancher celui-ci du secteur.
AVIS ! Risque d'endommagement !
• Ne nettoyez jamais la glacière à l’eau courante et ne la plongez pas
non plus dans l'eau.
• N'utilisez pour le nettoyage ni produits abrasifs ni objets durs qui
pourraient endommager la glacière.
71

FR
Guide de dépannage CFF20, CFF35, CFF 45, CFF70DZ
➤ Nettoyez de temps à autre l’appareil à l’intérieur et à l’extérieur avec un chiffon
humide.
➤ Assurez-vous que les ouvertures d'aération et de ventilation de l'appareil ne sont
pas encombrées de saletés ou de poussières, pour que la chaleur générée par le
fonctionnement soit évacuée et que l'appareil ne soit pas endommagé.
8 Guide de dépannage
Panne Cause possible Solution proposée
L’appareil ne fonctionne pas, la LED n’est
pas allumée.
L’appareil ne réfrigère
pas (le connecteur est
branché, la LED
« POWER » est allumée).
L’appareil ne réfrigère
pas (le connecteur est
branché, la LED
« POWER » clignote en
orange, l’écran est
éteint).
La prise de courant
connectée n’est pas
sous tension.
L’un des fusibles de
l’appareil est défectueux.
Le bloc d’alimentation
intégré est défectueux.
Compresseur défectueux.
Le réglage du protecteur de batterie est trop
élevé.
La tension de la batterie
est insuffisante.
Branchement sur une prise de courant
continu : Dans la plupart des véhicules,
l’allumage doit être allumé avant que
l’alimentation soit fournie à la prise CC.
Branchement sur une prise de courant
alternatif : Essayez une autre prise.
Remplacez le fusible défectueux, voir
chapitre « Remplacement du fusible CC
de l’appareil », page 70 ou chapitre
« Remplacement du fusible CA »,
page 70.
La réparation doit être effectuée uniquement par un service après-vente agréé.
La réparation doit être effectuée uniquement par un service après-vente agréé.
Sélectionnez un réglage plus faible.
Contrôlez la batterie et chargez-la si
nécessaire.
72

FR
CFF20, CFF35, CFF45, CFF70DZ Guide de dépannage
Panne Cause possible Solution proposée
En cas d’utilisation sur
la prise de courant
continu :
L’allumage est en
marche, l’appareil ne
fonctionne pas et la
LED n’est pas allumée.
Un message d’erreur
s’affiche (par ex.
« Err1 ») et l’appareil ne
réfrigère pas.
La prise de courant
continu est sale. Ceci
entraîne un mauvais
contact électrique.
Le fusible de sécurité de
la fiche CC a sauté.
Le fusible CC de l’appareil a sauté.
Le fusible du véhicule a
grillé.
Un dysfonctionnement
interne a arrêté l’appareil.
Si le connecteur devient très chaud
lorsqu’il est branché dans la prise de
l’allume-cigare, c’est que la prise de
l’allume-cigare doit être nettoyée ou que
le connecteur n’est pas bien monté.
Remplacez le fusible de la fiche CC, voir
chapitre « Remplacement du fusible de
la fiche CC (fig. a, page 10) », page 71.
Remplacez le fusible de l’appareil, voir
chapitre « Remplacement du fusible CC
de l’appareil », page 70.
Remplacez le fusible de la prise CC du
véhicule. Veuillez vous référer au manuel
d’utilisation de votre véhicule.
La réparation doit être effectuée uniquement par un service après-vente agréé.
8.1 Le couvercle a été forcé au-delà de sa position d’arrêt intégrée (CFF35, CFF45 uniquement)
Procédez comme suit (fig. b, page 10) :
➤ Soutenez le couvercle d’une main (A).
➤ Maintenez appuyé le loquet de l’autre main (B).
ATTENTION ! RISQUE POUR LA SANTÉ
!
A
➤ Fermez le couvercle autant que possible sans vous coincer le pouce, tout en
maintenant appuyé le loquet pour éviter qu’il ne se casse.
Le non-respect de cette mise en garde peut entraîner des blessures
légères ou de gravité modérée.
Faites attention de ne pas vous coincer le pouce à la fermeture du couvercle.
AVIS ! RISQUE D’ENDOMMAGEMENT !
Le non-respect de cette mise en garde peut provoquer la cassure du
couvercle.
73

FR
Garantie CFF20, CFF35, CFF45, CFF70DZ
✔ Le couvercle devrait maintenant être environ à l’angle indiqué (fig. b, page 10).
➤ Retirez la main du loquet (B), et continuez à fermer le couvercle tout en l’accom-
pagnant.
REMARQUE
I
Il se peut que les charnières sortent de leur position correcte durant
l’action de fermeture finale. Repositionnez le couvercle de la manière
suivante :
➤ Actionnez les loquets des deux côtés du couvercle simultanément.
➤ Soulevez et repositionnez le couvercle.
9 Garantie
Le délai légal de garantie s'applique. Si le produit s'avérait défectueux, veuillez vous
adresser à la filiale du fabricant située dans votre pays (voir dometic.com/dealer) ou
à votre revendeur spécialisé.
Veuillez y joindre les documents suivants pour la gestion des réparations et de la
garantie :
• une copie de la facture avec la date d'achat,
• le motif de la réclamation ou une description du dysfonctionnement.
10 Mise au rebut
➤ Jetez les emballages dans les conteneurs de déchets recyclables prévus à cet
effet.
Lorsque vous mettrez votre produit définitivement hors service, informezvous auprès du centre de recyclage le plus proche ou auprès de votre
M
74
revendeur spécialisé sur les prescriptions relatives au retraitement des
déchets.

FR
CFF20, CFF35, CFF45, CFF70DZ Caractéristiques techniques
11 Caractéristiques techniques
CFF20 CFF35
Tension de raccordement : 12/24 Vg
100 – 240 Vw
Courant nominal : 12 Vg : 4,8 A
24 Vg : 2,8 A
240 Vw : 0,3 A
Puissance frigorifique : +20 °C à –18 °C (+68 °F à 0 °F)
Classe climatique : N, T
Température ambiante : +16 °C to +43 °C (+60 °F to +110 °F)
Réfrigérant : R134a
Volume de fluide
frigorigène :
28 g 34 g
12 Vg : 7,8 A
24 Vg : 3,5 A
240 Vw : 0,4 A
Équivalent CO
Potentiel d’effet de serre
(GWP) :
Dimensions
(L x h x p) (poignées
comprises) :
(L x h x p) (sans les
poignées) :
Poids : 10,5 kg 17,2 kg
: 0,040 t 0,049 t
2
1430
283 x 430 x 660 mm
283 x 430 x max 533 mm
715 x 407 x max 398 mm
590 x 500 x max 443 mm
75

FR
Caractéristiques techniques CFF20, CFF35, CFF 45, CFF70DZ
CFF45 CFF70DZ
Tension de raccordement : 12/24 Vg
100 – 240 Vw
Courant nominal : 12 Vg : 8,6 A
24 Vg : 3,8 A
240 Vw : 0,41 A
Puissance frigorifique : +20 °C à –18 °C (+68 °F à 0 °F)
Classe climatique : N, T
Température ambiante : +16 °C to +43 °C (+60 °F to +110 °F)
Réfrigérant : R134a
Volume de fluide
frigorigène :
43 g 34 g
12 Vg : 9,0 A
24 Vg : 4,0 A
240 Vw : 0,44 A
Équivalent CO
Potentiel d’effet de serre
(GWP) :
Dimensions
(L x h x p) (poignées
comprises) :
(L x h x p) (sans les
poignées) :
Poids : 18,6 kg 26,4 kg
: 0,061 t 0,049 t
2
1430
715 x 475 x max 398 mm
590 x 475 x max 398 mm
914 x 500 x max 443 mm
785 x 500 x max 443 mm
REMARQUE
I
Si la température ambiante est supérieure à + 32 °C (+ 90 °F), la température minimale ne peut être atteinte.
Conformité :
Contient des gaz à effet de serre fluorés
Equipement hermétiquement scellé
76

ES
CFF20, CFF35, CFF45, CFF70DZ Explicación de los símbolos
Lea atentamente estas instrucciones y siga las indicaciones, directrices y advertencias incluidas en este manual para asegurarse de que instala, utiliza y mantiene correctamente el producto en todo momento. Estas instrucciones DEBEN permanecer con este producto.
Al utilizar el producto, usted confirma que ha leído cuidadosamente todas las instrucciones, directrices y advertencias, y que entiende y
acepta cumplir los términos y condiciones aquí establecidos. Usted se compromete a utilizar este producto solo para el propósito y la aplicación previstos y de acuerdo con las instrucciones, directrices y advertencias establecidas en este manual del producto, así como de
acuerdo con todas las leyes y reglamentos aplicables. La no lectura y observación de las instrucciones y advertencias aquí expuestas puede
causarle lesiones a usted o a terceros, daños en el producto o daños en otras propiedades cercanas. Este manual del producto, incluyendo
las instrucciones, directrices y advertencias, y la documentación relacionada, pueden estar sujetos a cambios y actualizaciones. Para obtener
información actualizada sobre el producto, visite la página www.dometic.com.
Índice
1 Explicación de los símbolos . . . . . . . . . . . . . . . . . . . . . . . . . . . . . . . . . . . . . 77
2 Indicaciones de seguridad . . . . . . . . . . . . . . . . . . . . . . . . . . . . . . . . . . . . . . 78
3 Volumen de entrega . . . . . . . . . . . . . . . . . . . . . . . . . . . . . . . . . . . . . . . . . . . .81
4 Uso previsto . . . . . . . . . . . . . . . . . . . . . . . . . . . . . . . . . . . . . . . . . . . . . . . . . . 81
5 Descripción del funcionamiento . . . . . . . . . . . . . . . . . . . . . . . . . . . . . . . . . 82
6 Manejo. . . . . . . . . . . . . . . . . . . . . . . . . . . . . . . . . . . . . . . . . . . . . . . . . . . . . . 84
7 Limpieza y mantenimiento . . . . . . . . . . . . . . . . . . . . . . . . . . . . . . . . . . . . . . 93
8 Solución de averías . . . . . . . . . . . . . . . . . . . . . . . . . . . . . . . . . . . . . . . . . . . . 94
9 Garantía . . . . . . . . . . . . . . . . . . . . . . . . . . . . . . . . . . . . . . . . . . . . . . . . . . . . . 96
10 Gestión de residuos . . . . . . . . . . . . . . . . . . . . . . . . . . . . . . . . . . . . . . . . . . . 96
11 Datos técnicos. . . . . . . . . . . . . . . . . . . . . . . . . . . . . . . . . . . . . . . . . . . . . . . . 97
1 Explicación de los símbolos
¡PELIGRO!
D
!
!
Aviso de seguridad sobre una situación de peligro que, si no se evita,
es causa de muerte o heridas graves.
¡ADVERTENCIA!
Aviso de seguridad sobre una situación de peligro que, si no se evita,
puede causar la muerte o heridas graves.
¡ATENCIÓN!
Aviso de seguridad sobre una situación de peligro que, si no se evita,
puede causar heridas leves o de consideración.
77

ES
Indicaciones de seguridad CFF20, CFF35, CFF45, CFF70DZ
¡AVISO!
A
I
Aviso sobre una situación que, si no se evita, puede causar
daños materiales.
NOTA
Información complementaria para el manejo del producto.
2 Indicaciones de seguridad
¡ADVERTENCIA! El incumplimiento de estas advertencias podría
acarrear la muerte o lesiones graves.
!
Peligro de muerte por descarga eléctrica
• No ponga el aparato en funcionamiento si presenta desperfectos
visibles.
• Si el cable de alimentación de este aparato de refrigeración está
dañado, se deberá sustituir para evitar riesgos de seguridad.
• Sólo personal especializado puede realizar reparaciones en el aparato. Las reparaciones realizadas indebidamente pueden dar lugar a
situaciones de considerable peligro.
Peligro de incendio
• Al colocar el aparato, asegúrese de que el cable de suministro
eléctrico no se haya quedado atrapado o esté dañado.
• No coloque varias tomas o suministros de corriente portátiles detrás
del aparato.
Riesgo para la salud
• Este aparato puede ser utilizado por menores a partir de 8 años y
personas con capacidad física, sensorial o mental reducida, o con falta
de experiencia y conocimientos, siempre que lo hagan bajo supervisión o hayan recibido instrucciones relativas al uso del mismo de
manera segura y entendiendo los riesgos asociados.
• No deje que los niños jueguen con el aparato.
• Los niños solo podrán realizar las tareas de limpieza y mantenimiento
bajo vigilancia.
• Los menores de 3 a 8 años pueden meter y sacar artículos de la
nevera.
78

ES
CFF20, CFF35, CFF45, CFF70DZ Indicaciones de seguridad
Peligro de explosión
• No guarde en el aparato sustancias con peligro de explosión como,
p. ej., atomizadores con gases combustibles.
¡ATENCIÓN! El incumplimiento de estas precauciones podría
acarrear lesiones moderadas o leves.
!
Peligro de muerte por descarga eléctrica
• Antes de la puesta en funcionamiento, asegúrese de que el cable de
alimentación y la clavija de enchufe estén secos.
• Desconecte el aparato de la red
– antes de realizar cualquier tarea de limpieza y mantenimiento;
– después de cada uso.
Riesgo para la salud
• Compruebe si la potencia de refrigeración del aparato cumple las
exigencias de los alimentos o medicamentos que desea enfriar.
• Los alimentos sólo se pueden guardar en los envases originales o en
recipientes adecuados.
• Mantener la nevera abierta durante largos períodos de tiempo puede
producir un incremento considerable de la temperatura en los
compartimentos del aparato.
• Limpie periódicamente las superficies que puedan estar en contacto
con alimentos y los sistemas de desagüe accesibles.
• Si el aparato va a estar vacío durante un período prolongado:
– Desconéctelo.
– Descongélelo.
– Límpielo y séquelo.
– Deje la puerta abierta para evitar que se forme moho en el aparato.
A
¡AVISO! Peligro de ocasionar daños materiales
• Compare el valor de tensión indicado en la placa de características
con el suministro de energía existente.
• Conecte el aparato únicamente del siguiente modo:
– conecte el cable de alimentación CC a una caja de enchufe CC en
el vehículo
– o bien conecte el cable de alimentación de CA a la red de
corriente alterna
• No extraiga nunca la clavija de la caja de enchufe tirando del cable de
conexión.
79

ES
Indicaciones de seguridad CFF20, CFF35, CFF45, CFF70DZ
• Si la nevera está conectada a la caja de enchufe CC: Desconecte de la
batería el aparato refrigerador u otros dispositivos consumidores si va
a conectar un cargador rápido.
• Si la nevera está conectada a la caja de enchufe CC: Desconecte la
conexión o apague el aparato cuando apague el motor. De lo
contrario podrá descargarse la batería.
• Este aparato refrigerador no es apto para transportar sustancias
corrosivas o disolventes.
• Este aislamiento de este aparato refrigerador contiene ciclopentanto
inflamable. Los gases presentes en el material aislante requieren un
proceso de eliminación especial. Elimine debidamente el aparato al
final de su vida útil.
• No utilice ningún aparato eléctrico dentro de la nevera, a no ser que
el aparato en cuestión haya sido recomendado para ello por el
fabricante.
• No coloque el aparato cerca de llamas vivas ni de otras fuentes de
calor (calefacción, radiación directa del sol, estufas de gas, etc.).
• ¡Peligro de sobrecalentamiento!
Asegúrese de que siempre haya un mínimo de 50 mm de ventilación
en los cuatro lados del aparato de refrigeración. Mantenga la zona de
ventilación libre de objetos que puedan impedir el paso de aire a los
componentes refrigerantes.
No coloque el aparato de refrigeración en compartimentos cerrados
o en áreas donde no haya un flujo mínimo de aire.
• Procure que no se obstruyan las ranuras de ventilación.
• No introduzca líquidos ni hielo en el contenedor interior.
• No sumerja nunca el aparato en agua.
• Proteja el aparato y los cables del calor y de la humedad.
• El aparato no debe estar expuesto a la lluvia.
80

ES
CFF20, CFF35, CFF45, CFF70DZ Volumen de entrega
3 Volumen de entrega
Elemento
(fig. 1, página 3)
11Nevera
2 1 Cable de conexión para la conexión de corriente
3 1 Cable de conexión para la conexión de corriente
4 2 Asa de transporte, compuesta de:
– 1 Instrucciones de uso
Cantidad Descripción
continua
alterna
• 2 soportes
• 1 asa
• 4 tornillos de fijación
• 1 llave Allen
4 Uso previsto
Esta nevera es adecuada para enfriar alimentos. También es apta para su utilización
en vehículos. La nevera está diseñada para funcionar conectada a un enchufe de
corriente continua de un vehículo o a una red de corriente alterna.
La nevera es adecuada para utilizar en campings.
La nevera no es adecuada para:
• guardar sustancias corrosivas o que contengan disolventes
•congelar comida
Esta nevera no está diseñada para ser empotrada en un mueble.
Esta nevera solo es apta para el uso previsto y la aplicación de acuerdo con estas
instrucciones.
Este manual proporciona la información necesaria para la correcta instalación y/o
funcionamiento de la nevera. Una instalación deficiente y/o un uso y mantenimiento
inadecuados conllevan un rendimiento insatisfactorio y posibles fallos.
El fabricante no se hace responsable de ninguna lesión o daño en el producto
ocasionados por:
• Un montaje o conexión incorrectos, incluido un exceso de tensión
81

ES
Descripción del funcionamiento CFF20, CFF35, CFF45, CFF70DZ
• Un mantenimiento incorrecto o el uso de piezas de repuesto distintas de las
originales proporcionadas por el fabricante
• Modificaciones realizadas en el producto sin el expreso consentimiento del
fabricante
• Uso con una finalidad distinta de la descrita en las instrucciones
Dometic se reserva el derecho de cambiar la apariencia y las especificaciones del
producto.
5 Descripción del funcionamiento
La refrigeración se realiza a través de un circuito de refrigeración de bajo mantenimiento con compresor. El amplio aislamiento y el potente compresor aseguran una
refrigeración eficiente y rápida.
La nevera está prevista para un uso portátil.
La nevera puede estar inclinada a 30° durante períodos cortos (por ejemplo, en
embarcaciones).
5.1 Ámbito del funcionamiento
• Fuente de alimentación con conexión de prioridad para conexión a la tensión
alterna
• Controlador de la batería de tres etapas para proteger la batería del vehículo
se apaga automáticamente en caso de tensión baja de la batería
• Pantalla con sensor de temperatura en °C y °F
• Regulación de la temperatura: con dos botones, a intervalos de 1 °C (2 °F)
• Función de atenuación lumínica de la pantalla con 3 niveles de brillo
• Cesta de alambre extraíble (solo en CFF35, CFF45, CFF70DZ)
• Asas de transporte extraíbles
82

ES
CFF20, CFF35, CFF45, CFF70DZ Descripción del funcionamiento
5.2 Elementos de mando y de indicación
Bloqueos de la tapa (fig. 2, página 4)
Panel de control (fig. 3, página 5)
Pos. Descripción Explicación
1ON
OFF
2
POWER “P”
3 ERROR LED intermitente en rojo: La nevera está encendida pero no lista
4 – Pantalla, muestra la información
5 SET Selecciona el modo de entrada de datos
6 DOWN – Pulsar una vez para disminuir el valor
7 UP + Pulsar una vez para aumentar el valor
8 Solo en CFF70DZ: Indicación de estado: Las luces LED se ilumi-
Enciende o apaga la nevera cuando se pulsa la tecla durante uno o
dos segundos
Indicación de funcionamiento
LED iluminado en verde: El compresor está en marcha
LED iluminado en naranja: El compresor está apagado
LED intermitente en naranja: La pantalla se apaga automáticamente
debido a tensión baja de la batería
para funcionar
Solo en CFF70DZ: Hay una pantalla por zona
– Regulación de temperatura
– Indicación en Celsius o Fahrenheit
– Ajustar el controlador de la batería
– Ajustar el brillo de la pantalla
nan en azul cuando el compartimento se está enfriando
Conexiones de enchufe (fig. 4, página 5)
Pos. Descripción
1 Conexión de enchufe para la alimentación de tensión alterna
2 Portafusibles de corriente alterna
3 Tapa del fusible de corriente continua
4 Conexión de enchufe para la alimentación de tensión continua
83

ES
Manejo CFF20, CFF35, CFF45, CFF70DZ
6Manejo
Tenga en cuenta lo siguiente para no desperdiciar alimentos:
• Procure que las oscilaciones de temperatura sean mínimas. Abra la nevera solamente el tiempo y las veces que sea necesario. Almacene los alimentos de
manera que no impidan una buena circulación del aire.
• Ajuste la temperatura a la cantidad y el tipo de alimentos.
• Los alimentos pueden absorber o desprender sabores y olores con facilidad.
Almacene siempre los alimentos envueltos o cerrados en recipientes o botellas.
6.1 Antes del primer uso
NOTA
I
Montaje de las asas (fig. 5, página 6)
Se incluyen las asas sin ensamblar. Si desea fijar las asas, proceda de la forma
siguiente:
➤ Monte un asa poniendo juntos dos soportes (1) y un asa (2).
Por razones de higiene, deberá limpiar la nevera por dentro y por fuera
con un paño húmedo antes de ponerla en funcionamiento (véase también capítulo “Limpieza y mantenimiento” en la página 93).
➤ Fije las asas con los tornillos incluidos en los agujeros previstos a tal fin.
Inversión del sentido de apertura de la tapa
➤ CFF70DZ: Para invertir el sentido de apertura de la tapa, proceda como se
muestra (fig. 6, página 7).
Apertura o extracción de la tapa (fig. 7, página 8)
➤ Para abrir la tapa, desbloquéela (A).
CFF35, CFF45: La tapa se puede abrir por cualquier lado.
➤ CFF35, CFF45: Para retirar la tapa, desbloquee ambos lados al mismo
tiempo (B).
CFF20, CFF70DZ: Para retirar la tapa, empújela más allá de su posición de
tope (B).
84

ES
CFF20, CFF35, CFF45, CFF70DZ Manejo
Posición de tope de la tapa (fig. 8, página 9)
La tapa tiene una posición de tope integrada (A). No fuerce la tapa más allá del tope
integrado (B).
¡AVISO! PELIGRO DE DAÑOS
A
Extracción de la cesta (fig. 9, página 9)
A
Selección de las unidades de temperatura
Las unidades de indicación de temperatura puede cambiarse entre Celsius y Fahrenheit como se explica a continuación:
➤ Encienda la nevera.
➤ CFF20, CFF35, CFF45: Pulse dos veces el pulsador “SET” (fig. 3 5,
página 5).
CFF70DZ: Pulse tres veces el pulsador “SET” (fig. 3 5, página 5).
CFF35, CFF45: Si la tapa se ha forzado demasiado, siga los pasos des-
critos en el capítulo “La tapa ha sido forzada más allá del tope integrado
(solo en CFF35, CFF 45)” en la página 95.
¡AVISO! ¡PELIGRO DE DAÑOS!
Retirar la cesta con la tapa abierta puede arañar la tapa y deformar la
cesta. Le recomendamos que retire la tapa antes de extraer la cesta.
➤ Use los pulsadores “UP +” (fig. 3 7, página 5) y “DOWN –” (fig. 3 6,
página 5) para seleccionar grados Celsius o Fahrenheit.
✔ La pantalla indica durante unos segundos la unidad de temperatura ajustada. La
pantalla parpadea algunas veces antes de volver a mostrar la temperatura actual.
6.2 Ahorro de energía
• Elija un lugar de emplazamiento bien ventilado y protegido de la radiación solar.
• Antes de introducir alimentos calientes en el aparato para refrigerarlos, deje que
se enfríen un poco.
• No abra la nevera con mayor frecuencia de la necesaria.
• No deje la nevera abierta más tiempo del necesario.
• Si la nevera tiene una cesta: para un consumo de energía óptimo, coloque la
cesta en la misma posición que ocupa en el momento de la entrega.
• Compruebe periódicamente que la junta de la tapa encaja correctamente.
• Descongele la nevera una vez que se haya formado una capa de escarcha.
85

ES
Manejo CFF20, CFF35, CFF45, CFF70DZ
• Evite temperaturas innecesariamente bajas.
6.3 Conexión de la nevera
Conexión a una batería (vehículo o embarcación)
La nevera se puede usar a 12 V o 24 V
¡AVISO! PELIGRO DE DAÑOS
A
Por razones de seguridad la nevera está equipada con un sistema electrónico para
prevenir la inversión de polaridad. De esta manera se protege la nevera de cortocircuitos al conectarse a una batería.
Uso de la clavija de corriente continua con fusible
A
➤ Enchufe el cable de conexión de CC (fig. 1 2, página 3) en la caja de enchufe
de CC de la nevera (fig. 4 3, página 5).
➤ Conecte el cable de conexión a una salida de corriente continua.
Conexión a una red de corriente alterna
Antes de conectar la batería a un cargador rápido, desconecte la nevera
y otros consumidores.
La sobretensión puede dañar el sistema electrónico del aparato.
¡AVISO! PELIGRO DE DAÑOS
Para proteger el aparato, el cable de corriente continua suministrado
incluye un fusible dentro de la clavija. No retire la clavija de corriente
continua con fusible.
Utilice únicamente el cable de corriente continua suministrado.
g.
D
86
¡PELIGRO! RIESGO DE ELECTROCUCIÓN
El incumplimiento de estas advertencias puede acarrear la muerte o
lesiones graves.
• No manipule los enchufes ni interruptores con las manos mojadas ni
con los pies sobre una superficie mojada.
• Si la nevera funciona en una embarcación conectada a una red de
corriente alterna, deberá conectar un interruptor diferencial entre la
red de corriente alterna y la nevera.
Consulte con un especialista.

ES
CFF20, CFF35, CFF45, CFF70DZ Manejo
Las neveras tienen un suministro de energía multivoltaje con una conexión de prioridad para su conexión a una fuente de voltaje de corriente alterna. La conexión de
prioridad conmuta automáticamente la nevera a la operación de corriente alterna si
el aparato está conectado a una fuente de alimentación de corriente alterna, incluso
si un cable de conexión de corriente continua aún está conectado.
El LED rojo puede iluminarse brevemente al cambiar entre la fuente de alimentación
de corriente alterna y la alimentación de la batería.
➤ Enchufe el cable de conexión de corriente alterna (fig. 1 3, página 3) en la caja
de enchufe de corriente alterna de la nevera (fig. 4 1,página 5).
➤ Conecte el cable de conexión a la salida de corriente alterna.
6.4 Uso del controlador de la batería
El aparato está equipado con un controlador de batería de varias etapas que evita
que la batería del vehículo se descargue excesivamente cuando el aparato esté
conectado a la red de a bordo de corriente continua.
En caso de poner la nevera en funcionamiento en el vehículo con el encendido apagado, ésta se desconectará automáticamente en cuanto la tensión de alimentación
descienda por debajo de un nivel definido. La nevera vuelve a conectarse tan pronto
como se cargue la batería y se alcance la tensión de alimentación de reconexión.
¡AVISO! PELIGRO DE DAÑOS
A
En el modo “HIGH” el controlador de batería se activa antes que en el nivel “LOW”
y “MED” (véase la siguiente tabla).
Modo del controlador de batería LOW MED HIGH
Tensión de desconexión a 12 V
Tensión de reconexión a 12 V
Tensión de desconexión a 24 V
Tensión de reconexión a 24 V
La batería no se cargará de forma completa, al ser desconectada por el
controlador de la batería. Evite arranques repetidos o utilizar los aparatos conectados a la corriente sin fases de recarga largas. Asegúrese de
que la batería está recargada.
10,1 V 11,2 V 11,8 V
11,4 V 12,2 V 12,6 V
21,5 V 24,1 V 24,6 V
23,0 V 25,3 V 26,2 V
87

ES
Manejo CFF20, CFF35, CFF45, CFF70DZ
El modo del controlador de la batería puede seleccionarse como se muestra a continuación:
➤ Encienda la nevera.
➤ Pulse el botón “SET” (fig. 3 5, página 5):
– CFF 20, CFF35, CFF45: Tres veces.
– CFF 70DZ: Cuatro veces.
➤ Utilice los botones “UP +” (fig. 3 7, página 5) y “DOWN –” (fig. 3 6,
página 5) para seleccionar el modo del controlador de la batería.
✔ En la pantalla se muestra lo siguiente:
Lo (LOW), ΠEd (MED), Hi (HIGH)
✔ La pantalla indica durante unos segundos el modo seleccionado. La pantalla par-
padea algunas veces antes de volver a mostrar la temperatura actual.
NOTA
I
6.5 Uso de la nevera
Cuando la nevera está alimentada por la batería de arranque, seleccione
el modo del controlador de batería “HIGH”. Si la never a est á cone ctada
a una batería de alimentación, es suficiente el modo de controlador de
batería “LOW”.
¡AVISO! PELIGRO DE SOBRECALENTAMIENTO
A
➤ Coloque la nevera sobre una base firme.
Asegúrese de que no se obstruyan las ranuras de ventilación y que el aire recalentado se evacue correctamente. Recomendamos mantener un espacio de al
menos 50 mm alrededor de los orificios de ventilación.
A
➤ Conecte la nevera (véase capítulo “Conexión de la nevera” en la página 86).
88
Asegúrese que en todo momento exista suficiente ventilación para que
el calor originado durante el uso se pueda disipar. Evite que se obstruyan las ranuras de ventilación. Asegúrese de que el aparato guarde la
suficiente distancia respecto a paredes u objetos, de forma que el aire
pueda circular.
¡AVISO! PELIGRO DE DAÑOS
Coloque la nevera como se indica en (fig. 1, página 3). Si la nevera se
pone en marcha con otra orientación, podría sufrir daños.

ES
CFF20, CFF35, CFF45, CFF70DZ Manejo
¡AVISO! PELIGRO POR TEMPERATURA EXCESIVAMENTE BAJA
A
➤ Mantenga el pulsador “ON/OFF” (fig. 3 1, página 5) pulsado durante uno o
dos segundos.
✔ El LED “P” se ilumina (fig. 3 2, página 5).
✔ La pantalla (fig. 3 4, página 5) se enciende e indica la temperatura actual.
✔ La nevera empieza a refrigerar el espacio interior.
I
Bloqueo de la tapa de nevera
➤ Cierre la tapa.
➤ Presione el bloqueo (fig. 2, página 4) hacia abajo hasta que lo oiga encajar.
I
Asegúrese de que en la nevera estén solamente los objetos o productos
que se pretendan enfriar a la temperatura ajustada.
NOTA
En el funcionamiento con batería, la pantalla de desconecta de forma
automática si la tensión es baja. El LED “P” parpadea en naranja.
NOTA
CFF35, CFF45: Al bloquear la tapa, asegúrese de que los dos estribos
laterales del bloqueo están completamente engranados para asegurar
que la tapa cierre bien. Un bloqueo puede engranar un poco antes que
el otro.
Si la tapa no está cerrada de forma uniforme en los dos lados, presione
hasta que se oiga un segundo clic.
6.6 Ajuste de la temperatura
CFF20, CFF35, CFF 45
➤ Presione una vez el pulsador “SET” (fig. 3 5, página 5).
➤ Seleccione la temperatura de refrigeración usando los pulsadores “UP +”
(fig. 3 7, página 5) y “DOWN –” (fig. 3 6, página 5).
✔ La temperatura de refrigeración se indica durante unos segundos en la pantalla.
La pantalla parpadea varias veces y se vuelve a mostrar la temperatura actual.
89

ES
Manejo CFF20, CFF35, CFF45, CFF70DZ
CFF70DZ
➤ Pulse el botón “SET” (fig. 3 5, página 5):
– una vez para el compartimento grande
– dos veces para el compartimento pequeño
✔ La pantalla del compartimento elegido parpadea.
➤ Seleccione la temperatura de refrigeración usando los pulsadores “UP +”
(fig. 3 7, página 5) y “DOWN –” (fig. 3 6, página 5).
Cada compartimento puede ser configurado para funcionar como refrigerador
o congelador.
✔ La temperatura de refrigeración aparece en la pantalla durante unos segundos.
La pantalla parpadea varias veces y se vuelve a mostrar la temperatura actual.
6.7 Apagar o encender un compartimento (CFF70DZ)
Si solo se necesita un compartimento, el otro se puede apagar para ahorrar energía.
Apagar un compartimento
Si la pantalla del compartimento muestra una temperatura, puede apagar el compartimento de la siguiente manera:
➤ Pulse el botón “SET” (fig. 3 5, página 5):
–Una vez para el compartimento grande
– Dos veces para el compartimento pequeño
✔ La pantalla del compartimiento respectivo parpadea.
➤ Pulse el botón “ON/OFF” (fig. 3 1, página 5).
✔ “OFF” parpadea durante cinco segundos en la pantalla del compartimiento res-
pectivo, y después indica “OFF”.
Encender un compartimento
Si la pantalla del compartimento indica “OFF”, puede encender el compartimento
de la siguiente manera:
➤ Pulse el botón “SET” (fig. 3 5, página 5):
–Una vez para el compartimento grande
– Dos veces para el compartimento pequeño
✔ La pantalla del compartimiento respectivo parpadea.
➤ Pulse el botón ON/OFF (fig. 3 1, página 5).
90

ES
CFF20, CFF35, CFF45, CFF70DZ Manejo
✔ La temperatura de refrigeración se indica durante unos segundos en la pantalla.
La pantalla parpadea varias veces y después aparece la temperatura actual.
6.8 Ajuste del brillo de la pantalla
El brillo de la pantalla puede atenuarse para condiciones lumínicas poco intensas.
Proceda como se explica a continuación para ajustar el nivel de atenuación de la pantalla:
➤ Encienda la nevera.
➤ Pulse el botón “SET” (fig. 3 5, página 5):
– CFF 20, CFF35, CFF45: Cuatro veces.
– CFF 70DZ: Cinco veces.
➤ Utilice los botones “UP +” (fig. 3 7, página 5) y “DOWN –” (fig. 3 6,
página 5) para ajustar el brillo de la pantalla.
✔ En la pantalla se muestra lo siguiente:
d0 (por defeco), d1 (medio), d2 (oscuro)
✔ La pantalla muestra el modo ajustado durante varios segundos. La pantalla parpa-
dea dos veces antes de volver a mostrar la temperatura actual.
NOTA
I
• Los ajustes de fábrica para el brillo de la pantalla es d0 (por defecto).
• Si se produce un fallo, el brillo se revierte automáticamente al brillo
d0 (por defecto). Tras la resolución de problemas, el brillo ajustado
se restablece.
6.9 Apagar la nevera
➤ Vacíe la nevera.
➤ Apague la nevera.
➤ Desenchufe el cable de conexión.
Si no va a usar la nevera durante un largo período de tiempo:
➤ Deje la tapa ligeramente abierta. De esta forma, evitará la formación de olores.
91

ES
Manejo CFF20, CFF35, CFF45, CFF70DZ
6.10 Descongelación de la nevera
La humedad del aire puede formar escarcha en el interior de la nevera o en el evaporador. Esto reduce la potencia de refrigeración.
¡AVISO! PELIGRO DE DAÑOS
A
Para descongelar la nevera, proceda como se indica a continuación:
➤ Retire el contenido de la nevera.
➤ En caso necesario, colóquelo en otro aparato refrigerador para mantenerlos refri-
gerados.
➤ Desconecte el aparato.
➤ Deje la tapa abierta.
➤ Elimine con un paño el agua descongelada.
No utilice nunca herramientas de material duro o afiladas para quitar el
hielo o soltar objetos que se hayan congelado en su ubicación.
6.11 Cambio del fusible de corriente alterna
¡PELIGRO! RIESGO DE ELECTROCUCIÓN
D
El incumplimiento de esta advertencia puede acarrear la muerte o lesiones graves.
Desconecte el suministro eléctrico y el cable de conexión antes de sustituir el fusible del aparato.
➤ Desconecte la alimentación de corriente del aparato.
➤ Retire el cable de conexión.
➤ Quite el juego de fusibles (fig. 4 2, página 5) con un destornillador.
➤ Cambie el fusible de vidrio averiado por otro nuevo del mismo tipo y valor (4 A,
250 V).
➤ Vuelva a presionar el juego de fusibles en la carcasa.
➤ Vuelva a conectar la alimentación de corriente del aparato.
6.12 Sustitución del fusible de corriente continua del aparato
➤ Desconecte la alimentación de corriente del aparato.
92

ES
CFF20, CFF35, CFF45, CFF70DZ Limpieza y mantenimiento
➤ Extraiga la tapa del fusible (fig. 4 3, página 5) para acceder al fusible.
➤ Dé la vuelta a la tapa del fusible y utilice el gancho para extraer el fusible defec-
tuoso.
➤ Sustituya el fusible averiado por uno nuevo del mismo tipo (Automotive Standard
blade fuse, 10 A).
➤ Vuelva a colocar la cubierta de fusibles.
➤ Vuelva a conectar la alimentación de corriente del aparato.
6.13 Sustitución del fusible de la clavija de corriente continua (fig. a, página 10)
➤ Desatornille la carcasa de la clavija de contacto (3) de la clavija (1).
➤ Sustituya el fusible estropeado (2) por uno nuevo del mismo tipo y valor (3AG,
Fast Acting, 10 A).
➤ Vuelva a montar la clavija procediendo en el orden inverso.
6.14 Sustitución de la luz del PCB
¡AVISO! Peligro de ocasionar daños materiales
A
Únicamente el fabricante, un técnico de mantenimiento o una persona
con cualificación similar podrá cambiar la bombilla con el fin de evitar
peligros.
7 Limpieza y mantenimiento
¡ADVERTENCIA! RIESGO DE ELECTROCUCIÓN
!
A
El incumplimiento de esta advertencia puede acarrear la muerte o lesiones graves.
Desconecte siempre el aparato de la red de corriente antes de proceder
a la limpieza o al mantenimiento de la misma.
¡AVISO! ¡Peligro de ocasionar daños materiales!
• Nunca limpie la nevera bajo el chorro de agua corriente ni inmersa
en agua jabonosa.
• No emplee productos de limpieza corrosivos u objetos que puedan
arañar o deteriorar el aparato durante su limpieza.
93

ES
Solución de averías CFF20, CFF35, CFF45, CFF70DZ
➤ Limpie de vez en cuando el interior y el exterior de la nevera con un paño
húmedo.
➤ Asegúrese de que las aberturas de ventilación y desaireación del aparato están
limpias de polvo para que se pueda evacuar el calor generado durante el
funcionamiento y el aparato no resulte perjudicado.
8 Solución de averías
Fallo Posible causa Propuesta de solución
El aparato no funciona,
el LED no se ilumina.
El aparato no enfría (la
clavija está conectada, el LED “POWER”
se ilumina).
El aparato no enfría (el
enchufe está enchufado, el LED “POWER”
parpadea en naranja,
la pantalla está desconectada).
No hay tensión en la
toma de corriente
conectada.
Uno de los fusibles del
aparato está averiado.
La fuente de alimentación integrada está averiada.
Compresor averiado. Solo un centro de atención al cliente
El controlador de la
batería está ajustado
demasiado alto.
La tensión de batería no
es suficiente.
Enchufado en una toma de corriente
continua: En la mayoría de los vehículos,
el encendido debe estar conectado
para que se pueda suministrar corriente
a la salida de alimentación de corriente
continua.
Enchufado en una toma de corriente
alterna: Inténtelo en otra toma de salida.
Cambie el fusible averiado del aparato,
véase capítulo “Cambio del fusible de
corriente alterna” en la página 92 o capítulo “Sustitución del fusible de corriente
continua del aparato” en la página 92.
Solo un centro de atención al cliente
autorizado puede realizar la reparación.
autorizado puede realizar la reparación.
Seleccione un ajuste más bajo para el
controlador de la batería.
Compruebe la batería y cárguela si fuera
necesario.
94

ES
CFF20, CFF35, CFF45, CFF70DZ Solución de averías
Fallo Posible causa Propuesta de solución
En funcionamiento
conectado a corriente
continua:
El encendido está
conectado, pero el
aparato no funciona y
el LED no está iluminado.
La pantalla muestra un
mensaje de error (p.
ej. “Err1”) y el aparato
no enfría.
La salida de corriente
continua está sucia. En
consecuencia, el contacto eléctrico es defectuoso.
El fusible de la clavija de
corriente continua se ha
fundido.
El fusible de la salida de
corriente continua del
aparato se ha fundido.
Se ha fundido el fusible
del vehículo.
El aparato se ha apagado por un fallo
interno.
Si el enchufe de la nevera se calienta
demasiado en la toma de corriente continua, limpie la caja del enchufe o
conecte bien el enchufe.
Cambie el fusible de la clavija de
corriente continua, véase capítulo “Sustitución del fusible de la clavija de
corriente continua (fig. a, página 10)”
en la página 93.
Cambie el fusible averiado, véase capítulo “Sustitución del fusible de corriente
continua del aparato” en la página 92.
Sustituya el fusible de la salida de
corriente continua del vehículo. Consulte para ello las instrucciones de uso
del vehículo.
Solo un centro de atención al cliente
autorizado puede realizar la reparación.
8.1 La tapa ha sido forzada más allá del tope integrado (solo en CFF35, CFF45)
Proceda de la siguiente manera (fig. b, página 10):
➤ Sujete la tapa con una mano (A).
➤ Sujete el bloqueo abajo con la otra mano (B).
¡ATENCIÓN! RIESGO PARA LA SALUD
!
A
El incumplimiento de esta precaución puede acarrear lesiones moderadas o leves.
Tenga cuidado para no pellizcarse el pulgar al cerrar la tapa.
¡AVISO! ¡PELIGRO DE DAÑOS!
El incumplimiento de estas instrucciones puede provocar que la tapa se
rompa.
95

ES
Garantía CFF20, CFF35, CFF45, CFF 70DZ
➤ Cierre la tapa todo lo posible sin pellizcarse el pulgar, mientras mantiene el blo-
queo abajo, para evitar que se rompa.
✔ La tapa debería estar ahora formando aproximadamente el ángulo mostrado
(fig. b, página 10).
➤ Retire la mano del bloqueo (B) y continúe cerrando la tapa por completo.
NOTA
I
Los topes pueden soltarse de su posición correcta durante el procedimiento final de cierre. Vuelva a colocar la tapa como se indica a continuación:
➤ Accione los bloqueos a ambos lados de la tapa simultáneamente.
➤ Levante y vuelva a colocar la tapa.
9 Garantía
Rige el plazo de garantía legal. Si el producto presenta algún defecto, diríjase a la
sucursal del fabricante de su país (véase dometic.com/dealer) o a su establecimiento especializado.
Para la tramitación de la reparación y de la garantía debe enviar también los
siguientes documentos:
• una copia de la factura con fecha de compra,
• el motivo de la reclamación o una descripción de la avería.
10 Gestión de residuos
➤ Deseche el material de embalaje en el contenedor de reciclaje correspondiente.
Cuando vaya a desechar definitivamente el producto, infórmese en el
centro de reciclaje más cercano o en un comercio especializado sobre las
M
96
normas pertinentes de eliminación de materiales.

ES
CFF20, CFF35, CFF45, CFF70DZ Datos técnicos
11 Datos técnicos
CFF20 CFF35
Tensión de conexión: 12/24 Vg
100 a 240 Vw
Corriente nominal: 12 Vg: 4,8 A
24 Vg: 2,8 A
240 Vw: 0,3 A
Potencia de refrigeración: +20 °C hasta –18 °C (+68 °F hasta 0 °F)
Clase climática: N, T
Temperatura ambiente: +16 °C to +43 °C (+60 °F to +110 °F)
Refrigerante: R134a
Volumen del refrigerante: 28 g 34 g
Equivalente de CO
Índice GWP (Global warming
potential):
Dimensiones
Dimensiones (AxHxP)
en mm (incluyendo asas):
Dimensiones (AxHxP)
en mm (sin incluir las asas):
Peso: 10,5 kg 17,2 kg
: 0,040 t 0,049 t
2
1430
283 x 430 x 660 mm
283 x 430 x 533 mm
12 Vg: 7,8 A
24 Vg: 3,5 A
240 Vw: 0,4 A
715 x 407 x 398 mm
590 x 500 x 443 mm
97

ES
Datos técnicos CFF20, CFF35, CFF45, CFF 70DZ
CFF45 CFF70DZ
Tensión de conexión: 12/24 Vg
100 a 240 Vw
Corriente nominal: 12 Vg: 8,6 A
24 Vg: 3,8 A
240 Vw: 0,41 A
Potencia de refrigeración: +20 °C hasta –18 °C (+68 °F hasta 0 °F)
Clase climática: N, T
Temperatura ambiente: +16 °C to +43 °C (+60 °F to +110 °F)
Refrigerante: R134a
Volumen del refrigerante: 43 g 34 g
Equivalente de CO
Índice GWP (Global warming
potential):
Dimensiones
Dimensiones (AxHxP)
en mm (incluyendo asas):
Dimensiones (AxHxP)
en mm (sin incluir las asas):
Peso: 18,6 kg 26,4 kg
: 0,061 t 0,049 t
2
1430
715 x 475 x 398 mm
590 x 475 x 398 mm
12 Vg: 9,0 A
24 Vg: 4,0 A
240 Vw: 0,44 A
914 x 500 x 443 mm
785 x 500 x 443 mm
NOTA
I
Si la temperatura ambiente es mayor de +32 °C (+90 °F), no se puede
alcanzar la temperatura mínima.
Conformidad:
Contiene gases de efecto invernadero fluorados
Aparato sellado herméticamente
98

PT
CFF20, CFF35, CFF45, CFF70DZ Explicação dos símbolos
Leia atentamente as presentes instruções e siga todas as instruções, orientações e avisos incluídos neste manual, de modo a garantir a correta
instalação, utilização e manutenção do produto. É OBRIGATÓRIO manter estas instruções junto com o produto.
Ao utilizar o produto, está a confirmar que leu atentamente todas as instruções, orientações e avisos, e que compreende e aceita cumprir os
termos e condições estabelecidos no presente manual. Aceita utilizar este produto exclusivamente para o fim e a aplicação a que se destina
e de acordo com as instruções, orientações e avisos estabelecidos neste manual, assim como de acordo com todas as leis e regulamentos
aplicáveis. Caso não leia nem siga as instruções e os avisos aqui estabelecidos, poderá sofrer ferimentos pessoais ou causar ferimentos a terceiros e o produto ou outros materiais nas proximidades poderão ficar danificados. Este manual do produto, incluindo as instruções, orientações e avisos, bem como a documentação relacionada, podem estar sujeitos a alterações e atualizações. Para consultar as informações
atualizadas do produto, visite www.dometic.com.
Índice
1 Explicação dos símbolos . . . . . . . . . . . . . . . . . . . . . . . . . . . . . . . . . . . . . . . 99
2 Indicações de segurança . . . . . . . . . . . . . . . . . . . . . . . . . . . . . . . . . . . . . . .100
3 Material fornecido. . . . . . . . . . . . . . . . . . . . . . . . . . . . . . . . . . . . . . . . . . . . .103
4 Utilização adequada . . . . . . . . . . . . . . . . . . . . . . . . . . . . . . . . . . . . . . . . . . .103
5 Descrição do funcionamento . . . . . . . . . . . . . . . . . . . . . . . . . . . . . . . . . . . .104
6 Operação . . . . . . . . . . . . . . . . . . . . . . . . . . . . . . . . . . . . . . . . . . . . . . . . . . .106
7 Limpeza e manutenção. . . . . . . . . . . . . . . . . . . . . . . . . . . . . . . . . . . . . . . . . 116
8 Resolução de falhas. . . . . . . . . . . . . . . . . . . . . . . . . . . . . . . . . . . . . . . . . . . . 116
9 Garantia . . . . . . . . . . . . . . . . . . . . . . . . . . . . . . . . . . . . . . . . . . . . . . . . . . . . . 118
10 Eliminação . . . . . . . . . . . . . . . . . . . . . . . . . . . . . . . . . . . . . . . . . . . . . . . . . . . 119
11 Dados técnicos . . . . . . . . . . . . . . . . . . . . . . . . . . . . . . . . . . . . . . . . . . . . . . . 119
1 Explicação dos símbolos
PERIGO!
D
!
!
Indicação de segurança sobre uma situação de perigo que leva à
morte ou a ferimentos graves se não for evitada.
AVISO!
Indicação de segurança sobre uma situação de perigo que pode
levar à morte ou a ferimentos graves se não for evitada.
PRECAUÇÃO!
Indicação de segurança sobre uma situação de perigo que pode
levar a ferimentos ligeiros ou moderados se não for evitada.
99

PT
Indicações de segurança CFF20, CFF35, CFF45, CFF 70DZ
NOTA!
A
I
Indicação sobre uma situação que leva a danos materiais se não for
evitada.
OBSERVAÇÃO
Informações complementares sobre a operação do produto.
2 Indicações de segurança
AVISO! O incumprimento destes avisos poderá resultar em
morte ou ferimentos graves.
!
Perigo de morte devido a choque elétrico
• Quando o aparelho apresentar danos visíveis, ele não deve ser
colocado em funcionamento.
• Se o cabo de alimentação deste aparelho de refrigeração estiver
danificado, ele terá de ser substituído para evitar perigos.
• As reparações neste aparelho apenas devem ser realizadas por
técnicos especializados. As reparações inadequadas podem
provocar perigos substanciais.
Perigo de incêndio
• Ao colocar o aparelho, certifique-se de que o cabo de alimentação
não fica preso nem é danificado.
• Não coloque tomadas múltiplas ou fontes de alimentação portáteis na
parte de trás do aparelho.
Risco para a saúde
• Este aparelho pode ser utilizado por crianças a partir dos 8 anos e
pessoas com capacidades físicas, sensoriais ou mentais reduzidas ou
sem experiência e conhecimento se forem supervisionadas ou receberem instruções sobre a utilização do aparelho de forma segura e
compreenderem os perigos implicados.
• As crianças não podem brincar com o aparelho.
• A limpeza e a manutenção por parte do utilizador não podem ser
efetuadas por crianças sem supervisão.
• Crianças com idades entre os 3 e os 8 anos podem colocar e tirar itens
de aparelhos frigoríficos.
100
 Loading...