

CF35, CF40, CF50, CF60
CF35
CF40
CF50
CF60
DE 6 Kompressor-Kühlbox
Bedienungsanleitung
EN 24 Compressor Cooler
Instruction Manual
FR 42 Glacière à compression
Manuel d’utilisation
ES 61 Nevera por compresor
Instrucciones de uso
IT 80 Frigorifero a compressore
Istruzioni per l’uso
NL 99 Compressorkoelbox
Gebruiksaanwijzing
DA 117 Kompressor-køleboks
Betjeningsvejledning
SV 135 Kylbox med kompressor
Bruksanvisning
NO 153 Kjøleboks med kompressor
Bruksanvisning
FI 171 Kompressori-kylmälaatikko
Käyttöohje
PT 189 Geleira com compressor
Manual de instruções
RU 208 Компрессорный холодильник
PL 227 Przenośna lodówka
CS 246 Kompresorový chladicí box
SK 264 Chladiaci box s kompresorom
Инструкция по эксплуатации
kompresorowa
Instrukcja obsługi
Návod k obsluze
Návod na obsluhu

Fordern Sie weitere Informationen zur umfangreichen Produktpalette aus dem
DE
EN
FR
ESITNL
DASVNO
FIRUPL
CS
SK
Hause Dometic WAECO an. Bestellen Sie einfach unsere Kataloge kostenlos und
unverbindlich unter der Internetadresse: www.dometic-waeco.de
We will be happy to provide you with further information about Dometic WAECO
products. Please order our free catalogue with no obligation to buy on our
homepage: www.dometic-waeco.com
Demandez d’autres informations relatives à la large gamme de produits de la
maison Dometic WAECO. Commandez tout simplement notre catalogue
gratuitement et sans engagement à l’adresse internet suivante :
www.dometic-waeco.com
Solicite más información sobre la amplia gama de productos de la empresa
Dometic WAECO. Solicite simplemente nuestros catálogos de forma gratuita y sin
compromiso en la dirección de Internet: www.dometic-waeco.com
Per ottenere maggiori informazioni sull’ampia gamma di prodotti Dometic WAECO
è possibile ordinare una copia gratuita e non vincolante del nostro Catalogo
all’indirizzo Internet: www.dometic-waeco.com
Maak kennis met het omvangrijke productscala van de firma Dometic WAECO.
Bestel onze catalogus gratis en vrijblijvend onder het internetadres:
www.dometic-waeco.com
Bestil yderligere information om det omfattende produktudvalg fra Dometic
WAECO. Bestil vores katalog gratis og uforpligtende på internetadressen:
www.dometic-waeco.com
Inhämta mer information om den omfattande produktpaletten från Dometic
WAECO: Beställ våra kataloger gratis och utan förpliktelser under vår
Internetadress: www.dometic-waeco.com
Be om mer informasjon om det rikholdige produktutvalget fra Dometic WAECO.
Bestill vår katalog gratis uforbindtlig på Internettadressen:
www.dometic-waeco.com
Pyytäkää lisää tietoja Dometic WAECOn kattavista tuotevalikoimista. Tilatkaa
tuotekuvastomme maksutta ja sitoumuksetta internet-osoitteesta:
www.dometic-waeco.com
Запросите дальнейшую информацию об обширном ассортименте продукции
компании Dometic WAECO. Просто закажите наши каталоги на сайте
www.dometic-waeco.com; эта услуга предоставляется бесплатно и ни к чему
не обязывает.
Proszę się zapoznać z informacjami na temat szerokiej gamy produktów Dometic
WAECO. Proszę zamówić nasz bezpłatny katalog i zapoznać się zniewiążącą
ofertą pod adresem: www.dometic-waeco.com
Žádejte další informace o rozsáhlé nabídce výrobků firmy Dometic WAECO. Stačí
zdarma a nezávazně
www.dometic-waeco.com
Vyžiadajte si ďalšie informácie o rozsiahlej palete výrobkov Dometic WAECO.
Objednajte si bezplatne a nezáväzne náš katalóg na internetovej adrese:
www.dometic-waeco.com
objednat naše katalogy na internetové adrese:
CoolFreeze
1
4
2
3
1
1
2
CF35, CF40
ON
OFF
SET
POWER
UP
+
DOWN
–
ERROR
°
1 3 4 5 6 72
3
CF35, CF40, CF50, CF60
3
CoolFreeze
100-240V~AC
FUSE
12/24V DC
1
2 3
4
1
2
1
5
4
CoolFreeze
6
CF50, CF60
AB
1 2 3
4
5
6
7
1 2
8
5

DE
CoolFreeze
Bitte lesen Sie diese Anleitung vor der Inbetriebnahme sorgfältig durch und bewahren Sie sie auf. Geben Sie sie im Falle
einer Weitergabe des Gerätes an den Nutzer weiter.
Der Hersteller haftet nicht für Schäden, die durch nicht
bestimmungsgemäßen Gebrauch oder falsche Bedienung ver-
ursacht werden.
Inhaltsverzeichnis
1 Erklärung der Symbole . . . . . . . . . . . . . . . . . . . . . . . . . . . . . . . . . . 7
2 Sicherheitshinweise . . . . . . . . . . . . . . . . . . . . . . . . . . . . . . . . . . . . 7
2.1 Allgemeine Sicherheit . . . . . . . . . . . . . . . . . . . . . . . . . . . . . . 7
2.2 Sicherheit beim Betrieb des Gerätes . . . . . . . . . . . . . . . . . . 9
3 Lieferumfang . . . . . . . . . . . . . . . . . . . . . . . . . . . . . . . . . . . . . . . . . 10
4 Bestimmungsgemäßer Gebrauch . . . . . . . . . . . . . . . . . . . . . . . . 10
5 Funktionsbeschreibung . . . . . . . . . . . . . . . . . . . . . . . . . . . . . . . . 11
5.1 Funktionsumfang . . . . . . . . . . . . . . . . . . . . . . . . . . . . . . . . 11
5.2 Bedien- und Anzeigeelemente . . . . . . . . . . . . . . . . . . . . . . 12
6 Bedienung . . . . . . . . . . . . . . . . . . . . . . . . . . . . . . . . . . . . . . . . . . . 13
6.1 Vor dem ersten Gebrauch . . . . . . . . . . . . . . . . . . . . . . . . . 13
6.2 Tipps zum Energiesparen . . . . . . . . . . . . . . . . . . . . . . . . . . 14
6.3 Kühlbox anschließen . . . . . . . . . . . . . . . . . . . . . . . . . . . . . 14
6.4 Batteriewächter verwenden . . . . . . . . . . . . . . . . . . . . . . . . 15
6.5 Kühlbox benutzen . . . . . . . . . . . . . . . . . . . . . . . . . . . . . . . . 16
6.6 Temperatur einstellen . . . . . . . . . . . . . . . . . . . . . . . . . . . . . 18
6.7 Kühlbox ausschalten . . . . . . . . . . . . . . . . . . . . . . . . . . . . . . 18
6.8 Kühlbox abtauen . . . . . . . . . . . . . . . . . . . . . . . . . . . . . . . . . 18
6.9 Gerätesicherung austauschen . . . . . . . . . . . . . . . . . . . . . . 19
6.10 Steckersicherung (12/24 V) austauschen . . . . . . . . . . . . . . 19
6.11 Leuchtkörper wechseln . . . . . . . . . . . . . . . . . . . . . . . . . . . . 19
7 Reinigung und Pflege . . . . . . . . . . . . . . . . . . . . . . . . . . . . . . . . . . 20
8 Gewährleistung . . . . . . . . . . . . . . . . . . . . . . . . . . . . . . . . . . . . . . . 20
9 Störungsbeseitigung. . . . . . . . . . . . . . . . . . . . . . . . . . . . . . . . . . . 21
10 Entsorgung. . . . . . . . . . . . . . . . . . . . . . . . . . . . . . . . . . . . . . . . . . . 22
11 Technische Daten . . . . . . . . . . . . . . . . . . . . . . . . . . . . . . . . . . . . . 22
6

DE
CoolFreeze Erklärung der Symbole
1 Erklärung der Symbole
GEFAHR!
D
!
!
A
I
Sicherheitshinweis: Nichtbeachtung führt zu Tod oder schwerer
Verletzung.
WARNUNG!
Sicherheitshinweis: Nichtbeachtung kann zu Tod oder schwerer
Verletzung führen.
VORSICHT!
Sicherheitshinweis: Nichtbeachtung kann zu Verletzungen
führen.
ACHTUNG!
Nichtbeachtung kann zu Materialschäden führen und die
Funktion des Produktes beeinträchtigen.
HINWEIS
Ergänzende Informationen zur Bedienung des Produktes.
➤ Handlung: Dieses Symbol zeigt Ihnen, dass Sie etwas tun
müssen. Die erforderlichen Handlungen werden Schritt für
Schritt beschrieben.
✓ Dieses Symbol beschreibt das Ergebnis einer Handlung.
Abb. 1 5, Seite 3: Diese Angabe weist Sie auf ein Element in ei-
ner Abbildung hin, in diesem Beispiel auf „Position 5 in Abbildung 1
auf Seite 3“.
2 Sicherheitshinweise
2.1 Allgemeine Sicherheit
GEFAHR!
D
Bei Booten: Sorgen Sie bei Netzbetrieb unbedingt dafür, dass
Ihre Stromversorgung über einen FI-Schalter abgesichert ist.
7

DE
Sicherheitshinweise CoolFreeze
WARNUNG!
!
Wenn das Gerät sichtbare Beschädigungen aufweist, dürfen
Sie es nicht in Betrieb nehmen.
Reparaturen an diesem Gerät dürfen nur von Fachkräften
durchgeführt werden. Durch unsachgemäße Reparaturen
können erhebliche Gefahren entstehen.
Personen (einschließlich Kinder), die aufgrund ihrer physi-
schen, sensorischen oder geistigen Fähigkeiten oder ihrer
Unerfahrenheit oder Unkenntnis nicht in der Lage sind, das
Gerät sicher zu benutzen, sollten dieses Gerät nicht ohne
Aufsicht oder Anweisung durch eine verantwortliche Person
nutzen.
Elektrogeräte sind kein Kinderspielzeug!
Verwahren und benutzen Sie das Gerät außerhalb der Reichweite von Kindern.
Kinder sollten beaufsichtigt werden, um sicherzustellen, dass
sie nicht mit dem Gerät spielen.
Wenn das Anschlusskabel dieses Gerätes beschädigt wird,
muss es durch den Hersteller, seinen Kundendienst oder eine
ähnlich qualifizierte Person ersetzt werden, um Gefährdungen
zu vermeiden.
Lagern Sie keine explosionsfähigen Substanzen wie z. B.
Sprühdosen mit Treibgas im Gerät.
!
A
8
VORSICHT!
Trennen Sie das Gerät vom Netz
– vor jeder Reinigung und Pflege
– nach jedem Gebrauch
Lebensmittel dürfen nur in Originalverpackungen oder
geeigneten Behältern eingelagert werden.
ACHTUNG!
Schließen Sie das Gerät nur wie folgt an:
– mit dem DC-Anschlusskabel an die DC-Bordsteckdose
(z. B. Zigarettenanzünder) im Fahrzeug
– oder mit dem 230-V-Anschlusskabel an das 230-V-Wechsel-
stromnetz
Vergleichen Sie die Spannungsangabe auf dem Typenschild
mit der vorhandenen Energieversorgung.

DE
CoolFreeze Sicherheitshinweise
Das Kühlgerät ist nicht geeignet für den Transport ätzender
oder lösungsmittelhaltiger Stoffe.
Ziehen Sie den Stecker nie am Anschlusskabel aus der Steck-
dose.
Wenn das Kühlgerät an der DC-Steckdose angeschlossen ist:
Klemmen Sie Ihr Kühlgerät und andere Verbraucher von der
Batterie ab, bevor Sie ein Schnellladegerät anschließen.
Wenn das Kühlgerät an der DC-Steckdose angeschlossen ist:
Trennen Sie die Verbindung oder schalten Sie das Kühlgerät
aus, wenn Sie den Motor ausschalten. Sonst kann die Batterie
entladen werden.
2.2 Sicherheit beim Betrieb des Gerätes
GEFAHR!
D
!
Fassen Sie nie mit bloßen Händen an blanke Leitungen. Dies
gilt vor allem beim Betrieb am Wechselstromnetz.
VORSICHT!
Achten Sie vor der Inbetriebnahme darauf, dass Zuleitung und
Stecker trocken sind.
A
ACHTUNG!
Benutzen Sie keine elektrischen Geräte innerhalb des Kühl-
gerätes, außer wenn diese Geräte vom Hersteller dafür empfohlen werden.
Stellen Sie das Gerät nicht in der Nähe von offenen Flammen
oder anderen Wärmequellen (Heizung, starke Sonneneinstrahlung, Gasöfen usw.) ab.
Überhitzungsgefahr!
Achten Sie stets darauf, dass beim Betrieb entstehende Wärme
ausreichend abgeführt werden kann. Sorgen Sie dafür, dass
das Gerät in ausreichendem Abstand zu Wänden oder Gegenständen steht, sodass die Luft zirkulieren kann.
Achten Sie darauf, dass die Lüftungsöffnungen nicht abgedeckt
werden.
Füllen Sie keine Flüssigkeiten oder Eis in den Innenbehälter.
Tauchen Sie das Gerät nie in Wasser.
Schützen Sie das Gerät und die Kabel vor Hitze und Nässe.
9
DE
Lieferumfang CoolFreeze
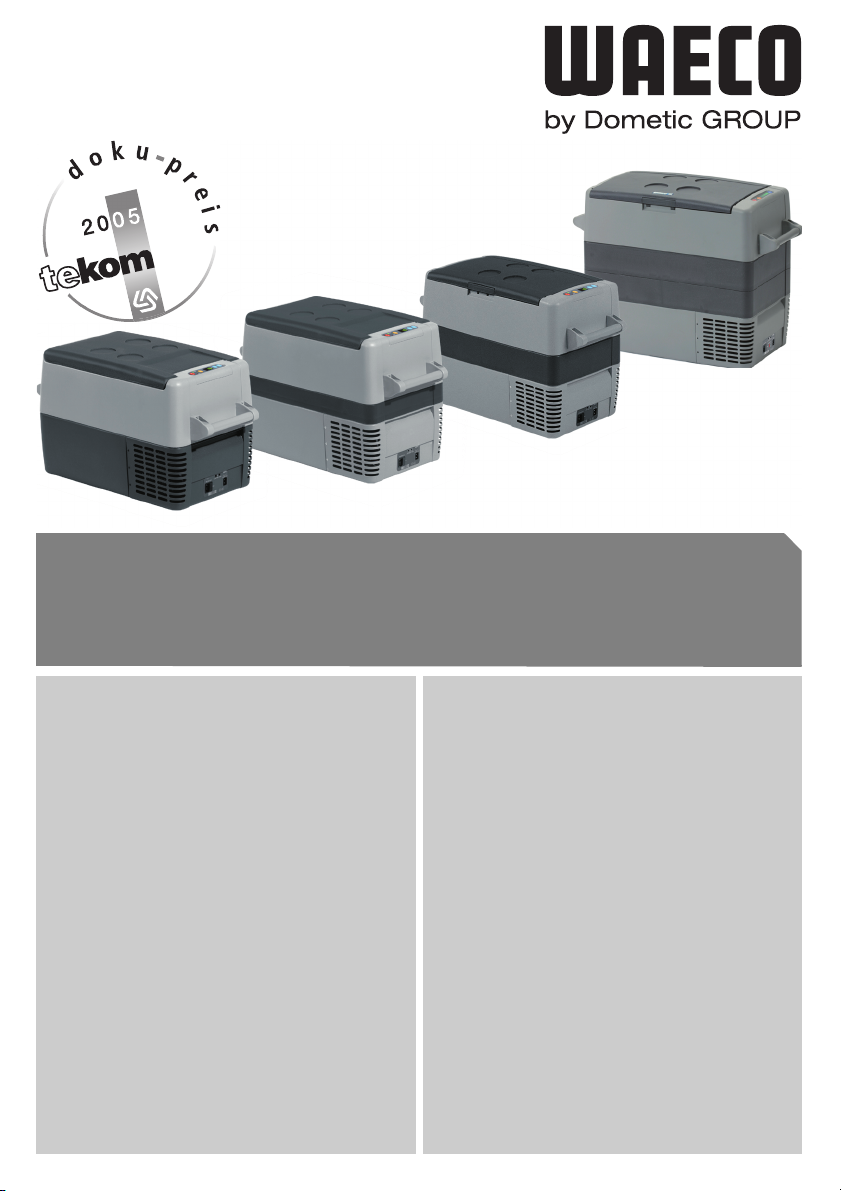
3 Lieferumfang
Abb. 1, Seite 3, zeigt den Lieferumfang.
Pos. Menge Bezeichnung
1 1 Kühlbox
2 1 Anschlusskabel für 12/24-Vg-Anschluss
3 1 Anschlusskabel für 100–240-V~-Anschluss
4 2 Tragegriff, bestehend aus:
–2 Haltern
– 1 Griffstück
– 4 Befestigungsschrauben
– 1 Bedienungsanleitung
4 Bestimmungsgemäßer Gebrauch
Die Kühlbox eignet sich zum Kühlen und Tiefkühlen von Lebensmitteln. Das Gerät ist auch für den Betrieb auf Booten geeignet.
!
10
Das Gerät ist für den Betrieb an einer 12-V
Bordnetzsteckdose eines Fahrzeugs (z. B. Zigarettenanzünder),
Boots oder Wohnmobils sowie an einem 100–240-V
stromnetz ausgelegt.
VORSICHT! Gesundheitsgefahr!
Prüfen Sie bitte, ob die Kühlleistung des Gerätes den Anforderungen der Lebensmittel oder Medikamente entspricht, die Sie kühlen wollen.
g- oder 24-Vg-
~
-Wechsel-

DE
CoolFreeze Funktionsbeschreibung
5 Funktionsbeschreibung
Die Kühlbox kann Waren abkühlen und kühl halten sowie tiefkühlen. Die Kühlung erfolgt durch einen wartungsfreien Kühlkreislauf mit Kompressor. Die extrastarke Isolierung und der
leistungsstarke Kompressor gewährleisten eine besonders schnelle Kühlung.
Die Kühlbox ist für den mobilen Einsatz geeignet.
Beim Einsatz auf Booten kann die Kühlbox einer Dauerkrängung
von 30° ausgesetzt werden.
5.1 Funktionsumfang
Netzteil mit Vorrangschaltung zum Anschluss an
Wechselspannung
Dreistufiger Batteriewächter zum Schutz der Fahrzeugbatterie
Turbo-Modus zum schnelleren Kühlen
Display mit Temperaturanzeige,
wird bei niedriger Batteriespannung automatisch abgeschaltet
Temperatureinstellung: Mit zwei Tasten in 1 °C-(2 °F)-Schritten
Montierbare Tragegriffe
11
DE
Funktionsbeschreibung CoolFreeze
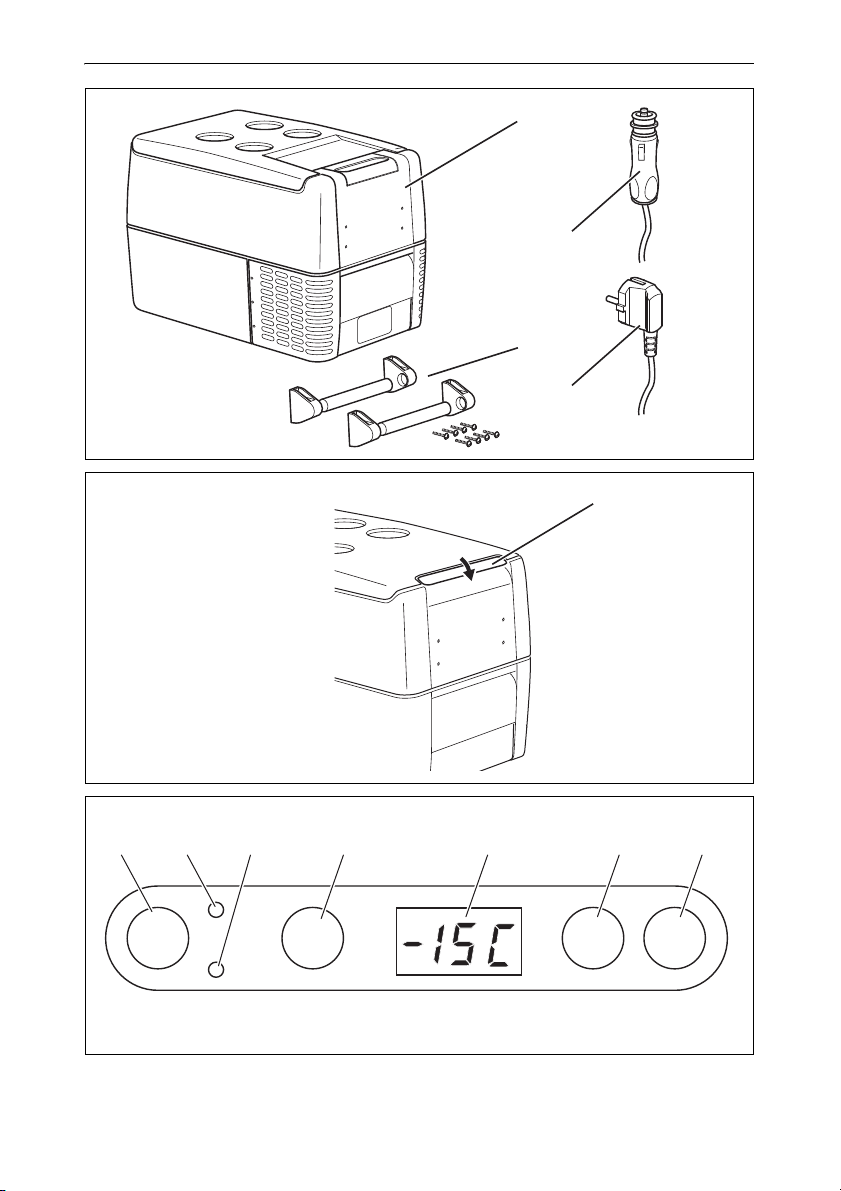
5.2 Bedien- und Anzeigeelemente
CF35, CF40
Verriegelung des Deckels: Abb. 2 1, Seite 3
CF35, CF40, CF50, CF60
Bedienfeld (Abb. 3, Seite 3)
Pos. Bezeichnung Erklärung
1ON
OFF
2 POWER Betriebsanzeige
3 ERROR LED blinkt rot: eingeschaltetes Gerät
4 SET Wählt den Eingabemodus
5 – Display, zeigt die Werte an
6 UP + Einmal antippen erhöht den gewählten
7 DOWN – Einmal antippen verringert den gewählten
Schaltet die Kühlbox ein oder aus, wenn die
Taste ein bis zwei Sekunden gedrückt wird
LED leuchtet grün: Kompressor ist an
LED leuchtet
orange:
LED blinkt orange: Display wurde auto-
– Temperatureinstellung
– Angabe von °Celsius oder °Fahrenheit
– Batteriewächter einstellen
Eingabewert
Eingabewert
Kompressor ist aus
matisch abgeschaltet,
weil die Batteriespannung niedrig ist
ist nicht betriebsbereit
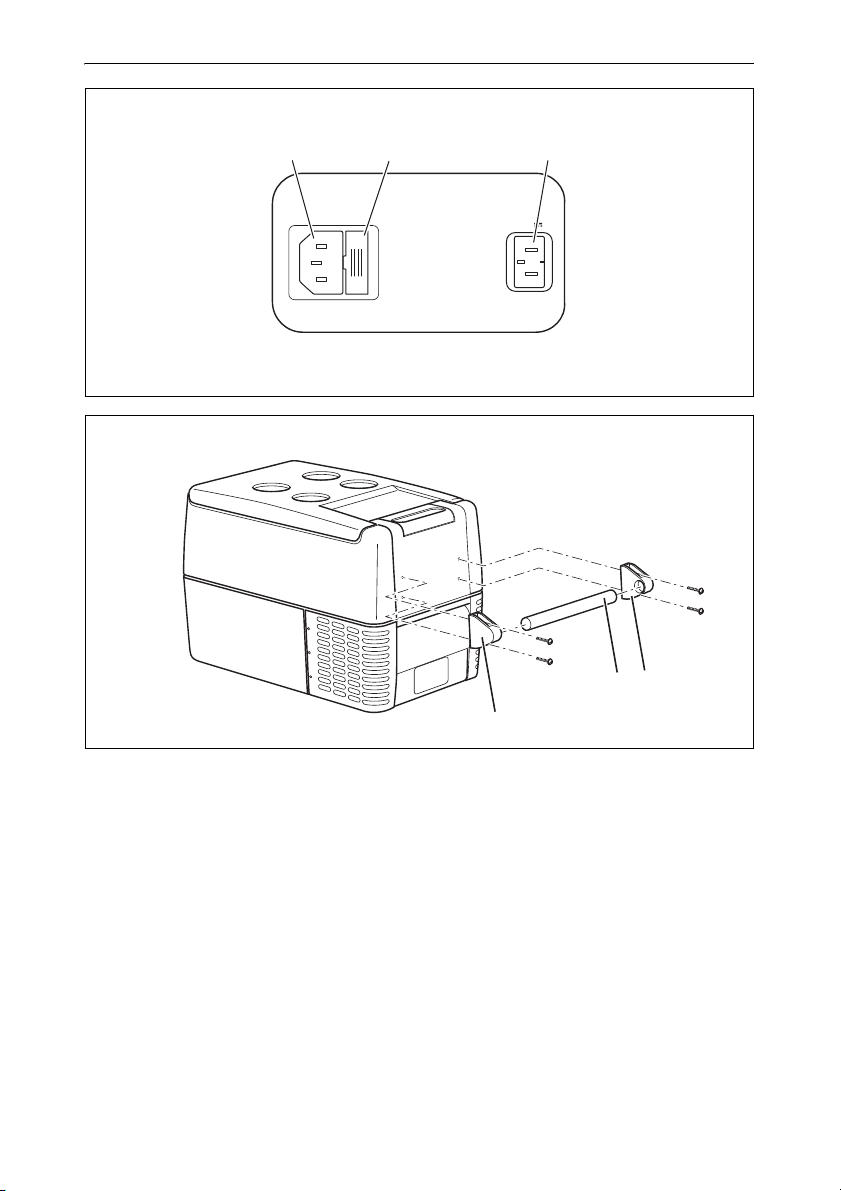
Anschlussbuchsen (Abb. 4, Seite 4):
Pos. Bezeichnung
1 Anschlussbuchse Wechselspannungsversorgung
2 Sicherungshalter
3 Anschlussbuchse Gleichspannungsversorgung
12

DE
CoolFreeze Bedienung
6 Bedienung
6.1 Vor dem ersten Gebrauch
HINWEIS
I
Griffe montieren
Deckelanschlag umdrehen
CF50, CF60
Bevor Sie die neue Kühlbox in Betrieb nehmen, sollten Sie sie aus
hygienischen Gründen innen und außen mit einem feuchten Tuch
reinigen (siehe auch „Reinigung und Pflege“ auf Seite 20).
Die Griffe liegen lose bei. Falls Sie die Griffe montieren wollen,
gehen Sie wie folgt vor:
➤ Stecken Sie jeweils zwei Halter (Abb. 5 1, Seite 4) und ein
Griffstück (Abb. 5 2, Seite 4) zu einem Griff zusammen.
➤ Befestigen Sie den Griff mit den beiliegenden Schrauben in den
vorgesehenen Bohrungen.
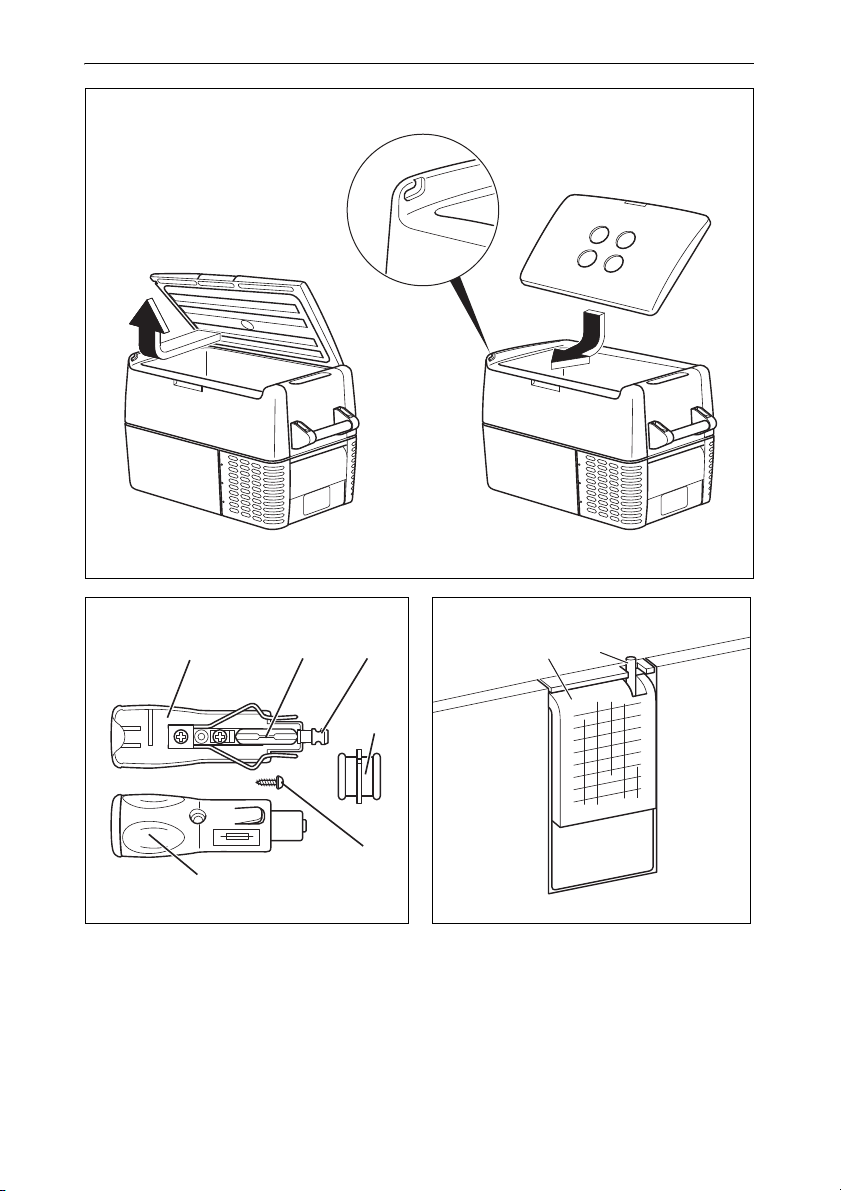
Sie können den Deckelanschlag umdrehen, falls Sie den Deckel
zur anderen Seite öffnen möchten. Gehen Sie hierzu wie folgt vor:
➤ Öffnen Sie den Deckel und ziehen Sie ihn heraus (Abb. 6 A,
Seite 5).
➤ Drehen Sie den Deckel.
➤ Setzen Sie den Deckel in die Deckelaufnahmen auf der gegen-
überliegenden Seite der Kühlbox ein (Abb. 6 B, Seite 5).
Temperatureinheit wählen
Sie können zur Temperaturanzeige zwischen den Werten für
°Celsius und °Fahrenheit wählen. Gehen Sie hierzu wie folgt vor:
➤ Schalten Sie die Kühlbox ein.
➤ Drücken Sie den Taster „SET“ (Abb. 3 4, Seite 3) zweimal.
➤ Stellen Sie mit den Tastern „UP +“ (Abb. 3 6, Seite 3) bzw.
„DOWN -“ (Abb. 3 7, Seite 3), die Temperatureinheit °Celsius
oder °Fahrenheit ein.
13

DE
Bedienung CoolFreeze
✓ Das Display zeigt für einige Sekunden die eingestellte
Temperatureinheit an. Das Display blinkt einige Male, bevor es
zur Darstellung der aktuellen Temperatur zurückkehrt.
6.2 Tipps zum Energiesparen
Wählen Sie einen gut belüfteten und vor Sonnenstrahlen ge-
schützten Einsatzort.
Lassen Sie warme Speisen erst abkühlen, bevor Sie sie im
Gerät kühl halten.
Öffnen Sie das Kühlgerät nicht häufiger als nötig.
Lassen Sie das Kühlgerät nicht länger offen als nötig.
Tauen Sie das Kühlgerät ab, sobald sich eine Eisschicht gebil-
det hat.
Vermeiden Sie eine unnötig tiefe Innentemperatur.
6.3 Kühlbox anschließen
An eine Batterie anschließen (Fahrzeug oder Boot)
Die Kühlbox kann mit 12 V oder 24 V Gleichspannung betrieben
werden.
A
14
ACHTUNG! Beschädigungsgefahr!
Klemmen Sie die Kühlbox und andere Verbraucher von der Batterie ab, bevor Sie die Batterie mit einem Schnellladegerät
aufladen.
Überspannungen können die Elektronik der Geräte beschädigen.
Zur Sicherheit ist die Kühlbox mit einem elektronischen
Verpolungsschutz ausgestattet, der die Kühlbox gegen Verpolung
beim Batterieanschluss und gegen Kurzschluss schützt.
➤ Stecken Sie das 12/24-V-Anschlusskabel (Abb. 1 2, Seite 3)
in die Gleichspannungs-Buchse und schließen Sie es an den
Zigarettenanzünder oder eine 12-V- oder 24-V-Steckdose an.

DE
CoolFreeze Bedienung
An ein 100–240-V-Wechselstromnetz anschließen (z. B. zu Hause oder
im Büro)
GEFAHR! Lebensgefahr durch Stromschlag!
D
Hantieren Sie nie mit Steckern und Schaltern, wenn Sie nasse
Hände haben oder mit den Füßen in der Nässe stehen.
Wenn Sie Ihre Kühlbox an Bord eines Bootes per Landan-
schluss am 100–240-V-Wechselstromnetz betreiben, müssen
Sie auf jeden Fall einen FI-Schutzschalter zwischen 100–240V-Wechselstromnetz und Kühlbox schalten.
Lassen Sie sich von einem Fachmann beraten.
Die Kühlboxen haben ein integriertes Multispannungsnetzteil mit
Vorrangschaltung zum Anschluss an eine Wechselspannung von
100-240 V. Durch die Vorrangschaltung wird automatisch auf
Netzbetrieb umgeschaltet, wenn das Gerät an ein 100–240-VWechselstromnetz angeschlossen ist, auch wenn das 12/24-VAnschlusskabel noch angeschlossen ist.
Beim Umschalten zwischen Wechselstromnetz und Batterieversorgung kann für einige Minuten die rote LED leuchten.
➤ Stecken Sie das 100–240-V-Anschlusskabel (Abb. 1 3,
Seite 3) in die Wechselspannungs-Buchse und schließen Sie
es an das 100–240-V-Wechselstromnetz an.
6.4 Batteriewächter verwenden
Das Gerät ist mit einem mehrstufigen Batteriewächter ausgestattet, der Ihre Fahrzeugbatterie beim Anschluss an das 12/24-VBordnetz vor zu tiefer Entladung schützt.
Wird die Kühlbox bei ausgeschalteter Zündung im Fahrzeug
betrieben, schaltet sich die Box selbstständig ab, sobald die
Versorgungsspannung unter einen einstellbaren Wert abfällt. Die
Kühlbox schaltet sich wieder ein, sobald durch Aufladung der Batterie die Wiedereinschaltspannung erreicht wird.
ACHTUNG! Beschädigungsgefahr!
A
Die Batterie besitzt beim Abschalten durch den Batteriewächter
nicht mehr ihre volle Ladekapazität, vermeiden Sie mehrmaliges
Starten oder den Betrieb von Stromverbrauchern ohne längere
Aufladephasen. Sorgen Sie dafür, dass die Batterie wieder aufgeladen wird.
15

DE
Bedienung CoolFreeze
Im Modus „HIGH“ spricht der Batteriewächter schneller an als in
den Stufen „LOW“ und „MED“ (siehe folgende Tabelle).
Batteriewächter-Modus LOW MED HIGH
Ausschaltspannung bei 12 V 10,1 V 11,4 V 11,8 V
Wiedereinschaltspannung bei 12 V 11,1 V 12,2 V 12,6 V
Ausschaltspannung bei 24 V 21,5 V 24,1 V 24,6 V
Wiedereinschaltspannung bei 24 V 23,0 V 25,3 V 26,2 V
Um den Modus für den Batteriewächter zu ändern gehen Sie wie
folgt vor:
➤ Schalten Sie die Kühlbox ein.
➤ Drücken Sie den Taster „SET“ (Abb. 3 4, Seite 3) dreimal.
➤ Stellen Sie mit den Tastern „UP +“ (Abb. 3 6, Seite 3) bzw.
„DOWN -“ (Abb. 3 7, Seite 3), den Modus für den Batteriewächter ein.
✓ Das Display zeigt für einige Sekunden den eingestellten Modus
an. Das Display blinkt einige Male, bevor es zur Darstellung der
aktuellen Temperatur zurückkehrt.
HINWEIS
I
Wenn die Kühlbox von der Starterbatterie versorgt wird, wählen
Sie den Batteriewächter-Modus „HIGH“. Wenn die Kühlbox an
eine Versorgungsbatterie angeschlossen ist, reicht der Batteriewächter-Modus „LOW“ aus.
Wenn Sie die Kühlbox am Wechselstromnetz betreiben wollen,
stellen Sie den Batteriewächter auf „LOW“.
6.5 Kühlbox benutzen
ACHTUNG! Überhitzungsgefahr!
A
Achten Sie stets darauf, dass beim Betrieb entstehende Wärme
ausreichend abgeführt werden kann. Achten Sie darauf, dass die
Lüftungsschlitze nicht abgedeckt werden. Sorgen Sie dafür, dass
das Gerät in ausreichendem Abstand zu Wänden oder Gegenständen steht, sodass die Luft zirkulieren kann.
16

DE
CoolFreeze Bedienung
➤ Stellen Sie die Kühlbox auf eine feste Unterlage.
Achten Sie darauf, dass die Lüftungsschlitze nicht abgedeckt
sind und die erwärmte Luft gut abziehen kann.
HINWEIS
I
I
A
Stellen Sie die Kühlbox wie dargestellt auf (Abb. 1, Seite 3).
Wird die Box in einer anderen Position betrieben, so kann das
Gerät Schaden nehmen.
➤ Schließen Sie die Kühlbox an, siehe „Kühlbox anschließen“ auf
Seite 14.
HINWEIS
Wenn Sie die Kühlbox am Wechselstromnetz betreiben wollen,
stellen Sie den Batteriewächter auf „LOW“.
ACHTUNG! Gefahr durch zu niedrige Temperatur!
Achten Sie darauf, dass sich nur Gegenstände bzw. Waren in der
Kühlbox befinden, die auf die gewählte Temperatur gekühlt werden dürfen.
➤ Drücken Sie den Taster „ON/OFF“ (Abb. 3 1, Seite 3) für ein
bis zwei Sekunden.
✓ Die LED „POWER“ leuchtet.
✓ Das Display (Abb. 3 5, Seite 3) schaltet sich ein und zeigt die
aktuelle Kühltemperatur an.
I
I
HINWEIS
Die angezeigte Temperatur bezieht sich auf die Mitte des Innenraums. Die Temperatur an anderen Stellen kann davon
abweichen.
✓ Die Kühlbox startet mit dem Kühlen des Innenraums.
HINWEIS
Beim Betrieb an einer Batterie schaltet das Display automatisch
ab, wenn die Batteriespannung niedrig ist. Die LED „POWER“
blinkt orange.
17

DE
Bedienung CoolFreeze
Kühlbox verriegeln
CF35, CF40
➤ Schließen Sie den Deckel.
➤ Drücken Sie die Verriegelung (Abb. 2 1, Seite 3) nach unten,
bis sie hörbar einrastet.
6.6 Temperatur einstellen
➤ Drücken Sie den Taster „SET“ (Abb. 3 4, Seite 3) einmal.
➤ Stellen Sie mit den Tastern „UP +“ (Abb. 3 6, Seite 3) bzw.
„DOWN -“ (Abb. 3 7, Seite 3) die Kühltemperatur ein.
✓ Das Display zeigt für einige Sekunden die eingestellte ge-
wünschte Kühltemperatur an. Das Display blinkt einige Male,
bevor es zur Darstellung der aktuellen Temperatur zurückkehrt.
6.7 Kühlbox ausschalten
➤ Räumen Sie die Kühlbox leer.
➤ Schalten Sie die Kühlbox aus.
➤ Ziehen Sie das Anschlusskabel ab.
Wenn Sie die Kühlbox für längere Zeit nicht benutzen wollen:
➤ Lassen Sie den Deckel leicht geöffnet. So verhindern Sie, dass
sich Gerüche bilden.
6.8 Kühlbox abtauen
Luftfeuchtigkeit kann sich am Verdampfer oder im Innenraum der
Kühlbox als Reif niederschlagen, der die Kühlleistung verringert.
Tauen Sie das Gerät rechtzeitig ab.
ACHTUNG! Beschädigungsgefahr!
A
Verwenden Sie nie harte oder spitze Werkzeuge zum Entfernen
von Eisschichten oder zum Lösen festgefrorener Gegenstände.
Gehen Sie wie folgt vor, um die Kühlbox abzutauen:
➤ Nehmen Sie das Kühlgut heraus.
➤ Lagern Sie es ggf. in einem anderen Kühlgerät, damit es kalt
bleibt.
18

DE
CoolFreeze Bedienung
➤ Schalten Sie das Gerät ab.
➤ Lassen Sie den Deckel offen.
➤ Wischen Sie das Tauwasser auf.
6.9 Gerätesicherung austauschen
GEFAHR! Lebensgefahr durch Stromschlag!
D
Ziehen Sie vor dem Austauschen der Gerätesicherung die
Anschlusskabel ab.
➤ Ziehen Sie die Anschlusskabel ab.
➤ Hebeln Sie den Sicherungseinsatz (Abb. 4 2, Seite 4) z. B. mit
einem Schraubendreher heraus.
➤ Tauschen Sie die defekte Sicherung gegen eine neue Siche-
rung mit demselben Wert (T4AL 250V) aus.
➤ Drücken Sie den Sicherungseinsatz wieder in das Gehäuse.
6.10 Steckersicherung (12/24 V) austauschen
➤ Ziehen Sie die Ausgleichshülse (Abb. 7 4, Seite 5) vom
Stecker ab.
➤ Drehen Sie die Schraube (Abb. 7 5, Seite 5) aus der oberen
Gehäusehälfte (Abb. 7 1, Seite 5) heraus.
➤ Heben Sie vorsichtig die obere Gehäusehälfte von der unteren
(Abb. 7 6, Seite 5) ab.
➤ Nehmen Sie den Kontaktstift (Abb. 7 3, Seite 5) heraus.
➤ Tauschen Sie die defekte Sicherung (Abb. 7 2, Seite 5) gegen
eine neue Sicherung mit demselben Wert (8A 32V) aus.
➤ Setzen Sie den Stecker in umgekehrter Reihenfolge wieder
zusammen.
6.11 Leuchtkörper wechseln
➤ Drücken Sie den Schaltpin (Abb. 8 2, Seite 5) nach unten,
sodass sich das transparente Teil (Abb. 8 1, Seite 5) der
Leuchte nach vorne abnehmen lässt.
➤ Tauschen Sie den Leuchtkörper aus.
19

DE
Reinigung und Pflege CoolFreeze
HINWEIS
I
Die LEDs im Leuchtkörper müssen zum transparenten Teil der
Leuchte ausgerichtet sein.
➤ Setzen Sie das transparente Teil der Leuchte wieder in das
Gehäuse ein.
7 Reinigung und Pflege
WARNUNG!
!
A
Trennen Sie vor jeder Reinigung und Pflege das Gerät vom Netz.
ACHTUNG! Beschädigungsgefahr!
Reinigen Sie das Kühlgerät niemals unter fließendem Wasser
oder gar im Spülwasser.
Verwenden Sie zur Reinigung keine scharfen Reinigungs-
mittel oder harten Gegenstände, da diese das Kühlgerät
beschädigen können.
➤ Reinigen Sie das Gerät innen und außen gelegentlich mit einem
feuchten Tuch.
➤ Stellen Sie sicher, dass die Be- und Entlüftungsöffnungen des
Geräts frei von Staub und Verunreinigungen sind, damit die
beim Betrieb entstehende Wärme abgeführt werden kann und
das Gerät keinen Schaden nimmt.
8 Gewährleistung
Es gilt die gesetzliche Gewährleistungsfrist. Sollte das Produkt
defekt sein, wenden Sie sich bitte an die Niederlassung des Herstellers in Ihrem Land (Adressen siehe Rückseite der Anleitung)
oder an Ihren Fachhändler.
Zur Reparatur- bzw. Gewährleistungsbearbeitung müssen Sie folgende Unterlagen mitschicken:
eine Kopie der Rechnung mit Kaufdatum,
einen Reklamationsgrund oder eine Fehlerbeschreibung.
20
DE
CoolFreeze Störungsbeseitigung
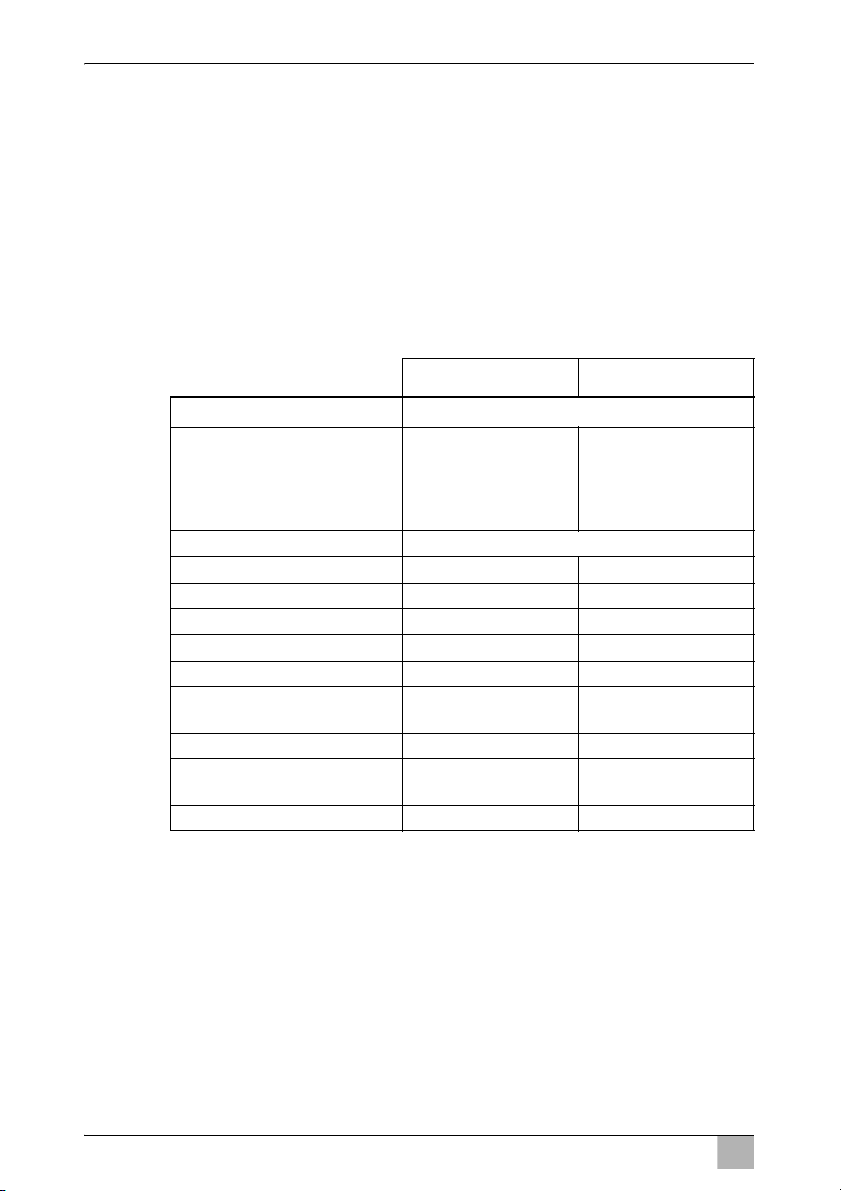
9 Störungsbeseitigung
Störung Mögliche Ursache Lösungsvorschlag
Das Gerät funktioniert
nicht, LED leuchtet
nicht.
Das Gerät kühlt nicht
(Stecker ist eingesteckt,
LED „POWER“ leuchtet).
Das Gerät kühlt nicht
(Stecker ist eingesteckt,
LED „POWER“ blinkt
orange, Display ist ausgeschaltet).
Beim Betrieb an der
12/24-V-Steckdose
(Zigarettenanzünder):
Die Zündung ist eingeschaltet, das Gerät
funktioniert nicht und
die LED leuchtet nicht.
Ziehen Sie den Stecker
aus der Steckdose und
nehmen Sie folgende
Prüfungen vor.
Das Display zeigt eine
Fehlermeldung (z.B.
„Err1“) an und das
Gerät kühlt nicht.
An der 12/24-Volt-Steckdose (Zigarettenanzünder) im Fahrzeug liegt
keine Spannung an.
WechselspannungsSteckdose führt keine
Spannung.
Gerätesicherung ist
defekt.
Das integrierte Netzteil
ist defekt.
Kompressor defekt. Die Reparatur kann nur von einem zuge-
Batteriespannung nicht
ausreichend.
Die Fassung des Zigarettenanzünders ist verschmutzt. Das hat einen
schlechten elektrischen
Kontakt zur Folge.
Die Sicherung des
12/24-V-Steckers ist
durchgebrannt.
Die Fahrzeug-Sicherung
ist durchgebrannt.
Eine interne Betriebsstörung hat das Gerät
ausgeschaltet.
In den meisten Fahrzeugen muss der
Zündschalter eingeschaltet sein, damit
der Zigarettenanzünder Spannung hat.
Versuchen Sie es an einer anderen Steckdose.
Tauschen Sie die Gerätesicherung aus,
siehe „Gerätesicherung austauschen“ auf
Seite 19.
Die Reparatur kann nur von einem zugelassenen Kundendienstbetrieb durchgeführt werden.
lassenen Kundendienstbetrieb durchgeführt werden.
Prüfen Sie die Batterie und laden Sie sie
gegebenenfalls.
Wenn der Stecker in der Zigarettenanzünderfassung sehr warm wird, muss entweder die Fassung gereinigt werden, oder
der Stecker ist möglicherweise nicht richtig zusammengebaut.
Tauschen Sie die Sicherung (8 A) des
12/24-V-Steckers aus, siehe „Steckersicherung (12/24 V) austauschen“ auf
Seite 19
Tauschen Sie die Fahrzeug-Sicherung der
12/24-V-Steckdose (üblicherweise 15 A)
aus (Beachten Sie dazu die Bedienungsanleitung zu Ihrem KFZ).
Die Reparatur kann nur von einem zugelassenen Kundendienstbetrieb durchgeführt werden.
21
DE
Entsorgung CoolFreeze
10 Entsorgung
➤ Geben Sie das Verpackungsmaterial möglichst in den entspre-
chenden Recycling-Müll.
Wenn Sie das Produkt endgültig außer Betrieb nehmen, informieren Sie sich bitte beim nächsten Recyclingcenter oder bei
M
Ihrem Fachhändler über die zutreffenden Entsorgungsvorschriften.
11 Technische Daten
CF35 CF 40
Anschlussspannung:
Nennstrom:
g: 6,0 A 6,0 A
– 12 V
g: 3,0 A 3,0 A
– 24 V
~
– 100–240 V
Kühlleistung: +10 °C bis –18 °C (+50 °F bis 0 °F)
Kategorie: 1 1
Energieeffizienzklasse: A+ A+
Energieverbrauch: 92 kWh/annum 101 kWh/annum
Nutzinhalt: 31 l 37 l
Klimaklasse: N, ST, T N, ST, T
Umgebungstemperatur: +16°C –
Schallemissionen: 45 dB(A) 45 dB(A)
Abmessungen (B x H x T) in
mm:
Gewicht: 15 kg 16 kg
: 1,3 bis 0,7 A 1,3 bis 0,7 A
12/24 V
g und 100–240 V
+43 °C
580 x 385 x 360 580 x 445 x 360
~
+16°C –
+43 °C
22
DE
CoolFreeze Technische Daten
CF50 CF 60
Anschlussspannung:
Nennstrom:
g: 7,0 A 7,0 A
– 12 V
g: 3,0 A 3,0 A
– 24 V
~
– 100–240 V
Kühlleistung: +10 °C bis –18 °C (+50 °F bis 0 °F)
Kategorie: 1 1
Energieeffizienzklasse: A+ A+
Energieverbrauch: 110 kWh/annum 111 kWh/annum
Nutzinhalt: 47 l 57 l
Klimaklasse: N, ST, T N, ST, T
Umgebungstemperatur: +16°C –
Schallemissionen: 45 dB(A) 45 dB(A)
Abmessungen (BxHxT) in mm: 630 x 480 x 360 630 x 582 x 360
Gewicht: 18 kg 21,6 kg
: 1,3 bis 0,7 A 1,3 bis 0,7 A
12/24 V
+43 °C
g und 100–240 V
+16°C –
+43 °C
~
HINWEIS
I
Ab Umgebungstemperaturen von über 32 °C (90 °F) kann die
minimale Temperatur nicht mehr erreicht werden.
Prüfung/Zertifikate:
4
Der Kühlkreis enthält R134a.
23

EN
CoolFreeze
Please read this operating manual carefully before starting the
device. Keep it in a safe place for future reference. If the device
is passed on to another person, this operating manual must be
handed over to the user along with it.
The manufacturer cannot be held liable for damage resulting from
improper usage or incorrect operation.
Contents
1 Explanation of symbols. . . . . . . . . . . . . . . . . . . . . . . . . . . . . . . . . 25
2 Safety instructions. . . . . . . . . . . . . . . . . . . . . . . . . . . . . . . . . . . . . 25
2.1 General safety . . . . . . . . . . . . . . . . . . . . . . . . . . . . . . . . . . 25
2.2 Operating the device safely . . . . . . . . . . . . . . . . . . . . . . . . 27
3 Scope of delivery . . . . . . . . . . . . . . . . . . . . . . . . . . . . . . . . . . . . . . 28
4 Intended use. . . . . . . . . . . . . . . . . . . . . . . . . . . . . . . . . . . . . . . . . . 28
5 Function description . . . . . . . . . . . . . . . . . . . . . . . . . . . . . . . . . . . 29
5.1 Scope of functions . . . . . . . . . . . . . . . . . . . . . . . . . . . . . . . 29
5.2 Operating and display elements . . . . . . . . . . . . . . . . . . . . . 30
6Operation . . . . . . . . . . . . . . . . . . . . . . . . . . . . . . . . . . . . . . . . . . . . 31
6.1 Before initial use . . . . . . . . . . . . . . . . . . . . . . . . . . . . . . . . . 31
6.2 Energy saving tips . . . . . . . . . . . . . . . . . . . . . . . . . . . . . . . 32
6.3 Connecting the cooler . . . . . . . . . . . . . . . . . . . . . . . . . . . . . 32
6.4 Using the battery monitor . . . . . . . . . . . . . . . . . . . . . . . . . . 33
6.5 Using the cooler . . . . . . . . . . . . . . . . . . . . . . . . . . . . . . . . . 34
6.6 Setting the temperature . . . . . . . . . . . . . . . . . . . . . . . . . . . 35
6.7 Switching off the cooler . . . . . . . . . . . . . . . . . . . . . . . . . . . . 36
6.8 Defrosting the cooler . . . . . . . . . . . . . . . . . . . . . . . . . . . . . . 36
6.9 Replacing the device fuse . . . . . . . . . . . . . . . . . . . . . . . . . . 36
6.10 Replacing the plug fuse (12/24 V) . . . . . . . . . . . . . . . . . . . 37
6.11 Replacing the light bulb . . . . . . . . . . . . . . . . . . . . . . . . . . . 37
7 Cleaning and maintenance . . . . . . . . . . . . . . . . . . . . . . . . . . . . . . 38
8Guarantee. . . . . . . . . . . . . . . . . . . . . . . . . . . . . . . . . . . . . . . . . . . . 38
9 Troubleshooting. . . . . . . . . . . . . . . . . . . . . . . . . . . . . . . . . . . . . . . 39
10 Disposal . . . . . . . . . . . . . . . . . . . . . . . . . . . . . . . . . . . . . . . . . . . . . 40
11 Technical data . . . . . . . . . . . . . . . . . . . . . . . . . . . . . . . . . . . . . . . . 40
24

EN
CoolFreeze Explanation of symbols
1 Explanation of symbols
DANGER!
D
!
!
A
I
Safety instruction: Failure to observe this instruction will cause
fatal or serious injury.
WARNING!
Safety instruction: Failure to observe this instruction can cause
fatal or serious injury.
CAUTION!
Safety instruction: Failure to observe this instruction can lead to
injury.
NOTICE!
Failure to observe this instruction can cause material damage and
impair the function of the product.
NOTE
Supplementary information for operating the product.
➤ Action: This symbol indicates that action is required on your
part. The required action is described step-by-step.
✓ This symbol describes the result of an action.
Fig. 1 5, page 3: This refers to an element in an illustration. In
this case, item 5 in figure 1 on page 3.
2 Safety instructions
2.1 General safety
DANGER!
D
On boats: If the appliance is powered by the mains, ensure that
the power supply has a residual current circuit breaker.
25

EN
Safety instructions CoolFreeze
WARNING!
!
!
Do not operate the device if it is visibly damaged.
This device may only be repaired by qualified personnel.
Improper repairs can lead to considerable hazards.
Persons (including children) whose physical, sensory or mental
capacities or whose lack of experience or knowledge prevent
them from using this product safely should not operate it without
the supervision or instruction of a responsible person.
Electrical devices are not toys.
Always keep and use the device out of the reach of children.
Children must be supervised to ensure that they do not play with
the device.
If this device's power cable is damaged, it must be replaced by
the manufacturer, customer service or a similarly qualified
person in order to prevent safety hazards.
Do not store any explosive substances such as spray cans with
propellants in the device.
CAUTION!
Disconnect the device from the mains
– before each cleaning and maintenance
– after every use
Food may only be stored in its original packaging or in suitable
containers.
A
26
NOTICE!
Only connect the device as follows:
– With the DC cable to a DC plug socket in the vehicle (e. g.
cigarette lighter)
– Or with the 230 V connection cable to the 230 V AC mains
supply
Check that the voltage specification on the type plate
corresponds to that of the energy supply.
The cooling device is not suitable for transporting caustic
materials or materials containing solvents.
Never pull the plug out of the socket by the cable.
If the cooler is connected to the DC socket: Disconnect the
cooler and other power consuming devices from the battery
before connecting the quick charging device.

EN
CoolFreeze Safety instructions
If the cooler is connected to the DC socket: Disconnect the
cooler or switch it off when you turn off the engine. Otherwise
you may discharge the battery.
2.2 Operating the device safely
DANGER!
D
!
A
Do not touch exposed cables with your bare hands. This
especially applies when operating the device with an AC mains
power supply.
CAUTION!
Before starting the device, ensure that the power supply line
and the plug are dry.
NOTICE!
Do not use electrical devices inside the cooler unless they are
recommended by the manufacturer for the purpose.
Do not place the device near naked flames or other heat
sources (heaters, direct sunlight, gas ovens etc.).
Danger of overheating!
Ensure at all times that there is sufficient ventilation so that the
heat that arises during operation does not build up. Make sure
that the device is sufficiently far away from walls and other
objects so that the air can circulate.
Ensure that the ventilation openings are not covered.
Do not fill the inner container with ice or fluid.
Never immerse the device in water.
Protect the device and the cable against heat and moisture.
27
EN
Scope of delivery CoolFreeze
3 Scope of delivery
fig. 1, page 3, shows the scope of delivery.
Item Quantity Description
11Cooler
2 1 Connection cable for 12/24 Vg connection
3 1 Connection cable for 100 –240 V~ connection
4 2 Carrying handle, consisting of:
– 2 holders
– 1 handle
– 4 fastening screws
– 1 Operating manual
4 Intended use
The cooler is suitable for cooling and freezing foods. The device is
also suitable for use on boats.
!
28
The device is designed to be operated from a 12 V
board supply socket of a vehicle (e. g. cigarette lighter), boat or
caravan as well as from a 100–240 V AC mains.
CAUTION! Health hazard!
Please check if the cooling capacity of the device is suitable for
storing the food or medicine you wish to cool.
g or 24 Vg on-

EN
CoolFreeze Function description
5 Function description
The cooler can chill products, keep them cool as well as freeze
them. A maintenance-free refrigerant circuit with compressor provides the cooling. The extra strong insulation and powerful compressor ensure especially fast cooling.
The cooler is portable.
When used on boats, the cooler can be withstand a constant heel
(inclination) of 30°.
5.1 Scope of functions
Power supply with priority circuit for connecting to the AC mains
Three-level battery monitor to protect the vehicle battery
Turbo mode for rapid cooling
Display with temperature gauge
switches off automatically at low battery voltage
Temperature setting: With two buttons in steps of 1 °C (2 °F)
Removable carrying handles
29
EN
Function description CoolFreeze
5.2 Operating and display elements
CF35, CF40
Lock for lid: fig. 2 1, page 3
CF35, CF40, CF50, CF60
Operating panel (fig. 3, page 3)
Item Description Explanation
1ON
OFF
2 POWER Status indication
3 ERROR LED flashes red: Device is switched on
4 SET Selects the input mode
5 – Display, shows the information
6 UP + Press once to increase the value
7 DOWN – Press once to decrease the value
Switches the cooler on or off when the button
is pressed for between one and two seconds
LED lights up green: Compressor is on
LED lights up
orange:
LED flashes orange: display switched off
– Temperature setting
– Celsius or Fahrenheit display
– Set battery monitor
Compressor is off
automatically due to
low battery voltage
but not ready for operation
Connection sockets (fig. 4, page 4):
Item Description
1 Connection socket AC voltage supply
2 Fuse holder
3 Connection socket DDC voltage supply
30

EN
CoolFreeze Operation
6 Operation
6.1 Before initial use
NOTE
I
Mounting the handles
Turning the lid stop around
CF50, CF60
Before starting your new cooler for the first time, you should clean
it inside and outside with a damp cloth for hygienic reasons
(please also refer to the “Cleaning and maintenance” on page 38).
The handles are enclosed unassembled. If you wish to attach the
handles, proceed as follows:
➤ Make a handle by putting two holders (fig. 5 1, page 4) and a
handle (fig. 5 2, page 4) together.
➤ Fasten the grip with the enclosed screws in the holes provided.
You can turn the lid stop around if you want to open the lid from the
other side. To do this, proceed as follows:
➤ Open the lid and pull it out (fig. 6 A, page 5).
➤ Turn the lid.
➤ Insert the lid in the lid holders on the side opposite the cooler
(fig. 6 B, page 5).
Selecting the temperature units
You can switch the temperature display between Celsius and Fahrenheit. This is how to do it:
➤ Switch on the cooler.
➤ Press the “SET” button (fig. 3 4, page 3) twice.
➤ Use the “UP +” (fig. 3 6, page 3) and “DOWN -” (fig. 3 7,
page 3) buttons to select Celsius or Fahrenheit.
✓ The selected temperature units then appear in the display for a
few seconds. The display flashes several times before it returns
to the current temperature.
31

EN
Operation CoolFreeze
6.2 Energy saving tips
Choose a well ventilated installation location which is protected
against direct sunlight.
Allow warm food to cool down first before placing it in the device
to keep cool.
Do not open the cooling device more often than necessary.
Do not leave the cooler unit open for longer than necessary.
Defrost the cooler once a layer of ice forms.
Avoid unnecessary low temperatures.
6.3 Connecting the cooler
Connecting to a battery (Vehicle or boat)
A
The cooler can be operated with 12 V or 24 V
NOTICE! Danger of damage!
Disconnect the cooler and other consumer units from the battery
before you connect the battery to a quick charging device.
Overvoltage can damage the electronics of the device.
For safety reasons the cooler is equipped with an electronic system
to prevent the polarity reversal. This protects the cooler against
short-circuiting when connecting to a battery.
➤ Plug the 12/24-V connection cable (fig. 1 2, page 3) into the
DC voltage socket and also into the cigarette lighter or a 12 V
or 24 V socket.
g.
Connecting to a 100–240 V AC mains (E.g. in the home or office)
DANGER! Danger of electrocution!
D
Never handle plugs and switches with wet hands or if you are
standing on a wet surface.
If you are operating your cooler on board a boat from a mains
connection of 100–240 V
circuit breaker between the 100–240 V AC mains and the
cooler.
Seek advice from a trained technician.
~
, you must install a residual current
32

EN
CoolFreeze Operation
The coolers have an integrated multi-voltage power supply with
priority circuit for connecting to an AC voltage source of 100–240 V.
The priority circuit automatically switches the cooler to mains operation, if the device is connected to a 100–240 V AC mains, even if
the 12/24 V connection cable is still attached.
When switching between the AC mains and the battery supply,
the red LED may light up briefly.
➤ Plug the 100–240 V connection cable (fig. 1 3, page 3) into
the AC voltage socket and connect it to the 100–240 V AC
voltage mains.
6.4 Using the battery monitor
The device is equipped with a multi-level battery monitor that
protects your vehicle battery against excessive discharging when
the device is connected to the on-board 12/24 V supply.
If the cooler is operated when the vehicle ignition is switched off,
the cooler switches off automatically as soon as the supply voltage
falls below a set level. The cooler will switch back on once the
battery has been recharged to the restart voltage level.
NOTICE! Danger of damage!
A
When switched off by the battery monitor, the battery will no
longer be fully charged. Avoid starting repeatedly or operating
current consumers without longer charging phases. Ensure that
the battery is recharged.
In “HIGH” mode, the battery monitor responds faster than at the
levels “LOW” and “MED” (see the following table).
Battery monitor mode LOW MED HIGH
Switch-off voltage at 12 V 10.1 V 11.4 V 11.8 V
Restartvoltage at 12 V 11.1 V 12.2 V 12.6 V
Switch-off voltage at 24 V 21.5 V 24.1 V 24.6 V
Restart voltage at 24 V 23.0 V 25.3 V 26.2 V
33

EN
Operation CoolFreeze
This is how to select the battery monitor mode:
➤ Switch on the cooler.
➤ Press the “SET” button (fig. 3 4, page 3) three times.
➤ Use the “UP +” (fig. 3 6, page 3) and “DOWN -” (fig. 3 7,
page 3) buttons to select the battery monitor mode.
✓ The selected mode then appears in the display for a few sec-
onds. The display flashes several times before it returns to the
current temperature.
NOTE
I
6.5 Using the cooler
A
When the cooler is supplied by the starter battery, select the battery monitor mode “HIGH”. If the cooler is connected to a supply
battery, the battery monitor mode “LOW” will suffice.
If you wish to operate the cooler from the AC mains, set the battery monitor to the “LOW” position.
NOTICE! Danger of overheating!
Ensure at all times that there is sufficient ventilation so that the
heat that generated during operation can dissipate. Ensure that
the ventilation slots are not covered. Make sure that the device
is sufficiently far away from walls and other objects so that the
air can circulate.
I
I
34
➤ Place the cooler on a firm foundation.
Make sure that the ventilation slots are not covered and that the
heated air can dissipate.
NOTE
Place the cooler as shown (fig. 1, page 3).If you operate the box
in a different position it can be damaged.
➤ Close the cooler, see “Connecting the cooler” on page 32.
NOTE
If you wish to operate the cooler from the AC mains, set the battery monitor to the “LOW” position.

EN
CoolFreeze Operation
NOTICE! Danger from excessively low temperature!
A
I
I
Locking the cooler
CF35, CF40
Ensure that the only those objects are placed in the cooler that are
intended to be cooled at the selected temperature.
➤ Press the “ON/OFF” button (fig. 3 1, page 3) for between one
and two seconds.
✓ The “POWER” LED lights up.
✓ The display (fig. 3 5, page 3) switches on and shows the
current cooling temperature.
NOTE
The temperature displayed is that of the middle of the interior.
The temperatures elsewhere can deviate from this temperature.
✓ The cooler starts cooling the interior.
NOTE
When operating with the battery, the display switches off automatically if the battery voltage is low. The LED “POWER” flashes
orange.
➤ Close the lid.
➤ Press the lock (fig. 2 1, page 3) down, until it latches in
place audibly.
6.6 Setting the temperature
➤ Press the “SET” button (fig. 3 4, page 3) once.
➤ Use the “UP +” (fig. 3 6, page 3) and “DOWN -” (fig. 3 7,
page 3) buttons to select the cooling temperature.
✓ The cooling temperature appears in the display for a few
seconds. The display flashes several times and then the current
temperature is displayed again.
35

EN
Operation CoolFreeze
6.7 Switching off the cooler
➤ Empty the cooler.
➤ Switch the cooler off.
➤ Pull out the connection cable.
If you do not want to use the cooler for a longer period of time:
➤ Leave the cover slightly open. This prevents odour build-up.
6.8 Defrosting the cooler
Humidity can form frost in the interior of the cooling device or on the
vaporiser. This reduces the cooling capacity. Defrost the device in
good time to avoid this.
NOTICE! Danger of damage!
A
Never use hard or pointed tools to remove ice or to loosen objects
which have frozen in place.
To defrost the cooler, proceed as follows:
➤ Take out the contents of the cooling device.
➤ If necessary, place them in another cooling device to keep them
cool.
➤ Switch off the device.
➤ Leave the cover open.
➤ Wipe off the defrosted water.
6.9 Replacing the device fuse
DANGER! Danger of electrocution!
D
Disconnect the connection cable before you replace the device
fuse.
➤ Pull off the connection cable.
➤ Pry out the fuse insert (fig. 4 2, page 4) with a screwdriver.
➤ Replace the defective fuse with a new one that has the same
rating (T4AL 250V).
➤ Press the fuse insert back into the housing.
36

EN
CoolFreeze Operation
6.10 Replacing the plug fuse (12/24 V)
➤ Pull the adapter sleeve (fig. 7 4, page 5) off of the plug.
➤ Unscrew the screw (fig. 7 5, page 5) out of the upper half of
the housing (fig. 7 1, page 5).
➤ Carefully raise the upper half of the housing from the lower
(fig. 7 6, page 5) half.
➤ Take out the contact pin (fig. 7 3, page 5).
➤ Replace the defective fuse (fig. 7 2, page 5) with a new one
that has the same rating (8A 32V).
➤ Re-assemble the plug in the reverse order.
6.11 Replacing the light bulb
➤ Press the switch pin (fig. 8 2, page 5) downwards so that the
transparent part (fig. 8 1, page 5) of the lamp can be removed
at the front.
➤ Replace the light bulb.
NOTE
I
The LEDs in the light bulb must be aligned with the transparent
part of the lamp.
➤ Press the transparent part of the lamp back into the housing.
37

EN
Cleaning and maintenance CoolFreeze
7 Cleaning and maintenance
WARNING!
!
A
Always disconnect the device from the mains before you clean
and service it.
NOTICE! Risk of damage
Never clean the cooler under running water or in dish water.
Do not use abrasive cleaning agents or hard objects during
cleaning as these can damage the cooler.
➤ Occasionally clean the device interior and exterior with a damp
cloth.
➤ Make sure that the air inlet and outlet vents on the device are
free of any dust and dirt, so that heat can be released and the
device is not damaged.
8 Guarantee
The statutory warranty period applies. If the product is defective,
please contact the manufacturer's branch in your country (see the
back of the instruction manual for the addresses) or your retailer.
For repair and guarantee processing, please include the following
documents when you send in the device:
A copy of the receipt with purchasing date
A reason for the claim or description of the fault
38

EN
CoolFreeze Troubleshooting
9 Troubleshooting
Fault Possible cause Suggested remedy
Device does not function, LED does
not glow.
The device does not
cool (plug is inserted,
“POWER” LED is lit).
The device does not
cool (plug is inserted,
“POWER” LED flashes
orange, display is
switched off).
When operating from
the 12/24-V socket
(cigarette lighter):
The ignition is on
and the device is not
working and the LED
is not lit.
Pull the plug out of the
socket and make the
following checks.
The display shows an
error message (e.g.
“Err1”) and the appliance does not cool.
There is no voltage present in the 12/24 V socket
(cigarette lighter) in your
vehicle.
No voltage present in the
AC voltage socket.
The device fuse is defective.
The integrated mains
adapter is defective.
Defective compressor. This can only be repaired by an
Battery voltage is too
low.
The cigarette lighter
socket is dirty. This
results in a poor electrical contact.
The fuse of the 12/24 V
plug has blown.
The vehicle fuse has
blown.
The appliance has
switched off due to an
internal fault.
The ignition must be switched on in most
vehicles to apply current to the cigarette
lighter.
Try using another plug socket.
Replace the device fuse, see “Replacing
the device fuse” on page 36.
This can only be repaired by an
authorised repair centre.
authorised customer services unit.
Test the battery and charge it as needed.
If the plug of your cooler becomes very
warm in the cigarette lighter socket, either
the lighter socket must be cleaned or the
plug has not been assembled correctly.
Replace the fuse (8 A) in the 12/24 V
plug, see “Replacing the plug fuse
(12/24 V)” on page 37.
Replace the vehicle’s 12/24 V socket fuse
(usually 15 A). Please refer to your vehicle’s operating manual.
This can only be repaired by an
authorised repair centre.
39

EN
Disposal CoolFreeze
10 Disposal
➤ Place the packaging material in the appropriate recycling waste
bins wherever possible.
If you wish to finally dispose of the product, ask your local recycling
centre or specialist dealer for details about how to do this in
M
accordance with the applicable disposal regulations.
11 Technical data
CF35 CF 40
Connection voltage:
Rated current:
g: 6.0 A 6.0 A
– 12 V
g: 3.0 A 3.0 A
– 24 V
~
– 100–240 V
Cooling capacity: +10 °C to –18 °C (+50 °F to 0 °F)
Category: 1 1
Energy efficiency class: A+ A+
Energy consumption: 92 kWh/annum 101 kWh/annum
Usable capacity: 31 l 37 l
Climate class: N, ST, T N, ST, T
Ambient temperature: +16°C –
Noise emission: 45 dB(A) 45 dB(A)
Dimensions (W x H x D) in mm: 580 x 385 x 360 580 x 445 x 360
Weight: 15 kg 16 kg
: 1.3 to 0.7 A 1.3 to 0.7 A
12/24 V
+43 °C
g and 100–240 V
+16°C –
+43 °C
~
40

EN
CoolFreeze Technical data
CF50 CF 60
Connection voltage:
Rated current:
g: 7.0 A 7.0 A
– 12 V
g: 3.0 A 3.0 A
– 24 V
~
– 100–240 V
Cooling capacity: +10 °C to –18 °C (+50 °F to 0 °F)
Category: 1 1
Energy efficiency class: A+ A+
Energy consumption: 110 kWh/annum 111 kWh/annum
Usable capacity: 47 l 57 l
Climate class: N, ST, T N, ST, T
Ambient temperature: +16°C –
Noise emission: 45 dB(A) 45 dB(A)
Dimensions (W x H x D) in mm: 630 x 480 x 360 630 x 582 x 360
Weight: 18 kg 21.6 kg
: 1.3 to 0.7 A 1.3 to 0.7 A
12/24 V
+43 °C
g and 100–240 V
+16°C –
+43 °C
~
NOTE
I
If the ambient temperature is above +32°C (+90 °F), the minimum
temperature cannot be attained.
Test/certificates:
4
The coolant circuit contains R134a.
41

FR
CoolFreeze
Veuillez lire ce manuel avec attention avant de mettre l’appareil en service. Conservez ensuite ce manuel. En cas de passer de l’appareil, veuillez le transmettre au nouvel acquéreur.
Le fabricant décline toute responsabilité en cas de dommages provoqués par une utilisation non-conforme de l'appareil ou par
des erreurs de manipulation.
Table des matières
1 Explication des symboles. . . . . . . . . . . . . . . . . . . . . . . . . . . . . . . 43
2 Consignes de sécurité. . . . . . . . . . . . . . . . . . . . . . . . . . . . . . . . . . 43
2.1 Sécurité générale . . . . . . . . . . . . . . . . . . . . . . . . . . . . . . . . 43
2.2 Consignes de sécurité concernant le fonctionnement
de l’appareil . . . . . . . . . . . . . . . . . . . . . . . . . . . . . . . . . . . . 45
3 Contenu de la livraison . . . . . . . . . . . . . . . . . . . . . . . . . . . . . . . . . 46
4 Usage conforme. . . . . . . . . . . . . . . . . . . . . . . . . . . . . . . . . . . . . . . 46
5 Description du fonctionnement . . . . . . . . . . . . . . . . . . . . . . . . . . 47
5.1 Fonctions de l’appareil . . . . . . . . . . . . . . . . . . . . . . . . . . . . 47
5.2 Commandes et affichage . . . . . . . . . . . . . . . . . . . . . . . . . . 48
6 Utilisation . . . . . . . . . . . . . . . . . . . . . . . . . . . . . . . . . . . . . . . . . . . . 49
6.1 Avant la première utilisation . . . . . . . . . . . . . . . . . . . . . . . . 49
6.2 Conseils pour économiser de l’énergie . . . . . . . . . . . . . . . . 50
6.3 Raccordement de la glacière . . . . . . . . . . . . . . . . . . . . . . . 50
6.4 Utilisation du protecteur de batterie . . . . . . . . . . . . . . . . . . 52
6.5 Utilisation de la glacière . . . . . . . . . . . . . . . . . . . . . . . . . . . 53
6.6 Réglage de la température . . . . . . . . . . . . . . . . . . . . . . . . . 54
6.7 Mise hors-service de la glacière . . . . . . . . . . . . . . . . . . . . . 55
6.8 Dégivrage de la glacière . . . . . . . . . . . . . . . . . . . . . . . . . . . 55
6.9 Remplacement du fusible de l’appareil . . . . . . . . . . . . . . . . 56
6.10 Remplacement du fusible du connecteur (12/24 V) . . . . . . 56
6.11 Changer les éléments lumineux . . . . . . . . . . . . . . . . . . . . . 56
7 Nettoyage et entretien . . . . . . . . . . . . . . . . . . . . . . . . . . . . . . . . . . 57
8Garantie . . . . . . . . . . . . . . . . . . . . . . . . . . . . . . . . . . . . . . . . . . . . . 57
9 Dépannage . . . . . . . . . . . . . . . . . . . . . . . . . . . . . . . . . . . . . . . . . . . 58
10 Retraitement. . . . . . . . . . . . . . . . . . . . . . . . . . . . . . . . . . . . . . . . . . 59
11 Caractéristiques techniques. . . . . . . . . . . . . . . . . . . . . . . . . . . . . 59
42

FR
CoolFreeze Explication des symboles
1 Explication des symboles
DANGER !
D
!
!
A
I
Consigne de sécurité : le non-respect de ces consignes
entraîne la mort ou de graves blessures.
AVERTISSEMENT !
Consigne de sécurité : le non-respect de ces consignes peut
entraîner la mort ou de graves blessures.
ATTENTION !
Consigne de sécurité : le non-respect de ces consignes peut
entraîner des blessures.
AVIS !
Le non-respect de ces consignes peut entraîner des dommages
matériels et des dysfonctionnements du produit.
REMARQUE
Informations complémentaires sur l'utilisation du produit.
➤ Manipulation : ce symbole vous indique une action à effectuer.
Les manipulations à effectuer sont décrites étape par étape.
✓ Ce symbole décrit le résultat d’une manipulation.
Fig. 1 5, page 3 : cette information renvoie à un élément figurant
sur une illustration, dans cet exemple à la « position 5 de
l'illustration 1 à la page 3 ».
2 Consignes de sécurité
2.1 Sécurité générale
DANGER !
D
Sur les bateaux : veillez à ce que votre alimentation électrique
soit sécurisée par un disjoncteur différentiel si l’appareil est
branché sur le secteur.
43

FR
Consignes de sécurité CoolFreeze
AVERTISSEMENT !
!
Si l’appareil présente des dégâts visibles, vous ne devez pas le
mettre en service.
Seul un personnel qualifié est habilité à effectuer des répara-
tions sur l’appareil. Toute réparation mal effectuée risque
d’entraîner de graves dangers.
Ne laissez pas des personnes (enfants compris) incapables
d’utiliser le produit de manière sûre, en raison de déficiences
physiques, sensorielles ou mentales ou de leur manque
d’expérience ou de connaissances, utiliser ce produit sans
surveillance.
Les appareils électriques ne sont pas des jouets pour
enfants !
Placez et utilisez l’appareil hors de portée des enfants.
Les enfants doivent être surveillés pour s’assurer qu’ils ne
jouent pas avec l’appareil.
Si le câble de raccordement de l’appareil est endommagé, il doit
être remplacé par le fabricant, son service après-vente ou une
personne de qualification similaire, afin d’éviter tout danger.
Ne stockez aucune substance explosive comme p. ex. des
aérosols contenant des agents propulseurs dans l’appareil.
!
A
44
ATTENTION !
Débranchez l'appareil du secteur
– avant tout nettoyage et entretien
– après chaque utilisation
Les aliments ne peuvent être conservés que dans leurs
emballages originaux ou dans des récipients appropriés.
AVIS !
Branchez l’appareil uniquement comme indiqué ci-dessous :
– avec le câble de raccordement CC sur une prise CC du
véhicule (par ex. un allume-cigare)
– ou avec le câble de raccordement 230 V au secteur à
courant alternatif 230 V
Comparez la tension indiquée sur la plaque signalétique avec
l’alimentation électrique dont vous disposez.
N’utilisez pas la glacière pour le transport de produits corrosifs
ou de solvants.

FR
CoolFreeze Consignes de sécurité
Ne tirez jamais sur le câble de raccordement pour sortir la fiche
de la prise.
Si la glacière est raccordé à la prise CC : Débranchez de la
batterie la glacière et les autres consommateurs d’énergie
avant de raccorder un chargeur rapide.
Si la glacière est raccordé à la prise CC : Débranchez ou
éteignez la glacière lorsque vous éteignez le moteur. Dans le
cas contraire, il se pourrait que la batterie se décharge.
2.2 Consignes de sécurité concernant
le fonctionnement de l’appareil
DANGER !
D
!
A
Ne touchez jamais les lignes électriques dénudées avec les
mains nues. Cela est surtout valable en cas de fonctionnement
sur secteur.
ATTENTION !
Avant de mettre l’appareil en service, assurez-vous que la ligne
d’alimentation électrique et la fiche sont sèches.
AVIS !
N'utilisez aucun appareil électrique dans la glacière, sauf si ces
appareils sont recommandés par le fabricant pour cet usage.
Ne placez pas l’appareil près de flammes ou d’autres sources
de chaleur (chauffage, rayons solaires, fours à gaz, etc.).
Danger de surchauffe !
Veillez toujours à ce que la chaleur produite lors du fonctionnement soit suffisamment dissipée. Veillez à ce que l'appareil se
trouve à une distance suffisante des murs ou des objets, de
sorte que l'air puisse circuler.
Assurez-vous que les fentes d’aération ne sont pas
recouvertes.
Ne pas remplir le bac intérieur de substances liquides ou de
glace.
Ne plongez jamais l’appareil dans l’eau.
Tenez l’appareil et les câbles à l’abri de la chaleur et de
l’humidité.
45

FR
Contenu de la livraison CoolFreeze
3 Contenu de la livraison
La fig. 1, page 3, indique les pièces comprises dans la livraison.
N° Quantité Désignation
11Glacière
2 1 Câble de raccordement pour prise 12/24 Vg
3 1 Câble de raccordement pour prise
100–240 V
4 2 Poignée de transport, composée de :
– 2 fixations
– 1 corps de poignée
– 4 vis de fixation
– 1 Manuel d’utilisation
~
4 Usage conforme
La glacière est conçue pour la réfrigération et la congélation de
produits alimentaires. L’appareil peut également être utilisé sur
des bateaux.
L’appareil peut être branché sur la prise d’alimentation 12 V
24 V
g d’un véhicule (par ex. un allume-cigare), d’un bateau ou
d’un camping-car, ou être raccordé à un réseau à tension alternative de 100–240 V
~
.
g ou
!
46
ATTENTION ! Risque pour la santé !
Veuillez vérifier si la puissance frigorifique de l'appareil correspond à la température de conservation recommandée pour les aliments ou les médicaments que vous souhaitez refroidir.

FR
CoolFreeze Description du fonctionnement
5 Description du fonctionnement
La glacière permet de réfrigérer, de tenir au frais ou de congeler
des produits. La réfrigération est assurée par un circuit de
refroidissement à compresseur qui fonctionne ne nécessite aucune maintenance. Sa puissante isolation son compresseur performant garantissent un refroidissement particulièrement rapide.
La glacière convient pour une utilisation mobile.
En cas d’utilisation sur bateaux, la glacière peut supporter un angle
de gîte permanent de 30°.
5.1 Fonctions de l’appareil
Bloc d’alimentation avec raccordement prioritaire pour branche-
ment sur une tension alternative
Protecteur de batterie à trois niveaux pour protéger la batterie
du véhicule
Mode turbo pour un refroidissement plus rapide
Ecran avec affichage de la température,
s'éteint automatiquement lorsque la tension de la batterie est
faible
Réglage de la température: avec deux touches, par pas de 1 °C
(2 °F)
Poignées de transport montables
47

FR
Description du fonctionnement CoolFreeze
5.2 Commandes et affichage
CF35, CF40
Verrouillage du couvercle : fig. 2 1, page 3
CF35, CF40, CF50, CF60
Panneau de commande (fig. 3, page 3)
Pos. Désignation Signification
1ON
OFF
2 POWER Témoin lumineux de fonctionnement
3 ERROR La DEL clignote
4 SET Permet de sélectionner le mode de saisie
5 – Ecran, affiche les valeurs
6 UP + Une pression sur cette touche augmente la
7 DOWN – Une pression sur cette touche diminue la
Permet d’allumer ou d’éteindre la glacière sur
une pression d’une à deux seconde sur la
touche
La DEL s’allume en
vert :
La DEL s’allume en
orange :
La DEL clignote en
orange :
en rouge :
– Réglage de la température
– Indication de degrés Celsius ou Fahrenheit
– Réglage du protecteur de batterie
valeur de saisie sélectionnée
valeur de saisie sélectionnée
le compresseur est en
marche
le compresseur est
arrêté
l'écran a été automatiquement éteint parce
que la tension de la
batterie est faible
l’appareil est allumé
mais n’est pas prêt
à fonctionner
48

FR
CoolFreeze Utilisation
Prises de raccordement (fig. 4, page 4) :
N° Désignation
1 Prise de raccordement de l’alimentation en tension alternative
2Porte-fusible
3 Prise de raccordement de l’alimentation en tension continue
6 Utilisation
6.1 Avant la première utilisation
REMARQUE
I
Monter les poignées
Avant de mettre en service votre nouvelle glacière, vous devez,
pour des raisons d’hygiène, la nettoyer à l’intérieur et à l’extérieur
à l’aide d’un tissu humide (voir aussi « Nettoyage et entretien »,
page 57).
Les poignées sont fournies démontées. Pour monter les poignées,
procédez de la manière suivante :
➤ Assemblez deux fixations (fig. 5 1, page 4) avec un corps de
poignée (fig. 5 2, page 4) pour former une poignée.
➤ Vissez la poignée ainsi constituée dans les orifices prévus à
l’aide des vis fournies.
Retournement de la butée du couvercle
CF50, CF60
Vous pouvez retourner la butée du couvercle si vous voulez ouvrir
celui-ci par l'autre côté. Procédez comme suit :
➤ Ouvrez le couvercle et retirez-le (fig. 6 A, page 5).
➤ Tournez le couvercle.
➤ Placez le couvercle dans l'emplacement du couvercle situé du
côté opposé de la glacière (fig. 6 B, page 5).
49

FR
Utilisation CoolFreeze
Sélection de l’unité de température
Vous pouvez sélectionner l’affichage de la température en degrés
Celsius ou Fahrenheit. Procédez comme suit :
➤ Allumez la glacière.
➤ Appuyez deux fois sur la touche « SET » (fig. 3 4, page 3).
➤ Sélectionnez l’unité de température (Celsius ou Fahrenheit) à
l’aide des touches « UP + » (fig. 3 6, page 3) ou « DOWN - »
(fig. 3 7, page 3).
✓ L’écran affiche l’unité de température sélectionnée pendant
quelques secondes. L’écran clignote plusieurs fois avant de revenir à l'affichage de la température actuelle.
6.2 Conseils pour économiser de l’énergie
Choisissez un emplacement bien aéré et à l'abri du soleil.
Laissez refroidir les aliments chauds avant de les déposer dans
la glacière.
Ne pas ouvrir la glacière plus souvent que nécessaire.
Ne laissez pas la glacière ouverte plus longtemps que néces-
saire.
Dégivrez la glacière dès qu’une couche de glace s’est formée.
Evitez une température intérieure inutilement basse.
6.3 Raccordement de la glacière
Raccordement à une batterie (automobile ou bateau)
La glacière peut être branchée sur une tension continue de 12 V ou
de 24 V.
AVIS ! Risque d'endommagement !
A
Débranchez la glacière et les autres consommateurs d’énergie de
la batterie avant de recharger la batterie avec un chargeur rapide.
Les surtensions peuvent endommager l’électronique des appareils.
50

FR
CoolFreeze Utilisation
Pour des raisons de sécurité, la glacière est équipée d’une
protection électronique contre les inversions de polarité en
cas de raccordement à une batterie et contre les court-circuits.
➤ Branchez le câble de raccordement 12/24 V (fig. 1 2, page 3)
dans la prise pour tension continue et raccordez-le à l’allumecigares ou à une prise 12 ou 24 V.
Raccordement à un réseau à tension alternative de 100–240 V (p. ex. à
la maison ou au bureau)
DANGER ! Danger de mort par électrocution !
D
Ne vous approchez pas de prises ou de commutateurs lorsque
vous avez les mains mouillées ou les pieds dans l’eau.
Si vous raccordez votre glacière à bord d’un bateau à un
réseau à tension alternative 100–240 V l’intermédiaire d’une
prise de quai, vous devez absolument brancher un disjoncteur
différentiel entre le réseau 100–240 V et la glacière.
Veuillez vous renseigner auprès d’un spécialiste.
Les glacières sont équipées d’un bloc d’alimentation intégré avec
raccordement prioritaire pour branchement sur une tension alternative de 100–240 V. Il permet de passer directement en
fonctionnement sur secteur quand l’appareil est raccordé à un
réseau de courant alternatif 100–240 V, même si le câble de
raccordement 12 V ou 24 V est encore branché.
Lors du basculement entre alimentation sur réseau à courant alternatif et sur batterie, la DEL rouge peut s’allumer pendant quelques
minutes.
➤ Branchez le câble de raccordement 100–240 V (fig. 1 3,
page 3) sur la prise pour tension alternative et raccordez-le
au secteur à courant alternatif 100– 240 V.
51

FR
Utilisation CoolFreeze
6.4 Utilisation du protecteur de batterie
L’appareil est équipé d’un protecteur de batterie qui protège
la batterie de votre véhicule, afin qu’elle ne se décharge pas
excessivement lorsque la glacière est raccordée au réseau
12/24 V du véhicule.
Si la glacière est mise en service alors que l’allumage du véhicule
est éteint, elle s’éteint automatiquement dès que la tension d’alimentation descend en dessous d’une valeur réglable. La glacière
se rallume dès que la batterie est rechargée et que la tension de
rallumage est atteinte.
AVIS ! Risque d'endommagement !
A
Au moment de l’arrêt par le protecteur de batterie, la batterie ne
possède plus toute sa capacité de charge ; évitez les démarrages
répétés ou la mise en marche de consommateurs d’énergie,
tant que la batterie n’a pas été rechargée. Veillez à recharger
la batterie.
En mode « HIGH », le protecteur de batterie se met en marche plus
rapidement qu’en mode « LOW » ou « MED » (voir tableau suivant).
Mode protecteur de batterie LOW MED HIGH
Tension d’arrêt pour 12 V 10,1 V 11,4 V 11,8 V
Tension de rallumage pour 12 V 11,1 V 12,2 V 12,6 V
Tension d’arrêt pour 24 V 21,5 V 24,1 V 24,6 V
Tension de rallumage pour 24 V 23,0 V 25,3 V 26,2 V
Pour modifier le mode du protecteur de batterie, procédez comme
suit :
➤ Allumez la glacière.
➤ Appuyez trois fois sur la touche « SET » (fig. 3 4, page 3).
➤ Sélectionnez le mode du protecteur de batterie à l’aide des
touches « UP + » (fig. 3 6, page 3) ou « DOWN - » (fig. 3 7,
page 3).
✓ L’écran affiche le mode sélectionné pendant quelques se-
condes. L’écran clignote plusieurs fois avant de revenir à l’affichage de la température actuelle.
52

FR
CoolFreeze Utilisation
REMARQUE
I
6.5 Utilisation de la glacière
A
Lorsque la glacière est alimentée par la batterie de démarrage,
réglez le protecteur de batterie sur le mode « HIGH ». Lorsque la
glacière est raccordée à une batterie d’alimentation, le mode
« LOW » suffit.
Lorsque vous voulez faire fonctionner la glacière sur le réseau à
tension alternative, réglez le protecteur de batterie sur le mode
«LOW».
AVIS ! Danger de surchauffe !
Veillez toujours à ce que la chaleur produite lors du fonctionnement puisse se dissiper suffisamment. Assurez-vous que les
fentes d’aération ne sont pas recouvertes. Veillez à ce que l’appareil se trouve à distance suffisante des murs ou des objets, de
sorte que l’air puisse circuler.
➤ Placez la glacière sur une surface stable.
Veillez à ce que les fentes d’aération ne soient pas recouvertes,
afin que l’air chaud puisse bien s’évacuer.
I
I
A
REMARQUE
Montez la glacière comme indiqué sur l'illustration (voir fig.). Si la
glacière est utilisée dans une autre position, elle risque d'être
endommagée.
➤ Raccordez la glacière (voir « Raccordement de la glacière »,
page 50).
REMARQUE
Lorsque vous voulez faire fonctionner la glacière sur le réseau à
tension alternative, réglez le protecteur de batterie sur le mode
«LOW».
AVIS ! Risque de températures trop basses !
Veillez à ne déposer dans la glacière que des objets ou des aliments qui peuvent être réfrigérés à la température sélectionnée.
➤ Appuyez pendant une à deux secondes sur la touche
« ON/OFF » (fig. 3 1, page 3).
53

FR
Utilisation CoolFreeze
✓ La DEL « POWER » s’allume.
✓ L’écran (fig. 3 5, page 3) s’allume et indique la température
actuelle.
REMARQUE
I
I
Verrouiller la glacière
CF35, CF40
La température affichée est celle du centre du compartiment intérieur. Il est possible que la température varie selon la position.
✓ La glacière commence par la réfrigération du compartiment
intérieur.
REMARQUE
En cas de fonctionnement sur batterie, l'écran s'éteint automatiquement lorsque la tension de la batterie est faible.
La DEL « POWER » clignote en orange.
➤ Fermez le couvercle.
➤ Abaissez le verrouillage (fig. 2 1, page 3) jusqu'à ce qu'il
s'enclenche audiblement.
6.6 Réglage de la température
➤ Appuyez une fois sur la touche « SET » (fig. 3 4, page 3).
➤ Sélectionnez la température de refroidissement à l’aide des
touches « UP + » (fig. 3 6, page 3) ou « DOWN - » (fig. 3 7,
page 3).
✓ L’affichage indique pendant quelques secondes la température
de refroidissement réglée. L'écran clignote plusieurs fois avant
de revenir à l'affichage de la température actuelle.
54

FR
CoolFreeze Utilisation
6.7 Mise hors-service de la glacière
➤ Videz la glacière.
➤ Eteignez la glacière.
➤ Débranchez le câble de raccordement.
Lorsque vous ne voulez pas utiliser la glacière pendant une période
prolongée :
➤ Laissez le couvercle légèrement ouvert. Vous évitez ainsi la
formation d’odeurs.
6.8 Dégivrage de la glacière
L’humidité de l’air peut se condenser sous forme de givre au niveau
de l’évaporateur ou à l’intérieur de la glacière et diminuer ainsi sa
puissance frigorifique. Veillez donc à dégivrer l’appareil à temps.
AVIS ! Risque d'endommagement !
A
N’utilisez jamais d’outils durs ou pointus pour enlever les couches
de glace ou pour détacher des objets pris dans le givre.
Procédez de la manière suivante pour dégivrer la glacière :
➤ Retirez les aliments.
➤ Placez-les éventuellement dans un autre réfrigérateur,
pour qu’ils restent froids.
➤ Eteignez l’appareil.
➤ Laissez le couvercle ouvert.
➤ Essuyez l’eau provenant du dégivrage.
55

FR
Utilisation CoolFreeze
6.9 Remplacement du fusible de l’appareil
DANGER ! Danger de mort par électrocution !
D
Avant de remplacer le fusible, retirez les câbles de raccordement.
➤ Débranchez les câbles de raccordement.
➤ Retirez le porte-fusible (fig. 4 2, page 4) en faisant par ex.
levier avec un tournevis.
➤ Remplacez le fusible défectueux par un nouveau fusible de
même valeur (T4AL 250V).
➤ Replacez le porte-fusible dans le boîtier, en appuyant dessus.
6.10 Remplacement du fusible du connecteur (12/24 V)
➤ Dévissez le compensateur (fig. 7 4, page 5) du connecteur.
➤ Retirez la vis (fig. 7 5, page 5) de la partie supérieure du
boîtier (fig. 7 1, page 5).
➤ Soulevez avec précaution la partie supérieure du boîtier pour la
séparer de la partie inférieure (fig. 7 6, page 5).
➤ Retirez la fiche de contact (fig. 7 3, page 5).
➤ Remplacez le fusible défectueux (fig. 7 2, page 5) par un
nouveau fusible de même valeur (8A 32V).
➤ Remontez le connecteur en effectuant les opérations dans
l’ordre inverse.
6.11 Changer les éléments lumineux
➤ Appuyez sur la tige de contact (fig. 8 2, page 5) pour que la
partie transparente (fig. 8 1, page 5) de la lampe puisse être
retirée par devant.
➤ Remplacez l'élément lumineux.
REMARQUE
I
Les DEL de l'élément lumineux doivent être orientées vers la partie transparente de la lampe.
➤ Replacez la partie transparente de la lampe dans le boîtier.
56

FR
CoolFreeze Nettoyage et entretien
7 Nettoyage et entretien
AVERTISSEMENT !
!
A
Avant toute opération de nettoyage ou d'entretien de l'appareil,
veillez à le mettre hors secteur.
AVIS ! Risque d'endommagement !
Ne nettoyez jamais la glacière à l’eau courante et ne la
plongez pas non plus dans l'eau.
N'utilisez pour le nettoyage ni produits abrasifs ni objets durs
qui pourraient endommager la glacière.
➤ Nettoyez de temps à autre l’appareil à l’intérieur et à l’extérieur
avec un chiffon humide.
➤ Assurez-vous que les ouvertures d'aération et de ventilation de
l'appareil ne sont pas encombrées de saletés ou de poussières,
pour que la chaleur générée par le fonctionnement soit évacuée
et que l'appareil ne soit pas endommagé.
8 Garantie
Le délai légal de garantie s'applique. Si le produit s'avérait défectueux, veuillez vous adresser à la filiale du fabricant située dans
votre pays (voir adresses au verso du présent manuel) ou à votre
revendeur spécialisé.
Veuillez y joindre les documents suivants pour la gestion des réparations et de la garantie :
une copie de la facture avec la date d'achat,
le motif de la réclamation ou une description du dysfonctionne-
ment.
57

FR
Dépannage CoolFreeze
9 Dépannage
Dysfonctionnement Cause éventuelle Solution proposée
L’appareil ne fonctionne
pas, la DEL n’est pas
allumée.
L’appareil ne réfrigère
pas (le connecteur
est branché, la DEL
« POWER » est allumée).
L'appareil ne réfrigère
pas (le connecteur est
branché, la DEL
« POWER » clignote en
orange, l'écran est
éteint).
Lors du fonctionnement sur prise 12/24-V
(allume-cigares) :
L’allumage est en
marche, l’appareil ne
fonctionne pas et la
DEL n’est pas allumée.
Retirez la fiche de la
prise, puis procédez
aux contrôles suivants.
Un message d'erreur
s'affiche (p. ex.
« Err1 ») et l'appareil ne
réfrigère pas.
La prise 12/24 Volts
(allume-cigares) de
votre véhicule n’est
pas sous tension.
La prise de tension alternative n’est pas sous
tension.
Le fusible de l’appareil
est défectueux.
Le bloc d’alimentation
intégré est défectueux.
Compresseur
défectueux.
La tension de la batterie
est insuffisante.
La prise de l’allumecigares est sale.
Ceci entraîne un mauvais contact électrique.
Le fusible de la prise
12/24 V est grillé.
Le fusible du véhicule
correspondant à l’allumecigares est grillé.
Un dysfonctionnement
interne a arrêté
l'appareil.
Dans la plupart des véhicules, le contact
doit être mis pour que l’allume-cigares soit
sous tension.
Essayez sur une autre prise.
Remplacez le fusible de l’appareil
(voir « Remplacement du fusible de
l’appareil », page 56).
La réparation peut être effectuée uniquement par un service après-vente agréé.
La réparation peut être effectuée uniquement par un service après-vente agréé.
Contrôlez la batterie et chargez-la si
nécessaire.
Si la fiche devient très chaude lorsqu’elle
est branchée dans la prise de l’allumecigares, c’est que la prise de l’allumecigares doit être nettoyée ou que la
fiche n’est pas bien montée.
Remplacez le fusible (8 A) du connecteur
12/24 V (voir « Remplacement du fusible
du connecteur (12/24 V) », page 56).
Remplacez le fusible du véhicule correspondant à la prise 12/24 V (normalement
15 A) (veuillez respecter les instructions
du manuel d’entretien de votre véhicule).
La réparation peut être effectuée uniquement par un service après-vente agréé.
58

FR
CoolFreeze Retraitement
10 Retraitement
➤ Jetez les emballages dans les conteneurs de déchets recy-
clables prévus à cet effet.
Lorsque vous mettrez votre produit définitivement hors service,
informez-vous auprès du centre de recyclage le plus proche ou
M
auprès de votre revendeur spécialisé sur les prescriptions relatives
au retraitement des déchets.
11 Caractéristiques techniques
CF35 CF 40
Tension de raccordement :
Courant nominal :
g: 6,0 A 6,0 A
– 12 V
g: 3,0 A 3,0 A
– 24 V
~
– 100–240 V
Puissance frigorifique : de +10 °C à –18 °C (+50 °F à 0 °F)
Catégorie : 1 1
Catégories d’efficacité
d’énergie :
Consommation électrique : 92 kWh/an 101 kWh/an
Capacité utile : 31 l 37 l
Classe climatique : N, ST, T N, ST, T
Température ambiante : +16°C –
Emissions sonores : 45 dB(A) 45 dB(A)
Dimensions (L x h x p, mm) : 580 x 385 x 360 580 x 445 x 360
Poids : 15 kg 16 kg
: 1,3 à 0,7 A 1,3 à 0,7 A
12/24 V
g et 100–240 V
A+ A+
+43 °C
~
+16°C –
+43 °C
59

FR
Caractéristiques techniques CoolFreeze
CF50 CF 60
Tension de raccordement :
Courant nominal :
g: 7,0 A 7,0 A
– 12 V
g: 3,0 A 3,0 A
– 24 V
~
– 100–240 V
Puissance frigorifique : de +10 °C à –18 °C (+50 °F à 0 °F)
Catégorie : 1 1
Catégories d’efficacité
d’énergie :
Consommation électrique : 110 kWh/an 111 kWh/an
Capacité utile : 47 l 57 l
Classe climatique : N, ST, T N, ST, T
Température ambiante : +16°C –
Emissions sonores : 45 dB(A) 45 dB(A)
Dimensions (L x h x p, mm) : 630 x 480 x 360 630 x 582 x 360
Poids : 18 kg 21,6 kg
: 1,3 à 0,7 A 1,3 à 0,7 A
12/24 V
g et 100–240 V
A+ A+
+43 °C
~
+16°C –
+43 °C
REMARQUE
I
La température minimale ne peut plus être atteinte à des températures ambiantes supérieures à +32 °C (+90 °F).
Contrôle/certificats :
4
Le circuit de refroidissement contient du R134a.
60

ES
CoolFreeze
Lea atentamente este manual antes de la puesta en funcionamiento del aparato y consérvelo en un lugar seguro para futuras consultas. En caso de vender o entregar el aparato a otra
persona, entregue también estas instrucciones.
El fabricante declina toda responsabilidad por los daños causados
por el uso inadecuado o por el uso incorrecto del aparato.
Índice
1 Aclaración de los símbolos . . . . . . . . . . . . . . . . . . . . . . . . . . . . . 62
2 Indicaciones de seguridad . . . . . . . . . . . . . . . . . . . . . . . . . . . . . . 62
2.1 Seguridad general . . . . . . . . . . . . . . . . . . . . . . . . . . . . . . . 62
2.2 Seguridad durante el funcionamiento del aparato . . . . . . . 64
3 Volumen de entrega. . . . . . . . . . . . . . . . . . . . . . . . . . . . . . . . . . . . 65
4 Uso adecuado . . . . . . . . . . . . . . . . . . . . . . . . . . . . . . . . . . . . . . . . 65
5 Descripción del funcionamiento . . . . . . . . . . . . . . . . . . . . . . . . . 66
5.1 Indicaciones relativas al funcionamiento . . . . . . . . . . . . . . 66
5.2 Elementos de mando y de indicación . . . . . . . . . . . . . . . . . 66
6Manejo. . . . . . . . . . . . . . . . . . . . . . . . . . . . . . . . . . . . . . . . . . . . . . . 68
6.1 Antes del primer uso . . . . . . . . . . . . . . . . . . . . . . . . . . . . . . 68
6.2 Consejos para el ahorro de energía . . . . . . . . . . . . . . . . . . 69
6.3 Conexión de la nevera . . . . . . . . . . . . . . . . . . . . . . . . . . . . 69
6.4 Uso del controlador de la batería . . . . . . . . . . . . . . . . . . . . 70
6.5 Uso de la nevera . . . . . . . . . . . . . . . . . . . . . . . . . . . . . . . . . 72
6.6 Ajustar la temperatura . . . . . . . . . . . . . . . . . . . . . . . . . . . . 73
6.7 Desconectar la nevera . . . . . . . . . . . . . . . . . . . . . . . . . . . . 73
6.8 Descongelar la nevera . . . . . . . . . . . . . . . . . . . . . . . . . . . . 74
6.9 Sustituir el fusible del aparato . . . . . . . . . . . . . . . . . . . . . . . 74
6.10 Cambiar el fusible de la clavija (12/24 V) . . . . . . . . . . . . . . 75
6.11 Cambiar el elemento luminoso . . . . . . . . . . . . . . . . . . . . . . 75
7 Limpieza y mantenimiento . . . . . . . . . . . . . . . . . . . . . . . . . . . . . . 76
8 Garantía legal . . . . . . . . . . . . . . . . . . . . . . . . . . . . . . . . . . . . . . . . . 76
9 Solución de averías . . . . . . . . . . . . . . . . . . . . . . . . . . . . . . . . . . . . 77
10 Eliminación de desechos . . . . . . . . . . . . . . . . . . . . . . . . . . . . . . . 78
11 Datos técnicos . . . . . . . . . . . . . . . . . . . . . . . . . . . . . . . . . . . . . . . . 78
61

ES
Aclaración de los símbolos CoolFreeze
1 Aclaración de los símbolos
¡PELIGRO!
D
!
!
A
I
Indicación de seguridad: su incumplimiento acarrea la muerte o
graves lesiones.
¡ADVERTENCIA!
Indicación de seguridad: su incumplimiento puede acarrear la
muerte o graves lesiones.
¡ATENCIÓN!
Indicación de seguridad: su incumplimiento puede acarrear
lesiones.
¡AVISO!
Su incumplimiento puede acarrear daños materiales y perjudicar
el correcto funcionamiento del producto.
NOTA
Información adicional para el manejo del producto.
➤ Paso a seguir: este símbolo le indica que debe realizar un pa-
so. Todos los procedimientos necesarios se describen paso a
paso.
✓ Este símbolo describe el resultado de un paso realizado.
Fig. 1 5, página 3: esta indicación hace referencia a un elemento
de una figura, en este ejemplo a la “Posición 5 en la figura 1 de la
página 3”.
2 Indicaciones de seguridad
2.1 Seguridad general
¡PELIGRO!
D
62
En embarcaciones: en caso de funcionamiento conectado a la
red eléctrica, asegúrese de que el suministro de corriente esté
protegido con un interruptor diferencial.

ES
CoolFreeze Indicaciones de seguridad
¡ADVERTENCIA!
!
No ponga el aparato en funcionamiento si presenta desperfec-
tos visibles.
Sólo personal especializado puede realizar reparaciones en el
aparato. Las reparaciones realizadas indebidamente pueden
dar lugar a situaciones de considerable peligro.
Las personas (incluidos los niños) que, debido a sus capacida-
des físicas, sensoriales o mentales, a su falta de experiencia o
a desconocimiento, no pueden utilizar el producto de forma
segura, no tienen permitido utilizar este producto sin la vigilancia y las instrucciones de una persona sobre la que recae tal
responsabilidad.
Los aparatos eléctricos no son juguetes.
Guarde y utilice el aparato fuera del alcance de los niños.
Se ha de vigilar a los niños para garantizar que no usen este
aparato como juguete.
Si se daña el cable de conexión del aparato, éste deberá ser
reemplazado por el fabricante, su servicio de atención al cliente
o una persona cualificada para evitar así posibles peligros.
No guarde en el aparato sustancias con peligro de explosión
como p. ej. atomizadores con gas.
!
A
¡ATENCIÓN!
Desconecte el aparato de la red
– antes de realizar cualquier tarea de limpieza y
mantenimiento;
– después de cada uso.
Los alimentos sólo se pueden guardar en los envases
originales o en recipientes adecuados.
¡AVISO!
Conecte el aparato únicamente del siguiente modo:
– conecte el cable de alimentación CC a una caja de
enchufe CC en el vehículo (por ejemplo mechero del
vehículo)
– o bien conecte el cable de alimentación de 230 V a la red de
corriente alterna de 230 V
Compare el valor de tensión indicado en la placa de
características con el suministro de energía existente.
63

ES
Indicaciones de seguridad CoolFreeze
Este aparato refrigerador no es apto para transportar
sustancias corrosivas o disolventes.
No extraiga nunca la clavija de la caja de enchufe tirando del
cable de conexión.
Si la nevera está conectada a la caja de enchufe CC:
Desconecte de la batería el aparato refrigerador u otros
dispositivos consumidores si va a conectar un cargador rápido.
Si la nevera está conectada a la caja de enchufe CC:
Desconecte la conexión o apague el aparato cuando apague el
motor. De lo contrario podrá descargarse la batería.
2.2 Seguridad durante el funcionamiento del aparato
¡PELIGRO!
D
!
No toque directamente con las manos cables sin aislamiento.
Esto rige especialmente en caso de funcionamiento con la red
de corriente alterna.
¡ATENCIÓN!
Antes de la puesta en funcionamiento, asegúrese de que el
cable de alimentación y la clavija de enchufe estén secos.
A
64
¡AVISO!
No utilice ningún aparato eléctrico dentro de la nevera, a no ser
que el aparato en cuestión haya sido recomendado para ello
por el fabricante.
No coloque el aparato cerca de llamas vivas ni de otras fuentes
de calor (calefacción, radiación directa del sol, estufas de gas,
etc.).
¡Peligro de sobrecalentamiento!
Asegúrese todo el tiempo de que el calor producido durante el
funcionamiento se puede desalojar adecuadamente. Asegúrese de que el aparato guarda la suficiente distancia con las
paredes u objetos, de forma que el aire pueda circular.
Procure que no se obstruyan las ranuras de ventilación.
No introduzca líquidos ni hielo en el contenedor interior.
No sumerja nunca el aparato en agua.
Proteja el aparato y los cables del calor y de la humedad.

ES
CoolFreeze Volumen de entrega
3 Volumen de entrega
La fig. 1, página 3, muestra el volumen de entrega.
Pos. Cantidad Denominación
11Nevera
2 1 Cable de alimentación para conexión de 12/24 Vg
3 1 Cable de conexión para 100–240 V
4 2 Asa de transporte, compuesta de:
– 2 soportes
–1 asa
– 4 tornillos de fijación
– 1 Instrucciones de uso
~
4 Uso adecuado
La nevera es apta tanto para enfriar como para congelar los
alimentos. El aparato también es apto para su funcionamiento
en embarcaciones.
El aparato está diseñado para el uso de una caja de enchufe de a
bordo de 12 V
del vehículo), de una embarcación o una caravana, así como para
una corriente alterna de 100–240 V
g ó 24 Vg de un vehículo (por ejemplo, el mechero
~
.
!
¡ATENCIÓN! ¡Riesgo para la salud!
Compruebe si la potencia de refrigeración del aparato cumple las
exigencias de los alimentos o medicamentos que desea enfriar.
65

ES
Descripción del funcionamiento CoolFreeze
5 Descripción del funcionamiento
En la nevera se pueden enfriar y mantener fríos los productos, así
como congelar. La refrigeración se realiza a través de un circuito
de refrigeración con compresor que no requiere mantenimiento. El
aislamiento exterior extrafuerte y el compresor de alto rendimiento
garantizan una refrigeración especialmente rápida.
La nevera está prevista para un uso portátil.
Para su uso en embarcaciones, la nevera puede funcionar con un
ángulo de escora constante de 30°.
5.1 Indicaciones relativas al funcionamiento
Fuente de alimentación con conexión de prioridad para la cone-
xión a la corriente alterna
Controlador de la batería de tres etapas para proteger la batería
del vehículo
Modo Turbo para un enfriamiento rápido
La pantalla con indicación de temperatura
se apaga automáticamente en caso de una tensión baja de la
batería
Ajuste de temperatura: Con dos pulsadores en pasos de 1 °C
(2 °F)
Asa de transporte desmontable
5.2 Elementos de mando y de indicación
CF35, CF40
Bloqueo de la tapa: fig. 2 1, página 3
66

ES
CoolFreeze Descripción del funcionamiento
CF35, CF40, CF50, CF60
Panel de mando (fig. 3, página 3)
Pos. Denominación Explicación
1ON
OFF
2 POWER Indicación del modo de funcionamiento
3 ERROR LED parpadea
4 SET Selecciona el modo de entrada de datos
5 – Display, indica la temperatura
6 UP + Pulsando una vez, aumenta el valor
7 DOWN – Pulsando una vez, disminuye el valor
Enciende o apaga la nevera cuando se pulsa
la tecla durante uno o dos segundos
LED iluminado
en verde:
LED iluminado
en naranja:
LED parpadea
en naranja:
en rojo:
– ajuste de temperatura
– indicación en °Celsius o °Fahrenheit
– ajuste del controlador de la batería
de entrada
de entrada
el compresor está en
marcha
el compresor está
apagado
La pantalla se apaga
automáticamente
porque la tensión de la
batería es baja
el aparato conectado
no está listo para funcionar
Conectores (fig. 4, página 4):
Pos. Denominación
1 Conectores para la alimentación de corriente alterna
2 Portafusible
3 Conectores para la alimentación de corriente continua
67

ES
Manejo CoolFreeze
6 Manejo
6.1 Antes del primer uso
NOTA
I
Montaje de las asas
Dar la vuelta al tope de la tapa
CF50, CF60
Por razones de higiene, debería limpiar la nueva nevera por dentro y por fuera con un paño húmedo antes de ponerla en funcionamiento (véase también “Limpieza y mantenimiento” en la
página 76).
Las asas se adjuntan sueltas. Si las quiere montar, proceda como
se indica a continuación:
➤ Monte dos soportes (fig. 5 1, página 4) y un asa
(fig. 5 2, página 4) formando una unidad.
➤ Fije el asa con los tornillos adjuntos en los orificios previstos
para ello.
Puede dar la vuelta al tope de la tapa, en caso de que desee abrir
la tapa hacia el otro lado. Para ello proceda de la siguiente manera:
➤ Abra la tapa y extráigala (fig. 6 A, página 5).
➤ Gire la tapa.
➤ Coloque la tapa en sus alojamientos del lado contrario de la
nevera (fig. 6 B, página 5).
Seleccionar la unidad de temperatura
Para la indicación de temperatura puede elegir entre °Celsius o
°Fahrenheit. Para ello proceda de la siguiente manera:
➤ Encienda la nevera.
➤ Pulse el botón “SET” (fig. 3 4, página 3) dos veces.
➤ Ajuste con las teclas “UP +” (fig. 3 6, página 3) o “DOWN -”
(fig. 3 7, página 3) la unidad de temperatura °Celsius o
°Fahrenheit.
68

ES
CoolFreeze Manejo
✓ El display indica durante unos segundos la unidad de tempera-
tura ajustada. El display parpadea algunas veces antes de volver a mostrar la temperatura actual.
6.2 Consejos para el ahorro de energía
Elija un lugar de montaje correctamente ventilado y protegido
de la radiación solar.
Antes de introducir alimentos calientes, deje que se enfríen.
Evite abrir la nevera más de lo necesario.
No deje la nevera abierta más tiempo del que sea necesario.
Descongele la nevera cuando se forme una capa de escarcha.
Evite utilizar temperaturas innecesariamente bajas.
6.3 Conexión de la nevera
Conexión a una batería (Vehículo o embarcación)
La nevera puede funcionar con una tensión continua de 12 V ó
24 V.
¡AVISO! ¡Peligro de daños en el aparato!
A
Antes de cargar la batería con un cargador rápido, desconéctela
de la nevera y de otros consumidores.
La sobretensión puede dañar el sistema electrónico del aparato.
Por motivos de seguridad, la nevera está equipada con una protección electrónica contra inversión de polaridad que la protege si no
se respetala polaridad al conectarla a la batería y contra cortocircuitos.
➤ Enchufe el cable de alimentación de 12/24 V (fig. 1 2,
página 3) en el conector de tensión continua y conéctelo al
mechero del vehículo o a una caja de enchufe de 12 V ó 24 V.
69

ES
Manejo CoolFreeze
Conexión a la red de corriente alterna de 100–240 V (p. ej., en casa o
en la oficina)
¡PELIGRO! ¡Peligro de muerte por descarga eléctrica!
D
No manipule los enchufes ni interruptores con las manos
mojadas o con los pies sobre una superficie mojada.
Si usa la nevera en una embarcación a través de una cone-
xión de tierra de corriente alterna de 100–240 V, deberá
conectar un interruptor diferencial entre la red de 100–240 V y
el refrigerador.
Consulte con un especialista.
Las neveras tienen una fuente de alimentación integrada de tensión múltiple con conexión de prioridad para la conexión de tensión
alterna de 100–240 V. Mediante la conexión de prioridad se cambia de forma automática al funcionamiento con corriente de red,
cuando se conecte el aparato a la red de corriente alterna de 100–
240 V, aunque esté conectado de cable de conexión de 12/24 V.
Al cambiar entre la red de corriente alterna y la alimentación por
batería, es posible que el LED rojo se ilumine durante unos
minutos.
➤ Introduzca el cable de conexión de 100–240 V (fig. 1 3,
página 3) en el conector de tensión alterna y conéctelo a la
red de corriente alterna de 100– 240 V.
6.4 Uso del controlador de la batería
El aparato está equipado con un controlador de la batería de
varios niveles que evita que la batería del vehículo se descargue
excesivamente al utilizar la red de a bordo de 12/24 V.
En caso de poner en funcionamiento la nevera en el vehículo con
el contacto apagado, ésta se desconectará automáticamente en
cuanto descienda la tensión de alimentación por debajo del valor
programable. La nevera vuelve a conectarse tan pronto como se
cargue la batería y se alcance la tensión de alimentación de reconexión.
70

ES
CoolFreeze Manejo
¡AVISO! ¡Peligro de daños en el aparato!
A
Al apagarse mediante el controlador de la batería la batería ya
no dispone de su capacidad de carga completa, evite continuos
arranques o poner en funcionamiento otros consumidores de
corriente sin haber recargado la batería. Asegúrese de recargar
la batería.
En el modo “HIGH” el controlador de batería se activa antes que en
el nivel “LOW” y “MED” (véase la siguiente tabla).
Modo de controlador de la batería LOW MED HIGH
Tensión de desconexión a 12 V 10,1 V 11,4 V 11,8 V
Tensión de reconexión a 12 V 11,1 V 12,2 V 12,6 V
Tensión de desconexión a 24 V 21,5 V 24,1 V 24,6 V
Tensión de reconexión a 24 V 23,0 V 25,3 V 26,2 V
Para cambiar el modo del controlador de la batería, proceda
como sigue:
➤ Encienda la nevera.
➤ Pulse el botón “SET” (fig. 3 4, página 3) tres veces.
➤ Ajuste con las teclas “UP +” (fig. 3 6, página 3) o “DOWN -”
(fig. 3 7, página 3) el modo del controlador de la batería.
✓ El display indica durante unos segundos el modo del controla-
dor de la batería. El display parpadea algunas veces antes de
volver a mostrar la temperatura actual.
I
NOTA
Cuando la nevera está alimentada por la batería de arranque,
seleccione el modo de controlador de la batería “HIGH”.
Cuando la nevera está alimentada por la batería de abastecimiento, es suficiente el modo de controlador de la batería “LOW”.
Cuando utilice la nevera conectada a la red de corriente alterna,
ponga el controlador de la batería en la posición “LOW”.
71

ES
Manejo CoolFreeze
6.5 Uso de la nevera
¡AVISO! ¡Peligro de sobrecalentamiento!
A
I
I
Asegúrese todo el tiempo de que el calor producido durante el
funcionamiento se pueda desalojar adecuadamente. Evite que se
obstruyan las ranuras de ventilación. Asegúrese de que el
aparato guarde la suficiente distancia con las paredes u objetos,
de forma que el aire pueda circular.
➤ Coloque la nevera sobre una base firme.
Procure que no se obstruyan las ranuras de ventilación y que
el aire recalentado se evacue correctamente.
NOTA
Coloque la nevera como aparece representado (véase fig.). Si la
nevera se pone en marcha situada en otra posición, podría dañar
el aparato.
➤ Conecte la nevera, véase “Conexión de la nevera” en la
página 69.
NOTA
Cuando utilice la nevera conectada a la red de corriente alterna,
ponga el controlador de la batería en la posición “LOW”.
A
I
72
¡AVISO! ¡Peligro debido a temperatura demasiado baja!
Asegúrese de que en la nevera solo hay objetos o productos que
puedan enfriarse a la temperatura seleccionada.
➤ Pulse el botón “ON/OFF” (fig. 3 1, página 3) durante uno o
dos segundos.
✓ El LED “POWER” se ilumina.
✓ La pantalla (fig. 3 5, página 3) se enciende e indica la tempe-
ratura de enfriado actual.
NOTA
La temperatura indicada se refiere al centro del compartimiento
interior. La temperatura de otras partes puede ser diferente.
✓ La nevera empezará a refrigerar el interior.

ES
CoolFreeze Manejo
NOTA
I
Bloqueo de la nevera
CF35, CF40
Durante el funcionamiento con batería, la pantalla se apaga automáticamente si la tensión de la batería es baja. El LED “POWER”
parpadea en naranja.
➤ Cierre la tapa.
➤ Presione el bloqueo hacia abajo (fig. 2 1, página 3) hasta que
se la oiga encajar.
6.6 Ajustar la temperatura
➤ Pulse el botón “SET” (fig. 3 4, página 3) una vez.
➤ Ajuste la temperatura de enfriamiento con las teclas “UP +”
(fig. 3 6, página 3) o “DOWN -” (fig. 3 7, página 3).
✓ La pantalla indica, durante unos segundos, la temperatura de
enfriado ajustada. El display parpadea algunas veces antes de
volver a mostrar la temperatura actual.
6.7 Desconectar la nevera
➤ Vacíe la nevera.
➤ Desconecte la nevera.
➤ Desenchufe el cable de alimentación.
Si no va a usar la nevera durante un largo período de tiempo:
➤ Deje la tapa de la nevera ligeramente abierta. De esta forma,
evitará la aparición de olores.
73

ES
Manejo CoolFreeze
6.8 Descongelar la nevera
Es posible que la humedad del aire se deposite en forma de escarcha en el evaporador o en el interior de la nevera, disminuyendo de
este modo la potencia frigorífica. Descongele la nevera para evitarlo.
¡AVISO! ¡Peligro de daños en el aparato!
A
Nunca utilice herramientas duras o puntiagudas para retirar
capas de hielo o soltar productos que se hayan adherido al congelarse.
Para descongelar la nevera, proceda como se indica a continuación:
➤ Saque los productos del interior de la nevera.
➤ En caso necesario, coloque los productos en otro refrigerador
para mantenerlos fríos.
➤ Desconecte el aparato.
➤ Deje abierta la tapa de la nevera.
➤ Seque con un paño el agua descongelada.
6.9 Sustituir el fusible del aparato
¡PELIGRO! ¡Peligro de muerte por descarga eléctrica!
D
Desenchufe el cable de conexión antes de cambiar el fusible del
aparato.
➤ Desenchufe el cable de alimentación.
➤ Saque el juego de fusibles (fig. 4 2, página 4) con un desator-
nillador, por ejemplo.
➤ Cambie el fusible averiado por otro nuevo del mismo valor
(T4AL 250V).
➤ Presione el juego de fusibles en la carcasa.
74

ES
CoolFreeze Manejo
6.10 Cambiar el fusible de la clavija (12/24 V)
➤ Saque el casquillo de compensación (fig. 7 4, página 5) de la
clavija.
➤ Desatornille el tornillo (fig. 7 5, página 5) de la parte superior
de la carcasa (fig. 7 1, página 5).
➤ Separe con cuidado la mitad de la carcasa superior de la infe-
rior (fig. 7 6, página 5).
➤ Extraiga la clavija de contacto (fig. 7 3, página 5).
➤ Cambie el fusible averiado (fig. 7 2, página 5) por otro nuevo
del mismo valor (8A 32V).
➤ Vuelva a montar la clavija procediendo al revés.
6.11 Cambiar el elemento luminoso
➤ Presione hacia abajo el pasador (fig. 8 2, página 5), de forma
que la pieza transparente (fig. 8 1, página 5) de la lámpara se
pueda extraer hacia delante.
➤ Cambie el elemento luminoso.
NOTA
I
Los LEDs del elemento luminoso tienen que estar orientados
hacia la pieza transparente de la lámpara.
➤ Vuelva a introducir la pieza transparente de la lámpara en la
carcasa.
75

ES
Limpieza y mantenimiento CoolFreeze
7 Limpieza y mantenimiento
¡ADVERTENCIA!
!
A
Desconecte el aparato de la red antes de proceder con la
limpieza o el mantenimiento del mismo.
¡AVISO! ¡Peligro de ocasionar daños materiales!
Nunca limpie la nevera bajo el chorro de agua corriente ni
inmersa en agua jabonosa.
No emplee productos de limpieza corrosivos u objetos que
puedan arañar o deteriorar el aparato durante su limpieza.
➤ Limpie de vez en cuando el interior y el exterior de la nevera con
un paño húmedo.
➤ Asegúrese de que las aberturas de ventilación y desaireación
del aparato están limpias de polvo para que se pueda evacuar
el calor generado durante el funcionamiento y el aparato no resulte perjudicado.
8 Garantía legal
Rige el plazo de garantía legal. Si el producto presenta algún
defecto, diríjase a la sucursal del fabricante de su país (ver direcciones en el dorso de estas instrucciones) o a su establecimiento
especializado.
Para la tramitación de la reparación y de la garantía debe enviar
también los siguientes documentos:
una copia de la factura con fecha de compra,
el motivo de la reclamación o una descripción de la avería.
76

ES
CoolFreeze Solución de averías
9 Solución de averías
Avería Causa posible Propuesta de solución
El aparato no funciona,
el LED no se ilumina.
El aparato no enfría
(la clavija está conectada, el LED “POWER”
se ilumina).
El aparato no enfría (la
clavija está conectada,
el LED “POWER”
parpadea en naranja, la
pantalla está apagada).
Al funcionar conectada
al enchufe de 12/24 V
(mechero del vehículo):
el encendido está
conectado, pero el aparato no funciona y el
LED no está iluminado.
Desenchufe la clavija
de la caja de enchufe y
realice las siguientes
comprobaciones.
En la pantalla se indica
un mensaje de error
(por ejemplo, “Err1”) y
el aparato no enfría.
No hay tensión en la caja
de enchufe de 12/24 V
(mechero) del vehículo.
La caja de enchufe
de tensión alterna no
conduce corriente.
El fusible del aparato
está averiado.
La fuente de alimentación integrada está averiada.
Compresor averiado. Sólo un servicio de asistencia técnica
La tensión de batería no
es suficiente.
El alojamiento del
mechero está sucio, de
modo que el contacto
eléctrico es defectuoso.
Se ha fundido el fusible
de la clavija de 12/24 V.
Se ha fundido el fusible
del vehículo.
El aparato se ha apagado por un fallo interno.
En la mayoría de los vehículos debe estar
conectado el interruptor de encendido
para que el mechero tenga corriente.
Inténtelo en otra caja de enchufe.
Cambie el fusible del aparato, véase
“Sustituir el fusible del aparato” en la
página 74.
Sólo un servicio de asistencia técnica
autorizado puede realizar las reparaciones.
autorizado puede realizar las reparaciones.
Compruebe la batería y cárguela de ser
necesario.
Cuando la clavija se calienta demasiado
en el alojamiento del mechero, puede ser
que dicho alojamiento esté sucio, en cuyo
caso se deberá limpiar, o también es posible que no se haya montado la clavija
correctamente.
Cambie el fusible (8 A) de la clavija de
12/24 V, véase “Cambiar el fusible de la
clavija (12/24 V)” en la página 75.
Cambie el fusible de la caja de enchufe
de 12 V del vehículo (normalmente 15 A)
(consulte para ello las instrucciones de su
automóvil).
Sólo un servicio de asistencia técnica
autorizado puede realizar las reparaciones.
77

ES
Eliminación de desechos CoolFreeze
10 Eliminación de desechos
➤ Deseche el material de embalaje en el contenedor de reciclaje
correspondiente.
Cuando vaya a desechar definitivamente el producto, infórmese en
el centro de reciclaje más cercano o en un comercio especializado
M
sobre las normas pertinentes de eliminación de materiales.
11 Datos técnicos
CF35 CF 40
Tensión de conexión:
Corriente nominal:
g: 6,0 A 6,0 A
– 12 V
g: 3,0 A 3,0 A
– 24 V
~
– 100–240 V
Capacidad de enfriamiento: +10 °C hasta –18 °C (+50 °F hasta 0 °F)
Categoria: 1 1
Clase de eficiencia energética: A+ A+
Consumo de energía: 92 kWh/año 101 kWh/año
Capacidad útil: 31 l 37 l
Clase climática: N, ST, T N, ST, T
Temperatura ambiente: +16°C –
Emisiones de ruido: 45 dB(A) 45 dB(A)
Medidas (l x h x a) en mm: 580 x 385 x 360 580 x 445 x 360
Peso: 15 kg 16 kg
: 1,3 hasta 0,7 A 1,3 hasta 0,7 A
12/24 V
+43 °C
g y 100–240 V
+16°C –
~
+43 °C
78

ES
CoolFreeze Datos técnicos
CF50 CF 60
Tensión de conexión:
Corriente nominal:
g: 7,0 A 7,0 A
– 12 V
g: 3,0 A 3,0 A
– 24 V
~
– 100–240 V
Capacidad de enfriamiento: +10 °C hasta –18 °C (+50 °F hasta 0 °F)
Categoria: 1 1
Clase de eficiencia energética: A+ A+
Consumo de energía: 110 kWh/año 111 kWh/año
Capacidad útil: 47 l 57 l
Clase climática: N, ST, T N, ST, T
Temperatura ambiente: +16°C –
Emisiones de ruido: 45 dB(A) 45 dB(A)
Medidas (l x h x a) en mm: 630 x 480 x 360 630 x 582 x 360
Peso: 18 kg 21,6 kg
: 1,3 hasta 0,7 A 1,3 hasta 0,7 A
12/24 V
+43 °C
g y 100–240 V
+16°C –
~
+43 °C
NOTA
I
En el caso de temperaturas ambiente superiores a +32 °C
(+90 °F) ya no será posible alcanzar la temperatura mínima.
Inspección/Certificados:
4
El circuito de refrigeración contiene R134a.
79

IT
CoolFreeze
Prima di effettuare la messa in funzione leggere accuratamente questo manuale di istruzioni, conservarlo e, in caso di trasmissione dell’apparecchio consegnarlo all'utente
successivo.
Il produttore declina ogni responsabilità per danni risultanti da un
uso non conforme alla destinazione o da un impiego scorretto.
Indice
1 Spiegazione dei simboli . . . . . . . . . . . . . . . . . . . . . . . . . . . . . . . . 81
2 Indicazioni di sicurezza. . . . . . . . . . . . . . . . . . . . . . . . . . . . . . . . . 81
2.1 Sicurezza generale . . . . . . . . . . . . . . . . . . . . . . . . . . . . . . . 81
2.2 Sicurezza durante il funzionamento dell’apparecchio . . . . . 83
3 Dotazione . . . . . . . . . . . . . . . . . . . . . . . . . . . . . . . . . . . . . . . . . . . . 84
4 Uso conforme alla destinazione . . . . . . . . . . . . . . . . . . . . . . . . . . 84
5 Descrizione del funzionamento . . . . . . . . . . . . . . . . . . . . . . . . . . 84
5.1 Funzioni . . . . . . . . . . . . . . . . . . . . . . . . . . . . . . . . . . . . . . . 85
5.2 Elementi di comando e indicazione . . . . . . . . . . . . . . . . . . 85
6Impiego. . . . . . . . . . . . . . . . . . . . . . . . . . . . . . . . . . . . . . . . . . . . . . 87
6.1 Prima della messa in funzione iniziale . . . . . . . . . . . . . . . . 87
6.2 Suggerimenti per risparmiare energia . . . . . . . . . . . . . . . . 88
6.3 Come collegare il frigorifero . . . . . . . . . . . . . . . . . . . . . . . . 88
6.4 Utilizzo del dispositivo di controllo della batteria . . . . . . . . . 89
6.5 Come usare il frigorifero . . . . . . . . . . . . . . . . . . . . . . . . . . . 91
6.6 Regolazione della temperatura . . . . . . . . . . . . . . . . . . . . . . 92
6.7 Come spegnere il frigorifero . . . . . . . . . . . . . . . . . . . . . . . . 92
6.8 Sbrinamento del frigorifero portatile . . . . . . . . . . . . . . . . . . 93
6.9 Come sostituire il fusibile dell’apparecchio . . . . . . . . . . . . . 93
6.10 Sostituzione del fusibile della spina (12/24 V) . . . . . . . . . . 94
6.11 Sostituire il corpo luminoso . . . . . . . . . . . . . . . . . . . . . . . . . 94
7 Pulizia e cura . . . . . . . . . . . . . . . . . . . . . . . . . . . . . . . . . . . . . . . . . 95
8Garanzia . . . . . . . . . . . . . . . . . . . . . . . . . . . . . . . . . . . . . . . . . . . . . 95
9 Eliminazione dei disturbi. . . . . . . . . . . . . . . . . . . . . . . . . . . . . . . . 96
10 Smaltimento . . . . . . . . . . . . . . . . . . . . . . . . . . . . . . . . . . . . . . . . . . 97
11 Specifiche tecniche . . . . . . . . . . . . . . . . . . . . . . . . . . . . . . . . . . . . 97
80

IT
CoolFreeze Spiegazione dei simboli
1 Spiegazione dei simboli
PERICOLO!
D
!
!
A
I
Avviso di sicurezza: la mancata osservanza di questo avviso
comporta ferite gravi anche mortali.
AVVERTENZA!
Avviso di sicurezza: la mancata osservanza di questo avviso
può causare ferite gravi anche mortali.
ATTENZIONE!
Avviso di sicurezza: la mancata osservanza di questo avviso
può essere causa di lesioni.
AVVISO!
La mancata osservanza di questa nota può causare danni materiali e compromettere il funzionamento del prodotto.
NOTA
Informazioni integranti relative all'impiego del prodotto.
➤ Modalità di intervento: questo simbolo indica all'utente che è
necessario un intervento. Le modalità di intervento necessarie
saranno descritte passo dopo passo.
✓ Questo simbolo descrive il risultato di un intervento.
Fig. 1 5, pagina 3: questi dati si riferiscono ad un elemento in
una figura, in questo caso alla “posizione 5 nella figura 1 a
pagina 3”.
2 Indicazioni di sicurezza
2.1 Sicurezza generale
PERICOLO!
D
Per imbarcazioni: con il collegamento alla rete fare in modo che
l’alimentazione elettrica sia sempre controllata da un interruttore differenziale.
81

IT
Indicazioni di sicurezza CoolFreeze
AVVERTENZA!
!
Se l’apparecchio presenta danni visibili, non metterlo in
funzione.
Questo apparecchio deve essere riparato solo da personale
specializzato. Le riparazioni effettuate in modo scorretto
potrebbero causare rischi enormi.
Persone (bambini compresi) che a causa della proprie capacità
fisiche, sensoriali o mentali, oppure che a causa della propria
inesperienza e scarsa conoscenza non siano in grado di utilizzare il prodotto in modo sicuro, devono evitare di utilizzarlo se
non in presenza e seguendo le istruzioni di una persona per loro
responsabile.
Gli elettrodomestici non sono giocattoli!
Conservare e impiegare l’apparecchio lontano dalla portata dei
bambini.
Sorvegliare i bambini per evitare che giochino con l’apparec-
chio.
Se il cavo di allacciamento di questo apparecchio viene
danneggiato, esso deve essere sostituito dal produttore, da
parte del suo servizio clienti, oppure da una persona sufficientemente qualificata, al fine di evitare pericoli.
Nell'apparecchio non conservare sostanze esplosive come
ad es. bombolette spray con gas propellente.
!
A
82
ATTENZIONE!
Staccare l'apparecchio dalla rete
– prima di effettuare la pulizia e la cura
– dopo ogni utilizzo
I prodotti alimentari possono essere conservati solo nelle
confezioni originali o in contenitori adeguati.
AVVISO!
Collegare l’apparecchio solo nel modo seguente:
– con il cavo di allacciamento CC alla spina CC del veicolo
(ad es. accendisigari)
– oppure con il cavo di allacciamento da 230 V alla rete di
alimentazione in corrente alternata da 230 V
Confrontare i dati della tensione riportati sulla targhetta con
quelli delle prese e degli attacchi disponibili.

IT
CoolFreeze Indicazioni di sicurezza
Il frigorifero non è adatto per il trasporto di sostanze corrosive o
solventi.
Non estrarre mai la spina dalla presa tirando il cavo di allaccia-
mento.
Quando il frigorifero è collegato ad un presa CC: Staccare il
frigorifero e le altre utenze dalla batteria prima di collegare il
caricabatterie rapido.
Quando il frigorifero è collegato ad un presa CC: Interrompere
il collegamento o spegnere il frigorifero se il motore viene
spento. Altrimenti la batteria si può scaricare.
2.2 Sicurezza durante il funzionamento
dell’apparecchio
PERICOLO!
D
!
Non toccare mai i cavi nudi a mani nude. Questo vale soprat-
tutto per il funzionamento con rete di alimentazione in corrente
alternata.
ATTENZIONE!
Prima della messa in funzione assicurarsi che la linea di
alimentazione e la spina siano asciutte.
A
AVVISO!
Non utilizzare apparecchi elettrici all'interno del frigorifero ad
eccezione di quelli consigliati dallo stesso produttore.
Non collocare l’apparecchio nelle vicinanze di fiamme libere o
altre fonti di calore (riscaldamento, intensa esposizione ai raggi
solari, forni a gas ecc.).
Pericolo di surriscaldamento!
Assicurarsi che il calore generato durante il funzionamento sfiati
sufficientemente. Assicurarsi che la distanza fra l'apparecchio e
le pareti o altri oggetti sia tale che l'aria possa circolare liberamente.
Fare attenzione che le feritoie di aerazione non vengano
coperte.
Non versare nessun tipo di liquido o ghiaccio nel contenitore
interno.
Non immergere mai l’apparecchio in acqua.
Proteggere l’apparecchio e i cavi dal caldo e dall’umidità.
83

IT
Dotazione CoolFreeze
3 Dotazione
La fig. 1, pagina 3, indica il volume di fornitura.
Pos. Quantità Denominazione
1 1 frigorifero portatile
2 1 cavo di allacciamento per collegamento da
12/24 Vg
3 1 cavo di allacciamento per collegamento da 100–
~
240 V
4 2 maniglia, costituita da:
– 2 supporti
– 1 impugnatura
– 4 viti di fissaggio
– 1 istruzioni per l’uso
4 Uso conforme alla destinazione
Il frigorifero è adatto per raffreddare e surgelare gli alimenti.
L’apparecchio è anche adatto per il funzionamento su imbarcazioni.
L’apparecchio è stato ideato per il funzionamento con una presa
di rete di bordo da 12 V
l’accendisigari), di una barca o di un camper oppure con una rete
di alimentazione in corrente alternata da 100–240 V
g oppure da 24 Vg di un veicolo (ad es.
~
.
ATTENZIONE! Pericolo per la salute!
!
Controllare che la capacità di raffreddamento dell'apparecchio sia
conforme ai requisiti degli alimenti o medicinali che si desidera
raffreddare.
5 Descrizione del funzionamento
Il frigorifero portatile può raffreddare, mantenere freddi i prodotti
e surgelarli. Il raffreddamento avviene mediante un circuito di raffreddamento che non richiede manutenzione e con compressore.
L’isolamento, particolarmente spesso, e il potente compressore
garantiscono un raffreddamento estremamente veloce.
84

IT
CoolFreeze Descrizione del funzionamento
L'apparecchio è adatto per essere utilizzato anche come frigorifero
portatile.
Nel caso di impiego su imbarcazioni il frigorifero può essere sottoposto ad uno sbandamento continuo di 30°.
5.1 Funzioni
Alimentatore con circuito prioritario per il collegamento alla
tensione alternata
Dispositivo di controllo automatico della batteria a tre livelli per
la protezione della batteria del veicolo
Modalità Turbo per il raffreddamento rapido
Il display con indicazione della temperatura
viene spento automaticamente in caso di bassa tensione della
batteria
Regolazione della temperatura: con due tasti in passi da 1 °C (2 °F)
Possibilità di montaggio maniglie
5.2 Elementi di comando e indicazione
CF35, CF40
Fermo del coperchio: fig. 2 1, pagina 3
85

IT
Descrizione del funzionamento CoolFreeze
CF35, CF40, CF50, CF60
Campo di controllo (fig. 3, pagina 3)
Pos. Denominazione Spiegazione
1ON
OFF
2 POWER Spia di funzionamento
3 ERROR Il LED rosso lampeg-
4 SET Seleziona la modalità di immissione
5 – Display, indica i valori
6 UP + Premuto una volta aumenta il valore impo-
7 DOWN – Premuto una volta diminuisce il valore impo-
Accende o spegne il frigorifero se si tiene
premuto il tasto da uno a due secondi
Il LED verde
è acceso:
il LED arancio
è acceso:
Il LED lampeggia
con luce arancia:
gia:
– impostazione della temperatura
– valori in gradi Celsius oppure Fahrenheit
– impostazione dispositivo di controllo
automatico della batteria
stato selezionato
stato selezionato
il compressore
è acceso
il compressore
è spento
il display si è spento
automaticamente perché la tensione della
batteria è bassa
l’apparecchio è acceso
ma non è pronto per il
funzionamento
Prese di collegamento (fig. 4, pagina 4):
Pos. Denominazione
1 Presa di collegamento per l’alimentazione di tensione alternata
2 Portafusibile
3 Presa di collegamento per l’alimentazione di tensione continua
86

IT
CoolFreeze Impiego
6Impiego
6.1 Prima della messa in funzione iniziale
NOTA
I
Montaggio dei manici
Spostamento del lato apertura coperchio
CF50, CF60
Per motivi igienici, prima della messa in funzione iniziale del frigorifero, pulirne l’interno e l’esterno con un panno umido
(vedi anche “Pulizia e cura” a pagina 95).
Le maniglie fornite in dotazione non sono assemblate. Per montare
le maniglie, procedere come segue:
➤ Assemblare i due supporti (fig. 5 1, pagina 4) e l’impugnatura
(fig. 5 2, pagina 4) in modo tale da formare una maniglia.
➤ Fissare la maniglia con le viti in dotazione nei fori predisposti
per tale scopo.
Nel caso in cui si desideri aprire il coperchio dall'altro lato è possibile spostare il lato apertura coperchio. A questo scopo procedere
come segue.
➤ Aprire il coperchio ed estrarlo (fig. 6 A, pagina 5).
➤ Ruotare il coperchio.
➤ Inserire il coperchio nelle sedi del coperchio sul lato opposto del
frigorifero (fig. 6 B, pagina 5).
Selezione dell’unità di temperatura
L’indicazione di temperatura può essere selezionata in gradi
Celsius e Fahrenheit. A questo scopo procedere come segue:
➤ Accendere il frigorifero.
➤ Premere due volte il tasto “SET” (fig. 3 4, pagina 3).
➤ Impostare con i tasti “UP +” (fig. 3 6, pagina 3) oppure
“DOWN -” (fig. 3 7, pagina 3), l’unità di temperatura Celsius
oppure Fahrenheit.
87

IT
Impiego CoolFreeze
✓ Il display visualizza per alcuni secondi l’unità di temperatura im-
postata. Il display lampeggia alcune volte prima di tornare alla
rappresentazione della temperatura attuale.
6.2 Suggerimenti per risparmiare energia
Scegliere un luogo di impiego ben aerato e riparato dai raggi so-
lari.
Prima di immagazzinare cibi caldi nell'apparecchio, lasciarli pri-
ma raffreddare.
Non aprire il frigorifero più spesso del necessario.
Non lasciare il frigorifero aperto più del necessario.
Sbrinare il frigorifero portatile appena si è formato uno strato di
ghiaccio.
Evitare un abbassamento eccessivo della temperatura interna
se non necessario.
6.3 Come collegare il frigorifero
Allacciamento ad una batteria (Veicolo o imbarcazione)
Il frigorifero portatile può essere allacciato ad una tensione continua compresa tra 12 V e 24 V.
A
88
AVVISO! Pericolo di danni!
Staccare il frigorifero portatile e altre utenze dalla batteria prima
di caricare la batteria con un caricabatterie rapido.
Le sovratensioni possono danneggiare il sistema elettronico degli
apparecchi.
Per motivi di sicurezza, il frigorifero portatile è dotato di una protezione elettronica contro l’inversione di polarità che lo protegge contro l’inversione di polarità durante il collegamento della batteria e un
eventuale cortocircuito.
➤ Inserire il cavo di allacciamento da 12/24 V (fig. 1 2, pagina 3)
nella presa con tensione continua e collegarlo all’accendisigari
o ad una presa da 12 V o 24 V.

IT
CoolFreeze Impiego
Allacciamento ad una rete di alimentazione in corrente alternata da
100–240 V (ad es a casa o in ufficio)
PERICOLO! Pericolo di morte a causa di scossa elettrica!
D
Non usare spine e interruttori se avete mani o piedi bagnati.
Se il frigorifero si trova a bordo di un’imbarcazione ed è azio-
nato mediante un collegamento a terra con una rete di alimentazione in corrente alternata da 100–240 V, è necessario in
ogni caso inserire un interruttore differenziale di protezione fra
la rete di alimentazione in corrente alternata da 100–240 V e il
frigorifero.
Fatevi consigliare da un esperto.
I figoriferi dispongono di un alimentatore multitensione integrato
con circuito prioritario per il collegamento alla tensione alternata da
100–240 V. Tramite il circuito prioritario l’apparecchio viene commutato automaticamente sul funzionamento di rete quando l’apparecchio viene allacciato ad una rete di alimentazione in corrente
alternata da 100–240 V, anche se il cavo di allacciamento da
12/24 V è ancora collegato.
Quando si commuta tra la rete di alimentazione in corrente alternata e l’alimentazione della batteria è possibile che il LED rosso
rimanga acceso alcuni minuti.
➤ Inserire il cavo di allacciamento da 100– 240 V (fig. 1 3,
pagina 3) nella presa a tensione alternata e collegarlo alla rete
di alimentazione in corrente alternata da 100–240 V.
6.4 Utilizzo del dispositivo di controllo della batteria
L’apparecchio dispone di un dispositivo di controllo automatico
della batteria a più livelli che protegge la batteria del veicolo da
uno scaricamento eccessivo durante il collegamento alla rete di
bordo da 12/24 V.
Se il frigorifero viene azionato a motore spento all’interno del
veicolo, il frigorifero si spegne automaticamente non appena la
tensione di alimentazione scende al di sotto di un valore impostato.
Il frigorifero si riaccende non appena viene raggiunta la tensione
di ripristino ottenuta caricando la batteria.
89

IT
Impiego CoolFreeze
AVVISO! Pericolo di danni!
A
Quando la batteria viene spenta dal dispositivo di controllo automatico della batteria essa non dispone più della sua capacità di
carica totale, evitare quindi ripetuti avvii o il funzionamento di reti
di bordo senza fasi di carica di lunga durata. Fare in modo che la
batteria venga ricaricata.
Nella modalità “HIGH”, il dispositivo di controllo automatico della
batteria si attiva più velocemente che nei livelli “LOW” e “MED” (vedi la tabella seguente).
I
Modo operativo del dispositivo di controllo
automatico della batteria
Tensione di interruzione a 12 V 10,1 V 11,4 V 11,8 V
Tensione di ripristino a 12 V 11,1 V 12,2 V 12,6 V
Tensione di interruzione a 24 V 21,5 V 24,1 V 24,6 V
Tensione di ripristino a 24 V 23,0 V 25,3 V 26,2 V
Per modificare la modalità per il dispositivo di controllo automatico
della batteria, procedere come segue:
➤ Accendere il frigorifero.
➤ Premere tre volte il tasto “SET” (fig. 3 4, pagina 3).
➤ Impostare con i tasti “UP +” (fig. 3 6, pagina 3) oppure
“DOWN -” (fig. 3 7, pagina 3), la modalità per il dispositivo
di controllo automatico della batteria.
✓ Il display visualizza per alcuni secondi la modalità impostata. Il
display lampeggia alcune volte prima di tornare alla rappresentazione della temperatura attuale.
NOTA
Se il frigorifero è alimentato dalla batteria di avviamento del veicolo, selezionare la modalità del dispositivo di controllo automatico della batteria “HIGH”. Se il frigorifero è collegato ad una
batteria di alimentazione, è sufficiente selezionare la modalità del
dispositivo di controllo automatico della batteria “LOW”.
Qualora si voglia mettere in funzione il frigorifero con rete di alimentazione in corrente alternata, portare il dispositivo di controllo
automatico della batteria sulla posizione “LOW”.
LOW MED HIGH
90

IT
CoolFreeze Impiego
6.5 Come usare il frigorifero
AVVISO! Pericolo di surriscaldamento!
A
I
I
Assicurarsi che il calore generato durante il funzionamento fuoriesca sufficientemente. Fare attenzione che le feritoie di aerazione
non vengano coperte. Assicurarsi che la distanza fra l’apparecchio e le pareti o altri oggetti sia tale che l’aria possa circolare liberamente.
➤ Collocare il frigorifero su una base stabile.
Assicurarsi che le feritoie di aerazione non vengano coperte
e che l’aria calda prodotta possa fuoriuscire liberamente.
NOTA
Posizionare il frigorifero secondo l'immagine (vedi fig.). Se il
frigorifero viene posizionato in maniera differente, esso può
venire danneggiato.
➤ Collegare il frigorifero, vedi “Come collegare il frigorifero” a
pagina 88.
NOTA
Qualora si voglia mettere in funzione il frigorifero con rete di alimentazione in corrente alternata, portare il dispositivo di controllo
automatico della batteria sulla posizione “LOW”.
A
I
AVVISO! Pericolo dovuto alla temperatura troppo bassa!
Assicurarsi che nel frigorifero si trovino solo oggetti o prodotti che
possono essere raffreddati alla temperatura selezionata.
➤ Premere il tasto “ON/OFF” (fig. 3 1, pagina 3) da uno a
due secondi.
✓ Il LED “POWER” è acceso.
✓ Il display (fig. 3 5, pagina 3) si accende e visualizza l’attuale
temperatura di raffreddamento.
NOTA
La temperatura visualizzata si riferisce alla parte centrale del
vano interno. La temperatura può essere diversa in altri punti.
✓ Lo spazio interno del frigorifero inizia a raffreddarsi.
91

IT
Impiego CoolFreeze
NOTA
I
Bloccaggio del frigorifero
CF35, CF40
In caso di funzionamento a una batteria, il display si spegne automaticamente quando la tensione della batteria è bassa.
Il LED “POWER” lampeggia con luce arancia.
➤ Chiudere il coperchio.
➤ Premere il fermo (fig. 2 1, pagina 3) verso il basso, finché non
si innesta con uno scatto udibile.
6.6 Regolazione della temperatura
➤ Premere una volta il tasto “SET” (fig. 3 4, pagina 3).
➤ Impostare la temperatura di raffreddamento con i tasti “UP +”
(fig. 3 6, pagina 3) oppure “DOWN -” (fig. 3 7, pagina 3).
✓ Il display visualizza per alcuni secondi la temperatura di raffred-
damento impostata. Il display lampeggia alcune volte prima di
tornare alla rappresentazione della temperatura attuale.
6.7 Come spegnere il frigorifero
➤ Svuotare il frigorifero.
➤ Spegnere il frigorifero.
➤ Estrarre il cavo di allacciamento.
Nel caso in cui il frigorifero non venga utilizzato per un lungo periodo di tempo:
➤ Lasciare il coperchio leggermente aperto. In questo modo si im-
pedisce la formazione di odori.
92

IT
CoolFreeze Impiego
6.8 Sbrinamento del frigorifero portatile
L’umidità dell’aria può condensarsi sul vaporizzatore o all’interno
del frigorifero formando brina la quale diminuisce la potenza frigorifera. Sbrinare perciò l’apparecchio a tempo debito.
AVVISO! Pericolo di danni!
A
6.9 Come sostituire il fusibile dell’apparecchio
D
Non impiegare mai utensili duri o accuminati per rimuovere gli
strati di ghiaccio o per liberare oggetti congelati.
Per sbrinare il frigorifero, procedere come segue:
➤ Togliere i prodotti dal frigorifero.
➤ Immagazzinarli eventualmente in un altro frigorifero affinché si
mantengano freddi.
➤ Spegnere l’apparecchio.
➤ Lasciare il coperchio aperto.
➤ Asciugare la condensa.
PERICOLO! Pericolo di morte a causa di scossa elettrica!
Estrarre i cavi di allacciamento prima di sostituire il fusibile
dell’apparecchio.
➤ Estrarre i cavi di allacciamento.
➤ Sbloccare il portafusibili (fig. 4 2, pagina 4) utilizzando ad es.
un cacciavite.
➤ Sostituire il fusibile difettoso con un fusibile nuovo dello stesso
amperaggio (T4AL 250V).
➤ Premere di nuovo in sede il portafusibili.
93

IT
Impiego CoolFreeze
6.10 Sostituzione del fusibile della spina (12/24 V)
➤ Estrarre il manicotto di compensazione (fig. 7 4, pagina 5)
dalla spina.
➤ Svitare la vite (fig. 7 5, pagina 5) dalla metà superiore dell’al-
loggiamento (fig. 7 1, pagina 5).
➤ Sollevare con cautela la metà superiore dell’alloggiamento da
quella inferiore (fig. 7 6, pagina 5).
➤ Estrarre la spina di contatto (fig. 7 3, pagina 5).
➤ Sostituire il fusibile difettoso (fig. 7 2, pagina 5) con un nuovo
fusibile dello stesso amperaggio (8A 32V).
➤ Riassemblare la spina nell’ordine inverso.
6.11 Sostituire il corpo luminoso
➤ Premere il pin di commutazione (fig. 8 2, pagina 5) verso il
basso in modo tale che la parte trasparente (fig. 8 1,
pagina 5) della lampadina possa essere estratta dal davanti.
➤ Sostituire il corpo luminoso.
NOTA
I
Assicurarsi che i LED del corpo luminoso siano orientati verso la
parte trasparente della lampadina.
➤ Inserire di nuovo in sede la parte trasparente della lampadina.
94

IT
CoolFreeze Pulizia e cura
7 Pulizia e cura
AVVERTENZA!
!
A
Staccare l'apparecchio dalla rete ogni volta che si effettua la
pulizia e la cura.
AVVISO! Pericolo di danni!
Non lavare mai il frigorifero sotto acqua corrente e non
immergerlo in acqua per risciacquarlo.
Per la pulizia non impiegare detergenti corrosivi oppure oggetti
ruvidi, perché potrebbero danneggiare il frigorifero.
➤ Pulire l’interno e l’esterno dell’apparecchio di tanto in tanto con
un panno umido.
➤ Assicurarsi che le aperture di aerazione e disaerazione dell'ap-
parecchio siano prive di polvere e sporcizia in modo da permettere, al calore generato durante il funzionamento, di fuoriuscire
e non danneggiare l'apparecchio.
8 Garanzia
Vale il termine di garanzia previsto dalla legge. Qualora il prodotto
risultasse difettoso, La preghiamo di rivolgersi alla filiale del produttore del suo Paese (l'indirizzo si trova sul retro del manuale di istruzioni), oppure al rivenditore specializzato di riferimento.
Per la riparazione e per il disbrigo delle condizioni di garanzia è necessario inviare la seguente documentazione:
una copia della fattura con la data di acquisto del prodotto,
un motivo su cui fondare il reclamo, oppure una descrizione del
guasto.
95

IT
Eliminazione dei disturbi CoolFreeze
9 Eliminazione dei disturbi
Disturbo Possibile causa Proposta di soluzione
L’apparecchio non funziona, il LED è spento.
L’apparecchio non raffredda (la spina è inserita
nella presa, il LED
“POWER” è acceso).
L'apparecchio non raffredda (la spina è inserita
nella presa, il LED
“POWER” lampeggia con
luce arancione, il display è
spento).
Con il funzionamento
con una presa da
12/24 V (accendisigari):
l’accensione è inserita,
l’apparecchio non funziona e il LED
nonèacceso.
Estrarre la spina dalla
presa ed eseguire le
seguenti verifiche.
Il display indica un messaggio di errore (p.es.
“Err1”) e l'apparecchio
non raffredda.
Nella presa da 12/24 Volt
(accendisigari) del veicolo
non c’è tensione.
Nella presa di tensione
alternata non c’è tensione.
Il fusibile dell’apparecchio
è diffettoso.
L’alimentatore integrato
è difettoso.
Compressore difettoso. I lavori di riparazione devono essere
Tensione della batteria
insufficiente.
La presa dell’accendisigari è sporca. Questo provoca un contatto elettrico
sbagliato.
Il fusibile della spina da
12/24 V è bruciato.
Il fusibile del veicolo è bruciato.
Un disturbo di funzionamento interno ha spento
l'apparecchio.
Nella maggior parte dei veicoli
è necessario che l’interruttore di
accensione sia inserito perché
all’accendisigari possa arrivare tensione.
Provare a collegare l’apparecchio ad
un’altra presa.
Sostituire il fusibile dell’apparecchio,
vedi “Come sostituire il fusibile
dell’apparecchio” a pagina 93.
I lavori di riparazione devono essere
effettuati solo da un Punto Assistenza
Clienti autorizzato.
effettuati solo da un Punto Assistenza
Clienti autorizzato.
Controllare la batteria ed eventualmente caricarla.
Se la spina inserita nella presa
dell’accendisigari è diventata molto
calda, significa che è necessario
pulire la presa o che la spina probabilmente non è montata in modo corretto.
Sostituire il fusibile (8 A) della spina
da 12 V, vedi “Sostituzione del fusibile
della spina (12/24 V)” a pagina 94.
Sostituire il fusibile del veicolo della
presa da 12/24 V (solitamente di
15 A); (osservare inoltre le istruzioni
per l’uso del vostro veicolo).
I lavori di riparazione devono essere
effettuati solo da un Punto Assistenza
Clienti autorizzato.
96

IT
CoolFreeze Smaltimento
10 Smaltimento
➤ Raccogliere il materiale di imballaggio possibilmente negli ap-
positi contenitori di riciclaggio.
Quando il prodotto viene messo fuori servizio definitivamente,
informarsi al centro di riciclaggio più vicino, oppure presso il proprio
M
rivenditore specializzato, sulle prescrizioni adeguate concernenti lo
smaltimento.
11 Specifiche tecniche
CF35 CF 40
Tensione di allacciamento:
Corrente nominale:
g: 6,0 A 6,0 A
– 12 V
g: 3,0 A 3,0 A
– 24 V
~
– 100–240 V
Capacità di raffreddamento: +10 °C / –18 °C (+50 °F / 0 °F)
Categoria: 1 1
Classe di efficienza energetica: A+ A+
Consumo energetico: 92 kWh/annum 101 kWh/annum
Volume utile: 31 l 37 l
Classe climatica: N, ST, T N, ST, T
Temperatura ambiente: +16°C –
Emissioni acustiche: 45 dB(A) 45 dB(A)
Dimensioni (L x A x P) in mm: 580 x 385 x 360 580 x 445 x 360
Peso: 15 kg 16 kg
: 1,3 / 0,7 A 1,3 / 0,7 A
12/24 V
+43 °C
g e 100–240 V
+16°C –
~
+43 °C
97

IT
Specifiche tecniche CoolFreeze
CF50 CF 60
Tensione di allacciamento:
Corrente nominale:
g: 7,0 A 7,0 A
– 12 V
g: 3,0 A 3,0 A
– 24 V
~
– 100–240 V
Capacità di raffreddamento: +10 °C / –18 °C (+50 °F / 0 °F)
Categoria: 1 1
Classe di efficienza energetica: A+ A+
Consumo energetico: 110 kWh/annum 111 kWh/annum
Volume utile: 47 l 57 l
Classe climatica: N, ST, T N, ST, T
Temperatura ambiente: +16°C –
Emissioni acustiche: 45 dB(A) 45 dB(A)
Dimensioni (L x A x P) in mm: 630 x 480 x 360 630 x 582 x 360
Peso: 18 kg 21,6 kg
: 1,3 / 0,7 A 1,3 / 0,7 A
12/24 V
+43 °C
g e 100–240 V
+16°C –
~
+43 °C
NOTA
I
Con temperature ambiente a partire da +32 °C (+90 °F) in su, la
temperatura minima non può più essere raggiunta.
Certificati di controllo:
4
Il circuito del refrigerante contiene R134a.
98

NL
CoolFreeze
Lees deze handleiding voor de ingebruikname zorgvuldig
door en bewaar deze. Geef de handleiding bij doorgeven van
het toestel door aan de gebruiker.
De fabrikant kan niet aansprakelijk worden gesteld voor schade die
door gebruik tegen de voorschriften in of door verkeerde bedie-
ning wordt veroorzaakt.
Inhoudsopgave
1 Verklaring van de symbolen . . . . . . . . . . . . . . . . . . . . . . . . . . . . 100
2 Veiligheidsinstructies . . . . . . . . . . . . . . . . . . . . . . . . . . . . . . . . . 100
2.1 Algemene veiligheid . . . . . . . . . . . . . . . . . . . . . . . . . . . . . 100
2.2 Veiligheid bij het gebruik van het toestel . . . . . . . . . . . . . 102
3 Omvang van de levering . . . . . . . . . . . . . . . . . . . . . . . . . . . . . . . 103
4 Gebruik volgens de voorschriften . . . . . . . . . . . . . . . . . . . . . . . 103
5 Beschrijving van de werking . . . . . . . . . . . . . . . . . . . . . . . . . . . 104
5.1 Omvang functies . . . . . . . . . . . . . . . . . . . . . . . . . . . . . . . . 104
5.2 Bedienings- en indicatie-elementen . . . . . . . . . . . . . . . . . 105
6 Bediening . . . . . . . . . . . . . . . . . . . . . . . . . . . . . . . . . . . . . . . . . . . 106
6.1 Voor het eerste gebruik . . . . . . . . . . . . . . . . . . . . . . . . . . 106
6.2 Tips om energie te besparen . . . . . . . . . . . . . . . . . . . . . . 107
6.3 Koelbox aansluiten . . . . . . . . . . . . . . . . . . . . . . . . . . . . . . 107
6.4 Accumeter gebruiken . . . . . . . . . . . . . . . . . . . . . . . . . . . . 108
6.5 Koelbox gebruiken . . . . . . . . . . . . . . . . . . . . . . . . . . . . . . 109
6.6 Temperatuur instellen . . . . . . . . . . . . . . . . . . . . . . . . . . . . 111
6.7 Koelbox uitschakelen . . . . . . . . . . . . . . . . . . . . . . . . . . . . 111
6.8 Koelbox ontdooien . . . . . . . . . . . . . . . . . . . . . . . . . . . . . . 111
6.9 Toestelzekering vervangen . . . . . . . . . . . . . . . . . . . . . . . . 112
6.10 Stekkerzekering (12/24 V) vervangen . . . . . . . . . . . . . . . 112
6.11 Gangbare lamp vervangen . . . . . . . . . . . . . . . . . . . . . . . . 112
7 Reiniging en onderhoud . . . . . . . . . . . . . . . . . . . . . . . . . . . . . . . 113
8Garantie . . . . . . . . . . . . . . . . . . . . . . . . . . . . . . . . . . . . . . . . . . . . 113
9 Verhelpen van storingen. . . . . . . . . . . . . . . . . . . . . . . . . . . . . . . 114
10 Afvoer . . . . . . . . . . . . . . . . . . . . . . . . . . . . . . . . . . . . . . . . . . . . . . 115
11 Technische gegevens . . . . . . . . . . . . . . . . . . . . . . . . . . . . . . . . . 115
99

NL
Verklaring van de symbolen CoolFreeze
1 Verklaring van de symbolen
GEVAAR!
D
!
!
A
I
Veiligheidsaanwijzing: Het niet naleven leidt tot overlijden of
ernstig letsel.
WAARSCHUWING!
Veiligheidsaanwijzing: Het niet naleven kan leiden tot overlijden
of ernstig letsel.
VOORZICHTIG!
Veiligheidsaanwijzing: Het niet naleven kan leiden tot letsel.
LET OP!
Het niet naleven ervan kan leiden tot materiële schade en de
werking van het product beperken.
INSTRUCTIE
Aanvullende informatie voor het bedienen van het product.
➤ Handeling: dit symbool geeft aan dat u iets moet doen. De ver-
eiste handelingen worden stap voor stap beschreven.
✓ Dit symbool beschrijft het resultaat van een handeling.
Afb. 1 5, pagina 3: deze aanduiding wijst u op een element in
een afbeelding, in dit voorbeeld op „positie 5 in afbeelding 1 op
pagina 3”.
2 Veiligheidsinstructies
2.1 Algemene veiligheid
GEVAAR!
D
100
Op boten: als uw toestel op het stroomnet is aangesloten, dient
u er absoluut voor te zorgen dat de stroomtoevoer via een
aardlekschakelaar beveiligd is.
 Loading...