

Dometic Group ACX3 30, ACX3 40, ACX3 40G Operating manual [ml]
ENDEFR
ESPTIT
NLDASV
NO
FIPLSKCSHU
MOBILE COOLING
ACX330, ACX340, ACX340G
Absorber Cooler
Operating manual . . . . . . . . . . . . . . . . . . . . 13
Absorber-Kühlbox
Bedienungsanleitung . . . . . . . . . . . . . . . . .30
Glacière à absorption
Notice d’utilisation . . . . . . . . . . . . . . . . . . .49
Nevera con extractor
Instrucciones de uso . . . . . . . . . . . . . . . . . .68
Geleira de absorção
Manual de instruções . . . . . . . . . . . . . . . . .88
Frigorifero portatile ad
assorbimento
Istruzioni per l’uso . . . . . . . . . . . . . . . . . . .107
Absorptie-koelbox
Gebruiksaanwijzing. . . . . . . . . . . . . . . . . .127
Absorptionskøleboks
Betjeningsvejledning . . . . . . . . . . . . . . . .145
Absorptionskylbox
Bruksanvisning. . . . . . . . . . . . . . . . . . . . . .162
ACX 3 SERIES
Absorbasjons-kjøleboks
Bruksanvisning . . . . . . . . . . . . . . . . . . . . . 179
Absorbtio-kylmälaatikko
Käyttöohje . . . . . . . . . . . . . . . . . . . . . . . . . 196
Lodówka absorbcyjna
Instrukcja obsługi . . . . . . . . . . . . . . . . . . . 213
Absorpčný chladiaci box
Návod na obsluhu. . . . . . . . . . . . . . . . . . . 232
Chladicí box absorbéru
Návod k obsluze . . . . . . . . . . . . . . . . . . . . 251
Abszorpciós hűtőláda
Használati utasítás. . . . . . . . . . . . . . . . . . .269

© 2020 Dometic Group. The visual appearance of the contents of this manual is
protected by copyright and design law. The underlying technical design and the
products contained herein may be protected by design, patent or be patent
pending. The trademarks mentioned in this manual belong to Dometic Sweden AB.
All rights are reserved.

ACX3
>30 cm
>4 cm
>4 cm
>10 cm
1
1
2
3
4
5
ACX 3 30, ACX 3 40
2
3
ACX3
1
2
3
4
5
ACX 3 40G
3
13
0
7
5
x 2
1
2
3
ACX 3 30, ACX 3 40
4
4
ACX3
71
62
53
4
MAX
0
1
2 3
ACX 3 40G
5
6
5
ACX3
1.
100 – 240 V
71
62
53
4
MAX
0
13
0
7
5
x 2
2.
2.
7
1.
2.
3.
8
6
ACX3
1.
2.
1.
DK, FI, NO,
SE
2.
DE, AT, CH,
LU
CZ, ES, FR, GB,
HU, IT, NL,
PL, PT, SK
9
7
ACX3
DE, AT, CH, PL
DE, AT, CH, LU, DK, ES,
FR, IE, IT, SE
CZ, ES, FR, GB, IT, NL, PT,
SE, SK
DK, FI, NO
3.
4.
3.
4.
5.
6.
5.
4.
3.
5.
3.
6.
4.
5.
7.
DE, AT, CH, LU
DK, FI, HU, NO, PL, SE
BE, CZ, ES, FR, GB, IT, NL, PT, SK
I3B/P – 50 mbar
I
3
B/P – 30 mbar
I
3
± 28 - 30/37 mbar
0
8
ACX3
a
9
ACX3
1.
1.
>10 s
20 s
71
62
53
4
MAX
0
13
0
7
5
x 2
2.
2.
4.
3. 3.
4.
5.
71
62
53
4
MAX
0
13
0
7
5
x 2
6.
6.
b
10
ACX3
500
440,5
420
293
442
3411
c
500
505,5
485
358
442
3411
d
11
ACX3
500
505,5
485
358
442
34
11
e
12

EN
ACX3 Explanation of symbols
Please carefully read and follow all instructions, guidelines and warnings included in this product manual in order to ensure that you install,
use and maintain the product properly at all times.
By using the product, you hereby confirm that you have read this disclaimer, all instructions, guidelines and warnings carefully and that you
understand and agree to abide by the terms and conditions as set forth herein.
You agree to use this product only for the intended purpose and application and in accordance with the instructions, guidelines and warnings
as set forth in this product manual as well as in accordance with all applicable laws and regulations.
A failure to read and follow the instructions and warnings set forth herein may result in an injury to yourself and others, damage to your product
or damage to other property in the vicinity.
Dometic accepts no liability for any loss, damage or injury incurred, directly or indirectly, from the installation, use or maintenance of the
product not in compliance with the instructions and warnings in the product manual.
This product manual, including the instructions, guidelines and warnings, and related documentation may be subject to changes and
updates. For up-to-date product information, please visit: documents.dometic.com, dometic.com.
Table of contents
1 Explanation of symbols . . . . . . . . . . . . . . . . . . . . . . . . . . . . . . . . . . . . . . . . . . 13
2 Safety instructions . . . . . . . . . . . . . . . . . . . . . . . . . . . . . . . . . . . . . . . . . . . . . .14
3 Scope of delivery . . . . . . . . . . . . . . . . . . . . . . . . . . . . . . . . . . . . . . . . . . . . . .18
4 Intended use . . . . . . . . . . . . . . . . . . . . . . . . . . . . . . . . . . . . . . . . . . . . . . . . . . 18
5 Technical description . . . . . . . . . . . . . . . . . . . . . . . . . . . . . . . . . . . . . . . . . . .18
6 Operation . . . . . . . . . . . . . . . . . . . . . . . . . . . . . . . . . . . . . . . . . . . . . . . . . . . 20
7 Cleaning and maintenance. . . . . . . . . . . . . . . . . . . . . . . . . . . . . . . . . . . . . . 25
8 Warranty . . . . . . . . . . . . . . . . . . . . . . . . . . . . . . . . . . . . . . . . . . . . . . . . . . . . 26
9 Troubleshooting . . . . . . . . . . . . . . . . . . . . . . . . . . . . . . . . . . . . . . . . . . . . . . 26
10 Disposal . . . . . . . . . . . . . . . . . . . . . . . . . . . . . . . . . . . . . . . . . . . . . . . . . . . . . 27
11 Technical data . . . . . . . . . . . . . . . . . . . . . . . . . . . . . . . . . . . . . . . . . . . . . . . . 28
1 Explanation of symbols
WARNING!
!
!
Safety instruction: Indicates a hazardous situation that, if not avoided,
could result in death or serious injury.
CAUTION!
Safety instruction: Indicates a hazardous situation that, if not avoided,
could result in minor or moderate injury.
13

EN
Safety instructions ACX3
NOTICE!
A
I
Indicates a situation that, if not avoided, can result in property damage.
NOTE
Supplementary information for operating the product.
2 Safety instructions
2.1 General safety
WARNING! Failure to obey these warnings could result in death
or serious injury.
!
Electrocution hazard
• Do not operate the cooling device if it is visibly damaged.
• If this cooling device's power cable is damaged, it must be replaced
by the manufacturer, customer service or a similarly qualified person in
order to prevent safety hazards.
• This cooling device may only be repaired by qualified personnel.
Improper repairs can lead to considerable hazards.
Fire hazard
• The refrigerant in the refrigerant circuit is highly flammable.
In the event of any damage to the refrigerant circuit (smell of
ammonia):
– Switch off the device.
– Avoid naked flames and sparks.
– Air the room well.
• When positioning the device, ensure the supply cord is not trapped or
damaged.
• Do not locate multiple portable socket-outlets or portable power
supplies at the rear of the device.
Health hazard
• Never open the absorber unit. It is under high pressure and can cause
injury if it is opened.
14

EN
ACX3 Safety instructions
• This device can be used by children aged from 8 years and above and
persons with reduced physical, sensory or mental capabilities or lack
of experience and knowledge if they have been given supervision or
instruction concerning use of the device in a safe way and understand
the hazards involved.
• Children shall not play with the device.
• Cleaning and user maintenance shall not be made by children without
supervision.
• Children aged from 3 to 8 years are allowed to load and unload
cooling devices.
Explosion hazard
• Do not store any explosive substances such as spray cans with a
flammable propellant in the cooling device.
CAUTION! Failure to obey these cautions could result in minor or
moderate injury.
!
Electrocution hazard
• Before starting the cooling device, ensure that the power supply line
and the plug are dry.
• Disconnect the cooling device from the power supply
– before each cleaning and maintenance
– after every use
Health hazard
• Please check if the cooling capacity of the device is suitable for storing
the food or medicine you wish to cool.
• Only use the appliance where there is good ventilation.
• Do not let the appliance operate unattended.
• Only operate the cooler from a single energy source.
• Food may only be stored in its original packaging or in suitable
containers.
• Opening the cooling device for long periods can cause significant
increase of the temperature in the compartments of the device.
• Clean regularly surfaces that can come in contact with food and
accessible drainage systems.
• Store raw meat and fish in suitable containers in the device, so that it is
not in contact with or can drip onto other food.
15

EN
Safety instructions ACX3
• If the device is left empty for long periods:
– Switch off the device.
– Defrost the device.
– Clean and dry the device.
– Leave the lid open to prevent mould developing within the device.
NOTICE! Damage hazard
A
• Check that the voltage specification on the type plate corresponds to
that of the energy supply.
• Only connect the cooling device as follows:
– DC outlet: Only use cables with an appropriate cross section.
– AC outlet: Only use the AC cable supplied
• Never pull the plug out of the socket by the cable.
• If the cooling device is connected to a DC outlet: Only select DC
operation (battery mode) if you are using a battery monitor or if the
alternator in your vehicle provides sufficient voltage.
• If the cooling device is connected to a DC outlet: Disconnect the
cooling device or switch it off when you turn off the engine. Otherwise
you may discharge the battery.
• The cooling device is not suitable for transporting caustic materials or
materials containing solvents.
• The insulation of the cooling device contains flammable cyclopentane
and requires special disposal procedures. Deliver the cooling device
at the end of its life-cycle to an appropriate recycling center.
• Do not use electrical devices inside the cooling device unless they are
recommended by the manufacturer for the purpose.
• Do not place the cooling device near naked flames or other heat
sources (heaters, direct sunlight, gas ovens etc.).
• Risk of overheating!
Always ensure sufficient ventilation so that the heat generated during
operation can dissipate. Make sure that the cooler is sufficiently far
away from walls and other objects so that the air can circulate.
Keep the following spaces (fig. 1, page 3).
• To enable the refrigerant to circulate properly, the cooler may not
tilted by more than 3°. Use a spirit level to make sure the cooler is level.
• Ensure that the ventilation openings are not covered.
• Do not fill the inner container with ice or fluids.
• Never immerse the cooling device in water.
• Protect the cooling device and cables against heat and moisture.
16

EN
ACX3 Safety instructions
• The device shall not to be exposed to rain.
2.2 Safety when operating with gas
WARNING! Failure to obey these warnings could result in death
or serious injury.
!
Explosion hazard
• Only operate the device at the pressure sho wn o n th e ty pe pla te. Only
use pressure controllers with a fixed setting which comply with the
national regulations. Use a DIN-DVGW-approved pressure regulator
with a fixed setting in accordance with DIN EN 16129.
• When using gas, the cooler may only be used outdoors.
• Beware of suffocation!
Operating the device with gas in an unventilated area will reduce the
amount of oxygen in this area.
• Do not operate the device in unventilated areas such as enclosed
premises, tents, motor vehicles, motor homes, caravans, ships,
yachts, boots and truck cabs.
• Never place the device near flammable materials (paper, dry leaves,
textiles).
• Keep flammable objects away from the burner.
• Never store liquid gas cylinders in unventilated areas or below
ground level (funnel shaped holes in the ground).
• Keep liquid gas cylinders away from direct sunlight. The temperature
may not exceed 50 °C.
• Never use a naked flame to check the cooler for leaks.
• If you smell gas:
– Close the gas supply cock and the valve on the cylinder.
– Do not press an electric switch.
– Put out any naked flames.
– Have the gas system checked by a specialist.
A
NOTICE!
• Only use propane or butane gas (not natural gas).
17

EN
Scope of delivery ACX3
3Scope of delivery
•Absorber cooler
• Tray with cover for making ice cubes
4 Intended use
The absorber cooler is suitable for cooling food.
The cooler can be operated with DC power, AC power or gas.
The cooler is suitable for camping use.
This product is only suitable for the intended purpose and application in accordance
with this instruction. Any other use, deviating from the intended use, is not allowed!
Dometic accepts no liability for any loss, damage or injury incurred, directly or
indirectly due to other as the intended use.
5 Technical description
The cooler is portable. It can keep goods cool up to max. 30 °C below ambient
temperature.
If using gas, the cooler may only be operated outdoors.
If using electricity, the cooler may also be operated in enclosed spaces.
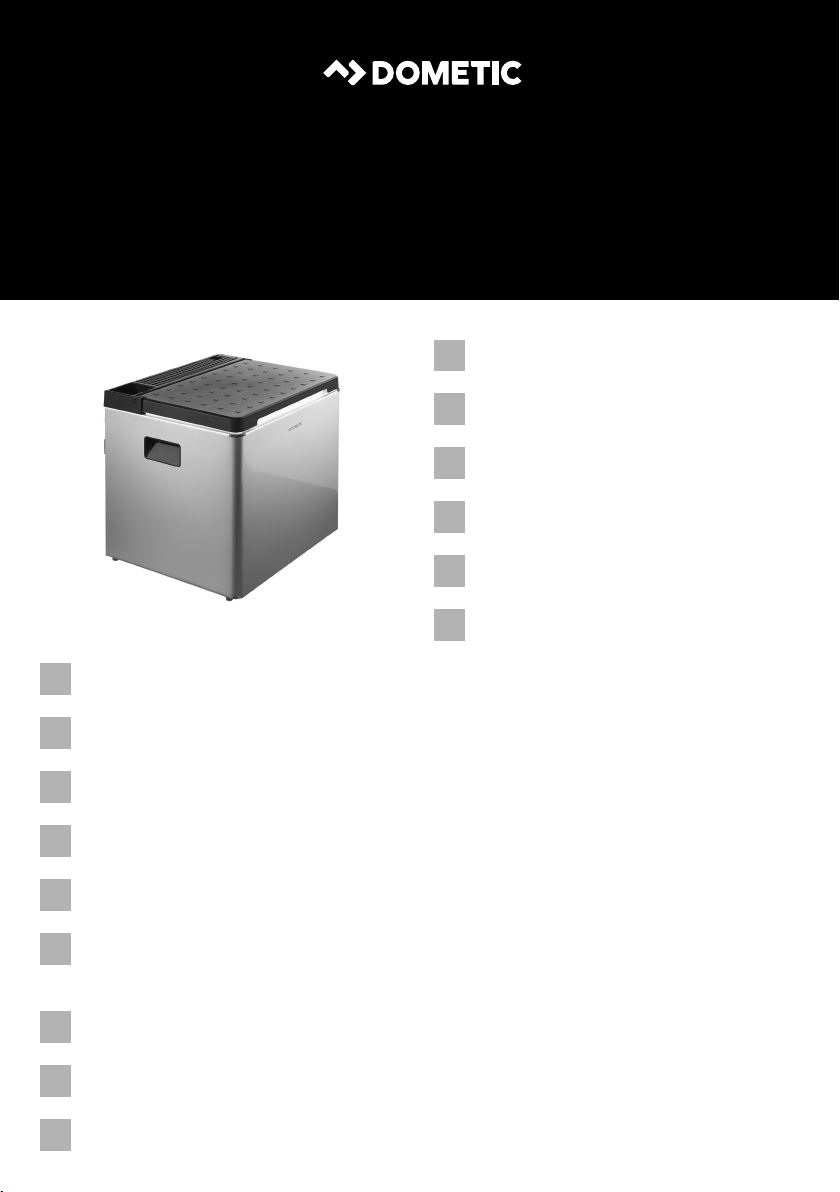
5.1 Connections
No. in
fig. 2, page 3,
fig. 3, page 4
1 DC connection cable
2 AC connection cable
3 Control elements
4 Gas connection port (only ACX3 30 and ACX3 40)
4 Gas cartridge (only ACX3 40G)
5 Pilot light sight glass
Description
18

EN
ACX3 Technical description
5.2 Control elements
No. in
fig. 4, page 4,
fig. 5, page 5
1 Cooling level controller (AC operation)
2 Cooling level controller (gas operation)
3 Ignition button
When the cooler is connected to the AC mains, the required cooling level is set using
the cooling level controller for AC operation (1).
➤ To increase the cooling level, turn the cooling level controller (1) clockwise.
For the maximum cooling level, turn the cooling level controller (1) clockwise as
far as it will go.
➤ To decrease the cooling level, turn the cooling level controller (1) anticlockwise.
➤ To switch the cooler off, turn the cooling level controller (1) anticlockwise as far as
it will go.
When the cooler is connected to the DC power socket the cooling level cannot be
adjusted.
Description
When the cooler is operated with gas, the required cooling level is set using the
cooling level controller for gas operation (2).
➤ To increase the cooling level, turn the cooling level controller (2) clockwise.
For the maximum cooling level, turn the cooling level controller (2) to the
maximum position.
➤ To decrease the cooling level, turn the cooling level controller (2) anticlock-
wise.
➤ To switch the cooler off, turn the cooling level controller (2) anticlockwise as far
as it will go .
19

EN
Operation ACX3
6Operation
NOTICE! Beware of damage
A
I
• Ensure that the items placed in the cooler are suitable for cooling to
the selected temperature.
• Ensure that food or liquids in glass containers are not excessively
refrigerated. Liquids expand when they freeze. and can therefore
destroy glass containers.
• Ensure that your refrigerated container is well ventilated so that any
heat created can dissipate. Otherwise proper functioning cannot be
ensured. It is especially important not to cover the air vents.
NOTE
• Before starting your new cooler for the first time, you should clean it
inside and outside with a damp cloth for hygienic reasons (see also
chapter “Cleaning and maintenance” on page 25).
• Cool the cooler for about 24 hours before starting your journey using
gas or electricity from the mains. This way your cooler will attain the
required cooling level faster when you reach your destination.
• The cooling performance can be affected by:
– the ambient temperature
– the amount of food to be conserved
– how often the lid is opened.
• A few water drops may form inside the cooler if it has been cooling
for a lengthy period. This is normal because the moisture in the air
condenses to water when the temperature in the cooler falls. The
cooler is not defective. Wipe it out with a dry cloth if necessary.
➤ Press the control element cover (fig. 2 3, page 3 and fig. 3 3, page 4) to
open it.
➤ To close the control element cover (fig. 2 3, page 3 and fig. 3 3, page 4),
push it towards the lid until it latches.
6.1 Energy saving tips
• Choose a well ventilated location which is protected from direct sunlight.
• Allow warm food to cool down first before placing it in the cooling device to
keep cool.
• Do not open the cooling device more often than necessary.
• Do not leave the cooling device open for longer than necessary.
20

EN
ACX3 Operation
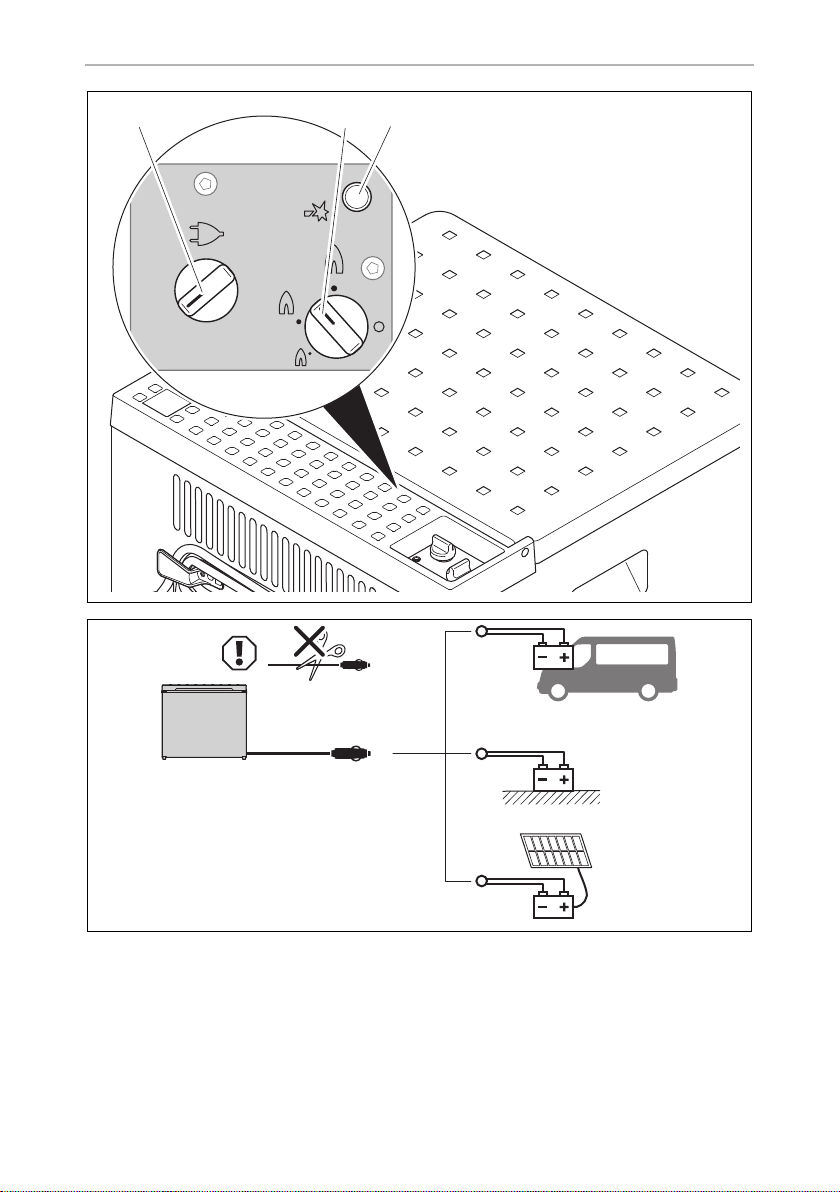
6.2 Using the cooler in DC mode
Proceed as follows (fig. 6, page 5):
➤ Place the cooler on a firm, level surface.
➤ Plug the DC connection cable (fig. 2 1, page 3 and fig. 3 1, page 4) into the
DC socket in the vehicle.
✔ The cooler starts cooling the interior.
➤ Pull out the DC connection cable to switch off the cooler.
6.3 Connecting to vehicle power
NOTE
I
6.4 Using the cooler in AC mode
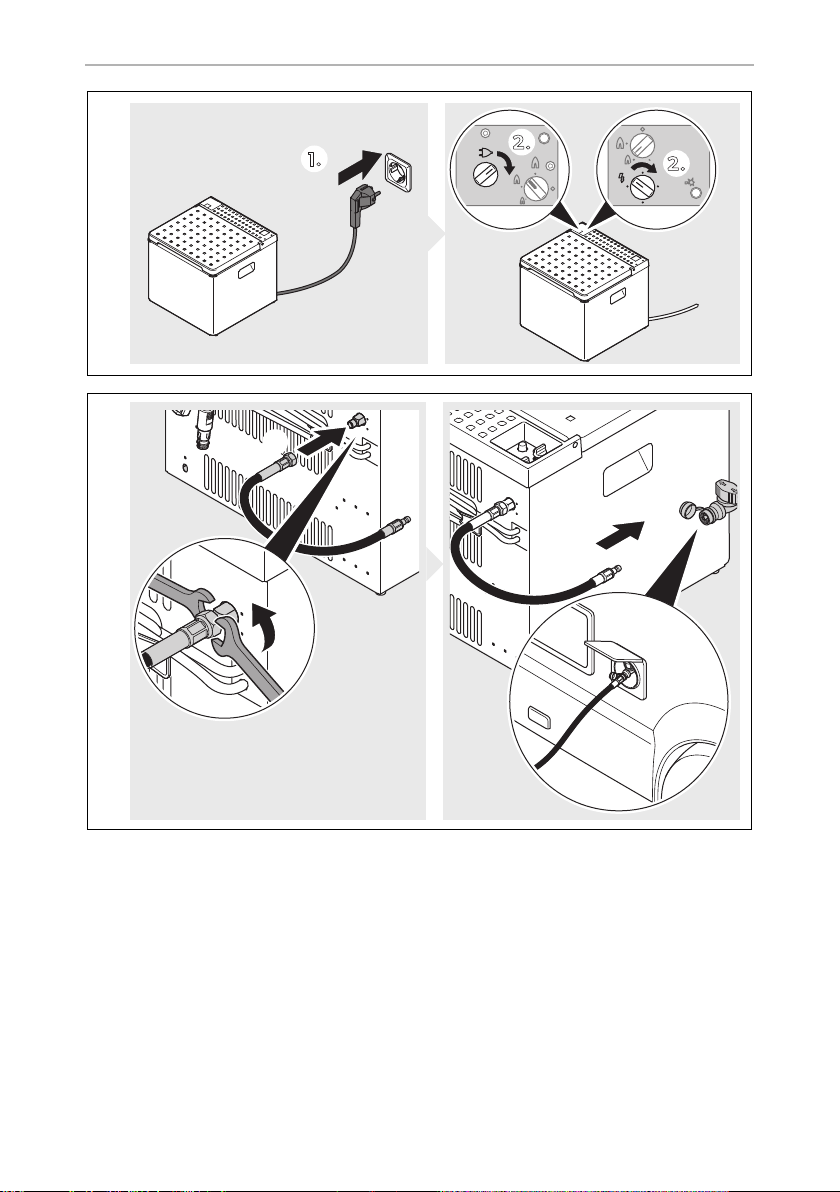
Proceed as follows (fig. 7, page 6):
➤ Place the cooler on a firm, level surface.
If you connect the cooling device to the vehicle power, remember that
you may have to turn on the ignition to supply it with power.
➤ Plug the AC connection cable (fig. 2 2, page 3 and fig. 3 2, page 4) into the
AC mains.
➤ Turn the cooling level controller (fig. 4 1, page 4 and fig. 5 1, page 5) to the
required position.
✔ The cooler starts cooling the interior.
6.5 Connecting the cooler to a gas supply
WARNING!
!
• Never check for leaks with an open flame or near sources of ignition.
• Only use approved hose lines (DIN 4815, part 2) with a maximum
length of 1.5 m.
21

EN
Operation ACX3
NOTICE!
A
I
6.6 Connecting the cooler to an external gas connection
!
• Only use cylinders of propane or butane gas (not natural gas or city
gas) with an approved pressure reduction valve and suitable head.
Compare the pressure information on the type plate with the
pressure information on the pressure regulator on the propane or
butane gas cylinder.
• Observe the pressures which are permitted in your country. Use a
DIN-DVGW-approved pressure regulator with a fixed setting:
– The following applies for Germany: DIN EN 16129.
– The following applies for Europe: EN 732, EN 521 and
EN 437:2019-04.
• The cooler may only be operated with hose lines in a perfect
technical condition. Replace any porous or damaged hose lines.
NOTE
Use a gas pressure controller to match the gas pressure that is specified
on the type plate.
socket (ACX3 30 and ACX3 40)
WARNING!
There must be a shut-off device in the gas line so that the cooler can be
cut off separately. The shut-off device must be easily accessible.
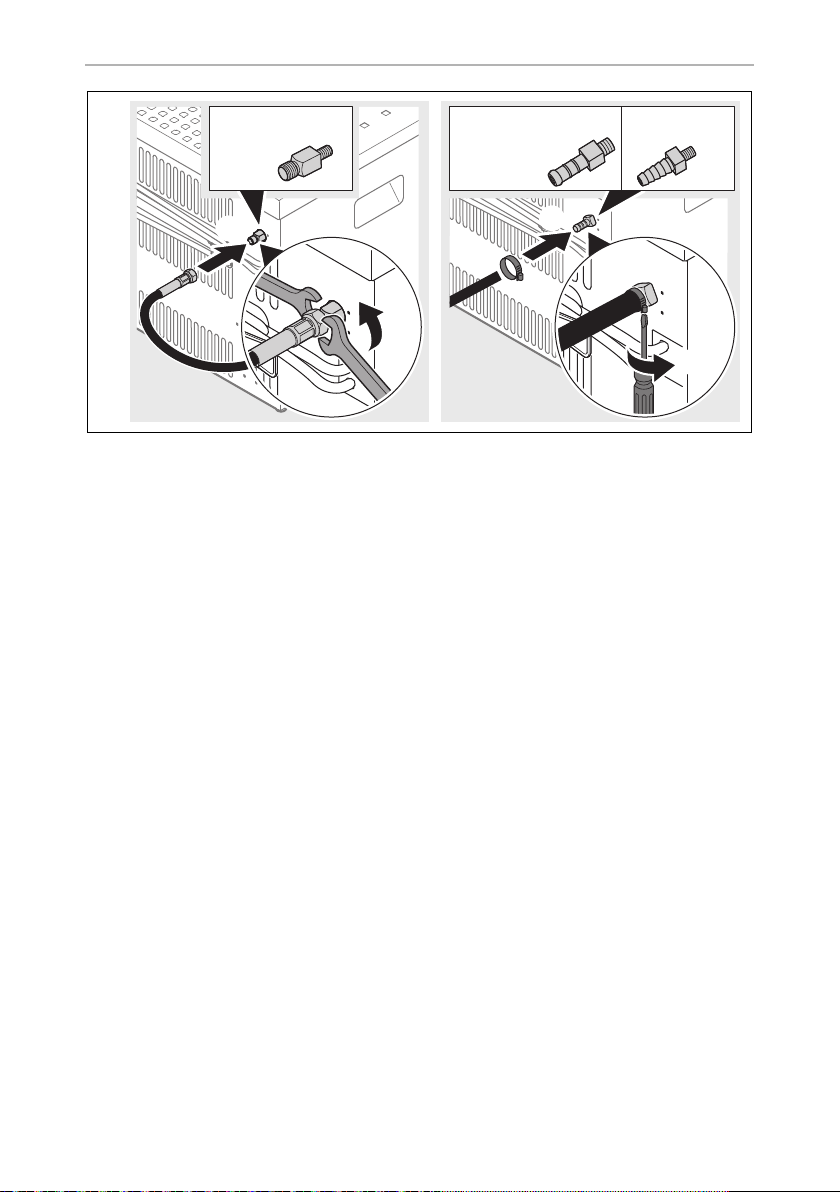
Proceed as follows (fig. 8, page 6):
➤ Place the cooler on a firm, level surface.
➤ Connect the hose line to the gas connection port of the cooler.
To do this, use two open-end spanners of 13 mm and 17 mm.
➤ Make sure that the hose line
– is not crushed or kinked
– is a safe distance from the burner
➤ Take the safety cap off the safety coupling of the gas port.
➤ Push the sleeve of the hose line into the safety coupling until you hear it latch.
➤ Open the valve on the safety coupling.
➤ Open the valve of the gas cylinder or container.
➤ Check all connections with leak spray.
22

EN
ACX3 Operation
There are no leaks at the connections if no bubbles form.
Disconnecting the cooler from the external gas supply
➤ Close the valve of the safety coupling of the gas port.
➤ Disconnect the hose line by pushing the sleeve towards the valve handle.
➤ Put the cap onto the safety coupling.
➤ Turn the cooling level controller (fig. 4 2, page 4 and fig. 5 2, page 5) anti-
clockwise as far as it will go (position “”).
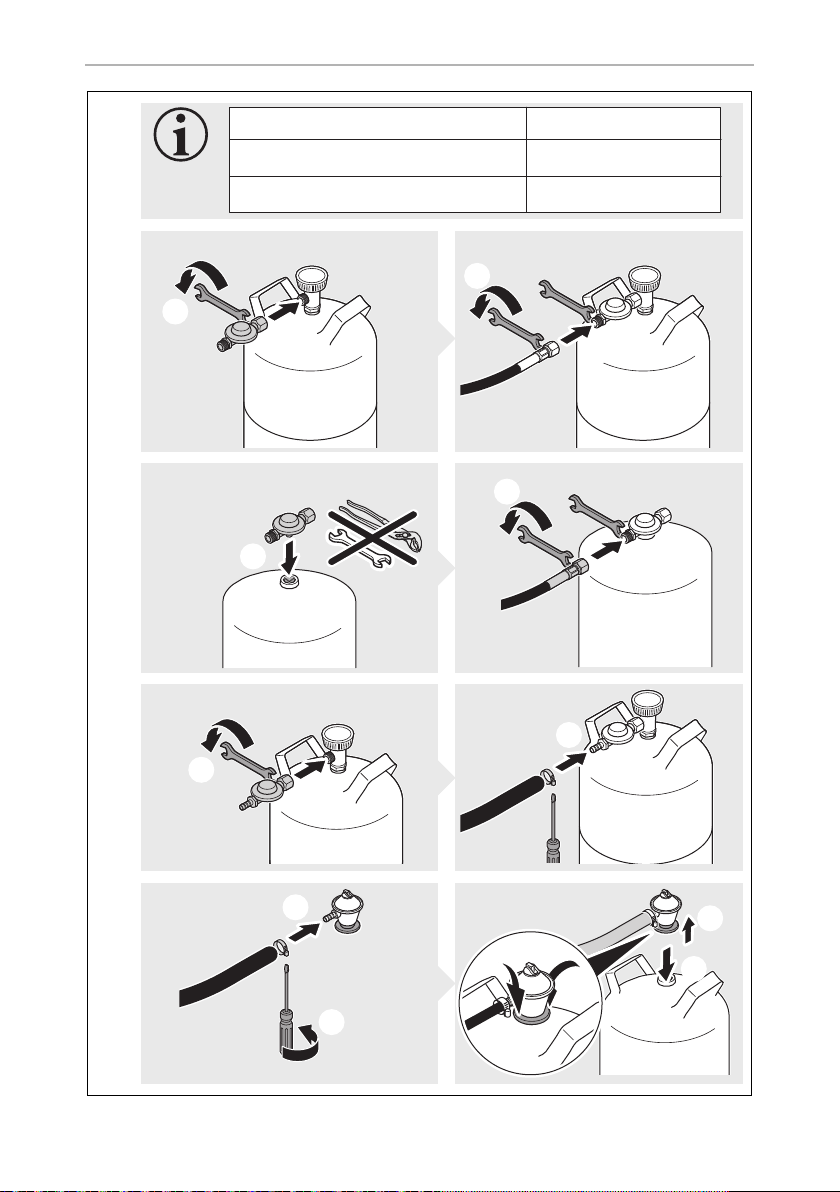
6.7 Connecting the cooler to a gas cylinder (ACX3 30 and ACX3 40)
Note the following country-specific gas type and gas pressure categories:
Country Device categories
Denmark (DK), Finland (FI), Hungary (HU),
Norway (NO), Poland (PL), Sweden (SE)
Belgium (BE), Czech Republic (CZ), France (FR),
Italy (IT), The Netherlands (NL), Portugal (PT),
Slovakia (SK), Spain (ES), United Kingdom (GB)
Germany (DE), Austria (AT), Switzerland (CH),
Luxembourg (LU)
➤ Connect the ACX 3 30 or ACX3 40 cooler to the gas hose (fig. 9, page 7) and
the gas cylinder (fig. 0, page 8).
NOTICE!
A
• After connecting the device to the gas supply, check the gas pipe for
leakage at all the connection points (all threaded connections, hose
connections with clamps, connection to the gas cylinder) using a
foaming agent, e.g. with soap.
• In addition, perform a visual inspection of the hose (for cracks,
weathering, damage).
• Replace any faulty hoses immediately with a new one.
I3B/P – 30 mbar
I
+ – 28 – 30 / 37 mbar
3
I
B/P – 50 mbar
3
23

EN
Operation ACX3
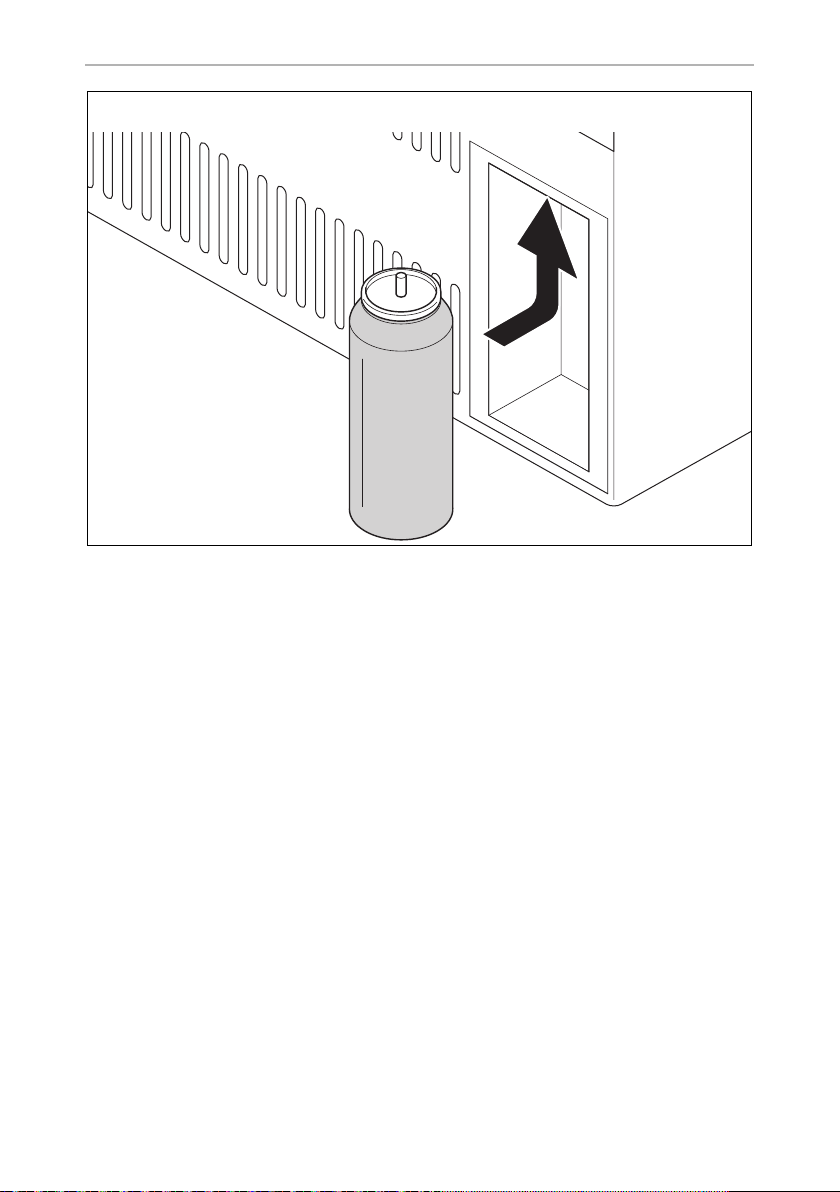
6.8 Connecting a gas cartridge to the cooler (ACX3 40G)
WARNING!
!
I
➤ Push the gas cartridge up into the port on the cooler (fig. a, page 9).
!
➤ Check all connections with leak spray.
There are no leaks at the connections if no bubbles form.
Any time you move the cooler:
➤ Take out the gas cartridge first.
• Observe the handling and storage instructions for the gas cartridge.
• Make sure that the ports on the cartridge and the cooler are free of
dirt.
NOTE
The cooler is suitable for operation with self-sealing gas cartridges of the
type CAMPINGAZ CP250.
WARNING!
Never check for leaks with an open flame or near sources of ignition.
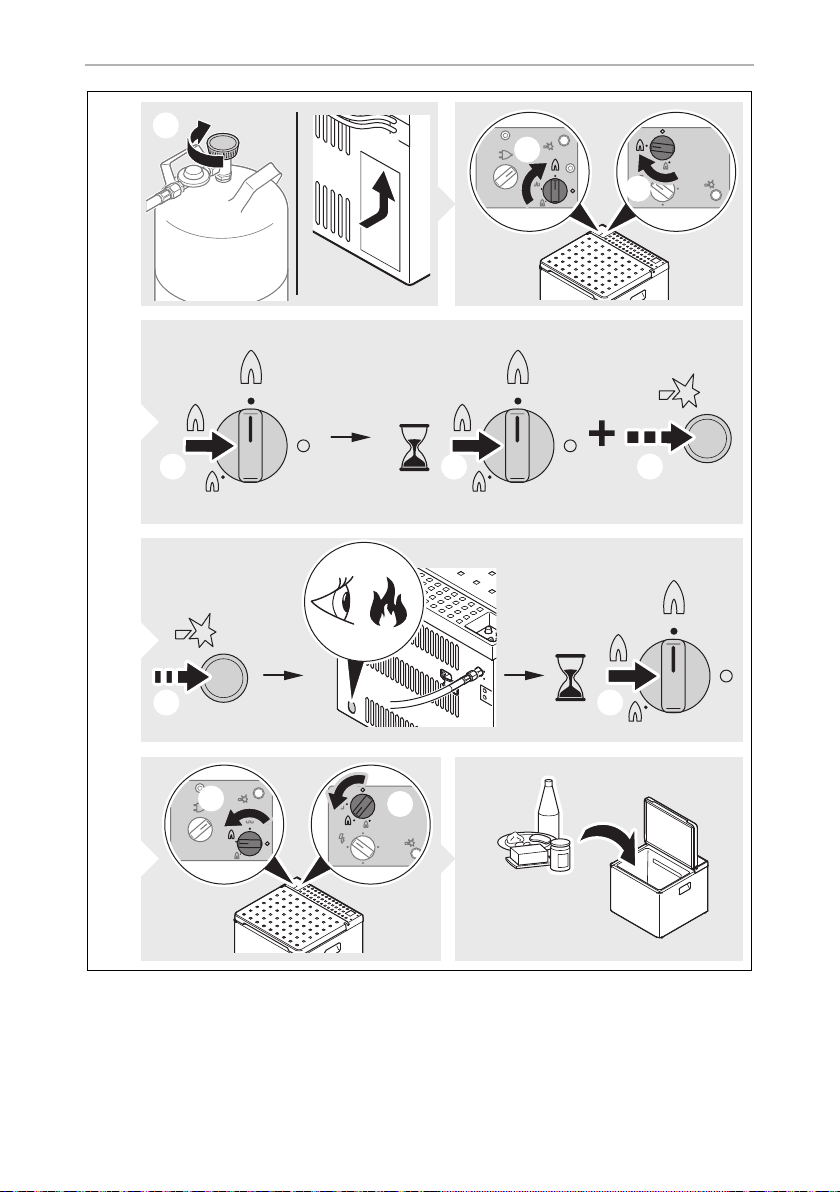
6.9 Using the cooler in gas mode
Proceed as follows (fig. b, page 10):
➤ Turn the cooling level controller (fig. 4 2, page 4 and fig. 5 2, page 5) to the
maximum position.
➤ Press and hold the cooling level controller.
➤ After 10 seconds, press the ignition button (fig. 4 3, page 4 and fig. 5 3,
page 5) several times quickly in succession until the flame is lit.
✔ After ignition, you can see the flame in the sight glass (fig. 2 5, page 3 and
fig. 3 5, page 4).
➤ Hold down the cooling level controller for another 20 seconds.
To switch off the cooler:
➤ Close off the gas valve on the device and on the gas cylinder.
24

EN
ACX3 Cleaning and maintenance
6.10 Defrosting the cooler
NOTICE!
A
I
➤ Disconnect the voltage and gas supply.
➤ Empty the cooler.
➤ Put a cloth in the cooler to absorb any excess water.
➤ Leave the lid open.
➤ Wipe the coolerdry with a cloth.
Never use mechanical tools to remove ice or to loosen objects stuck to
the device.
NOTE
Over time, frost builds up on the cooling fins inside the cooler. If this
layer of frost is about 3 mm thick, you should defrost the cooler.
7 Cleaning and maintenance
NOTICE! Damage hazard
A
➤ Occasionally clean the product with a damp cloth.
7.1 Cleaning the gas burner
!
I
Do not use sharp or hard objects or cleaning agents for cleaning as these
may damage the product.
WARNING!
• Work on gas installations may only be performed by qualified
technicians.
• Allow the burner to cool down before cleaning it.
NOTE
• Dirt in the gas burner is indicated by poor ignition or deflagrations.
• The manufacturer also recommends cleaning the burner after it has
not been used for an extended period, and at least once a year.
25
EN
Warranty ACX3
8Warranty
The statutory warranty period applies. If the product is defective, please contact your
retailer or the manufacturer's branch in your country (see dometic.com/dealer).
For repair and warranty processing, please include the following documents when
you send in the device:
• A copy of the receipt with purchasing date
• A reason for the claim or description of the fault
9 Troubleshooting
Problem Possible cause Suggested remedy
The cooler does not
work.
IN DC mode:
The cooler is not
working (plug is
inserted).
In AC mode:
The cooler is not working (plug is inserted).
The cooler has not been
set up properly.
The refrigerant circuit is
defective.
No voltage is flowing
from the DC power
socket in your vehicle.
The DC socket is dirty.
This results in a poor
electrical contact.
The fuse of the DC plug
has blown.
The vehicle fuse has
blown.
No voltage present in
the AC socket.
Check if the device is horizontal.
Check if the ventilation of the device is
sufficient.
This can only be repaired by an
authorised repair centre.
The ignition must be switched on in
most vehicles to supply current to the
DC power socket.
If the plug of your cooler becomes
very warm in the DC socket, either the
socket must be cleaned or the plug
has not been assembled correctly.
Replace the fuse of the DC plug with
one of the same rating.
Replace the vehicle fuse in the DC
socket (usually 15 A) (Please refer to
the operating manual of your vehicle).
Try using another plug socket.
26

EN
ACX3 Disposal
Problem Possible cause Suggested remedy
In gas mode:
The cooler is not
working (to cooler is
connected to the gas).
The cooler does not start
up after a long period of
inactivity.
The cooler is not
properly connected to
the gas.
– Disconnect the device from the power
Check if the gas supply is in full
working order.
Check if the valve on the gas bottle is
open.
Check if there is still gas in the bottle.
Check if several energy sources are
connected at the same time.
Hold down the cooling level control-
ler longer to ignite the flame.
supply, turn it upside down and wait
for five minutes.
Turn the cooler the right way up again
and switch it on again.
10 Disposal
➤ Place the packaging material in the appropriate recycling waste bins wherever
possible.
If you wish to finally dispose of the product, ask your local recycling centre
or specialist dealer for details about how to do this in accordance with the
M
applicable disposal regulations.
27
EN
Technical data ACX3
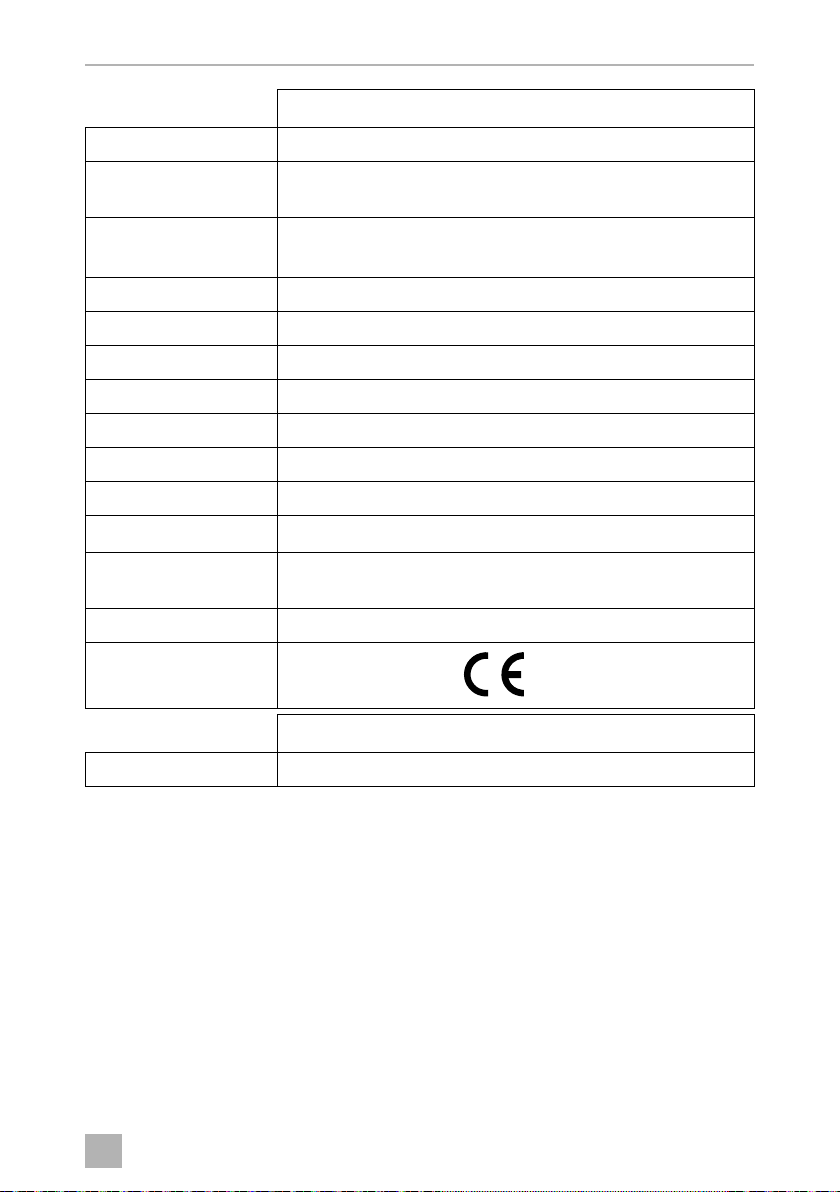
11 Technical data
ACX3 30 ACX3 40
Gas consumption: 12.6 g/h
Nominal heat input
Butane: 175 W
Minimum heat input
Butane: 128 W
Connection voltage: 12 Vg
220 – 240 Vw, 50/60 Hz
Power consumption: 75 W 85 W
Cooling capacity: max. 30 °C below ambient temperature
Total volume: 33 l 41 l
Energy consumption: 1.4 kWh/24 h 1.6 kWh/24 h
Climate class: N
Ambient temperature: 16 to 32 °C
Noise emission: >0 dB
Refrigerant: 159 g H
Dimensions
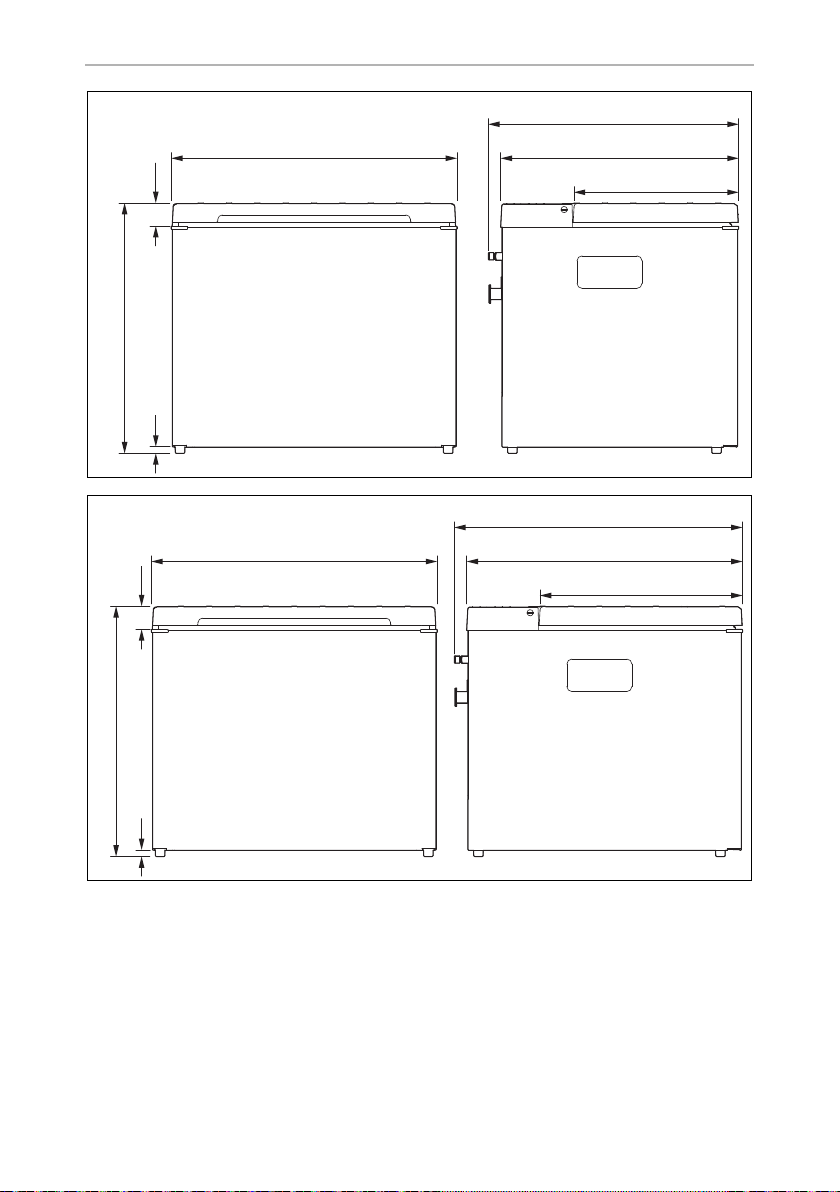
(W x H x D) in mm: see fig. c, page 11 see fig. d, page 11
Weight: Approx. 15 kg Approx. 16 kg
Inspection/certification:
O+86g NH
2
2806
3
ACX3 30 ACX3 40
28 – 30 mbar, 30 mbar,
37 mbar
Ref. no.: 9600028404, 9600028405,
9600028406, 9600028413
ACX3 30 ACX3 40
50 mbar 50 mbar
Ref. no.: 9600028403 9600028407
28 – 30 mbar, 30 mbar,
37 m bar
9600028408, 9600028409,
9600028410, 9600028411
28
EN
ACX3 Technical data
ACX3 40G
Gas consumption: 12.6 g/h
Nominal heat input
Butane: 175 W
Connection voltage: 12 Vg
220 – 240 Vw, 50/60 Hz
Power consumption: 85 W
Cooling capacity: max. 30 °C below ambient temperature
Total volume: 41 l
Energy consumption: 1.6 kWh/24 h
Climate class: N
Ambient temperature: 16 to 32 °C
Noise emission: >0 dB
Refrigerant: 159 g H
Dimensions
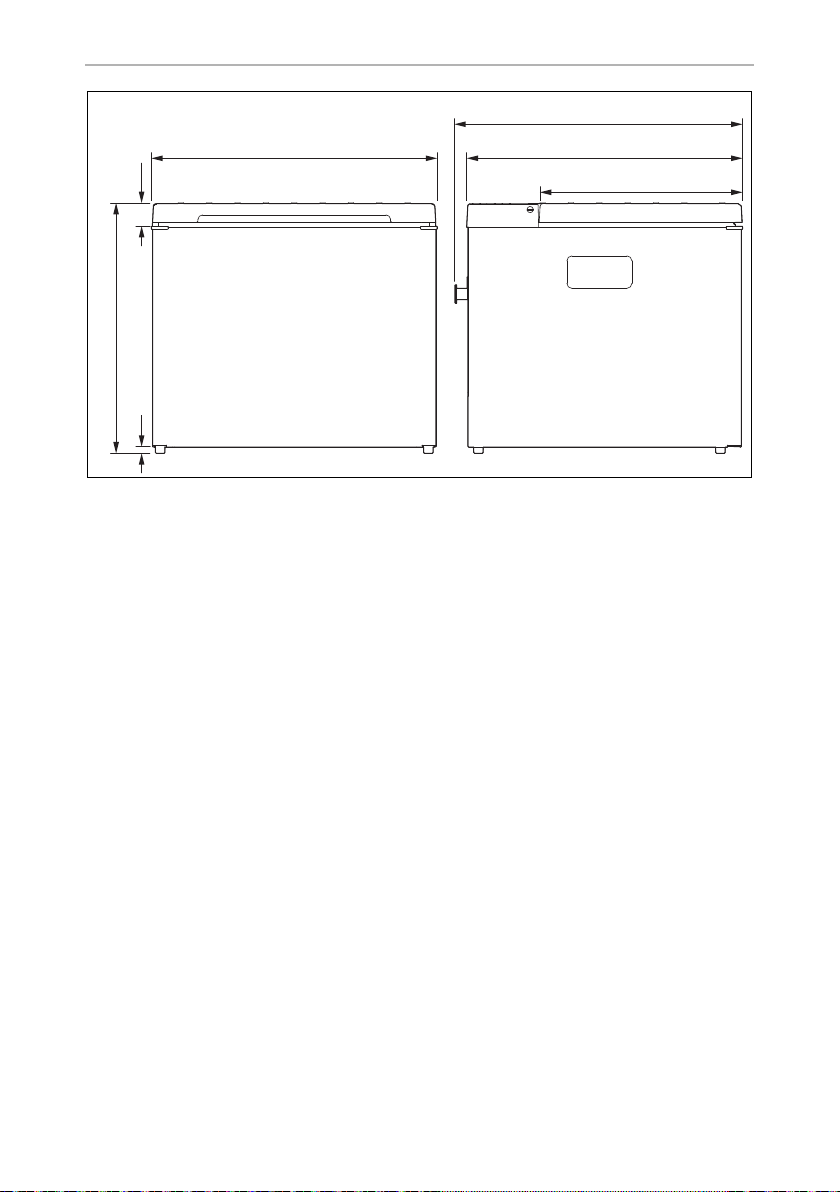
(W x H x D) in mm: see fig. e, page 12
Weight: Approx. 16 kg
Inspection/certification:
Ref. no.: 9600028412,9600028414
O+86g NH
2
2806
ACX3 40G
3
29

DE
Erklärung der Symbole ACX3
Lesen und befolgen Sie bitte alle Anweisungen, Richtlinien und Warnhinweise in diesem Produkthandbuch sorgfältig, um sicherzustellen,
dass Sie das Produkt jederzeit ordnungsgemäß installieren, verwenden und warten.
Durch die Verwendung des Produktes bestätigen Sie hiermit, dass Sie diesen Haftungsausschluss, alle Anweisungen, Richtlinien und
Warnhinweise sorgfältig gelesen haben und dass Sie die hierin dargelegten Bestimmungen verstanden haben und ihnen zustimmen.
Sie erklären sich damit einverstanden, dieses Produkt nur für den angegebenen Verwendungszweck und in Übereinstimmung mit den
Anweisungen, Richtlinien und Warnhinweisen dieses Produkthandbuchs sowie in Übereinstimmung mit allen geltenden Gesetzen und
Vorschriften zu verwenden.
Eine Nichtbeachtung der hierin enthaltenen Anweisungen und Warnhinweise kann zu einer Verletzung Ihrer selbst und anderer Personen,
zu Schäden an Ihrem Produkt oder zu Schäden an anderem Eigentum in der Umgebung führen.
Dometic übernimmt keine Haftung für Verluste, Schäden oder Verletzungen, die direkt oder indirekt durch die Installation, Verwendung
oder Wartung des Produktes entstehen, wenn die Anweisungen und Warnhinweise in diesem Produkthandbuch nicht befolgt werden.
Dieses Produkthandbuch, einschließlich der Anweisungen, Richtlinien und Warnhinweise, sowie die zugehörige Dokumentation können
Änderungen und Aktualisierungen unterliegen. Aktuelle Produktinformationen finden Sie unter documents.dometic.com, dometic.com.
Inhaltsverzeichnis
1 Erklärung der Symbole . . . . . . . . . . . . . . . . . . . . . . . . . . . . . . . . . . . . . . . . . 30
2 Sicherheitshinweise . . . . . . . . . . . . . . . . . . . . . . . . . . . . . . . . . . . . . . . . . . . .31
3 Lieferumfang . . . . . . . . . . . . . . . . . . . . . . . . . . . . . . . . . . . . . . . . . . . . . . . . . 35
4 Bestimmungsgemäßer Gebrauch . . . . . . . . . . . . . . . . . . . . . . . . . . . . . . . . 35
5 Technische Beschreibung . . . . . . . . . . . . . . . . . . . . . . . . . . . . . . . . . . . . . . 35
6 Bedienung. . . . . . . . . . . . . . . . . . . . . . . . . . . . . . . . . . . . . . . . . . . . . . . . . . . 37
7 Reinigung und Pflege . . . . . . . . . . . . . . . . . . . . . . . . . . . . . . . . . . . . . . . . . . 44
8 Garantie. . . . . . . . . . . . . . . . . . . . . . . . . . . . . . . . . . . . . . . . . . . . . . . . . . . . . 44
9 Störungsbeseitigung . . . . . . . . . . . . . . . . . . . . . . . . . . . . . . . . . . . . . . . . . . 45
10 Entsorgung . . . . . . . . . . . . . . . . . . . . . . . . . . . . . . . . . . . . . . . . . . . . . . . . . . 46
11 Technische Daten . . . . . . . . . . . . . . . . . . . . . . . . . . . . . . . . . . . . . . . . . . . . . 47
1 Erklärung der Symbole
WARNUNG!
!
!
30
Sicherheitshinweis auf eine Gefahrensituation, die zum Tod oder zu
schwerer Verletzung führen kann, wenn sie nicht vermieden wird.
VORSICHT!
Sicherheitshinweis auf eine Gefahrensituation, die zu einer leichten
oder mittelschweren Verletzung führen kann, wenn sie nicht vermieden
wird.
 Loading...