

Page 1

207.5192.11
RH 161
Type: MF20-60
miniBar
Operating Instructions
Bedienungsanleitung
Mode d'emploi
Istruzioni per l'uso
Handleiding
Manual de Instrucciones
Instruções de Utilização
GB
DE
FR
IT
NL
ES
PT
Page 2
2
Thank you for choosing our appliance. We are sure it will provide you with trouble-free use.
In the following, we would like to familiarise you with some symbols, which we bring to your attention to ensure the safe
and efficient operation of the appliance:
source of danger, in event of improper operation
suggested useful tips to read
information concerning environmental protection
This refrigerator is intended for the storage of food and drinks.
Attention!
This product is designed to be operated by adults. Children should not be allowed to
tamper with the controls or play with the product.
Any electrical work required to install this appliance should be carried out by a
qualified electrician.
This product should be serviced by an authorised Service Engineer, and only genuine
spare parts should be used.
It is dangerous to alter the specifications or modify this product in any way.
Care must be taken to ensure that the appliance does not stand on the electrical
supply cable.
There are working parts in this product which heat up. Always ensure that there is
adequate ventilation as a failure to do this will result in component failure and possible
content loss. See installation instructions.
Parts which heat up should not be exposed. Wherever possible the back of the product
should be close to a wall but leaving the required distance for ventilation as stated in
the installation instructions.
Before defrosting, cleaning or maintenance work is carried out, be sure to switch off
the appliance and unplug it.
DO NOT USE SHARP INSTRUMENTS to scrape off frost or ice. Under no circumstances
should solid ice be forced off the cooling fins. Solid ice should be allowed to thaw
when defrosting the appliance. See defrost instructions.
This appliance is heavy. Care should be taken when moving it.
Under no circumstances should you attempt to repair the appliance yourself. Repairs
carried out by inexperienced persons may cause injury or more serious
malfunctioning. Refer to your local Service Centre and always insist on genuine spare
parts.
In this appliance the storage of any toxic or explosive substance is forbidden!
Please read these operating instructions carefully before putting the refrigeration unit
into operation. If you later sell or dispose of it, please ensure that the new owner receives
these operating instructions.
Please follow the installation details below carefully Guarantee is valid for products
installed as described only. (See chapter 4.1)
GB
Page 3
3
CONTENTS
1. Unpacking
2. View of the appliance
3. Cleaning
4. Positioning the appliance
4.1. Installation instruction
5. Using the appliance
5.1. Temperature regulation
5.2. Cooling unit control (CUC)
6. Useful suggestions
7. Defrosting, cleaning and maintenance
8. Changing the lightbulb
9. Reversing the door hang
10. Replacing the decorative door panel
11. Customer service
12. Putting into operation, technical data
12.1. Connecting to electrical mains
13. Environmental protection information
14. Recycling
Attention!
Warranty arrangements are in accordance with EC Directive 44/1999/CE and the normal
conditions applicable in the country concerned.
For warranty or other servicing, such as spare-parts, please contact our Dometic Service
Network.
The warranty does not cover any damage due to improper use.
The warranty does not cover any modifications to the appliance or the use of non-original
Dometic spare-parts.
The warranty does not apply if the installing and operating instructions are not adhered to.
When contacting Dometic Service Network, please state the model, product number and serial
number. You will find this information on the data plate inside of the refrigerator.
GB
Page 4

4
1. Unpacking
After removal from the cardboard packaging, make sure the
appliance is not damaged. If you find damage to the
appliance resulting from transport, report it immediately to
the transportation firm.
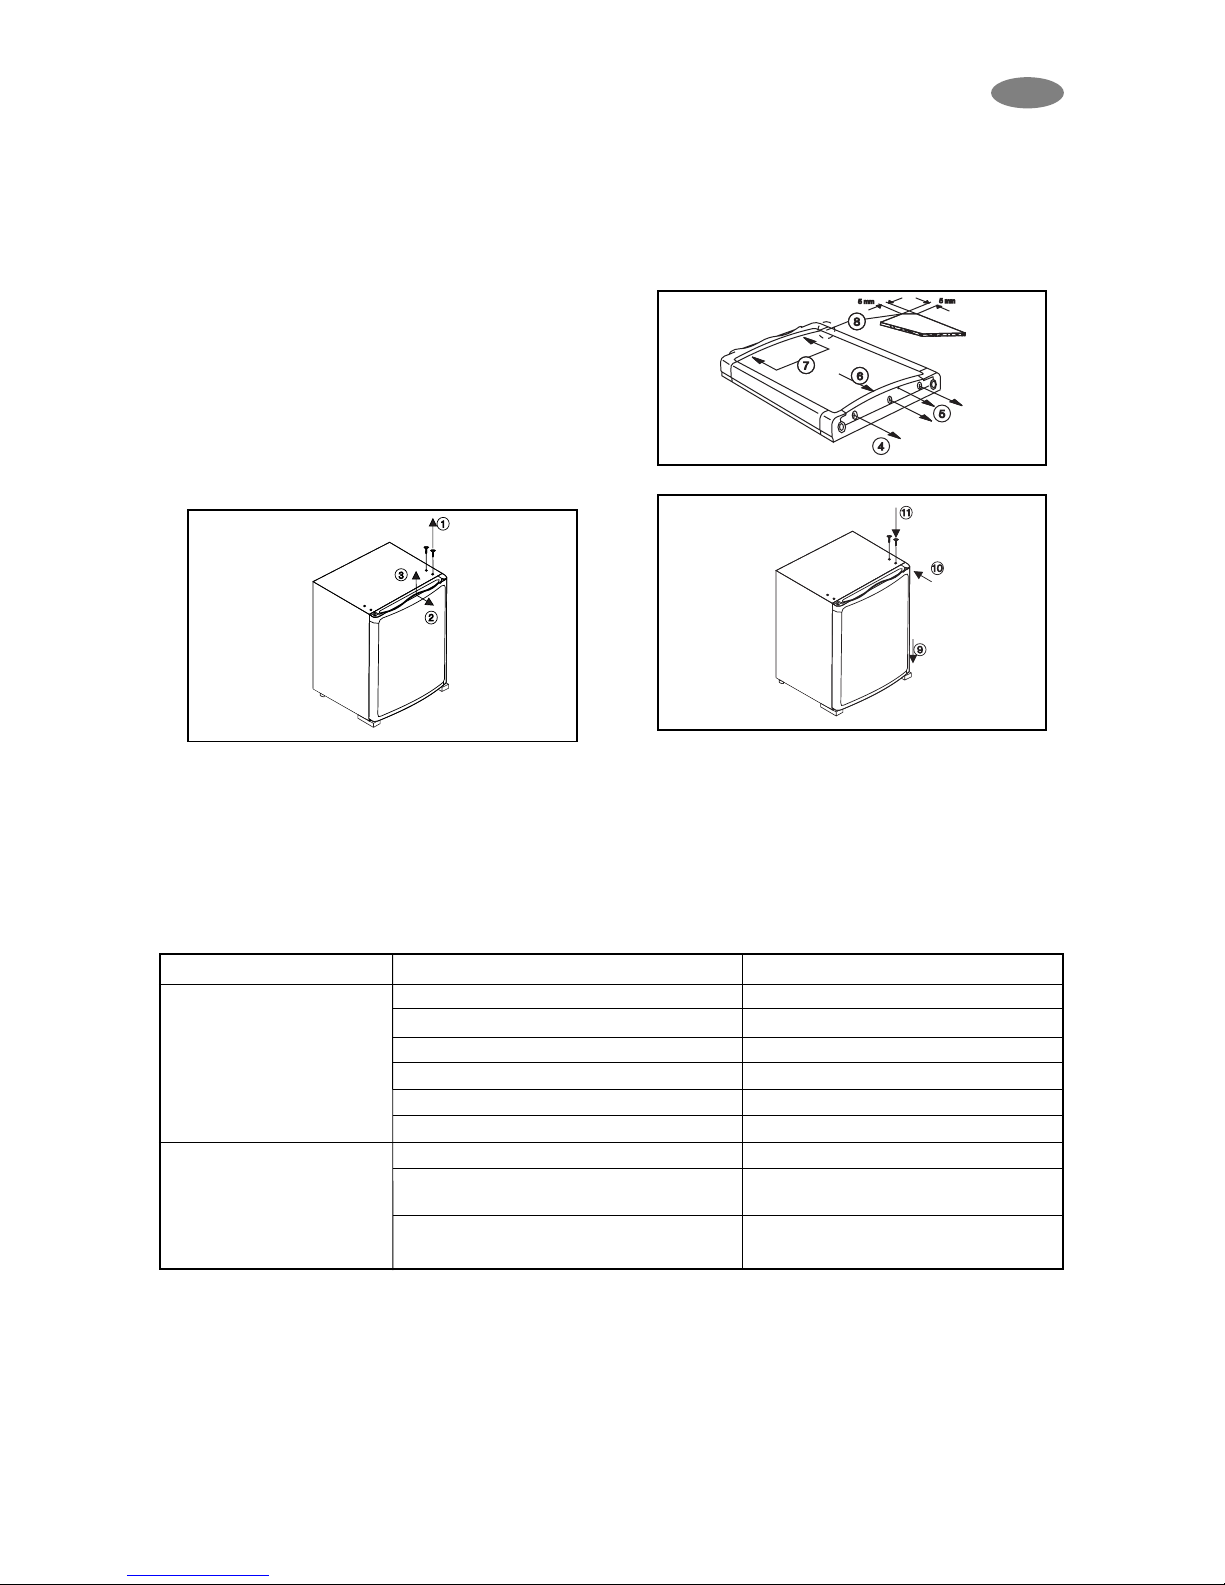
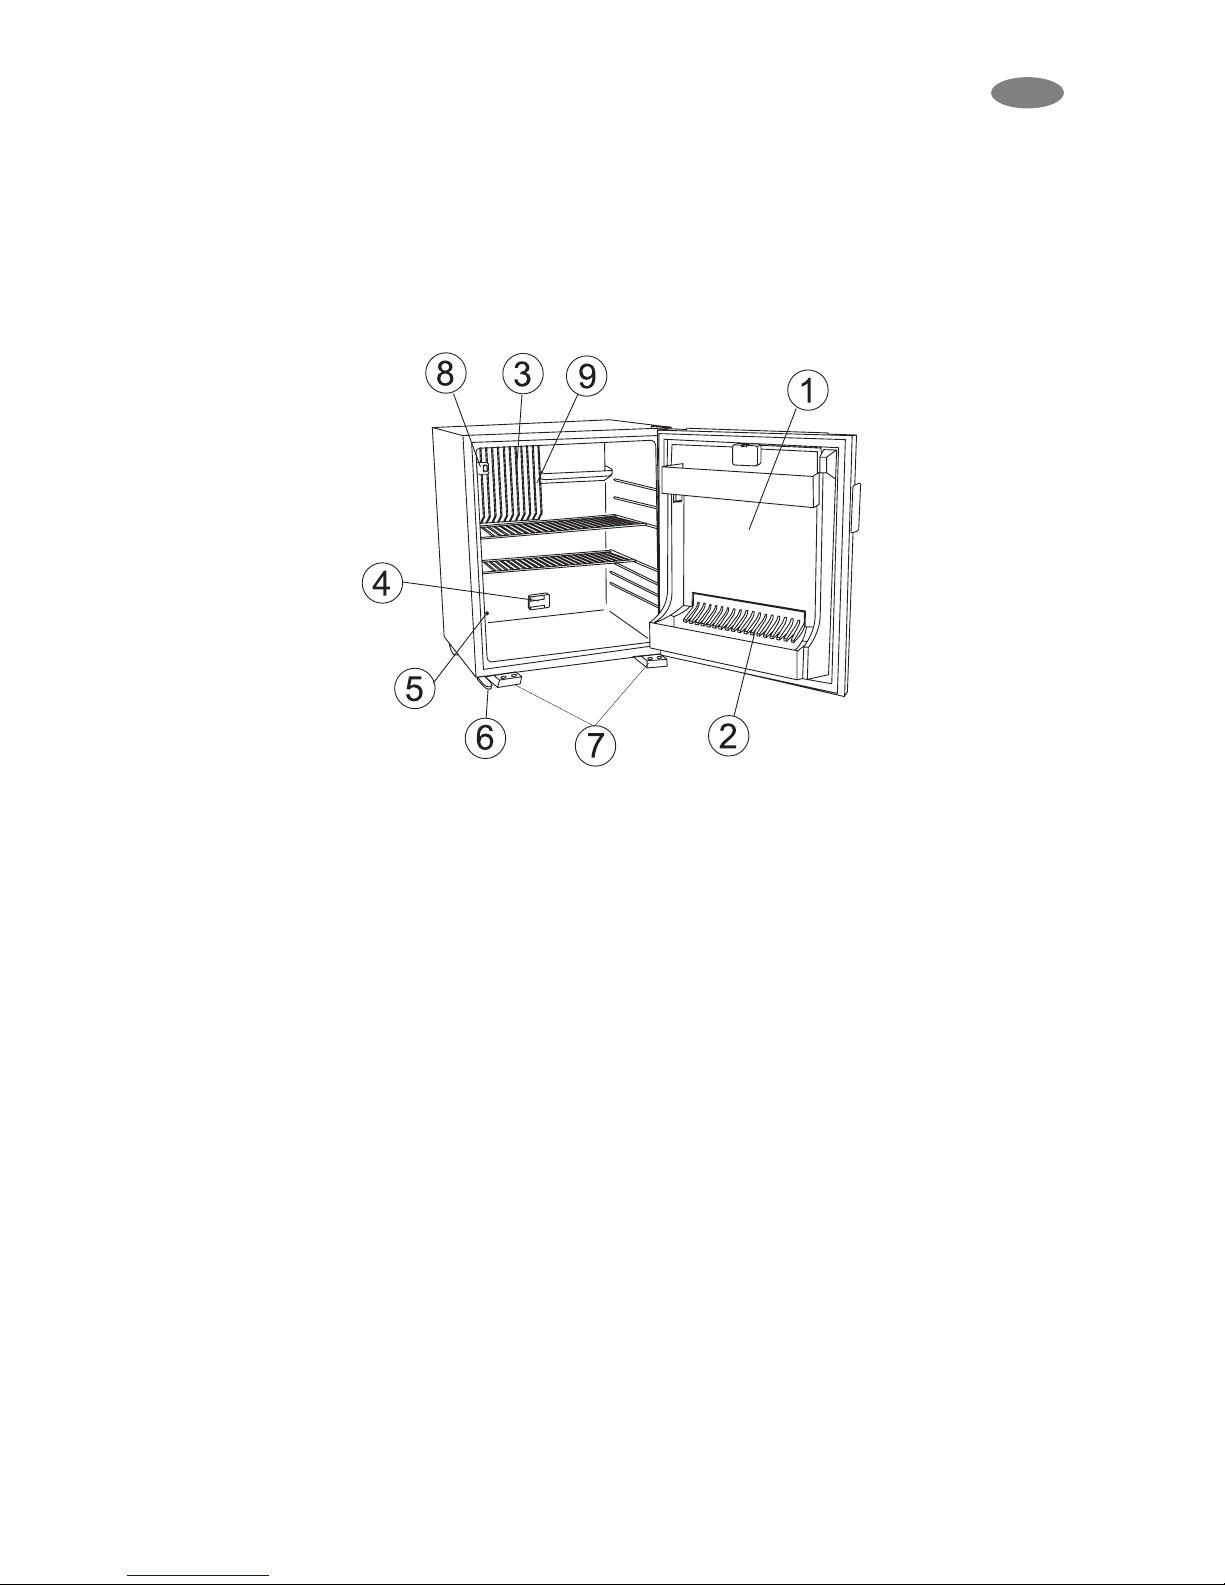
2. View of the appliance
1. door
2. bottle retainer
3. evaporator
4. sensor
5. thermostat knob
6. hinge plate
7. fixing foot
8. lamp (if available)
9. Evaporator sensor
Figure 1.
IN CASE IF YOUR REFRIGERATOR IS EQUIPPED WITH LOCK, DOMETIC ZRT DO NOT ACCEPT LIABILITY FOR
LOSS OR DAMAGE OF KEYS. HOWEVER A COMPLETE LOCK CAN BE SUPPLIED.
GB
Page 5
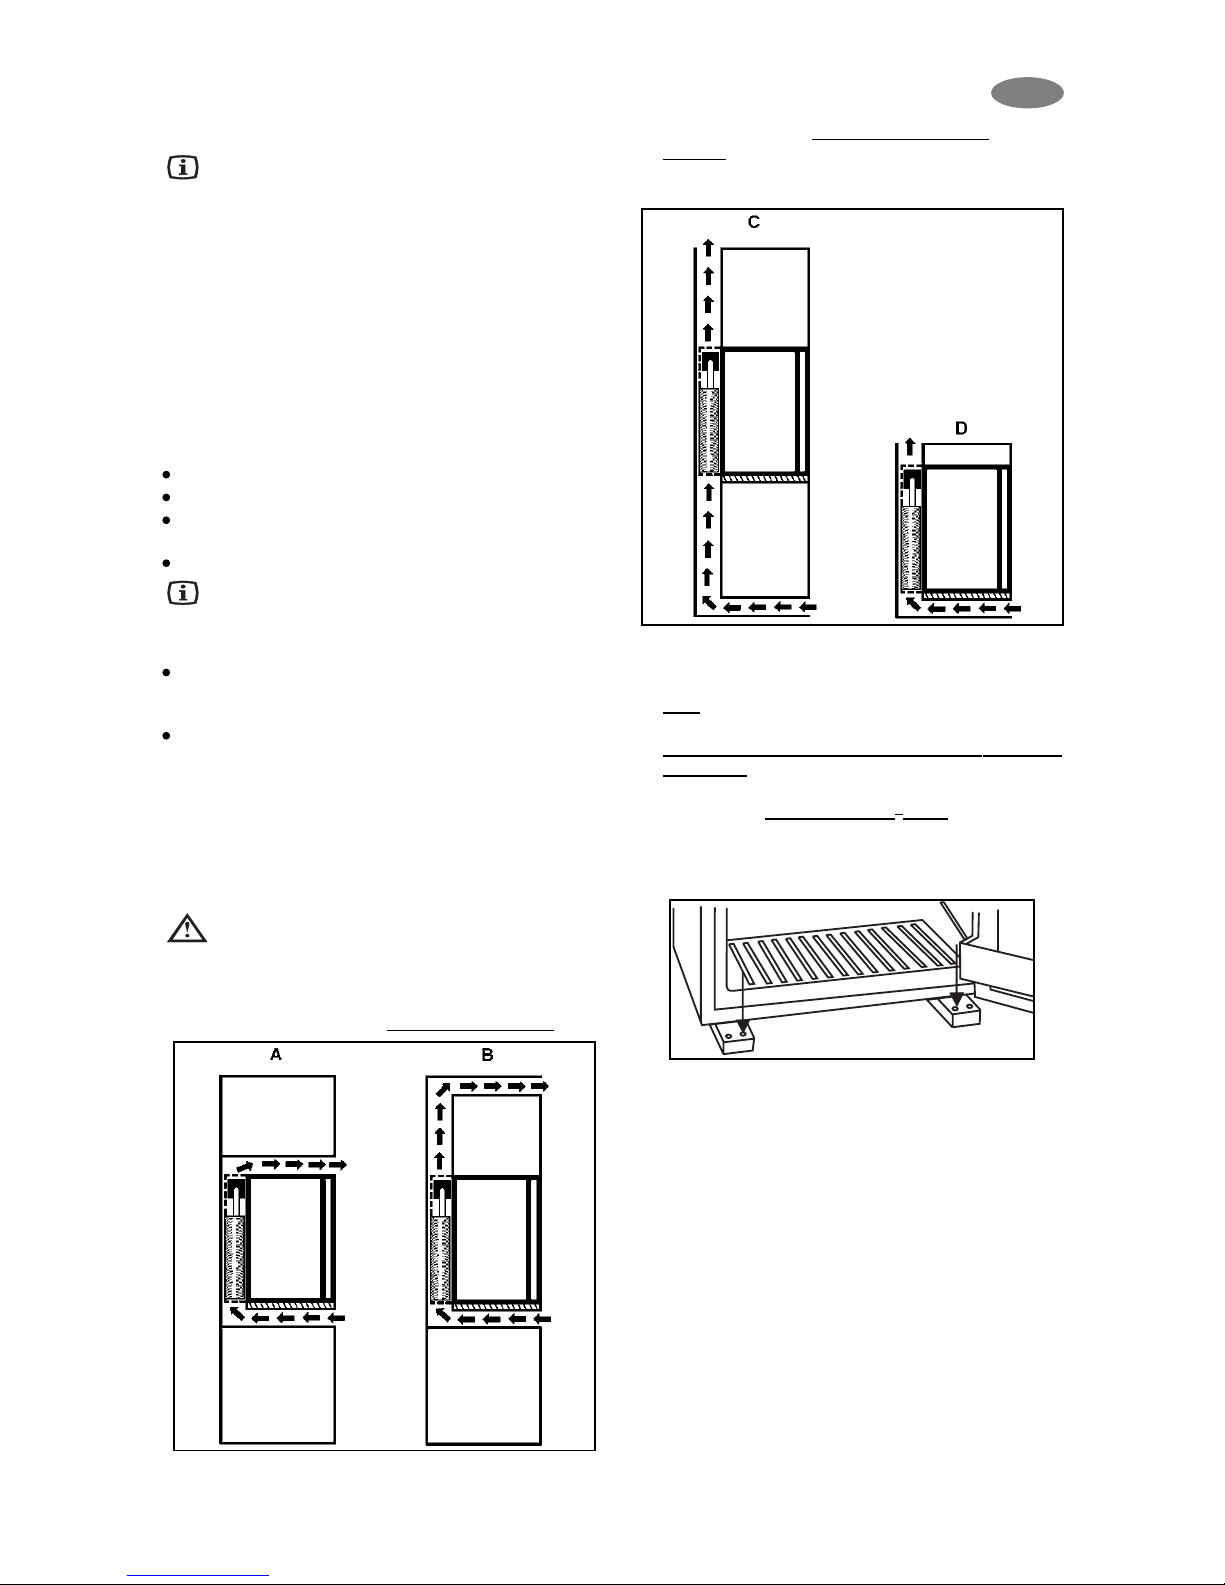
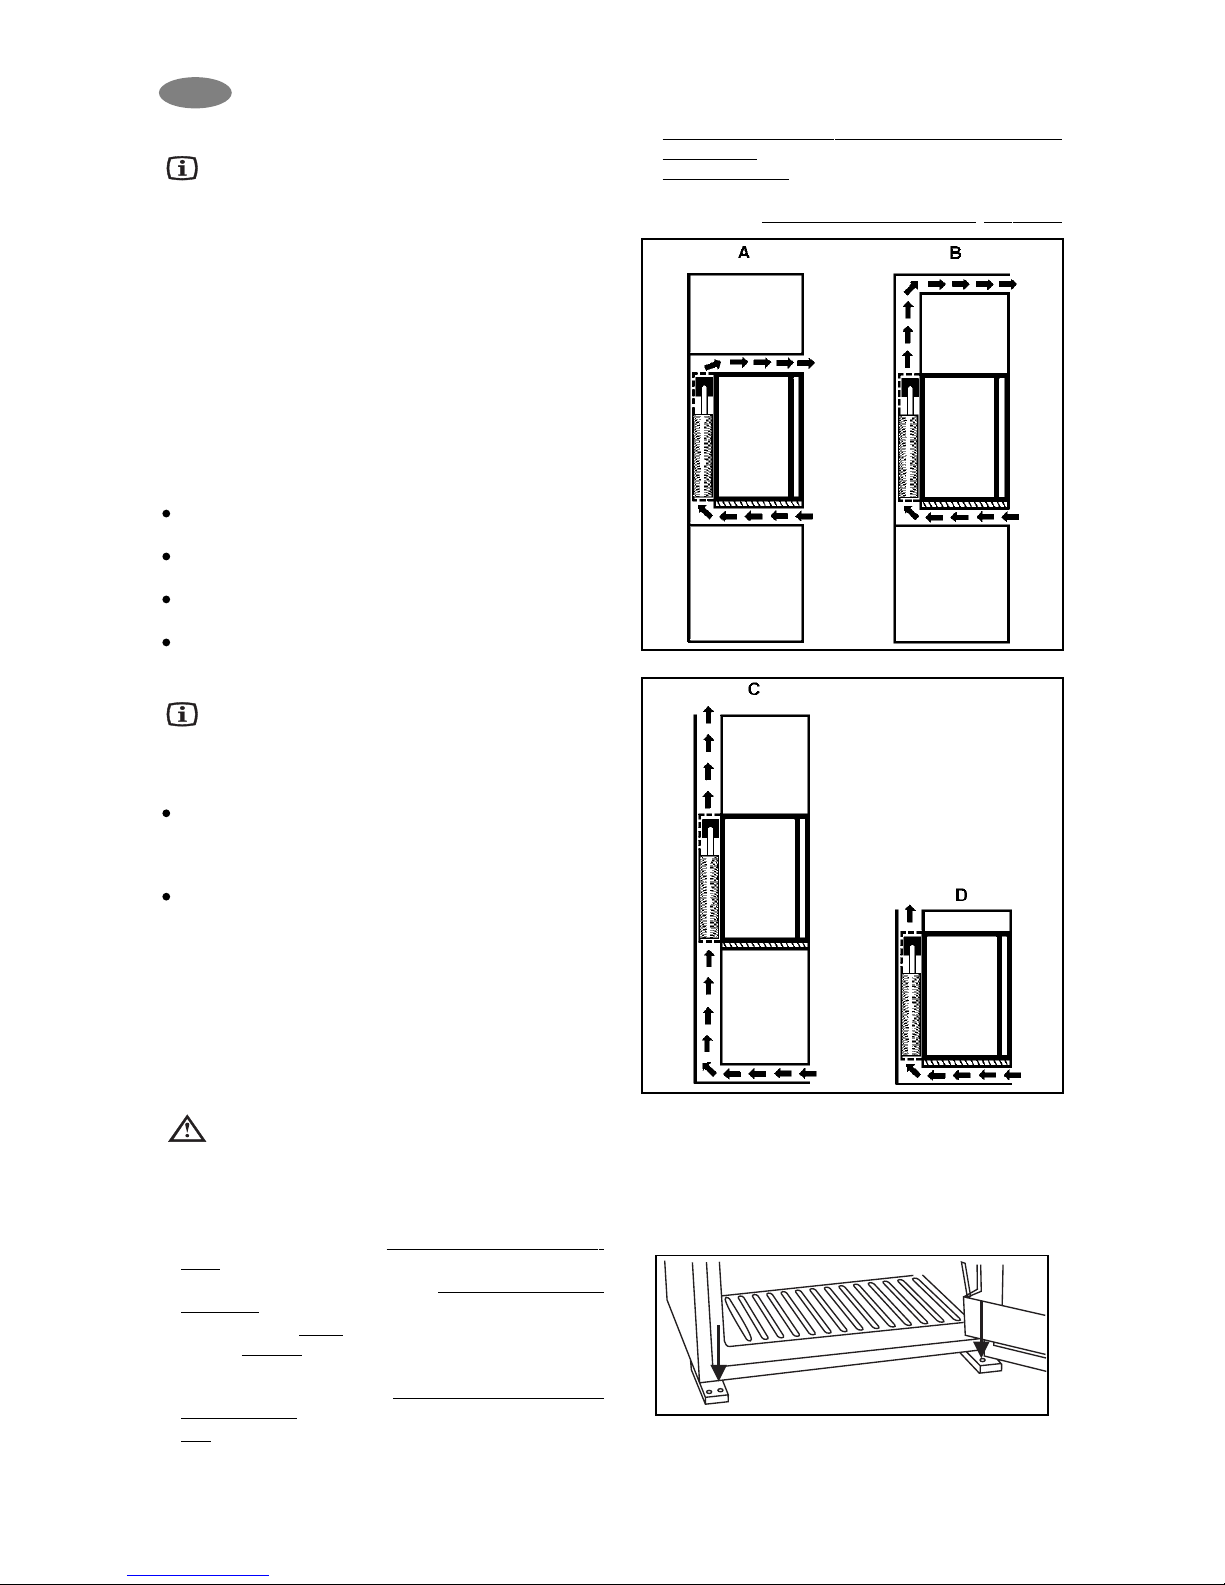
2. There should be 20 mm clearance to
the wall
3. Ventilation must be provided as shown in
alternatives A, B, C or D (fig 2-3)
Figure 3.
4. The ventilation duct must at least measure 105
mm x the width of the refrigerator
5. Only
the entire cooling unit must project into the
duct as shown
6. Air passing thr
ough the duct mus
t not be
preheated by any source of heat
7. Ventilation grills, if used, must have an free
openings of at leas
t 200 cm
2
each
The refrigerator can be fixed to the bottom of the
furniture through its fixing feet using screws of an
appropiate length. (Fig. 4)
Figure 4.
During installation, please ensure the mains plug is
accessible at all times.
5. Using the appliance
To start the refrigerator connect the plug to the socket
outlet and switch on the socket. The cooling fins should
show signs of cooling after about 3 hours.
The refrigerator needs about 6 hours at normal ambient
temperature to reach 6 °C in the storage compartment.
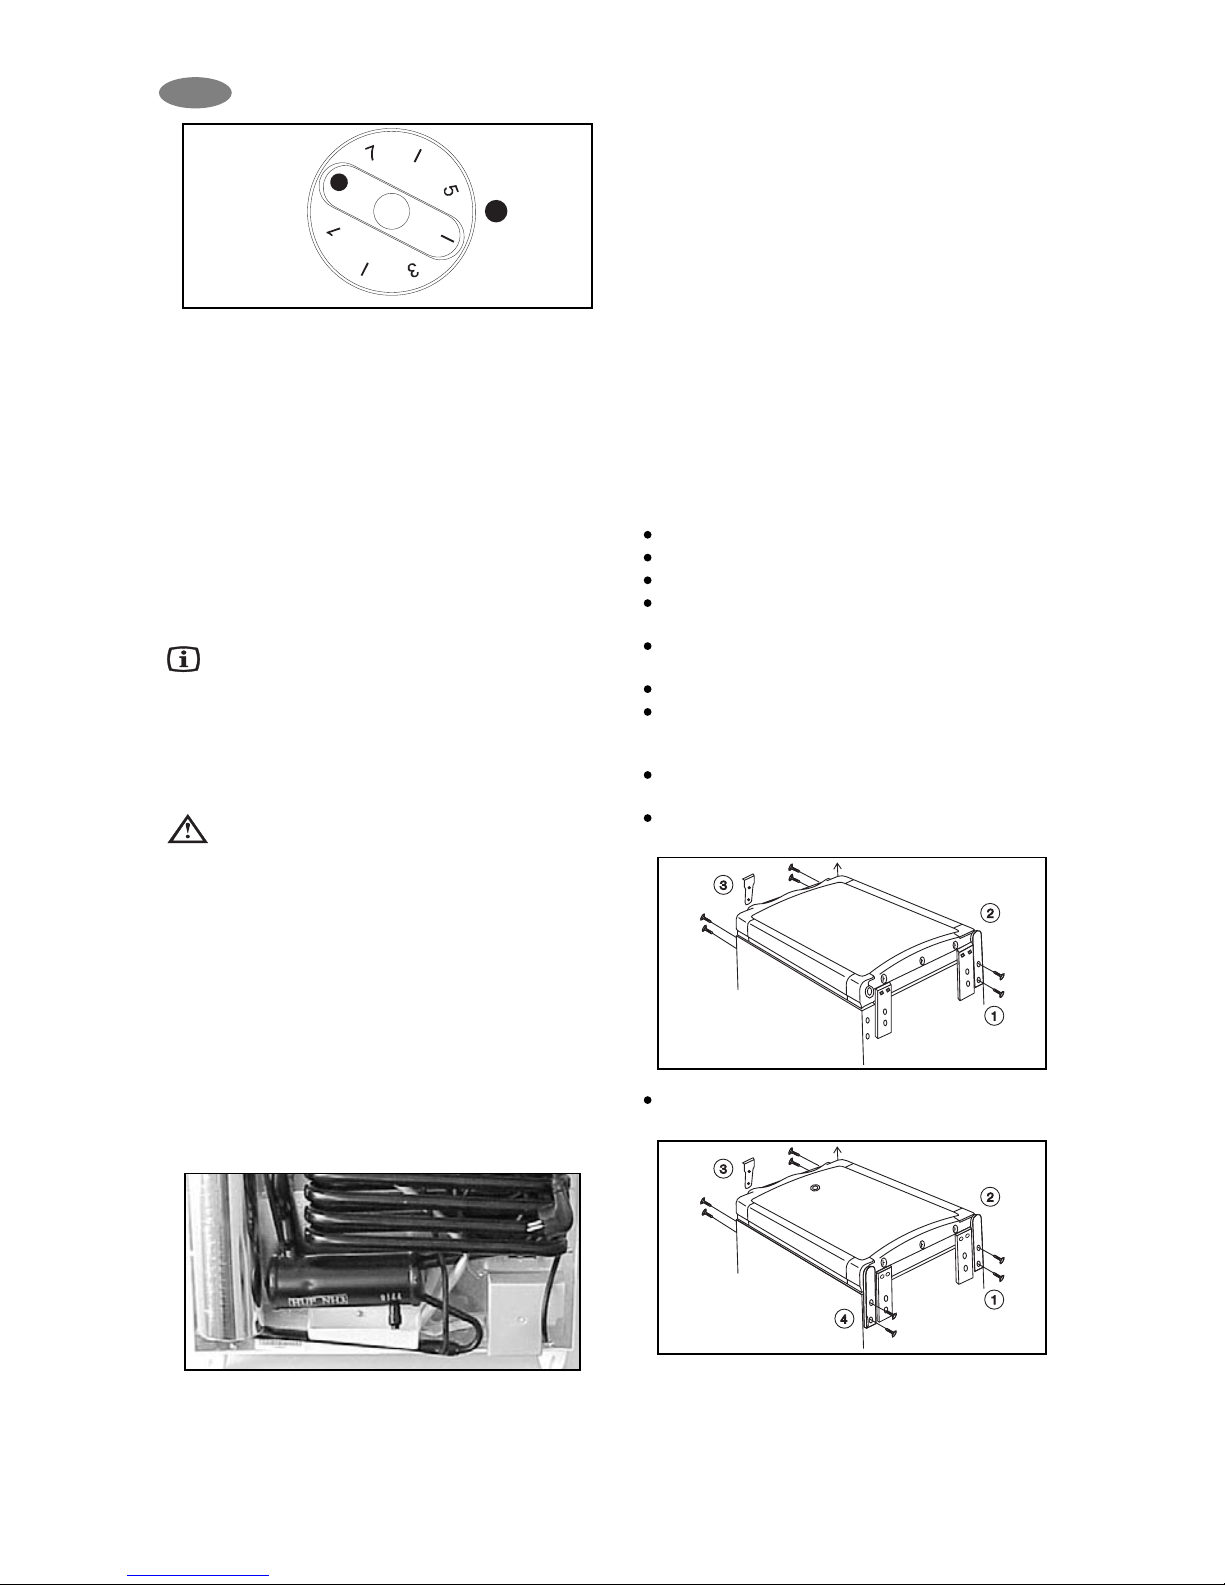
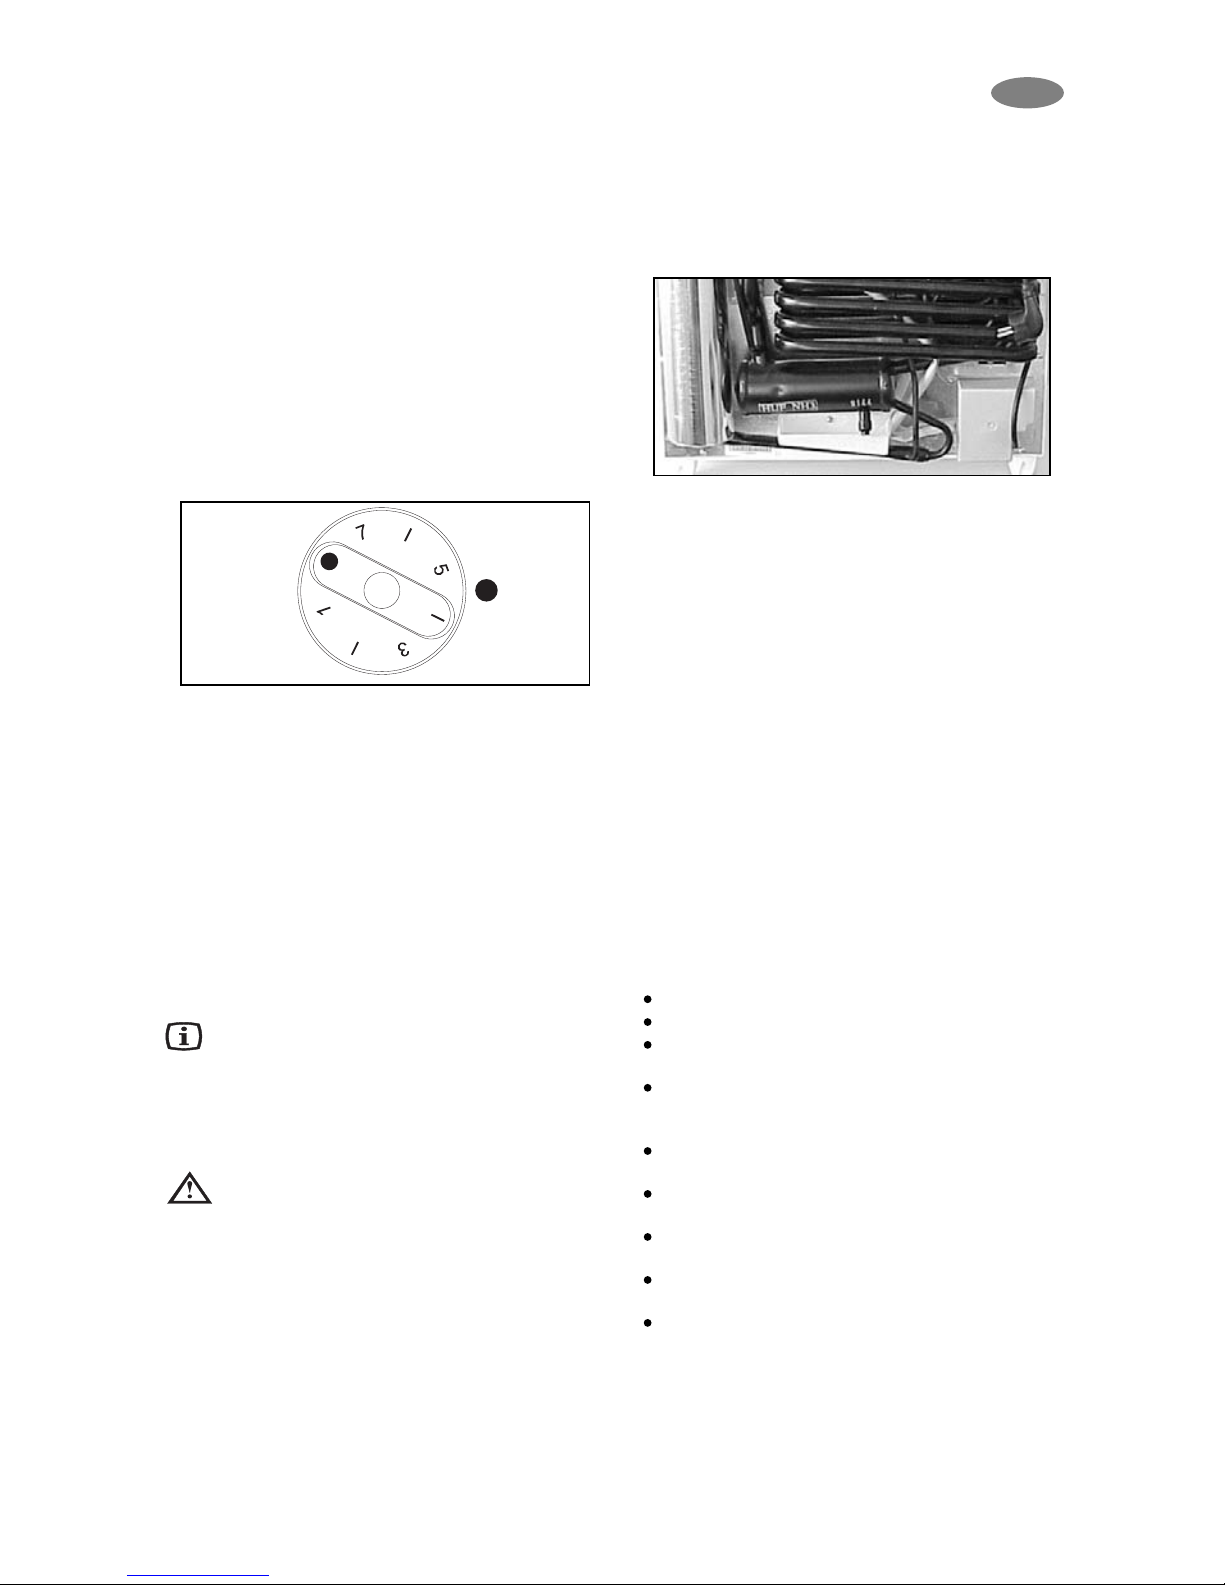
5.1. Temperature regulation
The usual setting required is in middle of the setting
range on the thermostat knob (Fig. 5), but this can vary
with conditions of load and installation. If it is found
necessary to change the setting,the knob can be turned
to a higher number to give a lower temperature, or a
lower number to give a higher temperature. The effect of
any adjustment can be checked by means of a
5
3. Cleaning
Clean the refrigerator thoroughly at intervals, as
necessary. Remove the shelves; these, parts, as well
as the cabinet interior and the door should be washed with
a warm solution of sodium bi-carbonate. Finally wipe over
with a cloth rinsed in warm water only, and dry with a clean
cloth. Do not wash any plastic parts in water that is more
than hand warm, and do not expose them to dry heat. The
outside of the cabinet should be wiped down regularly with
a clean, damp cloth.
NEVER USE STRONG CHEMICALS OR ABRASIVE
CLEANING MATERIALS ON ANY PART OF THE CABINET.
4. Positioning the appliance
When first using this refrigerator please consider the
following points:
ENSURE REFRIGERATOR IS LEVEL
THE PIPEWORK AT THE BACK GETS HOT IN USE
THE REFRIGERATOR HAS NO 'MOTOR' AND IS
THEREFORE VIRTUALLY SILENT
ALLOW AT LEAST 3 HRS. FOR SIGNS OF COOLING
During the refrigeration process, the appliance gives
off heat from the condenser (under the upper part of
the rear cover) into the surrounding air. The more ventilated
the condenser is, the more effective the refrigeration will be.
The other condition for satisfactory operation is that the
appliance is levelled. This could be checked by placing
a glass of water on top of the appliance.
It is important that the appliance is not directly exposed
to radiated heat (sunlight, radiator, near an oven, etc.).
4.1. Installation instructions
The refrigerator is equipped with an electrically heated
absorption cooling unit which is virtually silent in operation.
The fridge is designed for free-standing installation, but can be
built-in if the following conditions are complied with to ensure
satisfactory operation and maximum cooling efficiency.
IMPORTANT
Please follow the installation details below carefully.
Guarantee is valid for products installed as described
only.
1. The refrigerator must be le
vel both directions
Figure 2.
GB
Page 6
6
thermometer when the refrigerator has reached the new
temperature after some hours.
5.2. Cooling unit control (CUC)
The electronic checks the function after every defrosting
period (every 24 hours) by measuring the evaporator
temperature drop. If it registers a problem the refrigerator
will shut down and stops cooling. If this happens you should
check whether the refrigerator has been overloaded, that
the door was properly closed, that the cooling unit
ventilation is correct and that the refrigerator is levelled.
After checking, unplug the refrigerator at least for 10
seconds and plug it in again. This resets the unit and it will
function again. If no sign of cooling there is a problem with
the cooling unit and you should contact Dometic service.
6. Useful suggestion
Do not overfill the appliance.Put warm foods and drinks in
the appliance only when they have cooled down to room
temperature. It is advisable to leave some space between
the products in the cabinet to ensure efficient and even
cooling. If the shelves are packed too tightly there may be
unacceptable temperature variations.
7. Defrosting, cleaning and
maintenance
Frost will gradually form on the cooling surfaces and it must
not be allowed to become too thick since it acts as an
insulator and interferes with the cooling.
This frost-formation is kept back by the FUZZY LOGIC
system built into the appliance. The first defrosting phase
commences 39 hours after the start and lasts for two
hours. After this, the device operates for 22 hours at a time,
followed by a defrosting period of 2 hours.
The frost will melt and the defrost water will run through the
drain tube from the drip channel into an evaporating vessel
located at the bottom rear of the refrigerator at all models.
(Fig. 6.) The defrost water will evaporate automatically into
the circulating air and the vessel will not need emptying
manually.
Figure 6.
If we want to switch off the unit, turn the thermostat knob to
"0", disconnect the refrigerator from the electricity supply
and leave the cabinet door open. After defrosting the
cabinet interior should be wiped out with a clean, damp
cloth.
In the case of increased air humidity, frost may form on
the cooling ribs. Should the frost layer attain a thickness
of approximately 3 mm, the refrigerator must be
defrosted to avoid impairing the performance level.
8. Changing the lightbulb (If available)
If the lightbulb needs changing, pull out the plug and
proceed as follows:
Press the metal reflector to one side and draw the lamp
covering backwards. Replace the bulb and push the
covering back into place.
A new max. 10-watt bulb can be obtained at any service
shop.
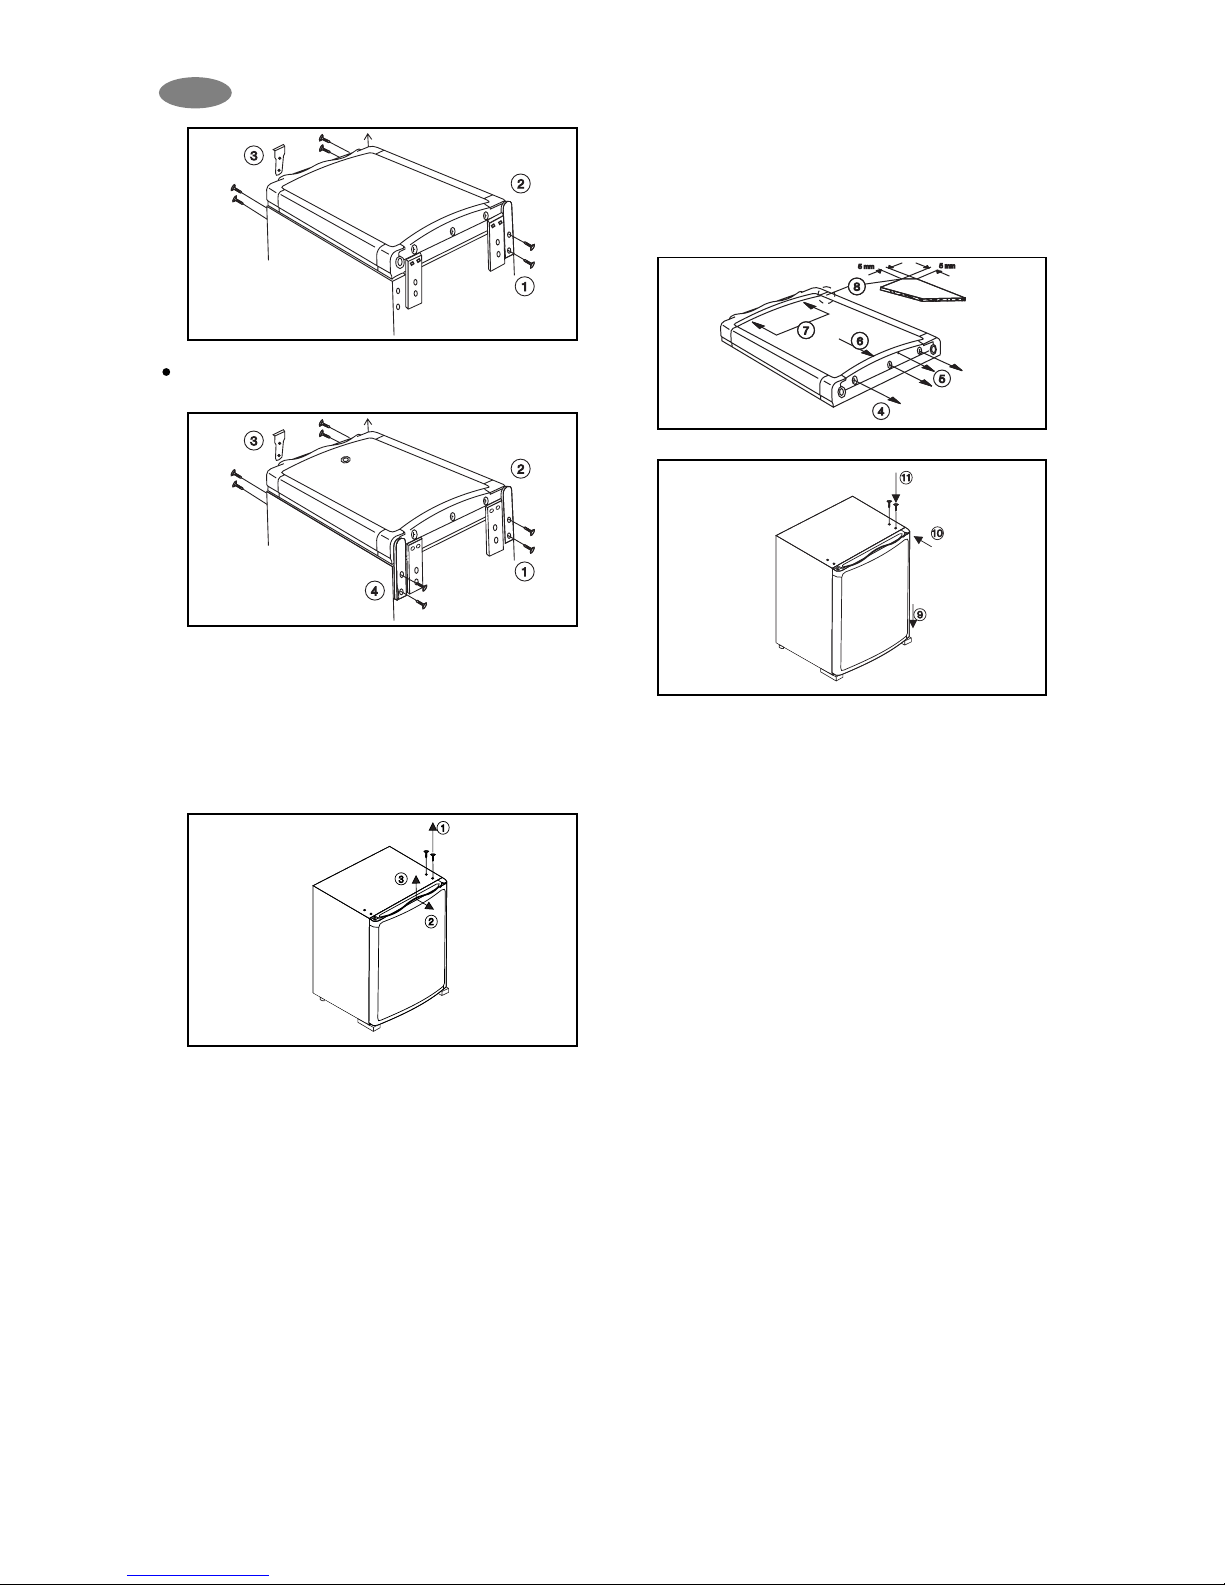
9. Reversing the door hang (Fig. 7-8)
The direction the door opens can be transferred from
one side to the other by carrying out the following steps:
disconnect the mains
lay the refrigerator down carefully on its back
remove the lower hinge d and detach the door
remove the two upper left-hand screws and detach
the covering plate e by pulling it forward
detach the upper hinge and mount it on the opposite
side
remove the hinge bolt and screw it in from below
insert the covering plate in the upper right-hand
corner by pushing it in and secure it with the two
screws
position the door on the upper hinge bolt and mount
the lower hinge
ensure the door can move freely and the seal is
correctly positioned.
Figure 7.
Remove the hinge plate f and mount it on the
opposite side
Figure 8.
Figure 5.
GB
Page 7
7
Figure 10.
Figure 11.
10. Replacing the decorative door
panel
(Fig. 9-11)
Remove the two screws (1) from the upper hinge of the
door.
Pull the door together with the hinge away from the housing
and up off the lower hinge bolt (2-3).
Remove screws (4) and pull off the frame edge (5).
Slide the decorative panel (6) out of the door frame and
insert the new panel (7), so that the upper edge of the panel
runs exactly parallel to the upper edge of the frame. A new
panel can be inserted more easily into the upper edge of
the frame when the two corners are cut off by approx. 5 x
5 mm (8). Put the frame edge (5) back in place and secure
with screws.
Place the door on the lower hinge (9), slot the upper hinge
into the opening, press together with the door against the
housing and secure with the two screws (11).
Figure 9.
GB
11. Customer service
Before you call a service engineer, carry out the following
simple tests:
Problem
The appliance does not
cool sufficiently
The appliance does not
cool at all
Possible cause
Thermostat control is set too low
Too much food to be cooled was put in
Door is not shut properly.
Refrigerator not level
Internal air circulation is restricted.
External air circulation is restricted.
CUC system stopped the operation
Plug is not connected to the mains
socket properly.
There is no voltage in the mains socket
Solution
Set to a higher position
Put in less food to be be cooled
Check if the door is shut
Level refrigerator
Provide inside cool air circulation.
Provide outside air circulation.
See operating instruction 5. 2.
Check if the connection is proper.
Check if there is voltage.
(eg. Connect a lamp to the socket)
If after checking all the above points, the refrigerator is still
not working satisfactorily, contact your nearest service
engineer. State the problem, model, product- and serialnumber.
(Details of the model, product- and serialnumber are to
be found on the data label in the top left of the inside
compartment.)
In the event of a fault developing, contact your nearest
Service Centre-see local telephone directory.
www.dometic.com
Page 8
8
GB
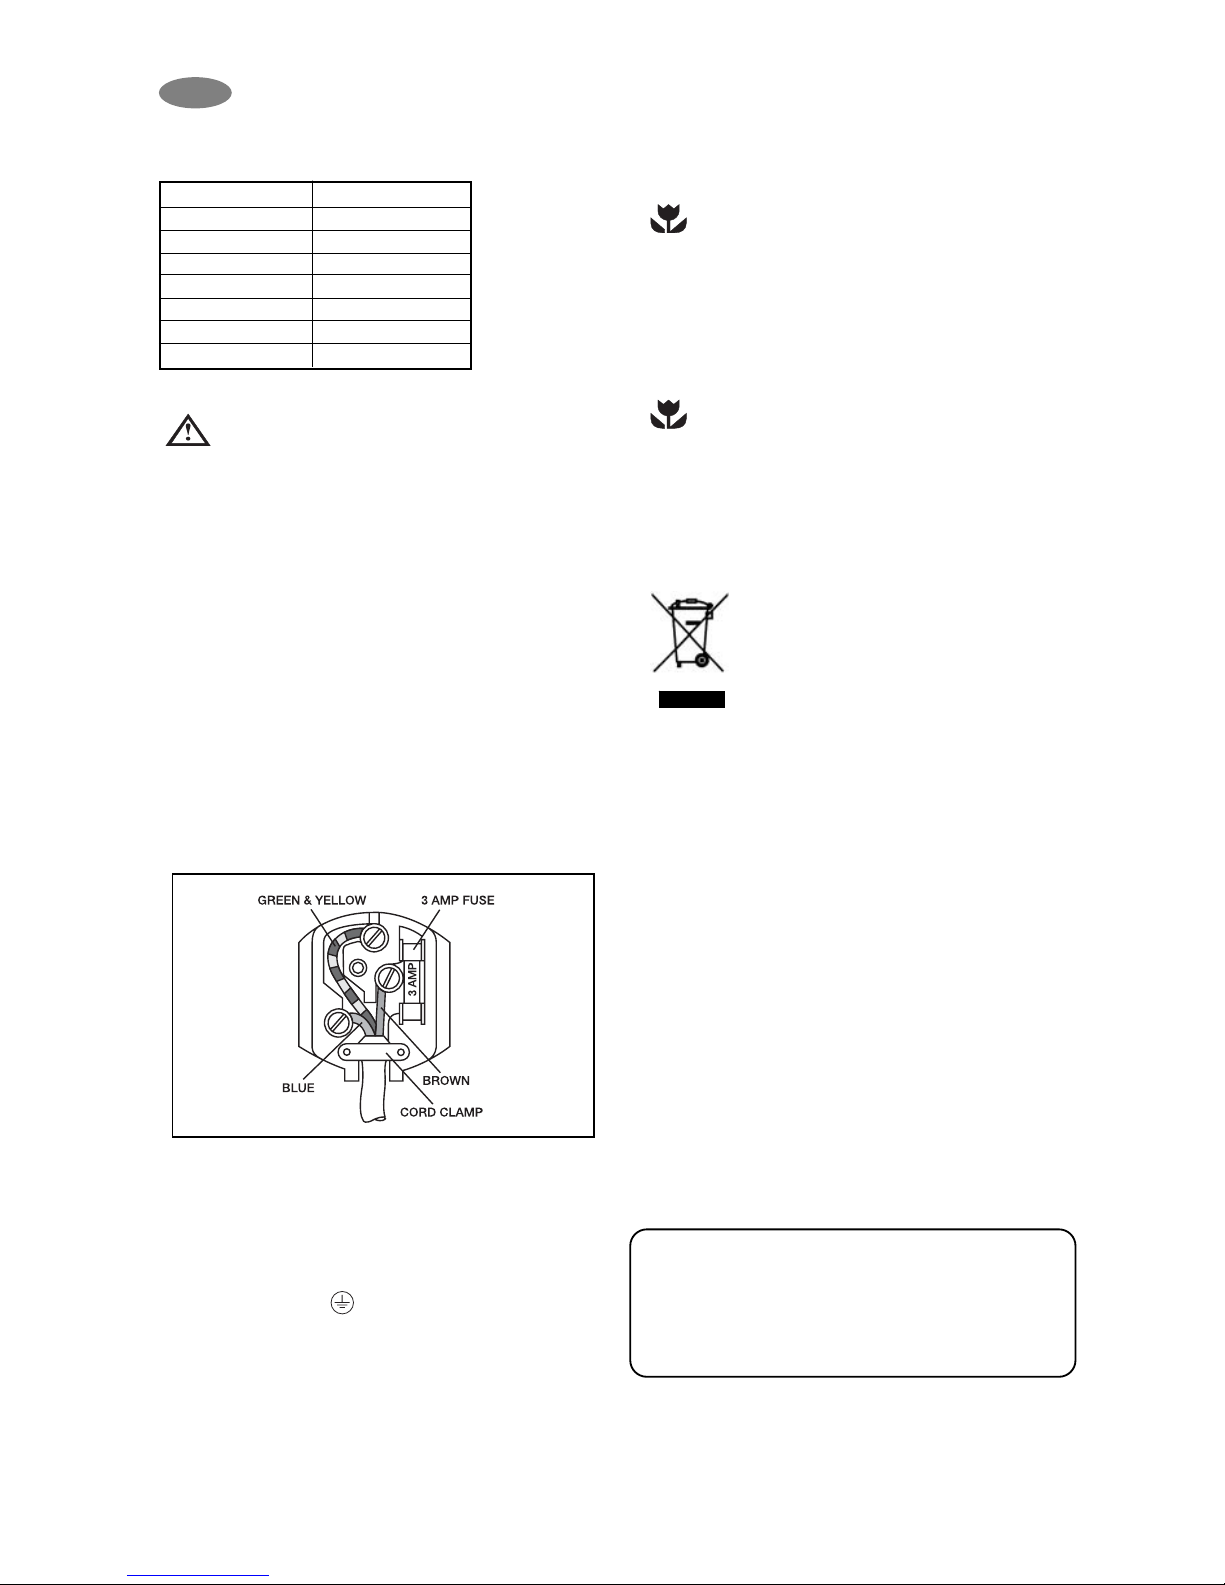
Upon completion there must be no cut, or stray
strands of wire present and the cord clamp must be
secure over the outer sheath.
13. Environmental
protection information
Ammonia (natural hydrogen and nitrogen compound) is
used as a refrigerating agent in the refrigeration unit.
The ozone-friendly cyclopentane is activated as a motive
agent for the PU foam insulation.
Sodium chromate is used for corrosion protection (less
than 2 weight % of the coolant).
14. Recycling
After unpacking the appliance, the packing materials
should be delivered to a local collection site. At the end
of its useful lifetime, the appliance should be delivered to
a specialized collection and reprocessing firm, which
reclaims the usable materials. The rest is properly
destroyed.
Appliances bearing this symbol must be
deposited at the designated local reception
point for the disposal of electrical and
electronic equipment.
It is not permitted that this product be
disposed of by way of the normal household
refuse collection system.
Dometic refrigerators bear this symbol on the
specifications plate (data plate) to be found in the interior
of the unit.
This appliance complies with the following EEC
directives:
LVD-Directive 73/23/EEC with amendment
90/683/EEC
EMC-Directive 89/336/EEC
RoHS-Directive 2002/95/EC
12. Putting into operation
Technical data:
12.1. Connecting to electrical mains
The appliance may only be operated from nominal
voltage mains as shown on the data plate. The
appliance mains plug may be connected to a mains socket
earthed in accordance with regulations.
Any electrical work required to install this appliance should
be carried out by a qualified electrician or competent
person.
The manufacturer declines any liability should these
safety measures not be observed.
Electrical Requirements
Before switching on, make sure the electricity supply
voltage is the same as that indicated on the appliance rating
plate.
Only for UK:
The appliance is supplied with a 3 amp plug fitted. In
the event of having to change the fuse in the plug
supplied, a 3 amp ASTA approved (BS 1362) fuse
must be used. Should the plug need to be replaced
for any reason, the wires in the mains lead are
coloured in accordance with the following code:
Green and Yellow: Earth
Blue: Neutral
Brown: Live
The wire coloured green and yellow must be
connected to the terminal marked with the letter „E“ or
by the earth symbol or coloured green and yellow.
The wire coloured blue must be connected to the
terminal „N“ or coloured black.
The wire coloured brown must be connected to the
terminal marked „L“ or coloured red.
Model RH 161
Type MF20-60
Gross volume 60 liter
Mains operation 220-240V (AC)
Input 115W
Energy consumption 1.4 kWh/24h
Climate class N
Refrigerant 357g H
2
O+168g NH
3
Page 9
9
Wir gratulieren Ihnen zum Erwerb unseres Produktes und hoffen, dass Sie mit der Funktion des Gerätes zufrieden sind.
Nachfolgend ist die Bedeutung einiger Symbole erklärt, die zu beachten sind, um einen sicheren und effizienten Betrieb
des Gerätes zu gewährleisten.
Gefahrenquelle bei unsachgemäßer Bedienung
Nützliche Hinweise
Informationen zum Umweltschutz
Dieses Kühlgerät dient zur Lagerung von Lebensmitteln und Getränken.
Achtung!
Dieses Gerät sollte nur von Erwachsenen bedient werden. Kindern ist der Zugriff auf
die Bedienelemente und das Spielen mit dem Gerät nicht zu gestatten.
Alle notwendigen Elektroarbeiten müssen von einem qualifizierten Fachmann
durchgeführt werden.
Das Gerät sollte von einem autorisierten Kundendiensttechniker gewartet werden. Es
sind ausschließlich Original-Ersatzteile zu verwenden.
Jegliche Änderungen an der Technik oder am Gerät sind nicht zulässig und gefährden
die Garantiebedingungen.
Es ist darauf zu achten, dass das Netzkabel nicht eingeklemmt wird.
Teile des Geräts heizen sich während des Betriebs auf. Deshalb ist für ausreichende
Belüftung zu sorgen. Eine unzureichende Belüftung des Gerätes kann zu
Fehlfunktionen oder auch zum Ausfall von Gerätekomponenten und dadurch zum
Verderb des Kühlrauminhalts führen.
Teile, die sich aufheizen, dürfen von außen nicht zugänglich sein. Das Gerät sollte so
aufgestellt werden, dass der Abstand zwischen Wand und Gerät dem in der
Aufstellanleitung angegebenen Belüftungsraum entspricht.
Vor dem Abtauen, Reinigen und Warten muss das Gerät abgeschaltet und der
Netzstecker gezogen werden.
VERWENDEN SIE KEINE SCHARFKANTIGEN GEGENSTÄNDE, um das Gerät von Reif
oder Eis zu befreien. Dickere Eisschichten müssen ausschließlich durch Abtauen des
Gerätes (siehe Abtauanleitung) von den Kühlrippen entfernt werden, niemals mit
Gewalt entfernen.
Das Gerät ist sehr schwer. Beim Transport ist daher Vorsicht geboten.
Versuchen Sie niemals, das Gerät selbst zu reparieren. Unsachgemäß durchgeführte
Reparaturen können zu Verletzungen führen und den Schaden noch vergrößern.
Wenden Sie sich an Ihr zuständiges Kundendienstzentrum, und verlangen Sie stets
Original-Ersatzteile.
In diesem Kühlgerät dürfen keine giftigen oder explosiven Stoffe aufbewahrt werden.
Vor Inbetriebnahme des Kühlgeräts ist diese Bedienungsanleitung sorgfältig zu lesen.
Beim Verkauf oder bei Weitergabe an einen neuen Besitzer muss auch die
Bedienungsanleitung weitergeleitet werden.
Beachten Sie die nachfolgend aufgeführten Installationshinweise. Die Garantie gilt nur
für Produkte, die entsprechend dieser Beschreibung installiert wurden.
DE
Page 10
10
INHALT
1. Auspacken
2. Geräteübersicht
3. Reinigung
4. Aufstellen des Gerätes
4.1. Aufstellanleitung
5. Einsatz des Gerätes
5.1. Temperaturregulierung
5.2. Steuerung der Kühleinheit
6. Nützliche Hinweise
7. Abtauen, Reinigung und Wartung
8. Wechseln der Glühbirne
9. Umkehren der Türaufhängung
10. Austauschen der Zierfront
11. Kundendienst
12. Inbetriebnahme, Technische Daten
12.1. Anschluss an das Stromnetz
13. Umweltschutz-Informationen
14. Entsorgung
Achtung!
Die Garantiebedingungen entsprechen der EU-Richtlinie 44/1999/CE und den im
jeweiligen Bestimmungsland geltenden Gesetzen.
Bei Fragen zu Garantie und Kundendienst sowie für Ersatzteile wenden Sie sich bitte an
unser Dometic Servicenetzwerk.
Die Garantie deckt keine Schäden durch unsachgemäße Benutzung ab.
Die Garantie deckt keine Änderungen am Gerät oder den Einsatz nicht-originaler
Ersatzteile von Dometic ab.
Die Garantie erlischt, wenn das Gerät nicht gemäß den Anweisungen installiert und
benutzt wird.
Nennen Sie bitte das Modell sowie die Produkt- und die Seriennummer des Geräts,
wenn Sie sich mit dem Dometic Servicenetzwerk in Verbindung setzen. Diese
Informationen finden Sie auf dem Typenschild im Innern des Kühlgerätes.
DE
Page 11
11
1. Auspacken
Stellen Sie nach der Entnahme aus der Kartonverpackung
sicher, dass das Gerät unbeschädigt ist. Melden Sie
Transportschäden bitte sofort dem mit dem Transport
beauftragten Unternehmen.
2. Geräteübersicht
1. Tür
2. Flaschenbehälter
3. Verdampferplatte
4. Sensor
5. Thermostatregler
6. Scharnierplatte
7. Befestigungsfuß
8. Beleuchtung
9. Verdampfersensor
BEI GERÄTEN MIT SCHLOSS ÜBERNIMMT DOMETIC ZRT KEINE HAFTUNG FÜR VERLUST ODER
BESCHÄDIGUNG VON SCHLÜSSELN. WIR SIND JEDOCH GERN BEREIT, SCHLOSS UND SCHLÜSSEL ALS
ERSATZTEIL-SET ZU LIEFERN.
DE
Page 12
12
6. Die durch den Belüftungsschacht geleitete Luft
darf nicht durch irgendeine Wärmequelle
vorgeheizt sein.
7. Eventuell verwendete Belüftungsgitter müssen eine
Öffnung von jeweils mindestens 200 cm2 verfügen.
Beim Einbau muß darauf geachtet werden, daß der
Netzstecker zugänglich bleibt.
Mit der Anwendung von geeigneten langen
Schrauben der Kühlschrank kann mittels
Befestigungsfüßen zum Boden des Möbels
befestigt werden (Abbildung 4).
Abbildung 4.
3. Reinigung
Das Gerät ist von Zeit zu Zeit gründlich zu reinigen.
Entfernen Sie hierzu die Ablagen. Die Ablagen, der
Innenraum des Gerätes und die Tür sollten mit lau-warmem
Wasser und einem milden Reinigungsmittel abgewaschen
und anschließend mit einem feuchten Tuch nachgewischt
und trocken gerieben werden. Kunststoffteile dürfen nur mit
lauwarmem Wasser gereinigt und keiner direkten
Wärmequelle ausgesetzt werden. Die Außenseite des
Gerätes sollte regelmäßig mit einem sauberen, feuchten
Tuch abgewischt werden.
VERWENDEN SIE ZUR REINIGUNG DES GEHÄUSES
IHRES GERÄTES NIEMALS CHEMIKALIEN ODER
SCHEUERMITTEL.
4. Aufstellen des Gerätes
Beim erstmaligen Gebrauch Ihres Gerätes ist Folgendes zu
beachten:
DAS GERÄT MUSS FEST UND EBEN AUFGESTELLT
SEIN
DIE ROHRE AN DER GERÄTERÜCKSEITE KÖNNEN
SICH ERWÄRMEN
DAS GERÄT HAT KEINEN „MOTOR" UND ARBEITET
DAHER SEHR GERÄUSCHARM
NACH INBETRIEBNAHME KANN ES MINDESTENS
DREI STUNDEN DAUERN, BIS EINE ERKENNBARE
KÜHLWIRKUNG EINSETZT
Während des Kühlprozesses leitet das Gerät über den
Kondensator, der sich hinter dem oberen Teil der
rückwärtigen Geräteabdeckung befindet, Wärme an die
Umgebungsluft ab. Je besser der Kondensator belüftet ist,
desto wirksamer ist die Kühlung.
Für eine einwandfreie Funktion muss das Gerät auf
ebenem Boden stehen. Dies lässt sich leicht überprüfen,
indem man ein mit Wasser gefülltes Glas auf dem Gerät
platziert.
Das Gerät darf keiner direkten Wärmequelle (z. B.
Sonnenlicht, Heizkörper, Ofennähe usw.) ausgesetzt sein.
4.1. Aufstellanleitung
Das Kühlgerät ist mit einem elektrisch beheizten
Absorptions-Kühlaggregat ausgestattet, das sehr
geräuscharm arbeitet. Es ist als frei stehendes Gerät
konzipiert, kann jedoch auch eingebaut werden, wenn
folgende Voraussetzungen erfüllt sind, um optimale
Funktionstüchtigkeit und maximale Kühlleistung zu
gewährleisten.
WICHTIG:
Beachten Sie die nachfolgend aufgeführten
Installationshinweise. Die Garantie gilt nur für
Produkte, die entsprechend dieser Beschreibung
installiert wurden.
1. Der Kühlschrank muss in beide Richtungen niv
elliert
sein.
2. Der Abstand zur Wand muss mindes
tens 20 mm
betr
agen.
3. Die Belüftung muss wie in den Abbildungen A, B, C
oder D gezeigt erfolgen.
4. Der Belüftungsschacht muss die folgenden
Mindestmaße aufweisen: 1
05 mm x der Breite des
Kühlschranks.
5. Nur die gesamte Kühleinheit darf wie gezeigt in den
Belüftungsschacht hineinragen.
Abbildung 2.
Abbildung 3.
DE
Page 13
13
5. Einsatz des Gerätes
Zur Inbetriebnahme verbinden Sie das Gerät mit dem
Stromnetz. Die Kühlrippen sollten nach etwa drei Stunden
eine feststellbare Kühlwirkung zeigen.
Das Kühlgerät benötigt bei normaler Raumtemperatur etwa
6 Stunden, um 6 °C im Kühlraum zu erreichen.
5.1. Temperaturregulierung
Die Normaleinstellung des Thermostatreglers liegt bei
einem Wert im mittleren Einstellbereich (Abb. 5). Je nach
Beladung und Installation kann jedoch eine Änderung
dieses Wertes nötig werden. In diesem Fall wird der Regler
auf einen höheren Wert eingestellt, wenn eine niedrigere
Temperatur erwünscht ist, bzw. auf einen geringeren Wert,
wenn eine höhere Temperatur erwünscht ist. Die Wirkung
der geänderten Einstellung kann am Thermometer
abgelesen werden, sobald das Kühlgerät sich der neuen
Einstellung angepasst hat.
5.2. Steuerung der Kühleinheit (CUC)
Alle 24 Stunden nach jeder Abtauperiode prüft die
Elektronik die Gerätefunktion durch die Messung des
Verdampfer-Temperaturabfalls. Wird ein Problem erkannt,
schaltet sich das Gerät aus und beginnt nicht zu kühlen.
Prüfen Sie in diesem Fall, ob der Kühlschrank überladen
ist, die Tür korrekt geschlossen war, die Kühleinheit
ausreichende Luftzirkulation erhält und das Gerät
waagerecht steht. Trennen Sie danach das Gerät für
mindestens 10 Sekunden vom Stromnetz und schließen es
wieder an. Dadurch wird die Elektronik zurückgesetzt und
das Gerät sollte wieder normal arbeiten. Beginnt das Gerät
nicht zu kühlen, liegt eine ernsthafte Störung vor und Sie
sollten Ihren Dometic Kundendienst informieren.
6. Nützliche Hinweise
Überladen Sie das Gerät nicht. Zwischen den
Kühlprodukten sollte etwas Platz gelassen werden, um eine
effiziente und gleichmäßige Kühlung zu gewährleisten.
Werden die Ablagen überladen, kann es zu
Temperaturschwankungen kommen.
7. Abtauen, Reinigung und
Wartung
Mit der Zeit bildet sich eine Reifschicht an den Kühlflächen
des Gerätes. Es muss darauf geachtet werden, dass diese
Schicht nicht zu dick wird, denn sie wirkt isolierend und
beeinträchtigt die Kühlwirkung.
Die Reifbildung wird durch die in das Gerät eingebaute
FUZZY LOGIC reguliert.
Die erste Abtauphase beginnt 39 Stunden nach dem ersten
Einschalten und dauert zwei Stunden.
Danach kühlt das Gerät jeweils 22 Stunden
ununterbrochen, gefolgt von einer zweistündigen
Abtauphase.
Der Reif schmilzt, und das Tauwasser läuft über das
Ablaufloch der Tauwasserablaufrinne in den
Verdampfungsbehälter, der sich am rückwärtigen
unteren Ende des Gerätes befindet (Abb. 6). Dort wird
es automatisch verdampft, so dass eine manuelle
Entleerung des Behälters nicht erforderlich ist.
Abbildung 6.
Wenn Sie das Gerät abschalten wollen, drehen Sie den
Thermostatregler auf „0", ziehen Sie den Netz-stecker,
und lassen Sie die Tür geöffnet. Nachdem das
Gehäuseinnere abgetaut ist, muss es mit einem
sauberen, feuchten Tuch ausgewischt werden.
Bei erhöhter Luftfeuchtigkeit kann sich an den Rippen
eine Reifschicht bilden. Wenn diese Schicht eine Dicke
von 3 mm überschreitet, muss das Gerät abgetaut
werden, um uneingeschränkt funktionstüchtig zu sein.
8. Wechseln der Glühbirne(wo vorhanden)
Wenn die Glühbirne ausgewechselt werden muss,
ziehen Sie den Netzstecker, und gehen Sie so vor:
Drücken Sie den Metallreflektor zur Seite, und ziehen
Sie die Lampenabdeckung nach hinten. Ersetzen Sie
die Glühbirne, und drücken Sie die Abdeckung zurück in
ihre ursprüngliche Position.
Eine neue, maximal 10 Watt starke Glühbirne erhalten
Sie bei jedem Kundendienst.
9. Umkehren der Türaufhängung
(Abb. 7-8)
Um die Türaufhängung umzukehren, gehen Sie so vor:
Ziehen Sie den Netzstecker
Legen Sie das Gerät vorsichtig auf die Rückseite
Entfernen Sie das untere Scharnier, und nehmen Sie
die Tür ab d
Entfernen Sie die beiden oberen linken Schrauben,
und lösen Sie die Deckplatte, indem Sie sie nach
vorne ziehen e
Lösen Sie das obere Scharnier, und befestigen Sie
es an der gegenüberliegenden Seite
Entfernen Sie den Gelenkbolzen, und schrauben Sie
ihn von unten an
Schieben Sie die Deckplatte in die obere rechte
Ecke, und befestigen Sie sie mit beiden Schrauben
Positionieren Sie die Tür auf dem oberen Gelenkbolzen, und montieren Sie das untere Scharnier
Vergewissern Sie sich, dass sich die Tür leicht
bewegt und rundum schließt
DE
Figure 5.
Page 14
14
Abbildung 7.
Entfernen Sie die Scharnierplatte, f und befestigen Sie
sie an der gegenüberliegenden Seite
Abbildung 8.
10. Austauschen der Zierfront
(Abb. 9-11)
Entfernen Sie die beiden Schrauben (1) vom oberen
Türscharnier.
Ziehen Sie die Tür zusammen mit dem Scharnier aus dem
Gehäuse und aus dem unteren Scharniergelenk (2-3).
Abbildung 9.
Entfernen Sie die Schrauben (4) und die entsprechende
Rahmenkante (5).
Ziehen Sie die Zierfront (6) aus dem Rahmen, und
schieben Sie die neue Front hinein (7). Achten Sie darauf,
dass die obere Kante der Front genau parallel zur oberen
Rahmenkante verläuft. Eine neue Front lässt sich leichter in
die obere Rahmenkante einschieben, wenn die beiden
oberen Ecken der Front etwa 5 x 5 mm gekürzt werden (8).
Legen Sie die Rahmenkante (5) wieder auf, und fixieren
Sie sie mit den Schrauben.
Stellen Sie die Tür auf das untere Scharnier (9),
schieben Sie das obere Scharnier in die Öffnung,
drücken Sie die Tür zurück ins Gehäuse, und fixieren
Sie sie mit den zwei Schrauben (11).
Abbildung 10.
Abbildung 11.
DE
Page 15
15
11. Kundendienst
Vor Benachrichtigung des Kundendienstes sollten Sie
folgende Punkte überprüfen:
Falls das Gerät auch nach Überprüfung dieser Punkte nicht
einwandfrei funktioniert, wenden Sie sich an den
Kundendienst. Bei der Beschreibung der Störung sind die
Art der Störung, das Gerätemodell und die Produkt- und
Seriennummer anzugeben.
(Angaben zum Modell, die Produkt- und die Seriennummer
entnehmen Sie bitte dem Aufkleber, der sich oben links im
Innern des Gerätes befindet.)
Im Problemfall wenden Sie sich an das nächst-gelegene
Kundendienstzentrum - die Telefonnummer entnehmen Sie
bitte Ihrem örtlichen Telefonbuch.
www.dometic.com
12. Inbetriebnahme
Technische Daten
12.1. Anschluss an das Stromnetz
Das Gerät darf nur mit der auf dem Typenschild
angegebenen Nennbetriebsspannung betrieben
werden. Der Netzstecker des Gerätes kann an eine
vorschriftsmäßig geerdete Steckdose angeschlossen
werden.
Elektroarbeiten zur Installation des Gerätes sind von einem
qualifizierten Fachmann durchzuführen.
Falls diese Sicherheitsmaßnahmen nicht beachtet
werden, lehnt der Hersteller jede Haftung ab.
Elektrische Anforderungen
Vor dem Einschalten ist sicherzustellen, dass die
Spannungsangabe auf dem Typenschild des Gerätes der
Versorgungsspannung entspricht, an die das Gerät
angeschlossen werden soll.
Modell RH 161
Typ MF20-60
Fassungsvermögen 60 liter
Netzbetrieb 220 - 240V
(Weschelstrom)
Eingangsleistung 115W
Stromverbrauch 1.4 kWh/24h
Klimaklasse N
Kältemittel 357g H
2
O+168g NH
3
DE
Problem
Die Kühlleistung des
Geräts ist zu gering
Das Gerät kühlt nicht
Mögliche Ursache
Thermostat ist zu niedrig eingestellt
Zu viele zu warme Speisen wurden
eingelagert
Die Tür ist nicht korrekt verschlossen
Der Kühlschrank ist nicht nivelliert.
Die Luft kann im Kühlfach nicht zirkulieren
Die äußere Belüftung ist nicht ohne
Hindernisse.
Das CUC-System hat das Gerät
ausgeschaltet
Der Stecker sitzt nicht korrekt in der
Steckdose
Die Steckdose ist ohne Strom
Abhilfe
Thermostat höher drehen
Weniger Speisen einlagern
Tür korrekt verschließen
Der Kühlschrank muss nivelliert sein.
Schaffen Sie Platz zwischen den
Speisen, damit die Luft zirkulieren kann
Sichern Sie die äußere Belüftung.
Siehe Abschnitt 5.2.
Stecker korrekt anschließen
Überprüfen Sie, ob es Spannung gibt
(z.B. schließen Sie eine Lampe an die
Steckdose an).
13. Umweltschutz-Information
Im Kühlaggregat wird Ammoniak (natürliche Wasserstoffund Stickstoffverbindung) als Kältemittel eingesetzt.
Als Treibmittel für die PU-Schaum-Isolierung wird das
ozonfreundliche Cyclopentan eingesetzt.
Natriumchromat wird als Korrosionsschutz verwendet
(weniger als 2 Gew.% des Kühlmediums).
14. Entsorgung
Um die stoffliche Verwertung der recyclingfähigen
Verpackungsmaterialien sicherzustellen, sind diese den
örtlichen Sammelsystemen zuzuführen.
Das Gerät ist einem entsprechenden
Entsorgungsunternehmen zu überlassen, das eine
sachgerechte Verwertung der recyclingfähigen Teile
und ordnungsgemäße Entsorgung der Restteile
gewährleistet.
Geräte, die mit diesem Symbol
gekennzeichnet sind, müssen an dem
örtlichen Sammelpunkt für die Entsorgung
von elektrischen und elektronischen
Geräten abgegeben werden.
Dieses Produkt darf nicht über den
normalen Haushaltsabfall entsorgt werden.
Kühlschränke von Dometic enthalten das Symbol auf
dem Datenschild (Typenschild) im Inneren des Gerätes.
Das Gerät entspricht den folgenden EG-Richtlinien:
LVD-Richtlinie 73/23/EWG mit Änderung
90/683/EWG
EMV-Richtlinie 89/336/EWG
RoHS-Richtlinie 2002/95/EG
Page 16
16
Merci d'avoir choisi cet appareil. Nous sommes certains que son utilisation sera exempte de problèmes.
A présent, nous aimerions vous familiariser avec quelques symboles utilisés pour garantir le fonctionnement
efficace et en toute sécurité de l'appareil, sur lesquels nous attirons votre attention.
source de danger dans le cas d'une utilisation inappropriée
conseils utiles à lire
informations sur la protection de l'environnement
Ce réfrigérateur est conçu pour le stockage d'aliments et de boissons.
Attention !
Le fonctionnement de cet appareil doit être réservé à des adultes. Les enfants ne
peuvent pas toucher aux commandes ni jouer avec l'appareil.
Tout travail d'électricité nécessaire à l'installation de cet appareil doit être réalisé
par un électricien qualifié.
Cet appareil doit être réparé par un réparateur agréé. Seules les pièces de
rechange d'origine doivent être utilisées.
Il est dangereux de modifier les spécifications ou l'appareil de quelque manière
que ce soit.
Veillez à ce que l'appareil ne repose pas sur le cordon d'alimentation électrique.
Cet appareil contient des pièces qui dégagent de la chaleur. Par conséquent,
veillez à toujours garantir une ventilation suffisante. A défaut, cela risque
d'entraîner une panne de l'appareil et la perte éventuelle de son contenu. Voir les
instructions d'installation.
Les pièces dégageant de la chaleur ne doivent pas être exposées. Dans la
mesure du possible, l'arrière de l'appareil doit être situé à proximité d'un mur, en
laissant une distance suffisante pour la ventilation, comme mentionné dans les
instructions d'installation.
Avant de réaliser des opérations de dégivrage, nettoyage ou entretien, veillez à
éteindre l'appareil et à le débrancher.
N'UTILISEZ PAS D'INSTRUMENTS COUPANTS pour retirer le givre ou la glace. Ne
forcez jamais pour retirer des morceaux de glace des ailettes de refroidissement.
Laissez-les fondre lorsque vous dégivrez l'appareil. Voir les instructions de
dégivrage.
Cet appareil est lourd. Déplacez-le avec prudence.
Ne tentez jamais de réparer vous-même l'appareil. Les réparations effectuées par
des personnes non qualifiées risquent d'entraîner des blessures ou une
défectuosité plus grave. Contactez votre centre de réparation local et insistez
toujours pour obtenir des pièces de rechange d'origine.
Il est interdit de conserver toute substance toxique ou explosive dans l'appareil.
Veuillez lire ce mode d'emploi attentivement avant de mettre en service l'unité de
réfrigération. Veuillez vous assurer que le nouveau propriétaire recevra ce mode
d'emploi lors de la vente ou cession de l'unité.
Veuillez respecter scrupuleusement les instructions d'installation ci-dessous. La
garantie couvre uniquement les appareils installés conformément à ces
instructions.
FR
Page 17

17
FR
SOMMAIRE
1. Déballage
2. Aperçu de l'appareil
3. Nettoyage
4. Mise en place de l'appareil
4.1. Instructions d'installation
5. Utilisation de l'appareil
5.1. Réglage de la température
5.2. Systèm de contrôle de l'agrégat
6. Suggestions utiles
7. Dégivrage, nettoyage et entretien
8. Remplacement de l'ampoule
9. Inversion des charnières
10. Remplacement du panneau de porte décoratif
11. Service à la clientèle
12. Mise en service, données techniques
12.1. Branchement au réseau électrique
13. Informations sur la protection de l'environnement
14. Recyclage
Attention!
Les conditions de garantie sont conformes à la Décision du Comité mixte de
l'EEE nº 44/1999 du 26 mars 1999 modifiant l'annexe (environnement) de l'accord
EEE, et également conformes aux lois applicables dans les divers pays.
Si vous avez des questions concernant la garantie, le service après-vente ou les
pièces de rechange, veuillez bien vous adresser à notre réseau de services
Dometic.
Les dommages résultant d'un usage inapproprié de l'appareil ne sont pas
couverts par la garantie.
Les modifications apportées à l'appareil ou l'utilisation de pièces de rechange qui
ne sont pas d'origine Dometic, ne sont pas couvertes par la garantie.
Le non-respect des instructions d'installation ou du mode d'emploi, entraîne
l'extinction totale de cette garantie.
Veuillez bien préciser le modèle d'appareil, la référence du produit et le numéro
de série si vous voulez contacter le réseau de services Dometic. Vous trouverez
ces informations sur la plaque signalétique, située à l'intérieur du réfrigérateur.
Page 18

18
FR
1. Déballage
Assurez-vous que l'appareil n'est pas endommagé
après l'avoir déballé. Si vous constatez des dommages
causés par le transport, signalez-les immédiatement à
la société de transport.
2. Aperçu de l'appareil
1. porte
2. compartiment bouteilles
3. évaporateur
4. capteur
5. bouton de thermostat
6. penture
7.
patte de fixation
8. lampe
9.
capteur de l'évaporateur (CUC)
SI VOTRE REFRIGERATEUR EST EQUIPE D'UNE SERRURE, DOMETIC ZRT N'ASSUME AUCUNE
RESPONSABILITE EN CAS DE PERTE DES CLES OU DOMMAGES A CELLES-CI.
Page 19

19
FR
3. Nettoyage
Nettoyez le réfrigérateur à fond à intervalles
réguliers. Retirez les étagères. Nous vous
recommandons de nettoyer ces étagères, ainsi que
l'intérieur de l'appareil et la porte avec une solution
chaude de bicarbonate de soude. Ensuite, rincez avec
un chiffon et de l'eau chaude, puis séchez avec un
chiffon propre. Ne lavez pas les pièces en plastique
avec de l'eau à une température supérieure au lavage
à la main et ne les faites pas sécher à la chaleur.
L'extérieur de l'appareil doit être régulièrement essuyé
avec un chiffon humide et propre.
N'UTILISEZ JAMAIS DE PRODUITS CHIMIQUES
PUISSANTS OU D'AGENTS NETTOYANTS ABRASIFS
SUR LES DIFFERENTS ELEMENTS DE L'APPAREIL.
4. Mise en place de l'appareil
Lors de la première utilisation du réfrigérateur, tenez
compte des points suivants:
L'APPAREIL DOIT TOUJOURS ETRE DE NIVEAU
LA TUYAUTERIE SITUEE A L'ARRIERE CHAUFFE
LORS DE L'UTILISATION
LE REFRIGERATEUR EST VIRTUELLEMENT
SILENCIEUX, CAR IL NE DISPOSE D'AUCUN
"MOTEUR"
ATTENDEZ AU MOINS 3 HEURES AVANT
L'APPARITION DES SIGNES DE
REFROIDISSEMENT
Pendant le processus de réfrigération, l'appareil
diffuse de la chaleur par le biais du condensateur
(situé sous la partie supérieure du couvercle arrière)
dans l'air environnant.
Plus le condensateur est ventilé, plus la réfrigération
sera efficace.
En outre, l'appareil doit toujours être placé sur une
surface plane pour atteindre des performances
optimales. Pour vérifier le niveau, placez un verre
d'eau sur l'appareil.
Il est important que l'appareil ne soit pas exposé
directement à une chaleur par rayonnement (rayons
solaires, radiateur, proximité d'un four, etc.).
4.1. Instructions d'installation
Le réfrigérateur est muni d'une unité de refroidissement
à absorption à réchauffement électrique dont le
fonctionnement est virtuellement silencieux. Le
réfrigérateur est prévu pour une installation autonome,
mais il peut être encastré si les conditions ci-après sont
respectées afin de garantir un fonctionnement optimal
et une efficacité de refroidissement maximale.
IMPORTANT:
Veuillez respecter scrupuleusement les
instructions d'installation ci-dessous. La garantie
couvre uniquement les appareils installés
conformément à ces instructions.
1. Le réfrigérateur doit être de niv
eau dans les
deux directions.
2. L'écartement minimal entre le réfrigérateur et le
mur doit être de 20 mm.
3. La ventilation de l'appareil doit être assurée
conf
ormément aux dessins de cette page, par la
configuration A, B, C ou D.
4. La profondeur de l'ouverture à l'arrière
destinée au passage d'air doit être au moins
égale à 105 mm.
5. Seul l'ensemble de l'unité de refroidissement
doit ventiler dans le passage, comme sur
l'illustration.
6. L'air circulan
t à travers le passage ne doit pas
être préchauffé par une quelconque source
de chaleur.
7. Les grilles de ventilation doivent, le cas
échéant, comporter des ouvertures d'au
moins 2
00 cm² chacune.
Lors du montage, il convient de s'assurer que la
fiche secteur reste accessible.
A travers de la patte de fixation le réfrigérateur
peut être fixé au fond du meuble avec des vis
d'une longueur appropriée. (fig. 4)
Figure 2.
Figure 3.
Page 20

20
Figure 4.
5. Utilisation de l'appareil
Pour mettre le réfrigérateur en route, branchez la fiche
dans la prise et allumez la prise. Les ailettes de
refroidissement doivent montrer des signes de
refroidissement après environ 3 heures.
Pour que la température du compartiment de stockage
atteigne 6 °C, vous devez attendre environ 6 heures à
une température ambiante normale.
5.1. Réglage de la température
Le réglage habituel se fait en plaçant le bouton en
position médiane du jeu de réglage du thermostat (fig.
5), mais il varie en fonction des conditions de charge et
d'installation. Si vous devez modifier le réglage, placez le
bouton sur une position supérieure pour produire une
température plus froide ou sur une position inférieure
pour obtenir une température moins froide.
Pour vérifier l'effet d'une modification du réglage,
laissez le réfrigérateur fonctionner pendant un certain
temps, puis consultez le thermomètre.
5.2. Systèm de contrôle de l'agrégat
(CUC system)
Toutes les 24 heures suivant un dégivrage,
l'électronique contrôle le bon fonctionnement de
l'appareil en mesurant la chute de température de
l'évaporateur. En cas de problème, l'appareil
s'arrêtera. Vérifiez alors si le réfrigérateur n'est pas
surchargé, si la porte est bien fermée, si la circulation
d'air du bloc réfrigérant est suffisante et si l'appareil
se trouve sur une surface bien plane. Débranchez
l'appareil pour au moins 10 secondes, puis
rebranchez-le. Ce qui permettra de redémarrer
l'électronique, l'appareil devrait alors fonctionner
normalement. Si l'appareil ne recommence pas à
fonctionner, vous devrez en informer immédiatement
votre service après-vente Dometic.
6. Suggestion utile
Ne surchargez pas l'appareil. Il est recommandé de
laisser de l'espace entre les produits afin de garantir un
refroidissement efficace et uniforme. La surcharge des
étagères risque de provoquer des variations de
température non souhaitées.
7. Dégivrage, nettoyage et
entretien
Du givre se forme progressivement sur les parois de
refroidissement. Il ne peut devenir trop épais, car il
agit comme isolant et perturbe le refroidissement.
Intégré à l'appareil, le système FUZZY LOGIC
permet d'éviter cette formation de givre.
La première phase de dégivrage commencera
environ 39 heures après la première mise en
service et durera environ deux heures. L'appareil
fonctionnera ensuite 22 heures sans interruption, ce
cycle sera suivi d'une phase de dégivrage durant
deux heures.
Ainsi, le givre fond et l'eau dégelée s'écoule via le
tube de drainage dans un récipient d'évaporation
situé dans le bas, à l'arrière du réfrigérateur (fig. 6).
Le récipient ne doit jamais être vidé manuellement,
car l'eau dégelée s'évapore automatiquement dans
l'air ambiant.
Figure 6.
Pour mettre l'unité hors tension, tournez le bouton
de thermostat sur la position "0", débranchez le
réfrigérateur de l'alimentation électrique, puis
laissez la porte ouverte.
Après dégivrage, essuyez l'intérieur de l'appareil
avec un chiffon propre et humide.
En cas d'humidité de l'air accrue, du givre peut se
former sur les ailettes de refroidissement. Si la
couche de givre atteint une épaisseur d'environ 3
mm, le réfrigérateur doit être dégivré pour éviter
d'altérer le bon fonctionnement de l'appareil
8. Remplacement de l'ampoule
(sur certains modèles)
Pour remplacer l'ampoule, retirez la prise et suivez
la procédure suivante:
Appuyez sur le réflecteur métallique d'un côté, puis
poussez le capot d'ampoule vers l'arrière.
Remplacez l'ampoule et remettez le capot en place.
Vous pouvez vous procurer de nouvelles ampoules
de maximum 10 watts auprès de n'importe quel
magasin.
9. Inversion des charnières
(fig. 7-8)
Le sens d'ouverture des portes peut être inversé en
observant les étapes suivantes:
débranchez l'appareil de l'alimentation électrique
couchez délicatement le réfrigérateur sur le dos
enlevez la charnière inférieure et retirez la porte
d
FR
Figure 5.
Page 21

21
enlevez les deux vis supérieures gauches et retirez
la plaque de recouvrement en exerçant une traction
vers l'avant e
enlevez la charnière supérieure et fixez-la sur le côté
opposé
enlevez le boulon d'articulation et revissez-le par audessous
insérez la plaque de recouvrement dans le coin
supérieur droit en la poussant et fixez-la avec les deux vis
placez la porte sur le boulon d'articulation supérieur
et fixez la charnière inférieure, assurez-vous que la
porte peut se mouvoir librement et que le joint est
correctement placé.
Figure 7.
enlevez la penture f et fixez-la sur le côté opposé
Figure 8.
10. Remplacement du panneau
de porte décoratif (fig. 9 à 11)
Dévissez les deux vis (1) de la charnière supérieure de
la porte.
Tirez la porte vers vous en la levant de la charnière
inférieure (2-3).
Dévissez les vis (4) et retirez le bord du cadre (5).
Faites glisser le panneau décoratif (6) en dehors du
cadre de porte et insérez le nouveau panneau (7). Le
bord supérieur du panneau doit être parallèle au bord
supérieur du cadre. Vous pouvez plus facilement
insérer un nouveau panneau dans le bord supérieur du
cadre en coupant les deux coins d'environ 5 x 5 mm
(8). Remettez le bord du cadre en place (5) et vissezle.
Placez la porte sur la charnière inférieure (9),
insérez la charnière supérieure dans l'ouverture,
appuyez la porte contre le corps de l'appareil, puis
vissez la charnière avec les deux vis (11).
Figure 9.
Figure 10.
Figure 11.
FR
Page 22

22
11. Service à la clientèle
Avant d'appeler un réparateur, réalisez les tests
simples suivants:
Si, après avoir vérifié les points ci-dessus, le
réfrigérateur ne fonctionne pas de façon satisfaisante,
contactez le réparateur le plus proche. Décrivez le
problème et communiquez le modèle, ainsi que le
numéro de produit et de série.
(Vous trouverez les détails sur le modèle, le numéro de
produit et de série sur la plaque signalétique à
l'intérieur de l'appareil, en haut à gauche.)
En cas de panne, contactez le centre de réparation le
plus proche (consultez l'annuaire téléphonique local).
www.dometic.com
12. Mise en service
Données techniques:
12.1. Branchement au réseau
électrique
L'appareil ne peut être utilisé qu'avec la tension
nominale affichée sur la plaque signalétique.
Vous pouvez connecter la fiche de courant à une prise
avec mise à la terre, selon les réglementations en
vigueur.
Tout travail électrique exigé pour installer cet appareil
doit être effectué par un électricien qualifié ou une
autre personne compétente.
Le fabricant décline toute responsabilité en cas de
non-respect de ces mesures de sécurité.
Exigences en matière d'électricité
Assurez-vous que la tension d'alimentation correspond
à la tension indiquée sur la plaque signalétique avant
de mettre l'appareil en service.
Modèle RH 161
Type MF20-60
Volume total 60 litres
Tension d’alimentation 220 - 240V (AC)
Puissance 115W
Consommation 1.4 kWh/24h
Classe de climat N
Agent réfrigérant 357g H
2
O+168g NH
3
FR
Problème
La performance
frigorifique de l'appareil
est insuffisante.
L'appareil ne refroidit pas
Raison possible
Le réglage du thermostat est trop bas.
Le compartiment refroidisseur contient une
trop grande quantité d'aliments chauds.
La porte est mal fermée.
La position du réfrigérateur n'est pas
horizontale.
L'air ne peut pas circuler dans le
compartiment refroidisseur.
La circulation d'air extérieure est bloquée.
Le régulateur automatique de contrôle a
arrêté l'appareil.
La fiche d'alimentation est mal branchée
dans la prise de courant
La prise de courant n'est pas alimentée.
Remède
Augmentez le réglage du thermostat.
Réduire le volume des denrées
stockées.
Bien fermer la porte.
Il faut positionner le réfrigérateur
horizontalement.
Laissez un espace suffisant entre les
denrées alimentaires afin que l'air
puisse circuler.
Il faut assurer la circulation d'air
extérieure.
Cf. paragraphe 5.2.
Brancher correctement la fiche
d'alimentation.
Il faut vérifier la présence de la tension
(par exemple connecter une lampe à
la prise de courant).
13. Informations sur la
protection de
l'environnement
L'agent réfrigérant utilisé dans cette unité de
réfrigération est de l'ammoniaque (combinaison
d'hydrogène et d'azote).
Le cyclopentane qui respecte la couche d'ozone est
utilisé en tant qu'agent actif pour l'isolation en
mousse de PU.
Le chromate de sodium est un agent anti-corrosion
(dosé à moins de 2% du poids du liquide de
refroidissement).
14. Recyclage
Après le déballage de l'appareil, vous devez
déposer les matériaux d'emballage auprès d'un
centre de recyclage local. A la fin du temps de
service de l'appareil, il doit être remis à une firme
spécialisée de recyclage, qui reconvertira les
matériaux réutilisables. Le reste doit être détruit de
manière appropriée.
Les appareils portant ce symbole doivent
être obligatoirement remis à un point de
collecte local pour la mise au rebut
d'appareils électriques et électroniques.
Il est interdit de jeter ce produit dans les
ordures ménagères.
Sur les réfrigérateurs Dometic, le symbole figure sur
la plaque des caractéristiques (plaque signalétique)
apposée à l'intérieur de l'appareil.
Cet appareil est conforme aux directives CEE
suivantes:
Directive LVD 73/23/CEE y compris la
modification 90/683/CEE
Directive EMC 89/336/CEE
Directive RoHS 2002/95/CE
Page 23

23
Vi ringraziamo per aver scelto il nostro apparecchio che Vi garantirà la massima semplicità d'uso.
Di seguito vengono riportati e definiti alcuni simboli al fine di assicurare un impiego sicuro ed efficace
dell'apparecchio:
pericolo in caso di utilizzo improprio
suggerimenti utili
informazioni relative alla tutela dell'ambiente
Il frigorifero è destinato alla conservazione di cibi e bevande.
Attenzione!
L'apparecchio deve essere utilizzato esclusivamente da persone adulte. Tenere
lontano dalla portata dei bambini.
Tutte le operazioni d'installazione e regolazione vanno effettuate da personale
qualificato.
Gli interventi di manutenzione dell'apparecchio vanno effettuati da un tecnico
autorizzato. Utilizzare esclusivamente parti di ricambio.
In ogni caso è pericoloso apportare modifiche alle caratteristiche tecniche o
all'apparecchio.
Assicurarsi che l'apparecchio non poggi sul cavo di alimentazione elettrica.
L'apparecchio presenta parti soggette a riscaldamento. Assicurarsi sempre che
vi sia un'adeguata ventilazione. L'assenza di ventilazione potrebbe causare
danni ai componenti e avaria di cibi e bevande. Vedere istruzioni per
l'installazione.
Non esporre i componenti soggetti a riscaldamento. Posizionare possibilmente il
retro dell'apparecchio contro una parete mantenendo la dovuta distanza per una
buona ventilazione, come descritto nelle istruzioni per l'installazione.
Prima di effettuare operazioni di sbrinamento, pulizia o manutenzione,
assicurarsi che l'apparecchio sia spento e disinserire la spina.
NON UTILIZZARE UTENSILI APPUNTITI per rimuovere brina o ghiaccio. Non
rimuovere mai il ghiaccio solido dalle alette di raffreddamento. Far sciogliere il
ghiaccio durante l'operazione di sbrinamento. Vedere istruzioni di sbrinamento.
L'apparecchio è pesante. Maneggiare con cura.
Non tentare di riparare l'apparecchio di persona. Riparazioni effettuate da parte
di personale non esperto potrebbero causare ferite o compromettere il buon
funzionamento dell'apparecchio. Rivolgersi al proprio Centro Assistenza e
utilizzare esclusivamente parti di ricambio originali.
Nell'apparecchio è vietato conservare sostanze tossiche o esplosive
Prima della messa in funzione dell'apparecchio si raccomanda di leggere
attentamente le seguenti istruzioni per l'uso. In caso di vendita o noleggio
dell'apparecchio fornire le istruzioni al nuovo proprietario.
Seguire attentamente le istruzioni sull'installazione. La garanzia è valida solo per i
prodotti installati come descritto.
IT
Page 24

24
IT
INDICE
1. Disimballaggio
2. Schema dell'apparecchio
3. Pulizia
4. Posizionamento dell'apparecchio
4.1 Istruzioni per l'installazione
5. Impiego dell'apparecchio
5.1. Regolazione della temperatura
5.2. Controllo del gruppo refrigerante (Cooling Unit Control, CUC)
6. Suggerimenti utili
7. Sbrinamento, pulizia e manutenzione
8. Sostituzione lampada
9. Cambio direzione apertura porta
10. Sostituzione del pannello decorativo della porta
11. Servizio Assistenza Clienti
12. Messa in funzione, caratteristiche tecniche
12.1 Allacciamento alla rete elettrica
13. Informazioni relative alla tutela dell'ambiente
14. Riciclaggio
Attenzione!
Le condizioni di garanzia sono conformi alla direttiva CE 44/1999/CE nonché alle
disposizioni specifiche applicabili nel paese interessato.
Per questioni di garanzia o altre esigenze di assistenza tecnica (come p.es. i
ricambi) contattare Dometic Service Network.
La garanzia decade in caso di danni causati da un uso improprio dell'apparecchio.
La garanzia non comprende qualsiasi modifica apportata all'apparecchio o
qualora non fossero utilizzati ricambi originali Dometic.
La garanzia decade in caso di inosservanza delle istruzioni di installazione e uso.
Nel contattare Dometic Service Network occorre segnalare il modello, il codice
prodotto e il numero di serie. Queste informazioni sono riportate sulla targhetta
identificativa applicata all'interno del frigorifero.
Page 25

25
IT
1. Disimballaggio
Rimuovere l'imballaggio in cartone e accertarsi che
l'apparecchio non sia danneggiato. In caso di danni
all'apparecchio dovuti al trasporto, contattare
immediatamente la società di trasporti.
2. Schema dell'apparecchio
1. porta
2. mensola portabottiglie
3. evaporatore
4. sensore
5. pomello termostato
6. bandella
7.
piedino per fissaggio
8. lampada
9.
sensore evaporatore
SE IL FRIGORIFERO È DOTATO DI SERRATURA, DOMETIC ZRT NON SI ASSUME ALCUNA
RESPONSABILITÀ PER PERDITA O DANNI DELLE CHIAVI. SAREMO TUTTAVIA LIETI DI FORNIRE UN
NUOVO SET COMPLETO DI SERRATURA E CHIAVI.
Page 26

26
IT
3. Pulizia
Provvedere regolarmente alla pulizia completa
dell'apparecchio, se necessario. Rimuovere i
ripiani; lavare i ripiani, l'interno dell'armadietto e la
porta con una soluzione calda di bicarbonato di sodio.
Passare un panno inumidito in acqua calda e infine
asciugare con un panno pulito. Lavare i componenti in
plastica esclusivamente in acqua tiepida e non esporli
a fonti di calore. Passare regolarmente un panno
umido e pulito sulla parte esterna dell'armadietto.
NON UTILIZZARE SOSTANZE CHIMICHE
AGGRESSIVE O MATERIALI ABRASIVI PER LA
PULIZIA DELL'ARMADIETTO.
4. Posizionamento
dell'apparecchio
Al primo utilizzo dell'apparecchio considerare i
seguenti punti:
ASSICURARSI CHE IL FRIGORIFERO SIA SU UN
PIANO ORIZZONTALE
LE TUBATURE SUL RETRO SI RISCALDANO
DURANTE IL FUNZIONAMENTO
IL FRIGORIFERO NON È DOTATO DI "MOTORE";
È QUINDI POTENZIALMENTE SILENZIOSO.
CALCOLARE ALMENO 3 ORE PER I PRIMI
EFFETTI DI RAFFREDDAMENTO.
Durante il processo di refrigerazione l'apparecchio
emana calore nell'aria circostante attraverso il
condensatore posto al di sotto della parte superiore
della calotta posteriore. Maggiore è la ventilazione del
condensatore, più efficace sarà la refrigerazione.
Altra premessa per un funzionamento ottimale è il
posizionamento dell'apparecchio su una superficie
piana. Per meglio controllare la posizione appoggiare
un bicchiere d'acqua sopra l'apparecchio.
È importante che l'apparecchio non venga esposto a
fonti di calore dirette (luce solare, radiatore, accanto
a un forno, ecc.).
4.1. Istruzioni per l'installazione
Il frigorifero è dotato di un'unità di refrigerazione ad
assorbimento riscaldata elettricamente che funziona in
modo silenzioso. Il frigorifero è stato progettato per
un'installazione libera ma può essere installato ad
incasso, rispettando le seguenti condizioni per
garantire un funzionamento soddisfacente e la
massima efficienza di raffreddamento.
IMPORTANTE:
Seguire attentamente le istruzioni sull'installazione.
La garanzia è valida solo per i prodotti installati
come descritto.
1. Il frigorifero deve essere posto per
fettamente in
piano in entrambe le direzioni.
2. Lasciare almeno 2
0 mm di spazio libero verso la
parete.
3. Prevedere il passaggio per la ventilazione come
illus
trato nelle alternative A, B, C e D.
4. Il passaggio per la ventilazione deve misurare
almeno 1
05 mm x la larghezza del frigorifero.
5. Solamente l'intera unità di raffreddamento deve
rientrare nel passaggio per la ventilazione come
illustrato.
6. Non preriscaldare in alcun modo l'aria che
circola nel passaggio di ventilazione.
7. Se previste, le griglie di ventilazione devono
presentare aperture di almeno 200 cm
2
ciascuna.
Al momento del montaggio occorre fare in modo
che la spina resti accessibile.
Il frigorifero puo' essere fissato sulla base del
mobile di incasso utilizzando i piedini di
fissaggio e due viti di lunghezza appropriata.
(fig 4.)
Figura 4.
Figura 2.
Figura 3.
Page 27

27
5. Impiego dell'apparecchio
Per mettere in funzione l'apparecchio inserire la spina
nella presa e regolare il termostato.
Le alette indicheranno i primi effetti di raffreddamento
dopo ca. 3 ore.
Ad una normale temperatura ambiente sono
necessarie ca. 6 ore affinché il frigorifero raggiunga 6
°C nel comparto di conservazione.
5.1. Regolazione della temperatura
In genere il valore della temperatura necessario
corrisponde a un valore medio dei parametri di
regolazione indicati sul pomello del termostato (fig. 5),
ma può variare secondo carico e tipo di installazione.
Se è necessario modificare la temperatura, posizionare
il pomello su un valore più alto per una temperatura più
fredda o su uno più basso per una temperatura più
calda. Per mezzo di un termometro è possibile
verificare che sia stata raggiunta la temperatura
desiderata.
5.2.Controllo del gruppo
refrigerante
(Cooling Unit Control,
CUC)
Il sistema elettronico controlla il funzionamento dopo
ogni ciclo di sbrinamento (ogni 24 ore) misurando il
calo di temperatura dell'evaporatore. Se viene
registrato un problema il frigorifero si arresta. In questo
caso si consiglia di verificare che il frigorifero non sia
stato riempito in modo eccessivo, che la porta sia stata
chiusa, che la ventilazione del gruppo refrigerante sia
corretta e che il frigorifero sia a livello. Dopo il
controllo, staccare la spina del frigorifero per almeno
10 secondi e inserirla nuovamente nella presa. Con
questa operazione l'apparecchio riprenderà il regolare
funzionamento. Se no, questo significa che è presente
un'anomalia. In questo caso contattare il servizio di
assistenza tecnica Dometic.
6. Suggerimenti utili
Evitare di riempire troppo l'apparecchio. Si consiglia di
lasciare dello spazio tra i prodotti all'interno del frigo
per garantire un processo di raffreddamento efficiente
e uniforme. Ripiani troppo vicini possono causare alti
sbalzi di temperatura.
7. Sbrinamento, pulizia e
manutenzione
La formazione di brina sulle superfici di raffreddamento
avviene gradualmente; evitare che lo strato di brina
diventi troppo spesso perché la brina agisce quale
isolante e ostacola il processo di raffreddamento.
La formazione di brina è rallentata dal sistema
FUZZY LOGIC inserito all'interno dell'apparecchio.
Il primo ciclo di sbrinamento inizia dopo 39 ore dalla
messa in funzione e dura due ore. Dopodiché il
frigorifero funziona in raffreddamento continuo per
22 ore, seguito da un altro ciclo di sbrinamento della
durata di 2 ore.
La brina si scioglie e l'acqua di sbrinamento scorre
lungo il tubo di scolo dal gocciolatoio fino ad una
vaschetta di evaporazione posta sul retro del
frigorifero in basso. (fig. 6) L'acqua di sbrinamento
evapora automaticamente nell'aria circostante; non
è necessario svuotare la vaschetta manualmente.
Figura 6.
Per spegnere l'apparecchio posizionare il pomello
del termostato su "0", disinserire la spina e lasciare
aperta la porta. Dopo lo sbrinamento passare un
panno umido e pulito all'interno del frigorifero.
In condizioni di elevata umidità dell'aria può
verificarsi una formazione di brina sulle alette. Se lo
strato di brina raggiunge uno spessore di circa 3
mm, è necessario sbrinare il frigorifero per non
compromettere il grado di refrigerazione.
8. Sostituzione della lampada
(se in dotazione)
Se è necessario sostituire la lampada, disinserire la
spina e procedere come segue:
portare il riflettore in metallo su un lato e spostare
indietro il coperchio della lampada. Sostituire la
lampada e riposizionare il coperchio.
La lampada a 10 Watt (max.) è disponibile presso
ogni punto vendita.
9. Cambio direzione apertura
porta (fig.7-8)
La direzione di apertura della porta può essere
modificata procedendo come segue:
disinserire la spina
posizionare con cautela il retro dell'apparecchio
sul piano
rimuovere la cerniera inferiore e quindi la porta d
svitare le due viti superiori di sinistra e rimuovere
il pannello spingendolo in avanti e
rimuovere la cerniera superiore e montarla sul
lato opposto
rimuovere l'aggancio della cerniera e avvitarlo
inserendolo dal basso
inserire il pannello nell'angolo superiore di destra
spingendo e serrandolo con due viti
posizionare la porta sull'aggancio della cerniera
superiore e montare la cerniera inferiore
IT
Figure 5.
Page 28

28
controllare che la porta si chiuda facilmente e in
modo corretto
Figura 7.
rimuovere la bandella f e montarla sul lato opposto
Figura 8.
10. Sostituzione del pannello
decorativo della porta
(fig. 9-11)
Svitare le due viti (1) dalla cerniera superiore della porta.
Rimuovere la porta e la cerniera dal corpo e rimuovere
l'aggancio della cerniera inferiore (2-3).
Rimuovere le viti (4) ed estrarre il bordo del telaio (5).
Far scivolare il pannello decorativo (6) dal telaio della
porta e inserire il nuovo pannello (7) in modo che il
bordo superiore del pannello coincida perfettamente
con il bordo superiore del telaio. L'inserimento di un
nuovo pannello nel bordo superiore del telaio risulta più
facile se si arrotondando i due angoli di ca. 5 x 5 mm
(8). Riposizionare il bordo del telaio (5) e fissare le viti.
Posizionare la porta sulla cerniera inferiore (9),
spostare la cerniera superiore nell'apertura, premere
con la porta contro il corpo e fissare le due viti (11).
Figura 9.
Figura 10.
Figura 11.
IT
Page 29

29
11. Servizio assistenza clienti
Prima di rivolgersi al servizio di assistenza clienti,
verificare che:
Se, una volta verificato quanto sopra, il frigorifero non
riprendesse a funzionare correttamente, contattare il
punto assistenza tecnica più vicino. Illustrare il
problema indicando modello, numero di serie e del
prodotto riportati sull'etichetta in alto a sinistra nel
comparto interno.
Se il problema permane, contattate il centro servizio
più vicino- cercare sull'elenco telefonico.
www.dometic.com
12. Messa in funzione
Caratteristiche tecniche:
12.1. Allacciamento alla rete elettrica
L'apparecchio funziona soltanto mediante una
rete con la tensione nominale indicata sulla
targhetta dati. La spina di rete può essere inserita in
una presa con messa a terra secondo le disposizioni
vigenti.
Qualsiasi operazione d'installazione dell'apparecchio
va effettuata da parte di personale esperto o da una
persona competente.
L'azienda produttrice declina ogni responsabilità
in caso di inosservanza delle presenti misure di
sicurezza.
Requisiti elettrici
Prima di accendere, assicurarsi che la tensione di rete
corrisponda alla tensione indicata sulla targhetta
dell'apparecchio.
IT
Modello RH 161
Typo MF20-60
Volume lordo 60 litre
Alimentazione 220 - 240V (AC)
Potenza 115W
Consumo energia 1.4 kWh/24h
Classe climatica N
Refrigerante 357g H
2
O+168g NH
3
Problema
L'apparecchio non
raffredda in modo
sufficiente.
L'apparecchio non
raffredda e tutti
Causa possibile
Il controllo del termostato è stato impostato
a una temperatura troppo bassa
Il frigo è stato caricato con troppi cibi e/o
bevande da raffreddare
La porta non è stata chiusa correttamente
La posizione del frigorifero non è
orizzontale.
Il ricircolo interno dell'aria è ostacolato
La circolazione d'aria esteriore è chiusa.
Il sistema CUC ha arrestato il
funzionamento del frigo
La spina del cavo di rete non è collegata
correttamente alla presa di alimentazione
Assenza di tensione nella presa di rete
Soluzione
Impostare una temperatura più alta
Caricare il frigo con meno cibi e/o
bevande
Verificare che la porta del frigorifero
sia chiusa
Si deve aggiustare la posizione
orizzontale del frigorifero.
Garantire una corretta ricicolazione
dell'aria fredda all'interno del frigo
Si deve assicurare la circolazione
d'aria esteriore.
Vedere le apposite istruzioni al par.
5.2.
Verificare il corretto collegamento tra
spina e presa di rete
Si deve verificare la tensione (per
esempio con la connessione di una
lampada)
13. Informazioni relative alla
tutela dell'ambiente
Come refrigerante per l'unità di refrigerazione viene
utilizzata ammoniaca (composto naturale di
idrogeno e azoto).
Il ciclopentano, sostanza non nociva all'ozono, viene
attivato come agente motore per l'isolamento
mediante poliuretano espanso.
Il sodio cromato viene utilizzato per proteggere dalla
corrosione (il suo peso equivale a meno del 2 % del
peso del refrigerante).
14. Riciclaggio
Dopo aver tolto il materiale d'imballaggio,
questo va depositato presso un centro raccolta rifiuti
locale. Al termine della vita utile dell'apparecchio,
consegnarlo a una ditta specializzata nella raccolta
e nella rilavorazione, la quale recupererà i materiali
riutilizzabili. Il resto verrà distrutto.
Gli apprecchi che sono contrassegnati
con questo simbolo devono essere
consegnati al posto di raccolta locale per
lo smaltimento e il trattamento di
apparecchi elettrici ed elettronici.
Questo prodotto non deve essere
smaltito con i normali rifiuti domestici.
Il simbolo si trova sulla targhetta dei dati tecnici dei
frigoriferi Dometic (targhetta del modello) all'interno
dell'apparecchio.
L'apparecchio è conforme alle seguenti direttive
CEE
direttiva sui dispositivi a bassa tensione
73/23/CEE con emendamento
90/683/CEE
direttiva sulla compatibilità elettromagnetica
89/336/CEE
Direttiva 2002/95/CE (RoHS)
Page 30

30
IT
NORME DI GARANZIA
Il periodo di garanzia per i nostri prodotti è di un anno dalla data di vendita.
Durante il periodo di garanzia la Società si impegna a sostituire gratuitamente tutte le parti Che presentassero
difetti di fabbricazione esclusi i pezzi ad usura.
Le riparazioni in garanzia si intendono franco Electrolux Commerciale S.r.l. - Moncalieri (To) o Sedi dei centri
assistenza autorizzati. Eventuali spese di trasporto del materiale, trasferte o trasporto del personale sono a
carica del Cliente.
La garanzia decade automaticamente al verificarsi di una delle seguenti condizioni:
a) cambio di proprietà dell'apparecchio (la garanzia è valida solo per il cliente a cui è intestata);
b) guasto provocato da trascuratezza o imperizia nell'uso (urti o cadute dell'apparecchio, errata tensione di
esercizio, ecc.);
c) guasto provocato da impiego diverso da quello a cui l'apparecchio è destinato;
d) manomissione dell'apparecchio o riparazione eseguita da persone estranee alla nostra organizzazione (cioè
non dipendenti dalle nostre officine o dai centri di assistenza tecnica autorizzati).
Regione
Abruzzo
Calabria
Campania
Campania
Emilia Romagna
Emilia Romagna
Emilia Romagna
Emilia Romagna
Friuli Venezia Giulia
Friuli Venezia Giulia
Lazio
Lazio
Lombardia
Lombardia
Lombardia
Marche
Piemonte
Piemonte
Piemonte
Puglia
Sardegna
Sicilia
Sicilia
Toscana
Toscana
Trentino Alto Adige
Umbria
Veneto
Veneto
Veneto
Cittŕ
Pescara
Vibo Valentia
Napoli
Salerno
Bologna
Rimini
Vaciglio
Ferrara
Muggia
Beivars
7 Camini
Roma
Milano
Brescia
Varese
Civitanova Marche
Trofarello
Genola
Vercelli
Bari
Olbia
Palermo
Catania
Porcari
Firenze
Bolzano
Perugia
Cavallino
Verona
Rubano
Indirizzo
Via Mazzini, 144
Via Terravecchia Inf. 99
Via Salomone, 23
Via Acquasanta-Zona Ind.
P.zza della Pace, 7/F
Via Paolucci, 14/B
Via Collegarola, 70
Via Darsena, 74
Str. Per I Laghetti, 1
Via Emilia, 127
Via Tiburtina, 1470 Ang.
Via Feo Belcari, 303/A
Via Cadibona, 9
Via Triumplina, 19
Via Beratti, 21
Via De Amicis, 1
Str. Rondello, 11
V.Div.Alp.Cuneense, 2
S.S.142 Biella Laghi
L.go Ciaia, 4
S.S. 127Km. 2,400Loc. Ist
L.go Pisani
V.le Africa, 190
Via Romana Est, 101
Via Sirtori, 39
V.le Europa, 60
Via S. Martino in Campo
Via Fausta, 269
P.zza Carrubbio, 6/A
Via Meucci, 13
Ditta
Centrolux
Vacatello Francesco Paolo
Superfreddo sas
Frigolettieri
Accorsi Prospero
C.R.E.
Caravan Market
Fabbri Claudio
Centro Vacanze
Punto Tre
L.A.R.E. di Botti
Valleriani
Erranti e Farina
Gialdini
Bariati
CAT Cluana Caravan
Camper Home
Grosso Vacanze
Valsesia Centro Caravan
C.A.I.P.
S.A.R.C.
Centro Caravan
SIMA
Emmemme Caravan
Italux
Pedrazzoli
E 7 Caravan
Camping Market
C.A.T.E.
Caravan Service
CAP
65100
89900
80144
84100
40100
47037
4101 0
44100
34015
33100
00131
00138
20100
25100
21100
62012
10028
120 40
13060
70100
07025
90100
91100
55016
50100
39100
06079
30013
37123
35030
Prov
PE
VV
NA
SA
BO
RN
MO
FE
TS
UD
RM
RM
MI
BS
VA
MC
TO
CN
VC
BA
SS
PA
CT
LU
FI
BZ
PG
VE
VR
PD
Prefisso
085
0963
081
089
051
0541
059
0532
040
0432
06
06
02
030
0332
0733
011
0172
015
080
0789
091
095
0583
055
0471
075
041
045
049
Tel_Uff
385128
547496
7803365
302565
6141928
384276
373588
765680
231711
565793
4192204
87121126
5466919
2002385
289596
771287
6804048
68288
985225
5425475
21783
420864
533519
297850
609208
914511
609451
5371001
8000854
8976009
Fax
4510506
547133
6804048
297850
5371031
8976009
Tipo
CAT
CAT
CAT
CAT
CAT
CAT
CAT
CAT
CAT
CAT
CAT
CAT
CAT
CAT
CAT
CAT
CAT
CAT
CAT
CAT
CAT
CAT
CAT
CAT
CAT
CAT
CAT
CAT
CAT
S-CAT
Page 31

31
Wij danken u dat u ons toestel heeft gekozen en zijn ervan overtuigd dat u er lang plezier aan zult beleven.
Voor een veilig en efficiënt gebruik van het toestel willen wij u graag vertrouwd maken met enkele in deze
gebruiksaanwijzing gebruikte symbolen:
bron van gevaar bij verkeerd gebruik
nuttige tips
informatie inzake milieubescherming
Deze koelkast is bedoeld om voedsel en drank te bewaren.
Opgelet!
Dit product is bestemd voor gebruik door volwassenen. Kinderen mogen niet
prutsen aan de bedieningsfuncties of spelen met het toestel.
Als er voor de installatie van dit toestel elektrische werken nodig zijn, dan dient
een erkende elektricien deze uit te voeren.
Het toestel moet worden onderhouden door een erkende Service Ingenieur; er
mogen ook enkel originele wisselstukken worden gebruikt.
Het is gevaarlijk de specificaties te wijzigen of het product in welke zin dan ook
te veranderen.
Let erop dat het toestel niet op de elektriciteitsdraad staat.
Het toestel bevat onderdelen die warm worden. Zorg voor voldoende ventilatie
om te voorkomen dat onderdelen defect en de inhoud wellicht verloren gaan. Zie
ook: installatie-aanwijzingen.
Onderdelen die warm worden, moeten verborgen zijn. Probeer altijd het product
tegen een muur te plaatsen, maar laat - zoals vermeld in de installatieaanwijzingen - voldoende ruimte voor ventilatie.
Vooraleer het toestel te ontdooien, schoon te maken of te onderhouden, moet het
worden uitgeschakeld en het snoer uitgetrokken.
GEBRUIK GEEN SCHERPE VOORWERPEN om rijp of ijs af te schrapen. Hechte
ijsblokken mogen nooit met geweld worden verwijderd. Laat ze bij het ontdooien
van het toestel op natuurlijke wijze smelten. Zie ontdooiingsaanwijzingen.
Dit toestel is zwaar; let dus op wanneer u het verplaatst.
Probeer nooit zelf om het toestel te herstellen. Herstellingen die door onervaren
personen worden uitgevoerd, kunnen leiden tot kwetsuren of tot een totaal
verkeerde werking. Doe een beroep op uw plaatselijk Service Center, en dring
erop aan dat men enkel originele wisselstukken gebruikt.
Het is verboden om in dit koelapparaat enig toxisch of ontplofbaar product op te
slaan.
Lees aandachtig deze gebruiksaanwijzing voor u het koelapparaat in werking stelt.
Als u het toestel later verkoopt of weggeeft, zorg er dan voor dat de nieuwe
eigenaar de gebruiksaanwijzing ontvangt.
Volg de onderstaande installatie-instructies. De garantie geldt alleen voor
toestellen diegeïnstalleerd zijn volgens de beschrijving.
NL
Page 32

32
NL
INHOUD
1. Uitpakken
2. Afbeelding van het toestel
3. Schoonmaak
4. Plaatsing van het toestel
4.1. Installatie-aanwijzingen
5. Gebruik van het toestel
5.1. Regeling van de temperatuur
5.2. Elektronische regeling van de Koeleenheid (CUC)
6. Nuttige tip
7. Ontdooien, schoonmaken en onderhoud
8. De gloeilamp vervangen
9. De draairichting van de deur veranderen
10. Een ander decoratief deurpaneel aanbrengen
11. Klantenservice
12. Inwerkingstelling, technische gegevens
12.1. Aansluiting op het elektriciteitsnet
13. Informatie over milieubescherming
14. Recyclage
Let op!
Garantiebepalingen zijn conform EU-richtlijn 44/1999/CE en de wettelijke
bepalingen van het land waarin het product wordt gebruikt.
Voor vragen over garantie, klantenservice en onderdelen kunt u contact opnemen
met Dometic servicedienst.
Schade veroorzaakt door verkeerd gebruik, valt niet onder de garantie.
Schade als gevolg van modificaties of gebruik van onjuiste onderdelen valt niet
onder de garantie.
Als het apparaat niet is ingebouwd conform onze richtlijnen of onjuist wordt
gebruikt, vervalt de garantie.
Als u contact opneemt met onze servicedienst, dient u altijd het model, produkt-
en serienummer van de koelkast bij de hand te hebben. De gegevens vindt u op
het typeplaatje aan de binnenzijde van de koelkast.
Page 33

33
NL
1. Uitpakken
Nadat u de kartonnen verpakking hebt verwijderd,
controleert u best of het toestel intact is. Werd het
toestel tijdens het transport beschadigd, meld dit dan
meteen aan de transportfirma.
2. Afbeelding van het toestel
1. deur
2. flessenhouder
3. verdamper
4. sensor
5. thermostaatknop
6. scharnierblad
7.
bevestigingsplaatje
8. lamp
9.
verdampervoeler
IS UW KOELKAST UITGERUST MET EEN SLOT, DAN IS DOMETIC ZRT NIET VERANTWOORDELIJK
VOOR HET VERLIES VAN OF DE BESCHADIGING AAN DE SLEUTELS. WE LEVEREN ECHTER GRAAG
EEN VOLLEDIG NIEUW SLOT MET SLEUTELS TER VERVANGING.
Page 34

34
NL
3. Schoonmaak
Maak regelmatig en telkens wanneer nodig de
koelkast grondig schoon. Verwijder de rekken die,
net als de binnenwanden en de deur, met een warme
oplossing van sodiumbicarbonaat kunnen worden
afgewassen. Ga er nog eens over met een in warm
water uitgespoelde vod. Was de plastic onderdelen
nooit in te heet water en stel ze niet bloot aan droge
hitte. De buitenwanden moeten regelmatig worden
schoongemaakt met een propere, vochtige vod.
GEBRUIK NOOIT STERKE CHEMICALIËN OF
BIJTENDE SCHOONMAAKMIDDELEN OP DE
ONDERDELEN VAN DE KOELKAST.
4. Plaatsing van het toestel
Voordat u de koelkast in werking stelt, graag even uw
aandacht voor onderstaande punten:
ZORG ERVOOR DAT DE KOELKAST WATERPAS
STAAT.
HET ROOSTER ACHTERAAN WORDT WARM
TIJDENS HET GEBRUIK.
DE KOELKAST HEEFT GEEN 'MOTOR' EN
FUNCTIONEERT NAGENOEG GERUISLOOS.
REKEN MINSTENS 3 UUR VOOR HET EERSTE
KOELINGSEFFECT.
Tijdens het koelen geeft de condensator van het
toestel warmte af (onder het bovenste gedeelte
van de zijwand), waardoor de omringende lucht
opwarmt. Hoe beter de condensator is verlucht, hoe
efficiënter de koeling.
Voor een goede werking moet het toestel op een
vlakke ondergrond staan. Dit kan u het best nagaan
door een glas water bovenop de koelkast te plaatsen.
Het toestel niet rechtstreeks blootstellen aan een
warmtebron (zonlicht, radiator, naast een oven, enz.)
4.1. Installatie-aanwijzingen
De koelkast is uitgerust met een elektrisch verwarmde
absorberende koelingseenheid, die nagenoeg
geruisloos functioneert. De koelkast kan als dusdanig
worden geïnstalleerd of ingebouwd, waarbij, voor een
doeltreffende werking en een maximale
koelingsefficiëntie, rekening moet worden gehouden
met onderstaande voorwaarden:
BELANGRIJK:
Volg de onderstaande installatie-instructies. De
garantie geldt alleen voor toestellen
diegeïnstalleerd zijn volgens de beschrijving.
1. De koelkast moet in beide r
ichtingen horizontaal
uitger
icht zijn.
2. De afstand tussen koelkast en wand moet 20 mm
bedragen.
3. De ventilatie moet uitgevoerd zijn z
oals getoond
in de alternatieven A, B, C of D.
4. Het ventilatiekanaal moet tenminste de volgende
afmetingen hebben: 1
05 mm x de breedte van de
koelkast.
5. Alleen
de volledige koeleenheid mag in het
ventilatiekanaal blootgesteld zijn aan de
ventilatielucht.
6. L
ucht die door het ventilatiekanaal stroomt mag
niet voorverwarmd zijn door een
verwarmingsbron.
7. Eventueel gebruikte ventilatieroosters moeten
openingen van tenminste 200 cm² hebben.
Gelieve bij het installeren er op te letten dat de
stekker toegankelijk blijft.
De koelkast kan vastgezet worden op de
bodemplaat van het meubel met behulp van het
bevestigingsplaatje en het gebruik van schroeven
met de juiste lengte (Afbeelding. 4)
Afbeelding 4.
5. Gebruik van het toestel
Om de koelkast in gebruik te nemen, steekt u de
stekker in het stopcontact, dat u activeert. Het
eerste koelingseffect merkt u na ongeveer 3 uur.
Afbeelding 2.
Afbeelding 3.
Page 35

35
De koelkast heeft ongeveer 6 uur nodig om bij normale
kamertemperatuur een binnentemperatuur van 6 °C te
bereiken.
5.1. Regeling van de temperatuur
Normaal wordt de thermostaatknop ingesteld op de
middelste stand (Afbeelding 5); deze instelling hangt
evenwel af van het opgeslagen volume en de plaats
van installatie. U kan de temperatuur zo nodig wijzigen
door de knop hoger te zetten voor een koudere
temperatuur, of lager voor een warmere temperatuur.
Het effect van de wijziging kan u aflezen van een
thermometer die u geruime tijd in de koelkast laat
liggen - de tijd die nodig is om de koelkast te laten
functioneren volgens de nieuwe instellingen.
5.2.Elektronische regeling van de
Koeleenheid (CUC)
De elektronica controleert de werking na iedere
ontdooifase (elke 24 uur) door middel van een meting van
de temperatuurdaling van de verdamper. Als er een
probleem wordt vastgesteld, stopt de werking van de
koelkast. Als dat gebeurt, controleer dan of de koelkast
overbelast is, of de deur correct afsluit, of de koeleenheid
voldoende geventileerd is en of de koelkast waterpas staat.
Na controle de stekker van de koelkast minstens voor 10
seconden uit het stopcontact trekken en weer aansluiten.
De koeleenheid wordt gereset en begint weer te werken.
Mocht u merken, dat het toestel niet koelt, dan is er
waarschijnlijk een probleem en dient u contact op te nemen
met de klantenservice.
6. Nuttige tip
Stouw het toestel niet te vol. Laat voor een
doeltreffende en gelijkmatige koeling wat ruimte tussen
de opgeslagen producten. Als de artikelen te dicht
opeen worden gestapeld, kan dit resulteren in
onaanvaardbare temperatuurschommelingen.
7. Ontdooien, schoonmaken
en onderhoud
Op de koelelementen treedt automatisch ijsvorming op.
Deze ijslaag mag echter niet te dik worden omdat die
dan als isolatie fungeert en de koeling negatief
beïnvloedt.
De vorming van een ijslaag wordt vermeden door het
ingebouwde FUZZY LOGIC-systeem.
De eerste ontdooifase start 39 uur na het eerste
inschakelen en duurt circa twee uur. Daarna zal de
koelkast weer 22 uur aan één stuk koelen, opgevolgd
door een twee uur durende ontdooifase.
De ijslaag smelt en het smeltwater drupt van het
opvangkanaal via een gootje naar de verdamper
onderaan de koelkast (afbeelding 6). Het smeltwater
verdampt automatisch in de lucht; u hoeft de
verdamper dan ook niet manueel leeg te maken.
Afbeelding 6.
Als u het toestel wilt uitschakelen, draai dan de knop
op "0", trek de stekker uit het stopcontact en laat de
koelkastdeur open. Na het toestel te hebben
ontdooid, moet de binnenkant van de koelkast
worden schoongewreven met een propere, vochtige
doek.
Bij verhoogde luchtvochtigheid kan er zich een
ijslaag vormen op de koelelementen. Wordt deze
laag zo'n 3 mm dik, dan dient de koelkast te worden
ontdooid zodat het prestatieniveau niet vermindert.
8. De gloeilamp vervangen (indien
aanwezig)
Als de gloeilamp aan vervanging toe is, trek dan de
stekker uit het stopcontact en ga als volgt tewerk:
Druk de metalen reflector naar één kant toe en trek
het beschermkapje naar achter toe af. Vervang de
gloeilamp en schuif het beschermkapje er weer op.
Een nieuwe gloeilamp van max. 10 Watt kunt u bij
iedere servicedienst krijgen.
9. De draairichting van de deur
veranderen
(Afb.7-8)
De draairichting van de deur kan men als volgt
veranderen:
trek de stekker uit het stopcontact
leg de koelkast voorzichtig op de achterkant
verwijder de onderste scharnier en licht de deur
eruit d
verwijder de twee schroeven links bovenaan
alsook de dekplaat door die naar voren te trekken
e
verwijder de bovenste scharnier en bevestig deze
op de tegenovergestelde kant
verwijder de scharnierbout en schroef die van
onderaan in
breng de dekplaat aan in de rechter bovenhoek
(druk in) en hecht die stevig vast met de twee
schroeven
plaats de deur in de bovenste scharnierbout en
bevestig de scharnier onderaan
controleer of de deur goed draait en rondom sluit.
NL
Figure 5.
Page 36

36
Afbeelding 7.
verwijder het scharnierblad f en bevestig deze op
de tegenovergestelde kant
Afbeelding 8.
10. Een ander decoratief
deurpaneel aanbrengen
(Afb. 9-11)
Verwijder de 2 schroeven (1) uit het bovenste scharnier
van de deur.
Trek de deur en het scharnier weg van de behuizing
door deze uit het onderste scharnier te heffen (2-3).
Afbeelding 9.
Verwijder de schroeven (4) en de steun van het kader
(5).
Glijd het decoratieve paneel uit het deurkader en
vervang het door het nieuwe paneel (7); de bovenste
hoek van het paneel moet daarbij exact parallel met de
bovenste hoek van het kader lopen. Het nieuwe paneel
kan makkelijker worden aangebracht in de bovenste
hoek van het kader als de twee hoeken met ongeveer
5x5 mm worden afgerond (8). Plaats de steun van het
kader terug (5) en hecht het vast met de schroeven.
Afbeelding 10.
Plaats de deur in het onderste scharnier (9), klik het
bovenste scharnier vast in de opening en druk het
scharnier en de deur tegen de behuizing aan. Bevestig
de 2 schroeven (11).
Afbeelding 11.
NL
Page 37

37
11. Klantenservice
Voor u de hulp van een service-ingenieur inroept, kunt
u zelf volgende eenvoudige tests uitvoeren:
Heeft u alle bovenstaande punten gecontroleerd en
werkt de koelkast nog steeds niet naar behoren?
Contacteer dan de dichtstbijzijnde servicedienst. Leg
het probleem uit en vermeld het model, het product- en
serienummer van uw koelkast. (Details hierover vindt u
op het gegevensplaatje linksboven binnenin het
toestel.)
Bij problemen, contacteer het dichtstbijzijnde Service
Center - zie plaatselijke telefoongids.
www.dometic.com
12. Inwerkingstelling
Technische gegevens:
12.1. Aansluiting op het elektriciteitsnet
Het toestel mag enkel functioneren onder de
nominale voltage vermeld op het
gegevensplaatje. De elektriciteitsstekker wordt in een
stopcontact gestoken dat voorzien is van een wettige
aarding.
Als er voor de installatie van dit toestel elektrische
werken nodig zijn, dan dient een erkende elektricien of
een bevoegd persoon deze uit te voeren.
De fabrikant wijst elke verantwoordelijkheid bij
niet-naleving van deze veiligheidsmaatregelen.
Elektrische vereisten
Voor u de koelkast aanzet, dient u na te gaan of het
voltage hetzelfde is als dat vermeld op het
gegevensplaatje van het toestel.
NL
Model RH 161
Type MF20-60
Brutovolume 60 liter
Elektriciteitsnet 220 - 240V (AC)
Input 115W
Energieverbruik 1.4 kWu/24u
Categorie Klimaat N
Koelmiddel 357g H
2
O+168g NH
3
Probleem
Het apparaat koelt niet
(voldoende)
Het toestel koelt
helemaal niet
Eventuele oorzaak
De thermostaat staat te laag
Te veel voedsel in de koelkast geplaatst
De deur sluit niet volledig.
De koelkast staat niet waterpas
Interne luchtcirculatie is gestoord
De externe luchtcirculatie is beperkt.
Het CUC-systeem heeft de koelkast buiten
werking gezet
De stekker is niet goed in het stopcontact
gestoken.
Er staat geen spanning op het stopcontact
Oplossing
Zet hem hoger
Zet minder voedsel ineens in de
koelkast
Controleer of de deur gesloten is
Zet de koelkast waterpas
Maak de interne luchtcirculatie weer
mogelijk
Zorg dat er voldoende externe
luchtcirculatie is.
Zie gebruiksaanwijzing 5.2.
Controleer stekker en stopcontact.
Controleer of er spanning op het
stopcontact staat (bv. door een lampje
in het stopcontact te steken)
13. Informatie inzake
milieubescherming
Als koelmiddel in het koelapparaat wordt
ammoniakgas (natuurlijke waterstof- en
stikstofverbinding) gebruikt.
Het ozonvriendelijke cyclopentaan dient als agens
voor de polyurethaanschuimisolatie.
Der anvendes natriumchromat til
korrosionsbeskyttelse (i en koncentration på mindre
end 2 % i kølervæsken).
14. Recyclage
Nadat u het toestel uitgepakt heeft, brengt u het
verpakkingsmateriaal best naar een inzamelpunt in
uw buurt. Na afloop van de nuttige levensduur moet
het toestel afgeleverd worden bij een
gespecialiseerd inzamel- en recyclagebedrijf, dat de
nog bruikbare materialen terugwint. De rest wordt
zorgvuldig vernietigd.
Apparaten, die met dit symbool zijn
voorzien, moeten bij het gemeentelijk
verzamelpunt voor afgedankte
elektrische en electronische apparatuur
worden afgegeven.
Ze mogen niet via het gewone huisafval
worden weggegooid.
Bij koelkasten van Dometic staat het symbool op het
typeplaatje aan de binnenkant van het apparaat.
Dit toestel is conform de volgende EUrichtlijnen:
LVD-Richtlijn 73/23/EEG, gewijzigd bij
90/683/EEG.
EMC-Richtlijn 89/336/EEG.
RoHS - Richtlijn 2002/95/EG
Page 38

38
ES
Le agradecemos que haya elegido nuestro electrodoméstico. Estamos seguros de que podrá utilizarlo sin
problemas.
A continuación, le explicamos el significado de algunos símbolos, sobre los que deseamos llamar su atención,
para asegurar el uso seguro y eficiente del aparato.
Peligro en caso de uso incorrecto
Sugerencias útiles.
Información relativa a la protección del medio ambiente
Este frigorífico está destinado al almacenamiento de comidas y bebidas.
¡Atención!
Este producto ha sido diseñado para ser utilizado por adultos. No se debe
permitir que los niños jueguen con los controles ni con el producto.
Cualquier trabajo eléctrico necesario para la instalación de esta unidad, deberá
ser realizado por personal técnico cualificado.
Este producto deberá ser atendido por un Servicio Técnico Autorizado , y
solamente deberán utilizarse piezas de recambio originales.
Es peligroso alterar las especificaciones o modificar este producto de cualquier
forma.
Hay que tener cuidado y asegurarse de que la unidad no esté colocada sobre un
cable de suministro eléctrico.
En este producto hay algunas piezas que pueden calentarse durante su
funcionamiento. Asegúrese siempre de que tenga una ventilación adecuada, ya
que, de lo contrario, se podría producir algún fallo en sus componentes, así
como el deterioro del contenido. Consulte las instrucciones de instalación.
Antes de realizar la descongelación, limpieza o mantenimiento, asegúrese de
apagar la unidad y desenchufarla.
NO UTILICE INSTRUMENTOS AFILADOS para rascar el hielo de la congelación.
Bajo ninguna circunstancia deberá forzar la extracción del hielo de las
superficies de enfriamiento. Deberá esperar a que el hielo se licúe durante el
proceso de descongelación. Consulte las instrucciones de descongelación.
Este frigorífico tiene un peso considerable, que deberá tenerse en cuenta
durante su traslado.
En este aparato, está prohibido el almacenamiento de cualquier sustancia tóxica
o explosiva.
Bajo ninguna circunstancia intente reparar usted mismo el frigorífico. Las
reparaciones realizadas por personas sin experiencia pueden ocasionar daños
o producir un funcionamiento defectuoso. Consulte con su Centro de Servicio
local, e insista siempre en recibir piezas de recambio genuinas.
Está prohibido el almacenamiento de sustancias tóxicas o explosivas en este
aparato.
Rogamos que lea detenidamente este Manual de Instrucciones antes de poner en
funcionamiento el frigorífico. Si, posteriormente, lo vende o se desprende de él,
asegúrese de entregar este Manual de Instrucciones de utilización al nuevo
propietario.
Siga cuidadosamente las instrucciones de instalación que se indican a
continuación. La garantía sólo es válida para los productos que se instalen según
se describe aquí.
Page 39

39
ES
ÍNDICE
1. Desembalaje
2. Descripción de la unidad
3. Limpieza
4. Colocación de la unidad
4.1. Instrucciones de instalación
5. Utilización de la unidad
5.1. Regulación de la temperatura
5.2. Control de la Unidad Refrigeradora (CUC)
6. Consejos útiles
7. Descongelación, limpieza y mantenimiento
8. Cambio de la bombilla
9. Inversión del sentido de apertura de la puerta
10. Colocación del panel embellecedor de la puerta
11. Servicio al cliente
12. Puesta en funcionamiento, datos técnicos
12.1. Conexión a la red eléctrica
13. Información sobre protección del medio ambiente
14. Reciclaje
¡Atención!
Las condiciones de la garantía corresponden a la Directiva 44/1999/CE de la Unión
Europea y las respectivas leyes vigentes del país donde se utilice este aparato.
Si usted tiene alguna pregunta sobre la garantía y el servicio al cliente o si
necesita piezas de recambio, diríjase por favor a la Red de Servicio de Dometic.
La garantía no cubre daños causados por el uso indebido de este aparato.
La garantía no cubre las modificaciones al aparato ni tampoco el empleo de
piezas de recambio que no sean piezas originales de Dometic.
La garantía quedará anulada si este aparato se instala o se utiliza de forma
contraria a la estipulada en las instrucciones.
Indique por favor el nombre del modelo así como el número del producto y su
número de serie al comunicarse con la Red de Servicio de Dometic. Hallará estos
datos en la placa de características técnicas situada en el interior del refrigerador.
Page 40

40
ES
1. Desembalaje
Después de extraer el frigorífico de su embalaje de
cartón, asegúrese de que la unidad no presenta
ningún daño. Si detecta algún daño a consecuencia
del transporte, informe inmediatamente a la empresa
de transporte.
2. Descripción de la unidad
1. puerta
2. compartimento para botellas
3. evaporador
4. sensor
5. botón del termostato
6. bisagra
7.
soporte de fijación
8. bombilla
9. sensor del evaporador
EN CASO DE QUE SU FRIGORÍFICO ESTÉ EQUIPADO CON CIERRE, DOMETIC ZRT NO ACEPTA
NINGUNA RESPONSABILIDAD POR LA PÉRDIDA O DAÑO DE LAS LLAVES, AUNQUE ESTAREMOS
ENCANTADOS DE SUMINISTRARLE TODO EL CONJUNTO DE CIERRE Y LLAVES DE RECAMBIO.
Page 41

41
ES
3. Limpieza
Debe limpiar el frigorífico a fondo y con
regularidad, según sea necesario. Extraiga las
bandejas; estas bandejas, la cabina interior y la puerta
se deben lavar con una solución templada de
bicarbonato sódico. Después, pase un paño escurrido
humedecido con agua templada, a continuación seque
el frigorífico con un paño limpio. No lave nunca las
piezas de plástico en agua que tenga una temperatura
superior a la de la mano, y no las exponga al aire
caliente. El exterior de la cabina se debe limpiar
regularmente con un paño limpio y húmedo.
NO UTILICE NUNCA PRODUCTOS QUÍMICOS, NI
MATERIALES DE LIMPIEZA ABRASIVOS SOBRE
NINGUNA PIEZA DE LA UNIDAD.
4. Colocación de la unidad
Cuando utilice este frigorífico por primera vez, por favor
tenga en cuenta los siguientes puntos:
ASEGÚRESE DE QUE EL FRIGORÍFICO ESTÉ
NIVELADO.
LOS CONDUCTOS DE LA PARTE TRASERA SE
CALIENTAN DURANTE LA UTILIZACIÓN.
EL FRIGORÍFICO NO TIENE MOTOR Y, POR
TANTO, ES TOTALMENTE SILENCIOSO.
DEBERÁN PASAR AL MENOS 3 HORAS PARA
QUE SE EMPIECE A NOTAR EL ENFRIAMIENTO.
Durante el proceso de refrigeración, la unidad
desprende calor al ambiente a través del
condensador (bajo la parte superior de la cubierta
trasera). Cuanto más ventilado esté el condensador,
más efectiva será la refrigeración.
La otra condición para que su funcionamiento sea
satisfactorio es que la unidad repose sobre una
superficie plana. Esto se observa mejor, si se coloca
encima un vaso de agua.
Es importante que la unidad no esté expuesta
directamente a ningún foco de calor (luz del sol,
radiador, proximidad a un horno, etc.).
4.1. Instrucciones de instalación
El frigorífico está equipado con una unidad de
enfriamiento por absorción eléctrica del calor que, en la
práctica, tiene un funcionamiento totalmente silencioso.
Está diseñado para su instalación al descubierto, pero
se puede empotrar si se cumplen las siguientes
condiciones, que garantizan un funcionamiento
satisfactorio y una máxima eficacia de enfriamiento.
IMPORTANTE:
Siga cuidadosamente las instrucciones de
instalación que se indican a continuación. La
garantía sólo es válida para los productos que se
instalen según se describe aquí.
1. El frigorífico debe estar niv
elado en ambas
direcciones.
2. Debe quedar una holgura de 20 mm. entre el
frigorífico y la pared.
3. La ventilación debe proporcionarse como se
ilustra en las alternativas A, B, C o D.
4. El conducto de ventilación debe medir 1
05 mm.
x el ancho del frigorífico, como mínimo.
5. Sólo
la unidad de refrigeración completa debe
orientarse al conducto como se ilustra.
6. El aire que atraviesa el conducto no debe haber
sido precalentado por ninguna fuente de calor.
7. Si se usan rejillas de ventilación, cada una
debe tener una abertura de al menos 2
00 cm².
Durante la instalación es necesario asegurarse
de que el enchufe de alimentación de red
permanece accesible.
Mediante los soportes de fijación el frigorífico
se puede asegurar al panel inferior del mueble
con un tornillo de longitud adecuada. (Figura 4.)
Figura 4.
Figura 2.
Figura 3.
Page 42

42
5. Utilización de la unidad
Para empezar, conecte el enchufe del frigorífico en la
toma de corriente de la pared y enciéndalo. Las
superficies de enfriamiento empezarán a enfriar
después de unas 3 horas.
El frigorífico necesita aproximadamente 6 horas, a una
temperatura normal de ambiente, para alcanzar 6 °C
en el compartimento de almacenamiento.
5.1. Regulación de la temperatura
Normalmente, deberá establecerse en el punto medio
de los parámetros del botón del termostato (Figura 5),
pero esto puede variar según las condiciones de carga
y de instalación. Si fuera necesario modificar este
nivel, se puede girar el mando hacia un número
superior para obtener una temperatura más fría, o
hacia un número inferior para obtener una temperatura
más cálida. El efecto de cualquier ajuste se deberá
comprobar mediante el termómetro, después de que el
frigorífico haya estado funcionando durante un cierto
tiempo, para que la temperatura se haya estabilizado
de nuevo.
5.2. Control de la Unidad Refrigeradora (CUR)
Les componentes electrónicos comprueban el
funcionamiento del refrigerador después de cada período
de descongelación (24 horas), midiendo el descenso de la
temperatura del evaporador. Si estos componentes
detectan un problema, hay que comprobar si no se ha
cargado excesivamente el refrigerador, si la puerta está
cerrada correctamente, si la ventilación de la unidad de
refrigeración es adecuada y si el refrigerador está
nivelado. Después de efectuar estas comprobaciones, hay
que desenchufar el refrigerador para al menos 10
segundos y volver a enchufarlo. Así la unidad volverá a
funcionar. Si la refrigeración no se lanza, hay algún
problema, por eso le pedimos que acuda al Servicio de
Cliente Dometic.
6. Consejo útil
No llene la unidad en exceso. Es aconsejable dejar
algún espacio entre los productos dentro de la cabina
para garantizar una enfriamiento eficaz y uniforme. Si
las bandejas están demasiado llenas se pueden
producir variaciones de temperatura inapropiadas.
7. Descongelación, limpieza
y mantenimiento
Gradualmente, se irá formando hielo en las superficies
de enfriamiento, y éste no debe alcanzar un grosor
excesivo, ya que actuaría como aislante y dificultaría el
enfriamiento.
Esa formación de hielo se evita mediante el sistema
FUZZY LOGIC integrado en esta unidad.
La primera fase de descongelación se inicia 39 horas
después de la operación inicial y dura dos horas.
Después de ese tiempo, el aparato funciona 22 horas
seguidas, luego de las cuales viene un período de
descongelación de 2 horas.
Cuando se derrita el hielo, el agua de la
descongelación pasará por el tubo de drenaje, a
través del canal de goteo, hacia una vasija de
evaporación situada en la parte inferior trasera del
frigorífico (Figura 6). El agua de descongelación se
evaporará automáticamente, por lo que no es
necesario vaciar la vasija de forma manual.
Figura 6.
Si desea desconectar el frigorífico, ponga el
termostato en la posición "0", desconéctelo del
suministro eléctrico y deje abierta la puerta de la
cabina. Después de la descongelación se debe
limpiar el interior con un paño limpio y húmedo.
En caso de que exista una mayor humedad en el
aire, es posible que se forme hielo en esas varillas
de enfriamiento. Cuando la capa de hielo alcance
un grosor de 3 mm, aproximadamente, será
necesario descongelar el frigorífico, para evitar que
disminuya su nivel de rendimiento.
8. Cambio de la bombilla (si está
disponible)
Si necesita cambiar la bombilla, desenchufe el
frigorífico y proceda de la siguiente manera:
Presione el protector metálico en un extremo y
arrastre la cubierta hacia atrás. Sustituya la
bombilla y coloque de nuevo la cubierta en su sitio.
Podrá obtener una bombilla nueva de 10 vatios
como máximo, en cualquier establecimiento.
9. Cambio del sentido de
apertura de la puerta
(Figura 7-8)
Se puede cambiar el sentido de apertura de la
puerta, de un lado a otro, realizando los siguientes
pasos:
desenchufe el frigorífico
coloque el frigorífico, con cuidado, sobre su parte
trasera
extraiga la bisagra inferior y libere la puerta d
extraiga los dos tornillos superiores de la
izquierda y libere la plancha protectora tirando de
ella e
suelte la bisagra superior y colóquela en el lado
opuesto
ES
Figure 5.
Page 43

43
extraiga el pasador de la bisagra y atorníllelo desde
abajo
introduzca la plancha protectora en la esquina
superior derecha, empujándola y asegúrela con los
dos tornillos
coloque la puerta sobre el pasador de la bisagra
superior y monte la bisagra inferior
asegúrese de que la puerta se puede mover
libremente y de que el cierre está colocado en la
posición correcta.
Figura 7.
extraiga la bisagra superior f y colóquela en el
lado opuesto
Figura 8.
10. Colocación del panel
embellecedor de la puerta
(Figuras 9-11)
Extraiga los dos tornillos (1) del gozne superior de la
puerta.
Tire de la puerta junto con el gozne y sáquela del
soporte del gozne inferior, para extraerla de la carcasa
(2-3).
Extraiga los tornillos (4) y tire del borde del marco (5).
Deslice el panel embellecedor (6) por fuera del marco
de la puerta e inserte el nuevo panel (7), de forma que
el borde superior del panel discurra en paralelo con el
borde superior del marco. El nuevo panel se podrá
colocar más fácilmente por el borde superior del
marco, si se rebajan las esquinas aproximadamente 5
x 5 mm (8). Coloque el borde del marco (5) de nuevo
en su sitio y apriete los tornillos.
Coloque la puerta en el gozne inferior (9), introduzca el
gozne superior en la abertura y empuje la puerta
contra la carcasa, asegurándola con los dos tornillos
(11).
Figura 9.
Figura 10.
Figura 11.
ES
Page 44

44
11. Servicio al cliente
Antes de llamar a un técnico de servicio, realice las
siguientes pruebas:
Sí después de comprobar todos los puntos anteriores, el
frigorífico sigue sin funcionar de forma satisfactoria,
contacte con su servicio técnico más cercano. Deberá
señalar el problema, el modelo, el producto y el número
de serie.
(Los detalles sobre el modelo, el producto y el número de
serie, se encuentran en la etiqueta situada en la parte
superior izquierda del interior del compartimento).
En el caso de que el funcionamiento no sea correcto,
contacte con su Centro de Servicio más próximo
(consulte la guía de teléfonos local).
www.dometic.com
12. Puesta en funcionamiento
Datos técnicos:
12.1. Conexión a la red eléctrica
La unidad solamente deberá conectarse a una red
eléctrica del mismo voltaje que se muestra en la
placa de datos. El enchufe de corriente de la unidad se
puede conectar a una toma de tierra, que cumpla lo
establecido con la normativa correspondiente.
Cualquier trabajo eléctrico que se precise para la
instalación de esta unidad, deberá ser realizado por
personal eléctrico cualificado o por alguna persona
competente.
El fabricante no asumirá ninguna responsabilidad, si
no se observan estas medidas de seguridad.
Requisitos eléctricos
Antes de conectarlo, asegúrese de que el voltaje del
suministro eléctrico es el mismo que el indicado en la
placa de datos de la unidad.
ES
Modelo RH 161
Tipo MF20-60
Volumen bruto 60 litros
Voltaje 220 - 240V (AC)
Entrada 115W
Consumo de energia 1.4 kWh/24h
Clase de clima N
Refrigerante 357g H
2
O+168g NH
3
Problema
El aparato no enfría
suficiente.
El aparato no enfría en
absoluto
Posible causa
El control del termostato se ajustó a un
valor demasiado bajo.
Se colocaron demasiados alimentos en el
refrigerador.
La puerta no se cerró correctamente.
La posición del frigorífico no está
horizontal.
La circulación interna del aire está
restringida.
La circulación de aire exterior está
bloqueada.
El sistema CUC dejó de funcionar.
El aparato no está correctamente
conectado a la toma de corriente.
La toma de corriente de la red eléctrica no
tiene voltaje.
Solución
Ajústelo a un valor más alto.
Ponga menos alimentos en su
interior.
Compruebe si la puerta está cerrada.
Hay que arreglar la posición del
frigorífico de manera que esté
horizontal.
Permita que el aire circule
correctamente dentro del refrigerador.
Hay que asegurar la circulación de
aire exterior.
Ver las instrucciones de uso en la
sección 5.2.
Compruebe si la conexión es
correcta.
Hay que comprobar la tensión (por
ejemplo conenctando a la tomada
una lámpara)
13. Información relativa a la
protección del medio
ambiente
El amoníaco (compuesto natural de hidrógeno y
nitrógeno) es el agente de refrigeración que se emplea
en esta unidad.
El ciclopentano, no perjudicial para el ciclo del ozono,
es el agente utilizado como impulsor en la espuma
aislante PU.
El cromato sódico se utiliza para la protección contra la
corrosión (menos del 2% del peso del refrigerante).
14. Reciclaje
Después de desembalar la unidad, los materiales de
embalaje deberán ser entregados en un centro de
recogida de residuos. Al final de su vida útil, se deberá
entregar la unidad a una empresa especializada de
recogida y de procesamiento de materiales, que
reutilizará los materiales que se puedan aprovechar y
destruirá el resto de forma adecuada.
Los aparatos que lleven este símbolo
deberán depositarse en los lugares
locales de recogida de aparatos eléctricos
y electrónicos.
Este producto no debe desecharse en la
basura doméstica convencional.
Los refrigeradores de Dometic llevan el
símbolo en la placa de datos (placa indicadora)
situada en el interior del aparato.
Esta unidad cumple con las siguientes directivas
de la EEC:
Directiva LVD 73/23/EEC con la modificación
90/683/EEC
Directiva EMC 89/336/EEC
Directiva RoHS 2002/95/EC
Page 45

45
Muito obrigado por ter escolhido o nosso aparelho. Estamos certos de que lhe vai proporcionar uma utilização
sem problemas.
Seguidamente, gostaríamos de o familiarizar com alguns símbolos para os quais chamamos a sua atenção, por
forma a garantir o funcionamento seguro e eficiente do aparelho.
Fonte de perigo, em caso de funcionamento impróprio
Sugestões de leitura útil
Informação referente à protecção do meio ambiente
Este frigorífico destina-se à armazenagem de comida e bebidas.
Atenção!
Este produto foi concebido para ser operado por adultos. Não deverá permitirse às crianças mexer nos controlos ou brincar com o produto.
Qualquer tipo de trabalho eléctrico necessário para instalar este produto, deverá
ser executado por um electricista qualificado.
A assistência a este produto deverá ser feita por um técnico de assistência e só
poderão ser usadas peças sobressalentes genuínas.
É perigoso alterar as especificações ou modificar este produto de qualquer
forma.
É necessário que se assegure de que o aparelho não se encontre em cima do
cabo de alimentação eléctrica.
Há peças móveis neste produto que aquecem. Certifique-se sempre de que a
ventilação seja adequada, já que se não for o caso, poderá originar uma falha
dos componentes e uma possível perda do conteúdo. Veja as instruções de
montagem.
As peças que aquecem não deverão ficar expostas. Sempre que for possível, a
parte traseira do produto deverá ficar próxima de uma parede, deixando-se a
distância necessária para a ventilação, tal como indicado nas instruções de
montagem.
Antes de proceder à descongelação e de serem executados trabalhos de
limpeza ou de manutenção, certifique-se de que desligou o aparelho e retire a
ficha da tomada.
NÃO USE INSTRUMENTOS AFIADOS para raspar o gelo. O gelo sólido não
deverá, em nenhuma circunstância, ser forçado a sair das nervuras de
refrigeração. É necessário permitir que o gelo sólido derreta ao descongelar o
aparelho. Veja as instruções de descongelação.
Este aparelho é pesado. É necessário ter cuidado ao movê-lo.
Em nenhuma circunstância deverá tentar reparar o aparelho Você mesmo. As
reparações efectuadas por pessoas sem experiência podem causar danos ou
avarias mais sérias. Contacte o seu Centro Local de Assistência e insista
sempre em peças sobressalentes genuínas.
É proibido armazenar substâncias tóxicas ou explosivas neste aparelho.
Por favor leia estas instruções de serviço cuidadosamente antes de colocar a
unidade de refrigeração em funcionamento. Se, posteriormente, vender ou ceder
esta unidade de refrigeração, por favor certifique-se de que o novo dono recebe
estas instruções de serviço.
Por favor siga cuidadosamente os detalhes de instalação indicados abaixo. A
garantia só é válida para os produtos instalados conforme a descrição.
PT
Page 46

46
PT
ÍNDICE
1. Desembalagem
2. Vista do aparelho
3. Limpeza
4. Colocação do aparelho em posição
4.1. Instruções de montagem
5. Utilização do aparelho
5.1. Regulação da temperatura
5.2. Controlo da unidade de congelamento (CUC)
6. Sugestão útil
7. Descongelação, limpeza e manutenção
8. Substituição da lâmpada eléctrica
9. Inversão da abertura da porta
10. Substituição do painel decorativo da porta
11. Assistência ao cliente
12. Colocação em funcionamento, dados técnicos
12.1. Ligação à corrente eléctrica
13. Informação relativa à protecção do meio ambiente
14. Reciclagem
Atenção!
Os acordos referentes à garantia estão em concordância com a directiva CEE
44/1999/CEE e com as condições normais aplicáveis no país em questão.
Para garantia ou outros serviços tais como, peças sobresselentes contacte por
favor o nosso Serviço de Rede Dometic.
A garantia não cobre quaisquer danos causados por uso impróprio.
A garantia não cobre quaisquer modificações feitas no aparelho ou o uso de
peças sobresselentes que não sejam originais Dometic.
A garantia não será aplicada, se as instruções de instalação e funcionamento não
forem seguidas.
Ao contactar o Serviço de Rede Dometic, mencione por favor, o modelo, número
do produto e número de série. Encontrará esta informação na placa de dados,
colocada na parte interior da geladeira.
Page 47

47
PT
1. Desembalagem
Após ter retirado o aparelho da sua embalagem de
cartão, certifique-se de que o mesmo não esteja
danificado. Se constatar qualquer dano causado pelo
transporte, contacte imediatamente a empresa
responsável pelo transporte, avisando-a da ocorrência.
2. Vista do aparelho
1. Por ta
2. Fixador das garrafas
3. Evaporador
4. Sensor
5. Botão do termóstato
6. Dobradiça
7. Suporte de fixaçăo
8. Lâmpada
9. Sensor do evaporador
A DOMETIC ZRT APARELHOS PARA OS TEMPOS LIVRES NÃO ACEITA QUALQUER
RESPONSABILIDADE PELA PERDA OU DANIFICAÇÃO DE CHAVES. TODAVIA, TEREMOS TODO O
PRAZER EM FORNECER UM CONJUNTO COMPLETO DE FECHOS E CHAVES DE SUBSTITUIÇÃO.
Page 48

48
PT
3. Limpeza
Limpe o frigorífico inteiramente com os intervalos
de tempo necessários. Remova as prateleiras;
estas, o interior do armário e a porta deverão ser
lavados com uma solução de bicarbonato de sódio
quente. No fim, limpe apenas com um pano molhado
em água quente e seque com um pano seco. Não lave
as partes plásticas em água com temperatura superior
à temperatura das mãos e não as exponha ao calor
para secar. A parte exterior do armário deverá ser
limpa regularmente com um pano limpo e húmido.
NÃO USE NUNCA QUÍMICOS AGRESSIVOS OU
MATERIAIS DE LIMPEZA ABRASIVOS EM
QUAISQUER PARTES DO ARMÁRIO.
4. Colocação do aparelho em posição
Ao usar este frigorífico pela primeira vez, por favor
tome os seguintes pontos em consideração:
CERTIFIQUE-SE DE QUE O FRIGORÍFICO ESTÁ
NIVELADO
A TUBAGEM TRASEIRA FICA QUENTE DURANTE
O FUNCIONAMENTO
FRIGORÍFICO NÃO TEM QUALQUER "MOTOR" E,
POR ISSO, É REALMENTE SILENCIOSO
ESPERE PELO MENOS DURANTE 3 HORAS POR
SINAIS DE ARREFECIMENTO
Durante o processo de refrigeração, o aparelho
liberta o calor do condensador (por baixo da parte
superior da tampa traseira) para o ar ambiente. Quanto
mais o condensador for ventilado, mais eficiente será a
refrigeração.
Uma outra condição para um funcionamento
satisfatório consiste em que o aparelho esteja
assente numa superfície plana. A melhor forma de o
verificar consiste em colocar um copo de água na
parte de cima do aparelho.
É importante que o aparelho não esteja exposto à
radiação directa do calor (luz solar, radiador, perto
de um forno, etc.).
4.1. Instruções de montagem
O frigorífico está equipado uma unidade refrigeradora
de absorção aquecida electricamente, que é realmente
silenciosa em funcionamento. O frigorífico foi
concebido para ser montado em posição livre, mas
pode ser embutido se se observarem as seguintes
condições, de forma a assegurar um funcionamento
satisfatório e uma eficiência de refrigeração máxima.
IMPORTANTE:
Por favor siga cuidadosamente os detalhes de
instalação indicados abaixo. A garantia só é válida
para os produtos instalados conforme a descrição.
1. O refrigerador tem de estar niv
elado em ambas
as direcções
2. A dis
tância em relação à parede deverá ser de 2
0
mm.
3. A ventilação deverá ser fornecida tal como
apr
esentado nas alternativas A,B, C ou D.
4. O tubo de ventilação tem de medir, no mínimo,
1
95 mm x a largura do refrigerador.
5. S
omente a unidade de refrigeração inteira
poderá incidir sobre o tubo, tal como se mostra.
6. O ar que passa pelo tubo não deve ser
préaquecido com nenhuma fonte de calor.
7. Se forem usadas grelhas de ventilação,
deverão possuir aberturas de 2
00 cm² cada,
no mínimo.
Aquando da instalação, deve-se assegurar que a
ficha fica acessível.
Mediante os suportes de fixação o frigorífico se
pode assegurar ao painel inferior do móvel com
um parafuso de longitude adequada. (Fig.4)
Figura 4.
Figura 2.
Figura 3.
Page 49

49
5. Utilização do aparelho
Para efectuar o arranque do frigorífico, conecte a ficha
à entrada da tomada e ligue a tomada. As nervuras de
refrigeração deverão apresentar indícios de
refrigeração após aprox. 3 horas.
O frigorífico necessita de aprox. 6 horas à temperatura
ambiente normal para atingir 6 °C no compartimento
de armazenagem.
5.1. Regulação da temperatura
O ajuste normal exigido situa-se no meio da gama de
ajuste do botão do termostato (fig. 5), mas tal pode
variar com as condições da carga e da instalação. Se
se achar conveniente alterar o ajuste, o botão pode ser
rodado para um número superior, para produzir uma
temperatura mais fria ou para um número inferior, para
produzir uma temperatura mais quente.
O efeito de qualquer ajuste pode ser controlado
através do termómetro, depois de se deixar o frigorífico
a funcionar por um período de tempo subsequente,
para voltar novamente ao estado inicial.
5.2.Controlo da unidade de congelamento (CUC)
O componente electrónico verifica o funcionamento, após
cada período de descongelamento (cada 24 horas),
medindo a temperatura das gotas do evaporizador. Se
detectar algum problema, o refrigerador deixa de funcionar.
Caso isto aconteça deverá verificar se o refrigerador não foi
sobrecarregado, se a porta está correctamente fechada e
se a ventilação da unidade de congelamento está correcta
e se o refrigerador está nivelado. Após a verificação,
desligue o refrigerador por 10 segundos e volta a ligá-lo.
Assim o dispositivo voltará a funcionar. Se não, existe um
problema e devia-se contactar o serviço da Dometic.
6. Sugestão útil
Não encha o aparelho demasiado. É aconselhável
deixar algum espaço entre os produtos, no armário,
para assegurar uma ventilação eficiente e uniforme. Se
as prateleiras estiverem acondicionadas de forma
demasiado apertada, podem verificar-se variações de
temperatura inadmissíveis.
7. Descongelação, limpeza
e manutenção
Nas superfícies de refrigeração forma-se gelo,
gradualmente, e não deverá permitir-se que o mesmo
se torne demasiado espesso, já que actua como
isolador e interfere na refrigeração.
A formação de gelo é impedida pelo sistema FUZZY
LOGIC montado no aparelho.
A primeira fase de descongelamento começa 39
horas após o inicio e dura duas horas. Após isto, o
aparelho funciona por um período de 22 horas,
seguido por um período de 2 horas de
descongelamento.
O gelo derreterá e a água da descongelação
correrá através do tubo de drenagem, desde o canal
de condensação até ao recipiente de evaporação
situado na base posterior do frigorífico (Fig.6). A
água de descongelação evaporar-se-á
automaticamente no ar circulante e o recipiente não
necessitará de ser esvaziado manualmente.
Figura 6.
Se pretender desligar a unidade, rode o botão do
termostato para "0", desligue o frigorífico da
corrente eléctrica e deixe a porta do armário aberta.
Depois da descongelação, o interior do armário
deverá ser limpo com um pano limpo e húmido.
Caso se verifique um aumento da humidade
atmosférica, poderá formar-se gelo nas nervuras de
refrigeração. Se a camada do gelo atingir uma
espessura de aprox. 3 mm, o frigorífico terá de ser
descongelado para evitar que o seu nível do
desempenho diminua.
8. Substituição da lâmpada
eléctrica (se existir)
Se a lâmpada eléctrica tiver de ser substituída,
desligue a ficha e proceda da seguinte maneira:
Prima o reflector de metal para um dos lados e puxe
a cobertura da tampa para trás. Substitua a
lâmpada e empurre a cobertura para a posição
inicial.
A lâmpada nova de 10 watts, no máximo, pode ser
obtida em qualquer loja de assistência.
9. Inversão da abertura da
porta
(fig. 7-8)
O sentido da abertura da porta pode ser transferido
de um lado para o outro, executando os seguintes
passos:
Desligue o aparelho da corrente eléctrica
Deite o refrigerador de costas, cuidadosamente
Retire a dobradiça inferior e desprenda a porta d
Retire os dois parafusos superiores esquerdos e
desprenda a placa de cobertura empurrando-a
para a frente e
PT
Figure 5.
Page 50

50
Desprenda a dobradiça superior e monte-a no lado
oposto
Retire o parafuso da dobradiça e aparafuse-o pelo
lado de baixo
Coloque a placa de cobertura no canto superior
direito empurrando-a, e prenda-a com os dois
parafusos
Posicione a porta no parafuso da dobradiça superior
e monte a dobradiça inferior
Certifique-se de que a porta se movimenta sem
dificuldade e de que a vedação está posicionada
correctamente.
Figura 7.
Desprenda a dobradiga f superior e monte-a no
lado oposto
Figura 8.
10. Substituição do painel
decorativo da porta (fig. 9-11)
Remova os dois parafusos (1) da dobradiça superior
da porta.
Afaste a porta da armação juntamente com a
dobradiça, e puxe para cima o pino da dobradiça
inferior (2-3).
Remova os parafusos (4) e puxe para fora o bordo da
moldura (5).
Deslize o painel decorativo (6) para fora da moldura da
porta e insira o novo painel (7), de forma a que o bordo
superior do painel fique exactamente paralelo em
relação ao bordo superior da moldura. É mais fácil
inserir o novo painel no bordo superior da moldura, se
os dois cantos forem cortados em aprox. 5 x 5mm (8).
Torne a colocar o bordo da moldura (5) na sua posição
e prenda com os parafusos.
Coloque a porta na dobradiça inferior (9) e a
dobradiça superior no entalhe da abertura.
Comprima-as com a porta contra a armadura e
prenda com os dois parafusos (11).
Figura 9.
Figura 10.
Figura 11.
PT
Page 51

51
11. Assistência ao cliente
Antes de chamar um técnico de assistência, execute
os seguintes testes simples:
Se, após ter verificado os pontos acima referidos, o
frigorífico continuar a não trabalhar de forma
satisfatória, contacte o seu técnico de assistência mais
próximo. Descreva o problema, o modelo, o número do
produto e o número de série.
(Os detalhes do modelo, o número do produto e o
número de série encontram-se na etiqueta com os
dados na parte superior esquerda do compartimento
interior).
No caso de falha iminente, contacte o seu Centro de
Assistência mais próximo - consulte a sua lista
telefónica local.
www.dometic.com
12. Colocação em funcionamento
Dados técnicos
12.1. Ligação à corrente eléctrica
O aparelho só pode funcionar com a tensão
nominal indicada na chapa de características. A
ficha de ligação à corrente eléctrica pode ser ligada a uma
tomada de terra, de acordo com as regulamentações.
Qualquer tipo de trabalho que seja necessário para
instalar este aparelho, deverá ser executado por um
electricista qualificado ou pessoa competente.
O fabricante declina qualquer responsabilidade no
caso destas medidas de segurança não serem
respeitadas.
Requisitos eléctricos
Antes de ligar, certifique-se de que a tensão da
electricidade fornecida é a mesma que a indicada na
chapa de características.
PT
Modelo RH 161
Tipo MF20-60
Volume total 60 litros
Operaçao eléctrica 220 - 240V (AC)
Entrada 115W
Consumo de energia 1.4 kWh/24h
Classe climatérica N
Refrigerante 357g H
2
O+168g NH
3
Problema
A unidade não arrefece o
suficiente
A unidade não arrefece
de todo
Possível causa
O controlo do termóstato está regulado
baixo demais
Comida a mais foi posta a refrigerar
A porta não está propriamente fechada
A posição do refrigerador não é horizontal.
A circulação de ar interna está restringida.
A circulação de ar exterior é cerrada.
O sistema CUC parou a operação
A ficha não está correctamente ligada à
corrente.
Não há tensão na tomada
Solução
Regule-o para uma posição mais alta
Retire alguma comida
Verifique se a porta está fechada
E necessário pôr o refrigerador na
posição horizontal.
Melhore a circulação de ar interior
E necessário assegurar a circulação
de ar exterior.
Veja o manual de instruções 5.2.
Verifique a ligação.
E necessário controllar a tensão (por
exemplo com a connessione duma
lâmpada)
13. Informação relativa à
protecção do meio
ambiente
A amónia (composto natural de hidrogénio e
nitrogénio) é usada na unidade de refrigeração
como agente de refrigeração.
O ciclopentano, que é inócuo para o ozono, é
activado como agente motriz para o isolamento com
espuma de PU.
O cromato de sódio é utilizado como protecção
contra a corrosão (peso equivalente a 2% do peso
do líquido de refrigeração).
14. Reciclagem
Depois de desembalar o aparelho, os materiais de
embalagem deverão ser entregues num local de
recolha. No termo do seu período de vida útil, o
aparelho deverá ser entregue a uma empresa
especializada na recolha e tratamento, que irá
recuperar os materiais reutilizáveis. O restante será
devidamente destruído.
Aparelhos caracterizados com este
símbolo precisam ser jogados fora nos
pontos de recolha locais especiais para
descarte de aparelhos eléctricos e
electrónicos.
Este aparelho não deve ser jogado fora
junto com o lixo doméstico normal!
Os frigoríficos da Dometic levam um símbolo na
placa de características técnicas (placa do tipo) no
interior do aparelho.
Este aparelho está de acordo com as seguintes
directivas da CEE:
Directiva-LVD 73/23/CEE corrigida com
90/683/CEE
Directiva-EMC 89/336/CEE
Directiva -RoHS 2002/95/CE
Page 52

Printed by Océ Hungária Kft. 2011. 01. 12.
 Loading...