

Page 1
REFRIGERATION
EN
DE
FR
IT
NL
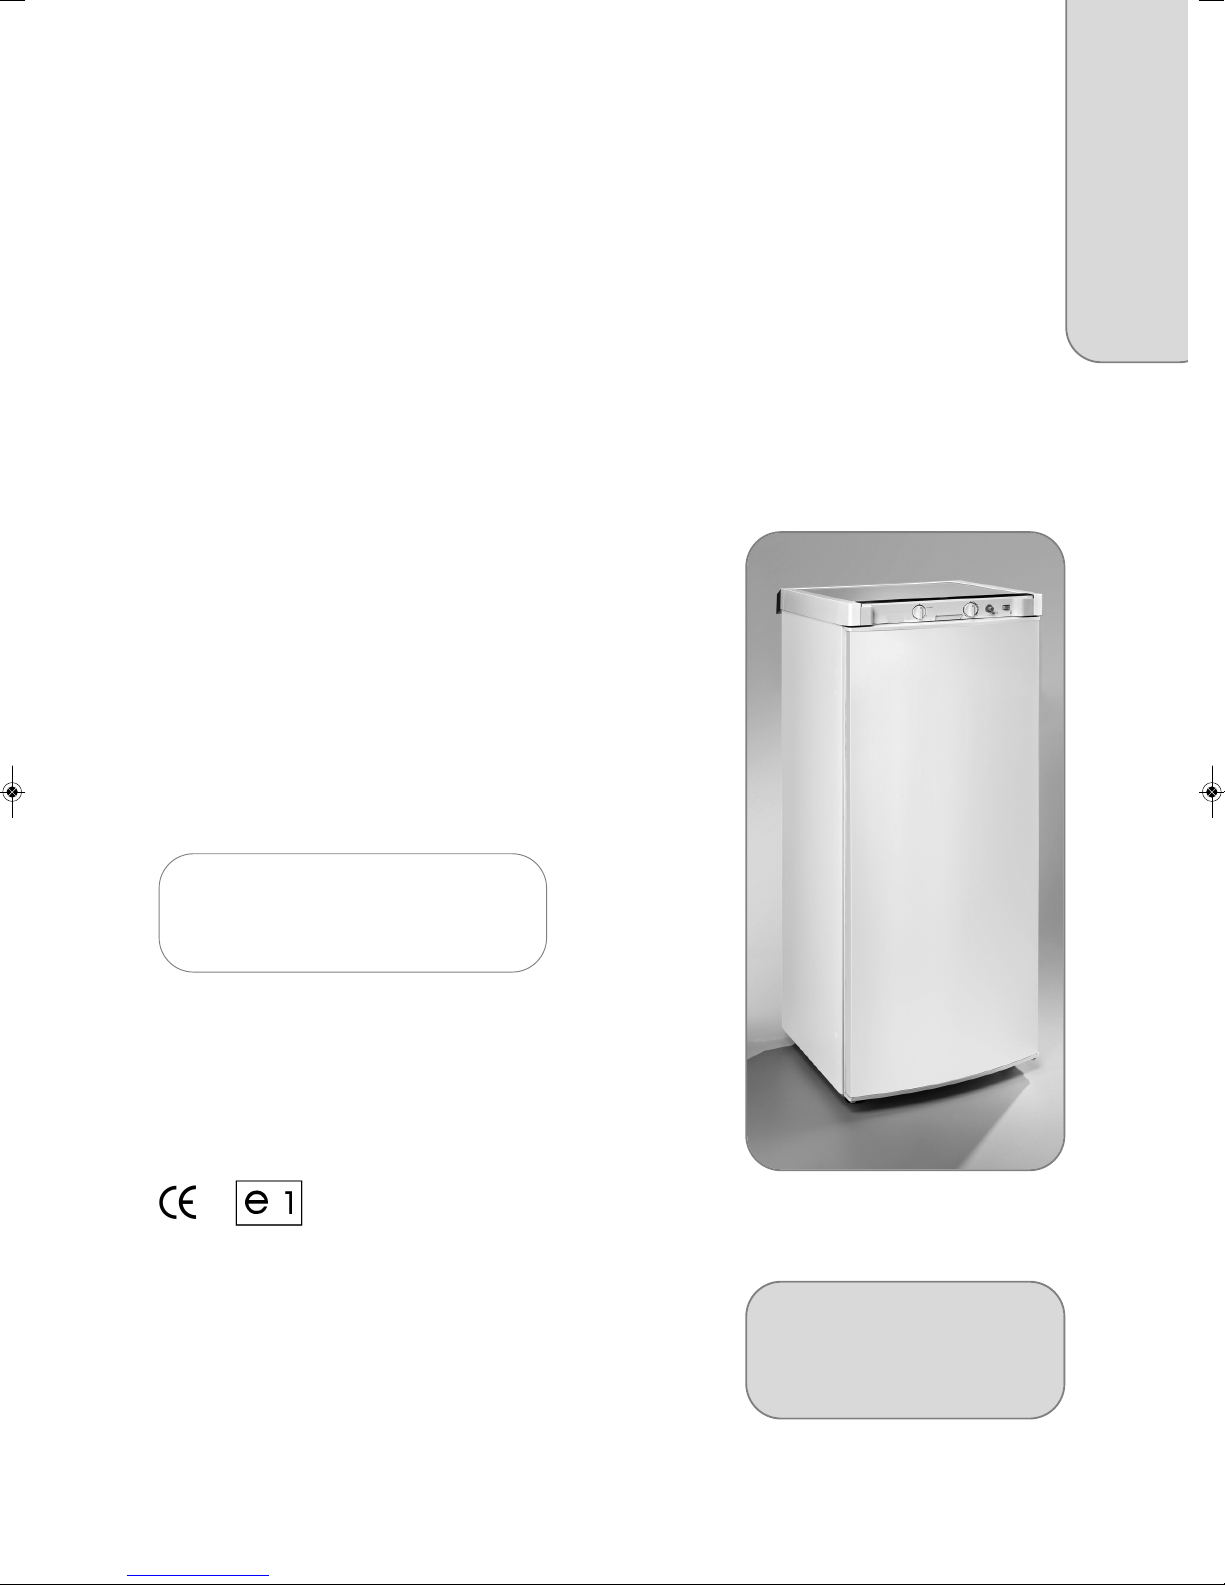
REFRIGERATORS
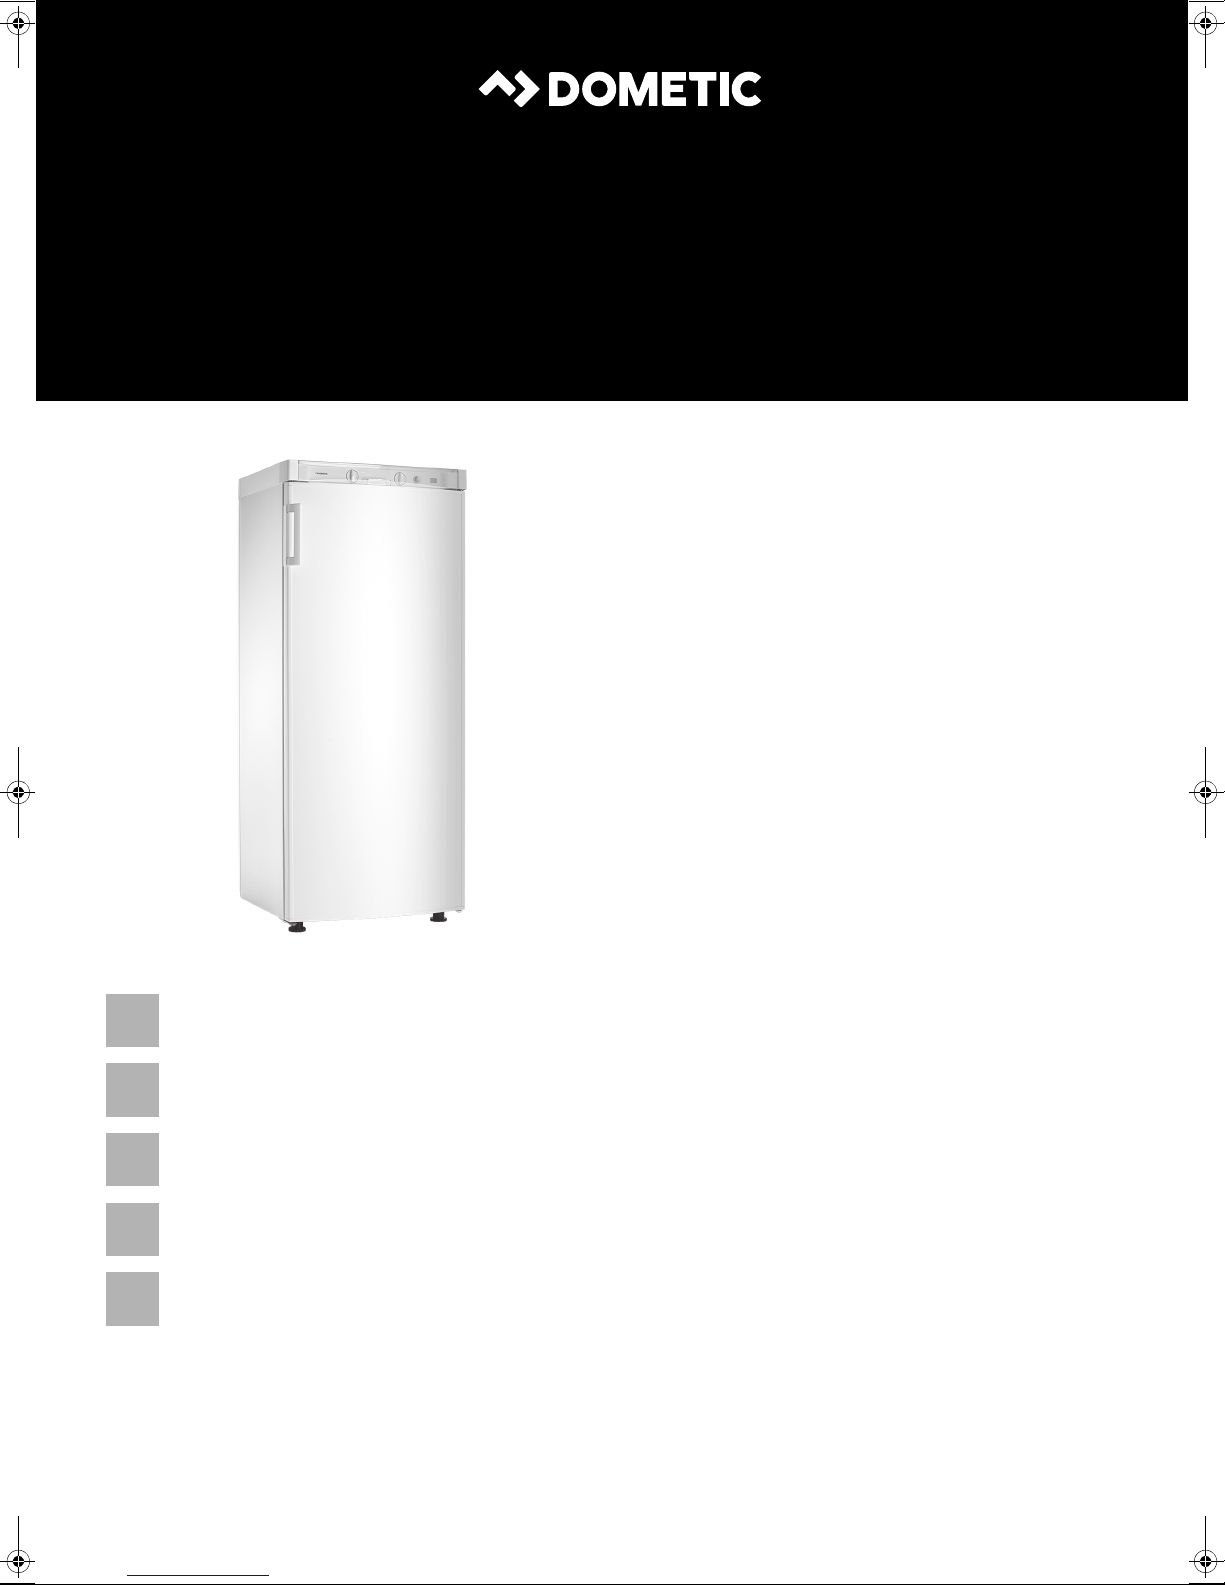
RGE3000
Absorber refrigerator
Operating manual
Absorber-Kühlschrank
Bedienungsanleitung
Réfrigérateur à absorption
Notice d’utilisation
Frigorifero ad assorbimento
Istruzioni per l’uso
Absorptiekoelkast
Gebruiksaanwijzing
Page 2
ENGLISH
Dometic Group is a customer-driven, world-leading provider of leisure products for the RV, automotive, truck and marine markets. We supply the industry and aftermarket with a complete range of air conditioners, refrigerators, awnings,
cookers, sanitation systems, lighting, mobile power equipment, comfort and safety solutions, windows, doors and other
equipment that make life more comfortable away from home.
Dometic Group supplies a wide range of workshop equipment for service and maintenance of built-in air conditioners.
Dometic Group also provides specially designed refrigerators for hotel rooms, offices, wine storage and transport and
storage of medical products.
Our products are sold in almost 100 countries and are produced mainly in wholly-owned production facilities around the
world.
DEUTSCH
Die Dometic Group ist ein kundenorientierter, weltweit führender Hersteller innovativer Komfortprodukte für den
Wohnwagen-, Reisemobil-, Lkw-, Pkw- und Bootsmarkt. Die Unternehmensgruppe beliefert dabei ebenso die Industrie,
wie den Nachrüstmarkt mit einem kompletten Sortiment von Klimaanlagen, Kühlgeräten, Markisen,
Beleuchtungssystemen, Kochgeräten, Komfort-Toiletten und Sanitärprodukten, Ausrüstungen für die mobile
Stromversorgung, Komfort- und Sicherheitslösungen, Fenstern, Türen und vielen weiteren Produkten, die das Leben
unterwegs angenehmer und bequemer machen. Darüber hinaus liefert die Dometic Group die nötige WerkstattAusrüstung für die Wartung und Reparatur von Fahrzeug-Klimaanlagen.
Die Dometic Group ist weiterhin Marktführer mit Spezialkühlschränken für Hotels, Büros und medizinische Einrichtungen
und produziert ebenso maßgeschneiderte Weinklimaschränke.
Die Produkte der Dometic Group werden in nahezu 100 Ländern der Welt verkauft und hauptsächlich in eigenen
Produktionsstätten hergestellt.
FRANÇAIS
Le Groupe Dometic, à l'écoute des clients est leader mondial dans la fourniture d'équipements et produits de confort
destinés aux marchés des véhicules de loisirs, de l'automobile, du transport routier et de la plaisance. Nous offrons aux
constructeurs ainsi qu'à la deuxième monte, une gamme complète de climatiseurs, réfrigérateurs, auvents, produits de
cuisson, sanitaires, éclairages, solutions en énergie, produits de confort et de sécurité, fenêtres, portes et autres équipements qui rendent la vie plus agréable lors des déplacements.
Le Groupe Dometic fournit une gamme complète d'équipements de climatisation destinés aux ateliers de montage et
réparation.
Le Groupe Dometic développe aussi des réfrigérateurs pour l'hôtellerie, les bureaux, les collectivités, ainsi que pour le
transport et la conservation des vins et des produits médicaux.
Nos produits sont vendus dans près de 100 pays et fabriqués principalement dans nos propres usines partout dans le
monde.
ITALIANO
Dometic è un fornitore attento alla clientela, ed è l 'azienda leader a livello mondiale nella fornitura di prodotti per il tempo
libero nei mercati dei caravan, motorhome, industria automobilistica, veicoli industriali e imbarcazioni da diporto.
Forniamo sia le industrie di primo impianto sia i canali di accessoristica con una gamma completa di condizionatori d
'aria, frigoriferi, verande, cucine, sanitari, illuminazione, equipaggiamenti elettronici e di potenza mobili, soluzioni per il
comfort e la sicurezza, finestre, porte ed altre attrezzature per rendere il tempo libero più confortevole quando ci si trova
lontano da casa.
Il Gruppo Dometic fornisce una vasta gamma di equipaggiamento per officine di assistenza e manutenzione di condizionatori.
Il Gruppo Dometic offre anche frigoriferi per usi specifici:per stanze di hotel, uffici, conservazione di prodotti medicali e
vini.
I nostri prodotti sono venduti in quasi 100 nazioni e sono prodotti principalmente in fabbriche di nostra proprieta' dislocate in tutto il mondo.
Page 3

1
Model number .............................................
Product number .............................................
Serial number .............................................
Record for future reference:
RGE 3000
MBA 11/2012
N 1
Operating Instructions
Absorption-Refrigerator
EN
English
Page 4

2
1.0 General . . . . . . . . . . . . . . . . . . . . . . . . . . . . . . . . . . . . . . . . . . . . . . 4
1.1 Introduction . . . . . . . . . . . . . . . . . . . . . . . . . . . . . . . . . . . . . . . . . . . . . . . . . . . . . . . . . . . . . . . . 4
1.2 Guide to these operating instructions . . . . . . . . . . . . . . . . . . . . . . . . . . . . . . . . . . . . . . . . . . . .4
1.3 Copyright protection . . . . . . . . . . . . . . . . . . . . . . . . . . . . . . . . . . . . . . . . . . . . . . . . . . . . . . . . . 4
1.4 Explanation of symbols used in this manual . . . . . . . . . . . . . . . . . . . . . . . . . . . . . . . . . . . . . . . 4
1.5 Warranty . . . . . . . . . . . . . . . . . . . . . . . . . . . . . . . . . . . . . . . . . . . . . . . . . . . . . . . . . . . . . . . . . . . 5
1.6 Limitation of liability . . . . . . . . . . . . . . . . . . . . . . . . . . . . . . . . . . . . . . . . . . . . . . . . . . . . . . . . . . 5
1.7 Customer services . . . . . . . . . . . . . . . . . . . . . . . . . . . . . . . . . . . . . . . . . . . . . . . . . . . . . . . . . . . 5
1.8 Spare parts . . . . . . . . . . . . . . . . . . . . . . . . . . . . . . . . . . . . . . . . . . . . . . . . . . . . . . . . . . . . . . . . . 5
1.9 Environmental notices . . . . . . . . . . . . . . . . . . . . . . . . . . . . . . . . . . . . . . . . . . . . . . . . . . . . . . . . 6
1.9.1 Disposal . . . . . . . . . . . . . . . . . . . . . . . . . . . . . . . . . . . . . . . . . . . . . . . . . . . . . . . . . . . . . . . . . . . . . . . . . . . 6
1.9.2 Energy-saving-tips . . . . . . . . . . . . . . . . . . . . . . . . . . . . . . . . . . . . . . . . . . . . . . . . . . . . . . . . . . . . . . . . . . . 6
1.10 Declaration of conformity . . . . . . . . . . . . . . . . . . . . . . . . . . . . . . . . . . . . . . . . . . . . . . . . . . . . . . 6
2.0 Safety instructions . . . . . . . . . . . . . . . . . . . . . . . . . . . . . . . . . . . . . . 7
2.1 Application according to regulations . . . . . . . . . . . . . . . . . . . . . . . . . . . . . . . . . . . . . . . . . . . . .7
2.2 User's responsibility . . . . . . . . . . . . . . . . . . . . . . . . . . . . . . . . . . . . . . . . . . . . . . . . . . . . . . . . . . 7
2.3 Protection of children when disposing of the equipment . . . . . . . . . . . . . . . . . . . . . . . . . . . . . 7
2.4 Working upon and checking the refrigerator . . . . . . . . . . . . . . . . . . . . . . . . . . . . . . . . . . . . . . . 7
2.5 Information on coolant . . . . . . . . . . . . . . . . . . . . . . . . . . . . . . . . . . . . . . . . . . . . . . . . . . . . . . . . 8
2.6 Operating the refrigerator with gas . . . . . . . . . . . . . . . . . . . . . . . . . . . . . . . . . . . . . . . . . . . . . . 8
2.7 Electrical operation . . . . . . . . . . . . . . . . . . . . . . . . . . . . . . . . . . . . . . . . . . . . . . . . . . . . . . . . . . 8
2.8 Safety instructions when storing foodstuffs . . . . . . . . . . . . . . . . . . . . . . . . . . . . . . . . . . . . . . . 9
2.9 Battery replacement . . . . . . . . . . . . . . . . . . . . . . . . . . . . . . . . . . . . . . . . . . . . . . . . . . . . . . . . . . 9
3.0 Description of model . . . . . . . . . . . . . . . . . . . . . . . . . . . . . . . . . . . . 10
3.1 Model identification . . . . . . . . . . . . . . . . . . . . . . . . . . . . . . . . . . . . . . . . . . . . . . . . . . . . . . . . . . 10
3.2 Refrigerator rating plate . . . . . . . . . . . . . . . . . . . . . . . . . . . . . . . . . . . . . . . . . . . . . . . . . . . . . . . 10
3.3 Technical data . . . . . . . . . . . . . . . . . . . . . . . . . . . . . . . . . . . . . . . . . . . . . . . . . . . . . . . . . . . . . . 10
3.4 Description of refrigerator . . . . . . . . . . . . . . . . . . . . . . . . . . . . . . . . . . . . . . . . . . . . . . . . . . . . . 10
4.0 Installation . . . . . . . . . . . . . . . . . . . . . . . . . . . . . . . . . . . . . . . . . . . . 11
4.1 Mounting and connection . . . . . . . . . . . . . . . . . . . . . . . . . . . . . . . . . . . . . . . . . . . . . . . . . . . . . 11
4.1.1 Electrical connection . . . . . . . . . . . . . . . . . . . . . . . . . . . . . . . . . . . . . . . . . . . . . . . . . . . . . . . . . . . . . . . . . 11
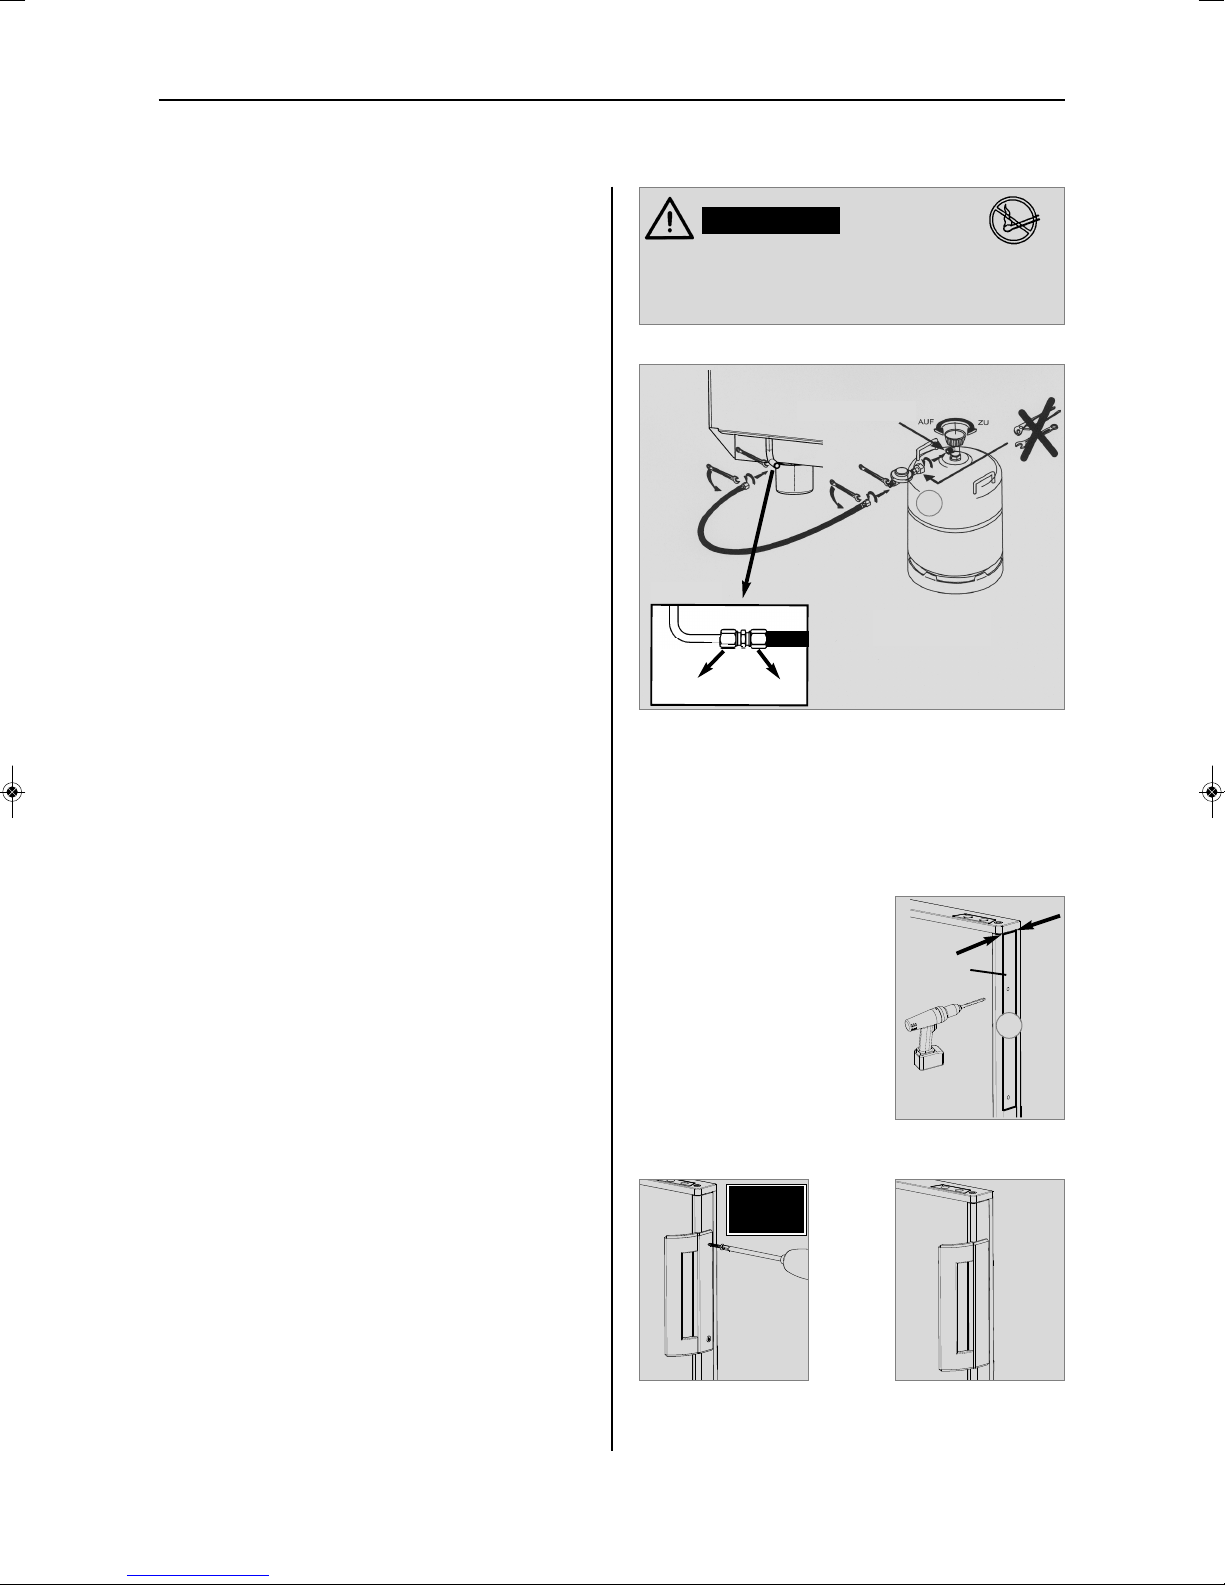
4.1.2 Placing the gas bottle . . . . . . . . . . . . . . . . . . . . . . . . . . . . . . . . . . . . . . . . . . . . . . . . . . . . . . . . . . . . . . 11
4.1.3 Gas connection . . . . . . . . . . . . . . . . . . . . . . . . . . . . . . . . . . . . . . . . . . . . . . . . . . . . . . . . . . . . . . . . . . . . . . 12
4.2 Assembling the doorgrip . . . . . . . . . . . . . . . . . . . . . . . . . . . . . . . . . . . . . . . . . . . . . . . . . . . . . . 12
5.0 Refrigerator operation . . . . . . . . . . . . . . . . . . . . . . . . . . . . . . . . . . . 13
5.1 Cleaning . . . . . . . . . . . . . . . . . . . . . . . . . . . . . . . . . . . . . . . . . . . . . . . . . . . . . . . . . . . . . . . . . . . 13
5.2 Maintenance . . . . . . . . . . . . . . . . . . . . . . . . . . . . . . . . . . . . . . . . . . . . . . . . . . . . . . . . . . . . . . . . 13
5.3
Electrical operation . . . . . . . . . . . . . . . . . . . . . . . . . . . . . . . . . . . . . . . . . . . . . . . . . . . . . . . . . . . . 13
5.4 Gas operation . . . . . . . . . . . . . . . . . . . . . . . . . . . . . . . . . . . . . . . . . . . . . . . . . . . . . . . . . . . . . . . 13
5.5 Operation . . . . . . . . . . . . . . . . . . . . . . . . . . . . . . . . . . . . . . . . . . . . . . . . . . . . . . . . . . . . . . . . . . 14
5.5.1 Explanation of operating controls . . . . . . . . . . . . . . . . . . . . . . . . . . . . . . . . . . . . . . . . . . . . . . . . . . . . . . . 14
5.5.2 Electrical operation . . . . . . . . . . . . . . . . . . . . . . . . . . . . . . . . . . . . . . . . . . . . . . . . . . . . . . . . . . . . . . . . . . . 14
5.5.3 Gas operation (Liquid gas) . . . . . . . . . . . . . . . . . . . . . . . . . . . . . . . . . . . . . . . . . . . . . . . . . . . . . . . . . . . . . 14
5.5.4 Setting of cooling compartment temperature . . . . . . . . . . . . . . . . . . . . . . . . . . . . . . . . . . . . . . . . . . . . . . 15
5.6 Interior lighting battery replacement . . . . . . . . . . . . . . . . . . . . . . . . . . . . . . . . . . . . . . . . . . . . . 15
5.7 Positioning the storage racks . . . . . . . . . . . . . . . . . . . . . . . . . . . . . . . . . . . . . . . . . . . . . . . . . . 15
5.8 Removable freezer compartment . . . . . . . . . . . . . . . . . . . . . . . . . . . . . . . . . . . . . . . . . . . . . . . .15
Table of contents
Page 5

3
5.9 Storing food and making ice cubes . . . . . . . . . . . . . . . . . . . . . . . . . . . . . . . . . . . . . . . . . . . . . .16
5.9.1 Storing products in the cooling compartment . . . . . . . . . . . . . . . . . . . . . . . . . . . . . . . . . . . . . . . . . . . . . . 16
5.9.2 Storing products in the freezer compartment . . . . . . . . . . . . . . . . . . . . . . . . . . . . . . . . . . . . . . . . . . . . . . 16
5.9.3 Refrigerator compartments . . . . . . . . . . . . . . . . . . . . . . . . . . . . . . . . . . . . . . . . . . . . . . . . . . . . . . . . . . . . . 16
5.9.4 Making ice cubes . . . . . . . . . . . . . . . . . . . . . . . . . . . . . . . . . . . . . . . . . . . . . . . . . . . . . . . . . . . . . . . . . . . . 17
5.10 Shutting off the refrigerator . . . . . . . . . . . . . . . . . . . . . . . . . . . . . . . . . . . . . . . . . . . . . . . . . . . . 17
5.11 Defrosting . . . . . . . . . . . . . . . . . . . . . . . . . . . . . . . . . . . . . . . . . . . . . . . . . . . . . . . . . . . . . . . . . . 17
5.12 Changing the doorhang . . . . . . . . . . . . . . . . . . . . . . . . . . . . . . . . . . . . . . . . . . . . . . . . . . . . . . . 18
5.13 Changing the decor panel . . . . . . . . . . . . . . . . . . . . . . . . . . . . . . . . . . . . . . . . . . . . . . . . . . . . . 18
5.14
Troubleshooting . . . . . . . . . . . . . . . . . . . . . . . . . . . . . . . . . . . . . . . . . . . . . . . . . . . . . . . . . . . . . . 20
5.15 Template (Annex)
© Dometic GmbH - 2012 - Subject to change without notice
Dometic GmbH
In der Steinwiese 16
D-57074 Siegen
www.dometic.com
Page 6
4
General
1.0 General
You have made an excellent choice in selecting the Dometic Absorption Refrigerator. We
are sure that you will be satisfied with your
new refrigerator in all respects. The refrigerator, which works silently, meets high quality
standards and guarantees the efficient utilisation of resources and energy throughout its
entire life cycle, during manufacture, in use
and when being disposed of.
1.1 Introduction
The information, texts and illustrations in these
instructions are copyright protected and are
subject to industrial property rights.
No part of these instructions may be reproduced, copied or utilised in any other way without written authorisation by Dometic GmbH,
Siegen.
1.3 Copyright protection
Before you start using the refrigerator,
please read the operating instructions
carefully.
These instructions provide you with the necessary guidance for the proper use of your refrigerator. Observe in particular the safety
instructions. Observation of the instructions
and handling recommendations is important
for dealing with the refrigerator safely and for
protecting you from injury and the refrigerator
from damage. You must understand what you
have read before you carry out a task.
Keep these instructions in a safe place
close to the refrigerator so they may be
referred to at any time.
1.2 Guide to these operating
instructions
1.4 Explanation of symbols
used in this manual
Warning notices are identified by symbols. A
supplementary text gives you an explanation
of the degree of danger.
Observe these warning notices rigorously.
You will thus protect yourself and other
people from injury, and the appliance from
damage.
Warning notices
DANGER indicates an imminent hazardous
situation which, if not avoided, could result in
death or serious injury.
DANGER!
WARNING indicates a potentially hazardous
situation which, if not avoided, could result in
death or serious injury
WARNING!
WARNING indicates a potentially hazardous
situation which, if not avoided, could result in
death or serious injury
CAUTION!
CAUTION (used without the safety alert sym-
bol) indicates a potentially hazardous situation
which, if not avoided, may result in damage to
the appliance.
CAUTION!
Page 7
5
General
Warranty arrangements are in accordance
with EC Directive 44/1999/CE and the normal
conditions applicable for the country concerned. For warranty or other maintenance, please contact our customer services department.
Any damage due to improper use is not covered by the warranty. The warranty does not
cover any modifications to the appliance or
the use of non-original Dometic parts. The
warranty does not apply if the installation and
operating instructions are not adhered to and
no liability shall be entertained.
1.5 Warranty
All information and guidance in these operating instructions were prepared after taking
into consideration the applicable standards
and regulations as well as the current state of
the art. Dometic reserves the right to make
changes at any time which are deemed to be
in the interest of improving the product and
safety.
1.6 Limitation of liability
Dometic offers a pan-European customer ser-
vice network. Find your authorised customer
service centre by calling the phone number
indicated in the EuroService Network book,
EuroService Network - which accompanies
every refrigerator. You can also obtain the
address information of the nearest customer
service from www.dometic.com. When con-
tacting Dometic Customer Services, please
state the model, product number and serial
number together with the MLC code, if applicable. You will find this information on the
rating plate inside the refrigerator. We recommend that you note this data in the field provided on the front page of this operation manual.
1.7 Customer services
Dometic will assume no liability for damage in
the case of :
n non-observation of the operating instructi-
ons
n application not in accordance with the
regulations or provisions
n use of non-original spare parts
n modifications and interferences to
the appliance
n effect of environmental influences, such as
- temperature fluctuations
- humidity
1.8 Spare parts
Parts can be ordered throughout Europe from
our customer services.
Always give the model and product number
when you contact the customer service! You
will find this information on the rating plate
inside the refrigerator.
Information
INFORMATION gives you supplementary and
useful guidance when dealing with your refrigerator.
Environmental Tips
ENVIRONMENTAL TIPS gives you useful gui-
dance for saving energy and disposal of the
appliance.
i
Page 8

6
1.10 Declaration of conformity
n At an average ambient temperature of
25°C, it is sufficient to operate the refrigerator at middle thermostat setting.
n Where possible, always store precooled
products.
n Do not expose the refrigerator to direct
sunlight or any other heat source (e.g. heater).
n Ensure that air circulation of the refrigerati-
on unit is not obstructed.
1.9.2 Energy-saving-tips
Ammonia (a natural compound of hydrogen
and nitrogen) is used in the cooling unit as a
coolant. Non-ozone-hazardous cyclopentane
is used as a propellant for manufacturing PU
foam insulation.
In order to ensure that the recyclable packaging materials are re-used, they should be
sent to the customary local collection system.
The appliance should be transferred to a suitable waste disposal company that will ensure
re-use of the recyclable components and proper disposal of the rest. For eco-friendly draining of the coolant from all absorber refrigeration units, a suitable disposal plant should be
used.
Appliances bearing this symbol
must be deposited at the designated local reception point for the
disposal of electrical and electronic equipment.
It is not permitted that this product
be disposed of by way of the normal household refuse collection system.
Dometic refrigerators bear this symbol on the
data plate to be found in the interior of the
unit.
1.9 Environmental notices
1.9.1 Disposal
n Arrange the shelves evenly in the refrigera-
tor (in the cooling compartment) in order to
achieve the most efficient use of energy.
n Do not overfill the storage grids and com-
partments to prevent obstructing the internal air circulation.
n Maintain a clearance of approx. 10 mm bet-
ween chilled products and post-evaporator
("cooling fins").
n Defrosting at regular intervals saves energy
(see section "Defrosting").
n Open the refrigerator door only for a short
period of time when removing products.
n Run the refrigerator for about 12 hours
before filling it.
- Low Voltage Directive 73/23/EEC and the
Amendment to LVD 2006/95EC
- EMC Directive 2004/108/EC
- RoHS Directive 2002/95EC
Directives
Type family : C 40/110
- EN 60335-1;(IEC 60335-1; 4ed., Am.1, Am. 2)
- EN 60335-2-24;03 (IEC 60335-2-24;6 ed.,
Am.1, Am. 2)
- EN 60335-2-102;06
- EN 61000-3-2;00, A1, A2, A14
- EN 61000-3-3;95,A1
- EN 50366;2003+A1
- EN 55014-1;07,A1,A2
- EN 55014-2;01,A1
Standards
The current Declaration of Conformity can also
be requested directly from Dometic GmbH,
Siegen.
General
i
Page 9
7
2.0 Safety instructions
The refrigerator is intended for installation in
homes, cottages, hunting lodges or similar.
The appliance has been certified for this application in accordance with EU Gas Directive
2009/142/EC. It is not designd for installati-
on in leisure vehicles such as caravans or
motorcaravans or boats.
The refrigerator is to be used solely for storing
foodstuffs
2.1 Application according to
regulations
Safety instructions
The refrigerator is not suitable for the proper storage of medication. Please observe in addition the instructions in the medication package inserts.
WARNING!
Anyone operating the refrigerator must be
familiar with the safe handling and understand
the advice in these operating instructions.
This appliance is not intended for use by persons (including children) with reduced physical, sensory or mental capabilities, or lack of
experience and knowledge, unless they are
supervised or have been given instruction
concerning use of the appliance by a person
responsible for their safety. Children should be
supervised to ensure that they do not play with
the appliance. Cleaning and user maintenance
shall not be made by children.
[EN 60335-2-24, 7.12]
2.2 User's responsibility
The appliance must not be exposed to
rain.
CAUTION!
2.4 Working upon and checking
the refrigerator
2.3 Protection of children when
disposing of the equipment
When disposing of the refrigerator, detach
all refrigerator doors and leave the storage racks in the refrigerator. In this way
inadvertent entrappment and suffocation
is prevented.
WARNING!
Work on gas equipment, exhaust system
and electrical facilities must be carried
out by authorised personnel only.
Substantial damage to property and/or
injury to persons can arise through unprofessional procedures.
WARNING!
Never use an unshielded flame to check
gas bearing parts and pipes for leakage!
There is a danger of fire or explosion..
DANGER!
Never open the absorber cooling unit! It is
under high pressure.
There is a danger of injury!
WARNING!
Page 10

8
2.5 Information on coolant
Ammonia is used as a coolant.
This is a natural compound also used in household cleaning agents (1 litre of Salmiak
cleaner contains up to 200g of ammonia about twice as much as is used in the refrigerator). Sodium chromate is used for corrosion
protection (1.8% by weight of the solvent).
In the event of leakage (easily identifiable from
the strong odour), proceed as follows:
- Switch off the appliance.
- Air the room thoroughly.
- Inform authorised customer services.
For your safety it was ascertained in an
expert's report that no impairment of health
exists when the coolant is discharged.
Compare the operating pressure of the rating
plate with the data specified on the pressure
reducing valve of the liquid gas cylinder.
2.6 Operating the refrigerator
with gas
The refrigerator is operated using the gases
and inlet pressures stated below. The pressure reducing valve between the gas cylinder
and cooker to be used must comply with the
categories stated in the following table.
It is imperative that the operating pressure corresponds to the data specified on
the rating plate of the appliance.
CAUTION!
2.7 Electrical operation
This option should only be selected where
the supply voltage of the connection for
power supply corresponds to the value
specified on the data plate. Any difference
in values may result in damage the appliance.
CAUTION!
Safety instructions
If you smell gas :
n Open all windows and leave the room.
n Do not operate any electrical equipment
and prevent the use of naked flames.
n Close the gas cylinder valve and leave it
closed until the fault has been rectified.
n Contact authorised specialist personnel*
for advice.
* authorised specialist personnel
Authorised specialist personnel are accredited
experts who are able, by virtue of their training and
knowledge, to vouch that the inspection has been
carried out properly.
Connection pressure and gas categories
Category Pressure / mbar GAS
I3B / P(30) 30 Butane
30 Propane
I3+ (28-30/37) 28-30 Butane
37 Propane
I3B/P(50) 50 Butane
I3B/P(50) 50 Propane
i
Page 11
9
2.8 Safety instructions when
storing foodstuffs
Safety instructions
Dometic refrigerators work according to the
absorption principle. For physical reasons, an
absorption system responds slowly to
changes made by the thermostat controller, by
loss of cooling energy through opening the
door or during storing food. The devices meet
the cooling performance requirements of the
Climatic Class SN acc. to EN/ISO 7371 in the
temperature range of +10°C to +32°C ambient
temperature.
Protect the environment!
Do not dispose of batteries in domestic waste.
Take your used batteries to your dealer or a
collection point.
No refrigerator of any kind can improve the
quality of the food; refrigerators can only
maintain the food's quality for a short duration as from the time of storing it.
Please observe the following particular
conditions for storing food in a refrigerator
that is built into a vehicle:
n A change in the climatic conditions such as
temperature fluctuations
n High temperatures inside the room
n A refrigerator built in behind a window and
exposed to direct sunlight
n Storing the products too soon, i.e. shortly
after starting up the appliance for use
Under these particular conditions the refrigerator cannot guarantee reaching the temperature needed for perishables.
Perishables include all products with a stipulated use-by date and a minimum storage temperature of +4°C or less, especially for meat,
poultry, fish, sausages, pre-packed foods.
n Pack raw and cooked foods separately
(e.g. in containers, aluminium foil, etc.).
n Only remove the outside packaging of sin-
gle packs if all the necessary information,
e.g. the use-by date, can also be read on
the single packs.
n Do not leave cooled goods outside the
refrigerator for too long.
n Place the foods with the next use-by date
at the front, accordingly.
n Pack away any left-over food and eat at the
first opportunity.
n Wash your hands before and after handling
any food.
n Regularly clean the inside of the refrigera-
tor.
Please observe the instructions and information regarding the use-by date on the outside
packaging of the food.
Please observe section
"5.1 Cleaning"
of this
instruction.
"
2.9 Exchange of battery
n Observe the correct polarity !
n Do not connect non-rechargeable bat-
teries to a charger.
n Remove rechargeable batteries from
the battery compartment before charging.
n Avoid short circuits on the contacts in
the battery compartment!
n Remove discharged batteries.
n Remove the batteries from the battery
compartment if the refrigerator will not
be used for a long time.
n Do not mix different types of batteries.
CAUTION!
i
Page 12
10
Fig. 1
Electrical
Gas
2
1
3
4
5
Gross contents (litres) ............................ 190
Freezer compartment (litres) ..................... 35
Dimensions (mm)
(H x W x D)................................1331x531x637
Electrical rating (W) .............................. 250
Gas consumption
g / 24h* ................................................... 440
Power consumption
kWh / 24h* .............................................. 3.8
Net weight (kg) ...................................... 45.5
Gas ignition .............................. Piezo-igniter
Freestanding
3.3 Technische Daten
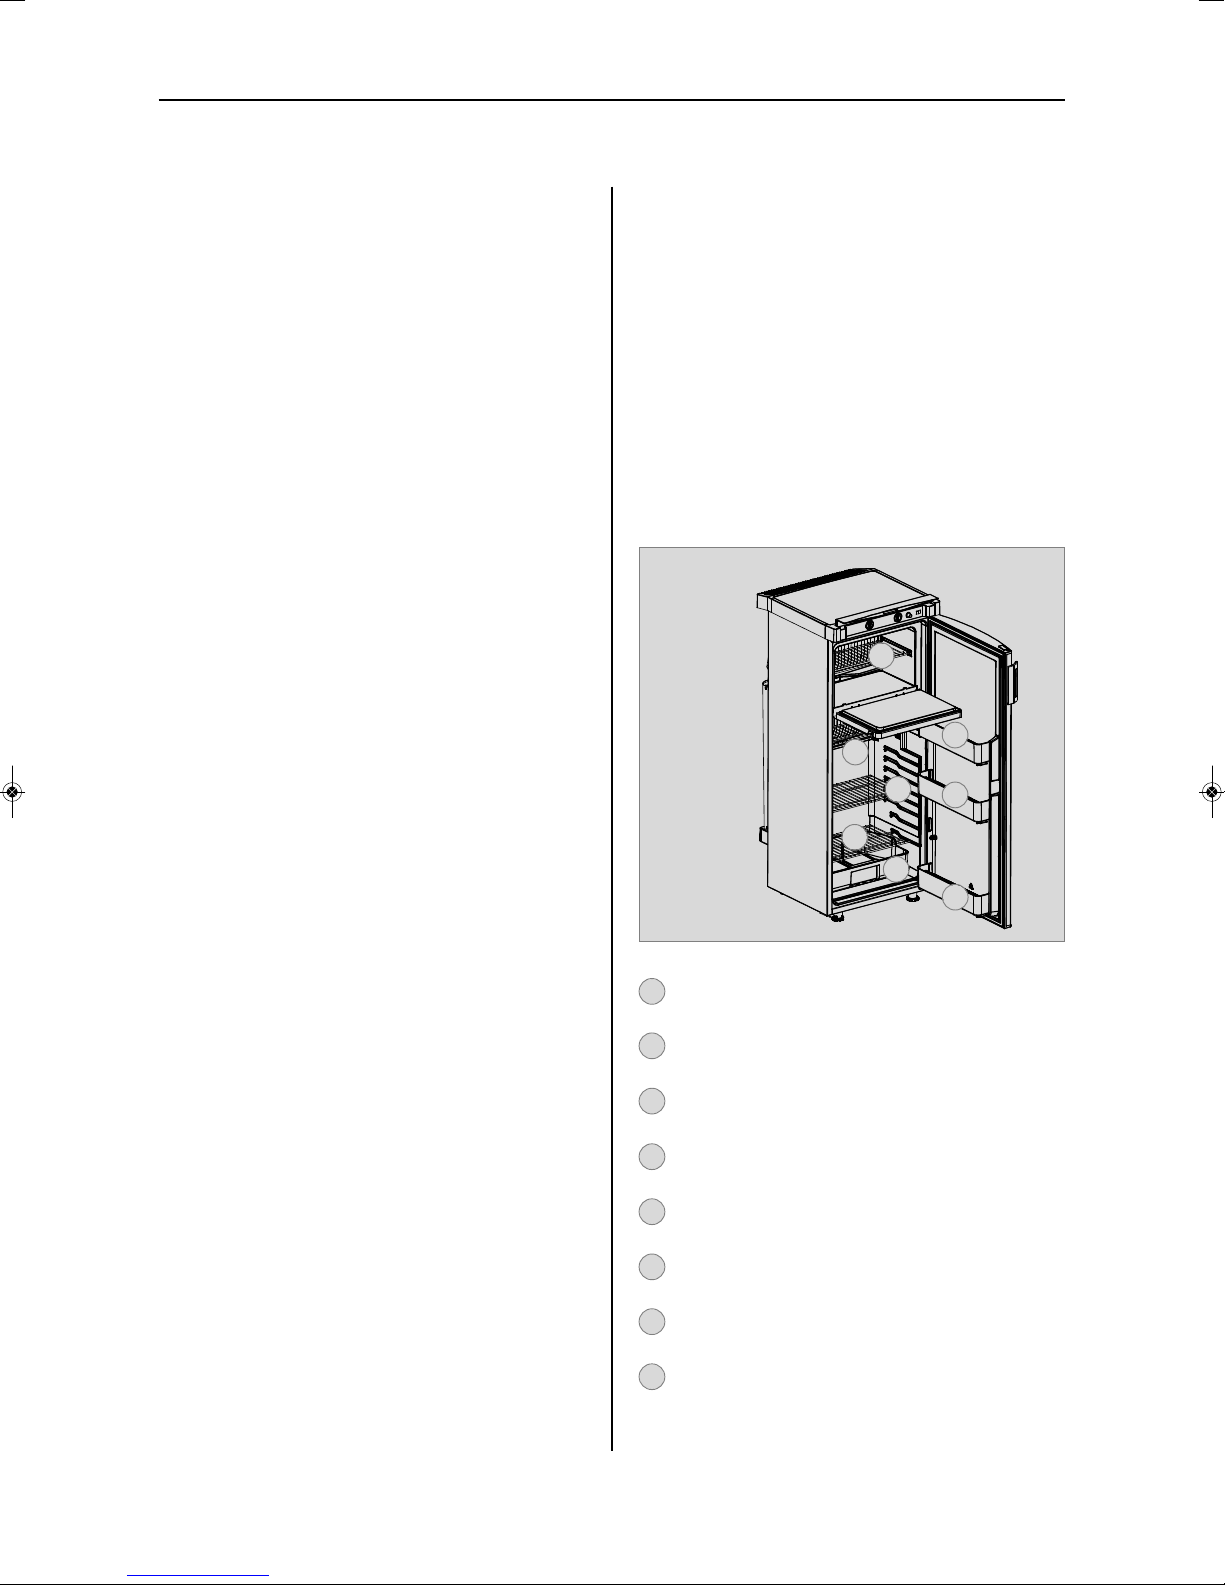
Operating controls
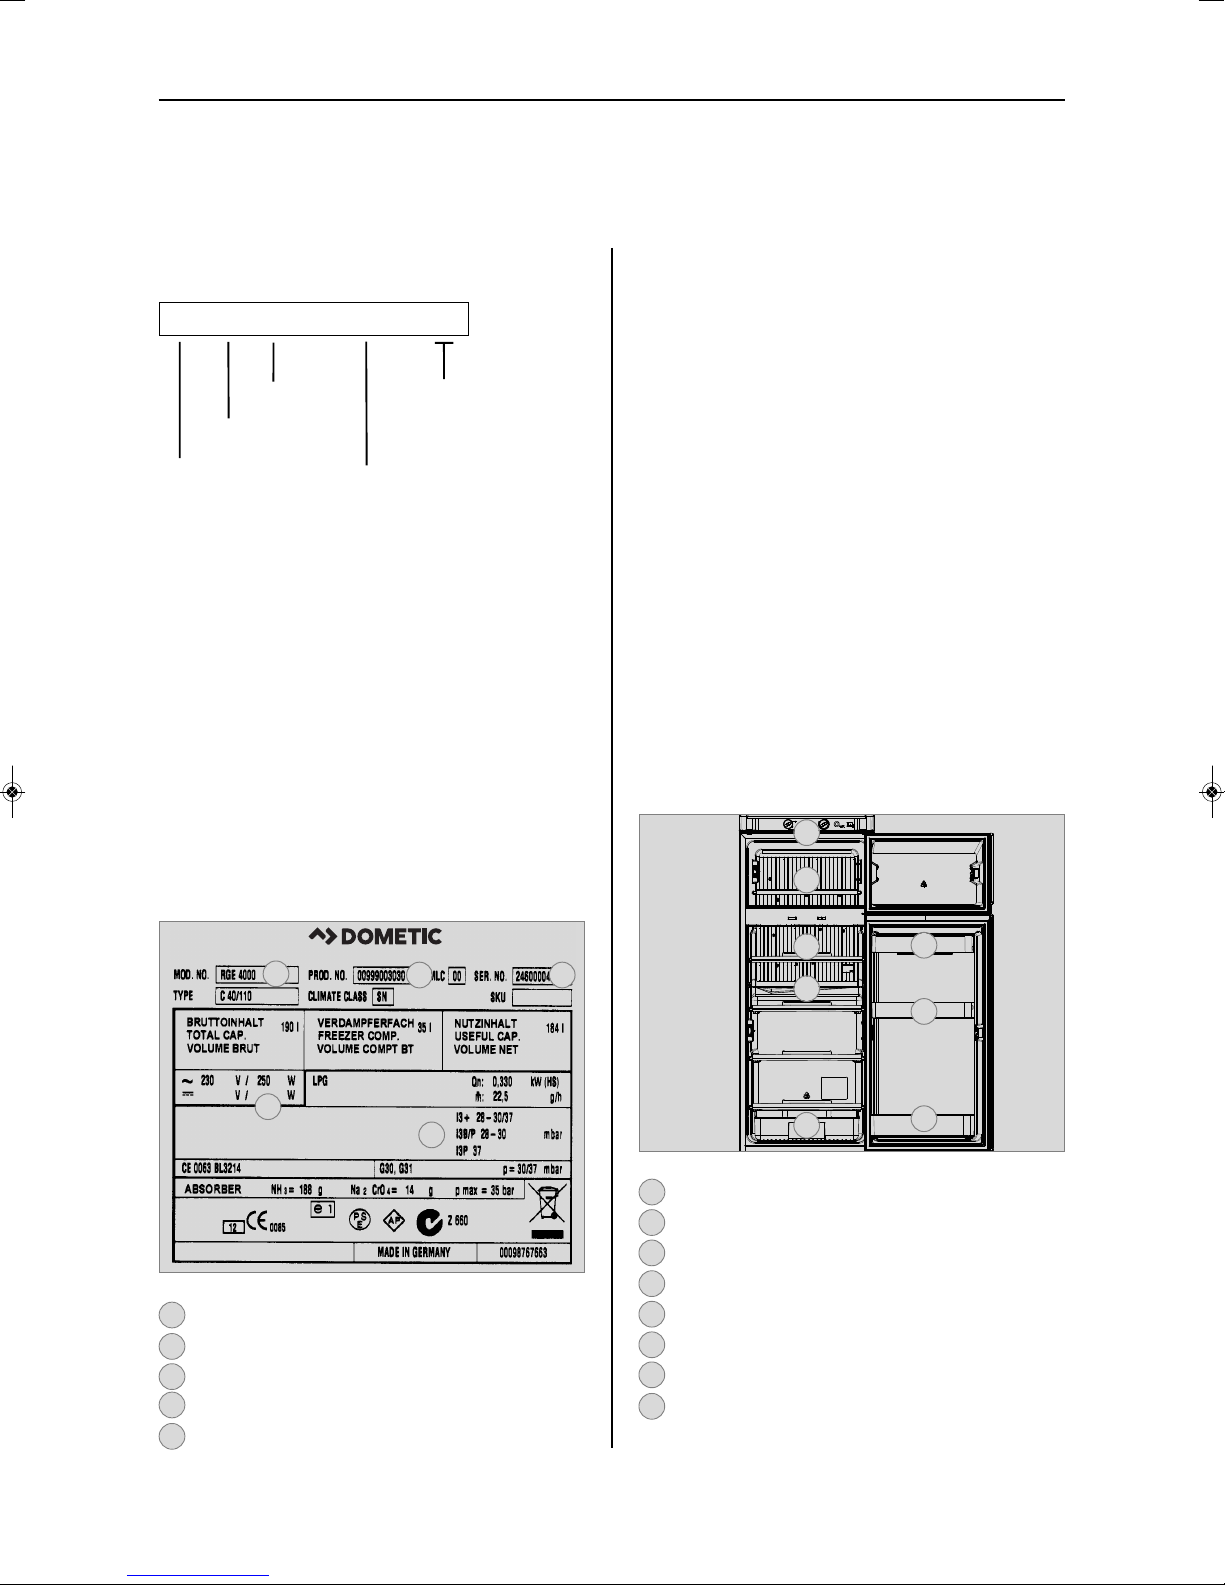
Freezer compartment
Post-evaporator for cooling compartment
Condensation water drain channel
Vegetable bin
Upper door shelf with flap
Middle door shelf
Lower door shelf with bottle holders
2
1
3
4
5
6
7
8
Fig. 2
2
8
7
6
5
3
4
1
The rating plate is to be found on the inside of
the refrigerator. It contains all important details
of the refrigerator. You can read off from this
the model identification, the product number
and the serial number. You will need these
details whenever you contact the customer
service centre or when ordering spare parts.
3.2 Refrigerator rating plate
Model number
Product number
Serial number
Electrical rating details
Gas pressure
2
1
3
4
5
Example
3.0 Description of model
3.1 Model identification
Description of model
3.3 Technical data
Subject to technical changes.
*Average consumption measured at an average ambient
temperature of 25°C in pursuance of ISO Standard.
3.4 Description of refrigerator
Refrigerator
Absorption refrigerator operated with liquid
gas and mains power
0 = manual
ignition
(Piezo-igniter)
Model range
R G E 4 0 0 0
Page 13
11
Installation
4.0 Installation
This fridge is tested and approved for usage in
closed rooms.
Mounting the fridge, please note the following
points:
4.1 Mounting and connection
n The room must have a cubic capacity of at
least 30m³, has to be well ventilated and
have a window, which can be opened or a
door, leading outside.
n The fridge has to be mounted free-stan-
ding, meaning a minimum clearance from
the (side) neighbouring walls or cabinets of
50mm (no build-in!)
n The space between the fridge and objects
(cupboards etc.) has to be at least 100mm.
n The fridge has to be mounted horizontally
and on a steady subsurface.
n The fridge must not be exposed to heat
radiation of hot objects (e.g. oven, radiator).
n The cooling unit on the backside (covered)
has to be well-ventilated continuously. Do
not cover the cooling unit (e.g. towels, curtains).
n Not sufficient ventilation will lead to loss of
cooling performance!
n The fridge must be protected from spray
water. Please respect, that the fridge is not
exposed to rain, before or during the mounting.
n The supply voltage must correspond to the
value specified on the data plate. Any difference in values may result in damage the
appliance.
n The power must be supplied via a properly
earthed socket outlet.
n It is advisable to run the incoming supply
through an automatic circuit breaker.
n The power cable must be laid in such a way
that it does not come in contact with hot
components of the unit/burner or with
sharp edges.
n Gas bottles have to stand up straight.
n Place the gas bottle well-ventilated.
n Place the gas-bottle, where it can be easily
recognized in case of a fire.
n The distance between the gas bottle and
the fridge must not exceed 1.5m.
n Only use bottle types and pressure regula-
tion device that are valid in the particular
country
4.1.1 Electrical connection
4.1.2 Placing the gas bottle
The mains plug/socket must be freely
accessible.
CAUTION!
If the connection cable is damaged it
must be replaced by the Customer
Service at Dometic, or by respectively
qualified personnel, in order to prevent
any hazards.
CAUTION!
Page 14
12
Installation
4.1.3 Gas connection
n The correct connection of the fridge has to
be carried out by a skilled specialist.
n Note the particularly valid national rules for
usage of LG-driven appliances.
- Technical Standards EN 732
n A preset pressure regulator (1), Fig. 3, has
to be installed within the supplying line to
the fridge. The fridge must not be operated
with any other pressure than the one indicated on the rating label.
n The fridge has to be connected to the gas
bottle with a security hose.
n Choose a sufficient length to connect the
hose pipe without kinks. The hose must not
be longer than 1.5 m.
n The gas connection to the appliance is
effected by means of a suitable coupling
tube fitting L8, complying with EN 1949 (e.
g. Ermeto).
n The hose has to be replaced within the
intervals settled in the particular national
rules.
n After having connected the gas bottle, a
leak test at all joints and a burner flame test
have to be carried out. Use a leak indicating
spray or a foaming agent carrying out the
leak test. After having opened the bottle
valve check the joints for bubbles.
1
Bottle valve
Fig. 4
Fig. 3
Fig. 5 Fig. 6
SG 14
SG 17
Detail
2. Adjust door handle
at the door and
screw onto it.
1. Fixing points:
use true-to-scale
template (1) (see
"Annex")
3. Attach cover and fix by pushing.
4.2 Assembling the doorgrip
1
Never use a naked flame to check the
appliance for leaks.
DANGER !
The refrigerator should only be operated using
liquid gas (propane, butane).
Do not use town gas or natural gas!
Template
1
Ø 2mm
max
1.1 Nm!
Page 15
13
5.2 Maintenance
Refrigerator operation
n The gas burner must be inspected and
cleaned as necessary at least once a year.
Keep the evidence of maintenance work
carried out on your refrigerator.
n We recommend maintenance following an
extended shutdown of the vehicle. Please
contact our customer services.
Check prior to initial operation that the voltage noted on the model label corresponds to
the mains voltage. If this is not the case, do
not connect the device and contact your
dealer!
The cooling unit is silent in operation.
When the appliance is first put into operation,
there may be a mild odour which will disappear after a few hours.
The refrigerator will take several hours to reach
its operating temperature in the cooling compartment. The freezer compartment should be
cold about one hour after switching on the
refrigerator.
The refrigerator is equipped to operate on
three power modes:
n Mains voltage (230V AC)
n Gas (liquid gas propane/butane)
Select the desired power mode by the energy
selector switch (Fig.7).
5.1 Cleaning
Before starting up the refrigerator, it is recommended that you clean it inside and repeat this
at regular intervals.
Use a soft cloth and lukewarm water with a
mild detergent. Then wipe out the appliance
with clean water and dry thoroughly.
To avoid material alterations, do not use soap
or hard, abrasive or soda-based cleaning
agents. Do not allow the door seal to come
into contact with oil or grease.
5.0 Refrigerator operation
5.3 Electrical operation
Any difference in values may result in
damage the appliance.
CAUTION!
5.4 Gas operation (liquid gas)
n The refrigerator must be operated using
liquid gas (propane, butane) (no natural gas
or town gas).
n For physical reasons, gas ignition faults
could occur starting from an altitude above
sea level of approx. 3280 ft. / 1000 m (No
malfunction!)
n On the initial refrigerator start-up or after a
cylinder change, air may be trapped in the
gas line. To purge the air from the lines,
switch on the refrigerator for a short time.
The gas ignites without delay.
n Each refrigerator with manual ignition is
equipped with an automatic flame safety
valve which interrupts the gas supply automatically after approx. 30 seconds when
the flame has extinguished.
The cooling unit becomes very hot during
operation. Protect yourself against contact with these hot parts.
CAUTION!
i
Page 16
14
Fig. 4
Fig. 10Fig. 9
Fig. 6
Fig. 7 Fig. 8
1
1
2
2 3 4
Fig. 5
1
1 2
3
4
1.
2.
3.
4.
Refrigerator operation
Explanations :
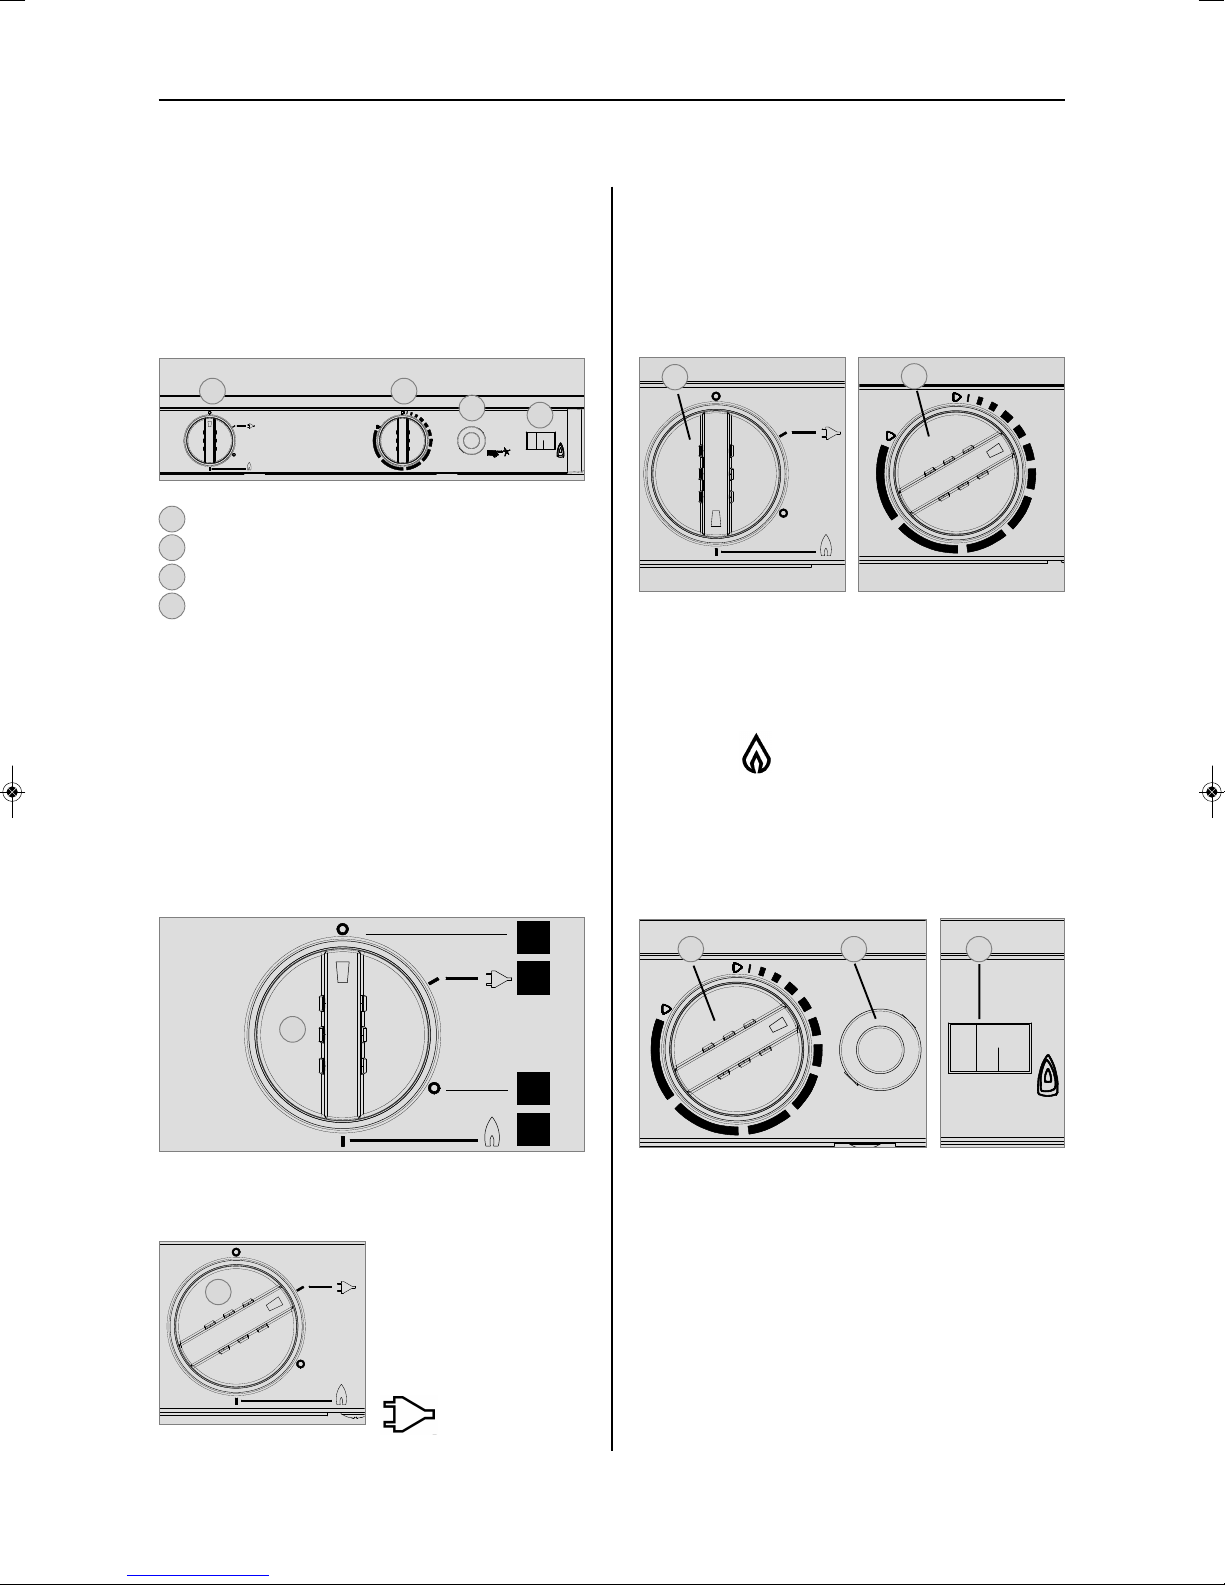
Select the desired power supply by turning the
energy selector switch (1). The energy selector
switch has four settings :
n Off (1.)
n Mains voltage (230V AC) (2.)
n Off (3.)
n Gas (liquid gas propane/butane) (4.)
5.5.1 Explanation of operating
controls
Manual energy selection /
manual ignition Piezo-igniter :
5.5 Operation
1 = Power On switch / Energy selector switch
2 = Temperature controller
3 = Piezo-igniter (gas)
4 = Flame indicator (galvanometer)
2
1
3
4
5.5.3 Gas operation (liquid gas)
Prior to starting the refrigerator in gas
mode :
n Open the gas cylinder valve.
3. Activate Piezo ignition (3) several times at
intervals 1-2 second.
4. Once the flame ignites, the pointer of galva-
nometer (4) begins moving into the green
range. Keep knob (2) depressed for
approx. 15 seconds and finally release it.
The refrigerator is operational.
5.5.2 Electrical operation
Switch on the appliance by turning the
energy selection
switch (1) clockwise
to position :
230V operation.
1. Turn the rotary selector switch (1) to
position
2. Turn the temperature selector (2) clockwise
and push. Keep the controller button
depressed.
gas operation.
Page 17
15
Refrigerator operation
5.5.4 Setting of cooling compartment
temperature
Select the desired
cooling compartment
temperature by turning
the rotary knob (2) .
The scale starts with
MIN position (small
bar = highest temperature) and climbs up
to MAX position (large
bar = lowest temperature).
Note: The temperature levels do not relate to
absolute temperature values. Please select the
medium setting (3) for ambient temperatures
between +15°C and +25°C. The unit operates
within its optimum performance range.
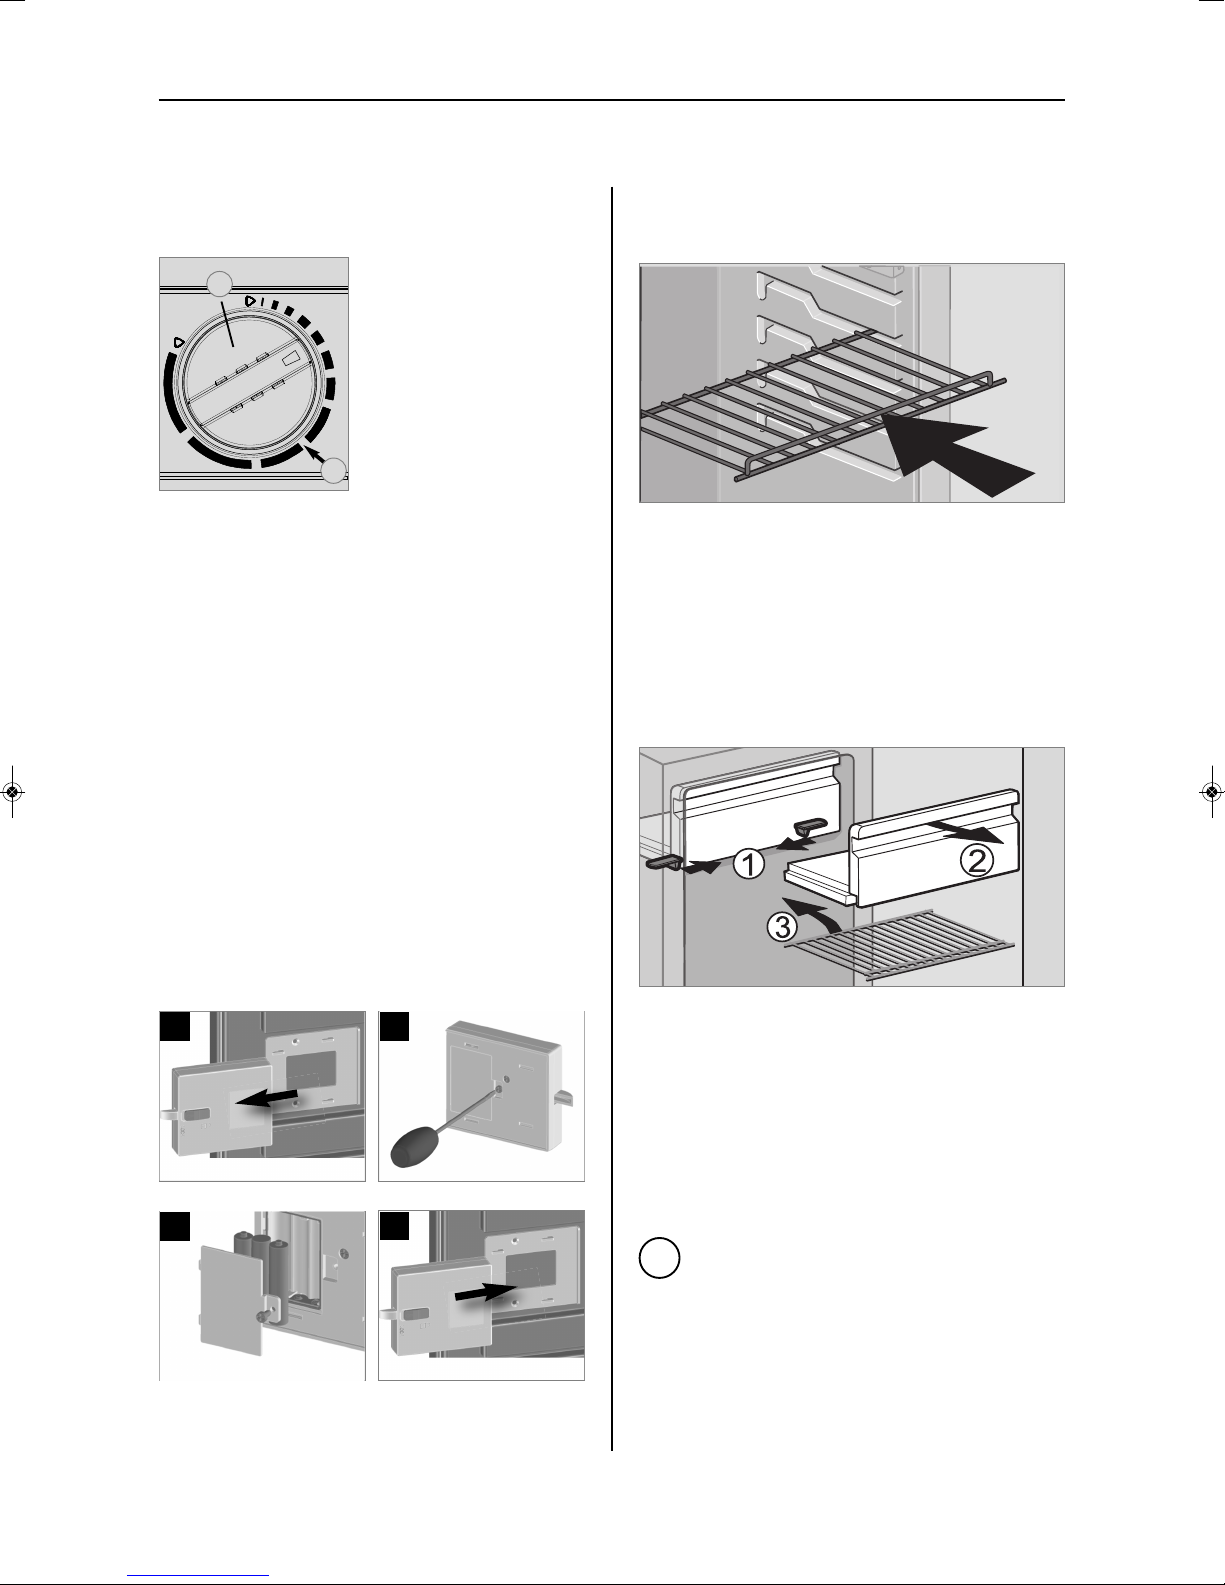
5.7 Positioning the storage
racks
The storage racks may be pulled out by
smoothly lifting them and may be positioned
as desired.
Fig. 19
Fig. 20
To enlarge the cooling compartment, just
remove the freezer compartment.
1. Unlock the freezer compartment on both
sides.
2. Pull the freezer compartment out.
Store the freezer compartment safely in order
to prevent damage
Once the freezer compartment is removed, an
additional storage rack (3.) may be installed.
The storage rack is a piece of extra equipment
and may be obtained by Dometic.
5.8 Removable freezer
compartment
The battery-operated interior lighting is controlled using a door contact. To replace the
batteries (3 x 1.5 V AAA/R3/Micro), remove the
lighting unit and open the battery compartment using a suitable screwdriver.
Fig. 14
Fig. 15
Fig. 16
Fig. 17
medium setting
2
3
1
Fig. 18
4
2
3
5.6 Interior lighting battery
replacement
i
Page 18
16
Refrigerator operation
5.9 Storing food and making ice
cubes
n Switch the refrigerator on approx. 12 hours
before filling it.
n Always store pre-cooled foods in the refri-
gerator. Make sure that the food is well
cooled when it is bought and also when
transporting it. Use insulated cooling bags.
n Open the refrigerator door only for a short
period of time when removing products.
n Products must be packed - best of all in
closed containers, wrapped in aluminium
foil or similar - and stored separately from
each other, in order to prevent drying out or
odours.
n Allow foods that have been warmed up to
cool down before storing.
n Avoid storing products in the refrigerator
that could emit volatile flammable gases.
n Do not overfill the storage grids and com-
partments to prevent obstructing the internal air circulation.
n Maintain a clearance of approx. 10 mm bet-
ween chilled products and post-evaporator ("cooling fins").
n Ensure that air circulation of the cooling unit
is not obstructed. Keep the ventilation grilles free from obstructions.
5.9.1 Storing products in the cooling
compartment
5.9.2 Storing products in the freezer
compartment
n Do not keep carbonated drinks in the free-
zer.
n The freezer compartment is suitable for
making ice cubes and for short-term storage of frozen food. It is not suitable as a
means of freezing foods.
When ambient temperatures are lower than
+10°C and the refrigerator is exposed to
these temperatures for extended periods of
time, an even regulation of freezer temperature cannot be guaranteed for systemrelated reasons. This can cause the temperature in the freezer to rise and the stored
goods to melt..
Fig. 21
5.9.3 Refrigerator compartments
Freezer compartment :
already frozen food (deep-frozen food)
Top compartment :
convenience food
Middle compartment:
Dairy products, convenience food
Bottom compartment:
Meat, fish, food for defrosting
Vegetable compartment:
Salads, vegetables, fruit
Top door shelf:
Eggs, butter
Middle door shelf:
Cans, dressings, ketchup, jam
Bottom door shelf (drinks compartment):
Drinks in bottles or bags
2
1
3
4
5
6
7
8
1
2
3
4
5
6
7
8
Page 19
17
Refrigerator operation
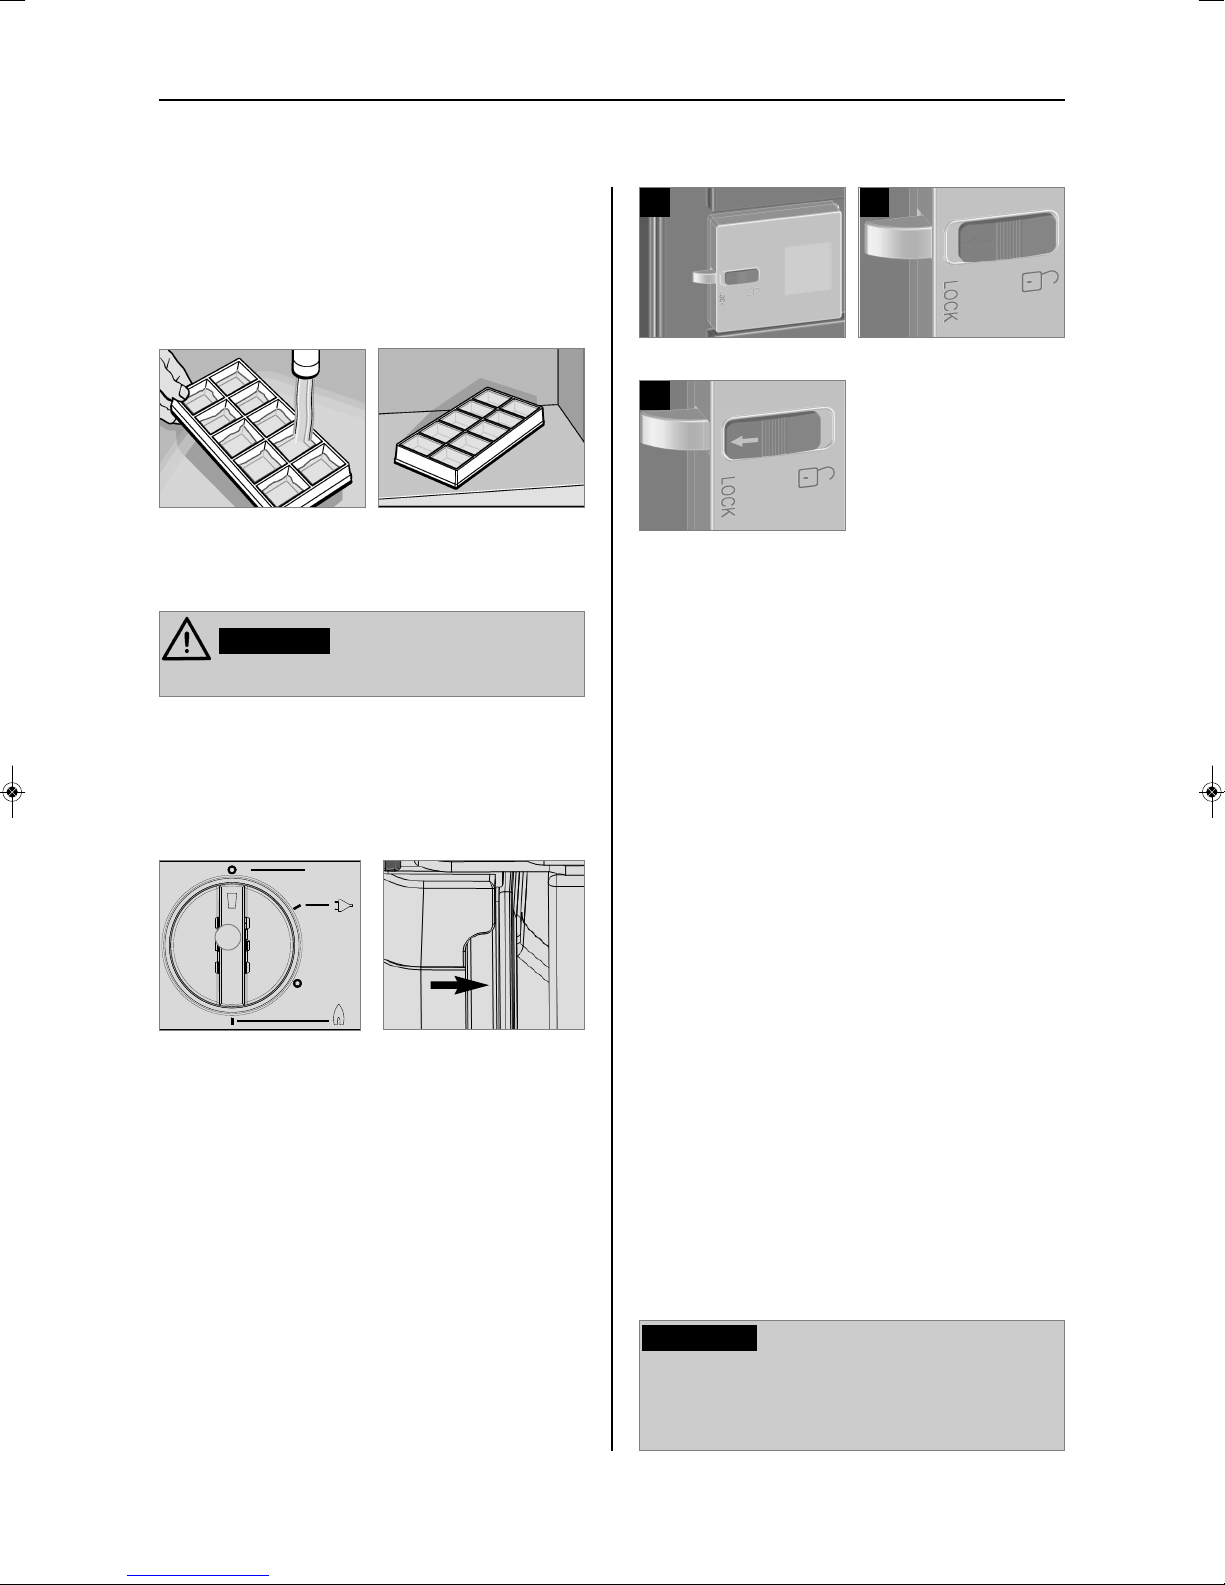
5.9.4 Making ice cubes
Ice cubes are best frozen overnight. At night,
the refrigerator has less work to do and the
unit has more reserves.
1. Fill the ice cube tray
with drinking water.
2. Place the ice cube
tray in the freezer
compartment.
Fig. 23
Fig. 22
Only use drinking water!
WARNING!
5.10 Shutting off the refrigerator
n Set energy selector switch (1) to position
"OFF". The appliance is switched off.
n If the refrigerator is to be taken out of ser-
vice for an extended period of time, close
the onboard shut-off valve and the cylinder
valve .
n Leave the door open. It shall be slightly ajar.
This is to prevent mould from forming
inside the appliance.
n Release the locking mechanism of the door
lock by pushing it and shift it to the front. If
the door is shut in this position, a small gap
is nevertheless kept open to prevent formation of mildew.
Fig. 24
Fig. 25
1
OFF
OFF
5.11 Defrosting
As time goes by, frost builds up on the fins
inside the refrigerator. A layer of frost thicker
on one side may occur and does not represent
a malfunction. When this layer of frost is about
0.118 inches (3 mm) thick, the refrigerator
should be defrosted.
n Switch off the refrigerator, as described in
section
5.10 Shutting of the refrigerator
.
n Remove all food and the ice cube tray.
n Leave the rfrigerator door open to allow air
to enter and to prevent formation of mildew.
n After defrosting (freezer compartment and
fins free of frost), wipe both cooling compartments dry with a cloth.
Note: Water thawing in the main compartment
of the refrigerator runs into an appropriate
container at the back of the refrigerator. From
there, the water evaporates.
The layer of ice must never be removed
forcibly, nor may defrosting be accelerated using a heat source!
CAUTION!
Fig. 26
Fig. 27
1
2
Fig. 28
2
normal position
out of operation
Page 20
18
Refrigerator operation
Fig. 32
Fig. 33
Fig. 30
5.12 Changing the doorhang
1
3
Fig. 31
2
4
n Open the door, unscrew the hinge screw
and keep it to hand.
n Take off the door by moving it in your direc-
tion.
n Loosen hinge pin and screw it in at opposi-
te side.
n Transfer distance washer on lower hinge.
n Shove door into upper hinge pin and put it
on lower hinge.
n Screw in hinge screw.
n Check that the door moves freely and the
gasket seals completely when the door is
closed.
If it is necessary to tilt or lay the fridge onto the
side, wait for one hour, before taking the fridge into operation. The cooling agent runs back
into the reservoir of the cooling unit. Thus a
correct operating of the fridge is guaranteed.
Fig. 29
2
3
1
4
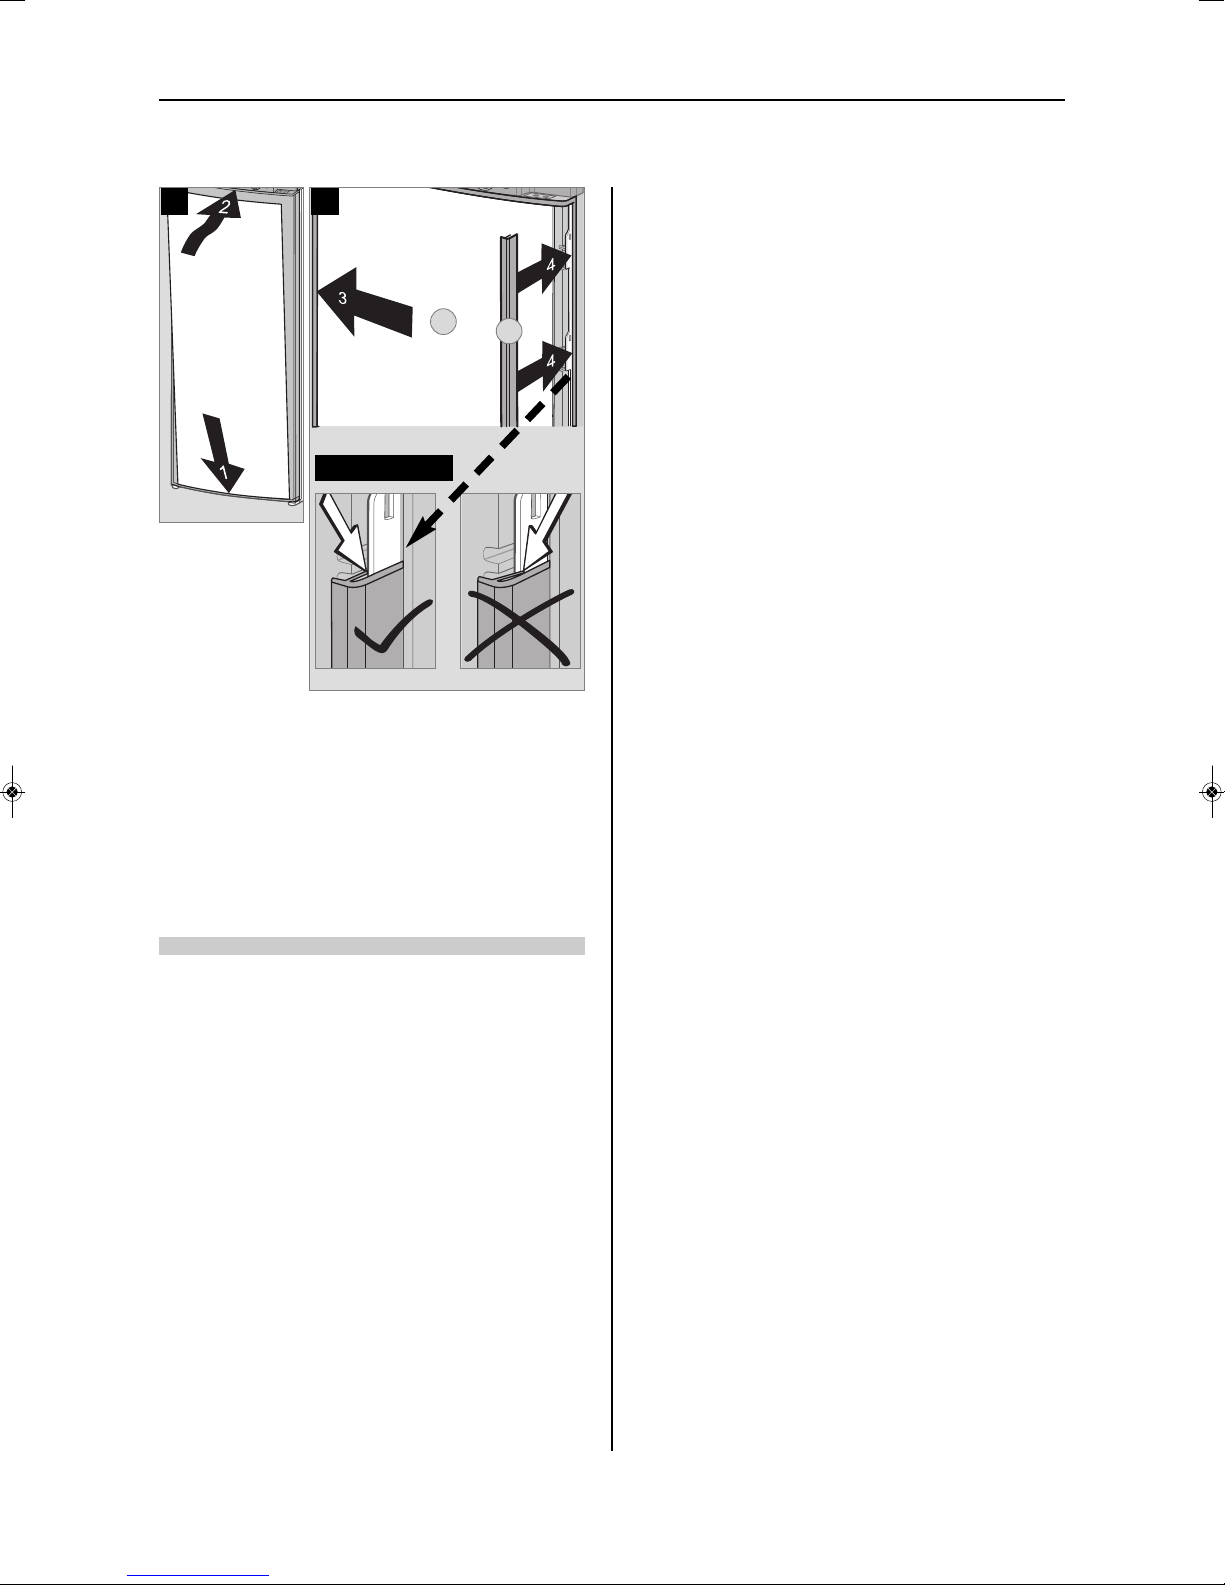
5.13 Changing the decor panel
Decor panel with frame
n Remove door grip first (if assembled)
n Remove the lateral ledge (1) the door
(ledge is attached, not screwed).
n Shift decor panel (2) away from the door
and insert the new decor panel. Re-attach
ledge (1) .
Fig. 34
2
1
1
i
Page 21
19
Refrigerator operation
Fig. 36
Fig. 35
2
1
2
3
CAUTION!
Decor panel dimensions :
1169,5 +0/-1 mm 507,5 +0/-1 mm max. 1.5 +0/-1 mm
Height Width Thickness
RGE 3000
Page 22
20
Refrigerator operation
5.14 Trouble-shooting
Failure: The refrigerator does not cool sufficiently.
- Inadequate ventilation to the unit.
- Thermostat setting is too low.
- The condenser is heavily frosted.
- Too much warm food has been stored inside
within short period of time.
- The appliance has been running for only a short
period of time.
- Ambient temperatures too high.
- Check that the ventilation grille of the cooling
unit is not covered.
- Set thermostat to a higher level.
- Check that the refrigerator door closes properly.
- Allow warm food to cool down before storage.
- Check whether the cooling compartment works
after approx. 4 - 5 hours.
- Ventilate room.
Possible cause
Action you can take
Failure: The refrigerator does not cool in gas operation mode.
- Gas cylinder empty.
- Is the upstream shut-off device open ?
- Air in the gas pipe ?
- Change gas cylinder.
- Open shut-off device.
- Switch off the appliance and start again. Repeat
this procedure 3 - 4 times, if necessary
Possible cause
Action you can take
Failure: The refrigerator does not cool in 230V operation.
- On-board fuse defective.
- No connection to mains supply voltage.
- Heating element defective.
- Fit new fuse.
- Make a connection to a mains power supply.
- Please inform the Dometic Customer Service.
Possible cause
Action you can take
Before notifying the authorised Service Center,
please check whether:
n the instructions in section "Operating the
refrigerator" have been observed.
n the refrigerator stands level.
n it is possible to operate the refrigerator with
any available power source.
Page 23
1
Modellnummer .............................................
Produktnummer .............................................
Seriennummer ..............................................
Notieren Sie hier :
MBA 11/2012
N 1
RGE 3000
Bedienungsanleitung
Absorber-Kühlschrank
DE
Deutsch
Page 24

2
1.0 Allgemeines . . . . . . . . . . . . . . . . . . . . . . . . . . . . . . . . . . . . . . . . . . . 4
1.1 Einleitung . . . . . . . . . . . . . . . . . . . . . . . . . . . . . . . . . . . . . . . . . . . . . . . . . . . . . . . . . . . . . . . . . . 4
1.2 Hinweise zu dieser Bedienungsanleitung . . . . . . . . . . . . . . . . . . . . . . . . . . . . . . . . . . . . . . . . . 4
1.3 Urheberschutz . . . . . . . . . . . . . . . . . . . . . . . . . . . . . . . . . . . . . . . . . . . . . . . . . . . . . . . . . . . . . . 4
1.4 Erklärung der verwendeten Symbole . . . . . . . . . . . . . . . . . . . . . . . . . . . . . . . . . . . . . . . . . . . . . 4
1.5 Gewährleistung . . . . . . . . . . . . . . . . . . . . . . . . . . . . . . . . . . . . . . . . . . . . . . . . . . . . . . . . . . . . . 5
1.6 Haftungsbeschränkung . . . . . . . . . . . . . . . . . . . . . . . . . . . . . . . . . . . . . . . . . . . . . . . . . . . . . . . 5
1.7 Kundendienst . . . . . . . . . . . . . . . . . . . . . . . . . . . . . . . . . . . . . . . . . . . . . . . . . . . . . . . . . . . . . . . 5
1.8 Ersatzteile . . . . . . . . . . . . . . . . . . . . . . . . . . . . . . . . . . . . . . . . . . . . . . . . . . . . . . . . . . . . . . . . . . 5
1.9 Umwelthinweise . . . . . . . . . . . . . . . . . . . . . . . . . . . . . . . . . . . . . . . . . . . . . . . . . . . . . . . . . . . . . 6
1.9.1 Entsorgung . . . . . . . . . . . . . . . . . . . . . . . . . . . . . . . . . . . . . . . . . . . . . . . . . . . . . . . . . . . . . . . . . . . . . . . . . 6
1.9.2 Energiesparhinweise . . . . . . . . . . . . . . . . . . . . . . . . . . . . . . . . . . . . . . . . . . . . . . . . . . . . . . . . . . . . . . . . . . 6
1.10 Konformitätserklärung . . . . . . . . . . . . . . . . . . . . . . . . . . . . . . . . . . . . . . . . . . . . . . . . . . . . . . . . 6
2.0 Sicherheitshinweise . . . . . . . . . . . . . . . . . . . . . . . . . . . . . . . . . . . . . 7
2.1 Bestimmungsgemäße Verwendung . . . . . . . . . . . . . . . . . . . . . . . . . . . . . . . . . . . . . . . . . . . . . . 7
2.2 Verantwortung des Nutzers . . . . . . . . . . . . . . . . . . . . . . . . . . . . . . . . . . . . . . . . . . . . . . . . . . . . 7
2.3 Kinder schützen bei Entsorgung des Gerätes . . . . . . . . . . . . . . . . . . . . . . . . . . . . . . . . . . . . . . 7
2.4 Arbeiten und Überprüfungen am Kühlschrank . . . . . . . . . . . . . . . . . . . . . . . . . . . . . . . . . . . . . 7
2.5 Kältemittelinformation . . . . . . . . . . . . . . . . . . . . . . . . . . . . . . . . . . . . . . . . . . . . . . . . . . . . . . . . 8
2.6 Betreiben des Kühlschrankes mit Gas . . . . . . . . . . . . . . . . . . . . . . . . . . . . . . . . . . . . . . . . . . . . 8
2.7 Betrieb mit Strom . . . . . . . . . . . . . . . . . . . . . . . . . . . . . . . . . . . . . . . . . . . . . . . . . . . . . . . . . . . . 8
2.8 Sicherheitshinweise zum Einlagern von Lebensmitteln . . . . . . . . . . . . . . . . . . . . . . . . . . . . . . . 9
2.9 Batterietausch . . . . . . . . . . . . . . . . . . . . . . . . . . . . . . . . . . . . . . . . . . . . . . . . . . . . . . . . . . . . . . 9
3.0 Modellbeschreibung . . . . . . . . . . . . . . . . . . . . . . . . . . . . . . . . . . . . 10
3.1 Modellbezeichnung . . . . . . . . . . . . . . . . . . . . . . . . . . . . . . . . . . . . . . . . . . . . . . . . . . . . . . . . . . 10
3.2 Typenschild des Kühlschranks . . . . . . . . . . . . . . . . . . . . . . . . . . . . . . . . . . . . . . . . . . . . . . . . . . 10
3.3 Technische Daten . . . . . . . . . . . . . . . . . . . . . . . . . . . . . . . . . . . . . . . . . . . . . . . . . . . . . . . . . . . . 10
3.4 Erklärung des Kühlschranks . . . . . . . . . . . . . . . . . . . . . . . . . . . . . . . . . . . . . . . . . . . . . . . . . . . 10
4.0 Installation . . . . . . . . . . . . . . . . . . . . . . . . . . . . . . . . . . . . . . . . . . . . 11
4.1 Aufstellen und Anschließen . . . . . . . . . . . . . . . . . . . . . . . . . . . . . . . . . . . . . . . . . . . . . . . . . . . . 11
4.1.1 Elektrischer Anschluss . . . . . . . . . . . . . . . . . . . . . . . . . . . . . . . . . . . . . . . . . . . . . . . . . . . . . . . . . . . . . . . . 11
4.1.2 Gasflaschenaufstellung . . . . . . . . . . . . . . . . . . . . . . . . . . . . . . . . . . . . . . . . . . . . . . . . . . . . . . . . . . . . . . . . 11
4.1.3 Gasanschluss . . . . . . . . . . . . . . . . . . . . . . . . . . . . . . . . . . . . . . . . . . . . . . . . . . . . . . . . . . . . . . . . . . . . . . . 12
4.2 Anbringen des Türgriffs . . . . . . . . . . . . . . . . . . . . . . . . . . . . . . . . . . . . . . . . . . . . . . . . . . . . . . . 12
5.0 Betrieb des Kühlschranks . . . . . . . . . . . . . . . . . . . . . . . . . . . . . . . . 13
5.1 Reinigung . . . . . . . . . . . . . . . . . . . . . . . . . . . . . . . . . . . . . . . . . . . . . . . . . . . . . . . . . . . . . . . . . . 13
5.2 Wartung . . . . . . . . . . . . . . . . . . . . . . . . . . . . . . . . . . . . . . . . . . . . . . . . . . . . . . . . . . . . . . . . . . . 13
5.3 Betrieb mit Strom . . . . . . . . . . . . . . . . . . . . . . . . . . . . . . . . . . . . . . . . . . . . . . . . . . . . . . . . . . . . 13
5.4 Betrieb mit Gas . . . . . . . . . . . . . . . . . . . . . . . . . . . . . . . . . . . . . . . . . . . . . . . . . . . . . . . . . . . . . 13
5.5 Bedienung . . . . . . . . . . . . . . . . . . . . . . . . . . . . . . . . . . . . . . . . . . . . . . . . . . . . . . . . . . . . . . . . . 14
5.5.1 Erklärung der Bedienungselemente . . . . . . . . . . . . . . . . . . . . . . . . . . . . . . . . . . . . . . . . . . . . . . . . . . . . . . 14
5.5.2 Betrieb mit Strom . . . . . . . . . . . . . . . . . . . . . . . . . . . . . . . . . . . . . . . . . . . . . . . . . . . . . . . . . . . . . . . . . . . . 14
5.5.3 Betrieb mit Gas (Flüssiggas) . . . . . . . . . . . . . . . . . . . . . . . . . . . . . . . . . . . . . . . . . . . . . . . . . . . . . . . . . . . . 14
5.5.4 Regeln der Kühlraumtemperatur . . . . . . . . . . . . . . . . . . . . . . . . . . . . . . . . . . . . . . . . . . . . . . . . . . . . . . . . 15
5.6 Batterietausch an der Innenbeleuchtung . . . . . . . . . . . . . . . . . . . . . . . . . . . . . . . . . . . . . . . . . . 15
5.7 Ablageroste positionieren . . . . . . . . . . . . . . . . . . . . . . . . . . . . . . . . . . . . . . . . . . . . . . . . . . . . . . 15
5.8 Herausnehmbares Frosterfach . . . . . . . . . . . . . . . . . . . . . . . . . . . . . . . . . . . . . . . . . . . . . . . . . . 15
Inhaltsverzeichnis
Page 25

3
5.9 Einlagern von Lebensmitteln und Eiswürfelbereitung . . . . . . . . . . . . . . . . . . . . . . . . . . . . . . . . 16
5.9.1 Einlagern von Waren in den Kühlraum . . . . . . . . . . . . . . . . . . . . . . . . . . . . . . . . . . . . . . . . . . . . . . . . . . . . 16
5.9.2 Einlagern von Waren in das Frosterfach . . . . . . . . . . . . . . . . . . . . . . . . . . . . . . . . . . . . . . . . . . . . . . . . . . . 16
5.9.3 Kühlschrankfächer . . . . . . . . . . . . . . . . . . . . . . . . . . . . . . . . . . . . . . . . . . . . . . . . . . . . . . . . . . . . . . . . . . . 16
5.9.4 Eiswürfelbereitung . . . . . . . . . . . . . . . . . . . . . . . . . . . . . . . . . . . . . . . . . . . . . . . . . . . . . . . . . . . . . . . . . . . 17
5.10 Außerbetriebnahme . . . . . . . . . . . . . . . . . . . . . . . . . . . . . . . . . . . . . . . . . . . . . . . . . . . . . . . . . . 17
5.11 Abtauen . . . . . . . . . . . . . . . . . . . . . . . . . . . . . . . . . . . . . . . . . . . . . . . . . . . . . . . . . . . . . . . . . . . 17
5.12 Wechsel des Türanschlags . . . . . . . . . . . . . . . . . . . . . . . . . . . . . . . . . . . . . . . . . . . . . . . . . . . . 18
5.13 Wechsel der Dekorplatte . . . . . . . . . . . . . . . . . . . . . . . . . . . . . . . . . . . . . . . . . . . . . . . . . . . . . . 18
5.14 Verhalten bei Störungen . . . . . . . . . . . . . . . . . . . . . . . . . . . . . . . . . . . . . . . . . . . . . . . . . . . . . . . 20
5.15 Schablone (Anhang)
© Dometic GmbH - 2012 - Änderungen vorbehalten
Dometic GmbH
In der Steinwiese 16
D-57074 Siegen
www.dometic.com
Page 26

4
Allgemeines
1.0 Allgemeines
Mit diesem Absorber-Kühlschrank von
Dometic haben Sie eine gute Wahl getroffen.
Wir sind davon überzeugt, dass Sie Ihr neuer
Kühlschrank in jeder Hinsicht zufrieden stellen
wird. Der geräuschlos arbeitende Kühlschrank
entspricht hohen Qualitätsanforderungen und
gewährleistet einen effizienten Umgang mit
Ressourcen und Energien im gesamten
Lebenslauf - bei Herstellung, Nutzung und
Entsorgung.
1.1 Einleitung
Die Angaben, Texte und Abbildungen in dieser
Anleitung sind urheberrechtlich geschützt und
unterliegen den gewerblichen Schutzrechten.
Kein Teil dieser Anleitung darf ohne die schriftliche Genehmigung der Dometic GmbH,
Siegen, reproduziert, kopiert oder sonstwie
verwendet werden.
1.3 Urheberschutz
Bevor Sie den Kühlschrank in Betrieb setzen, lesen Sie diese Bedienungsanleitung
bitte sorgfältig durch.
Diese Anleitung gibt Ihnen die nötigen
Hinweise für den richtigen Gebrauch Ihres
Kühlschrankes. Beachten Sie besonders die
Sicherheitshinweise. Die Einhaltung der
Hinweise und Handlungsanweisungen ist
wichtig für den sicheren Umgang mit Ihrem
Kühlschrank und schützt Sie und den
Kühlschrank vor Schäden. Das Gelesene
muss verstanden worden sein, bevor Sie eine
Maßnahme durchführen.
Bewahren Sie diese Bedienungsanleitung
sorgfältig in der Nähe des Kühlschrankes
auf, sodass sie jederzeit verwendet werden
kann.
1.2 Hinweise zu dieser
Bedienungsanleitung
1.4 Erklärung der verwendeten
Symbole
Warnhinweise sind durch Symbole gekennzeichnet. Ein ergänzender Text erläutert Ihnen
den Grad der Gefährdung.
Beachten Sie diese Warnhinweise sehr
genau. Damit schützen Sie sich, andere
Personen und das Gerät vor Schäden.
GEFAHR kennzeichnet eine unmittelbare
Gefahrensituation, die zum Tod oder einer ernsten Verletzung führen kann, wenn die angegebenen Anweisungen nicht befolgt werden.
GEFAHR!
WARNUNG kennzeichnet eine mögliche
Gefahrensituation, die zum Tod oder einer ernsten Verletzung führen kann, wenn die angegebenen Anweisungen nicht befolgt werden.
WARNUNG!
VORSICHT kennzeichnet eine mögliche
Gefahrensituation, die zu leichten oder mittleren Verletzungen führen kann, wenn die angegebenen Anweisungen nicht befolgt werden.
VORSICHT!
VORSICHT ohne Warnsymbol kennzeichnet
eine mögliche Gefahrensituation, die zu
Beschädigungen des Gerätes führen kann,
wenn die angegebenen Anweisungen nicht
befolgt werden.
VORSICHT!
Warnhinweise
Page 27

5
Allgemeines
Information
INFORMATION gibt Ihnen ergänzende und
nützliche Hinweise zum Umgang mit Ihrem
Kühlschrank.
Umwelthinweis
UMWELTHINWEIS gibt Ihnen nützliche
Hinweise zur Energieeinsparung und
Entsorgung des Gerätes.
Gewährleistungsabwicklungen erfolgen nach
der europäischen Richtlinie 44/1999/EC und
den landesüblichen Bedingungen. Im
Gewährleistungs- oder Servicefall wenden Sie
sich bitte an unseren Kundendienst.
Störungen, die auf fehlerhafte Bedienung
zurückzuführen sind, unterliegen nicht der
Gewährleistung. Jede Veränderung am Gerät
oder die Verwendung von Ersatzteilen, die
keine Original - Dometic - Ersatzteile sind,
sowie das Nichteinhalten der Installationsund Bedienungsanleitung führt zum Erlöschen
der Gewährleistung und zum Ausschluss von
Haftungsansprüchen.
1.5 Gewährleistung
Alle Angaben und Hinweise in dieser
Bedienungsanleitung wurden unter
Berücksichtigung geltender Normen und
Vorschriften sowie dem Stand der Technik
erstellt. Dometic behält sich vor, jederzeit
Änderungen am Produkt vorzunehmen, die im
Interesse der Verbesserung des Produktes
und der Sicherheit angebracht sind.
1.6 Haftungsbeschränkung
Autorisierte Kundendienststellen erfahren Sie
über die Rufnummern aus dem Euro Service
Network - Heft, das jedem Kühlschrank beiliegt.
Auch im Internet erfahren Sie Ihren nächstgelegen Kundendienstpartner auf www.dome-
tic.com. Geben Sie bei Kontakten mit dem
Kundendienst bitte immer das Modell,
Produktnummer, Seriennummer und ggf. den
MLC - Code an! Diese Informationen finden
Sie auf dem Typenschild im Innenraum des
Kühlschrankes. Wir empfehlen Ihnen, diese
Daten im dafür vorbereiteten Feld auf der
Titelseite dieser Anleitung einzutragen.
1.7 Kundendienst
Dometic übernimmt keine Haftung für
Schäden bei :
n Nichtbeachtung der Bedienungsanleitung
n nicht bestimmungsgemäßer Verwendung
n Verwendung von nicht originalen Ersatz-
teilen
n Veränderungen und Eingriffen am Gerät
n Einwirkung von Umgebungseinflüssen, wie
- Temperaturänderungen
- Luftfeuchtigkeit
1.8 Ersatzteile
Ersatzteile können von unseren Kundendienststellen bezogen werden. In Deutschland erhalten Sie Ersatzteile auch über das Dometic Call
Center:
n Telefon 0180 53 66 384
n Fax 0180 53 66 385
n Email ersatzteile@dometic.de
Bei Kontakten mit dem Call Center geben Sie
bitte immer das Modell und die
Produktnummer an! Diese Informationen finden Sie auf dem Typenschild im Innenraum
des Kühlschranks.
i
Page 28
6
Allgemeines
1.10 Konformitätserklärung
n Bei einer durchschnittlichen Umgebungs-
temperatur von 25°C ist es ausreichend,
den Kühlschrank bei mittlerer Thermostatstellung zu betreiben.
n Wenn möglich, immer vorgekühlte Waren
einlagern.
n Den Kühlschrank nicht der direkten Son-
nenbestrahlung oder einer anderen
Wärmequelle (z.B. Heizung) aussetzen.
n Eine ungehinderte Luftzirkulation des
Kühlschrankaggregates muss gewährleistet sein.
1.9.2 Energiesparhinweise
Im Kühlaggregat wird als Kältemittel
Ammoniak (natürliche Verbindung aus
Wasserstoff und Stickstoff) verwendet. Als
Treibmittel für die Isolierung aus PU-Schaum
kommt das ozonunschädliche Cyclopentan
zum Einsatz.
Um die stoffliche Verwertung der recyclingfähigen Verpackungsmaterialien sicherzustellen,
sind diese den ortsüblichen Sammelsystemen
zuzuführen. Das Gerät ist einem entsprechenden Entsorgungsunternehmen zu überlassen,
das eine Verwertung der recyclingfähigen
Anteile und die ordnungsgemäße Entsorgung
des Restes gewährleistet. Zur umweltfreundlichen Entleerung des Kühlmediums aus allen
Absorber-Kühlschrankaggregaten ist eine
geeignete Entsorgungsanlage einzusetzen.
Geräte, die mit diesem Symbol
gekennzeichnet sind, müssen an
dem örtlichen Sammelpunkt für
die Entsorgung von elektrischen
und elektronischen Geräten abge-
geben werden. Dieses Produkt
darf nicht über den normalen Haushaltsabfall
entsorgt werden. Diese Kühlschränke von
Dometic enthalten das Symbol auf dem
Typenschild im Inneren des Gerätes
.
1.9 Umwelthinweise
1.9.1 Entsorgung
n Ordnen Sie die Ablageroste gleichmäßig im
Kühlraum an, um die effizienteste Energieausnutzung zu erzielen.
n Ablageroste und Fächer nicht überfüllen,
um die interne Luftzirkulation nicht zu
behindern.
n Abstand zwischen Kühlgut und Nachver-
dampfer ("Kühlrippen") lassen (ca. 10 mm).
n Regelmäßiges Abtauen spart Energie
(s."Abtauen").
n Bei Warenentnahme die Kühlschranktür nur
kurzzeitig öffnen.
n Den Kühlschrank ca. 12 Stunden vor der
Bestückung in Betrieb setzen.
- Low Voltage Directive 73/23/EEC and the
Amendment to LVD 2006/95EC
- EMC Directive 2004/108/EC
- RoHS Directive 2002/95EC
Richtlinien / Directives
Typfamilie / Type family : C 40/110
- EN 60335-1;(IEC 60335-1; 4ed., Am.1, Am. 2)
- EN 60335-2-24;03 (IEC 60335-2-24;6 ed.,
Am.1, Am. 2)
- EN 60335-2-102;06
- EN 61000-3-2;00, A1, A2, A14
- EN 61000-3-3;95,A1
- EN 50366;2003+A1
- EN 55014-1;07,A1,A2
- EN 55014-2;01,A1
Normen / Standards
Die aktuelle Konformitätserklärung können Sie
auch bei Dometic GmbH, Siegen, direkt anfragen.
i
Page 29

7
2.0 Sicherheitshinweise
Der Kühlschrank ist nicht für die fachgerechte Lagerung von Medikamenten vorgesehen. Beachten Sie dazu die Hinweise
in der Packungsbeilage des Medikamentes.
WARNUNG!
Dieser Kühlschrank ist für das freie Aufstellen
in geschlossenen Räumen, wie Freizeit- oder
Jagdhütten, vorgesehen. Das Gerät ist für
diese Anwendung in Konformität mit der EUGasrichtlinie 2009/142/EG baumustergeprüft.
Es eignet sich nicht zum Einbau in Straßen
- und Wasserfahrzeugen.
Benutzen Sie den Kühlschrank ausschließlich
zum Kühlen und Lagern von Lebensmitteln.
2.1 Bestimmungsgemäße
Verwendung
2.4 Arbeiten und Überprüfungen
am Kühlschrank
2.3 Kinder schützen nach
Entsorgung des Gerätes
Demontieren Sie alle Kühlschranktüren
bei Entsorgung des Kühlschrankes und
belassen Sie die Ablageroste im Kühlgerät . Ein versehentliches Einschließen
und Ersticken wird verhindert.
WARNUNG!
Arbeiten an den Gas-, Abgas- und
Elektroeinrichtungen dürfen nur von autorisierten Fachkräften ausgeführt werden.
Durch nicht fachgerechte Maßnahmen
können erhebliche Sach- und/oder
Personenschäden entstehen.
WARNUNG!
Überprüfen Sie niemals gasführende Teile
und Leitungen mit einer offenen Flamme
auf Undichtigkeit !
Es besteht Brand- oder Explosionsgefahr.
GEFAHR!
Öffnen Sie niemals das Absorberkühlaggregat ! Es steht unter hohem Druck.
Es besteht Verletzungsgefahr!
WARNUNG!
Personen, die den Kühlschrank bedienen,
müssen mit dem sicheren Umgang vertraut
sein und die Hinweise dieser Bedienungsanleitung kennen.
Dieses Gerät kann von Kindern ab 8 Jahren
und von Personen mit reduzierten physischen,
sensorischen oder mentalen Fähigkeiten oder
Mangel an Erfahrung und/oder Wissen benutzt
werden, wenn sie überwacht oder unterwiesen
werden bezüglich des sicheren Gebrauchs
des Gerätes und die daraus resultierenden
Gefahren verstanden haben. Kinder dürfen
nicht mit dem Gerät spielen. Reinigung und
Benutzerwartung dürfen nicht durch Kinder
durchgeführt werden. [EN 60335-2-24, 7.12]
2.2 Verantwortung des Nutzers
Sicherheitshinweise
Der Kühlschrank darf nicht dem Regen
ausgesetzt werden.
VORSICHT!
Page 30
8
2.5 Kältemittelinformation
Als Kältemittel wird Ammoniak verwendet.
Dies ist eine natürliche Verbindung, die auch in
Haushaltsreinigern enthalten ist (1 Liter
Salmiakreiniger enthält bis zu 200 g
Ammoniak, mehr als doppelt soviel, wie im
Kühlgerät enthalten ist). Natriumchromat wird
als Korrosionsschutzmittel eingesetzt (1,8
Gewichtsprozent des Lösungsmittels).
So verhalten Sie sich bei einer eventuell auftretenden Leckage (leicht erkennbar wegen
des starken Geruchs) :
n Schalten Sie das Gerät ab.
n Durchlüften Sie den Raum gut .
n Informieren Sie den autorisierten Kunden-
dienst.
Zu Ihrer Sicherheit wurde gutachterlich
festgestellt, dass keine Beeinträchtigung
der Gesundheit bei Austritt des Kältemittels
besteht.
Vergleichen Sie die Angabe des Betriebsdrukkes auf dem Typenschild mit den Daten des
Druckminderers an der Flüssiggasflasche.
2.6 Betreiben des Kühlschranks
mit Gas
Sicherheitshinweise
Wenn Sie Gasgeruch wahrnehmen :
n Öffnen Sie alle Fenster und verlassen Sie
den Raum.
n Betätigen Sie keine elektrische Einrichtung
und vermeiden Sie die Benutzung offener
Flammen.
n Schließen Sie das Gasflaschenventil und
lassen Sie es geschlossen, bis der Fehler
behoben wurde.
n Ziehen Sie autorisiertes Fachpersonal* zu
Rate.
* autorisiertes Fachpersonal
Autorisierte Fachleute sind anerkannte Sachkundige,
die aufgrund ihrer Ausbildung und Kenntnisse die
Gewähr dafür bieten, dass die Prüfung ordnungsgemäß durchgeführt wird.
Anschlussdruck und Gaskategorien
Der Kühlschränk wird mit den nachfolgend
angegebenen Gasen und Einlassdrücken
betrieben. Die zwischen Gasflasche und
Kühlschrank einzusetzenden Druckminderer
müssen den in der nachfolgenden Tabelle
angegebenen Kategorien entsprechen.
Kategorie Druck in mbar GAS
I3B / P(30) 30 Butan
30 Propan
I3+ (28-30/37) 28-30 Butan
37 Propan
I3B/P(50) 50 Butan
I3B/P(50) 50 Propan
Der Betriebsdruck muss unbedingt der
Angabe auf dem Typenschild des
Kühlschranks entsprechen.
VORSICHT!
2.7 Betrieb mit Strom
Wählen Sie diese Betriebsart nur , wenn
die Spannungsversorgung des Stromanschlusses mit dem auf dem Typenschild
angegebenen Wert übereinstimmt. Bei
abweichenden Werten kann das Gerät
beschädigt werden.
VORSICHT!
i
Page 31

9
2.8 Sicherheitshinweise zum
Einlagern von Lebensmitteln
Sicherheitshinweise
Dometic Kühlschränke arbeiten nach dem
Absorptionsprinzip. Physikalisch bedingt reagiert ein Absorbersystem träge auf Änderungen des Thermostatreglers, Kälteverlust beim
Öffnen der Tür oder Einlagerung von Waren.
Die Geräte erfüllen die Leistungsanforderungen der Klimaklasse SN nach EN/ISO
15502 im Temperaturbereich von +10°C bis
+32°C Umgebungstemperatur.
Schützen Sie Ihre Umwelt!
Batterien gehören nicht in den Hausmüll.
Geben Sie bitte Ihre verbrauchten Batterien
beim Händler oder bei einer Sammelstelle ab .
Kühlgeräte jeder Art können die Qualität
von Lebensmitteln nicht verbessern, sondern maximal die Qualität der Lebensmittel
zum Zeitpunkt der Einlagerung über einen
kurzen Zeitraum erhalten.
Berücksichtigen Sie folgende besondere
Bedingungen beim Aufbewahren von
Lebensmitteln in einem Kühlschrank :
n Veränderung der klimatischen Beding-
ungen, wie Temperaturänderungen
n hohe Raumtemperatur
n Kühlschrank aufgestellt hinter einem
Fenster und direkte Sonnenbestrahlung
n zu schnelles Einlagern von Waren kurz nach
Inbetriebnahme des Gerätes.
Bei diesen besonderen Bedingungen kann der
Kühlschrank die benötigte Temperatur für
schnell verderbliche Lebensmittel nicht garantieren.
Zu den schnell verderblichen Waren gehören
alle Produkte mit angegebenem Verfallsdatum
und Mindestaufbewahrungstemperatur von
+4°C oder weniger, besonders Fleisch,
Geflügel, Fisch, Wurst, Fertiggerichte.
n Rohe und gekochte Waren separat verpak-
ken (z.B. Behälter, Alu-Folie o.ä.).
n Umverpackungen von Einzelverpackungen
nur entfernen, wenn alle nötigen Daten wie
z.B. Verfallsdatum auch auf den Einzelverpackungen abzulesen sind.
n Gekühlte Ware nicht zu lange außerhalb
des Kühlschranks belassen.
n Lebensmittel mit dem jüngsten Verfalls-
datum nach vorne stellen.
n Reste wieder verpacken und schnellstmög-
lich verzehren.
n Hände vor und nach dem Berühren von
Lebensmitteln waschen.
n Innenraum des Kühlschranks in regelmäßi-
gen Abständen reinigen.
Beachten Sie die Hinweise und
Beschreibungen zum Verfallsdatum auf den
Warenumverpackungen.
Beachten Sie in dieser Anleitung den
Abschnitt
"5.1 Reinigung"
2.9 Batterietausch
n Beachten Sie die Polarität !
n Schließen Sie nichtaufladbare Batterien
nicht an ein Ladegerät an.
n Entnehmen Sie aufladbare Batterien
(Akkus) vor dem Aufladen aus dem
Batteriefach.
n Vermeiden Sie Kurzschlüsse an den
Kontakten im Batteriefach !
n Entnehmen Sie entladene Batterien.
n Entnehmen Sie die Batterien aus dem
Batteriefach bei längerer Außerbetriebnahme des Kühlschranks.
n Mischen Sie unterschiedliche Batterie-
typen nicht.
VORSICHT!
i
Page 32

10
3.0 Modellbeschreibung
3.1 Modellbezeichnung
Im Inneren des Kühlschranks finden Sie das
Typenschild des Kühlschranks. Es enthält alle
wichtigen Angaben zum Kühlschrank. Dort
können Sie die Modellbezeichnung, die
Produktnummer und Seriennummer ablesen.
Diese Angaben benötigen Sie bei allen
Kontakten mit dem Kundendienst oder der
Ersatzteilbestellung.
3.2 Typenschild des Kühlschranks
Abb. 1
Modellnummer
Produktnummer
Seriennummer
Elektrische Anschlusswerte
Gasdruck
2
1
3
4
5
Modellbeschreibung
Bruttoinhalt (Liter) .................................. 154
Frosterfach (Liter) ..................................... 28
Bruttoinhalt (Frosterfach entnommen)..... 164
Abmessungen (mm)
(H x B x T) ................................1276x531x582
Anschlussleistung (W) ......................... 190
Gasverbrauch
g / 24h* ................................................... 380
Stromverbrauch
kWh / 24h* .............................................. 3.2
Nettogewicht (kg) .................................. 44.0
Gaszündung .............................. Piezozünder
Freistehende Aufstellung
3.3 Technische Daten
Technische Änderungen vorbehalten.
*Durchschnittsverbrauch gemessen bei einer durchschnittlichen
Umgebungstemperatur von 25°C in Anlehnung an ISOStandard.
3.4 Erklärung des Kühlschranks
Bedienungselemente
Frosterfach (entnehmbar)
Einlege-Gitterrost (
optional, einsetzbar
bei entnommenem Frosterfach
)
Nachverdampfer für Kühlraum
Tauwasserablaufrinne
Gemüseschale
Etageren
Untere Etagere mit Flaschenhalter
2
1
3
4
5
6
7
8
Abb. 2
2
1
8
7
6
5
3
4
R G E 3 0 0 0
Electrical
Gas
Refrigerator
mit Gas oder Netzstrom betriebener
Absorberkühlschrank
0 = manuelle
Zündung
(Piezozünder)
Modellreihe
2
1
3
4
5
Beispiel
Page 33

11
Installation
4.0 Installation
Dieser Kühlschrank ist für die Verwendung in
geschlossenen Räumen geprüft und zugelassen.
Beachten Sie bei der Aufstellung des Gerätes
folgende Punkte :
4.1 Aufstellen und Anschließen
n Der Aufstellraum muss einen Rauminhalt
von mindestens 30 m³ aufweisen, gut
belüftet sein und über ein zu öffnendes
Fenster oder eine Tür ins Freie verfügen.
n Der Kühlschrank muss freistehend, d. h. mit
einem Mindestabstand von 50 mm zu (seitlich) benachbarten Wänden oder Schränken, aufgestellt werden (kein Einbau!).
n Der Abstand zu darüber befindlichen
Einrichtungen (Schränke etc.) muss mindestens 100 mm betragen.
n Stellen Sie das Gerät waagerecht auf einen
festen Untergrund.
n Der Kühlschrank darf nicht der Wärme-
strahlung heisser Gegenstände (z. B. Herd,
Heizung) ausgesetzt sein.
n Das Kühlaggregat auf der Rückseite (unter
Abdeckung) muss stetig gut belüftet werden. Decken Sie das Aggregat nicht ab
(z.B. Handtücher, Vorhänge).
n Mangelnde Belüftung führt zu Kühlleis-
tungseinbußen !
n Stellen Sie den Kühlschrank spritzwasser-
geschützt auf. Achten Sie auch darauf,
dass das Gerät vor und während der
Aufstellung nicht dem Regen ausgesetzt
ist.
n Die Spannungsversorgung muss mit dem
auf dem Typenschild angegebenen Wert
übereinstimmen. Bei abweichenden Werten
kann das Gerät beschädigt werden.
n Die Spannungsversorgung des Gerätes für
den elektrischen Betrieb muss über eine
vorschriftsmäßig geerdete Steckdose erfolgen.
n Ein Sicherungsautomat muss in der
Zuleitung vorhanden sein.
n Das Netzkabel muss jederzeit frei zugäng-
lich sein und darf nicht mit heißen Teilen
des Aggregates / Brenners in Berührung
kommen.
n Gasflaschen müssen aufrecht stehen.
n Stellen Sie die Gasflasche an einen gut
belüfteten Ort.
n Stellen Sie die Gasflasche so auf, dass sie
bei einem Brand leicht erkennbar ist.
n Die maximale Entfernung der Gasflasche
zum Gerät darf 1,5 m nicht überschreiten.
n Nur die in den jeweiligen Ländern gültigen
Flaschentypen und Druckregeleinrichtungen dürfen verwendet werden. In
Deutschland werden üblicherweise 5kgoder 11kg-Flaschen mit fest eingebautem
Entnahmeventil oder 3kg-Flaschen mit
innenliegendem Kugelrückschlagventil eingesetzt.
4.1.1 Elektrischer Anschluss
4.1.2 Gasflaschenaufstellung
Der Netzstecker muss frei zugänglich
sein.
VORSICHT!
Wenn die Anschlussleitung beschädigt
wird, muss sie durch den Kundendienst
von Dometic oder durch ebenso qualifiziertes Personal ersetzt werden, um
Gefährdungen zu vermeiden.
VORSICHT!
Page 34

12
Installation
4.1.3 Gasanschluss
n Der fachgerechte Anschluss des Kühl-
schrankes muss durch eine zugelassene
Fachkraft gemäß der Technischen Regeln
Flüssiggas (TRF) ausgeführt werden.
n Die jeweils gültigen nationalen Vorschriften
für den Einsatz von flüssiggasbetriebenen
Geräten müssen beachtet werden.
In Deutschland sind dies:
- Technische Regeln für Flüssiggasanlagen
in Gebäuden,
- DVGW-Arbeitsblatt G 600 (DVGW-TRGI
86/96),
- Europäische Norm EN 732
n Ein fest eingestellter Druckregler (1), Abb.
3, (Druckminderer) muss in der Zuleitung
zum Gerät installiert sein. Der Kühlschrank
darf mit keinem anderen als dem auf dem
Typenschild angegebenen Druck betrieben
werden.
n Der Kühlschrank muss mit einer
Sicherheitsschlauchleitung (in Deutschland
nach DIN 4815-2) an die Gasflasche angeschlossen werden.
n Wählen Sie eine ausreichende Länge, um
die Schlauchleitung ohne Knicken anzuschließen. Die Schlauchleitung darf nicht
länger als 1,5 m sein.
n Der Gasanschluss am Gerät erfolgt mittels
einer Schneidring- (Ermeto-) Verschraubung L8 . Ein Anschluss der Leitung mit
Klemmen / Schellen ist in Deutschland
nicht zulässig.
n Die Schlauchleitung muss gemäß der in
den jeweiligen nationalen Bestimmungen
vorgesehenen Zeitabständen ausgetauscht
werden (in Deutschland nach 10 Jahren).
n Nach dem Anschluss an die Gasflasche
muss eine Dichtheitsprüfung an allen
Verbindungen sowie eine Flammprobe des
Brenners erfolgen. Verwenden Sie zur
Dichtheitsprüfung ein Lecksuchspray oder
ein schaumbildendes Mittel. Überprüfen
Sie die Verbindungsstellen nach Öffnen des
Flaschenventils auf etwaige Bläschen.
1
Flaschenventil
Abb. 4
Abb. 3
Abb. 5 Abb. 6
SW 14
SW 17
Detail
2. Türgriff an der Tür
ausrichten und
anschrauben.
1. Befestigungspunkte:
Nutzen Sie die maßstabsgerechte
Schablone (1)
(s."Anhang")
3. Abdeckung aufstecken und festdrücken.
4.2 Anbringen des Türgriffs
1
Überprüfen Sie niemals das Gerät und die
Zuleitung mit einer offenen Flamme auf
Undichtigkeit !
GEFAHR !
Der Kühlschrank ist auschliesslich für den
Betrieb mit Flüssiggas wie Propan / Butan vorgesehen. Verwenden Sie auf keinen Fall
Stadtgas, Erdgas oder Autogas !
Schablone
1
Ø 2mm
max
1.1 Nm!
Page 35

13
5.2 Wartung
Betrieb des Kühlschranks
n Der Gasbrenner muss bei Bedarf, jedoch
mindestens einmal jährlich von
Verunreinigungen gesäubert werden.
Bewahren Sie die Nachweise über durchgeführte Wartungen an Ihrem Kühlschrank
auf.
n Wir empfehlen eine Wartung nach längerer
Außerbetriebnahme. Nehmen Sie dazu
Kontakt mit unserem Kundendienst auf.
Vor Inbetriebnahme kontrollieren Sie bitte, ob
die auf dem Typenschild angegebene
Spannung mit der Netzspannung übereinstimmt. Sollte dieses nicht der Fall sein,
schließen Sie das Gerät nicht an! Wenden Sie
sich an den zuständigen Händler.
Das Kühlschrankaggregat arbeitet geräuschlos.
Bei Erstinbetriebnahme des Gerätes kann es
zu einer Geruchsbildung kommen, die sich
nach einigen Stunden verflüchtigt. Durchlüften
Sie den Wohnraum gut.
Etwa eine Stunde nach dem Einschalten sollte
das Tiefkühlfach des Kühlschrankes kalt werden. Der Kühlschrank erreicht seine
Betriebstemperatur nach einigen Stunden.
Der Kühlschrank kann mit zwei Energiearten
betrieben werden:
n Netzspannung (230V)
n Gas (Flüssiggas Propan/Butan)
Die gewünschte Energieart wird über den
Energiewahlschalter (Abb.7) angewählt .
5.1 Reinigung
Bevor Sie den Kühlschrank in Betrieb nehmen,
empfiehlt es sich, das Gerät von innen zu reinigen und dies regelmäßig zu wiederholen.
Benutzen Sie ein weiches Tuch und lauwarmes Wasser mit einem milden Reinigungsmittel. Waschen Sie anschließend das Gerät mit
klarem Wasser aus und trocknen Sie es gut
ab.
Um Materialveränderungen zu vermeiden, verwenden Sie keine Seife oder scharfe, körnige
bzw. sodahaltige Reinigungsmittel. Bringen
Sie die Türdichtung nicht mit Öl oder Fett in
Berührung .
5.0 Betrieb des Kühlschranks
5.3 Betrieb mit Strom
Bei abweichenden Werten kann das Gerät
beschädigt werden.
VORSICHT!
5.4 Betrieb mit Gas
n Der Kühlschrank muss mit Flüssiggas
(Propan, Butan) betrieben werden (kein
Erdgas, Stadtgas) .
n Über einer Höhe von ca. 1000 m NN kön-
nen beim Zünden des Gases physikalisch
bedingt Störungen auftreten (Keine
Fehlfunktion !).
n Bei der ersten Inbetriebnahme sowie nach
Gasflaschenwechsel können die Gasleitungen Luft enthalten. Durch kurze
Inbetriebnahme des Kühlschrankes werden
die Gasleitungen entlüftet. Das Gas zündet
ohne Verzögerung.
n Alle Kühlschränke sind mit einer automati-
schen Flammensicherung ausgestattet, die
selbsttätig die Gaszufuhr nach ca. 30
Sekunden unterbricht, wenn die Flamme
erlischt.
Das Kühlschrankaggregat wird im Betrieb
sehr heiß. Schützen Sie sich vor dem
Kontakt mit hitzeführenden Teilen.
VORSICHT!
i
Page 36

14
Betrieb des Kühlschranks
Erläuterung
Die gewünschte Energieart wird durch Drehen
des Energiewahlschalters (1) eingestellt. Der
Energiewahlschalter hat vier Stellungen:
n Aus (1.)
n Netzspannung (230V~) (2.)
n Aus (3.)
n Gas (Flüssiggas Propan/Butan) (4.)
5.5.1 Erklärung der Bedienungselemente
Manuelle Energiewahl / manuelle Zündung
mit Piezozünder :
5.5 Bedienung
1 = Einschalter / Energiewahlschalter
2 = Temperaturregler
3 = Piezozünder für Gasbetrieb
4 = Flammenindikator (Galvanometer)
Abb. 7
2
1
3
4
5.5.3 Betrieb mit Gas (Flüssiggas)
Bevor Sie den Kühlschrank im Gasmodus in
Betrieb nehmen :
n Öffnen Sie das Ventil der Gasflasche.
3. Drücken Sie den Betätigungsknopf (3)
mehrfach im Abstand von 1-2 Sekunden.
4. Der Zeiger des Galvanometers (4) wandert
in den grünen Bereich, wenn die Flamme
gezündet wurde. Halten Sie den Drehknopf
(2) noch ca. 15 s gedrückt und lassen Sie
ihn dann los. Der Kühlschrank ist in Betrieb.
Abb. 13Abb. 12
5.5.2 Betrieb mit Strom
Abb. 9
Abb. 10 Abb. 11
Zum Einschalten des
Gerätes drehen Sie
den Energiewahlschalter (1) nach
rechts auf die
Position :
230V-Betrieb.
1. Stellen Sie den Drehwahlschalter (1) auf die
Position :
2. Drehen Sie den Temperaturstufenregler (2)
nach rechts und drücken ihn ein. Halten Sie
den Regler eingedrückt.
1
1
2
2 3 4
für Gasbetrieb.
Abb. 8
1
1 2
3
4
1.
2.
3.
4.
Page 37

15
Betrieb des Kühlschranks
5.5.4 Regeln der Kühlraumtemperatur
Mit Hilfe des
Drehknopfes (2) wählen Sie die Temperatur
im Kühlraum.
Die Skala beginnt mit
der MIN Position
(schmaler Balken =
wärmste Temperatur)
und reicht bis zur MAX
Position (breiter
Balken = kälteste
Temperatur).
Beachten Sie bitte, dass den Temperaturstufen keine absoluten Temperaturwerte zugeordnet sind. Wählen Sie bei Umgebungstemperaturen zwischen +15°C und +25°C die
Mittelstellung (3). Das Aggregat arbeitet im
optimalen Leistungsbereich.
5.7 Ablageroste positionieren
Die Ablageroste lassen sich durch leichtes
Anheben aus der Führung herausziehen und
können beliebig platziert werden.
Abb. 19
Abb. 20
Zur Vergrößerung des Kühlraums kann das
Frosterfach herausgenommen werden.
1. Entriegeln Sie das Frosterfach beidseitig.
2. Ziehen Sie das Frosterfach heraus.
Lagern Sie das Frosterfach sorgfältig, um
Beschädigungen zu vermeiden.
Bei entnommenem Frosterfach können Sie
einen zusätzlichen Ablagerost (3.) einsetzen.
Der Ablagerost ist als Sonderausstattung in
Deutschland erhältlich beim
Dometic Call Center (0180 53 66 384)
.
5.8 Herausnehmbares Frosterfach
Die batteriebetriebene Innenbeleuchtung wird
über einen Türkontakt gesteuert. Ziehen Sie
zum Austausch der Batterien (3 x 1.5V
AAA/R3/ Micro) das Beleuchtungsgehäuse ab
und öffnen Sie das Batteriefach mit einem
geeigneten Schraubendreher.
Abb. 14
Abb. 15
Abb. 16
Abb. 17
Mittelstellung
2
3
1
Abb. 18
4
2
3
5.6 Batterietausch an der
Innenbeleuchtung
i
Page 38

16
Betrieb des Kühlschranks
5.9 Einlagern von Lebensmitteln
und Eiswürfelbereitung
n Setzen Sie den Kühlschrank ca. 12 Std. vor
der Bestückung in Betrieb.
n Lagern Sie immer vorgekühlte Waren ein.
Achten Sie bereits beim Kauf und Transport
darauf, dass die Ware gut gekühlt ist.
Verwenden Sie Isoliertaschen.
n Bei Warenentnahme die Kühlschranktür nur
kurzzeitig öffnen.
n Waren müssen verpackt, am besten in
geschlossenen Behältern, Alufolie oder dgl.
und getrennt voneinander eingelagert werden, um ein Austrocknen und Geruchsbildung zu vermeiden.
n Nie warme Lebensmittel in den Kühl-
schrank einlagern, erst abkühlen lassen.
n Waren, die leichtflüchtige, brennbare Gase
abgeben können, dürfen nicht im Kühlschrank aufbewahrt werden.
n Überfüllen Sie die Ablageroste und Fächer
nicht, um die interne Luftzirkulation nicht zu
behindern.
n Lassen Sie Abstand zwischen Kühlgut und
Nachverdampfer (“Kühlrippen”) (ca.10 mm).
n Eine ungehinderte Luftzirkulation des Kühl-
schrankaggregates muss gewährleistet
sein. Die Lüftungsöffnungen dürfen nicht
verdeckt sein.
5.9.1 Einlagern von Waren in den
Kühlraum
5.9.2 Einlagern von Waren in das
Frosterfach
n Bewahren Sie keine kohlesäurehaltigen
Getränke im Frosterfach auf.
n Das Frosterfach ist für die Eiswürfelberei-
tung und für die kurzfristige Aufbewahrung
gefrorener Lebensmittel geeignet. Es ist
nicht geeignet zum Einfrieren von Lebensmitteln.
Bei umgebenden Raumtemperaturen niedriger als +10°C kann systembedingt eine
gleichmäßige Regelung der Frosterfachtemperatur nicht gewährleistet werden,
wenn der Kühlschrank diesen
Temperaturen längere Zeit ausgesetzt ist.
Dies kann zu einem möglichen
Temperaturanstieg im Frosterfach und
einem Auftauen des eingelagerten Gutes
führen.
Abb. 21
5.9.3 Kühlschrankfächer
Frosterfach :
bereits gefrorene Waren (Tiefkühlwaren)
Oberes Fach:
zubereitete Speisen
Mittleres Fach:
Milchprodukte, zubereitete Speisen
Unteres Fach:
Fleisch, Fisch, Waren zum Auftauen
Gemüsefach:
Salat, Gemüse, Obst
Obere Türetagere:
Eier, Butter
Mittlere Türetagere:
Dosen, Dressings, Ketchup, Marmelade
Untere Türetagere (Getränkefach):
Getränke in Flaschen oder Tüten
2
1
3
4
5
6
7
8
1
2
3
4
5
6
7
8
Page 39

17
Betrieb des Kühlschranks
5.9.4 Eiswürfelbereitung
Eiswürfel werden am besten nachts gefroren.
Nachts ist der Kühlschrank weniger belastet
und das Aggregat hat mehr Reserven.
1. Eisschale mit
Trinkwasser füllen.
2. Eisschale ins
Frosterfach stellen.
Abb. 23
Abb. 22
Nur Trinkwasser verwenden!
WARNUNG!
5.10 Außerbetriebnahme
n Stellen Sie den Energiewahlschalter (1) auf
Position "AUS". Das Gerät ist abgeschaltet.
n Wird der Kühlschrank für längere Zeit außer
Betrieb genommen, schließen Sie das
bordseitige Absperrventil und das Flaschenventil .
n Lassen Sie die Tür ist einen Spalt weit
geöffnet, um Schimmelbildung im Gerät zu
vermeiden.
n Entriegeln Sie die Verschlusseinrichtung
der Türverriegelung durch Eindrücken und
schieben Sie sie nach vorne. Wird die Tür
nun geschlossen, bleibt der Kühlschrank
einen Spalt weit geöffnet, um Schimmelbildung zu vermeiden.
Abb. 24
Abb. 25
1
AUS
AUS
5.11 Abtauen
Mit der Zeit bildet sich Reif auf den Kühlrippen
im Inneren des Kühlschranks. Eine einseitig
stärkere Bereifung kann vorkommen und
bedeutet keine Fehlfunktion. Wenn diese
Reifschicht etwa 3 mm beträgt, sollten Sie den
Kühlschrank abtauen.
n Schalten Sie den Kühlschrank wie unter
Pkt.
5.10 Außerbetriebnahme
beschrieben
aus.
n Nehmen Sie alle Lebensmittel und die Eis-
schale heraus.
n Lassen Sie die Kühlschranktür geöffnet, um
Luft hineingelangen zu lassen und Schimmelbildung zu vermeiden.
n Wischen Sie beide Kühlfächer nach dem
Abtauen (Frosterfach und Kühlrippen sind
frei von Reif) mit einem Tuch trocken.
Bemerkung: Das Tauwasser des Hauptkühlfaches läuft in einen Auffangbehälter auf der
Rückseite des Gerätes. Dort verdunstet das
Wasser.
Die Reifschicht darf niemals gewaltsam
entfernt oder das Abtauen mit einem
Heizstrahler beschleunigt werden!
VORSICHT!
Abb. 26
Abb. 27
1
2
Abb. 28
2
Normalstellung
außer Betrieb
Page 40

18
Betrieb des Kühlschranks
Abb. 32
Abb. 33
Abb. 30
5.12 Wechsel des Türanschlags
1
3
Abb. 31
2
4
n Tür öffnen, Scharnierschraube lösen und
aufbewahren.
n Tür nach vorne wegnehmen.
n Scharnierstift lösen und auf anderer Seite
einschrauben.
n Distanzscheibe auf unterem Scharnier ver-
setzen.
n Tür in oberen Scharnierstift schieben und
auf unteres Scharnier aufsetzen.
n Scharnierschraube einschrauben.
n Achten Sie darauf, dass die Tür frei beweg-
lich ist und dass die Türdichtung ringsum
anliegt.
Sollte es nötig sein, dabei den Kühlschrank
seitwärts zu neigen oder zu legen, warten Sie
eine Stunde, bevor der Kühlschrank in Betrieb
genommen wird. Die Kühlflüssigkeit sammelt
sich wieder im Vorratsbehälter des
Kühlaggregates. Ein korrekter Betrieb des
Kühlschranks ist so gewährleistet.
Abb. 29
2
3
1
4
5.13 Wechsel der Dekorplatte
Dekorplatte mit Rahmen
n Entfernen Sie den Türgriff zuerst (falls mon-
tiert).
n Ziehen Sie die seitliche Leiste (1) der Tür ab
(Leiste ist aufgesteckt, nicht verschraubt).
n Schieben Sie die Dekorplatte (2) aus der
Tür hinaus, setzen Sie die neue Dekorplatte
ein und stecken Sie die Leiste (1) wieder
auf.
Abb. 34
2
1
1
i
Page 41

19
Betrieb des Kühlschranks
Abb. 36
Abb. 35
2
1
2
3
VORSICHT!
Abmessungen der Dekorplatte :
1169,5 +0/-1 mm 507,5 +0/-1 mm max. 1.5 +0/-1 mm
Höhe Breite Dicke
RGE 3000
Page 42

20
Betrieb des Kühlschranks
5.14 Verhalten bei Störungen
Störung : Der Kühlschrank kühlt nicht ausreichend.
- Die Belüftung des Aggregates ist nicht ausreichend.
- Die Thermostateinstellung ist zu niedrig.
- Der Nachverdampfer ist stark vereist.
- Zuviele warme Lebensmittel wurden kurzfristig
eingelagert.
- Das Gerät ist noch nicht lange in Betrieb.
- Die umgebenden Temperaturen sind zu hoch.
- Prüfen Sie , ob das Lüftungsgitter des
Aggregates nicht abgedeckt ist.
- Stellen Sie den Thermostatregler auf eine höhere Stellung.
- Prüfen Sie, ob die Kühlschranktür korrekt
schließt.
- Lassen Sie erwärmte Waren vor Einlagerung
abkühlen.
- Prüfen Sie den Kühlraum nach ca. 4-5 h auf
Kühlung.
- Lüften Sie den Raum.
mögliche Ursache
Abhilfe
Störung : Der Kühlschrank kühlt nicht im Gasbetrieb.
- Gasflasche ist leer.
- Die vorgeschaltete Absperreinrichtung ist
geschlossen
- Es befindet sich Luft in der Leitung
- Gasflasche tauschen.
- Absperreinrichtung öffnen.
- Gerät ausschalten und neu starten. Vorgang ggf.
3-4 mal wiederholen.
mögliche Ursache
Abhilfe
Störung : Der Kühlschrank kühlt nicht im 230V-Betrieb.
- Sicherung defekt.
- Netzversorgung nicht angeschlosssen.
- Heizelement defekt.
- Neue Sicherung einsetzen.
- Netzverbindung herstellen.
- Verständigen Sie den Dometic-Kundendienst.
mögliche Ursache
Abhilfe
Bevor Sie den autorisierten Kundendienst
benachrichtigen, kontrollieren Sie bitte, ob :
n die Anweisungen im Abschnitt „Bedienung
des Kühlschranks“ korrekt befolgt wurden.
n der Kühlschrank waagerecht steht.
n es möglich ist, den Kühlschrank mit irgend-
einer vorhandenen Energieart zu betreiben.
Page 43

1
Numéro du modèle .............................................
Numéro du produit .............................................
Numéro de série .............................................
Veuillez noter les données suivantes :
MBA 11/2012
N 1
RGE 3000
Mode d'emploi
Réfrigérateur à absorption
FR
Français
Page 44

2
1.0 Généralités . . . . . . . . . . . . . . . . . . . . . . . . . . . . . . . . . . . . . . . . . . . . 4
1.1 Introduction . . . . . . . . . . . . . . . . . . . . . . . . . . . . . . . . . . . . . . . . . . . . . . . . . . . . . . . . . . . . . . . . 4
1.2 Indications concernant ce mode d'emploi . . . . . . . . . . . . . . . . . . . . . . . . . . . . . . . . . . . . . . . . 4
1.3 Droit de reproduction réservé . . . . . . . . . . . . . . . . . . . . . . . . . . . . . . . . . . . . . . . . . . . . . . . . . . 4
1.4 Explication des symboles utilisés . . . . . . . . . . . . . . . . . . . . . . . . . . . . . . . . . . . . . . . . . . . . . . . 4
1.5 Garantie . . . . . . . . . . . . . . . . . . . . . . . . . . . . . . . . . . . . . . . . . . . . . . . . . . . . . . . . . . . . . . . . . . . 5
1.6 Limitation de la responsabilité . . . . . . . . . . . . . . . . . . . . . . . . . . . . . . . . . . . . . . . . . . . . . . . . . . 5
1.7 Service après-vente . . . . . . . . . . . . . . . . . . . . . . . . . . . . . . . . . . . . . . . . . . . . . . . . . . . . . . . . . . 5
1.8 Pièces de rechange . . . . . . . . . . . . . . . . . . . . . . . . . . . . . . . . . . . . . . . . . . . . . . . . . . . . . . . . . . 6
1.9 Conseils relatifs à l'environnement . . . . . . . . . . . . . . . . . . . . . . . . . . . . . . . . . . . . . . . . . . . . . . 6
1.9.1 Mise au rebut . . . . . . . . . . . . . . . . . . . . . . . . . . . . . . . . . . . . . . . . . . . . . . . . . . . . . . . . . . . . . . . . . . . . . . . 6
1.9.2 Conseils d'économie d'énergie . . . . . . . . . . . . . . . . . . . . . . . . . . . . . . . . . . . . . . . . . . . . . . . . . . . . . . . . . 6
1.10 Déclaration de conformité . . . . . . . . . . . . . . . . . . . . . . . . . . . . . . . . . . . . . . . . . . . . . . . . . . . . . 6
2.0 Consignes de sécurité . . . . . . . . . . . . . . . . . . . . . . . . . . . . . . . . . . . 7
2.1 Utilisation conforme . . . . . . . . . . . . . . . . . . . . . . . . . . . . . . . . . . . . . . . . . . . . . . . . . . . . . . . . . . 7
2.2 Responsabilité de l'utilisateur . . . . . . . . . . . . . . . . . . . . . . . . . . . . . . . . . . . . . . . . . . . . . . . . . . 7
2.3 Protéger les enfants lors de la mise au rebut de l'appareil . . . . . . . . . . . . . . . . . . . . . . . . . . . . 7
2.4 Travaux et contrôles sur le réfrigérateur . . . . . . . . . . . . . . . . . . . . . . . . . . . . . . . . . . . . . . . . . .7
2.5 Information sur le fluide réfrigérant . . . . . . . . . . . . . . . . . . . . . . . . . . . . . . . . . . . . . . . . . . . . . . 8
2.6 Utilisation du réfrigérateur au gaz . . . . . . . . . . . . . . . . . . . . . . . . . . . . . . . . . . . . . . . . . . . . . . . 8
2.7 Fonctionnement à l'électricité . . . . . . . . . . . . . . . . . . . . . . . . . . . . . . . . . . . . . . . . . . . . . . . . . . 8
2.8 Consignes de sécurité pour le stockage des aliments . . . . . . . . . . . . . . . . . . . . . . . . . . . . . . . 9
2.9 Remplacer les piles . . . . . . . . . . . . . . . . . . . . . . . . . . . . . . . . . . . . . . . . . . . . . . . . . . . . . . . . . . 9
3.0 Description du modèle . . . . . . . . . . . . . . . . . . . . . . . . . . . . . . . . . . 10
3.1 Désignation de modèle . . . . . . . . . . . . . . . . . . . . . . . . . . . . . . . . . . . . . . . . . . . . . . . . . . . . . . . 10
3.2 Plaque signalétique du réfrigérateur . . . . . . . . . . . . . . . . . . . . . . . . . . . . . . . . . . . . . . . . . . . . .10
3.3 Données techniques . . . . . . . . . . . . . . . . . . . . . . . . . . . . . . . . . . . . . . . . . . . . . . . . . . . . . . . . . 10
3.4 Description du réfrigérateur . . . . . . . . . . . . . . . . . . . . . . . . . . . . . . . . . . . . . . . . . . . . . . . . . . . . 10
4.0 Installation . . . . . . . . . . . . . . . . . . . . . . . . . . . . . . . . . . . . . . . . . . . . 11
4.1 Montage et raccordement . . . . . . . . . . . . . . . . . . . . . . . . . . . . . . . . . . . . . . . . . . . . . . . . . . . . . 11
4.1.1 Connection électrique . . . . . . . . . . . . . . . . . . . . . . . . . . . . . . . . . . . . . . . . . . . . . . . . . . . . . . . . . . . . . . . . . 11
4.1.2 Installation de la bouteille de gaz . . . . . . . . . . . . . . . . . . . . . . . . . . . . . . . . . . . . . . . . . . . . . . . . . . . . . . . . 11
4.1.3 Connection de gaz . . . . . . . . . . . . . . . . . . . . . . . . . . . . . . . . . . . . . . . . . . . . . . . . . . . . . . . . . . . . . . . . . . . 12
4.2 Montage de la poignée de la porte . . . . . . . . . . . . . . . . . . . . . . . . . . . . . . . . . . . . . . . . . . . . . .12
5.0 Utilisation du réfrigérateur . . . . . . . . . . . . . . . . . . . . . . . . . . . . . . . . 13
5.1 Nettoyage . . . . . . . . . . . . . . . . . . . . . . . . . . . . . . . . . . . . . . . . . . . . . . . . . . . . . . . . . . . . . . . . . . 13
5.2 Entretien . . . . . . . . . . . . . . . . . . . . . . . . . . . . . . . . . . . . . . . . . . . . . . . . . . . . . . . . . . . . . . . . . . . 13
5.3 Fonctionnement à l'électricité . . . . . . . . . . . . . . . . . . . . . . . . . . . . . . . . . . . . . . . . . . . . . . . . . . 13
5.4 Fonctionnement au gaz . . . . . . . . . . . . . . . . . . . . . . . . . . . . . . . . . . . . . . . . . . . . . . . . . . . . . . . 13
5.5 Utilisation . . . . . . . . . . . . . . . . . . . . . . . . . . . . . . . . . . . . . . . . . . . . . . . . . . . . . . . . . . . . . . . . . . 14
5.5.1 Description des éléments de commande . . . . . . . . . . . . . . . . . . . . . . . . . . . . . . . . . . . . . . . . . . . . . . . . . . 14
5.5.2 Fonctionnement à l'électricité . . . . . . . . . . . . . . . . . . . . . . . . . . . . . . . . . . . . . . . . . . . . . . . . . . . . . . . . . . 14
5.5.3 Fonctionnement au gaz liquéfié . . . . . . . . . . . . . . . . . . . . . . . . . . . . . . . . . . . . . . . . . . . . . . . . . . . . . . . . . 14
5.5.4 Réglage de la température de réfrigération . . . . . . . . . . . . . . . . . . . . . . . . . . . . . . . . . . . . . . . . . . . . . . . . 15
5.6 Remplacer les piles de l'éclairage intérieur . . . . . . . . . . . . . . . . . . . . . . . . . . . . . . . . . . . . . . . . 15
5.7 Positionnement des clayettes . . . . . . . . . . . . . . . . . . . . . . . . . . . . . . . . . . . . . . . . . . . . . . . . . . 15
5.8 Compartiment congélateur amovible . . . . . . . . . . . . . . . . . . . . . . . . . . . . . . . . . . . . . . . . . . . . . 15
Table des Matières
Page 45

3
5.9 Stockage des aliments et préparation des glaçons . . . . . . . . . . . . . . . . . . . . . . . . . . . . . . . . . 16
5.9.1 Stockage des aliments dans la chambre de réfrigération . . . . . . . . . . . . . . . . . . . . . . . . . . . . . . . . . . . . . 16
5.9.2 Stockage des aliments dans le compartiment congélateur . . . . . . . . . . . . . . . . . . . . . . . . . . . . . . . . . . . . 16
5.9.3 Compartiments du réfrigérateur . . . . . . . . . . . . . . . . . . . . . . . . . . . . . . . . . . . . . . . . . . . . . . . . . . . . . . . . . 17
5.9.4 Préparation des glaçons . . . . . . . . . . . . . . . . . . . . . . . . . . . . . . . . . . . . . . . . . . . . . . . . . . . . . . . . . . . . . . . 17
5.10 Mise hors-service . . . . . . . . . . . . . . . . . . . . . . . . . . . . . . . . . . . . . . . . . . . . . . . . . . . . . . . . . . . . 17
5.11 Dégivrage . . . . . . . . . . . . . . . . . . . . . . . . . . . . . . . . . . . . . . . . . . . . . . . . . . . . . . . . . . . . . . . . . . 17
5.12 Changement de la butée de porte . . . . . . . . . . . . . . . . . . . . . . . . . . . . . . . . . . . . . . . . . . . . . . .18
5.13 Changement de la plaque de décoration . . . . . . . . . . . . . . . . . . . . . . . . . . . . . . . . . . . . . . . . . 18
5.14 Conseils en cas d'affichage de panne et dépannage . . . . . . . . . . . . . . . . . . . . . . . . . . . . . . . . 20
5.15 Gabarit (Annexe)
© Dometic GmbH - 2012 - Sous réserve de modifications
Dometic GmbH
In der Steinwiese 16
D-57074 Siegen
www.dometic.com
Page 46

4
1.4 Explication des symboles
utilisés
Les avertissements sont caractérisés par des
symboles. Un texte complémentaire vous indique le degré de danger.
Veuillez tenir compte de ces avertissements. Vous protégez ainsi les personnes
contre les blessures et votre appareil contre les dégâts.
Avertissements
DANGER caractérise une situation de danger
immédiate qui peut causer la mort ou des blessures graves en cas de non-application des
mesures de prévention.
DANGER!
AVERTISSEMENT caractérise une situation de
danger possible qui peut causer la mort ou des
blessures graves en cas de non-application des
mesures de prévention.
AVERTISSEMENT !
ATTENTION caractérise une situation de dan-
ger possible qui peut causer des blessures
légères ou sérieuses en cas de non-application
des mesures de prévention.
ATTENTION!
ATTENTION sans le symbole de sécurité carac-
térise une situation de danger possible qui peut
endommager l'appareil en cas de non-application des mesures de prévention.
ATTENTION!
1.0 Généralités
Généralités
En achetant ce réfrigérateur à absorption
Dometic, vous avez fait un choix judicieux.
Nous sommes persuadés que votre nouveau
réfrigérateur vous donnera entière satisfaction.
Ce réfrigérateur, de marche silencieuse, satisfait aux exigences de qualité et garantit une
utilisation optimale pendant toute sa durée de
vie (fabrication, utilisation et mise au rebut).
1.1 Introduction
Les indications, textes et figures contenus
dans cette notice sont soumis au droit de
reproduction réservé et au droit de propriété
industrielle. Aucun contenu de cette notice ne
peut être reproduit, copié ou utilisé de quelconque manière sans l'accord par écrit de
Dometic GmbH, Siegen.
1.3 Droit de reproduction réservé
Il convient de lire attentivement ce mode
d'emploi avant de mettre le réfrigérateur en
marche.
Cette notice vous donne les indications
nécessaires pour une utilisation conforme et
correcte de votre réfrigérateur. Tenez compte
en particulier des consignes de sécurité. Il
est important de respecter les indications et
instructions de service pour votre propre
sécurité et pour éviter tout dommage sur l'appareil. Il est important de comprendre ce que
vous lisez avant d'effectuer toute manipulation.
Conservez soigneusement ce mode d'emploi à proximité du réfrigérateur afin de
pouvoir le consulter à tout moment.
1.2 Indications concernant ce
mode d'emploi
Page 47

5
Les conditions de garantie sont conformes à
la directive EC 44/1999/CE et aux règlements
en vigueur dans le pays concerné. Au cas où
vous auriez besoin d'avoir recours à la garantie ou à un service, adressez-vous à notre service après-vente. Les pannes consécutives à
une mauvaise utilisation de l'appareil ne sont
pas couvertes par la garantie. Toute modification sur l'appareil ou utilisation de pièces de
rechange qui ne sont pas des pièces origina-
les Dometic ainsi que le non-respect des
instructions de montage et d'utilisation, entraînent la suppression de la garantie et excluent
la responsabilité du fabricant.
1.5 Garantie
Toutes les instructions et indications contenues dans ce mode d'emploi ont été données en
tenant compte des normes et prescription en
vigueur et correspondent au niveau de la technique. Dometic se réserve le droit d'effectuer
à tout moment des modifications sur le produit
qu'il considère appropriées pour l'amélioration
du produit et la sécurité.
1.6 Limitation de la responsabilité
Dometic dispose d'un réseau de services
après-vente étendu sur toute l'Europe. Pour
connaître les services après-vente autorisés,
consultez les numéros EuroService Network
- du manuel fourni avec chaque réfrigérateur.
Sur Internet également, découvrez votre partenaire de service le plus proche à l'adresse
www.dometic.com. Lorsque vous contactez
nos services après-vente, indiquez toujours le
modèle, le numéro du produit, le numéro de
série et, le cas échéant, le code MLC ! Vous
trouverez ces informations sur la plaque
signalétique située à l'intérieur du réfrigérateur. Nous vous conseillons de reporter ces
données dans la case prévue sur la page de
couverture de ce mode d'emploi.
1.7 Service après-vente
Dometic n'endosse aucune responsabilité
pour les dommages résultant de :
n non-observation du mode d'emploi
n utilisation non conforme
n utilisation de pièces de rechange non origi-
nales
n modifications et interventions sur l'appareil
n Effets dûs aux conditions ambiantes, tels
que
- changements de température
- humidité
1.8 Pièces de rechange
Vous pouvez vous procurer les pièces détachées dans toute l'Europe, dans nos services
après-vente.
Lorsque vous contactez le centre d'appels,
indiquez toujours le modèle et le numéro du
produit ! Vous trouverez ces informations sur
la plaque signalétique située à l'intérieur du
réfrigérateur.
Information
INFORMATION vous donne des indications
complémentaires utiles pour une manipulation
correcte de votre réfrigérateur.
Environnement
ENVIRONMENT vous donne des conseils uti-
les pour économiser l'énergie et pour la mise
au rebut de votre appareil.
Généralités
i
Page 48

6
Généralités
1.10 Déclaration de conformité
n Pour une température externe moyenne de
25°C, un réglage du thermostat sur une
position moyenne est suffisant.
n Dans la mesure du possible, ne stocker que
des aliments déjà refroidis.
n Ne pas exposer le réfrigérateur aux rayons
directs du soleil. ou à toute autre source de
chaleur (p. ex. chauffage).
n Veiller à ne pas obstruer la circulation d'air
du groupe frigorifique.
1.9.2 Conseils d'économie d'énergie
Le fluide réfrigérant utilisé dans le groupe frigorifique est de l'ammoniaque (composé
naturel d'hydrogène et d'azote). Le cyclopentane, produit qui n'attaque pas la couche
d'ozone, est utilisé comme produit moussant
dans la préparation de la mousse PU d'isolation.
Afin de s'assurer que le matériel d'emballage
recyclable sera réutilisé, il doit être envoyé au
centre de collecte habituel. L'appareil doit être
cédé à une société de recyclage appropriée
qui assure la récupération des parties recyclables et une mise au rebut conforme du reste
de l'appareil. Pour des raisons écologiques, la
vidange du liquide réfrigérant de tous les groupes frigorifiques à absorption doit être effectuée dans un établissement de retraitement
approprié.
Les appareils portant ce symbole
doivent être obligatoirement remis
à un point de collecte local pour la
mise au rebut d'appareils électriques et électroniques.
Il est interdit de jeter ce produit
dans les ordures ménagères.
Sur les réfrigérateurs Dometic, le symbole
figure sur la plaque des caractéristiques
(plaque signalétique) apposée à l'intérieur de
l'appareil.
1.9 Conseils relatifs à l'environ-
nement
1.9.1 Mise au rebut
n Placez les clayettes/bacs à distance égale
dans la chambre frigorifique.
n Ne pas surcharger les clayettes et compar-
timents pour ne pas entraver la circulation
d'air interne.
n Laisser un espace d'env. 10 mm entre les
denrées réfrigérées et l'évaporateur (" ailettes de refroidissement ").
n Le dégivrage régulier de l'appareil permet
d'économiser l'énergie (voir Section
"Dégivrage").
n Lors du retrait de denrées, veillez à refer-
mer rapidement la porte du réfrigérateur.
n Mettre le réfrigérateur en service environ 12
heures avant de le remplir.
- Low Voltage Directive 73/23/EEC and the
Amendment to LVD 2006/95EC
- EMC Directive 2004/108/EC
- RoHS Directive 2002/95EC
Directives
Type (famille) : C 40/110
- EN 60335-1;(IEC 60335-1; 4ed., Am.1, Am. 2)
- EN 60335-2-24;03 (IEC 60335-2-24;6 ed.,
Am.1, Am. 2)
- EN 60335-2-102;06
- EN 61000-3-2;00, A1, A2, A14
- EN 61000-3-3;95,A1
- EN 50366;2003+A1
- EN 55014-1;07,A1,A2
- EN 55014-2;01,A1
Normes
Vous pouvez vous procurer la déclaration de
conformité actuelle également auprès de
Dometic GmbH, Siegen.
i
Page 49

7
Le réfrigérateur est prévu pour une installation
sur pieds et libre dans des pièces fermées,
comme des pavillons de chasse ou des résidences secondaires. Le type de construction
de l'appareil a été testé pour cette utilisation
en conformité avec la directive européenne
2009/142/CEE relative aux appareils à gaz. Il
n'est pas approprié pour un montage dans
des véhicules routiers ou des bateaux.
Utilisez le réfrigérateur uniquement pour le
refroidissement et le stockage des aliments.
2.1 Utilisation conforme
2.0 Consignes de sécurité
Consignes de sécurité
Le réfrigérateur n'a pas été conçu pour la
conservation professionnelle de médicaments. Veuillez tenir compte des indications figurant sur la notice d'emballage du
médicament.
AVERTISSEMENT !
2.4 Travaux et contrôles sur le
réfrigérateur
2.3 Protéger les enfants après la
mise au rebut de l'appareil
Lors de la mise au rebut du réfrigérateur,
démontez toutes les portes et laissez les
clayettes dans l'appareil. Tout risque
d'enfermement ou d'asphyxie pourra ainsi
être évité.
AVERTISSEMENT !
Seule une personne habilitée est autorisée à effectuer des travaux sur les installations électriques et de gaz, ainsi que sur
le système d'évacuation du gaz. Les
mesures non appropriées peuvent causer
des dommages aux personnes et des
dégâts matériels considérables.
AVERTISSEMENT !
Ne contrôlez jamais les défauts d'étanchéité des pièces et conduites d'amenée
du gaz à côté d'une flamme!
Danger d'incendie ou d'explosion !
DANGER !
Ne jamais ouvrir le groupe frigorifique à
absorption! Il est sous haute pression.
Risque de blessures !
AVERTISSEMENT !
Les personnes utilisant le réfrigérateur doivent
être familiarisées avec les consignes de sécurité et connaître les indications de ce mode
d'emploi.
Cet appareil peut être utilisé par les enfants
âgés de plus de 8 ans et par les personnes à
aptitudes physiques, sensorielles ou mentales
réduites ou manquant d'expérience et/ou de
connaissances, si celles-ci sont surveillées ou
ont été instruites sur l'utilisation sans risques
de l'appareil et si celles-ci sont conscientes
des dangers potentiels. Cet appareil ne doit
pas être utilisé comme jeu par les enfants. Le
nettoyage et l'entretien ne doivent pas être
effectués par les enfants.
[EN 60335-2-24, 7.12]
2.2 Responsabilité de l'utilisateur
L'appareil ne peut pas être exposé à la
pluie.
ATTENTION!
Page 50

8
Comparez les données relatives à la pression
de service de la plaque signalétique à celles
du détendeur de la bouteille de gaz.
2.6 Utilisation du réfrigérateur
au gaz
Si vous sentez une odeur de gaz :
n Ouvrez toutes les fenêtres et quittez la
pièce.
n N'actionnez aucun appareil électrique et
évitez d'utiliser les flammes.
n Fermez la vanne de bouteille de gaz et lais-
sez-la fermée jusqu'à ce que l'incident soit
éliminé.
n Demandez conseil auprès des profession-
nels agréés*.
* professionnels agréés
Les professionnels agrées sont des experts reconnus
qui, en raison de leur formation et de leurs connaissances peuvent garantir que le contrôle sera effectué
dans les règles de l'art.
Pression du gaz à l'entrée et catégories de
gaz
Les réfrigérateurs fonctionnent avec les gaz et
pressions d'admission indiqués ci-après. Les
détendeurs de pression à utiliser entre la bouteille de gaz et le réfrigérateur doivent correspondre aux catégories indiquées au tableau
suivant.
Catégorie
Pression en
mbar
GAZ
I3B / P(30) 30 butane
30 propane
I3+ (28-30/37) 28-30 butane
37 propane
I3B/P(50) 50 butane
I3B/P(50) 50 propane
La pression de service doit absolument
correspondre aux spécifications de la
plaque signalétique du réfrigérateur.
ATTENTION!
2.7 Fonctionnement à l'électri cité
Ne sélectionner ce type de fonctionnement que si le voltage de la prise correspond valeur indiquée sur l'appareil.
Risque de dommages si les valeurs sont
différentes!
ATTENTION!
Consignes de sécurité
2.5 Information sur le fluide réfrigérant
L'ammoniaque est utilisée comme fluide réfrigérant.
C'est un composé naturel, également contenu
dans les nettoyants ménagers (1 litre de nettoyant au sel ammoniac contient jusqu'à 200 g
d'ammoniaque, c'est-à-dire environ deux fois
plus que le réfrigérateur). Le chromate de
sodium est utilisé comme agent anti-corrosion
(dosé 1,8% du dissolvant).
En cas de fuite (facilement décelable en raison
de la forte odeur) procédez ainsi :
- Débranchez l'appareil.
- Aérez la pièce à fond.
- Informez votre service après-vente agréé.
Les recherches confirment qu'en cas de
fuite du fluide réfrigérant, il n'y a aucun risque pour la santé.
i
Page 51

9
2.8 Consignes de sécurité pour
le stockage des aliments
Consignes de sécurité
Les réfrigérateurs Dometic fonctionnent selon
le principe de l'absorption. Selon les règles de
la physique, un système d'absorption ne réagit que peu aux modifications du thermostat,
aux pertes de froid dues à l'ouverture de la
porte ou au stockage des denrées. Les appareils remplissent les exigences de performance de la classe climatique SN d'après
EN/ISO 7371 dans la plage de température
comprise entre +10°C et +32°C.
Protégez votre environnement !
Ne pas jeter les piles usagées dans les orduresménagères. Veuillez remettre vos piles
usagées à votre magasin de vente ou au centre de
collecte des piles.
Les réfrigérateurs ne peuvent pas améliorer la qualité des aliments, mais conserver
au plus leur qualité sur une courte période,
au moment de leur stockage dans le réfrigérateur.
Tenez compte des conditions particulières
suivantes lors de la conservation de denrées alimentaires dans un réfrigérateur
installé dans un véhicule :
n Changement des conditions climatiques tel
que les variations de température
n Température intérieure élevée
n Exposition directe au soleil du réfrigérateur
placé derrière une vitre
n Stockage trop rapide des denrées, peu
après la mise en service de l'appareil.
Dans ces conditions particulières, l'appareil ne
peut garantir la température nécessaire à la
conservation des denrées rapidement périssables.
Les denrées rapidement périssables sont tous
les produits portant une date limite de consommation associée à une température de
conservation inférieure ou égale à 4°C, en particulier, viandes, poissons, volaille, charcuterie, plats préparés
n Emballer séparément les aliments crus et
les aliments cuits (p. ex. boîtes de conservation, papier aluminium ou film alimentaire).
n Ôter le suremballage carton ou plastique,
uniquement si les indications nécessaires
(DLC, température, mode d'emploi) figurent
sur l'emballage qui est au contact du pro
duit.
n Ne pas laisser trop longtemps les produits
réfrigérés hors du réfrigérateur.
n Placer à l'avant les produits dont les dates
limite de consommation sont les plus proches.
n Mettre les restes dans des emballages fer
més et les consommer rapidement.
n Se laver les mains avant et après avoir tou-
ché les aliments.
n Nettoyer l'intérieur du réfrigérateur à des
intervalles réguliers.
Tenez compte des indications de préparation
et de date de consommation sur les emballages.
Tenez compte des instructions dans ce mode
d'emploi, voir section
5.1, " Entretien ".
2.9 Remplacer les piles
n Tenir compte de la polarité !
n Ne pas raccorder les batteries non
rechargeables à un chargeur de batterie.
n Retirer les batteries rechargeables
(accu) du compartiment à batteries
avant de recharger.
n Eviter les courts-circuits sur les con
tacts dans le compartiment à batteries !
n Retirer les batteries déchargées.
n Retirer les batteries du compartiment à
batteries en cas de mise hors-service
prolongée du réfrigérateur.
n Ne pas utiliser des types de batterie
diverses.
ATTENTION!
i
Page 52

10
La plaque signalétique se trouve à l'intérieur
du réfrigérateur. Elle contient toutes les informations importantes sur le réfrigérateur. On
peut y relever la désignation de modèle, le
numéro de produit et le numéro de série. Vous
aurez besoin de toutes ces informations en
contactant le service après-vente ou en
commandant des pièces de rechange.
3.2 Plaque signalétique du réfrigérateur
Fig. 1
Numéro du modèle
Numéro du produit
Numéro de série
Puissance de raccordement électrique
Pression de gaz
2
1
3
4
5
Capacité brute (litres) ............................ 154
Congélateur (litres) ................................... 28
Capacité brute (congélateur enlevé)........ 164
Dimensions (mm)
(H x L x P) ................................1276x531x582
Puissance nominale (W) ..................... 190
Consommation gaz
g / 24h* ................................................... 380
Consommation électricité
kWh / 24h* .............................................. 3.2
Poids Net (kg) ....................................... 44.0
Allumage ................................ allumeur piézo
Installation libre
3.3 Données techniques
Sous réserve de modifications
* Consommation moyenne pour une température ambiante
moyenne de 25°C, en conformité avec les normes ISO.
3.4 Description du réfrigérateur
Eléments de commande
Congélateur (amovible)
Grille d'insertion (
en option, peut être
installée lorsque le compartiment congélateur est retiré
)
Evaporateur pour chambre de réfrigération
Gouttière d'eau de dégivrage
Bac à légumes
Etagère du haut avec rabat
Etagère du bas avec porte-bouteilles
2
1
3
4
5
6
7
8
Fig. 2
2
1
8
7
6
5
3
4
2
1
3
4
5
Exemple
3.0 Description du modèle
3.1 Désignation du modèle
Description du modèle
électrique
Gaz
Réfrigérateur
Réfrigérateur à absorption pour du gaz et
l'électricité
0 = allumage
manuel
(allumeur piézo)
Série de modèles
R G E 3 0 0 0
Page 53

11
Installation
4.0 Installation
Ce réfrigérateur a été testé et autorisé pour
l'utilisation dans des pièces fermées.
Lors de l'installation de l'appareil, veuillez tenir
compte des points suivants :
4.1 Montage et raccordement
n La pièce d'installation doit présenter un
volume de 30 m³ minimum, être bien ventilée et disposer d'une fenêtre ouvrable ou
d'une porte conduisant à l'extérieur.
n Le réfrigérateur doit être sur pieds et libre,
c'est-à-dire qu'il doit être installé avec un
écart minimum de 50 mm (sur le côté) par
rapport aux parois ou armoires (pas de
montage intégré!).
n L'écart par rapport aux équipements exi-
stants (armoires etc.) doit être de 100 mm
minimum.
n Posez l'appareil à l'horizontale sur un sol
ferme.
n Le réfrigérateur ne doit pas être exposé à
un rayonnement thermique d'objets chauds
(cuisinière, chauffage par ex.).
n Le groupe frigorifique installé sur la paroi
arrière (sous le recouvrement) doit être constamment bien ventilé. Ne recouvrez pas le
groupe frigorifique (par des torchons de
cuisine, des rideaux par ex.).
n Une mauvaise ventilation conduit à des
réductions de performance de la réfrigération!
n Installez le réfrigérateur afin qu'il ne soit pas
exposé aux éclaboussures d'eau. Veillez
également à ce que l'appareil ne soit pas
exposé à la pluie avant et pendant l'installation.
n L'alimentation en tension doit être confor-
me à la valeur indiquée sur la plaque signalétique. Risque de dommages si les valeurs
sont différentes!
n L'alimentation en courant doit être assurée
à l'aide d'une prise de courant reliée à la
terre, conformément au règlement, ou d'un
raccordement fixe relié à la terre.
n La ligne électrique doit être muni d'un fusi-
ble ou un un coupe-circuit automatique.
n Le câble de raccordement au réseau ne
doit entrer en contact, ni avec les parties
chaudes du groupe ou du brûleur, ni avec
les angles saillants.
n Les bouteilles de gaz doivent être obligatoi-
rement posées debout.
n Installez la bouteille de gaz à un emplace-
ment bien ventilé.
n Installez la bouteille de gaz de telle manière
qu'elle soit facilement reconnaissable en
cas d'incendie.
n La distance maximum de la bouteille de gaz
par rapport à l'appareil ne doit pas dépasser 1,5 m.
n Seuls les types de bouteilles et les disposi-
tifs de réglage de pression valables peuvent être utilisés dans les pays respectifs.
4.1.1 Connection électrique
4.1.2 Installation de la bouteille de gaz
La fiche secteur doit être accessible.
ATTENTION!
Si la ligne de branchement est endommagée, celle-ci doit être remplacée par le
service clientèle de Dometic ou tout autre
personnel également qualifié afin d'éviter
les éventuels dangers.
ATTENTION!
Page 54

12
Installation
4.1.3 Connection de gaz
n Le raccordement professionnel du réfrigé-
rateur doit être réalisé par un technicien
spécialisé et autorisé conformément aux
réglementations techniques en matière de
gaz liquide.
n Les directives nationales valables respecti-
ves pour l'utilisation d'appareils fonctionnant avec du gaz liquide doivent être
respectées.
- Norme européenne EN 732
n Un régulateur de pression (1), Fig. 3, réglé
de manière fixe (réducteur de pression) doit
être installé dans la conduite d'amenée de
l'appareil. Il est interdit de faire fonctionner
le réfrigérateur avec une autre pression que
celle indiquée sur la plaque signalétique.
n Le réfrigérateur doit être obligatoirement
raccordé à la bouteille de gaz avec un tuyau
souple de sécurité.
n Choisissez une longueur suffisante afin de
raccorder le tuyau souple sans être obligé
de le plier. Le tuyau souple ne doit pas
dépasser une longueur de 1,5 m.
n Le raccordement du tuyau souple est réali-
sé avec des pinces pour tuyau / des colliers.
n Dans tous les cas, les conditions nationales
respectives doivent être respectées pour le
raccordement du tuyau souple.
n Suite au raccordement à la bouteille de gaz,
un test d'étanchéité doit être réalisé au
niveau de toutes les connexions. Un test de
la flamme du brûleur doit être également
effectué. Pour le test d'étanchéité, utilisez
un spray de recherche de fuite ou un agent
moussant. Après ouverture de la valve de la
bouteille, contrôlez les points de raccordement quant à la formation d'éventuelles
bulles.
1
Valve de bouteille
Fig. 4
Fig. 3
Fig. 5 Fig. 6
SW 14
SW 17
Detail
2. Ajustez et vissez la
poignée sur la porte.
1. Points de fixation:
utilisez le gabarit (1)
à échelle.
(voir "Annexe")
3. Posez le recouvrement et enfoncez-le
fermement.
4.2 Montage de la poignée de la
porte
1
Ne contrôlez jamais l'appareil et l'étanchéité du tuyau avec une flamme nue !
DANGER !
Le réfrigérateur doit fonctionner exclusivement avec du gaz liquéfié (propane, butane)
En aucun cas gaz de ville ou gaz naturel)!
Gabarit
1
Ø 2mm
max
1.1 Nm!
Page 55

13
5.2 Entretien
Utilisation du réfrigérateur
n Le brûleur à gaz doit être nettoyé en cas de
besoin ou libéré d'impuretés au moins une
fois par an. Conservez les justificatifs de
travaux d'entretien effectués sur votre réfrigérateur.
n Nous conseillons de faire une inspection
après une période prolongée de mise hors
service du véhicule. Veuillez pour cela prendre contact avec notre service après-vente.
Vérifiez que la puissance indiquée sur l'étiquette correspond à la puissance du réseau
avant d'utilisation. Dans le cas contraire, ne
procédez pas au branchement et prenez contact avec votre revendeur !
L'aggrégat est silencieux.
Lors de la première mise en service de l'appa-
reil, il se peut qu'une odeur se dégage; elle
disparaîtra en quelques heures. Veillez à bien
aérer la pièce.
La température de fonctionnement est atteinte
après quelques heures, mais le compartiment congélateur du réfrigérateur doit être
froid environ une heure après la mise en service.
Le réfrigérateur est conçu pour fonctionner
selon trois sources d'énergie :
n Tension secteur (230V CA)
n Gaz (gaz liquéfié propane/butane)
Vous pouvez sélectionner la source d'énergie
souhaitée en utilisant le commutateur de
sélection de la source d'énergie (Fig.7) .
5.1 Nettoyage
Avant de mettre en service votre réfrigérateur,
nous vous recommandons de le nettoyer à
l'intérieur et à l'extérieur et d'effectuer des nettoyages réguliers par la suite. Pour cela, utilisez un chiffon doux et de l'eau tiède,
mélangée à un produit de nettoyage doux.
Rincez ensuite l'appareil à l'eau claire et
séchez bien.
Pour éviter toute modification des matériaux
n'utilisez pas de savon, ni de nettoyant corrosif, granuleux ou sodé. Ne pas mettre en contact le joint de la porte avec de l'huile ou de la
graisse.
5.0 Utilisation du réfrigérateur
5.3 Fonctionnement à l'électricité
Risque de dommages si les valeurs sont
différentes!
ATTENTION!
5.4 Fonctionnement au gaz
n Le réfrigérateur doit être alimenté exclusi-
vement avec du gaz liquéfié (propane,
butane), en aucun cas avec du gaz de ville
ou du gaz naturel.
n A une altitude supérieure à 1 000 m au-des-
sus du niveau de la mer, des dérangements
physiques conditionnels peuvent se produire lors de l'amorçage du gaz (il ne s'agit
pas d'un dysfonctionnement !).
n Lors de la première mise en service ainsi
qu'après changement de bouteille de gaz,
les conduites de gaz peuvent contenir de
l'air. En mettant brièvement le réfrigérateur
en service, les conduites de gaz sont purgées. Le gaz s'allume sans délai.
n Tous les réfrigérateurs avec allumage
manuel sont équipés d'un dispositif de
sécurité automatique qui interrompt l'alimentation en gaz après env. 30 secondes,
lorsque la flamme s'est éteinte.
Le groupe frigorifique en service devient
très chaud. Protégez-vous avant de toucher aux pièces conductrices de chaleur !
ATTENTION!
i
Page 56

14
Utilisation du réfrigérateur
Remarques
Vous pouvez sélectionner la source d'énergie
souhaitée en tournant le commutateur de
sélection de la source d'énergie (1). Ce commutateur possède quatre positions :
n Arrêt (1.) + (3.)
n Tension secteur (230V CA) (2.)
n Gaz (gaz liquéfié propane/butane) (4.)
5.5.1 Description des éléments de
commande
Sélection manuelle de l'énergie / allumage
manuel , allumeur piézo :
5.5 Utilisation
1 = Commutateur de sélection de la source
d'énergie
2 = Thermostat
3 = Allumeur piézo (gaz)
4 = Indicateur de flamme (galvanomètre)
Fig. 7
2
1
3
4
5.5.3 Fonctionnement au gaz liquéfié
Avant de mettre en service le réfrigérateur
au mode gaz :
n Ouvrez la vanne de la bouteille de gaz.
3. Appuyez sur le bouton d'allumage piézo (3)
à des intervalles de 1-2 seconde.
4. L'indicateur du galvanomètre (4) passe du
côté vert lorsque la flamme a été allumée.
Le réfrigérateur est en service. Maintenez le
bou ton de réglage (2) enfoncé encore env.
15 s puis relâchez-le.
Fig. 13Fig. 12
5.5.2 Fonctionnement à l'électricité
Fig. 9
Fig. 10 Fig. 11
Pour allumer l'appareil, tournez le commutateur de sélection
d'énergie (1) vers la
droite sur la position :
pour fonctionnement sur
230V.
1. Positionnez le commutateur rotatif de sélec
tion (1) sur la position :
2. Tournez le régulateur de seuil de températu-
re (2) vers la droite et appuyez dessus.
Tenez le régulateur enfoncé.
1
1
2
2 3 4
pour fonctionnement au gaz.
Fig. 8
1
1 2
3
4
1.
2.
3.
4.
Page 57

15
Utilisation du réfrigérateur
5.5.4 Réglage de la température de
réfrigération
À l'aide du bouton
tournant (2) , sélectionnez la température
de la chambre frigorifique. L'échelle commence avec la position MIN (barre étroite =
température la plus
chaude) et s'étend jusqu'à la position MAX
(barre large = température la plus froide).
Veuillez noter qu'aucune valeur de température absolue n'est affectée aux seuils de température. Pour une température extérieure comprise entre +15°C et +25°C, choisissez la température moyenne (3). L'appareil se trouve
alors en mesure de fournir une performance
optimale.
5.7 Positionnement des
clayettes
Les clayettes sont facilement détachables en
les soulevant légèrement de leur coulisse et
peuvent être placées au choix.
Fig. 19
Fig. 20
Afin d'agrandir la chambre de refroidissement,
le compartiment congélateur peut être enlevé
1. Déverrouillez le compartiment congélateur
des deux côtés.
2. Retirez le compartiment congélateur.
Stockez le compartiment congélateur dans un
endroit sûr pour éviter tout endommagement.
Si vous avez retiré le compartiment congélateur, vous pouvez ajouter une clayette supplémentaire (3.). Les clayettes sont disponibles
comme équipement optionnel.
5.8 Compartiment congélateur
amovible
L'éclairage intérieur sur piles est commandé
par un contact de porte. Pour remplacer les
piles (3 x 1,5 V AAA/R3/Micro), retirer le boîtier
d'éclairage et ouvrir le compartiment à piles en
utilisant un tournevis approprié.
Fig. 14
Fig. 15
Fig. 16
Fig. 17
Réglage température
moyenne
2
3
1
Fig. 18
4
2
3
5.6 Remplacer les piles de
l'éclairage intérieur
i
Page 58

16
Utilisation du réfrigérateur
5.9 Stockage des aliments et
préparation des glaçons
5.9.1 Stockage des aliments dans la
chambre de réfrigération
5.9.2 Stockage des aliments dans le
congélateur
n Ne conservez pas de boissons gazeuses
dans le congélateur.
n Le congélateur est prévu pour la préparati-
on des glaçons et la conservation à court
terme des aliments congelés. Il n'est pas
adapté à la congélation d'aliments.
n Mettez votre réfrigérateur en marche envi-
ron 12 heures avant de le remplir.
n Ne stockez que des denrées refroidies à
l'avance. Lors des achats et du transport,
veillez à ce que les denrées soient bien fraîches et refroidies. Utilisez des sacs thermo.
n Lors du retrait de denrées, veillez à refer-
mer rapidement la porte du réfrigérateur.
n Il convient d'emballer les denrées dans des
boîtes de conservation, du papier alu ou
dufilm transparent et de les stocker séparément afin d'éviter qu'elles ne se dessèchent ou ne dégagent des odeurs.
n Laissez d'abord refroidir les denrées avant
de les placer au réfrigérateur.
n Ne pas stocker de denrées contenant des
gaz volatiles et inflammables dans le réfrigérateur.
n Ne pas surcharger les clayettes et compar-
timents pour ne pas entraver la circulation
d'air interne.
n Laisser un espace d'env. 10 mm entre les
denrées réfrigérées et l'évaporateur (" ailettes de refroidissement ").
n Veiller à ne pas obstruer la circulation d'air
du groupe frigorifique. Les grilles d'aération ne doivent pas être recouvertes.
Importantes recommandations d'hygiène:
n Ne stockez que des denrées emballées.
n Certaines denrées particulièrement délica-
tes doivent être stockées uniquement dans
des récipients fermés.
n Ne pas déposer de couverts ou de vaissel-
le utilisés dans le réfrigérateur (verres, casseroles…).
n Nettoyer le réfrigérateur régulièrement à
l'aide d'un chiffon doux, d'eau tiède et d'un
produit détergent non agressif.
n Puis rincer le réfrigérateur à l'eau claire, et
sécher consciencieusements.
Fig. 36
L'indicateur de température (A) et l’autocollant (B) indiquent la zone fraicheur plus.
L'indicateur montre que la température correcte est atteinte dans la zone désirée.
L'affichage indique alors « OK » ( temps de
réaction à peu près 30 min.). Si l'affichage
n'apparaît pas, cela indique que la température moyenne dans cette zone est trop haute.
Tournez alors le bouton du thermostat de
manière à faire baisser la température à l'intérieur du réfrigérateur.
B
Le conseil ne concerne que des produits
très périssables !
Produits moins périssables (p.e. jus de
fruits) peuvent être stockés à l’emplacement de votre choix.
Après avoir stocké des denrées fraîches,
après avoir retiré plusieurs fois de suite des
denrées du réfrigérateur ou laissé la porte
ouverte ainsi que des températures exterieures de plus de 32°C, il se peut que l'affichage
« OK » n'apparaisse pas ou qu'il s'éteigne.
A
i
Page 59

17
Utilisation du réfrigérateur
Le système n'est pas conçu pour garantir
une régulation uniforme de la température
du congélateur si le réfrigérateur est soumis pendant une période prolongée à des
températures ambiantes inférieures à
+10°C. Ceci peut éventuellement entraîner
une hausse de température dans le compartiment congélateur, ayant pour effet la
décongélation des produits stockés à l'intérieur.
5.9.4 Préparation des glaçons
Nous vous conseillons de préparer vos glaçons la nuit. En effet, le réfrigérateur est moins
chargé et le groupe frigorifique a plus de réserves.
1. Remplir le bac à glaçons avec de l'eau
potable.
2. Placer le bac à glaçons dans le congélateur
Fig. 23
Fig. 22
Fig. 21
Utiliser uniquement de l'eau potable !
AVERTISSEMENT!
5.10 Mise hors-service
n Positionnez le commutateur de sélection
de la source d'énergie (1) sur " Arrêt".
L'appareil est déconnecté.
n Si le réfrigérateur est mis hors service sur
une période prolongée, fermez le robinet
d'arrêt à bord et la valve de bouteille à gaz.
n Laissez la porte entreouverte afin d'éviter
la formation de moisissures.
n Débloquez le dispositif de verrouillage de
porte en appuyant et en le tirant vers
l'avant. Si la porte est fermée, le réfrigérateur restera néanmoins entrouvert pour éviter la formation de moisissures.
Fig. 24
Fig. 25
1
Arrêt
Arrêt
5.9.3 Compartiments du réfrigérateur
1
2
3
4
5
6
7
8
Freezer : denrées déjà congelées (pro-
duits surgelés)
Compartiment du haut :
plats cuisinés
Compartiment du milieu :
produits laitiers, plats cuisinés
Compartiment du bas :
viande, poisson, produits à décongeler
Bac à légumes :
salade, légumes, fruits
Etagère de porte du haut :
œufs, beurre
Etagère de porte du milieu :
conserves, sauces, ketchup, confiture
Etagère de porte du bas (casier à bouteilles) :
boissons en bouteilles ou en cartons
2
1
3
4
5
6
7
8
Page 60

18
Utilisation du réfrigérateur
Fig. 32
Fig. 33
Fig. 30
5.12 Changement de la butée de
porte
1
3
Fig. 31
2
4
S'il est nécessaire de pencher ou de coucher
l'appareil sur le côté, attendez une heure avant
de mettre le réfrigérateur en service. Le liquide
frigorifique est de nouveau collecté dans le
compartiment de réserve du groupe frigorifique. Un fonctionnement correct de l'appareil
est ainsi garanti.
Fig. 29
2
3
1
4
5.11 Dégivrage
Avec le temps, du givre se forme sur les ailettes de refroidissement à l'intérieur du réfrigérateur. Le dépôt de givre peut être plus épais
sur un côté, ce qui ne signifie pas qu'il y a dysfonctionnement. Lorsque la couche de givre
atteint environ 3 mm, il faut dégivrer le réfrigérateur.
n Déconnectez le réfrigérateur, comme indi-
qué à la section " Mise hors service ".
n Retirez tous les aliments et le bac à gla-
çons.
n Laissez la porte du réfrigérateur ouverte
pour y laisser l'air circuler et éviter la formation de moisissures.
n Après le dégivrage, essuyez avec un chiffon
sec les deux compartiments du réfrigérateur (le bac de congélation et les ailettes de
refroidissement sont libérés du givre).
Remarque: L'eau de dégivrage du compartiment réfrigérateur est recueillie dans un bac
collecteur, situé à l'arrière de l'appareil, d'où
elle s'évapore.
Ne jamais enlever la couche de givre en
utilisant la force, ni accélérer le dégivrage
en utilisant une source de chaleur !
ATTENTION!
Fig. 26
Fig. 27
1
2
Fig. 28
2
position normale
arrêt de porte,
hors service
i
Page 61

19
Utilisation du réfrigérateur
n Ouvrez la porte, desserrez la vis de la char-
nière et conservez-la.
n Retirez la porte en la tirant vers l'avant.
n Desserrez la tige de la charnière et vissez
de l'autre côté.
n Déplacez la rondelle d'écartement sur la
charnière basse.
n Poussez la porte dans la tige de charnière
supérieure et posez-la sur la charnière inférieure.
n Serrez la vis de la charnière.
n Veillez à ce que la porte puisse être ouver-
te et fermée sans problèmes et que le joint
d'étanchéité de la porte soit correctement
posé sur le pourtour.
5.13 Changement de la plaque
de décoration
Fig. 36
Fig. 35
Plaque de décoration avec cadre
2
1
2
3
ATTENTION!
Dimensions de la plaque de décoration :
1169,5 +0/-1 mm 507,5 +0/-1 mm max. 1.5 +0/-1 mm
Hauteur Largeur Epaisseur
RGE 3000
n Démontez la poignée de porte en premier
(si elle est montée).
n Enlevez en tirant le listeau latéral (1) de la
porte (le listeau est posé sans être vissé).
n Dégagez en poussant la plaque de décora-
tion (2) de la porte, engagez la nouvelle
plaque de décoration et remettez le listeau
(1) en place.
Fig. 34
2
1
1
Page 62

20
Utilisation du réfrigérateur
5.14 Conseils en cas de panne
Dysfonctionnement : Le réfrigérateur ne refroidit pas suffisamment.
- Le groupe frigorifique n'est pas suffisamment
ventilé.
- Le réglage du thermostat est trop bas.
- L'évaporateur est recouvert d'une épaisse couche de glace.
- Trop d'aliments chauds ont été stockés en peu
de temps.
- L'appareil n'est pas encore assez longtemps en
service.
- La température ambiante est trop élevée.
- Vérifier si la grille d'aération d'aggrégat n'est pas
couverte.
- Réglez le thermostat sur une position plus éle
vée.
- Vérifiez si la porte du réfrigérateur ferme correctement.
- Laissez d'abord refroidir les aliments réchauffés
avant de les mettre au réfrigérateur.
- Vérifiez si la chambre de réfrigération est suffisamment froide après 4 à 5 h.
-
Aérer la pièce.
Causes possibles
Marche à suivre
Dysfonctionnement : Le réfrigérateur ne fonctionne pas au mode gaz.
- La bouteille de gaz est vide.
- Le dispositif d'arrêt placé en amont est-il ouvert.
- La conduite contient-elle de l'air.
- Remplacer la bouteille.
- Ouvrir le dispositif d'arrêt.
- Eteindre l'appareil et le rallumer. Répéter l'opération 3-4 fois si nécessaire.
Causes possibles
Marche à suivre
Dysfonctionnement : Le réfrigérateur ne refroidit pas au mode 230V.
- Le fusible est défectueux.
- Le réfrigérateur n'est pas connecté au réseau
électrique.
- Elément chauffant défectueux.
- Remplacer le fusible.
- Etablir la connexion au réseau électrique.
- Veuillez informer votre service après-vente
Dometic.
Causes possibles
Marche à suivre
Avant d'appeler le service après-vente agréé,
veuillez vérifier si :
n les instructions à la section " Utilisation du
réfrigérateur " ont été suivies correctement;
n le réfrigérateur est en position horizontale ;
n le réfrigérateur peut fonctionner avec n'im-
porte quelle source d'énergie disponible.
Page 63

1
MBA 11/2012
N 1
Numero di modello .............................................
Numero di prodotto .............................................
Numero di serie .............................................
Prendere nota dei seguenti dati :
RGE 3000
Istruzioni per l'uso
Frigorifero ad assorbime n to
IT
Italiano
Page 64

2
1.0 Generalità . . . . . . . . . . . . . . . . . . . . . . . . . . . . . . . . . . . . . . . . . . . . . 4
1.1 Introduzione . . . . . . . . . . . . . . . . . . . . . . . . . . . . . . . . . . . . . . . . . . . . . . . . . . . . . . . . . . . . . . . . 4
1.2 Avvertenze relative a queste istruzioni per l'uso . . . . . . . . . . . . . . . . . . . . . . . . . . . . . . . . . . . . 4
1.3 Tutela dei diritti d'autore . . . . . . . . . . . . . . . . . . . . . . . . . . . . . . . . . . . . . . . . . . . . . . . . . . . . . . 4
1.4 Spiegazione dei simboli utilizzati . . . . . . . . . . . . . . . . . . . . . . . . . . . . . . . . . . . . . . . . . . . . . . . . 4
1.5 Garanzia . . . . . . . . . . . . . . . . . . . . . . . . . . . . . . . . . . . . . . . . . . . . . . . . . . . . . . . . . . . . . . . . . . . 5
1.6 Limitazione della responsabilità . . . . . . . . . . . . . . . . . . . . . . . . . . . . . . . . . . . . . . . . . . . . . . . . . 5
1.7 Servizio Clienti . . . . . . . . . . . . . . . . . . . . . . . . . . . . . . . . . . . . . . . . . . . . . . . . . . . . . . . . . . . . . . 5
1.8 Pezzi di ricambio . . . . . . . . . . . . . . . . . . . . . . . . . . . . . . . . . . . . . . . . . . . . . . . . . . . . . . . . . . . . 6
1.9 Consigli sull'ambiente . . . . . . . . . . . . . . . . . . . . . . . . . . . . . . . . . . . . . . . . . . . . . . . . . . . . . . . . 6
1.9.1 Rottamazione . . . . . . . . . . . . . . . . . . . . . . . . . . . . . . . . . . . . . . . . . . . . . . . . . . . . . . . . . . . . . . . . . . . . . . . 6
1.9.2 Consigli sul risparmio energetico . . . . . . . . . . . . . . . . . . . . . . . . . . . . . . . . . . . . . . . . . . . . . . . . . . . . . . . . 6
1.10 Dichiarazione di conformità . . . . . . . . . . . . . . . . . . . . . . . . . . . . . . . . . . . . . . . . . . . . . . . . . . . . 6
2.0 Norme di sicurezza . . . . . . . . . . . . . . . . . . . . . . . . . . . . . . . . . . . . . 7
2.1 Uso conforme alle norme . . . . . . . . . . . . . . . . . . . . . . . . . . . . . . . . . . . . . . . . . . . . . . . . . . . . . . 7
2.2 Responsabilità dell'utente . . . . . . . . . . . . . . . . . . . . . . . . . . . . . . . . . . . . . . . . . . . . . . . . . . . . . 7
2.3 Protezione dei bambini per lo smaltimento dell'apparecchio . . . . . . . . . . . . . . . . . . . . . . . . . . 7
2.4 Lavori e controlli sul frigorifero . . . . . . . . . . . . . . . . . . . . . . . . . . . . . . . . . . . . . . . . . . . . . . . . . . 7
2.5 Informazioni sul refrigerante . . . . . . . . . . . . . . . . . . . . . . . . . . . . . . . . . . . . . . . . . . . . . . . . . . . . 8
2.6 Funzionamento del frigorifero a gas . . . . . . . . . . . . . . . . . . . . . . . . . . . . . . . . . . . . . . . . . . . . .8
2.7 Funzionamento con corrente elettrica . . . . . . . . . . . . . . . . . . . . . . . . . . . . . . . . . . . . . . . . . . . . 8
2.8 Norme di sicurezza per conservare i prodotti alimentari . . . . . . . . . . . . . . . . . . . . . . . . . . . . . . 9
2.9 Sostituzione delle pile . . . . . . . . . . . . . . . . . . . . . . . . . . . . . . . . . . . . . . . . . . . . . . . . . . . . . . . . 9
3.0 Descrizione del modello . . . . . . . . . . . . . . . . . . . . . . . . . . . . . . . . . 10
3.1 Nome del modello . . . . . . . . . . . . . . . . . . . . . . . . . . . . . . . . . . . . . . . . . . . . . . . . . . . . . . . . . . . 10
3.2 Targhetta indicatrice del frigorifero . . . . . . . . . . . . . . . . . . . . . . . . . . . . . . . . . . . . . . . . . . . . . . 10
3.3 Dati tecnici . . . . . . . . . . . . . . . . . . . . . . . . . . . . . . . . . . . . . . . . . . . . . . . . . . . . . . . . . . . . . . . . . 10
3.4 Spiegazione del frigorifero . . . . . . . . . . . . . . . . . . . . . . . . . . . . . . . . . . . . . . . . . . . . . . . . . . . . . 10
4.0 Installazione . . . . . . . . . . . . . . . . . . . . . . . . . . . . . . . . . . . . . . . . . . 11
4.1 Installazione e allacciamento . . . . . . . . . . . . . . . . . . . . . . . . . . . . . . . . . . . . . . . . . . . . . . . . . . . 11
4.1.1 Collegamento elettrica . . . . . . . . . . . . . . . . . . . . . . . . . . . . . . . . . . . . . . . . . . . . . . . . . . . . . . . . . . . . . . . . 11
4.1.2 Installazione della bombola di gas . . . . . . . . . . . . . . . . . . . . . . . . . . . . . . . . . . . . . . . . . . . . . . . . . . . . . . . 11
4.1.3 Installazione a gas . . . . . . . . . . . . . . . . . . . . . . . . . . . . . . . . . . . . . . . . . . . . . . . . . . . . . . . . . . . . . . . . . . . 12
4.2 Montare la maniglia della porta . . . . . . . . . . . . . . . . . . . . . . . . . . . . . . . . . . . . . . . . . . . . . . . . . 12
5.0 Funzionamento del frigorifero . . . . . . . . . . . . . . . . . . . . . . . . . . . . . 13
5.1 Pulizia . . . . . . . . . . . . . . . . . . . . . . . . . . . . . . . . . . . . . . . . . . . . . . . . . . . . . . . . . . . . . . . . . . . . . 13
5.2 Manutenzione . . . . . . . . . . . . . . . . . . . . . . . . . . . . . . . . . . . . . . . . . . . . . . . . . . . . . . . . . . . . . . . 13
5.3 Funzionamento con corrente elettrica . . . . . . . . . . . . . . . . . . . . . . . . . . . . . . . . . . . . . . . . . . . . 13
5.4 Funzionamento a gas . . . . . . . . . . . . . . . . . . . . . . . . . . . . . . . . . . . . . . . . . . . . . . . . . . . . . . . . . 13
5.5 Funzionamento . . . . . . . . . . . . . . . . . . . . . . . . . . . . . . . . . . . . . . . . . . . . . . . . . . . . . . . . . . . . . . 14
5.5.1 Spiegazione degli elementi di comando . . . . . . . . . . . . . . . . . . . . . . . . . . . . . . . . . . . . . . . . . . . . . . . . . . 14
5.5.2 Funzionamento con corrente elettrica . . . . . . . . . . . . . . . . . . . . . . . . . . . . . . . . . . . . . . . . . . . . . . . . . . . . 14
5.5.3 Funzionamento a gas (liquido) . . . . . . . . . . . . . . . . . . . . . . . . . . . . . . . . . . . . . . . . . . . . . . . . . . . . . . . . . . 14
5.5.4 Regolazione della temperatura nel vano frigorifero . . . . . . . . . . . . . . . . . . . . . . . . . . . . . . . . . . . . . . . . . . 15
5.6 Sostituzione delle pile dell'illuminazione interna . . . . . . . . . . . . . . . . . . . . . . . . . . . . . . . . . . . . 15
5.7 Sistemare i ripiani . . . . . . . . . . . . . . . . . . . . . . . . . . . . . . . . . . . . . . . . . . . . . . . . . . . . . . . . . . . . 15
5.8 Scomparto surgelati estraibile . . . . . . . . . . . . . . . . . . . . . . . . . . . . . . . . . . . . . . . . . . . . . . . . . . 15
Sommario
Page 65

3
5.9 Sistemazione degli alimenti in frigorifero e preparazione dei cubetti di ghiaccio . . . . . . . . . . . 16
5.9.1 Conservare gli alimenti nel vano frigorifero . . . . . . . . . . . . . . . . . . . . . . . . . . . . . . . . . . . . . . . . . . . . . . . . 16
5.9.2 Conservazione di alimenti nel comparto del congelatore . . . . . . . . . . . . . . . . . . . . . . . . . . . . . . . . . . . . . 16
5.9.3 Scomparti frigorifero . . . . . . . . . . . . . . . . . . . . . . . . . . . . . . . . . . . . . . . . . . . . . . . . . . . . . . . . . . . . . . . . . . 16
5.9.4 Produzione di cubetti di ghiaccio . . . . . . . . . . . . . . . . . . . . . . . . . . . . . . . . . . . . . . . . . . . . . . . . . . . . . . . . 17
5.10 Messa fuori servizio . . . . . . . . . . . . . . . . . . . . . . . . . . . . . . . . . . . . . . . . . . . . . . . . . . . . . . . . . . 17
5.11 Sbrinamento . . . . . . . . . . . . . . . . . . . . . . . . . . . . . . . . . . . . . . . . . . . . . . . . . . . . . . . . . . . . . . . . 17
5.12 Cambio riscontro dello sportello . . . . . . . . . . . . . . . . . . . . . . . . . . . . . . . . . . . . . . . . . . . . . . . . 18
5.13 Sostituzione della placca decorativa . . . . . . . . . . . . . . . . . . . . . . . . . . . . . . . . . . . . . . . . . . . . . 18
5.14 Risoluzione dei problemi . . . . . . . . . . . . . . . . . . . . . . . . . . . . . . . . . . . . . . . . . . . . . . . . . . . . . . 20
5.15 Sagoma (Supplemento)
© Dometic GmbH - 2012 - Si riservano modifiche
Dometic GmbH
In der Steinwiese 16
D-57074 Siegen
www.dometic.com
Page 66

4
1.0 Generalità
Generalità
Con questo frigorifero ad assorbimento della
Dometic avete fatto una buona scelta. Siamo
sicuri che sarete completamente soddisfatti
del vostro nuovo frigorifero, sotto tutti i punti di
vista. Il frigorifero, che funziona silenziosamente, è prodotto in base a standard di alta
qualità e garantisce un efficiente utilizzo delle
risorse e dell'energia elettrica per tutta la durata del suo ciclo vitale, durante la produzione,
durante l'uso e quando viene rottamato.
1.1 Introduzione
Dati, testi e illustrazioni di queste istruzioni
d'uso sono protetti dai diritti d'autore e sono
soggetti ai diritti di protezione industriale.
Nessuna parte di queste istruzioni può essere
riprodotta,copiata o altrimenti utilizzata senza
l'autorizzazione della Dometic GmbH, Siegen.
1.3 Tutela dei diritti d'autore
Prima di mettere in funzione il frigorifero,
leggere attentamente queste istruzioni per
l'uso.
Queste istruzioni vi forniscono le necessarie
indicazioni per l'uso corretto del vostro frigorifero. Fate particolarmente attenzione alle
norme di sicurezza. L'osservanza delle
avvertenze e delle istruzioni sul modo di procedere è importante per l'impiego sicuro del
vostro frigorifero e per proteggere da danni voi
e il frigorifero. Per poter attuare un provvedimento è necessario aver capito quanto è stato
letto.
Conservate accuratamente queste istruzioni per l'uso accanto al frigorifero in modo
da poterle utilizzare in qualsiasi momento.
1.2 Avvertenze relative a queste
istruzioni per l'uso
1.4 Spiegazione dei simboli
utilizzati
Le avvertenze sono contrassegnate da simboli. Un testo integrativo vi spiega il grado di
pericolo.
Osservate molto accuratamente questi
segnali di avvertimento. In questo modo
potete proteggere da danni voi, altre persone e l'apparecchio.
PERICOLO questo simbolo indica una situazio-
ne immediata di pericolo che può causare la
morte o ferite gravi in caso di mancata osservanza delle istruzioni date.
PERICOLO!
AVVERTIMENTO questo simbolo indica una
situazione potenziale di pericolo che può causare la morte o ferite gravi in caso di mancata
osservanza delle istruzioni date.
AVVERTIMENTO!
ATTENZIONE questo simbolo indica una situa-
zione potenziale di pericolo che, può causare
ferite leggere o di media gravità in caso di mancata osservanza delle istruzioni date.
ATTENZIONE!
ATTENZIONE questo simbolo indica una situa-
zione potenziale di pericolo che, può causare
ferite leggere o di media gravità in caso di mancata osservanza delle istruzioni date.
ATTENZIONE!
Avvertenze
Page 67

5
Generalità
Informazioni
INFORMAZIONE questo simbolo vi fornisce
ulteriori e utili indicazioni sul modo di procedere con il vostro frigorifero
Indicazione per l'ambiente
INDICAZIONE PER L'AMBIENTE questo sim-
bolo vi fornisce indicazioni utili sul risparmio di
energia e lo smaltimento dell'apparecchio.
I termini di garanzia sono in conformità con la
direttiva comunitaria 44/1999/CE e le normali
condizioni applicabili per le nazioni in questione. Per la garanzia o per operazioni di manutenzione, contattare il nostro centro Servizio
clienti. Eventuali danni causati da uso improprio non sono coperti dalla garanzia. Qualsiasi
modifica all'apparecchio o l'uso di pezzi di
ricambio non originali Dometic nonché
l'inosservanza delle garanzia istruzioni di
installazione e d'uso rende nulla la garanzia ed
esonera da ogni responsabilità.
1.5 Garanzia
Tutti i dati e le indicazioni di queste istruzioni
per l'uso sono stati stabiliti tenendo conto
delle norme e delle disposizioni in vigore, nonché secondo lo stato dell'arte. La Dometic si
riserva di apportare in qualsiasi momento delle
modifiche sul prodotto che siano opportune
per migliorare sia il prodotto stesso che la
sicurezza.Dometic übernimmt keine Haftung
1.6 Limitazione della responsabilità
La Dometic offre una rete di Servizio
Assistenza a livello mondiale. Potete trovare i
numeri di telefono dei centri di Servizio
Assistenza autorizzati sull'opuscolo
EuroService Network accluso ad ogni frigorifero. Anche in Internet potete trovare il centro
di Servizio Assistenza più vicino cliccando su
www.dometic.com. Quando si contatta il
Servizio clienti, indicare il modello, il numero di
prodotto e il numero di serie, insieme al codice
MLC, se applicabile. Queste informazioni si
trovano sulla targhetta dei dati all'interno del
frigorifero. Vi raccomandiamo di riportare questi dati nel campo previsto sul frontespizio di
queste istruzioni.
1.7 Servizio Clienti
La Dometic non assume nessuna responsabi-
lità nel caso di:
n mancata osservanza delle istruzioni per
l'uso,
n impiego non conforme alle norme,
n uso di pezzi di ricambio non originali,
n modifiche e interventi sull'apparecchio
n effetto di influenze ambientali, come
- variazioni di temperatura
- umidità atmosferica
1.8 Pezzi di ricambio
I pezzi di ricambio possono essere ordinati in
tutta Europa tramite il centro di Servizio clienti.
Se vi rivolgete al Call Center vogliate sempre
indicare il modello e il numero del prodotto!
Queste informazioni si trovano sulla targhetta
dei dati all'interno del frigorifero.
i
Page 68

6
1.10 Dichiarazione di conformità
n Ad una temperatura ambiente media di
circa 25°C, è sufficiente regolare il termostato ad un valore medio per far funzionare
correttamente il frigorifero.
n Se possibile, conservare sempre gli alimen-
ti raffreddati e confezionati.
n Non esporre il frigorifero alla luce diretta del
sole o ad altre fonti di calore (ad es. riscaldamento).
n Garantire la libera circolazione dell'aria del
gruppo frigorifero.
1.9.2 Consigli sul risparmio energetico
n Sistemare i ripiani nel vano frigorifero in
maniera uniforme per ottenere il massimo
rendimento energetico.
n Non riempire eccessivamente i ripiani e i
cassetti per consentire una corretta circolazione dell'aria all'interno.
n Lasciare dello spazio libero (circa 10 mm)
tra i prodotti refrigerati e l'evaporatore
posteriore ("alette di raffreddamento")
n Sbrinare il frigo con regolarità fa risparmia-
re energia (consultare il cap.
"Sbrinamento").
n Quando si preleva un alimento, aprire solo
brevemente la porta del frigorifero.
n Mettere il frigorifero in funzione 12 ore
prima di utilizzarlo.
- Low Voltage Directive 73/23/EEC and the
Amendment to LVD 2006/95EC
- EMC Directive 2004/108/EC
- RoHS Directive 2002/95EC
Directives
Type family : C 40/110
- EN 60335-1;(IEC 60335-1; 4ed., Am.1, Am. 2)
- EN 60335-2-24;03 (IEC 60335-2-24;6 ed.,
Am.1, Am. 2)
- EN 60335-2-102;06
- EN 61000-3-2;00, A1, A2, A14
- EN 61000-3-3;95,A1
- EN 50366;2003+A1
- EN 55014-1;07,A1,A2
- EN 55014-2;01,A1
Standards
Potete richiedere la dichiarazione di conformità anche direttamente a Dometic GmbH,
Siegen.
Generalità
L'ammoniaca (un composto naturale di idrogeno e azoto) è usata nell'unità di raffreddamento come refrigerante. Il ciclopentano, non
dannoso per l'ozono, è usato come propellente per la produzione della schiuma di isolamento PU.
1.9 Consigli sull'ambiente
Per far in modo che i materiali riciclabili siano
riutilizzati, gli stessi dovrebbero essere inviati
al centro di raccolta locale. L'apparecchio
dovrebbe essere trasferito a una azienda specializzata nell'eliminazione dei rifiuti, in modo
che i componenti riciclabili siano riutilizzati e
gli altri componenti siano eliminati secondo le
leggi vigenti. Per l'eliminazione in modo ecologico del refrigerante da tutte le unità del frigorifero di assorbimento, deve essere usato un
adeguato impianto di eliminazione.
Gli apparecchi contrassegnati da
questo simbolo devono essere
consegnati al centro di raccolta
locale preposto allo smaltimento
di apparecchiature elettriche ed
elettroniche. Questo prodotto non
deve essere smaltito nei rifiuti domestici. I frigoriferi Dometic sono provvisti del simbolo
sulla targhetta all’interno dell’apparecchio.
1.9.1 Rottamazione
i
Page 69

7
2.0 Norme di sicurezza
Il frigorifero non è stato ideato per la conservazione conforme di medicinali. Fate
attenzione alle indicazioni nel foglietto
illustrativo dei medicinali.
AVVERTIMENTO!
Il frigorifero è destinato all'installazione libera
in spazi chiusi, come capanne per il tempo
libero o capanne di caccia. L'apparecchio è
stato sottoposto alla prova di omologazione
per questo uso in conformità alla direttiva
europea sul gas 2009/142/CEE. Non è adatto
all'installazione su veicoli stradali o natanti.
Utilizzate il frigorifero esclusivamente per raffreddare e immagazzinare generi alimentari.
Le persone che utilizzano il frigorifero devono
avere dimestichezza con l'uso dello stesso e
conoscere le avvertenze di queste istruzioni
d'uso.
Il presente apparecchio non può essere utilizzato da bambini (dagli 8 anni in su) né da persone con capacità fisiche, sensoriali o mentali ridotte o con inadeguata esperienza e/o inadeguate conoscenze, che non siano sottoposti a supervisione o che non siano stati adeguatamente istruiti per un uso sicuro dell'apparecchio e che non abbiamo compreso i pericoli derivanti da tale uso. I bambini non devono giocare con l'apparecchio. La pulizia e le
operazioni di manutenzione da parte dell'utente non devono essere effettuate da bambini.
[EN 60335-2-24, 7.12]
2.2 Responsabilità dell'utente
Norme di sicurezza
L'apparecchio non deve essere esposto
alla pioggia.
ATTENZIONE!
2.1 Uso conforme alle norme
2.4 Lavori e controlli sul
frigorifero
2.3 Poteggere i bambini dopo
lo smaltimento dell'apparecchio
Quando il frigorifero viene rottamato,
rimuovere tutti gli sportelli e lasciare i
ripiani all'interno. Questa operazione ne
impedirà la chiusura accidentale e il
rischio soffocamento.
AVVERTIMENTO!
Lavori su impianti a gas, impianti di gas di
scarico ed elettrici devono essere
effettuati solo da personale di servizio
autorizzato. Con provvedimenti non conformi alla perfetta regola d'arte possono
risultare gravi danni a persone e/ o a
cose.
AVVERTIMENTO!
Non usare mai una fiamma viva per controllare se le parti e le condutture che trasportano il gas non hanno delle perdite!
Vi è rischio d'incendio ed esplosione.
Non aprire mai il gruppo refrigeratore ad
assorbimento! È ad alta pressione.
Vi è pericolo di ferimento!
AVVERTIMENTO!
PERICOLO!
Page 70

8
Il refrigerante usato è l'ammoniaca.
Questa sostanza è un composto naturale
usato anche come prodotto di pulizia per la
casa (1 litro di Salmiak per la pulizia contiene
fino a 200 grammi di ammoniaca -circa il doppio della quantità usata nel frigorifero). Il sodio
cromato viene utilizzato per proteggere dalla
corrosione (1,8 % sul peso del solvente).
In caso di perdite (facilmente identificabili
dall'odore sgradevole) procedere come segue:
n Spegnere l'apparecchio.
n Aerare bene la stanza.
n Contattare il centro autorizzato di Servizio
clienti.
Per la vostra sicurezza è stato accertato
dalla perizia che non vi è alcun pregiudizio
alla salute a causa dell'uscita del refrigerante.
Confrontare i dati della pressione operativa
dichiarati sulla targhetta con i dati presenti sul
monitor circa la pressione della bombola del
gas liquido.
2.6 Funzionamento del
frigorifero a gas
Se si sente odore di gas:
n Aprire tutte le finestre e uscire dal locale.
n Non accendere nessun dispositivo elettrico
ed evitare l’utilizzo di fiamme.
n Chiudere la valvola della bombola a gas e
lasciarla chiusa fino a risoluzione del problema.
n Consultare il personale specializzato* auto-
rizzato.
* personale specializzato autorizzato
Le persone specializzate autorizzate sono esperti
riconosciuti per i loro studi e le loro conoscenze che
garantiscono un controllo a regola d’arte e sicuro.
Pressione di alimentazione e categorie gas
Il frigorifero possono funzionare con le
seguenti categorie di gas e le relative pressioni di alimentazione. I riduttori di pressione da
utilizzare fra la bombola e l’apparecchio devono essere conformi alle categorie indicate
nella tabella sottostante.
Categoria
Pressione in
mbar
GAS
I3B / P(30) 30 Butano
30 Propano
I3+ (28-30/37) 28-30 Butano
37 Propano
I3B/P(50) 50 Butano
I3B/P(50) 50 Propano
È essenziale che la pressione operativa
corrisponda a quanto dichiarato sulla
targhetta dell'apparecchio.
ATTENZIONE!
2.7 Funzionamento con corrente elettrica
Selezionare questa modalità operativa
solamente se l'alimentazione di tensione
del collegamento elettrico corrisponde al
valore indicato sulla targhetta. In caso di
valori divergenti è possibile danneggiare
l'apparecchio!
ATTENZIONE!
2.5 Informazioni sul refrigerante
Norme di sicurezza
i
Page 71

9
2.8 Norme di sicurezza per conservare i prodotti alimentari
Norme di sicurezza
I frigoriferi DOMETIC funzionano secondo il
principio dell’assorbimento. A causa della sua
caratteristica fisica, un sistema di assorbimento ha una reazione ritardata alle variazioni del
termoregolatore, alla perdita di freddo quando
si apre la porta o si ripongono i cibi. Gli apparecchi appartengono alla classe clima SN in
conformità alla norma EN / ISO 7371 nella
gamma di temperatura ambiente da +10 °C a
+32 °C.
Proteggete l’ambiente!
Non gettate le batterie tra i rifiuti domestici.
Consegnate le batterie consumate a un rivenditore o ad un centro di raccolta.
Qualsiasi tipo di frigorifero non è in grado di
migliorare la qualità degli alimenti, ma può
al massimo conservarne per un breve periodo di tempo la qualità al momento della
collocazione.
Tenere in considerazione le seguenti condizioni particolari per la conservazione degli
alimenti in un frigorifero installato su un
veicolo :
n Variazione delle condizioni climatiche,
come p. es. variazioni di temperatura.
n Temperatura interna elevata
n Frigorifero installato dietro ad un finestrino
ed esposto direttamente al sole.
n Gli alimenti sono stati riposti troppo presto
dopo la messa in funzione dell'apparecchio.
Con queste condizioni particolari il frigorifero
non può garantire la temperatura necessaria
per alimenti rapidamente deperibili.
Fanno parte delle merci rapidamente deperibili: tutti i prodotti con data di scadenza riportata e temperatura di conservazione minima di
+4°C o inferiore, in particolare carne, pollame,
pesce, salumi, cibi pronti.
n Confezionare separatamente i prodotti
crudi e quelli cotti (per es. contenitori, pellicola d'alluminio o simili).
n Togliere il sovra-imballaggio delle confezio-
ni singole soltanto se tutti i dati necessari,
come ad esempio la data di scadenza,
sono indicati anche nelle singole confezioni.
n Non lasciare troppo a lungo fuori dal frigo-
rifero gli alimenti raffreddati.
n Porre in evidenza gli alimenti con la data di
scadenza più ravvicinata.
n Riavvolgere nella confezione i resti dei cibi
e consumarli il più in fretta possibile.
n Lavare le mani, prima e dopo aver toccato-
gli alimenti.
n Pulire l'interno del frigorifero ad intervalli
regolari.
Osservare le indicazioni e le avvertenze relative alla data di scadenza indicate sulle confezioni.
Osservare la sezione
"5.1 Pulizia"
in queste
istruzioni
2.9 Sostituzione delle pile
n Rispettare la polarità !
n Non collegare le batterie non ricaricabi-
li ad un caricabatteria.
n Rimuovere le batterie ricaricabili dal
vano batterie prima di ricaricarle.
n Evitare i cortocircuiti sui contatti del
vano batterie !
n Rimuovere le batterie scariche.
n Rimuovere le batterie dall'apposito
vano se il frigorifero non verrà utilizzato
per lungo tempo.
n Non mescolare tipologie diverse di bat-
terie.
ATTENZIONE!
i
Page 72

10
All’interno del frigorifero si trova la targhetta
d’identificazione dello stesso. Contiene tutti i
dati relativi al frigorifero. Riporta il nome del
modello, il codice del prodotto e il numero di
serie. Occorre avere a portata di mano questi
dati ogni volta che ci si rivolge al centro di
Assistenza Clienti o per ordinare i pezzi di
ricambio.
3.2 Targhetta d’identificazione
del frigorifero
Fig. 1
Numero modello
Codice del prodotto
Numero di serie
Potenza massima assorbita
Pressione del gas
2
1
3
4
5
Contenuto lordo (litri) ............................. 154
Scomparto surgelati (litri)........................... 28
Contenuto lordo (senza scomp.surgelati)..164
Dimensioni (mm)
(A x L x P) ................................1276x531x582
Uscita nominale (W) ............................. 190
Consumo di gas
g / 24h*.................................................... 380
Potenza dissipata
kWh / 24h* .............................................. 3.2
Peso netto (kg) .................................. 44.0
Accensione .............................. piezoelletrica
Installazione libera
3.3 Dati tecnici
Il produttore si riserva il diritto di apportare modifiche tecniche.
*Il consumo medio è calcolato a una temperatura ambiente di
25°C in conformità allo standard ISO.
3.4 Spiegazione del frigorifero
Fig. 2
2
1
8
7
6
5
3
4
2
1
3
4
5
Esempio
3.0 Descrizione del modello
3.1 Nome del modello
Descrizione del modello
Elementi di comando
Scomparto surgelati (estraibile)
Ripiano a griglia (
opzionale, inseribile
togliendo lo scomparto surgelati
)
Evaporatore per vano frigorifero
Canaletto di raccolta per l'acqua di decon-
gelamento
Vassoio portaverdura
Balconcino superiore con coperchio
Balconcino inferiore portabottiglie
2
1
3
4
5
6
7
8
Electrical
Gas
Refrigerator
Frigorigero absorber / Funzionamento a
gas liqudido e rete eletricca
0 = accensione
manuale (accen-
sione piezoelettrica)
Serie modello
R G E 3 0 0 0
Page 73

11
Installazione
n Il locale di installazione deve avere un volu-
me di almeno 30 m³, essere ben ventilato e
disporre di una finestra o una porta apribile
verso l'esterno.
n Il frigorifero deve essere installato libera-
mente, ossia ad una distanza minima di 50
mm dalle pareti attigue o armadi (non deve
essere incassato!).
n La distanza dagli altri oggetti di arredamen-
to (armadi, ecc.) deve essere di almeno 100
mm.
n Collocare l'apparecchio in orizzontale su un
terreno stabile.
n Il frigorifero non deve essere sottoposto alla
radiazione termica di oggetti caldi (per es.
fornelli, riscaldamento).
n La parte posteriore del frigorifero deve
essere sempre ben aerata (sotto il coperchio). Non coprite l'apparecchio (per es.
asciugamani, tende).
n La mancanza di aerazione porta a cali di
potenza frigorifera!
n Installate il frigorifero in modo che sia pro-
tetto da spruzzi d'acqua. Basate a che l'apparecchio non sia esposto alla pioggia
prima e durante l'installazione!
n Verificare che la tensione indicata sull'eti-
chetta del modello corrisponda alla tensione di rete. In caso di valori divergenti è possibile danneggiare l'apparecchio!
n L'elettricità deve essere fornita tramite una
presa propriamente collegata a terra o con
una connessione cablata.
n L alimentazione deve essere equipaggiato
con un fusibile.
n Il cavo di alimentazione deve essere posi-
zionato in modo tale che non entri in contatto con componenti caldi dell'unità/bruciatore o con bordi taglienti.
n Le bombole di gas devono essere colloca-
te in posizione verticale.
n Collocare la bombola di gas in un ambiente
ben aerato.
n Collocare la bombola di gas in modo tale
da poter essere subito individuata in caso
di incendio.
n La distanza massima tra la bombola di gas
e l'apparecchio non deve essere superiore
a 1,5 m.
n Si devono utilizzare soltanto tipi di bombo-
le e dispositivi di regolazione di pressione
validi nei rispettivi paesi
4.1.1 Collegamento elettrica
4.1.2 Installazione della bombola di
gas
La spina deve essere facilmente accessibile all'utente.
ATTENZIONE!
Se la linea di allacciamento è danneggiata, deve essere sostituita dall'assistenza
clienti Dometic o da personale specializzato e qualificato al fine di evitare pericoli.
ATTENZIONE!
4.0 Installazione
Questo frigorifero è collaudato e omologato
per l'uso in spazi chiusi.
All'atto dell'installazione dell'apparecchio vi
preghiamo di osservare i seguenti punti:
4.1 Installazione e
allacciamento
Page 74

12
Installazione
4.1.3 Installazione a gas
n L'allacciamento appropriato del frigorifero
deve essere eseguito da specialisti abilitati
in conformità alle regole tecniche sul gas
liquido.
n Si devono osservare le norme valide nel
rispettivo paese per l'utilizzo di apparecchi
funzionanti a gas liquido.
- Norme tecniche EN 732
n Nel condotto dell'apparecchio deve essere
installato un dispositivo di regolazione (1)
(riduttore di pressione). Il frigorifero non
deve essere fatto funzionare con una pressione diversa da quella indicata sulla targhetta dati.
n Il frigorifero deve essere collegato alla bom-
bola di gas con una conduttura flessibile di
sicurezza.
n Scegliere una lunghezza sufficiente per
poter collegare il tubo flessibile senza piegarlo. La conduttura flessibile non deve
essere più lunga di 1,5 m.
n L'allacciamento della conduttura viene fatto
con con pinze /fascette per tubo flessibile.
In ogni caso si devono osservare le prescrizioni valide nel rispettivo paese per il collegamento del tubo flessibile.
n La conduttura flessibile deve essere sosti-
tuita ad intervalli di tempo previsti dalle disposizioni nazionali valide per il relativo
paese.
n Dopo l'allacciamento alla bombola di gas,
deve essere eseguito un controllo di tenuta
ermetica su tutte le connessioni nonché
una prova della fiamma del bruciatore.
Utilizzare per la prova di tenuta uno spray
rivelatore di fughe oppure un prodotto
schiumogeno. Dopo l'apertura del rubinetto
della bombola controllate che non vi siano
bollicine.
1
Rubinetto della bombola
Fig. 4
Fig. 3
Fig. 5 Fig. 6
SW 14
SW 17
Dettaglio
2. Mettere in posizione
la maniglia sulla
porta e avvitare.
1. Punti di fissaggio:
utilizzare la sagoma
(1) in scala (vedi
"Supplemento")
3. Inserire il coperchio e premere.
4.2 Montare la maniglia della
porta
1
Non controllare mai la tenuta ermetica
dell'apparecchio e la conduttura utilizzando una fiamma viva!
PERICOLO!
Il frigorifero deve essere alimentato esclusivamente con gas liquefatto (propano e butano).
Non usare gas da abitazione, gas naturale o
Autogas !
Sagoma
1
Ø 2mm
max
1.1 Nm!
Page 75

13
5.2 Manutenzione
Funzionamento del frigorifero
n Il bruciatore del gas deve essere pulito
quando necessario e almeno una volta
all'anno. Conservare i documenti comprovanti le manutenzioni effettuate sul frigorifero.
n Si consiglia di eseguire la manutenzione
dopo che il veicolo è stato fermo per lunghi periodi. Rivolgersi al nostro Servizio
Assistenza Clienti.
Prima di mettere in funzione il frigorifero, verificare che la tensione indicata sull'etichetta del
modello corrisponda alla tensione di rete. In
caso contrario, non collegare l'unità e contattare il fornitore.
Il gruppo frigorifero è silenzioso.
Alla prima accensione dell'apparecchio
potrebbe prodursi un odore particolare, che
scomparirà dopo qualche ora. Aerare bene il
locale prima di soggiornarvi.
Il frigorifero raggiunge la temperatura d'esercizio dopo alcune ore, mentre il scomparto surgelati dovrebbe raffreddarsi dopo circa un'ora.
Questo frigorifero può funzionare con tre tipi di
alimentazione.
n Tensione di rete (230 V)
n Gas (gas liquido propano / butano)
Il tipo di alimentazione desiderato viene selezionato con il selettore di alimentazione
(Fig. 7).
5.1 Pulizia
Prima di mettere in funzione il frigorifero si raccomanda di pulire l’apparecchio all’interno e
di ripetere tale operazione regolarmente.
Usare un panno soffice e acqua tiepida con un
detergente delicato.
Poi risciacquare l’apparecchio con acqua pulita e asciugarlo con cura.
Per evitare l’alterazione dei materiali non usare
sapone, detergenti abrasivi, granulari o contenenti soda. Fare in modo che la guarnizione
dello sportello non venga a contatto con olio o
grasso.
5.0 Funzionamento del frigorifero
5.3 Funzionamento con corrente elettrica
In caso di valori divergenti è possibile danneggiare l'apparecchio!
ATTENZIONE!
5.4 Funzionamento a gas
n Il frigorifero deve essere alimentato da gas
liquido (propano, butano, e non da metano
o gas di città).
n Ad un'altitudine di circa 1000 m s.l.m.,
quando si accende il gas possono verificarsi dei disturbi condizionati da fenomeni fisici (non si tratta di una disfunzione!).
n Dopo la prima messa in funzione e dopo la
sostituzione di una bombola, le conduttore
di gas possono contenere dell'aria. Dopo
una breve messa in funzione del frigorifero
le conduttore del gas devono essere disareate. Il gas si accende senza rallentamento.
n Tutti i frigoriferi con accensione manuale
sono equipaggiati di un sistema automatico
ignifugo, che interrompe automaticamente
il flusso del gas circa 30 secondi dopo che
la fiamma si spegne.
Durante il funzionamento, il gruppo frigorifero si scalda molto. Evitate il contatto
con le parti che conducono calore.
ATTENZIONE!
i
Page 76

14
Funzionamento del frigorifero
Note esplicative:
Il tipo di alimentazione desiderato viene rego-
lato ruotando il selettore di alimentazione (1) .
Il selettore di alimentazione ha quattro posizioni:
n Spento (1.) (3.)
n Tensione di rete (230V~) (2.)
n Gas (gas liquido propano / butano) (4.)
5.5.1 Spiegazione degli elementi di
comando
Selezione manuale dell’alimentazione/
accensione manuale con accenditore piezoelettrica
5.5 Funzionamento
1 = Accensione / Selettore di alimentazione
2 = Termoregolatore
3 = Tasto di accensione manuale (accensione
piezoelettrica)
4 = Indicatore di fiamma (galvanometro)
Fig. 7
2
1
3
4
5.5.3 Funzionamento a gas (liquido)
Prima di mettere in funzione il frigorifero
nella modalità a gas:
n Aprire la valvola della bombola a gas.
3. Attivare l'accensione piezoelettica(3) diver-
se volte a intervalli di 1 -2 sec.
4. L’indice del galvanometro (4) si sposta nella
zona verde quando si accende la fiamma.
Tenere la manopola (2) premuta ancora per
circa 15 sec. e poi lasciarla. Il frigorifero è in
funzione.
Fig. 13Fig. 12
5.5.2 Funzionamento con corrente
elettrica
Fig. 9
Fig. 10 Fig. 11
Per mettere in funzione l’apparecchio, ruotare a destra il selettore di alimentazione
(1) sulla posizione:
per il funzionamento a 230 V.
1. Mettere il selettore rotante (1) sulla posizio-
ne :
2. Ruotare il termostato (2) a destra e premer-
lo. Tenerlo premuto.
1
1
2
2 3 4
per il funzionamento a gas.
Fig. 8
1
1 2
3
4
1.
2.
3.
4.
Page 77

15
Funzionamento del frigorifero
5.5.4 Regolazione della temperatura
nel vano frigorifero
Mediante il tasto (2)
selezionare la temperatura desiderata nel
vano frigorifero.
La scala cominicia con
la posizione MIN (trat-
tino sottile = temperatura massima) e va
fino alla posizione
MAX (trattino più largo
= temperatura minima).
Tener presente che i livelli della temperatura
non sono assegnati ad un valore di temperatura assoluto. In caso di temperature d'ambiente tra +15°C e +25°C impostare sulla posizione centrale (3). In tal modo il frigorifero avrà
una resa ottimale.
5.7 Sistemare i ripiani
I ripiani si tolgono sollevandoli leggermente
dalla guida e possono essere sistemati a piacere.
Fig. 19
Fig. 20
Per una maggiore capacità del vano frigorifero
si può estrarre lo scomparto surgelati.
1. Sbloccare lo scomparto surgelati da
entrambi i lati.
2. Estrarre lo scomparto surgelati.
Riporre con cura lo scomparto surgelati per
evitare che si danneggi.
Togliendo lo scomparto surgelati, si può inserire un ripiano supplementare (3.). Il ripiano a
griglia è disponibile come dotazione speciale
presso la Dometic.
5.8 Scomparto surgelati estraibile
L’illuminazione interna alimentata a pile viene
controllata da un interruttore a sfioramento
sulla porta. Per sostituire le pile (3 x
AAA/R3/Micro da 1,5 V), tirare l'alloggiamento
dell'illuminazione e aprire il vano apposito con
un cacciavite adatto.
Fig. 14
Fig. 15
Fig. 16
Fig. 17
Posizione centrale
2
3
1
Fig. 18
4
2
3
5.6 Sostituzione delle pile
dell'illuminazione interna
i
Page 78

16
Funzionamento del frigorifero
5.9 Sistemazione degli alimenti
in frigorifero e preparazione
dei cubetti di ghiaccio
n Mettere il frigorifero in funzione 12 ore
prima di utilizzarlo.
n Inserire sempre prodotti preraffreddati.
Assicurarsi che già al momento dell’acquisto e durante il trasporto i prodotti siano ben
raffreddati. Usare borse isotermiche.
n Quando si preleva un alimento, aprire solo
brevemente la porta del frigorifero.
n Gli alimenti devono essere confezionati
possibilmente in contenitori chiusi, in pellicola d’alluminio o simili e riposti separatamente uno dall’altro, per evitare che si secchino o per impedire la formazione di odori.
n Far raffreddare i cibi riscaldati prima di
riporli in frigorifero.
n Non conservare nel frigorifero prodotti da
cui possano esalare gas volatili o infiammabili.
n Non riempire eccessivamente i ripiani e i
cassetti per consentire una corretta circolazione dell'aria all'interno.
n Lasciare dello spazio libero (circa 10 mm)
tra i prodotti refrigerati e l'evaporatore
posteriore ("alette di raffreddamento").
n Deve essere assicurata la libera circolazio-
ne dell’aria dell’unità di raffreddamento del
frigo. Non ostruire le griglie di ventilazione.
5.9.1 Conservazione di alimenti nel
vano frigorifero
5.9.2 Conservazione di alimenti nello
scomparto surgelati
n Non conservare nello scomparto surgelati
delle bevande addizionate di anidride carbonica.
n Lo scomparto surgelati è previsto per pro-
durre cubetti di ghiaccio e per una breve
conservazione di vivande surgelate. Non è
adatto per congelare vivande.
Con temperature ambiente inferiori ai +10
°C non può essere assicurata una regolazione uniforme della temperatura dello
scomparto surgelati, qualora il frigorifero
sia esposto per lungo tempo a queste temperature. Ciò può causare un possibile
aumento di temperatura nello scomparto
surgelati e provocare lo scongelamento dei
prodotti depositati
Fig. 21
5.9.3 Scomparti frigorifero
Scomparto surgelati :
vivande già congelate (surgelati)
Scomparto superiore:
piatti pronti
Scomparto medio:
prodotti caseari, piatti pronti
Scomparto inferiore:
carne, pesce, vivande da scongelare
Scomparto verdura:
insalate, verdura, frutta
Ripiano superiore porta:
uova, burro
Ripiano medio porta:
lattine, condimenti, ketchup, marmellata
Ripiano inferiore porta
(ripiano bevande):
bevande in bottiglia o in cartoni
2
1
3
4
5
6
7
8
1
2
3
4
5
6
7
8
Page 79

17
Funzionamento del frigorifero
5.9.4 Preparazione dei cubetti di
ghiaccio
È consigliabile produrre i cubetti di ghiaccio
durante la notte. Durante la notte, il frigorifero
viene utilizzato in modo ridotto e l’unità ha più
riserve..
Fig. 23
Fig. 22
5.10 Messa fuori servizio
n Mettere il selezionatore di alimentazione (1)
sulla posizione "OFF". L’apparecchio è
spento.
n Se il frigorifero deve restare inutilizzato per
un lungo periodo di tempo, la valvola di
sicurezza installata sullo stesso e la valvola
della bombola devono essere chiuse.
n Lasciare lo sportello aperto. Lo sportello
rimarrà leggermente socchiuso per prevenire la formazione di muffa all'interno
dell'apparecchio.
n Sbloccare premendo il dispositivo di chiu-
sura del bloccaggio porta e spostarlo in
avanti . Se la porta viene chiusa, il frigorifero rimane leggermente aperto per prevenire la formazione di muffa.
Fig. 24
Fig. 25
1
OFF
OFF
5.11 Sbrinamento
Con il tempo si accumula del ghiaccio sulle
griglie del frigorifero. Può formarsi una patina
di brina più spessa da un lato, ma ciò non
comporta una disfunzione. Quando lo strato di
ghiaccio è spesso circa 3 mm, il frigorifero
deve essere sbrinato.
n Spegnere il frigorifero come descritto al
punto "Messa fuori servizio".
n Rimuovere tutte le vivande e il vassoio dei
cubetti di ghiaccio.
n Lasciare aperta la porta del frigorifero per
lasciare entrare l’aria e impedire che si
formi della muffa.
n Dopo lo sbrinamento (scomparto surgelati
e griglie libere dal ghiaccio), asciugare con
un panno i due compartimenti del frigorifero.
Nota: L’acqua che si forma a causa dello
scongelamento nello scomparto principale del
frigorifero finisce in un appropriato contenitore
posto sul retro dell’apparecchio, da cui evapora.
Lo strato di ghiaccio non deve mai essere
rimosso con la forza e il processo di sbrinamento non deve essere accelerato
usando una sorgente di calore!
ATTENZIONE!
Fig. 26
Fig. 27
1
2
Fig. 28
2
posizione normale
fuori servizio
1. Riempire il vassoio
per i cubetti di ghiaccio con acqua potabile.
2. Mettere il vassoio
per i cubetti di ghiaccio nello scomparto surgelati.
Usare solo acqua potabile!
AVVERTIMENTO!
Page 80

18
Funzionamento del frigorifero
Fig. 32
Fig. 33
Fig. 30
5.12 Cambio riscontro dello
sportello per porta
1
3
Fig. 31
2
4
n Aprire la porta, allentare la vite della cernie-
ra e metterla da parte.
n Togliere la porta verso l'esterno.
n Allentare il perno della cerniera e avvitare
dall'altra parte.
n Spostare lo spessore sulla cerniera inferio-
re.
n Spingere la porta verso il perno superiore
della cerniera e appoggiarla sul perno inferiore della cerniera.
n
Avvitare la vite della cerniera.
n
Accertatevi che la porta si muova liberamente e
che la guarnizione della porta aderisca tutt'intorno.
Se dovesse essere necessario inclinare o
posare l'apparecchio lateralmente, attendere
un'ora prima di mettere in funzione il frigorifero. Il liquido refrigerante si raccoglie di nuovo
nel serbatoio di accumulo del frigorifero, assicurando così il corretto funzionamento
dell'apparecchio.
Fig. 29
2
3
1
4
5.13 Sostituzione della placca
decorativa
Placca decorativa con telaio
n Prima rimuovere l'interruttore a sfioramento
sulla porta (se presente).
n Rimuovere il listello laterale (1) della porta (il
listello è inserito, non avvitato).
n Estrarre la placca decorativa (2) dalla porta,
inserire la nuova placca e infilare di nuovo il
listello (1) .
Fig. 34
2
1
1
i
Page 81

19
Funzionamento del frigorifero
Fig. 36
Fig. 35
2
1
2
3
ATTENZIONE!
Dimensioni della placca decorativa :
1169,5 +0/-1 mm 507,5 +0/-1 mm max. 1.5 +0/-1 mm
Altezza Larghezza Spessore
RGE 3000
Page 82

20
Funzionamento del frigorifero
5.14 Risoluzione dei problemi
Disfunzione: Il frigorifero non raffredda a sufficienza.
- Ventilazione dell'unità di raffreddamento non
adeguata.
- L'impostazione del termostato è troppo bassa.
- L'evaporatore è troppo ghiacciato.
- Sono state inserite nel frigo troppe vivande
calde.
- Apparecchio acceso da troppo poco tempo.
- Le temperature ambiente sono troppo alte.
- Controllare che le grate di ventilazione dell'unità
di raffreddamento non siano ostruite.
- Impostare il termostato su un valore più alto.
- Controllare che il frigorifero sia collegato correttamente.
- Lasciare raffreddare le vivande riscaldate prima
di porle in frigorifero.
- Controllare il raffreddamento del vano frigorifero
dopo circa 4-5 ore.
- Aerare la stanza.
Possibile causa
Rimedio
Disfunzione: Il frigorifero non funziona nella modalità di funzionamento a gas.
- Bombola del gas vuota.
- Il dispositivo di chiusura alimentazione inserito a
monte è aperto.
- C'è dell'aria nel condotto.
- Sostituire la bombola del gas.
- Aprire il dispositivo di chiusura alimentazione.
- Spegnere e riaccendere l'apparecchio.
Eventualmente ripetere 3 o 4 volte questo procedimento.
Possibile causa
Rimedio
Disfunzione: Il frigorifero non raffredda nella modalità di funzionamento a 230V.
- Fusibile difettoso.
- Il frigorifero non allacciato all'alimentazione di
rete.
- Riscaldatore difettoso.
- Sostituire il fusibile.
- Collegarlo alla rete di alimentazione.
- Rivolgersi al Servizio clienti Dometic.
Possibile causa
Rimedio
Prima di avvertire il Servizio Assistenza Clienti
autorizzato Vi preghiamo di controllare se:
n sono state seguite correttamente le istru-
zioni nella sezione “Impiego del frigorifero”;
n il frigorifero è sistemato in piano;
n è possibile accendere il frigorifero con una
fonte di alimentazione disponibile.
Page 83

1
RGE 3000
MBA 11/2012
N 1
Modelnummer .............................................
Productnummer .............................................
Serienummer ..............................................
Noteert u deze gegevens hier
Handleiding
Absorptiekoelkast
NL
Nederlands
Page 84

2
1.0 Algemeen . . . . . . . . . . . . . . . . . . . . . . . . . . . . . . . . . . . . . . . . . . . . . 4
1.1 Inleiding . . . . . . . . . . . . . . . . . . . . . . . . . . . . . . . . . . . . . . . . . . . . . . . . . . . . . . . . . . . . . . . . . . . 4
1.2 Instructies bij deze handleiding . . . . . . . . . . . . . . . . . . . . . . . . . . . . . . . . . . . . . . . . . . . . . . . . . 4
1.3 Bescherming van het auteursrecht . . . . . . . . . . . . . . . . . . . . . . . . . . . . . . . . . . . . . . . . . . . . . . 4
1.4 Verklaring van de gebruikte symbolen . . . . . . . . . . . . . . . . . . . . . . . . . . . . . . . . . . . . . . . . . . . . 4
1.5 Wettelijke garantie . . . . . . . . . . . . . . . . . . . . . . . . . . . . . . . . . . . . . . . . . . . . . . . . . . . . . . . . . . . 5
1.6 Beperking van aansprakelijkheid . . . . . . . . . . . . . . . . . . . . . . . . . . . . . . . . . . . . . . . . . . . . . . . . 5
1.7 Klantenservice . . . . . . . . . . . . . . . . . . . . . . . . . . . . . . . . . . . . . . . . . . . . . . . . . . . . . . . . . . . . . . 5
1.8 Reserveonderdelen . . . . . . . . . . . . . . . . . . . . . . . . . . . . . . . . . . . . . . . . . . . . . . . . . . . . . . . . . . 5
1.9 Milieuadvies . . . . . . . . . . . . . . . . . . . . . . . . . . . . . . . . . . . . . . . . . . . . . . . . . . . . . . . . . . . . . . . . 6
1.9.1 Afvalverwijdering . . . . . . . . . . . . . . . . . . . . . . . . . . . . . . . . . . . . . . . . . . . . . . . . . . . . . . . . . . . . . . . . . . . . . 6
1.9.2 Tips voor energiebesparing . . . . . . . . . . . . . . . . . . . . . . . . . . . . . . . . . . . . . . . . . . . . . . . . . . . . . . . . . . . . 6
1.10 Conformiteitsverklaring . . . . . . . . . . . . . . . . . . . . . . . . . . . . . . . . . . . . . . . . . . . . . . . . . . . . . . . 6
2.0 Veiligheidsinstructies . . . . . . . . . . . . . . . . . . . . . . . . . . . . . . . . . . . . 7
2.1 Correct gebruik . . . . . . . . . . . . . . . . . . . . . . . . . . . . . . . . . . . . . . . . . . . . . . . . . . . . . . . . . . . . . 7
2.2 Verantwoordelijkheid van de gebruiker . . . . . . . . . . . . . . . . . . . . . . . . . . . . . . . . . . . . . . . . . . . 7
2.3 Veiligheid van kinderen na afvalverwerking . . . . . . . . . . . . . . . . . . . . . . . . . . . . . . . . . . . . . . . . 7
2.4 Werkzaamheden aan en controleren van de koelkast . . . . . . . . . . . . . . . . . . . . . . . . . . . . . . . . 7
2.5 Koelmiddelinformatie . . . . . . . . . . . . . . . . . . . . . . . . . . . . . . . . . . . . . . . . . . . . . . . . . . . . . . . . . 8
2.6 Gebruik van de koelkast op gas . . . . . . . . . . . . . . . . . . . . . . . . . . . . . . . . . . . . . . . . . . . . . . . .8
2.7 Gebruik op elektriciteit . . . . . . . . . . . . . . . . . . . . . . . . . . . . . . . . . . . . . . . . . . . . . . . . . . . . . . . . 8
2.8 Veiligheidsinstructies voor het bewaren van levensmiddelen . . . . . . . . . . . . . . . . . . . . . . . . . . 9
2.9 Vervangen van de batterijen . . . . . . . . . . . . . . . . . . . . . . . . . . . . . . . . . . . . . . . . . . . . . . . . . . . 9
3.0 Modelbeschrijving . . . . . . . . . . . . . . . . . . . . . . . . . . . . . . . . . . . . . . 10
3.1 Modeltype . . . . . . . . . . . . . . . . . . . . . . . . . . . . . . . . . . . . . . . . . . . . . . . . . . . . . . . . . . . . . . . . . 10
3.2 Typeplaatje van de koelkast . . . . . . . . . . . . . . . . . . . . . . . . . . . . . . . . . . . . . . . . . . . . . . . . . . . . 10
3.3 Technische gegevens . . . . . . . . . . . . . . . . . . . . . . . . . . . . . . . . . . . . . . . . . . . . . . . . . . . . . . . . . 10
3.4 Uitleg over de koelkast . . . . . . . . . . . . . . . . . . . . . . . . . . . . . . . . . . . . . . . . . . . . . . . . . . . . . . . 10
4.0 Installatie . . . . . . . . . . . . . . . . . . . . . . . . . . . . . . . . . . . . . . . . . . . . . 11
4.1 Opstellen en aansluiten . . . . . . . . . . . . . . . . . . . . . . . . . . . . . . . . . . . . . . . . . . . . . . . . . . . . . . . 11
4.1.1 Elektrische aansluiting . . . . . . . . . . . . . . . . . . . . . . . . . . . . . . . . . . . . . . . . . . . . . . . . . . . . . . . . . . . . . . . . 11
4.1.2 Gasflessen plaatsen . . . . . . . . . . . . . . . . . . . . . . . . . . . . . . . . . . . . . . . . . . . . . . . . . . . . . . . . . . . . . . . . . . 11
4.1.3 Gasaansluiting . . . . . . . . . . . . . . . . . . . . . . . . . . . . . . . . . . . . . . . . . . . . . . . . . . . . . . . . . . . . . . . . . . . . . . 12
4.2 Deurgreep monteren . . . . . . . . . . . . . . . . . . . . . . . . . . . . . . . . . . . . . . . . . . . . . . . . . . . . . . . . . 12
5.0 Gebruik van de koelkast . . . . . . . . . . . . . . . . . . . . . . . . . . . . . . . . . 13
5.1 Reiniging . . . . . . . . . . . . . . . . . . . . . . . . . . . . . . . . . . . . . . . . . . . . . . . . . . . . . . . . . . . . . . . . . . . 13
5.2 Onderhoud . . . . . . . . . . . . . . . . . . . . . . . . . . . . . . . . . . . . . . . . . . . . . . . . . . . . . . . . . . . . . . . . . 13
5.3 Gebruik op elektriciteit . . . . . . . . . . . . . . . . . . . . . . . . . . . . . . . . . . . . . . . . . . . . . . . . . . . . . . . . 13
5.4 Gebruik op gas . . . . . . . . . . . . . . . . . . . . . . . . . . . . . . . . . . . . . . . . . . . . . . . . . . . . . . . . . . . . . . 13
5.5 Bediening . . . . . . . . . . . . . . . . . . . . . . . . . . . . . . . . . . . . . . . . . . . . . . . . . . . . . . . . . . . . . . . . . . 14
5.5.1 Uitleg over de bedieningselementen . . . . . . . . . . . . . . . . . . . . . . . . . . . . . . . . . . . . . . . . . . . . . . . . . . . . . 14
5.5.2 Gebruik op elektriciteit . . . . . . . . . . . . . . . . . . . . . . . . . . . . . . . . . . . . . . . . . . . . . . . . . . . . . . . . . . . . . . . . 14
5.5.3 Gebruik op gas (vloeibaar gas) . . . . . . . . . . . . . . . . . . . . . . . . . . . . . . . . . . . . . . . . . . . . . . . . . . . . . . . . . . 14
5.5.4 Regels voor de temperatuur van de koelruimte . . . . . . . . . . . . . . . . . . . . . . . . . . . . . . . . . . . . . . . . . . . . . 15
5.6 Vervanging batterijen van de binnenverlichting . . . . . . . . . . . . . . . . . . . . . . . . . . . . . . . . . . . . . 15
5.7 Opbergroosters plaatsen . . . . . . . . . . . . . . . . . . . . . . . . . . . . . . . . . . . . . . . . . . . . . . . . . . . . . . 15
5.8 Uitneembaar vriesvak . . . . . . . . . . . . . . . . . . . . . . . . . . . . . . . . . . . . . . . . . . . . . . . . . . . . . . . . . 15
Inhoudsopgave
Page 85

3
5.9 Bewaren van levensmiddelen en bereiding van ijsblokjes . . . . . . . . . . . . . . . . . . . . . . . . . . . . . 16
5.9.1 Bewaren van producten in de koeling . . . . . . . . . . . . . . . . . . . . . . . . . . . . . . . . . . . . . . . . . . . . . . . . . . . . 16
5.9.2 Bewaren van producten in het vriesvak . . . . . . . . . . . . . . . . . . . . . . . . . . . . . . . . . . . . . . . . . . . . . . . . . . . 16
5.9.3 Koelkastvakken . . . . . . . . . . . . . . . . . . . . . . . . . . . . . . . . . . . . . . . . . . . . . . . . . . . . . . . . . . . . . . . . . . . . . . 16
5.9.4 Bereiding van ijsblokjes . . . . . . . . . . . . . . . . . . . . . . . . . . . . . . . . . . . . . . . . . . . . . . . . . . . . . . . . . . . . . . . 17
5.10 Buitenbedrijfstelling . . . . . . . . . . . . . . . . . . . . . . . . . . . . . . . . . . . . . . . . . . . . . . . . . . . . . . . . . . 17
5.11 Ontdooien . . . . . . . . . . . . . . . . . . . . . . . . . . . . . . . . . . . . . . . . . . . . . . . . . . . . . . . . . . . . . . . . . . 17
5.12 Deuraanslag wisselen . . . . . . . . . . . . . . . . . . . . . . . . . . . . . . . . . . . . . . . . . . . . . . . . . . . . . . . . 18
5.13 Decorpaneel vervangen . . . . . . . . . . . . . . . . . . . . . . . . . . . . . . . . . . . . . . . . . . . . . . . . . . . . . . . 18
5.14 Handelwijze bij storingen . . . . . . . . . . . . . . . . . . . . . . . . . . . . . . . . . . . . . . . . . . . . . . . . . . . . . . 20
5.15 Sjabloon (Bijlage)
© Dometic GmbH - 2012 - Wijzigingen voorbehouden
Dometic GmbH
In der Steinwiese 16
D-57074 Siegen
www.dometic.com
Page 86

4
1.0 Algemeen
U hebt met de Dometic-absorptiekoelkast
een uitstekende keuze gemaakt. Wij zijn er
zeker van dat u in elk opzicht tevreden zult zijn
over uw nieuwe koelkast. Deze koelkast is stil,
voldoet aan de hoogste kwaliteitseisen en
garandeert gedurende de hele levenscyclus,
van fabricage en gebruik tot recycling, een zuinig en efficiënt energieverbruik.
1.1 Inleiding
Alle gegevens, teksten en afbeeldingen uit
deze handleiding zijn auteursrechtelijk
beschermd en vallen onder het octrooirecht.
Niets uit deze handleiding mag zonder schriftelijke toestemming van Dometic GmbH,
Siegen, verveelvoudigd, gekopieerd of op
andere wijze worden gebruikt.
1.3 Bescherming van het
auteursrecht
Lees voordat u de koelkast in gebruik
neemt eerst zorgvuldig deze handleiding.
In deze handleiding vindt u belangrijke instructies voor het juiste gebruik van uw koelkast.
Let vooral op de veiligheidsinstructies. Het
opvolgen van de instructies is van wezenlijk
belang voor een veilig gebruik van uw koelkast. U beschermt uzelf en de koelkast hiermee tegen mogelijke schade. Voordat u een
instructie uitvoert, moet u eerst begrijpen wat
u in de handleiding hebt gelezen.
Bewaar deze handleiding zorgvuldig in de
buurt van de koelkast, zodat u deze altijd
snel bij de hand hebt.
1.2 Instructies bij deze
handleiding
1.4 Verklaring van de gebruikte
symbolen
Waarschuwingen zijn d.m.v. symbolen gekenmerkt. De tekst bij het waarschuwingssymbool geeft uitleg over de mate van het risico.
U dient de waarschuwingen nauwkeurig in
acht te nemen. Daarmee beschermt u zichzelf, anderen en het apparaat tegen mogelijke schade.
GEVAAR geeft aan dat het om een direct
gevaarlijke situatie gaat die kan leiden tot overlijden of ernstig letsel, wanneer de opgegeven
instructies niet worden opgevolgd.
GEVAAR!
WAARSCHUWING geeft aan dat het om een
mogelijk gevaarlijke situatie gaat die kan leiden
tot overlijden of ernstig letsel, wanneer de
opgegeven instructies niet worden opgevolgd.
WAARSCHUWING!
LET OP geeft aan dat het om een mogelijk
gevaarlijke situatie gaat die kan leiden tot licht
of middelzwaar letsel, wanneer de opgegeven
instructies niet worden opgevolgd.
LET OP!
LET OP zonder symbool geeft aan dat het om
een mogelijk gevaarlijke situatie gaat die kan
leiden tot beschadiging van het apparaat,
wanneer de vermelde instructies niet worden
opgevolgd.
LET OP!
Waarschuwingen
Algemeen
Page 87

5
Algemeen
Informatie
INFORMATIE geeft u nuttige, aanvullende tips
over het gebruik van uw koelkast.
Milieuadvies
MILIEUADVIES geeft u nuttige tips over ener-
giebesparing en afvalverwerking.
1.5 Wettelijke garantie
Bij de samenstelling van de informatie in deze
handleiding is rekening gehouden met de geldende normen en voorschriften, alsmede de
stand der techniek. Dometic behoudt zich het
recht voor te allen tijde wijzigingen aan te
brengen aan het product die in het belang van
de verbetering van het product en de veiligheid adequaat worden geacht.
1.6 Beperking van
aansprakelijkheid
Erkende klantenservicepunten vindt u via de
telefoonnummers in het Euro Service
Network-boekje dat bij iedere koelkast wordt
meegeleverd.
U kunt ook op internet uw meest nabijgelegen
klantenservicedesk zoeken via www.dome-
tic.com. Bij telefonisch of schriftelijk contact
met de klantenservice altijd model, productnummer, serienummer en evt. de MLC-code
opgeven! Deze informatie vindt u op het typeplaatje in de koelkast. Wij adviseren u deze
informatie te noteren in de daarvoor bestemde
vakjes op het titelblad van deze handleiding.
1.7 Klantenservice
Dometic is niet aansprakelijk in geval van
schade bij:
n niet-naleving van de handleiding;
n verkeerd gebruik;
n gebruik van niet-originele reserveonder-
delen;
n onvakkundige wijzigingen en ingrepen aan
het apparaat;
n inwerking van omgevingsinvloeden, zoals
- temperatuurveranderingen;
- luchtvochtigheid.
1.8 Reserveonderdelen
Onderdelen kunt u bestellen bij de afdeling
klantenservice. Bij contact met het Call Center
altijd model en productnummer opgeven.
Deze informatie vindt u op het typeplaatje in
de koelkast.
Garantiebepalingen zijn in overeenstemming
met EG-richtlijn 44/1999/EC en de voorwaarden zoals van toepassing voor het betreffende
land. Voor garantie en andere service neemt u
contact op met de afdeling klantenservice.
Storingen die het gevolg zijn van verkeerd
gebruik, vallen niet onder de garantie. De
garantie dekt geen wijzigingen aan de apparatuur of gebruik van onderdelen die niet-origi-
nele Dometic-onderdelen zijn. In dergelijke
gevallen en indien de instructies voor installatie en gebruik niet worden opgevolgd, vervalt
de garantie en aanvaardt Dometic geen enkele aansprakelijkheid.
i
Page 88

6
- Low Voltage Directive 73/23/EEC and the
Amendment to LVD 2006/95EC
- EMC Directive 2004/108/EC
- RoHS Directive 2002/95EC
Directives
Type family : C 40/110
- EN 60335-1;(IEC 60335-1; 4ed., Am.1, Am. 2)
- EN 60335-2-24;03 (IEC 60335-2-24;6 ed.,
Am.1, Am. 2)
- EN 60335-2-102;06
- EN 61000-3-2;00, A1, A2, A14
- EN 61000-3-3;95,A1
- EN 50366;2003+A1
- EN 55014-1;07,A1,A2
- EN 55014-2;01,A1
Standards
U kunt de actuele verklaring van conformiteit
ook rechtstreeks bij Dometic GmbH, Siegen,
aanvragen.
Algemeen
1.9.2 Tips voor energiebesparing
In de koeleenheid wordt als koelmiddel
ammoniak gebruikt (een natuurlijke verbinding
van waterstof en stikstof). Als drijfgas voor de
isolatie van PU-schuim wordt ozonvriendelijk
cyclopentaan gebruikt.
Lever recyclebaar verpakkingsmateriaal in via
de u bekende inzamelpunten. Het apparaat
dient u in te leveren bij een afvalverwerkingsbedrijf dat volgens de geldende voorschriften
zorg draagt voor de verwerking van de recyclebare onderdelen en het restafval. Voor een
milieuvriendelijke verwerking van het koelmiddel uit alle absorptiekoeleenheden moet
een geschikte afvalverwerkingsinstallatie worden ingezet.
Apparaten die van dit symbool zijn
voorzien, moeten bij het gemeentelijk inzamelpunt voor afgedankte
elektrische en elektronische apparatuur worden ingeleverd. Dit product mag niet bij het gewone
huisafval. Bij koelkasten van
Dometic staat het symbool op het typeplaatje
aan de binnenkant van het apparaat
.
1.9 Milieuadvies
1.9.1 Afvalverwijdering
n Bij een gemiddelde buitentemperatuur van
25 °C is het voldoende als u de thermostaat op de middelste stand zet.
n Doe, indien mogelijk, altijd voorgekoelde
producten in de koelkast.
n Stel de koelkast niet bloot aan directe
zonnestraling of een andere warmtebron
(bijv. verwarming).
n Het koelkastaggregaat moet constant wor-
den geventileerd.
n Plaats het legrooster gelijkmatig in de
koelruimte.
n Zet legroosters en opbergvakjes niet te vol
om de luchtcirculatie in de koelkast niet te
belemmeren.
n Laat een afstand van ca. 10 mm tussen de
producten en de naverdamper
(“koelribben”) leeg.
n Regelmatig ontdooien bespaart energie (zie
“Ontdooien”).
n Open de deur zo kort mogelijk als u dingen
uit de koelkast neemt.
n Zet de koelkast ongeveer 12 uur voordat u
deze vult aan.
1.10 Conformiteitsverklaring
i
Page 89

7
2.0 Veiligheidsinstructies
De koelkast is bestemd voor vrije opstelling in
gesloten ruimtes, alsmede in vrijetijds- en
jachthutten. Het apparaat is goedgekeurd
voor deze toepassing volgens de EG-richtlijn
2009/142/EG gastoestellen. Deze is niet
geschikt voor montage in weg- en watervoertuigen.
Gebruik de koelkast uitsluitend voor het koelen en bewaren van levensmiddelen.
2.1 Correct gebruik
2.4 Werkzaamheden aan en
controleren van de koelkast
2.3 Veiligheid van kinderen na
afvalverwerking
Als u de koelkast afdankt, verwijder dan
alle koelkastdeuren en laat de roosters in
de koelkast. U voorkomt hiermee insluiting en verstikking.
WAARSCHUWING!
Montage- en/of onderhoudswerkzaamheden aan gas- en elektrische apparatuur
mogen alleen worden uitgevoerd door een
erkend installateur. Ondeskundig uitgevoerde werkzaamheden kunnen aanzienlijke materiële schade en/of lichamelijk
letsel tot gevolg hebben.
WAARSCHUWING!
Gebruik nooit open vuur als u gasvoerende onderdelen en leidingen op lekken
controleert!
Er bestaat brand- of ontploffingsgevaar.
Open nooit het absorptieaggregaat!
Het staat onder hoge druk.
Er bestaat risico op verwondingen!
WAARSCHUWING!
Personen die de koelkast bedienen, moeten
vertrouwd zijn met het veilig gebruik ervan en
de instructies in deze handleiding kennen.
Dit apparaat kan door kinderen vanaf 8 jaar en
door personen met een lichamelijke, sensorische of verstandelijke beperking of een gebrek
aan ervaring en/of kennis worden gebruikt,
indien zij onder toezicht staan of geïnstrueerd
zijn over het veilig gebruik van het apparaat en
de daaruit voortvloeiende risico’s hebben
begrepen. Kinderen mogen niet spelen met
het apparaat. Reiniging en onderhoud mogen
niet door kinderen worden uitgevoerd.
[EN 60335-2-24, 7.12]
2.2 Verantwoordelijkheid van
de gebruiker
Veiligheidsinstructies
Het apparaat mag niet aan regen worden
blootgesteld.
LET OP!
De koelkast is niet geschikt voor het
bewaren van geneesmiddelen. Lees ook
de instructies in de bijsluiter van het
geneesmiddel.
WAARSCHUWING!
Page 90

8
2.5 Koelmiddelinformatie
Als koelmiddel wordt ammoniak gebruikt.
Dit is een natuurlijke verbinding die ook wordt
gebruikt in schoonmaakmiddelen (1 liter salmiakreiniger bevat tot 200 g ammoniak, tweemaal zoveel als in de koelkast wordt gebruikt).
Natriumchromaat wordt gebruikt als roestwerend middel (1,8% gewichtspercentage van
het oplosmiddel).
Bij een eventueel optredende lekkage (gemakkelijk herkenbaar aan de scherpe geur)
handelt u als volgt:
- schakel de koelkast uit.
- Ventileer de ruimte goed.
- Neem contact op met de erkende klanten-
service.
Het vrijkomen van het koelmiddel heeft
geen schadelijke gevolgen voor de gezondheid. Dit is voor uw veiligheid door deskundigen onderzocht en vastgesteld.
Vergelijk de bedrijfsdruk op het typeplaatje
met de gegevens van het drukreduceerventiel
op de gasfles.
2.6 Gebruik van de koelkast op
gas
Als u gas ruikt:
n open alle ramen en verlaat de ruimte.
n Gebruik geen elektrische apparaten en ver-
mijd het gebruik van open vuur.
n Sluit het ventiel van de gasfles en laat het
gesloten, totdat de fout is verholpen.
n Neem contact op met een erkend installa-
teur*.
* erkend installateur
Een erkend installateur is iemand die op grond van
zijn of haar opleiding en kennis de garantie biedt dat
het apparaat volgens de voorschriften wordt gecontroleerd.
Aansluitdruk en gascategorieën
De koelkast werkt op de hierna aangegeven
gassen en met de beschreven inlaatdruk. De
drukreduceerventielen die u gebruikt tussen
de gasfles en de koelkast, moeten overeenkomen met de categorieën uit de volgende tabel.
Categorie Druk in mbar GAS
I3B / P(30) 30 Butaan
30 Propaan
I3+ (28-30/37) 28-30 Butaan
37 Propaan
I3B/P(50) 50 Butaan
I3B/P(50) 50 Propaan
De bedrijfsdruk moet overeenkomen met
de gegevens op het typeplaatje van de
koelkast.
LET OP!
2.7 Gebruik op elektriciteit
Kies alleen deze modus, wanneer de
stroomvoorziening van de stroomaansluiting overeenkomt met de op het typeplaatje aangegeven waarde. Bij afwijkende
waarden kan het apparaat beschadigd
raken.
LET OP!
Veiligheidsinstructies
i
Page 91

9
2.8 Veiligheidsinstructies voor
het bewaren van levensmiddelen
Veiligheidsinstructies
De werking van de Dometic-koelkasten berust
op het absorptieprincipe. Een absorptiesysteem reageert traag op veranderingen van de
thermostaatregelaar, op uitstromende kou bij
het opengaan van de deur of op het opbergen
van de eetwaren. De apparaten voldoen aan
de eisen van de klimaatklasse SN volgens
EN/ISO 7371 bij een temperatuurbereik van
+10 °C tot +32 °C omgevingstemperatuur.
Bescherm het milieu!
Batterijen horen niet thuis bij het huishoudelijk
afval. Geef uw verbruikte batterijen af bij de
dealer of bij een inzamelpunt.
Geen enkele koelkast kan de kwaliteit van
levensmiddelen verbeteren; hoogstens kan
de kwaliteit van de levensmiddelen op het
tijdstip van opslag gedurende een korte
periode blijven behouden.
Let op de volgende speciale omstandigheden bij het bewaren van levensmiddelen in
een koelkast:
n verandering van de klimaatomstandig-
heden, zoals temperatuurveranderingen;
n hoge kamertemperatuur;
n de koelkast is achter een raam opgesteld
en er is sprake van directe zonnestraling;
n te vroeg opbergen van de eet- en drinkwa-
ren nadat het apparaat net is ingeschakeld.
Onder deze speciale omstandigheden is de
benodigde temperatuur voor snel bederfelijke
producten niet gewaarborgd.
Tot de snel bederfelijke levensmiddelen behoren alle producten met een aangegeven vervaldatum en een bewaartemperatuur van ten
hoogste +4 °C of lager, in het bijzonder vlees,
gevogelte, vis, worst, kant-en-klaarmaaltijden.
n Rauwe en gekookte eetwaren apart ver-
pakken (bijv. in dozen, aluminiumfolie, enz.).
n De buitenverpakking van de portiever-
pakkingen alleen eraf doen, als alle belangrijke gegevens, zoals de houdbaarheidsdatum, ook op de portieverpakkingen staan.
n Gekoelde producten niet te lang buiten de
koelkast laten staan.
n Levensmiddelen met de kortste houdbaar-
heidsdatum vooraan zetten.
n Restjes weer inpakken en zo snel mogelijk
opmaken.
n Handen voor en na aanraking van levens-
middelen wassen.
n De binnenruimte van de koelkast regelma-
tig schoonmaken.
Let op de instructies over de houdbaarheidsdatum op de buitenverpakking van de producten.
Let op punt
“5.1 Reiniging”
van deze gebruiks-
aanwijzing
2.9 Vervangen van de batterijen
n Let op de polariteit !
n Plaats geen niet-oplaadbare batterijen
in een oplader.
n Verwijder oplaadbare batterijen uit het
batterijvak voordat u ze oplaadt.
n Voorkom dat de contactpunten in het
batterijvak worden kortgesloten!!
n Verwijder lege batterijen.
n Verwijder de batterijen uit het batte-
rijvak als u de koelkast lange tijd niet
gebruikt.
n Gebruik niet verschillende typen batte-
rijen door elkaar.
LET OP!
i
Page 92

10
3.0 Modelbeschrijving
3.1 Modeltype
Het typeplaatje vindt u aan de binnenkant van
de koelkast. Op het typeplaatje staat alle
belangrijke informatie over de koelkast vermeld. U vindt hier het modeltype, productnummer en serienummer. Deze informatie
heeft u nodig als u contact opneemt met de
klantenservice of bij de bestelling van reserveonderdelen.
3.2 Typeplaatje van de koelkast
Afb. 1
Modelnummer
Productnummer
Serienummer
Elektrische aansluitwaarden
Gasdruk
2
1
3
4
5
Modelbeschrijving
Brutoinhoud (liter) .................................. 154
Vriesvak (liter) ........................................... 28
Brutoinhoud (zonder vriesvak).................. 164
Afmetingen (mm)
(H x B x D)................................1276x531x582
Aansluitvermogen (W) ......................... 190
Gasverbruik
g/24 h*..................................................... 380
Stroomverbruik
kWh/24 h* .............................................. 3.2
Nettogewicht (kg) .................................. 44.0
Gasontsteking ..................... Piëzo-ontsteker
Vrijstaande opstelling
3.3 Technische gegevens
Technische wijzigingen voorbehouden.
* Gemiddeld verbruik gemeten bij een gemiddelde
omgevingstemperatuur van 25 °C volgens de ISO-standaard.
3.4 Uitleg over de koelkast
Bedieningselementen
Vriesvak (uitneembaar)
Inschuifbaar draadrooster (
optioneel, als
vriesvak eruit genomen is
)
Naverdamper voor koelruimte
Afvoergootje voor dooiwater
Groentelade
Bovenste opbergvak met klep
Opbergvak onder met flessenhouder
2
1
3
4
5
6
7
8
Afb. 2
2
1
8
7
6
5
3
4
2
1
3
4
5
Voorbeeld
Electrical
Gas
Refrigerator
op gas of netstroom werkende
absorptiekoelkast
0 = handmatige
ontsteking
(Piëzo-ontsteker)
Modellserie
R G E 3 0 0 0
Page 93

11
Installatie
4.0 Installatie
Deze koelkast is gekeurd en toegestaan voor
gebruik in gesloten ruimtes.
Neem bij het opstellen van het apparaat de
volgende punten in acht:
4.1 Opstellen en aansluiten
n De opstelruimte moet een inhoud hebben
van ten minste 30 m³, een goede ventilatie
en een raam of een deur die naar de buitenlucht open gaat.
n De koelkast moet vrijstaand, d.w.z. met een
minimumafstand van 50 mm ten opzichte
van nabijgelegen (zij-) wanden of kasten,
worden opgesteld (geen inbouw!).
n De afstand ten opzichte van de daarboven
liggende inrichting (kasten, enz.) moet ten
minste 100 mm zijn.
n Plaats het apparaat waterpas op een
stevige ondergrond.
n De koelkast mag niet zijn blootgesteld aan
de warmtestraling van hete objecten (bijv.
haard, verwarming).
n Het koelaggregaat aan de achterzijde
(onder de afdekking) moet constant worden
geventileerd. Dek het aggregaat niet af (bijv.
handdoeken, gordijnen).
n Een gebrekkige ventilatie leidt tot vermin-
dering van het koelvermogen!
n Plaats de koelkast waar deze is beschermd
tegen spatwater. Let erop dat het apparaat
voor en tijdens het opstellen niet is blootgesteld aan regen.
n De stroomvoorziening moet overeenkomen
met de op het typeplaatje vermelde waarde. Bij afwijkende waarden kan het apparaat beschadigd raken.
n De voeding van het apparaat voor de elek-
trische werking moet via een reglementair
geaarde contactdoos geschieden.
n In de aanvoerkabel moet een automatische
uitschakelaar aanwezig zijn.
n Het netsnoer moet altijd vrij toegankelijk
zijn en het mag niet in contact komen met
hete delen van het aggregaat/de brander.
n Gasflessen moeten rechtop staan.
n Zet de gasfles op een goed geventileerde
plaats.
n Plaats de gasfles op een wijze dat deze bij
een brand goed is te herkennen.
n De maximale afstand van de gasfles ten
opzichte van het apparaat mag niet groter
zijn dan 1,5 m.
n Het is alleen toegestaan het in de betreffen-
de landen geldige type fles en de drukregelinrichtingen te gebruiken.
4.1.1 Elektrische aansluiting
4.1.2 Gasflessen plaatsen
De netstekker moet vrij toegankelijk zijn.
LET OP!
Wanneer de aansluitkabel wordt beschadigd, moet deze door de klantenservice
van Dometic of door net zo gekwalificeerd personeel worden vervangen om
gevaarlijke situaties te vermijden.
LET OP!
Page 94

12
Installatie
4.1.3 Gasaansluiting
n De deskundige aansluiting moet worden
uitgevoerd door een erkende deskundige .
n Neem de telkens geldige nationale voor-
schriften voor het gebruik van op vloeibaar
gas werkende apparaten in acht.
- Technische regels EN 732
n Er moet een vast ingestelde drukregelaar
(1), afb. 3, (drukreduceerklep) in de aanvoerleiding naar het apparaat zijn geïnstalleerd. De koelkast mag met geen
andere dan op het typeplaatje vermelde
druk worden gebruikt.
n De koelkast moet met een flexibele veilig-
heidsslang op de gasfles worden aangesloten.
n Kies een lengte die voldoende is om de
flexibele slang zonder knikken aan te
sluiten. De flexibele slang mag niet langer
zijn dan 1,5 m.
n Het gas wordt op het apparaat aangesloten
door middel van een snijring- (Ermeto-)
schroefverbindingL8, conform EN 1949.
n De flexibele slang moet conform de in de
betreffende nationale bepalingen voorgeschreven tijdsintervallen worden vervangen.
n Na aansluiting op de gasfles moeten een
dichtheidscontrole op alle aansluitingen
alsmede een vlamproef van de brander
worden uitgevoerd. Gebruik voor de dichtheidscontrole een lekopspoorspray of een
schuimvormend middel. Controleer de
aansluitpunten na het openen van het ventiel van de fles op eventuele belletjes.
1
Flesventiel
Afb. 4
Afb. 3
Afb. 5 Afb. 6
SW 14
SW 17
Detail
2. Lijn de deurgreep op
de deur uit en
schroef deze erop.
1. Bevestigingspunten:
gebruik de sjabloon
(1) met de juiste
maat-voering (zie
"Bijlage")
3. Steek de afdekking erop en druk deze vast
aan.
4.2 Deurgreep monteren
1
Gebruik nooit open vuur, als u het apparaat en de aanvoerleiding op lekken
controleert!
GEVAAR !
De koelkast is uitsluitend voorzien voor
gebruik met vloeibaar gas, zoals
propaan/butaan. Gebruik nooit stadsgas,
aardgas of lpg!
Sjabloon
1
Ø 2mm
max
1.1 Nm!
Page 95

13
5.2 Onderhoud
Gebruik van de koelkast
n De gasbrander moet ten minste eens per
jaar en daarnaast indien nodig worden
schoongemaakt. Bewaar kwitantiebewijzen
van onderhoudsbeurten aan uw koelkast.
n Wanneer de koelkast langere tijd buiten
gebruik is geweest, is een onderhoudsbeurt aan te bevelen. Neem daarvoor
contact op met onze klantenservice.
Controleer voor ingebruikname of de op de
typeplaatje vermelde spanning overeenstemt
met de netspanning ter plaatse. Als dat niet zo
is, sluit de koelkast dan niet aan maar neem
contact op met uw leverancier.
Het koelkastaggregaat werkt geluidloos.
Bij de eerste ingebruikname van het apparaat
kunt u iets ruiken dat na enige uren vervliegt.
Zorg dat de woonruimte goed wordt geventileerd.
Na ongeveer een uur na het inschakelen dient
het diepvriesvak van de koelkast koud te worden. Na enkele uren bereikt de koelkast zijn
bedrijfstemperatuur.
Deze koelkast werkt op twee verschillende
energiebronnen:
n netspanning (230 V)
n gas (vloeibaar gas propaan/butaan).
De gewenste energiebron kiest u met de
energiekeuzeschakelaar (afb. 7).
5.1 Reiniging
Voordat u de koelkast in gebruik neemt, is het
aan te raden het apparaat eerst van binnen
schoon te maken. Wij adviseren een regelmatige reiniging.
Gebruik een zachte doek en lauwwarm water
met een mild schoonmaakmiddel. Vervolgens
met schoon water afwassen en afdrogen.
Gebruik geen zeep of harde, bijtende of op
soda gebaseerde schoonmaakmiddelen om
aantasting van het materiaal te voorkomen.
Zorg ervoor dat de afdichtstrip van de deur
niet in contact komt met olie of vet.
5.0 Gebruik van de koelkast
5.3 Gebruik op elektriciteit
Bij afwijkende waarden kan het apparaat
beschadigd raken.
LET OP!
5.4 Gebruik op gas
n De koelkast mag alleen op vloeibaar gas
(propaan, butaan) worden gebruikt (geen
aardgas, stadsgas).
n Vanaf een hoogte van ca. 1000 m NN
kunnen bij het ontsteken van het gas storingen optreden die een fysische oorzaak
hebben (geen defect!).
n Bij het eerste gebruik en na het vervangen
van de gasfles kan er lucht in de gasleidingen zitten. Door kort gebruik van de
koelkast worden de gasleidingen ontlucht.
Het gas ontsteekt dan zonder vertraging.
n Alle koelkasten met handmatige ontsteking
hebben een automatische vlambeveiliging.
Dit betekent dat de gastoevoer na ca. 30
seconden automatisch wordt onderbroken,
zodra de vlam dooft.
Het koelkastaggregaat wordt tijdens de
werking zeer heet. Kom niet in contact
met onderdelen die heet worden.
LET OP!
i
Page 96

14
Gebruik van de koelkast
Toelichting
Door aan energiekeuzeschakelaar (1) te draaien kiest u de gewenste energiebron. De energiekeuzeschakelaar heeft vier standen:
n Uit(1.)
n Netspanning (230V~) (2.)
n Uit (3.)
n Gas (vloeibaar gas propaan/butaan) (4.)
5.5.1 Uitleg over de bedieningselementen
Handmatige energiebronkeuze/handmatige ontsteking met piëzo-ontsteker :
5.5 Bediening
1 = Schakelaar ON/energiekeuzeschakelaar
2 = Thermostaat
3 = Piëzo-ontsteker voor gaswerking
4 = Vlamindicator (galvanometer)
Afb. 7
2
1
3
4
5.5.3 Gebruik op gas (vloeibaar gas)
Voordat u de koelkast op gas gaat gebruiken:
n open het ventiel van de gasfles.
3. Druk meerdere keren om de 1 - 2 seconden
op activeringsknop (3).
4. De wijzer van galvanometer (4) loopt naar
het groene gedeelte wanneer de vlam is
ontstoken. Houd draaiknop (2) nog ca. 15
sec ingedrukt en laat deze dan los. De koelkast is nu ingeschakeld.
Afb. 13Afb. 12
5.5.2 Gebruik op elektriciteit
Afb. 9
Afb. 10 Afb. 11
Schakel het apparaat
in door energiekeuzeschakelaar (1) naar
rechts te draaien naar
de stand:
voor 230 Vbedrijf.
1. Zet energiekeuzeschakelaar (1) op stand:
2. Draai de thermostaatregelaar (2) naar
rechts en druk deze in. Houd de regelaar
ingedrukt.
1
1
2
2 3 4
voor gaswerking.
Afb. 8
1
1 2
3
4
1.
2.
3.
4.
Page 97

15
Gebruik van de koelkast
5.5.4 Het regelen van de temperatuur
van de koelruimte
Met de draaiknop (2)
selecteert u de temperatuur van de koelruimte.
De schaal begint bij de
MIN-stand (smal
balkje = warmste temperatuur) en gaat tot
de MAX-stand (breed
balkje = koudste temperatuur).
Let er wel op dat deze
thermostaatindeling geen absolute temperatuurwaarden inhoudt. Kies indien de omgevingstemperatuur tussen +15 en +25 °C ligt de middelste stand (3). Het aggregaat werkt in het
optimale prestatiebereik.
5.7 Opbergroosters plaatsen
U kunt de roosters eruit halen door deze een
beetje op te tillen en uit de geleiding te
trekken. U kunt de indeling geheel naar wens
variëren.
Afb. 19
Afb. 20
Om de koelruimte te vergroten kunt u het
vriesvak eruit halen.
1. Ontgrendel het vriesvak aan beide zijden.
2. Trek het vriesvak eruit.
Berg het vriesvak zorgvuldig op om beschadi-
gingen te voorkomen.
Als u het vriesvak niet nodig hebt en eruit
haalt, kunt u een extra rooster (3) plaatsen. Het
legrooster is als optie verkrijgbaar.
5.8 Uitneembaar vriesvak
De binnenverlichting op batterijen wordt
gestuurd via een deurcontact. Trek voor het
vervangen van de batterijen (3 x 1,5 V
AAA/R3/micro) de verlichtingsbehuizing eraf
en open het batterijvak met een geschikte
schroevendraaier.
Afb. 14
Afb. 15
Afb. 16
Afb. 17
Middelste stand
2
3
1
Afb. 18
4
2
3
5.6 Vervanging batterijen van
de binnenverlichting
i
Page 98

16
Gebruik van de koelkast
5.9 Bewaren van levensmiddelen
en bereiding van ijsblokjes
n Schakel de koelkast ongeveer 12 uur voor
het vullen in.
n Doe altijd voorgekoelde producten in de
koelkast. Let er bij de aankoop en het
transport al op dat de producten goed zijn
gekoeld. Gebruik een koeltas.
n Open de deur zo kort mogelijk als u dingen
uit de koelkast neemt.
n Producten moeten verpakt, het beste in
gesloten dozen, aluminiumfolie of iets dergelijks en apart worden bewaard om uitdrogen en geurtjes te vermijden.
n Zet warme levensmiddelen nooit direct in
de koelkast; altijd eerst laten afkoelen.
n Producten die vluchtige, brandbare gassen
kunnen afgeven, mogen niet in de koelkast
worden bewaard.
n Zet legroosters en opbergvakjes niet te vol
om de luchtcirculatie in de koelkast niet te
belemmeren.
n Laat een afstand van ca. 10 mm tussen de
producten en de naverdamper (“koelribben”) leeg.
n Het koelkastaggregaat moet constant wor-
den geventileerd. De ventilatieopeningen
mogen niet worden afgedekt.
5.9.1 Bewaren van producten in de
koeling
5.9.2 Bewaren van producten in het
vriesvak
n Bewaar geen koolzuurhoudende dranken in
uw vriesvak.
n Het vriesvak is geschikt voor het bereiden
van ijsblokjes en voor het gedurende korte
tijd opslaan van bevroren levensmiddelen.
Het is niet geschikt om levensmiddelen in
te vriezen.
Bij een omgevingstemperatuur lager dan
+10 °C kan een gelijkmatige regeling van
de vriesvaktemperatuur door het systeem
niet worden gegarandeerd, wanneer de
koelkast gedurende langere tijd aan deze
temperatuur is blootgesteld. Hierdoor kan
de temperatuur in het vriesvak stijgen,
waardoor de daarin bewaarde producten
zullen ontdooien
Afb. 21
5.9.3 Koelkastvakken
Vriesvak:
reeds ingevroren voedsel
Bovenste vak:
kant-en-klare levensmiddelen
Middelste vak:
zuivelproducten, kant-en-klaarmaaltijden
Onderste vak:
vlees, vis, te ontdooien voedsel
Groentevak:
salades, groenten, fruit
Bovenste deurvak:
eieren, boter
Middelste deurvak:
blikjes, dressings, ketchup, jam
Onderste deurvak (drankenvak):
dranken in flessen of pakken
2
1
3
4
5
6
7
8
1
2
3
4
5
6
7
8
Page 99

17
Gebruik van de koelkast
5.9.4 Bereiding van ijsblokjes
Ijsblokjes kunt u het beste ‘s nachts maken. ‘s
Nachts wordt de koelkast minder belast en
heeft het aggregaat meer reserve.
1. Vul het ijsklontjesbakje met drinkwater.
2. Plaats het bakje in
het vriesvak.
Afb. 23
Afb. 22
Gebruik alleen drinkwater!
WAARSCHUWING!
5.10 Buitenbedrijfstelling
n Zet de energiekeuzeschakelaar 1 op de
stand “UIT”. Het apparaat is nu uitgeschakeld.
n Gebruikt u de koelkast langere tijd niet, sluit
dan het afsluitventiel en het ventiel van de
gasfles.
n De deur staat nu op een kier om schimmel-
vorming in de koelkast te voorkomen.
n Ontgrendel het slot van de deurvergrende-
ling door dit in te drukken en schuif het naar
voren. Als u de deur nu dicht doet, blijft de
koelkast op een kiertje open staan om
schimmelvorming te vermijden.
Afb. 24
Afb. 25
1
UIT
UIT
5.11 Ontdooien
Geleidelijk zet zich ijs af op de vinnen aan de
binnenkant van de koelkast. Een sterkere
ijsvorming aan één zijde kan optreden en betekent niet dat de koelkast niet goed functioneert. Als de ijslaag ongeveer 3 mm dik is,
moet u de koelkast ontdooien.
n Schakel de koelkast uit zoals beschreven
bij punt
5.10 Buitenbedrijfstelling
.
n Verwijder het ijsklontjesbakje en alle levens-
middelen.
n Laat de deur van de koelkast open om te
luchten en schimmelvorming te vermijden.
n Na het ontdooien (het vriesvak en de vinnen
zijn ijsvrij) droogt u beide koelcompartimenten met een doek af.
Opmerking: het dooiwater uit het
hoofdcompartiment van de koelkast loopt in
een container achterin de koelkast. Van hieruit
verdampt het water.
U mag de ijslaag nooit met kracht verwijderen of het ontdooien met een warmtebron versnellen!
LET OP!
Afb. 26
Afb. 27
1
2
Afb. 28
2
Normale stand
Buiten bedrijf
Page 100

18
Gebruik van de koelkast
Afb. 32
Afb. 33
Afb. 30
5.12 Deuraanslag wisselen
1
3
Afb. 31
2
4
n Open de deur, maak de scharnierschroef
los en bewaar deze.
n Haal de deur naar voren eruit.
n Maak de scharnierpen los en schroef deze
aan de andere kant erin.
n Plaats de afstandschijf op het onderste
scharnier.
n Schuif de deur in de bovenste scharnierpen
en plaats deze op het onderste scharnier.
n Schroef de scharnierschroef erin.
n Let erop dat de deur vrij kan bewegen en
dat de deurvoeg rondom is aangesloten.
Mocht het nodig zijn om de koelkast daarbij
zijwaarts te kantelen of leggen, wacht dan
daarna een uur voordat u de koelkast gaat
gebruiken. De koelvloeistof verzamelt zich
weer in het voorraadreservoir van het koelaggregaat. Op die manier is een correcte werking van de koelkast gewaarborgd.
Afb. 29
2
3
1
4
5.13 Decorpaneel vervangen
Decorpaneel met rand
n Verwijder eerst de deurgreep (indien
gemonteerd).
n Haal zijstrip (1) van de deur af (strip is aan-
gedrukt, niet opgeschroefd).
n Schuif decorplaat (2) in de deur en steek
strip (1) er weer op.
Afb. 34
2
1
1
i
 Loading...