

Dometic PERFECTROOF PR2000, PERFECTROOF PR2500 Operating Manual
PR2000, PR2500
EN
DE
FR
ES
PT
IT
NL
DA
SV
NO
FI
RU
PL
SK
CS
HU
SL
EL
Awning
Operating manual . . . . . . . . . . . . . . . . . . . . 11
Markise
Bedienungsanleitung . . . . . . . . . . . . . . . . .27
Store extérieuru
Notice d’utilisation . . . . . . . . . . . . . . . . . . .45
AWNINGS
PERFECTROOF
Синусоидальный инвертор
Инструкция по эксплуатации . . . . . . . . . 199
Markiza
Instrukcja obsługi . . . . . . . . . . . . . . . . . . . 217
Markíza
Návod na obsluhu. . . . . . . . . . . . . . . . . . . 234
Markýza
Návod k obsluze . . . . . . . . . . . . . . . . . . . . 251
Előtető
Használati utasítás. . . . . . . . . . . . . . . . . . . 267
Markiza
Navodilo za uporabo . . . . . . . . . . . . . . . .284
ȉȑȞIJĮ
ȅįȘȖȓİȢ ȤİȚȡȚıȝȠȪ . . . . . . . . . . . . . . . . 300
Tol d o
Instrucciones de uso . . . . . . . . . . . . . . . . . .63
Tol d o
Manual de instruções . . . . . . . . . . . . . . . . . 81
Ten da d a sole
Istruzioni per l’uso . . . . . . . . . . . . . . . . . . . .99
Zonnescherm
Gebruiksaanwijzing. . . . . . . . . . . . . . . . . . 116
Markise
Betjeningsvejledning . . . . . . . . . . . . . . . .134
Markis
Bruksanvisning. . . . . . . . . . . . . . . . . . . . . . 151
Markise
Bruksanvisning. . . . . . . . . . . . . . . . . . . . . . 167
Markiisi
Käyttöohje . . . . . . . . . . . . . . . . . . . . . . . . .183
PR2000, PR2500
1
1
2
1.
2
3
4
1
2
3
2.
3.
3
3
PR2000, PR2500
1,5 m
4
1,5 m
4

PR2000, PR2500
5
1.
2.
5

6
PR2000, PR2500
7
6
PR2000, PR2500
1.
2.
3.
8 9
2.
0
1.
3.
a
7
b
c
PR2000, PR2500
8
1.
2.
PR2000, PR2500
1
1
2
d
D
A
C
A
B
B
D
C
e
9
f
PR2000, PR2500
15 – 25 Nm
10
EN
PR2000, PR2500
WARNING!
!
• This operating manual must be read and understood before the
device is set up, operated, cleaned or serviced.
• This device must be installed by a specialist. Improper installation
can lead to serious injury. Alterations to the device can be extremely
dangerous and lead to serious injury or damage to the device.
• Keep this operating manual with the device. The owner must read it
carefully.
Table of contents
1 Notes on using the operating manual . . . . . . . . . . . . . . . . . . . . . . . . . . . . . .12
2 Safety instructions . . . . . . . . . . . . . . . . . . . . . . . . . . . . . . . . . . . . . . . . . . . . . .12
3 Scope of delivery . . . . . . . . . . . . . . . . . . . . . . . . . . . . . . . . . . . . . . . . . . . . . .14
4 Accessories . . . . . . . . . . . . . . . . . . . . . . . . . . . . . . . . . . . . . . . . . . . . . . . . . . .15
5 Intended use . . . . . . . . . . . . . . . . . . . . . . . . . . . . . . . . . . . . . . . . . . . . . . . . . .15
6 Technical description . . . . . . . . . . . . . . . . . . . . . . . . . . . . . . . . . . . . . . . . . . .16
7 Operating the awning. . . . . . . . . . . . . . . . . . . . . . . . . . . . . . . . . . . . . . . . . . .17
8 Cleaning and maintenance. . . . . . . . . . . . . . . . . . . . . . . . . . . . . . . . . . . . . . 22
9 Troubleshooting . . . . . . . . . . . . . . . . . . . . . . . . . . . . . . . . . . . . . . . . . . . . . . 24
10 Warranty . . . . . . . . . . . . . . . . . . . . . . . . . . . . . . . . . . . . . . . . . . . . . . . . . . . . 25
11 Disposal. . . . . . . . . . . . . . . . . . . . . . . . . . . . . . . . . . . . . . . . . . . . . . . . . . . . . 25
12 Technical data . . . . . . . . . . . . . . . . . . . . . . . . . . . . . . . . . . . . . . . . . . . . . . . . 26
11
EN
Notes on using the operating manual PR2000, PR2500
1 Notes on using the operating manual
WARNING!
!
A
Safety instruction: Failure to observe this instruction can cause fatal or
serious injury.
NOTICE!
Failure to observe this instruction can cause material damage and impair
the function of the product.
NOTE
Supplementary information for operating the product.
I
2 Safety instructions
Please observe the safety instructions and stipulations issued by the
vehicle manufacturer and service workshops.
The manufacturer accepts no liability for damage in the following cases:
• Damage to the product resulting from mechanical influences and excess voltage
• Alterations to the product without express permission from the manufacturer
• Use for purposes other than those described in the operating manual
Please note the following warnings:
WARNING!
!
• Before starting your journey, check that the awning is fully retracted.
Never move the vehicle when the awning is open.
• Never drive with the crank inserted. Remove the crank before starting
your journey.
• Do not drive the vehicle if the fabric is damaged or torn, even if the
awning has been properly retracted. The awning arms are held in
place by the fabric. If the fabric rips while driving, the awning will
suddenly shoot out. This can lead to serious injury. Secure the awning
so that it cannot extend suddenly and unexpectedly while driving.
• Do not open the awning while driving.
• Do not open the awning in strong winds or snowfall.
12
EN
PR2000, PR2500 Safety instructions
• Retract the awning if strong winds, heavy rain or snowfall are
imminent.
• Make sure that water or snow does not accumulate on the fabric.
Otherwise this could damage the awning or the awning arms could
collapse and cause severe injury or fatality.
• Do not approach the awning
– if it was left open during heavy winds
– if pools of water have formed on it
– if snow has accumulated on it
– if any debris is on the awning fabric.
The awning may move unexpectedly, become unstable and bend or
break.
• PR2500, optional: If the connection cable of the awning is
damaged, it must be replaced by an expert.
• PR2500, optional: Disconnect the power supply by means of the
on/off switch before you clean the vehicle in the vicinity of the awning
or the awning itself.
A
• Do not leave the extended awning unattended. Retract the awning
before leaving your location.
• Keep a safe distance away from the awning when having barbecues or
open fires. The fabric can be damaged by heat or catch fire.
• This device can be used by children aged 8 years or over, as well as by
persons with diminished physical, sensory or mental capacities or a
lack of experience and knowledge, providing they are supervised, or
have been taught how to use the device safely and are aware of the
resulting risks.
• PR2500, optional: Electrical devices are not toys.
Keep the remote control out of the reach of children. Prevent children
from playing with the wall switch (accessory).
• Children must be supervised to ensure that they do not play with the
device.
NOTICE!
• Park the motorhome or caravan so that no debris (branches, leaves or
similar) can get onto the fabric.
• The fabric of the awning should not hang down at the edges but must
be taut at all times. If the fabric hangs down, it could rub on the arms
and get damaged.
The fabric should not sag in the middle with long awnings.
13
EN
Scope of delivery PR2000, PR2500
• Only retract the awning, when the fabric is free of debris (branches,
leaves or similar). Otherwise the awning can be damaged when it is
retracted.
• Keep the awning free of dirt to prevent abrasions, stains and mildew.
• Only retract the awning if it is wet for safety reasons. Extend it again as
soon as possible. Otherwise, mildew or stains can form or the colour
may fade.
• Never bend an awning arm or the cover down to drain water off the
awning. This can bend the awning and impair its function.
• Do not hang any objects on the awning, on the front cover or the
awning arms.
• Do not use any sprays (e. g. insect repellent, hairspray) near the
awning. This will soil the fabric or the water-repellent effect of the
fabric will be lost.
• If there is insufficient space above the door after the awning is
mounted, the door must remain closed when retracting or extending
to avoid the door making contact with the arms or the front panel.
The required space depends on the design of the door (door width,
swing or sliding door) as well as the set awning angle of inclination.
3Scope of delivery
Quantity Designation
1 Awning
1 Hand crank (only awnings without motor)
1 Tension rafter (only for awnings with a length of 4 m or more)
1 Remote control (only PR2500, optional)
1 Awning switch (only PR2500, optional)
4Pegs
1 Operation manual
1 Installation manual
14
EN
PR2000, PR2500 Accessories
4Accessories
Available as accessories (not included in the scope of delivery):
Description
TieDown Kit
Straps for anchoring the awning
CampRoom
Awning tent front panel and sides for various models with support legs in different sizes
RainProtect
Front panel and sides available in different sizes
SunProtect
Front panel and sides available in different sizes
Dometic Light LK120
LED light kit with remote control for installation on the awning arms
LED LightStrip
LED strip available in different lengths for installation on the underside of the awning
Awning cleaner
Special awning cleaner
Repair Kit
Awning repair patch
5 Intended use
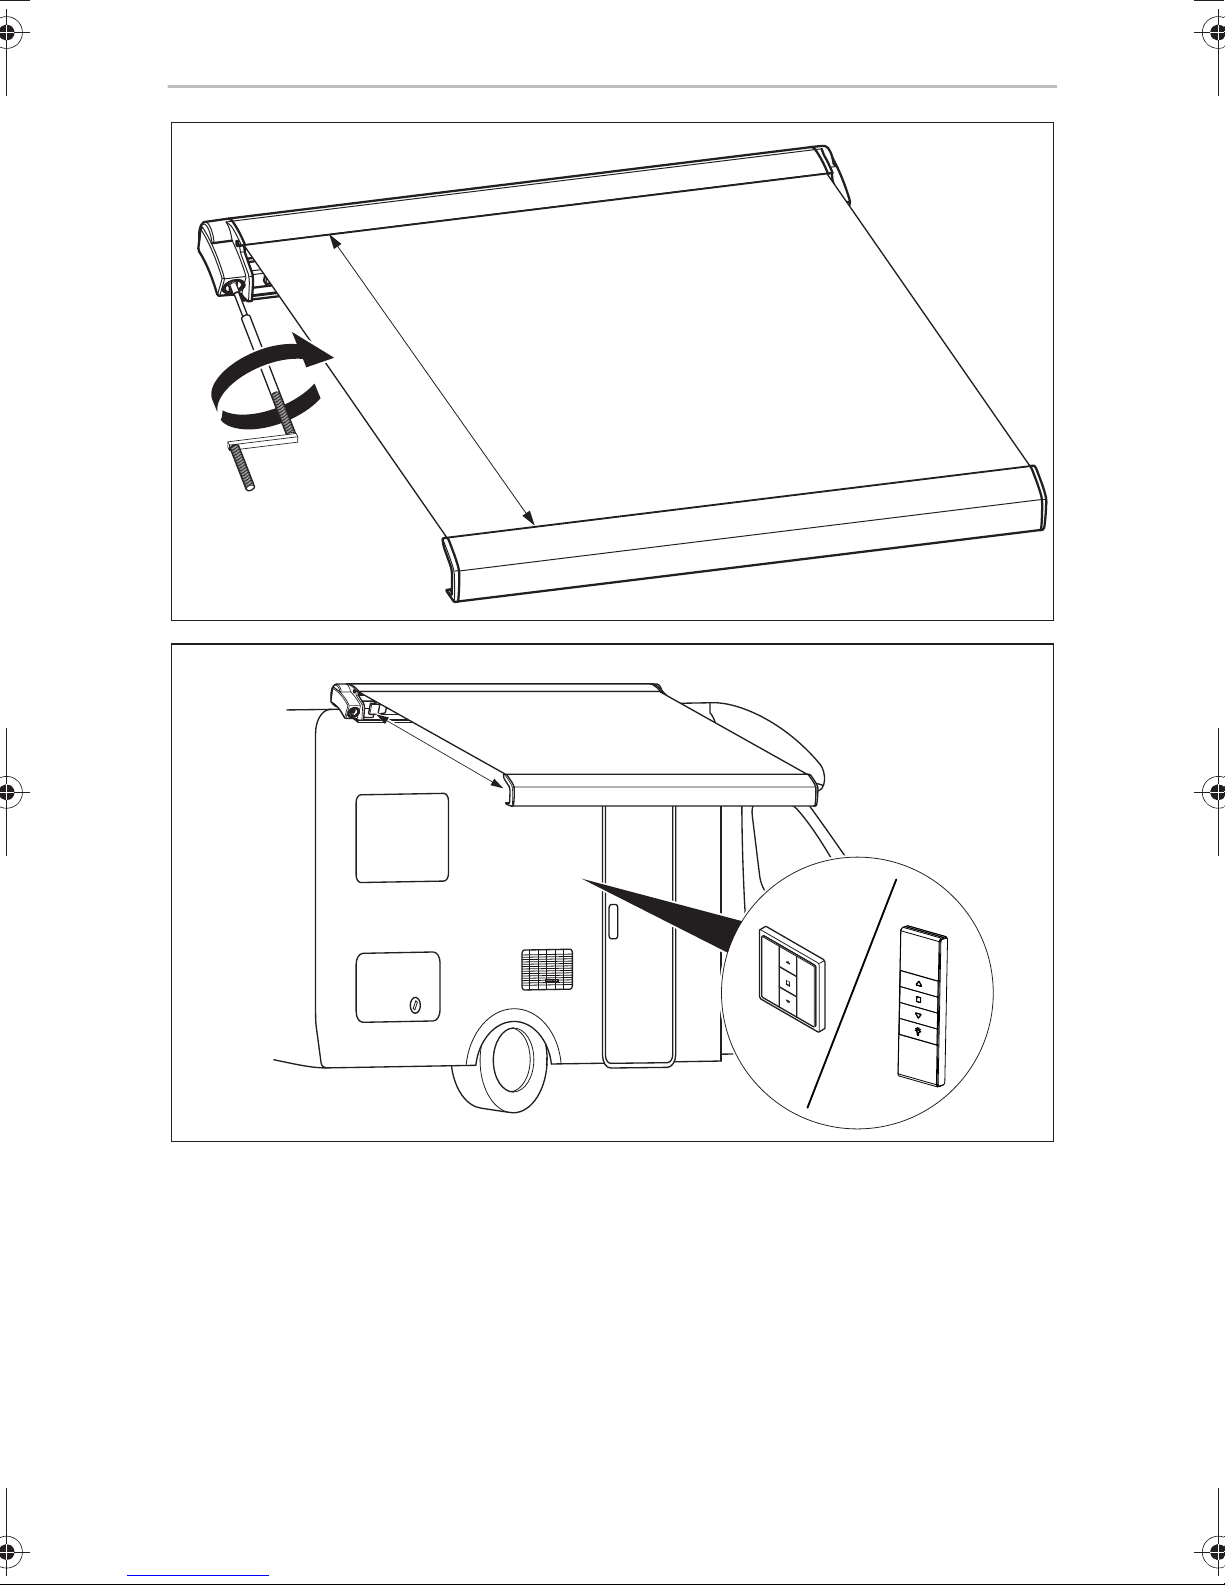
The PerfectRoof PR2000 and PR2500 awnings are suitable for installing on
motorhomes or caravans.
The awnings shall only be used whilst the vehicle is stationary.
15
EN
Technical description PR2000, PR2500
6 Technical description
PerfectRoof PR2000 and PR2500 are awnings which can be extended and retracted
using a hand crank.
The PerfectRoof PR2500 awning can optionally also be extended and retracted with
a 12 V motor that is controlled by switch or remote control.
The awnings are secured on the side of the vehicle or on the ground using struts.
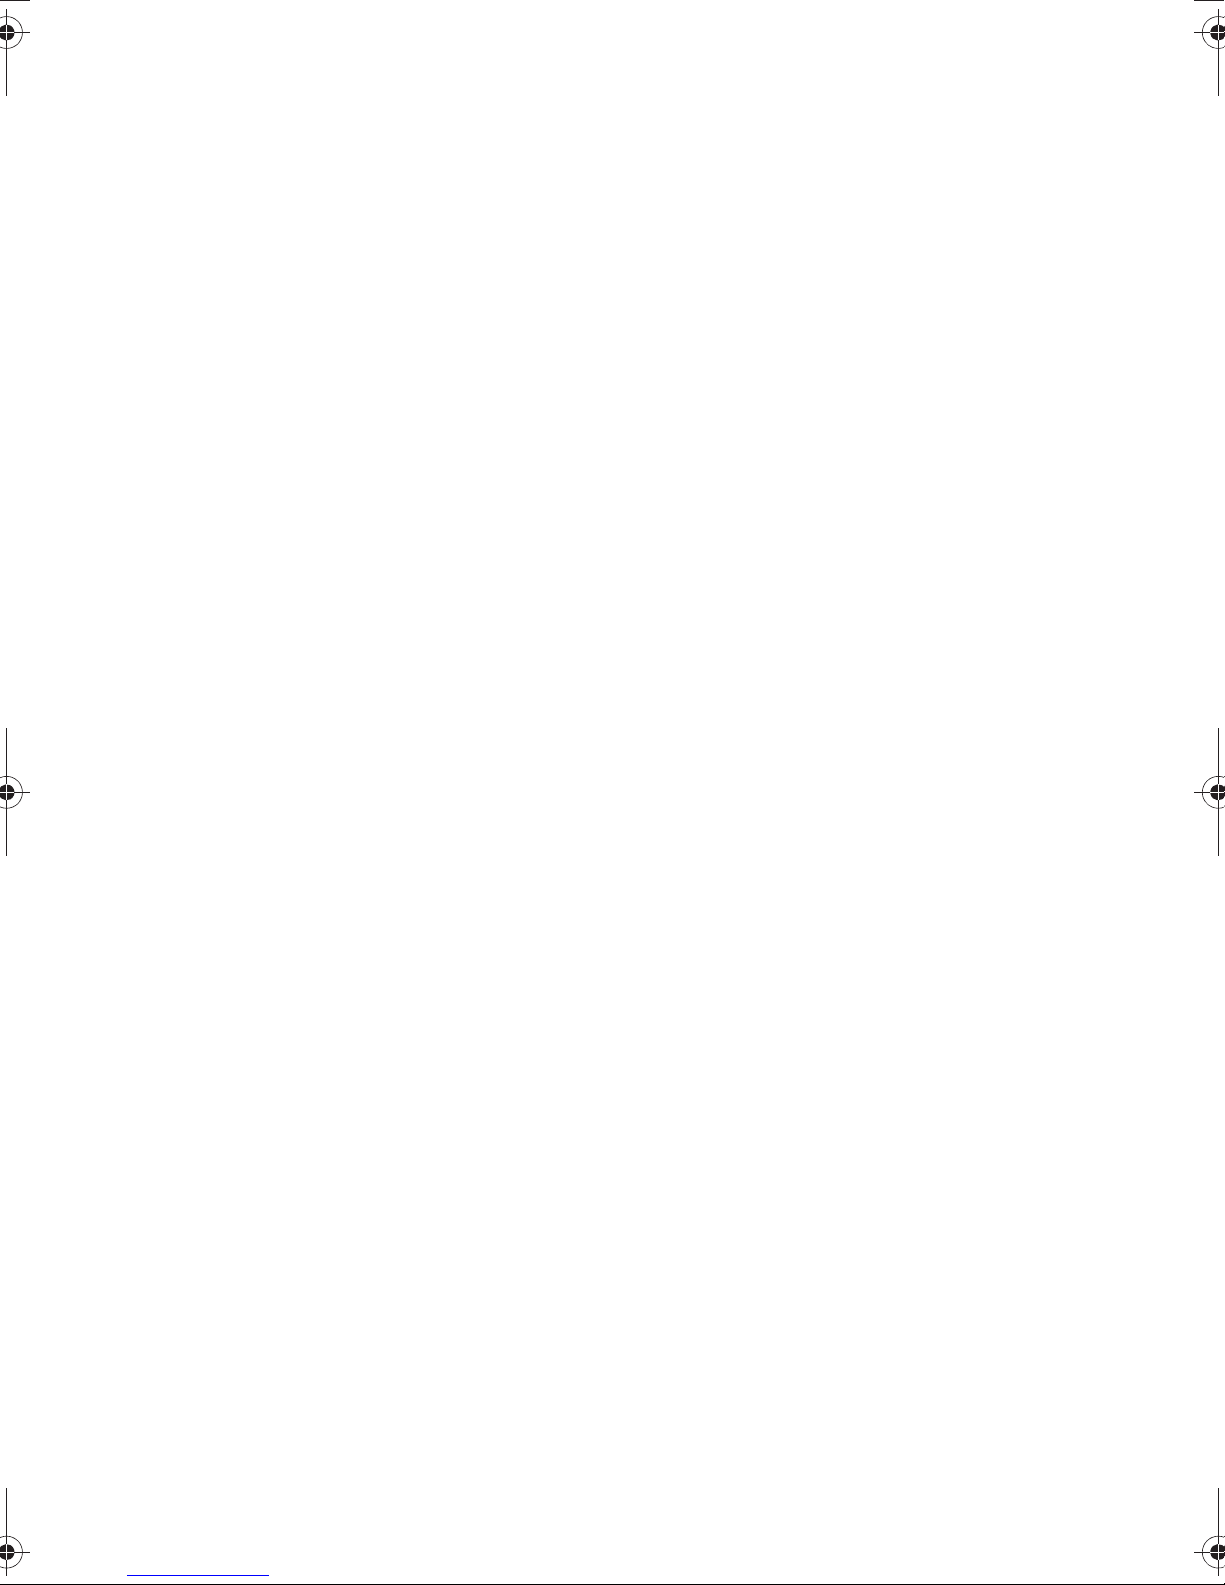
Controls of the remote control (only PR2500, optional)
No. in fig. 1,
page 3
1 Retract awning
2 Stop
3 Extend awning
4 Switch LED lighting on/off (accessory)
Description
Controls of the switch (only PR2500, optional)
No. in fig. 1,
page 3
1 Retract awning
2 Stop
3 Extend awning
Description
16
EN
PR2000, PR2500 Operating the awning
7 Operating the awning
Observe the safety instructions in chapter “Safety instructions” on page 12.
7.1 Note on the vehicle location
NOTICE!
A
7.2 Extending the awning
Extending the awning using a hand crank
!
• Park the vehicle so that no debris (branches, leaves or similar) gets on
to the fabric.
• Keep the awning free of dirt to prevent abrasions, stains and mildew.
WARNING! Beware of injury.
Keep a sufficient distance from objects or other vehicles. Once it is
retracted, it should be at least 40 cm away from other objects and
vehicles on all sides.
➤ Click the hand crank into the holder in the awning (fig. 2, page 3).
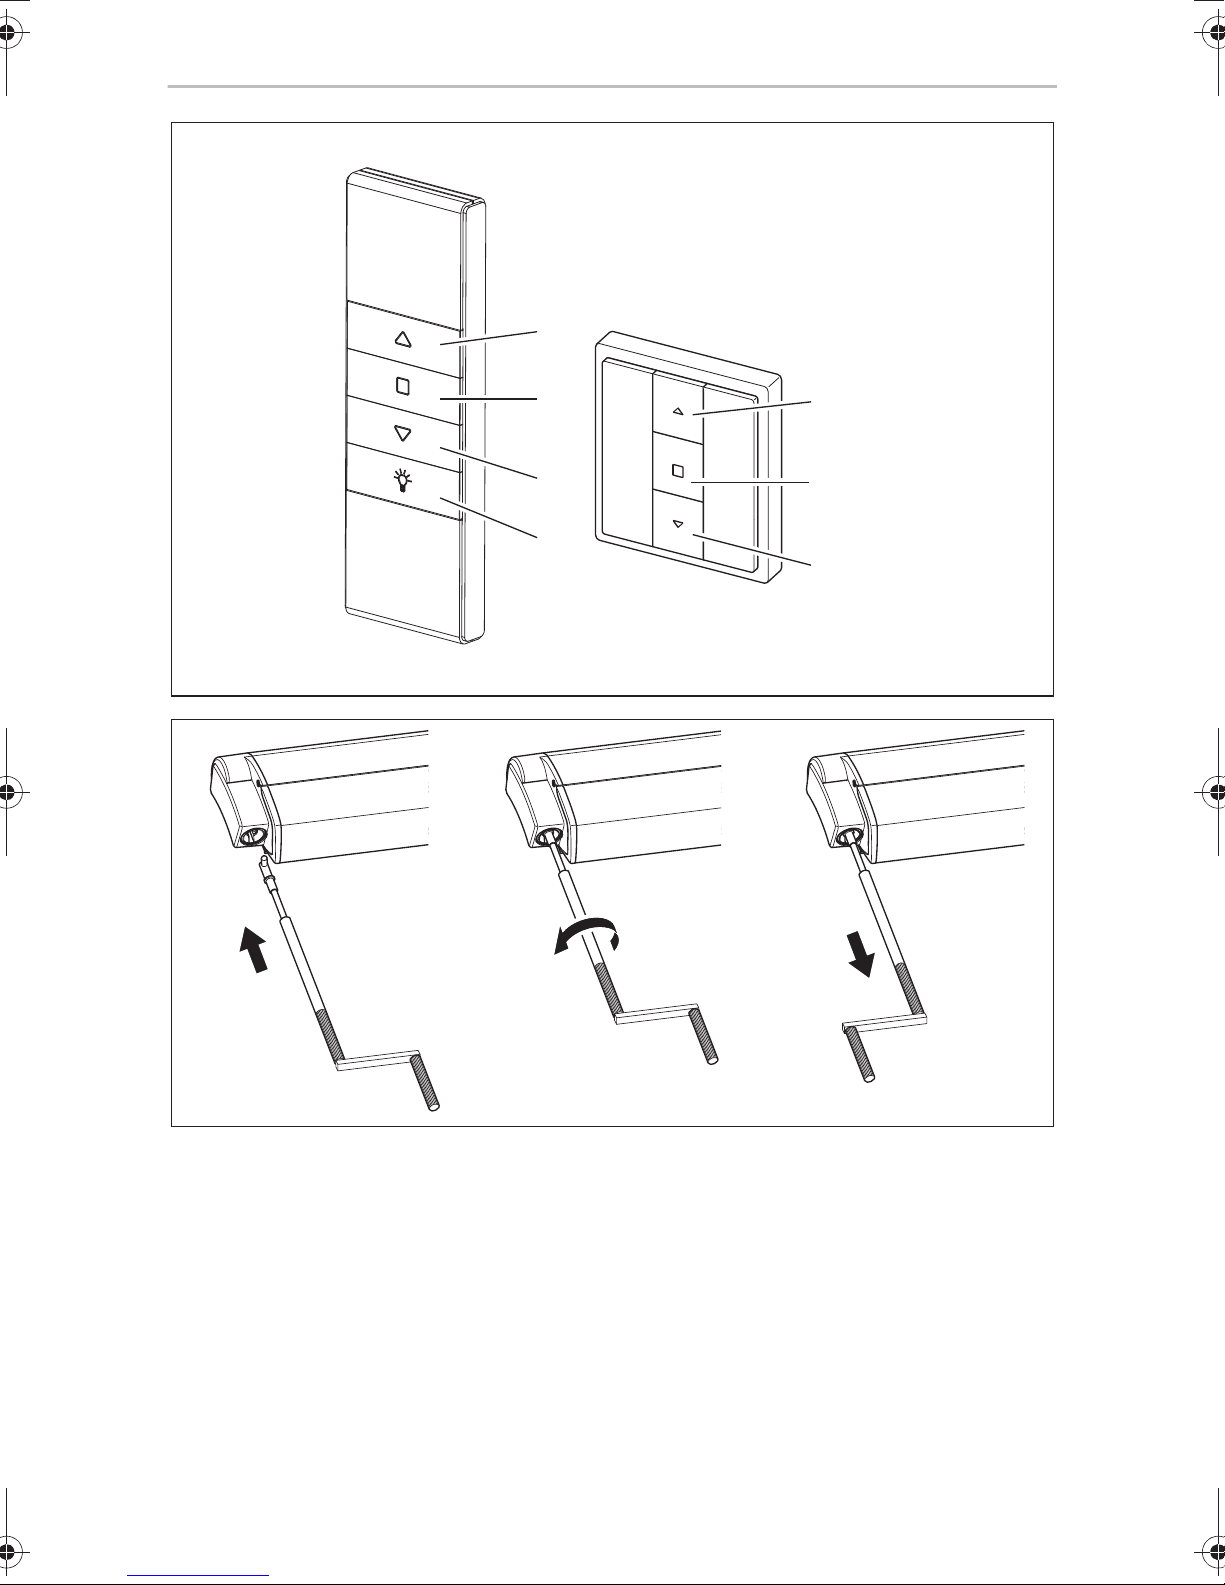
➤ Turn the hand crank until the awning is extended by about 1.5 metres (fig. 3,
page 4).
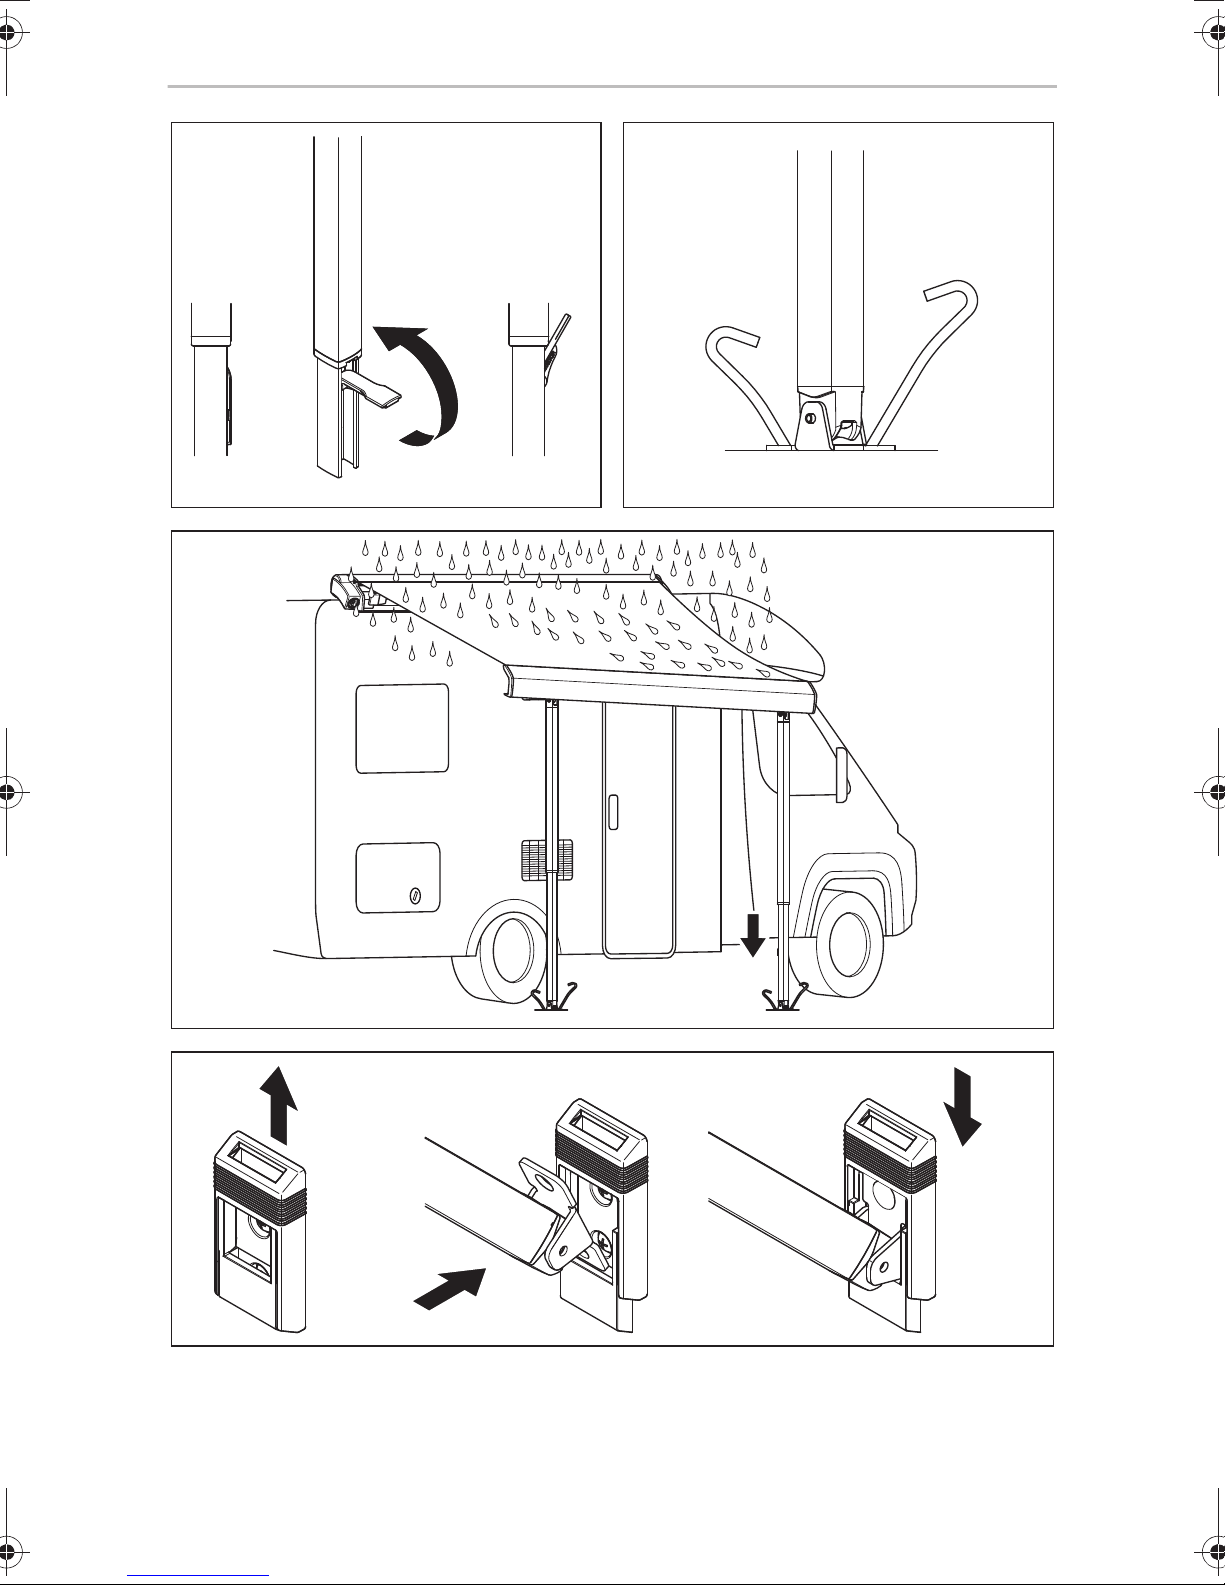
➤ Push the right strut in the front cover together so that you can move it freely
(fig. 5, page 5).
➤ Turn the right strut to the side (fig. 5, page 5).
➤ Fold the right strut down and set it on the ground (fig. 6, page 6).
➤ Adjust the strut to the required height (fig. 7, page 6).
➤ Fold the lever for the strut up to secure the struts (fig. 8, page 7).
➤ Extend the other strut in the same way.
➤ Turn the hand crank until the awning is extended to the required position.
Position the struts vertically and back under the front panel every 30 cm so that
the awning stays secured at all times.
➤ Turn the hand crank approx. a quarter of the way back to tighten the fabric.
17
EN
Operating the awning PR2000, PR2500
NOTICE! Beware of damage.
A
➤ Remove the hand crank from the holder on the awning.
Extending the awning using a 12 V motor (only PR2500, optional)
!
I
The fabric of the awning should not hang down at the edges, and must
remain taut at all times. If the fabric hangs down, it could rub against the
arms and become damaged.
The fabric used for long awnings should not sag in the middle.
WARNING! Beware of injury.
Keep a sufficient distance from objects or other vehicles. Once it is
retracted, it should be at least 40 cm away from other objects and
vehicles on all sides.
NOTE
Only for operation with the remote control:
• When the vehicle is started, the awning retracts automatically. While
the vehicle is running, the awning is blocked and can not be
extended.
• The receiver beeps once when it is switched on.
• Operation of the remote control can be affected by interference if
another device is being used nearby on the same frequency.
• Keep the remote control in a safe place while you are driving. The
magnet in the holder is not designed for strong vibrations, such as
sudden braking.
➤ Press the button of the switch or the remote control until the awning is
extended by about 1.5 metres (fig. 4, page 4).
➤ Push the right strut in the front cover together so that you can move it freely
(fig. 5, page 5).
➤ Turn the right strut to the side (fig. 5, page 5).
➤ Fold the right strut down and set it on the ground (fig. 6, page 6).
➤ Adjust the strut to the required height (fig. 7, page 6).
➤ Fold the lever for the strut up to secure the struts (fig. 8, page 7).
➤ Extend the other strut in the same way.
18
EN
PR2000, PR2500 Operating the awning
➤ Press the button of the switch or the remote control until the awning is
extended to the required position. Position the struts vertically and back under
the front panel every 30 cm so that the awning stays secured at all times.
➤ Press the switch of the switch or the remote control until the awning has
retracted far enough to tauten the fabric.
NOTICE! Beware of damage.
A
Positioning the struts on the ground
!
The fabric of the awning should not hang down at the edges, and must
remain taut at all times. If the fabric hangs down, it could rub against the
arms and become damaged.
The fabric used for long awnings should not sag in the middle.
WARNING! Beware of injury
• Only position the struts on solid ground.
• Secure the struts from slipping.
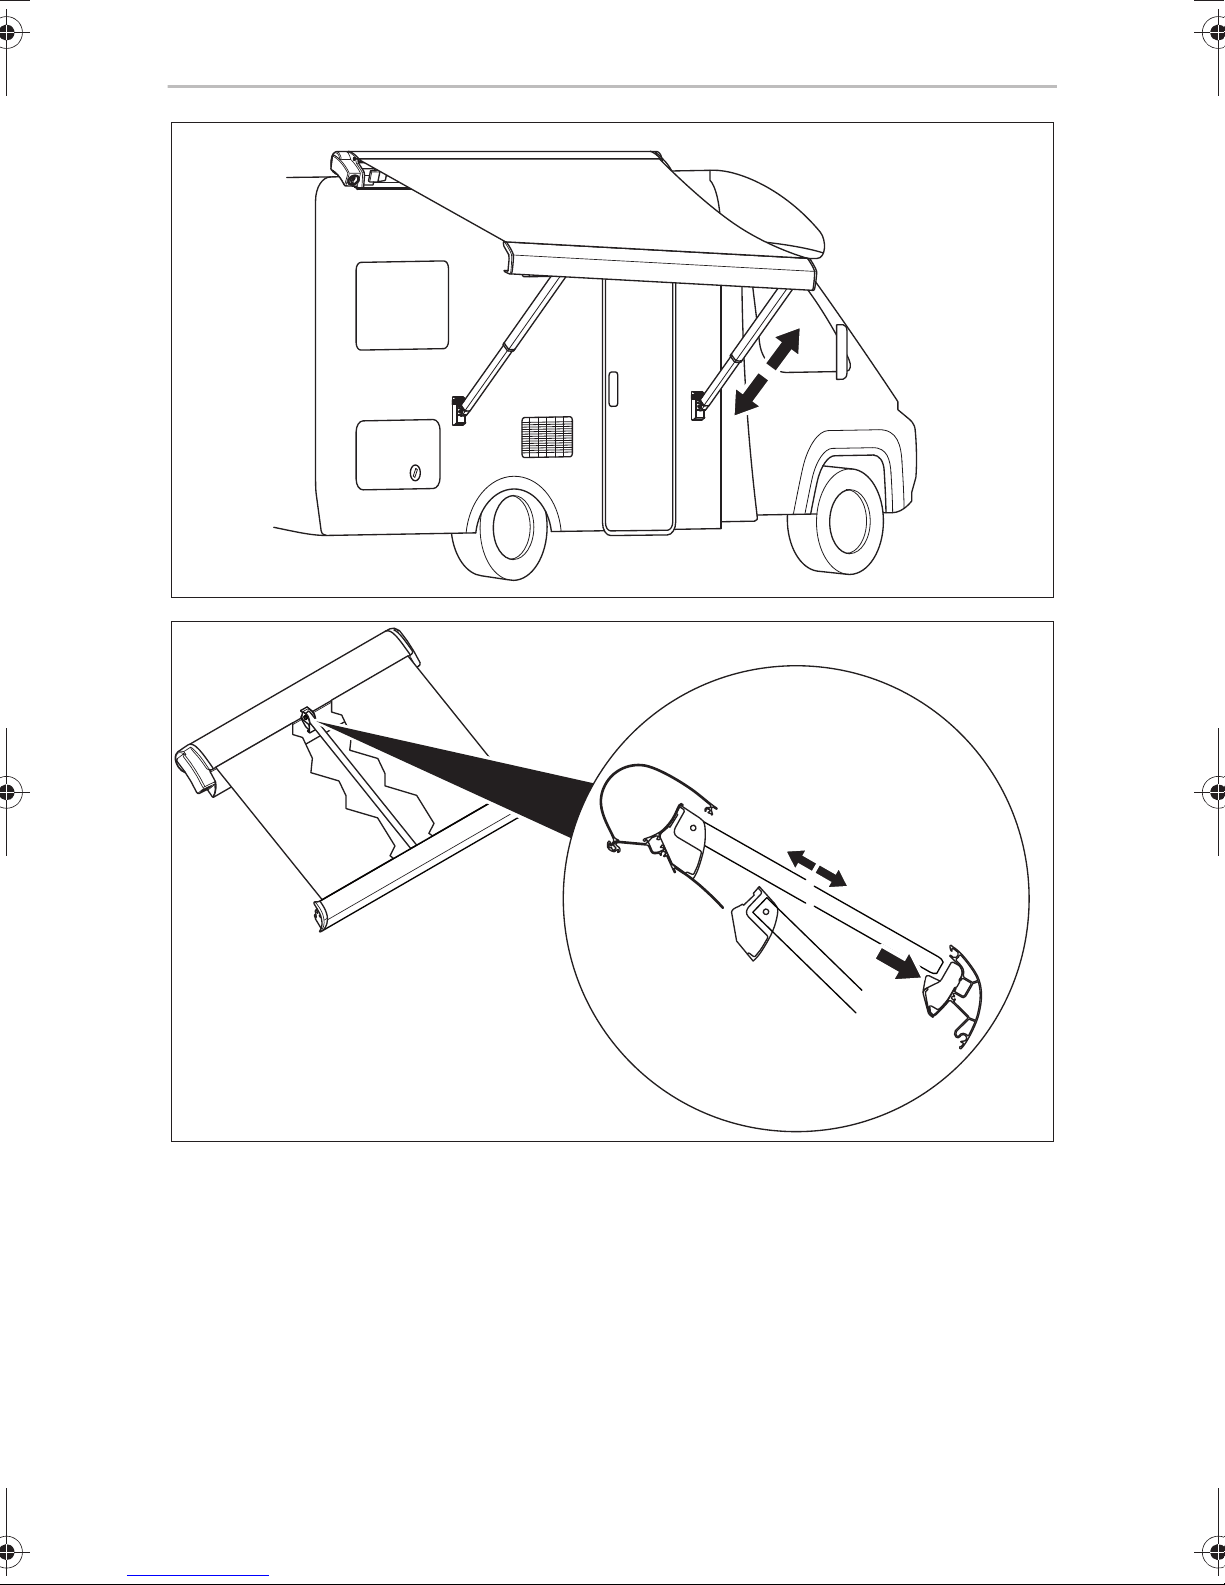
➤ Position the struts vertically underneath the front panel.
➤ Secure the struts with pegs (fig. 9, page 7).
➤ Position one of the struts slightly deeper so that the front panel hangs at an angle.
This allows rain to run off more easily (fig. 0, page 7).
Securing the struts on the vehicle
You can secure the awning on your vehicle directly if you have already mounted the
latches for the struts.
➤ Slide the cover of the latch up (fig. a, page 7).
➤ Fit the strut into the latch (fig. a, page 7).
➤ Slide the cover of the latch down (fig. a, page 7).
➤ Position one of the struts slightly deeper so that the front panel hangs at an angle.
This allows rain to run off more easily (fig. b, page 8).
Mounting the tension rafter (fig. c, page 8)
Awnings with a length of 4 m or more need to have a tension rafter fitted in the
middle of the awning. This prevents the awning from sagging.
➤ Slide in the tension rafter.
19
EN
Operating the awning PR2000, PR2500
➤ Fit the top end of the tension rafter into the attachment on the housing.
➤ Slide the other end of the tension rafter into the attachment in the front panel.
7.3 Retracting the awning
NOTICE!
A
➤ Remove any debris (branches, leaves or similar) lying on the fabric.
➤ Loosen the struts from the fastenings (pegs or latches on the vehicle).
• Only retract the awning, when the fabric is free of debris (branches,
leaves or similar). Otherwise, the awning can be damaged when it is
retracted.
• Keep the awning free of dirt to prevent abrasions, stains and mildew.
• When retracting the awning, make sure that any branches or other
objects are not trapped in it.
Retracting the awning using a hand crank
➤ Click the top end of the hand crank into the holder in the awning.
➤ Turn the hand crank until the awning is extended by only about 1.5 metres.
Position the struts vertically and back under the front panel every 30 cm so that
the awning stays secured at all times.
➤ Fold the lever of the right strut down to loosen the struts.
➤ Slide the struts together completely.
➤ Fold the right strut up.
➤ Turn the right strut into the front panel.
➤ Slide the bottom part of the right strut into the latch of the front panel.
➤ Retract the other strut in the same way.
➤ Turn the hand crank until the awning is fully retracted.
➤ Double-check that the awning is fully retracted before starting your journey.
The front panel should be right up against the housing.
➤ Remove the hand crank from the holder on the awning.
20

EN
PR2000, PR2500 Operating the awning
NOTICE! Beware of damage.
A
Retracting the awning using a 12 V motor (only PR2500, optional)
➤ Press the button of the switch or the remote control until the awning is only
extended by about 1.5 metres. Position the struts vertically and back under the
front panel every 30 cm so that the awning stays secured at all times.
➤ Fold the lever of the right strut down to loosen the struts.
➤ Slide the struts together completely.
➤ Fold the right strut up.
➤ Turn the right strut into the front panel.
➤ Slide the bottom part of the right strut into the latch of the front panel.
If the awning is retracted when wet, extend it again and let the fabric dry
out at the next opportunity. If the wet fabric stays rolled up for a long
time, mildew will form and the fabric can fade.
➤ Retract the other strut in the same way.
➤ Press the button of the switch or the remote control until the awning has been
completely retracted.
➤ Double-check that the awning is fully retracted before starting your journey. The
front panel should be right up against the housing.
NOTICE! Beware of damage.
A
7.4 Adjusting the 12 V motor (only PR2500, optional)
If the awning is retracted when wet, extend it again and let the fabric dry
out at the next opportunity. If the wet fabric stays rolled up for a long
time, mildew will form and the fabric can fade.
NOTE
The 12 V motor is pre-assembled in the roller tube.
I
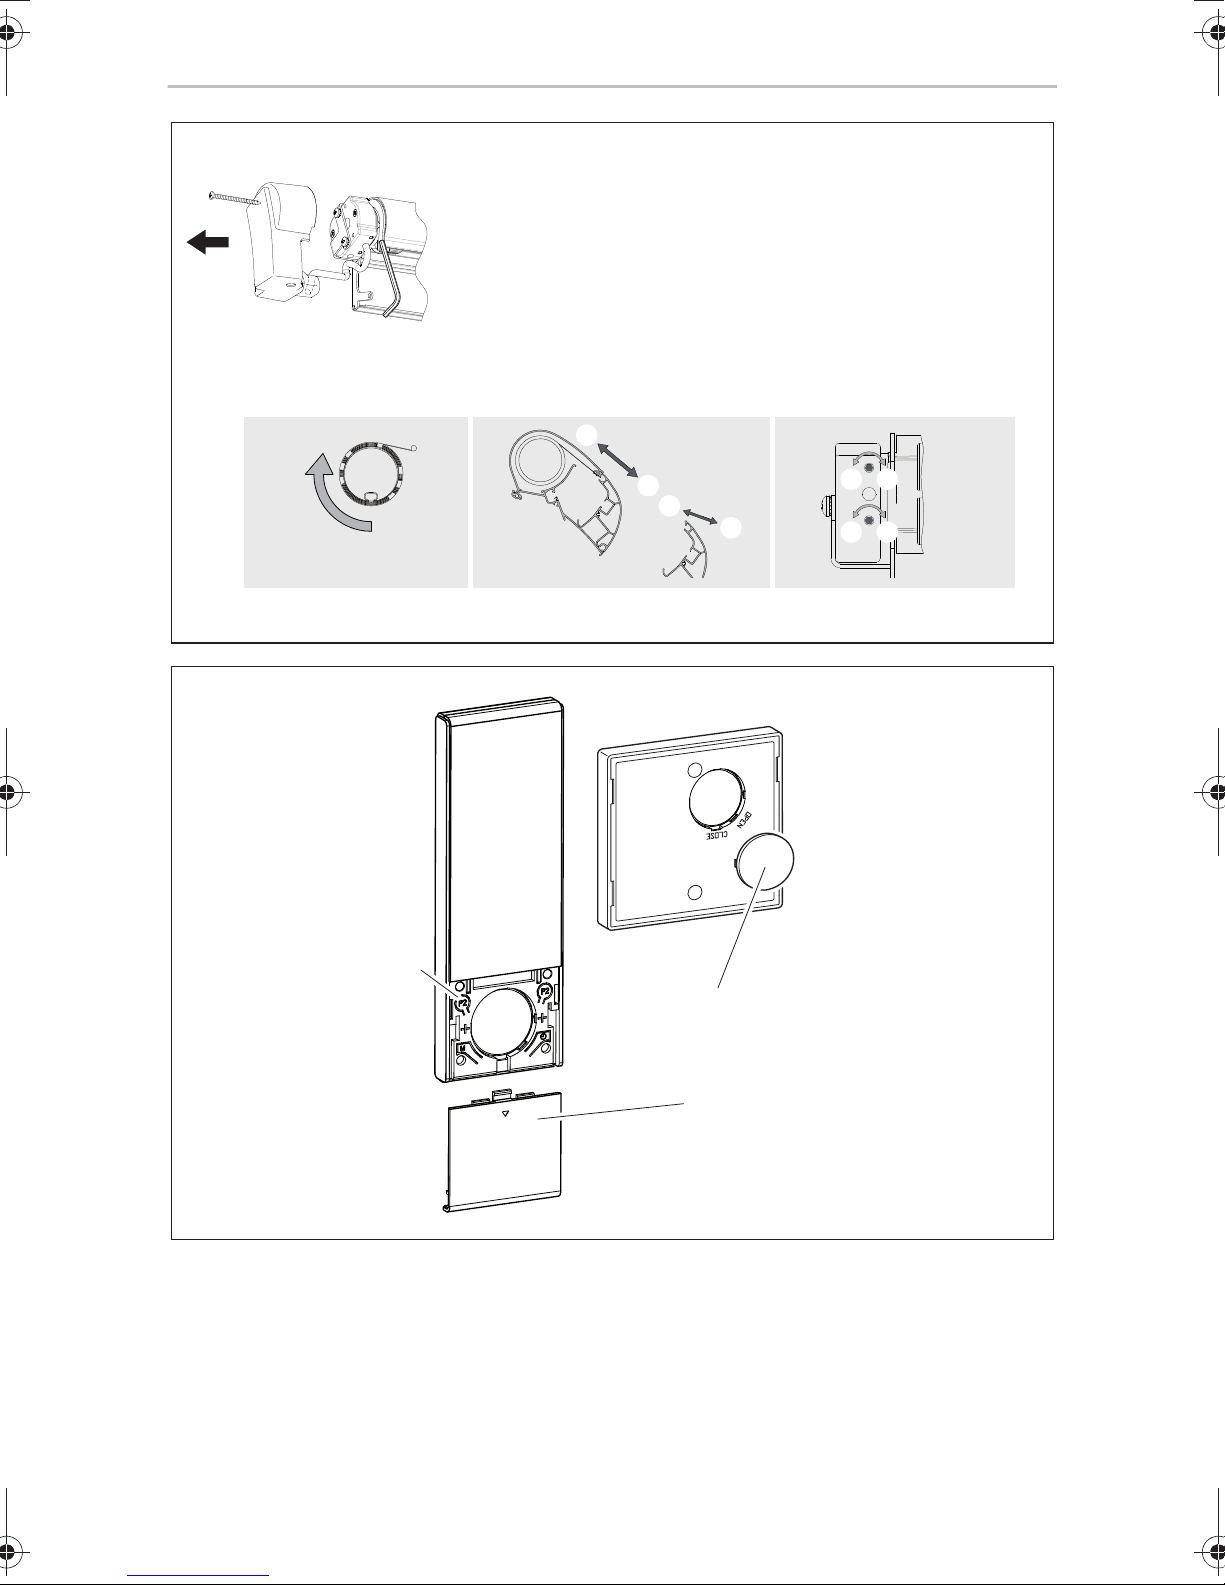
If the awning no longer fully closes or opens, adjust the 12 V motor (fig. d, page 9).
21
EN
Cleaning and maintenance PR2000, PR2500
7.5 Replacing the batteries of the remote control and the
wall switch (only PR2500, optional)
NOTE
I
➤ Open the housing (fig. e 1, page 9).
➤ Remove the old battery from the holder.
➤ Insert a new battery (type CR2450 for remote control, type CR2430 for wall
switch, fig. e 2, page 9) into the holder with the positive terminal facing
upwards.
➤ Reassemble the remote control or wall switch.
B
If the LED of the remote control does not light up after pressing one of
the buttons, the remote control battery is flat.
Protect the environment!
Do not dispose of any batteries with general household waste.
Return defective or used batteries to your retailer or dispose of them at
collection points.
8 Cleaning and maintenance
8.1 Cleaning
NOTICE! Risk of damage!
A
➤ Remove any debris (twigs, leaves or similar) lying on the awning fabric to prevent
abrasions, stains and mildew. The awning can also get damaged when it is
retracted.
➤ Clean the awning fabric regularly to remove any dirt and dust:
– To do this, use water with 30 ml detergent and 30 ml bleach for 10 l of water.
– Soap down the fabric and leave the liquid to soak in for five minutes.
– Rinse thoroughly with clean water.
– Leave the fabric to dry.
• Never clean the awning with a high-pressure cleaner.
• Do not use abrasive cleaning agents or hard objects during cleaning,
as these can damage the product.
Make sure that the detergent with the bleach is completely washed off.
Otherwise it can damage the fabric.
22
EN
PR2000, PR2500 Cleaning and maintenance
NOTE
I
8.2 Lubricating
➤ If required, lubricate the joints of the awning with paraffin wax, teflon oil or
silicone oil.
8.3 Checking
!
The manufacturer recommends:
To clean the cloth, use the Dometic awning cleaner
(ref. no. 9600000165, available from your service partner).
WARNING!
Do not use the awning if any settings or maintenance work are required.
If you discover any damage, please contact the service partner in the
respective country (see addresses on the back of the manual).
➤ Check the awning regularly for any imbalance and wear, as well as damage to
major parts.
➤ Check the awning regularly:
– Is the fabric free of damage?
– Are the arms and front panel free of damage with no signs of wear?
– Does the awning close properly?
8.4 Tightening the screws on the hinges
The screws on the hinges must be tightened up after being used for the first time:
• after the first holiday using the awning
• after driving 20000 km or six months after the awning was mounted
(whichever occurs first)
The screws on the hinge also need to be checked during the routine vehicle
inspection.
Contact your service partner to tighten up the screws.
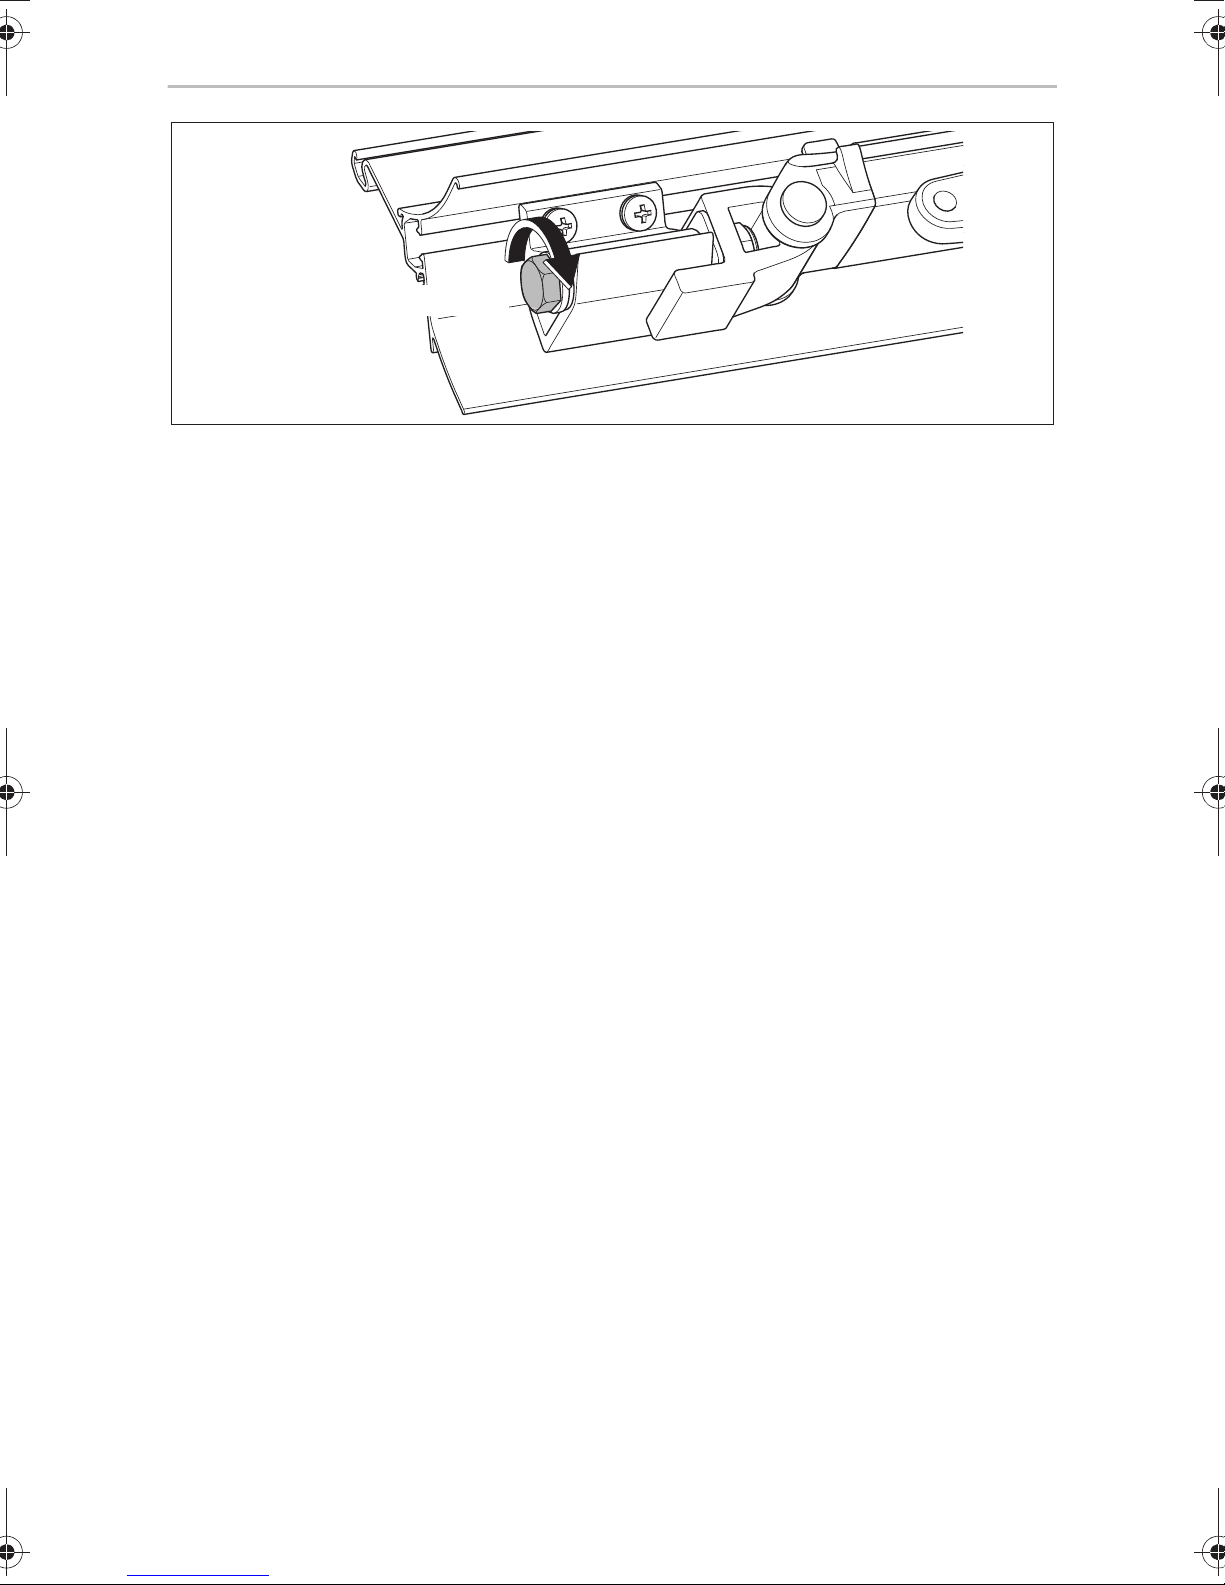
Instructions for servicing (fig. f, page 10)
NOTICE!
A
The awning arms must not bear any load. This is to prevent the fastening
torque of the screws from being distorted.
23
EN
Troubleshooting PR2000, PR2500
➤ Lift up the front panel slightly so that the hinge does not bear any load.
➤ Tighten the screws with 15 – 25 Nm.
8.5 Patching small holes in the fabric
You can patch any small holes in the fabric or parts where the coating has come off:
➤ Use a cotton cloth to rub around the damaged area with a small amount of liquid
vinyl plaster (ref. no. 9103104018, available from your service partner).
✓ The liquid vinyl plaster dissolves the coating. The coating seals the hole when it
dries.
➤ Wait until the area is dry before you retract the awning again.
9 Troubleshooting
NOTE
I
Fault Possible cause Suggested remedy
PR2500 only:
The motor is not
responding to the
remote control.
If you are not able to rectify a fault with the help of the following table,
please contact the relevant service partner in your country (see the back
of the manual for the address).
The remote control
battery is flat.
The remote control is no
longer or not properly
set to the motor.
No power supply
available
Briefly press one of the buttons or
. If the remote control LED does not
light up, the battery is flat.
Replace the battery, see chapter
“Replacing the batteries of the remote
control and the wall switch (only
PR2500, optional)” on page 22.
Reprogram the remote control, see the
installation manual.
Check the electric connections.
24
The motor is defective. Retract the awning manually and
contact the service partner in the
respective country.

EN
PR2000, PR2500 Warranty
10 Warranty
The statutory warranty period applies. If the product is defective, please contact your
retailer or the manufacturer's branch in your country (see the back of the instruction
manual for the addresses).
For repair and guarantee processing, please include the following documents when
you send in the device:
• A copy of the receipt with purchasing date
• A reason for the claim or description of the fault
11 Disposal
➤ Place the packaging material in the appropriate recycling waste bins wherever
possible.
M
If you wish to finally dispose of the product, ask your local recycling centre
or specialist dealer for details about how to do this in accordance with the
applicable disposal regulations.
25
EN
Technical data PR2000, PR2500
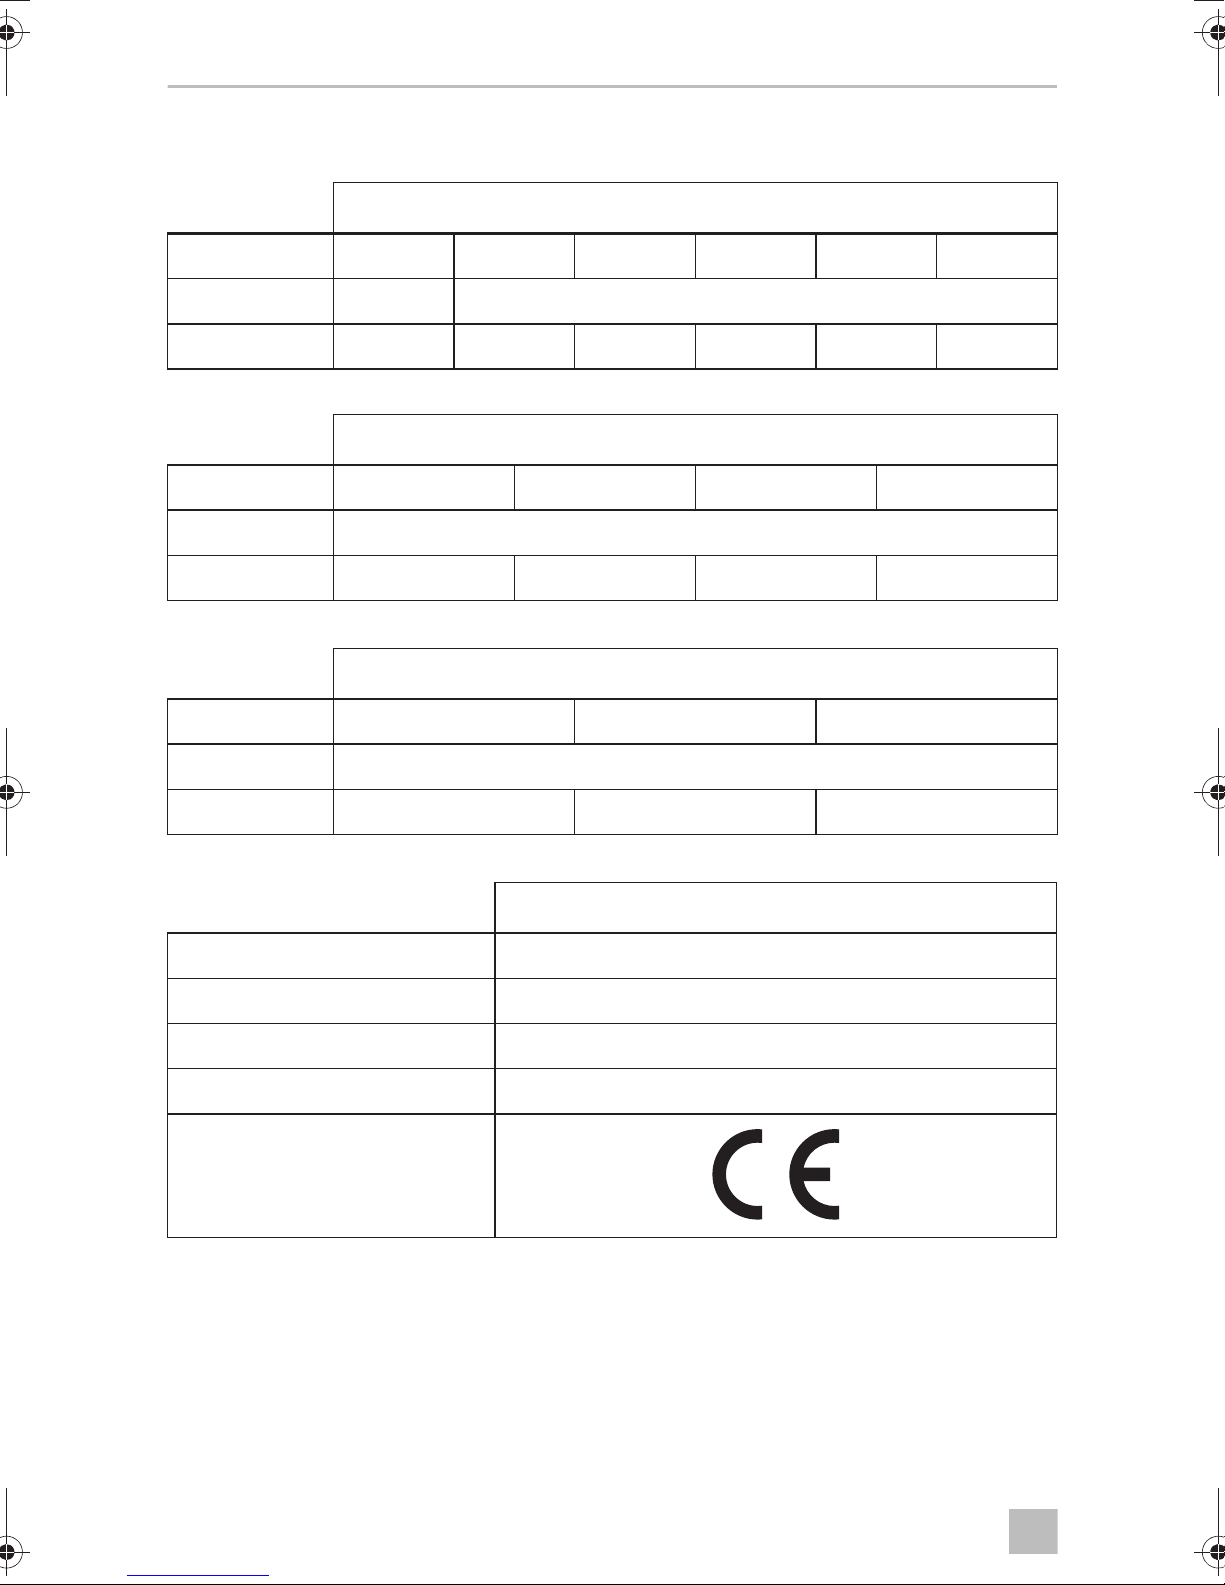
12 Technical data
PerfectRoof PR2000
Width: 2.65 m 3 m 3.25 m 3.5 m 3.75 m 4 m
Extended: 2 m 2.5 m
Weight: 18kg 21kg 22kg 24kg 27kg 28kg
PerfectRoof PR2500
Width: 3.5 m 3.75 m 4 m 4.5 m
Extended: 2.5 m / 2.75 m
Weight: 27kg 28kg 30kg 33kg
PerfectRoof PR2500
Width: 5m 5.5m 6m
Extended: 2.5 m / 2.75 m
Weight: 36kg 40kg 45kg
12 V motor (only PR2500, optional)
Connection voltage: 12 Vg (11 – 15 V)
Amperage: 7 A
Output power: 84 W
Torque: 35 Nm
Inspection/certification:
26
DE
PR2000, PR2500
WARNUNG!
!
• Diese Anleitung muss vor der Benutzung, der Reinigung und
Wartung gelesen und verstanden werden.
• Dieses Produkt muss von einer Fachkraft montiert werden. Eine
fehlerhafte Montage kann zu schweren Verletzungen führen.
Umbauten am Produkt können äußerst gefährlich werden und zu
schweren Verletzungen oder zu Geräteschäden führen.
• Diese Anleitung muss beim Produkt verbleiben. Der Besitzer muss
sie aufmerksam lesen.
Inhaltsverzeichnis
1 Hinweise zur Benutzung der Anleitung . . . . . . . . . . . . . . . . . . . . . . . . . . . . 28
2 Sicherheitshinweise . . . . . . . . . . . . . . . . . . . . . . . . . . . . . . . . . . . . . . . . . . . 28
3 Lieferumfang . . . . . . . . . . . . . . . . . . . . . . . . . . . . . . . . . . . . . . . . . . . . . . . . . .31
4 Zubehör. . . . . . . . . . . . . . . . . . . . . . . . . . . . . . . . . . . . . . . . . . . . . . . . . . . . . 32
5 Bestimmungsgemäßer Gebrauch . . . . . . . . . . . . . . . . . . . . . . . . . . . . . . . . 32
6 Technische Beschreibung . . . . . . . . . . . . . . . . . . . . . . . . . . . . . . . . . . . . . . 33
7 Markise bedienen . . . . . . . . . . . . . . . . . . . . . . . . . . . . . . . . . . . . . . . . . . . . . 34
8 Reinigung und Pflege . . . . . . . . . . . . . . . . . . . . . . . . . . . . . . . . . . . . . . . . . . 40
9 Störungsbeseitigung . . . . . . . . . . . . . . . . . . . . . . . . . . . . . . . . . . . . . . . . . . 42
10 Gewährleistung. . . . . . . . . . . . . . . . . . . . . . . . . . . . . . . . . . . . . . . . . . . . . . . 43
11 Entsorgung . . . . . . . . . . . . . . . . . . . . . . . . . . . . . . . . . . . . . . . . . . . . . . . . . . 43
12 Technische Daten . . . . . . . . . . . . . . . . . . . . . . . . . . . . . . . . . . . . . . . . . . . . . 44
27

DE
Hinweise zur Benutzung der Anleitung PR2000, PR2500
1 Hinweise zur Benutzung der Anleitung
WARNUNG!
!
A
Sicherheitshinweis: Nichtbeachtung kann zu Tod oder schwerer
Verletzung führen.
ACHTUNG!
Nichtbeachtung kann zu Materialschäden führen und die Funktion des
Produktes beeinträchtigen.
HINWEIS
Ergänzende Informationen zur Bedienung des Produktes.
I
2 Sicherheitshinweise
Beachten Sie die vom Fahrzeughersteller und vom Kfz-Handwerk
vorgeschriebenen Sicherheitshinweise und Auflagen!
Der Hersteller übernimmt in folgenden Fällen keine Haftung für Schäden:
• Beschädigungen am Produkt durch mechanische Einflüsse und Überspannungen
• Veränderungen am Produkt ohne ausdrückliche Genehmigung vom Hersteller
• Verwendung für andere als die in der Anleitung beschriebenen Zwecke
Beachten Sie folgende Warnhinweise:
WARNUNG!
!
• Kontrollieren Sie vor Fahrtantritt, ob die Markise vollständig
eingefahren ist. Bewegen Sie nie bei geöffneter Markise das
Fahrzeug.
• Fahren Sie nie mit eingehängter Kurbel. Nehmen Sie die Kurbel vor
Fahrtantritt ab.
• Fahren Sie das Fahrzeug nicht, wenn das Tuch beschädigt oder eingerissen ist, auch wenn die Markise ordnungsgemäß geschlossen ist!
Die Markisenarme werden durch das Tuch gehalten. Wenn das Tuch
beim Fahren reißt, schnellt die Markise plötzlich heraus. Das kann zu
schweren Verletzungen führen. Sichern Sie die Markise so, dass sie
während der Fahrt nicht plötzlich und unerwartet ausfahren kann.
• Öffnen Sie die Markise nicht während der Fahrt.
28

DE
PR2000, PR2500 Sicherheitshinweise
• Öffnen Sie die Markise nicht bei starken Wind oder Schneefall.
• Fahren Sie die Markise ein, wenn starker Wind, starker Regen oder
Schneefall zu erwarten sind.
• Achten Sie darauf, dass sich kein Wasser oder Schnee auf dem Tuch
ansammelt. Anderenfalls kann die Markise beschädigt werden oder
die Markisenarme können abbrechen und so schwere Verletzungen
oder Tod verursachen.
• Nähern Sie sich nicht der Markise,
– wenn sie während heftigem Wind offengelassen wurde,
– wenn sich Wasserlachen auf ihr gebildet haben,
– wenn sich Schnee angehäuft hat,
– wenn sich viel grober Schmutz auf dem Markisentuch befindet.
Die Markise kann sich unerwartet bewegen, instabil werden und sich
verbiegen oder abbrechen.
• PR2500, optional: Wenn das Anschlusskabel der Markise
beschädigt ist, muss es von Fachmann ausgetauscht werden.
• PR2500, optional: Unterbrechen Sie mit dem Ein-/Aus-Schalter die
Spannungsversorgung, bevor Sie das Fahrzeug in der Umgebung der
Markise oder die Markise selbst reinigen.
• Lassen Sie die ausgefahrene Markise nicht unbeaufsichtigt. Fahren Sie
die Markise ein, bevor Sie Ihren Standplatz verlassen.
• Halten Sie beim Grillen mit offenem Feuer Abstand von der Markise.
Das Tuch kann durch die Hitze beschädigt werden oder in Brand
geraten.
• Dieses Gerät kann von Kindern ab 8 Jahren und darüber sowie von
Personen mit verringerten physischen, sensorischen oder mentalen
Fähigkeiten oder Mangel an Erfahrung und Wissen benutzt werden,
wenn sie beaufsichtigt oder bezüglich des sicheren Gebrauchs des
Gerätes unterwiesen wurden und die daraus resultierenden Gefahren
verstehen.
• PR2500, optional: Elektrogeräte sind kein Kinderspielzeug!
Verwahren Sie die Fernbedienung außerhalb der Reichweite von
Kindern. Halten Sie Kinder davon ab, mit dem Wandschalter
(Zubehör) zu spielen.
• Kinder sollten beaufsichtigt werden, um sicherzustellen, dass sie nicht
mit dem Gerät spielen.
29
DE
Sicherheitshinweise PR2000, PR2500
ACHTUNG!
A
• Stellen Sie das Wohnmobil oder den Wohnwagen so auf, dass kein
Schmutz (Zweige, Blätter oder ähnliches) auf das Tuch geraten
können.
• Das Tuch der Markise darf an den Rändern nicht durchhängen,
sondern muss stets straff sein. Wenn das Tuch durchhängt, kann es
auf den Armen scheuern und beschädigt werden.
Bei langen Markisen darf das Tuch in der Mitte durchhängen.
• Fahren Sie die Markise nur ein, wenn kein Schmutz (Zweige, Blätter
oder ähnliches) auf dem Tuch liegt. Beim Einfahren kann sonst die
Markise beschädigt werden.
• Halten Sie die Markise frei von Schmutz, um Abschürfungen, Flecken
und Schimmel zu verhindern.
• Fahren Sie die Markise nur aus Sicherheitsgründen nass ein. Fahren
Sie sie so bald wie möglich wieder aus. Anderenfalls können sich
Schimmel oder Flecken bilden, oder die Farbe kann ausbleichen.
• Biegen Sie nie einen Markisenarm oder die Blende herunter,
um Wasser auf der Markise ablaufen zu lassen. Die Markise kann
sich dadurch verbiegen und ihre Funktion wird beeinträchtigt.
• Hängen Sie keine Gegenstände an die Markise, weder an die
Frontblende, noch an die Markisenarme.
• Benutzen Sie keine Sprays (z. B. Insektenspray, Haarspray) in der Nähe
der Markise. Das Tuch wird dadurch beschmutzt oder der Abperleffekt des Tuches kann dadurch verloren gehen.
• Falls nach dem Einbau der Markise kein ausreichender Freiraum über
der Tür verbleibt, muss die Tür während des Ein- oder Ausfahrens
geschlossen bleiben, um einen Kontakt der Tür mit den Armen oder
der Frontleiste zu vermeiden.
Der benötigte Freiraum hängt von der Bauart der Tür (Türbreite,
Schwenk- oder Schiebetür) sowie dem eingestellten Neigungswinkel
der Markise ab.
30
 Loading...