

Dome CXtra User Manual
Dome® CXtra
User’s Guide
™

© 2012 NDS Surgical Imaging, LLC. All rights reserved.
This document contains proprietary information of NDS Surgical Imaging. It is exclusive property of
NDS Surgical Imaging. It may not be reproduced or transmitted, in whole or in part, without
a written agreement from NDS Surgical Imaging. No patent or other license is granted to this
information.
The software, if any, described in this document is furnished under licensed agreement. The
software may not be used or copied except as provided in the licensed agreement.
NDS Surgical Imaging provides this publication as is without warranty of any kind, either express or
implied, including but not limited to the implied warranties of merchantability or fitness for
a particular purpose. NDSsi may revise this document from time to time without notice. Go to web
site www.ndssi.com for the latest documentation. Some states or jurisdictions do not allow
disclaimer of express or implied warranties in certain transactions; therefore, this statement may not
apply to you.
Information in this document about products not manufactured by NDS Surgical Imaging is
provided without warranty or representation of any kind, and NDS Surgical Imaging is not be liable
for any damages resulting from the use of such information.
020-09
11 Rev03A
NDS Surgical Imaging, NDS Surgical Imaging logo, Dome, Dome by NDSsi logo, Dome CXtra, DICal,
RightLight, Dome Dashboard, and all Dome display names are either registered trademarks or
trademarks of NDS Surgical Imaging. All other trademarks are the property of their respective
owners.

Contents
What’s New in Version 6.x Series 1
Getting Started 5
Display Compatibility 5
CXtra Services 6
System Requirements 8
Installing the Dome CXtra Software 8
Installing or Removing Services 9
Installing the Photometer 10
Starting Dome CXtra 12
Opening the CXtra Services Menu 13
CXtra Utilities 14
Exiting Dome CXtra 14
Uninstalling Dome CXtra 14
RightLight Service 15
Configuring the RightLight Service 17
Running Conformance Tests 28
Checking Current Conformance Status 35
Reviewing Conformance Events 36
Reviewing Manual Conformance Data 37
Disabling RightLight Popup Warnings 42
White Level Calibration Service 44
MQSA Quality Control Tests 48
Scope 48
Materials/Equipment 48
Configuring MQSA Test Reminders 50
Configuring the Warning Light Indicators 52
MQSA Test Wizard 54
Running the Daily Quality Control Test 56
Running the Monthly Quality Control Test 60

DICal Service 81
Configuring the DICal Service 82
Using DICOM Response Function as Default Calibration 83
Choosing Display Calibration 84
Performing a Custom DICOM Calibration 85
Reviewing Calibration Events 87
Performing a Conformance Test 88
Reviewing Conformance Test Data 88
Reviewing Conformance Test Events 92
Advanced Options 94
Test Patterns Service 96
AAPM TG18 Test Patterns 96
Miscellaneous Test Patterns 96
Displaying Test Patterns 99
Adding a Custom Test Pattern 100
Modifying or Deleting Custom Test Patterns 102
Dome Visual and Interactive Evaluations 102
Backlight Saver Service 108
DIN Test Service 111
Setting Up for Testing 112
Running a DIN Acceptance Test 122
Running a DIN Constancy Test 123
Viewing DIN Test Results 125
AAPM TG18 Test Service 126
AAPM TG18 Test Setup 128
Completing AAPM TG18 Tests 134
Viewing AAPM TG18 Test Results 136
Privilege Service 138
Reporting Service 140
Enterprise Management Service 146
Troubleshooting 155
Appendix 156
Index 160

What’s New in Version 6.x Series
Menu Update
Reporting Control has been changed to CXtra Preference. This
command change appears on the Cxtra Services menu and on the
related dialog. Use this dialog to disable the beeping sound that
occurs with some software functionality.
Front Sensor Scheduling
The functionality for specifically scheduled front sensor testing has
been eliminated. You can elect to run front sensor testing
automatically and manually. Automatic testing occurs each day.
Dome Displays
Dome CXtra support has been added for the Dome GX4MP display,
a 4-megapixel color unit with DVI video connectivity.
Support was added in previous versions of Dome CXtra for the
GX2MP Plus display, a 2-megapixel color unit with DVI connectivity;
Dome E3cHB and Dome S3c displays, both 3-megapixel color units,
and Dome S3, a 3-megapixel grayscale unit, all with DVI and
DisplayPort video connectivity; and the Dome S10 display,
a 10-megapixel grayscale unit with video input via DVI connectivity.
MQSA Test Service
You can set up test reminders for consistent quality control activity
and record the results of the quality control tests electronically.
NOTE: Applies to Dome E5 and Dome S10 displays only.

Expansion of Manual Conformance Testing
With the addition of the front sensor on some models of Dome
displays, the Manual Conformance functionality has been bifurcated
into the External Sensor Conformance testing (using the photometer
device) and the Front Sensor Conformance testing.
External Sensor Conformance replaces Manual Conformance on the
CXtra Services menu and the Conformance wizard. All operational
procedures are unchanged.
Front Sensor Conformance has been added to the menu. With this
functionality you can perform auto and manual conformance testing.
NOTE: Applies to Dome S3, Dome S3c, and Dome S10 displays only.
White Level Maximum Limit Exceedance
If you have a requirement to exceed the maximum limit of the preset
White Level target range, you can now do so but your display
warranty becomes void. Contact NDSsi Customer Care for more
information.
European Reference Guidelines
The EUREF guidelines, organized by the European Reference
Organization for Quality Assured Breast Screening and Diagnostic
Services, promotes mammography care of high quality in European
Union member states. Users of Dome displays qualified for AAPM
TG18 can perform the White Level Calibration procedure to meet this
standard. See “White Level Calibration Service” on page 44.
Modification of Color Calibration Setting
Only an administrator, not privileged users, can modify the color
calibration setting accessible on the RightLight Panel Configuration
dialog, Color tab. (See page 22.)
NOTE: Applies only to Dome displays using the RightLight
functionality.
2 | Dome CXtra

Windows Platform Support
Support is available for the Microsoft Windows 7 (x86 or x64) and
Windows Server 2008 R2 (x64 only) operating systems.
Support for the Microsoft Windows XP x64 operating system was
®
added to the Dome
CXtra™ 6.x series in an earlier version.
CXtra Utilities
Users can start, restart, and stop all CXtra services and application,
and run CXtradiag with utilities. Access the tools via the Windows
Start menu.
NOTE: Windows administrator privilege is required to run the utilities.
Users without privilege must enter an authorized username and
password as prompted.
Fast User Switching
The Fast User Switching feature is not supported on display systems
using NVIDIA drivers previous to version 197.03.
Installation Upgrades
The installation procedure for Dome CXtra is now simpler, faster, and
more reliable. All services and features are installed by default. To
customize your installation, you must deselect the service or
application feature you do not wish to install.
White Level Calibration
Correction of the display white level can now be done via manual
conformance testing or with the White Level Calibration service.
A one-time, end-user calibration of the white level may be necessary
when the target luminance is outside the tolerance established for
proper display conformance, such as when the white level of a display
has failed a manual conformance test, or when two or more displays
in a multi-unit configuration show disparate white levels. An external
photometer is required.
What’s New in Version 6.x Series | 3

NOTE: Privileged users and administrators can calibrate the
white level if a display fails the White Level test during the manual
conformance testing. Only administrators can calibrate the white
level via the White Level Calibration service.
Support for 10-Bit Displays
You can now run the Dome CXtra software on Dome 10-bit grayscale
displays. You can check for 10-bit capability (both current and
maximum supported) on the Properties tab of the Reporting dialog.
You can also view 10-bit patterns (horizontal ramp and vertical
ramp test patterns) using the Test Patterns service. And in manual
external sensor conformance testing, you can take all 1024
measurements for more precise testing results.
Using Dome CXtra with Dome Dashboard
For best practice of using Dome Cxtra 6.x with Dome Dashboard 2.x,
observe the following requirement and recommendation.
• When using Dome Dashboard 2.x, make sure that Dome CXtra 6.x
or later is installed on each CXtra workstation.
• On the CXtra workstation, limit the retention of history to 365 days
(one year).
Single Dome CXtra Package
The separate packaging of the Enterprise Management Service has
been discarded. All CXtra services, including the Enterprise
Management Service, are now available in a single CD package.
Dome CXtra Limitation
When using a display configuration with the NVIDIA 1800 board in
Windows XP Span mode, the only video connection supported is
two (2) DisplayPort-to-DVI adapters.
4 | Dome CXtra

Getting Started
The Dome CXtra software adds essential functionality to Dome
medical imaging display systems in diagnostic and referral settings.
By using the Dome CXtra suite of value-added services, you can
calibrate and maintain displays, run acceptance tests, and monitor
displays remotely. While the services operate as independent plugins, they each use the Reporting service for listing properties, logging
events, and saving history.
Display Compatibility
CXtra services enhance the functionality of these display systems:
•Dome Cx
•Dome Ex
•Dome Gx
•Dome Sx
• Select Desktops
You can also install the Dome CXtra software on systems using
third-party commodity monitors to enable DICOM calibration. See
“Enabling DICOM Calibration on Third-Party Monitors” on page 95.
NOTE: When you add or remove displays on the Windows desktop,
you must restart the Dome CXtra software by rebooting the system.
(Refer to ReadMe file for more information.)
WARNING: When the Dome CXtra application is running on the
system, power off the workstation before you either connect a DVI
cable to or disconnect a cable from the Dome display. Connecting or
disconnecting a DVI cable with the workstation power on may
corrupt the display EDID data.
Getting Started | 5

CXtra Services
The following services constitute the Dome CXtra software.
RightLight™ – Assures backlight stabilization for your display panel,
calibrates your panel to the DICOM Grayscale Standard Display
Function, automatically tests the calibration for conformance, allows
manual conformance testing, and supports DICOM calibration at
various color coordinates on Dome color displays. (Manual external
sensor conformance testing requires the LCD or the LCD II photometer. Use only the LCD II photometer with Dome color displays.)
White Level Calibration – For displays using the RightLight service,
calibrates the display photometer that stabilizes the white level.
(Calibration of the white level requires the LCD or the LCD II photometer. Use only the LCD II photometer with Dome color displays.)
DICal™ – Calibrates your display panel to the DICOM Grayscale
Standard Display Function, tests the calibration for conformance, and
allows the selection of individual displays to run the service at any
given time. (Custom calibration and manual external sensor
conformance testing require the LCD or LCD II photometer.)
Backlight Saver – Extends the clinical life of your display by turning
off panel backlights during periods of inactivity you define.
MQSA Tests – Provides procedures for daily tests, monthly tests, and
quality control tests for medical physicists (quarterly, biannually, or
annually) to support consistent image quality and constant display
maintenance in accordance with the Mammography Quality
Standards Act. Available for Dome E5 and Dome S10 displays only.
Test Patterns – Provides test images and allows use of custom
test patterns for demonstrating and evaluating the performance of
your display.
AAPM TG18 – Performs flat panel evaluations recommended by
the American Association of Physicists in Medicine, Task Group 18.
DIN Test – Tests your display for compliance with German
standard DIN 6868-57.
6 | Dome CXtra

Privilege – Password-protects operating parameters of
the display system.
Reporting – Collects, displays, and prints configuration data,
characteristics, and event logs created by most other services.
Enterprise Management – Manages displays from a central location.
Requires SNMP console (not provided) for remote viewing.
The use of CXtra services is display-dependent. Check the following
table for display compatibility by service:
Dome Cx,
Dome Ex,
CXtra Service
Dome GX4MP &
Dome Sx
GX2MP &
GX2MP Plus
Select
Desktop
RightLight
White Level Calibration
MQSA Testing
DICal
Backlight Saver
Test Patterns
AAPM TG18
DIN Test
Privilege
Reporting
Enterprise Management
†
9
*
9
9
99
999
999
9
9
999
999
999
* Restoration of factory White Level calibration available only on
Dome Ex, Dome GX4MP, and Dome Sx displays.
† Service applies to Dome E5 and Dome S10 displays only.
Getting Started | 7
System Requirements
The Dome CXtra software requires one of these operating systems:
• Windows 7 (x86 or x64)
• Windows Server 2008 R2 (x64 only)
• Windows XP Professional (x86 or x64), Service Pack 3
Installing the Dome CXtra Software
NOTE: Install the Dome CXtra software to a local disk drive only. The
software may not work properly if any components are installed on
a network drive.
To install the Dome CXtra software
1 Log onto Windows with administrator privileges.
2 Insert the installation CD and run setup.exe.
3 Follow the wizard instructions to complete the installation.
FIRST-TIME INSTALLATION: By default, all services are selected for
installation. To customize your installation, deselect the services you
do not wish to install.
8 | Dome CXtra

UPGRADE INSTALLATION: To upgrade to package 6.0.1 or later, insert
the installation CD and run setup.exe. Follow the wizard instructions
to complete the installation. Services that have been modified since
the previous release are upgraded.
The application starts when the installation is finished. The Dome
CXtra icon appears on the Windows taskbar. The check mark indicates
that the application is running successfully.
Installing or Removing Services
You can add a service individually if you do not install it during the
initial installation. You can also delete a single service as necessary.
To install or remove an individual service
1 Log onto Windows with administrator privileges.
2 Insert the installation CD and run setup.exe.
3 Follow the wizard instructions to the Modify, Repair, or
Remove dialog.
4 Select and deselect the service to be installed or removed.
5 Follow the wizard instructions to complete the installation or
remove the service.
Getting Started | 9

Installing the Photometer
To use the RightLight and DICal custom calibration and conformance
test features, you must purchase and install the optional LCD or
LCD II photometer. (Only the LCD II photometer is RoHS compliant.)
NOTE: The LCD II photometer is required for use with Dome color
displays.
Use the following instructions to install the photometer correctly per
your operating system.
To install the photometer on Windows 7/Windows Server 2008 R2
1 Log onto Windows with administrator privileges.
2 Plug the photometer into an available USB slots on the system.
3 Go to the Control Panel and select System and Security. Next,
select System from the options. Then, on the next screen, select
Device Manager in the left pane.
4 In the Device Manager dialog, expand Other device. Right-click on
the Calibrator node, and select Update Driver Software.
5 In the Update Driver Software dialog, select Browse my computer
for driver software, and browse to <cxtra install directory>\
USBx64Driver for 64-bit operating systems. Or, browse to <cxtra
install directory>\USBDriver for 32-bit operating systems.
6 Click Next to start the driver installation. When finished, close
the dialog to use the photometer.
Note the following:
• The Device Manager can also be launched by running
devmgmt.msc.
• Default <cxtra install directory> on the 32-bit operating system is
C:\Program Files\NDSsi\CXtra.
• Default <cxtra install directory> on the 64-bit operating system is
C:\Program Files (x86)\NDSsi\CXtra.
10 | Dome CXtra

To install the photometer on Windows XP
1 Log onto Windows with administrator privileges.
2 If necessary, install the Dome CXtra software. (See page 8.)
3 Connect the photometer to a USB port on the computer.
The operating system detects the new hardware and opens
the Found New Hardware Wizard.
NOTE: If you connect the photometer to a USB hub and the Found
New Hardware Wizard does not appear, connect the photometer
directly to a USB port on the computer.
4 Follow the wizard instructions until a window prompts you to select
a driver for the device.
5 Select Search for a suitable driver for my device and click Next.
6 Select Specify a location and click Next.
7 Navigate to the folder on your hard drive containing the
photometer driver. If you accepted the default location during
installation, the driver is stored in this folder:
C:\Program Files\NDSsi\CXtra\USBDriver
8 Click Next to install the driver.
9 Click Finish to complete the installation.
Getting Started | 11
Starting Dome CXtra
The Dome CXtra application starts automatically when you run your
computer. If you exit the application or if it stops running for any
reason, restart it by selecting Windows Start > All Programs > NDSsi >
CXtra.
A Dome CXtra status icon appears on the Windows taskbar to
indicate application status. The Success icon shows that the display
is operating normally. The Wait icon appears the application is
starting up or restarting from a stop. If the Warning or System Error
icon appears, check the History tab in the Reporting service and
troubleshoot the error. See “Reporting Service” on page 140 for
detailed information.
Dome CXtra Icon Status
Success
Wait
Warning
System Error
12 | Dome CXtra
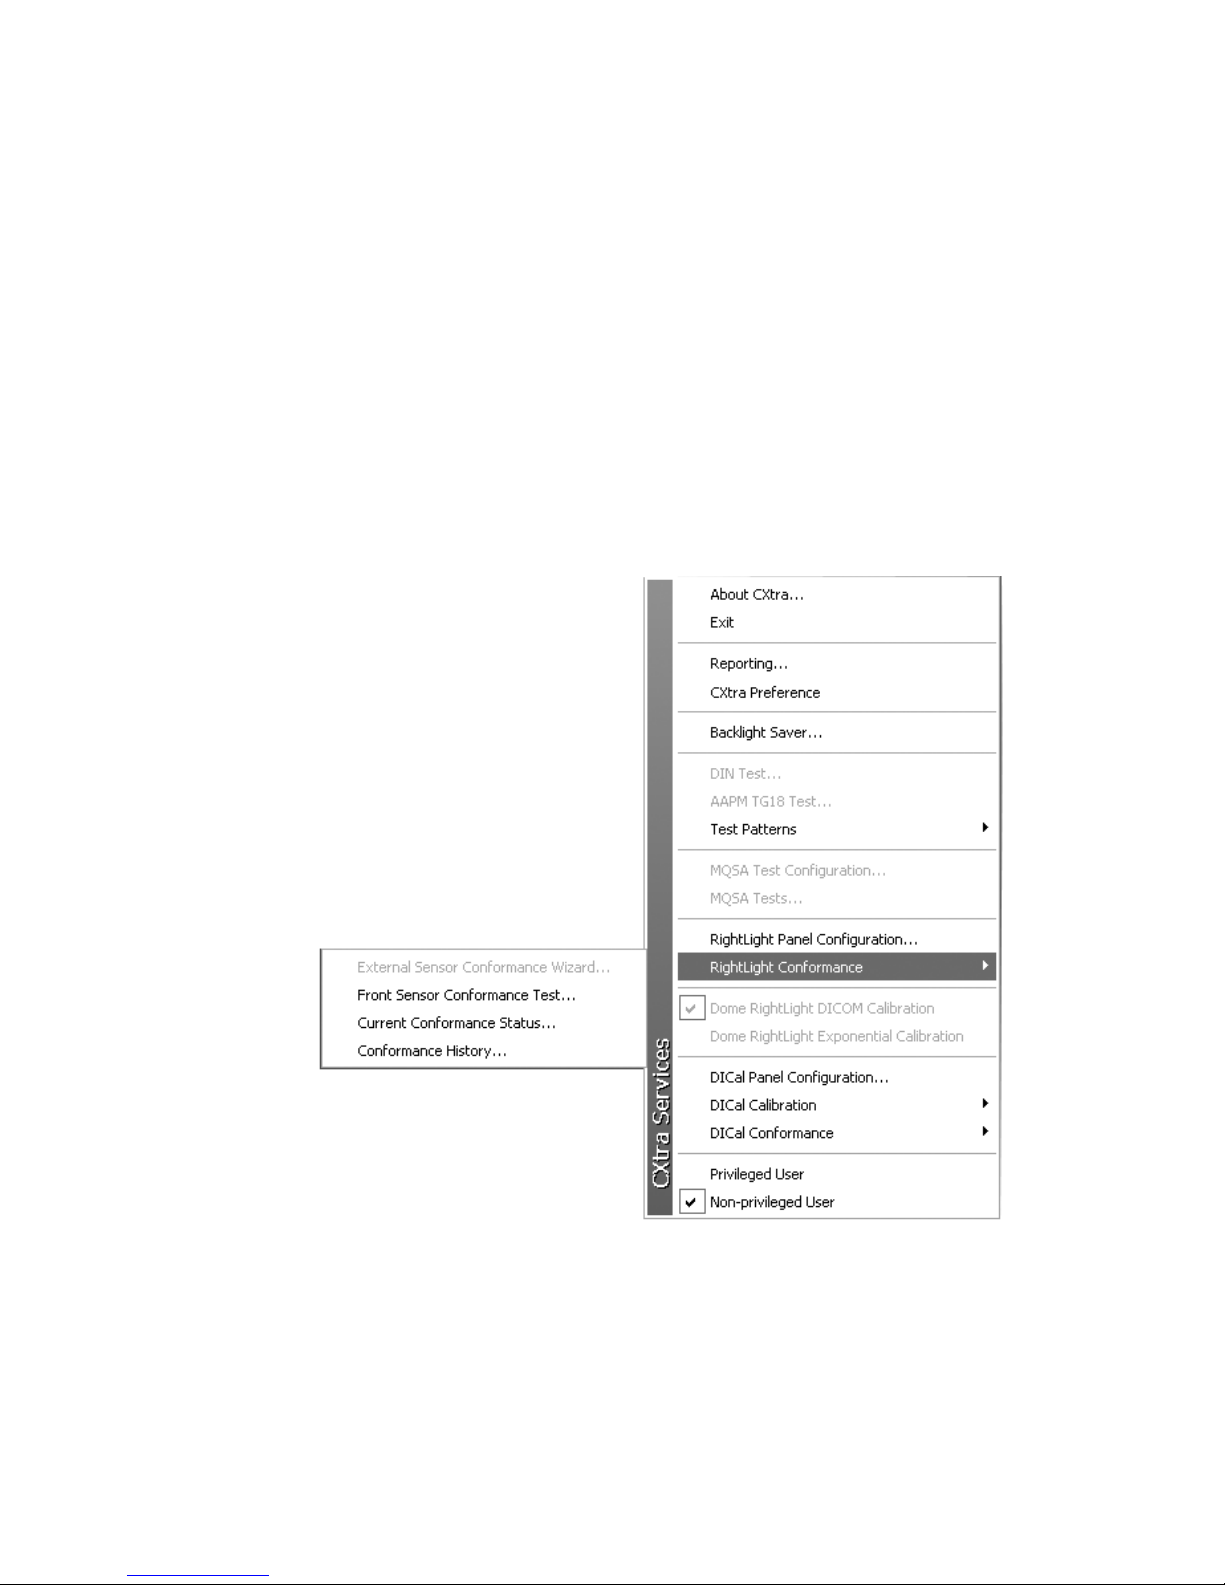
Opening the CXtra Services Menu
All Dome CXtra functions are accessible from the services menu.
This graphic shows the default menu entries for standard services.
To open the menu, click the Dome CXtra icon on the Windows
taskbar. If the Dome CXtra icon is not visible on the Windows taskbar,
open the menu by Windows Start > All Programs > NDSsi > CXtra.
The menu is expanded to show the White Level Calibration service
when the user is logged on as administrator. For more information,
see “White Level Calibration Service” on page 44 and “Logging On as
Privileged User/Administrator” on page 138.
Getting Started | 13

CXtra Utilities
The following utilities have been added to the application.
CXtra Start Launch the application and all CXtra services
CXtra Diag Create Cxtradiag package
CXtra Restart Resume application operation and all CXtra services
CXtra Stop Terminate the application and all CXtra services
To access a utility, click Windows Start > All Programs > NDSsi > CXtra
Utilities, then select one of the four options.
NOTE: Windows administrator privilege is required to run the utilities.
Users without privilege must enter an authorized username and
password as prompted.
Exiting Dome CXtra
If you need to exit (close) the application, open the CXtra Services
menu and select Exit.
NOTE: Exiting from Dome CXtra may require a password. See
“Privilege Service” on page 138 for more information.
Uninstalling Dome CXtra
Use this procedure to uninstall the entire Dome CXtra application.
To uninstall the entire application
1 Log onto Windows with administrator privileges.
2 Select Windows Start > Settings > Control Panel > Add/Remove
Programs to view a list of installed applications.
3 To uninstall the entire application, select CXtra.
4 Click Change/Remove to start the uninstall process. A message
prompts you to restart the computer.
14 | Dome CXtra

RightLight Service
The RightLight service performs backlight stabilization,
DICOM calibration, automatic conformance testing, and manual
conformance testing via an external photometer for Dome Cx,
Dome Ex, Dome GX4MP, and Dome Sx displays. Manual conformance
testing via the display front sensor is available for Dome Sx units.
With RightLight, you can set a target white level, equalize the black
level across the displays, set a desired response function, and specify
ambient light in the viewing area. This service also reports current
white and black levels.
RightLight automatically calibrates the displays at regular intervals.
Calibration adjusts the response of a display to conform to the
response function you specify. There are four calibration response
functions, one of which is a correction to the DICOM Grayscale
Standard Display Function.
DICOM calibration is based on the unique characteristic curve stored
in each display at the time of manufacturing. RightLight routinely
checks how well each display conforms to the DICOM standard and
calculates a Luminance Uniformity Metric (LUM) value that indicates
the degree of conformance.
Besides the automatic conformance testing and adjustment that
RightLight performs regularly, you can perform manual external
sensor conformance testing, using an optional photometer. On
Dome Sx displays, you can also perform manual conformance testing
with the embedded front sensor photometer.
RightLight Service | 15
You can also calibrate the internal RightLight photometer to generate
a new calibration data file whenever the white level is outside the
tolerances set for the display configuration. Calibrating the white
level requires an external photometer.
For Dome Ex, Dome GX4MP, and Dome Sx color displays, you can set
color coordinates for panel appearance in one of two ways:
• Select an option for panel appearance with blue, clear, or default.
• Use the LCD II photometer to perform color calibration
when you specify color coordinates by color temperature
(Kelvin scale) or by CIE xy coordinates.
NOTE: Setting nondefault color coordinates can change the target
luminance range.
CXtra Services menu, and commands of the RightLight Conformance submenu
16 | Dome CXtra

Configuring the RightLight Service
If the Privilege service has been installed, you must log on as
a privileged user to change the RightLight configuration. (See
page 138.)
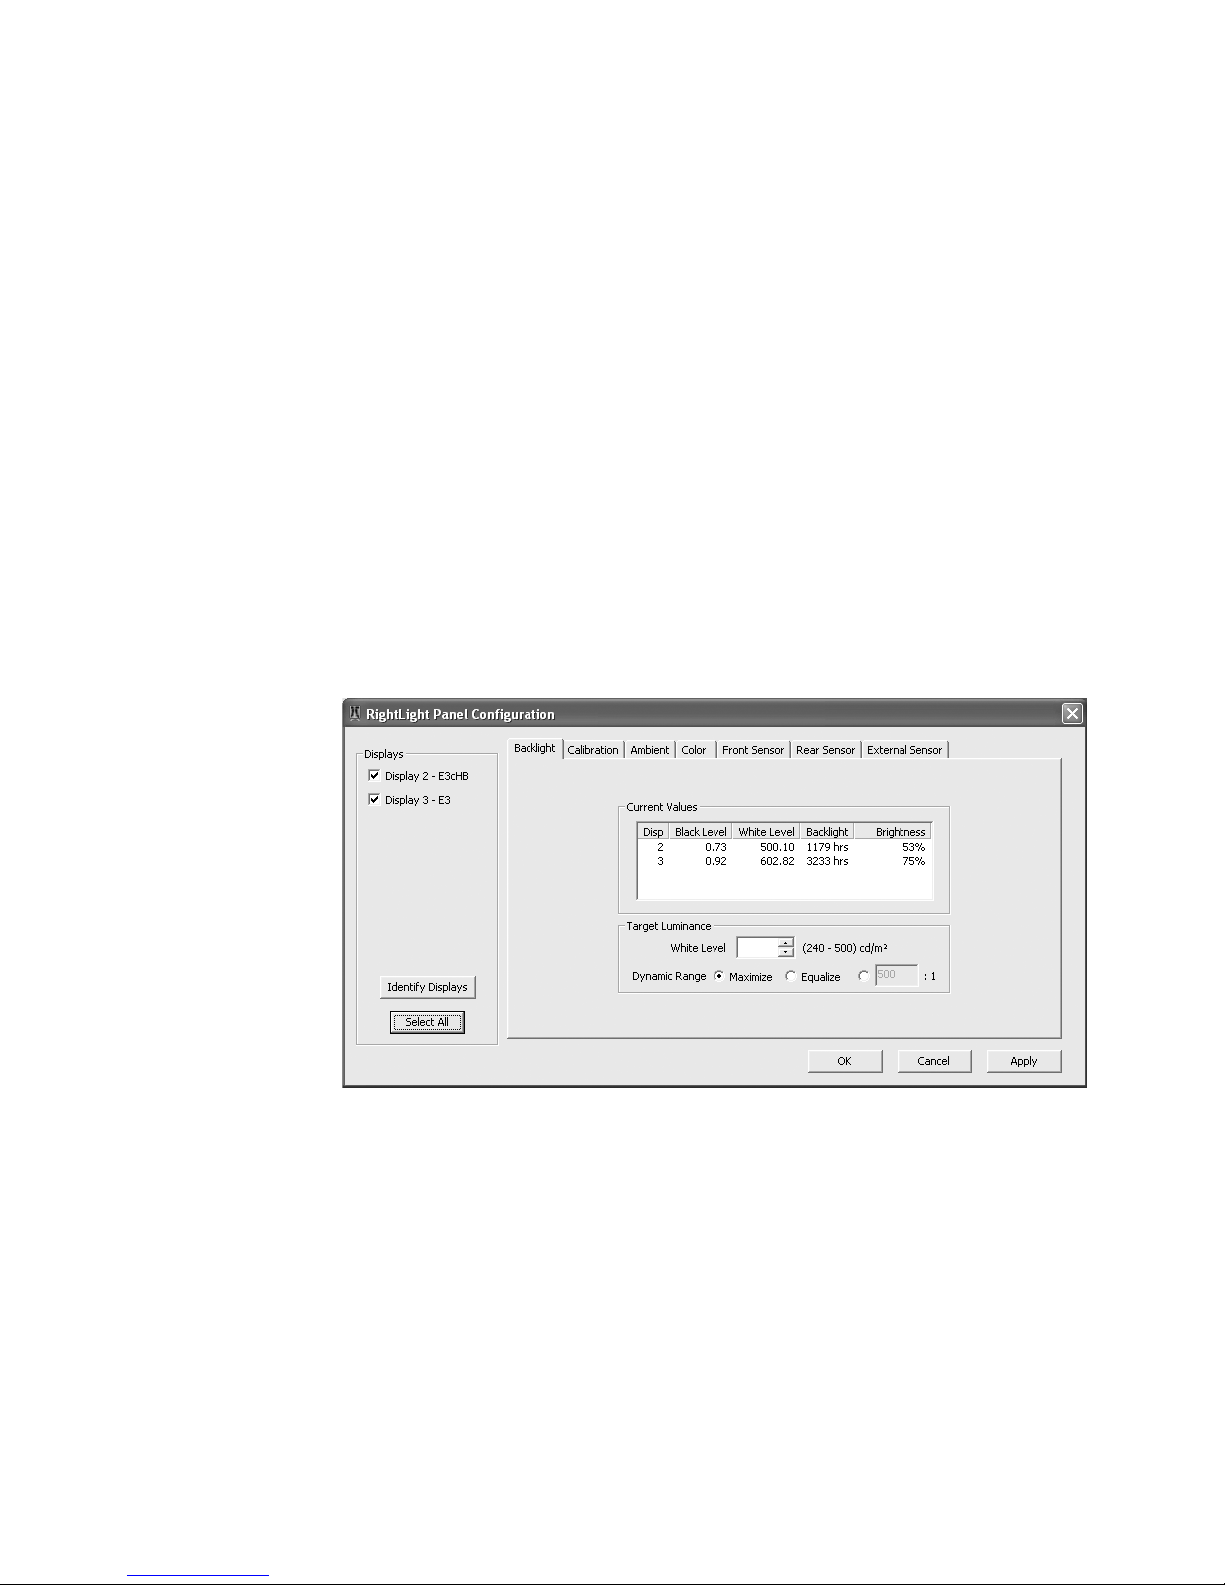
To configure the RightLight service
1 Open the CXtra Services menu and select RightLight Panel
Configuration. The RightLight Panel Configuration dialog appears
with these tabs:
• Backlight
•Calibration
•Ambient
• Color
• Front Sensor
• Rear Sensor
• External Sensor
2 Check the selection box for each display you want to configure, or
click Select All.
3 Select a tab and change the settings as described in the following
sections. Click Apply to activate the changes without closing the
dialog; click OK to activate the changes and close the dialog.
RightLight Service | 17
Backlight tab
For displays selected, you can view the values of these parameters:
• Black level, in cd/m
• White level, in cd/m2
• Backlight use, in hours
• Brightness, as a percentage of maximum effective brightness
2
In the White Level field, type the target white level value (in cd/m
2
) or
use the arrow keys to change the value shown. Click Apply or OK.
NOTE: White Level values are limited to the upper and lower ranges
specified per display.
RightLight stabilizes the backlights of selected displays to attain the
target white level. Your system may require several moments for the
white level to stabilize after adjustment. Below are the default target
white level at native color coordinates of Dome display models.
Display Default Target White Level
Dome C2 600 cd/m
Dome C3 600 cd/m
Dome C3i 600 cd/m
Dome C5 400 cd/m
Dome C5i 500 cd/m
Dome E2 600 cd/m
Dome E2c 400 cd/m
Dome E2cHB 500 cd/m
Dome E3 600 cd/m
Dome E3c 300 cd/m
Dome E3cHB 500 cd/m
Dome E4c 250 cd/m
Dome E5 500 cd/m
Dome GX4MP 250 cd/m
Dome S3 600 cd/m
Dome S3c 500 cd/m
Dome S10 600 cd/m
2
2
2
2
2
2
2
2
2
2
2
2
2
2
2
2
2
18 | Dome CXtra
NOTE: If you set the white level too close to the maximum brightness
capability of the display, frequent warnings on high white levels may
appear. To correct this problem, reduce the white level setting on the
Backlight tab until the warnings stop appearing or use the CXtra
Preference dialog to disable the warning popups. If you have a requirement to exceed the maximum limit, you can do so but you void your
display warranty. Contact NDSsi Customer Care for instructions.
Dome CXtra gives you three options for controlling dynamic range.
• Maximize - Causes each selected display to be calibrated using its full
dynamic range. The range of the selected displays may differ.
• Equalize - Causes all selected displays to be calibrated using the same
dynamic range. The system locates the selected display that has the
smallest dynamic range and adjusts the range of the other selected
displays to match it.
• Specify - Causes all selected displays to be calibrated using the
specified dynamic range. The system notifies you if any of the
selected displays cannot achieve the specified range.
If all the selected displays have similar dynamic range, there may be
little or no visual difference among the selections.
The black levels and white levels shown on the Backlight tab include
the ambient light level specified on the Ambient tab. NOTE: Choosing
the Native or the No RightLight Calibration option on the Calibration
tab or on the services menu prevents RightLight from equalizing black
levels. When you do this, you are no longer applying DICOM calibration.
RightLight Service | 19
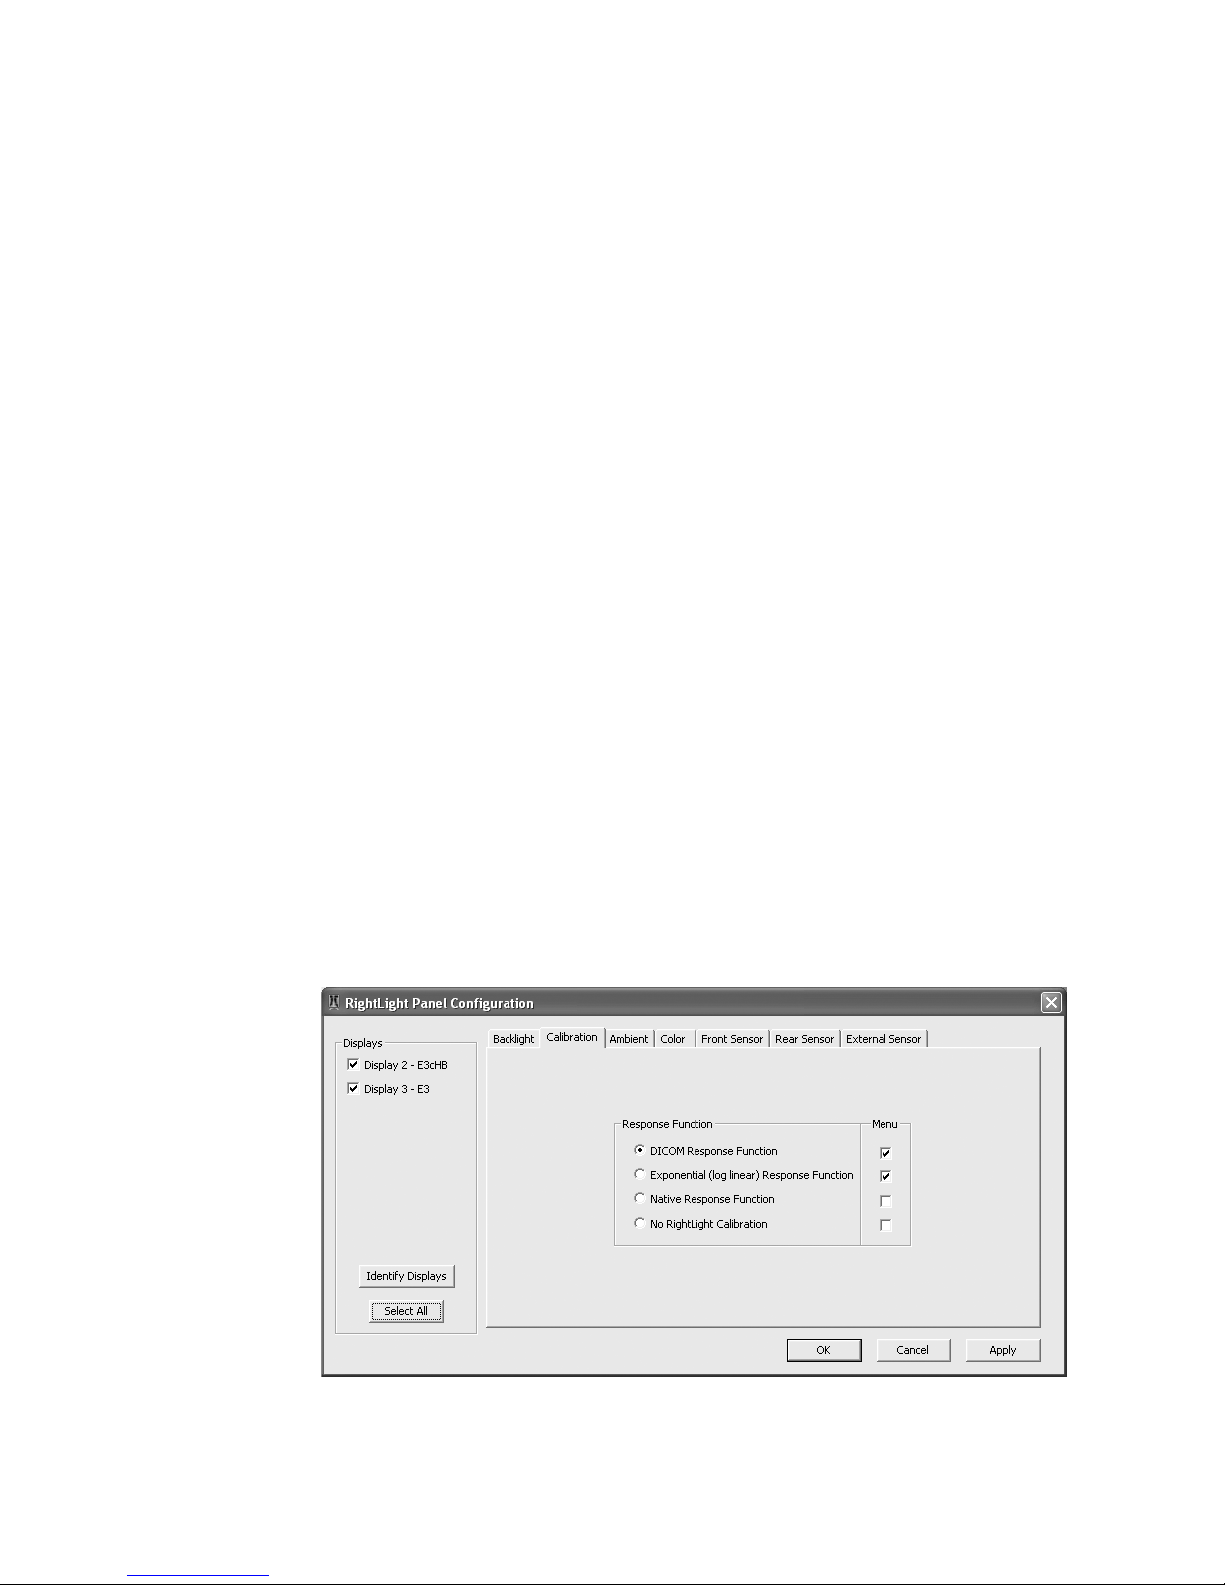
Calibration tab
Select one of these response functions for auto-calibration:
• DICOM Response Function (default) – Calibrates to the DICOM
Grayscale Standard Display Function. See DICOM PS 3.14-2000
(Digital Imaging and Communications in Medicine (DICOM),
Part 14: Grayscale Standard Display Function).
• Exponential (log linear) Response Function – Calibrates to an
exponential (log linear) response function. The logarithm of
the luminance is a linear function of the digital driving level.
• Native Response Function – Automatically sets the flat panel to its
native response function (characteristic curve). The characteristic
curve is the response function of the panel with no calibration
applied. This is the display function created by loading a linear
gamma correction table, or GCT.
• No RightLight Calibration – Turns off auto-calibration. Choose this
response function if you are using an external calibration product
such as the Dome Calibration TQA™ system. Dome CXtra retains
GCTs currently set or created by an external calibration. RightLight
stabilizes the backlights only.
CAUTION: Do not calibrate with an external calibration product,
such as the Dome Calibration TQA system, unless your response
function is set to No RightLight Calibration. Otherwise, RightLight
overwrites the gamma correction table.
Check the selection box for each function you want to place on the
services menu, then change the operating parameter via the menu.
20 | Dome CXtra
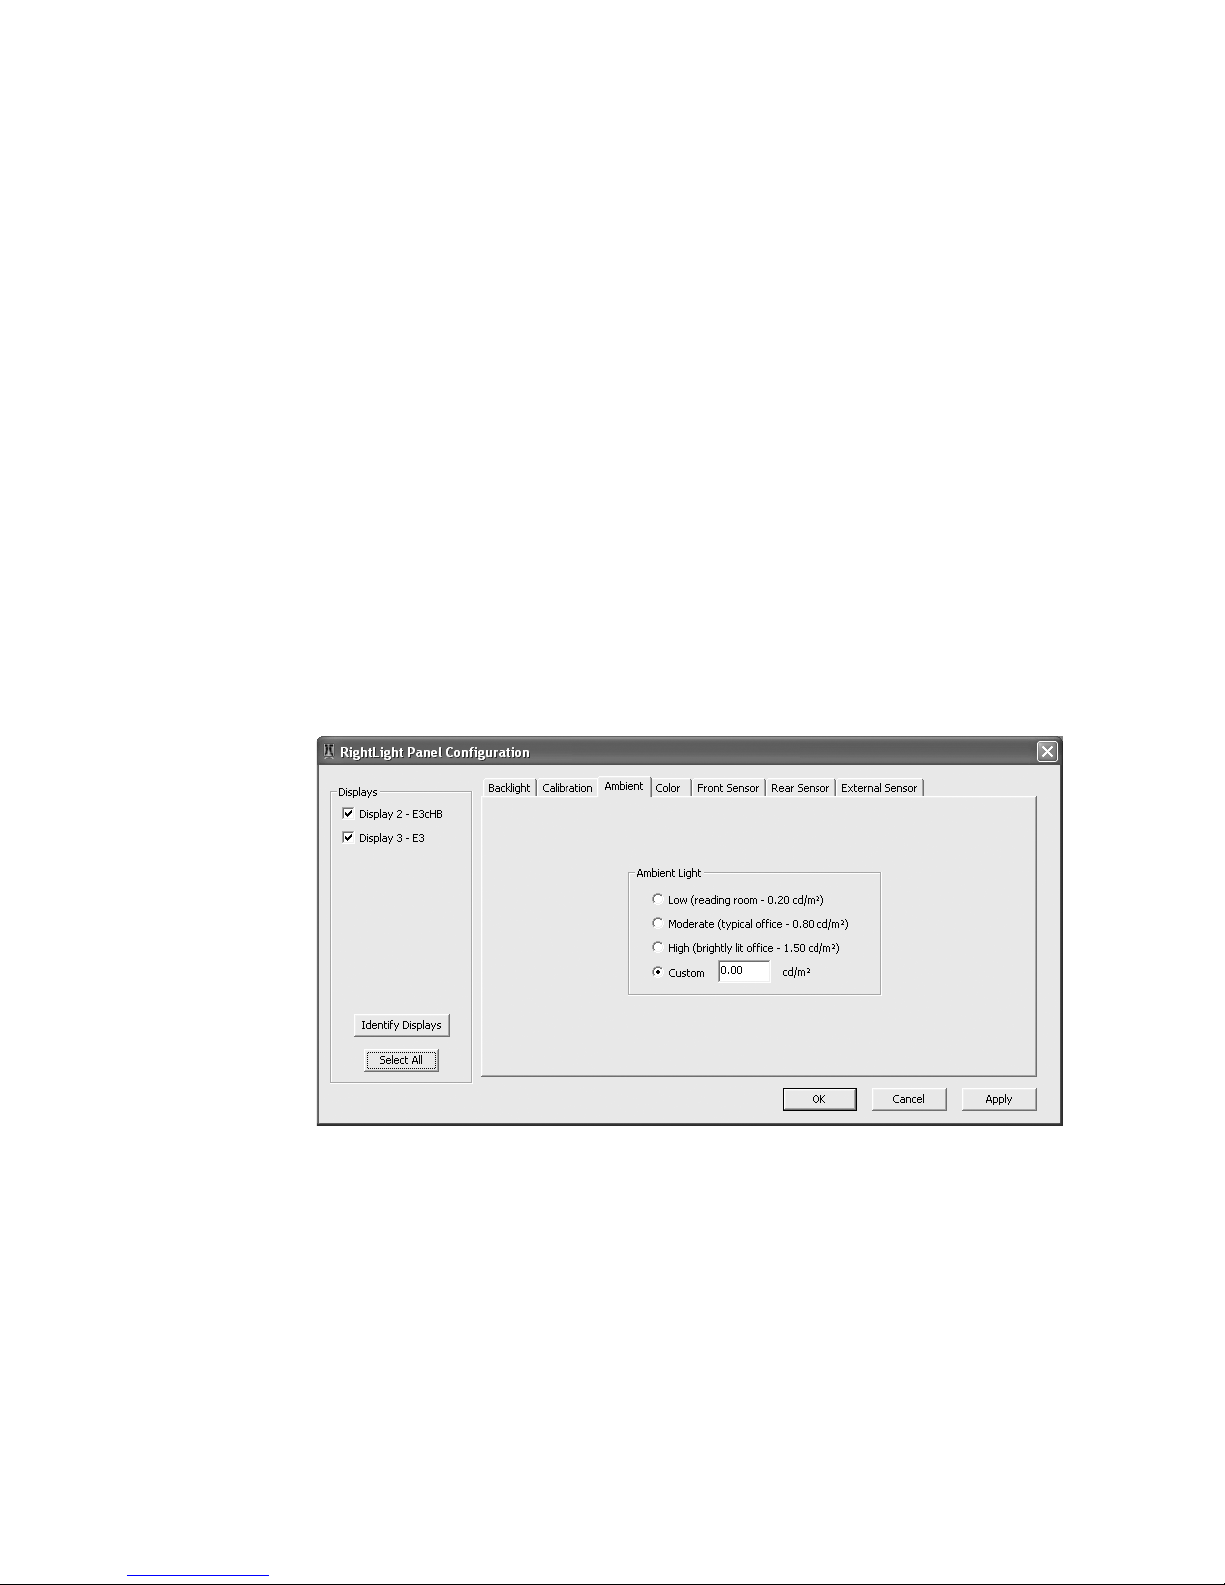
Ambient tab
Specify the ambient light in the viewing area. Select the ambient light
description that best fits the display location:
2
• Low (reading room - 0.20 cd/m
• Moderate (typical office - 0.80 cd/m
• High (brightly lit office - 1.50 cd/m
• Custom – Fill in a value ranging from 0.00 (default) to 5.00 cd/m
The RightLight service allows you to enter luminance in cd/m
resulting from the diffuse reflection of ambient illuminance.
Since typical Dome panels have a reflectance of 1.25%, given
illuminance E in lux, you can calculate the luminance in cd/m
using this equation:
)
2
)
2
)
2
.
2
2
luminance = 1.25% × E /
π
The default values are typical of reading rooms (approx. 50 lux),
moderately bright offices (approx. 200 lux), and brightly lit offices
(approx. 375 lux).
NOTE: Choosing the Native or the No RightLight Calibration option on
the Calibration tab or on the services menu prevents RightLight from
correcting for ambient light. When you do this, you are no longer
applying DICOM calibration.
RightLight Service | 21

Color tab
Specify the panel appearance of Dome Ex, Dome GX4MP, and
Dome Sx color displays, with or without calibration.
Appearance. Use options in the Appearance field to specify blue,
clear, or default when you do not color-calibrate the display panel.
Calibrated color coordinates. Use options in the Calibrated Color
Coordinates field for precise specification of color coordinates. Apply
this method, for example, with multiple displays when a discrepancy
appears in color matching after you have selected an option in the
Appearance field.
NOTE: Only an administrator, not privileged users, can modify the
color calibration setting. The functionality is enabled only when the
administrator is logged onto the system.
First, click Color Calibrate to run the calibration wizard. Next, test and
accept the calibration. Then, set the color temperature by Kelvin
scale (from 5000 to 12000) or specify the CIE xy coordinates. Click
Apply or OK to finish.
NOTE: The LCD II photometer is required for color calibration of
the Dome color displays.
22 | Dome CXtra
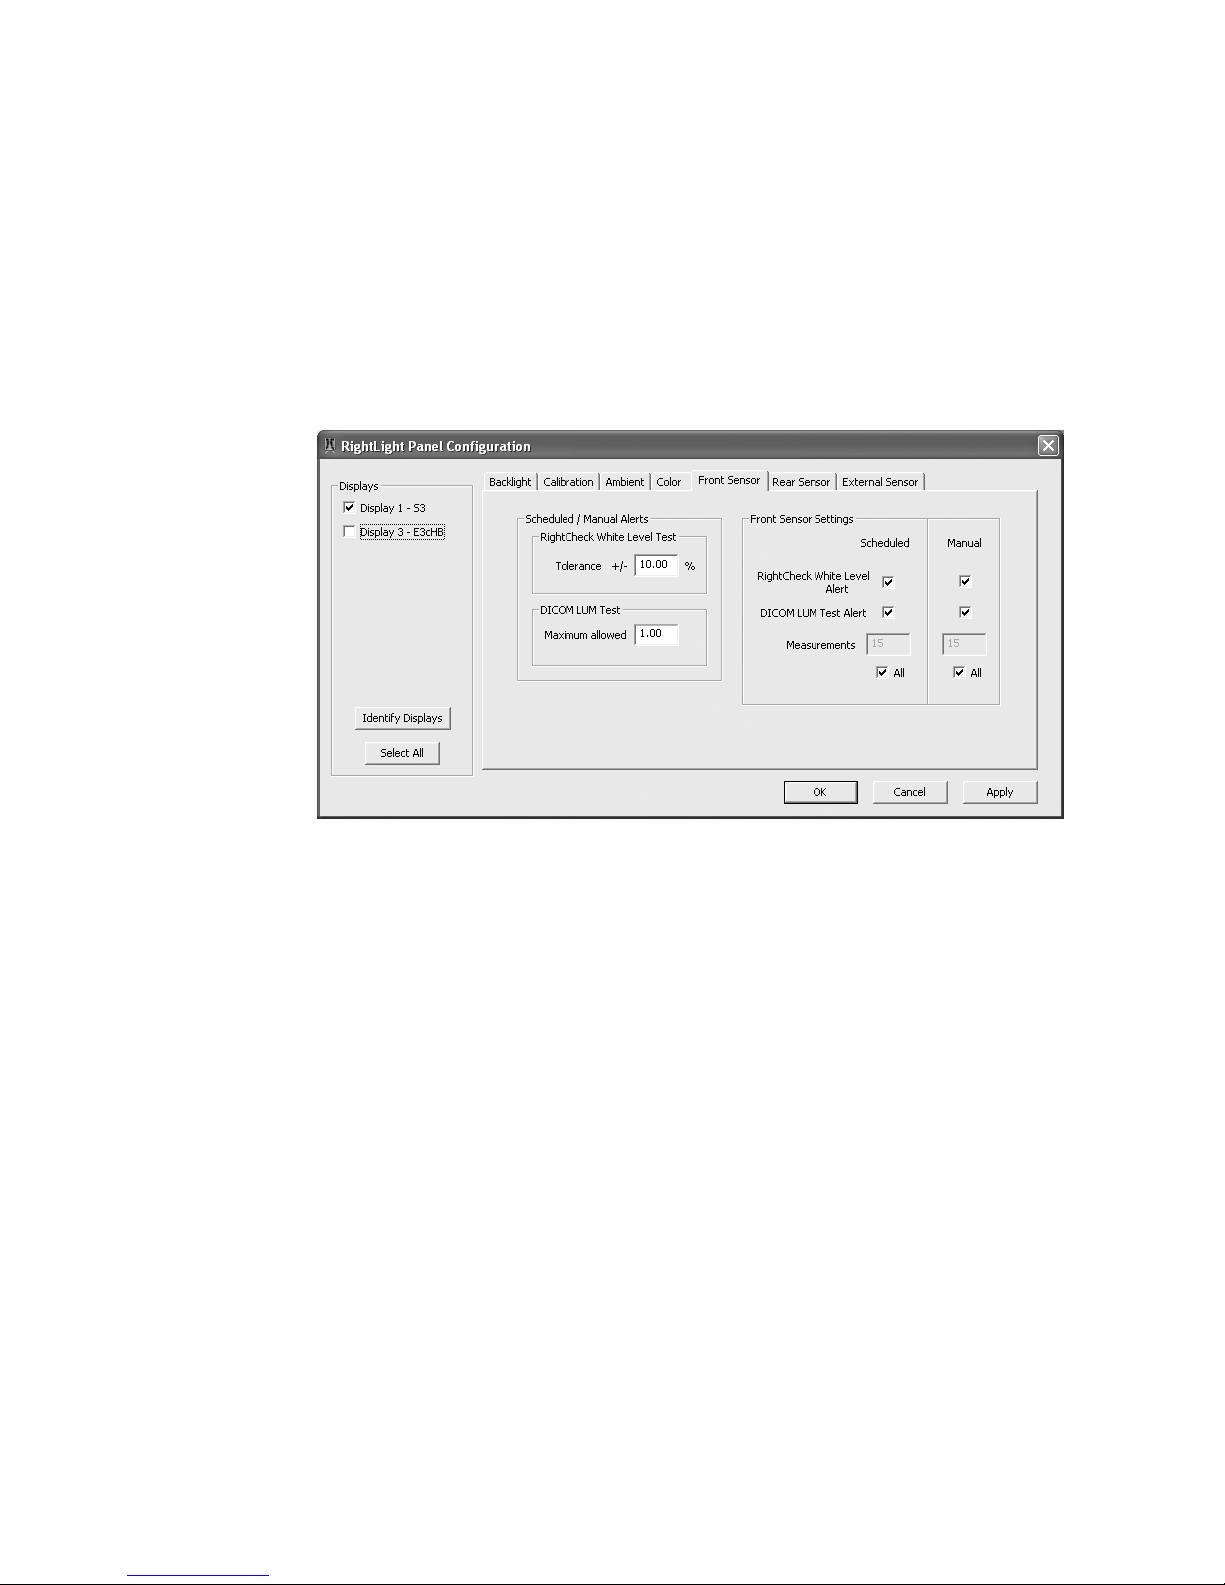
Front Sensor tab
Specify the front sensor conformance test(s) you want RightLight to
run. You can schedule testing to run automatically each day and
conduct testing manually.
RightLight alerts you of a failure in these three ways: by message, by
entries in the History log, and by status change of the Dome CXtra
icon in the system tray. If the CXtra-enabled workstation is connected
to Dome Dashboard, an alert is also sent to the Dashboard app or
SNMP console.
To set auto alert parameters
Click the selection box for the automatically scheduled and manual
tests you want to run.
• For the RightCheck White Level test, enter a value for Tolerance ±.
Then check the scheduled or manual selection box, or both, for test
alerts. The RightCheck White Level test is classified a failure if the
measured white level is outside the range defined by this percent,
applied to the Target Luminance defined on the Backlight tab.
Enter a value ranging from 0 (zero) to 25 (default = 10.00). Tests
producing a white level value outside of this percentage range
generate a warning message.
EXAMPLE: Target white level: 600 cd/m
2
Tolerance: ±10% Result: Values outside the range from 540 to 660
(600 ± 60 cd/m
2
) indicate a test failure.
RightLight Service | 23

• For the DICOM LUM test, enter a value for Maximum allowed.
Then check the scheduled or manual selection box, or both, for test
alerts. The DICOM LUM test is classified a failure if it produces
a value greater than the maximum allowed. Enter a value ranging
from 0 (zero) to 2 (default=1.00). A value of 0 (zero) indicates
perfect conformance with the DICOM Grayscale Standard Display
Function. The DICOM LUM Test assesses the standard deviation of
JNDs (Just Noticeable Differences) per digital interval.
EXAMPLE: Maximum allowed: 1.00 Result: A test result of 0.421
passes, because it is less than 1.00.
Enter the number of measurement you want the system to take for
this test. For the front sensor, the default number of measurements is
15; the minimum,5; the maximum, 32 (All).
If you run the Front Sensor Conformance Wizard with the selection
boxes unchecked for both the DICOM LUM test and the White level
test, you are logging the data from a completed conformance test
without applying the criteria of the DICOM LUM and White Level tests
for Pass/Fail determination.
24 | Dome CXtra
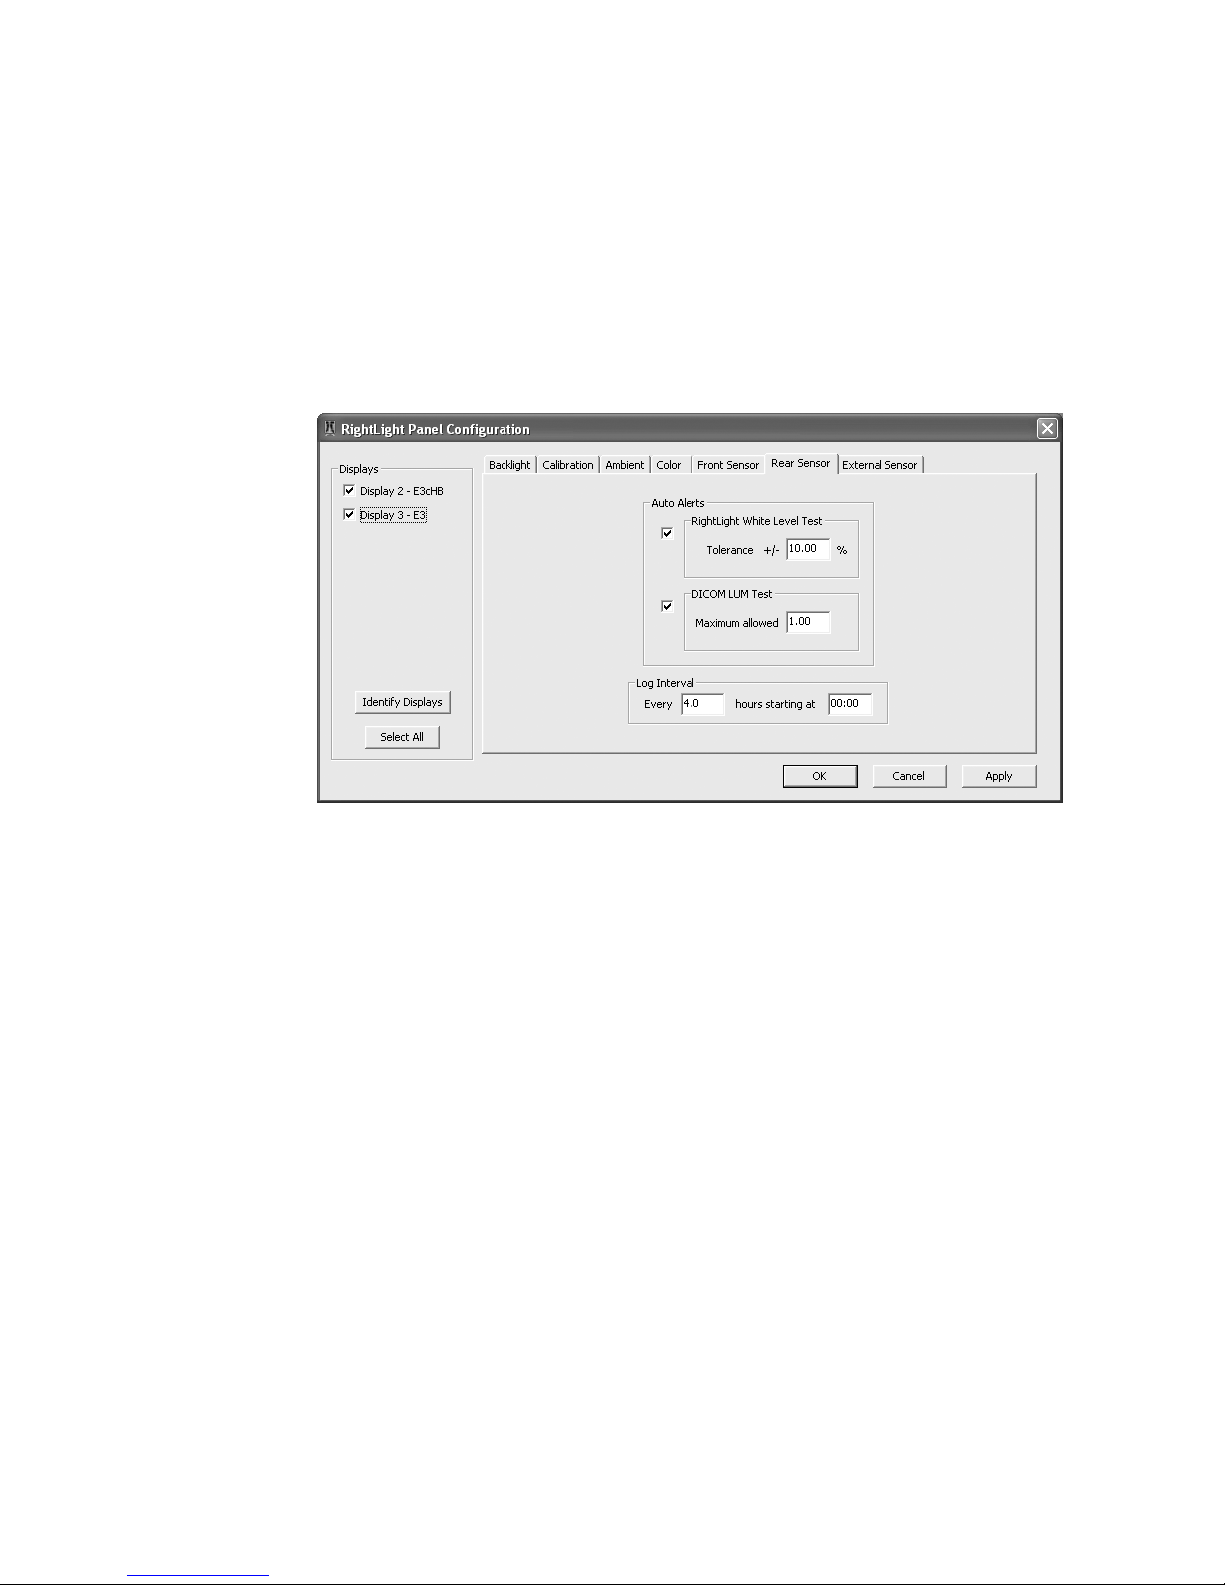
Rear Sensor tab
Specify the conformance test(s) you want RightLight to run. Every
5 minutes, RightLight automatically performs the tests selected on
this tab. For each test you select, you can specify a threshold value
that defines a test failure. RightLight alerts you of a failure in these
three ways: by message, by entries in the History log, and by status
change of the Dome CXtra icon in the system tray. If the CXtraenabled workstation is connected to Dome Dashboard, an alert is also
sent to the Dashboard app or SNMP console.
To set alert parameters
1 For the rear (backlight) sensor, select either the RightLight White
Level test or the DOICOM LUM test, or select both.
For the RightLight White Level test, check the selection box. Then
enter a value for Tolerance ±. The RightLight White Level test is
classified a failure if the measured white level is outside the range
defined by this percent, applied to the Target Luminance defined
on the Backlight tab. Enter a value ranging from 0 (zero) to 25
(default = 10.00). Tests producing a white level value outside of this
percentage range generate a warning message.
EXAMPLE: Target white level: 600 cd/m
2
Tolerance: ±10% Result: Values outside the range from 540 to 660
(600 ± 60 cd/m
2
) indicate a test failure.
RightLight Service | 25

For the DICOM LUM test, check the selection box. Then enter
a value for Maximum allowed. The DICOM LUM test is classified
a failure if it produces a value greater than the maximum allowed.
Enter a value ranging from 0 (zero) to 2 (default=1.00). A value of
0 (zero) indicates perfect conformance with the DICOM Grayscale
Standard Display Function. The DICOM LUM Test assesses the
standard deviation of JNDs (Just Noticeable Differences) per digital
interval.
EXAMPLE: Maximum allowed: 1.00 Result: A test result of 0.421
passes, because it is less than 1.00.
2 In the Log interval section, enter a time interval and starting time
for the first daily test in the hours starting at field. RightLight logs
the first set of conformance tests at the time specified and at
regular intervals thereafter until the end of the day.
Enter a positive integer for hours and a time in the 24-hour format,
such as 13:30. This interval specifies how often the system logs the
results of the selected test(s).
When a selected test fails, a message appears and the CXtra icon
changes to indicate a warning state. View the test results in the
Reporting History log.
NOTE: The log interval and start time must apply to all displays.
These fields are not enabled unless all displays are selected.
26 | Dome CXtra
 Loading...