

Page 1

Read all instructions before assembly and use.
KEEP INSTRUCTIONS FOR FUTURE USE.
ADULT ASSEMBLY REQUIRED
Due to the presence of small parts during assembly,keep
out of reach of children until assembly is complete.
THIS PRODUCT IS NOT INTENDED FOR INSTITUTIONAL OR COMMERCIAL USE.
When contacting Dream On Me you
will need to reference the above
numbers .They can also be found on
the label on the Crib End bottom rail.
To register your product for important safety alerts and updates to your product
please visit www.dreamonme.com and click on Product Registration.
style #: 752
Date
: Oct 12,2016
5 IN 1 CRIB
Consumer Care:
www.dreamonme.com
1532 S WASHINGTON AVE
PISCATAWAY TWP NJ 08854
OFFICE: 732-752-7220
CUSTOMER SERVICE: 732-366-1788
Page 2
.
. Strangulation Hazard: Do not place crib near window or patio door where cords from blinds or
drapes may strangle a child.
CAUTION:
Fall Hazard: When child is able to pull to a standing position, set mattress to lowest position and
remove bumper pads, large toys and other objects that could serve as steps for climbing out.This
crib has an sdjustable mattress support For the convenience of the parent when the baby is very
small, the mattress support may be used in the highest position.Important: with the mattress
support and mattress in the highest position, be absolutely sure that the top of the front crib side is
at least 3 inches higher then the top surface of the mattress.If it is not, lower the mattress support
and the mattress to the next h ighest position.
. Fall Hazard: Stop using crib when child begins to climb out or reaches s height of 35in(89cm),
whichever occurs first. The child should be placed in a youth or regular bed.
.
Check this product for damagde hardware, loose joints,loose bolts or other fasteners,missing parts,
or sharp edges before and after assembly and frequently during use.Securdly tighten loose bolts
and other fasteners. Do not use crib if any parts are missing,damagde or broken.Contact Dream
On Me for replacement parts and instructional literature if needed.Do not substitute parts.
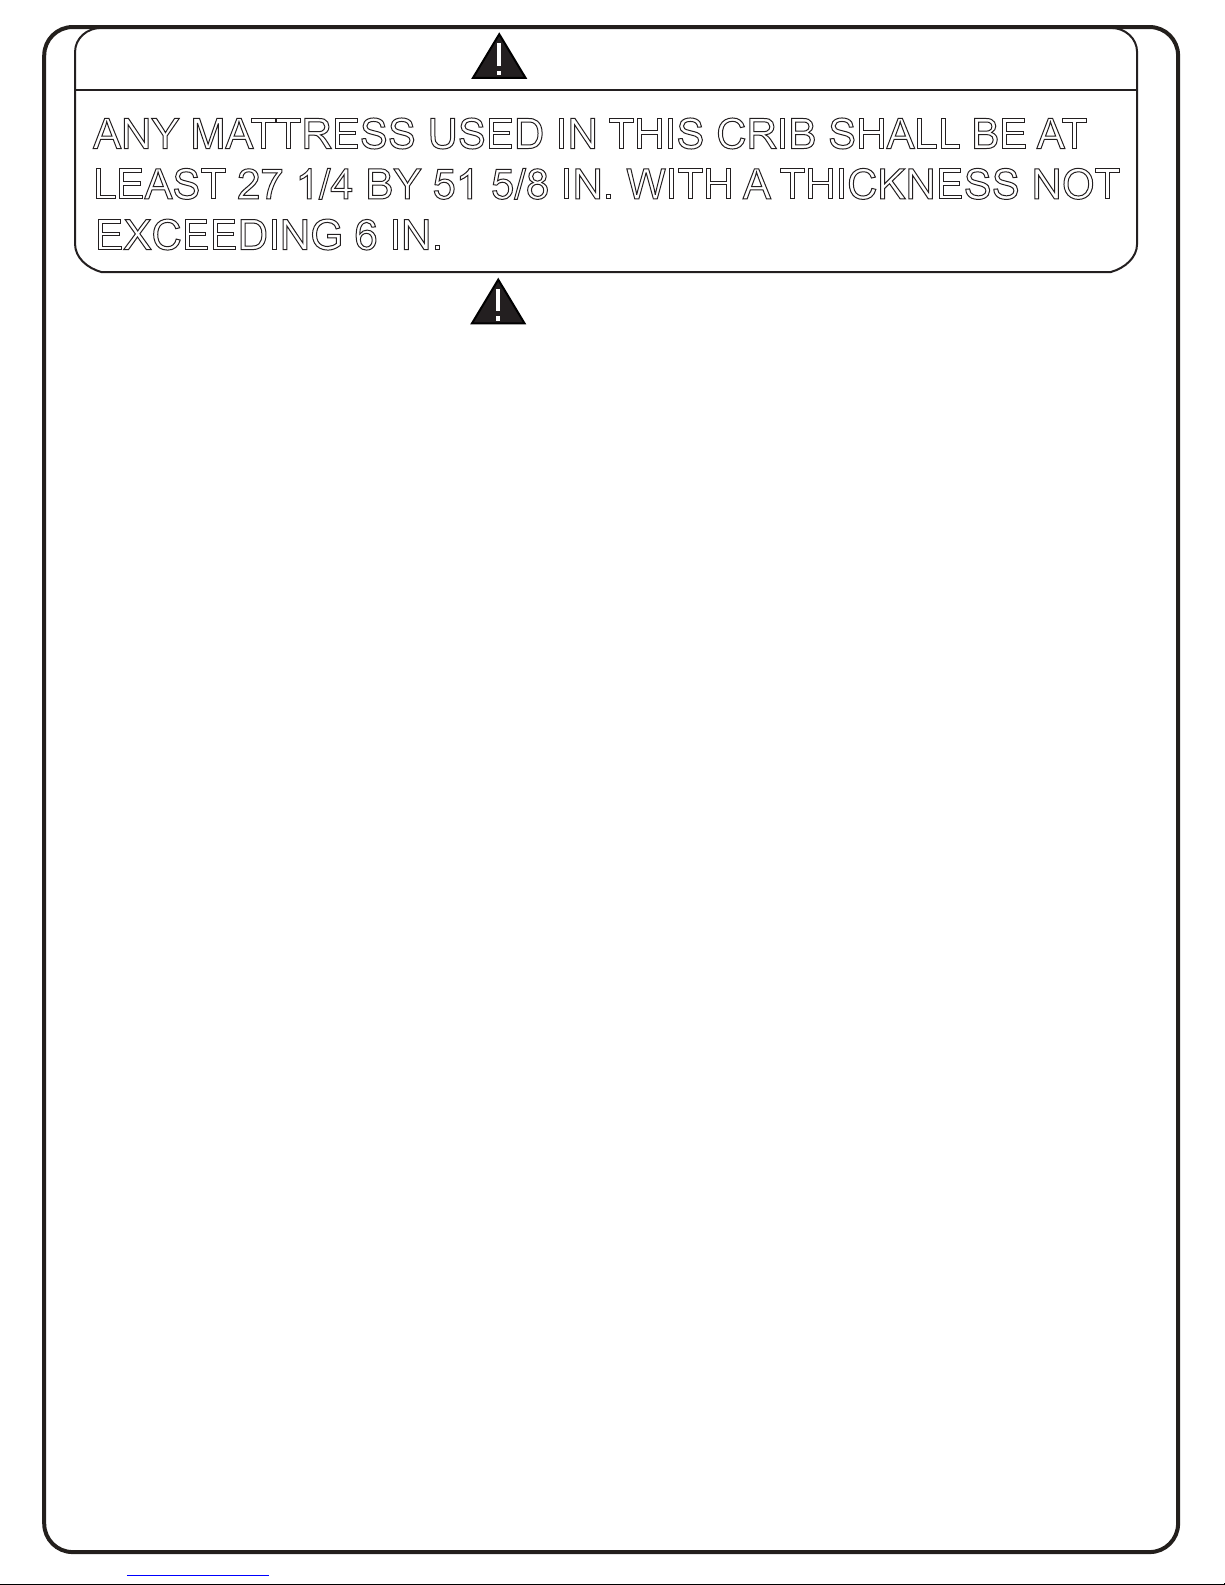
ANY MATTRESS USED IN THIS CRIB SHALL BE AT
LEAST 27 1/4 BY 51 5/8 IN. WITH A THICKNESS NOT
To reduce the risk of SIDS,pediatricians recommend healthy infants be placed
on their backs to sleep,
unless otherwise advised by your physician.
.
Infants can suffocate on soft bedding.Never add a pillow or comforter.Never place additional padding
under an infant.
.
.
Strangulation Hazard:STRINGS CAN CAUSE STRANGULATION! Do not
place items with a string
around a child’s neck, such as hood strings or pacifier cords. Do not suspend strings over a crib or attach
strings to toys. Strangulation Hazard: To help prevent strangulation tighten all fasteners.A child can trap
parts of the body or clothing on loose fasteners.
Failure to follow these warnings and the assembly instructions could result in
serious injury or death.
DO NOT use this crib if you cannot exactly follow the accompanying instructions.
WARNING:
.
.
Follow warnings on all products in a crib.
.
If refinishing,use a non-toxic finish specified for children’s products.
.
Never use plastic shipping bags or other plastic film as mattress covers because they can cause
suffocation.
.
Infants can suffocate in gaps between crib sides and a mattress that is too small.
.
Ensure a safe environment for the child by checking regularly, before placing the child in the crib,that
every component is properly and securely in place.
.
To avoid head injury, do not allow any child to play underneath the crib.
.
Never add an accessory such as a bassinet or changing table that extends over the sleeping area.
.
In Canada Only-Use a crib mattress that is no thicker than 15 cm and is of such a size that,when it
is pushed firmly against any side of the crib, it does not leave a gap of more than 3 cm between the
mattress and any part of the sides of the crib. Do not use this crib for a child who can climb out of it
or who is taller than 90 cm.
EXCEEDING 6 IN.
2
Page 3
3
NOTES ON ASSEMBLY:
During the assembly process whenever using screws or bolts, check each by placing the screw/bolt
on the diagram of the item which is drawn actual size and design.Be sure to use the proper size and
shape specified in the instructions.
.
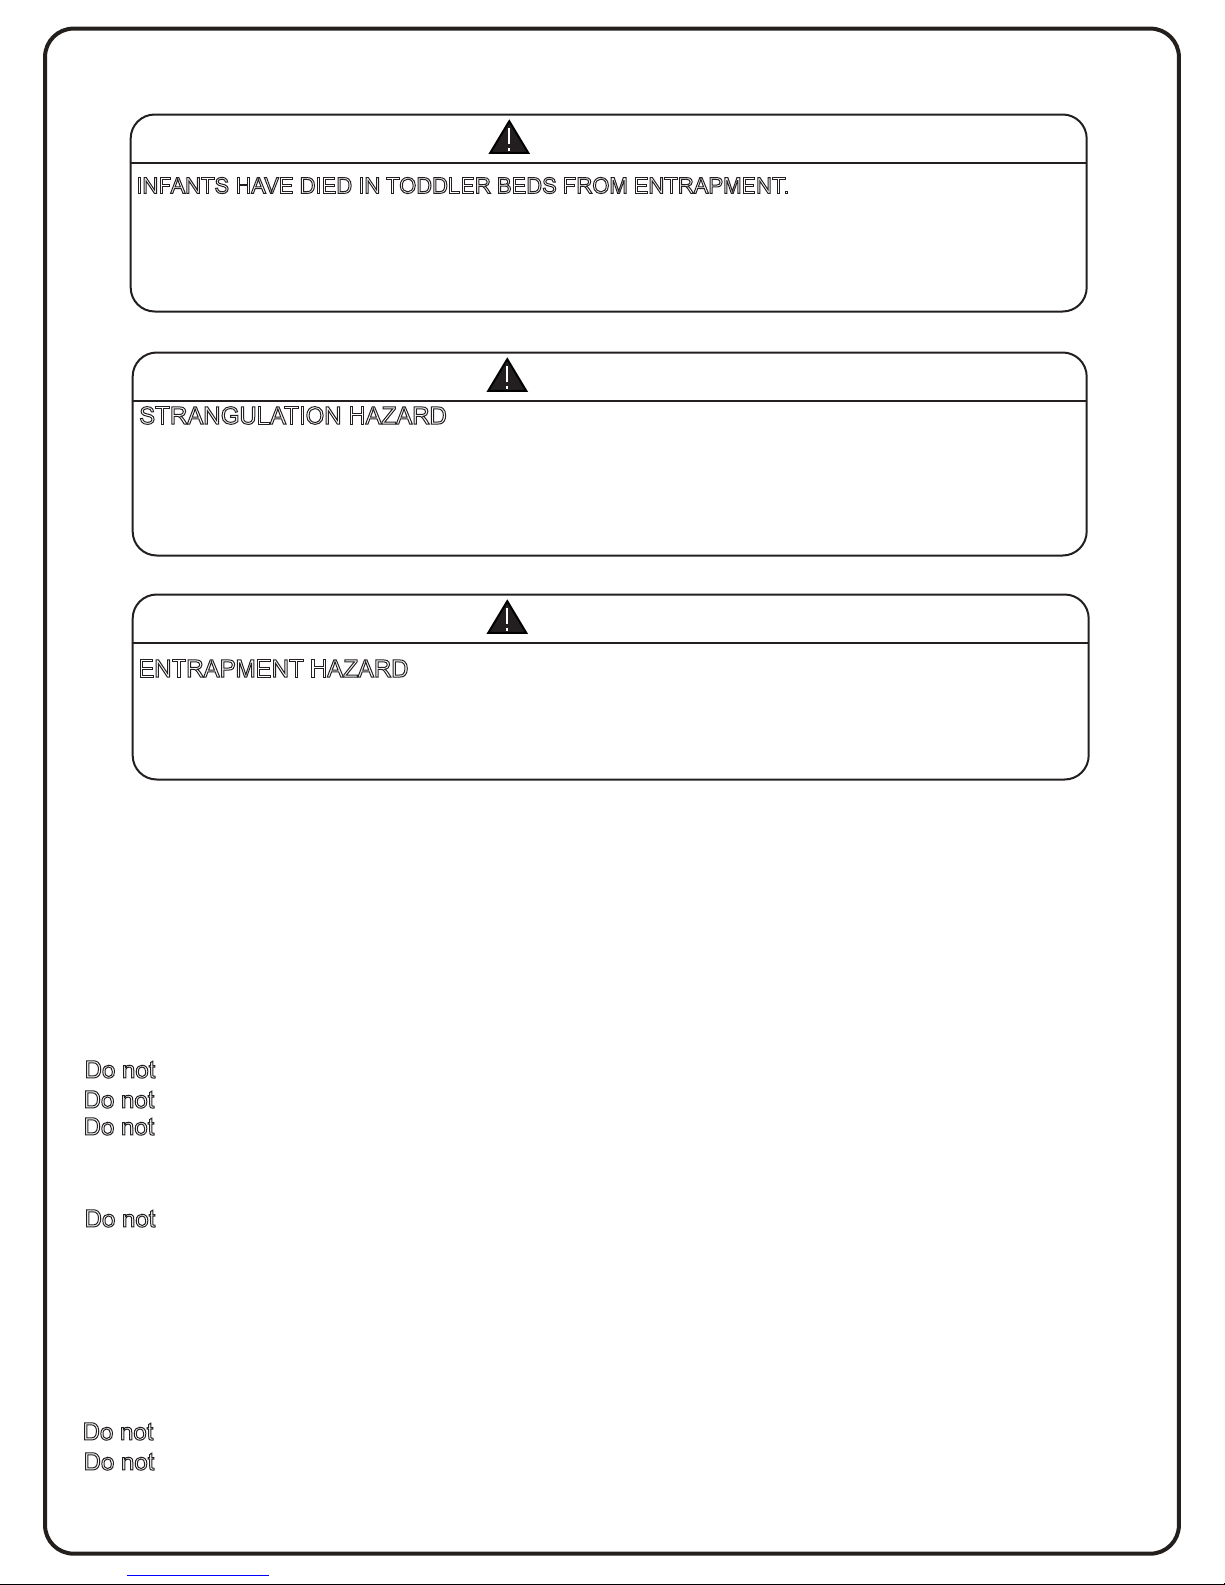
INFANTS HAVE DIED IN TODDLER BEDS FROM ENTRAPMENT.
Openings in and between bed parts can entrap head and neck of a small child.
NEVER use bed with children younger than 15 months.
ALWAYS follow assembly instructions.
The maximum user weight is 50Ibs(22.7kg)
WARNING:
.
To assemble this unit you may be required to place the unit on it’s side and face. It is strongly
recommended that assembly is done on a soft, non-abrasive surface to avoid damaging the finish.
NOTES ON USE:
Keep children and others safe by following these simple rules:
.
Do not
allow any child to play on furniture.
.
Always monitor your child’s activity when in the nursery.
NOTES ON CARE AND MAINTENANCE:
.
Do not
scratch or chip the finish.
STRANGULATION HAZARD
NEVER place bed near windows where cords from blinds or drapes may strangle a
NEVER suspend strings over a bed.
NEVER place items with a string,cord,or ribbon,such as hood strings or pacifier
around a child’s neck. These items may catch on bed parts.
WARNING
ENTRAPMENT HAZARD
To avoid dangerous gaps, any mattress used in this bed shall be a full-size crib
at least 51 5/8 in (1310mm) in length, 27 1/4 (690mm) in width and 4
thickness. The mattress thickness must not exceed 6 in(150mm).
CAUTION
.
Do not
allow climbing on any piece of furniture.
.
Do not allow hanging from any piece of furniture.
.
Do not store the product or any parts in extreme temperatures and conditions such as a hot attic or
a damp, cold basement. These extremes can cause a loss of structural integrity.
.
Inspect the product periodically, contact Dream On Me for replacement parts or questions.
.
To preserve the luster of the high quality finish on your product, it is recommended to place a doily or
felt pad under any items you place on the finish.
.
Clean with a damp cloth, then a dry cloth to preserve the original luster and beauty of this fine finish.
.
Do not
use abrasive chemicals.
.
Do not spray cleaners directly onto furniture.
.
Lift slightly when moving on carpeting to prevent leg breakage.
.
Use of a vaporizer near furniture will cause wood to swell and finish to peel.
child.
cords,
mattress
in (100mm) in
TODDLER BED
Page 4

4
Respecter les avertissements sur tous les produits du berceau.
L'assemblage par un adulte est nécessaire.
Les petites pièces peuvent présenter un danger d'étranglement avant l'assemblage.
Ci-joint s'il vous plaît trouver les instructions simples, étape par étape pour vous aider à
assembler rapidement vos produits. Avant de commencer, nous vous recommandons de
suivre les étapes ci-dessous:
1.Lire attentivement les instructions, s'il vous plaît.
2.Identifier toutes les pièces et le matériel.
3.Vous aurez besoin des outils suivants:
Tournevis tête phillips
Tournevis à tête plate
Marteau
Ne pas utiliser les perceuses ou pilotes
Pour protéger vos pièces lors de l'assemblage, placez-les sur une surface molle.
Pour nettoyer la surface, utiliser seulement l'eau et un chiffon humide.
Ne pas utiliser des nettoyants pour vitres ou des abrasifs de nettoyage car il va rayer la
surface et pourrait endommager le revêtement protecteur.
Le non-respect de ces avertissements et instructions peut entraîner des blessures graves
ou la mort.
Lisez toutes les instructions avant l'assembler du crèche, garder les instructions pour une
utilisation future.
À l'issue de l'assemblée, assurez-vous que toutes les vis, les boulons et les dispositifs de
fixation ont été bien serrés. Un contrôle fréquent doit être fait.
Ne jamais utiliser ce produit s'il y a des pièces desserrées ou manquantes, des joints lâches,
des pièces cassées ou maille/tissu déchiré. Vérifiez avant le montage et périodiquement
pendant l'utilisation. Contactez DREAM ON ME pour les pièces de rechange et des
instructions, si nécessaire. Ne jamais substituer les parties, y compris le produit des rails
latéraux, doivent être complètement érigé avant utilisation. Cesser d'utiliser le produit
lorsque l'enfant est capable de sortir ou atteint la hauteur de 35 pouces (890mm).
Ne placez jamais ce produit près de la fenêtre où les cordons de stores ou rideaux peuvent
étrangler un enfant.
Lorsque l'enfant est capable de tirer à la position debout, placez le matelas/base à la plus
basse position de réglage et enlever les bordures de protection, les gros jouets et d'autres
objets qui pourraient servir de marches pour grimper. Un enfant peut piéger les parties du
corps ou les vêtements sur des fixations desserrées. Ne jamais utiliser de sac en plastique
ATTENTION!
Page 5

5
de transport ou tout autre film plastique pour recouvrir le matelas non vendu et conçus à
cette fin, ils peuvent provoquer la suffocation.
ATTENTION: Tout matelas utilisé dans ce lit doit être au moins 27-1/4 pouces (690mm) par
51-5/8 pouces (1310mm), avec une épaisseur n'excédant pas 6 pouces (150 mm), les
dimensions du matelas doivent être prises de la couture à la couture ou bord à bord dans le
cas échéant.
Ne jamais utiliser un matelas à eau avec ce produit.
Les cordes peuvent étrangler! Ne jamais placer des objets avec une chaîne autour du cou
de l'enfant, tels que les chaînes de capot ou de cordons de sucette. Ne jamais suspendre
de ficelles sur le produit ou attacher des ficelles aux jouets.
Les bébés peuvent être suffoqués dans les espaces entre un matelas trop petit ou trop
épais au côtés et des produits, ne jamais ajouter un matelas, un oreiller, une couette ou un
rembourrage sur un matelas mou.
Pour réduire le risque de SMSN, les pédiatres recommandent que les enfants en bonne
santé doivent être placés sur le dos pour dormir, sauf avis contraire de votre médecin.
Si la finition, utilisez un fini non toxique indiqué pour les produits pour enfants.
Les bébés peuvent suffoquer sur un matelas mou.
Ne jamais ajouter un coussin ou une couverture.
Ne placez jamais un rembourrage supplémentaire en vertu d'un nourrisson.
Pour aider à prévenir l'étranglement, serrer toutes les fixations. .
Un enfant peut piéger les parties du corps ou les vêtements sur des fixations desserrées.
Respecter les avertissements sur tous les produits du berceau.
Voir panneau tête et support du matelas du produit pour les avertissements.
Remplacer dentition ferroviaire si endommagé, fissuré ou lâche.
FABRIQUÉ EN CHINE
Page 6
6
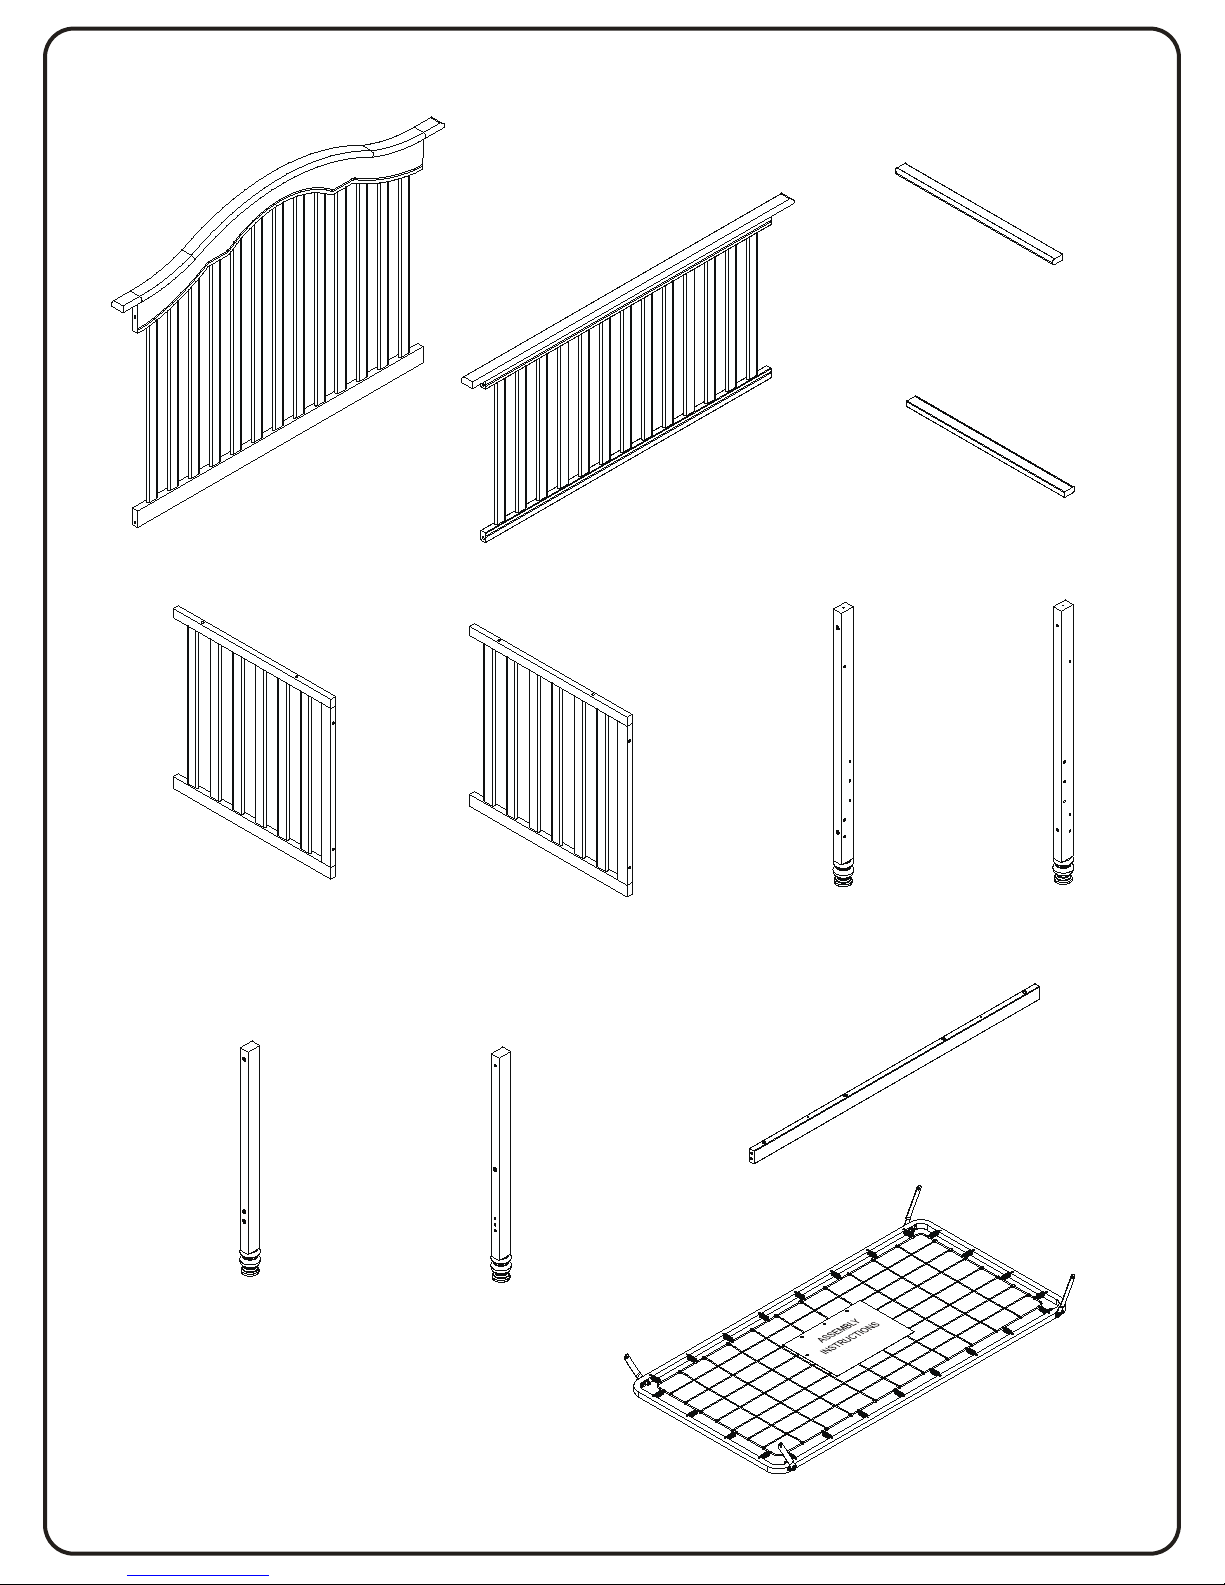
P. Mattress
Support x1
K. Right Front
Leg x1
J. Left Front
Leg x1
F.Right Crib End x1
B. Front Rail x1
H. Right Rear
Leg x1
G. Left Rear
Leg x1
A. Back Rail Bottom x1
PARTS: MAKE SURE THAT ALL PRE-ASSEMBLED PARTS ARE TIGHT.
M. Stabilizer Bar x1
C. Left Crib End Top x1
D. Right Crib End Top x1
E. Left Crib End x1
Page 7
7
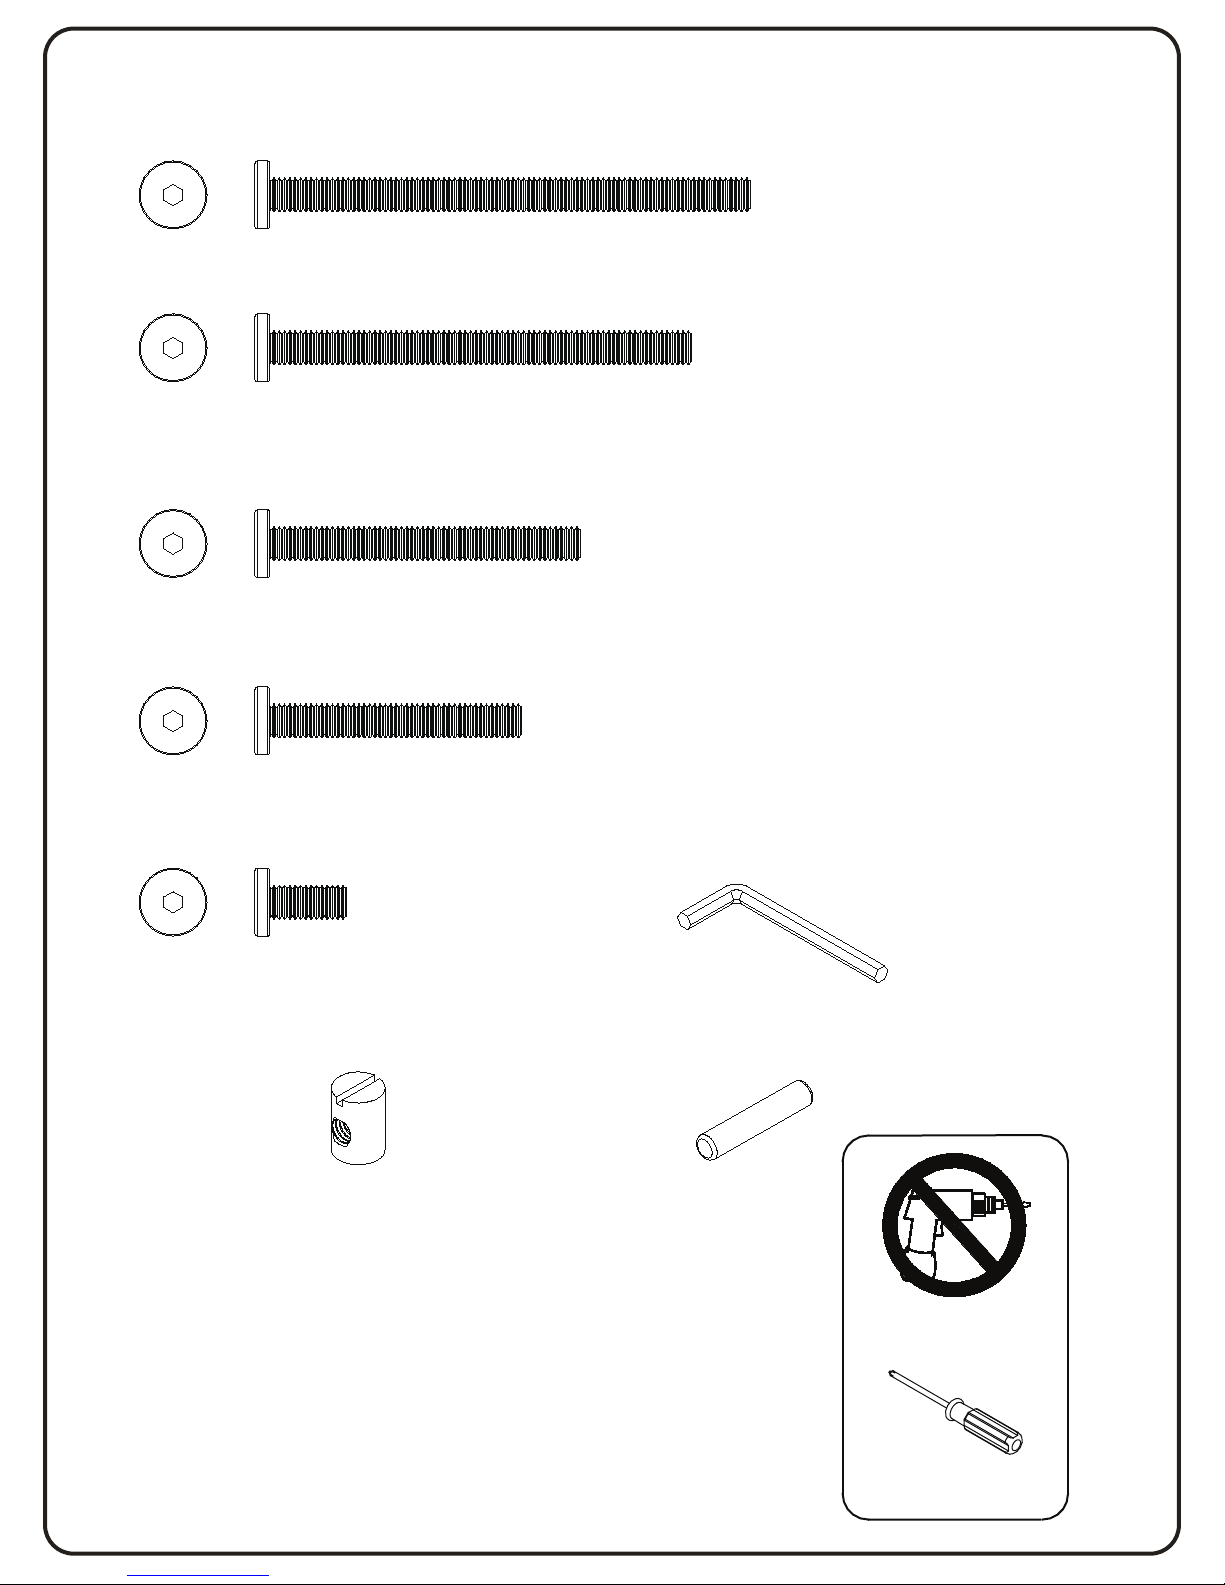
No drills necessary.
Do not use power
screwdriver
Phillips Screwdriver
(not supplied)
PARTS:
HARDWARE AND TOOLS
M4 ALLEN
WRENCH SUPPLIED
a. M6 x 85 mm Bolt x10
e. M6 x 15 mm Bolt x4
(Painted blue)
f.
Barrel nuts
x14
g. Dowel x4
d. M6 x 45 mm Bolt x4
b. M6 x 75 mm Bolt x4
c. M6 x 55 mm Bolt x4
Page 8
8
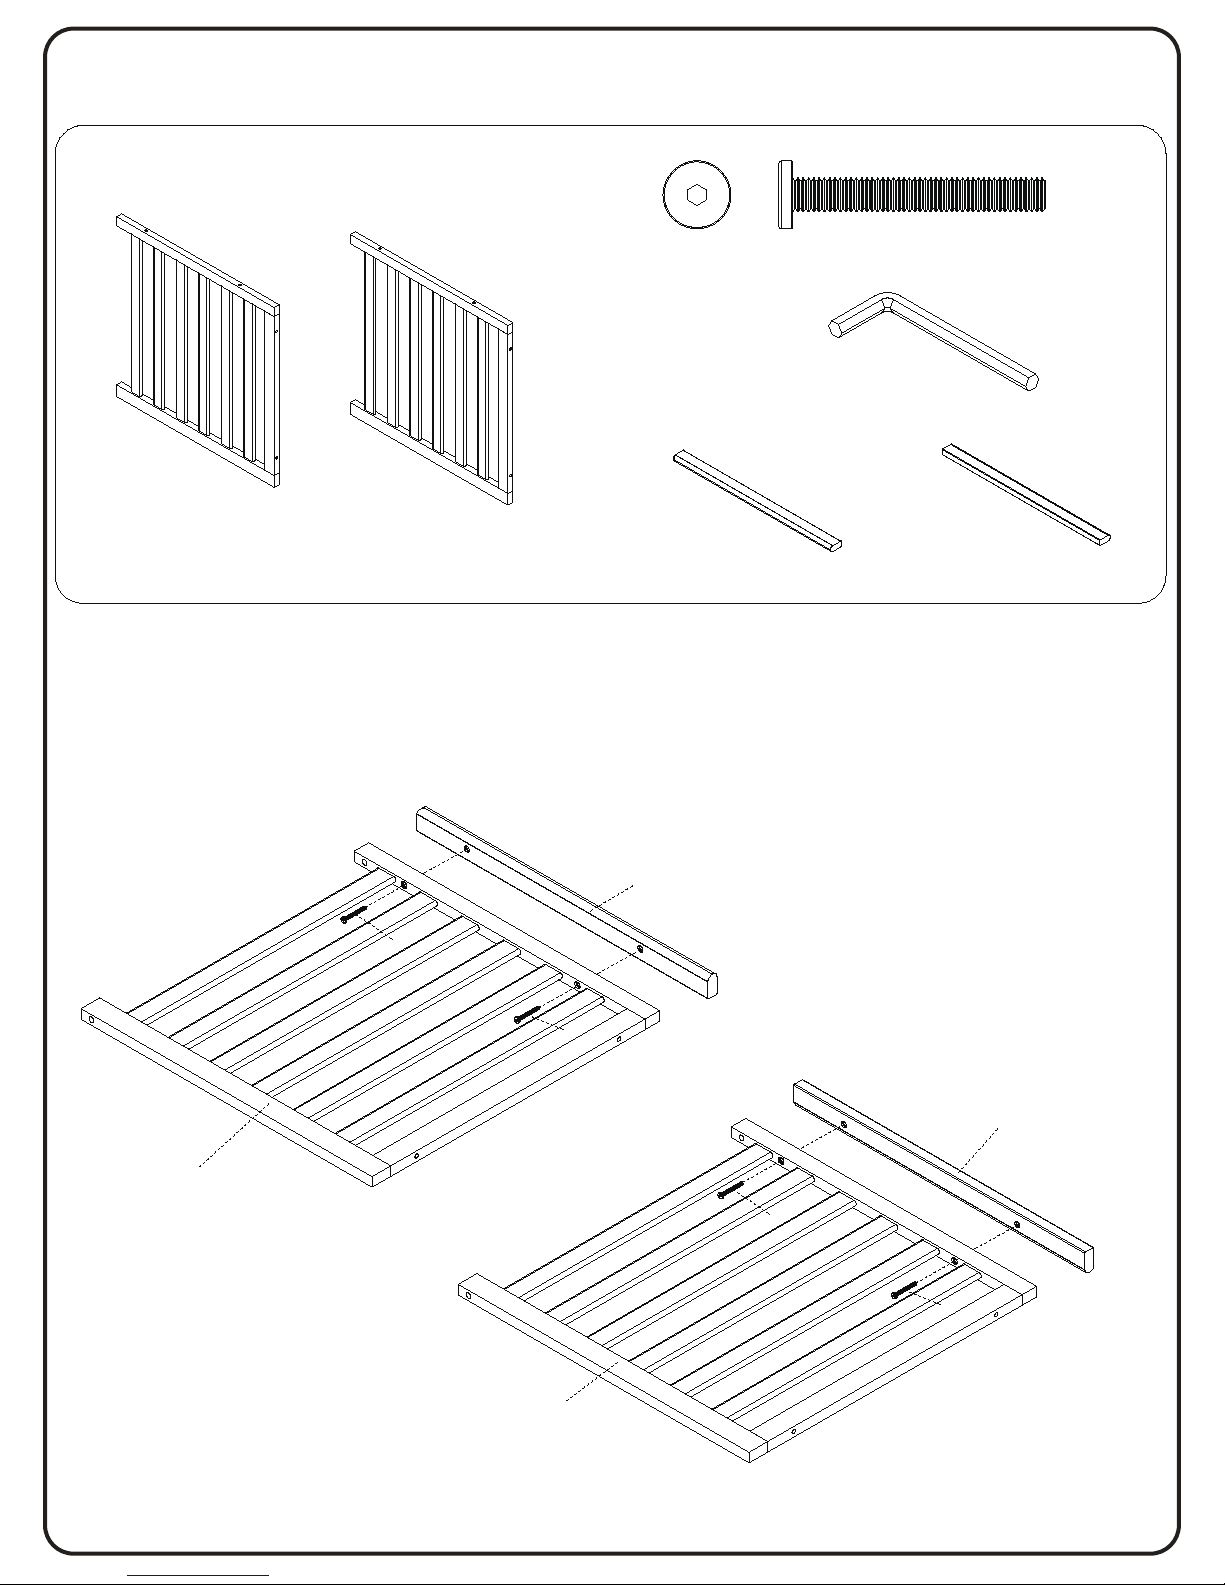
Attach (1) Right Crib End Top (Part D) to (1) Right Crib End (Part F) using (2) M6x45mm Bolts (Part d).
Tighten with the M4 Allen Wrench.
d
d
d
d
F
C
D
Attach (1) Left Crib End Top (Part C) to (1) Left Crib End (Part E) using (2) M6x45mm Bolts (Part d).
Tighten with the M4 Allen Wrench.
Parts and tools required to complete step.
E
F.Right Crib End x1
C. Left Crib End Top x1
D. Right Crib End Top x1
E. Left Crib End x1
M4 ALLEN
WRENCH SUPPLIED
d. M6 x 45 mm Bolt x4
SECTION 1: CRIB ASSEMBLY
STEP 1
Page 9
9
Parts and tools required to complete step.
SECTION 1: CRIB ASSEMBLY
STEP 2
f
f
a
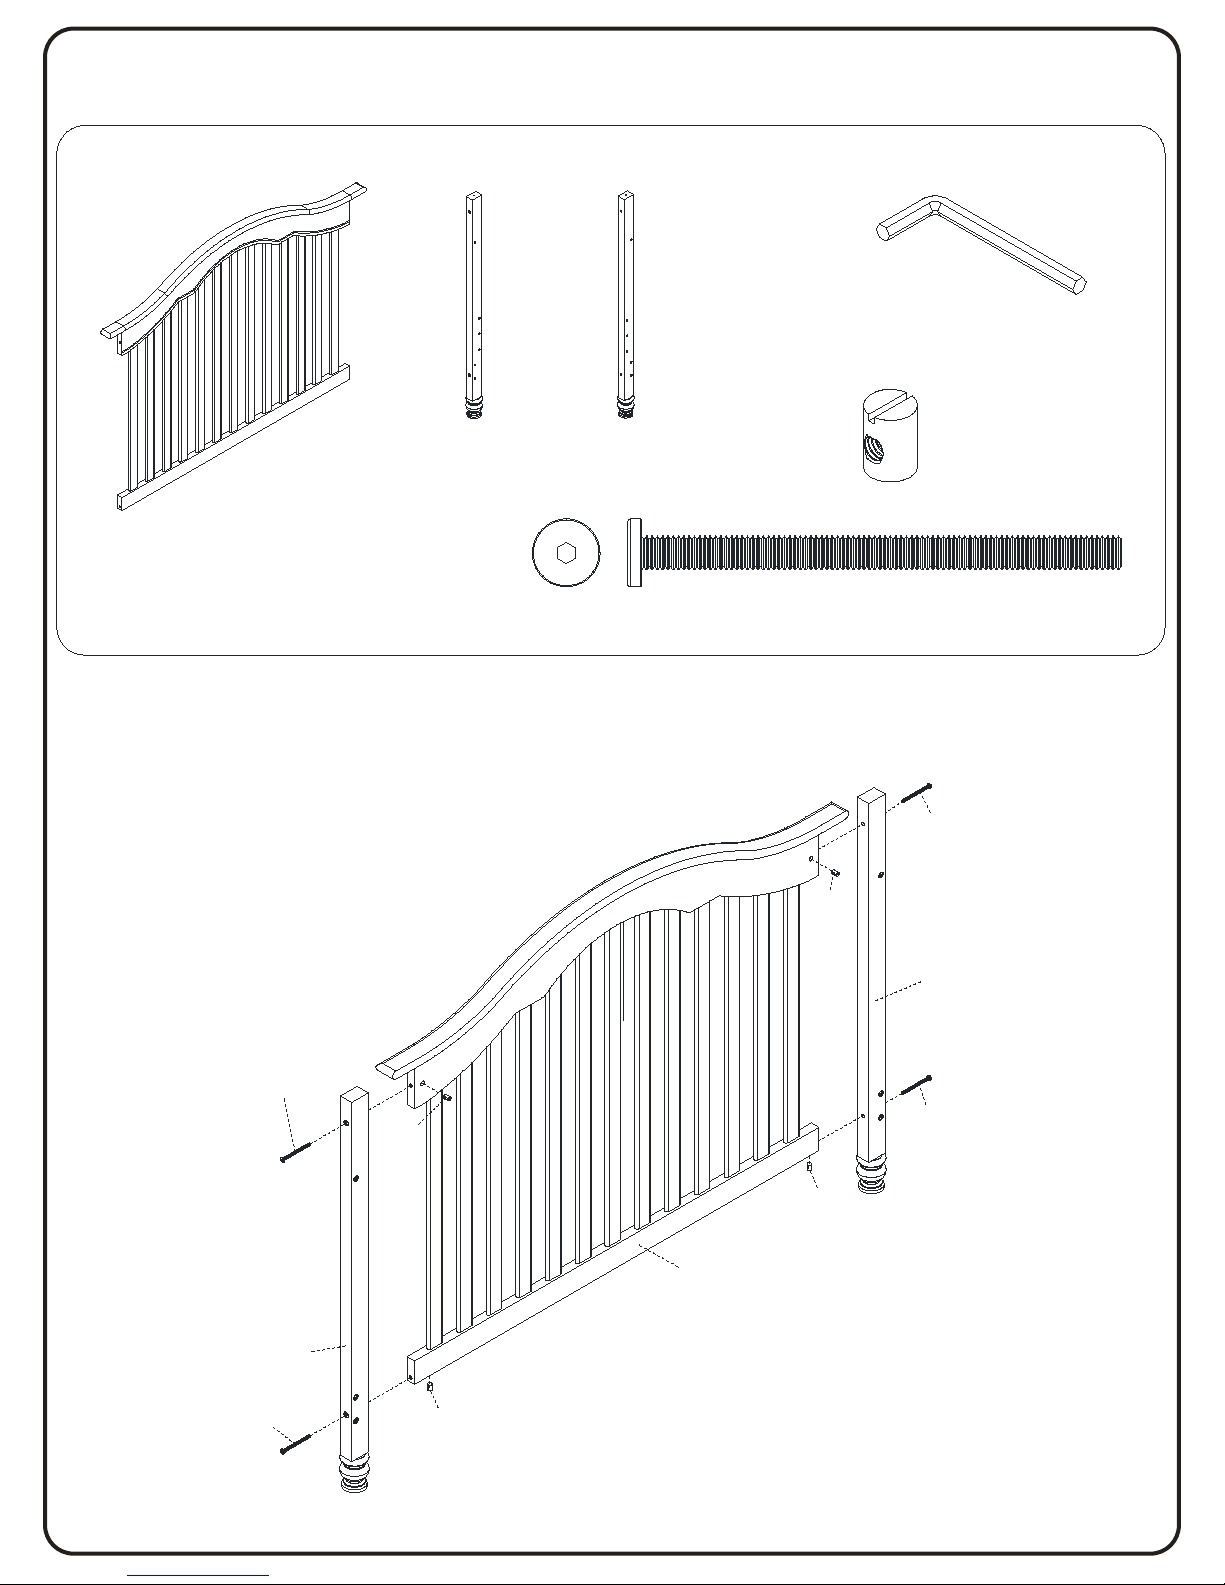
Install (1) Back Rail Bottom (Part A) to (1) Left Rear Leg (Part G ) , (1) Right Rear Leg (Part H )
using (4) M6x85mm Bolts (Part a), (4) Barrel nuts (Part f). Tighten with the M4 Allen Wrench.
a
a
a
f
f
A
H. Right Rear
Leg x1
G. Left Rear
Leg x1
A. Back Rail Bottom x1
f.
Barrel nuts
x4
a. M6 x 85 mm Bolt x4
M4 ALLEN
WRENCH SUPPLIED
G
H
Page 10
10
B
M
K
J
a
a
a
a
a
a
g
g
g
g
f
f
f
f
f
f
Parts and tools required to complete step.
SECTION 1: CRIB ASSEMBLY
STEP 3
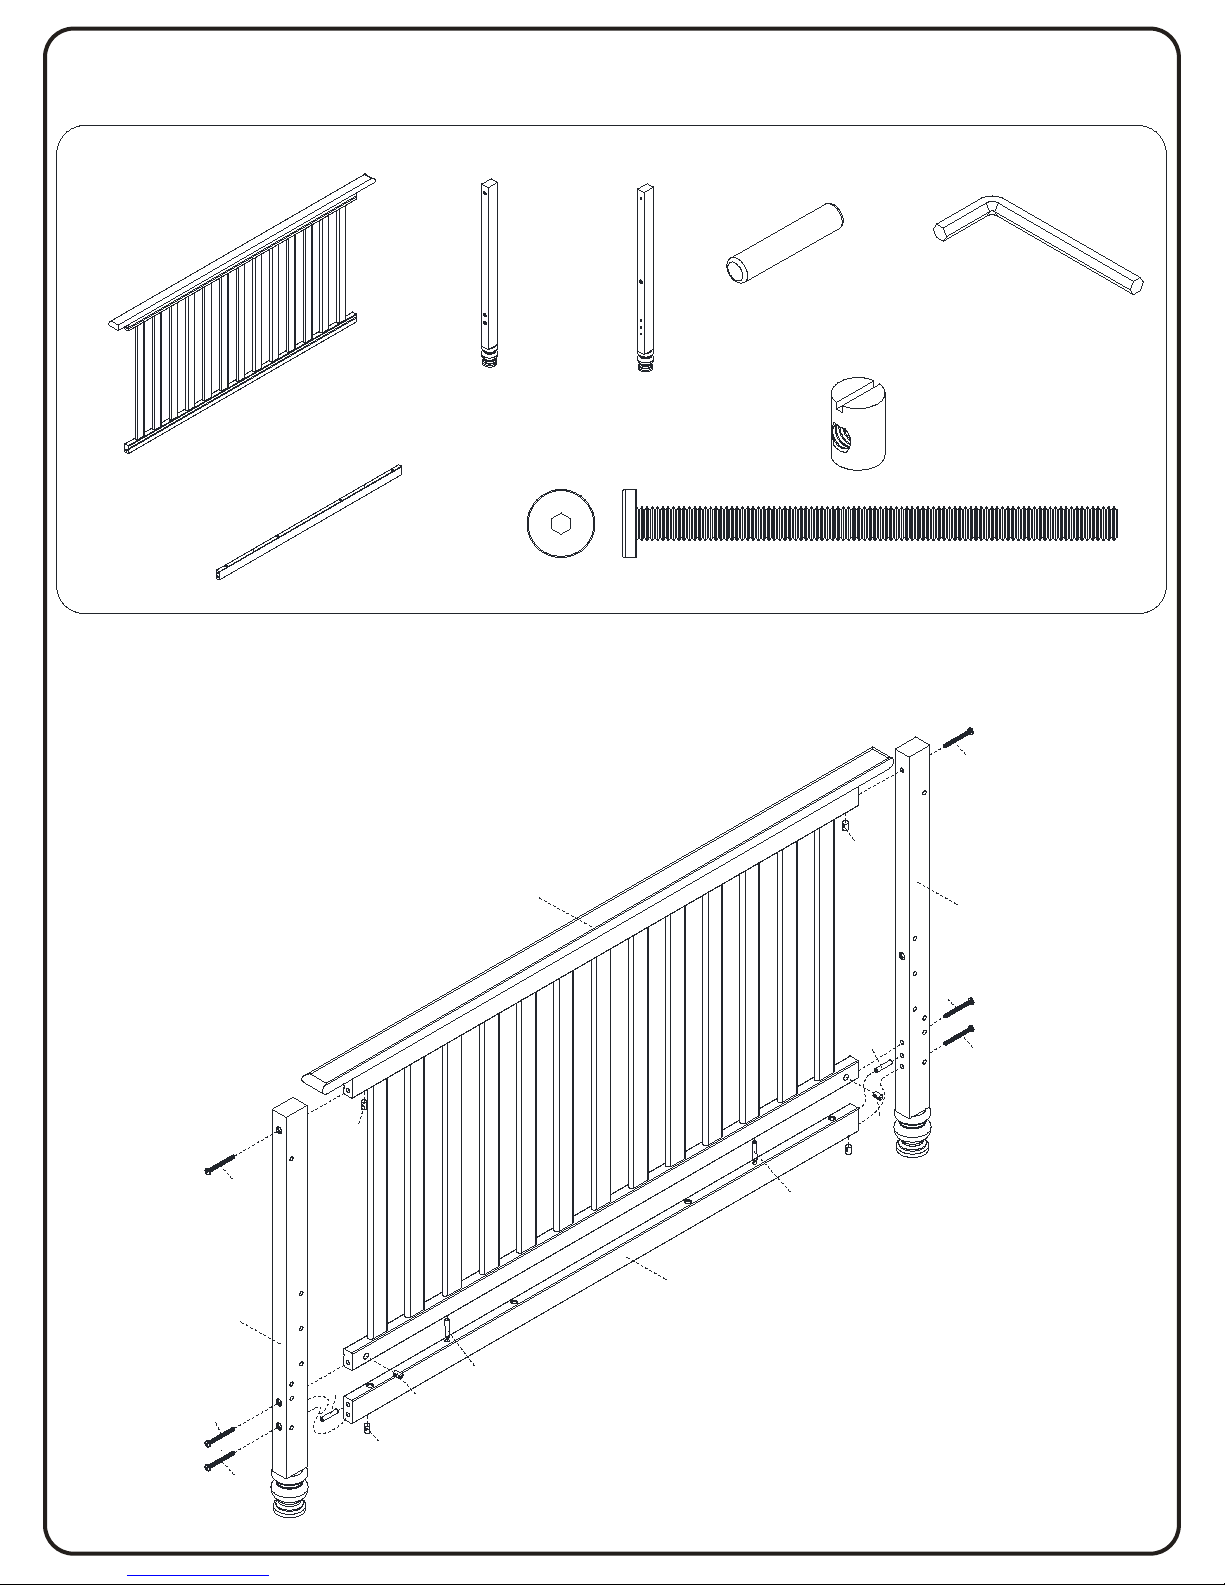
Install (1) Front Rail (Part B) , (1) Stabilizer Bar (Part M) to (1) Left Front Leg (Part J ) , (1) Right Front
Leg (Part K ) using (6) M6x85mm Bolts (Part a) , (6) Barrel nuts (Part f) and (4) Dowel (Part g).
Tighten with the M4 Allen Wrench.
f.
Barrel nuts
x6
a. M6 x 85 mm Bolt x6
M4 ALLEN
WRENCH SUPPLIED
K. Right Front
Leg x1
J. Left Front
Leg x1
M. Stabilizer Bar x1
B. Front Rail x1
g. Dowel x4
Page 11
11
Parts and tools required to complete step.
SECTION 1: CRIB ASSEMBLY
STEP 4
Parts and tools required to complete step.
A
From Step 1
From Step 1
f.
Barrel nuts
x4
b. M6 x 75 mm Bolt x4
M4 ALLEN
WRENCH SUPPLIED
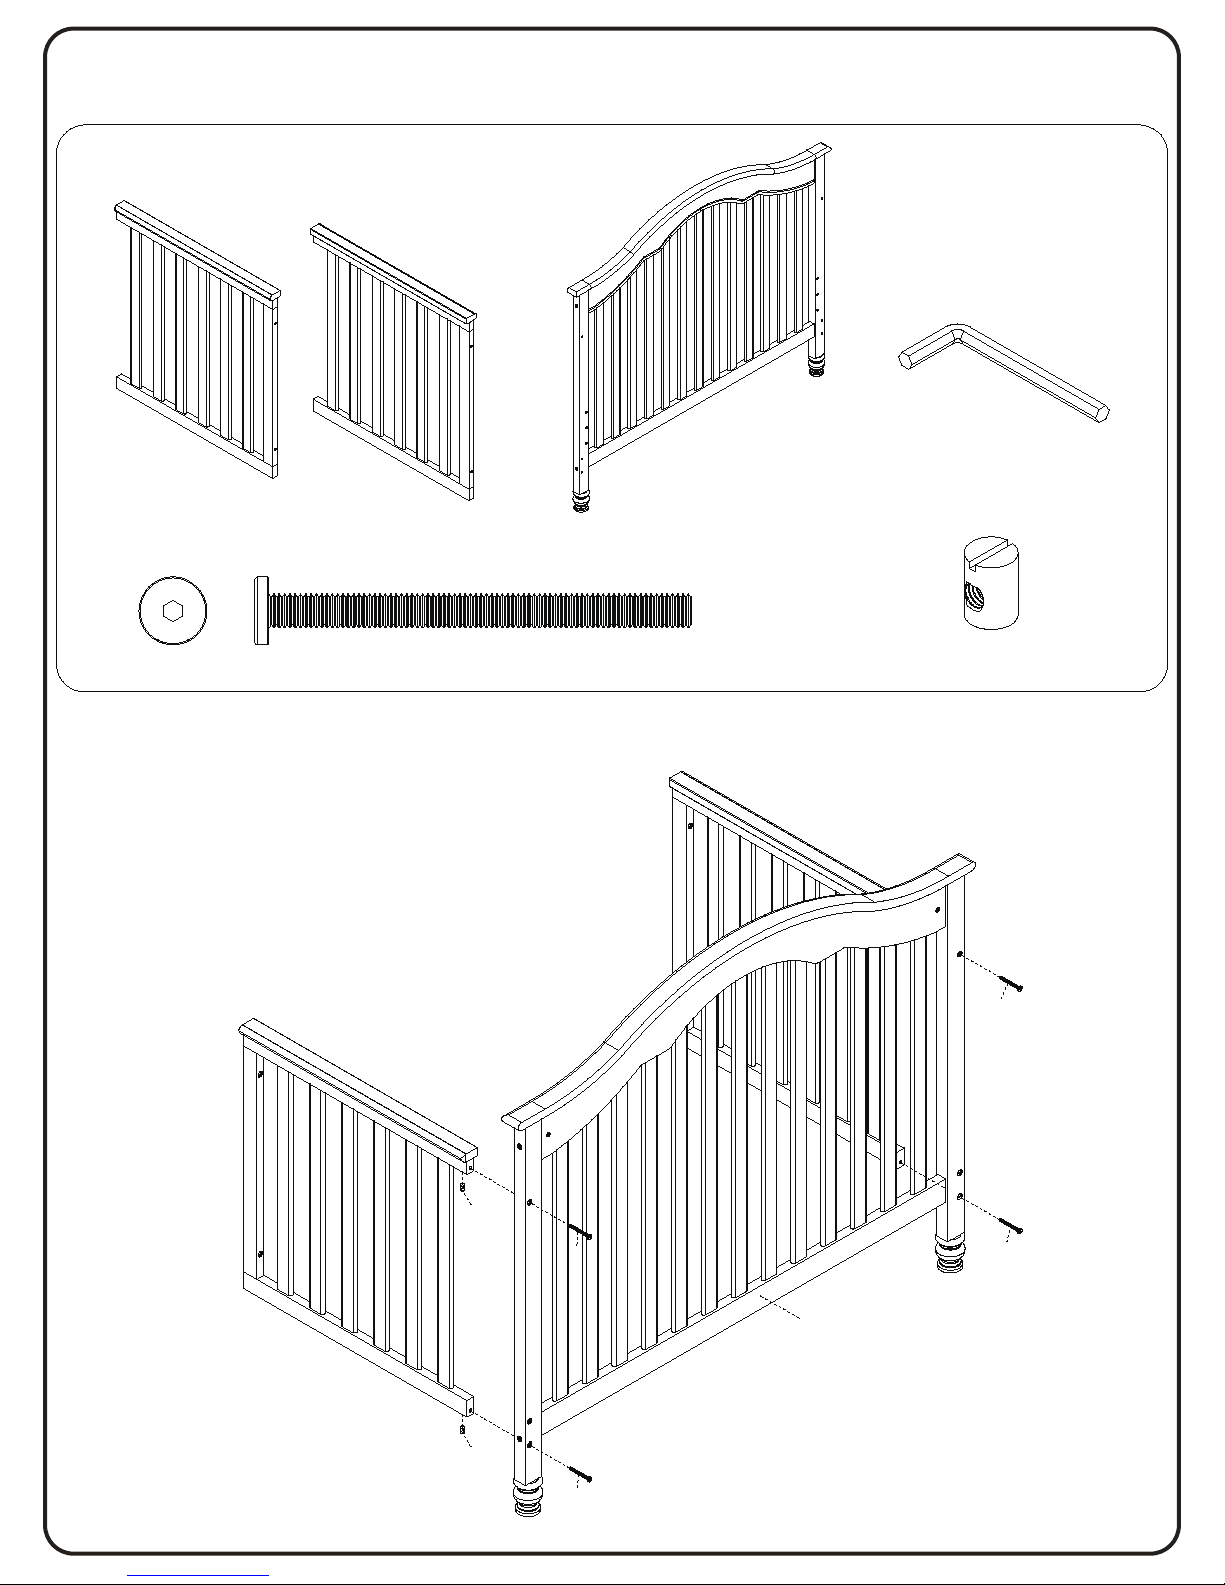
Install The Assembly From 1 To The Assembly From 2 using (4) M6x75mm Bolts (Part b), (4) Barrel
nuts (Part f). Tighten with the M4 Allen Wrench.
b
f
b
f
b
b
From Step 2
Page 12
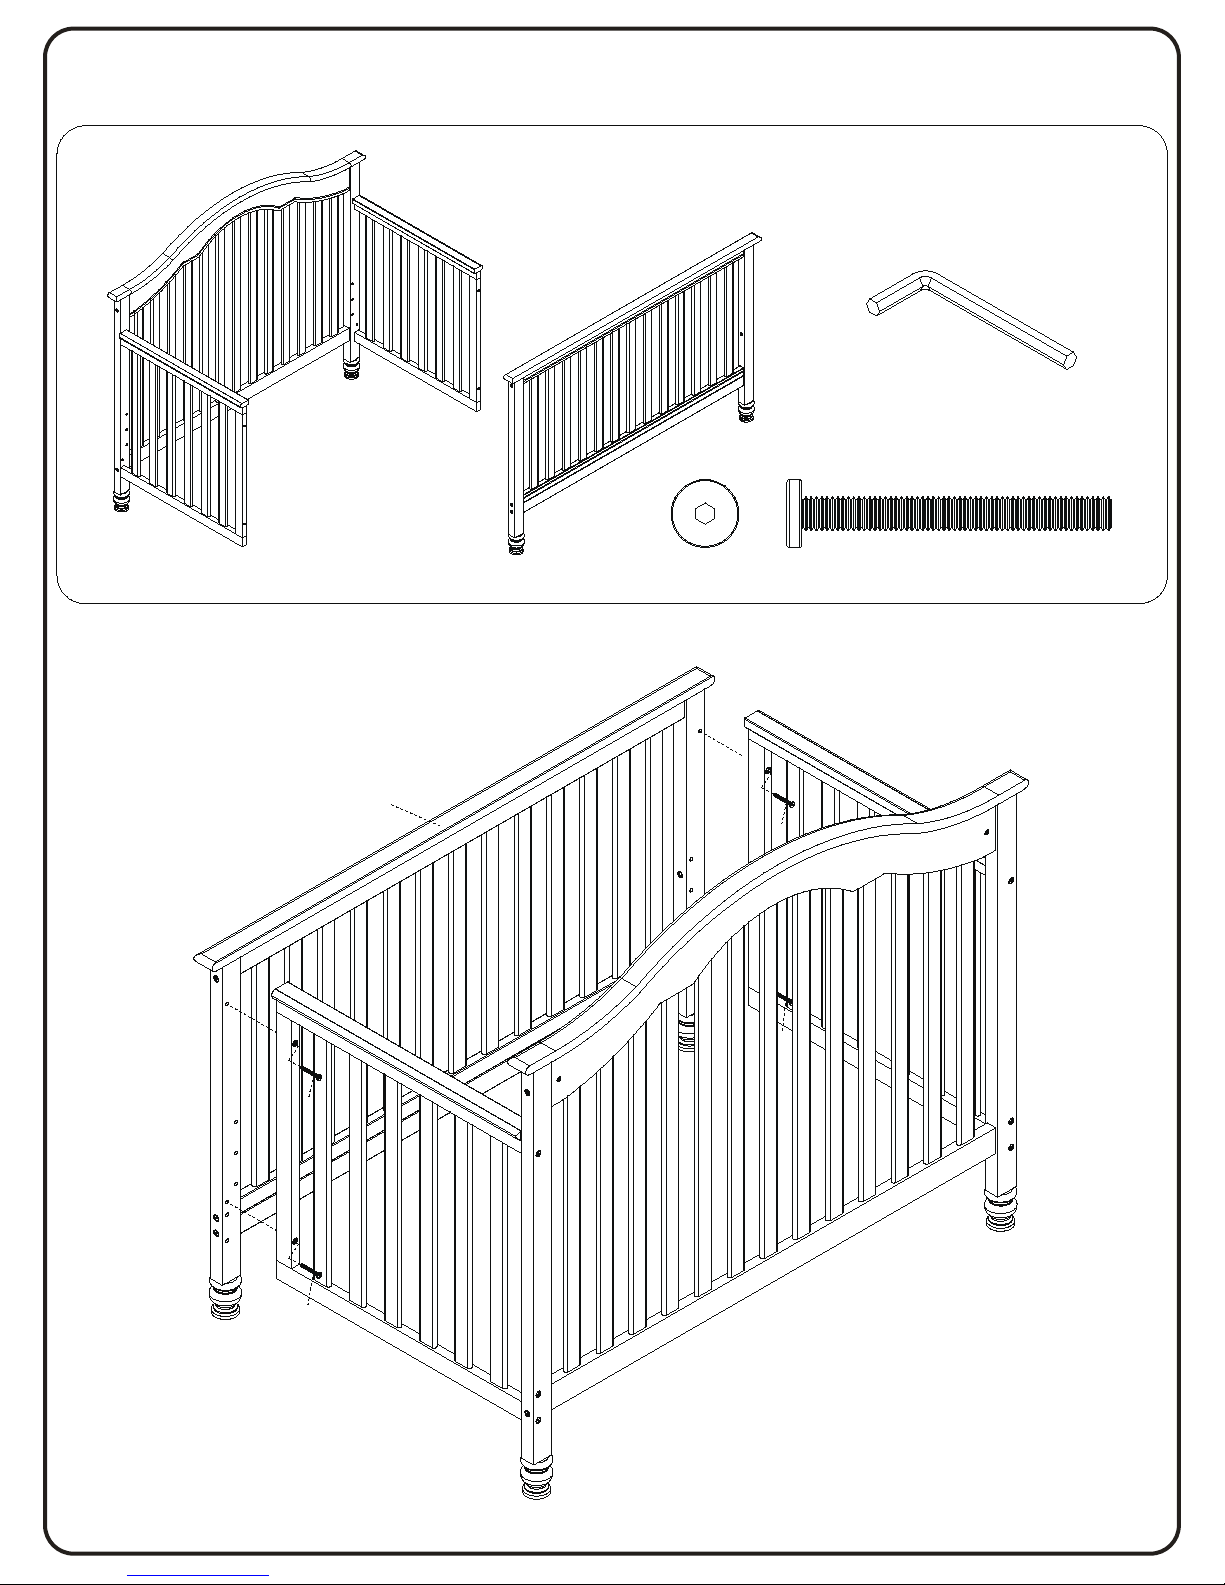
12
SECTION 1: CRIB ASSEMBLY
STEP 5
M4 ALLEN
WRENCH SUPPLIED
c. M6 x 55 mm Bolt x4
From Step 4
Install The Assembly From 4 To The Assembly From 3 using (4) M6x55mm Bolts (Part b)nuts (Part f).
Tighten with the M4 Allen Wrench.
B
c
c
c
c
From Step 3
Page 13
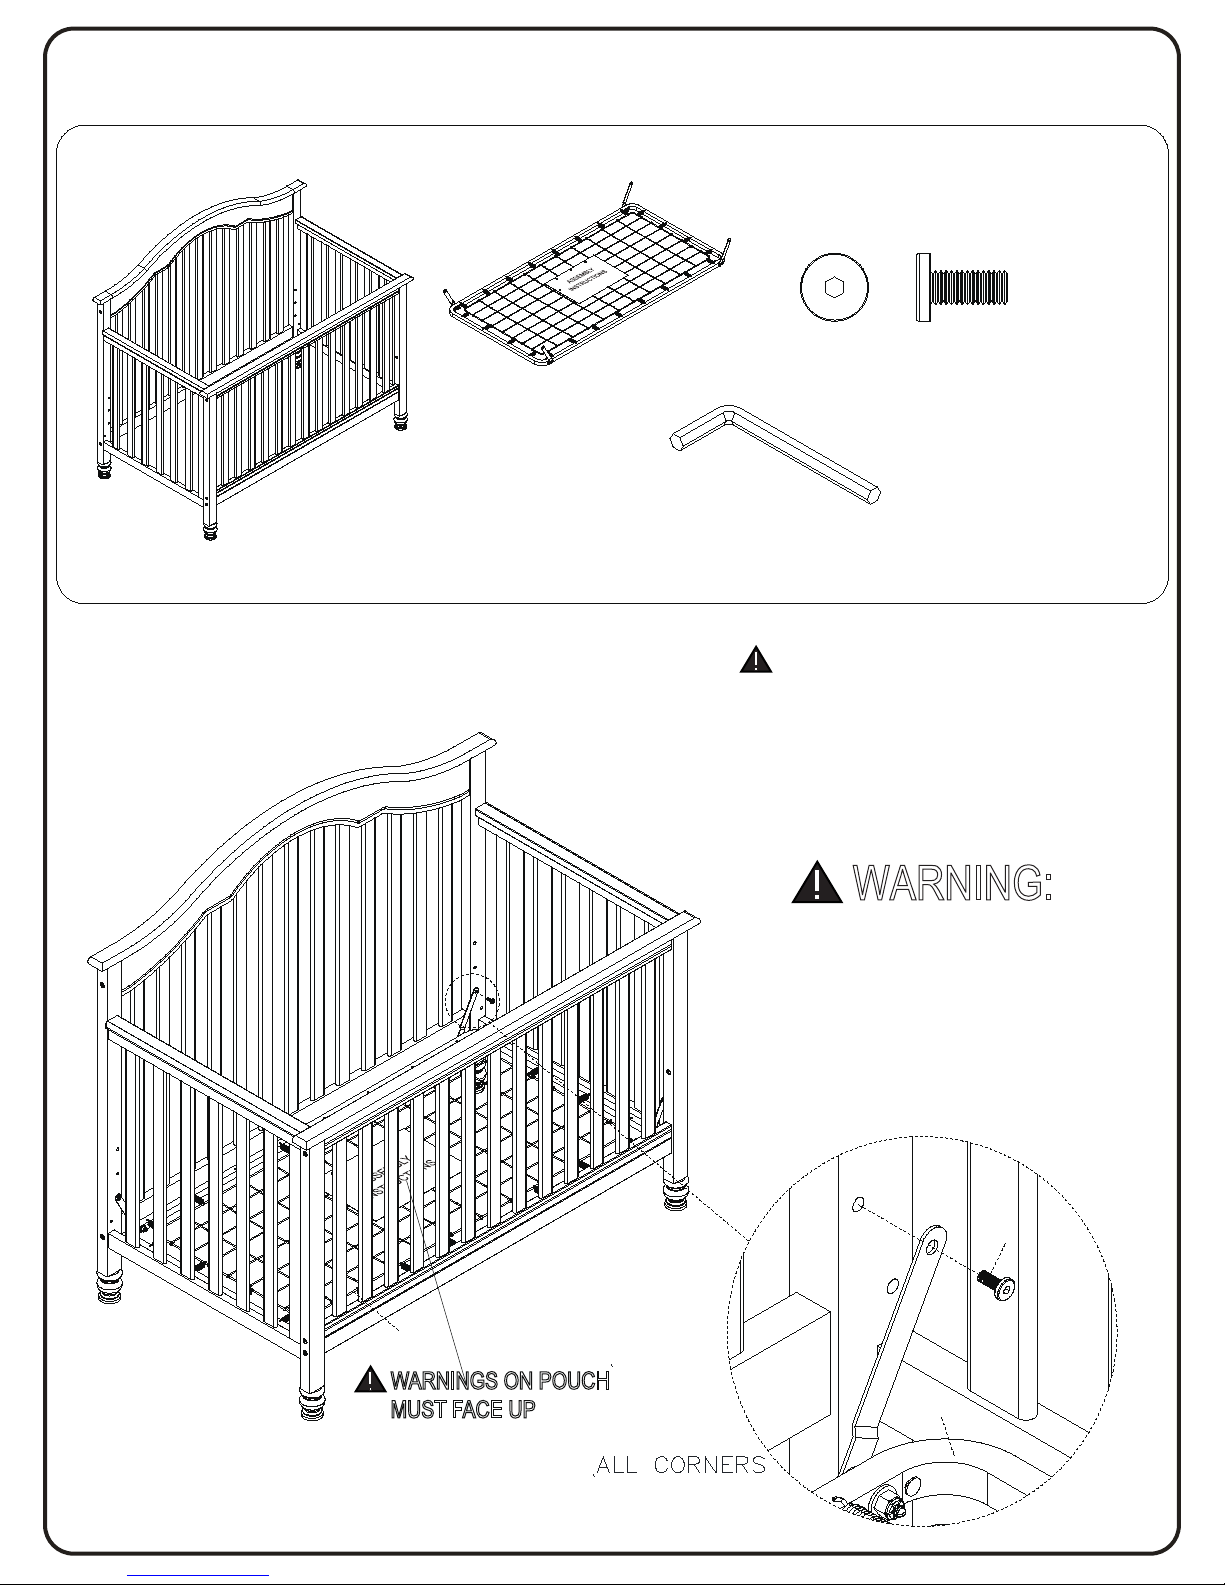
13
From Step 3
e
P. Mattress
Support x1
P
Attach (1) Mattress Support (Part P) To The Assembly From 5 Using (4) M6x15mm Bolts (Part e) .
Tighten With The M4 Allen Wrench.
M4 ALLEN
WRENCH SUPPLIED
e. M6 x 15 mm Bolt x4
(Painted blue)
Parts and tools required to complete step.
SECTION 1: CRIB ASSEMBLY
STEP 6
P
WARNINGS ON POUCH
MUST FACE UP
Fall Hazard: When child is able to pull to
a standing position,set mattress to
lowest position and remove bumper
pads ,large toys and other
objects that
could serve
as steps for
climbing out.
The Warnings printed on the pouch
attached to the mattress support must
face up, the springs must face up. This crib
has adjustment positions, use the highest
only for new borns, move the mattress
down as the child grows.
WARNING:
Page 14
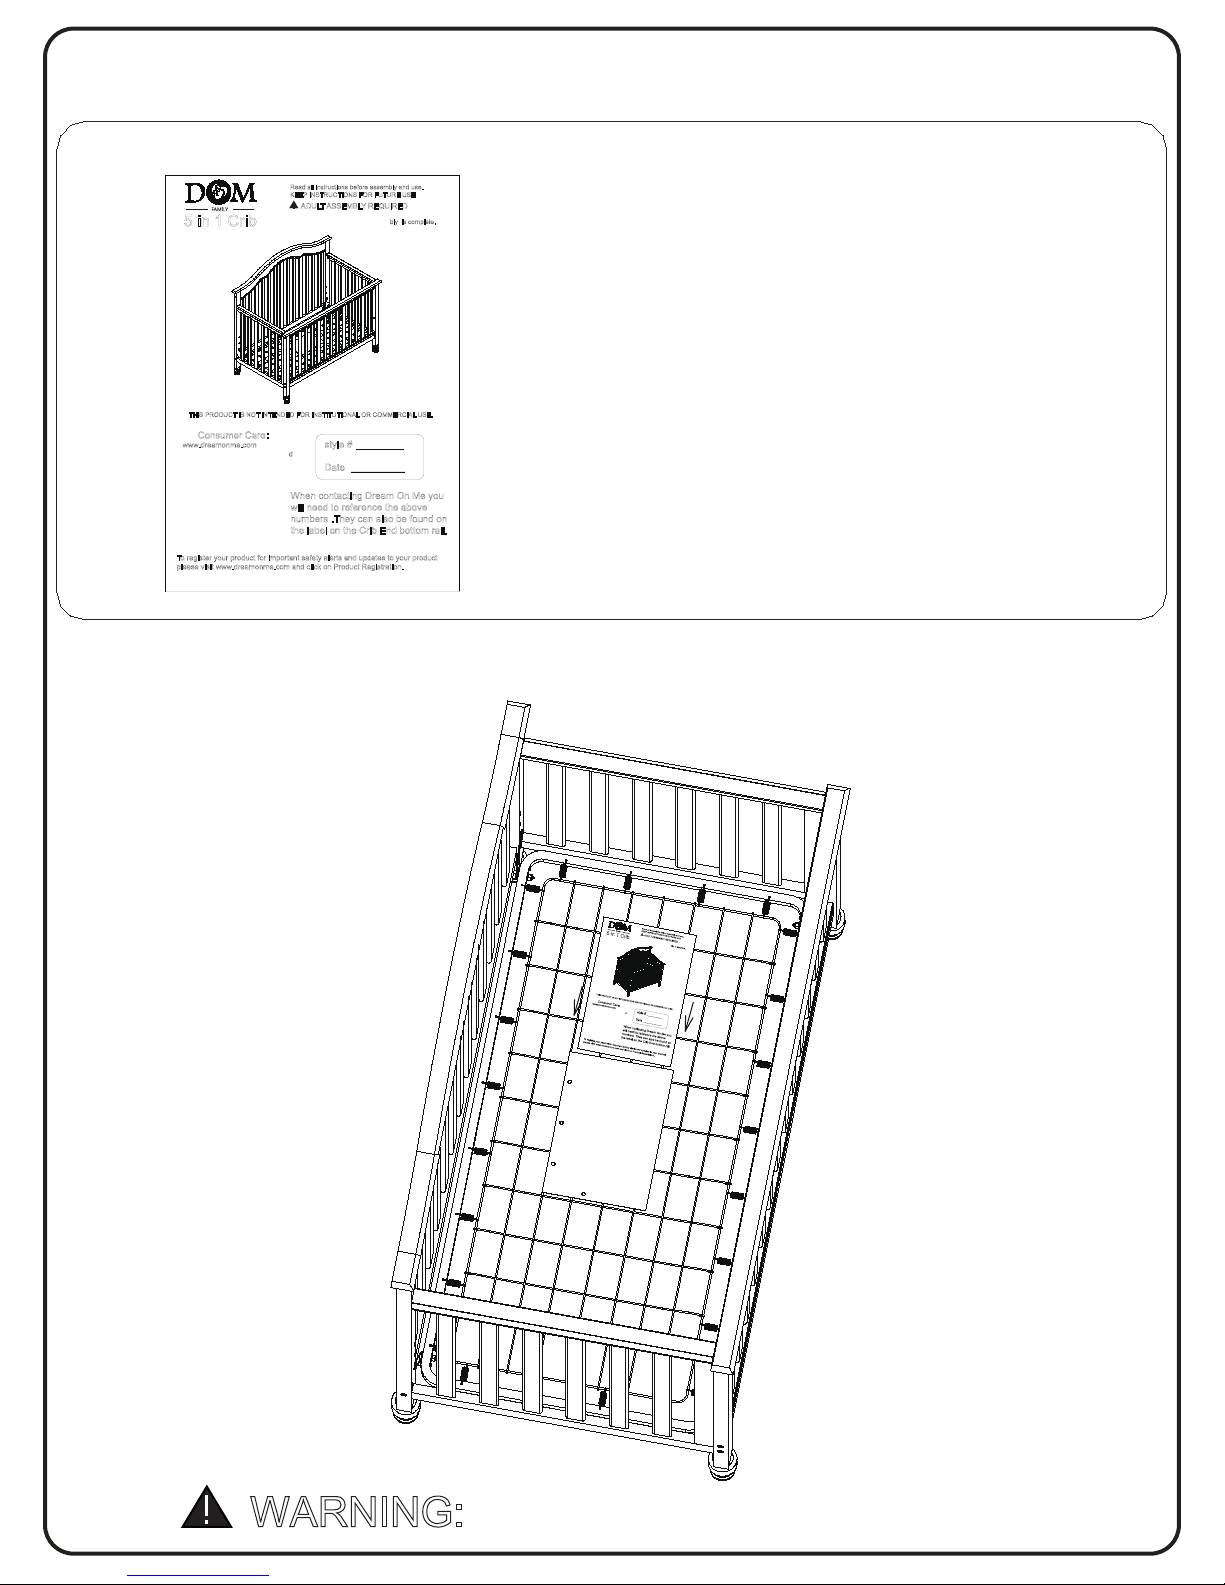
Assenmbly Instruction
Booklet
Parts and tools required to complete step.
7P
STE
Store the assembly instrucion booklet in the pouch attached to the mattress support. Store
all parts and tools separately, in a safe place.
WARNING:
SEE PAGE 2 FOR INFORMATION
Read all instructions before assembly and use.
KEEP INSTRUCTIONS FOR FUTURE USE.
ADULT ASSEMBLY REQUIRED
Due to the presence of small parts during assembly,keep
out of reach of children until assembly is complete.
THIS PRODUCT IS NOT INTENDED FOR INSTITUTIONAL OR COMMERCIAL USE.
Consumer Care:
www.dreamonme.com
When contacting Dream On Me you
will need to reference the above
numbers .They can also be found on
the label on the Crib End bottom rail.
To register your product for important safety alerts and updates to your product
please visit www.dreamonme.com and click on Product Registration.
5 in 1 Crib
style #:
Date
:
SECTION 1: CRIB ASSEMBLY
14
1532 S WASHINGTON AVE
PISCATAWAY TWP NJ 08854
OFFICE: 732-752-7220
CUSTOMER SERVICE: 732-366-1788
Ai Bag
Read all instructions before assembly and use.
KEEP INSTRUCTIONS FOR FUTURE USE
.
ADULT ASSEMBLY REQUIRED
Due to the presence of small parts during assembly,keep
out of reach of children until assembly is complete.
THIS PRODUCT IS NOT INTENDED FOR INSTITUTIONAL OR COMMERCIAL USE.
Consumer Care:
www.dreamonme.com
When contacting Dream On Me you
will need to reference the above
numbers .They can also be found on
the label on the Crib End bottom rail.
To register your product for important safety alerts and updates to your product
please visit www.dreamonme.com and click on Product Registration.
5 in 1 Crib
style #
:
Date
:
1532 S WASHINGTON AVE
PISCATAWAY TWP NJ 08854
OFFICE: 732-752-7220
CUSTOMER SERVICE: 732-366-1788
Page 15
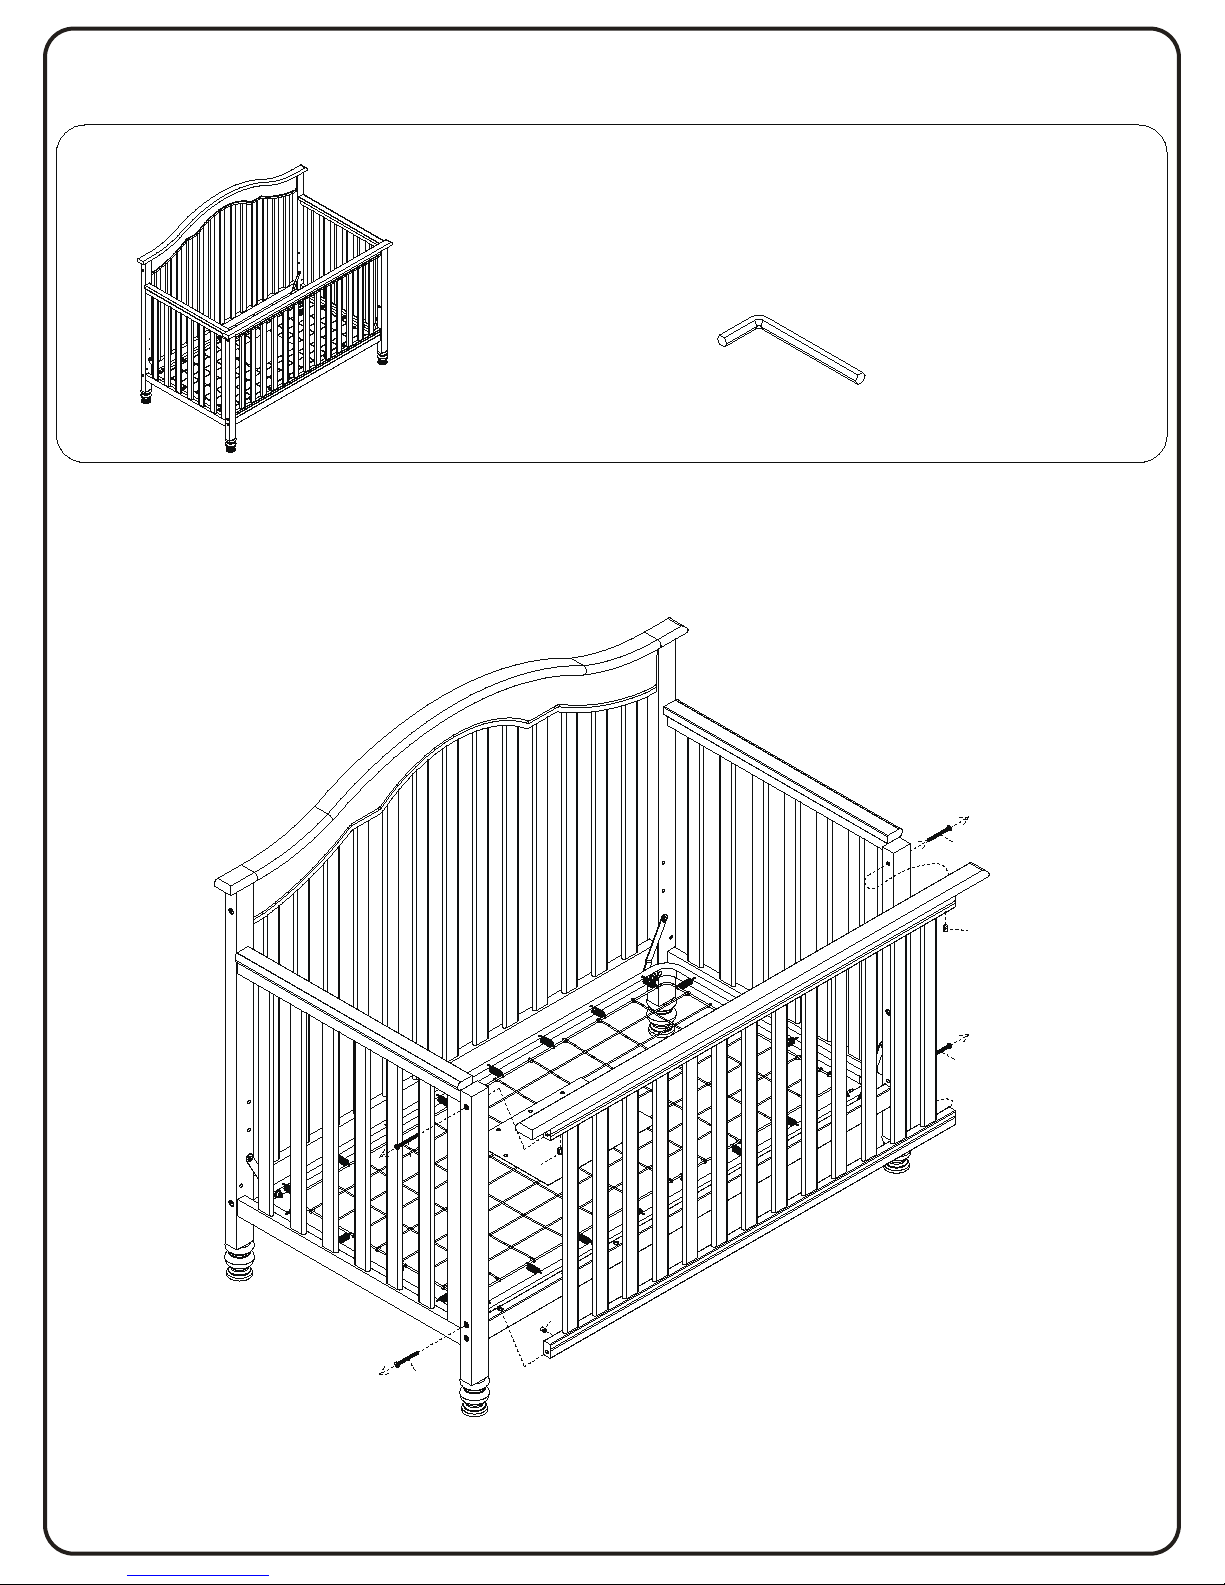
15
f
a
a
a
f
f
a
1P
STE
Section 2: Toddler Bed Conversion
M4 ALLEN
WRENCH SUPPLIED
Finished Crib
Remove the Front Rail installed in step 3 of section 1 Crib Assembly.
Parts and tools required to complete step.
Page 16
16
Section 2: Toddler Bed Conversion
STEP 2
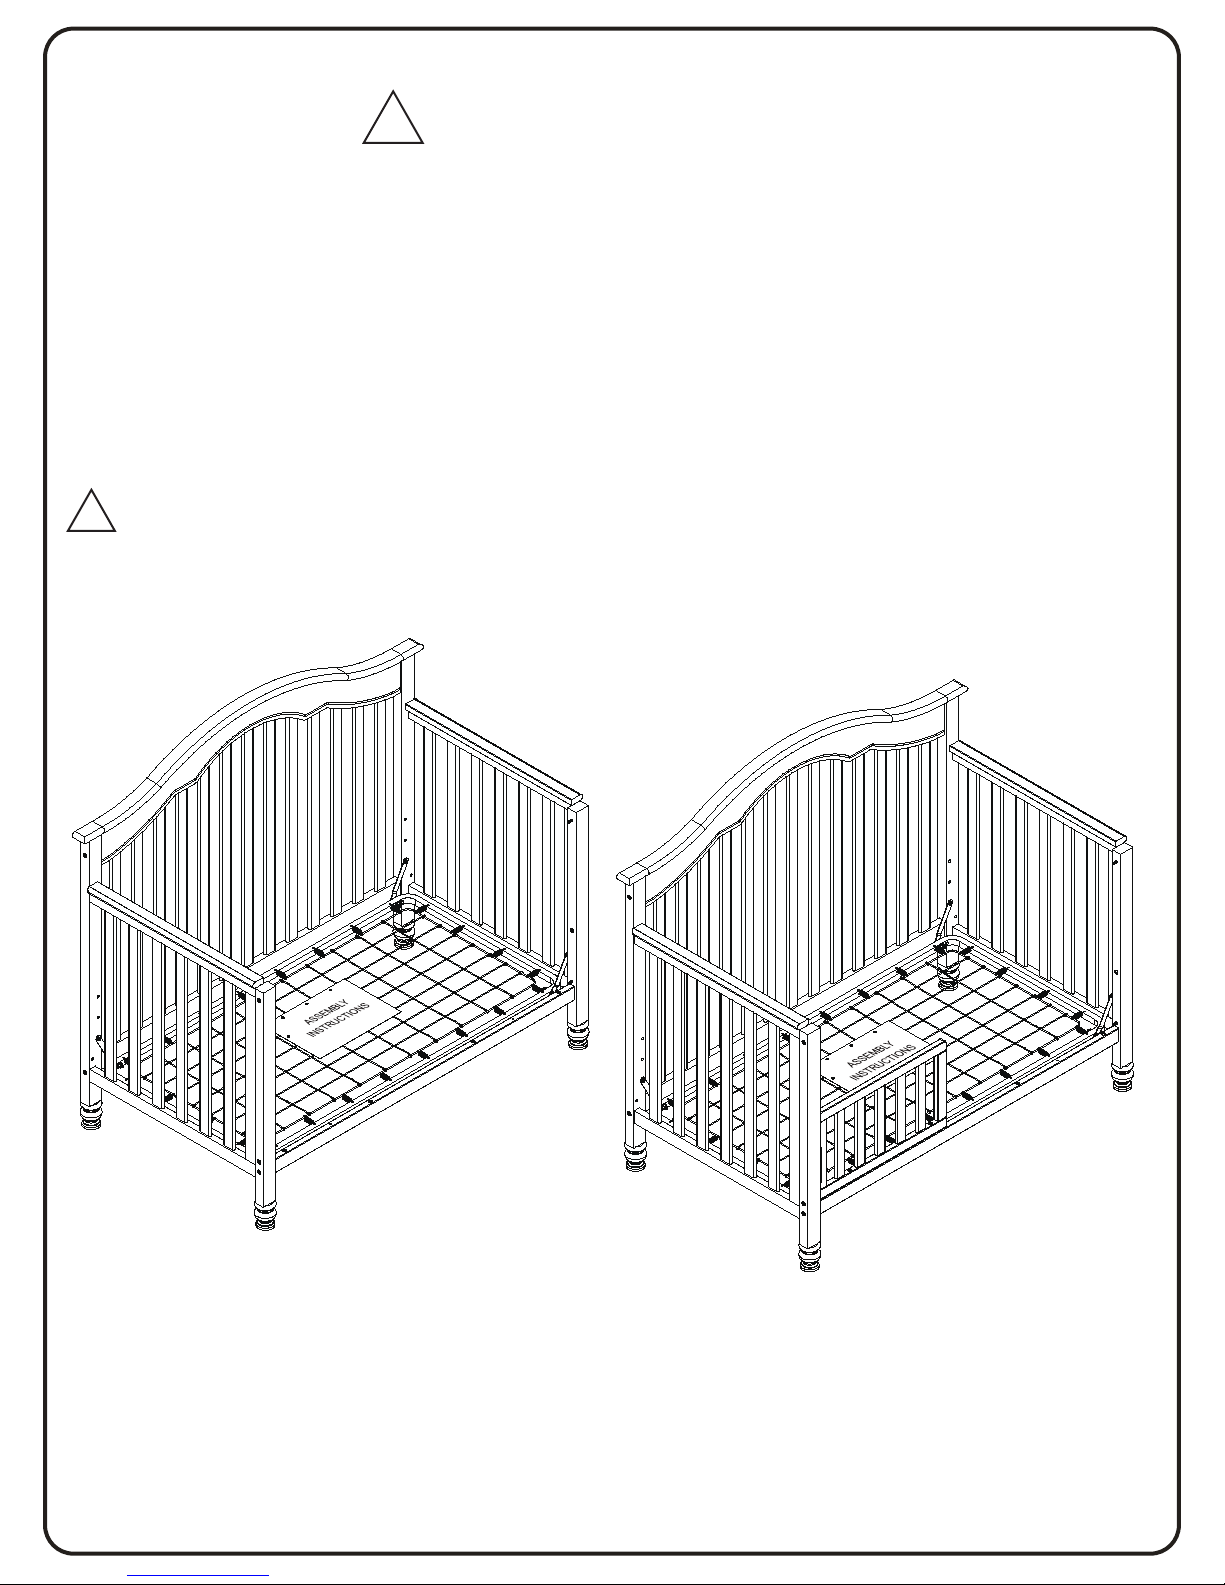
Stabilizer bar must be used when converted
to a toddler bed.
!
WARNING:
!
SEE PAGE 3 FOR
TODDLER BED WARNINGS
The mattress support must be in the lowest positions.
Store all hardware safely.
Read all warnings on page 3.
As shown, use as a day bed or love seat sofa.
No Not use without stabilizer bar installed.
A toddler bed guardrail is available
for this crib. Please see your crib
retailer, visit www.dreamonme.com
or contact Consumer Care for more
information.
This crib uses Style #692 Guardrail.
Page 17
17
f
a
f
a
f
a
f
c
c
c
Parts and tools required to complete step.
1P
STE
Section 3: Full Size Bed Conversion I
M4 Allen
Wrench Supplied
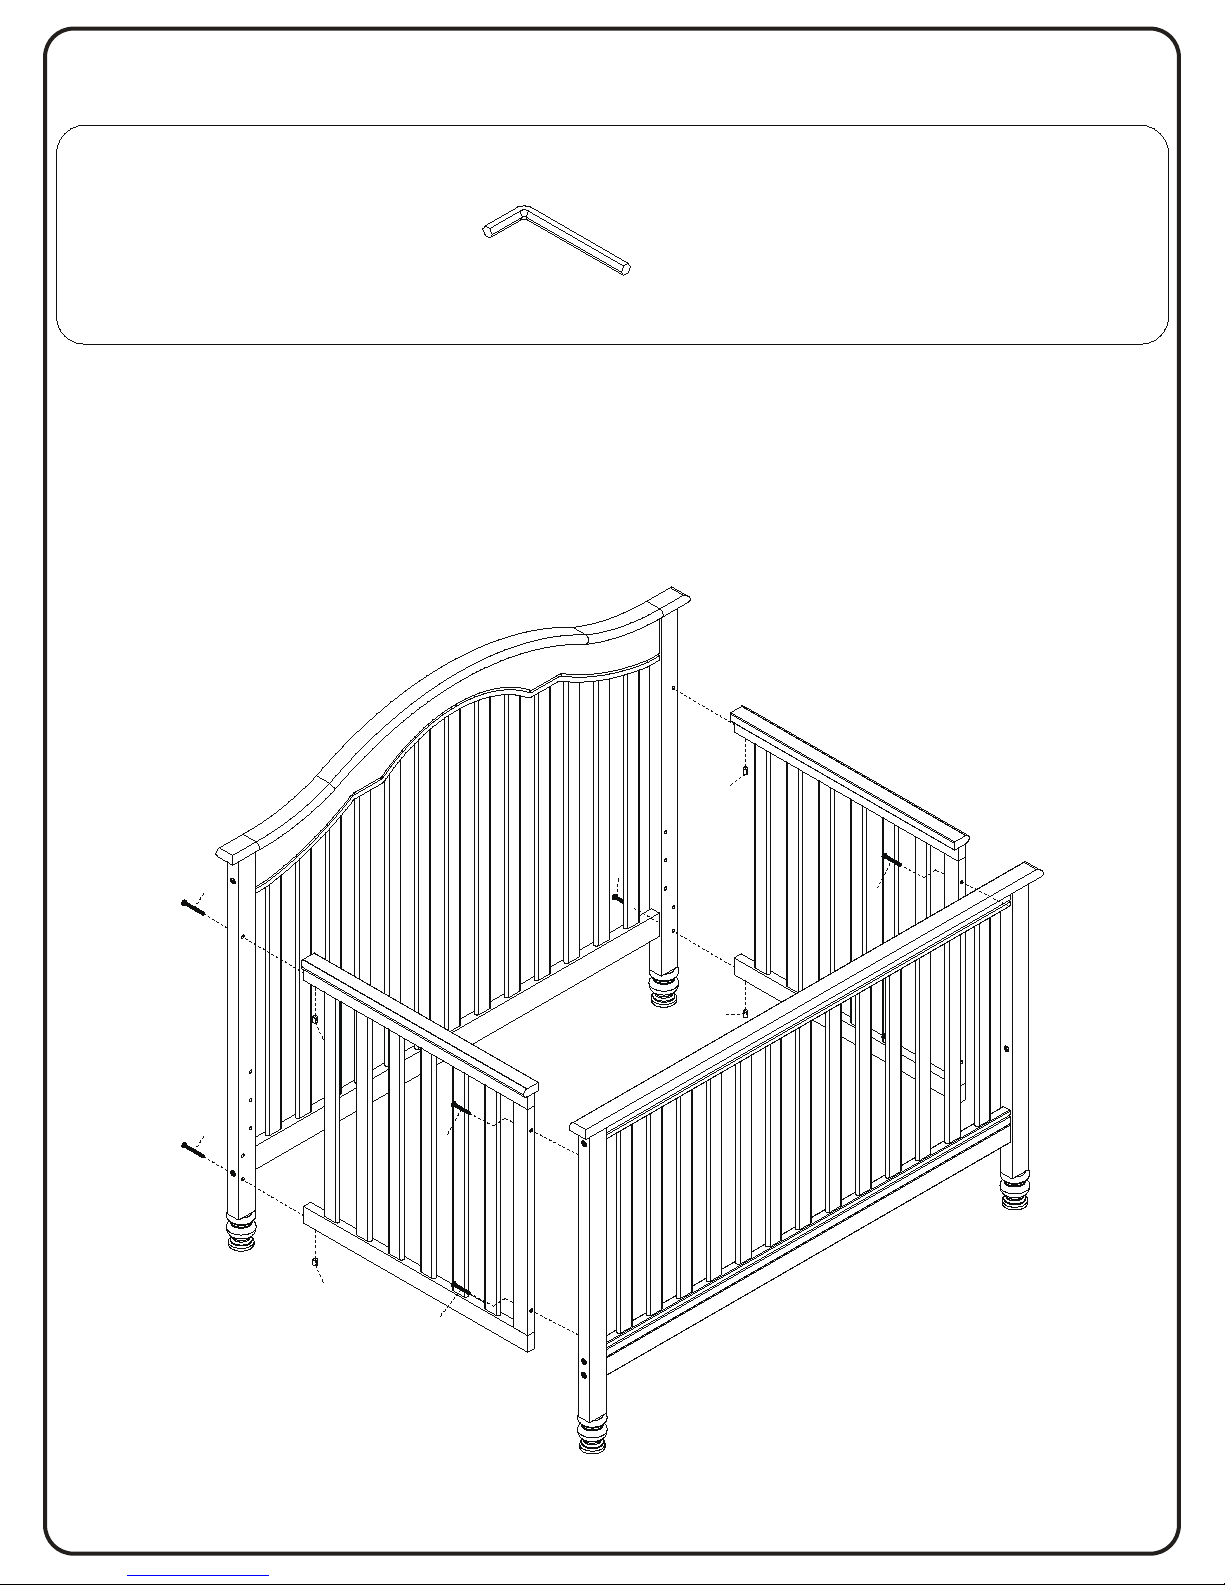
You have the option to convert the crib to a Full Size Bed. Simply follow steps in reverse
order to disassemble the crib. Then remove the Rear Legs from the left Crib End and
Right Crib END with the M4 Allen Wrench as shown.
Store all parts and hardware in a safe place..
Parts and tools required to complete step.
Page 18
18
Parts and tools required to complete step.
2P
STE
Section 3: Full Size Bed Conversion I
M4 Allen
Wrench Supplied
Parts and tools required to complete step.
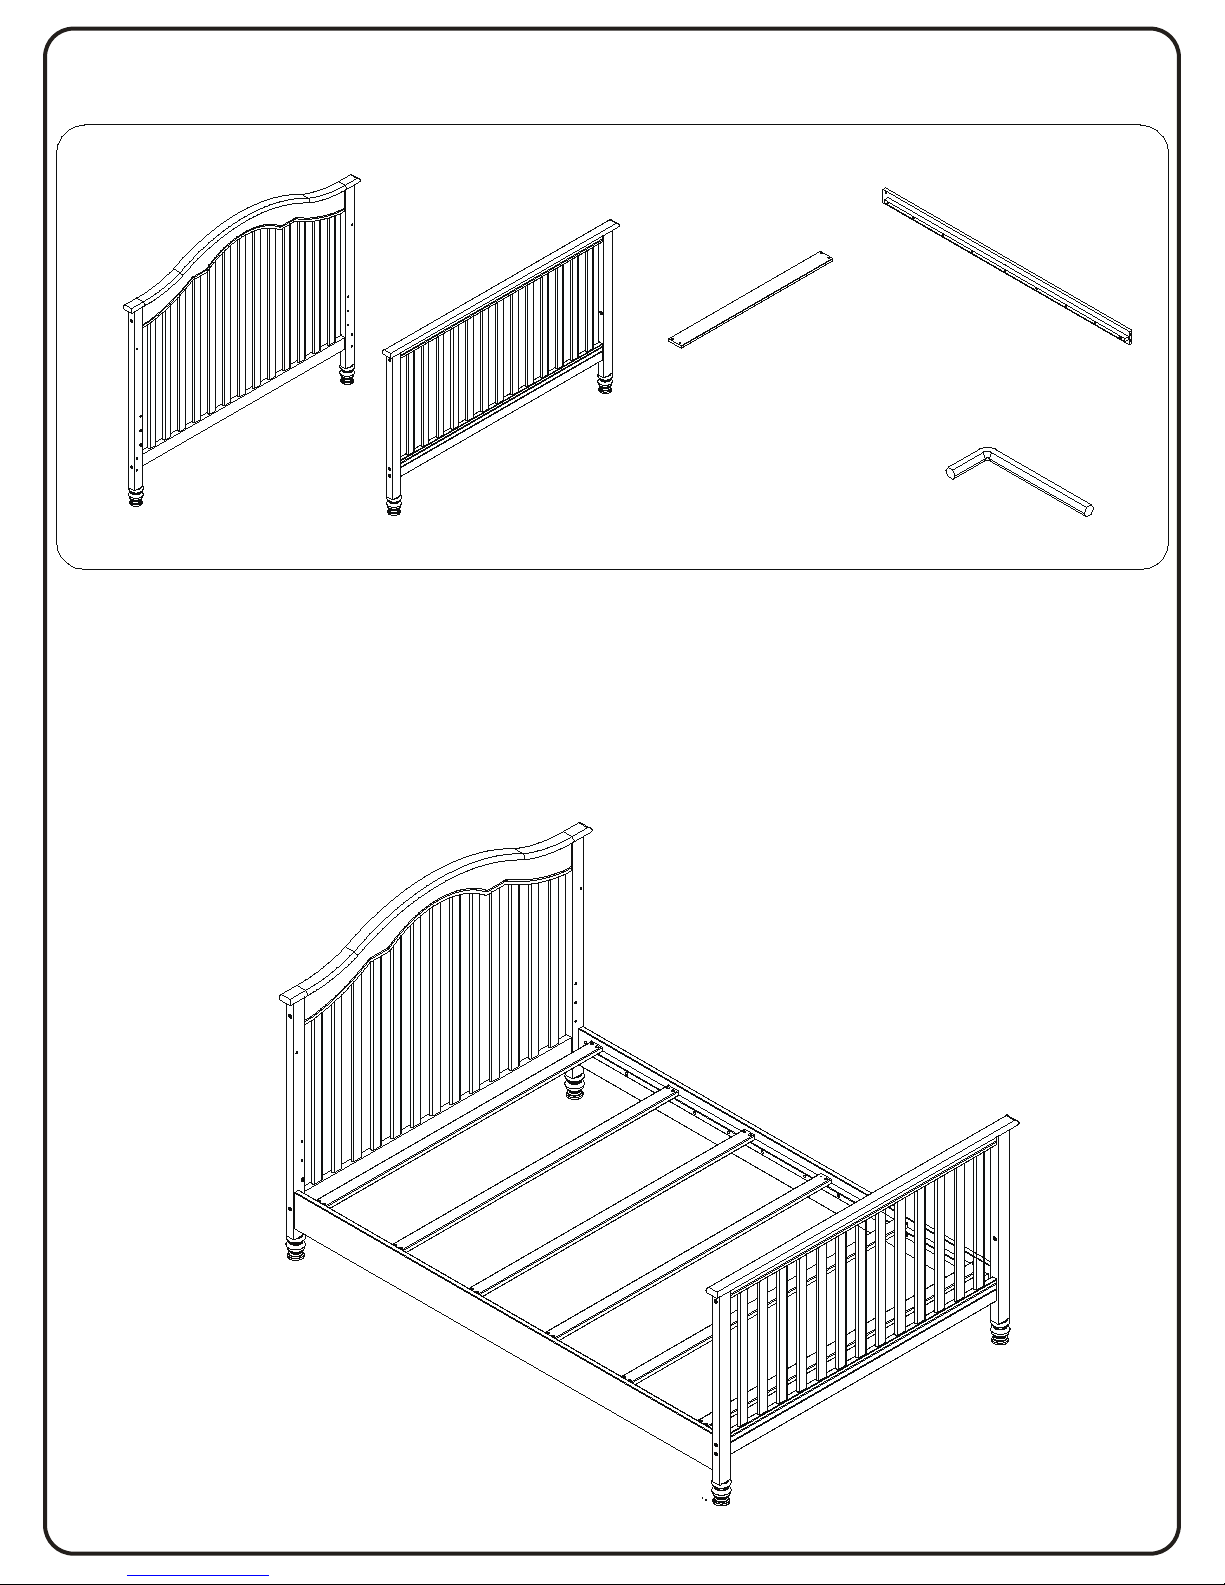
Converting kit is sold separately
You have the option to convert crib to a full size bed II
1.Insert the split leg to the left&right side bar .
2.Connect the headboard Leg to the left side bar and the right side bar.
3.Connect the footboard Leg to the left&right side bar.
4.Connect the c to the left&right side bar. cross bar to the side bar.
From Section 3 Step 1
Cross Bar (6PCS)
Side Bar ( 2PCS)
Page 19
19
Parts and tools required to complete step.
1P
STE
Section 3: Full Size Bed Conversion II
Parts and tools required to complete step.
From Section 3 Step 1
Not Supplied
Not Supplied
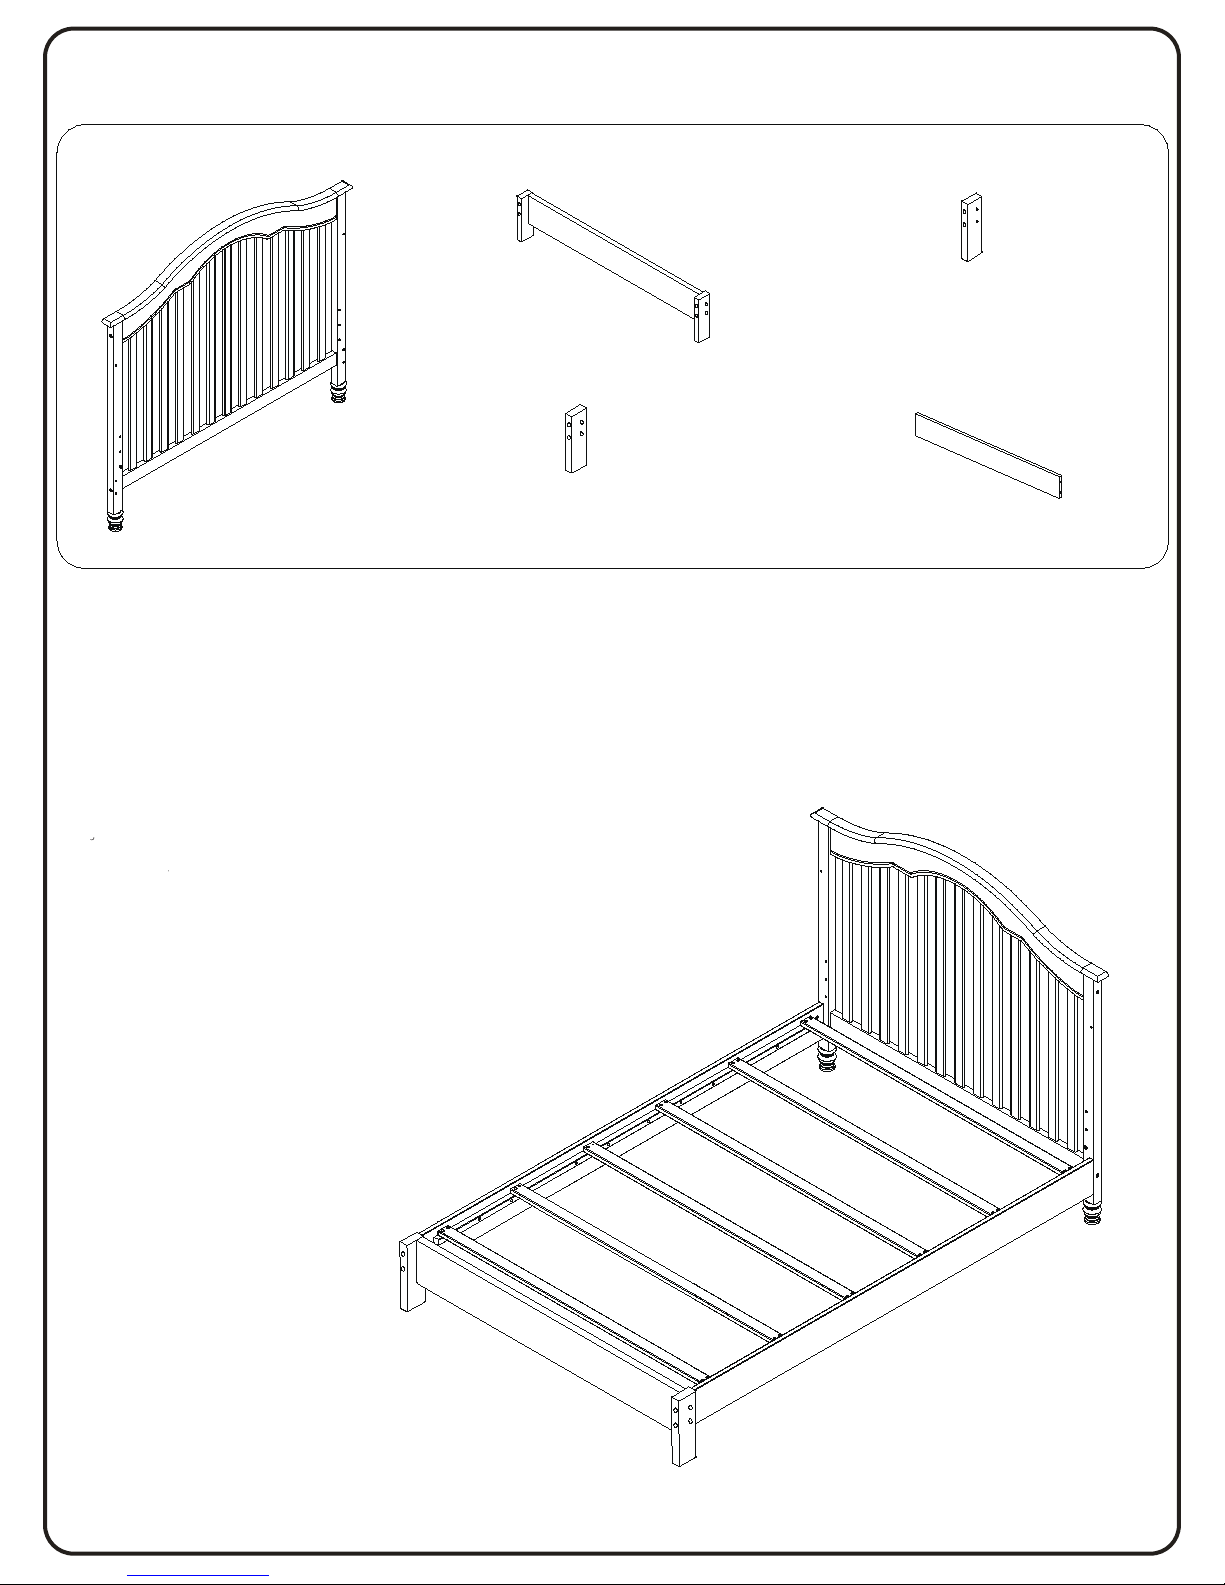
Right Foot Platform Post (1pc)
Not Supplied
Left Foot Platform Post (1pc)
Not Supplied
Rail Post(6pcs)
Model shown is example only.
Styles may vary .
Modèle présenté à titre indicatif.
Les styles peuvent varier.
ou have the option to convert crib to a full size bed II
1:Use the back rail as the headboard of full size
3:Connect the assembled parts and headboard o
hardware ) which are not included and sold sep
2:Connect the left foot platform and the right foot platform to the rail which are not included and
sold separately.
Converting kit is sold separately
Le Kit de conversion est fourni séparément
Vous avez la possibilité de convertir la crèche à un lit
de taille complète II
1.Utilisez le rail de la tête arrière du grand lit.
2.Connectez la plate-forme de pied gauche et la plateforme de pied droit sur les rails qui ne
sont pas inclus
3.Connectez les pièces assemblées et tête de lit de lit
de taille pour les kits (jambes, longuesrails et le
matér
iel)
qui ne
sont pas inclus et vendus
et vendu séparément.
séparément.
Page 20
20
To register your product for important safety alerts and updates to
your product please visit www.dreamonme.com
Please do not return this item to the store before contacting
us about missing parts or with any questions.
To report a problem, please log on to www.dreamonme.com and
contact us by phone at 732-366-1788
In the event that you need to contact our customer service
department please have the Style Number and MFG available.
Use the space below to make note of those numbers. They can be
found on the label on the Crib End bottom rail.
STYLE No: 752
COLOR
FTY
Lot No:
Pack Date:
Date of Purchase: (you should also keep your receipt)
 Loading...