

Page 1

1
DOLPHIN SUPREME M5
English
EN
FR
IT
SP
DEU
User Instructions
This model includes a Remote Control Unit.
You will find the User Instructions in a separate document.
Guide d’utilisation
Ce modèle comprend une télécommande.
Sa notice d’emploi fait l’objet d’un document séparé.
Istruzioni per l’uso
Questo modello è dotato di telecomando.
Le istruzioni per l’uso si trovano in un documento separato.
Instrucciones para el Usuario
Este modelo incluye una Unidad de Control Remoto.
Las Instrucciones para el Usuario están en un documento separado.
Bedienungsanweisungen
Dieses Modell verfügt über eine Fernbedienung.
Die Bedienungsanweisungen für die Fernbedienung können Sie in einem anderen
Dokument finden.
by
8151147 Ver. 02, 3/2011
Page 2

Page 3
1
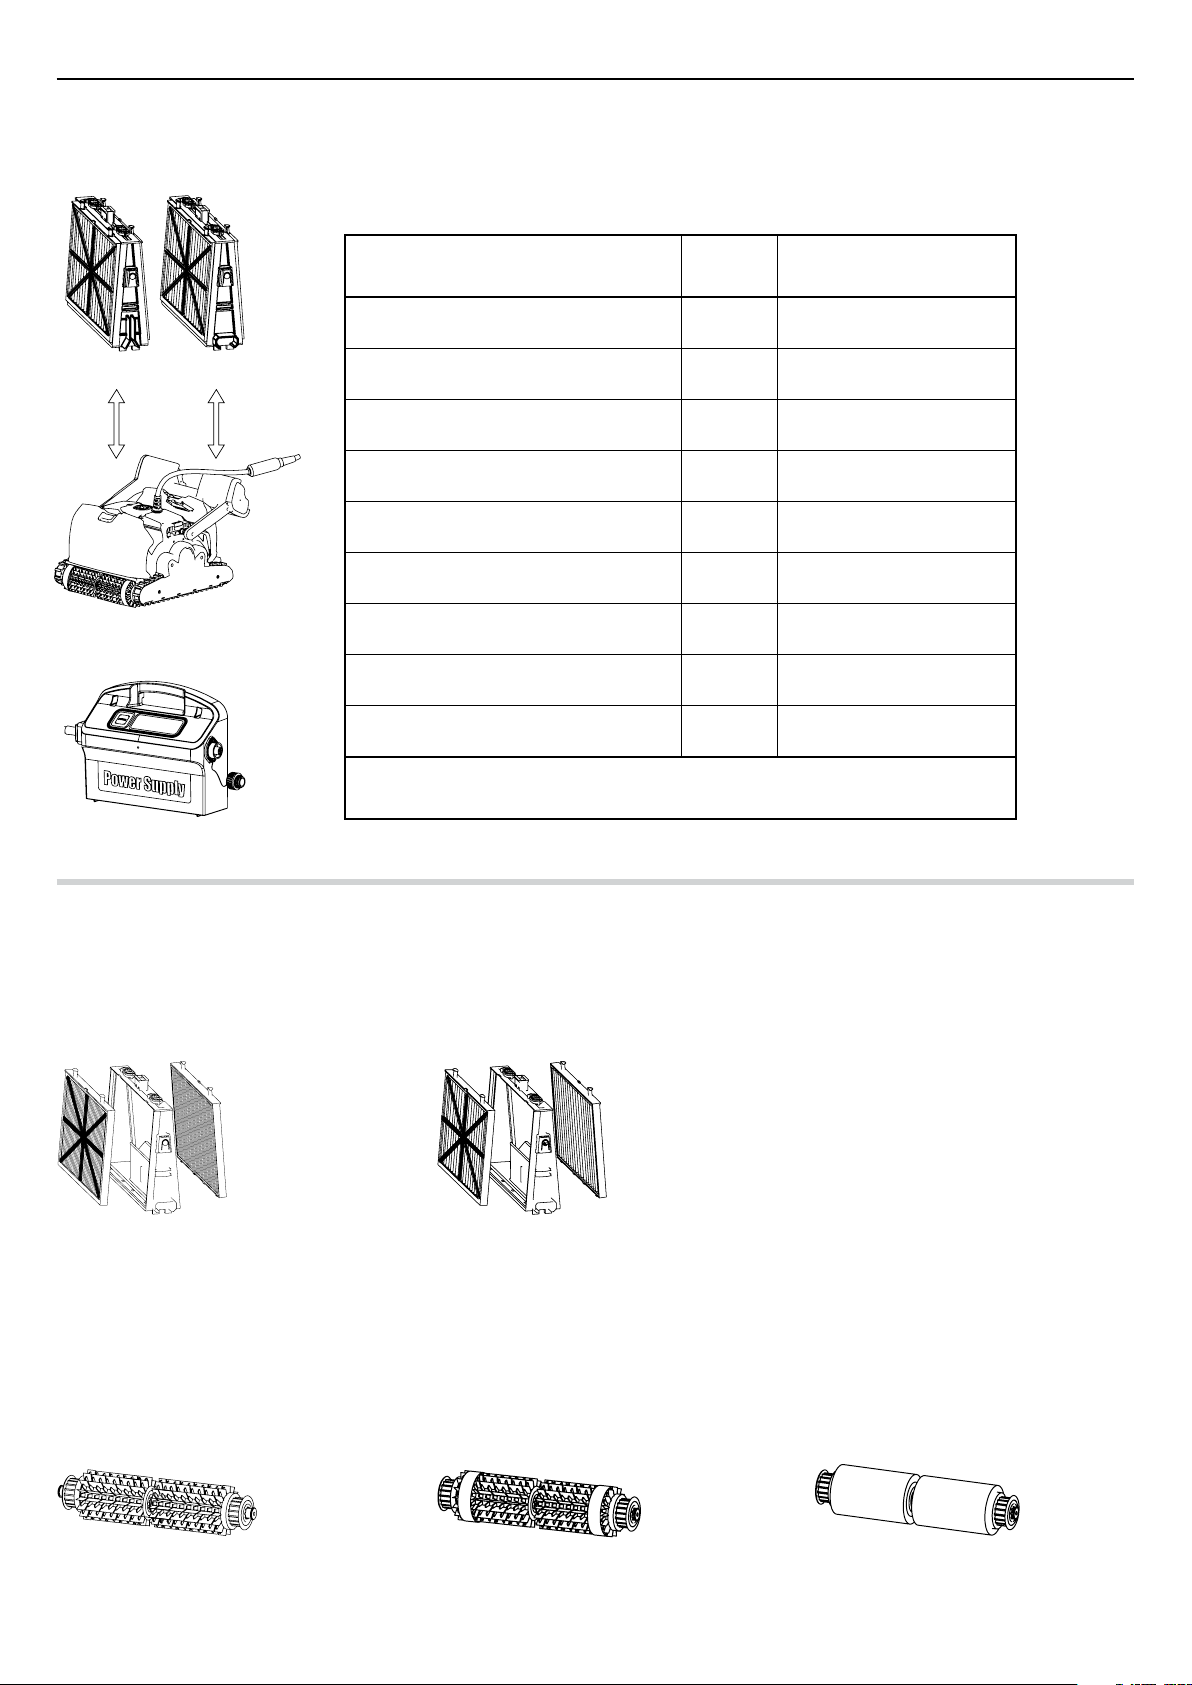
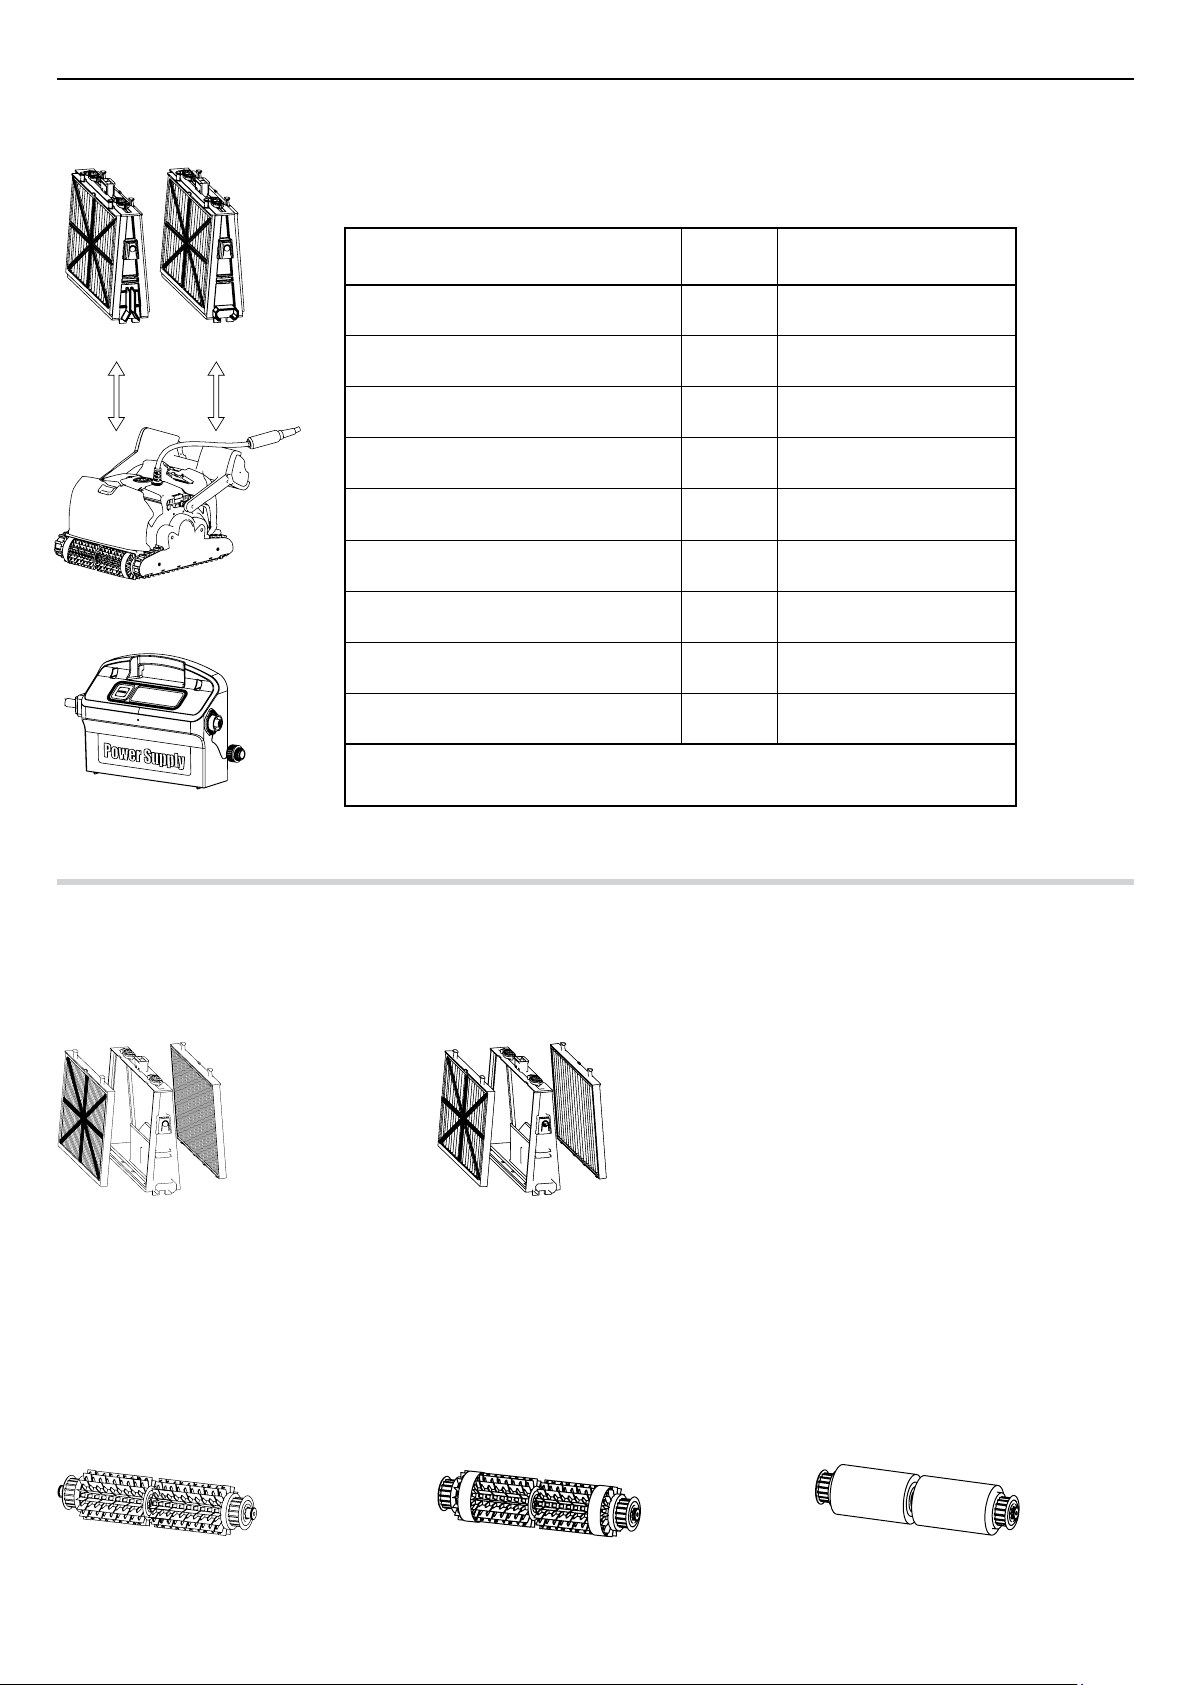
What You’ll Find Inside the Box
Part X Comment
Base frame for filter elements 2
English
Filter and cartridges
Dolphin pool cleaner
Optional components available on request from your Dolphin distributor
Power supply unit
Ultra-fine filter 4 filters
Bag for filters storage 1
Spring net filter 4 filters
“S” clip 4
Power supply unit 1
Dolphin pool cleaner 1
Caddy kit 1
Remote control unit 1
Section 1 - Description of Main Components
1. Filters
Dual-level filtration system.
Spring net filter + base frame
For dirty pools with large debris such as
leaves etc. – Useful for beginning of season.
Ultra-fine filter cartridge + base frame
For day-to-day use.
Factory default.
2. Brushes
There are three types of optional brushes, each designed to provide optimal traction on different pool surfaces. Only one type set is
provided with your Dolphin.
PVC Brush
For concrete, PVC, fiberglass and liner.
Combined Brush
For rough ceramic surface and mosaic tiles.
Wonder Brush
For smooth ceramics.
Page 4
English
2
3. Power supply unit
Digital, “Switch-Mode” power supply:
• Input - 100-250 AC Volts
• 50-60 Hertz
• 180 Watt
• Output - 30 VDC
• IP 54
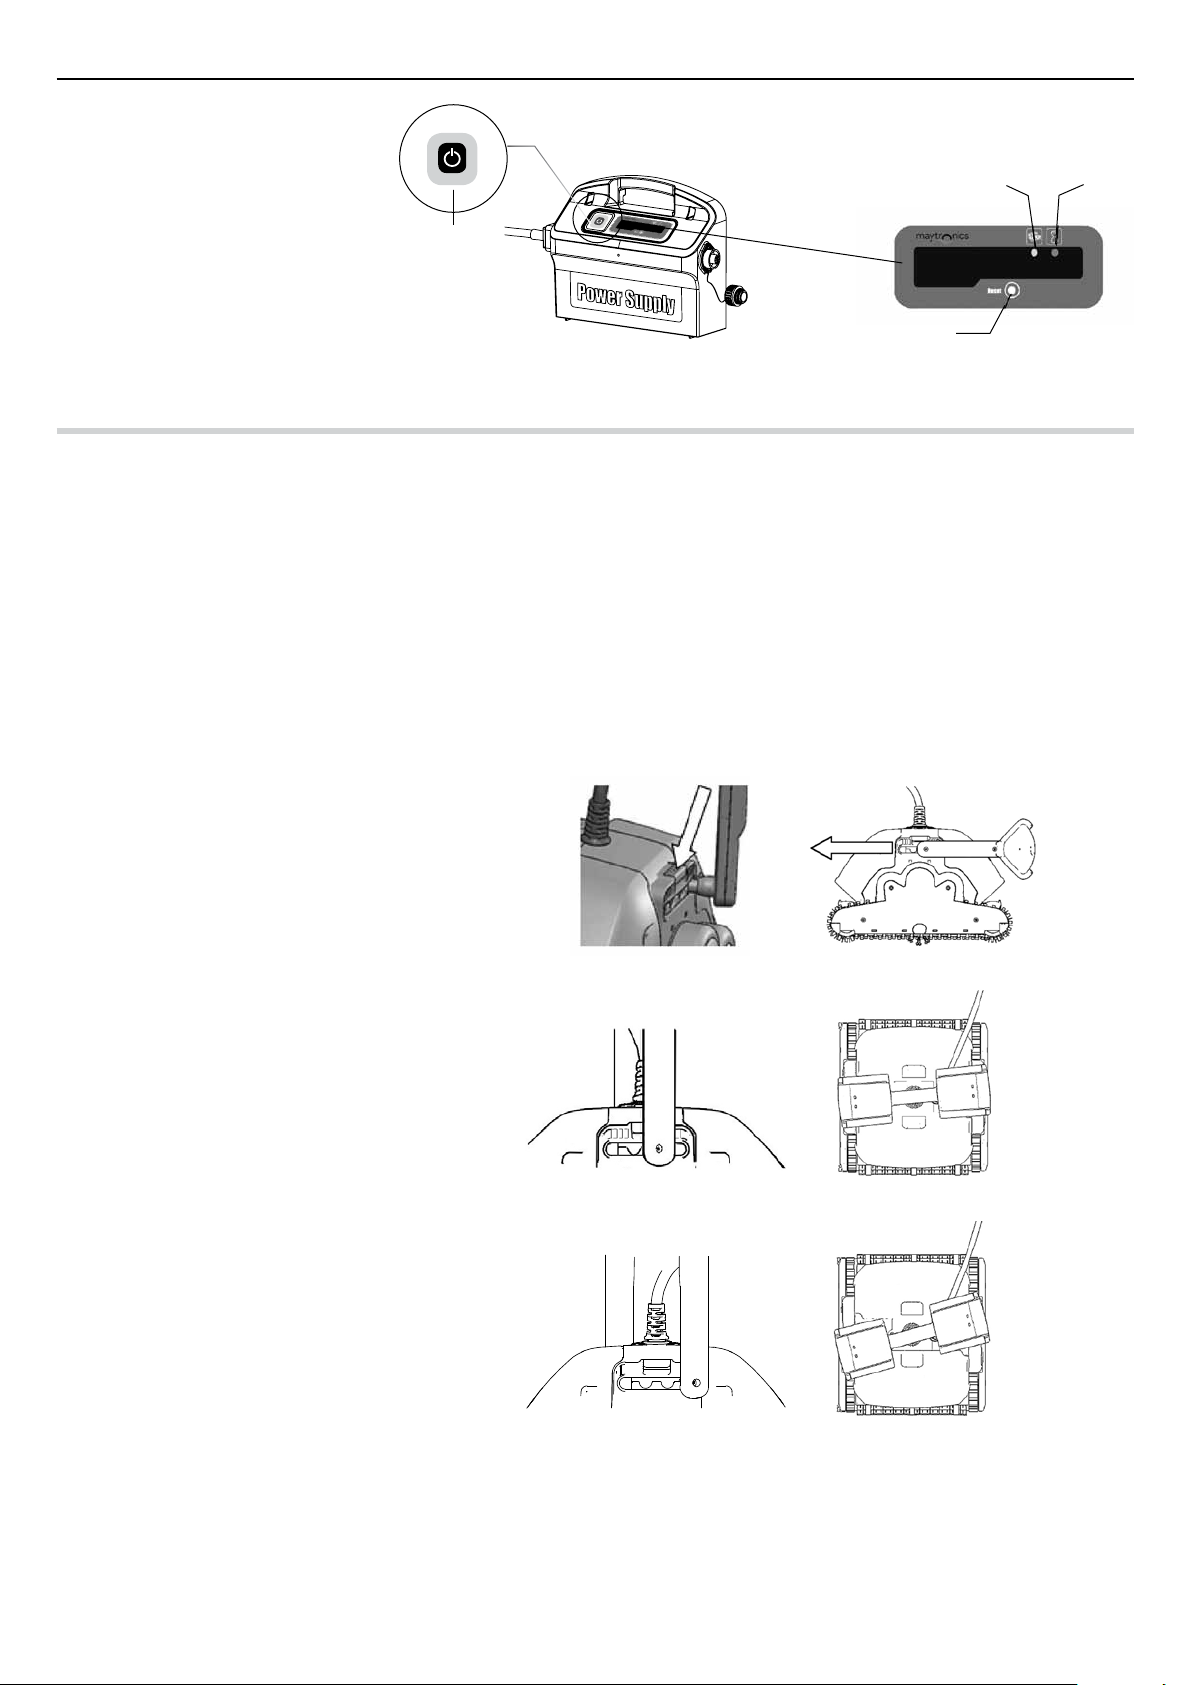
ON
On/Off
switch
Reset button
Full Filter
Bag Indicator
Section 2 – Dolphin Operation
Part 1 – Preparing the Dolphin pool cleaner for use
A. Assemble the Caddy kit – you will find the instructions in a separate document
B. Adjusting the handle float angle
Delay
Indicator
The handle angle must be adjusted to determine the speed that the Dolphin advances along the water-line.
1. Press the latch down and hold in position.
2. Move the handle to the required position
and release the latch to lock the Handle in place.
Normal advance
More efficient cleaning action on water-line.
Fast advance
Fast speed – for faster but less efficient cleaning
action on water-line.
Page 5

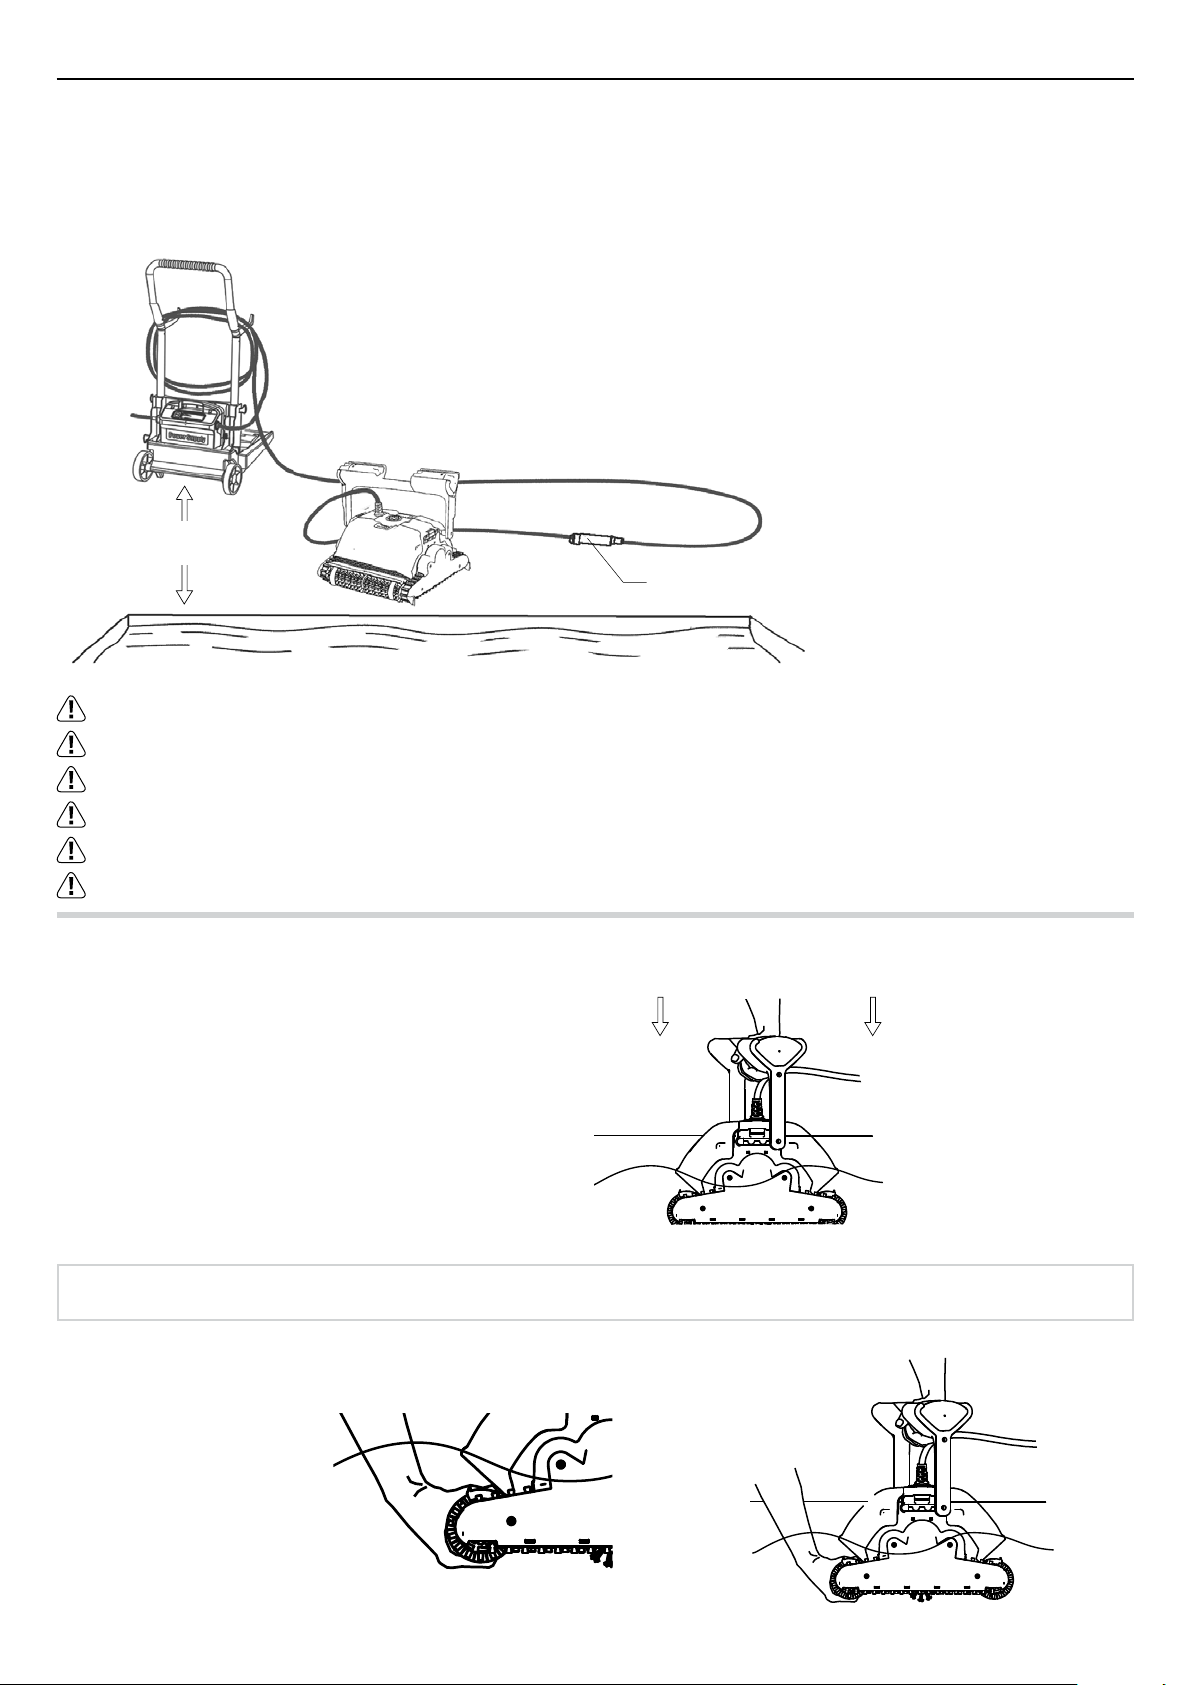
3
C. Laying out the cable
Unwind minimal required cable to cover the entire pool size, straight the cable along the pool side.
Make sure there are no twists or kinks.
3 Meters
10 feet
Swivel
English
Use only the original supplied power supply unit.
The power supply unit is splash proof – do not immerse it in water.
Unplug the power supply unit before any servicing activity.
Do not plug the power supply unit in before placing the pool cleaner in the water.
Ensure the mains outlet is protected by a ground fault interrupter (GFI) or an earth leakage interrupter (ELI).
Important: DO NOT enter the swimming pool while the pool cleaner is working.
Part 2 - Into the water
Inserting the Dolphin into the pool.
Place your Dolphin into the pool and release it.
Note: When using the combined brushes or Wonder brushes, gently squeeze the Wonder brush material until it is totally wet.
Page 6

English
Turning the Dolphin ON
4
1. Plug the floating cable from the
Dolphin into the power supply unit.
2. Plug the electrical cable from the power
supply unit into the mains.
3. Press on the ON/OFF switch.
4. The Dolphin will now start to work.
Note: If your model includes the remote control unit, please refer to the included instruction leaflet.
Floating cable
ON
On/Off
switch
Important: DO NOT enter the swimming pool while the pool cleaner is working.
Part 3 - Taking the Dolphin out of the water
Unplug power supply before any servicing activity.
1. If the Dolphin has not finished its cycle, turn off the power
supply unit and unplug the mains.
2. Pull the floating cable gently until the Dolphin has risen
to the surface, then lift by the handle.
Important: Do NOT lift the Dolphin from the water by its cable.
Page 7
5
Section 3 - Routine Maintenance
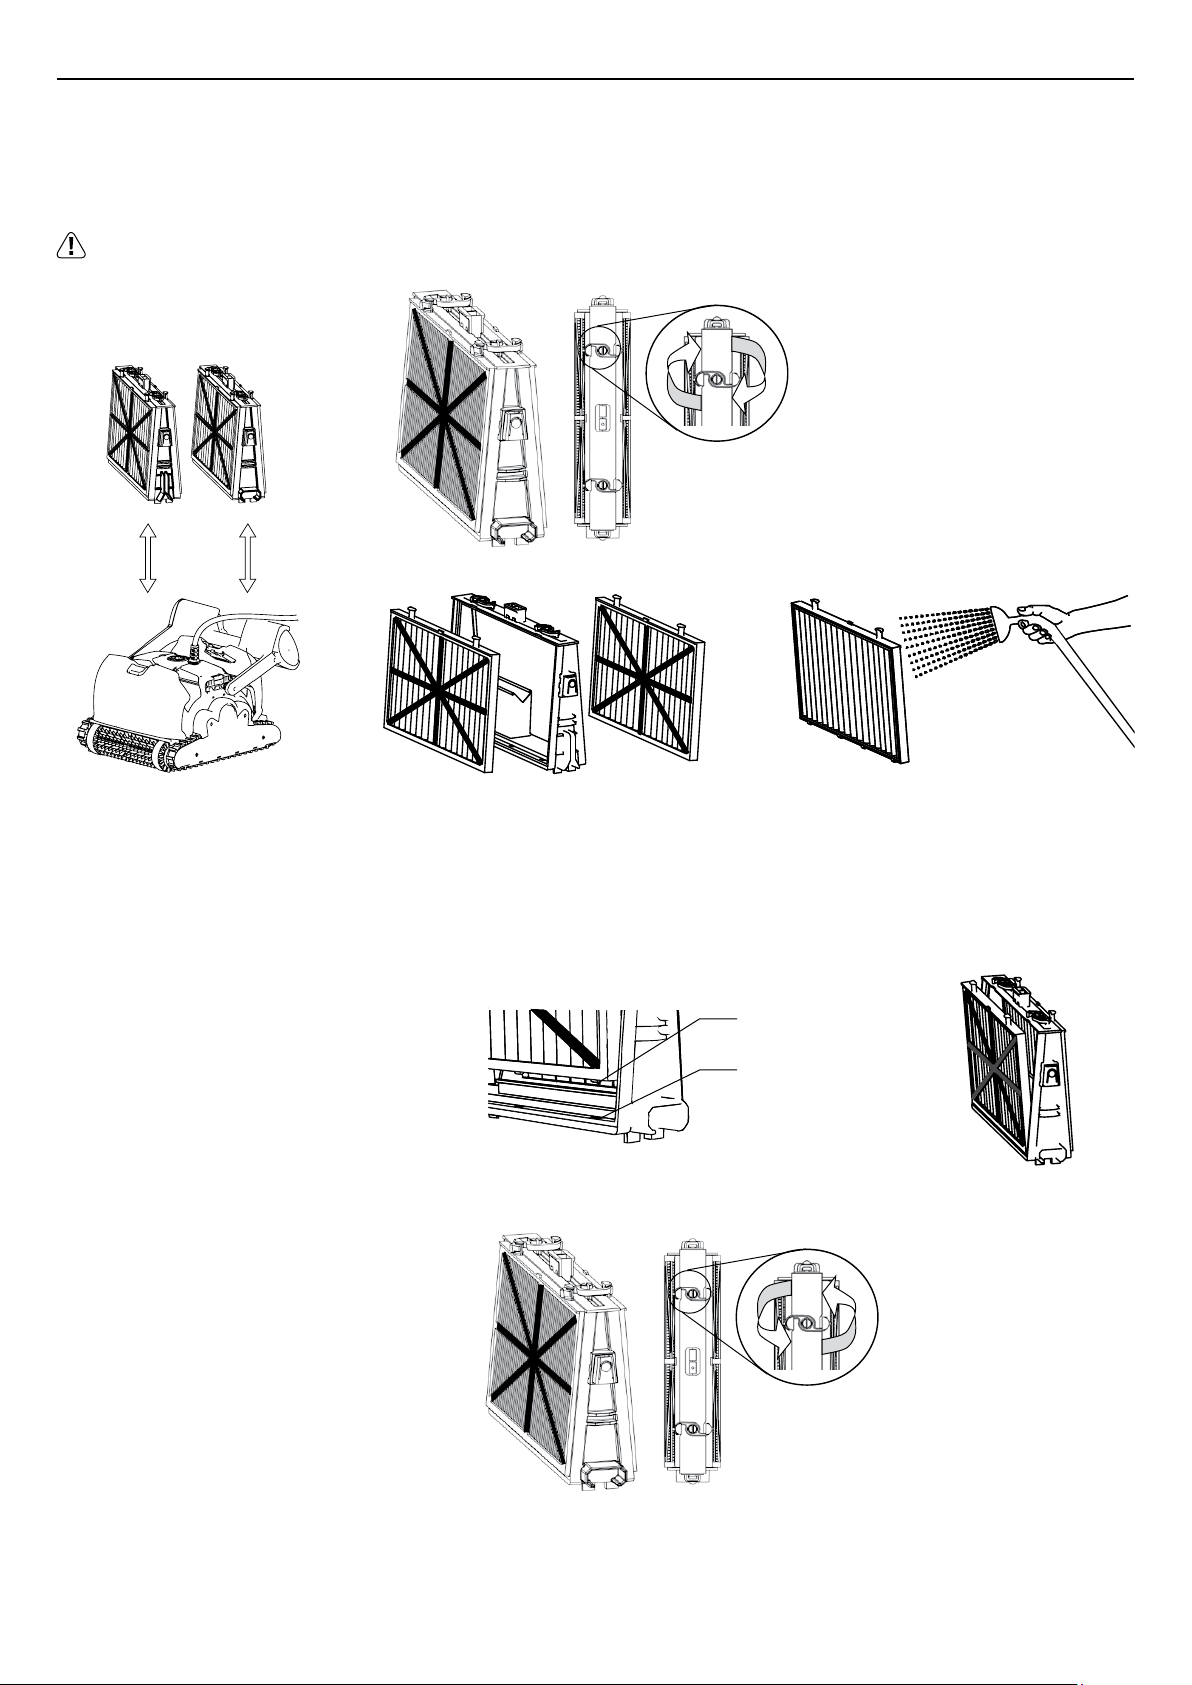
Part 1 - Extracting and cleaning the filter elements
Unplug power supply before any servicing activity.
English
1
Reassembling the filter elements
Insert the locating tabs at the bottom of the filter element into their
groves on the base frame, then close the “S” clip.
2 3
Locating tab
Locating tab groove
Page 8
English
Reinstall the filters according to the diagram
DO NOT FORCE THE FILTERS INTO PLACE.
6
Grooved end fitting
Important: Where applicable, you must reset the full filter bag indicator on the power supply unit.
Recommendation: Rinse all brushes with clean water after each cleaning cycle.
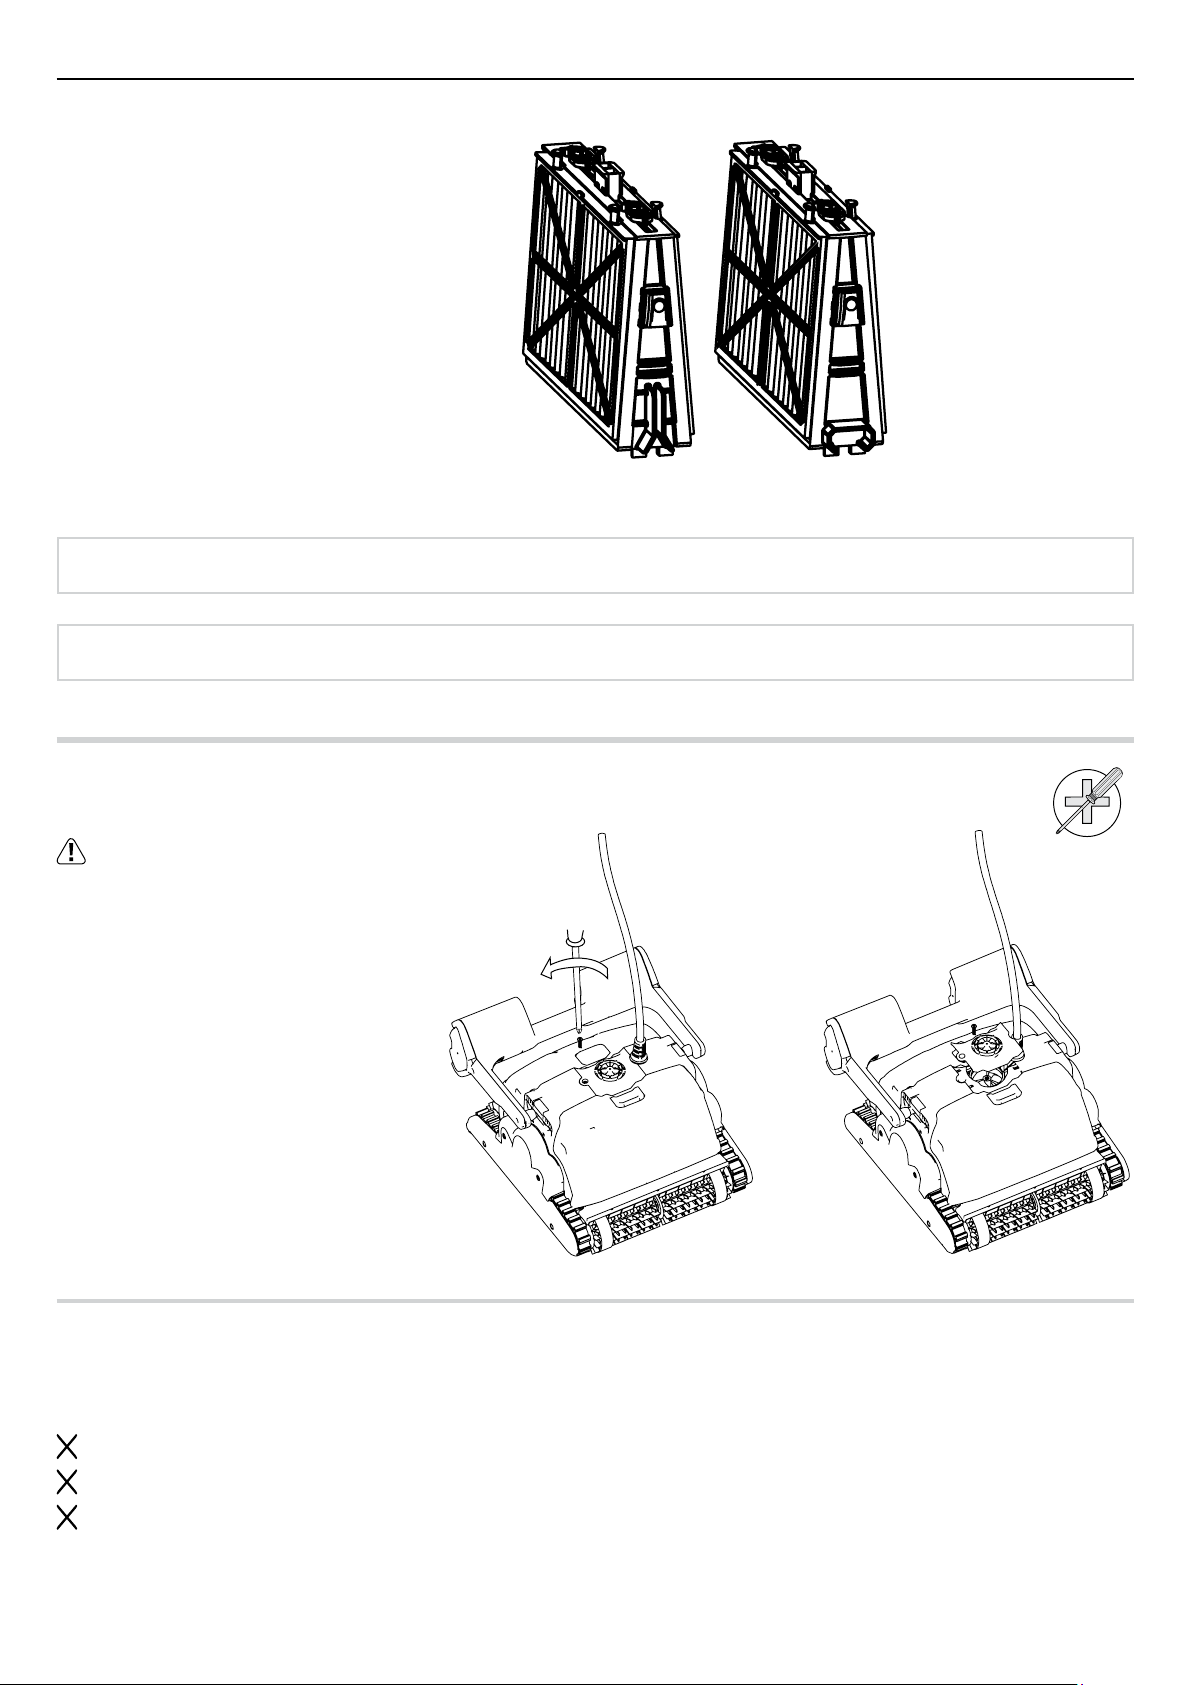
Part 2 - Dismantling and cleaning the impeller
Unplug power supply before any servicing activity.
Dismantle the impeller cover and
clean around the impeller housing,
then reassemble.
Octagonal end fitting
Philips head
Part 3 - Storage instructions
Coil the cable and store in dry cool area – preferably on the Caddy if available.
Do NOT store the Dolphin exposed to direct sunlight.
Do NOT store the Dolphin exposed to excessive heat.
Do NOT store the Dolphin exposed to frost.
21
Page 9

7
Troubleshooting Guide
Before contacting your Dolphin distributor please read through this guide.
The pool water condition must be within the following parameters:
PH: 7.0 – 7.8 Salt: Max 5,000 ppm
Temperature: 6˚C(43˚F) to 34˚C(93˚F) Chlorine: Max 4 ppm
Symptom Solution
Cable twisting or cable coils up Check for any obstruction in the pool
Remove excess cable from the pool
Make sure filter cartridge is clean
Straighten cable and lay it in the sun periodically
Dolphin is moving in circles or does not reach all pool areas Check for foreign objects in moving parts
Make sure filter cartridge is clean and well mounted
and that the filter doors are closed
Make sure that there is enough cable laid out to cover the
whole pool
Before using the Dolphin at the beginning of the season you
should brush any algae from the floor and walls of the pool
Dolphin is not traveling sideways on walls Adjust the diagonal angle of the handle
Dolphin does not climb walls Make sure the filter cartridge is clean
If using the Dolphin at the beginning of the season,
use the spring cartridge
Check if brushes are suitable for pool coating and replace
them if necessary
Check if brushes are worn and replace them if necessary
Make sure the impeller area is clean
Check that the RCU is set for climbing
Dolphin not sinking Make sure the Wonder brushes or the combined brushes
are soaked in water
Dolphin disengaging from wall at water line If Dolphin climbs too high consult your Dolphin distributor
RCU is not working Check if the batteries need replacing
Motor is not working
Check if the impeller is blocked
Check if the drive system is blocked
Electrical problem (power supply), check power source.
If power source is in order, please contact your Dolphin distributor
English
Additional troubleshooting is available at our Website:
www.maytronics.com
Page 10
French
Liste des pièces fournies dans l’emballage
Pièces X Remarque
Châssis des composants du filtre 2
Filtre et cartouches
Robot nettoyeur de
piscine Dolphin
Poche de rangement des sacs filtres 1
Filtre pour nettoyage de printemps 4 filtres
Robot nettoyeur de piscine Dolphin 1
Filtre ultrafin 4 filtres
Crochet en “S” 4
Bloc d’alimentation 1
8
Kit Caddy 1
Télécommande 1
Les éléments optionnels sont disponibles sur demande
de la part de votre distributeur Dolphin
Bloc d’alimentation
électrique
Chapitre 1 - Description des principaux composants
1. Filtres
Système à double filtrage.
Filet filtre printemps + châssis
(pour nettoyage de printemps)
Pour piscines sales contenant des saletés de
grande taille, par ex. des feuilles – utile en
début de saison.
Cartouche de filtre ultrafin + châssis
A usage quotidien.
Réglage d’usine, défini par défaut.
2. Brosses
Trois types de brosses sont proposés en option, chacune d’elles étant conçue pour fournir une traction optimale sur différentes
surfaces de piscine. Un seul ensemble brosse est fourni avec votre nettoyeur Dolphin.
Brosse PVC – pour surfaces en béton,
PVC, fibre de verre et à revêtement.
Brosse combinée – pour surface rugueuse
en céramique et pavés en mosaïque.
Brosse Wonder – pour sols en
céramique lisse.
Page 11

9
French
3. Bloc d’alimentation électrique
Alimentation numérique avec
« Mode Interrupteur » (Switch mode):
• Entrée - 100-250 AC Volts
• 50-60 Hertz
• 180 Watt
• Sortie - 30 VDC
• IP 54
Marche/Arrêt
ON
Chapitre 2 – Fonctionnement du Dolphin
ère
1
partie – Préparation du nettoyeur de piscine Dolphin
A. Montez le kit du charriot – mode d’assemblage indiqué séparément
B. Réglage de l’angle de la poignée du flotteur
Le réglage de l’angle de la poignée permet de déterminer la vitesse
de progression du Dolphin le long de la ligne de bordure de l’eau.
Indicateur de sac
filtre plein
Bouton de
remise à zéro
Indicateur de
temporisation
1. Appuyez sur le loquet et maintenez-le ainsi,
puis actionnez la poignée pour la mettre
dans la position voulue.
2. Relâchez le loquet pour bloquer la poignée
dans l’angle ainsi déterminé.
Progression normale – pour un nettoyage plus
efficace de la bordure de l’eau.
1 2
Progression rapide – vitesse accélérée – pour
un nettoyage plus rapide mais moins appliqué
de la bordure de l’eau.
Page 12
French
C. Disposition du câble
Déroulez le minimum nécessaire de câble pour assurer la couverture de toute la piscine.
Veillez à le poser bien droit le long de la paroi et vérifiez qu’il ne présente ni nœuds ni torsades.
3 mètres
10 ft.
Pivot (Swivel)
10
Utilisez exclusivement le bloc d’alimentation électrique d’origine.
Le bloc d’alimentation électrique est conçu anti-éclaboussures – Ne pas l’immerger dans l’eau.
Débranchez l’alimentation avant d’entreprendre toute activité d’entretien.
Ne branchez pas l’alimentation avant d’avoir placé le robot nettoyeur dans l’eau.
Assurez-vous que la prise du secteur est protégée par un interrupteur de mise à la terre (GFI) ou de fuite à la terre (ELI).
Important! NE PAS entrer dans la piscine lorsque le nettoyeur de piscine fonctionne.
ère
2
partie – Insertion du Dolphin dans l’eau
Installation du Dolphin dans la piscine.
Plongez votre Dolphin dans la piscine, puis lâchez-le.
Remarque: Lors de l’utilisation de brosses combinées ou de brosses Wonder, pressez doucement
le matériau constituant la brosse pour l’humidifier à fond.
Page 13

11
Mise sous tension du Dolphin
French
1. Reliez le câble flotteur du Dolphin
au bloc d’alimentation.
2. Reliez le câble électrique du bloc
d’alimentation au secteur.
3. Appuyez sur l’interrupteur
de marche/arrêt (ON/OFF).
4. Le Dolphin va maintenant entamer
son cycle de nettoyage.
Remarque: Si votre modèle comprend une télécommande, reportez-vous à sa notice d’emploi.
Câble flotteur
ON
Marche/Arrêt
Important! NE PAS entrer dans la piscine lorsque le nettoyeur de piscine fonctionne.
ère
partie – Retrait du Dolphin hors de l’eau
3
Débranchez l’alimentation avant d’entreprendre toute activité d’entretien.
1. Si le Dolphin n’a pas terminé son cycle, éteignez le bloc
d’alimentation, puis débranchez le secteur.
2. Tirez doucement les flotteurs jusqu’à ce que le Dolphin
remonte à la surface, ensuite relevez-le par la poignée.
Important! NE PAS soulever le Dolphin en tirant sur son câble.
Page 14

French
Chapitre 3 – Maintenance de routine
ère
1
partie – Extraction et nettoyage des composants du filtre
Débranchez l’alimentation avant d’entreprendre toute activité d’entretien.
12
1
Remontage
Insérez les attaches de fixation au bas du filtre dans les rainures prévues à cet effet sur le châssis,
ensuite fermez le crochet en « S ».
2
Attache de fixation
Rainure pour attache
de fixation
3
Page 15

13
Réinstallez les filtres suivant le schéma
NE PAS FORCER SUR LES FILTRES POUR
LES METTRE EN PLACE.
French
Important! Le cas échéant, remettez l’indicateur de sac filtre à zéro sur le bloc d’alimentation.
Recommendation: Rincez toutes les brosses à l’eau claire après chaque cycle de nettoyage.
ère
2
partie – Démontage et nettoyage de la turbine
Débranchez l’alimentation avant d’entreprendre
toute activité d’entretien.
Démontez le couvercle de la turbine
et nettoyez son boîtier, ensuite
remontez l’ensemble.
Embout à rainure
Embout octogonal
Tournevis
Cruciforme
21
ère
3
partie – Instructions de rangement
Enroulez le câble et rangez-le dans un endroit sec et frais – De préférence sur le Caddy (charriot) si disponible.
NE PAS ranger le Dolphin en exposition directe aux rayons du soleil.
NE PAS ranger le Dolphin dans un endroit exposé à une chaleur excessive.
NE PAS ranger le Dolphin dans un endroit exposé au gel.
Page 16

French
Localisation des pannes
Avant de contacter votre distributeur Dolphin, veuillez lire attentivement ce guide.
L’eau de la piscine doit être conforme aux paramètres suivants :
PH: 7,0 – 7,8 Teneur en sel: max. 5000 ppm
Température: 6˚C(43˚F) to 34˚C(93˚F) Chlore: max. 4 ppm
Symptôme Solutions
Câble entortillé ou enroulé Vérifiez si un obstacle est présent dans la piscine
Réduisez la distance excessive de câble dans la piscine
Assurez-vous que la cartouche du filtre est propre
Redressez le câble et étalez-le régulièrement au soleil
Le Dolphin tourne en rond ou n’atteint pas toutes
les surfaces de la piscine
Le Dolphin ne se déplace pas latéralement sur les parois Réglez l’angle de la poignée
Le Dolphin n’escalade pas les parois Assurez-vous que la cartouche du filtre est propre
Le Dolphin ne plonge pas Assurez-vous que les brosses Wonder ou les brosses combinées
Le Dolphin se dégage de la paroi à hauteur de la bordure
de l’eau
La télécommande ne fonctionne pas Vérifiez si les piles doivent être changées
Le moteur ne fonctionne pas Vérifiez si la turbine est bloquée
Vérifiez si des corps étrangers bloquent les parties mobiles
Assurez-vous que la cartouche du filtre est propre et que les
accès au filtre sont bien fermés
Assurez-vous que la distance de câble tirée est suffisante pour
couvrir toute la piscine
Avant d’utiliser le Dolphin en début de saison,
il est recommandé de brosser toutes les algues
susceptibles de se trouver sur le sol et les parois de la piscine
Pour un nettoyage en début de saison, utilisez les cartouches
« Printemps » (Spring)
Pour un nettoyage en début de saison, commencez
par brosser toutes les algues susceptibles
de se trouver sur le sol et les parois de la piscine
Vérifiez si les brosses installées conviennent
au revêtement de la piscine, et remplacez-les si nécessaire
Vérifiez si les brosses sont usées, et remplacez-les si nécessaire
Assurez-vous que la turbine est propre
Vérifiez que la télécommande est paramétrée pour l’option
« escalade des parois »
sont bien imprégnées d’eau
Si le Dolphin monte trop haut dans le parcours d’escalade,
consultez votre distributeur Dolphin
Vérifiez si le système d’entraînement est bloqué
Vérifiez s’il existe un problème électrique (alimentation)
en contrôlant l’arrivée du secteur.
Si l’arrivée du courant est correcte, veuillez contacter votre
distributeur Dolphin
14
D’autres cas de panne sont consultables sur notre site Internet:
www.maytronics.com
Page 17

15
Cosa trovate nella scatola
Parti X commenti
Telaio base per elementi filtro 2
Filtro ultra fine 4 filtri
Filtro e cartuccia
Sacchetto per la conservazione dei filtri 1
Filtro per la primavera 4 filtri
Fermagli a “S” 4
Alimentatore elettrico 1
Italiano
Robot Dolphin per la
pulizia della piscina
Alimentatore
elettrico
Robot per la pulizia della piscine
Dolphin
Kit Caddy 1
Telecomando 1
I componenti optional sono disponibili a richiesta presso
il distributore locale Dolphin
1
Sezione 1 – Descrizione dei componenti principali
1. Filtri
Sistèma di filtraggio a due livelli.
Rete filtrante per primavera + telaio base
Per piscine molto sporche con grossi
detriti quali foglie ecc. – Utile all’inizio
della stagione.
Cartuccia filtro ultra fine + telaio base
Per uso quotidiano.
Valori predefiniti di fabbrica.
2. Spazzole
Vi sono tre tipi di spazzole optional, ciascuna delle quali è stata progettata per massima trazione su diversi tipi di superficie della piscina.
Con il robot Dolphin viene fornito un solo tipo di spazzola.
Spazzola PVC – Per superfici di
cemento, PVC, fiberglass e tela.
Spazzola combo – Per superfici
di ceramica grezza e mosaici di piastrelle.
Spazzola Wonder – Per superfici
ceramiche levigate.
Page 18

Italiano
16
3. Alimentatore elettrico
Alimentatore digitale switching
• Ingresso - 100-250 Volt CA
• 50-60 Hertz
• 180 Watt
• Uscita - 30 VCC
• IP 54
ON
Interruttore
On/Off
Indicatore di sacchetto
filtro pieno
Pulsante Reset
Sezione 2 – Funzionamento di Dolphin
Parte 1 – Preparazione del robot per la pulizia della piscina all’uso
A. Montaggio del kit Caddy – le istruzioni relative si trovano in un documento separato
B. Regolazione dell’angolo dell’impugnatura di galleggiamento
L’angolo dell’impugnatura deve essere regolato per determinare la velocità in cui Dolphin avanza lungo la linea di livello.
Indicatore di
ritardo
1. Premere verso il basso la serratura e tenere
premuto in posizione.
2. Poi spostare l’impugnatura nella posizione
desiderata e rilasciare la serratura per
bloccare l’impugnatura.
Avanzamento normale – Per un’azione di pulizia
più efficiente sulla linea di livello.
Avanzamento veloce – Alta velocità – Per un’azione
di pulizia più veloce ma meno efficiente
della linea di livello.
Page 19

17
C. Posa del cavo
Svolgere la lunghezza di cavo minima per la copertura di tutti i punti della piscina, stendendo il cavo lungo il bordo della piscina.
Assicurare che non ci siano aggrovigliamenti e piegature.
3 Metri
Mulinello
Italiano
Usare solo l’alimentatore elettrico fornito in dotazione.
L’alimentatore è a prova di spruzzo - non va immerso nell’acqua.
Staccare l’alimentatore elettrico dalla rete prima di ogni attività di servizio.
Non collegare l’alimentatore elettrico prima di posare il robot sull’acqua.
Assicurare che la presa di rete sia protetta con un interruttore differenziale di terra (GFI)
o un interruttore di perdite a terra (ELI).
Importante: NON entrare nella piscina quando il pulitore é in funzione.
Parte 2 – In acqua
Immersione dei Dolphin in piscina.
Posate Dolphin in piscina e rilasciatelo.
Nota: Usando le spazzole combo o wonder, spremere il materiale della spazzola wonder fino che completamente umida.
Page 20

Italiano
Avviare Dolphin
18
1. Collegare il cavo galleggiante di
Dolphin all’alimentatore elettrico.
2. Collegare il cavo elettrico dell’alimentatore
elettrico alla presa di rete.
3. Premere l’interruttore ON/OFF.
4. Dolphin inizierà così a funzionare.
Nota: Se il modello è dotato di telecomando, fare riferimento all’accluso foglietto d’istruzioni.
Cavo galleggiante
ON
Interruttore
ON/OFF
Importante: NON entrare nella piscina quando il pulitore é in funzione.
Parte 3 – Estrazione di Dolphin dall’acqua
Staccare l’alimentatore elettrico dalla rete prima di ogni attività di servizio.
1. Se Dolphin non ha completato il suo ciclo, spegnere l’alimentatore
elettrico e staccare il cavo dalla presa di rete.
2. Tirare delicatamente il cavo galleggiante finché Dolphin raggiunge
la superficie, poi estrarlo usando l’impugnatura.
Importante: NON estrarre Dolphin dall’acqua tirandone il cavo.
Page 21

19
Sezione 3 – Manutenzione di routine
Parte 1 – Estrazione degli elementi filtro e loro pulizia
Staccare l’alimentatore elettrico dalla rete prima di ogni attività di servizio.
Italiano
1
Rimontaggio
Inserire le alette di posizione del fondo del filtro nelle loro scanalature del telaio di base, poi chiudere i fermagli a “S”.
2 3
Alette di posizione
Scanalatura per le
alette di posizione
Page 22

Italiano
Re-installare i filtri secondo il diagramma
NON FORZARE I FILTRI IN POSIZIONE.
20
Raccordo finale scanalato
Importante: Se applicabile, bisogna azzerare l’indicatore di sacchetto filtro pieno sull’alimentatore.
Consiglio: Sciacquare tutte le spazzole con acqua pura dopo ogni ciclo di pulizia.
Parte 2 – Smontaggio e pulizia della girante
Staccare l’alimentatore elettrico dalla rete prima di ogni attività di servizio.
Smontare il coperchio della
girante e pulirne l’alloggiamento,
poi rimontare.
Raccordo finale ottagonale
Cacciavite con
punta a croce
21
Parte 3 – Istruzioni per la conservazione in deposito
Avvolgere il cavo e conservare in luogo fresco e asciutto – Preferibilmente sul carrello Caddy se disponibile.
NON mettere in deposito Dolphin esposto direttamente ai raggi del sole.
NON mettere in deposito Dolphin esposto ad eccessivo calore.
NON mettere in deposito Dolphin esposto al gelo.
Page 23

21
Guida per la ricerca ed eliminazione dei guasti
Prima di contattare il distributore Dolphin si invita a leggere questo manuale.
L’acqua della piscina deve trovarsi nelle condizioni indicate dai parametri che seguono:
PH: 7.0 – 7.8 Sale: Max 5.000 ppm
Temperatura: Da 6˚C(43˚F) a 34˚C(93˚F) Cloro: Max 4 ppm
Sintomo Soluzione
Cavo attorcigliato o arrotolato Verificare che non vi siano ostruzioni in piscina
Estrarre dalla piscina il cavo in eccesso
Assicurare che la cartuccia del filtro sia pulita
Stirare il cavo e stenderlo al sole periodicamente
Dolphin si muove in cerchio o non raggiunge
tutti i punti della piscina
Dolphin non si sposta di traverso sulle pareti Regolare l’angolo diagonale dell’impugnatura
Dolphin non si arrampica sulle pareti Assicurare che la cartuccia del filtro sia pulita
Le Dolphin ne plonge pas Assicurare che le spazzole combo o wonder siano
Dolphin si stacca dalla parete sulla linea di livello dell’acqua Se Dolphin si arrampica troppo in alto,
RCU non funziona Verificare se le batterie devono essere sostituite
Il motore non funziona Verificare se la girante è bloccata
Verificare che non vi siano oggetti estranei nelle parti mobili
Assicurare che la cartuccia filtro sia pulita e che gli sportelli del
filtro siano chiusi
Assicurare che la lunghezza del cavo sia sufficiente
a coprire ogni punto della piscina
Prima di mettere in uso Dolphin all’inizio della stagione
bisogna spazzolare ogni residuo di alghe
dal fondale e dalle pareti della piscina
Usando Dolphin all’inizio di stagione,
usare la cartuccia per la primavera
Prima di mettere in uso Dolphin all’inizio della stagione
bisogna spazzolare ogni residuo di alghe
dal fondale e dalle pareti della piscina
Verificare che le spazzole siano adatte ai rivestimenti superficiali
della piscina e sostituirle se necessario
Verificare se le spazzole sono consunte e sostituirle se necessario
Assicurare che l’area della girante sia pulita
Verificare che RCU sia impostato sulla salita delle pareti
bagnate con acqua
consultare il distributore Dolphin
Verificare se il sistema di trazione è bloccato
Problema elettrico (alimentatore), verificare l’alimentatore.
Se l’alimentatore è funzionante, contattare il distributore Dolphin
Italiano
Un’ulteriore guida per la riparazione dei guasti è ottenibile sul sito web:
www.maytronics.com
Page 24

Spanish
Dentro de la Caja Usted encontrará
Parte X Observaciones
22
Filtros y Cartuchos
Limpiador de Piscina
Dolphin
Unidad de la Fuente
de Alimentación
Armazón para los Elementos del Filtro 2
Filtro Ultra-Fino 4 filtros
Bolsa para almacenamiento de filtros 1
Filtro de Resorte 4 filtros
Clip “S” 4
Unidad de la Fuente de Alimentación 1
Limpiador de Piscina Dolphin 1
Kit del Caddy 1
Unidad de Control Remoto 1
Componentes opcionales disponibles a petición de su distribuidor Dolphin
Sección 1 - Descripción de los Principales Componentes
1. Filtros
Sistema de filtración a nivel-doble.
Red de filtro para primavera +
bastidor de base
Para piscinas sucias con detritos grandes como
hojas etc. – Útil para el inicio de la estación.
2. Cepillos
Hay tres tipos de cepillos opcionales, cada uno diseñado para proporcionar tracción óptima en diversas superficies de piscinas.
Solamente un tipo es proveído con su Dolphin.
Cartucho de Filtro Ultra-Fino + bastidor de base
Para uso diario.
Predeterminado en fábrica.
Cepillo PVC – Para concreto, PVC,
fibra de vidrio y revestimiento.
Cepillo Combinado – Para superficies de
cerámica áspera y azulejos de mosaico.
Cepillo Wonder – Para cerámica lisa.
Page 25

23
Spanish
3. Unidad de la Fuente
de Alimentación
Fuente de alimentación Digital,
“Switch-Mode”:
• Entrada - 100-250 AC Voltios
• 50-60 Hertz
• 180 Watt
• Salida – 30 VDC
• IP 54
ON
Interruptor de
Encendido/
Apagado
Filtro Lleno
Indicador de la Bolsa
Botón de
Reencendido
Sección 2 – Operación del Dolphin
Parte 1 – Preparar el Limpiador de Piscinas Dolphin para Uso
A. Montar el kit del Caddy – las instrucciones están en un documento separado
B. Ajustar el Ángulo del Flotador de la Manija
El ángulo de la manija debe ser ajustado para determinar la velocidad en que el Dolphin avanza a lo largo de
la línea de flotación.
Indicador de
Demora
1. Presione el pestillo hacia abajo y mantengalo
en la posición.
2. Mueva la manija a la posición deseada y libere
el pestillo para trabar la manija en la posición.
Avanzo Normal – Acción de limpieza más eficiente
en la línea de flotación.
21
Avanzo Rápido – Velocidad rápida – Para limpieza más
rápida pero menos eficiente en la línea de flotación.
Page 26

Spanish
C. Colocar el Cable
Desenrolle el mínimo cable requerido para cubrir todo el tamaño de la piscina, enderece el cable a lo largo del lado de la piscina.
Cerciórese de que no haya torceduras o vueltas.
3 Metros
10 pies
Eslabón Giratorio
24
Use solamente la unidad de la fuente de alimentación original suministrada.
La Unidad de la fuente de alimentación es a prueba de salpicaduras – No la sumerja en agua.
Desenchufe la unidad de la fuente de alimentación antes de cualquier actividad de mantenimiento.
No conecte la unidad de la fuente de alimentación antes de colocar el limpiador de piscina en el agua.
Asegúrese que el enchufe de las cañerías sea protegido por un interruptor de fallos de conexión a tierra (GFI) o un
interruptor de pérdidas a tierra (ELI).
Importante: NO INGRESAR a la piscina mientras el limpiador de piscinas esté en funcionamiento.
Parte 2 – En el agua
Colocar el Dolphin en la piscina.
Coloque su Dolphin en la piscina y libérelo.
Nota: Al usar los cepillos combinados o cepillos “Wonder”,
exprima suavemente el material del cepillo hasta que esté totalmente mojado.
Page 27

25
Activar el Dolphin
Spanish
1. Enchufe el cable flotador del Dolphin
en la unidad de la fuente de alimentación.
2. Enchufe el cable eléctrico de la unidad
de la fuente de alimentación en la red eléctrica.
3. Presione el interruptor de Encendido/Apagado.
4. El Dolphin empezará ahora a trabajar.
Nota: Si su modelo incluye la unidad de control remoto, por favor refiérase al folleto de instrucciones incluido.
Cable flotador
ON
Interruptor de
Encendido/Apagado
Importante: NO INGRESAR a la piscina mientras el limpiador de piscinas esté en funcionamiento.
Parte 3 – Retirar el Dolphin del agua
Desconecte la fuente de alimentación antes de cualquier actividad de mantenimiento.
1. Si el Dolphin no ha concluido su ciclo, cierre la unidad de la fuente
de alimentación y desconecte de la red principal.
2. Tire del cable flotador suavemente hasta que el Dolphin haya subido
a la superficie, y levántelo por la manija.
Importante: NO levante el Dolphin del agua por su cable.
Page 28

Spanish
Sección 3 – Mantenimiento General
Parte 1 – Remover y limpiar los Elementos del Filtro
Desconecte la fuente de alimentación antes de cualquier actividad de mantenimiento.
26
1
Reensamblar
Inserte las lengüetas de localización en la parte inferior del elemento
del filtro en sus ranuras en el bastidor base, después cierre el clip “S”.
2 3
Lengüeta de localización
Ranura de la lengüeta
de localización
Page 29

27
Re-instale los filtros según el diagrama
NO FUERCE LOS FILTROS EN EL LUGAR.
Spanish
Pieza de extremidad con ranuras
Importante: Cuando pertinente, usted debe reajustar el indicador de bolsa de
filtro llena en la unidad de la fuente de alimentación.
Recomendación: Lave todos los cepillos con agua limpia después de cada ciclo de limpieza.
Pieza de extremidad octagonal
Parte 2 – Desmontar y limpiar el impulsor
Desmonte la tapa del impulsor y limpie alrededor del compartimiento del Impulsor, después reensamble.
Desmonte la tapa del impulsor y limpie
alrededor del compartimiento del
impulsor, después reensamble.
Cabeza
Phillips
Parte 3 – Instrucciones de Almacenamiento
Enrolle el cable y almacénelo en área fresca y seca – Preferiblemente en el Caddy si disponible.
NO almacene el Dolphin expuesto a luz solar directa.
NO almacene el Dolphin expuesto a calor excesivo.
NO almacene el Dolphin expuesto a helada.
21
Page 30

Spanish
Guía de Localización de Averías
Antes de entrar en contacto con su distribuidor Dolphin lea por favor toda esta guía
Las condiciones del agua de la piscina deben estar dentro de los siguientes parámetros:
PH: 7.0 – 7.8 Sal: Máx. 5,000 ppm
Temperatura: 6˚C(43˚F) a 34˚C(93˚F) Cloro: Máx. 4 ppm
Síntomas Solución
El Cable se tuerce o se enreda Verifique cualquier obstrucción en la piscina
Quite el exceso del Cable de la piscina
Cerciórese que el Cartucho del Filtro esté limpio
Enderece el cable y tiéndalo al sol periódicamente
El Dolphin se desplaza en círculos
o no llega a todas las áreas de la piscina
El Dolphin no se está desplazando de lado en las paredes Ajuste el ángulo diagonal de la manija
El Dolphin no trepa paredes Cerciórese que el Cartucho del Filtro esté limpio
El Dolphin no se hunde Cerciórese que los Cepillos Wonder o los Cepillos
El Dolphin se suelta de la pared en la línea de agua Si el Dolphin sube demasiado alto consulte su distribuidor
La RCU no está funcionando Verifique si las baterías necesitan ser reemplazadas
El motor no está funcionando Verifique si el Impulsor está bloqueado
Verifique si hay objetos extraños en las piezas móviles
Cerciórese de que el cartucho de Filtro esté limpio
y que las puertas del Filtro estén cerradas
Cerciórese de que hay suficiente Cable
para cubrir toda la piscina
Antes de usar el Dolphin al principio de la estación usted debe
cepillar todas las algas del piso y de las paredes de la piscina
Al usar el Dolphin al principio de la estación,
use el cartucho de Resorte
Al usar el Dolphin al principio de la estación debe primero
cepillar todas las algas del piso y de las paredes de la piscina
Verifique si los cepillos son apropiados para el revestimiento
de la piscina y reemplácelos si necesario
Verifique si los Cepillos están gastados
y reemplácelos si necesario
Cerciórese que el área del Impulsor esté limpia
Verifique que la RCU está fijada para trepar
Combinados están mojados
Verifique si el sistema de Impulsión está bloqueado
Problema eléctrico (fuente de alimentación). Verifique la fuente
de energí. Si la fuente de energía está en orden,
entre en contacto con su distribuidor Dolphin
28
Soluciones adicionales de problemas están disponibles en nuestro sitio Web:
www.maytronics.com
Page 31

29
Was Sie in der Box finden sollten
Teil X Bemerkung
Grundrahmen für Filterelemente 2
Ultrafeiner Filter 4 filter
German
Filter und Kartuschen
Dolphin Schwimmbad-
Reiniger
Stromversorgungs-
Einheit
Beutel zur Aufbewahrung der Filter 1
Frühlingsfilter 4 filter
S-Klips 4
Stromversorgungs-Einheit 1
Dolphin-Schwimmbadreiniger 1
Caddy Kit 1
Fernbedienungseinheit 1
Optionale Komponenten sind auf Anfrage bei Ihrem
Dolphin-Händler erhältlich.
Abschnitt 1 – Beschreibung der Hauptkomponenten
1. Filter
Zweistufiges filtersystem.
Frühlings-Netzfilter + Grundrahmen
Für verschmutzte Schwimmbäder mit
grossen Verschmutzungen wie Blättern
usw. – geeignet für den Saisonbeginn.
2. Bürsten
Es gibt drei verschiedene Arten von optionalen Bürsten. Jede dieser Bürstenarten ist für andere Beckenböden geeignet,
auf denen sie die beste Haftung bietet. Im Lieferumfang Ihres Dolphin Schwimmbadreinigers ist nur eine Bürstenart enthalten.
Ultrafeine Filterkartusche + Grundrahmen
Für den täglichen Einsatz.
Auslieferungszustand.
PVC Bürste – Für Beton, PVC,
Fiberglas und Liner.
Kombinierte Bürste – Für rauhe
Keramikoberflächen und Mosaik-Fliese.
Wunderbürste – Für glatte
Keramikoberflächen.
Page 32

German
30
3. Stromversorgungseinheit
Digitale Stromversorgungseinheit mit
Schalter:
• Eingangsstrom - 100-250 AC Volts
• 50-60 Hertz
• 180 Watt
• Ausgangsstrom - 30 VDC
• IP 54
Anzeige des vollen
Filterbeutels
ON
An-/Aus-schalter
Rücksetztaste
Verzögerungs-
Anzeige
Abschnitt 2 – Betrieb des Dolphins
Teil 1 – Vorbereitung des Dolphin-Schwimmbadreinigungs-Roboters
A. Bauen Sie das Caddy-Kit zusammen – die Anweisungen dazu finden Sie auf einem separaten Blatt
B. Einstellen des Handgriff-Winkels
Der Winkel des Handgriffes bestimmt die Geschwindigkeit, mit der der Dolphin sich entlang der
Wasserlinie bewegt.
1. Drücken Sie den.
2. Riegel nach unten und halten ihn in dieser Position.
Jetzt können Sie den Handgriff in die gewünschte
Position schieben.
Sobald Sie den Riegel wieder loslassen, rastet der
Griff in dieser Position ein.
Normale Geschwindigkeit – Bessere
Reinigungsleistung an der Wasserlinie.
Hohe Geschwindigkeit – Für schnellere,
aber dafür weniger wirksame Reinigungsleistung.
Page 33

31
C. Auslegen des Kabels
Rollen Sie soviel Kabel ab wie Sie benötigen, um das gesamte Becken zu erreichen und legen es entlang
der Schwimmbadseite aus. Vergewissern Sie sich, dass das Kabel keine Verdrehungen oder Knoten aufweist.
3 Meter
Drehgelenk
German
Benutzen Sie nur die vom Hersteller gelieferte Original-Stromversorgungseinheit.
Die Stromversorgungseinheit ist spritzwasserdicht – tauchen Sie sie nicht ins Wasser ein.
Vor dem Ausführen von Wartungsarbeiten ziehen Sie den Stecker der Stromversorgungseinheit aus der Steckdose.
Stecken Sie den Stecker der Stromversorgungseinheit erst in die Steckdose,
nachdem der Schwimmbadreinigungs-Robot er ins Wasser gelassen wurde.
Vergewissern Sie sich, dass die Netzsteckdose mit einem Fehlerstromschutzschalter oder
Erdschluss-Schutzschalter geschützt ist.
Wichtig: Der Pool darf NICHT betreten werden, solange der Pool Reiniger in Betrieb ist.
Teil 2 – In das Wasser
Eintauchen des Dolphin-Roboters in das Wasser.
Setzen Sie Ihren Dolphin-Roboter in das
Schwimmbad und lassen ihn los.
Hinweis: Wenn Sie kombinierte Bürsten oder Wunderbürsten benutzen, drücken Sie das Bürstenmaterial sanft,
bis es sich vollkommen voll Wasser gesogen hat.
Page 34

German
Anschalten des Dolphin-Roboters
32
1. Verbinden Sie das Schwimmkabel
des Dolphin-Roboters mit der
Stromversorgungseinheit.
2. Verbinden Sie das Stromkabel der
Stromversorgungseinheit mit dem Stromnetz.
3. Betätigen Sie den AN-/AUS-Schalter.
4. Daraufhin beginnt der Dolphin-Roboter mit der Arbeit.
ON
An/AusSchalter
Hinweis: Wenn Ihr Modell über eine Fernbedienung verfügt, beachten Sie bitte die beiliegende Gebrauchsanweisung.
Schwimm - kabel
Wichtig: Der Pool darf NICHT betreten werden, solange der Pool Reiniger in Betrieb ist.
Teil 3 – Herausnehmen des Dolphin-Roboters aus dem Wasser
Trennen Sie die Stromversorgungseinheit vom Stromnetz ab,
bevor Sie irgendwelche Wartungsarbeiten ausführen.
1. Wenn der Dolphin-Roboter seinen Zyklus noch nicht beendet hat, schalten
Sie die Stromversorgungseinheit ab und trennen sie vom Stromnetz.
2. Ziehen Sie den Dolphin-Roboter sanft mit Hilfe
des Schwimmkabels an die Wasseroberfläche.
Jetzt können Sie ihn mit Hilfe des Handgriffs aus dem Wasser nehmen.
Wichtig: Ziehen Sie den Dolphin-Roboter nicht mit Hilfe des Schwimmkabels aus dem Wasser.
Page 35

33
Abschnitt 3 – Routinemässige Wartung
Teil 1 – Herausnahme und Reinigung der Filterelemente
Trennen Sie die Stromversorgungseinheit vom Stromnetz ab, bevor Sie irgendwelche Wartungsarbeiten ausführen.
German
1
Wiedereinbau
Schieben sie die Fixierlaschen an der Unterseite des Filterelements in die entsprechenden
Rillen im Basisrahmen und schliessen dann den S-Klips.
2 3
Fixierlasche
Rille für die Fixierlasche
Page 36

German
Setzen Sie die Filter gemäss des Diagramms wieder ein.
DRÜCKEN SIE DIE FILTER NICHT MIT GEWALT AN IHREN PLATZ.
34
Geriffeltes Endstück
Wichtig: Gegebenenfalls müssen Sie die Anzeige des vollen Filterbeutels auf der Stromversorgungseinheit zurücksetzen.
Empfehlung: Spülen Sie alle Bürsten nach jedem Reinigungszyklus mit sauberem Wasser ab.
Achteckiges Eckstück
Teil 2 – Ausbau und Reinigung des Flügelrads
Trennen Sie die Stromversorgungseinheit vom Stromnetz, bevor Sie irgendeine Wartungsarbeit ausführen.
Nehmen Sie die Abdeckung des
Flügelrads ab und reinigen dann das
Flügelrad-Gehäuse.
Danach setzen Sie die Abdeckung
wieder zurück.
Cabeza
Phillips
21
Teil 3 – Lagerungsanweisungen
Rollen Sie das Kabel auf und lagern es an einem trockenen Ort – vorzugsweise auf dem Caddy, falls vorhanden.
Lagern Sie den Dolphin-Roboter nicht an einem Ort, der direktem Sonnenlicht ausgesetzt ist.
Lagern Sie den Dolphin-Roboter nicht an einem Ort, der übermässiger Hitze ausgesetzt ist.
Lagern Sie den Dolphin-Roboter nicht an einem Ort, der Frost ausgesetzt ist.
Page 37

35
German
Anleitung zur Fehlerbehebung
Lesen Sie bitte diese Anleitung, bevor Sie sich an Ihren Dolphin-Händler wenden
Die Wasserbedingungen des Schwimmbads müssen innerhalb folgender Parameter liegen:
PH: 7.0 – 7.8 Salz: Max 5,000 ppm
Temperatur: 6˚C(43˚F) bis 34˚C(93˚F) Chlor: Max 4 ppm
Symptom Lösung
Das Kabel verdreht sich oder wickelt sich auf Überprüfen Sie, ob sich im Schwimmbad ein Hindernis befindet
Nehmen Sie überrschüssiges Kabel aus dem Schwimmbecken
Vergewissern Sie sich, dass die Filterkartusche sauber ist
Von Zeit zu Zeit sollten Sie das Kabel gerade richten
und in der Sonne auslegen
Der Dolphin-Roboter bewegt sich in Kreisen
oder erreicht nicht alle Beckenbereiche
Der Dolphin bewegt sich nicht seitwärts an den Wänden Stellen Sie den diagnonalen Winkel des Griffs ein
Der Dolphin klettern die Wände nicht hoch Vergewissern Sie sich, dass die Filterkartusche sauber ist
Der Dolphin-Roboter sinkt nicht Vergewissern Sie sich, dass die Wunderbürsten oder
Der Dolphin-Roboter fällt an der Wasserlinie von der Wand ab Wenn der Dolphin-Roboter zu hoch klettert,
Die Fernbedienung funktioniert nicht Überprüfen Sie, ob die Batterien ausgetauscht werden müssen
Der Motor funktioniert nicht Überprüfen Sie, ob das Flügelrad blockiert wird
Überprüfen Sie die sich bewegenden Teile auf Fremdkörper
Vergewissern Sie sich, dass die Filterkartusche sauber ist und die
Filtertüren geschlossen sind
Vergewissern Sie sich, dass genügend Kabel ausliegt, so dass der
Roboter den gesamten Beckenbereich erreichen kann
Sie sollten Algen von dem Boden und den Wänden des
Schwimmbads entfernen, bevor Sie den Dolphin-Roboter am
Saisonbeginn das erste Mal benutzen
Wenn Sie den Dolphin-Roboter zu Saisonbeginn zum ersten
Mal benutzen, sollten Sie die Frühlings-Kartusche verwenden
Sie sollten Algen von dem Boden und den Wänden des
Schwimmbads entfernen, bevor Sie den Dolphin-Roboter am
Saisonbeginn das erste Mal benutzen
Überprüfen Sie, ob die Bürsten der Art der Boden- und
Wandverkleidung entsprechen und wechseln
Sie sie gegebenenfalls aus
Überprüfen Sie, ob die Bürsten abgenützt sind
und wechseln Sie sie gegebenenfalls aus
Vergewissern Sie sich, dass der Bereich des Flügelrads sauber ist
Überprüfen Sie, ob die Fernbedienung auf
Klettern eingestellt ist.
kombinierten Bürsten mit Wasser vollgesogen sind
wenden Sie sich an Ihren Dolphin-Fachhändler
Überprüfen Sie, ob das Antriebssystem blockiert wird
Elektrisches Problem (Stromzufuhr), überprüfen Sie die Stromquelle
Wenn die Stromquelle in Ordnung ist, wenden Sie sich bitte an
Ihren Dolphin - Fachhändler
Weitere Hinweise zur Fehlerbehebung finden Sie auf unserer Webseite unter:
www.maytronics.com
Page 38

Page 39

Page 40

English
DOLPHIN SUPREME M5
38
by
www.maytronics.com
 Loading...