

GB
Cordless Chain Saw Instruction Manual
F
Tronçonneuse sans fil Manuel d’instructions
D
Akku-Kettensäge Betriebsanleitung
I
Motosega a batteria Istruzioni per l’uso
NL
Accu-kettingzaag Gebruiksaanwijzing
E
Motosierra a batería Manual de instrucciones
P
Electroserra a bateria Manual de instruções
DK
Akku-kædesav Brugsanvisning
GR
Αλυσοπρίονο χωρίσ καλώδιο
Οδηγίεσ χρήσεωσ
AS-1812
2
ENGLISH FRANÇAIS
1
2
3
4
5
6
7
8
9
10
11
12
13
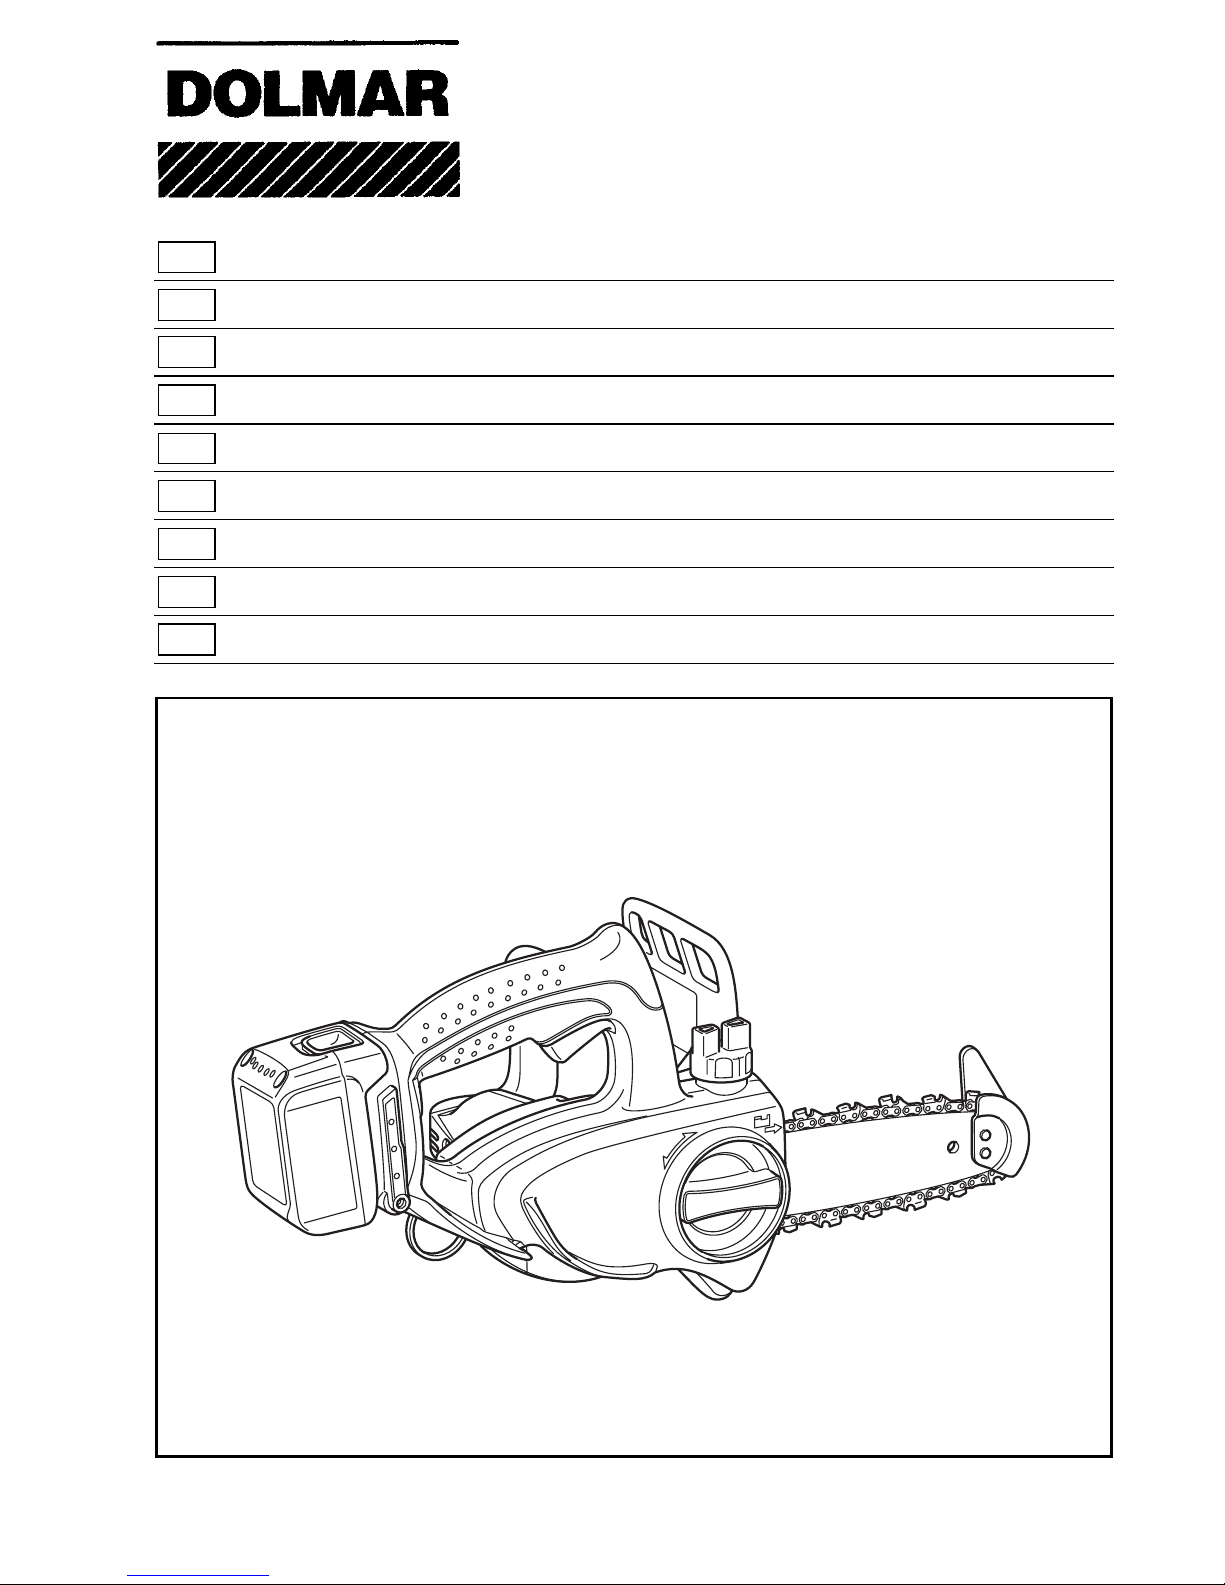
1 Top handle
2 Battery cartridge
3 Sprocket cover
4 Front hand guard
5 Guide bar
6 Tip guard
7 Saw chain
8 Knob
9 Lock-off button
10 Front handle
11 Switch trigger
12 Chain cover
13 Carabiner or rope attachment point
1 Poignée supérieure
2Batterie
3 Couvre-pignon
4 Protège-m ain avant
5 Guide de chaîne
6 Protection de la pointe
7Chaîne
8Bouton
9 Bouton de sécuri té
10 Poignée avant
11 Gâchette
12 Cache de chaîne
13 Point de fixation du mousqueton ou de la corde

3
DEUTSCH
ITALIANO
NEDERLANDS
ESPAÑOL
1Obergriff
2 Akku
3 Kettenraddeckel
4 Vorderer Handschutz
5Schwert
6 Berührungsschutz
7 Sägekette
8 Knopf
9 Einschaltarretierung
10 Frontgriff
11 Schalter
12 Kettenabdeckung
13 Befestigungsöse für Karabin er haken oder Seil
1 Manico superiore
2 Cartuccia batteria
3 Coperchio rocchetto
4 Protezione mano anteriore
5 Barra guida
6 Riparo punta
7 Catena sega
8 Manopola
9 Bottone di sblocco
10 Manico anteriore
11 Interruttore
12 Coperchio catena
13 Gancio o punto di attacco fune
1 Bovenhandgreep
2Accu
3 Afdekking van kettingwiel
4 Beschermkap van voorhandgreep
5 Zaagblad
6 Zaagpuntbescherming
7 Zaagketting
8Knop
9 Ontgrendelknop
10 V oorhandgreep
11 Trekschakelaar
12 Kettingdeksel
13 Bevestigingsoog voor karabijnhaak of touw
1 Empuñadura pri n cipal
2 Cartucho de batería
3 Cubierta del piñón
4 Protector de la mano delantera
5 Placa de guía
6 Guía de la punta de la sierra
7 Cadena de sierra
8 Perilla
9 Botón de seguro
10 Empuñadura delante ra
11 Gatillo interruptor
12 Cubierta de la caden a
13 Punto de sujeción de mosquetón o cuerda

4
PORTUGUÊS
DANSK
ΕΛΛΗΝΙΚΑ
1 Pega superior
2Bateria
3 Cobertura da roda dentada
4 Protector frontal das mãos
5 Espada
6 Resguardo da ponta
7 Corrente da electr ose rra
8Botão
9 Botão de bloqueio
10 Pega frontal
11 Gatilho do interruptor
12 Cobert ura da cor ren te
13 Ponto de fixação da corda ou gancho
1 Tophåndtag
2 Akku
3 Kædehjulsdæksel
4 Frontkappe
5Sværd
6 Næseanslag
7 Savkæde
8Drejeknap
9 Låseknap
10 Fronthåndtag
11 Afbryderknap
12 Kædedæksel
13 Fastgørelsespunkt til karabinhage eller reb
1 Άνω λαβή
2 Κασετίνα µπαταρίασ
3 Κάλυµµα οδοντωτού τροχού
4 Μπροστινσ προφυλακτήρασ χεριών
5 Κατευθυντήρια λάµα
6 Ακραίοσ προφυλακτήρασ
7 Αλυσίδα πριονιού
8 Κουµπί
9 Πλήκτρο ασφάλειασ
10 Μπροστινή λαβή
11 Σκανδάλη διακπτησ
12 Κάλυµµα αλυσίδασ
13 Carabiner ή σηµείο πρσδεσησ σχοινιού
5
12
34
56
13
11
9
12
13
11
8
9
10
6
7
4
5
1
2
3
6
78
910
11 12
13 14
1
2
20
19
17
16
18
1
2
14
15
6
7
15 16
17 18
19 20
21 22
22
23
3
21
8
23 24
25 26
27 28
29 30
28
29
27
25
12
26
12
25
22
24
24

9
Symbols
The followings show the symbols used for the tool. Be sure that you understand their meaning before use.
Symboles
Nous donnons ci-dessous les symboles utilisés pour l’outil. Assurez- vous que vous en avez bien compris la signification avant d’utiliser l’outil.
Symbole
Die folgenden Symbole w erden für die Maschine verwen det. Machen Sie sich vor der Be nutzung unbe dingt mit ihr er
Bedeutung vertraut.
Simboli
Per questo utensile vengono usati i simboli seguenti. Bisogna capire il loro significato prima di usare l’utensile.
Symbolen
Voor dit gereedschap worden de volgende symbolen gebruikt. Zo rg ervoor dat u de betekenis van deze symb olen
begrijpt alvorens het gereedsc hap te gebruiken.
Símbolos
A continuación se muestran los símbolos utilizados con esta herramienta. Asegúrese de q ue entiende su significado
antes de usarla.
Símbolos
O seguinte mostra os símbolos utilizados para a ferramenta. Certifique-se de que compreende o seu significado antes
da utilização.
Symboler
Nedenstående sym bole r e r a nvendt i forbindel se me d d enn e m ask in e. Vær sikker p å, a t D e ha r forståe t sym bo lernes
betydning, før maskinen anvendes.
Σύµβολα
Τα ακλουθα δείχνουν τα σύµβολα που χρησιµοποιούνται για το µηχάνηµα. Βεβαιωθείτε τι καταλαβαίνετε
τη σηµασία τουσ πριν απ τη χρήση.
❏ Read instruction manual.
❏ Lire le mode d’emploi.
❏ Bitte Bedienungsanleitung lesen.
❏ Leggete il manuale di istruzioni.
❏ Lees de gebruiksaanwijzing.
❏ Lea el manual de instrucciones.
❏ Leia o manual de instruções.
❏ Læs brugsanvisningen.
❏ ∆ιαβάστε τισ οδηγίεσ χρήσησ.
❏ Wear eye protection.
❏ Portez une protection pour les yeux.
❏ Eine Schutzbrille tragen.
❏ Indossare gli occhiali di protezione.
❏ Draag oogbescherming.
❏ Póngase protección para los ojos.
❏ Utilize protectores para os olhos.
❏ Brug øjenbeskyttelse.
❏ Να φοράτε προστατευτικά µατιών.

10
❏ Wear ear protection.
❏ Portez une protection pour les oreilles.
❏ Einen Gehörschutz tragen.
❏ Indossare la protezione delle orecchie.
❏ Draag gehoorbescherming.
❏ Póngase protección para los oídos.
❏ Utilize protectores para os ouvidos.
❏ Brug høreværn.
❏ Να φοράτε προστατευτικά αυτιών.
❏ Wear a helmet, goggles and ear protection.
❏ Portez un casque, des lunettes de sécurité et une protection pour les oreilles.
❏ Tragen Sie einen Helm, eine Schutzbrille und einen Gehörschutz.
❏ Indossare il casco, gli occhiali di protezione e i paraorecchi.
❏ Draag een veiligheidshelm, veiligheidsbril en oorbescherming.
❏ Póngase casco, gafas de seguridad y protección para los oídos.
❏ Use um capacete, óculos de segurança e protectores para os ouvidos.
❏ Bær hjelm, sikkerhedsbriller og høre værn.
❏ Να φοράτε κράνοσ και µέσα προστασίασ ρασησ και ακοήσ.
❏ Use appropriate protection for foot-leg and hand-arm.
❏ Portez des protections adéquates pour les pieds, les jambes, les mains et les bras.
❏ Angemessenen Schutz für Füße/Bei ne und Hände/Arme verwenden .
❏ Usare le protezioni appropriate per i piedi, le gambe, le mani e le braccia.
❏ Gebruik afdoende beschermingsmiddelen voor voet/been en hand/arm.
❏ Utilice protección apropiada para pies-piernas y manos-brazos.
❏ Utilize protectores adequados para os pés e pernas e também para as mãos e braços.
❏ Brug passende beskyttelse til fødder/ben og hænder/arme.
❏ Να χρησιµοποιείτε κατάλληλη προστασία για πέλµατα-κνήµεσ και χέρια-βραχίονεσ.
❏ Do not expose to rain.
❏ N’exposez pas l’outil à la pluie.
❏ Die Maschine keinem Regen aussetzen.
❏ Non esporre alla pioggia.
❏ Stel het gereedschap niet bloot aan regen.
❏ No exponga a la lluvia.
❏ Não exponha a ferramenta à chuva.
❏ Udsæt ikke saven for regn.
❏ Να µην εκτίθεται στη βροχή.
11
❏ Hold the saw with both hands while working! One-handed use is extremely hazardous!
❏ Tenez la scie fermement à deux mains pendant que vous travaillez ! L’utilisation avec une seule main
est extrêmement dangereuse !
❏ Die Säge während der Arbeit mit beiden Händen halten! Einhändiger Betrieb ist äußerst gefährlich!
❏ Tenere la sega con entrambe le mani durante il lavoro! L’uso con una sola mano è estremamente per-
icoloso!
❏ Houd de kettingzaag tijd ens het wer k met beid e handen vast! Gebrui k met slech ts één han d is uiter -
mate gevaarlijk.
❏ ¡Sujete la sierra con ambas manos mientras realiza el trabajo! ¡La utilización una sola mano es muy
peligroso!
❏ Segure a electroserra com as duas mãos ao trabalhar. É muito perigoso segurá-la só com uma mão.
❏ Hold i saven med begge hæmder unde r arbejdet! Anvendelse m ed kun den en e hånd på saven er
yderst farligt!
❏ Να κρατάτε το αλυσοπρίονο µε τα δύο χέρια στη διάρκεια τησ εργασίασ! Η χρήση µε το ένα
χέρι είναι εξαιρετικά επικίνδυνη!
❏ This saw is to be use d by properly trained operators only.
❏ Cette scie ne doit être utilisée que par des personnes ayant reçu une formation adéquate.
❏ Diese Säge darf nur von fachlich geschulten Personen benutzt werden.
❏ Questa sega deve essere usata soltanto dagli operatori addestrati appropriatamente.
❏ Deze kettingzaag mag alleen worden gebruikt door goed opgeleide personen.
❏ Esta sierra es para ser utilizada solamente por operarios debidamente preparados.
❏ Esta electroserra deve ser utilizada somente por operadores devidamente treinados.
❏ Denne sav må kun anvendes af oplærte operatører.
❏ Αυτ το αλυσοπρίονο προορίζεται για χρήση µνο απ κατάλληλα εκπαιδευµένουσ χειριστέσ.
❏ Only for EU countries
Do not dispose of electric equipment together with household waste material!
In observance of European Directive 2002/96/EC on waste electrical and electronic equipment and its
implementation in accordance with national law, electric equipment that have reached the end of their
life must be collected separately and returned to an environmentally compatible recycling facility.
❏ Pour les pays europ éen s unique me nt
Ne pas jeter les équipements électriques dans les ordures ménagères !
Conformément à la directive européenne 2002/96/EG relative aux déchets d’équipements électriques
ou électroniques (DEEE), et à sa transposition dans la législation nationale, les équipements électriques doivent être collectés à part et être soumis à un recyclage respectueux de l’environnement.
❏ Nur für EU-Länder
Werfen Sie Elektrogeräte nicht in den Hausmüll!
Gemäß Europäischer Richtlinie 2002/96/EG über Elektro- und Elektronik-Altgeräte und Umsetzung in
nationales Rech t müssen verbrauchte E lektrog eräte g etrenn t gesam mel t und ein er umweltge re chten
Wiederverwertung zugeführt werden.
❏ Solo per Paesi UE
Non gettare le apparecchiature elettriche tra i rifiuti domestici.
Secondo la Dir ettiva Europea 2002/96/CE sui rifiuti di appare cchiature elettric he ed elett roniche e l a
sua attuazione in conformità alle norme nazionali, le apparecchiature elettriche esauste devono
essere raccolte separatamente, al fine di essere riciclate in modo eco-compatibile.

12
❏ Alleen voor EU-landen
Geef elektrische apparaten niet met het huisvuil mee!
Volgens de Europese rich tlijn 2002/96/EG inzake oude elektr ische en elektronisc he apparaten en de
toepassing daar van binnen de nat ionale wetgeving, dient gebru ikt elektr ische apparate n gescheid en
te worden ingezameld en te worden af gevoerd naar een recycle bed rijf da t voldoet aan de ge ldende
milieu-eisen.
❏ Sólo para países de la Unión Europea
¡No deseche los aparatos eléctricos junto con los residuos domésticos!
De conformidad con la D irectiva Europea 2002/9 6/CE sobre residu os de aparatos eléct ricos y elec-
trónicos y su aplicació n de acuerdo co n la legislación na cional, los ap aratos eléct ricos cuya vida útil
haya llegado a su fin se deberán recoger por separado y trasladar a una planta de reciclaje que cumpla con las exigencias ecológicas.
❏ Apenas para países da UE
Não deite ferramentas eléctric as no lix o domé stico !
De acordo com a directiva europeia 2002/96/CE sobre ferramentas eléctricas e electrónicas usadas e
a sua aplicação para as leis nacionais, as ferramentas eléctricas us adas deven ser reco lhidas em
separado e encaminhadas a uma instalação de reciclagem dos materiais ecológicos.
❏ Kun for EU-lande
Elværktøj må ikke bortskaffes som almindeligt affald!
I henhold til det europæiske direktiv 2002/96/EF om bortskaffelse af elektriske og elektroniske produk-
ter og gældende national lovgivning skal brugt elværktøj indsamles separat og returneres til miljøgodkendt genindvinding.
❏ Μνο για τισ χώρεσ τησ ΕΕ
Μη πετάτε τα είδη ηλεκτρικού εξοπλισµού µαζί µε τα οικιακά απορρίµµατα.
Σε τήρηση τησ Eυρωπαϊκήσ Oδηγίασ 2002/96/ΕΚ, περί απορριµµάτων ειδών ηλεκτρικού και
ηλεκτρονικού εξοπλισµού και την εφαρµογή τησ σύµφωνα µε την εθνική νοµοθεσία, τα είδη
ηλεκτρικού εξοπλισµού που έχουν φθάσει στο τέλοσ τησ ζωήσ τουσ πρέπει να συλλέγονται
ξεχωριστά και να επιστρέφονται σε µιά περιβαλλοντικά συµβατή εγκατάσταση ανακύκλωσησ.

13
ENGLISH
Explanation of general view
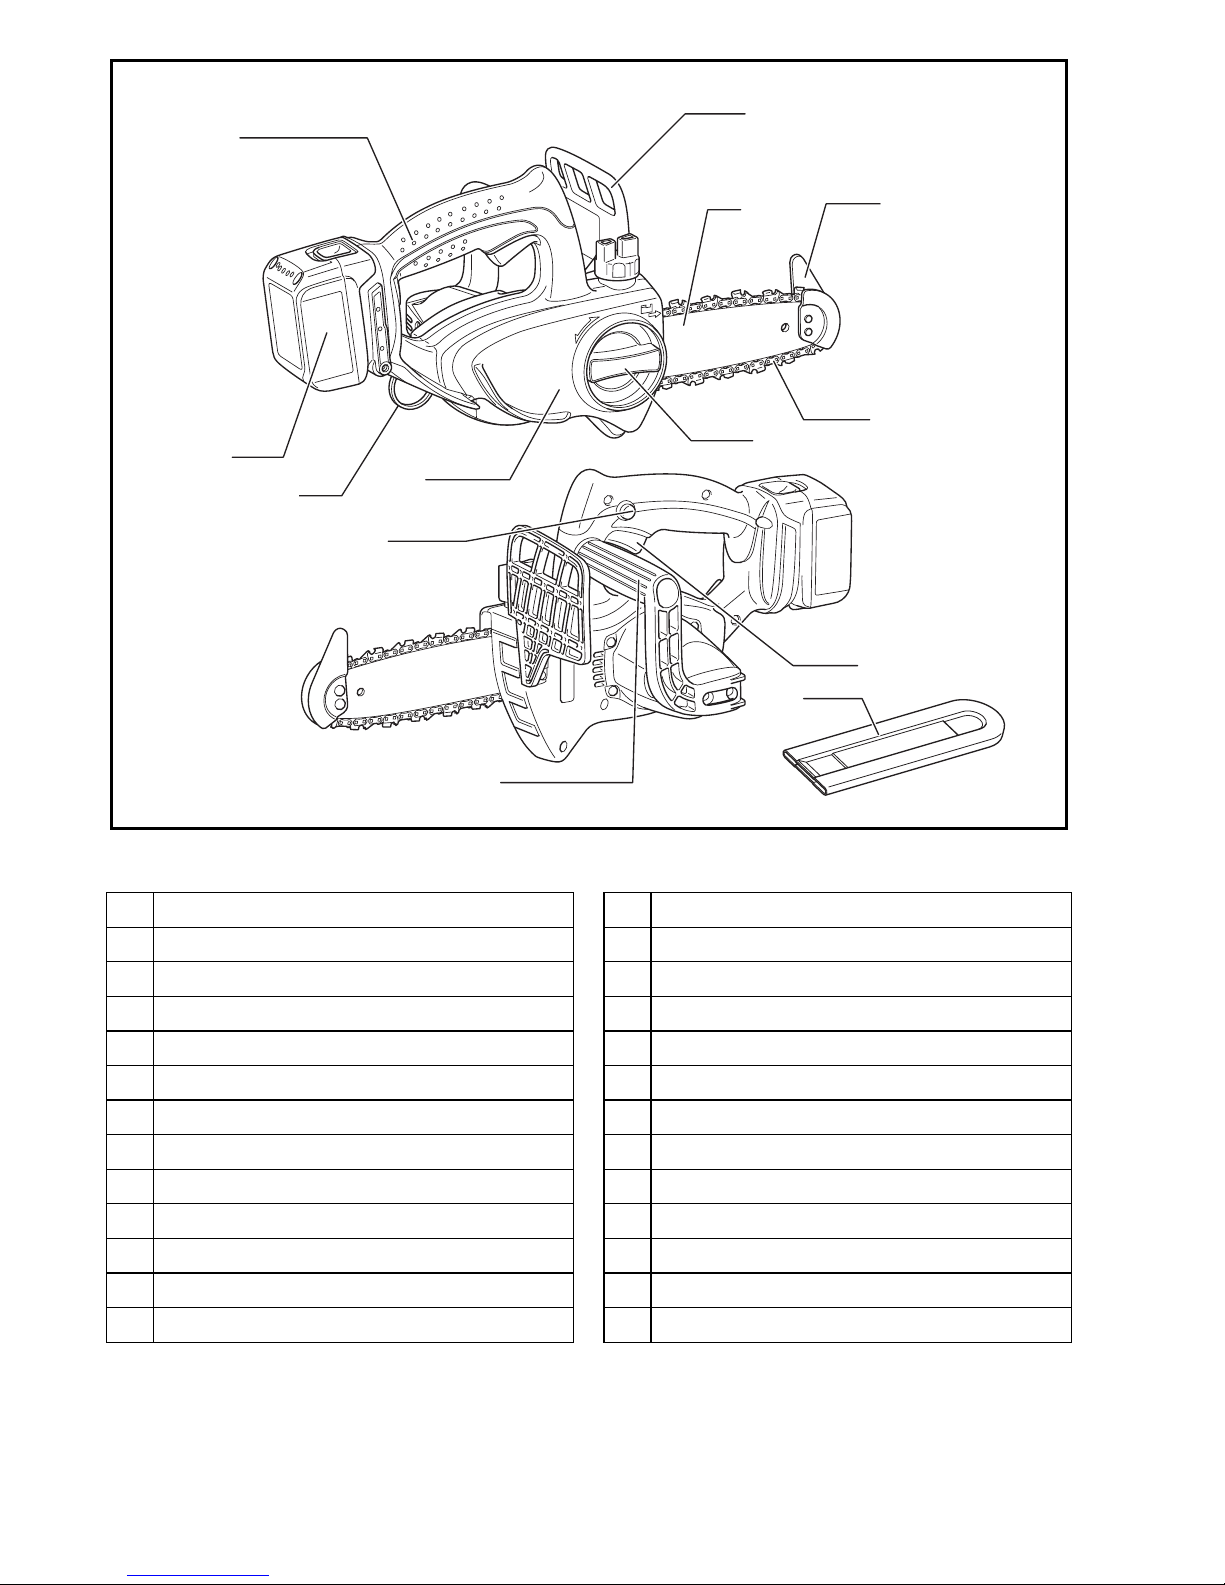
1 Red part
2 Button
3 Battery cartridge
4 Lock-off button
5 Switch tr igger
6 Spro cke t c over
7Knob
8Cutter
9 Guide bar
10 Arrow
11 Spring
12 Sprocket
13 Boss
14 Hook
15 Hole
16 Oil tank cap
17 Oil inspection window
18 Oil tank opening
19 Tip guard
20 Lower guide
21 Scabba rd (ch ai n cover)
22 Push nut
23 Slotted bit screwdriver
24 Filter
25 Lo cking ri ng
26 Washer
27 Limit mark
28 Brush holder cap
29 Screwdriver
SPECIFICATIONS
• Due to our conti nuing program of re search and development, the specifications herein are subject to change
without notice.
• Note: Specifications may differ from country to country .
Intended u se
The tool is intended for cutting lumbers and logs.
Safety hints
For your own safety, please refer to t he enclosed safety
instructions.
GEB037-1
Chain saw safety warnings:
DO NOT let comfort or familiarity with product
(gained from repeated use) replace strict adherence
to chain saw safety rules. If you use this tool
unsafely or incorrectly, you can suffer serious personal injury.
1. Keep all parts of the body away from the saw
chain when the chain saw is operating. Before
you start the chain saw, make sure the saw chain
is not co ntacting anything. A moment of inatten-
tion while operating chain saws may caus e entanglement of your clothing or body with the saw chain.
2. Always hold the chain saw with your right hand
on the rear handle and your left hand on the
front handle. Holding the chain saw with a reversed
hand configuration increases the risk of personal
injury and should never be done.
3. Wear safety gla ss es an d hea r ing prote cti on . Fur -
ther protective equipment for head, hands, legs
and feet is recommended. Adequate protective
clothing will redu ce personal injury by flying debr is
or accidental contact with the saw chain.
4. Do not operate a chain saw in a tree. Operation of
a chain saw while up in a tree may result in personal
injury.
5. Always keep proper footing and operate the
chain saw only when standin g on fixed, secure
and level surface. Slippery or unstable surfaces
such as ladders may cause a loss of balance or control of the chain saw.
6. When cutting a limb that is under tension be
alert for spring back. When the tension in the wood
fibres is releas ed the sprin g loaded limb m ay strike
the operator and/or throw the chain saw out of control.
7. Use extreme caution when cutting brush and
saplings. The slen der material may catch the saw
chain and be whipped toward you or pull you off balance.
8. Carry the chain saw by the front handle with the
chain sa w swi tc hed off an d aw ay fr om your bod y.
When transporting or storing the chain saw
always fit the guide bar cover. Proper handling of
the chain saw will reduce the likelihood of accidental
contact with the moving saw chain.
9. Follow instructions for lubricating, chain tensioning and changing accessories. Improperly
tensioned or lubricated chain may either break or
increase the chance for kickback.
10. Keep handles dry, clean, and free from oil and
grease. Greasy, oily handles are slippery causing
loss of control.
Model AS-1812
Chain speed per minute (min
–1
) 5.0 m/s (300 m/min)
Length of guide bar 115 mm
Saw chain
Type 25 AP
Pitch 1/4”
No. of drive links 42
Overall length 422 mm
Net weight 2.5 kg
Rated voltage D.C. 18 V
14
11. Cut wood only. Do not use chain saw for purposes not intended. For example: do not use
chain saw for cutting plastic, masonry or nonwood building materials. U se of the chain s aw for
operations different than intended could re sult in a
hazardous situation.
12. Causes and operator prevention of kickback:
Kickback may occur when the nose or tip of the
guide bar touches an object, or when the wood
closes in and pinches the saw chain in the cut.
Tip contact in some cases may cause a sudden
reverse reaction, kicking the guide bar up and back
towards the operator.
Pinching the saw cha in along the top of the guide
bar may push the guide bar rapidly back towards the
operator.
Either of these reactions may cause you to lose control of the saw which could result in serious personal
injury. Do not rely exclusively upon the safety
devices built into your saw. As a chain saw user, you
should take several steps to keep your cu tting jobs
free from accident or injury.
Kickback is the result of tool m isuse and /or incor rect
operating procedures or conditions and can be
avoided by taking proper precautions as given
below:
- Maintain a firm grip, with thumbs and fingers
encircling the chain saw handles, with both hands
on the saw and position your body and arm to
allow you to resist kickback forces. Kickback
forces can be controlled by the operator, if proper
precautions are taken. Do not let go of the chain
saw.
- Do not ove rreach and do no t c ut ab ove sh o ul-
der height. This helps prevent unintended tip
contact and enables better control of the chain
saw in unexpected situations.
- Only use replacement bars and chains speci-
fied by the m anu fac tu re r. Incorrect r eplacement
bars and chains may cause cha in breakage and /
or kickback.
- Follow the manufacturer’s sharpening and
maintenance instructions for the saw chain.
Decreasing the depth gauge height can lead to
increased kickback.
ADDITIONAL SAFETY RULES
1. Read the instruction manual in order to familiarize
yourself with operation of the chain saw.
2. Before using the chain saw for the first time, arrange
to have instruction in its operation. If this is not possible, at least practice cutting round timber on a trestle before beginning work.
3. The chain saw must not be used by children or
young persons und er 18 years of age. Young persons over 16 years of age may be exempted from
this restr iction if they are u ndergoing traini ng under
the supervision of an expert.
4. Working with the chain saw requires a high level of
concentration. Do not work wit h the saw if you are
not feeling fit and well. Carry out all work calmly and
carefully.
5. Never work un der the influ ence of alcohol , drugs or
medication.
Proper use
1. The chain saw is intended solely for cutting wood.
Do not use it for example to cut plastic or porous
concrete.
2. Onl y use the chain saw for operations described in
this instru ction manual. Do not, for example, use it
to trim hedges or for similar purposes.
3. The chain saw must not be used for forestry work,
i.e. for felling and limbing standing timber. The chain
saw cable does not provide the operator with the
mobility and safety required for such work.
4. The chain saw is not intended for commercial use.
5. Do not overload the chain saw.
Personal protective equipment
1. Clothin g must be close-fitting, but must not obstr uct
mobility.
2. Wear the following protective clothing during work:
• A tested safety helmet, if a hazard is presente d by
falling branches or similar;
• A face mask or goggles;
• Suitable ear protection (ear muffs, custom or moul-
dable ear plugs). Octave band analysis upon
request.
• Firm leather safety gloves;
• Long trousers manufactured from strong fabric;
• Protective dungarees of cut-resistant fabric;
• Safety shoes or boots with non-slip soles, steel
toes, and cut-resistant fabric lining;
• A breathing mask, when carrying out wo rk which
produces dust (e.g. sawing dry wood).
Safe working practices
1. Do not operat e the cha in saw in the vi cinity of f lammable dust or gases, as the mot or g ene rate s sparks
and presents a risk of explosion.
2. Work only on fi rm ground and with a good footing.
Pay particular atte ntion to o bstacles (e.g. the c able)
in the working area. Take particular care where
moisture, ice, snow, freshly cut wood or bark may
make surfaces slippery. Do not stand on lad ders or
trees when using the saw.
3. Take particular care when working on sloping
ground; rolling trunks and branches pose a potential
hazard.
4. Clean the area to be cut of foreign objects such as
sand, stones, nails, wire, etc. Foreig n objects damage the bar and chain, and can lead to dan gerous
kickback.
5. Take particular care when cutting in the vicinity of
wire fences. Do nut cut into the fence, as the saw
may kick back.
6. Do not cut into the ground.
7. Cut pieces of wood singly, not in bunches or stacks.
15
8. Avoid using the saw to cut thin branches and roots,
as these can become entangled in the chain saw.
Loss of balance presents a hazard.
9. Use a secure support (trestle) when cutting sawn
timber.
10. Do not use the chai n saw to pr ise off or br ush away
pieces of wood and other objects.
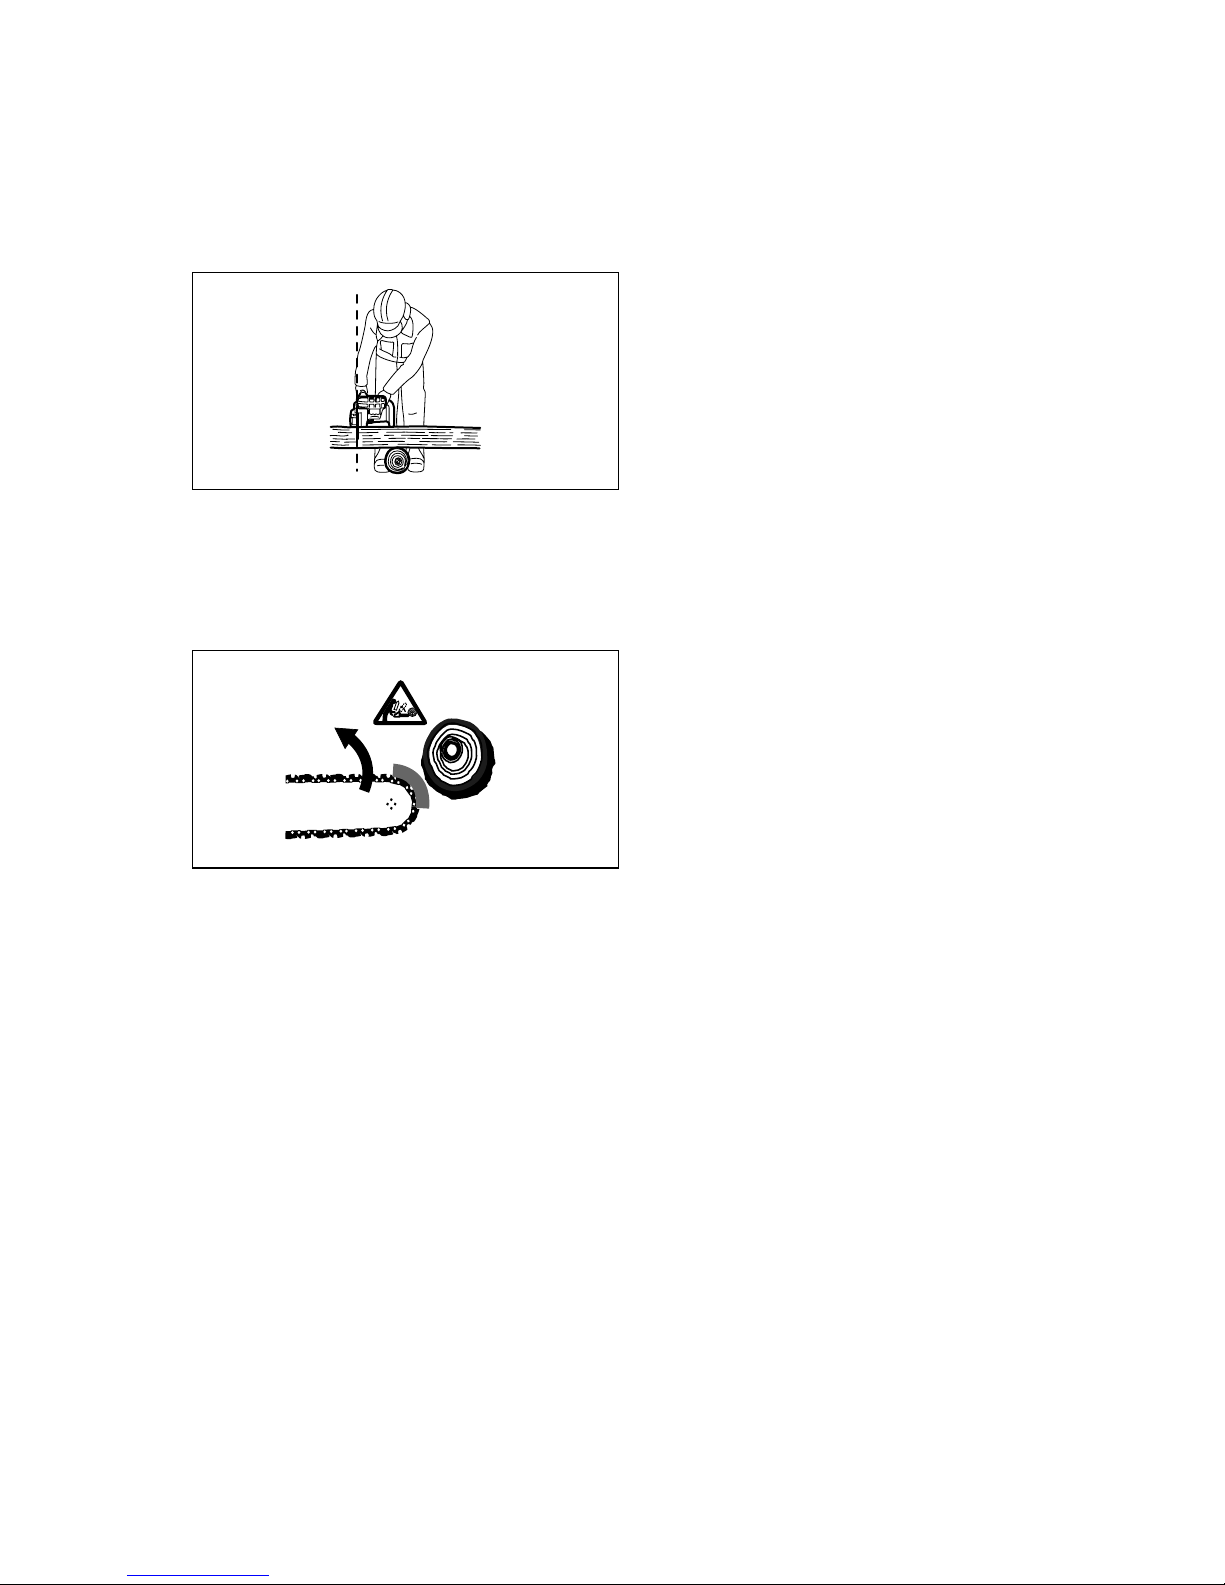
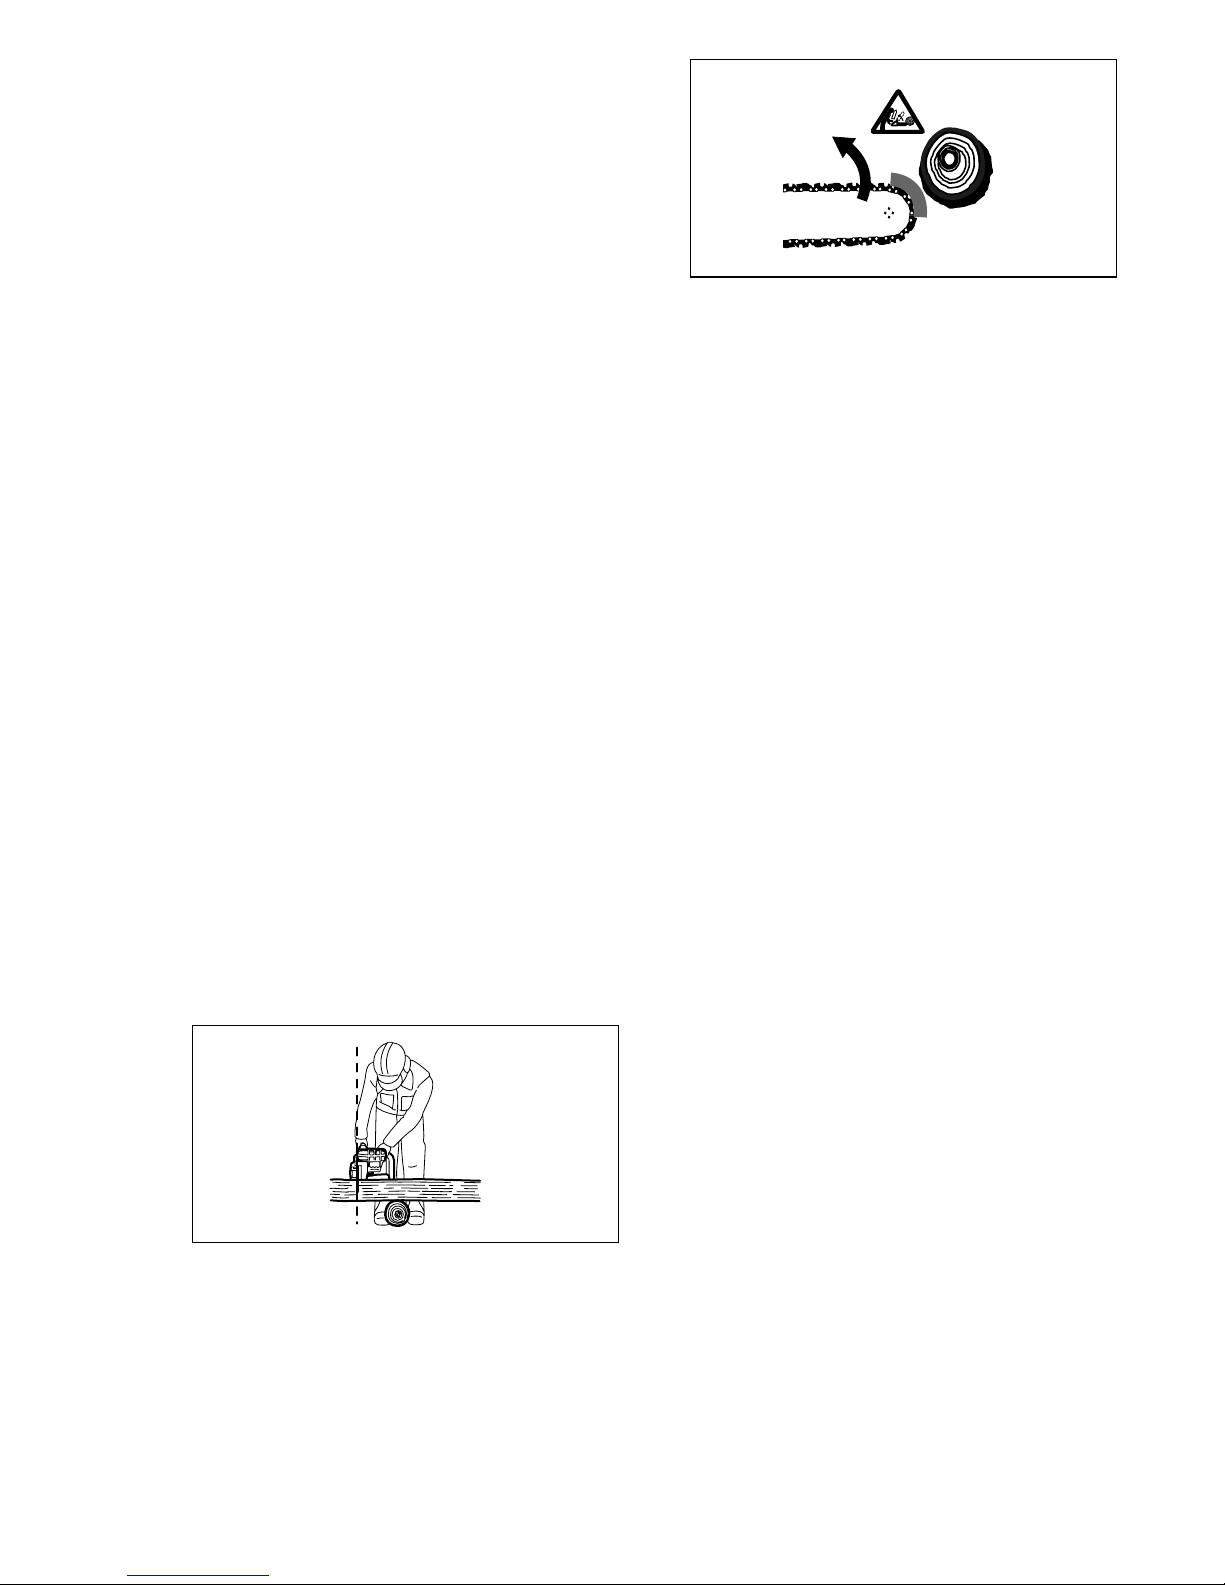
11. Guide the chain saw such that no par t of your body
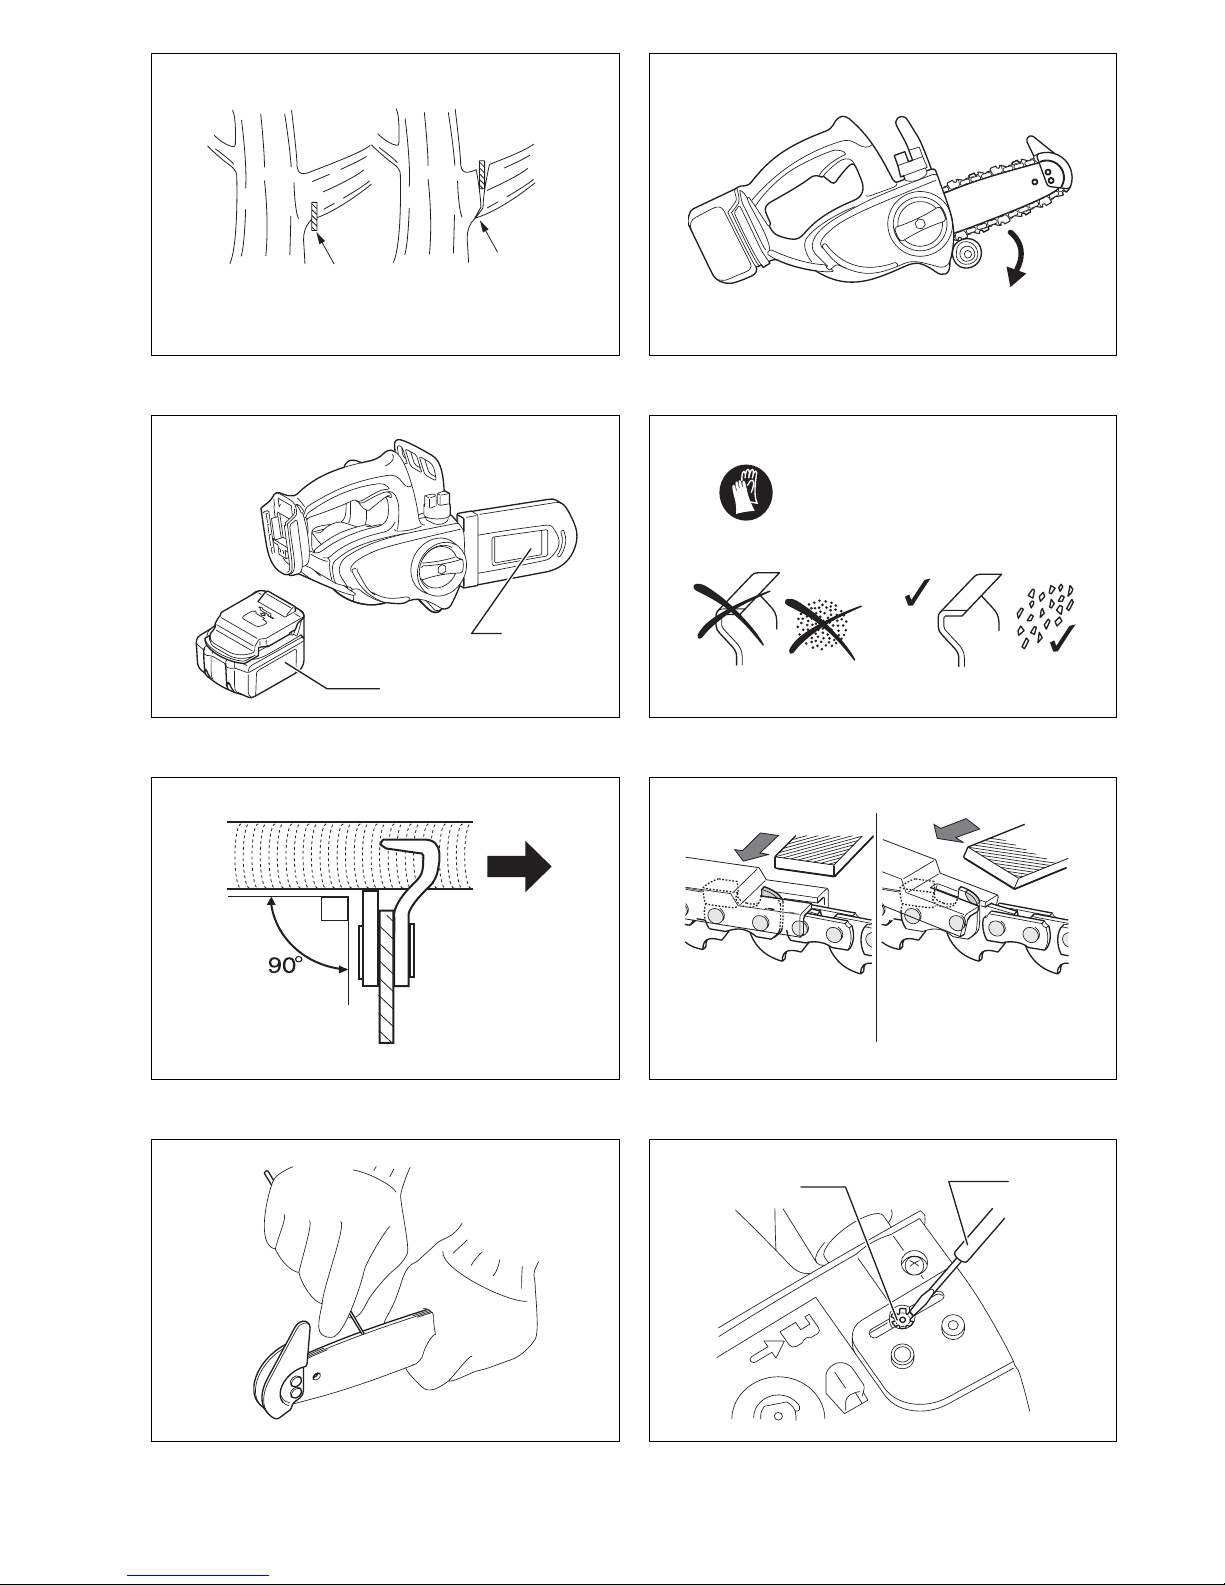
is within the extended path of the saw chain (see figure).
Kickback
1. Haz ardous kickback may arise dur ing work with the
chain saw. Kickback arises when th e tip of the bar
(in particular the upper quarter) comes into contact
with wood or another solid object. This causes the
chainsaw to be deflected in the direction of the operator.
2. In order to avoid kickback, observe the following:
• Never begin the cut with the tip of the bar.
• Never use the tip of the bar for cutting. Take partic-
ular care when resuming cuts whi ch have already
been started.
• Start the cut with the chain running.
• Always sharpen the chain correctly. In particular,
set the depth ga uge to the corr ect height (re fer to
“Sharpening the chain” for details).
• Never saw through several branches at a time.
• When limbing, take care to prevent the bar from
coming into contact w ith other branches.
• When bucking, keep clear of adjacent trunks.
Always observe t he bar tip.
• Use a trestle.
Transport and storage
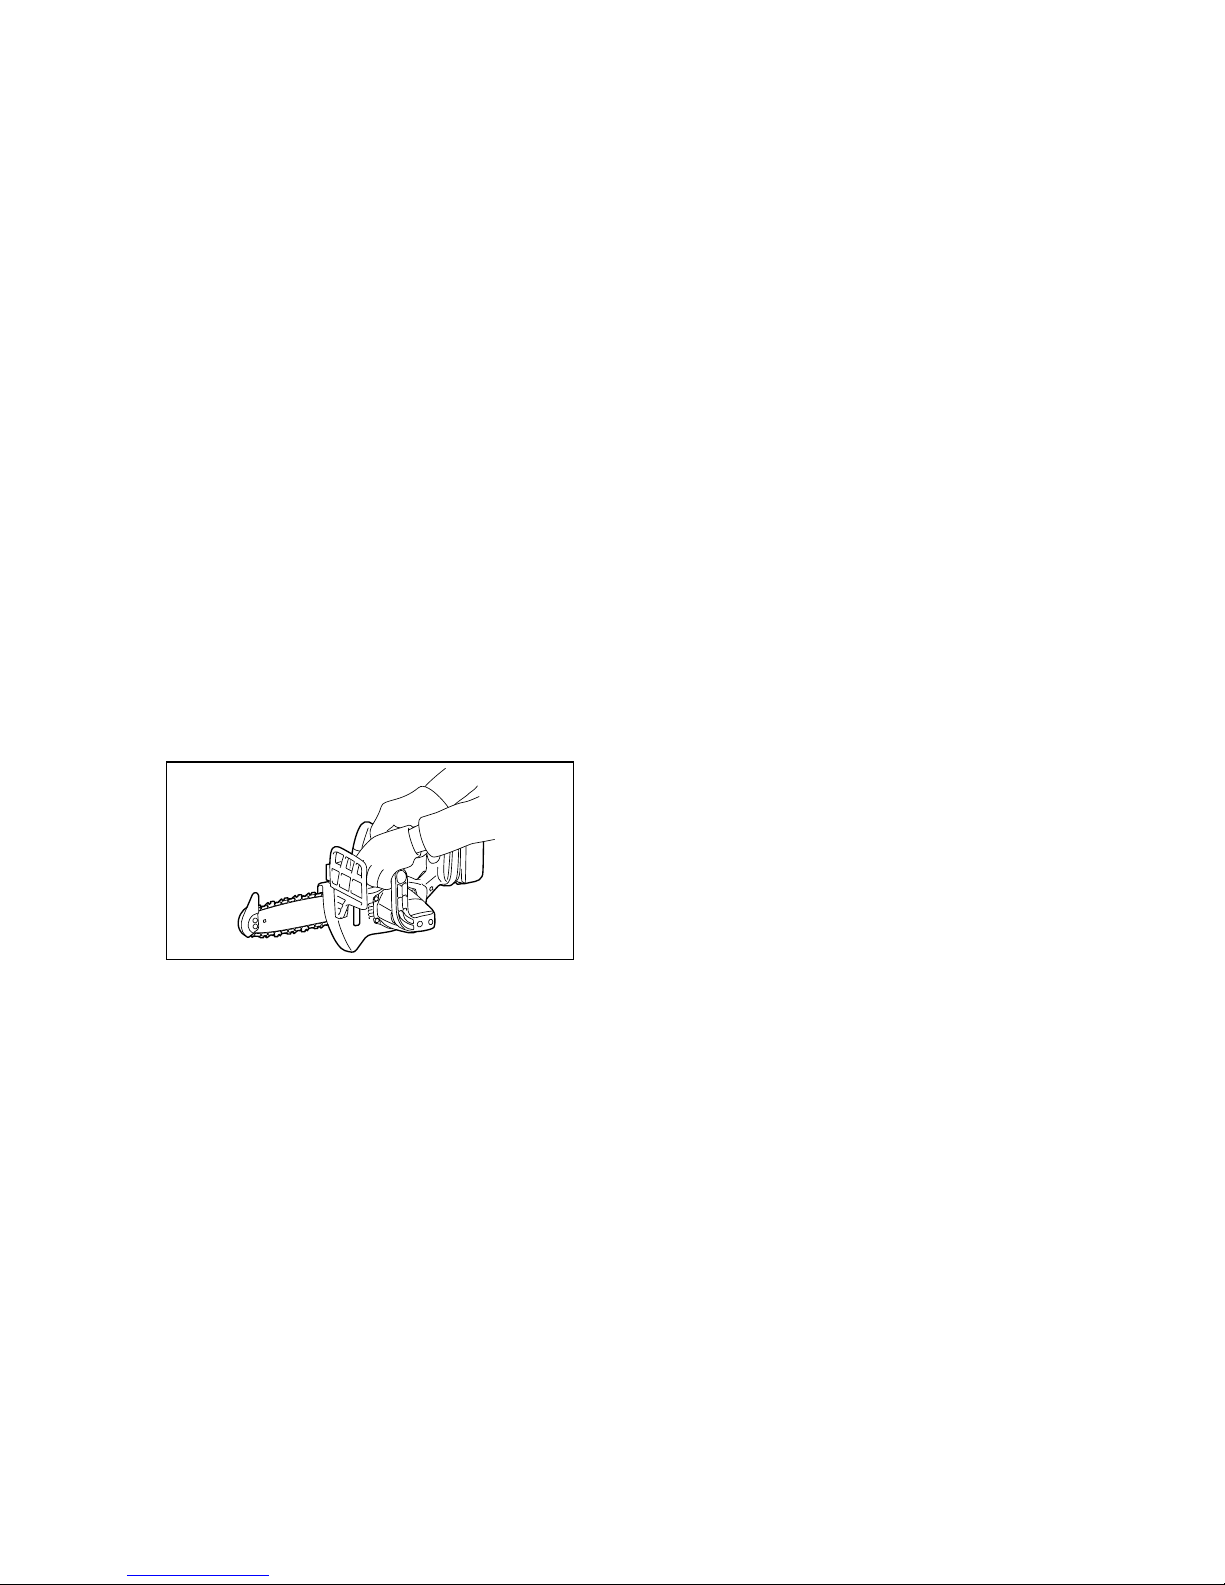
1. Carr y the chain saw by the front handle only, with
the bar pointing backwards.
2. Keep the chain saw in a secure, dry and locked
room out of th e reach of childre n. Do not store the
chain saw outdoors.
SAVE THESE INSTRUCTIONS.
WARNING:
MISUSE or failu re to follow th e safety ru les stated in
this instruc tion manual may ca use seriou s personal
injury.
IMPOR TANT SAFET Y IN S TRUCTION S FOR
CHARGER & BATTERY CARTRIDGE
ENC004-1
1. Before using battery cartridge, read all instructions and cautionary markings on (1) battery
charger, (2) battery, and (3) product using battery.
2. Do not disassemble battery cartridge.
3. If operating time has become excessively
shorter, stop operating immediately. It may
result in a risk of overheating, possible burns
and even an explosion.
4. If electrolyte gets into your eyes, rinse them out
with clear water and see k m edi cal attention ri ght
away. It may result in loss of your eyesight.
5. Do not short the battery cartridge:
(1) Do not touch the terminals with any conduc-
tive materi al.
(2) Avoid stor ing ba tter y car tr idge in a con tain er
with other metal objec ts such as na ils, coins,
etc.
(3) Do not expose battery cartrid ge to water or
rain.
A battery short can caus e a large cur rent flow,
overheating, possible burns and even a breakdown.
6. Do not store the tool and battery cartridge in
locations where the temperature may reach or
exceed 50°C (122°F).
7. Do not incinerate th e battery car tridge even if it
is severely damag ed or is com pletely worn out.
The battery cartridge can explode in a fire.
8. Be careful not to drop or strike battery.
SAVE THESE INSTRUCTIONS.
Tips for maintaining maximum battery life
1. Charge the battery cartridge before completely
discharged.
Always stop tool operation and charge the battery cartridge when you notice less tool power.
2. Never recharge a fully charged battery cartridge.
Overcharging shortens the battery service life.
3. Ch arge the b atter y car t ridge with room temper ature at 10°C – 40°C (50° F – 104°F ). Let a hot battery cartridge cool down before charging it.
FUNCTIONAL DESCRIPTION
CAUTION:
• Always be sure that the tool is switched off and the bat-
tery cartridge is removed before adjusting or checking
function on the tool.
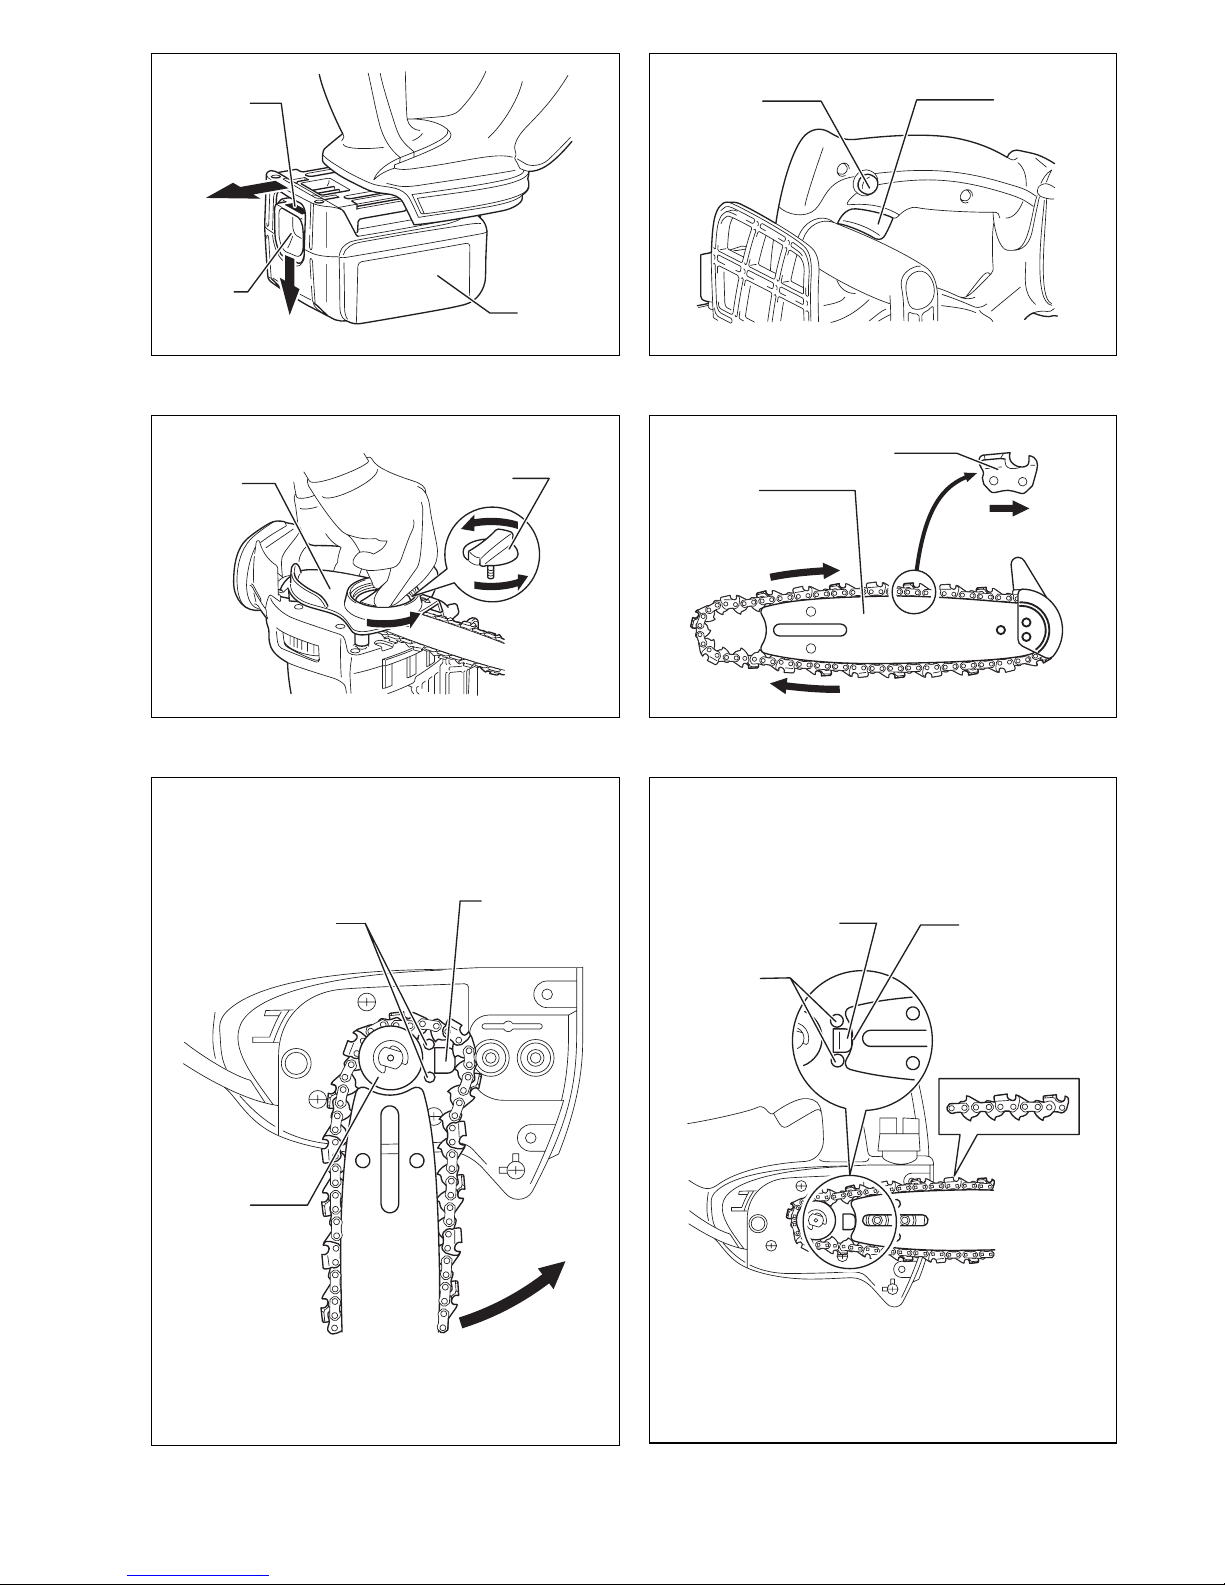
Installing or removing battery cartridge (Fig. 1)
• Always switch off the tool before installing or removal of
the battery cartridge.
• To remove the battery car tridge, withdraw it from the
tool while sliding the button on the front of the cartridge.
• To inser t the batter y cartr idge, align the to ngue on the
battery ca rtridge w ith t h e g r oo ve in the ho usi n g and s l ip
it into place. Always inser t it all the way until it locks in
place with a little click. If you can see the red part on
the upper side of the butto n, i t is not locked com ple tely.
Insert it fully until the red par t can not be seen. If not, it
may accidentally fall out of the tool, causing injury to
you or someone around you.

16
• Do not use force when inserting the battery ca rtridge. If
the cartridge does not slide in easily, it is not being
inserted correctly.
Switch actio n (Fig. 2)
CAUTION:
• Before inserting the battery cartridge into the tool,
always check to see that the switch trigger actuates
properly and returns to the “OFF” position when
released.
To prevent the switch trigger from being accidentally
pulled, a lock-off button is provided.
To star t the tool, depress t he lock-off butto n and pu ll the
switch trigger. Release the switch trigger to stop.
ASSEMBLY
CAUTION:
• Always be sure that the tool is switched off and the battery cartridge is removed before carrying out any work
on the tool.
Installing or removing saw chain
CAUTION:
• Always be sure that the tool is switched off and the battery car tridge is removed before installing or removing
the saw chain.
• Always wear gloves when installing or removing the
saw chain.
• Use only saw chain and guide bar with bar tip designed
for this chain saw (see the Ext ract fr om the sp ar e pa rts
list).
• In order to prevent kickback, do not remove the bar tip
or replace the guide bar with one without a bar tip.
Loosen the screw by turnin g counterclockwise the knob
until the sprocket cover comes off. (Fig. 3)
Remove the sprocket cover.
Remove saw chain and guide bar from the tool.
Fit in one end of the saw chain on the top of guide bar. At
this time, fit the saw chain as shown in the figure
because it rotates in the direction of arrow. (Fig. 4)
Place the saw chain so that the spring and boss are positioned inside it and fit in the other end of saw chain
around the sprocket as shown in the figure. (Fig. 5)
While turnin g th e gu id e ba r co unt erclo ckwise, in sta ll it so
that the end of guide bar contacts the spring. (Fig. 6)
Insert th e hook o f sprocket cover into the hole in the tool
and then place the sprocket cover on the tool. (Fig. 7)
Turn the knob clockwise to tighten the screw firmly.
(Fig. 8)
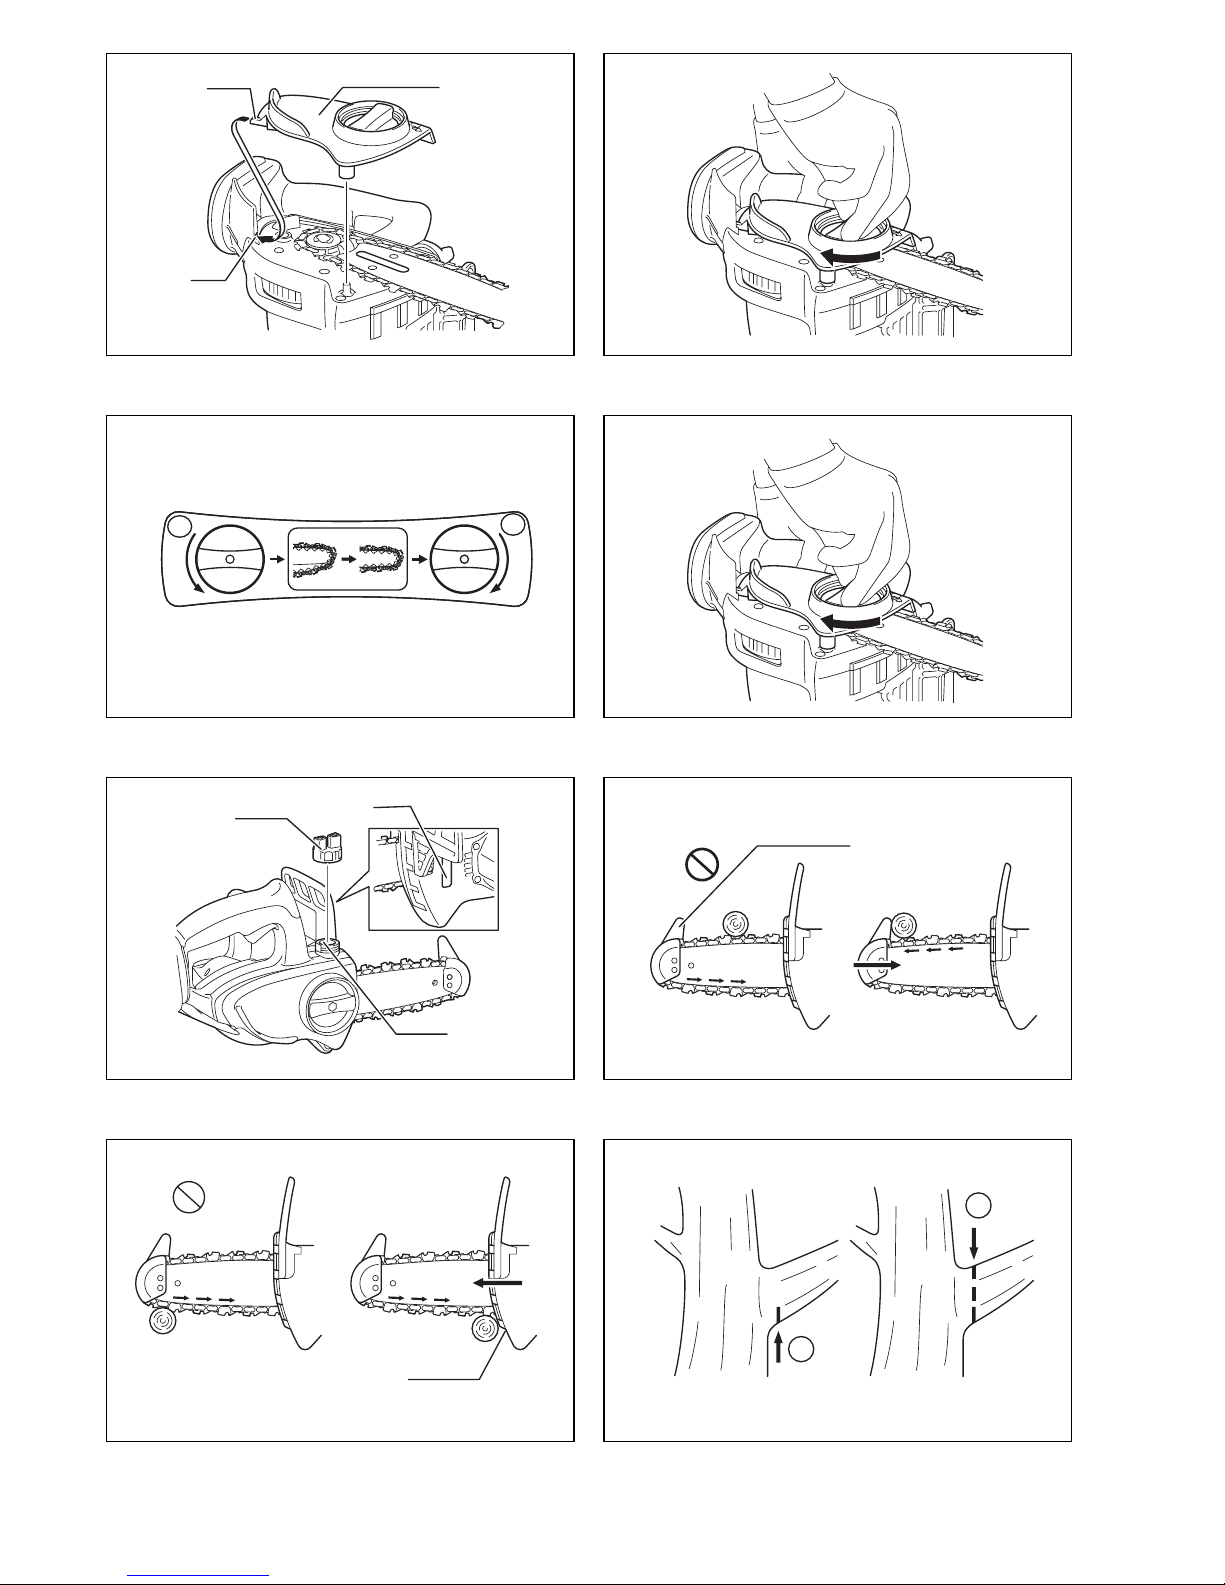
Adjusting saw chain tension (Fig. 9 & 10)
Just a slight loosening of the screw allows the saw chain
tension to be adjusted.
After adjusting, retighten the screw firmly.
CAUTION:
• For a while after a new saw chain is installed, it tends to
become loosened. From time to time check the saw
chain tension before use.
• Low tension of saw chain may cause coming out of
place.
• Installing or removing saw chain sho uld be carried out
in a clean place free from sawdust and the like.
OPERATION
Lubrication (Fig. 11)
Saw chain is automatically lubricated when the tool is in
operation.
Check the amount of r em ainin g oi l in the oil tank thro ugh
the oil inspection window.
To refill the tank, remove the cap from the oil tank opening. The oil tank capacity is 80 ml.
After refilling the tank, always screw the provided oil tank
cap on the chain saw.
CAUTION:
• When filling the chain saw with chain oil for the first
time, or refilling the tank after it has be en completely
emptied, add oil up to the bottom edge of the filler neck.
The oil delivery may otherwise be impaired.
• As a saw c hain oil, use o il exclus ively for Dol ma r cha in
saws or oil available in market.
• Never use oil including dust and particles or volatile oil.
• When pruning trees, use botanical oil. Mineral oilmay
harm trees.
• Never force the chain saw when pruning trees.
• Before cutting out, make sure that the provided oil tank
cap is screwed in place.
Hold the chain saw away from the tree. Star t it an d wait
until lubrication on saw chain is adequate.
Bring the tip guard/lower guide into contact with the
branch to be cut before switching on. Cutting withoutbringing the tip guard/lower guide into contact with thebranch may cause the guide bar to wobble, resulting
ininjury to operator.
Saw the wood to be cut by just moving it down.
Pruning trees
CAUTION:
• Keep all parts of the body away from the saw chain
when the motor is operating.
• Hold the chain saw firmly with both hands when the
motor is running.
• Do not overreach. Keep proper foot ing and ba lance at
all times.
Bring the tip guard/lower guide into contact with the
branch to be cut before switching on. Cutting without
bringing the tip guard/lower guide into contact with the
branch may cause the guide bar to wobble, resulting in
injury to operator. (Fig. 12 & 13)
When cutting thick branches, first make a shallow undercut and then make the finish cut from the top. (Fig. 14)
If you try to cut off th ick branches from the bottom, the
branch may close in and pinch the saw chain in the cut. If
you try to cut off thick branche s from the top without a
shallow undercut, the branch may splinter. (Fig. 15)
If you cannot cut the timber right th rough with a single
stroke:
Apply light pressure to the handle and continue sawing
and draw the chain saw back a little; then apply the spike
a little lower and finish the cut by raising the handle.
(Fig. 16)
Carrying tool (Fig. 17)
Always remove the battery cartridge from the tool and
overlap the guid e bar with the scabbard before carr ying
the tool. Also cover the battery car tr idge with the batte ry
cover.

17
MAINTENANCE
CAUTION:
• Always be sure that the tool is switched off and the battery car trid ge is removed before attemptin g to perform
inspection or maintenance.
• Always wear gloves when performing any inspection or
maintenance.
Sharpe n in g the saw chain
CAUTION:
• Always remove the battery cartrid ge and wear safety
gloves when performing work on the saw chain.
Sharpen the saw chain when:
• Mealy sawdust is produced when damp wood is cut;
• The chain penetrates the wood with difficulty, even
when heavy pressure is applied;
• The cutting edge is obviously damaged;
• The saw pulls to the left or right in the wood. The reason for this behaviour is uneven sharp enin g of the saw
chain, or damage to one side only. (Fig. 18)
Sharpen the saw chain frequently, but remove only a
little material each time.
Two or three strokes with a file are usually sufficient for
routine resharpening. When the saw chain has been
resharpen ed several times, have it sharpe ned in a DO LMAR specialist repair shop.
File and file guiding
• Use a special round file (optional accessor y) for saw
chains, with a diamete r of 4 m m, to sha r pen th e chain.
Normal round files are not suitable.
• The file should only engage the material on the forward
stroke. Lift the file off the material on the return stroke.
• Sharpen th e sh ortest cutt er first. Th e len gth of this c utter is then the ga uge dimens ion for all othe r cutters on
the saw chain.
• Guide the file as shown in the figure. (Fig. 19)
• The file can be guided more easily if a file holder
(accessor y) is employed. The file hol der has mark ings
for the correct sharpening angle of 30 ° (align the markings parallel to the saw chain) and limits the depth of
penetration (to 4/5 of the file diameter).
Guide the file as shown in the figure. (Fig. 20)
• After sharpening the chain, check the height of the
depth gauge using the chain gauge tool (optional
accessory).
• Remove any projecting material, however small, with a
special flat file (optional accessory).
• Round off the front of the depth gauge again.
• Wash away dust and particles from saw chain after
adjusting the height of depth gauge.
Cleaning guide bar (Fig. 21)
Chips and sawdust will build up in the guide bar groove,
clogging it and impairing oil flow. Always clean out the
chips and sawdust when sharpening or replacing the saw
chain.
Cleaning the oil fi lter at the oil discharge hole
Small dust or particles may be built up in the oil filter at
the oil discharge hole during operation.
Small dust or particles built up in the oil filter may impair
the oil discharg e flow and cause an insuffic ient lubrication on the whole saw chain.
When a poor ch ain oi l deli ver y occurs at th e top of gu i de
bar, clean the filter as follows.
Remove the battery cartridge fro m the tool.
Remove the sprocket cover and saw chain f rom th e tool.
(Refer to the section titled “Installing or removing saw
chain”.)
Remove the push nut using a slotted bit screwdriver with
a slender shaft or the like. (Fig. 22)
Take the filter out of the chain saw and remove small dust
or par ticles from it. When the f ilter is too d irty, replace it
with a new one. (Fig. 23)
Insert the battery cartridge into the tool.
Pull the switch trigger to flow built-up dust or particles off
the oil discharge hole by discharging chain oil. (Fig. 24)
Remove the battery cartridge from the tool.
Insert the cleaned oil filter into the oil discharge hole.
When the filter is too dirty, replace it with a new one.
(Fig. 25)
Insert the push nut with its correct side facing up as
shown in the figure into the oi l discharge hole to secure
the filter. When the filter cannot be secured with a disfigured push nut, replace the push nut with a new one.
(Fig. 26)
Reinstall the sprocket cover and saw chain on the tool.
Replacing the sprocket (Fig. 27 & 28)
Before fitting a new saw chain, check the condition of the
sprocket.
CAUTION:
• A worn sprocket will damage a new saw chain. Have
the sprocket replaced in this case. The sprocket need
to be installed so th at it always faces as shown in the
figure.
Always fit a new locking ring when replacing the
sprocket.
Replacing carbon brushes (Fig. 29 & 30)
Remove and check the carbon brushes regularly.
Replace when th ey wear down to the limit mark. Keep
the carbon br ushes clea n and fre e to slip in the holde rs.
Both carbon brushes should be replaced at the same
time. Use only identical carbon brushes.
Use a screwdriver to remove the brush holder caps. Take
out the worn carbon brushes, inser t the new ones and
secure the brush holder caps.
Storing tool
Clean the tool before storing. Remove any chips and
sawdust from the tool after rem oving the spro cket cover.
After cleaning the too l, run it under no load to lubr icate
the saw chain and guide bar.
Cover the guide bar with the scabbard.
Remove oil from the oil tank to empty it and place the
chain saw with the tank cap facing upward.
To maintain product SAFETY and RELIABILITY, repairs,
any other maintenance or adjustment should be performed by Dolmar Authorized Service Centres, always
using Dolmar replacement parts.

18
ACCESSORIES
CAUTION:
• These acce ssories or attachments ar e recommended
for use with your Dolmar to ol specified in this m anual.
The use of any other accessories or attachments might
present a risk o f injur y to perso ns. Only us e accessory
or attachment for its stated purpose.
If you need any assistance for more details regarding
these accessories, ask your local Dolmar service center.
• Various type of Dolmar genuine batteries and chargers
• Saw chain
• Scabbard
• Guide bar complete
• File

19
FRANÇAIS
Descriptif
1 Partie rouge
2 Pattes de verrouillage
3Batterie
4 Bouton de sécurité
5 Gâchette
6 Couvre-pignon
7Bouton
8 Tranchant du maillon
9 Guide de chaîne
10 Flèche
11 Ressort
12 Pignon
13 Moyeu
14 Crochet
15 Orifice
16 Bouchon du réservoir d’huile
17 Fenêtre d’inspection du réser-
voir d’huile
18 Ouverture du réservoir d’huile
19 Protection de la pointe
20 Guide inférieur
21 Fourreau (cache de chaîne)
22 Écrou capuchon
23 Tournevis à tête fendue
24 Filtre
25 Bague de blocage
26 Rondelle
27 Trait de limite d’usure
28 Bouchons de porte-charbon
29 Tournevis
SPECIFICATIONS
• Etant donné l’é volution consta nte de no tre program me
de recherche et de développement, les spécifications
contenues dans ce manuel sont su jette s à mo difica ti on
sans préavis.
• Note : Les spécifications peuvent varier suivant les
pays.
Utilisations
L’outil est con çu pour le tronçonna ge du bois d’ œuvre et
des rondins.
Consigne s de sécurité
Pour votre propre sécurité, rep or tez-vous aux consig nes
de sécurité qui accompagnent l’outil.
Consignes de sécurité pour la tronçonneuse :
NE vous laissez PAS tromper (au fil d’une utilisa tion
répétée) par u n sentime nt d’aisance e t de familiar ité
avec le produit, en négligeant le respect rigoureux
des consignes de sécurité qui accompagnent la tronçonneuse. Si vous n’utilisez pas cet outil de façon
sûre et adéqu ate , vous cour ez un risq ue de blessur e
grave.
1. Gardez toute partie du corps à l’écart de la
chaîne pendant l’utilisation de la tronçonneuse.
Avant de faire démarrer la tronçonneuse, assurez-vous que la chaîne n’entre en contact avec
rien. Tout moment d’inattention pendant l’utilisation
d’une tronçonn euse compor te un r isque de con tact
entre la chaîne et vos vêtements ou votre corps.
2. Tenez toujours la tronçonneuse fermement avec
la main droite sur la poignée arrière et la main
gauche sur la poi gnée a va nt. N’in v ersez ja mais les
mains pour tenir l a tro nço nne use car il y a r i sq ue de
blessure.
3. Portez des lun ett es de séc urité et une protection
d’oreilles. Il est recommandé de porter des dispositifs de protection supplémentaires pour la
tête, les mains, les jambes et les pieds. Le port de
vêtements de protection adéquats réduit le risque de
blessure causée par les débris éjectés ou par le
contact avec la chaîne.
4. N’utilisez pas la tronçonn euse en grimpant sur
un arbre. Il y a risque de blessure si la tronçon-
neuse est utilisée sur un arbre.
5. Assurez-vous toujours d’être en bonne position
d’équilibre et d ’utiliser la tronçonneuse sur une
surface stable, sûre et plane. Vous risquez de per-
dre l’équilibre ou de perdre la maîtrise de la tronçonneuse si vous travaillez sur une surface gliss ante ou
instable comme une échelle.
6. Lorsque vous coupez une branche tendue, prenez garde au retour de la branche. Lorsque la ten-
sion exercée sur les fibres de la branche tendue est
libérée, elle risque de frapper l’utilisateur et/ou de
provoquer une perte de maîtrise de la tronçonneuse.
7. Faites preuve d’une grande prudence lorsque
vous coupez des broussailles ou des jeunes
arbres. Des fines pièces de bois, en se coinçant
dans la chaîne, pe uvent être pr ojetée s vers vous ou
exercer une traction vous mettant hors d’équilibre.
8. Pour transporter la tronçonneuse, coupez le
contact, sais issez-l a pa r la poig née avant et gardez-la éloignée du corps. Avant de transporter
ou de ranger la tronçonneuse, installez toujours
le protecteur du guide de chaîne. Une manipula-
tion adéquate de la tro nço nne use rédu it le ri sq ue de
contact avec la chaîne en mouvement.
Modèle AS-1812
Vitesse de chaîne par minute (T/MIN) 5,0 m/s (300 m/mn)
Longueur du guide de chaîne 115 mm
Chaîne
Type 25 AP
Pas 1/4”
Nombre de maillons d’entraînement 42
Longueur totale 422 mm
Poids net 2,5 kg
Tension nominale D.C. 18 V
20
9. Suivez les instructions de lubrification, de
réglage de la tensio n de la ch aîne et de ch angement des accessoires. Une chaîne mal tendue ou
mal lubrifiée peut se casser ou augmente r les risques de choc en retour.
10. Maintenez les poignées sèches, propres et
exemptes d’huile et de graisse. Les poignées
graisseuses ou hui leuse s son t g lis sant es e t pe uvent
causer une perte de maîtrise.
11. Coupez uniquement dans le bois. N’utilisez pas
la tronçonneuse pour des travaux autres que
ceux pour lesquels elle a été conçue. Par exemple, ne l’uti lis e z pas po ur c oup er l e pl ast i qu e, le s
matériaux de maçonnerie et les matériaux de
construction autres que le bois. L’utilisation de la
tronçonneuse pou r effectuer des travaux autres que
ceux pour lesquels e lle a été conçue comport e un
risque de danger.
12. Causes de choc en retour et m esures préventives à prendre :
Il y a risque de choc en retour lorsque le nez ou le
bout du guide de chaîne touche un objet, ou lorsque
le bois se r eferme et coi nce la chaîne dans sa li gne
de coupe.
Le contact du bout, dans cer tains cas, peut entraîner une réaction instantané e e n se ns inverse, proj etant le guide de chaîne vers le haut et vers
l’utilisateur.
Le guide de chaîne risque d’être projeté vers l’utilisateur si la chaîne se coince le long de la partie
supérieure du guide de chaîne.
L’une ou l’autre de ces r éactions peut ent raîner une
perte de maîtrise de la scie et causer une grave
blessure. Ne vous fiez pas unique ment aux dis positifs de sécurité intégrés à la scie. En tant qu’utilisateur de la tronçonneuse, vous devez prendre des
mesures pour é carter les risque s d’accident ou de
blessure pendant le travail de coupe.
Le choc en retour est le résul tat d’une ma uvaise utilisation et/ou de procédures ou conditions inadéquates de travail. Il peut être évité en prenant les
mesures appropriées, tel qu’indiqué ci-dessous :
- Maintenez une prise ferm e, avec les pouces et l e s
doigts encerclant les poignées de la tronçonneuse, tenez la tronçonneuse à deux mains et placez le corps et les bras dans une position vous
permettant de résister aux chocs en retour. Les
forces de choc en retour peuvent être contrôlées
par l’utilisateur s’il prend les précautions nécessaires. Ne lâchez pas la tronçonneuse.
- Ne vous penchez pas trop en avant, et n e cou-
pez pas pl us ha ut qu’à l a ha uteu r des ép aules .
Cela aide à éviter le contact involontaire du bout et
permet d e mieux maîtriser la tron çonneuse dans
les situations imprévues.
- Utilisez exclusivement les guides et chaînes
spécifié(e)s par le fabricant. Un remplacement
incorrect du guide ou de la chaîne peut causer le
bris de la chaîne et/ou un choc en retour.
- Suivez les instructions du fabricant concer-
nant l’affûtage et l’entretien de la tronçonneuse. Le risque de choc en retour augmente si
l’on abaisse la jauge de profondeur.
RÈGLES DE SÉCURITÉ SUPPLÉMENTAIRES
1. Veuillez lire le manuel d’ins tructions pour vous familiariser avec le fonctionnement de la tronçonneuse.
2. Avant d’utiliser la tronçonneuse pour la première
fois, demandez qu’o n vous explique son foncti onnement. Si cela n’est pas possible, ent raînez-vous au
moins à couper des rondins sur un chevalet avant de
commencer votre travail.
3. La tronçonneuse ne doit pas être utilisée par les
enfants et les jeun es de moins de 18 an s. Les jeunes de 16 ans et plus peuvent toutefois l’utiliser
dans le cadre d’une formation effectuée sous la
supervision d’un expert.
4. Le travail avec la tronçonneuse exige beaucoup de
concentration. Ne travaillez pas avec la tronçonneuse si vous ne vous sentez pas en pleine possession de vos moyens. Effectuez tout le travail avec
prudence et calme.
5. Ne travaillez jamais alors que vous êtes sous l’effet
de l’alcool, d’une drogue ou d’un médicament.
Utilisation adéquate
1. La tronçonneuse est conçue uniquement pour la
coupe du bois. Ne l’utilisez pas, par exemple, pour
couper du plastique ou du béton poreux.
2. Utilisez la tronçonneuse uniquement pour les opérations décrites dans ce manuel d’instructions. Ne l’uti-
lisez pas, par exemple, pour couper des haies ou
pour des travaux similaires.
3. La tr onçonneuse ne doit pa s être utilisée pour des
travaux de foresterie, c’est-à-dire pou r l’abattage et
l’émondage. Le câble de la tronçonneuse n’offre pas
à l’utilisateur une mobilité et une sécurité suffisantes
pour ce type de travail.
4. La tronçonneuse n’est pas conçue pour un usage
commercial.
5. Ne so um ette z p as la tr onç onn eu se à u ne charge de
travail excessive.
Dispositifs de protection personnelle
1. Les vête me nts doivent être moul a nts, sa ns t out efois
gêner les mouvements.
2. Port ez les dispositifs de protection qui suivent pour
travailler :
• un casque de sé curité homolo gué pour vous pro-
téger contre les chutes de branches et dangers
similaires ;
• un écran facial ou des lunettes à coques ;
• une protectio n d’oreilles adéquate (cache-o reilles
ou bouchons d’oreilles adaptés ou adaptables).
Analyse par bande d’octave sur demande.
• des gants de sécurité en cuir rigide ;
• un pantalon long en tissu résistant ;
• un bleu de travail en tissu résistant aux coupures ;
• des chaussures ou bottes de sécurité à semelle
antidérapante, bout métallique et doublure résistante aux coupures ;
21
• un masque an ti-poussières si vous effectuez des
travaux qui génèrent de la poussière (par exemple,
scier du bois sec).
Habitudes de travail sûres
1. N’utilisez pas la tronçonneuse près de poussières
ou gaz inflammables, car ils présentent un risque
d’explosion au cont act des étincel les p rojetée s par
le moteur.
2. Travaillez toujours sur une surface ferme, avec une
bonne position d’équilibre. Prenez tout particulièrement garde au x obstacles (par exemple, le cordon
d’alimentation) dans la zone de travail. Soyez tout
particulièrement prudent lorsque les surfaces sont
rendues glissa ntes pa r l’h umidi té, la g lace, la neige,
le bois fraîchement coupé ou les bouts d’écorce partiellement détachés. N’utilisez pas la scie sur une
échelle ou dans un arbre.
3. Soyez tout particulièrement prudent lorsque vous
travaillez sur un sol en pente, car les troncs et branches qui roulent sur le sol représentent alors un danger.
4. Ret irez tout corps étranger de la surface à couper,
tels que grains de sable, cailloux, clous, fils métalliques, etc. Les cor ps étrangers endommag eraient le
guide et la chaî ne, et ils peuvent causer u n dangereux choc en retour.
5. Soyez tout particulièrement prudent lorsque vous
coupez près de clôtures métalliques. Ne coupez pas
à travers la clôture, car la scie risquerait de faire un
choc en retour.
6. Évitez de couper dans le sol.
7. Cou pez les pièces de bois une à la fois, jamais en
paquets.
8. Évitez d’utiliser la scie pour couper les branches
fines et les racines, car elles risqu ent de s’enc hevêtrer dans la tronçonneuse. Toute perte d’équilibre
est dangereuse.
9. Utilisez un support sûr (un chevalet) lorsque vous
coupez du petit bois d’œuvre.
10. N’utilisez pas la tronço nneuse pour mettre de côté
ou balayer les pièces de bois ou autres objets.
11. Guidez la tronçonn euse de sorte qu’aucune p artie
de votre corps ne se tro uve sur sa trajectoire (voir
l’illustration).
Choc en retour
1. Le travail avec la tro nçonneuse compor te un risque
de choc en re tour dangereux. Les chocs en retour
surviennent lorsque le bout du guide (et tout particulièrement le quar t supérieur) entre en contact avec
le bois ou autre matière solide. La tronçonneuse se
trouve alors déviée vers l’utilisateur.
2. Pour éviter les c hocs en reto ur, respectez les p oints
suivants :
• Ne commencez jamais la coupe par le bout du
guide.
• N’utilisez jamais le bout du guide pour couper.
Soyez tout particu lièrement pruden t lorsque vous
reprenez une coupe déjà comme ncé e.
• Attendez que la cha îne tourn e avant de commen-
cer la coupe.
• Affûtez toujour s bien la chaîne. Tout pa rticulière-
ment, réglez la jauge de profondeur sur la bon ne
hauteur (reportez-vous à “Affûtage d e la chaîne”
pour plus de détails).
• Ne sciez jamais plusieurs branches à la fois.
• Lorsque vous émondez, évitez que le guide
n’entre en contact avec les autres branche s.
• Lorsque vous tronçonnez, faites-le à l’écart des
autres troncs. Surveillez toujours le bout du guide.
• Utilisez un che valet.
Transport et rangement
1. Tr ansportez la tronçonneuse uniquement par sa poignée avant, avec le guide pointant vers l’arrière.
2. Rangez la tronçonneuse dans une pièce sûre,
sèche, verrouilée et e t hors de por tée des enfants.
Ne rangez pas la tronçonneuse à l’extérieur.
CONSERVEZ CES INSTRUCTIONS.
AVERTISSEMENT :
La MAUVAISE UTILISATION de l’outil ou l’ignorance
des consignes de sécurité indiquées dans ce manuel
d’instructions peut entraîner une blessure grave.
PRÉCAUTIONS IMPORTANTES POUR LE
CHARGEUR ET LA BATTERIE
1. Avant d’utiliser la batterie, lisez toutes les instructions et précautions relatives (1) au chargeur
de batterie, (2 ) à la batterie, et (3) à l’ou til utilisant la batterie.
2. Ne démontez pas la batterie.
3. Cessez immédiatement l’utilisation si le temps
de fonctionnement devient excessivement court.
Il y a risque de surchauffe, de brûlures, voire
d’explosion.
4. Si l’é lectrolyte pé nètr e dans vos yeux , rincez- les
à l’eau claire et consultez immédiatement un
médecin. Il y a risque de perte de la vue.
5. Ne court-circuitez pas la batterie :
(1) Ne touchez les bornes avec aucun matériau
conducteur.
(2) Évitez de ranger la batterie dans un conte-
neur avec d’autres objets métalliques, par
exemple des clous, des pièc es de monnaie,
etc.

22
(3) N’exposez pas la batterie à l’eau ou à la pluie.
Un court-circuit de la batterie pourrait provoquer
un fort courant, une surchauffe, parfois des brûlures et même une pann e.
6. Ne rangez pas l’outil ou la batterie dans des
endroits où la température risque d’atteindre ou
de dépasser 50°C.
7. Ne jetez pas la batterie au feu m ême si elle est
sérieusement endommagée ou complètement
épuisée. La batterie peut exploser au contact du
feu.
8. Pr enez garde d’échapper ou de he urter l a batterie.
CONSERVEZ CES INSTRUCTIONS.
Conseils pour assurer la durée de vie optimale de
la batterie
1. Recharge z la batterie avant qu’e lle ne soit complètement déchargée.
Arrêtez toujours l’outil et rechargez la batterie
quand vous remarquez que la puissance de
l’outil diminue.
2. Ne rechargez jamais une batter ie complètement
chargée. La surcharge réduit la durée de service
de la batter ie.
3. Ch argez la batterie alo rs que la température de
la pièce se trouve entre 10° C et 40°C. Avant de
charger une batterie chaude, laissez-la refroidir.
DESCRIPTION DU FONCTIONNEMENT
ATTENTION :
• Assurez-vous toujours que l’outil est hors tension et
que sa batter i e est ret irée avant de l’aj us ter ou de vér i fier son fonctionnement.
Installation et retrait de la batt erie (Fig. 1)
• Mettez toujour s l’outil hors tension avant d’installer ou
de retirer la batterie.
• Pour retirer la batterie, sortez-la de l’outil tout en faisant
glisser le bouton à l’avant de la batterie.
• Pour insérer la batterie, alignez la languette de la batte-
rie avec la rainure située dans le carter, puis faites-la
glisser en place. In sérez-la toujou rs à fond, jusqu’à ce
qu’un léger déclic se fasse entendre. Si vous pouvez
voir la partie rouge du côté supérieur du bouton, la batterie n’est pas complètement verrouillée. Insérez-la
entièrement, jusqu’à ce que la partie rouge ne soit plus
visible. Sinon, elle pour rait tomber accidente lleme nt de
l’outil, au risque de vous blesser ou de blesser
quelqu’ un se trouvant près de vous.
• N’insérez pas la batterie de force. Si elle ne rentre pas
facilement, c’est que vous ne l’insérez pas correctement.
Interrupteur (Fig. 2)
ATTENTION :
• Avant d’insérer la batterie dans l’outil, vérifiez toujours
que la gâchette fonctionne correctement et qu’elle
revient sur la position “OFF” quand vous la relâche z.
Pour éviter tout déclenchement accidentel de la
gâchette, un bouton de sécurité a été prévu.
Pour démarrer l’outil, appuyez sur le bouton de sécurité
et tirez sur la gâchette. Pour l’arrêter, relâchez la
gâchette.
ASSEMLAGE
ATTENTION :
• Assurez-vous toujours que l’outil est hors tension et
que sa batter ie est ret irée avant d’effectuer tout travail
dessus.
Installation ou retrait de la chaîne de scie
ATTENTION :
• Assurez-vous toujours que l’outil est hors tension et
que la batteri e est retiré e avant d’installer ou d e retirer
la chaîne de scie.
• Portez toujours des gants pour installer ou retirer la
chaîne de scie.
• N’utilisez la chaîne et le guide de chaîne qu’avec un
bout de guide conç u pour cette tronçonneuse (voir la
liste des pièces de rechange).
• Pour éviter les chocs en retour, ne retirez pas le bout
de guide et ne remplacez pas le guide de chaîne par
un autre sans bout de guide.
Desserrez la vis en t ournant le b out on dans le sens contraire des aiguilles d’une montre jusqu’à ce que le couvre-pignon se détache. (Fig. 3)
Retirez le couvre-pignon.
Retirez la chaîne et le guide de chaîne de l’outil .
Placez une extrémité de la chaîne sur le dessus du guide
de chaîne. Il faut a lors placer la chaî ne comme indiqué
sur l’illustration, car elle tourne dans le sens de la flèche.
(Fig. 4)
Placez la chaîne de sor te que le r essort et le moyeu se
trouvent à l’intérieur de la chaîne, et placez l’autre extrémité de la chaîne autour du pignon, tel qu’indiqué sur
l’illustration. (Fig. 5)
Tout en tour nant le guide de chaîne dans le sens contraire des aiguilles d’une montre, installez-le de sorte que
son extrémité touche le ressort. (Fig. 6)
Insérez le crochet du couvre-pignon dans l’orifice de
l’outil, puis posez le couvre-pignon sur l’outil. (Fig. 7)
Tournez le bouton dans le sens des aiguilles d’une montre pour serrer la vis fermement. (Fig. 8)
Réglage de la tension de la chaîne (Fig. 9 et 10)
Vous pouvez régler la tension de la chaîne en desserrant
légèrement la vis.
Après le réglage, resserrez la vis fermement.
ATTENTION :
• Les chaînes neu ves ont tendance à se desserrer pendant un certain temps après l’installation. Vérifiez la
tension de la chaîne de temps à autre avant d’utiliser la
tronçonneuse.
• La chaîne r isque de se déplacer si elle n’est pas bien
tendue.
• L’installation et le retrait de la chaîne doivent être effectués dans un emplacement propre, sans sciure de bois,
etc.
OPÉRATION
Lubrification (Fig. 11)
La chaîne se lubrifie automatiquement pen dant l’utilisation de l’outil.
Vérifiez la quantité d’h uile restante par la fenêtre d’inspection du réservoir d’huile.
Pour remplir le réservoir, retirez le bouchon posé sur
l’ouvertur e du réser voir d’huile. L a capacité du réser voir
d’huile est de 80 ml.
 Loading...