

Page 1
DVD & MP3
RDS RECEIVER
MODEL NO:
ZE-200DVD
OPERATION MANUAL
Page 2

CONTENTS
Before You Start
General Functions ......................................... 4
Precautions ................................................... 5
Care of Discs .................................................6
Region Number .............................................. 6
What the Marks on DVDs Indicate ...............6
Disc Organization ...........................................7
Theft Protection .............................................8
What is What
■ Head Unit ...................................................9
■ Remote Control ........................................ 12
Basic Operation
Power ON/OFF ............................................ 13
Mute Control .............................................13
Mode Switch ............................................13
Switching the Display Mode ........................ 13
Set Clock ..................................................... 13
System Setup .............................................. 13
Setup Bass, Treble, Balance, Fader,
Loudness and Sound Effects ...................... 14
■ Bass and Treble Control ..........................14
■ Balance and Fader Control ..................... 14
■ Loudness Control ....................................14
■ Sound Effect Control ...............................14
Tuner Operation
Select Band ................................................. 15
Search Station .............................................15
Change to Preset Station ............................ 15
Store Current Station ................................... 15
Scan Stored Station ....................................15
Select LOC/DX Control ................................15
RDS Functions ........................................15-17
DVD Player Setup
Loudspeaker Setup .....................................21
Set TV Aspect .............................................. 22
Set OSD Language ..................................... 23
Set Dolby ProLogic Output ........................ 23
Select Audio language ................................. 23
Select Subtitle Language ...........................23
Set TV Type .................................................. 23
Set Parental Lock/Password ......................24
CD Changer Operation
Mode Switch ................................................ 25
Pause and Playback ....................................25
Select Discs .................................................25
Random/Scan .............................................. 25
Repeat Play .................................................25
AUX Operation .................................. 25
Installation & Connection
Installation Notes ........................................26
Accessories and Hardware .........................26
Installation Procedure
■ Installation of Unit ....................................27
■ Wiring of Power Input ..............................28
■ Connection of Speakers .......................... 29
■ Connection of Line-Out’s .........................30
Fuse ............................................................. 30
Troubleshooting ......................................30-31
Specifications ..............................................62
Warranty .......................................................63
DVD Player Operation
Panel and Disc Operation ............................ 18
2-CH ~ 5.1-CH Setup .................................. 18
Pause/Playback ........................................... 19
Start/Stop Playback ...................................19
Skip Playback ..............................................19
Repeat Playback .......................................... 19
Random/Scan Playback ..............................19
Select Chapter/Track or Playtime ............... 19
Select Subtitle Language .............................19
Select Audio Track (language) .....................19
Select Camera Angle ...................................20
Fast Forward/Fast Backward .....................20
Slow Play ....................................................20
2
Page 3

INHALT
Vor der Montage
Generelle Funktionen .................................. 32
Vorsichtsmassnahmen ................................33
Aufbewahrung von Disks ............................. 34
Ländercode .................................................. 34
DVD Labels & Bezeichnungen .................... 34
Disk Organisation .........................................35
Diebstahlschutz ...........................................36
Bedienungselemente
■ Head Unit ............................................37-39
■ Fernbedienung ......................................... 40
Grundfunktionen
Power EIN/AUS ..........................................41
Stummschaltung ......................................... 41
Betriebsmodus ............................................41
Betriebsmodus Anzeige ............................... 41
Einstellung Uhrzeit .......................................41
System Einstellung ...................................... 41
Klangeinstellungen wie Bass, Treble,
Balance, Fader, Loudness
und Sound-Effekte ....................................... 42
■ Bass und Treble ....................................... 42
■ Balance und Fader ................................... 42
■ Loudness ................................................. 42
■ Klang-Effekte ...........................................42
Tuner Bedienung
Auswahl Tuner Band ....................................43
Stationssuche .............................................. 43
Senderabspeicherung Preset ......................43
Abspeichern vom aktuellen Sender ............. 43
Absuchen der gespeicherten Sender ..........43
Auswahl LOCAL/DX ..................................... 43
RDS Funktionen ......................................44-46
DVD Player Einstellungen
Lautsprecher Setup ....................................50
Einstellung Bildformat .................................. 51
Einstellung Sprache OSD ...........................51
Einstellung Dolby Pro Logic ....................... 51
Auswahl Sprache Audio ..............................52
Auswahl Sprache Untertitel .........................52
Auswahl TV Typ ...........................................53
Einstellung Parental Lock/Password .......... 54
CD Wechsler Bedienung
Mode Switch ................................................ 55
Pause und Playback ....................................55
Disk Auswahl ............................................... 55
Random/Scan .............................................. 55
Wiederhol-Funktionen .................................. 55
AUX Funktion ....................................55
Installation & Anschluss
Installations-Hinweise ................................. 56
Zubehör und Hardware ..............................56
Installations Prozedur
■ Geräte Installation ....................................57
■ Anschluss vom Gerät ............................... 58
■ Lautsprecheranschluss ............................ 59
■ Verstärker Anschluss ............................... 60
Sicherung ..................................................... 60
Fehlersuche ............................................60-63
Spezifikationen ............................................62
Garantie .......................................................63
DVD Player Bedienung
Bedienpanel & Disks .................................... 47
2-Kanal~5.1 Einstellungen ........................... 48
Pause/Playback ........................................... 48
Start/Stop Wiedergabe ............................... 48
Titelsprung ................................................... 48
Wiederholfunktionen .................................... 48
Random/Scan Wiedergabe ..........................48
Auswahl Kapitel/Track oder Spielzeit ......... 49
Auswahl Sprache Untertitel .........................49
Auswahl Sprache Soundtrack .....................49
Auswahl Kamerawinkel ................................ 49
Schneller Vor/Rücklauf ...............................49
Zeitlupe ........................................................ 49
3
Page 4
BEFORE YOU START
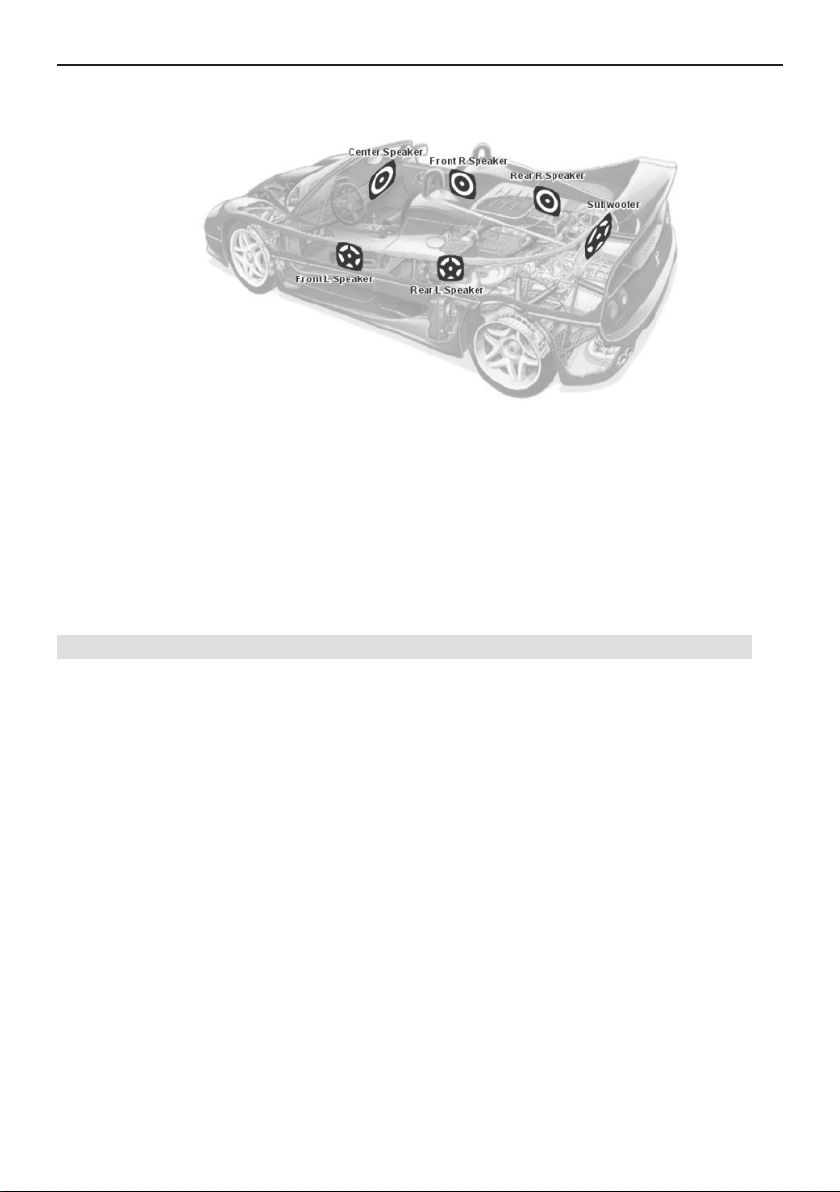
Dolby Digital & ProLogic 5.1 channel surround setup — installation diagram of
speakers
Specifications for reproduction of Dolby Digital 5.1 sources (DVD discs)
The sound system in a car - for best reproduction of 5.1 Dolby Digital encoded
discs – requests the following speaker systems to be installed:
e 2 front speakers e 2 rear surround speakers e a center channel speaker and e
a subwoofer. Together with an LCD monitor, the in-car AV system can create a perfect sound stage and faithfully reproduce the sound tracks contained on DVD’s that
have been mastered with Dolby Digital 5.1 encoding equipment.
GENERAL FUNCTIONS
Type of supported discs: DVD, SVCD, DVCD, VCD, CD, MP3, etc.
TV Type: NTSC, PAL or Auto
Video Output: Pan & Scan, Letterbox, Wide Screen
Audio Output:
■ DOLBY DIGITAL and DTS decoder
■ PRO LOGIC decoder
■ Full 5.1CH or DOWNMIX stereo output
Disc Playback functions:
■ Multi-angle, Multi-language
■ Fast Forward, Fast Backward, Slow Forward, Slow Backward
■ Last memory auto-play
RDS Tuner:
■ Store 18 FM and 12 AM broadcasting stations
■ FM Frequency: 87.5~108 MHz
■ AM Frequency: 531~1602 kHz
■ Tuner with automatic and manual scan
4
Page 5

BEFORE YOU START
DTS is a registered trademark of
Digital Theater System, Inc.
.
Manufactured under license from Dolby Laboratories.
Dolby, Pro Logic and the double-D symbol are
trademarks of Dolby Laboratories
PRECAUTIONS
■ Do not directly expose the headunit or parts of it to rain or moisture, in order to prevent
the risk of fire and electric shock.
■ Do not place the monitor in the direct viewing range of the driver to avoid traffic accidents.
■ The product contains a Class 1 laser source. The laser emits a visible or invisible hazardous laser beam.
■ Do not open the housing of this headunit and do not attempt to repair this device by
yourself.
■ Do not operate this headunit with an LCD monitor while you drive because this can lead
to a traffic accident. Park the car in safe place and operate the monitor when the car is
not on the move.
■ When washing your car, do not expose any device of your car AV system to water or
excessive moisture. This may result in electric shortcuts, fire or other serious damages.
■ Parking in direct sunlight can heat up the interior to extremely high temperatures. Let
your car cool down before you activate your car AV system.
■ Do not operate this DVD headunit at a higher than rated voltage for longer periods of
time. The power supply is designed to handle DC 12V.
■ Do not put anything other than discs into the disc tray.
■ When leaving the car, be sure to eject the disc and put it away to protect the software.
■ Keep the listening volume at a low level to be able to drive in a behaved manner and
concentrate on traffic and road conditions.
■ When you wash your car, always try to avoid exposure of the installed AV System (speakers, amplifier, monitor and headunit) to water or excessive humidity, in order to avoid
electric shorts or other damages.
■ Leave the service or maintenance of electronic devices up to qualified personnel. Never
try to disassemble or adjust any electronic devices.
■ Try to mount the headunit with a low horizontal angle (flat). If the unit is tilted up or down
for more than 15°, malfuntions may occur.
■ This headunit is fully NTSC/PAL compliant. When you connect other (video) devices to
this product, be sure these components are compatible with the same video standards,
otherwise images will not be displayed correctly.
5
Page 6

BEFORE YOU START
CARE OF DISCS
How to hold disc
Do not touch the disc on the information side with your fingers.
Do not scratch the disc.
Do not bend the disc.
When not in use, put away the disc.
Do not use irregular and deformed discs.
Do not leave the disc in following places:
Direct sunlight
Near car heaters
Dirt, dust and humid areas
Seats and dashboards
Disc cleaning
Use a dry and soft cloth and always wipe from the center of the disc outwards.
Treatment of new discs
Remove potential rough edges on the inner and outer rim of new discs with a pencil, to
avoid malfunctions of the transport mechanism.
REGION NUMBERS
DVD players and DVD discs feature region numbers indicating the area in which they were
purchased. Playback of DVD is not possible unless it features the same region number as the
DVD player. This product’s region number is displayed on a sticker applied to the housing of
the device.
The illustration below shows the regions and corresponding region numbers:
■ Region 1: USA, Canada, Islands in the Eastern Pacific Ocean;
■ Region 2: Japan, Western Europe, Northern Europe, South America, and Middle East;
■ Region 3: Taiwan, Hong Kong, South Korea, Thailand, Indonesia, countries in Southeast
Asia;
■ Region 4: Australia, New Zealand, Central America, island countries in the Southern
Pacific Ocean;
■ Region 5: Northwest Asia, Eastern Europe, Russia, Mongolia, the Indian Subcontinent,
Central Asia, North Korea, North Africa;
■ Region 6: Mainland China.
WHAT THE MARKS ON DVDS INDICATE
The marks shown below can be found on DVD disc labels and packages. They indicate the
type of images and audio tracks recorded on the disc, and the functions you can use.
Indicates the number of audio tracks.
Indicates the number of subtitle languages.
Indicates the number of viewing angles.
Indicates the picture aspect ratio (screen width-to-height ratio)
Indicates the region number / code.
6
Page 7
BEFORE YOU START
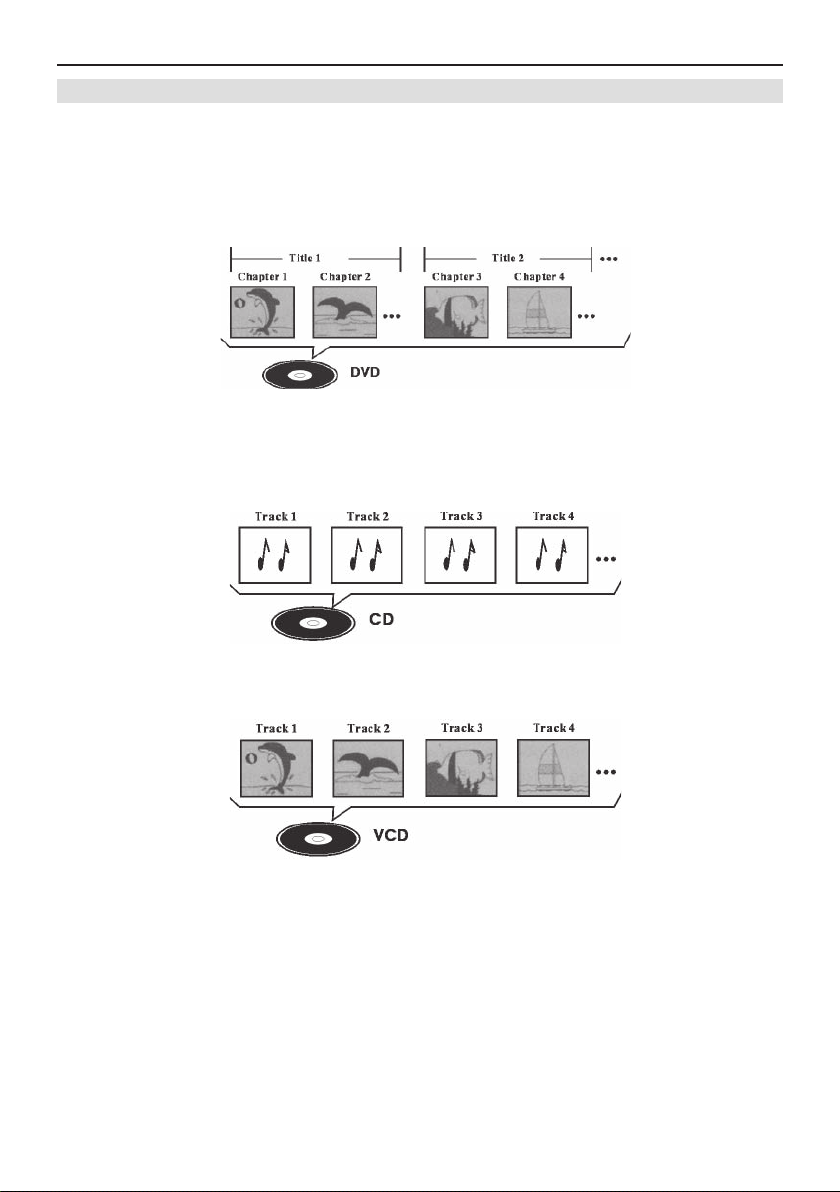
DISC ORGANIZATION
DVD Discs
On DVD-Video discs, the contents are divided chapters. With video material, a single file/
track (movie etc.) usually corresponds to a single title, containing different scenes that correspond to separate chapters. With karaoke discs, one song normally corresponds to one title.
However, some discs are not structured like this, so bear this in mind when trying to use the
search function.
Video-CD and CD/MP3 Discs
On CDs/MP3 and Video-CDs, the contents are divided into tracks. One track usually corresponds to one song.
7
Page 8
BEFORE YOU START
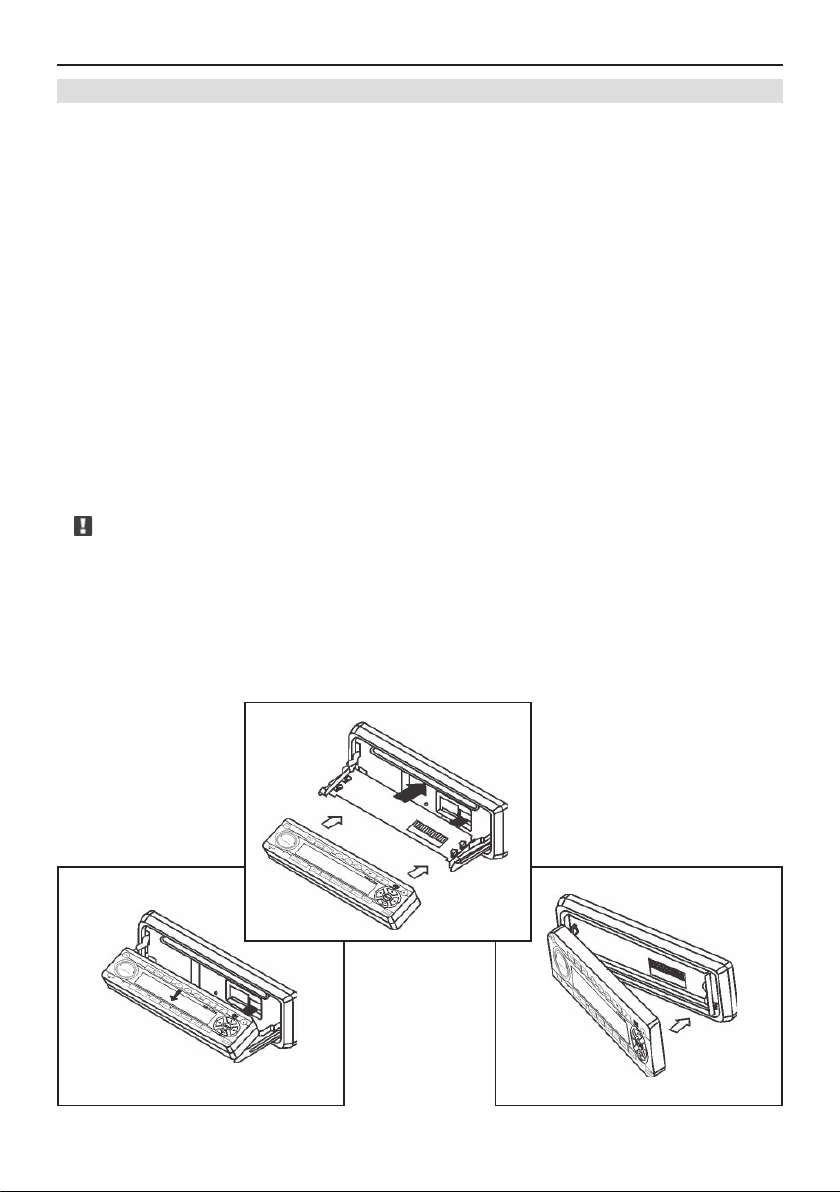
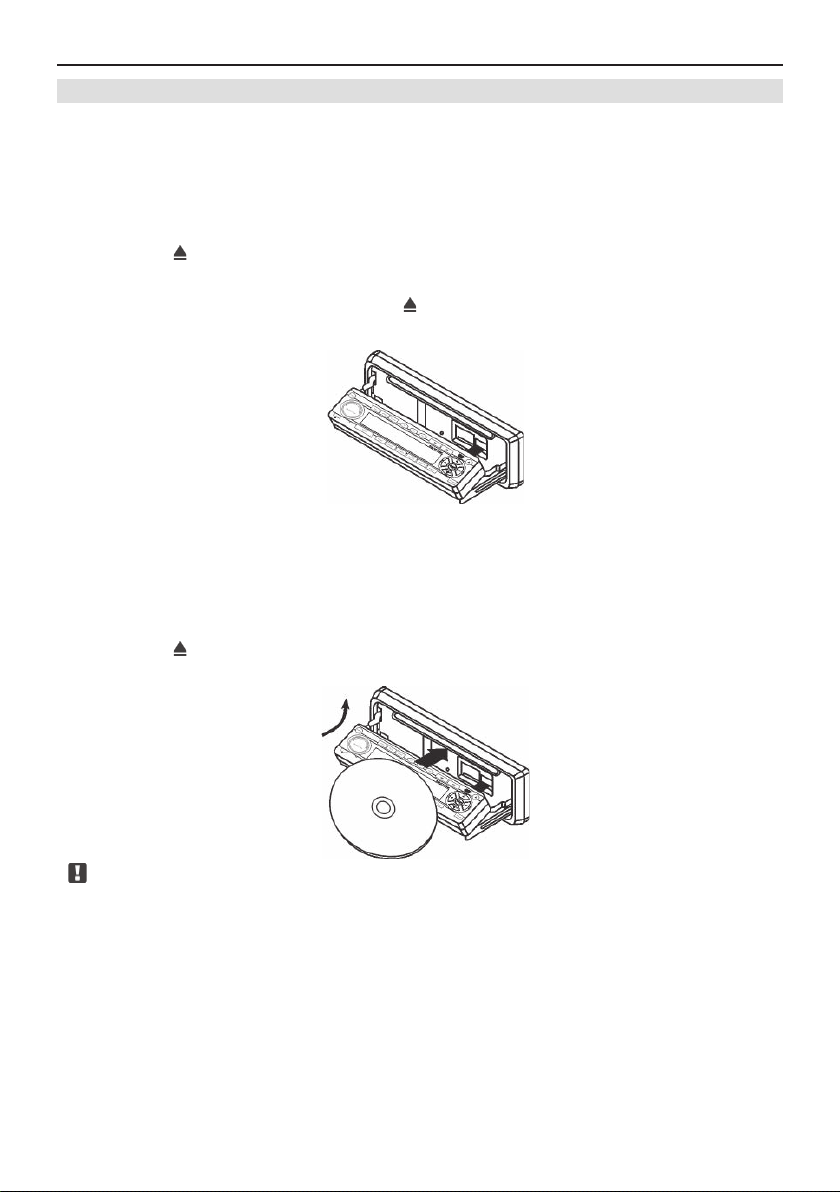
THEFT PROTECTION
The front panel can be detached from the head unit and stored in the protective case provided. When you turn off the ignition, the panel will automatically slide down for a period of 25
sec. so you can take it off. This function can be turned off in the SETUP mode.
1. Removing the front panel
■ Press the OPEN/EJECT button on the head unit or turn off the front panel.
■ Grip the middle part of panel and pull it gently outward.
■ Put the front panel into the protective case to avoid scratches.
2. Attaching the front panel
When the slide arm is in its lower position:
■ Put the front panel in place by holding the middle part of it paralleled to the slide arm,
and then push it securely into the mounting hooks.
3. When slide arm is in its normal position:
■ Align the front panel with the headunit. Grip the right side of the panel and clip it securely into the left mounting hooks – now apply pressure to the right side of the panel in
order to lock it into the right mounting hooks.
Note:
■ Never use too much force – the mechanical parts are fine and may be damaged.
■ Avoid dropping the front panel – hard impacts may damage the panel or parts of it.
■ Keep the front panel out of direct sunlight and avoid exposure to high temperatures.
1.
2.
3.
8
Page 9
BEFORE YOU START
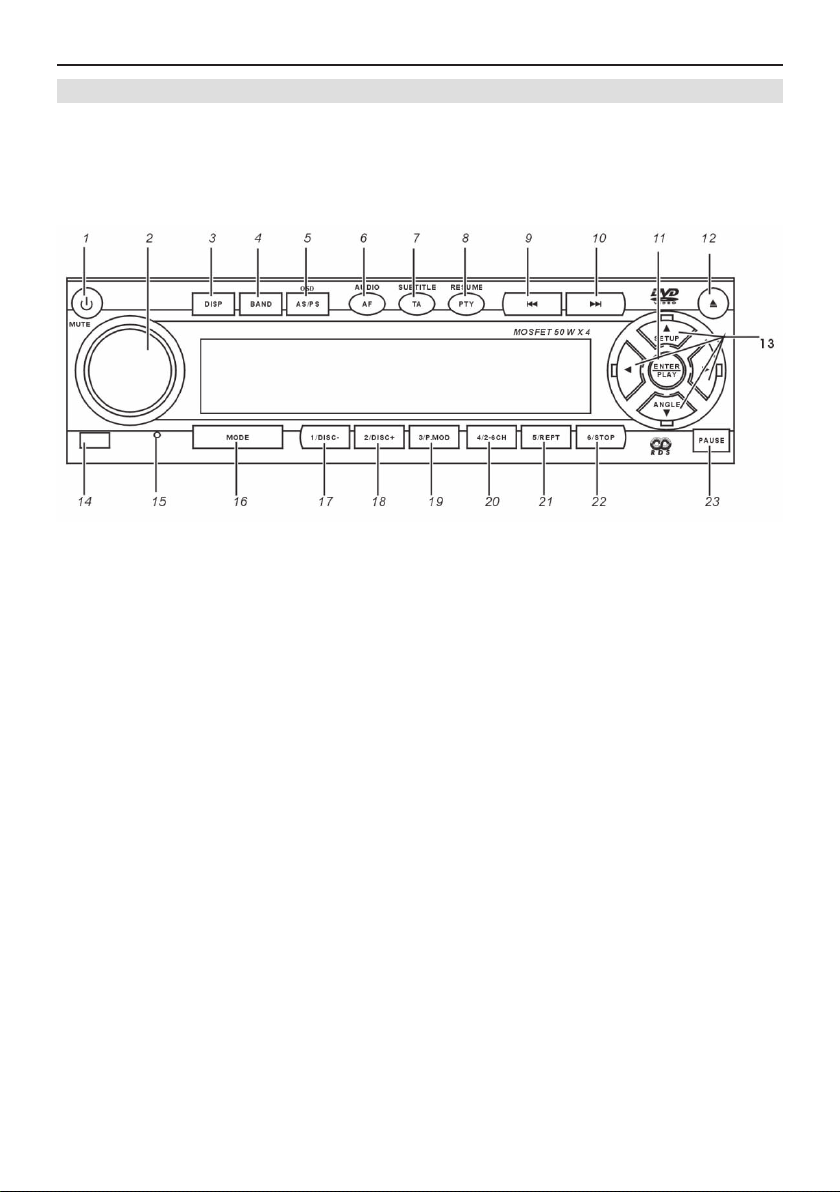
WHAT IS WHAT?
HEAD UNIT
1. POWER/MUTE button
■ Press to turn on the unit when in standby state; Press to mute the volume at power on
state.
■ Press and hold over 2 sec, to turn it off.
2. VOLUME ADJUSTMENT/SELECT/LOCAL button
■ Rotate to adjust the volume.
■ Press to select sound effect setup, e.g.: Bass, Treble, Balance, Fader, Loudness, Sound
Effects.
■ Press and hold over 2 sec, to switch between LOCAL/DISTANCE while the tuner is
playing as a source.
3. DISP button
■ Press to select different displays.
4. BAND button
■ Press to select between three FM and two AM bands.
5. AS/PS button
■ Press to scan the preset station (PS).
■ Press and hold over 2 sec to start the auto-scan search mode for stations at the selec-
ted (current) band and store it to the preset stations (AS).
■ When playing disc, press to display the OSD. Different disc will display the different
OSD.
9
Page 10

BEFORE YOU START
6. AUDIO button
■ When playing a DVD disc, press this button to select the audio language; when playing a
VCD / MP3 disc, press it to select the audio sound channel.
7. SUBTITLE button
■ When playing a DVD disc, press this to select a title language.
8. RESUME button
■ Press the STOP button when playing a disc, later on you can press the RESUME button,
and the player returns to the initial break(stop) point and start playing from this position.
6. AF button
■ When the receiving situation is not good, RDS can automatically send AF of same program from RDS broadcasting station. When playing DVD disc, press it to select audio
language; when playing VCD MP3 disc, press to select audio sound channel.
7. TA button
■ Traffic announcement function: When EON broadcasting station has traffic announcement, it can temporarily switch to EON broadcasting station to broadcast. After the
announcement is over, it can switch automatically to original broadcasting station, you
can listen to the original program.
■ During the playing of DVD or CDC, it can insert TA information, after TA broadcasting is
over, it can automatically switch to original DVD or CDC playing model.
■ When playing DVD disc, press to select title language.
8. PTY button
■ Program type: Some stations carry a recognition signal like: news, rock, classic music,
etc.
9. PREVIOUS (
■ Press to go to the previous track (chapter) or start an automatic scan for a lower tuning
frequency when the headunit is in tuner mode.
■ If pressed and hold for over 2 sec, a fast reverse playback will be performed, or the
tuning frequency can be decreased manually when the headunit is in tuner mode.
10. NEXT (
■ Press to go to the next track (chapter) or start an automatic scan for a higher tuning frequency when the headunit is in tuner mode.
■ If pressed and hold over 2 sec, a fast forward playback will be performed, or the tuning
frequency can be decreased manually when the headunit is in tuner mode.
11. ENTER/PLAY button
■ If the current operating mode is DVD, this key is used to start playback of the disc
(ENTER).
12. OPEN.EJECT button
■ Press to open the front panel. If the unit features a loaded disc, it will be ejected.
5643Button
13.
■ Press to move the cursor.
■ Press the button
adjustment mode. While in this mode, press the button
move one angle step.
■ In DVD mode, press the button
setup.
) /REVERSE ( ) button
)/FORWARD ( ) button
6and hold it for more than 2 sec, the unit will enter the panel angle
6once and the front panel will
5and hold it for more than 2 sec, to enter the menu
10
Page 11

BEFORE YOU START
14. REMOTE SENSOR
15. RESET
■ Press the reset switch with a sharp tipped tool (needle, ball pen etc). All adjustments
made will be erased and over-written by the factory default.
16. MODE button
■ Press to select the desired source
17. 1 button
■ Press for preset tuning.
18. 2 button
■ Press for preset tuning.
17. 1/DISC-buttons
■ Press for preset tuning and previous disc search when using a CDC player.
18. 2/DISC+buttons
■ Press for preset tuning and next disc search when using a CDC player.
19. 3/P.MODE button
■ Press for preset tuning and switch the play mode (e.g. random, intro (scan)) when using a
CDC player or the built-in DVD player.
20. 4/2-6CH button
■ Press for preset tuning and switch between 2CH and 6CH output mode when using the
built-in DVD player.
21. 5/REPT button
■ Press for preset tuning and repeat playback when using a CDC player or the built-in DVD
player.
22. 6/STOP button
■ Press for preset tuning and stop playback when in DVD mode.
23. PAUSE button
■ Press to pause play.
11
Page 12

BEFORE YOU START
REMOTE CONTROL
■ The operation and functions of the keys on the remote are identical with the front panel
– see descriptions under headunit in the previous chapter.
■ For the other additional keys refer to the chapter “DVD operation”.
Use and care of the remote control
Installing the battery
Slide out the battery tray on the back of the remote control and insert the battery with the
plus (+) and minus (-) poles pointing in the proper directions.
Warning & Caution
■ Keep the battery out of the reach of children. Should the battery be swallowed, immedia-
tely consult a doctor.
■ Use only batteries of the following type: CR2025 (3V) lithium battery.
■ Remove the battery if the remote control will not be used for a period of one month or
longer.
■ Do not recharge, disassemble, heat or dispose battery in fire.
■ Do not handle the battery with metallic tools.
■ Do not store the battery with metallic materials.
■ In the event of battery leakage, wipe the remote control battery tray completely clean and
install a new battery.
■ For disposal of used batteries, please follow and comply with the regulations imposed by
the government of your territory.
12
Page 13
BASIC OPERATION
POWER ON/OFF
■ Press the [POWER/MUTE] button on the front panel to turn the unit on
■ Press the [POWER/MUTE] button on the front panel for more than 2 sec to turn the unit
off
MUTE CONTROL
■ When the unit is turned on, press the [POWER/MUTE] button on the front panel to mute
the sound; press this button once more to exit MUTE mode.
MODE SWITCH
■ Press the [MODE] button repeatedly to switch between the following modes:
■ Tuner
Note:
In the following case, the source mode will not change:
■ When no disc is loaded into the headunit, the DVD mode is invalid.
■ When no magazine is loaded into the CD-changer, or the CD-changer is not connected
to the headunit, the CDC mode is invalid.
SWITCH THE DISPLAY MODES
■ Press the [DISP] button repeatedly, to check out different displays on the on the LCD
screen, according to the following sequence. After 5 sec, the display will turn back to the
default display of the current mode automatically.
Tuner: frequency (default)
CDC: play time (default)
DVD: play time (default)
AUX: AUX
Note:
■ When the unit is in standby state, only the current time will be displayed on the LCD, if
the clock display is enabled.
DVD (Built-in player) CDC (Multi-CD changer) AUX Tuner
clock
clock
disc type clock
clock
SET CLOCK
■ If the current display mode is set to clock mode, pressing the button [DISP] for a little
longer will put the unit into clock set mode.
In clock set mode:
■ Pressing the [DISP] button will switch between Hour and Minute setting.
■ Pressing the [
■ Pressing the [
Note:
■ If there no operation within 5 sec, the device will quit clock set mode.
SYSTEM SETUP
■ When the unit has been turned on, and the current display mode isn’t set to clock mode,
pressing the [DISP] button a little longer will activate the system setup mode.
■ Press the [
button to select a value and apply.
] button will increase time data.
] button will decrease time data.
] and [ ] buttons to select the item you want to adjust, then use the [DISP]
13
Page 14

BASIC OPERATION
Setup item Range Default
Clock mode 12H/24H 12H
Panel detachable ON/OFF OFF
Beep ON/OFF ON
Clock display ON/OFF ON
Light in ON/OFF ON
LCD flash mode 0~14 14
LCD contrast 0~7 2
Note:
■ If there is no operation within 5 sec or the [DISP] button has been pressed for a little lon-
ger once more, the unit will exit the system setup mode.
SETUP BASS, TREBLE, BALANCE, FADER, LOUD
ANDSOUND EFFECT
■ Press the [SEL/LOC] button to select the audio mode according the following sequence:
Volume
Bass Treble Balance Fader Loud Sound effect Volume
BASS AND TREBLE CONTROL
■ In Bass or Treble mode, rotate the [VOLUME ADJUSTMENT] knob to increase or decrease
Bass/Treble.
■ If this button is pressed for more than 0.5 sec, the value will be continuously adjusted.
BALANCE AND FADER CONTROL
■ In Balance mode, rotate the [VOLUME ADJUSTMENT] knob, to shift the relative volume
to the Left or Right speaker system. In Fader mode, rotate the [VOLUME ADJUSTMENT]
knob, to shift the volume more to the Front or to the Rear speaker system.
■ If this button is pressed for more than 0.5 sec, the value will be continuously adjusted.
LOUDNESS CONTROL
■ In Loud mode, rotate the [VOLUME ADJUSTMENT] knob to activate or turn off the
Loudness function.
SOUND EFFECT CONTROL
■ In Sound Effect mode, rotate the [VOLUME ADJUSTMENT] knob to select a sound effect
according to the following sequence: Normal
FLAT JAZZ ROCK CLASSIC
POP
14
Page 15
TUNER OPERATION
SELECT TUNER FUNCTION
Press the [MODE] button and select RADIO mode, then the headunit will switch over to the
tuner.
SELECT BAND
Press the [BAND] button to select the band in the following sequence:
FM2 FM3 AM1 AM2 FM1
FM1
SEARCH STATION
Auto-search Station
■ Press the [
step until the radio station you are looking for is found.
■ Press the [
this step until the radio station you are looking for is found.
] button to auto-search a radio station with increasing frequency. Repeat this
] button to auto-search a radio station with decreasing frequency. Repeat
MANUAL SEARCH STATION
■ Press the [
mode.
■ Press the [
ly.
Note:
■ Without operation of a key within 5 sec, the system will exit the manual search mode.
CHANGE TO PRESET STATION
■ Press the [1/DISC-], [2/DISC+], [3/P.MODE], [4/2-6CH], [5/REPT], [6/STOP] buttons to
switch to a preset station. The relevant frequency will be indicated on the LCD display.
STORE CURRENT STATION
■ Press any of the 6 station presets (see above) for a longer period of time, to store a cur-
rent station to a specific preset button of your choice.
SCAN STORED STATION
■ Press the [AS] button to scan the stored stations of currently selected band and playback
each station for 5 sec. Press the [PS] button for a longer period of time, to scan the current tuner band and auto-store all stations of good quality that were found, directly into
the 6 available station presets of the currently selected band.
SELECT LOC/DX CONTROL
■ Press the [SEL/LOC] button for more than 2 sec to enter short-distance control mode,
and turn on the LOC icon. Press this button once more for a period of more than 2 sec, to
switch back into long-distance control mode, and turn the LOC icon off.
RDS (RADIO DATA SYSTEM) FUNCTIONS
When FM broadcasting stations transmit radio programs, additional RDS data can be received by RDS capable receivers. The extra data which is broadcasted along with the audio signal, gives the user a handful of extra features and it also simplifies the use of the integrated
tuner device.
] or [ ] buttons for a longer period of time to enter the manual search
] or [ ] buttons again to decrease or increase the tuning frequency manual-
15
Page 16

TUNER OPERATION
AF (Alternative Frequency)
■ When the received signal of a given radio station becomes too weak for clear reception,
the AF function enables the tuner to switch over to the same station that s broadcasted
on another frequency that transmits the same program, but can be received with a stronger signal level and reproduced in higher quality.
EON (Enhanced Other Networks)
■ This function is to improve the traffic announcement function of RDS tuners. Besides
receiving traffic announcements of certain preset radio stations, EON provides traffic
news of the current location to be transmitted – no matter what station is currently playing
back.
PS (Program Service Name)
When radio station broadcasts with RDS data, the display of the headunit can automatically
display the name of the currently received broadcasting station (instead of displaying the
tuning frequency only).
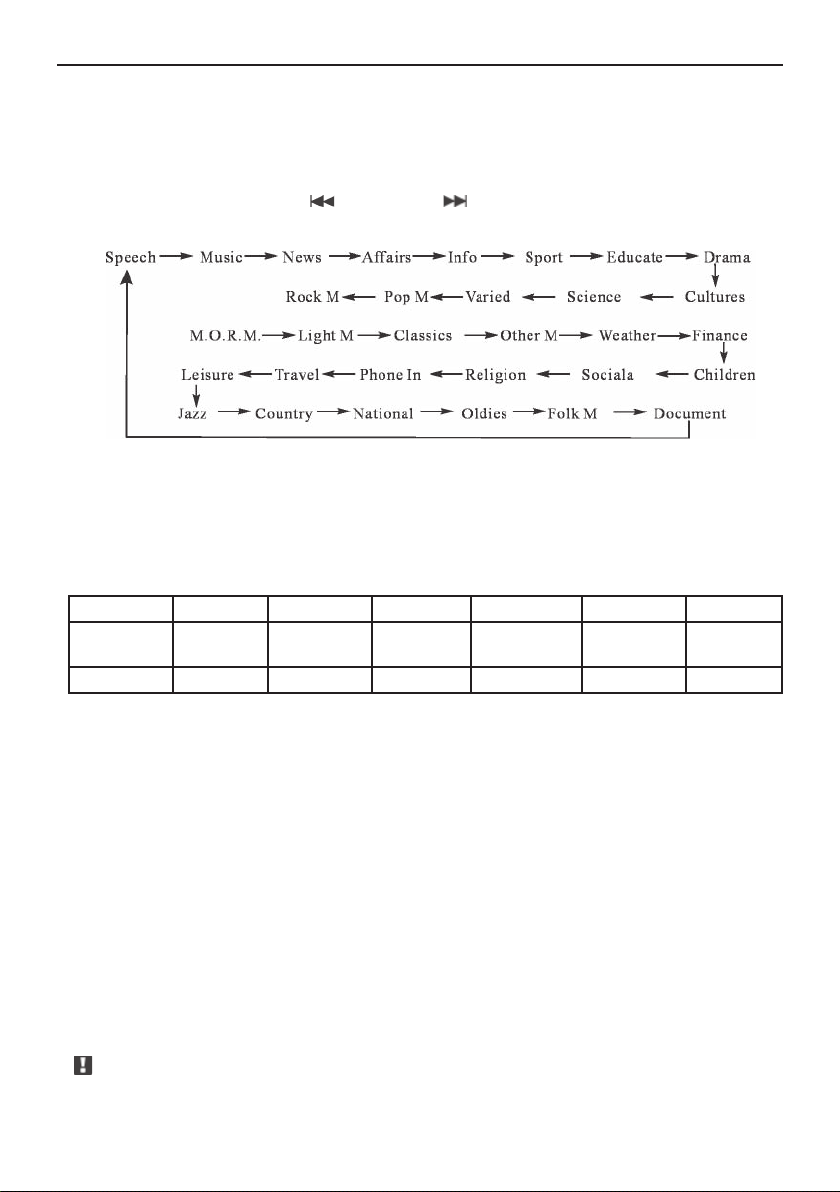
PTY (Program Type)
■ Program type signal recognition, such as: news, rock, classic music, etc. You can select
or search any kind of program material you’d like to hear by using the PTY function.
TA (Traffic Announcement)
■ Traffic announcement function in the FM band: When an RDS-EON broadcasting radio
station transmits traffic news, the built-in tuner can temporarily switch to an EON broadcasting station, to broadcast this message. After the traffic announcement is over, the
tuner automatically switches back to the original broadcasting station you have chosen
before, so you can listen to the original program without having to change the station.
■ During playback of other sources like DVD or CDC, the TA function will insert TA informati-
on automatically (when TA is activated). After the TA broadcasting is over, the receiver will
automatically switch back to the original source that was playing before.
CT (Clock Time)
■ The tuner will receive and accept time data to autocorrect the system clock.
Changing AF mode
■ Pressing the AF key for a longer period of time changes the AF mode. When AF is activa-
ted, the AF icon is illuminated and can be seen in the LCD display. When the current radio
station signal becomes too weak, you can watch the AF icon blink as the tuner currently
seeks a better station.
Changing Display
■ Pressing the DISP button will change the display as follows: broadcasting station name
type of station CT station current frequency broadcasting station name
Select TA on
■ When want to listen to traffic news and announcements, press the TA button for a longer
period of time, and switch to a station that broadcasts traffic news. Press the TA button
once again to end the TA function.
Volume setup
■ While you listen to TA controlled traffic news, you can rotate the VOLUME ADJUSTMENT
knob to adjust the playback volume of the news you hear. The volume level you have set
is stored, and the next time the TA function is activated, the volume level that was set
before is used. The TA volume level is stored separately, and is therefore independent
from the main volume setting.
Traffic Program searching tuner
■ When TA is turned on, press the
■ When TA is off, activate the TA function, so the tuner can trigger a TP station search.
button or button, to start the TA auto search.
16
Page 17
TUNER OPERATION
Switch to PTY state
■ Press the DIGIT button, then enter PTY mode. Now all the listening program type will be
displayed on the LCD display. If no program type identification can be received, the LCD
screen will display “NO PTY”.
Program type selection
■ When PTY is on, press the
button or the button to select the preferred program
type as follows:
After selecting PTY, press the BAND button to start the auto search for radio stations.
PTY programmed table and program type
When selecting PTY, according to your preferences of the program you’d like to listen to,
press any key from 1 to 6. The preset key is setup to the program types (factory default setting) as shown in the diagram below:
Preset key 1 2 3 4 5 6
Program
type
Display News Speech Sport Pop music Classics Music
News Speech Sport Pop music Classics
music
Music
You can change these presets according to own requirements. When in the process of PTY
selection, press any of the preset PTY number keys for a longer period of time, and your
selection is stored to the tuner memory.
Search of a broadcasting station using PTY
■ Press any of the preset keys from 1 to 6, and select what you like. The current preset
program type will be displayed approx. 5 sec on the LCD screen.
■ Press the BAND button and the receiver will start a search across the FM frequency program selection. Once the playing program selection is exit, you can directly receive the
found radio station.
■ If no current station does broadcast the program type information, the screen will indicate this by displaying “NO PTY” in blinking letters on the display, and the receiver will
default back to a normal radio station.
Urgent message receiving
■ A special function allows to broadcast URGENT messages, no matter how the tuner is
set up. So for so called urgent messages, the receiver will switch over to the appropriate
channel and display the urgency by the letters “ALARM” in the display of the headunit.
Note:
In some areas, receiving of urgent messages is not possible.
17
Page 18
DVD PLAYER OPERATION
BEFORE OPERATION
■ Before laser disc operation, make sure the TFT monitor has been properly connected to
this headunit.
■ The audio output mode depends on the type of laser disc and keep in mind that different
discs can have different output modes. Carefully read the description of disc before operation.
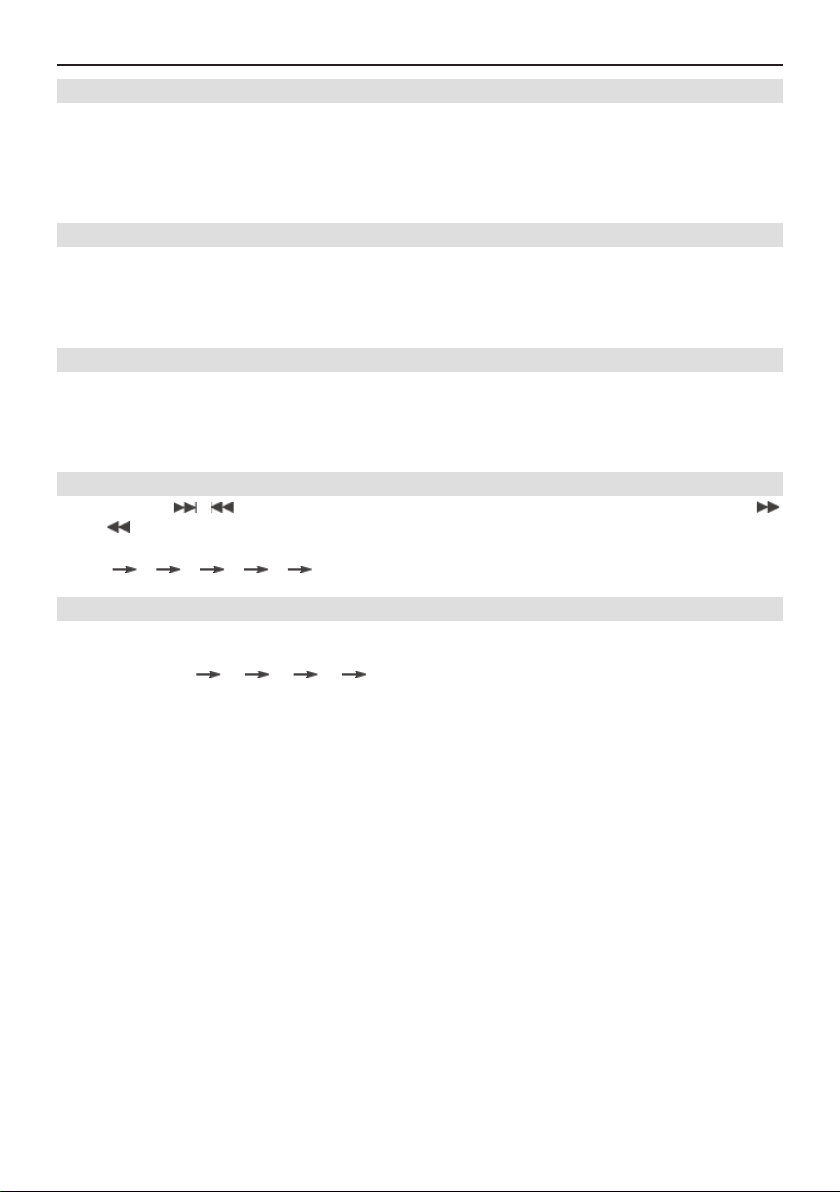
Release/Open Front Panel
■ Press the [
Close Front Panel
■ When the front panel is open, press the [
Disc Loading
■ Before inserting a disc, make sure that there is no disc loaded already. Please check the
disc mark on the LCD screen to confirm whether there is a disc inserted or not.
■ After the disc has loaded, the unit will automatically close the front panel.
] button to slide the front panel down. Please see the sketch below.
] button to automatically close the panel.
Disc Eject Out
■ Press the [
now.
Note:
■ In DVD mode, ejecting a loaded disc will automatically put the headunit into tuner mode.
■ When the headunit is in standby mode, inserting a disc will turn the the headunit on.
■ When a disc is loaded, it will take some time to start playback.
] button to slide the front panel down. If a disc is loaded, it will be ejected
18
Page 19

DVD PLAYER OPERATION
2-CHANNEL ~ 5.1-CHANNEL SETUP
■ When the unit is set to 2-channel mode, pressing the [4/2-6CH] button for a longer period
of time will set the mode to 5.1 channel. This will be indicated on the LCD display with
“FULL 6CH”.
Note:
■ The volume of 2-CH and 5.1-CH modes is controlled and stored independently. Before
you switch to 5.1-CH mode, lower the volume and also check the input gain settings of
your external amplifier, to avoid nasty surprises!
PAUSE & PLAYBACK
■ Press the [PAUSE] button to pause playback.
■ Press it again to resume normal playback.
START & STOP PLAYBACK
■ Press the [ENTER/PLAY] button to start playback of the disc.
■ Press [6/STOP] button to stop playback of the disc.
SKIP PLAYBACK
■ Press the [
■ Press the [
back from there.
Note:
■ When a VCD disc is loaded and PBC is turned ON, this function will not work.
REPEAT PLAYBACK
■ Press the [5/REPT] button once to repeat playback the current Chapter/Track.
■ Press it once more to repeat playback of the whole Title/Disc.
■ Press it a third time to cancel the repeat playback function.
RANDOM/SCAN PLAYBACK
■ Repeatedly press the [3/P.MODE] button to switch among Random/Scan and Normal
playback modes according to the following sequence: Random
■ The “Scan” playback function will play the beginning of each track for roughly 10 sec and
then continue to play the next track/section.
SELECT CHAPTER/TRACK OR PLAY TIME
■ Press the [GOTO] button on the remote control to select the play time (for CD/VCD) or
select the desired chapter (for DVD).
■ Then press the direction button to select different content or use the numeric keys to
enter a chapter number or time data (if there is no operation within 5 sec, the unit will exit
this mode.)
■ In DVD mode, press the button again to select playtime of the title, which will be indicated
on monitor.
Note:
■ If you’re using CD discs, you can also directly press a number button on the remote con-
trol to select a certain track, and you don’t need to press the [GOTO] button first, to use
this function.
] button to skip to the next track/chapter and playback from there.
] button to skip backwards to the previous section/chapter and begin play-
Scan Normal
19
Page 20
DVD PLAYER OPERATION
SELECT SUBTITLE LANGUAGE ---ONLY DVD
■ When the disc is playing, the subtitle language will be chosen according the initial preset
of the preferred subtitle language. To change this, press the [SUBTITLE] button on the
remote control to switch among the disc-supported languages. If the disc only supports
one subtitle, the function won’t work. If no setting is chosen within 5 sec, the language
description will disappear.
SELECT AUDIO TRACK (LANGUAGE)---ONLY DVD
■ When the disc is playing, the pre-selected preferred audio track (language) will be repro-
duced. To change this, press the [AUDIO] button on the remote control to select one of
the disc-supported languages. If no setting is chosen within 5 sec, the audio description
will disappear.
SELECT CAMERA ANGLE---ONLY DVD IF DVD DISCS
■ If the DVD disc supports multi-angle playback, press the [ANGLE] button on the remote
control to chose between different camera angles. Note: There are only a few discs that
support this function. If no setting is chosen within 5 sec, the angle description will disappear.
FAST FORWARD & FAST BACKWARD
■ Press the [
]/[ ] buttons on the remote control to FF and FB play of the current disc. Press the button repeatedly, to change the speed of FF and FB according to the following sequence:
1X
SLOW PLAY
■ Press the [SLOW] on the remote control to slow play contents of the current disc. Press
it repeatedly, and the slow play speed will be changed according to the following
sequence: 1X
]/[ ] buttons on the front panel for a longer period of time, or press the [
2X 4X 6X 8X 1X.
1/2 1/4 1/8 1X
20
Page 21

DVD PLAYER SETUP
SET SPEAKER
■ Insert DVD disc and start playback.
■ Press the [SETUP] button on the remote control or the
the setup menu.
■ Select e SPEAKER SETUP e and press [ENTER] to confirm.
■ Set Center and Surround speakers ON or OFF according to your installation.
■ Set the delay time of Center and Surround speakers.
■ Exit Speaker Setup Menu.
■ Use the direction buttons to select [MAIN PAGE] and press [ENTER] to exit speaker set-
ting menu.
Note:
■ If the system output is set to 2-CH, the [SPEAKER SETUP] mode must be changed to 6-
CH mode fist, before any other settings can be attempted.
button on the front panel to enter
21
Page 22

DVD PLAYER SETUP
SET TV ASPECT
■ Select [GENERAL SETUP] and then press [ENTER] to enter General Setup.
■ Select [TV DISPLAY], there are 3 options to choose from (see drawing below). Select the
correct option and press [ENTER] to confirm.
Set OSD Language
■ Select [GENERAL SETUP]; and then press [ENTER] to enter General Setup.
■ Select [OSD LANG] to select OSD Language including English and Chinese in this sys-
tem, and then press [ENTER] to confirm.
Set Dolby Pro logic Output
■ If your audio source is 2CH, e.g. CD, VCD, you can use the Dolby Pro logic function to
enjoy surround effect on all channels.
■ Select [AUDIO SETUP] in main menu, and then select [PRO LOGIC] in main menu, then
select [PRO LOGIC] and set it to ON. Finally press [ENTER] to confirm.
22
Page 23

DVD PLAYER SETUP
Set Audio Language
■ Most DVD’s support different audio languages. Select default audio language [AUDIO]
under section [PREFERENCE SETUP] in the main menu and then confirm with pressing
[ENTER]. If the disc that is played does support the selected language, playback will automatically begin with the desired (pre-selected) audio language.
■ During playback, press the [AUDIO] button on the remote control to directly switch among
the languages present on the DVD disc.
Select Subtitle Language
■ Set the default subtitle language under [SUBTITLE] options.
■ Set the preferred subtitle language when the disc is not being played back.
■ During playback, press the [SUB-TITLE] button on the remote control to switch between
the different languages on the DVD disc.
Select TV Type
■ Set video systems in the section [TV TYPE] which is part of the options in the section
[PREFRENCE SETUP].
■ There are 3 options to choose from (see drawing below).
■ Select the video system according to the actual monitor type in use. Press the [ENTER]
button to confirm the selection. The chosen video system will be changed after exit of
the setup mode.
■ The [P/N] button on the remote control can directly change this option.
Note:
■ This operation can only work when no disc is played (stop state).
23
Page 24

DVD PLAYER SETUP
SET PARENTAL LOCK & PASSWORD
■ Some DVDs let you use the parental lock function to restrict viewing of violent and adult
oriented scenes by children. You can set the parental lock level in eight different steps as
desired.
■ Select [PREFENCES SETUP], select [PARENTAL], select a suitable level and press
[ENTER] to confirm. This operation requests you to input a password. The default pass-
word is 3308. For modifications of the password, refer to the next paragraph.
■ Select [PASSWORD], select [CHANGE] and press [ENTER] to confirm.
■ Firstly you must input the old password, and then input the new password, and input new
password again to confirm, finally press [ENTER] to finish this operation.
Note:
■ We recommend you to keep a written record of your new password!
24
Page 25

CD CHANGER OPERATION / AUX OPERATION
MODE SWITCH
■ Press the [MODE] button to switch from RADIO e DVD e CDC e AUX e RADIO
■ When no disc is inserted to the headunit, it will directly switch to CDC mode. If a CD-
changer is not connected to the headunit, you won’t be able to select CDC mode.
PAUSE AND PLAYBACK
■ In disc playback mode, press the [PAUSE] button to pause playback;
■ When playback is paused, press the [ENTER] or [PAUSE] button to continue playback;
■ When the unit is in FF or FB mode, press [PAUSE] to pause.
SELECT DISCS (CD-CHANGER)
■ Press the [1/DISC-] button to select the previous disc.
■ If no disc is found, press again to continue to previous disc.
■ If the current disc is the last disc in the CD-changer, the search will restart at disc one.
■ Press the [2/DISC+] button to select the next disc.
■ If no disc is found, press again to continue the search for the next disc.
■ If the current disc is the last disc in the CD-changer, the search will restart at disc one.
RANDOM/SCAN
■ Continuously press [3/P.MODE] to switch between Random/Scan and Normal playback,
according to the following sequence:
Random playback current disc e Random playback all discs e Scan all discs e Normal
playback
■ The “Scan” playback function will play the beginning of each track for roughly 10secs
and then play the next track/section.
REPEAT PLAY
■ Press the [5/REPT] button to repeat playback of the current track ; press it once more to
playback the current disc; press it a third time to cancel the repeat playback mode.
Note:
■ For all other operations, please see the section “DVD Operation” for reference.
AUX OPERATION
■ The player can input a 2-channel audio source, and reproduce the fed signal as 4-channel audio with surround sound effect.
■ Connect a 2-channel audio source to this DVD player (AUX in RCA inputs).
■ Press the MODE button and select AUX IN mode.
■ Play the external 2-channel audio source, and turn on the car DVD headunit to listen to
surround sound.
25
Page 26

INSTALLATION & CONNECTION
INSTALLATION NOTES
■ If possible, get this unit installed by a qualified dealer/installer.
■ Before mounting this unit to the dashboard, properly connect all wires and check if the
unit and all peripheral devices work as intended.
■ Use only the mounting hardware supplied with the set contents to ensure proper installati-
on. The use of unauthorized parts can cause malfunctions and/or damage.
■ Consult your dealer if the installation requires the drilling of holes or other modifications to
the vehicle.
■ Install the unit where it does not get in the driver’s way and where it cannot injure passen-
gers upon a sudden stop or accident.
■ The semiconductor laser will be damaged if it overheats, so don’t install the unit in places
exposed to heat, for example near a heater outlet.
■ Power supply for the unit is 12V DC with negative (-) ground.
■ Carefully read the operating and installation manual, before attempting the installation of
this unit. Please connect electric parts according to the depicted diagrams. Incorrect connections may damage the equipment or parts of it.
■ Do not insert the power supply connector before all other connectons have been made.
■ Do insulate exposed wires to prevent short circuits against vehicle ground.
■ This headunit is compatible with CD-changer made by SANYO.
■ Refer to the instruction manual of SANYO CD-changers for proper connections, moun-
ting and setup.
ACCESSORIES AND HARDWARE
26
Page 27

INSTALLATION & CONNECTION
INSTALLATION PROCEDURE
Unit Installation
If your vehicle has a 1-DIN cutout in the dashboard, you can mount this DVD headunit directly without any further modifications.
■ Disconnect the power wire from the
negative (-) battery terminal before you
start any wiring work.
■ Insert the metal mounting bracket into
the dashboard and bend the mounting
tabs outwards with a screwdriver.
■ Connect mounting bolt with a proper
spanner.
■ Check all audio connections and the
necessary wiring according to the specification of the mounted devices.
■ Insert ISO-DIN power connector to the
ISO plug of your car.
■ Insert the headunit into the mounting
Bracket and push it back until you hear
the unit lock in place.
■ Use the provided screw (Bt5×16) to fix
the other side of the assembly bar with
the car body (optional).
■ Attach the plastic trim ring to the unit.
Note:
■ Be sure not to scratch and wound your
fingers when bending the mounting tabs
of the mounting bracket with a screwdriver.
27
Page 28

INSTALLATION & CONNECTION
CONNECTION OF AV AND POWER WIRES
Auto-Antenna Cable
Note: Connected to auto-antenna relay control terminal (Max 300mA, 12C DC)
28
Page 29

INSTALLATION & CONNECTION
SPEAKER CONNECTION
Left+ Left- Right+ Right-
Front Speaker
Rear Speaker
Note:
■ Do only use groundless speaker systems (TWO wires for each speaker!).
■ Input power of used speakers must be over 45W, or damage may result.
■ Speaker impedance: 4Ω
■ Speakers with an impedance too big or too small may affect output power and/or damage
the unit or the speakers.
■ Do not use 3-cable speaker systems and do not connect speakers to the car body. This
unit uses BTL amp circuit and thus, the speakers installed must be connected to this unit
with their positive and negative wires.
■ Speaker wires and separate power amplifier(s) must keep a distance of about 30CM from
the antenna and the antenna extension leads.
■ Connect the speakers according to the following diagram. Incorrect connection will dama-
ge this unit (or the speakers).
Correct wires connection
White White/Black Gray Gray/Black
Green Green/Black Violet Violet/Black
Wrong wires connection
29
Page 30

INSTALLATION & CONNECTION
OUTPUT POWER AMPLIFIER CONNECTION:
■ Connect an external power amplifier correctly according to the following connection dia-
gram. Incorrect connection will cause incorrect soundstage and also may cause damage
to the speakers.
Note:
In tuner, AUX or DVD stereo mode, the 5.1-CH output is analog.
In 6-CH DVD mode, there is Dolby 5.1-CH output.
FUSE
■ The inline fuse is rated 10A. If it needs to be replaced, please only use a identical fuse
with identical rating and specs. A wrong fuse value can easily cause a fire or damage the
installed equipment.
TROUBLESHOOTING
■ If such problem arises during your usage, the troubleshooting guide will settle down all
your problems immediately. If it still doesn’t work, please contact professional technicians to perform.
Symptom Cause Action
Confirm once more that all connections
are correct.
Press [reset] button again.
Rectify the reason for the fuse blowing.
Then replace the fuse. Be sure to
replace the fuse with the same rating.
Turn the unit off and then on.
Press [reset] button
Retry using another disc.
Power doesn’t turn on. The unit
doesn’t operate.
Operation with the remote control
isn’t possible. The unit does not
operate correctly even when
the appropriate remote control
buttons are pressed.
Leads and connectors are incorrectly
connected.
The fuse is blown.
Noise and other factors are causing
the build-in microprocessor to operate
incorrectly.
Battery power is low. Load a new battery.
Some operations are prohibited with
certain DVD discs.
30
Page 31

INSTALLATION & CONNECTION
The disc is dirty. Clean disc.
Playback is not possible.
No sounds are heard. The
volume level does not rise.
There is no picture.
The icon
operation is not possible.
The picture stops (pauses) and
the unit can not be operated.
There is no sound. Volume level
is low.
There’s audio and video skipping. This unit is not firmly secured. Secure this unit firmly.
The picture is stretched. The
aspect is incorrect.
All the lamps of the panel and
the LCD screen have gone out.
is displayed, and
☞
The loaded disc is a type this unit cannot
play.
A video system disc not compatible with
this unit is loaded.
Cables are not connected correctly.
The monitor or video line-out is not
connected right.
The operation is prohibited for the disc. This operation is not possible.
The operation is not compatible with the
disc’s organization.
Reading of data has become impossible
during playback.
The volume level is low. Adjust the volume level.
The attenuator is on. Turn the attenuator off.
The aspect setting is incorrect for the
display.
When the car starts, the build-in
microprocessor may have mistake.
Problems during DVD playback
Symptom Cause Action
Playback is not possible.
A parental lock message is displayed
and playback is not possible.
Parental lock can not be canceled. The code number is incorrect. Input the correct code number.
Dialog language (and subtitle
language)can not be switched.
No subtitles are displayed.
Playback is not with the audio
language and subtitle language
settings selected in SET-UP menu.
Switching the viewing angle is not
possible.
The picture is extremely unclear/
distorted and dark during playback.
The loaded disc has a different
region number from this unit.
Parental lock is on. Turn parental lock off of change the level.
The DVD playing does not
feature multiple language
recordings.
You can only switch between
items indicated in the disc
menu.
The DVD playing does not
feature subtitles.
The DVD playing does not
feature dialog or subtitles in the
language selected in SET-UP
menu.
The DVD playing does not
feature scenes shot from
multiple angles.
You are trying to switch to
multiple angle viewing of a
scene that is not recorded from
multiple angles.
The disc features a signal to
prohibit copying.
Check what type the disc is.
Change to a disc compatible to your
video system.
Connect the cables correctly.
Press [mute] button twice.
Make sure you operate the monitor
correctly, then turn on monitor and
select the VIDEO.
This operation is not possible.
After pressing [stop] button once, start
playback once more.
Select the appropriate setting for your
display.
Please press the [reset] button in the
panel to restart the unit.
Replace the disc with one featuring the same
region number as this unit.
You can not switch among multiple languages
if they aren’t recorded on the disc.
Switch using the disc menu.
Subtitles are not displayed if they are not
recorded on the disc.
Switching to a selected language is not
possible if the language selected in SET-UP
menu is not recorded on the disc.
You can not switch between multiple angles
if the DVD does not feature scenes recorded
from multiple angles.
Switch between multiple angles when
watching scenes recorded from multiple
angles.
Since this unit is compatible with the copy
guard analog copy protect system, when
playing a disc that has a signal prohibiting
copying, the picture may suffer from horizontal
stripes or other imperfections when viewed on
some displays. This does not mean this unit is
malfunctioning.
31
Page 32

VOR DER MONTAGE
Klangfeld von Dolby Surround 5.1 Systemen — und die Lautsprecherplazierung
Spezifikationen vom Dolby Digital 5.1 System (DVD Disks)
Ein DVD taugliches Dolby Digital Car-Hifi Setup besteht aus einem Paar
Frontlautsprechern, einem Center-Kanal Lautsprecher, zwei Rücklautsprechern,
einem Subwoofer System – und den für die Bildwiedergabe nötigen Komponenten
wie TFT Monitor und DVD Head Unit. Eine solche Installation ermöglicht die perfekte
Wiedergabe der auf einer DVD gespeicherten Bild und Toninformationen.
GENERELLE FUNKTIONEN
Unterstützte Disk-Formate: DVD, SVCD, DVCD, VCD, CD, MP3, etc.
Unterstützte TV Bildformate: NTSC, PAL or Auto
Video Ausgang: Pan & Scan, Letter Box, Widescreen
Audio Ausgang:
■ DOLBY DIGITAL und DTS Decoder
■ PRO LOGIC II Decodierung
■ 5.1CH Dolby Digital oder 2-Kanal stereo DOWNMIX
Disk Wiedergabe Funktionen:
■ Multi-visual angle, Multi-language selective output
■ Fast Forward, Fast Backward, Slow Forward, Slow Backward
■ Broken point auto-memory
Langwellen/UKW Tuner:
■ 18 UKW und 12 Langwellen Stations-Speicher
■ UKW Empfangsfrequenzband: 87.5~108 MHz
■ Langwellen Empfangsfrequenzband: 531~1602 kHz
■ Automatischer und manualler Sendersuchlauf
32
Page 33

VOR DER MONTAGE
DTS ist ein eingetragenes Warenzeichen
von Digital Theater System, Inc.
Hergestellt unter Lizenz von Dolby Laboratories.
Dolby, Pro Logic und das Doppel-D Symbol sind
eingetragene Warenzeichen von Dolby Laboratories.
ZU BEACHTEN
WARNUNG!
■ Vermeiden Sie es, dieses Gerät übermässiger Feuchtigkeit oder gar Regen auszusetzen.
Ein elektrischer Schlag, oder auch ein Brand könnten dadurch resultieren.
■ Der Video-Monitor der an dieses DVD Headunit angeschlossen wird, sollte sich nicht
im direkten Blickfeld des Fahrers befinden. Je nach Land des Einsatzes ist dies nicht
erlaubt und es besteht ausserdem eine erhöhte Gefahr von Verkehrsunfällen (durch
Ablenkung des Fahrers).
■ Dieses Produkt beinhaltet eine kohärente Strahlenquelle (Laser) der Klasse 1 und strahlt
im sichtbaren oder unsichtbaren Bereich. Vermeiden Sie Augenkontakt mit dem Gerät
wenn der Deckel entfernt wurde!
■ Das Gerät darf nur von qualifiziertem Personal geöffnet und gewartet oder repariert werden!
VORSICHTSMASSNAHMEN
■ Schauen Sie keine VCD’s oder DVD’s während das Fahrzeug auf der Strasse in
Bewegung ist. Das könnte einen Verkehrsunfall verursachen.
■ Wenn Sie Ihr Fahrzeug reinigen, vermeiden Sie das Gerät Waschwasser oder anderen
Reinigungsmitteln auszusetzen.
■ Parken in direktem Sonnelicht kann den Innenraum des Fahrzeuges sehr stark aufheizen.
Lassen Sie den Innenraum in so einem Fall abkühlen, bevor Sie das Gerät in Gang setzen!
■ Halten Sie die Wiedergabelautstärke in einem Bereich, der eine volle Konzentration auf
das Verkehrsgeschehen zulässt
■ Wenn Sie Ihr Fahrzeug reinigen, halten Sie Wasser oder Sprühnebel von
Reinigungsmitteln dem Gerät fern, um Kurzschlüsse oder andere Beschädigungen im
inneren des Gerätes zu vermeiden
■ Führen Sie auf keinen Fall selbsttätige Modifikations- oder Reparaturversuche an diesem
Gerät durch. Sollte eine Reparatur des ZE-200DVD nötig werden, kontaktieren Sie Ihren
ZENEC Händler
■ Dieses Gerät sollte möglichst horizontal montiert werden, mit einem Kippwinkel von
unter 15°.
■ Dieses DVD Gerät weist volle Kompatibilität mit PAL/NTSC Systemen auf. Andere
Formate können nicht korrekt wiedergegeben warden.
■ Betrieben Sie dieses Gerät nicht über eine längere Zeit mit einer höheren Spannung wie
vorgesehen (12V DC).
■ Führen Sie keine Gegenstände in den Disk-Slot des Gerätes ein, die Mechanik und der
Laserschlitten können dadurch beschädigt werden.
■ Wenn Sie Ihr Fahrzeug während längerer Zeit nicht benutzen, entfernen Sie eingelegte
CD’s oder DVD’s und lagern Sie diese in einem entsprechenden Behältnis, welches für
die Lagerung von Disks vorgesehen ist.
VON CD’S/DVD’S
33
Page 34

VOR DER MONTAGE
PFLEGE VON CD’S/DVD’S
■ Berühren Sie niemals die Datenseite der Disks. Fingerabdrücke lassen die
Fehlerkorrektur unnötig arbeiten.
■ Versuchen Sie Kratzer auf der Datenseite der Disk zu vermeiden.
■ Biegen Sie die Disks nicht, es könnten Risse entstehen!
■ Verstauen Sie die Disks in einem geeigneten Disk-Etui, wenn nicht in Gebrauch.
■ Verwenden Sie niemals verformte oder sonst augenscheinlich beschädigte Disks.
■ Lassen Sie die Disk nie im direkten Sonnenlicht liegen, oder in der Nähe von starken
Hitzequellen.
■ Wenn Sie eine verschmutzte Disk reinigen müssen, wischen Sie immer vom Zentrum der
Disk nach aussen – und niemals mit kreisförmigen Bewegungen!
■ Bei neuen Disks: Entgraten Sie – falls nötig – den inneren und äusseren Rand mit einem
im Kreis geführten Bleistift (o.ä.).
LÄNDERKENNUNG (REGIONAL CODE):
DVD Abspielgeräte und auch DVD Disks beinhalten eine Länderkennung, die definiert wo die
Hard- oder Software gekauft wurde. Die Wiedergabe einer Disk ist nicht möglich, wenn die
Länderkennung vom Abspielgerät und der Disk übereinstimmen. Die Länderkennung ist jeweils auf
dem Produkt aufgeführt.
Die unten aufgeführte Liste zeigt die Aufteilung in die verschiedenen Ländercodes, mit der
zugewiesenen Länder Kennzahl (Region Code):
■ Region 1: USA, Kanada, Inselstaaten im ostpazifischen Ozean;
■ Region 2: Japan, Westeuropa, Nord Europa, Südamerika, und der Mittlere Osten;
■ Region 3: Taiwan, Hong Kong, Süd-Korea, Thailand, Indonesien, weitere Länder in
Südost-Asien;
■ Region 4: Australien, Neuseeland, Zentralamerika, Inselstaaten im südpazifischen
Ozean;
■ Region 5: Nordwest-Asien, Osteuropa, Russland, Mongolei, Indischer Subkontinent,
Zentral-Asien, Nord-Korea, Nord-Afrika;
■ Region 6: China
Die unten gelisteten Markierungen können auf handelsüblichen DVD’s und den Umschlägen
gefunden werden. Die Markierungen bezeichnen Bildtyp, Audio-Formate und weitere
Funktionen die genutzt werden können:
WAS DIE MARKIERUNGEN AUF DEN DVD’S BEDEUTEN
Zeigt die Anzahl der auf der Disk gespeicherten Tonformate
Zeigt die Anzahl der auf der Disk gespeicherten Untertitel-Sprachen
Zeigt die Anzahl der auf der Disk enthaltenen Kamerawinkel
Zeigt das vorhandene Bildwiedergabe-Format an (Bildverhältnis Breite zu Höhe)
Zeigt den Länder Code an, d.h. woher die DVD Disk stammt
34
Page 35

VOR DER MONTAGE
STRUKTURELLER AUFBAU VON DVD DISKS
Der Inhalt von DVD-Disks ist in Kapitel unterteilt, währendem andere Video-Formate wie VCD
und SVCD mit Tracks arbeiten, die oft den gesamten Film beinhalten. Auf Karaoke CD’s sind
oft die einzelnen Songs als Einzeltrack abgespeichert. Dies gilt es zu beachten, wenn die
Suchfunktion sinnvoll genutzt werden soll.
Suchfunktion sinnvoll genutzt werden soll.
Video-CD und MP3-CD
Auf MP3-CD’s und auch Video-CD’s ist der Inhalt in Tracks aufgeteilt. Ein Einzeltrack entspricht meist einem Lied (oder einem Clip).
35
Page 36

VOR DER MONTAGE
DIEBSTAHLSCHUTZ IHRES GERÄTES
Das Frontpanel kann vom Gerät entfernt werden. Ein mitgeliefertes Plastiketui ermöglicht die Aufbewahrung des Bedienteils, wenn es abgenommen wurde. Wenn Sie die
Zündung von Ihrem Fahrzeug ausschalten fährt der Motorschlitten das Bedienteil runter
– und Sie haben 25 Sekunden Zeit um das Panel zu entfernen. Diese Funktion kann im
Setup-Menü abgeschaltet werden.
1. Entfernen vom Bedienteil
■ Drücken Sie die Taste OPEN/EJECT am Gerät, oder schalten Sie das Gerät aus.
■ Greifen Sie das Bedienteil in der Mitte und ziehen Sie es gegen sich ab.
■ Bewahren Sie das Bedienteil am besten im Etui auf, um es vor Kratzern und Staub zu
schützen.
2. Befestigung vom Bedienteil
Wenn der Bedienteil-Ausleger noch ausgefahren ist:
■ Halten Sie das Bedienteil gerade an den Ausleger und führen Sie es in die seitlichen
Führungshaken des Auslegers rechts und links ein, ohne zu verkanten. Nun schieben Sie
das Bedienteil nach hinten bis es mit einem Klick hörbar einrastet.
3. Bei eingerastetem Bedienteil-Ausleger:
■ Fahren Sie das Bedienteil mit seiner linken Seite links am Gerät ein und drücken Sie das
Bedienteil mit leichtem Druck auf seiner rechten Seite in seine Klickhalterung.
Anmerkung:
■ Wenden Sie bei der Entnahme oder der Re-Montage des Bedienteils niemals Gewalt an
– die feine Mechanik könnte sonst beschädigt werden.
■ Vermeiden Sie starke Schläge auf das Bedienteil.
■ Setzen Sie das Bedienteil nicht direktem Sonnenlicht oder hohen Temperaturen aus.
1.
2.
3.
36
Page 37

VOR DER MONTAGE
BEDIENUNGELEMENTE
HEAD UNIT
1. POWER/MUTE
■ Drücken Sie diese Taste um das Gerät in seinen Standby Betrieb zu bringen. Wenn das
Gerät eingeschaltet ist, bewirkt das Drücken auf diese Taste die Aktivierung der MutingFunktion (Stummschaltung).
■ Durch drücken der Taste für mehr als 2 Sek. wird das Gerät ausgeschaltet.
2. VOLUME DREHKNOPF/BESTÄTIGUNG/LOCAL
■ Drehen dieses Knopfes bewirkt eine Veränderung der Lautstärke.
■ Drücken Sie auf den Volume-Drehknopf um eine Einstellung der Klang-Effekte vorzuneh-
men , also Bass, Treble, Balance, Fader, Loudness, Sound Effect.
■ Drücken und halten Sie den Volume-Drehknopf länger als 2 Sekunden, um im
Radiobetrieb zwischen den RDS Funktionen LOCAL/DISTANCE auszuwählen.
3. DISP
■ Drücken Sie diese Taste um unterschiedliche Anzeigen des Displays auszuwählen.
4. BAND
■ Drücken Sie diese Taste um zwischen drei UKW und zwei AM Bändern zu wählen.
5. AS/PS
■ Drücken Sie diese Taste um die bereits gespeicherten Sender zu scannen. (PS).
■ Durch Drücken und Halten dieser Taste für mehr als zwei Sekunden wird der
Sendersuchlauf des aktuellen Bandes aktiviert – und direkt auf den Preset-Stationen
(1 – 6) abgespeichert.(AS).
■ Wenn gerade eine Disk läuft, bewirkt das Drücken der Taste die Einblendung des
Bildschirm-Menüs.
37
Page 38

VOR DER MONTAGE
6. AUDIO
■ Drücken Sie diese Raste um die Tonspur-Sprache während der Wiedergabe eine DVD
auszuwählen. Bei der Wiedergabe einer VCD MP3 Disk kann durch drücken dieser Taste
die Audio Tonspur gewählt werden.
7. SUBTITLE
■ Drücken dieser Taste während der DVD Wiedergabe ermöglicht die Auswahl der vorhandenen Untertitel-Sprachen.
8. RESUME
■ Drücken Sie die Taste STOP bei der Wiedergabe einer Disk und dann die Taste Resume.
Wenn nun mit dem Abspielen der Disk fortgefahren wird, ermöglicht das Drücken der
Taste Resume zum vorher gespeicherten Stop-Punkt zurück zu gehen.
6. AF
■ Zum Einstellen der AF (Alternativ-Frequenz) Funktion wenn sich das Gerät im TunerModus befindet.
■ Beim Abspielen einer DVD, bewirkt drücken der Taste AF die Auswahl Tonspur-Sprache,
bei der Wiedergabe von VCD MP3 Disks die Auswahl der Tonkanäle.
7. TA
■ Zum Einstellen der TA (Trafic Announcement = Verkehrsdurchsage) Funktion im TunerModus.
■ Während der Wiedergabe einer DVD oder auch im CD-Wechsler Modus kann durch eine
vorher aktivierte TA Funktion die Wiedergabe mit einer Verkehrsdurchsage unterbrochen
werden. Das Gerät kehrt nach Ende der Durchsage wieder in den Disk Wiedergabe
Modus (DVD oder CD-Wechsler) zurück.
■ Durch drücken der TA Taste während der DVD Wiedergabe kann die Titel-Sprache
gewählt werden.
8. PTY
■ Im Tuner-Mode: Aktiviert die Programm Typ Erkennung, z.B.: News, Rock, Classic, etc.
9. VORHERIGE ( ) /ZURÜCK ( ) Tasten
■ Durch Drücken dieser Taste gelangen sie zum vorhergehenden Track oder Kapitel, oder
der automatische Sendersuchlauf sucht den Sender mit der nächst tieferen Frequenz
wenn sich das Gerät im Tuner Modus befindet.
■ Durch längeres drücken der Tasten beginnt das Gerät mit dem schnellen Rücklauf – oder
aber im Tuner-Modus die Empfangsfrequenz manuell in Schritten zu verkleinern.
10. NÄCHSTE ( )/VORWÄRTS ( )
■ Durch drücken dieser Taste gelangen sie zum nächsten Track oder Kapitel, oder der
automatische Sendersuchlauf sucht den Sender mit der nächst höheren Frequenz wenn
sich das Gerät im Tuner Modus befindet..
■ Durch längeres drücken der Tasten (mehr als 2 Sek.) beginnt das Gerät mit dem schnellen Vorlauf – oder aber im Tuner-Modus die Empfangsfrequenz manuell in Schritten zu
erhöhen.
11. ENTER/PLAY
■ Wenn das Gerät im DVD Wiedergabe Modus ist, bewirkt ein drücken dieser Taste die
Wiedergabe.
12. OPEN/EJECT
■ Drücken Sie diese Taste um das Front Panel herunter zu schwenken. Wenn eine Disk
geladen ist, wird diese ausgeworfen.
38
Page 39

VOR DER MONTAGE
13. 5643
■ Drücken Sie die Richtungspfeil Tasten um den Cursor zu bewegen.
■ Drücken der Taste
Setup. Erneutes drücken dieser Taste bewirkt eine Änderung des Winkels vom
Bedienpanel.
■ Im DVD Wiedergabe Modus gelangen Sie durch das Drücken der Taste
2 Sekunden in das Setup Menü.
6 für mehr als 2 Sekunden bringt das Gerät in das Displaywinkel
5 für mehr als
14. REMOTE SENSOR
15. RESET
■ Durch drücken des RESET pins mit einem spitzen Gegenstand werden alle vorgenommenen Einstellungen auf Ihren Fatory-Default Wert zurück gesetzt.
16. MODE
■ Durch drücken dieser Taste wird die gewünschte Quelle gewählt.
17. 1
■ Zum anwählen eines gespeicherten Senders.
18. 2
■ Zum anwählen eines gespeicherten Senders.
17. 1/DISC-
■ Zum anwählen eines gespeicherten Senders und zum suchen einer weiter zurückliegenden Disk im CD-Wechsler Betrieb.
18. 2/DISC+
■ Zum anwählen eines gespeicherten Senders und zum suchen einer weiter vorne liegenden Disk in CD-Wechsler Betrieb.
19. 3/P.MODE
■ Zum anwählen eines gespeicherten Senders, oder um den Abspielmodus (Random, Intro
Scan) zu aktivieren, bei DVD Wiedergabe oder bei der CD-Wechsler Wiedergabe zu aktivieren.
20. 4/2-6CH
■ Zum anwählen eines gespeicherten Senders und zum Umschalten zwischen 2-Kanal und
6-Kanal Wiedergabe bei gebrauch des integrierten DVD Players.
21. 5/REPT
■ Zum anwählen eines gespeicherten Senders und zur Wiederholung eines Tracks wenn
ein CD-Wechsler angeschlossen ist, oder beim eingebauten DVD Player.
22. 6/STOP
■ Zum anwählen eines gespeicherten Senders und zum Anhalten der Wiedergabe beim
integrierten DVD Player.
23. PAUSE
■ Drücken Sie diese Taste um die Wiedergabe anzuhalten.
39
Page 40

VOR DER MONTAGE
FERNBEDIENUNG
■ Die Tastenbelegung und Beschriftung entspricht dem Bedienteil – Beschreibung der
Funktionen siehe vorangehendes Kapitel.
■ Einige Tasten die in der Beschreibung nicht erläutert werden sind im Kapitel DVD
Wiedergabe beschrieben.
Gebrauch und Pflege der Fernbedienung
Batterie einsetzen
Ziehen Sie das kleine Batteriefach auf der Rückseite der Fernbedienung zurück. Setzen Sie
nun die Batterie ein und achten Sie auf die richtige Polung.
Warnung & Caution
■ Bewahren Sie Batterien sicher und niemals in Reichweite von Kindern auf. Wenn
Batterien trotz Vorsichtsmassnahmen verschluckt wurden, suchen Sie unverzüglich einen
Arzt auf.
■ Verwenden Sie ausschliesslich Lithium-Batterien des Typs CR2025 (3V).
■ Entfernen Sie die Batterie wenn die Fernbedienung über längere Zeit nicht benutzt wird.
■ Versuchen Sie niemals die Batterie aufzuladen, zu zerlegen oder sie durch Feuer zu ent-
sorgen.
■ Lassen Sie die Batterie nicht auf Metalloberflächen liegen und bringen Sie die Batterie
nicht mit metallenen Gegenständen in Kontakt (Schlüssel etc.)
■ Wenn eine Batterie durch lange Nichtbenützung der Fernbedienung oder durch Hitze
ausgelaufen ist, säubern Sie das Batteriefach gründlich!
■ Beachten Sie bei der Entsorgung von Altbatterien die Vorschriften Ihres Landes.
■ Beachten Sie UNBEDINGT die auf der Batterie angegebenen Polaritäten und führen Sie
die Batterie gemäss den korrespondierenden Kenzeichnungen im Batteriefach ein.
40
Page 41

GRUNDFUNKTIONEN
POWER ON/OFF
■ Drücken Sie die Taste [POWER/MUTE] um das Gerät einzuschalten
■ Drücken Sie die Taste [POWER/MUTE] etwas länger, um das Gerät auszuschalten
MUTE
■ Wenn das Gerät eingeschaltet ist, drücken Sie die Taste [POWER/MUTE] um den
Tonausgang des Gerätes stummzuschalten. Wenn Sie diese Taste erneut drücken, verlassen Sie den Stummschaltungs (MUTE) Mode.
MODE
■ Drücken Sie die Taste [MODE] wiederholt, um eine der nachfolgenden Quellen auszuwählen:
■ Tuner e DVD (eingebauter Player) e CDC (externer Multi-CD Wechsler) e AUX e Tuner
Anmerkung:
In den nachfolgenden Fällen lässt sich die Quelle nicht umschalten:
■ Wenn sich keine DVD im Gerät befindet, kann der DVD Mode nicht angewählt werden.
■ Wenn im externen Multi-CD Wechsler keine CD Cartridge geladen ist, oder der CD-
Wechsler nicht angeschlossen ist, kann der CDC Mode nicht angewählt werden.
ANZEIGEN VERSCHIEDENER DISPLAY-INFOS
■ Drücken Sie die Taste [DISP] mehrfach, und Sie sehen unterschiedliche Info’s im LCD
Display – gemäss untenstehender Sequenz. Nach 5 Sekunden fällt die Anzeige zurück in
den Default-Modus.
Tuner: Frequenz (default)
CDC: Spielzeit (default)
DVD: Speilzeit (default)
AUX: AUX
Anmerkung:
■ Wenn sich das Gerät im Standby-Modus befindet, wir die Zeit nur angezeigt, wenn die
Uhrzeit-Funktion aktiviert ist.
Zeitanzeige
Zeitanzeige
Zeitanzeige
Disk Typ Zeitanzeige
ZEITEINSTELLUNG
■ Wenn sich das LCD-Display im Zeitanzeigenmodus befindet, drücken Sie die Taste
[DISP] etwas länger, um in den Einstellmodus zu gelangen.
Im Zeit-Einstell Modus:
■ Drücken der Taste [DISP] wechselt zwischen Stunden und Minuten.
■ Drücken der Taste [
■ Drücken der Taste [
Anmerkung:
■ Wenn für 5 Sekunden keine Eingabe oder Operation erfolgt, verlässt das Gerät den
Zeiteinstell-Modus wieder.
SYSTEM EINSTELLUNGEN
■ Im eingeschaltetern Zustand und mit dem Display NICHT im Zeitanzeige-Modus können
Sie ins System Setup gelangen: Drücken Sie die Taste [DISP] etwas länger:
■ Drücken Sie nun die Tasten [
die Taste [DISP] um den Wert auszuwählen und zu bestätigen:
] erhöht den Wert.
] verringert den Wert.
] und [ ] um ein Einstellmenu anzuwählen. Drücken Sie
41
Page 42

GRUNDFUNKTIONEN
Auswahl Default
Modus Zeitanzeige 12H/24H 12H
Bedienteil abnehmbar ON/OFF OFF
Beep ON/OFF ON
Zeitanzeige ON/OFF ON
Beleuchtung ON/OFF ON
LCD Blink-Modus 0~14 14
LCD Kontras 0~7 2
Anmerkung:
■ Wenn während 5 Sekunden keine Eingabe erfolgt, oder Sie nicht nochmals Taste [DISP]
drücken, beendet das Gerät den Setup-Mode.
EINSTELLUNG BASS, TREBLE, BALANCE, FADER,
LOUDNESS UND SOUND-EFFEKTE
■ Drücken Sie die Taste [SEL/LOC] um die einzelnen Klanganpassungen anzuwählen, entsprechend der aufgeführten Sequenz:
Volume
Bass Treble Balance Fader Loudness Sound effect Volume
BASS UND TREBLE EINSTELLUNG
■ Im Bass oder Treble Modus drehen Sie den Lautstärke Knopf [VOLUME ADJUSTMENT]
um Bass oder Treble Anteil zu erhöhen oder verkleinern.
■ Wenn Sie den Lautstärkeknopf länger als 0.5 Sekunden gedrückt halten, wird der Wert
stufenlos verändert.
BALANCE UND FADER EINSTELLUNG
■ Im Balance Modus bewirkt das drehen des Lautstärkeknopfes [VOLUME ADJUSTMENT]
das Verschieben der Balance nach links oder rechts. Im Fader Modus kann durch drehen
des Lautstärkeknopfes [VOLUME ADJUSTMENT] die Lautstärke zwischen vorne und hinten verschoben werden.
■ Wenn Sie den Lautstärkeknopf länger als 0.5 Sekunden gedrückt halten, wird der Wert
stufenlos verändert.
LOUDNESS EINSTELLUNG
■ Im Loudness Mode, bewirkt das Drehen des Lautstärkeknopfes [VOLUME
ADJUSTMENT] das Aktivieren oder Deaktivieren der Loudness Funktion.
SOUND EFFECT EINSTELLUNG
■ Im Sound Effect Modus bewirkt ein Drehen des Lautstärkerknopfes die Anwahl der
nachfolgenden Sound-Programm Sequenz: Normal
FLAT JAZZ ROCK
CLASSIC POP
42
Page 43

TUNER-BEDIENUNG
ANWÄHLEN VOM TUNER
Drücken Sie die Taste [MODE] und wählen Sie “RADIO” aus, um den eingebauten RDS Tuner
zu aktivieren.
AUSWAHL VOM FREQUENZBAND
Drücken Sie die Taste [BAND] um sich durch die nachfolgenden Radiostations-Bänder durchzuwählen (FM = UKW Band):
FM2 FM3 AM1 AM2 FM1
FM1
SENDERSUCHE
Automatischer Sendersuchlauf
■ Drücken Sie die Taste [
Frequenz zu starten. Drücken Sie diese Taste erneut, bis Sie eine entsprechende
Senderfrequenz gefunden haben.
■ Drücken Sie die Taste [
Senderfrequenz zu starten.
] um den Stationssuchmodus zu einer höher gelegenen
] um den Sendersuchlauf zu einer tiefer gelegenen
MANUELLER SENDERSUCHLAUF
■ Drücken Sie die Tasten [
Modus zu gelangen.
■ Drücken Sie nun die Taste [
oder oben zu verstellen.
Anmerkung:
■ Der manuelle Sendersuchlauf bleibt nur 5 Sekunden aktiviert, wenn innerhalb dieser Zeit
keine Suche gestartet wird, fällt das Gerät aus dem manuellen Sendersuchlauf Mode
heraus.
ANWAHL VON ABGESPEICHERTEN SENDERN
■ Drücken Sie einer der Tasten [1/DISC-], [2/DISC+], [3/P.MODE], [4/2-6CH], [5/REPT]
oder [6/STOP] um einer vorher abgespeicherte Senderfrequenz anzuwählen. Nach der
Auswahl wird die Senderfrequenz auf dem LCD-Display des Gerätes angezeigt.
ABSPEICHERN DES AKTUELLEN SENDERS
■ Eine Station die gerade gehört wird, lässt sich mit einem etwas längeren Druck auf eine
der sechs oben aufgeführten Direktwahl Stations-Tasten
abspeichern.
KURZES ANSPIELEN DER ABGESPEICHERTEN SENDER
■ Drücken Sie die Taste [AS] um alle bereits abgespeicherten Sender für eine Dauer von 5
Sekunden anzuwählen. Drücken Sie die Taste [PS] lange, um das gewählte Band abzuscannen und die besten empfangbaren Radiostationen direkt ins Stations-Memory abzuspeichern.
AUSWAHL DER TUNER-FUNKTION LOC/DX
■ Drücken Sie die Taste [SEL/LOC] länger als 2 Sekunden, um LOC anzuwählen (Sender
in näherer Umgebung). Das LOC Icon im LCD Display leuchtet auf. Drücken Sie dieselbe
Taste erneut für länger als 2 Sekunden, und das LOC Icon erlischt wieder (und der Tuner
befindet sich im DX Modus).
] oder [ ] etwas länger, um in den manuellen Sendersuchlauf
] oder [ ] erneut, um die Empfangsfrequenz nach unten
43
Page 44

TUNER-BEDIENUNG
RDS (RADIO DATA SYSTEM) FUNKTIONEN
Während des Empfangs eines UKW Senders werden mittels „Radio Data System“ zusätzliche
Informationen übertragen, welche die RDS Funktionen des Tuners unterstützen. Die RDS
Funktion sorgt für eine einfachere Bedienung und diverse Zusatzfunktionen die nachfolgend
beschrieben werden:
AF (Alternativ Frequenz)
■ Wenn der empfangene Sender durch verlassen des Gebietes schwächer wird, sucht das
Empfangsteil eine Alternativ-Sendefrequenz, auf der das gleiche Programm ausgestrahlt
wird und wechselt automatisch zur Station mit besserem Empfang über.
EON (Enhanced Other Networks)
■ Diese Funktion ist eine die AF Funktion unterstützende Funktion. Wenn sich das Gerät
im UKW Betrieb befindet, wechselt der Tuner auf einen EON Sender, auf der eine
Verkehrsdurchsage erfolgt oder erfolgen kann.
PS (Program Service Name)
Wenn ein RDS fähiger Sender empfangen wird, zeigt das Display anstelle der
Empfangsfrequenz den Sendernamen im Display an.
PTY (Program Type)
■ Diverse RDS Sender senden eine Zusatzkennung die es ermöglicht, Sender nach
Programmtyp zu suchen, mit ihrer jeweiligen Programm-Typ Kennung wie: News, Rock,
Classic Music, etc.
TA
■ TA bedeutet Traffic Announcement, also Verkehrsdurchsage. Wenn ein RDS-EON Sender
– bei aktivierter TA Funktion – eine Verkehrsdurchsage sendet, wird der UKW Kanal eingeblendet auf welchem die Durchsage stattfindet. Nach Ende der Durchsage wechselt
das Headunit automatisch wieder zurück zum vorher empfangenen Sender, oder die
CD/DVD Wiedergabe wird wieder an dem Punkt aufgenommen wo sie für die Durchsage
unterbrochen wurde.
CT (Clock Time)
■ Der eingebaute Tuner gleicht die Zeit automatisch durch den Empfang eines Senders ab,
die angezeigte Uhrzeit ist dadurch immer korrekt.
Einstellung AF Modus
■ Durch langes drücken der AF Taste wird die Alternativfrequenz Funktion aktiviert – sichtbar durch das AF Icon im LCD-Display. Bei schlechtem Empfang blinkt das AF Icon und
zeigt dadurch an, dass der Tuner nach einem Sender mit besserem Empfang sucht.
Umschalten der Display-Anzeige
■ Das Drücken der Taste DISP wechselt die im LCD-Display angezeigte Info, wie folgt:
Name des Radio-Senders
des Radio-Senders
Aktivierung von TA (Verkehrsdurchsagen)
■ Wenn Sie Verkehrsdurchsagen hören wollen, drücken Sie die Taste TA etwas länger,
damit das Radio auf die nächste Sendefrequenz mit Verkehrsdurchsagen einwählt.
Drücken Sie die TA Taste nochmals um diese Funktion wieder auszuschalten.
Lautstärkeeinstellung von Durchsagen
■ Sie können während einer Verkehrsdurchsage die Lautstärke der Wiedergabe mit dem
Volume-Drehknopf anpassen. Dieser eingestellte Wert wird separate abgespeichert, d.h.
weitere Durchsagen werden mit dem eingestellten Wert wiedergegeben.
Stationstyp CT Station Empfangs-Frequenz Name
44
Page 45

TUNER-BEDIENUNG
Traffic Program Suche
■ Wenn die TA Funktion aktiviert ist, drücken Sie die Tasten
oder um einen TA
unterstützenden Sender zu suchen.
■ Wenn TA ausgeschaltet ist, aktivieren Sie die TA Funktion – der Tuner sucht nun einen
entsprechenden Sender der die TA Durchsagen unterstützt.
Umschalten auf PTY
■ Drücken Sie die Taste {DIGIT} um die PTY Funktion zu aktivieren (Anzeige von
Programm-Typ). Die Sender werden nun mit ihrer PTY Kennung am LCD-Display angezeigt. Wenn zu einem Sender keine PTY Kennung zugeordnet ist, kommt die Meldung
„NO PTY“ auf dem Display.
PROGRAMM-TYP AUSWAHL
■ Wenn die PTY Funktion aktiviert ist, drücken Sie die Taste
oder um das
Programm auszuwählen:
Nachdem Sie ein PTY Programmtyp gefunden haben der zusagt, drücken Sie auf die BAND
Taste um die Suche nach diesem Programm-Typ zu starten.
PTY PROGRAMM-TABELLE UND PROGRAMM-TYP
Um einen Programm-Typ auszuwählen können Sie durch drücken einer der Stations-Speicher
Tasten einen entsprechenden PTY direkt anwählen. Am Gerät selbst sind die direkt anwählbaren PTY’s wie folgt belegt:
Preset key 1 2 3 4 5 6
Program
type
Display News Speech Sport Pop music Classics Music
News Speech Sport Pop music Classics
music
Music
Sie können diese Zuweisung der PTY’s aber abändern, und so anpassen wie sie wollen:
Wenn Sie einen PTY Sender gefunden haben, können Sie diesen durch einen längeren Druck
auf eine beliebige Preset Taste abspeichern.
45
Page 46

TUNER-BEDIENUNG
SUCHEN VON SENDERN MIT PTY KENNUNG
■ Drücken Sie eine beliebige Taste von 1 bis 6, das gegenwärtige Programm wird mit PTY
Kennung für 5 Sekunden auf dem Display angezeigt.
■ Drücken Sie die Taste Band und der Tuner sucht nun einmal quer durchs UKW Band und
wenn die PTY Einstellung verlassen wird, wird das gefundene Programm wiedergegeben.
■ Wenn keine der empfangbaren Sender eine PTY Kennung aufweist, zeigt der Tuner dies
durch ein blinken von “NO PTY” auf dem LCD Display des Gerätes an und der Tuner
geht auf die Wiedergabe der “normalen” Stationen zurück.
Notfall-Durchsagen
■ Eine RDS Sonderfunktion erlaubt die Durchsage von Notfall-Mitteilungen – die immer
unter allen Umständen (egal wie das Head-Unit eingestellt ist) wiedergegeben werden.
D.h. Notfall-Durchsagen warden automatisch emfangen und durchgegeben. In so einem
Fall sehen Sie auf dem LCD Display die Meldung “ALARM”.
Anmerkung: In einigen Gegenden ist es unmöglich, Notdurchsagen zu empfangen.
46
Page 47

DVD PLAYER BEDIENUNG
VOR INBETRIEBNAHME
■ Bevor Sie eine Disk ins Gerät einschieben, vergewissern Sie sich, dass das Bedienteil
sauber am Gerät eingeratstet ist.
■ Die Tonwiedergabe dieses Gerätes hängt von dem Format der abgespielten Disk ab.
Lesen Sie die Kapitel mit den Formatbeschreibungen aufmerksam durch, bevor Sie mit
dem Abspielen von unter4shiedlichen Disks beginnen.
Disk-Schacht freigeben
■ Drücken Sie die Taste [
freizugeben.
Bedienteil am Gerät schliessen
■ Wenn das Bedienteil nach unten gefahren ist, drücken Sie die Taste [
wieder zu schliessen.
Disk laden
■ Bevor Sie eine CD oder DVD in das Gerät einführen, stellen Sie sicher dass sich nicht
schon eine Disk im Einzug befindet. Schauen Sie hierzu auf die LCD Anzeige, die eine
bereits eingelegte Disk anzeigt.
■ Wenn eine Disk eingeführt wurde, schliesst sich das Bedienteil automatisch.
Disk Auswurf
■ Drücken Sie die Taste [
befindet, wird diese ausgeworfen.
] um das Bedienteil nach unten zu fahren und den Disk-Einzug
] um die Front
] um das Bedienteil zu senken. Wenn sich eine Disk im Gerät
Anmerkung:
■ Wenn sich das Gerät im DVD Abspielmodus befindet (also eine DVD eingelegt ist) und
man die Taste [
Auswurf automatisch in den Tuner Modus.
■ Wenn sich das Gerät im Stand-By Modus befindet und eine Disk eingeführt wird, aktiviert
sich das Gerät automatisch.
■ Wenn eine Disk eingeführt wurde, benötigt das Gerät einige Sekunden um das
Inhaltsverzeichnis zu lesen. Die Wiedergabe beginnt nicht sofort.
] drückt, um die Disk auszuwerfen, geht das Gerät nach dem Disk-
47
Page 48

DVD PLAYER BEDIENUNG
2-KANAL ~ 5.1-KANAL UMSCHALTUNG
■ Wenn sich das Gerät im 2-Kanal Modus befindet, drücken Sie die Taste [4/2-6CH] und
das Gerät wechselt auf 5.1 Ausgabe. Dies wird auf dem LCD Display mit „FULL 6CH“
angezeigt.
Anmerkung:
■ Die Wiedergabelautstärke vom 2-Kanal und dem 5.1-Kanal Modus werden separat ver-
waltet und abgespeichert. Bevor Sie in einen anderen Tonwiedergabe-Modus wechseln,
empfiehlt es sich immer die Lautstärke nach unten zu regeln, damit es beim nächsten
Umschalten keine Überraschungen gibt. Beachten Sie auch, dass die Lautstärker der
5.1 Wiedergabe über externe Verstärker von der Input-Gain Einstellung am Verstärker
abhängt; und dass weiterhin durch die zusätzlichen Lautsprecher der Wiedergabepegel
– bei gleicher Lautstärkeeinstellung am Gerät - deutlich lauter sein kann wie im 2-Kanal
Modus!
PAUSE & PLAYBACK
■ Drücken Sie die Taste [PAUSE] um die Wiedergabe zu pausieren.
■ Drücken Sie diese Taste erneut, um den Pausen-Modus wieder zu verlassen.
WIEDERGABE START & STOP
■ Drücken Sie die Taste [ENTER/PLAY] um mit der Wiedergabe einer Disk zu beginnen.
■ Drücken Sie die Taste [6/STOP] um die Wiedergabe anzuhalten.
TITEL/KAPITELSPRUNG BEI DER WIEDERGABE
■ Drücken Sie die Taste [
Kapitel zu gelangen.
■ Drücken Sie die Taste [
drücken dieser Taste mehrere Kapitel zurück zu springen.
Anmerkung:
■ Wenn es sich bei der abgespielten Disk um eine VCD handelt, und PBC aktiviert ist funkti-
oniert der Titel/Kapitelsprung nicht!
WIEDERGABE WIEDERHOLUNG
■ Drücken Sie die Taste [5/REPT] einmal, um das gerade abgespielte Kapitel oder den
Track zu wiederholen.
■ Drücken Sie diese Taste ein zweites mal, um die gesamte Disk zu wiederholen.
■ Drücken Sie die Taste ein drittes mal um die Wiederholfunktion zu deaktivieren.
ZUFALLSWIEDERGABE
■ Drücken Sie die Taste [3/P.MODE] wiederholt, um zwischen Zufallswiedergabe der vor-
handenen Titel, dem anspielen der Titel für 10 Sekunden und Normal umzuschalten. Die
Auswahlsequenz erscheint wie folgt: Random
■ Der Scan Modus spielt alle vorhandenen Titel auf der Disk an, für ca. 10 Sekunden. Der
Random Modus spielt alle auf der Disk verfügbaren Titel in voller Länge, aber in beliebiger Reihenfolge.
] um das/den Kapitel/Track zu überspringen und zum nächsten
] um an den Anfang zurück zu springen, oder durch mehrfaches
Scan Normal
48
Page 49

DVD PLAYER BEDIENUNG
AUSWAHL VON KAPITEL/TRACK ODER SPIELZEIT
■ Drücken Sie die Taste [GOTO] auf der Fernbedienung um entweder die Spielzeit (für CD/
VCD) oder die das gewünschte Kapitel (DVD) auszuwählen.
■ Drücken Sie eine der Richtungspfeil Tasten, um eine Auswahl zu treffen, und geben Sie
anschliessend entweder die Kaptitelnummer oder die Spielzeit ein, um zur gewünschten
Stelle zu gelangen. Nach dem Drücken der Taste [GOTO] muss innerhalb von 5 Sekunden
eine Eingabe erfolgen, oder das Gerät verlässt den Eingabemodus von Kapitel oder
Spielzeit.
■ Im DVD Wiedergabe Modus bewirkt erneutes drücken der Taste [GOTO] die Anzeige der
Spielzeit auf dem LCD-Display.
Anmerkung:
■ Bei der Wiedergabe von CD’s lassen sich die einzelnen Tracks direkt anwählen, durch
drücken der entsprechenden Nummerntaste auf der Fernbedienung – ohne vorher die
[GOTO] Taste zu benutzen.
AUSWAHL DER UNTERTITEL-SPRACHE --- NUR DVD
■ Beim Abspielen einer DVD kann als erstes im DVD-Menü die Untertitel Sprache gewählt
werden. Dies lässt sich auch nachträglich einstellen, wenn die DVD schon spielt, durch
drücken der Taste [SUBTITLE] auf der Fernbedienung. Wenn die eingelegte DVD nur
eine Untertitel-Sprache unterstützt, lässt sich diese Einstellung nicht vornehmen. Wenn
Sie innerhalb von 5 Sekunden keine Wahl treffen, verschwindet die Einblendung mit der
Sprachauswahl wieder.
AUSWAHL DER SPRACHE DER TONSPUR --- NUR DVD
■ Wenn eine DVD abgespielt wird, lässt sich die Sprache der Tonspur (Soundtrack) nach-
träglich durch das Drücken der Taste [AUDIO] auf der Fernbedienung ändern. Wenn Sie
innerhalb von 5 Sekunden keine Wahl treffen, verschwindet die Einblendung mit der
Sprachauswahl wieder.
AUSWAHL DES KAMERAWINKELS --- NUR DVD
■ Einige DVD unterstützen unterschiedliche Kamerawinkel. D.h. eine Szene wurde gleich-
zeitig aus mehreren Winkeln aufgenommen, durch das Drücken der Taste [ANGLE] auf
der Fernbedienung kann diese Zusatzfunktion genutzt werden. Dieses Feature ist nur auf
wenigen DVD’s vorzufinden.
Wenn Sie innerhalb von 5 Sekunden keine Wahl treffen, verschwindet die Einblendung mit
der Sprachauswahl wieder.
SCHNELLER VORLAUF & SCHNELLER RÜCKLAUF
■ Drücken Sie die Tasten [
die Tasten [
ten. Drücken Sie diese Tasten kurz, um die Vor- oder Rücklaufgeschwindigkeit zu verändern, gemäss nachfolgender Sequenz: 1X
WIEDERGABE ZEITLUPE
■ Drücken Sie die Taste [SLOW] auf der Fernbedienung um eine DVD im Zeitlupen-Tempo
anzuschauen. Durch kurzes drücken der Taste [SLOW] können Sie das Zeitlupen-Tempo
in der folgenden Sequenz variieren: 1X
]/[ ] auf der Fernbedienung um den schnellen Vor- oder Rücklauf zu star-
]/[ ] an der Bedienfront des Gerätes etwas länger, oder aber
2X 4X 6X 8X 1X.
1/2 1/4 1/8 1X
49
Page 50

DVD PLAYER EINSTELLUNGEN
LAUTSPRECHERSETUP
■ Laden Sie eine DVD und starten Sie die Wiedergabe.
■ Drücken Sie die Taste [SETUP] auf der Fernbedienung, oder die Taste
Vorderseite des Gerätes, im ins Setup Menü zu gelangen.
■ Wählen Sie Speaker Setup e SPEAKER SETUP e und drücken Sie die Taste [ENTER] um
die Auswahl zu bestätigen.
■ Stellen Sie den Center-Lautsprecher und die hinteren Surround Lautsprecher auf ON
oder OFF – je nach dem ob diese vorhanden sind.
■ Stellen Sie das Time-Delay für den Center und die Surround Speaker ein.
■ Verlassen Sie das Lautsprecher Setup Menu. Verwenden Sie hierzu die Richtungstasten
um [MAIN PAGE] auszuwäheln. Bestätigen Sie abschliessen mit [ENTER] um das Setup
Menü zu verlassen.
Anmerkung:
■ Wenn im Speaker Setup der Ausgang auf 2-CH (2-Kanal) steht, muss im Setup diese
Einstellung erst auf 6-CH Modus gebracht werden.
an der
50
Page 51

DVD PLAYER EINSTELLUNGEN
EINSTELLUNG BILDFORMAT
■ Wählen Sie [GENERAL SETUP] aus und bestätigen Sie diese Auswahl drücken der
[ENTER] Taste.
■ Wählen Sie [TV DISPLAY], es gibt in diesem Menü drei Positionen zu Auswahl (siehe
Grafik unten). Wählen Sie WIDE wenn Sie einen 16:9 Monitor betrieben wollen, oder eine
der anderen Varianten (Pan&Scan oder Letterbox). Drücken Sie [ENTER] zur Bestätigung
Ihrer Wahl.
Auswahl der Menu Sprache
■ Wählen Sie [GENERAL SETUP] und drücken Sie [ENTER] zur Bestätigung dieser
Auswahl.
■ Wählen Sie [OSD LANG] um die Menüsprache zu ändern. Möglich sind Englisch und
Chinesisch – drücken Sie [ENTER] um Ihre Wahl zu bestätigen.
Setup vom Dolby Pro Logic Ausgang
■ Wenn Ihre Wiedergabequelle von Musik hauptsächlich 2-kanalig ist, z.B. CD oder VCD,
können Sie die eingebaute Funktion nutzen um trotzdem Surround Sound zu geniessen.
■ Wählen Sie [AUDIO SETUP] im Hauptmenü und wählen Sie anschliessend [PRO LOGIC]
um diese Funktion zu aktivieren wählen Sie [ON] und bestätigen die Wahl durch drücken
der Taste [ENTER].
51
Page 52

DVD PLAYER EINSTELLUNGEN
Einstellung der Sprache für die Tonspur
■ Die meisten DVD Disks beinhalten mehrere Tonspuren in unterschiedlichen Sprachen.
Sie können – wenn es die verwendeten DVD’s zulassen – Ihre Wunsch Sprache für die
Tonspur vorwählen. Gehen Sie hierzu auf die Auswahl [AUDIO] im Menü [PREFERENCE
SETUP] und bestätigen Sie die gewünschte Default Sprache der Tonspur durch Drücken
der Taste [ENTER]. Wenn die gewünschte Sprache auf der DVD enthalten ist, wird diese
nun ohne weiteres anwählen direkt von Anfang an wiedergegeben.
■ Während der Wiedergabe einer DVD drücken Sie die Taste[AUDIO] auf der
Fernbedienung, Sie können nun direkt aus allen auf der DVD gemasterten Tonspuren
auswählen.
Einstellung Sprache der Untertitel
■ Wählen Sie unter dem Menü-Punkt [SUBTITLE] die bevorzugte Sprache der Untertitel,
auch diese Wahl ist abhängig vom Mastering der DVD (d.h. auf einer DVD sind meist
Deutsch, Englisch, Französisch und Spanische Untertitel wählbar). Das Einblenden von
Untertiteln lässt sich abstellen, indem Sie im „Subtitel Language“ Menü die Auswahl OFF
treffen.
■ Während der Wiedergabe einer DVD drücken Sie die Taste [SUB-TITLE] auf der
Fernbedienung, um die auf der Disk vorhandenen Untertitel an- und auszuwählen.
52
Page 53

DVD PLAYER EINSTELLUNGEN
Einstellung vom Monitor Typ (PAL/NTSC)
■ Einstellung Video-System in [TV TPYE] in den Optionen von [PREFRENCE SETUP].
■ Drei mögliche Typen sind wählbar, (siehe Grafik unten).
■ Wählen Sie den Monitor Typ entsprechend dem verwendeten Monitor aus – oder testen
Sie welche Einstellung ein stabiles Bild auf dem Monitor ergibt – und bestätigen Sie mit
drücken der Taste[ENTER]. Ihre Auswahl wird erst übernommen, wenn sie das Setup
Menü verlassen!
■ Durch drücken der Taste [P/N] auf der Fernbedienung lässt sich diese Option auch direkt
anwählen (ohne ins Setup Menu zu gehen).
Anmerkung:
■ Diese Einstellung ist nur anwählbar wenn keine DVD läuft (Wiedergabe angehalten).
53
Page 54

DVD PLAYER EINSTELLUNGEN
EINSTELLUNG VON PARENTAL LOCK & PASSWORT
■ Einige DVD lassen es zu, dass Sie über die Parental Lock Funktion die Wiedergabe von
DVD die Gewaltszenen oder sonstiges nicht für Kinder geeignetes Material einschränken
können. Die Einschränkung kann in verschiedenen Stufen erfolgen, muss aber von der
DVD unterstützt werden.
■ Wählen Sie [PREFENCES SETUP], dann [PARENTAL] und wählen Sie nun den
gewünschten Level des Schutzes. Nach der Wahl, es stehen 8 Stufen zur Verfügung,
bestätigen Sie Ihre Wahl durch drücken der Taste [ENTER]. Danach müssen Sie ein
Passwort eingeben – um diesen Schutz vor Manipulation abzusichern. Das default
Passwort ist 3308. Um dies zu ändern, folgen Sie den Anweisungen weiter unten.
■ Wählen Sie [PASSWORD], dann [CHANGE] und drücken Sie [ENTER] um zu bestätigen.
■ Geben Sie nun erst das alte Passwort ein, dann das neue und nochmals das neue – um
das neue Passwort zu bestätigen und Falscheingaben zu vermeiden. Drücken Sie nun
[ENTER] um diese Einstellung zu bestätigen und abzuschliessen.
Anmerkung:
■ Wir empfehlen Ihnen das neu gewählte Passwort aufzuschreiben und es sicher aufzubewahren.
54
Page 55

CD CHANGER OPERATION / AUX OPERATION
BETRIEBSMODUS
■ Drücken Sie die Taste [MODE] um die möglichen Quellen wie folgt anzuwählen RADIO e
DVD e CDC e AUX e RADIO
■ Wenn keine Disk im Einzeleinzug des Gerätes geladen ist, können Sie direkt CDC (Multi
CD-Wechsler) anwählen. Wenn kein Wechsler angeschlossen ist, kann die die Funktion
CDC nicht angewählt werden.
PAUSE UND WIEDERGABE
■ Wenn eine Disk gerade spielt, drücken Sie die Taste [PAUSE] um die Wiedergabe zu
pausieren.
■ Im Pausen-Modus drücken Sie die Taste [ENTER] oder [PAUSE] um mit der Wiedergabe
fortzufahren.
■ Im schnellen Vor- oder Rücklauf, drücken Sie auch die Taste [PAUSE] um die Funktion zu
pausieren.
AUSWAHL VON DISKS
■ Drücken Sie die Taste [1/DISC-] um die vorherige Disk anzuwählen.
■ Wenn keine Disk angezeigt wird, drücken Sie erneut die Taste [1/DISC-] um weiter
zurück zu springen.
■ Wenn die momentan aktive Disk die letzte ist, springt das Gerät durch Taste [1/DISC-]
wieder auf die erste eingelegte Disk.
■ Drücken Sie die Taste [2/DISC+] um die nachfolgende Disk anzuwählen.
■ Wenn keine Disk angezeigt wird, drücken Sie erneut die Taste [2/DISC+] um weiter vor
zu springen.
■ Wenn die momentan aktive Disk die letzte ist, springt das Gerät durch Taste [2/DISC+]
wieder auf die erste eingelegte Disk.
RANDOM/SCAN WIEDERGABE
■ Drücken Sie wiederholt die Taste [3/P.MODE] um unter den verschiedenen WiedergabeModi hin und her zu schalten. Sie sehen nachfolgende Sequenz der möglichen Modi:
■ Zufallswiedergabe der aktuellen Disk e Zufallswiedergabe aller vorhandenen Disks e Alle
Disks kurz anspielen e Normale Wiedergabe
■ Die Wiedergabe-Scan Funktion spielt jeden Track ca. 10 Sekunden an und wechselt
dann zum nächsten Track.
WIEDERHOLUNG DER WIEDERGABE
■ Drücken Sie die Taste [5/REPT] um den gerade abgespielten Track zu wiederholen; drücken Sie dieses Taste nochmals um die ganze Disk zu wiederholen, und erneut um den
Wiederhol-Modus zu verlassen.
Anmerkung: Für weitere Funktionen des eingebauten DVD Player, schauen Sie bitte im
Kapitel DVD Operation nach!
AUX WIEDERGABE
■ Das DVD Headunit kann eingespiesene 2-kanalige Quellen auf vier Kanälen wiedergeben. Zum Beispiel um Surround-Sound von Tonträgern im stereo Format zu hören.
■ Drücken Sie die Taste MODE und wählen Sie AUX IN.
■ Spielen Sie einen Tonträger mit 2-Kanal Information ab und speisen Sie diese Quelle in
das DVD Headunit, um 4-Kanal Surround Sound zu geniessen.
55
Page 56

INSTALLATION & ANSCHLUSS
INSTALLATION NOTES
■ Wenn immer möglich, lassen Sie dieses Gerät durch den qualifizierten Fachhandel montieren.
■ Zur Not kann das Gerät auch durch eine Vertrags-Werkstätte Ihrer Fahrzeugmarke instal-
liert werden.
■ Bevor das Gerät fest im Montagerahmen eingerastet wird, sollte vorab die korrekte
Funktion getestet werden. Erst nachdem ein kurzer Funktionstest durchgeführt wurde,
sollte das Gerät endgültig fest montiert werden!
■ Verwenden Sie ausschliesslich die beiliegenden Schrauben und das weitere
Montagezubehör zur Installation im Fahrzeug. Die Verwendung von anderen Schrauben
kann zu Fehlfunktionen des Gerätes führen.
■ Konsultieren Sie Ihren Car-Audio Fachhändler, wenn die Montage dieses Gerätes
Modifikationen am Fahrzeug nach sich zieht.
■ Montieren Sie das Gerät an einem “sicheren” Ort, wo es nicht mit der Lenkung des
Fahrzeuges interferiert und auch im Falle eines Unfalls oder eines abrupten Stopps, keine
Gefahr für die Insassen darstellt.
■ Der Halbleiter-Laser vom DVD Transport ist hitzeempfindlich. Montieren Sie das Gerät nicht
an einem Ort, wo ein heisser Luftstrom von der Fahrzeuglüftung oder Heizung austritt.
■ Die Stromversorgung dieses Gerätes ist für den Anschluss an +12V Gleichstrom mit
Minus gegen Masse ausgelegt.
■ Lesen Sie dieses Manual mit den Installationshinweisen sorgfältig durch, bevor Sie mit der
Montage beginnen! Der Anschluss sollte gemäss den Vorgaben per abgebildetem Schema
/ Stromlaufplanes erfolgen, falscher Anschluss kann das Gerät zerstören.
■ Die ISO-Stecker für die Stromversorgung sollte erst eingesteckt werden, wenn alle anderen nötigen Verbindungen vorgenommen wurden.
■ Alle nicht benötigten Kabel sollten isoliert werden, um Kurzschlüsse mit dem
Montagerahmen aus Metall oder den Strom führenden Kabeln zu verhindern.
■ Dieses Gerät ist kompatibel mit CD-Wechslern von SANYO.
■ Beachten Sie die Montage- und Betriebshinweise von SANYO CD-Wechslern, wenn die-
ses DVD Headunit mit einem CD-Wechlser verbunden werden soll.
ZUBEHÖR UND INSTALLATIONS-HARDWARE
56
Page 57

INSTALLATION & ANSCHLUSS
INSTALLATION DES GERÄTES
Wenn Ihr Fahrzeug über einen 1-DIN Geräteschacht verfügt, können Sie dieses DVD
Headunit ohne weitere Anpassungen direkt in den vorhandenen DIN-Schacht montieren.
■ Schieben Sie die Montagerahmen aus
Blech vollständig in den Schacht ein.
Durch umbiegen der Blechlaschen
am Rahmen, lässt sich dieser fest im
Schacht verankern.
■ Montieren Sie den Stehbolzen hinten
am Gerät, falls erwünscht.
■ Verbinden Sie die ISO-DIN Stecker für
Lautsprecher und Stromversorgung des
Gerätes mit den am Fahrzeug vorhandenen Buchsen. Oder verbinden Sie die
Cinch-Ausgänge des Gerätes mit den
Cinchkabeln zur externen Endstufe.
■ Überprüfen Sie die weiteren notwendigen elektrischen Verbindungen und
nehmen Sie diese vor.
■ Überprüfen Sie nun die korrekte
Funktion des Gerätes!
■ Führen Sie das Gerät in den
Montagerahmen ein und schieben Sie
es nach hinten, bis es hörbar in der
Arretierung des Rahmen einrastet.
■ Befestigen Sie den Kunststoff-Rahmen
am Gerät, er lässt sich einfach von
vorne aufklicken.
Anmerkung:
■ Passen Sie auf Ihre Finger auf,
wenn Sie Blech-Arretierungen
des Montagerahmens mit einem
Schraubenzieher umbiegen, um den
Rahmen im Schacht zu verankern!
■ Entfernen Sie das Massekabel vom
Minus-Pol (-) der Batterie bevor Sie mit
der Installation dieses Gerätes beginnen, um Kurzschlüsse zu vermeiden.
57
Page 58

INSTALLATION & ANSCHLUSS
VERBINDUNGSKABEL & ANSCHLÜSSE
Batterie (12V Dauerstrom)
Anschluss an den Dauerstrom des Fahrzeuges (+12V Batterie).
ACC (Zündung)
Anschluss an die Zündung des Fahrzeuges (+12V DC)
Ground (Masse)
Anschluss an einen sauberen Massepunkt des Fahrzeuges.
Auto-Antenne
Anschluss an das Antennenrelais,(Schaltstrom max. 300mA, 12C DC)
58
Page 59

INSTALLATION & ANSCHLUSS
ANSCHLUSSBELEGUNG LAUTSPRECHER
Left+ Left- Right+ Right-
Front Speaker
Rear Speaker
Anmerkung:
■ Die Lautsprecher-Ausgänge dürfen nur an Lautsprecher angeschlossen werden, die über
eine separate Masseführung verfügen.
■ Die Belastbarkeit der angeschlossenen Lautsprecher sollte 45W oder mehr betragen.
■ Die ab Werk im Fahrzeug installierten Lautsprecher werden durch die relativ hohe
Ausgangsleistung dieses Gerätes leicht übersteuert – und können dadurch Schaden
nehmen!
■ Nenn-Impedanz der zu verwendenden Lautsprecher: 4Ω
■ Lautsprecher mit falscher Impedanz führen zu reduzierter Ausgangsleistung und/oder
können das Gerät beschädigen.
■ Dieses Gerät ist nicht für den Anschluss an Fahrzeuge mit 3-Kabel
Lautsprechersystemen geeignet (d.h. minus von linkem und rechtem Kanal zusammengeführt). Dieses Gerät verwendet BTL Brückenendstufen und benötigt daher einen
separaten Masse-Anschluss von jedem angeschlossenen Lautsprecher.
■ Die Lautsprecherkabel und auch externe Endstufen müssen mindestens 30cm vom
Antennenkabel entfernt sein.
■ Schliessen Sie die Lautsprecher gemäss dem unten abgedruckten Diagramm an.
Falscher Anschluss kann die Lautsprecher selbst, oder auch das Gerät beschädigen.
White White/Black Gray Gray/Black
Green Green/Black Violet Violet/Black
Korrekter Anschluss der Lautsprecher
Falscher Anschluss der Lautsprecher
59
Page 60

INSTALLATION & ANSCHLUSS
ANSCHLUSS EINES EXTERNEN VERSTÄRKERS
■ Bitte schliessen Sie einen externen Verstärker gemäss dem untenstehenden Diagramm
an. Nicht richtig zugeordnete Cinch-Verbindungen ergeben einen schlechten Klang mit
falscher Bühnenabbildung und können im schlimmsten Fall zur Zerstörung der angeschlossenen LS-Systeme führen.
Anmerkung:
Beachten Sie: Bei der Wiedergabe von Tuner / AUX-Signalen und auch der Wiedergabe
von DVD’s mit 2-Kanal stereo Information erfolgt die Ausgabe als analoges 5.1 Signal.
Die Wiedergabe von DVD’s mit Surround-Sound Kodierung erfolgt als 5.1 Kanal Dolby
Digital.
SICHERUNG
■ Die korrekte Spezifikation der Sicherung beträgt 10A. Falls Sie die Sicherung ersetzen
müssen, verwenden Sie nur eine mit korrektem Wert. Das Einsetzen einer Sicherung mit
falschem Wert kann zu einem Fahrzeugbrand führen!
PROBLEMBEHANDLUNG / FEHLERSUCHE
■ Sollten während dem Gebrauch Probleme auftauchen, wird Ihnen diese Liste helfen alle
auftretenden Probleme unverzüglich zu lösen. Sollte dies nicht der Fall sein, wenden Sie
sich bitte direkt an einen ZENEC-Händler.
Symptom Grund Lösung
Überprüfen Sie erneut ob alles richtig
angeschlossen wurde.
Drücken Sie die Reset - Taste.
Finden Sie den Grund heraus warum
die Sicherung durchgebrannt ist.
Ersetzen Sie dann die Sicherung
Schalten Sie das Gerät aus und wieder
ein.
Drücken Sie die Reset - Taste.
Das Gerät lässt sich nicht
einschalten und bedienen.
Das Gerät wurde nicht richtig
angeschlossen.
Die Sicherung ist durchgebrannt.
Diverse Faktoren beeinflussen die
Arbeit des eingebauten
Mikroprozessors.
60
Page 61

INSTALLATION & ANSCHLUSS
Das Gerät lässt sich mit der
Fernbedienung nicht steuern.
Die Gerät funktioniert nicht
korrekt wenn die entsprechende
Taste auf der Fernbedienung
gedrückt wird.
Keine Wiedergabe möglich.
Kein Ton.
Kein Bild.
Dieses Symbol
angezeigt und der aus –
gewählte Bedienvorgang
lässt sich nicht ausführen.
Das Bild bleibt stehen und das
Gerät lässt sich nicht mehr
bedienen.
Die Lautstärke ist zu gering.
Die Audio und Video
Wiedergabe stockt bei leichten
Erschütterungen.
Das Bild ist gestreckt und das
Seitenverhältnis stimmt nicht.
Die Tastenbeleuchtung und die
LCD Anzeige gehen aus.
☞
wird
Die Batterie ist leer.
Gewisse Disks unterstützen manche
Optionen nicht.
Die Disk ist verschmutzt. Reinigen Sie die Disk.
Die Disk hat ein Format, welches von
diesem Gerät nicht unterstützt wird.
Die Disk ist nicht mit dem Videosystem
des Gerätes kompatibel.
Die Verkabelung wurde nicht
korrekt ausgeführt.
Der Monitor ist nicht richtig
angeschlossen.
Dieser Bedienvorgang ist auf dieser
Disk nicht erlaubt.
Der ausgewählte Bedienvorgang
ist mit der Datenstruktur der Disk
nicht kompatibel.
Das Einlesen von Daten während
der Wiedergabe einer Disk hat ein
Problem verursacht.
Die Lautstärke ist zu leise. Erhöhen Sie die Lautstärke.
Die Lautstärkedämpfung (Mute) ist
aktiviert.
Das Gerät ist nicht fest montiert. Montieren Sie das Gerät fest.
Die Einstellung des Formates (Seitenverhältnis) passt nicht zu dem des
angeschlossenen Bildschirms.
Wenn das Fahrzeug startet, kann der
eingebaute Mikroprozessor eine
Fehlfunktion ausführen.
Legen Sie eine neue Batterie in
die Fernbedienung ein.
Probieren Sie eine andere Disk.
Überprüfen Sie das Format der
Disk.
Verwenden Sie eine Disk die
Kompatibel ist.
Verbinden Sie die Kabel korrekt.
Drücken Sie zweimal die Mute - Taste.
Überprüfen Sie ob der Monitor
richtig angeschlossen ist,schalten
Sie ihn an und wählen den richtigen
Videoausgang.
Dieser Bedienvorgang ist nicht
möglich.
Dieser Bedienvorgang ist nicht
möglich.
Starten Sie die Wiedergabe erneut,
nachdem Sie die Stop - Taste einmal
gedrückt haben.
Deaktivieren Sie die Lautstärke Dämpfung (Mute).
Wählen Sie die passende
Einstellung für Ihren Monitor.
Drücken Sie die Reset – Taste.
Probleme während der DVD Wiedergabe
Symptom Grund Lösung
Wiedergabe nicht möglich.
Im Display wird Parental Lock
angezeigt und es ist keine
Wiedergabe möglich.
Die Funktion Parental Lock
lässt sich nicht aufheben.
Sprache und Untertitel können
nicht umgeschaltet werden
Die Disk hat eine andere
Länderkennung (Regional
Code) als das Gerät.
Die Funktion Parental
Lock ist aktiviert.
Der Code ist nicht korrekt. Geben Sie den richtigen Code ein.
Die Disk unterstützt die
Auswahl zwischen ver –
schiedenen Sprachen nicht.
Sie können nur zwischen
Optionen wählen die im
Menü der Disk vorhanden sind.
61
Benutzen Sie Disks mit der gleichen
Länderkennung wie das Gerät.
Schalten Sie die Funktion Parental
Lock aus.
Sie können nicht zwischen mehreren
Sprachen wählen wenn diese nicht auf
der Disk gespeichert wurden.
Benutzen Sie die Optionen die im
Menü der Disk vorhanden sind.
Page 62

INSTALLATION & CONNECTION
Keine Untertitel werden
angezeigt.
Die Disk wird nicht in der
Sprache und dem Untertitel
wiedergegeben, wie es im
SET – UP eingestellt wurde.
Umschalten zwischen
verschiedenen Blickwinkel
ist nicht möglich.
Das Bild ist während der Wiedergabe
extrem unscharf, verzerrt und dunkel.
Die Disk unterstützt keine
Untertitel.
Die Disk unterstützt die
Sprache nicht, die Sie im
SET – UP ausgewählt haben.
Die Disk bietet keine
Möglichkeit (Option) den
Blickwinkel zu ändern.
Sie versuchen den Blickwinkel
einer Szene umzuschalten
obwohl keine anderen Blickwinkel aufgenommen wurde.
Auf der Disk ist ein Signal
vorhanden, das Kopien
verhindern soll.
SPECIFICATIONS ZE-200DVD
Power
Supply power voltage: 12V DC (10.8-16V DC allowable)
MAX Current 10A
S/N Ration: 80dB
Dynamic Range: 80dB
Audio
Output power: 50W×4
Load Impedance: 4Ω
Distortion: 0.05%
Video
Video Output: 1±0.2V
Horizontal Definition: ≥500 lines
Frequency range: 87.5-108MHz
Usable Sensitivity (S/N: 30dB): 12dBu
FM Tuner
Frequency Response: 55Hz-10kHz
S/N Ratio: 50dB
Antenna Impedance: 50Ω
Frequency Range: 531~1602kHz
AM Tuner
Usable Sensitivity (S/N: 20dB): 35dBu
S/N Ratio: 40dB
Antenna Impedance: 50Ω
Untertitel können nicht angezeigt werden, wenn
sie nicht auf der Disk gespeichert wurden.
Es ist nicht möglich die Disk in einer
Sprache wiederzugeben die nicht
darauf gespeichert ist.
Sie können nicht zwischen
verschiedenen Blickwinkeln wählen,
wenn die Disk dies nicht unterstützt.
Wählen Sie zwischen verschiedenen
Blickwinkel während der Wiedergabe
einer Szene die mit mehreren Blick –
winkel aufgenommen wurde.
Da dieses Gerät mit dem Kopierschutzsystem
Copy Guard Analog kompatibel ist, kann es
sein das bei der Wiedergabe von Disks
die einen Kopierschutz haben, Störungen
auftreten (horizontale Streifen). Das bedeutet
nicht, dass ein Defekt vorliegt und kommt auch
nur bei wenigen Monitoren vor.
62
Page 63

WARRANTY / GARANTIE
2 YEARS LIMITED WARRANTY
Dear customer
Thank you for purchasing this ZENEC product. It is advisable to keep the original packing material for
any future transporting of the product.
Should your ZENEC product require warranty service, please return it to the retailer from whom it was
purchased or the distributor in your country.
This ZENEC product is warranted against defective materials or workmanship for a period of TWO
years from date of purchase at retail.
Warranty Limitations
This warranty does not cover any damage due to:
1. Improper installation, incorrect audio or mains connection(s).
2. Exposure to excessive humidity, fluids, heat sun rays or excessive dirt or dust.
3. Accidents or abuse, unauthorized repair attempts and modifications not explicitly
authorized by the manufacturer.
This warranty is limited to the repair or the replacement of the defective product at the
manufacturer’s option and does not include any other form of damage, whether incidental, consequential or otherwise. The warranty does not cover any transport costs
or damages caused by transport or shipment of the product. Warranty work will not
be carried out unless this warranty certificate is presented fully completed with model,
serial number, purchaser’s address, purchasing date and dealer stamp together with the
original sales slip!
2 JAHRE GARANTIE
Sehr geehrter Kunde,
Vielen Dank, dass Sie sich zum Kauf dieses Produktes von ZENEC entschlossen haben. Wir bitten Sie,
die Originalverpackung aufzuheben, z.B. für den Transport bei einem Garantiefall.
Wenn Sie Garantie-Leistungen für dieses ZENEC Produkt beanspruchen, wenden Sie sich bitte direkt
an den Händler, bei dem das Gerät gekauft wurde.
Dieses ZENEC Produkt ist durch eine Werksgarantie von 2 Jahren ab Kaufdatum im Fachhandel gegen
Material- oder Herstellungsfehler geschützt.
Garantie-Einschränkungen
Nicht unter Garantie fallen Schäden infolge von:
1. unsachgemässem Einbau oder inkorrektem Audio- oder Stromanschluss.
2. Einwirkung von übermässiger Feuchtigkeit, Flüssigkeit, Hitze, Sonneneinstrahlung
oder starker Verschmutzung.
3. mechanischer Beschädigung durch Unfall, Fall oder Stoss; Schäden durch nicht
autorisierte Reparaturversuche und/oder Modifikationen.
Die Garantie dieses Produkts bleibt in jedem Fall auf die Reparatur bzw. den Ersatz
(Entscheidung beim Hersteller) des ZENEC Produktes beschränkt. Transportschäden
und die Kosten des Rücktransportes sind durch diese Garantie nicht abgedeckt. Jeder
über diese Garantie-Erklärung hinausgehende Anspruch und Haftung für direkte /
indirekte Folgeschäden werden ausdrücklich abgelehnt. Garantie-Ansprüche können
nur mit einer korrekt und vollständig ausgefüllten Garantie-Karte und dem OriginalKaufbeleg geltend gemacht werden.
63
Page 64

ZENEC Model: ZE-200DVD
Serial Number: ........................................................................................................................................
Date of Purchase: ...................................................................................................................................
Your name: .............................................................................................................................................
Your address: .........................................................................................................................................
City: ........................................................................................................................................................
State: ................................... ZIP or Postal Code ..................................................................................
Country: .................................................................................................................................................
Your phone number: ...............................................................................................................................
Dealer’s address & stamp
 Loading...