

Page 1
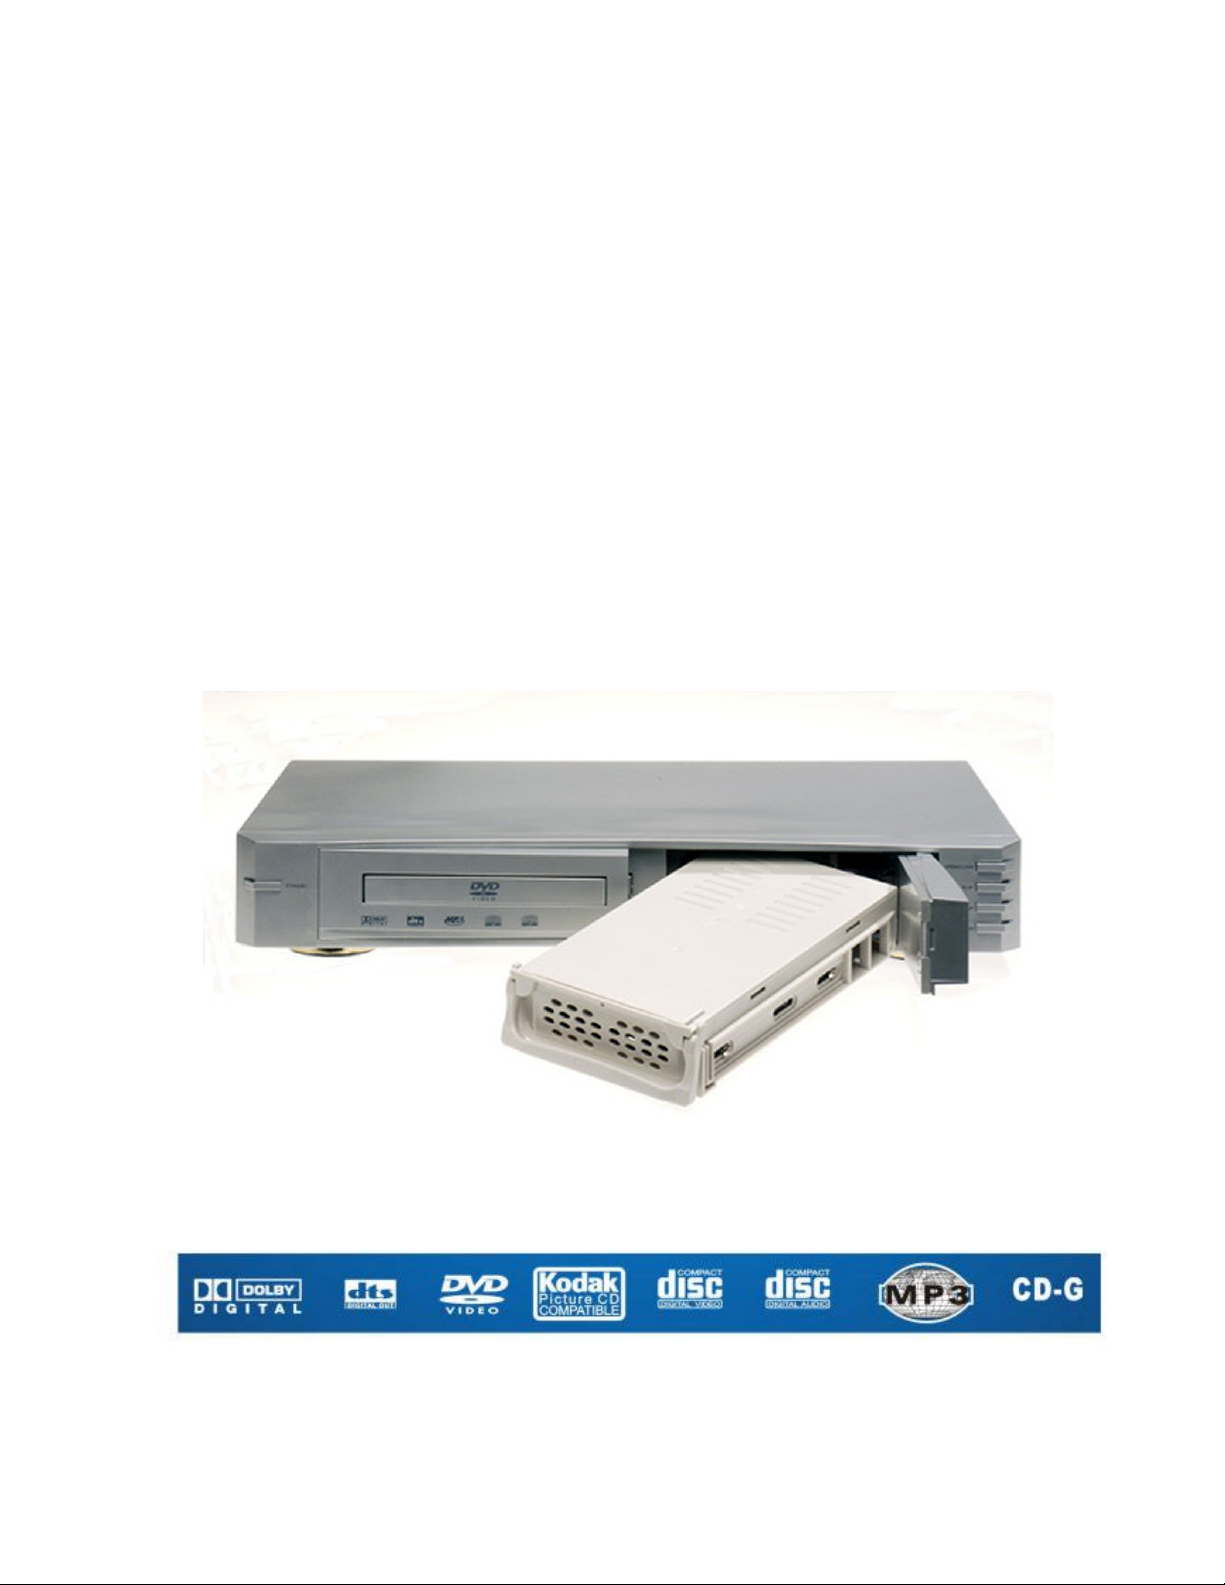
Personal Video R ecorder
User Manual
Hard Disk Recorder and DVD Player
Please read the manual in detail before using the unit.
WARNING: AVOID THE EXPOSING THE UNIT TO WATER OR MOISTURE TO PREVENT
THE POSSIBILITY OF FIRE OR ELECTRICAL SHOCK.
Page 1 of 46
Page 2

WARNINGS
The lightning flash with arrowhead,
within an equilateral triangle, is
intended toalert the user to the presence
of uninsulate "dangerous voltage"
within the product's enclosure that may
be of sufficient magnitude to constitute
risk of electric shock to persons.
The exclamation point within an
equilateral triangle is intended to alert
the user to the presence of important
operating and maintenance (servicing)
instructions in the literature
accompanying this product
DANGER
DO NOT OPEN
TO PREVENT THE RISK OF ELECTRIC
SHOCK, DO NOT REMOVE PVR'S
COVER. NO USERSERVICEABLE PARTS
INSIDE. REFER SERVICING TO QUAL
IMPORTANT READ THE SAFETY WARNINGS
Caution:
To avoid a possible electrical
shock, insert the connection cables
correctly.
IFIED SERVICE PERSONNEL.
ON REAR OF UNIT CAREFULLY
Important notice:
The serial number for the product
it is on the back panel.
Please write this number down and
keep it in a secure place
Page 2 of 46
Page 3

SAFETY INSTRUCTIONS
READ INSTRUCTIONS-All
safety and operating instructions
should be read before the product
is operated.
RETAIN INSTRUCTIONS-The
safety and operating instructions
should be retained for future
reference.
HEED WARNINGS-All warnings
on the product and in the
ooperating instructions should be
adhered to.
FOLLOW INSTRUCTIONS-All
operating and use instructions
should be followed.
CLEANING-Unplug the product
from the wall outlet or other power
source before cleaning. Use a dry
cloth for cleaning.
ATTACHMENTS-Do not use any
adapters or attachments not
recommended.
WATER AND MOISTURE-Do not
use the product near water-for
example, near a bath tub, wash bowl,
kitchen sink,or laundry tub; in a wet
basement; or near a swimming pool or
other similar areas.
ACCESSORIES-Do not place. the
product on an unstable cart,
stand,tripod, bracket, or table. The
product may fall, causing serious injury
to a child or adult and serious damage
to the product.
VENTILATION-Any slots, openings
and metal fins provided for ventilation
must not be blocked or covered such as
by placing the product on a
bed,sofa,deep pile rug, or other similar
surface. The product should not be
placed in a built-in installation such as
a bookcase or rack unless sufficient
clearance is maintainedto provide
adequate ventilation.
HEAT-The product should be situated
away from heat sources such as
radiators, heat registers, stoves, and
other products (including amplifiers)
that produce heat.
POWER SOURCE-The product should be
operated only from the type of power source
indicated on therear panel. If you are not sure of
the type of power supply to your home, consult
your dealer or local power company.
LIGHTNING-For added protection for this product
during a lightning storm, or when it is left
unattended and unused for long periods of
time,unplugit from the wall outlet. This will
prevent damage to the product due to lightning and
power-line surges.
OVERLOADING-Do not overload wall
outlets, extension cords, or integral
convenience outletsas this can result in a risk
of fire or electric shock.
OBJECT AND LIQUID ENTRY-Never use
probes of any kind to reach into the product as
they may touch dangerous voltage points or short
parts that could resultin a fire or electric
shock.Never spill liquid of any dind onto
thproduct
SERVICING-Do not attempt to service the
product your self as opening or removing the
cover may expose you to dangerous voltage or
other hazards. Refer all servicing to qualified
service personnel.
Page 3 of 46
Page 4

SAFETY INSTRUCTIONS
DAMAGE REQUIRING
SERVICE
Immediately unplug the
productfrom thewall outlet or other
power source and refer servicing to
qualified service personnel under
the following conditions: a)When
the power cord or plug isdamaged.
b)If liquid has been spilled, or
objectshave fallen into the product.
c)If the product has been exposed
to rain or water. d)If the product
does not operate normally by
following the operating
instruction; or exhibits a
distinctchange in performance. e)If
the product has been dropped or
damaged in any way.
SAFETY CHECK-Upon
completion of any service or
repairs, ask the service technician
to perform safety checks to
determine that the product is in
proper operating condition.
DISC PRECAUTIONS:
MOISTURE OR DEW-May occur
if the product is suddenly moved
from a cold environment to a
warm one, and prevent it from
readingthe disc. If this happens,
turn the product on for a least one
hour beforeinsertinga disc.
DAMAGED DISCS-Never play
cracked, warped, or otherwise
damaged discs as they may harm
the drive mechanism.
HANDLING DISCS
1 Do not touch the play side of the
disc. Always handle the disc by the
edges. *Do not attach paper, tape
or labels to the disc except for
purpose-designed CD labels
applied with an applicator intended
for the purpose. Out of balance
discs damage the mechanism.
*Keep discs away from direct
sunlight and excessive heat.
DISC CLEANING
*Before playback,wipe the play
surface of the disc outwardsfrom
the center with a clean,soft,
lint-free cloth.
STATEMENT OF
COMPLIANCEThis equipment
has been tested and found to
comply with the limits for A Class
B Digital device pursuant to Part
15 of the FCC Rules, These limits
are designed to provide reasonable
protectionagainst harmful
interferencein a residential
installation, This equipment
generates ,uses,and can radiate
radio frequency energy and, if not
installed andusedinaccordance
with the instructions, may cause
harmfLi interference to radio
communications. However,this is
no guarantee that interference will
not occur in apart icular
installation. If lhis equipment does
cause harmful interference to radio
or television reception,which can
be determined by turning
theequipment off and on,you are
encouraged to tryto correct the
interference by one or more ofthe
following measures: *Reorient or
relocate the receiving antenna and
the power cord. lncrease the
separation between the equipment
and the receiver. *Connect the
equipment to an outlet on a
different circuit than the one to
which the receiver is connected.
*Consult the dealer or an
experienced radio & TV technician
for help.
This product is manufactured under
license from Dolby laboratories,
"DOLBY" , "AC-3" , and the double D
symbol are trademarks of Dolby
laboratories. Copyright 1992-1997,Dolby
aboratories.
This Product incorporates copyright
protection technology that is protected by
method claims of certain U.S.patents and
other intellectual property rights owned
by Macrovision Corporation and other
rights owners. Use ofthis
copyrightprotection technology must be
authorized by Macrovision
Corporation,and is intendedfor home and
other limited viewing usesonly unless
otherwise authorized by Macrovision
Corporation Reverse engineering or
disassembly is prohibited.
4
Page 4 of 46
Page 5

INDEX
1 Warnings 2
2 Safety instructions 3
3 PV R introduction 6
4 Remote control 7
5 Front panel and display 9
6 System connections 10
7 Main menu and fr ont panel buttons 13
8 DVD from the remote control 14
9 DVD Setup menu operation 23
10 Playing MP3 and JPEG images 29
11 Playing MP3 and JPEG simultaneously 31
12 Rece iving TV c h a n n els 33
13 Setting the time and display 34
14 Setting timer recordings 35
15 Editing timer recordings 36
16 Recording a program 37
17 Rename , move/copy, erase document and property
18 Format, repair and de-fragment the hard disk 42
19 Time-shift function 43
20 Using the USB port 43
21 Change the hard disk 44
22 Specifications 45
23 Problem solving 46
40
display
Page 5 of 46
Page 6
INTRODUCTION
Thank you for choosing our PVR which could
become the entertainment center of your family. This
product has two channel AV input, and SVIDEO,
SCART input, TV receiver, DOLBY PROLOGIC,
DOLBY PROLOGIC 2 function. For the
sophisticated operation of this product such as play,
record, time recorder, usage of mp3 and jpe g. An
optional usb port, use it you can connect PVR to a
computer.
DVD part: Introduction
DVD, SVCD, CVD, VCD, CDDA, Mp3, CD-R,
CD-RW, KODAK PICTURE, CD DISC compatible.
Multilevel picture zoom of high clarity, multi-view
angle picture selection, multi-plot selection
multi-language subtitle menu opt ional, parental lock,
play, FWD/FFD, skip, slow motion and single-step
play, program play and repeat play optional, JPEG
picture view with music slide show play. Built-in dolby
digital AC3 decoder, optical, coaxial digital audio
output, 5.1 channels output.
HDD part introduction
Standard play, FWD/FFD, skip, slow motion and
single-step play, timer play, program play, repeat play.
play program, modify file name, move, copy, and
delete file. Time record, watch record, background
record, record format optional, 4x video quality record.
TV part introduction It can receive all channel
program with PLL, it has the other funti on of automatic
scanning and save channels(max saving 256 channe ls).
NOTE:
The hard disk must be set as the slave and
connected correctly otherwise the unit will need a
longer time to initialize and only DVD player will
function
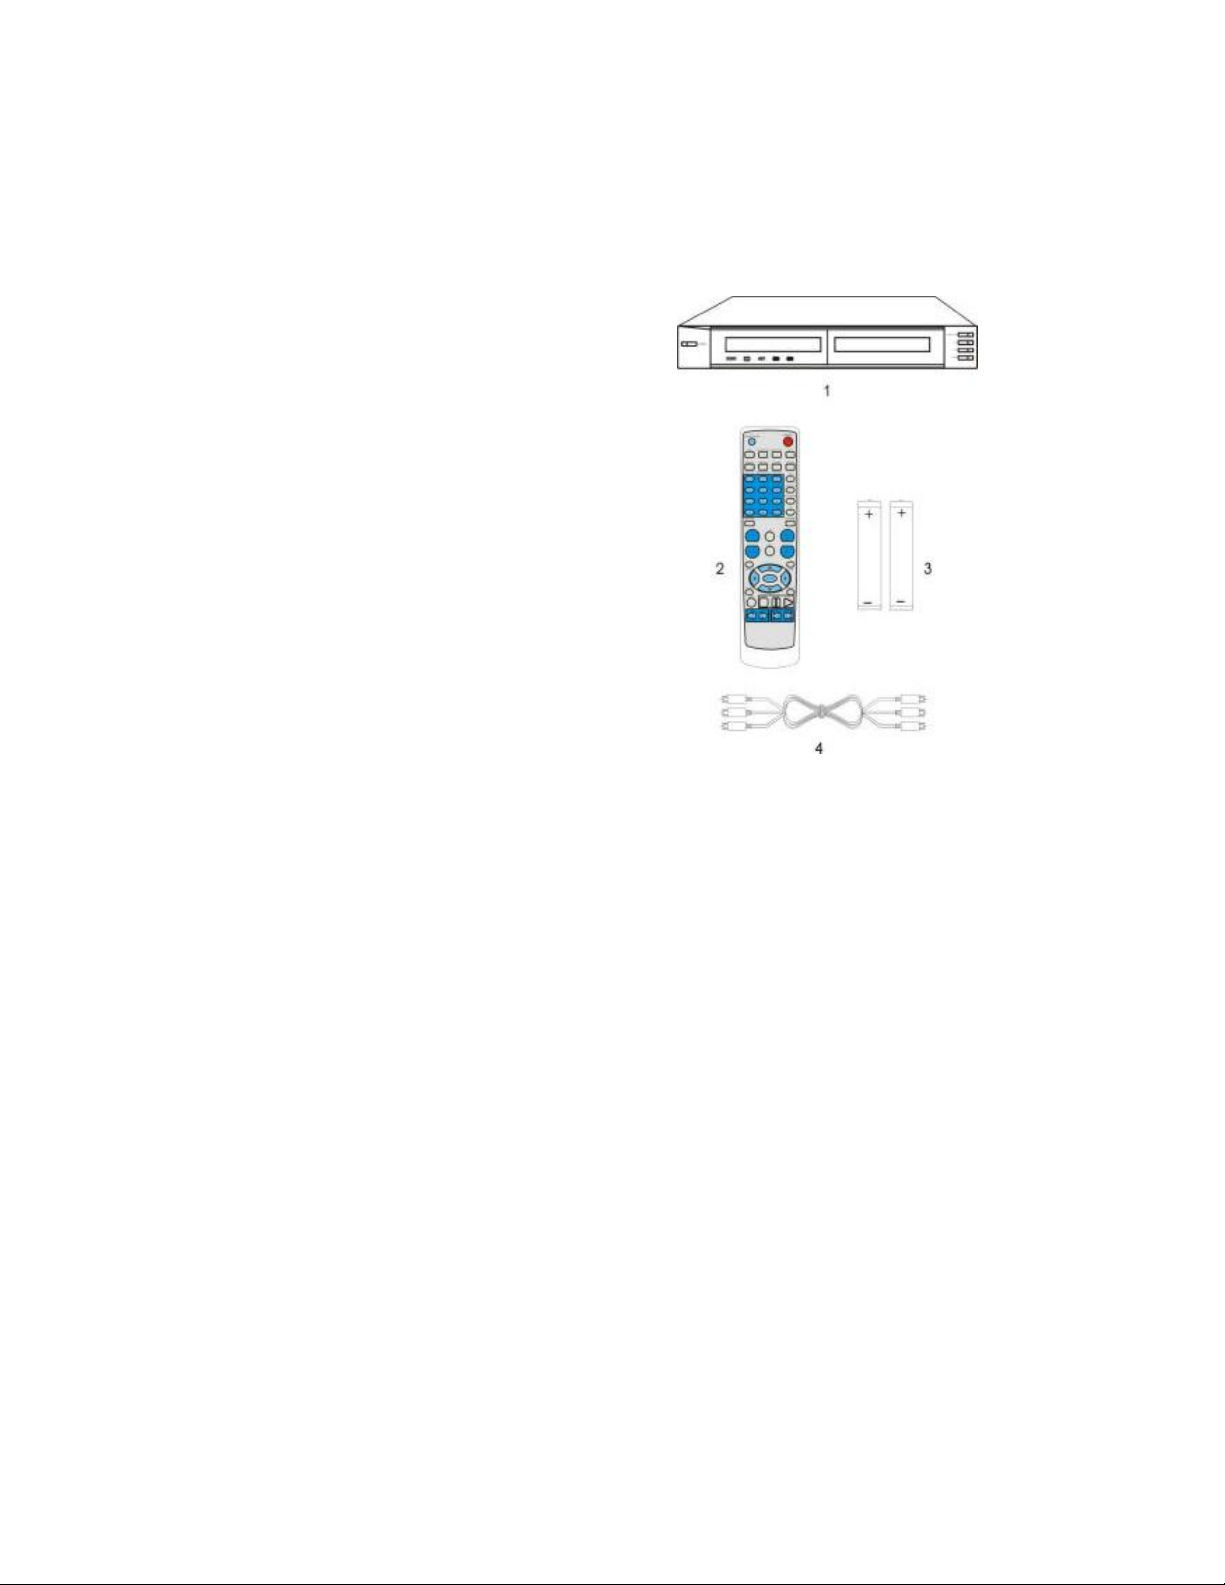
ACCESSORIES:
1. Unit.
2. Remote control.
3. Batteries.
4. Cable.
Page 6 of 46
Page 7

REMOTE CONTROL:
How to put the batteries in the
remote control
Removing the cover opens the
battery compartment. Insert the
batteries –type AAA- into the
remote control according to the
indicated polarity.
- If the e f f e c t iveness of the remote
control diminishes considerably, it
is probable that the batteries are
worn out. Replace the old batteries
for some new ones.
- If you don’t use the remote
control for a long time, we advise
you to removes the batteries.
5. ANGLE/LIVE TV: the same as the
previous button also has a double
function, on one hand it allows
selection of the multiple angles in
DVDs that support this function or to
go to intelligent navigation from live
video.
Remote control:
1. OPEN/CLOSE: this button opens
and closes the disk tray.
2. SCARTMO: switches the SCART
port between AV/TV.
3. OSD: changes the time display
mode.
4. SUBTITLE / SMART NAVI: this
button has a double function, it allows
selection of the subtitle in the
reproduction; gives a di sk DV D, gi ves
intelligent navigation.
Page 7 of 46
Page 8

REMOTE CONTROL:
6. NUMBER KEYS: choose specific cha pter, subtitle,
track directly(note : not all discs support this function)
you can choose the TV channel in the state of tv.
7. RESUME: continue from where it stopped last
time.
8. STEP: play one frame by one fram e.
9. SLOW: play in slow step.
10. SETUP: enter or exit the system menu.
11. (
ST): shift the cursor up and down to choose
your wanted item in menu.
X: Shift the cursor to the right .
W: shift the cursor to the left iwhen using the hdd
or dvd.
ENTER: to confirm that what you choosen.
12. TITLE: return to the title menu of the disc.
13. MUTE: keep in mute or return to voice.
14. FB, FF: fast backward or fast forward.
15. PREV, NEXT: choose the previous or ne xt
chapter.
16. STOP, PLAY, PAUSE: control the state of
playing.
17. MENU: return to the present menu.
18. ZOOM: enlarge the pictures.
19. N/P: switch video output type between PAL,
NTSC and MULTI.
20. VOLUME: adjust the volume from mimimum of
00 to maximum of 16; displayed o n the OSD.
21. L/R : left and right channel control when
play the dvd or vcd disc.
22. LANGUAGE: choose the audio language
from many language.
23. A-B: repeat a certain period.
24. PROGRAM: program the order of playing.
25. REPEAT: switch repeat mode
26. PBC: play back control(on or off ).
27. PSCAN: choose progressivescan or inerlaced output
format.
28. VIDEO IN/CLEAR: choose external video input
sources [(AV 1,AV2(SCART), S-VIDEO], or erase the
wrong characters in edit box.
29.REC: record.
30. SHUFFLE: change the order of playing in the state of
dvd.
31. STANDBY: switch between stan by and on.
Page 8 of 46
Page 9
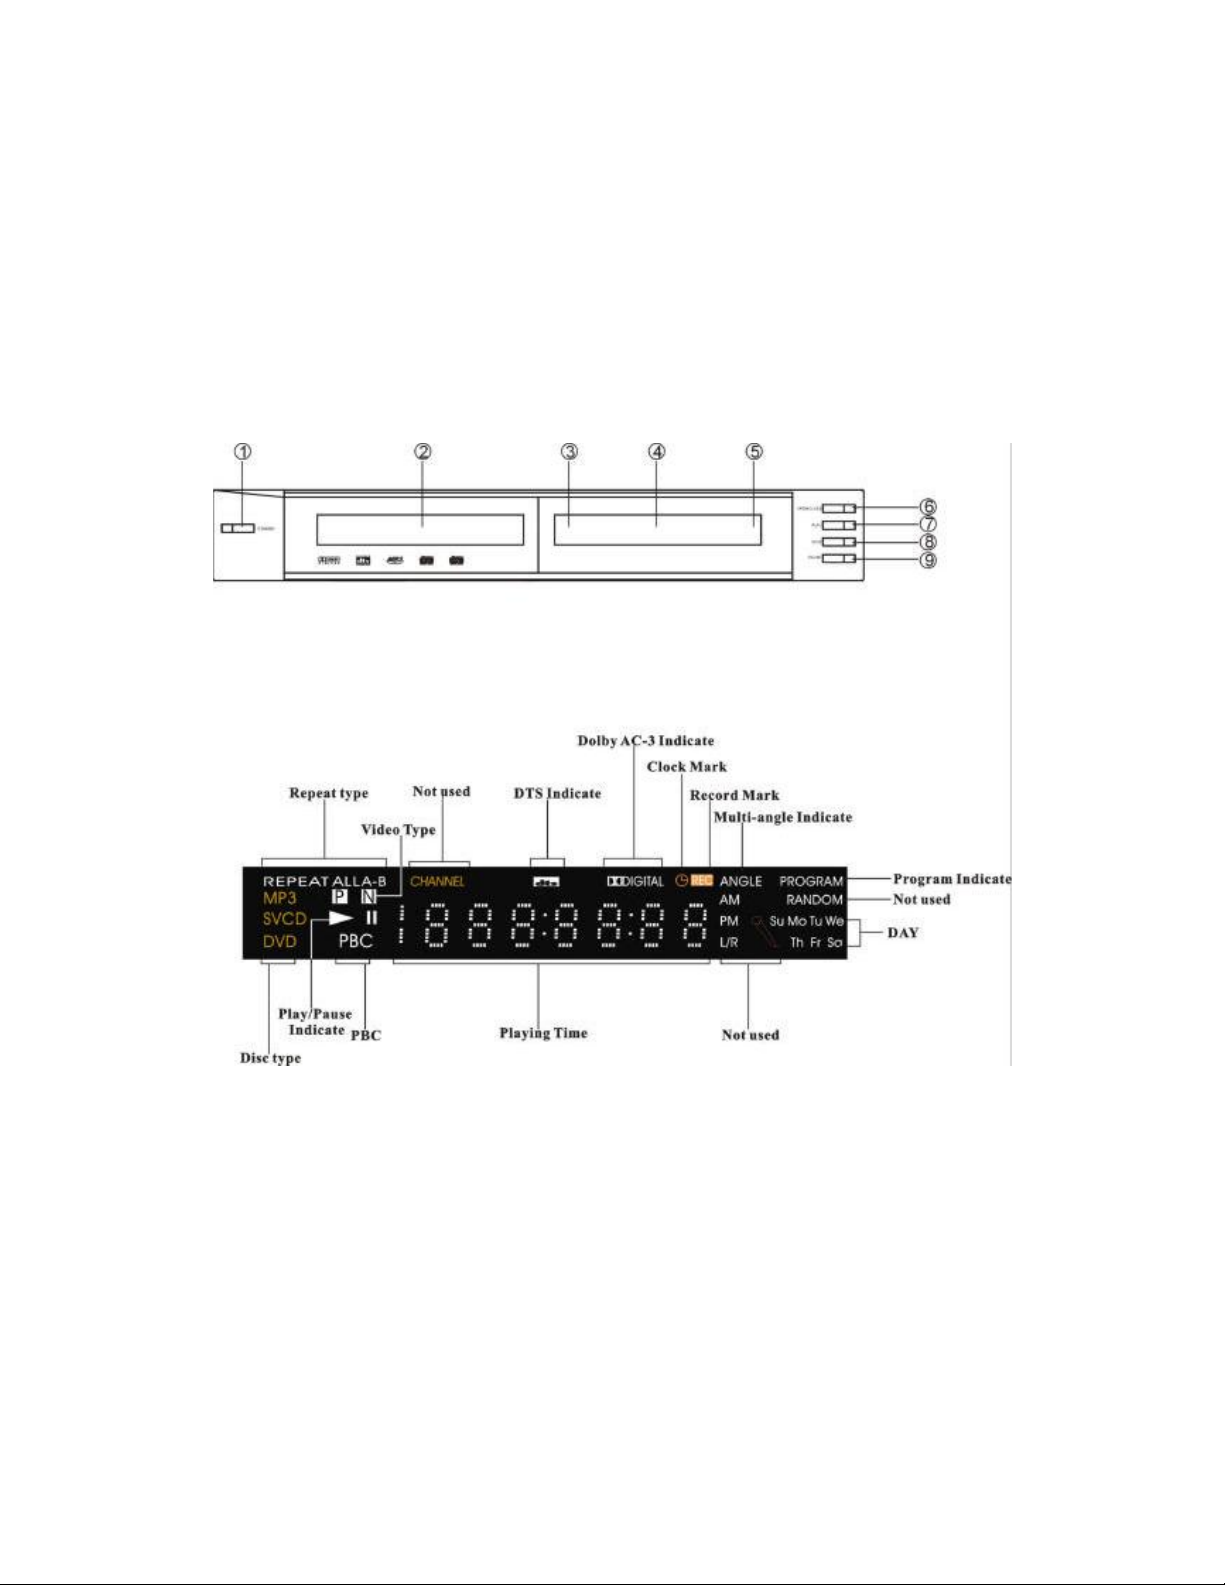
FRONT PANEL AND DISPLAY
1. Standby.
2. DVD Tray.
3. Receiving sensor for the
remote control.
4. V F D D IS PLA Y .
5. Indicator light.
6. Button to open, to close,
to verify selection
(OPEN/CLOSE/ENTER).
7. PLAY /S
8. STOP /
9. PAUSE (Setup).
T
Page 9 of 46
Page 10
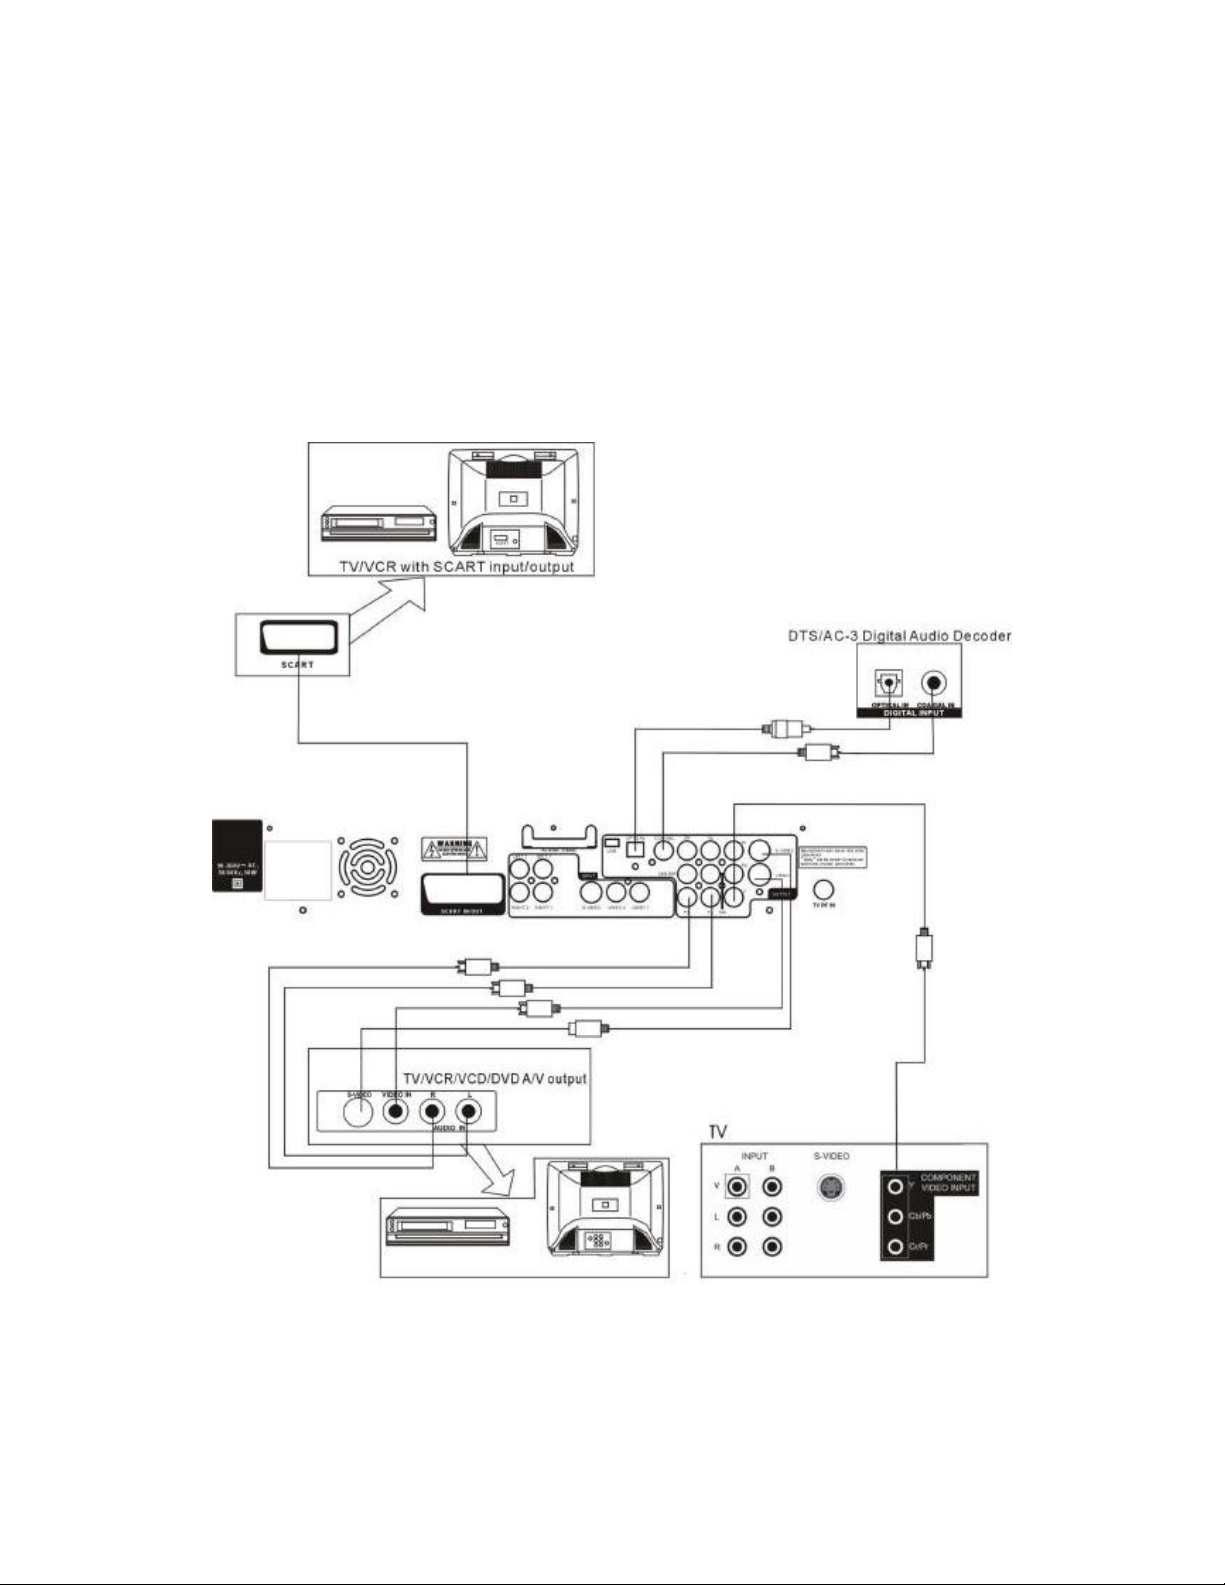
SYSTEM CONNECTIONS
1. Output connections:
a. Connection: CVBS, Euroconector (SCART), S-videotape, Y
Cb/Pb Cr/Pr.
NOTE: it is not possible to connect the SCART and CVBS
simultaneously, because this would affect to the display
quality.
b. Connection stereo: connection for speakers right front and
left front.
c. Digital connection (optics and coax): for connecting to
an amplifier or decoder with coax or optic port.
Page 10 of 46
Page 11
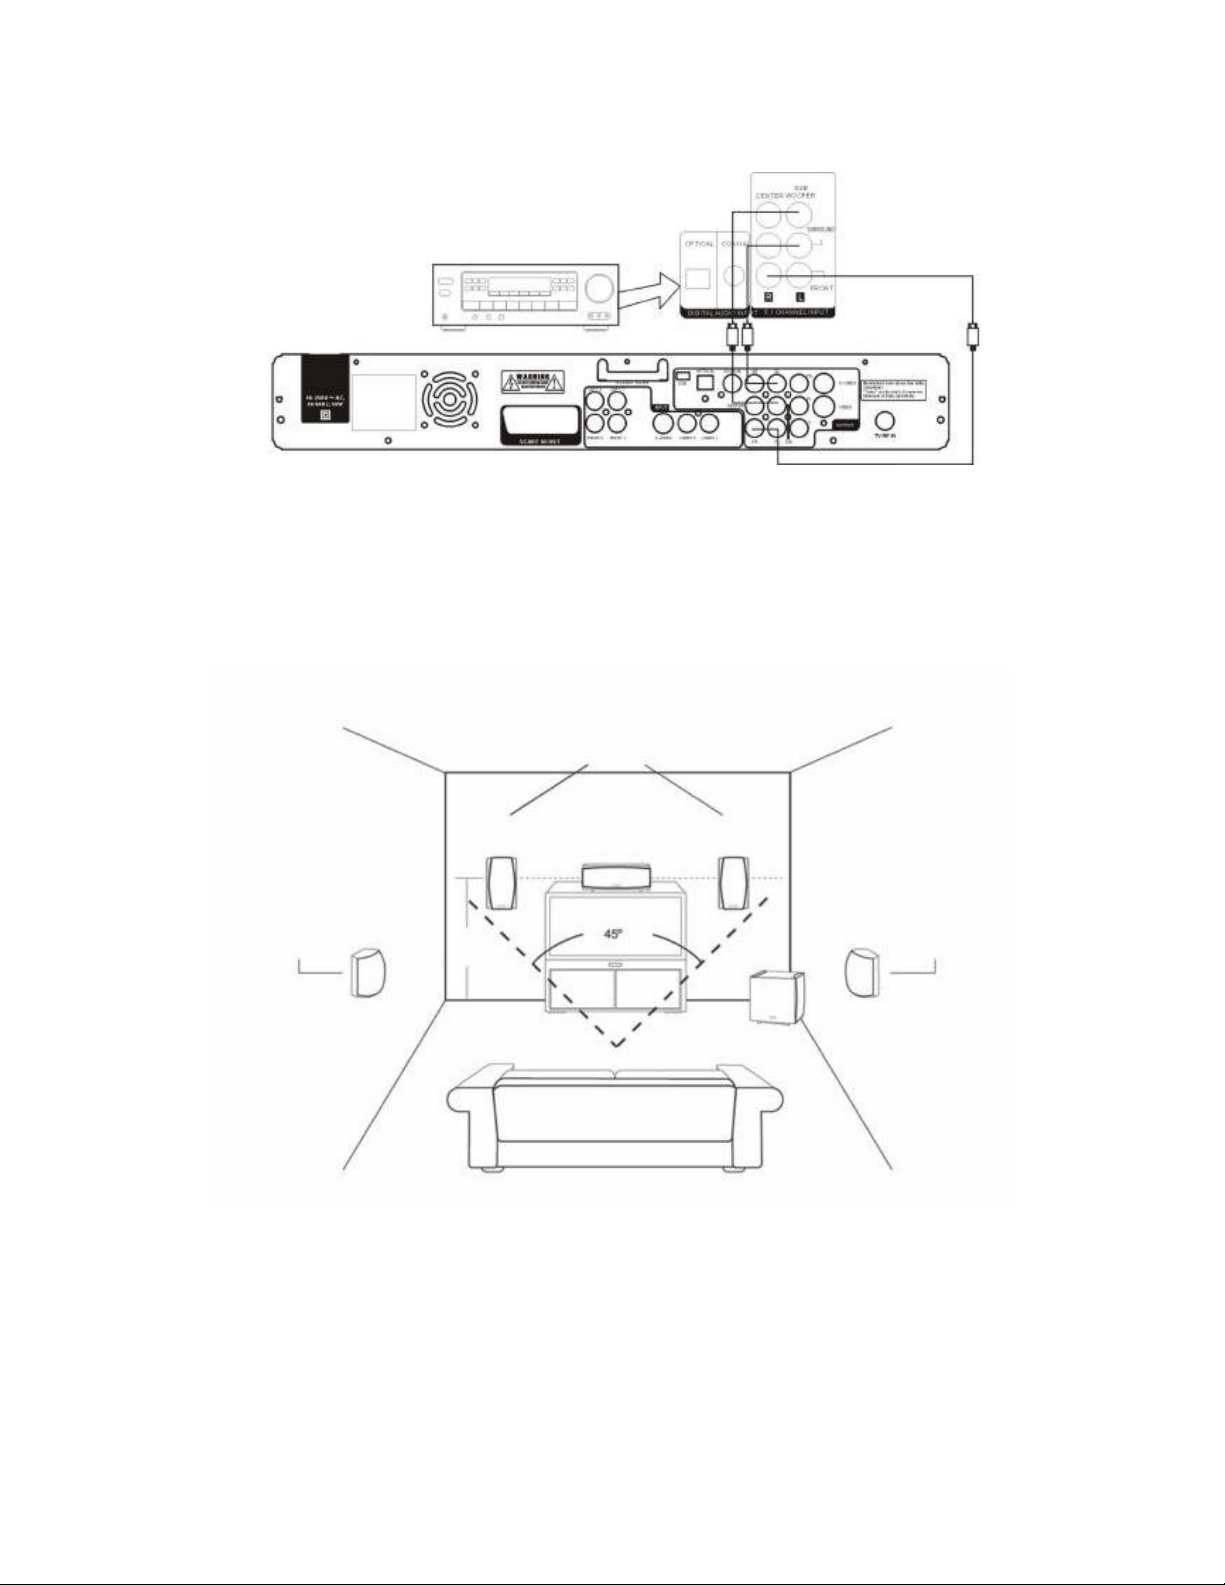
SYSTEM CONNECTIONS
2. CONNECTIONS FOR 5.1.
3. POSITION AND ANGLE OF THE SPEAKERS
Main Speakers
Surround
Speakers
Surround
Speakers
Subwoofer
Page 11 of 46
Page 12
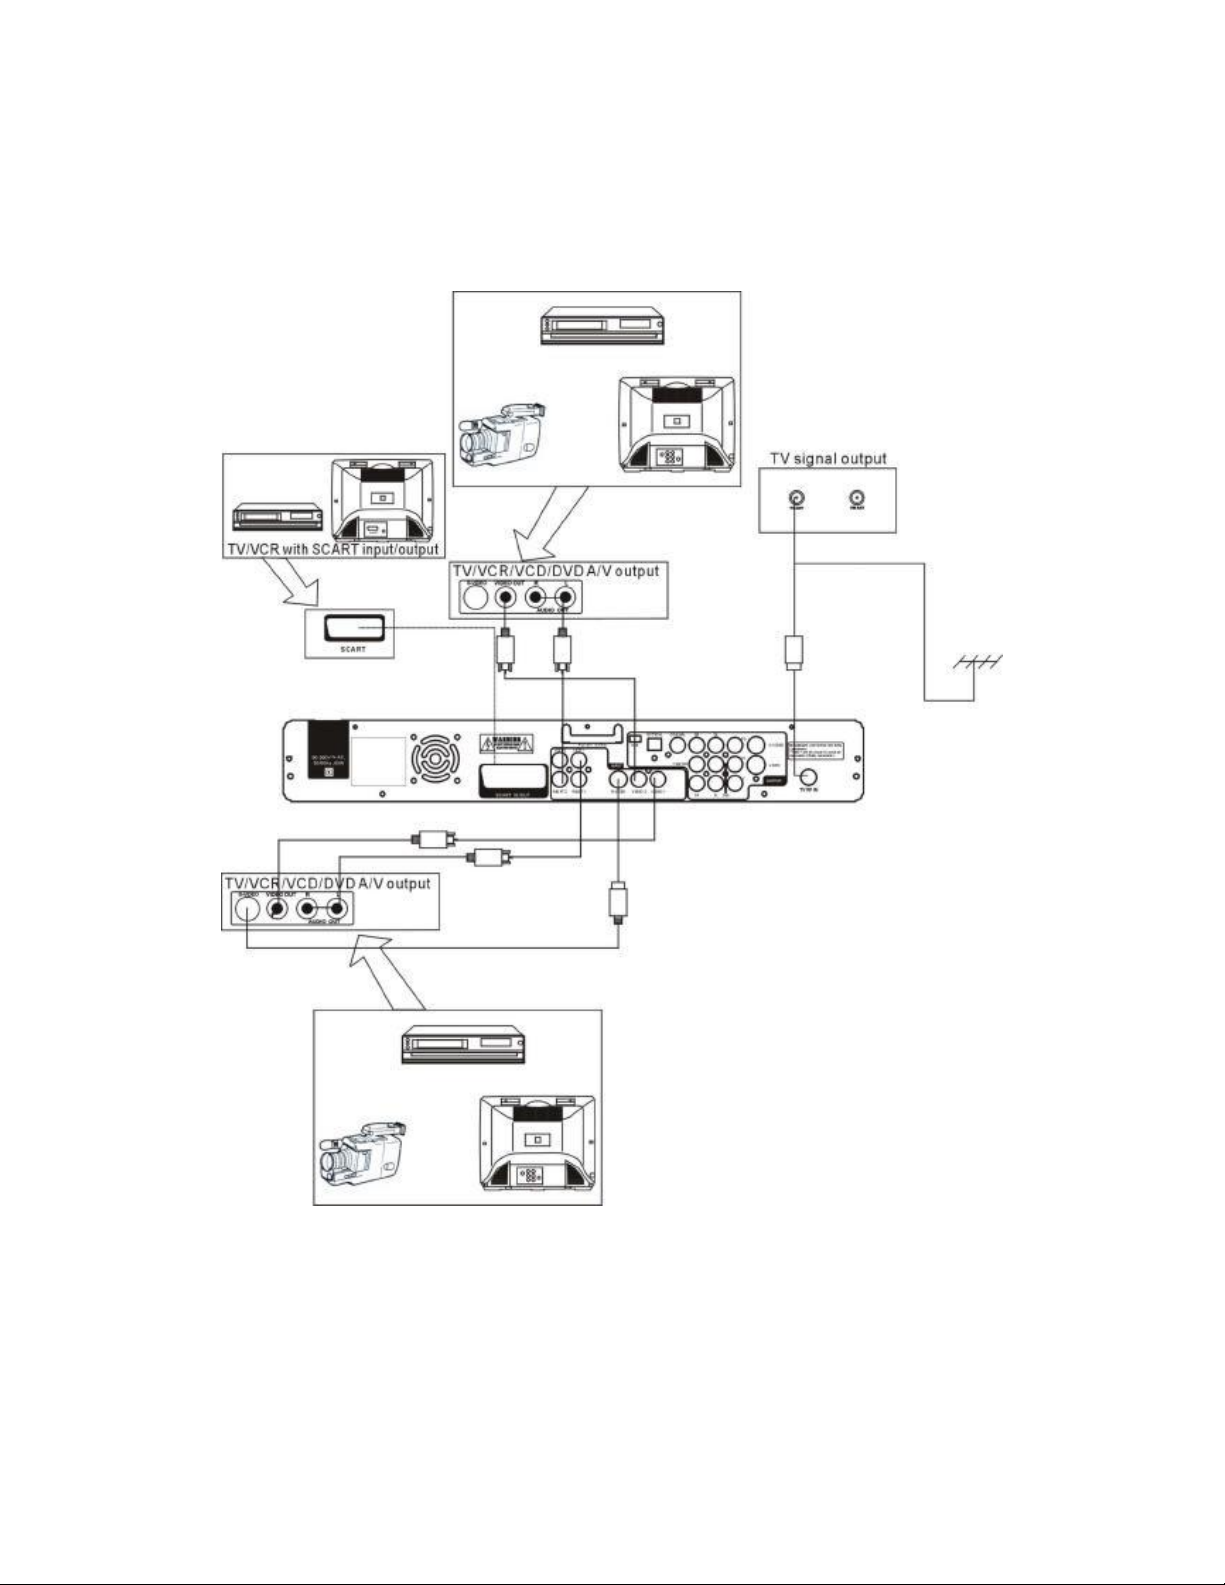
SYSTEM CONNECTIONS
4. INPUT CONNECTIONS:
Inputs: input AV1, input AV2 (SCART), input S-videotape, input RF.
NOTE: if using the S-video input the audio input A V1, AV2 an d SCART
cannot be connected at the same time.
Page 12 of 46
Page 13

MAIN MENU AND FRONT PANEL BUTTONS
MAIN MENU
On plugging the unit in, it will go into standby state
automatically. Press standby to open se lf-che ck a nd
then system menu will appear (if hard disc or CDROM are not connected correctly, it will prolong
self-check and lead to malfunction.
Using. ST To move cursor, X or ENTER
button to enter submenu, press ENTER to
confirm or press
menu
W to return to the previous
Choose playing DVD to enter DVD play
mode, and then you can operate relevant
functions.
Choose Smart Navi to enter the hard disc.
You can choose playing of recorde d
program.
Choose Live Video to play the input
source , use VIDEO IN button to choose
AVI, AV2(SCART), SVIDEO or TV
program.
Choose setup menu to enter the system setup
menu. You can choose general setup, speaker
setup. audio setup, prefer ences choose disc
tools, recording mode. Time shifting mode,
maximum pause, input source, source format,
reset index, tuner control, clock setup program
setup usage of panel button..
1. WHEN DVD PLAYING
Press OPEN/CLOSE to open or close disc tray.
When playing
Press STOP to stop playing.
When stopping press PLAY to continue to play
2. WITHIN THE SYSTEM MENU
Press FUNCTION key to enter or exit the system
menu. Pressing PLAY is same as pressing
Pressing STOP is same as pressing
CURSOR MOVING INSTRUCTIONS
T.
When the arrowhead is grey color, it
means that the cursor cannot move in that
direction.
S.
Page 13 of 46
Page 14
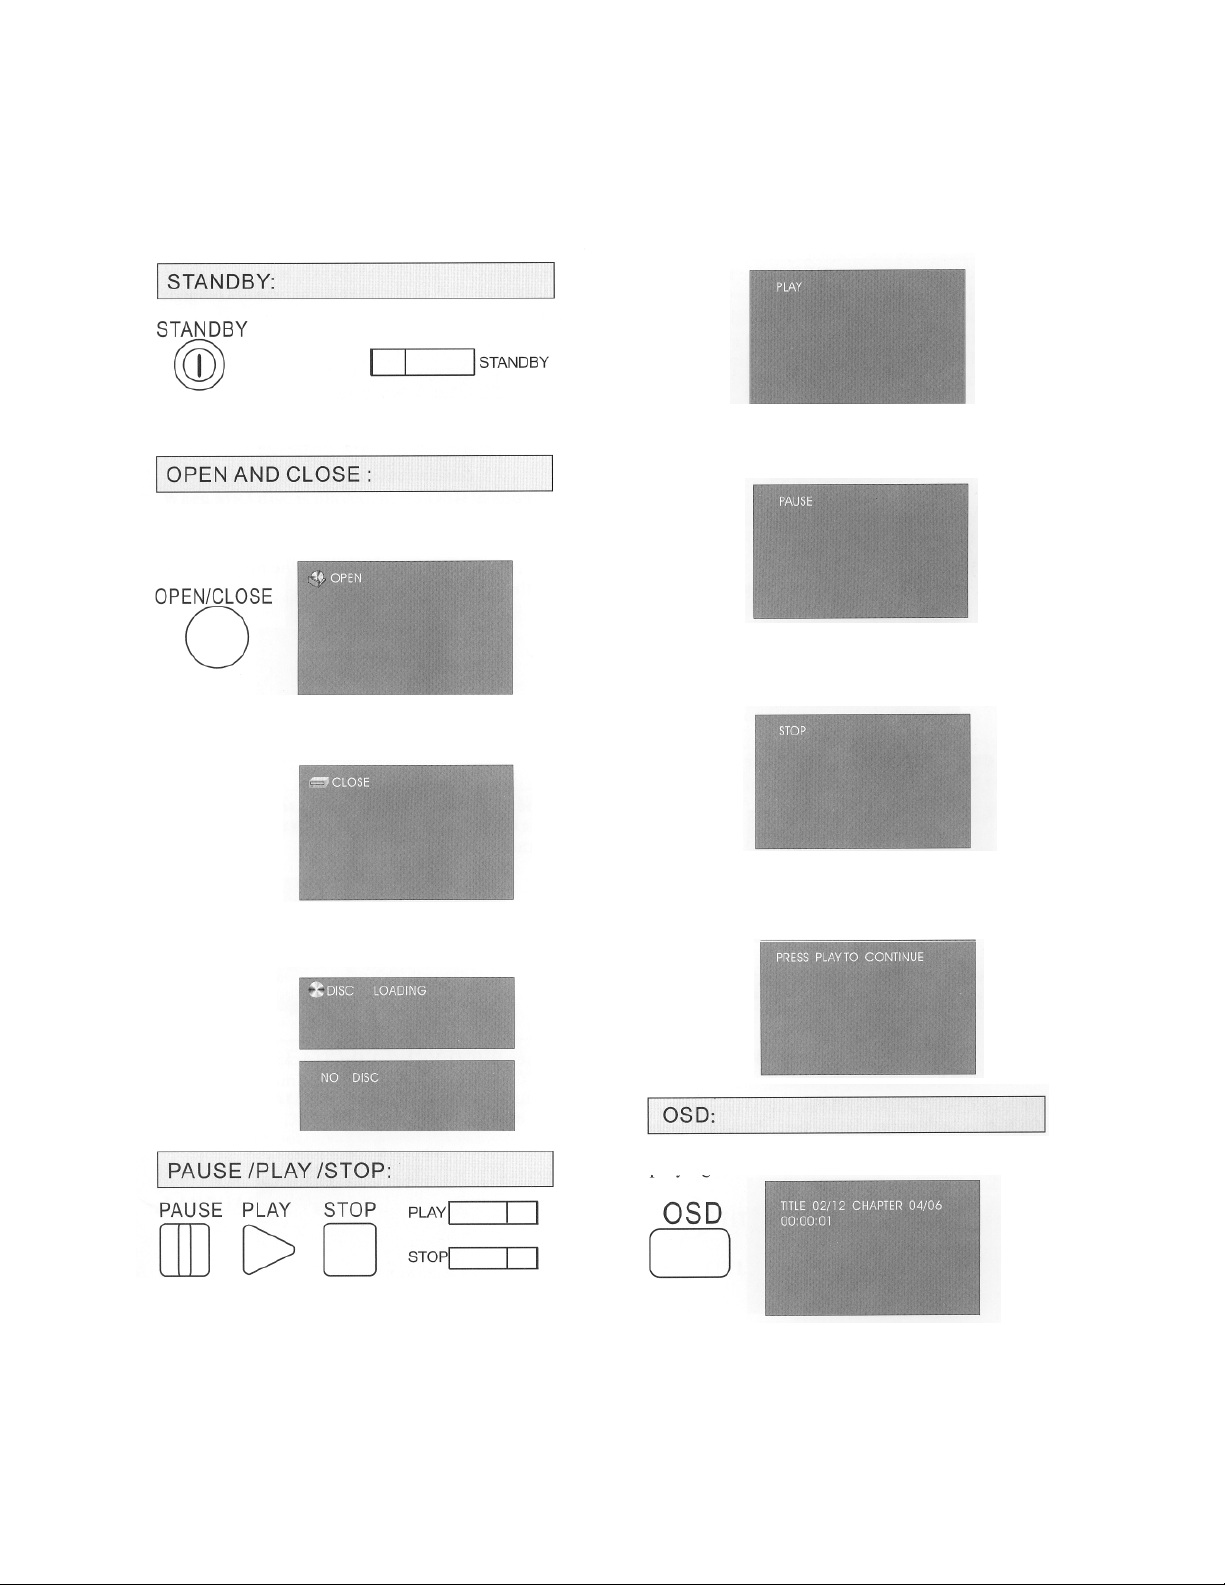
p
DVD INSTRU C T ION REMOTE C ONTROL OPERATION
Press this button to turn the machine on or to standby.
Press this button to open the disc door and then you can put in
or take out the disc. OSD: OPEN
After the disc is put in or taken out press this button to close
the door. OSD: CLOSE
is reading the disc. OSD will be NO DISC if no disc is put in.
When the machine is playing a disc. Press the PAUSE to
pause the playing. Press this button again, the machine
resumes playing disc.
Press STOP to stop playing disc. OSD is STOP. When svcd,
cvd, vcd discs are played, press STOP to return to the disc
menu(PBC should be on).
When DVD disc is played, press STOP one time to stop
playing. Press PLAY to resume where it stops. Press STOP
two times to com
letely stop.After the disc is put in OSD is disc loading when the machi ne
When DVD is playing, press OSD once to show the playing
time of the whole disc.
When the machine is stopped or paused, press PLAY button to
play. OSD: PLAY
Page 14 of 46
Page 15

DVD FROM THE REMOTE CONTROL
When a DVD is playing, press the
OSD button twice to show the time
remaining on the disk.
When a DVD is playing, press the
button OSD three times to show the
playing time of the chapters.
When SVCD/VCD/CVD/CD discs are
played, press OSD twice to show
the rest playing time of the single
song.
When SVCD/VCD/CVD/CD discs are
played, press OSD three times to
show the playing time of the wh ole
disc.
When a DVD is playing, press the
button OSD four times to show the
remaining time of the chapters.
When a DVD is playing, press the
button OSD five times to close the
time display.
When SVCD/VCD/CVD/CD discs are
played press OSD once to show the
playing time of the single song.
When SVCD/VCD/CVD/CD discs are
played, press OSD four times to
show the rest playing time of the
whole disc.
When SVCD/VCD/CVD/CD discs are
played, press OSD five times to
close time display.
Page 15 of 46
Page 16

DVD FROM THE REMOTE CONTROL
When an Mp3 disc is played, the
playing time of a single song is
shown automatically.
When an MP3 disc is played,
press OSD to show the rest time
of the single song.
ANGLE:
When multi-angle discs are
played, the icon for multi-angle
shows. Press ANGLE to choose
your wanted angle. The first
number of icon shows the chosen
angle, and the second number
shows the total angles available.
Press the button SUBTITLE
to select the language
Press N/P to switch Video Output
between PAL, NTSC and MULTI TV
type.
Press LANGUAGE to choose the
spoken language if your d isc h as
DTS audio; press this button to
switch to DTS out.
TITLE AND MENU:
Press MENU to return to the DVD
chapter menu, if PBC is on. When
PBC is off, press MENU to enter
directly into the nine pictures.
Press the button TITLE to return
to the DVD menu.
Page 16 of 46
Page 17

DVD FROM THE REMOTE CONTROL
PROGRAM (PROGRAMMING):
Procedures for programming when
DVD, SVCD, CVD, VCD discs are
played: 1. Make PBC off. 2. Press
PROGRAM button and enter the chapter
or song with number keys. PROGRAM
P00:00 shows on the upper left of the
screen. (The first number P00:00 shows
the play order of the song, and the
second shows the chapter or song you've
entered) 3. Press PLAY or ENTER to
play the disc. 4. Press STOP to exit
programming which makes it return to
former programming state, at this time
press PLAY or ENTER button to resume
playing the formerly programmed songs.
Press PROGRAM button twice to exit
programming. Press PROGRAM button
once to start another programming
process.
Procedures for programming when
CD discs are played: 1. Press STOP
to stop playing disc. 2. Press
PROGRAM and enter the chapter or
song with number keys. PROGRAM
P00:00 shows on the upper left of the
screen.( The first number of P00:00
shows the play order of the song, and
the second shows the chapter or song
you've entered.) 3. Press PLAY or
ENTER to play the disc. 4. Press STOP
to exit programming which makes it
return to former programming state,
at this time press PLAY or ENTER to
resume playing the formerly
programmed songs. Press PROGRAM
twice to exit programming. Press
PROGRAM once to start another
programming process.
RELEVANT OPERATION: Press
REPEAT to repeat playing the
programmed song or chapter. When
the programmed songs get more
than the total songs of disc, it cannot
be programmed. Mp3 programming
refers to page 29.
Press MENU to return to the DVD chapter menu,
if PBC is off. When PBC is off, press MENU to
enter directly into the nine pictures. When PBC
is off and DVD discs are played, press this
button to enter the nine-picture screen. There are
several nine-picture screens for you to choose.
Use NUMBER KEYS, PREV, NEXT to choose
songs or enter last or next menu.
Press MENU to show the menu of four choices
for you to choose when SVCD/CVD/VCD discs
are played.
Choice 1: INTRO; Each song will be played
for 9s. When your wanted song is played, press
number keys to play the song wholly.
Choice 2: DISC; enter the nine
picture menu each picture
representing one song. Press the
number keys or NEXT, PREV to play
your wanted songs.
Choice 3: TRACK; Enter the nine
picture menu. Each song is divided
into nine parts.
Choice 4: Exit from menu.
Press STOP when last 3 items play
over, then press MENU to go back
to INTRO to re-choose songs.
Page 17 of 46
Page 18

DVD FROM THE REMOTE CONTROL
Press MENU to enter the menu after STOP
is pressed if it is a CD disc.
Choice 1: INTRO; Each song will be
played for 9s. When your wanted song
is played, press number keys to play
the song wholly. Choice 4: Exit from
the menu. Press STOP, then press
MENU to go back to INTRO to rechoose songs.
SELECTION OF A SONG:
choose chapter and title after pressing
GOTO. The first number of TITLE
03/04 shows the title which is being
played. The second one shows the
number of the total titles. The first
number of CHAPTER 007/017 shows
the chapter which is being played. The
second one shows the number of the
total chapters.
Press the button GOTO twice to choose
the playing time. Select the time through
the numeric keys.
Press NUMBER KEYS to choose your
wanted song in SVCD, CVD, VCD and
CD discs when PBC is off.(E.G, song No
19, press +10 first, then 9, and player
will play the 19
No28, press+10 twice, then 8.and
press +10 over 10 times to choose
songs or pictures over 100). Invalid if
input number is over the amount of
disc' s songs or pictures.
th
song or picture. Song
Press NUMBER KEYS to choose a
specific playing time of SVCD, CVD and
VCD. (Not for all of discs, user can
choose time directly, if chosen time is
over the whole disc time, operation will
be invalid.)
When DVD discs are played, use
direction keys
W Xand number keys to
PBC:
Press the button PBC to disable this
function and this way to be able to select
the songs in disks SVCD, CVD, VCD 2.0
through the numeric keys.
Press the button PBC to disable this
function to see the contents of a disk
DVD.
Page 18 of 46
Page 19

DVD FROM THE REMOTE CONTROL
Cancel the function by pressing the
button A-B three times.
Press the PBC button again to make
sure that the function is activated
and press the button MENU to return
to the menu.
TITLE, CHAPTER, DISC AND
REPEAT:
Press the button REPEAT to repeat the
chapter in a disk DVD.
A-B:
Choose the starting point of A by
pressing the button A-B once.
Press the REPEAT button twice to
repeat the DVD.
Choose the end point of B by pressing
the button TO-B twice.
The part from A to B will repeated.
Press the button REPEAT three times
to cancel the.
Page 19 of 46
Page 20

DVD FROM THE REMOTE CONTROL
Press the button once REPEAT to
repeat the SVCD, CVD, Videotape CD ,
CD, and MP3.
Press the button REPEAT twice to
repeat the SVCD, CVD, VCD, CD and
MP3.
VOL- +
Press this button to adjust the volume;
minimum 0 to a maximu m 16.
Press the button REPEAT three times
to cancel.
ZOOM
Press the button ZOOM to enlarge the
image 1.5x, 2x, 3x and normal size.
the direction keys.
WX ST
Use
MUTE
Press the button once to mute .
Press the MUTE button again to renew
the sound.
Page 20 of 46
Page 21

DVD FROM THE REMOTE CONTROL
L/R:
ANGLE/LIVE T V:
Press L/R button repeatedly and the
audio mode will move AUDIO 1,
AUDI02, AUDIO 1 VOCAL, AUD102
VOCAL (for DVD),within LEFTVOCAL,
RIGHT VOCAL,MONO LEFT, MONO RIGHT, STEREO(for VCD). If the disc
has two sound language, you can use
this button to select one.
FB/FF:
Press the button to choose live video
mode when the unit is in navigation
mode.
SUBTITLE / SMART NAV
FB/FF
Choose 2X, 4X, 6X and 8 X fast
forward or backward speeds by
pressing FF or FB when DVD and MP3
discs are played. Choose 1X, 2X, 3X
and 4 X fast forward or backward
speeds by pressing FF or FB when
SVCD, CVD, and CD discs are played.
PREV/NEXT:
Press the button PREV/NEXT in a disk
DVD to go respectively to the previous
chapter or the following one.
Press the button PREV/NEXT in a disk
SVCD, CVD, Videotape CD, CD and
MP3 to go respectively to the previous
song or the following one.
Press this button to return to the
navigation mode from the live video
mode.
CLEAR/VIDEO IN (to Erase,
entrance gives videotape):
Press this button to change the input
source in the live video mode.
CLEAR/VIDEO IN
Press this button to erase erroneous
input characters.
SCARTMO:
Page 21 of 46
Press this button to the Vídeo/TV to
the SCART.
Page 22

REMOTE CONTROL INSTRUCTIONS
DIRECTIONAL KEYS:
SLOW MOTION
CURSOR CONTROL:
S T to move the cursor up or down
X to move the cursor right
W
to move the cursor left
ENTER
to enter the selected function
Slow the playing speed, in the case
gives of a DVD by 2x, 4x and 8x and
in the case of SVCD, CVD and VCD
by
1x, 2x and 3x.
RESUME:
Resumes the playing of SVCD, CVD,
VCD and CD from the memory stop
mode.
PLAYING FRAME BY FRAME:
Playing a disk frame by frame.
Page 22 of 46
Page 23

DVD SETUP MENU
- SET MENU MAIN PAGE
In the main page you can select
general setup, speaker setup, audio
setup, preferences & PVR control
-ANGLE MARK
The angle marker will be shown
-GENERAL SETUP
DISPLAYING FORMAT SETUP
automatically on screen (in the top
right corner) if the disk has multiple
angles of view for certain scenes.
Choose OFF if you don't want to see
the marker and ON if you want to
have it activated.
-OSD LANGUAGE
Set 4:3 pan scan, 4:3 letterbox, 16:9
panoramic.
Note – this moved to preferences
-PICTURE MODE
You may select the language for
the menu and OSD.
-CAPTIONS
You will be able to choose among
the different formats that can be
detected according to the
configuration you give each movie:
AUTO, FILM (panoramic), VIDEO
(videotape), SMART and SUPER
SMART.
Captions will not be shown if OFF is
selected. This function is only valid if
the disk supports it.
Page 23 of 46
Page 24

DVD SETUP MENU
-SCREEN SAVER
If the unit is without a picture for
more than one minute, screensaver
will operate to protect the screen.
Choose ON to activate this function
(default is OFF - disabled).
-SPEAKER SETUP
5.1 CHANNELS & STEREO
REAR SPEAKER
To activate (ON) or to disable (OFF)
the rear speaker.
SUBWOOFER
To activate (ON) or to disable (OFF)
the subwoofer.
-CENTER DELAY
LT/RT: mixes the left & right channels
and transfers it then to the left &
right channels.
STEREO: output stereo.
OFF: opens the 5.1 channels.
-CENTER SPEAKER
Configures the time delay of the
central speaker.
-REAR DELAY
To activate (ON) or to disable (OFF)
the central speaker.
Configures the time delay of the rear
speaker.
Page 24 of 46
Page 25

DVD
-TEST TONE
Tests if all the speakers
are connected correctly.
-AUDIO OUT
SETUP MENU
-DUAL MONO
STEREO: standard output.
L-mono: transfers the left ch annel to
the left and right channels.
R-mono tran sf ers th e righ t ch ann el to
the left and right channels
Mix-mono: transfers both the left &
right channels to the left & right
outputs.
-DYNAMIC
You can choose between: Analog,
RAW, digital and digital PCM.
-OUTPUT MODE
This option allows you to adjust the
dynamic range.
-PRO LOGIC
You can choose between two: linear
& radio frequency.
Select ON (to activate), OFF (to
disable) and AUTO (automatic).
Page 25 of 46
Page 26

DVD SETUP MENU
PRO LOGIC II MODE
PANORAMA
This option allows selection of: Logic,
Virtual, Music, Movie and Matrix.
PRO LOGIC II CONTROL
This option allows selection and
control.
DIMENSION
Activate (ON) or disable (OFF) the
way
CENTRE WIDTH
This option allows selection of central
width from 0 at 4.
SUBWOOFER FILTER
Activate (ON) or disable (OFF).
Adjust from 3 to +3.
Page 26 of 46
Page 27

DVD SETUP MENU
SURROUND COHERENCE
VIDEO OUTPUT MODE
Activate (ON) or disable (OFF) this
option.
LPCM OUTPUT
Choose 48k or 96k.
PREFERENCES
TV TYPE SETUP
Select the output: S-video or Y, Cb,
CR.
AUDIO SETUP
Select the language for the sound
channel.
You can also choose the language in
the option DIALOGUE LANGUAGE
SETUP.
Note: the DVD must support this
function.
SUBTITLE SETUP
Select PAL, NTSC or MULTI. (If the TV
is PAL, select PAL; if it is only NTSC,
select NTSC; if the TV accepts both
select MULTI - if it is a PAL DVD, PAL
will be output, if the disk is NTSC,
NTSC will be output.
Note: this function corresponds with
the button N/P on the remote control.
Select the language for the subtitles.
You can also choose the language in
the option DIALOGUE LANGUAGE
SETUP.
Note: the DVD must support this
function.
Page 27 of 46
Page 28

DVD SETUP MENU
DISC MENU SMART NAVIGATION
Choose the language for the menu.
Note: the disk must support this
function.
LOCALE
When playing MP3 files, the user can
choose songs through the menu using
the option WITH MENU is activated;
If NO MENU is selected this selection
is not possible
DEFAULTS
Each country has different standards
of paternal control
Select the option for your country.
PARENTERAL
This option restores the factory
defaults.
PASSWORD CHANGE
There are eight levels of restriction of
access.
The password by default is 3308
Note: the disk must support this
function.
To change the password, carry out
the following steps:
1º: Enter the old password.
2º: Enter the new password.
3º: Enter the new password again.
Reset with the super password
(3308) if you forget the new
password.
Page 28 of 46
Page 29

MP3 AND JPEG
Playing of MP3 and JPEG when the
NO MENU option is selected.
Press PLAY when the player has read the
disc. When playing, user can only press
previous, Next or 0-9, +10 numeric button
to choose songs. Press Stop, previo us
appears. Cannot use STWX to choose
songs, and use only 0-9, +10 to play.
(e.g. song or picture No 19, press +10
first, then 9, and player will play the 19th
song or picture. song and picture No28,
press+l0 twice, then S. and press +10
over 10 times to choose songs or pictures
over N0.100). Invalid if input number over
the number of disc's songs or pictures.
MP3 and JPEG when the option
WITH MENU is active.
Select the option WITH MENU.
Reproduction with menu:
Select the option you want: files
JPEG or files MP3.
1. After carrying out the selection,
the folder shows all the files it contains.
2. When the folder that contains the
required images or songs, press ST, or 09 or +10 to select the images or desired
songs. Press PLAY or ENTE R to begin the
reproduction.
3. Select “O” to move up a folder.
PLAYING MODE:
Press REPEAT to select mode from the
seven different modes.
FOLDER: plays songs or images in order.
REP-ONE: plays one song or image
repeatedly.
FOLDER REPEAT: plays all the songs or
images in the folder repeatedly in order.
Page 29 of 46
Page 30

MP3 AND JPEG
DISC: play songs or pictures of all folders
DISC REP: repeat playing all
songs or pictures of all folders.
DISC SCAN: every song will play 10 for
seconds (pictures can not play when in this
mode.).
SINGLE PLAYING: stop playing when
songs played, and repeat playing when
picture played.
Press SHUFFLE key to select random mode:
SHUFFLE: songs and pictures will
play Randomly and can repeat.
RANDOM: songs and pictures will
play Randomly and can not repeat.
PLAYJPEG (DVD)
When playing JPEG or pause:
W Xto turn left or right, TURN
Press
LEFT/ TURN RIGHT
Press
S to play invert or normal
picture (INVERT/NORMAL).
press
T to Scenes will shuffle between left
and right (MIRROR / NORMAL).
PRESS RESUME TO CHOOSE
FOLLOWING 13 PLAYING MODES
WHEN PLAYING JPEG.
MODE 0: no special Transition effect(default)
MODE 1: wipe from top t o bo tto m
MODE 2: wipe from bot tom t o to p
MODE 3: wipe top / bottom to centre
MODE 4: wipe center to top / bottom
MODE 5: vertical blinds
MODE 10: wipe from edge to centre
MODE 11: horizontal blinds
MODE 12: random
ZOOM
Press ZOOM when playing JPEG and press
FF, FB to zoom out or zoom in. OSD will
show ZOOM 25, 50,100 and press ZOOM
again to exit)
PROGRAM PLAYING
1. Press PROGRAM to go to program
playing mode when songs or pictures stop
playing.
2. Press 0-9, +10 to choose songs or
pictures to be programmed. And P00:00
will show left upside corner (left 00:00
show playing order of programmed songs
and right 00:00 shows current
programmed songs). 3. Press STOP to stop
program and press PLAY or ENTER to
begin playing.
4. Press REPEAT when program playing,
the whole programmed pictures will
played repeate dl y.
5. Press STOP to exit programming (Press
Program firstly to cancel last programmed
songs and choose Program to do next
programming). Press Program secondly to
exit program mode
NINE PICTURE FUNCTION
Press MENU when playing JPEG, screen will
show 9 pictures mode. Press PRE, NEXT to
go to last or next picture and press button 1
until 9 to choose current picture. Press MENU
to return to the nine-picture mode to rechoose when the formerly chosen pictures are
finished.
MODE 6: wipe from left to righ t
MODE 7: wipe from rig ht to lef t
MODE 8: wipe left/right to centre
MODE 9: wipe centre to left/right
Page 30 of 46
Page 31

PLAYING MP3 AND JPEG SIMULTANEOUSLY
When the images and the songs
are in the same folder
Operation I: playing begins from the
first song and continues until the end
of the images.
3. Press the button A-B to select the
MP3 file.
4. Use the keys UP, DOWN and ENTER
If the disk has JPEG and MPEG files,
ST to choose JPEG. Press STEP
press
to open the music background (the
OSD will show (MUSIC SLIDE SHOW)
and press ENTER or PLAY to begin the
reproduction.
If you want to repeat the
reproduction, repeat the procedure
described previously.
to reach the folder that contains the
picture files.
5. Move the cursor to the image from
which you want to begin the
reproduction.
6. Press ENTER or PLAY to begin the
reproduction.
When the images and the songs
are in different folders.
1. When the disk is loaded select
S T MP3.
with
2. Press STEP to open begin
(OSD will display MUSIC SLIDE SHOW
MODE)
7. Once the playing has finished
DONE will appear on the screen.
If you want to carry out the
reproduction again, repeat the
procedure described above.
Page 31 of 46
Page 32

PLAYING MP3 AND JPEG SIMULTANEOUSLY
When music & pictures are in the same folders.
When playing pictures and music, if the pictu res can not play over the music, press PAUSE once to pause the
pictures but the music will continue pl ayi ng.
Press PAUSE a second time and music & pictures will stop playing
Press PAUSE a third or press PLAY to continue playing songs and pictures.
When music & pictures in the different folders.
When playing pictures and music, if pictures can not pl ay over in the music, you can press PAUSE once to pause
pictures but music continue playing.
Press PAUSE a second time and music & pictures will stop playing
Press PAUSE a third time or press PLAY to continue playing songs and pictures
Page 32 of 46
Page 33

TUNING TV CHANNELS
SCAN CHANNELS
1. Select the option PVR CONTROL
inside the Menu for Configu ra tion to
carry out the tuning . Remember to
configure the correct input format
before carrying out this operation.
2. Select the option TUNER
CONTROL.
3. The previous option offers two
possibilities. Select AUTOSCAN and
ENTER to confirm. ENTER again and
the TV carries out the Automatic
Tuning. While this is carried out a blue
line that will be shown moving left to
right.
4. VLH, VHF and UHF will be shown.
The number of channels will be shown
on screen after the tuning.
CHOOSE TV CHANNEL
SEARCHING FOR CHANNELs
If the signal or the color is poor, the
user can modify the configuration to
carry out another search or skip a
channel.
Steps:
1. When in TUNER CONTROL, press
CHANNEL SETUP to enter.
2. Use the
and ENTER to confirm (X will be
shown on the screen).
3. Press the
finished.
CHANNEL ADJUSTMENT
If the signal is not good or the color is
poor, adjust the tuning using
NOTE: If signal is weak, the message
“No signal“ it will be shown on screen
or the image disappears. Press the
button SETUP to reach the system
menu. Press SETUP again to leave this
menu. This will make that the unit
retune.
S T to select the channel
X to exit once it has
X and W.
5. If you want to receive TV programs
press
Then select LIVE TV) and press the
VIDEO IN button) to choose RF and to
receive TV
W to return to the top menu.
Page 33 of 46
Page 34

TIME AND DISPLAY SETTING
TIME SETTING:
Steps:
1. Selec t PVR Control in t he SETUP
menu.
DISPLAY AND WEEK
SETTING
Only when the Menu is selected
will the time and day of the week
be displayed.
2. Choose CLOCK SETUP
3.Enter the year, month, day,
hour and minute through the
numeric keys.
Note: The screen will show an
error if the data is not correct.
4.Confirm the information to
leave this screen.
Choose the option CANCEL if
you want to exit without
keeping the changes.
Note: If you don't confirm the
changes, the system won't
store them.
Page 34 of 46
Page 35

TIMER RECORDING
TO PROGRAM TIME RECORDING
This function sets the recorder to
record unattended at some preset
time.
Steps
1. Press the button SETUP MENU and
select MAIN PAGE, then select PVR
Control. And press ENTER.
4. Press CONFIRM to confirm the
settings. If you want to cancel the
entered program times etc press
CANCEL.
5.The unit can record several
programs, but it requires a minimum
gives two minutes between the end of
one timer recording and the beginning
of the next. If less than two minutes
are entered then the last entered
recording is invalid.
NOTE: If the unit is in standby mode
it will enter the operate mode one
minute before the recording is due to
start and will re-enter standby when
the recording is complete.
2. Select PROGRAM SETUP
and then CREATE RECORD.
3. Use S T to select the source:
(TV-RF, AV1, AV2 SCART, S - Video),
the channel (you doesn't need to
select the channel if the recording
source gives is not RF ), Program
Name (one that you choose), the
frequency (once only, daily, weekly),
the display quality (XP, SP, LP, EP).
Through the numeric keys enter the
Parental/Locale wanted, the month,
day, start time and end time.
QUALITY:
XP: NTSC 720X480/PAL 720X576.
SP: NTSC 720X480/PAL 720X576.
LP: NTSC 352X480/PAL 352X576.
EP: NTSC 352X240/PAL 352X576.
TO CHANGE PRESET RECORDING
TIMES:
1. Goto PVR CONTROL, PROGRAM
SETUP
and EDIT RECORD. Select the one to
change using S T. press EDIT. If you
wants to delete it press DELETE.
2. If you select the EDIT it will go to
the menu for configuration. If you
select CANCEL it will return to the
menu PVR.
Page 35 of 46
Page 36

TO EDIT A TIMER RECORDING
3. The unit allows you to see the
recording and a DVD at the same time.
NOTE: a red display will appear in the
bottom left corner giving the state of the
recording.
4. After having carried out the changes to
the time press, CONFIRM to leave.
Page 36 of 46
Page 37

TO RECORD A PROGRAM
Before time recording a
program
Before recording, go to PVR
CONTROL, select the quality (XP, SP,
LP, EP), the time shift mode and the
format of the source(AUTO, SECAM).
3. Press STOP to stop the recording
and return to the Smart NAVI.
TO PLAY A RECORDED
PROGRAM
When playing a DVD, VCD, CD, SVCD,
CVCD press REC to pla y a rec ord ed
program. When playing a CD only the
format and title will be shown.
Live recording
1. From the remote control press the
VIDEO IN button to be able to select,
AV1, AV2, SCART, S-video or TV.
2. Press REC to begin the recording
(the recorded files will be shown in
numerical sequence).
ILLUSTRATION:
While playing a recording, if using a
monitor through the S - Video or
Y,Cb,Cr, connect it to the SCART or
the S-video, as the unit won't be
able to record signals from itself.
Page 37 of 46
Page 38

TO RECORD A PROGRAM
Recording in the background
Steps:
1. Select LIVE VIDEO in the main
menu and enter CONFIRM. Through
the option VIDEO IN select the
source.
2. Select SMART NAVI to enter smart
navi mode and press REC from the
remote control to begin the recording
in the background.
SETTING THE DEFAULTSOURCE
If you want to always keep the same
external source (for example, the TV)
select the default option in the PVR
Control menu, Input Source
This way, whenever the unit is turned
on, this source will be selected by
default.
3. Whilst the back ground recording is
in operation you can play DVDs or
recorded programs.
4. Press STOP to stop the recording.
NOTE: If the light in the bottom left
corner is red, it means that it is
recording in the background. If the
light is yellow, it me ans th at th ere is a
programmed recording.
Direct recording icon:
Background recording icon:
MP3 AND JPEG RECORDING
Two different types exist: single and
multiple.
Select the required folder with the
button PBC fi rst.
A. Recording a single MP3 or
JPEG
Select the folder for the MP3 or JPEG
inside the SMART NAVI menu.
Note: If no folder is selected the main
folder will be used.
1. Select the fMP3 or JPEG using S T
2. Press OSD and select COPY and
confirm the file that you want to
record. During the recording the file
size and percentage recorded will be
shown.
Page 38 of 46
Page 39

TO RECORD A PROGRAM
B. Recording several MP3s or
JPEGs:
1. Press SELECT in the OSD menu
during playback of a DVD and
select the item. The unit will
automatically select one mode. If
you want to select all the files,
press SELECT twice. If you w ant to
leave the select mode press
SELECT three times.
2. After carrying out the
confirmation, press
S T to select
the song/image. If the display is
red it means that the song/image
has already been selected. If you
don't want to copy the
song/image, press ENTER and the
cursor will change to gray color.
3. After selecting the songs that
you want to record, press STOP to
stop selection mode then OSD on
the remote control. Use
S T to
select COPY and the selected files
will be copied automatically to the
hard disk.
4. If you give the same n ame to a
recording as already exists on the
hard disk, a message will ask if
you want to replace the existing
file. Press YES and
W to carry out
this substitution.
Page 39 of 46
Page 40

TO RENAME, MOVE/COPY, ERASE A FILE AND TO
VIEW ITS PROPERTIES
Through the menu SMART NAVI you
can rename, move, copy, erase files
or see its properties.
To rename
A. From the SMART NAVI menu select
the option RENAME (press the button
OSD on the remote control) to change
the name of a file. Select the CANCEL
to leave.
B. Enter the RENAME menu, using T
S to select a letter/symb ol and press
ENTER to confirm the selection. If a
letter/symbol has been incorrectly
entered press CLEAR on the remote
control and select the correct name.
Press the STOP to stop.
B. From this menu select RENAME,
and use W X T S to select a letter or
symbol and press ENTER to confirm
the selection. If an incorrect letter or
symbol is entered use CLEAR on the
remote control and reselect the name
that you want again. Press the STOP
to stop.
To copy a file
A. From the SMART NAVI menu press
OSD on the remote control and select
the name you gave the file; press PBC
on the remote control. Confirm that
the new file is the desired file.
To create a new folder:
A. From the menu SMART NAVI select
the NEW FOLDER option press OSD on
the remote control to confirm the new
folder. Select the option CANCEL to
leave.
B. Use S T to select the file that you
want to copy, press the button OSD
on the remote control and COPY.
Confirm that it is the correct file.
Page 40 of 46
Page 41

TO RENAME, MOVE, COPY AND ERASE
C. The recording begins. Press STOP
to stop the copying.
NOTE: If there are no files to copy,
move or delete, the option is not
valid.
To move files
Carry out the same steps as to copy
files.
To display properties
Move the cursor to the file or folders.
Press OSD and PROPERTIES. You will
be able to see the name, the file size,
the playing time, the creation date.
Press STOP to leave this option.
To erase files
Use T S to select the files that you
want to erase. Press OSD on the
remote control to select DELETE. After
confirming the action, a message will
appear asking if you really want to
erase the file. Choose Yes if you really
want to
Page 41 of 46
Page 42

TO FORMAT, REPAIR AND DEFRAGMENT THE HARD DISK
To format to th e h ar d d i s k
To play a program
1. Choose SMART NAVI from the TOP
MENU and use
program.
the program. Playing time will be
shown.
Press ENTER or PLAY to play
S T to select the
1. From the configuration menu
choose PVR Control.
2. Select FORMAT DISK from DISK
TOOLS. Press
format the disk. EXPLANATION: The
contents of the disk will be erased
after the formatting.
W to return or ENTER to
To repair a disk
Press ENTER from the option REPAIR
DISK. An indication will appear on
screen. Press
configuration. Press ENTER to repair
the disk.
NOTE: If power is lost during a
recording you should immediately
repair the disk.
To defragment the disk
W to return to another
Explanation: Press S to select a folder
and CONFIRM to return to the main
files.
To readjust the index
Press ENTER to choose REPAIR DISK.
Press
configuration. Press ENTER to
defragment the disk.
W to return to another
NOTE: If you erase parts of the disk
frequently the hard disk will slow
down; defragmenting the disk will
restore the original speed.
This function, will adjust the index
automatically putting the files in
sequence.
Page 42 of 46
Page 43

TIMESHIFTING
This function allows you to record
programs to the hard disk. It can also
play, advance, go back and pause a
recording.
Press LIVE TV, to see programs in real
time from external sources.
Go to the option PVR CONTROL in the
configuration menu to select the
display quality that you want for the
recording. Four different levels exist:
XP, SP, LP and EP.
From the option PVR CONTROL select
the maximum duration for the time
shift. There are five possibilities:
5, 15, 30, 45 and 60 minutes
USB (if fitted).
1. Connect a USB cable to the unit.
The unit will auto restart and show
USB INSERT.
2. The computer will detect the device
automatically. If Windows 98 is
installed on the PC, install the
appropriate driver. If Windows 2000
or later is installed no driver is
required.
3. Open up My Computer on your PC
and you will find the symbol for a new
disk, this is the hard disk in your
PVR. You will be able to use it as a
hard disk in your PC (to copy files , to
format the disk, etc...).
4. After using the hard disk, close the
software and disconnect the cable.
The PVR will light again restart
automatically.
NOTE: If the USB does not
function correctly, format the
PVR’s hard disk in your computer
then put it back in the PVR.
Page 43 of 46
Page 44

TO CHANGE THE HARD DISK
ATTENTION: Before you change
the hard disk, you must switch off
and unplug the PVR to avoid any
possible damage to the hard disk
or the circuit.
NOTE: You should prepare a new
hard disk using FDISK to partition
and format it in your PC before
installing it in the PVR.
The format must be FAT32 and
the hard disk set to be in SLAVE
mode.
To remove the hard disk:
1. Open the door to the hard disk.
After partitioning formatting the
hard disk in a PC insert the new
hard disk into the caddy.
Steps:
1. Connect the two cables to the hard
disk.
2. Slide the caddy cover back on.
2. Take out the hard disk using the handle.
3. Slide the cover off the hard disk caddy.
4. Use a screwdriver to take out the four
screws.
5. remove the hard disk after
disconnecting the power and data cables.
3. Replace the retaining screws.
4. Replace the caddy into the PV R and close
the door. Plug the PVR back into the
electrical supply and switch on. If
there is some problem with the
connection re-insert the caddy to remake the connections.
Page 44 of 46
Page 45

SPECIFICATIONS
General specifications:
Voltage: AC90V-260 50/60 Hz
Consumption-operate mode - 40 W
Consumption-standby mode: less
than 2W
Size: 430x440x60 mm
Weigh: 5 Kg
Temperature: 5-40º C
Humidity: 15-75%
DVD
Supports DVD, SVCD, CVD, VCD
1.0/1.1/2.0, YOU CD-GIVES,
MP3, KODAK PICTURE CD, CDR/RW.
Output-video: 1.0Vp-p 75 Ohms.
Output-audio: 1.0-2.0V 10 K ohms.
S/N: >90 DB
Frequency response: 20 Hz–
20Khz +-1dB.
Channel separation: > 80dB
Dynamic range: >80dB
HARD DISK
Capacity with 40 Gb Hard Disk
:
XP: NTSC 720X480 / PAL 720X576:
10 hours 45mins.
SP: NTSC 720X480 / PAL 720X576
14 hours.
LP: NTSC 544X480 / PAL 544X576
21 hours.
EP: NTSC 352X480 / PAL 352X576
40 hours.
Three recording modes: PAL, NTSC,
SECAM.
Input sources S-video, DVD, TV, HD,
etc...)
Recordings
Video outputs: 1.0 + - 0.2V 75 ohms.
Audio outputs: + - 1 dB 10K
Frequency response: 20 Hz–
20Khz +-2dB.
Separation between channels:
> 80dB
Dynamic range: >80dB
S-Video
Video outputs 0.7+- 0.14V p-p 75
Ohms.
C: 0.88 +- 0.176VP-P 75 OHMS.
Colour: 0.15–0.3Vp-p 75 Ohms.
Input: 100% color 1.0Vp-p.
TV
Video output: 1.0 + - 0.2V 75 Ohms.
Audio output: +-1dB 10K Ohms.
Frequency range:
VLH: 49.75-170.00 MHz
VHF: 170.00-450.00 MHz
UHF: 450.00-863.25 MHz
Page 45 of 46
Page 46

BASIC FAULT FNDING
No sound, No Video:
- Check all the cables give audio are
connected correctly.
It is not possible to use an
external source:
- Check the input connections.
-Check the external source.
External source errors:
- Check the input cables are correctly
connected.
- The source signal is very weak.
- The source format is not correct.
No sound during
playback:
-Check that the MUTE function is not
activated.
The remote control doesn't work:
-Check the batteries.
Long initiation time:
(more than 20 seconds):
-Check that the hard disk is
correctly connected.
The new hard disk you cannot
be used:
-The disk must be partitioned and
formatted before use.
Corrupt recording:
-Repair or defragment the hard
disk.
TV channels cannot be scanned:
- The aerial is not connected
correctly.
- The source format is not
correct.
Weak TV reception:
-Check that the aerial gives good TV
reception.
- Use fine tuning to improve the
reception.
- The source format is not
correct.
Recordings have no colour:
- The source format is not
correct.
Page 46 of 46
 Loading...