

Page 1
®
LS5000DVD_UM.qxp 4/18/05 10:37 Page 1
OWNER'S MANUAL
LS5000DVD
AM/FM Stereo Receiver with DVD/CD Player
Designed for In-Wall Installation of Recreational Vehicles, Motor Homes and Mobile Housings
Manufactured under license from Dolby Laboratories.
“Dolby” and the double-D symbol are trademarks of
Dolby Laboratories.Confidential Unpublished works.
© 1992-1997 Dolby Laboratories Inc. All rights reserved.
A Registered Trademark of Magnadyne Corporation
Page 2
MH
z
C
H
STERE
O
F
M
18
13
1
2
3
4
5
8
6
9
19
22
24
20 2321
14
10
11
12
15
17
16
7
LS5000DVD_UM.qxp 4/18/05 10:37 Page 2
INTRODUCTION
Please take the time to read all of the information in this manual. Familiarity with installation and operation procedures will
help you obtain the best possible performance from your new
AM/FM Stereo Receiver with DVD/CD Player.
CONTROLS AND FUNCTIONS
WARNING! To prevent fire or electrical shock hazard, do not
expose this product to moisture, or remove cover or bottom
screws. No user-serviceable parts inside. Refer servicing to
qualified personnel.
2
Page 3

LS5000DVD_UM.qxp 4/18/05 10:37 Page 3
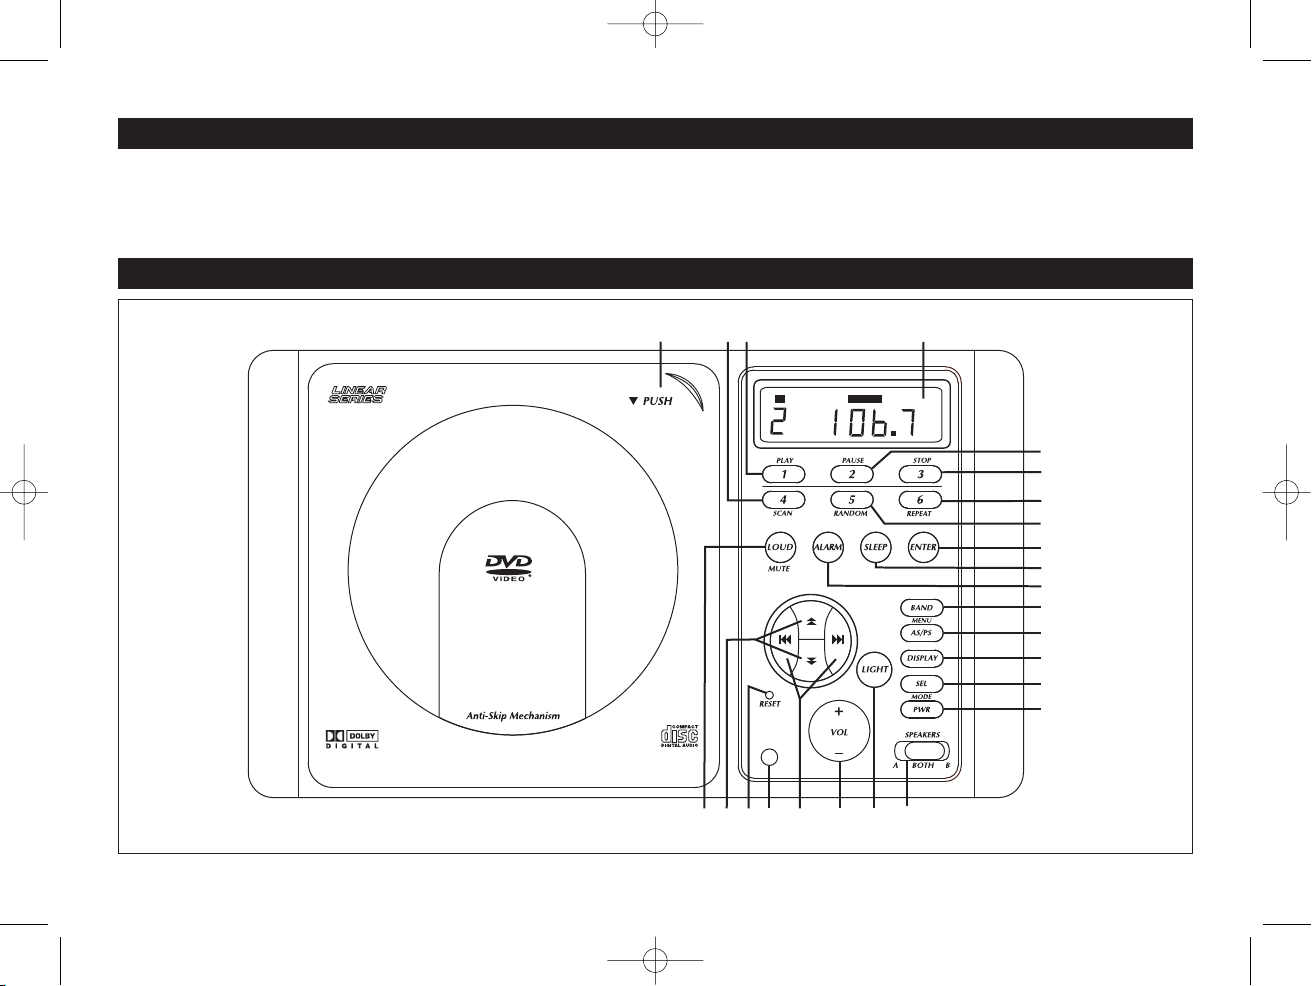
CONTROLS AND FUNCTIONS
1. Power / Mode Button (PWR)
Press and hold to turn the unit On/Off.
Momentarily press to switch modes from Radio to AUX IN to DVD.
2. Select Button (SEL)
Selects the audio mode in the following order:
Volume, Bass, Treble and Balance.
3. Display Button
Press at anytime to display the clock.
4. AS/PS / Menu Button
Radio Mode: Automatic memory storing and preset scanning.
DVD Mode: Enters DVD Menu. Please see "DVD Operation".
5. Band
Selects the band in the following order: FM1, FM2, FM3, AM1, AM2.
6. Alarm Button
Sets the alarm. Please see "Alarm Operation".
7. Sleep Button
Sets the sleep timer. Please see "Setting the Sleep Timer".
8. Enter Button
Radio Mode: Please see "Radio Operation".
DVD Mode: Please see "DVD Operation".
9. Preset #5 / Random Button
Radio Mode: Recalls memorized radio station #5.
DVD Mode: Plays the disc tracks in a random order.
10. Preset #6 / Repeat Button
Radio Mode: Recalls memorized radio station #6.
DVD Mode: Repeats all tracks or a single track.
11. Preset #3 / Stop Button
Radio Mode: Recalls memorized radio station #3.
DVD Mode: Stops disc play.
12. Preset #2 / Pause Button
Radio Mode: Recalls memorized radio station #2.
DVD Mode: Pauses disc play.
13. Display Area
Displays all digital messages.
14. Preset #1 / Play Button
Radio Mode: Recalls memorized radio station #1.
DVD Mode: Starts disc play.
15. Preset #4 / Scan Button
Radio Mode: Recalls memorized radio station #4.
DVD Mode: Plays the first 10 seconds of each track.
16. Disc Door
Allows you to insert a disc.
17. Mute / Loud Button
Short press mutes the audio level.
Long press enhances the high and low frequency sound quality.
18. Reset Button
Resets the Display Area. Please see “General Operations”.
19. Infrared Sensor
Receives the signals from the remote control.
20. Skip Up / Skip Down Buttons
Radio Mode: Searches the tuned frequency up/down.
DVD Mode: Skips to the next lower/higher track on the disc.
21. Fast Forward / Fast Reverse Buttons
Radio Mode: Changes the tuned frequency up/down.
DVD Mode: Fast forward/reverse through a track.
22. Volume Button
Increases or decreases the volume.
23. Light Button
Turns the backlight on briefly when the unit is powered off.
24. Speakers Switch
Selects the different sets of speakers installed.
3
Page 4
ENTER
VOLUME ADJUSTMEN
T
SEL
+–
EQ
MUTE
ZOOM
PROG
REPEAT AUDIO
12 3
45 6
78 9
0
DISP
MENU
BAND/SET UP
SUBTITLE
TITLE
SOURCE
PWR
1
2
3
4
5
9
7
10
11
12
13
8
15
16
17
18
19
20
6
21
22
23
24
14
LS5000DVD_UM.qxp 4/18/05 10:37 Page 4
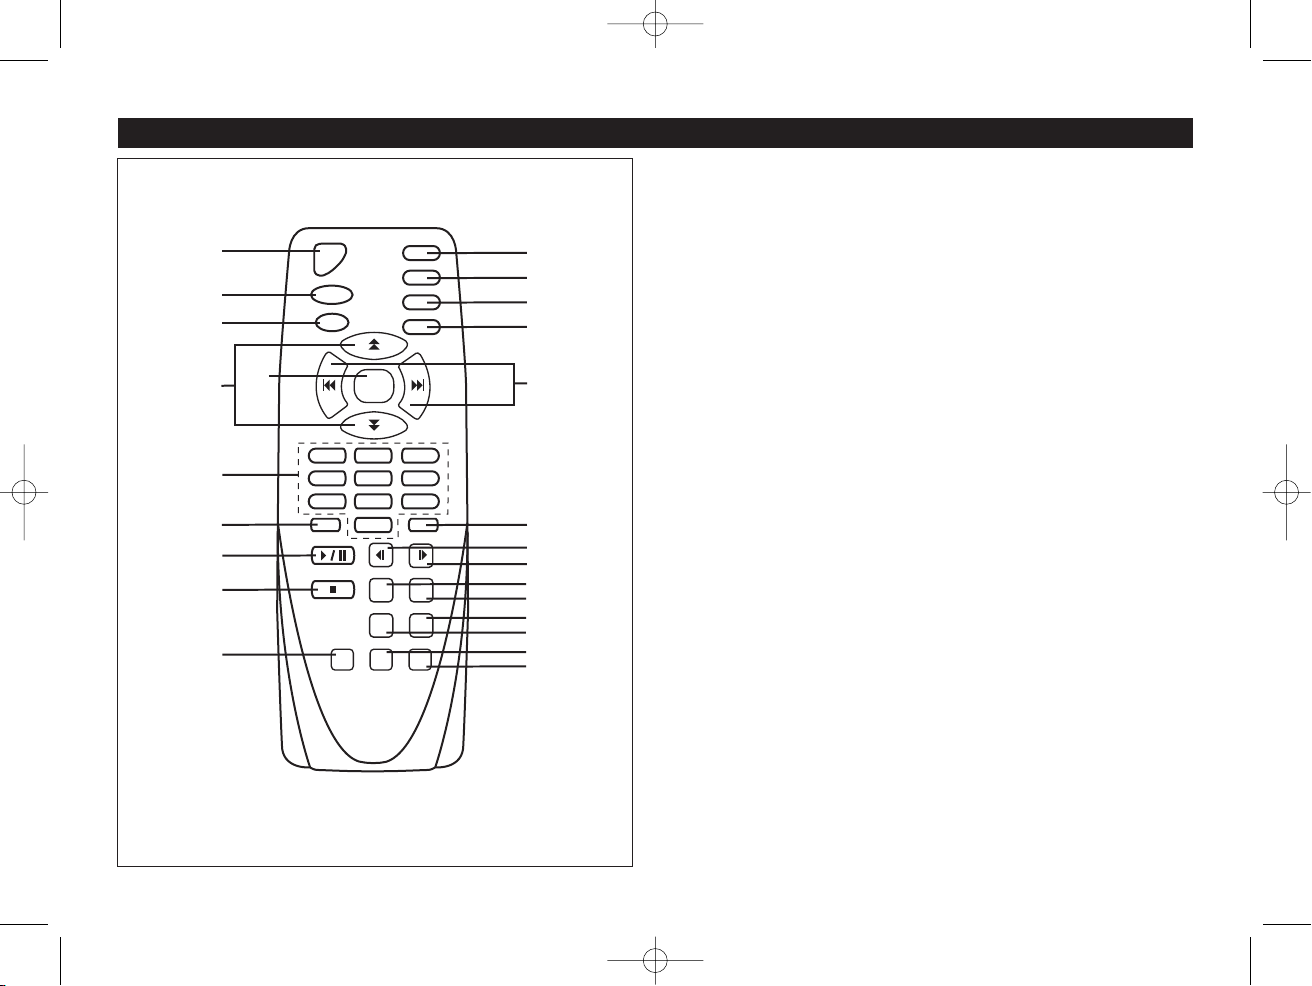
REMOTE CONTROL FUNCTIONS
1. Power / Mode Button (PWR)
2. Menu
3. Display Button (DISP)
4. Fast Forward / Fast Reverse Buttons
5. Skip Up / Skip Down Buttons
6. Enter Button
7. Preset / Numerical Buttons
8. Repeat Button
9. Play / Pause Button
10. Stop Button
11. Select Button (SEL)
12. Increase Volume Button
13. Decrease Volume Button
14. Loudness Button (EQ)
15. Mute Button
16. Program Button
17. Zoom Button
18. Slow Forward Button
19. Slow Reverse Button
20. Audio Button
21. Band / Set Up Button
22. Subtitle Button
23. Title Button
24. Source Button
Preparing the Remote Control
• Slide open the battery compartment cover.
• Insert two AAA batteries making sure that the positive and
negative terminals are oriented correctly.
• Close the battery compartment cover.
• Point the remote control at the unit's infrared sensor to
operate the player.
4
Page 5
CH
STEREO
Preset
Number
LS5000DVD_UM.qxp 4/18/05 10:37 Page 5
GENERAL OPERATIONS
Power On/Off
Press and hold the Power / Mode button to turn the unit On
or Off.
Auxiliary Input Mode
To access auxiliary devices, press the Power / Mode button
momentarily until "AUX IN" appears in the display.
DVD Mode
To play a CD or DVD, press the Power / Mode button
momentarily until "DVD ON" appears in the display.
Reset Display
Activate the Reset button with either a ballpoint pen tip or
paper clip for the following reasons:
• After initial installation of the unit is completed.
• If the function buttons do not operate.
• Error symbol on the display.
Speaker Switch
• To play the "A" set of speakers, slide the switch to the "A"
position.
• To play the "B" set of speakers, slide the switch to the "B"
position.
• To play both the "A" and "B" speakers simultaneously,
slide the switch to the "BOTH" (center) position.
RADIO OPERATION
Radio Operation
1. Press and hold the Power / Mode button to turn the unit On.
2. Press the Power / Mode button momentarily until the Radio
Mode is selected.
3. Press the Band button to select either the AM1, AM2, FM1,
FM2 or FM3 radio band.
4. Manually tune in the desired radio station by pressing the
Fast Forward / Fast Reverse button and Auto search to
the next station by pressing the
5. Adjust the volume as desired.
FM Stereo Operation
The unit will automatically switch from FM Mono to FM Stereo
when the signal strength increases to a stereo level. If the
stereo signal should become weak, the unit will switch back to
mono. FM Stereo reception is indicated by the word
"STEREO" in the display.
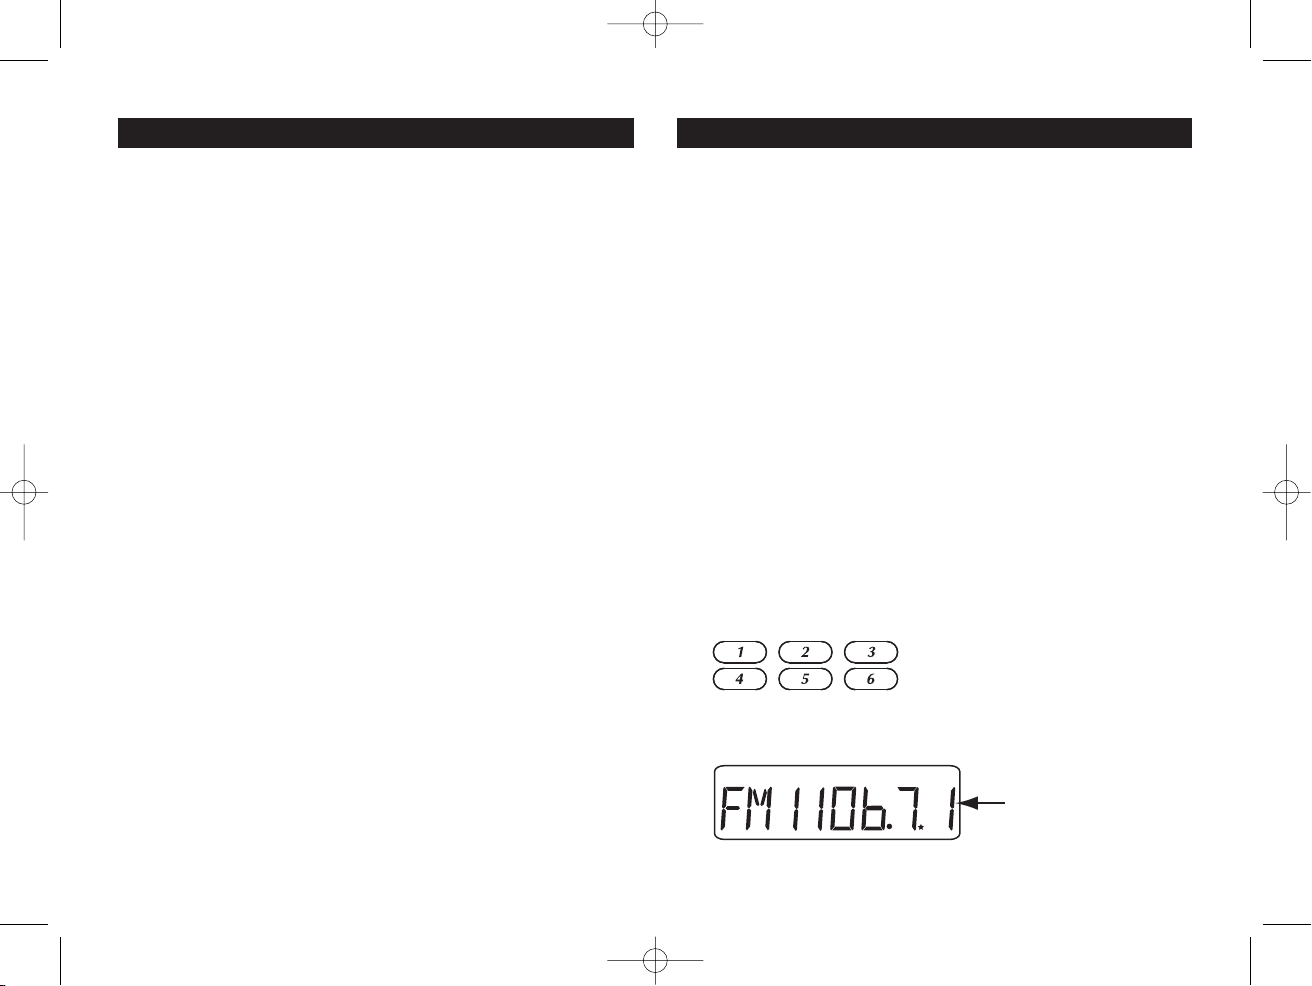
Memorizing Radio Stations (Presets)
1. Press the Band button to select either the AM1, AM2, FM1,
FM2 or FM3 radio band.
2. Tune in the desired radio station.
3. Press and hold anyone of the six Preset buttons to memo-
rize the station until the Preset Number is displayed.
Skip Up / Skip Down button.
The currently displayed radio station is now memorized. Each
band can store up to six preset stations.
5
Page 6
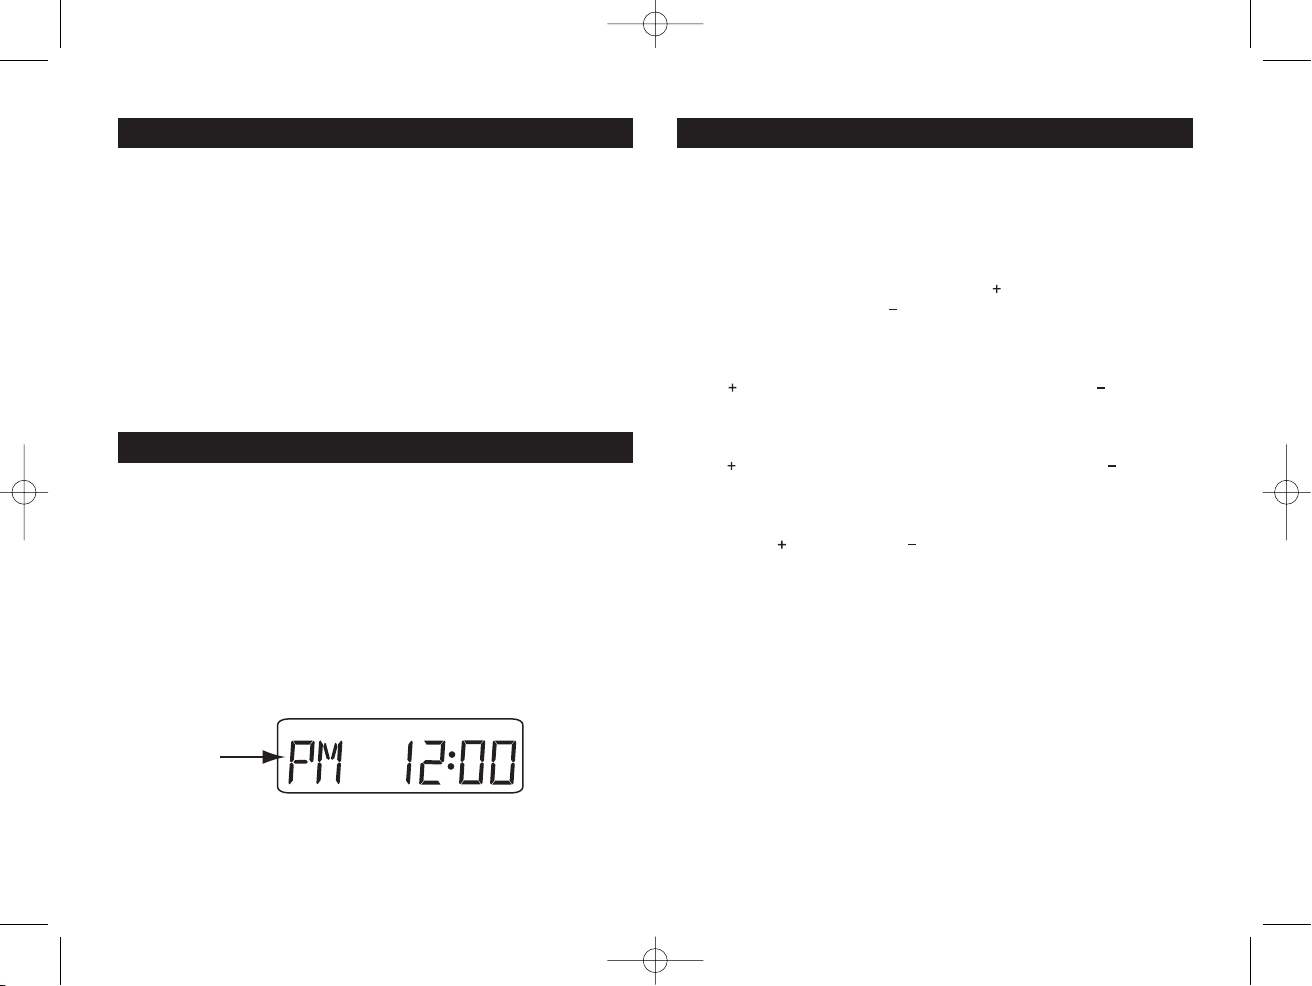
PM
Indicator
LS5000DVD_UM.qxp 4/18/05 10:37 Page 6
RADIO OPERATION
Automatically Store Stations
Select a Band (if needed). Press and hold the AS/PS button
for more than three seconds. The tuner will search for the six
strongest stations and store them in memory. The new stations replace stations that were already stored in the current
band.
Preset Scan
Select a Band (if needed). Press the AS/PS button. The tuner
scans for preset stations stored in the current band and pauses for five seconds at each station. When a desired station is
reached, press the AS/PS button again to stop scanning.
SETTING THE CLOCK
1. Press and hold the Power / Mode button to turn the unit On.
2. Press and hold the Display button. The clock will start
flashing, indicating the unit is in the clock setting mode.
3. Within 5 seconds, continuously press the Fast Reverse
button until the desired Hour is set. To quickly scroll
through the Hours, press and hold the same button. Note
the AM or PM indicator in the display.
4. Continuously press the Fast Forward button until the
desired Minute is set. To quickly scroll through the Minutes,
press and hold the same button.
5. The unit will exit the clock setting mode if either button is
not pressed within 5 seconds.
SOUND CONTROLS
Audio Mode Selection
Select the desired audio mode by pressing the SEL button.
The modes will be displayed the following order: Volume,
Bass, Treble and Balance.
Volume
Increase the volume by pressing the button. Decrease the
volume by pressing the button.
Bass
Press SEL button two times. Increase the Bass by pressing
the button. Decrease the Bass by pressing the button.
Treble
Press SEL button three times. Increase the Treble by pressing
the button. Decrease the Treble by pressing the button.
Balance
Press SEL button four times. Adjust the Balance by pressing
either the button or the button.
R10 = Right speakers only
00 = Equal sound right and left
L10 = Left speakers only
Mute
Press and release the Mute / Loud button once to mute the
audio level. "MUTE" will appear in the display.
Loud
Press and hold the Mute / Loud button to enhance the high
and low frequency sound quality. "LOUD" will appear in the
display.
Note: To display the clock while in Radio, CD/DVD or AUX
mode, press the
Display button.
6
Page 7

ALARM
AM Indicator
Alarm Timer
"On" Indicator
Alarm Mode
Indicator
SLEEP
Sleep Timer
Minutes
ALARM
PM Indicator
Alarm Timer
"Off" Indicator
Alarm Mode
Indicator
LS5000DVD_UM.qxp 4/18/05 10:37 Page 7
ALARM OPERATION
The alarm is used to power the unit On at a set time, and to
power the unit Off at another set time.
Setting the Alarm Timer
1. Press and hold the Alarm button until the display shows
“ON A 0:00”.
2. Press the Fast Reverse button to adjust the Hours, then
press the
3. When the desired time is set, press the Enter button to
confirm the "Alarm On" time, and the display will show
“OFF A 0:00”.
4. Repeat the same procedures above to set the "Alarm Off"
time and press the
display will then show "ALARM", indicating the Alarm
Function is activated
5. To activate the Alarm Timer, power off the unit by pressing
and holding the
Fast Forward button to adjust the Minutes.
Enter button to confirm the setting. The
Power / Mode button.
Switching the Alarm Function On/Off
1. Press the Alarm button, then press the Enter button at
anytime to turn the Alarm "On" or "Off".
2. If “ALARM” is showing in the display, the Alarm Function is
activated.
SETTING THE SLEEP TIMER
1. Press and hold the Sleep button until "00" is displayed.
2. Within 5 seconds, continuously press the Fast Forward /
Fast Reverse
80, 70, 60, 50, 40, 30, 20, 10 minutes).
3. The unit will exit the Sleep Timer setting mode if either button is not pressed within 5 seconds.
4. After the sleep timer has expired the unit will automatically
turn off.
5. To manually turn the sleep timer Off, set the sleep time to
"00".
Note: The Sleep Timer function is not programmable into
memory. Therefore, it must be reset every time the function
is needed.
7
button until the desired sleep time is set (90,
Page 8

TUNING
REPEAT
REP1
INTRO
INTRO
PROGRAM
RANDOM
PGM
TONE
POWER
MIN
TUNING
MAX
A
A-B
B
VOL
FM88 92 98 104 108 MHz
AM53 92 100 130 171x10 KHz
REPEAT
REPEAT
ALL
INTRO PROG
RANDOM
CD
TUN
AM
FM
LS5000DVD_UM.qxp 4/18/05 10:37 Page 8
DISC WARNINGS
Handling a Disc
1. When inserting a disc onto the disc hub, hold it with your
thumb, middle finger and index finger. Gently press in the
center of the disc until it is securely on the hub.
2. When removing the disc, always pull at the top left edge of
the disc until it snaps loose from the hub. There are indentations in the plastic for your fingers at this point.
3. Always keep your discs clean and free from scratches, finger-
prints and dirt.
Warning! Never touch the laser eye. Moisture and oils
from your fingers can impair proper operation.
COMPACT DISC OPERATION
General Operations
1. Press and hold the Power / Mode button to turn the unit On.
2. Press on the disc door next to the word “PUSH”, the door
will open slightly. Then gently pull the door fully open.
3. Insert a disc onto the hub until it snaps into place.
4. Close the disc door until it locks into place.
5. Press the Power / Mode button until "DVD ON" appears in
the display. Disc play will start momentarily after "LOADING" and "CD" appear in the display.
Play Program
The unit can be programmed to play disc titles and chapters in a specified order.
1. At CD stop, press Prog button.
2. Program P00:00 is displayed.
3. Press numeric buttons to select favorite songs, press
Enter button.
4. To start playing programmed songs, press Play button.
To clear the program, select "CLEAR ALL" and press the
Enter button.
Stopping Play
To stop CD play, press the Stop button.
Pausing Play
To pause CD play, press the Pause button. To resume CD
play, press the
Play button.
Fast Forward / Fast Reverse
To fast forward through a track during CD play, press and
hold the
Fast Forward button. Release the button to play
8
Page 9

Random On
Indicator
Repeat All
Indicator
Repeat One
Indicator
Scan On
Indicator
LS5000DVD_UM.qxp 4/18/05 10:37 Page 9
COMPACT DISC OPERATION
the disc at that point.
To fast reverse through a track during CD play, press and
hold the Fast Reverse button. Release the button to play
the disc at that point.
Track Search
To search forwards or backwards for a specific track on a
disc, press the Skip Up / Skip Down buttons until you reach
the one that you want to listen to.
Repeating a Single Track
Press the
will appear in the display. The track that is currently playing will
repeat continuously.
Repeat button
while a CD is playing until "RPT ONE"
Repeating the Entire Disc
Press the Repeat button while a CD is playing until "RPT
ALL" will then appear in the display. The CD will repeat all
tracks on the disc continuously.
Random Feature
The Random Feature plays all the tracks on the disc in random
order.
1. Press the Random button on the player while the disc is
playing. With "RDM ON" displayed, the disc will play tracks in
random order.
2. To turn off the Random Feature, press the Random button
again. The display will return to the normal title and track info.
Track Scan Feature
The Track Scan Feature plays the first 10 seconds each track,
allowing the user to quickly preview each song.
1. Press the Scan button to play the first 10 seconds of each
track. "SCAN ON" will appear in the display.
2. Press the Scan button again to stop the Track Scan Feature
and listen to a track.
9
Page 10

1/40
00:05:17
TITLE 005/0028CHAPTER
LS5000DVD_UM.qxp 4/18/05 10:37 Page 10
DVD OPERATION
General Operations
1. Press and hold the Power / Mode button to turn the unit On.
2. Press on the disc door next to the word “PUSH”, the door
will open slightly. Then gently pull the door fully open.
3. Insert a disc onto the hub until it snaps into place.
4. Close the disc door until it locks into place.
5. Press the Power / Mode button until "DVD ON" appears in
the display. Disc play will start momentarily after "LOADING" and "DVD" appear in the display.
Stopping Disc Play
To stop DVD play, press the Stop button. To resume play,
press the
Pausing Disc Play
To pause DVD play, press the Pause button. To resume
play, press the
Play button.
Play button.
Repeat
Press the Repeat button to select a repeat mode in the
following order:
Repeat Chapter
Slow Motion
Press the Slow Forward button to play the DVD in slow
motion forward.
Press the
motion reverse.
Each time the button is pressed, the speed of slow forward/slow reverse changes in the following order:
2x Ô 4x Ô 8x Ô PLAY
To resume normal play, press the
to press
displayed on the screen.
Slow Forward or Slow Reverse until “PLAY” is
Ô Repeat Title Ô Repeat Off
Slow Reverse button to play the DVD in slow
Play button or continue
Fast Forward/Fast Reverse Disc Play
Press the Fast Forward or Fast Reverse button during
play. Each time the button is pressed, the speed of fast forward/fast reverse changes in the following order:
2x
To resume normal play, press the
to press
played on the screen.
Skipping Chapters
Press the Skip Up button to skip forward through the
chapters.
Press the
chapters.
Ô 4x Ô 6x Ô 8x Ô PLAY
Play button or continue
Fast Forward or Fast Reverse until “PLAY” is dis-
Skip Down button to skip backwards through the
On-Screen Display Function
1. Press the Display button during DVD play to display:
Ô Title Remain Ô Chapter Elaspsed Ô Chapter
Title
Remain
2. Press the Display button during CD play to display:
Single Elapsed
Remain
3. Press the Display button a third time during DVD play and
the screen will be cleared of all messages.
10
Ô Off
Ô Single Remain Ô Total Elapsed Ô Total
Ô Off
Page 11

ZOOM X 1.5 ZOOM X 2 ZOOM X 3 ZOOM OFF
LS5000DVD_UM.qxp 4/18/05 10:37 Page 11
DVD OPERATION
Menu Function
Press the Menu button during disc play and the main disc
“Root Menu” will be displayed. Scroll through the menu with
either the
Fast Reverse buttons. Select a feature by pressing the Enter
button.
Title Menu Function
If the DVD has multiple titles recorded on the disc, a preferred title can be selected from the title menu to start
playback.
1. Press the Title button during playback. The title menu is
2. Scroll through the menu with the Skip Up / Skip Down
Zooming the Image
To enlarge the onscreen image during disc play, press the
Zoom button. Each time the button is pressed, the magnification increment changes in the following order:
Skip Up / Skip Down buttons or the Fast Forward /
then displayed.
buttons to select a title. Confirm the title by pressing the
Enter button.
INITIAL DVD SETUP
Initial Setup
1. Using the remote press the Stop button to display
RESUME STOP.
2. Press the Stop button again to display STOP.
3. Press the Band / Setup button to view the SETUP Menu -
Main Page.
3. The Setup Menu Main Page categories are:
General
Speaker Setup
Audio Setup
Preferences
4.
Select one of the four main menu categories by pressing
the
Fast Forward / Fast Reverse buttons.
5. Press the Enter button to confirm the selection.
11
Page 12

-- SPEAKER SETUP PAGE --
DOWNMIX
MAIN PAGE
LOUD SPEAKERS SETUP
LT / RT
STEREO
-- AUDIO SETUP --
OP MODE
DUAL MONO
COMPRESSION
PRO LOGIC
LPCM OUTPUT
AUDIO RELATED
LINE OUT
RF REMOD
MAIN PAGE
-- GENERAL PAGE --
PIC MODE
ANGLE MARK
OSD LANG
CAPTIONS
GENERAL SETUP
AUTO
FILM
VIDEO
SMART
SUPER SMART
MAIN PAGE
LS5000DVD_UM.qxp 4/18/05 10:37 Page 12
INITIAL DVD SETUP
General Submenu Setup
Use the Skip Up / Skip Down buttons or the Fast Forward /
Fast Reverse
Make a selection by pressing the
General Submenu Options:
PIC mode:
Angle Mark: On / Off
OSD Lang: English / Chinese
Captions: On / Off
Speaker Setup Submenu
buttons to scroll between the menu items.
Enter button.
Auto / Film / Video / Smart / Super Smart
Use the Skip Up / Skip Down buttons or the Fast Forward /
Fast Reverse buttons to scroll between the menu items.
Make a selection by pressing the
Enter button.
Speaker Setup Submenu Options:
Downmix:
Lt / Rt or Stereo
Audio Setup Submenu
Use the Skip Up / Skip Down buttons or the Fast Forward /
Fast Reverse buttons to scroll between the menu items.
Make a selection by pressing the
Enter button.
Audio Setup Submenu Options:
OP Mode:
Line Out / RF Remod
Dual Mode: Stereo, L-Mono / R-Mono / Mix Mono
Compression: Full / 6/8 / 4/8 / 2/8 / Off
Pro Logic: Off / On / Auto
LPCM Output: LPCM 48 K / LPCM 96 K
12
Page 13

-- PREFERENCES PAGE --
TV DISPLAY
TV TYPE
AUDIO
SUBTITLE
PAR ENTAL
SET PREFERENCES
DISC MENU
DEFAULTS
PAS SWORD
NORMAL / PS
NORMAL / LB
WIDE
SMARTNAVI
MAIN PAGE
LS5000DVD_UM.qxp 4/18/05 10:37 Page 13
INITIAL DVD SETUP
Preferences Setup Submenu
Use the Skip Up / Skip Down buttons or the Fast Forward /
Fast Reverse buttons to scroll between the menu items.
Make a selection by pressing the
Preferences Setup Submenu Options:
TV Display:
Normal PS / Normal LB / Wide
TV Type: Multi. System / NTSC / PAL
Audio: English / French / Spanish / Chinese / Japanese
Subtitle: English / French / Spanish / Chinese /
Japanese / Off
Disc Menu: English / French / Spanish / Chinese /
Japanese / Off
Enter button.
Parental: 1 - G
2 - Kid
3 - PG
4 - PG 13
5 - R
6 - PG R
7 - NC 17
8 - Adult
No Parental
Password: Change
Defaults: Reset
SmartNav: No Menu / With Menu
13
Page 14

8
1
/
2
"
LS5000DVD_UM.qxp 4/18/05 10:37 Page 14
INSTALLATION
Wall Panel
End Caps
Structural
Stud
Caution: Do not install radio without rear
cover installed. No user-serviceable parts
inside. Rear cover provides protection
against potential fire hazard.
14
Page 15

RED Wire (+)
To 12 Volt DC Power
BLACK Wire (-) Ground
LS5000DVD_UM.qxp 4/18/05 10:37 Page 15
POWER CONNECTIONS
This unit for use only with a 12 Volt DC power
source with a negative ground.
15
Page 16

+
_
+
_
+
_
+
_
Left Speaker (B)
Left Speaker (A)
Right Speaker (B)
Right Speaker (A)
BROWN Wire
ORANGE Wire
GREEN Wire
GRAY Wire
WHITE Wire
BLUE Wire
LS5000DVD_UM.qxp 4/18/05 10:37 Page 16
SPEAKER CONNECTIONS
Speaker Connections: Do not confuse the A and B speaker sets.
16
Page 17

External Automotive
Type Antenna (Not Provided)
Plug either type of antenna illustrated below
into the female antenna receptacle.
DP36AXT In-Wall Antenna (Not Provided)
LS5000DVD_UM.qxp 4/18/05 10:37 Page 17
ANTENNA CONNECTIONS
The LS5000DVD have a provision for a standard automotive antenna. If an automotive antenna is used, insert the male plug from the
antenna into the female receptacle provided on the unit.
If an automotive antenna is not available or is undesired, we recommend the use of a Magnadyne DP36AXT di-pole antenna substitute.
Insert the male plug from the DP36AXT into the female receptacle of
the LS5000DVD unit and allow the cable of the antenna to lay inside
the wall.
17
Page 18

A/V In RCA Connectors:
Yellow - Video Input
Red - R-CH Input
White - L-CH Input
A/V Out RCA Connectors:
Yellow - Video Output
Red - R-CH Output
White - L-CH Output
A/V OUT
A/V IN
VCR with
Line Out
TV Monitor
with A/V Input
LS5000DVD_UM.qxp 4/18/05 10:37 Page 18
AUXILIARY CONNECTIONS
Aux Audio Input: Left and Right RCA type input jacks are provided
on the back panel for connection to a second sound source such as
a TV system or component cassette deck. Connect a stereo "male to
male" patch cord to the units input jacks and then connect the
remaining ends to the second sound sources output jacks.
Note: If the second sound source only has a single mono output
jack, it may be necessary to use a "Y" adapter to provide both the
left and right inputs.
18
Page 19

Antenna Lead-In Wire (B)
Antenna Discharge
Unit (C)
To Receiver
Mast
Ground
Clamp
Ground
Wire
(A,B)
Grounding
Clamps
Grounding Electrode
Driven 8’ Into the Earth
2.44 Meters
Example of Antenna Grounding as per
National Electrical Code. Instructions
Contained in Article 810-"Radio and
Television Equipment"
LS5000DVD_UM.qxp 4/18/05 10:37 Page 19
SAFETY INSTRUCTIONS
Read Instructions: All the safety and operating instructions
should be read before the appliance is operated.
Retain Instructions: The safety and operating instructions
should be retained for future reference.
Heed Warnings: All warnings on the appliance and in the oper-
ating instructions should be adhered to.
Follow Instructions: All operating and use instructions should
be followed.
Water and Moisture: The appliance should not be used near
water. For example, near a bathtub, washbowl, kitchen sink,
laundry tub, in a wet basement, or near a swimming pool, etc.
Wall or Cabinet Mounting: The appliance should be mounted
to a wall or cabinet only recommended by the manufacturer.
Heat: The appliance should be situated away from heat
sources such as radiators, heat registers, stoves, or other appliances (including amplifiers) that produce heat.
Power Supply: The appliance should be connected to a power
supply only of the type described in the operating instructions
or as marked on the appliance.
Cleaning: The appliance should be cleaned only as recommended by the manufacturer.
Power Lines: An outdoor antenna should be located away
from power lines.
Object and Liquid Entry: Care should be taken so that objects
do not fall, and liquids are not spilled into the enclosure through
openings.
Outdoor Antenna Grounding: If an outside antenna is connected to the receiver, be sure the antenna system is grounded, so as to provide some protection against voltage surges
and built up static charges. Section 810 of the National
Electrical Code, ANSI/NFPS No. 70-1983, provides information
with respect to proper grounding of the mast and supporting
structure, grounding of the lead-in wire to an antenna discharge
unit, size of grounding conductors, location of antenna-discharge unit, connection to grounding electrodes, and requirements for the grounding electrode. See illustration below.
A. Use No. 10 AWG (5.3mm2) copper, No. 8 AWG (8.4mm2) aluminum, No. 17
AWG (1.0mm2) copper clad steel or bronze wire, or larger as ground wire.
B. Secure antenna lead-in and ground wires to house with stand-off insulators
spaced from 4 feet (1.22m) to 6 feet (1.83m) apart.
C. Mount antenna discharge unit as close as possible to where lead-in enters
house.
19
Page 20

104 F
C
40
LS5000DVD_UM.qxp 4/18/05 10:37 Page 20
OPERATION AND MAINTENANCE
Damage Requiring Service: The appliance should be serviced
by qualified personnel when:
A. Objects have fallen, or liquid has spilled into the appliance; or
B. The appliance has been exposed to rain; or
C. The appliance does not appear to operate normally or
exhibits a marked change in performance; or
D. The appliance has been dropped, or the enclosure
damaged.
Servicing: The user should not attempt to service the appliance
beyond that described in the operating instructions. All other servicing should be referred to qualified personnel.
Caution: Compact disc should be stored in a container or vinyl
bag to prevent contamination. Disc should not be placed in
locations exposed to sunlight or heat.
WARNINGS
Handle CD’s
Properly
Do Not Scratch
CD’s
Do Not Touch
CD’s
Keep Below 104
Fahrenheit
Do Not Get Dirt
on CD’s
0
Do Not Write on
CD’s
Do Not Bend CD’s
WARRANTY
ONE (1) YEAR LIMITED WARRANTY
Magnadyne Corporation or its authorized agents will within one year from the date of sale
to you, repair, replace or refund the retail sales price of said product or any part thereof, at
the option of the Magnadyne Corporation or its authorized agents, if said product or part is
found defective in materials or workmanship, when properly connected and operating
on the correct power requirements designated for the specific product. This warranty and
Magnadyne Corporation or its authorized agents obligations hereunder do not apply where
the product was; damaged while in the possession of the consumer, subjected to unreasonable
or unintended use, not reasonably maintained, utilized in commercial or industrial operations, or
serviced by anyone other than Magnadyne Corporation or its authorized agents, or where the
warning seal on the product is broken or the power and/or plugs are detached from the unit.
Magnadyne Corporation or any of its authorized agents will not assume any labor costs for
the removal and reinstallation of any product found to be defective, or the cost of transportation to
Magnadyne Corporation or its authorized agents. Such cost are the sole responsibility of the purchaser.
This warranty does not cover the cabinet appearance items or accessories used in connection
with this product, or any damage to recording or recording tape, or any damage to the products
resulting from improper installation, alteration, accident, misuse, abuse or acts of nature.
MAGNADYNE CORPORATION OR ITS AUTHORIZED AGENTS SHALL NOT BE LIABLE
TO ANYONE FOR CONSEQUENTIAL OR INCIDENTAL DAMAGES OR CLAIMS EXCEPT
THOSE ACCORDED BY LAW. NO EXPRESSED WARRANTY OR IMPLIED WARRANTY IS
GIVEN EXCEPT THOSE SET FORTH HEREIN. NO IMPLIED WARRANTY SHALL EXTEND
BEYOND ONE YEAR FROM THE DATE OF SALE.
This warranty extends only to the original purchaser of the product and is not
transferable. Some states do not allow limitations on how long an implied warranty lasts,
and some states do not allow the exclusion or limitation of incidental or consequential
damages, so the above limitations or exclusion may not apply to you. This warranty gives
you specific legal rights, and you may have other rights that vary from state to state.
“NOTE: The manufacturer is not responsible for any radio or TV interference caused
by unauthorized modifications to this equipment. Such modifications could void the
User’s authority to operate the equipment.”
Defective merchandise should be returned to the original point of purchase or secondly,
to Magnadyne Corporation, 1111 W. Victoria Street, Compton CA 90220.
Return Authorization must be obtained before sending, or merchandise may be refused.
20
LS5000DVD_UM Rev. E 4-18-05
 Loading...