

Page 1
Home Theater Speaker Guide
Optimize your sound system that includes Dolby® technology with this step-by-step guide to
the best speaker setup, including room considerations and other valuable tips.
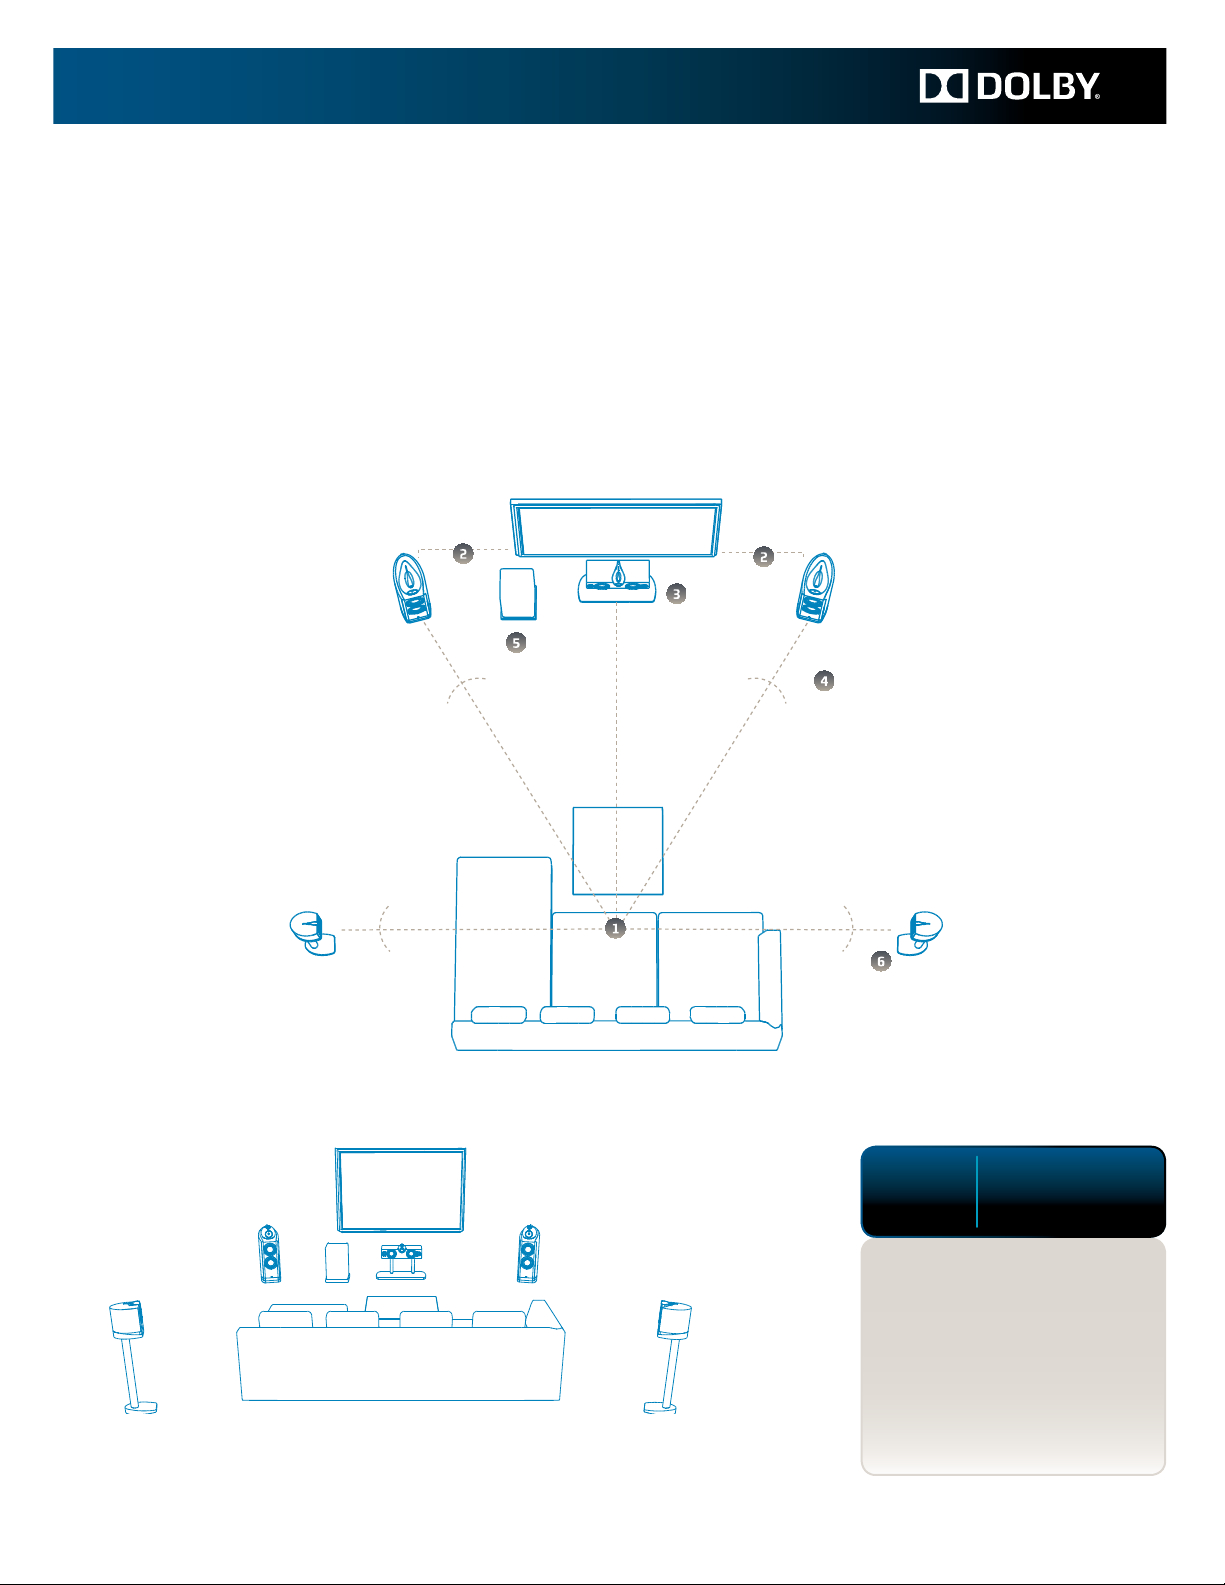
90º
110º
22º 22º
30º 30º
0º
90º
110º
2.1
5.1
2 Speakers
5 Speakers
1 Subwoofer
1 Subwoofer
5.1-Speaker Room View
1. Seating Position
2. Left and Right Speakers
3. Center Speaker
4. Left and Right Speaker Angle
5. Subwoofer (the “.1”)
6. Left and Right Surround Speakers
Page 2

Fine-Tuning
Once you’ve done your basic speaker setup, you’re ready to enjoy the home theater
entertainment experience. Keep in mind, however, that every room is dierent; you may
be able to further improve the sound by going beyond the general guidelines and ne-
tuning the speaker placement within your room. You could, of course, hire a professional
installer; however, with just a little time and some careful listening, you can do it yourself.
Your Environment
An Ongoing Experiment
There is no objectively “perfect” setup. All speakers, no matter how good, are bound by
the laws of physics. What you can do is put them in the best locations to take maximum
advantage of their capabilities, both individually and within the total system. Remember
that the best sound is what sounds best to you. It’s your system. If you’ve set it up and it
sounds great, you may not need to read any further.
However, if you’re not hearing any bass, or there’s no sense of spaciousness and depth, or
something seems to be missing, some ne-tuning may be in order. Even small adjustments
in placement can have clearly audible eects. And that goes for your furnishings as well
as your speakers.
First, do some extended listening. Do you hear a convincing sonic “image” between
your main (front left and right) speakers? This is the soundstage, and you want to
maximize it for depth and richness. Ideally, the speakers will “disappear,” and the sound
will ll the space between them. Focus on dierent types of sounds—voices, motion,
music, sound eects—in turn. Individual vocals or instruments, or eects such as
footsteps, should be precisely placed across this space.
Now try positioning your main speakers farther apart and then closer together and listen
to the results. Move the speakers in small increments, a few inches at a time. Generally,
the greater the distance between your main speakers, the wider your soundstage; the
closer they are, the more centered the sound. If the speakers are too far apart, they will
start to sound like separate speakers rather than a coherent system.
Similarly, when ne-tuning the placement of the surrounds, keep the idea of the
coherent system in mind. Surround sounds should emanate from within a general area
(covering the sides and rear of the room). Even if the surround sounds can be localized,
the localization should be from within this overall area and not just from an individual
speaker. The sonic image should be a single entity or environment.
Many of the more full-featured A/V receivers include a calibration microphone and can
generate test tones for each speaker individually, then automatically calibrate distance,
levels, and other settings. An increasingly popular receiver feature goes further, providing
full and automatic room equalization. These features greatly simplify setting up your
system properly.
Be aware of standing waves in your room, which are caused by sound waves reecting
o the walls. Because the reections can overlap, the waves will cancel each other out at
some spots (dips or null points) and reinforce each other at dierent spots (peaks). All
rooms have standing waves, and they’re most noticeable at low frequencies in smaller
(and especially squarer) rooms. Play some music with strong, steady bass, and walk
around the room. If you hear very little bass in some spots and lots of it in others, then
you have a standing-wave problem, and you want to be sure that your listening spot
HOME THEATER SE TUP GUIDE
2
Page 3

is not in a peak or dip. If it is, rst try moving your subwoofer—even a few inches can
make a dierence. Similar shifts in the main speakers, or in room furnishings—even
moving your listening spot—may help.
Let Nothing Come Between You and Your Sound
You want a clear path for the sound between your speakers and your listening position.
If you have furnishings blocking your view of the speakers, you can be sure they’re also
blocking sound. The only exception here is the subwoofer, whose low-frequency sounds
are omnidirectional and do not follow the “line of sight” rule.
Room Geometry
Room shape, ceiling height, and ooring material all contribute to your room’s acoustics,
its unique sound signature. While you probably can’t redesign or rebuild your room,
there are some things you can do to make the most of it.
First, try to minimize the areas of bare walls and oors, although that doesn’t mean
you need to cover every square inch. Keep the aesthetics of your room and the sound
benets of wall and oor coverings in balance. The idea is to have as much of the sound
as possible reach your ears straight from the speaker—not from o your oor and walls.
Reected sounds reach your ears together with those coming directly from the speaker,
reducing clarity. So the placement of rugs and wall coverings is as important as their
coverage. Also, furnishings don’t have to be soft and absorbent to minimize reections.
Bookshelves, for instance, can serve the same purpose by diusing reections.
Some of the biggest acoustic problems are caused by rooms that are perfectly square
or have one dimension exactly twice another. These are the geometries that tend to
generate standing waves that cause clarity and level issues. If this describes your room,
you may need to perform extra experimentation with speaker and furniture placement to
defeat the geometric odds.
The Multipurpose Home Theater
If, like most of us, your home theater room also is your living/family/workout room,
then you may have to make a few allowances for your speakers. But sound can still be a
top priority.
To avoid shaking and rumbling the whole house or disturbing your neighbors, you
can place your subwoofer on rubber, dense foam, or neoprene pads to isolate it
from the oor. (Many companies sell pads and platforms specically for subwoofer
isolation.) Also, make sure all your speakers are far enough away from intersecting
room boundaries (wall and ceiling, wall and oor, and especially corners) to reduce
“boom”—these areas naturally reinforce bass frequencies.
To ensure a home theater experience that isn’t dominated by dramatic sound eects at
the expense of dialogue clarity, be sure to set the proper volume level for your center
speaker. Turning up the overall volume to compensate for dialogue that’s too soft will
often overpower you with everything except dialogue. Most movies and TV shows are
mixed with the bulk of the dialogue in the center channel, and proper level setting will
keep it loud and clear.
All in all, your home theater can deliver great sound while still accommodating the other
activities in your home.
HOME THEATER SE TUP GUIDE
3
Page 4

A Bit About the Visual
Audio’s not the only part of your home theater you’ll want to calibrate. Most TV sets
will need calibration as well. Most TVs have been factory calibrated to look good in a
retail showroom, whereas your lighting conditions and preferences are likely to be very
dierent. Your furniture and decorations aect how you see your TV picture, too, so it’s
important to calibrate your visual settings—like brightness, contrast, and colors—for
your room. As with audio, this can be done by a professional installer, for a fee. For much
less, you can buy a calibration DVD to help you. These are available from a number
of dierent manufacturers—ask your A/V equipment retailer or check the web. This
calibration will probably take half an hour to an hour, which will be time well spent.
For the optimum viewing experience, check out the recommended viewing distance for
various screen sizes and resolutions when choosing a TV set. Most manufacturers oer
guidelines on this.
Basic Speaker Math
Five from Two
Even if most of your TV and music is in stereo, you can still take advantage of a multichannel
surround system using all your speakers, thanks to Dolby technologies. Enable Dolby Pro
®
IIx for your stereo content (there’s usually a control for this on your receiver), and
Logic
you’ll hear very natural surround sound. Dolby Pro Logic analyzes the stereo signal and
creates the surround channels based on directional cues in the signal.
Distribute Your Frequencies Properly
If you have a subwoofer, don’t ask your other speakers to try to reproduce low-frequency
bass. Receivers with Dolby Digital technology can be set for “large” or “small” speakers.
Set it for “small,” and the subwoofer to “on.” Now the bass frequencies will be sent only
to the subwoofer, and your sound dynamics will open up as your other speakers are freed
from reproducing low bass.
Further Reading
Another tip: The owner’s manuals that come with your equipment usually have a
great deal of good information in them, with far more specic instructions than we
can oer here.
Myriad Media Preferences
Terric TV: Why does Dolby matter? Digital high-denition TV broadcasts include Dolby
Digital 5.1-channel surround sound technology, so you get compelling audio along with
the super-sharp high-denition picture. Make sure your set-top box or TV is set to output
Dolby Digital to take advantage of great cinema-quality surround sound.
Magic movies: Movie soundtracks are engineered by industry-leading professionals, so
they oer a great opportunity to let your sound system show what it can do. Surround
sound home theater systems bring out optimal movie sound: bass response you can
feel, the ambience of each scene all around you, and crystal-clear dialogue from your
center channel.
HOME THEATER SE TUP GUIDE
4
Page 5

Go games: Games immerse you in a virtual world. When the game world is coming at
you from all sides, you can really enjoy your system (and especially your rear speakers).
If you’re auto racing, you’ll hear the car drafting you. If you’re in a stealth rst-person
shooter, you’ll hear a creeper lurking around the corner. Note that Dolby Headphone
technology delivers full surround sound for gaming headsets, giving you all the benets
of surround sound without all of the speakers.
Enter Internet: With more and more receivers able to pull in Internet radio and other
media using an Ethernet connection, the web is playing an increasingly larger role in
the home theater lineup. Plus, game consoles and PCs hooked up to movie and media
services can deliver media on demand to your TV. Your sound system is equipped with
Dolby technologies (and others) ready to handle these services, so don’t be afraid to
check out what web-enabled devices can do for a home theater.
Dolby Laboratories, Inc.
100 Po trero Av enue, San Francisc o, CA 9 4103-4 813 USA T 415-558-0200 F 415-645-4000
dolby.com
Dolb y, Pro L ogic, and t he double- D symbol a re regis tered t rademar ks of Dolb y Labora tories . © 2013 Dolb y Labora tories , Inc.
All rights reser ved. S13/22369/26528
 Loading...