

Page 1
COMBINATION FLAT COLOR TELEVISION
AND DVD/VCD/CD PLAYER
Owner's Manual
DV2018
DV2418
Before operating the unit, please read this manual thoroughly.
Page 2

Table of Contents
Important Safety Instructions--------------------1
Getting Started----------------------------------------3
Front ------------------------------------------------------3
Back-------------------------------------------------------4
Remote Control ----------------------------------------5
Installing batteries -------------------------------------6
Effective range of the Remote----------------------6
Installation----------------------------------------------7
Antenna connections ---------------------------------7
Cable (CATV) satellite connections ---------------8
Using an Audio Amplifier -----------------------------9
Using an AV Amplifier with
built-in digital surround -------------------------------9
Connecting AV1 inputs------------------------------10
Connecting AV2 inputs------------------------------10
TV Operation Guide
Power on/off------------------------------------------11
Turning on----------------------------------------------11
Turning off----------------------------------------------11
Select the Video Input-----------------------------12
Watching AV program -------------------------------12
Switching from AV to TV ----------------------------12
Tuning --------------------------------------------------13
To enter the TUNING menu -----------------------13
Setting the TV/Cable option -----------------------13
Auto Search -------------------------------------------13
Erasing an unnecessary channel ----------------14
Fine tuning ---------------------------------------------14
Setting the Color System---------------------------15
Channel Selection----------------------------------16
Adjusting Picture -----------------------------------17
To enter the PICTURE menu----------------------17
Adjusting picture--------------------------------------17
Selecting picture mode -----------------------------17
Setting SVM option ----------------------------------18
Setting Blue background option ------------------18
Setting Noise reducer option ----------------------18
Sound---------------------------------------------------19
Adjusting volume -------------------------------------19
To enter the SOUND menu ------------------------19
Adjusting sound --------------------------------------20
Selecting sound mode ------------------------------20
Setting S.woofer item -------------------------------20
Timer----------------------------------------------------21
To enter the TIMER menu--------------------------21
Setting Clock ------------------------------------------21
Setting Sleep timer ----------------------------------21
Setting Off Time --------------------------------------22
Setting On Time --------------------------------------22
System Setup ----------------------------------------23
To enter the SET UP menu ------------------------23
Selecting a language--------------------------------23
Menu Demo--------------------------------------------23
Setting Closed Caption(CCD)---------------------24
Selecting audio mode -------------------------------24
Recalling On-screen display ----------------------24
Parental Control-------------------------------------25
Child lock----------------------------------------------25
To enter Child lock submenu ----------------------25
Setting Child lock-------------------------------------25
Changing password ---------------------------------25
Setting V-chip----------------------------------------26
To enter V-chip menu -------------------------------26
MPAA RATING SET-UP ----------------------------26
TV RATING SET-UP --------------------------------27
Setting individual Content Categories
for TV Rating ------------------------------------------28
CANADIAN ENGLISH RATING SET-UP-------28
CANADIAN FRENCH RATING SET-UP -------29
Changing password ---------------------------------29
DVD Operation Guide
Disc Information ------------------------------------31
Basic Playback --------------------------------------32
Using On-screen Menu ---------------------------34
Locating Desired Scene--------------------------35
Displaying Status of Disc------------------------36
Special Functions ----------------------------------37
Zooming ------------------------------------------------37
Setting soundtrack language----------------------37
Repeat playback -------------------------------------37
Changing Angles [DVD] ----------------------------38
Changing Subtitle languages [DVD]-------------38
Initial Settings ---------------------------------------39
GENERAL SETUP-----------------------------------39
AUDIO SETUP----------------------------------------41
VIDEO SETUP----------------------------------------42
PREFERENCE SETUP ----------------------------43
Playing Back MP3 disc ---------------------------45
PLAYBACK OPERATIONS ------------------------45
PLAY MODE selection ------------------------------46
Playing Back Kodak Picture CD ---------------47
PLAYBACK OPERATIONS ------------------------47
PLAY MODE selection ------------------------------47
Setting picture transition effects ------------------48
Zooming picture --------------------------------------48
Rotating/Mirrorring picture -------------------------48
Browsing pictures ------------------------------------48
Other Information
Setting the Universal Remote Control Unit ----49
Troubleshooting Guide------------------------------55
Reception Disturbances ----------------------------57
Specifications -----------------------------------------58
Page 3
Important Safety Instructions
The lightning flash with arrowhead symbol,
within an equilateral triangle is intended to
CAUTION
RISK OF ELECTRIC SHOCK
DO NOT OPEN
CAUTION-These servicing instructions are for use by qualified
service personnel only. To reduce the risk of
electric shock, do not perform any servicing other
than that contained in the operating instructions
unless you are qualified to do so.
WARNING: To reduce the risk of fire or electric shock, do not expose this apparatus to rain or moisture.
Before using the unit, be sure to read all operating instructions carefully. Please note that these
are general precautions and may not pertain to your particular unit. For example, this unit may not
have the capability to be connected to an outdoor antenna.
1. Read these instructions.
2. Keep these instructions.
3. Heed all warnings.
4. Follow all instructions.
5. Do not use this apparatus near water.
6. Clean only with dry cloth.
7. Do not block any ventilation openings. Install in accordance with the manufacturer instructions.
8. Do not install near any heat sources such as radiators, heat registers, stoves, or other apparatus
(including amplifiers) that produce heat.
9. Do not defeat the safety purpose of the polarized or grounding-type plug. A polarized plug has
two blades with one wider than the other. A grounding type plug has two blades and a third
grounding prong. The wide blade or the third prong are provided for your safety. If the provided
plug does not fit into your outlet, consult an electrician for replacement of the obsolete outlet.
10. Protect the power cord from being walked on or pinched particularly at plugs,
convenience receptacles, and the point where they exit from the apparatus.
11. Only use attachments/accessories specified by the manufacturer.
12. Use only with the cart, stand, tripod, bracket, or table specified by the
manufacturer, or sold with the apparatus. When a cart is used, use
caution when moving the cart/apparatus combination to avoid injury from
tip-over.
13. Unplug this apparatus during lightning storms or when unused for long
periods of time.
14. Refer all servicing to qualified service personnel. Servicing is required when the apparatus has
been damaged in any way, such as power-supply cord or plug is damaged, liquid has been
spilled or objects have fallen into the apparatus, the apparatus has been exposed to rain
ormoisture, does not operate normally, or has been dropped.
alert the user to the presence of uninsulated
dangerous voltage within the product's
enclosure that may be of sufficient
magnitude to constitute a risk of electric
shock to persons.
The exclamation point within an equilateral
triangle is intended to alert the user to the
presence of important operating and
maintenance (servicing) instructions in the
literature accompanying the appliance.
PORTABLE CART WARNING
(symbol provided by RETAC)
S3126A
1
Page 4
Important Safety Instructions
15. Do not overload wall outlets and extension cords as this can result in a risk of fire or electric shock.
Apparatus shall no t be exposed to dripping or splashing and no objects filled with liquids, such as
16.
vases, shall be placed on the apparatus.
17. If an outside antenna is connected to the product, be sure the antenna system is grounded so as to
provide some protection against voltage surges and built-up static charges. Section 810 of the
National Electric Code, ANSI/NFPA 70, provides information with respect to proper grounding of
the mast and supporting structure, grounding of the lead-in wire to an antenna discharge product,
size of grounding conductors, location of antenna discharge product, connection to grounding
electrodes, and requirements for grounding electrodes.
Refer all servicing to qualified service personnel. Servicing is required when the apparatus has
18.
been damaged in any way, such as power-supply cord or plug is damaged, liquid has been spilled
or objects have fallen into the apparatus, the apparatus has been exposed to rain or moisture, does
not operate normally, or has been dropped.
19. When replacement parts are required, be sure the service technician uses replacement parts
specified by the manufacturer or those that have the same characteristics as the original part.
Unauthorized substitutions may result in fire, electric shock or other hazards.
20. Upon completion of any service or repairs to this product, ask the service technician to perform
safety checks to determine that the product is in proper operating condition.
21. The product should be mounted to a wall or ceiling only as recommended by the manufacturer.
22. Unplug the product from the wall outlet and refer servicing to qualified service personnel under
the following conditions:
a. When the power-supply cord or plug is damaged.
b. If liquid has been spilled, or objects have fallen into the product.
c. If the product has been exposed to rain or water.
d. If the product does not operate normally after installation by following the operating
instructions. Adjust only those controls that are covered by the operating instructions, as
adjustment of other controls may result in damage and will often require extensive work by a
qualified technician to restore the product to its normal operation.
e. If the product has been dropped or the cabinet has been damaged.
f. When the product exhibits a distinct change in performance.
23. This reminder is provided to call the Cable
system installer's attention to Article 820-40
of the NEC that provides guidelines for
proper grounding and, in particular, specifies
that the cable ground shall be connected to
the grounding system of the building, as
ELECTRIC
SERVICE
EQUIPMENT
close to the point of cable entry as practical.
24. Product complies with DHHS rule 21 CFR
subchapter J in effect at date of manufacture.
NEC-NATIONAL ELECTRICAL CODE
S2898A
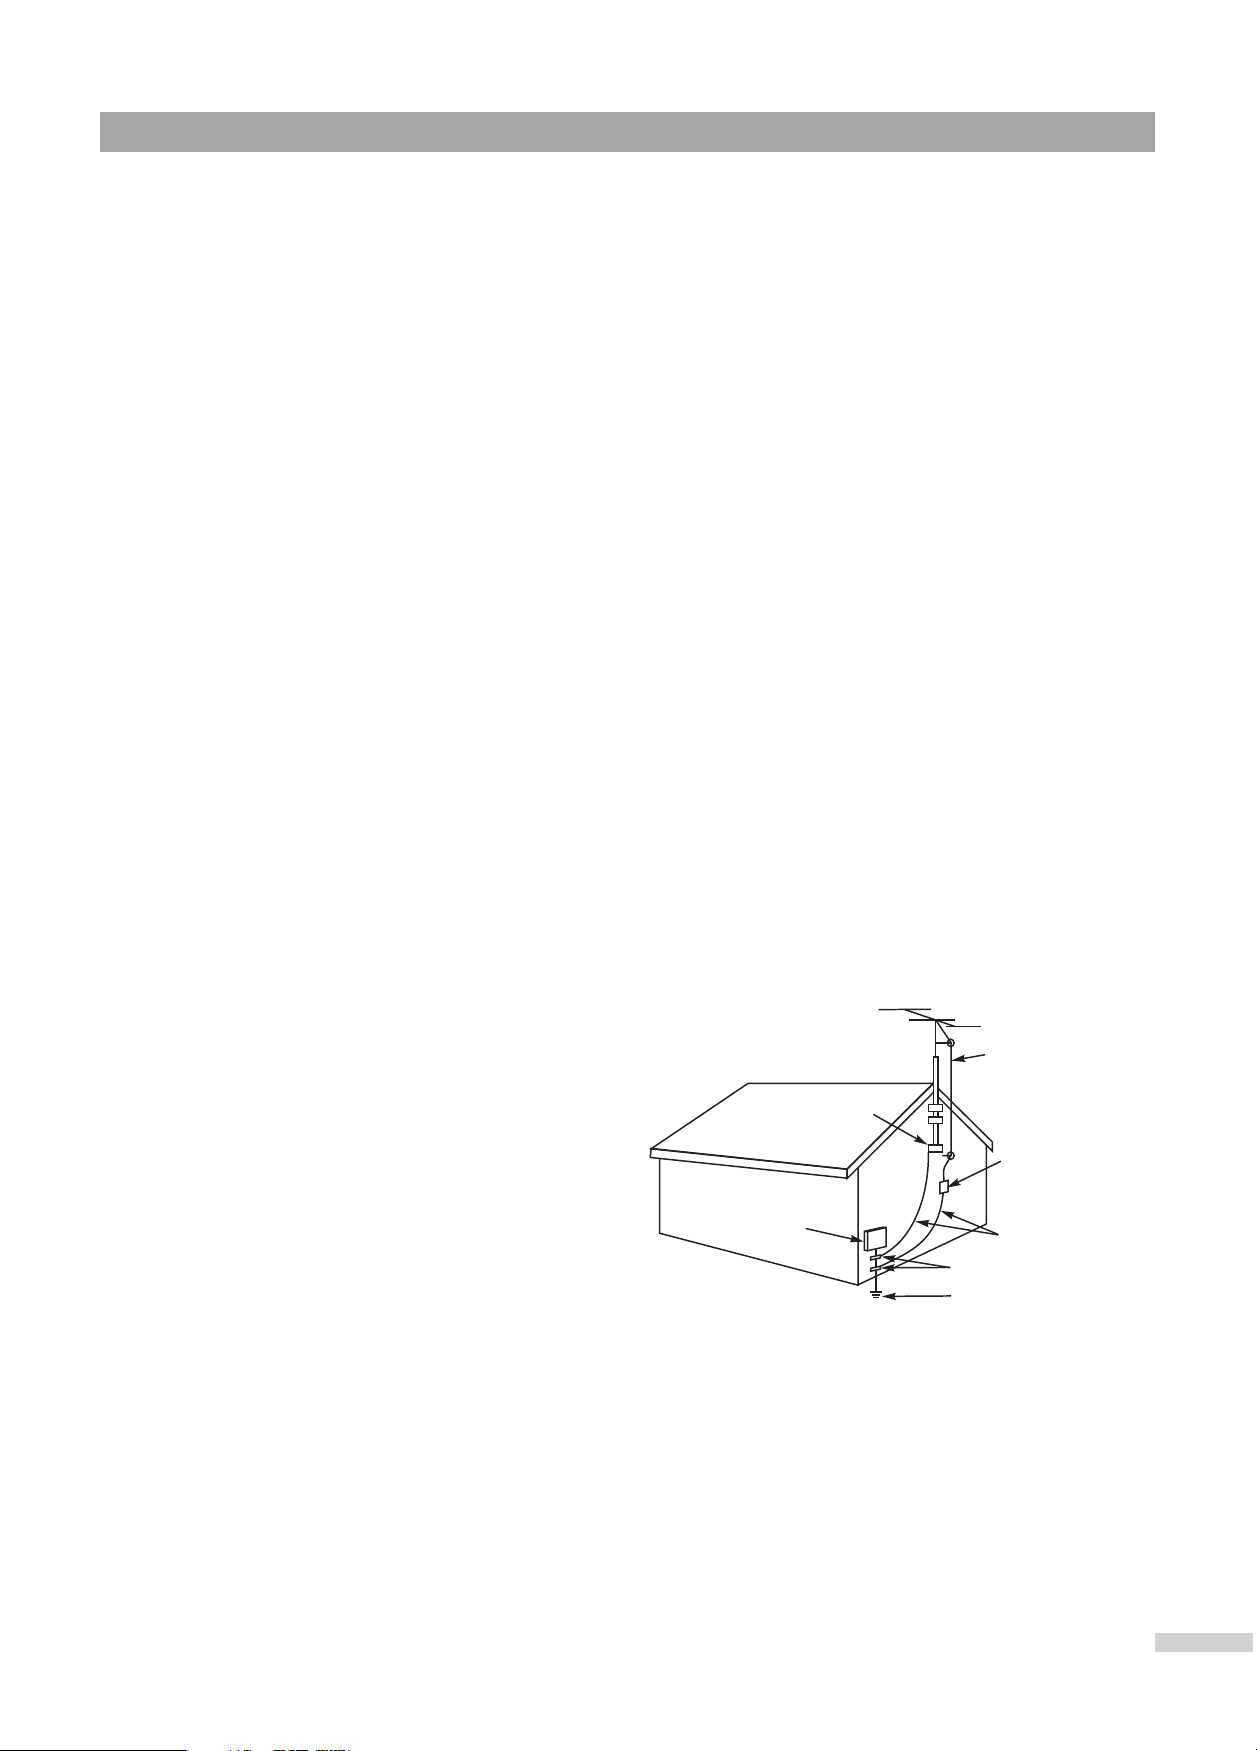
EXAMPLE OF ANTENNA GROUNDING AS PER
NATIONAL ELECTRICAL CODE
GROUND
CLAMP
ANTENNA
LEAD IN
WIRE
ANTENNA
DISCHARGE UNIT
(NEC SECTION 810-20)
GROUNDING CONDUCTORS
(NEC SECTION 810-21)
GROUND CLAMPS
POWER SERVICE GROUNDING
ELECTRODE SYSTEM
(NEC ART 250, PART H)
CAUTION: use of any controls, adjustments, or procedures other than those specified herein may
result in hazardous radiation exposure.
WARNING: FOR CONTINUED SAFETY, REPLACE SAFETY CRITICAL COMPONENTS
ONLY WITH MANUFACTURER'S RECOMMENDED PARTS (REFER TO SERVICE
LITERATURE).
2
Page 5
Getting Started
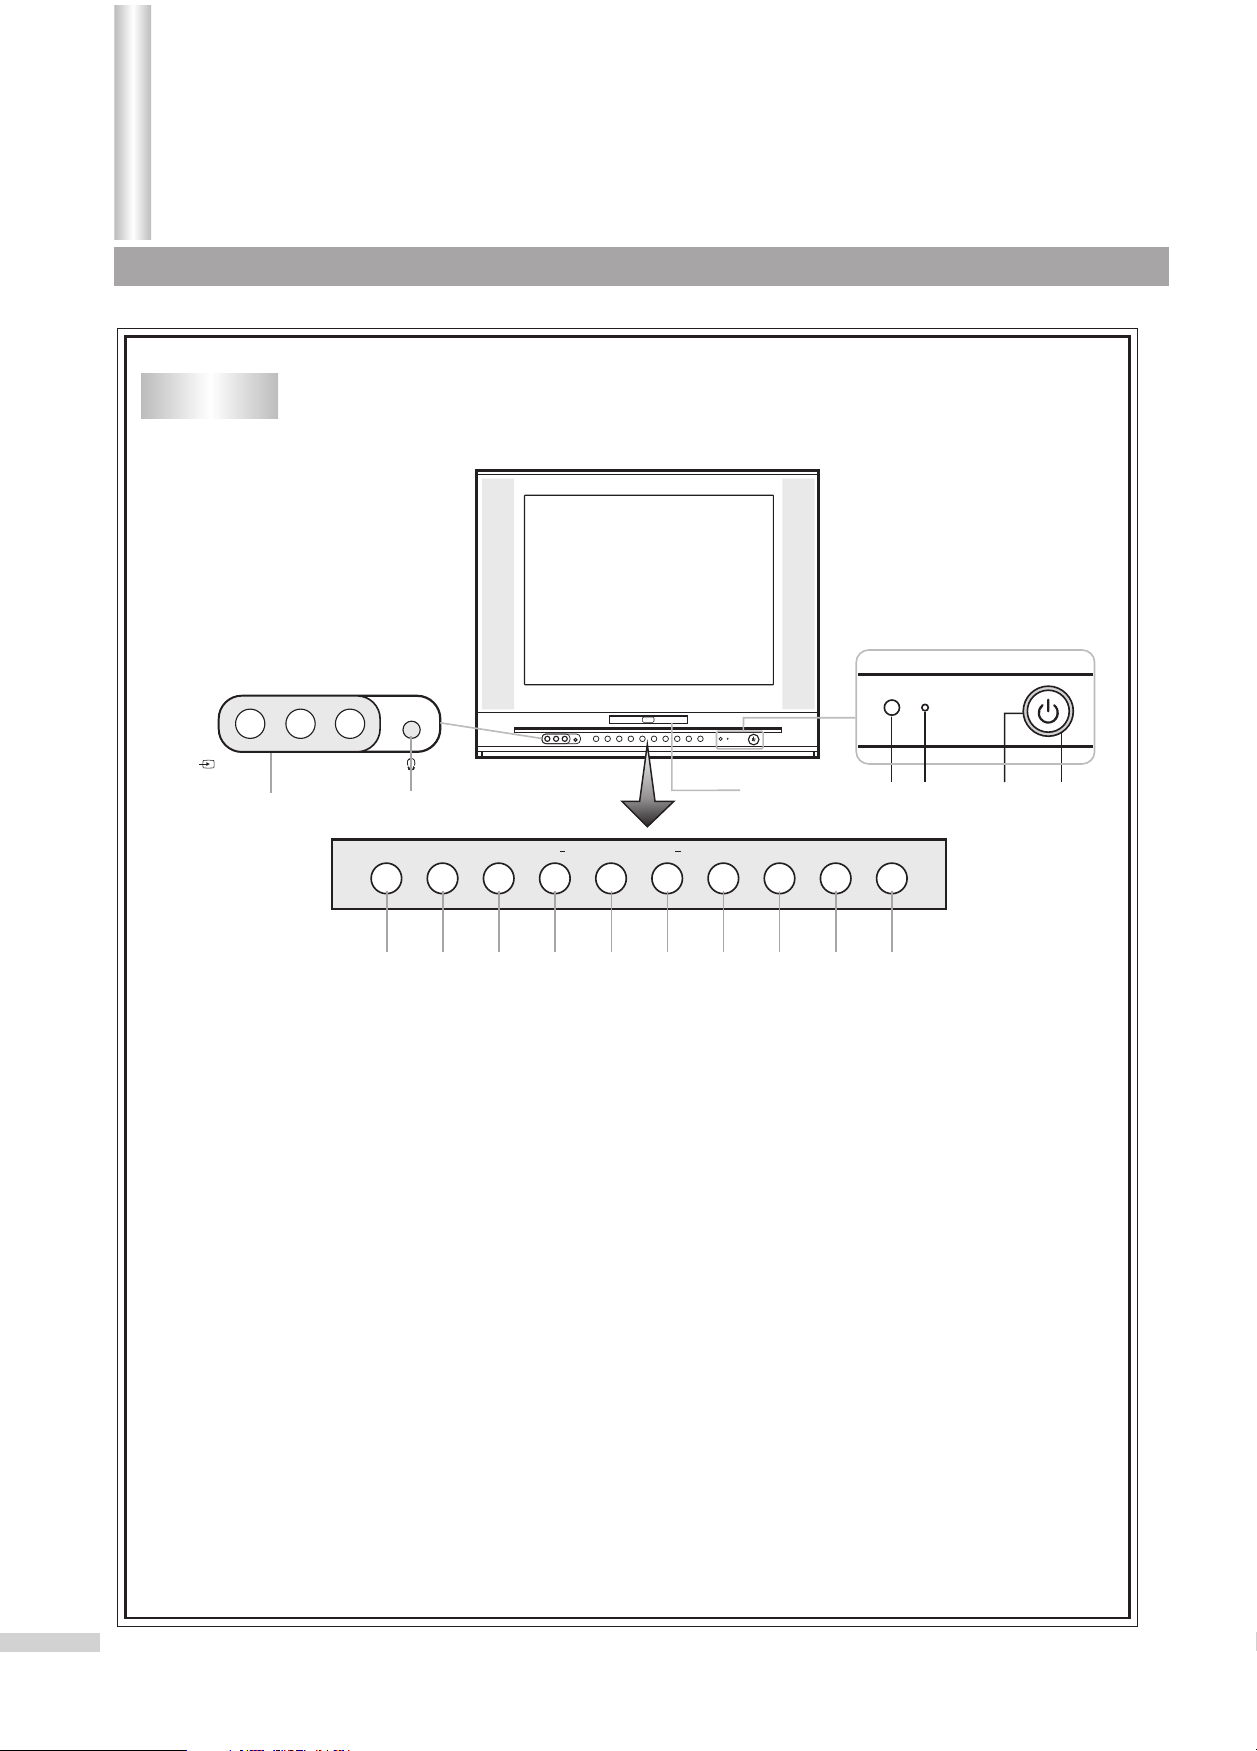
Front
()
2
VIDEO L /MONO-AUDIO-R
1
2
PLAY
4
STOP
5
OPEN/ CLOSE TV/AV TV/ DVDVOL
3
6
H
7
+C
8 9 10 11
1. AV2 inputs (VIDEO, AUDIO L/MONO, R)
2. Earphone jack
3. Open/close disc tray
4. Playback
5. Stop playback
6. Channel down select; menu item select
7. Channel up select; menu item select
8. Volume down adjust; menu item adjust
9. Volume up adjust; menu item adjust
10. Display MENU of TV
11. Video input select
12. Switch between TV/AV and DVD
13. Remote sensor
14. Power indicator (red)
15. Purple indicator
16. Power button
VOLCH
Disc tray
MENU
+
13 14 15 16
12
3
Page 6
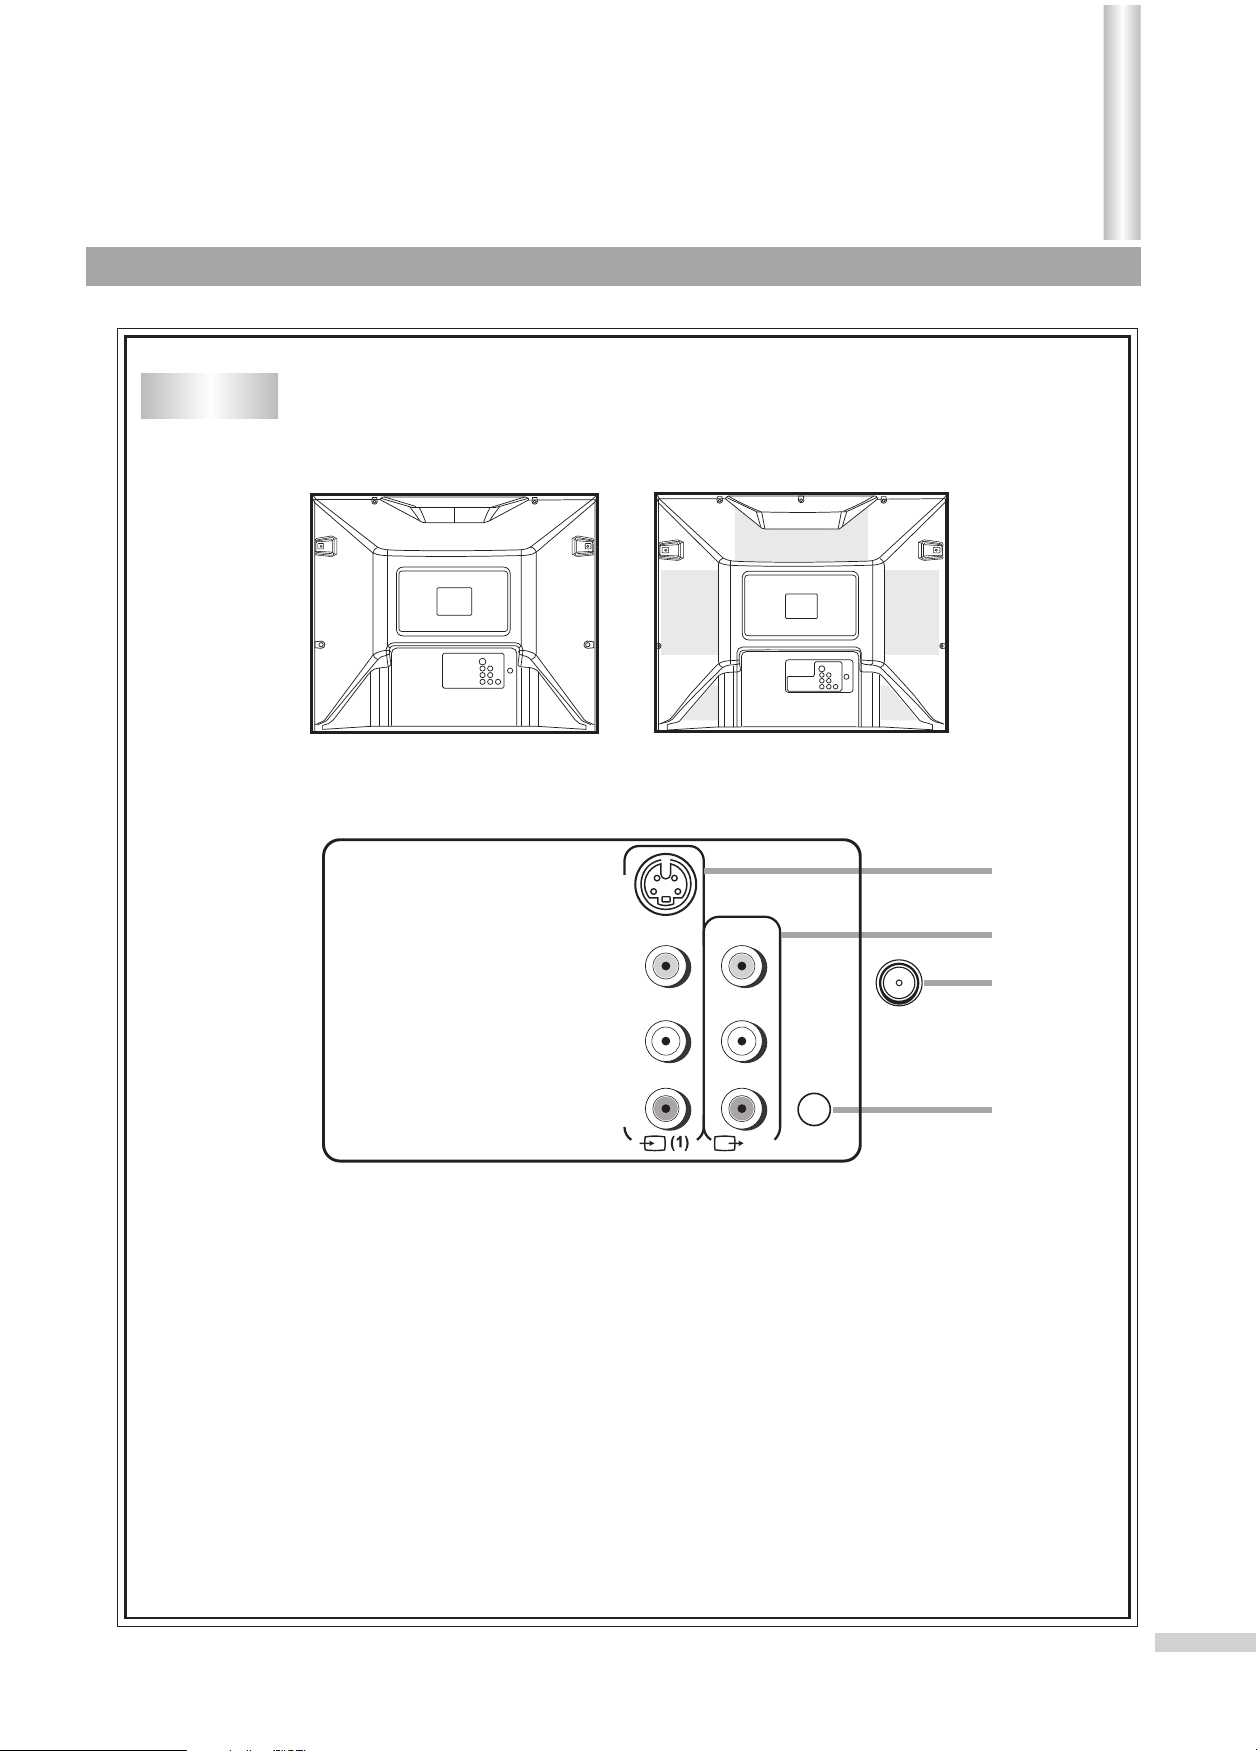
Back
Getting Started(continued)
DV2018
-
S VIDEO
VIDEO
L /MONO
AUDIO
DV2418
1
2
3
DIGITAL
AUDIO
COAXIAL
R
OUT
4
1. AV1 inputs (S-VIDEO, VIDEO, AUDIO L/MONO, R)
2. Monitor outputs (VIDEO, AUDIO L/MONO, R)
3. Antenna input
4. DIGITAL AUDIO COAXIAL OUTPUT jack
4
Page 7
Getting Started(continued)
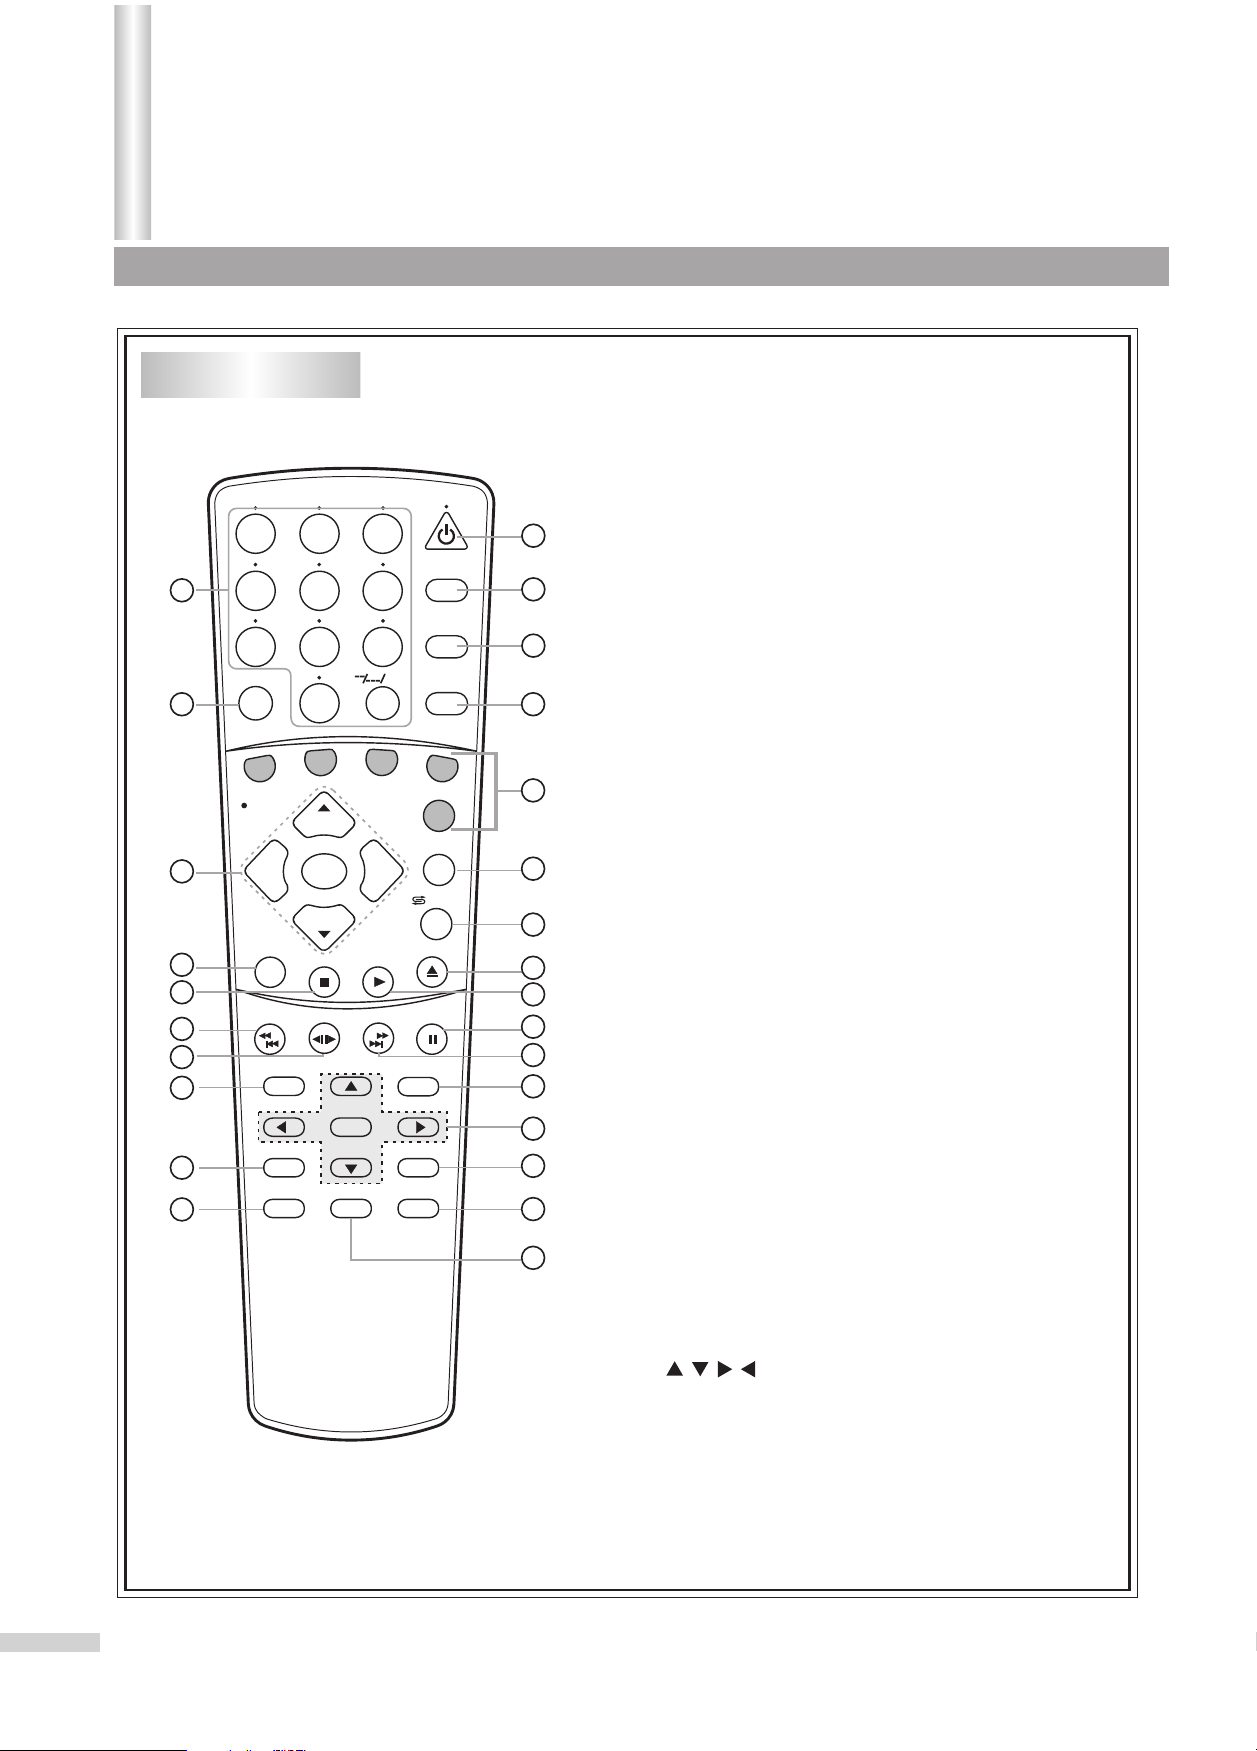
Remote Control
1
2
3
4
7
8
9
10
14
16
18
20
21
22
24
26
12
13
15
17
19
23
25
FWD/NEXT
DVD MENU
TITLE
VOL
PLAY
3
6
9
+10
TV
+
SLEEP
TV/DVD
AV/SETUP
VCR
SET
DSP/OSD
/ZOOM
OPEN/CLOSE
PAUSE/STEP
RETURN
ENTER
ANGLE
1
5
4
7
MUTE
6
Cable/SAT
11
STEREO/AUDIO&CH
REW/PREV
VOL
-
SEARCH
REPEAT A-B
SUBTITLE
2
5
8
0
DVD COMBO
CH
MENU
CH
STOP
SR/SF
1. Power on/off
2. Sleep timer
3. Switch between TV/AV and DVD
4. Video input select
Display initial setup menu
5. Number buttons (Keyboard)
6. Mute the sound
7. Remote control unit selection
8. Display TV information
Display DVD information
9. Switch between present/previous channel
Zoom (DVD)
10. Open or close the DVD disc tray
11. VOL+/-: adjust volume; adjust menu item
CH+/-: Select channel; Select menu item
MENU: Display menu of TV
12. Switch the sound of TV
Change DVD language selection
13. Stop playback
14. Playback
15. Reverse playback
Chapter Back
16. Pause playback
Step playback
17. Forward/Reverse-slow motion
18. Forward playback
Chapter forward
19. Locate desired scene
20. Return to previous menu screen
21. DVD MENU: Display DVD menu
: Cursor buttons
22. Enter information in menu
23. Repeat playback between A and B
24. Change playback angle
25. Set subtitle
26. Go to DVD title menu
5
Page 8
Getting Started(continued)
Important:
11
Your remote control has been preprogrammed. If your remote controller does not work
correctly, maybe the setting is wrong, please try the following steps.
1. Press and hold the “SET ” button, followed by the “DVD COMBO ” button at the same
time until the indicator lights up.
2. Press 1, 4, 7 buttons one by one. As a response, the indicator of the remote control
will twinkle twice, otherwise please repeat the above 2 steps.
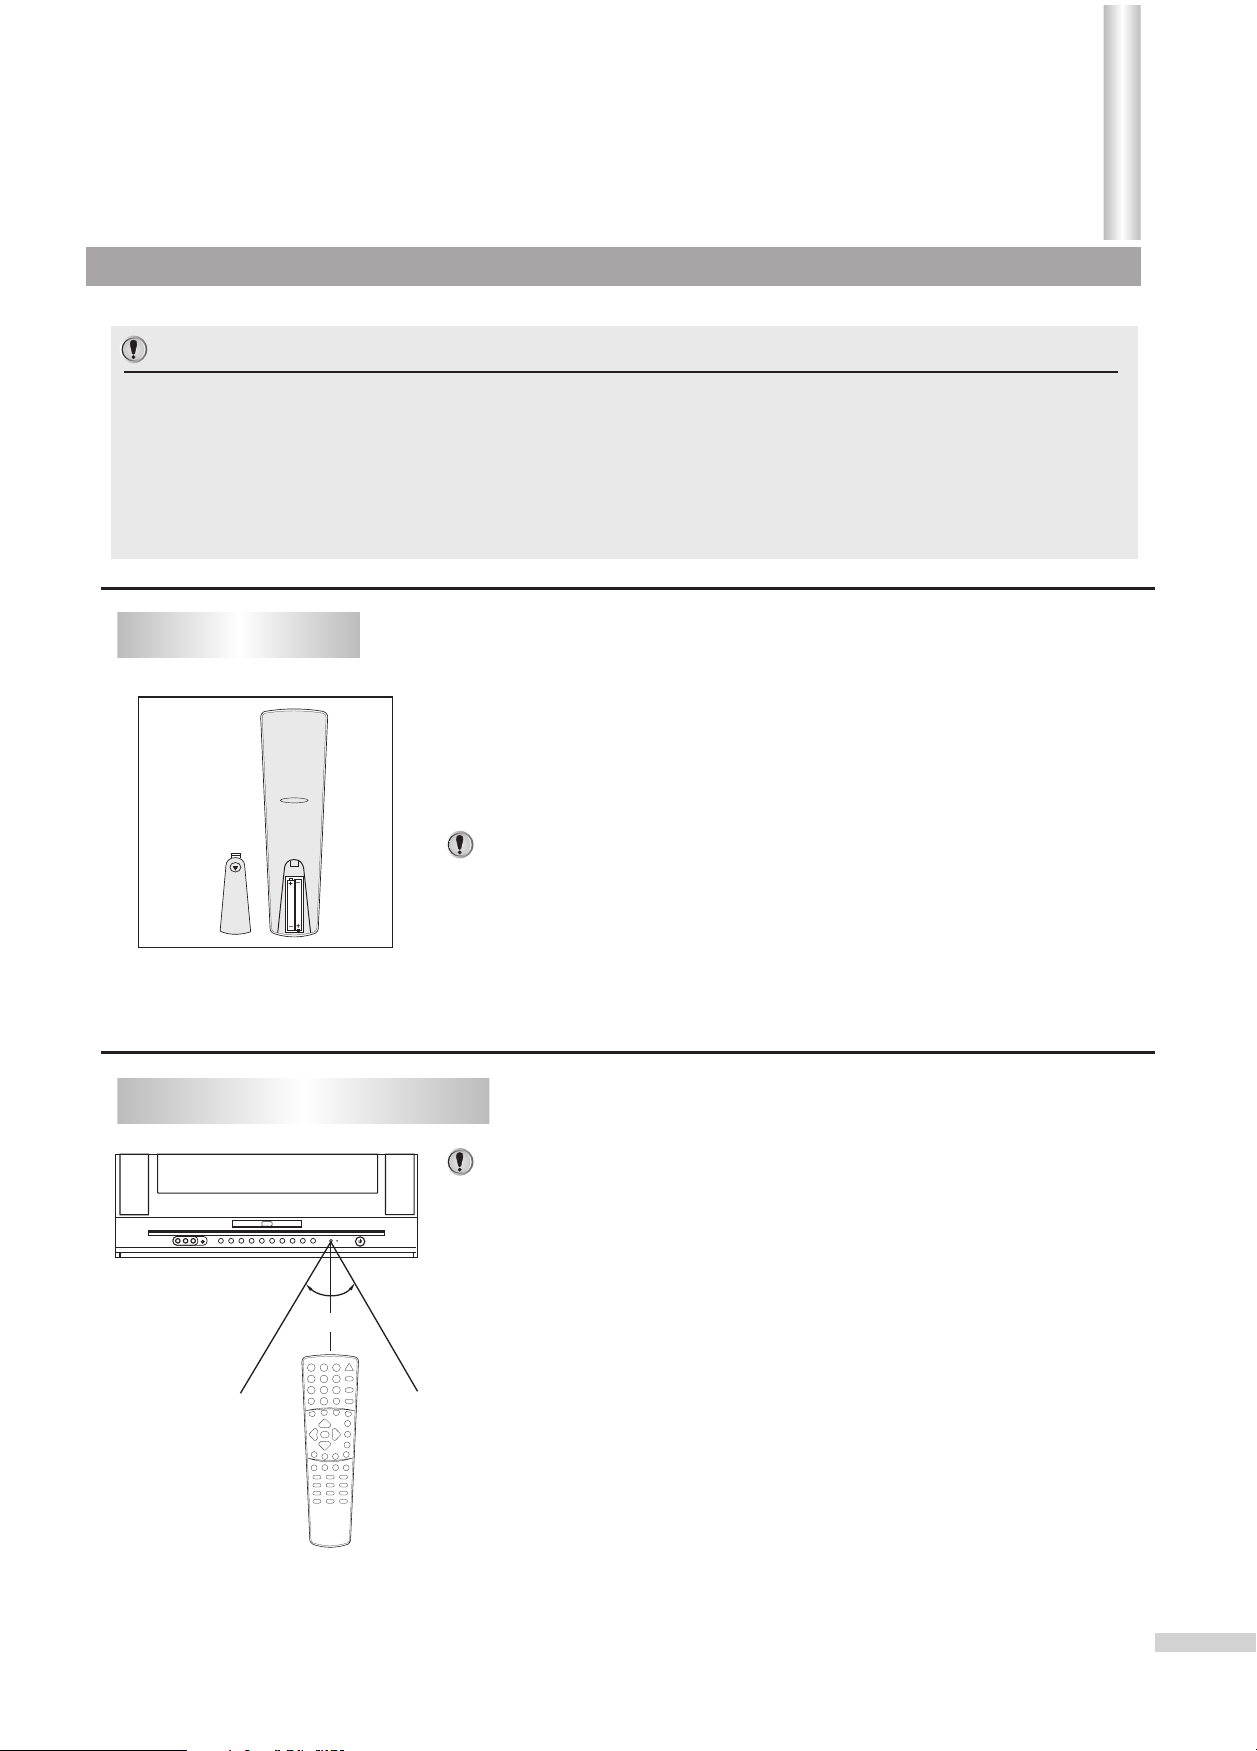
Installing batteries
Slide the battery compartment cover in the direction of the arrow.
1
Install two "AAA" batteries matching the +/- polarities of the battery to the
2
+/- marks inside the battery compartment.
3
*
*
*
*
Effective range of the Remote
*
*
*
5m5m
*
Replace the compartment cover.
Notes:
Do not try to recharge batteries they are not rechargeable.
Use only the size and type of batteries specified. Do not mix different
types of batteries together or old batteries with fresh ones.
When the remote control will not be used for a long period of time or when
the batteries are worn out, remove the batteries.
Do not throw the batteries into a fire. Do not drop, dampen or disassemble
the remote control. Dispose of used batteries in the specified manner.
Notes:
Aim the remote control at the remote sensor and press control buttons to
operate.
Operate the remote control within 30 angle on either side of the remote
sensor, up to a distance of approx. 5 meters or 16 feet.
When there is an obstacle between the TV/DVD and the transmitter, the
transmitter may not operate.
When direct sunlight, and incandescent lamp, fluorescent lamp or any
other strong light shines on the REMOTE SENSOR of the TV/DVD, the
operation of the remote may be unstable.
o
6
Page 9
INSTALL the unit in a room where direct light will not fall upon the screen.
Tip: Total darkness or a reflection on the picture screen may cause
Installation
eyestrain. For best results, soft, indirect lighting is recommended.
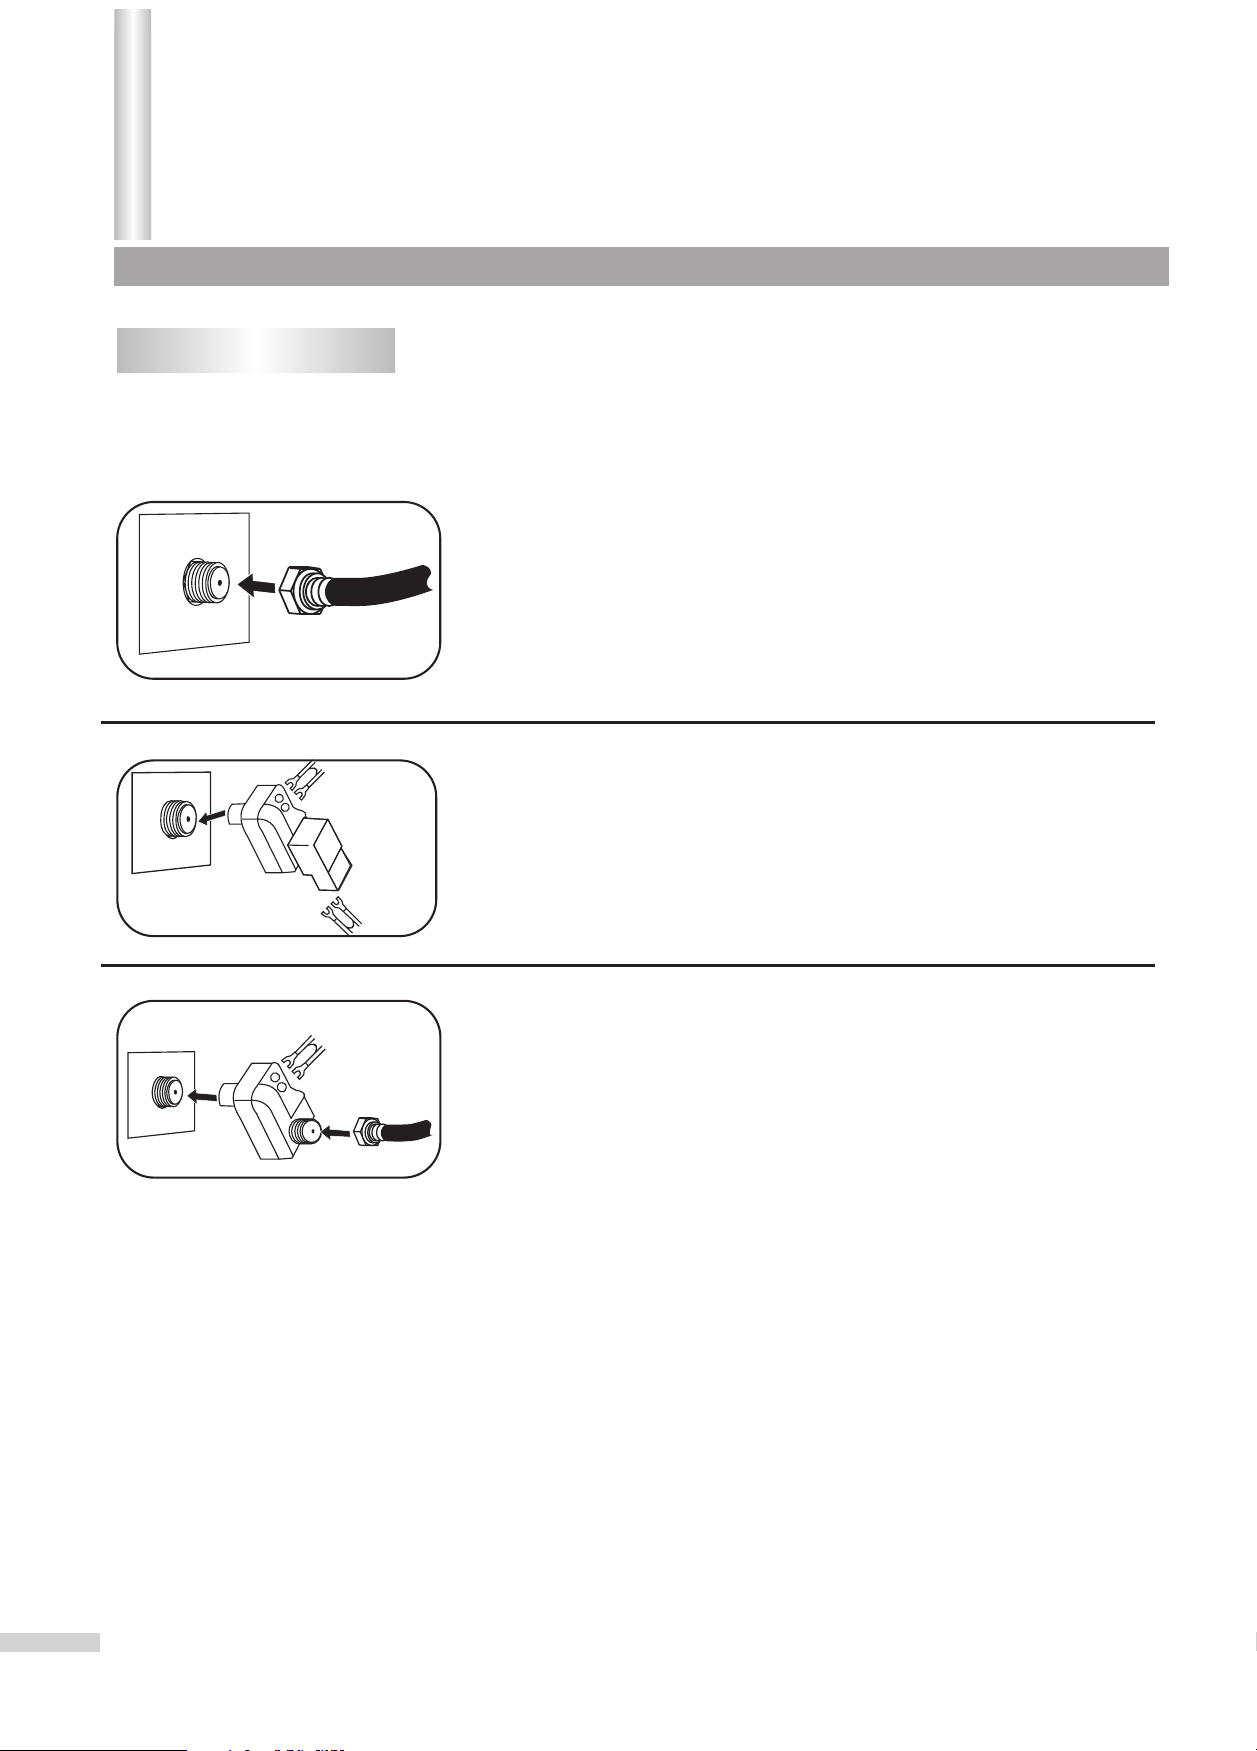
Antenna connections
OUTDOOR VHF/UHF ANTENNA CONNECTION (ANTENNA NOT INCLUDED)
Follow the instructions for the type of antenna system you intend to use. If using Cable or satellite, see
the next page.
Combination VHF/UHF
Antenna (Single 75 ohm cable or 300 ohm twin-lead wire)
Connect the 75 ohm cable from combination VHF/UHF antenna to the
antenna jack.
VHF/UHF
75 OHM
If your combination antenna has a 300 ohm twin-lead wire, use a 300-75
OR
ohm matching transformer (NOT SUPPLIED).
Combiner
Combiner
UHF 300 Ohm
VHF 300
OHM
UHF 300 Ohm
VHF 75 Ohm
Combination VHF/UHF
Antenna (Separate VHF and UHF 300 ohm twin-leads)
Connect the UHF twin-lead wire to a combiner (NOT SUPPLIED).
Connect the VHF twin-lead to a 300-75 ohm matching transformer (NOT
SUPPLIED). Attach the transformer to the combiner. Attach the
combiner to the antenna jack.
Separate VHF/UHF Antennas
Connect the 75 ohm cable from the VHF antenna and the UHF antenna
twin-lead wire to a combiner (NOT SUPPLIED). Attach the combiner to
the antenna jack.
NOTE: If your VHF antenna has a twin-lead wire use a 300-75 ohm
matching transformer, then connect the transformer to the combiner.
7
Page 10
Installation (continued)
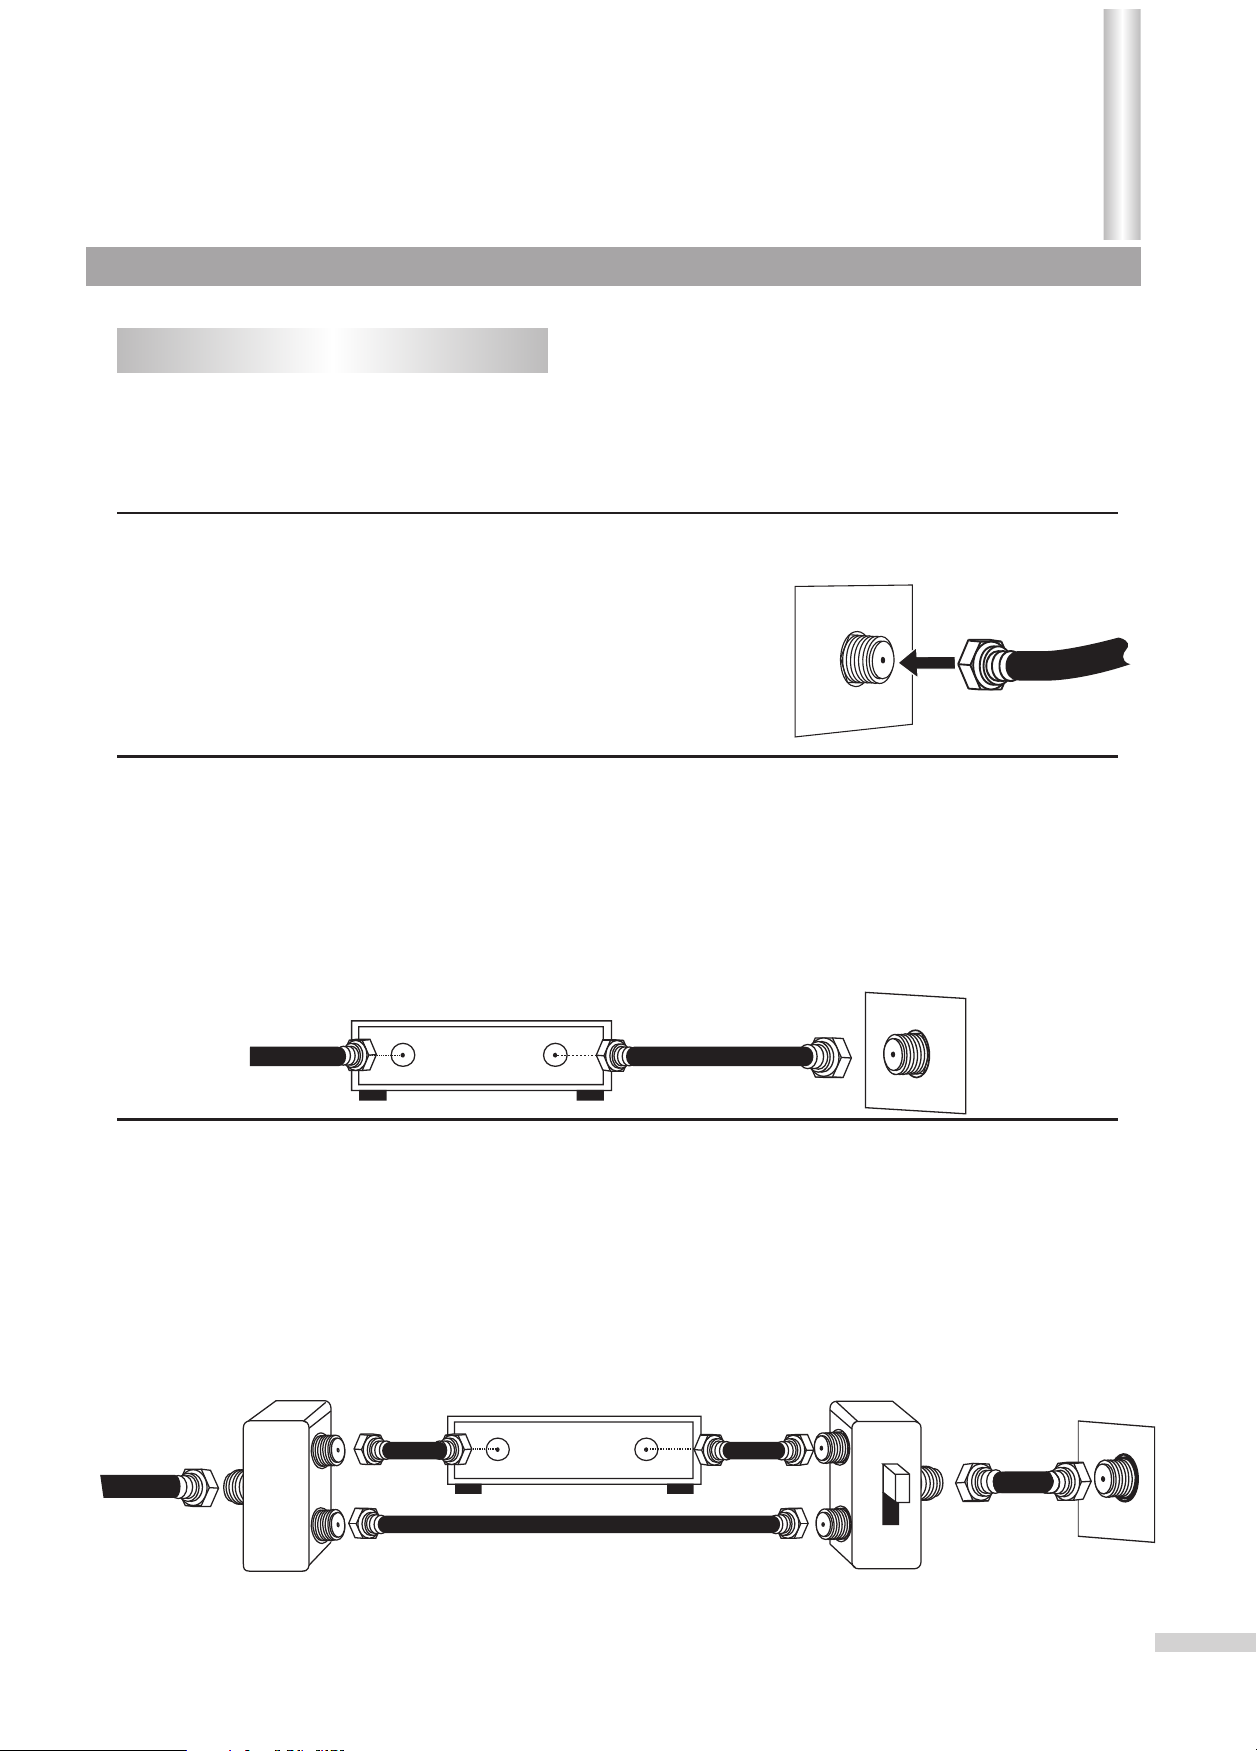
Cable (CATV)/satellite connections
This TV has an extended tuning range and can tune most cable channels without using a Cable TV converter box.
Some Cable TV companies offer "premium pay channels" in which the signal is scrambled. Descrambling these
signals for normal viewing requires the use of a descrambling device and is generally provided by the cable company.
FOR SUBSCRIBERS TO BASIC CABLE TV SERVICE
For basic cable service not requiring a converter/descrambler box,
connect the CATV 75 ohm coaxial cable to the VHF/UHF jack on the
rear of the DVD Combo.
FOR SUBSCRIBERS TO SCRAMBLED CABLE TV SERVICE OR SATELLITE
If you subscribe to a satellite service or a cable TV service which requires the use of a converter/
descrambler box, connect the incoming 75 ohm coaxial cable to the converter/descrambler box. Using
another 75 ohm cable, connect the output of the converter/descrambler or satellite box to the antenna jack
on the DVD Combo. Follow the connections shown below. Set the DVD Combo to the output channel of the
converter/descrambler or satellite box (usually 3 or 4) and use the converter/descrambler or satellite box to
select channels.
INCOMING
75 OHM
CATV CABLE
CONVERTER/DESCRAMBLER
OR SATELLITE BOX
75 OHM CABLE
TO DVD Combo
FOR SUBSCRIBERS TO UNSCRAMBLED BASIC CABLE TV SERVICE
WITH SCRAMBLED PREMIUM CHANNELS
If you subscribe to a satellite service or a cable TV service in which basic channels are unscrambled and
premium channels require the use of a converter/descrambler box, you may wish to use a signal splitter
and an A/B switch box (available from the cable company or an electronic supply store). Follow the
connections shown below. With the switch in the "B" position, you can directly tune any nonscrambled
channels on your DVD Combo. With the switch in the "A" position, tune your DVD Combo to the output of
the converter/descrambler box (usually channel 3 or 4) and use the converter/descrambler box to tune
scrambled channels.
INCOMING
75 OHM
CATV CABLE
CONVERTER/DESCRAMBLER
75 OHM
CABLE
SPLITTER A/B SWITCH
8
Page 11
Installation
This TV set provides 2 groups of AV inputs (including S-VIDEO) and 1 group of MONITOR outputs for your
convenient connection to VCR, Camcorder, Amplifier or other equipment. Check the Owner's Manual of the
equipment to be connected as well.
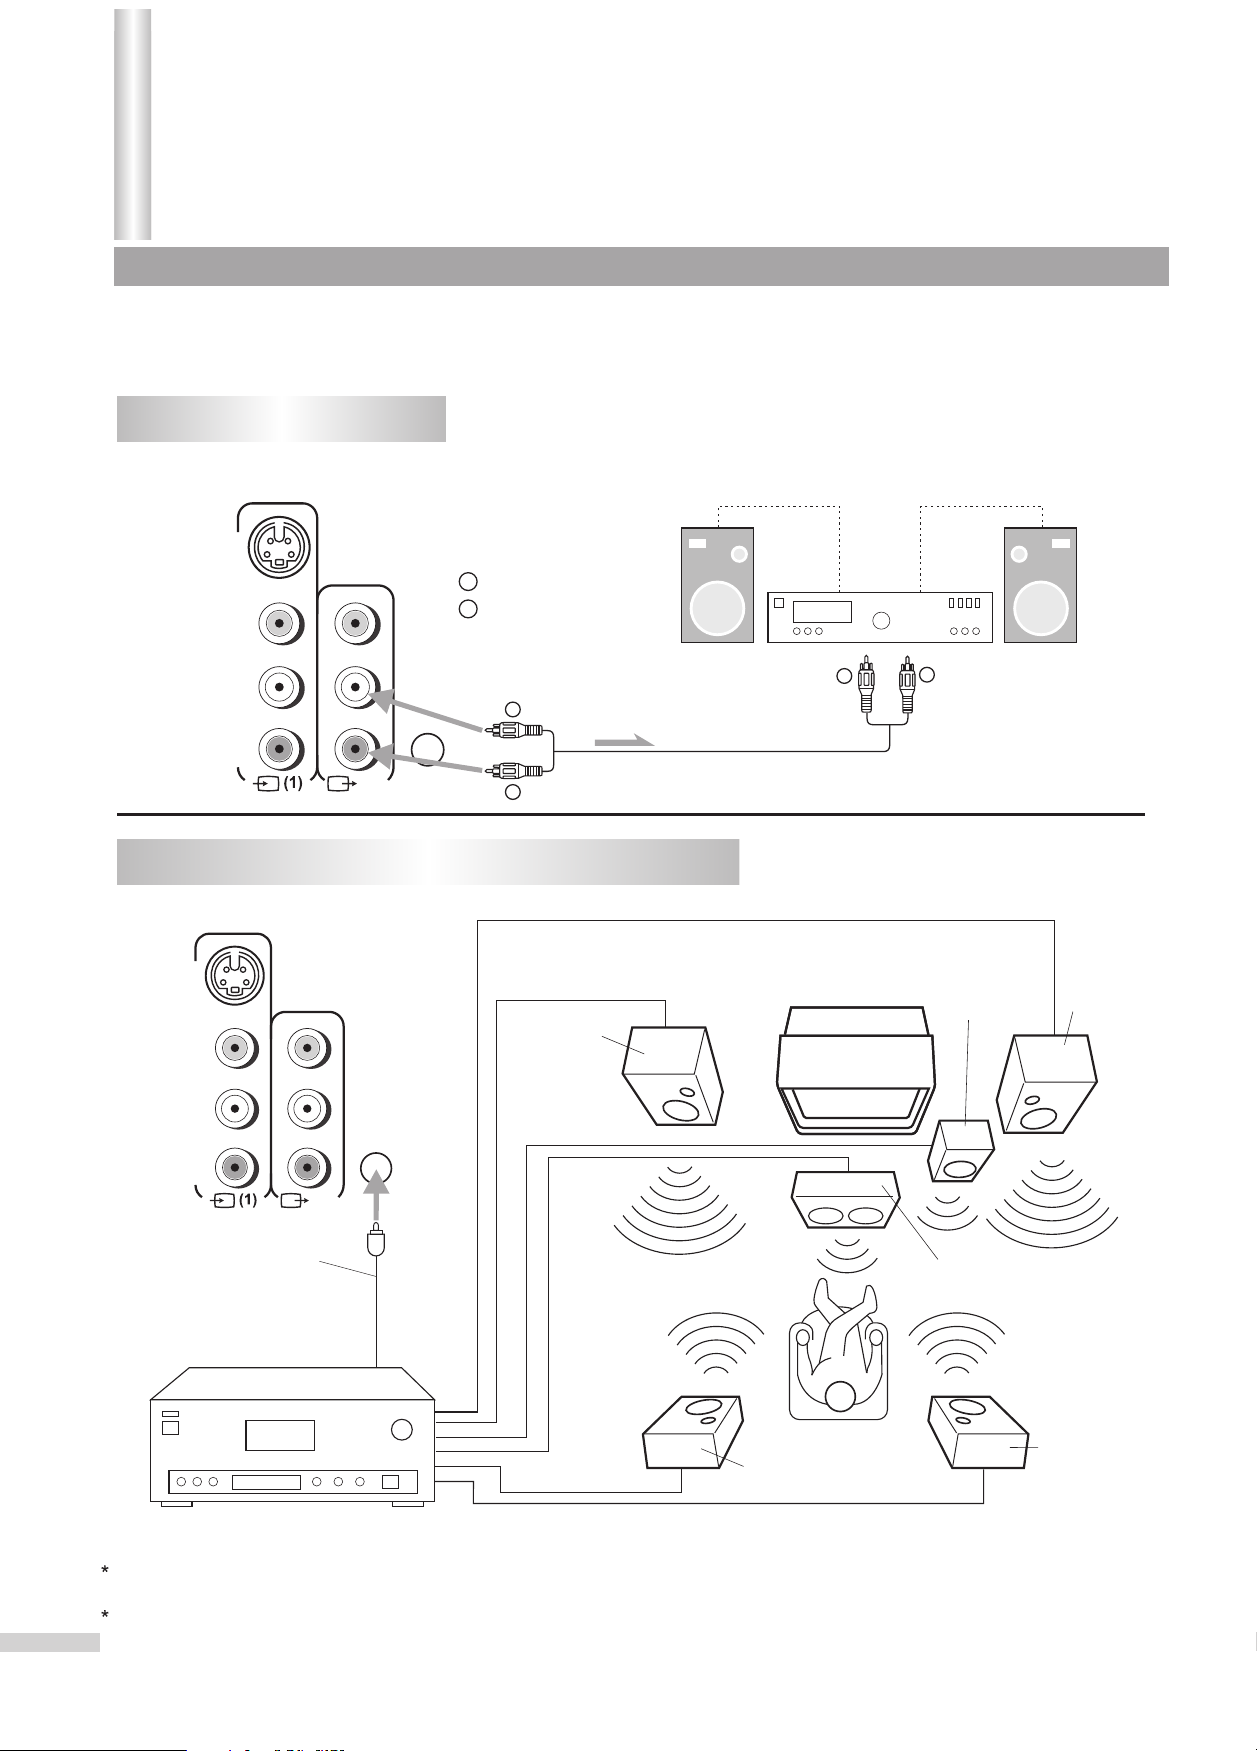
Using an Audio Amplifier
Rear of TV/DVD
-
S VIDEO
White (audio L/MONO)
WW
Red (audio R )
VIDEO
RR
OUT
DIGITAL
AUDIO
COAXIAL
WW
RR
Signal
L /MONO
AUDIO
R
Using an AV Amplifier with built-in digital surround
Rear of TV/DVD
-
S VIDEO
VIDEO
L /MONO
AUDIO
DIGITAL
AUDIO
COAXIAL
R
OUT
Coaxial digital cable
(not supplied)
Front
Speaker
(Left)
WW
To audio (L) input To audio (R) input
TV/DVD
RR
Subwoofer
Center Speaker
Front
Speaker
(Right)
To Coaxial Digital
Audio Input
Surround
Speaker (Left)
Surround
Speaker
(Right)
AV Amplifier with built-in digital surround
Manufactured under license from Dolby Laboratories. “Dolby” and the double-D symbol are trademarks of Dolby
Laboratories. Confidential unpublished works. © 1992-1997 Dolby Laboratories, Inc. All rights reserved.
“DTS” and “DTS Digital Out” are trademarks of Digital Theater System, Inc.
9
Page 12
Installation (continued)
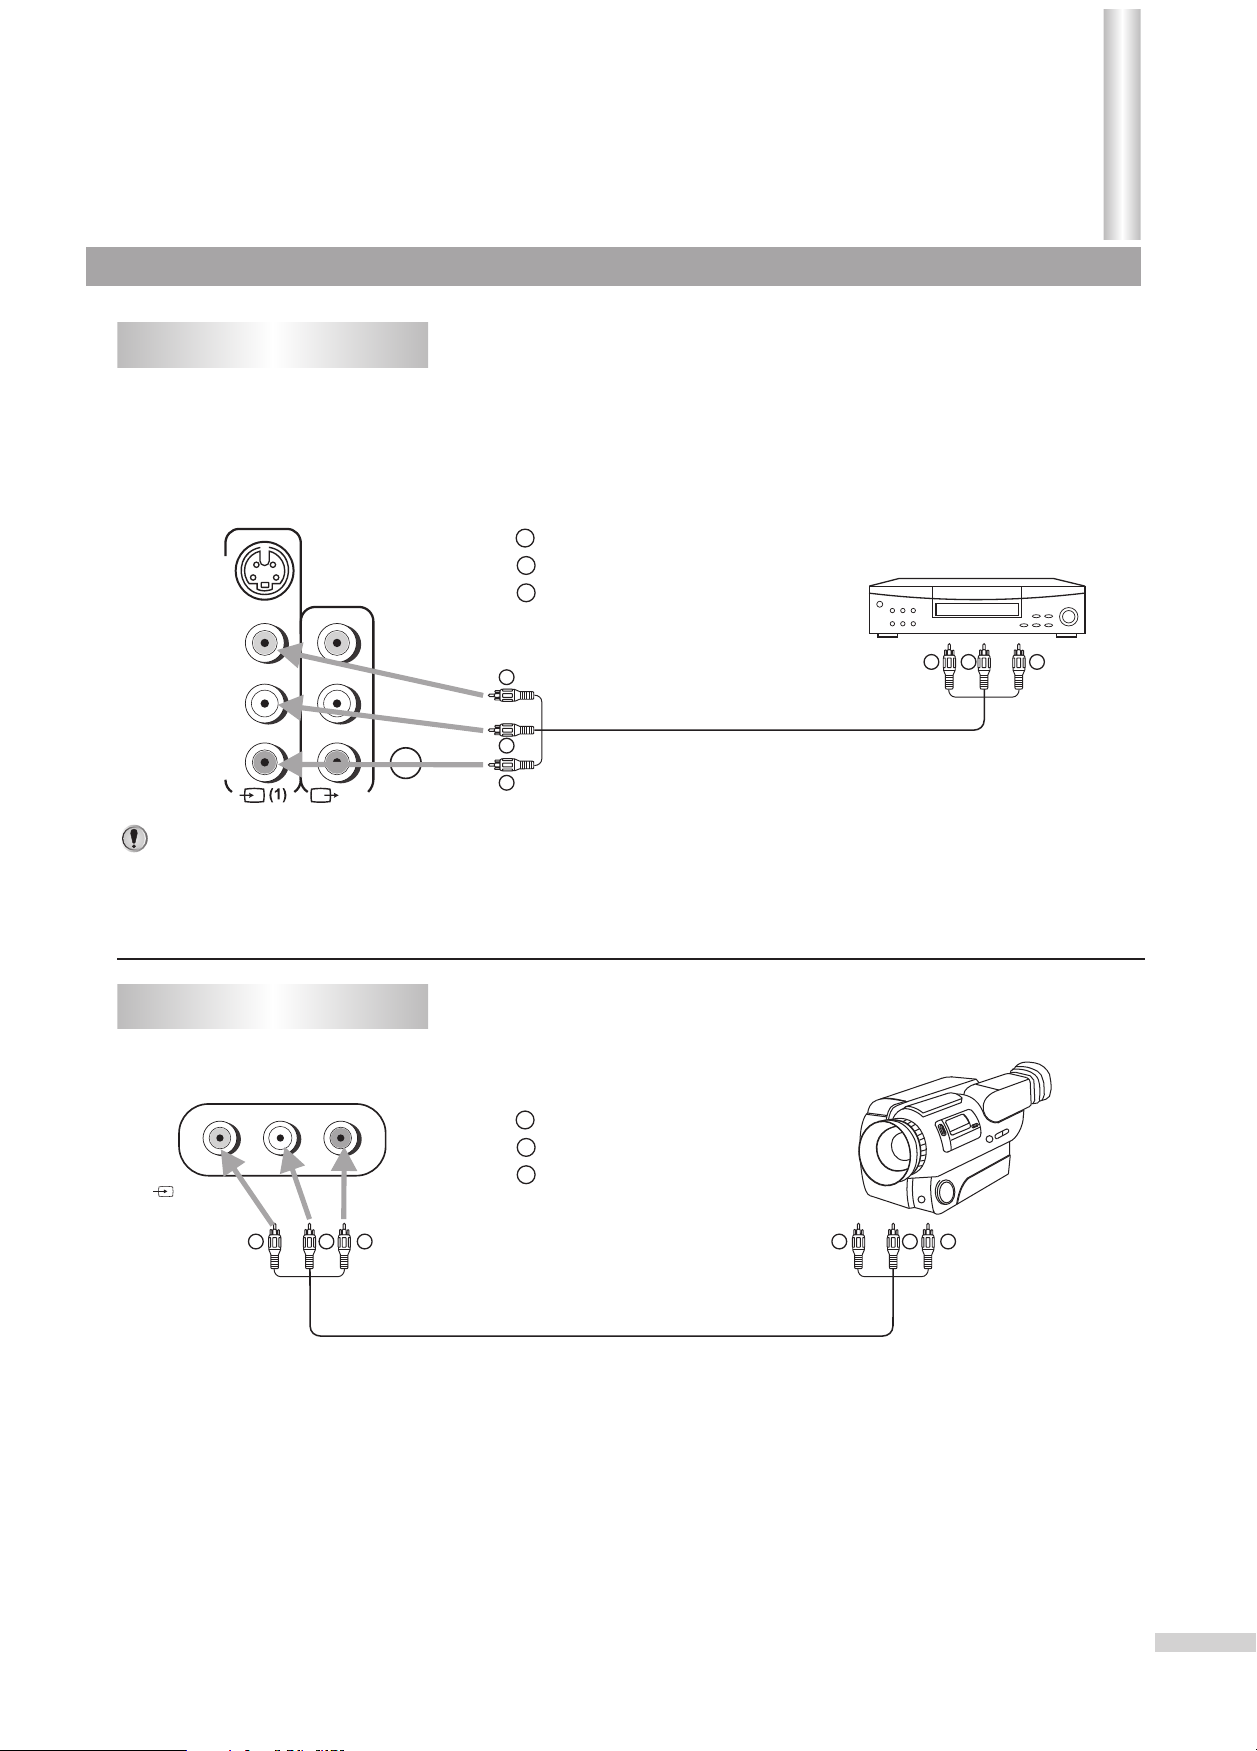
Connecting AV1 inputs
If you connect the TV/DVD to VCR or camcorder, you can select by pressing the AV/SETUP button. Press
this button repeatedly to select the desired mode. “Video 1”, “Video 2” or TV channel will display on the
screen.
In the DVD mode this button will not operate.
Rear of TV/DVD
Yellow (video)
YY
white (audio L/MONO)
-
S VIDEO
WW
red (audio R )
RR
VCR
VIDEO
L /MONO
AUDIO
DIGITAL
AUDIO
COAXIAL
R
OUT
To video
input
YY
WW
RR
To audio
inputs
To audio
outputs
WW
RR
YY
To video
output
Notes:
With the AV1 input terminals, the S-VIDEO terminal takes precedence to the Video 1 input. When an S-Video
cable is plugged in the AV1 input is disabled. To view the video signal from the AV1 terminals, disconnect the
S-VIDEO connection.
Connecting AV2 inputs
Front of TV/DVD
Yellow (video)
YY
white (audio L/MONO)
WW
red (audio R )
()
2
VIDEO L /MONO-AUDIO-R
RR
To video
input
WW
YY
RR
To audio
inputs
YY
To video
output
WW
RR
To audio
outputs
10
Page 13
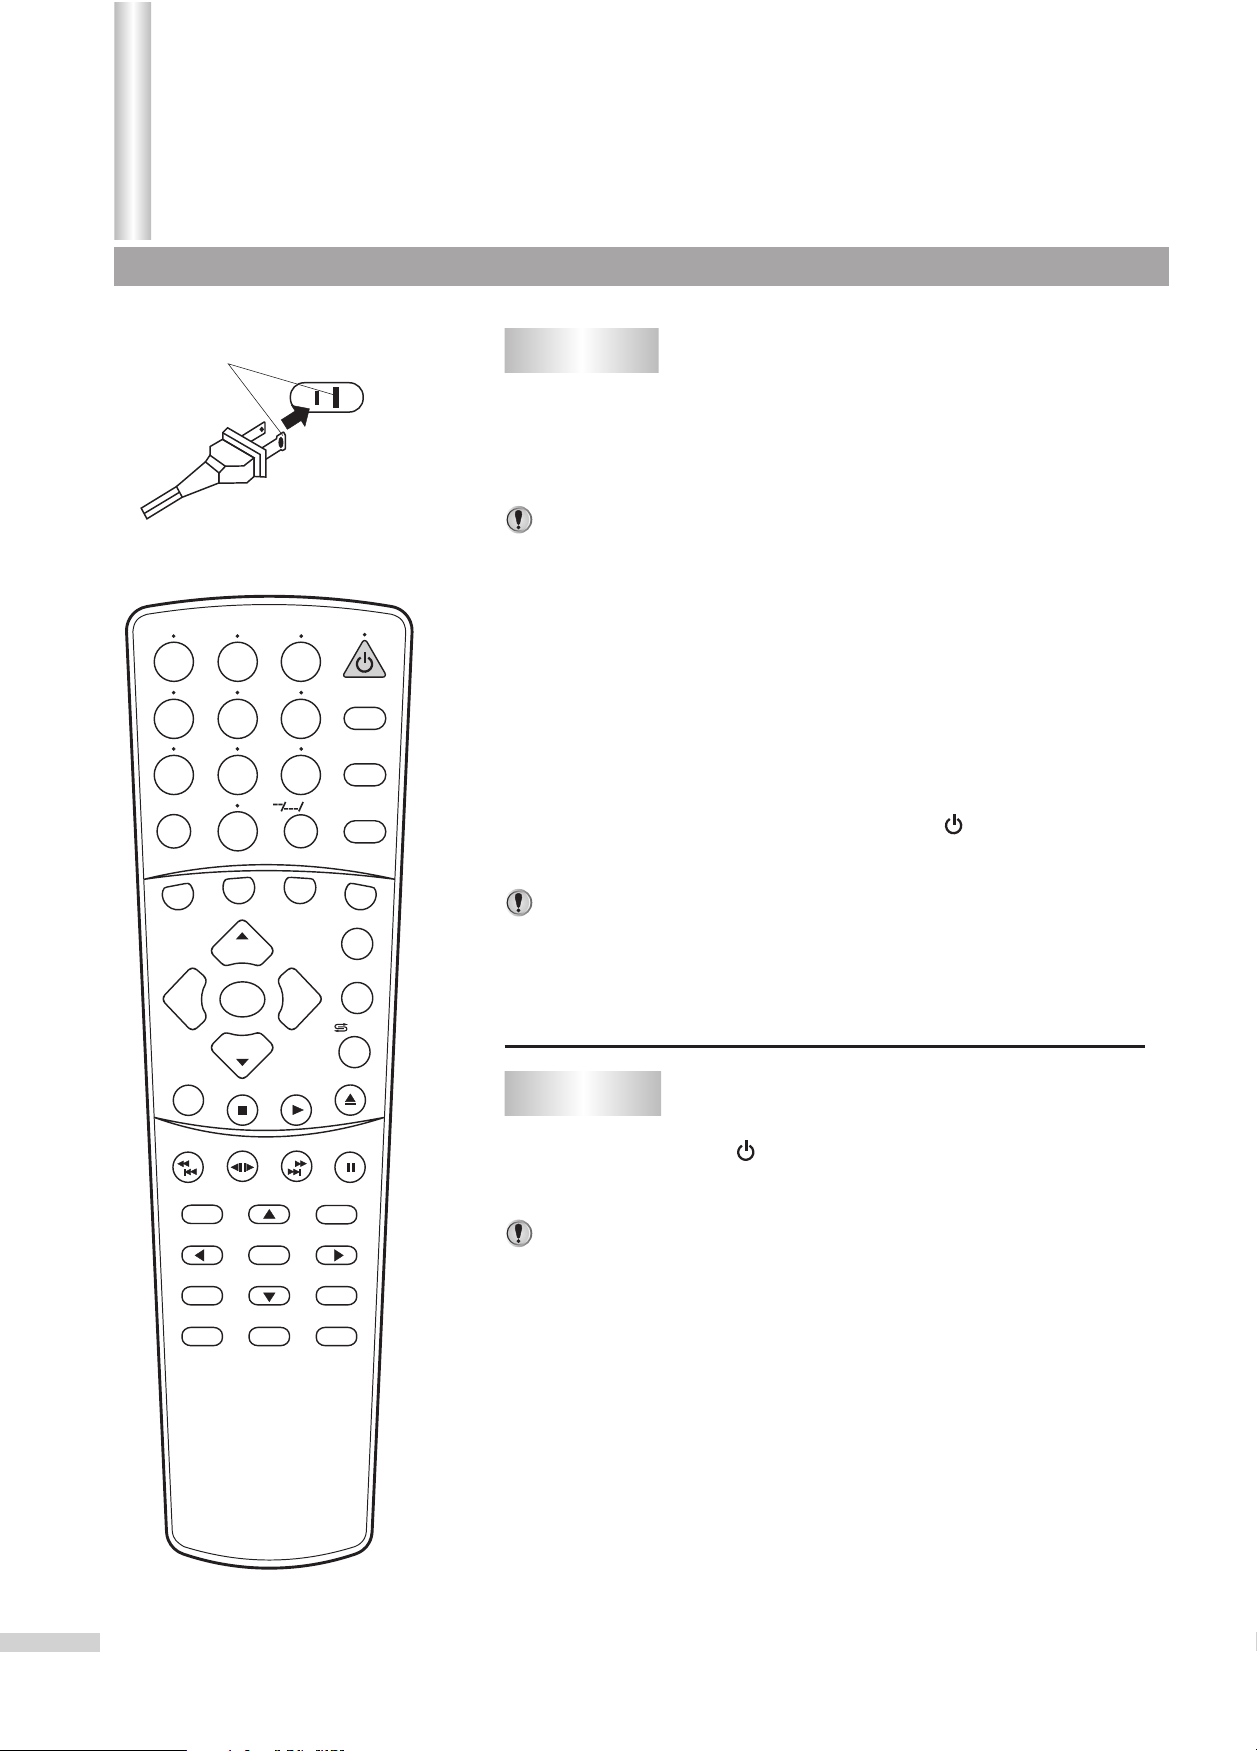
Power on/off
Wider Hole
and Blade
Polarized AC cord plug
(One blade is wider than the other)
1
4
7
MUTE
AC Outlet
2
5
8 9
3
SLEEP
6
TV/DVD
+10
AV/SETUP
0
Cable/SAT
VOL
-
STEREO/AUDIO&CH
DVD COMBO
CH
MENU
CH
STOP
VOL
PLAY
TV
+
VCR
SET
DSP/OSD
/ZOOM
OPEN/CLOSE
Turning on
Insert the AC plug (with the 2 blades) into a
1
conveniently located AC outlet having 120V, 60Hz.
If the red indicator lights up and no picture appears, then the TV
set is in STANDBY mode. Now please follow step 2.
Notes:
The AC plug supplied with the unit is polarized to help minimize
the possibility of electric shock. If the AC plug does not fit into a
non-polarized AC outlet, do not file or cut the wide blade. It is the
user's responsibility to have an electrician replace the obsolete
outlet.
To prevent electric shock, do not use a
(polarized) plug with an extension cord
receptacle or other outlet unless the blades
can be fully inserted.
In STANDBY mode, press the power button on the
2
TV set or on the remote controller to turn on the unit.
Notes:
In STANDBY mode, you can also turn on the set by pressing the
TV/AV, Channel up/down or Volume up/down button on the
set's panel.
If there is no input signal, then a blue background appears.
Turning off
11
REW/PREV
SEARCH
REPEAT A-B
SUBTITLE
SR/SF
FWD/NEXT
DVD MENU
TITLE
PAUSE/STEP
RETURN
ENTER
ANGLE
Press the Power button on the remote controller
11
or on the TV set to turn off the TV set.
Notes:
The TV set can turn off automatically by:
A. Sleep timer function (needs to be set in advance).
B. OFF timer function (needs to be set in advance).
Page 14
Selecting the Video Input
1
4
7
MUTE
Cable/SAT
VOL
-
STEREO/AUDIO&CH
2
5
8 9
0
DVD COMBO
CH
MENU
CH
STOP
VOL
PLAY
3
6
+10
TV
+
Video1
SLEEP
TV/DVD
AV/SETUP
VCR
SET
DSP/OSD
/ZOOM
OPEN/CLOSE
Watching AV program
To watch video program from AV inputs, Press
1
AV/SETUP repeatedly to select the desired mode.
Video1
Video2
TV 10
MONO
Notes:
With the AV1 input terminals, the S-VIDEO terminal takes
precedence to the Video 1 input. When both S-video and AV1 cables
are connected, the S-video signal is automatically selected and the
On-screen display is "S-Video". To view the video signal from the AV1
terminals, disconnect the S-VIDEO connection.
Switching from AV to TV
When the TV set is in AV mode, there are four ways for you to switch
back to TV mode.
Press AV/SETUP repeatedly until the TV program
11
appears.
Press digit buttons to switch back to TV mode.
22
REW/PREV
SEARCH
REPEAT A-B
SUBTITLE
SR/SF
FWD/NEXT
DVD MENU
TITLE
PAUSE/STEP
RETURN
ENTER
ANGLE
Press CH+ or CH- to switch back to TV mode.
33
Press /ZOOM to switch back to TV mode.
44
12
Page 15
Tuning
PICTURE
Channel
Color system
TV/Cable
Add/Erase
AFT
Fine
Auto search
Move[ ] Adjust[ ]
TUNING
TIMERSOUND
7
AUTO
TV
Add
On
0
SET UP
To enter the TUNING menu
Press the MENU button.
1
Press VOL+ or VOL- to select TUNING icon.
2
If the TUNING icon is not present on the menu group, the
TV/DVD may be in AV mode. Press the AV/SETUP button till
TV mode appears. Press MENU again and the TUNING icon
should appear.
1
4
7
MUTE
Cable/SAT
VOL
-
STEREO/AUDIO&CH
REW/PREV
SEARCH
2
5
8 9
0
DVD COMBO
CH
MENU
CH
STOP
SR/SF
3
6
TV
VOL
PLAY
FWD/NEXT
+10
SET
+
OPEN/CLOSE
PAUSE/STEP
RETURN
SLEEP
TV/DVD
AV/SETUP
VCR
DSP/OSD
/ZOOM
Press CH- to display the TUNING menu.
3
Setting the TV/Cable option
From the TUNING menu, press CH+ or CH- repeatedly
11
to highlight TV/Cable item.
Press VOL+ or VOL- to select TV or Cable.
22
In TV mode, the set receives antenna signals. In Cable mode the
set receives Cable TV programs. Please select:
TV: If using VHF/UHF antenna. Only channels received on
antenna can be selected.
Cable: If using Cable TV. Only channels received on cables can be
selected
Auto Search
From the TUNING menu, press CH+ or CH- repeatedly
11
to highlight Auto Search item.
13
REPEAT A-B
SUBTITLE
DVD MENU
TITLE
ENTER
ANGLE
22
Press VOL+ to start Auto Search.
All active channels will be preset and stored into the memory
automatically. After presetting, the TV will go to the channel
before the Auto Search started.
Notes:
During the process of Auto Search,
pressing the VOL- button will stop
the process and the TV will return to
the original channel when Auto
Search started.
TV
Auto memory
Stop
18
Page 16
PICTURE
Channel
Color system
TV/Cable
Add/Erase
AFT
Fine
Auto search
Move[ ] Adjust[ ]
1
4
7
MUTE
2
5
8 9
TUNING
TIMERSOUND
AUTO
TV
Erase
On
3
6
+10
0
7
0
SET UP
SLEEP
TV/DVD
AV/SETUP
Tuning (continued)
Erasing an unnecessary channel
From the TUNING menu, press CH+ or CH- repeatedly
1
to highlight Channel item.
Press VOL+ or VOL- to select a channel number (for
2
example, channel10)
Press CH+ or CH- repeatedly to highlight Add/Erase
3
item.
Press VOL+ or VOL- to set to Erase.
4
Now channel 10 will be skipped when
you browse channels by the CH+ or
CH- button.
To restore a skipped channel, please
use the digit buttons to select the
skipped channel, then repeat the
above steps 3 and 4 from above and
set the Add/Erase item to Add.
PICTURE
Channel
Color system
TV/Cable
Add/Erase
AFT
Fine
Auto search
Move[ ] Adjust[ ]
TUNING
TIMERSOUND
7
AUTO
TV
Erase
On
0
SET UP
Cable/SAT
VOL
-
STEREO/AUDIO&CH
REW/PREV
SEARCH
REPEAT A-B
SUBTITLE
DVD COMBO
CH
MENU
CH
STOP
SR/SF
DVD MENU
TITLE
TV
VOL
PLAY
FWD/NEXT
SET
+
OPEN/CLOSE
PAUSE/STEP
RETURN
ENTER
ANGLE
VCR
DSP/OSD
/ZOOM
Fine tuning
Fine tuning is unnecessary under normal conditions. However, in areas of
inferior broadcast conditions where adjustment is necessary for a better
picture and sound, use Fine tuning.
From the TUNING menu, press CH+ or CH- repeatedly
1
to highlight Channel item.
Press VOL+ or VOL- to select a channel number you
2
want to Fine tune (for example, channel10).
3
Press CH+ or CH- repeatedly to highlight Fine item.
Press VOL+ or VOL- to fine
4
tune till the best possible
picture and sound are
obtained.
PICTURE
Channel
Color system
TV/Cable
Add/Erase
AFT
Fine
Auto search
Move[ ] Adjust[ ]
TUNING
AUTO
SET UP
7
TV
On
0
TIMERSOUND
Erase
Notes about AFT item:
The AFT can be set to On or Off. When the AFT is set to On, the TV set
will automatically tune the program frequency to provide the best
possible picture and sound.
14
Page 17
Tuning (continued)
TUNING
PICTURE
Channel
Color system
TV/Cable
Add/Erase
AFT
Fine
Auto search
Move[ ] Adjust[ ]
1
4
7
MUTE
TIMERSOUND
AUTO
Erase
2
5
8 9
0
SET UP
7
TV
On
0
3
SLEEP
6
TV/DVD
+10
AV/SETUP
Setting the Color System
If the picture color is abnormal, maybe the color system setting is wrong.
You can select a proper color system as follows.
From the TUNING menu, press CH+ or CH- repeatedly
1
to highlight Color System item.
Press VOL+ or VOL- to select
2
a proper color system.
The color system switches between
AUTO, NTSC358 and NTSC443.
PICTURE
Channel
Color system
TV/Cable
Add/Erase
AFT
Fine
Auto search
Move[ ] Select[ ]
TIMERSOUND
TUNING
NTSC443
Erase
SET UP
7
TV
On
0
Cable/SAT
VOL
-
STEREO/AUDIO&CH
REW/PREV
SEARCH
REPEAT A-B
SUBTITLE
DVD COMBO
CH
MENU
CH
STOP
SR/SF
DVD MENU
TITLE
TV
VOL
PLAY
FWD/NEXT
VCR
SET
DSP/OSD
+
/ZOOM
OPEN/CLOSE
PAUSE/STEP
RETURN
ENTER
ANGLE
15
Page 18

1
4
7
MUTE
2
5
8 9
0
Channel Selection
Use 0~9 digit buttons and the --/---/+10 button
TV 10
Mono
3
SLEEP
6
TV/DVD
+10
AV/SETUP
1
To select one-digit channel:
Press one of the 0-9 digit buttons and wait for 2 seconds.
To select two-digit channel:
Input the channel using the digit buttons. Be sure to enter the
channel within 2 seconds.
To select three-digit channel:
Press the "--/---/+10” button to display "1--".
Press two digit buttons to input the remaining two digits of the
channel. For example, to select channel 124, press "--/---/+10”,
press 2, then press 4.
Use the CH+ or CH- button
2
Press the CH+ button, the channel number increases;
Press the CH- button, the channel number decreases.
Cable/SAT
VOL
-
STEREO/AUDIO&CH
REW/PREV
SEARCH
REPEAT A-B
SUBTITLE
DVD COMBO
CH
MENU
CH
STOP
SR/SF
DVD MENU
TITLE
TV
VOL
PLAY
FWD/NEXT
SET
+
OPEN/CLOSE
PAUSE/STEP
RETURN
ENTER
ANGLE
VCR
DSP/OSD
/ZOOM
Use the /ZOOM button
3
Press this button to switch between the current channel and the
previous channel.
16
Page 19

Adjusting Picture
TUNING
100
70
70
50
00
Sports
SET UP
1
2
PICTURE
Contrast
Brightness
Color
Sharpness
Tint
Picture mode
More
Move[ ] Adjust[ ]
TIMERSOUND
3
To enter the PICTURE menu
Press the MENU button.
Press VOL+ or VOL- to select PICTURE icon.
Press CH- to display the PICTURE menu.
1
4
7
MUTE
Cable/SAT
VOL
-
STEREO/AUDIO&CH
REW/PREV
SEARCH
2
5
8 9
0
DVD COMBO
CH
MENU
CH
STOP
SR/SF
3
6
TV
VOL
PLAY
FWD/NEXT
+10
SET
+
OPEN/CLOSE
PAUSE/STEP
RETURN
SLEEP
TV/DVD
AV/SETUP
VCR
DSP/OSD
/ZOOM
Adjusting picture
From the PICTURE menu, press CH+ or CH-
11
repeatedly to select item.
22
Press VOL+ or VOL- to adjust.
Item
Contrast
Brightness
Color
Sharpness
Tint
VOL- VOL+
Minus Plus
darker
paler deeper
softer
purplish
lighter
sharper
greenish
Selecting picture mode
From the PICTURE menu, press CH+ or CH- repeatedly
11
to select Picture Mode item.
22
Press VOL+ or VOL- to select.
17
REPEAT A-B
SUBTITLE
DVD MENU
TITLE
ENTER
ANGLE
There are three preset picture modes (Sports, Standard and Movie) and
one user-set picture mode (Personal).
Each preset mode has its own picture settings (Color, Brightness,
Contrast, Sharpness and Tint).
Sports: Select for a bright picture.
Standard: Select for a standard picture.
Movie: Select for a finely detailed picture.
Adjusted settings are stored in Personal mode.
Page 20

Adjusting Picture (continued)
Auto search/Manual search/Channel skip/Fine tuning
Setting SVM option
TUNING
Off
SET UP
On
On
From the PICTURE menu, press CH+ or CH- repeatedly
1
to select SVM item.
Press VOL+ or VOL- button to adjust.
2
This function helps to improve the quality of picture.
You can switch between Off, Soft, Mild and Hard.
Notes:
Model DV2018 does not have the "SVM" function.
PICTURE
More
SVM
Blue back
Noise reducer
Move[ ] Adjust[ ]
TIMERSOUND
1
4
7
MUTE
Cable/SAT
VOL
-
STEREO/AUDIO&CH
REW/PREV
SEARCH
REPEAT A-B
SUBTITLE
2
5
8 9
0
DVD COMBO
CH
MENU
CH
STOP
SR/SF
DVD MENU
TITLE
3
6
TV
VOL
PLAY
FWD/NEXT
+10
SET
+
OPEN/CLOSE
PAUSE/STEP
RETURN
ENTER
ANGLE
SLEEP
TV/DVD
AV/SETUP
VCR
DSP/OSD
/ZOOM
Setting Blue background option
From the PICTURE menu,
1
press CH+ or CH- repeatedly to
select Blue Back item.
Press VOL+ or VOL- to select
2
On or Off.
PICTURE
SOUND
More
SVM
Blue back
Noise reducer
Move[ ] Adjust[ ]
TIMER
TUNING
Off
On
On
If the Blue Back is set to On, the TV
set will display a blue background
when there is no input signal.
Setting Noise reducer option
From the PICTURE menu, press CH+ or CH- repeatedly
1
to select Noise reducer function.
Press VOL+ or VOL- button to
2
select On or Off.
This function is useful when the
picture is snowy because of a poor
signal.
If the Noise reducer is set to On,
the picture will be improved.
PICTURE
SOUND
More
SVM
Blue back
Noise reducer
Move[ ] Adjust[ ]
TIMER
TUNING
Off
On
On
SET UP
SET UP
18
Page 21

Sound
Volume 50
1
4
7
MUTE
2
5
8 9
0
VOL
-
STEREO/AUDIO&CH
DVD COMBO
CH
MENU
CH
STOP
Cable/SAT
VOL
PLAY
3
6
+10
TV
+
SLEEP
TV/DVD
AV/SETUP
VCR
SET
DSP/OSD
/ZOOM
OPEN/CLOSE
Adjusting volume
1
Adjusting volume/Muting the Sound
Use the VOL+ or VOL- button.
Press VOL+, the volume increases;
Press VOL-, the volume decreases.
The minimum volume is 0 and the maximum volume is 100.
Use the MUTE button.
2
If you want to mute the sound, press
the MUTE button on the remote.
To resume the sound, press this button
again.
Notes:
You can also resume the sound by pressing the VOL+ or VOL- button.
To enter the SOUND menu
Press the MENU button.
11
Press VOL+ or VOL- to select
22
SOUND icon.
Press CH- to display the
33
SOUND menu.
PICTURE
Bass
Treble
Balance
Sound mode
S.woofer
Move[ ] Adjust[ ]
TIMERSOUND
59
69
Personal
On
TUNING
00
SET UP
19
REW/PREV
SEARCH
REPEAT A-B
SUBTITLE
SR/SF
FWD/NEXT
DVD MENU
TITLE
PAUSE/STEP
RETURN
ENTER
ANGLE
Page 22

PICTURE
Bass
Treble
Balance
Sound mode
S.woofer
Move[ ] Adjust[ ]
1
4
7
MUTE
2
5
8 9
TIMERSOUND
TUNING
59
69
00
Personal
On
3
6
0
+10
SET UP
SLEEP
TV/DVD
AV/SETUP
Sound
(Continued)
Adjusting sound
From the SOUND menu, press CH+ or CH- repeatedly
1
to select item.
Press VOL+ or VOL- to adjust.
2
Item
Bass
Treble
Balance
VOL- VOL+
Minus Plus
Minus Plus
decreases the
right channel
decreases the
left channel
Selecting sound mode
From the SOUND menu, press
1
CH+ or CH- repeatedly to
select Sound Mode item.
PICTURE
Bass
Treble
Balance
Sound mode
S.woofer
TIMERSOUND
TUNING
59
69
00
Personal
On
SET UP
Cable/SAT
VOL
-
STEREO/AUDIO&CH
REW/PREV
SEARCH
REPEAT A-B
SUBTITLE
DVD COMBO
CH
MENU
CH
STOP
SR/SF
DVD MENU
TITLE
TV
VOL
PLAY
FWD/NEXT
SET
+
OPEN/CLOSE
PAUSE/STEP
RETURN
ENTER
ANGLE
VCR
DSP/OSD
/ZOOM
Press VOL+ or VOL- to select.
2
Move[ ] Adjust[ ]
There are two preset sound modes (News, and Music) and
one user-set sound mode (Personal).
Each preset mode has it's own sound settings (Bass, Treble, and
Balance).
News: Select for a speech or conversation program.
Music: Select for a music program.
The adjusted settings are stored in Personal mode.
Setting S.woofer item
From the SOUND menu, press CH+ or CH- repeatedly
1
to select S. woofer item.
Press VOL+ or VOL- to set On
2
or Off.
PICTURE
Bass
Treble
Balance
Sound mode
S.woofer
Move[ ] Adjust[ ]
TIMERSOUND
TUNING
59
69
00
Personal
On
SET UP
20
Page 23

Timer
PICTURE
Off Time
On Time
Channel
TV/Cable
Clock
Move[ ] Select[ ]
TIMERSOUND
AM 12:00
AM 12:00
AM 8:00
TUNING
Off
Off
2
TV
SET UP
To enter the TIMER menu
Press the MENU button.
1
Press VOL+ or VOL- to select TIMER icon.
2
Press CH- to display the TIMER menu.
3
Setting Clock
1
4
7
MUTE
Cable/SAT
VOL
-
STEREO/AUDIO&CH
REW/PREV
SEARCH
REPEAT A-B
SUBTITLE
2
5
8 9
0
DVD COMBO
CH
MENU
CH
STOP
SR/SF
DVD MENU
TITLE
3
6
TV
VOL
PLAY
FWD/NEXT
+10
SET
+
OPEN/CLOSE
PAUSE/STEP
RETURN
ENTER
ANGLE
SLEEP
TV/DVD
AV/SETUP
VCR
DSP/OSD
/ZOOM
From the TIMER menu, press CH+ or CH- repeatedly
11
to select CLOCK.
22
Press VOL+ or VOL- button to set the current time.
Notes:
Before setting the Off Time or On Time, first set the clock.
If you disconnect the AC plug, the clock will reset. Please set the
clock after disconnecting power.
Setting Sleep timer
You can quickly set the sleep timer by using the SLEEP button on
the remote control. With every press of this button the sleep time
changes as follows:
OFF
For example, you would like the TV to
turn off in 60 minutes, you can press
the SLEEP button repeatedly until the
screen displays 60 min.
To cancel the sleep timer, you can
press the SLEEP button repeatedly
until "Off" is displayed on the screen.
120 Min. 110 Min. 10 Min.20 Min.
Sleep:60 Min.
21
Notes:
When there is no video input signal for 15 minutes, the TV set
automatically goes to STANDBY mode.
Page 24

PICTURE
Off Time
On Time
Channel
TV/Cable
Clock
Move[ ] Select[ ]
1
4
7
MUTE
2
5
8 9
TIMERSOUND
10:00PM
TUNING
Once
Once
6:00PM
8:00AM
3
6
TV
+10
0
2
SET UP
SLEEP
TV/DVD
AV/SETUP
Timer(continued)
Setting Off Time
From the TIMER menu, press CH+ or CH- repeatedly
1
to select OFF TIME.
Press VOL+ or VOL- to select Once or Every. If you set
2
OFF TIME to Once, this occurs only once; If you set OFF TIME to
Every, this occurs every day. To cancel this function, set OFF TIME
to Off.
Press CH- .
3
Press VOL+ or VOL- to set the OFF time. The TV will
4
turn off at the designated time.
Notes:
You must first set OFF TIME to Once or Every. When you are setting the
time by the VOL+/- button, if you press and hold , the time will increase
or decrease by 10 minutes.
Setting On Time
Cable/SAT
VOL
-
STEREO/AUDIO&CH
REW/PREV
SEARCH
REPEAT A-B
SUBTITLE
DVD COMBO
CH
MENU
CH
STOP
SR/SF
DVD MENU
TITLE
TV
VOL
PLAY
FWD/NEXT
SET
+
OPEN/CLOSE
PAUSE/STEP
RETURN
ENTER
ANGLE
VCR
DSP/OSD
/ZOOM
From the TIMER menu, press CH+ or CH- repeatedly
1
to select ON TIME.
Press VOL+ or VOL- to select Once or Every. If you
2
set ON TIME to Once, this function occurs once. If you set ON
TIME to Every, this occurs every day. To cancel this function, set
ON TIME to Off.
Press CH- .
3
Press VOL+ or VOL- to set the
4
ON time. Press and hold to
increase/decrease by 10
minutes.
Press CH- to select Channel item.
5
Press VOL+ or VOL- to select a channel number.
6
Press CH- to select TV/Cable.
7
Press VOL+ or VOL- to select TV or Cable.
8
PICTURE
Off Time
On Time
Channel
TV/Cable
Clock
Move[ ] Select[ ]
TIMERSOUND
10:00PM
TUNING
Once
Once
6:00PM
8:00AM
Notes:
If the television automatically turns on and receives no user input
(volume adjustment, etc.) for two hours, it will automatically turn
off to conserve power. You must set ON TIME to Once or Every
prior to setting the time.
SET UP
2
TV
22
Page 25

System Setup
TUNING
Stop
3
6
+10
SET UP
SLEEP
TV/DVD
AV/SETUP
PICTURE
Language:
ENGLISH
FRANCAL
ESPANOL
Menu Demo:
Child lock menu:
More
Move[ ] Confirm[ ]
1
4
7
MUTE
TIMERSOUND
2
5
8 9
0
To enter the SET UP menu
Press the MENU button.
1
Press VOL+ or VOL- to select SETUP icon.
2
Press CH- to display the SETUP menu.
3
Selecting a Language
From the SETUP menu, press CH+ or CH- repeatedly
11
to select an on-screen display language.
Press the VOL+ to confirm.
22
There are three OSD languages on this TV set: English, French
and Spanish.
Cable/SAT
VOL
-
STEREO/AUDIO&CH
REW/PREV
SEARCH
REPEAT A-B
SUBTITLE
DVD COMBO
CH
MENU
CH
STOP
SR/SF
DVD MENU
TITLE
TV
VOL
PLAY
FWD/NEXT
SET
+
OPEN/CLOSE
PAUSE/STEP
RETURN
ENTER
ANGLE
VCR
DSP/OSD
/ZOOM
Menu Demo
From the SETUP menu, press CH+ or CH- repeatedly
11
to select MENU DEMO item.
Press the VOL+ or VOL- to start.
22
PICTURE
Language:
ENGLISH
FRANCAL
ESPANOL
Menu Demo:
Child lock menu:
More
Move[ ] Confirm[ ]
TIMERSOUND
TUNING
Start
SET UP
23
Page 26

PICTURE
More
Closed Caption
Vchip password
System Setup(continued)
Setting Closed Caption (CCD)
TUNING
OFF
SET UP
From the SETUP menu, press CH+ or CH- repeatedly
1
to select Closed Caption item.
Press the VOL+ or VOL- to select.
2
TIMERSOUND
Move[ ] Select[ ]
1
4
7
MUTE
2
5
8 9
3
6
0
Cable/SAT
VOL
-
STEREO/AUDIO&CH
DVD COMBO
CH
MENU
CH
STOP
TV
VOL
PLAY
+10
SET
+
OPEN/CLOSE
SLEEP
TV/DVD
AV/SETUP
VCR
DSP/OSD
/ZOOM
You can select the caption data channel (C1/C2/C3/C4), the text
service channel (T1/T2/T3/T4) or turn off Closed Captioning (Off).
Notes:
1.Some TV programs may not be broadcast with closed caption
signals, and therefore, the TV will not be able to display captions.
Also, text information is not offered by all stations.
2.Some TV programs only provide one channel caption, one
channel text , or only caption without text.
Selecting audio mode
If the program you are watching is "STEREO" or "SAP", you can
change the audio mode by using the STEREO/AUDIO&CH button on
the remote control. The audio mode changes as follows.
MONO
MONO
MONO
STEREO
SAP
STEREO SAP
Recalling On-screen display
(If the audio is STEREO)
(If the audio is SAP)
(If the audio is
STEREO & SAP)
REW/PREV
SEARCH
REPEAT A-B
SUBTITLE
SR/SF
FWD/NEXT
DVD MENU
TITLE
PAUSE/STEP
RETURN
ENTER
ANGLE
You can press the DSP/OSD button on the
remote control to display the On-screen
display.
Press DSP/OSD once and the channel
and audio mode are displayed for a brief
time. Press DSP/OSD before the display
disappears, and the time will display. To
cancel the on-screen display, press the
DSP/OSD again or wait for it to
automatically disappear.
AM 10:00
TV 10
MONO
24
Page 27

Parental Control
Child lock
TUNING
PICTURE
Language:
ENGLISH
FRANCAL
ESPANOL
Menu Demo:
Child lock menu:
More
Move[ ] Number[0-9]
TIMERSOUND
SET UP
Stop
To enter Child lock submenu
From the SETUP menu, press CH+ or CH- repeatedly
1
to select Child lock.
Input a password for the Child
2
lock menu.
The default password to enter the Child
lock menu is 0000 and you can change
it in the Child lock submenu.
PICTURE
Channel:
TV/Cable:
Child lock:
New password:
Move[ ] Select[ ]
TUNING
TIMERSOUND
TV
0n
SET UP
5
1
4
7
MUTE
Cable/SAT
VOL
-
STEREO/AUDIO&CH
REW/PREV
SEARCH
REPEAT A-B
SUBTITLE
2
5
8 9
0
DVD COMBO
CH
MENU
CH
STOP
SR/SF
DVD MENU
TITLE
3
6
TV
VOL
PLAY
FWD/NEXT
+10
SET
+
OPEN/CLOSE
PAUSE/STEP
RETURN
ENTER
ANGLE
SLEEP
TV/DVD
AV/SETUP
VCR
DSP/OSD
/ZOOM
Setting Child lock
From the Child lock submenu, press CH+ or CH-
11
repeatedly to select Channel.
Press VOL+ or VOL- to select a channel you want to
22
lock.
33
Press CH- to select TV/Cable.
Press VOL+ or VOL- to select TV or Cable.
44
Press CH- to select Child Lock.
55
Press VOL+ or VOL- to select ON or OFF.
66
Now the Child lock is active. When you select a locked channel, a
blue box appears with the following: "Notice: child lock function
active".
Changing password
From the Child lock submenu,
1
Press CH+ or CH- repeatedly to
select New password item.
Input a new password by using
2
0-9 digit buttons. Press MENU
button to confirm after you finish
inputting the new password.
PICTURE
Channel:
TV/Cable:
Child lock:
New password:
Move[ ] Number[0-9]
TIMER
TUNING
5
TV
0n
SET UP
25
Important:
Be sure to write down your password and retain it for future use.
If you forget the password, press 4 3 2 1 in order to access the Child lock submenu.
Page 28

Parental Control
To enter V-chip menu
(Continued)
Setting V-chip
PICTURE
MPAA RATING
TV PARENTAL GUIDELINES
CANADIAN ENGLISH RATING
CANADIAN FRENCH RATING
BLOCK
NEW PASSWORD
Move[ ] Select[ ]
1
4
7
MUTE
2
5
8 9
TUNING
TIMERSOUND
ON
3
6
+10
0
Cable/SAT
VOL
-
STEREO/AUDIO&CH
DVD COMBO
CH
MENU
CH
STOP
TV
VOL
+
PLAY
SET UP
SLEEP
TV/DVD
AV/SETUP
VCR
SET
DSP/OSD
/ZOOM
OPEN/CLOSE
V-Chip enables parents to prevent their children from watching
inappropriate material on TV. V-Chip reads the ratings for
programming (except for news, sports, unedited movies on premium
cable and Emergency System signals ), then denies access to
programming if the program's rating meets the limitations you select.
From the SETUP menu, press CH+ or CH- repeatedly
1
to select VCHIP PASSWORD.
Use digit buttons (0-9) to enter a
2
password (the preset password
More
Closed Caption
Vchip password
OFF
is 0000).
To enable the V-chip, set BLOCK to
ON in the V-chip menu.
IMPORTANT: The password can be
changed later by entering the original
password and following the above steps.
Move[ ] Number[0-9]
MPAA RATING
TV PARENTAL GUIDELINES
CANADIAN ENGLISH RATING
CANADIAN FRENCH RATING
BLOCK ON
New password
Move[ ] Select[ ]
MPAA RATING SET-UP
Rating guidelines are provided by broadcast stations. Most television
programs and television movies can be blocked by TV Rating and/or
Individual Categories. Movies that have been shown at the theaters or
direct-to-video movies use the Movie Rating System (MPAA) only.
REW/PREV
SEARCH
REPEAT A-B
SUBTITLE
SR/SF
FWD/NEXT
DVD MENU
TITLE
PAUSE/STEP
RETURN
ENTER
ANGLE
From the V-chip submenu, press CH+ or CH- repeatedly
11
to select MPAA RATING.
Press VOL+ or VOL- to enter into MPAA RATING sub-
22
menu.
33
Use CH+ or CH- repeatedly to select the desired
rating.
Press VOL+or VOL- button to
44
block a rating (" " will appear),
or unblock (" " will appear).
Movie Ratings:
* Unblocked
* G and Above (general audience)
* PG and Above (parental guidance suggested)
* PG-13 and Above (13 years and up)
* R and Above (restricted)
* NC-17 and Above (18 years and up)
* X (adult)
N/A
G
PG
PG-13
R
NC-17
X
Move[ ] Select[ ]
26
Page 29

Parental Control
Setting V-chip
TUNING
PICTURE
NONE F V S L D
TV-Y
TV-Y7
TV-G
TV-PG
TV-14
TV-MA
CONTENT
Move[ ] Select[ ]
TIMERSOUND
SET UP
TV RATING SET-UP
TV Parental Guidelines may have one or more letters added to the
basic rating to let parents know when a show contains higher levels of
violence, sex, adult language or suggestive dialogue:
From the V-chip submenu, press
1
CH+ or CH- repeatedly to select TV
PARENTAL GUIDELINES.
Press VOL+ or VOL- to enter
2
into TV PARENTAL GUIDELINES
MPAA RATING
TV PARENTAL GUIDELINES
CANADIAN ENGLISH RATING
CANADIAN FRENCH RATING
BLOCK ON
New password
Move[ ] Select[ ]
sub-menu.
1
4
7
MUTE
Cable/SAT
VOL
-
STEREO/AUDIO&CH
REW/PREV
SEARCH
REPEAT A-B
SUBTITLE
2
5
8 9
0
DVD COMBO
CH
MENU
CH
STOP
SR/SF
DVD MENU
TITLE
3
6
TV
VOL
PLAY
FWD/NEXT
+10
SET
+
OPEN/CLOSE
PAUSE/STEP
RETURN
ENTER
ANGLE
SLEEP
TV/DVD
AV/SETUP
VCR
DSP/OSD
/ZOOM
3
Use CH+ or CH- repeatedly to select the desired
rating.
Press VOL+ or VOL- to block the rating (" " will
4
appear), or unblock (" " will appear).
US TV PROGRAMS RATINGS: (Chart 1)
TV-Y
TV-Y7
TV-G
TV-PG
TV-14
TV-MA
US TV PROGRAMS RATINGS: (Chart 2)
F Violence
Violence
Sex scenes
Language
Dialog
FOR ALL CHILDREN:
Content specifically geared to young viewers ages 2-6.
FOR AGE 7 AND OLDER:
May contain mild physical or comedic violence which may
frighten children under 7.
GENERAL AUDIENCE:
Contains little or no violence, strong language, or sexual dialogue
or Situations.
PARENTAL GUIDANCE:
May contain infrequent coarse language, limited violence, some
suggestive sexual dialogue and Situations.
PARENTS CAUTIONED:
May contain sophisticated themes, sexual situations, strong
language, and more intense violence.
MATURE AUDIENCE:
May contain mature themes, profane language, graphic
violence, and Sexual situations.
Fantasy Violence
Violence
Sexual Situations
Adult Language
Sexually Suggestive Dialogue
27
Page 30

PICTURE
CONTENT
TV-Y
TV-Y7 VIEW
TV-G
TV-PG
TV-14
Move[ ] Select[ ]
TV-MA
FANTASY V
VIOLENCE
SEXUAL
LANGUAGE
DIALOG
TUNING
TIMERSOUND
---
---
---
---
SET UP
Parental Control
(Continued)
Setting V-chip
Setting individual Content Categories for TV Rating
From the PARENTAL
GUIDELINES submenu, press
1
CH+ or CH- repeatedly to
select CONTENT.
Press VOL+ or VOL- to enter
2
the CONTENT menu.
Press CH + or CH- repeatedly to select a TV Rating.
3
NONE F V S L D
TV-Y
TV-Y7
TV-G
TV-PG
TV-14
TV-MA
CONTENT
Move[ ] Select[ ]
1
4
7
MUTE
Cable/SAT
VOL
-
STEREO/AUDIO&CH
REW/PREV
SEARCH
REPEAT A-B
SUBTITLE
2
5
8 9
0
DVD COMBO
CH
MENU
CH
STOP
SR/SF
DVD MENU
TITLE
3
6
TV
VOL
PLAY
FWD/NEXT
+10
SET
+
OPEN/CLOSE
PAUSE/STEP
RETURN
ENTER
ANGLE
SLEEP
TV/DVD
AV/SETUP
VCR
DSP/OSD
/ZOOM
Press VOL + to enter the content categories menu.
4
Press CH+ or CH- repeatedly to select a content
5
category.
Press VOL + to set Block or View. If the content
6
category does not apply to the TV rating, - - - will be
displayed.
Press VOL - to exit content categories menu.
Notes:
If you want to exit the menu, please press the MENU button
repeatedly.
CANADIAN ENGLISH RATING SET-UP
From the V-chip submenu,
11
press CH+ or CH- repeatedly to
select CANADIAN ENGLISH
RATING item.
Press VOL+ or VOL- to enter
22
the CANADIAN ENGLISH
RATING sub-menu.
Press CH+ or CH- repeatedly to
33
select the desired rating.
Press VOL+ or VOL- to either
44
block the rating (" " will appear),
or unblock (" " will appear) it.
Canadian English Language Ratings:
E: Exempt.
*
C: Children.
*
C8+: Children 8 years and older.
*
G: General programming, suitable for all audiences.
*
PG: Parental guidance.
*
14+: Viewers 14 years and older.
*
18+: Adult programming.
*
MPAA RATING
TV PARENTAL GUIDELINES
CANADIAN ENGLISH RATING
CANADIAN FRENCH RATING
BLOCK ON
New password
Move[ ] Select[ ]
E
C
C8+
G
PG
14+
18+
Move[ ] Select[ ]
28
Page 31

Parental Control(continued)
Setting V-chip
CANADIAN FRENCH RATING SET-UP
TUNING
VOL
PLAY
3
6
+10
TV
+
SET UP
SLEEP
TV/DVD
AV/SETUP
VCR
SET
DSP/OSD
/ZOOM
OPEN/CLOSE
PAUSE/STEP
RETURN
From the V-CHIP submenu,
1
press CH+ or CH- repeatedly to
select CANADIAN FRENCH
RATING.
Press VOL+ or VOL- to enter
2
the CANADIAN FRENCH
RATING sub-menu.
Press CH+ or CH- repeatedly to select the desired
3
rating.
Press VOL+ or VOL- to block the rating (" " will
4
appear), or unblock (" " will appear) it.
Canadian French Language Ratings:
*
E: Exempt.
: Children.
* G
8 ans+: Children 8 years and older.
*
* 13 ans+
* 16 ans+
18 ans+: Adult programming.
*
Changing password
From the V-CHIP submenu,
11
press CH+ or CH- repeatedly to
select NEW PASSWORD.
Input a new password by using
22
the 0-9 digit buttons. Press
MENU to confirm the new
password.
PICTURE
E
G
8 ans+
13 ans+
16 ans+
18 ans+
Move[ ] Select[ ]
1
4
7
MUTE
TIMERSOUND
2
5
8 9
0
VOL
-
STEREO/AUDIO&CH
REW/PREV
SEARCH
DVD COMBO
CH
MENU
CH
STOP
SR/SF
FWD/NEXT
Cable/SAT
: Children 13 years and older.
:Viewers 16 years and older.
MPAA RATING
TV PARENTAL GUIDELINES
CANADIAN ENGLISH RATING
CANADIAN FRENCH RATING
BLOCK
New password
Move[ ] Select[ ]
MPAA RATING
TV PARENTAL GUIDELINES
CANADIAN ENGLISH RATING
CANADIAN FRENCH RATING
BLOCK
New password 145-
Move[ ] Number[0-9]
PRESS MENU KEY TO CONFIRM
ON
ON
29
REPEAT A-B
SUBTITLE
DVD MENU
TITLE
ENTER
ANGLE
Next time, you enter the V-chip menu, you must use this new
password. Please be sure to remember your passwords.
Page 32

DVD Operation Guide
Page 33

Disc Information
Discs that can be played
This TV/DVD supports DVD, SVCD, VCD, CD-DA, HDCD, KODAK picture CD and CD-R/RW including
discs containing MP3 files. Please do not play any disc other than the above formats.
This unit detects the disc loaded and automatically sets the mode.
Discs that can not be played
Do not play DVD-Audio, DVD-ROM, DVD-RAM, CD-G, CDV, CVD, DVD-RW, CVD, SACDand Divx Video
Discs. This unit may not be able to play some CD-R/RW due to the condition of the recording.
This unit has a Dolby Digital decoder and DTS decoder so you can
play DVDS with the right symbols.
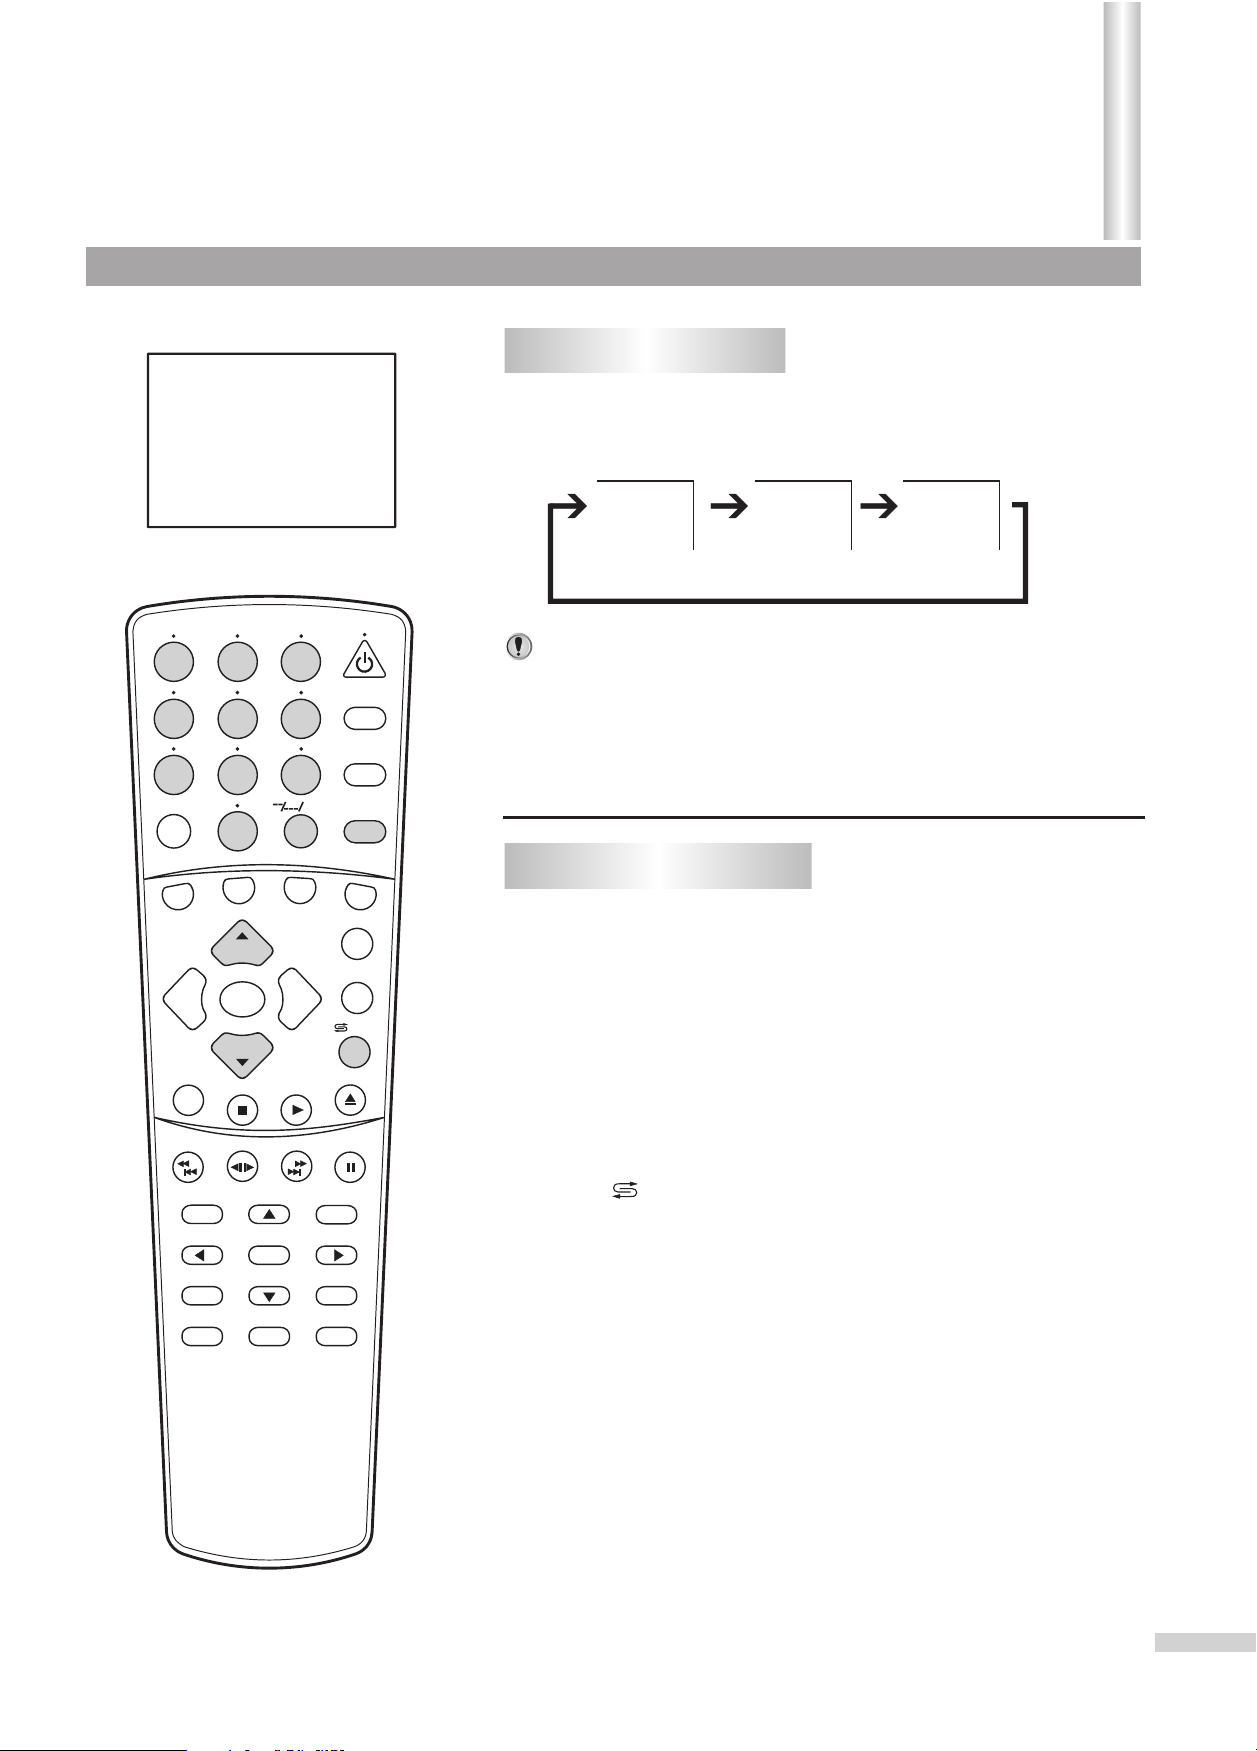
Title/Chapter/Track
Title
When two or more movies are recorded on a disc, the
disc is divided into two or more sections. Each section
is called a “TITLE”.
TITLE 1 TITLE 2
CHAPTER 1 CHAPTER 2 CHAPTER 3CHAPTER 1 CHAPTER 2
DVD DISC
Chapter
The titles can be subdivided into many sections. Each section is call a “CHAPTER”.
Track
An audio CD can contain audio tracks.
TRACK 1 TRACK 2 TRACK 3 TRACK 4 TRACK 5
CD
These numbers are assigned to each track.
Disc handling
Handling precautions
Hold the disc by the edges so the surface will not be soiled with fingerprints.
Fingerprints, dirt and scratches can cause skipping and distortion.
Do not write on the label side.
Do not use record cleaning sprays, benzine, thinner, static electricity
prevention liquids or any other solvent.
Be careful not to drop or bend the disc.
Do not install more than 1 disc on the disc tray.
Do not close the disc tray if the disc is not installed properly.
Store the disc in its case when not in use.
If the surface is soiled
Wipe gently with a soft, damp (water only) cloth.
When wiping discs, always wipe from the center toward the outer edge.
(If you wipe using a circular motion, circular scratches can occur, which will cause noise.)
Disc tray
Disc
If the disc is brought from a cold to a warm environment, moisture may form on the disc
Wipe with a soft, dry, Iint-free cloth before using the disc.
Improper disc storage
You can damage discs if you store them in the following places:
Areas exposed to direct sunlight
Humid or dusty areas
Areas directly exposed to a heat outlet or heating appliance
31
Page 34

1
4
7
MUTE
2
5
8 9
0
Basic Playback
Preparation
Insert the AC cord plug into the specified polarized AC outlet.
3
SLEEP
6
TV/DVD
+10
AV/SETUP
Press POWER to turn on the unit.
When using an amplifier, switch on the amplifier.
Start Playback
Press TV/DVD to select the DVD mode.
1
“LOADING” changes to “NO DISC”.
(If a DVD disc has already been loaded,
the playback will start automatically)
NO DISC
Cable/SAT
VOL
-
STEREO/AUDIO&CH
REW/PREV
SEARCH
REPEAT A-B
SUBTITLE
DVD COMBO
CH
MENU
CH
STOP
SR/SF
DVD MENU
TITLE
TV
VOL
PLAY
FWD/NEXT
SET
+
OPEN/CLOSE
PAUSE/STEP
RETURN
ENTER
ANGLE
VCR
DSP/OSD
/ZOOM
Press OPEN/CLOSE to open the disc
2
tray.
Place a disc onto the tray. Hold the disc,
3
position it with the printed label side up,
align it with the guides, and place it in its
proper position.
Press PLAY or OPEN/CLOSE to close
4
the disc tray and automatically start the
playback.
A menu screen will appear on the TV screen
if the disc has a menu feature.
In case of many movie DVDs, an interactive
DVD or Video CD with playback control, a
menu screen appears.
Press 3/4 or 5/6 to select title.
5
Press ENTER.
6
Title is selected and playback starts.
Stop Playback
Label must face
double-sided
discs, load so the
LOADING
TITLE MENU
Dogs
Birds
Example of DVD
Lovers
Castles
upward.(With
label for the side
you want to play
is facing up.)
Note
=
The disc continues to rotate while
the menu is displayed even after the
player has finished playing a
particular item. When no further
selections are to be played, be sure
to press STOP to clear the menu
display.
=
If appears on the screen when a
button is pressed, the operation is
prohibited by the player or disc.
=
In stop mode, if there is no operation
for 1 minute, the screen saver starts
up (this feature needs to be set in
advance). If there is no operation for
5 minutes, the DVD goes to sleep
mode automatically.
=
In some cases, a blue screen may
appear when you press TV/DVD. To
go back to TV or AV mode, press this
button again.
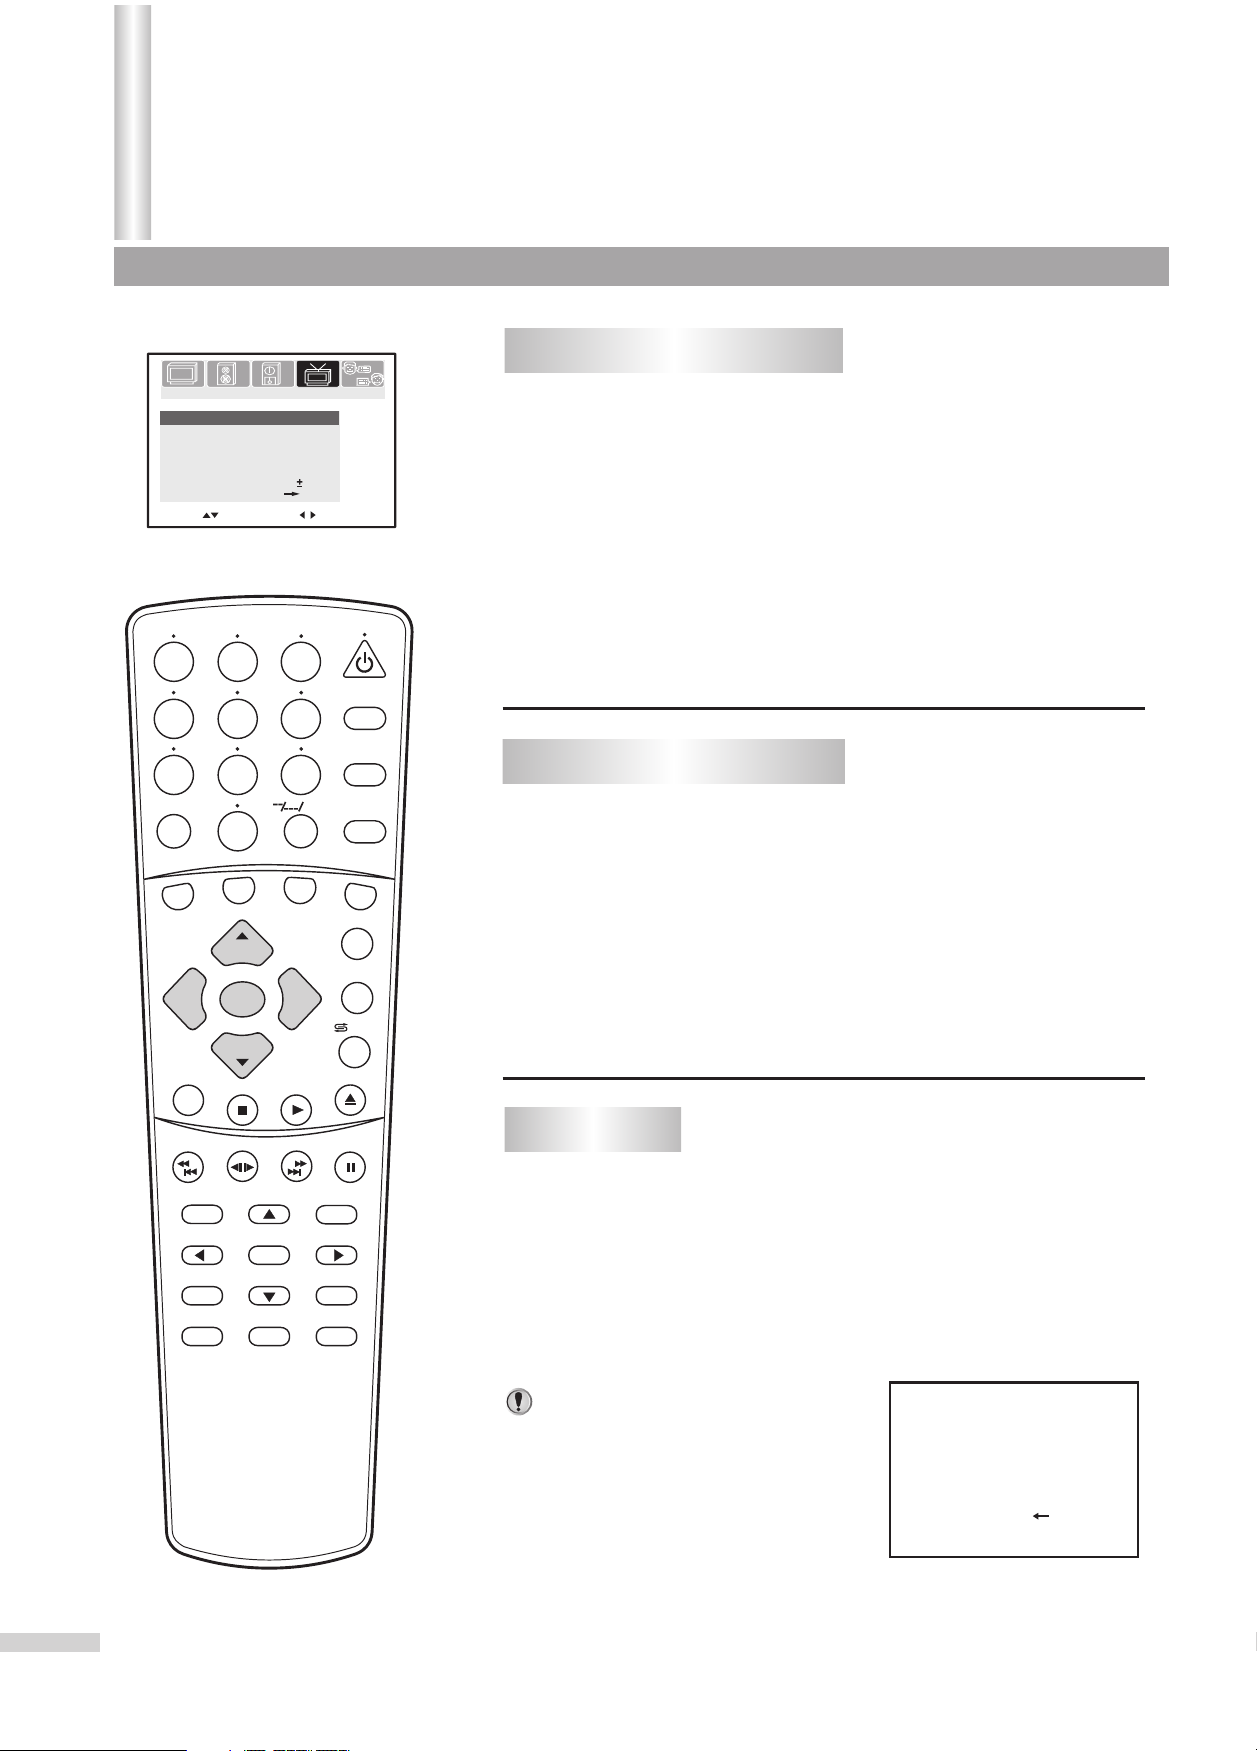
Press STOP to end playback.
1
The DVD player will remember where you stopped the playback
(depending on type of disc).
“PRESS PLAY KEY TO CONTINUE” appears on the screen. Press
PLAY to resume playback from the stopped point.
If you press STOP again or unload the disc, the unit will clear the stopped
point.
After Operation
When the player is not in use, press OPEN/CLOSE to open the disc tray.
Remove the disc and press POWER on the remote or television set.
The disc tray closes automatically and unit turns off.
Switch from DVD to TV or AV
In DVD mode, you can press TV/DVD to switch back to TV or AV mode,
which depends on the previous mode before the DVD mode is selected.
For example, you had switched the unit to DVD mode from AV mode, now
if you press TV/DVD, the unit goes back to AV mode.
32
Page 35

1
4
7
MUTE
2
5
8 9
0
Basic Playback
Quickly select Chapter or Track
You can quickly select chapter or track by using number buttons.
3
SLEEP
6
TV/DVD
+10
AV/SETUP
Note
!
Some Video-CDs have a PBC feature. When the PBC is ON, you cannot
select a track during playback by pressing the number buttons.
What is Playback control (PBC)?
If a Video-CD has “Playback control” written on its disc or jacket, it
means that particular scenes or information can be selected for viewing
interactively using the menu screen.
Cable/SAT
VOL
-
STEREO/AUDIO&CH
REW/PREV
SEARCH
REPEAT A-B
SUBTITLE
DVD COMBO
CH
MENU
CH
STOP
SR/SF
DVD MENU
TITLE
TV
VOL
PLAY
FWD/NEXT
SET
+
OPEN/CLOSE
PAUSE/STEP
RETURN
ENTER
ANGLE
VCR
DSP/OSD
/ZOOM
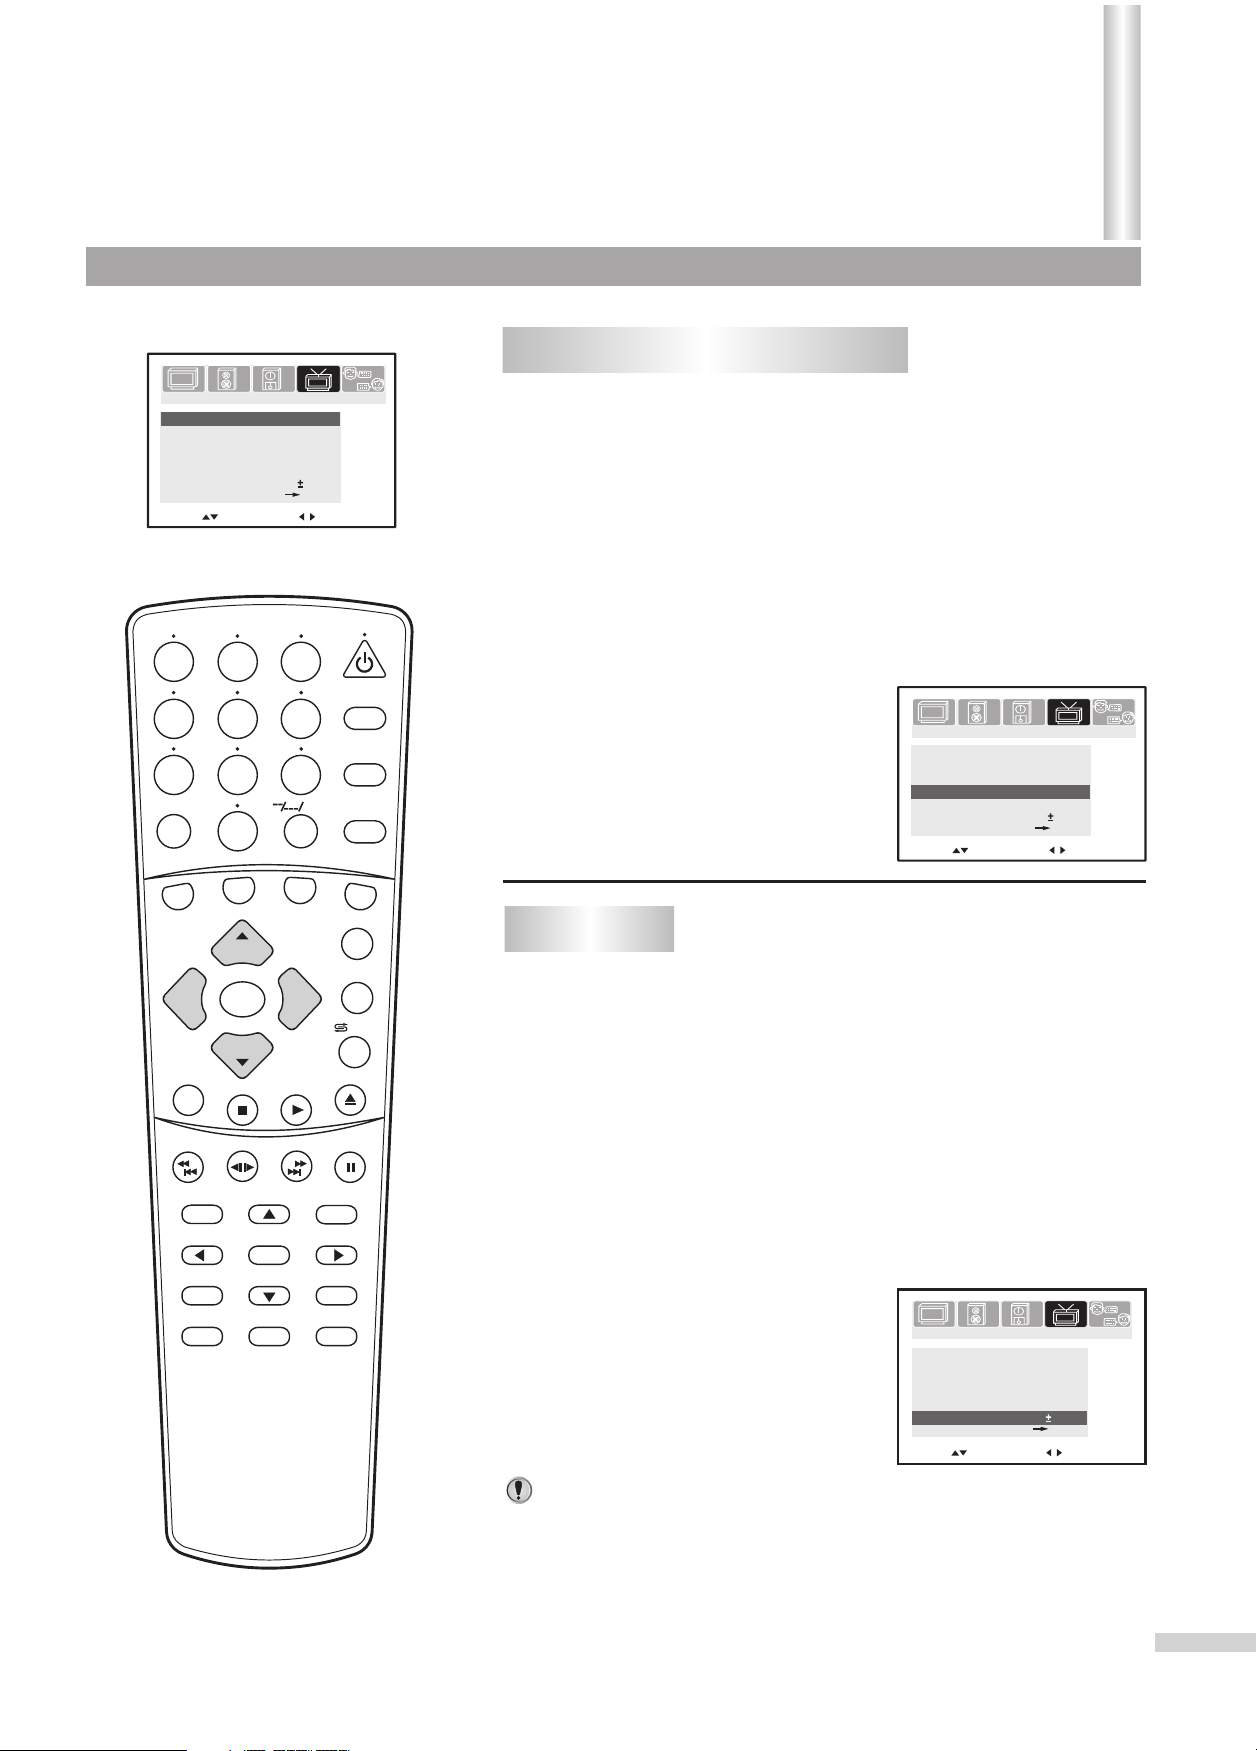
Fast Forward Playback /
Skipping chapters or tracks forward
Use the FWD/NEXT button to view fast forward playback or skip to
the next chapter. Press and release to skip chapter, press and hold to
fast forward. With each press of this button, the unit operation is:
2X 4X
8X
16X
To resume normal playback, press PLAY.
Reverse Playback /
Skipping chapters or tracks reverse
Use the REW/PREV button to view reverse playback or skip to the
previous chapter. Press and release to skip chapter, press and hold
to reverse. With each press of this button, the unit operation is:
2X 4X
8X
16X
To resume normal playback, press PLAY.
Slow motion Playback
Press SR/SF repeatedly to view slow motion playback in reverse or
forward. With each press of this button, the unit operation is:
1 2 1 4 1 8 1 16 1 2 1 4 1 8 1 16
When playing DVD
33
1 2 1 4 1 8 1 16
When playing VCD
Still Playback/Frame Advance
Press PAUSE/STEP during normal playback to pause
playback.
To resume normal playback, press PLAY.
Press PAUSE/STEP during still playback.
One frame is advanced each time you press
PAUSE/STEP.
To resume normal playback, press PLAY.
Note
!
When playing Audio CD or MP3 CD, the function of Frame Advanced does
not work .
Page 36

1
4
7
MUTE
2
5
8 9
0
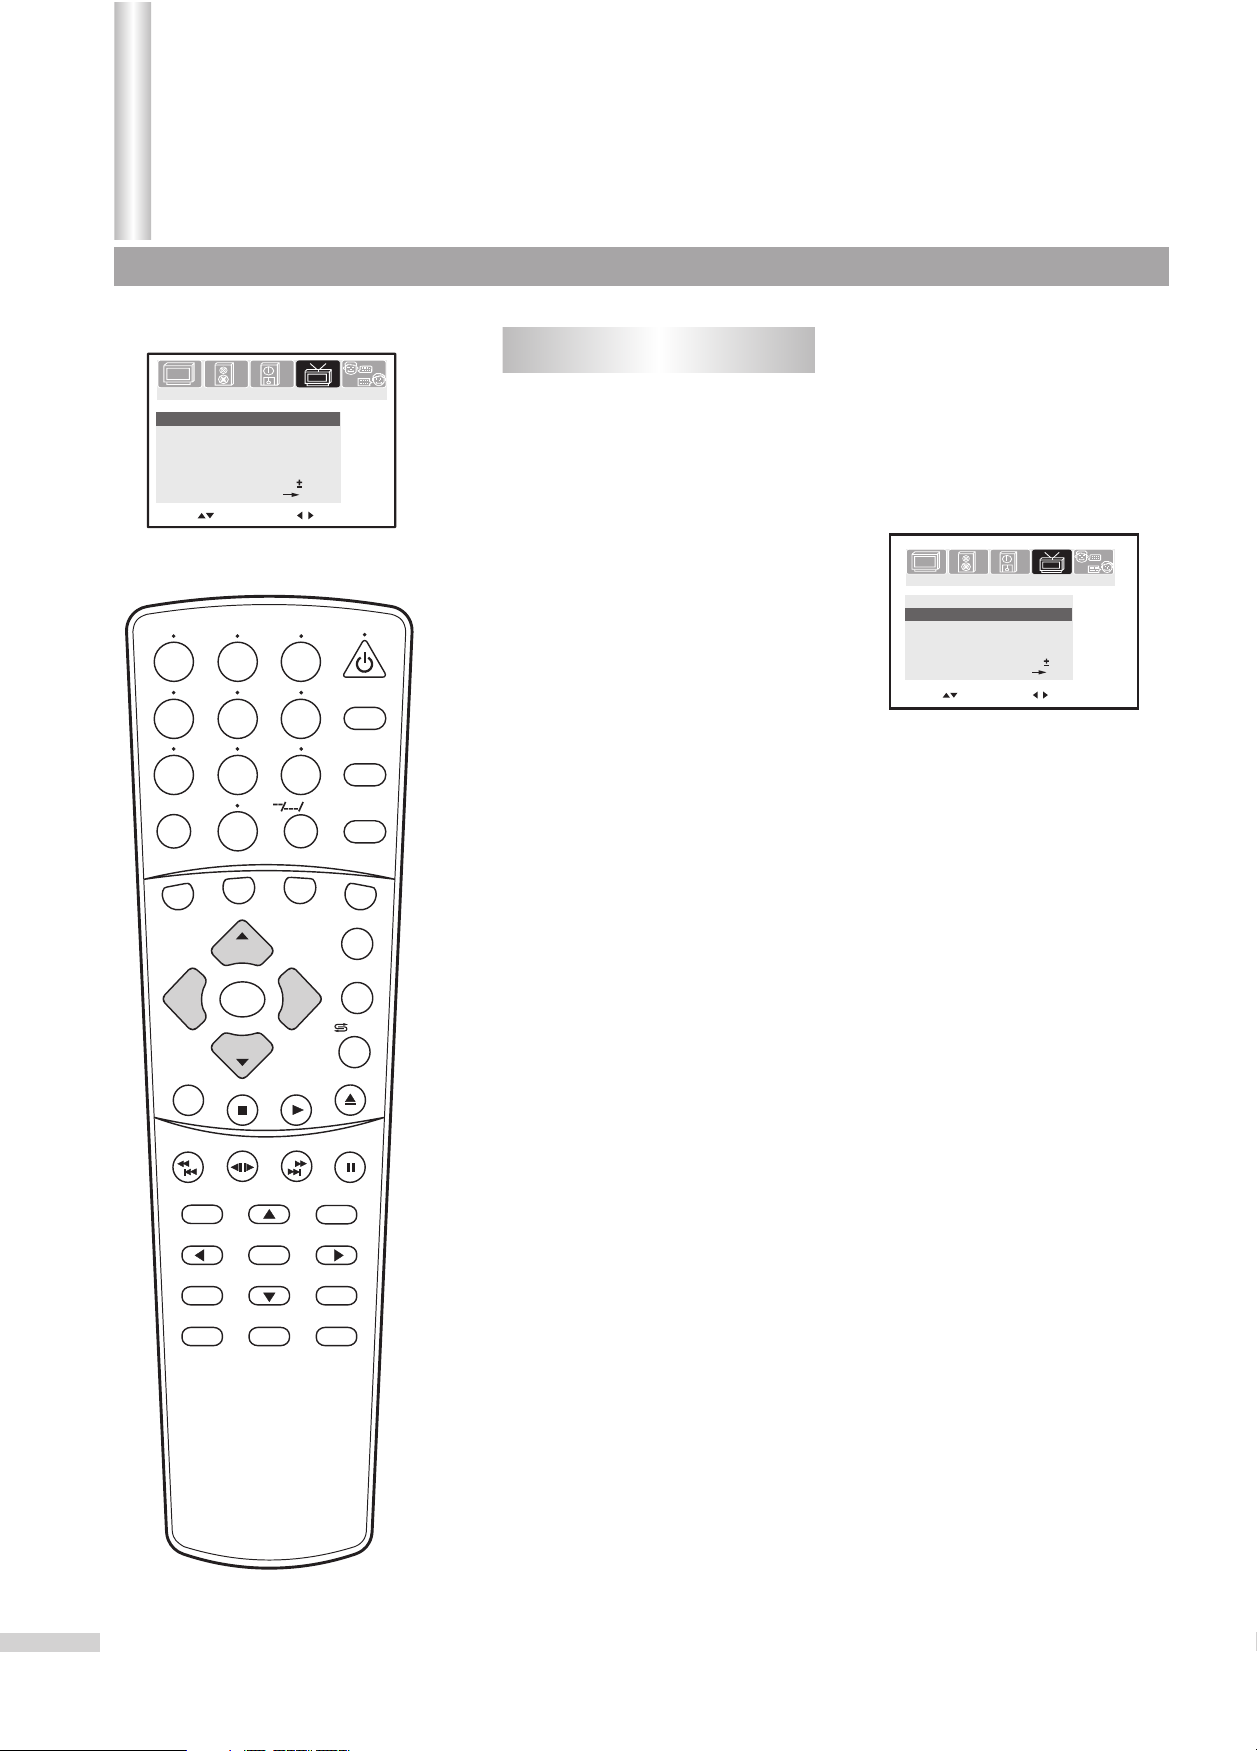
Using On-screen Menu
Using a TITLE MENU [DVD]
Some movie discs may have two or more titles. If the disc has a title
3
SLEEP
6
TV/DVD
+10
AV/SETUP
menu recorded on it, the TITLE button can be used to select this menu.
(The details of operation depend on the disc used.)
Press TITLE during playback.
1
A list of the titles on the disc is now displayed.
Note
=
If the disc contains only one movie, the unit
plays from the beginning of the disc.
TITLE MENU
Dogs
Birds
Example of DVD
Lovers
Castles
Cable/SAT
VOL
-
STEREO/AUDIO&CH
REW/PREV
SEARCH
REPEAT A-B
SUBTITLE
DVD COMBO
CH
MENU
CH
STOP
SR/SF
DVD MENU
TITLE
TV
VOL
PLAY
FWD/NEXT
SET
+
OPEN/CLOSE
PAUSE/STEP
RETURN
ENTER
ANGLE
VCR
DSP/OSD
/ZOOM
Press 3/4or 5/6 to select item and press ENTER or PLAY.
2
TITLE MENU
Birds
Dogs
Birds
The selected title now starts playing.
Using a DVD menu [DVD]
Some DVDs have unique menus. These menus can be for language
selection, audio output selection and/or subtitle language selection, etc.
Although the DVD menu’s contents and operation differ from disc to disc, the
following explains basic operation when this feature is used.
Press DVD MENU during playback.
1
The DVD menu available on the disc is now
displayed.
Pressing RETURN resumes playback from
the scene when MENU was first pressed.
Lovers
Castles
Example
Example
DVD MENU
1. Play Movie
2. Subtitle
3. Audio
4. Chapter
Example
Press 3/4or 5/6 to select item and press ENTER, or press
2
number buttons to select item.
Using a PBC menu [VCD]
When playing a VCD with PBC features and
the PBC fucntion is turned on, pressing the
RETURN will display the PBC menu.
Now you can select a track by using the
number buttons.
1. Sailing
2. Heal the world
3. Say you, say me
4. Happy nation
5. I can’t tell you why
6. I just call to say I love you
Press to display remain tracks
Example
Note
=
Only those VCD discs with PBC features can use this menu feature.
=
You can toggle PBC ON and PBC OFF by pressing DVD MENU.
34
Page 37

1
4
7
MUTE
Cable/SAT
VOL
-
STEREO/AUDIO&CH
REW/PREV
SEARCH
2
5
8 9
0
DVD COMBO
CH
MENU
CH
STOP
SR/SF
DVD MENU
3
6
TV
VOL
PLAY
FWD/NEXT
+10
SET
+
OPEN/CLOSE
PAUSE/STEP
RETURN
SLEEP
TV/DVD
AV/SETUP
VCR
DSP/OSD
/ZOOM
Locating Desired Scene
Locating desired scene [DVD]
You can use the title, chapter and time recorded on the disc to locate a
desired point to play back.
Press SEARCH during playback.
1
Press this button once and the unit allows
you to select title or chapter with the number
buttons.
You can toggle TITLE and CHAPTER with
3or4.
Press SEARCH again to locate desired
2
scene by TITLE or TIME.
The unit allows you to select title or time with
the number buttons.
You can toggle TITLE and TIME with 3or4.
Note
=
The time you input should not longer than the total time of current TITLE.
Press SEARCH third time to locate
3
desired scene by CHAPTER or TIME.
The unit allows you to select chapter or time
with the number buttons.
You can toggle CHAPTER and TIME with
3or4.
Note
=
The time you input should not longer than the total time of current CHAPTER.
TITLE 01/02 CHAPTER /16
TITLE 01/02 CHAPTER 00/00
TITLE 01/02 TIME : :
TITLE 01/02 TIME 0:00:00
CHAPTER 01/16 TIME : :
CHAPTER 01/16 TIME 0:00:00
REPEAT A-B
SUBTITLE
TITLE
ENTER
ANGLE
Note
=
The on-screen display maybe
different and it depends on the disc
you are playing back.
Locating desired point [Audio CD/VCD]
Press SEARCH during playback.
1
The unit allows you to locate desired point by
time.
DISC GOTO --:--
Note
=
The time you input should not longer than the total time of the disc.
Press SEARCH again.
2
The unit allows you to locate desired point by
TRACK GOTO --:--
time.
Note
=
The time you input should not longer than the total time of the current track.
Press SEARCH third time.
3
The unit allows you to locate desired point by
track.
SELECT TRACK --/12
35
Page 38

1
4
7
MUTE
Cable/SAT
VOL
-
STEREO/AUDIO&CH
REW/PREV
SEARCH
REPEAT A-B
SUBTITLE
2
5
8 9
0
DVD COMBO
CH
MENU
CH
STOP
SR/SF
DVD MENU
TITLE
3
6
TV
VOL
PLAY
FWD/NEXT
+10
SET
+
OPEN/CLOSE
PAUSE/STEP
RETURN
ENTER
ANGLE
SLEEP
TV/DVD
AV/SETUP
VCR
DSP/OSD
/ZOOM
Displaying Status of Disc
The status of disc can be displayed by pressing DSP/OSD
repeatedly. The information displayed on the screen is different
according to the type of disc you are playing back. Each press of this
button displays the following:
[DVD]
There are 2 titles in the
disc and title 1 is now
playing.
There are 16 chapters
in title1 and chapter2 is
now playing.
[VCD]
There are 12 tracks in
the disc and track 2 is
now playing.
DVD
TT 01/02 CHAPTER 02/16
DVD
TT 01/02 CHAPTER 02/16
DVD
TT 01/02 CHAPTER 02/16
DVD
TT 01/02 CHAPTER 02/16
DVD
DISPLAY OFF
VCD
TRACK 02/12
VCD
TRACK 02/12
VCD
TRACK 02/12
VCD
TRACK 02/12
VCD
DISPLAY OFF
The elapsed time of current
0:08:31
title.
The remaining time of current
1:21:29
title.
The elapsed time of current
0:02:31
chapter.
The remaining time of current
0:03:29
chapter.
The elapsed time of current
02:31
track.
The remaining time of current
02:29
track.
The elapsed time of the whole
07:31
disc.
The remaining time of the
52:29
whole disc.
Note
=
The on-screen display may be
different than illustrated and
dependent on the type of disc being
played.
Note
=
When playing VCD or SVCD, the "elapsed time of the whole disc" and
"remaining time of the whole disc" can not display unless the PBC is turned off.
[CD]
There are 12 tracks in
the disc and track 2 is
now playing.
CD
TRACK 02/12
CD
TRACK 02/12
CD
TRACK 02/12
CD
TRACK 02/12
CD
DISPLAY OFF
The elapsed time of current
02:31
track.
The remaining time of current
02:29
track.
The elapsed time of the whole
07:31
disc.
The remaining time of the
52:29
whole disc.
36
Page 39

Special Functions
Zooming
1
4
7
MUTE
Cable/SAT
VOL
-
STEREO/AUDIO&CH
REW/PREV
SEARCH
REPEAT A-B
SUBTITLE
2
5
8 9
0
DVD COMBO
CH
MENU
CH
STOP
SR/SF
DVD MENU
TITLE
3
6
TV
VOL
PLAY
FWD/NEXT
+10
SET
+
OPEN/CLOSE
PAUSE/STEP
RETURN
ENTER
ANGLE
SLEEP
TV/DVD
AV/SETUP
VCR
DSP/OSD
/ZOOM
When you play DVD or VCD, this unit allows you to
2X
zoom in or zoom out during playback. Each press of
the /ZOOM button, the unit operates as:
2X 1 3 1 4
3X 4X 1 2
Normal
When you zoom in the frame image, you can make selections by
switching the position of the frame by using 3/4or 5/6.
Setting soundtrack language
You can select the language when you play a multilingual disc.
Press STEREO/AUDIO&CH during
1
playback.
The current soundtrack language will appear.
Press STEREO/AUDIO&CH repeatedly
2
until the desired language is selected.
The on-screen display will disappear after a
few seconds.
When you play Video CD, press STEREO/AUDIO&CH to change the
audio channel. With each press of this button, the unit operation is:
AUDIO 1/2 AC3 5.1CH ENGLISH
AUDIO 2/2 AC3 5.1CH FRENCH
STEREOMONO LEFT MONO RIGHT MIX-MONO
Note
=
If you play DVD, please set point A
and B in the same chapter; If you
play VCD or audio CD, please set
point A and B in the same track.
=
Some discs may not work with the
repeat operation.
=
You may not be able to set A-B
repeat, depending on the scenes
of the DVD.
Note
=
This function depends on the disc. If the desired language is not heard after
pressing the button several times, the language is not recorded on the disc.
=
The soundtrack language selection is cancelled when you open the disc
tray or turn the power off. The initial default language or available language
will be heard if the disc is played back again.
Repeat playback
This unit allows you to repeat material between two selected points.
Press REPEAT A-B during playback.
1
The start point is selected.
Press REPEAT A-B again.
2
The end point is selected. Playback
starts at the start point you selected and
stops at the end point, returns to Point A
automatically, then starts again.
A
AB
37
To resume normal playback press once again.REPEAT A-B
Page 40

Special Functions
Changing Angles [DVD]
1
4
7
MUTE
Cable/SAT
VOL
-
STEREO/AUDIO&CH
REW/PREV
2
5
8 9
0
DVD COMBO
CH
MENU
CH
STOP
SR/SF
3
6
TV
VOL
PLAY
FWD/NEXT
+10
SET
+
OPEN/CLOSE
PAUSE/STEP
SLEEP
TV/DVD
AV/SETUP
VCR
DSP/OSD
/ZOOM
Some DVDs contain scenes which have been shot
simultaneously from a number of different angles. For these discs,
the same scene can be viewed from these different angles with
the ANGLE button. (This feature depends upon inclusion on the disc)
Press ANGLE during playback.
1
The current angle will appear.
Press ANGLE repeatedly until the desired angle is selected.
2
Note
=
This function only works for titles having scenes recorded at
different angles.
=
Depending on the DVD, you may not be able to change the angles using
this button even if multi-angles are recorded on the DVD.
Changing Subtitle languages [DVD]
You can select the language when playing back a disc recorded with
multi-lingual subtitles.
Press SUBTITLE during playback.
1
The current subtitle will appear.
SUBTITLE 1/8: ENGLISH
SEARCH
REPEAT A-B
SUBTITLE
DVD MENU
TITLE
RETURN
ENTER
ANGLE
Press SUBTITLE repeatedly until your
2
desired language appears.
SUBTITLE 3/8: FRENCH
The on-screen display will disappear after a few seconds
If you want to turn off the subtitle, press
3
SUBTITLE repeatedly until “SUBTITLE
SUBTITLE OFF
OFF” appears.
Note
=
This operation works only with discs on which multiple subtitle
languages are recorded.
=
If desired language is not selected after pressing the SUBTITLE button
several times, the language is not recorded on the disc.
=
The selected subtitle language is cancelled when you open the disc tray or
turn the power off.
=
In some cases, the subtitle language is not changed to the selected one
immediately.
38
Page 41

1
4
7
MUTE
2
5
8 9
3
SLEEP
6
TV/DVD
+10
AV/SETUP
0
VOL
-
STEREO/AUDIO&CH
REW/PREV
SEARCH
REPEAT A-B
SUBTITLE
DVD COMBO
CH
MENU
CH
STOP
SR/SF
Cable/SAT
Note
=
Press the AV/SETUP button to exit
setup menu after completion of
initial settings.
=
The "6" mark
indicates that there are some items
that cannot be displayed on screen.
To display the concealed items,
press the " " button.
6
TV
SET
DSP/OSD
VOL
+
OPEN/CLOSE
PLAY
PAUSE/STEP
FWD/NEXT
RETURN
DVD MENU
ENTER
TITLE
ANGLE
on the screen
VCR
/ZOOM
Initial Settings
Once the initial settings have been completed, the player can
always be operated under the same conditions (especially DVDs).
The settings will be retained in the memory even after switching to
standby mode.
GENERAL SETUP
Accessing GENERAL SETUP page
=
Press AV/SETUP to display initial setup
menu.
=
Press5or6to select GENERAL SETUP
item.
=
Press ENTER.
Now you can start GENERAL SETUP.
1. Setting TV TYPE
=
Press5or6to select TV TYPE item.
=
Press 4 to access option item.
=
Press5or6to select option item.
=
Press ENTER to confirm and press 3to
return.
PAL: force PAL system output.
NTSC: force NTSC system output.
AUTO: automatically identify system.
2. Setting TV DISPLAY
=
Press5or6to select TV DISPLAY item.
=
Press 4 to access option item.
=
Press5or6to select option item.
=
Press ENTER to confirm and press 3to
return.
NORMAL/PS: It displays the wide screen image
as full screen with left and right edges
automatically cut off.
NORMAL/LB: Select this mode when connecting to a conventional TV. When
playing back a wide screen-DVD disc, it displays the wide picture with black bands
at the top and bottom of screen.
WIDE: Select this mode when connecting to wide-screen TV. A wide screen picture
is displayed in full size.
Note
=
This function may not operate on all discs.
3. Setting ANGLE MARK
=
Press5or6to select ANGLE MARK
item.
=
Press 4 to access option item.
=
Press5or6to select option item.
=
Press ENTER to confirm and press 3to
return.
SETUP MENU--MAIN PAGE
GENERAL SETUP
AUDIO SETUP
VIDEO SETUP
PREFERENCE SETUP
EXIT SETUP
GENERAL SETUP PAGE
TV TYPE
TV DISPLAY
ANGLE MARK
OSD LANG
CAPTIONS
SCREEN SAVER
LAST MEMORY
GENERAL SETUP PAGE
TV TYPE
TV DISPLAY
ANGLE MARK
OSD LANG
CAPTIONS
SCREEN SAVER
LAST MEMORY
GENERAL SETUP PAGE
TV TYPE
TV DISPLAY
ANGLE MARK
OSD LANG
CAPTIONS
SCREEN SAVER
LAST MEMORY
PAL
AUTO
NTSC
NORMAL/PS
NORMAL/LB
WIDE
OFF
ON
39
ON: When playing back a DVD disc recorded with a multi-angle feature, an angle
indicator will display on the screen.
OFF: turns off the multi angle display indicator.
Note
=
This function only works for the discs recorded with the multi angle feature.
Page 42

Initial Settings
GENERAL SETUP (continued)
1
4
7
MUTE
Cable/SAT
VOL
-
STEREO/AUDIO&CH
REW/PREV
SEARCH
REPEAT A-B
SUBTITLE
2
5
8 9
0
DVD COMBO
CH
MENU
CH
STOP
SR/SF
DVD MENU
TITLE
3
6
TV
VOL
PLAY
FWD/NEXT
+10
SET
+
OPEN/CLOSE
PAUSE/STEP
RETURN
ENTER
ANGLE
SLEEP
TV/DVD
AV/SETUP
VCR
DSP/OSD
/ZOOM
4. Setting OSD LANGUAGE
=
Press5or6to select OSD LANG item.
=
Press 4 to access option item.
=
Press5or6to select option item.
=
Press ENTER to confirm and press 3to
return.
This unit provides ENGLISH, FRENCH and
SPANISH OSD languages for your selection.
GENERAL SETUP PAGE
TV TYPE
TV DISPLAY
ANGLE MARK
OSD LANG
CAPTIONS
SCREEN SAVER
LAST MEMORY
5. Setting the CAPTION feature
=
Press5or6to select CAPTIONS item.
=
Press 4 to access option item.
=
Press5or6to select option item.
=
Press ENTER to confirm and press 3to
return.
This function allows you to turn the closed caption
feature on or off.
GENERAL SETUP PAGE
TV TYPE
TV DISPLAY
ANGLE MARK
OSD LANG
CAPTIONS
SCREEN SAVER
LAST MEMORY
Note
=
This function depends on the discs.
6. Setting SCREEN SAVER
=
Press5or6to select SCREEN SAVER
item.
=
Press 4 to access option item.
=
Press5or6to select option item.
=
Press ENTER to confirm and press 3to
return.
If you set SCREEN SAVER to ON, the unit will start
the screen saver when there is no disc or the DVD
is in STOP mode for 1 minute.
GENERAL SETUP PAGE
TV TYPE
TV DISPLAY
ANGLE MARK
OSD LANG
CAPTIONS
SCREEN SAVER
LAST MEMORY
Note
=
This function only works when the TV/DVD is in DVD mode.
ENGLISH
FRENCH
SPANISH
ON
OFF
ON
OFF
Note
=
Press the AV/SETUP button to exit
setup menu after completion of
initial settings.
7. Setting LAST MEMORY
=
Press5or6to select LAST MEMORY
item.
=
Press 4 to access option item.
=
Press5or6to select option item.
=
Press ENTER to confirm and press 3to
return.
If you set this feature to ON, the unit remembers the stop point on the disc when the
DVD component is switched off by the remote control. Once the DVD component
is switched on again, the unit will play from the last stop point automatically. This
function is useful when you are watching movie.
GENERAL SETUP PAGE
TV TYPE
TV DISPLAY
ANGLE MARK
OSD LANG
CAPTIONS
SCREEN SAVER
LAST MEMORY
ON
OFF
Note
=
This function does not work when the DVD component is switched off by
pressing POWER or TV/DVD button on the panel of the unit.
40
Page 43

Initial Settings
AUDIO SETUP
1
4
7
MUTE
Cable/SAT
VOL
-
STEREO/AUDIO&CH
REW/PREV
SEARCH
REPEAT A-B
SUBTITLE
2
5
8 9
0
DVD COMBO
CH
MENU
CH
STOP
SR/SF
DVD MENU
TITLE
3
6
TV
VOL
PLAY
FWD/NEXT
+10
SET
+
OPEN/CLOSE
PAUSE/STEP
RETURN
ENTER
ANGLE
SLEEP
TV/DVD
AV/SETUP
VCR
DSP/OSD
/ZOOM
Accessing AUDIO SETUP page
=
Press AV/SETUP to display initial setup
menu.
=
Press5or6to select AUDIO SETUP
AUDIO SETUP PAGE
SPEAKER SETUP
SPDIF SETUP
HDCD
item.
=
Press ENTER.
MAIN PAGE
Now you can start AUDIO SETUP.
1. SPEAKER SETUP
=
Press5or6to select SPEAKER SETUP
item.
=
Press ENTER to enter.
=
Press 4 to access option item.
=
Press5or6to select option item.
=
Press ENTER to confirm and press 3to
return.
=
Press6to select AUDIO SETUP item and press ENTER to return
to AUDIO SETUP PAGE.
LT/RT: output audio signal which is encoded with Dolby surround stereo
information so that an amplifier is able to process the signal.
STEREO: output audio signal in left and right channel.
SPEAKER SETUP PAGE
DOWNMIX
AUDIO SETUP
LT/RT
STEREO
2. SPDIF SETUP
=
Press5or6to select SPDIF SETUP item.
=
Press ENTER to enter.
SPDIF: Sony/Philips Digital Interface. The unit outputs a digital signal for the
amplifier to decode via SPDIF.
Note
=
Press the AV/SETUP button to exit
setup menu after completion of
initial settings.
SPDIF OUTPUT
=
Press5or6to select SPDIF OUTPUT item.
=
Press 4 to access option item.
=
Press5or6to select option item.
=
Press ENTER to confirm and press 3to
SPDIF SETUP PAGE
SPDIF OUTPUT
LPCM OUT
AUDIO SETUP
SPDIF OFF
SPDIF/RAW
SPDIF/PCM
return.
SPDIF OFF: turn off SPDIF output.
SPDIF/PCM: the unit first decodes the disc and then encodes the audio signal as
PCM to the output.
LPCM OUT
=
Press5or6to select LPCM OUT item.
=
Press 4 to access option item.
=
Press5or6to select option item.
=
Press ENTER to confirm and press 3to
SPDIF SETUP PAGE
SPDIF OUTPUT
LPCM OUT
AUDIO SETUP
48K
96K
return.
48k: convert 96K LPCM digital audio to 48K
LPCM digital audio and output.
96K: output LPCM digital audio with its original codes.
=
Press6to select AUDIO SETUP item and press ENTER to return
to AUDIO SETUP PAGE.
Note
=
If the sample rate of the disc is lower than your choice, the audio outputs
according to the lower sample rate.
41
Page 44

Initial Settings
AUDIO SETUP (continued)
1
4
7
MUTE
Cable/SAT
VOL
-
STEREO/AUDIO&CH
REW/PREV
SEARCH
REPEAT A-B
SUBTITLE
2
5
8 9
0
DVD COMBO
CH
MENU
CH
STOP
SR/SF
DVD MENU
TITLE
3
6
TV
VOL
PLAY
FWD/NEXT
+10
SET
+
OPEN/CLOSE
PAUSE/STEP
RETURN
ENTER
ANGLE
SLEEP
TV/DVD
AV/SETUP
VCR
DSP/OSD
/ZOOM
3. Setting HDCD
=
Press5or6to select HDCD item.
=
Press ENTER to confirm.
=
Press 4 to access option item.
=
Press5or6to select option item.
=
Press ENTER to confirm and press 3to
return.
=
Press6to select AUDIO SETUP item
and press ENTER to return to AUDIO
SETUP PAGE.
VIDEO SETUP
Accessing VIDEO SETUP page
=
Press AV/SETUP to display initial setup
menu.
=
Press5or6to select VIDEO SETUP
item.
=
Press ENTER.
Now you can start VIDEO SETUP.
1. Setting SHARPNESS
=
Press5or6to select SHARPNESS item.
=
Press 4 to access option item.
=
Press5or6to select option item.
=
Press ENTER to confirm and press 3to
return.
The unit allows you to set SHARPNESS to HIGH,
MEDIUM or LOW.
HDCD SETUP PAGE
FILTER
AUDIO SETUP
VIDEO SETUP PAGE
SHARPNESS
BRIGHTNESS
CONTRAST
LUMA DELAY
MAIN PAGE
VIDEO SETUP PAGE
SHARPNESS
BRIGHTNESS
CONTRAST
LUMA DELAY
MAIN PAGE
OFF
ON
HIGH
MEDIUM
LOW
HIGH
MEDIUM
LOW
Note
=
Press the AV/SETUP button to exit
setup menu after completion of
initial settings.
2. Setting BRIGHTNESS
=
Press5or6to select BRIGHTNESS item.
=
Press 4 to access option item.
=
Press ENTER to confirm.
=
Press5or6to adjust.
=
Press 3to return.
3. Setting CONTRAST
=
Press5or6to select CONTRAST item.
=
Press 4 to access option item.
=
Press ENTER to confirm.
=
Press5or6to adjust.
=
Press 3to return.
VIDEO SETUP PAGE
SHARPNESS
BRIGHTNESS
CONTRAST
LUMA DELAY
MAIN PAGE
PRESS LEFT TO MAIN MENU
BRIGHTNESS
VIDEO SETUP PAGE
SHARPNESS
BRIGHTNESS
CONTRAST
LUMA DELAY
MAIN PAGE
PRESS LEFT TO MAIN MENU
CONTRAST
+2
0
+2
0
42
Page 45

Initial Settings
VIDEO SETUP (continued)
1
4
7
MUTE
Cable/SAT
VOL
-
STEREO/AUDIO&CH
REW/PREV
SEARCH
REPEAT A-B
SUBTITLE
2
5
8 9
0
DVD COMBO
CH
MENU
CH
STOP
SR/SF
DVD MENU
TITLE
3
6
TV
VOL
PLAY
FWD/NEXT
+10
SET
+
OPEN/CLOSE
PAUSE/STEP
RETURN
ENTER
ANGLE
SLEEP
TV/DVD
AV/SETUP
VCR
DSP/OSD
/ZOOM
4. Setting LUMA DELAY item
=
Press5or6to select LUMA DELAY item.
=
Press 4 to access option item.
=
Press5or6to select option item.
=
Press ENTER to confirm and press 3to
return.
In most cases, "1T" is recommended when playing
DVD material. "0T" is recommended when playing
other material.
PREFERENCE SETUP
Accessing PREFERENCE SETUP page
=
Press AV/SETUP to display initial setup
menu.
=
Press5or6to select PREFERENCE
SETUP item.
=
Press ENTER.
Now you can start PREFERENCE SETUP.
The PREFERENCE PAGE can not be accessed
unless the DVD is in STOP mode or no disc
loaded by the unit.
1. Setting Audio Language
=
Press5or6to select AUDIO item.
=
Press 4 to access option item.
=
Press5or6to select an audio language.
=
Press ENTER to confirm and press 3to
return.
VIDEO SETUP PAGE
SHARPNESS
BRIGHTNESS
CONTRAST
LUMA DELAY
MAIN PAGE
PREFERENCE PAGE
AUDIO
SUBTITLE
DISC MENU
PARENTAL
PASSWORD
DEFAULT
MAIN PAGE
PREFERENCE PAGE
AUDIO
SUBTITLE
DISC MENU
PARENTAL
PASSWORD
DEFAULT
MAIN PAGE
0T
1T
ENGLISH
FRENCH
SPANISH
CHINESE
JAPANESE
KOREAN
RUSSIAN
THAI
OTHERS
ENGLISH
FRENCH
SPANISH
CHINESE
JAPANESE
KOREAN
RUSSIAN
THAI
OTHERS
Note
=
Press the AV/SETUP button to exit
setup menu after completion of
initial settings.
=
The AUDIO LANGUAGE,
SUBTITLE LANGUAGE and DISC
MENU LANGUAGE features are
only available if they have been
programmed into the DVD.
43
2. Setting Subtitle Language
=
Press5or6to select SUBTITLE item.
=
Press 4 to access option item.
=
Press5or6to select a subtitle
language.
=
Press ENTER to confirm and press 3to
return.
3. Setting Disc menu Language
=
Press5or6to select DISC MENU item.
=
Press 4 to access option item.
=
Press5or6to select a disc menu
language.
=
Press ENTER to confirm and press 3to
return.
PREFERENCE PAGE
AUDIO
SUBTITLE
DISC MENU
PARENTAL
PASSWORD
DEFAULT
MAIN PAGE
PREFERENCE PAGE
AUDIO
SUBTITLE
DISC MENU
PARENTAL
PASSWORD
DEFAULT
MAIN PAGE
ENGLISH
FRENCH
SPANISH
CHINESE
JAPANESE
KOREAN
RUSSIAN
THAI
OTHERS
ENGLISH
FRENCH
SPANISH
CHINESE
JAPANESE
KOREAN
RUSSIAN
THAI
OTHERS
Page 46

Initial Settings
PREFERENCE SETUP (continued)
1
4
7
MUTE
2
5
8 9
3
SLEEP
6
TV/DVD
+10
AV/SETUP
0
VOL
-
STEREO/AUDIO&CH
REW/PREV
SEARCH
REPEAT A-B
SUBTITLE
DVD COMBO
CH
MENU
CH
STOP
SR/SF
Cable/SAT
Note
=
Press the AV/SETUP button to exit
setup menu after completion of
initial settings.
FWD/NEXT
DVD MENU
TITLE
VOL
PLAY
TV
VCR
SET
DSP/OSD
+
/ZOOM
OPEN/CLOSE
PAUSE/STEP
RETURN
ENTER
ANGLE
4. Setting Parental lock level
This is to disable the playing of some DVDs which are unsuitable for some
audiences, for example, children. Some DVDs are encoded with a specific
rating level. If the rating level of the disc is higher than that preset in the initial
settings operation, playback of the disc will be prohibited.
=
Press5or6to select PARENTAL item.
=
Press 4 to access option item.
=
Press5or6to select a desired rating.
=
Press ENTER to confirm.
The unit will display "PASSWORD VERIFY
PAGE" and you will need to input your
PREFERENCE PAGE
AUDIO
SUBTITLE
DISC MENU
PARENTAL
PASSWORD
DEFAULT
MAIN PAGE
1 KID SAF
2 G
3 PG
4 PG 13
5 PGR
6 R
7 NC 17
8 ADULT
OFF
password to finish setting the rating level.
Please refer to the "Setting PASSWORD"
subchapter for information on setting a
password for the Parental Lock
=
Enter password with number buttons.
=
Press ENTER to confirm.
PASSWORD VERIFY PAGE
OLD PASSWORD
Note
=
This function depends upon encoding on the
disc. Some discs may not be encoded with
specific rating level information. For those
discs without this encoding the PARENTAL
LOCK function may not work.
5. Setting 6-digit Password
=
Press5or6to select PASSWORD item.
=
Press 4 to access option item.
=
Press ENTER to confirm.
Now the unit display "PASSWORD CHANGE
PREFERENCE PAGE
AUDIO
SUBTITLE
DISC MENU
PARENTAL
PASSWORD
DEFAULT
MAIN PAGE
CHANGE
PAGE".
=
Enter the old password.
=
Enter the new password.
=
Repeat the new password.
Be sure to remember your new password!
PASSWORD CHANGE PAGE
OLD PASSWORD
NEW PASSWORD
CONFIRM PWD
The default password for the unit is blank. If you
are entering a password into the unit for the first
time, you will not be asked to enter the OLD
PASSWORD.
6. Loading Default setttings
This function allows you to load the default settings from factory. Please use
CAUTION when activating this function as all programmed setting will be
replaced by the factory default settings.
=
Press5or6to select DEFAULT item.
=
Press 4 to access option item.
=
Press ENTER to confirm.
PREFERENCE PAGE
AUDIO
SUBTITLE
DISC MENU
PARENTAL
PASSWORD
DEFAULT
MAIN PAGE
RESET
44
Page 47

Playing Back MP3 disc
1
4
7
MUTE
Cable/SAT
VOL
-
STEREO/AUDIO&CH
REW/PREV
SEARCH
REPEAT A-B
SUBTITLE
2
5
8 9
0
DVD COMBO
CH
MENU
CH
STOP
SR/SF
DVD MENU
TITLE
3
6
TV
VOL
PLAY
FWD/NEXT
+10
SET
+
OPEN/CLOSE
PAUSE/STEP
RETURN
ENTER
ANGLE
SLEEP
TV/DVD
AV/SETUP
VCR
DSP/OSD
/ZOOM
This unit is able to playback discs recorded
with MP3 files. When a MP3 disc is loaded,
a file menu screen displays.
Note
=
This menu screen is for illustration only.
=
If all MP3 files are recorded in the root
FOLDER1
FOLDER2
FOLDER3
FOLDER4
FOLDER5
FOLDER6
PLAY MODE FOLDER
MENU
directory, no folder appears.
PLAYBACK OPERATIONS
1. Playback
=
Press5or6to select your desired folder
=
Press ENTER to enter the folder and display MP3 tracks.
=
Press 4 to access MP3 track item.
=
Press5or6to select a desired track.
=
Press PLAY or ENTER to playback.
How do you return to the upper directory?
=
Press STOP to stop playback.
=
Press 3to select <UP DIR> item.
=
Press ENTER to confirm.
< UP DIR >
PLAY MODE FOLDER
MENU
MP3Track1
MP3Track2
MP3Track3
MP3Track4
MP3Track5
MP3Track6
2. Music track selection
=
Press 0-9 to select a desired track.
You need to input a 3-digit track number by using number buttons.
For example, you want MP3Track5, press 0 0 5 in order.
- or -
=
Press STOP to stop playback.
=
Press 5or6to select a desired track.
=
Press PLAY or ENTER to playback.
3. Pause Playback
=
Press PAUSE/STEP during playback.
=
To resume playback, press PAUSE/STEP again or press PLAY.
Note
=
The on-screen display may be
different depending on the disc you
are playing.
45
4. Stop Playback
=
Press STOP during playback.
5. Fast Forward Playback / Skip tracks forward
Press FWD/NEXT repeatedly to playback fast forward or skip to next
track. Each press of this button, the unit functions as follows:
2X 4X
8X
16X
To resume normal playback, press PLAY.
6. Reverse Playback /Skip tracks reverse
Press REW/PREV repeatedly to playback reverse or skip to last
track. Each press of this button, the unit functions as follows:
2X 4X
8X
16X
To resume normal playback, press PLAY.
Page 48

Playing Back MP3 disc
PLAY MODE selection
1
4
7
MUTE
Cable/SAT
VOL
-
STEREO/AUDIO&CH
REW/PREV
SEARCH
REPEAT A-B
SUBTITLE
2
5
8 9
0
DVD COMBO
CH
MENU
CH
STOP
SR/SF
DVD MENU
TITLE
3
6
TV
VOL
PLAY
FWD/NEXT
+10
SET
+
OPEN/CLOSE
PAUSE/STEP
RETURN
ENTER
ANGLE
SLEEP
TV/DVD
AV/SETUP
VCR
DSP/OSD
/ZOOM
You need to stop playback before selecting a play mode.
=
Press STOP to stop playback.
=
Press4to toggle MP3track and PLAY MODE
- or -
Press3to toggle <UP DIR> item and PLAY MODE.
=
Press5or6 to select desired play mode.
1. SINGLE
The unit only plays the selected track
and automatically stops when the track
is finished.
2. REPEAT ONE
The unit plays only the selected track
and automatically repeats this track.
3. REPEAT FOLDER
The unit plays all tracks in current folder
and automatically repeats all tracks in
this folder.
4. SHUFFLE
The unit only tracks in current folder in
random order, regardless of pressing
the REW/PREV or FWD/NEXT buttons.
5. FOLDER
The unit only plays all tracks in current
folder and automatically stops when all
tracks have been played.
< UP DIR >
PLAY MODE SINGLE
MENU
MP3Track1
MP3Track2
MP3Track3
MP3Track4
MP3Track5
MP3Track6
REPEAT ONE
REPEAT FOLDER
SHUFFLE
FOLDER
SINGLE
Note
=
The on-screen display may be
different depending on the disc you
are playing.
46
Page 49

Playing Back Kodak Picture CD
1
4
7
MUTE
Cable/SAT
VOL
-
STEREO/AUDIO&CH
REW/PREV
SEARCH
REPEAT A-B
SUBTITLE
2
5
8 9
0
DVD COMBO
CH
MENU
CH
STOP
SR/SF
DVD MENU
TITLE
3
6
TV
VOL
PLAY
FWD/NEXT
+10
SET
+
OPEN/CLOSE
PAUSE/STEP
RETURN
ENTER
ANGLE
SLEEP
TV/DVD
AV/SETUP
VCR
DSP/OSD
/ZOOM
This unit is able to playback Kodak picture
CDs.
Supported formats:
=
File system: ISO9660, Joliet.
=
File extension: JPEG files.
=
Max. picture size: 3072 x 3072 pixels
FOLDER1
FOLDER2
FOLDER3
FOLDER4
FOLDER5
FOLDER6
PLAY MODE FOLDER
MENU
When a Kodak picture CD is loaded, a
menu screen displays.
Note
=
This menu screen is for illustration only.
=
If all JPEG files are recorded in the root directory, no folder appears.
PLAYBACK OPERATIONS
1. Slide Playback
=
Press5or6to select your desired folder
=
Press ENTER to enter the folder and display picture files.
=
Press 4 to access picture files.
=
Press5or6to select a desired file.
=
Press PLAY or ENTER to playback.
< UP DIR >
MENU
How do you return to the upper directory?
=
Press DVD MENU to stop playback.
=
Press 3to select <UP DIR> item.
=
Press ENTER to confirm.
PLAY MODE FOLDER
2. Picture selection
=
Press 0-9 to select a desired picture.
You need to input a 3-digit number by using number buttons.
For example, you want JPEG5, press 0 0 5 in order.
- or -
=
Press DVD MENU to stop playback.
=
Press 5or6to select a desired picture.
=
Press PLAY or ENTER to playback.
JPEG1
JPEG2
JPEG3
JPEG4
JPEG5
JPEG6
Note
=
The on-screen display may be
different depending on the disc you
are playing.
47
3. Pause Slide Playback
=
Press PAUSE/STEP during slide playback.
=
To resume slide playback, press PAUSE/STEP again or press
PLAY or ENTER.
4. Stop playback and return to file list
=
Press DVD MENU during slide playback.
PLAY MODE selection
The operation of this feature is similar to the section "PLAY MODE
selection" detailed on the previous page.
Page 50

Playing Back Kodak Picture CD
Setting picture transition effects
1
4
7
MUTE
Cable/SAT
VOL
-
STEREO/AUDIO&CH
REW/PREV
SEARCH
2
5
8 9
0
DVD COMBO
CH
MENU
CH
STOP
SR/SF
DVD MENU
3
6
TV
VOL
PLAY
FWD/NEXT
+10
SET
+
OPEN/CLOSE
PAUSE/STEP
RETURN
SLEEP
TV/DVD
AV/SETUP
VCR
DSP/OSD
/ZOOM
The transition effects is applied at the moment when the current slide
image is replaced by the next slide image. This unit provides 17
kinds of transition effects. You can select the transition effect by
pressing ANGLE during slide playback.
Transit from top to bottom
Transit from bottom to top
Transit from left to right
Transit from right to left
Transit from top left corner to
bottom right corner
Transit from top right corner to
bottom left corner
Transit from bottom left corner to
top right corner
Transit from bottom right corner
to top left corner
Transit from horizontal center to
bottom and top
Transit from vertical center to left
and right
Transit from bottom and top to
horizontal center
Transit from left and right to
vertical center
Transit from top to bottom in
four windows
Transit from left to right in
four windows
Transit periphery top to center
RANDOM:
NONE:
Apply effects in random
No effect is applied
Zooming picture
=
Press /ZOOM during slide playback to turn on ZOOM function.
=
Press FWD/NEXT to zoom in. Each press of this button, the unit
functions as follows:
ZOOM
100%
ZOOM
125%
ZOOM
150%
ZOOM
200%
REPEAT A-B
SUBTITLE
TITLE
ENTER
ANGLE
Note
=
The on-screen display may be
different depending on the disc you
are playing.
=
The ZOOM function does not
works with progressive scanning
pictures.
You can move the picture by pressing 5/6or3/4.
=
Press REW/PREV to zoom out. Each press of this button, the unit
operates as:
100%
ZOOM
=
Press /ZOOM to turn off ZOOM function.
ZOOM
75%
ZOOM
50%
Rotating/Mirroring picture
The unit allows you to rotate or mirror picture during slide playback
by pressing 3/4or5/6.
=
Press 3during slide playback to rotate picture anti-clockwise by 90 .
=
Press4during slide playback to rotate picture clockwise by 90 .
=
Press 5during slide playback to mirror picture vertically.
=
Press 6during slide playback to mirror picture horizontally.
o
o
Browsing pictures
=
Press STOP during slide playback to browse pictures.
Every screen displays 12 pictures in proportional thumbnails.
=
Press 3/4or5/6to select item.
=
Press ENTER or playback to confirm.
48
Page 51

Setting the Universal Remote Control Unit
Your Universal Remote Control has been preprogrammed to operate your TV (just press the TV button). You may also
program the Universal Remote Control to operate other devices.
1. HOW TO SET THE UNIT
Locate the correct code for the Brand/Model of the device you wish to control from the attached code list.
Press and hold the SET key and then press the key that corresponds to the device you wish to control (TV, VCR,
1
Cable/SAT, or DVD/VCD/HIFI).
2
Enter one of the 3-digit code for your Brand/Model from the list.
The LED indicator will blink twice.
3
If the correct code has been entered, all the functions of the device you wish to control should operate. Some of the
codes will control most but not all of the functions of your device. If this occurs, repeat the above 3 steps using
another 3 digit code from the code list that corresponds to your Brand/Model.
Note:
Do not exceed 5 seconds between each step.
2. HOW TO DETERMINE A 3-DIGIT CODE
Hold SET and press 1 simultaneously then release. The number of times LED indicator represents the number
1
of the 1 digit.
Hold SET and press 2 simultaneously then release. The number of times LED indicator represents the number
2
of the 2 digit.
Hold SET and press 3 simultaneously then release. The number of times LED indicator represents the number
3
of the 3 digit.
st
nd
rd
3. HOW TO USE “QUICK SEARCH”
If you can not locate the appropriate code for your Brand/Model, you can try “Quick Search”.
Turn the device you wish to control ON.
1
Locate the button on the Universal Remote Control for the device you want to operate (TV, VCR, Cable/SAT, or
2
DVD/VCD/HIFI). Press this key for 3 seconds, then release. The “Quick Search” mode is on when the LED
indicator blinks.
When the device you wish to control shuts off, immediately press the SET key and release.
3
If the correct code has been found, all the functions of the device you wish to control should operate. If not,
repeat the above steps 1 -3.
4. HOW TO SWITCH OVER TO DIFFERENT DEVICE
Your Universal Remote Control is already programmed to operate your TV (just press the TV button). If you have
programmed the Universal Remote Control to operate other devices, you must press the key that corresponds to the
device you wish to control (TV, VCR, Cable/SAT, or DVD/VCD/HIFI).
5. CODE LIST ON SETUP MODE OR QUICK SEARCH MODE
DEVICE NAME
TV
VCR
CAB/SAT
DVD/VCD/HIFI DVD/VCD/HIFI 292 001-292
FOR DEVICE TOTAL CODES ACTIVE DEVICE CODE
TV/CTV/TXT
VCR 384 001-384
CABEL/SATELLITE
304 001-304
270 001-270
6. MEMO OF BRAND & MODEL
DEVICE
TV
VCR
CAB/SAT
DVD/VCD/HIFI
49
BRAND
MODEL CODE
Page 52

Setting the Universal Remote Control Unit
ADMIRAL 143 146 147 148
ADVENT
001 002 133 134 142 153 155
157
AIKO 026
AIWA 039 058
AKAI
073 079 084 085 101 107 109
111 123 125
AUDIOVOX 026
BLUEHOUSE 150
CCE 126 127 149 150
DAEWOO
026 030 040 080 081 082 086
128 151 152
DIGISTAR
001 002 133 134 142 153 155
157
DISH 146
ELBE 089 130 103 154
EMERSON 030 137 143 153
FINLUX 034 135 155 156 157
FIRSTLINE 136 160 161 162 163
FISHER 088 164 165 166 167
FUNAI 057 059 060 158 159
GINXIN 113
GOLDSTAR
027 171 172 173 174 178 179
180 181
GRADIENTE 024 029 168 169 170
GRUNDIG 028 077 175 176 177
HITACHI 019 099 050 182 183
HUGHES 148
ITT-NOKIA 102 110 112 184 185
JENSEN
001 002 133 134 142 153 155
157
JVC
011 012 032 033 045 066 095
186 187 188
KASEIKYOU 047 189 190 191 192
LG 027 193 194 195 196
LG-GOLDSTAR 092 104 106 205 206
LOEWE 129 201 202 203 204
LUXOR 125 197 198 199 200
MAGNAVOX 013 207 208 209 210
METZ 132 217 218 219 220 221
MITSUBISHI 014 048 211 212 213
MIVAR 070 131 214 215 216
NEC 029 056 227 228 229 230
NIKKO 026 222 223 224 225 226
NOBLEX 031 231 232 233 234 235
NOKIA 035 036 236 237 238 239
OPTA 129 240 241 242 243 244
PANASONIC
015 020 046 047 061 062 078
096 097 122 245 246
PEONY 038 042 260 261 262 263
PHILCO 026 030 247 248 249 250
PHILIPS
013 072 124 251 252 253 254
255 256 257 258 259
PIONEER 055 151 264 265 266 267 268
PRIMA
001 002 133 134 142 153 155
157
RCA 068 147 269 270 271 272 273
SAMSUNG 021 037 038 071 094 285
SANYO
022 025 052 053 064 090 108
138 139 140 286 287
SEARS 064 288 289 290
SELECO 087 105
SHARP 016 054 063 274 275 276
SINUDYNE 074 075 076 091
SONY
017 049 069 098 277 278 279
280 281 282 283 284
TEKNIKA 026
THOMSON 067 083 093
TOBO 119
TOSHIBA
018 023 051 065 100 298 299
300
WHITE-W ESTING
HOUSE
001 002 133 134 142 153 155
157
YAMAHA 145
ZENITH 026 030 143 144 301 302
7. CODE LIST ON SETUP MODE OR QUICK SEARCH MODE
TV codes
50
Page 53

Setting the Universal Remote Control Unit
ADVENT 147
AIWA 021
AKAI 145
ALCO 145
BLUEHOUSE 123
DENON 018 061 062 107 108 121
DMTECH 050 096 122 123 124 125
FISHER 143
GRUNDIG
016 050 126 127 128 129
130 131 132 241 242 243
244 245
HARMAN
063 109 138 139 140 141
142 143 246 247 248 249
250
HITACHI
024 025 133 134 135 136
137 142 251 252 253 254
IRT
050 255 256 257 258 259
260
JENSEN 147
JVC
006 017 047 048 051 054
060 064 065 093 094 097
100 106 110 111
JX2033G
122 261 262 263 264 265
266
KARDON
063 109 144 145 146 147
148
KENWOOD
008 029 030 031 032 039
043 066 075 076 078 085
089 112 138 140 141
LENCO
136 137 138 139 140 149
150
MAGNAT 050 235 236 237
MAGNAVOX
067 113 154 155 156 157
158
MATSUI
013 159 160 161 162 163
164
MICROMEGA
009 174 175 176 177 178
179
MITSUBISHI
010 045 068 091 114 165
166 167 168 169 170 171
172 173
NORDMENDE
144 267 268 269 270 271
272
ONKYO
022 067 069 113 115 134
135 187 188
OPTIMUS
004 181 182 183 184 185
186
ORION
042 044 059 088 090 105
120 180
PANASONIC
002 018 019 020 052 061
098 107 133 189 190 191
192 193 194
PHILIPS
023 067 070 113 116 195
196 197
PIONEER
004 034 041 080 087 132
198 199 200 201
PRIMA 147
PROSCAN
071 117 202 203 204 205
206 207 208
RCA
071 117 209 210 211 212
213 214
SAMSUNG
011 014 015 049 095 226
227 228
SANYO
007 033 040 056 057 079
086 102 103 121 131 229
230 231 232 233 234
SHARP
026 130 215 216 217 218
219 220 221
SHERWOOD
072 118 126 127 128 129
238 239
SONY
001 054 055 101 125 222
223 224 225
TECHNICS
004 061 107 124 273 274
275
THOMSON 012 046 092 240
TOSHIBA
003 005 031 042 053 058
059 067 077 088 099 104
105 113
VIDEOWAY
060 276 277 278 279 280
281
WANLIDE
119 282 283 284 285 286
287
YAMAHA
035 036 037 038 061 081
082 083 084 107 288
ZENITH 067 113 289 290
DVD/VCD/HIFI codes
51
Page 54

Setting the Universal Remote Control Unit
ALPHASTIR 097
AMSTRAD
029 030 031 032 065
066 067 068 092
AMWAY 098
ATLANTA
059 097 098 099 140
141 142 143
ATRANTA
055 094 095 096 136
137 138 139
BT
074 100 101 102 144
145 146 147
CABLE
INNOVATIONS
114
CABLEVIEW
011 014 017 103 148
149
CENTURY 100
CHANNEL
MASTER
101 150 151 152 153
CHAPANAL 102 133 158 159 160
CHEYENNE 133 154 155 156 157
CI SATELLITE 099 167 168 169
CINAL+ 044 081 170 171 172
CITIZEN
011 014 017 104 165
166
CITOH 134 161 162 163 164
CONILER 103 173 174 175 176
CURTIS-MATHES 001 006 055 059 104
D-BOX
085 110 111 112 177
178 179 180
DEHAN
019 107 108 109 181
182 183 184
DIRECTV
105 106 107 108 109
110 111
DISH 095
DISHPLAYER 135 185 186 187 188
DRAHE 112
DX ANTENNA 025 123
ECHOSTAR
026 041 042 043 045
078 079 080 189 190
FORCE
050 089 113 114 191
192 193
FUJITSU 113 194 195 196 197
GALAXIS 035 049 088 123 124
GENERAL
INSTRUMENT
025 114 124
GI
002 004 020 056 082
122
GI/JERROLD 056 125 126 127 128
GOLDSTAR
018 115 116 117 118
198 199 200 201
GRUNDIG
033 069 119 120 121
202 203 204
HAMLIN KARDON
008 012 015 061 129
205
HEME CABLE 115 206 207 208 209
HITACHI 105 210 211 212 213
HOUSTON
TRACKER
045 214 215 216 217
HUGHES
096 105 106 107 108
109 110 111
INNTERSAT 117 218 219 220 221
IO 116 222 223 224 225
JANEIL 113 226 227 228 229
JERROLD
002 004 020 056 077
082 138 139 140 141
142 143 230 231 232
233
JVC
038 039 074 075 130
131 132 133 134 135
136 137 234
KATHREIN 036 037 072 073
LEGEND 132
LG
018 144 145 146 147
148 235 236 237 238
MAGNAVOX
023 024 130 149 150
151 152 245 246
MASCOM
053 093 119 153 154
155 156 157 239 240
MASPRO
036 158 159 160 161
162 241 242 243 244
MEMGREX 130 247 248 249 250
NOKIA
087 163 164 165 166
167 251 252 253 254
NORSAT 103
OAK
005 013 058 168 169
170 255 256
OPTIMUS 130 257 258 259 260
ORB 120
PACE 048 052 086 261 262
PANASONIC
009 010 040 062 063
076 171 172 173 174
175 176
PANSAT 121
PHILIPS
034 047 070 084 130
177 178 179 180 181
182 183 184
PHONOTREND 035
PICO 122
PIONEER
003 057 185 186 263
264 265
PRIMESTAR 025
PROSCAN 131
QUICK ORAW 123 266 267 268 269
RADIO SHACK 114 124
RAMSEY 122
RCA
009 010 021 062 063
094 131 270
REALISTIC 129
REGAL 008 012 015 061
RFT 035
RURAL CABLE 124
SAGEM 046
SAMSUNG 003 016 027 057 125
SATLANTA 001 006
SELECTOR 090
SIERRA 133
SIGMA 005 013 058
SKY 028 064
SKYMASTER 035 071
SL MARX 016
SONY 022
STAR SIGHT 131
STAR TRAK 120
STRONG 126
STS 116
SUPER GUIDE 127
TAIHAN 019
TCE 131
TEECOM 128
THOMSON 019
TOSHIBA 104 119
TPS 046 083
TRIAX 051 054 091
UNIDEN 114 115 129 130
VIDEO CIPHER II
113
VIDEOWAY 060
ZENITH 007 060 104 112 113
CABLE/SATELLITE codes
52
Page 55

Setting the Universal Remote Control Unit
ADMIRAL 024
ADVENT 138 139
ADVENTURE 138139
AIKO 138
AIWA
111 114 136 025 031 051
085 096 138 139 140 141
184
AKAI
003 026 029 030 089 090
098 099 101 108 132 137
139 142 175 177 185 186
187 188
ALLEGRO 188
ALOSTAY 113 157 158 159 160 161
AMERICAN HIGH 173 174
ANITECH 118 131 148 149 150 151
ASHA 041
AUDIO DYNAMICS 074
AUDIOVOX 032
AUSTAR 117 143 144 145 146 147
AUTOVOX 119 152 153 154 155 156
BAIRD 102 162 163 164 165 166
BEAUMAIK 041
BELL&HOWELL 035
BIOKSONIC 056
BROKSONIC 140 141 144
BSR
108 128 133 134 167
168 169 170
CALIX 032
CANDLE
032 037 041 074 160 164
189
CANON 165 172 173 174
CAPEHART 161
CARVER 180
CCE 145 166
CITIZEN
032 037 041 074 160 164
166 189
COLORTYME 074
COLT 145
CRAIG 032 041 145 147
CURTIS-MATHES
041 074 139 146 174 171
172 189
CYBERNEX 041
DAEWOO
037 042 043 069 138 141
160 161 164 166 171 172
173 174 175 176 177 178
179
DAYTRON 161 162
DBX 014 074
DIMENSIA 171
DUAL-TEC 120 180 181 182 183 184
DYNATECH 138 139
ELBE 100 185 186 187 188 189
ELECTROHOME 032 177
ELECTROPHONIC 032
EMERSON
032 037 056 138 139 140
141 156 158 162 173 174
176 177 184 186 191
FERGUSON 104 190 191 192 193 194
FISHER
035 074 095 103 142 147
154 180 195 196 197 198
FUJI 003 173 174
FUNAI 138 139
GARRARD 138
GE 152 171 172 173 174
GOLDSTAR 032 074
GO-VIDEO 039 148
GRADIENTE 138
GRANDA 094 110 199 200 201 202
GRUNDIG 055 070 071 091 092 093
HARMAN 074 138
HARWOOD 145
HEADQUARTER 035
HINARI 097 130 206 207 208 209
HI-Q 147
HITACHI
027 033 034 139 149 150
175 204 205
INNOHT 105 210 211 212 213 214
INSTANT
REPLAY
139 173 174
INTEQ 032
IRRADIO 082 215 216 217 218 219
JC PENNEY
014 032 035 041 074 149
150 172 174 175
JCL 173 174
JENSEN 149 175
JVC
014 015 022 044 048 049
052 053 054 074 077 078
079 080 115 116 175 188
KATHREIN 036 037 072 073 220 221
KENWOOD 014 074 175 189
KLH 145 151
KODAK 032 173 174
LG 038 222 223 224 225 226
LG-GOLDSTAR 032 106 107 231 232 233
LLOYD 138 139
LOEWE 020 127 227 228 229 230
LOGIK 145
LXI 032
MAGNAVOX 172 173 174 180
VCR codes
53
Page 56

Setting the Universal Remote Control Unit
MAGNIN 041
MARANTZ
014 035 074 121 144 174
180 189 242 243 244 245
246
MARDS 173
MARTA 032
MASUSHITA 173 174
MATSUI 056 057 234 235 236 237
MEI 173 174
MEMGREX
024 032 035 041 138 139
147 173 174 185
MGA 176 177
MGN TECHNOLOGY 041
MIDLAND 152
MINOLTA 149
MITSUBISHI
014 046 047 063 149 176
177 183 191 238 239 240
MOTOROLA 024173 174
MTC 041 138 139
MULTITECH 041 138 139 142 152
NEC
014 035 074 075 144 146
175 189 248 249 250 251
NIKKO 032
NOBLEX 041
NORDMENDE 083 252 253 254 255
OLYMPUS 173 174
OPTIMUS 021 024 032 153
OPTONICA 039 157
ORION 028 056 084 112 135
PANASONIC
021 023 060 061 062 172
173 174
PENTAX 149 150 189
PENTEX RESEARCH 074
PHILCO 172 173 174
PHILIPS
011 012 013 016 017 018
058 059 173 174 180
PILOT 032
PIONEER 014 086 149 163
PORTLAND 160 161 164 189
PROTEC 145
QUARTER 035
QUARTZ 035
QUASAR 172 173 174
RADIO SHACK
021 024 032 035 041 138
139 142 147 153 154 171
172 173 174 177 185
RADIX 032
RANDEX 032
RCA
143 149 150 167 168 169
170 171 172 173 174 181
187
RICOH 002
RRADIO 109
SAMSUNG
039 037 040 041 045 057
149 152 155 185 256 257
258
SANSUI 175 181
SANYO
035 036 041 067 068 134
147 259 260 261
SCOTT 141 156 176 191
SEARS
032 035 142 147 149 150
154 173 174
SHARP
024 064 139 164 262 263
264 265 266
SHINTOM 002 003 145 149 190
SHOGUN 041
SIGNATURE 139
SINGER 145 173 174
SINUDYNE 087 088
SONY
001 002 003 004 005 006
007 008 009 010 178 179
267 268 269 270
STS 173 174
SYLVANIA 138 139 176
SYMPHONIC 139
TANDY 035 139
TASHIKO 032
TATUNG 175
TEAC 138 139 175 181
TECHNICS 021 173
TEKNIKA 032 138 174
THOMSON
019 050 066 072 073 076
123 124 125 126
THORN 104 122
TMK 041 146 158
TOSHIBA
037 050 065 081 154 271
272 273 274
TOTEVSION 032 041
UNITECH 041
VECTOR RESEARCH 014 037 074 189
VICTOR 014
VIDEO CONCEPTS 037 074 177 189
VIDEOSONIC 014 041
WARDS
024 032 037 041 138 139
145 147 149 150 174 177
WHITE WEST 139
XR-1000 138 145 173 174
YAMAHA 014 035 074 175
ZENITH 002 003 014 039 159 188
VCR codes
54
Page 57

Troubleshooting Guide
Check the following before requesting service.
SYMPTOM
Power
No power
TV broadcast reception
Poor or no picture.
Picture wobbles
or drifts.
No Cable reception.
No reception above
CH13.
POSSIBLE CAUSE POSSIBLE SOLUTION
The AC power cord is not connected.
TV station experiencing problems. Try another channel.
Picture control is not adjusted.
Possible local interference.
Antenna/Cable connector is not connected. Check Cable connection or VHF/UHF ant.
TV station experiencing problems. Try another channel.
Cable TV channel is scrambled.
Possible local interference.
Cable connected or not connected. Check all Cable connections.
TV/Cable set to TV. Set TV/Cable to Cable
Cable TV service interrupted.
TV/Cable set to TV. Set TV/Cable to Cable.
TV station experiencing problems. Try another channel.
Connect the AC power cord
to the AC outlet
Check picture control adjustments.
Check for source of reception disturbance.
A Cable box needs to be used (if desired).
Check for source of reception disturbance.
Contact your Cable TV company.
Poor or no sound.
TV Shuts off.
Closed Captioning
not working.
Remote Control
Remote control
does not operate.
V-CHIP
MUTE button is pressed.
Possible local interference.
Antenna/Cable connector is not connected. Check Cable connection or VHF/UHF ant.
Volume is set to minimum. Increase volume.
Sleep Timer is set.
Off Timer is set. Clear Off Timer.
TV Signal is weak.
TV station experiencing problems or
program tuned is not closed captioned.
The remote control is not aimed at the
sensor.
Distance is too far or too much light in the
room.
There is an obstacle in the path of the beam. Clear the path of the beam.
The batteries are weak.
The batteries are not inserted correctly. Insert correctly.
Press MUTE button again.
Check for source of reception disturbance.
Set Sleep Timer to "Off".
Check Cable or VHF/UHF antenna.
Try another channel.
Aim the remote control at the Remote
sensor.
Operate within 23 feet or reduce the
light in the room.
Replace the batteries.
Parental Control not
Working properly.
55
Block item is set to "Off". Set the block item "On".
News or sports event being broadcast.
Ratings not set.
Parental Control does not work with
News or sporting events.
Set ratings as desired.
Page 58

Troubleshooting Guide
SYMPTOM
DVD
Playback does not start
No picture
No sound
Picture is distorted during REVIEW.
Stopping playback, search, slowmotion play or repeat play, etc.
cannot be performed.
No 4:3 (16:9) picture
No on-screen display
no surround sound
The unit or remote operation key is
not functioning.
Playback does not start when the
title is selected.
Audio soundtrack and/or subtitle
language is not changed when you
playback a DVD.
No subtitle
Angle cannot be changed.
appears on the screen
POSSIBLE SOLUTIONS
=
No disc is inserted.
=
The disc may be dirty. Clean up the disc.
=
The disc is badly distorted.
=
TV/DVD selector is not set correctly.
=
Check the input selector of the amplifier is set properly.
=
The unit is in the Special playback mode.
=
Select the correct Audio Output position on AV amplifier.
=
The picture will be distorted occasionally.
=
Some discs may not do some of the functions.
=
The setup does not match your TV.
=
Turn on on-screen display.
=
The setup does not match your stereo system.
=
Turn off the unit and unplug the AC power cord for several minutes,
then replug it.
=
Check the "parental Lock Level" setup.
=
Multilingual language is not recorded on the DVD disc.
=
Some discs have no subtitles.
=
Subtitles are cleared. Press SUBTITLE.
=
Multi-angles are not recorded on the DVD disc.
=
The function is prohibited with the unit or the disc.
56
Page 59

Reception Disturbances
Most types of television interference can be remedied by adjusting the height and position of the VHF/UHF antenna.
Outdoor antennas are recommended for best results if not using cable or a satellite. The most common types of
television interference are shown below. If one of these symptoms appear when the TV is connected to a Cable TV
system, the disturbance may be caused by the local cable company broadcast.
IGNITION:
Black spots or horizontal streaks may appear, picture may flutter or drift.
Usually caused by interference from automobile ignition systems, neon
lamps, electric drills and other electric appliances.
GHOSTS:
Ghosts are caused by the television signal following two paths. One is the
direct path and the other is reflected from tall buildings, hills or other
objects. Changing the direction or position of the antenna may improve the
reception.
SNOW:
If your receiver is located in the fringe area of a television station where the
signal is weak, your picture may be marred by the appearance of small dots.
When the signal is extremely weak, it maybe necessary to install an
external antenna to improve the picture.
RADIO FREQUENCY INTERFERENCE:
This interference produces moving ripples or diagonal streaks, and in some
cases, causes loss of contrast in the picture.
PICTURE SIZE VARIATION:
A slight picture size variation is quite normal when you adjust the
CONTRAST or BRIGHTNESS setting.
CARE AND MAINTENANCE
To prevent fire or shock hazard, disconnect your unit from the AC power source when cleaning. The finish on the
receiver may be cleaned with a dust cloth and cared for as other furniture. Use caution when cleaning and wiping
the plastic parts. Mild soap and a soft, damp cloth may be used.
57
Page 60

Specifications
Power Supply:
AC 120V, 60Hz
AC 120V, 60Hz
Power Consumption: 120W 150W
Dimensions:
23.2(W) 19.5(H) 18.5(D) inch
rr
26.9(W) 21.9(H) 18.9(D) inch
Weight(kg/lb): 27 kg/60 lb 40 kg/88 lb
CRT: 20" SCREEN 24" SCREEN
Audio Output: 2.5W 2 3W 2
rr
TELEVISION
Color System: TV: NTSC-M
AV: NTSC 3.58/4.43, PAL 4.43
Receiving channel: VHF 2-13
UHF 14-69
Cable 2-69, (A-6)-(A-1), A-W, (W+1)-(W+28)
Total 181 channels
Antenna Impedance: VHF/UHF 75 ohm
DVD/VCD/CD player
rr
Video out: CVBS
Audio out: 2 channels
Digital out: Coaxial
Disc diameter: 120mm, 80mm
Pickup: 1-Lens 2-Beams System
Accessories: Remote controller 1
Design and specifications are subject to change without notice.
r
58
 Loading...