

Page 1

Model DP503
MAIN
Two Channel AC-2/AC-3/MPEG
Digital Audio Encoder and
Dolby Fax
Users' Manual
System
Page 2

MAIN
Page 3

Users' Manual
MAIN
For
Model DP503
Two Channel AC-2/AC-3/MPEG
Digital Audio Encoder
and
Dolby Fax System
Dolby Laboratories Incorporated
U.S.A. 100 Potrero Avenue, San Francisco, CA 94103
Tel: 415-558-0200; Fax: 415-863-1373
www.dolby.com
U.K. Wootton Bassett, Wiltshire SN4 8QJ
Tel: 01793-842100; Fax: 01793-842101
WARRANT Y INFORMATION, USA: warranty on the product covered by this manual is subject to the limitations and disclaimers
set forth in the warranty disclaimer originally shipped with the product and also printed on the back of the invoice.
All requests for repairs or information should include the unit serial number to assure rapid service.
Dolby, Dolby Fax, and the double-D symbol are registered trademarks of Dolby Laboratories Licensing Corporation.
Windows Windows NT and Window 95 are registered trademarks for Microsoft Corporation
©1997 Dolby Laboratories
ISSUE 1
S97/11336
Dolby Part No. 91451
Page 4

MAIN
Page 5

TABLE OF CONTENTS
MAIN
SECTION 1 INTRODUCTION
1.1 Introduction ...............................................................................................1-1
1.2 Features......................................................................................................1-2
1.3 Dolby AC-2 and Dolby Digital (AC-3).....................................................1-2
1.4 Available Algorithms, Data Rates and Sample Rates ...............................1-3
1.5 Regulatory Notices....................................................................................1-4
SECTION 2 APPLICATIONS
2.1 Telecommunications..................................................................................2-1
Dolby Fax............................................................................................2-1
2.2 Cable..........................................................................................................2-1
2.3 Satellite / Terrestrial Radio Communications ...........................................2-2
SECTION 2A DOLBY FAX - AN OVERVIEW
2A.1 Introduction ...............................................................................................2A-1
2A.2 Algorithms and Applications.....................................................................2A-1
2A.3 Quick Start for Equipment Installation......................................................2A-2
2A.4 Quick Start for ISDN Setup.......................................................................2A-3
2A.5 Quick Start for Developing a Phone Directory..........................................2A-3
2A.6 Quick Start for Placing Dolby Fax Calls...................................................2A-4
2A.7 Receiving Dolby Fax Calls........................................................................2A-4
2A.8 Some Specific Applications ......................................................................2A-5
SECTION 3 PRE-INSTALLATION
3.1 Unpacking..................................................................................................3-1
3.2 Inspection ..................................................................................................3-1
3.2.2 Claims for Shipping Damage ..................................................3-1
3.3 Fusing Information....................................................................................3-1
Main Fuse:...........................................................................................3-1
Internal Fuse........................................................................................3-2
3.4 Configuring Jumper Settings.....................................................................3-3
Removing the Top Cover ....................................................................3-3
3.4.1 Clock Termination Jumper J12 [terminated]...........................3-3
3.4.2 Analog Audio Input Termination J13/J14 [10k ohms] ...........3-3
3.4.3 Signal Ground-to-Chassis Link J15 [open].............................3-3
3.5 Configuring the Rear Panel DIP Switch S101...........................................3-4
3.5.1 Switch nos. 1-5 - Unit Address................................................3-4
3.5.2 Switch no. 6 - Mode of Operation: Normal/Download...........3-5
3.5.5 Switch nos. 7 & 8 - Baud Rate Set..........................................3-6
Page 6

ii
MAIN
SECTION 4 INSTALLATION and LEVEL CALIBRATION
4.1 Mounting...................................................................................................4-1
4.2 Audio Connections....................................................................................4-1
4.2.1 S/PDIF Input............................................................................4-1
4.2.2 AES/EBU Input.......................................................................4-1
4.2.3 Analog Input............................................................................4-1
4.3 Data / Status / Control Connections..........................................................4-2
4.3.1 Encoded Data Out and Timing................................................4-2
4.3.2 Auxiliary Data.........................................................................4-2
4.3.3 Terminal Adapter Control.......................................................4-3
4.3.4 Remote Control.......................................................................4-3
4.3.5 Status.......................................................................................4-3
4.4 Power.........................................................................................................4-3
4.5 Level Calibration (Analog Inputs).............................................................4-3
Calibration Procedure..........................................................................4-4
4.6 Dolby Fax Connections—Additional Procedures.....................................4-4
4.6.1 Mounting.................................................................................4-4
4.6.2 Audio Connections..................................................................4-4
4.6.3 Encoded Data Out and Timing................................................4-4
4.6.4 Auxiliary Data.........................................................................4-5
4.6.5 Terminal Adapter Control.......................................................4-5
4.6.6 Remote Control.......................................................................4-5
4.6.7 Status.......................................................................................4-5
4.6.8 Power.......................................................................................4-5
4.6.9 Level Calibration.....................................................................4-6
4.6.10 ISDN Connections...................................................................4-6
SECTION 5 OPERATION
5.1 Introduction to the User Interface..............................................................5-1
5.1.1 Push-button Key Description ..................................................5-1
5.1.2 Operational Modes..................................................................5-3
5.1.3 Operational Hierarchy.............................................................5-3
5.2 Encoder Configuration..............................................................................5-4
5.2.1 To change Algorithm Type .....................................................5-5
5.2.2 To change Data Rate ...............................................................5-5
5.2.3 To change Channel Mode........................................................5-6
5.2.4 To change Sample Rate...........................................................5-6
5.2.5 To change Aux Rate (auxiliary data rate)................................5-7
5.3 ISDN Setup (for Dolby Fax applications only).........................................5-8
5.3.1 Entering ISDN Setup Mode ....................................................5-8
5.3.2 To choose Switch Type...........................................................5-9
5.3.3 To configure Line 1 (L1).........................................................5-10
5.3.4 To configure Line 2 (L2), Line 3 (L3), Line 4 (L4) ................5-12
5.3.5 Concluding ISDN Setup..........................................................5-12
Page 7

iii
MAIN
5.4 Using the DIRectory: Dolby Fax Applications..........................................5-13
5.4.1 Entering DIRectory Mode .......................................................5-13
5.4.2 Creating New Directory Entries ..............................................5-14
5.4.2.1 Using the COPY ENTRY? Feature.............................5-18
5.4.3 Using Directory Entries...........................................................5-19
5.4.4 Editing Directory Entries.........................................................5-20
5.4.5 Deleting Directory Entries.......................................................5-20
5.5 Using the DIRectory: Encoder-only Applications.....................................5-20
5.5.1 Entering DIRectory Mode .......................................................5-21
5.5.2 Creating New Directory Entries ..............................................5-22
5.5.2.1 Using the COPY ENTRY? Feature.............................5-24
5.5.3 Using Directory Entries...........................................................5-25
5.5.4 Editing Directory Entries.........................................................5-25
5.5.5 Deleting Directory Entries.......................................................5-25
APPENDIX A INTERFACE SPECIFICATIONS AND DESCRIPTIONS
APPENDIX B SOFTWARE DOWNLOADING PROCEDURE
APPENDIX C DP503 USER INTERFACE STRUCTURE
APPENDIX D ISDN ORDERING GUIDE (North America)
APPENDIX E GLOSSARY OF ISDN TERMS
Page 8

MAIN
Page 9

1.1 Introduction
MAIN
The Dolby Model DP503 is a digital audio encoder supporting up to two channels
of Dolby AC-2, Dolby Digital (AC-3), and MPEG Layer-II digital audio coding
algorithms at data rates from 40 kbps to 448 kbps. Single channel, dual channel,
and joint stereo configurations are selectively available, depending on the chosen
data rate. A front panel menu and directory system provides convenient access to
the desired operating modes and to recall frequently used encoder settings.
This front panel user interface is also able to control an ISDN terminal
adapter/inverse multiplexer when combined with other equipment as part of a
Dolby Fax installation. The result is a flexible, multi-unit solution for real-time,
high-quality digital audio transmission on ISDN that does not require a computer,
terminal, or palmtop unit for its control. The built-in directory system, in Dolby
Fax applications, also stores ISDN settings and frequently dialed phone numbers.
SECTION 1
INTRODUCTION
For the ultimate in flexibility, the DP503 can be remotely controlled via a Windows
based PC for use as a stand-alone encoder or as part of a Dolby Fax system.
Both digital (AES/EBU and S/PDIF) and analog audio inputs are provided. Analog
to digital conversion is performed at 18 bit resolution. Digital inputs include a
built-in sample rate converter.
The encoder will operate in synchronization with an externally provided clock or
from its own internal time base reference. Once converted to a digital data stream
(at an internal sampling rate of 32, 44.1 or 48 kHz), the 18-bit PCM serial input
data representing both audio channels is processed using the selected algorithm and
formatted into a single serial output data stream at the selected bit rate. An
industry-standard RS-449/422 data connection simplifies incorporation into a
variety of digital communications systems, including the Dolby Fax system for real
time transmission over ISDN.
RS-232 ports are provided for remote control via a PC; software download
capability for field-upgrade of the algorithm software; auxiliary data input; and
ISDN terminal adapter/inverse multiplexer control.
The encoder provides front panel system status indicators as well as a rear-panel
connector with TTL logic levels for remote status monitoring. A digitally generated
test signal is provided for system alignment and troubleshooting and can be
activated from the front panel or via a remote control.
-
Rear panel analog input trimmers are provided, along with calibration LEDs on
both the front and rear panels. Front panel overload LEDs are also provided.
Page 10

This manual includes installation procedures, descriptions of Model DP503
MAIN
operation, installation details, and interface specifications.
The complementary DP524 decoder unit features automatic algorithm detection to
provide foolproof operation in conjunction with the DP503. The DP524 is provided
with its own user manual.
1.2 Features
1-2
x
x
x
x
x
x
x
x
x
x
x
x
x
x
x
x
x
Dolby AC-2, Dolby Digital (AC-3), and MPEG Layer-II audio
coding algorithms from 40 kbps - 448 kbps
Mono, dual-mono, or joint stereo modes
Algorithm operation at 32, 44.1, 48 kHz sampling rates
*
*
*
Analog inputs with 18-bit A/D converters
Digital inputs (AES/EBU and S/PDIF)
Built-in sample rate converter and selectable internal sample rate
Selectable auxiliary data rates (0 - 9.6 kbps)
*
*
RS-449 data interface (EIA-530, V.35, and X.21 compatible)
Internal or external clock reference
RS-232 port for auxiliary data
RS-232 port for remote control via PC
RS-232 port for telco control (terminal adapter/inverse multiplexer)
Download capability for software upgrades
Front panel user interface with alphanumeric display
Ideal for use in a Dolby Fax system
Built-in test tone generator
Status indicators with rear-panel logic tallies
*
Certain restrictions apply. See product brochure.
1.3 Dolby AC-2 and Dolby Digital (AC-3)
Dolby AC-2 combines spectrum-efficient data compression with professionalquality audio performance. Two-channel modes excel at conveying different
material such as audio and time code or separate language programming.
Despite the low, spectrum-efficient data rate, Dolby Digital yields very high audio
quality and is suitable for the most demanding of professional and consumer
distribution applications. First demonstrated to the film industry in May of 1991,
Dolby Digital audio coding technology has evolved into a very sophisticated and
flexible system for the digital representation of high quality sound. Dual channel
implementations of the Dolby Digital algorithm can be user-configured to operate
in dual mono or joint stereo modes.
Both the Dolby AC-2 and Dolby Digital algorithms are compatible with Dolby
Matrix Surround decoding. A wide range of bit rates and audio coding modes are
Page 11

1-3
MAIN
supported with this audio coding technique, and are summarized in the product
brochure.
1.4 Available Algorithms, Data Rates and Sample Rates
Please refer to the product brochure packed with the unit for the most current
information.
Page 12

1.5 Regulatory Notices
MAIN
FCC
This equipment has been tested and found to comply with the limits for a Class A
digital device, pursuant to part 15 of the FCC Rules. These limits are designed to
provide reasonable protection against harmful interference when the equipment is
operated in a commercial environment. This equipment generates, uses, and can
radiate radio frequency energy and, if not installed and used in accordance with this
instruction manual, may cause harmful interference to radio communications.
Operation of this equipment in a residential area is likely to cause harmful
interference in which case the user will be required to correct the interference at his
or her own expense.
1-4
UL
Troubleshooting must be performed by trained technicians. Do not attempt to
service this equipment unless you are qualified to do so.
WARNING:
Check that the correct fuses have been installed. To reduce the risk
of fire, replace the fuses only with the same type and rating. See manual Section
3.3 for detailed fusing information.
Exposed portions of the power supply are electrically "hot". In order to reduce the
risk of electrical shock, the power cord MUST be disconnected when the cover of
this equipment is removed.
UK
Connections for the United Kingdom:
WARNING: THIS APPARATUS MUST BE EARTHED
As the colours of the cores in the mains lead may not correspond with the coloured
markings identifying the terminals in your plug, proceed as follows:
x
The core which is coloured green and yellow must be con nected t o the terminal in th e
plug which is marked with the letter E or by the earth symbol
green and yellow.
The core which is coloured b lue must be co nnected to th e terminal which is marked
x
with the letter N or coloured black.
The core which is coloured b rown must be con nected t o the t erminal which is marked
x
with the letter L or coloured red.
or coloured green o r
Page 13

1-5
MAIN
IEC NOTICES
This unit complies with the EMC requirements of of EN55103-1 and EN 55103-2 when installed in an E2
environment in accordance with this manual.
IMPORTANT SAFETY NOTICE
This unit complies with the safety standard IEC65. To ensure safe operation and to guard
against potential shock hazard or risk of fire, the following
o Ensure the
o Ensure
o The unit
o The
Ce materiel est conforme à la norme IEC65. Pour vous assurer d'un fonctionnement sans danger et de prévenir
tout choc électrique ou tout risque d'incendie, veillez à observer les recommandations suivantes.
o Le selecteur de tension doit être placé sur la valeur correspondante à votre alimentation réseau.
o Les fusibles doivent correspondre à la valeur indiquée sur le materiel.
o Le materiel doit être correctement relié à la terre.
o Le cordon secteur livré avec le materiel doit être cablé de la manière suivante:
Dieses Gerät entspricht der Sicherheitsnorm IEC65. Für das sichere Funktionieren des Gerätes und zur
Unfallverhütung (elektrischer Schlag, Feuer) sind die folgenden Regeln unbedingt einzuhalten:
o Der Spannungswähler muß auf Ihre Netzspannung eingestellt sein.
o Die Sicherungen müssen in Type und Stromwert mit den Angaben auf dem Gerät übereinstimmen.
o Die Erdung des Gerätes muß über eine geerdete Steckdose gewährleistet sein.
o Das mitgelieferte Netzkabel muß wie folgt verdrahtet werden:
Questa apparecchiatura è stata costruita in accordo alle norme di sicurezza IEC 65. Per una perfetta
sicurezza ed al fine di evitare eventuali rischi di scossa êlettrica o d'incendio vanno osservate le
seguenti misure di sicurezza:
o Assicurarsi che il selettore di cambio tensione sia posizionato sul valore corretto.
o Assicurarsi che la portata ed il tipo di fusibili siano quelli prescritti dalla casa costruttrice.
o L'apparecchiatura deve avere un collegamento di messa a terra ben eseguito; anche la connessione rete deve
avere un collegamento a terra.
o Il cavo di alimentazione a corredo dell'apparecchiatura deve essere collegato come segue:
Esta unidad cumple con la norma de seguridad IEC65. Para asegurarse un funcionamiento
seguro y prevenir cualquier posible peligro de descarga o riesgo de incendio, se han de observar
las siguientes precauciones:
o Asegúrese que el selector de tensión esté ajustado a la tensión correcta para su alimentación.
o Asegúrese que los fusibles colocados son del tipo y valor correctos, tal como se marca en la unidad.
o La unidad debe ser puesta a tierra, conectándola a un conector de red correctamente cableado y puesto a tierra.
o El cable de red suministrado con esta unidad, debe ser cableado como sigue:
Denna enhet uppfyller säkerhetsstandard IEC65. För att garantera säkerheten och gardera mot
eventuell elchock eller brandrisk, måste följande observeras:
o Kontrollera att spänningsväljaren är inställd på korrekt nätspänning.
o Konrollera att säkringarna är av rätt typ och för rätt strömstyrka så som anvisningarna på enheten föreskriver.
o Enheten måste vara jordad genom anslutning till ett korrekt kopplat och jordat el-uttag.
o El-sladden som medföljer denna enhet måste kopplas enligt foljande:
Deze unit voldoet aan de IEC65 veiligheids-standaards. Voor een veilig gebruik en om het gevaar van electrische
schokken en het risico van brand te vermijden, dienen de volgende regels in acht te worden genomen:
o Controleer of de spanningscaroussel op het juiste Voltage staat.
o Gebruik alleen zekeringen van de aangegeven typen en waarden.
o Aansluiting van de unit alleen aan een geaarde wandcontactdoos.
o De netkabel die met de unit wordt geleverd, moet als volgt worden aangesloten:
voltage selector
fuses
fitted are the
must be earthed
power cord
is set to the correct mains voltage for your
correct rating and type
by connecting to a correctly wired and
supplied with this unit must be wired as follows:
Live—Brown Neutral—Blue Earth—Green/Yellow
IMPORTANT – NOTE DE SECURITE
Phase—Brun Neutre—Bleu Terre—Vert/Jaune
WICHTIGER SICHERHEITSHINWEIS
Phase—braun Nulleiter—blau Erde—grün/gelb
NORME DI SICUREZZA – IMPORTANTE
Filo tensione—Marrone Neutro—Blu Massa—Verde/Giallo
AVISO IMPORTANTE DE SEGURIDAD
Vivo—Marrón Neutro—Azul Tierra—Verde/Amarillo
VIKTIGA SÄKERHETSÅTGÄRDER!
Fas—Brun Neutral—Blå Jord—Grön/Gul
BELANGRIJK VEILIGHEIDS-VOORSCHRIFT:
Fase—Bruin Nul—Blauw Aarde—Groen/Geel
must
be observed:
as marked on the unit.
supply
earthed
.
power outlet.
GB
F
D
I
E
S
NL
Page 14

MAIN
Page 15

The Dolby Model DP503 is suitable for a variety of point-to-point and point-to-
MAIN
multipoint digital transmission applications, including cable, telecommunications,
and satellite or terrestrial microwave links. The very high audio quality and low,
spectrum-efficient data rates of the Dolby AC-2 or Dolby Digital (AC-3) coding
processes make them particularly appropriate for these applications. The inclusion
of MPEG algorithms provides further flexibility and compatibility with MPEG
installations.
The complementary DP524 decoder unit features automatic algorithm detection to
provide foolproof operation in conjunction with the DP503.
2.1 Telecommunications
The Model DP503 can be used with T1 or ISDN lines for point-to-point
communications. Film and recording studios, as well as mastering facilities, can be
interconnected with audio and control data to enable multi-site, real-time
operations. Broadcast applications include STL, ICR, and backhaul operations.
SECTION 2
APPLICATIONS
On T1 networks, only a small portion of the T1 bit stream is used; the residual
capacity remains available for additional audio channels or other services (e.g.,
voice or computer data). Otherwise, fractional service can be ordered. In ISDN
applications, the number of "B" channels needed is determined by the chosen bit
rate.
Dolby Fax
The DP503 is particularly suited to the Dolby Fax system, which provides the
highest quality real time digital audio transmission over ISDN phone circuits.
Originally limited to the Dolby AC-2 audio coding algorithm, the additional
capabilities of the DP503 in incorporating Dolby Digital (AC-3) and MPEG LayerII algorithms expands the applications possibilities, including operation at lower
data rates (hence, fewer ISDN lines) and interoperability with other ISDN
telecommunications hardware platforms.
Dolby Fax now permits contribution audio at the highest quality consistent with the
application and budget constraints. Voiceover work may be an application where
the ultimate in quality can be sacrificed for a savings in data rate; conversely,
playback for quality control purposes or mix approvals would dictate higher
quality. More information can be found in Section 2A and in the Appendices.
2.2 Cable
Whether for audio-only services or for an enhanced digital audio service
accompanying video, the DP503 is ideally suited to cable applications. The
availability of low data rates permits efficient use of cable bandwidth as either a
baseband signal or as a subcarrier above video.
Page 16

2-2
MAIN
Decoder circuitry can be readily incorporated into set-top decoder hardware, or
integrated directly into consumer receiver equipment.
2.3 Satellite / Terrestrial Radio Communications
With suitable digital modulation equipment, the Model DP503 can be used for
various satellite broadcast/distribution applications including subcarrier, bandedge, and SCPC schemes. It can also provide the basis for a spectrum-efficient
terrestrial radio system (e.g., STL, backhaul, or inter-city relay), either as an audio
link or as part of a combined video/audio link. For these applications, a digital
modem that can accept an RS-449/422 data connection is required. The DP503 can
be used successfully with the BPSK or QPSK digital modulation techniques typical
in the satellite industry, and with any degree of forward error correction (FEC)
desired. Given the variety of available data rates, users are free to determine the
tradeoffs between audio quality, bandwidth, cost, spectrum-efficiency, power, and
robustness in determining their transmission parameters.
Page 17

2A.1 Introduction
MAIN
The Dolby Fax system allows high quality audio to be sent over ISDN telephone
lines. With a complete encode/decode system, communication is full duplex; i.e.
two high quality audio channels can be sent in both directions at the same time.
Time code can also be sent down an audio channel. An additional auxiliary channel
can be used for signaling and data at 1200 baud. Where bi-directional two-channel
audio and synchronization is required, additional equipment can be used to send
and receive time code via the auxiliary data channel.
Audio inputs to the Dolby Fax are both analog and digital. The signal is converted
to PCM in the Dolby Model DP503 encoder. Three different audio coding
methods—Dolby AC-2 (the de facto standard in film and music) as well as the
Dolby Digital (AC-3) and MPEG Layer II— audio coding is used to reduce the bit
rate of the digital audio to a single bit stream of 56-384 kbps, incorporating 1 or 2
audio channels and the auxiliary data. This bit stream is sent to the ISDN terminal
adapter/inverse multiplexer unit, which interfaces with the public telephone
network, executes dialing, and handles differing call configurations between
countries. If needed, the digital data stream is divided up (inverse multiplexed) and
sent over several phone calls and is reassembled correctly at the destination. The
Dolby Model DP524 decoder converts the bit stream to audio and subsequently
feeds both analog and digital outputs.
SECTION 2A
DOLBY FAX - AN OVERVIEW
2A.2 Algorithms and Applications
The Dolby Fax system has built its reputation as being the de facto standard for
high quality audio using Dolby AC-2. With this reputation, a worldwide network
has been created which includes recording studios, film dubbing stages, record
labels, video post houses and home studios.
One of the most important new features of the Dolby Fax system is its ability to
connect to MPEG codecs, providing compatibility with users outside of the Dolby
Fax network of studios. Now with this addition, you have access to locations
whose work typically includes voice-over and jingle work.
To remain compatible with the existing network of Dolby Fax locations using
Dolby AC-2, two BRI lines—each with two 64 kb B channels—are needed for two
channels of "CD quality" 20 kHz audio. Dolby Fax with AC-2 can also operate at
384 kbps in situations where low coding delay is required. In this format, 3 BRI
lines are required at each location
MPEG locations, using codecs from companies such as Telos, Musicam USA
(formerly CCS) and RE typically operate at 56/112 kbps or 64/128 kbps for voice
over sessions and broadcast remotes. Switched 56 is used for 56/112 type calls,
while ISDN is used for 64/128 sessions. Calls at 56/64 kbps provide a 7-10 kHz
Page 18
2A-2
MAIN
audio bandwidth while 112/128 kbps calls provide 15-20 kHz audio bandwidth.
The 112/128 calls combine or "inverse multiplex" the two switched 56 or 64 kbps
ISDN B channels together to provide a higher bandwidth transmission path. Sites
that conform to the international inverse multiplexing standard Bonding Mode 1
can be accessed with your Dolby Fax system. Refer to the glossary in Appendix E
for more information on inverse multiplexing.
The DP503 also offers Dolby Digital (Dolby AC-3) in mono, stereo and joint
stereo modes with data rates ranging from 56-384 kbps. With this range of data
rates and their associated audio bandwidths, you can determine the tradeoff you
would like to make in terms of audio quality and call cost; this flexibility is
available when connecting to other Dolby Fax users with the DP503/DP524 codec
equipment. Dolby Digital (Dolby AC-3) is the same technology used in the Dolby
Digital film format, the DVD, US Advanced Television, as well as cable radio and
satellite audio services.
2 Chnls
Audio +
Data
2 Chnls
Audio +
Data
Dolby Fax - Send and Receive system
DP503
Encoder
DP524
Decoder
256
kbit/s
256
kbit/s
ISDN TA/
Imux
ISDN
ISDN TA/
Imux
Dolby Fax - Send and Receive system
Fig 1. Dolby Fax Sample Block Diagram
2A.3 Quick Start for Equipment Installation
Note
:
Refer to Sections 4 and 5 for comprehensive information.
Pre-Installation involves:
x
Unpacking
x
Inspection for damage
x
Checking fusing
x
Configuring internal jumpers (DP503 & DP524)
x
Configuring rear panel switches (DP503 & DP524)
x
Mounting rack ears (ISDN unit)
256
kbit/s
256
kbit/s
DP524
Decoder
DP503
Encoder
2 Chnls
Audio +
Data
2 Chnls
Audio +
Data
Page 19

2A-3
MAIN
Installation involves:
x
Equipment mounting
x
Audio connections
x
Data / Status / Control connections
Using the “Y” cable to interconnect the DP503, DP524 and ISDN unit
x
Applying power
x
Analog audio calibration
x
ISDN connections
2A.4 Quick Start for ISDN Setup
Note:
devoted to ISDN Setup. Refer also to Appendices D & E for ISDN background information.
Refer to Section 5 for a comprehensive procedure and details on user interface. Section 6.3 is
1. Select ISDN Setup by pressing SHIFT + DIR
2. Pick the appropriate switch type under the menu heading SW.
3. Enter your phone numbers (and SPIDs, if needed) under the menu headings
L1, L2, L3, L4 as needed (typical Dolby Fax installations use only 2 lines,
so only L1 and L2 will be used.). Leave unused lines disabled.
4. Store ISDN settings by pressing the ESC key and answering Y to the
UPDATE TA? inquiry.
5. Reset the ISDN unit by cycling mains power.
2A.5 Quick Start for Developing a Phone Directory
Notes:
Do
6.4.2)
Refer to Section 5.4 for a comprehensive procedure on entering directory items.
not
begin a Dolby Fax directory entry with an asterisk, as that signifies an encoder-only entry (See Section
1. Press DIR.
2. Select NEW. Use COPY ENTRY if modeling a new entry from an
existing one.
3. Enter required information. Be sure that encoder and ISDN unit parameters
match the capabilities of the site you will be calling. Default Dolby Fax
entries are:
Page 20

2A-4
MAIN
Parameter Value
Algorithm Type AC-2
Data Rate 256
Channel Mode 2C
Sample Rate 48
Aux Rate 12
ISDN (Inverse Multiplexing type) BONDING-1 64
4. Save the directory entry.
2A.6 Quick Start for Placing Dolby Fax Calls
Note
Refer to Section 5.4.3 for a comprehensive procedure on making calls.
1. Press
2. Select
DIR.
USE
.
3. Find the desired directory listing by scrolling with the ÇÈ keys.
4. Press ENTER. The call will be initiated. Look for ÆÆLOCATION on
the display to confirm that the call is established.
Hint:
extinguish.
You will also see the
Lock
LED on the DP524 become green, and the
5. Remember to Hang Up by pressing Shift + È or ESC. Select Y to
confirm.
2A.7 Receiving Dolby Fax Calls
Call setup is automatic: The ISDN unit will automatically answer an incoming call,
and the DP524 decoder unit will automatically configure itself for the proper
algorithm.
Mute
LED on the DP524
But, your DP503 encoder must be manually set to match the incoming call:
1. With the DP503 in the default encoder parameters screen, make
adjustments to the encoder, if necessary, to match the incoming algorithm,
data rate, channel mode, sample rate, and aux rate.
Note:
Refer to Section 5.2 for a comprehensive procedure on changing encoder parameters.
Page 21
2A-5
MAIN
2A.8 Some Specific Applications
Several applications are shown here. This is not an exhaustive list, neither is it the
only way to set up each application. They do however illustrate clearly the
principles and the issues that require consideration, particularly with regard to real
time audio synchronization.
Location X
Audio
Source
Applications
Music Recording:
Checking tracks/mixes
direct from the studio
Listening to demos
Post production:
Auditioning voices
Sending/receiving track
elements
Radio:
Sending/receiving jingles
Location Y
A
Dolby
Fax
B
Notes
2 Audio Channels from X to Y.
As both channels are independent, Dolby Stereo and
Dolby Surround Lt Rt tracks can be sent with the
Dolby Fax.
ISDN
A
Dolby
Fax
B
Key
Audio
Timecode
Stereo Playback
Page 22

2A-6
MAIN
Location X
Picture
(optional)
Audio
Source
Applications
Post production:
Soundtrack approval
to picture
Location Y
Offset
A
A
Dolby
Fax
B
Notes
2 Audio Channels from X to Y,
(1 Audio Channel from Y to X for code/bi-phase).
Timecode Offset should be set to total path delay
from Y to X to Y. This can be measured by
sending timecode from Y and looping it back via
X, so the offset can be read.
Where the picture is on film, bi-phase can be used
for synchronisation instead of time code by using
an external bi-phase to timecode generator.
ISDN
AA
Dolby
Fax
B
Picture
Key
Audio
Timecode
or bi-phase
As both channels are independent, Dolby Stereo and
Dolby Surround Lt Rt tracks can be sent with the
Dolby Fax. In this case they can be decoded to LCRS
at Location Y.
Soundtrack Approval
Page 23
2A-7
MAIN
Location X
Mic
Applications
Post production:
Dubbing to picture
AA
Dolby
B
Fax
A
Mic Amp/
Audio Mixer
Notes
2 Audio Channels from Y to X (1 used for code)
1 Audio Channel from X to Y.
Incoming audio at Y should be recorded on a
separate medium or one that will allow offset
synchronisation on relevant tracks.
ISDN
Dolby
Fax
A
+ Talkback
B
Location Y
PicturePicture
Existing
Audio Track
Audio
Mixer
Key
Audio
Timecode
This system allows off-line working: send
Existing Audio Track and code to location X,
record tracks to tape/film and send finished
audio back to Y by Dolby Fax or Courier.
Dubbing Sound to Picture
Page 24
2A-8
MAIN
Mic
Mic
Applications
Location X
Multi-track
Recorder
Audio
Mixer
Notes
Dolby
Fax
B
A
Location Y
Timecode
Offset
A
ISDN
B
A
Dolby
Fax
A
B
B
Multi-track
Mix
Audio
Delay
Key
Multi-track
Recorder
Audio
Mixer
Music Recording:
Mono/Stereo multi-track
overdubbing
Radio:
Mono/two channel
voice/overs
2 Audio Channels from X to Y,
2 Audio Channels from Y to X (1 used for code).
Timecode Offset is only required if the session
is to run in sync at both X and Y.
Timecode Offset and Audio Delay should be set
to total path delay from X to Y to X. This can be
measured by sending timecode from Y and
looping it back via X, so the offset can be read.
Incoming audio at Y should be recorded on a
separate medium or one that will allow offset
synchronisation on relevant tracks.
Recording audio at location X is optional.
This system allows off-line working: send
foldback and code to location X, record tracks
to tape and send finished audio back to Y by
Dolby Fax or Courier.
Multi-track Recording
Audio
Timecode
Page 25

3.1 Unpacking
MAIN
Before proceeding further, be sure to inspect the outer carton for shipping damage.
If there has been any penetration to the carton, be sure to inspect the unit for any
physical damage in those areas.
Several accessories have been provided in the packet provided with this manual.
Please compare them with the following list to ensure that there are no missing
items:
Rack screws and washers
Power cord
Spare fuse 1A
Spare fuse, 2A, used on the internal power supply
Warranty card
Registration card, Pro Products
Hex wrench (for access to inside of unit)
Alignment tool (“tweaker”)
Product brochure with specifications
(Part. No. 56016)
(Part No. 91292)
or variant
(Part No. 91155)
SECTION 3
PRE-INSTALLATION
(Part No. 56017)
or variant
3.2 Inspection
Carefully remove the unit from its carton. Remove the plastic wrapping and place
on a flat surface.
If there are no signs of physical damage, proceed to "Fusing Information" below.
3.2.2 Claims for Shipping Damage
If, in your inspection procedure, you should find physical damage, please notify the
carrier immediately. All claims for damage must be filed by the recipient. Dolby
Laboratories or your dealer/distributor will be happy to assist where possible.
3.3 Fusing Information
WARNING:
The DP503 utilizes a universal switching power supply that can accommodate the
full range of nominal voltages between 90 Vac and 264 Vac and any frequency
between 50 Hz and 60 Hz.
To reduce the risk of fire, replace fuses only with the same type and rating.
Main Fuse:
Use 1 Amp, 250V, 20 mm, Time-Lag fuse.
Page 26
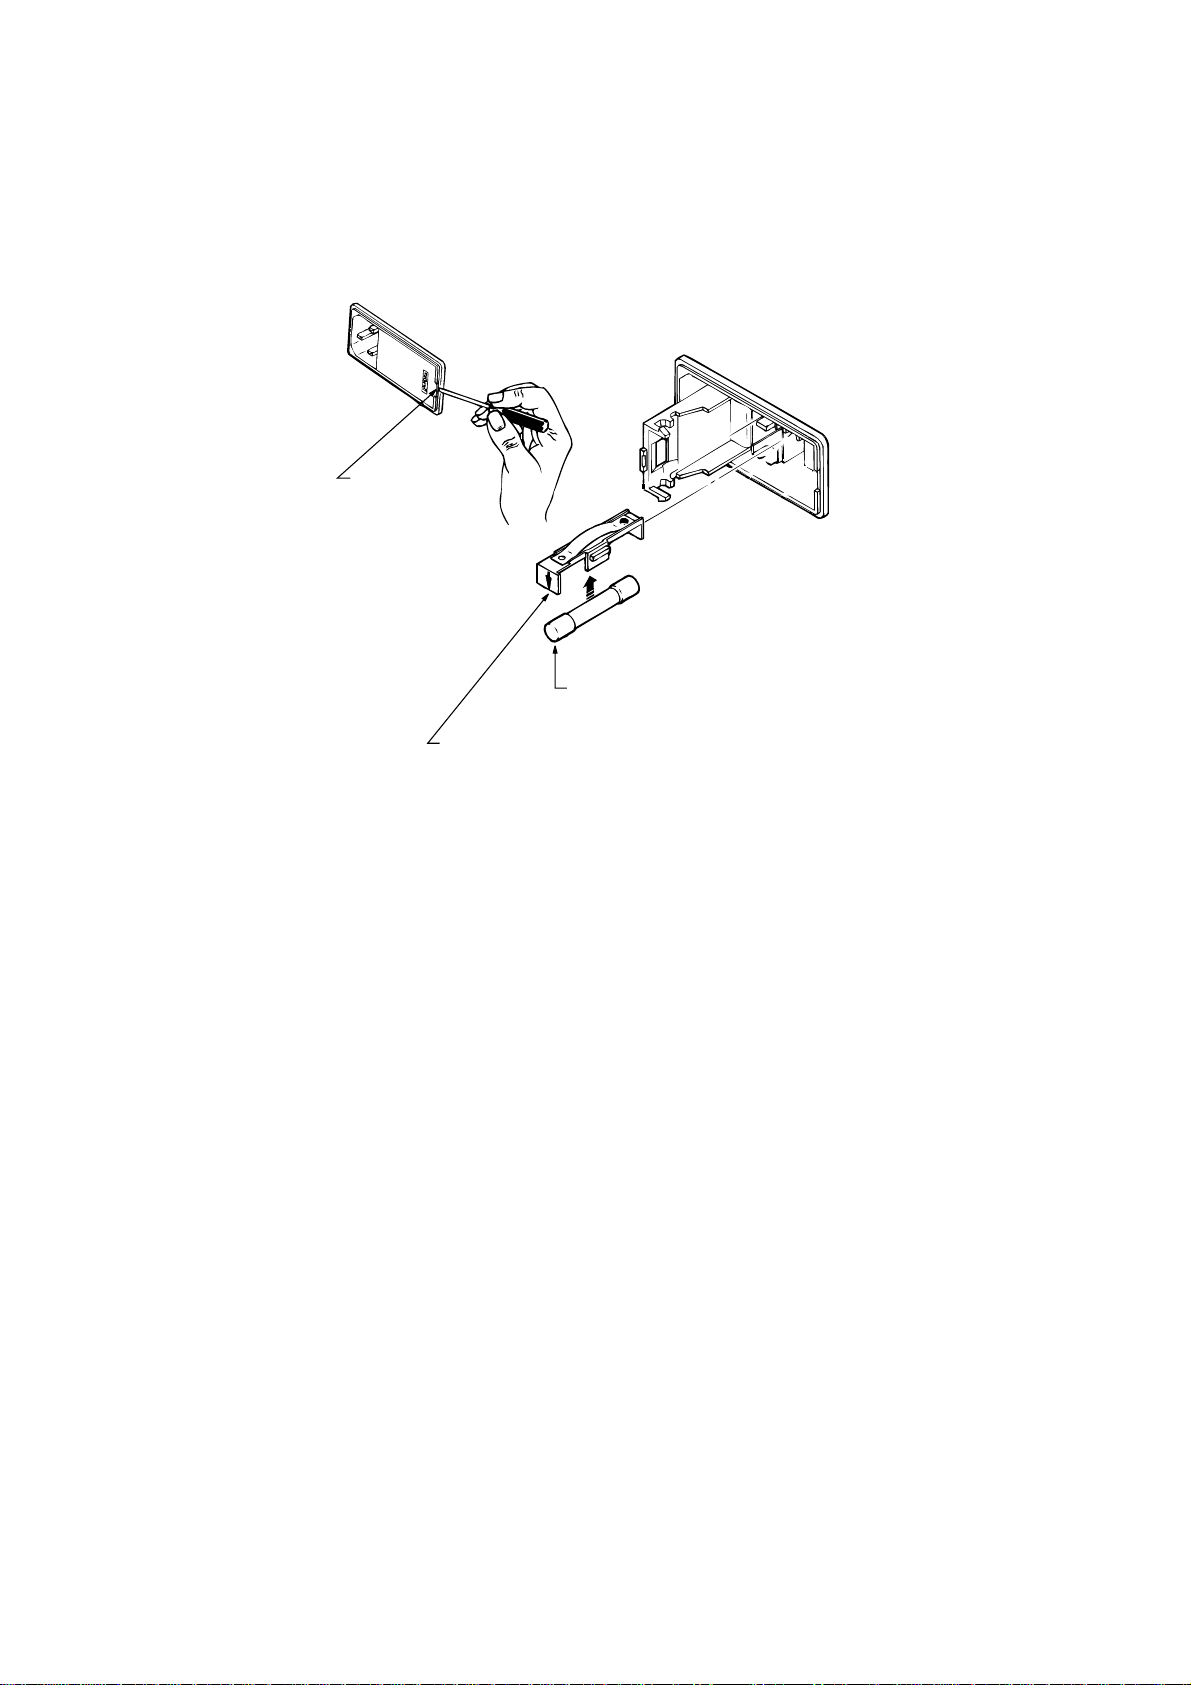
3-2
MAIN
With a small flat-blade screwdriver, open the fuse compartment door in the AC
power input housing (see figure below).
OPEN THE
DOOR
FUSE
ACTIVE
FUSE CARRIER
(LOWER)
Check that the fuse in the active (lower) fuse carrier is of the correct rating. A spare
fuse can be stored in the upper fuse carrier position.
Snap the fuse compartment door closed.
Internal Fuse
The switching power supply contains a separate fuse. Most fault conditions should
be protected by the main fuse. The internal fuse rating is:
2 Amp, 250V, 20 mm, fast-blow.
Page 27
3-3
MAIN
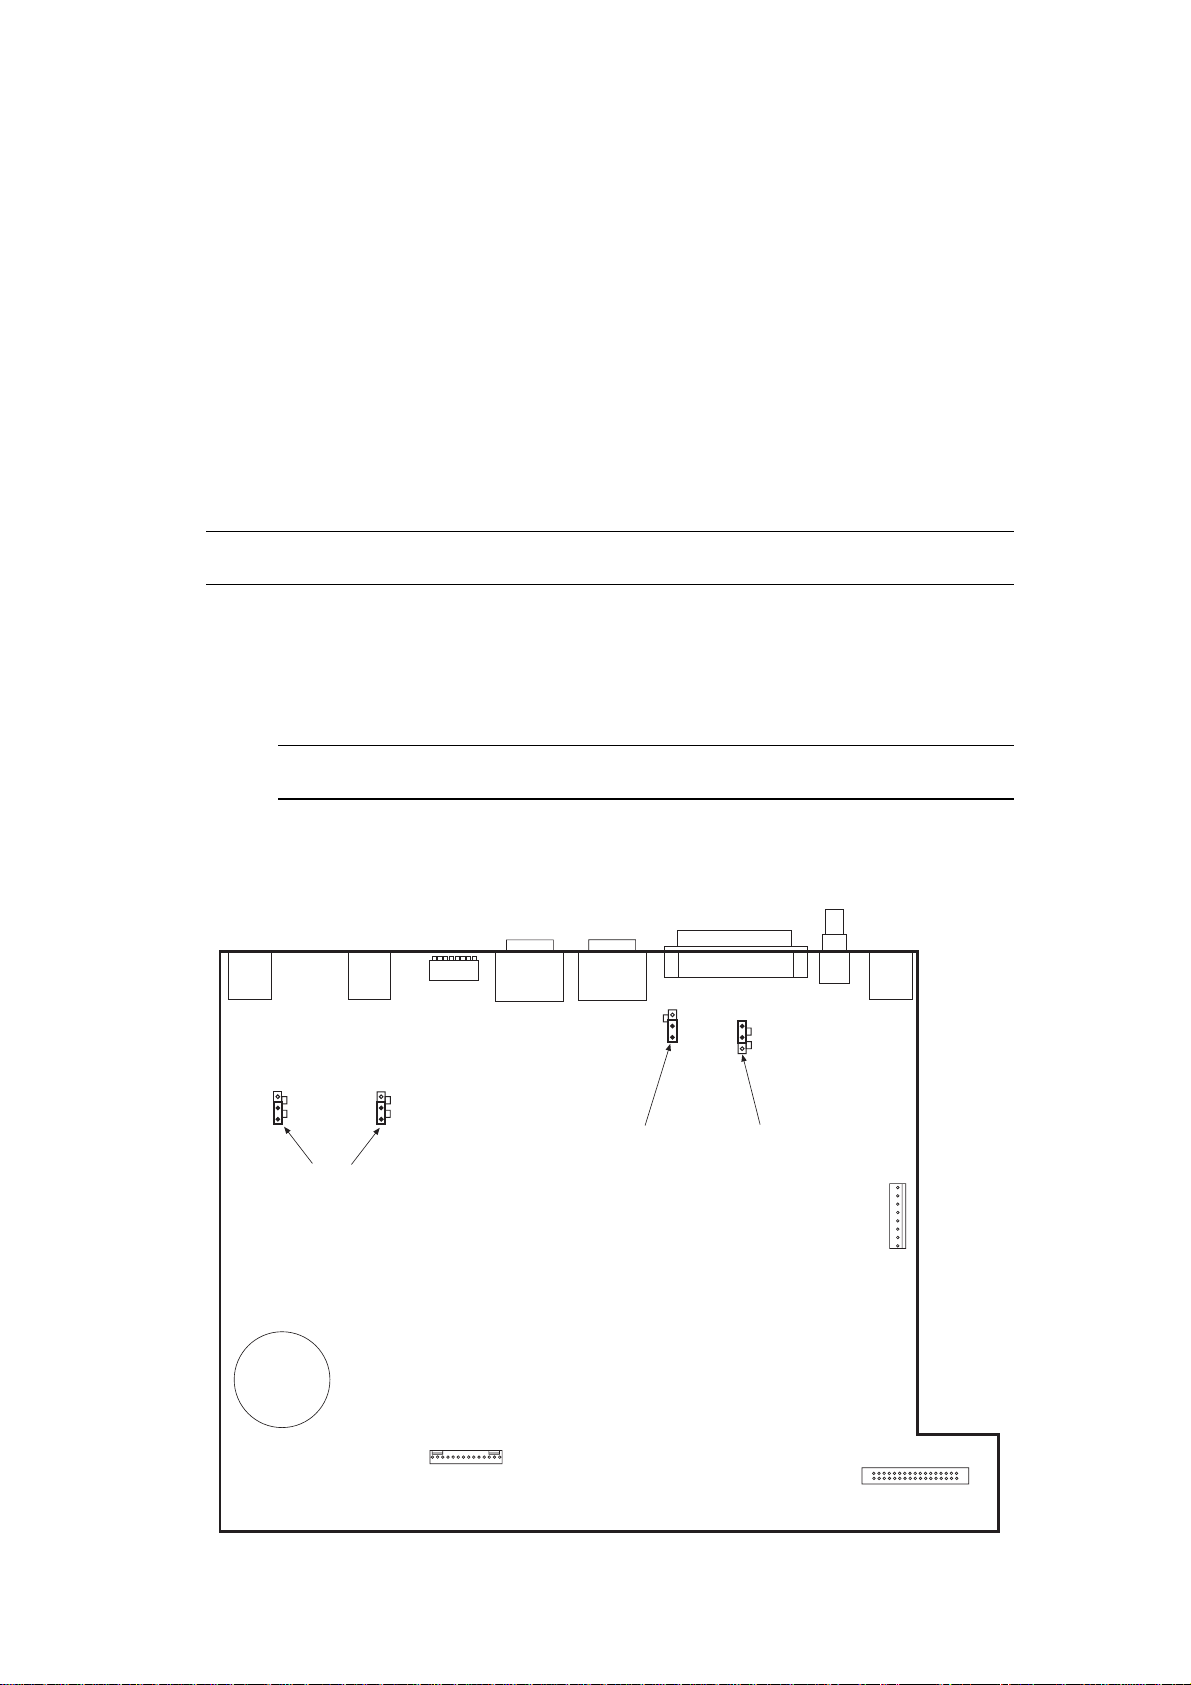
3.4 Configuring Jumper Settings
The Model DP503 includes certain user-selectable options that are configured by
means of internal jumpers, as shown below. Their default settings (shipped with
the unit) are shown in the figure. Any jumpers not specifically mentioned are for
factory use only and should not be disturbed.
Removing the Top Cover
If you need to gain access to the interior of the DP503 to change these jumpers,
remove the top cover of the unit as follows:
WARNING:
not be connected.
Be sure that the unit is NOT powered up. As there is no power switch, the power cord must
Using the supplied hex wrench, remove the 12 screws securing the top
cover to the chassis; there are three screws on the upper front panel, upper
rear panel, and each of the sides. The three washerless screws should be
reserved for affixing at the top of the front panel when re-assembling the
unit.
Note:
front panel. These do
The front panel is attached to the chassis by means of 3 screws at the lower portion of the
not
need to be disturbed in order to remove the top cover.
Gently lift the top cover upward and towards the rear. Carefully set aside.
Reverse the above procedure when re-assembling the unit.
J13 J14
600
10K
ChB ChA
Audio input
termination
600
10K
S101
Signal ground to
chassis ground link
LINKED
OPEN
J14
J12
ST input clock
termination (150 ohm)
TERMINATED
NOT TERMINATED
DP503 MOTHERBOARD
Page 28

3-4
MAIN
3.4.1 Clock Termination Jumper J12 [terminated]
As would be appropriate for most applications, the default condition for the Send
Timing inputs on the data and clock connector is
terminated
(by means of a 150
ohm resistor). Certain situations may require that these inputs be unterminated
(e.g., multiple inputs driven from a single output). This can easily be accomplished
by moving jumper J12 to the unterminated position (move jumper towards the
front of unit).
3.4.2 Analog Audio Input Termination J13/J14 [10k ohms]
If you are using equipment designed to drive loads with a high input impedance,
leave the jumpers in the DP503 in the
equipment whose output requires a 600 ohm load, these jumpers should be moved
to the 600 ohm position (move jumpers towards the rear of the unit).
10k
position. If you are driving the unit with
3.4.3 Signal Ground-to-Chassis Link J15 [open]
It is normal practice to connect signal ground to power line ground for many
reasons, including safety. In most systems, minimum induced hum is obtained
when this connection is made at one and only one piece of equipment in the audio
chain. To minimize the addition of circulating ground currents in a particular
installation, the default setting for this jumper link is
open
. Note that there is
always a 1 kohm resistor across the link so that the audio ground is never totally
isolated from the chassis ground. To connect audio ground directly to chassis
ground in the DP503, move jumper J15 to the closed position (move jumper
towards the rear of the unit).
CAUTION:
reasons this ground wire MUST NEVER be disconnected.
The chassis is always connected to the ground pin of the power line cord. For safety
3.5 Configuring the Rear Panel DIP Switch S101
The Model DP503 includes certain user-selectable options that are configured by
means of a rear panel DIP switch, S101. Some of them should be configured prior to
first use. Others can be changed as operational needs dictate (See also Section 5).
The default settings (delivered from the factory) are shown in brackets in the table
below. Before installing the unit, be sure to verify that the switch positions are in
their desired positions. Explanations follow below.
Note:
Unlike the DP524 decoder unit, on the DP503, the “
off
” position of the switch is in the UP position.
Page 29

3-5
MAIN
S101
Switch No.
1 Unit Address (Binary Code) [0]
2 [0] 1
3 [0] 1
4 [0] 1
5 [0] 1
6 Normal/Download
(Baud rate set by switches 7 & 8)
7 Baud Rate for Remote
8 Control or Download Operation
(Mode set by switch 6)
Function Up (Off) Down (On)
1
[Normal] Download
[up] down
[up] down
3.5.1 Switch nos. 1-5 - Unit Address
A unique address can be assigned to each DP503 in a multi-unit installation for
remote control applications using the RS-232 connector J108 Rem/Download.
Individual units can be uniquely controlled using this feature.
Note
retrieved remotely using the serial port. Instead, individual status information can be retrieved using the
separate connector
While individual units can be controlled this way, status information from a particular unit cannot be
J109 Status.
The address is set using conventional binary codes as follows:
S101- S101Unit
Address
10
11
12
12
14
15
12345 Unit
0
1
2
3
4
5
6
7
8
9
00000
00001
00010
00011
00100
00101
00110
00111
01000
01001
01010
01011
01100
01101
01110
01111
Address
16
17
18
19
20
21
22
23
24
25
26
27
28
29
30
31
123 4 5
100 0 0
100 0 1
100 1 0
100 1 1
101 0 0
101 0 1
101 1 0
101 1 1
110 0 0
110 0 1
110 1 0
110 1 1
111 0 0
111 0 1
111 1 0
111 1 1
Page 30

3-6
MAIN
3.5.2 Switch no. 6 - Mode of Operation: Normal/Download
The RS-232 port
J108 Rem/Download
can be used for 2 functions: upgrading of
the audio coding algorithm software whenever upgrades are introduced, and
remote control of the unit via a PC; in the latter instance upgrades can also be
performed via the remote control host.
Note:
switches S101-7 and S101-8 must also be set
Keep switch no. 6 in the
upgrade. Move the switch to the
When invoking the download mode or using the remote control feature, , the baud rate selection
Normal
position when not performing a software
Download
position when manually performing a
software upgrade.
Note:
See Appendix B for download instructions. RS-232 interface specifications are located in Appendix A.
3.5.5 Switch nos. 7 & 8 - Baud Rate Set
The combination of switches S101-7 and S101-8 select the choice of baud rate for
RS-232 port
software download as mentioned above.
Use the following table to set the baud rate:
J108 Rem/Download
, which can be used either for remote control or
SW101-7 SW101-8 Baud Rate
up up [9600]
up down 19200
down up 38400
down down 57600
Note
software for remote control operation. RS-232 interface specifications are located in Appendix A.
See Appendix B for download instructions. See the documentation supplied with the remote control
Page 31

SECTION 4
MAIN
INSTALLATION AND LEVEL CALIBRATION
Note
For Dolby Fax connections, see Section 4.4 below for additional information. An overview of the
Dolby Fax system is provided in Section 2A.
4.1 Mounting
The DP503 is designed for 19 inch rack mounting, but may be mounted in any
plane and with any orientation. It occupies 1U (1 3/4") of space.
When mounting the unit, ensure that there is air flow around it, and that it is not
mounted directly above any equipment generating high amounts of heat. The unit
will operate within specifications up to a maximum ambient temperature of 50º C
(122º F). Note that the ambient temperature inside a poorly-ventilated rack may be
considerably higher than that in the room.
4.2 Audio Connections
Note
4.2.1 S/PDIF Input
Detailed connector and pinout specifications can be found in Appendix A. See the rear panel figure
located at the end of section 5.
Connect the S/PDIF digital audio input to the DP503 input
J104 S/PDIF
using 75
ohm shielded cable. With its built-in sample rate converter, the DP503 can
accommodate any sampling rate between 32 kHz and 48 kHz.
Note:
To maintain better mechanical and electrical integrity, the rear panel connector on the DP503 is a
BNC female connector rather than the typical phono jack normally encountered in S/PDIF
installations.
4.2.2 AES/EBU Input
Alternatively, connect the AES/EBU digital audio input to the DP503 input
AES/EBU
using a balanced and shielded audio cable with a male XLR connector.
With its built-in sample rate converter, the DP503 can accommodate any sampling
rate between 32 kHz and 48 kHz.
Note:
The AES/EBU and S/PDIF inputs cannot be used simultaneously. If connections are made to both
inputs, neither will function.
J103
4.2.3 Analog Input
Alternatively, if using the analog inputs, make connections at the DP503 analog
inputs
J101Ch A
XLR female connectors.
and/or
J102 Ch B
which are provided with industry-standard
When operating in single channel audio coding modes, only audio from Channel A is used.
Note
Page 32

4-2
MAIN
AES and IEC convention calls for XLR pin 2 to be “high/hot” and pin 3 to be
“low/cold.” In the interests of maintaining international standardization, we suggest
that the AES and IEC recommendations be followed.
In an installation where the source is unbalanced, avoid ground loops by using two
conductor shielded cable exactly as for balanced circuits; in other words, ensure
that the unbalancing (connecting the wire to pin 3 to ground) occurs only at the end
remote from the Model DP503. Note that both audio pins of the XLRs (pins 2 and
3) must be connected; neither may be left open.
4.3 Data / Status / Control Connections
4.3.1 Encoded Data Out and Timing
Note
If you are using the DP503 as part of a
Section 4.4 below.
The data output connection occurs at the 37-pin D-connector
Out and Timing
.
Dolby Fax
system, substitute the information provided in
J105 Encoded Data
This connector follows the interface specifications of EIA standard RS-449 in the
type DT mode (data and timing signals only). Under RS-449, the DP503 is
categorized as data terminal equipment (DTE), and is typically connected to data
circuit-terminating equipment (DCE). Detailed information on the RS-449
interface is provided in Appendix A.
System Clock Requirements
A phase-locked loop (PLL) generates all sample and data timing. The PLL locks to an external data clock at
the target data rate, and a crystal-based oscillator is used within the PLL to minimize timing jitter in
r
the sampled audio data. The frequency locking range of the loop is
This requires a stable external data clock with a 50% duty cycle per RS-449 specifications.
For those applications that lack a suitable external data clock, the DP503 provides a reference clock for system
timing (RS-449 TT signal); this clock has been trimmed to an accuracy of r 25 ppm with respect to
the target bit rate.
100 ppm of the target bit rate.
4.3.2 Auxiliary Data
If required, make auxiliary data connections to the 9-pin D connector J106
Aux/Acc
This connector follows the interface specifications of EIA standard RS-232, with a
minimum 2-wire connection (half-duplex). The auxiliary data channel supports a
10-bit asynchronous serial data format (1 start bit, 1 stop bit, 8 data bits, no parity)
at a data rate specified by the user. Under RS-232, the Model DP503 is categorized
as a DCE device, and typically connected to data terminal equipment (DTE).
Detailed information on the RS-232 interface is provided in Appendix A.
.
Page 33

4-3
MAIN
4.3.3 Terminal Adapter Control
This connection is used only in a Dolby Fax installation. See Section 4.5 below.
4.3.4 Remote Control
If you wish to use a PC for remote control of the DP503, connect a standard 9-pin
RS-232 serial cable (not supplied) to
J108 Rem/Download
.
Remote control operation permits access to the setting of bitstream parameters in
Dolby Digital (AC-3).
Refer to the manual supplied with the remote control software for instructions on
its use.
4.3.5 Status
If required, make Status output connections to the 9-pin D-connector
This connector provides an external monitor for some of the front panel LED status
indicators. Signal levels are 5 volt CMOS (active high), with a 50 ohm output
impedance. The following status indications are available:
Fault Overload Ch A
Test Overload Ch B
Digital In Remote
Lock
Pinout information is provided in Appendix A.
4.4 Power
Read the safety information in Section 1. When you are confident that you have
observed its provisions, connect mains power to the unit at the power connector.
Upon power-up, the DP503 will go through a self-test sequence. Two screens
showing software revision levels will appear; then the default encoder
configuration screen will be displayed.
J109 Status
.
4.5 Level Calibration (Analog Inputs)
Note:
Upon initial power-up, the DP503 is configured with the analog inputs active. If you see that the
Digital
LED is illuminated (red or green), sequentially press the
should extinguish, meaning that the analog inputs are now active. Refer to the front panel figure
located at the end of Section 5 as needed.
Shift
keys. The Digital LED
n
and
n
Page 34

4-4
MAIN
The operating level for analog signals in the Model DP503 is referenced to -18dB
relative to digital full scale; in other words, the DP503 allows for 18 dB of
headroom. Analog input levels in the DP503 are adjustable by means of the rear
panel gain controls Gain from -18 dBu to +6 dBu, where 0 dBu is defined as 0.775
Vrms. These controls should be used in conjunction with the dual-LED calibration
display Cal located adjacent to the controls (and duplicated on the front panel).
Calibration Procedure
Feed a test tone from the signal source at a convenient frequency (typically 400 Hz
or 1kHz) corresponding to your 0 dB operating level to the analog inputs of the
DP503.
For each channel, adjust the input level control so that the LED pair shines with
equal brightness, corresponding to a level 18 dB below digital full scale. When the
signal level is too low, only the left LED of the pair will light. When the signal
level is too high, only the right LED of the pair will light.
Note:
If a different amount of headroom is required than 18dB, offset the reference input signal by the
degree that you want to increase or decrease the headroom. For example, for 15 dB of headroom,
supply a -3 dB reference tone, and adjust input levels for equal brightness of the LEDs. For 21 dB of
headroom, supply a +3 dB reference tone.
4.6 Dolby Fax Connections—Additional Procedures
If you are using the DP503 as part of a Dolby Fax installation, please follow the
additional procedures below.
4.6.1 Mounting
In the case of the ISDN unit, attach the supplied rack mount kit to the unit prior to
installation in the rack. Then mount it and the DP524 decoder (if present) in the
rack in spaces adjacent to the DP503. Refer to the manuals supplied with the
DP524 and ISDN unit, if necessary.
4.6.2 Audio Connections
Be sure to make audio connections to the DP524 decoder (if present). Refer to the
manual supplied with the DP524 as necessary.
4.6.3 Encoded Data Out and Timing
As part of the cable complement supplied for a Dolby Fax installation, you should
have received a “Y” cable (Dolby Part Number 83293), two of whose ends are
terminated in 37-pin female connectors and which are labeled “encoder” and
“decoder;” and a third end terminated in a 44-pin male connector.
Page 35

4-5
MAIN
At the DP503, connect the end of the “Y” cable labeled “encoder” to J105
Encoded Data Out & Timing.
At the DP524 digital audio decoder, furnished as part of the Dolby Fax system,
connect the end of the “Y” cable labeled “decoder” to J103 Encoded Data In &
Timing.
At the ISDN unit, connect the remaining end of the “Y” cable to its mating
connector at the rear of the unit, labeled HOST 1.
4.6.4 Auxiliary Data
Be sure to make auxiliary data connections to the DP524 decoder (if present), if
using this feature. Refer to the manual supplied with the DP524 as necessary.
4.6.5 Terminal Adapter Control
As part of the cable complement supplied for a Dolby Fax installation, packed with
the ISDN unit is a unique cable with a 9-pin female connector on one end and
telephone-style RJ-11 jack on the other.
At the DP503, connect the 9-pin female end of the cable to J107 TA Ctrl.
For the ISDN unit, connect the RJ-11 end of the cable to the RJ-11 connector
labeled CONTROL..
4.6.6 Remote Control
Note
All Dolby Fax remote control functions are accessed from the DP503.
4.6.7 Status
Be sure to make status connections to the DP524 decoder (if present), if using this
feature. Refer to the manual supplied with the DP524 as necessary.
4.6.8 Power
Also connect mains power to the DP524 and ISDN unit.
Note:
The ISDN unit uses an in-line transformer. Be sure to secure it safely in the rack. Connect it to the
mains line. Attach its output to the corresponding receptacle at the rear of the ISDN unit.
4.6.9 Level Calibration
The analog outputs of the DP524 decoder (if present) have output level controls.
Using the test tone of the DP524, adjust the output trims and/or the input to the
Page 36

4-6
MAIN
console (or next piece of equipment) for the desired operating level. Refer to the
manual supplied with the DP524 as necessary.
Note::
The test tone level in both the DP503 encoder and DP524 decoder is referenced to -18dB relative to
digital full scale.
4.6.10 ISDN Connections
Attach the RJ-11 connectors for each of the ISDN lines used (1-4, typically 2) to
the appropriate receptacles at the rear of the ISDN unit. Facing the rear of the unit,
Line 1 corresponds to the lower-most receptacle at the right side of the unit. Lines
2-4 are located in a row above the receptacle for Line 1; they are numbered 2
through 4, respectively, from left to right.
Note:
Proceed to Section 5 for ISDN setup and Dolby Fax operation. Be sure to read the
overview in Section 2A.
Be sure to note which phone number is connected to which line, as they will need to be entered
correctly during the Dolby Fax setup procedure.
Page 37

Notes:
MAIN
See the front and rear view figures located at the end of this section. Flow charts illustrating the user interface
structure are located in Appendix C.
An overview of Dolby Fax principles is described in Section 2A. An ISDN ordering guide (for North America)
can be found in Appendix D.
5.1 Introduction to the User Interface
The DP503 interface provides the user with all the necessary functions for controlling
the unit, and, in Dolby Fax applications, the ISDN unit. It consists of a front panel 16character alphanumeric display with accompanying momentary push-button keys.
While the front panel interface does away with the need for computer control, an RS232 port is available on the rear panel.
5.1.1 Push-button Key Description
SECTION 5
OPERATION
There are 4 directional arrow keys;
DIR
ectory keys.
The
Å
and Æ arrow keys are used to move back and forth among the available
ENTER
and
ESC
ape keys; as well as
SHIFT
and
parameters that can be user-configured; a cursor in the form of an underscore on the
first character highlights the selected parameter. In addition, they are used to move to
the next or previous character in character edit screens.
Note:
the left and right extremes.
Hint
chosen setting (mimicking the
In many screens, the cursor “wraps” around the screen when the Å and Æ arrow keys are moved past
In the encoder parameters screen (the default screen), the Å and Æ arrow keys can also act to select a
key) as well as to move to the next parameter.
ENTER
The Ç and È arrow keys are used to bring into view the available settings or
characters for each of the parameters.
Note:
keys are moved past the extremes.
The cursor “wraps” around the list of available settings or characters when the Ç and È arrow
The ENTER key is used both to select the chosen setting of the parameter and,
depending on the particular screen, to automatically move the cursor to the next screen
for further configuring.
Note:
appears, the parameter remains unselected; after a brief time-out period, the setting prior to any scrolling
action will be restored.
When changing parameter values, if the
ENTER
key is not depressed after a desired parameter
The ESCape key is used to cancel the current selection or to step upward in the menu
hierarchy.
Page 38

5-2
MAIN
The DIRectory key is used to access the directory functions of the DP503, which
enable the creation, editing, deletion, and access to entries of frequently used encoder
parameters as well as, in Dolby Fax applications, frequently dialed phone numbers
with their associated ISDN parameters.
The SHIFT key is used to access secondary functions assigned to the other keys.
Hint:
toggles on and off, as confirmed by the associated yellow LED.
Caution:
accept any further front panel input until the
operating mode; the only exception is that the
You do not have to hold down the
SHIFT
The
+ Æ key combination places the unit in remote control mode. The unit will not
SHIFT
key while pressing another key; rather, the shift function
SHIFT
Talkback
Æ
sequence is repeated again to return the unit to local
+
function is active.
Key Sequence Function Accessed Comments
SHIFT +
Å
Test Turns on test tone generator: nominal
1kHz sine wave at -18 dB relative to
digital full scale.
Repeat key sequence to toggle off.
SHIFT +
Æ
Remote Places unit under remote control. All
functions with the exception of the
Talkback function and return to local
mode, are subsequently disabled.
Repeat key sequence to toggle off and
return to local mode.
SHIFT +
Ç
Digital Switches audio inputs to digital inputs
(either AES/EBU or S/PDIF).
Associated LED glows green if valid
digital data is present; glows red if
signal is absent or unreadable.
SHIFT +
È
Repeat key sequence to toggle off and
to use analog inputs.
Delete/Hang-up During editing modes, deletes the
character above the cursor. Function
self-cancels after being invoked.
During Dolby Fax operation, invokes
the hang-up sequence.
Page 39

5-3
MAIN
SHIFT + ENTER
SHIFT + DIR
SHIFT + ESC
Insert/Contrast During editing modes, inserts a space
directly above the cursor and moves
remaining text to the right. Function
self-cancels after being invoked.
Otherwise, invokes mode to enable
adjustment of LCD screen contrast.
Ç
Use
by pressing ESC,
ISDN Setup Places unit into ISDN Setup mode for
Dolby Fax applications. See Section
5.3.
Loopback When using the DP503 as part of a
Dolby Fax system, invokes the ISDN
terminal adapter Loopback function. If
there is no call established, loopback
is local. If a call is established,
loopback is remote.
Repeat key sequence to toggle off.
Action is confirmed by the associated
yellow LED. A slight delay is normal,
as the DP503 is actually polling the
ISDN unit for confirmation.
and È keys to adjust. Cancel
5.1.2 Operational Modes
There are 3 major operational modes:
x
Encoder configuration
x
Directory functions
x
ISDN setup (for Dolby Fax applications)
By default, the display shows the encoder configuration parameters. The associated
parameter labels are silk-screened below the display.
Switching to the other modes requires pressing the DIR key for enabling Directory
functions, or the SHIFT + DIR keys to enter the ISDN setup mode. This allows the
user to access the necessary nested screens and parameters.
5.1.3 Operational Hierarchy
Behind the scenes intelligence ensures that illegal combinations of parameters cannot
be selected. Allowable values for a given parameter are based on the settings of other
parameters of higher priority. The following 3 diagrams show the priority of
configuration parameters:
Page 40

5-4
MAIN
1. Algorithm Type
Data Rate
Channel Mode
Aux Data Rate
2. Algorithm Type
Sample Rate
3. Algorithm Type
Data Rate
ISDN parameters (in Dolby Fax applications)
The setting of a particular parameter may therefore preclude the use of certain
selections in lower levels of the hierarchy; those selections are eliminated from the list
of available choices when navigating the screens. If a parameter is changed to a value
that is inconsistent with the settings of lower level parameters, the lower levels will
revert to default values. The following list of examples demonstrates this feature:
First Parameter Selected Impact on a Second Parameter Effect on Second Parameter Choices
Data Rate
Data Rate = 56 kbps
Algorithm Type = AC-2
= 56 kbps
Aux Rate can only be 1200 bps (or none)
Ö
Ö
Channel Mode is only 1 channel
Ö
Ö
Sample Rate is only 48 kHz
Ö
Ö
5.2 Encoder Configuration
Upon power-up, the DP503 will go through a self-test sequence. Two screens showing
software revision levels will appear. Then, the
will be displayed; their corresponding labels are printed below the display. It will look
similar to the following:
AC2 256 2C 48 12
Algorithm Data Channel Sample Aux
Type Rate Mode Rate Rate
As shown, the display indicates: 2 channels (dual mono) of Dolby AC-2 audio coding
algorithm at a total data rate of 256 kbps; the sample rate is 48 kHz, and the auxiliary
data rate is 1200 bps.
default
0 600 1200 2400 9600
Ö
Ö
1C 2C JS
Ö
Ö
32 44.1 48
Ö
Ö
encoder configuration screen
If you have already used any of the push-button keys to reach another screen and do
not see the display above, press the
key enough times so that you do. The actual
ESC
values displayed will depend on the previously defined state, if you or someone else
have already saved a different encoder configuration.
Tip:
cursor is below the character N and then pressing
If you encounter the
UPDATE TA? Y N
ENTER
screen, enter No by pressing the Æ arrow key so that the
.
Page 41

5-5
MAIN
ª
5.2.1 To change
Caution:
equipment associated with the decoder connected to the encoder you are utilizing has its level control turned
down.
Use the screen above to change algorithm type, data rate, channel mode,
sample rate, and auxiliary data rate (if any).
Å
Use the
Use the
of the parameters.
Once the ENTER key or
operation occur immediately.
Note:
original settings, or store the original configuration as a directory entry (see Section 5.4 below).
and Æ arrow keys to move back and forth among these parameters.
Ç
and È arrow keys to bring into view the available settings for each
Å
and Æ arrow keys are used, changes to encoder
There is no “undo” function. If you experiment with encoder parameters, make a note of the
Algorithm Type
Changing algorithms may result in audible chirps. Make sure that any monitoring
AC2 256 2C 48 12
Algorithm Data Channel Sample Aux
Type Rate Mode Rate Rate
Use the Å and Æ arrow keys to place cursor on the first character of settings in the
Algorithm Type column. Use the
settings as shown in the table below. Use the ENTER key to select the chosen value,
or press the Æ arrow key to both select the entry and move to the next parameter.
Display Algorithm Type
AC2
AC3 Dolby Digital (AC-3)
L2
Dolby AC-2
MPEG Layer II
5.2.2 To change
Ç
and È arrow keys to scroll through available
Data Rate
AC2 256 2C 48 12
Algorithm Data Channel Sample Aux
Type Rate Mode Rate Rate
Use the Å and Æ arrow keys to place cursor on the first character of settings in the
Data Rate column. Use the
shown in the table below. Use the ENTER key to select the chosen value, or press the
Ç
and È arrow keys to scroll through available settings as
Page 42

5-6
MAIN
Æ
arrow key to both select the entry and move to the next parameter. Units are kbps
(kilobits per second).
Note:
rate.
Available rates are dependent on the selected algorithm. Data rates displayed represent the
Available data rates:
Display Display Display
040 096 224
048 112 256
056 128 320
064 160 384
080 192 448
5.2.3 To change Channel Mode
AC2 256 2C 48 12
Algorithm Data Channel Sample Aux
Type Rate Mode Rate Rate
total
data
Use the Å and Æ arrow keys to place cursor on the first character of settings in the
Channel Mode
column. Use the
settings as shown in the table below. Use the
Ç
and È arrow keys to scroll through available
ENTER
key to select the chosen value,
or press the Æ arrow key to both select the entry and move to the next parameter.
Note
Available channel modes are dependent on the selected algorithm and data rate.
Available channel modes:
Label Channel Mode Comments
1C
Mono Accepts audio from Ch A only
2C Dual mono
JS
Joint stereo
5.2.4 To change Sample Rate
Use the Å and Æ arrow keys to place cursor on the first character of settings in the
Sample Rate
column. Use the
as shown in the table below. Use the
the Æ arrow key to both select the entry and move to the next parameter.
Ç
and È arrow keys to scroll through available settings
ENTER
key to select the chosen value, or press
Note
Available sample rates are dependent on the selected algorithm.
Page 43

AC2 256 2C 48 12
MAIN
Algorithm Data Channel Sample Aux
Type Rate Mode Rate Rate
Available sample rates:
Label Sample Rate (kHz)
32 32
44 44.1
48 48
5-7
5.2.5 To change
Aux Rate
(auxiliary data rate)
AC2 256 2C 48 12
Algorithm Data Channel Sample Aux
Type Rate Mode Rate Rate
Use the Å and Æ arrow keys to place cursor the first character of settings in the Aux
Rate column. Use the
shown in the table below. Use the
Æ
arrow key to both select the entry and move to the next parameter; in this case, the
cursor will wrap to the Algorithm Type column.
Note:
Available aux data rates:
Available aux data rates are dependent on the selected algorithm, data rate, and channel mode.
Display Aux Data Rate (bps)
00 none
06 600
12 1200
24 2400
96 9600
Ç
and È arrow keys to scroll through available settings as
ENTER
key to select the chosen value, or press the
Page 44

5-8
MAIN
5.3 ISDN Setup
Note:
information (for North America) is described in Appendix D.
Important:
connection of the ISDN lines to the ISDN unit. Otherwise, you will encounter an error message at the final
stage of this procedure.
Before using a Dolby Fax system for the first time, it is necessary to go through the
ISDN Setup procedure on the DP503 to correctly interface the ISDN unit to the phone
company switch and to have the unit recognize the ISDN line(s). Since not all
telephone companies have the same requirements for phone number entry, verify the
proper method with the installer or sales person. Requesting the following
information will make the installation easier: Switch type; whether a SPID is used
(Service Profile Identifier); whether one or two phone numbers are required per BRI
line. For more specific information in North America, refer to the ISDN ordering
guide in Appendix D.
Upon power-up, the DP503 will go through a self-test sequence. Two screens showing
software revision levels will appear; then the default encoder configuration screen will
be displayed. It will look similar to the following:
An overview of Dolby Fax principles is described in Section 2A. Detailed ISDN ordering
Be sure you have installed the complete Dolby Fax system per the previous section, including
(for Dolby Fax applications
only
)
AC2 256 2C 48 12
Algorithm Data Channel Sample Aux
Type Rate Mode Rate Rate
If you have already used the navigation keys to reach another screen, and do not see
the display above, press the
ESC
key enough times so that you do. The actual values
displayed will depend on the previously defined state, if you or someone else have
already saved a different encoder configuration.
Tip:
cursor is below the character N and then pressing
If you encounter the
5.3.1 Entering
Begin the process of ISDN setup by pressing the
Yellow LEDs confirm operation; the one associated with
UPDATE TA? Y N
ENTER
ISDN Setup
screen, enter No by pressing the Æ arrow key so that the
.
Mode
SHIFT
DIR
and
keys sequentially.
ISDN Setup
will remain lit.
You will then see the following main ISDN Setup screen:
SW L1 L2 L3 L4
Algorithm Data Channel Sample Aux
Type Rate Mode Rate Rate
Page 45

5-9
MAIN
ª
Use the screen above to select the switch type used by the phone company (or
to select the country of use) and to conform the ISDN unit to the ISDN lines in
use.
Å
Use the
parameters.
Use the ENTER key to descend into subsequent menus to fully configure the
multiple entries needed for each parameter.
Use the
sub-menus.
The ESC key can be used to back up. If exiting the ISDN Setup procedure, the
Update TA? screen will be encountered. Selecting Yes with the configuration
incomplete or erroneous may result in error messages until the problem has
been corrected.
Once the ENTER key is depressed used, settings are stored in the DP503.
However, they are not transmitted to the ISDN unit until the Update TA screen
has been encountered (See Section 5.3.4 below).
and Æ arrow keys to move back and forth among the five available
Ç
and È arrow keys to bring into view the available settings under
5.3.2 To choose Switch Type
SW L1 L2 L3 L4
Algorithm Data Channel Sample Aux
Type Rate Mode Rate Rate
Use the Å and Æ arrow keys to place the cursor on the first character of the
designation SW. Then press ENTER, which will place you on the previously selected
ISDN switch type, or, if you are performing this for the first time, the first selection in
the list of available switch types. Use the
available settings as shown in the table below. Use the ENTER key to select the
chosen value. The unit will accept the selected choice and return you to the main
ISDN Setup screen and move the cursor to the next parameter, L1.
Label Switch Type Comments
AT&T AT&T 5ESS North America
NTI Northern Telecom DMS100 North America
NI-1 National ISDN Type 1 North America
FRANC France country specific
U.K. U.K. country specific
JAPAN Japan country specific
BELGI Belgium country specific
AUSTR Australia country specific
SWISS Switzerland country specific
Ç
and È arrow keys to scroll through
Page 46

5-10
MAIN
Note:
approvals. If your country is not listed, please contact Dolby Laboratories.
The list of available countries continues to grow as the ISDN unit continues to gain government
5.3.3 To configure Line 1 (L1)
SW L1 L2 L3 L4
Algorithm Data Channel Sample Aux
Type Rate Mode Rate Rate
If you are not situated at this menu position, review the preceding sections or use the
cursor keys in order to do so.
With the cursor on the first character of L1, press
ENTER
. You will then see the
following screen:
ENABLE L1? Y N
Algorithm Data Channel Sample Aux
Type Rate Mode Rate Rate
Accept the default choice (yes) by pressing
ENTER
. You will then see the following
screen:
PRI NUM1: _
Algorithm Data Channel Sample Aux
Type Rate Mode Rate Rate
Begin entry of the primary number of the first ISDN line, which can be up to 18 digits
long: Use the
the table below. While the cursor is blinking after a desired parameter appears, the
parameter remains unselected; after a brief time-out period, the setting prior to any
scrolling action will be restored. To select the value, use the
place the cursor to the next position. When you have finished entering the number,
ENTER
press
Notes:
maintained.
To assist with data entry,
SHIFT
allow you to edit a string of characters without having to type over erroneous entries.
Spaces can be used to make the phone number more readable, as long as the 18 digit limit is
È
+
Ç
and È arrow keys to scroll through available characters as shown in
Å
and Æ arrow keys to
to store the number; you will then proceed to the next screen.
Insert
keystroke combinations, respectively. These functions act in typical word processor fashion to
and
Delete
functions are available, accessed with the
SHIFT + ENTER
and
Page 47

Available characters:
MAIN
Label Label
(space) 6
07
18
29
30
4#
5*
PRI SPID1: _
Algorithm Data Channel Sample Aux
Type Rate Mode Rate Rate
5-11
If required by your phone company’s switch, you will be prompted to enter the SPID
number associated with the primary number. Use the arrow keys as before to enter the
required digits. When you have finished entering the number, press
the number; you will then proceed to the next screen.
ENTER
to store
SEC NUM1: _
Algorithm Data Channel Sample Aux
Type Rate Mode Rate Rate
Continue by entering the second ISDN number. In many countries, this number may
be identical to the primary number. Use the arrow keys as before to enter the required
digits. When you have finished entering the number, press
number; you will then proceed to the next screen.
ENTER
to store the
SEC SPID1: _
Algorithm Data Channel Sample Aux
Type Rate Mode Rate Rate
Similarly, enter the SPID associated with the second number, if required. Use the
arrow keys as before to enter the required digits. When you have finished entering the
number, press
cursor will automatically advance to the next screen, to configure the second ISDN
line (L2).
ENTER
to store the number and return to the ISDN Setup screen. The
Page 48

5-12
MAIN
5.3.4 To configure Line 2 (L2), Line 3 (L3), Line 4 (L4)
SW L1 L2 L3 L4
Algorithm Data Channel Sample Aux
Type Rate Mode Rate Rate
Phone number entry for remaining ISDN lines is identical to that of the first line.
Note, however, that the designations for number and SPID will increment by
successive digits to indicate the “line number.” For example, the prompt for the
primary number of the second ISDN line will be designated PRI NUM2.
Note:
(L3, L4) disabled.
Typical Dolby Fax installations use only 2 lines, so only L1 and L2 will be used.. Leave unused lines
5.3.5 Concluding ISDN Setup
When all required numbers have been entered, press the
following inquiry:
ESC
key. You will see the
UPDATE TA? Y N
Algorithm Data Channel Sample Aux
Type Rate Mode Rate Rate
Use the Å and Æ arrow keys to place the cursor on Y, and press
information stored in the DP503 memory will be transferred to the ISDN unit. The
following message will appear, after which the default encoder screen will appear.
ENTER
. The
UPDATING TA...
Algorithm Data Channel Sample Aux
Type Rate Mode Rate Rate
If you select N, your settings will be stored in the DP503, but will not be
communicated to the ISDN unit. You must resume the setup to completion at some
later time in order to have a functioning Dolby Fax system.
After completing the update, reset the ISDN unit by momentarily removing the power.
By resetting the unit, the ISDN settings will be transferred to the phone company
switch at the Central Office. If changes to the ISDN settings are made, we suggest
that you once again reset the ISDN unit to update the switch of any new changes.
Page 49

5-13
MAIN
Note:
control cable between the DP503 and ISDN unit is not connected, an error message “
be displayed. Rectify the problem and repeat the update procedure.
If the ISDN unit is not powered up, if the ISDN line(s) are not connected to the ISDN unit, or if the
TA NOT READY
5.4 Using the DIRectory: Dolby Fax Applications
The DP503 can store up to 48 different entries, representing either encoder
parameters, complete Dolby Fax entries, or both, and can be retrieved by user-defined
names. Encoder-only parameters are designated with an asterisk (*) as the first
character of the directory entry. Dolby Fax entries not only store the encoder
parameter, but ISDN phone numbers and configurations as well.
Upon power-up, the DP503 will go through a self-test sequence. Two screens showing
software revision levels will appear; then the default encoder configuration screen will
be displayed. It will look similar to the following:
AC2 256 2C 48 12
Algorithm Data Channel Sample Aux
Type Rate Mode Rate Rate
” will
If you have already used the push-button keys to reach another screen, and hence do
not see the display above, press the
key enough times so that you do. The actual
ESC
values displayed will depend on the previously defined state, if you or someone else
have already saved a different encoder configuration.
Tip:
cursor is below the character N and then pressing
If you encounter the
5.4.1 Entering
Hint:
entries, encoder parameters, as listed on the default screen, are always required. Hence, to simplify operation,
the DP503 directory system permits the directory entry to “inherit” the encoder parameters in effect prior to
creating or editing entries. You may find it convenient, therefore, to choose encoder parameters before
entering the directory menus. You are given an opportunity, however, to modify parameters while performing
directory operations (
Begin the process by pressing the
Whether using directory entries only for encoder parameters or for entering full Dolby Fax directory
EDIT
UPDATE TA? Y N
DIRectory
NEW
&
); the choice is yours.
DIR
screen, enter No by pressing the Æ arrow key so that the
ENTER
.
Mode
key. You will then see the following main
Directory screen:
USE EDIT NEW DEL
Algorithm Data Channel Sample Aux
Type Rate Mode Rate Rate
Page 50

5-14
MAIN
ª
Use the screen above to USE an existing directory entry; EDIT an existing
directory entry; create a NEW directory entry, or DELete an existing directory
entry.
Use the
parameters.
Use the ENTER key to descend into subsequent menus to fully configure the
multiple entries needed for each parameter.
Use the
sub-menus.
The ESC key can be used to back up. You may encounter the ABORT
EDITS? inquiry. Use the arrow and ENTER keys to make your choice.
Choosing Y will return you to the default encoder parameters screen.
Once the ENTER key is depressed, settings are stored in the DP503.
Å
and Æ arrow keys to move back and forth among the five available
Ç
and È arrow keys to bring into view the available settings under
5.4.2 Creating
New
Directory Entries
Note
options. Remaining sub-sections rely on the information presented here.
The following sub-section is presented in great detail as a tutorial to the use of the other
Directory
USE EDIT NEW DEL
Algorithm Data Channel Sample Aux
Type Rate Mode Rate Rate
Begin by using the Å and Æ arrow keys to place the cursor on the first character of
the designation NEW. Then press ENTER.
You will then see the following screen:
COPY ENTRY? Y N
Algorithm Data Channel Sample Aux
Type Rate Mode Rate Rate
The purpose of the above screen is to simplify the creation of directory entries that
vary only slightly from existing entries. It is somewhat akin to the “save as” feature in
computer file management systems. See Section 5.4.2.1 below.
If this is your first entry, choose N by using the
pressing the ENTER key.
Å
and Æ arrow keys as needed and
Page 51

5-15
MAIN
You will then be presented with a screen that allows you to enter a name for the
directory entry.
NAME: _
Algorithm Data Channel Sample Aux
Type Rate Mode Rate Rate
Enter the name of your choice up to 13 characters in length.
Use the
Ç
and È arrow keys to scroll through available characters as shown in the
table below. While the cursor is blinking after a desired character appears, the
character remains unselected; after a brief time-out period, the setting prior to any
scrolling action will be restored. To select the character, use the
Å
and Æ arrow keys
to place the cursor to the next position. When you have finished entering the number,
ENTER
press
Note:
ENTER
fashion to allow you to edit a string of characters without having “ overtype” erroneous entries.
To assist with data entry,
and
to store the name; you will then proceed to the next screen.
SHIFT
Insert
È
keystroke combinations, respectively. These functions act in typical word processor
+
and
Delete
functions are available, accessed with the
SHIFT
+
Available characters:
AI QY6
BJ RZ7
CKS0 8
DLT19
E M U 2 * (reserved)
F N V 3 SPACE
GOW4
HPX5
Note:
of encoder parameters; phone numbers, and other parameters associated with a Dolby Fax installation are not
stored.
The asterisk (*), when appearing in the
first
position of a name, designates the entry for storage only
The next step allows you to enter the phone number.
PHONE: _
Algorithm Data Channel Sample Aux
Type Rate Mode Rate Rate
Use the Ç and È arrow keys to scroll through available characters as shown in the
table below. While the cursor is blinking after a desired character appears, the
character remains unselected; after a brief time-out period, the setting prior to any
scrolling action will be restored. To select the character, use the
Å
and Æ arrow keys
Page 52

5-16
MAIN
to place the cursor to the next position. When you have finished entering the number,
press ENTER to store the name; you will then proceed to the next screen.
Available characters:
06
17
28
39
4*
5#
SPACE
Note:
Spaces can be used to make the phone number more readable.
The next step allows you to edit the encoder parameters
EDIT CODEC? Y N
Algorithm Data Channel Sample Aux
Type Rate Mode Rate Rate
As usual, use the Å and Æ arrow keys and the ENTER key to make your selection.
If you choose Y, you will be shown a facsimile of the encoder screen, except that the
space between parameters is in reverse video. Modify the encoder parameters as
desired, using the procedure outlined earlier in Section 5.2
For conventional Dolby Fax applications, you should accept the default encoder
parameters (or use the push-buttons to modify as needed so that is the case):
Default encoder parameters for Dolby Fax:
Parameter Value
Algorithm Type AC-2
Data Rate 256
Channel Mode 2C
Sample Rate 48
Aux Rate 12
If you choose N, you will continue on to the next screen.
The next step allows you to edit certain parameters associated with ISDN calls that
determine the type of inverse multiplexing that will be used to make the call.
Page 53

5-17
MAIN
EDIT ISDN? Y N
Algorithm Data Channel Sample Aux
Type Rate Mode Rate Rate
As usual, use the Å and Æ arrow keys and the
then see a screen similar to the following:
ÇÈ
Algorithm Data Channel Sample Aux
Type Rate Mode Rate Rate
Use the Ç and È arrow keys to scroll through available parameters as shown in the
table below. While the cursor is blinking, the parameter remains unselected; after a
brief time-out period, the setting prior to any scrolling action will be restored. Use the
ENTER
Available parameters:
key to make your selection. You will then proceed to the next screen.
Parameter Comments
AIM STATIC 64 Ascend’s 64 kb version of inverse multiplexing.
AIM STATIC 56 Ascend’s 56 kb version of inverse multiplexing.
BONDING-1 64 Standard 64 kb version of inverse multiplexing.
BONDING-1 56 Standard 56 kb version of inverse multiplexing.
AIM DELTA 56 Ascend’s method of allowing the use of 56 kbps lines to
1 CHNL 56
1 CHNL 64
BONDING-1 64
convey data normally requiring 64 kpbs lines.
ENTER
key to choose Y. You will
Notes:
choose
The hierarchical nature of the menu system will eliminate from the visible menu choices those parameters that
are not relevant, as determined from the data rate that is being used.
Details of inverse multiplexing can be found in the ISDN Glossary in Appendix E.
The next screen concludes the directory entry procedure.
For standard Dolby Fax configurations using 2 channels of Dolby AC-2 audio coding at 256 kbps,
BONDING-1 64
.
STORE ENTRY? Y N
Algorithm Data Channel Sample Aux
Type Rate Mode Rate Rate
As usual, use the Å and Æ arrow keys and the
If you choose Y, you will return to the first screen in the Directory mode.
ENTER
key to make your selection.
Page 54

5-18
MAIN
If you choose N, you will be presented with the following screen
RE-EDIT? Y N
Algorithm Data Channel Sample Aux
Type Rate Mode Rate Rate
If you choose Y, you will have the opportunity to check your data entry, starting at the
top of the directory entry screens.
If you choose N, you will exit the data entry process without saving the entry, and you
will return to the first screen in the Directory mode.
5.4.2.1 Using the COPY ENTRY? Feature
Note:
used to create other encoder entries.
Dolby Fax entries can only be used to create other Dolby Fax entries; encoder entries can only be
COPY ENTRY? Y N
Algorithm Data Channel Sample Aux
Type Rate Mode Rate Rate
If, during the process of creating a new directory entry, you will have the opportunity
to use an existing entry as the basis for creating new entries.
If you select Y on the above screen, you will then see the following screen:
ÇÈ
Algorithm Data Channel Sample Aux
Type Rate Mode Rate Rate
Use the Ç and È arrow keys to scroll through your existing directory entries. While
the cursor is blinking, the entry remains unselected; after a brief time-out period, the
setting prior to any scrolling action will be restored. Use the ENTER key to make
your selection.
YOUR ENTRY 1
You will then proceed to the full set of data entry screens, beginning with NAME.
Enter a different name so that you can distinguish this entry from the one on which it
is based.
Page 55

5-19
MAIN
Continue with the remaining screens, using the arrow keys as appropriate to change
only the parameters that you wish to change.
5.4.3 Using Directory Entries
USE EDIT NEW DEL
Algorithm Data Channel Sample Aux
Type Rate Mode Rate Rate
To use an existing directory entry, use the arrow and
the above menu. Then use the
directory entries. Select the desired entry with the
control the ISDN unit to initiate a call. You will initially see the following screen:
Ç
and È arrow keys to scroll through your existing
ENTER
ENTER
keys to select
key. The DP503 will then
USE
INITIALIZING TA
Algorithm Data Channel Sample Aux
Type Rate Mode Rate Rate
Status messages will then appear on the display.
When the call is established, you will see the following screen:
ÆÆ
Algorithm Data Channel Sample Aux
Type Rate Mode Rate Rate
YOUR ENTRY 1
from
Hint:
extinguish.
You will also see the
Lock
LED on the DP524 become green, and the
Mute
LED on the DP524
After your session has concluded, be sure to hang up by using the key combination
SHIFT
+ È or the
ESC
key. Select Y when the confirmation screen appears.
Page 56

5-20
MAIN
5.4.4 Editing Directory Entries
USE EDIT NEW DEL
Algorithm Data Channel Sample Aux
Type Rate Mode Rate Rate
To edit an existing directory entry, use the arrow and
from the above menu. Then use the
existing directory entries. Select the desired entry with the
You will then proceed to the full set of data entry screens, beginning with
Use the arrow and
Select Y when presented with the
ENTER
keys as appropriate to make any desired modifications.
Ç
and È arrow keys to scroll through your
Store Entry?
ENTER
screen to save your changes.
keys to select
ENTER
key.
5.4.5 Deleting Directory Entries
USE EDIT NEW DEL
Algorithm Data Channel Sample Aux
Type Rate Mode Rate Rate
To delete an existing directory entry, use the arrow and
from the above menu. Then use the
existing directory entries. Select the desired entry with the
presented with the confirmation screen, selecting Y will delete the entry.
Ç
and È arrow keys to scroll through your
ENTER
ENTER
keys to select
key. When
EDIT
NAME
EDIT
.
5.5 Using the DIRectory: Encoder-only Applications
The DP503 can store up to 48 different entries, representing either encoder
parameters, complete Dolby Fax entries, or both, and can be retrieved by user-defined
names.
Encoder-only parameters are designated with an asterisk (*) as the first character of
the directory entry.
Upon power-up, the DP503 will go through a self-test sequence. Two screens showing
software revision levels will appear; then the default encoder configuration screen will
be displayed. It will look similar to the following:
AC2 256 2C 48 12
Algorithm Data Channel Sample Aux
Type Rate Mode Rate Rate
If you have already used the push-button keys to reach another screen, and hence do
not see the display above, press the
ESC
key enough times so that you do. The actual
Page 57

5-21
MAIN
values displayed will depend on the previously defined state, if you or someone else
have already saved a different encoder configuration.
Tip:
cursor is below the character N and then pressing
If you encounter the
5.5.1 Entering
Hint:
entries, encoder parameters, as listed on the default screen, are always required. Hence, to simplify operation,
the DP503 directory system permits the directory entry to “inherit” the encoder parameters in effect prior to
creating or editing entries. You may find it convenient, therefore, to choose encoder parameters before
entering the directory menus. You are given an opportunity, however, to modify parameters while performing
directory operations (
Begin the process by pressing the
Whether using directory entries only for encoder parameters or for entering full Dolby Fax directory
EDIT
UPDATE TA? Y N
DIRectory
NEW
&
); the choice is yours.
DIR
screen, enter No by pressing the Æ arrow key so that the
ENTER
.
Mode
key. You will then see the following main
Directory screen:
USE EDIT NEW DEL
Algorithm Data Channel Sample Aux
Type Rate Mode Rate Rate
ª
Use the screen above to
directory entry; create a
entry.
an existing directory entry;
USE
directory entry, or
NEW
an existing
EDIT
ete an existing directory
DEL
Use the
Å
and Æ arrow keys to move back and forth among the five available
parameters.
Use the
ENTER
key to descend into subsequent menus to fully configure the
multiple entries needed for each parameter.
Use the
Ç
and È arrow keys to bring into view the available settings under
sub-menus.
The
EDITS? inquiry. Use the arrow and
key can be used to back up. You may encounter the ABORT
ESC
ENTER
keys to make your choice.
Choosing Y will return you to the default encoder parameters screen.
Once the
ENTER
5.5.2 Creating
Note:
options. Remaining sub-sections rely on the information presented here.
The following sub-section is presented in great detail as a tutorial to the use of the other
key is depressed used, settings are stored in the DP503.
New
Directory Entries
Directory
Page 58

5-22
MAIN
USE EDIT NEW DEL
Algorithm Data Channel Sample Aux
Type Rate Mode Rate Rate
Begin by using the Å and Æ arrow keys to place the cursor on the first character of
the designation
NEW
. Then press
ENTER
.
You will then see the following screen:
COPY ENTRY? Y N
Algorithm Data Channel Sample Aux
Type Rate Mode Rate Rate
The purpose of the above screen is to simplify the creation of directory entries that
vary only slightly from existing entries. It is somewhat akin to the “save as” feature in
computer file management systems. See Section 5.5.2.1 below.
If this is your first entry, choose N by using the
pressing the
ENTER
key.
Å
and Æ arrow keys as needed and
You will then be presented with a screen that allows you to enter a name for the
directory entry.
NAME: _
Algorithm Data Channel Sample Aux
Type Rate Mode Rate Rate
Begin the name with an asterisk (*). Then enter up to 12 more characters of your
choosing.
Use the
table below. While the cursor is blinking after a desired character appears, the
character remains unselected; after a brief time-out period, the setting prior to any
scrolling action will be restored. To select the character, use the
to place the cursor to the next position. When you have finished entering the number,
press
Ç
and È arrow keys to scroll through available characters as shown in the
Å
and Æ arrow keys
ENTER
to store the name; you will then proceed to the next screen.
Note:
ENTER
fashion to allow you to edit a string of characters without having to type over erroneous entries.
To assist with data entry,
and
SHIFT
È
keystroke combinations, respectively. These functions act in typical word processor
+
Insert
and
Delete
functions are available, accessed with the
SHIFT
+
Page 59

5-23
MAIN
Available characters:
AI QY6
BJ RZ7
CKS0 8
DLT19
E M U 2 * (begin name with asterisk)
F N V 3 SPACE
GOW4
HPX5
The next step allows you to edit the encoder parameters
EDIT CODEC? Y N
Algorithm Data Channel Sample Aux
Type Rate Mode Rate Rate
As usual, use the Å and Æ arrow keys and the
If you choose Y, you will be shown a facsimile of the default encoder screen, except
that the space between parameters is in reverse video. Modify the encoder parameters
as desired, using the procedure outlined earlier in Section 5.2
If you choose N, you will continue on to the next screen.
The next screen concludes the directory entry procedure.
ENTER
key to make your selection.
STORE ENTRY? Y N
Algorithm Data Channel Sample Aux
Type Rate Mode Rate Rate
As usual, use the Å and Æ arrow keys and the
If you choose Y, you will return to the first screen in the Directory mode.
If you choose N, you will be presented with the following screen:
ENTER
key to make your selection.
Page 60

5-24
MAIN
RE-EDIT? Y N
Algorithm Data Channel Sample Aux
Type Rate Mode Rate Rate
If you choose Y, you will have the opportunity to check your data entry, starting at the
top of the directory entry screens.
If you choose N, you will exit the data entry process without saving the entry, and you
will return to the first screen in the Directory mode.
5.5.2.1 Using the COPY ENTRY? Feature
Note
used to create other encoder entries.
Dolby Fax entries can only be used to create other Dolby Fax entries; encoder entries can only be
COPY ENTRY? Y N
Algorithm Data Channel Sample Aux
Type Rate Mode Rate Rate
If, during the process of creating a new directory entry, you will have the opportunity
to use an existing entry as the basis for creating new entries.
If you select Y on the above screen, you will then see the following screen:
ÇÈ
Algorithm Data Channel Sample Aux
Type Rate Mode Rate Rate
Use the Ç and È arrow keys to scroll through your existing directory entries. While
the cursor is blinking, the entry remains unselected; after a brief time-out period, the
setting prior to any scrolling action will be restored. Use the
your selection.
*YOUR ENTRY 1
ENTER
key to make
You will then proceed to the full set of data entry screens, beginning with
Enter a different name so that you can distinguish this entry from the one on which it
is based.
Continue with the remaining screens, using the arrow keys as appropriate to change
only the parameters that you wish to change.
NAME
.
Page 61

5-25
MAIN
5.5.3 Using Directory Entries
USE EDIT NEW DEL
Algorithm Data Channel Sample Aux
Type Rate Mode Rate Rate
To use an existing directory entry, use the arrow and
from the above menu. Then use the Ç and È arrow keys to scroll through your
existing directory entries. Select the desired entry with the
encoder parameters associated with the selected entry will take effect immediately.
ENTER
ENTER
keys to select
key. The
USE
5.5.4 Editing Directory Entries
USE EDIT NEW DEL
Algorithm Data Channel Sample Aux
Type Rate Mode Rate Rate
To edit an existing directory entry, use the arrow and
from the above menu. Then use the
existing directory entries. Select the desired entry with the
You will then proceed to the full set of data entry screens, beginning with
Use the arrow and
Select Y when presented with the
ENTER
keys as appropriate to make any desired modifications.
Ç
and È arrow keys to scroll through your
Store Entry?
ENTER
screen to save your changes.
keys to select
ENTER
key.
EDIT
NAME
.
5.5.5 Deleting Directory Entries
USE EDIT NEW DEL
Algorithm Data Channel Sample Aux
Type Rate Mode Rate Rate
To delete an existing directory entry, use the arrow and
from the above menu. Then use the
existing directory entries. Select the desired entry with the
presented with the confirmation screen, selecting Y will delete the entry.
Ç
and È arrow keys to scroll through your
ENTER
ENTER
keys to select
key. When
EDIT
Page 62

5-26
MAIN
Page 63

5-27
MAIN
Page 64

MAIN
Page 65

INTERFACE SPECIFICATIONS AND DESCRIPTIONS
MAIN
A.1 DP503 Connector Pinouts
A.1.1 Analog Audio Input, J101 & J102
XLR female connectors.
Ch A Input, J101
Pin Connection
1 Analog signal ground
2 Analog audio +
3 Analog audio -
Ch B Input, J102
APPENDIX A
Pin Connection
1 Analog signal ground
2 Analog audio +
3 Analog audio -
A.1.2 AES/EBU Digital Audio Input, J103
XLR female connector.
Pin Connection
1 Digital signal ground
2 Digital audio +
3 Digital audio -
A.1.3 S/PDIF Digital Audio Input, J104
BNC female connector. Standard S/PDIF format.
Page 66

A-2
MAIN
A.1.4 Encoded Data Out and Timing, J105
DB-37 male connector.
Pin Connection Pin Connection
1 Shield (chassis ground)
2NC 20NC
3NC 21NC
4 SD + (send data +) 22 SD - (send data -)
5 ST + (send timing +) 23 ST - (send timing -)
6NC 24NC
7 RS + (ready to send +) 25 RS - (ready to send -)
8NC 26NC
9NC 27NC
10 NC 28 NC
11 NC 29 NC
12 TR + (terminal ready +) 30 TR - (terminal ready -)
13 NC 31 NC
14 NC 32 NC
15 NC 33 NC
16 NC 34 NC
17 TT + (terminal timing +) 35 TT - (terminal timing -)
18 NC 36 NC
19 SG (signal ground) 37 NC
A.1.5 Aux/Acc RS-232 Port, J106
DB-9 female connector.
Pin Connection Comments
1 DCD direct connection to DTR, DSR, and CTS
2 RX asynchronous data out
3 TX asynchronous data in
4 DTR direct connection to DCD, DSR, and CTS
5 Ground
6 DSR direct connection to DCD, DTR, and CTS
7NC
8 CTS direct connection to DCD, DTR, and DSR
9NC
Page 67

A-3
MAIN
A.1.6 TA Ctrl RS-232 Port, J107
DB-9 male connector.
Pin Connection Comments
1 DCD direct connection to DTR
2 RX asynchronous data in
3 TX asynchronous data out
4 DTR direct connection to DCD
5 Ground
6 DSR direct connection to RTS
7 RTS direct connection to DSR
8NC
9NC
A.1.7 Rem/Download RS-232 Port, J108
DB-9 female connector.
Pin Connection Comments
1 DCD direct connection to DTR, DSR, and CTS
2 RX asynchronous data out
3 TX asynchronous data in
4 DTR direct connection to DCD, DSR, and CTS
5 Ground
6 DSR direct connection to DCD, DTR, and CTS
7NC
8 CTS direct connection to DCD, DTR, and DSR
9NC
A.1.8 Status, J109
DB-9 male connector. 5 V CMOS levels.
Pin Connection Comments
1 Fault Power supply or processor/memory fault
2 Test Test tone selected
3 Digital Input Valid AES/EBU or S/PDIF signal present
4 Lock Phase locked loop locked to data clock
5 Overload Ch A Channel A input signal at full scale
6 Overload Ch B Channel B input signal at full scale
7 Remote Remote control mode selected
8NC
9 Ground
Page 68

A-4
MAIN
A.2 RS-449 Interface Description
A.2.1 Functional Description
The Dolby DP503 provides a standard RS-449 interface in the type DT mode (data
and timing signals only, no handshakes) through a 37-pin female D-connector.
RS-449 is the mechanical specification for a balanced (differential) transmission
system meeting RS-422 and RS-423 electrical specifications. The Model DP503 is
configured as data terminal equipment (DTE), and is typically connected to data
circuit-terminating equipment (DCE). The DP503 encoder provides a reference
clock at the target data rate on the terminal timing (TT) pins, receives a data clock
from a DCE device on the send timing (ST) pins, and transmits data on the send
data (SD) pins. The internal timing and sample clocks of the DP503 are phaselocked to ST and RT, respectively. In addition to these differential signals, the
connector also provides pins for signal and chassis ground. The connector pinout
is given in Section 8.1.4 above.
A.2.2 Interface Timing
A “mark,” or “off” state is said to exist when the “+” side of a signal is at a lower
potential than the corresponding “-” side. A “space,” or “on” state exists when the
opposite condition is true. The following timing diagram shows the relationship
between clock and signal lines:
TT
ST
SD
RT
on
off
RD
Page 69

A-5
MAIN
A.2.3 Back-to-Back Testing
For purposes of testing the Model DP503 and Model DP524 in a back-to-back
configuration, a special cable must be constructed. Note that a DTE to DTE
connection is not supported by the RS-449 specification; a standard 37-wire cable
cannot be used to connect the units together. The special cable connects the TT
outputs of the DP503 directly to the ST inputs of the DP503, and to the RT inputs
of the DP524. This cable also connects the SD outputs of the DP503 to the RD
inputs of the DP524, and connects the signal grounds (SG) of the two units. One
end of the cable should be labeled as Encoder (DP503), and the other as Decoder
(DP524.
From Pin Connection To Pin Connection
DP503 4 SD+ DP524 6 RD+
DP503 22 SD- DP524 24 RDDP503 5* ST+ DP524 8 RT+
DP503 17* TT+ DP524 8 RT+
DP503 23** ST- DP524 26 RTDP503 35** TT- DP524 26 RTDP524 19 SG DP524 19 SG
DP524 1 shield DP524 n/c
*For convenience, tie pins 5 & 17 together in the connector shell at the
encoder. Run one line to decoder pin 8.
**For convenience, tie pins 23 & 35 together in the connector shell at the
encoder. Run one line to decoder pin 26.
A.2.4 Dolby Fax Cable Pinout, Part No. 83293
A Dolby Fax installation requires the use of a supplied “Y” cable, two of whose
ends are terminated in 37-pin female connectors and which are labeled “encoder”
and “decoder;” and a third end terminated in a 44-pin male connector. Pinouts and
wire colors are as follows:
From Pin To Pin Connection Color
DP503 4 VSX 29 SD+ brn
DP503 22 VSX 30 SD- wht
DP503 5 VSX 42 ST+ red
DP503 23 VSX 41 ST- grn
DP503 19 VSX 1 shield blk
DP524 6 VSX 40 RD+ brn
DP524 24 VSX 39 RD- wht
DP524 8 VSX 37 RT+ red
DP524 26 VSX 38 RT- grn
DP524 19 VSX 1 shield blk
VSX 20 VSX 28 RX/Sel gra
Page 70

MAIN
Page 71

APPENDIX B
MAIN
SOFTWARE DOWNLOADING PROCEDURE
B.1 Introduction
In the event that a software upgrade is required, the J108 Rem/Download port may
be used to download the appropriate files and reprogram the Flash EEPROMs
residing in the DP503. When this method of upgrade is desired, the necessary files
will be supplied in IBM PC compatible format.
B.2 Software Downloading Procedure
1. Connect the DP503 rear panel connector J108 Rem/Download to a
standard PC serial port using a standard RS-232 cable.
2. Set rear panel switch S101-6 Configuration to the down position.
Alternately, the download mode can be enabled by removing power,
holding the front panel SHIFT key down, and reapplying power. Be
sure to keep the SHIFT key down until the message below is
cleared.
DP503 INIT XX.X
Algorithm Data Channel Sample Aux
Type Rate Mode Rate Rate
Notes:
However, if
power-on state. When
XX.X represents the software revision level in your unit.
Repeating the
S101-6
SHIFT
key power on function will return the unit to normal operation.
is down, the unit will remain in Download mode regardless of the
S101-6
is returned to its up position, the SHIFT key state will become active.
SHIFT
key
3. Verify that the following message is then displayed on the front panel LCD
screen.
READY TO LOAD...
Algorithm Data Channel Sample Aux
Type Rate Mode Rate Rate
4. Set the baud rate select switches S101-7 and S101-8 as desired, according
to the table below:
Baud Rate S101-7 S101-8
9600 Up Up
19200 Up Down
38400 Down Up
57600 Down Down
Page 72

B-2
MAIN
5. Download the required files from the PC using one of two methods:
a) Use the utility SERLOAD.EXE or SERLOADN.EXE (the latter
for use with Windows NT or Windows95) which are supplied
with the upgrade files, by typing the command line:
SERLOAD COM# BAUD FILENAME
where COM# is the number of the PC serial port;
BAUD is the baud rate from table above; and
FILENAME is the full name of the DP503 module file to be
loaded.
or,
b) Using any terminal emulator application, transfer the files in text
mode. Make sure that the proper baud rate is set. The serial port
should also be set for:
no parity,
8 data bits, and
1 stop bit.
Regardless of the method used, while a file is being transferred to the
DP503, messages will be displayed on the front panel display as well as on
the PC. The messages will indicate that a module is loading, that the
internal Flash EEPROM is being programmed, etc.
At the end of the downloading operation, the following message will be
displayed, unless an error has occurred.
UPDATE COMPLETE
Algorithm Data Channel Sample Aux
Type Rate Mode Rate Rate
If an error does occur, a message indicating the type of error will be
displayed. The possible error messages and their causes are described
below:
DOWNLOAD ERROR - Indicates that an error has occurred during the
loading process. This is usually due to an incorrect setup. Verify that the
baud rate and other port settings are correct, and that the DP503 is properly
connected to the PC before trying again.
PROGRAMMING ERROR - This indicates an internal problem during
the process of programming the Flash EEPROM with downloaded code. If
Page 73

B-3
MAIN
the problem continues after repeating the download process, contact Dolby
Laboratories.
After displaying the “UPDATE COMPLETE” message for a few seconds,
or in the event of an error, after displaying the error message, the DP503
will reset and enter Download mode again. If another file is to be loaded,
make sure that the “READY TO LOAD…” message is displayed before
sending the next file.
6. After all files have been loaded, move switch S101-6 back to its up (off)
position. The unit will then reset and begin running the new code. If the
alternate method for enabling Download mode was used, repeat the process
to return to normal operating mode.
Page 74

MAIN
Page 75

DP503 USER INTERFACE STRUCTURE
MAIN
C.1 Setup Menu Operation
APPENDIX C
From
Codec or
Dir Screen
ISDN Setup key pressed
SW
Select Switch
Type
**
Enable
Line1?
Edit PRI NUM
1
SPID
Required?
Yes
Edit PRI SPID
1
Edit SEC NUM
1
No
L1
L2
**
Enable
Line 2?
Yes YesYes
Edit PRI NUM
2
SPID
Required?
Yes
Edit PRI SPID
2
Edit SEC NUM
2
*
ISDN SETUP
SCREEN
No No
NoNoNo
L4
L3
**
Enable
Line 3?
Yes
Edit PRI NUM
3
SPID
Required?
Yes
Edit PRI SPID
3
Edit SEC NUM
3
No
**
Enable
Line 4?
Edit PRI NUM
4
SPID
Required?
Yes
Edit PRI SPID
4
Edit SEC NUM
4
No
SPID
No
Required?
Yes
Edit SEC SPID
1
Except as indicated above or noted below::
ENTER completes operation and leads to next screen.
ESC restores previous value when cursor flashing, otherwise leads to previous screen.
DIR, SETUP, and REMOTE are inactive.
* SETUP, DIR, and ESC lead to Confirm Update TA screen, and then, if confirmed, DIR leads to
Dir Menu screen, SETUP and ESC return to Codec screen.
** If changes are pending, ESC leads to Confirm Esc screen, and then if "Y" to previous screen.
SPID
Required?
Yes
Edit SEC SPID
2
No No
Required?
Yes
Edit SEC SPID
3
SPID
No
SPID
Required?
Yes
Edit SEC SPID
4
Page 76

C-2
MAIN
C.2 Directory Menu Operation - USE
*
"CALL EDT
NEW DEL"
CALL
Directory
empty?
Yes
"DIRECTORY
EMPTY"
No
Se lect S ite
Copy selected
dir entry to
"current entry"
Go to Codec
screen
Flash display 5
times
"TA N OT
READY"
"TA
COMMAND
ERROR"
Flash display 5
times
N
"EXIT TO
DIR? Y N"
current values
No
No
No
Copy code c
params to
ISDN
Entry?
TA ready?
Yes
TA cmd
ok?
Yes
***
TA status
Online?
"HANGUP?
Y N"
Yes
N
Send call
profile to TA
and dial
Y
"TA N OT
READY"
= user interface screen
Other shapes = internal program functions.
Within shapes, text in quotes appears on the LCD, other text idescribes functionality.
Outside of shapes, text in caps represents user selection of a displayed option, other text descibes program flow
Except as indicated above or noted below::
ENTER comp letes operation and leads to next screen.
ESC restores previous value when cursor flashing, otherwise leads to previous screen.
DIR, SETUP, and REMOTE are inactive.
* DIR or ESC return to Codec screen, SETUP leads to Setup screen.
** If changes are pending, ESC leads to Confirm Esc screen and then if confirmed, to previous screen.
*** REMOTE enables remote control mode and disables all other keys.
DELETE and ESC lead to Confirm Hangup if system is online, or Confirm Exit Status if offline..
No
TA ready?
Yes
Page 77

C-3
MAIN
C.3 Directory Menu Operation - EDIT
*
"CALL EDIT
NEW DEL"
EDIT
Flash display
"EDIT
CODEC?
Y N"
Y
"AC3 256 JS
48 12"
(all data
rates)
Directory
empty?
"DIRECTORY
EMPTY"
N
Duplicate
or Invalid
name?
no
Codec
only?
Select Site
**
Edit Site
Name
yes
noyes
Flash display 5
times
Flash display
"DUPLICATE
NAME" or
"INVALID
ENTRY"
Edit Site
Number
Valid
number?
yes
"EDIT
N
CODEC?
Y N"
Y
"AC3 256 JS
48 12"
(ISDN rates
only)
no
"INVALID
ENTRY"
Flash display
"EDIT
ISDN?
Y N"
N
Store entry
and reindex
directory
= user interface scree n
Other shapes = internal program functions.
Within shapes, text in quotes appears on the LCD, other text idescribes functionality.
Outside of shapes, text in caps represents user selection of a displayed option, other text descibes program flow
Except as indicated above or noted below::
ENTER completes operation and leads to next screen.
ESC restores previous value when cursor flashing, otherwise leads to previous screen.
DIR, SETUP, and REMOTE are inactive.
* DIR or ESC return to Codec screen, SETUP leads to Setup screen.
** If changes are pending, ESC leads to Confirm Esc screen and then if confirmed, to previous screen.
*** REMOTE enables remote control mode and disables all other keys.
DELETE and ESC lead to Confirm Hangup if system is online, or Confirm Exit Status if offline..
Y
N
"STORE
ENTRY?
Y N"
N
"RE-EDIT?
Y N"
Y
Y
Select Call
Type
Page 78

C-4
MAIN
C.4 Directory Menu Operation - NEW
*
"CALL EDT
NEW DEL"
NEW
"EDIT
CODEC?
Y N"
Y
"AC3 256 JS
48 12"
(all data
rar\tes)
Is D ir ful l ?
yes
"DIR FULL"
Flash display
N
no
"COPY
ENTRY?
Y N"
N
**
Edit Site
Name
Duplicate or
invalid s ite
name?
no
Codec
only?
yes
noyes
Is D ir
empty?
yes
"DIR
EMPTY"
Flash display
"DU PLIC AT E
NAME" or
" INVAL ID
NAME"
Edit Site
Number
Valid
Number?
yes
Valid ISDN
Data Rate?
yes
no
Select Site
Flash display 5
times
no
no
"INVALID
ENTRY"
"ISDN
RATE
ERROR"
"EDIT
N
CODEC?
Y N"
Y
"AC3 256 JS
48 12"
(ISDN ra tes
only)
"EDIT
N
ISDN?
Y N"
Store entry
and reindex
directory
= user interface screen
Other shapes = internal program functions.
Within shapes, text in quotes appears on the LCD, other text idescribes functionality.
Outside of shapes, text in caps represents user selection of a displayed option, other text descibes program flow
Except as indicated above or noted below::
ENTER completes operation and leads to next screen.
ESC restores previous value when cursor flashing, otherwise leads to previous screen.
DIR, SETUP, and REMOTE are inactive.
* DIR or ESC return to Codec screen, SETUP leads to Setup screen.
** If changes are pending, ESC leads to Confirm Esc screen and then if confirmed, to previous screen.
*** REMOTE enables remote control mode and disables all other keys.
DELETE and ESC lead to Confirm Hangup if system is online, or Confirm Exit Status if offline..
Y
N
"ST O RE
ENTRY?
Y N"
N
"RE-E DIT?
Y N"
Y
Y
Select Call
Type
Page 79

C-5
MAIN
C.5 Directory Menu Operation - DEL
*
"CALL EDT
NEW DEL"
DEL
Is DIR
empty?`
yes
"DIR
EMPTY"
no
Select Site
N
Delete entry
and reindex
"DELETE
ENTRY?"
Y
directory
N
= user interface sc reen
Other shapes = internal program functions.
Within shapes, text in quotes appears on the LCD, other text ides cribes functionality.
Outside of shapes, text i n caps represents user selection of a displayed option, other text descibes program flow
Except as indicated above or noted below::
ENTER completes operation and leads to next screen.
ESC restores previous value when cursor flashing, otherwise leads to previous screen.
DIR, SETUP, and REMOTE are inactive.
* DIR or ESC return to Codec screen, SETUP leads to Setup screen.
** If changes are pending, ESC leads to Confirm Esc scr een and then if confirmed, to previ ous screen.
*** REMO TE enables remote control mode and disables all other keys.
DELETE and ESC lead to Confirm Hangup if sys tem is online, or Confirm Exit St atus if offline..
Page 80

MAIN
Page 81

D.1 Introduction
MAIN
The following ISDN ordering guide is for Dolby Fax users ordering ISDN service
for the Ascend Multiband VSX ISDN terminal adapters/inverse multiplexer
(hereinafter referred to as the “ISDN unit”) that is used with the Dolby Fax system,
and is intended to provide answers to the basic questions that arise when ordering
ISDN service.
APPENDIX D
ISDN ORDERING GUIDE (NORTH AMERICA)
Tip:
ISDN stands for Integrated Switched Digital Network. It is a low-cost bidirectional digital data service that can transport any type of data, such as video,
graphics, and E-mail, for basically the cost of a regular phone call. Taking
advantage of the low-cost of ISDN, it is now also possible to economically send
CD-quality audio using Dolby Fax, originally with Dolby AC-2 digital audio, and
more recently with Dolby Digital (AC-3) and MPEG Layer II. ISDN allows high
transfer of data between locations without the usual problems associated with
regular phone lines. ISDN is currently available in all major markets around the
world.
ISDN BRI (Basic Rate Interface) is also referred to as 2B+D, which specifies 2 B
or Bearer channels each providing 64 kbps of voice or data and a D or Delta
channel which performs the dialing function. Technicians will typically refer to the
service as 2B+D, but either name is correct.
The most important rule when ordering ISDN circuits from the phone company is to be patient(!)
D.2 Ordering ISDN Service
When ordering ISDN from your local phone company, you will be asked specific
questions regarding the type of services available and equipment involved. For the
most part, the questions are all the same but may be worded a little differently. All
Dolby Fax ISDN installations have the following in common:
1. Specify the call types as Point to Point, not Point to Multipoint. This
means that you will only be connecting to one location during any one call.
Video conferencing systems utilize PTMP through bridges so that multiple
locations can participate in a video conference.
2. Choose the type of service as circuit switched as opposed to "nailed,"
leased or dedicated.
3. Specify the B or Bearer channels, usually referred to as B1 and B2, to be
defined as CSD or Circuit Switched Data, as opposed to CSV Circuit
Switched voice.
Page 82

D-2
MAIN
The information the phone company needs to give you is:
x
The switch type that the ISDN circuits are connecting to at the CO
(Central Office)
x
and the ISDN phone numbers for each line, and whether the B channels
are 56 or 64 kbps.
D.2.1 Switch Types
Certain switch types (there are only two manufacturers typically encountered in
North America: Northern Telecom and AT&T) require additional parameters to be
defined when setting up the ISDN unit which are called
I
dentifier. A SPID is part of the prefix or suffix used by the ISDN unit. In addition,
there are situations where only one phone number is given for both B channels. In
this situation, it is still possible to make two separate calls.
SPID
or Service Profile
Switch types used throughout U.S.
AT&T Switch type 5ESS
Northern Telecom DMS100
If your switch type is an AT&T 5ESS, provide the following information to your
phone company regarding the Ascend ISDN unit:
Parameter Value Notes
Terminal Type A
Number of CSD 2
Number of CSV 1
Number of Call
1
Appearances
Display is Y/N No Note that the value of this field is not relevant
for proper operation of the ISDN unit.
Ringing/Idle Call
Idle This value is the default for terminal type A.
Appearances
Auto hold is Y/N No This value is the default for terminal type A.
One touch is Y/N No This value is the default for terminal type A.
Page 83

D-3
MAIN
If your switch type is a Northern Telecom DMS-100, provide the following
information to your phone company regarding the ISDN unit:
Parameter Value Notes
Signaling Functional
Protocol Version
Control (PVER)
TEI Assignment Dynamic
Maximum
Number of Keys
Release Key is N
or a Key Number
Ringing Indicator
is Y/N
EKTS is Y/N No
1 or 2 A value of 1 is NTI custom. A value
of 2 is National ISDN-1 (NI-1) and
also requires a TID to be assigned as a
suffix to a SPID.
3 Note that any number that is greater
than one will work.
No Note that the value of this field is not
relevant for proper operation of the
ISDN unit.
No Note that the value of this field is not
relevant for proper operation of the
ISDN unit.
In addition to the DMS-100 or 5ESS switch types, NI-1 or National ISDN-1 is
another option or offering from the phone company. National ISDN-1 is a national
standard that includes compatibility with both switch types.
D.2.2 B Channels
The last question to ask is whether the B channels operate at 56 or 64 kbps; 64
kbps B channels operate under SS7 (System Signaling 7). The following is an
explanation regarding B channel data rates.
The Dolby Fax system, at the default data rate of 256 kbps for Dolby AC-2,
requires 256 kbps of bandwidth from the ISDN network to which it connects. With
ISDN BRI at 64 kbps per B (Bearer) channel, 2 BRI circuits are required which
provide 4 B channels for a total of 256 kbps. There are some parts of the country
that operate at 56 kbps per B channel. If you are within an area which offers 56
kbps B channels, such as GTE, or plan on making ISDN calls into an area offering
56 kbps B channels, then 3 BRI circuits are required.
The reason for 3 ISDN circuits within certain regions is due to the fact that B
channel access is limited to 56 kbps instead of 64 kbps. This means that a Dolby
Fax call into or from such regions requires 5 B channels instead of 4. The ISDN
unit takes 5 B channels at 56 kbps each for a total of 280 kbps and makes a 256
kbps call (creates a 256 kbps clock) by bit-stuffing the 24 kbps overhead of
bandwidth. Ascend refers to this as their Delta Mode call type.
Page 84

D-4
MAIN
B CHANNEL REQUIREMENTS
x
Dolby Fax locations that have and call locations with 64 kbps B channels:
Two ISDN BRI Lines are required.
x
Dolby Fax locations that have and call locations with 56 kbps B channels:
Three ISDN BRI lines are required.
Also, an IXC (Inter Exchange Carrier) or long distance carrier is chosen at
this point.
If the phone company wires to a terminating Jack, then either RJ-11 (small) or
RJ-45 (large) needs to be specified. Specify RJ-45 because an RJ-11 cable will
work properly in an RJ-45 jack.
D.3 Regional Bell Operating Companies’ ISDN Hotlines
Ameritech 800 Team DATA
Bell Atlantic 800 570-ISDN
Bell South 800 858-9413
GTE-Contel 214-718-5608 or 2648
NYNEX 800 GET ISDN
Pacific Bell 800 472-4736
Southern New England Telephone 203-771-5111
Southwestern Bell 800-992-4736
US West 303-965-7013
Page 85

Basic Rate Interface (BRI)
MAIN
An ISDN interface that provides two 64 kbps digital B (Bearer) channels
for voice or data and one 16 kbps signaling D (Delta) channel.
Bonding
Bandwidth ON Demand INteroperability Group, which is an industry
inverse multiplexing standard for dialing, establishing, maintaining, and
terminating n x 56 and n x 64 kbps calls.
Channel
In communications, any pathway between two devices (e.g. computers,
multiplexers). The channel may refer to the physical medium (e.g. coaxial
cable) or to a specific carrier frequency (subchannel) within a larger
channel. Within the ISDN BRI format, there are two B channels.
APPENDIX E
GLOSSARY OF ISDN TERMS
CPE
Customer Premises Equipment. This equipment is owned by the customer,
and includes items such as an audio codec, terminal adapter, and NT-1. The
RBOC does not typically assume any responsibility for this equipment.
DCE (Data circuit terminating equipment)
A device (e.g. modem) that establishes, maintains, and terminates a session
on a network.
DEMARC Point
This is the physical connection point for the local phone service on the
customer's premises up to which the RBOC assumes responsibility for any
failures that occur. Any failures beyond the DEMARC point are the
responsibility of the customer.
DTE (Data Terminal Equipment)
A communications device (e.g., an audio codec, terminal, or computer) that
is the source or destination of signals on a network.
IXC
Inter Exchange Carrier. IXC is another name for a long distance carrier
such as MCI, AT&T, and Sprint.
Page 86

Inverse Multiplexing
MAIN
Inverse Multiplexing is the process of distributing a high bandwidth
bitstream (like the default Dolby Fax format which operates at 256 kbps
using Dolby AC-2) onto multiple ISDN BRI-channels. The default Dolby
Fax format requires the ISDN unit to split up the 256 kbps bitstream into
four separate calls, each at 64 kbps. Another function of inverse
multiplexing is to synchronize the four calls as they travel over the ISDN
network. In some situations, one of the calls may take a longer path,
depending on network traffic, which then becomes delayed in relation to the
other calls; the worst case would be one of the calls being routed via
satellite which could delay the call by up to 500 msec. The ISDN unit also
provides buffering for the incoming bitstream so that it can re-synchronizes
all of the individual calls in order to reconstruct the original 256 kbps
bitstream.
E-2
Several different inverse multiplexing methods are available in the DP503,
as shown in the following list, and are discussed individually below.
AIM STATIC 64
AIM STATIC 56
BONDING-1 64
BONDING-1 56
AIM DELTA 56
(1 CHNL 56)
(1 CHNL 64)
AIM STATIC 64
AIM (Ascend Inverse Multiplexing) is Ascend's proprietary inverse
multiplexing method which calculates the inter-channel delay and then
stores that delay value in a buffer. Once the call is connected, the delay
value remains constant, i.e., “static.” The 64 kbps reference refers to
its use on 64 kbps ISDN B-channels.
AIM STATIC 56
This format is identical to AIM STATIC 64 and is used when
connecting to either 56 kbps ISDN or Switched 56 lines.
BONDING-1 64
BONDING refers to Bandwidth On Demand Interoperability Group,
which is an inverse multiplexing standard that manufacturers of ISDN
units have agreed to support to maintain compatibility. This version of
inverse multiplexing is basically identical to AIM STATIC, but is used
with the Dolby Fax system when connecting to locations that use an
ISDN unit that is not manufactured by Ascend. In addition to Ascend,
ADtran, Promptus and Motorola are some of the companies that
support BONDING.
Page 87

BONDING-1 56
MAIN
This version of inverse multiplexing is identical to BONDING-1 64
but is used when connecting to either 56 kbps ISDN or Switched 56
lines.
AIM DELTA 56
AIM Delta is a version of inverse multiplexing which provides
compatibility between 56 kbps and 64 kbps ISDN or Switched 56
lines. In a situation where a 64 kbps site calls a 56 kbps site, 3 ISDN
BRI lines are required. In the default Dolby Fax format, instead of
making four calls, a Delta call places five calls for a total of 280 kbps.
The Ascend ISDN unit converts the 280 kbps to 256 kbps and “bit
stuffs” the leftover bandwidth. As ISDN service proliferates
throughout North America, there are fewer and fewer 56 kbps ISDN
installations. International ISDN is always 64 kbps.
E-3
1 CHNL 56/1 CHNL 64
This type of call does not utilize inverse multiplexing since only one
call is placed.
LEC
Local Exchange Carrier is another term for RBOC. Besides the seven
RBOCs, other "specialty" local carriers that compete for local business
service.
NT-1
An isolation device, analogous to a transformer, which isolates the CPE
(Customer Premises Equipment) such as the terminal adapter or audio
codec, from the network and vice versa. The NT-1 is typically located with
the terminal adapter and also converts the 2 wire circuit from the phone
company into a 4 wire circuit. The Ascend Multiband VSX ISDN unit
supplied with Dolby Fax has the NT-1 built-in.
PRI (Primary Rate ISDN)
An ISDN interface that provides 23 64 kbps digital "B" (Bearer) channels
of voice or data and one 64 kbps digital "D" (Delta) channel for signaling.
ISDN PRI is sometimes referred to as 23B+D.
Basic Rate Interface (BRI)
An ISDN interface that provides two 64 kbps digital B (Bearer) channels
for voice or data and one 16 kbps signaling D (Delta) channel.
RBOC
Page 88

Regional Bell Operating Company. There are seven RBOCs, or local phone
MAIN
companies, throughout the U.S. that provide local telephone service and
exchange calls with the IXCs (long distance carriers).
Terminal Adapter (TA)
The Terminal Adapter is a device or modem which connects to the ISDN
lines. The TA formats the data into the correct format and originates the
dialing and signaling required by the ISDN network.
E-4
 Loading...