

Page 1
--
-~
DOLBY SURROUND PRO LOGIC
5 CD MINI HI FI SYSTEM
MINI-CHATNE HAUTE FIDELITE
PRO LOGIC DOLBY, AMBIOPHONIQUE,
A CHANGEUR POUR 5 DC
SISTEMA MINI HI FI CON 5 CD
DOLBY SURROUND PRO LOGIC
D() I DOLBY SURROUND I
PRO. LOGIC
INSTRUCTIONS DE FONCTIONNEMENT
OPERATING INSTRUCTIONS
MANUAL DE INSTRUCCIONES
Page 2
To reduce the risk of fire or electric shock, do not expose
EXPLANATION OF GRAPHICAL SYMBOLS.
this appliance to rain or moisture.
WARNING PRECAUTION SYSTEM CONNECTIONS PARTS IDENTIFICATIONS ,
DISPLA Y ADJUSTING THE SOUND ,
SURROUND SOUND SETTING THE CLOCK ,
SETTING THE SLEEP TIMER FOR BETTER RECEPTION TUNING INTO A STATION MANUALLY PRESETTING STATIONS TUNING INTO A PRESET STATION COMPACT DISC PLAYBACK COMPACT DISC PROGRAMMED PLAYBACK STOPPING AND CANCELLING PROGRAMMED PLAYBACK
TAPE PLAYBACK CONTINUOUS PLAYBACK --FROM DECK B TO DECK A .
TAPE CARE TIPS DUBBING FROM DECK B TO DECK A ,
RECORDING -DECK A ONL Y REMOTE CONTROL MAINTENANCE TROUBLE SHOOTING GUIDE SPECIFICATIONS
13-16
...19
...20
.20-21
3-4
"
10
11
11
11
12
17
18
19
20
21
22
22
23
~
Page 3
Follow the advice below for safe and appropriate operation.
ON PLACEMENT
.Do not use the unit in places which are extremely
hot, cold, dusty, or humid.
.Place the unit on a flat and even surface.
.Do not restrict the air flow through the ventilation
slots by placing the unit on soft furnishings, by
covering the unit with a cloth or by placing the unit
on a carpet.
ON AC VOL T AGE
.Before using the unit, check that the rated voltage
of your unit matches your local voltage.
ON SAFETY
.When connecting and disconnecting the AC cord,
grip the plug and not the cord itself. Pulling the
cord may damage it and create a hazard.
.When you are not going to use the unit for a long
period of time, disconnect the AC power cord.
ON CONDENSATION
.When left in a heated room where it is warm and
damp, water droplets or condensation may from
inside the CD player.
.When there is condensation inside the unit, the
unit may not function normally-
.Let it stand in a heated room for 1 to 2 hours to
allow the condensation to dry out.
FCC information (For N. America)
This device complies with Part 15 of FCC rules.
Operations are subject to the following two conditions:
[1] this device may not cause harmful interference, and
[2] this device must accept any interference received,
including interference that may cause undesirable
operations.
Should any trouble occur, disconnect the AC
power cord and refer servicing to qualified
personnel.
;i,
f;
f
{i
~,
f
-i'
:;.
"
~
E-2
Page 4
IMPORTANT
Switch off the power before connecting speakers and other equipment.
SPEAKER CORD CONNECTION
Connect the wires with the printed white lines to the red (+) terminals and the
plain-black wires to the black (-) terminals.
NOTE:
Connecting speakers other than the speakers supplied with the unit, may
damage the unit.
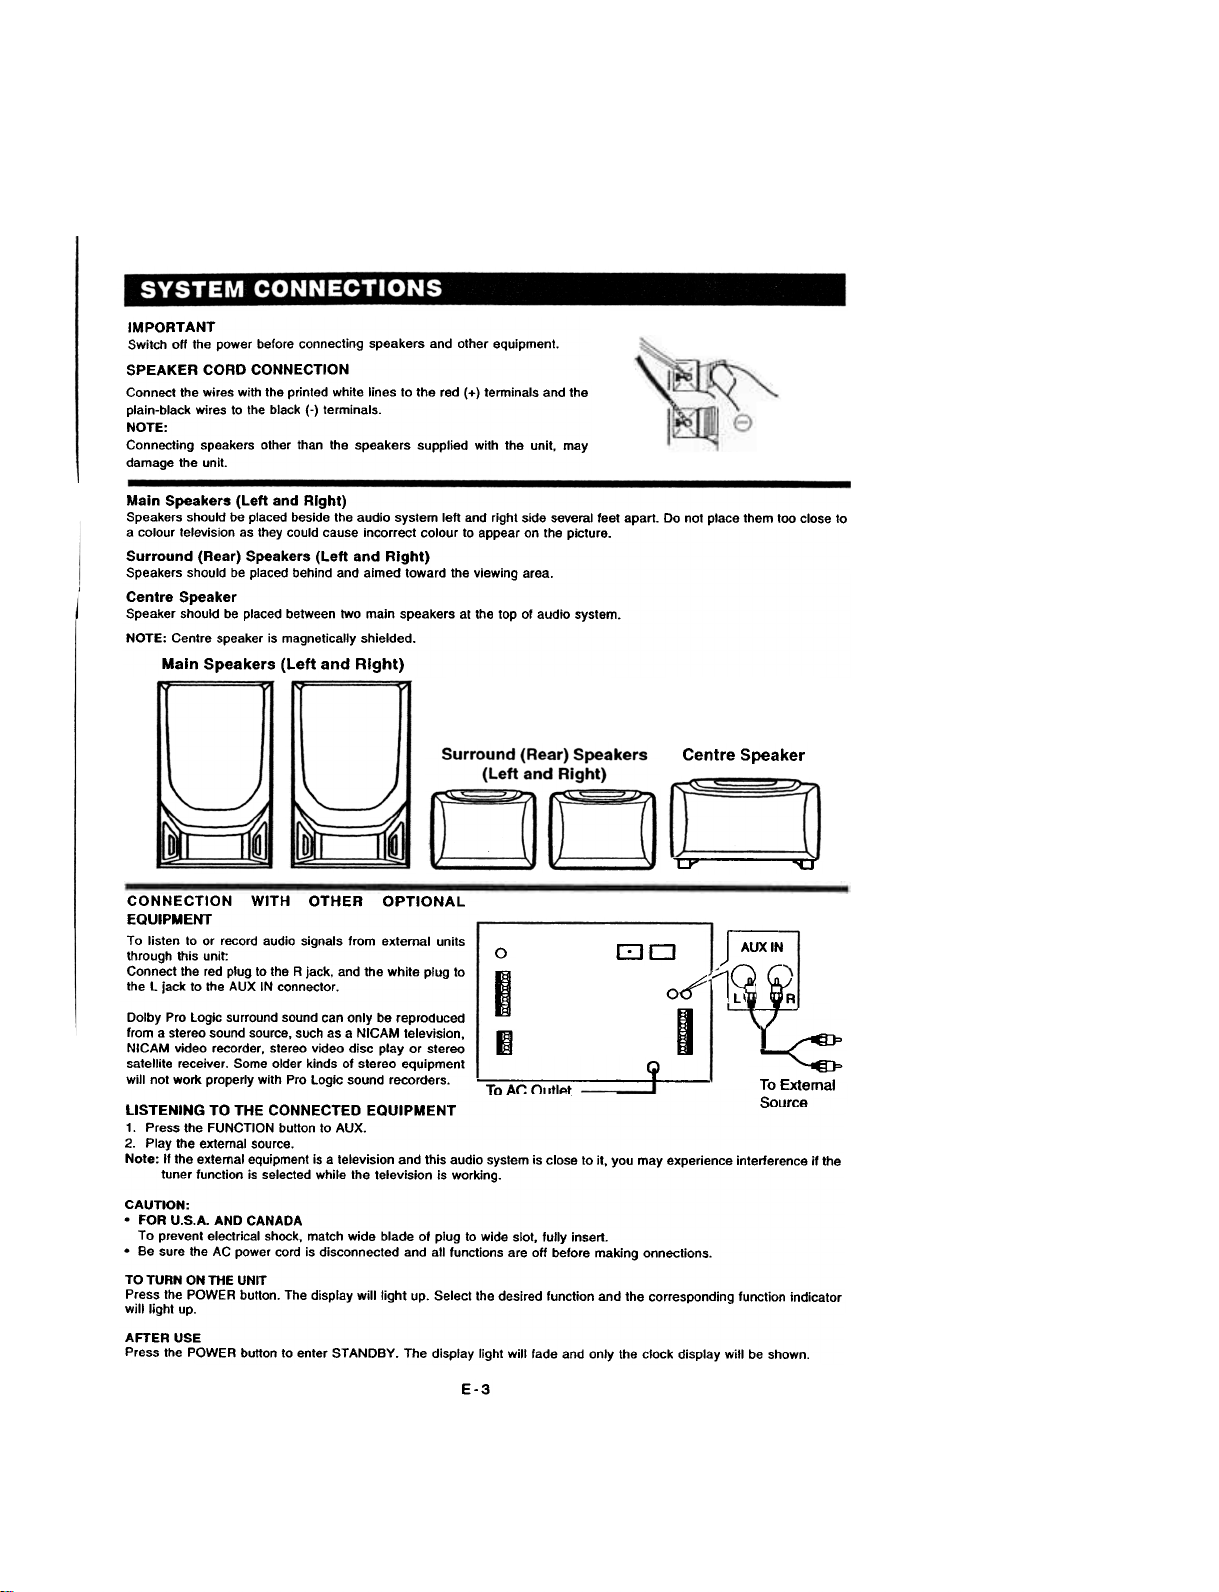
Main Speakers (Left and Right)
Speakers should be placed beside the audio system left and right side several feet apart. Do not place them too close to
a colour television as they could cause incorrect colour to appear on the picture.
Surround (Rear) Speakers (Left and Right)
Speakers should be placed behind and aimed toward the viewing area.
Centre Speaker
Speaker should be placed between two main speakers at the top of audio system.
NOTE: Centre speaker is magnetically shielded.
Main Speakers (Left and Right)
Centre Speaker
-LT "'U
CONNECTION WITH OTHER OPTIONAL
EQUIPMENT
To listen to or record audio signals from external units
through this unit:
Connect the red plug to the R jack, and the white plug to
the L jack to the AUX IN connector.
Dolby Pro logic surround sound can only be reproduced
from a stereo sound source, such as a NICAM television,
NICAM video recorder, stereo video disc play or stereo
satellite receiver. Some older kinds of stereo equipment
will not work properly with Pro logic sound recorders.
LISTENING TO THE CONNECTED EQUIPMENT
1. Press the FUNCTION button to AUX.
2. Play the external source.
Note: II the external equipment is a television and this audio system is close to it, you may experience interference if the
tuner function is selected while the television is working.
CAUTION:
.FOR U.S.A. AND CANADA
To prevent electrical shock, match wide blade of plug to wide slot, fully inser1.
.Be sure the AC power cord is disconnected and all functions are off before making onnections.
TO TURN ON THE UNIT
Press the POWER bu"on. The display will light up. Select the desired function and the corresponding function indicator
will light up.
AFTER USE
Press the POWER button to enter STANDBY. The display light will fade and only the clock display will be shown.
o
I
m
To AC Outlet
[:JD
E
o~
1~~
I
9
-<:::
To External
Source
E-3
Page 5
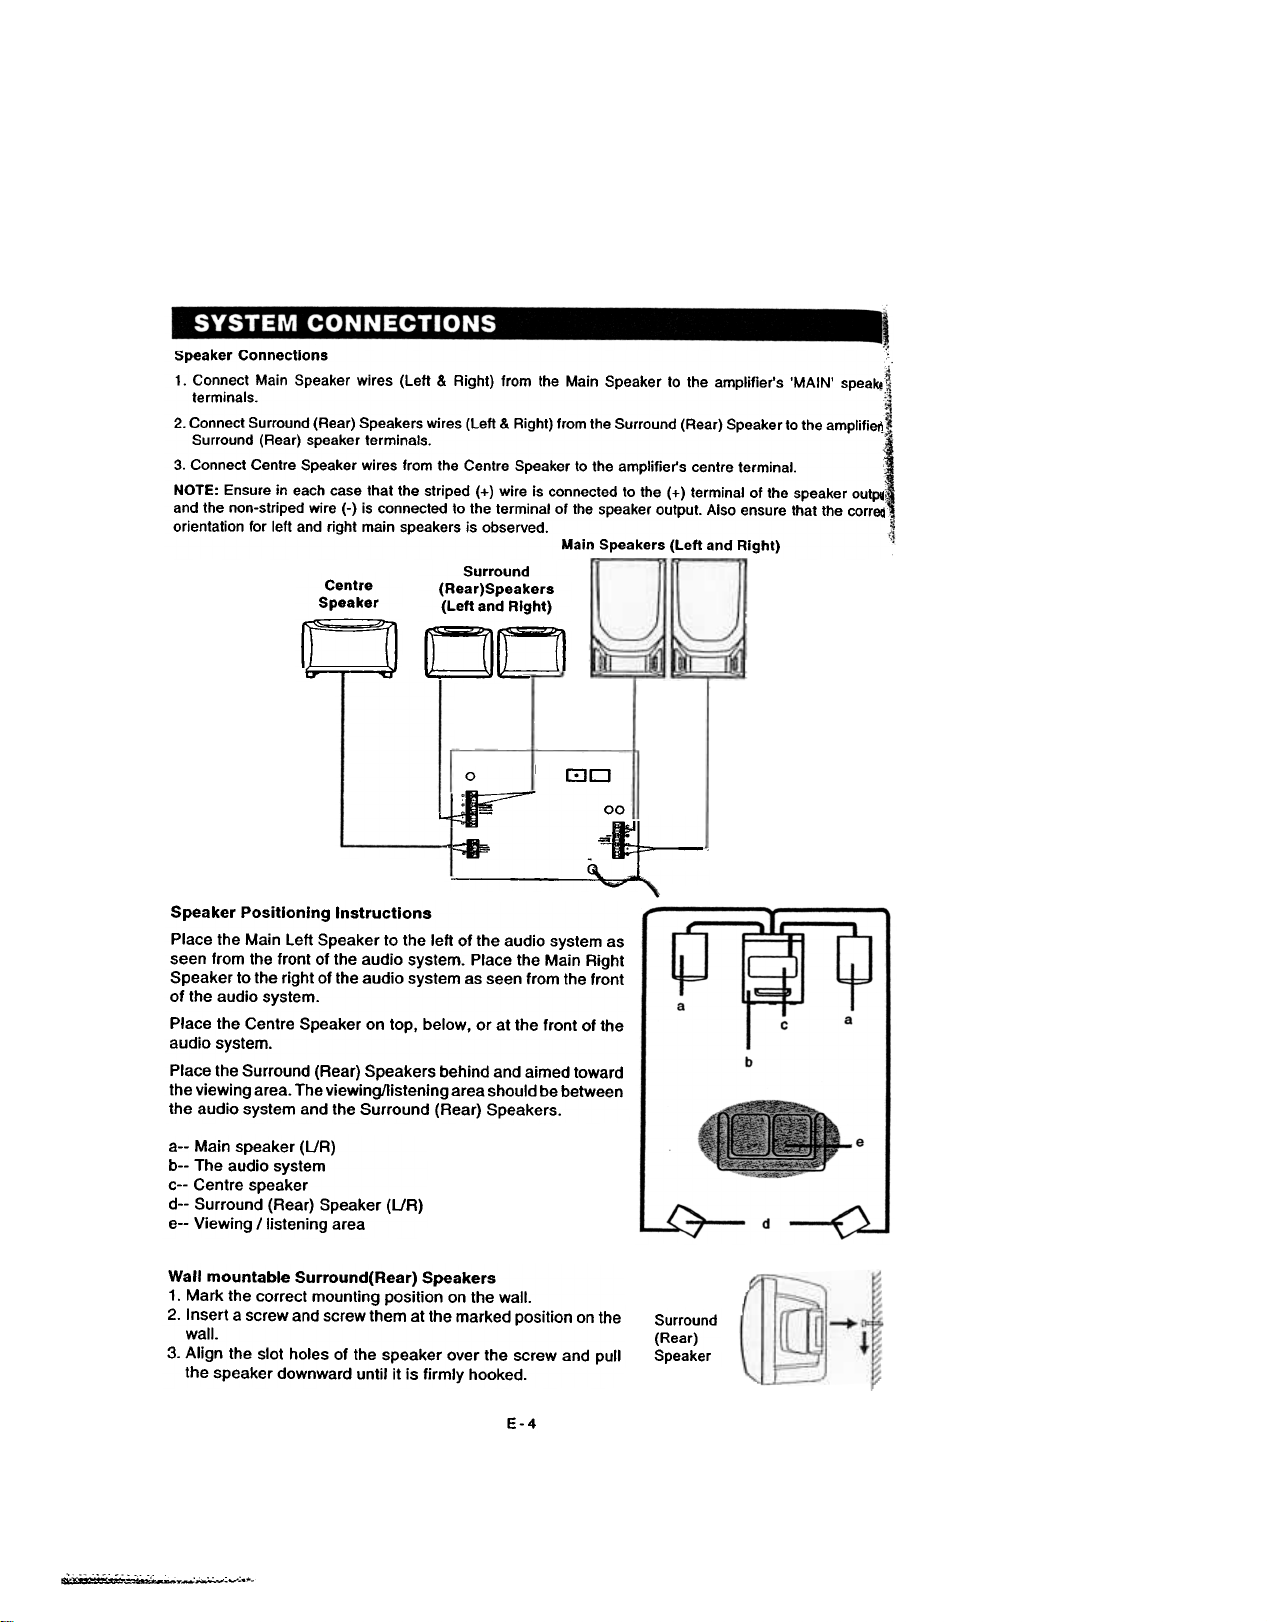
Speaker Connections
1. Connect Main Speaker wires (Left & Right) from the Main Speaker to the amplifier's 'MAIN' speake
terminals.
2. Connect Surround (Rear) Speakers wires (Left & Right) from the Surround (Rear) Speaker to the amplifiel\
Surround (Rear) speaker terminals.
3. Connect Centre Speaker wires from the Centre Speaker to the amplifier's centre terminal.
NOTE: Ensure in each case that the striped (+) wire is connected to the (+) terminal of the speaker outpU
and the non-striped wire (-) is connected to the terminal of the speaker output. Also ensure that the correQ
orientation for left and right main speakers is observed.
Centre
Speaker
Surround
(Rear)Speakers
(Left and Right)
Main Speakers (Left and Right)
a
Speaker Positioning Instructions
Place the Main Left Speaker to the left of the audio system as
seen from the front of the audio system. Place the Main Right
Speaker to the right of the audio system as seen from the front
of the audio system.
Place the Centre Speaker on top, below, or at the front of the
audio system.
Place the Surround (Rear) Speakers behind and aimed toward
the viewing area. The viewing/listening area should be between
the audio system and the Surround (Rear) Speakers.
DO
o I [:JD :
~ 00
~
a-- Main speaker (UR)
b-- The audio system
c-- Centre speaker
d-- Surround (Rear) Speaker (UR)
e-- Viewing / listening area
~~y...;",""",,-:.~
Wall mountable Surround(Rear) Speakers
1. Mark the correct mounting position on the wall.
2. Insert a screw and screw them at the marked position on the
wall.
3. Align the slot holes of the speaker over the screw and pull
the speaker downward until it is firmly hooked.
E-4
Surround
(Rear)
Speaker
Page 6
1
2
,25
3
~ 11- ..=~
4
5
6
7
8
9
10
11
12
13
It:>---
14
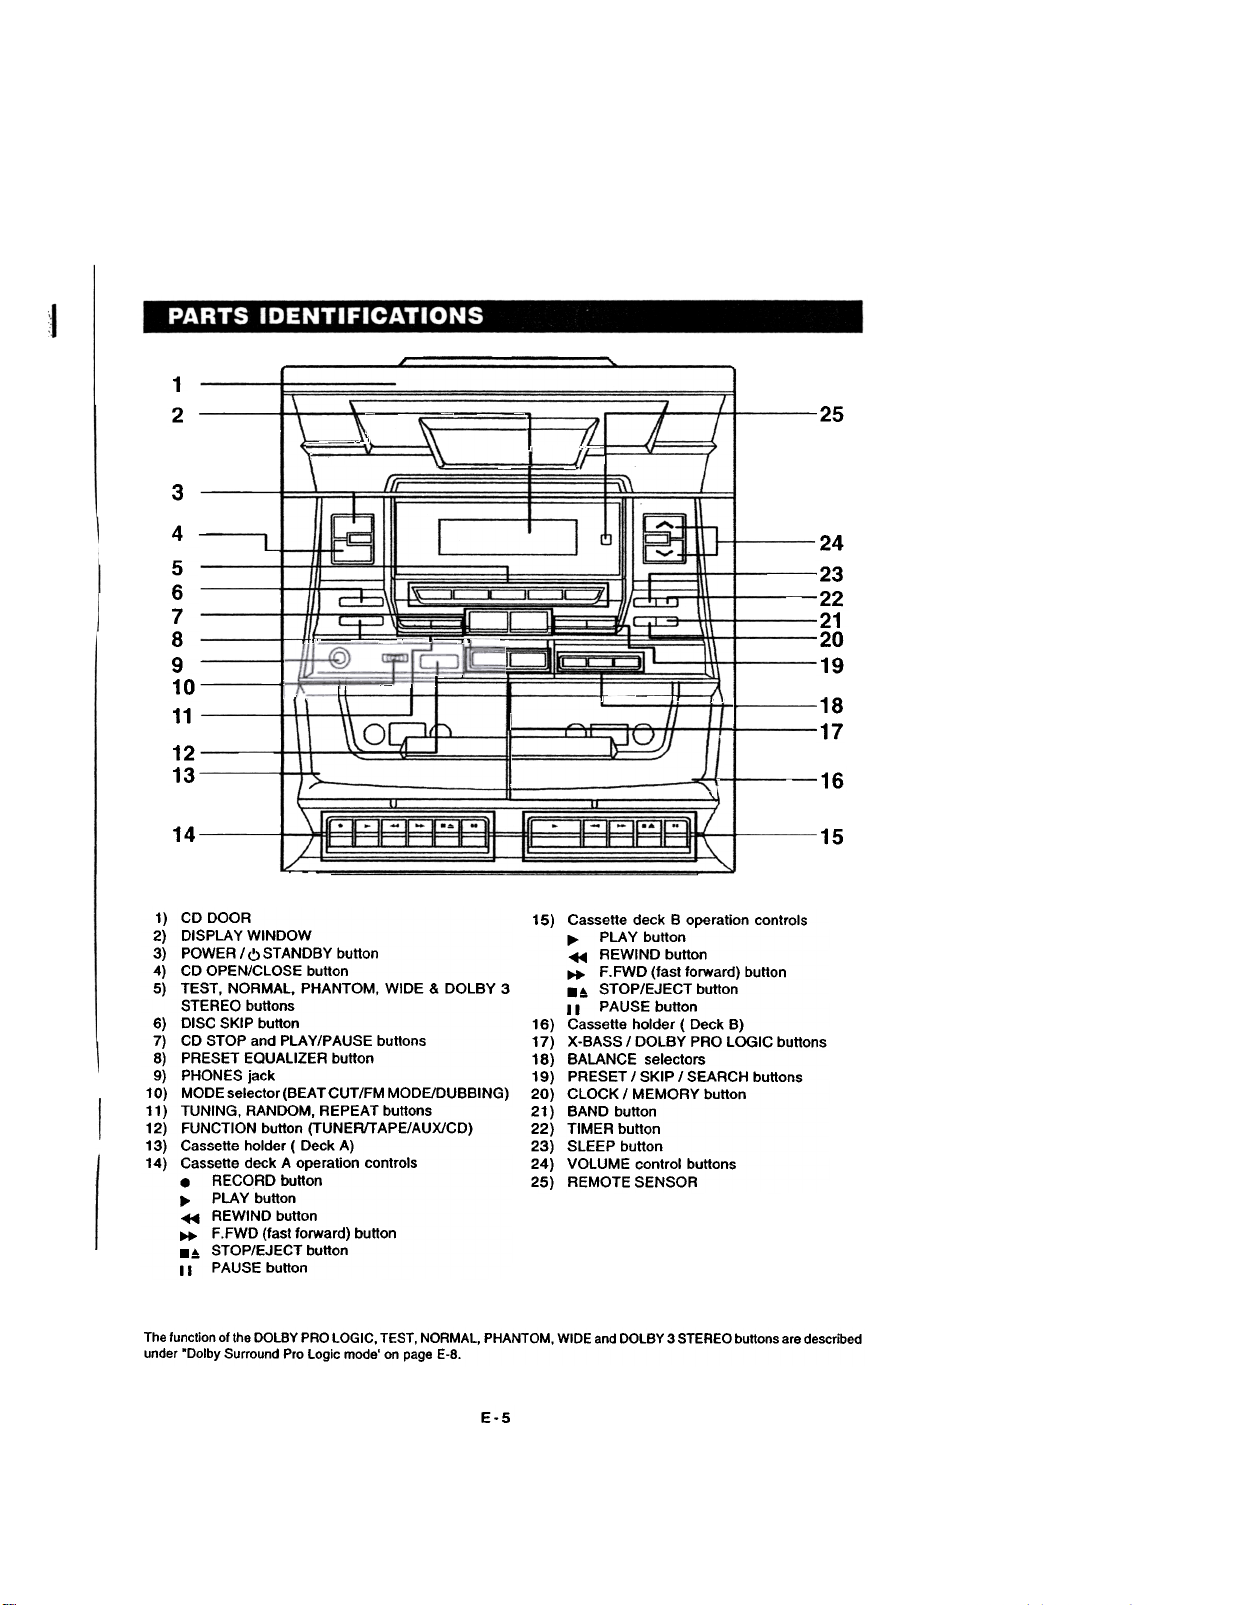
1) CD DOOR
2) DISPLAY WINDOW
3) POWER /6 STANDBY button
4) CD OPEN/CLOSE button
5) TEST, NORMAL, PHANTOM, WIDE & DOLBY 3
STEREO buttons
6) DISC SKIP button
7) CD STOP and PLAY/PAUSE buttons
8) PRESET EQUALIZER button
9) PHONES jack
10) MODE selector (BEAT CUT/FM MODE/DUBBING)
11) TUNING, RANDOM, REPEAT buttons
12) FUNCTION button (TUNER/TAPE/AUX/CD)
13) Cassette holder ( Deck A)
14) Cassette deck A operation controls
.RECORD button
..PLAY button
~ REWIND button
~ F.FWD (fast forward) button
.! STOP/EJECT button
II PAUSE button
~-
0'.
,r
15) Cassette deck B operation controls
~ PLAY button
~ REWIND button
~ F. FWD (fast forward) button
.~ STOP/EJECT button
II PAUSE button
16) Cassette holder ( Deck B)
17) X-BASS / DOLBY PRO LOGIC buttons
18) BALANCE selectors
19) PRESET / SKIP / SEARCH buttons
20) CLOCK / MEMORY button
21) BAND button
22) TIMER button
23) SLEEP button
24) VOLUME control buttons
25) REMOTE SENSOR
24
.23
22
21
.20
19
18
.17-6Q~ -
16
15
The lunction 01 the DOLBY PRO LOGIC, TEST, NORMAL, PHANTOM, WIDE and DOLBY 3 STEREO buttons are described
under "Dolby Surround Pro Logic mode' on page E-8.
E-5
Page 7
21
18 17 16 15
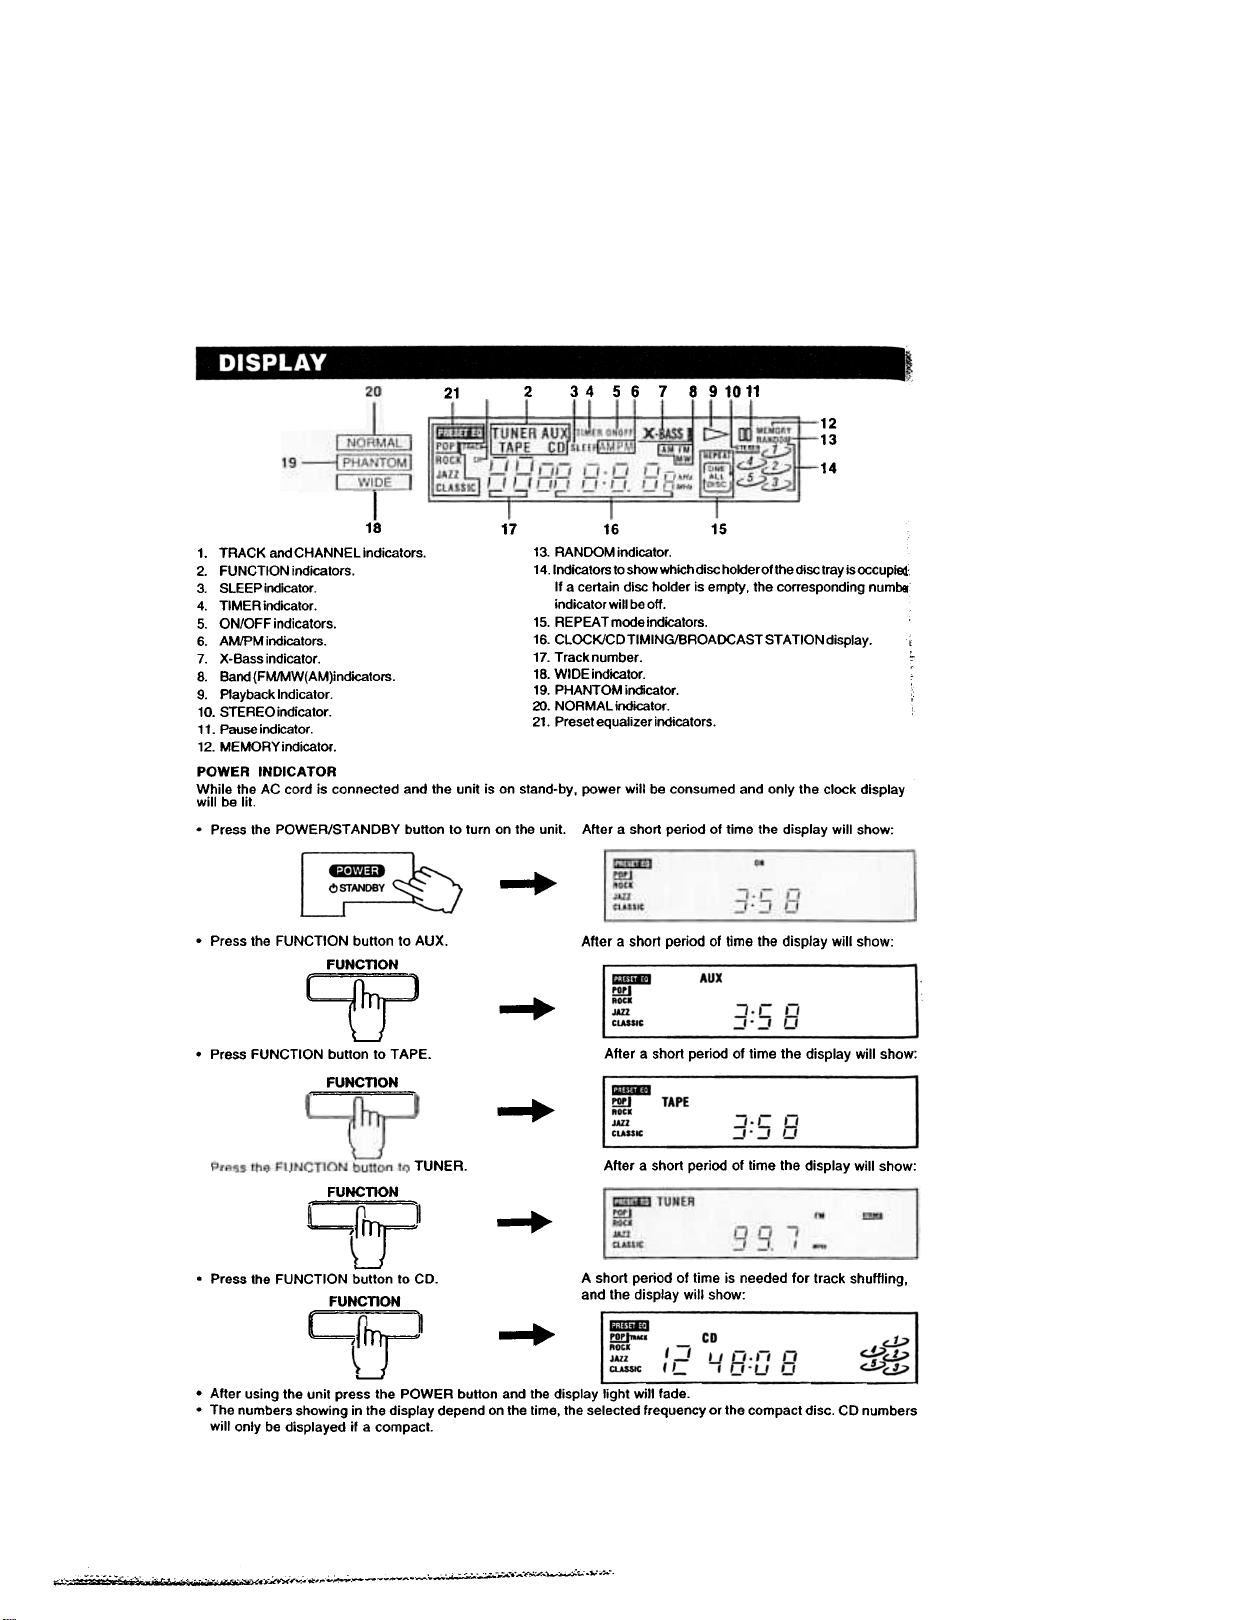
1. TRACK and CHANNEL indicators. 13. RANDOM indicator.
2. FUNCTION indicators. 14. Indicators to show which disc holder of the disc tray is occupi~
3. SLEEP indicator. If a certain dlsc holder is empty, the corresponding numbe
4. TIMER indicator. indicator will be off.
5. ON/OFFindicators. 15. REPEATmodeindicators.
6. AM/PMindicators. 16. CLOCK/CDTIMING/BROADCASTSTATIONdisplay. ,
7. X-Bassindicator. 17. Track number. ~
8. Band (FM/MW(AM)indicators. 18. WIDE indicator. ,
9. Playback Indicator. 19. PHANTOMindicator.
10 STEREO indicator. 20. NORMALindicator.
11.P .
12. MEMORYindicator.
POWER INDICATOR
While the AC cord is connected and the unit is on stand-by, power will be consumed and onty the clock display
will be lit.
.Press the POWERIST ANDBY button to turn on the unit. After a short period of time the display will show:
nd. t 21. Presetequalizerindicators.
.ausel Ica or.
2 3 4 5 6 7 8 9 10 11
12
13
14
-+-
.Press the FUNCTION button to AUX.
FUNCTION
After a short period of time the display will show:
-+-
.Press FUNCTION button to TAPE.
.Alter using the unit press the POWER button and the display light will fade.
.The numbers showing in the display depend on the time, the selected frequency or the compact disc. CD numbers
will only be displayed if a compact.
~
FUNCTION
TUNER.
FUNCTION
r
""===7T .Press the FUNCTION button to CD.
FUNCTION
C:;1;;;:=
.J
After a short period of time the display will show:
After a short period of time the display will show:
A short period of time is needed for track shuffling.
and the display will show:
-+
"",-:;i~"" -""~".E""~"#,.:.-~"'.."'".,;i'.';'"",,..;...;.-~~;.'...~-",,, ~= ,"""~" -"' -"' -
~
Page 8
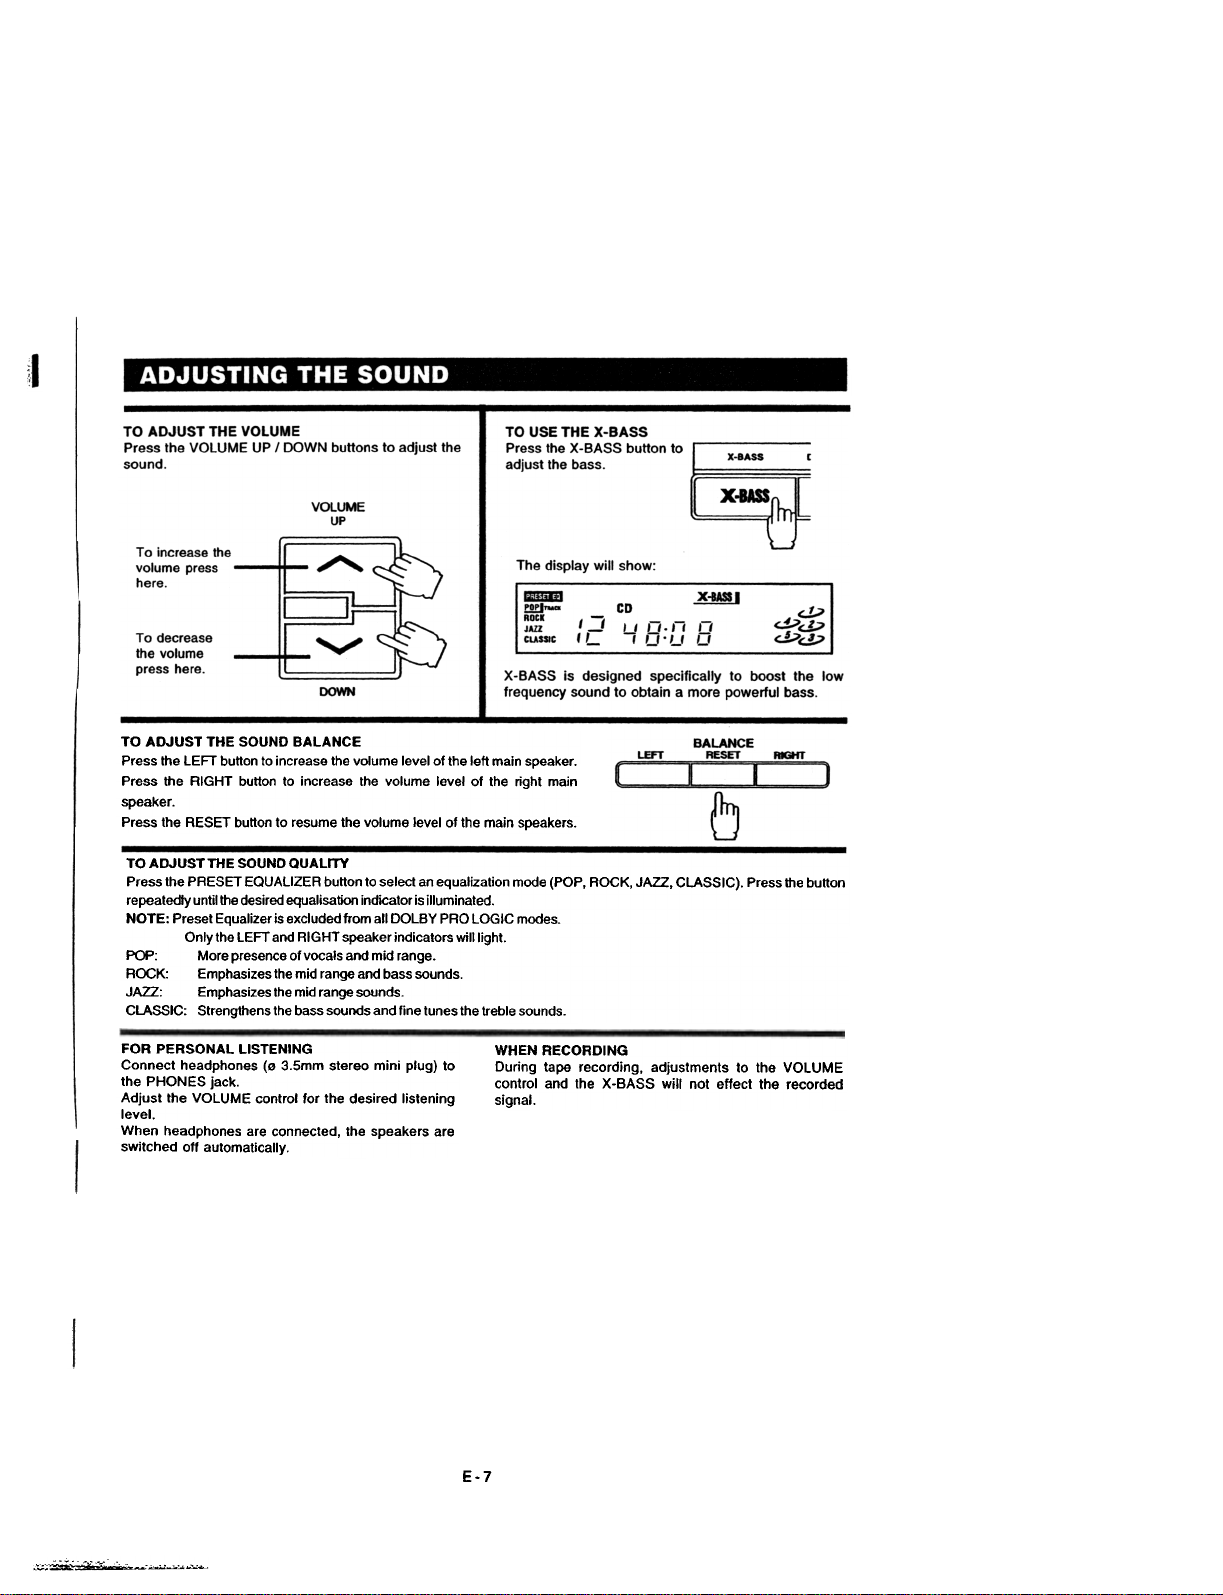
TO ADJUST THE SOUND BALANCE
Press the LEFT button to increase the volume level of the left main speaker.
Press the RIGHT button to increase the volume level of the right main
speaker.
Press the RESET button to resume the volume level of the main speakers.
TO ADJUST THE SOUND QUALITY
Press the PRESET EQUAliZER button to select an equalization mode (POP. ROCK, JAZZ. CLASSIC). Press the button
repeatedly until the desired equalisation indicator is illuminated.
NOTE: Preset Equalizer is excluded from all DOLBY PRO LOGIC modes.
Only the LEFT and RIGHT speaker indicators will light.
POP: More presence of vocals and mid range.
ROCK: Emphasizes the mid range and bass sounds.
JAZZ: Emphasizes the mid range sounds.
CLASSIC: Strengthens the bass sounds and fine tunes the treble sounds.
,"',~~=...;~~
FOR PERSONAL LISTENING
Connect headphones (0 3.5mm stereo mini plug) to
the PHONES jack.
Adjust the VOLUME control for the desired listening
level.
When headphones are connected, the speakers are
switched off automatically.
WHEN RECORDING
During tape recording, adjustments to the VOLUME
control and the X-BASS will not effect the recorded
signal.
E-7
Page 9

DOLBY SURROUND PRO LOGIC mode:
Choose this feature when playing Dolby Pro Logic
encoded movies and music (especially laser disc,
video tapes and TV broadcasts with Dolby Surround
sound). Most currently released video cassetles
and many TV broadcasts include this feature. Dolby
Pro Logic will not only give improved sound, it will
give a clear perception of the position and direction
of the original sound track.
Three types of centre mode are available when
using the Dolby Pro Logic feature, NORMAL WIDE
and PHANTOM. These options have programmed
surround (delay) values for the centre channel. The
delay (or echo effect) is different for each mode:
.The NORMAL mode gives true Dolby Pro Logic
sound.
.The WIDE mode can be used to gives greater
acoustic separation of the centre speaker-
.The PHANTOM mode diminishes the effect of
hearing a true centre channel. The main left and
right speakers give the effect of centre channel
information.
One other Pro Logic mode is available:
.The DOLBY 3 STEREO mode creates a Dolby
Pro Logic sound effect using just the left, right
and centre channels. No sound comes from the
surround channel speakers. You can still select
normal or wide effect in this mode.
To select and cancel Dolby Pro Logic modes
1.Press the PRO LOGIC. PHANTOM or DOLBY 3
STEREO button to select the required mode.
2. Press NORMAL or WIDE buttons to select normal
or wide effect (not available in phantom mode).
3. To cancel any Dolby Pro Logic mode. press the
PRESET EQUALIZER button.
NOTE:
It is not unusual on some Pro Logic material to have
little or no rear speaker output. This is normal and
to be expected, as part of the overall effect created
by the sound track producer.
you want to adjust, increase or decrease the volume
by holding the SPEAKER BALANCE + or -button
on the remote control. Let go when the balan~
sounds correct and the test noise cycle will continue
4. Press the TEST button again to stop the test
process.
Adjusting the surround sound balance while
playing a Pro Logic sound track
1.Select the desired audio (TUNER, CD, AUX'
TAPE)
2. Ensure that the Dolby Pro Logic is selected.
3.lf your source is Hi-Fi, VCR or laser disc player,
playa Dolby Pro Logic encoded video tape or
Dolby Pro Logic encoded laser disc. Make sure
your television's volume is turned down. Adjust
the MAIN volume buttons to a normal listening
level.
4.Using the remote control, press the SPEAKER
BALANCE button to light just the display symbol
for the speaker you wish to adjust.
5. Hold the SPEAKER BALANCE + button to
increase the volume or the SPEAKER BALANCE
-button to decrease the volume from the speaker
for which symbol is lit. Let go when the volume
sounds correct.
6. Wait about 10 seconds and the speaker display
symbols will go back to normal.
The following tables show which speakers are working in
the various modes.
Mode
I NORMAL
PRO LOGIC
PHANTOM
~I
PRESET
EOUAllSER
Manufactured under license from Dolby Laboratories
Licensing Corporation.
"
"
ound
kers
.J
x
x
x
To balance your Speakers for Surround sound:
Use the TEST button to set the correct balance of
sound between the LEFT, RIGHT, CENTRE and
SURROUND speakers in the Dolby Pro Logic mode.
NOTES: Ensure your speakers are correctly
positioned as shown on page E-4. " is recommended
to balance the speakers at a normal listening level.
1. With the unit switched on, press the TEST mode
2. You will hear a lest noise from the speakers which
3. While Ihe tesl noise is coming from the speaker
-,-~'0".c"" :.0, ",*"
DOLBY, the double-D symbol ID and "PRO LOGIC" are
trademarks of Dolby Laboratories Licensing Corporation.
(][) I DOLBY SURROUND I
p RO.LOG I C
button on the front panel or remote control.
will cycle from lefVright, centre and surround
speakers.
E-8
Page 10

To set the timer off {time to turn off)
NOTE: 1) Press the. STOP button to view the local time, time to turn on and time to turn off step by step, the previous
display will be retrieved after 8 seconds.
2) The timer will work if the TIMER key is pressed So that "TIMER' lights up in the display. Cancel the timer by
pressing the key so that "TIMER' goes out.
3) Suddenly OFF when playing, the TIMER OFF function are activated. Press the STOP button until the TIMER OFF'
indicator show on the display.
=,,~- '0"','<"; -<"~.,"""~.~""",-~"~...c,~""",=,",,,...;oc~,,.,","-v",,,~,,,,-~,~.,~
,-,~-~..~,--.""-,,-,c
Page 11

1. Press the SLEEP button while the power is on.
"SLEEP 90"'ights in the display.
NOTE:
SLEEP can only be adjusted in TUNER, TAPE and
AUX modes.
SLEEP
..,
2. Press and hold the SLEEP button to select the
length of remaining time until the unit turns off.
It changes the indicator in the following way:
SLEEP 90 -+- SLEEP 80
t ...
SLEEP 10 -+- SLEEP 20
The Sleep Timer is set and the SLEEP indicator
lights in the display. Let go when required sleep time
(in minutes) is shown.
To cancel the sleep timer, press the SLEEP button
once and "SLEEP" will go out in the display.
E-10
,-,co-,..c.-" --':." , -~.';'..~-"~~-~'~"".,", C~-"""".~-'-c-~~-.;.."""' ",,-.'.-'0."',.-~.~,"","--,.-" ,,"..~., ; ""
,~
~
Page 12

1. Press the FUNCTION button to
TUNER.
FUNCTION
"===}
,
TO SEARCH FOR A STATION OUICKL y
Hold the TUNING UP or DOWN button and station searching starts automatically. When a station is found, searching
stops automatically.
However, it may not stop if the signal is weak. In this case, search for the station manually.
c:,,--"'-4;.".cc;,c,".;-,"- -0, ,'c, <"
~
~
E-11
...'..~.'--~"-~~-.;;C~,",.-""";e~.",.-.","",-~,",,,,
Page 13

1. Press the FUNCTION button to
TUNER.
TO RECEIVE THE FM BROADCAST IN STEREO
Set the MODE selector to FM STEREO.
When the FM stereo broadcast is received, FM
STEREO indicator lights up.
l 2. Select a band.
3. Press the PRESET buttons I
preset number.
IFTHE FM STEREO BROADCAST SIGNAL IS WEJ
Set the MODE selector to FM MONO.
Background noise will be reduced but the si~
reproduced will be mono.
-
i
~
~
~
~=~~-<-;~~~"-""""~~~~...,...:.,"""'~..o.:=- ", 2~"' "",,0~..- ' -;,~~",.",."""",",~-V~'-"
E-12
Page 14

---'
IEAK
ugnal
I. Press Ihe FUNCTION button 10 CD
FUNCTION
3. Place the first disc onto the disc holder. with the
label side up.
CAUTION: This unit can play 5. (12cm) disc only
2. Press the OPEN/CLOSE button to open the
disc tray.
-.
4. Press the DISC SKIP button to revolve the tray
clockwise.
Place other disc(s) on the disc holder(s).
~
DISC SKIP
"5
\
I
5. Press the OPEN/CLOSE button to close the tray.
It takes a short while for your player to check the discs
6. Press the DISC SKIP button to select the desired disc. Press either one of the H4 I ~ (SKIP) buttons
to select the desired track. The selected disc symbol will flash.
7. Press the HI PLAY/PAUSE button to start
playback.
8. To stop playing:
(a) for a moment only, press HI PLAY/PAUSE
button and' .' will be displayed. Press this
button again to resume playing.
(b) Press the. STOP button.
~
E-13
..",,~~~~;.,
Page 15

Notes: ,. During playback, disc tray can be opened to change/add disc, but DISC SKIP button will become ini
and the current disc playback will not be interrupted.
2. The ~ / ...SKIP buttons can only be used to choose a track of the current disc. To choose a trad
another disc, DISC SKIP button should be pressed to get to the desired disc first.
LOCATING A PARTICULAR POINT IN A TRACK
To Locate a Track in Sequence
.To locate the beginning of the current or the
preceding track, press 144 reverse SKIP button.
.To locate the beginning of the succeeding track,
press... forward SKIP button.
.A short period of time will be needed for the disc
to read the information of the desired track before
playback can begin.
Reverse Forward
skip skip
SKIP I SEARCH
.-404
~
.To move forward at high speed, keep ~ forward
desired point.
To move backward at high speed, keep 44
backward SEARCH button pressed and release
it at the desired point.
.On forward search the track is rapidly scanned
first track on the next disc will be played normally;
to carry on scanning release and press the sear ,
button.
Reverse Forward
search search
SKIP' SEARCH
1-4-4
~
1then the next track and so on to the next disc. The,
-
j
l,To Locate a Particular Point In a Track
lSEARCH button pressed and release it at the
Press it once
Keep it pressed
Note: Searching and skipping can be done during playback or pause stage but are effective for the curr~
selected disc only.
Use DISC SKIP button to choose another disc.
.
!,
;,
,
E-14
~"' ,.-,~-.""~.. ;;,vc" ..-~-;.."..""'~ :"'";;;;"="~""""-"'--""~","",~~",-'i.",~-"':.~-,-:'=~,
Page 16

::t3~.J\'1'=l!L'~~11 .~IE--:~~ ~,.r!.~I:~~~[13:~ ~1~[.J~II~::!;[:].~I~ ~~j
SHUFFLE PLAY -PLAYING IN A RANDOM ORDER
IN STOP MODE
-
Notes:1. The random function shuffles all the tracks {maximum 48 tracks) of all discs in the disc tray and randomly
selects one track to play each time.
2. The player will skip to a new randomly selected track and start playing if ...SKIP button is pressed during
random playback.
IN PLAYBACK MODE
TO CANCEL RANDOM PLAYBACK
1. Press the. STOP button to stop random
playing.
2. Press the RANDOM button to deactivate random
playback.
RANDOM
""'B
Notes:
During random playback, the RANDOM playback function cannot be cancelled. Random play cancellation can
only be done in stop mode.
E-15
~",F"":""~"~-0:';;,;;",;,:;",;- -,,~"~ , ,x"""""""-,,'.;'..y~~,,-,,,-,-
Page 17

REPEAT PLAYBACK
DURING PLAYBACK MODE
To Repeat the Current Track
.Press the REPEAT button until REPEAT ()
REPEAT
appears on the display and the currently pla~
track will be played repeatedly until the STI
button is pressed.
~
.SKIP and SEARCH can still be used during
function. SKIP will go to the start of the next tr
Reverse Skip will go to the start of the pre
track, on the second press it will then go to
start of the previous track. SEARCH will sea
through the tracks normally.
To Repeat the Whole Disc or Programmed Tr
.Press the REPEAT button until REPEAT
REPEAT DISC appears on the display and the current
641~
~ starting from the currently playing point.
~<P .Press the ~ I.. SEARCH and ~ I... s~
i or the current program will be played repeated
.
buttons with repeat-one-disc function on, a
can still search through the whole disc or who
program, and the CD player will then start playil1
from the selected point.
To Repeat All Disc
DISC appears on the display.
.Press the 44 I ~ SEARCH and ~ I ~ S
buttons can make the player start playing fr
the newly selected point of the currently playi"
disc. 1
.Press DISC SKIP button can make the pla~
start playing from the first track of the new!
selected disc. The ~ I ~ SEARCH and ~ I ~
SKIP buttons can be used to choose a particula
track on this selected disc, the CD player will th~
start playing from that point.
~.Press the REPEAT button until REPEAT
~=.--',c,..",.".-""'-c, , ",,'~..~"'
~
REPEAT
~
DURING STOP MODE
c;...;;..~"";,~~
To Cancel Repeat Play ~
.Press the REPEAT button until the wo""':
"REPEAT" disappears from the display. [
DURING PAUSE MODE
The REPEAT operations can be done from the
pausing point. The player will start playing again
after "I PLAY/PAUSE button is pressed.
..'~i
~
E-16
""".",""'..,,'
r.:
Page 18

~~~.Jil'l:::l.!.'[~11 ,IJI ~-:~~ 1~';.[.J~C:::lr.!.lh'll'l~)~ ~.~¥.I:;r.!.,~~~~
A program of up to 32 tracks from all the available discs in the disc tray can be played in a preset order.
his
I:k,
ent
the
rch
tks
NE
ISc
Illy
UP
lIe
ole
ilg
II
OP
om
ng
rer
wly
lar
~n
~
1. Press the ClOCK I MEMORY button (in stop
NE
ing
OP
mode).
ClOCKI
MEMORY
2. Press the DISC SKIP button to select the desired
disc (the disc symbol moves).
DISC SKIP
3. Press the 1441 ~ SKIP bu"ons to select the
desired track.
SKIP I SEARCH
III
5. To add additional tracks,
6. To start playback, press the HI PLAY/PAUSE
button.
'd
Repeat steps 2 to 4.
NOTE: 1. The same track can be selected more than once in the same program.
2. With program on, the H4/... SKIP buttons function can only be used for the selected tracks.
3. With program on, repeat play cannot be done for ALL DISCS.
TO CHECK THE PROGRAM
After setting the program, press the CLOCK I MEMORY button repeatedly to check the order. This will not work when
the disc is playing.
E-17
.
Page 19

):..:~;;zc~"
E-18
Page 20

tm
---
Usable tapes. use only normal (type I) tapes for playback.
You can playback only the front sides of the tapes in Decks A and B.
TO STOP PLAYBACK
Press the STOP/EJECT button.
TO INTERRUPT PLAYBACK
Press the PAUSE button.
To resume play, press the PAUSE button again.
TO FAST WIND
Press the REWIND or F .FWD button. Press the STOP/
EJECT button to stop winding at the desired position.
1. Press the FUNCTION button to TAPE
3. Press the PLAY button.
@@]
4. Press the PAUSE button.
WHEN THE TAPE REACHES ITS END
During fast wind or regular play, the tape will stop
automatically when its end is reached.
WHEN BOTH DECK A AND DECK B ARE IN THE
PLAYBACK MODE
Deck B will playback no sound will come from deck A.
2. Insert a cassette in each deck.
~-+-~
Played II @0]@ III @CJ@ I
next 'I" ~8..I.J~ I~n ~8..I.J~ I
I~=--
I \
~~J
5. Press the PLAY button.
~
~
Played
first
b
As soon as the tape in deck B reaches its end and stop, the pause mode for deck A is released and playback
starts automatically.
:f.:&;C'-:;";Cc,c"'-":.::,c,.,.c-.,~ c ~,~,,«
b
E-19
,-~-~~.;; ,:.-c,c,~,.:.-"'~0'"'-~:.;.~
b
Page 21

Jse only normal {t)'~tal>es for recording and pla~b~~
1. Press the FUNCTION switch
to TAPE.
2. Insert the recorded tape into
Deck B and the blank tape into
Deck A.
,Q"",V,,","""' .--~ ,~
FUNCTION
--
3. Set the MODE selectorj
according to the desiredJ
dubbing speed: NORMAL or'
HIGH.
1 BEAT CUT 2
FM STEREO... I«)NO
lCOOI
NORM HIGH
DUBBING
4. Press the PAUSE button
6. Press the PLAY button5. Press the RECORD button
which also engages the PLAY
button.
lDECKAI
~
TO STOP DUBBING NOTE: !)
Press the STOP/EJECT buttons of Deck A and Deck B. Do not change the dubbing speed when dubbing is ~{
progress. 'c
~
~.;.;;,;---,c-,-0"c::,-."'- '-, "..:..;.."...,..~..""-,= """'~=."'~~."".,
Page 22

RECORDING FROM THE CD PLAYER
i
t
~;I
;1
~
~
.
:t:
TO STOP RECORDING
Press the STOP/EJECT button of Deck A.
TO INTERRUPT RECORDING
Press the PAUSE button of Deck A.
To resume recording; press the PAUSE button again.
TO ERASE A RECORDED TAPE
1) Press the FUNCTION button to TAPE.
2) Insert a tape with the side you want to erase facing
you.
3) Press the RECORD button to start erasing.
i
"
~
I
I
REMOTE CONTROL
1) SPEAKERS RESET button
2) SLEEPbutton
3) BALANCE UR, SPEAKER '+'1'.' buttons
4) FUNCTION button
5) TUNINGUPIDOWNIREPEATIRANDOM
buttons
6) DOLBY 3 STEREO button
7) SKIPISEARCI-VPRESET buttons
8) STOP button
9) TIMERbutton
10) TESTbutton
1
!1
TO INSTALL BATTERIES
1. Open the battery door.
USING THE REMOTE CONTROL CORRECTL y
.Point the Remote Control at the REMOTE SENSOR located on the unit.
.When there isa strong ambient light source, the performance of the infrared REMOTE
SENSOR may be degraded, causing unreliable operation.
.The recommended effective distance for remote operation is about 6 meters(19feet).
2. Insert two RO3 (MA or UM-4)
size batteries.
11) MEMORYbutton
12) OPEN/CLOSE button
13) BANDbutton
14) PRESETEQbutton
15) X-BASSbutton
16) PRO LOGIC button
17) VOLUMEcontrolbuttons
18) PlAY/PAUSEbutton
19) POWEFI/STANDBY
button
20) DISC SKIP button
BATTERY REPLACEMENT
When batteries become weak, the
operating distance of the Remote
Control is greatly reduced and you
will need to replace the batteries.
NOTE:
If the Remote Control is not going to
be used for a long time, remove the
batteries to avoid damage caused by
battery leakage corrosion.
E-21
Page 23

I GENERAL SYMPTOM
N;;'-~::d~
I
No sound from one channel or unbalanced lelt and right
.volume. I
Reversed len and rtgnt sound:
Lack 01 bass sound or apparently imprecise physlcallocalion
01 musIcal instruments.
Severe hum or noise.- .
I RADIO RECEPTION- -
i"he FM STEREO indicator llashes.- I
Severe hum or noise. :
I Th~-~te~FM p;~~ cannot be received in stereo.
CD PLAYER OPERATION
I CD door does no1 close due to power 011 or other functions
, are selected without closin(] it lirsl
Play~ does not staff
! Distorted playback or sound loss during CD playback.
I
, CASSET!E -DECK OPERATION -
t1eco-rafiig cannot be made.
Hecording or playback cannot be made or tnere IS a decrease .Dirty head. :
in sound level. .Maonelic bui1d-uo on the recordlolavback head. J
Excessive wow or flutter. or sound dropout .Contamina001 01 the capstans or pinch roners.
~ -.The taPe is wound completely. ~
c-; Set the MODE swiki1 to FM MijNO~ the FM S-,:EREO 1i!1-"
will QO out. ~~
I. ~~.!':. :,:!.~.?N ~tton.to se~.CD mode and pr~j
I the DISC SKIP button. The OOor will close. ~
.The disc's are not placed correctly.
.Dirty disc.
I. ~ disc is!nserted upside down. ;
I. The claver is ., the cause mode. ~
I. Moisture condensation ,:
I .CD disc is dirtv or scratched. ...;:
-..No cassette in ~ssette ~Ider .
.The tab is removed from the cassette.
~.
E-22
Page 24

TUNER SECTION
ng
Frequency range
Antenna
Id
~)
tt
Iy
S,
..
~t
AMPLIFIER SECTION
Pro Logic Mode
Intermediate distortion
Power Bandwidth
Frequeny Response
Surround Level Adjustment
Center Level Adjustment
Sub-WooferOutput (mono)
Power consumption
Power requirements
COMPACT DISC PLA YEA SECTION
Channels
SIN ratio
Wow & Flutter
Sampling frequency
Quantization
Pick up light source
Pick up wave length
CASSETTE SECTION
Track format
Frequency response
Signal to noise ratio
Wow and flutter
Tape speed
Rewindtime
Fast forward time
Recording system
Erasing system
Motor
Heads
SPEAKERS SECTION
Main Speakers
Impedance
Oimensions(WxDxH)
Weight
Centre Speaker
Impedance
Dimensions (WxDxH)
Weight
Surround (Rear) Speakers
Impedance
Dimensions (WxDxH)
Weight
COMMONSECTION
Dimensions (WxDxH)
Weight
FM 87.5-108 MHz
AM530-1710kHz
FM. Antenna Pig Tail
AM: loop antenna
Main 2 x 7W (OTHD 10%, al OdB IkHz)
Cenlre 1 X 7W (OTHD 10%, al OdB IkHz)
Rear 2 x 3.5W (OTHD 10%, al OdB IkHz)
1% allkHz.
40Hz 10 20kHz (OTHD 1%)
40Hz 10 20kHz, %3dB
%2OdB
%20dB
3OOmV
46W
AC- 120V 60Hz
2 channels
60dB
undetectable
441 kHz
1 bitlinear/ch
Semiconductor laser
79onm
4 tracks. 2 channels
Normal tape: 80 -10.000 Hz
40 de (Normal tape)
0.35% (WRMS)
4.8cm/sec.
120 sec (C-60)
120 sec (C-60)
AC bias
Magnetic erase
DC molor x I
Record/playback head x I (Deck A)
Erasure head x I (Deck A)
Playback head x I (Deck a)
6.5 inches cone type woofer, 2.25 Inches cone type tweeter
8 ohms 10W
[200mm x 239mm X 325mm] X 2
2.84 kgs x 2
5 inches cone type speaker
8 ohms 10W
179mm x260mm x 170mm
1.33 kgs
5 Inches cone type speaker
16ohms10W
[114mm X 184mm X 149mm) X 2
0.63 kgs x 2
288mm X 368mm x 304mm
7.5 kgs
,
~
,
"
;~
~
~
Specifications and external appearance are subject to change without advance notice due to continuous product improvemenL
811-217591-010
Prinled in China
E-23
 Loading...