


1
Dojo by BullGuard-DL0010
User’s Guide
9 Devonshire Square EC2M 4YF London. United Kingdom
Company website: dojo.bullguard.com
For information, contact: info@dojo-labs.com
For support, contact: helpdesk@dojo-labs.com
May 2017
® All rights reserved.

Overview - System Components
2
Table of Contents
Overview ............................................................................................................................... 3
System Components…………………………………………………………………………………3
Getting Help .......................................................................................................................... 3
Setup .................................................................................................................................... 4
Befor e You Start ................................................................................................................... 4
Unpacking the Dojo Pebble Kit .............................................................................................. 4
Setting Up Dojo ..................................................................................................................... 4
Connecting the Dojo Base Unit to the Router ........................................................................ 5
Downloading and Installing the Dojo App on your Smartphone ............................................. 8
Powering on the Dojo Pebble ................................................................................................ 8
Registering a New Dojo User and Pairing the Dojo App with the Dojo Base Unit .................. 9
Discovering Devices in Your Network ................................................................................. 17
Using the Dojo App ............................................................................................................. 18
Logging In ........................................................................................................................... 18
Dojo Tab ............................................................................................................................. 19
My Devices Tab .................................................................................................................. 21
Device Groups .................................................................................................................... 22
Changing Groups ................................................................................................................ 24
Editing Device Details ......................................................................................................... 25
Alerts and Actions ............................................................................................................... 26
Removing an Action from a Device ..................................................................................... 28
Dojo Menu .......................................................................................................................... 29
Protecting a Device with Remote Access ............................................................................ 31
Router settings .................................................................................................................... 31
Dojo app settings ................................................................................................................ 32
Regulatory Compliance Information .................................................................................... 33
Technical Specification ....................................................................................................... 33
Base Unit ............................................................................................................................ 33
Pebble ................................................................................................................................ 33
Product Information ............................................................................................................. 33
FCC Statement ................................................................................................................... 33
CE ....................................................................................................................................... 34

Overview - System Components
3
Overview
Welcome to Dojo, the smart security and privacy solution for your smart connected home.
Dojo keeps you in control of your home network and privacy by monitoring your Wi-Fi
network and alerting you of new devices trying to connect. Dojo provides a security
technology that connects to your network and acts as the essential layer between your smart
devices and any threats to your security and privacy.
Just tell Dojo how to respond to each new device. If any suspicious device tries to connect to
your Wi-Fi network, you can block it.
Dojo can be monitored from mobile devices running Android or iOS operating systems.
This guide provides you instructions for connecting the Dojo system to your home network
and for using the Dojo app to monitor and control devices in the network.
Both DOJO DL0007R and Pebble DL0007v2 have Bluetooth on board,
The DOJO
DL0007R unit sends alerts to the remote units via BT BLE (Bluetooth Low
Energy) and the remote unit light LEDs. And Pebble DL0007v2 uses Broadcom
20737s (BLE SIP) module to communicate with the main unit over BLE.
System Components
The main components of the solution protecting the home network are the following:
• Dojo Base Unit: A local intelligent unit which takes care of threat detection and
prevention alongside network management and control. Dojo constantly analyzes all the
network traffic within the home network and enforces the security policy of that specific
network. This analysis is done both on the device and Dojo-Labs cloud.
• Dojo Cloud Service: Dojo-Labs runs a cloud-based cyber security engine that
constantly collects and analyzes the metadata that has been generated by all the
deployed Dojos devices.
• Dojo Mobile App: The Dojo application is the main interface for using the service. It
provides an intuitive user interface that lets you take control over your home network
security and privacy without much technical knowledge.
Getting Help
In addition to this guide, the following resources are available for information:
• A Quick Start Guide is included in the Dojo Pebble kit.
• Visit the company website at: dojo.bullguard.com. It includes a collection of FAQs that
provide answers to many common questions.
If you experience technical difficulties, mail the support team at: helpdesk@dojo-labs.com

4
Setup
This chapter describes how to set up the Dojo network, install the Dojo app, register to the
Dojo service and discover the devices in your network.
Before You Start
Before you begin to set up the Dojo Pebble, ensure that you:
• Have four AA batteries.
• Have your Wi-Fi router admin credentials.
• Have powered on your smartphone and that it has Bluetooth turned on.
Unpacking the Dojo Pebble Ki t
Open the Dojo Pebble kit. It includes the following items (see Figure 1):
• Dojo Pebble
• Dojo base unit
• Quick Start Guide
• Ethernet cable
• AC adapter
Figure 1: Dojo Pebble kit
Setting Up Dojo
There are four general steps in the setup:
STEP 1: Connecting the Dojo Base Unit to the Router
STEP 2: Downloading and Installing the Dojo App on your Smartphone
STEP 3: Powering on the Dojo Pebble
STEP 4: Registering a New Dojo User and Pairing the Dojo App with the Dojo Base Unit

Setup - Setting Up Dojo
5
Connecting the Dojo Base Unit to the Router
There are two modes for connecting the Dojo base unit to the router, depending on the way
your home network is set up:
• Router mode: When using your service-provider router only. The connections look like
this:
Figure 2: Router setup
• Bridge router: When using both your service-provider router and an additional Wi-Fi
router. The connections look like this:
Figure 3: Bridge setup
It is important to understand which setup your network uses, both for the physical setup and
software configuration.
Router Mode
1. Plug one end of the provided Ethernet cable into the ETH2 port of the Dojo base unit,
as shown in Figure 4 then plug the other end into an available port in your ISP Wi-Fi
router.

Setup - Setting Up Dojo
6
Figure 4: Router mode power connection
2. Plug the AC adapter into the Dojo base unit as shown in Figure 5 ( Figure 4) , then
connect the adapter to a power outlet.
Figure 5: Router mode network connection
Wait a few minutes before you continue with the setup.

Setup - Setting Up Dojo
7
Bridge Mode
1. On the Wi-Fi router side, unplug the cable connecting the Wi-Fi router to the serviceprovider router.
2. Plug one end of the Ethernet cable that was provided in the Dojo kit into the ETH2
port of the Dojo base unit. Plug the other end into the same port of the Wi-Fi router
from which you unplugged the cable in step 1. See Figure 6.
3. Plug the AC adapter into the Dojo base unit and connect the adapter to a power
outlet. See Figure 6.
Figure 6: Power and ETH2 connections
4. Plug the Ethernet cable that you unplugged in step 1 into the ETH1 port.

Setup - Setting Up Dojo
8
Figure 7: ETH1 connection
Wait a few minutes before you continue with the setup.
Downloading and Installing the Dojo App on your Smartphone
Use the QR code in the Quick Start Guide code for downloading the Dojo app from the Play
Store for Android devices or App Store for iOS devices.
Powering on the Dojo Pebble
1. Turn the Pebble over, so that the Dojo logo is visible.
2. Slide the battery cover off in the direction of the arrows, to expose the battery holder.
3. Insert four AA batteries into the battery holder. Ensure they are aligned properly.
Close the battery cover.
4. Power on the Pebble: Press and hold down the button located next to the Dojo logo
for a few seconds.

Setup - Setting Up Dojo
9
Red, green, and blue circles flash to indicate that the Pebble is powering on.
5. Turn the Pebble right-side up.
The hollow in the base unit is designed to hold the Pebble. Place it there, or anywhere
within five meters of the base unit.
Registering a New Dojo User and Pairing the Dojo App with the Dojo Base Unit
In this phase of the setup, you register your username and pair the Dojo app with the Dojo
base unit.
As you perform the following procedures, make sure you are within five meters of the Dojo
base unit.
1. Open the Dojo app.
Figure 8: Push notifications screen
2. It is recommended to allow push notifications. Select Allow.
3. Touch Register.

Setup - Setting Up Dojo
10
Figure 9: Registration screen
4. Touch Register.
Figure 10: Welcome screen
If you have already performed the instructions in Connecting the Dojo Base Unit to the
Router, on page 5, touch Click Here When You’re Done. Wait for the app to display
Successfully connected to Dojo.

Setup - Setting Up Dojo
11
Figure 11: Successful Dojo connection screen
5. Touch Let’s Start to begin registration.
Figure 12: Personal details s c reen
6. Enter your first name, last name, email, and a password. Enter the password again in
the second field.
Note: The email is also used as your username and cannot be
changed once the Dojo is registered. Make sure you are satisfied with
the email address that you are going to enter.
7. (iPhone only) To enable sign in with Touch-Id, select the Allows login with Touch
ID check box.
8. Touch Next to proceed.

Setup - Setting Up Dojo
12
Figure 13: Terms and policy screen
9. Touch Agree to continue with the setup.
Figure 14: Confirmation screen
10. Check your email for a message that contains a six-digit PIN code. Enter the PIN
code into this screen, then touch Submit.

Setup - Setting Up Dojo
13
Figure 15: Account verification screen
11. Touch Next.
Figure 16: Installation mode screen
In this screen, you select either Router Mode or Bridge Mode, according to the network
configuration you set up earlier:
12. Select a mode, then touch Next.

Setup - Setting Up Dojo
14
Figure 17: Installation mode confirmation screen
13. Confirm or cancel your selection.
Figure 18: Wi-Fi Router admin screen
14. In this screen, you select one of the following options:
• Let Dojo set your router remotely. In that case, you enter your Wi-Fi router admin
credentials.
OR
• Change the Wi-Fi setting manually, on your own. In that case, you do not enter the
credentials, and instead, select the check box next to I’ll change my Wi-Fi router
settings manually.
Note: If you select this option, you must access your Wi-Fi router to

Setup - Setting Up Dojo
15
disable the DHCP server manually and then restart it and any Internet
switch or bridge that you may have in your home network. For
instructions, see
Disabling the DHCP Server Manually, on page 16.
15. Touch Next to complete the setup.
16. (Only if you chose to disable the DHCP manually) The following screen is displayed.
Figure 19: DHCP configuration notification screen
Make the necessary configuration in your router, then touch Click Here When
You’re Done to proceed.
Figure 20: Dojo is analyzing network screen
17. Dojo begins to analyze your network. This process may take several minutes. When
Dojo has completed the analysis, a notification is sent to your smartphone and the
following screen is displayed.

Setup - Setting Up Dojo
16
Figure 21: Dojo is ready screen
In addition, the Pebble blinks with a green light.
Figure 22: Pebble: ready state
Disabling the DHCP Server Manually
Perform the following procedures only if you chose the option I’ll change my Wi-Fi router
settings manually at the end of the process for Registering a New Dojo User and Pairing
the Dojo App with the Dojo Base Unit, on page 9.
1. Log into the Wi-Fi router admin page.
2. Disable the DHCP server.
3. Apply the changes.
4. Restart the router.

Setup - Setting Up Dojo
17
Discovering Devices in Your Network
Once the Dojo base unit is activated and ready, it scans your home network to discover all
connected devices.
Note: For Dojo to detect and manage all your devices, ensure that you
have restarted the Internet switch, or other Wi-Fi access points that
you may have in your home network.
As devices are discovered, they are displayed in the My Devices tab. A push notification
about each one is also sent and an event is added to the chat.
Figure 23: My Devices tab
Note: Dojo places a new device in the Guests group until you move it
into another group.

18
Using the Dojo App
This chapter shows you how to use the Dojo app.
Logging In
When you access the app, you are required to log in.
1. Touch Login.
Figure 24: Login screen
2. Enter your username and password.
3. Touch Login.
The Dojo tab is displayed.

Using the Dojo App - Dojo Tab
19
Figure 25: Dojo tab
Dojo Tab
The Dojo tab is the main screen of the app and shows the recent activity relating to devices
in your network. The activity is a kind of chat between you and the Dojo service.
There are three types of messages from Dojo:
• Red alerts: These are notifications about threats to your network and require you to take
action.

Using the Dojo App - Dojo Tab
20
Figure 26: Alerts
• Orange notifications: These are messages that Dojo has handled a threat to your
network. There is nothing more you need to do.
Figure 27: Warnings
• Green notifications: These are messages about routine monitoring.

Using the Dojo App - My Devices Tab
21
Figure 28: Routine message
Your interaction with Dojo is shown as a message in a grey block:
PIX
Figure 29: User message
My Devices Tab
In this tab, you can view all the devices that Dojo has identified in your home network.
Figure 30: My Devices tab
Each device has the following markings:
• Device name
• Device type. For example, a router has the following icon: .

Using the Dojo App - My Devices Tab
22
• Device activity. An active device is marked with three moving dots: ; an
inactive device is marked with three static dots:
• A blocked device is marked .
• A device that uses a static IP is marked .
Every detected device is located in one of four groups: Smart Home, Personal Devices,
Guests, and Unprotected. You can collapse and expand the devices in a group. In this
example, the first three groups are in a collapsed state:
Figure 31: Collapsed device group
• By touching a particular device, you can see detailed information about it (at the top of
the screen), as well as the recent Dojo monitoring activity relating to the device (at the
bottom of the screen).
Figure 32: Device details
• The Edit button lets you edit details of the device so that they are more easily
understood or recognized.
Device Groups
Devices that have been discovered by Dojo are sorted into groups.

Using the Dojo App - My Devices Tab
23
Each group has particular characteristics and capabilities. By placing a device in a particular
group, you define how it interacts with others in that group, how it accesses the Internet, and
how the Internet interacts with it.
The following groups are available:
Smart Home Group
The following are the characteristics and behaviors of the devices in the Smart Home group:
• Devices in this group are protected by the Dojo base unit. They are protected against
malicious webpages, unauthorized access from other networks, malware, Trojans, and
so forth.
• Usually, you place your smart home devices, cameras, door locks, and alarm systems in
this group.
• It is possible to open external ports from the Internet to devices in the Personal Devices
group, for example, setting port forwarding for remote access to your camera. See
Protecting a Device with Remote Access, on page 31.
Personal Devices Group
The following are the characteristics and behaviors of the devices in the Personal Devices
group:
• Devices in the Personal Devices group are protected by the Dojo base unit. They are
protected against malicious webpages, unauthorized access from other network,
malware, Trojans, etc.
• Devices in the Personal Devices group are allowed to access and configure the router.
• Usually, you will place your smart phones, mobile devices, tablets, PCs, Mac, laptops,
and other advanced devices in this group.
• It is possible to open external ports from the Internet to devices in the Personal Devices
network, for example. See Protecting a Device with Remote Access, on page 31.
Guests Group
The following are the characteristics and behaviors of the devices in the Guests group:
• Access to the Internet is unrestricted. Devices in this group can access any website.
• The guest group is not protected from malware, Trojans, malicious websi tes, and so
forth.
• Devices are not allowed to access other devices in the Personal Devices and Smart
Home groups.
• Devices are not allowed to configure the router.
Unprotected Group
The following are the characteristics and behaviors of the devices in the Unprotected group:
• Devices with static (manual) IP addresses of the router network are placed automatically
in this group.
• Once you change the IP address or a device from static (manual) to DHCP-assigned, the
device moves into the Guest group.
• Devices in the Unprotected group cannot be moved to other groups.
• Access to the Internet is unrestricted and the devices can access any website.
• Devices in the Unprotected group are not protected from malware, Trojans, malicious
websites and so forth.

Using the Dojo App - My Devices Tab
24
• Devices are not allowed to access other devices in the Personal and Smart Home
groups.
• Devices are not allowed to configure the router.
• To enable a device to entirely bypass Dojo, you can move it from its current group to the
Unprotected group.
Changing Groups
You can change the group to which a device belongs. There are two ways to do this: by
dragging it to a different group, or by editing the device details.
By dragging
1. Touch the My Devices tab.
2. Touch Edit.
3. Drag the required device from one group to another, by touching and holding down
its drag handle.
Figure 33: Group move confirmation
4. Touch Change Group of Cancel.
5. Touch Done.
The device gets a Pending status until it has moved successfully to its new group. This can
take up to five minutes.
By editing device settings
1. Touch the device to display the device’s details and touch Edit.

Using the Dojo App - My Devices Tab
25
Figure 34: Editing device detai ls
2. Touch the arrow next to Group.
Figure 35: Choose Group screen
3. From the groups that are displayed, select the group to which you want to move the
device.
4. Touch Save to apply the changes
Editing Device Details
You can modify device details as follows:
1. In the My Devices tab, touch the device to display its details.
2. Touch Show More to display more details.
3. Touch Edit in the top-right corner.
Figure 36: Editing device detai ls
4. Edit settings as needed.
5. Touch Save to apply the changes.
The following are the device details you can edit:

Using the Dojo App - My Devices Tab
26
• Block: This switch lets you block or unblock the device from the network. A blocked
device cannot communicate with other devices and has no access to the Internet.
Figure 37: Block switch on
• Device Name: Dojo displays the default device name. To change it, touch the name and
edit as needed.
• Device Type: Dojo displays the default device type. To change it, touch the arrow next
to the device type. Select a different device type from the list displayed.
• Group: Dojo places all new devices in the Guests group until you move it into another
group. To move it, touch the arrow next to the group name. Select the new group from
the list displayed.
• IP Address: Dojo displays the current IP address of the device and indicates whether it
is static or dynamic. By default, IP addresses are dynamic. If you choose to use a static
IP address, Dojo will permanently assign the same IP address to this device. This is
important when you need to access the device either remotely or internally by its IP
address. To modify the type of IP address, touch Static or Dynamic.
• Remote access: Dojo displays whether remote access is allowed or blocked for the
device. To allow, touch Yes and to block, touch No. W hen you select Yes, you must
provide the external IP address, the internal IP address, and network protocol (UDP or
TCP) to use. For more instructions, see Protecting a Device with Remote Access, on
page 31.
Alerts and Actions
Dojo protects you both from inside and outside your network by alerting you to unusual
activity:
• Red alerts: These messages require you to act. A red event typically occurs when an
unauthorized device is attempting to access the network or during a malicious attack. In
the event of a red alert, a red activity is added in the Dojo app and the Pebble lights up in
red.
Figure 38: Alert message

Using the Dojo App - My Devices Tab
27
Figure 39: Pebble: alert state
You must respond to every red alert with a specific action. Once you select an action, it
is recorded as an activity in the Dojo tab.
• Orange notifications: These messages merely inform you that the Dojo service has
handled the event. In the event of an orange alert, an orange activity is added in the Dojo
app and the Pebble lights up in orange.
PIXt
Figure 40: Pebble: warning state
Example of an Alert and Actions
In the event of an unauthorized attempt of a device to access your network, a red alert is
triggered. In the Dojo app, it looks like this:
Figure 41: Alert – example
To handle the alert:
1. Touch the notification. A popup appears displaying the following possible actions:

Using the Dojo App - My Devices Tab
28
Figure 42: Actions - example
• Allow once: This action allows the device temporary access to the Wi-Fi router. If
another attempt to gain access is made later, you will be notified again.
• Always allow this device: This action allows the device to access the Wi-Fi router.
Once the action is allowed, you will not be notified again about the specific device
and it will always be allowed to access the router.
• Block this attempt: This action temporarily blocks the device from accessing the Wi-
Fi router. If another attempt to gain access is made later, you will be notified again.
• Always block this device: This action blocks the device from accessing the Wi-Fi
router. Once the action is blocked, you will not be notified again about the specific
device and it will always be blocked from accessing the router.
2. Select an action, let’s say Allow Once. Dojo displays your selection, then follows up
with a confirmation:
Figure 43: Dojo alert and action mess ages - example
Removing an Action from a Device
If you apply a permanent action such as Always block this device to a particular device,
Dojo retains the policy for that device until you change it.
To change the policy for a device:
1. Touch the device.
2. Select the action from the list that appears.

Using the Dojo App - Dojo Menu
29
Figure 44: Removing an action from a device
Dojo Menu
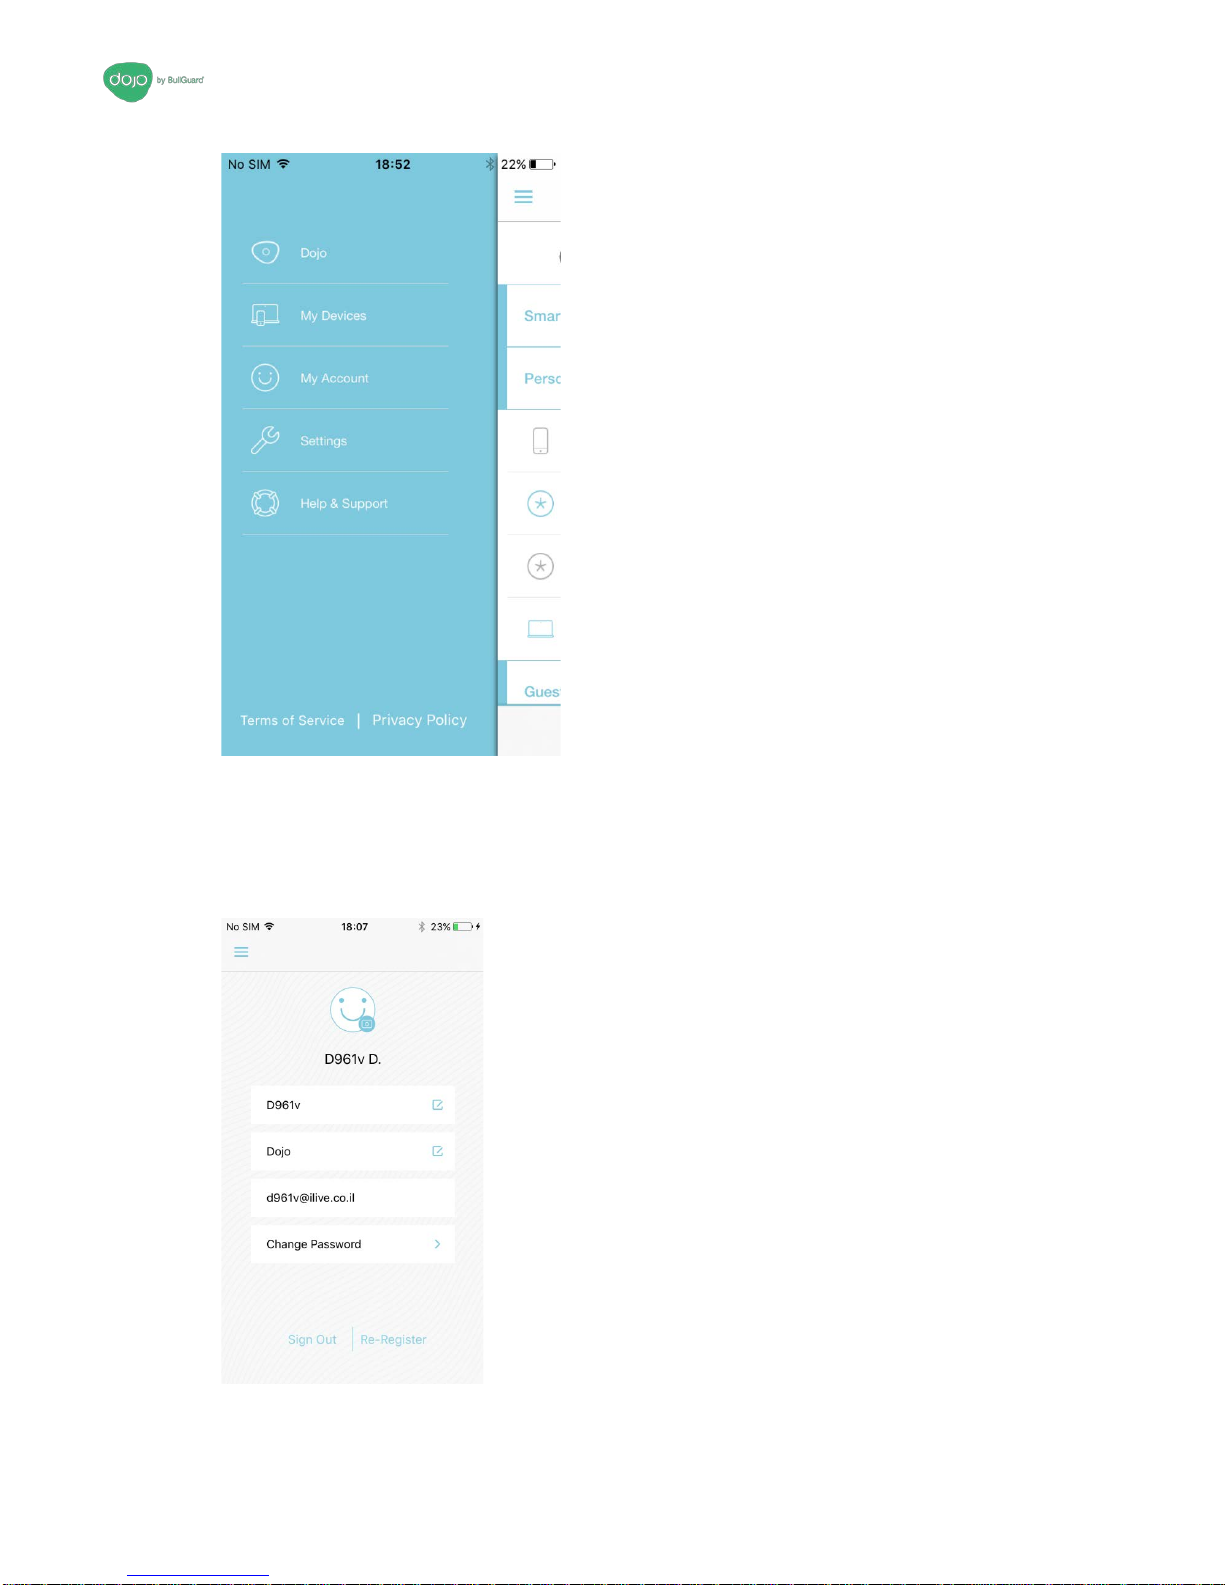
Figure 45: Menu button
Touch the Menu button in the top left corner of the app to access your Dojo account, Dojo
app settings, and online help and support.
Using the Dojo App - Dojo Menu
30
Figure 46: Dojo menu
• Touch Dojo to display the Dojo tab (main screen).
• Touch My Devices to display the My Devices tab.
• Touch My Account to display details of your Dojo account, where you can also change
your username and password.
Figure 47: My Account screen

Using the Dojo App - Protecting a Device with Remote Access
31
• Touch Settings to display a screen where you can change Dojo app settings.
Figure 48: Dojo app settings screen
• Touch Help/Support to display the Dojo Help and Support site.
Protecting a Device with Remote Access
Let’s say that you have set up remote access to a protected camera in your home network,
so that you can monitor activity from the office. To continue using this setup with Dojo, you
must change the settings in the Wi-Fi router and in the Dojo app.
Router settings
The following instructions refer to a generic Wi-Fi router. The settings may vary slightly
based on the Wi-Fi router model in your home network.
1. Log in to your Wi-Fi router. Go to the Port Forwarding page.
Note: Write down the current settings for internal port, external port,
and network protocol (UDP or TCP). You will need them later.
2. Change the device IP to which you currently forward traffic to the Dojo internal IP.
You can find Dojo internal IP in the About group, near the bottom of the Dojo app
Settings screen.
3. Change the internal port to be the same as the external port.
4. Apply the changes you have made.

Using the Dojo App - Protecting a Device with Remote Access
32
The Wi-Fi router might restart.
Dojo app settings
1. In the Dojo app, select the device that you want to access remotely. Touch Edit.
2. Ensure that the setting for IP Address is Static.
3. Change Remote Access to Yes.
4. Options are displayed.
5. For External Port, use the same external port setting as you have for the router.
6. For Internal Port, use the setting for the internal router port before you made the
change in step 3, above.
7. For Protocol, select the same protocol that is used by the router, either UDP or TCP.

33
Regulatory Compliance Information
Technical Specification
Base Unit
Power Supply: Input 110-240 VAC / Output 5V DC 2A
Operating temperature: 0 - 35 degrees C / 32 – 95 degrees F
Pebble
FCC ID: 2ALQXDL0007RV2
Power 4xAA size batteries (not included)
Operating temperature: 0 - 35 degrees C / 32 – 95 degrees F
Model: DL0007R
This equipment complies with FCC radiation exposure limits set forth for an uncontrolled env
ironment. This equipment should be installed and operated with minimum distance 0mm bet
ween the radiator and your body. This transmitter must not be co-located or operating in
conjunction with any other antenna or transmitter.
Product Information
FCC ID: 2ALQXDL0007V2
Model: DL0007v2
This equipment complies with FCC radiation exposure limits set forth for an uncontrolled env
ironment. This equipment should be installed and operated with minimum distance 20cm bet
ween the radiator and your body.
This transmitter must not be colocated or operating in conjunction with any other antenna or transmitter.
FCC Statement
Note: This equipment has been tested and found to comply with the limits for a Class B
digital device, pursuant to part 15 of the FCC Rules. These limits are designed to provide
reasonable protection against harmful interference in a residential installation. This
equipment generates, uses and can radiate radio frequency energy and, if not installed and
used in accordance with the instructions, may cause harmful interference to radio
communications. However, there is no guarantee that interference will not occur in a

Regulatory Compliance Information - CE
34
particular installation. If this equipment does cause harmful interference to radio or television
reception, which can be determined by turning the equipment off and on, the user is
encouraged to try to correct the interference by one or more of the following measures:
• Reorient or relocate the receiving antenna.
• Increase the separation between the equipment and receiver.
• Connect the equipment into an outlet on a circuit different from that to which the receiver
is connected.
• Consult the dealer or an experienced radio/TV technician for help.
Caution: Any changes or modifications not expressly approved by the party responsible for
compliance to this equipment would void the user’s authority to operate this device.
Changes or modifications not expressly approved by the party responsible for compliance
could void the user’s authority to operate the equipment.
CE
Declaration of Conformity (DoC)
Hereby, BullGuard Israel LTD declares that the radio equipment type [designation of type of
radio equipment] is in compliance with Directive 2014/53/EU.” Customers can download a
copy of the original DoC to our RE products from < exact Internet address where the full text
of the EU declaration of conformity can be obtained. >
Parameter Mode and Conditions Min. Typ. Max. Unit
Frequency range - 2402 - 2480 MHz
 Loading...