


Bedienungsanleitung
Operating Instructions
ExOn8 3x400V, DX318
Extrusionstechnik GmbH
Eitorfer Strasse 1
D – 53809 Ruppichteroth
www.dohle-extruder.de
Operating Instructions
Industrial Extruder DX318 ExOn8 3x400V
We retain all copyrights of all descriptions, drawings and schedules contained in these
operating instructions which may not be reproduced nor be made accessible by third parties
or by competitors, neither in whole nor in part, unless we have expressly consented thereto.
Before start-up these operating instructions must be examined carefully because we will not
assume any liability for any failures resulting from improper use. No warranty claims will be
accepted if the hand-held welding and extruding machine has been modified unless this has
been done in consultation with the manufacturer/ supplier.
The extruder shall be used for extrusion weld works only !
These operating instructions should always be accessible by the operator.
For after-sales service and orders please contact:
Extrusionstechnik GmbH
Eitorfer Strasse 1
D-53809 Ruppichteroth
Telephone: (+49) 02295 – 902960
Telefax: (+49) 02295 – 902961
E-Mail: info@dohle-extruder.de
www.dohle-extruder.de
english
Content
1. Description of Type 21
2. Safety 21
3. Start-up 23
4. Error tracing 26
5. Drawings, Informations 27
Extrusionstechnik GmbH 20

Operating Instructions
Industrial Extruder DX318 ExOn8 3x400V
1. Type
Art.-no/Type of machine : DX318 ExOn8 3x400V
Machine no. : .........
Required voltage : 400 V / 50 – 60 Hz
Heating unit for extruder : 1200 W
Heating unit for air : 3300 W
Extruder drive unit : 1500 W-400V
2. Safety
Pursuant to sec. 55 of VDE 0 100 (Regulations of the Association of German
Electrotechnical Engineers), the extruder must be operated using a protective switch or an
isolation transformer.
Keep extruder dry.
Operating hand-held welding and extruding machines is subject to applicable national
regulations. Observe applicable regulations for the prevention of accidents as well as
technical rules for safe and professional operation.
Directive 92 / 57 / EWG dated June 24, 1992, shall be applicable by analogy.
Utilisation:
Hand-held welding and extruding machines are manufactured according to the latest state of
the art and in compliance with safety requirements.
Any improper use may result in dangers for the operator or third parties or may adversely
affect machines and assets.
Only use hand-held welding and extruding machines if in technically perfect condition and for
the purposes for which they are intended while observing the operating instructions.
The manufacturer / supplier will not accept any liability for any failure to comply with the
above or for damages resulting therefrom.
Any utilisation of the hand-held welding and extruding machine for other purposes than those
for which it is intended is subject to the consent of the manufacturer / supplier.
Work on electrical parts of the hand-held welding and extruding machines may only be
performed by an electrical engineer in compliance with electro-technical rules.
Special risks:
All hand-held welding and extruding machines may only be held and operated using the
handles provided for this purpose.
A risk of burning exists on all uncovered metal parts. Avoid contact with these parts
because they may achieve temperatures of up to 350 °C.
Extrusionstechnik GmbH 21
Operating Instructions
Industrial Extruder DX318 ExOn8 3x400V
Safety area:
The hot air stream of the hand-held welding and extruding machine may not be directed to
temperature-sensitive objects or living things. Ensure that a safety distance of 2 m is
observed in all directions.
Operation:
Never use hand-held welding and extruding machines without air supply. In case of external
air supply ensure that the feed line is of sufficient size.
The pressurised air that is supplied must be free of oil and water.
Safety:
Check for correct nominal voltage before connecting the hand-held welding and extruding
machine to the mains voltage.
Mains voltage must be identical to the nominal voltage shown on the type plate of the handheld welding and extruding machine.
Pursuant to sec. 55 of VDE 0 100 the hand-held welding and extruding machine must be
operated using a protective switch or an isolation transformer.
Extension cords:
When using extension cords the minimum diameter of cables must be observed.
Length up to 18 m: diameter 2.5 mm²
Length up to 50 m: diameter 4.0 mm²
Extension cords must be approved and marked for their place of utilisation.
Stop operating the hand-held welding and extruding machine if:
- connecting line or plug have been damaged
- safety installations have been damaged
- foreign objects or liquids have entered the hand-held welding and extruding machine
- changes occur in the operating state
Never spray water on hand-held welding and extruding machines
(risk of short circuit)
Never use hand-held welding and extruding machines in hazardous or inflammable areas.
Extrusionstechnik GmbH 22
Operating Instructions
Industrial Extruder DX318 ExOn8 3x400V
3. Start-up
General:
Observe the notes on safety contained in these operating instructions. In addition, the
regulations on the prevention of accidents and the national regulations shall apply.
Assembling the hand-held welding and extruding machine
When dispatched, our hand-held welding and extruding machines are almost completely
assembled.
What remains to be done is to screw the enclosed handle to the machine.
For machines with external air supply the air supply hose must be connected.
Ensure sufficient supply with air which is free of oil and water (min. 300 l/min).
We recommend our air compressor, item no. DX 011.
Connect extruder with control box.
Weld shoe
The machine is supplied with two weld shoes blank which can be machined to suit your
requirements.
Note: please observe guideline DVS 2207 part 4.
If you indicate your required form of seam and thickness of plates we will supply two weld
shoes machined ready for use.
Start-up of hand-held welding and extruding machine
Observe the section concerning safety of these operating instructions.
Hand-held welding and extruding machines may not be used without air supply. This would
inevitably result in damages of the extruder.
Before connecting the extruder to the mains supply please check that
- the On/Off switch of the heating unit is in OFF position
- air supply is connected correctly
- the driving machine has not been put to permanent operation
- now switch on air supply
- and put plug into socket.
All our hand-held welding and extruding machines are provided with patented mass
measurement (the thermoelement is installed directly in the melting unit, between
worm and die) and with cold start protection.
Now put the On/Off switch of the heating unit into ON position. The machine will heat up to
the last selected temperature value. For information on how to modify the desired
temperature value please refer to the section on the adjustment of the controlling unit.
Extrusionstechnik GmbH 23

Operating Instructions
Desired value temperatur
Upward - key
Downward - key
By every press of this key, the value
becomes smaller, which is indicated
on the desired value display. If this
key is kept constantly pressed, then
the value is sequentially becomes
smaller.
Upward - key
By every press of this key, the
value increases, which is indicated
on the desired value display. If this
key is kept constantly pressed,
then the value sequentially
becomes higher.
Actual value temperature
Downward - key
AL (Alarm)
Shines if the alarm
exit is on
Temperature unit
Do not press these keys.
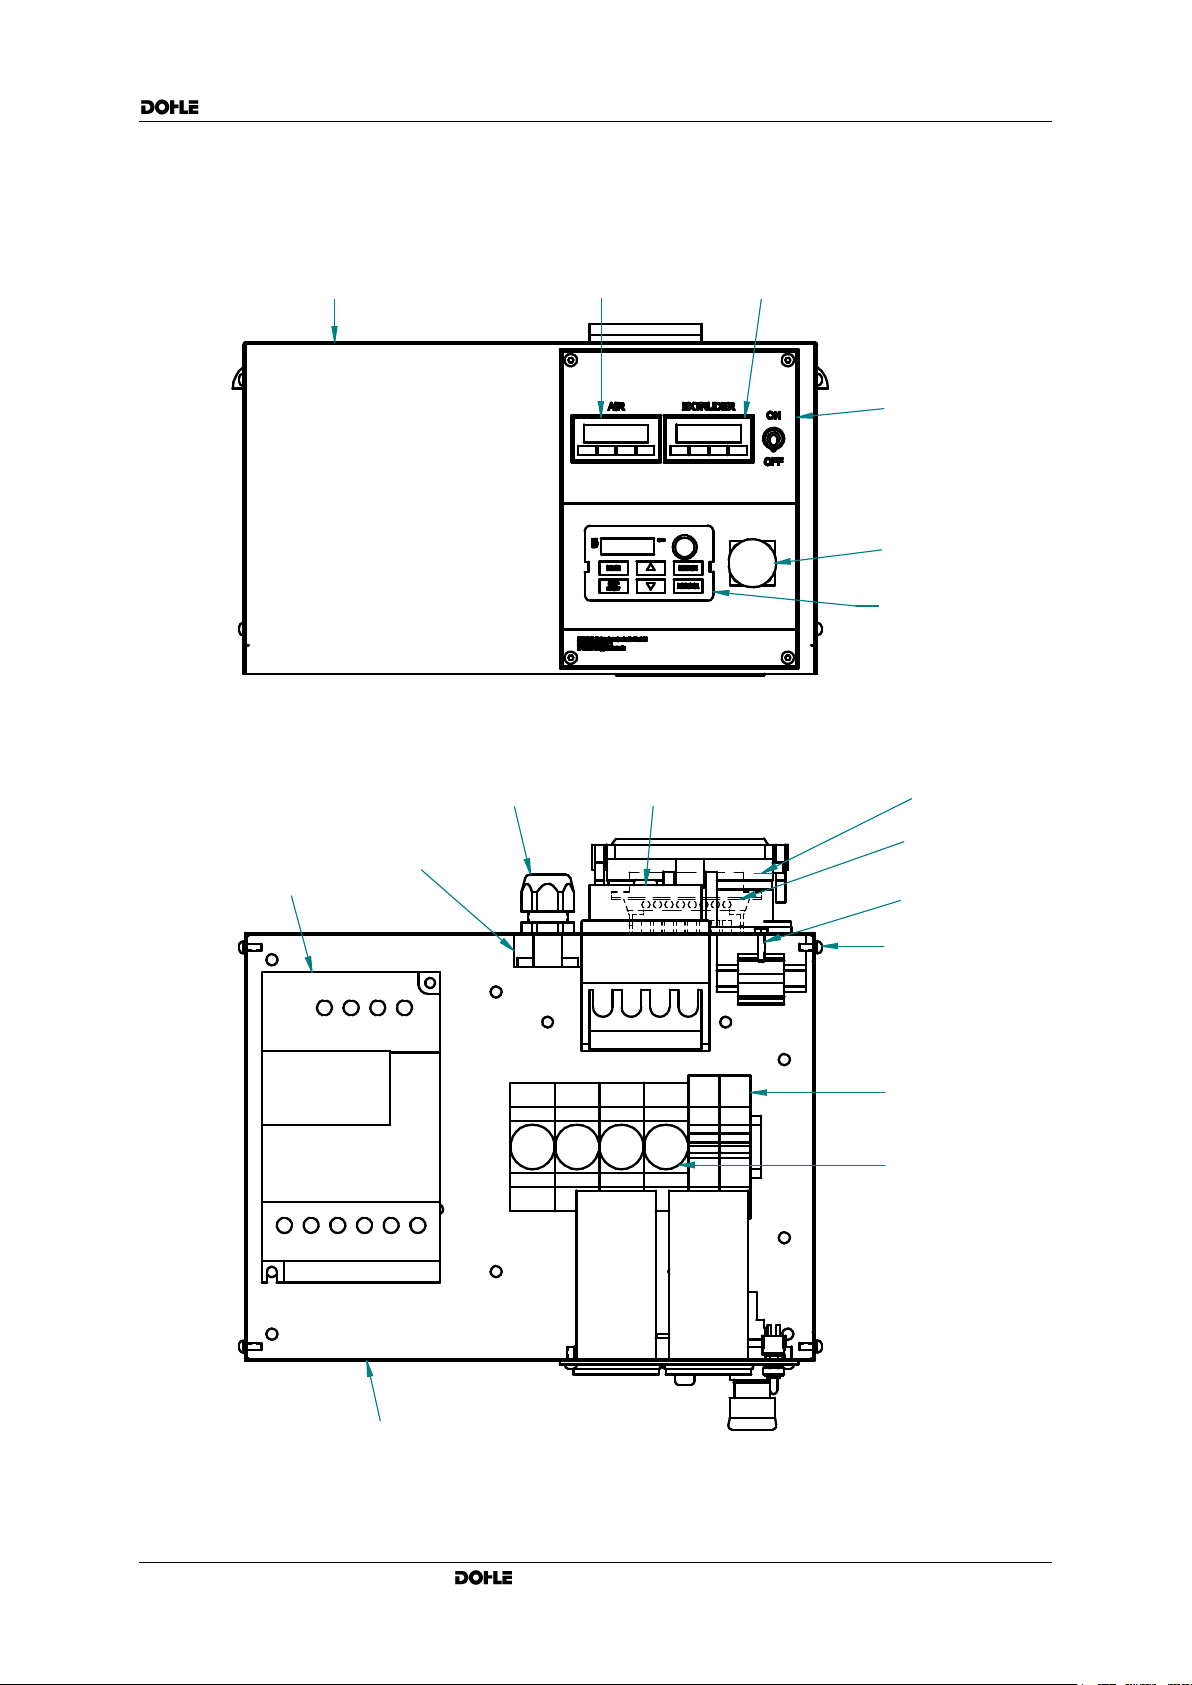
Industrial Extruder DX318 ExOn8 3x400V
Display and control elements of front part of control unit
Controller – desired value setting
All controllers can be changed only in the desired value and are electrnically locked against
wrong inputs.
Change the desired value
The controller indicates actual and desired value temperature at the same time. To change
the desired value temperature proceed as follows:
Extrusionstechnik GmbH 24
Operating Instructions
Industrial Extruder DX318 ExOn8 3x400V
Changing the welding filler
Heat up the hand-held welding and extruding machine until operating temperature is reached
to ensure that no welding filler is present in the machine, remove the weld shoe and
exchange the die (caution, left-handed thread) by a new one or by a die used with the
material to be applied now.
Caution: Risk of burning when working on the heated machine
After removing the old die and before placing the new one run the machine for approx. 1 min.
on new Welding filler.
Interruption of welding operations
Never leave the hand-held welding and extruding machine unattended.
Air supply may not be broken.
Caution: When processing PVC or PVDF, hand-held welding and extruding machines may
not be stopped for more than 3 min.
In such a case or if welding operations are completed a cleaning run must be performed on
the machine for about 2 min. using PE or PP welding filler.
Switching-off the hand-held welding and extruding machine
Place hand-held welding and extruding machine onto the support stand included in the
scope of supply.
Put the On/Off switch into OFF position and pull the plug after about 2 min.
Caution: Even after 15 minutes there is still a risk of burning present on uncovered
metal parts.
Never use water or other substances to speed up the cooling process.
Maintenance
Always disconnect the machine from power supply before performing any maintenance work.
Maintenance work may only be performed by skilled electricians.
Observe section on safety contained in these operating instructions!
Inspection
After an operating time of about 500 hours the hand-held welding and extruding machine and
the drive unit must be cleaned, re-filled with new grease and tested.
This work may only be performed by skilled electricians.
Drive unit
Check carbon brushes of the drive unit approximately every 100 operating hours and replace
them, if necessary.
Thrust bearing / extrusion worm
It is recommended to clean thrust bearing and extrusion worm and to re-grease the bearing
approximately every 200 operating hours.
Extrusionstechnik GmbH 25
Operating Instructions
01
No power supply
Provide power supply
02
Incorrect mains voltage
Have checked by skilled technician
03
Extension cord becomes hot
Check cable diameter
Run out cable completely from reel
04
Thermoelement for mass defective
Exchange thermoelement
05
Thermoelement for air defective
Exchange thermoelement
06
Temperature control unit for mass
defective
Exchange temperature control unit
07
Temperature control unit for air defective
Exchange temperature control unit
08
On/Off switch for heating units in OFF
position
Put switch to ON position
09
Defect on cable connections
Have checked by skilled technician
10
Carbon brushes of drive motor worn
Replace by new carbon brushes
11
Pre-heating time too short
Heat up extruder
12
External air supply not connected
Connect external air supply
13
Air flow too high when using external air
supply
Reduce to prescribed quantity
15
Breakage of monitoring thermoelement
Replace thermoelement
16
Unsuccessful attempt to change a
blocked parameter
Blockage can only be removed by a
skilled technician
17
Thermoelement failure or loose
connections
Check thermoelement
Check connections
18
Sensor incorrectly connected,
+ and – mistaken
Check connections
Industrial Extruder DX318 ExOn8 3x400V
4. Error tracing
Malfunctioning Error– No.
Driving motor does not start 01,02,04,05,06,07,08,09,10,11,12
Driving motor switches off 03,04,05,06,07,08,09,10
Extruder remains cold 04,05,06,07,08,09,15,17
Hot air remains cold 05,07,08,09,12
Hot air temperature is under 11,13
desired value
Extrusion temperature is under 11
desired value
Extruder does not deliver extruded 11
material from the die
Display does not light up 01
Display shows: S . e r r 15
Display not constant 17
Display shows direction of action: - 18
Error-No. possible cause Elimination of error
Extrusionstechnik GmbH 26

Operating Instructions
Industrial Extruder DX318 ExOn8 3x400V
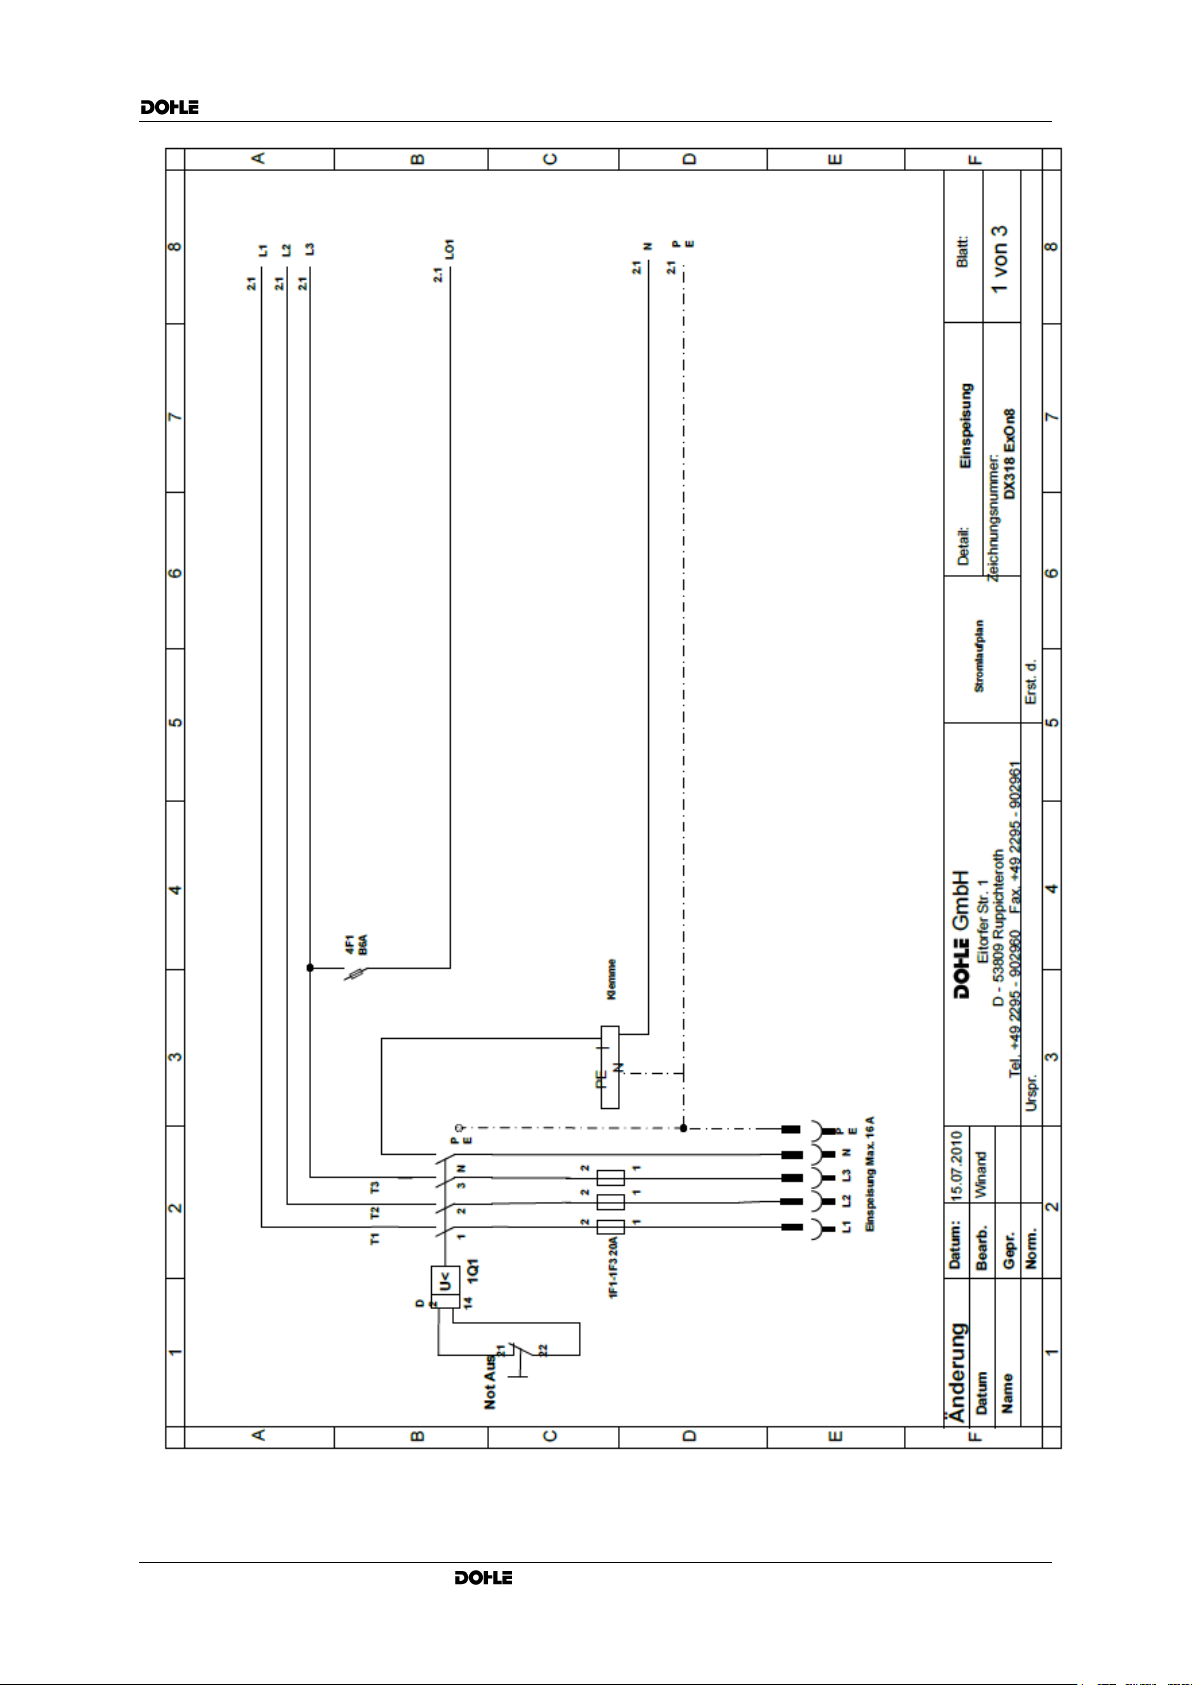
5 Drawings, Informations
DX318 ExOn8 3x400V
Extrusionstechnik GmbH 27

Operating Instructions
Article-No Description Qty
D-0012 feather key 1
D-0020 granulate case 1
D-0066 elbow screwed plug WES 10/R1/4 1
D-0120 thermoelement Air 1
D-0126 screw M5x10 DIN912 2
D-0145 connecting piece-granulate 1
D-0160 screw M6x10 2
D-0163 deep groove ball thrust bearing 1
D-0170 disc 8,4 DIN 125-A 4
D-0250 Extension burner pipe 30mm 1
D-0285 screw M6x45 DIN912 6
D-0378 die 5000 1
D-0386 threaded stud 2
D-0462 worm type 6000 1
D-0484 screw M8x25 DIN912 4
D-0642 elbow screwed plug WES 10/R3/8 1
D-0743 screw M8x35 DIN 912 4
D-0747 screw M6x25 DIN912 4
D-0864 screw 2.9x6.5 DIN 7981 4
Article-No Description Qty
D-0922 granulate cylinder 6007-400V 1
D-1013 connecting box 5007-6007 1
D-1016 srew M6x55 DIN 912 6
D-1017 ULS screw M4x10 4
D-1058 Eron SSR 5007-6007 1
D-1424 floor plate 1
D-1428 adaptor shaft 5012-6012 1
D-1429 flange 5012-6012 1
D-1432 drive unit Watt 1
D-1516 strip heater ExOn5-6 1
D-1860 cylinder ExOn6 complete 1
D-1861 thermoelement extruder ExOn5-6 1
D-1862 blowpipe ExOn7-8 Eron 1
D-2193 screwed cable PG16 3
D-2194 screwed cable PG21 1
D-2224 nut PG16 3
D-2280 nut PG21 1
D-2370 sealing ring CU 1
Industrial Extruder DX318 ExOn8 3x400V
Extrusionstechnik GmbH 28
Operating Instructions
2F1 2F2 2F3 3F13F22F4
D - 1087
D - 1090
D - 2193
D - 2062
D - 2340
D - 2334
D - 1091
D - 2196
D - 1681
D - 0505
D - 0326
D - 1017
D - 1092
D - 0131
DH 020
D - 1433
HS 024
Industrial Extruder DX318 ExOn8 3x400V
control box
Extrusionstechnik GmbH 29

Operating Instructions
article-no description qty
D - 0131 screw M4x16 Ms 1
D - 0326 control box 5000-6000 1
D - 0505 head control box 1
D - 1017 ULS screw M4x10 12
D - 1087 fuse automat B16A 1
D - 1088 fuse automat 2A 1
D - 1089 fuse 3pol Neozed 16A 1
D - 1090 fuse 1pol Neozed 16A 1
D - 1091 mounting case 1
D - 1092 bush insert 1
D - 1433 frequenzgenerator 1
D - 1681 front paneel 1
D - 2012 switch on-off 2-pol 1
D - 2062 solid state 1
D - 2193 screwed cable PG16 1
D - 2196 main switch 1
D - 2224 nut PG16 1
D - 2334 AIR temp controller 1
D - 2340 Melt temp controller 1
DH 020 emergency stop 1
HS 024 actuator frequency converter 1
Industrial Extruder DX318 ExOn8 3x400V
Extrusionstechnik GmbH 30

Operating Instructions
5101270 6600613
6107591
6600645
5101776
6600614
6107592 6101242
6600616
5101760
6600602
6600601
6100444
6100284
6600622
6100268
6600611
D - 2177
D - 0519
D - 0704
6113695 6100287
6600612
6600607
6600622
6600606
6600616
D - 0129
D - 2049
Industrial Extruder DX318 ExOn8 3x400V
Eron SSR, Art-Nr: D - 1058
Extrusionstechnik GmbH 31

Operating Instructions
article-no description qty
5101270 gas ket 70x48x4 1
5101760 mica tube 47,6x95 1
5101776 heating element 230 V/2200W 1
6100268 strain relief 1
6100284 countersunk screw M4x12 TX 3
6100287 hexagon nut M5 1
6100444 cord guard 9,6x75 1
6101242 connecting shackle 1
6107591 turbine 1
6107592 turbine 1
6113695 temperatur limit switch 135°C 1
6600601 air filter 1
6600602 handle 1
6600606 motor 230V SL 1
6600607 carbon brush 2
6600611 PT fillister head screw M3x8 TX 2
6600612 rubber ring 1
6600613 turbine housing lower part 1
6600614 stripper 1
6600616 countersunk screw M3x10 TX 6
6600622 fillister head screw M4x10 TX 5
6600645 turbine housing upper part with hole1/4" 1
D - 0129 screw M4x10 DIN912 2
D - 0519 angle head SSR Eron 1
D - 0704 screw M3x8 2
D - 2048 Ölflex 2x0,5 1
D - 2063 supply cable 1
D - 2177 solid state relais 1
Industrial Extruder DX318 ExOn8 3x400V
Extrusionstechnik GmbH 32
Operating Instructions
Industrial Extruder DX318 ExOn8 3x400V
Extrusionstechnik GmbH 33

Operating Instructions
Industrial Extruder DX318 ExOn8 3x400V
Extrusionstechnik GmbH 34

Operating Instructions
Industrial Extruder DX318 ExOn8 3x400V
Extrusionstechnik GmbH 35
Operating Instructions
A
S
S
S
S
B
X - weld
D-0174
D-0175
D-0177
D-0178
D-0179
D-0180
D-0181
D-0182
5-8
10-12
15
20
25
30
35
40
D-0183
D-0184
D-0185
D-0186
D-0187
D-0188
D-0189
D-0190
D-0191
5-8
10
15
20
25
30
35
40
12
D-0195
D-0196
D-0197
5-8
10-12
15
D-0600
D-0366
D-0337
Ø
20
15
Ø
Ø
D-0192
D-0193
D-0194
D-0599
25
30
35
40
D-0198
D-0199
D-0200
D-0201
D-0202
D-0203
D-0204
10
15
20
25
30
35
40
D-0223
D-0224
D-0225
D-0247
D-0248
D-0598
30 x 30 x 45
35
25Ø
30 x 40 x 50
30 x 45 x 45
50 x 60 x 80
50 x 70 x 80
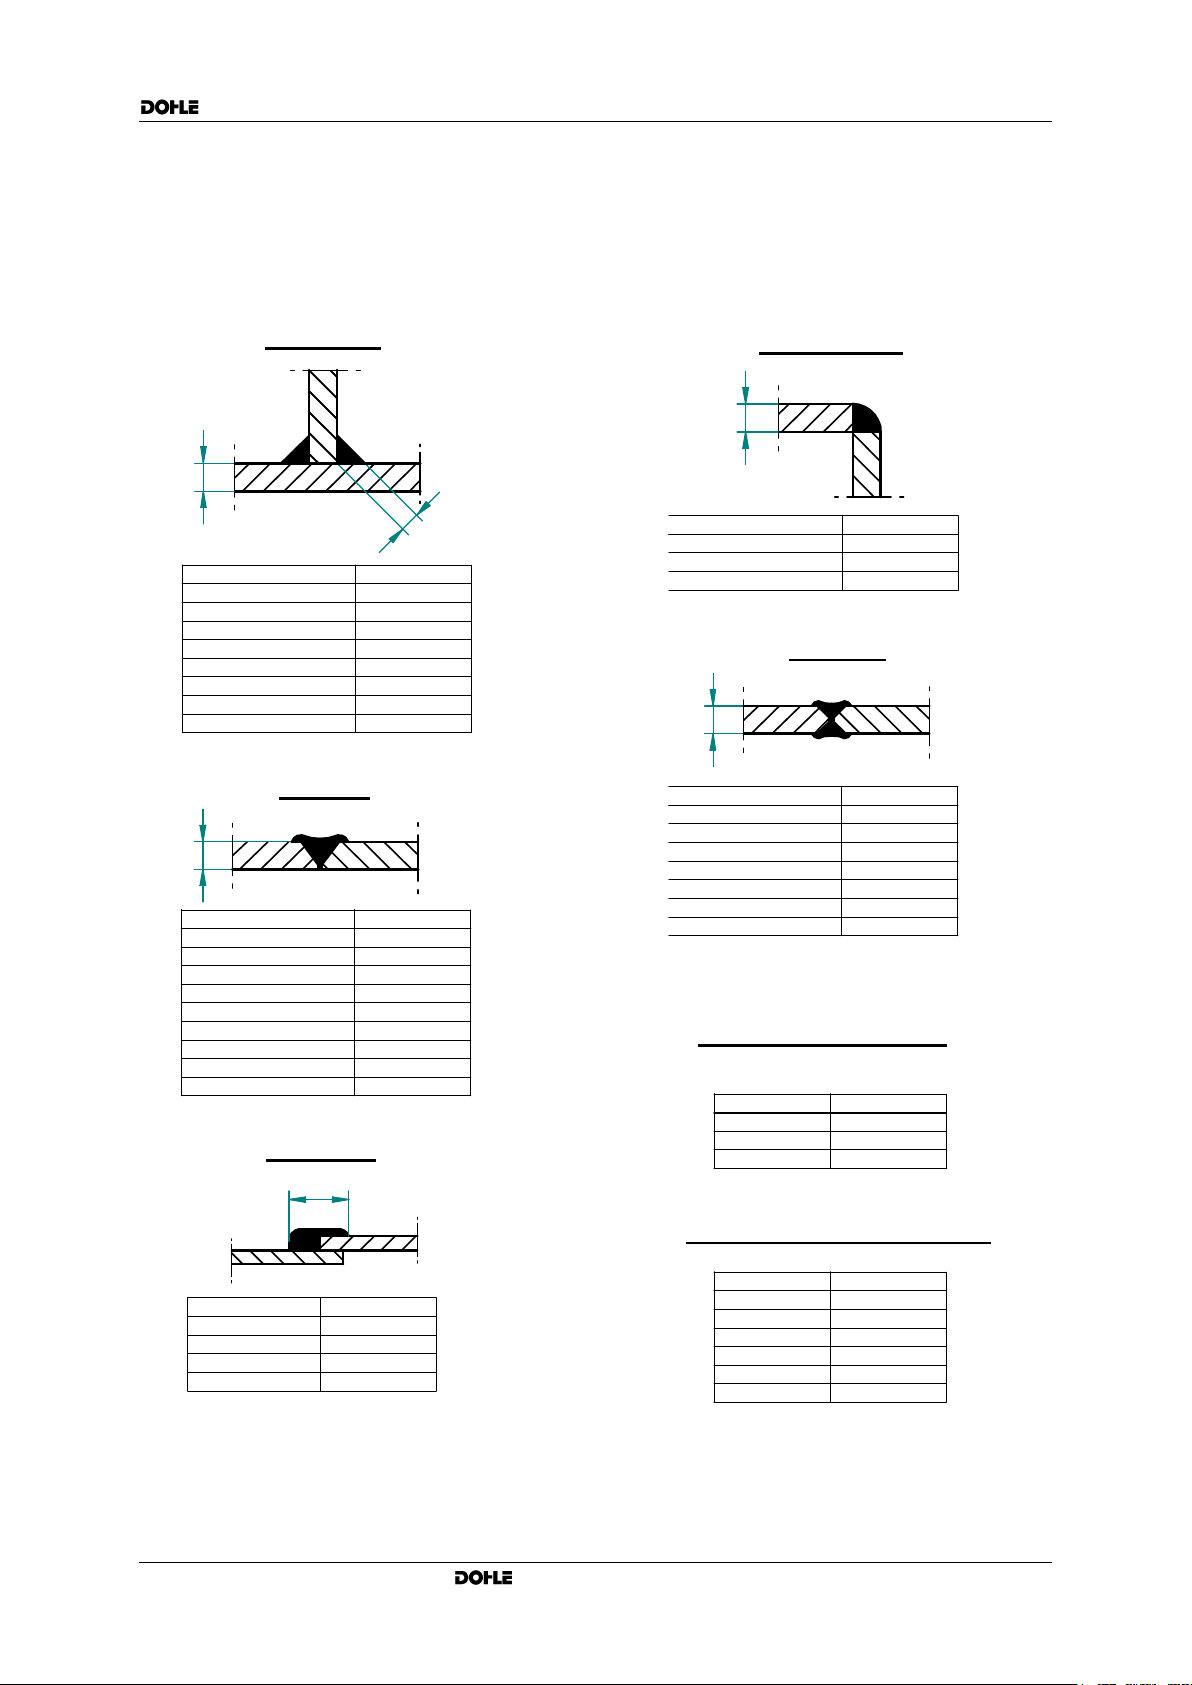
A = S x 0,7
welding shoes
S = thickness of material
fillet weld
corner weld
V-seam
film weld
thickness of material order - no.
welding shoe, round
width of weld B
welding shoe - unshaped
please require for shoes for special application
size
thickness of material order - no.
thickness of material order - no.
thickness of material order - no.
order - no.
order - no.
order - no.
Industrial Extruder DX318 ExOn8 3x400V
Extrusionstechnik GmbH 36
 Loading...