

DogWatch Performance Series, R7, R9, PT4 Owner's Manual

PERFORMANCE SERIES
OWNER’S GUIDE
HIDDEN FENCES

It’s all about your dog.™You’ve purchased the most technologically advanced
hidden fence available, thanks to our patented SafeLink®FM digital technology,
AutoMemory™, FastReact™and other pet-friendly™features.
Our extensive research and testing has resulted
in a product that will add value to your lifestyle —
you can enjoy your pet and know he’s safe.
We’re also pleased to provide you with a solution that’s cost-effective and has no
impact on the aesthetics of your property.
DogWatch®offers you great flexibility. Not only can you contain your dog in your
yard, you can also keep him out of your garden or swimming pool. DogWatch can
also be attached to an existing fence to keep your pet from jumping over or digging
under it.
We also have indoor systems that work throughout your home. Keep your dog off
couches and countertops, out of doorways and rooms — you name it. Ask your
DogWatch Dealer for a solution to your indoor needs.
To assure that your DogWatch Hidden Fence works properly, please follow the
training procedures outlined in this manual or provided by your DogWatch Dealer.
Any shortcuts may affect how your dog responds to the system and could be
unsafe to your pet.
If you have any questions, please contact your local authorized DogWatch Dealer.
Thank You for Purchasing a
DogWatch
®
Hidden Fence System!
®
Surrounding Pets With Freedom Since 1990.
™
The DogWatch Hidden Fence
is rated a ‘Best Buy’ by
Consumers Digest magazine.

Important Safeguards ...............................................................................................2
PT4 Transmitter Features ..........................................................................................3
R7 and R9 Receiver Collar Features ........................................................................5
Batteries
R7 and R9 Receiver Battery Insertion Instructions ......................................................7
Replacement Batteries and Battery Plans ....................................................................7
Resetting The Battery Reminder Feature......................................................................7
User Programmable Features ..................................................................................8
Receiver and Transmitter Settings............................................................................9
How the DogWatch Hidden Fence Works ..............................................................10
How the DogWatch Hidden Fence is Installed............................................................11
Important Reminders ..............................................................................................12
Pet-Friendly
™ Containment Training
Your Dog’s Response To Stimulation..........................................................................13
Dog Personalities & Traits ..........................................................................................13
Creating the Right Environment..................................................................................13
Safety and Avoidance Zones......................................................................................14
Adjusting the Receiver Collar ....................................................................................14
Containment Training Reminders ..............................................................................15
Phase 1: Audible Training.......................................................................................... 15
Phase 2: Introduction to Correction .......................................................................... 16
Phase 3: Introduction to Distractions ........................................................................17
Phase 4: Introduction to Increased Distractions ........................................................17
Phase 5: Letting Your Dog Off The Leash ..................................................................18
Phase 6: Taking your Dog Outside The Boundary......................................................18
Training Tips ..............................................................................................................19
Warranties
Warranty Registration ................................................................................................20
Manufacturer’s Warranty ............................................................................................20
System Maintenance Record ..................................................................................21
1
Table Of Contents

■
Please read all the literature included with your DogWatch®Hidden Fence before
turning the system on or beginning training.
■
Do not attempt to shortcut the complete training of your dog.
■
The DogWatch Hidden Fence is intended only for the purpose of containing
domestic dogs and cats. Use for any other purpose is at the system owner’s risk.
■
In the event your system requires servicing, please contact your local authorized
DogWatch Dealer. Attempting to service the system yourself may invalidate the
warranty.
■
The DogWatch Hidden Fence is recommended for dogs six (6) months or older.
Your Dealer will recommend if a puppy under 6 months old is ready.
■
Keep the collar and the transmitter out of the reach of children.
■
Never adjust the transmitter or receiver when your dog is wearing the collar.
■
DogWatch recommends that you unplug your transmitter from the wall outlet and
disconnect the loop wire during lightning storms or when it is left unused for
extended periods. This will prevent possible damage from lightning and powerline
surges.
■
This product is only intended for use with trained domestic dogs. If your dog is
aggressive or violent and could cause harm to itself or others outside the fenced
premises, you should take other measures to restrain your dog such as traditional
fencing.
2
Important Safeguards
DOGWATCH STRONGLY RECOMMENDS THAT YOU REMOVE THE COLLAR
AT NIGHT WHILE YOUR DOG IS INSIDE
To contact your local dealer, please call DogWatch at 800-793-3436
or go to our website at www.dogwatch.com.
Never adjust the transmitter while your dog is wearing the receiver collar.
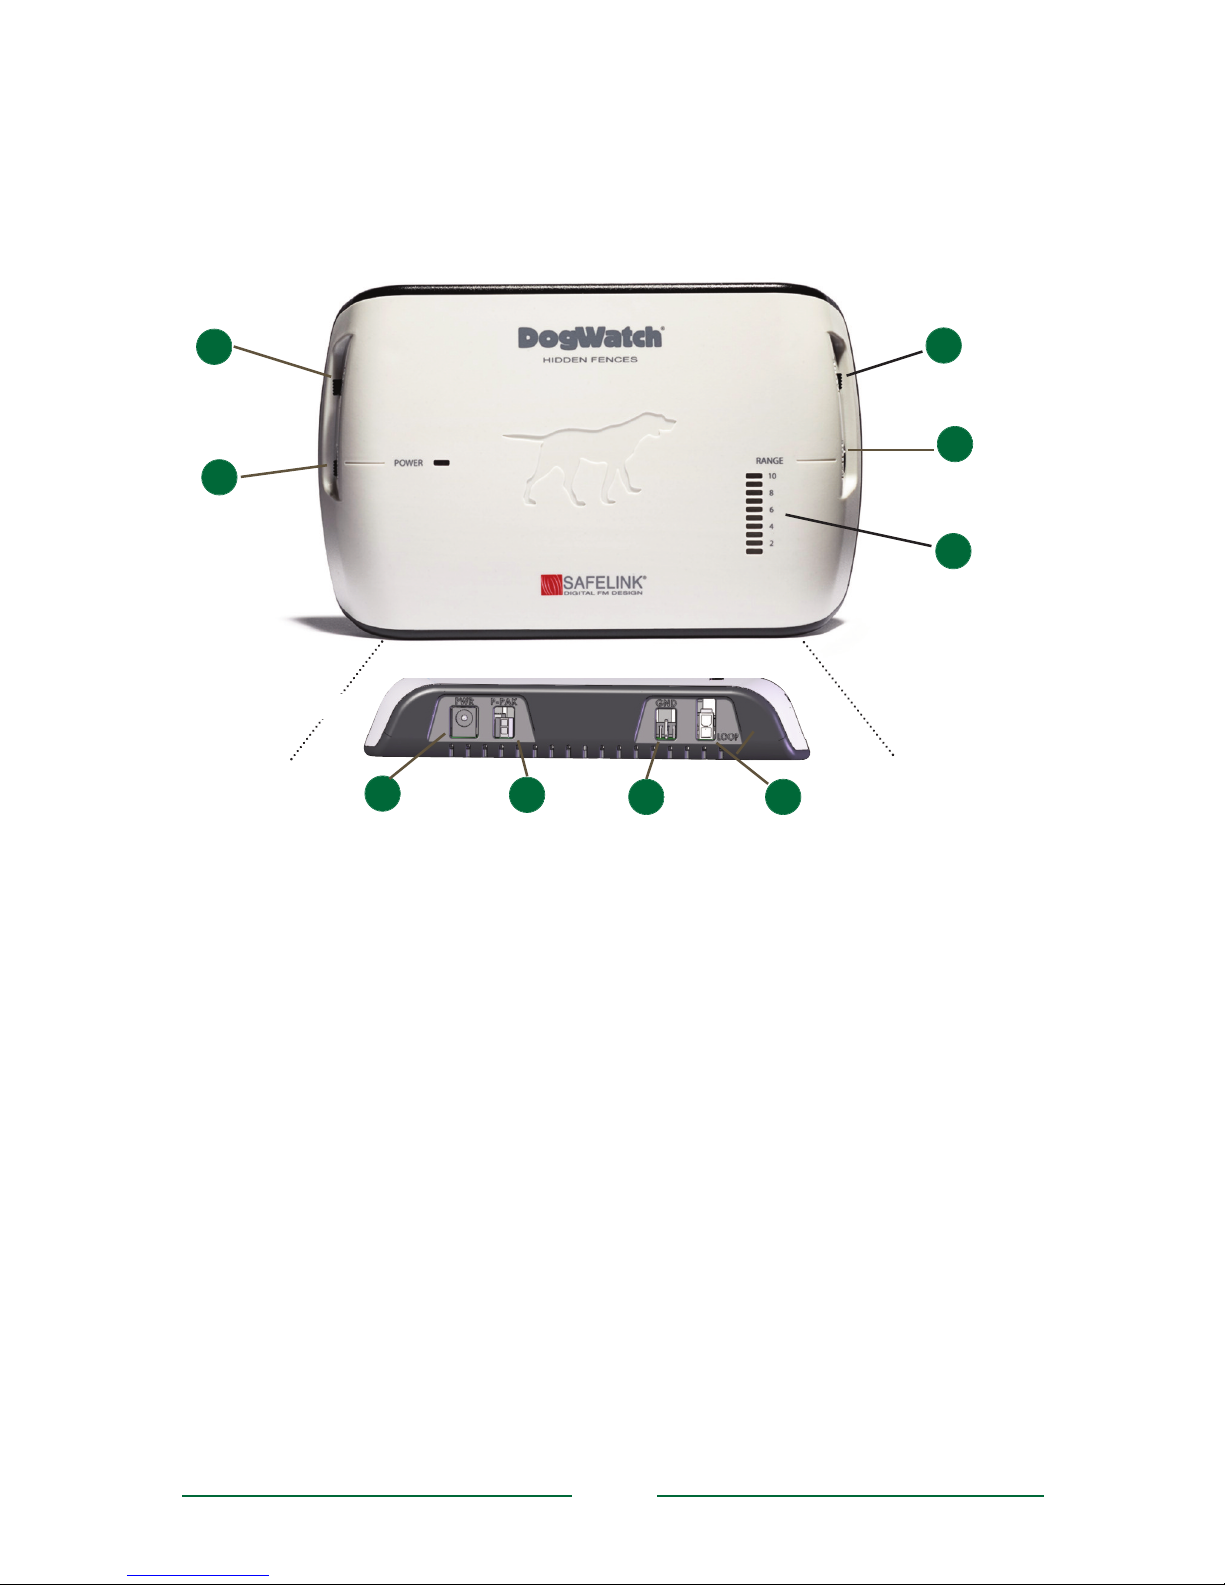
1. Power On/Off: This switch gives you easy access to turn the transmitter on or off.
The red Power light on the front panel lets you know that it is operating.
2. Power Supply: The transmitter is powered by the power supply/adapter provided
with the transmitter. The power supply is plugged into a properly grounded 110 volt
outlet and the adapter is plugged into the “PWR” jack on the bottom of transmitter.
3. PowerPak™: The optional PowerPak battery back-up keeps the transmitter
operating in the event of a power failure. When the transmitter is being powered by
the battery back-up, the red power light will remain off. The PowerPak plugs into the
transmitter at “P-PAK”.
4. Ground Wire: The green ground wire connects to the transmitter at the location
labeled “GND.” The round connector on the green ground wire is attached under
the screw on the outlet faceplate. It will, however, only be effective if your outlet is
properly grounded. If you have any questions about having a properly grounded
outlet, consult your local electrician.
5. Boundary Loop Plug: Your system includes a zip cord with a plug on one end. This
plug fits into the hole marked “Loop” on the bottom of the transmitter. This is the
beginning of the boundary wire that is buried in your yard. After the boundary wire
has been properly installed and plugged into the transmitter, the Range and
Boundary Loop Monitor light will turn on.
PT4 Transmitter Features
8
7
5
3
1
9
2
T
raining
Mode Switch
Range
Control
Power
On/Off
Power Supply PowerPak™ Ground Wire Boundary Loop Plug
4
6
3
The transmitter sends a coded digital FM radio signal through the boundary wire. This
signal can be adjusted, allowing you to control the “hidden fence” around your property.
Rate
Adjustment
Bottom View
Range & Boundary
Loop Monitor
Display

4
6. Range and Boundary Loop Monitor Display: The Range and Boundary Loop
Monitor Display(LMD) provides a visual indication of the status of your boundary
wire and signal range. On traditional boundary wire configurations, each number
on the scale represents the signal range in feet. Range = distance the signal is
being broadcast from each side
of the wire. A significant change (drop) in signal
range could indicate a partial wire break or other boundary wire problem. If the
boundary loop wire is broken or the signal is interrupted, the light will go out
and an audible warning will sound. You should check around your property for a
visible wire break. Contact your dealer for troubleshooting tips or to schedule an
appointment.
Note: For non-traditional wire configurations where the boundary wires may be
close to one another, the LMD may not measure the boundary signal accurately in
feet, but is a visual setting reference point. Your DogWatch dealer will explain the
LMD setting and your actual signal range.
7. Range: The radio signal is transmitted from the boundary wire in all directions. The
signal range (the distance the signal broadcasts from the wire) is adjusted by the
Range Control on the transmitter. The recommended signal range (on each side of
the wire) is 6-10 feet. Your DogWatch Dealer will adjust the range according to the
personality and traits of your dog. Consult your DogWatch Dealer before making
any adjustments yourself.
Signal Field: The signal field (the area in which the dog’s receiver collar detects the
signal) has two areas. The outer-most part of the signal field (~13% of the signal
field) triggers an audible warning. If your pet continues further into the signal field,
he will receive a correction. To prevent your dog from entering the signal field and
remaining in the audible area (causing depletion of the battery), the receiver
transitions from an audible warning to a short warning correction after a period of
15 seconds. This will not activate if the receiver is set to the “Audible Only” Training
Level (Level “0” - see Setting the Receiver: page 8.)
8. Training Mode: The Training Mode Switch allows you to choose between two pet
friendly training options: Basic (Mode A) and QuickAlert
TM
(Mode B). In the Basic
setting, your pet receives the normal audible warning followed by a correction if he
continues into the signal field. When set to QuickAlert (used primarily for harder to
train dogs), your pet receives a very quick “alert” correction followed by the normal
audible warning and correction.
NOTE: If you have multiple dogs on the system, the Training Mode setting effects
all receivers. They are
ALL set to the same mode, Basic or QuickAlert
TM
.
9. Rate: The Rate can be adjusted to three levels (1 = slow, 2 = medium, 3 = fast).
When your dog gets a correction, he receives it in a series of pulses. Increasing the
Rate delivers a greater number of pulses per second. The adjustable Rate feature
operates only when the Receiver Training Level is set to Level 1, 2, or 3.
See the Receiver Levels and Transmitter Settings chart on page 9.
Note: On the back of the transmitter are four very small switches. These
switches set your transmitter to the correct broadcast frequency. Your dealer
will set these switches for your system.
Do NOT change these settings. They are for DEALER USE ONLY.
Adjustable Collar: Your receiver comes fitted to an adjustable nylon collar. The
collar should be positioned above the dog’s regular collar. The collar should be
adjusted to insure that the contact posts touch the skin on the dog’s neck. Check the
fit for the first few days of wear to insure that the collar is not too tight or causing
irritation to your pet’s neck. To help prevent irritation of the skin, we recommend
removing the collar at night while your pet is inside.
SafeLink
®
Digital FM Design: Our patented FM design allows the DogWatch
receiver to recognize and activate only to our unique radio signal. This protects your
pet from unintentional correction caused by stray radio signals which may be emitted
by other electronic devices.
AutoMemory™: Our patented AutoMemory feature automatically adjusts the
correction level of the receiver when your pet challenges the boundary. When the
receiver is set to one of the AutoMemory levels, and the dog enters the signal field,
the dog will receive the correction of the initial setting. If your dog leaves the signal
field, the receiver will automatically advance the correction level setting by one, and
only one level. If the dog does not re-enter the signal field within the next 24-hour
period, the receiver defaults to the original setting. The AutoMemory feature operates
when your Receiver Training Level is set to 4, 5, or 6.
FastReact™ Time: Whether your dog, strolls, runs or sprints into the Avoidance
Zone, the receiver will react — and correct — within 1/8 of a second (.125).
Automatic Shutdown: The DogWatch system is designed to protect your dog from
an over-correction in the unlikely event that your dog gets caught in the signal field. If
your dog does not exit the signal field, the receiver will automatically stop correcting
after 15 seconds — protecting your dog from over-correction. The receiver will
automatically reset once the dog leaves the signal field.
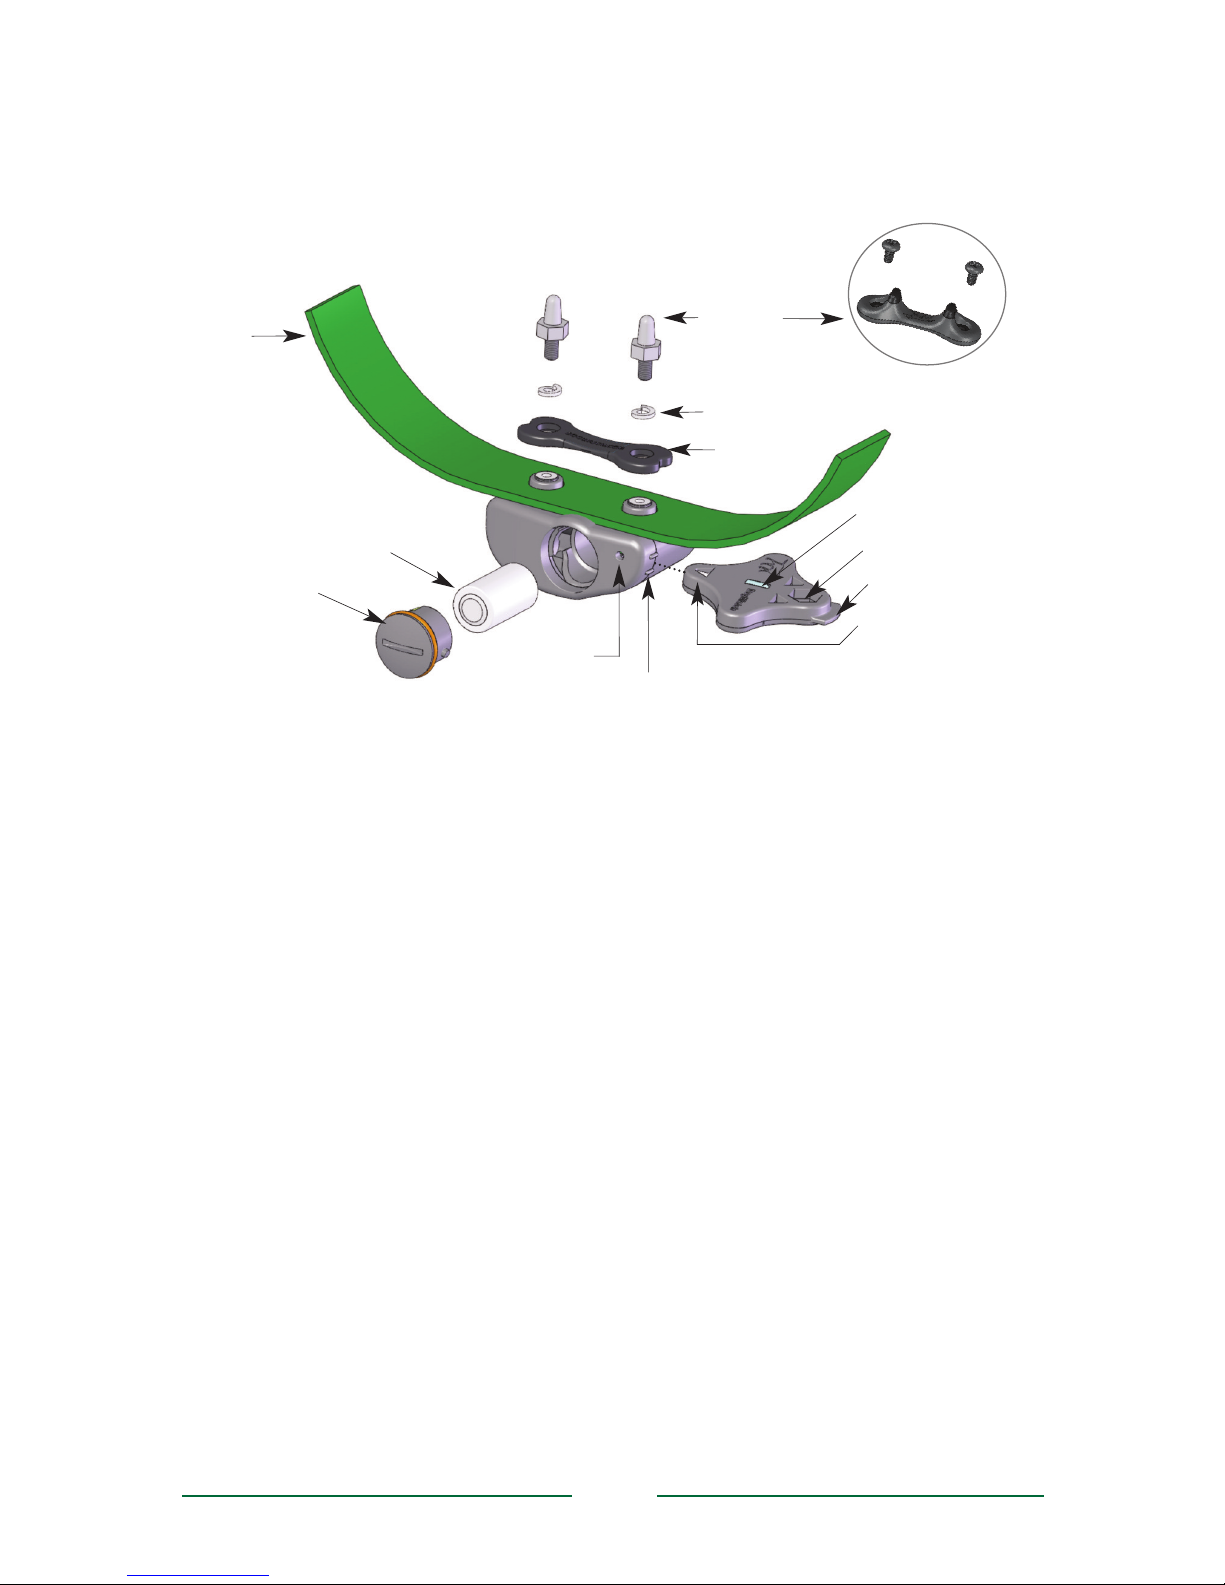
Collar Bone: The Collar Bone, metal lock washers and contact posts fasten the
receiver to the nylon collar. (A CollarBone is not used with the GentleFit™ posts.)
5
R7 and R9 Receiver Features
Magnet
Battery Cap Tool
Contact Post Wrench
Test Light
A
djustable
Collar
C
ontact
P
osts
Metal Lock Washer
Collar Bone
Training Level Adjustment Location
Status Light
3.6 Volt Battery (R9)
Battery Cap
The lightweight radio receiver worn by the dog identifies the coded FM radio signal from
the boundary wire. It creates an audible warning followed by stimulation if he comes too
close to the boundary wire. It operates on a replaceable battery and is
waterproof when the battery cap is securely fastened.
GentleFit™Contact Posts
(optional)
Contact Posts: The receiver comes with a set of stainless steel contact posts
(stainless steel or composite with stainless steel tips.) Conductive plastic ‘GentleFit’™
contact posts may be purchased separately if preferred or if recommended by your
Dealer.
Your DogWatch Dealer will determine the correct set based on your dog’s coat, neck
shape, and skin sensitivity. The posts must make contact with the skin in order for the
dog to feel the correction. In certain cases, your dealer may recommend clipping some
of the hair around the contact posts so that they can touch the skin more easily. Use
care if you find it necessary to tighten the contact posts with the collar wrench, as overtightening could cause damage to the receiver.
Antenna: The receiver’s omni-directional antenna design assures optimal reception
from the signal field.
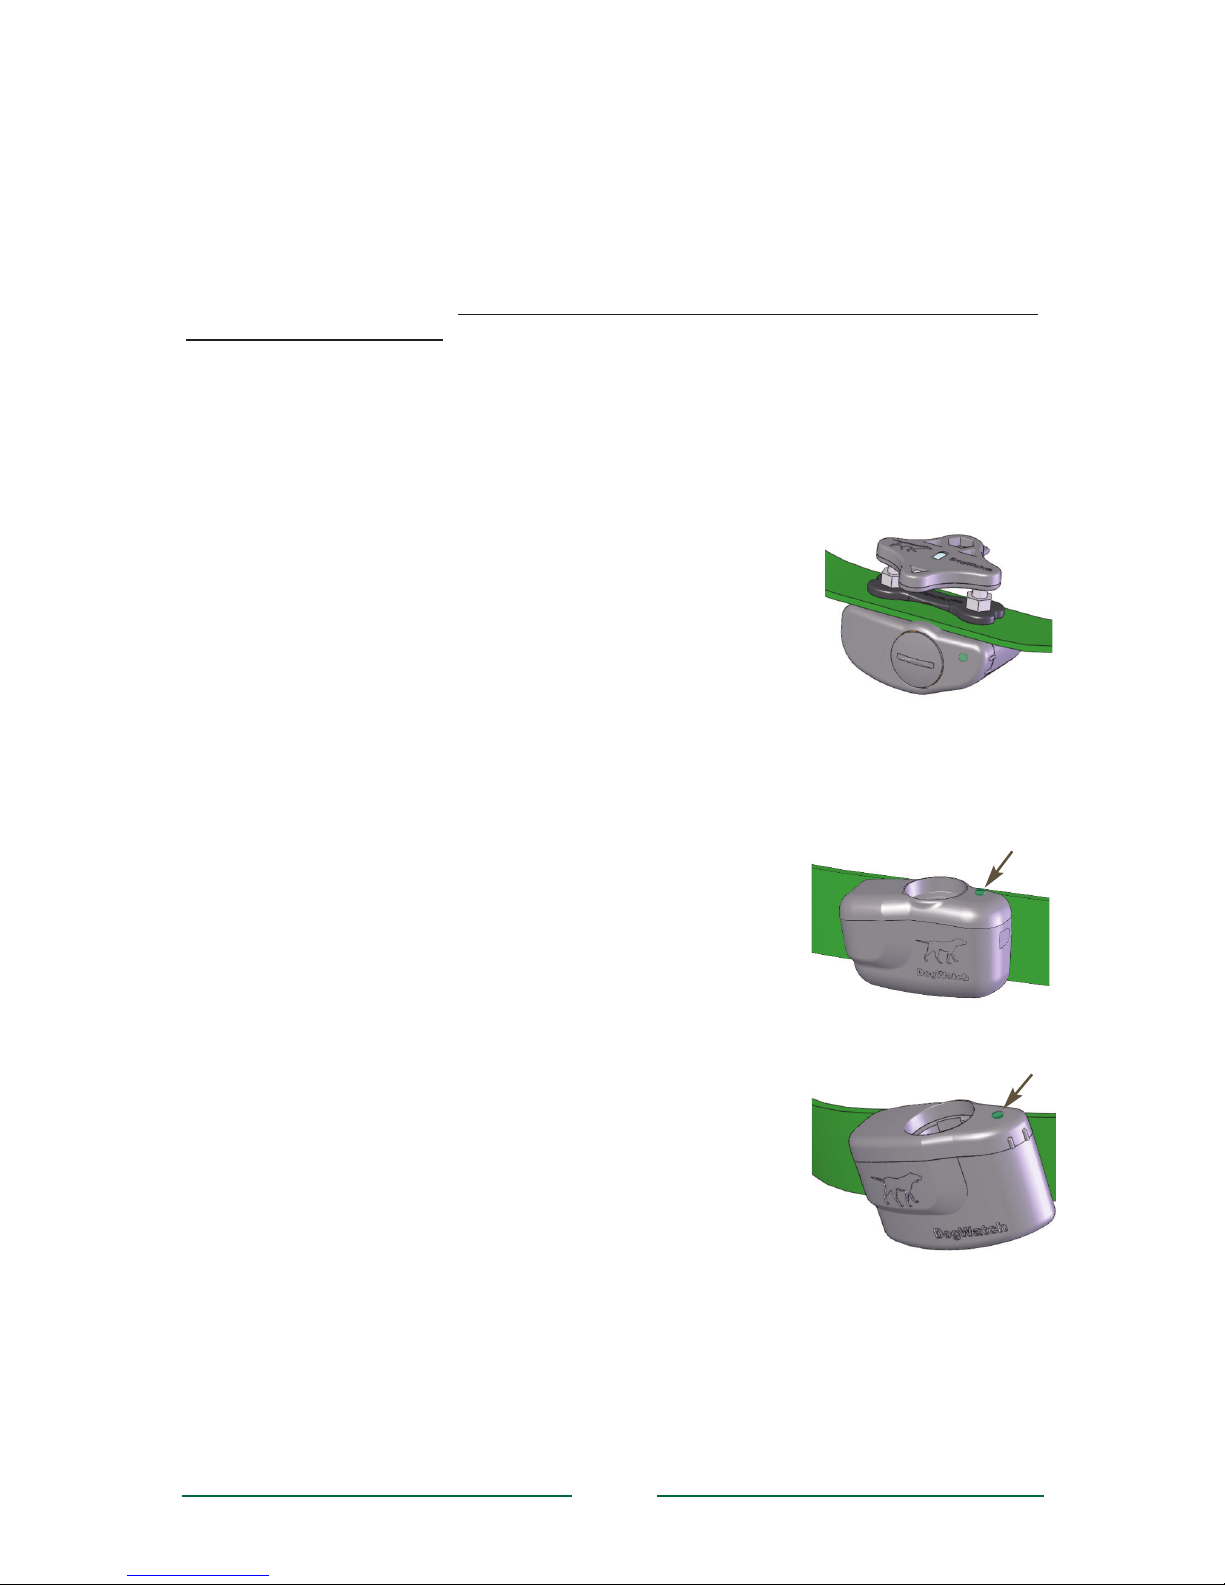
Test Light: The test light allows you to test the receiver. Hold the test light over the
contact posts and carry the receiver into the signal field a few
feet from the ground. When the receiver picks up the signal
from the boundary wire, the audible or vibation warning will
activate and the test light will come on.
Status Light The light continuously monitors your receiver and
provides these features.
■ Start-Up When you first insert the battery, the status light
will flash red and green. This indicates that the receiver has
started properly. Once started, the status light will continue to
flash green once every 40 seconds indicating normal operation.
In the event that the light does not flash, check the battery to be
sure that it has been inserted properly.
■ Training Level Indicator When programming the
training level of your receiver (see page 8), the status light
will flash green in conjunction with audible beeps. The
number of flashes/beeps will equal the training level you
have chosen.
■ Signal Field Indicator When testing the receiver in the
signal field, the status light will flash green when the
receiver is in the audible zone and will flash red and
green when the receiver is in the correction zone.
■ Correction Alert You will be able to tell if your pet has
tested the boundary by looking at the status light. The
status light will double flash green every 40 seconds
during the 24-hour period after the dog has entered the
boundary area.
■ Battery Indicator This feature monitors the voltage
level of the battery. Once the receiver detects that the
battery has reached a low voltage level, the status light
will change from blinking green every 40 seconds to
blinking red every 10 seconds. This indicates that your
battery is close to the end of its useful life and you should
change the battery within the next 3-4 days.
See page 7 for how to change your battery and reset your receiver.
6
Using the Test Light
The R7 Status Light
The R9 Status Light
 Loading...