

DogWatch PT4 User Manual
Never adjust the transmitter while your dog is wearing the receiver collar.
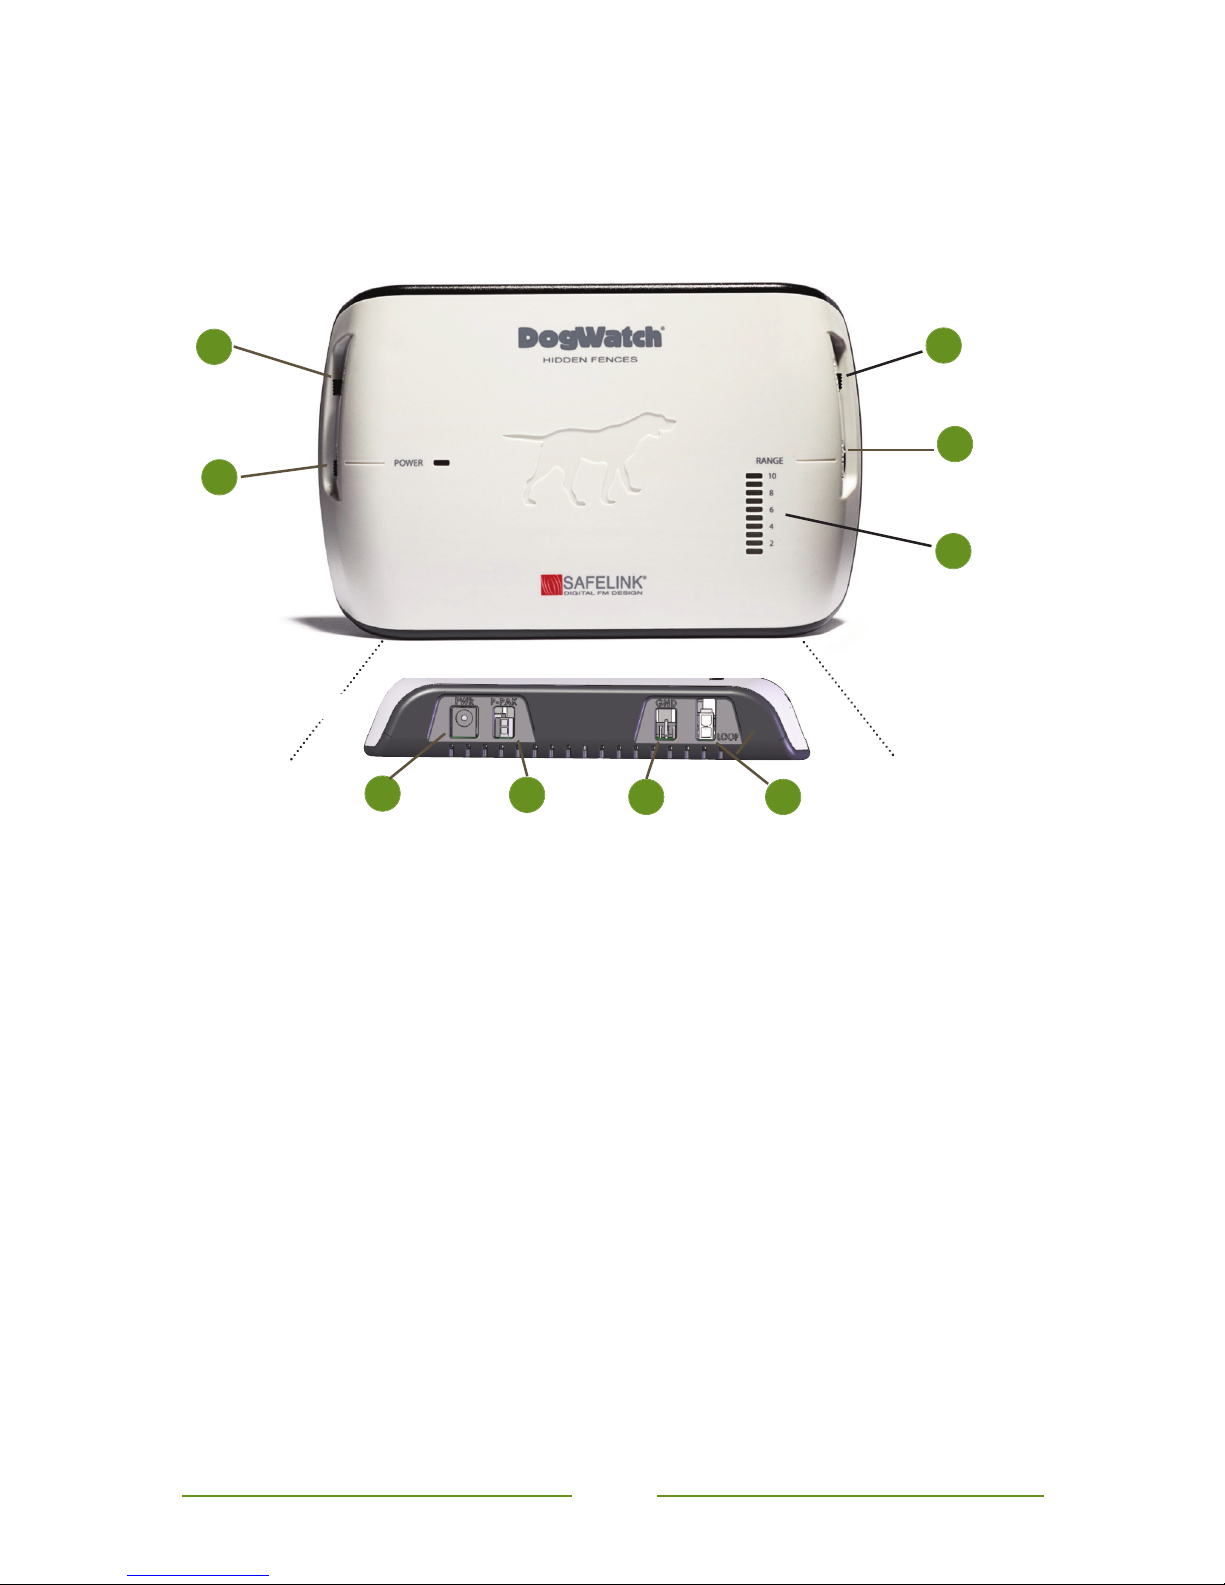
1. Power On/Off: This switch gives you easy access to turn the transmitter on or off.
The red Power light on the front panel lets you know that it is operating.
2. Power Supply: The transmitter is powered by the power supply/adapter provided
with the transmitter. The power supply is plugged into a properly grounded 110 volt
outlet and the adapter is plugged into the “PWR” jack on the bottom of transmitter.
3. PowerPak™: The optional PowerPak battery back-up keeps the transmitter
operating in the event of a power failure. When the transmitter is being powered by
the battery back-up, the red power light will remain off. The PowerPak plugs into the
transmitter at “P-PAK”.
4. Ground Wire: The green ground wire connects to the transmitter at the location
labeled “GND.” The round connector on the green ground wire is attached under
the screw on the outlet faceplate. It will, however, only be effective if your outlet is
properly grounded. If you have any questions about having a properly grounded
outlet, consult your local electrician.
5. Boundary Loop Plug: Your system includes a zip cord with a plug on one end. This
plug fits into the hole marked “Loop” on the bottom of the transmitter. This is the
beginning of the boundary wire that is buried in your yard. After the boundary wire
has been properly installed and plugged into the transmitter, the Range and
Boundary Loop Monitor light will turn on.
PT4 Transmitter Features
8
7
5
3
1
9
2
T
raining
Mode Switch
Range
Control
Power
On/Off
Power Supply PowerPak™ Ground Wire Boundary Loop Plug
4
6
3
The transmitter sends a coded digital FM radio signal through the boundary wire. This
signal can be adjusted, allowing you to control the “hidden fence” around your property.
Rate
Adjustment
Bottom View
Range & Boundary
Loop Monitor
Display

4
6. Range and Boundary Loop Monitor Display: The Range and Boundary Loop
Monitor Display(LMD) provides a visual indication of the status of your boundary
wire and signal range. On traditional boundary wire configurations, each number
on the scale represents the signal range in feet. Range = distance the signal is
being broadcast from each side
of the wire. A significant change (drop) in signal
range could indicate a partial wire break or other boundary wire problem. If the
boundary loop wire is broken or the signal is interrupted, the light will go out
and an audible warning will sound. You should check around your property for a
visible wire break. Contact your dealer for troubleshooting tips or to schedule an
appointment.
Note: For non-traditional wire configurations where the boundary wires may be
close to one another, the LMD may not measure the boundary signal accurately in
feet, but is a visual setting reference point. Your DogWatch dealer will explain the
LMD setting and your actual signal range.
7. Range: The radio signal is transmitted from the boundary wire in all directions. The
signal range (the distance the signal broadcasts from the wire) is adjusted by the
Range Control on the transmitter. The recommended signal range (on each side of
the wire) is 6-10 feet. Your DogWatch Dealer will adjust the range according to the
personality and traits of your dog. Consult your DogWatch Dealer before making
any adjustments yourself.
Signal Field: The signal field (the area in which the dog’s receiver collar detects the
signal) has two areas. The outer-most part of the signal field (~13% of the signal
field) triggers an audible warning. If your pet continues further into the signal field,
he will receive a correction. To prevent your dog from entering the signal field and
remaining in the audible area (causing depletion of the battery), the receiver
transitions from an audible warning to a short warning correction after a period of
15 seconds. This will not activate if the receiver is set to the “Audible Only” Training
Level (Level “0” - see Setting the Receiver: page 8.)
8. Training Mode: The Training Mode Switch allows you to choose between two pet
friendly training options: Basic (Mode A) and QuickAlert
TM
(Mode B). In the Basic
setting, your pet receives the normal audible warning followed by a correction if he
continues into the signal field. When set to QuickAlert (used primarily for harder to
train dogs), your pet receives a very quick “alert” correction followed by the normal
audible warning and correction.
NOTE: If you have multiple dogs on the system, the Training Mode setting effects
all receivers. They are
ALL set to the same mode, Basic or QuickAlert
TM
.
9. Rate: The Rate can be adjusted to three levels (1 = slow, 2 = medium, 3 = fast).
When your dog gets a correction, he receives it in a series of pulses. Increasing the
Rate delivers a greater number of pulses per second. The adjustable Rate feature
operates only when the Receiver Training Level is set to Level 1, 2, or 3.
See the Receiver Levels and Transmitter Settings chart on page 9.
Note: On the back of the transmitter are four very small switches. These
switches set your transmitter to the correct broadcast frequency. Your dealer
will set these switches for your system.
Do NOT change these settings. They are for DEALER USE ONLY.
 Loading...