

Dogwatch DWSFT, DWSFC, DWSFP User Manual

Owner’s Guide

Thank you for purchasing a
DogWatch® SmartFence!
It’s all about your dog.™ You’ve purchased the most technologically
advanced hidden fence available, thanks to our patented SafeLink®
FMdigital technology, AutoMemory™, FastReact™ and other
PetFriendly™ features.
The DogWatch Hidden Fence is the only
underground pet-containment system recognized
as a Premium Selecon “Best Buy”
by Consumers Digest.
If you have any questions, please contact your local authorized
DogWatch Dealer.
http://www.dogwatch.com/dealer-search/
Surrounding Pets With Freedom Since 1990.
™
TABLE OF CONTENTS
1 DogWatch System Overview
System Components ....................................................................
System Basics ..............................................................................
2 Setup
How the SmartFence is Installed ..................................................
How to setup your SmartFence Portal .........................................
How to setup your SmartFence WebApp .....................................
3 System Features & Settings
PT-5 SmartFence Transmitter Features & Settings .......................
SmartCollar Features ....................................................................
Collar Settings ..........................................................................
Collar Features .........................................................................
Replacing the Battery ................................................................
Setting the Training Levels .........................................................
Receiver Status Light Indicator ...................................................
SmartFence Portal Features .........................................................
SmartFence WebApp Profile Features & Settings ........................
Important Safeguards & Reminders / Troubleshooting
4 PetFriendly™ Containment Training
Your Dog’s Response To Stimulation ..........................................
Dog Personalities & Traits ...........................................................
Creating the Right Environment ..................................................
Safety and Avoidance Zones ......................................................
Adjusting the SmartCollar ...........................................................
Containment Training Reminders ................................................
Phase 1: Audible Training ...........................................................
Phase 2: Introduction to Correction ............................................
Phase 3: Introduction to Distractions .........................................
Phase 4: Introduction to Increased Distractions .........................
Phase 5: Letting Your Dog Off The Leash ...................................
Phase 6: Taking your Dog Outside The Boundary ......................
Training Tips ................................................................................
5 Warranties & Warranty Registration
FAQs
SYSTEM COMPONENTS
1
Hidden Fence Boundary
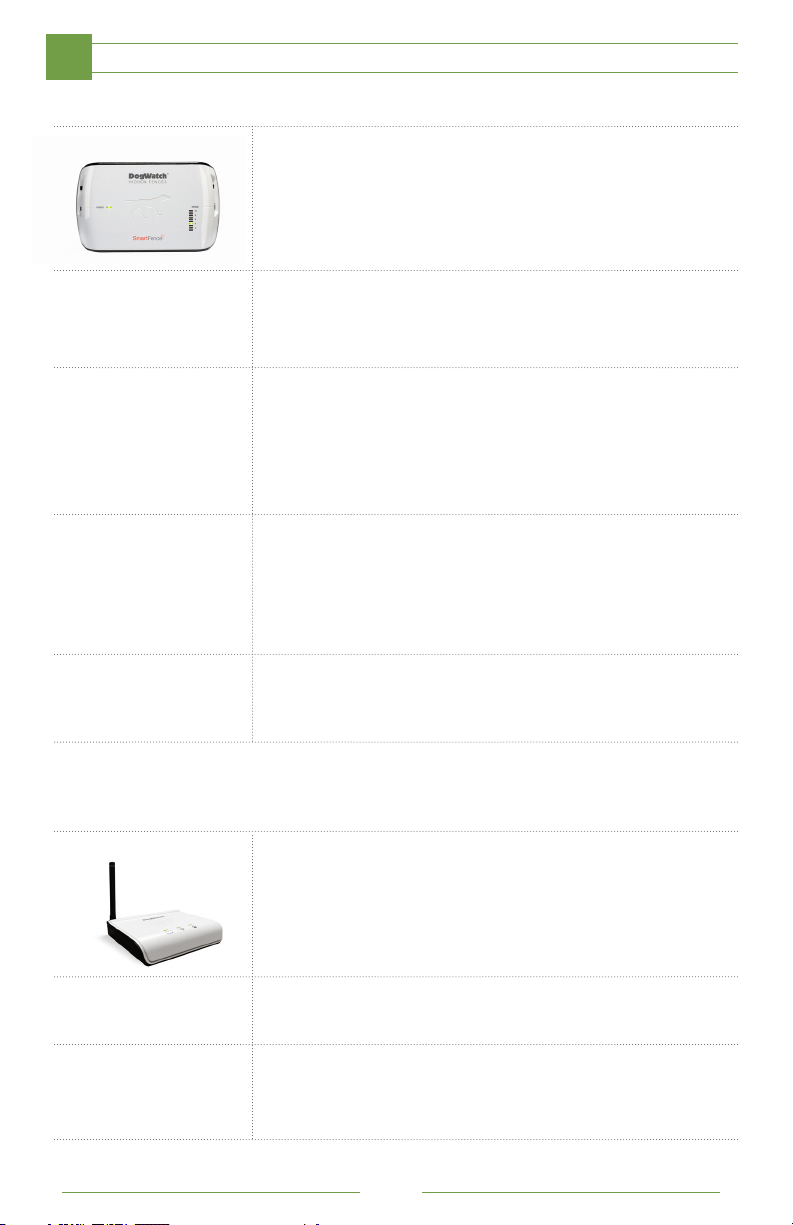
T-10 SmartFence Transmitter
The Smart Fence Transmitter sends a coded FM radio
signal through the boundary wire. If your boundary wire is
broken, damaged or if there is a loss of power the SmartFence
Transmitter can notify you via text and/or email.
Boundary Wire
The boundary wire carries the coded digital FM radio signal
around the perimeter of your property.
Surge Protector
The surge protector protects the PT-5 Transmitter from damage
due to lightning or power surges. Your Dealer will connect this to
an existing grounding source or will install
a grounding rod.
PowerPak™ (optional)
The optional PowerPak battery back-up keeps the PT-5
Transmitter operating in the event of a power failure.
NOTE: When the transmitter is being powered by the PowerPak,
the power light will remain off.
Portal
Power Supply
The SmartFence Transmitter is charged using
a 18 volt power supply.
SmartFence Portal
The SmartFence Portal allows system information and
notifications to be sent via an ethernet connection through your
existing internet network to your phone and/or computer via
text and email. Indicator lights are a quick way to be sure your
system is properly set up (see pg.19)
Ethernet Cord
The Portal connects to your router via an ethernet cord.
Power Supply
The SmartFence Portal is charged using a 5 volt power supply.
4
SmartCollar
SYSTEM COMPONENTS
1
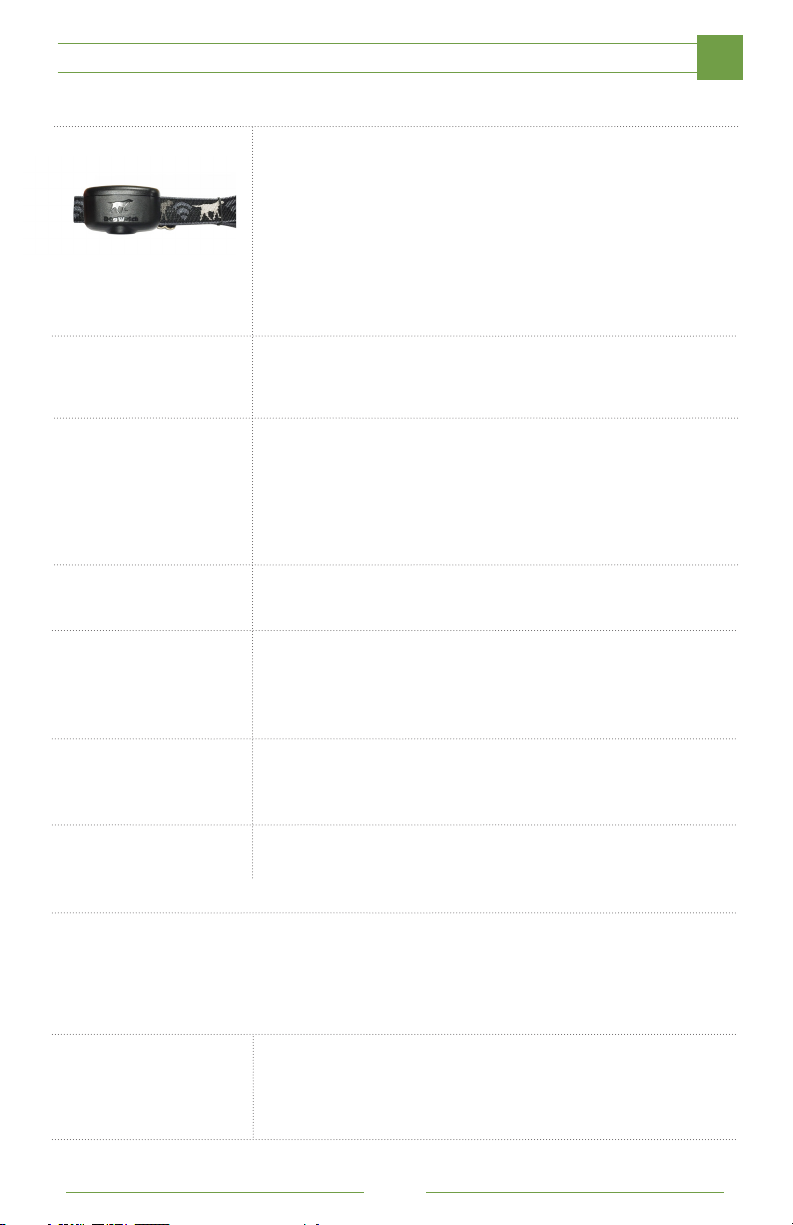
SmartCollar™
The lightweight collar unit, worn by your dog, identifies the
coded FM radio signal from the boundary wire. It will notify
your dog with an audible signal when he/she is approaching
the boundary wire. If your dog continues towards the wire,
after hearing the audible warning, the SmartCollar will create a
stimulation. The SmartCollar can also track your dog’s activity
level and can notify you via text and/or email if your battery is
getting low!
Battery
The SmartCollar uses a 3.6 volt battery with up to 1 year battery
life.
Muti-Tool
The Multi-Tool has the following components: Magnet (to be
used when changing training levels - See pg.16), Test-Light
(used when testing the collar stimulation - See pg.14), and a
Contact Post Wrench (For use when changing contact posts
- See pg.15).
Adjustable Collar Strap
The SmartCollar comes with a nylon adjustable strap
Contact Posts
The SmartCollar uses two contact posts designed for proper
and safe use. Available in small, medium or large depending on
your pet’s size and length of coat.
Lock Washers
The metal lock washers hold the contact posts in place on the
SmartCollar.
Collar Bone
The Collar Bone helps keep the contact posts in proper position
on the collar strap.
Training Leash
The SmartFence comes with a 6 foot training leash to help you
properly introduce and train your dog to his new boundary.
5
SYSTEM BASICS
1
Your new Smart Fence™ Transmitter sends signal through a hidden boundary
around your yard. Your pet wears a SmartCollar™ and is trained to recognize the
audible warning when he/she approaches the hidden boundary.
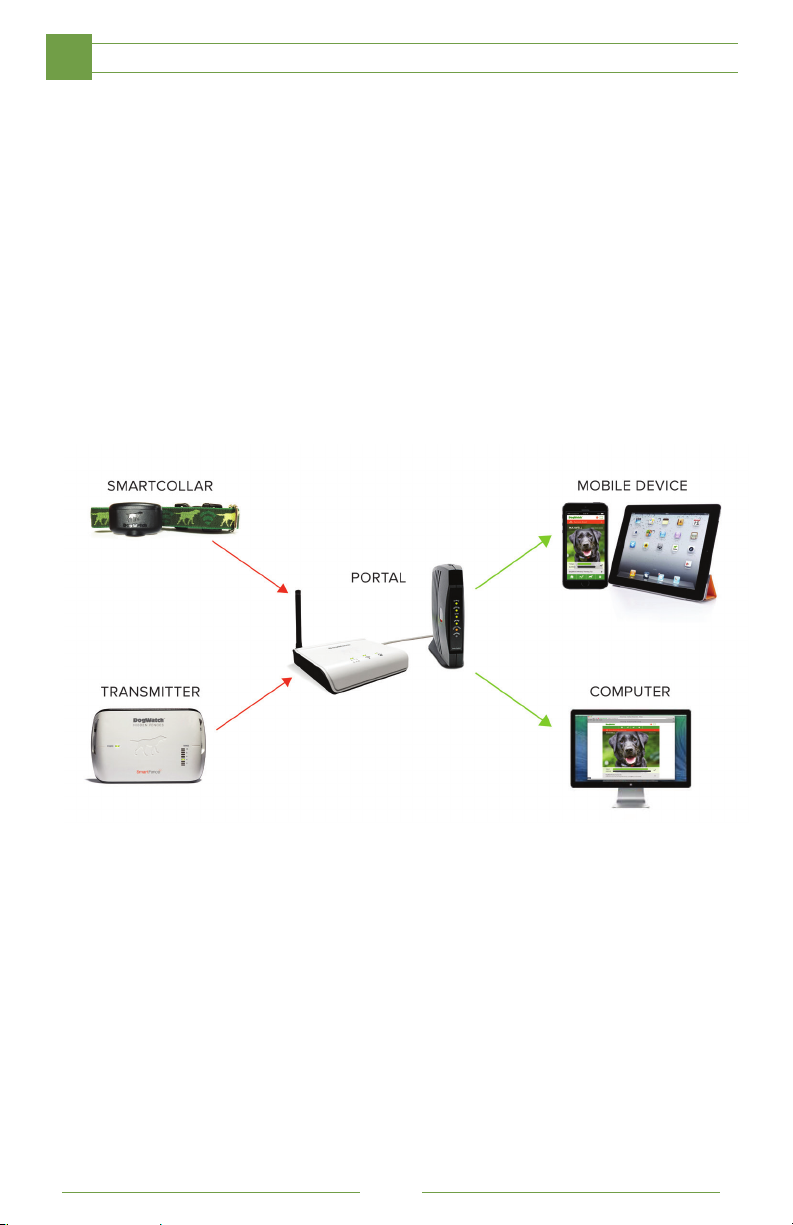
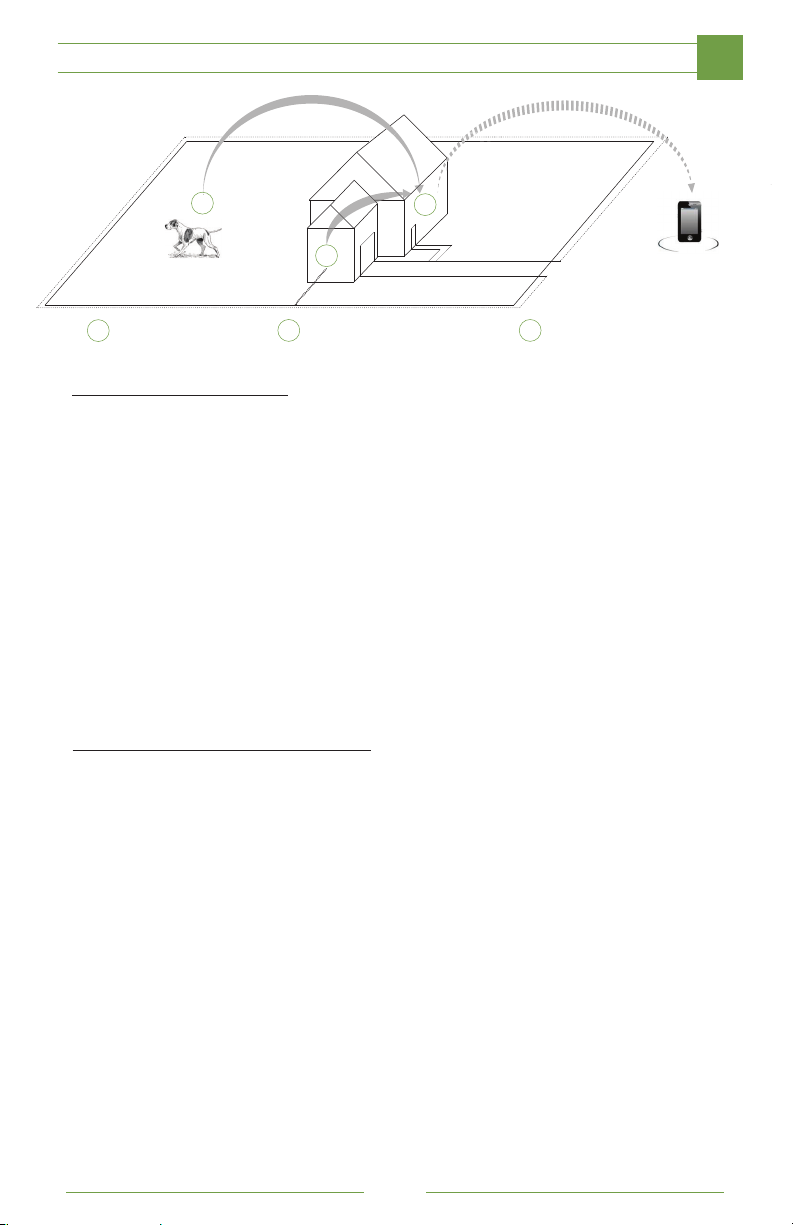
Your DogWatch SmartFence Portal collects system information (See Page 7) from the
SmartCollar and Transmitter. The Portal connects directly into any ethernet port in your
home router or modem, allowing it to send system information and notifications to your
mobile device or your computer.
You can now monitor your system, track your pet’s activity, and store contacts
remotely!
Here are three ways you can stay connected with your pet:
• On your computer: Visit www.smartfence.dogwatch.com to log into your
SmartFence profile, see your pet’s activity levels, and monitor your system
status.
• On your mobile phone: Use the SmartFence WebApp Icon on your
smartphone to view your dog’s activity and system status when you’re on the
go. (See the QuickStart Guide for WebApp download instructions)
• Through texts and emails: Receive DogWatch alerts and updates by text
message and email!
6
SYSTEM BASICS
1
1
3
2
SmartCollar
1
SmartFence Transmitter
2
SmartFence Portal
3
SmartFence Information
Your Dog’s Profile Set up your pet’s profile with a photo! Your profile
displays your pet’s Breed, Size and Date of Birth.
Manage your Contacts Add your contact information to receive important system
information via text messages and/or email. Add
multiple contacts for family members and dog walkers.
Activity Tracking See if your dog is Active, Moderately Active, Lightly
Active, or Resting under your App “Activity” tab!
Monitor daily, weekly, and monthly activity levels.
System Settings Monitor your system settings; Training Level, Training
Mode, Rate, Frequency, and Range on your App profile
under the “settings” tab on your bottom navigation
(Also displayed on your SmartFence Transmitter or SmartCollar)
SmartFence Notification Options
Battery Status Your SmartFence will notify you when it’s time to
replace your SmartCollar battery!
Boundary Connectivity If the Boundary Loop has been broken or disconnected
your Smart Fence will let you know! An alarm will
sound from your transmitter and a text alert can be sent
to your phone.
No Collar Connection If your Portal loses its connection with your SmartCollar
for a period of time it can alert you! This could be
triggered by a number of events: dead battery,
dog chewing on the receiver, or the collar is out of range.
No Transmitter Connection If your Portal loses its connection with your SmartFence
Transmitter it can alert you. This could be triggered by a
number of events: a loss of power, failed component,
or the Transmitter is out of range.
*Boundary Challenges Boundary Challenges are logged but not reported. If you
would like to retrieve boundary challenge information
contact your local dealer.
7
HOW THE HIDDEN FENCE IS INSTALLED
2
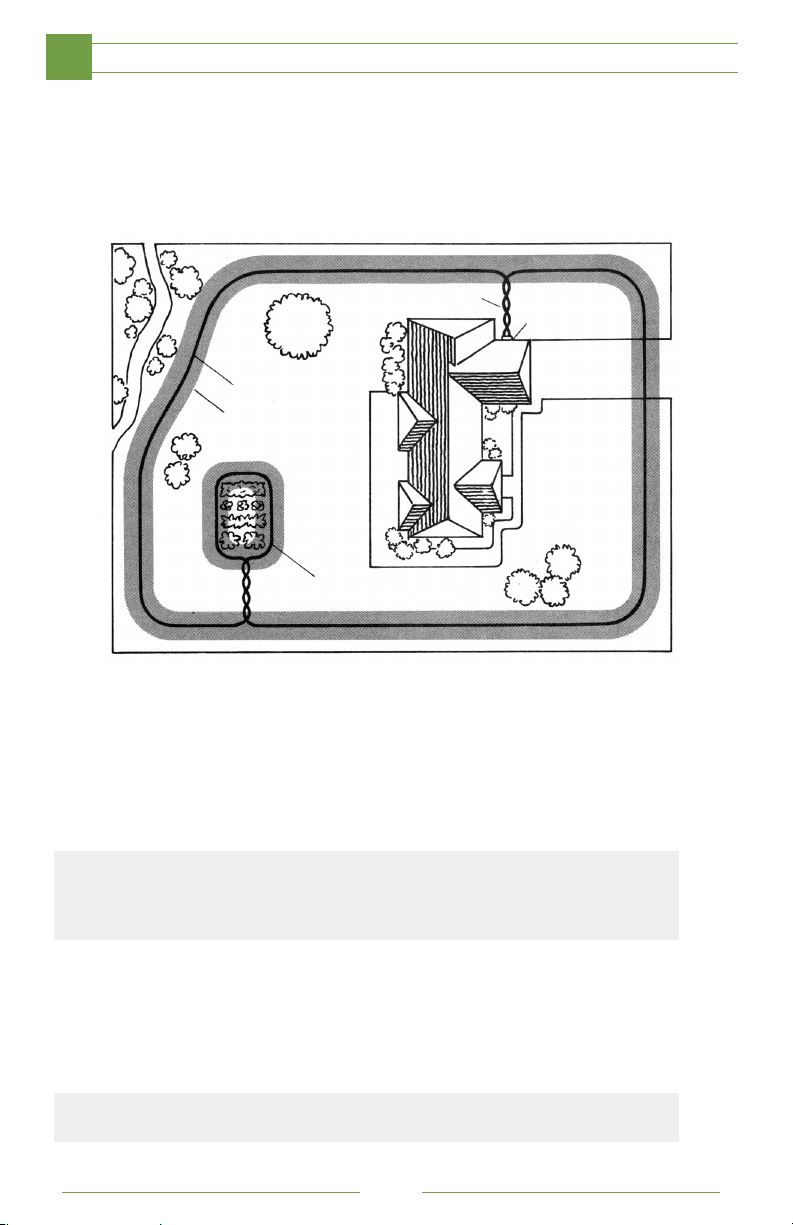
The boundary wire creates the perimeter for the DogWatch Hidden Fence System,
and can enclose any area up to 200 acres. The wire is buried 3-4” beneath the
surface of the yard or can lie on top of the ground (e.g. in wooded or rocky areas).
Each boundary wire is customized for your home, and can be configured to keep
your pet out of the pool, out of your garden, or away from other designated areas.
Twisted Wire
Boundary Wire
Signal Field
Garden Loop
T-10 SmartFence Transmitter: The T-10 SmartFence Transmitter sends a coded
FM radio signal through the boundary wire. All boundary settings can be manual-
ly adjusted on the SmartFence Transmitter.
Boundary Wire: The boundary wire, buried below or above ground, carries the
coded FM radio signal around the perimeter of your property. In order for the
system to work properly, the boundary wire must form a continuous loop.
NOTE: Any break in the wire will cancel the signal field. If the boundary wire is broken or
unplugged, the green Range & Boundary Loop Monitor Display (LMD) light will go out and
an audible warning will sound. Most breaks are caused by lawn/garden equipment. If you
cannot visibly locate the break, contact your Authorized Dealer for service.
Transmitter
& Surge
Protector
Signal Field: The radio signal is transmitted from the boundary wire in all directions.
It can be used to keep dogs in or out of an area. The signal is adjusted by the Range
Control on the Transmitter to create a signal field on each side of the wire. Your
Dealer has installed the wire to the recommended width of 8-10 feet and has carefully
configured the corners to avoid sharp angles.
NOTE: A twisted wire will result in no signal field at the wire and will not warn or correct your
dog when approaching or crossing the boundary at these locations.
8
HOW THE HIDDEN FENCE IS INSTALLED
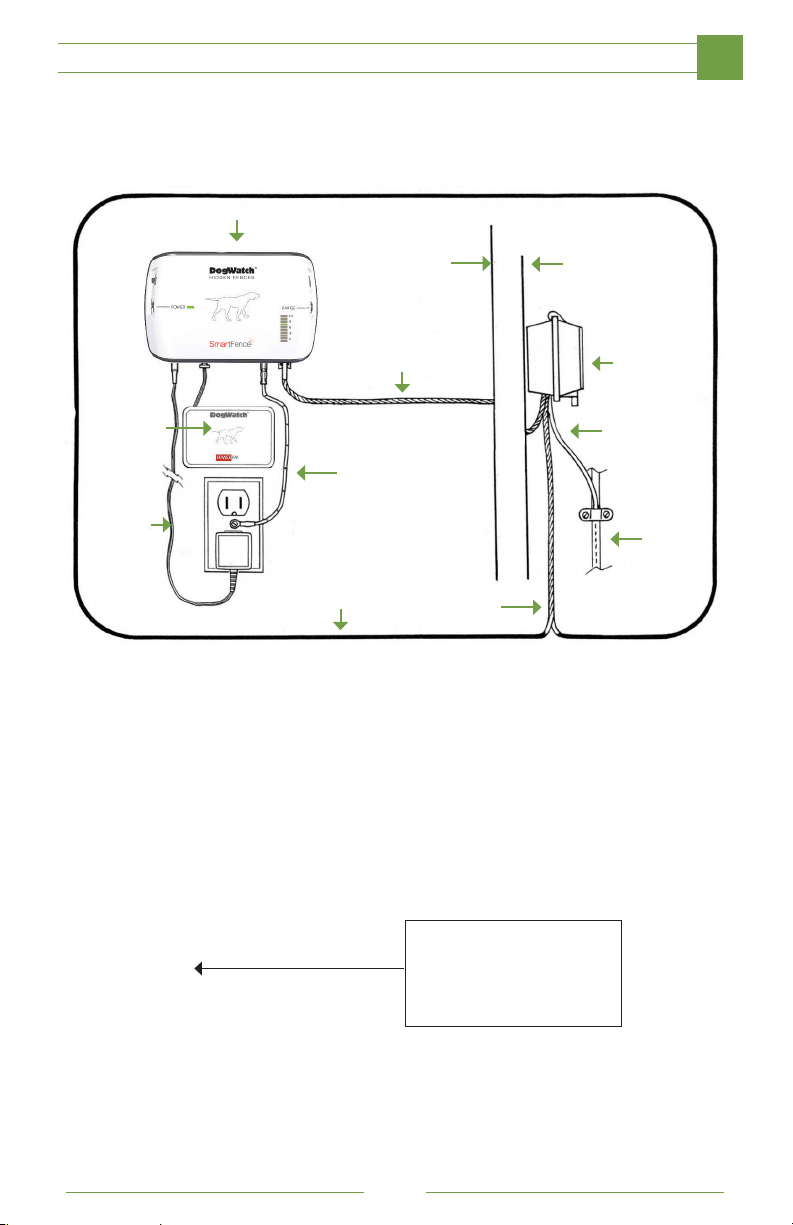
Your SmartFence Transmitter is mounted on a wall near a power outlet. The
Transmitter is connected to your boundary wire through a surge protector which
prevents lightning power surges from damaging your system (as shown below).
Transmitter
Inside Wall Outside Wall
2
Zip Cord
PowerPak
(Optional)
Ground
Wire
Power
Supply
Boundary Wire
DogWatch Smart System Components
• T-10 SmartFence Transmitter
• SmartCollar
• Adjustable Collar Strap
• Contact Posts (2)
• Lock Washers (2)
Surge
Protector
Ground Wire
Ground
Rod
Twisted
Wire
• Collar Bone
• Multi-Tool
• Battery
• Surge Protector
• Training Leash
• Power Supply (for Transmitter)
• PowerPak™ (optional)
• Magnet
• Test Light
• Contact Post Wrench
• Battery Cap Tool
9
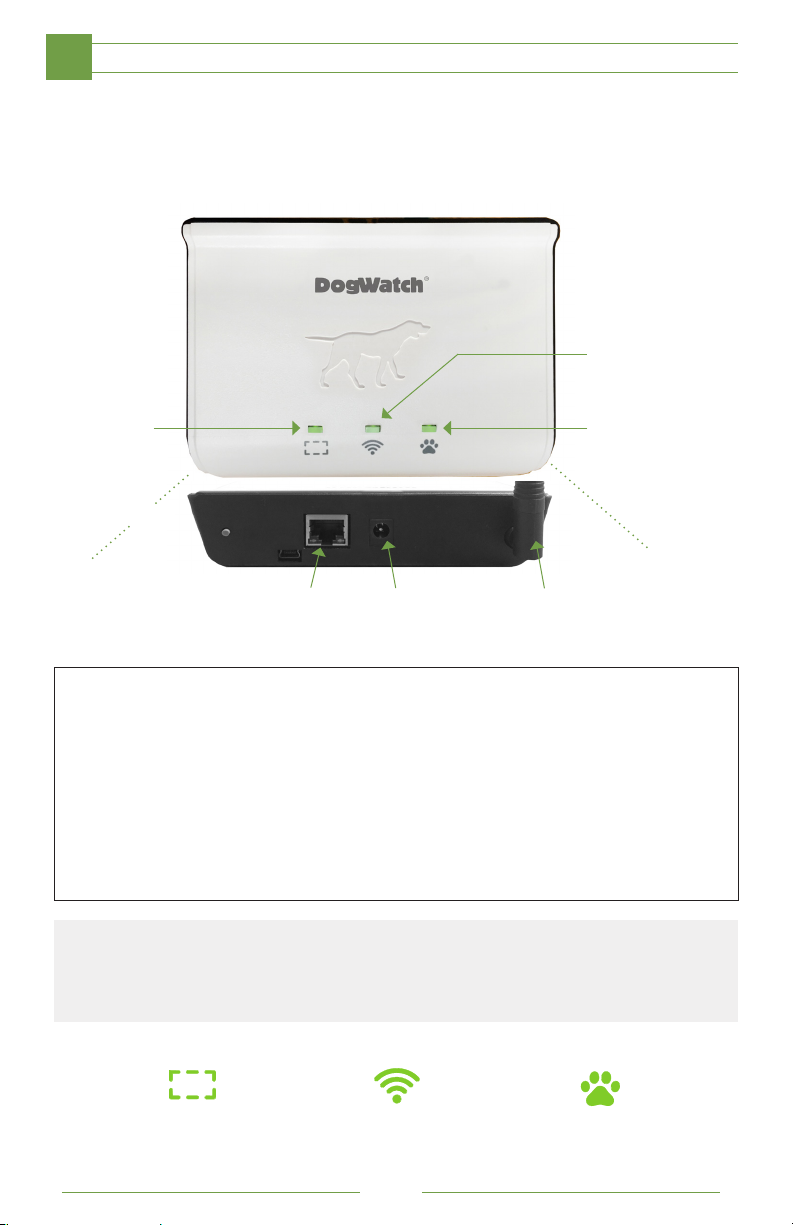
SMARTFENCE PORTAL SETUP
2
The SmartFence Portal collects all status information from your SmartCollar and
SmartFence Transmitter and sends it to you! Your Portal will also indicate that your
system is working properly via three indicator lights: Boundary Loop, Internet, and
Collar. (You must complete App profile setup for all indicator lights to turn green.)
Internet
Connection
Status
Boundary
Status
Rear View
Ethernet
Port
Follow these steps to setup your SmartFence Portal:
1. First, connect the Portal to Power.
Plug the power cord into the nearest outlet located by your router
and connect to the rear port on your Portal.
2. Second, connect the Portal to the Web.
Plug your ethernet cord into one of the rear ethernet ports on your
router and connect the other end of your ethernet cable to the rear
port to the Portal.
NOTE: Once the Portal is plugged into power and connected to an ethernet port on your router the
Center Internet Indicator light will turn green. Once it connects to your SmartCollar and Transmitter
the Boundary Loop and Collar Indicator will also turn Green
Power
Supply Port
Antenna
Collar
Status
Boundary Loop
Indicator Light
Internet
Indicator Light
10
Collar
Indicator Light

SMARTFENCE WEBAPP PROFILE SETUP
STEP 1 - Activate Your Profile
1. Go to smartfence.dogwatch.com
(On Smartphone, Tablet, or computer)
2. Click on the link: New Account
Follow prompts for a New System Setup
Account Information
Enter your email address and create a password that you
will use to login into the SmartFence WebApp.
System Information
Default system name is “Home”. Your serial numbers are
printed on your Transmitter, Portal and SmartCollar.
User Information - Enter appropriate information in each field.
Dog Profile Information - Follow prompts.
Congratulations you have activated your SmartFence!!
To save your SmartFence WebApp to your mobile device homescreen
simply follow Step 2.
2
STEP 2 - Save Your Profile to Your Phone Homescreen
For iPhone and iPad
1. Open Safari and visit smartfence.dogwatch.com
2. Tap the Bookmark icon and select Add to Homescreen
3. Confirm by clicking “Add”.
This DogWatch SmartFence Icon should now appear on your
iPhone or iPad Homescreen and is your link to your SmartFence
profile.
For Android
1. Open Chrome and visit smartfence.dogwatch.com
2. Tap the Menu Button and select “Add to Homescreen”
3. Confirm by clicking “Add”.
This DogWatch SmartFence Icon should now appear on
your Android Homescreen and is your link to your SmartFence
profile.
11
 Loading...