

Page 1

Owner’s Guide
Page 2

Thank you for purchasing a
DogWatch® SmartFence!
It’s all about your dog.™ You’ve purchased the most technologically
advanced hidden fence available, thanks to our patented SafeLink®
FMdigital technology, AutoMemory™, FastReact™ and other
PetFriendly™ features.
The DogWatch Hidden Fence is the only
underground pet-containment system recognized
as a Premium Selecon “Best Buy”
by Consumers Digest.
If you have any questions, please contact your local authorized
DogWatch Dealer.
http://www.dogwatch.com/dealer-search/
Surrounding Pets With Freedom Since 1990.
™
Page 3
TABLE OF CONTENTS
1 DogWatch System Overview
System Components ....................................................................
System Basics ..............................................................................
2 Setup
How the SmartFence is Installed ..................................................
How to setup your SmartFence Portal .........................................
How to setup your SmartFence WebApp .....................................
3 System Features & Settings
PT-5 SmartFence Transmitter Features & Settings .......................
SmartCollar Features ....................................................................
Collar Settings ..........................................................................
Collar Features .........................................................................
Replacing the Battery ................................................................
Setting the Training Levels .........................................................
Receiver Status Light Indicator ...................................................
SmartFence Portal Features .........................................................
SmartFence WebApp Profile Features & Settings ........................
Important Safeguards & Reminders / Troubleshooting
4 PetFriendly™ Containment Training
Your Dog’s Response To Stimulation ..........................................
Dog Personalities & Traits ...........................................................
Creating the Right Environment ..................................................
Safety and Avoidance Zones ......................................................
Adjusting the SmartCollar ...........................................................
Containment Training Reminders ................................................
Phase 1: Audible Training ...........................................................
Phase 2: Introduction to Correction ............................................
Phase 3: Introduction to Distractions .........................................
Phase 4: Introduction to Increased Distractions .........................
Phase 5: Letting Your Dog Off The Leash ...................................
Phase 6: Taking your Dog Outside The Boundary ......................
Training Tips ................................................................................
5 Warranties & Warranty Registration
FAQs
Page 4
SYSTEM COMPONENTS
1
Hidden Fence Boundary
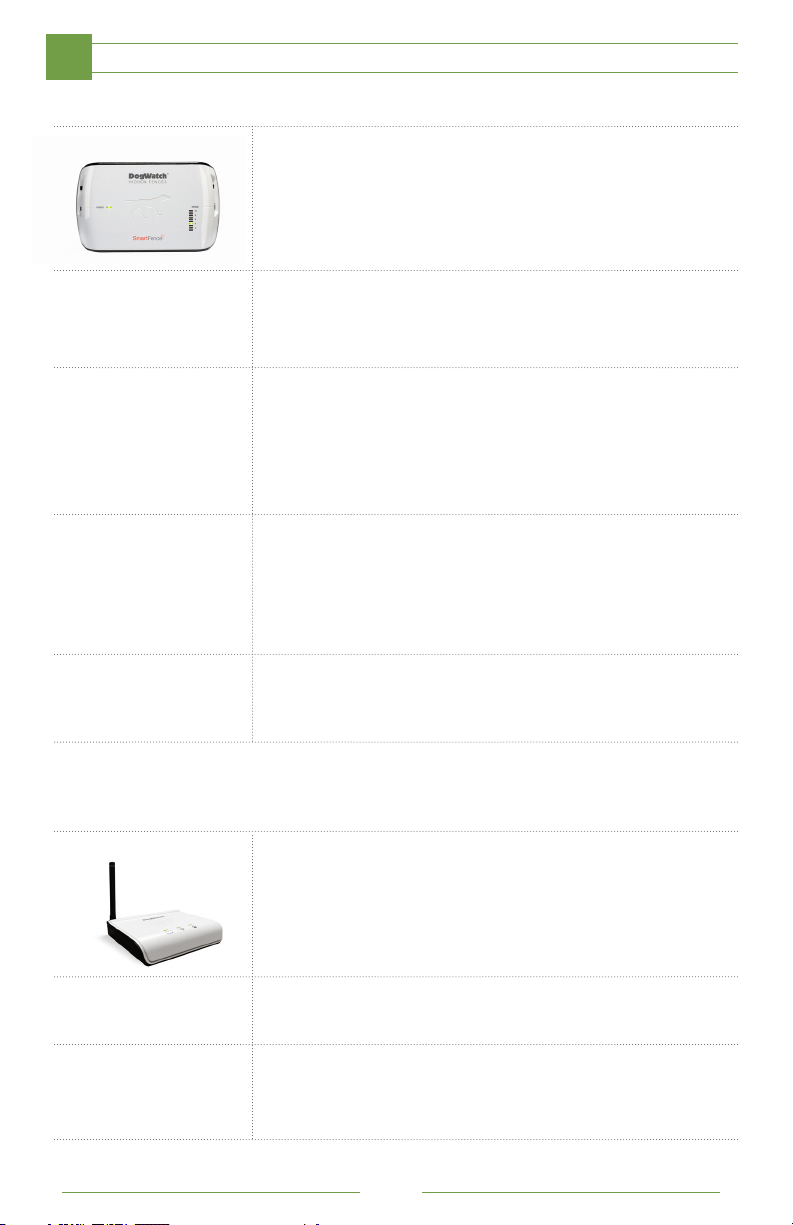
T-10 SmartFence Transmitter
The Smart Fence Transmitter sends a coded FM radio
signal through the boundary wire. If your boundary wire is
broken, damaged or if there is a loss of power the SmartFence
Transmitter can notify you via text and/or email.
Boundary Wire
The boundary wire carries the coded digital FM radio signal
around the perimeter of your property.
Surge Protector
The surge protector protects the PT-5 Transmitter from damage
due to lightning or power surges. Your Dealer will connect this to
an existing grounding source or will install
a grounding rod.
PowerPak™ (optional)
The optional PowerPak battery back-up keeps the PT-5
Transmitter operating in the event of a power failure.
NOTE: When the transmitter is being powered by the PowerPak,
the power light will remain off.
Portal
Power Supply
The SmartFence Transmitter is charged using
a 18 volt power supply.
SmartFence Portal
The SmartFence Portal allows system information and
notifications to be sent via an ethernet connection through your
existing internet network to your phone and/or computer via
text and email. Indicator lights are a quick way to be sure your
system is properly set up (see pg.19)
Ethernet Cord
The Portal connects to your router via an ethernet cord.
Power Supply
The SmartFence Portal is charged using a 5 volt power supply.
4
Page 5
SmartCollar
SYSTEM COMPONENTS
1
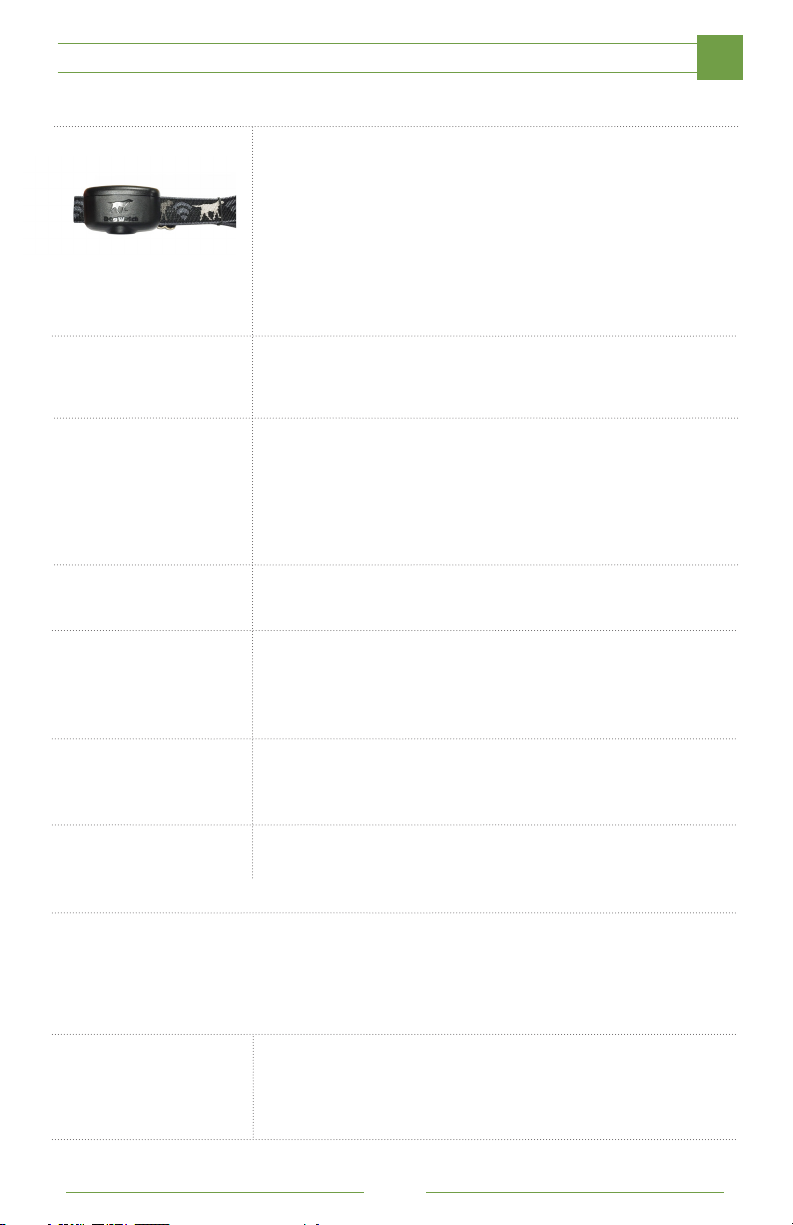
SmartCollar™
The lightweight collar unit, worn by your dog, identifies the
coded FM radio signal from the boundary wire. It will notify
your dog with an audible signal when he/she is approaching
the boundary wire. If your dog continues towards the wire,
after hearing the audible warning, the SmartCollar will create a
stimulation. The SmartCollar can also track your dog’s activity
level and can notify you via text and/or email if your battery is
getting low!
Battery
The SmartCollar uses a 3.6 volt battery with up to 1 year battery
life.
Muti-Tool
The Multi-Tool has the following components: Magnet (to be
used when changing training levels - See pg.16), Test-Light
(used when testing the collar stimulation - See pg.14), and a
Contact Post Wrench (For use when changing contact posts
- See pg.15).
Adjustable Collar Strap
The SmartCollar comes with a nylon adjustable strap
Contact Posts
The SmartCollar uses two contact posts designed for proper
and safe use. Available in small, medium or large depending on
your pet’s size and length of coat.
Lock Washers
The metal lock washers hold the contact posts in place on the
SmartCollar.
Collar Bone
The Collar Bone helps keep the contact posts in proper position
on the collar strap.
Training Leash
The SmartFence comes with a 6 foot training leash to help you
properly introduce and train your dog to his new boundary.
5
Page 6
SYSTEM BASICS
1
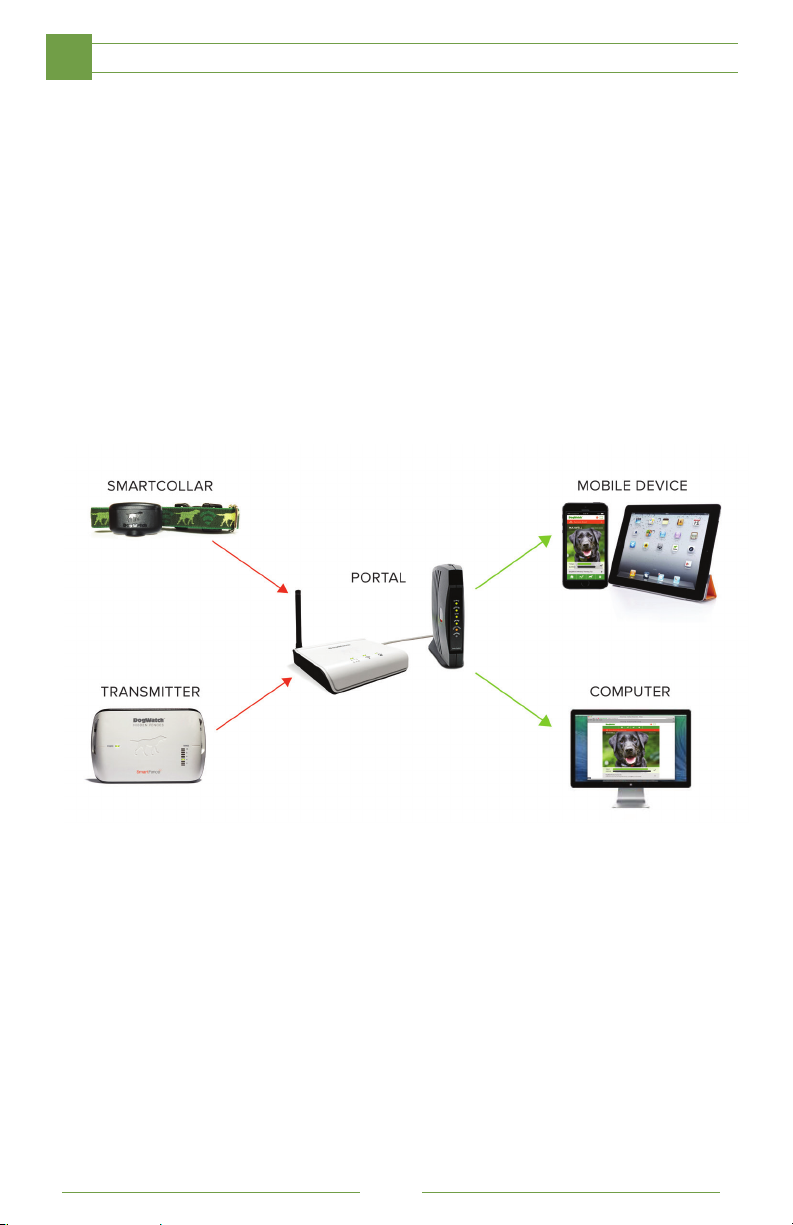
Your new Smart Fence™ Transmitter sends signal through a hidden boundary
around your yard. Your pet wears a SmartCollar™ and is trained to recognize the
audible warning when he/she approaches the hidden boundary.
Your DogWatch SmartFence Portal collects system information (See Page 7) from the
SmartCollar and Transmitter. The Portal connects directly into any ethernet port in your
home router or modem, allowing it to send system information and notifications to your
mobile device or your computer.
You can now monitor your system, track your pet’s activity, and store contacts
remotely!
Here are three ways you can stay connected with your pet:
• On your computer: Visit www.smartfence.dogwatch.com to log into your
SmartFence profile, see your pet’s activity levels, and monitor your system
status.
• On your mobile phone: Use the SmartFence WebApp Icon on your
smartphone to view your dog’s activity and system status when you’re on the
go. (See the QuickStart Guide for WebApp download instructions)
• Through texts and emails: Receive DogWatch alerts and updates by text
message and email!
6
Page 7
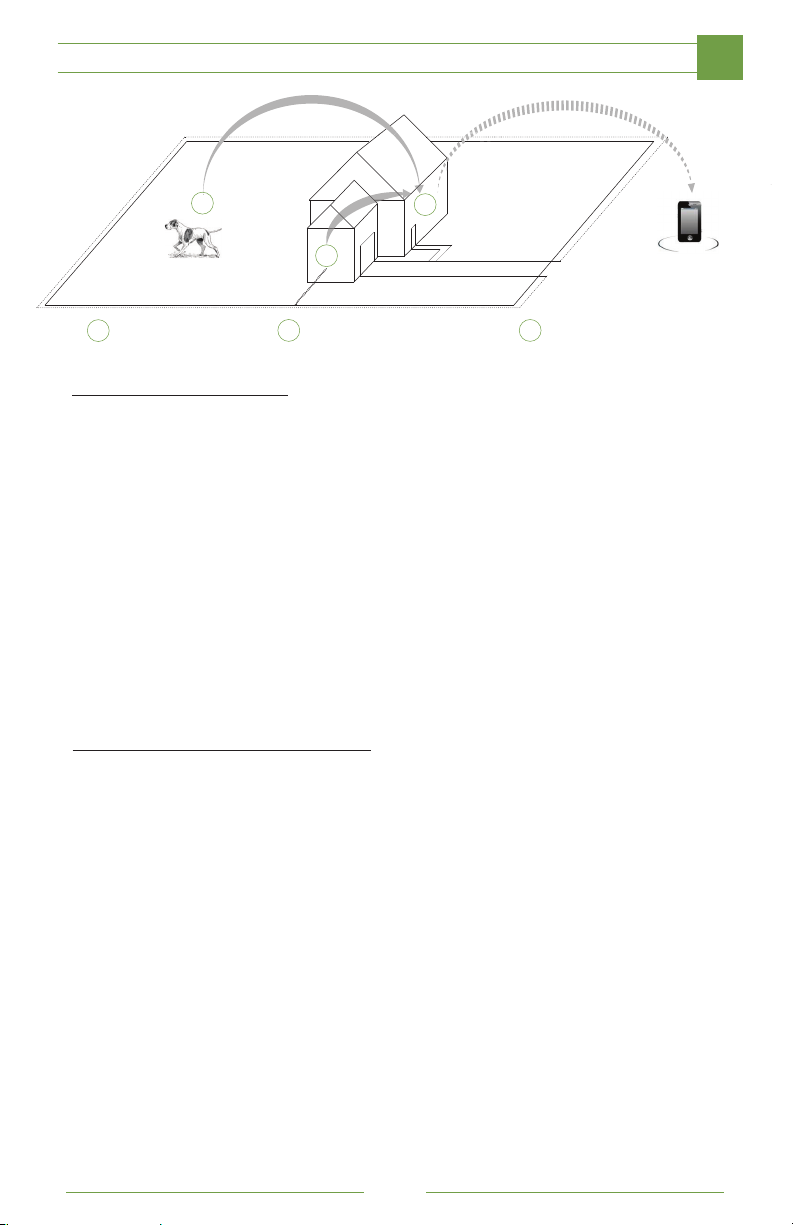
SYSTEM BASICS
1
1
3
2
SmartCollar
1
SmartFence Transmitter
2
SmartFence Portal
3
SmartFence Information
Your Dog’s Profile Set up your pet’s profile with a photo! Your profile
displays your pet’s Breed, Size and Date of Birth.
Manage your Contacts Add your contact information to receive important system
information via text messages and/or email. Add
multiple contacts for family members and dog walkers.
Activity Tracking See if your dog is Active, Moderately Active, Lightly
Active, or Resting under your App “Activity” tab!
Monitor daily, weekly, and monthly activity levels.
System Settings Monitor your system settings; Training Level, Training
Mode, Rate, Frequency, and Range on your App profile
under the “settings” tab on your bottom navigation
(Also displayed on your SmartFence Transmitter or SmartCollar)
SmartFence Notification Options
Battery Status Your SmartFence will notify you when it’s time to
replace your SmartCollar battery!
Boundary Connectivity If the Boundary Loop has been broken or disconnected
your Smart Fence will let you know! An alarm will
sound from your transmitter and a text alert can be sent
to your phone.
No Collar Connection If your Portal loses its connection with your SmartCollar
for a period of time it can alert you! This could be
triggered by a number of events: dead battery,
dog chewing on the receiver, or the collar is out of range.
No Transmitter Connection If your Portal loses its connection with your SmartFence
Transmitter it can alert you. This could be triggered by a
number of events: a loss of power, failed component,
or the Transmitter is out of range.
*Boundary Challenges Boundary Challenges are logged but not reported. If you
would like to retrieve boundary challenge information
contact your local dealer.
7
Page 8
HOW THE HIDDEN FENCE IS INSTALLED
2
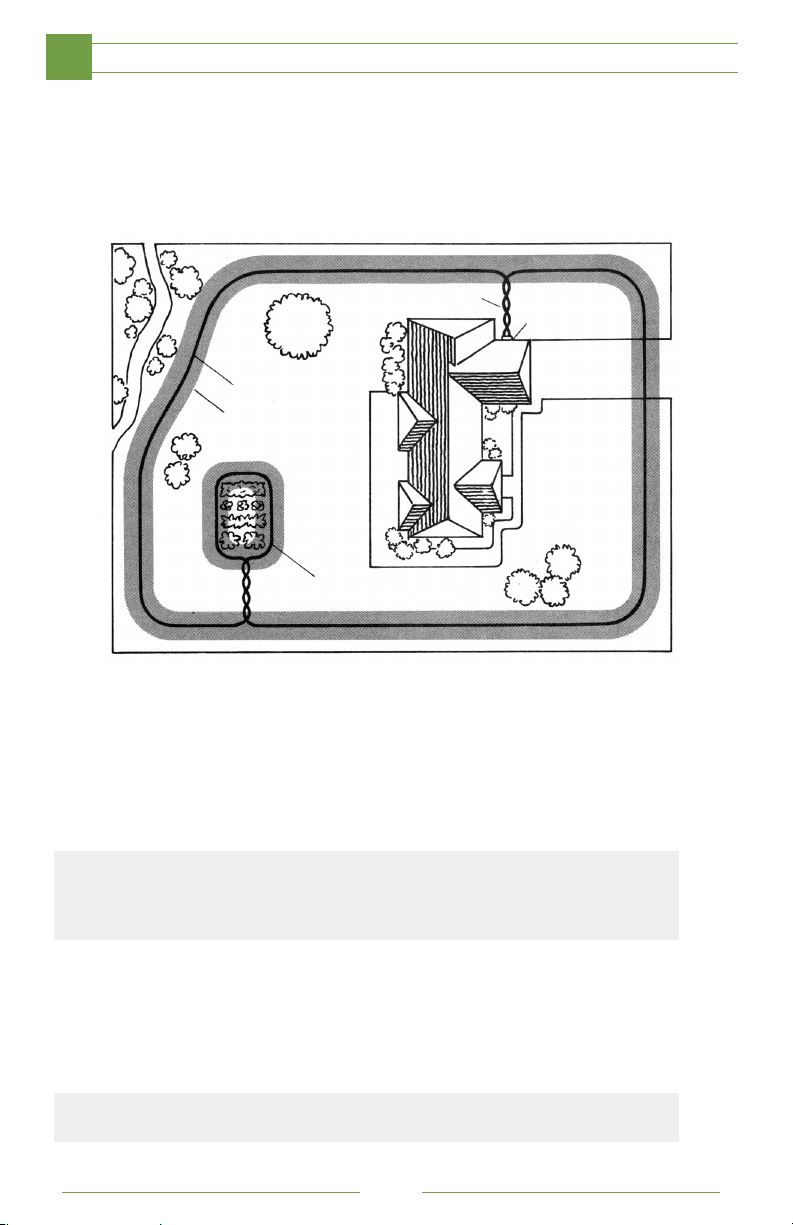
The boundary wire creates the perimeter for the DogWatch Hidden Fence System,
and can enclose any area up to 200 acres. The wire is buried 3-4” beneath the
surface of the yard or can lie on top of the ground (e.g. in wooded or rocky areas).
Each boundary wire is customized for your home, and can be configured to keep
your pet out of the pool, out of your garden, or away from other designated areas.
Twisted Wire
Boundary Wire
Signal Field
Garden Loop
T-10 SmartFence Transmitter: The T-10 SmartFence Transmitter sends a coded
FM radio signal through the boundary wire. All boundary settings can be manual-
ly adjusted on the SmartFence Transmitter.
Boundary Wire: The boundary wire, buried below or above ground, carries the
coded FM radio signal around the perimeter of your property. In order for the
system to work properly, the boundary wire must form a continuous loop.
NOTE: Any break in the wire will cancel the signal field. If the boundary wire is broken or
unplugged, the green Range & Boundary Loop Monitor Display (LMD) light will go out and
an audible warning will sound. Most breaks are caused by lawn/garden equipment. If you
cannot visibly locate the break, contact your Authorized Dealer for service.
Transmitter
& Surge
Protector
Signal Field: The radio signal is transmitted from the boundary wire in all directions.
It can be used to keep dogs in or out of an area. The signal is adjusted by the Range
Control on the Transmitter to create a signal field on each side of the wire. Your
Dealer has installed the wire to the recommended width of 8-10 feet and has carefully
configured the corners to avoid sharp angles.
NOTE: A twisted wire will result in no signal field at the wire and will not warn or correct your
dog when approaching or crossing the boundary at these locations.
8
Page 9
HOW THE HIDDEN FENCE IS INSTALLED
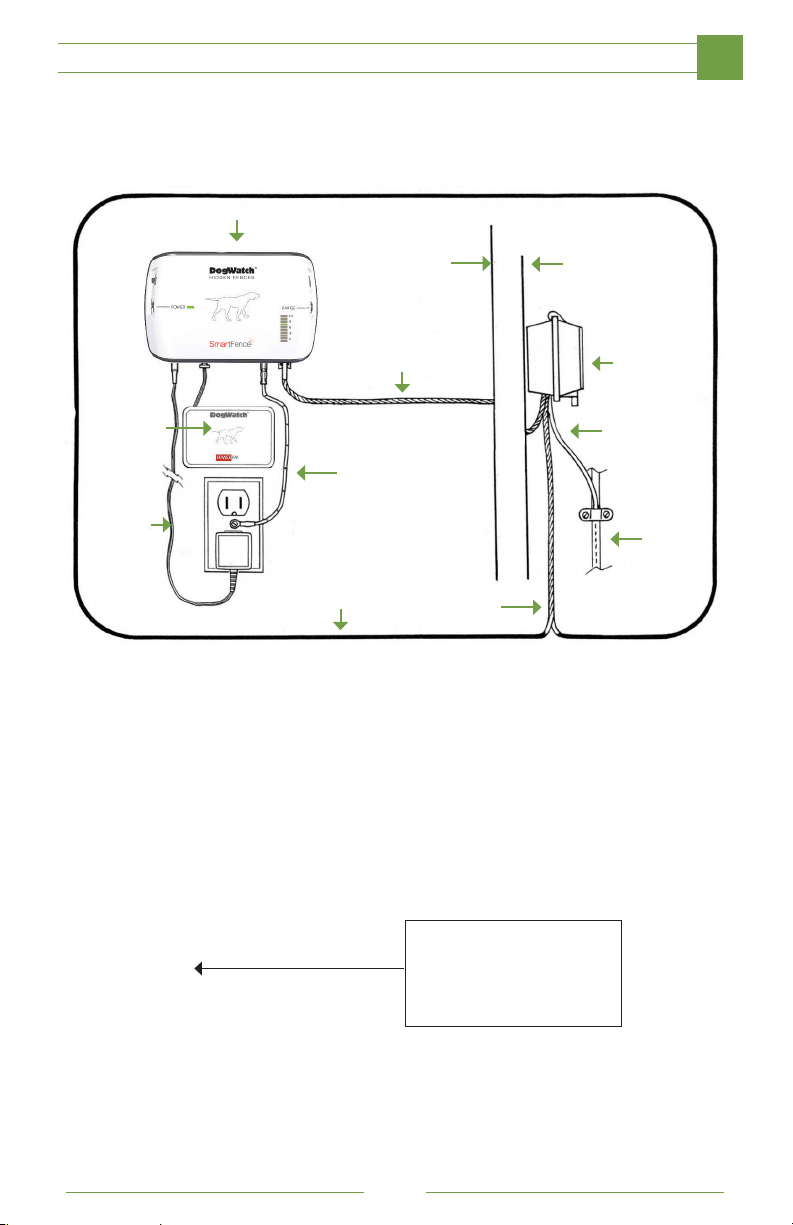
Your SmartFence Transmitter is mounted on a wall near a power outlet. The
Transmitter is connected to your boundary wire through a surge protector which
prevents lightning power surges from damaging your system (as shown below).
Transmitter
Inside Wall Outside Wall
2
Zip Cord
PowerPak
(Optional)
Ground
Wire
Power
Supply
Boundary Wire
DogWatch Smart System Components
• T-10 SmartFence Transmitter
• SmartCollar
• Adjustable Collar Strap
• Contact Posts (2)
• Lock Washers (2)
Surge
Protector
Ground Wire
Ground
Rod
Twisted
Wire
• Collar Bone
• Multi-Tool
• Battery
• Surge Protector
• Training Leash
• Power Supply (for Transmitter)
• PowerPak™ (optional)
• Magnet
• Test Light
• Contact Post Wrench
• Battery Cap Tool
9
Page 10
SMARTFENCE PORTAL SETUP
2
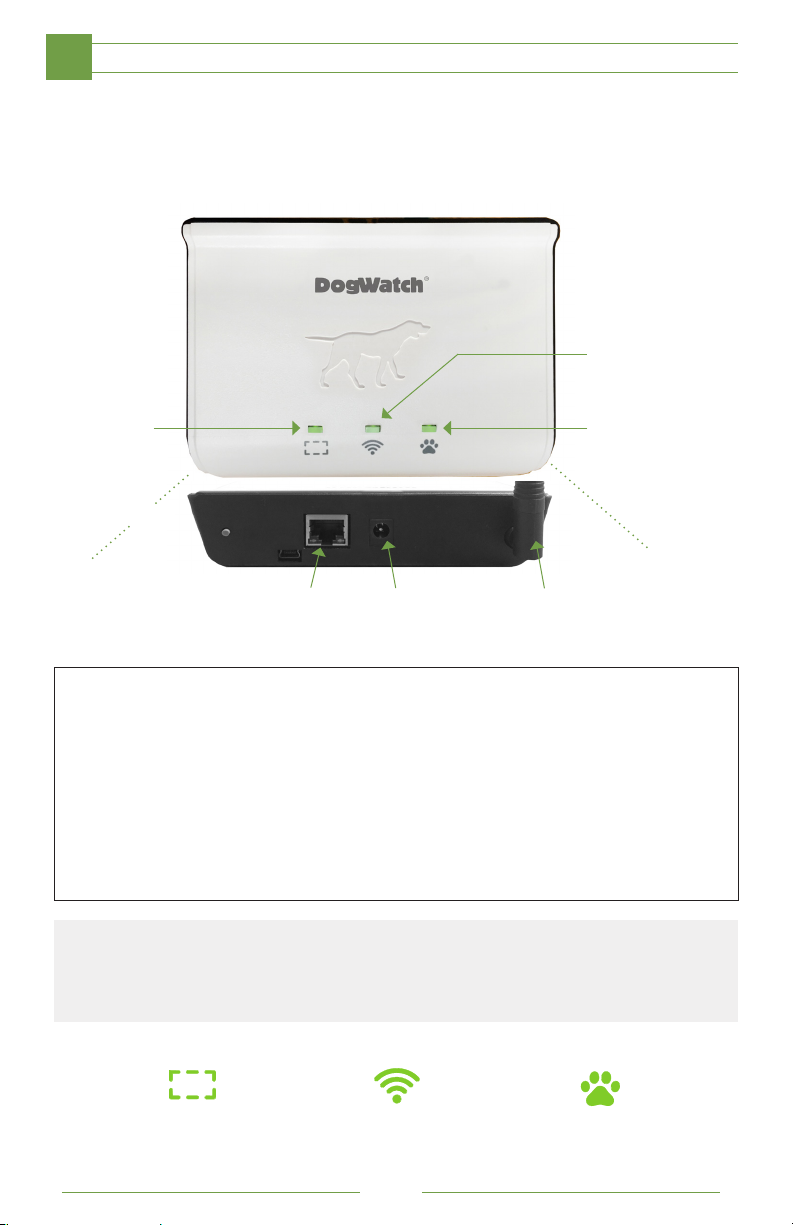
The SmartFence Portal collects all status information from your SmartCollar and
SmartFence Transmitter and sends it to you! Your Portal will also indicate that your
system is working properly via three indicator lights: Boundary Loop, Internet, and
Collar. (You must complete App profile setup for all indicator lights to turn green.)
Internet
Connection
Status
Boundary
Status
Rear View
Ethernet
Port
Follow these steps to setup your SmartFence Portal:
1. First, connect the Portal to Power.
Plug the power cord into the nearest outlet located by your router
and connect to the rear port on your Portal.
2. Second, connect the Portal to the Web.
Plug your ethernet cord into one of the rear ethernet ports on your
router and connect the other end of your ethernet cable to the rear
port to the Portal.
NOTE: Once the Portal is plugged into power and connected to an ethernet port on your router the
Center Internet Indicator light will turn green. Once it connects to your SmartCollar and Transmitter
the Boundary Loop and Collar Indicator will also turn Green
Power
Supply Port
Antenna
Collar
Status
Boundary Loop
Indicator Light
Internet
Indicator Light
10
Collar
Indicator Light
Page 11

SMARTFENCE WEBAPP PROFILE SETUP
STEP 1 - Activate Your Profile
1. Go to smartfence.dogwatch.com
(On Smartphone, Tablet, or computer)
2. Click on the link: New Account
Follow prompts for a New System Setup
Account Information
Enter your email address and create a password that you
will use to login into the SmartFence WebApp.
System Information
Default system name is “Home”. Your serial numbers are
printed on your Transmitter, Portal and SmartCollar.
User Information - Enter appropriate information in each field.
Dog Profile Information - Follow prompts.
Congratulations you have activated your SmartFence!!
To save your SmartFence WebApp to your mobile device homescreen
simply follow Step 2.
2
STEP 2 - Save Your Profile to Your Phone Homescreen
For iPhone and iPad
1. Open Safari and visit smartfence.dogwatch.com
2. Tap the Bookmark icon and select Add to Homescreen
3. Confirm by clicking “Add”.
This DogWatch SmartFence Icon should now appear on your
iPhone or iPad Homescreen and is your link to your SmartFence
profile.
For Android
1. Open Chrome and visit smartfence.dogwatch.com
2. Tap the Menu Button and select “Add to Homescreen”
3. Confirm by clicking “Add”.
This DogWatch SmartFence Icon should now appear on
your Android Homescreen and is your link to your SmartFence
profile.
11
Page 12
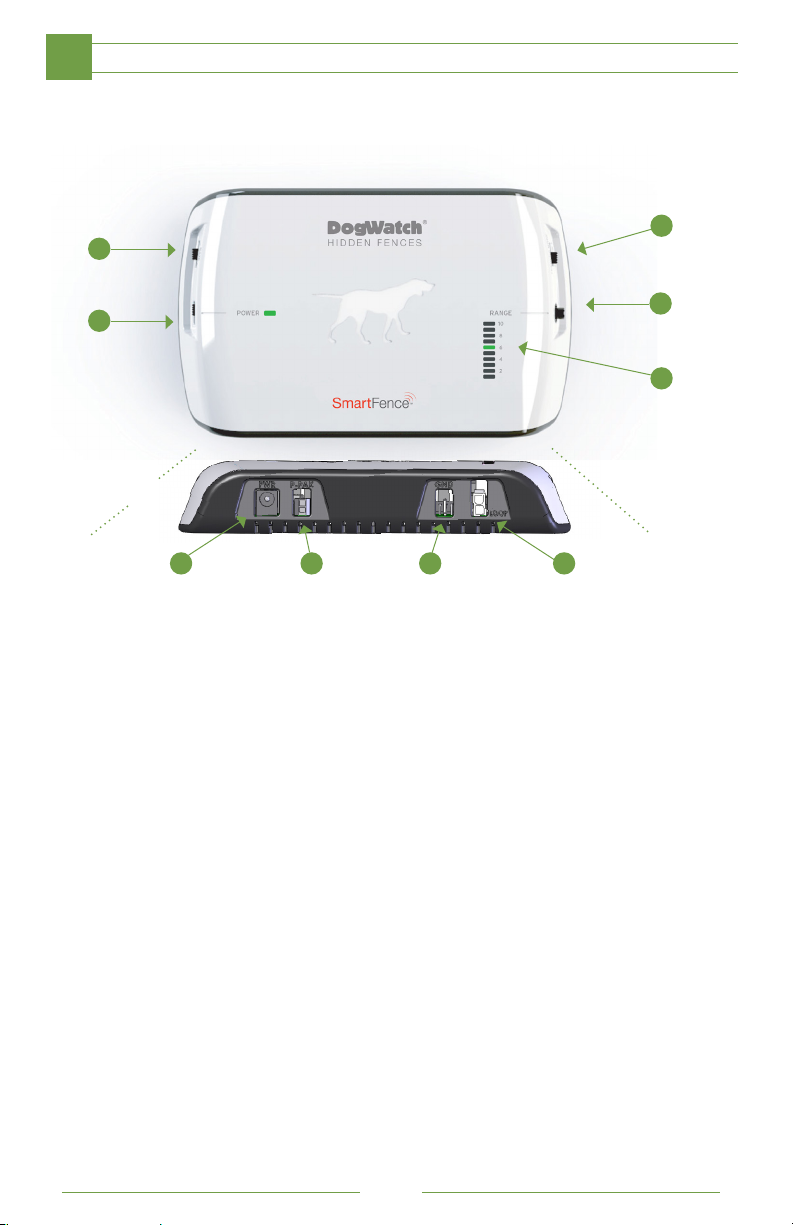
SMARTFENCE TRANSMITTER FEATURES & SETTINGS
3
The Transmitter’s coded digital FM radio signal can be adjusted, allowing you to
control the settings of the Hidden Fence around your property.
8
9
Rate
Adjustment
1
Power
On/Off
Training
Mode Switch
7
Range
Control
6
Range & Boundary
Loop Monitor
Display
Bottom View
2 3 4 5
Power Supply PowerPak
* Never adjust the transmitter while your dog is wearing the receiver collar.
Ground Wire Boundary Loop Plug
™
1. Power On/Off: This switch gives you easy access to turn the transmitter ‘ON’ or ‘OFF’. The
green Power light on the front panel lets you know that it is operating properly.
2. Power Supply: The transmitter is powered by the power supply/adapter provided with the
transmitter. The power supply is plugged into a properly grounded 110 volt outlet and the
adapter is plugged into the “PWR” jack on the bottom of transmitter.
3. PowerPak™: The optional PowerPak battery back-up keeps the Transmitter operating in the
event of a power failure. When the transmitter is being powered by the battery back-up, the red
power light will remain off. The PowerPak plugs into the Transmitter at “P-PAK”.
NOTE: After the SmartFence is installed and set up complete, the WebApp will alert
you if and when the PowerPak battery back-up has been activated.
4. Ground Wire: The green ground wire connects to the Transmitter at the location labeled “GND.”
The round connector on the green ground wire is attached under the screw on the outlet
faceplate. It will, however, only be effective if your outlet is properly grounded. If you have any
questions about having a properly grounded outlet, consult your local electrician.
5. Boundary Loop Plug: Your system includes a zip cord with a plug on one end. This plug
fits into the hole marked “Loop” on the bottom of the transmitter. This is the beginning of the
boundary wire that is buried in your yard.
NOTE: After the boundary wire has been properly installed and plugged into the
Transmitter, the Range and Boundary Loop Monitor light will turn on.
12
Page 13
SMARTFENCE TRANSMITTER FEATURES & SETTINGS
6. Range and Boundary Loop Monitor Display: The Range and Boundary Loop
Monitor Display (LMD) provides a visual indication of the status of your boundary wire
and signal range. On traditional boundary wire configurations, each number on the
scale represents the signal range in feet. Range is the distance the signal is being
broadcast from each side of the wire. A significant change (drop) in signal range could
indicate a partial wire break or other boundary wire problem. If the boundary loop wire
is broken or the signal is interrupted, the light will go out and an audible warning from
the Transmitter will sound. You should check around your property for a visible wire
break. Contact your dealer for troubleshooting tips or to schedule an service call.
NOTE: For non-traditional wire configurations where the boundary wires may be
close to one another, the LMD may not measure the boundary signal accurately in
feet, but is a visual setting reference point. Your DogWatch Dealer will explain the
LMD setting and your actual signal range.
7. Range Control: The radio signal is transmitted from the boundary wire in all directions.
The signal range (the distance the signal broadcasts from the wire) is adjusted by the
Range Control on the transmitter. The recommended signal range (on each side of
the wire) is 6-10 feet. Your DogWatch Dealer will adjust the range according to the
personality and traits of your dog. Consult your DogWatch Dealer before making any
adjustments yourself.
Signal Field: The signal field (the area in which the dog’s receiver collar detects the
signal) has two areas. The outer-most part of the signal field (~13% of the signal field)
triggers an audible warning. If your pet continues further into the signal field, he will
receive a correction. To prevent your dog from entering the signal field and remaining
in the audible area (causing depletion of the battery), the receiver transitions from an
audible warning to a short warning correction after a period of 15 seconds. This will
not activate if the receiver is set to the “Audible Only” Training Level (Level “0” - see
Setting the SmartCollar Levels on pg. 16)
3
8. Training Mode: The Training Mode switch allows you to choose between two pet-
friendly training options: Basic (Mode A) and QuickAlert™ (Mode B). In the Basic
setting, your pet receives the normal audible warning followed by a correction if he
continues into the signal field. When set to QuickAlert (used primarily for harder to train
dogs), your pet receives a very quick “alert” correction followed by the normal audible
warning and correction.
NOTE: If you have multiple dogs on the system, the Training Mode setting affects all
receivers. They are ALL set to the same mode, Basic or QuickAlert™.
9. Rate: The Rate can be adjusted to three levels (1 = slow, 2 = medium, 3 = fast).
When your dog gets a correction, he receives it in a series of pulses. Increasing the
Rate delivers a greater number of pulses per second. The adjustable Rate feature
operates only when the Receiver Training Level is set to Level 1, 2, or 3.
(See the SmartCollar Levels and Transmitter Settings chart on pg. 18)
13
Page 14
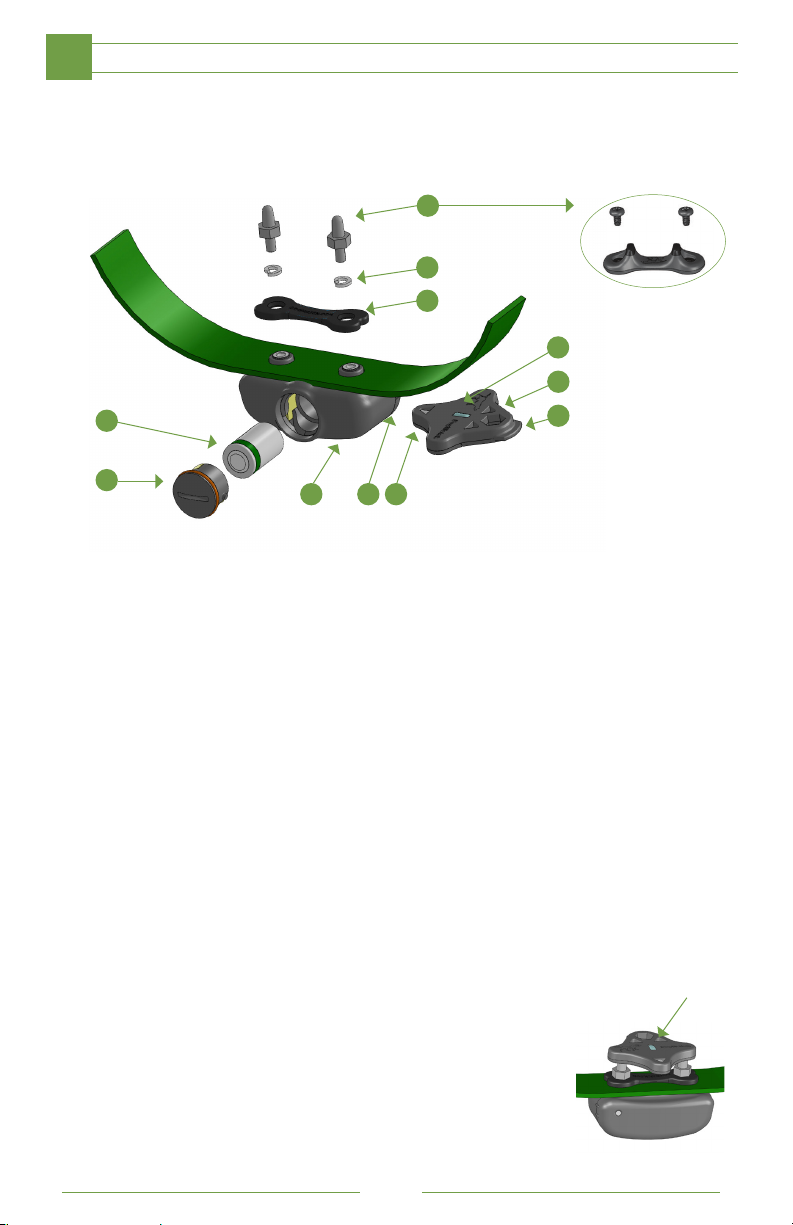
SMARTCOLLAR™ FEATURES
3
The SmartCollar is a lightweight radio receiver worn by the dog identifies the
coded FM radio signal from the boundary wire. It creates an audible warning
followed by stimulation if he comes too close to the boundary wire. It operates on a
rechargeable battery and is waterproof when the battery charge port is closed.
11
Contact
Posts
Lock Washers
10
Collar
9
Bone
3.5 Volt
Battery
1
Battery Cap
2
1. 3.5 Volt Battery: The SmartFence has a battery life of 2 years. (See pg. 16 for
more battery information)
2. Battery Cap: Our waterproof battery cap protects your battery from the elements.
Remove using the Battery Cap tool (#6)
Status
3 4 5
Light
(on top side)
Magnet
Training Level Adjustment Location
GentileFit Contact
Posts (optional)
Test Light
8
Contact Post Wrench
7
Battery Cap Tool
6
3. Status Light: The light continuously monitors your receiver and provides
information including training levels and battery status. (See pg. 17 for details)
4. Training Level Adjustment Location: Your receiver provides eight ‘training
levels’ that allow you to customize the receiver setting to your dog’s individual
needs: Audible Only, Level 1 (extra low), Level 2 (low), Level 3 (low medium), Level 4
(medium), Level 5 (medium high), Level 6 (high), and Level 7 (extra high). When the
receiver is first shipped from the manufacturer, it will automatically be set to Training
Level 2 (low). (See ‘Setting the Receiver Levels’ on pg. 16)
5. Magnet: The Magnet on your multi-tool is used to adjust the Training Level (See
‘Setting the Receiver Levels’ on pg. 16)
6. Battery Cap Tool: This tool is used to open your battery cap (See pg. 16 for more
information on how to use the tool)
7. Contact Post Wrench: Use to securely fasten Contact Posts.
8. Test Light: The test light allows you to test the receiver.
Hold the test light over the contact posts and carry the
receiver into the signal field a few feet from the ground.
When the receiver picks up the signal from the boundary
wire, the audible or vibration warning will activate and the
test light will come on.
See page 16 for how to change your battery and reset your receiver.
Test Light
14
Page 15
SMARTCOLLAR™ FEATURES & SETTINGS
9. Collar Bone: The Collar Bone, metal lock washers and contact posts fasten the
receiver to the nylon collar. (A Collar Bone is not used with the GentleFit™ posts)
10. Lock Washers: See #9 above.
11. Contact Posts: The receiver comes with a set of stainless steel contact posts
(stainless steel or composite with stainless steel tips.) Conductive plastic ‘GentleFit’™
contact posts may be purchased separately if preferred or if recommended by your
Dealer.
NOTE: Your DogWatch Dealer will determine the correct set based on your dog’s coat,
neck shape, and skin sensitivity. The posts must make contact with the skin in order
for the dog to feel the correction. In certain cases, your dealer may recommend
clipping some of the hair around the contact posts so that they can touch the skin
more easily. Use care if you find it necessary to tighten the contact posts with the
collar wrench, as over-tightening could cause damage to the receiver.
3
FUNCTIONALITY FEATURES
Antenna:
The receiver’s omni-directional antenna design assures optimal reception
from the signal field.
SafeLink® Digital FM Design:
Our patented FM design allows the SmartCollar to recognize and activate only to our
unique radio signal. This protects your pet from unintentional correction caused by stray
radio signals which may be emitted by other electronic devices.
AutoMemory™:
Our patented AutoMemory™ feature automatically adjusts the correction level of the
receiver when your pet challenges the boundary. When the receiver is set to one of the
AutoMemory levels, and the dog enters the signal field, the dog will receive the correction
of the initial setting. If your dog leaves the signal field, the receiver will automatically advance
the correction level setting by one, and only one level. If the dog does not re-enter the
signal field within the next 24-hour period, the receiver defaults to the original setting. The
AutoMemory feature operates when your Receiver Training Level is set to 4, 5, or 6.
FastReact™ Time:
Whether your dog, strolls, runs or sprints into the Avoidance Zone, the receiver will react—
and correct—within 1/8 of a second (.125 sec).
Automatic Shutdown:
The DogWatch SmartFence is designed to protect your dog from an over-correction in
the unlikely event that your dog gets caught in the signal field. If your dog does not exit the
signal field, the receiver will automatically stop correcting after 15 seconds—protecting
your dog from over-correction. The receiver will automatically reset once the dog leaves the
signal field.
15
Page 16
SMARTCOLLAR™ FEATURES & BATTERIES
3
BATTERIES
Resetting the Low Battery Light
1. Remove the old battery.
2. Before inserting a new battery, let the SmartCollar sit for five minutes with no
battery. If you forget to wait prior to inserting a new battery, the “low battery” light
will continue to blink red until it automatically resets itself after 24 hours.
3. After five minutes, insert the new battery.
Battery Insertion Instructions
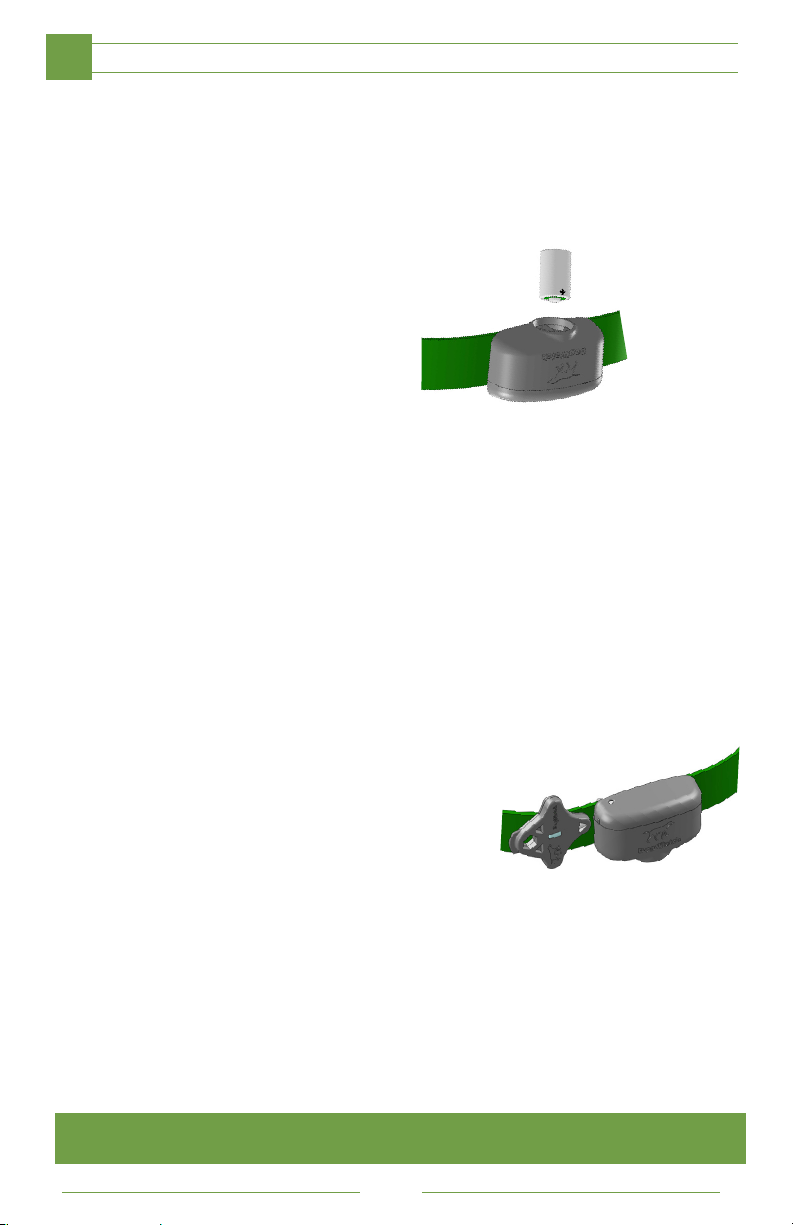
The SmartCollar is powered by
a 3 volt (1/3 N) lithium battery
with a battery life of up to 2 years.
The Positive end of the battery
must be insterted down.
Battery Plans
Ask your DogWatch Dealer about a battery plan. If your DogWatch Dealer does
not offer a battery plan, you can join the DogWatch Battery Program, where a new
battery is mailed to you every 6 or 24 months, depending on the type of receiver
you own. Call DogWatch at 800-793-3436 or join through the website at
www.dogwatch.com/customer-resources/outdoor/battery-plan-sign-up/
IMPORTANT: The use of any battery other than a battery authorized by DogWatch Inc.
can cause erratic operation of the SmartCollar and could cause permanent damage.
The use of any unauthorized battery will void the warranty on the SmartCollar.
Insert battery POSITIVE end down.
SETTING THE RECEIVER LEVELS
You can customize the SmartCollar Receiver to one of 20 training settings,
as outlined in the chart below.
Your DogWatch Dealer will start the training on the
appropriate level according to your dog’s personality
and traits. If you need to change the training level on
the receiver, hold the magnet on your ‘multi-tool’ to
the training level adjustment location on the side of
the receiver (see right). Hold the magnet steady and
you will hear a series of beeps that indicate the current
training level. The “Audible Only” level is one long beep,
Level 1 is one short beep, Level 2 is two short beeps,
Level 3 is three short beeps, etc. The training level will continue to advance
while the magnet is held in position. When you reach the desired setting, pull the
magnet away from the receiver. The receiver is now set.
Note: Any time the magnet activates the receiver, the number of beeps will indicate
the current training level. As long as the magnet is held in place, it will advance the
receiver to the next training level and continue to cycle through the settings in the
order shown in the chart on pg. 18.
***Important***
Never change the Receiver settings when your dog is wearing the SmartCollar.
Use the magnet to set the
training level on the Receiver.
16
Page 17
SMARTCOLLAR™ STATUS LIGHT
STATUS LIGHT
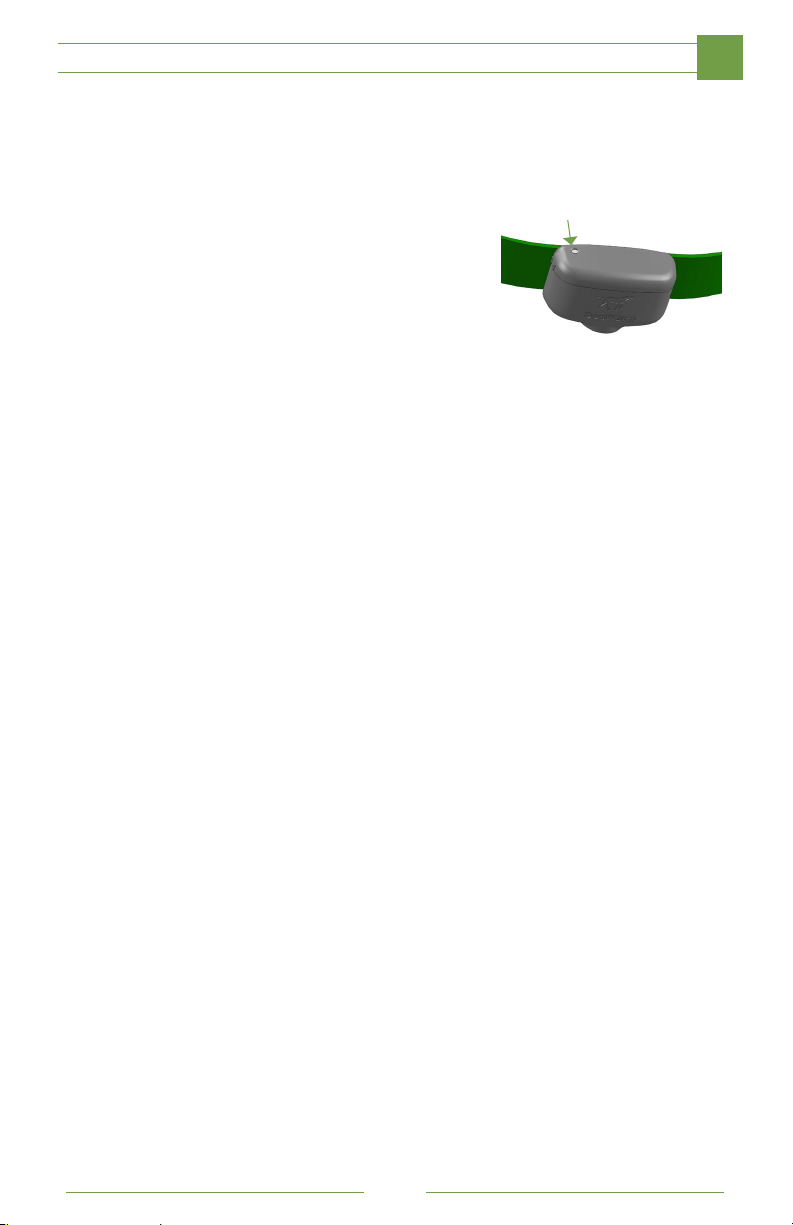
The status light on your SmartCollar continuously monitors your receiver and
provides these features.
• Start-Up When you first insert the battery,
the status light will flash red and green.
This indicates that the receiver has started
properly. Once started, the status light will
continue to flash green once every 40 seconds
indicating normal operation. In the event that
the light does not flash, check the battery to be
sure that it has been inserted properly.
• Training Level Indicator When programming the training level of your receiver
(see page 14), the status light will flash green in conjunction with audible
beeps. The number of flashes/beeps will equal the training level you have
chosen.
• Signal Field Indicator When testing the receiver in the signal field, the status
light will flash green when the SmartCollar is in the audible zone and will flash
red and green when the SmartCollar is in the correction zone.
• Correction Alert (TattleTale™) You will be able to tell if your pet has tested
the boundary by looking at the status light. The status light will double flash
green every 40 seconds during the 24-hour period after the dog has entered
the boundary area.
Status Light
3
• Battery Indicator This feature monitors the voltage level of the battery. Once
the SmartCollar detects that the battery has reached a low voltage level, the
status light will change from blinking green every 40 seconds to blinking red
every 10 seconds. This indicates that your battery is close to the end of its
useful life and you should change the battery within the next 3-4 days.
17
Page 18
SMARTCOLLAR LEVELS & TRANSMITTER SETTINGS
3
RECEIVER
TRAINING
LEVELS
Audible Only*
(extra low) 1
(low) 2
(low medium) 3
(medium) 4
(medium high) 5
(high) 6
(extra high) 7
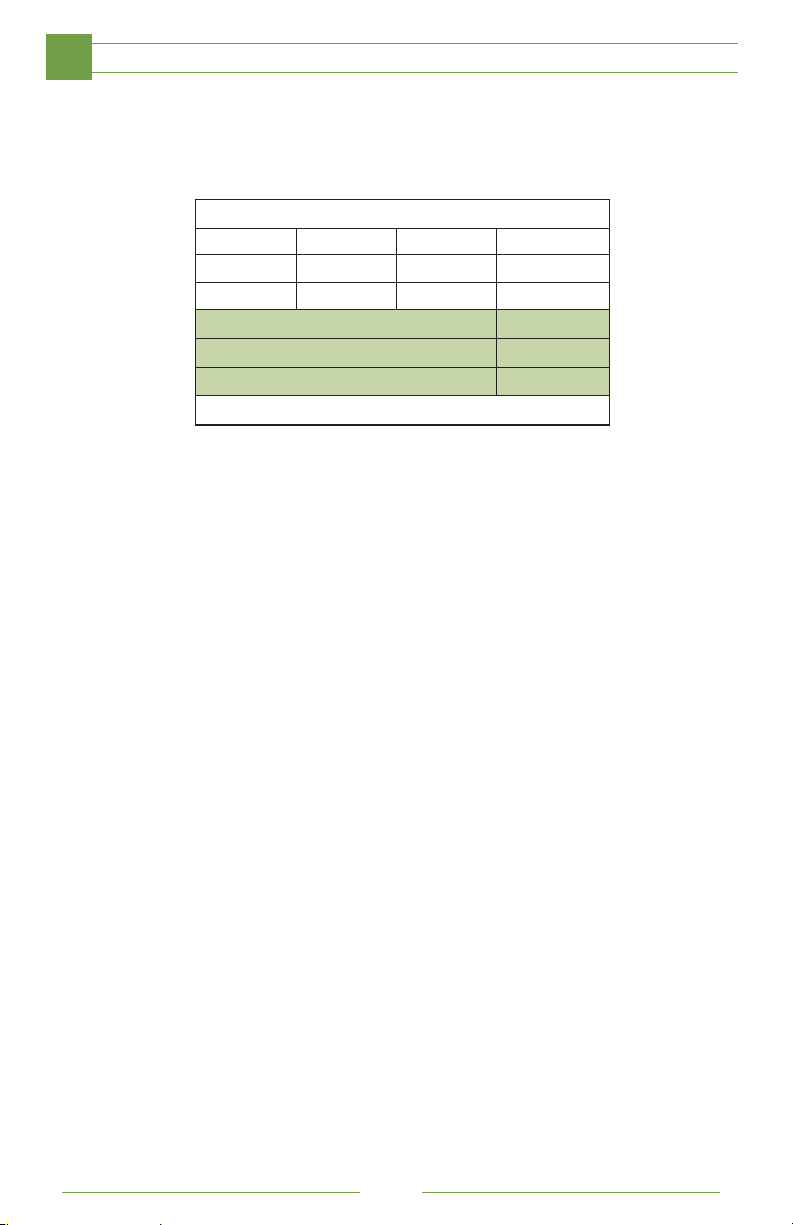
For example: If the receiver is on Level 1 and the transmitter is on Rate 1, your dog
will receive the lowest level of correction and the least number of pulses per second.
Please, remember that if your Receiver Level is set to 1, 2, or 3 and you switch
the Training Mode to QuickAlert (Mode B), your training setting may change. For
example, if the receiver is set to Level 3 and the transmitter is set to Rate 1, your dog
will receive a slow correction. If you switch your Training Mode to QuickAlert, your
dog will now receive a fast correction.
TRANSMITTER MODE AND RATE SETTINGS
Mode A
Rate 1
Slow Medium Fast Slow
Slow Medium
Slow Medium Fast Fast
Audible* and XXX Fast Correction are Simultaneous
Mode A
Rate 2
Transmitter Rate Fixed at Medium
XX-Fast
Mode A
Rate 3
Fast
QuickAlert™
Mode B
Medium
Fast Fast
X-Fast X-Fast
XX-Fast
AutoMemory™
self activates
and advances
}
to the next level.
PROGRAMMING TIPS
Recommended Settings: The majority of dogs respond well to Transmitter Rate
Setting 2 or 3 and a Receiver Training Level 3, 4 or 5. Sensitive or small dogs that
train easily respond best to lower rate settings and lower training levels. If your dog is
not responding to training, your DogWatch Dealer will adjust your system to a higher
training level.
If Your Dog Is Hard To Train: Training Levels 5, 6 and 7 are specifically designed to
meet the needs of hard to train or stubborn dogs. These settings will provide the extra
correction that some dogs need as part of their training.
Multiple Dogs: Our receivers allow you to select individual settings for each dog.
This means that one SmartCollar can be set to Audible Only* during training while
another dog is still protected with the correction feature enabled. It is recommended
that the Audible Only* setting be used only during supervised training sessions.
* Vibration Receivers replace the audible tone with a vibration feature. The vibration
feature works well for hard-of-hearing dogs and other dogs who may be sensitive to
the audible tone.
18
Page 19
Boundary
Status
6
Rear View
SMARTFENCE PORTAL FEATURES
Internet
Connection
5
Status
Collar
4
Status
3
Ethernet
Port
1 2 3
Power
Supply Port
Antenna
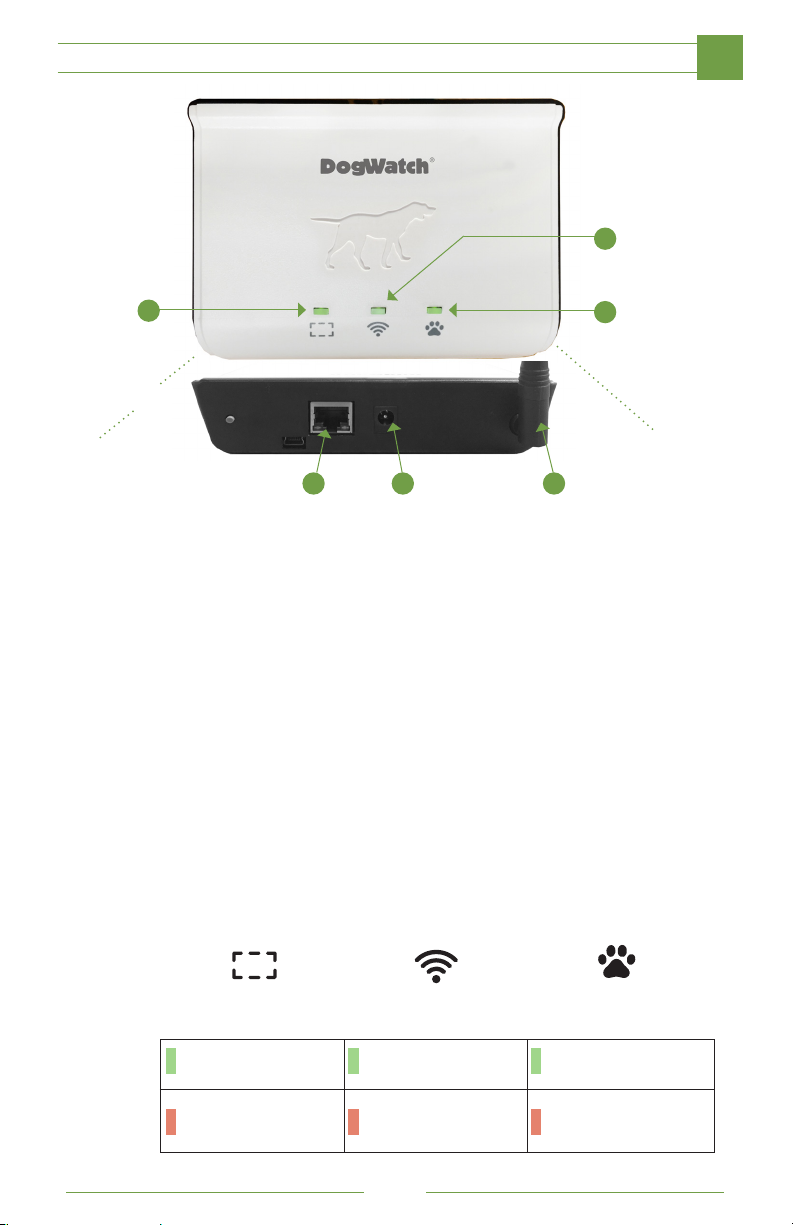
1. Ethernet Port: The SmartFence connects to your existing home network and
transmits information to the WebApp. Connect your ethernet cable to your Portal
here.
2. Power Supply Port: Connect your power supply here.
3. Antenna: The antenna assists the Portal in communicating with your
SmartFence system. Keep your antenna raised when Portal is in use.
4. Collar Status: The collar status light indicates if there are any notifications
from your SmartCollar. Green = No Notifications, Red = Low Collar battery.
5. Internet Connection Status: The internet connection status light indicates if
your system is properly connected to internet. Green = Connected, Red = Not
Connected. If your Portal is not connected you must check your router.
6. Boundary Status Indicator: The boundary status light indicates if there are
any notifications from your Transmitter. Green = No notifications, Red = Wire
Break (or) Lost Communication which could mean you have lost power.
Light
Indicator
Green
Red
Your Connection
to the Boundary Loop
Your Boundary Loop is
Working Properly
You May have a Wire Break
(Check your Transmitter
Power and Boundary Loop)
Your Connection
to the Internet
Connected to the Web
Not connected to the Web
(Check your Router)
Your Connection
to the Collar
Collar Is Working Properly
Collar Battery Is Low
(or)
We Have Not Heard From
Your Collar (Check Battery)
19
Page 20
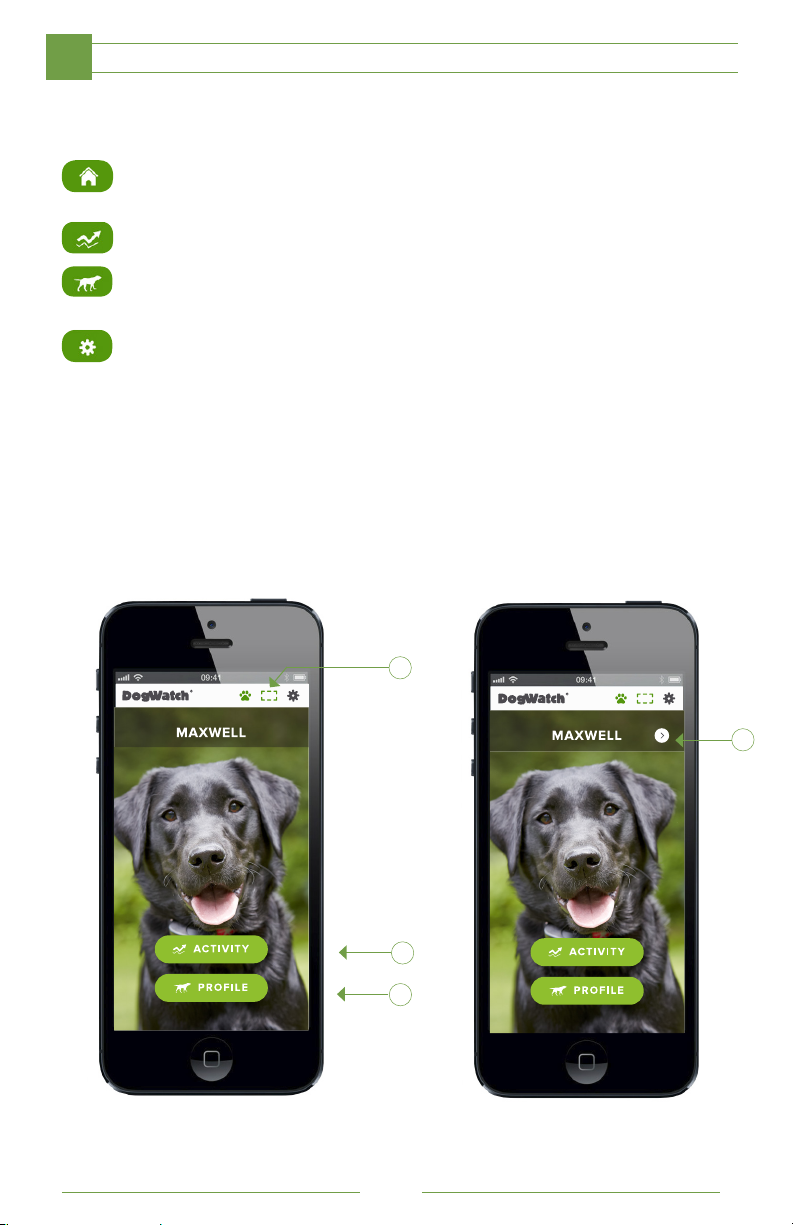
WEBAPP PROFILE FEATURES & SETTINGS
3
DogWatch SmartFence’s Home, Activity, Profile and Settings are areas that you’ll use
often on your SmartFence profile site.
Home: Get a quick view of your DogWatch system status and you pet’s
activity levels.
Activity: See how active your dog is daily, weekly and monthly.
Profile: Manage your pet’s information including a Photo, Breed, Size, and
Date of Birth.
Settings: Manage DogWatch settings & notifications for yourself and your
contacts. Choose which notifications you and your contacts
receive and how they’re delivered (email/text). You can also see
current and past notifications.
Home
Below is your Home screen, where you can:
A. Get a quick look at Dog Activity
B. Get updates on System Status (If you have an alert the icon will turn red)
C. View your Pet Profile
D. Two Dog Toggle
B
A
C
System Is Working Properly System Alert (Collar)
20
D
Page 21
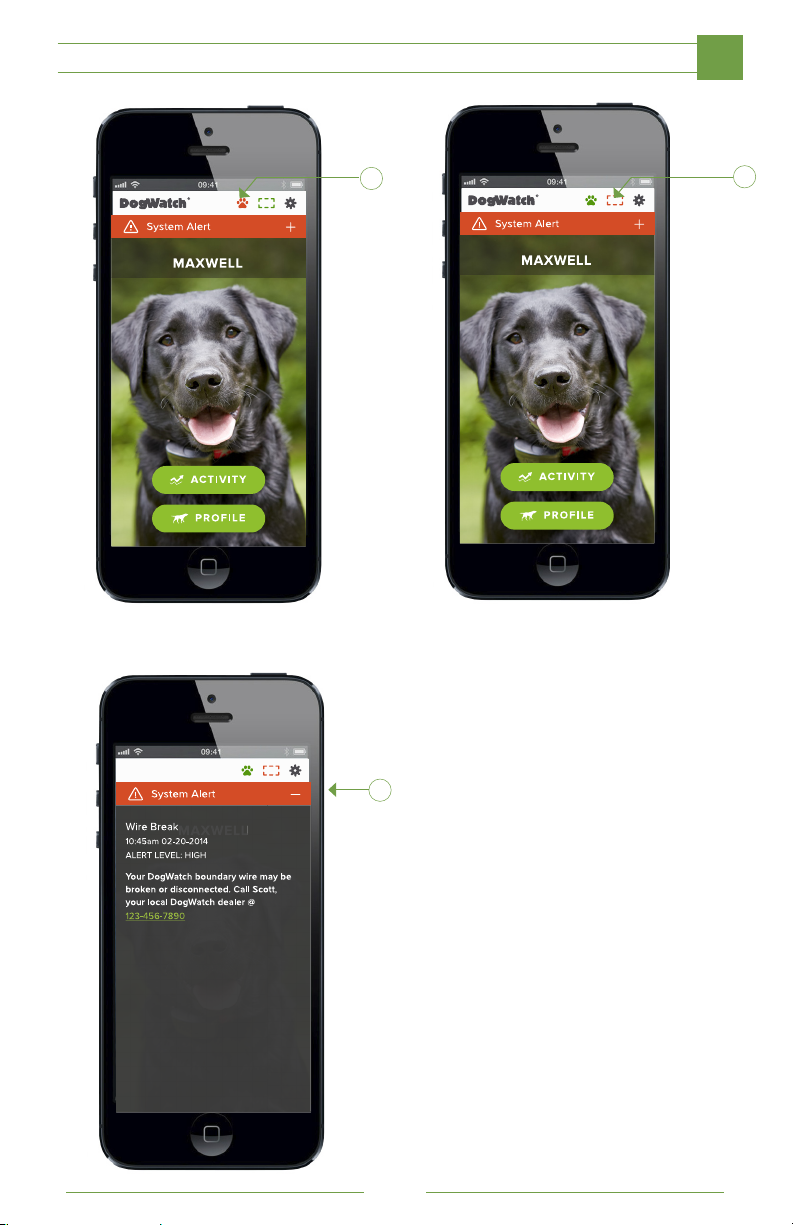
WEBAPP PROFILE FEATURES & SETTINGS
3
E
System Alert (Collar) System Alert (Transmitter)
E. SmartCollar Alert
G
F. SmartFence Transmitter Alert
G. Alert Expand Menu
F
21
Page 22
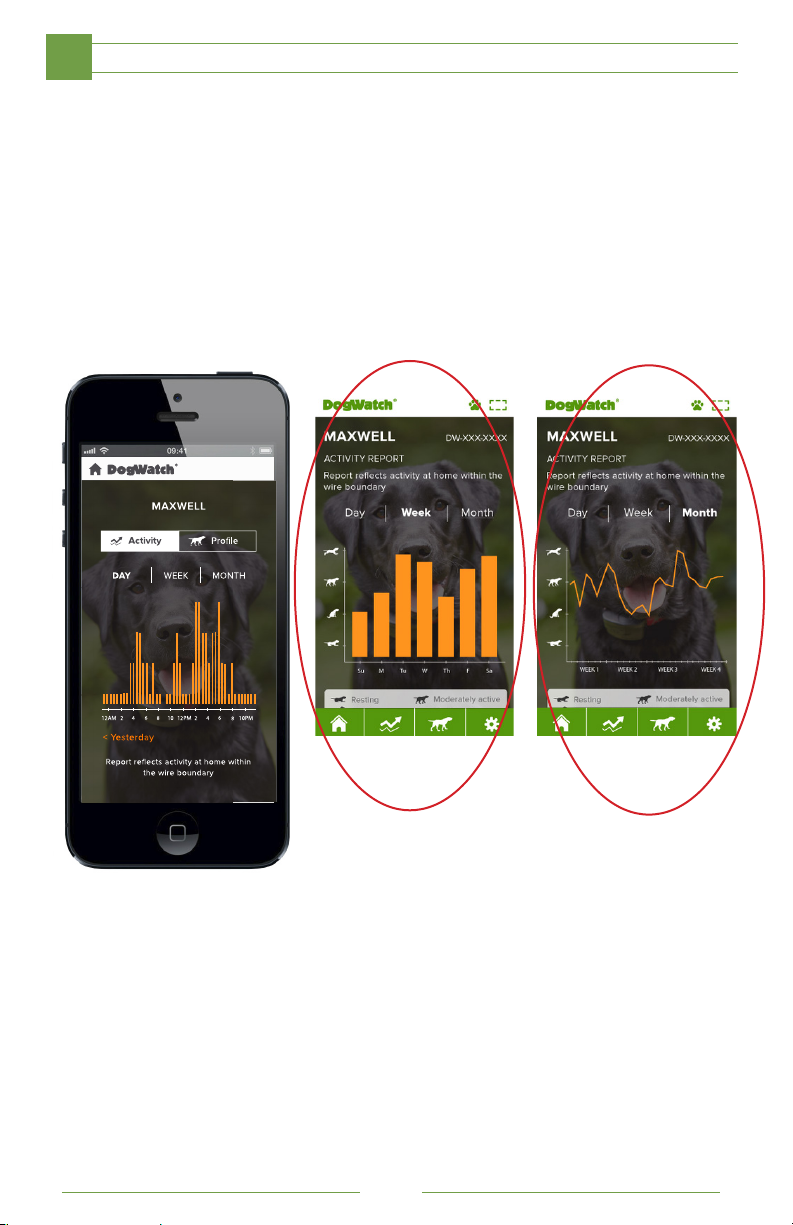
WEBAPP PROFILE FEATURES & SETTINGS
3
Activity
Below are your Activity screens, where you can:
A. See daily, weekly, or monthly activity views
A.
Weekly Activity View Monthly Activity View
22
Page 23
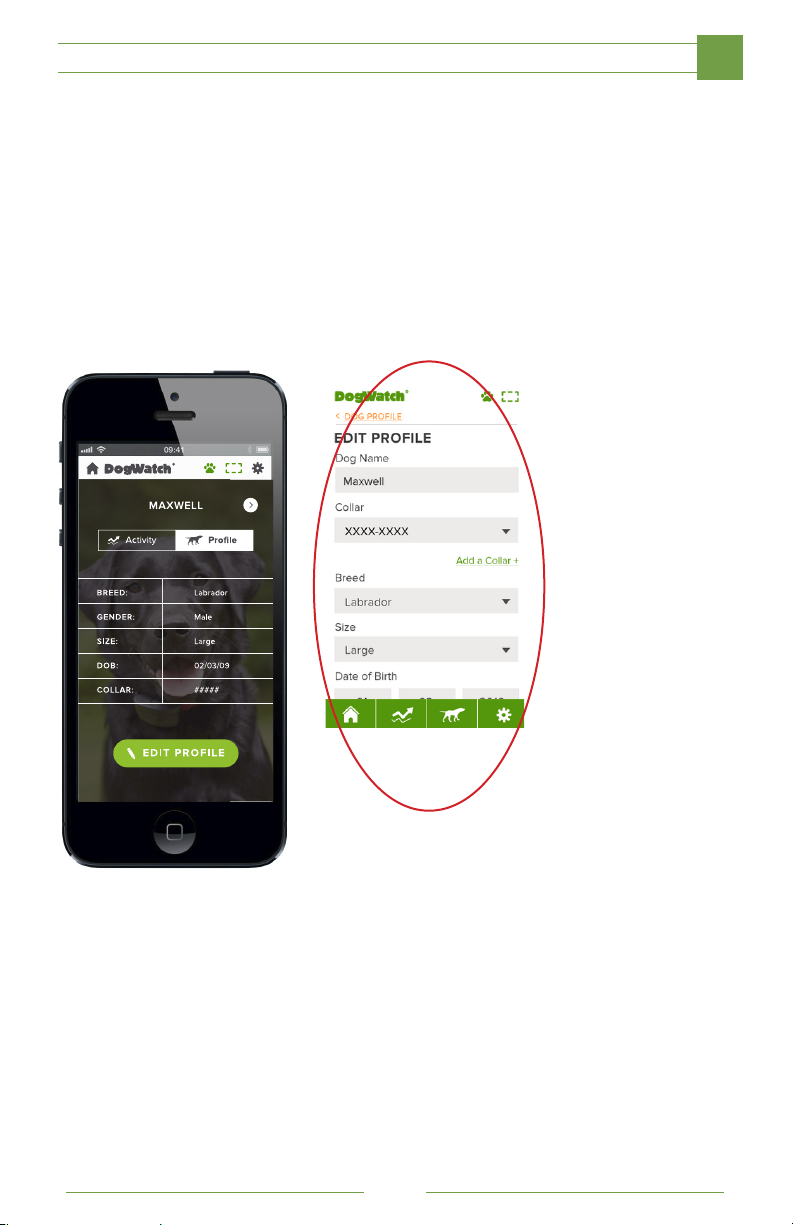
WEBAPP PROFILE FEATURES & SETTINGS
Profile
Below is your pet’s Profile screen, where you can:
A. View your pet’s profile settings
B. Change your dog’s profile settings
A. B.
3
Edit Your Dog’s Profile
23
Page 24
WEBAPP PROFILE FEATURES & SETTINGS
3
Settings
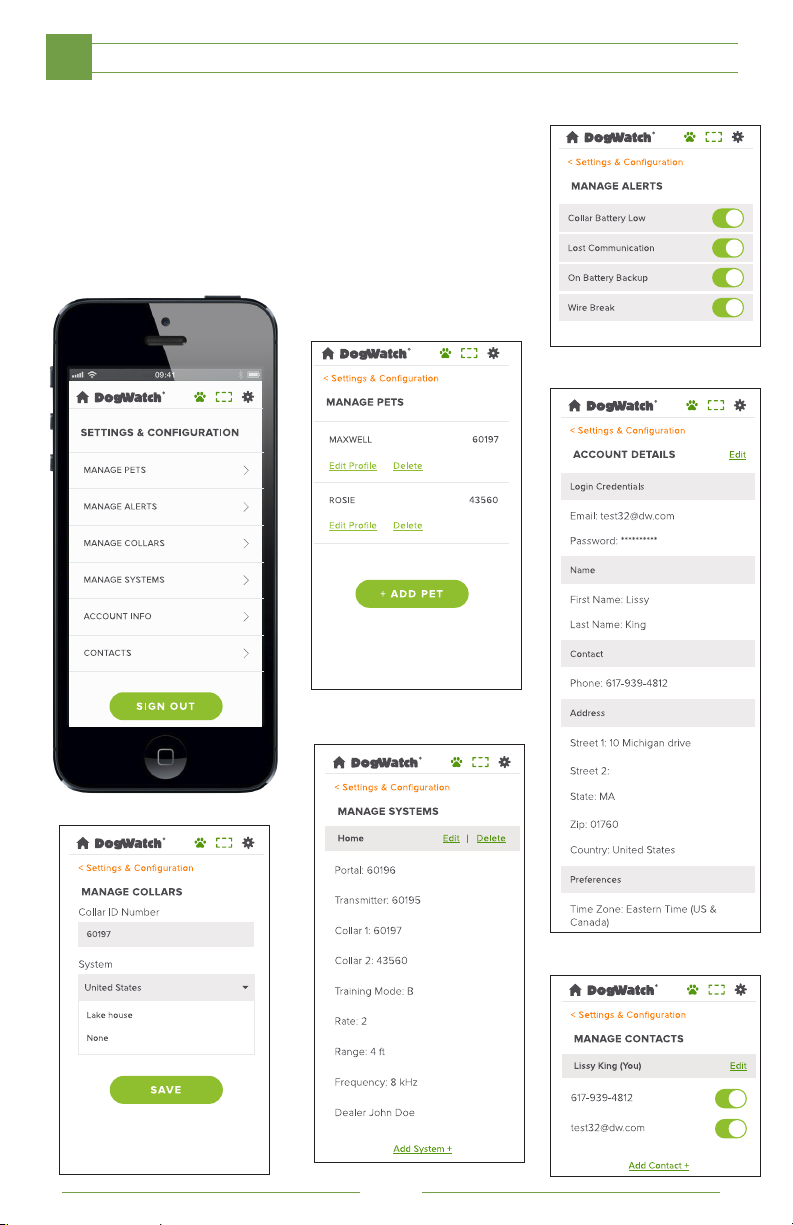
Below is your Settings screen, where you can:
A. Manage Pets
B. Manage Alerts
B. Manage Collars
C. Manage Systems
D. Account Info
E. Contacts
B.
A.
E.
C.
D.
F.
24
Page 25
IMPORTANT SAFEGUARDS & REMINDERS
• Keep the Transmitter and SmartCollar out of reach of children.
• Never attempt to service the Transmitter or SmartCollar yourself.
• Be sure your Transmitter and surge protector are properly grounded.
• Fit the collar snugly around your dog’s neck.
• Make sure that battery is fresh and is inserted correctly.
• Train your dog as outlined in this manual.
• Never adjust the Transmitter or Receiver while your dog is wearing
the SmartCollar.
Troubleshooting
If your dog is not staying within the boundary created by the DogWatch
SmartFence, check the following:
• Did you and your dog complete the Dealer-recommended training
program?
• Does the battery in the SmartCollar need to be replaced?
• Is the SmartCollar too loose?
• Is the SmartCollar operating properly?
• Is the Transmitter on and adjusted properly?
• Is the signal field too narrow?
• Is the Rate level too low?
• Is the Training Mode switch in the proper position?
• Is the boundary wire unplugged?
• Is the boundary wire broken?
3
Other troubleshooting tips are available at:
www.dogwatch com/customer-resources
If you are unable to determine the cause of the problem, please contact
your Authorized DogWatch Dealer.
25
Page 26
PET-FRIENDLY™ CONTAINMENT TRAINING
4
This section provides general guidelines for training your dog to remain within the
designated boundary of your property. Your DogWatch Dealer will customize the
training for your dog and teach you the appropriate training approach.
Your DogWatch Dealer will install your DogWatch SmartFence, set the system
to the appropriate training levels for your dog’s personality, and place
boundary flags around the perimeter of your yard. After
installing the system, your Dealer will prepare you and
your dog for the training process.
Your Dog’s Response To Stimulation
Stimulation has been a safe and effective part of dog training for more than 30 years.
All dogs respond differently when they feel a mild stimulation. Some dogs may
demonstrate little, if any, reaction, while others may yelp or jump back. Some dogs
“freeze”. Do not try to comfort the dog if he receives correction or it will reinforce
his anxiety.
Dog Personalities and Traits
Keep in mind that a dog’s personality and traits differ among breeds and individuals.
Dogs may not exhibit the same personalities and traits within the same breed.
Your DogWatch Dealer will ask you questions about your dog before training begins.
A shy or senior dog may require longer Phase 1 sessions, while a gregarious or easy
to distract dog may require a short Phase 1, but longer Phase 2 or 3 sessions.
The better you know your dog, the easier the training will be for both of you!
Creating The Right Environment
Attitude and Consistency is Important!
1. Keep the training “light”. Use lots of praise. Keep the dog’s spirits high.
2. Use high happy tones for praise. Use low tones for negative commands.
3. Move around the boundary in the same direction.
4. Reinforce the boundary with commands. Use the commands “No!” or
“Careful” as you slap or shake the flags.
5. Limit training sessions to no more than 20 minutes. Keep training consistent.
6. Keep your dog on the leash in the yard for five days.
7. If you are training more than one dog, train each dog separately.
8. Use naturally occurring distractions such as a neighbor or children.
9. Contact your DogWatch Dealer if you have any questions.
Remember!
Proper training is essential for successful containment. If you have any questions
about the training phases, especially during the first few weeks, or if you have
questions about your dog’s behavior during his training sessions, please contact
your DogWatch Dealer.
26
Page 27
PET-FRIENDLY™ CONTAINMENT TRAINING
4
Safety and Avoidance Zones
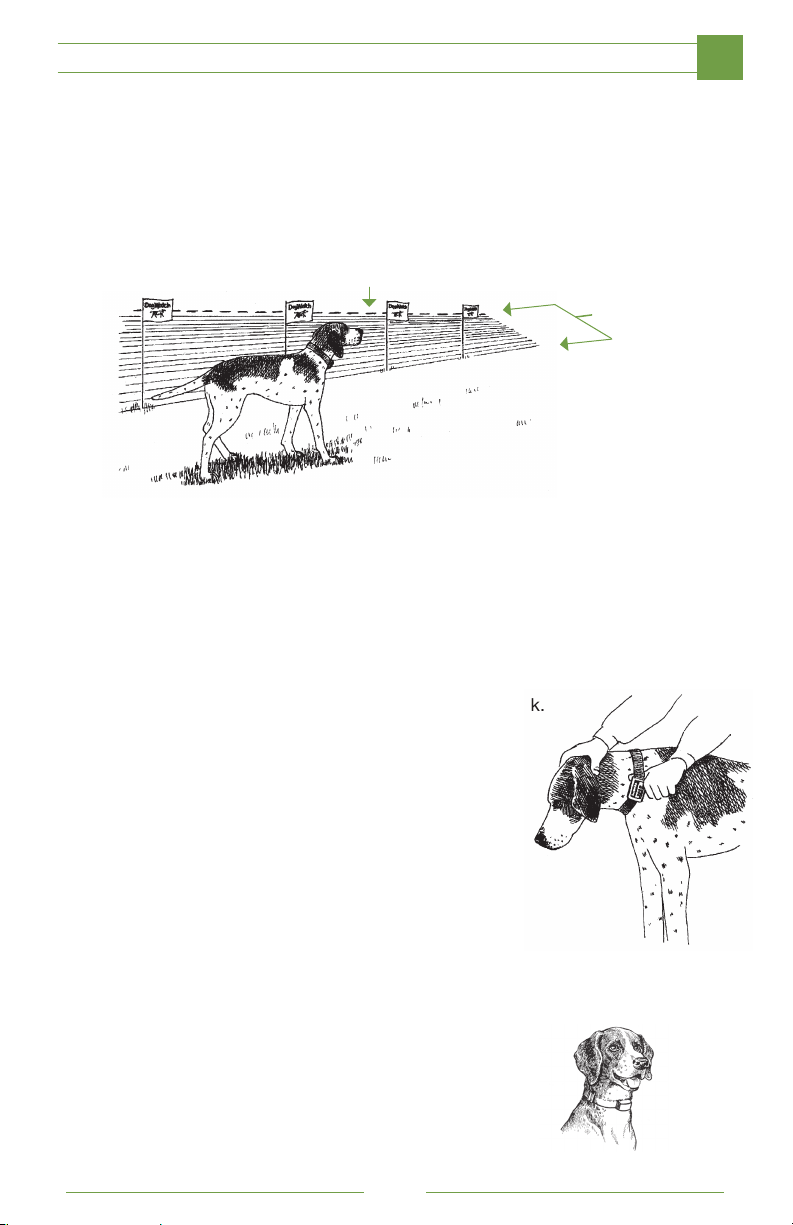
1. SAFETY ZONE: This is the area where the dog is free to play.
2. AVOIDANCE ZONE: The Avoidance Zone is the area between the flags and the
boundary wire where there is a signal created by the wire. When your dog crosses
into the signal field, the receiver collar emits an audible warning (or a vibration
warning if it is a vibration receiver.) If your dog continues to move toward the
boundary wire after hearing the warning beeps, he will receive a correction.
Boundary Wire
Safety Zone
*Training teaches your dog to stay in his Safe zone.
Avoidance
Zone
Adjusting the Receiver Collar
Your DogWatch Dealer has installed your DogWatch SmartFence, set the Transmitter
and receiver to the training levels appropriate for your dog’s personality and traits, and
has placed boundary flags around the perimeter of your yard. Your Dealer has already
begun your dog’s first day of containment training. Now it is your turn to continue the
training. Be sure to place the DogWatch SmartCollar on your dog’s neck before you go
outside to begin training.
1. The collar should be worn snugly on the dog’s neck.
This is extremely important!
2. Place no more than one thumb width between
the contact post and dog’s neck.
3. When checking snugness of
collar, the dog’s neck should be
facing down (sniffing position) as this
is where the dog’s neck is the smallest.
4. If the collar is too tight, the receiver
unit will stick out to the side when the
dog shakes his head.
5. If the collar is too loose, the dog will
not receive the intended correction when
he or she wanders into the Avoidance Zone.
6. Remember to periodically check for irritation
around the dog’s neck.
7. DogWatch strongly recommends that the collar be
removed daily and when the dog is inside the house.
Adjust
collar strap
27
Checking the collar
Contact Posts
must touch skin
Page 28
PET-FRIENDLY™ CONTAINMENT TRAINING
4
Containment Training Reminders
Purpose: To teach your dog where the boundary is and how to react to it.
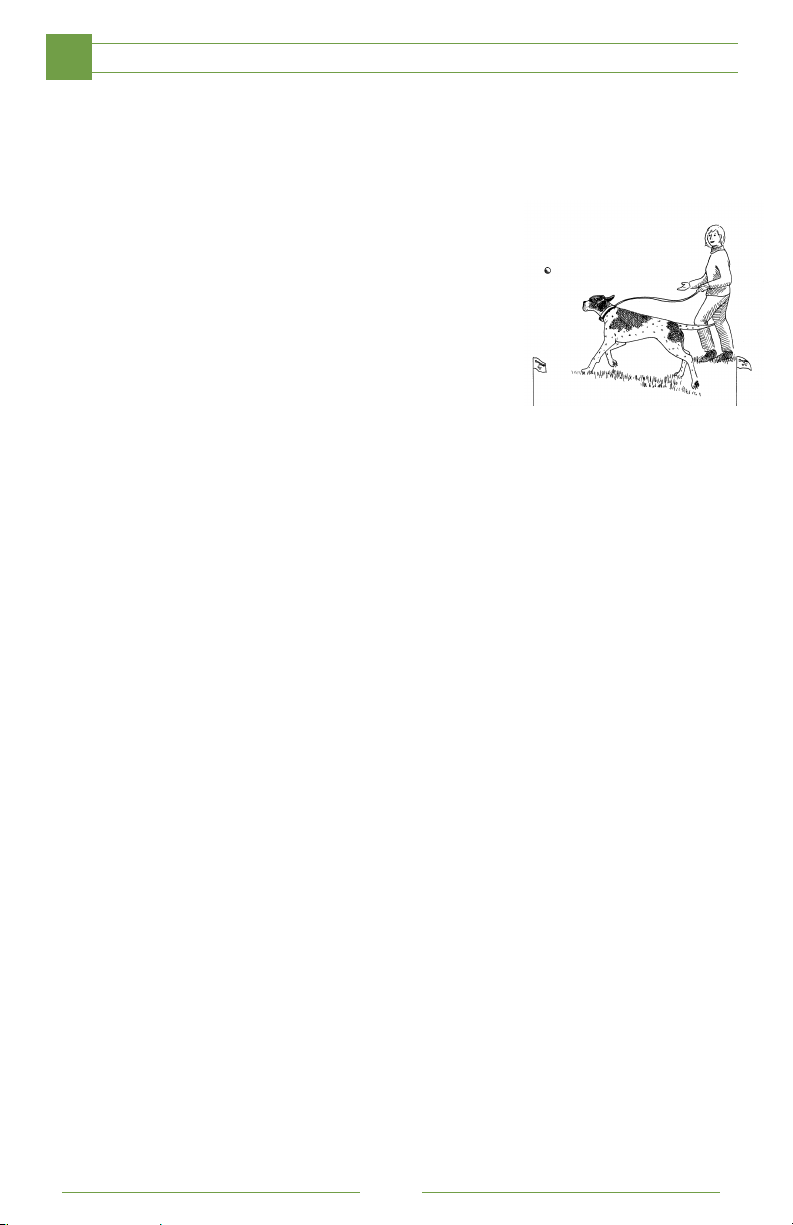
1. Only a portion of the yard, the Avoidance Zone,
is to be avoided.
2. Playtime is very important! Remember to
reinforce the Safety Zone and play with your
dog before, during, and after each training session.
3. Never throw a ball or toy into the Avoidance Zone
during training.
4. Your DogWatch Dealer will determine the most
appropriate training approach for your dog. It is
important to work with your Dealer to make sure
you understand the training plan.
The remainder of this section describes general
training Phases. Your Dealer may modify the approach
described in this manual in order to meet the specific
training needs of your dog. There are many successful
training appoaches that may be used. If you have questions about containment
training, please contact your DogWatch Dealer for assistance.
Play time while training is important
PHASE 1 (1-2 days)
1
During this phase, the Training Level on the receiver is set to “Audible Only”. On
this setting, your dog will hear only the audible “beep” tone (or feel the vibration
and will not receive a correction if he enters the Avoidance Zone.
Audible “Beep” Training (or Vibration)
1. Put the receiver collar on your dog 20 minutes before training. Your dog’s
regular collar should be positioned below the DogWatch collar.
2. Clip the green DogWatch training leash on his regular collar.
3. Take your dog outside and play with him in the Safety Zone for a few minutes.
4. Walk your dog around the perimeter of your yard, keeping inside the Safety
Zone and away (about 3 to 4 feet) from the training flags.
5. When you finish the walk, approach a training flag. Hold the dog by the leash
in one hand and slap or shake a flag with the other, warning the dog firmly (in
a low stern voice) “Watch out! or “Careful!” You can also use a friend or family
member to sit in the Avoidance Zone to shake the flag as you approach it.
6. Give the leash a firm tug, and quickly retreat into the Safety Zone. This
creates a sense of urgency to the retreat. It is not a casual turn. Remember to
use of lot of “Good dog!” praise after you’ve retreated into the Safety Zone.
7. Now walk your dog around the property allowing him to enter the Avoidance
Zone between the two flags.
28
Page 29
PET-FRIENDLY™ CONTAINMENT TRAINING
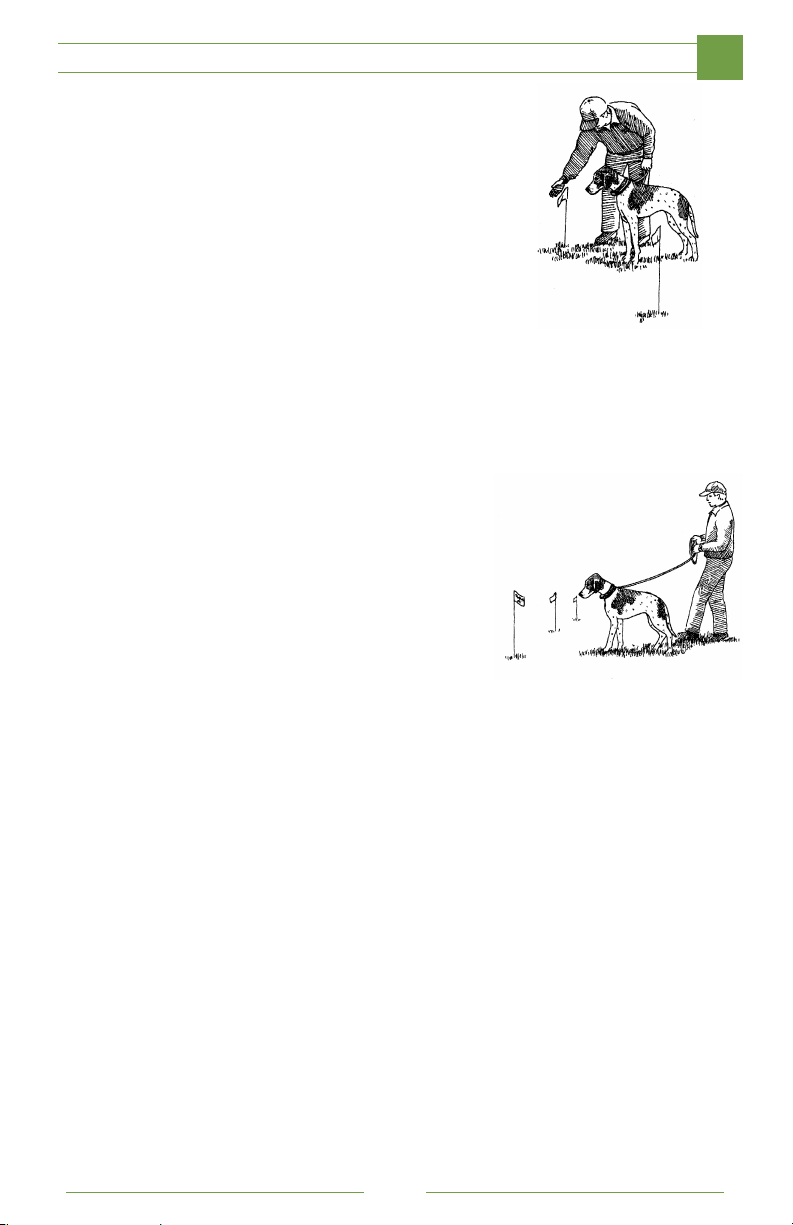
8. When your dog enters the Avoidance Zone,
he will receive an audible “beep” (or vibration)
warning. Immediately say, “Watch out!” and
quickly tug on the leash and direct him back
into the Safety Zone and praise.
9. Repeat several times in different locations
(where flags are visible) and watch for
hesitation as you approach the flags.
Your dog may turn or shake his head
when he hears the beep (or feels the vibration).
Remember: Playtime is very important!
Praise and play with your dog in the Safety Zone
for a few minutes. Take your dog inside and remove
the SmartCollar after about 20 minutes. Train your
dog in this manner for a least two days before moving on to Phase 2.
NOTE: In the remainder of the Training section, if you have a receiver equipped
with the Vibration feature: hear the audible “beep” = feel the vibration.
PHASE 2 (2-5 days)
2
1. Put the DogWatch receiver collar on your dog
Introduction to Correction
at least 20 minutes before going outside to train.
Give a verbal warning
at the flags,“No.”
4
2. Clip on the green DogWatch training leash and
take your dog outside and play a few minutes
in the Safety Zone.
3. Walk around the complete perimeter, remaining inside the Safety Zone. Pause
a few times along the way to slap a flag and say, “No!”
4. Your Dealer has set the receiver to the training level appropriate for your dog
and has helped you introduce your dog to correction. Phase Two will help
reinforce your dog’s new boundary and the consequences if he crosses the
training flags. Select a new location to teach your dog today. Allow your
dog to walk into the Avoidance Zone while saying the negative command.
When your dog retreats out of the Avoidance Zone after he hears the warning
“beep”, praise him for a few minutes in the Safety Zone. Select another
location and repeat the exercise. If your dog does not react to the correction,
first check to be sure the contact posts are touching the dog’s skin. If your
dog still does not respond to the correction, contact your Dealer.
Remember: Keep the training sessions to no longer than 20 minutes, once or
twice a day.
5. After training, praise your dog and play with him in the Safety Zone for a few
minutes, bring your dog into the house and remove the SmartCollar after
about 20 minutes.
Note: It is important not to remove the SmartCollar immediately following the
training as you do not want your dog to associate the SmartCollar with the
correction.
Give one tug and warning
at the flags,“No.”
29
Page 30
PET FRIENDLY™ CONTAINMENT TRAINING
4
PHASE 3 (2-5 days)
3
1. Put the receiver collar on your dog at least 20 minutes before going outside.
2. Clip on the green DogWatch training leash and take your dog outside and
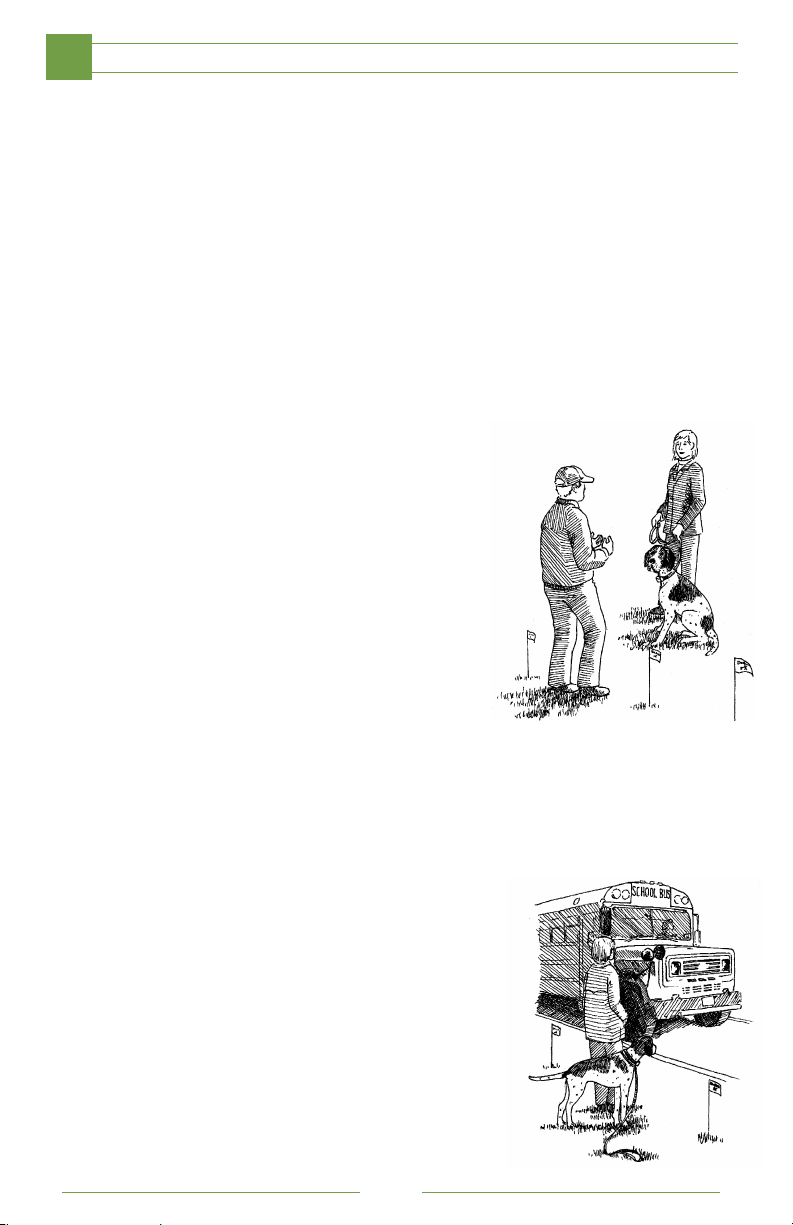
3. Walk around the Safety Zone and have an assistant (friend or family
4. If your dog approaches your assistant and enters the Avoidance Zone, allow
5. Let your assistant leave, walk your dog around the
6. If your dog attempts to go over to your assistant,
7. If your dog makes no attempt to go over to your
Introduction to Distractions
play a few minutes in the Safety Zone.
member) appear outside the Safety Zone at least 10 to 15 feet back from
the flags. Walk past your assistant without speaking, but remain in the
Safety Zone.
your dog to receive a correction. Say, “Watch out!” and tug him back into
the Safety Zone.
perimeter again, and let your assistant appear again.
Your assistant can call out the dog’s name, but do
not allow your assistant to ask the dog to “Come”.
reinforce the flags and say, “No!” Repeat the
exercise for no more than a total of 20 minutes.
assistant, reinforce the flags, end the exercise
and praise your dog in the Safety Zone.
8. Repeat the exercise for 2 to 5 days.
Then move to Phase 4.
Ask someone to be a distraction.
PHASE 4 (2-5 days)
Introduction to Increased Distractions
4
1. Put the SmartCollar on your dog at least 20 minutes before going outside
to train.
2. Clip on the green DogWatch training leash to
your dog’s regular collar and take him outside.
Play a few minutes in the Safety Zone.
3. Reinforce the flags.
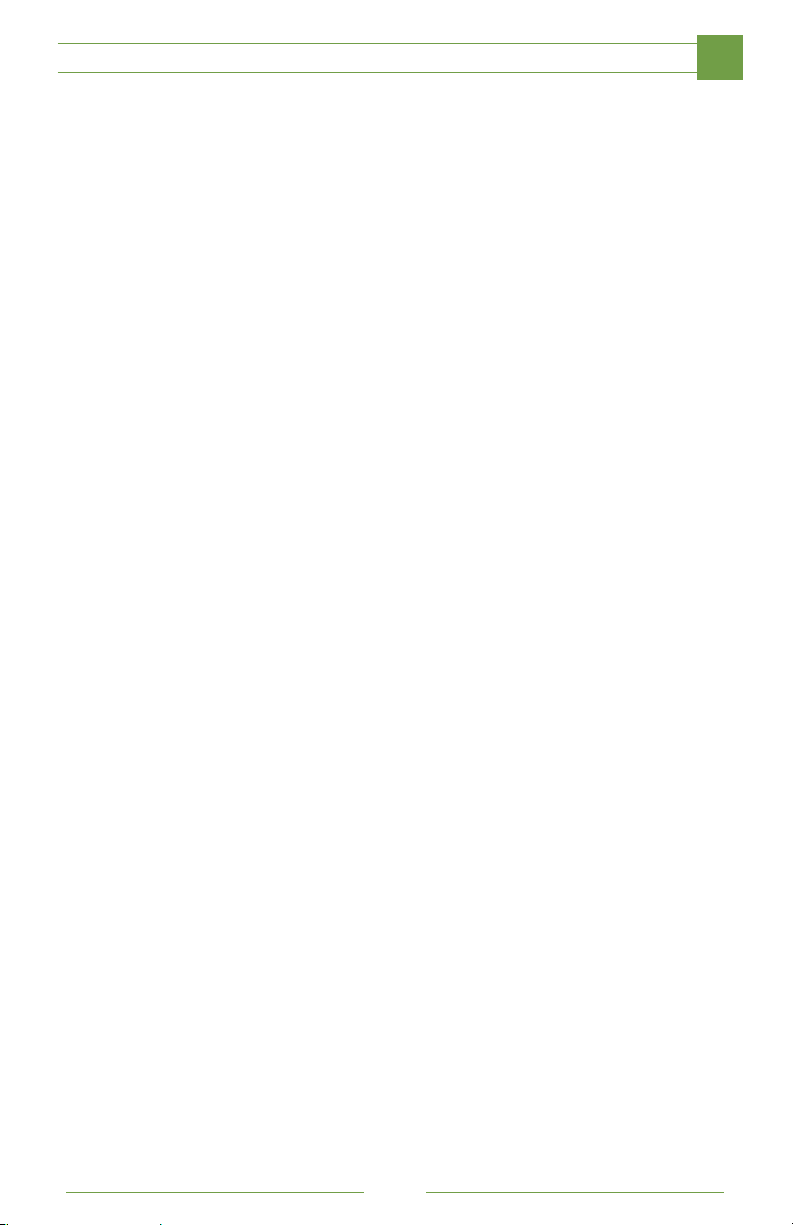
4. Introduce “real life” distractions to your dog.
Have a friend drop by or start training when the
letter carrier or school bus is scheduled. Take
extra care if you use a vehicle as a distraction.
5. Keep the dog on the leash when you first introduce
the distraction. If your dog attempts to run past the
flags and receives a correction, he should retreat to
the Safety Zone. Praise and play with your dog.
30
Introduce a distraction.
Page 31
PET FRIENDLY™ CONTAINMENT TRAINING
1. If your dog retreats to the Safety Zone, drop the leash (but keep it within
reach) and reintroduce the distraction. Praise and Play.
2. If your dog is afraid to move, pull him back into the Safety Zone. Continue
to train with distractions for 2-5 days
Remember: Play and praise at the end of each training session.
PHASE 5 (2-5 days)
5
1. Put the SmartCollar on your dog at least 20 minutes before going outside to
2. Clip on the green DogWatch training leash to your dog’s regular collar and take
3. Important: Your dog will expand his comfort level over a period of time. Your dog
What To Expect Off The Leash
1. Your dog will run toward the flags, see them and stop.
2. Your dog will run into the system, hear the “beep” warning and retreat.
3. Your dog will run into the system, hear the “beep” warning, receive a correction,
4. In rare cases, your dog will run through the boundary.
Letting Your Dog Off The Leash
train.
him outside and play a few minutes in the Safety Zone. Remove the training
leash and let him run freely in the yard. Shake the flags to reinforce where his
boundary is.
should remain about 6 feet away from the flags when he is first let off the leash.
Gradually your dog’s safety zone will increase to his individual level of comfort.
Remove the flags, every other one, every other day.
and retreat.
- Retrieve the dog. Take off the SmartCollar and walk him back into the yard.
- Bring the dog into the house and call your DogWatch Dealer. Additional flag
training or an increase in correction level is necessary. Your DogWatch Dealer
will instruct you over the phone or meet with you and your dog for additional
training. Important: Do not punish the dog verbally for making errors. He’s still
learning!
4
PHASE 6 (2-5 days)
6
Your Dealer will recommend when it is time to take your dog across the
boundary for a walk. It is important to be consistent when taking your dog for a
walk. Be sure to use your dog’s regular collar and leash and go to and from your
walk using the same “exit” area. You can also pick up a small dog and carry him
over the flagged boundary during the first weeks of training.
Taking Your Dog Outside The Boundary
31
Page 32
TRAINING TIPS
4
Training Tips
1. Never call your dog to “come” or give a recall command when you are
outside the flag line.
2. Never walk your dog through the flags during the training process.
3. Always reinforce the retreat concept by shaking the flag while saying
“Watch out!” and commanding “back-back-back” when your dog receives
an audible warning or a correction during the training process.
4. Adjust the SmartCollar, test the battery regularly, keep the
contact posts clean.
5. After the training period, your dog may wear the SmartCollar during the day,
but remove it at night. Check your dog’s neck area and make sure there is
no irritation.
6. Keep the training consistent: 15 to 20 minutes once or twice a day.
7. NEVER throw a stick or toy into the Avoidance Zone.
8. ALWAYS maintain a positive attitude when training your dog.
32
Page 33
WARRANTY
Warranty Registration
Your SmartFence warranty registration is automatically submitted when you
complete the SmartFence WebApp setup.
Manufacturer’s Warranty
DogWatch Inc., subject to the terms and conditions set forth hereunder, hereby
warrants that it will repair or replace, at its own discretion, without charge for
parts or labor, the Product or any part thereof (other than insulated wire) which
is found by DogWatch Inc. to be defective by reason of improper workmanship
and/or materials for the warranty period from the original date of sale hereunder.
Warranty claims may be subject to Dealer service charges when applicable and/
or manufacturer shipping and handling charges. Except for the express warranty
stated above, DogWatch Inc. disclaims all express and implied warranties or
merchantability or fitness for a particular purpose.
Warranty Claims
(a) Submit your warranty registration automatically by completing your
SmartFence WebApp setup.
(b) Notify your authorized DogWatch Dealer of your claim within the
warranty period.
(c) Mail product, insurance and postage prepaid, to your authorized
DogWatch Dealer.
5
DogWatch Inc.’s sole liability under this warranty will be to repair or replace,
at its option, any product or part which DogWatch Inc. determines to be
defective. In no event will DogWatch Inc. be liable for any special, indirect, or
consequential damages arising out of the purchase or use of the product. In no
event shall DogWatch Inc.’s liability exceed the purchase price of the product.
Base Station warranty 90 days?
33
Page 34
FAQs
System FAQ’s
34
Page 35
This device complies with part 15 of the FCC Rules. Operation is subject to the following two
conditions: (1) This de vice ma y not cause harmful interference, and (2) this device must accept
any interference received, including interference that may ca use undesired operation.
Changes or modifications not expressly approved by DogWatch, Inc., could void the user’s
authority to operate the equipment.
This equipment has been tested and found to comply with the limit s for a Class B digital device,
pursuant to Part 15 of the FCC Rules. These limits are designed to provide reasonable protection
against harmful interference in a residential installation. This equipment generates, uses and can
radiate radio frequency energy and, if not installed and used in accordance with the instructions,
may cause harmful interference to radio communications. However, there is no guarantee that
interference will not occur in a particular installation. If this equipment does cause harmful
interference to radio or television reception, which can be determined by turning the equipment
off and on, the user is encouraged to try to correct the interference by one of the following
measures:
- - Reorient or relocate the receiving antenna.
- - Increase the separation between the equipment and receiver.
- - Connect the equipment in to an outlet on a circuit different from that to which the receiver is
connected.
- - Consult the dealer or an experienced radio/ TV technician for help.
This device complies with Industry Canada regulations.
Under Industry Canada regulations, this radio transmitter may only operate using an antenna of
a type and maximum (or lesser) gain approved for the transmitter by Industry Canada. To reduce
potential radio interference to other users, the antenna type and its gain should be so chosen that
the equivalent isotropically radiated power (e.i.r.p.) is not more than that necessary for successful
communication.
This device complies with Industry Canada license-exempt RSS standard(s). Operation is subject
to the following two conditions: (1) this device may not cause interference, and (2) this device must
accept any interference, including interference that may cause undesired operation of the device.
Conformément à la réglementation d’Industrie Canada, le present émetteur radio peut fonctionner
avec une antenne d’un type et d’un gain maximal (ou inférieur) approuvé pour l’émetteur par
Industrie Canada. Dans le but de réduire les risques de brouillage radioélectrique à l’intention des
autres utilisateurs, il faut choisir le type d’antenne et son gain de sorte que la puissance isotrope
rayonnée équivalente (p.i.r.e.) ne dépasse pas l’intensité nécessaire à l’établissement d’une
communication satisfaisante.
Le présent appareil est conforme aux CNR d’Industrie Canada applicables aux appareils radio
exempts de licence. L’exploitation est autorisée aux deux conditions suivantes: (1) l’appareil
ne doit pas produire de brouillage, et (2) l’utilisateur de l’appareil doit accepter tout brouillage
radioélectrique subi, même si le brouillage est susceptible d’en compromettre le fonctionnement.
For RF exposure - This portable equipment complies with FCC and Industry Canada RF radiation
exposure limits set forth for an uncontrolled environment. To maintain compliance, it must not be
co-located or operated in conjunction with any other antenna or transmitter.
This system is composed of three components:
(1) Transmitter SF-T-10 (2) Portal SF-P-10 (3) SmartCollar SF-C-10.
35
Page 36
SmartFence™ System Information
Portal ID:
Transmitter ID:
Collar 1 ID:
Collar 2 ID:
Collar 3 ID:
Dealer ID:
Note your customer’s prole information
E-mail
Password
 Loading...