

Dogwatch DWHBLSH2, DWCBLSH2 User Manual
®
OWNER’S GUIDE

Thank You for Purchasing
At DogWatch, Inc., “It’s all about your dog.”™Whether you own one of our
BigLeash Remote Trainers or one of our great Hidden Fence products, you can be
assured that you have purchased the most technologically advanced pet
containment and pet training products available.
Our extensive research and testing has resulted
in products that are safe for your pet while helping
you keep your pet safe.
Because of our commitment to excellence and value,
Consumer Digest has awarded our Hidden Fence a
“Best Buy” rating every year since 1998.
DogWatch®offers a full range of solutions for pet containment and training. Our
Hidden Fences contain your dog in your yard and can keep him out of areas that
are “off limits”, such as your garden or swimming pool. And our BigLeash Remote
Trainer is a safe, effective and pet-friendly way to help train your dog to respond to
your commands and eliminate undesirable behaviors.
We also have indoor systems that work throughout your home to keep your dog off
couches and countertops, out of the trash, etc. — you name it.
To make sure that you get the most from your BigLeash Remote Trainer, please
follow the instructions outlined in this manual.
If you have any questions, please visit our website or call Customer Service:
1-800-793-3436, M-F, 9 am to 5 pm, EST.
®
The BigLeash.
Big Results Are Close At Hand.

ogWatch, DogWatch logos, BigLeash, and It’s All About Your Dog
D
The Consumers Digest logo and Best Buy Seal are Trademarks of
This device complies with part 15 of the FCC Rules. Operation is subject to the following two conditions:
(1) This device may not cause harmful interference, and (2) this device must accept any interference received,
Changes or modifications not expressly approved by DogWatch, Inc., could void the user’s
This equipment has been tested and found to comply with the limits for a Class B digital device, pursuant to
Part 15 of the FCC Rules. These limits are designed to provide reasonable protection against harmful
interference in a residential installation. This equipment generates, uses and can radiate radio frequency
energy and, if not installed and used in accordance with the instructions, may cause harmful interference to
radio communications. However, there is no guarantee that interference will not occur in a particular
installation. If this equipment does cause harmful interference to radio or television reception, which can be
determined by turning the equipment off and on, the user is encouraged to try to correct the interference by
- - Connect the equipment into an outlet on a circuit different from that to which the recieiver is connected.
- - Consult the dealer or an experienced radio/TV technician for help.
This portable equipment complies with FCC and Industry Canada RF radiation exposure limits set forth for an
uncontrolled environment. To maintain compliance, it must not be co-located or operated in conjunction with
re Registered Trademarks of DogWatch, Inc.
a
Consumers Digest and are used under license.
including interference that may cause undesired operation.
authority to operate the equipment.
one of the following measures:
- - Reorient or relocate the receiving antenna.
- - Increase the separation between the equipment and receiver.
For RF exposure
any other antenna or transmitter.
DogWatch products are lead-free and compliant with the Reduction of Hazardous Substances (RoHS) initiative.
©2010 DogWatch Inc. All rights reserved. 295059 Rev. D 10/2010
www.dogwatch.com www.bigleash.com

Table Of Contents
Important Safeguards .........................................................................................2
Getting Started .....................................................................................................3
Charging the Transmitter and Receiver Collar ......................................................3
Turning the Transmitter and Receiver “On” and “Off” ..........................................3
Transmitter Features............................................................................................4
1. Lanyard Loop ..................................................................................................4
2. Antenna /Range Information ............................................................................4
3. LCD Display ......................................................................................................5
4. Correction Level Adjustment ............................................................................6
5. Collar 1/Collar 2 Feature ..................................................................................6
6. Correction Button A
7. Correction Button B [Brief] ................................................................................6
8. Correction Button C [Continuous] ......................................................................6
Switching from Audible to Vibration ..................................................................7
Using the Test Light to Check Correction Function ..........................................7
Receiver Features ................................................................................................8
Adjusting the Receiver Collar ..............................................................................8
Setting the Contact Posts.................................................................................... 8
Using the Receiver Collar for Training ..................................................................8
Battery Status Light ..............................................................................................8
[Audible/Vibration] ..............................................................6
General Training Considerations ........................................................................9
Training Basics ..................................................................................................11
Obedience Training............................................................................................13
Behavior Training ..............................................................................................14
Barking ..............................................................................................................15
Digging ..............................................................................................................15
Jumping Up ......................................................................................................15
Jumping on Furniture ........................................................................................16
Chewing ............................................................................................................16
Chasing ..............................................................................................................16
Aggression ........................................................................................................16
Troubleshooting ................................................................................................17
Warranty & Repair ..............................................................................................18
Battery Replacement ........................................................................................19
Adding a Second Receiver Collar (Collar 2) ....................................................20
1

Important Safeguards
TO GET THE MOST FROM YOUR BIGLEASH
FOLLOW THE PROCEDURES IN THIS MANUAL
■
It is important to understand the training process before using the trainer.
■
Be consistent with your dog. Inconsistent cues (verbal and non-verbal) will
confuse your dog. A confused dog will have difficulty figuring out what you
want him to learn.
■
Attempting to service the system yourself may invalidate the warranty.
■
Keep the transmitter and receiver collar out of reach of children and others
unfamiliar with proper use of remote trainers.
■
Periodically inspect your dog’s neck for irritation due to rubbing.
■
This product is not recommended for training aggressive dogs. Dog aggression
should be handled by a qualified dog training professional.
If you have questions about your BigLeash Remote Trainer,
visit our website - or - contact Customer Service at
1-800-793-3436, Monday-Friday, 9 am-5 pm.
®
REMOTE TRAINER, PLEASE
.
WARRANTY REGISTRATION
To activate Warranty coverage, register online at:
www.dogwatch.com - or - www.bigleash.com
TH E SU CC ES S OF ALL TR AI NING REQUIRES REPETITION,
CO NS IS TE NC Y, PAT IE NC E AN D A LOT OF PRA ISE.
2
Getting Started
Charging the Transmitter and Receiver Collar
FULLY CHARGE THE TRANSMITTER AND THE RECEIVER COLLAR BEFORE USING THE FIRST TIME.
■
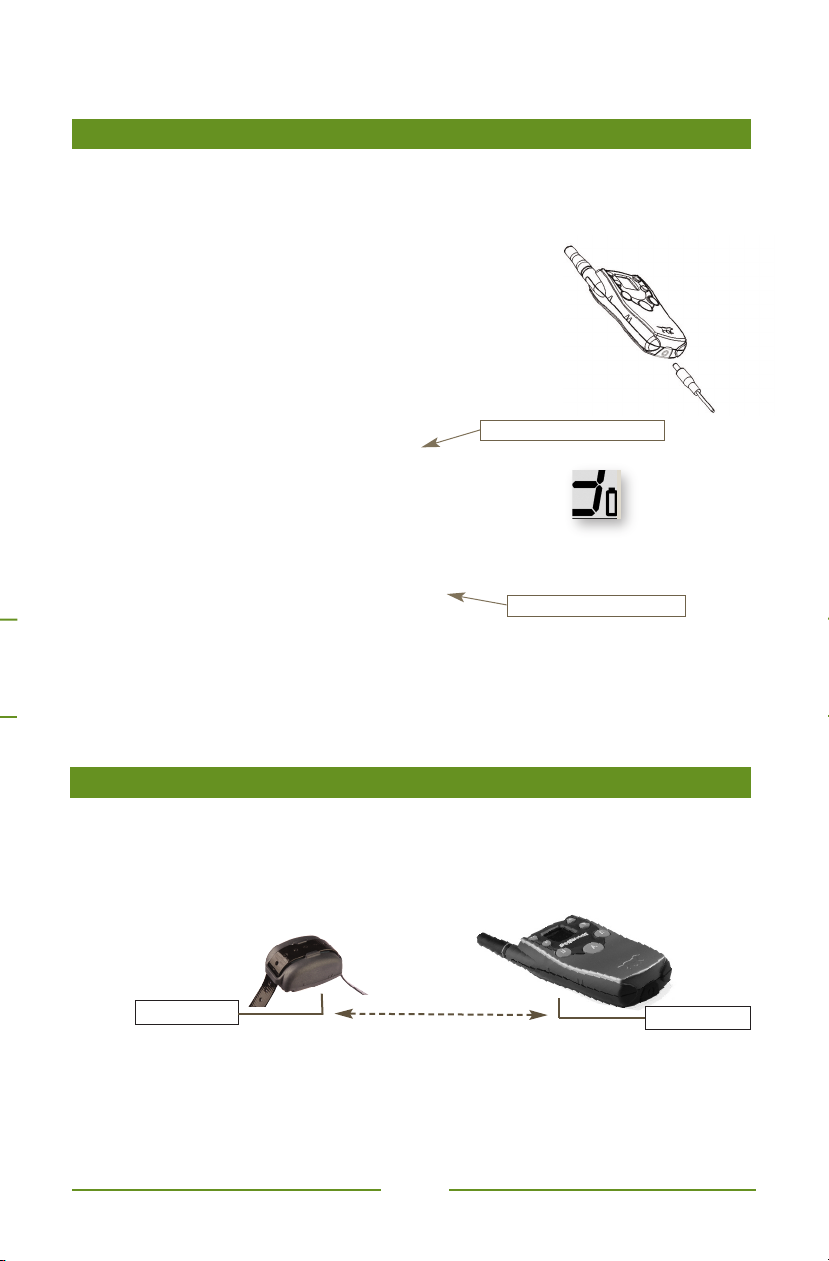
To charge the transmitter and/or the receiver collar, plug the power adaptor
into an electrical outlet and insert the other end securely into the charging
port. Use the “Y” connector to charge both the
transmitter and the receiver at the same time.
• It takes approximately 3-4 hours to charge.
• We recommend charging your batteries when
not in use. A protection circuit prevents overcharging.
• Both the transmitter and the receiver collar use a rechargable
lithium polymer battery.
■ Transmitter screen: Battery icon
• Comes on and flashes when the battery is low.
• Stays on in a steady state when charging.
• When charging is complete: Battery icon turns off.
(Note: The LCD screen backlight stays illuminated when transmitter is plugged-in.)
■ Receiver collar: Battery status light
• Flashes red when the battery is low.
• Turns steady red when the receiver collar is charging.
• Turns steady green when charging is complete (plugged-in).
• Flashing green light = charged battery (unplugged and turned on).
See illustration on page 5
See summary on page 8.
.
Battery Icon
For battery replacement information, see page 19.
Turning the Transmitter and Receiver “ON” and “OFF”
Both the transmitter and receiver must be turned “on” to operate.
■
To turn the transmitter and receiver “on” or “off”, hold the transmitter and
receiver next to one another so the alignment markers (indicated below) on
the transmitter match the alignment markers on the receiver.
ON/OFF
Alignment Markers
{
▲▲ ▲
■ When the transmitter and receiver collar turn “on”, you hear a low-to-hi
Hold the Alignment
Markers Together
“beep” tone and the LCD screen turns on.
■ Follow the same procedure to turn “off” the receiver and the transmitter.
You will hear a hi-to-low “beep” tone and the screen will turn off. Turning
your system “off” when not in use will help preserve the battery life.
3
{
▲ ▲▲
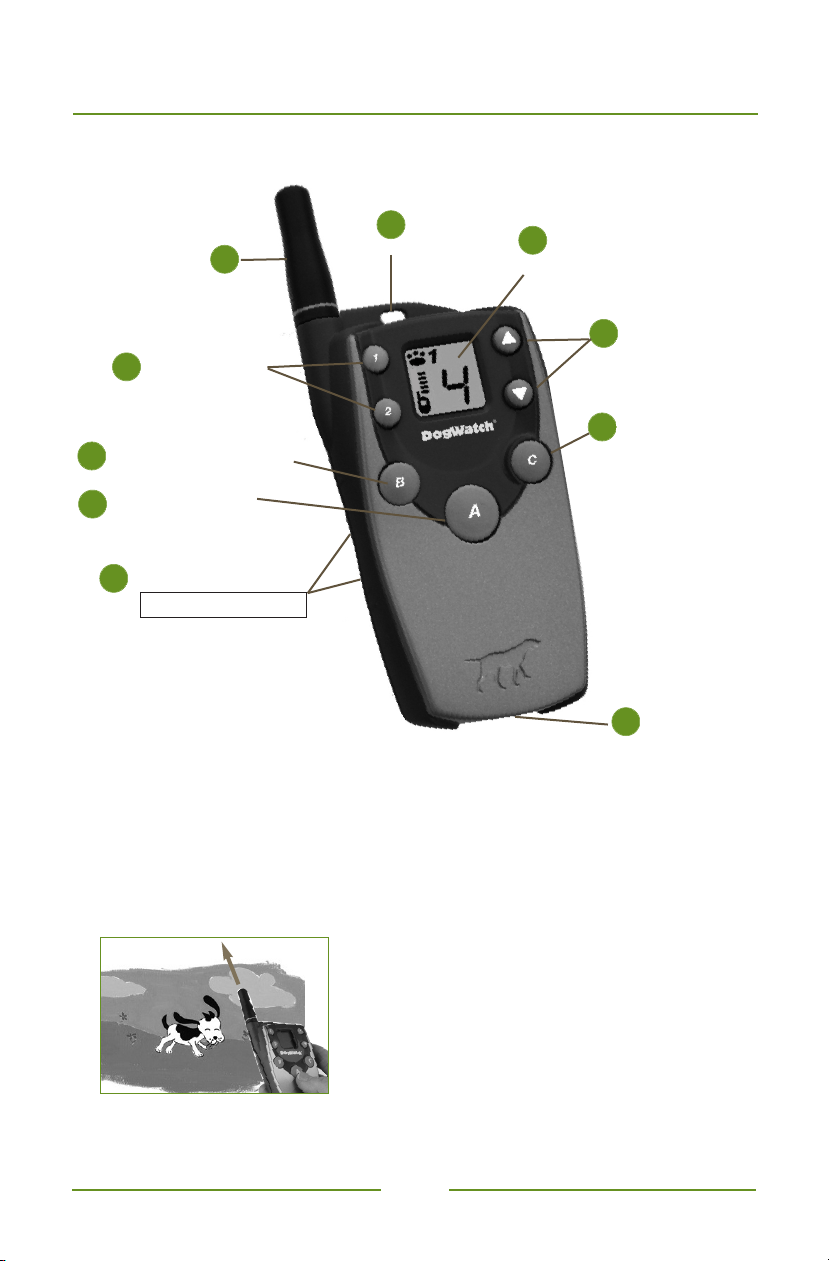
Transmitter Features
The BigLeash
communication between the transmitter and the receiver collar.
®
Remote Trainer is the only remote trainer with two-way
1
2
Antenna
Collar 1/Collar 2
5
Correction Button B (Brief)
7
Correction Button A
6
(Audible / Vibration)
On/Off Alignment Markers
9
▲ ▲▲
Lanyard Loop
3
LCD Display
Transmitter Features
Lanyard Loop
1.
■
A lanyard is supplied with each transmitter.
orrection Level
C
4
Adjustment
Correction Button C
8
(Continuous)
Charging Port
10
2.
Antenna/Range Information
■
Your BigLeash Remote Trainer provides more than a
conditions. Range will vary depending on environmental conditions such
as terrain, weather, vegetation, buildings and other obstructions.
■ How you hold the transmitter may affect the
range. For maximum range, keep the antenna
pointed toward the sky. Pointing the transmitter
antenna toward your pet will reduce the range.
Hold the transmitter with the antenna up.
■ Keep your fingers off the antenna. Touching the antenna during transmission
will greatly reduce the efficiency and the range of the antenna.
4
mile range in optimal
1/4
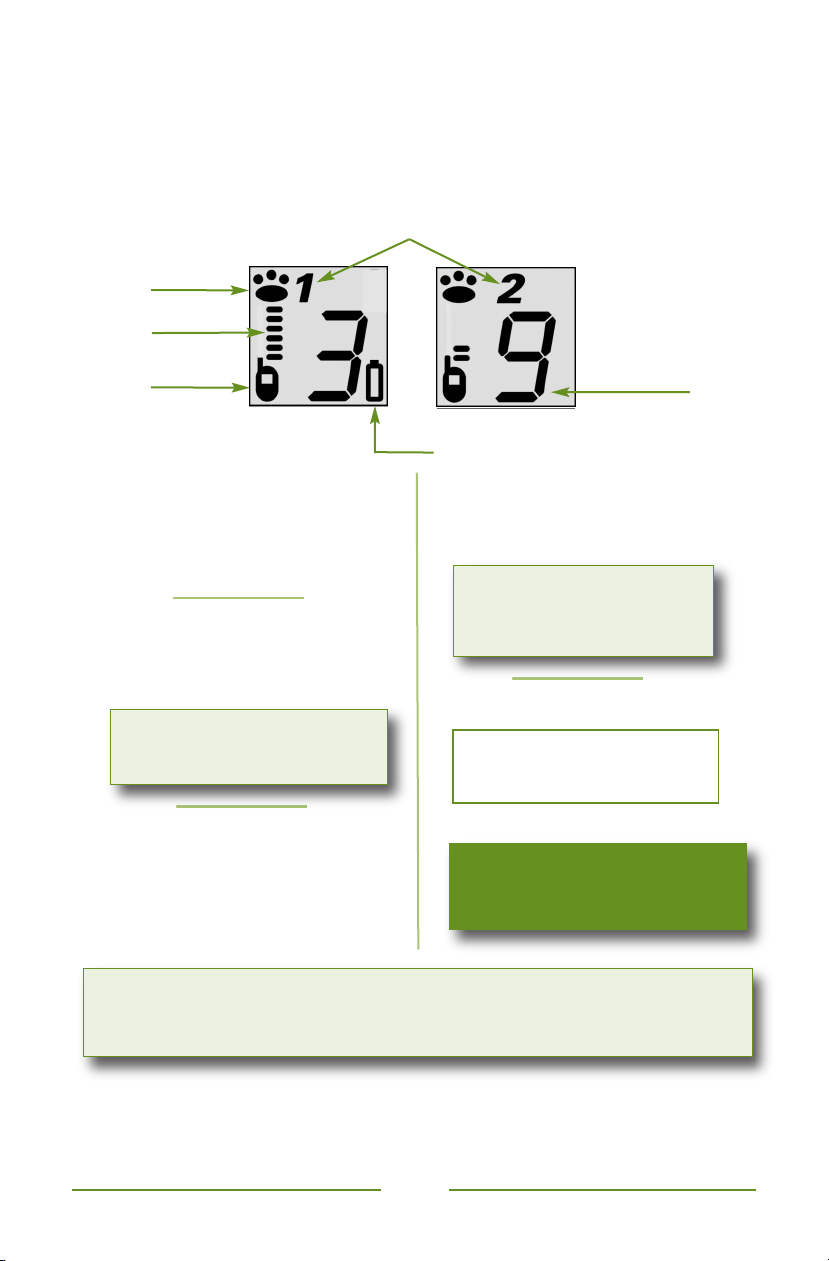
3. LCD Display
The LCD display on your transmitter lets you know your system is operating
properly. The LCD display illuminates briefly when the transmitter is turned on
or when one of the command buttons is pushed.
Collar1/Collar2Icon
■
Indicates which collar is receiving the signal when working with 2 dogs.
ollar 1
eceiver
R
con (Paw)
I
Signal
Strength
C
ollar 2
C
Transmitter
Icon
Example 1
■
Receiver Icon (Paw)
Indicates that the receiver collar
is ‘on’ and functioning properly.
Paw blinks if signal is lost
(dog out of range or collar
battery is depleted.)
■
Signal Strength
Indicated by the horizontal lines
between the transmitter and the
paw icons.
No lines + Paw Icon blinks
= Not Communicating
■
Transmitter Icon
Indicates that the transmitter is
‘on’ and functioning properly.
Transmitter icon blinks to
indicate activation when any
button is pushed.
Correction Level
Example 2
Transmitter Battery Icon
■
Transmitter Battery Icon
Turns on and begins flashing
when the transmitter battery is
getting low.
Battery Icon
• No icon = Charged battery
• Icon Flashes = Low battery
■
Correction Level
1 - 3 = Mild Correction
4 - 6 = Moderate Correction
7-10 = Strong Correction
Correction Level 0 = Safety Mode
No Audible / No Vibration
No Correction
Example 1:
Example 2:
Strong signal, correction level 3, collar 1, and low transmitter battery.
Weak signal, correction level 9, collar 2, and good battery.
A weak signal usually indicates the dog is moving out of range of the transmitter.
Training Tip:
Keep the trainer out of direct view of your pet when using it so he does not become
“transmitter-wise.” It is important that he associates the correction with his behavior,
not with the transmitter.
5
 Loading...