

Page 1
SPRAY TRAINING COLLAR
User guide
d-control 300
d-control 900
EN
Page 2
2
Declaration of Conformity
Manufacturer:
VNT electronics s.r.o.
Dvorská 605
563 01 Lanškroun
IČO: 64793826
declare under own responsibility that the product:
Spray training collar
Dogtrace d-control 300 AQUA spray
Dogtrace d-control 900 AQUA spray
is in compliance with the essential requirements and other relevant
provisions of Directivem 2014/53/EC, meets requirements of General
Licence of The Czech telecommunication oce according to general
licence no. VO-R/10/05.2014-3 and corresponds to the following standards:
ETSI EN 301 489-1 V1.9.2
ETSI EN 301 489-3 V1.6.1
ETSI EN 300 220-2 V.2.4.1
ETSI EN 60950-1 ed.2:2006 /A1:2010 /A11:2009 /A12:2011 /A2:2014/Cor.1:2012
EN 62479:2010
The product is safe under conditions of standard use in accordance with the user guide.
This declaration of Conformity is created in exclusive responsibility of producer.
In Lanškroun 1. 10. 2017
Ing. Jan Horák
executive director
Tel.: +420 461 310 764
www.dogtrace.com
Thank you for purchasing the d-control Dogtrace brand from VNT electronics s.r.o.
Before using your product, please read the instructions in this user guide carefully and keep
it for future reference.
VNT electronics s.r.o., hereby declares that the Dogtrace spray training collar d-control
300 AQUA spray and d-control 900 AQUA spray complies with the basic requirements
and further relevant regulations of directive 2014/53/EC.
Page 3
3
Important notice
Do not allow children to use this equipment without adult supervision.
The receiver contains a pressurized vessel - keep away from heat, hot surfaces sparks,
open flame and direct sunlight.
Do not expose the receiver to temperatures greater than 40 °C.
The training collar should not be worn more than 12 hours per day, as it may lead to
skin irritation. If this happens, do not use the training collar until all traces of irritation
have disappeared.
Do not attach a lead to the collar with electronic receiver, or use the collar to secure
your pet. This may lead to mechanical damage of the receiver box.
In case of any problems and for further guidance do not hesitate to contact a
professional trainer.
Do not place the transmitter near objects sensitive to magnetics fields, as they may
be permanently damaged.
The batteries in the receiver and transmitter must be replaced every two years, even
if the set has not been used for a long time. Never leave a low battery in your device
– it may damage the device.
If you have a cardiac pacemaker (pacemaker, defibrillator), please take appropriate
precautions. d-control radiates a certain magnetic field.
Spray container
The container is under pressure – if heated, it may rupture.
Keep away from heat, hot surfaces, sparks, open flame and other burning hazards.
Do not smoke when handling the container.
Do not spray towards open flame or other sources of ignition. Do not expose to
temperatures over 50°C.
Keep out of the reach of children.
Do not use this product for purposes other than that for which it is intended. Use
only outside or in a well-ventilated area.
Contains fluorinated greenhouse gases. HFC-134a: 0,079 kg; 0,113 t equiv. CO2; GWP:
1430.
Page 4

4
ECMA
VNT electronics s.r.o., professional producer of the dog training
equipment, which is manufactured and sold under the brand name
Dogtrace, is a proud and active member of the Electronic Collar
Manufacturers Association.
ECMA was founded in Brussels in 2004 as a result of increasing awareness from dierent
manufacturers concerning the necessity of regulating their industry. The main target
of the association is to develop and produce reliable training systems of high quality,
which are safe for the animals and improve the communication between pets and their
owners. All members of the ECMA provide you with both technical and training guides
that contain instructions and advice for safe use of electronic training equipment
and enable all dog owners to use the training systems in an eective, responsible and
humane way. All ECMA member´s products meet the latest technical requirements
which ensure minimum production standards and safety features and enable training
while protecting animal welfare.
The ECMA is convinced that the electronic training collars are eective and humane
training tools when used responsibly and combined with an appropriate reward.
For more information please visit www.ecma.eu.com.
Page 5

5
Contents
Introduction ...................................................................... 6
Features ........................................................................6
Package contents. . . . . . . . . . . . . . . . . . . . . . . . . . . . . . . . . . . . . . . . . . . . . . . . . . . . . . . . . . . . . . . 6
Optional accessories ............................................................ 6
Product description ............................................................... 7
Transmitter ..................................................................... 7
Display ......................................................................... 7
Receiver ........................................................................ 8
Transmitter preparation ........................................................... 8
Inserting (changing) the transmitter battery ..................................... 8
Checking the transmitter battery's status ........................................ 8
Switching the transmitter on/o ................................................8
Receiver preparation .............................................................. 9
Inserting (changing) the receiver battery ........................................ 9
Checking the receiver battery's status ........................................... 9
Switching the receiver on/o ................................................... 9
Pairing the receiver with the transmitter ........................................10
Filling the receiver with spray ..................................................11
Fitting the training collar ......................................................11
Basic use of the training collar ....................................................11
Transmitter functions ..........................................................12
Maximum transmitter range ......................................................13
Troubleshooting .................................................................13
Maintenance .....................................................................14
Technical data ...................................................................14
Warranty terms and conditions ...................................................16
Certicate of warranty ...........................................................16
Page 6
6
Introduction
Spray training collar d-control 300/900 AQUA spray is an eective aid for training not
only more sensitive dogs. The AQUA spray training collar helps you correct undesirable
behavior at the right time up to a distance of 300/900 m. The main function of this
device is spray correction in the form of an unpleasant cooling spray, which is directed
at the dog's muzzle. In fact, even the sound itself which is issued at the time as the
spray, is sucient to interrupt the dog's behavior. Sprays are available in citronella,
lavender, or no scent. Acoustic signal and vibration oer further correction possibilities.
Features:
Range of 300/900 m
Acoustic signal
Short (level 5) and long (level 10) sprays
Large spray container – up to 300 spray corrections with one filling
Vibration
Adjustable multifunctional button
Possible to use with two dogs
Transmitter with LCD display
Package contents
Transmitter
Receiver (with strap)
2 pcs lithium battery CR2 3V
Citronella spray refill
Neck strap for transmitter
Manual and warranty card
Optional accessories
Spray refill - citronella, lavender, no scent
Replacement battery
Straps in various colors
Replacement seals for receiver
Replacement lid for receiver
Replacement screws for the receiver
Page 7
7
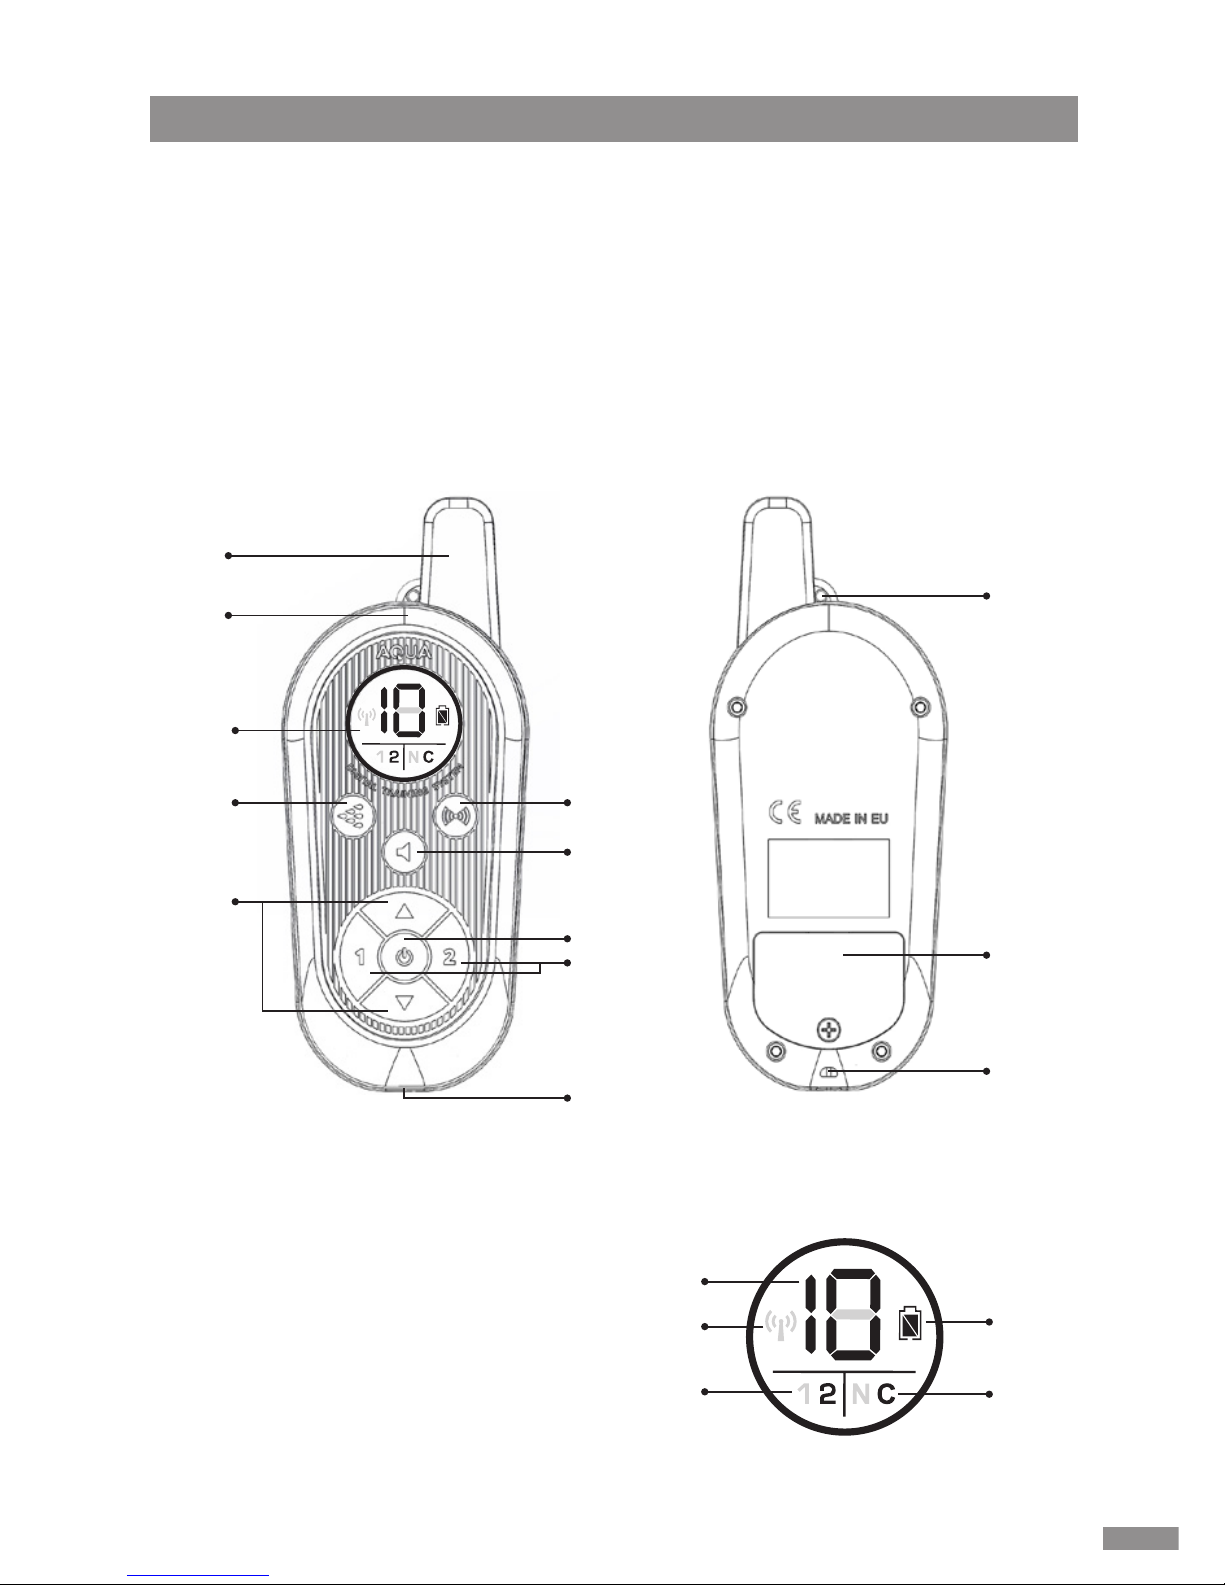
Product description
Transmitter
1. Antenna (on d-control 900)
2. Antenna (on d-control 300)
3. LCD display
4. Spray button
5. Multifunction button
6. Acoustic signal
7. Intensity adjustment buttons
Display
1. Degree of stimulation
2. Battery level
3. Transmission signal
4. Indicates dog 1 or 2
5. Indicates short (N) or long (C) spray
12
11
11
1
2
3
4 5
6
8
10
7
9
1
3
4
2
5
8. On/o button
9. Button to choose Dog 1 or 2
10. Storage place for magnet to turn
receiver on/o
11. Place for neck strap
12. Battery compartment cover
Page 8
8
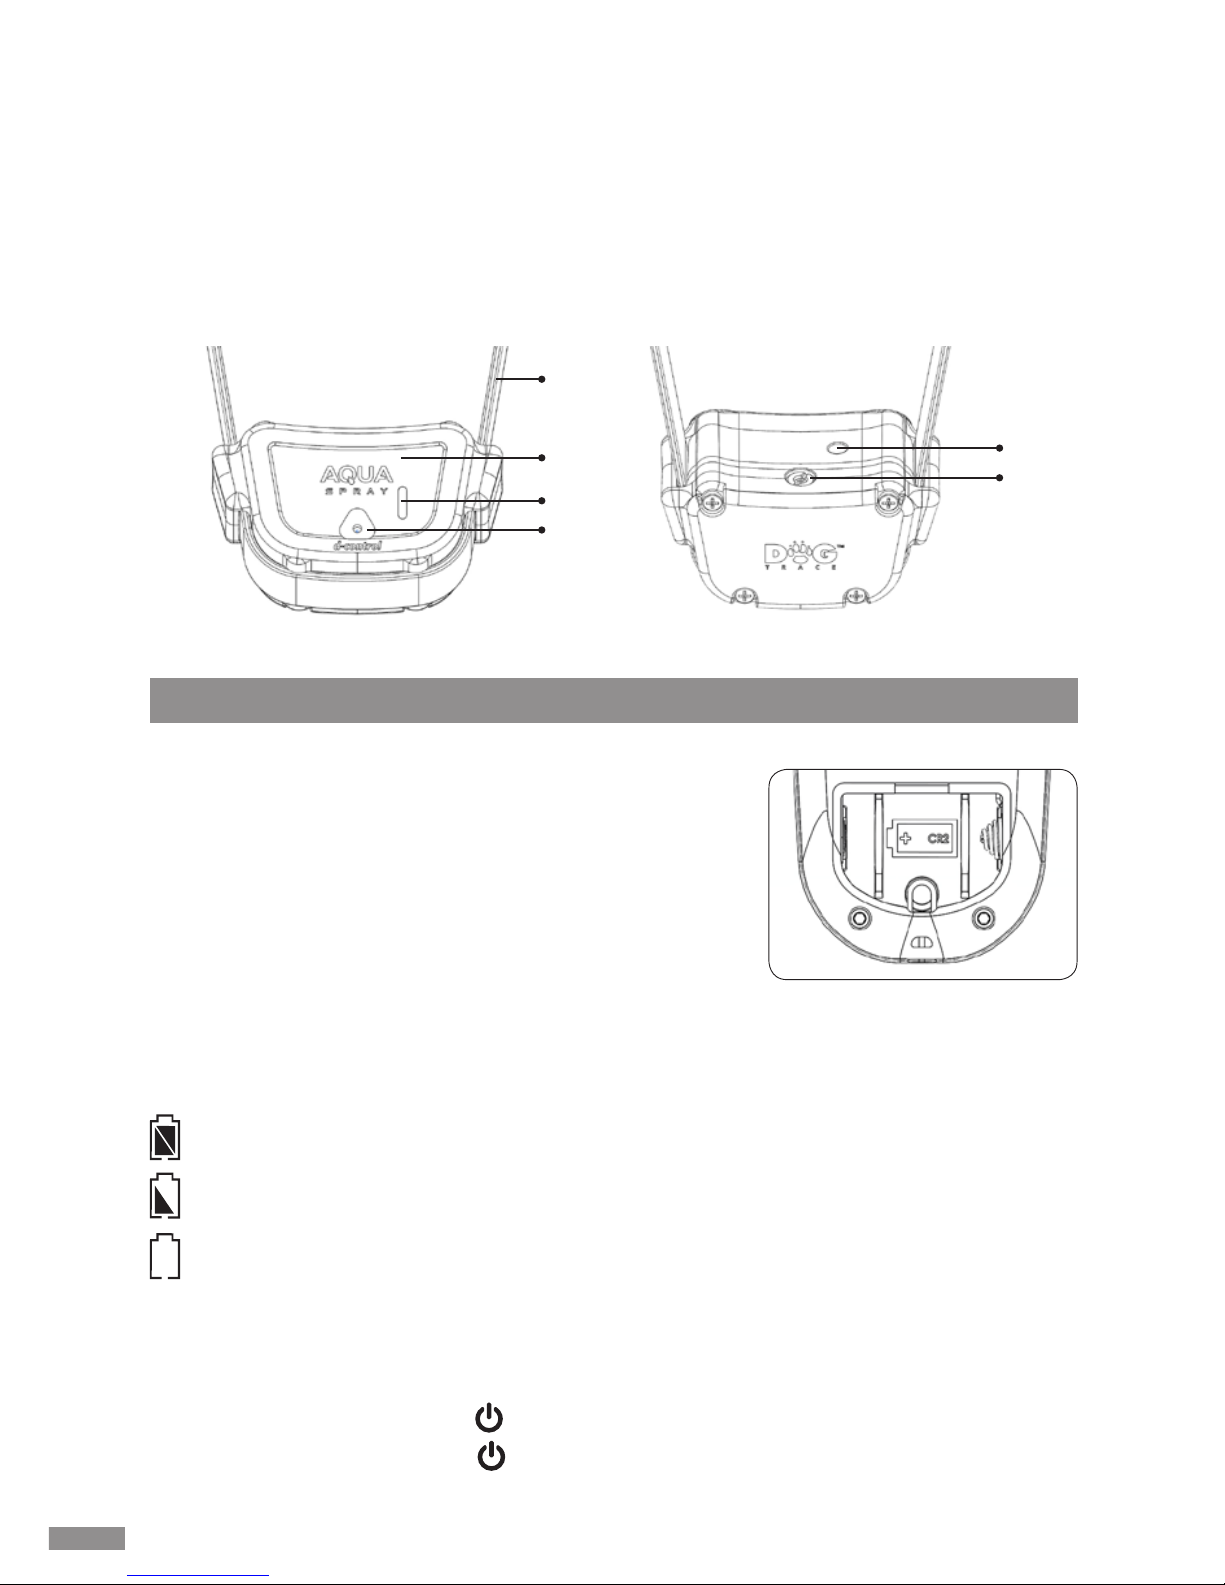
Receiver
1. Strap (collar)
2. Battery compartment lid
3. Indicator light
4. Spray nozzle
5. Red target – Marks the place for a magnet to turn on the receiver
6. Fill/Rell port
Transmitter preparation
Inserting (changing) the transmitter battery
1. On the back side, remove the screws of the battery
compartment cover with a Phillips-Head screwdriver.
2. Insert the lithium CR2 3 V battery with the correct
polarity (polarity is marked in the battery compartment).
3. Replace the cover and screws, making the screws
reasonably tight.
Checking the transmitter battery's status
To check battery status, see the LCD indicator:
– fully charged battery
– medium charged battery
– at battery
If the battery is at, insert new lithium battery CR2 3V into the battery compartment.
Switching the transmitter on/o
Switching on: hold down the button for one second. The display will turn on.
Switching o: hold down the button for one second. The display will turn o.
1
5
3
2
6
4
Page 9
9
Note: When the battery is replaced quickly, the
beep may not sound.
Receiver preparation
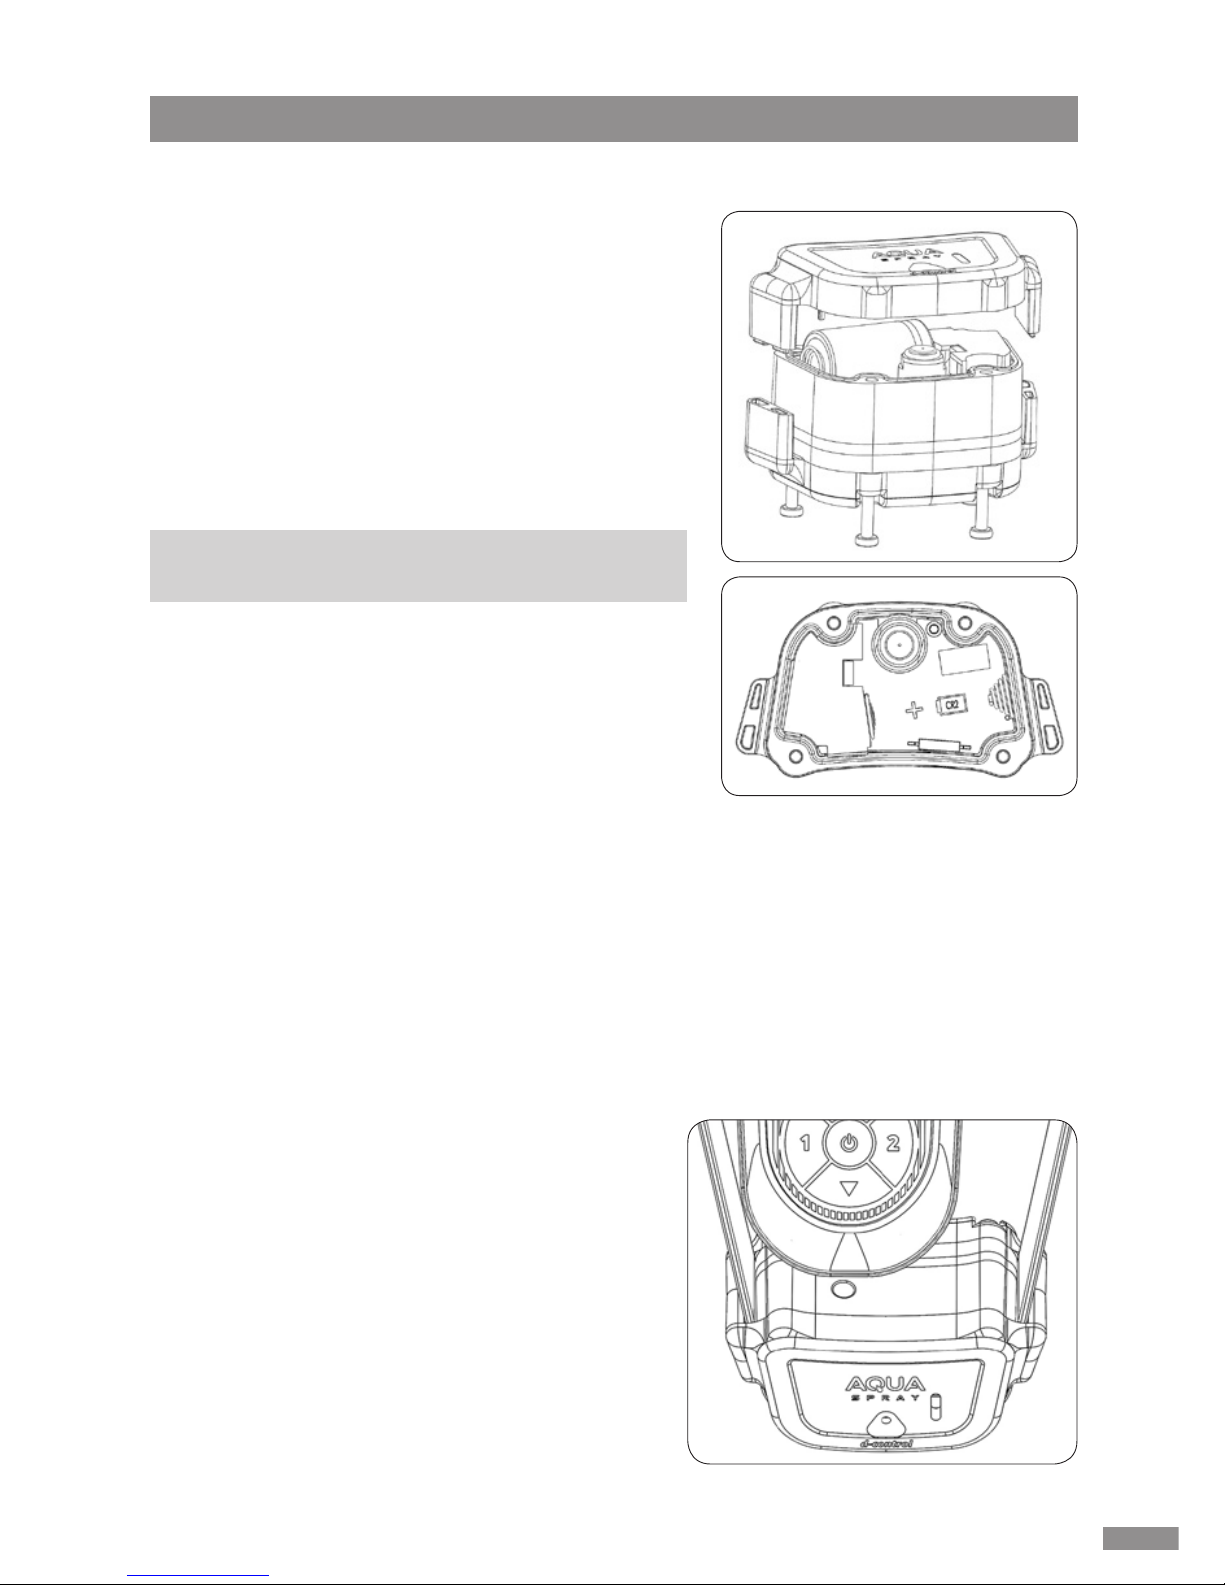
Inserting (changing) the receiver battery
1. Remove the 4 screws from the underside of the
receiver and remove the lid from the top.
2. Insert the lithium CR2 3 V battery with the correct polarity (polarity is marked in the battery
compartment).
When inserting battery for the first time, or if the
battery is removed for longer than a couple tens
of minutes (approx. 20 minutes), a beep sounds
to indicate that battery has been inserted
correctly.
3. Check that the rubber seal is correctly positioned in the receiver lid groove. If the rubber seals
are dirty, clean them.
4. Put the lid back on the receiver and replace the
screws.
Checking the receiver battery's status
To check the receiver battery, see the indicator light (LED) on the upper side of the
receiver (see chapter): Product description - Receiver.
Charged battery – when on, the LED ashes green
Low battery – when on, the LED ashes red
If the battery is at, insert new lithium battery CR2 3 V into the battery compartment.
Switching the receiver on/o
To turn the receiver on/o (e.g., when pairing
the transmitter and receiver), use the magnetic
switching system, activated by placing
the magnet stored in the lower part of the
transmitter near the correct receiver part.
Switching on:
1. Place the lower part of the transmitter near
the red target on the receiver (see picture) indicator light will shine red, then orange.
2. Once the light is orange remove the
transmitter from the receiver - the light will
shine green and start to ash.
Page 10

10
Important: Before pairing the transmitter and receiver, make sure that no one else
in your vicinity is using their own d-control. Your receiver could receive the code
of another transmitter. If this happens, re-pair your receiver with your transmitter.
Switching o:
1. Place the lower part of the transmitter near the red target on the receiver - indicator
light will shine red, then orange.
2. Once the light is orange remove the transmitter from the receiver - the light will
shine red.
Pairing procedure
1. Turn on the transmitter.
2. The receiver must be o.
3. On the transmitter, select the position (button 1 / 2), you want to pair with.
4. Place the lower part of the transmitter to the red target on the receiver and hold for
5 seconds. The LED indicator of the receiver will shine red, then orange.
5. After 5 seconds the orange indicator light will ash 3 times.
6. Remove the transmitter from the receiver - alternating green and red lights will ash.
7. Press the acoustic signal button on the transmitter. Successful pairing is indicated
by a long beep of the receiver.
Re-pairing the receiver
The number of times you may re-pair the receiver is unlimited, either with the same or
a dierent transmitter (see Pairing the receiver with the transmitter).
TIP: An unlimited number of receiver can be paired with one transmitter.
Example: On button 1 we pair 3 receivers, which can be paired one after another or
by putting all receivers in pairing mode and then pressing the acoustic signal button.
All of these receivers will respond the same when you press the command button.
For example, it's possible to use two training collars on one dog. Or alternatively for
training multiple dogs, where the same command is issue to all of them at once.
Important: When turning on, simply put the bottom of the transmitter on the
receiver's target for approx. 1 second. If you hold the transmitter at the receiver
target for more than 5 seconds, the receiver enters pairing mode. This mode is
indicated by alternating ashes of green and red indicator light. If this happens,
follow the chapter below - Pairing the transmitter and receiver.
Pairing the receiver with the transmitter
Each transmitter has its own radio code. For the transmitter to communicate with
the receiver, they must be paired together. If you have purchased a new d-control
transmitter/receiver set, no pairing is necessary – the set is already paired. Pairing is
only done if you want to use another transmitter or receiver.
The transmitter is designed for training two dogs, so you may pair it with two receivers.
Use buttons 1 and 2 to select one dog or the other.
Page 11
11
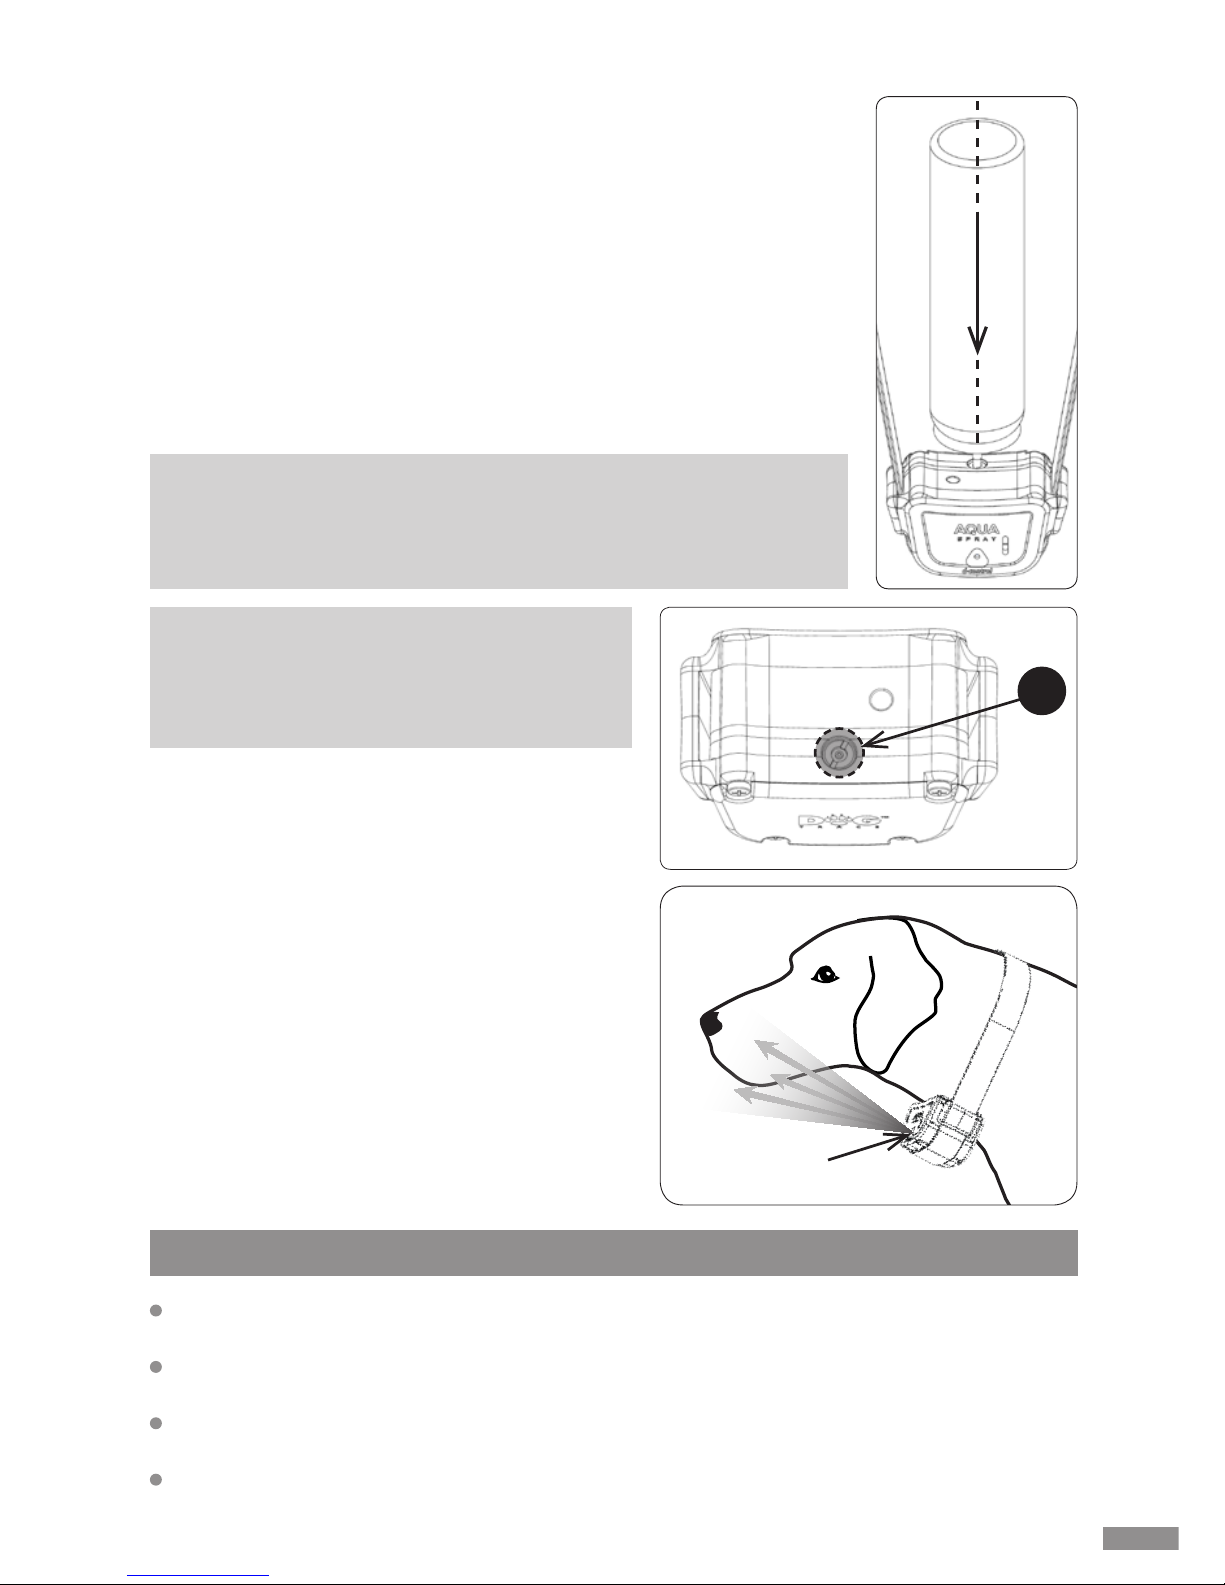
Filling the receiver with spray
Before using the spray training collar, you must fill the receiver
tank with spray.
1. Turn off the receiver.
2. Remove any dirt from the refill port.
3. Turn the receiver so the refill port points upwards.
4. Place the spray tip on the refill port as shown.
5. Press the spray bottle lightly into the container and hold for
about 15 seconds.
6. Stick the stick-on label that is under the cap of the spray bottle
over the refill port.
Fitting the training collar
Fitting the collar and receiver correctly is
important for proper functioning. Place the
dog collar so that the spray nozzle points
toward the dog's nose. The collar strap is
properly adjusted if you can insert 2 fingers
between the collar and the dog's neck. If
your dog has dense or long hair, it may
be necessary to trim it to ensure the spray
reaches the nose area.
Warning: Do not try to ll the receiver
while the dog is wearing the collar. To ll
the d-control AQUA spray receiver use
only original Dogtrace brand spray.
15 s
Spray
nozzle
Warning: The spray rell port must be protected against any
dirt in order to work properly. It is important to stick the label
over the rell port after every rell. This will protect the rell
port against dirt.
Basic use of the training collar
An important prerequisite for the use of the training collar is the trainer's basic
knowledge of dog training.
If you do not have this knowledge, please turn to a training center, cynology club or
dog school where you will learn basic communication with your dog.
You may begin using the training collar with a 6-month-old puppy that already has
some basic training, e.g., "SIT“, "LIE DOWN“, "STAY“ or at least "NO“…
The dog needs to know these commands in order to create a connection between
Page 12
12
Transmitter functions
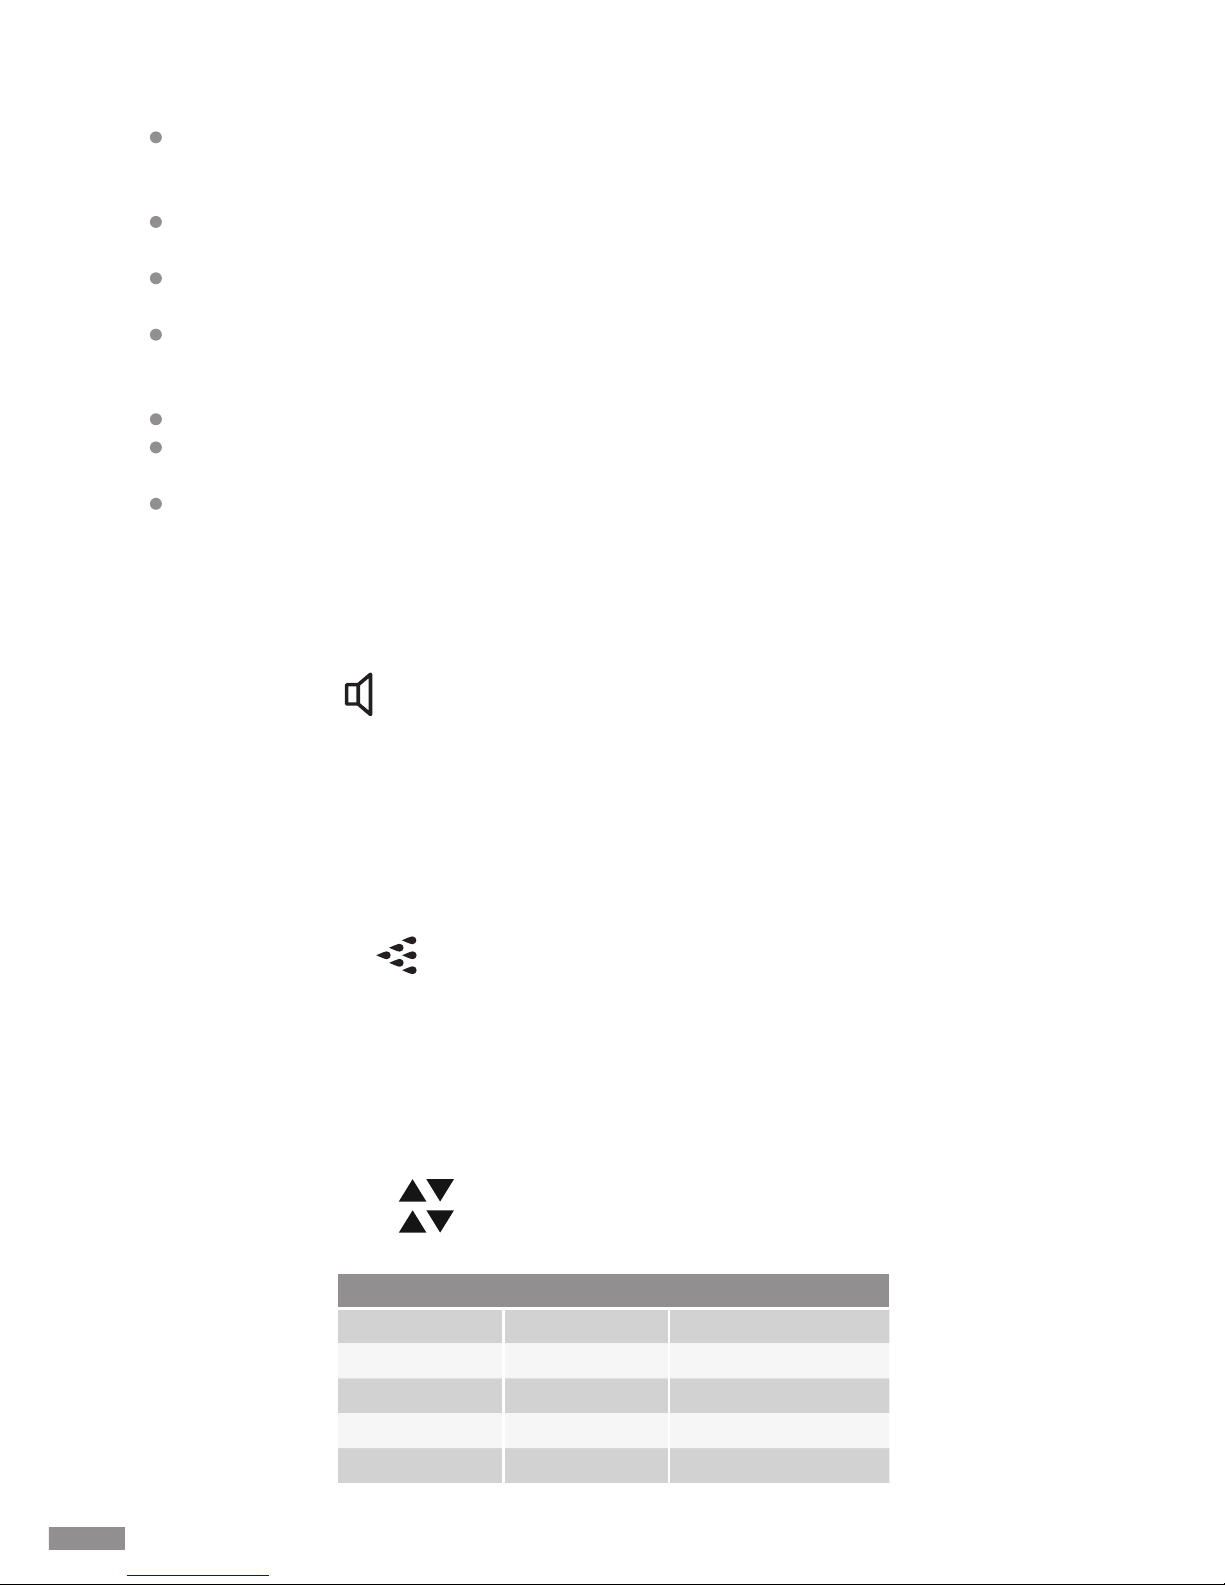
Before issuing a command choose the correct button for the dog, 1 / 2, which you want
to follow your command.
Acoustic signal:
The receiver on the dog collar starts to emit an acoustic of audible signal. This command
can precede the spray stimulation and is a very effective warning. You can use the
acoustic signal instead of the command "come/heel," in this case replacing a whistle;
the dog will always perceive the signal volume the same. It is very important to always
use the acoustic signal in the same way, so that it does not confuse your dog.
The green indicator light on the receiver will shine for the duration of the acoustic
signal.
Spray stimulation:
This function allows you to activate a warning from the receiver in the form of an
unpleasant cooling spray.
Choosing short N and long C sprays
Transmitter button 1 can be repeatedly pressed for the first dog (or button 2 for the
second), to choose between a short interrupting spray stimulation N (NICK) or long
stimulation C (CONTINUE).
Short stimulation N – choose the number of short sprays, from 1 to 5.
Long stimulation C – choose the length of 1 spray, from the shortest, 1, to the
longest, 10.
Number of sprays per rell
spray type degree no. of sprays
C 1 up to 300
C 10 up to 40
N 1 up to 200
N 5 up to 40
them and the training collar's acoustic signal.
After a successfully followed command, you should always follow with a reward or
praise so the dog learns to enjoy following commands and his desire to please you
grows.
You must not take successfully followed commands for granted and only react to
disobedience – the dog will soon lose interest.
If you're not certain that the dog will come when you call, start training on, for
example, a training line.
Your dog will have to get used to the training collar; let him wear it for several days,
but don't use it, so that he does not immediately recognize the link between its
wearing and its purpose. Positive and effective training takes time − don't rush!
Choose a place or environment to which your dog is accustomed.
Choose the right moment to press the button; at the precise time that your dog
displays undesirable behavior.
In case of any problems and for further guidance, do not hesitate to contact a
professional trainer.
Page 13
13
Maximum transmitter range
It's possible to use the d-control set at a distance of up to 300/900 m. The maximum
range is influenced by a number of factors – weather, terrain, vegetation, and so on.
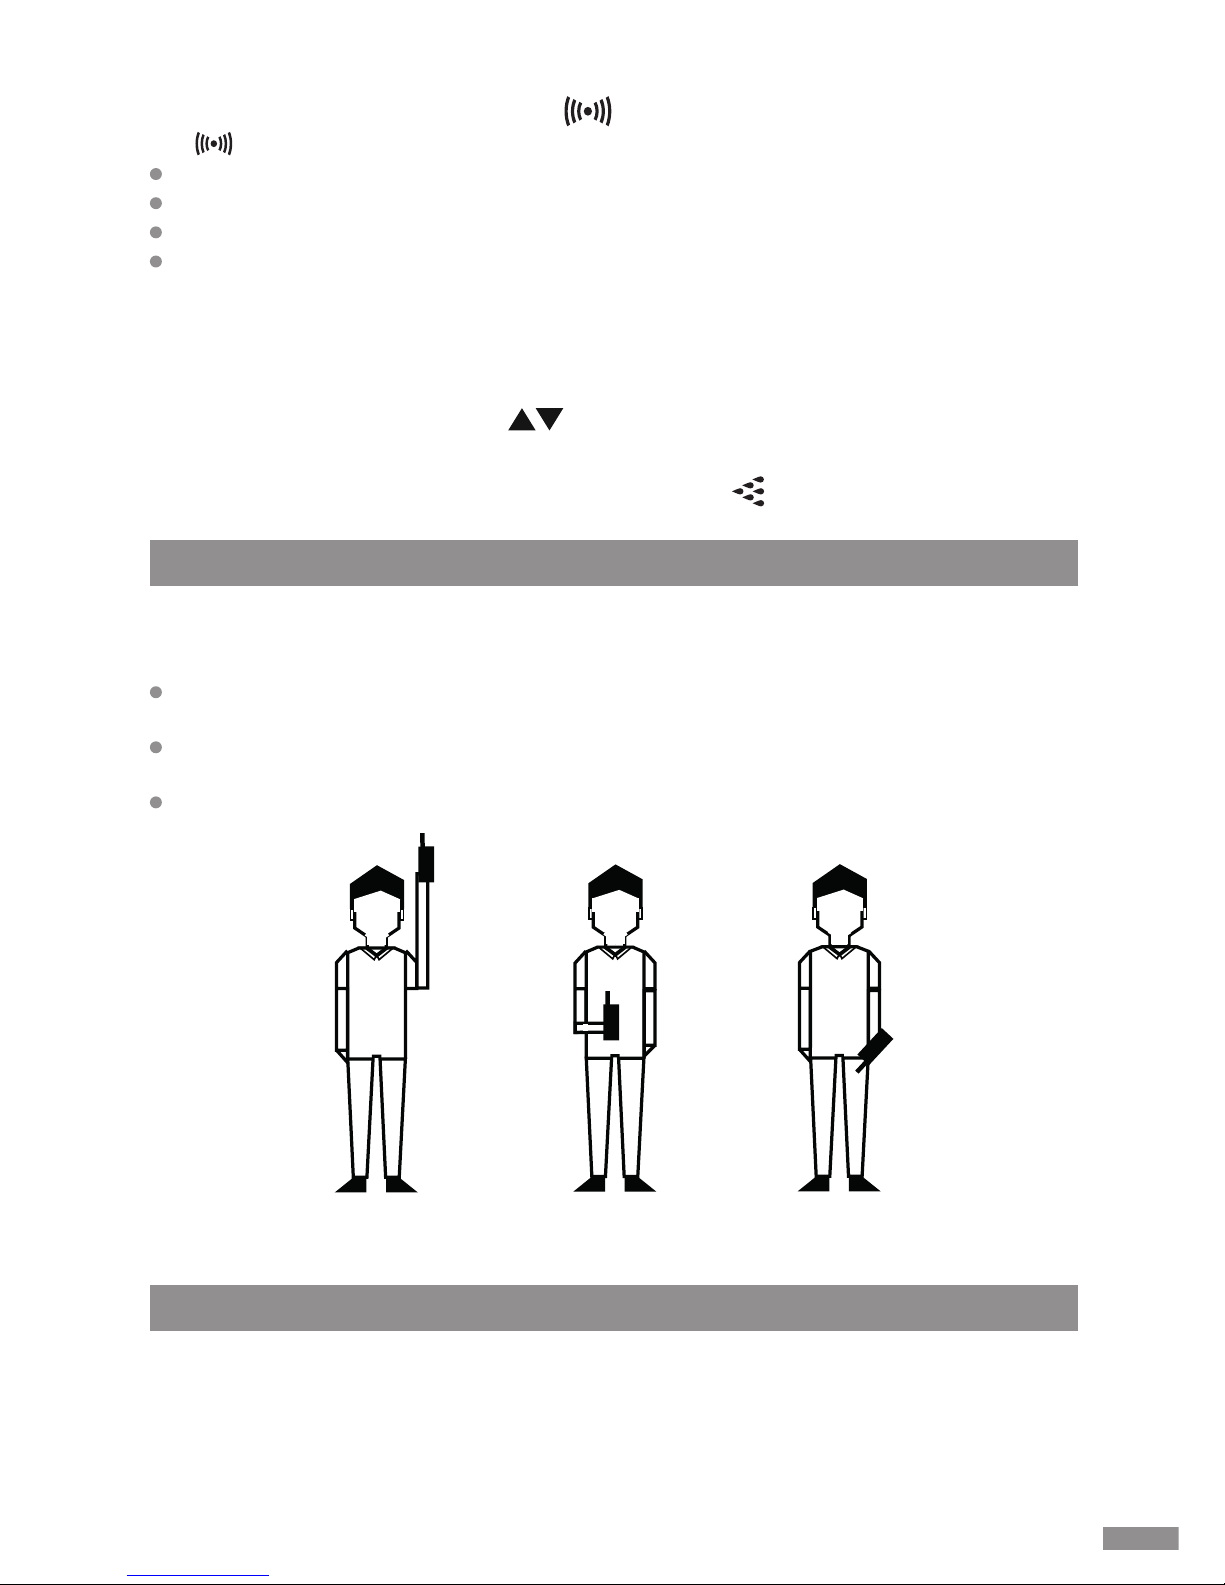
To ensure maximum range of equipment: Do not cover the antenna on top of the
transmitter.
When issuing a command, hold the transmitter in a vertical position away from the
body in your outstretched hand above your head.
Check the batteries in the transmitter and receiver, replace if necessary.
maximum range regular range minimum range
Multifunctional button (vibration):
The button switches between 4 modes:
vibration
long spray + vibration
long spray + acoustic signal
long spray + vibration + acoustic signal
Settings:
1. Choose the dog for whom you want to set the multifunctional button on the
transmitter.
2. Hold down the dog selection button (1 or 2) – until the dog selection symbol ashes.
3. Set the desired mode with the buttons.
4. Briey press the dog selection button (1 or 2).
The size of the long spray matches the settings of the C button (long spray).
1. Please read this manual again to ensure that the problem is not caused by faulty
batteries or improper use.
2. Make sure the batteries are inserted with the correct polarity.
3. If the transmitter is not communicating with the receiver, try pairing them again (see
chapter: Pairing the transmitter with the receiver p. 10).
Troubleshooting
Page 14

14
d-control 300 AQUA spray transmitter
Range ................................................................300 m
Power source ........................................lithium battery CR2 3 V
Battery life ...................................8-14 months depending on use
Frequency (output) ................................... 869,525 Mhz (10 mW)
Antenna ..........................................................integrated
Cover ........................................................ not watertight
Operating temperature ..................................... -10 °C to +50 °C
Weight .................................................57 g (w/out battery)
Dimensions ................................................103 x 52 x 22 mm
d-control 900 AQUA spray transmitter
Range ....................................................................... 900 m
Power source ................................................lithium battery CR2 3 V
Battery life ..........................................6–12 months depending on use
Frequency (output) ..........................................869,525 Mhz (100 mW)
Antenna ................................................................... external
Cover ................................................................ not watertight
Operating temperature .............................................-10 °C to +50 °C
Weight .........................................................60 g (w/out battery)
Dimensions ....................................................... 125 x 52 x 22 mm
Receiver
Power source ................................................lithium battery CR2 3 V
Battery life ..........................................6–12 months depending on use
Antenna .................................................................integrated
Cover .................................................................... watertight
Operating temperature .............................................-10 °C to +50 °C
Adjustable strap circumference ........................................cca 20 - 72 cm
Strap width ..................................................................20 mm
Receiver weight ...........................................74 g (w/out strap, battery)
Receiver dimensions ................................................68 x 38 x 35 mm
Technical data
Do not use volatile substances, such as paint thinner, gasoline or other cleaners, to
clean your d-control. Use a soft, damp cloth or neutral detergent.
The receiver (collar) is waterproof only provided good sealing conditions. To maintain
the watertightness of the receiver, we recommend replacing the rubber seal in the
battery compartment lid at least once a year. Also ensure that the seal is properly
cleaned and adjusted after each battery change and that the screws are properly
tightened. Tighten using force no greater than necessary!
If you don't use the training kit for a long time, remove the battery from the device.
Maintenance
4. If the problem persists, contact your retailer.
5. If the spray leaks from the refill port – check that there is a rubber seal around the
refill port and that there is not dirt on it. If everything is OK, try pushing harder on the
spray bottle when filling.
Page 15

15
VNT electronics s.r.o. provides a 2 year warranty on the Dogtrace products with
respect to defects in material and workmanship under normal use and service from the
date of the original purchase.
The limited warranty does not cover the following:
accumulators
straps
direct or indirect risks during transportation of the product to the retailer
mechanical damage of the product caused by user‘s negligence or an accident
(eg. biting, breaking, impacts, excessive pulling of d-ring etc.).
1. The warranty period commences on the date of purchase. The sales receipt or
your purchase invoice showing the date of purchase of the product, showing the
serial number and date of purchase of the product, is the proof of the purchase
date.
2. The warranty does not cover damage resulting from:
a) improper installation or breach of instructions from the manufacturer‘s user
guide
b) improper use of the product
c) improper storage or maintenance of the product
d) modication by a non authorized person, or a repair made without manufacturer‘s
knowledge
e) natural disaster (wind, earthquake, lightning storm, etc.)
f) alternation of the goods made by the consumer if such an alternation resulted
in a damage of the product
g) due to a consumer’s mechanical damage
h) other customer‘s process, which would be in a contrary to the Warranty terms
and conditions and the User guide
3. The warranty can not be claimed if the goods is not completely paid, or when
purchased on a sale
4. The claimant is obliged to prove the defect and to enable the manufacturer to
check the legitimacy of the product faults and assess the extent of the product
faults. Otherwise is loosing the right arising from the manufacturer’s responsibility
for product defects.
5. Consumer demands arising from the producer‘s liability for defects are regulated
in the general legislation.
6. It is required that all items being sent for a repair must be properly cleaned. Items
deemed to be insuciently cleaned will be returned unrepaired to the customer.
Please do not include the strap or any other accessories if it is not a subject of the
warranty.
7. When sending the device to the service with a transport company, pack the
goods adequately to protect it against a damage; it is recommended to keep
the original packaging for this purpose. The producer is not responsible for a loss
of goods during transport.
The information contained in this manual may be subject to change due to developments without
further notice.
Warranty terms and conditions
 Loading...