

Dog trace d–control 620, d–control 1020, d–control 1620, d–control 622, d–control 1022 User Manual
...Page 1
User’s guide
d–control
620, 1020, 1620
Electronic training collar
d–control
622, 1022, 1622
Electronic training collar –
set for two dogs
Page 2

2
Thank you for purchasing the product
DOGtrace™ d–control
from VNT electronics s.r.o., Czech Republic.
We would like to ask you for reading this manual carefully before using the unit
and keeping it for future use.
EC Declaration of Conformity
Guideline R&TTE 1999/5/CE
The manufacturer: VNT electronics s.r.o. declares that the below mentioned product:
Electronic training collar DOGtrace™ d–control
complies to all Europe Council Guidelines, Under No. 1999/5/CE of 7. 4. 1999
and corresponds to the following standards:
ETSI EN 300 220
CE
VNT electronics s.r.o. • Němčice 23 • 561 18 Němčice u České Třebové
Phone: +420 461 310 762 • Czech Republic • www.dogtrace.com
WARNING:
Persons with a personal heart activity support device (pacemaker, defi brillator)
must respect the relevant precautionary measures. The d–control transmitter emits a certain
stationary magnetic fi eld (lower part of the remote controller and RF signals).
Frequency = 869.525 MHz, maximum transmitted performance = 500 mW.
Page 3

3
Contents
Introduction . . . . . . . . . . . . . . . . . . . . . . . . . . . . . . . . . . . . . . . . . . . . . . . . . . . . . . . . . . . . . . . . . . . . . . . . 4
Delivery contents . . . . . . . . . . . . . . . . . . . . . . . . . . . . . . . . . . . . . . . . . . . . . . . . . . . . . . . . . . . . . . . . . . . 4
Optional accessories . . . . . . . . . . . . . . . . . . . . . . . . . . . . . . . . . . . . . . . . . . . . . . . . . . . . . . . . . . . . . . . . 4
Product description . . . . . . . . . . . . . . . . . . . . . . . . . . . . . . . . . . . . . . . . . . . . . . . . . . . . . . . . . . . . . . . . . 5
Battery installation and replacement . . . . . . . . . . . . . . . . . . . . . . . . . . . . . . . . . . . . . . . . . . . . . . . . 6
Turning ON/OFF . . . . . . . . . . . . . . . . . . . . . . . . . . . . . . . . . . . . . . . . . . . . . . . . . . . . . . . . . . . . . . . . . . . . 8
Programming (matching) of the remote controller and the receiver . . . . . . . . . . . . . . . . . 9
How to use the remote controller . . . . . . . . . . . . . . . . . . . . . . . . . . . . . . . . . . . . . . . . . . . . . . . . . . .10
How to check that your DOGtrace™ d–control works correctly . . . . . . . . . . . . . . . . . . . . . . .12
For the best results . . . . . . . . . . . . . . . . . . . . . . . . . . . . . . . . . . . . . . . . . . . . . . . . . . . . . . . . . . . . . . . . .13
Getting started . . . . . . . . . . . . . . . . . . . . . . . . . . . . . . . . . . . . . . . . . . . . . . . . . . . . . . . . . . . . . . . . . . . . .14
Advice . . . . . . . . . . . . . . . . . . . . . . . . . . . . . . . . . . . . . . . . . . . . . . . . . . . . . . . . . . . . . . . . . . . . . . . . . . . . .16
Hints for using . . . . . . . . . . . . . . . . . . . . . . . . . . . . . . . . . . . . . . . . . . . . . . . . . . . . . . . . . . . . . . . . . . . . . .17
Maintenance . . . . . . . . . . . . . . . . . . . . . . . . . . . . . . . . . . . . . . . . . . . . . . . . . . . . . . . . . . . . . . . . . . . . . . .17
Troubleshooting . . . . . . . . . . . . . . . . . . . . . . . . . . . . . . . . . . . . . . . . . . . . . . . . . . . . . . . . . . . . . . . . . . . .18
Warranty . . . . . . . . . . . . . . . . . . . . . . . . . . . . . . . . . . . . . . . . . . . . . . . . . . . . . . . . . . . . . . . . . . . . . . . . . . .19
Technical data . . . . . . . . . . . . . . . . . . . . . . . . . . . . . . . . . . . . . . . . . . . . . . . . . . . . . . . . . . . . . . . . . . . . . .20
Page 4

Introduction
Delivery contents
Optional accessories
Do you need to have your dog under control all the time? Do you want to train and breed it
easily, quickly, precisely, and effi ciently? Electronic training system DOGtrace™ d–control
consisting of transmitter and collar will help you train your dog with effi ciency incomparable
to other methods. The transmitter (similar to a TV remote controller) enables giving orders at
long distance. There are two sorts of commands. These are a warning sound signal and a set
of electronic impulses. It is possible to adjust the intensity of electronic pulses in a simple
way. Electronic systems of the transmitter and collar use state-of-the-art technology based on
single-chip microprocessors and wireless communications. Thanks to the ergonomic design
and low weight of the collar, it is possible to use it also for small dog races.
} Collar /receiver/ including a strap (2 pcs for d–control 622, 1022, 1622 models)
} 12 mm and 17 mm electrodes (2 pcs for d–control 622, 1022, 1622 models)
} CR2 3V lithium battery (2 pcs for d–control 622, 1022, 1622 models)
} 2 pcs alcaline battery LR6 1,5 V
} Neon discharge lamp (2 pcs for d–control 622, 1022, 1622 models)
} Remote controller /transmitter/ with a fastener
} String for hanging the transmitter around neck
} User’s guide and warranty certifi cate
} DVD – Dog Training
} Case
} Dummy collars } Spare batteries
} Woven or plastic straps in various colours } Spare seals
} Spare electrodes } Spare screws
4
Page 5
Product description
REMOTE CONTROLLER
5
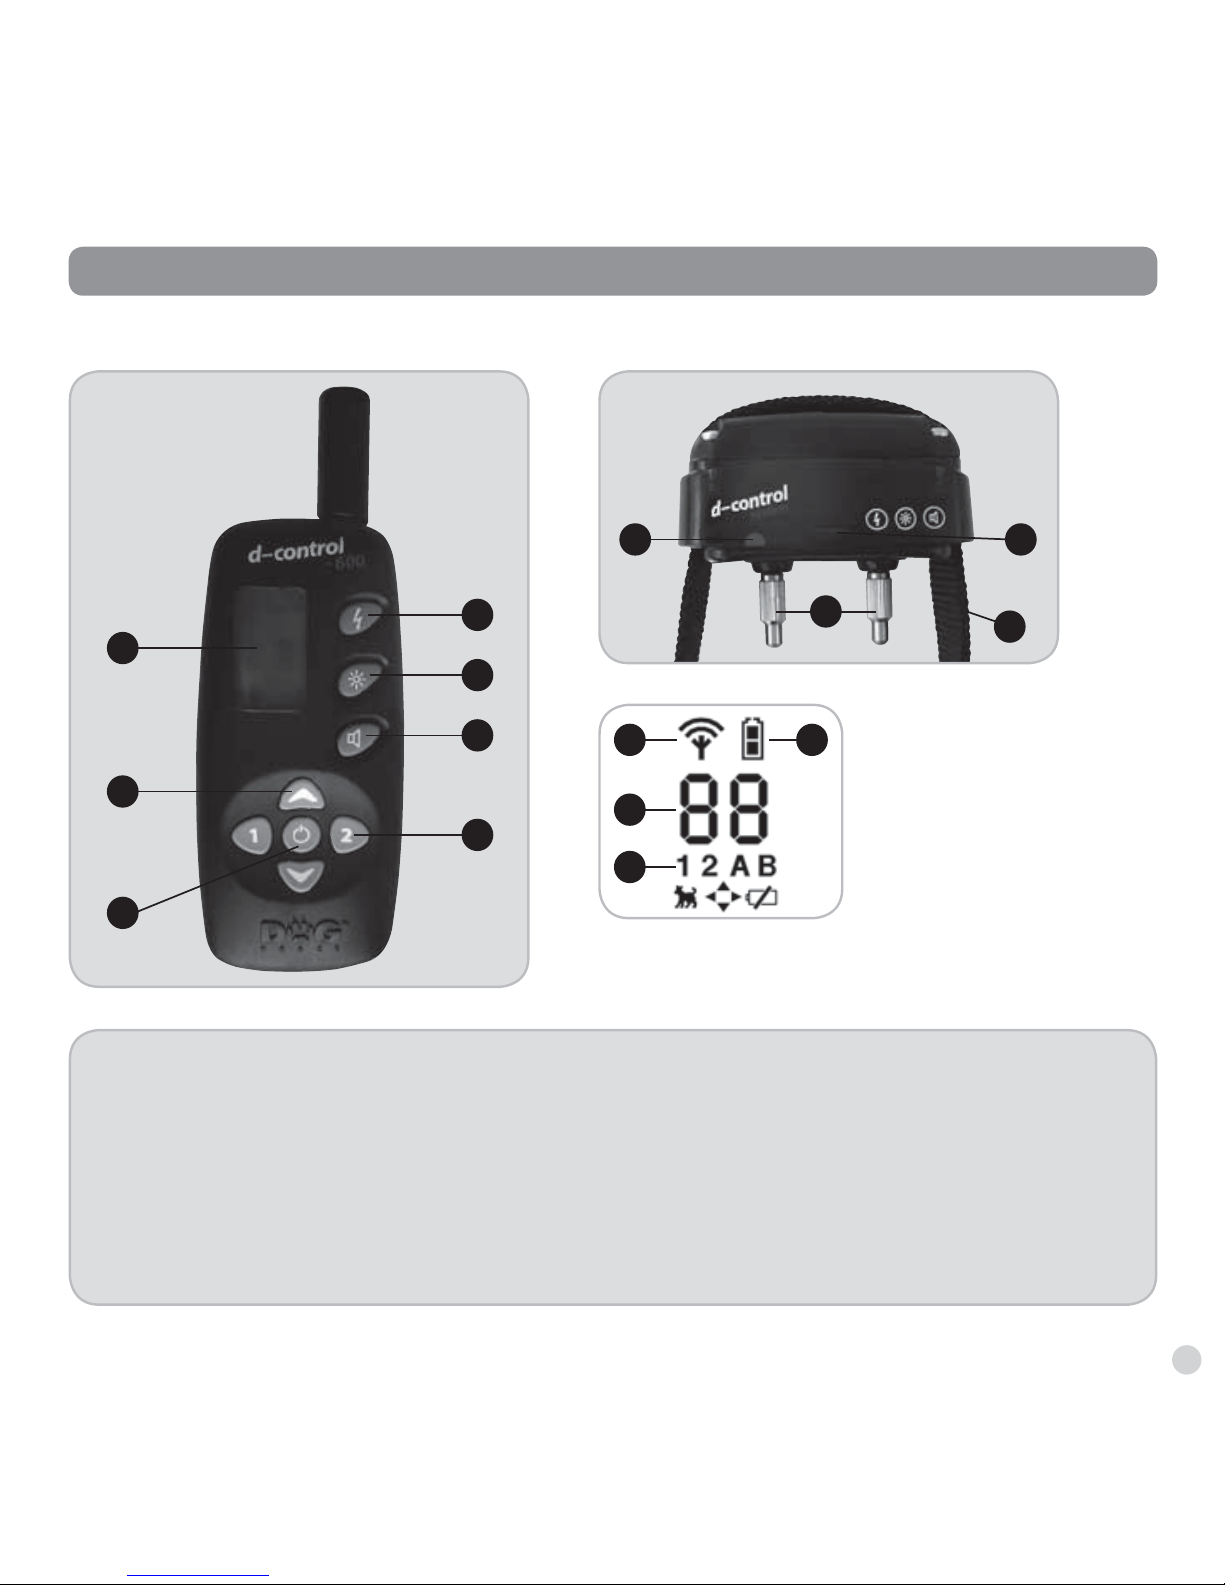
REMOTE CONTROLLER } 1 – Correction impulse button, 2 – Light button,
3 – Sound signal button, 4 – Illuminated LCD display, 5 – Correction impulse level buttons,
6 – Switch on/off button, 7 – Receiver selection (dog 1, dog 2) button.
COLLAR WITH THE STRAP } 1 – Target, 2 – Indicators, 3 – Electrodes, 4 – Woven strap.
LCD PANEL DESCRIPTION } 1 – Transmission indication, 2 – Battery status indicator,
3 – Set correction impulse level indicator, 4 – Receiver selection (dog 1, dog 2) indicator.
1
2
3
7
6
4
5
COLLAR WITH STRAP
LCD PANEL
DESCRIPTION
4
1
2
1 2
3
4
3
Page 6
Battery installation and replacement
INSTALLATION (REPLACEMENT) OF THE BATTERY IN THE RECEIVER (COLLAR)
} Remove 4 screws of the receiver housing cover plate with a cross-head screwdriver.
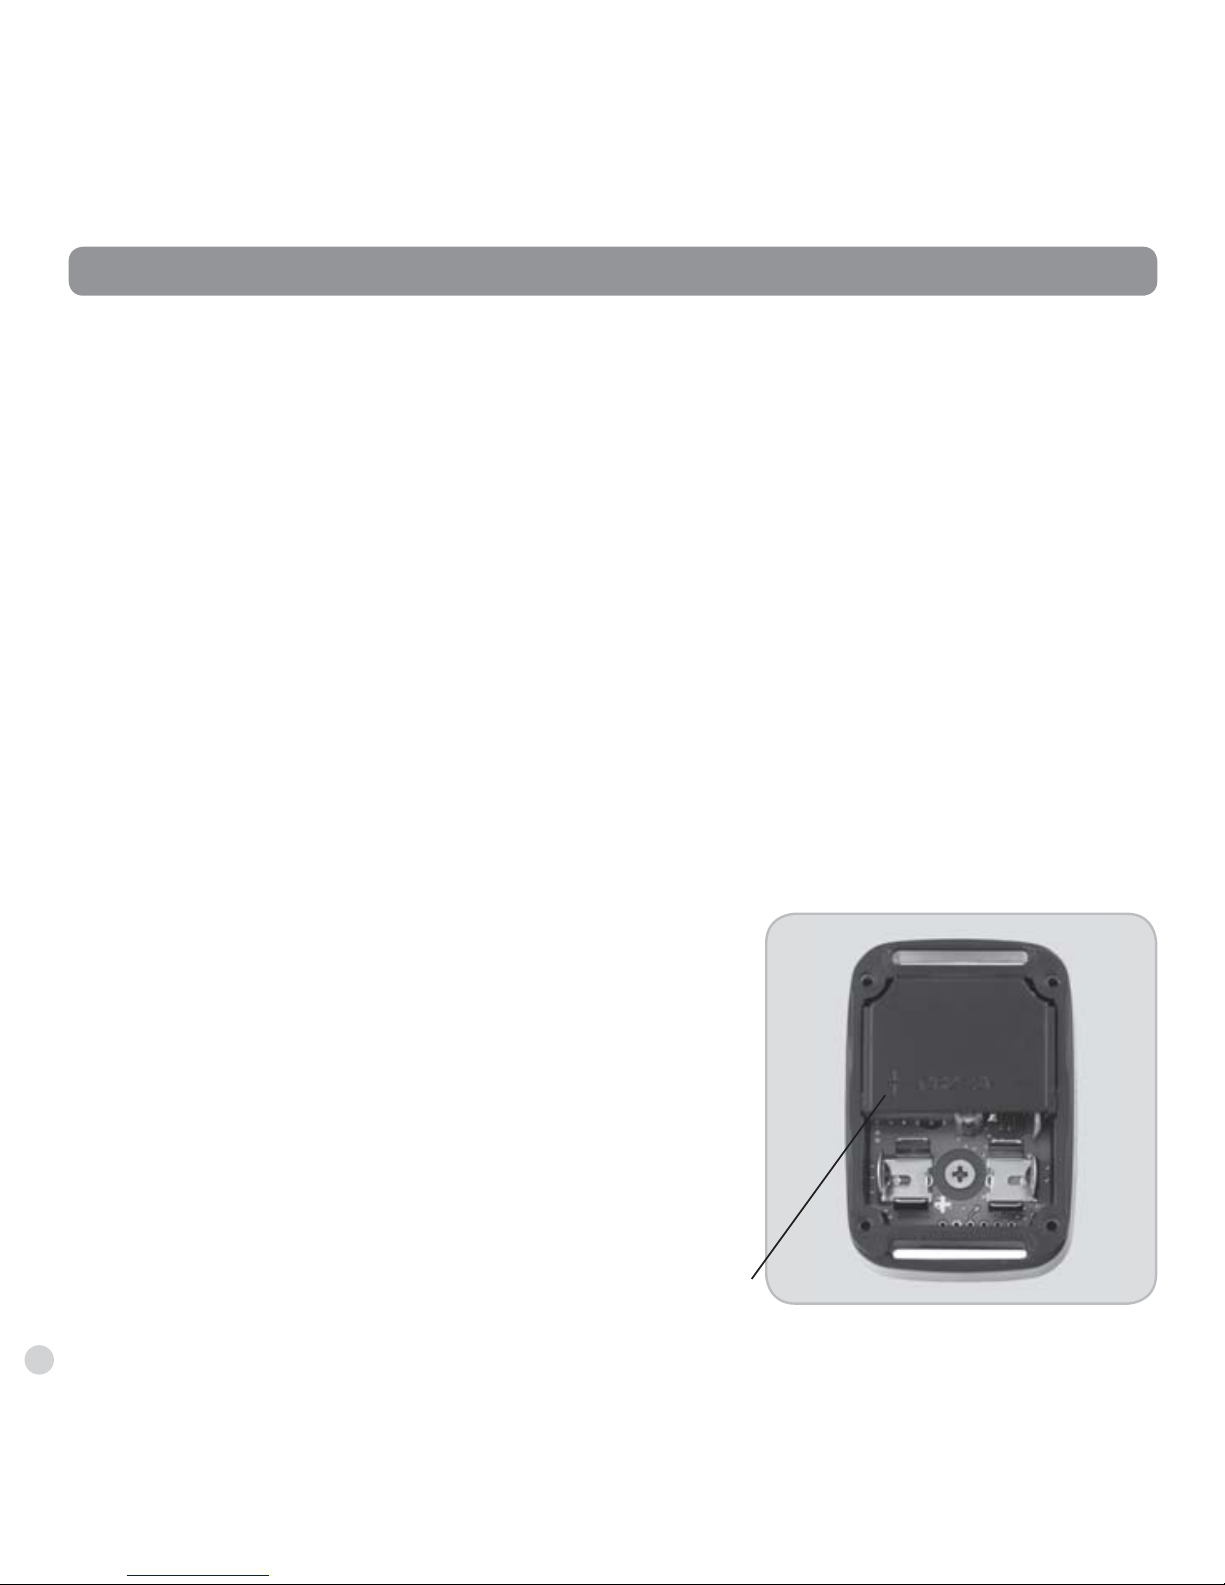
Install the 3V lithium CR2 battery. Mind the correct polarity indicated on the receiver PCB
with “+“ symbol in the battery compartment (see photo).
} A beep indicating correct installation of battery will sound.
} If you do not hear the beep after installation of the battery, remove it immediately.
Check the polarity and try again.
} Before putting the plate cover to its place make sure that the rubber seal is correctly
seated in its slot. Tighten the 4 screws on the cover plate of the receiver.
CAUTION: Always switch off the receiver before battery removal, remove the battery and
shortcut battery contacts using a metal tool (screwdriver, a pair of scissors and similar).
Checking the battery status
Look at the indicator on the front panel of the receiver (collar) to check the battery status:
} The battery is fully charged: The LED indicator in on-state
blinks slowly in green.
} The battery is weak: The LED indicator in on-state
blinks in red. Prepare a spare 3V lithium battery CR2
and follow the section describing the battery
installation.
Make sure that the receiver works correctly.
Battery polarity indicator
6
Page 7

7
INSTALLATION (REPLACEMENT) OF THE BATTERY IN THE REMOTE CONTROLLER
} Remove the cover of the battery compartement and insert 2 LR6 alcaline batteries.
Mind the correct polarity marked in the battery compartement.
} Replace the cover and tighten the screw.
Checking the battery status
Look at the LCD display to check the battery status:
} Fully charged battery: full battery symbol shines in the LCD permanently in on state.
} Weak battery: LCD display indicates battery capacity decrease. In case the battery symbol
is empty, insert new LR6 batteries according to the instructions above.
Make sure that the receiver works correctly.
NOTICE: you can also use rechargeable batteries in the remote controller.
They do not provide enough voltage for correct battery status indication
on the LCD.
CAUTION: Always switch off the remote controller before battery removal,
remove the battery and shortcut battery contacts using a metal tool.
}
Page 8
Turning ON/OFF
TURNING THE REMOTE CONTROLLER ON/OFF
} Turning on: Press down the On/Off button on the remote controller for 1 second.
Turning on is indicated by lighting up of the LCD display.
} Switching off : Again, press down the On/Off button for 1 second.
Turning off is indicated by going out of the LCD display.
TURNING THE RECEIVER (COLLAR) ON/OFF
A magnetic switching system located in the remote controller is used to turn the receiver
(collar) on and off .
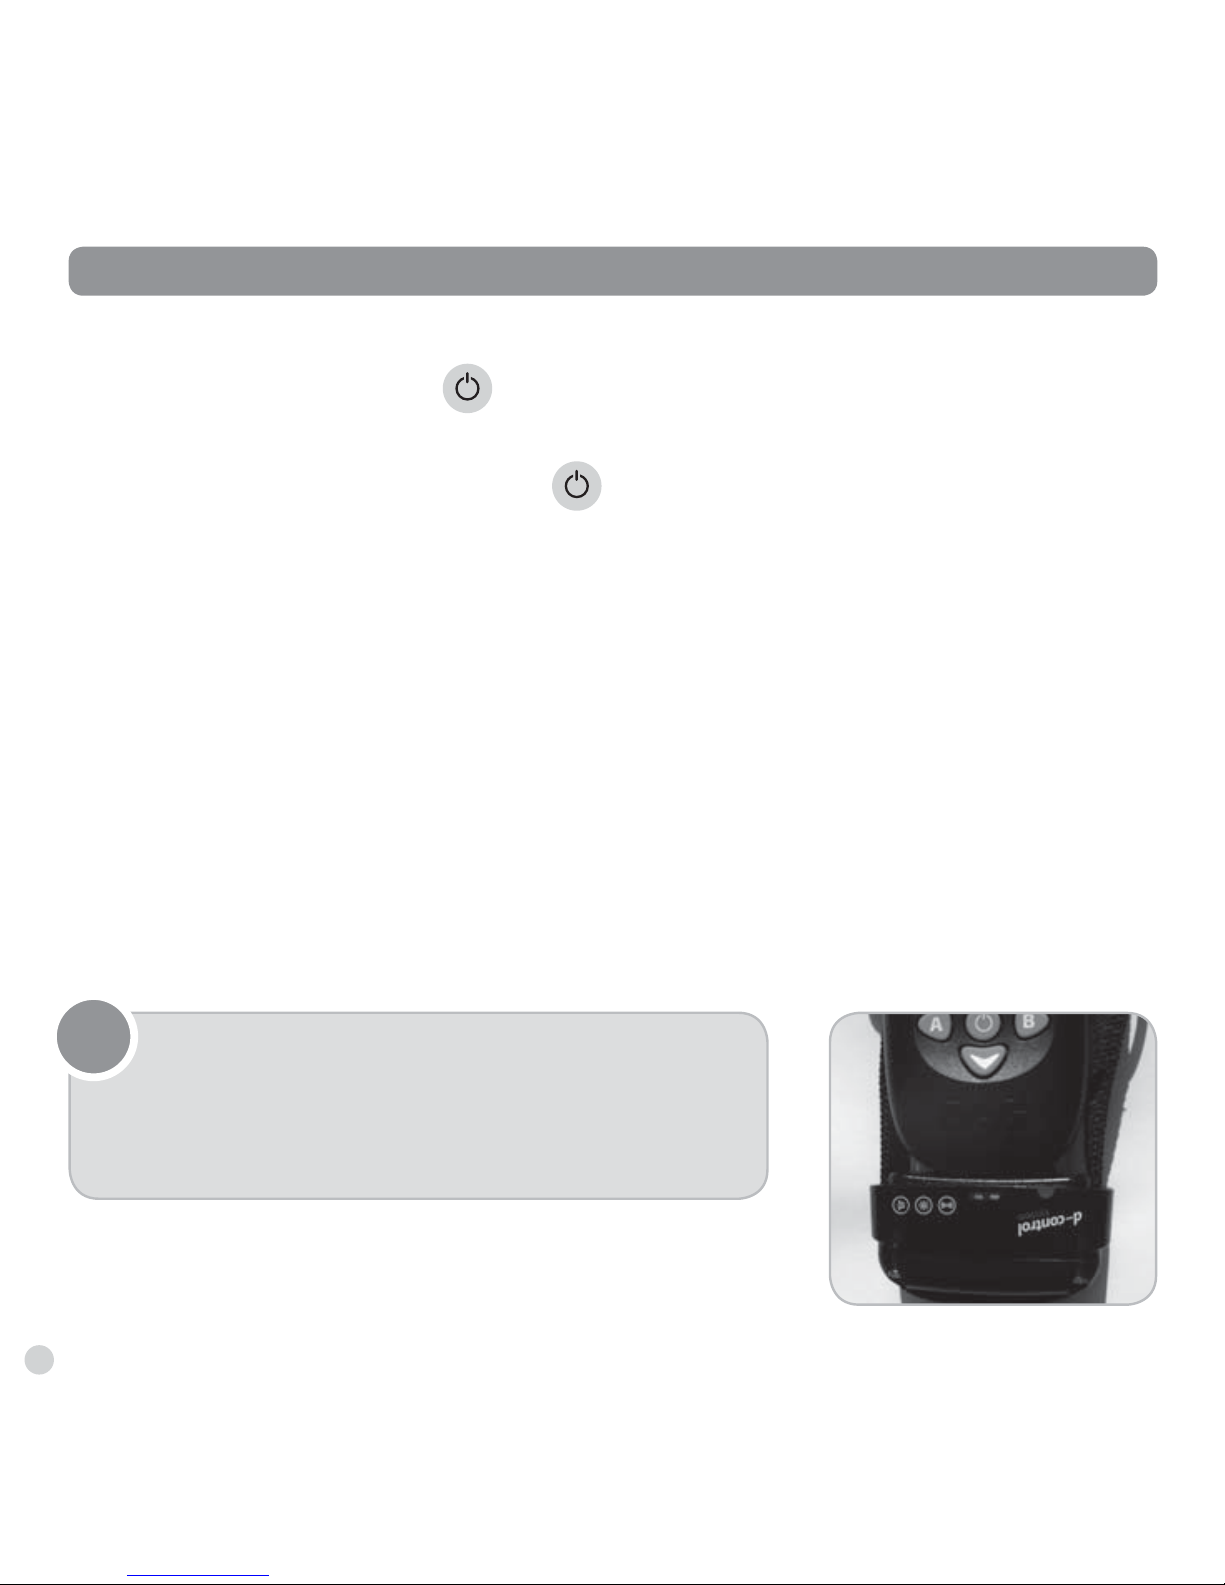
} Turning on: Place the lower part of the remote controller for 1 second to the target
on the receiver (refer to the Fig.). The receiver indicator will start blinking in green and this
indicates that the receiver is ready for use.
} Turning off : Again, place the lower part of the remote controller for 1 second to the
target on the receiver (see the Fig.). The LED indicator of the receiver will be lit red.
The receiver is turned off .
The situation when the receiver is turned on/off
and the transmitter is being matched with the receiver
}
CAUTION: To save the battery life time, it is
necessary to switch off both transmitter and
receiver after training!!! If you do not use the
device for a longer time period, it is recommended
to remove the batteries.
8
Page 9

Programming (matching) of the remote controller and the receiver
Every remote controller has its own RF operational code. Programming of the remote
controller with the receiver (collar) will be accomplished during the fi rst use of the
DOGtrace™ d–control set or with a new remote controller or a receiver (when one or the
other is lost). This operation will enable you to match your remote controller to the delivered
receiver (collar).
} Turn on your transmitter.
} Select dog 1 on the remote controller.
} Touch the lower part of your remote controller to the target on your receiver (see the
photo on page 8). The green LED will be permanently lit and after some 3 seconds, it will
switch to the programming mode, indicated by fl ashing of the red and green LED
at the same time.
} Now take your transmitter away and press down the sound signal button on your
remote controller. The codes will be matched in this step and your receiver will produce
a sound signal.
} Proceed in the same way when programming the second receiver (for the second collar
for d–control 622, 1022, 1622 models).
}
IMPORTANT: Before programming is started (before the fi rst use of your receiver
or code rewriting) make sure that no one else uses his/her d-control or another
product made by DOGtrace™ in your neighbourhood – your receiver could
randomly receive the code from the other remote controller and set itself to it.
If this happens, program your receiver once again using your remote controller.
9
Page 10
REPROGRAMMING OF YOUR RECEIVER
The receiver can be programmed repeatedly without restraint either using the same remote
controller or with another (see the section Programming /matching/ of your remote controller
and receiver).
How to use the remote controller
The DOGtrace™ d–control remoter controller is designed for cooperation with two separate
receivers independent of each other.
Button – Sound signal
When you press down the sound signal button, you will be able to send the sound signal to
your receiver at a long distance. There is no time limit for this function: The buzzer will sound
for as long as you are holding the pressed down button and the green LED on your receiver
will be permanently lit.
It will be indicated by the transmission symbol on the LCD display of your remote controller.
Button – Correction impulse
By pressing down this button, you send your dog a warning in the form of an electronic
impulse transmitted by the two electrodes located in the receiving collar. The implulse is
given as long as you keep the button pressed to a maximum of 8 seconds.
The red LED diode on your receiver is lit permanently.
It will be indicated by the transmission symbol on the LCD display of your remote controller.
10
ADVICE: It is possible to program an unlimited number of receivers to one transmit-
ter, which is possible to use for training of several dogs at the same time.
It is possible to record two transmitters into one receiver, which can be used,
for instance, for a potential correction of the dog’s training by an instructor.
}
Page 11
Button – lighting the collar
A red LED diode inbuilt in the collar emits very intensive fl ashes which are stronger than by
common light collars. Your dog can be easily located even in absolute darkness!
There are 8 interesting fl ashing modes available.
Mode Function
0 pressing shortly – single blink
1 pressing permanently – blinking as long as the button is pressed
2 pressing shortly – blinking 10times
3 after pressing – a blink in every 5 seconds
4 same function as mode 0 with a diff erent fl ashing frequency
5 same function as mode 1 with a diff erent fl ashing frequency
6 same function as mode 2 with a diff erent fl ashing frequency
7 same function as mode 3 with a diff erent fl ashing frequency
NOTICE: By modes 3 and 6 do not forget to switch off blinking by pressing the light
button. Modes 4–7 can be used for diff ering dogs in darkness.
Control buttons
These buttons are used for quick selection of impulse intensity from the receiving collar.
It is possible to set 30 levels, indicated by numbers 1–30 on the LCD display. When the preset
correction impulse level is changed, the LCD will be lit for 3 seconds.
Level 0: no impulse. Level 1: the weakest impulse. Level 30: the strongest impulse.
11
SETTING THE MODES:
Press a dog selection button 1 or 2 (depending on which button the required
receiver is paired) until symbol 1 or 2 starts blinking on the LCD.
Set the required mode number (0–7) using the correction impulse setting arrows.
Confi rm the selection by pressing button 1 or 2 again.
}
Page 12
How to check that your DOGtrace™ d–control works correctly
You can check anytime whether your set works correctly. Before checking, make sure that
the receiving collar is turned off .
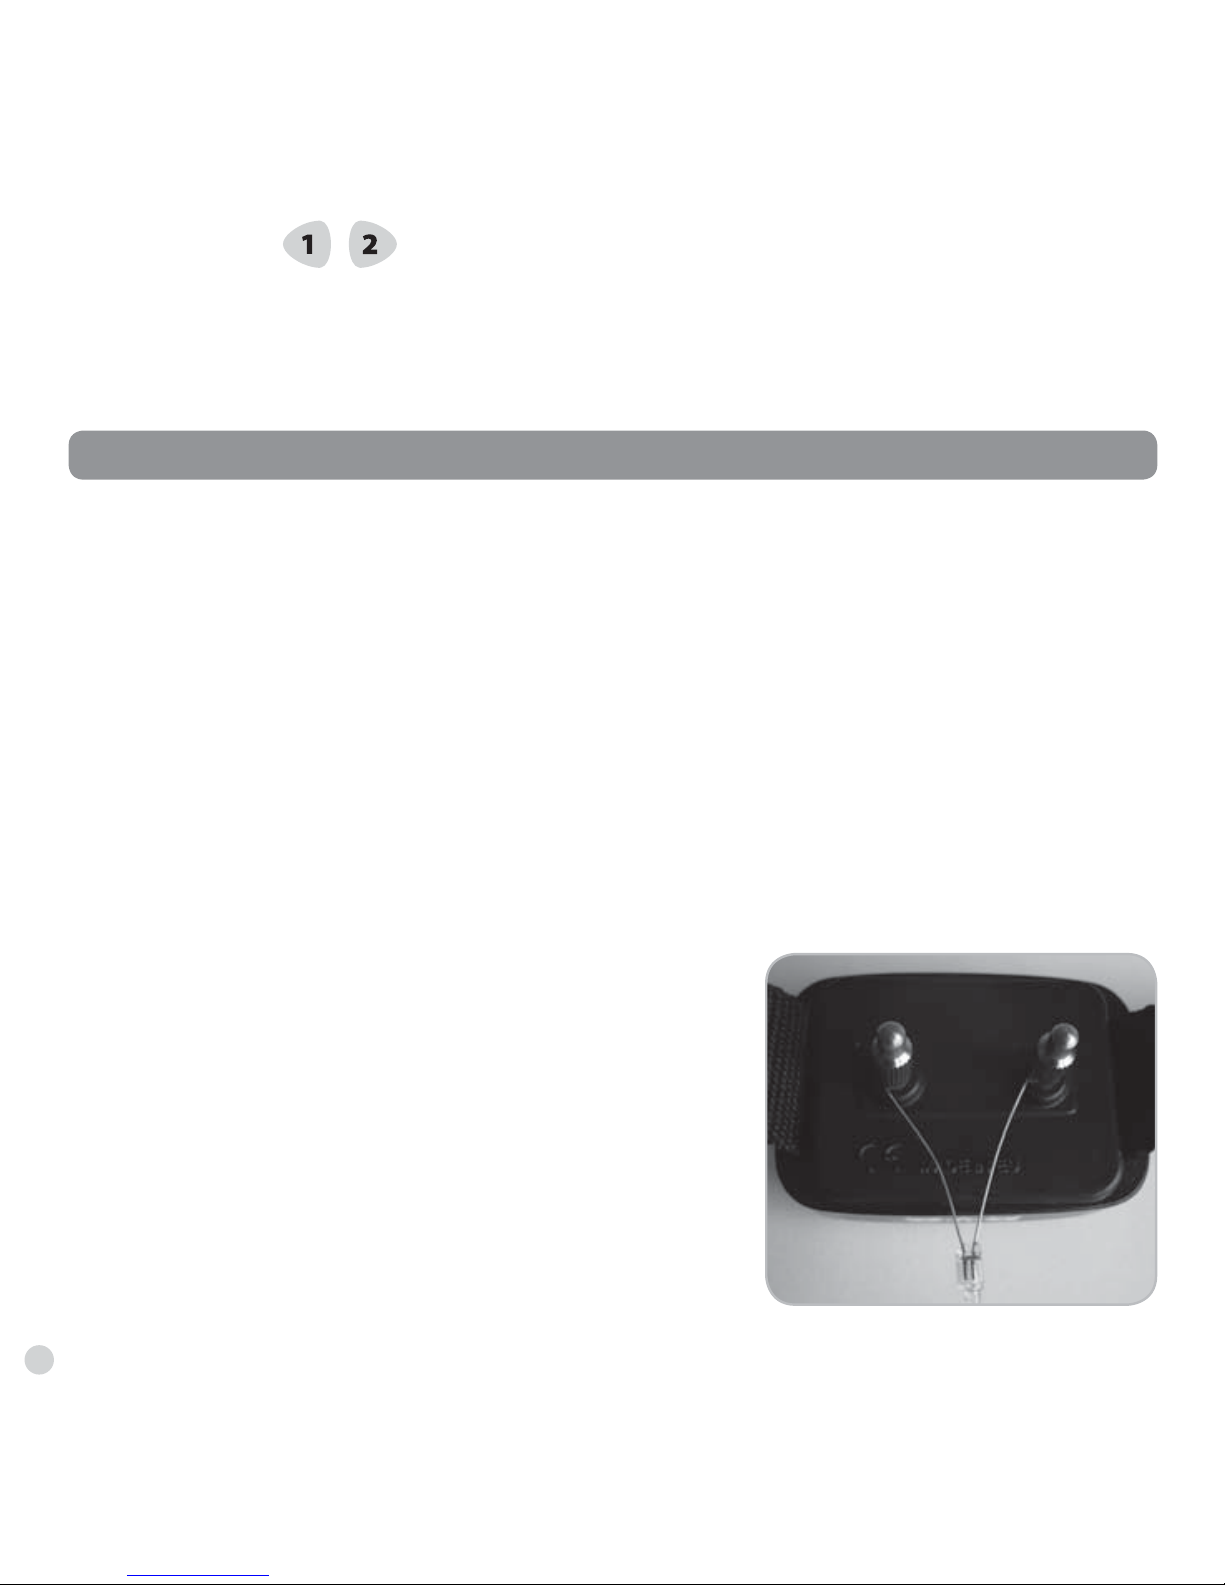
} Connect the leads of the testing discharge lamp to both electrodes (loosen up the
electrodes, insert the wires of the lamp under them so that they can be fi rmly held
and then retighten the electrodes).
} Turn on your remote controller and receiver.
} Press down the button for sending a correction pulse. The testing discharge lamp will
indicate the receipt of the signal by a blink. The alteration of the intensity of the pulses
according to options 1 to 30 will be indicated by a weaker or stronger light of the lamp.
} At this moment, the correction pulse is only indicated by the light of the lamp,
i.e. the electrodes do not emit any correction pulses.
Test discharge lamp connection
12
Control buttons
The buttons are used for dog selection. A diff erent impulse level can be set for each dog.
It remains saved even after selection switching to the other dog.
Page 13

Training orders you send to your dog are transmitted from the transmitting unit to the collar
equipped with the receiver on radio waves. The propagation of radio waves is infl uenced by
a series of factors and under normal conditions the range of this unit is about 600–1600 meters
(depending on geographic conditions and surroundings).
If you want to get the best results with your unit, adhere to the following instructions:
} To reach the best range for your communication, hold your remote controller in your hand
and do not cover its antenna.
} If you hold your remote controller in front of you with your hand reached out, the range
will get longer.
} Before using your training set, always check the batteries in the remote controller and
in the collar and replace them if necessary.
} The power of batteries slightly falls down at temperatures below 0 °C. If it is possible,
keep your remote controller warm (e.g. in your pocket) and take it out only for use.
SELECTION OF ELECTRODES
Every package contains readily two kinds of electrodes. If your dog is small and its fur
is short, use short electrodes. If your dog is of medium built or big, use long electrodes.
ATTACHMENT OF THE COLLAR
The strap of the collar must be adjusted so that the electrodes can be in contact with the
dog’s skin. When the strap is too slack, the dollar is likely to move and repeated fi ction may
irritate your dog’s skin. Moreover, in this case the contact with the skin surface is not reliable
and the same holds true for proper operation of the collar. We do not recommend you to
leave your dog wearing the collar for several hours in the same place as it might cause skin
irritation. If it is necessary for your dog to wear the collar for a long time, change its position
on your dog’s neck.
For the best results
13
ADVICE: If you attach the receiver on your dog’s neck
laterally, you will extend the range of transmission.
}
Page 14

Getting started
} The trainer’s elementary knowledge in training dogs is the prerequisite for using the
training collar.
} If you do not have this knowledge, we recommend you to turn to a training centre,
a cynology club, or a school for dogs where you will learn the basic communication with
your dog.
} You can start using the collar for a 6-month-old puppy who has undergone the basic
training ”SIT“, ” DOWN“, “STAY“, or at least ”FIE“, “YOU MUSTN’T“…
} Demand these commands along with the sound signal from the collar so that your dog
can create a link between them.
} After a command is successfully executed, you should always reward or encourage your
dog so that it can execute your commands with delight and its desire to make you happy
could grow.
} You must not consider the executed command as the absolute obviousness and punish
only disobedience – your dog would soon fall away from you.
} If you are not sure that your dog will obey you after recalling, start training, e.g. using
a tracing dog-lead.
} Your dog will have to get used to the collar; let the dog wear the collar for a few days,
but do not use it so that your pet does not discover the connection with its attachment
and eff ects.
} Affi rmative and effi cient training requires some time: do not hurry!
} Select a well-known environment your dog is used to.
} Select the right moment for pressing the button; exactly at the moment when your
dog is doing something forbidden.
} Do not hesitate to contact a professional trainer for more advice and in the event of any
problems.
} We do not recommend you to use the collar for the dogs not being in good physical
health state (e.g. heart problems, epilepsy, etc.) or having behaviour disorders.
14
Page 15

Sound signal
It is only up to you how you use it. It depends on the method you wish to train your dog
with. With the sound signal you can:
} Send a sound warning to your dog when it is doing something inappropriate.
} Catch the attention of your dog.
} Teach it that this signal means the command ”Come“, ”Stay“, wherever the dog is
(the sound signal replaces your dog whistle).
The sound signal forgoing the pulse is very effi cient; your dog will soon create a link between
its incorrect behaviour, the sound warning, and its unpleasant feeling.
It is very important to always use the sound signal in the same way to avoid your dog
of being confused.
Button
– Permanent pulse
If your dog does not obey your command and the following sound signal, send it a correction
pulse (at a suitable level) disattract it from its activity and draw its attention to you.
The objective of this correction pulse is not to hurt your dog, but the pulse is very unpleasant
for it and the result is that your dog will soon realize the connectedness between your
command, the sound, and its unpleasant feeling. Only a minimum of these correction pulses
will be necessary in the course of time since your dog will put it together very well with its
disobedience of your command and later, it will be enough to give a command, eventually
accompanied with a sound signal.
Thanks to this button, you can send to your dog's collar a long pulse (press down the button
and hold it longer) or a short pulse (press down the button for a very short time – however,
for 1 second at least).
15
Page 16

Advice
With the DOGtrace™ collars it is extremely easy and quick to teach the dog:
} To walk along without a dog-lead.
} To call in reliably (”To me“, ”Come to me“ commands).
} To interrupt an inappropriate activity (”Fie“, ”You mustn’t“).
} To unteach bad habits during daily coexistence with people, such as taking food from the
table, jumping at people, pawing, undesirable barking, etc.
} Precise training of virtually every skill whereas the dog must do it precisely and reliably
as if it were on a lead (as many as hundreds of meters long!) – with the removal
of the undesirable dependence on the lead which the dog knows very well and adapts its
behaviour to it.
} To unteach chasing animals and running away from its master in the country – and thus
being exposed to problems and risks related to them, so the solution bringing more
freedom for your dog who now can move freely also across patches where it would not
otherwise be possible or it would be dangerous.
} Special activities and commands for business, hunting, sports or other training.
} Using directly during hunting for communication with the dog.
} A series of other activities and applications which the owner of this unit will soon discover
in daily common life with his/her dog.
16
Page 17

Hints for using
} Do not place your remote controller close to objects sensitive to magnetic fi elds that
might get damaged and be out of repair.
} Do not put your d–control in places exposed to high temperatures.
} It is necessary to replace the batteries every two years and also in the case that the set
is not used for a long time. Never leave a fl at battery in your unit; it might leak and
damage your unit.
} Repeated contacts of the electrodes with the dog’s skin may cause its irritation.
If this happens, do not use the collar until all traces of irritation are gone.
}
WARNING!!!
In case your dog has a wet fur, use a lower
level of the correction pulse than you
usually use.
Maintenance
Never use volatile agents such as thinners, petrol, or various cleaners to clean your
DOGtrace™ d–control. Use a soft damped cloth and a neutral clearing agent if necessary.
The receiver (collar) DOGtrace™ d–control is water-tight only on condition of a good
state of the seal and after its treatment with silicone vaseline. If this is fulfi lled, your dog
can even swim with that. In order to maintain the water-tightness of your receiver, we
recommend to replace the rubber seal under the receiver’s cover and treat it with silicone
vaseline.
After every replacement of the battery in the collar, make sure that the seal is properly
cleaned and settled and that the screws are adequately tightened. Check them regularly
and tighten them only adequately!
17
Page 18

The remote controller is dustproof and moisture resistant! It is defi nitely not suitable to
expose it to rain or spraying water. Protect it against water and moisture however it is
possible. If it is dropped into water, it will certainly be irrecoverably damaged or destroyed.
If you do not use the unit for a long time, remove the batteries from your remote controller
and receiver.
The collar will remember the preset confi guration (auto encoding). When you turn it on next
time, it will be in the mode you selected last time.
Before you start considering your unit to be faulty:
} Read this Service Instruction manual once again and make sure that the problem is not
caused by weak batteries or by incorrect application.
} Check to see if the batteries are positioned correctly with regard to their polarity.
} If a problem persists, try to initialize the system by removing the battery from the battery
holders in the receiver, then use a metal tool (e.g. a screwdriver, scissors, etc.) and
short-circuit both contacts – battery holders for about 2 seconds. Reinstall the battery. The
unit emits a beep confi rming that the battery is installed with correct polarity.
} Unless this helps, program your receiver again. Clear the previous code in the memory and
then match your receiver with the remote controller according to instructions in this
manual.
If the problem persists, contact your supplier.
Troubleshooting
18
Page 19

DOGtrace™ provides the product with warranty for possible manufacture faults to the extent
of two years from the date of purchase.
The manufacturer does not take responsibility for damage to the instrument caused by
incorrect use, unauthorized repairs and dismantling.
The warranty does not cover the following items:
} Batteries
} New straps
} Direct or indirect risks during transportation of the product to the seller
} Damage to the product caused by user’s negligence or by an accident (e.g. by masticating,
breaking, impacts, etc.) and by interventions of unauthorized persons.
The information contained in this manual may be subject to alterations without prior
notice.
Warranty
19
Page 20

TRANSMITTER
} Weight . . . . . . . . . . . . . . . . . . . . . . . . . . . . . . . . . . . . . 175 grams (without battery)
} Range . . . . . . . . . . . . . . . . . . . . . . . . . . . . . . . . . . . . . . from 600 to 1600 meters in a free area
. . . . . . . . . . . . . . . . . . . . . . . . . . . . . . . . . . . . . . . . . . . . . depending on a transmitter model
} Power supply . . . . . . . . . . . . . . . . . . . . . . . . . . . . . . . 2 pcs alkaline 1.5 V LR6 batteries
} Battery life time . . . . . . . . . . . . . . . . . . . . . . . . . . . . . 6–12 months, based on usage
} Frequency (output) . . . . . . . . . . . . . . . . . . . . . . . . . 869.525 MHz (500 mW)
} Antenna . . . . . . . . . . . . . . . . . . . . . . . . . . . . . . . . . . . . helical or 1/2 wave depending on a model
} Coverage . . . . . . . . . . . . . . . . . . . . . . . . . . . . . . . . . . . IP 20
} Radio communication safety and coding . . . . by a microcontroller
} Number of pulse levels . . . . . . . . . . . . . . . . . . . . . . 30
} Operating temperature . . . . . . . . . . . . . . . . . . . . . –10 °C to +50 °C
} Dimensions . . . . . . . . . . . . . . . . . . . . . . . . . . . . . . . . . 118 × 52 × 32 mm (without antenna)
RECEIVER (COLLAR)
} Weight . . . . . . . . . . . . . . . . . . . . . . . . . . . . . . . . . . . . . 65 grams (without the strap and the battery)
} Power supply . . . . . . . . . . . . . . . . . . . . . . . . . . . . . . . CR2 3V lithium battery
} Battery life time . . . . . . . . . . . . . . . . . . . . . . . . . . . . . 6 months, based on usage
} Frequency . . . . . . . . . . . . . . . . . . . . . . . . . . . . . . . . . . 869.525 MHz
} Antenna . . . . . . . . . . . . . . . . . . . . . . . . . . . . . . . . . . . . Integrated
} IP code . . . . . . . . . . . . . . . . . . . . . . . . . . . . . . . . . . . . . Against submersion
} Radio communication safety and coding . . . . by a microcontroller
} Operating temperature . . . . . . . . . . . . . . . . . . . . . –10 °C to + 50 °C
} Adjustable neck circumference . . . . . . . . . . . . . . 20 to 75 centimetres
} Dimensions . . . . . . . . . . . . . . . . . . . . . . . . . . . . . . . . . 62 × 42 × 30 mm
Technical data
20
Page 21
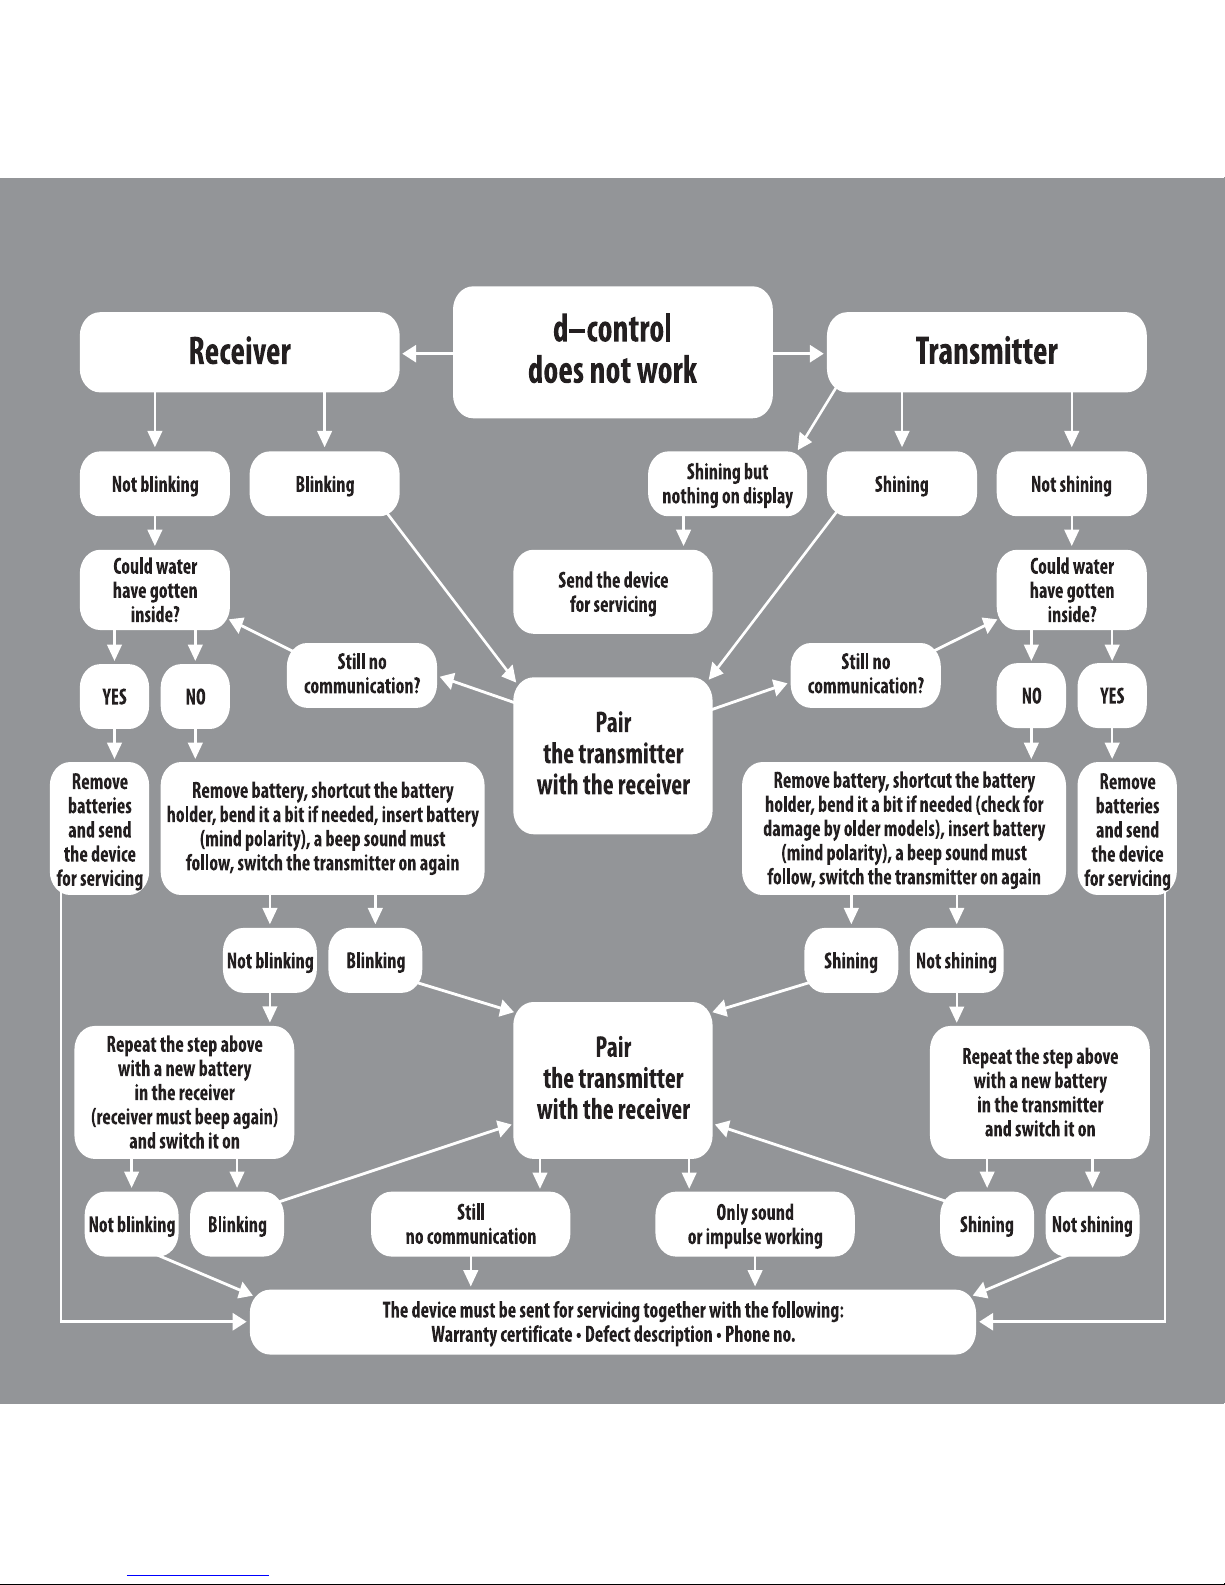
TROUBLE SHOOTING
 Loading...