

Dogtra PT10U, PC10U User Manual

User Manual
PT10U / PC10U

Pathfinder
by Dogtra
GPS Tracker for dog
Please read this manual thoroughly before operating the Dogtra Pathfinder.
Caution
1.The Dogtra Pathfinder is intended for the sole purpose of tracking and training dogs. The
Pathfinder is NOT intended for human use or use on other animals. Dogtra does not
assume any liability for the improper use of the Dogtra Pathfinder.
2. The Dogtra Pathfinder is meant for use in open outdoor areas. Operating the Pathfinder
near tall buildings and other steel structures will reduce the range of the GPS.
3.Pay close attention to the signal range when operating the Pathfinder across long
distances and low line-of-sight view.
2. Dogtra highly recommends consulting a dog training professional when using the
Pathfinder e-collar to correct dogs that are aggressive towards other dogs or people.
3. The Dogtra Pathfinder connects to your phone using Bluetooth. Dogtra’s industry leading
technology filtering system ensures minimal interference with other electronic devices. Out
digital microprocessor offers thousands of unique codes to eliminate frequency match-up
with other Dogtra e-collars. Dogtra recommends consulting your physician if you are
going to use the e-collar and you have any type of medical devices.
4. If the constant button is held down for 12 seconds or more, the unit will automatically
shut down. It reactivates when the button is released and depressed again.
5. A loose fit can allow the receiver/collar to move around on the dog’s neck. When this
happens, the contact points may rub the skin and cause irritation. If the unit is too loose,
the contact points will not make proper contact and your dog will not receive consistent
stimulation.
6. Leaving the receiver/collar in the same location on the dog’s neck for an extended period
of time can cause skin irritation. If the dog is to wear the e-collar for long periods,
occasionally reposition the receiver/collar so that the contact points are moved to a
different location on the dog’s neck. Make sure you check for skin irritation each time you
use the unit. If your dog exhibits signs of skin irritation, consult with a veterinarian.
7. Every dog has a different tolerance and reaction to the stimulation. Please look at your dog’s
reaction to find just the right level of stimulation. The stimulation level may vary depending on

the situation and distractions. Normally a distracted dog (chasing another dog, squirrel, etc.) will
require a higher level of stimulation compared to when there is no distraction.
8. E-collars can be used with many different methods. If you have any concerns in the training
methods provided by Dogtra, consult with a dog training professional.
1. First
1.1 Charging the Pathfinder
1.2 Power,
1.3 Operational buttons
1.3.1 Connector
1.3.2 Collar
1.4 About The LED
1.4.1 connector
1.4.2 collar
1.5 Connector
1.5.1 Replacing the antenna
1.6 Collar
1.6.1 Test Light
1.6.2 Replacing the Antenna
1.6.3 How to find the right stimulation
1.6.4 The GPS is for outdoor use.
1.6.5 Tone
1.6.6 Can I increase the range?
2. Installing the Pathfinder app
2.1 Compatible phones
2.1.1 iOS down
2.1.2 Android down
2.2 iOS down Downloading from the App Store
2.3 Android down Downloading with Google Play
3. Pairing
3.1 Pairing a phone to the GPS Connector
3.2 Phone and GPS Connector range
3.3 Pairing the GPS Connector and GPS Collar
4. App Features
4.1 MAP

4.2 COMPASS
4.3 E-COLLAR
4.4 Device List
4.5 Options in Device List
4.6 Device Detail Info & Edit
4.7 Map Record
4.8 Map Select
4.9 Offline map
4.10 Geo-fence
5. Pathfinder Setting
5.1 Screen Saver
5.2 Shake Control
5.3 Volume Button Control
5.4 Distance Unit
5.5 Speed Unit
5.6 GPS DATA
5.7 Tracking only mode
5.8 Offline map data usage
5.9 Always Fit boundary
5.10 Alarm Setting – Settings for various alarms
5.11 Connector Pairing
6. User Guide
Maintain
Troubleshooting

1. First
1.1 Charging the Pathfinder
Charge the Pathfinder’s GPS Connector and GPS Collar before the first use.
The Pathfinder uses Lithium Polymer batteries.
-Fully charge the Pathfinder’s GPS Connector and GPS Collar before the first
use.
- Only use official Dogtra chargers with the Pathfinder.
- Do not charge the Pathfinder in near flammable substances.
- Fully charge the Pathfinder if storing for 1 month or longer.
* When to recharge the Pathfinder
- When the LED is red on the GPS Connector or GPS Collar.
- When the app displays a low battery percentage.
- When the LED does not turn on.
How to charge the Pathfinder
1) Connect the charger to the GPS Connector and GPS Collar using the splitter
cable.
2) Plug the charger into a 120v (220v in Europe) outlet.
3) When fully charged, detach the cables and plug the rubber caps over the
charging ports on the GPS Connector/Collar.
4) The GPS Collar turns off while charging and cannot be used, while the GPS
Connector functions while charging.
- The LED will display red while charging and green when the unit is fully
charged. The GPS Connector LED will be green when turned on while charging.
- A depleted battery requires 3.5 hours to fully charge.
1.2 Power
To turn on the GPS Connector, press the blue select button until the LED turns
on.
To turn off the GPS Connector, press the blue select button until the red LED
turns off.
To turn on the GPS Collar, press the power button until the LED turns on. To
turn off the GPS Collar, press the power button until the LED turns red. A tone
will
r
1
T
sCON
r
n
i
a
2COL
wLEDPow
nConbeg
o
t
C
O
p
,
r
S
t
t
r
u
A
h
n
l
s
c
n
t
y
o
C
S
g
e
u
n
n
o
g
S
n
p
p
u
D
E
e
g
c
l
r
C
w
o
S
h
G
.
a
n
.
o
u
o
u
o
p
i
e
E
m
be played t
indicate t
at the GPS
Collar is sh
tting down.
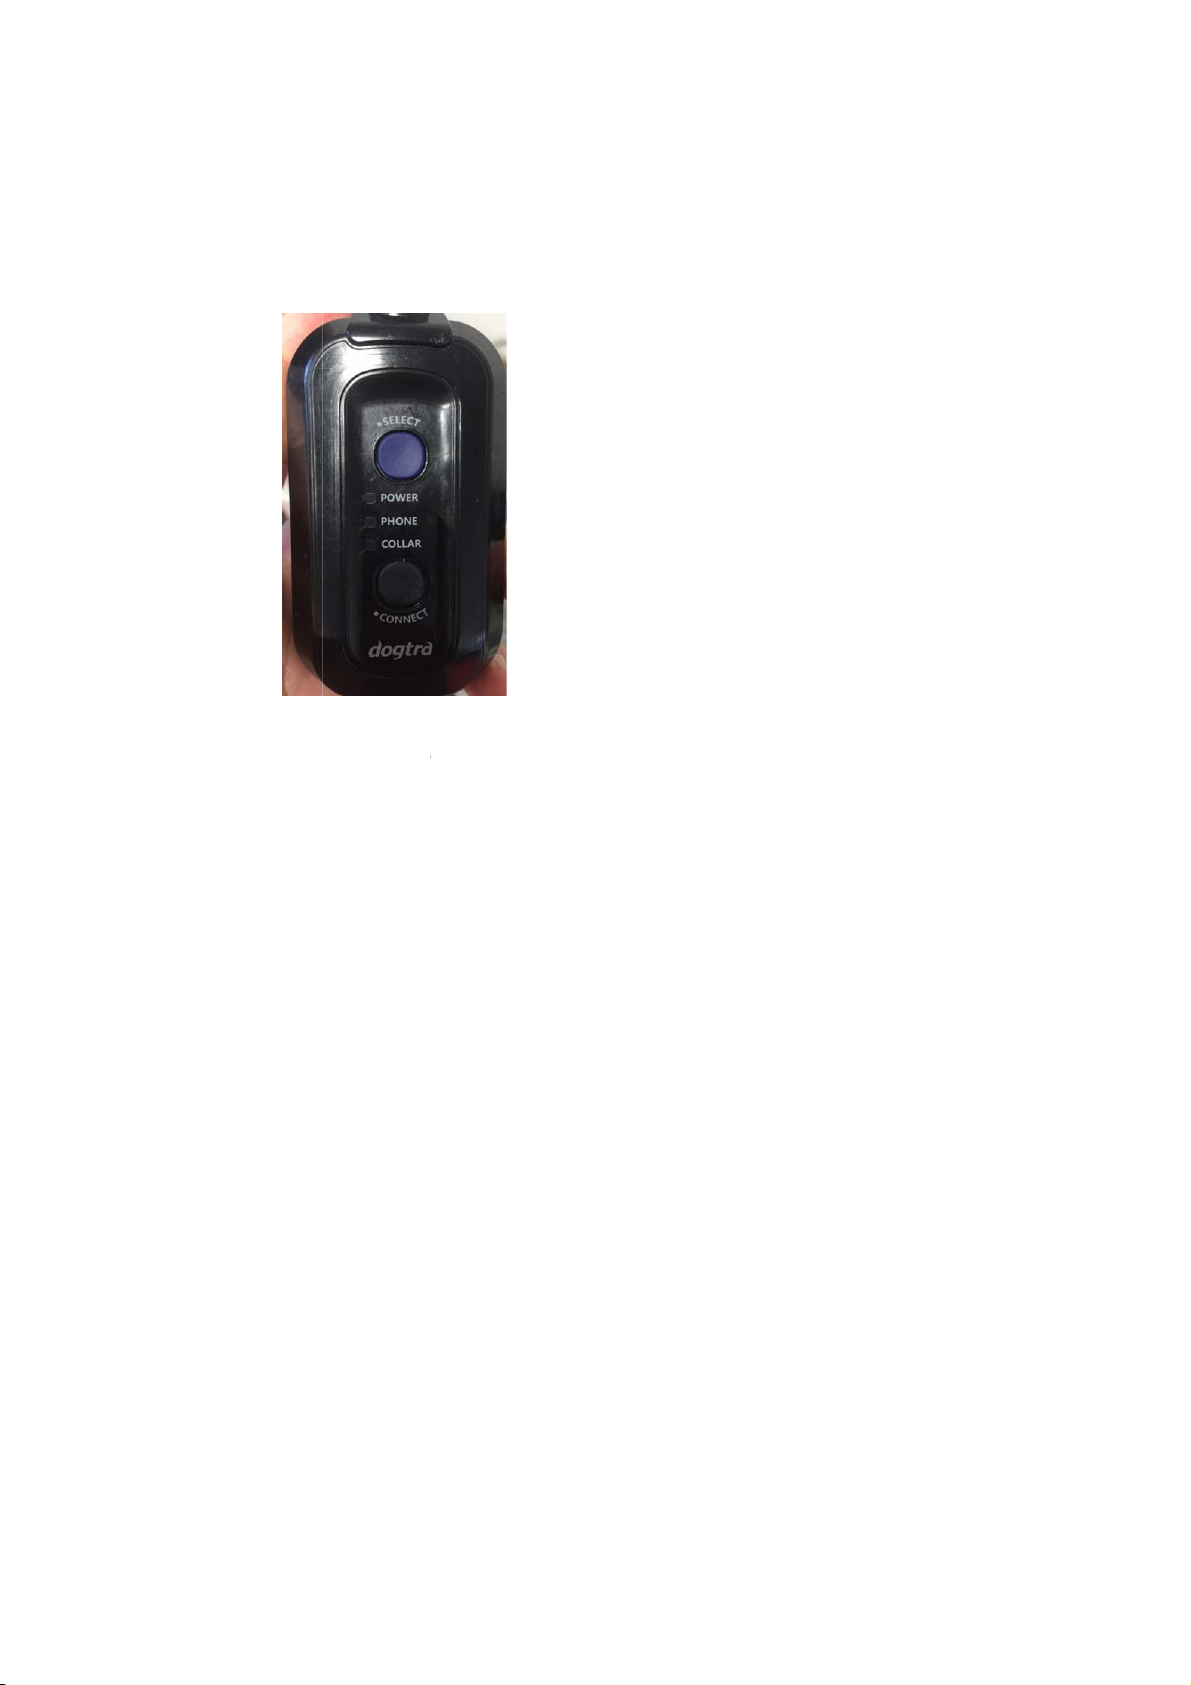
1.3 Ope
1.3.
SELE
ON:
OFF
Whil
ational But
CONNE
CT – ON/
o turn on,
:To turn off
e turned on
ons
TOR
FFOn/Off a
ress the se
press the s
, press the
d pairing d
ect button
elect butto
elect butto
evice selecti
ntil the LE
until the L
once to s
on
turns on.
D turns off
t pairing to
the GPS C
llar,
pres
the select
NECT –Sta
Afte
using the
and
hold down
Con
ector will n
※Us
ng the Sele
GPS
Connector
to p
1.3.
Collar
LAR–Powe
Po
erON :To t
turns on.
erOFF :To t
tur
s off.
nection mo
in with the
ks rapidly.
blin
ir the GPS
button a se
t Pairing
elect butto
he Connec
ow be read
ct button t
o the GPS
Connector t
rn the GPS
urn the GP
de &pairin
device turn
melody wi
ond time t
to set the
button unt
for pairin
set the GP
ollar. Setti
o a phone.
Collar on,
Collar off,
mode :To p
d off and h
ll be played
set pairin
GPS Conne
il the LED b
.
Connecto
g the GPS
ress the po
ress the p
lace the GP
old down t
when the
to the sm
tor to pho
inks rapidly
to Collar is
onnector t
er button
wer button
Collar int
e power b
PS Collar is
rtphone ap
e or collar,
The GPS
used to pa
Phone is u
ntil the gr
until the LE
pairing mo
tton until L
in pairing
.
press
r the
sed
en
D
de,
D
ode.
※T
hCon
u
1PowrepWhPHOWhbut
p
h
trap
2
a
o
w
t
h
c
n
t
o
c
n
o
s
n
d
u
e
C
n
C
w
s
D
t
n
t
t
n
l
n
g
t
d
m
m
a
o
n
o
h
h
o
h
h
r
o
0
b
b
e GPS Coll
r pairing m
de is used
to pair the
GPS Collar
nd the GPS
1.4 Abo
1.4.
nector. The
t the LED
connect
er :The po
resents the
Pathfinder
r
er LED bli
battery life,
et comes
ks every 2
with green
ith both pa
econds whi
(~50%), ora
rts paired t
e turned o
ge (~10%),
each othe
. The LED c
and red (~
.
lor
%).
ile charging
en set to P
ton will pla
ra
idly in gree
CO
LLAR Press
W
en set to C
bu
ton will pla
idly in gree
1.4.
collar
NE :Press
and turne
he Select b
one, a gre
e the GPS
.
he Select b
llar, a gree
e the GPS
.
on, the LE
tton twice
n LED will s
onnector i
utton once
LED will s
onnector i
will blink
o set the G
tay on. Hol
to pairing
o set the G
ay on. Hold
to pairing
reen.
PS Connect
ing down t
ode and t
PS Connect
ing down t
ode and t
r to Phone
e Connect
e LED will
r to Collar.
e Connect
e LED will
.
link
link
Th
erep
n
1Twi
2
a
1
T
h
s
T
2
n
e
n
m
e
h
G
a
P
t
n
r
r
-
a
a
h
e
e
o
e
a
2
h
n
n
h
s
e
D
P
o
t
e
0
o
s
e
d
i
LED on th
GPS Colla
blinks whil
turned on,
and the LE
color
1.5 Con
1.5.
1.5.
1.6 Coll
1.6.
resents the
ector
Replacin
st the ante
To maxi
with ant
r
Test Lig
battery life,
g the anten
na counte
ize the sig
nna facing
t
with green
na
clockwise t
nal with the
up.
(~50%), ora
remove.
GPS Collar,
ge (~10%),
hold the G
and red (~
S Connect
%).
r
1.
urn on the
2.T
e test light
Pathfinder
the
pre
sed in the
3.
he test ligh
PS Collar
will illumin
pp. The lig
athfinder a
will emit a
nd place th
te moment
t will stay l
pp, up to 1
brighter lig
Ttest light
rily when t
it as long a
seconds.
t when the
over the c
e Nick but
the Consta
stimulation
ntact point
on is press
nt button is
is increase
.
d in
.
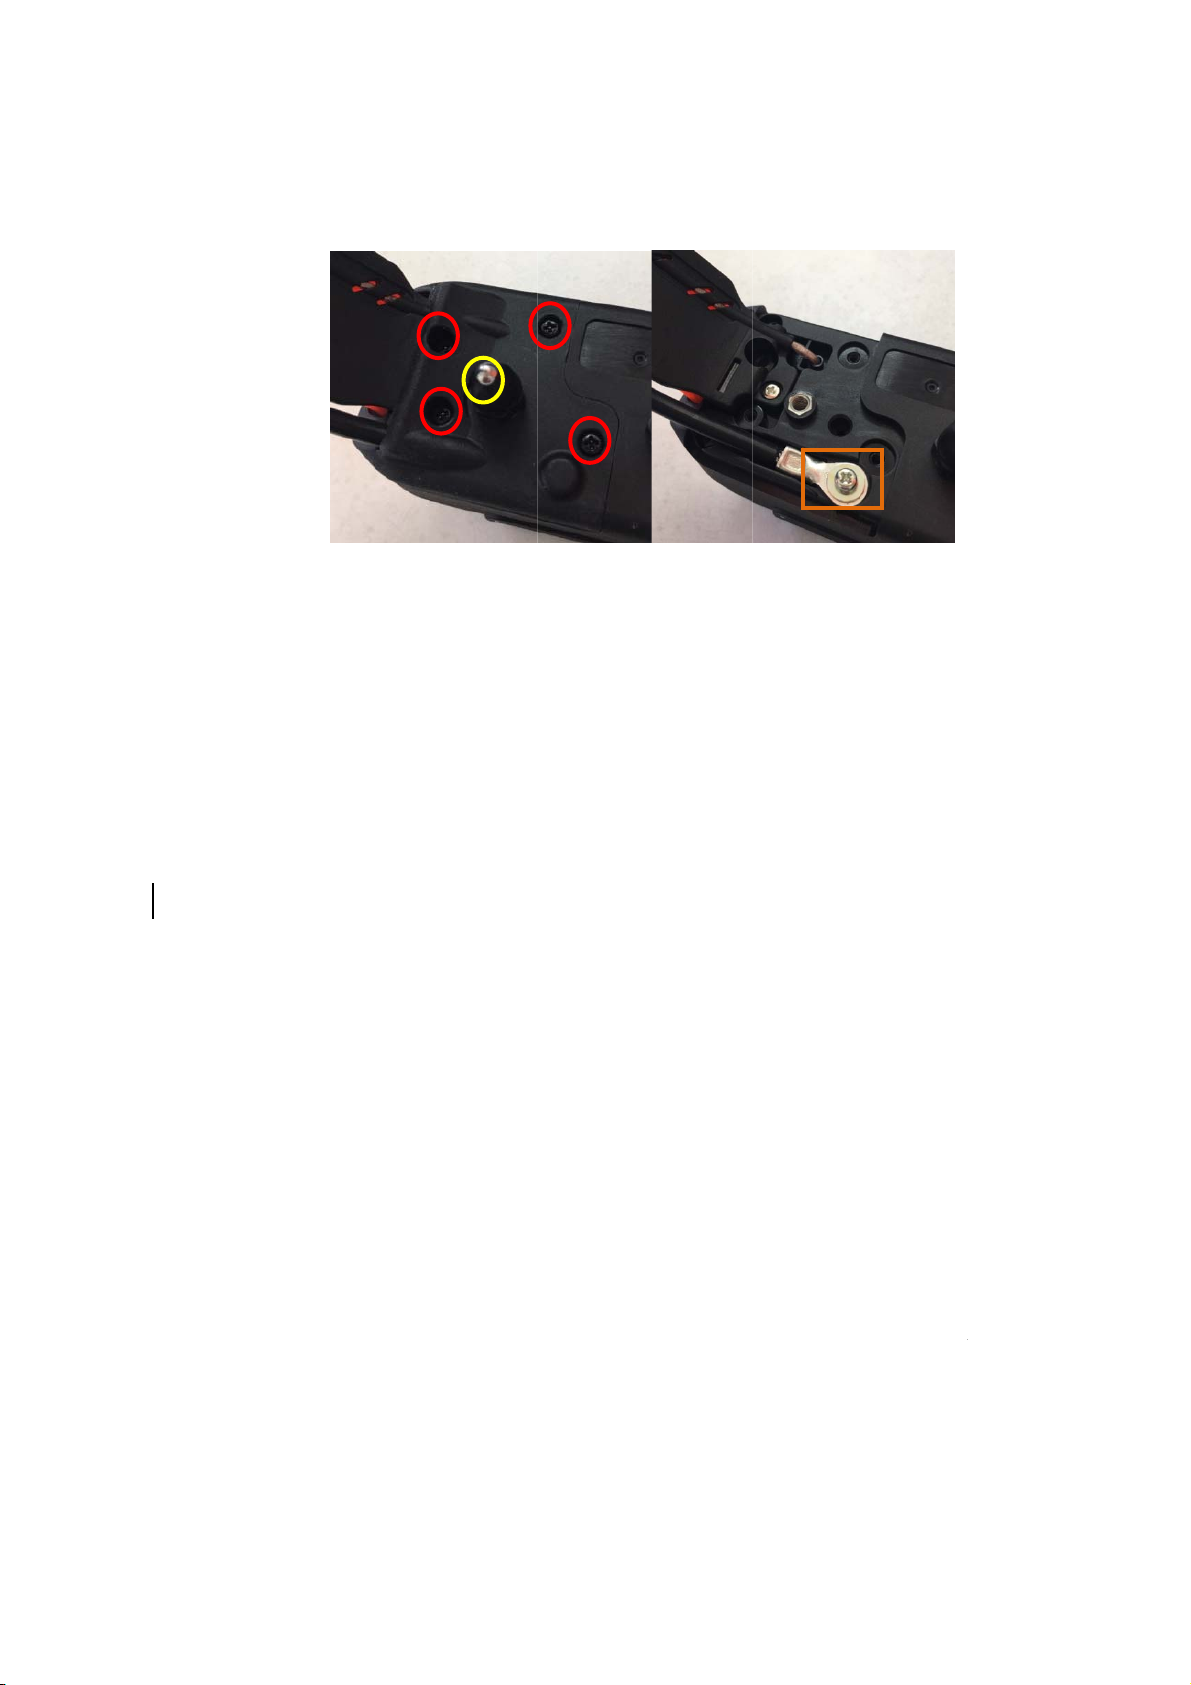
1.6.
Replacin
Ope
the anten
g the anten
a enclosur
na
by removi
g the 4 scr
ws and th
contact po
nts.
3
p
m
h
h
owe
4
h
G
5
b
6
h
oth
ove the scr
e
f
h
e
o
a
a
i
p
e
r
t
q
u
c
e
G
t
h
t
e
m
t
o
o
P
e
t
a
t
l
w
m
w
h
v
g
h
d
g
u
o
n
t
c
a
g
u
z
z
Rem
w holding
he antenna
in place to
replace the
antenna.
How to
1.6.
-.O
en the Pat
sti
ulation lev
- T
e stimulati
- Al
ways start
- T
e appropri
st
imulation w
* N
te: The ap
ight, and t
1.6.
The GPS
T
e Pathfinde
Path
finder near
the
PS. Not ac
may
indicate iss
1.6.
Tone
tone sound
The
ind the rig
finder app
l.
n levels are
t the lowes
te level can
th a mild r
ropriate sti
mperamen
is for outd
is meant f
all building
uiring a G
es with th
level canno
t stimulatio
to the E-Co
from 0 (lo
level of sti
be found
action, suc
ulation le
.
or use
r use in op
s and other
S signal for
unit.
be adjuste
n
lar tab and
est) to 100
ulation an
hen the do
as a tensin
el will depe
en outdoor
steel struct
prolonged
d and the t
select your
(highest).
work your
responds
g of the ne
nd on your
areas. Oper
res will red
periods of t
ne will ring
dog and
way up.
o the
k muscles.
dog’s size,
ting the
uce the ran
ime while o
once even
e of
tside
when
the
utton is he
1.6.
Can I in
- T
e Pathfind
- H
lding the
e range.
ld down.
rease the r
r has a 9-m
PS Connec
nge?
ile line of si
or high wit
ht range.
the anten
a facing up
will maximi
e
2. Installing the Pathfinder app
2.1 Compatible phones
1) iOS : iOS 8.1 and above
iPhone 5, 5C, 5S, 6, 6+, 6S, 6S+, 7, 7+
iPad Generation 3 and above
2) Samsung Galaxy S4 and above, Note 2 and above, and LG G3 and above
2.2 iOS down Downloading from the App Store
AppStore -> Pathfinder 검색 Search Pathfinder
2.3 Android down Downloading with Google Play

3. Pairing
3.1 Pairing a phone to the GPS Connector
3.1.1 Launch the Pathfinder app
3.1.2 On Turn on the GPS Connector
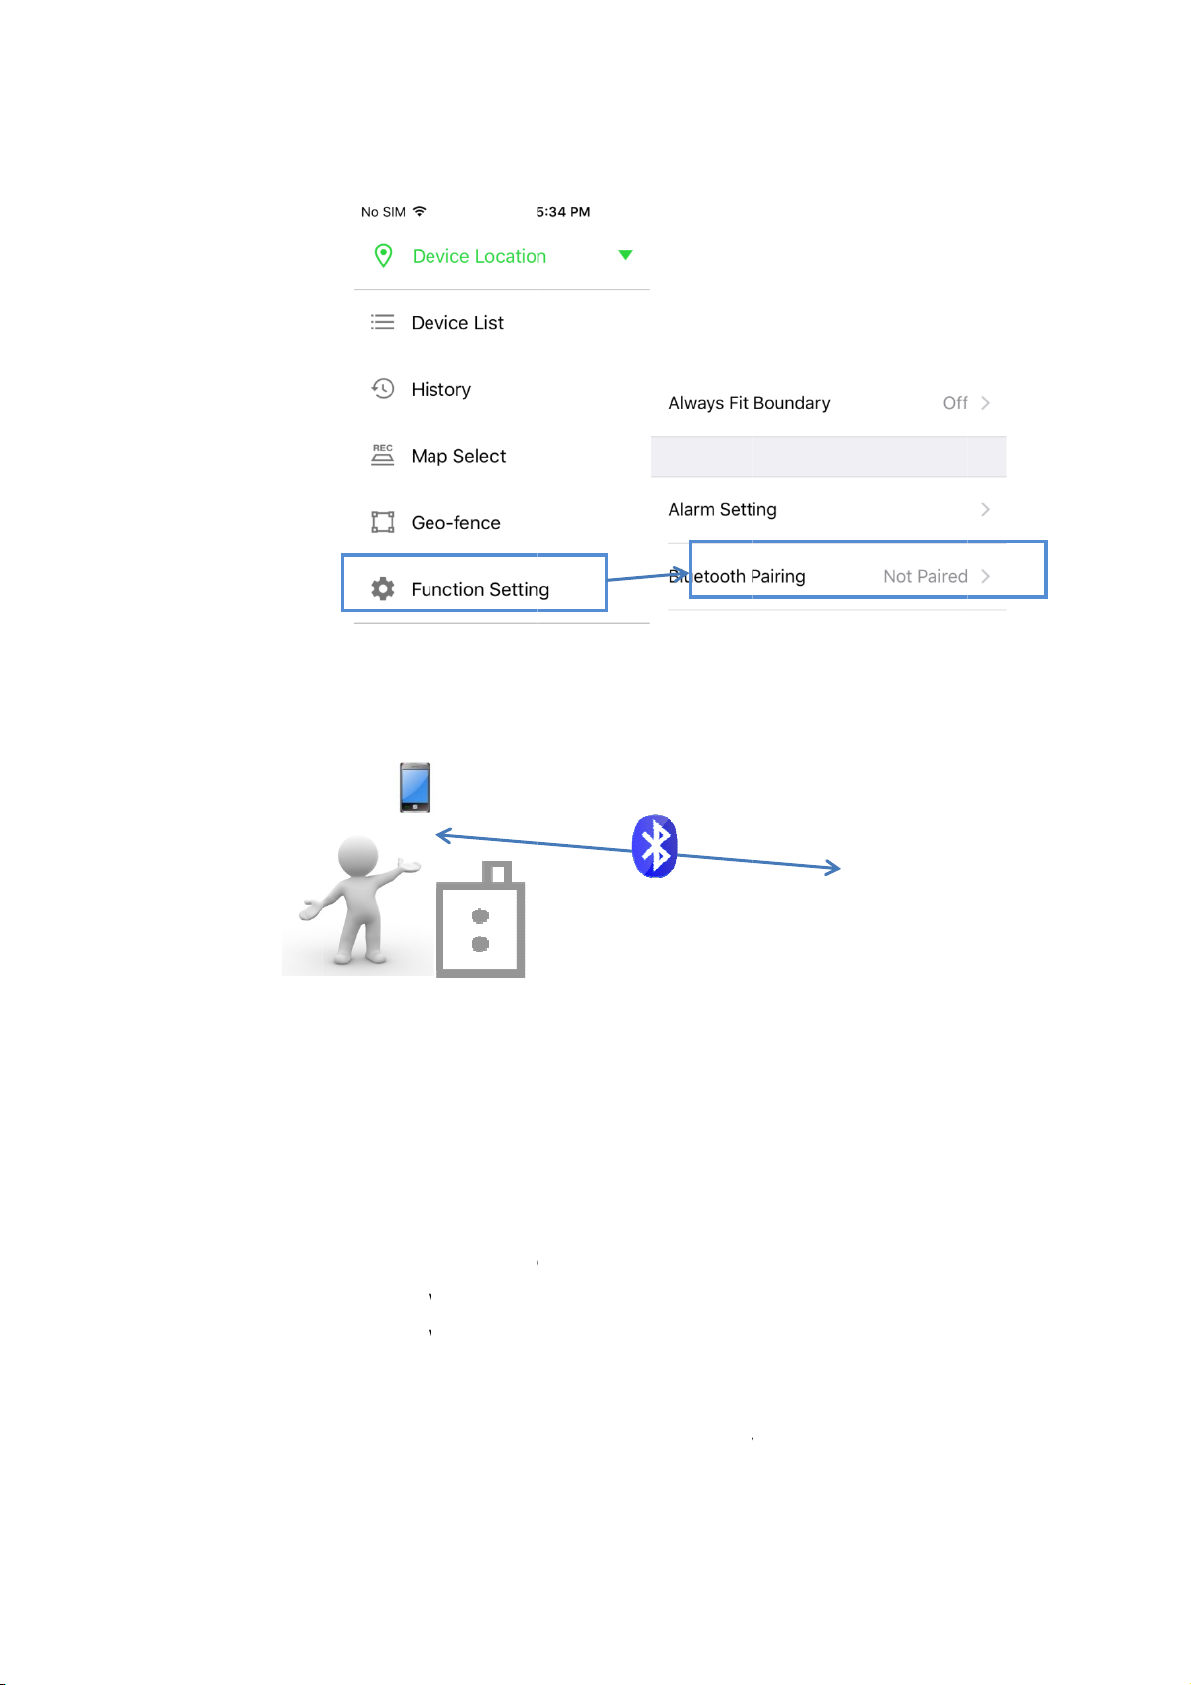
3.1.3 Select Pathfinder App Side Menu -> Function Setting -> Bluetooth
Pairing
3.1.4 Set the GPS Connector to pairing mode and click search in the app.
※Once paired, launching the app when the GPS Connector is on will
automatically connect them together
※ The GPS Connector should be within Bluetooth range (33 feet) of your phone
to operate.
※ The GPS Connector will reconnect with the phone when it is within range.
※ Reinstalling the app will require pairing with the GPS Connector.
※ The Pathfinder app may need to be restarted for compatibility issues.
n
h
u
1
2
3
4
5
6
m
n
h
h
w
w
o
i
r
a
a
t
o
n
p
n
P
n
E
n
1
o
t
d
G
v
a
E
h
t
v
i
o
s
3.2 Pho
※ T
feet.
3.3 Pairi
Pair
can
3.3.
3.3.
3.3.
e and GPS
e maximu
ng the GPS
the GPS Co
se the Pat
on Turn
Check t
Use the
Connector
communic
Connector
nector and
finder app
the GPS Co
at the GPS
select butt
ange
tion range
nd GPS Col
GPS Collar
o check if t
nnector on.
Collar is tur
n on the G
for the GPS
0m
lar
in close pr
he GPS Coll
ed off.
S Connect
Connector
ximity to e
ar is proper
o set the L
and phone
ch other. Y
ly paired.
D to Collar.
s 33
u
3.3.
Hold do
3.3.
Hold do
n the con
n the pow
ect button
er button o
for 5 secon
the GPS C
s until LED
ollar until t
blinks rapid
e melody i
ly.
played.
3.3.
The mel
Collar w
dy will sto
ll return to
and the L
blinking in
Ds on the
ormal inter
PS Connec
als.
or and GPS
 Loading...