

Page 1

PATHFINDER SE KIT
Web Manual
Page 2

PATHFINDER SE KIT
SMARTER WAY TO MAP, TRACK & TRAIN
Web Manual
Please read this manual thoroughly before
operating the PATHFINDER SE KIT.
1
Page 3
CONTENTS
PACKAGE CONTENTS
OVERVIEW
...................................................................................................................
GETTING STARTED
CUSTOMIZED FUNCTIONS FOR PATHFINDER
PTT BUTTON
1.
BACK BUTTON
2.
VOLUME BUTTONS
3.
ADDITIONAL FEATURES
RETURN POLICY
WARRANTY
................................................................................................................
...............................................................................................
....................................................................................................
............................................................................................................
........................................................................................................
................................................................................................
.........................................................................................
........................................................................................................
..................................................
3
4
6
7
8
9
9
10
11
11
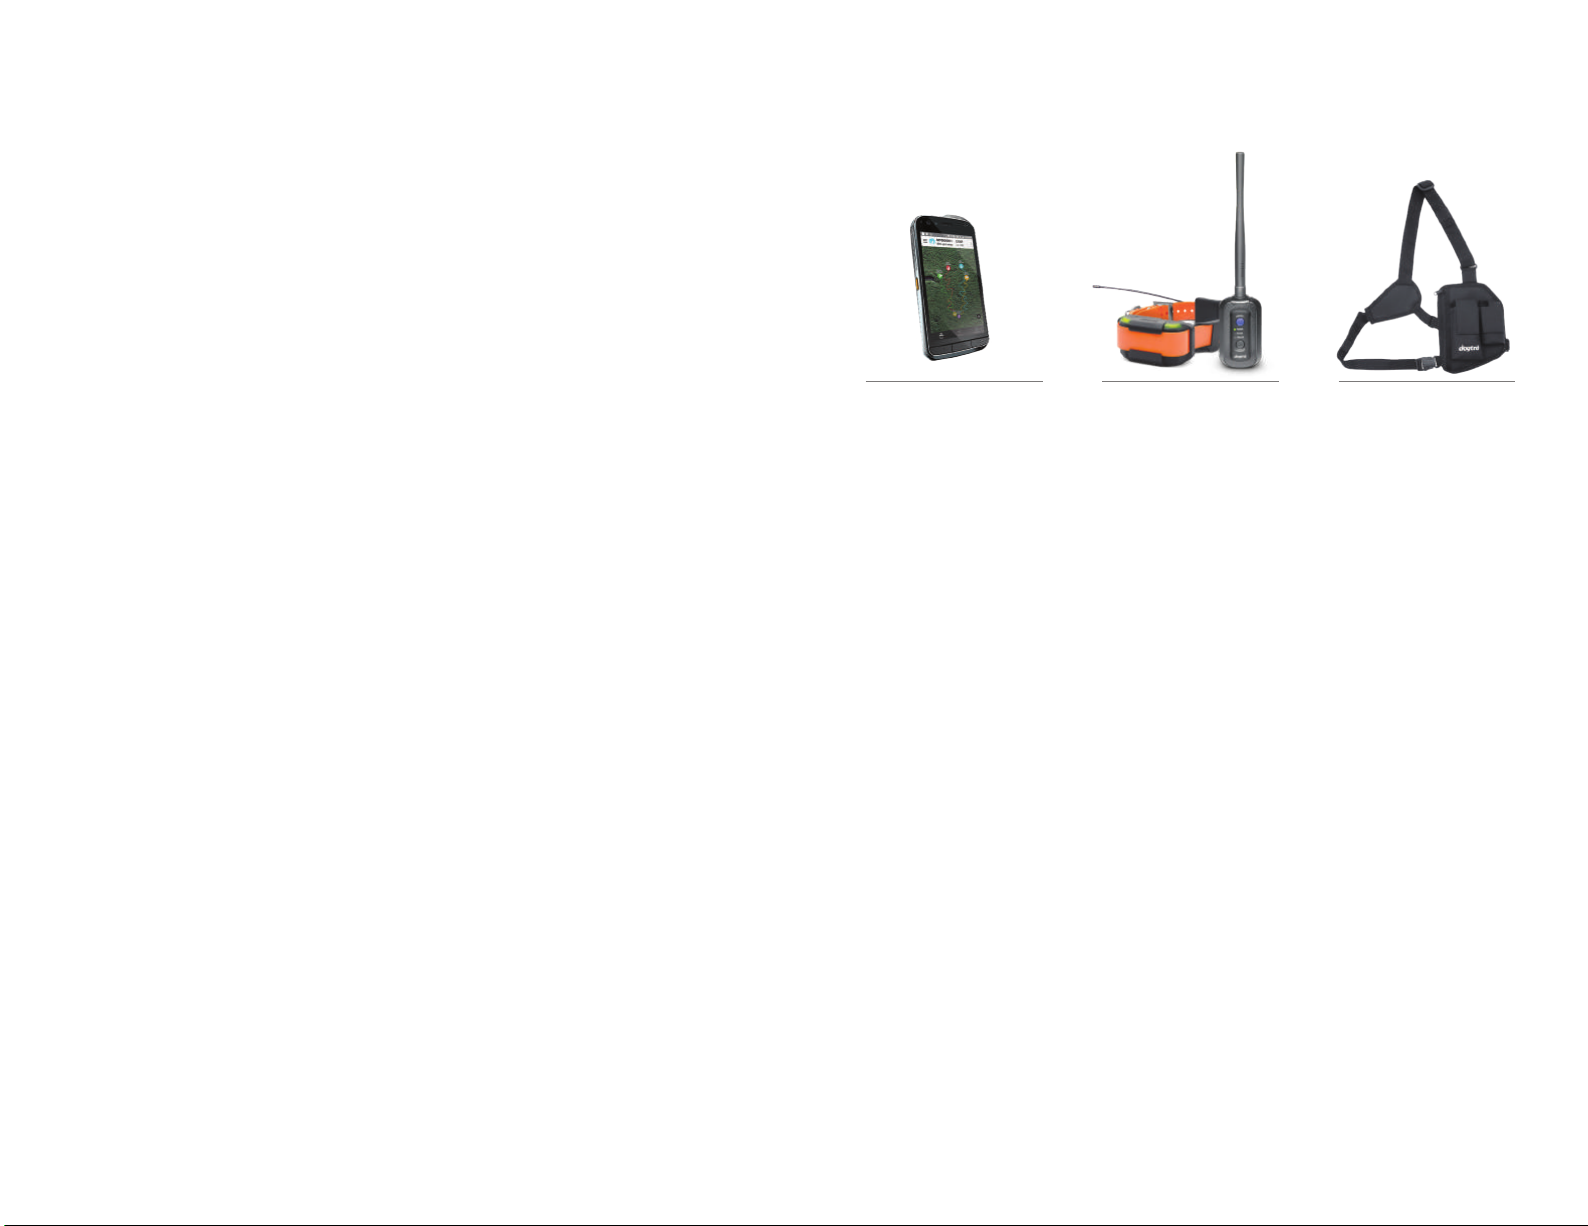
PACKAGE CONTENTS
CAT® Phone
(S48c or S61)
PATHFINDER
(or PATHFINDER MINI)
Wearable carrying
holster
2
3
Page 4
OVERVIEW
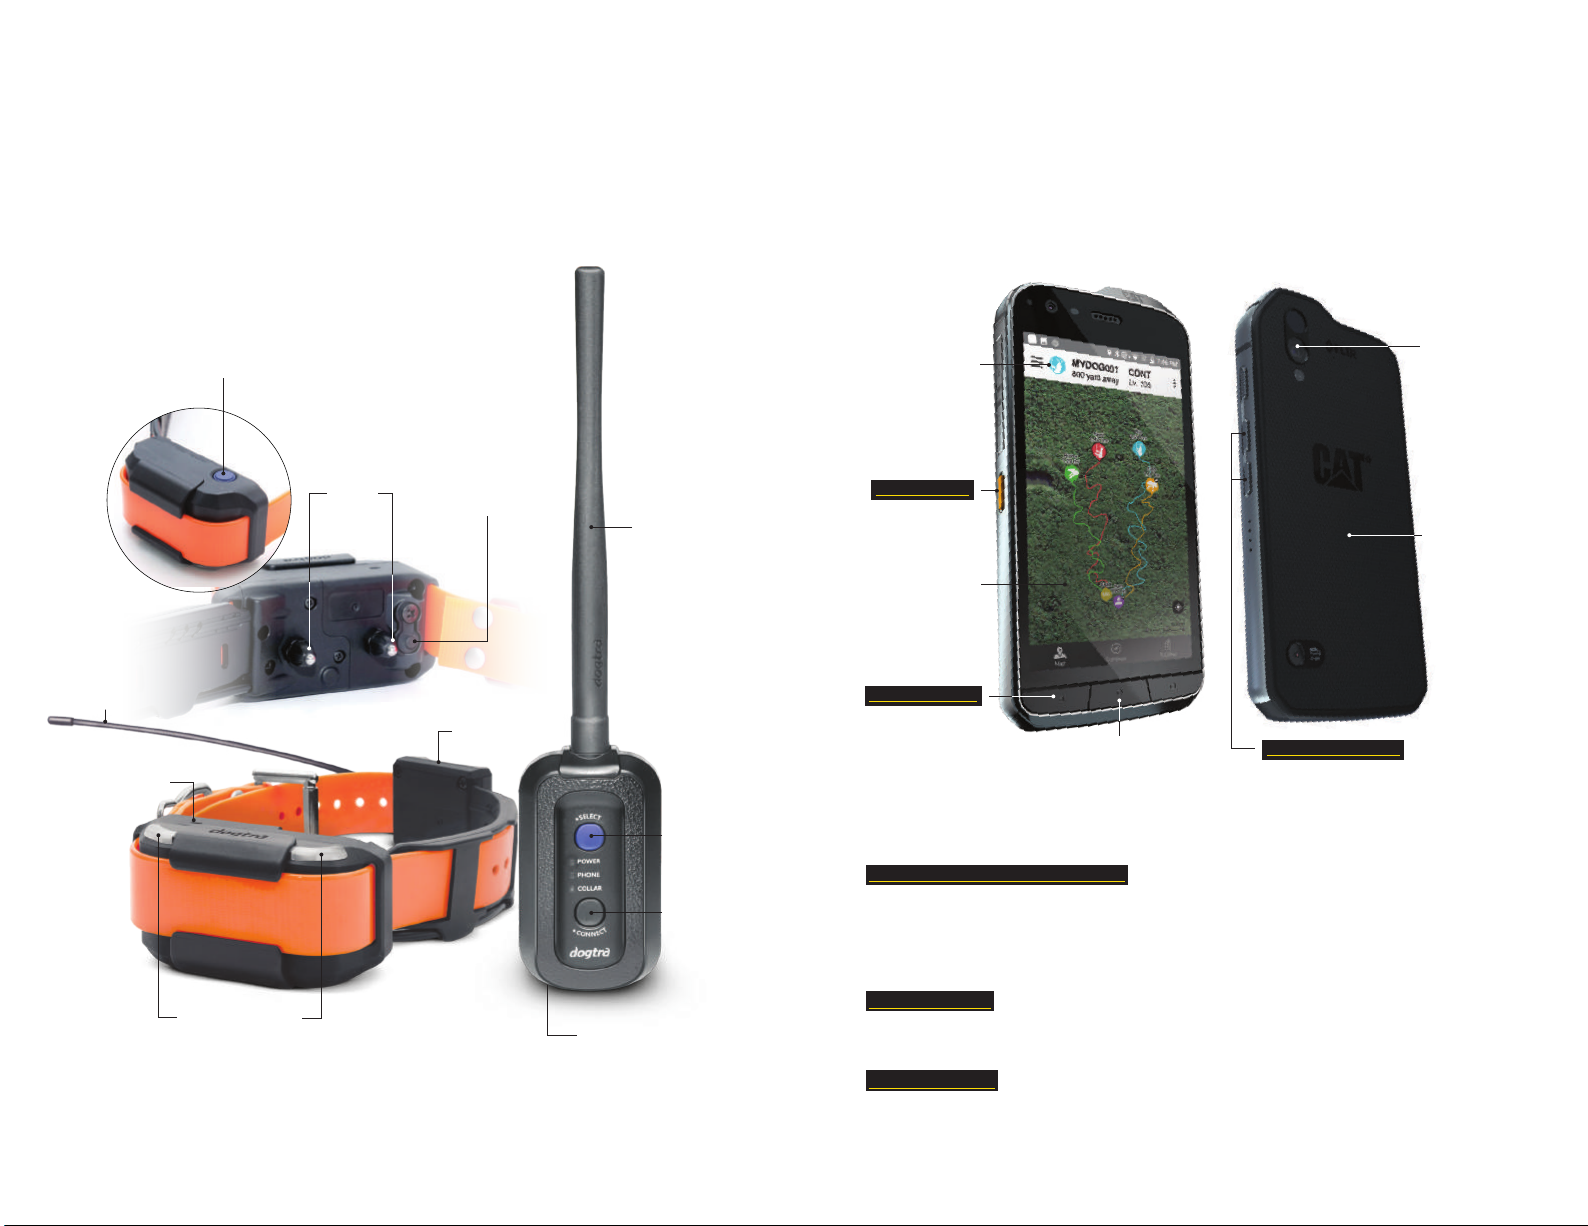
PATHFINDER COMES WITH SPECIAL EDITION RECEIVER
WITH BEACON & LOCATE LED LIGHT
* Check PATHFINDER manual to see details and how to charge the device.
Power
Button
Contact
Points
MURS Band
Antenna
Mic. Sensor
Battery Charging
Receptacle
MURS Band
Antenna
GPS Antenna
CAT® PHONE SET UP FOR PATHFINDER
* Customized for PATHFINDER with quick access operation buttons.
** Thermal imaging camera is only available on S61 model only.
*** When the display is off, double click the “Home” circle button to turn
on the device.
*
SELECTED
DEVICE
STATUS BAR
FREE
*
*
***
3. VOLUME BUTTONS:
DEVICE SELECTION
1. PTT BUTTON:
E-COLLAR BUTTON
SATELLITE MAP
2. BACK BUTTON:
MAIN TAB TOGGLER
**
THERMAL
IMAGING
CAMERA
IP68
WATERPROOF &
DUSTPROOF
Power &
Select
Button
Connect
Button
To use the PATHFINDER app as shown above on the C AT® Phone device,
please follow the following steps.
1. Programmable Key (PTT Key):
• PATHFINDER app: program as quick access button to open and use
PATHFINDER app
• Depending on the setting in the app, the PTT will apply Nick or Constant
stimulation, Tone, or Locate signal
LED Indicator Light
Battery Charging
Receptacle &
Rubber Plug
(on the back)
2. Back Button:
• PATHFINDER app: press to toggle between Map, Compass, E-Collar tabs
• Press to go to previous screen
3. Volume Keys:
• PATHFINDER app: depending on setup, "Map zoom" will zoom in and out of map
or "Collars" will select between paired receivers
4
5
Page 5
GETTING STARTED
CUSTOMIZED FUNCTIONS FOR PATHFINDER
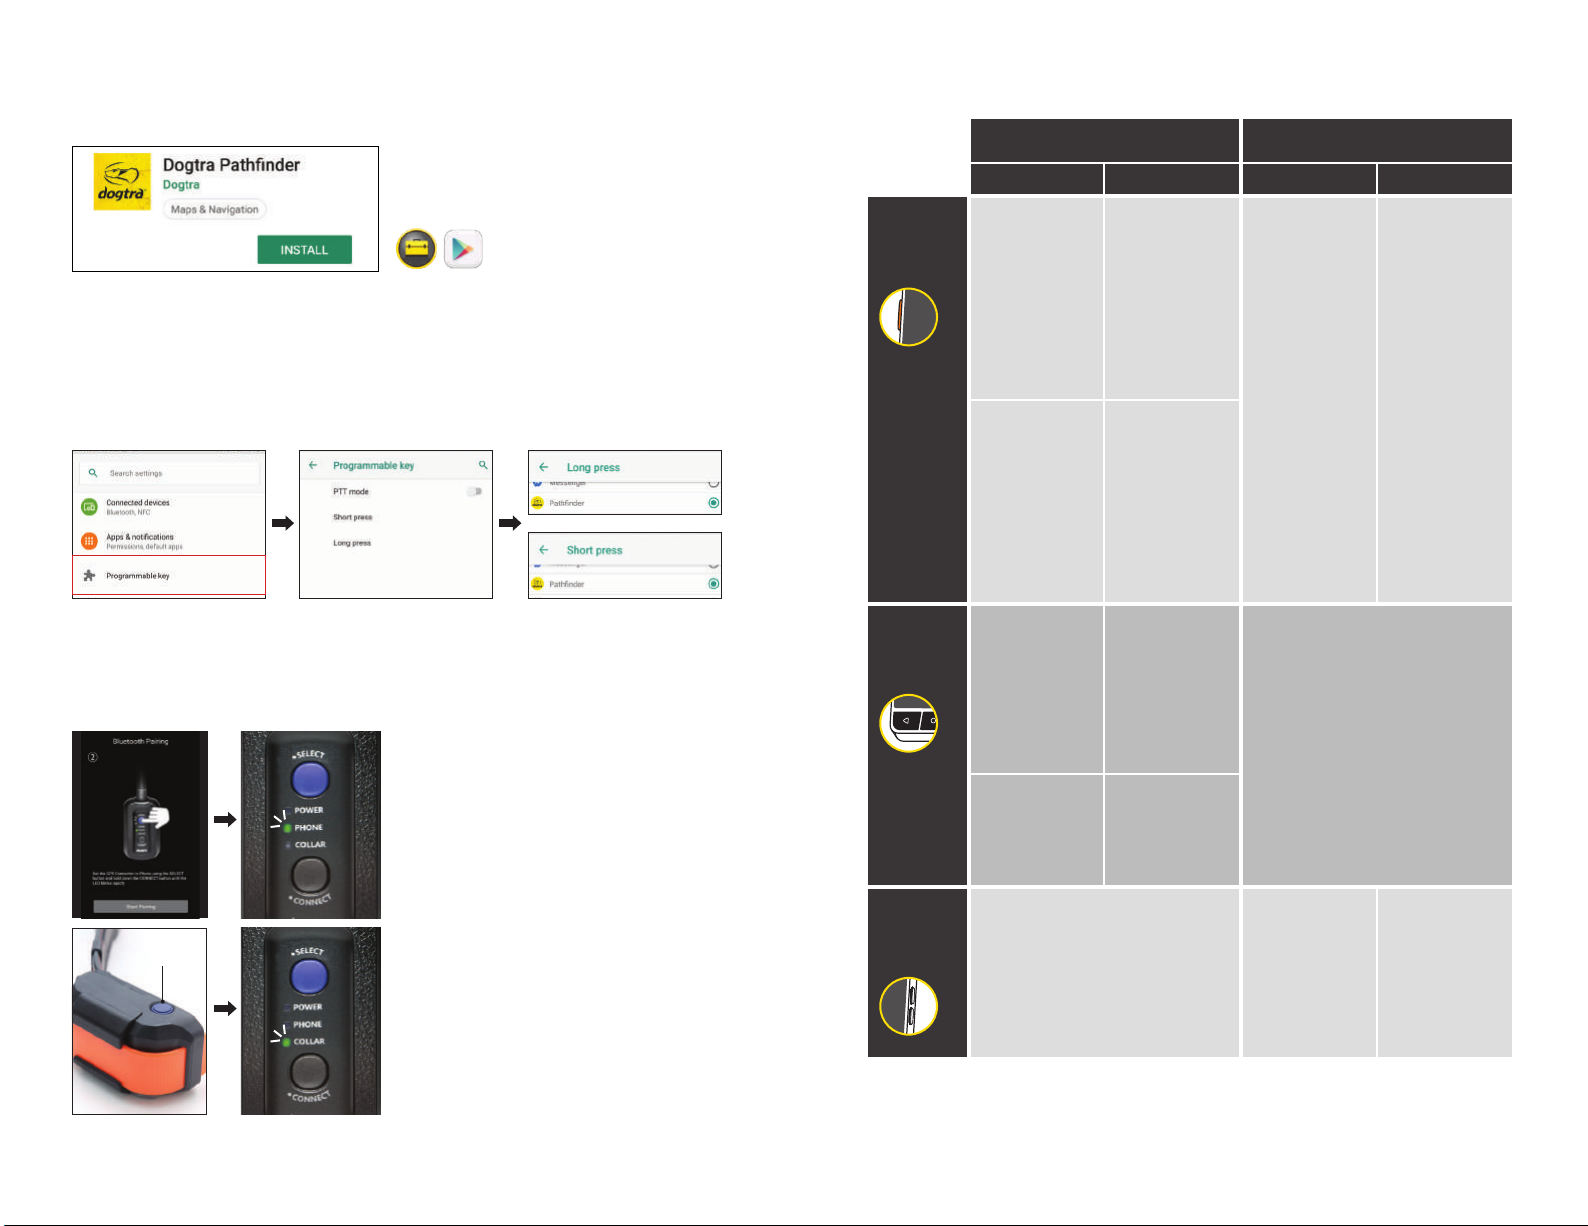
APP DOWNLOAD
Go to Google Play or the CAT Toolbox
app to find and download the Dogtra
PATHFINDER app.
PHONE SETTING
To use the PTT button, please follow these steps.
1. Go to “Programmable key” page under ‘Setting’ on the phone.
2. Turn off the ‘PTT Mode’.
3. Click “Short press” and find and select the ‘PATHFINDER’ app.
4. Click “Long press” and find and select the ‘PATHFINDER’ app.
PAIRING THE PATHFINDER
PATHFINDER GPS connector connects between your smartphone and PATHFINDER
GPS receiver. These devices need to be paired for the PATHFINDER system to work
properly.
CAT® Phone pairing with connector
1) PATHFINDER app >Settings >
Bluetooth Pairing > Start Pairing.
2) Turn on the GPS connector > Click
‘SELECT’ button to select 'PHONE.'
3) Hold ‘CONNECT’ on the GPS connector
until the LED light starts blinking rapidly.
The light will stop blinking when paired.
Power
Button
Receiver pairing with connector
1) Turn the receiver off. Press and hold
the power button on the receiver until
you hear a melodic sound.
2) Turn on the GPS connector> Click
‘SELECT’ button to select ‘COLLAR.'
3) Hold ‘CONNECT’ on the GPS connector
until the LED light starts blinking rapidly.
The receiver will emit 3 short beeps and
6
the light will stop blinking when paired.
On other pages while PATHFINDER app is
running in the background
Back to the
PATHFINDER app
& apply on-going
Back to the
PATHFINDER app
Constant, Tone, or
Locate* signal
(Nick setup sends
one-time Nick
stimulation only)
1.
PTT
BUTTON
On the PATHFINDER app
SHORT PRESS LONG PRESS SHORT PRESS LONG PRESS
On the main page:
Map/Compass/
E-Collar
Apply Nick or
brief Constant
stimulation, Tone,
or Locate* signal
(Nick setup sends
one-time Nick
stimulation only)
Subpages
Back to the last
tab on the main
page & apply
one-time Nick or
brief Constant
stimulation signal
On the main page:
Map/Compass/
E-Collar
Apply on-going
Constant
stimulation, Tone,
or Locate* signal
(Nick setup sends
one-time Nick
stimulation only)
Subpages
Back to last tab
on the main page
& apply on-going
Constant, Tone, or
Locate* signal
2.
BACK
BUTTON
On the main page:
Map/Compass/
E-Collar
Rotate between
tabs
Subpages
Back to the last tab
on the main page
On the main page:
Map/Compass/
E-Collar
Quit the
PATHFINDER app
Back to the previous screen
Subpages
Back to the last tab
on the main page
3.
VOLUME
BUTTONS
On the main page:
Map/E-Collar
Depending on setup, "Map zoom" will
zoom in and out of map or "Collars" will
select between paired receivers
System volume System volume
* PATHFINDER MINI comes with Beacon and Locate, while the PATHFINDER SE
comes with rapid blinking Beacon light only.
7
Page 6
1. PTT BUTTON 2. BACK BUTTON
MAP COMAPSS E-COLLAR
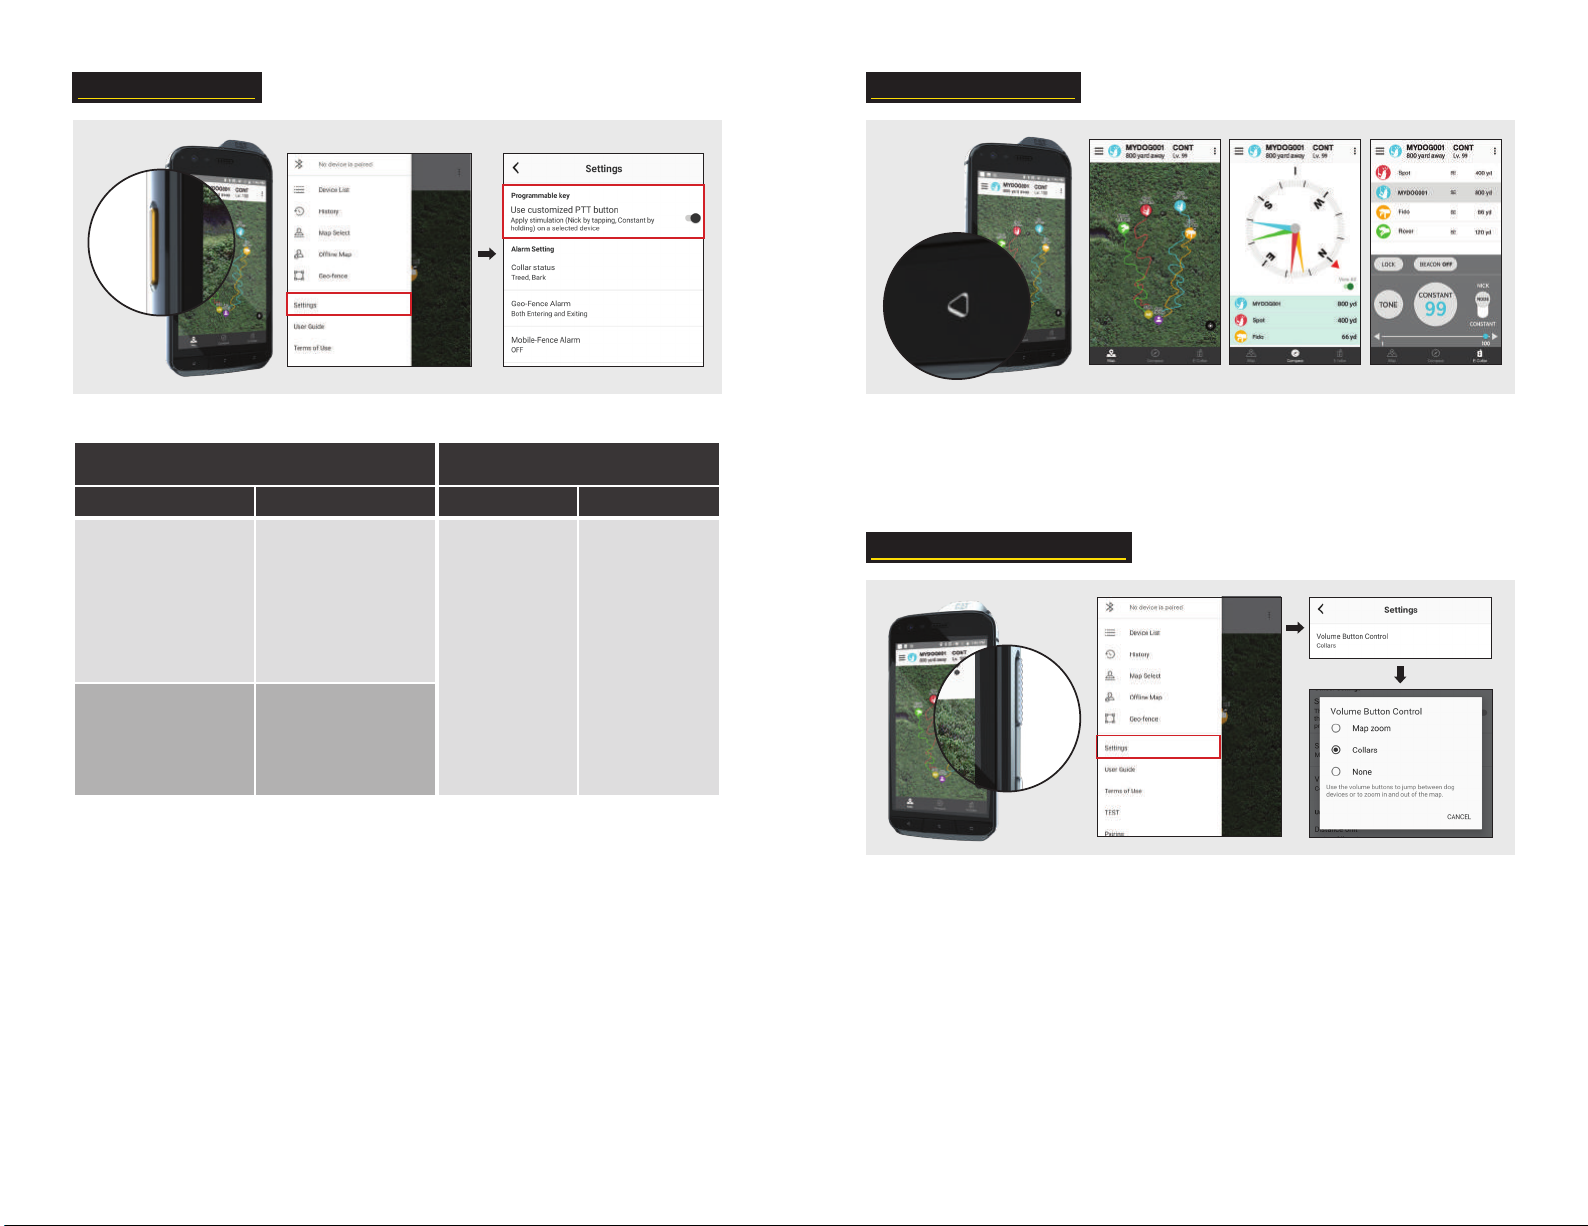
Turn on the mode to use the PTT button as following:
On the PATHFINDER app
SHORT PRESS LONG PRESS SHORT PRESS LONG PRESS
On the main page:
Map/Compass/E-Collar
Apply Nick or brief
Constant stimulation,
Tone, or Locate* signal
(Nick setup sends one-time
Nick stimulation only)
Subpages
Back to the last tab on the
main page & apply
one-time Nick or brief
Constant stimulation signal
On the main page:
Map/Compass/E-Collar
Apply on-going
Constant stimulation,
Tone, or Locate* signal
(Nick setup sends one-time
Nick stimulation only)
Subpages
Back to last tab on the
main page & apply
on-going Constant, Tone,
or Locate* signal
On other pages while PATHFINDER app is
running in the background
Back to the
PATHFINDER app &
apply on-going
Back to the
PATHFINDER app
Constant, Tone, or
Locate* signal
(Nick setup sends
one-time Nick
stimulation only)
You can disable the PTT button feature here if you want to turn it off for safety
reasons.
Please note PTT buttons will not operate on following occasions even if the feature
is activated:
• No device is paired
• Selected a shared device
• Selected SPOT marker
• Selected ME marker
• E-Collar tab is locked
• Track-only mode
“Back” button function is customized to be used as ‘Main page’ button.
On the main page, use it to toggle between Map, Compass, and E-Collar tabs.
•
On thea it go straight to the last main page.
•
Press and hold to quit the app.
•
3. VOLUME BUTTONS
Select the mode you wish to use the volume buttons for.
Select “Map zoom” to zoom in and out via volume buttons
•
Select “Collars” to select between paired receivers
•
Select "None" to not use the feature
•
8
9
Page 7
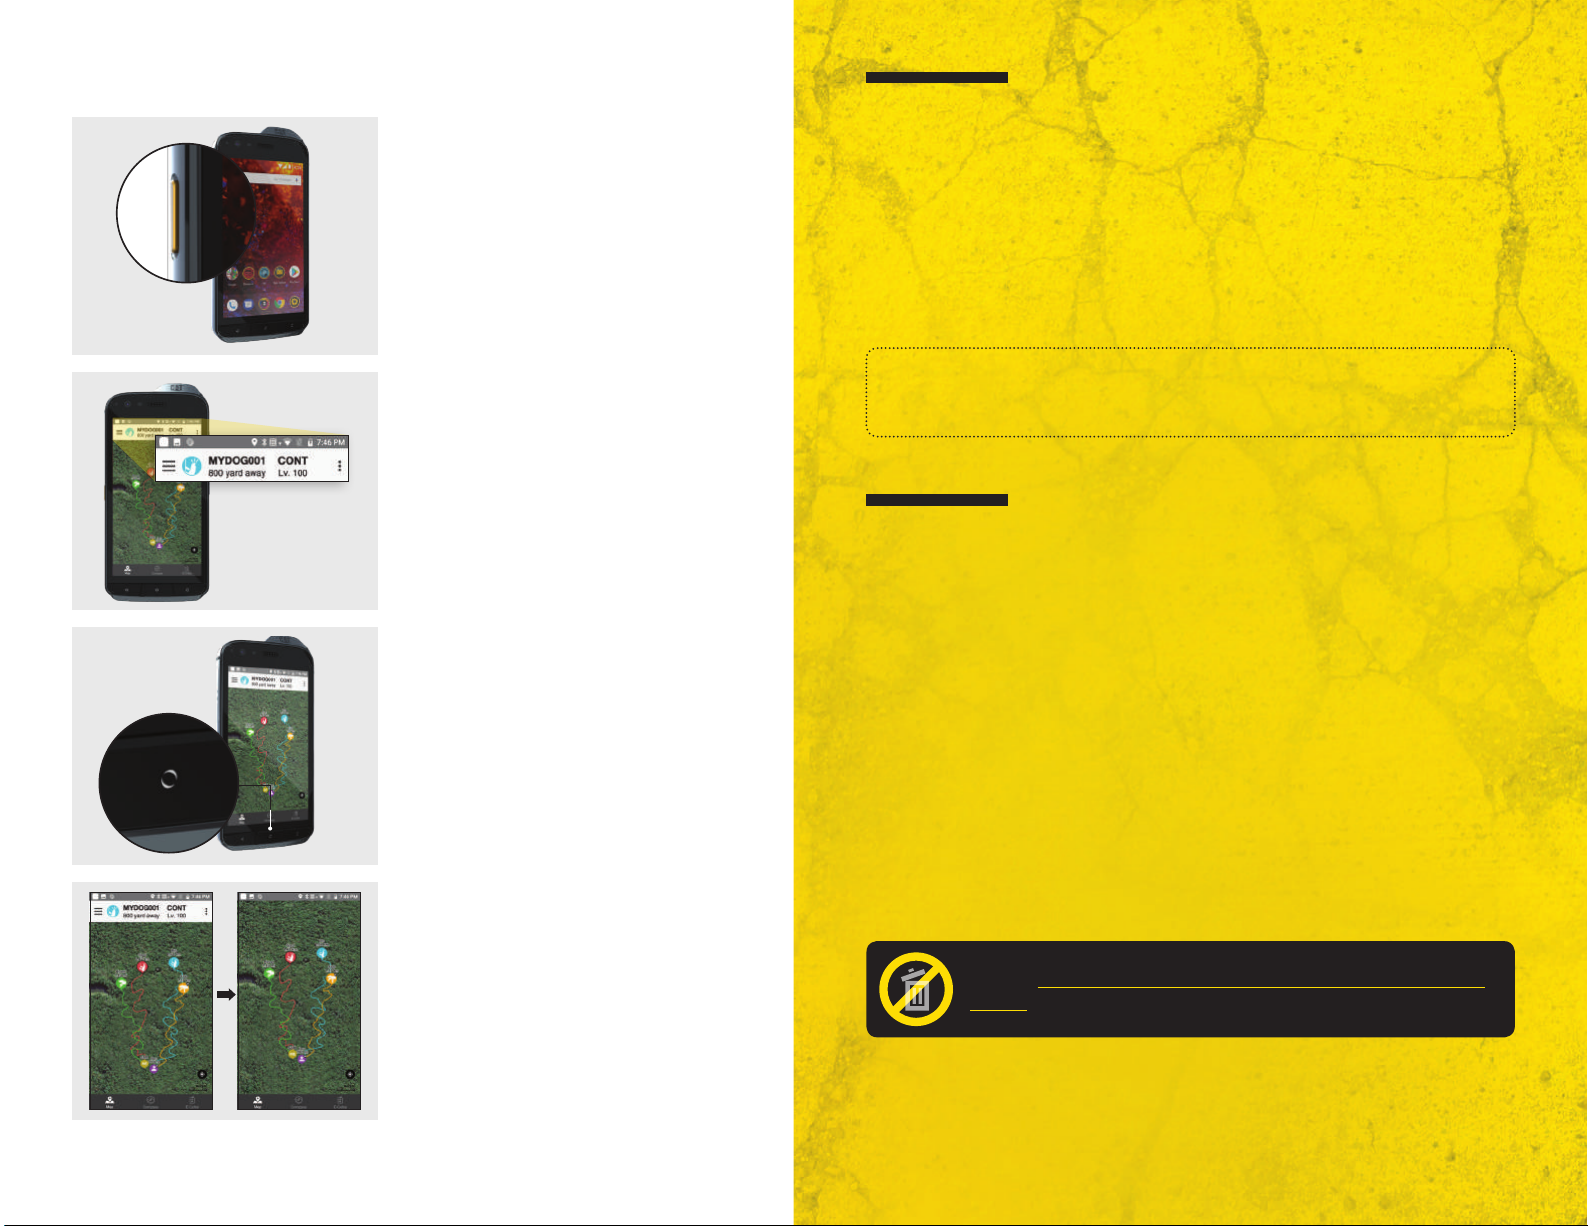
ADDITIONAL FEATURES
With the device turned on, use the
PTT button on any other screen to go
straight to the PATHFINDER app.
You can also disable the lock screen to
skip this step all together.
RETURN POLICY
Return Policy
Customers may return both devices (cannot return separately) within 30 days from
the date of purchase for a refund. No refunds or returns will be accepted after 30
days from the date of purchase.
All products returned must include a proof of purchase, original packaging, and all
contents must be in “like-new” condition.
Refund amounts exclude shipping charges or any other add-on charges to and
from the customer’s location.
Receiver status bar on the top of
the app screen shows the selected
receiver’s set up and distance from you.
When the display is off, double click
the “Home” circle to turn on the device.
Tap the screen once to hide the mode
titles at the bottom. Tap the screen
twice to zoom in on the map.
This function will not work on the
E-Collar or Compass tabs.
Attention!
This is a special bundle pack and parts cannot be resold separately. The
warranty will be voided if sold separately and the serial number will be invalid.
PATHFINDER 2 YEAR WARRANTY
In order to qualify, you’ll need:
1. Proof of purchase
2. Both product boxes and serial numbers for the Dogtra e-collar and
CAT® smartphone
REGISTER ONLINE AT: www.dogtra.com/product-registration
For warranty services and repair after 30 days from the date of purchase on the
Dogtra e-collar, please contact Dogtra at (888) 811-9111 or visit
www.dogtra.com/support.
CAT® SMARTPHONE 2 YEAR WARRANTY
The warranty activation date and covered period of the Dogtra warranty will
equally apply to the bundled C AT® smartphone. For warranty services and repair
after 30 days from the date of purchase on the C AT® smartphone, please contact
CAT® at (646) 568-9682 or visit http://www.catphones.com/en-us/help-support/.
Please keep your proof of purchase and both product
boxes in order to verify your warranty coverage period.
10
11
 Loading...