

Page 1
INSTALLATION INSTRUCTIONS:
CURVED HOUDINI DOG ARM
PAGE
1/4
INCLUDED PARTS: The components listed below are for a 50ft kit. For example, if you purchased a 100ft kit, you would receive 2X the components lis ted.
(6) Curved Dog Arm Extensions (1) Bag (100) UV Resist ant Zip Ties (1) 50f t Fence Roll (Poly Mesh or Welded Wire)
Please note: Fasteners to attach the arms to your fence or wall are not included. The appropriate fasteners needed for dierent fence types are addressed
within the instructions.
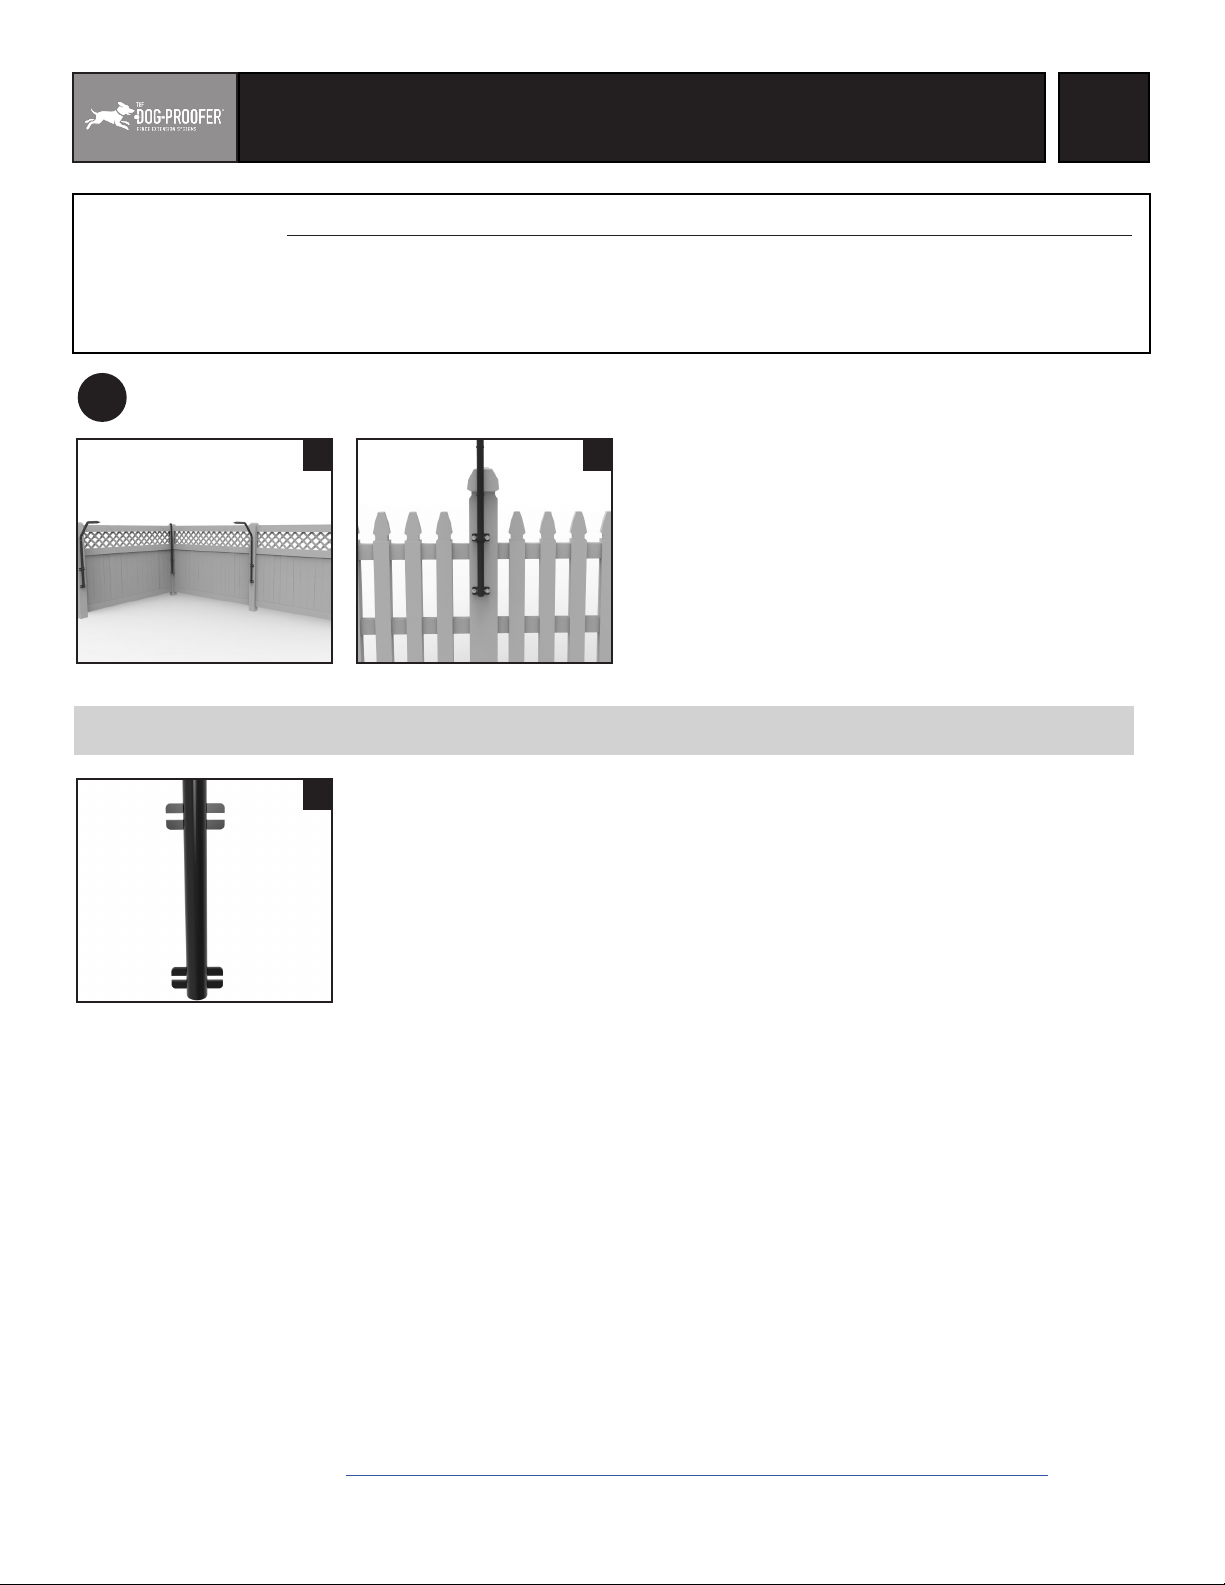
SECURE THE ARMS TO YOUR FENCE
1
1A 1B
FASTENER BASED ON FENCE TYPE
1C
1C. The width of the mounting slots allows the use of fasteners up to 5/16” in di-
ameter. For smaller diameter fasteners like wood screws, it is recommended
that a washer be used under the head of the screw so that the washer + screw
catches the face of the mounting brackets. The open slots of the mounting
brackets allow a number of standard sized U-Bolts to strap the arms to round
or square metal posts.
Determine Desired Fence Height
1A. The arms have (2) mounting brackets to secure the arms to
your fence post, gate, or wall. The open slots of the mounting
brackets allow standard sized U-Bolts for metal posts, washer
head screws for wood, and masonry fasteners for masonr y.
1B. Prior to securing the arms to your posts or wall, hold up the
arms to your posts or wall to determine the nished height
you want. String or chalk line can be used to keep the height
consistent. Max distance between arms is 14’ (8-12 feet preferred, especially for larger breed dogs.)
Wood Fence – If you have 4x4 posts with the posts visible from the inside of the fence, use (4) appropriate fasteners to secure the arms
directly to the posts. A screw/lag length of 2” or more is recommended. If you cannot see the posts from the inside of the fence, locate
and posts and mark the locations on the inside of the fence. Determine what leng th of screws will be needed to reach and screw into the
post at least 2 inches from the inside face of the fence. If your posts are round metal posts, follow the instructions for Chain Link fence.
Masonry Wall – The Fence Extender Arms most easily secure to a masonr y wall with masonry fasteners. Walls vary greatly so it is dicult
to say which fastener size and length would work best for your needs. A standard cinder block wall would use 1/4” or 5/16” diameter masonry screws 1 1/2” long. Longer screws are unnecessary due to the void spaces on cinder block.
Chain Link – The Fence Extender Arms will clamp onto the round metal posts with U-Bolts. Find the diameter of your chain link posts
by measuring the post circumference with a sof t measuring tape and divide that measurement by 3.14 (π) to get the diameter. We have
U-bolts available in sets of two (one set good for one arm) in 1 3/8”, 1 5/8”, 2”, and 2 1/2”. U-bolts can also be found at hardware stores.
Decorative Aluminum and Steel Fences – This fence type looks similar to wrought iron estate fencing and has square posts. The Fence
Extender arm can clamp onto the post with square U-bolts. We stock U-bolts for the most common size which is for 2” wide posts.
Vinyl Fence – Most vinyl fences have hollow posts. The simplest way to secure the arms to a vinyl post is to screw into a piece of wood
placed inside of the post. Mark the post and drill holes through the face of the plastic posts for screws. Take the post cap o and insert
an 18” to 24” section of 2x4 inside the post against the inside face with holes. Run screws through the Fence Extender Arm, through the
drilled holes in the post and into the 2x4. Please note: Since the posts are hollow plastic, if enough force is place on an arm, the post may
shatter.
NOTE: Corners may require special corner adapters sold seperately. Corner adapters generally are needed for any square corner
post regardless of material type. https://www.dogproofer.com/products/corner-adapter-for-houdini-dog-proofer-arms
Page 2
INSTALLATION INSTRUCTIONS:
CURVED HOUDINI DOG ARM
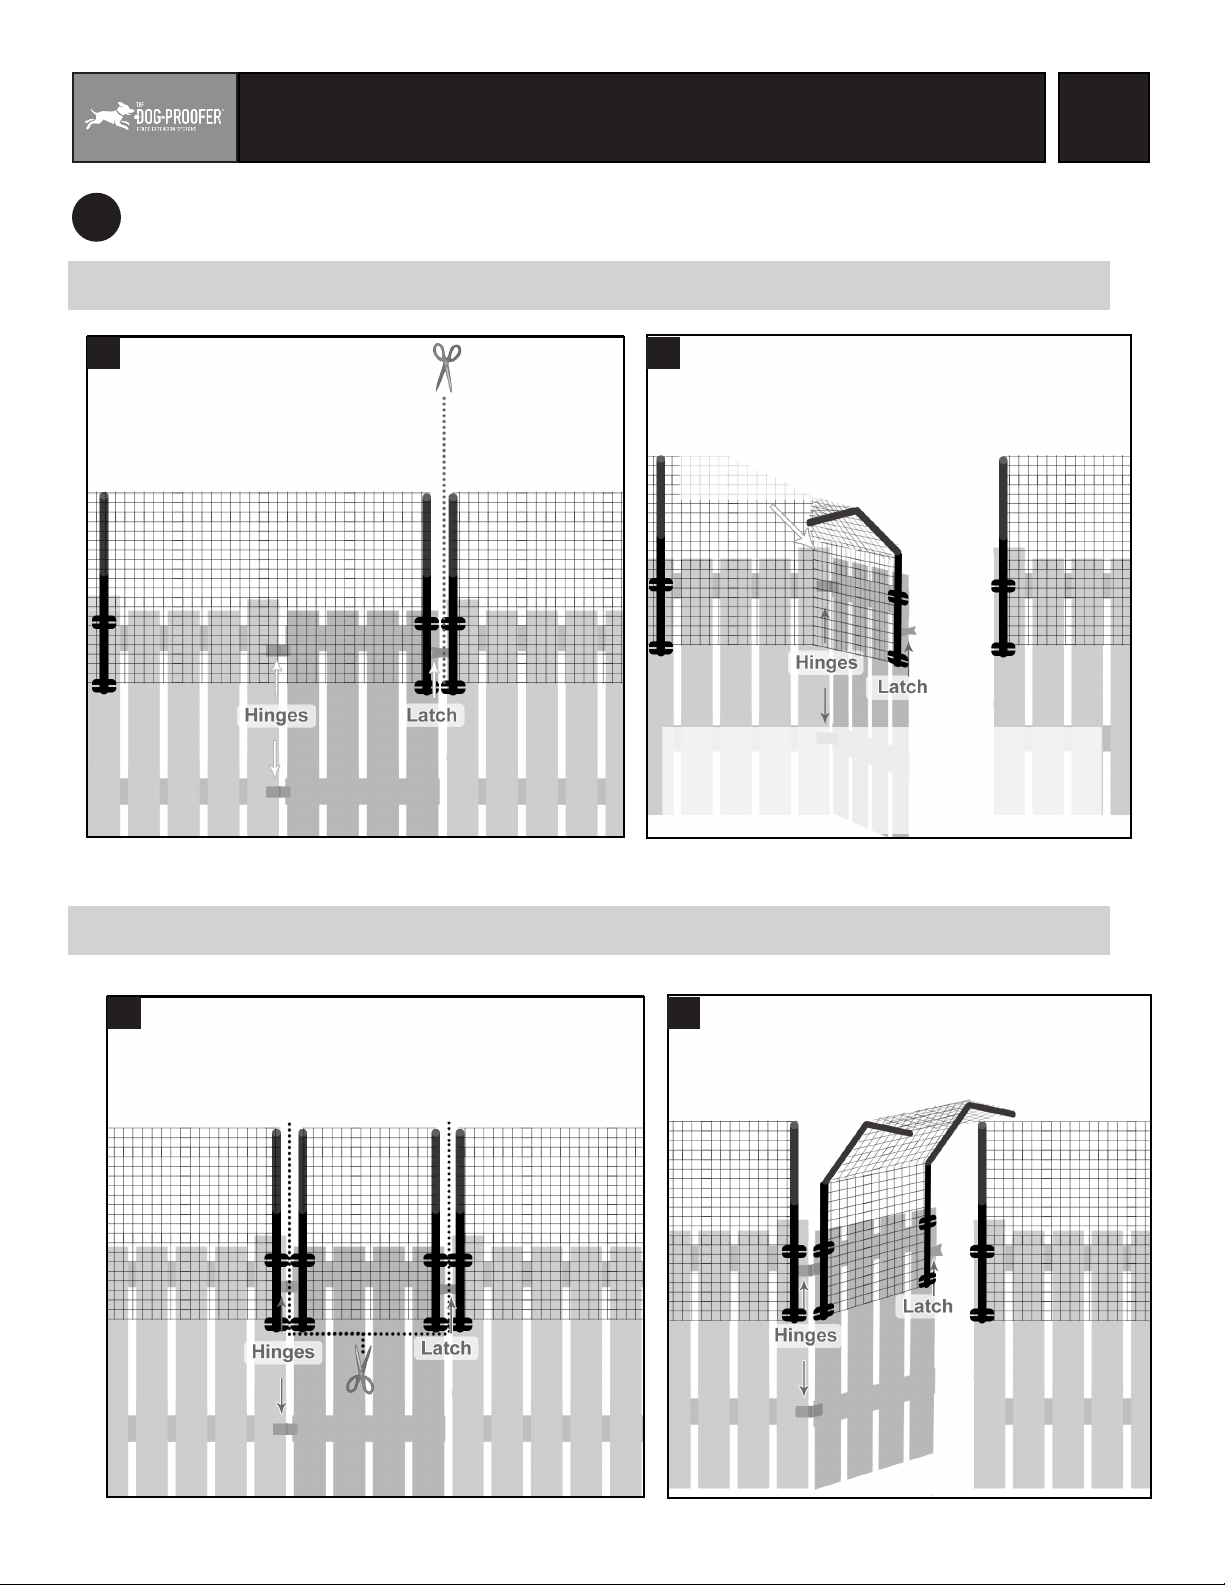
INSTALLING ARMS ON GATES
2
FOR INWARD SWINGING GATES WITH POLY MESH
2A 2B
PAGE
2/4
Fence bunches behind
gate when open
On an in-swinging gate, an arm is needed only on the
latch side of the gate. You also need an arm on the
latch post. You do not need an arm on the gate hinge
post unless that distance from the post before the
latch post to the latch side of the gate exceeds 14 ft.
FOR OUTWARD SWINGING GATES & INWARD SWINGING GATES W/ WELDED WIRE METAL FENCE
2C 2D
Page 3
INSTALLATION INSTRUCTIONS:
CURVED HOUDINI DOG ARM
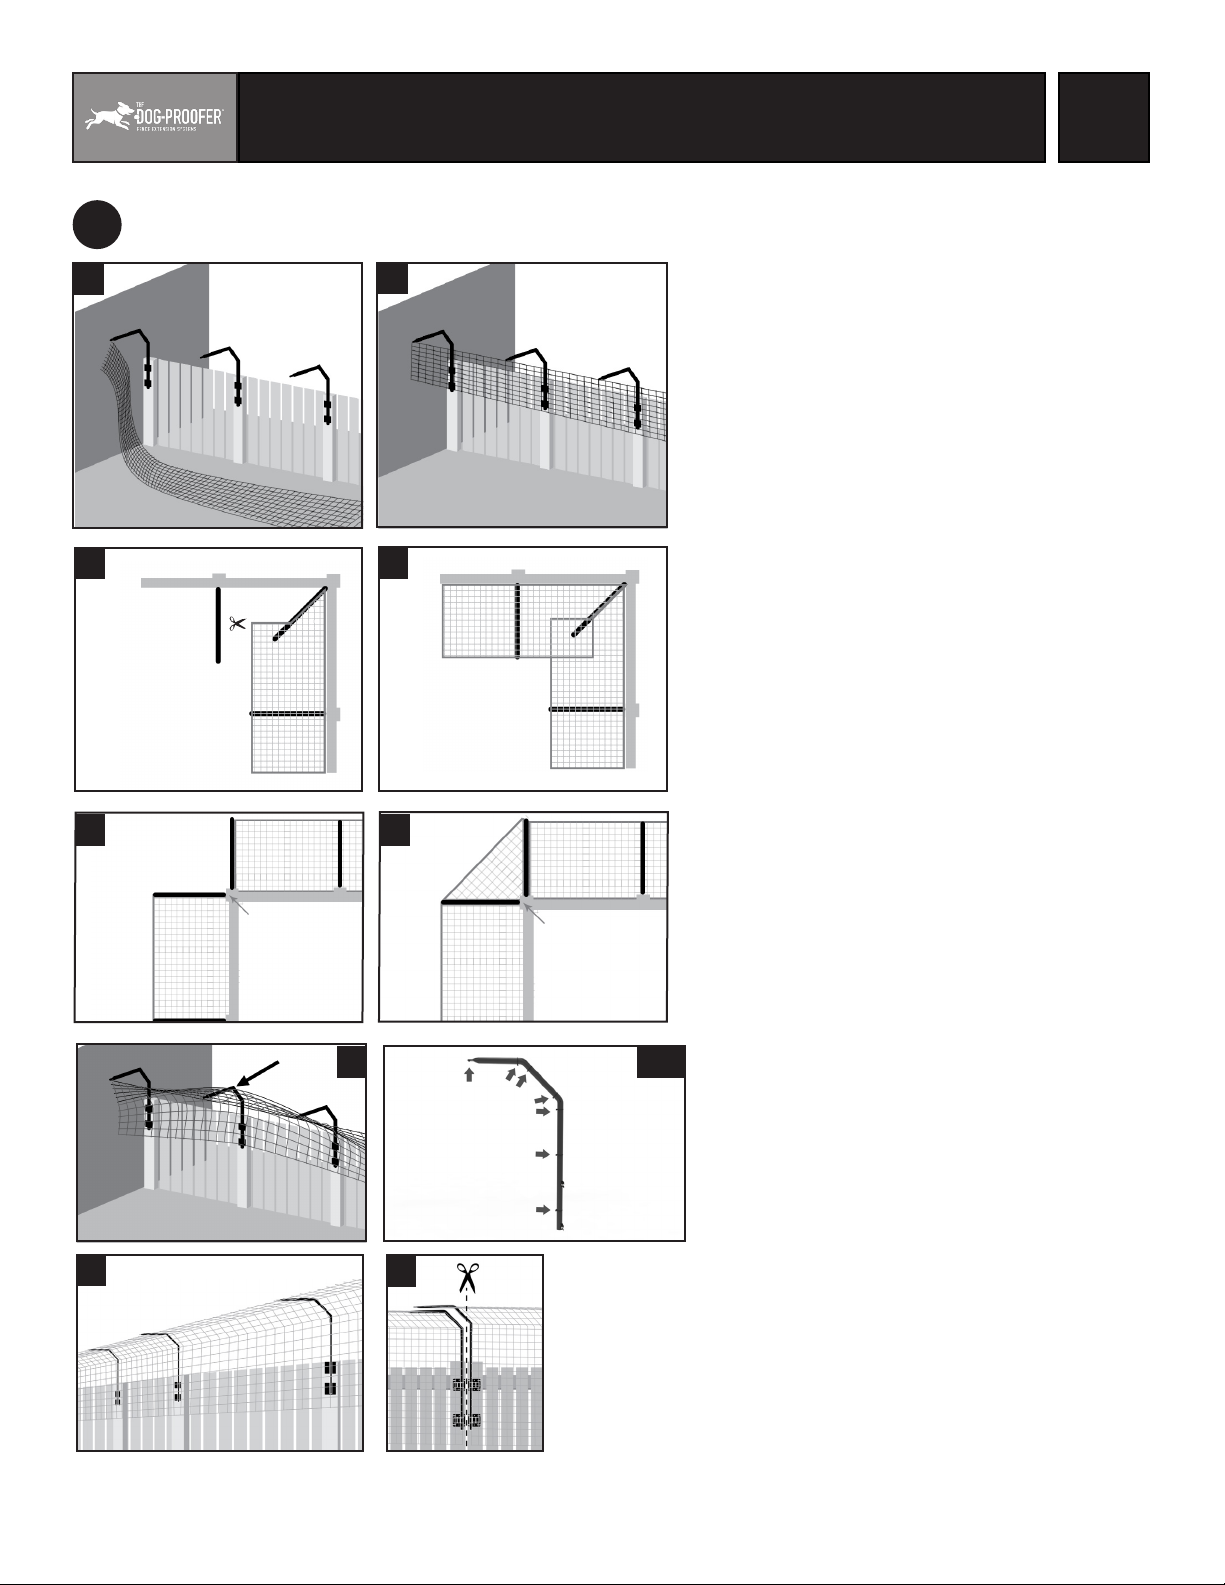
INSTALLING FENCING MATERIAL ONTO ARMS
3
PAGE
3/4
3A
3C 3D
B I R D S E Y E
VIEW
3E
3B
3F
B I R D S E Y E
VIEW
Install mesh fencing material one side at
a time
3A. Unroll the fence and lift it and hang the top edge of
fence from the tips of the arms with the included zip
ties. Do not try to pull it overly tight between arms.
3B. Now you have the fence hanging from the tips of all
the arms on a side.
3C. At corners the arms are angled relative to the rest of
the arms in the sections which makes them “shorter”. To adjust for this, attach the fence 4 squares in
from the edge of the fence.
3D. Run the fence slightly past the corner and cut the
fence o the roll.
Outside Corners
3E. Outside corners require 2 arms formed in a 90 de-
gree angle on the corner post as shown.
3H
B I R D S E Y E
VIEW
B I R D S E Y E
VIEW
3G 3G.2
3I
3F. Cut fence on turns. A seperate piece of fencing is
required for the outside corner between the arms.
Install mesh fencing material one side at
a time
3G. Lift the middle of the fence up and zip-tie it to the
arm where shown. ( 5G.2 )
3H. Continue lifting fence and zip-tieing to the sides
until all arms are secured to the mesh fence.
3I. At gates, cut the fence between the arms to allow the
gate to open.
Page 4
INSTALLATION INSTRUCTIONS:
CURVED HOUDINI DOG ARM
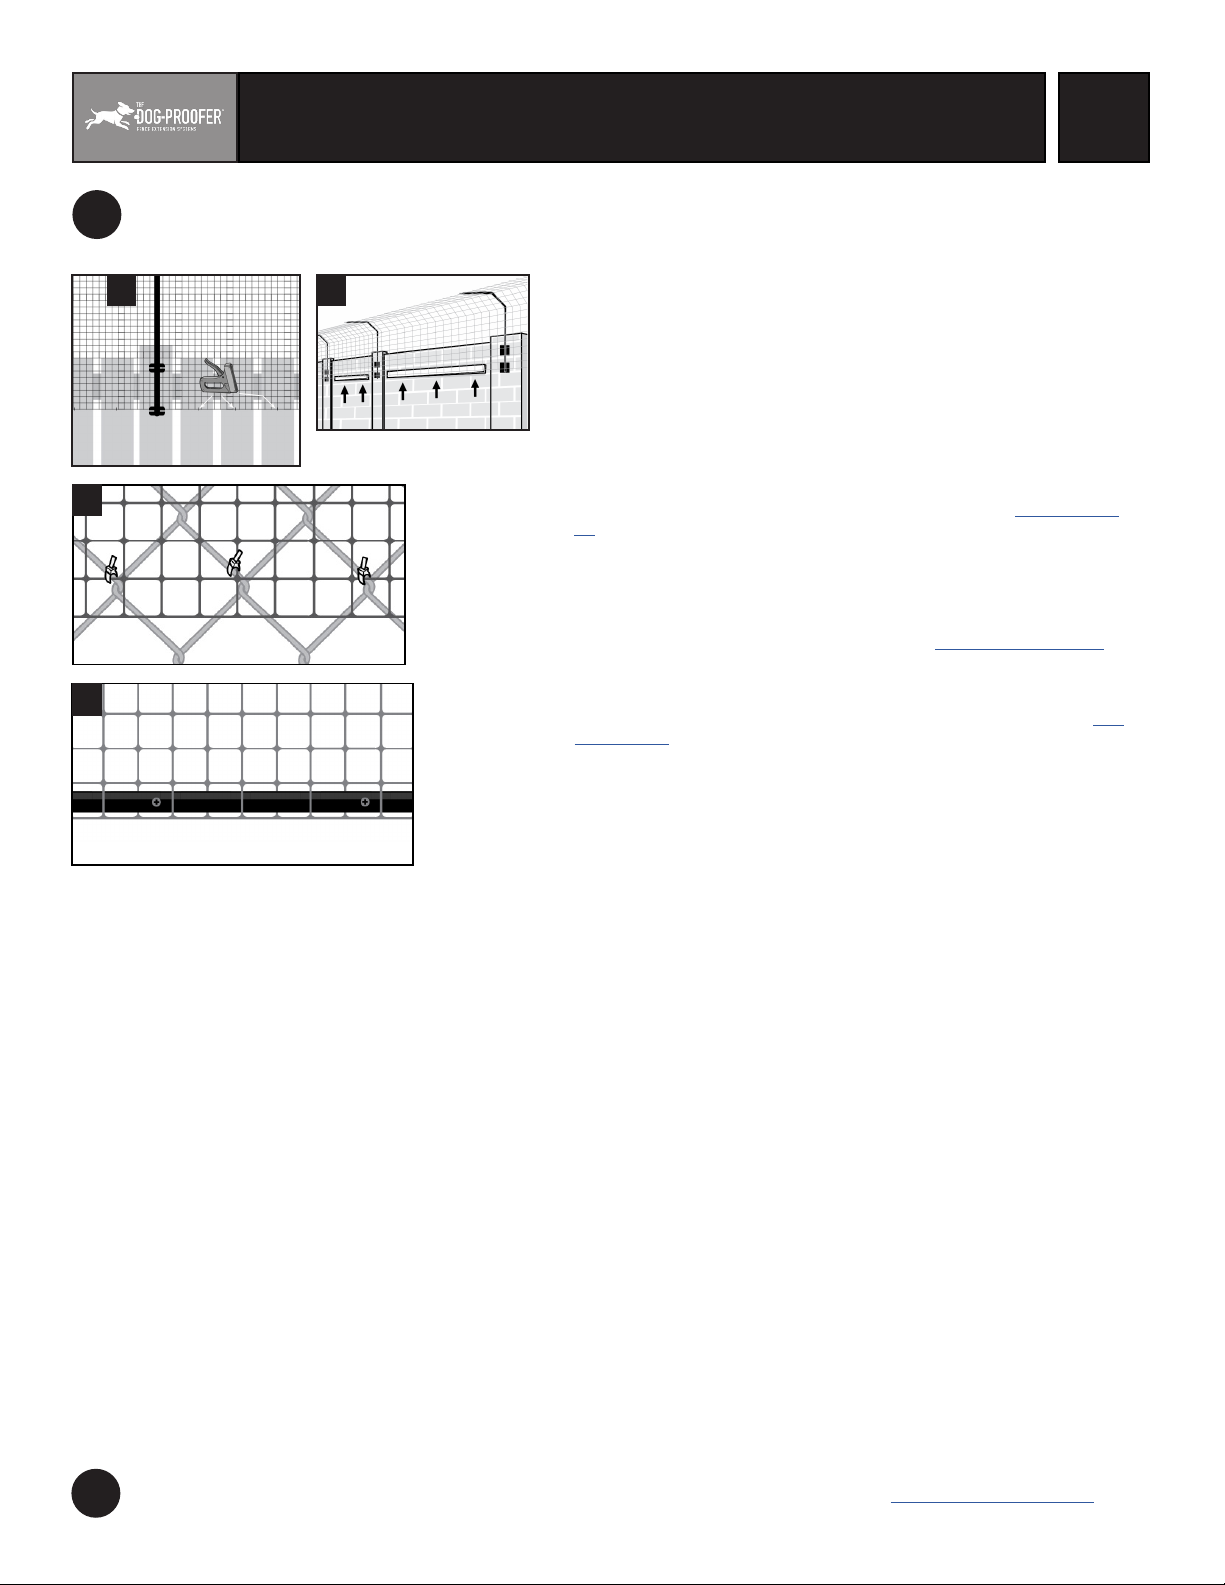
SECURING BOTTOM OF MESH FENCE
4
PAGE
4/4
5A
4A 4B
4C
4D
4A. Wood Fence - Use staples to secure the bottom edge of supplied fencing
material to your fence. Stainless steel staples are recommended for
staple gun-type staples. You can also use a pneumatic/battery narrow
crown stapler. The best hammered staples are Romex staples found in
the electrical dept of most home stores. Use three staples per foot. Trim
excess mesh fencing below arm bottom if needed.
4B. Masonry Wall - One option is to secure strips of wood to the wall be-
tween arms and staple the fencing to the wood. Another option is to use
masonr y screws with large (fender) washers to catch the grid joints of the
fence. We also oer a thick band of nylon that can be secured to your
wall every few feet and the fence secured to it with zip ties. It is stretched
and acts like a tight bungee cord when properly installed (see PVC/ Wall
Kit). Please contact us for alternate sug gestions.
4C. For Metal Fences - The dog fencing can be secured to your chain link
fence or top rail with zip ties. We recommend Heavy Duty Ties like used
to install the fencing to the Fence Extender Arms. Another option is
hogrings to secure the dog fence directly to the chain link mesh. We recommend the Stanley Ringer Style Hogring tool (see Hogringer & Rings).
4D. Vinyl / PVC Fence - We oer a thick band of nylon that can be secured
to your wall every few feet and the fence secured to it with screws. It is
stretched and acts like a tight bungee cord when properly installed (see
PVC/Wall Kit).
4E. Decorative Aluminum & Steel Fences (not shown) – Secure the dog
fencing with zip ties to the pickets or top rail. We recommend Heavy
Duty Zip Ties like those supplied to secure the dog fencing to the Fence
Extension Arms.
END
IF YOU HAVE ANY QUESTIONS PLEASE CALL 888-211-0617 DOGPROOFER.COM
 Loading...