

Page 1
INSTALLATION INSTRUCTIONS:
DIG PROOFER SYSTEM
PAGE
1/2
INCLUDED PARTS:
Please note:
• The components listed above are for a 50 feet kit. Ex: 100ft version would receive 2x the components listed above
• Fasteners to attach the wire mesh to your fence or wall are not included. The appropriate fasteners needed for dierent fence t ypes
are addressed within the instructions.
(1) 50 Feet of Galvanized & Powder Coated
Welded Wire
(30) 12 Inch Galvanized Ground Stakes
OVERVIEW
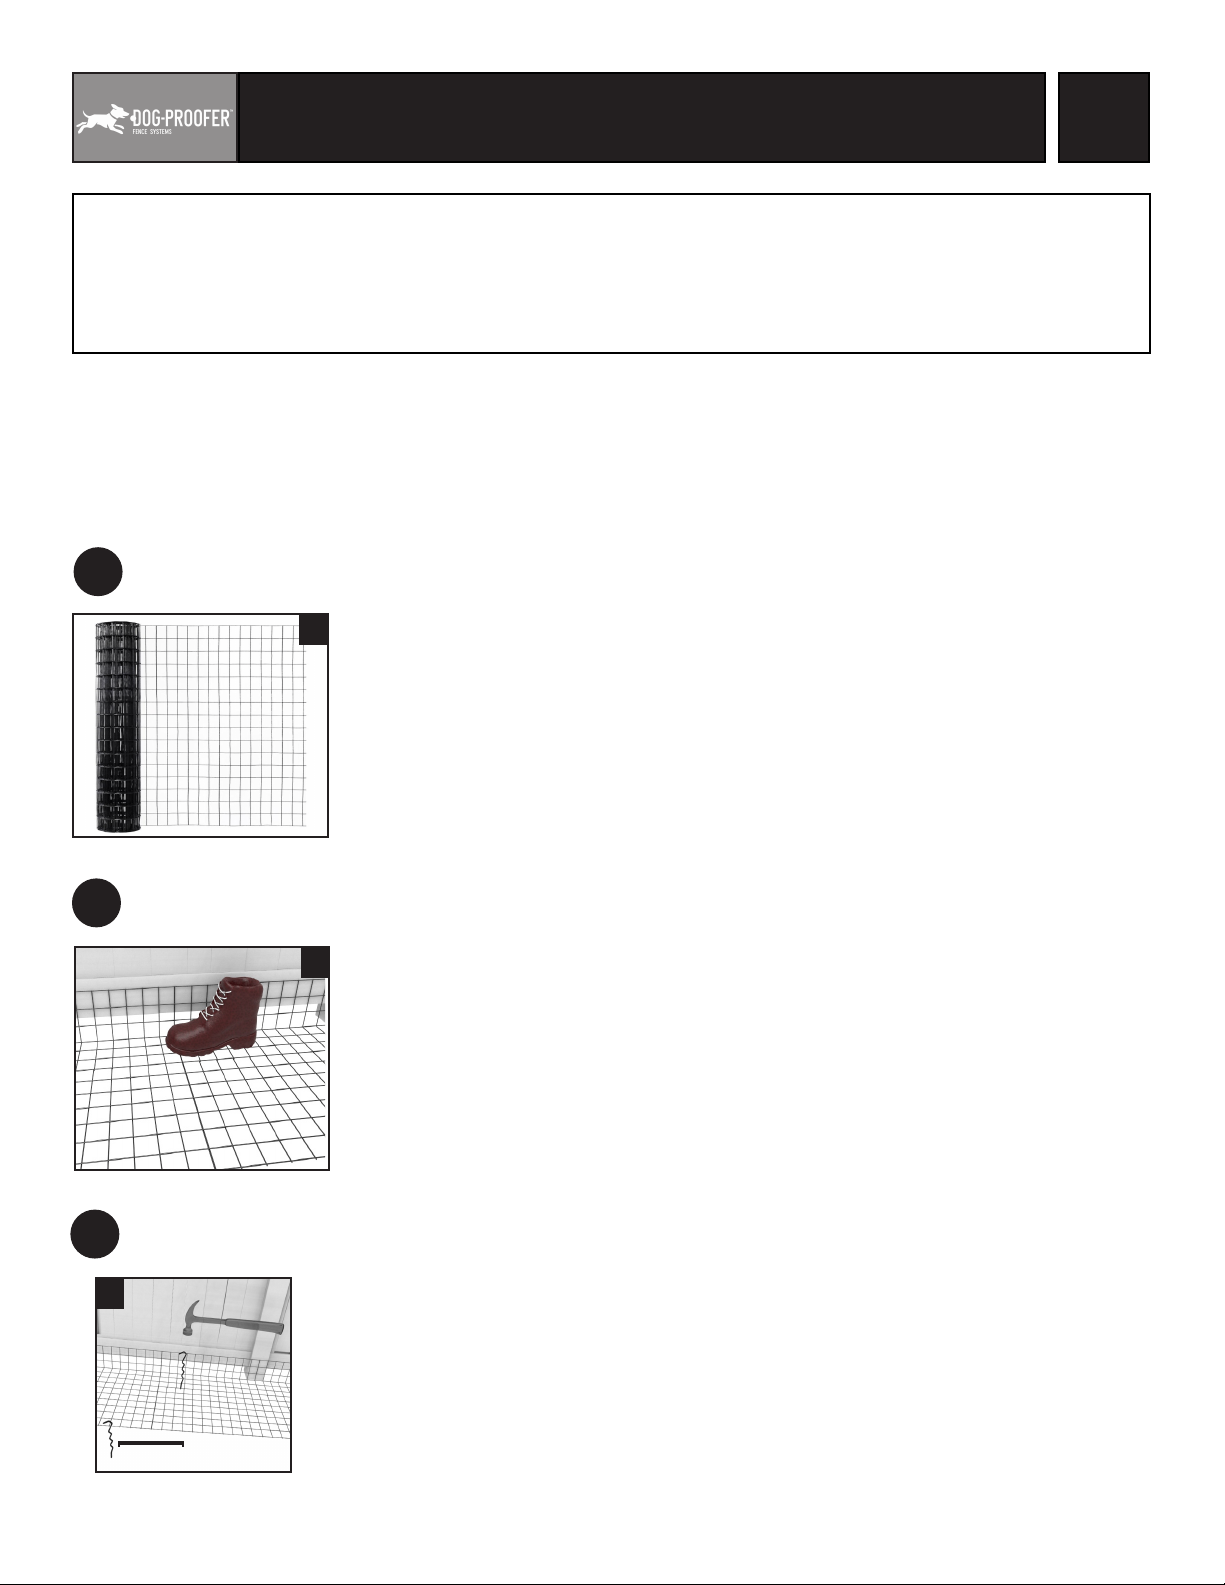
• The key to the Dig-Proofer system is that the steel wire mesh lay at on the ground.
• This makes it so a dog attempting to dig under the fence ends up digging on top of the wire mesh.
• The further out the wire mesh reaches away from the fence, the better.
• Utilize enough of the wire mesh vertically to secure it well to the bottom of your existing fence. This usually means at least 3-5 inches overlap-
ing the fence.
• The balance of the wire mesh should be folded onto the ground and pinned with the included ground stakes.
UNROLL & CUT WIRE FENCE ON THE GROUND FLAT
1
1A. Start by pinning one end of the wire down with a heavy item such as a brick (or better yet, a
1A
helper!) Plan to stop and start the wire mesh at corners and at either side of gates. More instructions
provided regarding corners and gates in section 5.
1B. Prepare a piece of wire mesh for installation by using a tape measure to nd the length you need
or by unrolling the mesh wire at on the ground from start to nish of the section you are out-
tting. Once you nd your ideal length, add an additional few squares of material to your measurement per 25 feet before making your cut to allow for the contours of the ground and other
variations
1C. Cut the wire mesh by using tin snips/aviation snips, metal shears or some other t ype of wire cut-
ting tool.
PREPARING WIRE MESH FOR MOUNTING
2
2A. Decide how much wire mesh you need to run ver tically up your existing fence. The general guide-
2B
STAKE WIRE MESH INTO GROUND
3
3A
3A. Using provided 12” galvanized ground stakes, use a hammer to drive them into the ground using the
line is leave enough material overlapping the fence so that you can securing fasten it based on the
methods shown in section 4.
2B. Hold the vertical edge of the wire mesh against the fence and using your foot press down to create
the 90 degree bend as shown in the diagram. Repeat this every few feet down the entire span of
the sec tion until the wire mesh section lays in a shape that is roughly consistent with an “L” shape.
hooked tip to hold the wire mesh securely to the ground. It is best if the stake is positioned to hold the
wire where two pieces of wire intersect. It is recommened that stakes are placed approximately every
1.5 feet (left to right) and to alternate them from front to back as shown. Additional stakes available for
purchase if needed.
1.5 Feet
Page 2
INSTALLATION INSTRUCTIONS:
DIG PROOFER SYSTEM
FASTEN WIRE MESH TO EXISTING FENCE
4
PAGE
2/2
5A4D4A 4B
4C
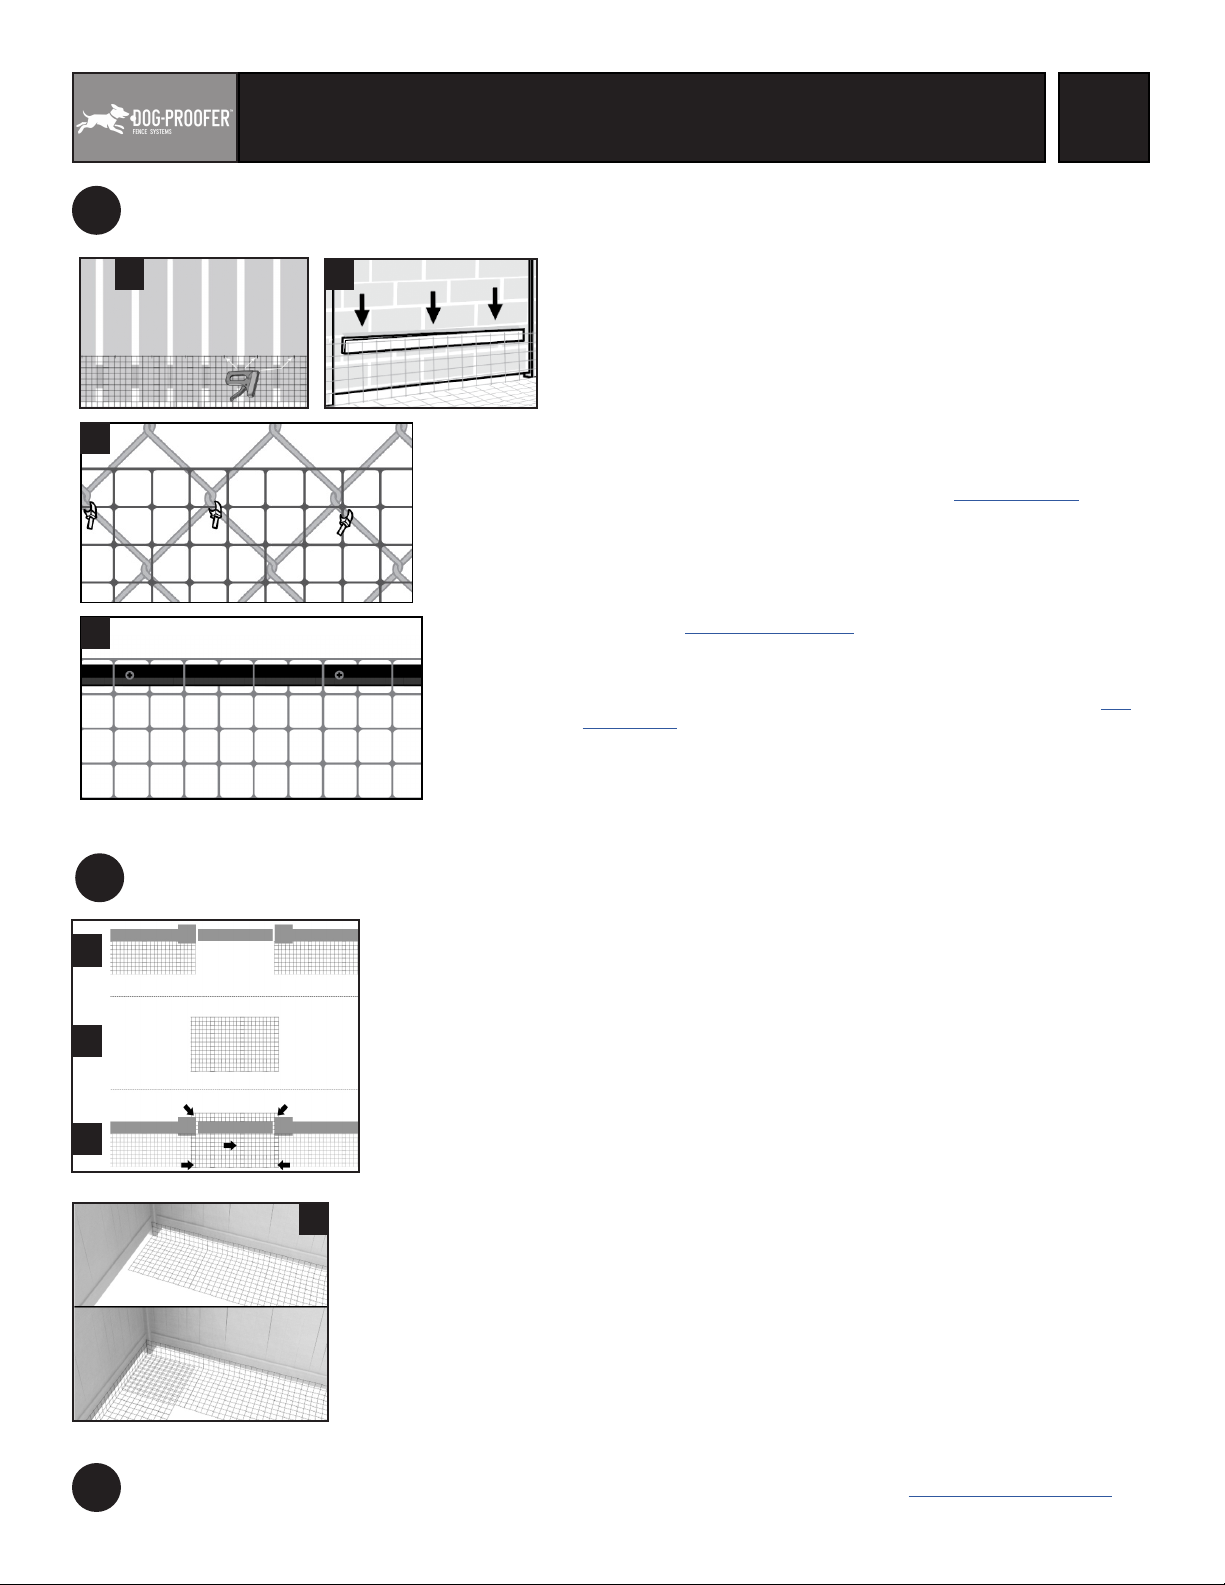
4A. Wood Fence - Use staples to secure the top edge of supplied fencing ma-
terial to your fence. Stainless steel staples are recommended for staple
gun-type staples. You can also use a pneumatic/battery narrow crown
stapler. The best hammered staples are Romex staples found in the electrical depar tment of most home stores. Use three staples per foot. Trim
excess mesh fencing if needed.
4B. Masonry Wall - One option is to secure strips of wood to the wall between
arms and staple the fencing to the wood. Another option is to use masonry screws with large (fender) washers to catch the grid joints of the fence.
We also oer a thick band of nylon that can be secured to your wall every
few feet and the fence secured to it with zip ties. It is stretched and acts
like a tight bungee cord when properly installed (see PVC /Wall Kit). Please
contact us for alternate sug gestions.
4C. For Metal Fences - The wire mesh can be secured to your chain link fence
or top rail with zip ties. We recommend Heav y Duty Ties that are UV resistant which are available for purchase seperately. Another option is hogrings to secure the wire mesh directly to the chain link. We recommend the
Hogring tool (see Hogringer & Rings).
4D. Vinyl / PVC Fence - We oer a thick band of nylon that can be secured to
your wall every few feet and the wire mesh secured to it with screws. It is
stretched and acts like a tight bungee cord when properly installed (see
PVC/Wall Kit).
4E. Decorative Aluminum & Steel Fences (not shown) – Secure the dog fenc-
ing with zip ties to the pickets or top rail. We recommend Heavy Dut y Zip
Ties that are UV resistant. Available seperately for purchase.
INSTALLING AROUND GATES AND CORNERS
5
GATES
5A
5B
5C
5D
5A. Gates are outtted by stopping and star ting the wire mesh on either side of the gate as
shown.
5B. Prepare a piece of wire mesh that is the width + 2 squares of material wider than the open-
ing as shown. This piece will not be bent or fastened to the gate itself. It will lay underneath
the gate to prevent digging and also to allow the gate to open freely.
5C. Open the gate and lay the wire at on the ground trimming the edges as necessary to t
around the posts. Once in place, secure to the ground with stakes in the 4 corners and 1
stake in the middle as indicated by the arrows. Larger width gates (36 inches +) may require
extra stakes. Stakes on the bottom left and right corners are used to hold the cut gate piece
of wire mesh and to hold the non-gate mesh on either side to the ground.
CORNERS
Plan to cut the wire mesh in the corners. When star ting a new por tion of wire mesh fence for
5D.
installation it is advised to overlap it as shown in the diagram. You may also choose to bend the
mesh around the corner but it tends to be more dicult as it requires a angled cut of the mesh so
it will lay properly.
END
IF YOU HAVE ANY QUESTIONS PLEASE CALL 888-211-0617
DOGPROOFER.COM
 Loading...